

Page 1
2 channel radio not included
Exclusief 2 kanaalsradiobesturingsset en batterijen.
Télécommande 2-voies et accus non inclus.
2 Kanal Fernsteuerung und batterien nicht in Baukasten enthalten.
4WD
Instruction manual • Bouwhandleiding • Bauanleitung • Instruction de montage
version: 29/09/03
Page 2
Fun 4WD - 2
SERVICE
SAS: Service after sales
Please note that only manufacturing faults or
problems caused by manufactor faults will be repaired on the account of SAS. It is not possible to
claim warranty if the problem is caused by misuse of this product.
SAV INTERNATIONALE
PROTECH
TEL: ++ 32 14 25 92 83
FAX: ++ 32 14 25 92 89
email: info@promodels.be
http://www.protech.be
Please use the diagrams in this instruction book
at page 25-26 to help in fi nding the spare parts
that you need
PROTECH cannot be held re spon si ble for damage
or any claims arizing from the use of this product.
SAV: Service après vente
Ne seront pris en charge par le SAV, que les pièces
présentant un vis de fab ri ca tion. En aucun cas, la
mauvaise utilisation du produit ne peut enjendrer
un SAV gratuit.
SAV INTERNATIONALE
PROTECH
TEL: ++ 32 14 25 92 83
FAX: ++ 32 14 25 92 89
email: info@promodels.be
http://www.protech.be
Afi n de faciliter la recherche de vos pièces
détachées, veuillez-consulter les pages 25 -26 de
cette notice
PROTECH ne peut pas être mis responsable pour
des endommagements ou ex i genc es provenant de
l’ usage de ce produit
SNV: Service na verkoop
Alléén fabricagefouten of problemen veroorzaakt
door een fabricagefout zullen op rekening van
de SNV hersteld worden. Er kan nooit aanspraak
gemaakt worden op een gratis herstelling door de
SNV als de problemen voortkomen uit een verkeerd gebruik van het produkt
SAV INTERNATIONALE
PROTECH
TEL: ++ 32 14 25 92 83
FAX: ++ 32 14 25 92 89
email: info@promodels.be
http://www.protech.be
Om het zoeken van het onderdeel dat u nodig hebt
te vergemakkelijken, gelieve de onderdelenlijst op
pagina 25-26 van deze handleiding te raadplegen
PROTECH kan niet verantwoordelijk gesteld
worden voor schaden of vorderingen voortvloeiend uit het gebruik van dit produkt
KD : Kundendienst
Nur Herstellungsfehler oder durch
Her stel lungs feh ler verursachte Probleme werden
für Rechnung des KD repariert. Die Garantie kann
nicht in Anspruch genommen werden, wenn das
Problem auf eine unsachgemäße Verwendung des
Er zeug nis ses zurückzuführen ist.
SAV INTERNATIONALE
PROTECH
TEL: ++ 32 14 25 92 83
FAX: ++ 32 14 25 92 89
email: info@promodels.be
http://www.protech.be
Bitte verwenden Sie die in diesem Anweisungsheft
auf Seite 25-26 ab ge druck ten Diagramme, um die
Ersatzteile zu fi nden, die Sie benötigen.
PROTECH kann nicht für Schäden oder An sprü che
haft bar gemacht wer den, die sich aus der
Ver wen dung dieses Produkts ergeben.
Page 3
Fun 4WD - 3
OUT OF THE BOX
1
fi g 1 fi g 2
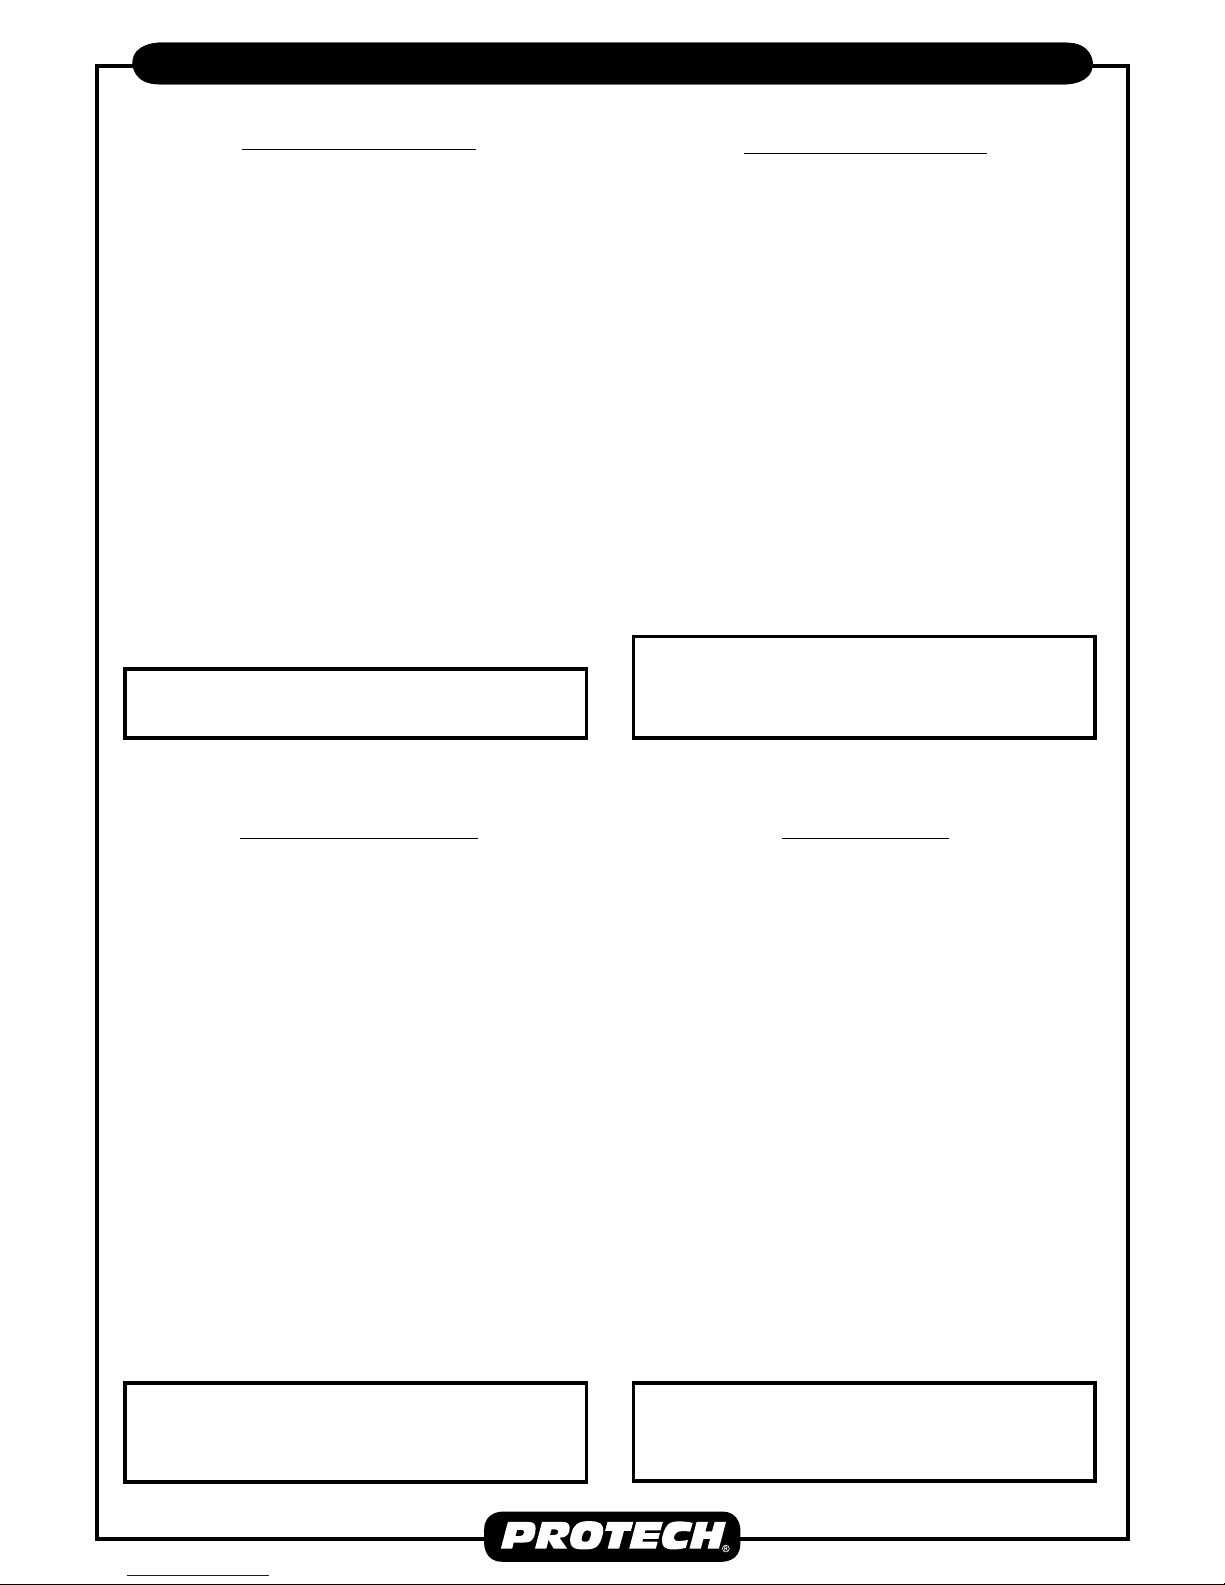
Place the batteries in the
trans mit ter.
Place the batteries in
the bat tery hold er for
the re ceiv er.
Plug the battery holder
into the slot on the reciever marked “BATT”.
Plug your steer ing servo
into chan nel 1 and your
throttle servo into chan nel 2. Check that your
servos move when you
move the sticks on the
trans mit ter, next set the
trims on the trans mit ter
to the neu tral position as
shown in
fi g 1.
Placez les piles dans la
radio-commande.
Placez les piles dans
le boîtier-piles du récepteur. Raccordez le
boîtier-piles, les servos
de gas et de direction
au récepteur. Mettez la
ra dio-commande et le
récepteur en marche.
Placez les manettes et les
trims en po si tion neutre.
Les leviers de commande
des deux servos doivent
maintenant se trouver en
position neutre.
Plaats de batterijen in
de radiobesturing.
Plaats de batterijen
in de batterijhouder.
Sluit de batterijhouder,
de gas- en stuurservo
aan op de ontvanger.
Schakel de radiobesturing en de ontvanger aan.
Plaats de stuurhendels
en de stuurtrims van
de radiobesturing in
de middelste positie.
De stuurarmen van de
beide servo’s moeten
nu neutraal staan.
Demonteer de nylon
radioplaat.
Voor de bevestiging van
de stuurservo gebruiken
we de plastiek steunen
zoals afgebeeld.
Bevestig de plastiek
steunen zoals afgebeeld
met de 3 X 8 mm zelftap
schroeven.
Demontez la platine ra dio
en nylon. Pour fixer le
servo de di rec tion, utilisez les supports en
plastique comme le
montre l’illustration. fi xez
les supports en plastique
comme représenté avec
les vis auto-taraudeuses
3 x 8 mm.
Disassemble the nylon
ra dio tray as shown in
fig 3.The mounting for
the steer ing servo uses
2 plas tic blocks.
Fix the steering servo to
the plas tic blocks using
the two 3X8mm selftappers sup plied. See fig
4,5.
fi g 3 fi g 4 fi g 5
2
Setzen Sie die Batterien
in den Sender. Setzen Sie
die für den Empfänger
be stimm ten Batterien in den
Bat te rie hal ter. Stecken Sie den
Bat te rie hal ter in den mit „BA TT“
ge kenn zeich ne ten Schlitz auf
dem Emp fän ger. Stecken Sie
Ihr Steuerservoservogerät in
Kanal 1 und Ihr Drosselklappenservogerät in Kanal 2.
Prüfen Sie, ob Ihre Ser vo ge rä te
sich be we gen, wenn Sie
die Hebel auf dem Sender
be we gen, und stellen Sie
die Trimme auf dem Sender
anschließend in die neu tra le
Position, so wie es Abb. 1 zu
Nehmen Sie die Nylon
R/C Platte auseinander
Abb.3.
Montieren Sie das
Steu er ser vo ge rät
mit den beiden
mit ge lie fer ten 3 x 8 mmSelbst boh rern gemäß an
den Plastikklötzen unter
den Funkgeräteinsatz.
Siehe Abb. 4-5.
Page 4
Fun 4WD - 4
Monteer de stuurservo
op de radioplaat zoals
afgebeeld. Gebruik hiervoor de zelftap schroeven 3 x 12 mm.
Montez le servo de
di rec tion sur la platine
radio comme le montre
l’illustration. Utilisez pour
cela les vis auto-taraudeuses 3 x 12 mm.
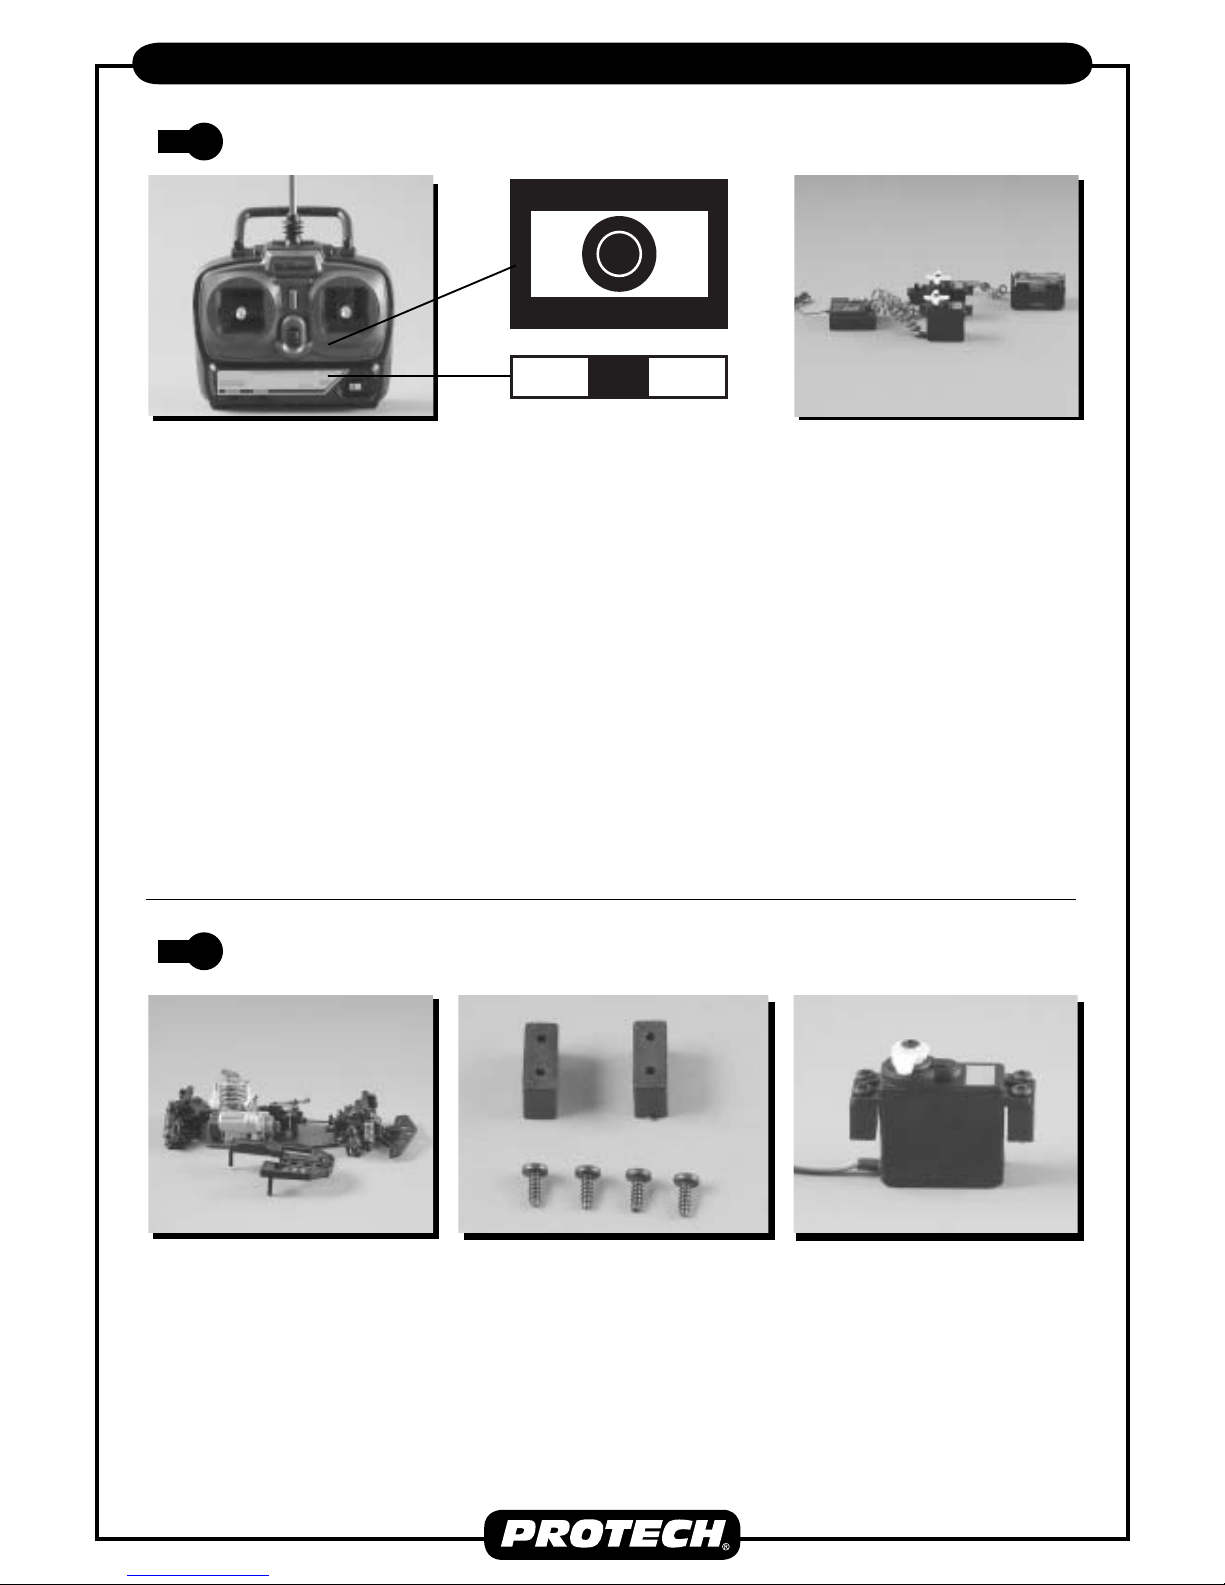
Mount the steering servo
upside down in the ra dio
tray, using the 3x 12mm
self-tappers as shown
in fi g 6.
Monteer de gasservo op
de radioplaat zoals afgebeeld. Gebruik hiervoor
de zelftap schroeven 3
x 12 mm en de plastiekblokjes zoals afgebeeld.
Monteer de schakelaar.
Montez le servo de gas
sur la platine radio comme le montre l’illustration.
Utilisez pour cela les vis
autotaraudeuses 3x12
mm ainsi que les petits
blocs en plastique.
Montez l’intérrupteur.
Mount the throttle servo
into the radio tray as
shown in fi g 8. Use parts
as shown in fi g 7.
Now you can mount the
switch into the radio tray ,
see fi g 9
fi g 6
fi g 7 fi g 8 fi g 9
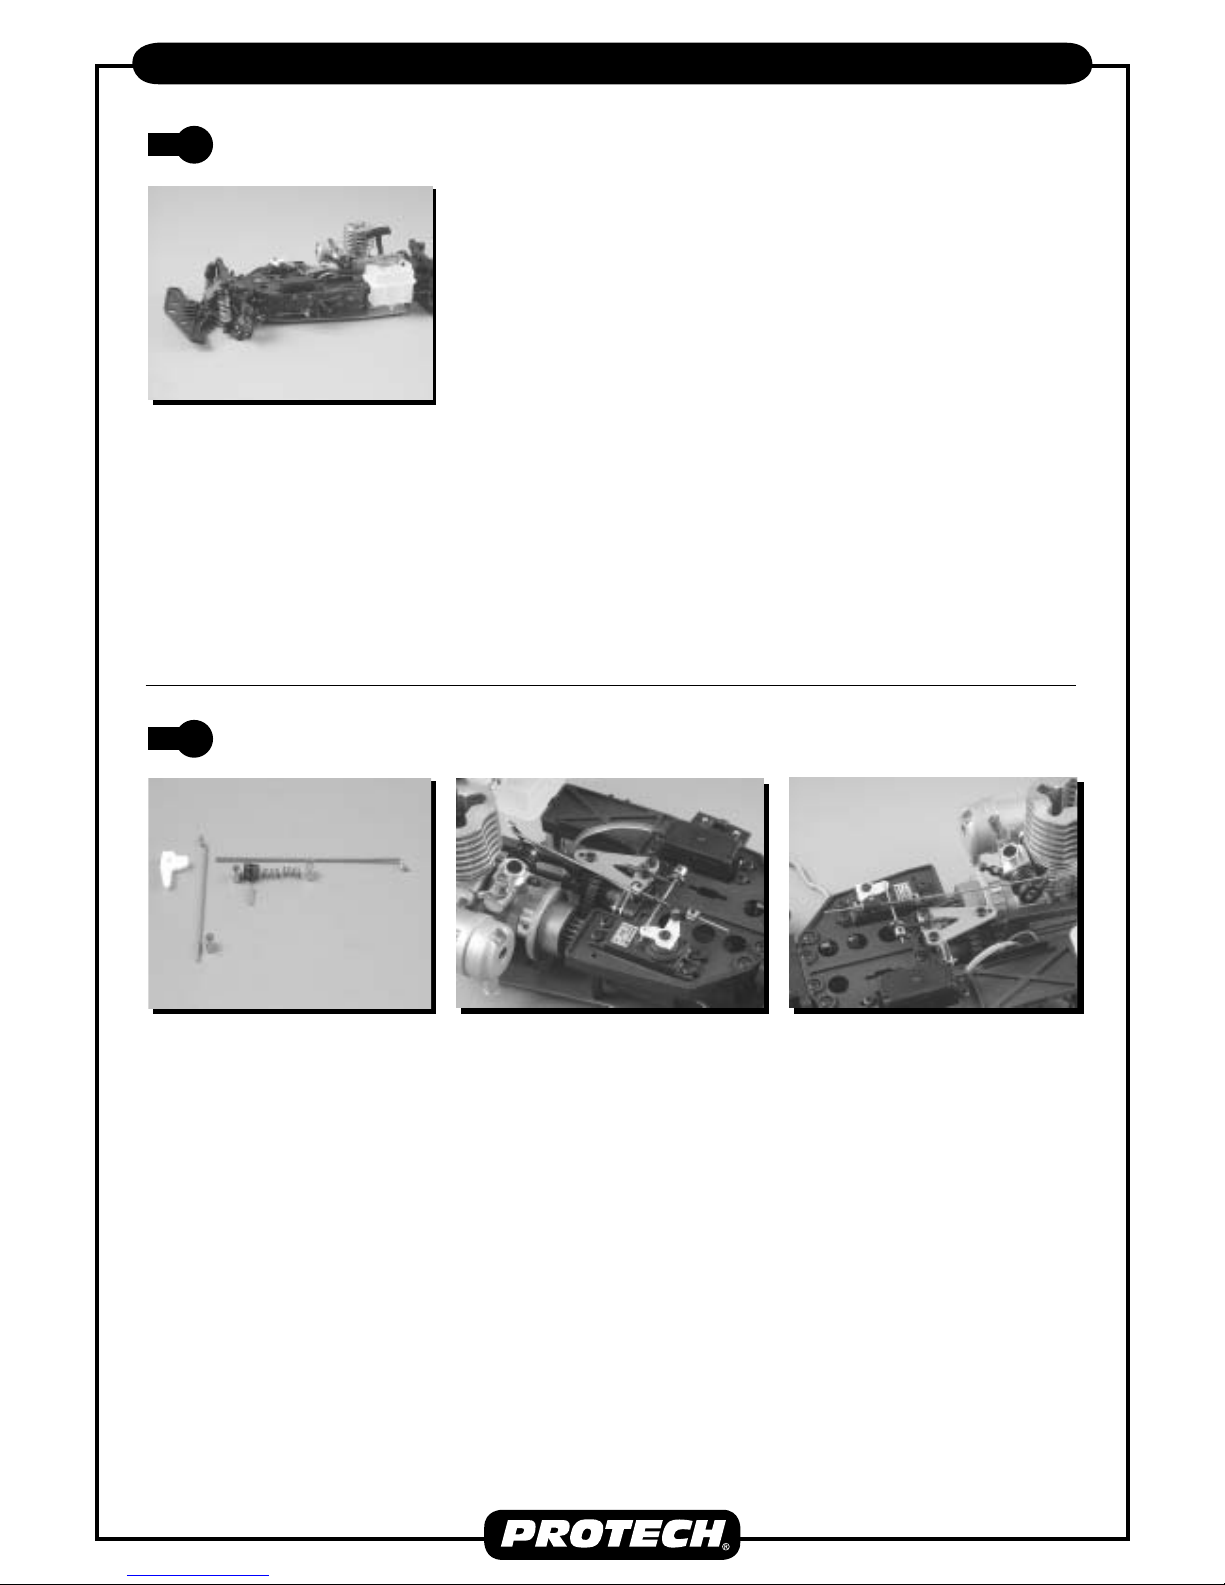
Monteer de stuurstang
zoals afgebeeld. (Pas
de lengte aan zodat uw
auto recht door rijdt)
Assemblez la tringle de
commande comme le
montre l’illustration.
Make the steering rod
using parts shown in fi g
10. (Adjust the length of
this rod to make your
car drive straight)
fi g 10
Befestigen Sie das
Steu er ser vo ge rät
Oberseite unten, unter
Ver wen dung der beiden
mit ge lie fer ten 3 x 12mm
Selbstbohrer, Abb. 6.
Befestigen Sie das Servo
in die R/C Platte, Abb. 8.
Ver wen den Sie die T eilen
gezeigt in Abb. 7.
Jetzt können Sie den
Schalter in die R/C Platte
montieren, Fig 9.
Befestigen Sie die
Lenkstangen gemäß Abb.
10 am Ser vo ge rät schutz.
(Justieren Sie die Länge
dieser Stan ge, darmit Ihr
auto gerade Fahrt)
OUT OF THE BOX
3
4
5
Page 5
Fun 4WD - 5
OUT OF THE BOX
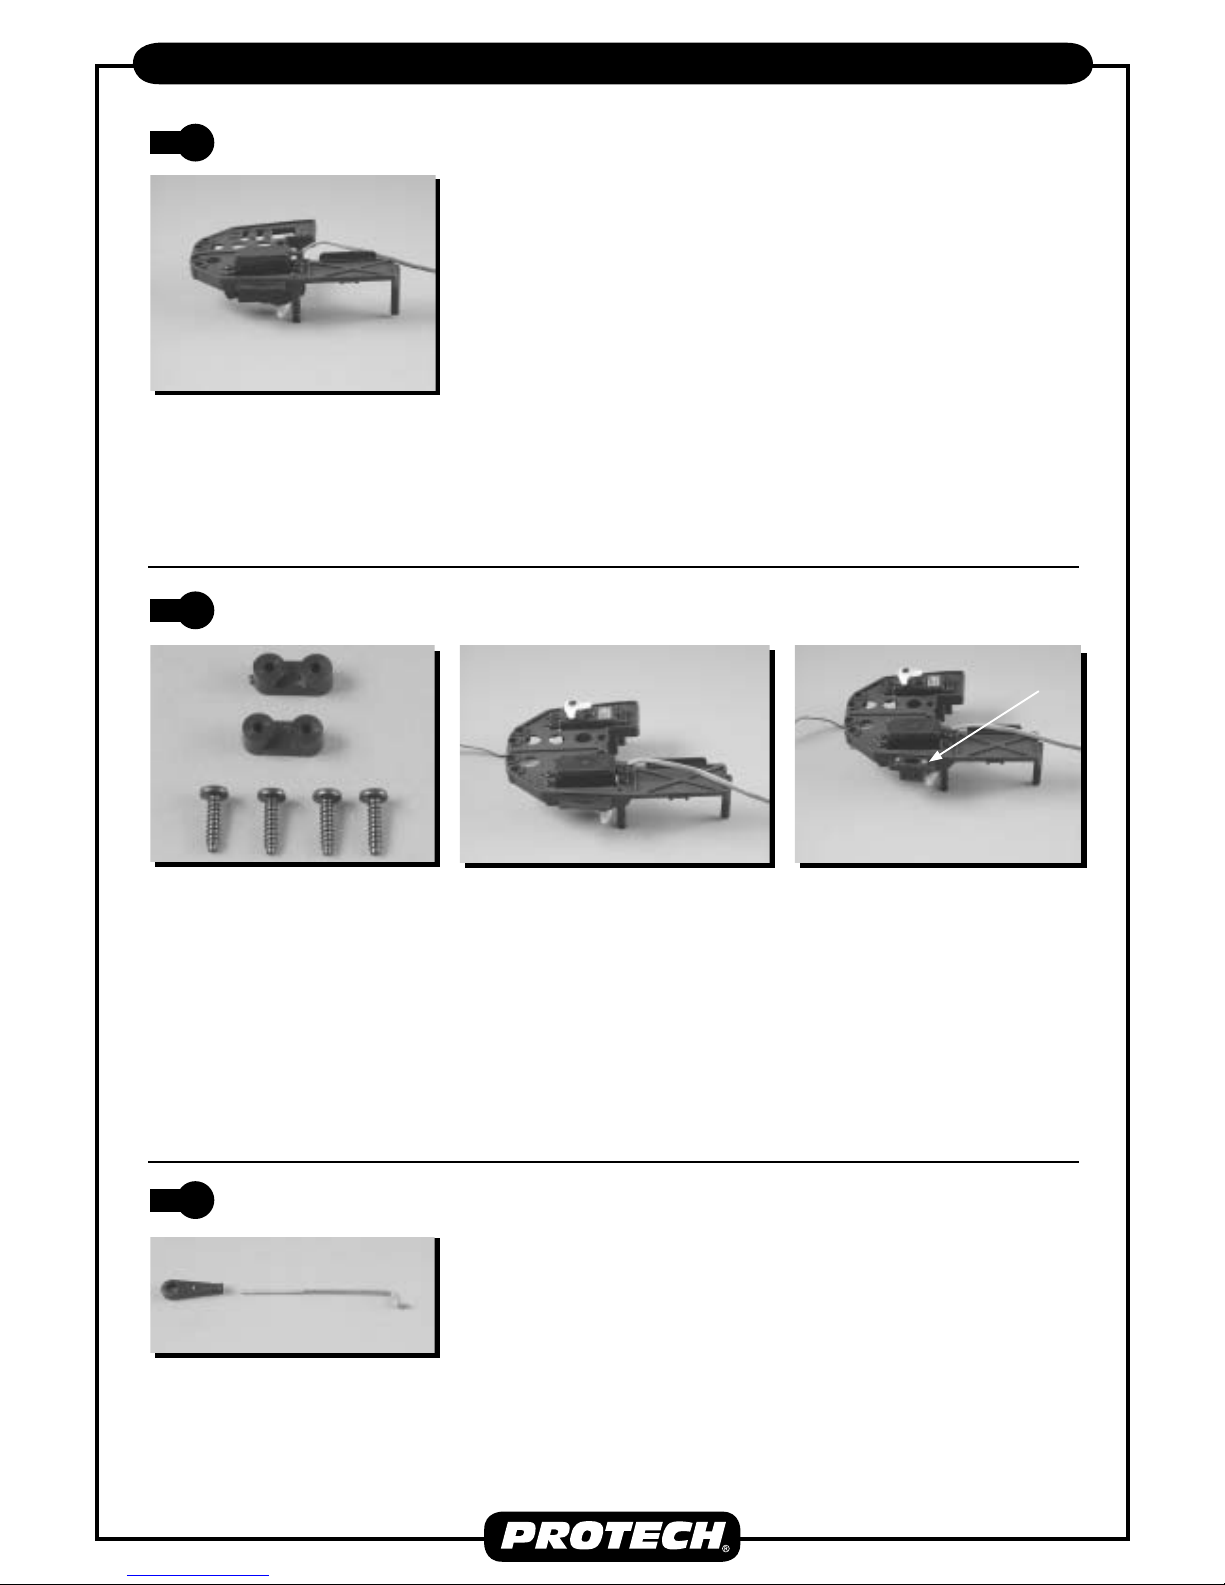
Onderdelen die nodig
zijn voor de aansturing
van de carburator en
de rem.
Monteer de gas en
remaansturing zoals
afgebeeld. Als de servo
neutraal staat moet de
carburator een klein
beetje openstaan. Als
de knuppel van het gas
naar voor geduwd wordt
moet de carburator volledig opengaan. Als de
knuppel naar achteren
getrokken wordt moet
de rem werken.
Monteer de afgewerkte
radioplaat terug op het
chassis. Vergeet niet
tussen één van de schroeven de antenne houder
te schroeven.
Monteer de stuurstang
op het bolgewrichten
van de servo-saver.
Remontez la platine ra dio
achevée sur le châssis.
N’oubliez pas de visser
le support d’antenne
avec l’une des vis.
Montez la tige de commande sur la rotule du
sauve-servo.
Now remount the radio
tray onto the chassis.
Don’t forget to put the
antenna holder under
one of the screws.
Mount the steering rod
on the pillow ball of the
servo-saver.
fi g 11
fi g 12 fi g 13 fi g 14
Pièces nécessaires à la
commande du carburateur et du frein.Fig 12.
Montez la commande
d’accélération et de freinage comme représenté
sur l’illustration. Si le
servo se trouve en position neutre, le carburateur doit être un petit
peu ouvert. Si la manette d’accélération est
poussée vers l’avant, le
carburateur doit s’ouvrir
complètement. Si la
manette est tirée vers
l’arrière, le frein doit
fonctionner.
Parts needed for the
link age of the throt tle
and brake. see fi g 12
Mount the throttle and
brake link age as shown
in fi g 13 and 14.
Make sure that the
throt tle stick is in the
neutral position, when
your throt tle linkage is
ad just ed cor rect ly your
carburator should be
open 1-2mm and the
brake should not be en gaged. When the stick
is pushed for wards the
carburator should open
completely, when you
pull back the stick the
brake should en gage.
Nun können Sie die
R/C Platte wieder in
das Chas sis mon tie ren.
Vergessen Sie nicht, den
An ten nen hal ter unter
einen der Schrauben
anzubringen.
Befestigen Sie die
Lenkstangen mit den
Ballverbindungen auf den
servo-saver.
Für die Verbindung von
Drosselklappe und Bremse
benötigte Teile: siehe Abb. 12
Montieren Sie die Ver bin dung
zwischen Dros sel klap pe und
Bremse wie in Abb. 13 und
14 gezeigt. Stellen Sie sicher,
dass der Dros sel klap pen he bel
sich in der neutralen
Position befi ndet. Wenn Ihre
Dros sel klap pen ver bin dung
richtig eingestellt ist, muss
Ihr Vergaser 1- 2 mm ge öff net
sein, und die Bremse darf
nicht angezogen sein. Wenn
der Hebel nach vorn gedrückt
wird, muss sich der Vergaser
vollständig öffnen. Wenn Sie
den Hebel nach hinten ziehen,
muss die Bremse angezogen
werden.
6
7
Page 6

Fun 4WD - 6
OUT OF THE BOX
fi g 15
Bevestig de ontvanger
op de radioplaat en de
ontvangerbatterij onder
de radioplaat d.m.v. de
zwarte trekband.
Fixez le récepteur et le
boîtier-piles du récepteur
sur et sous la platine ra dio au moyen du collier
rilsan noir.
Mount the reciever and
the battery to the radio
tray as shown in fi g 15.
Use the large reusable
cable tie surplied.
fi g 16
Monteer het luchtfi lter
Huilez et installez le fi ltre
à air.
Mount the air-filter as
shown in fi g 16
Montez sur les axes arrières et avants les hexagones d’ entraîne-ment
de roue.
Monteer op de achterste en voorste wielassen de metalen zeskant
wielmeenemer.
Mount the hexagonal
metal wheel-drivers on
the front and rear axles.
fi g 17
Befestigen Sie den
Empfänger und die
Batterie mit dem breiten
wiederverwendbaren
Kabelabbinder.
Montieren Sie den
Luftfi lter.
Montieren Sie
die sechseckigen
Me tall rad mit neh mer auf
die hinteren und vordere
Rad ach sen.
8
9
10
Never run without air fi lter or airfi lter oil.
Ne jamais rouler sans fi ltre à air ou sans huile sur
le fi ltre.
Page 7

Fun 4WD - 7
OUT OF THE BOX
Monteer de banden op de
velgen. Lijm de banden
vast met sekondenlijm.
Monteer vervolgens de
wielen aan het chas sis.
In de voorste velgen
worden aan beide zijden
een bronsen glijlager
geschoven. Schroef
de wielen vast met M4
stopmoeren.
Montez les pneus sur les
jantes. Collez fermement
les pneus avec de la colle
cy anoacr ylate. Montez
ensuite les roues sur le
châssis. Insérer dans les
jantes avants de chaque
côté un palier en bronze.
Vissez fermement les
rou es au moyen d’écrous
nylstop M4.
Mount the tires on the
rims, care ful ly glue the
tires to the rims using super glue(we rec om mend
using PROTECH CA
glue part no: A105 -25)
Once the tires are glued
place the rims onto the
car and secure with M4
lock-nuts.
Raccordez les durites en
silicone.
Une durite à carburant
est raccordée au nipple
inférieure du réservoir et
part ensuite vers le nipple
de raccordement du carburateur. La durite suivante
est raccordée au nip ple
supérieur du réservoir et
part ensuite vers le nipple de pres sur i sa tion sur
l’échappement.
Sluit de silicone brandstofslangen aan. Er wordt
een brandstofslang aan
de onderste tanknippel aangesloten, deze
vertrekt vervolgens naar
de aansluitnippel van de
carburator. De volgende
brandstofslang wordt
aan de druknippel van de
tank aangesloten (deze
bevindt zich aan de tankdop ), deze vertrekt naar
de aansluitnippel van de
uitlaat.
Connect the silicone
fuel tubing sup plied to
the fuel nipple un der neath the tank, con nect
to the fuel inlet nipple of
the carburataor . The next
fuel tubing to connect is
from the nipple on top of
the fuel tank to the exhaust pressure nipple.
Montez les fixations de
carrosserie dans leurs
sup ports et fi xez-les avec
les vis auto-taraudeuses
de 2 x 5 mm.
Monteer de carrosseriesteunen in de houder
en fi xeer ze met de 2 x 5
mm vijzen.
Mount the body mount ing post’s onto the chas sis as shown in fi g 17/18.
Use the 2x 5mm self tap pers surplied.
fi g 18
fi g 19
fi g 20
Montieren Sie die Reifen
auf die Felgen. Kleben Sie
die Reifen vorsichtig mit
Se kun den kle ber (Teil Nr.
A105-25) an die Felgen.
Sobald der Klebstoff trocken
ist, können Sie die Räder
an das Auto mon tie ren. Die
Hin ter rä der passen über
die Me tall sechs ec ke auf
den hinteren Achsen und
werden von M4-Muttern
gehalten.
Die Ka ros se rie mon ta ge stüt ze
n wer den mit den mit ge lie fer ten
2 x 5 mm-Selbst boh rer n
zu sam men ge schraubt. Abb.
17/18.
Schließen Sie
den mitgelieferten
Si li kon treib stoffRohrstrang an den
Treibstoffnippel unter
dem Tank und an den
Treibstoffeinlass-nippel
des Vergasers an. Der
nächste an zu schlie ßen de
Treib stoff rohr strang
reicht vom Nippel
oben auf dem
Treibstofftank zum
Aus puff druck nip pel.
11
12
13
Page 8

Fun 4WD - 8
OUT OF THE BOX
Mounting the body
Cut out the polycarbonate
body us ing a pair of curved
lexan scis sors. These spe cial lexan scis sors are avail a ble from all good model
shops (AK100). When cut ting , fol low the bottom line
on the body. Then cut out
the front wheel open ings.
Do not cut the rear wheels
out yet. When the body is
cut out place it onto the
chas sis and center it over
the chassis. Once the body
is centered on the chas sis,
mark the position of the
body mount ing posts with
a marker pen. Drill holes the
same di am e ter as the bodyposts. Once all the holes
have been drilled, place the
body onto the chas sis and
mark the po si tion of the rear
wheels, and cut out.
Mounting the wing
Cut out the wing along the
marked line. Cen tre the
wing over the body and
mark the po si tion of the
holes. Drill holes with a 3
mm drill. Fix the wing with
the plastic 3mm screws
and the plastic spacers
sup plied.
Painting the body and
wing
The body is painted or
sprayed on the in side. For
this use only spe cial paint
that is suitable for polycarbonate. (We rec om mend
PROTECH RAC ING FIN ISH) Be for e start ing to paint
or spray, the body must be
thor ough ly degreased.
This can be done by wash ing the inside of the body
with wa ter and wash ing up
liquid. Use a normal towel
to dry the body, do not use
paper tow els to do this as
they cause stat ic elec tric i ty
to build up in side the body
and this will attract dust.
When the body is dry, try
not to touch the in side of
the body. The fol low ing step
is to mask of the windows
with masking tape/film
or mask ing liquid. When
spray ing the body, use very
light coats and al low to dry
between coats.
Montage de la carrosserie
Découpez la carrosserie en
polycarbonate au moyen
de ciseaux spéciaux pour
Lexan. Ces ciseaux pour
Lexan sont disponibles chez
votre détaiilant en modélisme. (réf:AK100). Pour le
découpage, suivez la ligne
inférieure qui est dessinée
dans la carrosserie. Découpez ensuite les pas sag es
des rou es avants. Placez
la carrosserie découpée
sur le châssis et centrezla. Lorsque la carrosserie
est correctement alignée,
tracez l’emplacement des
sup ports de carrosserie au
moyen d’un crayon ou d’un
stylo à bille. Forez les trous
aux emplacements que
vous avez marqués. Le
diamètre des trous dépend
du diamètre du support de
la carrosserie.
Montage du spoiler
Découpez le spoiler sur la
ligne de contour. Centrez
le spoiler sur la carrosserie
et marquez l’emplacement
des trous de fi xation. Per-
cez les trous d’un diamètre
de 3 mm. Montez le spoiler
sur la carrosserie avec les
vis en plastique, n’oubliez
pas de placer les douilles
d’écartement en alu min i um
et vissez le tout fermement
.
Peinture de la carrosserie
La carrosserie est peinte au
pinceau, à l’aérographe ou
au spray, du côté intérieur.
Utilisez pour cela uniquement de la peintur e spéciale
convenant au polycarbonate
(par ex. Lexanit). Avant de
com menc er à peindre, la
carrosserie doit être bien
dégraissée. Elle peût être
simplement dégraissée avec
de l’eau et du détergent
vaisselle. Ensuite, séchez
soigneusement. N’utilisez
pas de mouchoirs en papier
qui chargent la carrosserie
en électricité statique. Un
essuie de cui sine ordinaire
convient parfaitement.
Montage van de carrosserie
Knip de polycarbonaat
carrosserie uit d.m.v. een
speciale lexanschaar . Deze
lexanschaar is te verkrijgen
bij uw modelbouw-vakhandelaar. (Best nr AK100).
Volg voor het uitknippen
de onderste lijn die in de
carrosserie afgetekend
staat. Knip vervolgens de
voorste wielrondingen uit.
Plaats de uitgesneden
carrosserie op het chas sis
en centreer de carrosserie
op het chas sis. Als de carrosserie mooi uitgelijnd is,
teken vervolgens de plaats
van de bodysteunen af
d.m.v. een stift of pen. Boor
gaten op de afgetekende
plaatsen. De di am e ter van
de gaten is afhankelijk van
de di am e ter van de carrosseriesteun.
Montage van de spoiler
Knip de spoiler uit op de
contourlijn. Centreer de
spoil er op de carrosserie en
teken de plaatsen af waar
de gaten voor de plastiekvijzen moeten komen.
De di am e ter van de plastiek vijzen is 3mm. Boor de
gaten met een di am e ter van
3mm. Monteer de spoil er op
de carrosserie, vergeet niet
de plastiek afstandsbussen
te plaatsen en schroef het
geheel aan elkaar vast.
Schilderen van de carrosserie
De carrosserie wordt aan
de binnenkant geschilderd
met penseel of gespoten.
Gebruik hiervoor enkel
speciale verf geschikt
voor polycarbonaat (b.v.
Lexanit). Alvorens met het
schilderen of spuiten te
beginnen moet de carrosserie goed ontvet worden.
De carrosserie kan eenvoudig ontvet worden met
water en de ter gent voor de
afwas. Daarna goed afdrogen. Gebruik hiervoor geen
papieren doekjes, zij maken
de carrosserie statisch. Een
gewone keukenhanddoek
is per fect.
Montage der Karosserie
Schneiden Sie die
Polycarbonatkarosserie mit
ei ner gebogenen Lexan-Schere
aus. Diese spe zi el len LexanSche ren sind in allen guten
Mo dell ge schäf ten erhältlich
(AK100). Folgen Sie beim
Schnei den der unteren Li nie der
Karosserie. Schnei den Sie dann
die Vor der rad öff nun gen aus.
Schneiden Sie die Hin ter rä der
noch nicht aus. Wenn die
Ka ros se rie aus ge schnit ten ist,
set zen Sie sie auf das Chas sis,
und zen trie ren Sie sie über dem
Chas sis. Sobald die Ka ros se rie
auf dem Chas sis zen triert ist,
mar kie ren Sie die Po si ti on der
Ka ros se rie-Mon ta ge stüt zen
mit ei nem Mar kier stift. Boh ren
Sie Löcher, die den sel ben
Durch mes ser ha ben wie die
Ka ros se rie stüt zen. Sobald alle
Löcher gebohrt sind, set zen Sie
die Ka ros se rie auf das Chas sis,
mar kie ren Sie die Po si ti on der
Hin ter rä der, und schnei den Sie
aus.
Montage des Kotfl ügels
Schneiden Sie den Kot flü gel
ent lang der markierten Linie aus.
Zentrieren Sie den Kot fl ü gel über
der Ka ros se rie, und mar kie ren
Sie die Position der Lö cher.
Boh ren Sie Löcher mit ei nem 3
mm-Boh rer. Be fe sti gen Sie den
Kot fl ü gel mit den mit ge lie fer ten
3 mm-Pla stik schrau ben und den
Pla stik-Ab stand hal tern.
Anstrich von Karosserie und
Kot fl ü gel
Die Karosserie wird innen lac kiert
oder gesprüht. Ver wen den Sie
hierfür nur Spe zi al far be, die für
Polycarbonat ge eig net ist. (Wir
empfehlen PROTECH RACING
FINISH). Vor Be ginn des
An strich- oder Sprüh vor gangs
muss die Ka ros se rie sorg fäl tig
ent fet tet werden. Dies kann durch
Rei ni gung des Wa gen in ne ren mit
Was ser und Ge schirr spül mit tel
er fol gen. Ver wen den Sie zum
Ab trock nen der Ka ros se rie ein
nor ma les Hand tuch. Ver wen den
Sie kei ne Pa pier hand tü cher,
da sie zum Auf bau sta ti scher
Elek tri zi tät im Wa gen in nern führen
wür den, was Staub anzieht.
Wenn die Ka ros se rie troc ken ist,
ver su chen Sie, das Wa gen in ne re
nicht zu be rüh ren. Der folgende
Schritt be steht im Ab dec ken der
Fen ster mit Ab deck band/film
oder Ab deck flüs sig keit. Wenn
Sie die Ka ros se rie sprühen,
ver wen den Sie sehr dünne
Schich ten, und las sen Sie
Page 9

Fun 4WD - 9
PRECAUTIONS
This radio-controlled car is not a toy. Always drive your car with a sense of responsibility.
Read the instructions before use. Never drive your car in public areas or playgrounds.
Never drive on public roads as this can cause accidents. Always keep the environment in mind. Don’t drive
the car in places where the noise can be disturbing. Never drive your car in the neighbourhood of heat
sourc es or fl ames. Check whether there is no one driving another car on the same frequency. This can result
to interferences or complete incontrolability of the car. Only use special model car fuel. Never use other fuels
that are explosive or fi re hazardous. A wrong use of the fuel can cause serious injuries or damages.
Only the user is responsible for the use of the product.
HEAT, FIRE AND FUEL
The engine and muffl er become very hot during the use of the car and can cause severe burns. Never touch
the rotating parts, they can cause serious injuries as they run at high RPM. Only use the fuel in open air and
keep clear from children or heat sources. Never fi ll the fuel tank when the glowstart is attached to the motor.
The fuel is toxic, avoid therefor all contact with skin or eyes.
MAINTENANCE
Let fi rst cool down the engine and muffl er before doing the maintenance of the car. Never leave fuel in the
fuel tank. It is very important to keep the air fi lter clean. Use special air fi lter oil on the air fi lter to avoid sand
and dust getting in the engine.
SECURITY
BEFORE FIRST USE
• Put new or freshly charged batteries in the transmitter (8 pcs) and in the receiver battery box (4 pcs)
• Check carefully the control functions of the transmitter corresponds with the movements on the car
(Throttle-Steering)
THROTTLE TRIGGER
Pulled position > Forwards
Neutral position > Engine runs on tick over and the brake is slightly activated
Pushed position > The brake is activated
STEERING WHEEL
Turn left > The wheels turn to the left
Turn right > The wheels turn to the right
• Charge the glowstart with the charger supplied overnight (14 hours)
• Check all nuts, bolts and screws if they are fully tightend
• Check the air fi lter and muffl er are fi tted correctly . Never drive the car if one of both elements are not pr operly
fi tted as this can cause serious damage to your engine.
• Check that all fuel tubes are in good condition.
• The engine must be run in before use (See paragraph ...)
BE FORE EVERY USE
• Check the batteries in the transmitter as well as the receiverbox that they are fully charged or in good con di tion. Old or uncharged batteries can cause radio problems.
• Always turn on the switch of the transmitter before turning on the switch in the car.
• Check carefully the control functions of the transmitter corresponds with the movements on the car
(Throttle-Steering)
THROTTLE TRIGGER
Pulled position > Forwards
Neutral position > Engine runs on tick over and the brake is slightly activated
Pushed position > The brake is activated
STEERING WHEEL
Turn left > The wheels turn to the left
Turn right > The wheels turn to the right
• Adjust the steering trim of the transmitter so that the car drives in a straight line.
• Check car efully that the throttle trigger as well the throttle trim ar e in the neutral position. A wrong adjustment
can lead to uncontrollable departure of the car.
CHECK LIST
Page 10

Fun 4WD - 10
• Check the main needle of the carburator is corr ectly set-up. The engine will be diffi cult to start and run if the
needle is not set correctly.
• Check the air fi lter and muffl er are fi tted correctly . Never drive the car if one of both elements are not properly
fi tted as this can cause serious damage to your engine.
• Check that all fuel tubes are in good condition.
• Use a little of oil or grease on turning parts if necessary. Never oil or grease the main gear.
• Fill the fuel tank with special model engine fuel. (DA YTONA 10%, never use another type of fuel not designed
for model use)
• Start the engine (See paragraph “ Starting & Running-in”)
AFTER EVERY USE
• Turn off the swith on the car before turning off the transmitter
• Make sure the fuel tank is empty. (Never leave fuel in the fuel tank)
• Clean the car with a brush and towel. (Never use water to clean the car)
• Check the condition of the air fi lter, and replace if necessary the foam insert.
• Check the shock absorbers.
• Check if the air fi lter and muffl er is correctly fi tted.
• Check all nuts, bolts & screws are properly tightend.
• Use a little of oil or grease on turning parts if necessary. Never oil or grease the main gear.
CHECK LIST
STARTING & RUNNING-IN
HOW TO START THE ENGINE
1. Fill the fuel tank
2. Turn the main needle (1) fully closed (clockwise) and re-open 2 full turns
3. Push 5 to 6 times on the pump of the fuel tank
4. Connect the glowstart to the glowplug. Leave the glowstart on and pull the throttle trigger on your trans
mitter to about half throttle
5. Start the engine by using small but sharp pulls on the pull starter. Never pull the cord more than 25 cm
6. If the motor doesn’t start straight away... STOP. If the engine will not turn over, there is too much fuel
inside the engine. Unscrew the glowplug and pull a few times on the pull starter to clear out the ex ces sive
fuel. Becarefull not to get fuel in your eyes. Blow on the glowplug to clear the fuel from the glow element.
Remount the glowplug and restart at step 4
RUNNING-IN THE ENGINE
The fi rst needle to set up is the main needle (1) that controls the fl ow of fuel at full throttle. Before running
your engine turn the main needle(1) clockwise until it is closed. When the needle (1) is fully closed, turn the
main needle (1) two turn’s open(anti-clockwise),this is the running in position. Now try to start the car as
described above. The engine should run rich ( a lot of smoke), drive the car very gently in the beginning to let
the motor warm up. The engine will not produce a lot of power but we rec om mend keeping these settings for
the fi rst 3 fuel tanks
SETTING-UP THE ENGINE
Once you have run the car for 3 fuel tanks you can begin to lean the motor out by turning the main needle (1)
clock wise. Only turn 1/8 of a turn at time, as you turn the main needle (1) inwards the RPM will raise. If you
turn it too far the motor will begin to lose RPM and stop when you give full throttle. If this happens then you
must open (anti-clockwise) the main needle (1) again until the motor runs with not too much smoke. Once
you have the top end set up you can adjust the low-end needle (2). You do this by running the car at idle for
around 10 seconds and then give full throttle, if the motor stutters and picks up RPM slowly then the low end
needle (2) is too rich (to much fuel) you must turn the low-end needle (2) inwards (clockwise). If the motor
picks quickly but then begins to die as you open the throttle, the low-end needle (2) is too lean (not enough
fuel). You must open the low-end needle (2) (anti-clockwise)
The adjustment of the main needle (1) and the low-end needle (2) can effect each other, so when you adjust
one needle you might need to adjust the other needle. Once the engine is correctly set-up, you must adjust
the throttle stop screw (3), which adjusts the tick-over speed of the engine. Adjust the tick-over of the engine
as low as possible without the engine stopping.
ATTENTION : TO EXTEND THE LIFE OF YOUR ENGINE, IT IS BET TER TO RUN YOUR EN GINE
TOO RICH THAN TOO LEAN.
Page 11

Fun 4WD - 11
THE ENGINE DOESN’T START
No fuel Fill the fuel tank and pump 3 times
Glowplug broken Unscrew the glowplug and check the condition of it
Glowstart uncharged Recharge the glowstart overnight
Too much fuel inside Unscrew the glowplug, take of the fuel line to the carburator and pull several
the engine times on the pull starter to empty the engine of excessive fuel.
ENGINE LOCKS WHEN PULLING THE PULL START
Too much fuel inside Unscrew the glowplug, take of the fuel line to the carburator and pull several
the engine times on the pull starter to empty the engine of excessive fuel.
THE ENGINE STARTS BUT STOPS RUNNING
Glowplug burned out Change the glowplug
Engine adjusted to lean Open the main needle (1) by 1/8 of a turn (Anti-clockwise)
Engine adjusted to rich Close the main needle (1) by 1/8 of a turn (Clockwise)
No fuel fl ow Check all fuel lines
Tick-over too low Screw in the throttle stop screw (3) until tick over is correct
Engine worn out Replace liner and piston, or send the engine back to the aftersales service
THE ENGINE RUNS OK BUT STOPS RUNNING AT HIGH RPM
Glowplug burned out Change the glowplug
Engine adjusted to lean Open the main needle (1) by 1/8 of a turn (Anti-clockwise)
Engine adjusted to rich Close the main needle (1) by 1/8 of a turn (Clockwise)
No fuel fl ow Check all fuel lines
Engine runs to hot Let cool down the engine, open the main needle (1) by 1/8 of a turn
and restart the engine
Engine worn out Replace liner and piston, or send the engine back to the aftersales service
THE RADIO SYSTEM DOESN’T WORK
Batteries empty Replace or recharge the batteries
Switches not turned on Check if the transmitter and receiver switches are turned on
Loose connectors Check if all connectors are properly fi tted in the receiver
THE RADIO SYSTEM HAS NO RANGE
Batteries empty Replace or recharge the batteries
Aerial broken Check the condition of both aerials
TROUBLE SHOOTING
Page 12

Fun 4WD - 12
VEILIGHEIDSVOORSCHRIFTEN
Gebruik uw telegeleide auto met een zekere verantwoordelijkheidszin, om eventuele materiele schade en of
lichamelijk letsel te voorkomen, en lees de volgende aanbevelingen. Houd altijd rekening met uw omgeving en
de natuur. Nooit uw auto laten rijden in de buurt van mensen of dieren.
Nooit uw auto gebruiken op de straat of openbare wegen, het model kan ernstige ongevallen veroorzaken in
het verkeer. Houd steeds rekening met de omgeving en de natuur. Vermijd het besturen van uw wagen in omgevingen waar het geluid storend werkt.
Gebruik uw auto nooit in de buurt van warmtebronnen of vlammen om ernstige ongelukken te voorkomen.
Gebruik uw auto steeds in open oppervlaktes of in ruimtes zonder veel obstakels. Hierdoor brengt men geen
schade aan andere objecten of aan het model zelf.
Kijk uit dat er niemand in uw omgeving dezelfde frequentie gebruikt als uzelf. Dit kan tot stor ing of volledige
oncontroleerbaarheid van het model leiden. Ernstige ongevallen kunnen het gevolg zijn. Gebruik enkel speciaal
voor de modelbouw samengestelde brandstoffen. Gebruik nooit brandstof van het pompstation of andere brandstoffen die ontploffi ngs- en of brandgevaarlijk zijn. Lees steeds de veiligheidsvoorschriften voor het gebruik.
Een verkeerdelijk gebruik van de brandstof kan ernstige materiële en of lichamelijke schade aanbrengen. Enkel
de gebruiker is persoonlijk verantwoordelijk voor het gebruik van deze produkten.
WARMTE, VUUR EN BRANDSTOF
De motor en uitlaat worden heel heet gedurende het gebruik van de auto en kunnen ernstige brandwonden
veroorzaken als men deze elementen aanraakt.
Raak nooit de draaiende delen aan. Doordat deze elementen zeer snel draaien kunnen ze ernstige letsels
veroorzaken.
Gebruik enkel brandstof voor de modelbouw gemaakt. Gebruik de brandstof enkel in goed geventileerde ruimtes.
Houd de brandstof buiten het bereik van kinderen of warmtebronnen. V ul de brandstoftank nooit als de startbatterij op de motor aangesloten is. De brandstof is toxisch, vermijd daarom elk contact met de huid en ogen.
ONDERHOUD
De motor en uitlaat worden tijdens het rijden zeer warm, en kunnen ernstige letsels veroorzaken als men deze
aanraakt. Laat steeds deze elementen voldoende afkoelen, vooraleer men met het onderhoud van de auto aanvangt. Laat nooit brandstof in de tank staan. Rijd steeds de brandstoftank volledig leeg. Het is zeer belangrijk
de luchtfi lter goed zuiver te houden.
VEILIGHEID
VOOR HET EERSTE GEBRUIK
• Plaats nieuwe of goed geladen batterijen in de zender (8 stuks) en de ontvangerbatterijhouder (4 stuks)
• Controleer of de stuurbevelen overeen komen met de bewegingen van de auto (gas-rem en stuur)
GASHENDEL
Getrokken positie > Vooruit
Neutrale positie > Motor draait stationair en de rem is lichtjes geactiveerd
Gedrukte positie > De rem is geactiveerd
STUURWIEL
Linkse positie > De auto stuurt naar links
Rechtse positie > De auto stuurt naar rechts
• Laad de GLOWSTART op met de bijgeleverde lader (14 uur)
• Controleer goed of alle schroeven, moeren en andere onderdelen goed vast zitten.
• Controleer of het luchtfi lter en de uitlaat juist zijn gemonteerd. Nooit de auto laten rijden als één van deze
beide elementen niet juist gemonteerd zijn. Dit kan ernstige schade tot gevolg hebben voor de motor.
• Controleer of de brandstofslangen niet gescheurd of beschadigd zijn.
• De motor moet eerst goed ingelopen worden (Zie paragraaf inlopen van de motor)
VOOR ELK GEBRUIK
• Plaats nieuwe of goed geladen batterijen in de zender (8 stuks) en de ontvangerbatterijhouder (4 stuks)
Oude of slecht opgeladen batteijen kan tot controle verlies leiden.
• Steeds eerst de zender aanzetten en vervolgens de schakelaar van de auto
• Controleer of de stuurbevelen overeen komen met de bewegingen van de auto (gas-rem en stuur)
GASHENDEL
CONTROLELIJST
Page 13

Fun 4WD - 13
Getrokken positie > Vooruit
Neutrale positie > Motor draait stationair en de rem is lichtjes geactiveerd
Gedrukte positie > De rem is geactiveerd
STUURWIEL
Linkse positie > De auto stuurt naar links
Rechtse positie > De auto stuurt naar rechts
• Regel de stuurservo zo af dat de auto een rechte lijn rijdt. Dit kan u doen door de stuurtrim op de zender bij
te regelen.
• Contr oleer goed of de gashendel in de neutraalpositie staat, zo ook de trim van de gas. Een slechte instelling
kan de auto op hol doen slaan.
• Controleer of de hoofdregelnaald van de carburator correct afgesteld is. De motor zal niet of slecht starten
als de hoofdregelnaald niet correct ingesteld is.
• Controleer of het luchtfi lter en de uitlaat juist zijn gemonteerd. Nooit de auto laten rijden als één van deze
beide elementen niet juist gemonteerd zijn. Dit kan ernstige schade tot gevolg hebben voor de motor.
• Controleer of de brandstofslangen niet gescheurd of beschadigd zijn.
• Gebruik een weinig olie of vet op de draaiende delen, ... enkel indien nodig. Nooit op het plastiek hoofd-
tandwiel.
• Vul de brandstoftank met modelbouwbrandstof (DA YTONA CAR 10%, nooit ander e brandstof gebruiken dan
de spéciale modelbouwbrandstof)
• Start de motor (Zie paragraaf “Starten en inlopen”)
NA ELK GEBRUIK
• Zet de schakelaar van de auto uit en vervolgens de zender
• Leeg de brandstoftank volledig (Laat nooit brandstof in de brandstoftank)
• Reinig de auto met een doek en een borstel (Niet met water)
• Controleer de staat van de luchtfi lter, indien nodig vervang het mousse fi lterelement
• Controleer de goede werking van de schokdempers
• Controleer of de luchtfi lter en de uitlaat goed bevestigd zijn
• Controleer goed of alle schroeven, moeren en andere onderdelen goed vast zitten.
• Gebruik een weinig olie of vet op de draaiende delen, ... enkel indien nodig
CONTROLELIJST
STARTEN EN INLOPEN
HOE DE MOTOR TE STARTEN
1. Vul de brandstoftank
2. Draai de hoofdregelnaald (1) van de carburator dicht om hem vervolgens met 2 toeren te openen.
3. Druk 5 tot 6 maal op het pompje om de brandstof aan te zuigen.
4. Sluit de gloeiplugstekker met zijn batterij op de gloeiplug aan. Laat de stekker op zijn plaats zitten en geef
50 % gas.
5. Start de motor met korte trekjes aan de trekstarter. Trek voorzichtig met herhalende en korte trekjes. Trek
het touw nooit verder als 25 cm.
6. Als de motor niet start, ga dan niet verder ! Als de motor teveel brandstof heeft, draai dan de gloeiplug uit
de motor en trek ongeveer 10 keer aan de trekstarter tot de motor weer leeg is. Let op voor de ogen ! Blaas
op de gloeiplug om het gloeidraadje van de gloeiplug te drogen. Hermonteer de gloeiplug en start terug
van stap 4.
HOE DE MOTOR INLOPEN
De motor moet eerst goed ingelopen worden alvorens met het model echt te gaan rijden.
Zoek een zuivere en goed geventileerde ruimte. Plaats het model op een verhoogje zodat de wielen vrij van de
grond kunnen draaien.
Vul de brandstoftank en start het model zoals voorheen beschreven werd. Laat de motor op leegloop draaien tot
de brandstoftank leeg is. Laat de motor afkoelen en vul de brandstoftank opnieuw voor een nieuwe inloopsessie. Regel de gastrim zo dat de wielen niet aangedreven worden.
Na deze inloopperiode kan het model gereden worden. Dit dient traag te gebeuren voor een periode van 2 tot
3 tankvullingen.
Vermijd de volgas positie tijdens het inlopen.
Een nieuwe motor reageert minder snel op het gasgeven en het is zelfs mogelijk dat de motor afslaat tijdens
het inlopen. In dit geval de motor herstarten en meer progressief gas geven.
Page 14

Fun 4WD - 14
HOE DE MOTOR AF TE REGELEN
Draai eerst de hoofdregelnaald (1) dicht om deze vervolgens met 2 toeren te openen. Nu kunnen we de motor
starten. De motor zal veel roken, wat op een zeer rijke afstelling duidt. Rij met de auto rechte lijnen.Om het
toptoerental van de motor te regelen gaan wij de hoofdregelnaald (1) dicht draaien, dit doen we met 1/8 toer
per keer. Als het toerental van de motor tijdens het rijden afneemt en de motor weinig of bijna geen rook meer
verspreidt staat deze te mager afgeregeld.
Laat de motor vervolgens 10 sec op leegloop draaien, om vervolgens volgas te geven. Als de motor niet snel
reageert, maar eerst sputtert om dan naar het volgas regime op te lopen moet de onderste regelnaald (2) een
weinig ingedraaid worden. Dit doen we ook weer per 1/8 toer . Neemt de motor echter dir ect op, dan kunnen wij
de onderste regelnaald (2) een ietsje opendraaien. De inregeling van de beide regelnaalden kan de afregeling
beinvloeden. Regel de stationair schroef (3) zo dat de motor in de leegloopstand een zo laag mogelijk toerental
draait.
LET OP : OM DE LEVENSDUUR V AN UW MOTOR TE VERLENGEN IS HET STEEDS AAN TE RADEN
DE MOTOR EEN WEINIG TE RIJK AF TE STELLEN.
STARTEN EN INLOPEN
DE MOTOR START NIET
Geen brandstof Vul de brandstoftank en pomp vervolgens 3 keer
Gloeiplug defect Schroef de gloeiplug los en controleer de goede werking
Glowstart leeg Laad de glowstart volledig op
Te veel brandstof in de motor Shroef de gloeiplug los, draai de hoofdregelnaald dicht en trek verschillende
keren aan de trekstarter om de overtollige brandstof te verwijderen.
DE MOTOR BLOKKEERT ALS AAN DE TREKSTARTER GETROKKEN WORDT
Te veel brandstof in de motor Shroef de gloeiplug los, draai de hoofdregelnaald dicht en trek verschillende
keren aan de trekstarter om de overtollige brandstof te verwijderen.
DE MOTOR START MAAR SLAAGT VERVOLGENS AF
Gloeiplug versleten Vervang de gloeiplug
Motor te arm afgesteld Open de hoofdregelnaald (1) 1/8 toer en start opnieuw
Motor te rijk afgesteld Draai de hoofdregelnaald (1) 1/8 toer dicht en start opnieuw
Geen toevoer van brandstof Controleer alle brandstofl eidingen
Stationair regeling te laag Schroef de stationair schroef (3) een beetje in
Motor versleten Vervang de zuiger en zuigerbus, of stuur de motor op naar de SNV
DE MOTOR DRAAIT GOED, MAAR SLAAT AF OP HOGE TOEREN
Gloeiplug versleten Vervang de gloeiplug
Motor te arm afgesteld Open de hoofdregelnaald 1/8 toer en start opnieuw
Motor te rijk afgesteld Draai de hoofdregelnaald 1/8 toer dicht en start opnieuw
Geen toevoer van brandstof Controleer alle brandstofl eidingen
Motor loopt warm Laat de motor afkoelen, open de hoofdregelnaald (1) 1/8 toer en start
opnieuw
Motor versleten Vervang de zuiger en zuigerbus, of stuur de motor op naar de SNV
DE RADIOBESTURING WERKT NIET
Batterijen leeg Vervang of herlaad de batterijen
Schakelaar staat niet aan Controleer of de zender en ontvanger aangeschakeld zijn
Stekker los Controleer of alle stekkers goed in de ontvanger steken
DE RADIOBESTURING HEEFT GEEN REIKWIJDTE
Batterijen leeg Vervang of herlaad de batterijen
Antenne gebroken Controleer de antenne van de ontvanger en zender
PROBLEMEN OPLOSSEN
Page 15

Fun 4WD - 15
PRECAUTIONS DE SECURITE
Afi n de prévenir tout dommage matériel ou corporel, faire évoluer les modèles radiocommandés de façon
responsable en suivant au minimum les quelques recommandations ci-après. Prendre l’environnement en
considération. Ne jamais faire évoluer les modèles R/C près de personnes ou animaux et ne pas considérer les
humains ou animaux comme des obstacles à éviter ! Ne jamais faire évoluer les modèles dans la rue ou sur une
route : ils peuvent causer de graves accidents de la circulation. Pour éviter tout dommage matériel ou corporel,
ne pas faire évoluer les modèles dans un espace restreint ou bondé . Tenir compte de l’environnement. Eviter les
évolutions dans les endroits ou le bruit peut entrainer des désagrements. Ne jamais faire évoluer le modèle près
d’une source de chaleur ou d’une fl amme sous peine d’accidents sérieux. La collision du modèle avec d’autres
objets entraine des dommages matériels aux objets et au modèle proprement dit, utilisez votre voiture dans les
zones dégagées. S’assurer que personne d’autre n’utilise la même fréquence dans les environs. L’utilisation
simultanée de la même fréquence pour les modèles roulants, volants ou navigants peut entrainer la perte de
contrôle des modèles et causer de sérieux accidents. N’utiliser que du carburant spécial pour modèles réduits.
Ne jamais utiliser d’essence ou autre carburant qui peuvent exploser et brûler causant dommages matériels et
blessures graves. Bien lire les précautions d’utilisation sur le contenant et s’y con form er. Un usage incorrect du
carburant peut entrainer de dommages matériels et corporels. Seul l’utilisateur est personnellement responsable
de l’usage qu’il fait du produit.
CHALEUR, FEU ET CARBURANT
Les éléments tels que le moteur, l’échappement ... deviennent très chauds lors des évolutions et peuvent
causer de sérieuses brûlures si on les touche ! Ne pas toucher les pièces en mouvement telles que les arbres
d’entrainement, les pignons ... car leur rotation rapide peut entrainer des blessures graves. N’utiliser que du car burant pour le modélisme. Ne jamais employer d’essence ou autres carburants pouvant exploser et s’enfl ammer
et donc provoquer de sérieuses brûlures / blessures. Manipuler le carburant uniquement dans les zones bien
ventilées. Le tenir éloigné d’une fl amme ou de toutes autres sources de chaleur. Ne jamais faire le plein du
modèle ou effectuer l’amorçage avec la batterie ou l’accu de démarrage connecté au moteur. Le carburant est
toxique : éviter le contact avec la peau et les yeux. Le tenir éloigné des en fants.
MAINTENANCE
Les éléments tels que le moteur, l ‘échappement ... deviennent très chauds lors des évolutions et peuvent
causer de sérieuses brûlures si on les touche ! En conséquence, laisser refroidir avant d’entamer le nettoyage
ou l’entretien du modèle. Ne jamais laisser de carburant dans le réservoir. Faire évoluer le modèle jusqu’à vider
le réservoir! Nettoyer la chambre du pot d’échappement. Il est impératif de maintenir le fi ltre à air propre.
SECURITÉ
AVANT LA PREMIÈRE UTILISATION
• Mettre des piles neuves dans l’émetteur (8 pcs) et dans le boîtier piles de la voiture (4 pcs)
• Vérifi er que les commandes de la radio correspondent avec les mouvements de la voiture (gas-frein et
di rec tion)
POIGNE DE GAS
Position tirée > Marche avant
Position neutre > Moteur au ralenti et la voiture freine un petit peu
Position poussée > Le frein est actionné
VOLANT
Position gauche > Voiture tourne à gauche
Position droite > Voiture tourne à droite
• Charger le chauffe bougie avec son chargeur ( 14 heures )
• S’assurer que les écrous et boulons sont bien serrés
• S’assurer que le fi ltre à air et l’échappement sont propr es et correctement installés. Ne jamais faire évoluer
le modèle sans ces éléments sous peine d’endommagement important du moteur.
• S’assurer que les durites ne sont pas fendues ou obstruées. Ceci peut entrainer des fuites ou même une
casse moteur.
• Il faut bien roder le moteur avant la première utilisation (Voir page “rodage du moteur”)
AVANT CHAQUE UTILISATION
• S’assurer que les piles ou accus de l’émetteur et du récepteur sont bien chargés. Des piles ou accus déchargés peuvent entrainer une perte de controle du modèle.
LISTE DE CONTRÔLE
Page 16

Fun 4WD - 16
LISTE DE CONTRÔLE
PROCEDURE DE DEMARRAGE DU MOTEUR
1. Remplir le réservoir à carburant.
2. Fermer le pointeau pricipal (1) situé sur le carburateur. L’ouvrir ensuite de deux tours.
3. Appuyer 5 ou 6 fois sur le bouton d’amorçage du réservoir.
4. Connecter le socquet à la bougie pour la faire chauffer.
5. Laisser le socquet en place et amener les gas à 50 %.
6. Démarr er le moteur par petites tractions sur la tirette de démarrage. Tir er par petits coups répétifs. Ne pas
tirer la corde au delà de 25 cm.
7. Si le moteur ne démarre pas, ne pas insister ! Si le moteur est noyé, enlever la bougie et tirer le lanceur 10
à 20 fois pour vider complètement le cylindre de carburant. Attention aux yeux ! Souffl er sur la bougie pour
sècher le fi lament. Réinstaller la bougie et reprendre à l’étape 4.
PROCEDURE DE RODAGE
Bien veiller à effectuer le rodage du moteur avant de faire évoluer le modèle pour la première fois.
Choisir un endroit propre et bien ventilé et poser le modèle sur un socle afi n que les roues ne soient pas en
contact avec le sol. Remplir le réservoir et démarrer le moteur selon la procédure précédemment décrite. Laisser
tourner le moteur au ralenti jusqu’à épuisement du carburant. Laisser le moteur refroidir et effectuer ensuite un
nouveau remplissage pour une nouvelle séance de ralenti. Agir éventuellement sur le trim de ralenti de façon
à ce que les roues ne soient pas entrainées. Après ce rodage statique, remplir le réservoir et faire évoluer le
modèle lentement en vérifi ant les fonctions R/C.
Répéter 2 à 3 fois cette opération.
• Allumer toujours en premier l’émetteur et ensuite l’interrupteur sur la voiture.
• Vérifi er que les commandes de la radio correspondent avec les mouvements de la voiture (gas-frein et
di rec tion)
POIGNE DE GAS
Position tirée > Marche avant
Position neutre > Moteur au ralenti et la voiture freine un petit peu
Position pousée > Le frein est actionné
VOLANT
Position gauche > Voiture tourne à gauche
Position droite > Voiture tourne à droite
• Ajuster le servo de direction et régler le trim de façon à ce que la voiture roule en ligne droite lorsque le
manche/volant de direction est au neutre.
• Vérifi er correctement le neutre de la commande de gas. Un réglage incorrect peut entrainer le départ inopiné
du modèle.
• Vérifi er correctement le réglage du pointeau de carburateur. Le moteur peut ne pas démarrer si le pointeau
n’est pas correctement réglé.
• S’assurer que le fi ltre à air et l’échappement sont propres et correctement installés. Ne jamais faire évoluer
le modèle sans ces éléments sous peine d’endommagement important du moteur.
• S’assurer que les durites ne sont pas fendues ou obstruées. Ceci peut entrainer des fuites ou même une
casse moteur.
• Appliquer de la graisse aux suspensions, pignons, paliers ... si nécessaire. Ne jamais mettre de l’huile ou
de la graisse sur la couronne principale.
• Remplir le réservoir avec du carburant de modélisme ( DAYTONA CAR 10%), ne jamais utiliser d’autres car -
burants que le carburant spéciale modélisme.
• Démarrer le moteur (Voir paragraphe “Démarrage et rodage”)
APRÈS CHAQUE UTILISATION
• Eteindre l’interrupteur de la voiture en premier ensuite l’émetteur.
• Vider le réservoir de carburant (Ne jamais laisser du carburant dans le réservoir)
• Nettoyer la voiture avec un chiffon et une brosse (jamais avec de l’eau)
• Vérifi er l’état du fi ltre à air, si nécessaire remplacer la mousse du fi ltre à air.
• Vérifi er le bon fonctionnement des amortisseurs.
• S’assurer que le fi ltre à air et l’échappement sont propres et correctement installés.
• S’assurer que les écrous et les boulons sont bien serrés.
• Appliquer de la graisse aux suspensions, pignons, paliers ... si nécessaire.
DÉMARRAGE ET RODAGE
Page 17

Fun 4WD - 17
DÉMARRAGE ET RODAGE
Eviter la position « Pleins Gas » lors des séances de rodage.
Un moteur neuf peut répondre mollement et même câler lors de l’accélération. Dans ce cas, réessayer en
ouvrant les gas plus progressivement.
PROCEDURE DE REGLAGE DU MOTEUR
Réglez d’abord le pointeau principal (1) en le fermant complètement pour le rouvrir ensuite de 2 tours. A présent,
démarrez le moteur qui tournera très riche tout en dégageant une forte fumée.
Conduisez la voiture en ligne droite.
Pour accélerer le rythme du moteur: mettre le moteur moins riche (diminuer l’apport du carburant, pointeau
pricipal (1)). Il convient de le faire par un 1/8 de tour à chaque fois. Le moteur accélère. Si à un moment donné
le rythme diminue, il suffi t de laisser tourner le moteur pendant quelques secondes au ralenti pour ensuite donner plein gas. Si le moteur ne répond pas aussitôt, il faut tourner d’un 1/8 de tour la vis de reprise (2) dans le
sens des aiguilles d’une horloge. Le maniement de la vis de reprise (2) peut néanmoins infl uencer le réglage du
pointeau principal (1). Réglez le ralenti du moteur au régime le plus bas possible (vis de ralenti (3)).
ATTENTION : POUR AUGMENTER LA LONGEVITE DE VOTRE MOTEUR, AJUSTER
LE POINTEAU UN PEU PLUS RICHE !
LE MOTEUR NE DÉMARRE PAS
Pas de carburant Remplir le réservoir et amorcer 3 fois
Bougie cassée Dévisser la bougie et vérifi er son fonctionnement avec le chauffe bougie
Chauffe bougie vide Recharger complètement le chauffe bougie
Moteur noyé Dévisser la bougie, fermer le pointeau principal et tirer au lanceur pour
vider le moteur de carburant
LE MOTEUR BLOQUE FORT QUAND ON TIRE LE LANCEUR
Moteur noyé Dévisser la bougie, fermer le pointeau principal et tirer au lanceur pour
vider le moteur de carburant. Remettre la bougie.
LE MOTEUR DÉMARRE MAIS S’ARRÈTE IMMÉDIATEMENT
Bougie usée Remplacer la bougie
Moteur reglé trop pauvre Ouvrir le pointeau principal (1) de 1/8 ième tour et redemarrer
Moteur reglé trop riche Fermer le pointeau principal (1) de 1/8 ième tour et redemarrer
Pas d’arrivée de carburant Vérifi er les durites de carburant
Ralenti trop bas Fermer la vis de ralenti (3) dans le sens horaire
Moteur usé Changer l’ensemble chemise/piston, ou renvoyez le moteur au SAV
LE MOTEUR TOURNE BIEN, MAIS CALE À HAUT RÉGIME
Bougie usée Remplacer la bougie
Moteur reglé trop pauvre Ouvrir le pointeau principal (1) de 1/8 ième tour et redemarrer
Moteur reglé trop riche Fermer le pointeau principal (1) de 1/8 ième tour et redemarrer
Pas d’arrivée de carburant Vérifi er les durites de carburant
Moteur chauffe de trop Laisser refroidir le moteur, ouvrir le pointeau principal (1) de 1/8 ième tour et
redémarrer
Moteur usé Changer l’ensemble chemise/piston, ou renvoyez le moteur au SAV
LA TÉLÉCOMMANDE NE FONCTIONNE PAS
Piles vides Remplacer ou recharger les piles/accus
Interrupteur pas allumé Vérifi er bien si l’émetteur et l’interrupteur de la voiture sont allumés
Cable débranché Vérifi er si les connecteurs sont bien enfoncés dans le récepteur
LA TÉLÉCOMMANDE N’ A PAS DE PORTÉE
Piles vides Remplacer ou recharger les piles/accus
Antenne cassée Vérifi er l’antenne de l’émetteur et du récepteur
REMÉDIER A CERTAINS PROBLÈMES
Page 18

Fun 4WD - 18
VORSICHTSMASSNAHMEN
Dieses funkgesteuerte Auto ist kein Spielzeug. Fahren Sie Ihr Auto stets mit Verantwortungsbewusstsein.
Lesen Sie vor der Verwendung die Anweisungen. Fahren Sie Ihr Auto nie in öf fent li chen Bereichen oder auf
Spielplätzen.
Fahren Sie niemals auf öffentlichen Straßen, da dies Unfälle verursachen kann. Denken Sie stets an die
Umwelt. Fahren Sie das Auto nicht an Orten, an denen der Lärm stören kann. Fahren Sie Ihr Auto nie in der
Nähe von Hitzequellen oder Flam men. Vergewissern Sie sich, dass kein anderes Fahrzeug auf der sel ben
Frequenz fährt. Dies kann zu Interferenzen oder zur vollständigen Un kon trol lier bar keit des Autos führen.
Verwenden Sie nur besonderen Mo dell au to kraft stoff. Verwenden Sie niemals anderen Kraftstoff, der explosiv
oder feu er ge fähr lich ist. Ein nicht sach ge mä ßer Einsatz des Kraftstoffes kann schwere Verletzungen oder
Schäden ver ur sa chen.
Allein der Verwender haftet für die Verwendung des Produkts.
HITZE, FEUER UND KRAFTSTOFF
Motor und Schalldämpfer werden bei der Verwendung des Autos sehr heiß und können schwere
Ver bren nun gen verursachen. Berühren Sie niemals die ro tie ren den Teile, sie können schwere Verletzungen
verursachen, wenn Sie mit hoher Drehzahl laufen. Verwenden Sie den Kraftstoff nur in freier Luft und halten
Sie ihn von Kindern und Hitzequellen fern. Füllen Sie den Kraftstofftank nicht, wenn der Glühstart mit dem
Motor ver bun den ist. Der Kraftstoff ist giftig. Vermeiden Sie daher jede Be rüh rung mit Haut oder Augen.
WARTUNG
Lassen Sie Motor und Schalldämpfer abkühlen, ehe Sie mit der Wartung des Wa gens beginnen. Lassen
Sie keinen Treibstoff im Treibstofftank. Es ist sehr wichtig, den Luftfi lter sauber zu halten. Verwenden Sie
be son de res Luftfi lteröl für den Luft fi l ter, um zu vermeiden, dass Sand und Staub in den Motor gelangen.
SICHERHEIT
VOR DER ERSTEN VERWENDUNG
• Geben Sie neue oder frisch aufgeladene Batterien in die Batteriebox von Sender (8 Stück) und Empfänger
(4 Stück).
• Prüfen Sie sorgfältig, dass die Kontrollfunktionen des Senders mit den Be we gun gen auf dem Auto
über ein stim men. (Drosselklappen-Steuerung)
DROSSELKLAPPEN-HEBEL
Gezogene Position > Vorwärts
Neutrale Position > Der Motor läuft im Leerlauf, und die Bremse ist leicht aktiviert.
Gedrückte Position > Die Bremse ist aktiviert.
LENKRAD
Linksdrehung > Die Räder laufen nach links.
Rechtsdrehung > Die Räder laufen nach rechts.
• Laden Sie den Glühstart über Nacht mit dem mitgelieferten Ladegerät (14 Stun den).
• Prüfen Sie, ob alle Muttern, Bolzen und Schrauben fest angezogen sind.
• Stellen Sie sicher, dass Luftfi lter und Schalldämpfer korrekt aufgesetzt sind. Fahren Sie das Auto nie, wenn
eines der beiden Elemente nicht ordnungsmäßig aufgesetzt ist, da dies schwere Schäden an Ihrem Motor
verursachen kann.
• Prüfen Sie, ob alle Kraftstoffl eitungen in gutem Zustand sind.
• Der Motor muss vor der Verwendung eingelaufen werden (Siehe Abschnitt ...)
VOR JEDER VERWENDUNG
• Prüfen Sie, ob die Batterien in der Sender- sowie in der Empfängerbox voll auf ge la den bzw. in gutem Zustand
sind. Alte oder nicht aufgeladene Batterien können Funkprobleme verursachen.
• Schalten Sie stets den Schalter des Senders ein, ehe Sie den Schalter im Wagen einschalten.
• Prüfen Sie sorgfältig, ob die Kontrollfunktionen des Senders mit den Bewegungen des Wagens
über ein stim men (Drosselklappen-Steuerung)
CHECKLISTE
Page 19

Fun 4WD - 19
DROSSELKLAPPEN-HEBEL
Gezogene Position > Vorwärts
Neutrale Position > Der Motor läuft im Leerlauf, und die Bremse ist leicht aktiviert.
Gedrückte Position > Die Bremse ist in Betrieb.
LENKRAD
Linksdrehung > Die Räder laufen nach links.
Rechtsdrehung > Die Räder laufen nach rechts.
• Stellen Sie den Steuertrimm des Senders so nach, dass das Auto in einer geraden Linie fährt.
• Prüfen Sie sorgfältig, dass der Drosselklappen-Hebel und der Drosselklappen-Trimm in einer neutralen
Position sind. Eine falsche Einstellung kann zu einem unkontrollierbaren Start des Wagens führen.
• Prüfen Sie, dass die Hauptnadel des Vergasers korrekt eingestellt ist. Der Motor ist schwierig zu starten und
zu betreiben, wenn die Nadel nicht korrekt eingestellt ist.
• Prüfen Sie, dass Luftfi lter und Schalldämpfer korrekt aufgesetzt sind. Fahren Sie das Auto nie, wenn
eines der beiden Elemente nicht ordnungsmäßig aufgesetzt ist, da dies schwere Schäden an Ihrem Motor
ver ur sa chen kann.
• Prüfen Sie, das alle Kraftstoffl eitungen in gutem Zustand sind.
• Verwenden Sie für die sich drehenden Teile bei Bedarf ein wenig Öl oder Schmie re.
• Füllen Sie den Treibstofftank mit besonderem Modellmotorkraftstoff. (DAYTONA 10%, verwenden Sie
niemals eine andere Art von Kraftstoff, die nicht für die Ver wen dung für Modellwagen geeignet ist).
• Starten Sie den Motor (vgl. Abschnitt “Starten & Einlaufen”).
NACH JEDER VERWENDUNG
• Stellen Sie den Schalter auf dem Wagen aus, ehe Sie den Sender ausschalten.
• Stellen Sie sicher, dass der Kraftstofftank leer ist. (Lassen Sie keinen Kraftstoff im Tank).
• Reinigen Sie das Auto mit einer Bürste und einem Handtuch. (Verwenden Sie zur Reinigung des Autos
niemals Wasser.)
• Prüfen Sie den Zustand des Luftfi lters, und ersetzen Sie bei Bedarf den Schaum ein satz.
• Prüfen Sie die Stoßdämpfer.
• Prüfen Sie, ob Luftfi lter und Schalldämpfer korrekt aufgesetzt sind.
• Prüfen Sie, ob alle Mutter, Bolzen & Schrauben richtig festgezogen sind.
• Geben Sie bei Bedarf ein wenig Öl oder Schmiere auf die sich bewegenden Teile. Ölen oder schmieren
Sie niemals das Hauptgetriebe.
CHECKLISTE
STARTEN & EINLAUFEN
STARTEN DES MOTORS
1. Füllen Sie den Treibstofftank.
2. Drehen Sie die Hauptnadel (1) (im Uhrzeigersinn) ganz zu, und öffnen Sie sie um zwei volle Umdrehungen.
3. Drücken Sie fünf bis sechs Mal auf die Pumpe des Treibstofftanks.
4. Verwenden Sie den Glühstart mit der Glühkerze. Lassen Sie den Glühstart an, und ziehen Sie den
Dros sel klap pen-Hebel auf Ihrem Sender ungefähr auf Halbgas.
5. Starten Sie den Motor mit Hilfe von kurzem, aber heftigem Ziehen am Seil zug star ter.
Ziehen Sie das Seil niemals mehr als 25 cm.
6. Wenn der Motor nicht sofort startet... STOPP. Wenn der Motor nicht umläuft, ist zu viel Treibstoff im Motor.
Schrauben Sie die Glühkerze los, und ziehen Sie einige Male am Seilzugstarter, um den überschüssigen
Treibstoff zu entfernen. Achten Sie darauf, dass kein Treibstoff in Ihre Augen gelangt. Blasen Sie auf die
Glühkerze, um den Treibstoff vom Glühelement zu entfernen. Montieren Sie die Glühkerze wieder, und
be gin nen Sie wieder bei Schritt 4.
EINLAUFEN DES MOTORS
Die zuerst einzustellende Nadel ist die Hauptnadel (1), die den Kraftstofffl uss bei Vollgas kontrolliert. Drehen
Sie die Hauptnadel (1) im Uhrzeigersinn, bis sie ge schlos sen ist, ehe Sie den Motor starten. Wenn die Nadel
(1) vollständig geschlossen ist, drehen Sie die Hauptnadel (1) zwei Drehungen (gegen den Uhrzeigersinn)
wieder auf. Dies ist die Fahrtstellung. Versuchen Sie nun, den Wagen wie oben beschrieben zu starten.
Der Motor sollte fett laufen (viel Rauch), fahren Sie das Auto am Anfang ganz behutsam, um den Motor
auf wär men zu lassen. Der Motor wird nicht viel Kraft entwickeln, aber wir empfehlen, diese Einstellungen für
die ersten drei Treibstofftanks beizubehalten.
Page 20

Fun 4WD - 20
STARTEN & EINLAUFEN
EINSTELLUNG DES MOTORS
Wenn Sie das Auto drei Treibstofftanks lang gefahren haben, können Sie beginnen, den Motor durch Drehen
der Hauptnadel (1) im Uhrzeigersinn magerer einzustellen. Drehen Sie nur in 1/8 Schritten. Wenn Sie die
Hauptnadel (1) nach innen drehen, steigt die Drehzahl. Wenn Sie sie zu weit drehen, wird der Motor an
Drehzahl zu verlieren beginnen und ausgehen, wenn Sie Vollgas geben. Wenn dies geschieht, müssen Sie
die Hauptnadel (1) (gegen den Uhrzeigersinn) wieder öffnen, bis der Motor mit nicht zu viel Rauch läuft.
Sobald Sie das obere Ende eingestellt haben, können sie die untere Nadel einstellen (2). Dies tun Sie, indem
Sie das Auto rund zehn Sekunden lang im Leerlauf laufen lassen und dann Vollgas geben. Wenn der Motor
stottert und die Drehzahl nur langsam zunimmt, ist die untere Nadel (2) zu fett eingestellt (zu viel Benzin), und
Sie müssen die untere Nadel (2) (im Uhrzeigersinn) nach innen drehen. Wenn der Motor schnell anläuft, dann
aber abzusterben beginn, wenn Sie die Drosselklappe öffnen, ist die untere Nadel (2) zu mager eingestellt
(nicht genug Treibstoff). Sie müssen die untere Nadel (2) (gegen den Uhrzeigersinn) öffnen.
Die Einstellung der Hauptnadel (1) und die Einstellung der unteren Nadel (2) können einander beeinfl ussen.
Wenn Sie daher eine Nadel anpassen, ist es möglich, dass Sie auch die andere nachstellen müssen. Sobald
der Motor korrekt eingestellt ist, müssen Sie die Drosselklappen-Anschlagschraube (3), die die Leer lauf ge sch
win dig keit des Motors regelt, einstellen. Stellen Sie den Leerlauf des Motors so niedrig wie möglich ein, ohne
dass der Motor ausgeht.
ACHTUNG: UM DIE LEBENSDAUER IHRES MOTORS ZU VERLÄNGERN, IST ES BESSER, IHREN
MO TOR BEI ZU FETTER ALS BEI ZU MAGERER EINSTELLUNG LAUFEN ZU LASSEN.
DER MOTOR STARTET NICHT
Kein Treibstoff ... Füllen Sie den Treibstofftank, und pumpen Sie drei Mal.
Glühkerze defekt Schrauben Sie die Glühkerze ab, und prüfen Sie deren Zustand
Glühstart nicht aufgeladen. Laden Sie den Glühstart über Nacht.
Zu viel Benzin im Innern. Schrauben Sie die Glühkerze los, nehmen Sie die Kraft stoffl ei tung zum Vergaser
heraus, und ziehen Sie mehrere Male am Seil zug star ter, um den Motor vom
überschüssigen Treibstoff zu befreien.
MOTOR BLOCKIERT BEIM ZIEHEN AM SEILZUGSTARTER
Zu viel Treibstoff im Innern. Schrauben Sie die Glühkerze los, nehmen Sie die Kraft stoffl ei tung zum Vergaser
heraus, und ziehen Sie mehrere Male am Seil zug star ter, um den Motor vom
überschüssigen Treibstoff zu befreien.
DER MOTOR STARTET, HÖRT JEDOCH WIEDER ZU LAUFEN AUF
Glühkerze ausgebrannt. Wechseln Sie die Glühkerze aus.
Motor zu mager eingestellt. Öffnen Sie die Hauptnadel (1) (gegen den Uhrzeigersinn) um 1/8-Drehung.
Motor zu fett eingestellt. Schließen Sie die Hauptnadel (1) (im Uhrzeigersinn) um 1/8-Drehung.
Kein Treibstofffl uss. Prüfen Sie alle Kraftstoffl eitungen.
Leerlauf zu niedrig. Schrauben Sie an der Drosselklappen-Anschlagschraube (3) bis der Leerlauf
korrekt ist.
Motor abgenutzt. Ersetzen Sie Laufbuchse und Kolben, oder senden Sie den Motor zurück an den
Kun den dienst.
DER MOTOR LÄUFT GUT, STOPPT ABER BEI HOHER DREHZAHL
Glühkerze ausgebrannt. Tauschen Sie die Glühkerze aus.
Motor zu mager eingestellt. Öffnen Sie die Hauptnadel (1) um eine Achtel Um dre hung (gegen den
Uhr zei ger sinn).
Motor zu fett eingestellt. Schließen Sie die Hauptnadel (1) um eine Achtel Um dre hung (im Uhrzeigersinn).
Kein Treibstofffl uss. Prüfen Sie alle Kraftstoffl eitungen.
Motor läuft zu heiß. Lassen Sie den Motor abkühlen, öffnen Sie die Hauptnadel (1) um eine Achtel
Um dre hung, und starten Sie den Motor erneut.
Motor abgenutzt. Ersetzen Sie Laufbuchse und Kolben, oder senden Sie den Motor zurück an den
Kun den dienst.
DAS FUNKSYSTEM FUNKTIONIERT NICHT
Batterien leer. Tauschen Sie die Batterien aus, oder laden Sie sie auf.
Schalter nicht eingeschaltet. Prüfen Sie, ob Sender- und Empfängerschalter ein ge schal tet sind.
Lose Anschlussklemmen. Prüfen Sie, ob alle Anschlussklemmen ordnungsmäßig an den Empfänger
an ge schlos sen sind.
DAS FUNKSYSTEM HAT KEINE REICHWEITE
Batterien leer. Ersetzen Sie die Batterien, oder laden Sie sie auf.
Antenne defekt. Prüfen Sie den Zustand beider Antennen.
MÖGLICHE STÖRUNGEN
Page 21

Fun 4WD - 21
TECHNICAL PLAN
Brake joint
Noix de cardan côté frein
Aandrijfhuls voor remschijf
Antriebsgelenk Bremsscheibe
T0600.007 (set)
8 X 14 X 4 mm ball bearing
Roulement à billes
Kogellager
Kugellager
T0600.006 (set)
Diff Case (F/R)
Carter de différentiel (Av/Ar)
Differentieel behuizing (V/A)
Differential Gehäuse (V/H)
T0620.003
Differential shaft
Axe de differentiel
Differentieelas
Differentialachse
Differential bevel gear 10T (L)
Pignon de différentiel 10T (Gr)
Differentieel tandwiel 10T (G)
Kegelzahnrad 10T (Gr)
Differential bevel gear 37T (L)
Pignon de différentiel 37T (Gr)
Differentieel tandwiel 37T (G)
Kegelzahnrad 37T (Gr)
T0620.010 (set)
Differential bevel gear 20T (L)
Pignon de différentiel 20T (Gr)
Differentieel tandwiel 20T (G)
Kegelzahnrad 20T (Gr)
6 X 10mm T/P screw (counter sunk)
Vis (Tête conique)
Zelftapschroef (Verzinkkop)
Blechschraube (Senk)
Joint
Noix de cardan
Aandrijfhuls
Antriebsgelenk
T0600.007 (set)
5 X 11mm Washer
Rondelle
Rondel
Unterlegscheibe
Shaft
Axe
As
Welle
T0620.019
M4 X 4mm Set screw
Vis allen
Stelschroef
Gewindestifte
Joint
Noix de cardan
Aandrijfhuls
Antriebsgelenk
T0620.006 (set)
5 X 10 X 4 mm ball bearing (optional)
Roulement à billes (optional)
Kogellager (optioneel)
Kugellager (Optional)
T0600.062
5 X 8 mm Washer
Rondelle
Rondel
Unterlegscheibe
T0620.008 (set)
5 X 10 X 4 mm Bushing
Bague
Glijlager
Gleitlager
5 X 10 X 4 mm Bushing
Bague
Glijlager
Gleitlager
11 X 4 mm Washer
Rondelle
Rondel
Unterlegscheibe
M3 x 40 T/P screw
Vis
Zelftapschroef
Blechschraube
T0620.066 (set)
M3 x 32 T/P screw
Vis
Zelftapschroef
Blechschraube
T0620.066 (set)
Differential
Differentieel
Différentiel
Differential
T0620.002
Bevel gear (small)
Pignon conique (petit)
Tandwiel (klein)
Kegelzahnrad (Klein)
T0620.009
Gear box (B)
Carter (B)
Tandwielkast (B)
Getriebe gehäuse (B)
T0620.012 (set A+B+C)
Gear box (A)
Carter (A)
Tandwielkast (A)
Getriebe gehäuse (A)
T0620.012 (set A+B+C)
Gear box (C)
Carter (C)
Tandwielkast (C)
Getriebe gehäuse (C)
T0620.012 (set A+B+C)
Differential gear set
Ensemble de pignons de différentiel
Differentieel tandwiel set
Kegelzahnrad Satz
T0600.005 (set)
Page 22

Fun 4WD - 22
TECHNICAL PLAN
Shock stay
Support d’amortisseurs
Schokdempersteun
Stoßdampferplatine
T0620.038 (set)
Front upper suspension arm
Bras de suspension avant supérieure
Voorste bovenste ophangingsarm
Vorderer Querlenker oben
T0620.013 (set)
Front lower suspension arm
Bras de supsension avant inférieure
Voorste onderste ophangingsarm
Vorderer Querlenker unten
T0620.014 (set)
M3 x 12 T/P screw
Vis
Zelftapschroef
Blechschraube
Pivot shaft
Axe
T0620.068 (set)
Pivot shaft
Axe
T0620.068 (set)
5 X 10 X 4 mm ball bearing (optional)
Roulement à billes (optional)
Kogellager (optioneel)
Kugellager (Optional)
T0600.062 (set)
5 X 10 X 4 mm Bushing
Bague bronze
Glijlager
Gleitlager
T0620.007 (set)
Wheel axle
Axe de roue
T0600.021 (set)
Ball end
Chape
Kogelgewricht
Kugelgelenkträger
T0620.015 (set)
Pillow ball 5.8 mm
Rotule
T0600.064 (set)
5 X 10 X 4 mm Bushing
Bague bronze
Glijlager
Gleitlager
T0620.007 (set)
Steering knuckle
Fusée de direction
Stuurblok
Achsschenke
T0620.016 (set)
Drive shaft 52.8 mm
Cardan
Steekas
Antriebswelles
T0620.017 (set)
E-7 clip
Clips
Clips
Sicherungsring
T0620.065 (set)
E-7 clip
Clips
Clips
Sicherungsring
T0620.065 (set)
Steering knuckle
Fusée de direction
Stuurblok
Achsschenke
T0620.016 (set)
Page 23

Fun 4WD - 23
TECHNICAL PLAN
M3 x 12 T/P screw
Vis
Zelftapschroef
Blechschraube
M3 x 12 screw
Vis
Schroef
Schraube
M3 x 12 T/P screw
Vis
Zelftapschroef
Blechschraube
M3 x 12 screw
Vis
Schroef
Schraube
Front shock absorber
Amortisseur avant
Voorste schokdemper
Stoßdämpfer vorne
T0620.040 (set)
Shock collar
Entretoise amortisseur
Veerhouder
Federhalterung
T0620.039 (set)
M3 x 10 T/P screw
Vis
Zelftapschroef
Blechschraube
Rear lower suspension arm
Bras de supsension arrière inférieur
Achterste onderste ophangingsarm
Hinterer Querlenker unten
T0620.014 (set)
Rear upper suspension arm
Bras de supsension arrière supérieur
Achterste bovenste ophangingsarm
Hinterer Querlenker öben
T0620.013 (set)
Pivot shaft
Axe
T0620.068 (set)
Pivot shaft
Axe
T0620.068 (set)
Page 24

Fun 4WD - 24
TECHNICAL PLAN
6 mm Ball
Boule
Kogel
Kugel
T0620.060 (set)
Drive shaft 52.8 mm
Cardan
Steekas
Antriebswelles
T0620.017 (set)
Pivot shaft
Axe
T0620.068 (set)
Wheel axle
Axe de roue
T0600.021 (set)
M3 x 15 screw
Vis
Schroef
Schraube
5 X 10 X 4 mm Bushing
Bague bronze
Glijlager
Gleitlager
T0620.039 (set)
Rear wheel Up-right
Fusée de roue arrière
Achterste wielophangingsblok
Achsschenkel hinten
T0620.018 (set)
M4 lock nut
Ecrou
Moer
Mutter
M3 x 12 screw
Vis
Schroef
Schraube
M3 x 12 T/P screw
Vis
Zelftapschroef
Blechschraube
Rear shock absorbers
amortisseur arrière
achterste schokdempers
hintere Stossdampfer
T0620.041 (set)
Shock collar
Entretoise amortisseur
Veerhouder
Federhalterung
T0620.039 (set)
Page 25

Fun 4WD - 25
TECHNICAL PLAN
Spur Gear 43T
Roue dentée
Tandwiel
Stirnrad
T0620.021 (set)
5 x 18 mm shaft
Axe
As
Achse
5 x 22 mm shaft
Axe
As
Achse
6 x 46 mm shaft
Axe
As
Achse
T0620.020
M2,6 x 10 F/H T/P screw
Vis
Zelftapschroef
Blechschraube
4 x 27,5 mm shaft
Axe
As
Achse
T0620.019 (set)
Diff Case
Carter de différentiel
Differentieel behuizing
Differential Gehäuse
T0620.021 (set)
Diff Case (Center)
Carter de différentiel (Central)
Differentieel behuizing (Midden)
Differential Gehäuse (Central)
T0620.022
M3 x 3 set screw
Vis allen
Stelschroef
Gewindestifte
M3 x 12 T/P screw
Vis
Zelftapschroef
Blechschraube
M3 x 12 T/P screw
Vis
Zelftapschroef
Blechschraube
Brake lever
Levier de frein
Remarm
Bremshebel
T0620.027
Differential plate
Platine de différentiel
Verbindingsplaat voor differentieel
erstärkungsplatte
T0620.028 (set)
Brake cam
Came de frein
T0620.026
M4 x 4 set screw
Vis allen
Stelschroef
Gewindestifte
Center diff. support
Support de diff. central
Midden diff.steun
Mittel diff. lagerbock
T0620.029 (set)
8 X 14 X 4 mm
Ball bearing
Roulement à billes
Kogellager
Kugellager
T0600.004 (set)
Brake pad
Plaquette de frein
Remplaatje
Bremsbacken
T0620.023 (set)
Brake disc
Disque de frein
Remschijf
Bremsscheibe
T0620.024
Spur Gear 43T
Couronne dentée
Tandwiel
Stirnrad
T0620.021 (set)
8 X 14 X 4 mm
Ball bearing
Roulement à billes
Kogellager
Kugellager
T0600.004 (set)
M4 x 4 set screw
Vis allen
Stelschroef
Gewindestifte
Joint cup
Noix de cardan
Aandrijfhuls
Antriebsgelenk
T0620.006 (set)
Joint cup
Noix de cardan
Aandrijfhuls
Antriebsgelenk
T0620.006 (set)
Center diff. support
Support de diff. central
Midden diff.steun
Mittel diff. lagerbock
T0620.029 (set)
Brake pad
Plaquette de frein
Remplaatje
Bremsbacken
T0620.023 (set)
E-2.5 clip
Clips
Clips
Sicherungsring
T0620.065 (set)
E-2.5 clip
Clips
Clips
Sicherungsring
T0620.065 (set)
Page 26

Fun 4WD - 26
TECHNICAL PLAN
Drive shaft 49.8 mm
Cardan
Steekas
Antriebswelles
T0620.030
Drive shaft 85.8 mm
Cardan
Steekas
Antriebswelles
T0620.031
M3 x 12 F/H T/P screw
Vis
Zelftapschroef
Blechschraube
M3 x 12 F/H T/P screw
Vis
Zelftapschroef
Blechschraube
M3 x 12 F/H T/P screw
Vis
Zelftapschroef
Blechschraube
Front bumper
Pare-chocs avant
Voorste bumper
Frontrammer
T0620.033
M2,6 x 6 Screw
Vis
Schroef
Schraube
Pillow ball
Rotule
T0620.064 (set)
E-6 clip
Clips
Clips
Sicherungsring
T0620.065 (set)
E-6 clip
Clips
Clips
Sicherungsring
T0620.065 (set)
Spring
Resort
Veer
Feder
Servo saver horn A
Pièce sauve servo A
Servo saver hoorn A
Servo-saver Teil A
T0620.032 (set)
Servo saver horn B
Pièce sauve servo B
Servo saver hoorn B
Servo-saver Teil B
T0620.032 (set)
Servo saver shaft
Axe sauve servo
Servo saver as
Servo-saver welle
T0620.032 (set)
M3 x 3 set screw
Vis allen
Stelschroef
Gewindestifte
M3 x 16 set screw
Vis allen
Stelschroef
Gewindestifte
Plastic steering link
Chape plastic
Kogelgewrichten
Kugelgelenk
T0620.070 (set)
Rod stopper
Bague d’arrêt
T0620.032 (set)
Connecting wire
Barre de connection
T0620.032 (set)
Page 27

Fun 4WD - 27
TECHNICAL PLAN
Steering rod
Tringlerie de direction
Stuurstang
Steuergestangen
T0620.032 (set)
Servo saver shaft
Axe sauve servo
Servo saver as
Servo-saver welle
T0620.034 (set)
M3 x 12 T/P screw
Vis
Zelftapschroef
Blechschraube
Support
Raidisseur
T0620.035 (set)
M3 x 12 T/P screw
Vis
Zelftapschroef
Blechschraube
M3 x 8 F/H screw
Vis
Zelftapschroef
Blechschraube
M3 x 8 T/P screw
Vis
Zelftapschroef
Blechschraube
M3 x 12 T/P screw
Vis
Zelftapschroef
Blechschraube
M3 x 12 T/P screw
Vis
Zelftapschroef
Blechschraube
M3 x 8 T/P screw
Vis
Zelftapschroef
Blechschraube
Washer
Rondelle
Rondel
Unterlegscheibe
T0620.036 (set)
Servo mounting plates
Fixations de servo
Servobevestigingen
Servohalterungen
T0620.036 (set)
Servo mounting plates
Fixations de servo
Servobevestigingen
Servohalterungen
T0620.036 (set)
RC plate
Platine radio
T0620.035 (set)
R/X Switch
Intérrupteur
Schakelaar
Schalter
Antenna holder
Support antenne
T0620.036 (set)
Antenna pipe
Tube antenne
T0620.037 (set)
Page 28

Fun 4WD - 28
TECHNICAL PLAN
Strip Tie
Collier de fi xation
T0600.054
Servo horn
Pièce servo
Servo hoorn
Servo Teil
M3 x 8 set screw
Vis allen
Stelschroef
Gewindestifte
Plastic steering link
Chape plastic
Kogelgewrichten
Kugelgelenk
T0620.067 (set)
M3 x 10 F/H T/P screw
Vis
Zelftapschroef
Blechschraube
M3 x 12 T/P screw
Vis
Zelftapschroef
Blechschraube
Fuel Tank
Réservoir
T0620.036
Steering rod 50 mm
Barre de direction
T0620.067 (set)
Page 29

Fun 4WD - 29
TECHNICAL PLAN
M3 x 8 screw
Vis
Schroef
Schraube
M3 x 25 screw
Vis
Schroef
Schraube
M3 x 12 screw
Vis
Schroef
Schraube
Clutch spring
Ressort d’embrayage
Koppelings veer
Kupplings Feder
T0600.045 (set)
Engine mount
Support moteur
Motorsteun
Motorbock
T0600.043 (set)
Clutch bell
Cloche d’embrayage
Koppeling
Kupplingsglocke
T0600.047 (set)
Washer
Rondelle
Rondel
Unterlegscheibe
Needle bearing
Roulement de cloche
T0600.046 (set)
E-7 clip
Clips
Clips
Sicherungsring
T0600.042 (set)
Clutch
Embrayage
Koppeling
Kupplung
T0600.045 (set)
9 x 13 x 15 Silicon Tube
Embout silicone
T0600.048 (set)
Muffl er
Echappement
T0600.051
(set)
Air Filter
Filtre à air
T0600.048 (set)
Gasket
Joint d’échappement
T0600.051 (set)
Flywheel
Volant moteur
T0600.044 (set)
Pilot Nut
Axe embrayage
T0600.042 (set)
M3 x 8 screw
Vis
Schroef
Schraube
M3 x 8 screw
Vis
Schroef
Schraube
Use special air-fi lter oil (Use LX 906 ) on the inner sponge fi lter ( not on the
outer fi lter) to stop dust from getting into the engine.
Utilisez toujours de l’huile spéciale pour fi ltre à air (LX906) pour empêcher la
poussière d’entrer dans le moteur.
Gebruik speciale luchtfi lter olie (Gebruik LX 906) op de mouse om te vermijden
dat stof en vuil in de motor terecht komt.
Gebrauchen Sie Spezialen Luftfi lter Öl (LX906) auf das Schaumstoff so ver-
meiden Sie das Schmutz und Staub im Motor eindringt.
LX 906
Page 30

Fun 4WD - 30
TECHNICAL PLAN
Rims
Jante
Velg
Felge
T0600.056RE (set)
Tire
Pneu
Band
Reife
T0600.057 (set)
Rim Stopper
Hexagone de roue
T0600.049(set)
M3 Lock nut
Ecrou nylstop
Stopmoer
Stop Mutter
T0600.049 (set)
Page 31

Fun 4WD - 31
TECHNICAL PLAN
M3 x 3 set screw
Vis allen
Stelschroef
Gewindestifte
M3 x 3 set screw
Vis allen
Stelschroef
Gewindestifte
M3 x 3 set screw
Vis allen
Stelschroef
Gewindestifte
Spring
Resort
Veer
Feder
2 mm Rod Stopper
Bague d’arrêt
Control Rod
Tringle
2 mm Rod Stopper
Bague d’arrêt
Spring
Resort
Veer
Feder
Control Rod
Tringle
2 mm Rod Stopper
Bague d’arrêt
Rod guide
M2 x 8 T/P screw
Vis
Zelftapschroef
Blechschraube
Shock absorber body (short)
Corp d’amortisseur (court)
Schockdemperhuis (kort)
Dämpferzylinder (kurzer)
P3 O-ring
Joint torique
O-ring
O-Ringe
P3 O-ring
Joint torique
O-ring
O-Ringe
2 mm washer
Rondelle
Rondel
Unterlegscheibe
Spring short
Ressort court
Korte veer
Kurze Feder
Spring long
Ressort long
Lange veer
Lange Feder
Shock shaft
Axe d’amortisseur
Shokdemperas
Kolbenstange
1,5 mm washer
Rondelle
Rondel
Unterlegscheibe
Shock cap
Bouchon d’amortisseur
Schokdemper afsluitkap
Oberteil des Stoßdämpfers
Shock absorber body (long)
Corp d’amortisseur (long)
Schockdemperhuis (lang)
Dämpferzylinder (lang)
P7 O-ring
Joint torique
O-ring
O-Ringe
Spring holder
Support de ressort
Veerhouder
Federhalterung
Adj. Spring collar
Bague de réglage
Veerhouder regelbaar
Federscheibe adj.
Shock end
Fixation d’amortisseur
Throttle linkage set
Tringlerie de gas
T0620.067 (set)
Shock absorber (front)
Amortisseur (avant)
Schockdemper (voor)
Stoßdämpfer (Vorne)
T0620.040 (set of 2 pcs)
Shock absorber (rear)
Amortisseur (arrière)
Schockdemper (achter)
Stoßdämpfer (Hinten)
T0620.041 (set of 2 pcs)
Page 32

Fun 4WD - 32
TECHNICAL PLAN
Body post
Support de carrosserie
Carrosseriesteunen
Karosseriestutzen
T0620.055 (set)
Body post
Support de carrosserie
Carrosseriesteunen
Karosseriestutzen
T0620.055 (set)
Front
Avant
Voorzijde
Vorne
Rear
Arrière
Achterzijde
Hinten
M2 x 5 T/P screw
Vis
Zelftapschroef
Blechschraube
M2 x 5 T/P screw
Vis
Zelftapschroef
Blechschraube
Cut out
Uitsnijding
A découper
Ausschnit
Cut a hole in the rear window
Faîtes une découpe dans la vitre arrière
Cut out for the engine cooling
Découpe des orifices de refroidissement du moteur
Page 33

Fun 4WD - 33
Joint cup Differential Differentiel case Diff gear set 8x14x4 Ball bearing Joint
5x10x4 Bushing 5x8 mm washer Gear 11T Bevel gear 37T 11x14 mm Washer Gear Case
Upper susp. arm Lower susp. arm Ball holder Steering knuckle Drive shaft 52,8 mm Rear wheel hub
4x27,5 mm shaft 8x46 mm shaft Spur gear 43T Center differential Brake pads Brake disc
Wheel axle Brake cam Brake lever Upper plate Center diff. mount
Rear Center drive shaft
49,8 mm
Front Center drive shaft
85,8 mm
Servo saver set Bumper Servo saver post RC plate Servo mount set
Antenna pipe Shock stay FR & RE Shock collar Front shock absorber Rear shock absorber Air fi lter
Engine mount Clutch bell 15T Needle bearing
2 shoe clutch w/ spring
Pilot nut w/ clips Flywheel
Wheel stopper 6 spoke rims Tires Muffl er VX 12 Engine Tail pipe
Body posts Fuel tank 75 ml Chassis Body clips 6 mm Balls
SPARE PARTS
T0600.007
T0620.002 T0620.003 T0600.005 T0600.006
T0620.007 T0620.008 T0620.009 T0620.010 T0620.011 T0620.012
T0620.013 T0620.014 T0620.015 T0620.016 T0620.017 T0620.018
T0620.019 T0620.020 T0620.021 T0620.022 T0620.023 T0620.024
T0600.021 T0620.026 T0620.027 T0620.028 T0620.029 T0620.030
T0620.031 T0620.032 T0620.033 T0620.034 T0620.035 T0620.036
T0620.037 T0620.038 T0620.039 T0620.040 T0620.041 T0600.048
T0600.043 T0600.047 T0600.046 T0600.045 T0600.042 T0600.044
T0600.049
T0600.056.RE
T0600.057 T0600.051 T0600.300 T0600.050
T0620.055 T0600.036 T0620.058 PA008 T0620.060
T0620.006
Page 34

Fun 4WD - 34
SPARE PARTS
T0600.064 T0620.062 T0600.062 T0620.064 T0620.065
T0620.067 T0620.068 T0620.069 T0620.070
T0620.066
Pillow ball Ball nut 4,8 mm 5x10x4 Ball bearing Ball end E-clips set 3x32-42 TP screw set
Throttle linkage set Pivot shaft set O ring set Steering rod
T0620.071
Screw set
Ensemble de vis
Out of stock
Subaru WRX
Body + decal 190 mm T0708.190
Body + decal 200 mm T0708.200
Porche 911
Body + decal 190 mm T0706.190
Body + decal 200 mm T0706.200
Volvo S40 BTCC
Body + decal 190 mm T0704.190
Body + decal 200 mm T0704.200
Dodge Viper
Body + decal 190 mm T0705.190
Body + decal 200 mm T0705.200
Mercedes CLK
Body + decal 190 mm T0709.190
Body + decal 200 mm T0709.200
Renault Maxi Megane
Body + decal 190 mm T0703.190
Body + decal 200 mm T0703.200
Renault Clio V6
Body + decal 190 mm T0701.190
Body + decal 200 mm T0701.200
Ford Focus WRC
Body + decal 190 mm T0700.190
Body + decal 200 mm T0700.200
Peugeot 206 ‘Team BeLux’
Body + decal 190 mm T0710.190
Body + decal 200 mm T0710.200
Renault Clio V6 ‘Catalunya’
Body + decal 190 mm T0711.190
Body + decal 200 mm T0711.200
1/10 Scale polycarbonate bodies
Carrosseries polycarbonate 1/10
1/10 Polycarbonate carrosserien
1/10 Polycarbonat Karosserien
Fun 4WD = 190mm
Out of stock
Page 35

Fun 4WD - 35
Man u fac tured
Ref. Nr. Description
D16099 After run oil 50 ml
Ref. Nr.Description Synth. Cas tor Nitro
oil % oil % %
D14101 Daytona fuel CAR 10% 1L 10% 2% 10%
D14102 Daytona fuel CAR 10% 2.5L 10% 2% 10%
D14105 Daytona fuel CAR 10% 5L 10% 2% 10%
D14161 Daytona fuel CAR 16% 1L 10% 2% 16%
D14162 Daytona fuel CAR 16% 2.5L 10% 2% 16%
D14165 Daytona fuel CAR 16% 5L 10% 2% 16%
D14251 Daytona fuel CAR 25% 1L 10% 2% 25%
D14252 Daytona fuel CAR 25% 2.5L 10% 2% 25%
Man u fac tured
The 16% and 25% car fuels are competition legal
OPTIONAL PARTS
Ref. nr. De scrip tion
T0113 Starter set car
T0113.UK Starter set car UK
Ref. nr. De scrip tion
T0102.4 Glow Start
T0102.4UK*
Glow Start UK
Ref. nr. De scrip tion
P10001 Glowplug P1 hot
P10002 Glowplug P2 hot
P10003 Glowplug P3 medium
P10004 Glowplug P4 cold
P10005 Glowplug P5 extra cold
P10006 Glowplug P6 cold
P10007 Glowplug P7 cold
P10008 Glowplug P8 cold
P10040 Glowplug 4-stroke
Ref. nr. De scrip tion
T0158 Hex wrench set
set of 4 hex
wrench es
1,5 mm
2 mm
2,5 mm
3 mm
Ref. nr. De scrip tion
E0416 Fuel bottle 500 ml
E0417 Fuel bottle 250 ml
Ref. nr. De scrip tion
T0620.101 Steel main gear 43T
Ref. nr. De scrip tion
T0620.103 Steel spiral bevel
gear 37T
Ref. nr. Description
T0620.102 Steel spiral
pinion 11T
Ref. nr. De scrip tion
T0620.108 CVD universal
joints for front
Ref. nr. De scrip tion
T60.500 2- Speed gear box
Ref. nr. De scrip tion
T0660.226
Tuned pipe set FUN 2WD
Page 36

Fun 4WD - 36
T0600.300 VX-pull start engine
with standard carburator
T0600.201 Cylinderhead screw
Vis pour culasse
Schraube für Zylinderkopf
Vijs voor cilinderkop
T0600.202 Cylinderhead
Culasse
Zylinderkopf
Cilinderkop
T0600.203 Cylinderhead gasket
Joint de culasse
Dichtung
Dichtingsring
T0600.204 Piston pin
Axe de piston
Kolbenbolzen
T0600.207 Conrod
Bielle
T0600.208 Piston & cylinder set
Chemise et piston
Zylinder und Kolben
Cilinder en
T0600.209 Crank case
Carter sans bouchon
Kurbelgehäuse ohne Deckel
T0600.210-8 Carburator needle
o-ring set
O-ring
Plug
T0600.201
T0600.203
T0600.208
T0600.204
T0600.051
T0600.226
T0600.220
T0600.217
T0600.219
T0600.227
T0600.210-14
T0600.210-08
T0600.210-10
T0600.210-08
T0600.230
T0600.211
T0600.215
T0600.216
T0600.214
T0600.213
T0600.212
T0600.300
T0600.202
T0600.210-15
T0600.310
T0600.210-10 Dust rubber protection
Souffl et de carburateur
T0600.210-14 Idling adj. screw set
Vis de butée
T0600.210-15 O-ring outer carburator
O-ring base carburateur
T0600.211 One way start shaft
Axe de lanceur
T0600.212 Rear cover screw
Vis de bouchon de carter
T0600.213 Rear cover
Bouchon de carter
T0600.214 Rear cover gasket
Joint de carter
T0600.215 Crank shaft
Vilbrequin
Kurbelwelle
M1014-26
M1014-16
M1014-14
VX 12 ENGINE SPARE PARTS WITH STANDART CARBURATOR
T0600.216 Rear ball bearing
Roulement à billes arrière
Hinteres Kugellager
Kogellager achteraan
T0600.217 Front ball bearing
Roulement à billes avant
Vorderes Kugellager
Kogellager vooraan
T0600.219 Carburator screw
Vis de carburateur
Vergaser-Schaube
Carburator vijs
T0600.220 Drive washer
Plateau
T0600.226 Muffl er gasket
Joint d’échappement
T0600.227 Muffl er screw
Vis d’échappement
T0600.230 Recoil assembly
Lanceur complet
T0600.310 Carburator
Carburateur
Vergaser
Carburator
T0600.051 Muffl er
Echappement
Resonanzschalldämpfer
Uitlaat
M1014-14 Main needle
Pointeau
Düselnadel
Naald
M1014-16 Main needle support
Support de pointeau
Düselnadel Stutze
Naald steun
M1014-26 Fuel supply nipple
Prise de carburant
T0600.207
T0600.209
Page 37

Fun 4WD - 37
Servo inverseur (directions)
Servoreverse (steering)
Stuurweg ompoling
Servoreverse (Steuer)
Servo inverseur (gas-frein)
Servoreverse (Throttle)
Gasweg ompoling
Servoreverse (Gas)
Enterrupteur ON-OFF
ON-OFF Switch
ON-OFF Schakelaar
ON-OFF Schalter
Quarts
Crystal
Kristal
Quartz
Sortie de charge
Charge output
Laaduitgang
Lade-Ausgang
Compartiment de piles (8pcs)
Batterie holder (8 pcs)
Batterij houder (8 stuks)
Batteriehalterung (8 Stuck)
RADIO
Volant de di rec tion
Steering wheel
Stuurwiel
Steuerrad
Réglage de débattements de
directions
Steering adjustment
Stuurweg instelling
Steuerweg einstellung
Poigné de gas-frein
Throttle lever
Gashendel
Gashendel
Trim gas-frein
Throttle trim
Gastrim
Gas Trim
Trim de direction
Steering trim
Stuurtrim
Steuer Trim
Antenne
Indication LED
LED indication
LED indicatie
LED Anzeige
Page 38

Fun 4WD - 38
Set screw (M4x4)
Stelschroef
Gewindestifte
Vis allen
T60.500H
Disc holder
•
•
Support de disque
T60.500B
One way bearing set
One-way kogellager
•
Roulement One-way
T60.500C
Spur gear 45T
Tandwiel 45T
Zanhrad 45T
Couronne 45D
T60.500E
Spur gear 42T
Tandwiel 42T
Zanhrad 42T
Couronne 42D
T0600.006
Ball bearing 8x14x4
Kogellager
Kugellager
Roulement à billes
Washer 8x18x1
Rondel
Unterleegscheibe
Rondelle
Shaft 8x51mm
As
Achse
Axe
T60.500F
Clutch set
•
•
Regleur
Set screw (M4x4)
Stelschroef
Gewindestifte
Vis allen
T0683.101
Split Clutch bell
Koppelingsklok
Kupplungsgloke
Cloche d’embrayage
T0683.105
19T Clutch gear
Tandwiel 19T
Zanhra 19T
Pignon 19D
T0683.102
16T Clutch gear
Tandwiel 16T
Zanhra 16T
Pignon 16D
T58.043
Ball bearing 5x8x2,5
Kogellager
Kugellager
Roulement à billes
Collar 5x7x3mm
2-Speed Gear Box
2-Speed Gear Box
ADJUSTING THE SHIFT POINT:
• First you have to adjust your engine as in the manual delivered with the
engine.
• Use a 2mm allen wrench to set the clutch cam shift timing.
• Adjust the clutch shift timing for your track conditions with the 4x4mm
set screw.
As you tighten (clockwise) the set screw, the shift will become slower.
As you loosen (anti-clockwise) the set screw, the shift will become
quicker.
• Set the shift timing to the track conditions. Check the timing while the
car is running on the track, adjust some more when necessary.
AANPASSEN VAN HET SCHAKELPUNT:
• Zorg eerst dat uw motor goed afgesteld (zie de handleiding van de
motor) alvorens het schakelpunt aan te passen.
• Gebruik een 2mm imbussleutel om het schakelpunt van koppeling aan
te passen.
• Pas het schakelmoment aan naar gelang de vereisten van de racebaan.
Als u de 4x4mm stelschroef vaster draait (wijzersin) dan wordt het
schakelmoment trager.
Als u de stelschroef losser draait (tegenwijzersin) dan zal het schakel-
moment sneller zijn.
• Pas het schakelpunt enkel aan aan de vereisten van de racebaan.
Kontroleer het schakelmoment terwijl u rijdt en pas aan indien nodig.
REGLAGE DU PASSAGE DE VITESSE:
• Réglez en premier votre moteur comme indiqué dans la notice.
• Utilisez une clé allen de 2mm pour régler la vis allen (4x4mm) de la
came.
• Réglez la rapidité de passage de vitesse en fonction de votre piste.
Si vous vissez (sens horaire) la vis allen, le changement de vitesse est
plus lent.
Si vous dévissez (sens antihoraire) la vis allen, le changement de
vitesse est plus rapide.
• Effectuez les réglages en fonction de votre piste. Faîtes des essais sur
piste et ajustez au besoin.
EINSTELLUNG VON SCHALTERPUNKT:
• Uberprüffen Sie zuerst ihr Motor (sehe in die Anleitung des Motors)
bevor Sie das Schalterpunkt enderen.
• Für die enderung des Schalterpunkt mußen Sie einen 2mm Stifftschlüssel benutzen.
• Enderen Sie das Schalterpunkt nach Alter des Rennplatz.
Wenn Sie den 4x4mm Gewindestift fester drehen (im Uhrzeigersinn)
wird das Schalterpunkt später aktiviert.
Wenn Sie den 4x4mm Gewindestift Lockern (gegen den Uhrzeigersinn)
wird das Schalterpunkt früher aktiviert.
• Nur das Schalterpunkt enderen wenn die Rennplatz es nötig macht.
Uberpruffen Sie das Schalterpunkt wenn Sie mit dat Modell fahren und
enderen Sie es nochmall wenn nötig.
T0620.107
Page 39

Fun 4WD - 39
Frequentie Kanaal Frequentie Toegelaten in volgende landen
Bande Canal Fréquence Admis dans les pays suivants
Frequency Channel Frequency Admitted in folowing countries
Frequenz Kanal Frequenz Zugelassen in folgende Länder
D B A DK F I L N NL S
CH
27 MHz-Band
1 26,965
2 26,975
3 26,985
4 26,995 # # # # # # # # # #
5 27,005 # #
6 27,015 # #
7 27,025 # #
8 27,035 # #
9 27,045 # # # # # # # # # #
10 27,055 # #
11 27,065 # #
12 27,075 # #
13 27,085 # #
14 27,095 # # # # # # # #
15 27,105 # #
16 27,115 # #
17 27,125 # #
18 27,135 # #
19 27,145 # # # # # # # # # #
20 27,155 #
21 27,165 #
22 27,175 #
23 27,185 #
24 27,195 # # # # # # # # #
25 27,205 #
26 27,215 #
27 27,225 #
28 27,235 # #
29 27,245 #
30 27,255 # # # # # #
31 27,265 #
32 27,275 # #
FREQUENTIE / FREQUENCE / FREQUENCY / FREQUENZ
D B A DK F I L N NL S CH
40 MHz-Band
50 40,665 # # # # # # # # #
51 40,675 # # # # # # # # #
52 40,685 # # # # # # # # #
53 40,695 # # # # # # # # #
54 40,715 # # # #
55 40,725 # # # #
56 40,735 # # # #
57 40,765 # # #
58 40,775 # # #
59 40,785 # # #
81 40,815 # # #
82 40,825 # # #
83 40,835 # # #
84 40,865 # # #
85 40,875 # # #
86 40,885 # # #
87 40,915 # # #
88 40,925 # # #
89 40,935 # # #
90 40,965 # # #
91 40,975 # # #
92 40,985 # # #
41 MHz-Band
400 41,000 #
401 41,010 #
402 41,020 #
403 41,030 #
404 41,040 #
405 41,050 #
406 41,060 #
407 41,070 #
408 41,080 #
409 41,090 #
410 41,100 #
411 41,110 #
412 41,120 #
413 41,130 #
414 41,140 #
415 41,150 #
416 41,160 #
417 41,170 #
418 41,180 #
419 41,190 #
420 41,200 #
Page 40

Fun 4WD - 40
PROTECH ® is a registered trademark
P.O.-Box 60 • B-2250 Olen
Tel.: +32 (0) 14 25 92 80
Fax: +32 (0) 14 25 92 89
info@protech.be
http://www.protech.be
CONFORMITY / GELIJKVORMIGHEID / CONFORMITÉ / KONFORMITÄT
This product is in accordance with/ce produit est conforme la/ Dit produkt is overeenkomstig
Richtlijnen - Directive - Richtlinie - Directive 1999/5/EG R&TTE
• This product is destinated for use in Europe. Use may be restricted by licence in some countries.
• Dit produkt is bestemd voor gebruik in Europa. Gebruik kan beperkt zijn door vergunningen in bepaalde landen.
• Ce produit est destiné pour emploi en Europe. L’emploi peut être limité par une autorisation dans certains pays.
• Dieses Produkt ist bestimmt für Gebrauch in Europa. Das Gebrauch kann eingeschrankt sein durch ein Erlaubniss
in einige Länder.
 Loading...