

Page 1

Operating Manual
MegaVac
®
AviationVac
Super CoachVac
®
Super QuarterVac
™
Page 2

Your Local Distributor
Page 3

TABLE OF CONTENTS
Super CoachVac®, Super QuarterVac
™,
MegaVac®Introduction . . . . .2-3
Super CoachVac®, Super QuarterVac
™,
MegaVac
®
Important Safety Instructions . . . . . . . . . . . . . . . . . . . . . . . . . . . . . .4
Super CoachVac®, Super QuarterVac
™,
MegaVac
®
Preventative Maintenance . . . . . . . . . . . . . . . . . . . . . . . . . . . . . . . .5
Super CoachVac®, Super QuarterVac™,MegaVac®Limited Warranty . . .6
AviationVac Introduction . . . . . . . . . . . . . . . . . . . . . . . . . . . . . . . . .7-8
AviationVac Important Safety Instructions . . . . . . . . . . . . . . . . . . . . . .9
AviationVac Preventative Maintenance . . . . . . . . . . . . . . . . . . . .10-11
AviationVac Limited Warranty . . . . . . . . . . . . . . . . . . . . . . . . . . . . . .12
Overview . . . . . . . . . . . . . . . . . . . . . . . . . . . . . . . . . . . . . . . . . . . . .13
Getting Started . . . . . . . . . . . . . . . . . . . . . . . . . . . . . . . . . . . . . . . .14
How To Wear/Ergonomics . . . . . . . . . . . . . . . . . . . . . . . . . . . . . . . .15
Operating/Proper Vacuuming Motion for Large Areas . . . . . . . . . . .16
Filter Maintenance . . . . . . . . . . . . . . . . . . . . . . . . . . . . . . . . . . . . . .17
Super CoachVac®Assembly . . . . . . . . . . . . . . . . . . . . . . . . . . . . . . .18
Super CoachVac®Parts List . . . . . . . . . . . . . . . . . . . . . . . . . . . . . . . .19
Super QuarterVac™Assembly . . . . . . . . . . . . . . . . . . . . . . . . . . . . . .20
Super QuarterVac™Parts List . . . . . . . . . . . . . . . . . . . . . . . . . . . . . . 21
MegaVac®Assembly . . . . . . . . . . . . . . . . . . . . . . . . . . . . . . . . . . . . .22
MegaVac®Parts List . . . . . . . . . . . . . . . . . . . . . . . . . . . . . . . . . . . . .23
AviationVac Assembly . . . . . . . . . . . . . . . . . . . . . . . . . . . . . . . . . . . .24
AviationVac Parts List . . . . . . . . . . . . . . . . . . . . . . . . . . . . . . . . . . . .25
E
N
G
L
I
S
H
E
S
P
A
~
N
O
L
F
R
A
N
C
A
I
S
D
E
U
T
S
C
H
Page 4

INFORMATION ON PAGES 2-6 PERTAINS ONLY TO:
MegaVac
®,
Super CoachVac
®,
Super QuarterVac
™
INSPECTION
The equipment detailed in this manual is suitable for commercial use, for example in
hotels, schools, hospitals, factories, shops, offices, and rental businesses.
Carefully unpack and inspect your new ProTeam vacuum for shipping damage. Each
unit is tested and thoroughly inspected before shipping. For instructions regarding any
shipping damage, contact your local ProTeam distributor.
This operator’s manual has important information for the use and safe operation of the
vacuum cleaners detailed in this manual. Read this manual carefully before starting the
machine. Keep this manual available at all times and instruct all operators to read this
manual. If instructions are not followed, an injury may occur or equipment, furniture or
buildings may become damaged.
The contents of this manual are based on the latest product information available at the
time of publication. ProTeam reserves the right to make changes or improvements to its
machines or components without notice.
The products that are covered by this instruction manual are intended for
commercial use.
WARNINGS
• USE ONLY genuine ProTeam replacement filters to ensure optimal performance,
improved indoor air quality and maintain a valid vacuum warranty.
• DO NOT vacuum with a frayed, worn, or damaged cord.
• DO NOT vacuum liquids or expose the vacuum to rain or water. The vacuums in this
manual are for dr
y use only and are not to be used or stored outdoors in wet conditions.
• DO NOT vacuum hazardous dust or toxic materials.
• DO NOT use vacuums to pick up flammable or combustible materials and do not
store them in the filter bay
.
The equipment detailed in this manual is not intended for use by persons (including
children) with reduced physical, sensory, or mental capabilities, or lack of experience and
knowledge, unless they have been given supervision or instruction concerning use of the
equipment by a person responsible for safety.
MOTOR
Electric thru-flow vacuum motors must never be used in applications in which wet or
moist conditions are involved, where dry chemicals or other volatile materials are present,
or where airflow may be restricted or blocked. Such motors are designed to permit the
vacuumed air to pass over the electrical wiring to cool it. Therefore, any liquid (including
water), dry chemical, or other foreign substance which would come in contact with
electrical conductors could cause combustion (depending on volatility) or electrical
shock. Failure to observe these precautions could result in property damage and severe
personal injury, including death in extreme cases.
INTRODUCTION
2 ProTeam
Page 5

ELECTRICAL
The vacuums as described in this manual, unless otherwise noted, are designed to
operate on 220VAC – 240VAC power supply at 50Hz / 60Hz. The vacuums as described
in this manual are a Class I appliance, unless otherwise noted.
The vacuum cleaners described in this manual are equipped with a thermal protection
device. The integrated thermal switch will remove power from the vacuum motor in the
event excessively high operating temperatures are detected. This condition is normally
the result of a blocked vacuum passage, clogged or full filters.
Should a thermal trip take place, immediately turn off the vacuum and inspect for a
blockage and verify the condition of the filter bag and change or empty as required.
The vacuum will require several minutes to cool down to a safe operating temperature.
When this temperature is attained, the thermal switch will reset and the vacuum will be
able to be used in a normal manner.
PROTECTIVE EARTHING INSTRUCTIONS
THESE VACUUMS MUST BE CONNECTED TO A PROPERLY EARTHED (GROUNDED)
POWER SUPPLY. If a vacuum should malfunction or stop working, earthing (grounding)
provides a path of least resistance for electrical current, thereby reducing the risk of
electrical shock. This unit is equipped with a cord that has an equipment-earthing
conductor and earthing plug. The plug must be inserted in an appropriate outlet that
is properly installed and grounded in accordance with all local codes and ordinances.
Cutting off or disabling the earthing wire or using a cord or outlet that is not properly
earthed will void the warranty on the unit, and ProTeam will accept NO liability
associated with the unit.
WARNING – Improper connection of the equipment-earthing connector conductor
can result in a risk of electrical shock. Check with a qualified electrician or ser
vice person
if you doubt that the outlet is properly earthed (grounded). Do not modify the plug
provided with the vacuum. If it will not fit the outlet, have a proper outlet installed by
a qualified electrician.
INTRODUCTION
ProTeam 3
Page 6

IMPORTANT SAFETY INSTRUCTIONS
WARNING
READ ALL INSTRUCTIONS BEFORE USING.
To reduce the risk of fire, electric shock or injury, read the following:
1. DO NOT leave any ProTeam vacuum plugged in when not in use. Unplug unit
from the outlet before servicing.
2. DO NOT use outdoors or on wet surfaces.
3. DO NOT try to recover any liquid with this vacuum. This vacuum is for
DRY RECOVERY only
.
4. Use only as described in this manual. Use only manufacturer’s recommended
attachments and replacement parts.
5. To prevent electrical damage, use the recommended and properly earthed
(grounded) cord as specified by ProTeam.
6. DO NOT USE A DAMAGED CORD OR PLUG. If the unit is not working as it
should, or if it has been dropped, damaged, left outdoors, or exposed to water
,
contact your local ProTeam distributor for inspection.
7. DO NOT pull or carry the vacuum by the cord or use the cord as a handle.
Do not close a door on the cord or pull the cord around sharp edges or corners.
Do not run over the cord. Keep the cord away from heated sur
faces.
8. DO NOT pull on the cord to unplug. Grasp the plug at the outlet and pull.
9. DO NOT handle the plug or vacuum with wet hands.
10. DO NOT put any objects into openings. Keep hair, loose clothing, fingers, and all
parts of the body away from openings and moving parts. Long hair should not
hang over or near the unit.
11. DO NOT vacuum flammable or combustible materials or anything that is burning
or smoking, such as cigarettes, matches, or hot ashes.
12.
Empty the Intercept Micro® Filter after every use and before storage. Some types
of wood dust and debris may spontaneously combust or self ignite.
13. Turn off the unit before unplugging.
14. Connect to a properly earthed outlet only. See Protective Earthing Instructions.
15. Use with care when cleaning stairs.
16. DO NOT allow the vacuum to be used as a toy. Pay close attention when using
the vacuum near children.
17. DO NOT use without filters in place.
SAVE THESE INSTRUCTIONS
Violation of any of these instructions may void any and all warranties.
4 ProTeam
Page 7

PREVENTATIVE MAINTENANCE
WARNING:
The following information is for use by qualified service personnel only and provides
guidance for troubleshooting and maintenance.
• Unplug the vacuum when working on the motor or any electrical part.
• Have a qualified service person at an authorized ProTeam Warranty Station check
the carbon brushes. If carbon brushes are not checked and replaced to
maintenance schedule listed on page 6, warranty will be void.
• Do not lubricate the motor.
CARING FOR YOUR VACUUM
1. To ensure a valid vacuum warranty, optimal performance and improved indoor
air quality, be sure to use genuine ProTeam Intercept Micro Filters.
2. Check all filters before each use. Empty or replace the filters as necessary.
3. Rinse, air dry, and reinsert the foam/filter diffuser each week.
4. Wipe the inside and outside of the vacuum with a household cleaning agent
after each use.
TROUBLESHOOTING
1. If the vacuum will not operate, check the following:
a. The power supply cord at the wall outlet
b. The power supply cord at the vacuum
c. That the switch is in the “ON” position and functioning properly
2. If the exhaust that comes out of the bottom of the vacuum is warmer than usual,
check and clean all four filters.
3. If the power switch fails, check the circuit breaker. If that is not the problem, call a
ProTeam Warranty Station.
4. If loss of suction occurs, check the following:
a. Check that debris is not plugging the hose, wand, and/or floor tool.
b. Check and/or clean both Intercept Micro Filter and Cloth Filters.
c. Check that the hose cuffs are fitting tightly on the hose and are not cracked.
d. Check that the cap is properly attached to the vacuum body.
e. Check that the Dome filter hasn’t shifted and is securely in place.
ELECTRICAL CORD CARE
NEVER stretch the cord tightly between the vacuum and the outlet. A cord that is
stretched or pulled will not function
properly and creates a danger.
After vacuuming, unplug the supply cord and wind it up loosely
(Figure A). DO NOT wind the cord up by wrapping it around
your hand and elbow.
If the supply cord is damaged, it must be replaced by a special
cord or assembly available from ProTeam, its service agent, or
similarly qualified persons in order to avoid a hazard.
PROPER STORAGE
When the vacuum is not in use, the vacuum, if applicable,
should be stored indoors and in a dry place.
ProTeam 5
Figure A
Page 8

ProTeam, Inc. warranties all commercial backpack and canister vacuum cleaners to be free from defects
in materials and workmanship arising under normal usage and care for the following terms:
The warranty period is for three (3) years or 1400 total hours of operation (whichever comes first)
on all parts, labor and motors and Lifetime on all molded body parts.
This warranty applies from the date of purchase only when the vacuum cleaner is used in
accordance with ProTeam’s operating instructions.
This warranty does not apply to:
Normal wear and tear including, but not limited to: hoses, filters, switches, carbon motor brushes
and attachments.
Ordinary wear and tear and blockages which occur during use.
Damage due to unauthorized or improper use, modification, alteration, service or repair.
All vacuum motors are guaranteed for their respective time frames only if the following carbon brush
maintenance schedule is completed and proof of maintenance provided:
1. Carbon brushes on the vacuum motor replaced after the first 800 hours of operation by a
ProTeam authorized service or warranty center.
2. Carbon brushes replaced again after the next 400 hours of operation by a ProTeam
authorized service or warranty center.
3. Carbon brushes replaced again after the next 200 hours of operation by a ProTeam
authorized service or warranty center.
If the above schedule is not followed, the vacuum motor armature will wear out prematurely and will
void the warranty coverage.
This warranty is extended only to the original purchaser of the vacuum cleaner. If the vacuum cleaner is
found to be defective during the warranty period, it will be ProTeam’s option to replace or repair it,
without charge, if returned in accordance with the following instructions:
The vacuum cleaner should be cleaned and packed carefully in a well paded carton and
returned, shipping charges prepaid. ProTeam will not be responsible for repairs to products
due to improper packing.
Please have English speaking person contact ProTeam’s customer service department at
208.377.9555 for all warranty correspondence.
Any repair or replacement under this warranty shall not extend the warranty period.
THE FOREGOING WRITTEN WARRANTY SHALL CONSTITUTE THE EXCLUSIVE LIABILITY OF PROTEAM.
The above warranty is exclusive and in lieu of all other expressed warranties whether oral or written.
Under no circumstances, whether alleged as a result of breach of contract or warranty, negligence or
otherwise, shall ProTeam be liable to the purchaser or gift recipient or any other person for
special incidental or consequential damages or nature, including, without limitation, damages
to or loss of use of property. ProTeam’s liability under any circumstances will not exceed the
purchase price of the vacuum cleaner. No agent, employee, or representative of ProTeam, nor
any other person, is authorized to modify this warranty in any respect.
ProTeam, Super CoachVac, Super QuarterVac, MegaVac and Filter Guard are trademarks of ProTeam,
Inc. in the USA. Velcro is a registered trademark of Velcro Company in the USA.
To ensure a valid vacuum warranty, optimal performance and improved indoor air quality, be sure
to use genuine ProTeam Intercept Micro Filters.
LIMITED WARRANTY
6 ProTeam
Page 9

INFORMATION ON PAGES 7-12 PERTAINS ONLY TO:
AviationVac
INSPECTION
The equipment detailed in this manual is specifically designed for use on air planes
with 110VAC – 120VAC, 400Hz service for connecting such appliances.
Carefully unpack and inspect your new ProTeam vacuum for shipping damage. Each
unit is tested and thoroughly inspected before shipping. For instructions regarding
any shipping damage, contact your local ProTeam distributor.
This operator’s manual has important information for the use and safe operation of
the vacuum cleaners detailed in this manual. Read this manual carefully before starting the machine. Keep this manual available at all times and instruct all operators to
read this manual. If instructions are not followed, an injury may occur or equipment,
furniture or buildings may become damaged.
The contents of this manual are based on the latest product information available at
the time of publication. ProTeam reserves the right to make changes or improvements
to its machines or components without notice.
The products that are covered by this instruction manual are intended for commercial
use.
WARNINGS
• USE ONLY genuine ProTeam replacement filters to ensure optimal performance,
improved indoor air quality and maintain a valid vacuum warranty.
• DO NOT vacuum with a frayed, worn, or damaged cord.
• DO NOT vacuum liquids or expose the vacuum to rain or water. The vacuums in
this manual are for dr
y use only and are not to be used or stored outdoors in wet
conditions.
• DO NOT vacuum hazardous dust or toxic materials.
• DO NOT use vacuums to pick up flammable or combustible materials and do not
store them in the filter bay
.
The equipment detailed in this manual is not intended for use by persons (including
children) with reduced physical, sensory, or mental capabilities, or lack of experience
and knowledge, unless they have been given supervision or instruction concerning
use of the equipment by a person responsible for safety.
MOTOR
Electric thru-flow vacuum motors must never be used in applications in which wet or
moist conditions are involved, where dry chemicals or other volatile materials are present, or where airflow may be restricted or blocked. Such motors are designed to permit the vacuumed air to pass over the electrical wiring to cool it. Therefore, any liquid
(including water), dry chemical, or other foreign substance which would come in contact with electrical conductors could cause combustion (depending on volatility) or
electrical shock. Failure to observe these precautions could result in property damage
and severe personal injury, including death in extreme cases.
INTRODUCTION
ProTeam 7
Page 10
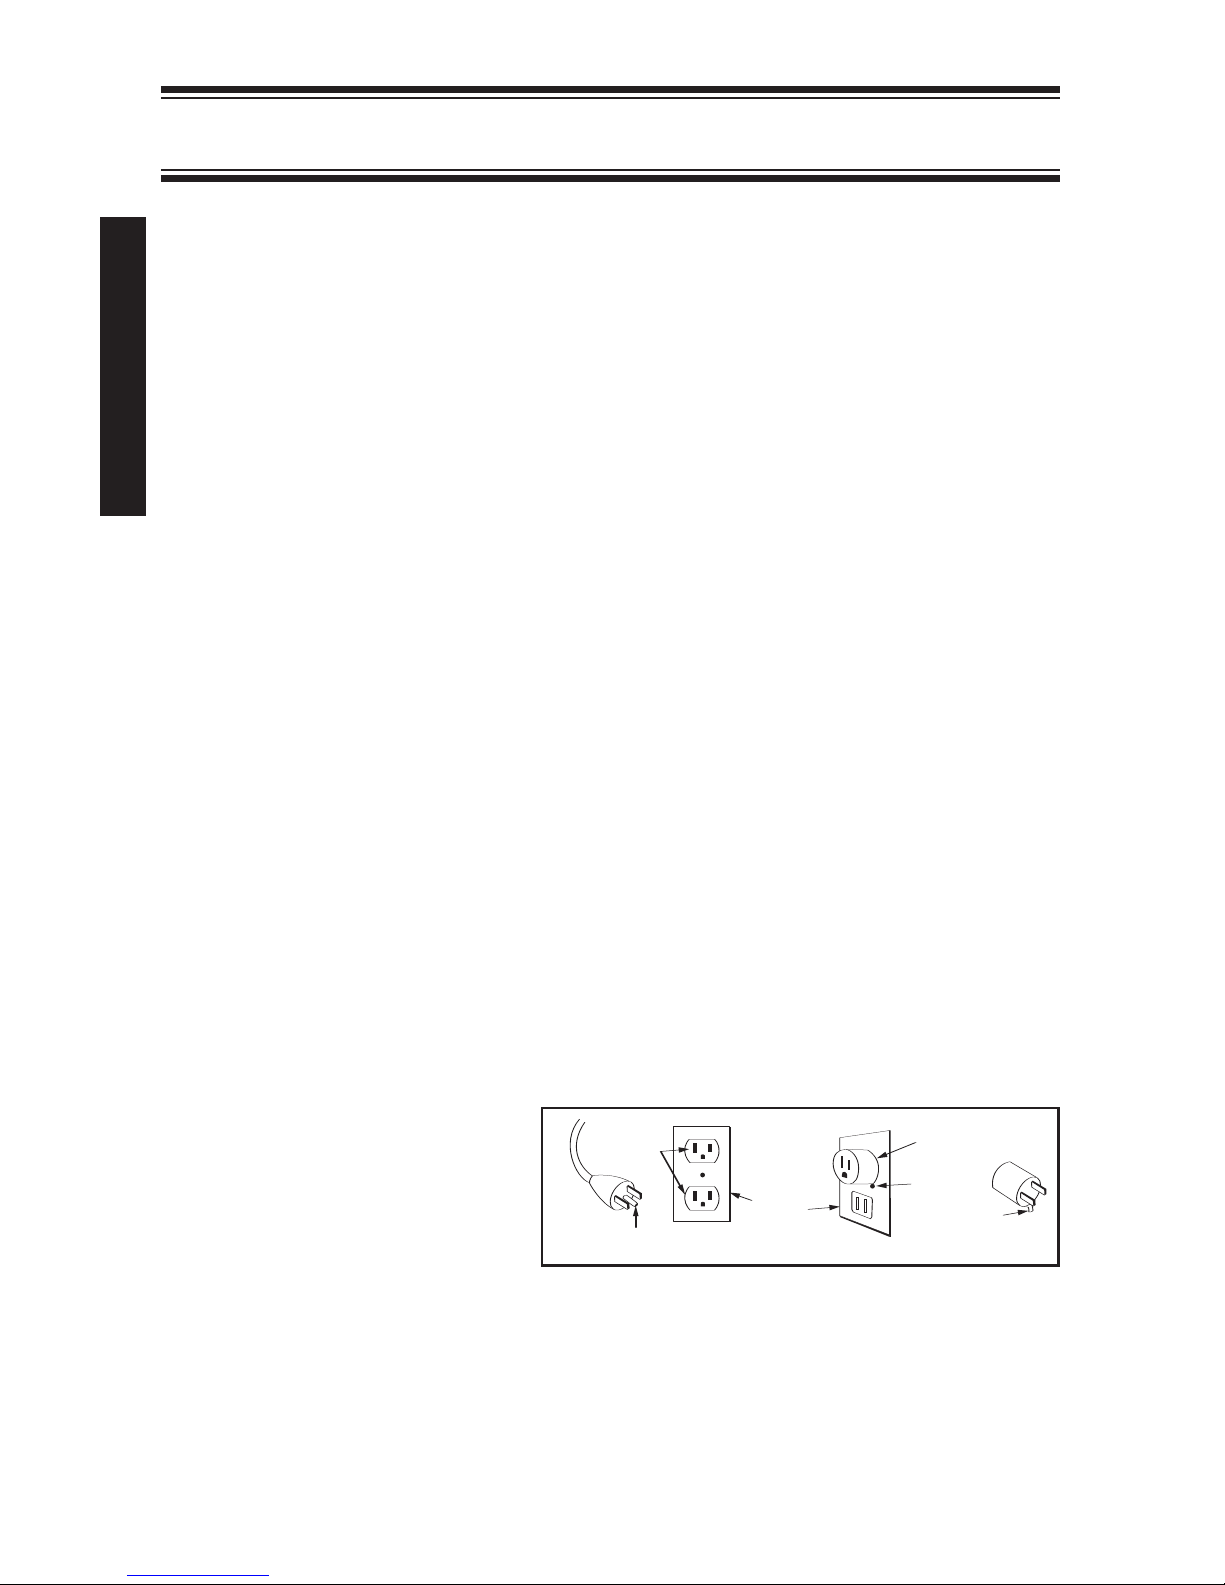
ELECTRICAL
The vacuum as described in this manual, unless otherwise noted, are designed to operate
on 110V – 120V ~ power supply at 400Hz. The vacuum as described in this manual is a
Class I appliance.
The vacuum cleaner described in this manual is equipped with a thermal protection device.
The integrated thermal switch will remove power from the vacuum motor in the event
excessively high operating temperatures are detected. This condition is normally the result
of a blocked vacuum passage, clogged or full filters.
Should a thermal trip take place, immediately turn off the vacuum and inspect for a
blockage and verify the condition of the filter bag and change or empty as required.
The vacuum will require several minutes to cool down to a safe operating temperature.
When this temperature is attained, the thermal switch will reset and the vacuum will be
able to be used in a normal manner.
PROTECTIVE EARTHING INSTRUCTIONS
THESE VACUUMS MUST BE CONNECTED TO A PROPERLY EARTHED (GROUNDED) POWER
SUPPLY. If a vacuum should malfunction or stop working, earthing (grounding) provides a
path of least resistance for electrical current, thereby reducing the risk of electrical shock. This
unit is equipped with a cord that has an equipment-earthing conductor and earthing plug.
The plug must be inserted in an appropriate outlet that is properly installed and grounded in
accordance with all local codes and ordinances. Cutting off or disabling the earthing wire or
using a cord or outlet that is not properly earthed will void the warranty on the unit, and
ProTeam will accept NO liability associated with the unit.
WARNING – Improper connection of the equipment-earthing connector conductor can
result in a risk of electrical shock. Check with a qualified electrician or ser
vice person if you
doubt that the outlet is properly earthed (grounded). Do not modify the plug provided with
the vacuum. If it will not fit the outlet, have a proper outlet installed by a qualified electrician.
The vacuum cleaners in this manual are for use on a nominal 120-volt circuit, and has a
grounded plug that looks like the plug illustrated in sketch A in Figure A. A temporary
adaptor that looks like the adaptor illustrated in sketches B and C may be used to connect
this plug to a 2-pole receptacle as shown in sketch B if a properly grounded outlet is not
available. The temporary adaptor should be used only until a properly grounded outlet
(sketch A) can be installed by a qualified electrician. The green colored rigid ear, lug, or the
like extending from the adaptor must
be connected to a permanent ground
such as a properly grounded outlet box
cover. Whenever the adaptor is used, it
must be held in place by a metal screw.
Note: In Canada, the use of a
temporary adaptor is not permitted
by the Canadian Electrical Code.
For Canada – This appliance is for use on a nominal 120-volt 400Hz circuit and has a
grounded attachment plug that looks like the plug illustrated in sketch A in Figure A.
Make sure that the vacuums are connected to an outlet having the same configuration as
the plug. No adaptor should be used with the vacuums detailed in this manual.
INTRODUCTION
8 ProTeam
GROUNDED
OUTLET
GROUNDING
PIN
GROUNDED
OUTLET BOX
(A)
(B)
ADAPTER
METAL
SCREW
TAB FOR
GROUNDING SCREW
(C)
Figure A
Page 11

WARNING
READ ALL INSTRUCTIONS BEFORE USING.
To reduce the risk of fire, electric shock or injury, read the following:
1. DO NOT leave any ProTeam vacuum plugged in when not in use. Unplug unit
from the outlet before servicing.
2. DO NOT use outdoors or on wet surfaces.
3. DO NOT try to recover any liquid with this vacuum. This vacuum is for
DRY RECOVERY only
.
4. Use only as described in this manual. Use only manufacturer’s recommended
attachments and replacement parts.
5. To prevent electrical damage, use the recommended and properly earthed
(grounded) cord as specified by ProTeam.
6. DO NOT
USE A DAMAGED CORD OR PLUG. If the unit is not working as it should,
or if it has been dropped, damaged, left outdoors, or exposed to water, contact a
ProTeam distributor for inspection.
7. DO NOT pull or carry the vacuum by the cord or use the cord as a handle. Do
not close a door on the cord or pull the cord around sharp edges or corners.
Do not run over the cord. Keep the cord away from heated sur
faces.
8. DO NOT pull on the cord to unplug. Grasp the plug at the outlet and pull.
9. DO NOT handle the plug or vacuum with wet hands.
10. DO NOT put any objects into openings. Keep hair, loose clothing, fingers, and
all parts of the body away from openings and moving parts. Long hair should
not hang over or near the unit.
11. DO NOT vacuum flammable or combustible materials or anything that is burning
or smoking, such as cigarettes, matches, or hot ashes.
12. Empty the Inter
cept Micro Filter® after every use and before storage. Some
types of wood dust and debris may spontaneously combust or self ignite.
13. Turn off the unit before unplugging.
14. Connect to a properly earthed outlet only.
15. Use with care when cleaning stairs.
16. DO NOT allow the vacuum to be used as a toy. Pay close attention when using
the vacuum near children.
17. DO NOT use without filters in place.
18.
Connect to a properly earthed outlet only. See Protective Earthing Instructions.
SAVE THESE INSTRUCTIONS
Violation of any of these instructions may void any and all warranties.
IMPORTANT SAFETY INSTRUCTIONS
ProTeam 9
Page 12

WARNING:
The following information is for use by qualified service personnel only and provides
guidance for troubleshooting and maintenance.
• Unplug the vacuum when working on the motor or any electrical part.
• Have a qualified service person at an authorized ProTeam Warranty Station check
the carbon brushes. If carbon brushes are not checked and replaced to
maintenance schedule listed on page 12, warranty will be void.
• Do not lubricate the motor.
• Do not tie extension cord and power cord together. Doing so will result in
damage to both cords and will not be covered under warranty.
CARING FOR YOUR VACUUM
1. To ensure a valid vacuum warranty, optimal performance and improved indoor
air quality, be sure to use genuine ProTeam Intercept Micro Filters.
2. Check all filters before each use. Empty or replace the filters as necessary.
3. Rinse, air dry, and reinsert the foam/filter diffuser each week.
4. Wipe the inside and outside of the vacuum with a household cleaning agent
after each use.
TROUBLESHOOTING
1. If the vacuum will not operate, check the following:
a. The power supply cord at the wall outlet
b. The power supply cord at the vacuum
c. That the switch is in the “ON” position and functioning properly
2. If the pigtail (18" power cord) is getting warm, check to see that the extension cord
does not exceed a length of 50 feet at 16 gauge or 100 feet at 14 gauge. Longer
cords will overheat and damage the vacuum.
3. If the exhaust that comes out of the bottom of the vacuum is warmer than usual,
check and clean all four filters.
4. If the power switch fails, check the circuit breaker. If that is not the problem, call a
ProTeam Warranty Station.
5. If loss of suction occurs, check the following:
a. Check that debris is not plugging the hose, wand, and/or floor tool.
b. Check and/or clean both Intercept Micro Filter and Cloth Filters.
c. Check that the hose cuffs are fitting tightly on the hose and are not cracked.
d. Check that the cap is properly attached to the vacuum body.
e. Check that the Dome filter hasn’t shifted and is securely in place.
PREVENTATIVE MAINTENANCE
10 ProTeam
Page 13
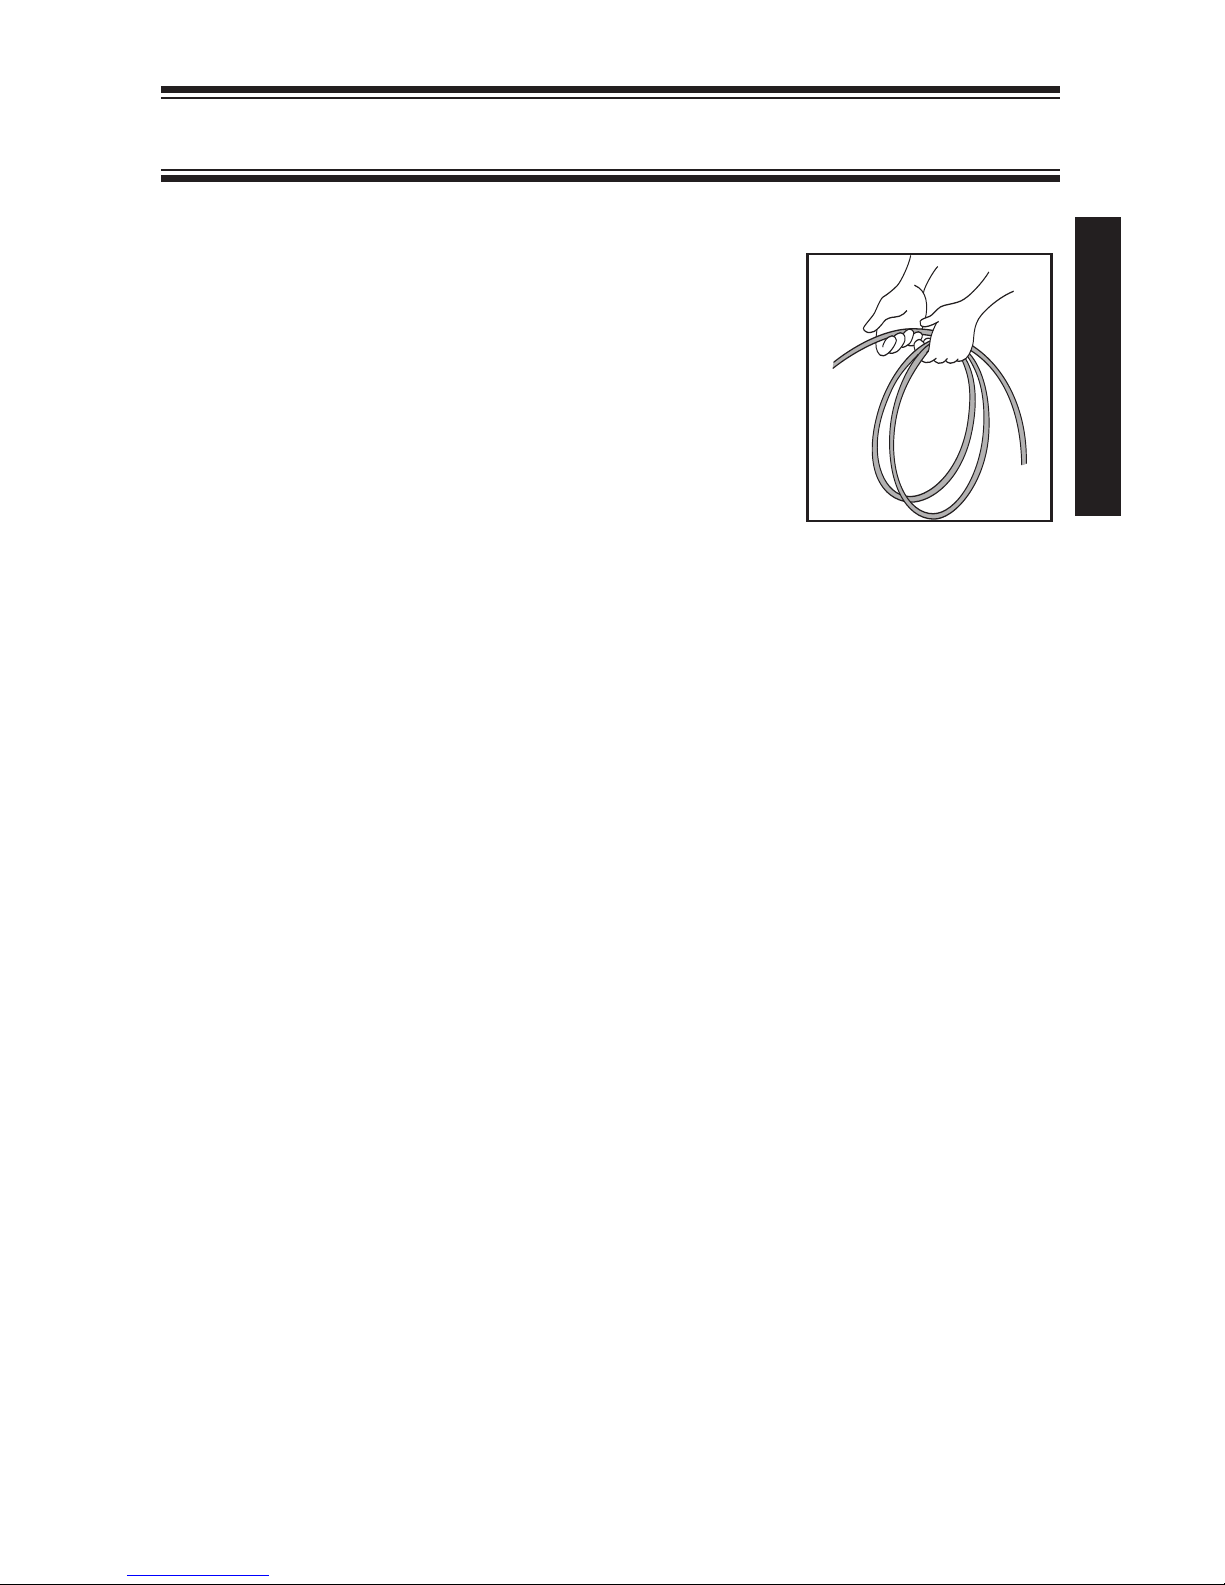
ELECTRICAL CORD CARE
NEVER stretch the cord tightly between the vacuum and the
outlet. A cord that is stretched or pulled will not function
properly and creates a danger.
After vacuuming, unplug the extension cord at both ends
and wind it up loosely (Figure A). DO NOT wind the cord
up by wrapping it around your hand and elbow. Acceptable
extension cord types are 16AWG, SJT or SJTW in 50 ft. or less
or 14AWG, SJT or SJTW in 50 ft. to 100 ft. lengths. ProTeam
will not be liable for damage to equipment or personnel if a
cord that does not meet the above requirements is used.
If the supply cord is damaged, it must be replaced by a
special cord or assembly available from ProTeam, its service
agent, or similarly qualified persons in order to avoid a hazard.
PROPER STORAGE
When the vacuum is not in use, the vacuum and extension cord, if applicable, should
be stored indoors and in a dry place.
PREVENTATIVE MAINTENANCE
ProTeam 11
Figure A
Page 14

ProTeam, Inc. warranties all commercial backpack and canister vacuum cleaners to be free from defects
in materials and workmanship arising under normal usage and care for the following terms:
The warranty period is for three (3) years or 1400 total hours of operation (whichever comes first)
on all parts, labor and motors and Lifetime on all molded body parts.
This warranty applies from the date of purchase only when the vacuum cleaner is used in
accordance with ProTeam’s operating instructions.
This warranty does not apply to:
Normal wear and tear including, but not limited to: hoses, filters, switches, carbon motor brushes
and attachments.
Ordinary wear and tear and blockages which occur during use.
Damage due to unauthorized or improper use, modification, alteration, service or repair.
All vacuum motors are guaranteed for their respective time frames only if thefollowing carbon brush
maintenance schedule is completed and proof of maintenance provided:
1. Carbon brushes on the vacuum motor replaced after the first 800 hours of operation by a
ProTeam authorized service or warranty center.
2. Carbon brushes replaced again after the next 400 hours of operation by a ProTeam
authorized service or warranty center.
3. Carbon brushes replaced again after the next 200 hours of operation by a ProTeam
authorized service or warranty center.
If the above schedule is not followed, the vacuum motor armature will wear out prematurely and will
void the warranty coverage.
This warranty is extended only to the original purchaser of the vacuum cleaner. If the vacuum cleaner is
found to be defective during the warranty period, it will be ProTeam’s option to replace or repair it,
without charge, if returned in accordance with the following instructions:
The vacuum cleaner should be cleaned and packed carefully in a well paded carton and returned,
shipping charges prepaid. ProTeam will not be responsible for repairs to products due to
improper packing.
Please have English speaking person contact ProTeam’s customer service department at
208.377.9555 for all warranty correspondence.
Any repair or replacement under this warranty shall not extend the warranty period.
THE FOREGOING WRITTEN WARRANTY SHALL CONSTITUTE THE EXCLUSIVE LIABILITY OF PROTEAM.
The above warranty is exclusive and in lieu of all other expressed warranties whether oral or written.
Under no circumstances, whether alleged as a result of breach of contract or warranty, negligence or
otherwise, shall ProTeam be liable to the purchaser or gift recipient or any other person for
special incidental or consequential damages or nature, including, without limitation, damages
to or loss of use of property. ProTeam’s liability under any circumstances will not exceed the
purchase price of the vacuum cleaner. No agent, employee, or representative of ProTeam, nor
any other person, is authorized to modify this warranty in any respect.
ProTeam, Super CoachVac, Super QuarterVac, MegaVac and Filter Guard are trademarks of ProTeam,
Inc. in the USA. Velcro is a registered trademark of Velcro Company in the USA.
To ensure a valid vacuum warranty, optimal performance and improved indoor air quality, be sure
to use genuine ProTeam Intercept Micro Filters.
LIMITED WARRANTY
12 ProTeam
Page 15
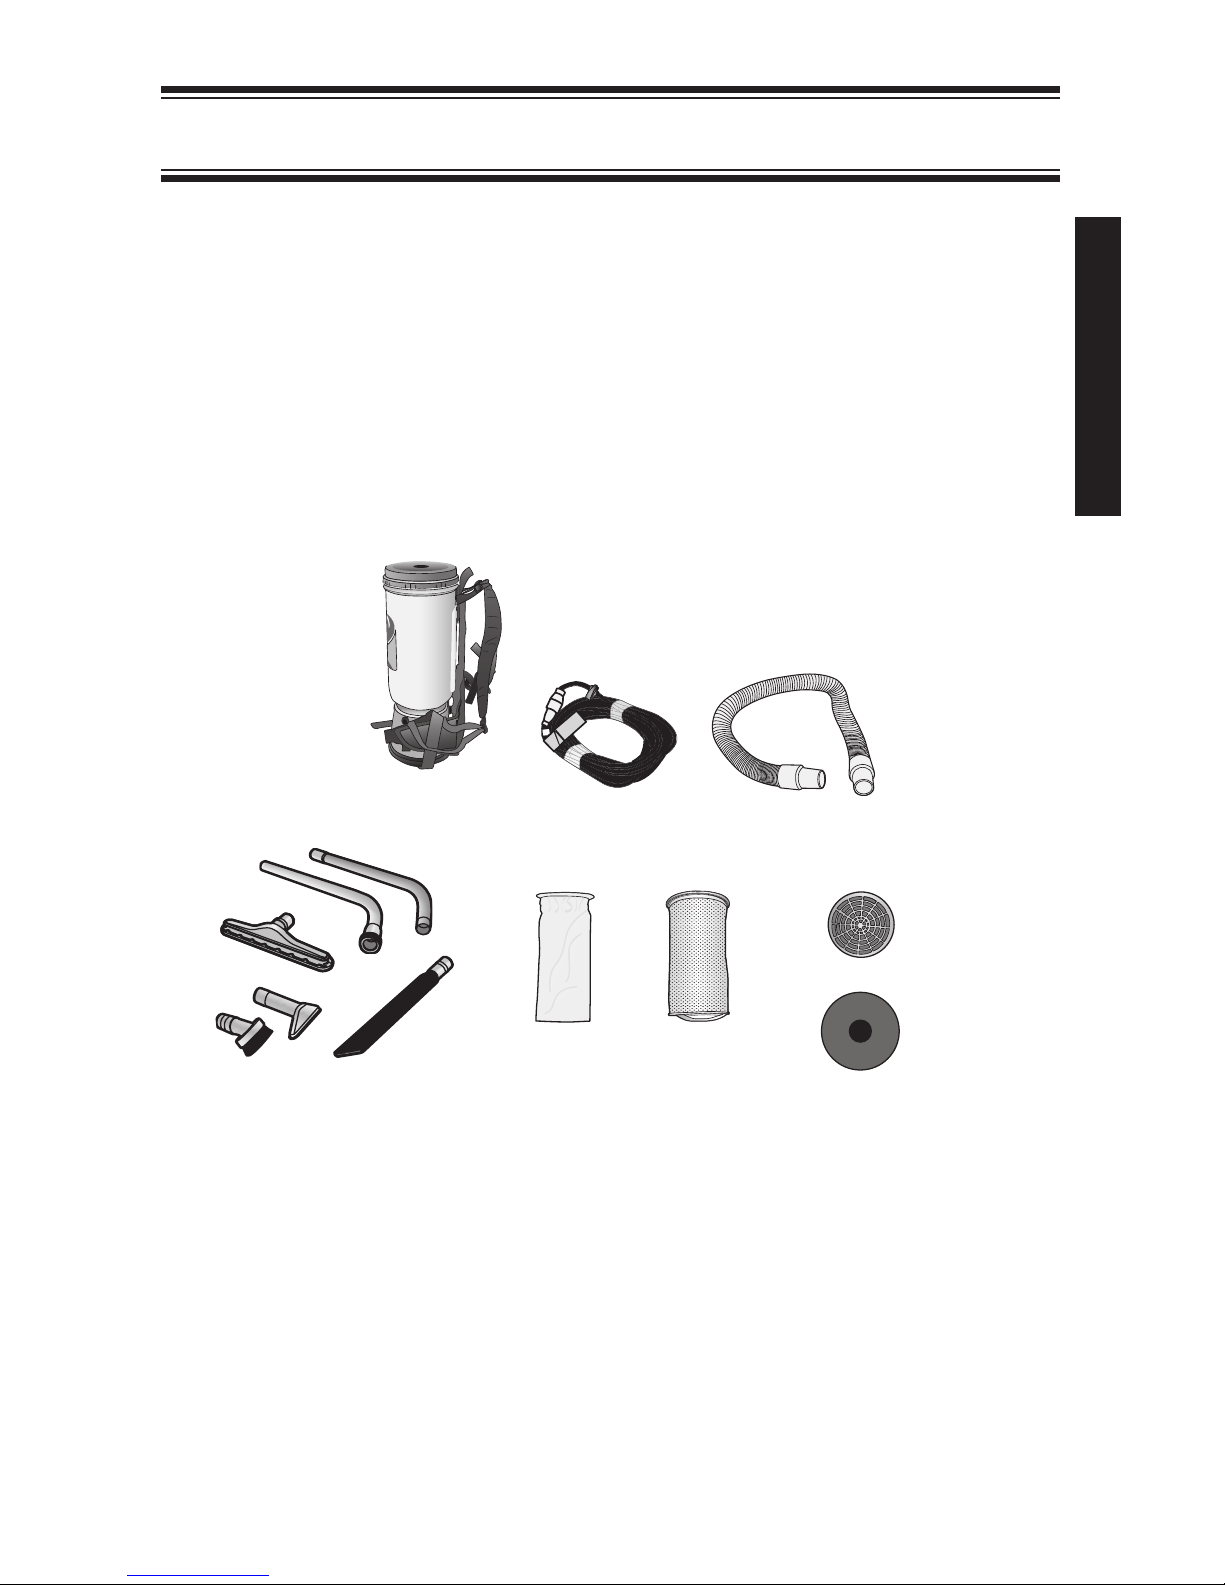
OVERVIEW
• Vacuum (1)
• Powercord (2) (AviationVac Only)
• Hose (3)
• Accessories (4)
• Intercept Micro Filter (5)
• Micro Cloth Filter (6)
• Dome Filter (7)
• Exhaust Filter (8)
BACKPACK VACUUMS
ProTeam 13
(1) (2) (3)
(4) (5) (6 )
(7)
(8)
Page 16
GETTING STARTED
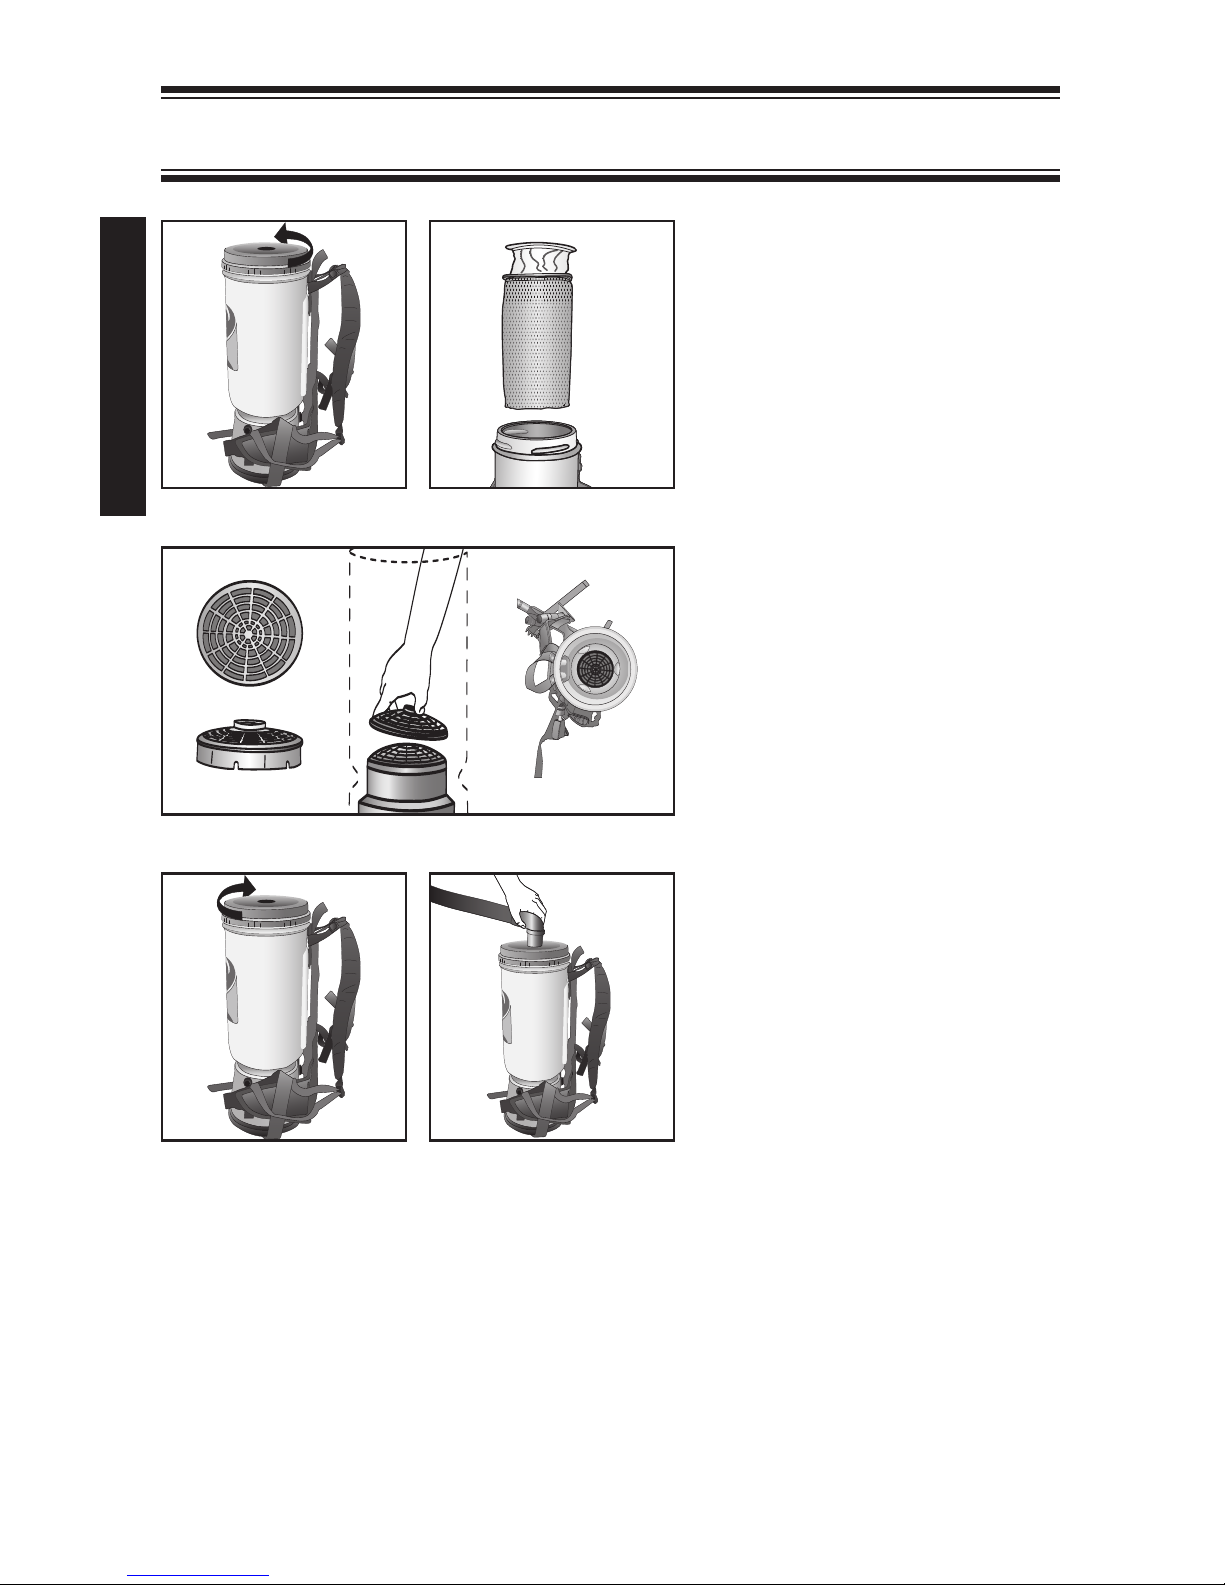
1. Unscrew the cap on the top
of the vacuum unit (Figure A).
2. Remove filters (Figure B).
3. Check to make sure the
Dome Filter did not shift
during shipping (Figure C).
4. Replace the Intercept Micro
Filter and the Micro Cloth
Filter into the vacuum
(Figure B).
5. Replace the cap (Figure D).
6. Push the hose into the cap
opening (Figure E).
BACKPACK VACUUMS
14 ProTeam
Figure A
Figure B
Figure C
Figure D
Figure E
Page 17
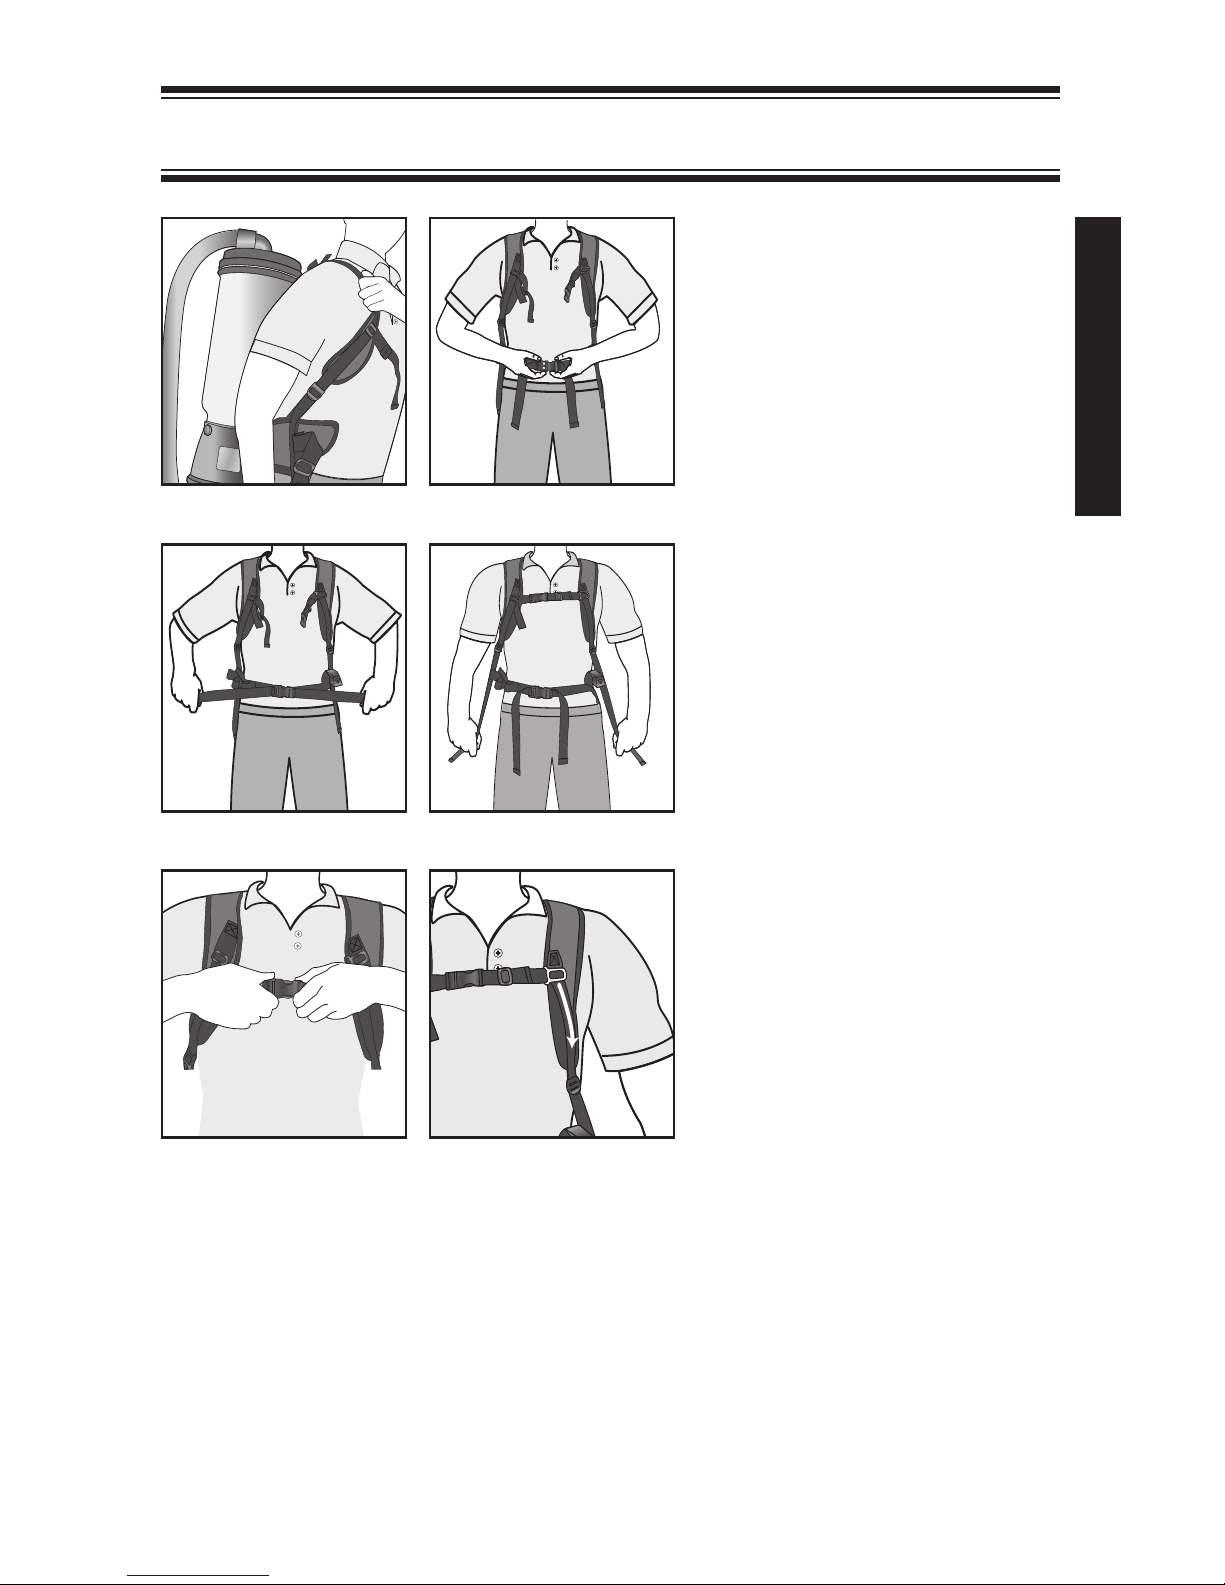
WEARING THE
BACKPACK VACUUM
7. Loosen the shoulder straps
and the waist belt. Lift the
vacuum and slide your arms
through the straps (Figure F).
8. Connect the waist strap
(Figure G).
9. Tighten the waist belt.
It is very important that
the weight of the unit be
concentrated on your hips
rather than your shoulders
(Figure H).
10. Adjust the shoulder straps
so that the unit fits
comfortably, but the
weight is still concentrated
on your hips (Figure I).
11. Connect the sternum strap
(Figure J).
12. Slide the buckle up or
down the strap for best fit
(Figure K).
BACKPACK ERGONOMICS
• The weight of the vacuum should be evenly distributed on your hips.
• Adjust the padded waist belt and shoulder straps for a custom fit.
• The backpacks have a ventilated backplate to keep the operator cool.
• The on/off switch is conveniently located on the waist belt of the backpack vacuums.
• Use the proper attachments for the job. ProTeam has attachments to perform most
jobs without requiring you to bend over or get into difficult positions.
BACKPACK VACUUMS
ProTeam 15
Figure F
Figure G
Figure I
Figure H
Figure J
Figure K
Page 18
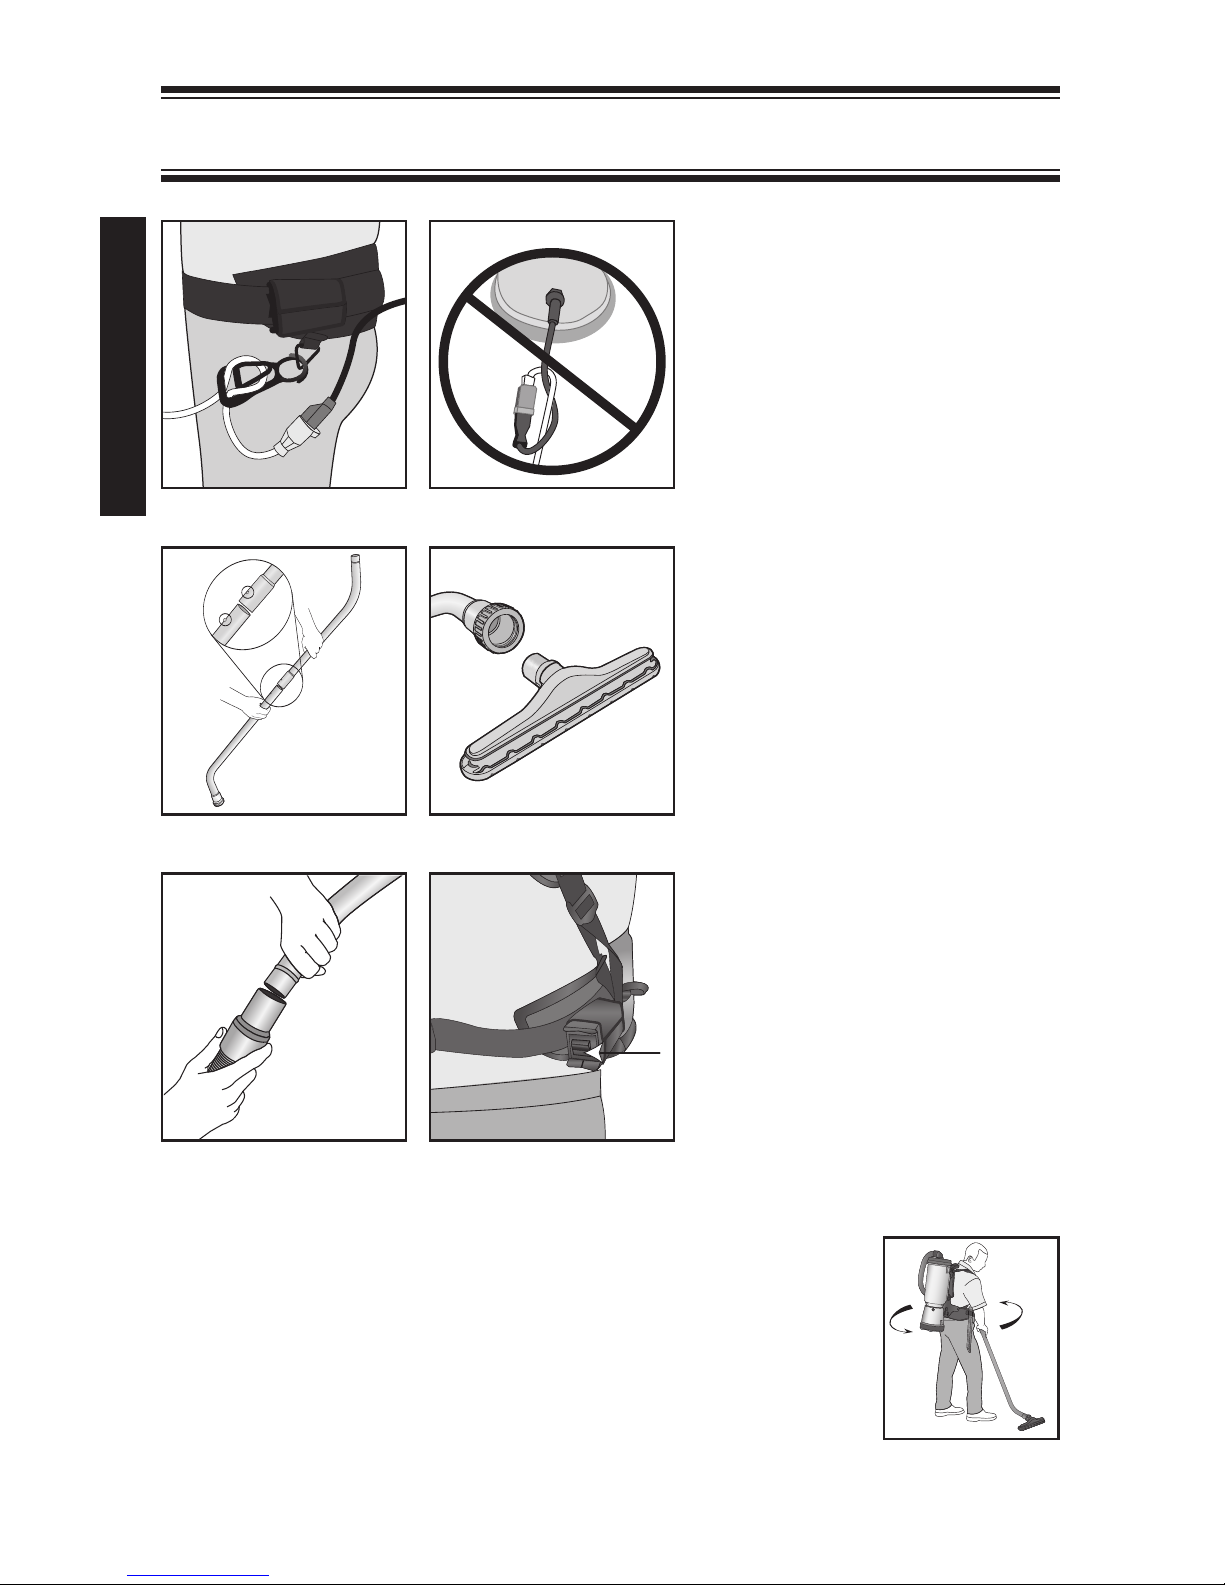
OPERATING THE
BACKPACK VACUUM
13. Thread the extension cord
through the Cord-O-Holder
on the waistbelt (Figure L).
14. Do not tie extension cord and
power cord together. Doing
so will result in damage to
both cords and will not be
covered under warranty
(Figure M).
15. Fasten the ends of the wands
together, snapping them into
place (Figure N).
16. Attach the floor tool to end of
wand. Align the brass ring
with the indentation on the
floor tool to ensure a secure
fit (Figure O).
17. Twist the wand onto the end
of the hose (Figure P).
18. Plug the power cord into the
wall. Turn the unit on, and
proceed with vacuuming.
19. The on/off switch is
conveniently located on the
waist belt of the backpack
vacuums (Figure Q).
20. The QuietPro BP has a
different power switch.
Use the power switch to
choose one of the following
power modes.
• POWER MODE (HI) mode
provides better performance.
• QUIET MODE (LO) mode
provides quieter operation.
PROPER VACUUMING MOTION
FOR LARGE AREAS
1. Begin with the wand parallel to your body.
2. Draw the top of the wand in toward your waist and twist at the
waist walking backward or forward, in a side-to-side motion
(Figure R). The motion is similar to mopping and keeps the upper
body and arms from tiring.
BACKPACK VACUUMS
16 ProTeam
Figure L
Figure M
Figure O
Figure N
Figure P
Figure Q
Figure R
Page 19
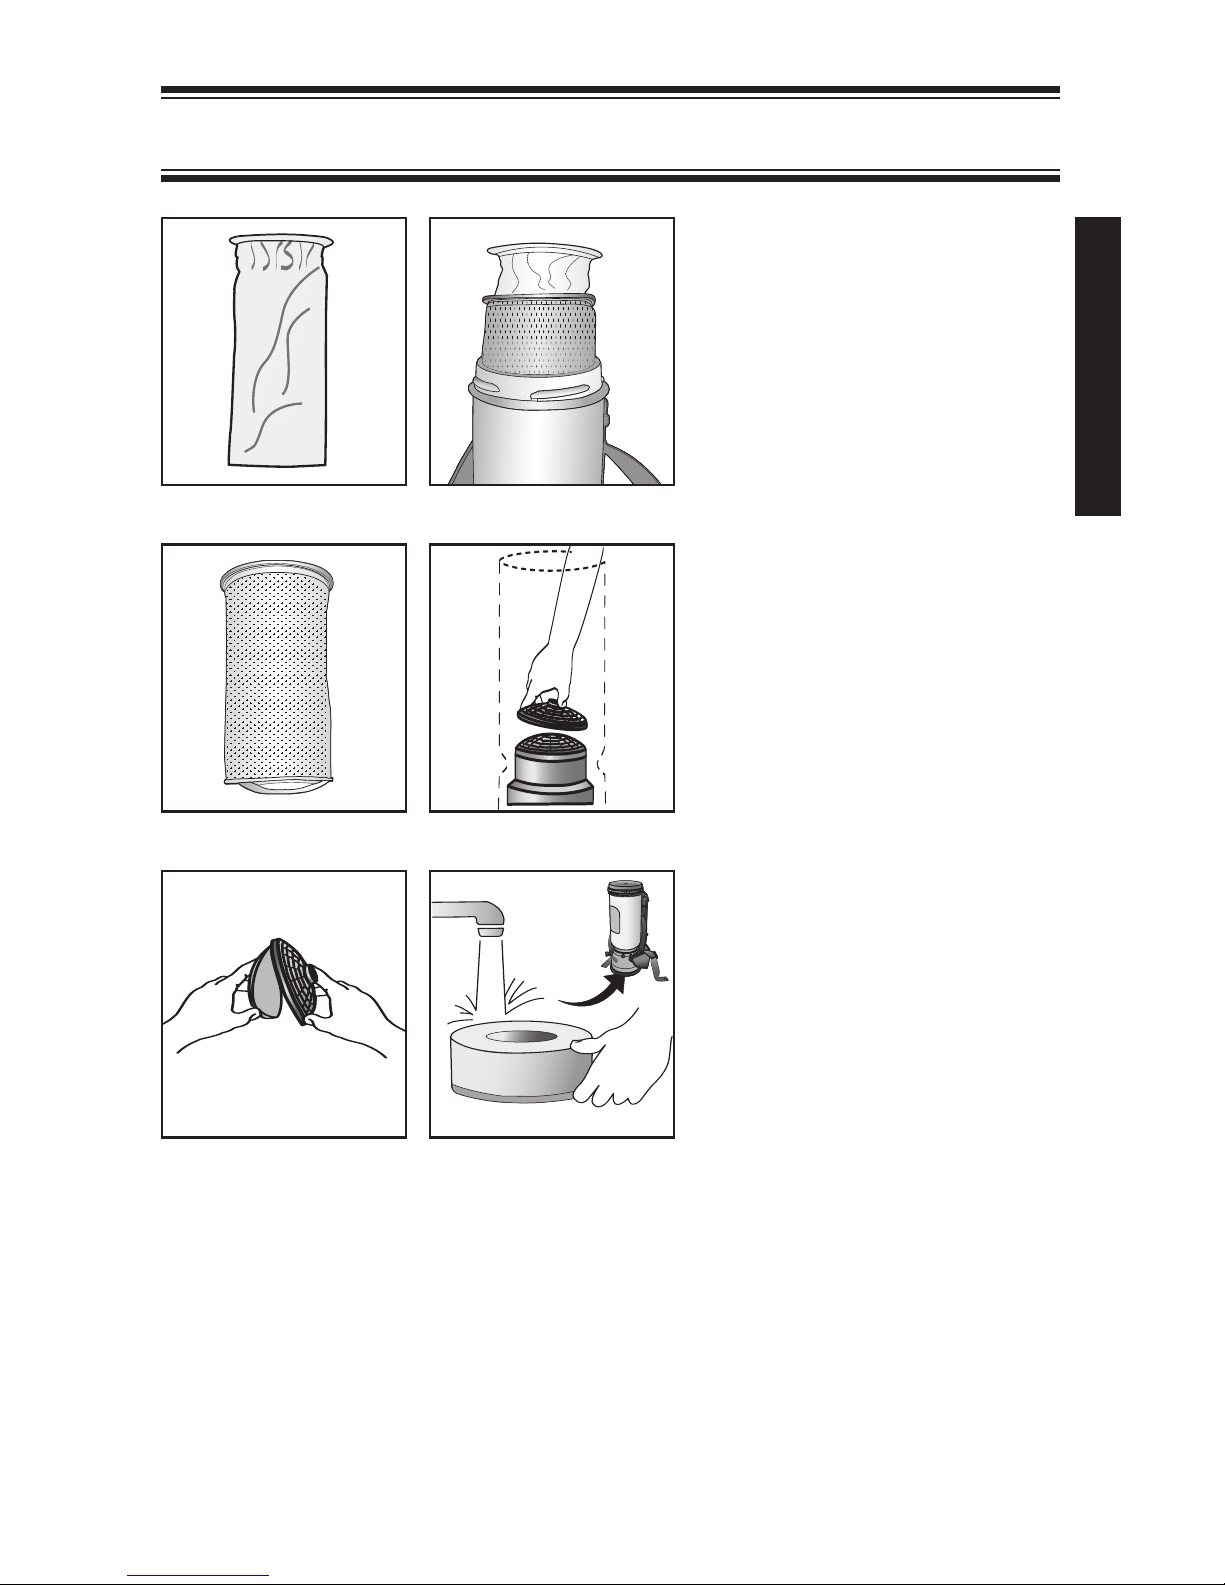
Filter Maintenance
1. Empty and inspect the filters
every time you start and finish
vacuuming (Figure S). Replace
if necessary. A clogged and
dirty filter restricts airflow and
results in reduced suction and
overheating.
2. To replace the Intercept Micro
Filter, slide filter into the Cloth
Filter and secure into vacuum
(Figure T).
3. Once a month, or as
necessary, hand or machine
wash the Cloth Filter and let it
line dry, do not put it in the
dryer (Figure U).
4. Once a week, or as necessary,
clean the Dome Filter.
a. First, remove the Intercept
Micro Filter and Cloth Filter.
Reach into the vacuum
body and twist the Dome
Filter from the motor
(Figure V).
b. Pull the top piece of the
Dome Filter off and remove
the foam media (Figure W).
Shake it out, rinse it and let
it air dry thoroughly
c. Firmly snap the top piece
of the Dome Filter into
place (Figure V).
NOTE: If using a high filtration disc in place of the foam media, check it every two to
three weeks. When the disc becomes discolored, replace it with a new disc. The life of
the high filtration disc will depend greatly on the use and care of the Intercept Micro
Filter and Cloth Filter.
5. For backpack models (with exposed exhaust filter), rinse, air dry, and return the foam
filter/diffuser at the bottom of the vacuum below the motor (Figure X).
6. Following the above instructions is the best way to prolong the life of the vacuum.
DO NOT TRY TO WASH or VACUUM the LineVacer HEPA, ULPA or QuietPro BP
and QuietPro CN HEPA Exhaust Filters. Doing so will fracture the filter media, greatly
decreasing its efficiency
. HEPA and ULPA filters CAN be shaken out gently.
BACKPACK VACUUMS
ProTeam 17
Figure S
Figure T
Figure V
Figure U
Figure W
Figure X
Page 20
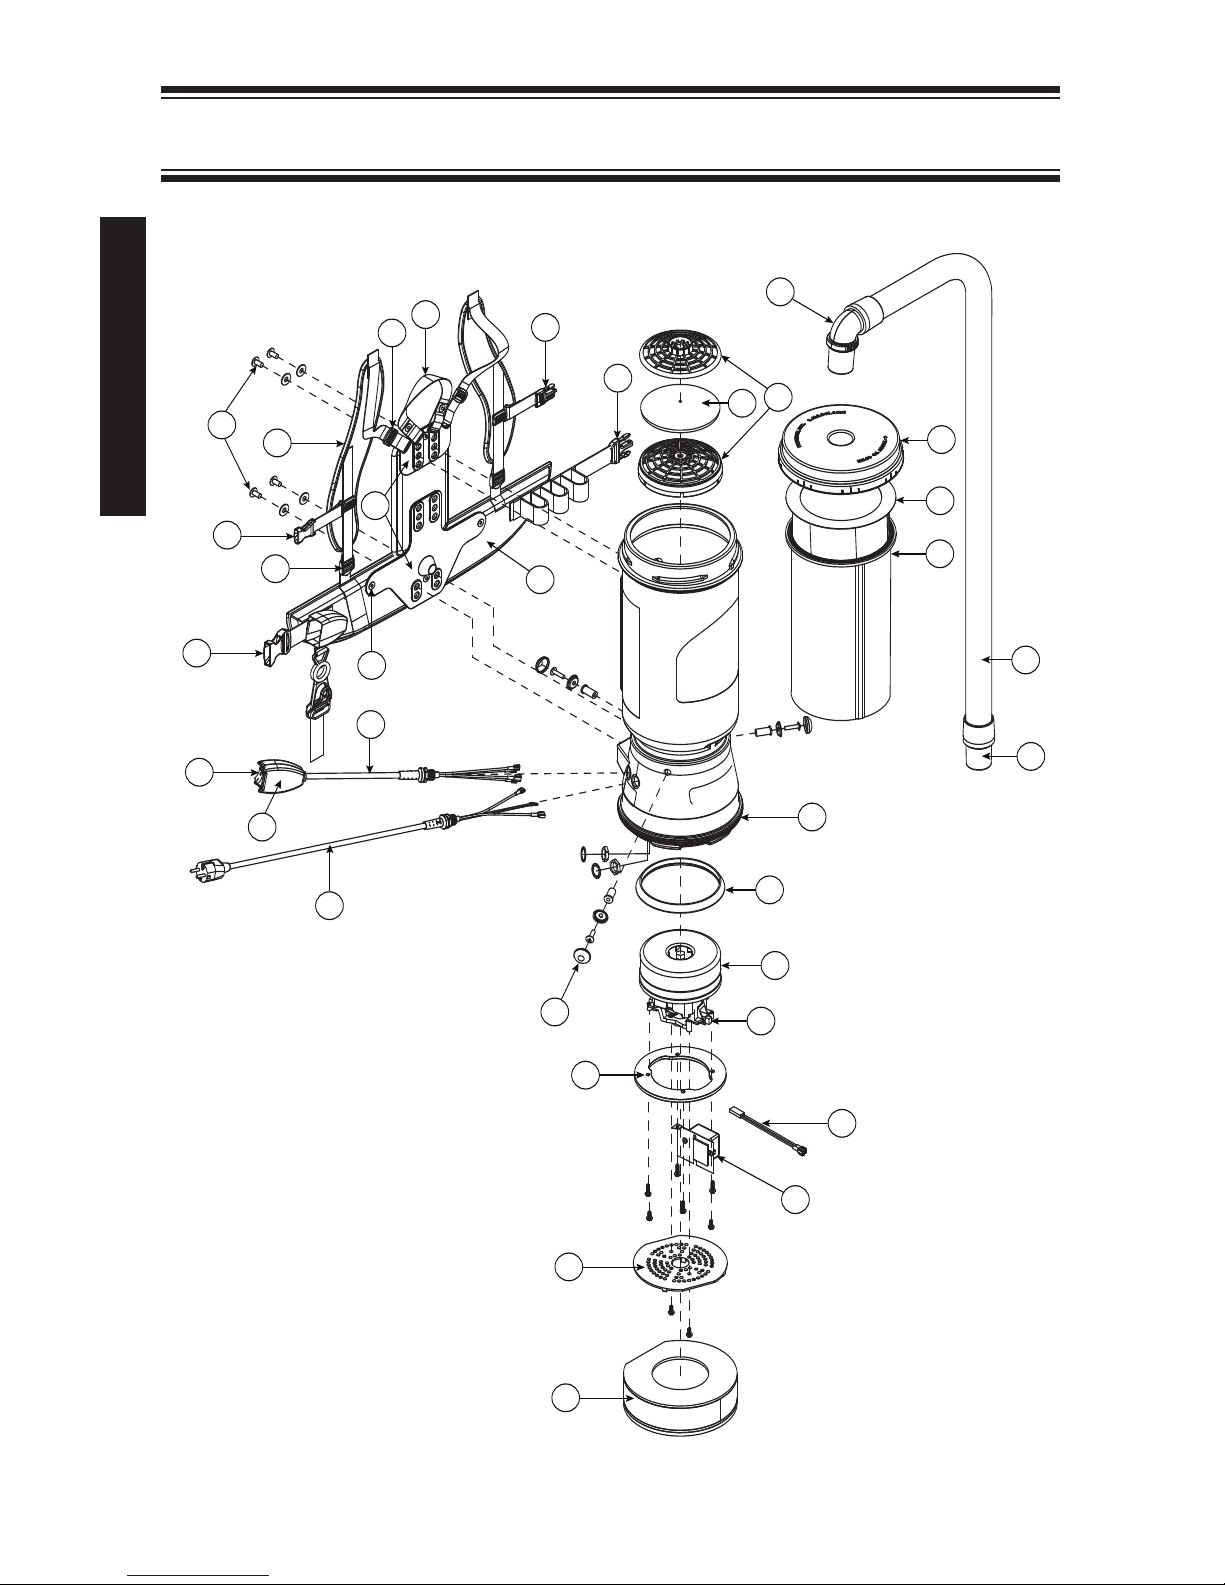
SUPER COACHVAC ASSEMBLY
18 ProTeam
1
2
3
4
5
6
7
8
9
10
11
12
13
14
15
16
17
18
19
20
21
22
23
25
2
6
27
28
29
5a
5b
5
c
9a
5c
24
Page 21

ProTeam 19
1 100197 Twist Cap (Purple) 1 ea.
2 100331 698 Sq. In. Intercept Micro Filter 10/pk
3 100565 Micro Cloth Filter 1 ea.
4 101737 Carry Handle w/Rivet and Washer Set 1 set
5 100356 Shoulder Strap Assembly (includes: #5a, 5b, 5c) 1 set
5a 100358 Shoulder Strap Plastic Adjustment Buckle (Top) 1 ea.
5b 100357 Shoulder Strap Plastic Adjustment Buckle (Bottom) 1 ea.
5c 103627 Sternum Strap Buckles (Latch and Keeper) 1 set
6 105046 Backplate (includes: #7) 1 ea.
7 100375 Barrel Nut Connection Set for Backplate (Replacement) 1 set
8 100716 Backplate (Black) Connection Set: 4 Screws w/Washers 1 set
9 103963 Waist Belt Keeper 1 ea.
9a 100364 Waist Belt Latch 1 ea.
10 100359 Waist Belt (includes: #9, 9a) 1 ea.
100354 Strap Assembly Complete (includes: #5, 5a, 5b, 5c, 9, 9a) 1 set
103166 Backplate (Black) System Complete
(includes: #4, 5, 5a, 5b, 5c, 6, 7, 8, 9, 9a)
1 set
11 106584 Schuko Power Cord Assembly (15M) 1 set
106585 British Power Cord Assembly (15M) 1 ea.
106586 Swiss Power Cord Assembly (15M) 1 ea.
12 106587 Switch Cord Assembly for 220V Vacs, w/Switch Box 1 set
106701 Switch Cord w/Crimps 1 ea.
13 101472 Switch Box w/Velcro and New Lamb Switch 1 set
106287 Switch Box w/Velcro and Screws 1 ea.
14 106066 On/Off Switch (must use with #106287) 1 ea.
15 100597 Sound Muffler 1 ea.
16 106583 Motor Shroud Cover F/220V Vacs W/Screws 1 ea.
17 100335 Motor Compression Ring w/Screws 1 set
100378 Compression Ring Screw Set: 4 Screws 1 set
18 100014 Tetraseal 1 ea.
19 101720 Carbon Brush Set for Super CoachVac Motor (Ametek Motor) 1 set
20 100324 Motor/Fan (220 V) w/Crimps for Super CoachVac (Ametek Motor) 1 ea.
100379 Motor Ground and Wire Clamp Set w/Screws 1 set
100380 Motor Crimp Set: 5 Female, 3 Male, Ground Crimp Connector 1 set
21 100368 Motor Mounting System Set: 3 Well Nuts, 3 Bolts, 3 Washers,
3 Covers 1 set
22 100586 Bottom Bumper 1 ea.
23 100030 Dome Filter w/Foam Media 1 ea.
24 100343 Foam Filter Media for Dome Filter 1 ea.
101220 High Filtration Disk (optional) 2/pk
25 103048 Static-Dissipating Hose w/Cuffs (Black) 1 ea.
26 101928 Replacement Double Swivel Elbow Cuff (Black) 1 ea.
27 100694 Replacement Swivel Cuff (Black) 11/2" 1 ea.
28 106581 Thermal Protector 1 ea.
29 106582 EMC Filter Assembly 1 set
101678 50' Extension Cord (Not Shown) 1 ea.
ORDER # SUPER COACHVAC PARTS
QUANTITY
Page 22
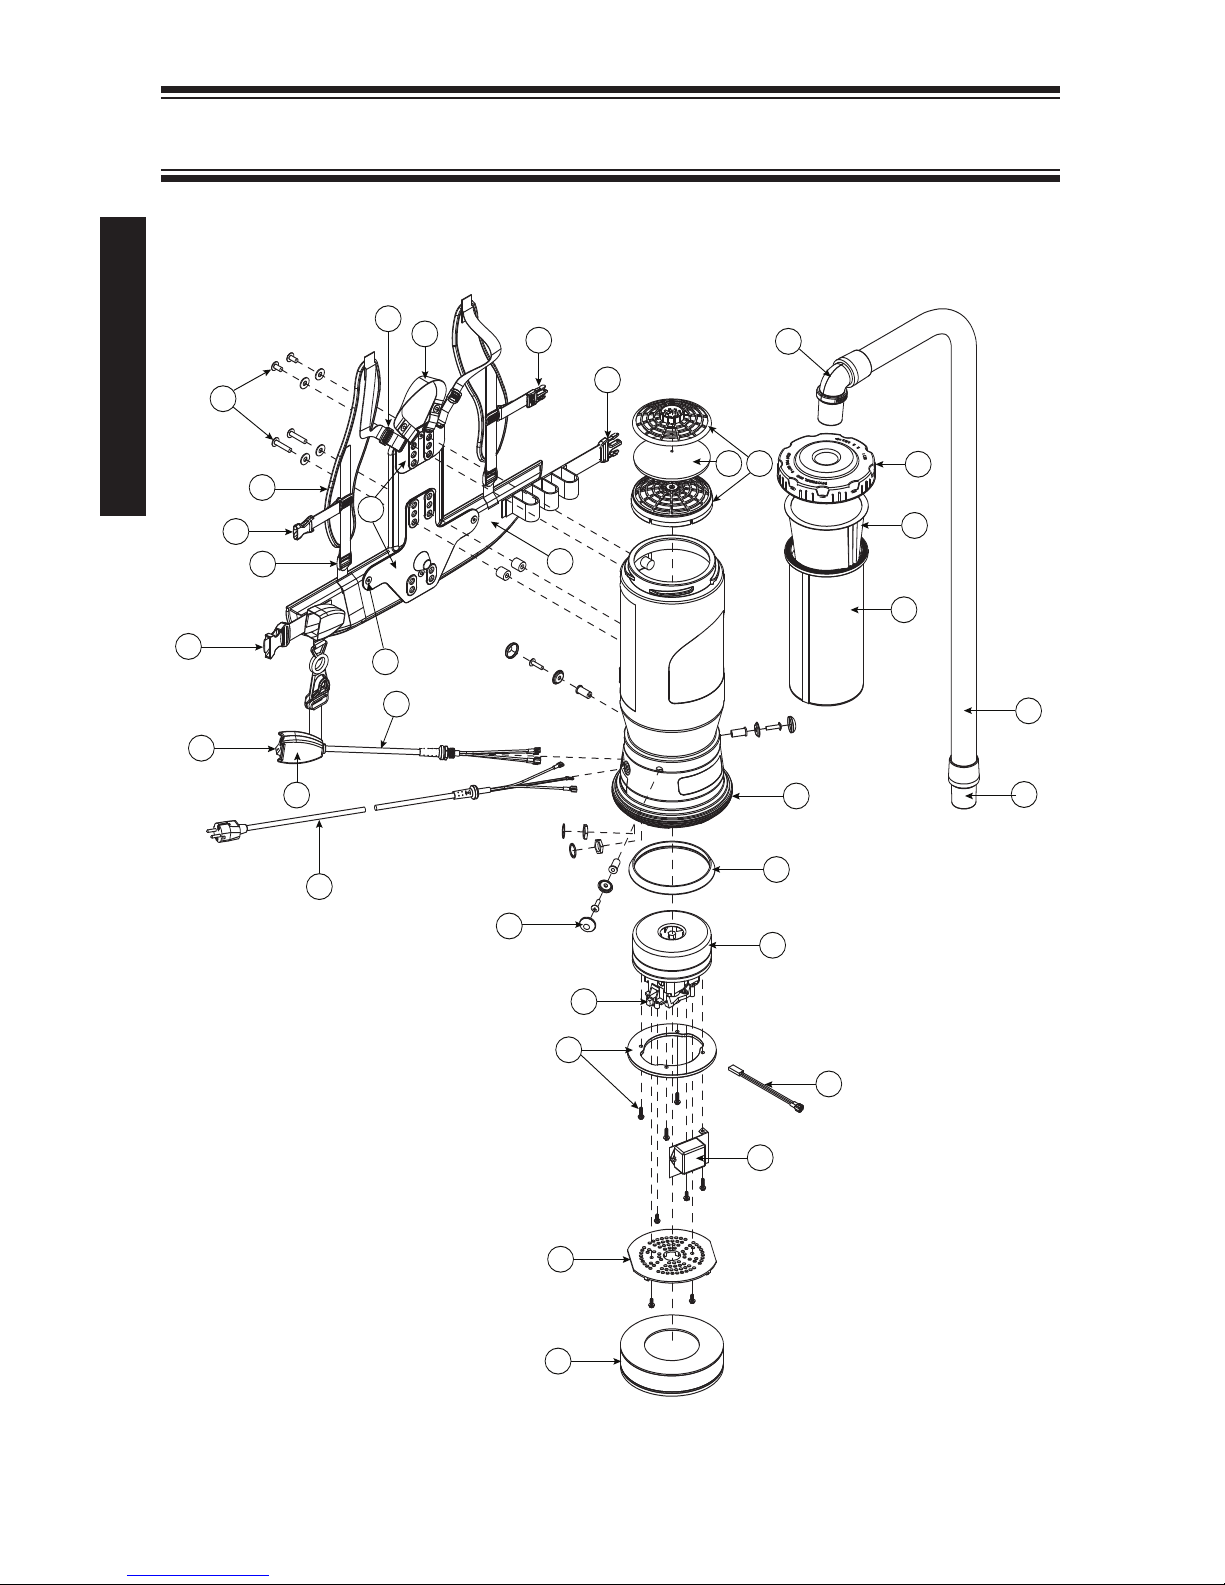
SUPER QUARTERVAC ASSEMBLY
20 ProTeam
1
2
3
4
5
29
26
30
24
25
20
17
19
18
15
14
13
10
12
11
16
7
8
9
22
31
32
2
1
28
23
2
3
2
7
6
33
Page 23

ProTeam 21
1 101928 Replacement Double Swivel Elbow Cuff (Black) 11/2" 1 ea.
2 106073 Twist Cap (Purple) 1 ea.
3 100431 496 Sq. In. Intercept Micro Filter 10/pk
4 100564 Micro Cloth Filter 1 ea.
5 103048 Static-Dissipating Hose (Black) w/Cuffs 1
1
/2" 1 ea.
6 100694 Replacement Swivel Cuff (Black) 11/2" 1 ea.
7 100030 Dome Filter w/Foam Media 1 ea.
8 100343 Foam Filter Media for Dome Filter 1 ea.
101220 High Filtration Disk (optional) 2/pk
9 100586 Bottom Bumper 1 set
10 100014 Tetraseal 1 ea.
11 100324 Motor/Fan (220 V) w/Crimps 1 ea.
12 101720 Carbon Brush Set 1 set
13 100335 Motor Compression Ring w/Screws 1 set
100378 Compression Ring Screws: 4 Screws 1 set
14 106583 Motor Shroud Cover w/Screws: 2 Screws 1 set
15 105800 Sound Muffler 1 ea.
16 100368 Motor Mounting System Set: 3 Well Nuts, 3 Bolts, 3 Washers,
3 Covers 1 set
17 106587 Switch Cord Assembly (includes: #17, 18, 19) 1 ea.
106701 Switch Cord w/Crimps 1 set
18 106066 On/Off Switch (must use with #106287) 1 ea.
19 106287 Switch Box w/Velcro and Screws 1 ea.
101472 Switch Box w/Velcro and New Lamb Switch 1 set
20 106584 Schuko Power Cord Assembly (15M) 1 set
106585 British Power Cord Assembly (15M) 1 ea.
106586 Swiss Power Cord Assembly (15M) 1 ea.
21 100358 Shoulder Strap Plastic Adjustment Buckle (Top) 1 ea.
22 101737 Carry Handle w/Rivet and Washer Set 1 set
23 103627 Sternum Strap Buckles (Latch and Keeper) 1 set
24 103963 Waist Belt Keeper 1 ea.
25 100359 Waist Belt (includes: #24, 27) 1 ea.
26 100375 Barrel Nut Connection Set for Backplate (Replacement) 1 set
27 100364 Waist Belt Latch 1 ea.
28 100357 Shoulder Strap Plastic Adjustment Buckle (Bottom) 1 ea.
29 105046 Backplate Assembly (includes: #26) 1 ea.
100354 Strap Assembly Complete (includes: #21, 23, 24, 27, 28, 31) 1 set
103166 Backplate System Complete
(includes: #21, 22, 23, 24, 26, 27, 28, 29, 30, 31) 1 set
30 100716 Backplate (Black) Connection Set: 4 Screws w/Washers 1 set
31 100356 Shoulder Strap Assembly (includes: #21, 23, 28) 1 set
32 106581 Thermal Protector 1 ea.
33 106582 EMC Filter Assembly 1 set
101678 50' Extension Cord (Not Shown) 1 ea.
ORDER # SUPER QUARTERVAC PARTS
QUANTITY
Page 24
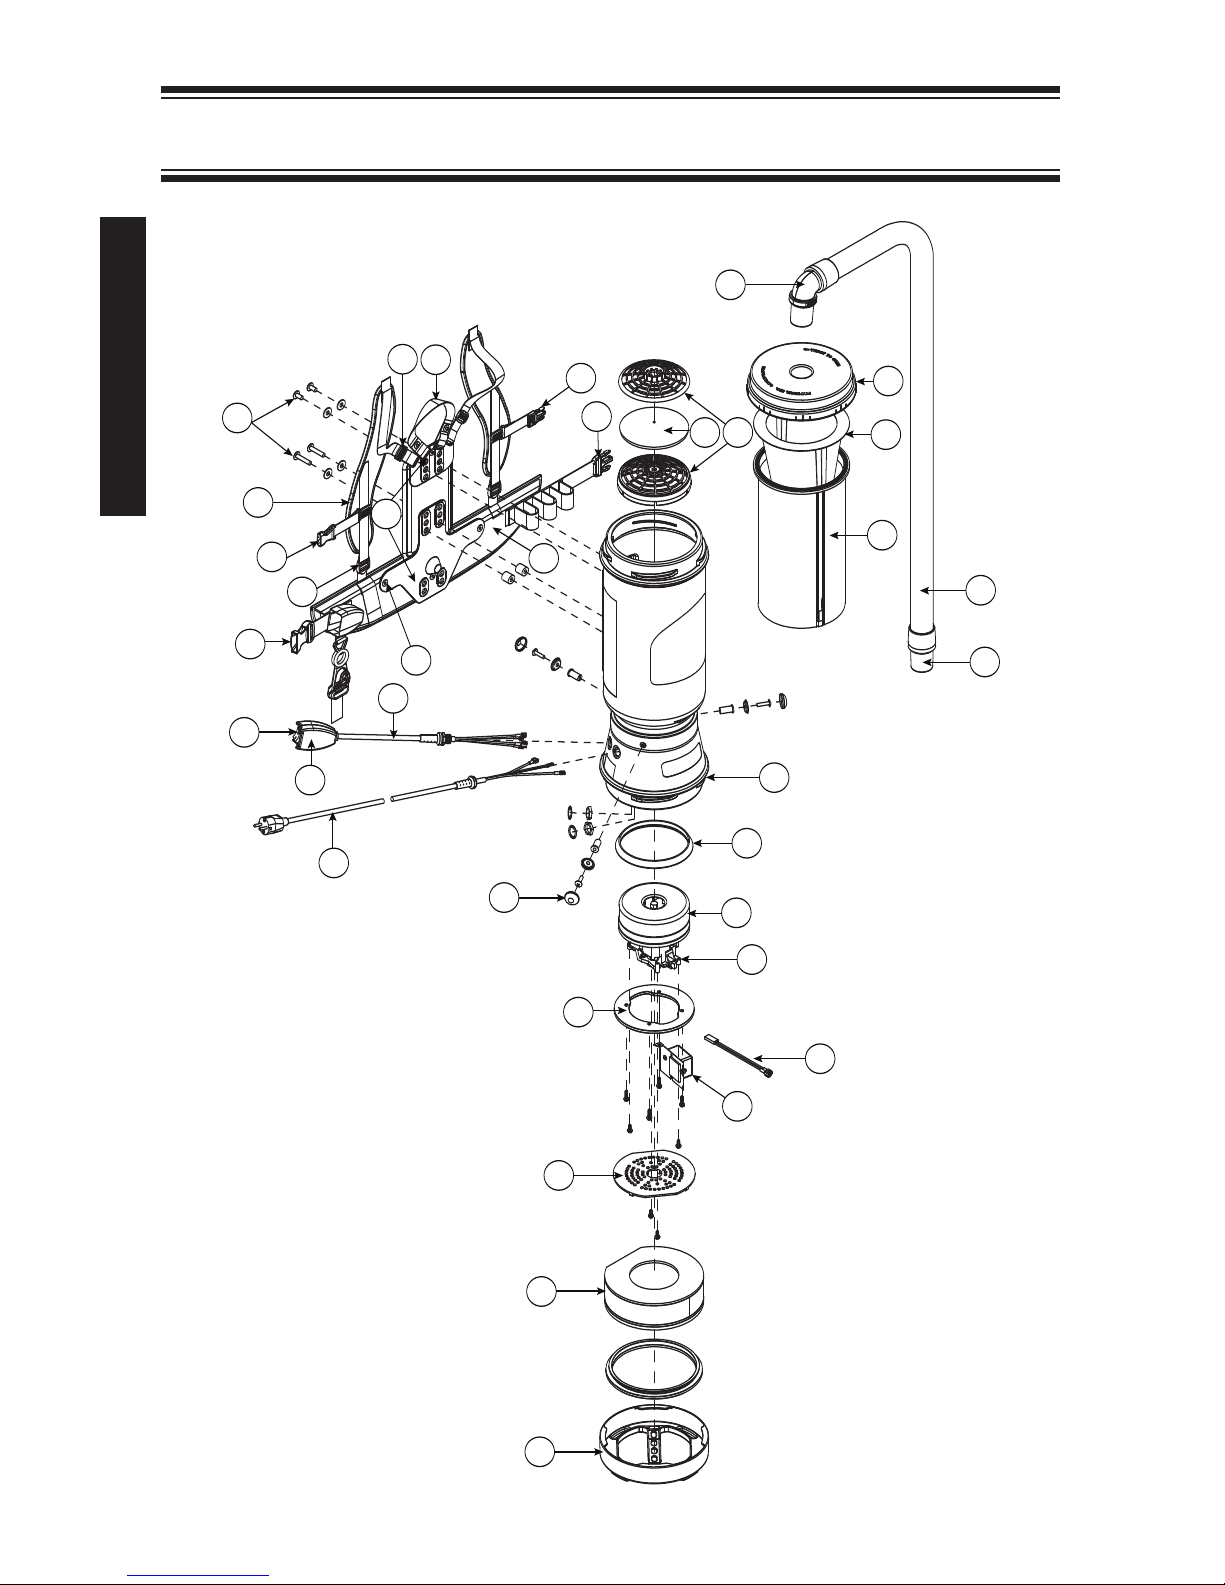
MEGAVAC ASSEMBLY
22 ProTeam
1
2
3
4
5
7
9
10
11
12
13
14
15
16
17
18
19
20
21
22
25
26
27
28
29
30
6
8
23
24
5a
5c
5c
9a
5b
Page 25

ProTeam 23
1 100320 Twist Cap (Black) 1 ea.
2 100331 698 Sq. In. Intercept Micro Filter 10/pk
3 100565 Micro Cloth Filter 1 ea.
4 101737 Carry Handle w/Rivet and Washer Set 1 set
5 100356 Shoulder Strap Assembly (includes: #5a, 5b, 5c) 1 set
5a 100358 Shoulder Strap Plastic Adjustment Buckle (Top) 1 ea.
5b 100357 Shoulder Strap Plastic Adjustment Buckle (Bottom) 1 ea.
5c 103627 Sternum Strap Buckles (Latch and Keeper) 1 set
6 105046 Backplate (includes: #7) 1 ea.
7 100375 Barrel Nut Connection Set for Backplate (Replacement) 1 set
8 100374 Backplate Connection Set: 4 Screws w/Washers, Stand Offs 1 set
9 103963 Waist Belt Keeper 1 ea.
9a 100364 Waist Belt Latch 1 ea.
10 100359 Waist Belt (includes: #9, 9a) 1 ea.
100354 Strap Assembly Complete (includes: #5, 5a, 5b, 5c, 9, 9a) 1 set
103166 Backplate System Complete
(includes: #4, 5, 5a, 5b, 5c, 6, 7, 8, 9, 9a)
1 set
11 106584 Schuko Power Cord Assembly (15M) 1 set
106585 British Power Cord Assembly (15M) 1 ea.
106586 Swiss Power Cord Assembly (15M) 1 ea.
12 106587 Switch Cord Assembly for 220V Vacs 1 ea.
106701 Switch Cord w/Crimps 1 set
13 101472 Switch Box w/Velcro and New Lamb Switch 1 set
14 106066 On/Off Switch (must use with #106287) 1 ea.
106287 Switch Box w/Velcro and Screws 1 ea.
15 105070 Bottom Twist Cap (Black) 1 ea.
16 100597 Sound Muffler 1 ea.
17 106583 Motor Shroud Cover F/220V Vacs w/Screws 1 set
18 100335 Motor Compression Ring w/Screws 1 set
100378 Compression Ring Screw Set: 4 Screws 1 set
19 100014 Tetraseal 1 ea.
20 101720 Carbon Brush Set for MegaVac Motor (Ametek Motor) 1 set
21 100324 Motor/Fan (220 V) w/Crimps for MegaVac 1 ea.
22 100368 Motor Mounting System Set: 3 Well Nuts, 3 Bolts, 3 Washers,
3 Covers 1 set
23 100030 Dome Filter w/Foam Media 1 ea.
24 100343 Foam Filter Media for Dome Filter 1 ea.
101220 High Filtration Disk (optional) 2/pk
25 104998 Bottom Twist Cap Gasket 1 ea.
26 103048 Static-Dissipating Hose w/Cuffs (Black) 1 ea.
27 101928 Replacement Double Swivel Elbow Cuff (Black) 1 ea.
28 100694 Replacement Swivel Cuff (Black) 11/2" 1 ea.
29 106581 Thermal Protector 1 ea.
30 106582 EMC Filter Assembly 1 set
101678 50' Extension Cord (Not Shown) 1 ea.
ORDER # MEGAVAC PARTS
QUANTITY
Page 26
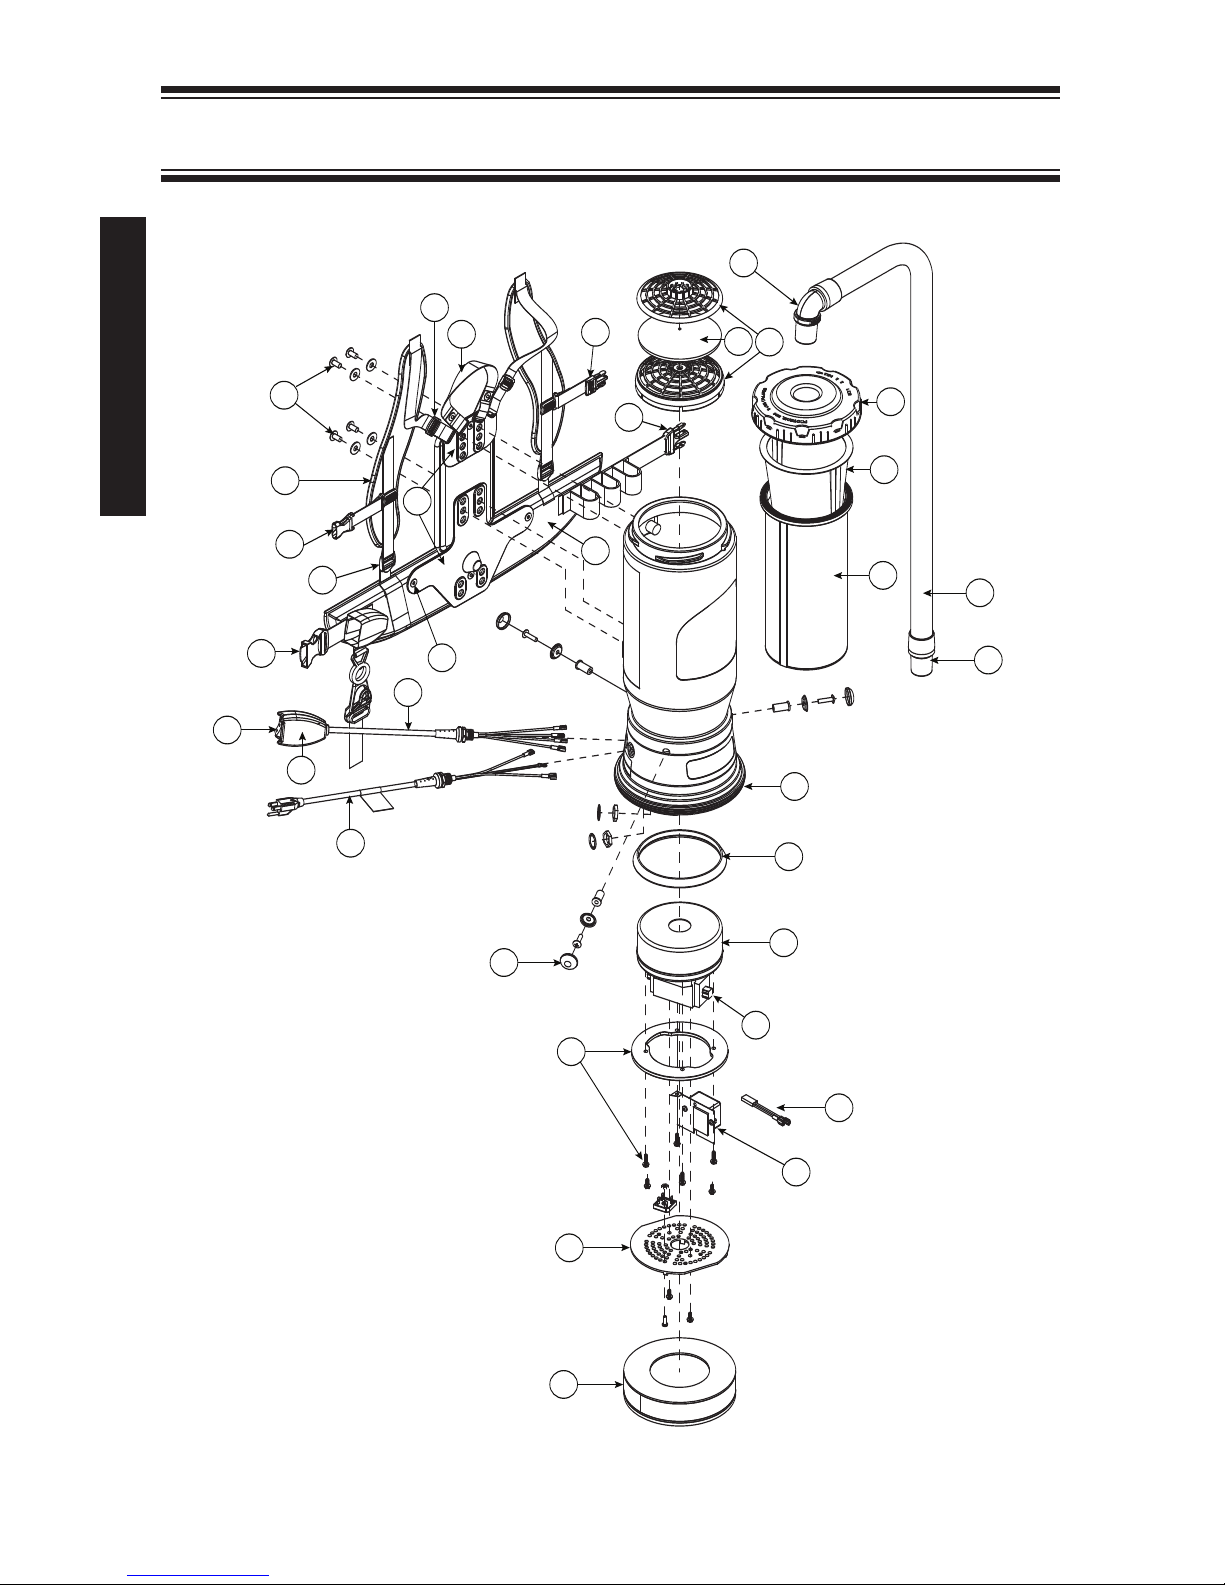
AVIATIONVAC ASSEMBLY
24 ProTeam
1
2
3
4
5
7
9
10
11
12
13
14
15
16
17
21
18
22
25
26
26
20
19
6
8
23
24
5a
5c
5c
9a
5b
28
27
Page 27

ProTeam 25
ORDER # AVIATIONVAC PARTS
QUANTITY
1 104273 Twist Cap (Black) 1 ea.
2 100431 496 Sq. In. Intercept Micro Filter 10/pk
3 100564 Micro Cloth Filter 1 ea.
4 101737 Carry Handle w/Rivet and Washer Set 1 set
5 100356 Shoulder Strap Assembly (includes: #5a, 5b, 5c) 1 set
5a
100358 Shoulder Strap Plastic Adjustment (Top) 1 ea.
5b 100357 Shoulder Strap Plastic Adjustment (Bottom) 1 ea.
5c 103627 Sternum Strap Buckles (Latch and Keeper) 1 set
6 105046 Backplate (includes: #7) 1 ea.
7 100375 Barrel Nut Connection Set for Backplate (Replacement) 1 set
8 100716 Backplate (Black) Connection Set: 4 Screws w/Washers
1 set
9 103963 Waist Belt Keeper 1 ea.
9a 100364 Waist Belt Latch 1 ea.
10 100359 Waist Belt (includes: #9, 9a)
1 ea.
100354 Strap Assembly Complete (includes: #5, 5a, 5b, 5c, 9, 9a, 10) 1 set
103166 Backplate System Complete
(includes: #4, 5, 5a, 5b, 6, 7, 8, 9, 9a, 10)
1 set
11 100641 Power Cord (18" 16/3) Assembly 1 set
12 106588 Switch Cord Assembly Complete (includes: #12, 13, 14) 1 set
106702 Switch Cord w/Crimps (AviationVac) 1 ea.
13 101472 Switch Box w/Velcro and New Lamb Switch 1 set
106287 Switch Box w/Velcro and Screws 1 ea.
14 106066 On/Off Switch (Must be Used with 106287) 1 ea.
15 105800 Sound Muffler 1 ea.
16 106583 Motor Shroud Cover F/220V Vacs w/Screws 1 set
17 100335 Motor Compression Ring w/Screws 1 set
100378 Compression Ring Screw Set: 4 Screws 1 set
18 100014 Tetraseal 1 ea.
19 100173 Carbon Brush Set for 400 Hz Motor (AviationVac) 1 set
20 100171 Motor/Fan w/Rectifier and Crimps (400Hz) (AviationVac) 1 set
100174 Motor Rectifier (AviationVac) 1 ea.
100379 Motor Ground Connection and Wire Clamp Set w/Screws 1 set
100380 Motor Crimp Set: 5 Female, 3 Male, Ground Crimp Connector 1 set
21 100586 Bottom Bumper 1 ea.
22 100368 Motor Mounting System Set: 3 Well Nuts, 3 Bolts, 3 Washers,
3 Covers
1 set
23 100030 Dome Filter w/Foam Media 1 ea.
24 100343 Foam Filter Media for Dome Filter 1 ea.
101220 High Filtration Disk (Optional) 2/pk
25 100505 Static-Dissipating Hose (Black) w/Cuffs 1
1
/2" 1 ea.
103237 Static-Dissipating Hose (AviationVac) 1
1
/2" (Black) 1 ea.
26 100694 Replacement Swivel Cuff (Black) 1
1
/2" 1 ea.
102715 Replacement Double Swivel Elbow Cuff 1
1
/2" (Black) (AviationVac) 1 ea.
103279 Replacement Swivel Cuff 1
1
/2" (Black) (AviationVac) 1 ea.
27 103476 Thermal Protector 1 ea.
28 106582 EMC Filter Assembly 1 set
101678 50’ Extension Cord (Not Shown) 1 ea.
Page 28

 Loading...