


User's Manual
KLEv2 Series
KVM Link Extender Generation 2
Version: 1.0

KLEv2 User's Manual
Rev 1.0 01/2016
- 2 -
Table of Contents
1. Introduction ................................................................................................................................ 3
1.1. Features ............................................................................................................................... 3
1.2. Package contents ................................................................................................................. 3
2. Product Overview....................................................................................................................... 4
2.1. Front Panels ......................................................................................................................... 4
2.2. Back Panels .......................................................................................................................... 5
2.3. Hardware Specifications ...................................................................................................... 6
3. Quick Start ................................................................................................................................... 7
3.1. Front Panel Typical Connections ......................................................................................... 7
3.2. Back Panel Typical Connection ............................................................................................ 8
3.3. Operation ............................................................................................................................. 8
3.4. Configuring the Attached PC/Server for Better Performance ............................................. 9
3.5. KLEv2 Default Setting......................................................................................................... 10
3.6. First Access to the Web Management ............................................................................... 10
3.7. Setting Up the Network Interfaces .................................................................................... 11
3.8. Downloading the Viewers.................................................................................................. 13
3.9. Accessing the KVM Server of KLEv2 ................................................................................... 14
4. Web Management .................................................................................................................... 16
4.1. Download ........................................................................................................................... 16
4.2. Main ................................................................................................................................... 16
4.3. Virtual Media ..................................................................................................................... 17
4.4. KVM Server ........................................................................................................................ 19
4.5. Users .................................................................................................................................. 22
4.6. Alarms ................................................................................................................................ 23
4.7. Maintenance ...................................................................................................................... 24
5. Viewers ...................................................................................................................................... 25
5.1. Menu Bar ........................................................................................................................... 25
5.2. Connection Dialog .............................................................................................................. 27
5.3. Local Cursor ........................................................................................................................ 28
5.4. Mouse Troubleshooting. ................................................................................................... 29
6. KCenter...................................................................................................................................... 30
7. Frequently Asked Questions ..................................................................................................... 31
8. Technical support ...................................................................................................................... 32
9. FCC / CE Statements ................................................................................................................. 32

KLEv2 User's Manual
Rev 1.0 01/2016
- 3 -
1. Introduction
KLEv2 (series) is the next generation of IP-based KVM Link Extender for remote server
management. It allows virtual management of server(s) or KVM(s) over the Internet. In addition to
support for secured access via 1024-bit PKI authentication, 256-bit SSL data encryption, LDAP,
RADIUS, and Active Directory authentication; it has virtualization of ISO file that allowed accessing
of remote drive to help manage server.
The Generation 2 of KLE provides a solid, reliable, and physical extension of keyboard, mouse, and
video to nearly unlimited distance. Video supports for both analog and digital video through the
DVI-I connector. Using two passive DVI to VGA adapters will provide VGA connection at both the
console and system ends.
KLEv2 options give user total control from the pre-boot stage such as BIOS-level CMOS setting with
USB interface, power cycling, and audio feedback. Along with the virtual media, you can rebuild the
operating system of any server that KLEv2 connecting on. With properly plan KVM infrastructure,
you can truly feel confident in your access to your systems.
1.1. Features
Full-featured IP-based Remote Control Solution for server management
DVI/VGA video, USB keyboard, and mouse extension over the Internet
2048x1152 resolution for clear and sharp video output
Supports virtual media/ISO
Supports audio and power management interface
Build-in 2-Port Ethernet Hub
Total transparent control
1.2. Package contents
KLEv2 or KLEv2P unit x1
Power adapter x1 (The power adapter may vary depending on models)
AC power cord x 1 (KLEv2P only)
User manual x1
KLEv2 Support CD x1
DVI-A to VGA Adapter x1
WiFi dongle x1 (optional)

KLEv2 User's Manual
Rev 1.0 01/2016
- 4 -
2. Product Overview
2.1. Front Panels
No.
Item
Description
1
Video LED
Video source in status.
2
Power LED
Power on status.
3
USB Device Ports
Plug in USB keyboard, USB mouse, or USB storage device.
4
Speaker Port
Plug in stereo analog speaker.
5
DVI-I Video Out
Connect to DVI-D monitor or with a passive converter, connect
to analog monitor
6
2-Ports Ethernet Hub
Connect to a network.
7
AC Power Switch
Button to manually turn on/off the AC Power-Out Socket.
8
AC Power LED
AC power on indicator.
CONSOLE
VDO
PWR
A -- REMOTE I/O -- B
SWITCH
ON
1 2 3 4 5
6
1 2 3 4 5
6
CONSOLE
VDO
PWR
A -- REMOTE I/O -- B
Figure 1: KLEv2 Front Panel
Figure 2: KLEv2P Front Panel

KLEv2 User's Manual
Rev 1.0 01/2016
- 5 -
2.2. Back Panels
No.
Item
Description
1
Power In Socket
Plug AC main power cable into this socket.
2
Power Out Socket
Plug the AC power cord of the PC/server
3
Power Jack
Connect to the 5V/2A power adapter
4
DVI-I Video In
Connect to the DVI or VGA port of the Server/PC. The VGA
connection needs a VGA to DVI-I cable or adaptor.
5
USB Port
Connect to PC/server
6
Audio In
Connect to PC system/ audio source
7
PDU Control Port
Connect to external PDU if any
8
WiFi Port
To get WiFi access, plug an EDIMAX Wireless nano USB adapter,
model EW-7811, to this USB extension port
1 2 4 5 6 7 8
USB
AUDIO
PWR CTRL
WIFI
PC SIDE
AC
IN
AC
OUT
3 4 5 6 7
8
USB
AUDIO
PWR CTRL
WIFI
PC SIDE
DC 5V
Figure 3: KLEv2 Back panel
Figure 4: KLEv2P Back Panel

KLEv2 User's Manual
Rev 1.0 01/2016
- 6 -
2.3. Hardware Specifications
Model
KLEv2
KLEv2P
Server Video Connector
1 x DVI-I Female
Server/KVM USB Connector
1 x USB Type B Female
Server Audio Connector
1 x 3.5mm Stereo Earphone Jack Female
Console Video Connector
1 x DVI-I Female
Console Audio Connector
2 x RJ45 Female, 10/100 Base-T with internal switch
Console USB Connectors
2 x USB 2.0 Type A Female Connector
Ethernet Connector
2 x RJ45 Female, 10/100 Base-T with internal switch
USB WiFi Port
USB 2.0 for Wireless USB Adapter
Internal PDU Push Button
Momentary
LED Indicators
Power Good, Video
Power Good, Video, Internal PDU
External PDU Control Port
1 x RJ11
Video Resolution
1600x1200 in VGA or 2048x1152 in DVI
Operation Temperature
0° ~40° C
Storage Temperature
-20° ~60° C
Humidity
0 ~90% RH, Non-condensing
Housing
Metal
Dimensions
120 x 135 x 26 mm
220 x 135 x 42 mm
Certifications
CE, FCC

KLEv2 User's Manual
Rev 1.0 01/2016
- 7 -
3. Quick Start
3.1. Front Panel Typical Connections
The diagrams in this chapter are examples, the actual application may vary. All accessories and
devices may not be included in the package. They are illustrated for reference only.
Connect a USB keyboard to one of the USB Type A connectors
Connect a USB mouse to the second USB Type A connector
Connect a speaker to the audio jack
Connect a DVI or VGA monitor to the DVI-I connector. Connecting a VGA monitor would
require a passive DVI-A to VGA converter
Connect to your local Ethernet network using Cat5/6 cable
Ethernet
Figure 5: Front Panel Typical Connections

KLEv2 User's Manual
Rev 1.0 01/2016
- 8 -
3.2. Back Panel Typical Connection
Plug the USB type B port to one of the USB ports of the PC/server.
Connect the PC Side DVI to the DVI Video output of the server. Connecting using VGA would
require passive DVI-A to VGA converter.
Plug the PC Side Audio input to the Speaker output of the Server.
Connect to a wireless network by plugging a WiFi dongle into the WiFi port (optional).
If your device is a KLEv2P as shown in Figure 6
Plug the power cable of the Server to the KLEv2P AC Out socket.
Plug the power cord to the KLEv2 socket AC In.
If your device is a KLEv2
Plug the power adapter to the DC 5V input.
3.3. Operation
Due to the topological data flow requirement, please follow the previous chapter to connect power,
PC, monitors and peripherals. Start from the console devices, press the power button to turn it on,
and then plug the power cord/adapter to the power socket.
Turn on the connected computer, the image will be outputted to DVI monitor.
The keyboard and mouse will be detected after turning on the computer.
PC SIDE
WiFi
Figure 6: Back Panel Typical Connections

KLEv2 User's Manual
Rev 1.0 01/2016
- 9 -
* Some older computers with USB interface might need to manually enable the USB option in the BIOS settings before
you can use any USB devices. If your USB interface does not work, please check the USB option in the BIOS.
* If you see Windows 95/98/SE or Mac OS and has not yet installed a USB mouse on your computer, there might be an
error message telling you that mouse is not detected and prompting you to decide whether to ignore the same
message in the future, and yet you will find there is no mouse movement to disable this message. So it is suggested
that you should install your USB mouse on your computer first before connecting to this KVM switch.
3.4. Configuring the Attached PC/Server for Better Performance
There are several aspects that have to be taken into consideration when configuring your PC/ server
for the best performance:
Refrain from selecting too peculiar video resolution modes. Choose a resolution that is within KLEv2
standard support.
Turn off special transition effects on your operating system such as fade.
Adjust the server desktop background with preferably plain solid colors with simple designs.
Concerning digital DVI video, KLEv2 is able to capture any resolution up to 2048x1152@60Hz. The
video resolution is discovered automatically.
Concerning analog VGA video, not all resolutions are possible. The video resolution discovery is
made by comparison with an internal table of VESA standards. Please refer to the table of
supported VGA video resolutions.
Please note that RB means reduced blanking. Resolutions with RB are not intended for older CRT
monitors. They are newer VESA standards for digital devices, which precisely KLEv2 is. However, not
all computers can generate reduced blanking VGA video.
In a general way, you will get much better results by using digital video: better video quality, better
video speed, higher compression, faster mouse, etc. Use HDMI or DVI each time possible.
Resolution
Refresh rate (Hz)
Resolution
Refresh rate (Hz)
640x480
60
1280x768
60
720x400
70
1024x768
60
720x400
72
1024x768
70
720x400
75
1024x768
75
720x400
85
1024x768
85
640x480
60
1152x864
60
640x480
72
1152x864
75
640x480
75
1440X900
60
640x480
85
1280x1024
60
800x600
60
1280x1024
75
800x600
72
1680x1050
60
800x600
75
1400x1050
75
800x600
85
1920x1080RB
60
1280x720
60
2048x1152RB
60
1360x768
60
1920x1200RB
60
Table 1: Supported VGA resolutions

KLEv2 User's Manual
Rev 1.0 01/2016
- 10 -
3.5. KLEv2 Default Setting
The factory default network settings for KLEv2 are as follows:
IPv4 Address: 192.168.1.200
Subnet Mask: 255.255.255.0
Default Gateway: 192.168.1.254
DNS Servers: 192.168.1.254
The default access KLEv2 Web Browser Management Interface: https://192.168.1.200:5908
The default administrator account name and password:
User name: superuser
Password: superu
3.6. First Access to the Web Management
The first access to the HTTP server can be a little bit tricky if the default settings, i.e.,
HTTPS://192.168.1.200:5908 are not compatible with your LAN, or if another machine already
occupies this address. In this case preferably use KCenter or getipdev
(http://www.prosum.net/download/GETIPDEVInstall.exe) to set up a temporary IP address. Then
open the KLEv2 web management to confirm this IP address or to change the IP settings.
* You could also create an isolated network, not connected to the local or company network, between KLEv2 and a
computer with a simple cross connect cable. Then set up the IP address of the computer to something like 192.168.1.xxx
, and then with a browser, open KLEv2 management at default address HTTPS://192.168.1.200:5908
* When accessing to the Web Management, your browser may provide a security warning. Please choose "Continue
to this website" since there is no risk of pirate website here. These warnings are not relevant for HTTPS servers of
hardware devices such as KLEv2. You can also install the Root certificate of KLEv2 in the list of trusted CA if you want
to remove this warning. You will also have to authorize the usage of certificates that do not contain the name of the
HTTPS server.

KLEv2 User's Manual
Rev 1.0 01/2016
- 11 -
3.7. Setting Up the Network Interfaces
Using a browser, login to the KLEv2 Web Management. Expand Main on the left menu and click
Networks.
Figure 7: Network Settings
Specify the port base for viewer connections in TCP Port Base. You can choose any available port
base, starting from 5900 with an increment of 10 right up to 6400. TCP port base + 8 is the port
number you will use for https web management.
Specify the host name, i.e., the name that KLEv2 will assume on your Local Area Network. Click Set
Default to load the default unique host name composed of the product name and the hardware
MAC address of the Ethernet port.
Ethernet IP Settings
The Ethernet 10/100 is the default network interface. It is faster than the Wireless Interface.
Fill in the form. Please refer to the help page if you need more information.
Wireless Interface IP Settings
This subsection is hidden if you do not have a compatible wireless 802.11 USB adapter plugged in
the USB extension port of your KLEv2. The supported USB adapter is the EW-7811 from Edimax.
Figure 8: Wireless nano 802.11 USB Adapter

KLEv2 User's Manual
Rev 1.0 01/2016
- 12 -
Preferably use a WPA/WPA2 wireless connection. Older protocols such as WEP are unsecure.
Check Enable Wireless Interface to put the wireless interface in service. Wait until the service is
started and the wireless part of this form is displayed.
In Network Name (SSID), select the name of the wireless network (SSID) you want to connect to. If
you do not know, please get this information from your network administrator. If the wanted SSID
does not appear in the list, try to click on Scan. Eventually, if you cannot get the desired SSID, this is
likely because the access point is out of reach.
Please refer to the help page to fill in the wireless interface parameters. We recommend you leave
the wireless router or access point configure the KLEv2 by checking Use DHCP
Store Settings
Click the Store Settings button to save the new network setting. Then press the Soft Restart to put
them in service. Once it restarted, all accesses to KLEv2 will need to use the new network
information. The new Web Management address will be:
https://<IP_address>:<TCP Port Base + 8>
For example let's suppose that the new IP Address is 192.168.1.192 and that the TCP Port Base is set
to 5920, then the Web Management new URL is: https://192.168.1.192:5928
Important Note
The Ethernet port and the Wireless port can work simultaneously at the condition they belong to
different IP networks. In the case that both ports are set to conflicting IP addresses, the Ethernet
port will work, and the wireless port will not work whether or not the Ethernet cable is connected.
So, if you plan you use the wireless alone, i.e., without Ethernet cable, please give to the Ethernet
port a fake IP address in a different network. For example, if the IP address of the wireless port
belongs to 192.168.1.xxx, you could set the Ethernet Port to 192.168.2.xxx (netmask =
255.255.255.0).
* Make sure you pass all information about KLEv2 to your Network Administrator so that he can make the needed
adjustments to the firewalls, network configuration, and DMZ of routers for the KLEv2 to function properly and to
allow it to be accessed from remote locations across the Internet.
*

KLEv2 User's Manual
Rev 1.0 01/2016
- 13 -
3.8. Downloading the Viewers
There are three different programs called viewers allowing to access the KVM server of KLEv2. The
KVM server captures and sends the video of the attached computer. In the other direction it receives the
events of your keyboard and mouse and transmits them to the attached computer by simulating a USB
keyboard and mouse.
Two viewers can be downloaded from the Web Management: Download --> Viewers. You have the
choice between the viewer for Windows® and the OS-independent viewer for Java™. Note that the
viewer for Java runs on Windows as well.
The third viewer for Android™ must be bought on the Google Play Store: PrimaView.
Figure 9 : Downloading the viewers
Download and install the preferred viewer on your computer.
* To run the Java viewer your computer must have a recent Java installed >= 7.

KLEv2 User's Manual
Rev 1.0 01/2016
- 14 -
3.9. Accessing the KVM Server of KLEv2
Viewer for Windows
Under Windows, click the viewer link icon to launch the Windows viewer. If insufficient rights are
granted to the viewer,
the
User Access Control will pop up for authorization.
Figure 10: Windows Viewer Connection Dialog
In the Connection Dialog, key-in the network information to access KLEv2, then press Connect.
If the KLEv2 is found, the viewer will come back and ask for User Authentication. Key-in the User ID
and Password for access.
Figure 11: Viewer User Authentication Dialog
Viewer for Java
This viewer can be used on any system that supports a recent version of Java, including Windows.
Run or double click the jar file and it will pop up the Connection Dialog similar to the Windows
viewer.
If the system is not intelligent enough to associate the Java virtual machine to the .jar file, open a
text console and type "java -jar mkview-dist.jar"
Figure 12: Jave Viewer, Connection Dialog

KLEv2 User's Manual
Rev 1.0 01/2016
- 15 -
Viewer Title Bar
The viewer title bar provides some basic information about the connection. These data are important
for the technician when requested. Changing the viewer basic settings will be introduced later on in
this manual. The format is like this:
Server Name - Computer Name - Capture Time - Transmission Time - User Session Mode - Encryption
Server Name - The name given to the current video server
Computer Name - The name given to the connected computer
Capture Time - The time in ms it takes to capture a screen image
Transmission Time - The time needed to transmit the video screen image
User Session Mode - Current user session mode, shared, private, see only.
256-bit encryption - Currently used encryption mode
The below information is a capture example: "KLEv2" server, with "unnamed" computer, 46 ms to
capture video screens, 2 ms to send the screens, user shared mode, with 256-bit encryption.
Similar information can be found in the viewer menu: Information--> Connection Information
Viewer Performance
The video can be slow when connecting across the Internet. The image quality is depending on the
global bandwidth of the network. If the bandwidth is too small, choose the appropriate
compression mode in the viewer connection options (Slow Internet,) and if not enough, use 7-bit
video depth. With the maximum compression and 7-bit video quality, it is possible to work with
bandwidths as low as 100 Kbps.

KLEv2 User's Manual
Rev 1.0 01/2016
- 16 -
4. Web Management
The Web Management is the main administrative user interface of KLEv2. This chapter provides a
short description of the form pages of the Web Management in same order as the left side menu.
More detailed information is available by clicking the Help icon in the title bar of each page.
4.1. Download
Get the Viewers. Refer to section 3.8.
4.2. Main
Date and Time
Specify the locale and time settings. It is recommended that KLEv2 gets its time from an NTP server.
Figure 13: Date and Time
Security
In this page you will specify the encryption level of connections, the certificates, and the password
policy: No Password, Global Password, or User Password.
Networks
Set up all Ethernet and Wireless networking settings. See section 3.5.
DDNS
In this page you can enable and configure a Dynamic DNS client allowing to access KLEv2 with a fixed
alias name when the public Internet IP address provided by the ISP is not fixed.

KLEv2 User's Manual
Rev 1.0 01/2016
- 17 -
4.3. Virtual Media
Remote Virtual Media
When running a viewer, you can share a DVD/CDROM, USB key, or ISO file with the computer
attached to KLEv2. For example, a CDROM in the drive of the computer running the viewer can
appear like a removable mass storage to the KLEv2-attached computer. Thus, from your remote
location, you can transfer files, install new programs or even install a complete OS into the attached
computer. Note that the transfer speed is limited by the network bandwidth, so it cannot be as fast
as a direct attachment.
If you share one of your hard drives, the attached computer can also write to your disk, provided
you did not check the option Disable Writes.
This page shows the current status of the connected Virtual Media and allows to forcefully
disconnect it. Specify whether the attached computer can or cannot write to the Virtual Media.
Figure 14: Remote Virtual Media

KLEv2 User's Manual
Rev 1.0 01/2016
- 18 -
Local Virtual Media
KLEv2 can get local access over the LAN to an ISO file shared by a Windows computer, or by another
machine emulating a Windows share (For example Linux with Samba server). Similarly to the
Remote Virtual Media feature, KLEv2 will emulate for the attached computer a removable mass
storage reflecting the ISO file. By nature this is a read-only storage. With this feature you can install
programs or boot the attached computer on the Virtual Media, provided the ISO file is the image of
a bootable disk.
Compared to the Remote Virtual Media, the Local Virtual Media is faster but limited to ISO files on
machines connected to the same LAN as KLEv2. The connection to the share does not involve the
viewer.
This page shows the current status of the connected ISO shared file. It allows you to set up the access
to the ISO file and to forcefully disconnect it.
Figure 15: Local Virtual Media

KLEv2 User's Manual
Rev 1.0 01/2016
- 19 -
4.4. KVM Server
Server Log
The Server Log keeps detailed record of events, errors, user logins and logouts, video modes, etc. It
also records each login attempt, even when the attempt is not successful. It provides certain
technical details such as compression ratio, encoding scheme, and bytes transmitted in each viewer
session. This is the place where you should go first to know the usage and state of your KLEv2.
This page is the place where you can see the log content, clear the log content, refresh the display
of the log, enable/disable the recording of statistical information about user connections.
Once the log file reaches its maximum size, oldest data is erase to give room to new data.
Each log entry is composed of the date plus time stamp, and the description of the event. The first
letter "K", "H" or "U" indicates whether the message is coming from the KVM server, the HTTP
server, or the USB server.
Figure 16: Server Log
Video Capture
Please note that the digital video capture is always set to optimal quality and speed. This page is not
relevant for digital video.
If the video is VGA, this page is the place where you can set up the level of quality and speed of the
video capture.
The setting here is use to balance the Video Quality against the Data Volume. Higher video quality
will generate larger data volume which will slow down the video transmission, especially across slow
Internet connections. Try to find a tradeoff between quality and speed.

KLEv2 User's Manual
Rev 1.0 01/2016
- 20 -
Viewer Connection
This page allows adjustment of settings related to the viewer usage:
KLEv2 name as it is displayed on the title bar of the viewer window
keyboard layout that should be consistent with the keyboard you use on your computer and
that is setup in the attached computer
mouse re-synchronization hot keys,
mouse shortcuts
special feature for anyone who uses a double-byte language such as Chinese, Japanese or
Korean (the CJK languages) and some other languages
If KLEv2 is connected to a KVM, you can also setup the KVM hot keys that will allow selecting the
active port in a mouse click.
Figure 17: Viewer Connection Settings
Computer
In this page you must provide some information concerning the attached computer:
Computer Name to be used
Type of Operating System
Digital or Analog Video Type
USB Mouse Relative of Absolute.

KLEv2 User's Manual
Rev 1.0 01/2016
- 21 -
Power Control
Allow or forbid the control or power by viewers. KLEv2P integrates a one-port PDU. The control of
power can also be made by an external PDU. External PDUs use the Power Control RS232 serial
port. The recommended serial PDU is ioPower.
Figure 18: Power Control

KLEv2 User's Manual
Rev 1.0 01/2016
- 22 -
4.5. Users
Local Database
In this page you can list, edit, add, or remove user accounts that can access the product. These users
are stored in the local database of the KLEv2. They need no external access to an authentication
server. In case of conflict, the information in the local database has higher priority than the
information provided by the possible authentication server.
Figure 19: User Local Database
Remote Server
In this page you will enable or disable the usage of a centralized server running a Radius service or
hosting a directory that can be accessed through the LDAP protocol (Active Directory for example).
This server can be interrogated each time a user tries to connect to the KLEv2. Its responses grant
or reject the connection attempts. This feature allows integrating KLEv2 into a more global
enterprise management of users.
By default, the Remote Authentication is configured as None, i.e., all remote authentications are
disabled. In this case, the authentication is all done locally by using the User database on KLEv2.
Radius Accounting
The Radius Accounting allows KLEv2 to record all user connection and disconnection events on a
remote Radius Accounting server. The Radius Accounting is not related to the RADIUS or LDAP
server features that can be used to authenticate users.
The RADIUS Accounting is disabled by default.
Connected Users
This page shows a list of all users that are connected with a viewer to the computer via KLEv2.
Note: This list of connected users is not generated when the password policy is No Password or
Global Password since by adopting these policies you imply that the distinction of user
identities is not necessary. Please refer to the Security page for more information about
password policies.

KLEv2 User's Manual
Rev 1.0 01/2016
- 23 -
4.6. Alarms
Emails
Settings to send out Email alarm notifications.
Figure 20: Email Alarms
SNMP
Settings concerning the SNMP manager that will get the SNMP traps sent by KLEv2.
Selection
In this page select which events will generate an alarm and the type of alarm that must be sent.

KLEv2 User's Manual
Rev 1.0 01/2016
- 24 -
4.7. Maintenance
Software Version
Basic information on the software.
Figure 21: Software Versions
Networking Status
View current Ethernet and Wireless networking information.
Figure 22: Networking Status
Software Upgrade
You can upgrade the software of the KLEv2 from this page across the LAN or the Internet.
Save/ Restore Settings
Save the current configuration for future usage or upload a previously saved configuration file.
Reboot
This page allows restarting KLEv2 from the boot loader. Note that this is generally useless. Most of
times a Soft Restart is enough.

KLEv2 User's Manual
Rev 1.0 01/2016
- 25 -
5. Viewers
This chapter provides some information, tricks and tips about the Windows and Java viewers. The
Android viewer is not described here but its features are very similar and it provides a detailed help.
The three viewers provide similar performances.
Refer to section 3.7 to log in to the Windows or Java Viewer.
5.1. Menu Bar
The menu bar can be hidden in Windows viewer.
Actions
Select Computer: Relevant when KLEv2 is driving a KVM and the KVM command have been set
up in the Web Management (Refer to Viewer Connection in section 4.4).
Send Shortcut: This menu item provides the list of mouse shortcuts previously defined in the
Web Management (Refer to Viewer Connection in section 4.4). Click on one of the shortcuts and
it will be sent to the attached computer.
Refresh Screen: Forces total update of the viewer screen.
Send Cntl-Alt-Del: Fixed shortcut to make KLEv2 send Control-Alt-Delete to the attached computer.
This sequence cannot be sent by normal strikes on the keyboard because it is captured by the
Windows operating system.
Power off Current Computer: No effect with KLEv2.
Power on Current Computer: No effect with KLEv2.
New Connection (Windows viewer only): Open another Connection Dialog to login to other
remote server.
Disconnect: Release access to the remote system. It will automatically close the viewer
application.
Settings
Connection Options: This menu item opens the Connection Options dialog box allowing to change
some options such as Scaling Factor, etc. Not all options can be changed on the fly. Some options
can only be set up at connection time.
Adjust Screen: Change the window centering (VGA only) and adjust the brightness and contrast.
Note that with digital video the screen is always perfectly centered.
Full Display (Windows viewer only): Hides all menu bars of the viewer to give the maximum space to
the display of the remote screen. It opens a small floating box with a single button "Quit Full
Screen". Click this button to come back to normal display.
Show Menu Bar (Windows viewer only): Enable or disable the menu bar. To get the menu bar
back, right click on the viewer top title bar and select Show Menu Bar in the menu.
Save Settings/ Store Connection Options: Store User ID/Password and connection options.
Device Management (Windows viewer only): Link to the KLEv2 Web Management.

KLEv2 User's Manual
Rev 1.0 01/2016
- 26 -
Virtual Medium
Manage Virtual Medium/ Drive Redirection: Opens the Virtual Medium dialog box. Select the
Hard Disk, DVD/CDROM drive or ISO file and click Connect. See details below.
- Status: Show current Virtual Media connection status
- Hard Disk or CD ROM Drive (Windows viewer only): Redirect and map a local drive onto the
attached computer. Check Enable Write Accesses if you want to allow the computer to write
on the Virtual Media.
- ISO Image File: File in ISO format that can be mapped onto the attached computer. This file
will appear as a removable mass storage device.
- Disconnect Button: Release the Virtual Media connection and mapping.
- Connect: Click to establish the Virtual Media connection and mapping. We recommend
mapping small file or drive because the time to link the file depends on its size.
- Close: Close the dialog box. Note: Closing the dialog box does not release the mapping of the
Virtual Medium
Information
Connection information: Displays information concerning the KLEv2, the video type, the capturing
and transmitting times, and the connection options.
- About (Java): Viewer copyright and version information.
KLEv2 User's Manual
Rev 1.0 01/2016
- 27 -
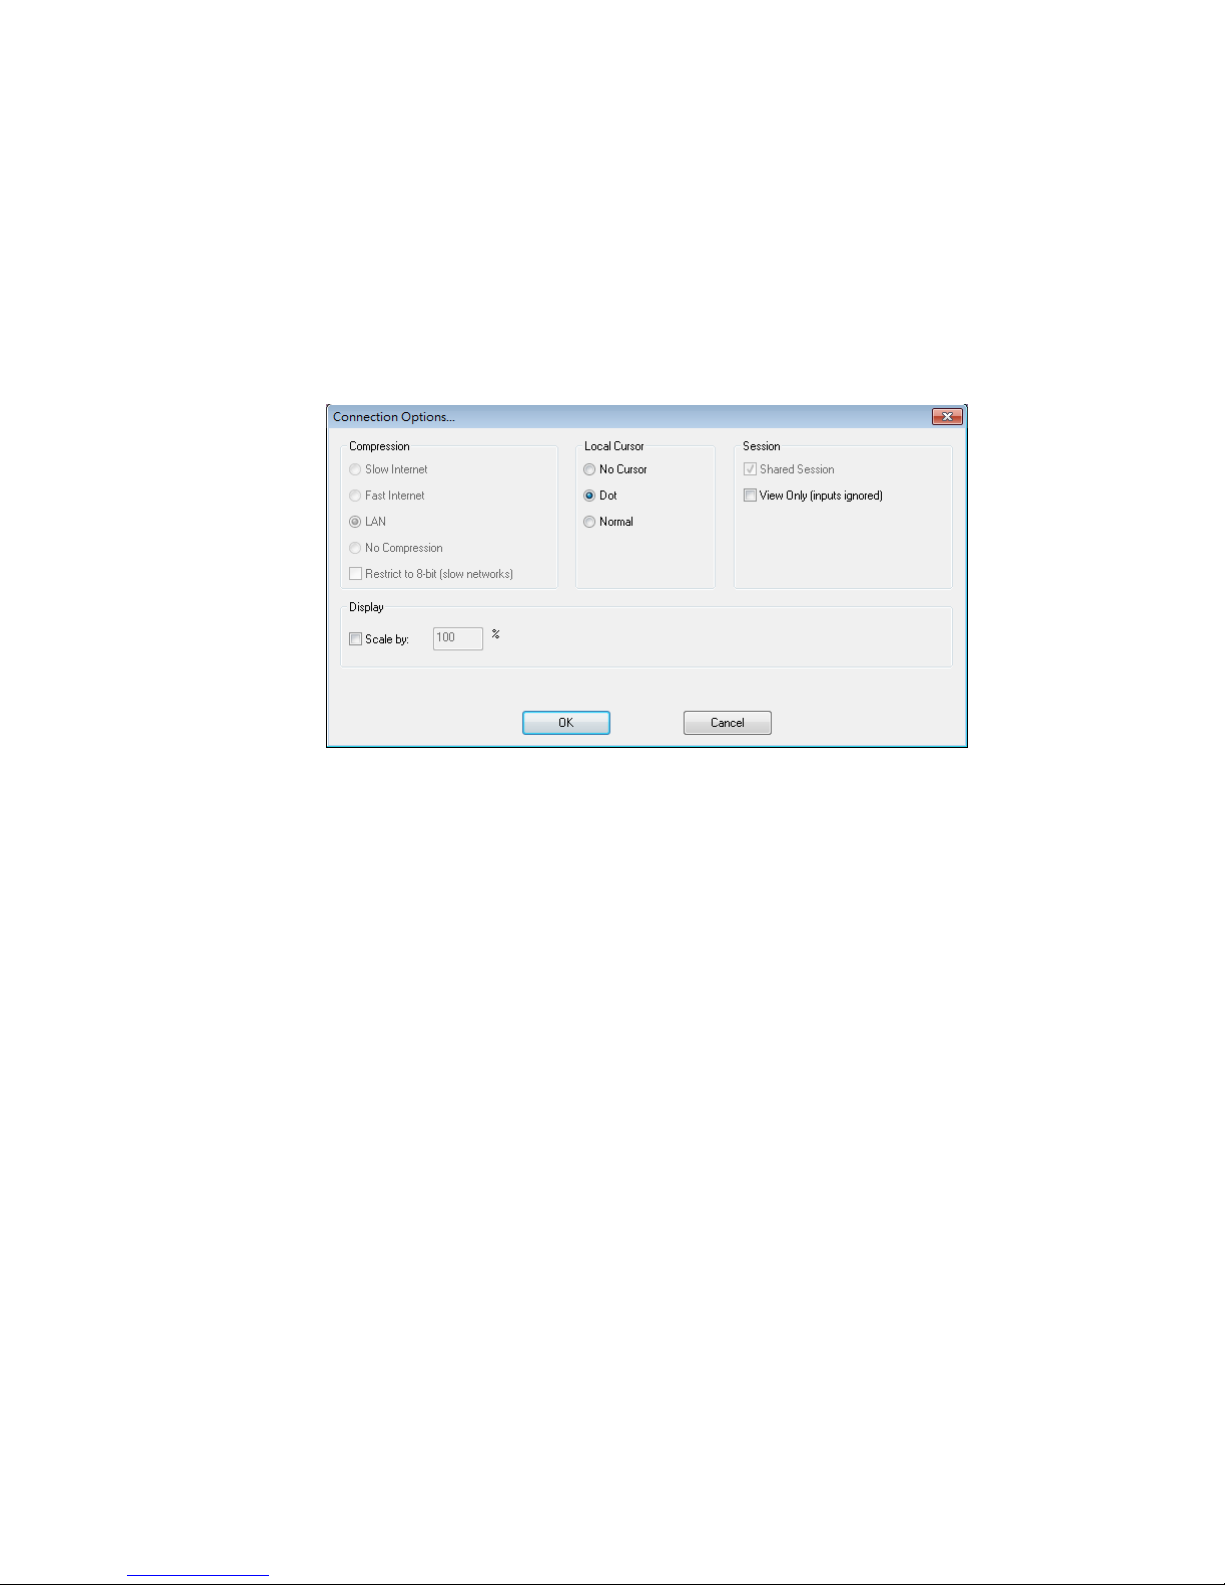
5.2. Connection Dialog
Compression
Specify the compression type that will be used to transmit the video from KLEv2 to viewer. The
compressions are listed from the lowest to the highest data volume. Note that high compressions
need more work and thus longer KLEv2 and viewer processing times. High compressions are
efficient when the network bandwidth is low. Note that all compressions are with NO loss.
The volume of data depends on the video type. It is lower with digital than with analog video. With
analog video, it depends on the video quality setting (refer to Video Capture in section 4.4)
Slow Internet: Video compression optimized for Internet bandwidth lower than 2Mbps.
Fast Internet: Video compression optimized for High Speed Internet.
LAN: Video compression optimized for 100BaseT. Note that KLEv2 rarely use more than
10Mbps.
No Compression: However this option is only useful for testing purposes. It does not provide
better performance than the LAN option. Note that "No Compression" is a misnaming
because there is still a video compression that can be high. Just a second level of data
compression is not applied.
Restrict to 8-bit: In worst cases, when the available bandwidth is below 1Mbps or even 500
Kbps, do not hesitate to check this box to limit the color depth of the video to 8 bits. Most
often you can still work with an 8-bit color video, provided you don't look at HD movie or try
to do artistic painting!

KLEv2 User's Manual
Rev 1.0 01/2016
- 28 -
5.3. Local Cursor
You see two cursors when accessing a remote system with a viewer, the local cursor and the remote
cursor. Normally, except during movements, the two cursors should be superimposed. If this is not the
case, please refer to section 5.3.
No Cursor: Due to personal preference, some may find confusing having two mouse cursors.
Dot: Having a dot as local cursor can help identifying which cursor is local and which one is
remote.
Normal: Having a big local cursor accelerates the mouse utilization. The reason is that you can
click on an element in the screen without worrying whether the remote cursor has already
reached this element or not. Only the local cursor is relevant. We recommend this option.
Session
A user session can be shared or private. If your connection is Shared, other users can connect
simultaneously. They will see the same video as you and compete for mouse and keyboard access. If
your connection is not shared (private), other users cannot get access to the computer as long as you
don't close your session. Note that by clicking on Software Restart in the Web Management, a user
with "superuser" privileges can kick off any user that does not want, or that forgot to close his session.
All viewer connections are immediately closed.
Concerning the keyboard and mouse, the behavior will depend on the View Only option. When this
box is checked, you can only see the computer video. Your keyboard and mouse have no action.
Shared Session: Authorize other users to simultaneously connect. This is the recommended
mode. If you forget closing your session, other users will not be penalized. Don't rely too
much on the pseudo security provided by private sessions. Anybody close to the computer
can see what you do with a local monitor and you will have no knowledge of this.
View Only: Use this option to survey without interfering.
Display
Scale by: Shrink or magnify the video display. to the non-full screen local display window.

KLEv2 User's Manual
Rev 1.0 01/2016
- 29 -
5.4. Mouse Troubleshooting.
If the remote and the local cursors are out of synchronization, and if the Ctrl-Ctrl-Home action
cannot get them resynchronized, please check the VGA and mouse settings.
If the computer is sending VGA video
Make sure the video sent by the computer corresponds to one the resolutions supported by KLEv2
(Refer to Table 1). Check the video resolution detected by KLEv2 in the KVM Server Log (Section
4.4).
Check whether the remote screen is well centered in the viewer window, without black borders. If
not, use the viewer screen adjustment to remove the black borders. Note that the Centering can be
Automatic.
If the mouse is set to relative in computer settings (Refer to Computer in section 4.4)
Make sure to turn off the mouse acceleration on the attached computer. If the acceleration is not
removed, the remote and local cursor cannot be synchronized. This is the most frequent cause of
desynchronization.
Unfortunately, some operating systems do not allow removing the mouse acceleration (Mac OS X).
On Linux you can quickly check this point by typing "xset m 1 1" in a console. This should turn off
the mouse acceleration temporarily. For permanent settings, use the configuration tools of your
distribution.
There is no mouse loss of synchronization possible when using digital video and when the KLEv2
mouse is set to Absolute, whatever the operating system of the computer.

KLEv2 User's Manual
Rev 1.0 01/2016
- 30 -
6. KCenter
KLEv2 like KMini is a distributed IP KVM. By using one KLEv2 or KMini for each PC or server and
managing them with the KCenter application, you can build efficient non-blocking matrix IP KVMs
with no limit concerning the number of simultaneous users.
KCenter is a free application designed for centralized management of sets of KLEv2s and/or KLEv2s.
With KCenter, IT administrators can easily manage all distributed IP KVMs connected to the LAN or
across the Internet. They can detect all devices on the LAN, upgrade them in a single operation,
duplicate settings, centralize and save all messages, execute group actions, change IP settings even
if several devices have same IP address, etc.
In KCenter just click on a computer name to open the viewer on it, or click on a device to open the
Web Management of the device in the same way you would do with a multiport IP KVM.
KCenter is a Java application that runs on all platforms able to run a Java virtual machine, Windows,
Linux, Mac OS X, etc.

KLEv2 User's Manual
Rev 1.0 01/2016
- 31 -
7. Frequently Asked Questions
I am able to login with the Application Viewers using the IP and Port Number but unable to login
to the browser viewer or Vice versa.
The browser viewer port and the application port number is different. Usually the
application port is lower and the viewer port is 8 greater. i.e. 192.168.1.192:5920 for
Application Viewer and 192.168.1.192:5928 for Browser Viewer
I have changed the setting but no change has been made.
Any change made to the settings need to be save first. Then a Software Restart must be
performed before the setting takes effect.
What is the difference between a Software Restart and Reboot?
For most cases, a Software Restart is all that is needed. Reboot is a cold start, and should
only be needed if Software Restart fails or having hardware issue.
My viewer's menu bar disappears.
Please put the mouse cursor on the title of the windows and right click to open the mouse
menu. Then select Show Menu Bar.
My remote system's mouse is not synchronizing.
Change the remote system display resolution to a more common resolution. refer to section
5.4
There are video artifacts on my screen or video response seems slow.
There are several solutions: a. Change the remote system display resolution to a more
common resolution. b. Select a compression that matches better with your current network
in the Connection Options when your login. c. Change the color depth of the display.
Where do I find information on...
Recommend you read the manual on the specific sections to get a general overview and
click the "HELP" in all pages of the Web Management to get further details along with the
latest updated information.
If you have forgotten the username or password...
Please contact your local dealer or distributor for help.

KLEv2 User's Manual
Rev 1.0 01/2016
- 32 -
8. Technical support
Please contact your local distributor for more information or technical support.
9. FCC / CE Statements
FCC Statement : This equipment has been tested and found to comply with the regulations for a
Class B digital device, pursuant to Part 15 of the FCC Rules. These limits are designed to provide
reasonable protection against harmful interference when the equipment is operated in a
commercial environment. This equipment generates, uses, and can radiate radio frequency energy
and, if not installed and used in accordance with this User Guide, may cause harmful interference to
radio communications. Operation of this equipment in a residential area is likely to cause harmful
interference in which case, the user will be required to correct the interference at his/her own
expense.
CE Statement : This is a Class B product in a domestic environment, this product may cause radio
interference, in which case the user may be required to take adequate measures.
RoHs
 Loading...