

Page 1
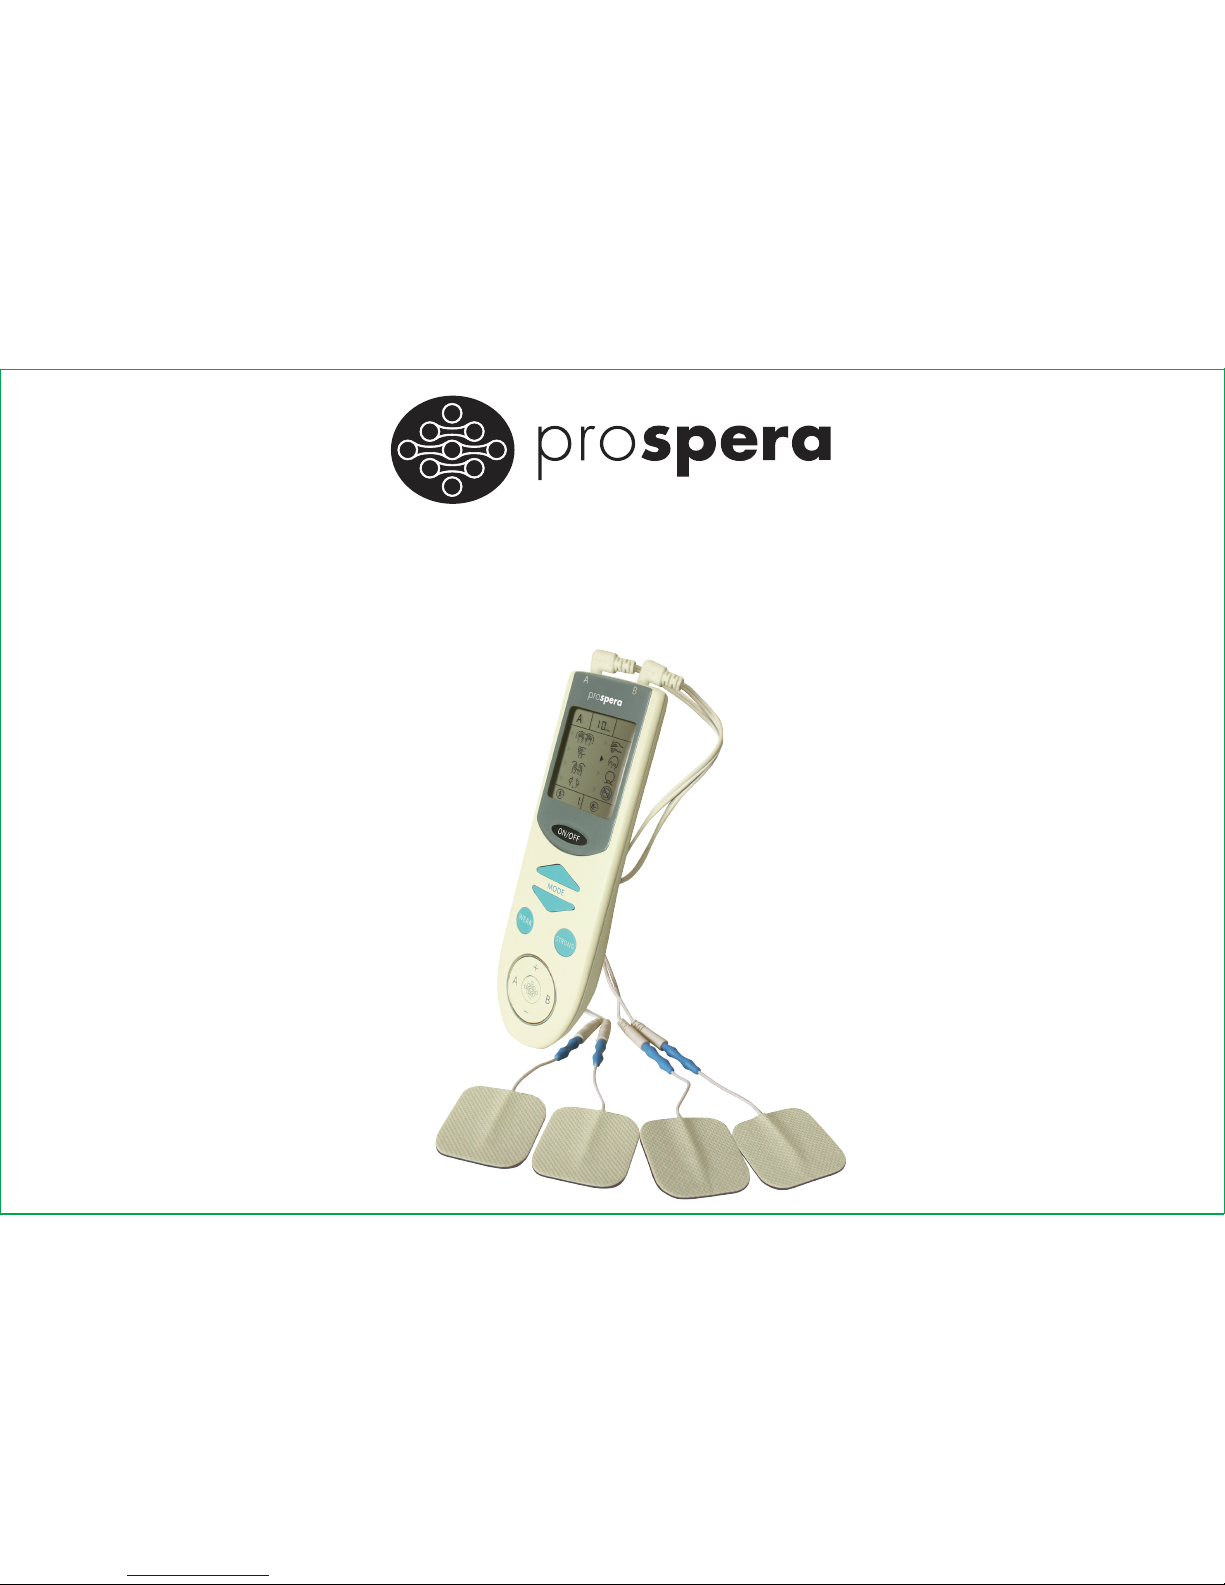
bYoung OTC TENS Electronic
Pulse Massager
PL029
Page 2
Safety Warning and Cautions
1.Do not use this device if you have a cardiac pacemaker, implanted defibrillator, or
other implanted metallic or electronic device. Such use could cause electric shock,
burns, electrical interference, or death;
2.If you are in the care of a physician, consult with your physician before using this
device;
3.Do not apply stimulation on your heart, head, mouth, pudendum or blemished skin
areas;
4.Do not apply stimulation across your chest because the introduction of electrical
current into the chest may cause rhythm disturbances to your heart, which could be
lethal;
5.Do not apply during pregnancy;
6.Do not apply stimulation over painful areas. If you have painful areas, you should
consult with your physician before using this device;
7.Do not apply stimulation over open wounds or rashes, or over swollen, red, infected,
or inflamed areas or skin eruptions (e.g., phlebitis, thrombophlebitis, varicose veins);
8.Do not apply stimulation over, or in proximity to, cancerous lesions;
WARNING
Page 3
Safety Warning and Cautions
1.This device is not effective for pain of central origin, including headache;
2.This device is not a substitute for pain medications and other pain management
therapies;
3.This device has no curative value;
4.This device is a symptomatic treatment and, as such, suppresses the sensation of
pain that would otherwise serve as a protective mechanism;
5.The long-term effects of electrical stimulation are unknown;
6.Since the effects of stimulation of the brain are unknown, stimulation should not be
applied across your head, and electrodes should not be placed on opposite sides of
your head;
7.The safety of electrical stimulation during pregnancy has not been established;
8.You may experience skin irritation or hypersensitivity due to the electrical
stimulation or electrical conductive medium (gel);
9.If you have suspected or diagnosed heart disease, you should follow precautions
recommended by your physician;
10.If you have suspected or diagnosed epilepsy, you should follow precautions
CAUTION
!
Page 4
Safety Warning and Cautions
recommended by your physician;
11.Use caution if you have a tendency to bleed internally, such as following an injury
or fracture;
12.Consult with your physician prior to using the device after a recent surgical
procedure, because stimulation may disrupt the healing process;
13.Use caution if stimulation is applied over the menstruating uterus;
14.Use caution if stimulation is applied over areas of skin that lack normal sensation;
15.Keep this device out of the reach of children;
16.Turn off the stimulator if the stimulation feels unpleasant or does not provide pain
relief; and
17.Use this device only with the leads, electrodes, and accessories recommended by
the manufacturer.
Adverse Reactions
You may experience skin irritation and burns beneath the stimulation electrodes
applied to your skin;
CAUTION
!
Page 5
Safety Warning and Cautions
9.Do not apply stimulation in the presence of electronic monitoring equipment (e.g.,
cardiac monitors, ECG alarms), which may not operate properly when the electrical
stimulation device is in use;
10.Do not apply stimulation when in the bath or shower;
11.Do not apply stimulation while sleeping;
12.Do not apply stimulation while driving, operating machinery, or during any activity
in which electrical stimulation can put you at risk of injury;
13.Do not use the device on children;
14.Consult with your physician before using this device, because the device may cause
lethal rhythm disturbances to the heart in susceptible individuals;
15.Apply stimulation only to normal, intact, clean, healthy skin;
16.Do not use this device in high humidity areas such as a bathroom;
17.Do not attempt to move the electrode heads while the device is operating;
18.Keep the device away from wet, high temperature and direct sunshine. Shady and
dry place is good for device stock.
WARNING
Page 6
Safety Warning and Cautions
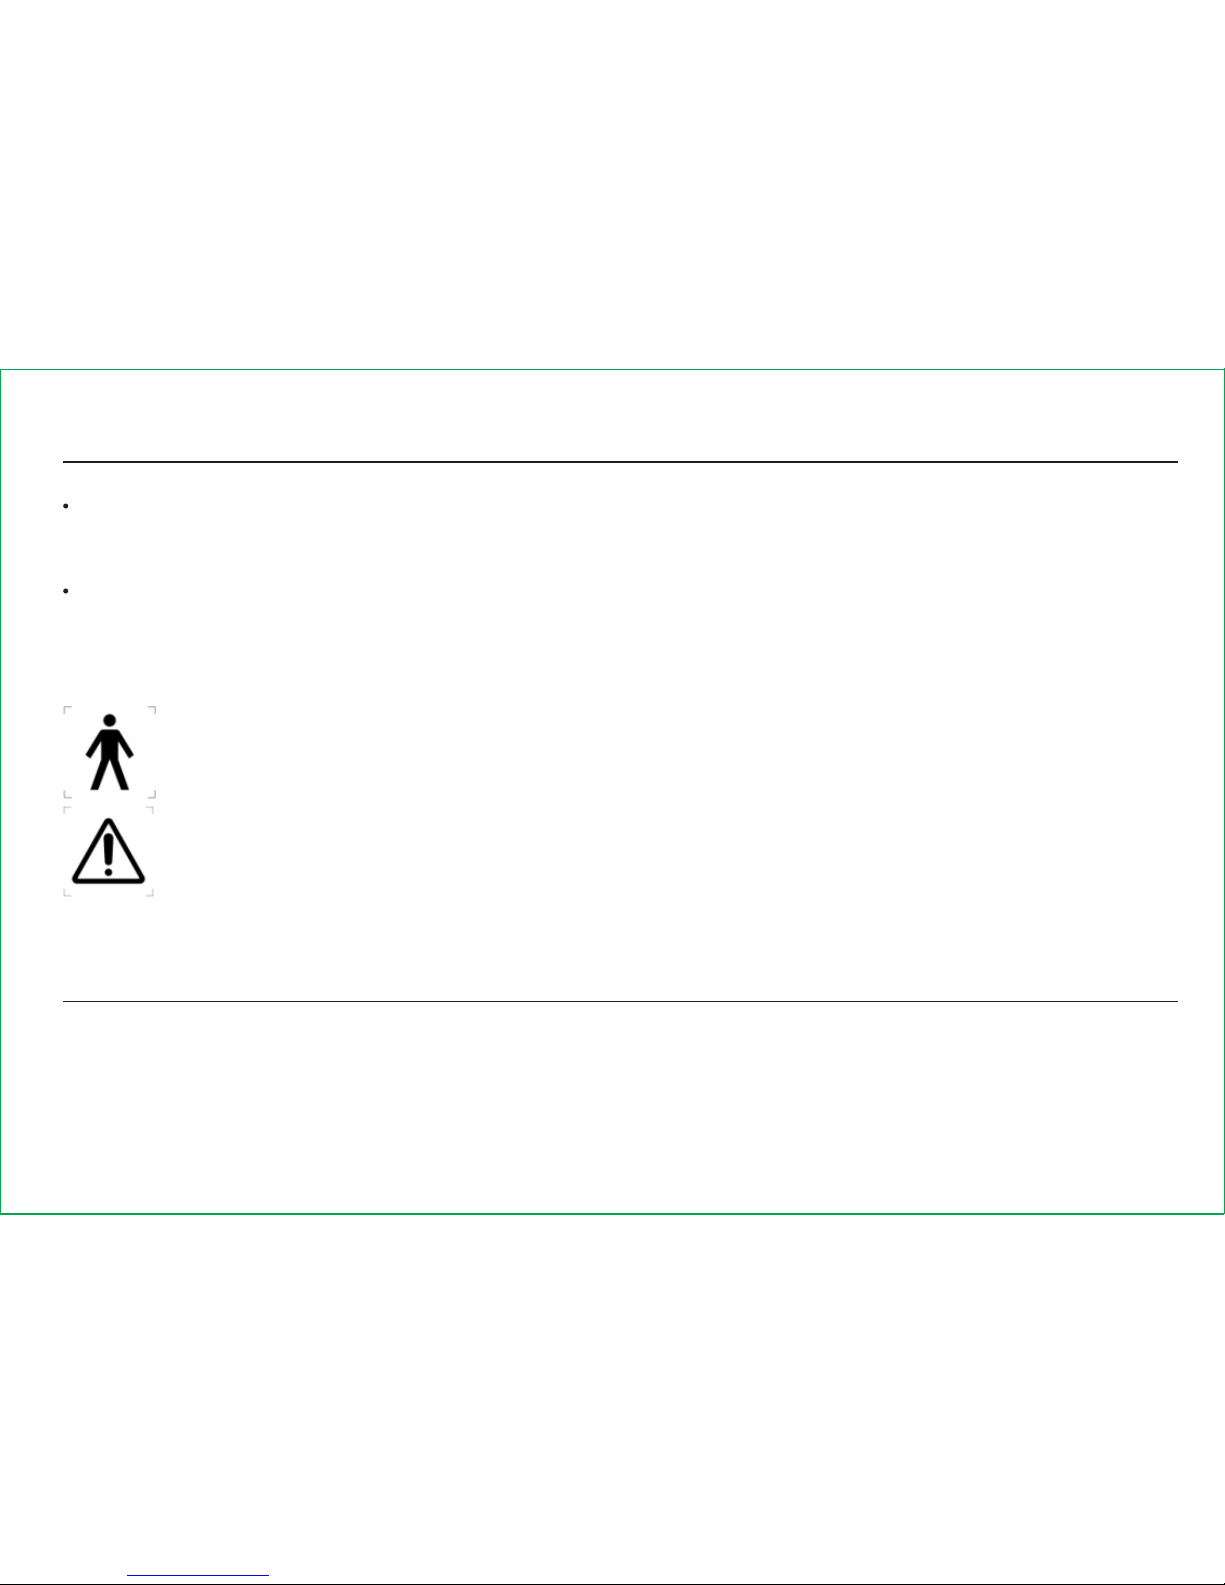
Safety symbols
Type B applied part
Attention, see operating manual for use
You may experience headache and other painful sensations during or following the
application of electrical stimulation near your eyes and to your head and face;
You should stop using the device and should consult with your physician if you
experience adverse reactions from the device.
To be used for temporary relief of pain associated with sore and aching muscles in the
shoulder, waist, back, neck, upper extremities (arm), and lower extremities (leg) due
to strain from exercise or normal household work activities.
Indications for Use
Page 7
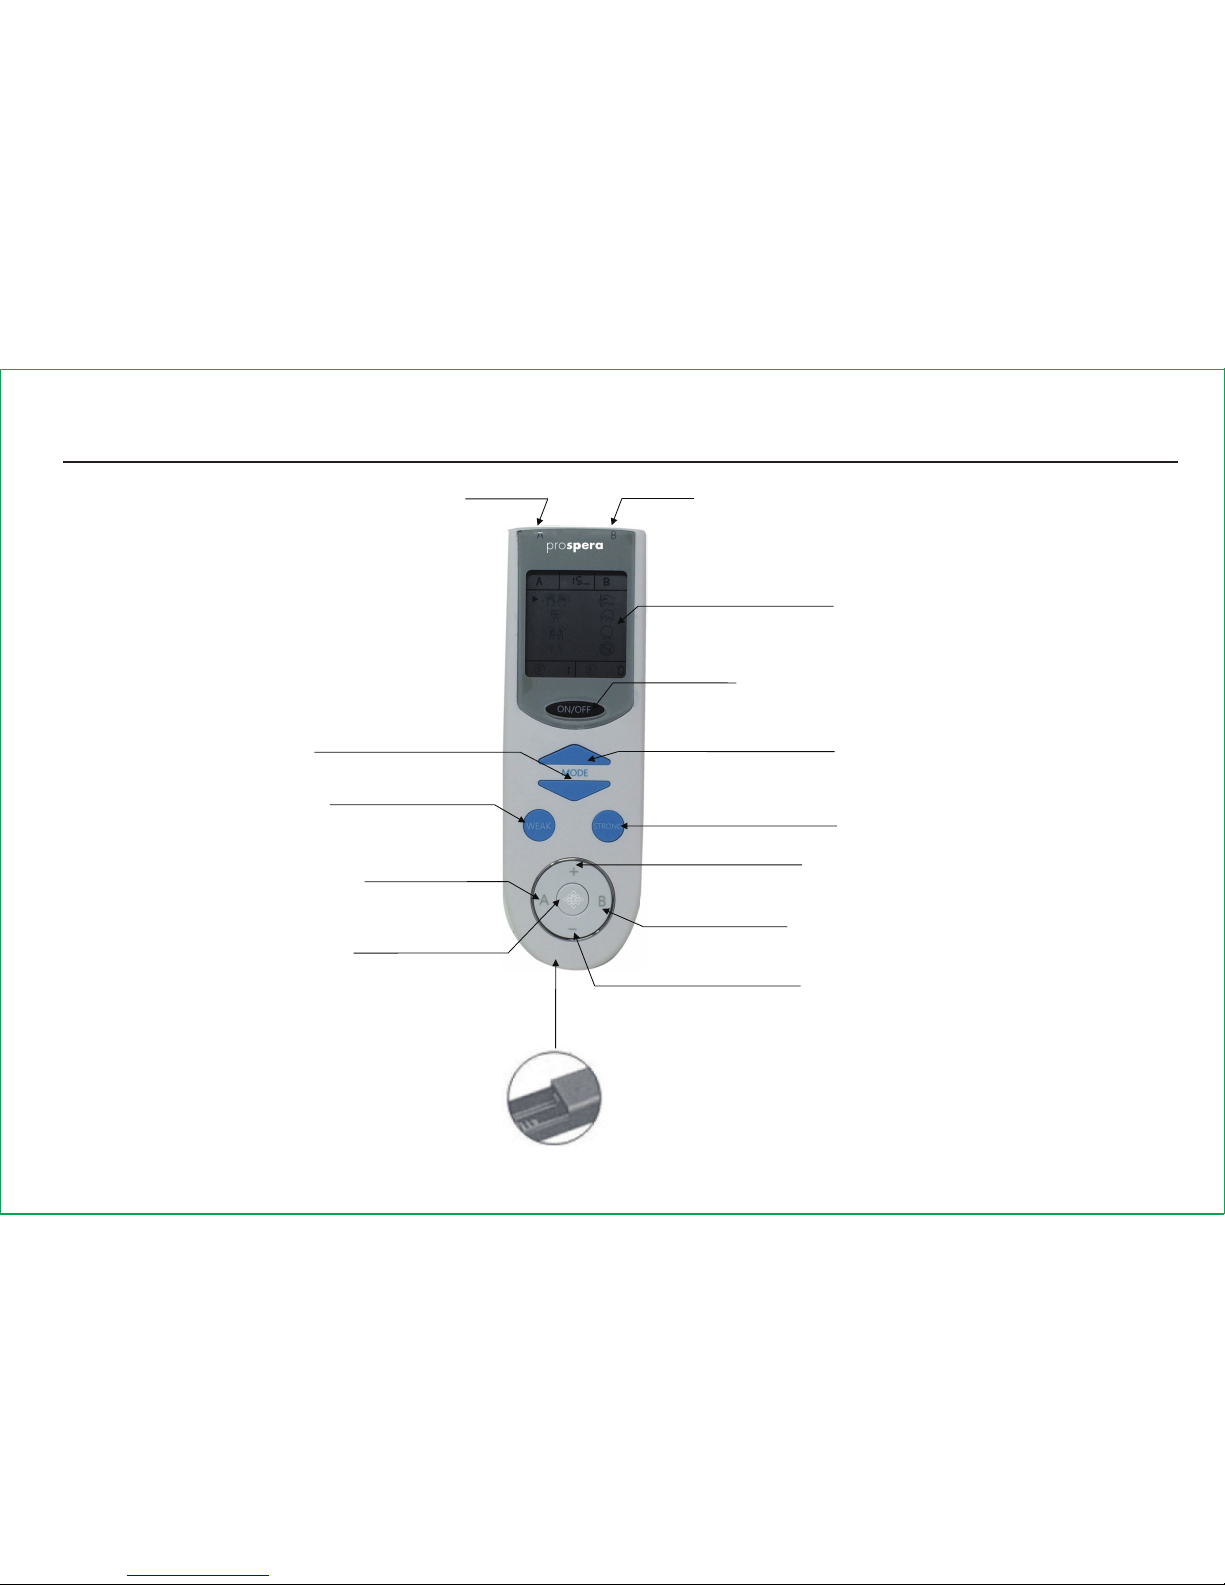
Product diagram
Channel A
Channel B
LCD display screen
Power switch
Choose the upper function
Stimulation strengthen
Speed increase
Control channel A
Stimulation weaken
Choose the lower function
Batteries
Bac k
High frequency
Control channel B
Speed decrease
Page 8
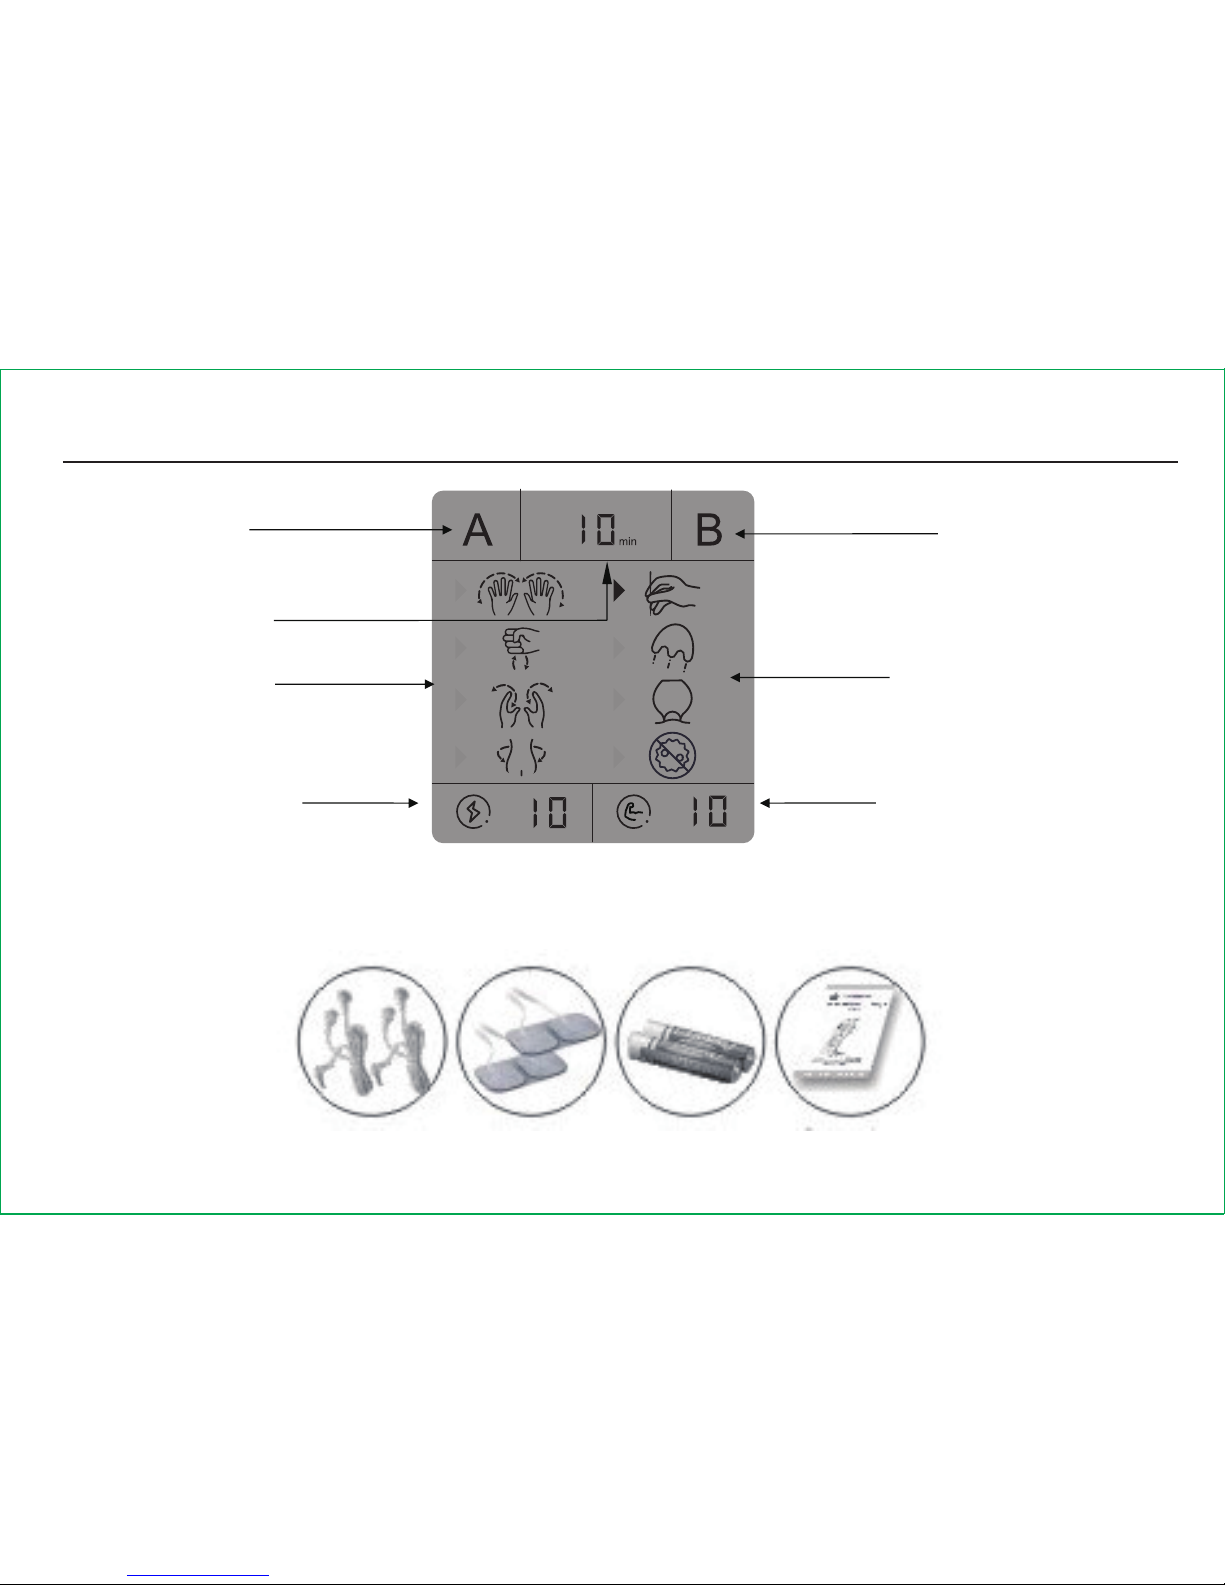
Product diagram
Control channel
Remain time
Function stock
Speed
Control channel
Function stock
Intensity
In addition to PL029 device, items included in the package:
Two sets of cables, four pads, operating manual and 2 AAA batteries
2 cables 4 pads
2 AAA
batteries
Operating
manual
Page 9

How the Electronic Pulse Massager works:
The operational principle of the device is to generate small pulses of electrical
current and deliver the pulses to an ordinary user’s skin through electrode
adhesive pads such that the underlying nerves are activated and the pain a
ssociated with sore and aching muscles is temporarily relieved.
Quick Operation Guide
The following steps are used to guide the device operation
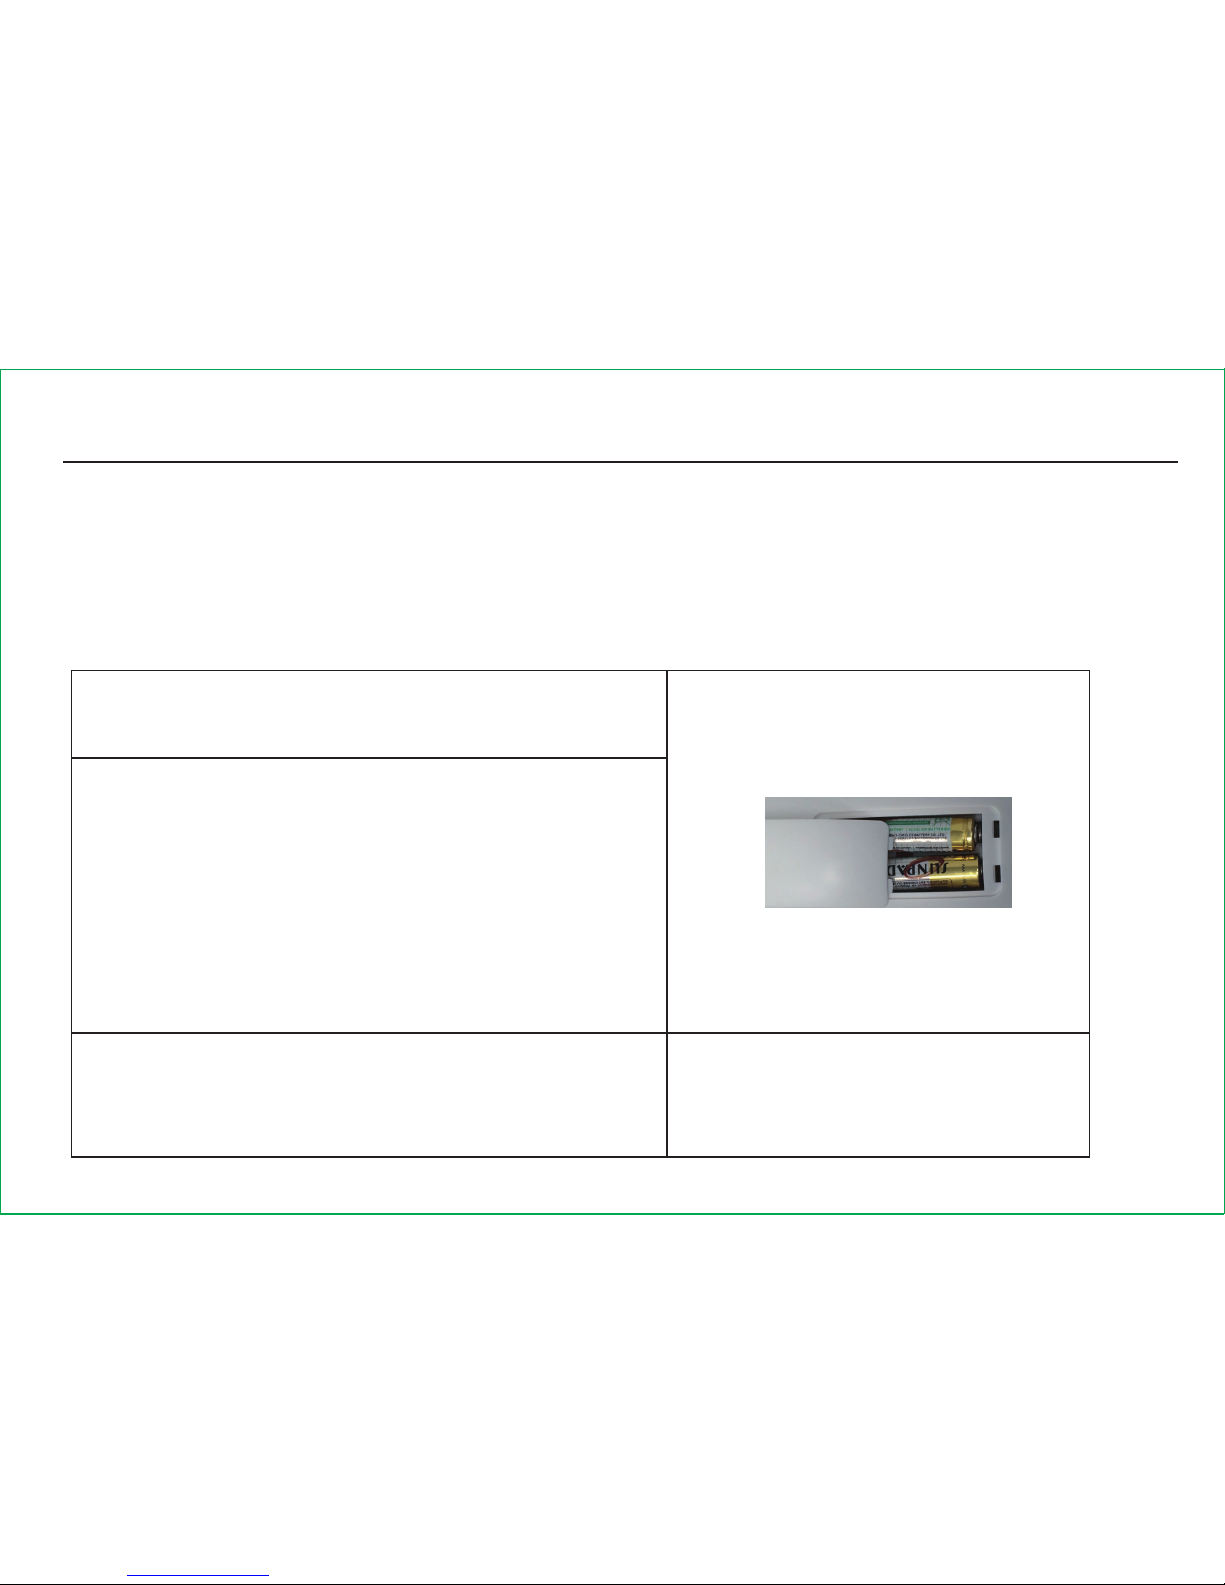
1st Step:Insert the 2pc AAA batteries into the device
2nd Step :Connect the electrode pads to the wire and then connect the wire to the
device
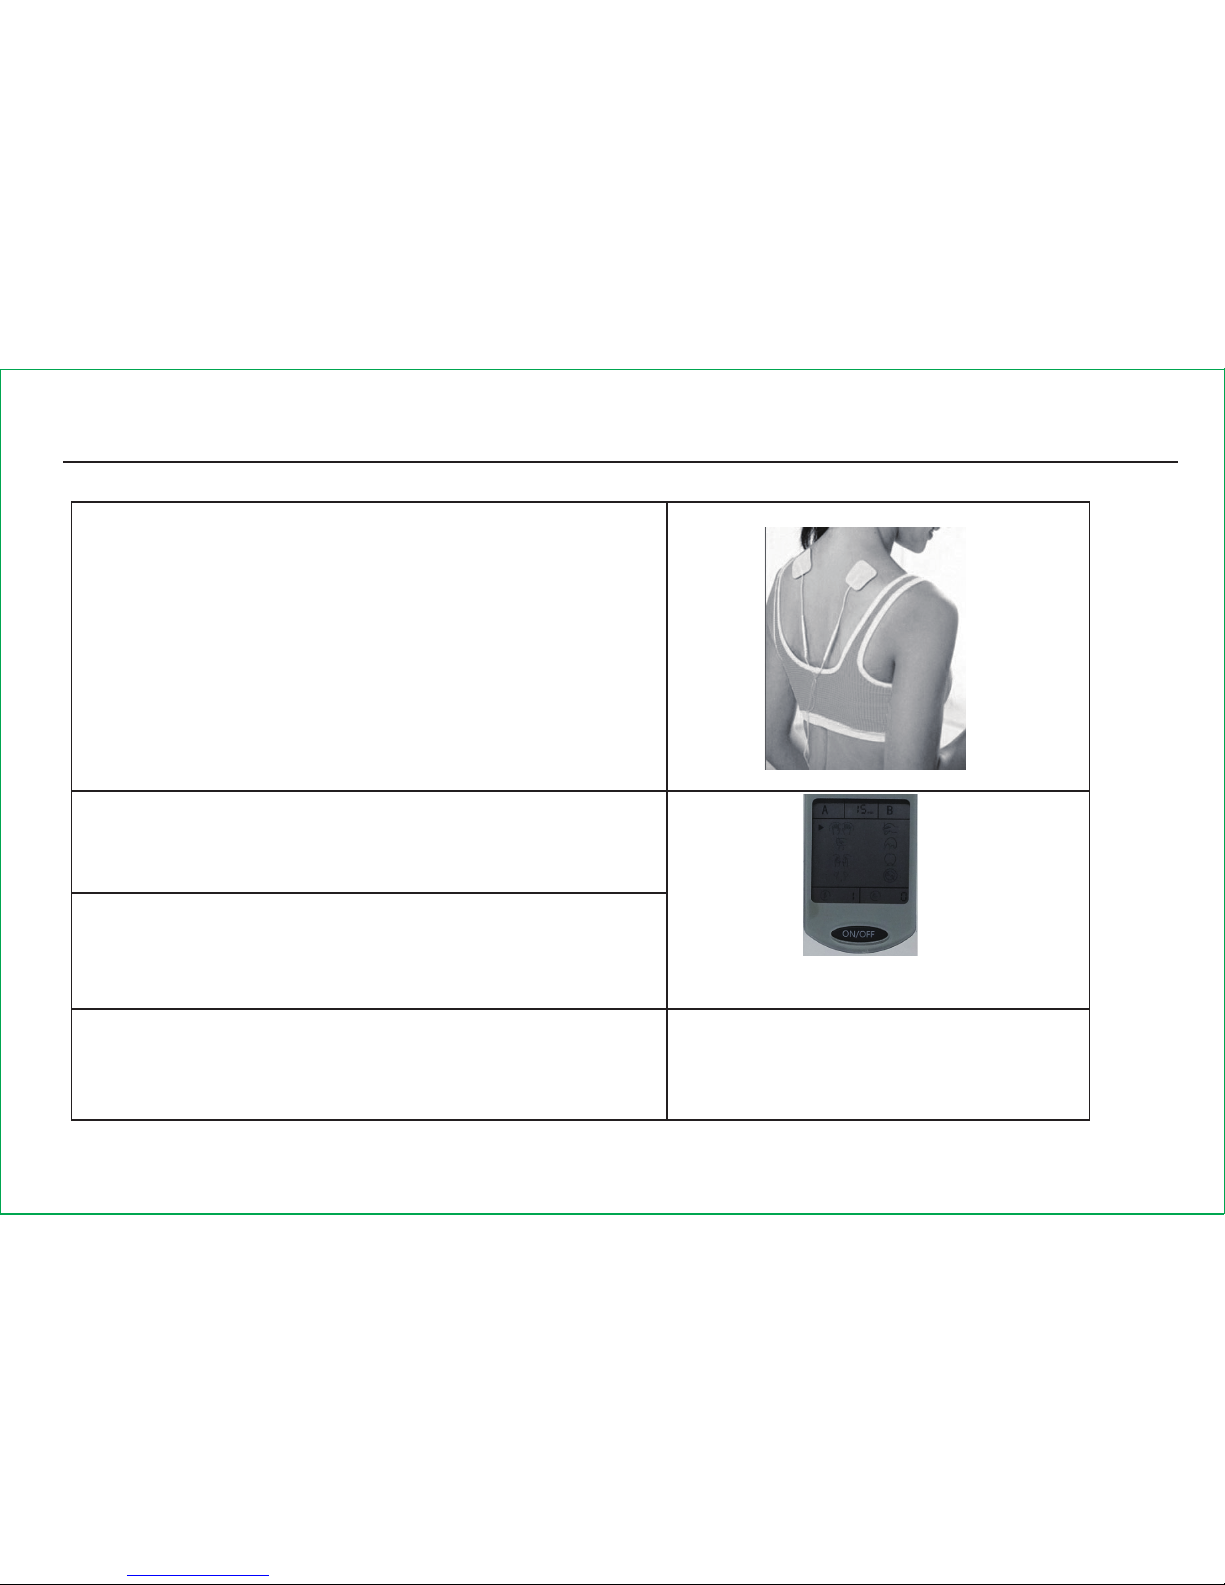
3rd Step :Put the electrode pads on massage-needed body area
4th Step :Press the “ON/OFF” button to turn on the power
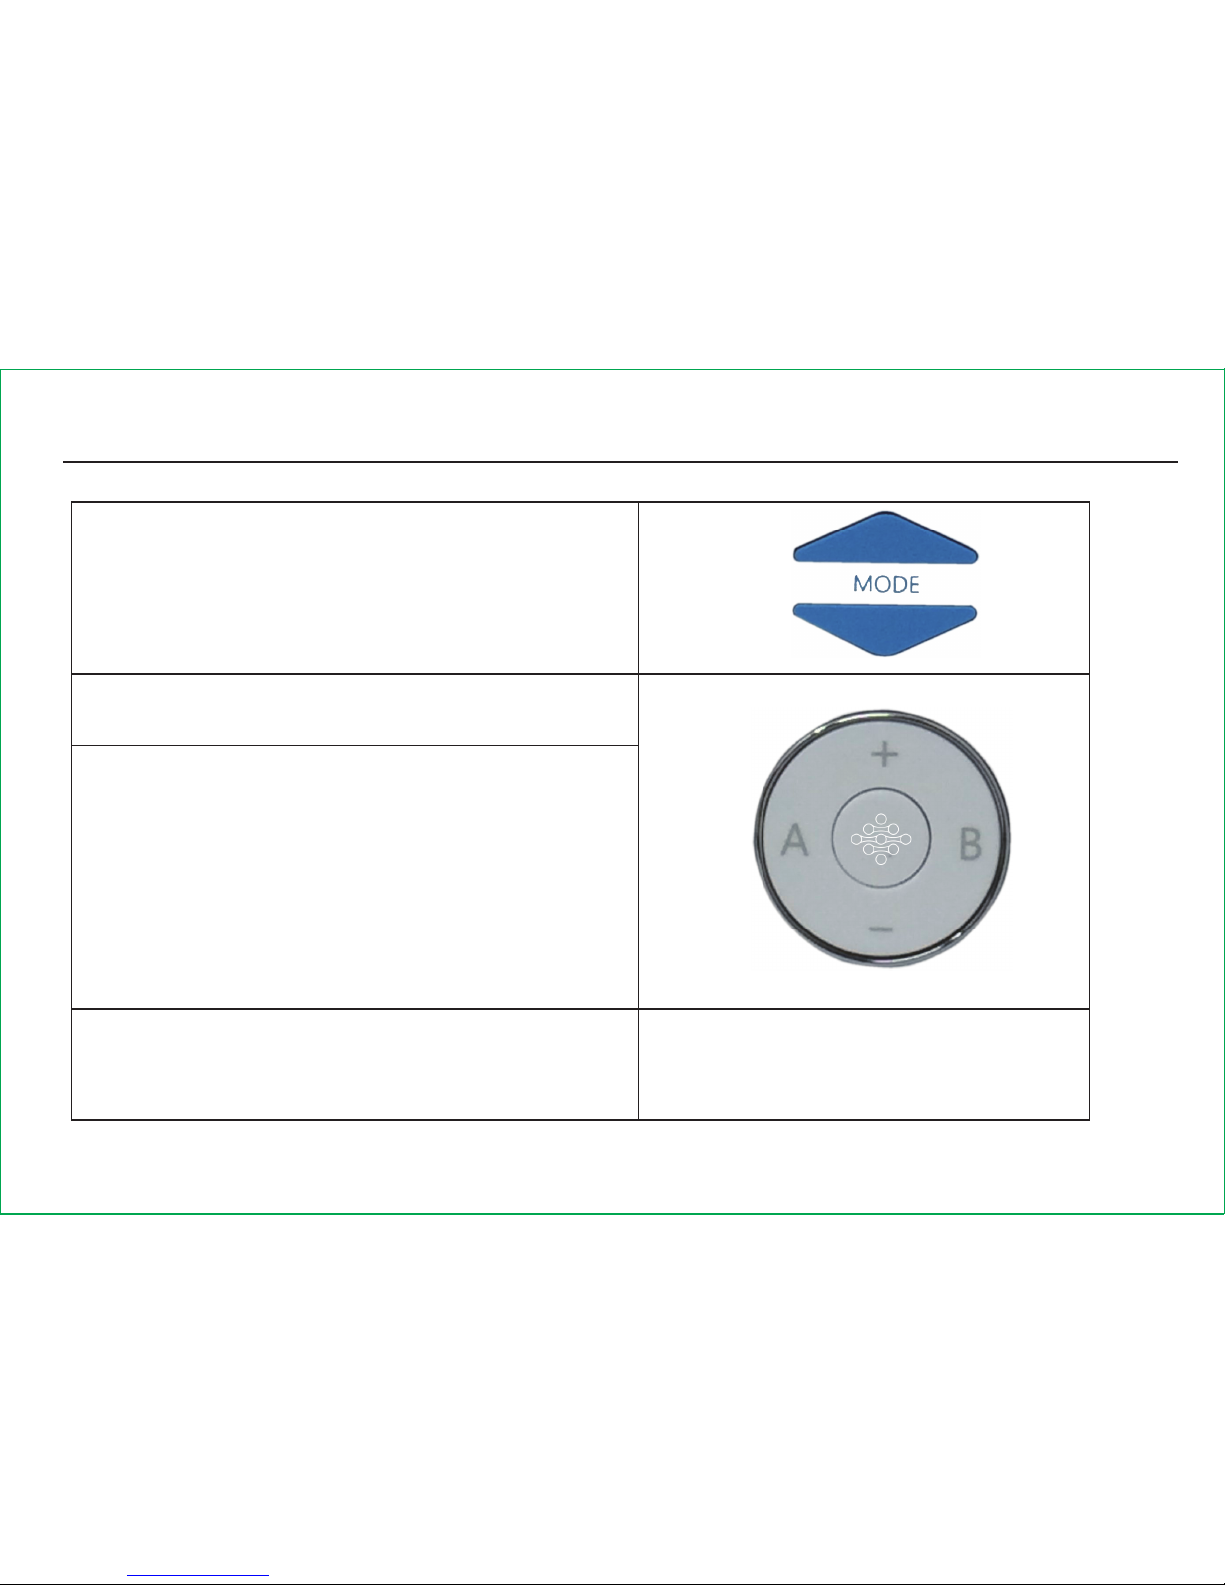
5th Step :Select one of massage modes
6th Step :Choose treatment time
7th Step :Adjust massage intensity
Page 10
Quick Operation Guide
8th Step: Adjust electronic pulse speed
9th Step: Start massaging
10th Step :Press the “ON/OFF” button to turn off the power
For the details of operation, please see the following operating instructions.
IMPORTANT: Match the flat end of the battery to
the negative “-” mark; and match the other end
to the positive “+” mark shown inside of the
compartment.
To insert the battery, slide the compartment cover
downward until the cover pops off. Insert 2pc AAA
batteries according to the diagram in the battery
compartment, and then close the cover.
1st Step: Insert the 2pc AAA batteries into
the device.
2nd Step : Connect the electrode pads to the
wire and then connect the wire to the device.
compartment
Page 11
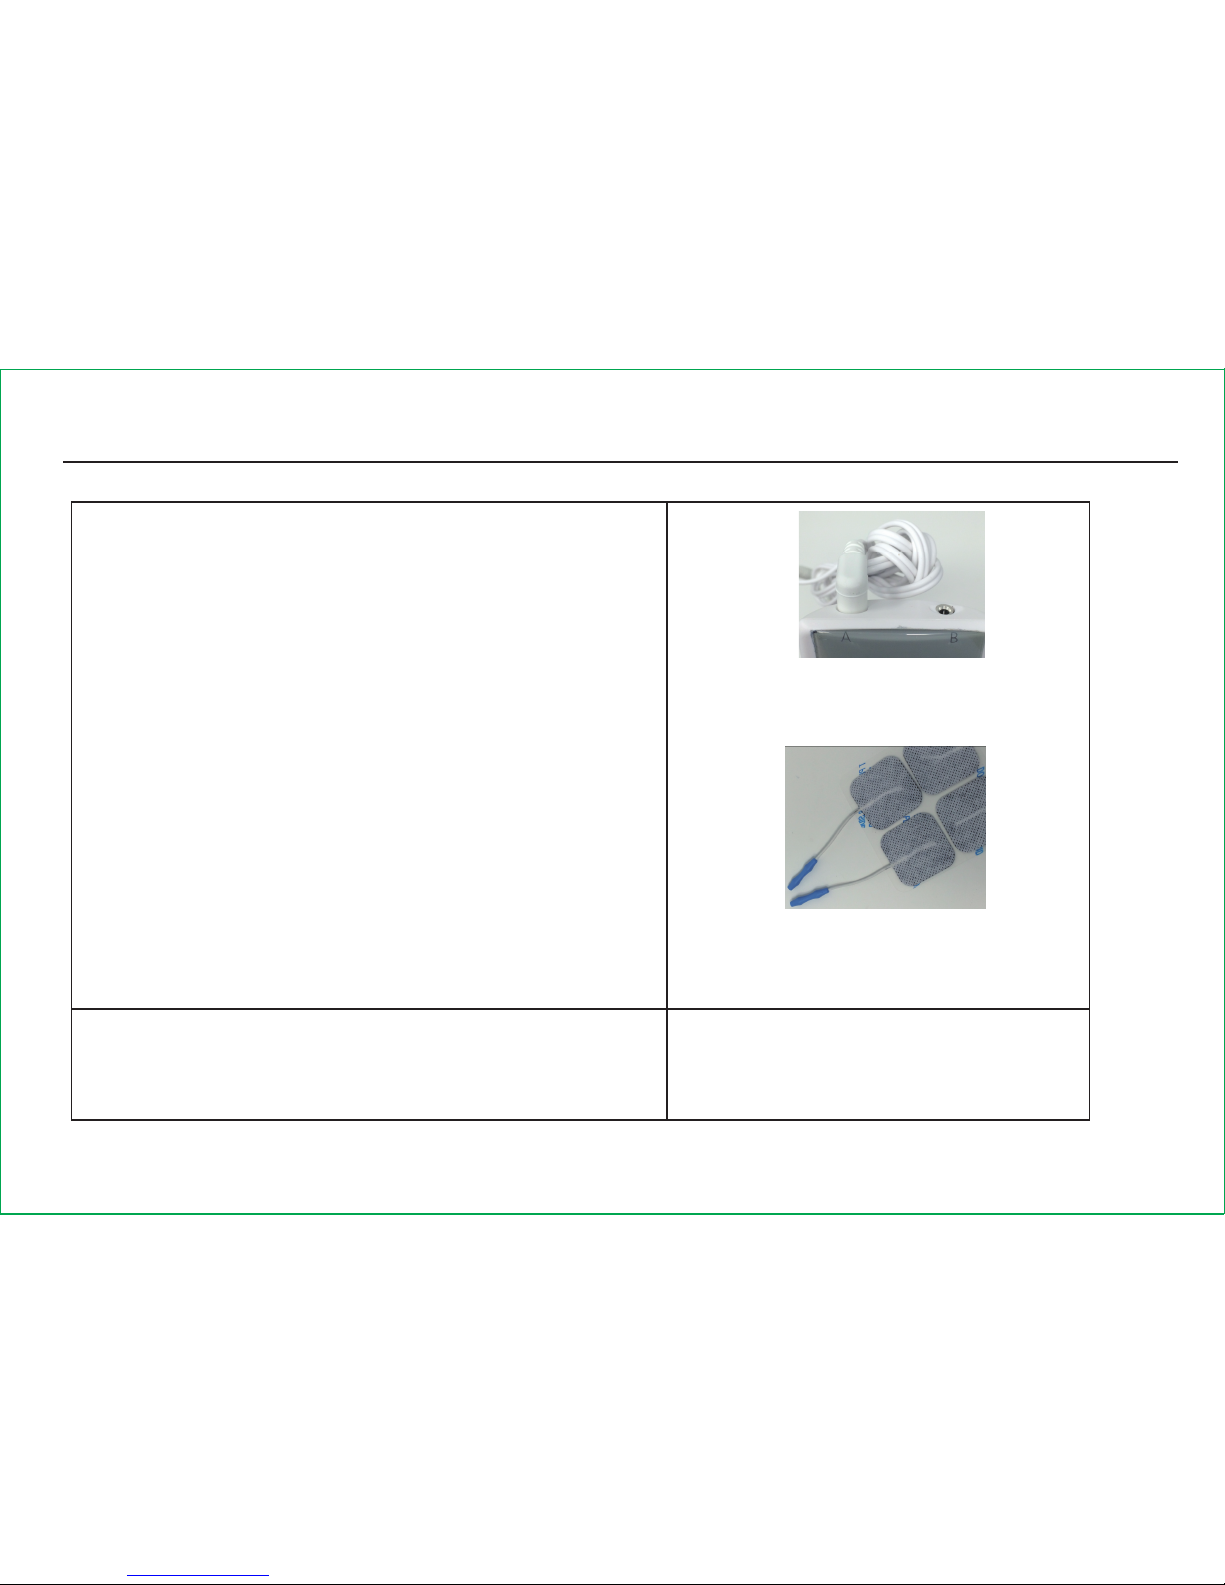
Electric wire insertion
Quick Operation Guide
The device has two identical ports (Channel A and
Channel B) for connecting the two identical lead
wires. Each lead wire is coupled to a pair of
identical electrode pads. Connect the first pair of
electrode pads to the two terminals of the first
lead wire, and insert the first lead wire’s other
end into the first port. Connect the second pair of
electrode pads to the two terminals of the second
lead wire, and insert the second lead wire’s other
end into the second port.
TIP: One channel is suggested for the first time
use.
3rd Step : Put the electrode pads
on massage-needed body area.
Electric wire connection to
electrode pads
Page 12
Quick Operation Guide
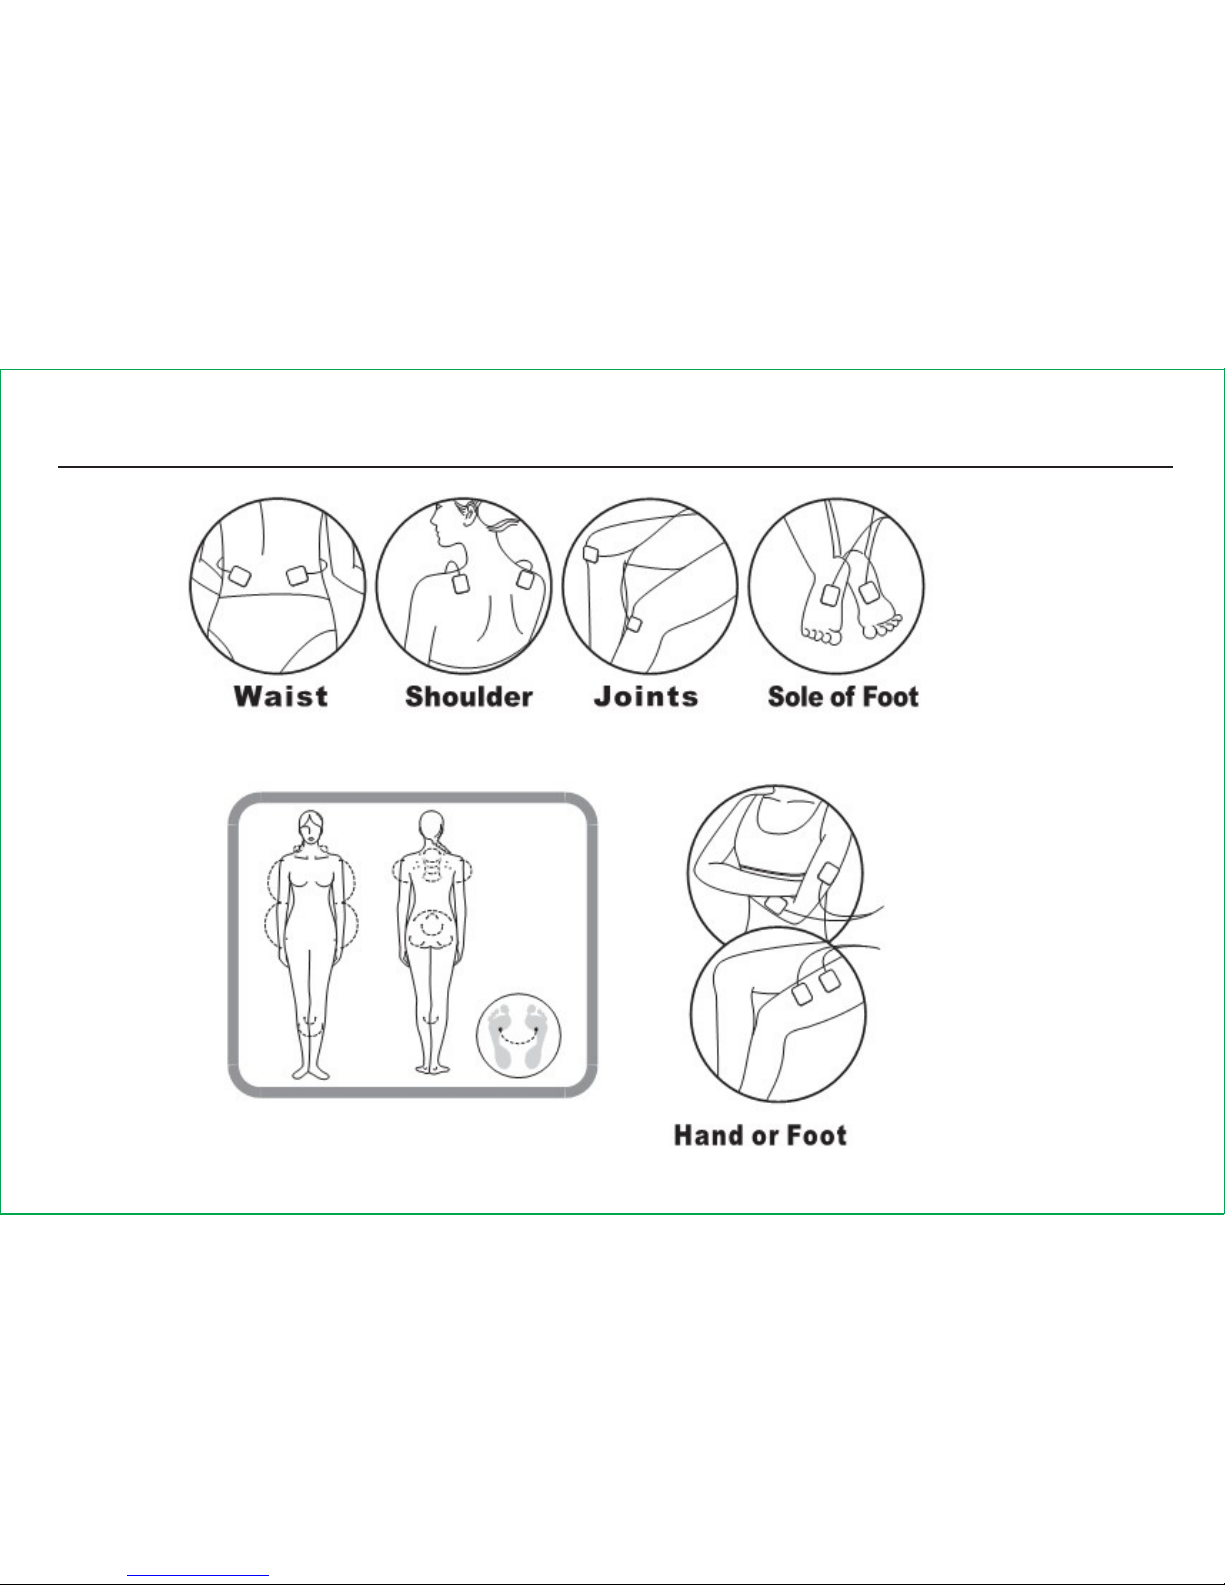
2 pads from one channel are placed on the body
area such as shoulder at the same time. Make sure
the pads stick on the skin. Do not place or move
the pads when the device is on.
Note: Keep the skin clean before placing the
pads. Channel A and Channel B can be used
separately or simultaneously.
4th Step : Press the “ON/OFF”
button to turn on the power.
Press “ON/OFF” button to start the device.
The LCD display will show massage modes.
ON /OFF power bu tton and LC D
di splay sho ws massage mode s
5th Step : Select one of massage
modes
Page 13
Quick Operation Guide
Select a massage mode by pressing the MODE
UP and MODE DOWN buttons. The selected
mode will be shown on the LCD display.
6th Step : Choose treatment time.
Press the TIME button to select the treatment
time 5 min, 10 min or 15 min. First press is
5 min; Second press is 10 min and third press
is 15 min then return to 5 min.
7th Step : Adjust massage intensity.
Page 14
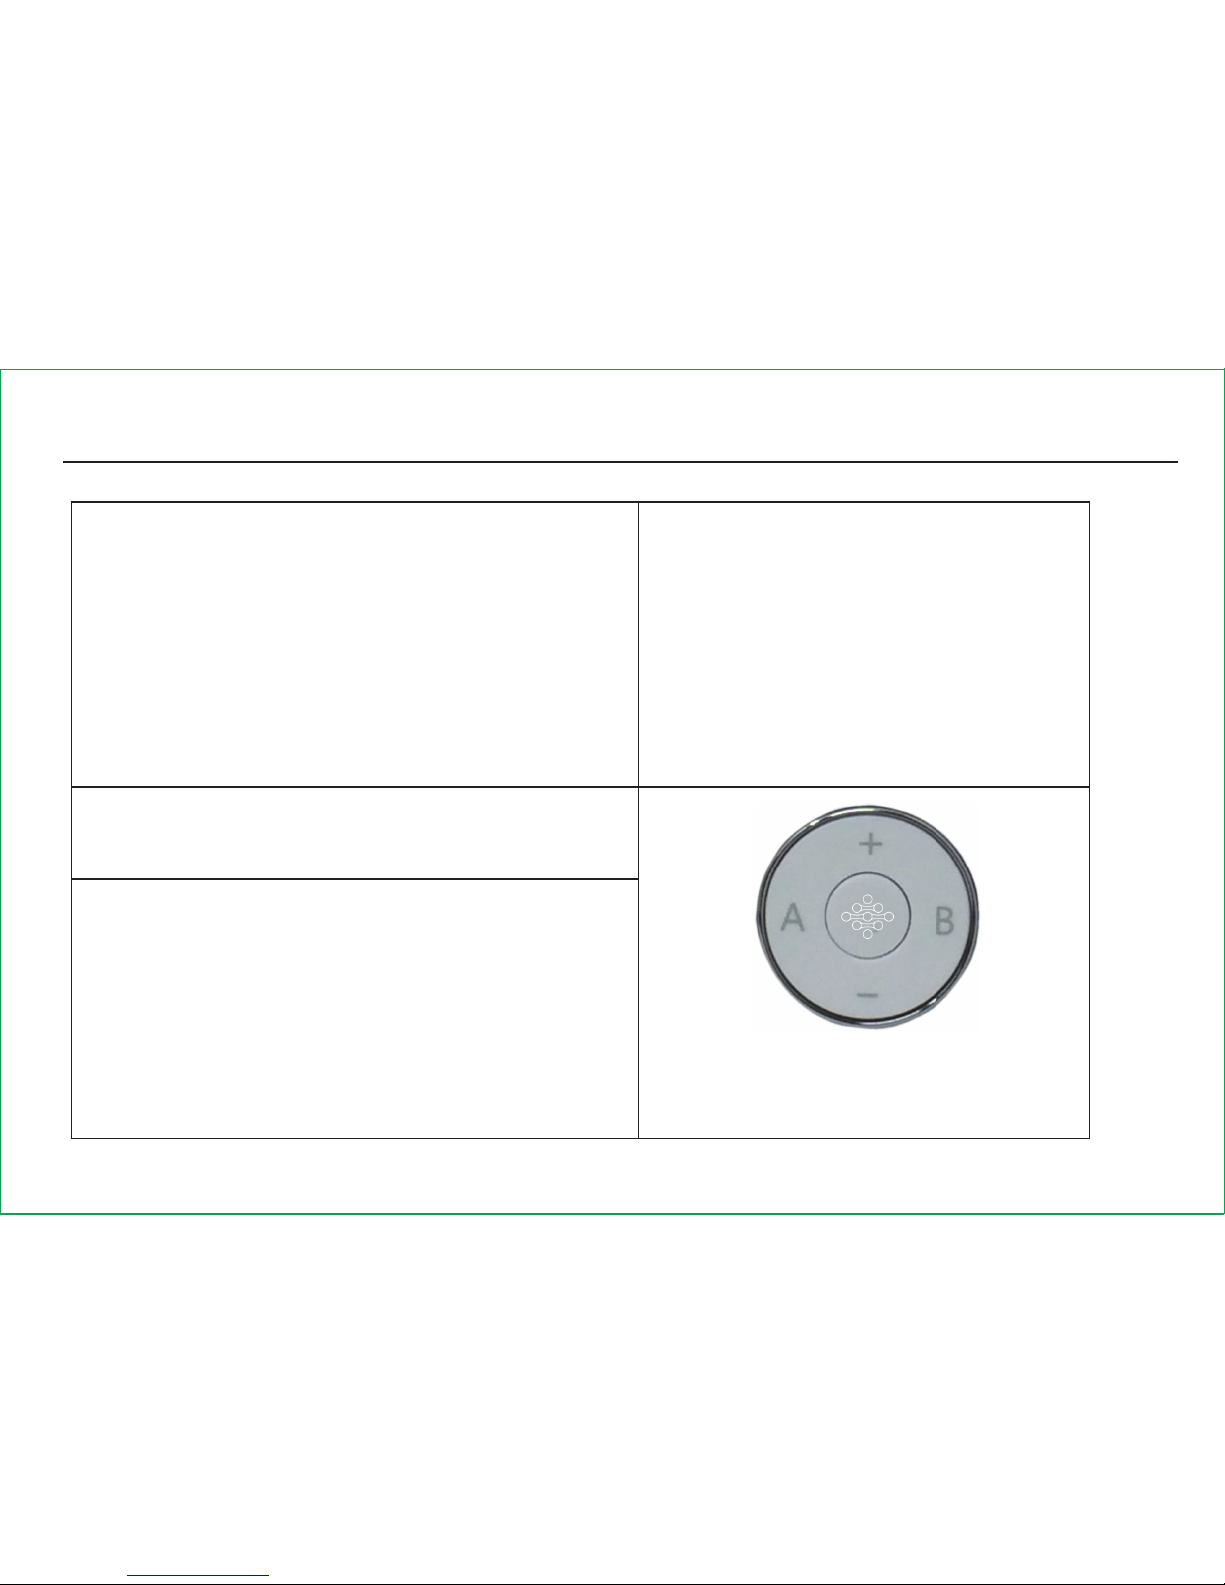
There are two intensity keys. WEAK means to
decrease the intensity, while STRONG means
to increase the intensity. There are ten levels
intensity for choosing. “STRENGTH” and level
numbers will be showed on the lower right
corner of LCD display.
Note: Increase the intensity gradually.
Quick Operation Guide
8th Step : Adjust the electronic
pulse speed.
There are 2 speed buttons to control the pulse
frequency. “SPEED + “ means to increase the
speed and “SPEED –“ means to decrease the
speed. “VELOCITY” and level numbers will be
showed on the lower left corner of the LCD
display. Level should be from 1 to 10 as graded.
Speed adjustment
Page 15
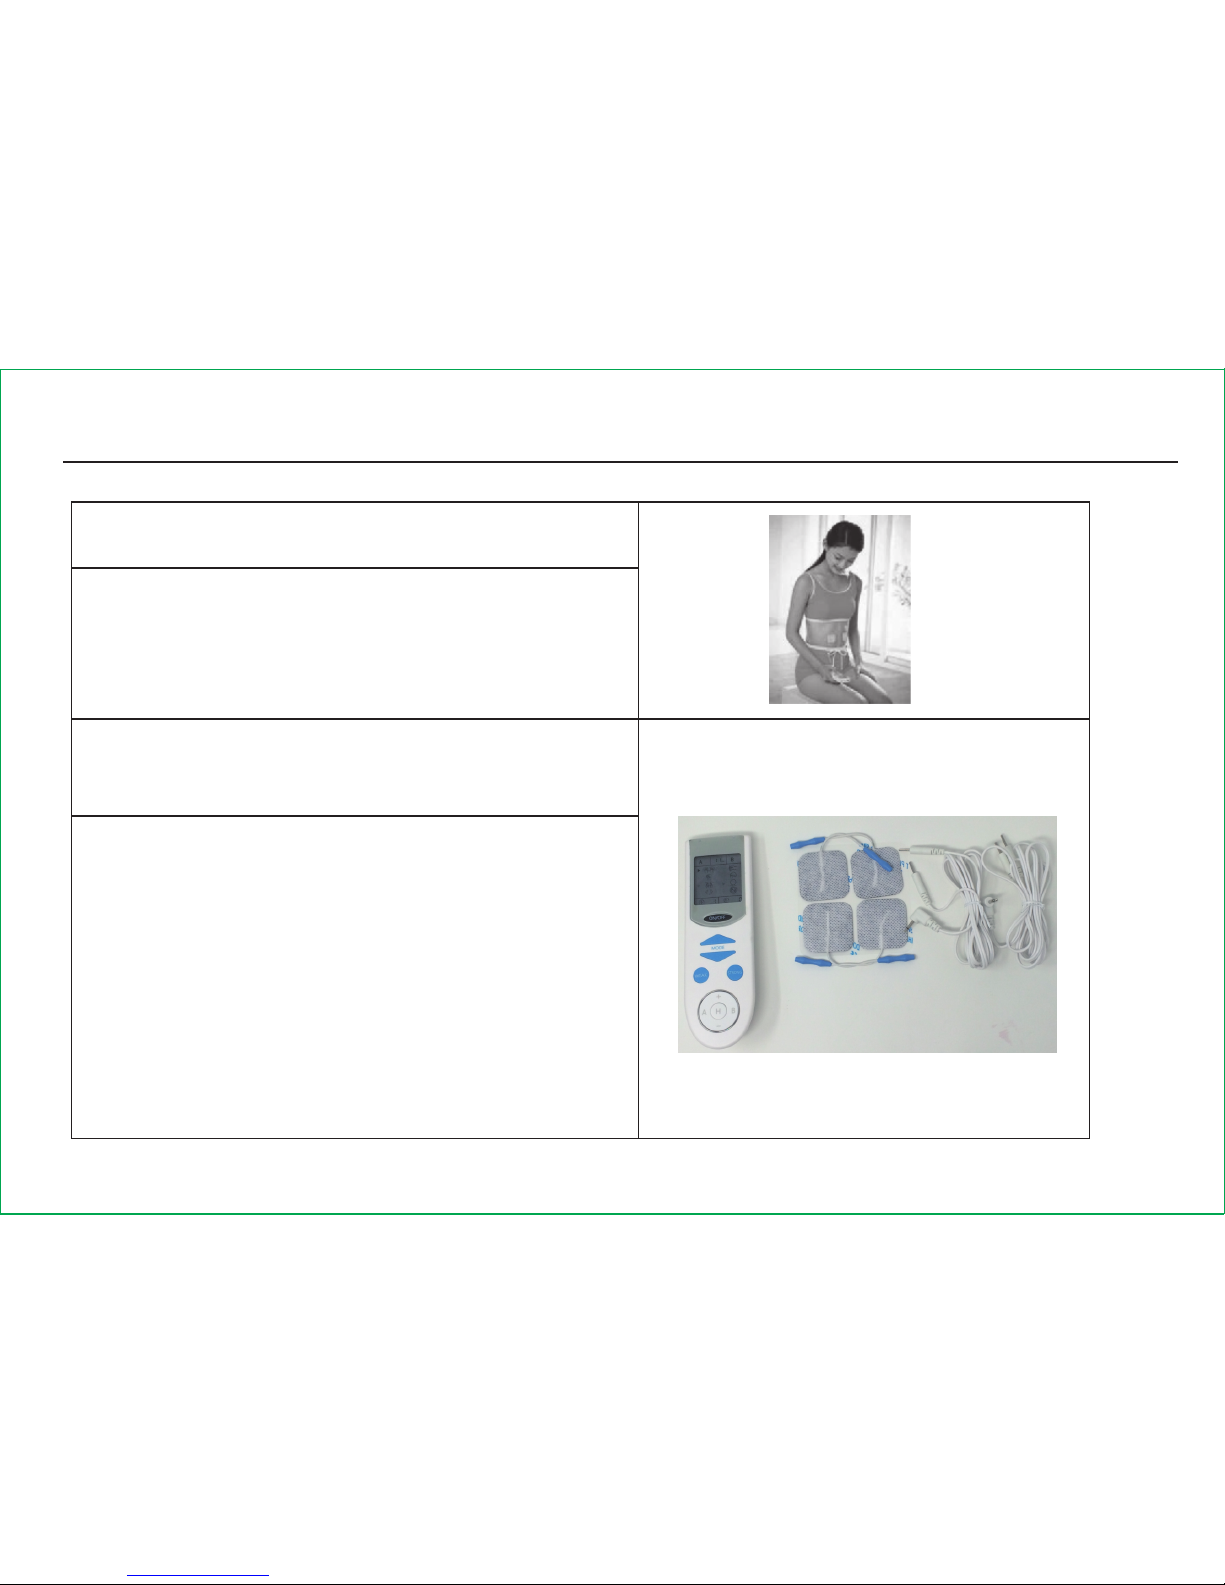
Quick Operation Guide
9th Step: Start massaging.
After the setting of device, it is working
and its pads could be covered with clothing.
Turn off the device if necessary.
10th Step : Press the “ON/OFF”
button to turn off the power.
Disconnect the wires and electrode pads after
the massaging. Take the batteries out if not
used frequently. Put the device in a dry and
shady place.
Important: Please make sure every part of the
device and accessories in good conditions before
the use of the device. Ask for replacement in
case of any breaking, cracking and scratching.
Page 16

Performance Specifications
Power Source 3 V Battery
Number of Output Modes 3
Number of Alternating Output Channels 2
Timer Range (minutes) 5 min, 10min, 15 min
Weight 6.0 oz. (battery and output wire included)
Dimensions (in.) [W x H x D]
2.32 x 7.87 x 0.83
Waveform Monophasic
Shape ectangular
Maximum Output Voltage 4 9.6V@500Ω
99.2V@ 2 kΩ
114V@10 kΩ
Maximum Output Current 15mA @500Ω
3.2mA@ 2 kΩ
0.6mA@10 kΩ
Duration of primary (depolarizing) phase
4
0 msec
Pulse Duration 100—200 µsec
Frequency 0.5-86Hz
Net Charge 18 000µC@500Ω
Page 17

Performance Specifications
Maximum Phase Charge 23 µC @500Ω
Maximum Current Density 1 .4mA/cm²@500Ω
Maximum Average Current 18mA@500Ω
Maximum Average Power Density 0.23W/cm²@500Ω
Burst Mode (Pulses per burst) 1
( Bursts per second) 7
( Burst duration) 0.17-1 sec
(Duty Cycle) 1. 19-7
ON Time 40 ms
OFF Time 18 ms
Page 18

Quality Assurance Tests
The test result of each step should meet the following pass criteria. Otherwise, it is
considered failed and you should contact Prospera Corporation for a repair or
replacement.
Key function test: When the functional keys are pressed step by step, the outputs
of the device should be identical to the following descriptions:
1. When the ON/OFF key at the off condition is pressed, the device is turned on and
massage output will be generated with level 1 speed and intensity.
2. When the mode-adjust keys is pressed, the corresponding mode showed on the
LCD screen will be generated.
3. Press the Speed up or down button to increase or decrease the speed
4. Press the module control keys “A” or “B” will generate output from module A or
module B.
5. When the time key is pressed, the countdown time can be selected from15, 10
and 5 minutes.
Page 19

LCD check: The information displayed on the LCD screen should be identical to the
following descriptions:
1. When the ON/OFF key is pressed, the device is turned on, and the LCD screen
displays
Letter “A” at the upper left corner with intensity and velocity of level 1 and a 15 min
countdown time.
2. When either of the mode-adjust keys (“”, “ ”) is pressed each time, a corresponding
icon is displayed by the name of “Massage”, “Beat”, “Knead”, “Slim”, “Acupuncture”,
“Scraping”, “Cupping” or “Immune”.
3. When either of the speed-adjust keys (“+”, “-”) is pressed each time, the LCD
screen shows a corresponding velocity level.
4. When either of the intensity keys (WEAK, STRONG) is pressed each time, the LCD
screen shows a corresponding intensity level.
5. When the time key is pressed each time, 15, 10 or 5 minutes will be shown on the
LCD screen in a circular manner.
Quality Assurance Tests
Page 20

Quality Assurance Tests
Program stability test: The program should work consistently and identically as
designed during multiple tests.
How to clean Electronic Pulse Massager
Use damp cloth or water to clean the device. Do not let the sticky side of the pad
touch anything, including the greasy finger tips. Clean the pads, if necessary,
with a soft damp cloth.
Maintaining the Electronic Pulse Massager
1. The device uses 2pc AAA batteries. To replace the battery, make sure the device is
turned “OFF”. Slide the compartment cover open. Remove the old batteries. Insert
2pc AAA batteries according to the diagram. And finally close the cover.
2. Be sure the electrode pads are suitable sticky. Replace the pads if the following
situations occur: a) cannot sense the stimulation; b) the stimulation is weaker; c)
cannot stick the pads on the skin; d) electrode pads are oily, wet, or their covers
Page 21
Maintaining the Electronic Pulse Massager
having breaking or worn out. Recommend to use Prospera’s electrode pads.
3. Change a new wire if it is too old or broken. Recommend to use Prospera’s wire.
How to store the Electronic Pulse Massager
Environmental condition for transport and storage
Easily fragile product.
Keep the product in the dry place. Be away from water and rain.
Product package should be recycled.
Stacked up 4 cartons at most.
o
o
Temperature range: 0 c to 48 c
Humidity: 10% to 85%
Atmospheric pressure: 400hpa to 1060pha
Page 22

When to order new pads
The electrode pads coming with the device are disposable, and should be replaced
when their adhesiveness becomes worse. Contact Prospera for replacements
Part Replacement
Contact Prospera to order replacement parts. Be sure to use only Prospera’s
Electronic Pulse Massager. You can check the Prospera website at
www.prosperacorp.com for additional Product information.
Electronic Pulse Massager---Part # PL029
Electrode Pads---Part # PL009-P
Electric Wire----Part # PL029-W
Conformity to Standards
1. The PL029 Electronic Pulse Massager is compliance with:
IEC60601-1 Medical electrical equipment -Part 1: General requirements for
safety.
Page 23

Conformity to Standards
Medical electrical equipment -Part 1-2: General requirements for
safety Collateral Standard" - Electromagnetic compatibility - Requirements and tests.
IEC 60601-2-10 Medical electrical equipment -Part 2: Particular requirements for
the safety of nerve and muscle stimulators.
IEC60601-1-2
2. The electrode pad is compliance with:
EN ISO 10993-5 Biological Evaluation of Medical Devices - Part 5: Tests for In
Vitro Cytotoxicity.
EN ISO 10993-10 Biological evaluation of medical devices - Part 10: Tests for
irritation and delayed-type hypersensitivity.
Page 24
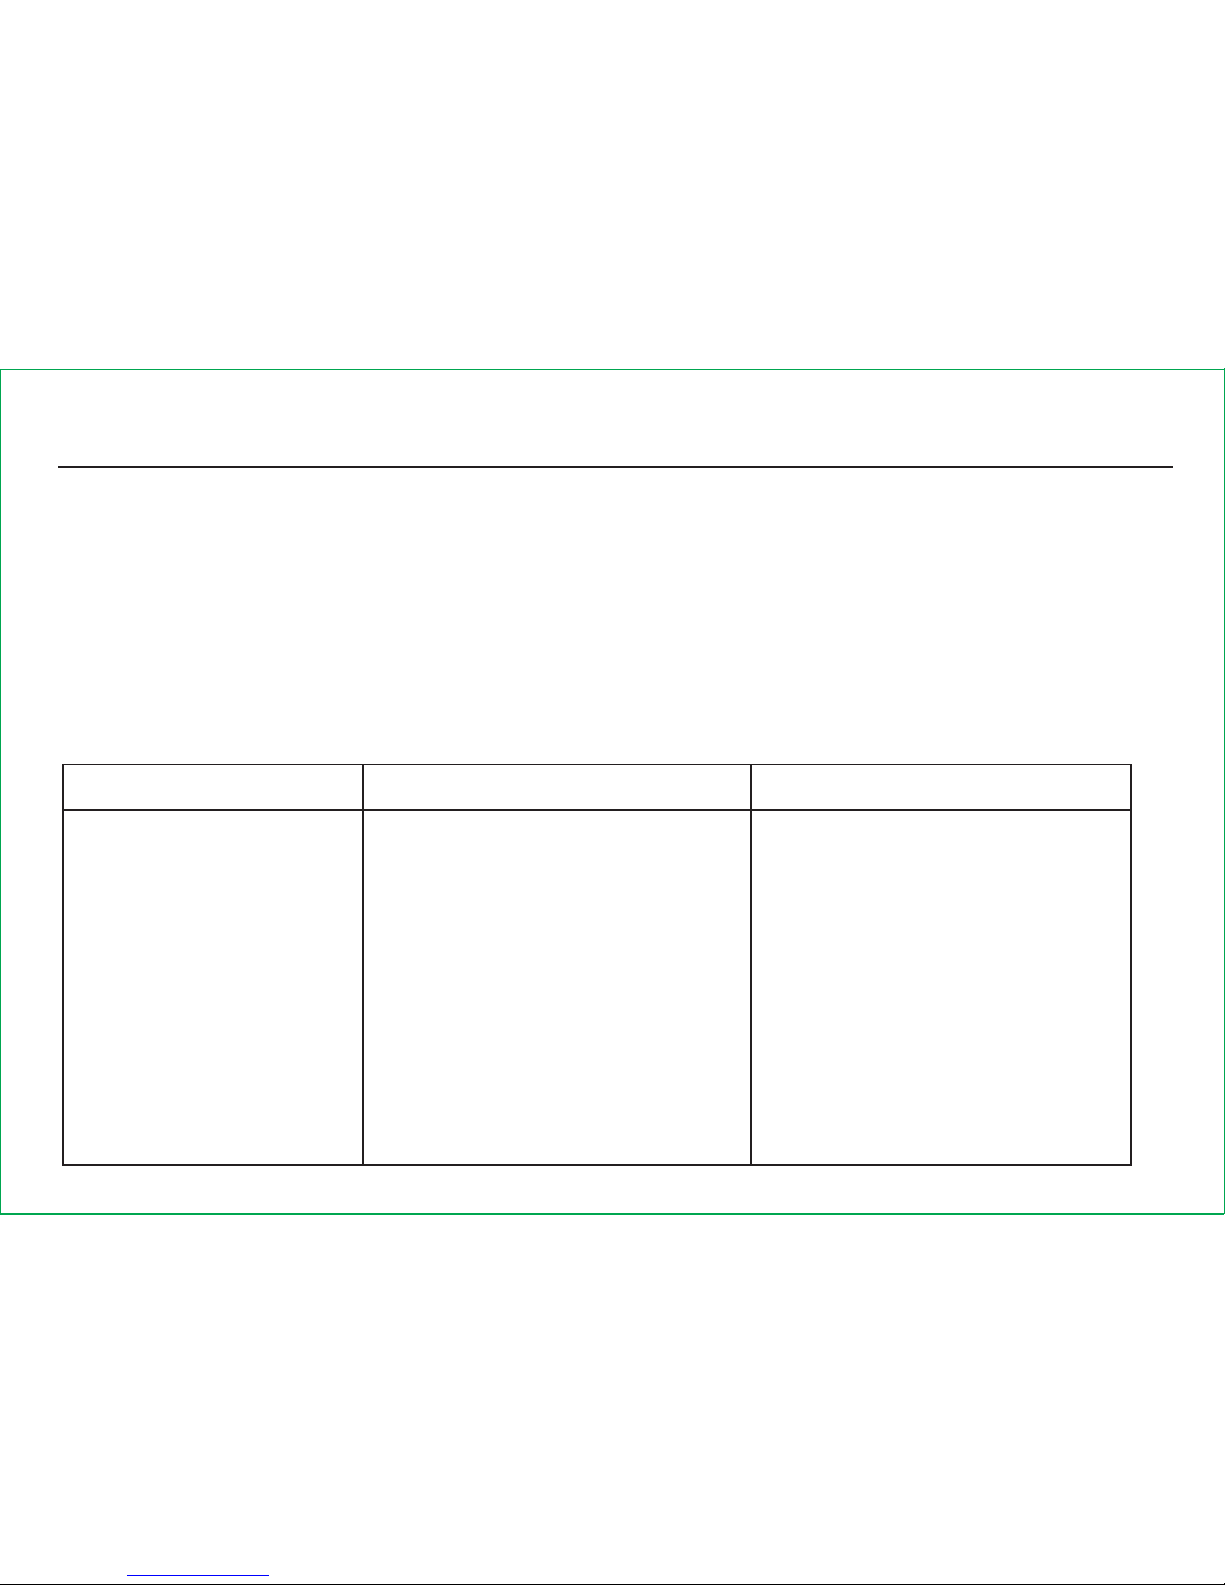
If the device is not operating properly, please check it for the following
problems or conditions. If the recommended action does not solve the problem,
please return it to the authorized dealer for the replacement/repair of the
device.
Trouble Shooting
Should the following situations happen, please take the recommended trouble
shooting procedures:
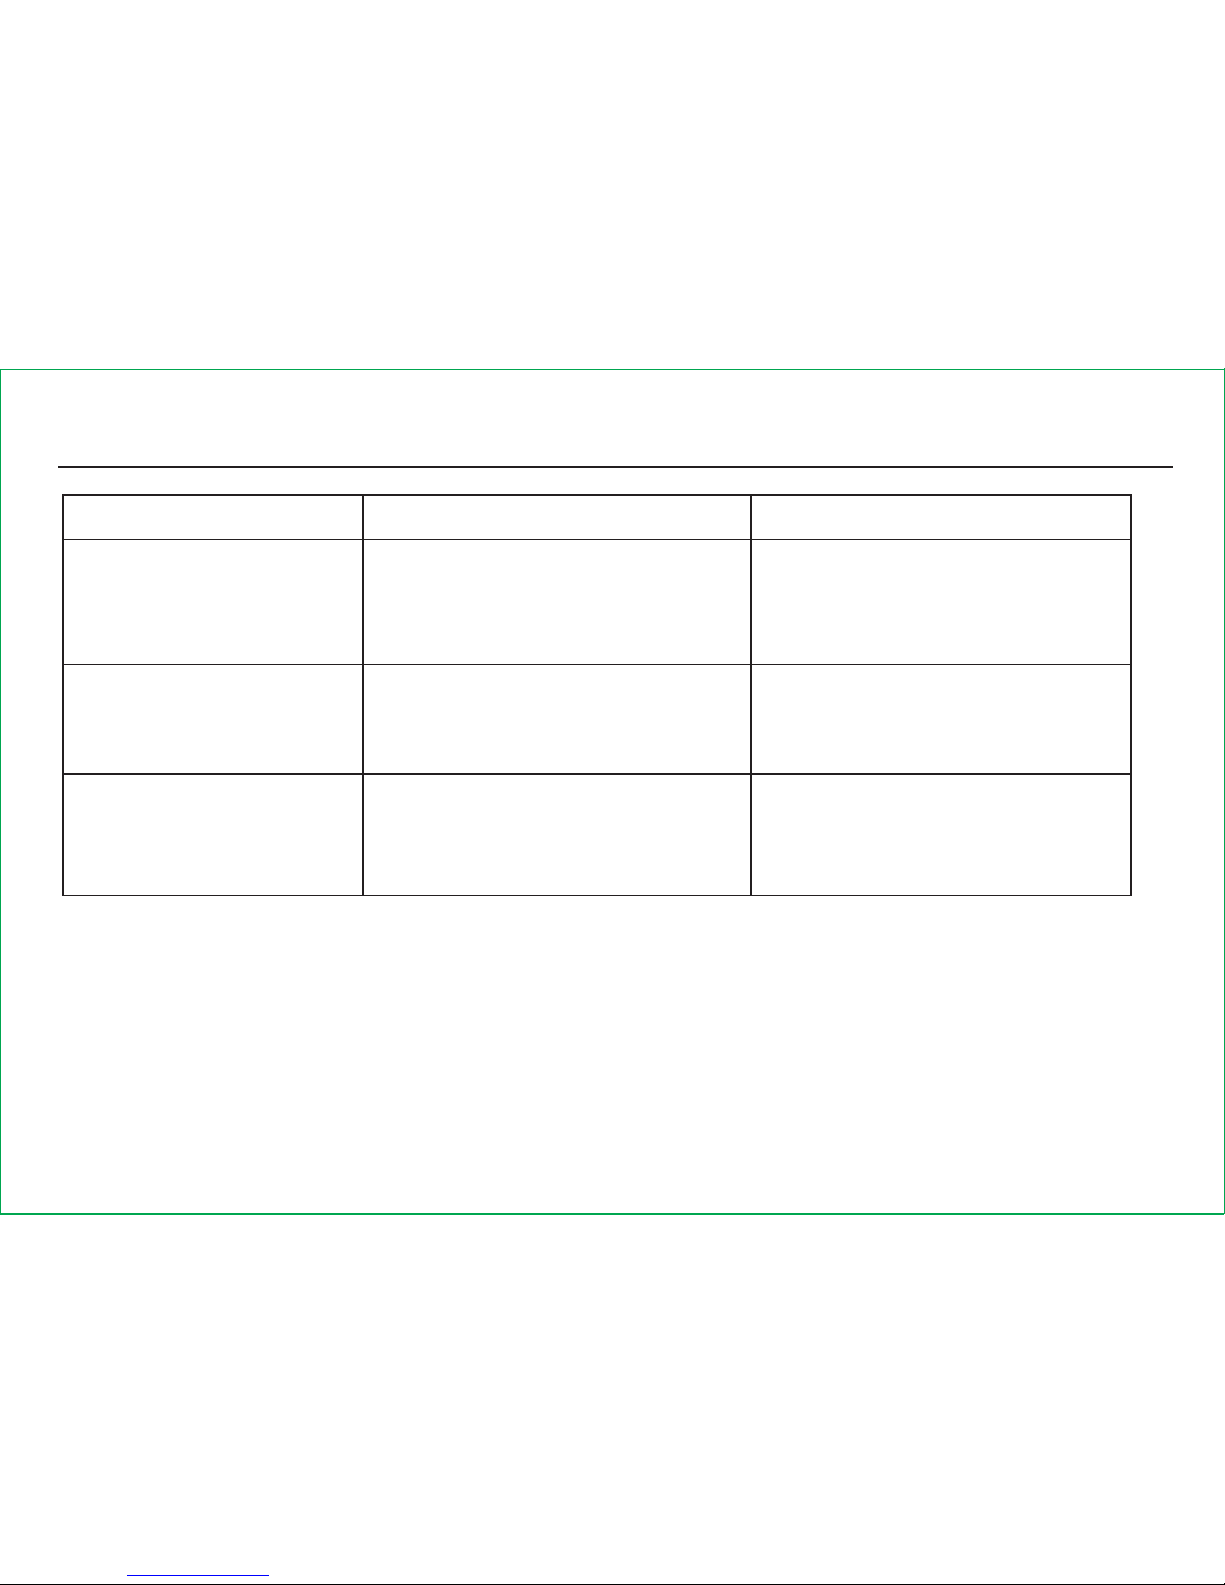
MALFUNCTION CAUSE SOLUTION
Stimulation is weak
or not existent
Are the electrode heads in close
contact with the skin?
Remove, clean and place back
on the skin.
Do the electrode heads touch
each other?
If so then separate.
Are the wires connected to the
electrode heads and the main
device properly?
Disconnect, clean and reconnect
all the parts.
Are the batteries dead?
Replace the dead batteries.
Page 25
Trouble Shooting
Skin turns red Is treatment time too long? Treat another area.
Skin feels numb
Are electrode heads dirty?
Do the electrode heads touch the
skin closely?
Clean with damp cloth.
Remove and place again on the
skin.
Device does not turn on
Batteries installed correctly?
Are batteries dead?
Remove and install batteries.
Replace the dead batteries.
Pads are not sticky Pads get deteriorative
Contact Prospera for
replacements.
Page 26

Consumer Warranty
Prospera offers a 90-day standard warranty to the massage products. Labor and parts
are included during warranty period. Consumers are required to provide model number
and dated proof of purchase (sales receipt) when contacting Prospera for the warranty
service.
A non-warranty service is provide on “a per incident” basis. The consumer will verify
that the product has failed and provide information for servicing the unit. All applicable
repairs, parts, shipping, handling, local tax and per incident fees will be charged for
non-warranty repairs and support.
Page 27
Positions
Page 28

Warranty Card
Warranty Registration Form
Product Name: Product Model:
Purchase Price: Date of Purchase:
Retailer:
First Name: Last Name:
Address: City:
State: Zip:
Phone: Email:
Signature and date:
Page 29

Warranty Card
Prospera Corporation
Email: [email protected]
Please mail to:
448 Commerce Way
Livermore, CA. 94551
Tel:(925) 225 0888
 Loading...