

Page 1

LOOP RESISTANCE BANDS SET
Instruction Manual & Exercise Guide
Page 2

Disclaimer, Terms and Conditions
IMPORTANT
Please read this entire manual before using the ProSource Loop Resistance Bands
set. Failure to follow these instructions can lead to signicant injury and/or
property damage.
ProSource recommends that you always obtain a complete physical examination
before beginning any exercise program. If you experience any discomfort while
using the Loop Resistance Bands discontinue use & consult your physician.
Please use caution & carefully follow all exercise instructions and use proper
technique when using the Loop Resistance Bands. Always modify exercises as
needed for your tness level.
If you have any questions, concerns or comments about the Loop Resistance Bands,
please contact Customer Service before using at 1 (800) 552-2637 and we will
be happy to help you.
Use & Care Instructions
1.
Before each use, check bands for damage or weak spots in order to avoid
breakage while training.
2.
Do not use bands on abrasive or jagged surfaces.
3.
Do not stretch to more than 3 times their original length.
4.
Do not release the bands when under tension to avoid injury. Carefully return
bands to their original length before releasing.
5.
Wipe with a damp cloth to clean. Do not use soap or other cleaning
products on bands, as it may damage and/or weaken latex.
6.
Store in a cool, dry place away from moisture, heat, and direct sunlight.
ProSource Loop Resistance Bands come in three resistance levels to accommodate
various tness levels and types of exercises:
Green = Light: 10 - 15 lb. Red = Medium: 15 - 20 lb. Blue = 25 - 30 lb.
It is recommended to start with the green band for each exercise in this guide.
Once that becomes easy, you can advance to the red and blue bands. Be sure
you can perform the exercise with proper form without using force or momentum
before advancing to the next level.
Make sure you can move through a full range of motion before advancing to a
heavier band in order to avoid overcompensating with other muscles. Many of
these exercises are intended to be very small movements in a limited range of
motion that require very little resistance to be effective.
Page 3
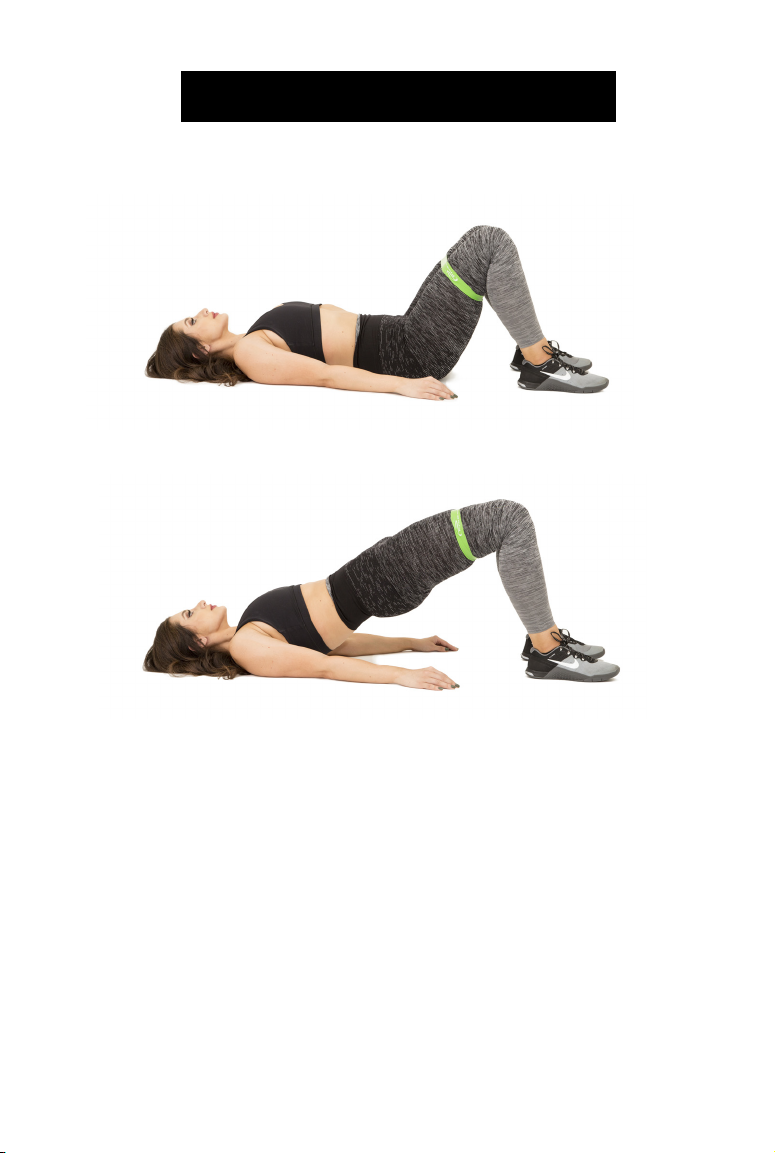
EXERCISE GUIDE
BRIDGES
1.
Lie on your back with feet hip or shoulder-distance apart. Bend your knees
with feet on the oor so that your heels are about a hand’s distance from
your buttocks.
2.
Place a band around your knees so that both knees are pushing out slightly
to hold the band in place, but keep knees aligned with your feet and hips.
3.
Slowly lift your hips up off the oor as high as you can, squeezing your
buttocks until your weight is on your shoulder blades.
4.
Pause for a moment as you contract your glutes, then slowly lower from the
bridge position, one vertebrae at a time, until the tailbone touches the mat.
Repeat 12-15 times.
Page 4
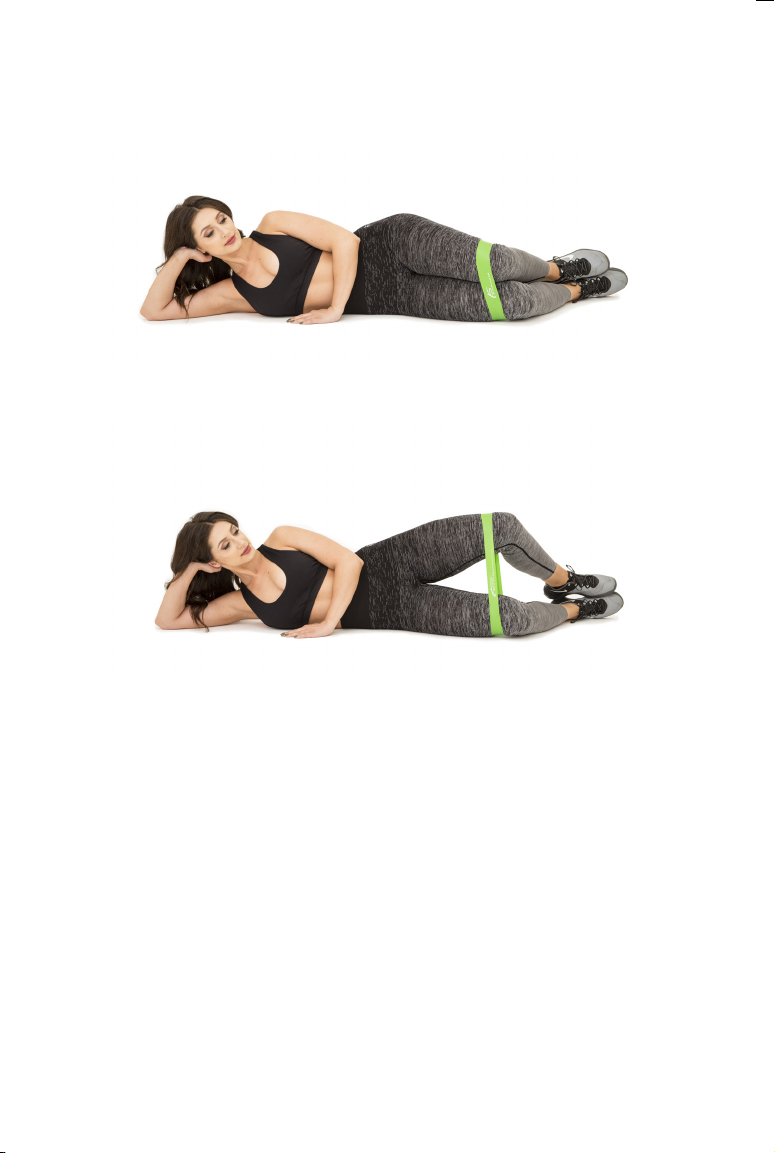
CLAM SHELLS
1.
Lie on your side with knees bent about 90 degrees, with a band wrapped
around your thighs just above your knees. Your head, shoulders, buttocks,
and bottom of feet should all be aligned.
2.
Rest your head on the arm that is in contact with the oor to support your
neck, and place the other arm on the oor in front you for support.
3.
Make sure that your pelvis is straight up and down, not open toward the
ceiling. Maintain this position throughout the exercise.
4.
Keeping your feet together, slowly raise your top knee into the air so that the
leg lifts like the opening of a clam shell. Raise the knee as far as you can
without your pelvis rocking backward.
5.
Slowly lower the knee with control. Repeat 8-10 times on each side.
Page 5
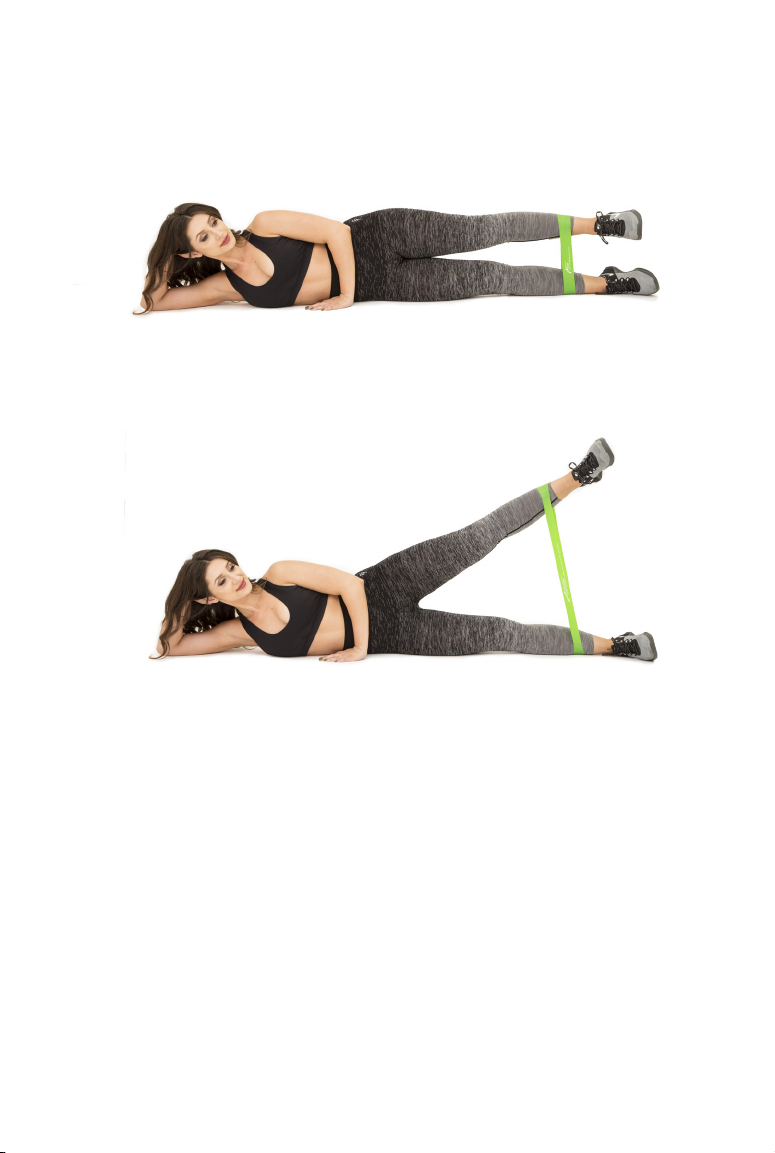
SIDE LYING LEG LIFTS
1.
Lie on your side with a band around your ankles. Stack your legs and keep
them straight.
2.
Rest your head on your bottom arm, top hand on mat in front of you for support.
3.
Flex both feet and draw your belly button in toward your spine to engage
your core. Lift your top leg toward the sky, creating tension on the band and
pulse the leg up 10 times at a medium pace. Repeat on other side.
Page 6
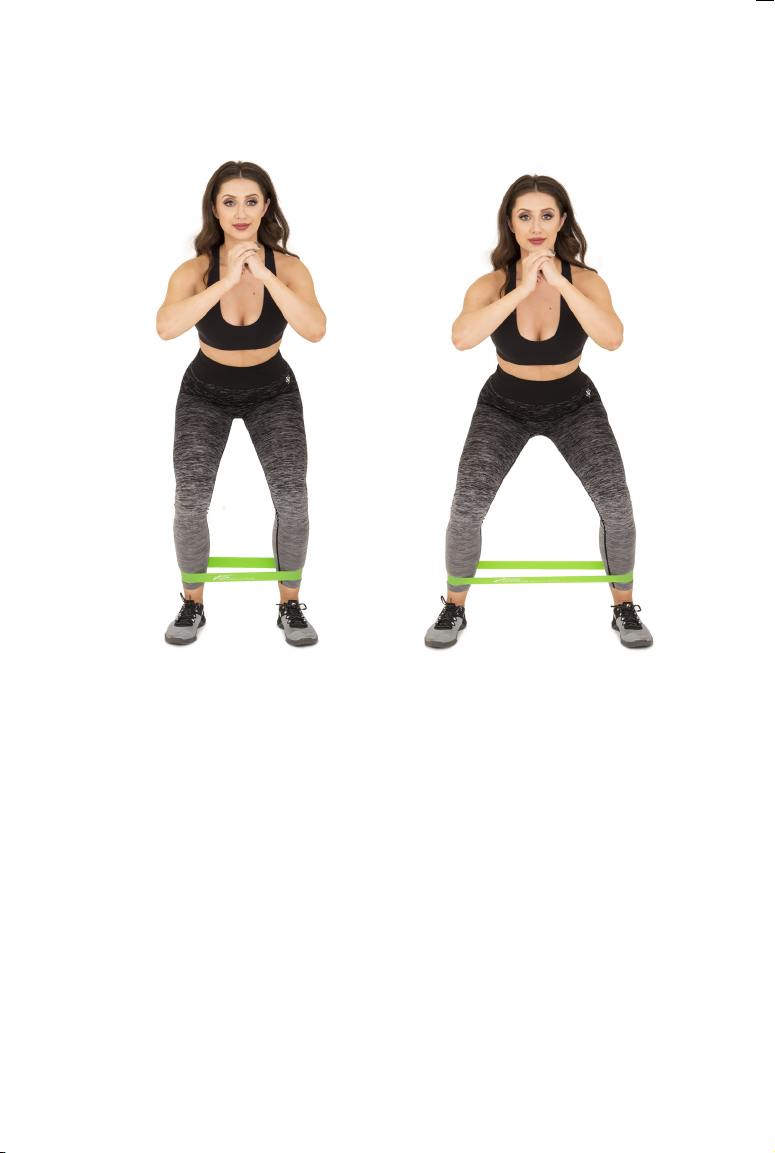
SIDE STEPS
1.
Place a band around your ankles. Stand tall with feet about two inches
apart, toes facing forward
2.
Bend knees slightly & keep them aligned with toes while butt pushes backward.
3.
Start by stepping your right leg gently out toward the right, as far as you
comfortably can without force (approximately hip to shoulder distance apart).
4.
Keeping your squat position, step the left foot in toward the right foot.
Continue stepping out with the right foot, and then stepping the left foot in.
5.
Complete 10-15 reps, then repeat in the opposite direction.
Page 7
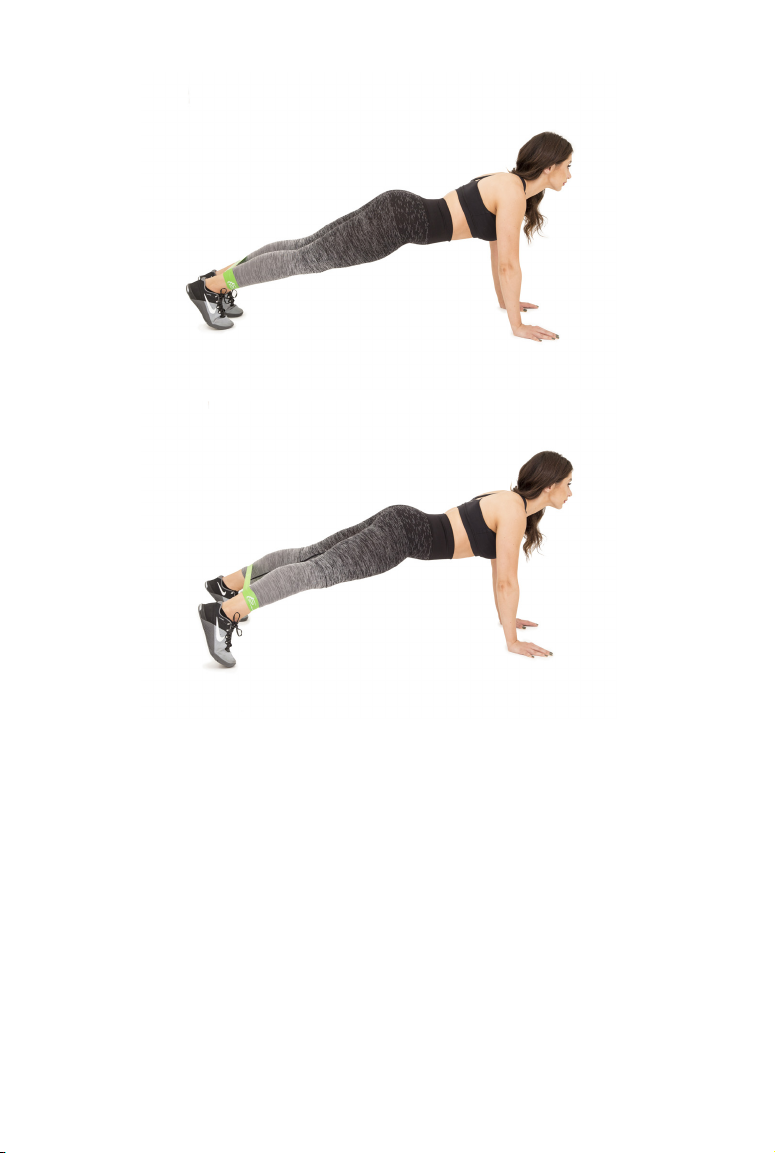
PLANK WITH SIDE STEPS
1.
Begin in a push-up position on your toes with hands underneath shoulders
and a band around your ankles.
2.
Make sure your body stays in a straight diagonal line the whole time, not
allowing your hips to rise up or sink down.
3.
Start with both feet close together, then extend one leg to the side, tapping
your toe on the ground. Then slowly return it to the start position.
4.
Repeat on the opposite side. Continue alternating sides until you complete
8-10 reps on each leg.
Page 8
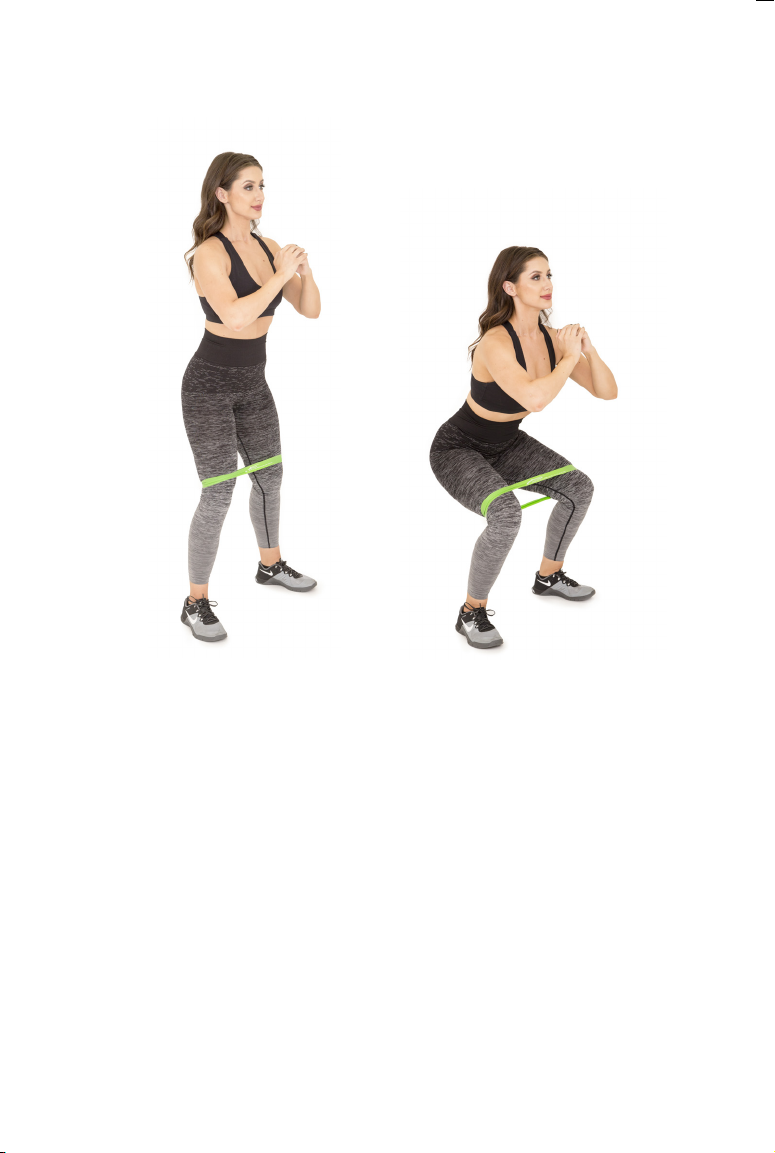
SQUATS
1.
Place a band around your lower thighs just above the knees. Stand with feet
about shoulder distance apart, keeping knees aligned with toes. The width of
your stance may vary slightly to maintain tension on the band.
2.
Clasp hands or extend them out in front of you and brace your core, then
lower toward the oor by bending at the knees and pressing butt back, as if
you were going to sit on a chair.
3.
Make sure to keep your torso straight and as tall as possible – don’t lean forward
– and press thighs slightly into the band to help engage your glute muscles.
4.
Lower until thighs are parallel with the oor (or as low as is comfortable for you),
keeping your weight in your heels.
5.
Press back up, contracting glutes as you return to the start position. Repeat
10-15 times.
Page 9
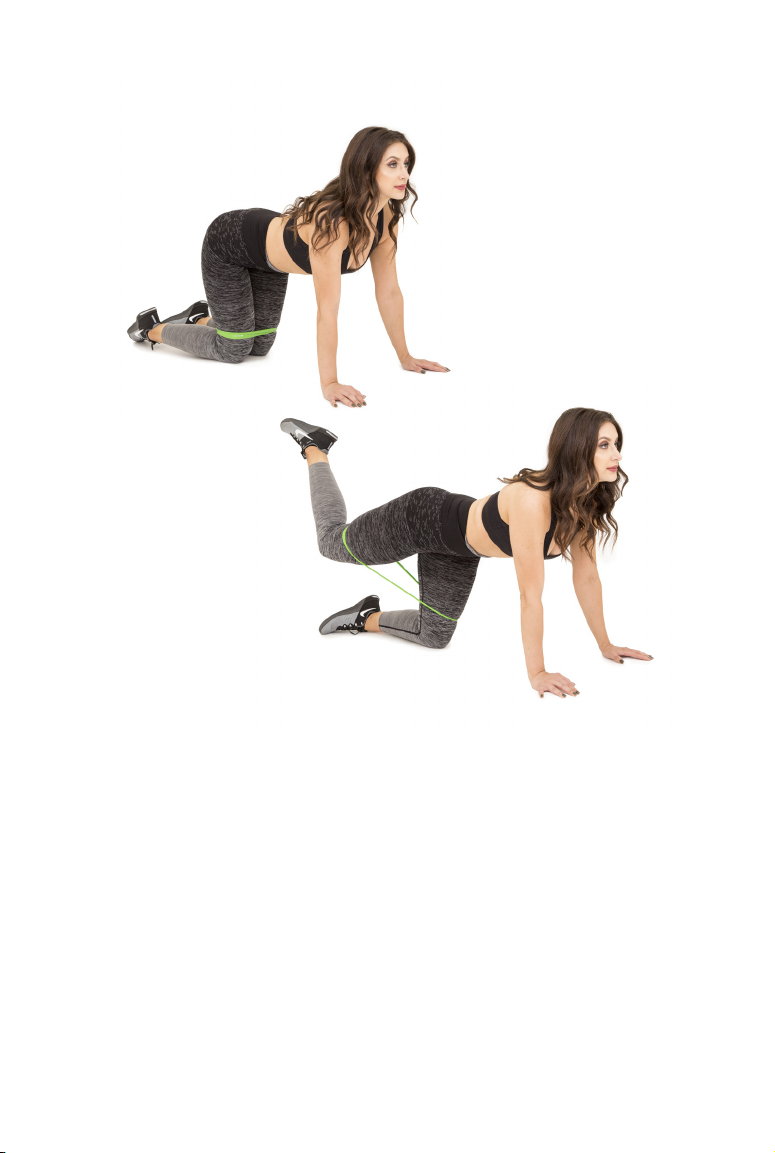
DONKEY KICKS
1.
Start on the oor on all fours. Hands should be directly below your
shoulders, and knees below your hips. Maintain a neutral spine.
2.
Place the band around thighs or calves. Flex one foot and lift it toward the
ceiling, keeping your knee bent.
3.
Squeeze your buttocks as you lift, until thigh is parallel to the oor. Pause for
one second, then slowly return to the start position.
4.
Repeat 10-15 times before switching to the other leg.
Page 10
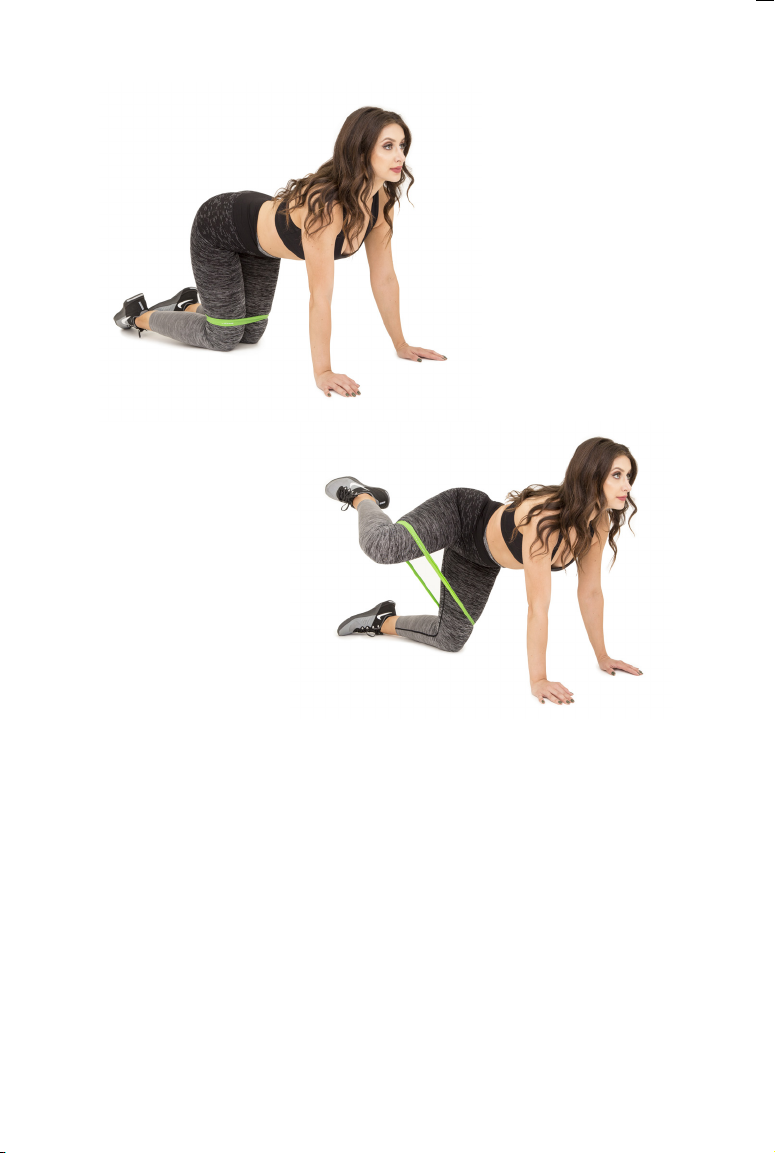
FIRE HYDRANTS
1.
Start on the oor on all fours, with the band around your lower thighs.
2.
Hands should be directly below your shoulders, and knees below your hips.
Maintain a neutral spine.
3.
Slowly lift one leg out to the side, with knee bent, until thigh is nearly parallel
to the oor.
4.
Return to start position and repeat 10-15 times on each side
Page 11
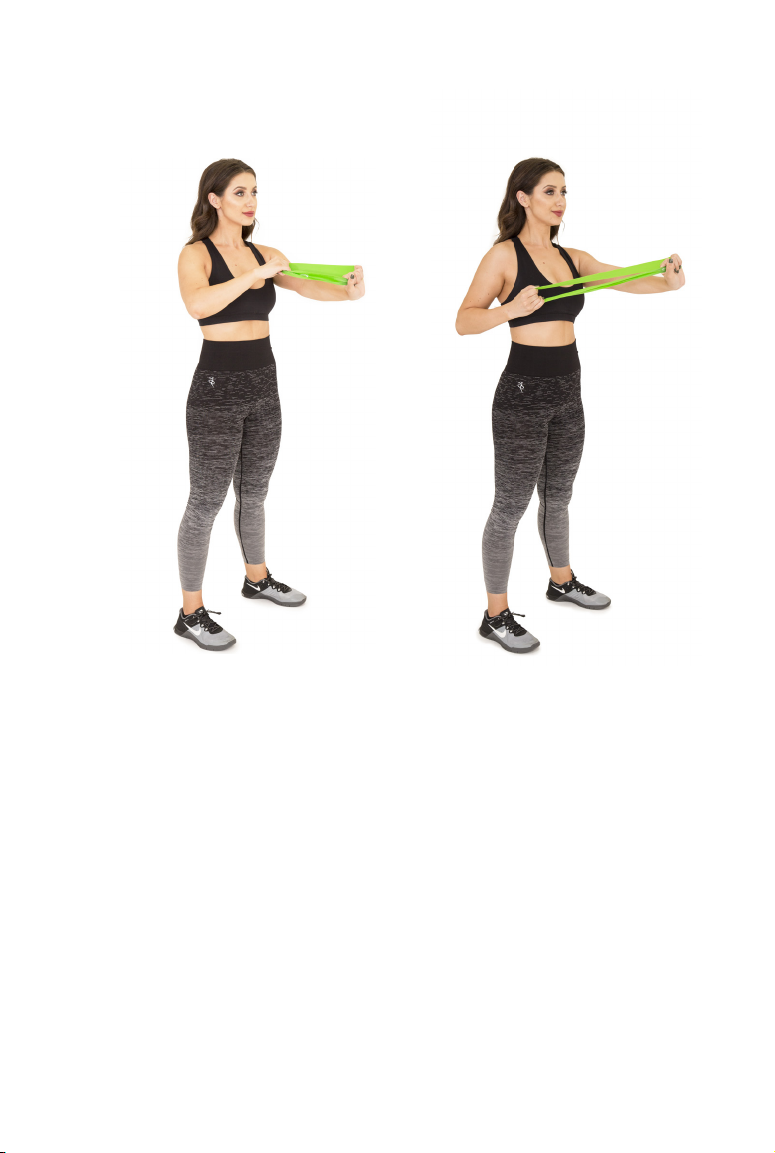
BACK ROW
1.
Hold one end of a band in one hand and extend arm out in front of you with
palm facing in.
2.
With your opposite hand, grab the other end of the band and bend arm to
90-degrees. Both hands should be grasping band rmly with closed sts.
3.
Draw elbow in by your side. Then, keeping your bent arm by your side,
draw the band back, squeezing your mid back as you pull.
4.
Once you’ve pulled as far as you’re able, release back to the start position.
Repeat 12-15 times, then switch to the other arm.
Page 12
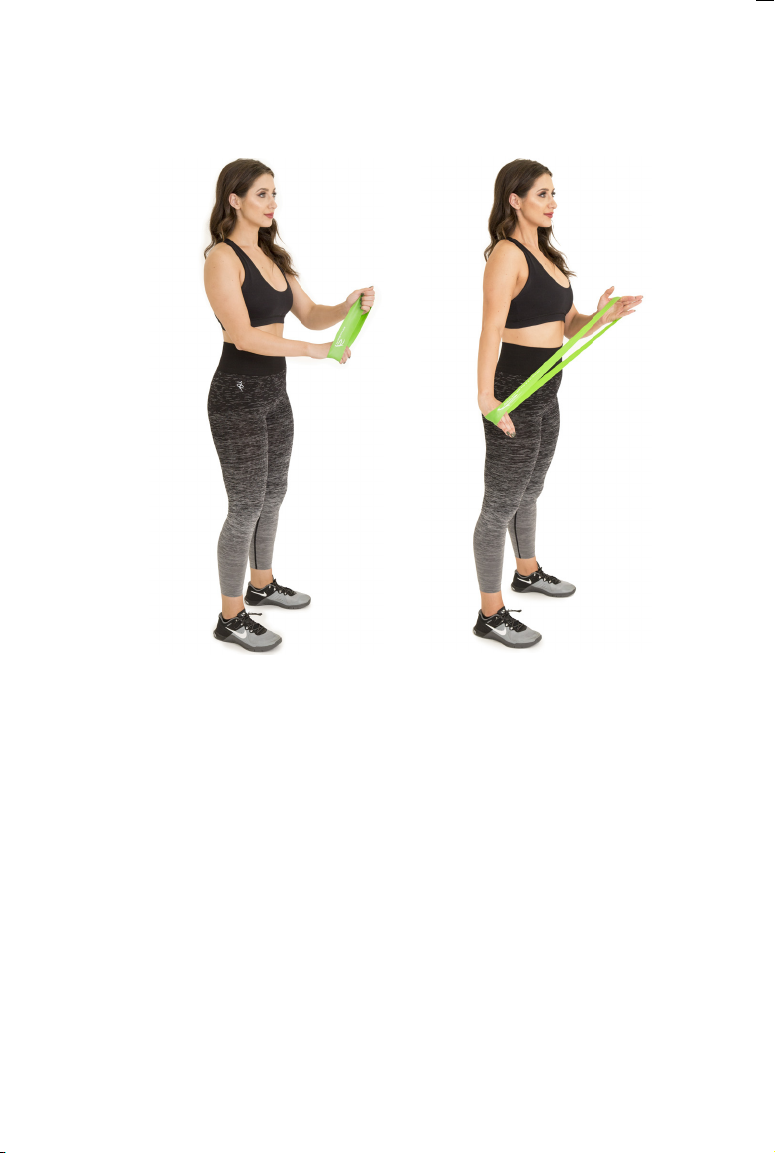
TRICEPS EXTENSIONS
1.
Wrap a band around both hands, then bend elbows at 90 degrees with
elbows tucked into your sides. Hands should be directly in front of you.
2.
Bring one hand to the opposite shoulder. Keep the other elbow tucked in
by your side, then with palm facing down, press the band down toward the
oor until your arm is straight.
3.
Slowly return to the start position, and complete 12-15 reps on each side.
Page 13
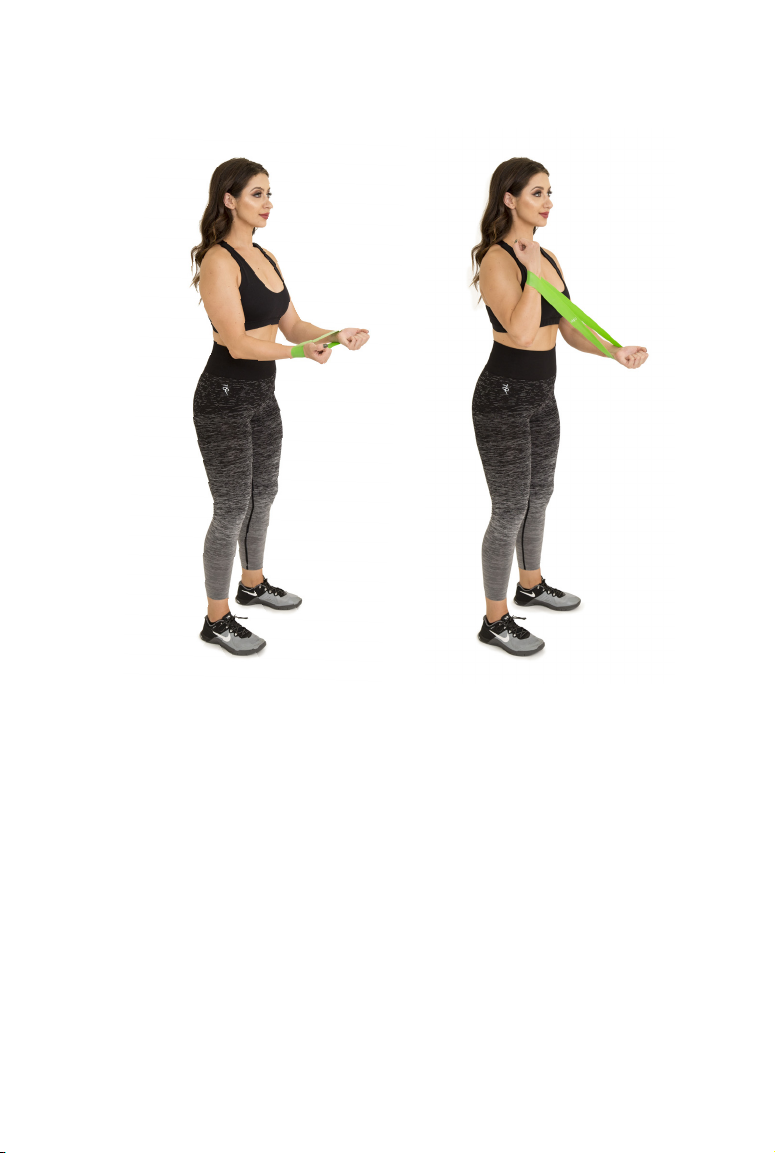
BICEP CURLS
1.
Place a band around both wrists, then bend elbows at 90 degrees with
elbows tucked into your sides. Hands should be directly in front of you with
hands turned toward the ceiling. You can keep palms open or make sts.
2.
Draw one hand up toward your shoulder, squeezing your bicep at the same
time. Then slowly release back to the start position, then repeat with other arm.
3.
Complete 12-15 reps with each arm.
Page 14
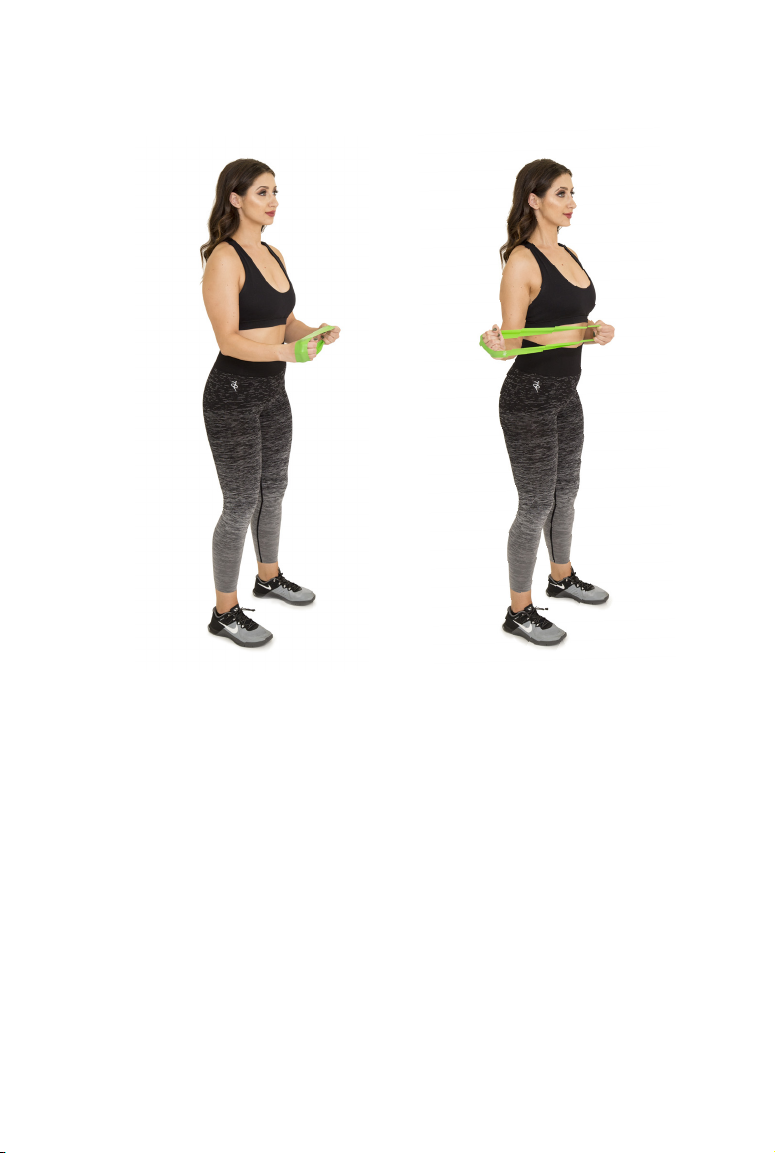
ROTATOR CUFF
1.
Place a band around both wrists, and bend arms at 90-degrees with elbows
tucked into your sides.
2.
Form sts with hands facing each other. Slowly externally rotate one arm,
drawing it away from your body. Make sure your arm only moves from the
elbow down.
3.
Once your arm is perpendicular to your body, return to the start position.
Repeat 10-12 times, then switch to the other side.
Page 15

WARNING
Do not use this product in ways not intended by its manufacturers. Failure to do
so may result in severe injury or death. Consult your physician before engaging
in any regular exercise. Do not use ProSource™ products for anything other than
their intended use. ProSource™ is not responsible for any problems that arise from
the misuse of this product.
LIMITED LIFETIME WARRANTY
Covers manufacturing defects including any defects in materials and workmanship.
ProSource has sole discretion to determine manufacturing defects. This Lifetime
Warranty does not cover: normal wear and tear, misuse, failing to follow use,
care, and safety instructions, loss and/or theft. This Lifetime Warranty applies to all
types of defects or failure during standard use.
QUESTIONS?
Contact Customer Support by email: support@prosourcet.com
All information in the manual is property of ProSource™
All trademarks, service marks, word marks, and trade names (collectively "Marks")
of ProSource used in this manual (including but not limited to the "ProSource"
name and stylized "ProSource" logos) are trademarks or registered trademarks
of ProSource. By using these products you accede to all terms and conditions
specied herein. All rights reserved.
Page 16

Train like a Pro, Train with ProSource
 Loading...