

Page 1
Drive Genius 2 User Guide 1
Drive Genius 2
User Guide
Doc Rev: 0608-1
Page 2

Table of Contents
Drive Genius 2 User Guide 2
1) Introduction
i) Welcome ..........................................................................................3
ii) Latest version of the software ..........................................................4
iii) Program Setup .................................................................................4
iv) Trial Version .....................................................................................4
v) Drive Genius 2 menu .......................................................................5
vi) Contacting Prosoft Engineering ......................................................7
vii) Drive Genius 2 Features ..................................................................8
viii) Steps to Complete a Task..............................................................10
ix) Tool Palette ....................................................................................11
x) Selecting an Operation...................................................................11
2) Maintenance and Management
i) Repair.............................................................................................12
ii) Defragment.....................................................................................16
iii) Duplicate ........................................................................................20
iv) Sector Edit......................................................................................25
v) Shredder.........................................................................................29
3) Testing and Reporting
i) Integrity check ................................................................................36
ii) Benchtest .......................................................................................41
iii) Scan ...............................................................................................48
iv) Information .....................................................................................50
4) Device Management
i) Initialize ..........................................................................................52
ii) Repartition......................................................................................55
(1) Resize.......................................................................................58
(a) Shrink ..................................................................................59
(b) Expand ................................................................................63
(2) Shift...........................................................................................64
(3) Delete........................................................................................68
(4) Create .......................................................................................69
(5) Reset.........................................................................................71
(6) Hide...........................................................................................72
(7) Reveal.......................................................................................72
5) Appendices
i) Questions and Answers .................................................................73
ii) Advanced Information about optimization and fragmentation ........75
iii) Expanding a drive in Windows XP .................................................78
iv) Moving the swap file in OS X .........................................................79
v) End User License Agreement ........................................................98
Page 3
Introduction
Drive Genius 2 User Guide 3
Welcome
Thank you for purchasing Drive Genius 2™
Drive Genius 2 is a collection of tools and helpers that help guard the data on
your drive.
Drive Genius 2 is designed from the ground up specifically for Mac OS X,
focusing on providing the best drive maintenance and management tools. Drive
Genius 2 optimizes drive performance, protects data and provides easy-to-use
yet powerful features for your storage needs.
Drive Genius 2 can defragment a volume, analyze a volume and repair it if
necessary. Its testing capability goes a few steps above other drive utilities with
media surface scanning and long term data integrity checking. Drive Genius 2
can also measure the throughput of the drives to see if they are performing up to
par.
The powerful repartitioning feature enables you to resize your drive without
reformatting. Drive Genius 2 can be used to add, initialize and delete partitions
from your hard drive. Drive Genius 2 can do volume and device copying. Drive
Genius 2 is able to hide partitions from most users. In addition, Drive Genius 2
has the ability to move a partition on the hard drive and even sports a sector
editing function to edit the data on any sector of the drive. Last but not least it has
a shredding feature that erases drives securely per the Department of Defense’s
standard.
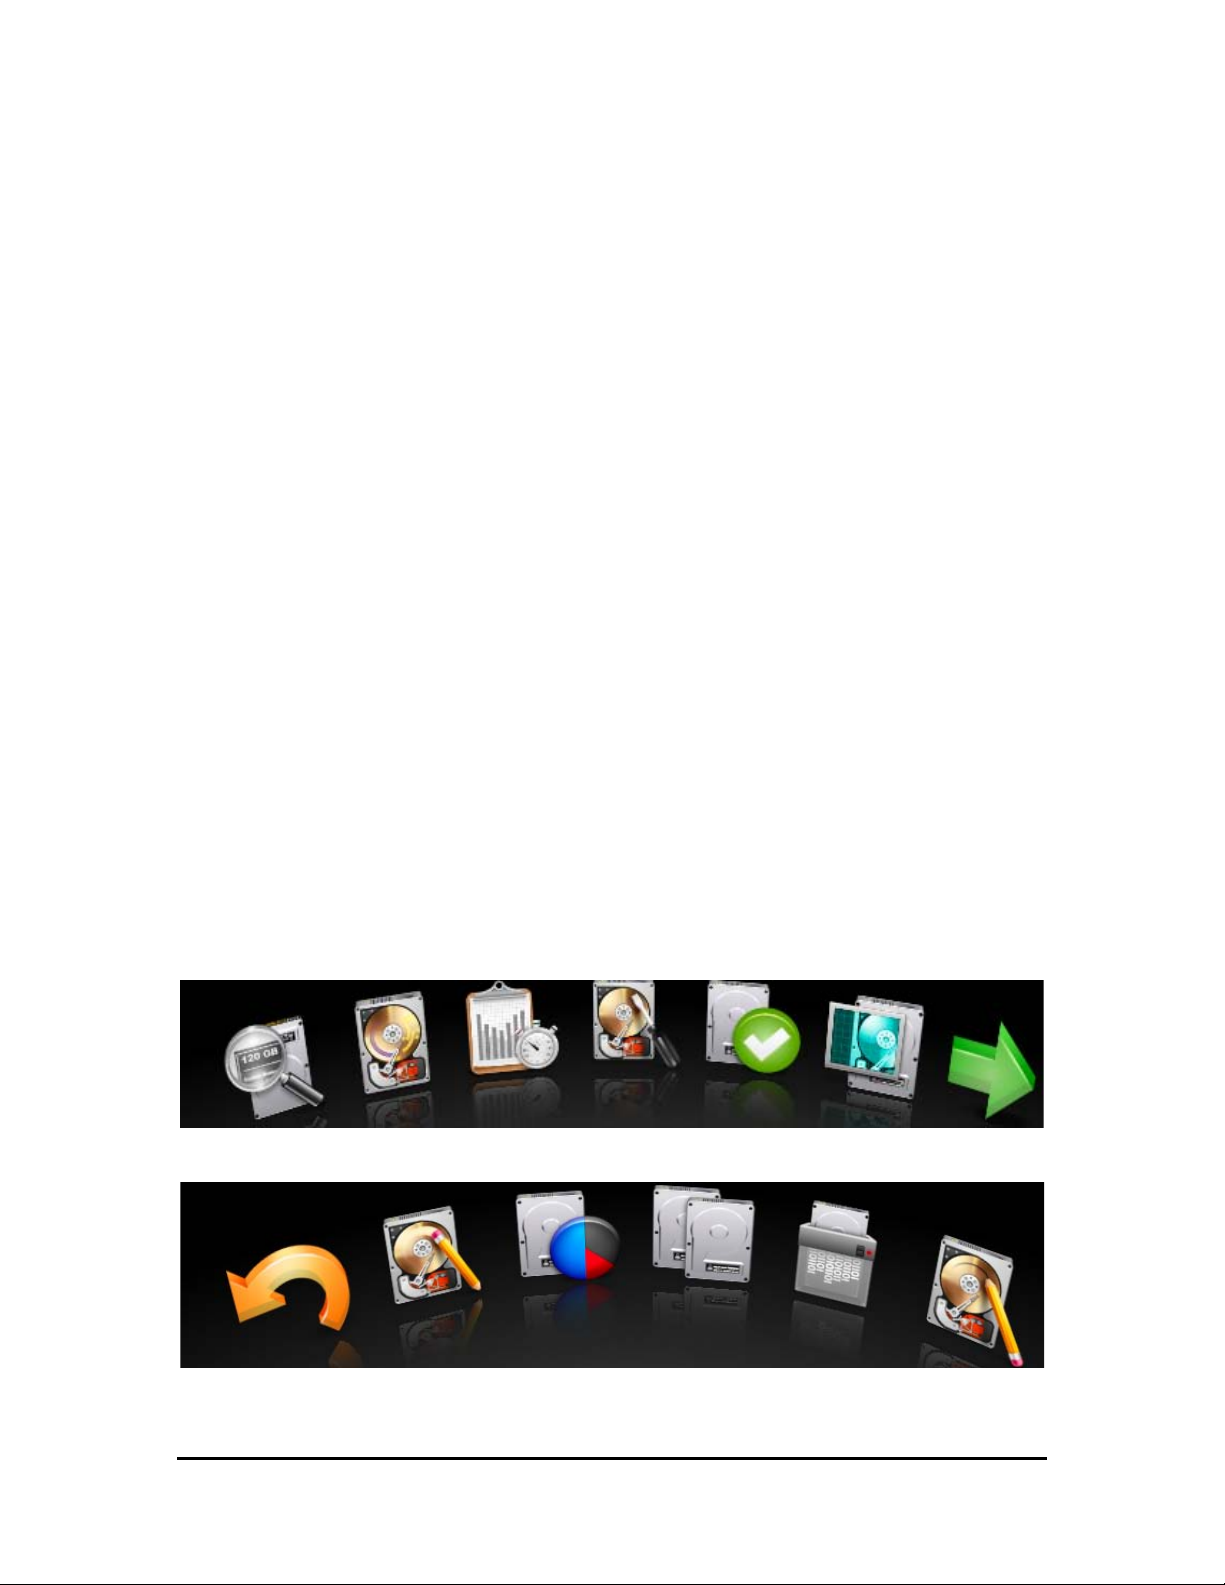
Drive Genius 2’ tool palettes
Page 4
Introduction
Drive Genius 2 User Guide 4
Latest version of the software
http://prosoftengineering.com
Check our web site to find out if you have the latest version of this software.
If you do not have the latest version of Drive Genius 2, you may download it from
our web site: http://prosoftengineering.com/products/downloadcenter.php
Program Setup
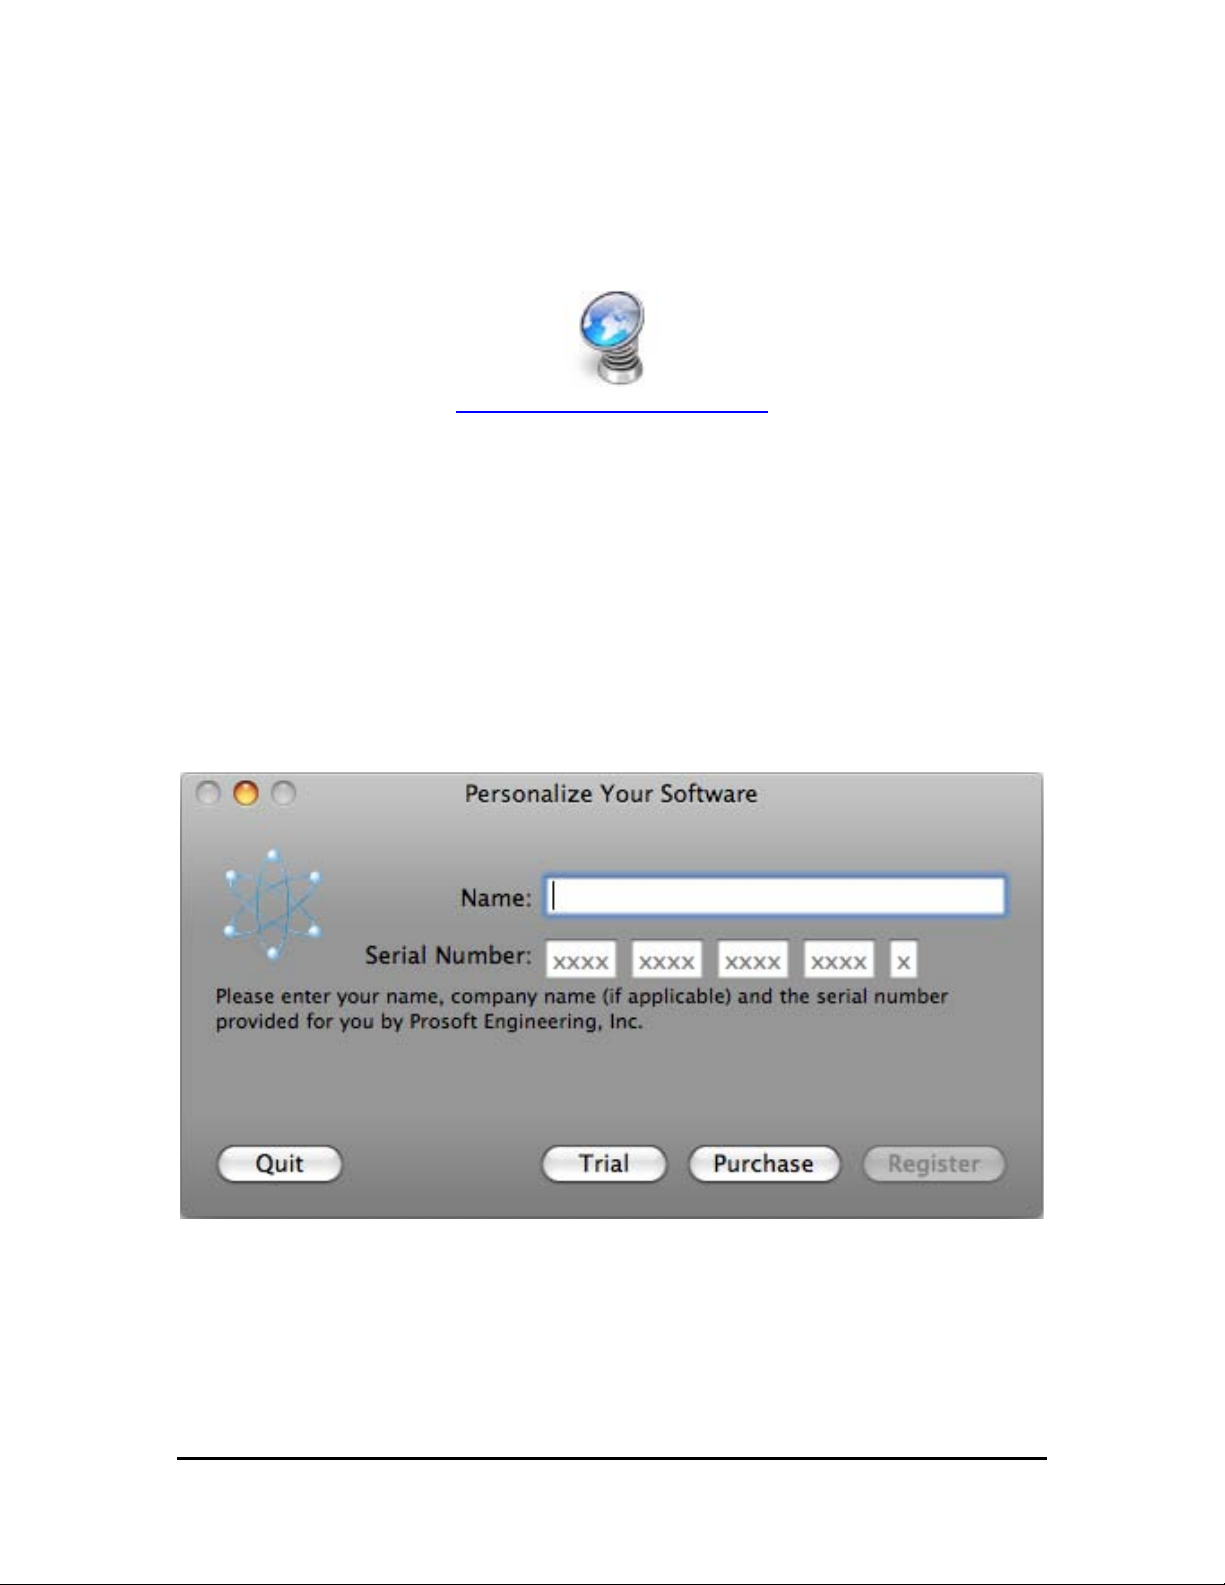
On the DVD, drag the Drive Genius 2.app to the Application folder on your hard
drive. The first time you launch Drive Genius 2, you will be prompted to enter
your name & serial number. To register enter in your name and serial number,
click Register.
Registration window
Page 5
Introduction
Drive Genius 2 User Guide 5
Trial Version
Drive Genius 2 allows users to try out the software. The Trial version has part of
the feature set disabled. To use in Trial mode, click Trial. For users interested in
purchasing Drive Genius 2, go to:
http://prosoftengineering.com
The following features are not enabled in the trial version:
o Benchtest
o Repartition
o Intergrity Check
o Duplicate
o Sector Edit (Writing)
o Defragment
o Initialize
o Repair and Rebuild
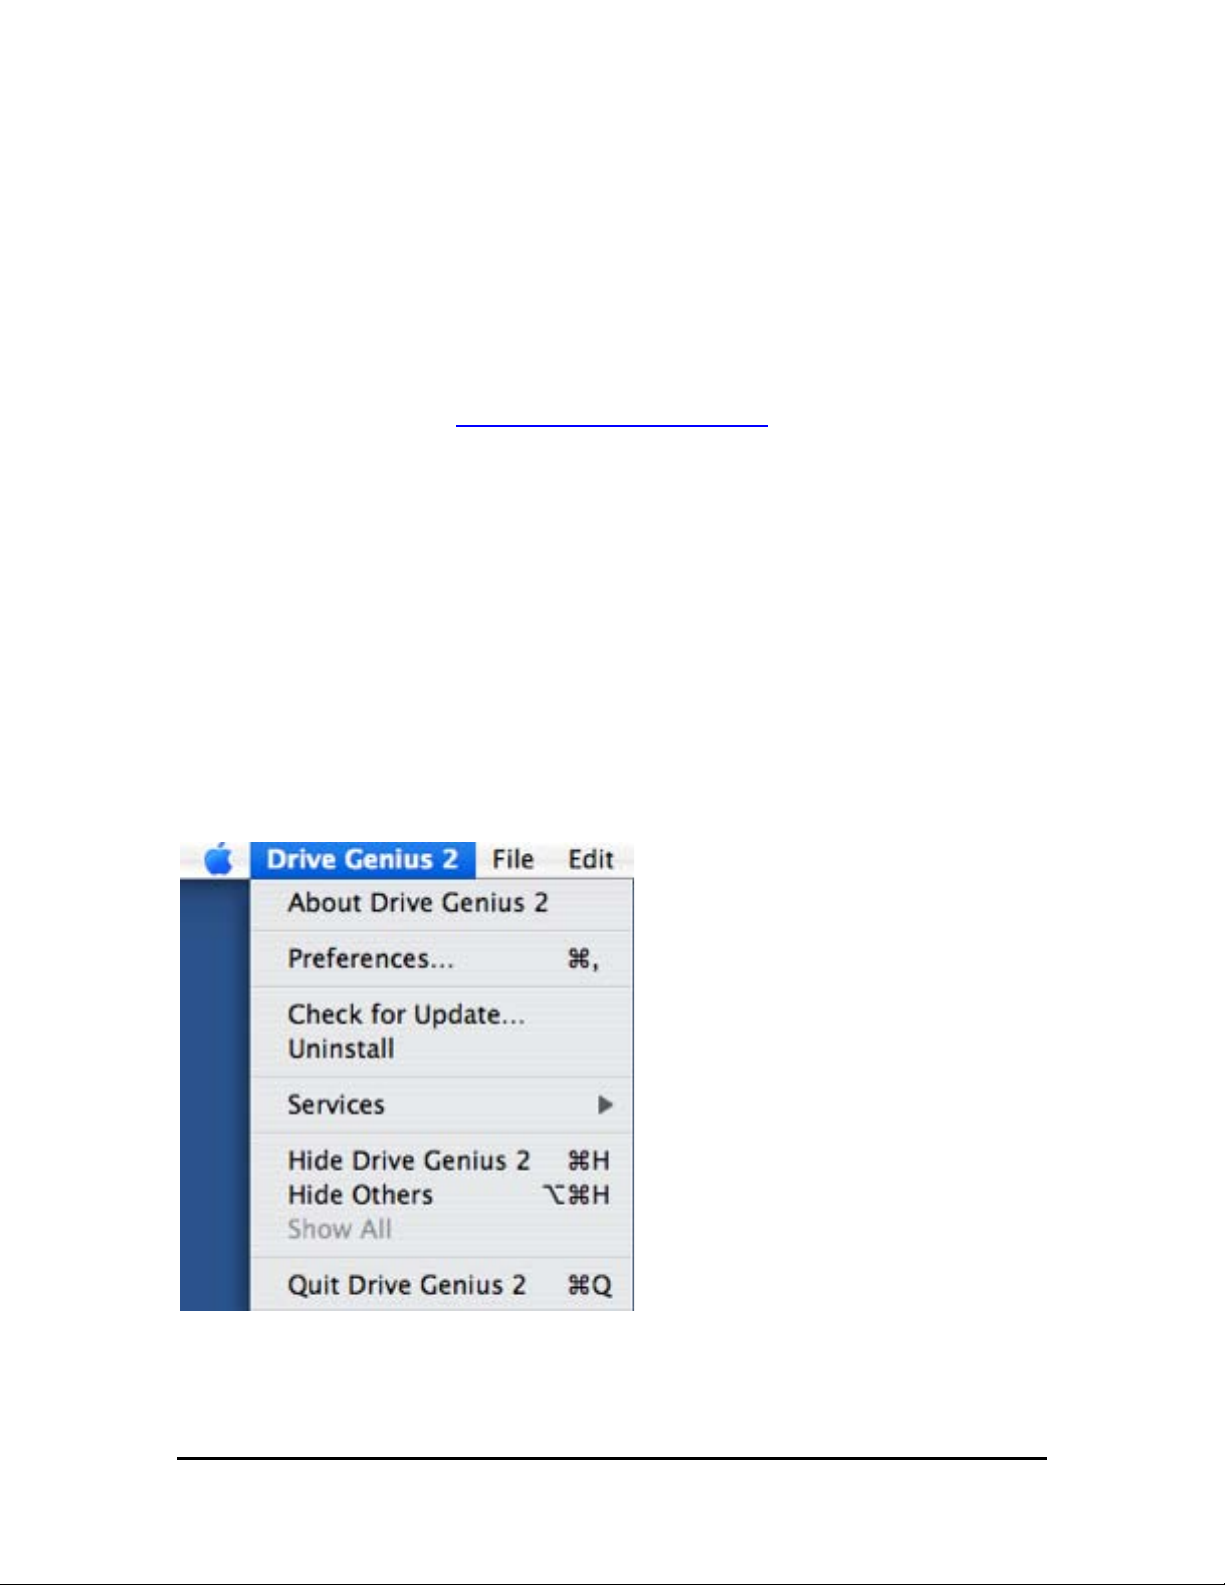
Drive Genius 2 Menu
Drive Genius 2 Menu
Page 6
Introduction
Drive Genius 2 User Guide 6
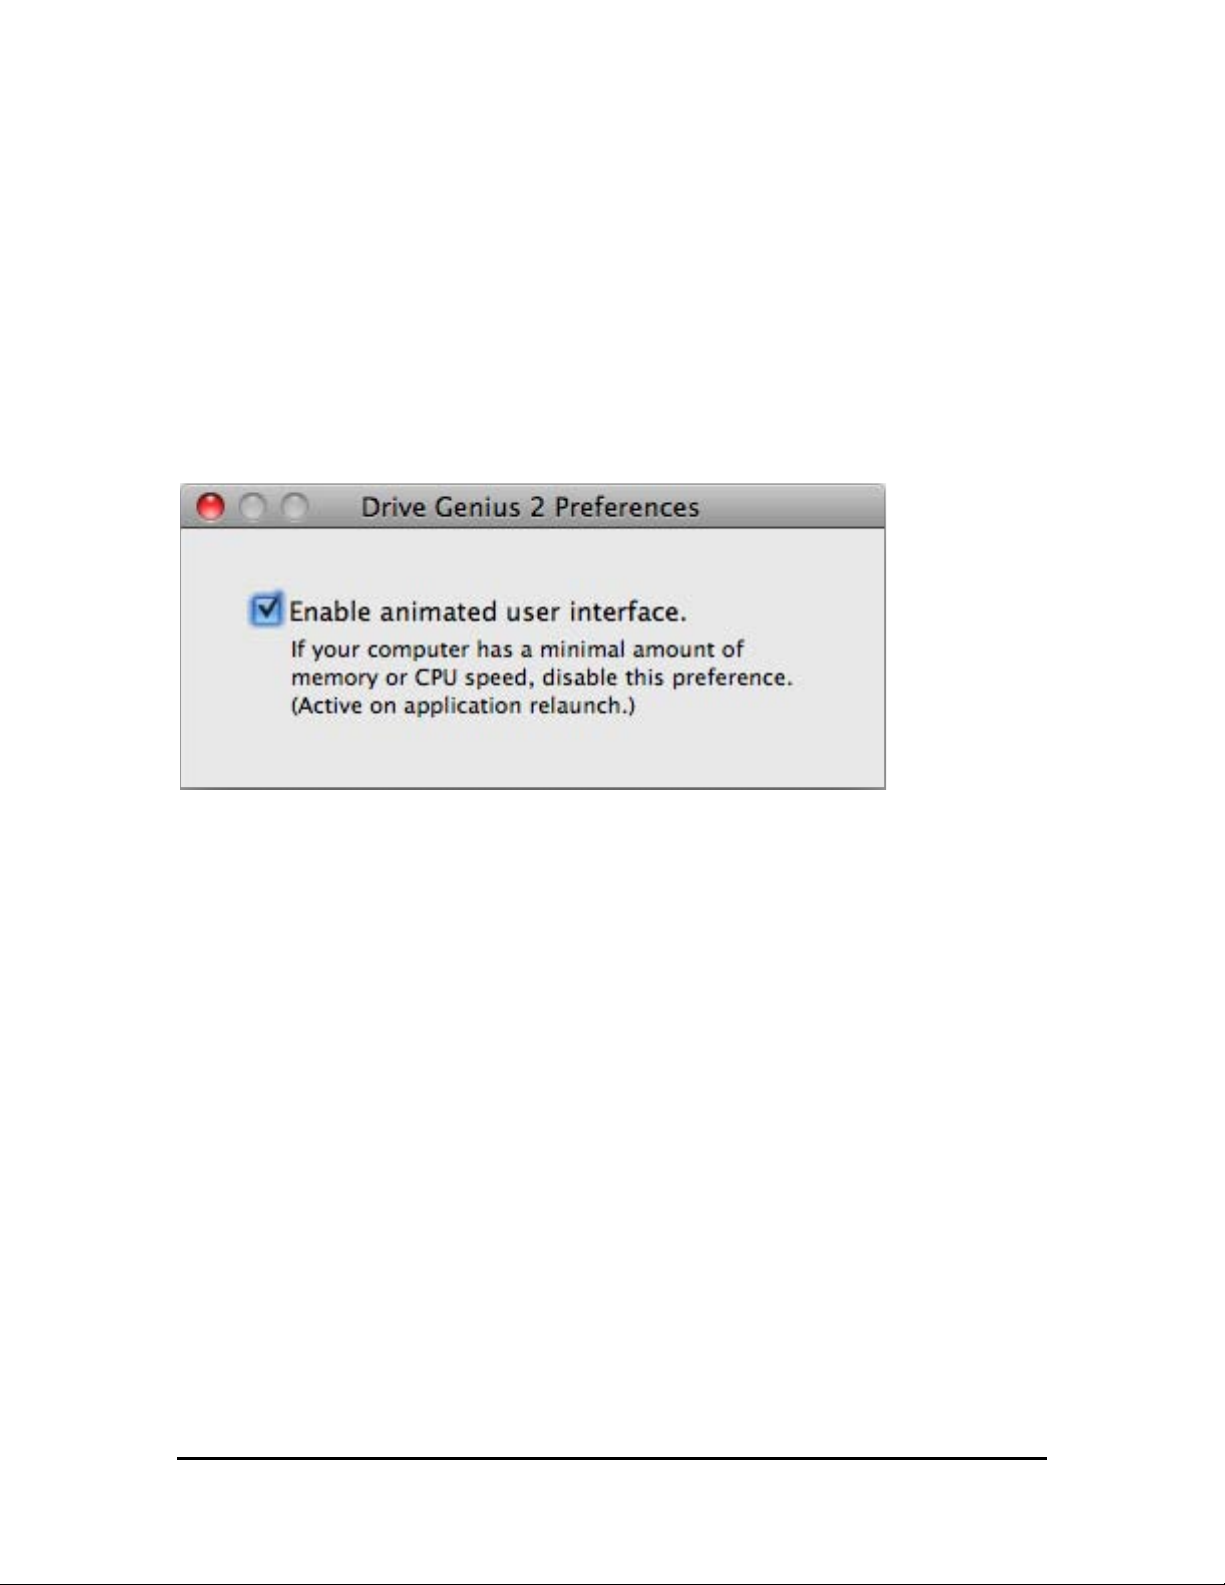
Preferences
The animated interface is an alternative to view Drive Genius 2 features on your
hard drive. Animated mode provides the same features and performance as
Drive Genius 2’ non-animated interface. Systems that do not meet Drive Genius
2’ animation requirements will default to the non-animated mode.
Preferences window
Preferences window
Uninstall
To remove this software from your hard disk:
1. Run uninstall from the Drive Genius 2 menu
Page 7
Introduction
Drive Genius 2 User Guide 7
Contacting Prosoft Engineering
If you have comments about this product, problems or questions about this user
guide, with our web site or if you are interested in a site license – please contact
PROSOFT ENGINEERING (please specify the version and serial numbers of
your copy):
http://prosoftengineering.com/contact_us.php
Sales: 1-877-477-6763
Tech Support: 925.426.6306
Fax: 925.426.6309
Page 8
Introduction
Drive Genius 2 User Guide 8
Drive Genius 2 Features
Drive Genius 2 is designed from the ground up specifically for Mac OS X.
Drive Genius 2 optimizes drive performance, protects data and provides easy-touse yet powerful features for your storage needs. Drive Genius 2 can defragment
a volume, analyze a volume and repair it if necessary. Its testing capabilities go a
few steps above other drive utilities with media surface scanning and long term
data integrity checking.
Written specifically for Mac OS X, Drive Genius 2 includes powerful features that
give the user greater flexibility and control in setting up and managing your hard
drives.
Analyze, Repair and Rebuild OS X directory information.
Defragment OS X drives for optimum performance.
Create high-speed backup clones of most devices.
Edit devices, volumes and files with the sector editor.
Securely erase drives using U.S. DoD specification algorithms.
Page 9
Introduction
Drive Genius 2 User Guide 9
Long range throughput tests for performance and diagnostics.
Benchtests for comparing drive performance.
Surface scanning to test for media faults.
Detailed information on drive and volume structure.
Format a comprehensive range of drives in OS X format.
Resize partitions without erasing them.
o Comprehensive Support including ATA, SCSI, Firewire and USB drives.
o Streamlined User Interface allowing most operations to be
accomplished in a few clicks.
o Bootable DVD-ROM support ranging from
PowerBooks to Macbooks.
Page 10
Introduction
Drive Genius 2 User Guide 10
Steps to Complete a Task
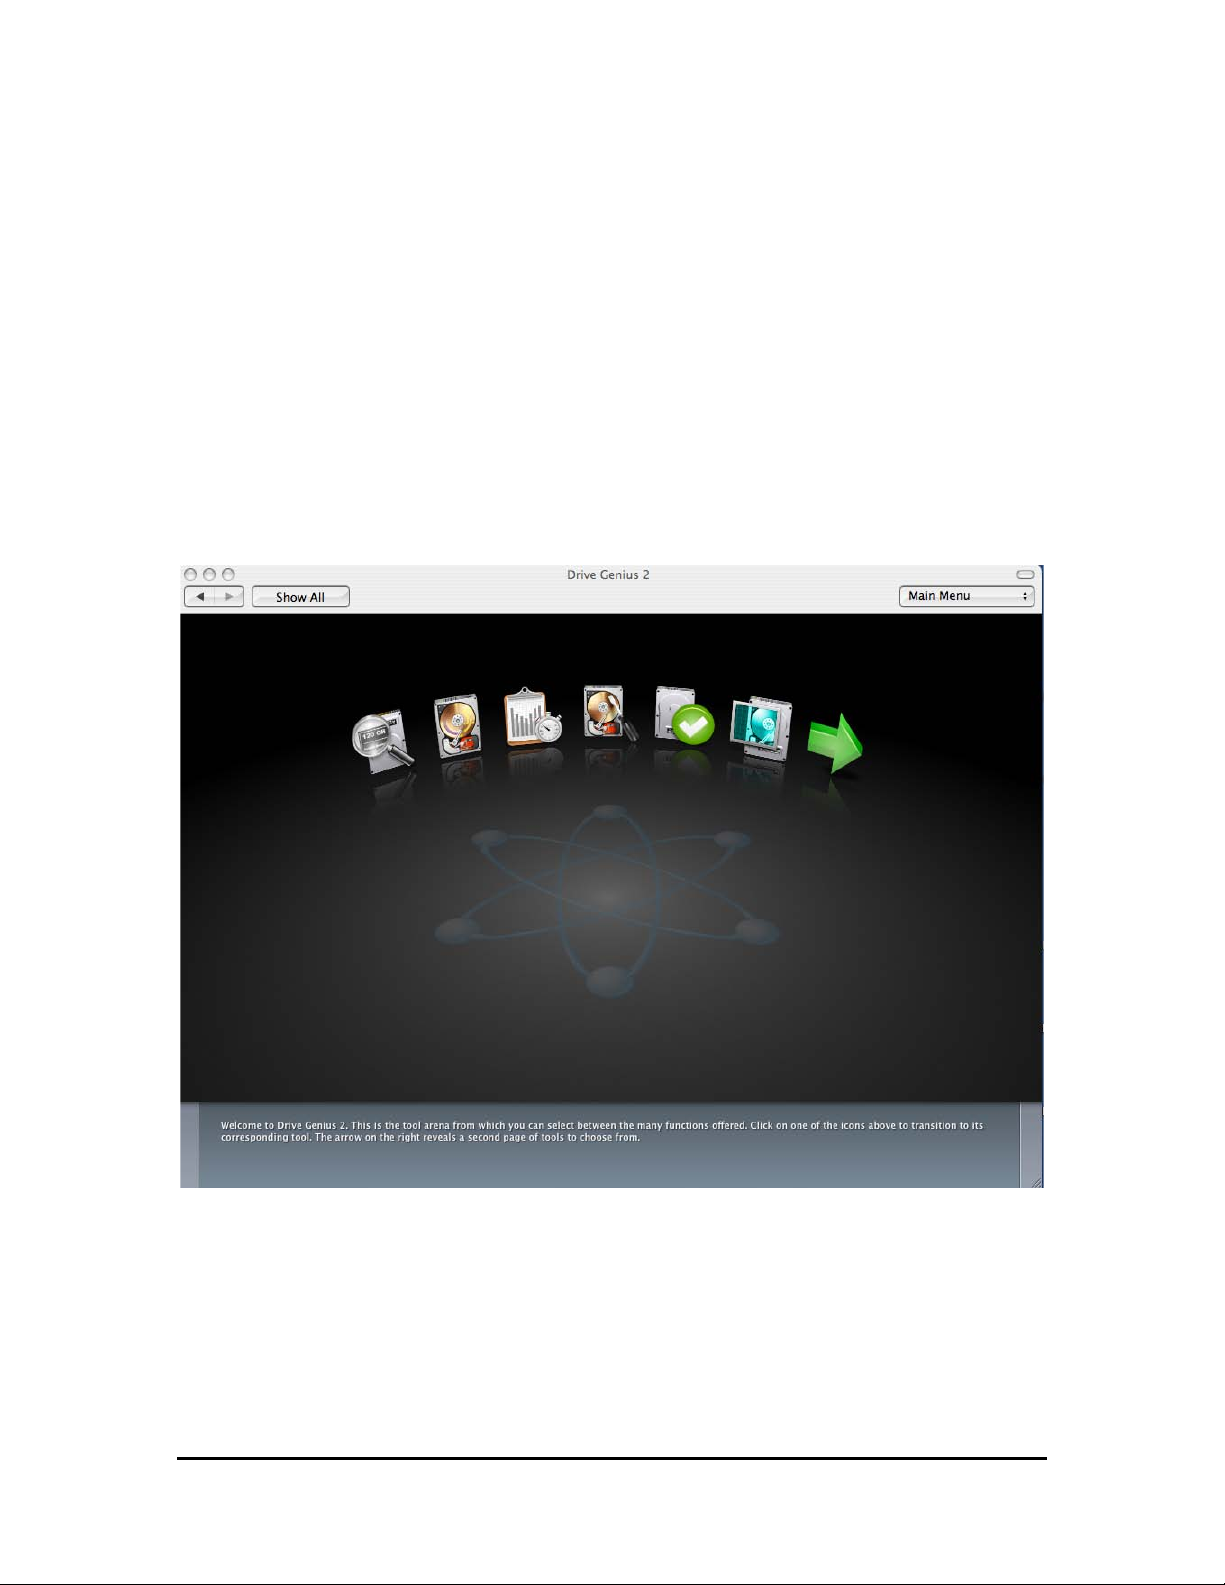
Most Drive Genius 2 functions require a three-step process to complete a task:
1. Select an operation.
2. Select a hard drive or volume in the main window.
3. Select a parameter and apply it to the drive or volume.
Selecting a Drive Genius 2 operation.
On the main window, you can select the Drive Genius 2 operation you wish to
perform. Click on the green arrow to choose more operations.
Drive Genius 2 Tool Arena
Page 11
Introduction
Drive Genius 2 User Guide 11
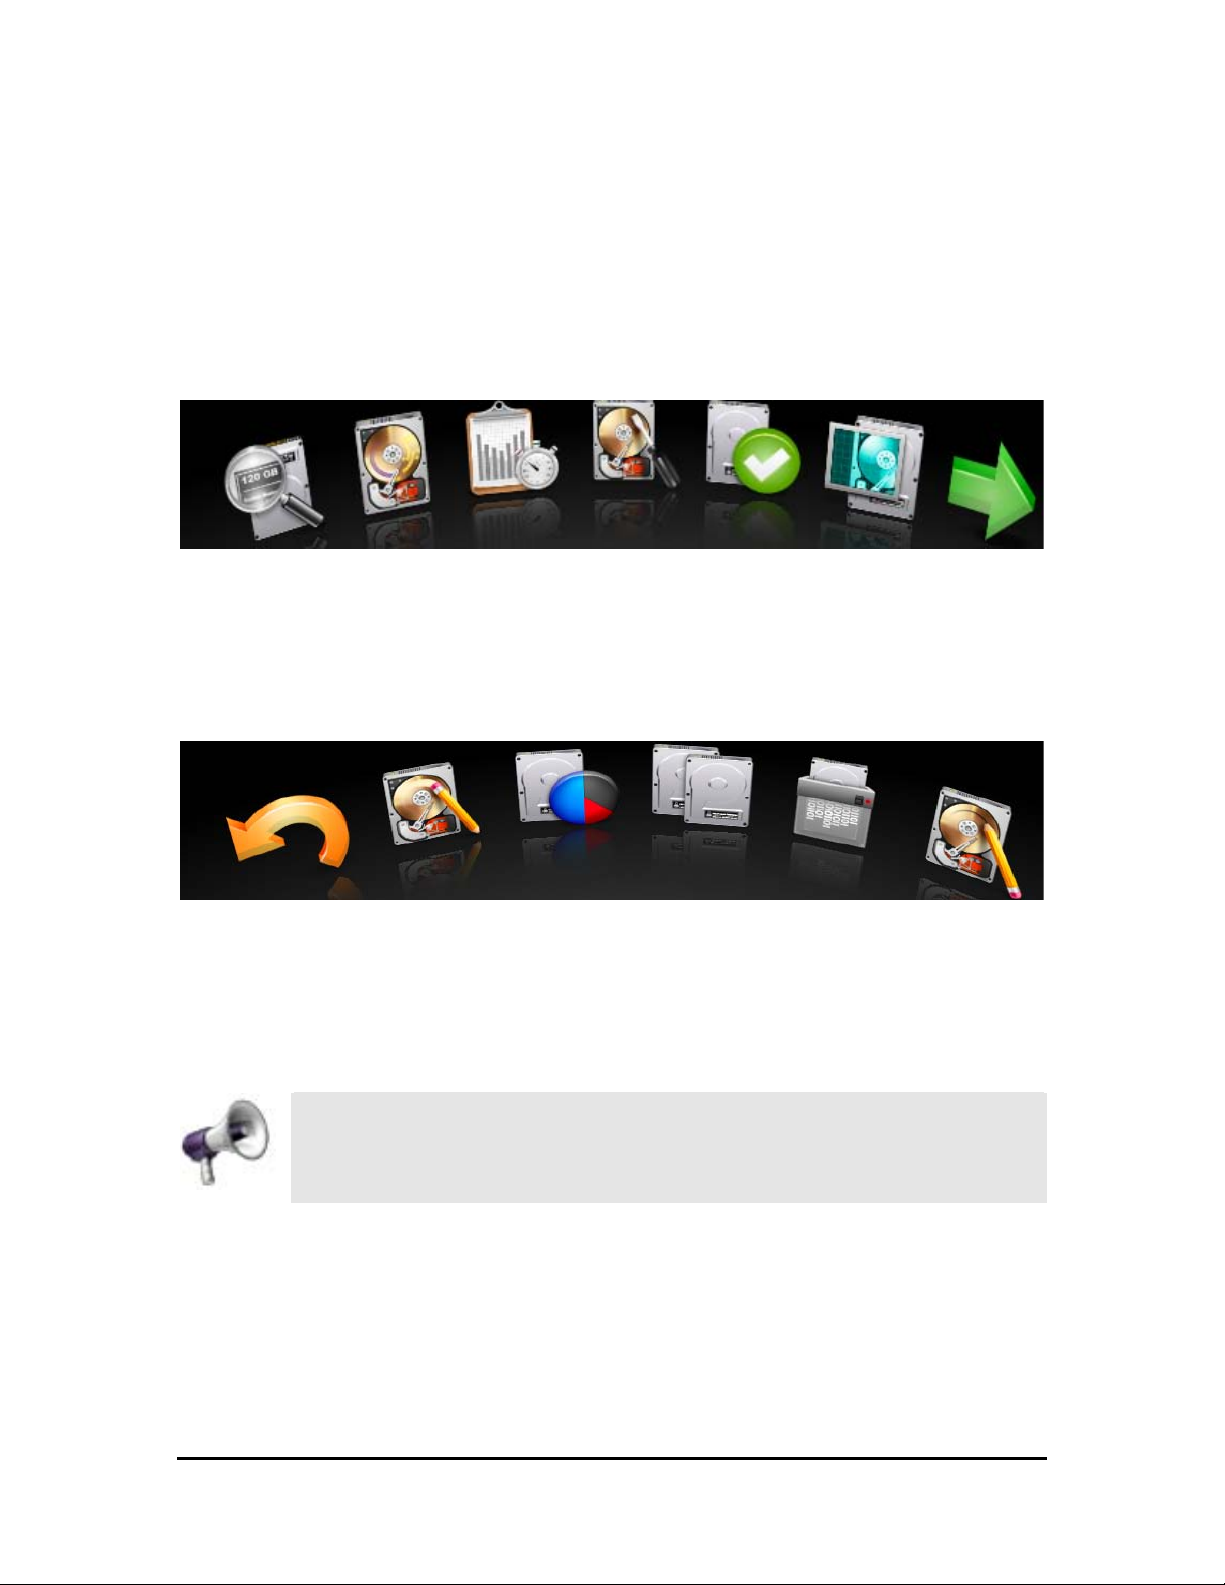
Selecting an Operation
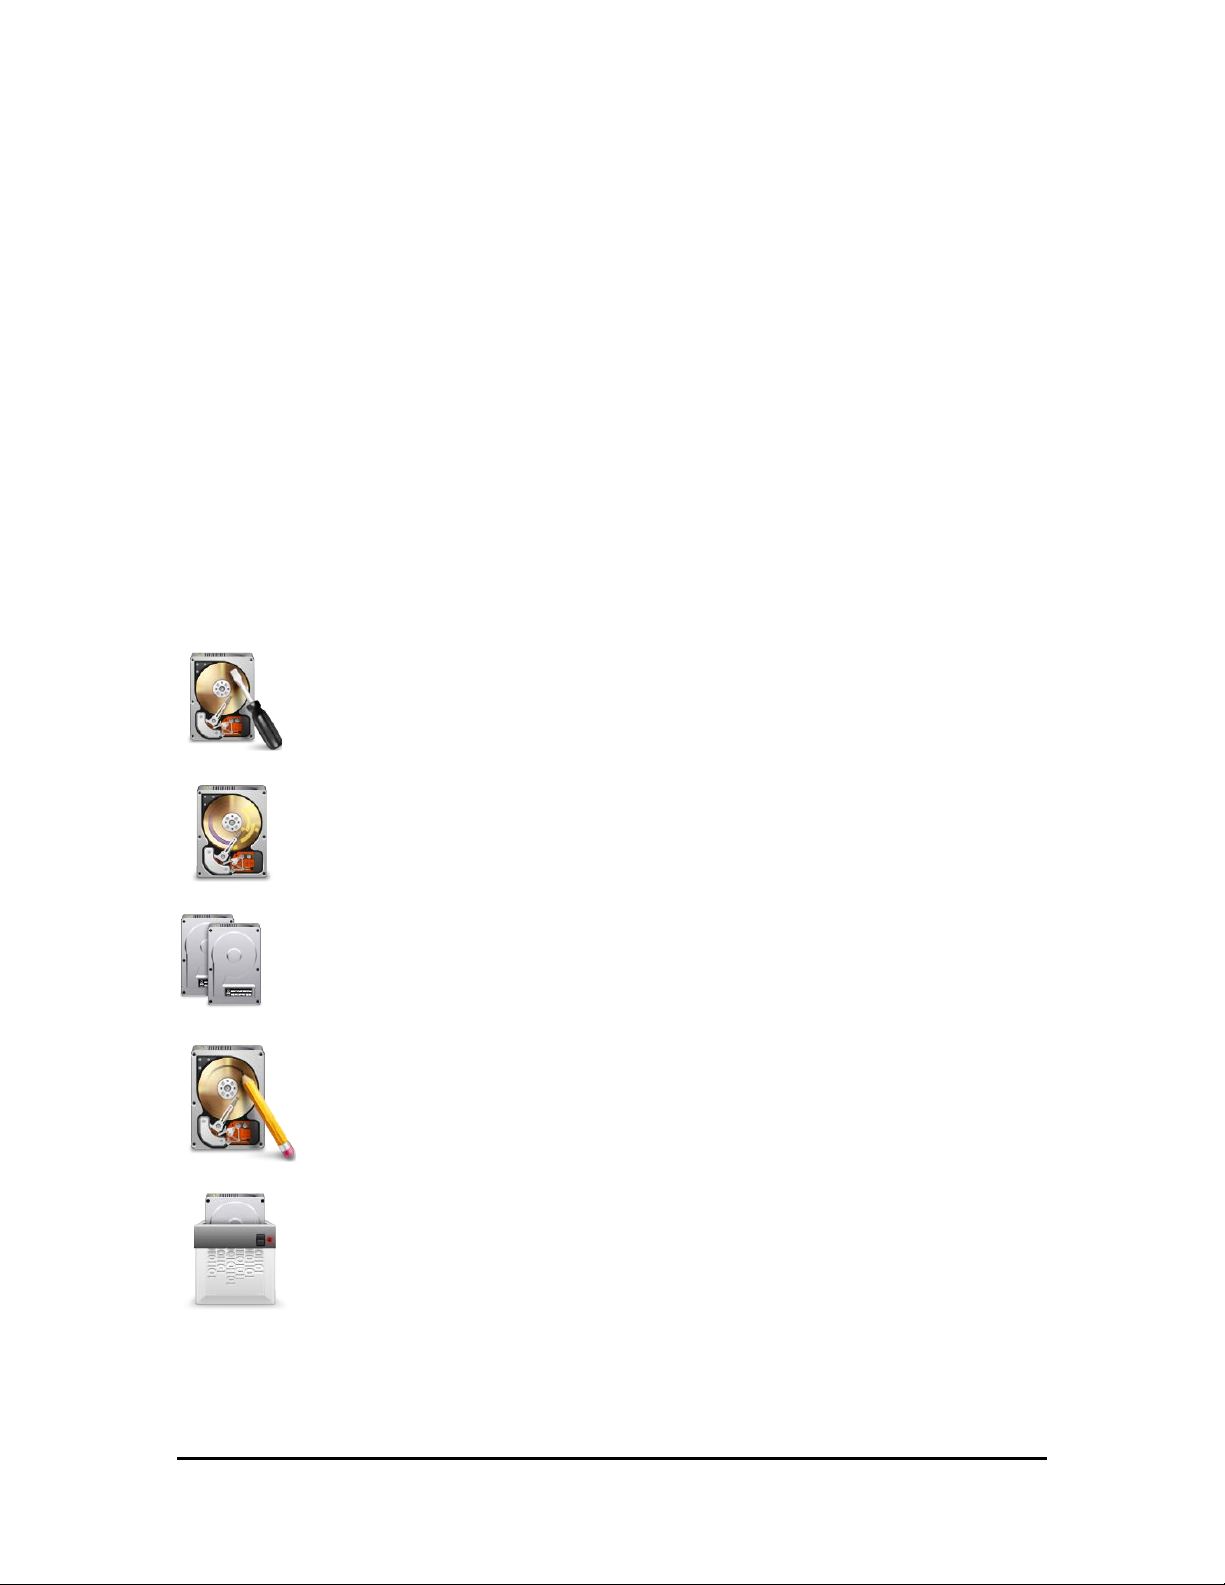
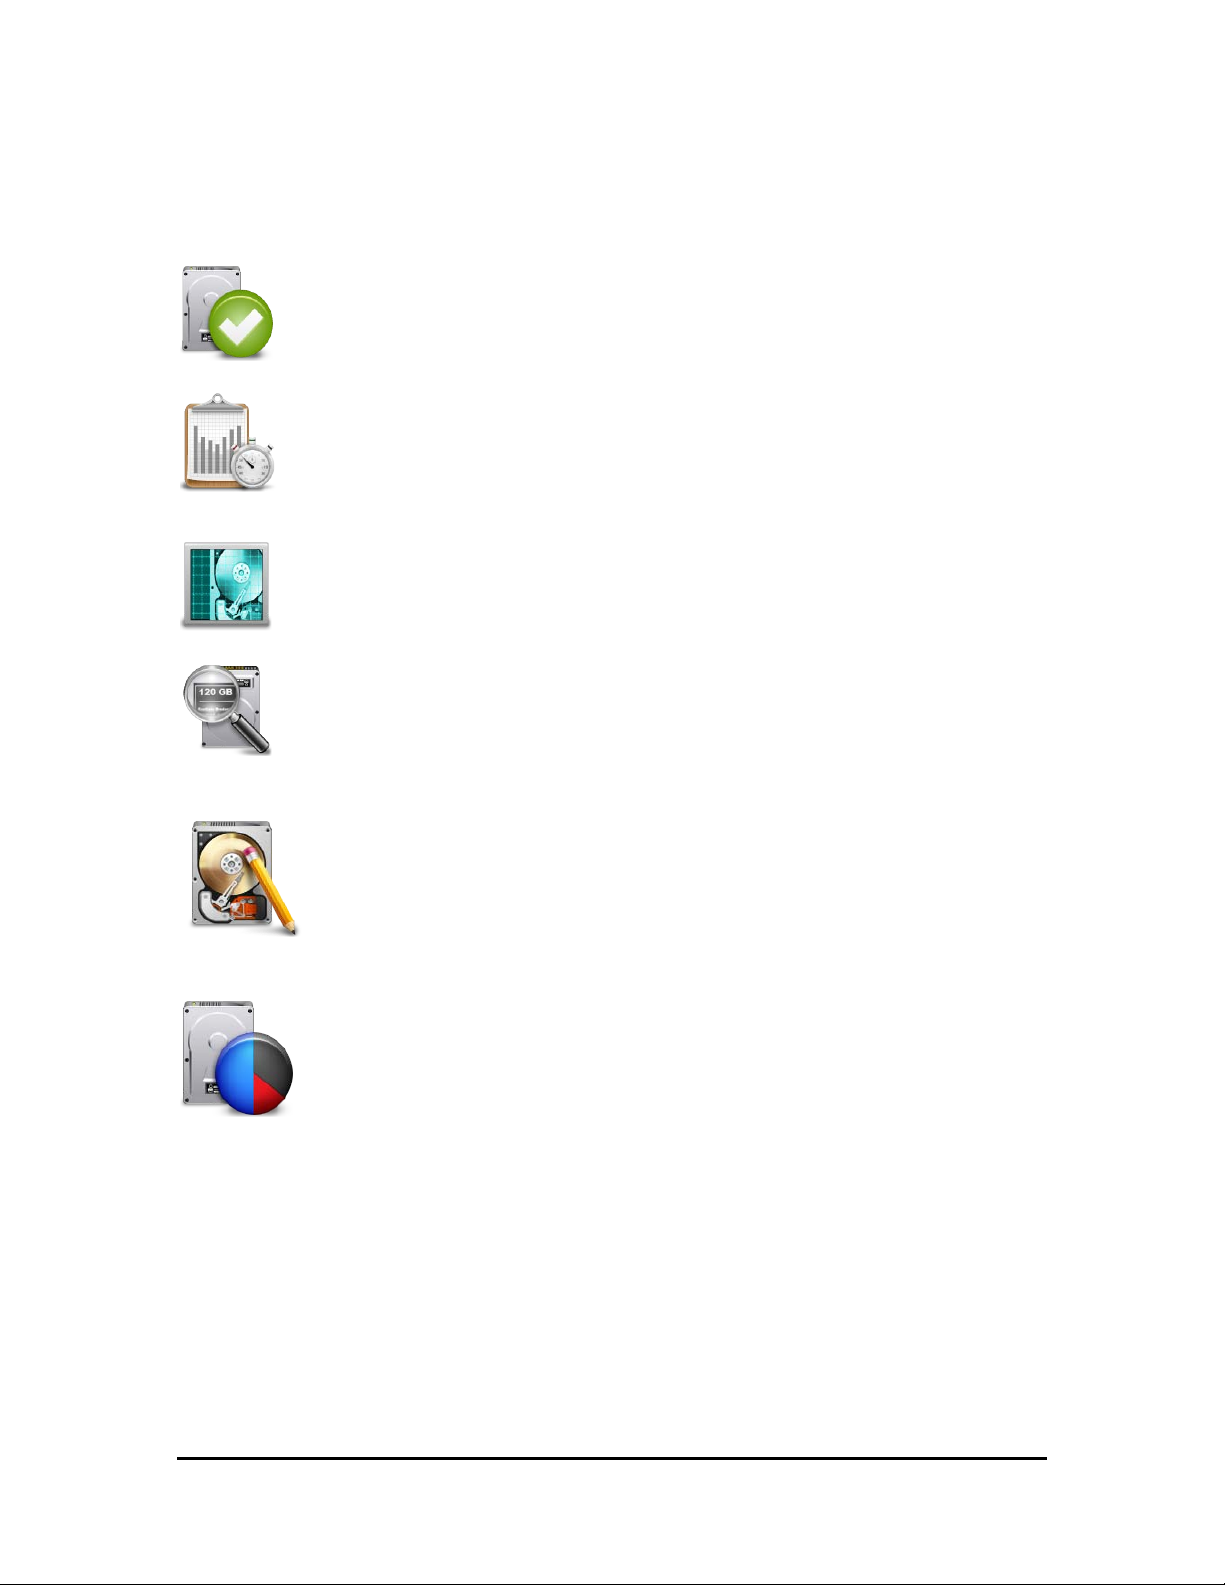
Select a task you want to perform by moving the mouse over and clicking on one
of the icon buttons in the middle of the screen.
Information, Defrag, Benchtest, Repair, Integrity Check, Scan
For operations such as copying, partition resizing and sector editing, you will
need to enter additional information pertaining to the operation. Shredding,
information, benchtest, integrity checking and initialize don’t require any
additional information.
Initialize, Repartition, Duplicate, Shred, Sector Edit
Prosoft recommends backing-up your data before using many features
in Drive Genius 2 and regularly; that way, if anything goes wrong
(virus, power blackout, OS error or hardware failure etc…), you will be
able to recover your data. Also, disable sleep mode before beginning.
Page 12
Drive Genius 2 User Guide
Repair
Drive Genius 2 User Guide 12
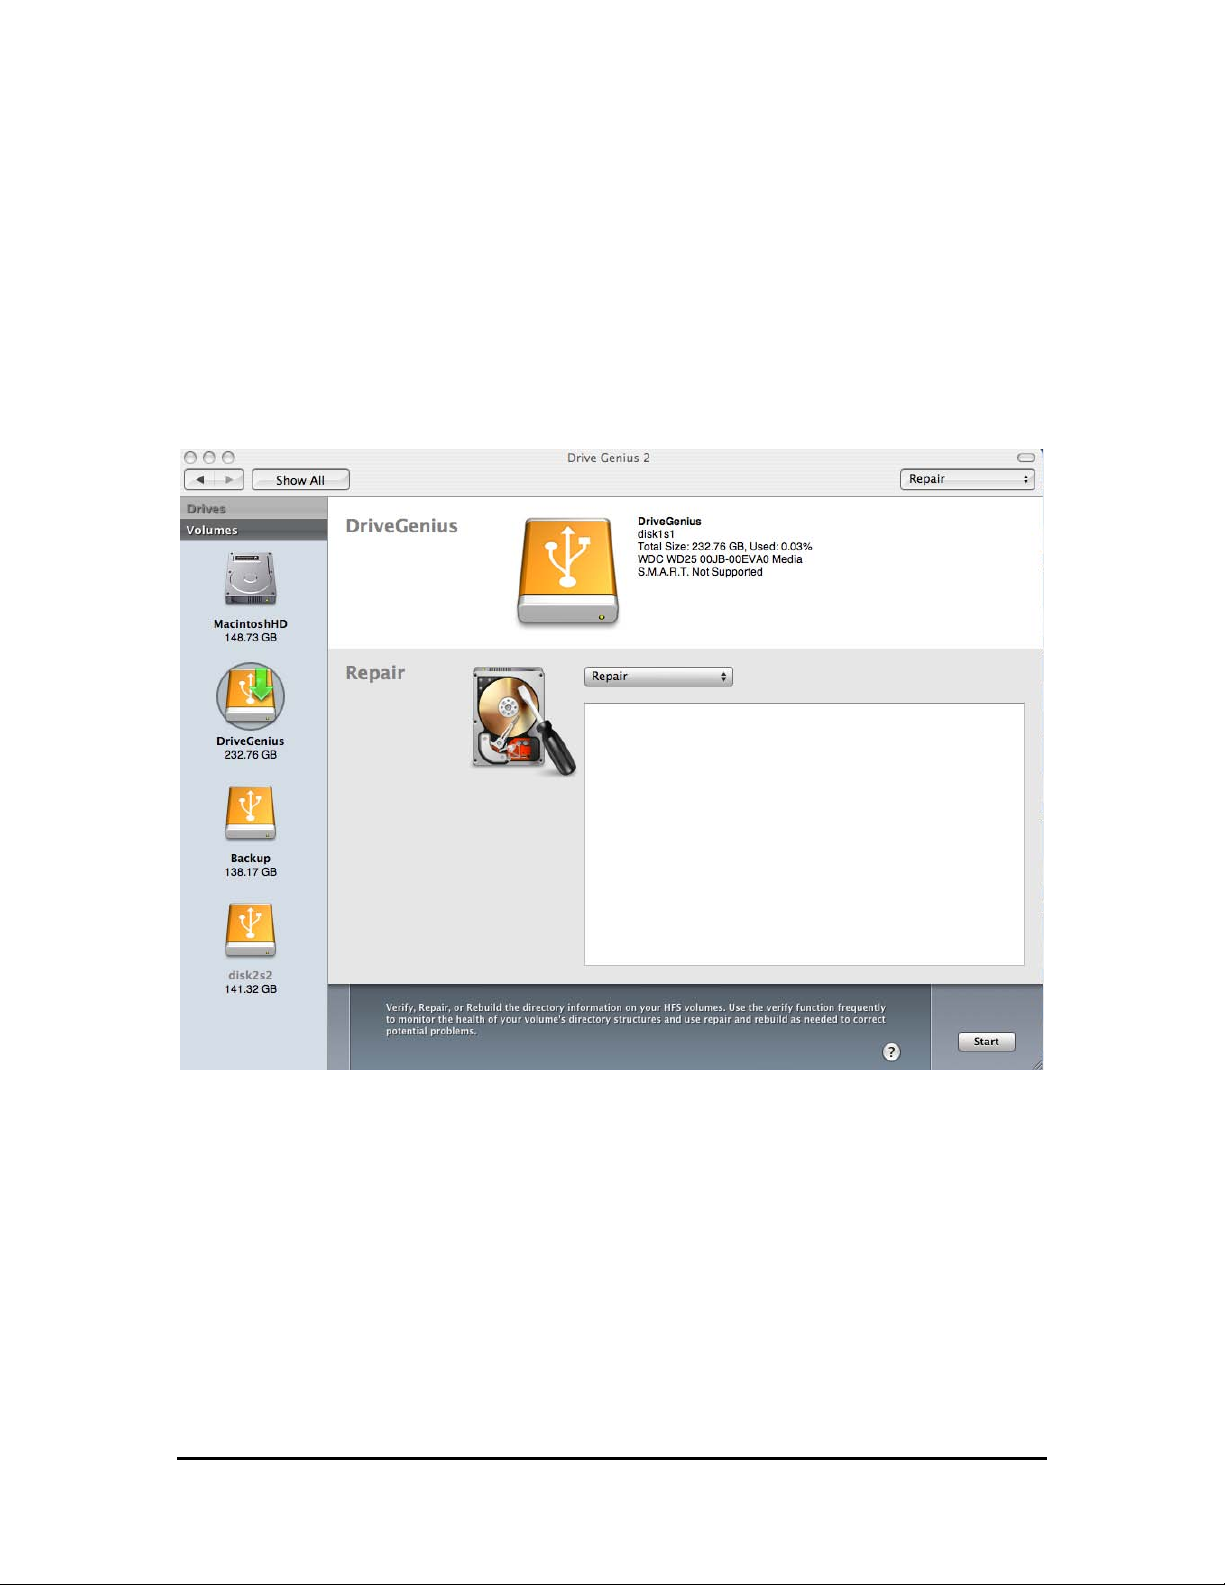
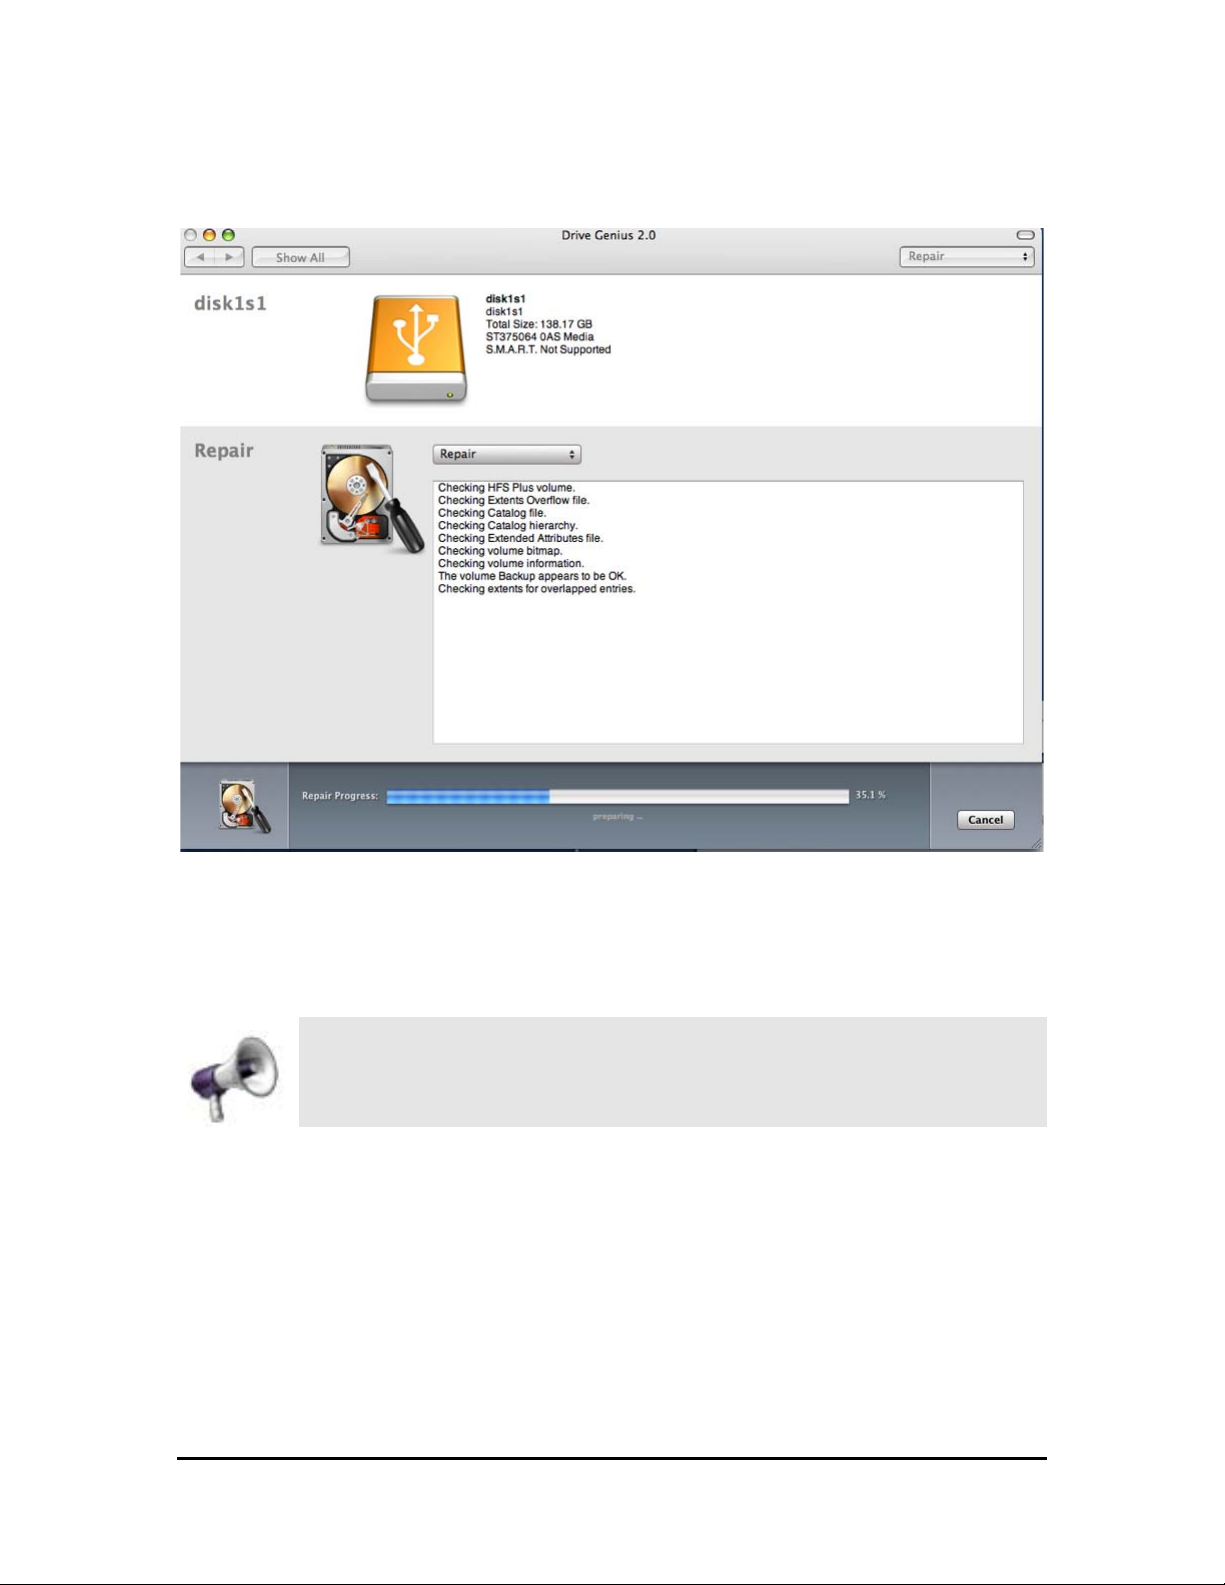
Repair is a tool for verifying and repairing most kinds of hard drive faults. It
analyzes the volume for a general overview and can repair/rebuild the volume. It
can also be used to enable and disable Apple journaling and fixes OS X file
permissions on your boot volume.
Repair should be run whenever excessive system crashes occur. It also pays to
run this periodically as it is not unusual for minor faults to appear on a hard drive.
Repair Window
Page 13
Drive Genius 2 User Guide
Repair
Drive Genius 2 User Guide 13
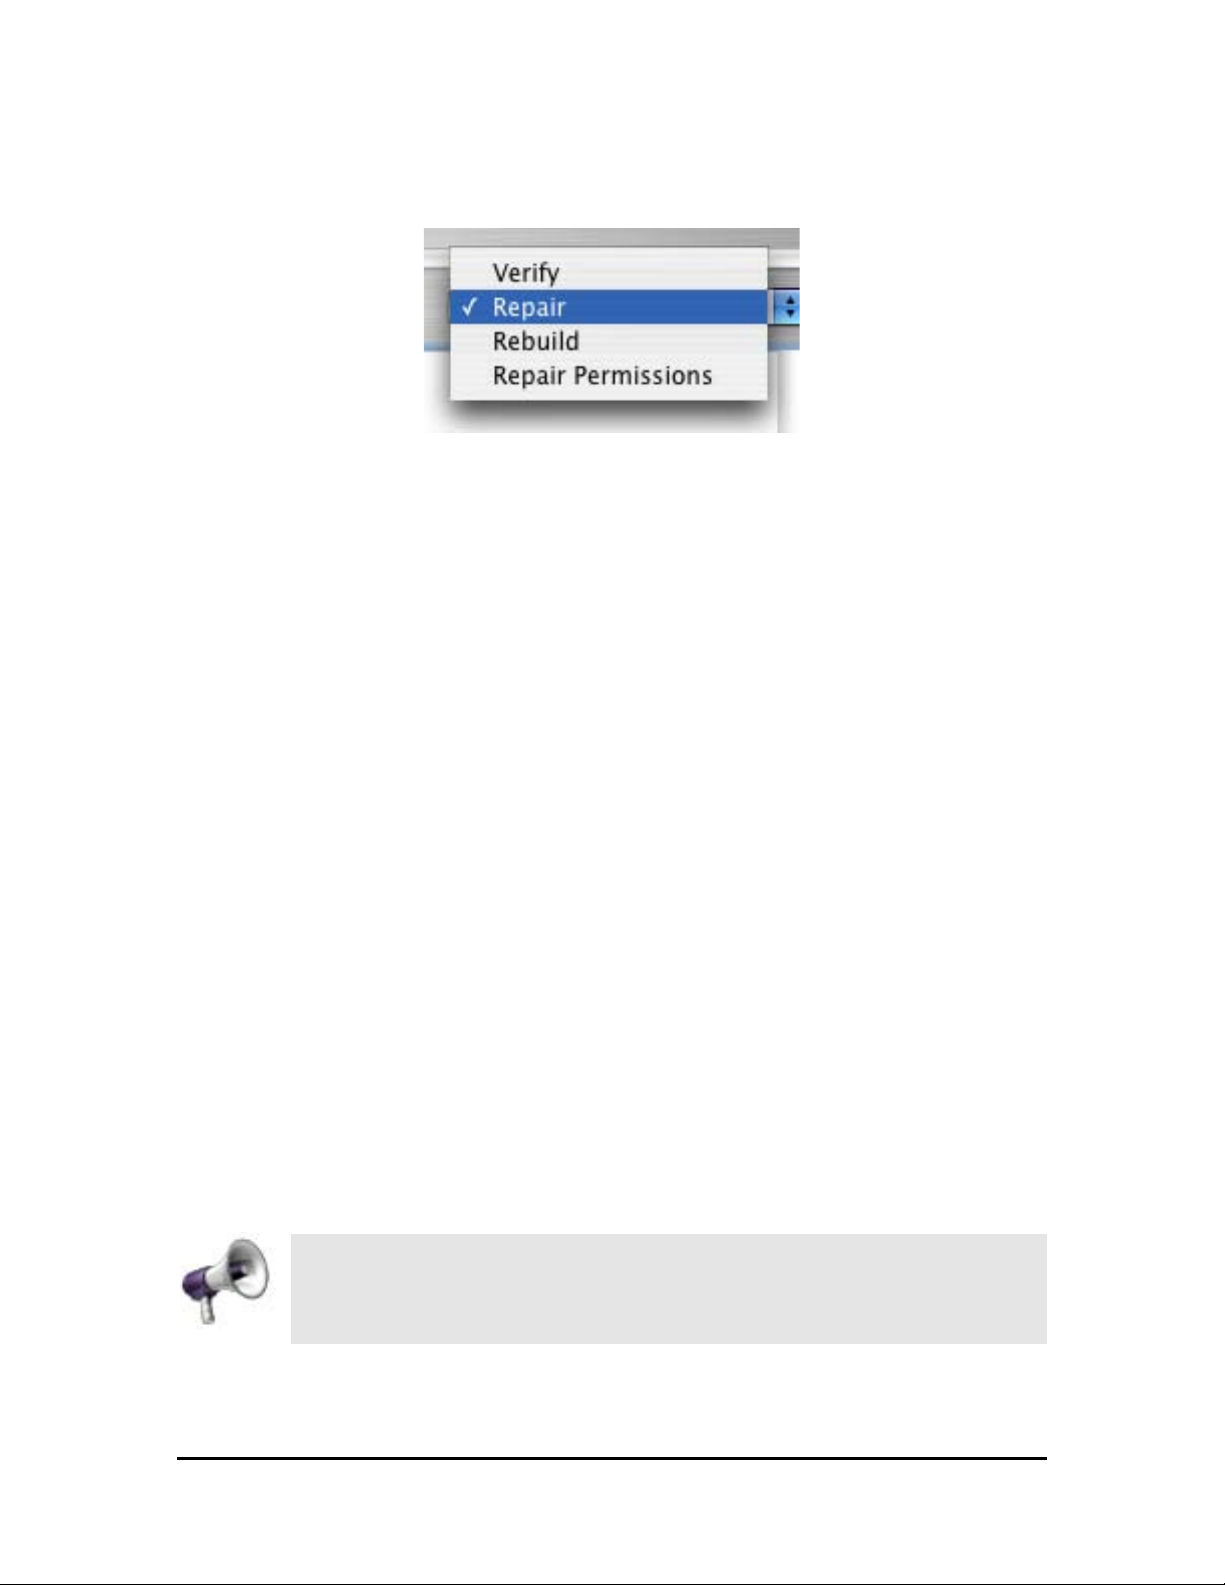
Options for drive repair
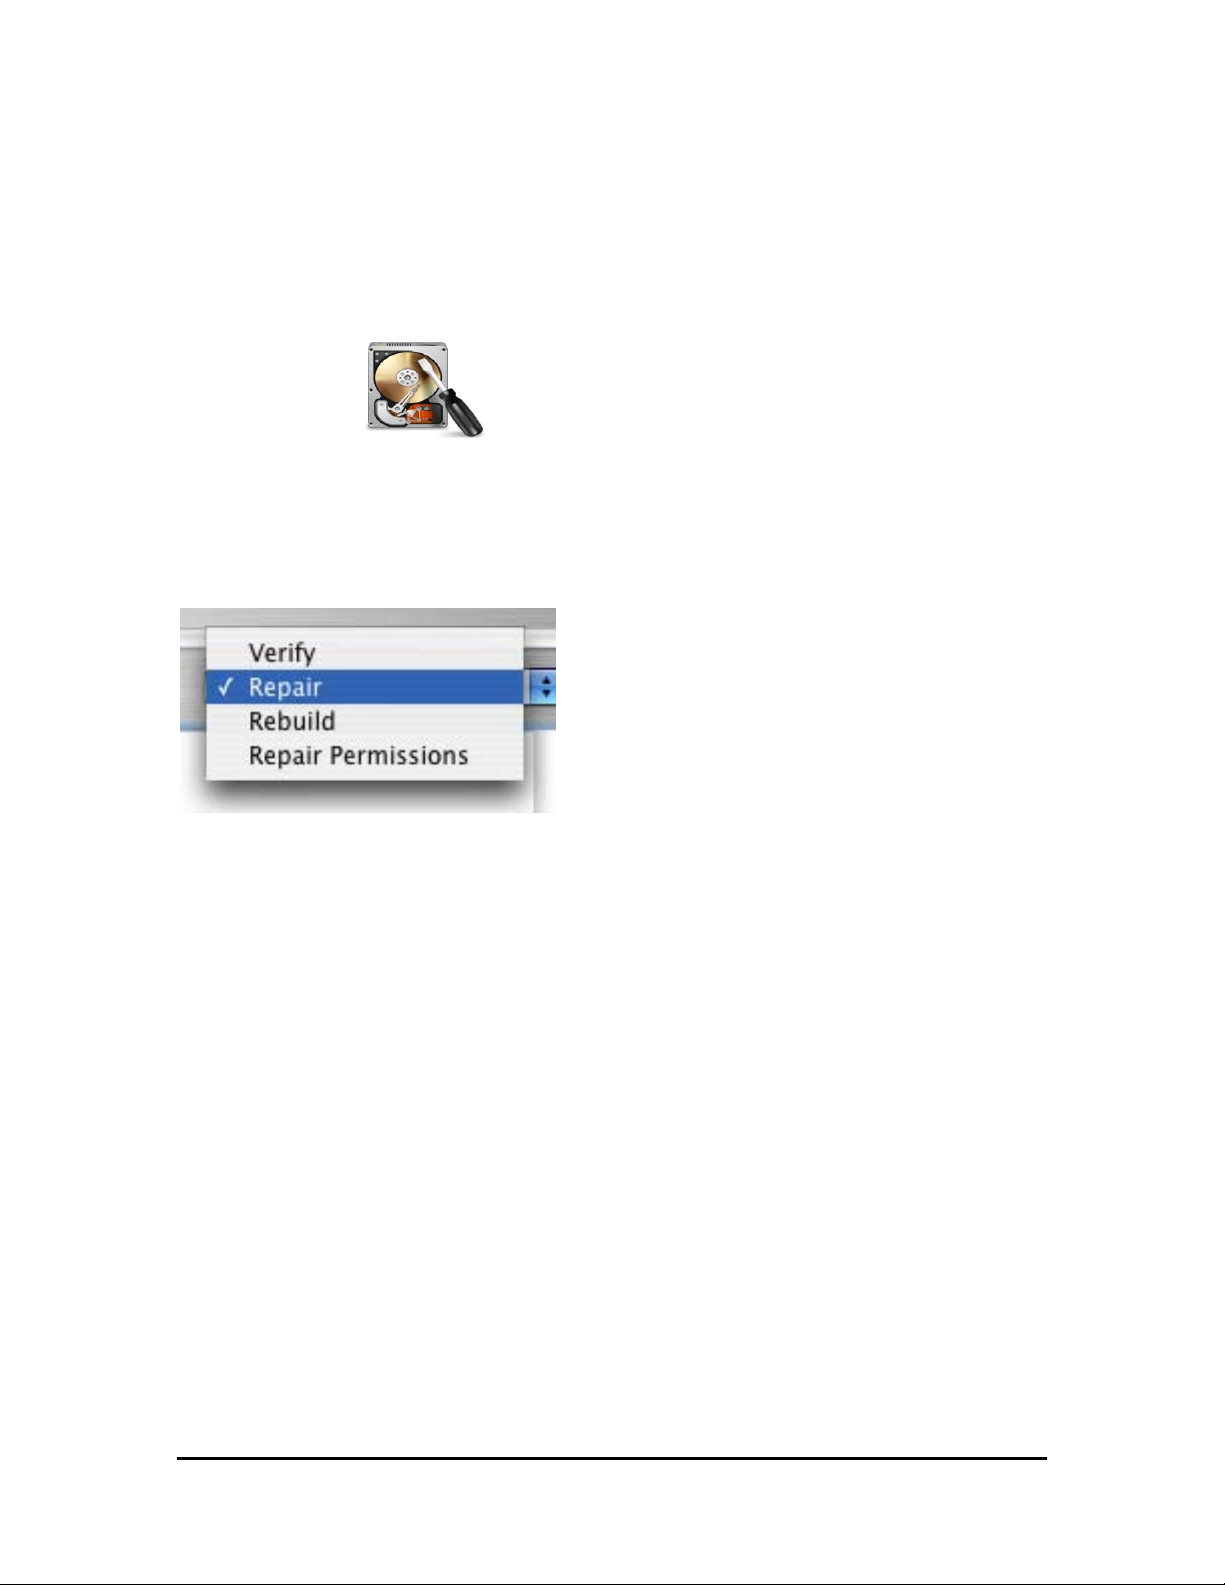
o Verify: Check a volume for errors.
Runs a general scan over the volume to detect any errors.
o Repair: Check for and repair any found errors on a volume.
Checks the volume for any errors, and attempts to repair them if they are
found. If the volume has been having serious problems, it is
recommended to repeat Repair until it stops reporting that errors have
been fixed.
o Rebuild: Rebuild the drive table that holds the file information.
This will rebuild the portion of the drive (known as the Catalog B-Tree) that
contains information pertaining to the location of all of the files on the
volume. It is a separate utility from the Verify and Repair functions and
may be used separately to repair faulty volumes. Since it rebuilds the
structure based on the existing content of the rest of the drive, it can
potentially fix errors that Repair tools cannot.
o Repair Permissions: Correct the ownership and permissions according to
Apple specifications. Repair Permissions will correctly set the permissions
to solve most of problems related to permission issues.
Repair does not verify any physical media defects. Please use the
Scan function of Drive Genius 2 to check for media errors.
Page 14
Drive Genius 2 User Guide
Repair
Drive Genius 2 User Guide 14
To Repair your drive:
Launch Drive Genius 2.
Click the Repair icon.
Select the Volume you wish to Repair.
Select from the popup menu whether you want to verify, repair, rebuild the
volume, or repair permissions.
Options for Drive Genius 2’ Repair feature
Page 15
Drive Genius 2 User Guide
Repair
Drive Genius 2 User Guide 15
Repair Window
Click the Start button to proceed.
Click the Cancel button to stop.
The repair feature should not be used as a substitute for regular
backups of your important data.
Page 16
Drive Genius 2 User Guide
Defragment
Drive Genius 2 User Guide 16
Adding and deleting files to and from your hard drive will cause the drive to
become fragmented. When the OS writes files to the drive, it will look for empty
spaces on the hard drive to write data to. If the space is too small to fit the file, it
will write part of the data in one area and the remaining to another area. This way
no disk space is wasted. However, this will cause the drive to slow down, as it
will need to scan multiple parts of the drive to locate and read the file.
The more writing and deleting you’ve done to your drive, the more fragmented
the drive will be. The process will gradually have an impact on the drive
performance. This is why using Drive Genius 2 to defragment your hard drive is
an excellent way to boost the performance of your computer. Drive Genius 2 puts
all of these broken up pieces into one continuous block with all of the empty
space at the end.
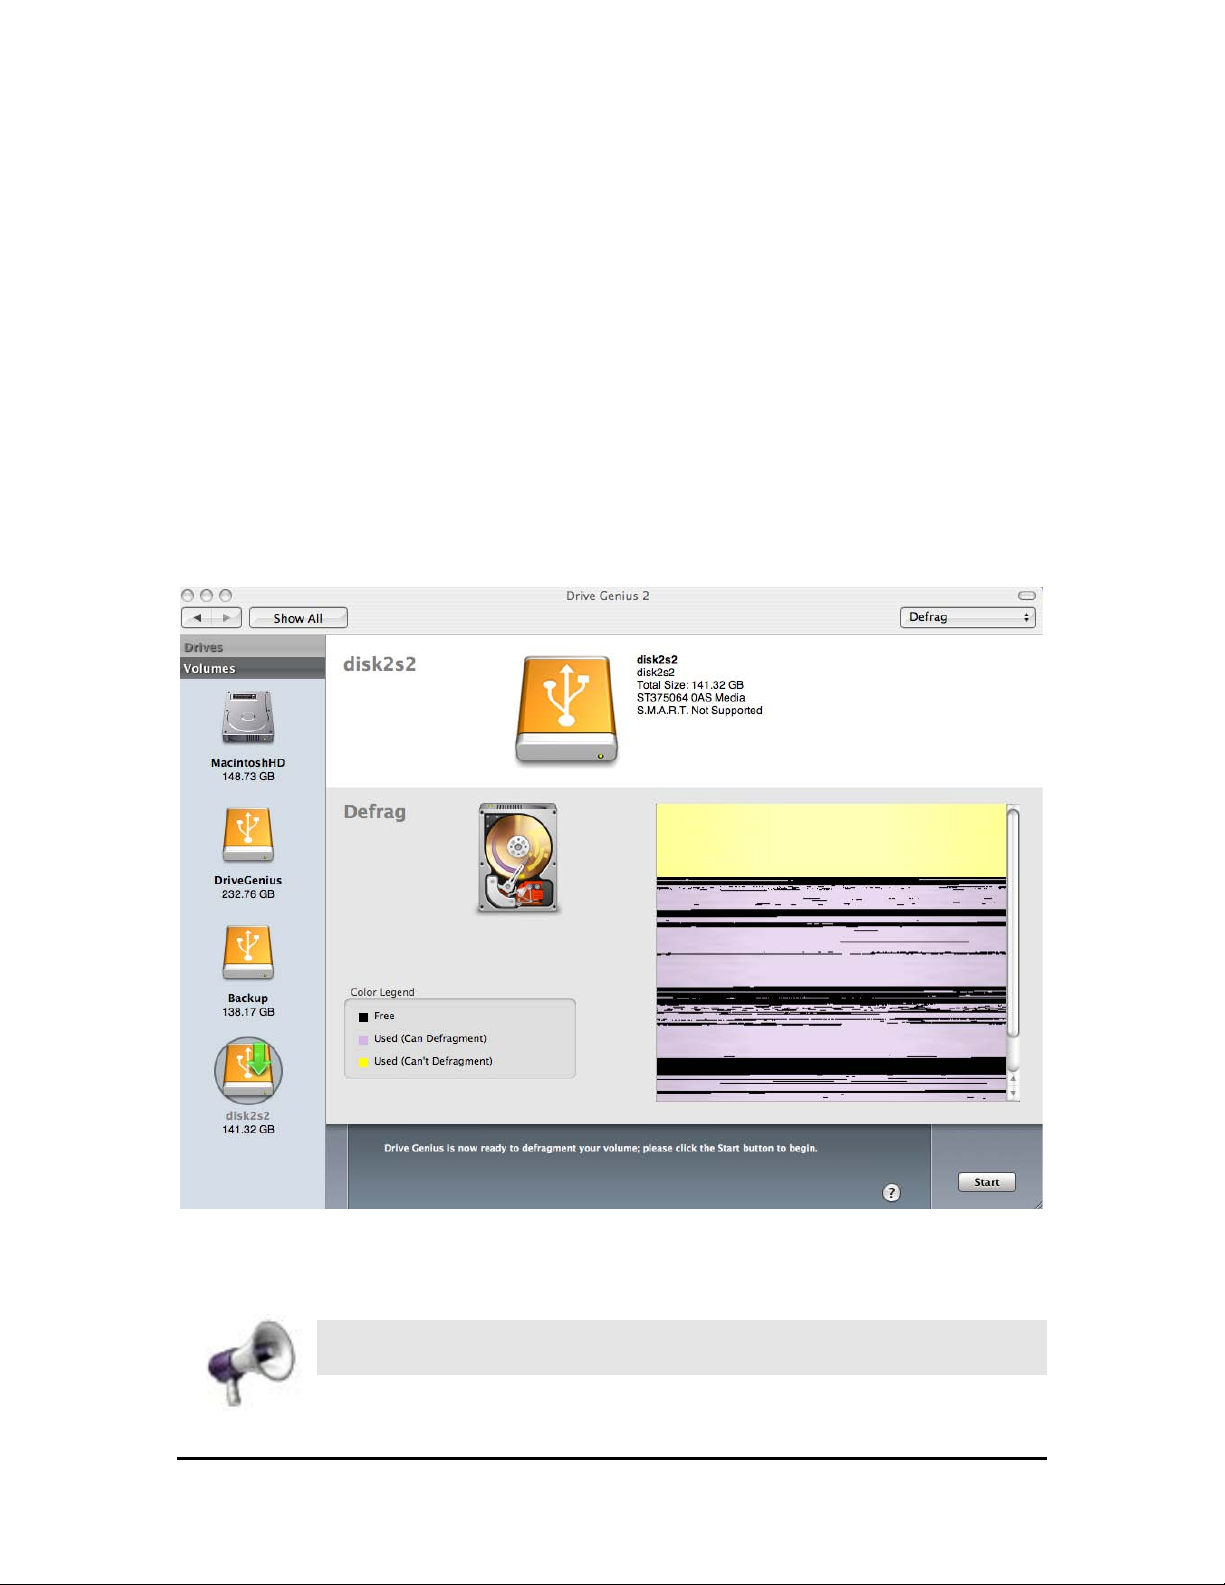
Defragment Window
Before you begin make sure sleep is disabled.
Page 17
Drive Genius 2 User Guide
Defragment
Drive Genius 2 User Guide 17
To Defragment your drive:
Launch Drive Genius 2.
Click the Defragment icon.
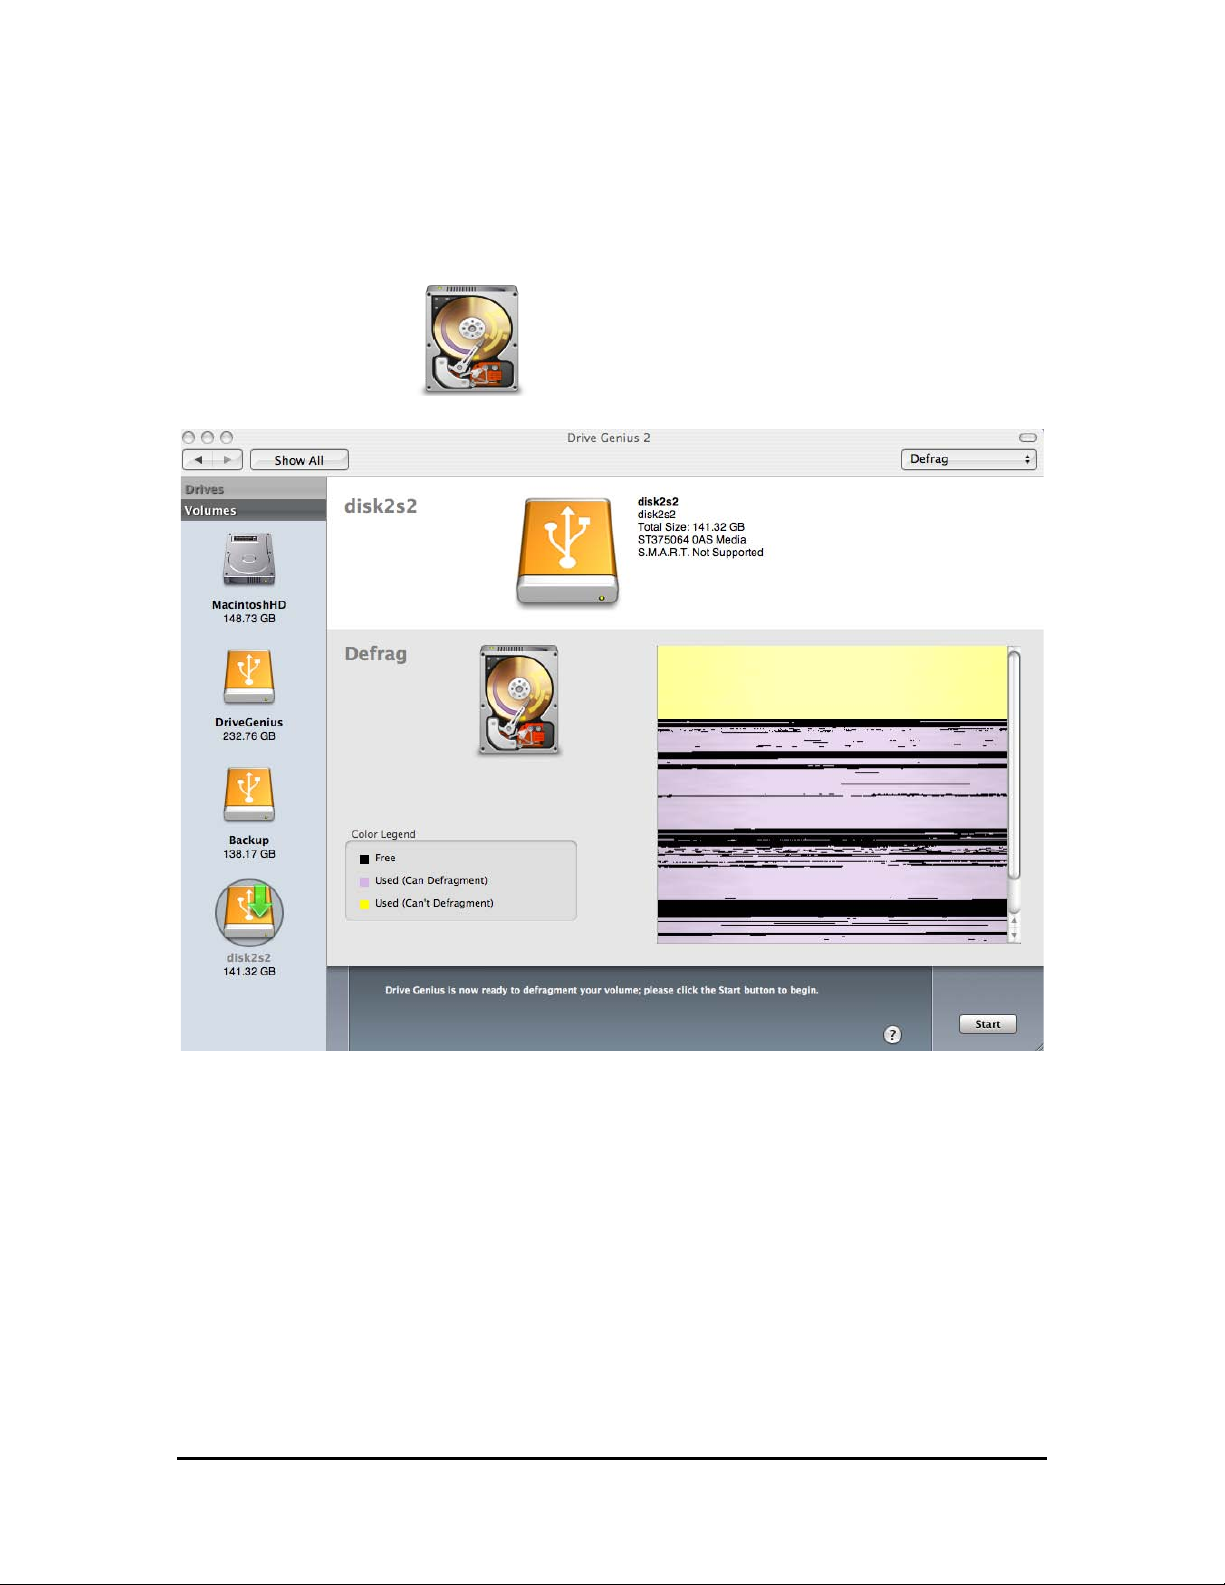
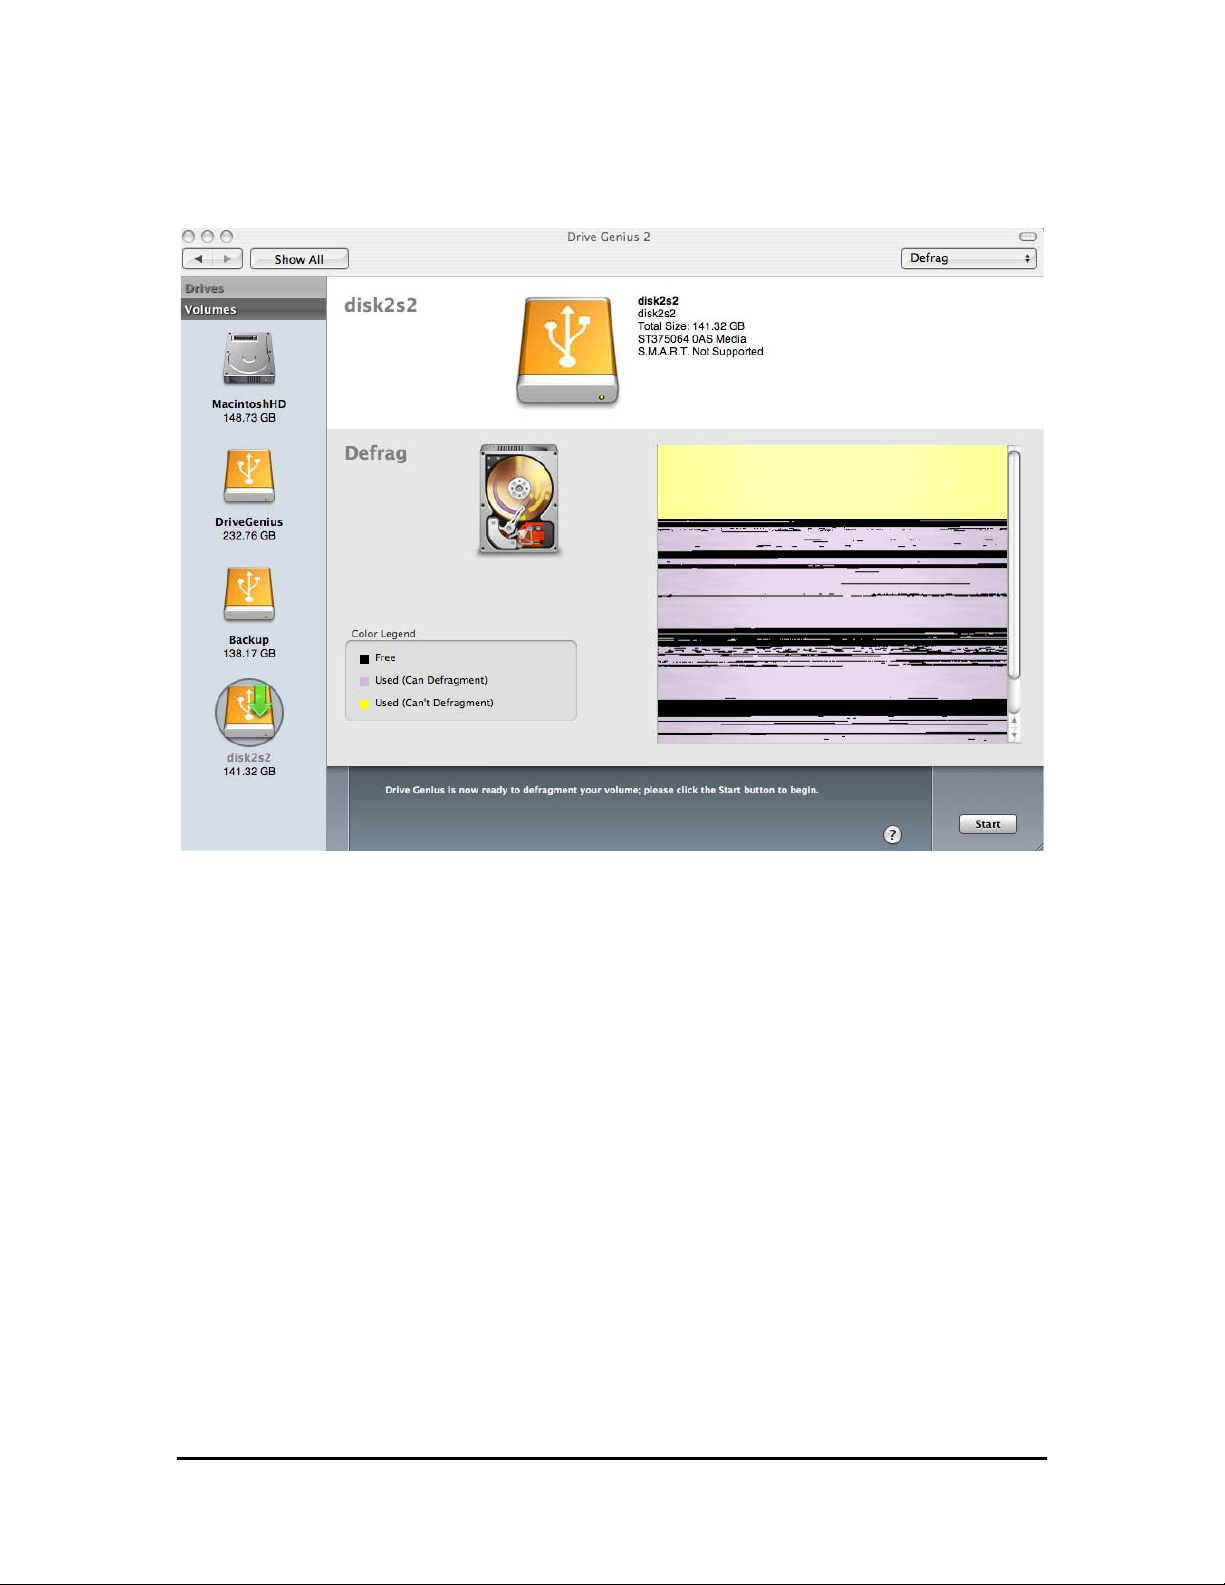
Selecting the volume to defrag
Select the volume you want to defragment by highlighting it.
Page 18
Drive Genius 2 User Guide
Defragment
Drive Genius 2 User Guide 18
The Defragment Window
Click the Start button to proceed.
To cancel, click on the Cancel button.
The screen shows the fragmentation of the volume:
o The yellow portion represents the data has already been defragmented.
o The lavender portion represents file that haven’t been moved yet.
o The black portion represents the free space.
Page 19
Drive Genius 2 User Guide
Defragment
Drive Genius 2 User Guide 19
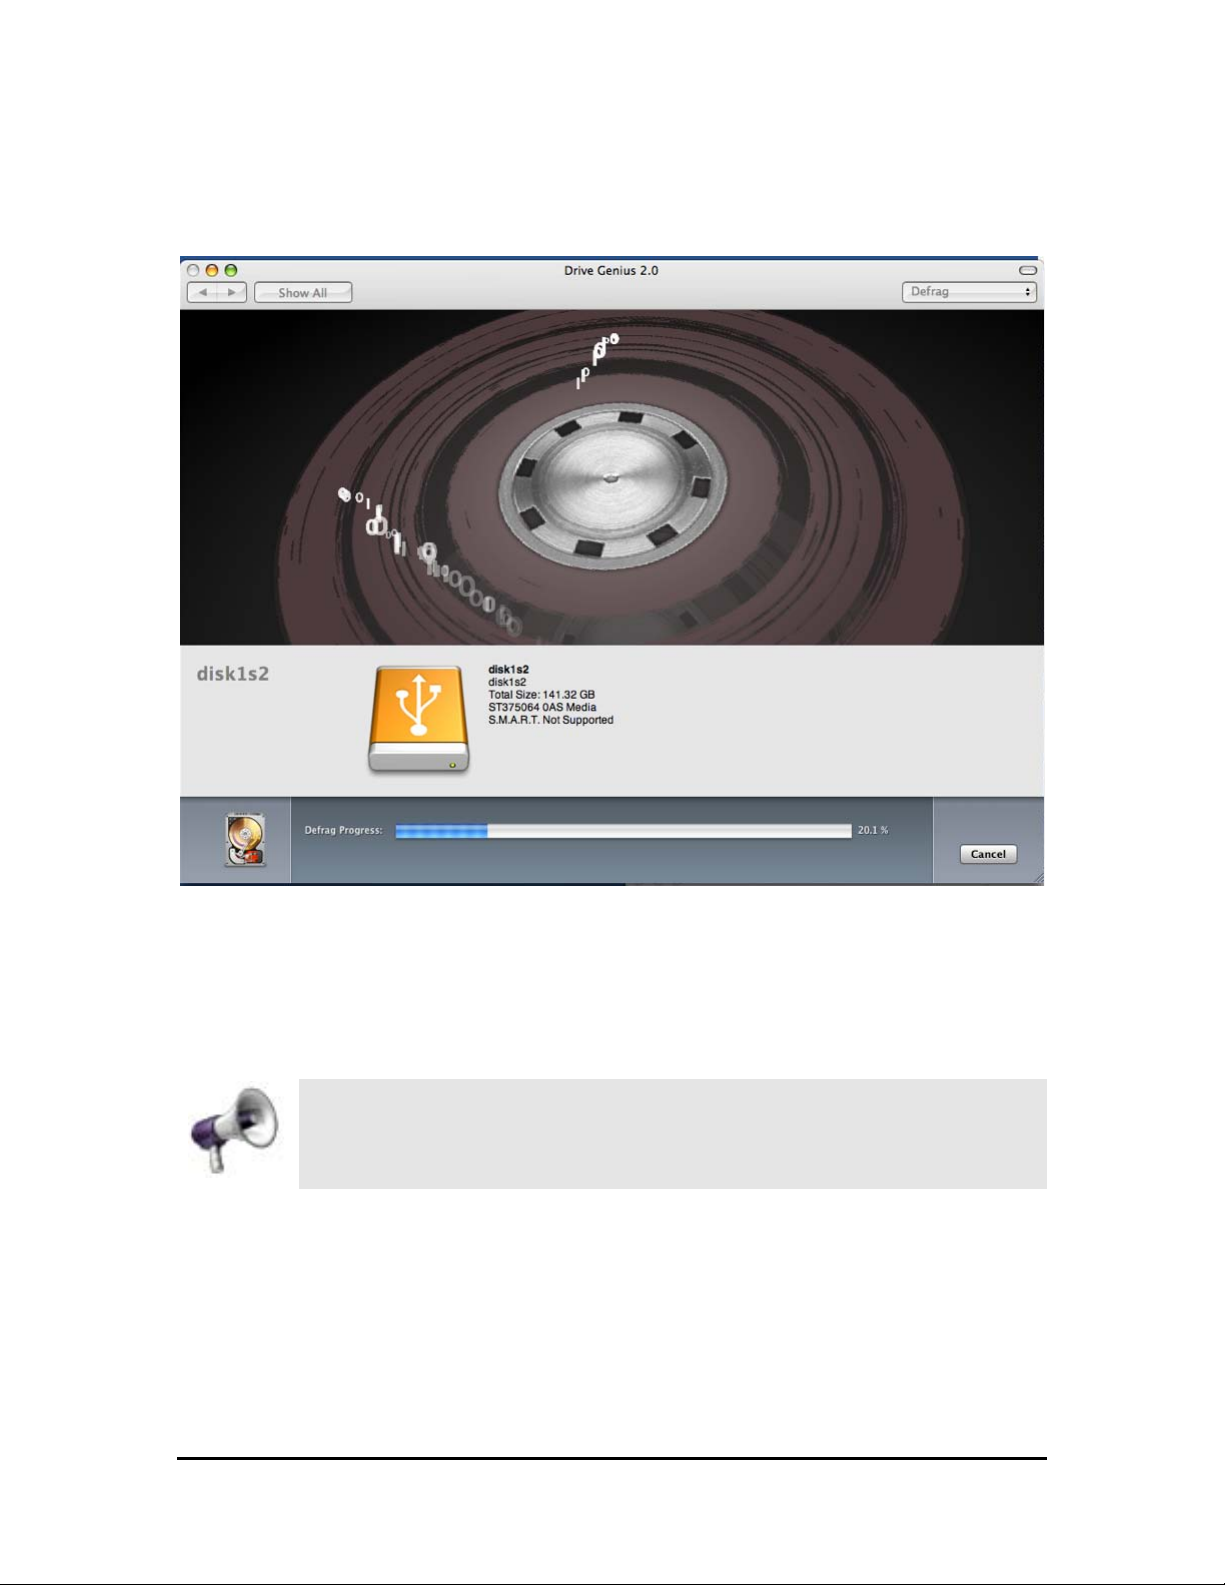
Drive Genius 2 verifies the volume and the defrag process begins.
Defragment in progress
It can take from half an hour to a day to defrag a high capacity drive
(depending on how fragmented it is). The end of the day is a great
time to kick this maintenance routine off.
Page 20
Drive Genius 2 User Guide
Duplicate
Drive Genius 2 User Guide 20
The Duplicate function copies all the information from the source drive to the
destination drive. A copy of the source drive is made to the destination, so if you
backup your startup drive, a bootable copy of it is created, with all information
such as file permissions preserved.
Unlike most backup programs which copy file-by-file, Drive Genius 2 utilizes a
method called device copy. Using device copy enables you to retain every detail
of the original drive, from bootablity to the icon locations. Device copy is also a lot
faster than the traditional file-by-file backup.
Drive Genius 2 supports duplication of drives and volumes. For drive copy, Drive
Genius 2 will duplicate an identical copy of the drive. For volume copy, an
identical volume is first duplicated, and then Drive Genius 2 will apply a
proprietary resizing technology to expand the volume size to the maximum, so no
space is wasted.
Duplication can be used for copying one drive to another drive or to a disk image
file.
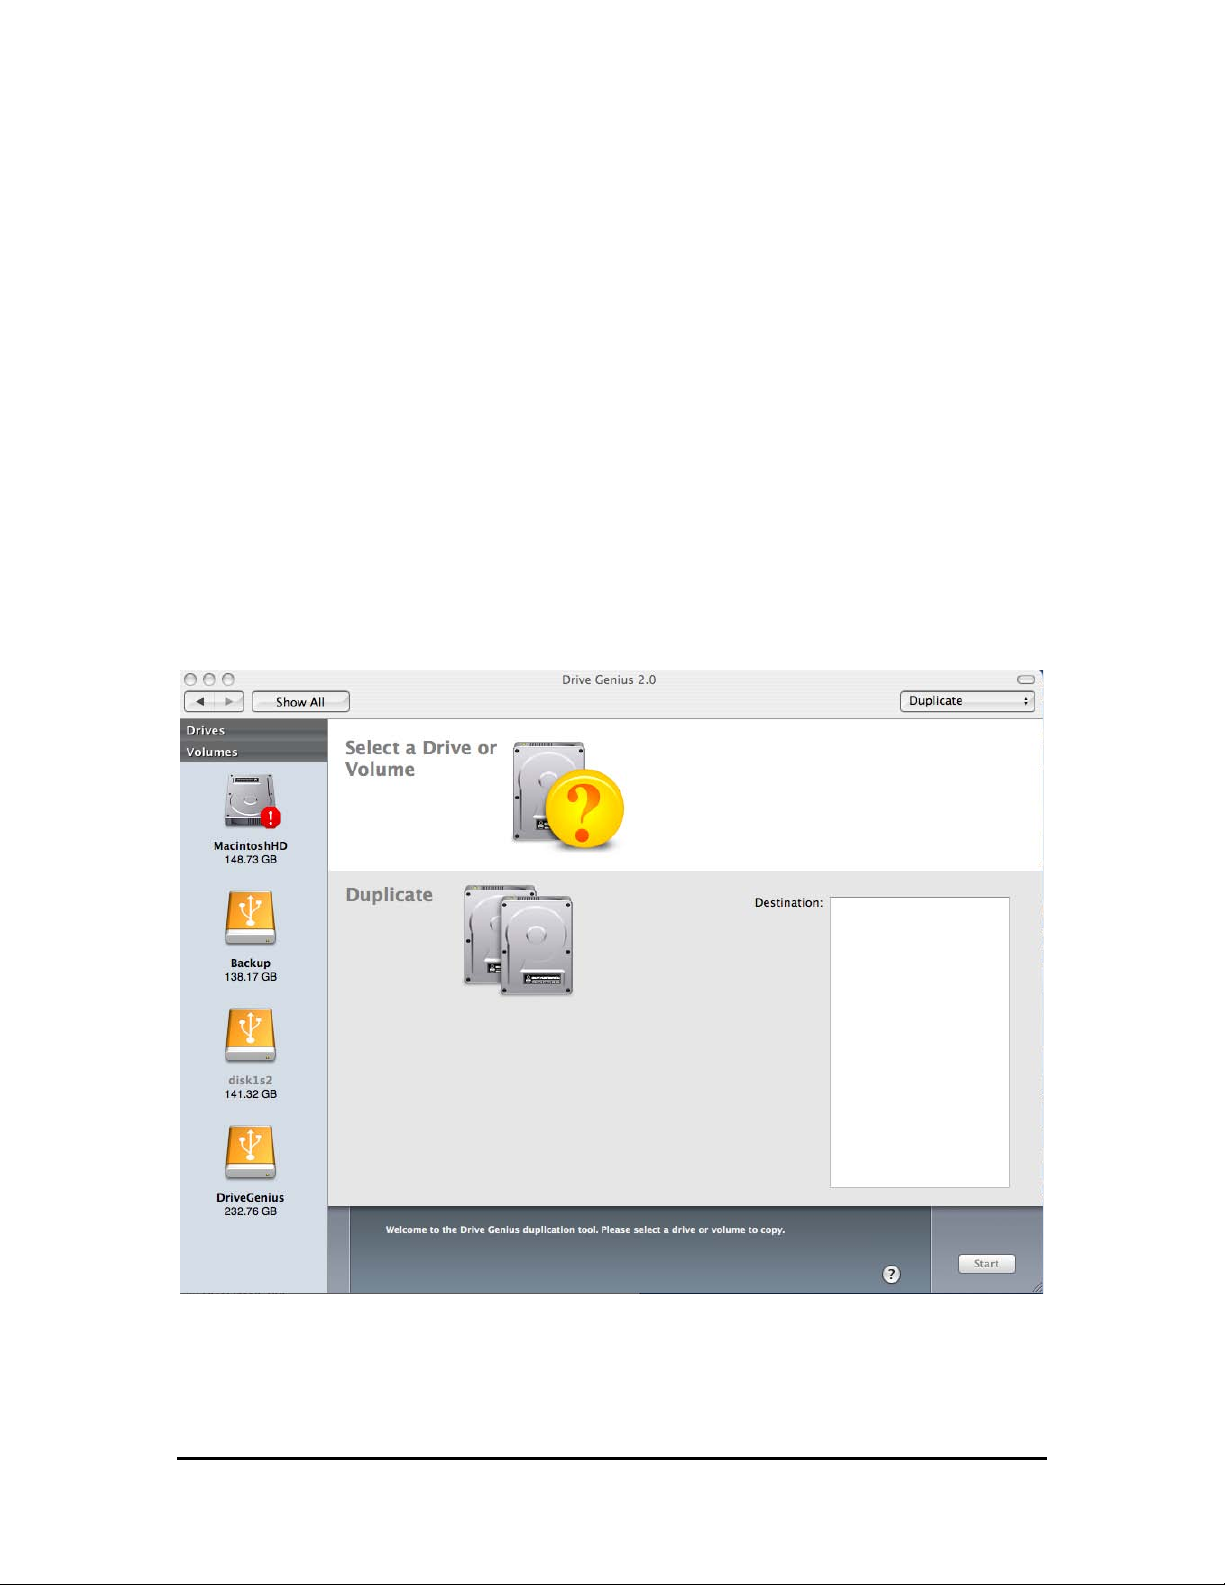
The Duplicate Window
Note: To perform Duplicate on main boot volume you must boot to Drive Genius
DVD or a secondary boot drive.
Page 21
Drive Genius 2 User Guide
Duplicate
Drive Genius 2 User Guide 21
To Duplicate a volume:
Launch Drive Genius 2.
Click on the green arrow.
Click the Duplicate icon.
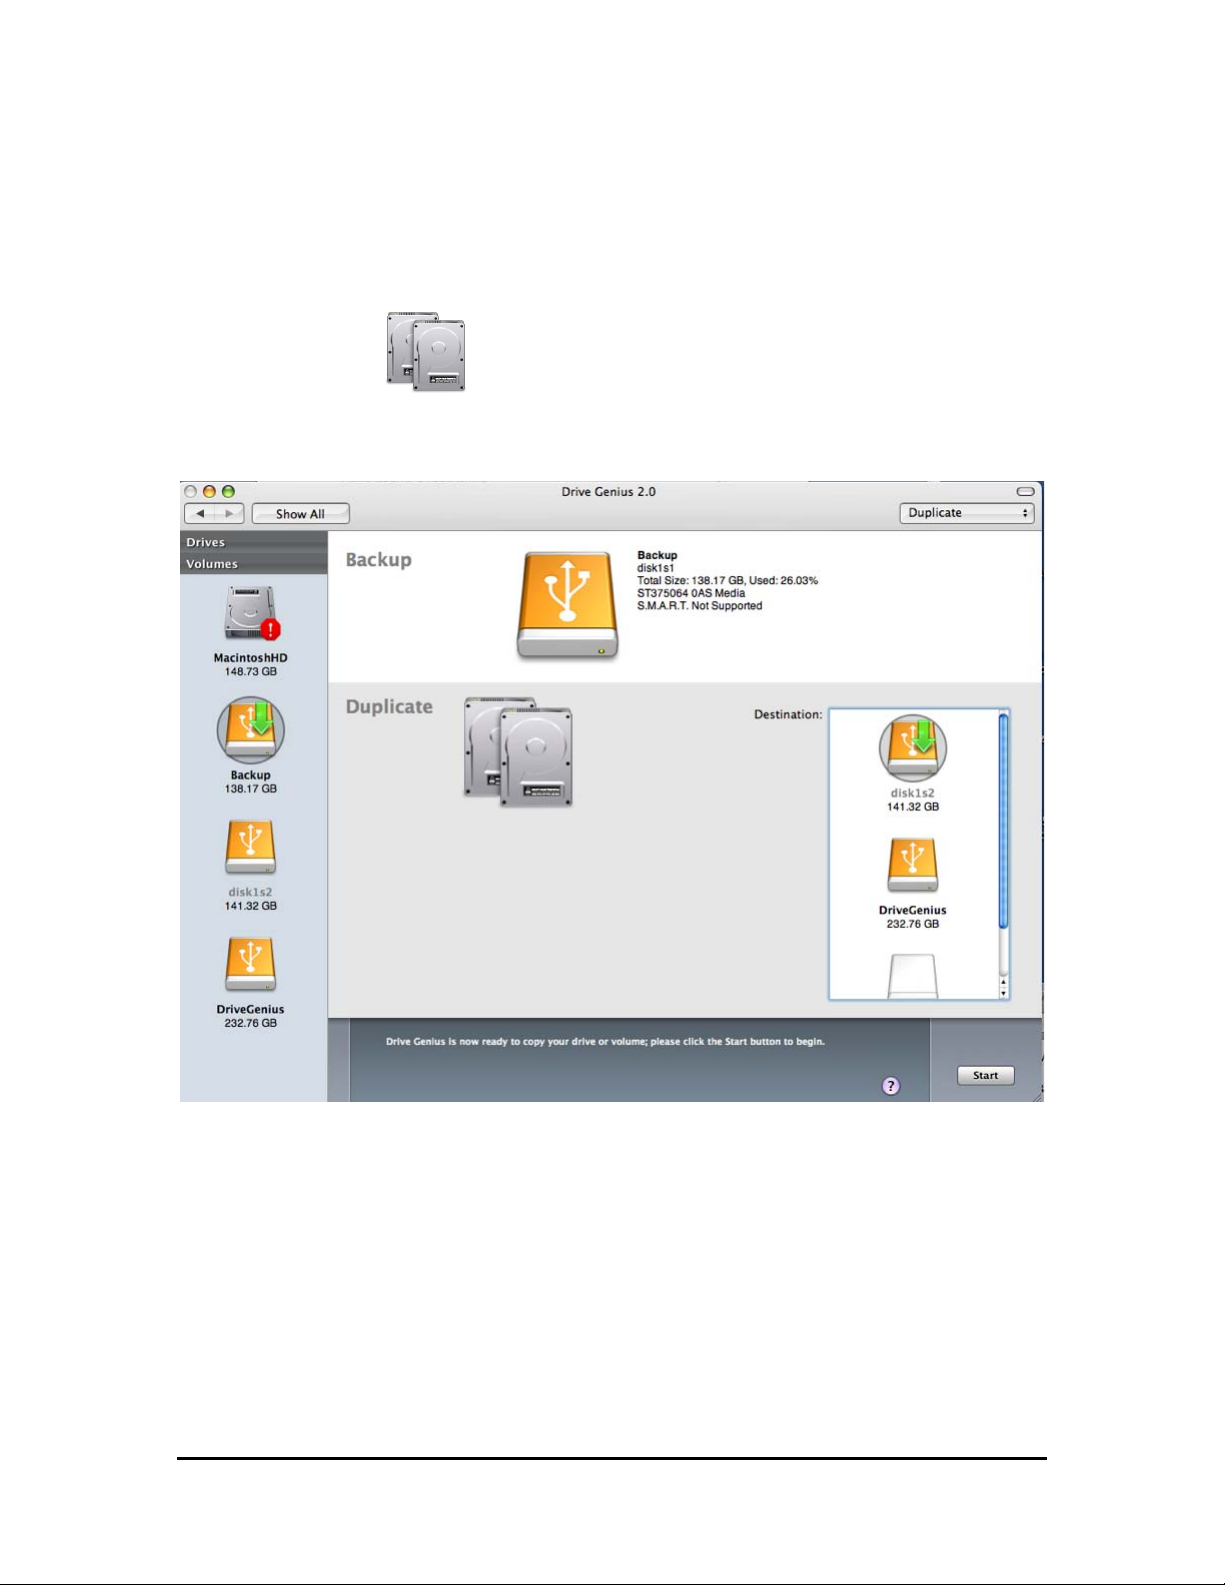
In the Drive Genius 2 Volumes window, select the volume you want to duplicate.
Selecting a volume to duplicate
Select the target volume from Destination box. You can also duplicate the source
volume to a Disk Image as your destination.
Click the Start button to proceed.
To cancel, click on the Cancel button.
Page 22
Drive Genius 2 User Guide
Duplicate
Drive Genius 2 User Guide 22
The information on the target drive will be replaced with the
information on the source volume. If you want to archive to a file
instead then select “New Disk Image” as the target. Drive Genius 2’
volume copy is designed to work with OS X volumes. Using Drive
Genius 2 on an OS 9 only volume may remove the ability to start up OS 9 from
that partition. Drive Genius 2 does not affect the data on OS 9 volumes at all.
Drive Genius 2’ device copy will work with almost all file systems including OS 9,
Linux and Windows®.
Drive Genius 2 can only duplicate HFS+ volumes (almost all formats can be
duplicated in the device view).Drive Genius 2’ Device Duplication function clones
an exact image of the original drive. Drive Genius 2 utilizes a method called
"device-to-device copying". Using device copy enables you to retain every detail
of the original drive, from boot ability to the icon locations. Device copy is a lot
faster than the traditional file-by-file backup when duplicating a relatively full
drive.
Device duplication is useful when you need to have an identical image of the
original drive. For example, for forensics reasons, law enforcement agencies
require their experts to work on drives identical to the original when dealing with
evidence stored in the hard drives. Drive Genius 2 can even be used to clone
Windows® or Linux drives.
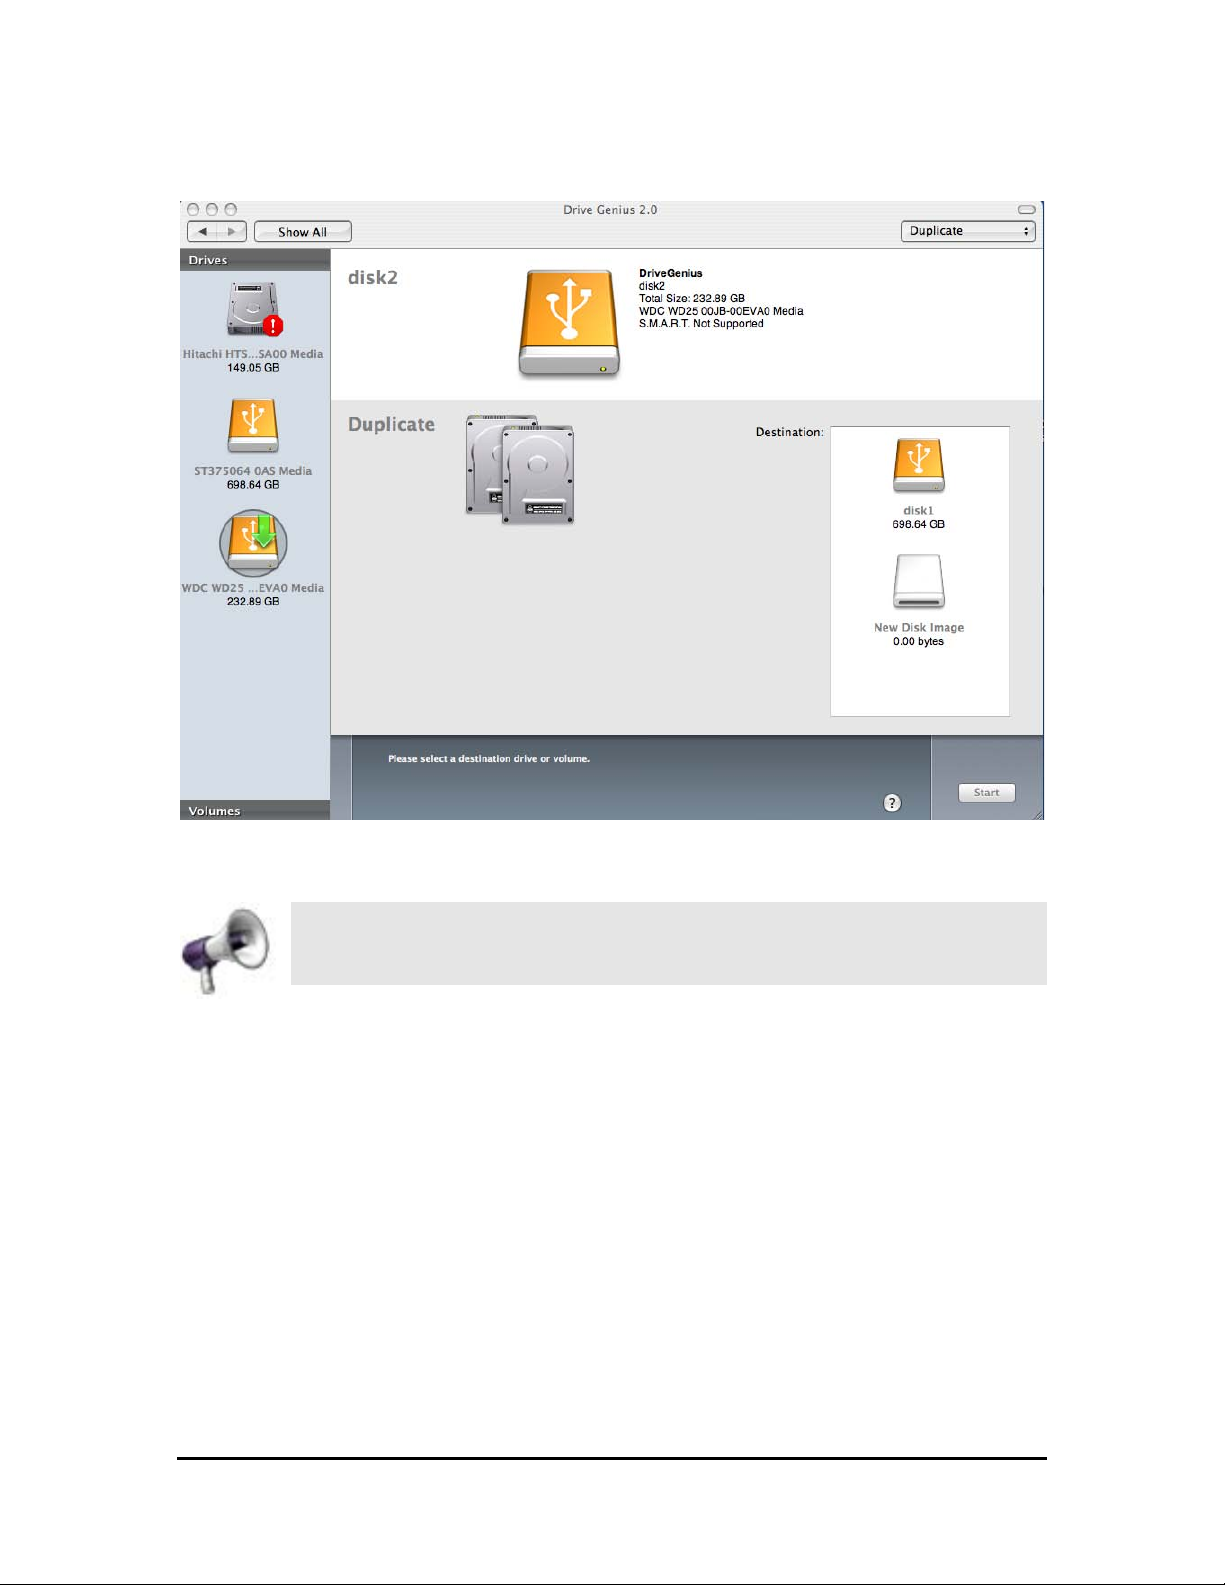
To Duplicate a device:
Launch Drive Genius 2.
Click the Duplicate icon.
In the Drive Genius 2 Drives view, select the device you want to duplicate.
Page 23
Drive Genius 2 User Guide
Duplicate
Drive Genius 2 User Guide 23
Selecting a device to duplicate
The destination drive’s existing partitioning scheme is affected by the
Duplicate operation. All data that was previously stored on the
destination disk will be replaced with the data from the source disk.
Page 24
Drive Genius 2 User Guide
Duplicate
Drive Genius 2 User Guide 24
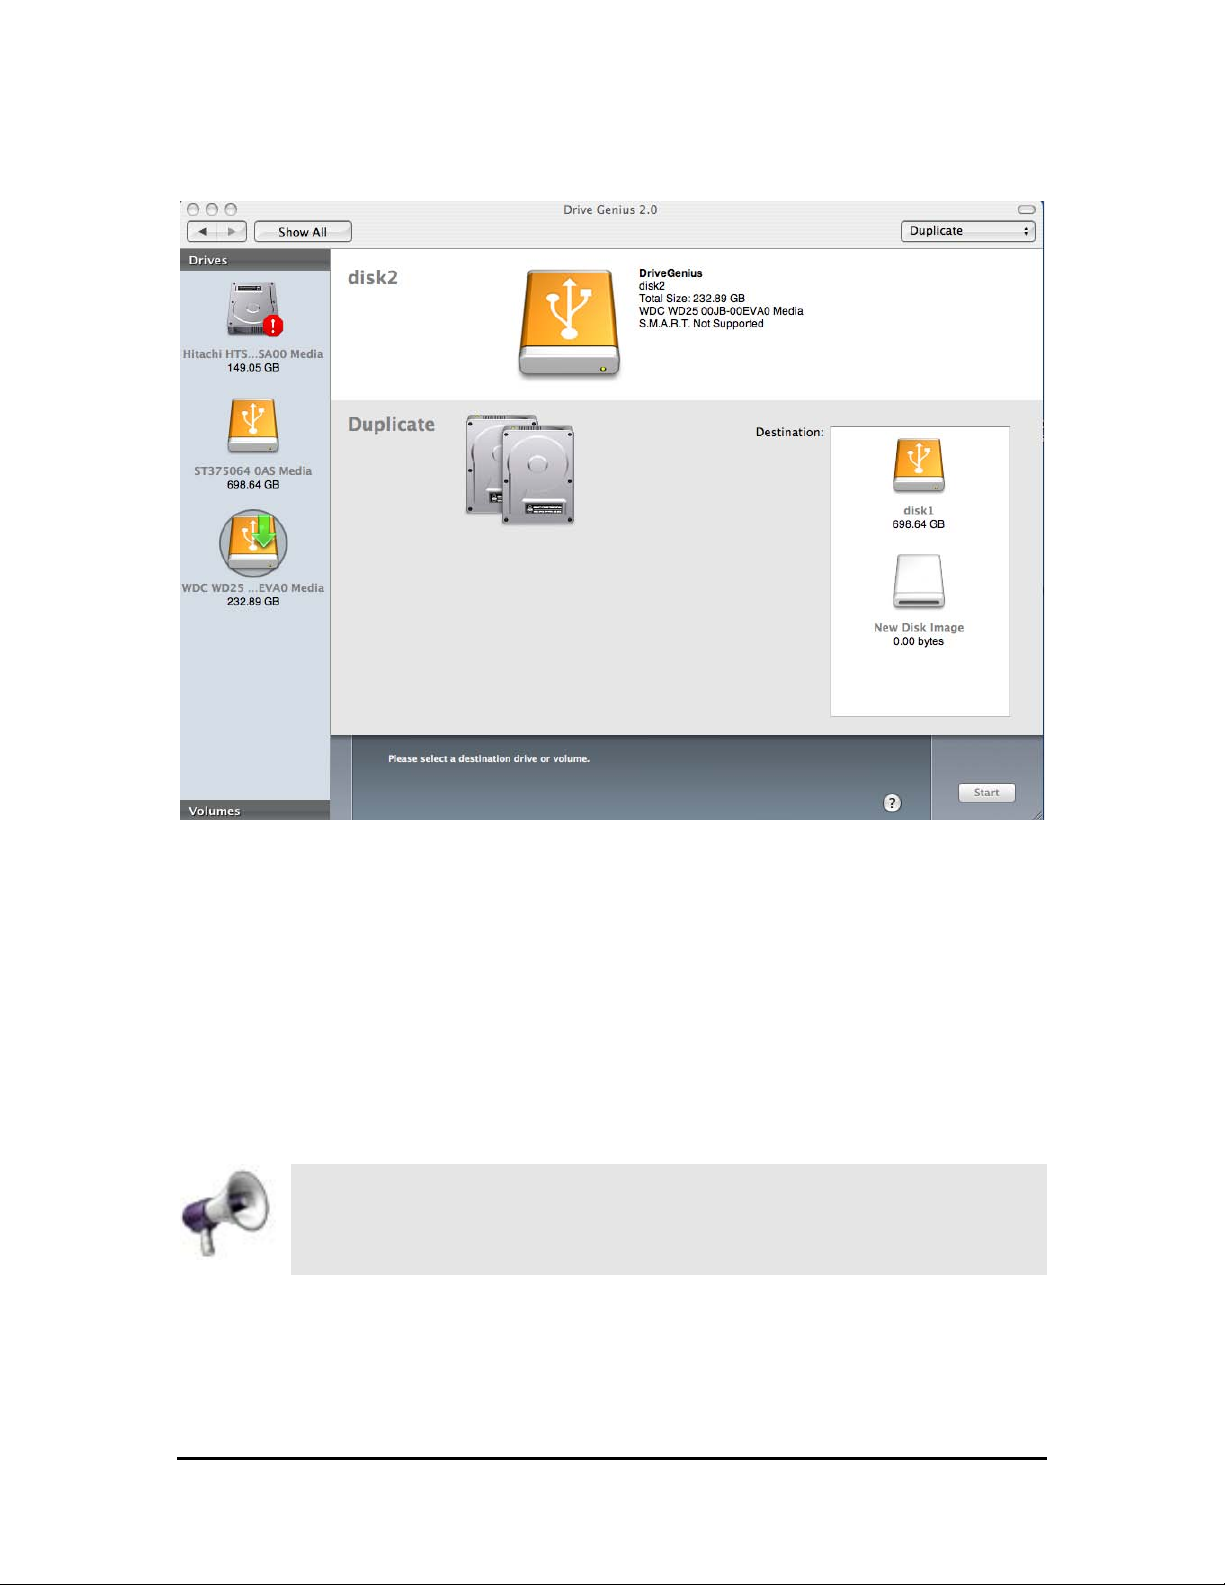
Duplicate window for devices
Select the target device from the Destination box. Only disks the same or
larger in size than the source disk are listed. You can also create a Disk Image
as your backup.
Click the Start button to proceed.
To cancel, click on the Cancel button.
Drive Genius 2 requires the source and the target devices to be
unmounted before proceeding with the duplication. You will need a
Drive Genius 2 bootable DVD or start up from another drive.
Page 25
Drive Genius 2 User Guide
Sector Edit
Drive Genius 2 User Guide 25
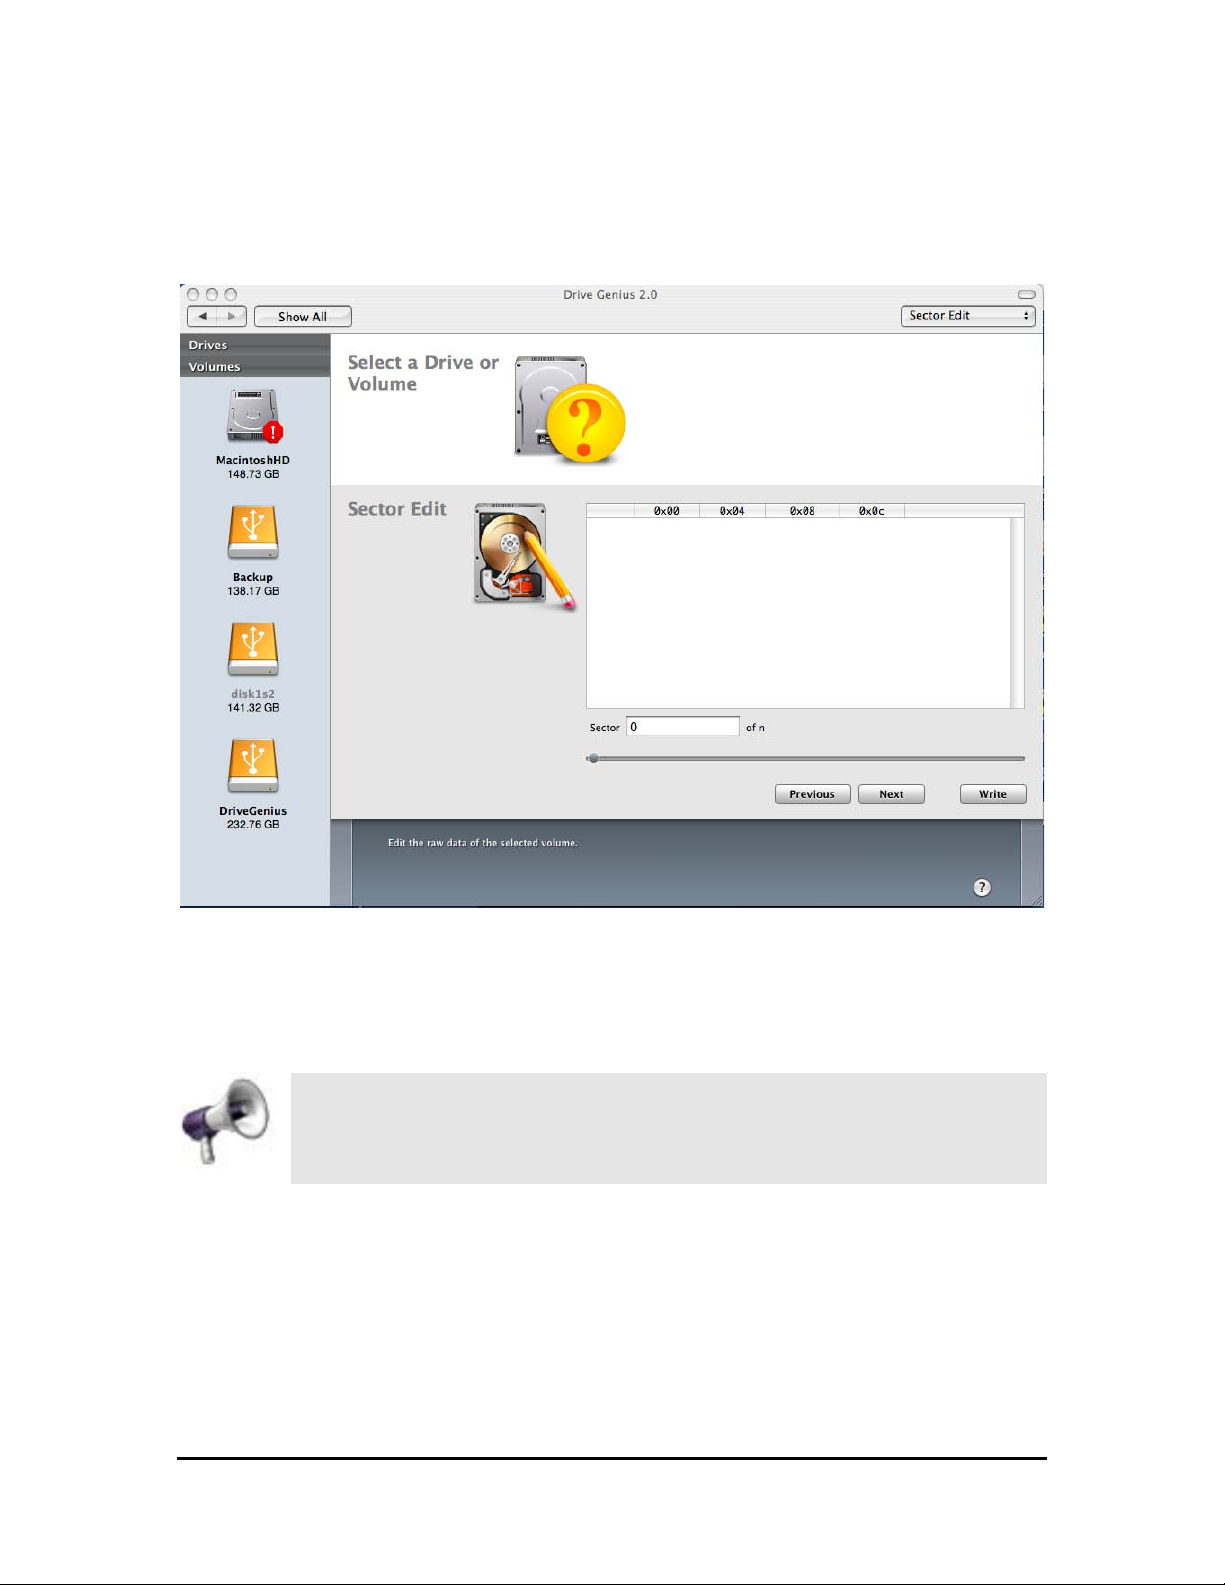
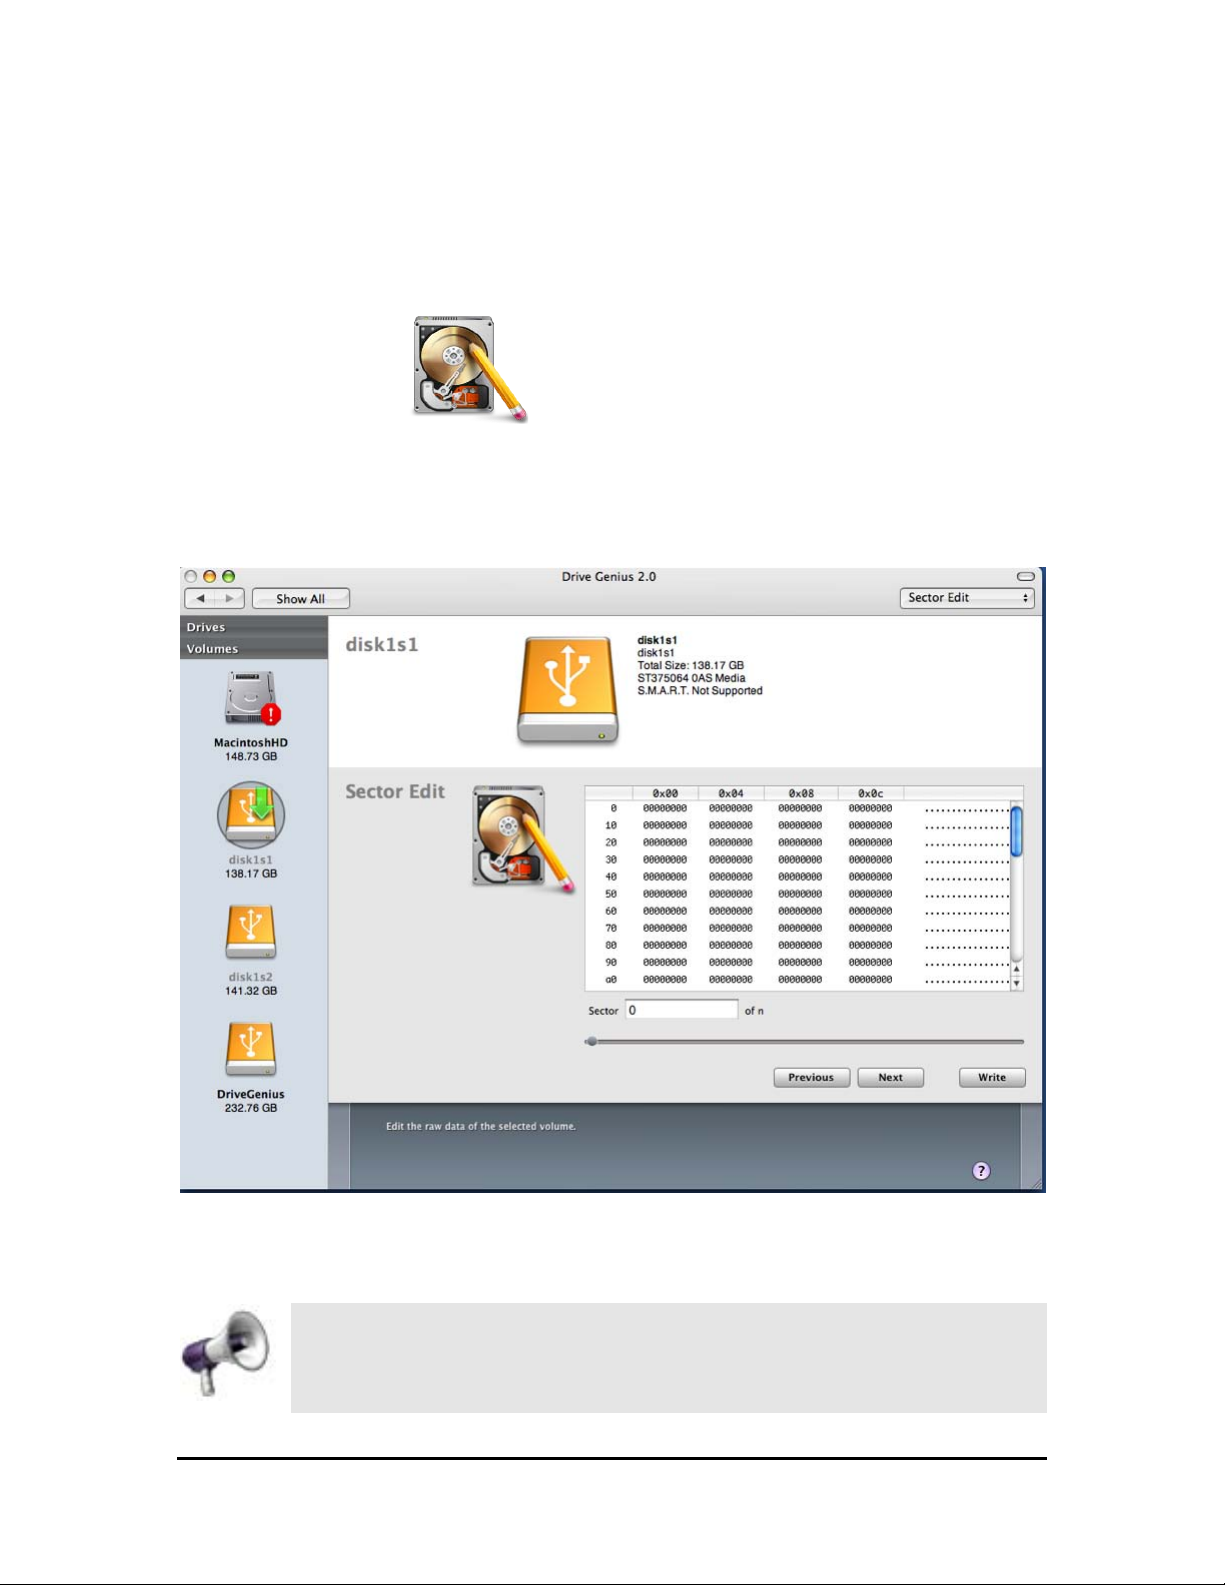
Drive Genius 2’ Sector Edit allows expert users the ability to access and modify
bits and bytes of a volume or a disk.
Sector Edit Window
Do not use this function unless you are extremely proficient with raw
hex data. Editing the data using Sector Edit may render your data files
unreadable, or even corrupt your drive.
Note: To perform a Sector Edit on main boot volume you must boot to Drive
Genius DVD or a secondary boot drive.
Page 26
Drive Genius 2 User Guide
Sector Edit
Drive Genius 2 User Guide 26
To perform a low level Sector Edit on your drive:
Launch Drive Genius 2.
Click the green arrow.
Click the Sector Edit icon.
In the Drive Genius 2 Volumes window, select the volume you want to perform a
sector edit. You can also perform sector edit on a device by selecting a drive
under Drives view.
Selecting a drive for sector edit
You can use the sector edit window on any file by using the file menu
to open a document.
Page 27
Drive Genius 2 User Guide
Sector Edit
Drive Genius 2 User Guide 27
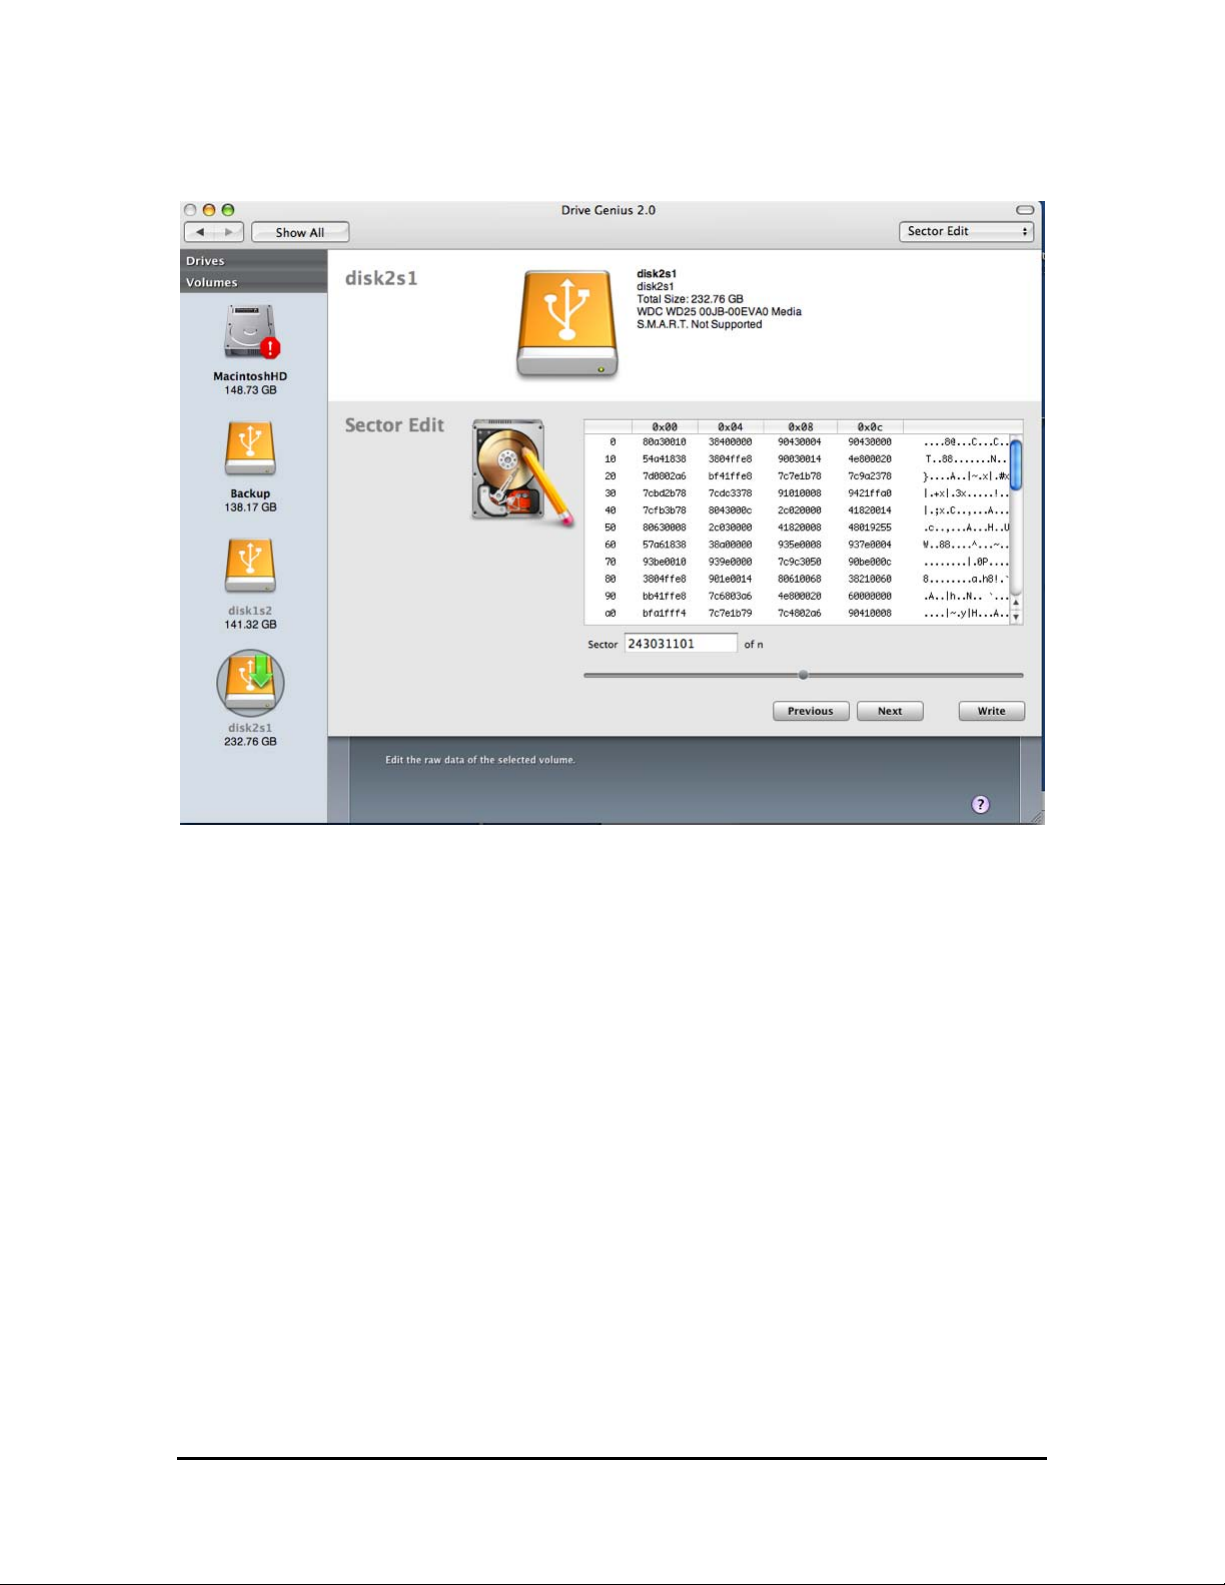
Sector Edit window
To navigate to the sector you want to edit, you have three options:
Type in the Sector number in the “Sector _________ of n” box.
Use the slider.
Use the Previous and Next buttons.
Page 28
Drive Genius 2 User Guide
Sector Edit
Drive Genius 2 User Guide 28
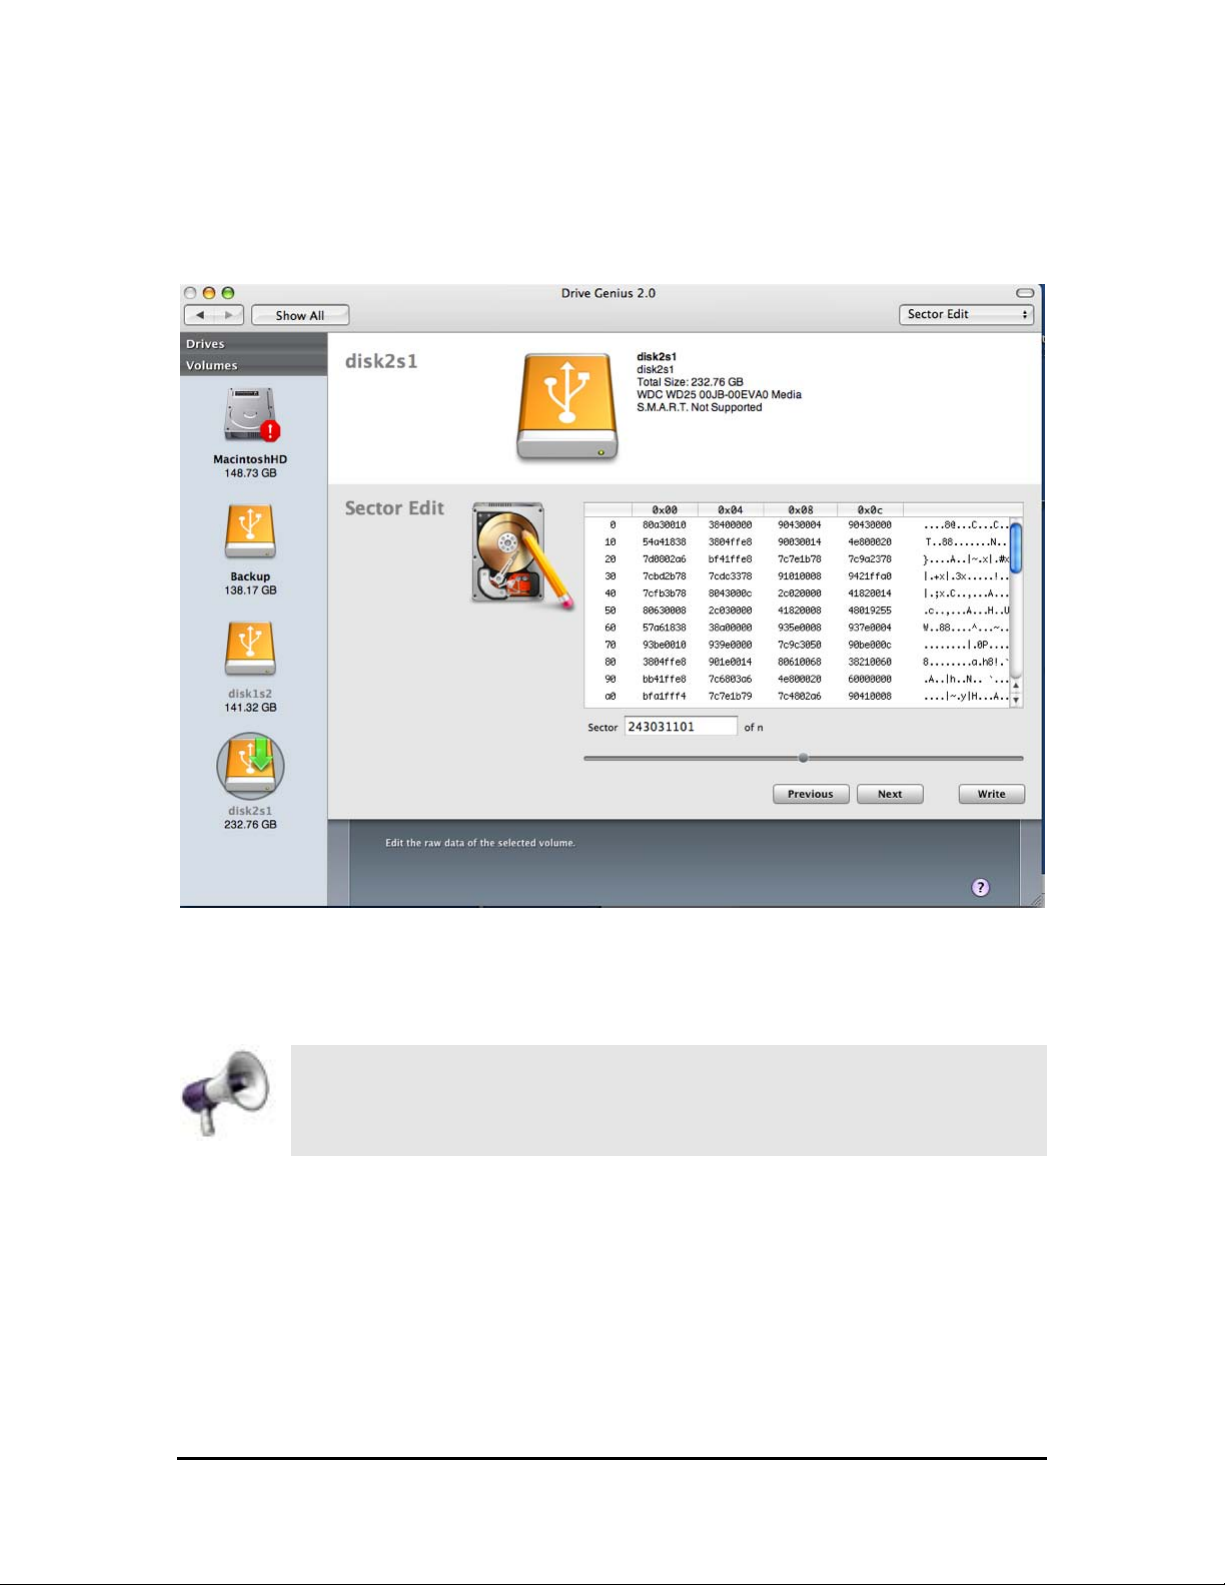
To modify the bytes, highlight the byte or bytes you want to modify, and type in
the new value.
Sector Edit window
To apply the sector edit modification, click on the Write button.
Prosoft recommends backing-up your data before using Sector Edit;
that way, if anything goes wrong (virus, power blackout, OS error or
hardware failure etc…), you will be able to recover your data.
Page 29
Drive Genius 2 User Guide
Shred
Drive Genius 2 User Guide 29
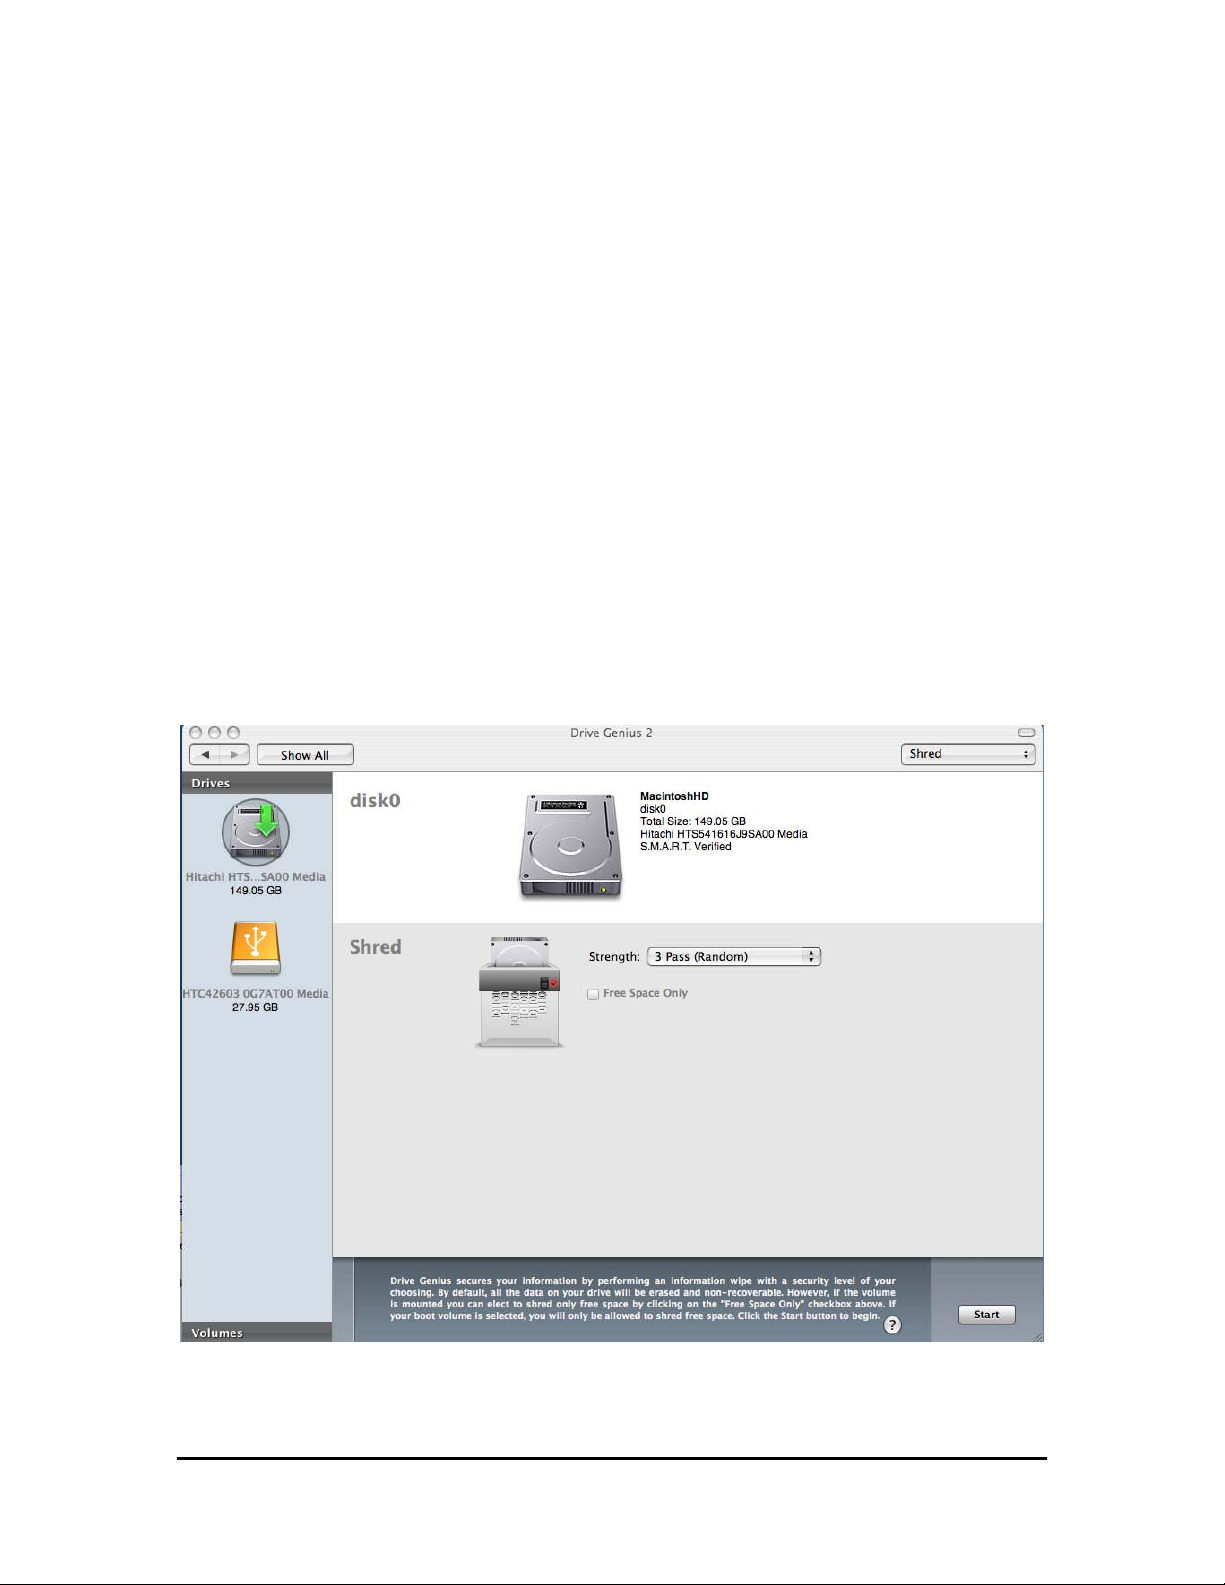
Drive Genius 2 Shred function is used for securely erasing the contents of a
volume or the whole drive. There are many reasons to perform a shredding
operation instead of simply dragging the files into the trash and emptying it.
For example:
o To avoid identity theft and protect your credit.
o Stop intellectual property theft.
o Permanently get rid of your data files so no one can recover it. For
example, a volume with adult oriented materials.
o Permanently remove any software that you are going to be using on your
new machine since software licenses usually only apply to one computer.
o Most Government/large corporations require the drives to be securely
erased before disposing or transferring to other users.
The only secure way to erase your drive is by writing repeated passes of various
data patterns. Drive Genius 2 has been written to conform to the United States
Department of Defense standards for drive sanitation.
Shred Window
Page 30
Drive Genius 2 User Guide
Shred
Drive Genius 2 User Guide 30
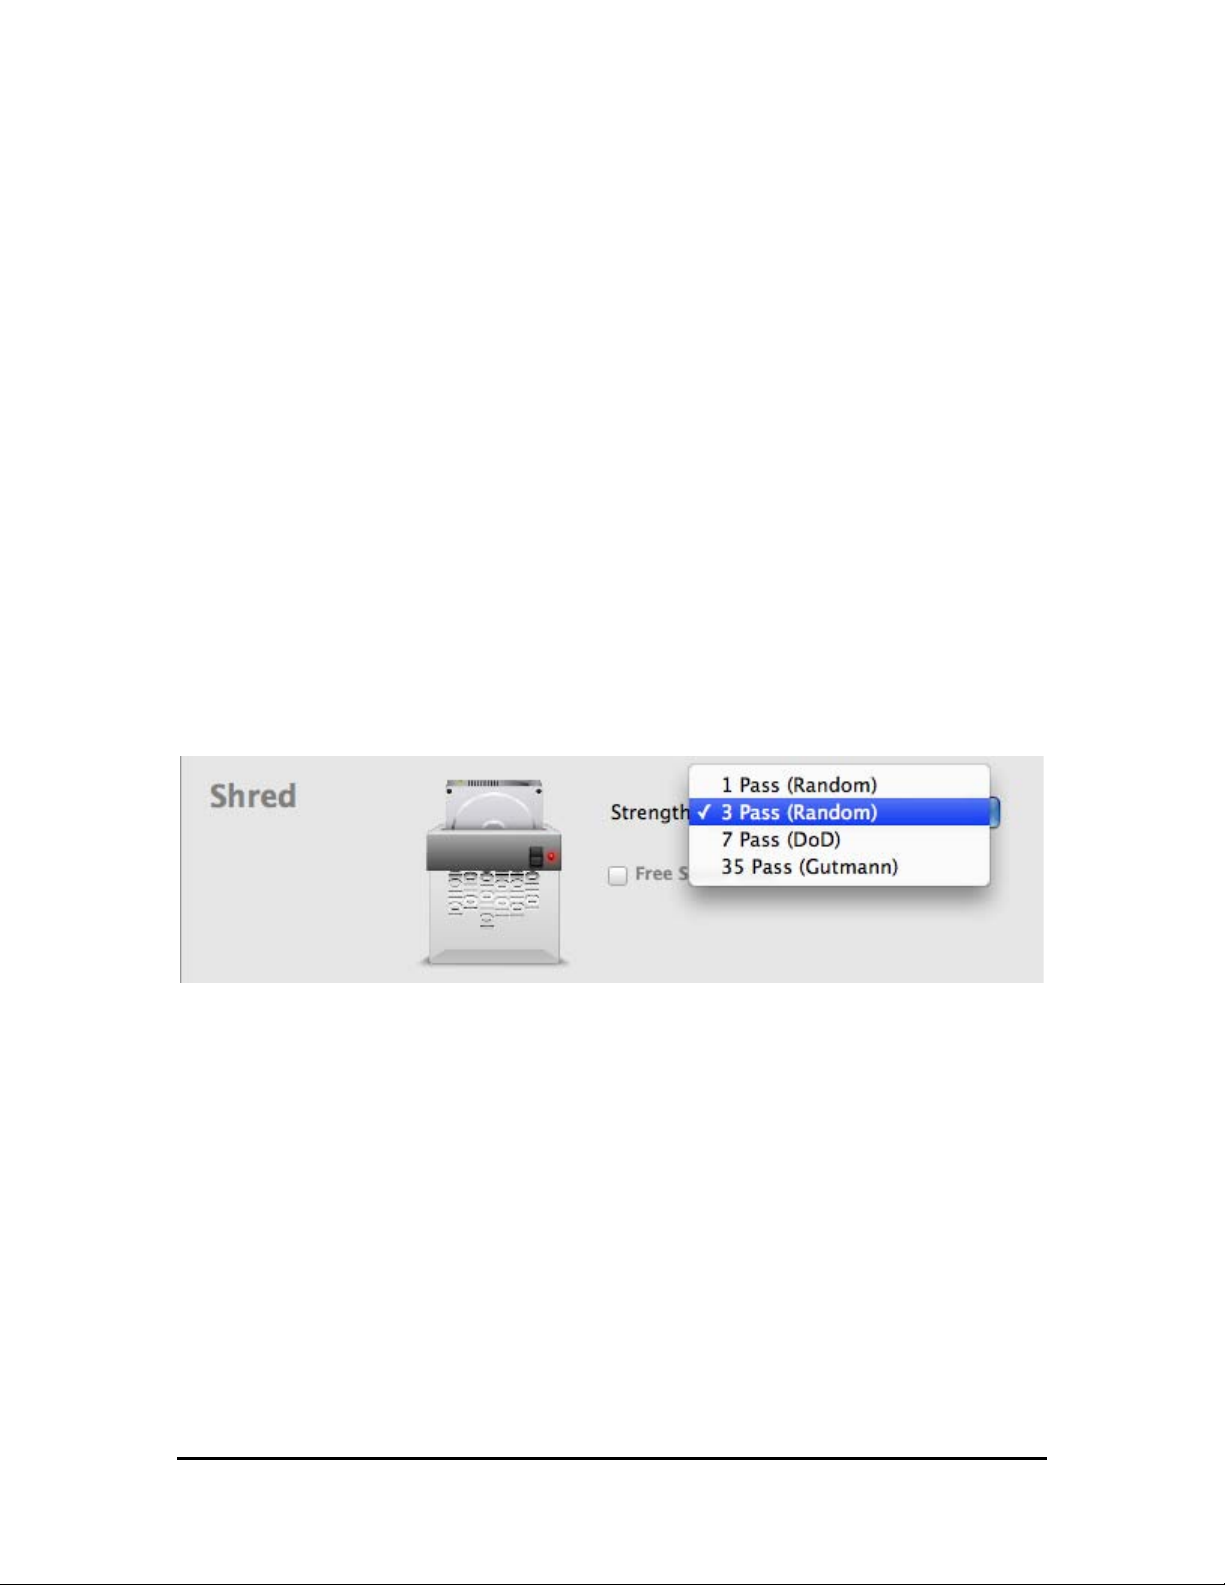
Shred overwrites the volume or the drive with 1, 3 (Random) or 7 pass (DoD)
and ensures all previous data will never be recoverable. Drive Genius also
features a 35 pass (Gutmann) option, which overwrites every block of data 35
times. Drive Genius 2’s Shredder function conforms to the U.S. Department of
Defense standard for drive sanitization (DoD 5220.22 M), and it works with IDE
(ATA), SCSI, USB, and Firewire hard drives.
Note: US Department of Defense in the clearing and sanitizing standard DoD
5220.22-M recommends the approach "Overwrite all addressable locations with a
character, its complement, then a random character, verify for clearing and
sanitizing information on the writable media”.
Drive Genius 2 can shred either a volume or the whole drive. If you are shredding
your boot volume or your startup drive, you will need to boot the system from the
Drive Genius 2 DVD, or boot of from another drive with Drive Genius 2 installed.
Drive Genius 2 also allows you to permanently erase the free space on your
volume making it impossible for anyone to retrieve old files you have previously
deleted.
Drive Genius 2 Shred options
Page 31
Drive Genius 2 User Guide
Shred
Drive Genius 2 User Guide 31
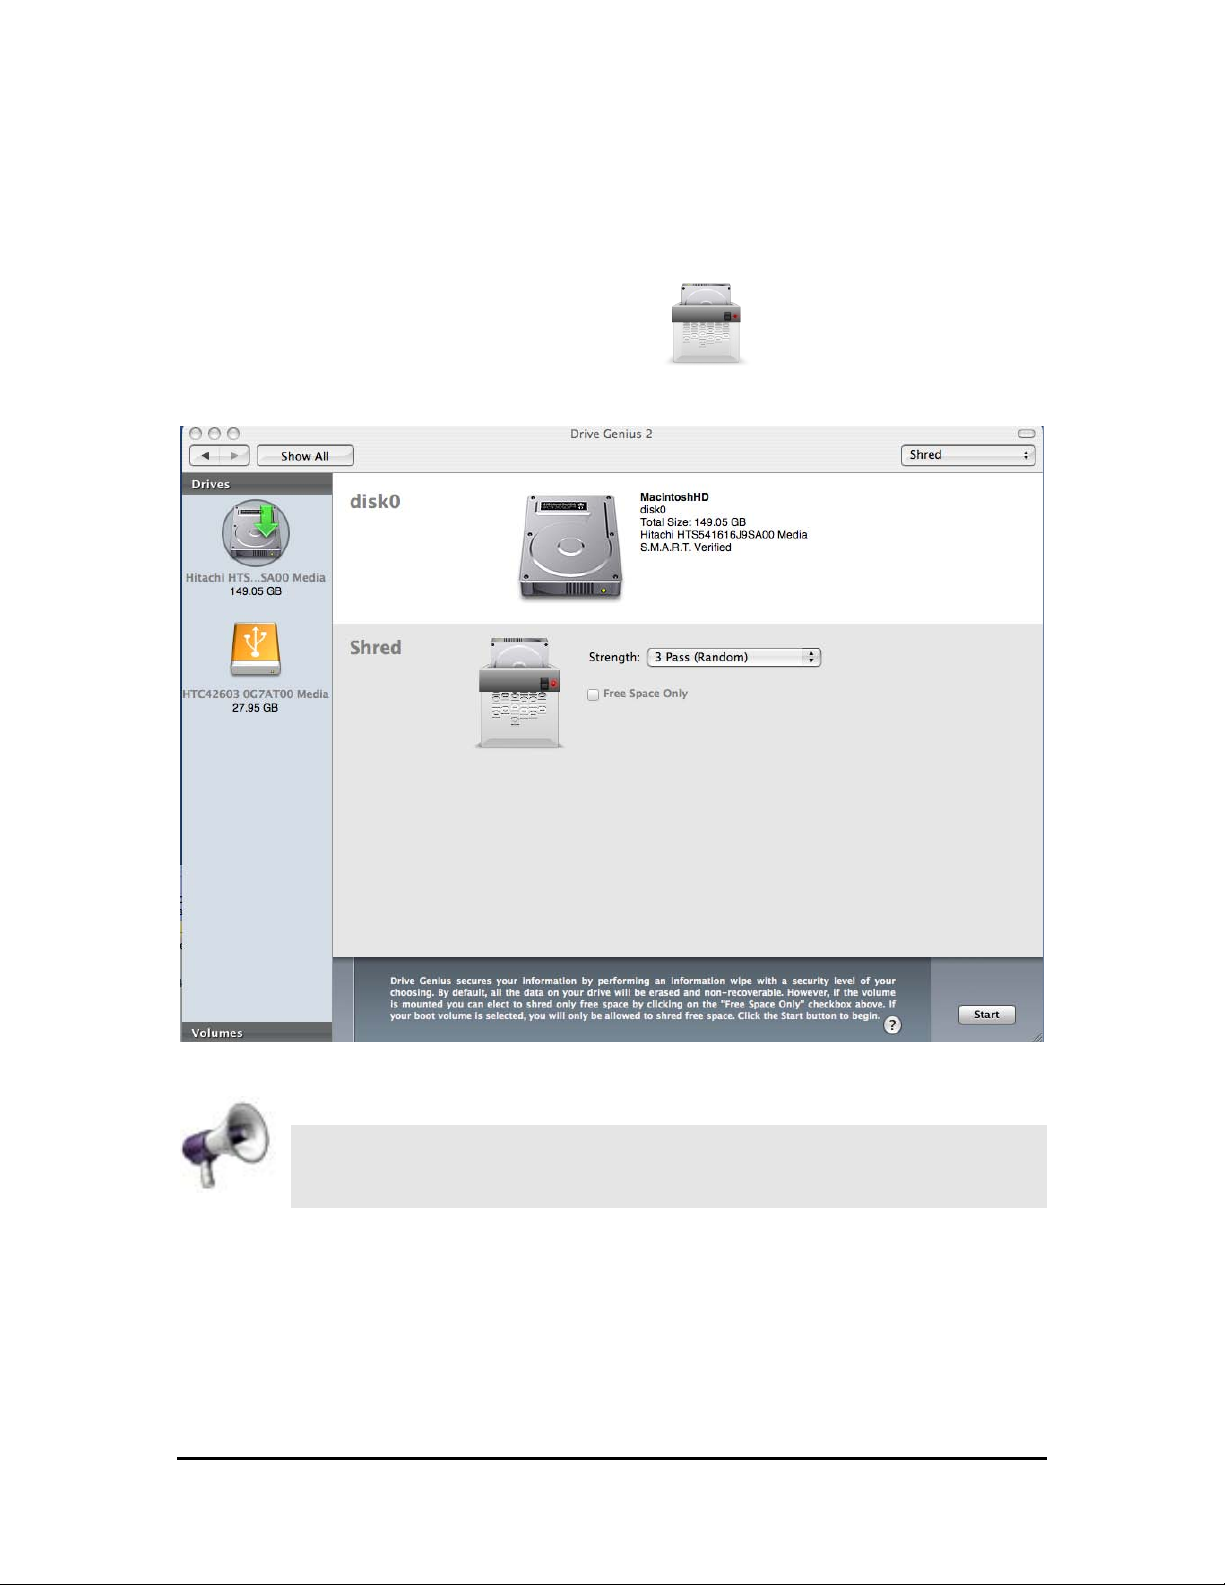
To run Shred from the Drive Genius 2 DVD:
Insert the Drive Genius 2 DVD. Press and hold down the letter “C” key.
Click the green arrow and click on the Shred icon.
From the Volumes view, select the volume you want to shred.
Selecting a volume to shred
To shred a volume instead of free space only, uncheck the Free
Space Only check box.
Click the Start button to proceed.
To cancel, click on the Cancel button.
After the operation, a newly initialized HFS Plus partition will appear on the
desktop.
Page 32

Drive Genius 2 User Guide
Shred
Drive Genius 2 User Guide 32
When you are done with shredding, quitting Drive Genius 2 will shut down the
computer. To eject the Drive Genius 2 DVD, restart the computer, and press and
hold (unless other method specified) the mouse button.
Page 33
Drive Genius 2 User Guide
Shred
Drive Genius 2 User Guide 33
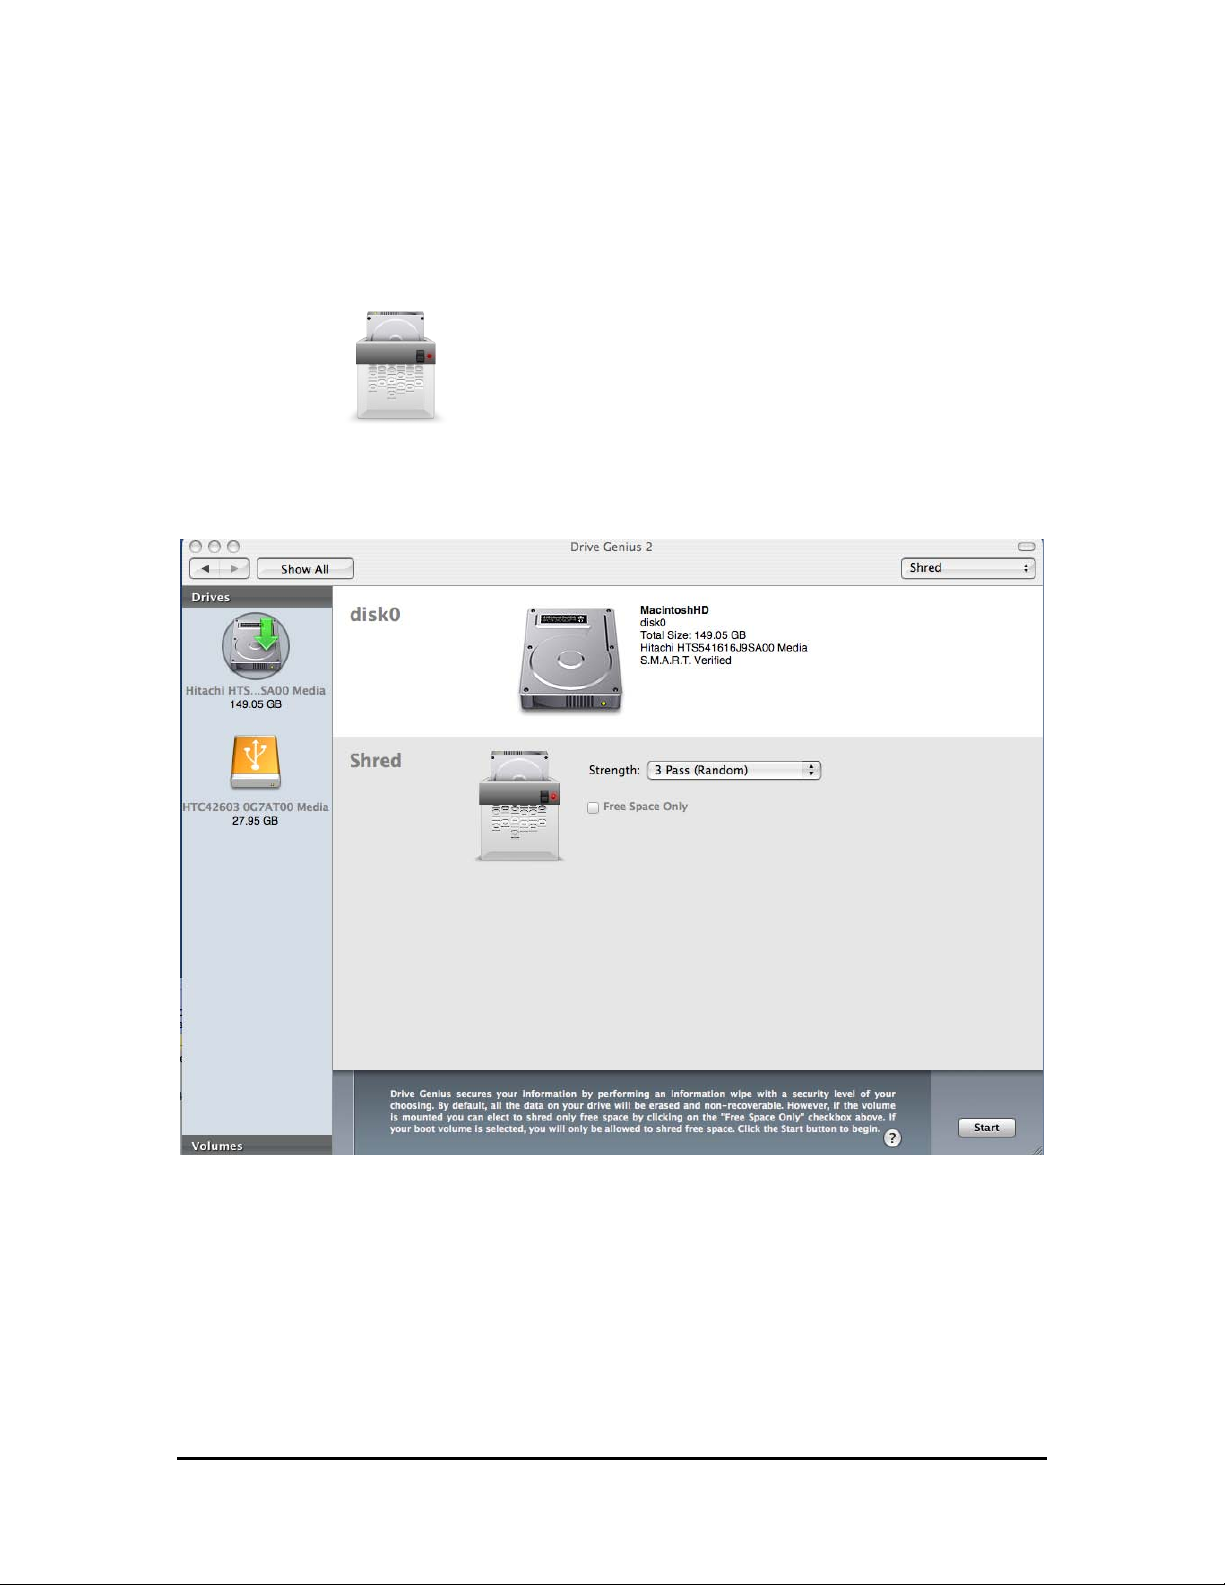
To run Shred from your hard drive:
Launch Drive Genius 2.
Click the green arrow.
Click on Shred icon.
From the Volumes view, select the volume you want to shred.
Selecting a volume to shred
Page 34
Drive Genius 2 User Guide
Shred
Drive Genius 2 User Guide 34
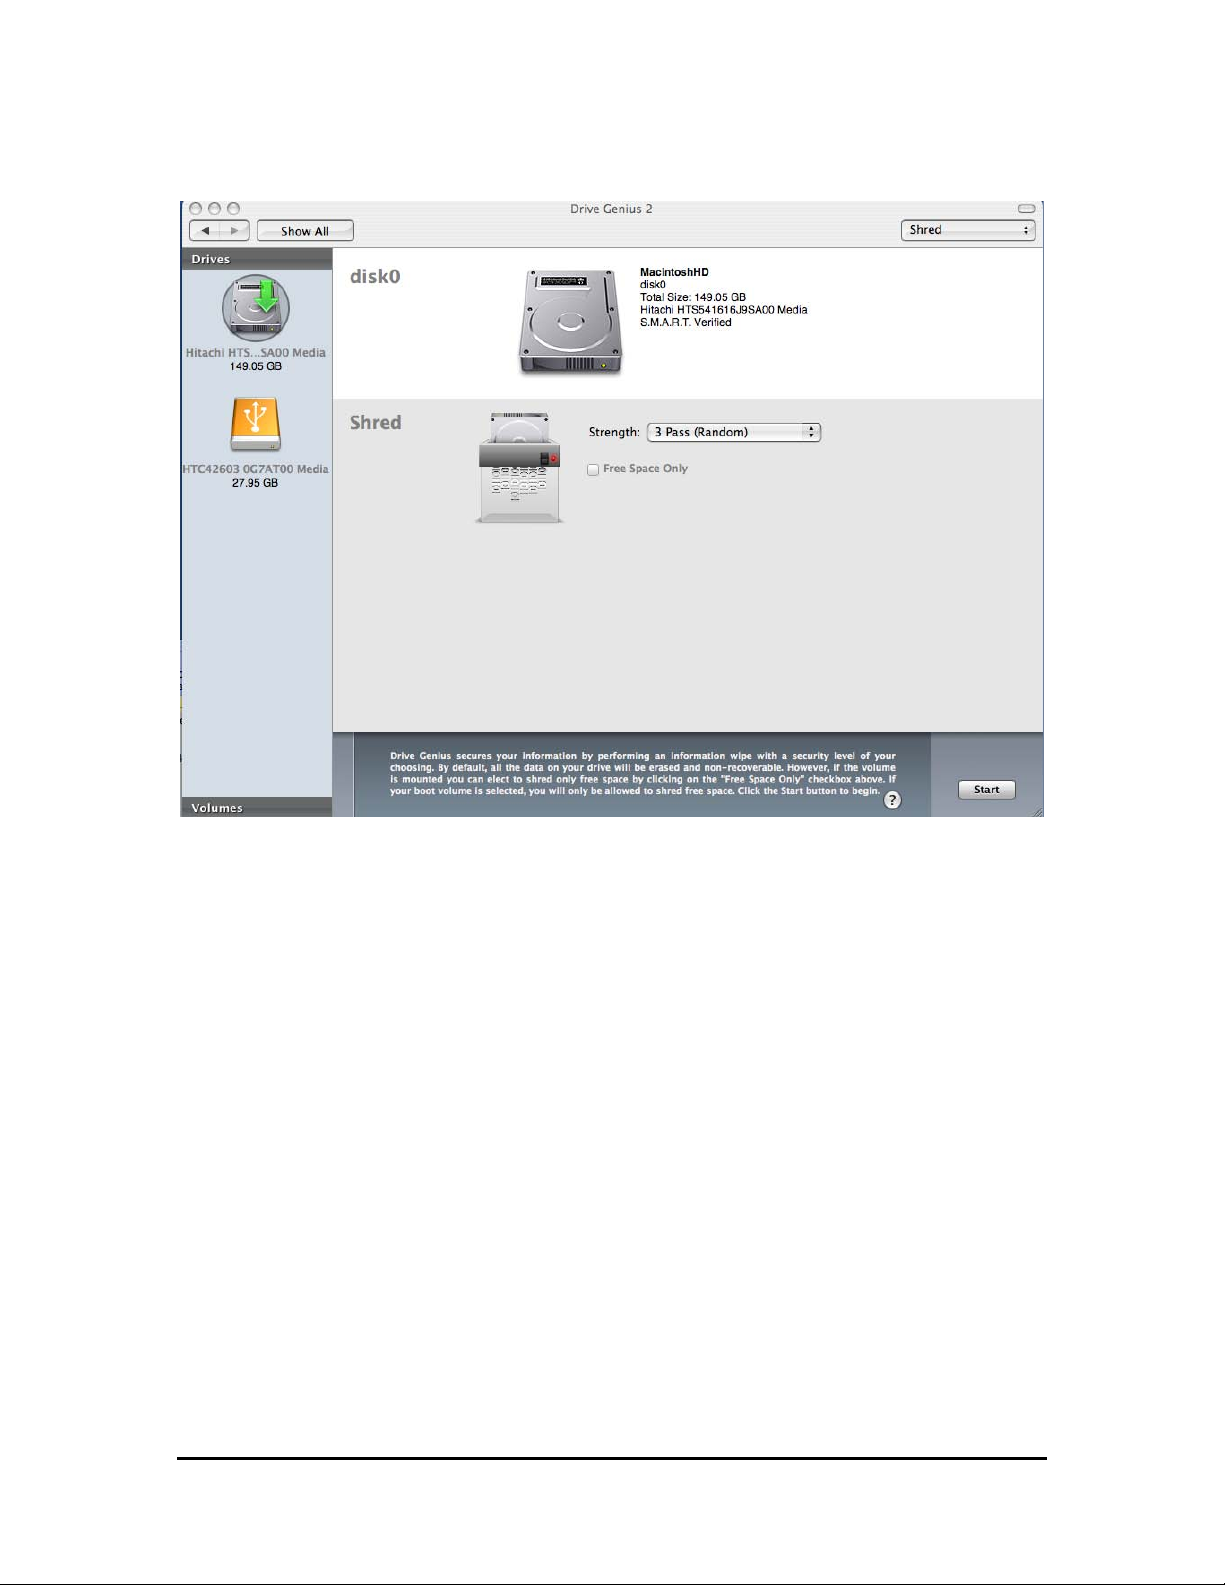
Shred Window
Uncheck the Free Space Only check box if you wish to Shred the contents of the
entire Volume.
Click the Start button to proceed.
To cancel, click on the Cancel button.
After the operation, a newly initialized HFS Plus partition will be mounted.
Erasing Free Space
Drive Genius 2 allows you to permanently erase the free space on your volume in
a secure fashion making it impossible for anyone to retrieve old files you have
previously deleted. Technically, this process is achieved by first filling up your
volume with temporary files, and then writing a secure pattern over the files.
This process is particularly important if your hard drive is to be shared among a
few users, or you are selling it, or disposing of it.
Page 35
Drive Genius 2 User Guide
Shred
Drive Genius 2 User Guide 35
To erase the free space of a volume:
Click on the Volumes tab, and click on the volume you want to perform a free
space erase.
Click on the Shred icon.
Make sure the Free Space Only check box is checked.
Click on the Start icon.
A sheet dialog will open to inform you of the progress.
To cancel, click on the Cancel button.
If you have a big volume or a slow machine, shredding free space can
take a while. If you erase the free space on a disk or other device,
there is no way any file recovery programs will be able to retrieve your
deleted files up to that point
Page 36
Drive Genius 2 User Guide
Integrity check
Drive Genius 2 User Guide 36
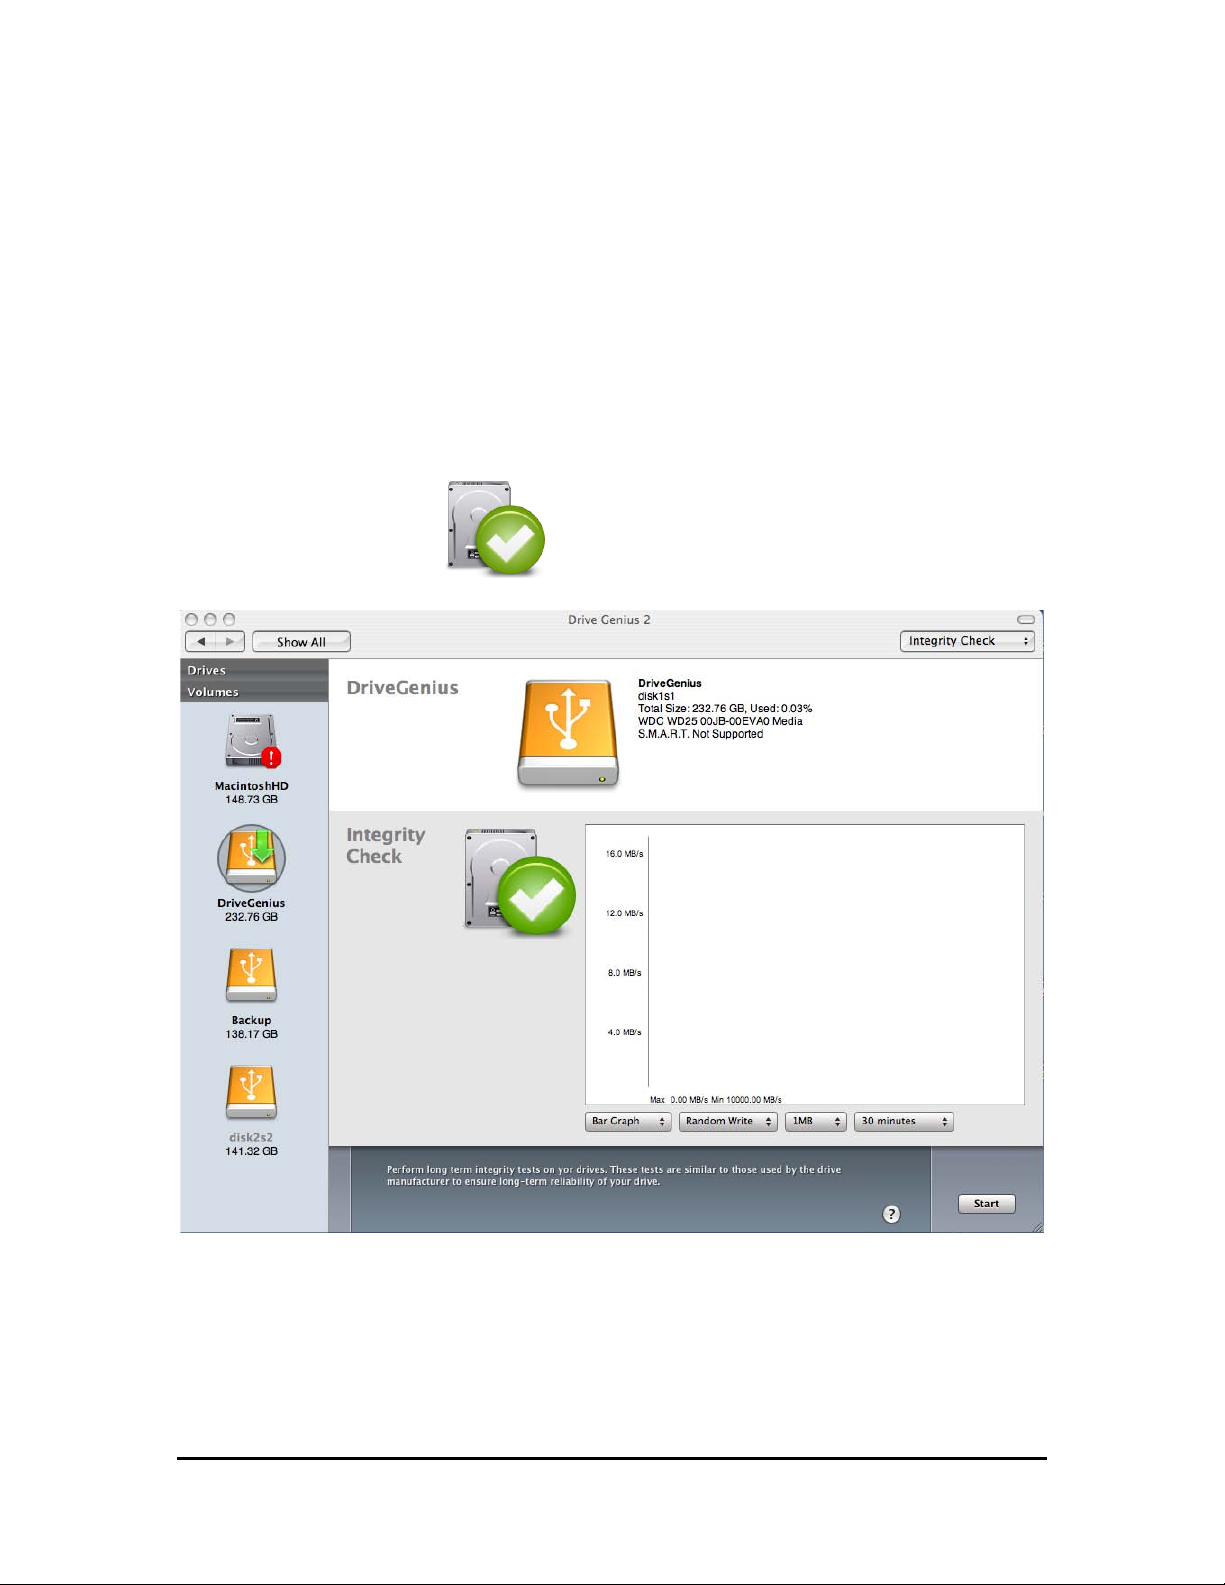
Integrity Check is a suite of diagnostics designed to test the overall integrity of
the disk drive by writing and reading various block sizes to and from the drive. By
reading, writing and comparing the read and write data, Integrity check measures
and reports various aspects of the drive subsystem including the driver, the drive
controller, the cabling, the drive’s motherboard and the head seek mechanism.
To use Integrity Check on a volume/device:
Launch Drive Genius 2.
Click the Integrity Check button.
Integrity Check Window
Select the drive you want to test by highlighting it.
Note: To perform Integrity Check on main boot volume you must boot to Drive
Genius DVD or a secondary boot drive.
Page 37
Drive Genius 2 User Guide
Integrity check
Drive Genius 2 User Guide 37
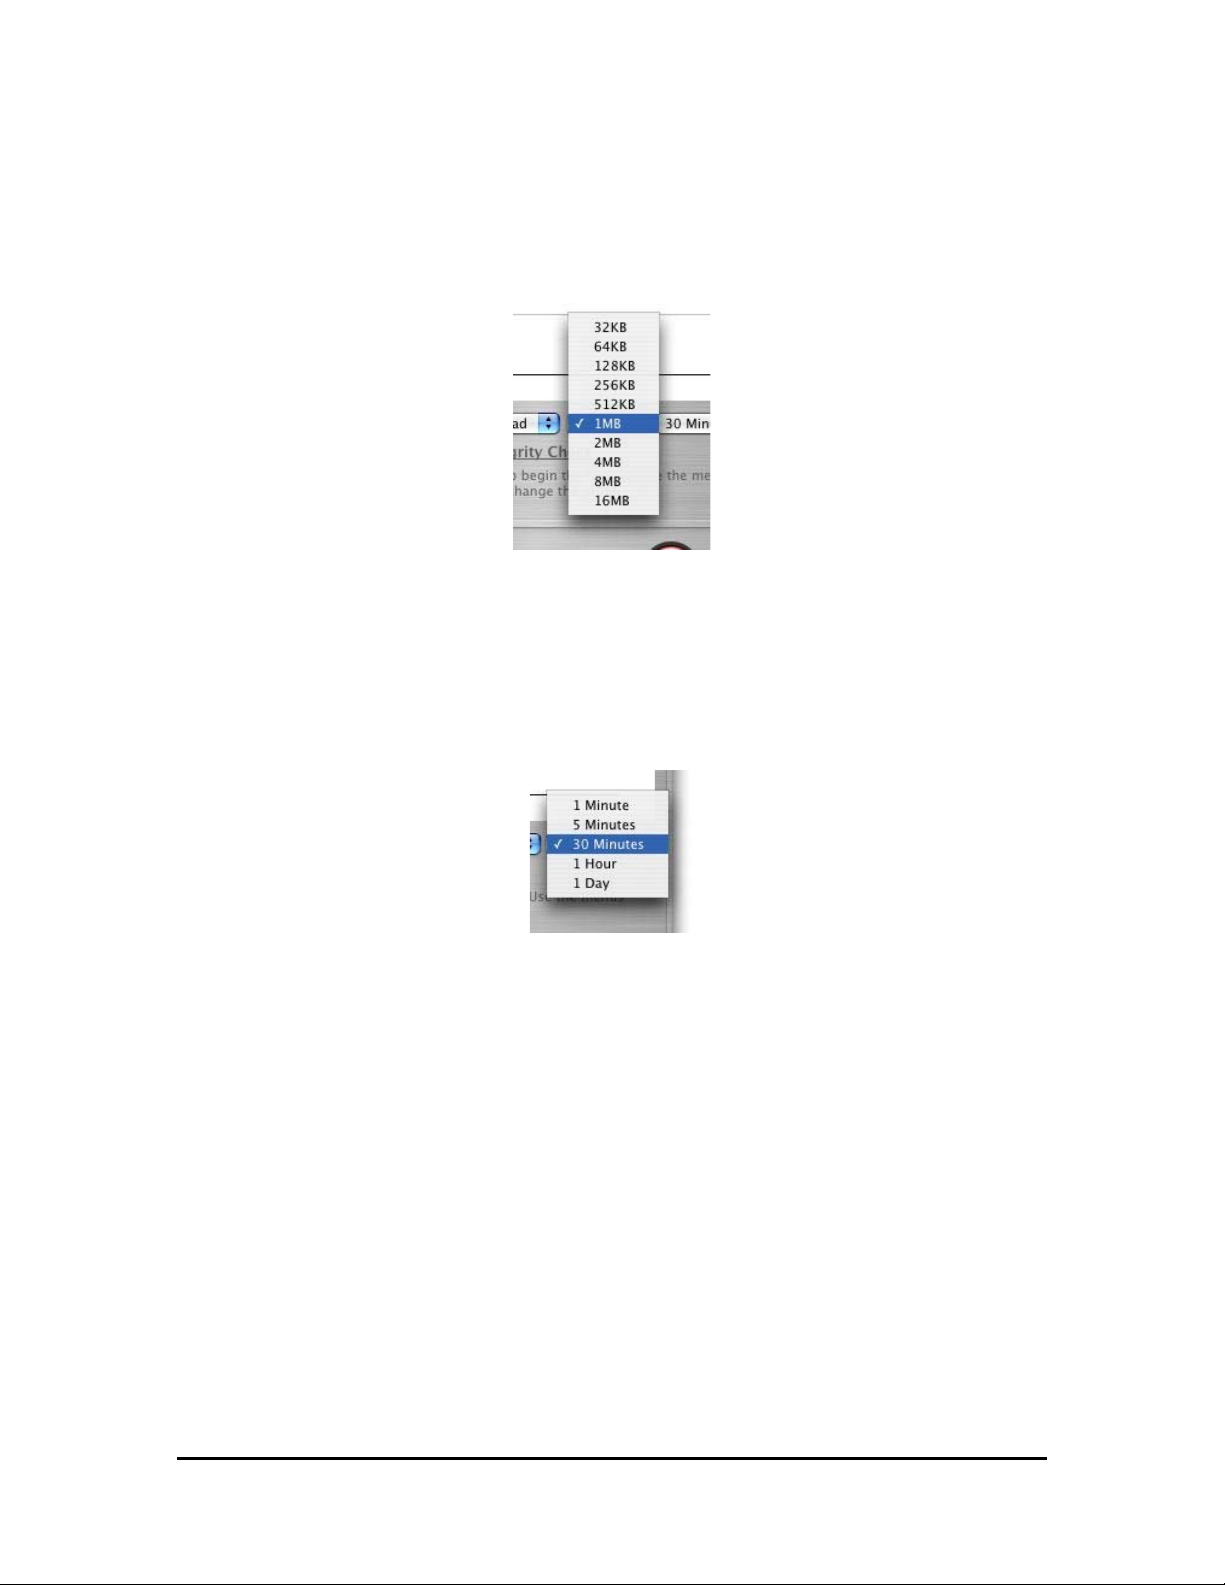
Options for Integrity check Settings
Transfer Size
The transfer size ranges from 2 KB to 16 MB. For setup such as mail server or
accounting server, test the drive at 2 KB block. Database servers do lots of little
searches and hardly ever read lots at a time so small blocks are a good test. Use
a bigger block size if you use the drive for graphic intensive application and
digital audio and video applications.
Test Duration
The length of test can be varied from one minute to one day. The longer the
duration given to the test, the more reliable the results are. Start with smaller time
frames and give it a longer period to detect more subtle flaws.
Page 38
Drive Genius 2 User Guide
Integrity check
Drive Genius 2 User Guide 38
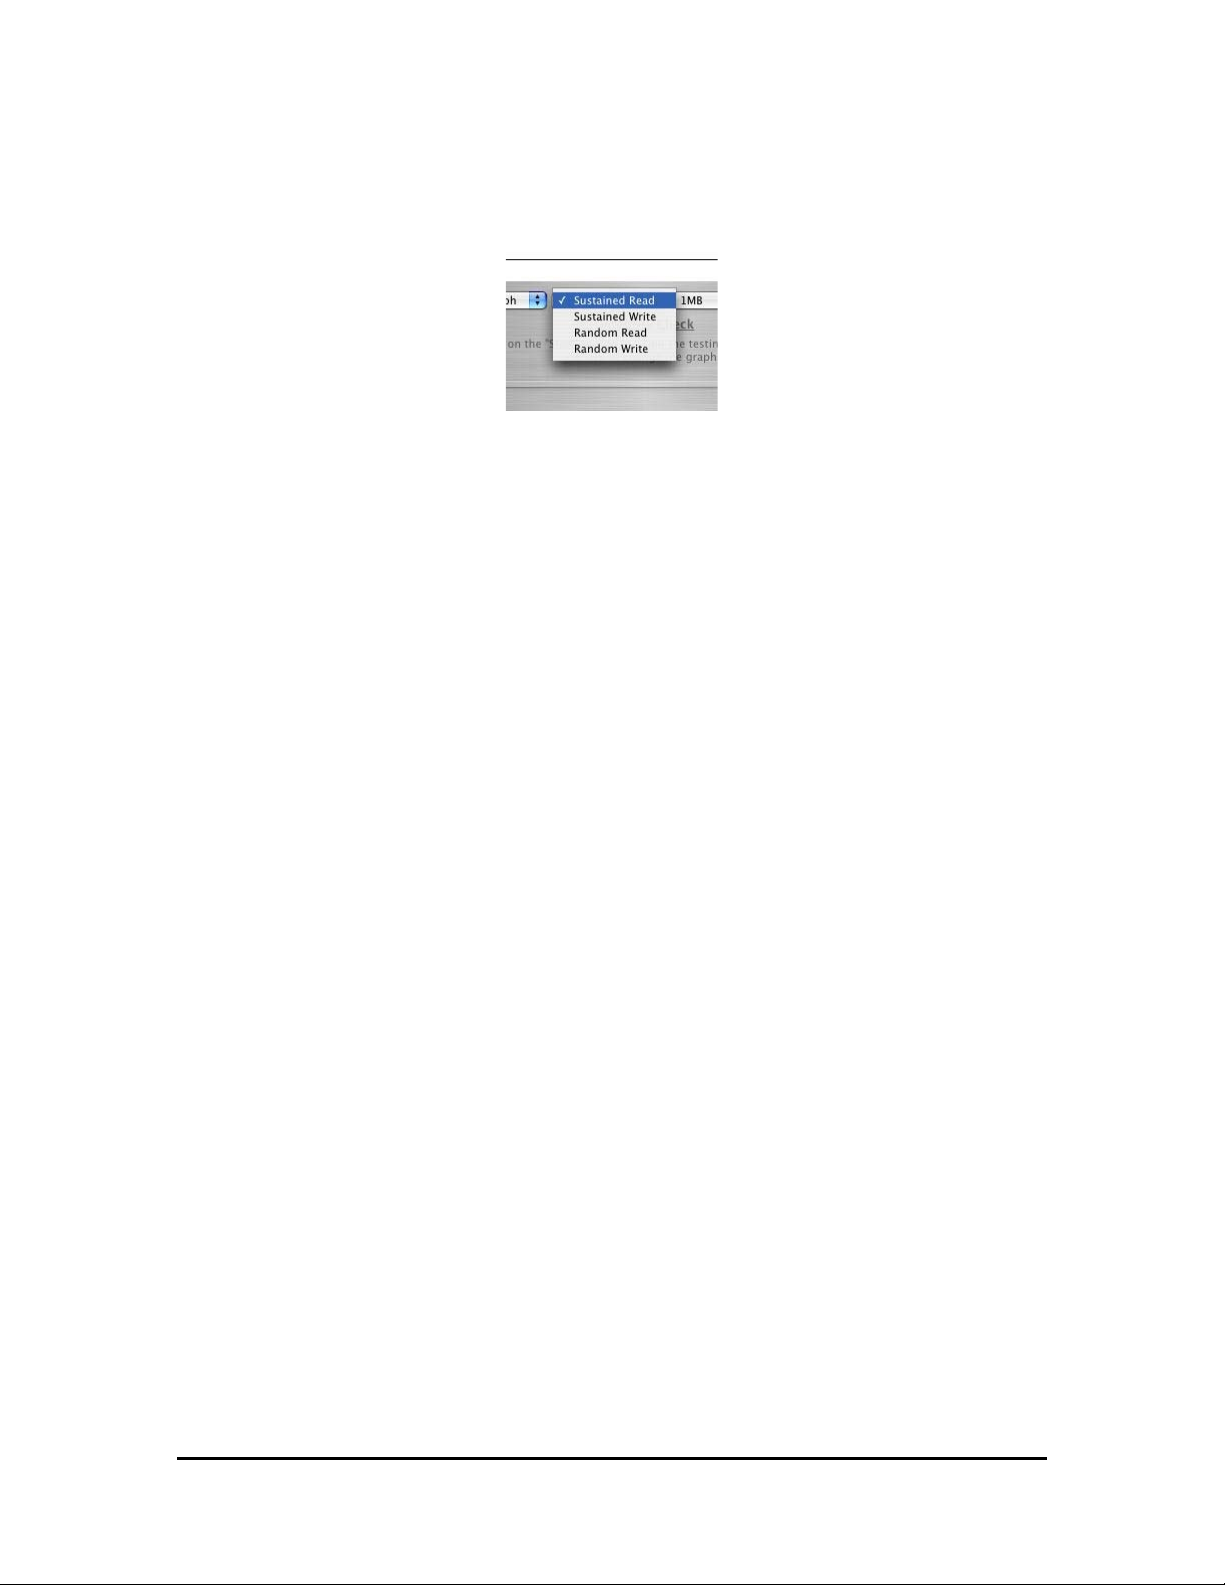
Test type
o Sequential read - test measures how many times single-block reads can
be performed in one second.
This test is affected by read caching (the larger the read cache, the faster
the performance).
o Sequential write - test measures how many times single-block writes can
be performed in 1 second.
This test is affected by write caching (the larger the write cache, the faster
the performance).
o Random read - test measures drive performance for reads of blocks of
data from 2 kilobytes to 16 megabytes. For small block sizes, seek time
and rotational latency are weighted more heavily. For large block sizes,
the transfer rate is weighted more heavily.
o Random write - test measures drive performance for writes of blocks of
data from 2 kilobytes to 16 megabytes.
For small block sizes, seek time and rotational latency are weighted more
heavily. For large block sizes, the transfer rate is weighted more heavily.
Page 39
Drive Genius 2 User Guide
Integrity check
Drive Genius 2 User Guide 39
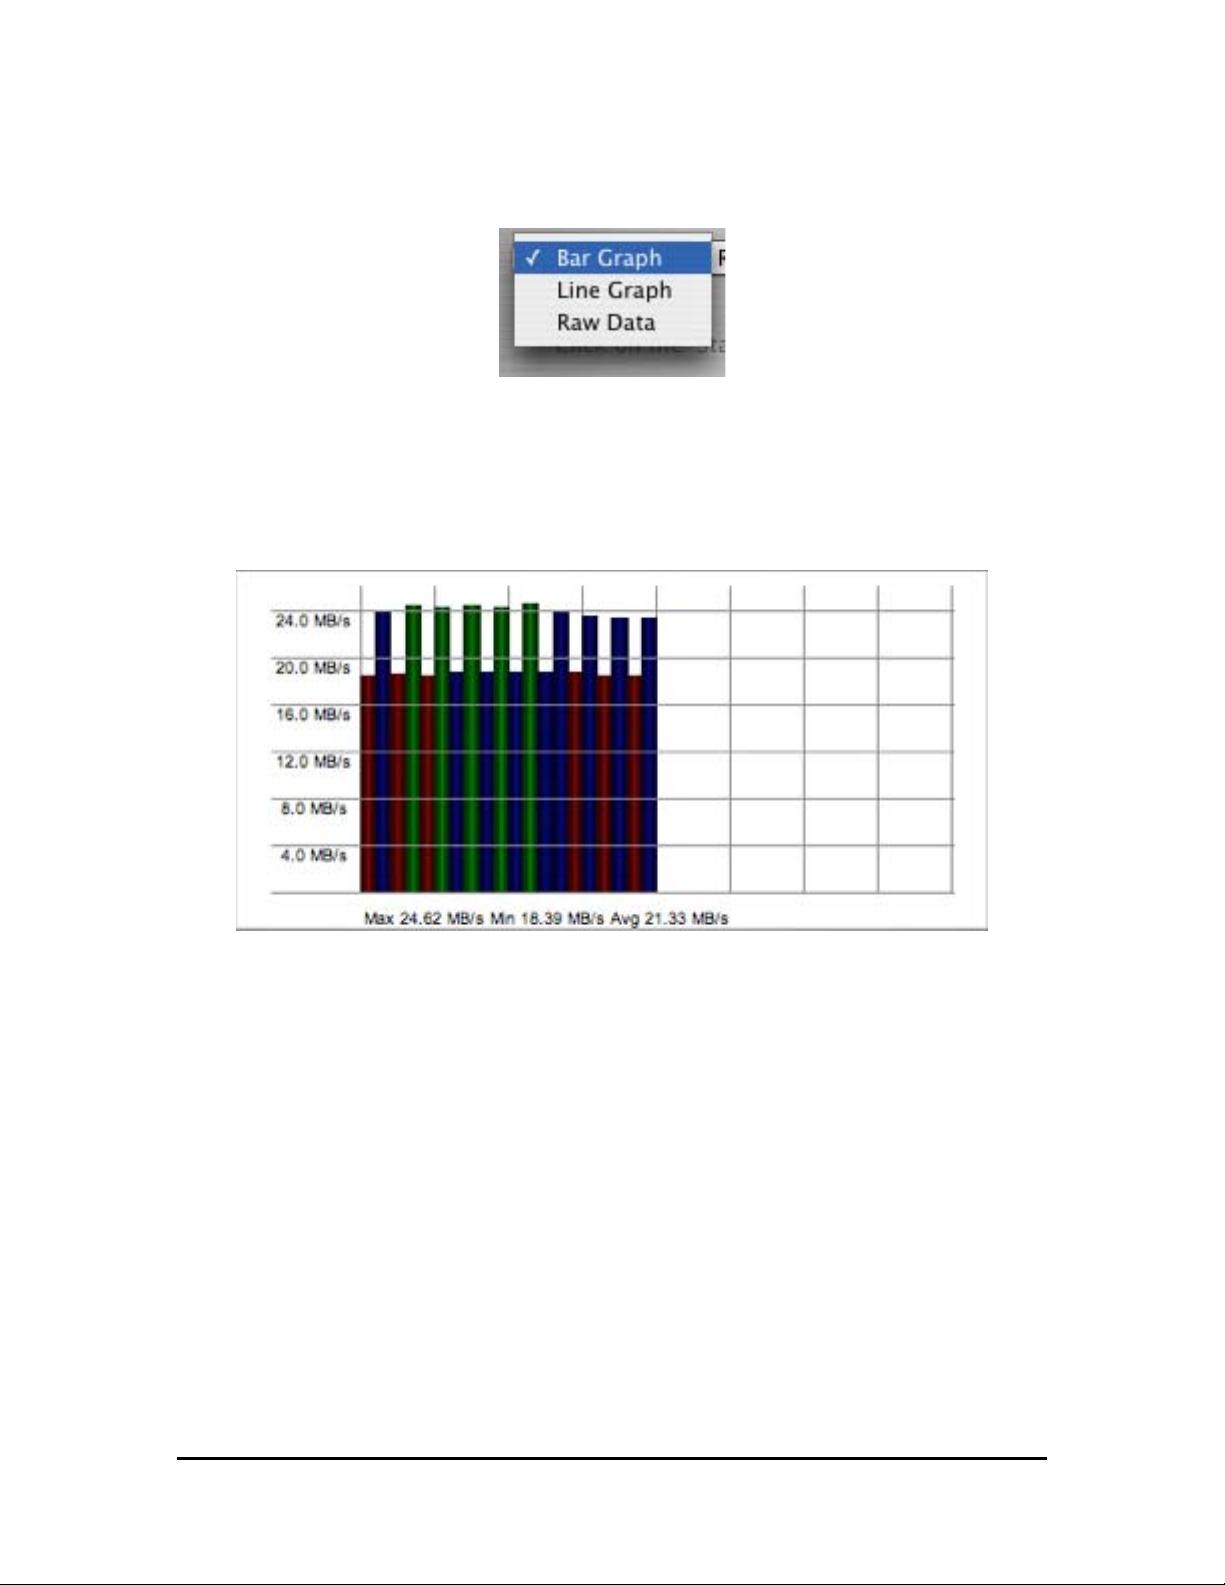
Selecting a graph type
Graph Type: Allows you to select the graphical way that the information related
to the speed of the operations is displayed.
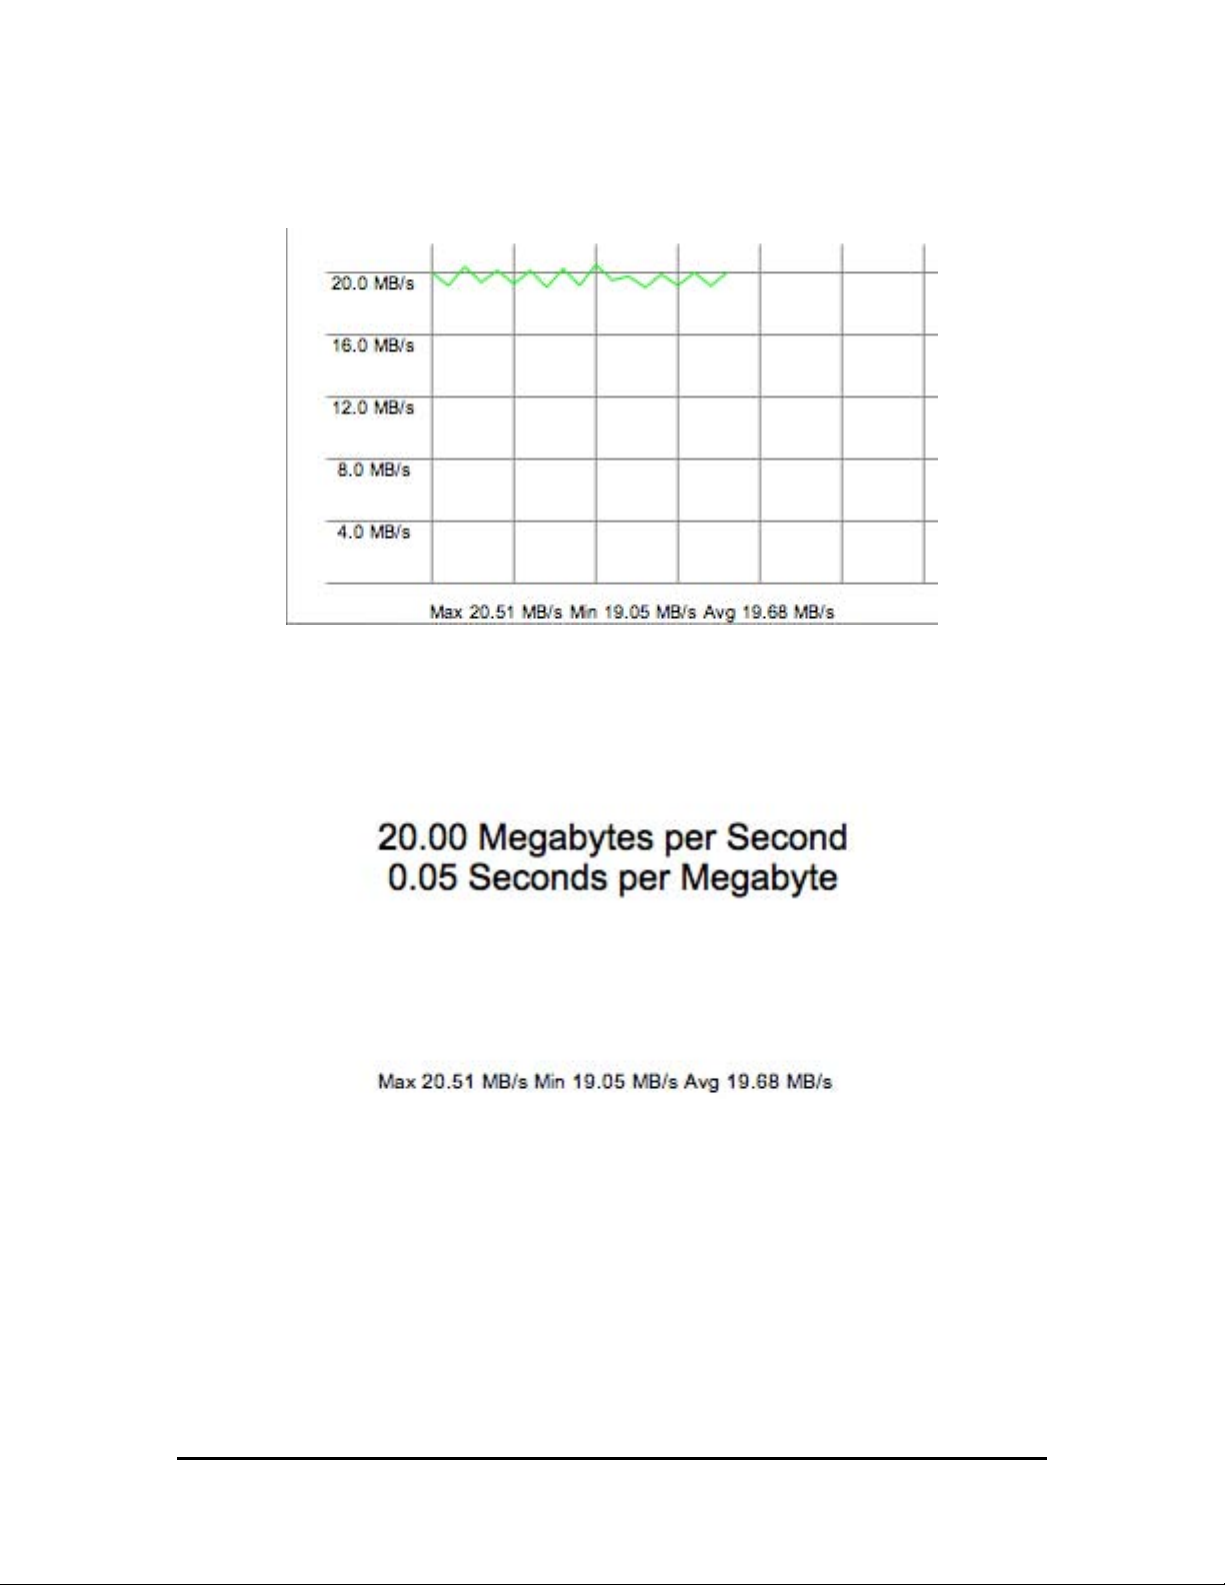
There are three ways to display the data:
Bar graph
Page 40
Drive Genius 2 User Guide
Integrity check
Drive Genius 2 User Guide 40
Line graph
Raw data
Page 41
Drive Genius 2 User Guide
Benchtest
Drive Genius 2 User Guide 41
Benchtest is a tool to test the performance of different drivers, CPU’s, operating
systems, and data-transfer efficiency of large and small volumes. For example,
digital video users can use Benchtest to see how differing custom driver and
mode page settings affect the efficiency of video capture and web server
administrator can find out how the volume performs under small file transactions.
Benchtest reports the results in either graphical or numeric formats, and you can
save them as files. Drive Genius 2 comes with a set of them from most current
Macintosh systems. You can select these for a live on-screen comparison
between your system and others.
Benchtest Window
Note: To perform Duplicate on boot volume you must boot to Drive Genius DVD
or a secondary boot drive.
Page 42

Drive Genius 2 User Guide
Benchtest
Drive Genius 2 User Guide 42
Benchtest will perform the following tests on the drive selected:
o Sequential read test measures how many times single-block reads can
be performed in one second.
This test is affected by read caching (the larger the read cache, the faster
the performance).
o Sequential write test measures how many times single-block writes can
be performed in 1 second. This test is affected by write caching (the larger
the write cache, the faster the performance).
o Random read test measures drive performance for reads of blocks of
data from 2 kilobytes to 16 megabytes.
For small block sizes, seek time and rotational latency are weighted more
heavily. For large block sizes, the transfer rate is weighted more heavily.
o Random write test measures drive performance for writes of blocks of
data from 2 kilobytes to 16 megabytes.
For small block sizes, seek time and rotational latency are weighted more
heavily. For large block sizes, the transfer rate is weighted more heavily.
Page 43
Drive Genius 2 User Guide
Benchtest
Drive Genius 2 User Guide 43
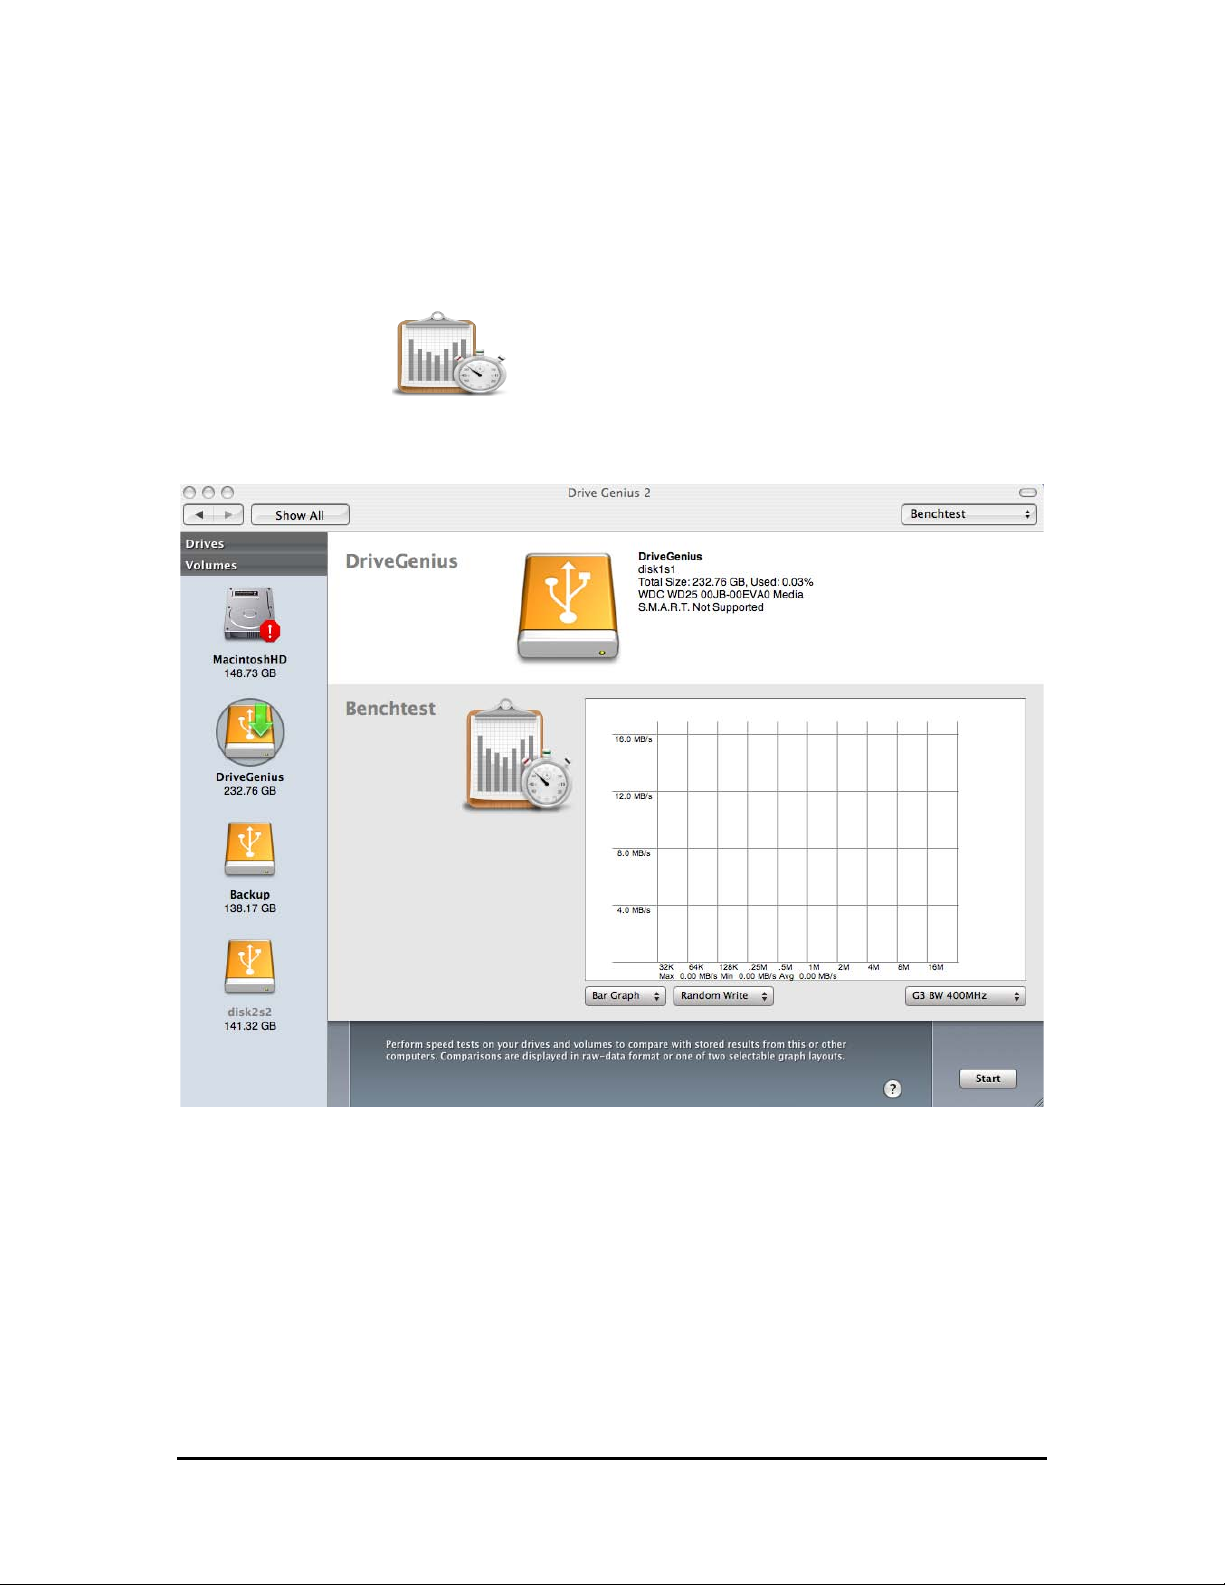
To Benchtest your drive:
Launch Drive Genius 2.
Click the Benchtest icon.
Select the drive you want to benchtest by highlighting it.
Selecting the drive to Benchtest
Page 44
Drive Genius 2 User Guide
Benchtest
Drive Genius 2 User Guide 44
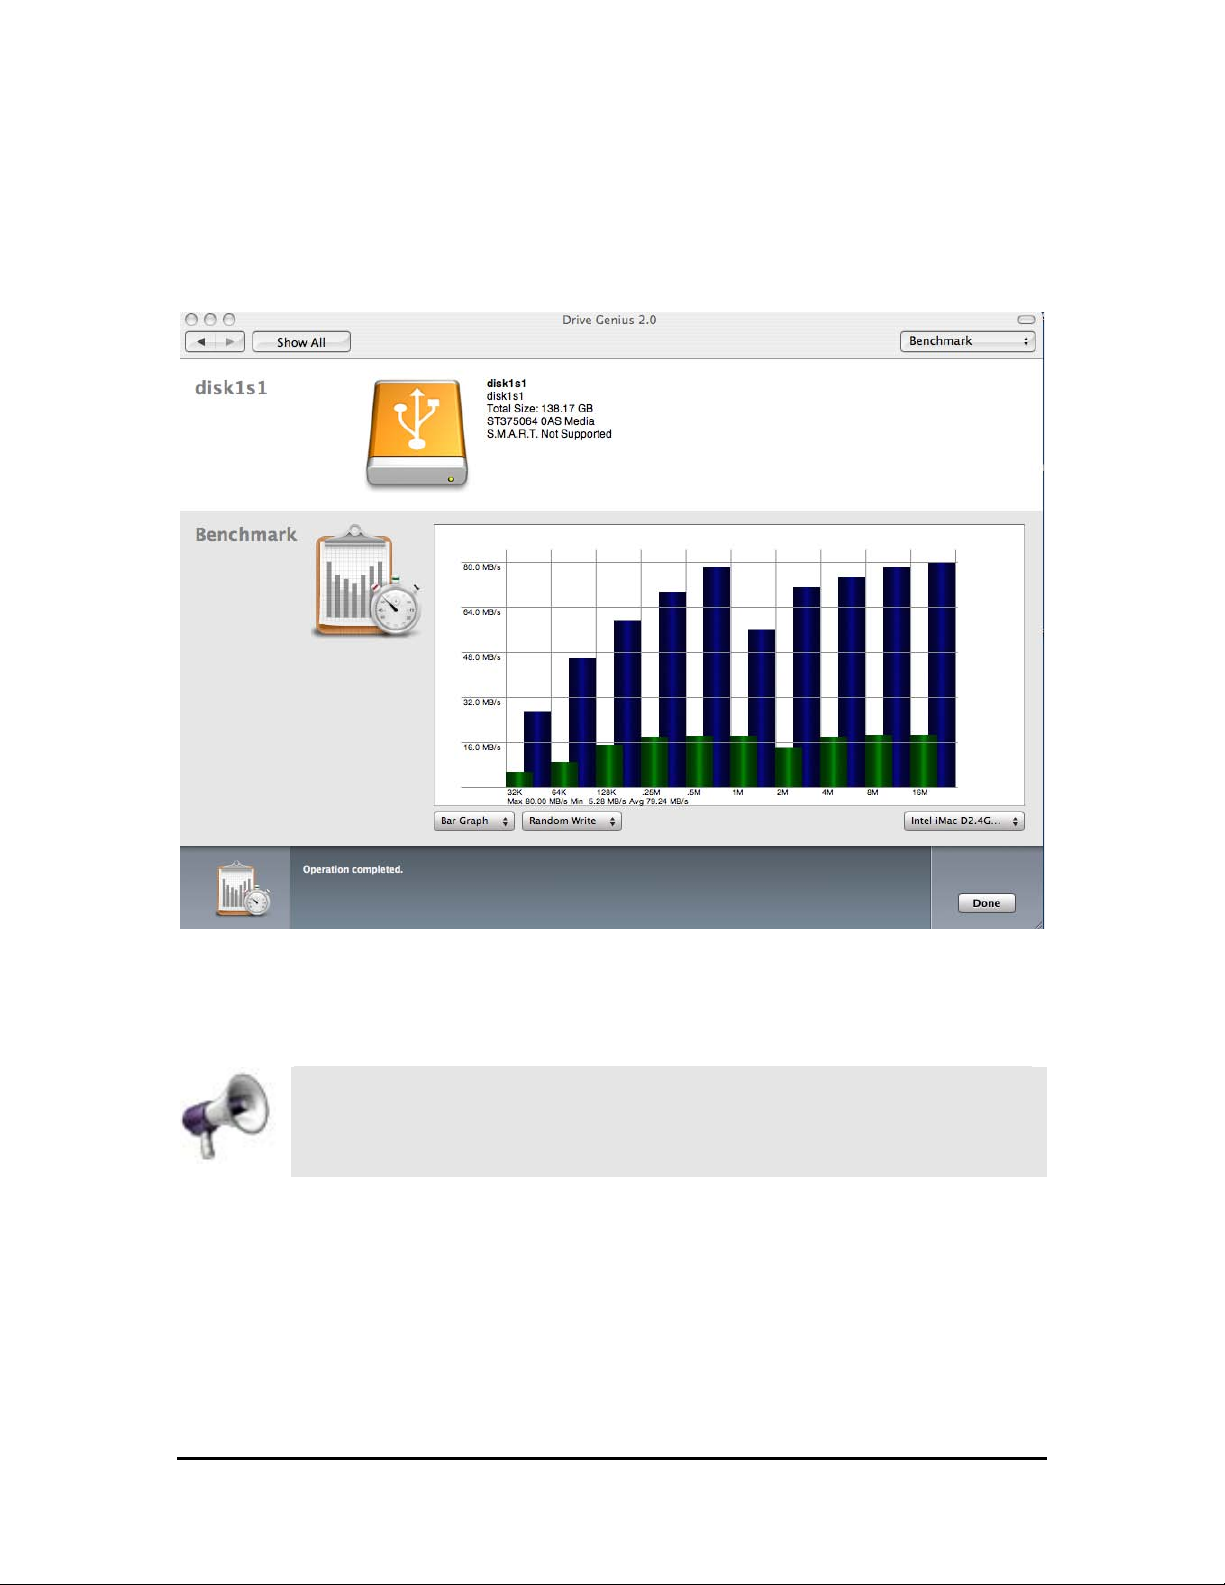
Depending on the speed of the drive and the CPU, it may take up to ten minutes
to finish the test. The test data is updated as soon as each task is completed.
Benchtest window with test results displayed
The graph depicts the read/write performance (vertical axis) in relation to transfer
size (horizontal axis).
To get the most accurate test results, we recommend that you do not
run the Benchtest in the background. Avoid running other CPU
intensive applications in the background as this may also affect the
results
Page 45
Drive Genius 2 User Guide
Benchtest
Drive Genius 2 User Guide 45
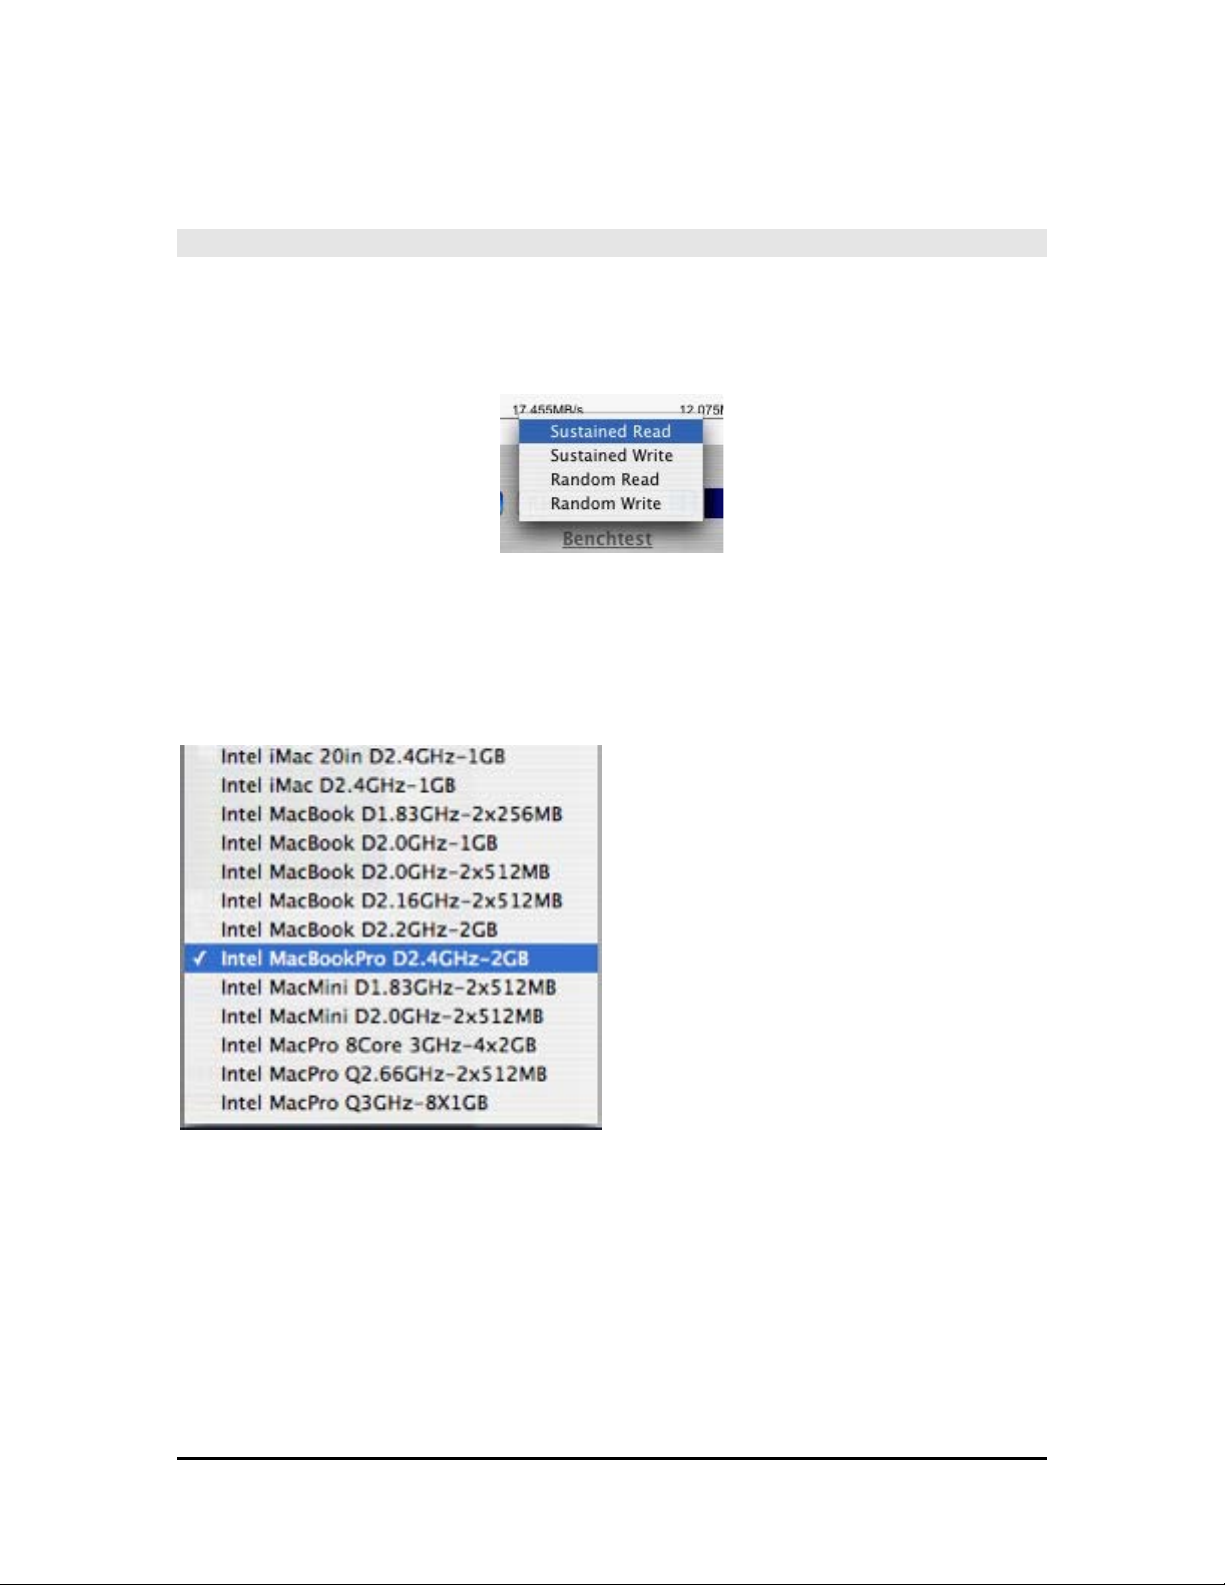
There are various selections to display the test results:
Test Display - Drive Genius 2 performs the following tests: Sustained Read,
Sustained Write, Random Read and Random Write. To display any of the tests
above, simply select it from the pop-up menu.
Selecting test to be displayed
Comparisons - Drive Genius 2 gives you the ability to compare to other drives
as the test is being run and it includes many sets of test data. To select other
drives for comparison, click on the Comparison Device pop-up menus on the
lower half of the Benchtest window.
Comparison Window
Page 46
Drive Genius 2 User Guide
Benchtest
Drive Genius 2 User Guide 46
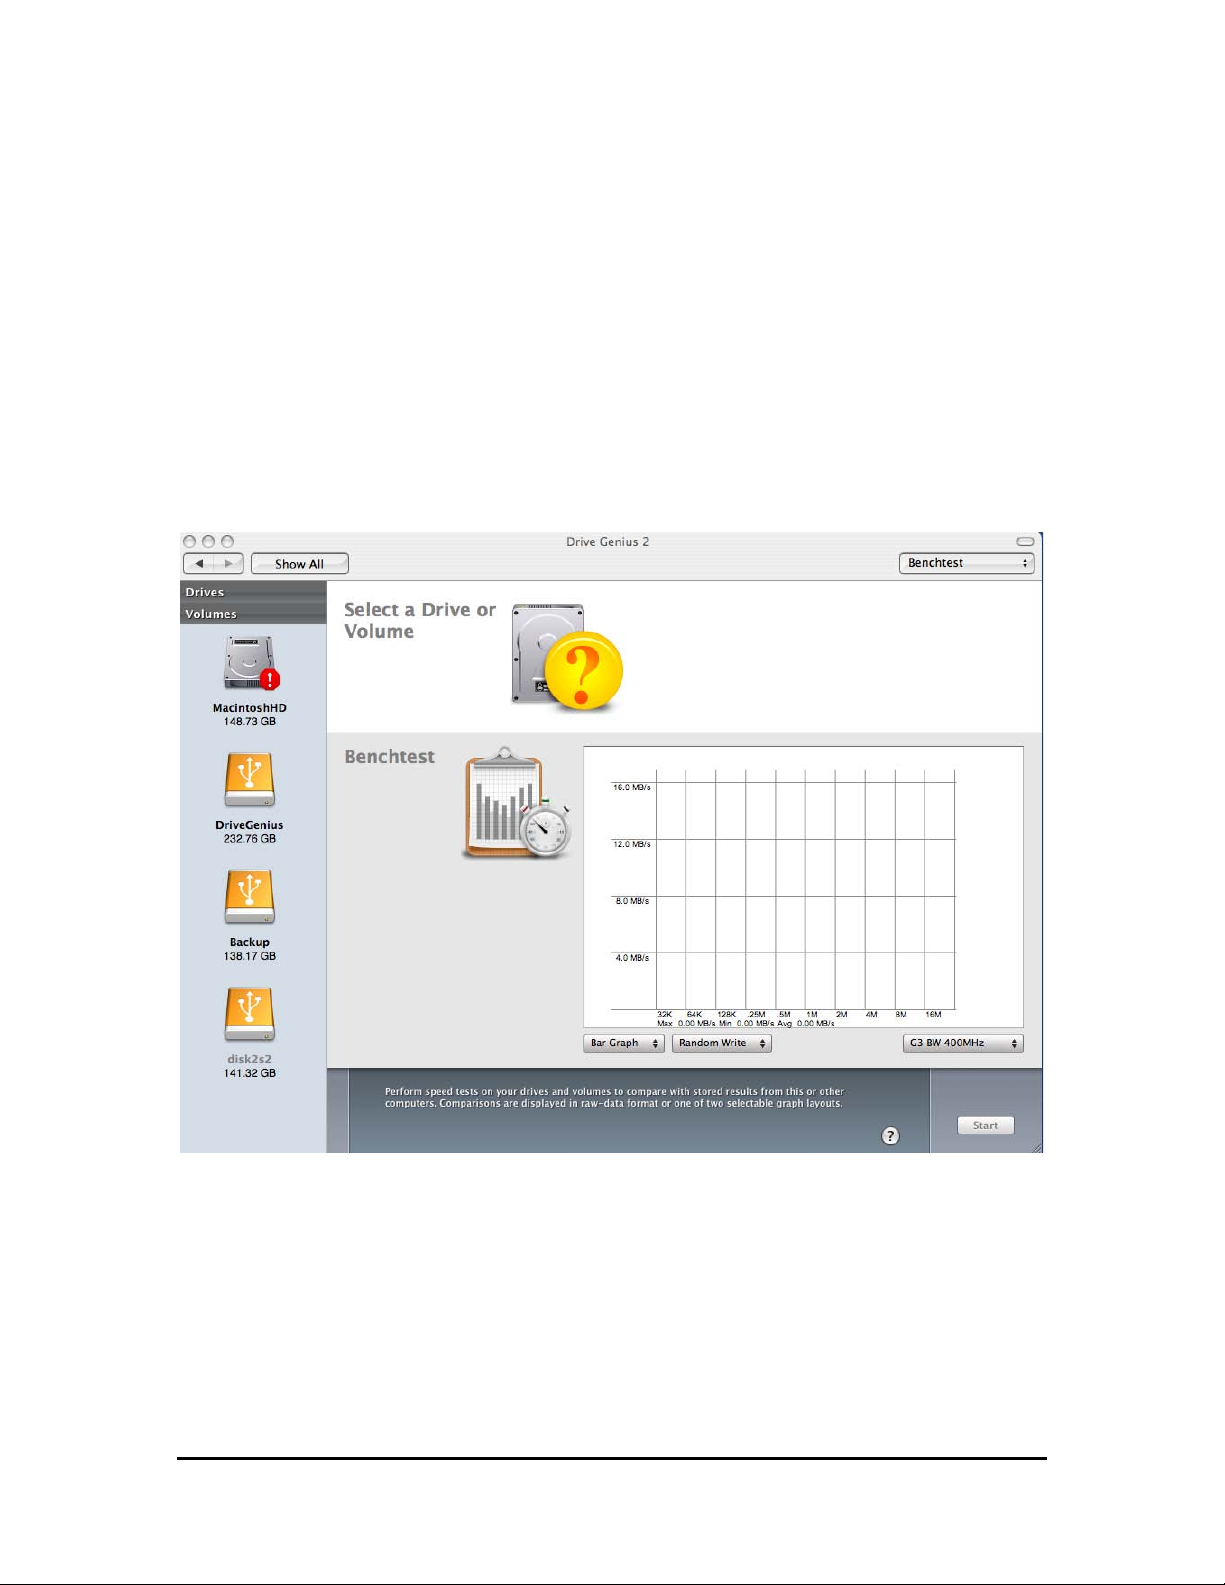
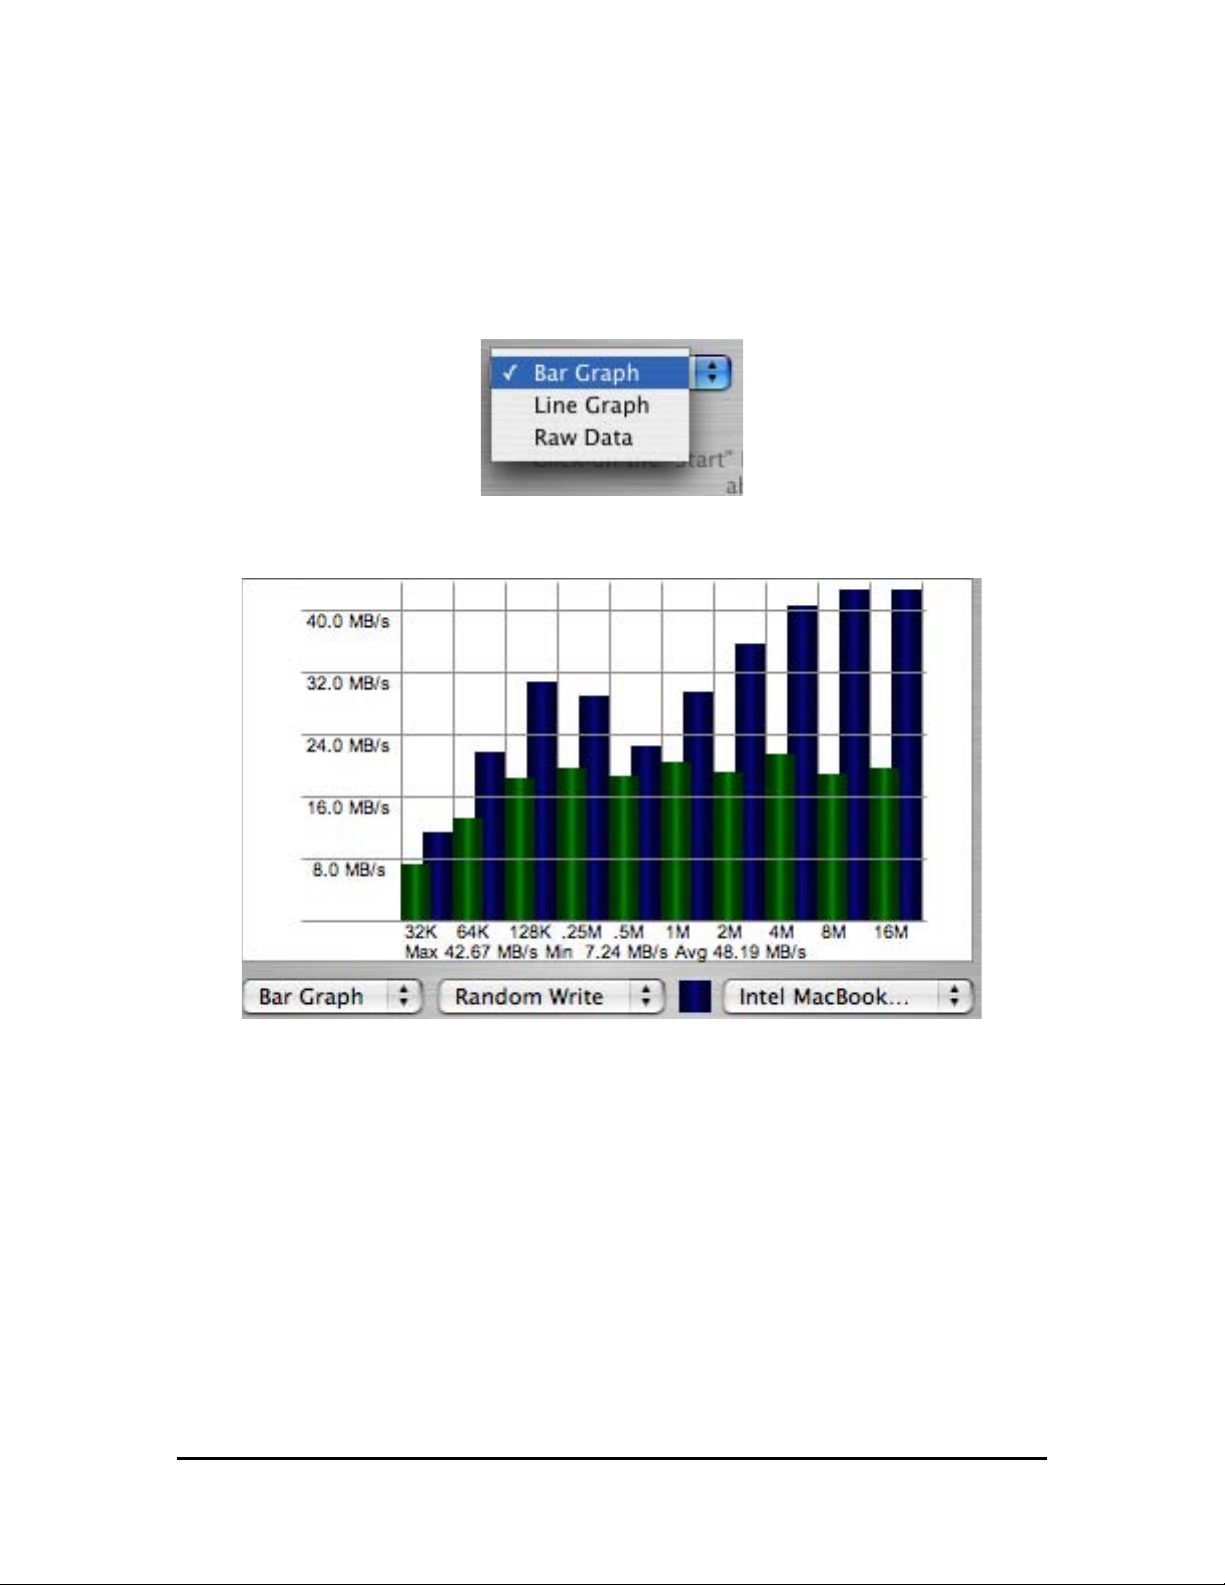
Graph Types - Once you have the test results, you can select from a pop-up
menu to display the data in various formats. There are three ways to display the
data:
Selecting the type of graph to draw
Bar graph - Draws a bar graph comparing your drive with
your choice of a comparison drive.
Page 47
Drive Genius 2 User Guide
Benchtest
Drive Genius 2 User Guide 47
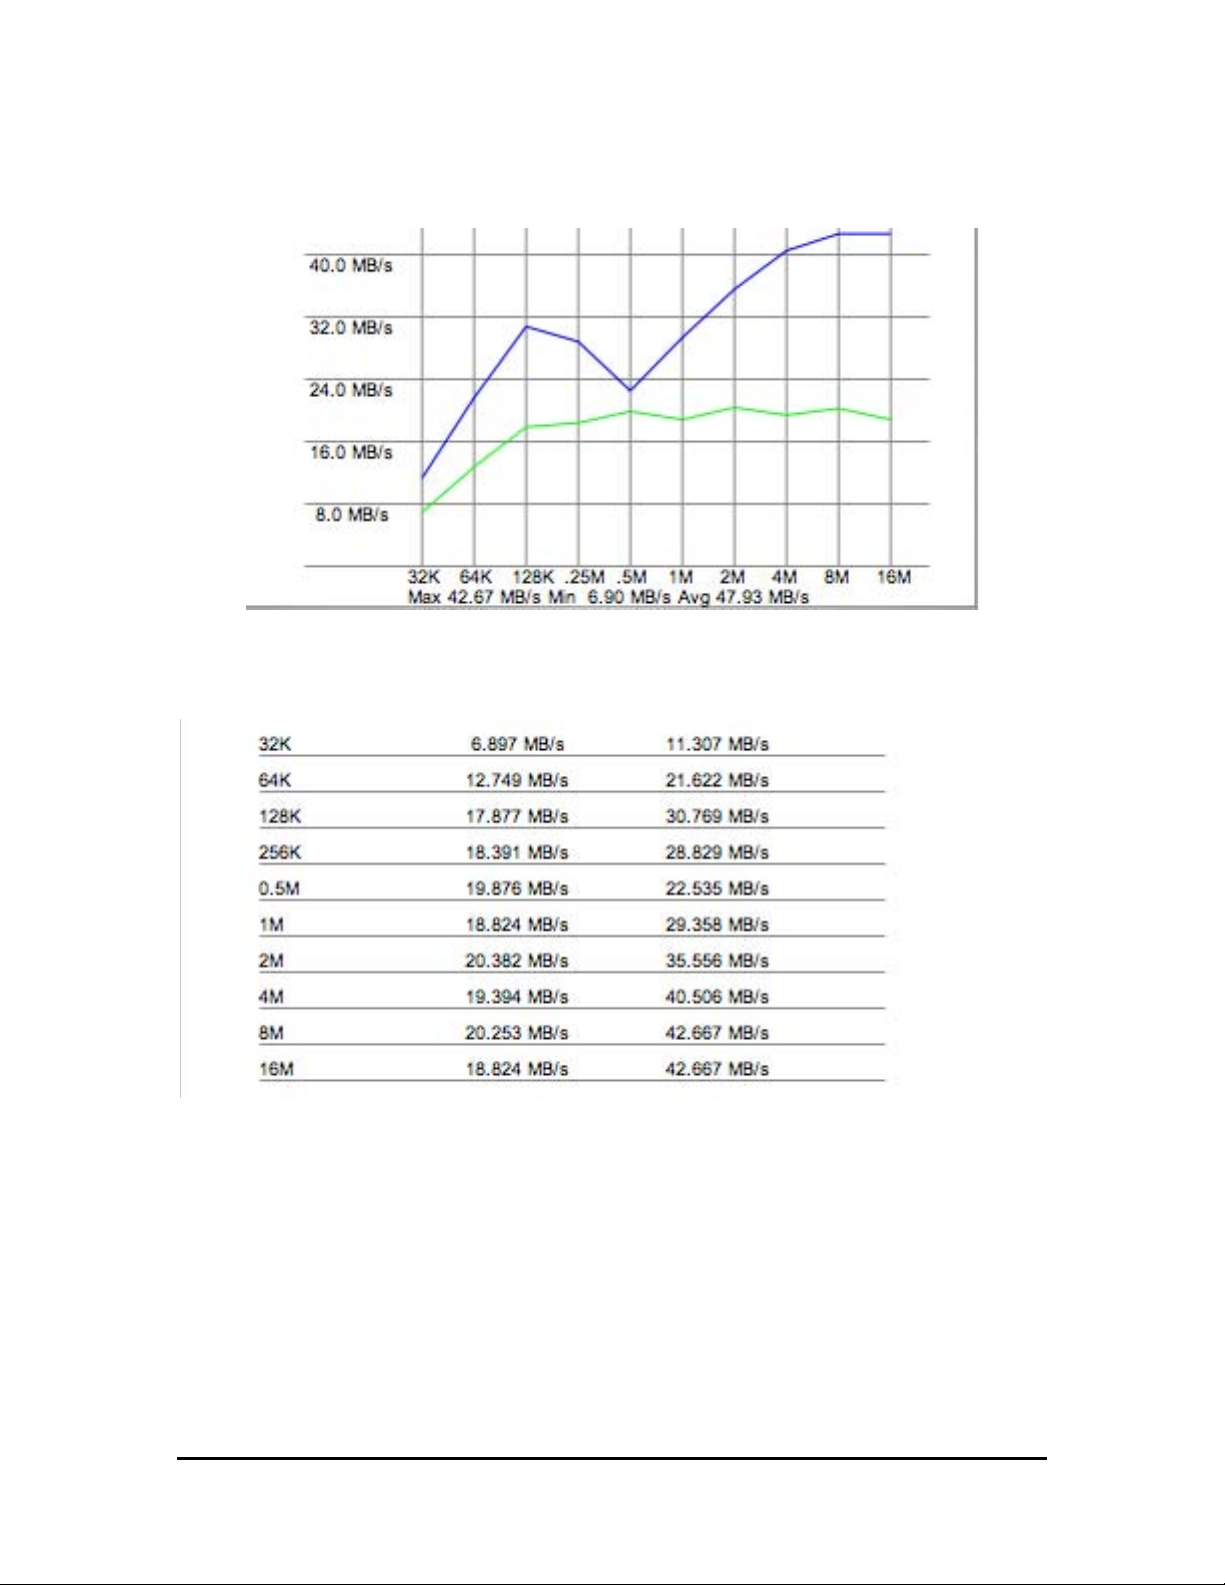
Line graph - Draws a line graph comparing your drive with
your choice of a comparison drive.
Raw data -- Displays the numerical figures rather than
representing the information graphically.
Page 48
Drive Genius 2 User Guide
Scan
Drive Genius 2 User Guide 48
Drive Genius 2 Scan is designed specifically to verify that every sector (block
which can contain information) on your volume or drive can be read correctly. It is
recommended to run this test if you notice abnormal sound emitting from the
drive, or the Finder reports some of the files cannot be copied. Drive Genius 2
Scan tests all of your drives data space.
Data on a hard drive is stored in a series of blocks. In usual operation every
block of the drive should be able to be written to and read from again. However
sometimes a hard drive can develop a problem where one or more blocks may
lose storage capacity and become unreadable. Surface Scanning is the process
of requesting a read on every block on the drive in sequence and determining if
the drive reports an error on any of these requests.
The time required for a Scan test is dependent on the drive’s capacity and
rotational speed. The blocks are read in sequential order and the operation is
performed on all blocks. Drive Genius 2 will not remove or map out bad blocks. If
Drive Genius 2 reports any bad block, you may need to reformat the drive with
Apple Disk Utility.
To Scan your drive:
Launch Drive Genius 2.
Click on the Scan icon.
Page 49
Drive Genius 2 User Guide
Scan
Drive Genius 2 User Guide 49
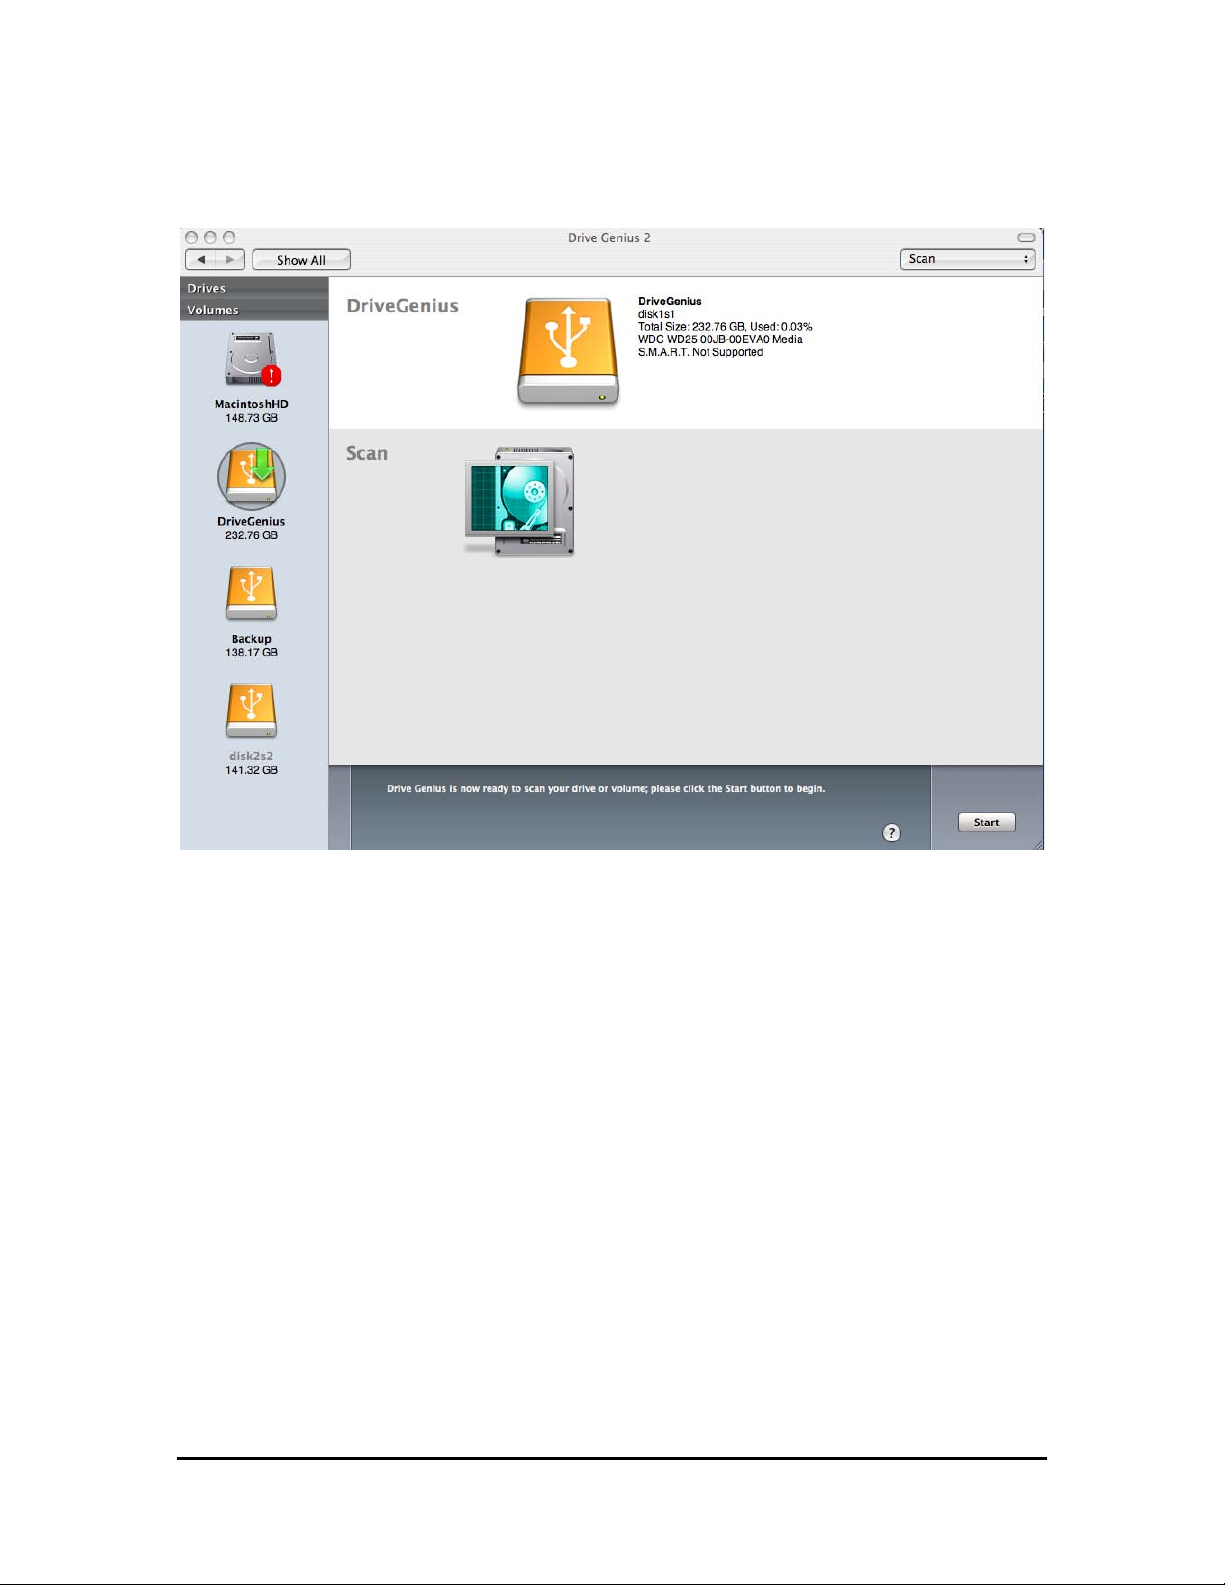
Scan window
Click the Start button to proceed.
To cancel, click on the Cancel button.
Page 50
Drive Genius 2 User Guide
Information
Drive Genius 2 User Guide 50
To get Information on your drive:
Launch Drive Genius 2.
Click on the Information icon.
Select the volume you want to get Information on by highlighting it.
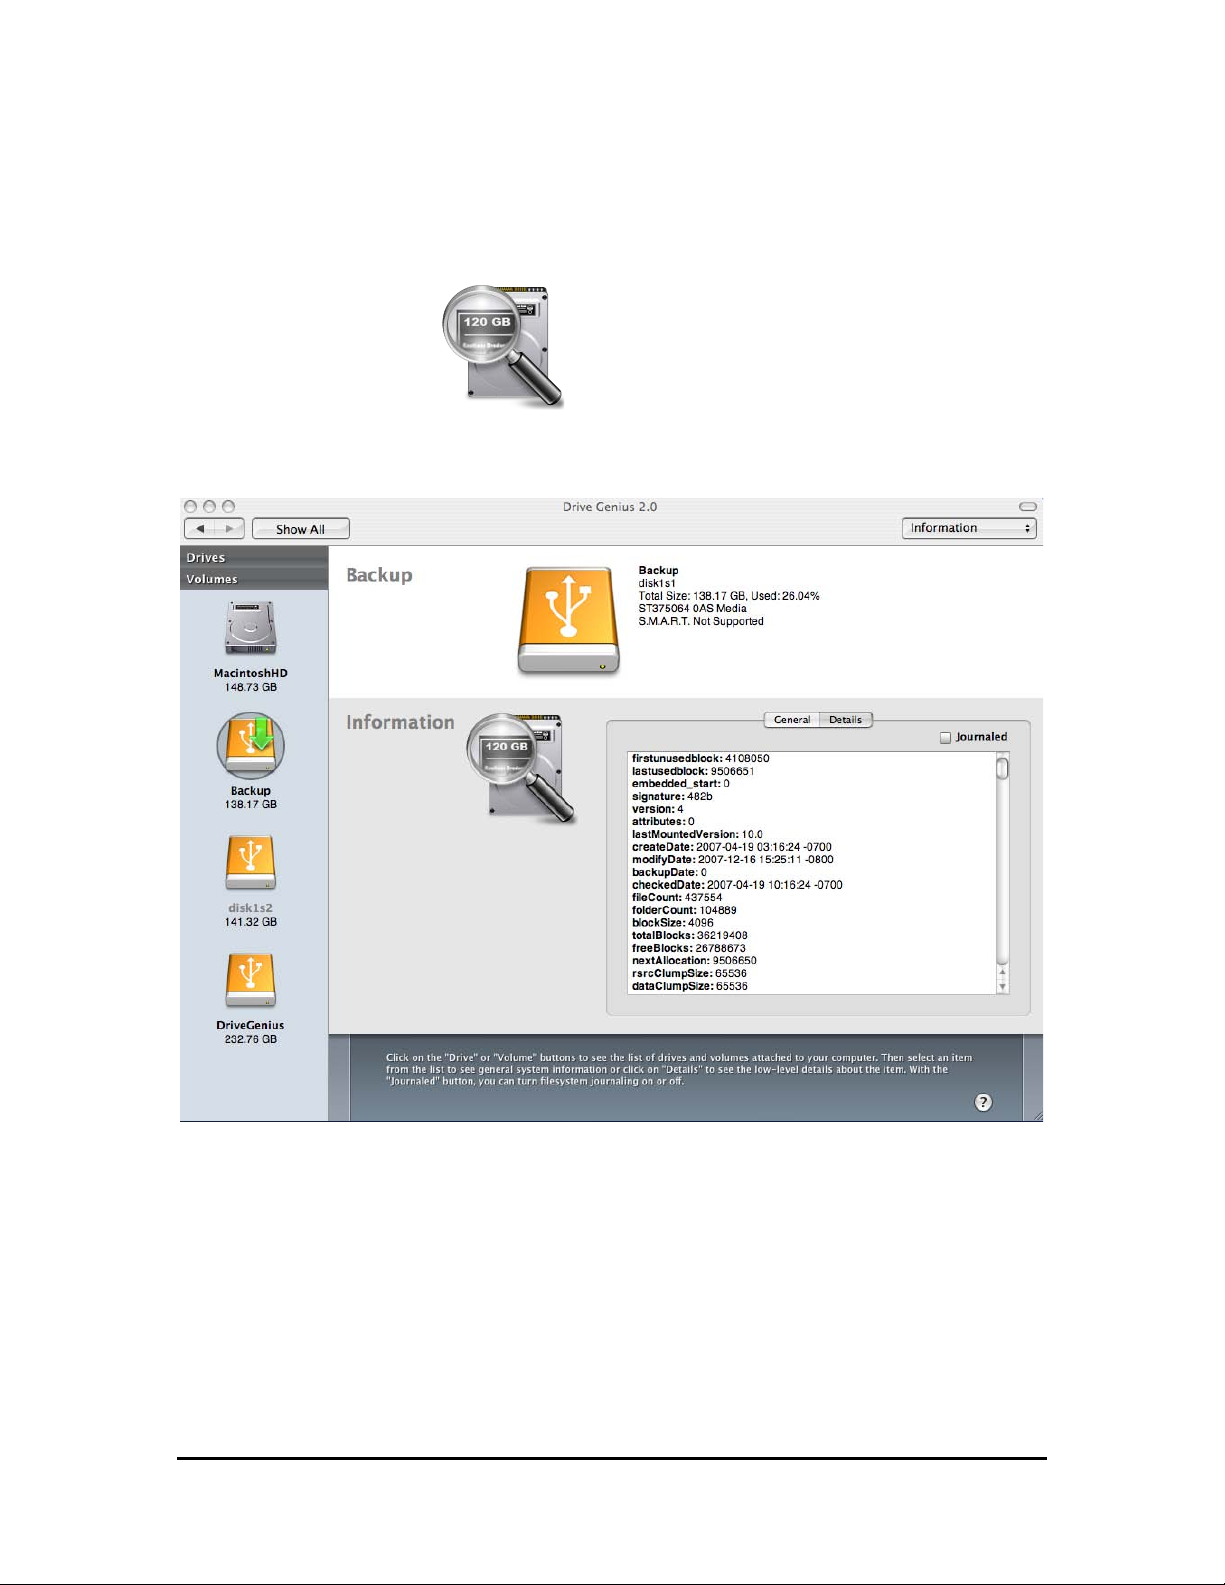
Information Window
The Information window will open, select General or Details to display
information of the volume such as name, total blocks, partition ID and information
that expert users will find useful.
Page 51
Drive Genius 2 User Guide
Information
Drive Genius 2 User Guide 51
Journaling - Apple's journal file system keeps a log of the hard drive's main data
activity. In the case of a crash or other system failure, the file system can retrieve
lost data by consulting the "journal" log, restoring the system to its previous state
instead of having to go through the lengthy process of rebuilding it. It is important
to note that enabling Journaling can potentially slow drive access time down by
up to 10%, but can be preferable in situations where data stability is more
important than drive access speed.
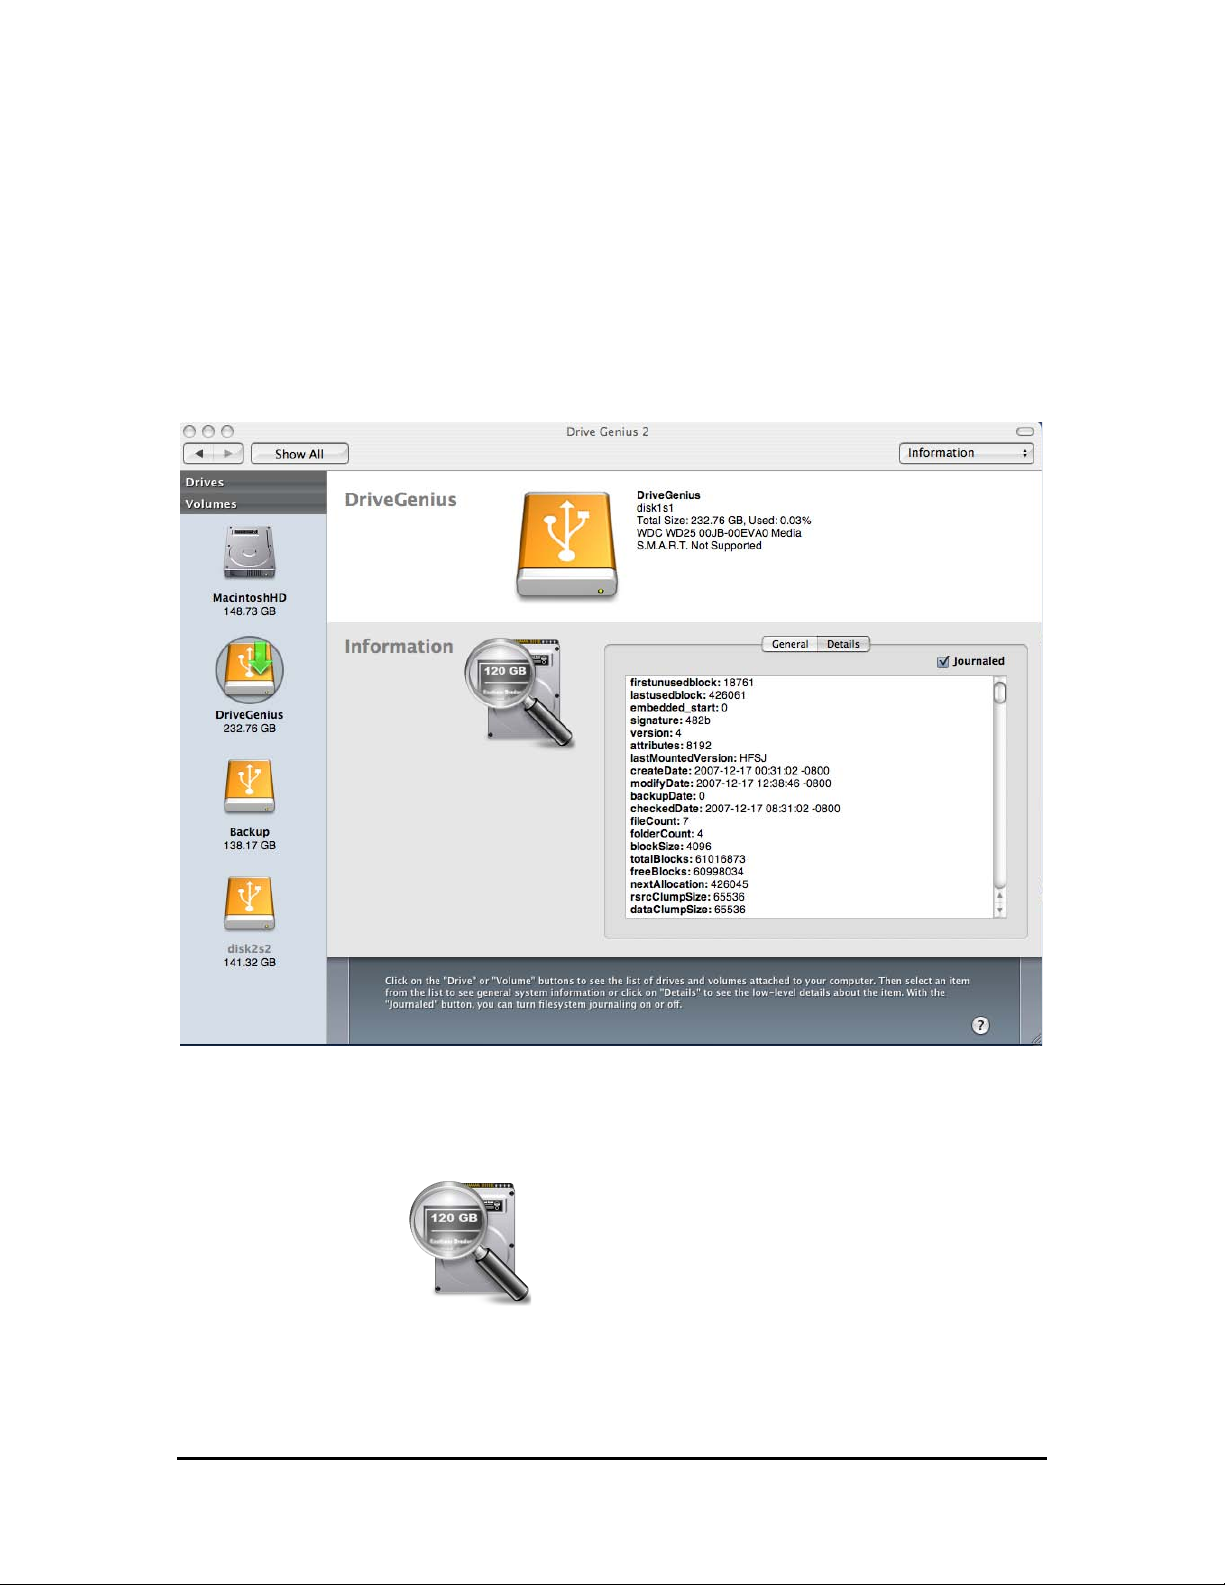
External drive with the journal system turned on
To turn Journaled on/off:
Click the Information icon.
In the Volumes view, select the mounted volume you want journaling to be turned
on/off. Check Journaled to enable, uncheck to disable.
Page 52
Drive Genius 2 User Guide
Initialize
Drive Genius 2 User Guide 52
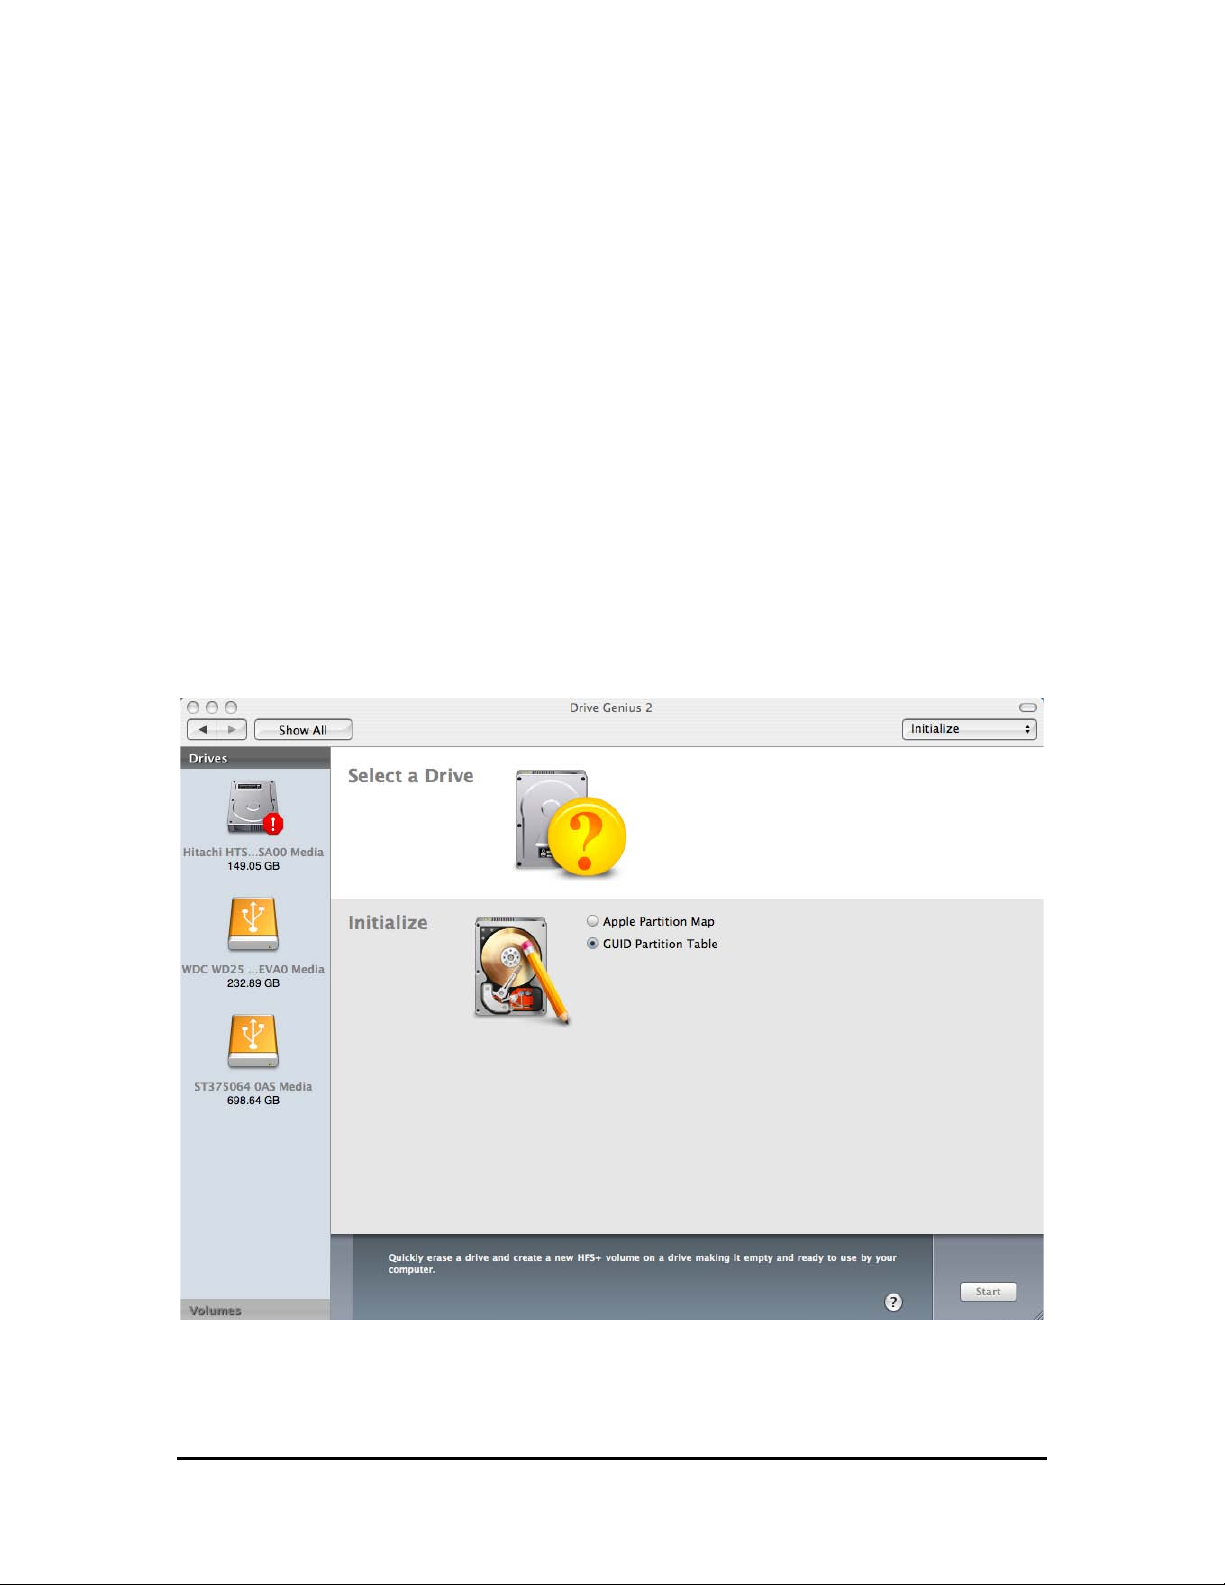
Drive Genius 2’s Initialize feature is the easiest way to prepare a disk for general
use. Most hard drives are already formatted at the factory. However, almost none
of them are ready for Mac use. Initialize will:
o Install the Apple driver
o Write a partition map
o Create a new volume and mount it to the desktop
Initializing will wipe out the first few thousand blocks of the drive in order to place
a device driver and the partition map on the drive. The rest of the drive is intact
but files that were previously on the drive will not be accessible any more. If you
accidentally initialize a drive and it contains information that you did not backup,
you will need software such as “Data Rescue” to recover the files.
If you are initializing your boot drive or you only have a single drive connected to
your system, you will need to boot the system from the Drive Genius 2 DVD.
The Initialize window
To Initialize your drive:
Page 53
Drive Genius 2 User Guide
Initialize
Drive Genius 2 User Guide 53
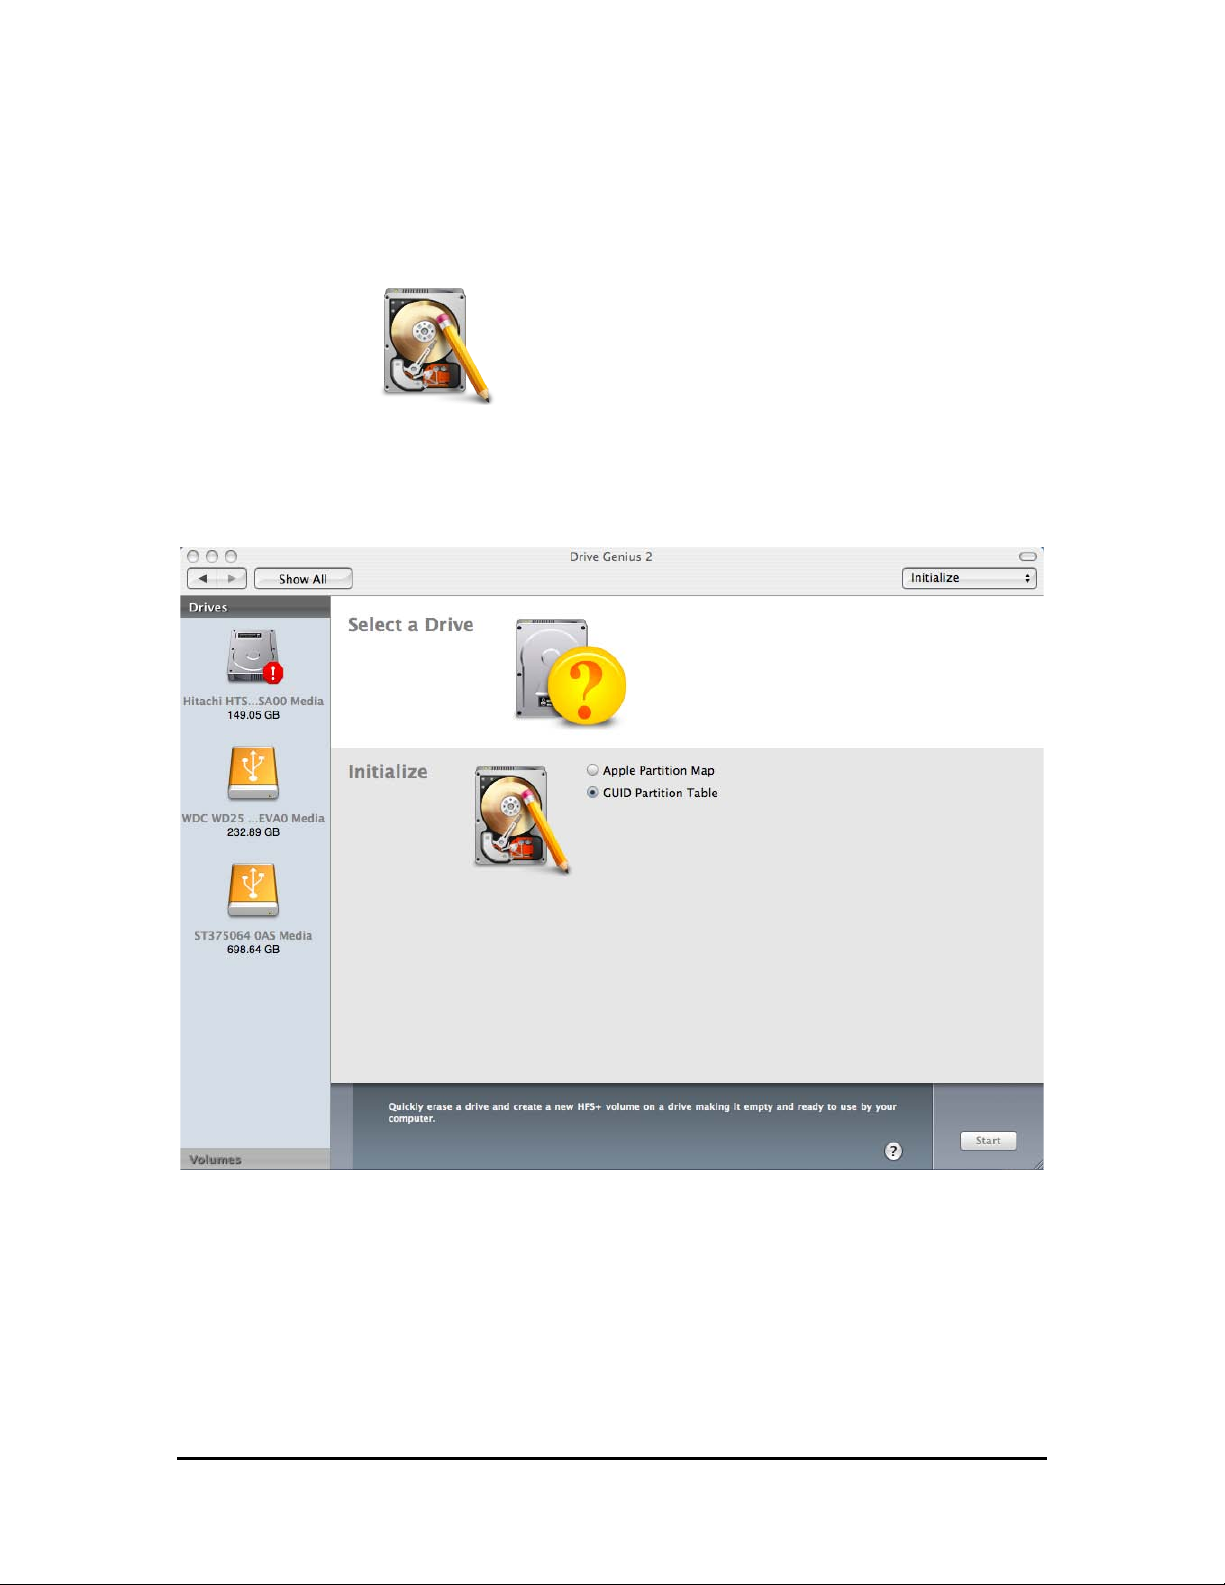
Launch Drive Genius 2 and click on the green arrow.
Click the Initialize icon.
Select the drive you want to initialize by highlighting it.
Select Apple Partition Map or GUID depending on which Mac you are using.
Selecting the drive to initialize
Click the Start button to proceed.
To cancel, click on the Cancel button.
Page 54
Drive Genius 2 User Guide
Initialize
Drive Genius 2 User Guide 54
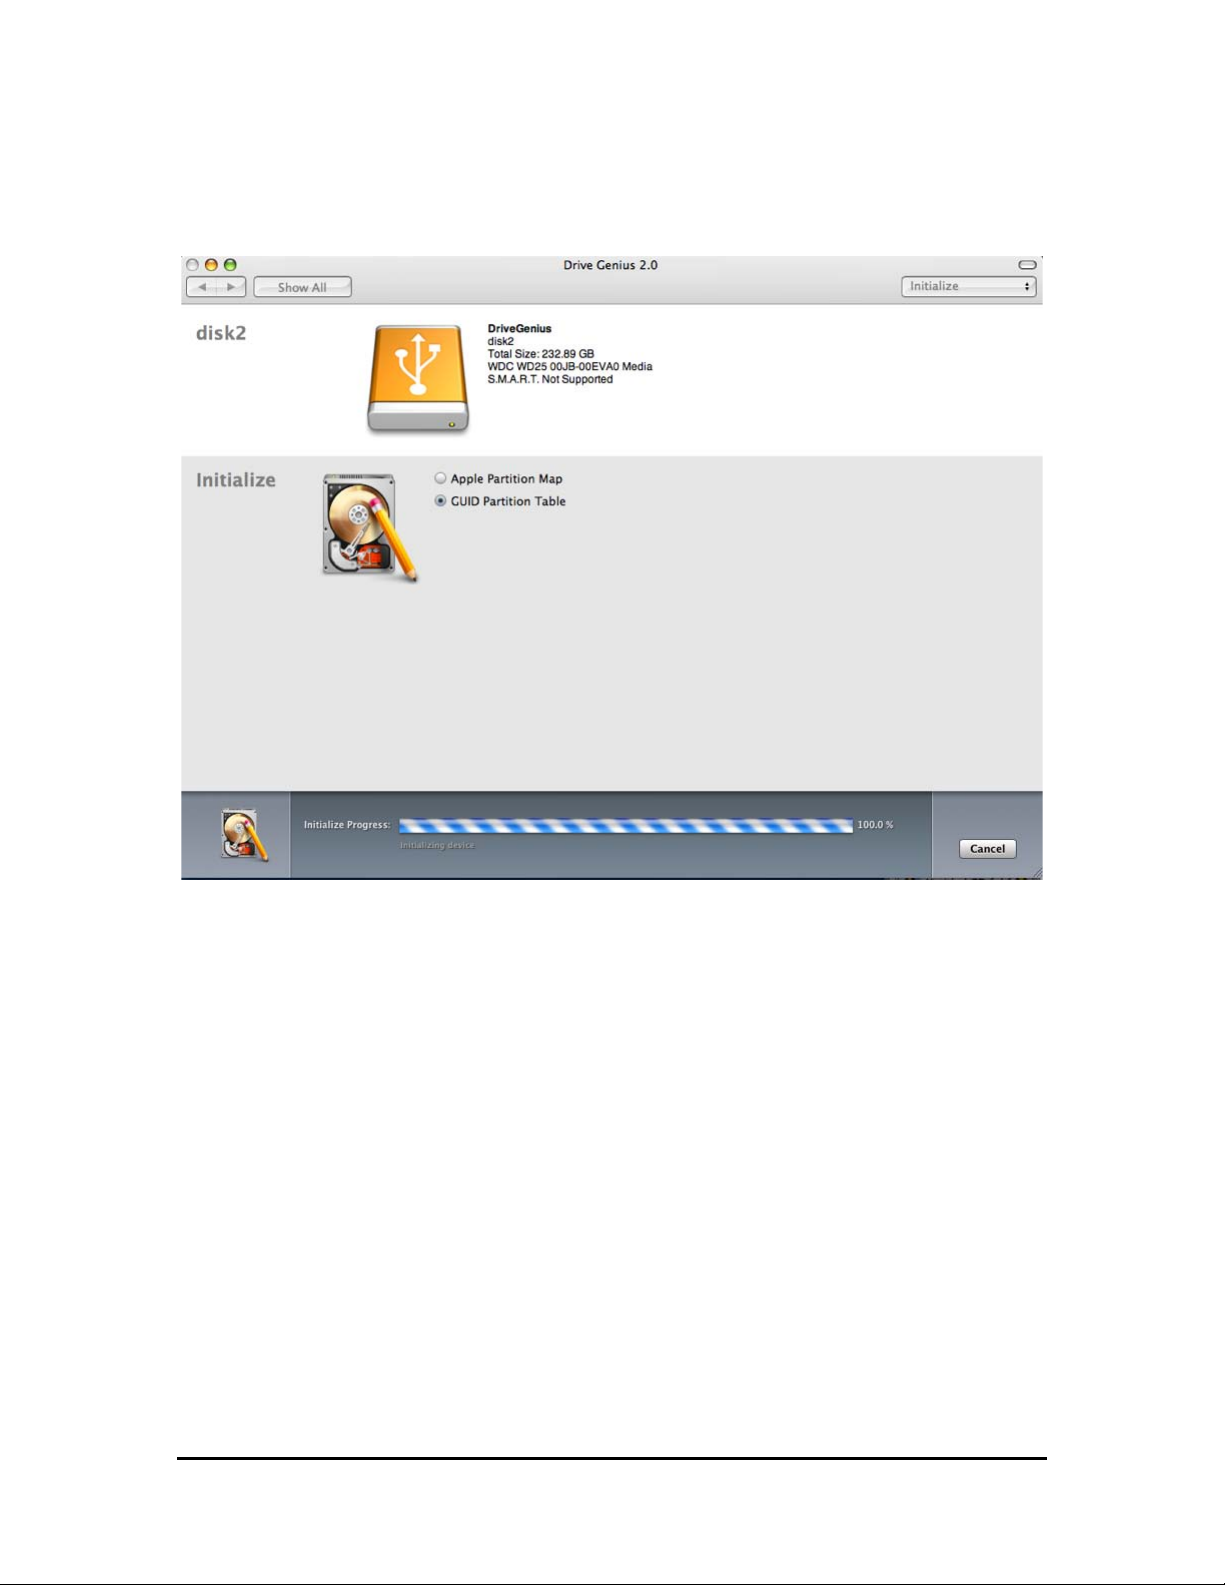
The initialize window
When you are done with initializing the drive, quitting Drive Genius 2 will shut
down the computer. To eject the Drive Genius 2 DVD, restart the computer, and
press and hold (unless other method specified) the mouse button. If initializing
an external drive select “Done” to exit the operation.
Page 55
Drive Genius 2 User Guide
Repartition
Drive Genius 2 User Guide 55
Repartition enables you to resize and manage partitions (volumes) on your hard
drives. Unlike traditional methods of backing up, erasing and repartitioning the
drive, Drive Genius 2 allows you to expand or shrink partitions without erasing
them.
Drive Genius 2 is extremely easy to use. In just a few clicks, Drive Genius 2 will
defragment and resize your partition to the size of your choice. You can use the
Repartition feature to create and delete partitions. Drive Genius 2 includes many
custom icons that can be automatically applied to your newly created partition.
The Repartition feature can hide partitions from users as well. Last but not least,
the feature also has the ability to shift a partition on the hard drive in addition to
reconstructing partition maps.
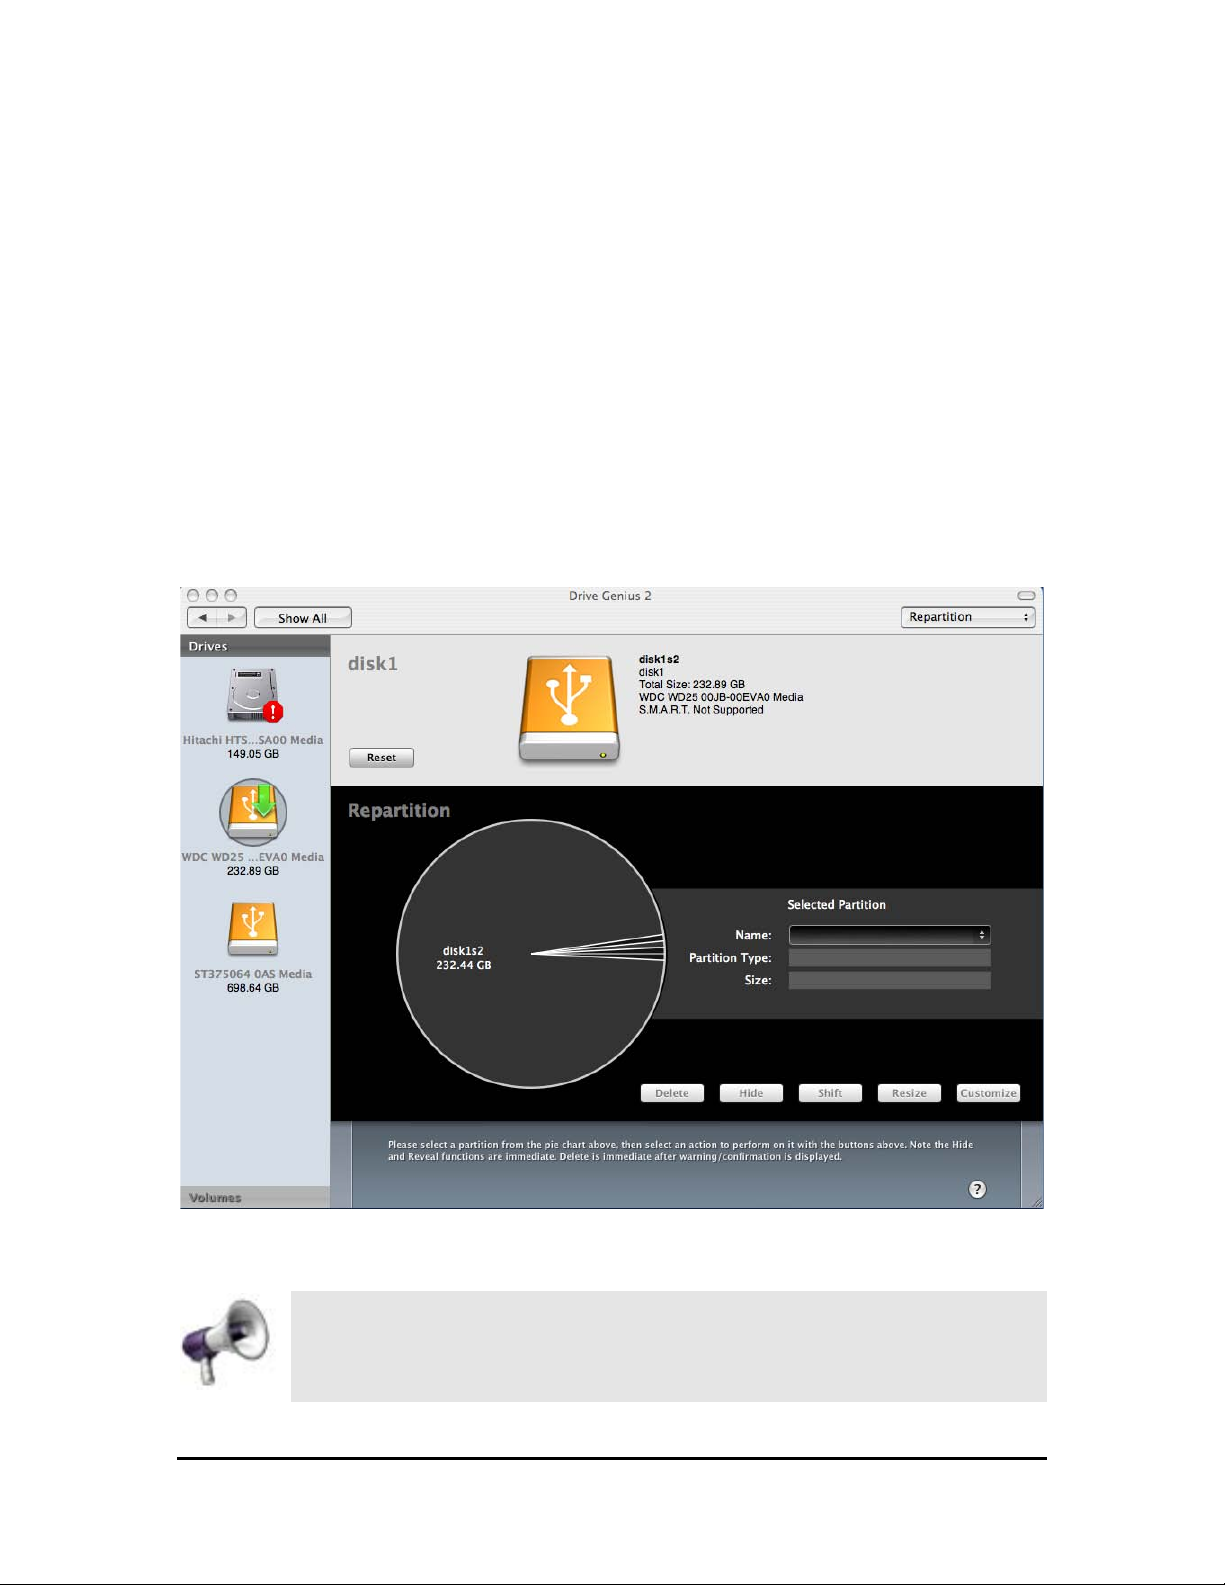
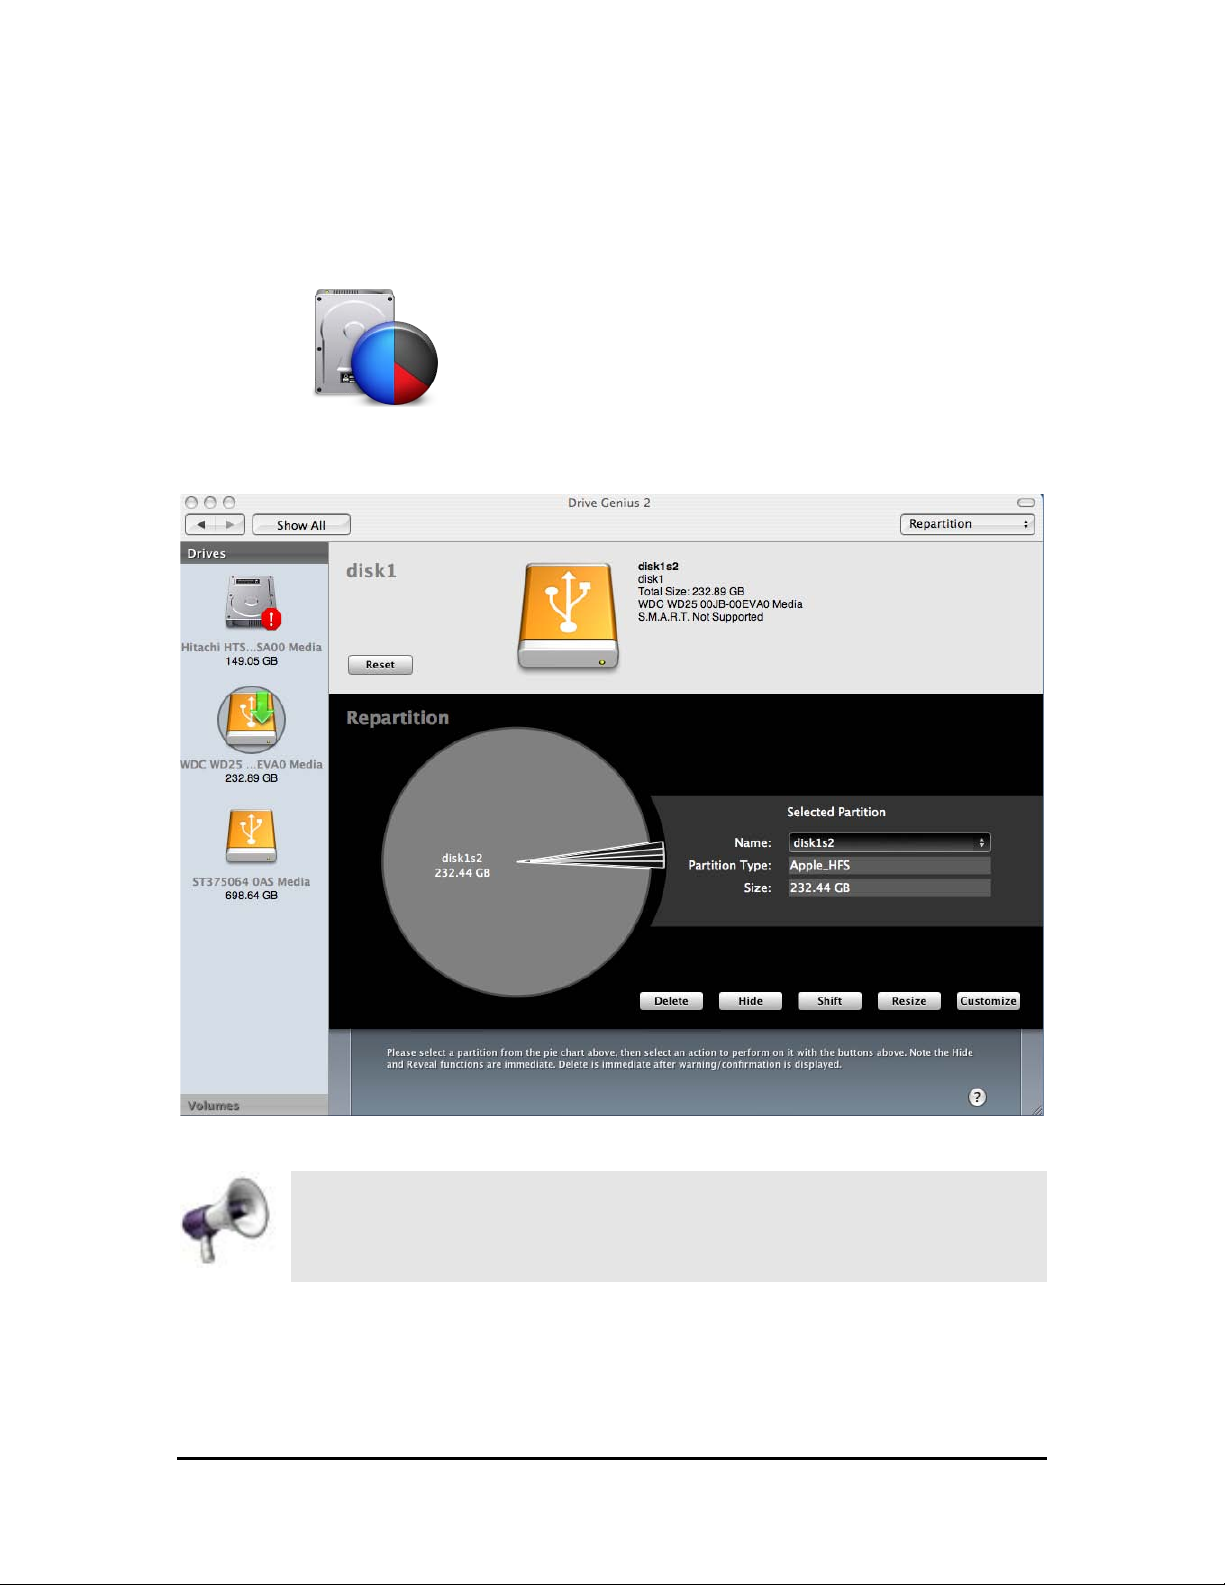
Drive Genius 2’ Repartition window
We have made Repartition a feature that is extremely easy to use.
However, we strongly recommend you read the following few sections.
The Repartition feature is extremely powerful and will have a negative
effect on your drive if not used correctly.
Page 56
Drive Genius 2 User Guide
Repartition
Drive Genius 2 User Guide 56
To run Repartition from your hard drive:
Launch Drive Genius 2 and click on the green arrow.
Click on the Repartition icon.
From the Drives view, select the drive you want to repartition.
Selecting a drive to repartition
Repartition is designed to work with OS X partitions. Using it on OS 9
volume may remove the ability to start up OS 9 from that partition. It
does not affect the data on OS 9 volumes at all.
Page 57
Drive Genius 2 User Guide
Repartition
Drive Genius 2 User Guide 57
There are 3 key areas in the main window:
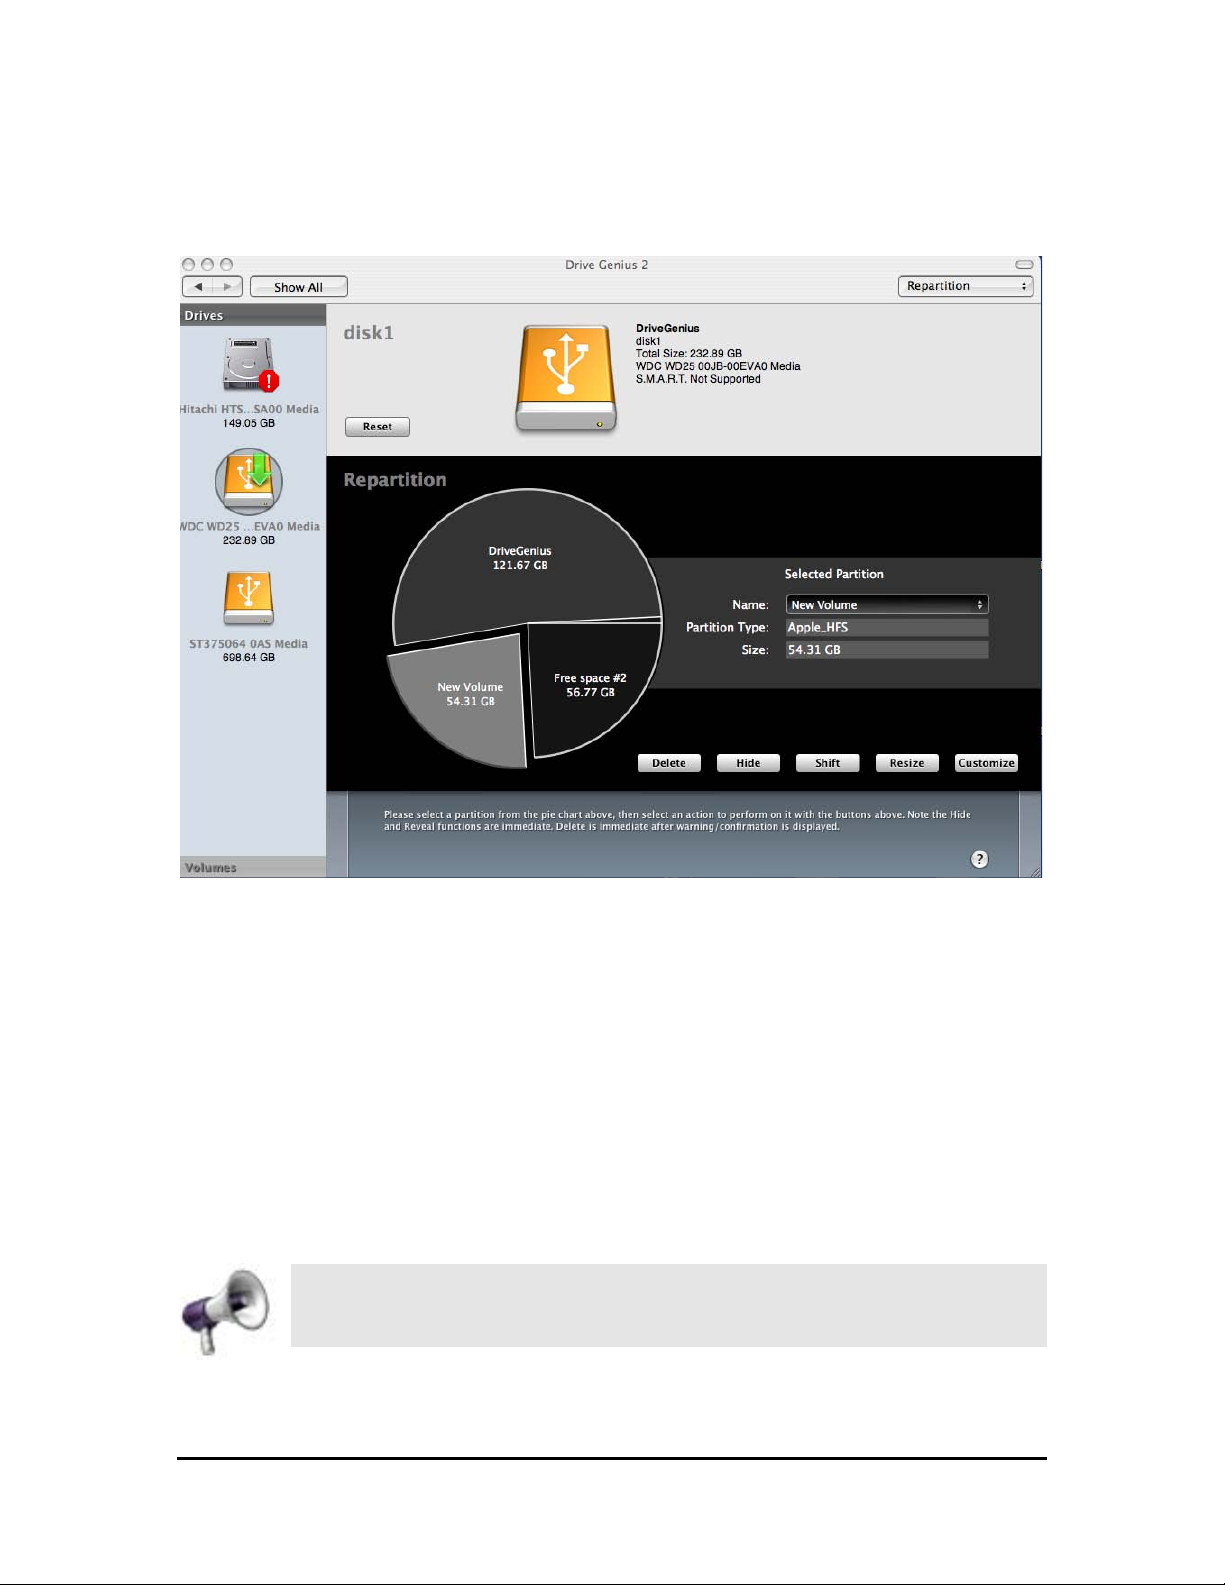
Partition pie chart - the pie chart shows all the partitions on the currently
selected hard drive. The pie chart will also show hidden partitions and partitions
with file systems not supported by the OS. Free space contains no data.
Drive Name and Icon – at top of window, name of the drive, the drive’s icon and
the total size of the drive.
Context-sensitive help - provides help and descriptions of the current active
screen.
Prosoft recommends that you back up your data before using Drive
Genius 2; that way, if anything goes wrong (virus, power blackout, OS
error, or hardware failure etc…), you will be able to recover your data.
Page 58
Drive Genius 2 User Guide
Repartition
Drive Genius 2 User Guide 58
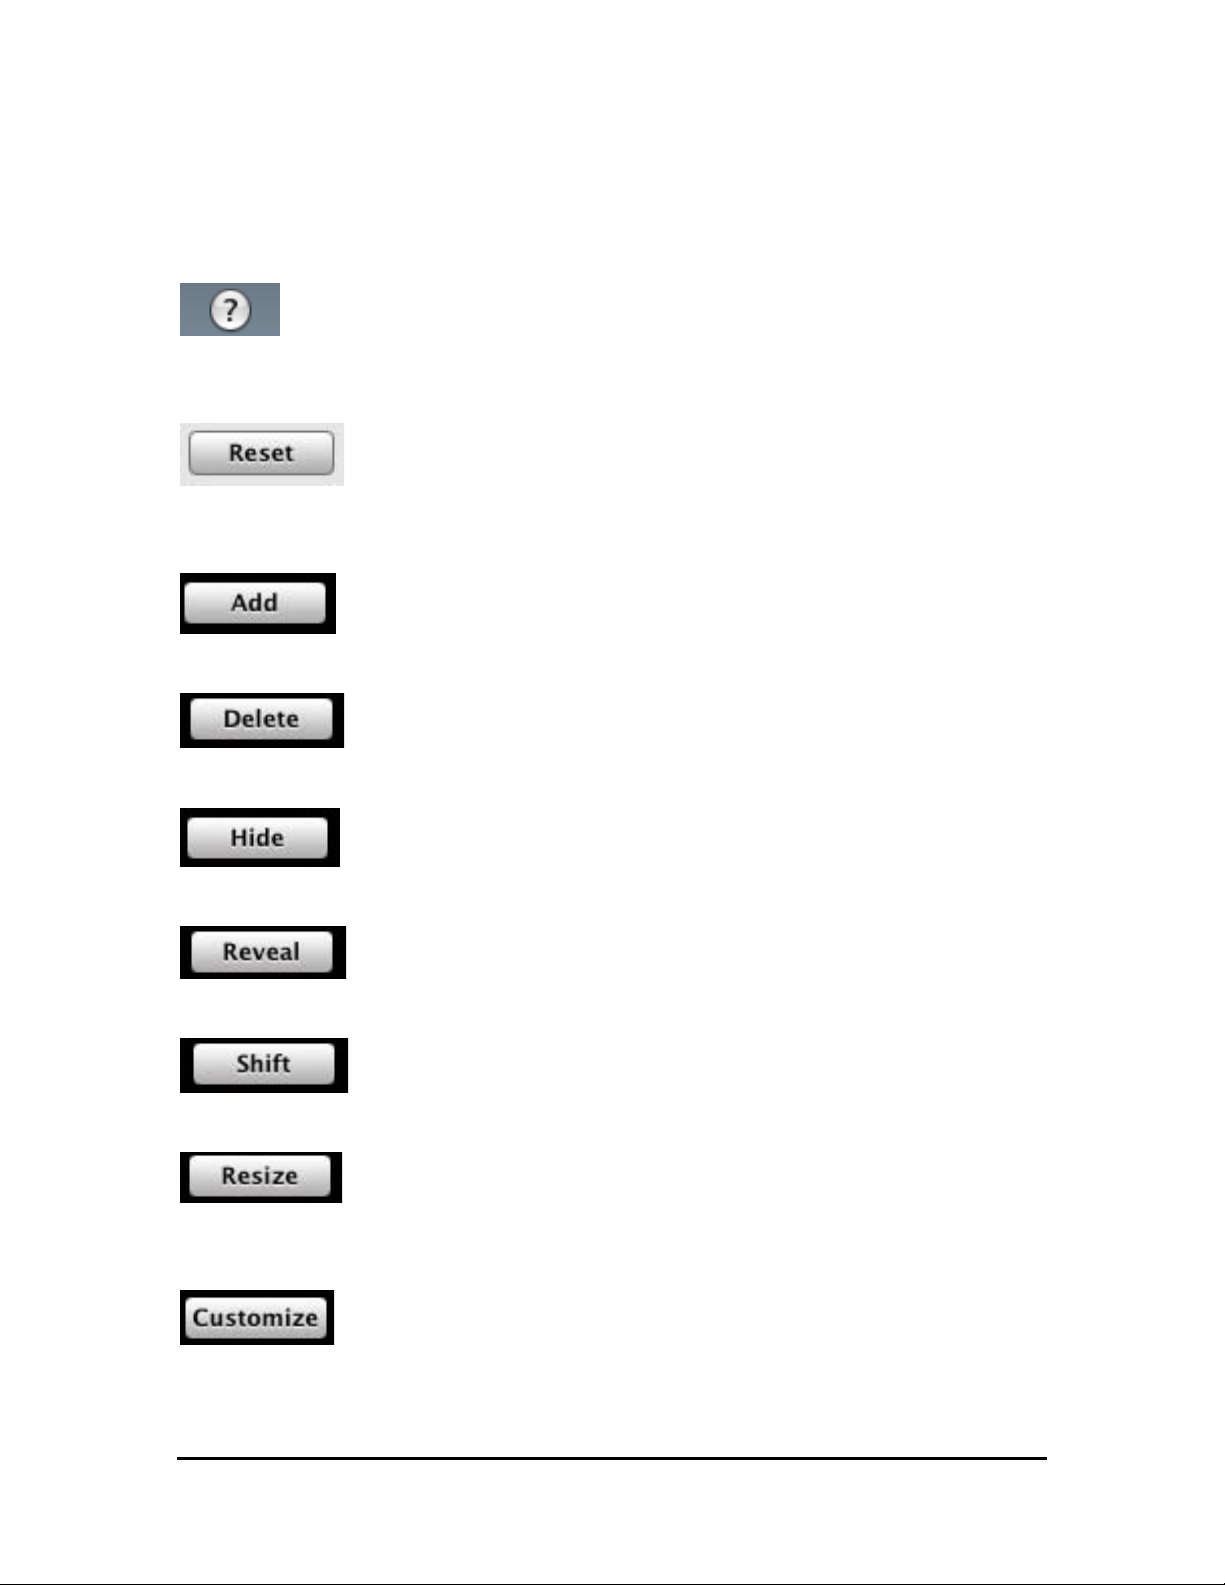
Icon Buttons - the icon buttons shown at the bottom of the Repartition window
are used to perform most of the functions within the program:
Provides information on Drive Genius 2’ features and step-by-step
instructions for performing specific tasks.
Resets the partition map to regain the extra space wasted during
a hardware device-to-device copy.
Add a new volume to the drive.
Delete a partition from your drive.
Hide partitions on your drive.
Reveal partitions on your hard drive.
Shift volumes without requiring you to erase them.
Resize (expand or shrink) your OS X partitions without requiring
you to erase the volume.
Allows you to customize your new volume (icons used with the
kind permission of http://www.iconizer.com/).
Page 59
Drive Genius 2 User Guide
Repartition
Drive Genius 2 User Guide 59
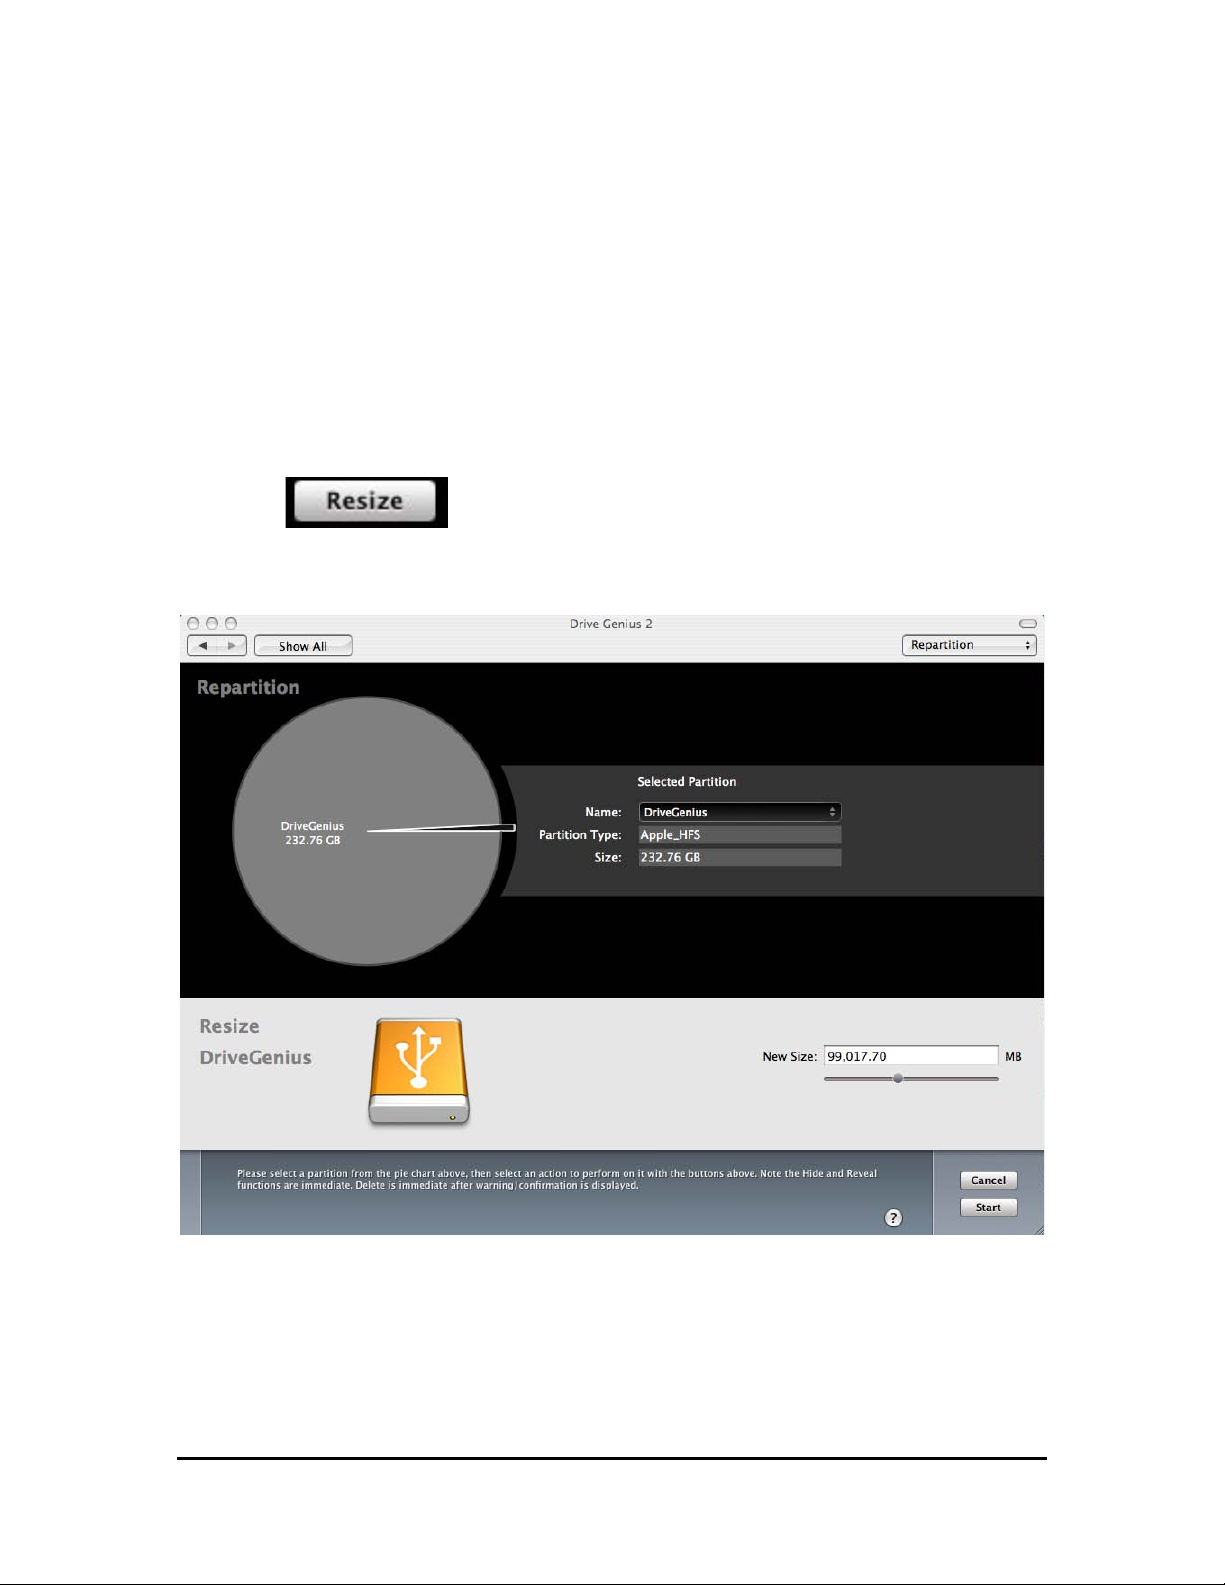
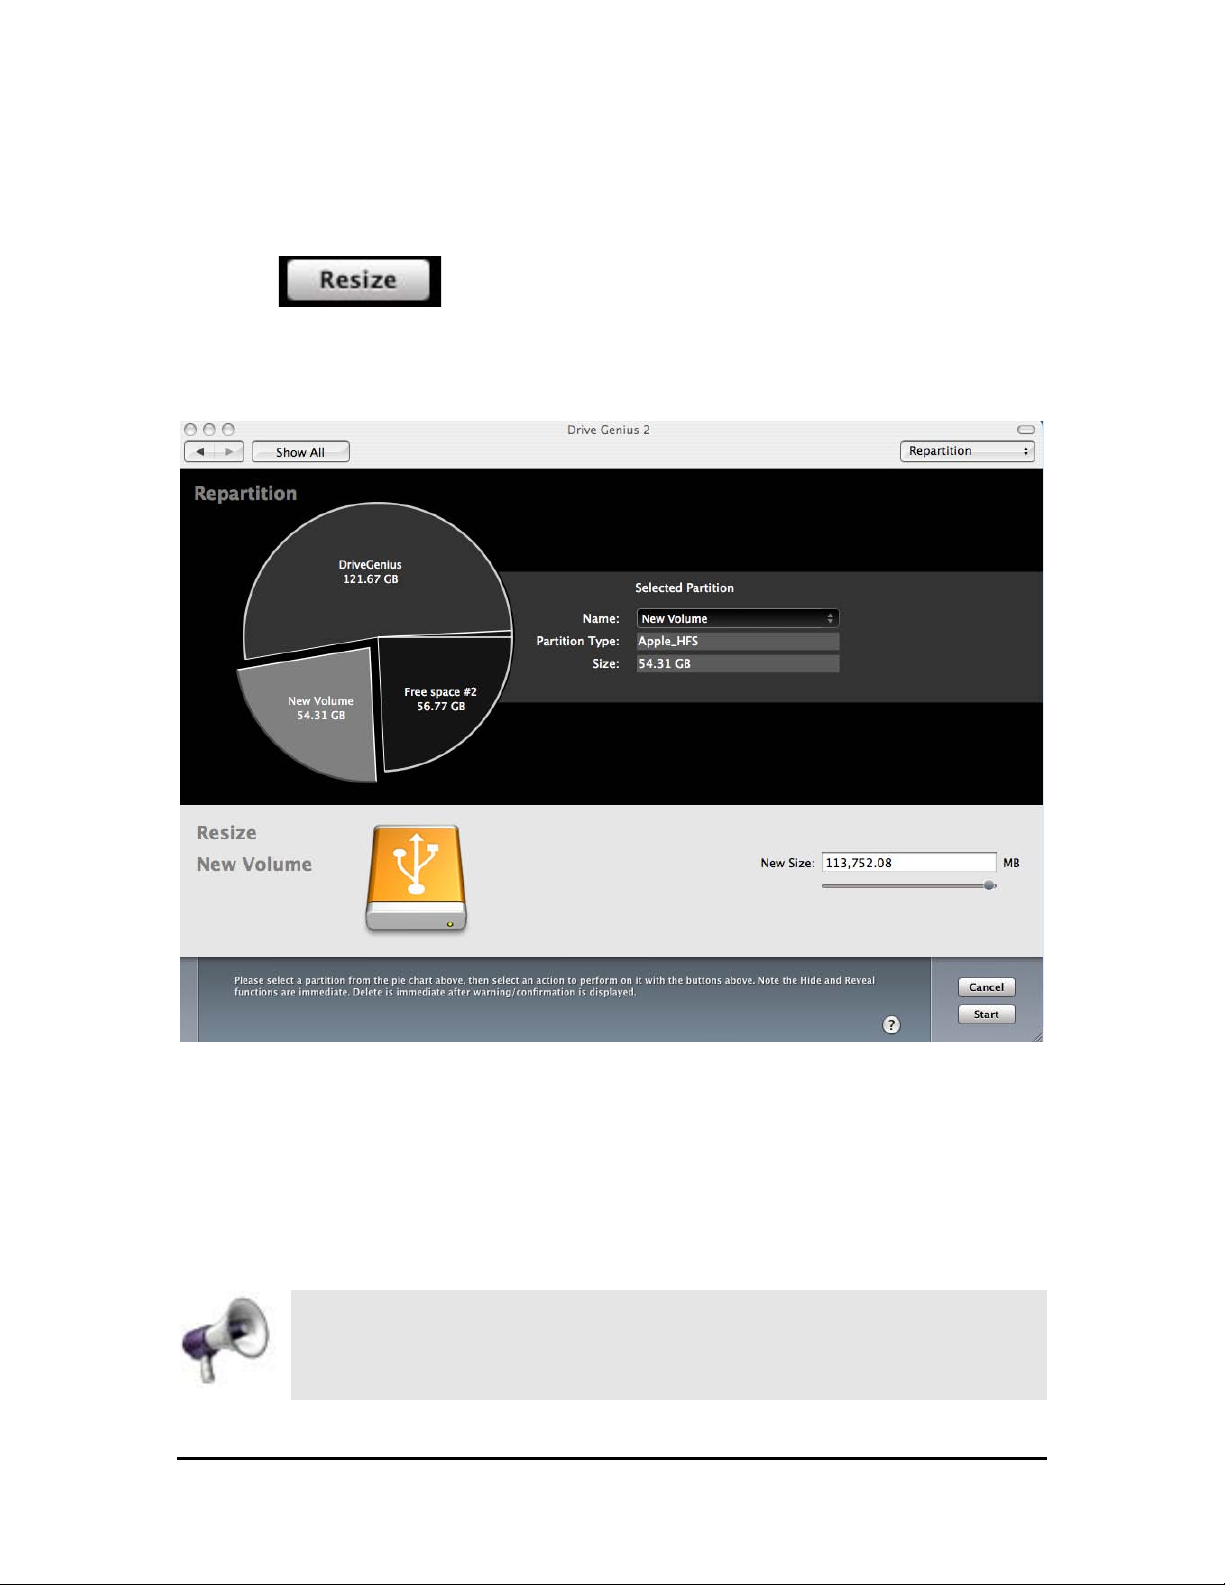
Resize allows you to resize your OS X disk partitions (volumes) without requiring
you to erase the volume. Partitions can be shrunk in order to make room for a
new partition, or they can be expanded to take advantage of free space on the
drive.
To shrink a volume:
On the Repartition window, select the volume/partition you want to work on by
highlighting it.
Click the button.
You will be presented with the dialog as shown below.
The Resize sheet
Use the slider to select the new size of your partition and click Start to continue.
You can also type in the new size of the partition. Please note that you cannot
make a volume smaller unless it has unused space.
Page 60
Drive Genius 2 User Guide
Repartition
Drive Genius 2 User Guide 60
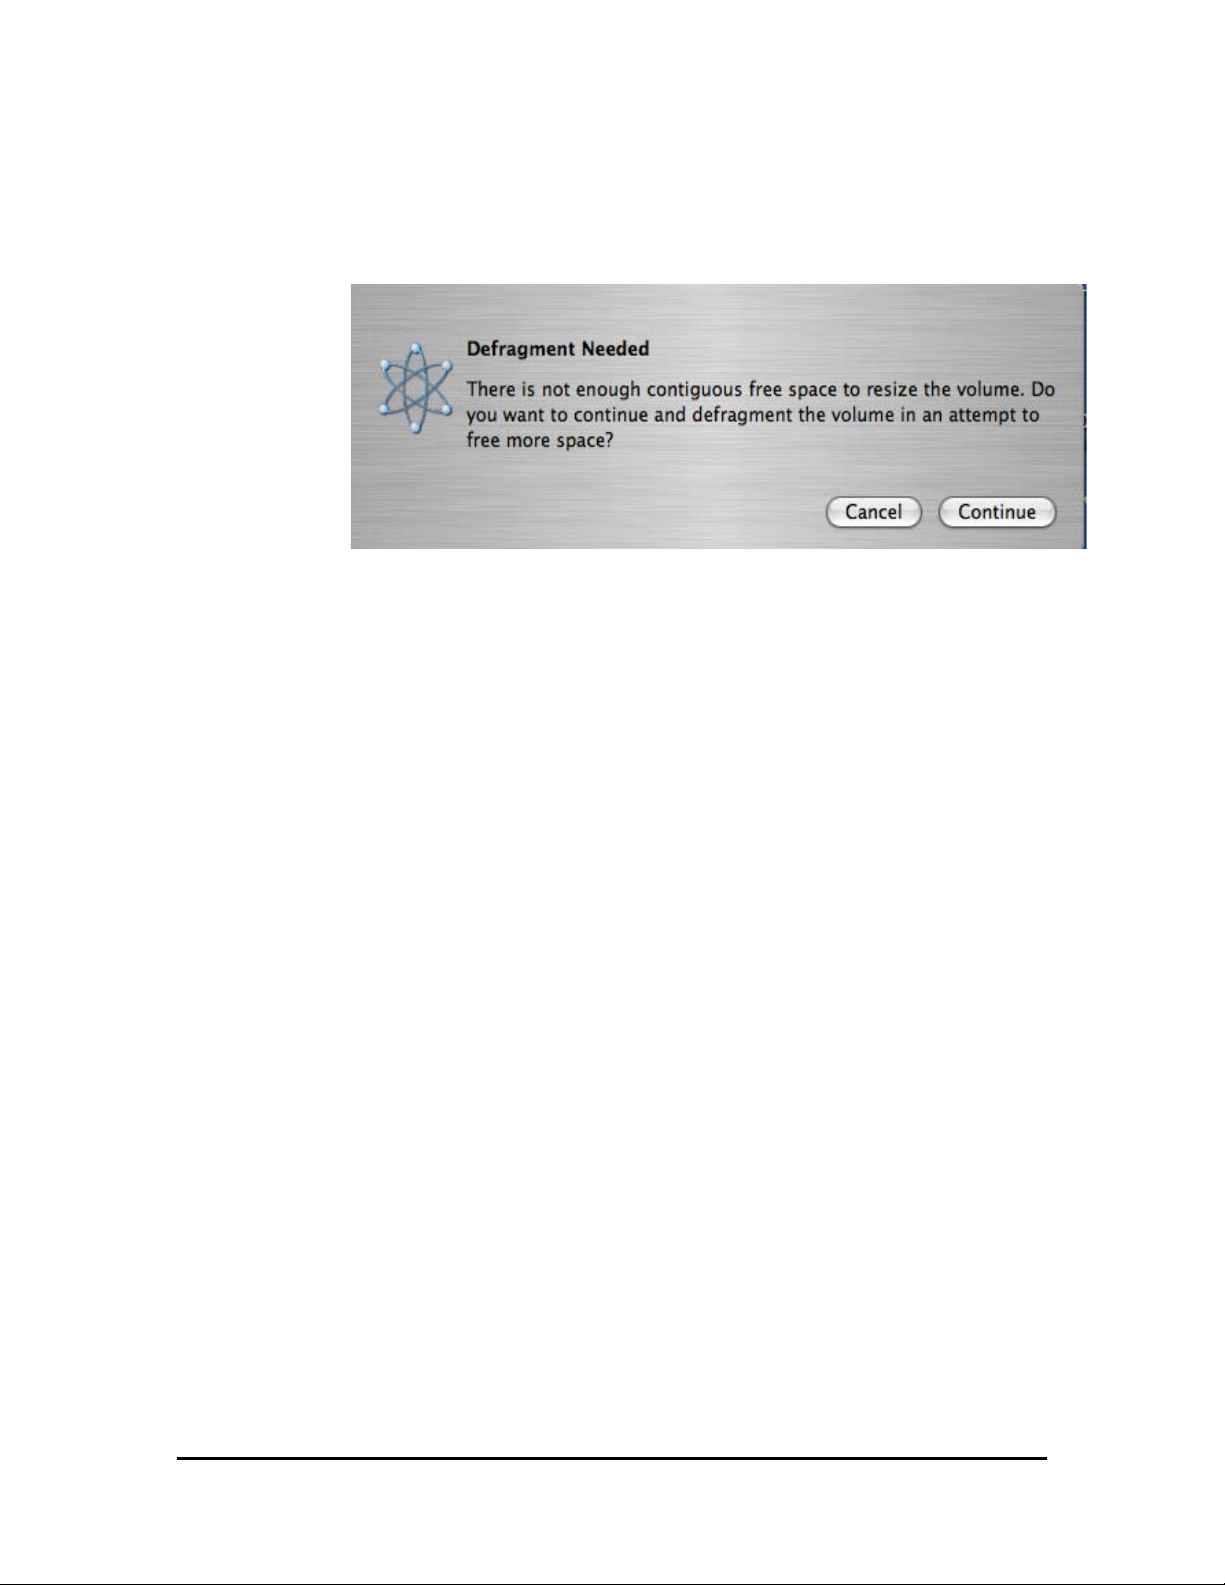
If you are shrinking a partition and the data needs to be defragmented, a new
window will pop up for the defragmenting process.
Click the Continue button to proceed.
To cancel, click on the Cancel button.
Page 61
Drive Genius 2 User Guide
Repartition
Drive Genius 2 User Guide 61
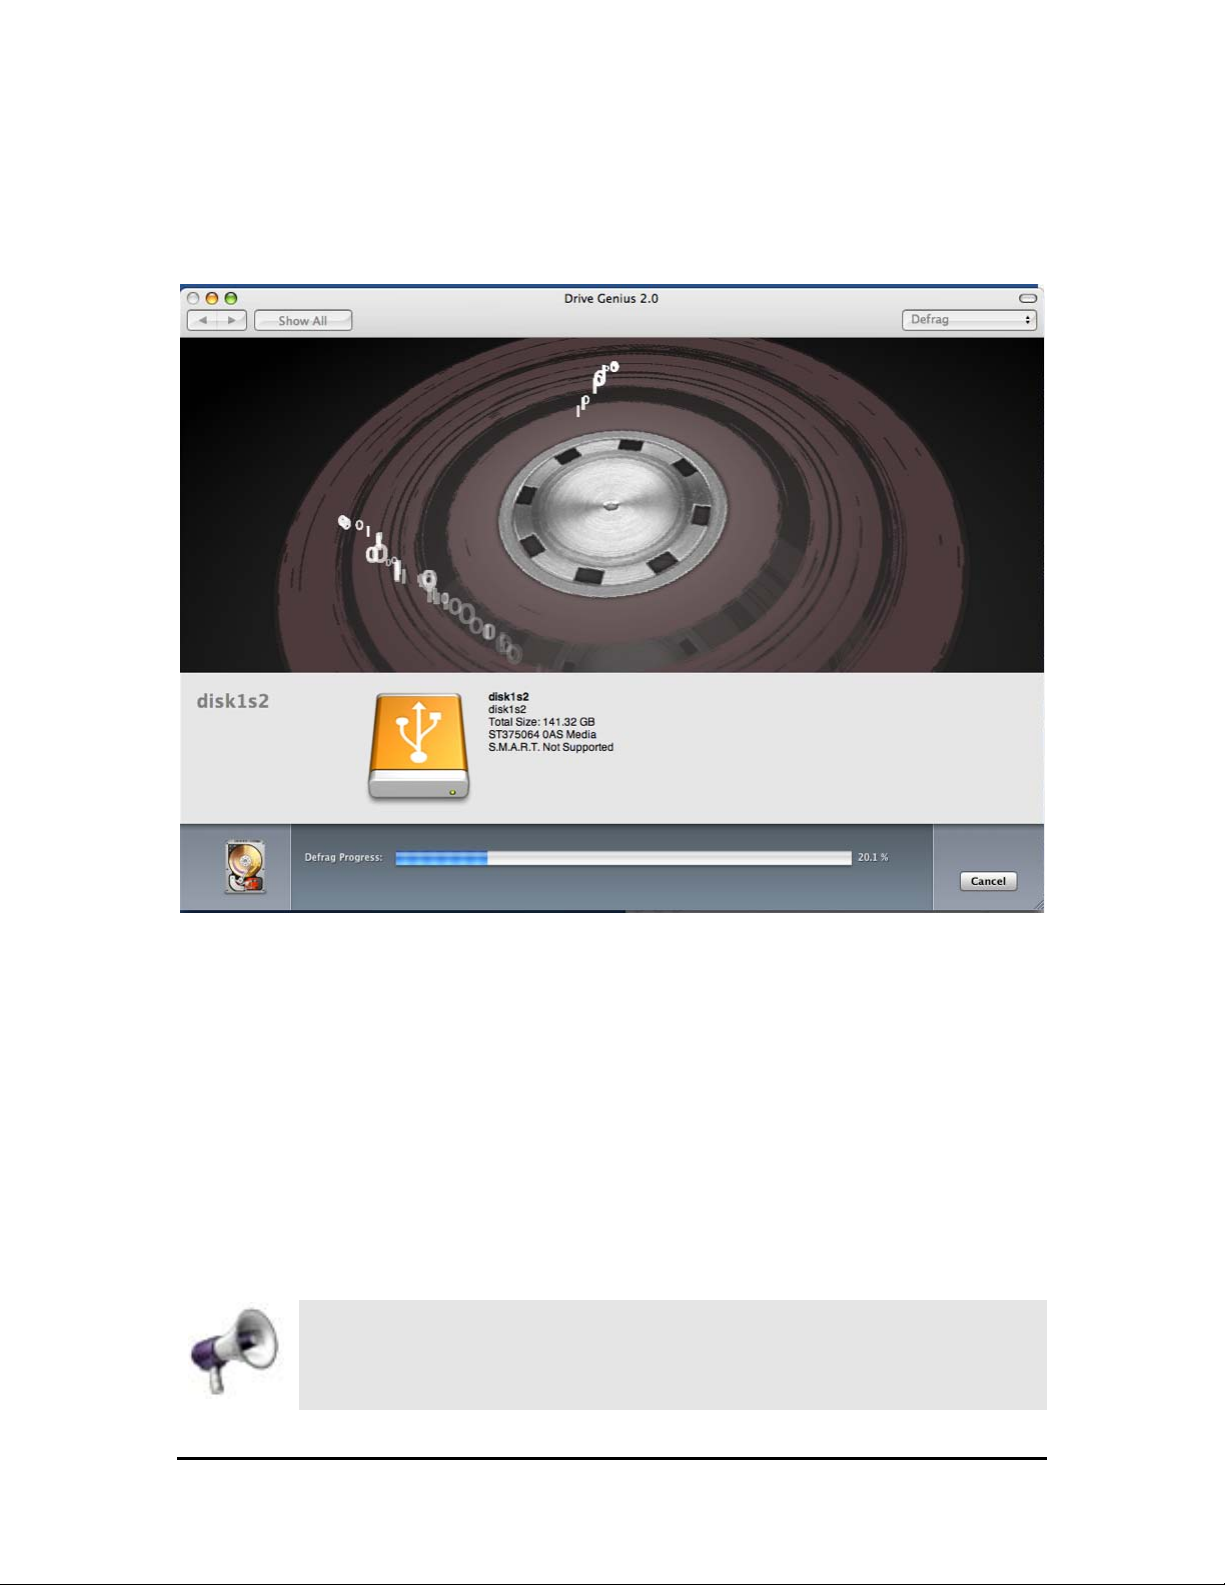
Once the volume integrity is verified by Drive Genius 2, the defrag process
begins.
Defrag in progress
It can take from half an hour to a day to defrag a high capacity drive
(depending on how fragmented it is). The end of the day is a great
time to kick this maintenance routine off.
Page 62
Drive Genius 2 User Guide
Repartition
Drive Genius 2 User Guide 62
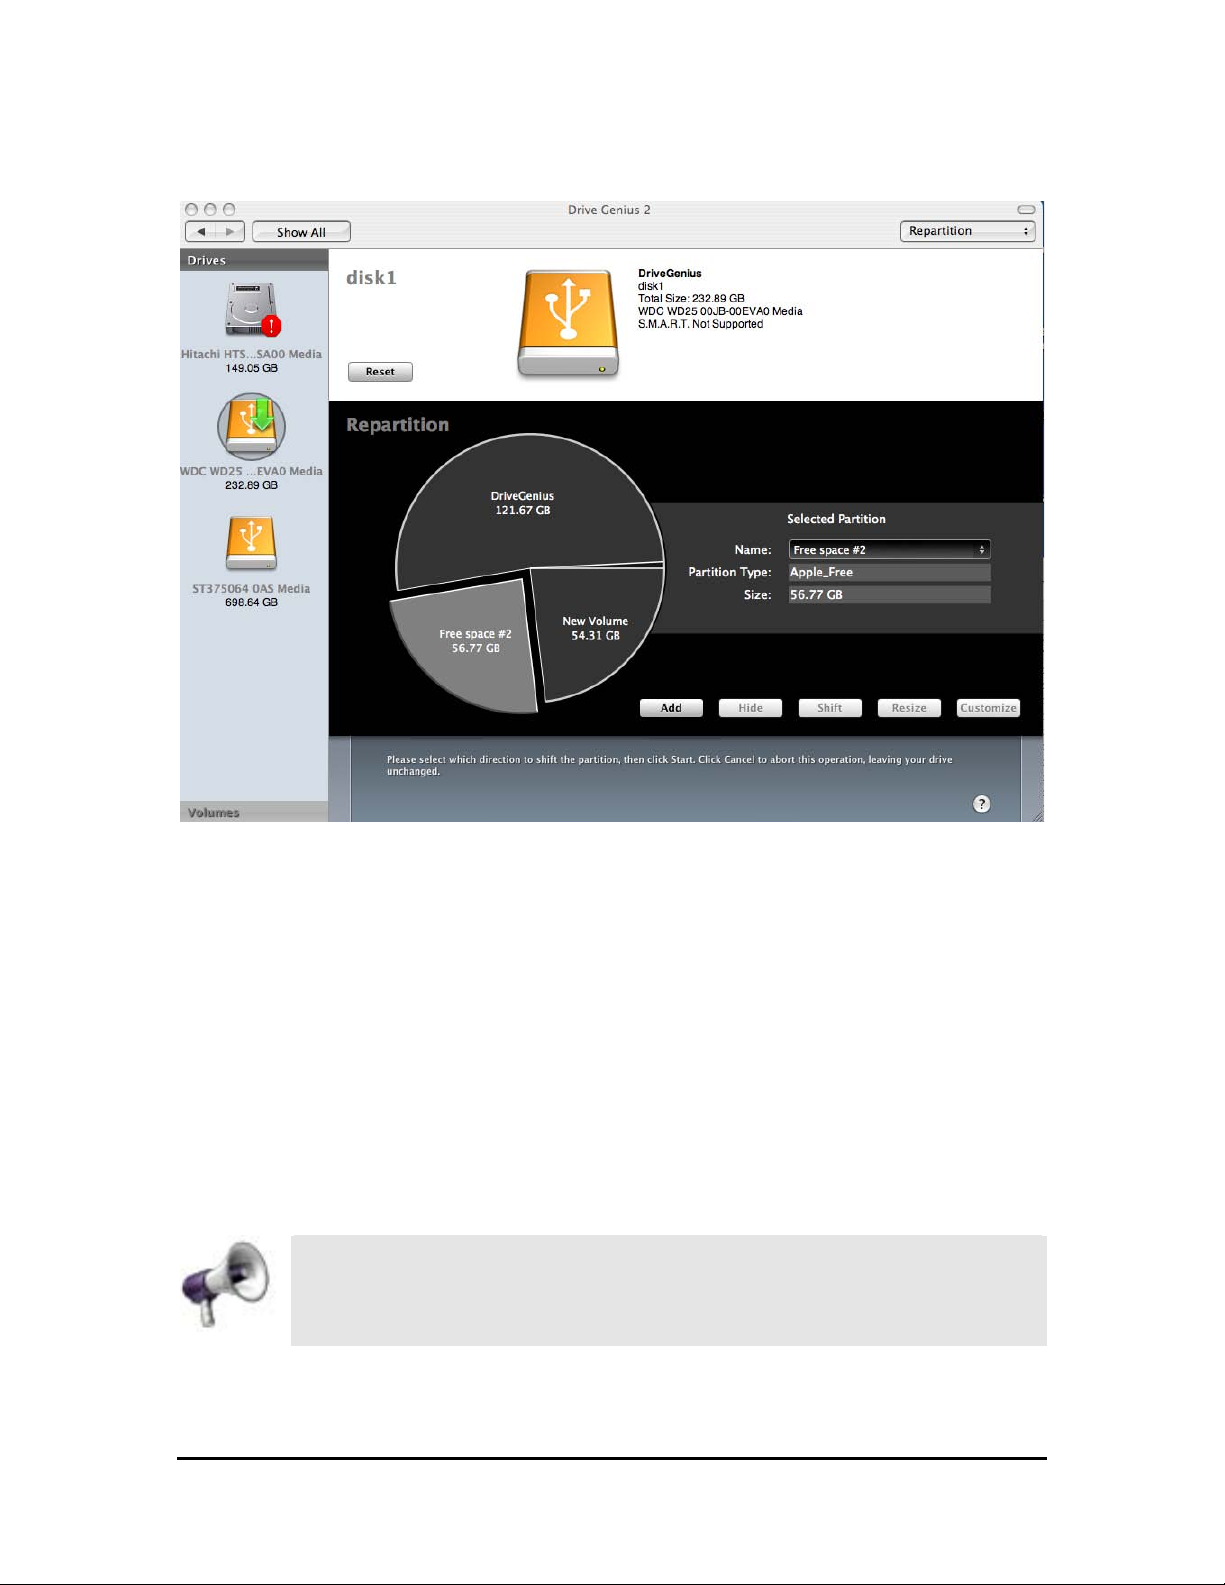
After the operation is completed, a new free space partition will be present.
Volume is resized down
Prosoft recommends that you back up your data before using Drive
Genius 2; that way, if anything goes wrong (virus, power blackout, OS
error or hardware failure etc…), you will be able to recover your data.
Page 63
Drive Genius 2 User Guide
Repartition
Drive Genius 2 User Guide 63
To expand a volume:
Click the button.
Select the volume you want to expand by clicking on it.
You will be presented with the window shown below.
Selecting a volume to expand
Use the slider to select the new size of your partition. Notice that ‘New Size’ of
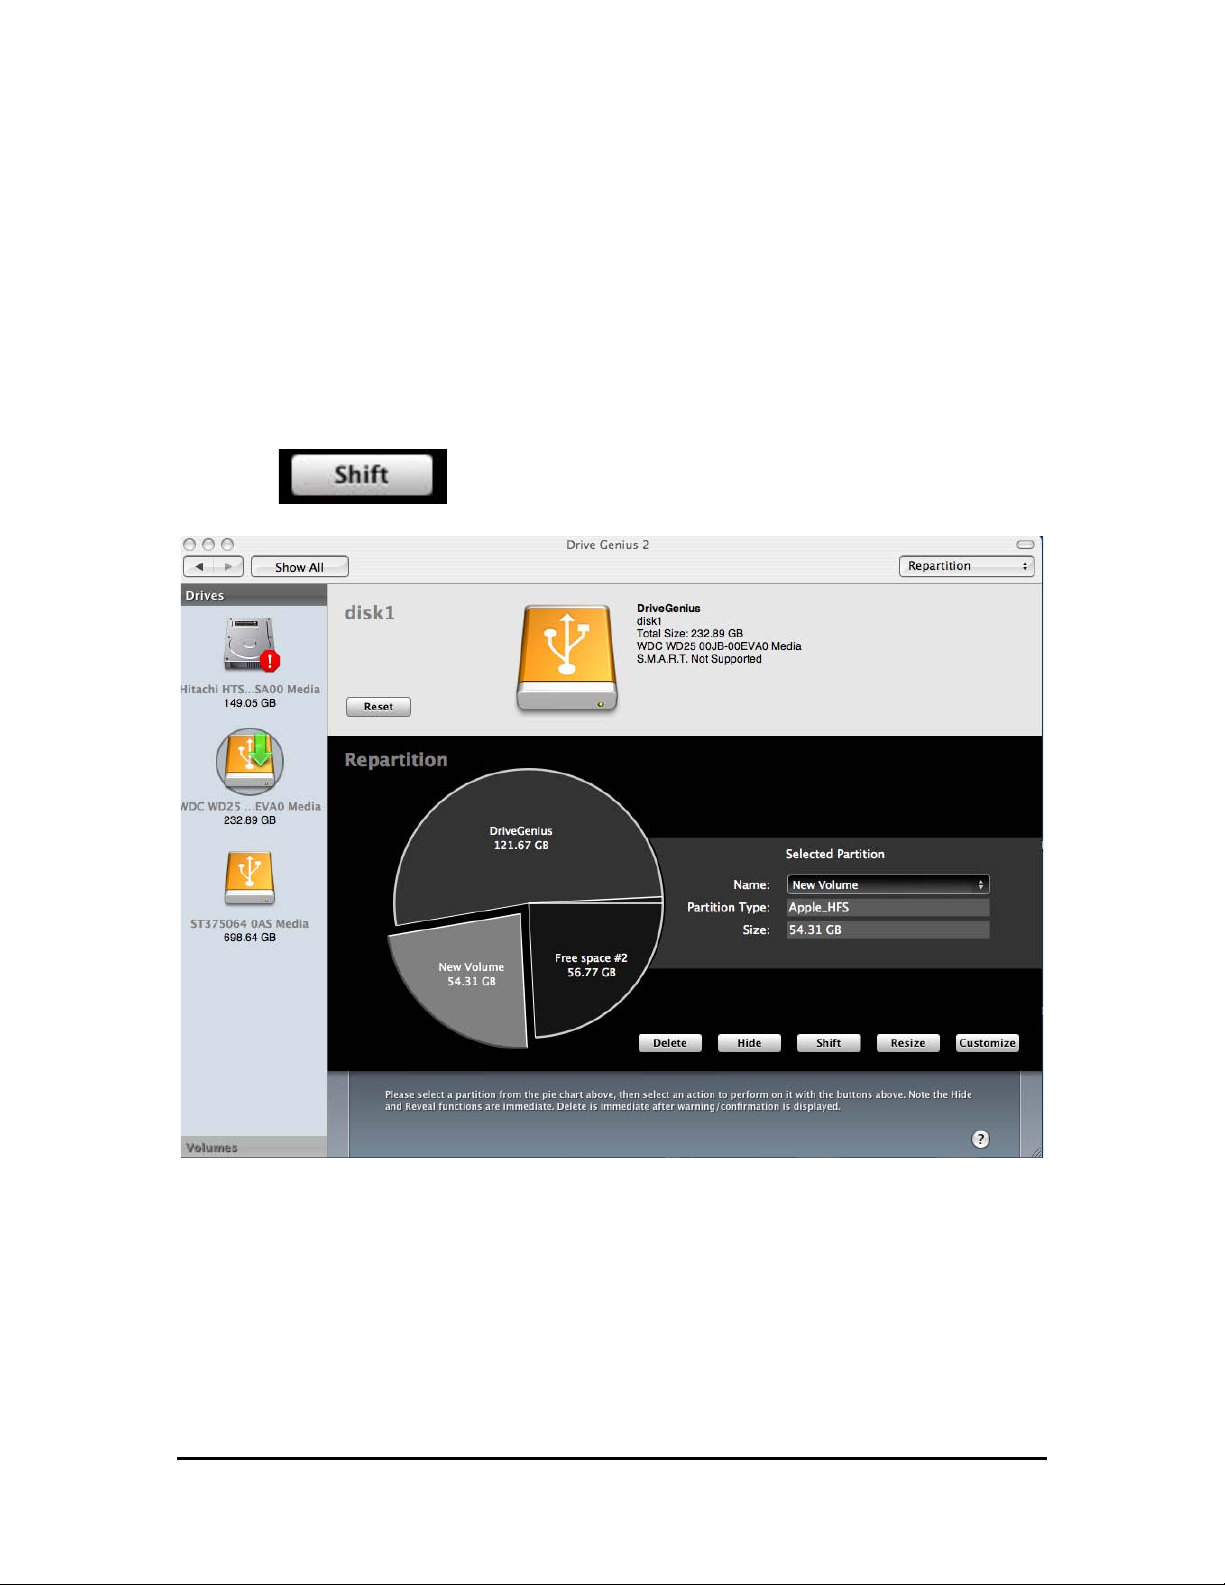
113,752.08 is now the combined size of 54.31gb + 56.77gb.
You will need to have free space counterclockwise to the volume you
want to expand. You cannot expand a volume if there is no
Apple_Free space adjacent to it.
Page 64
Drive Genius 2 User Guide
Repartition
Drive Genius 2 User Guide 64
Drive Genius 2 allows you to shift disk partitions (volumes) without requiring you
to erase the volume. Partitions can be moved clockwise and counterclockwise on
the hard disk allowing you to combine free spaces into one. When you shift a
partition, the partition’s data is unaffected. The free space adjacent to the
partition will determine how far forward or backward you can move the partition. If
there is no free space adjacent to it, the partition cannot be moved. Additionally,
you cannot move an Apple_Free partition.
To Shift a Volume:
Click the button.
Shift Window
Page 65
Drive Genius 2 User Guide
Repartition
Drive Genius 2 User Guide 65
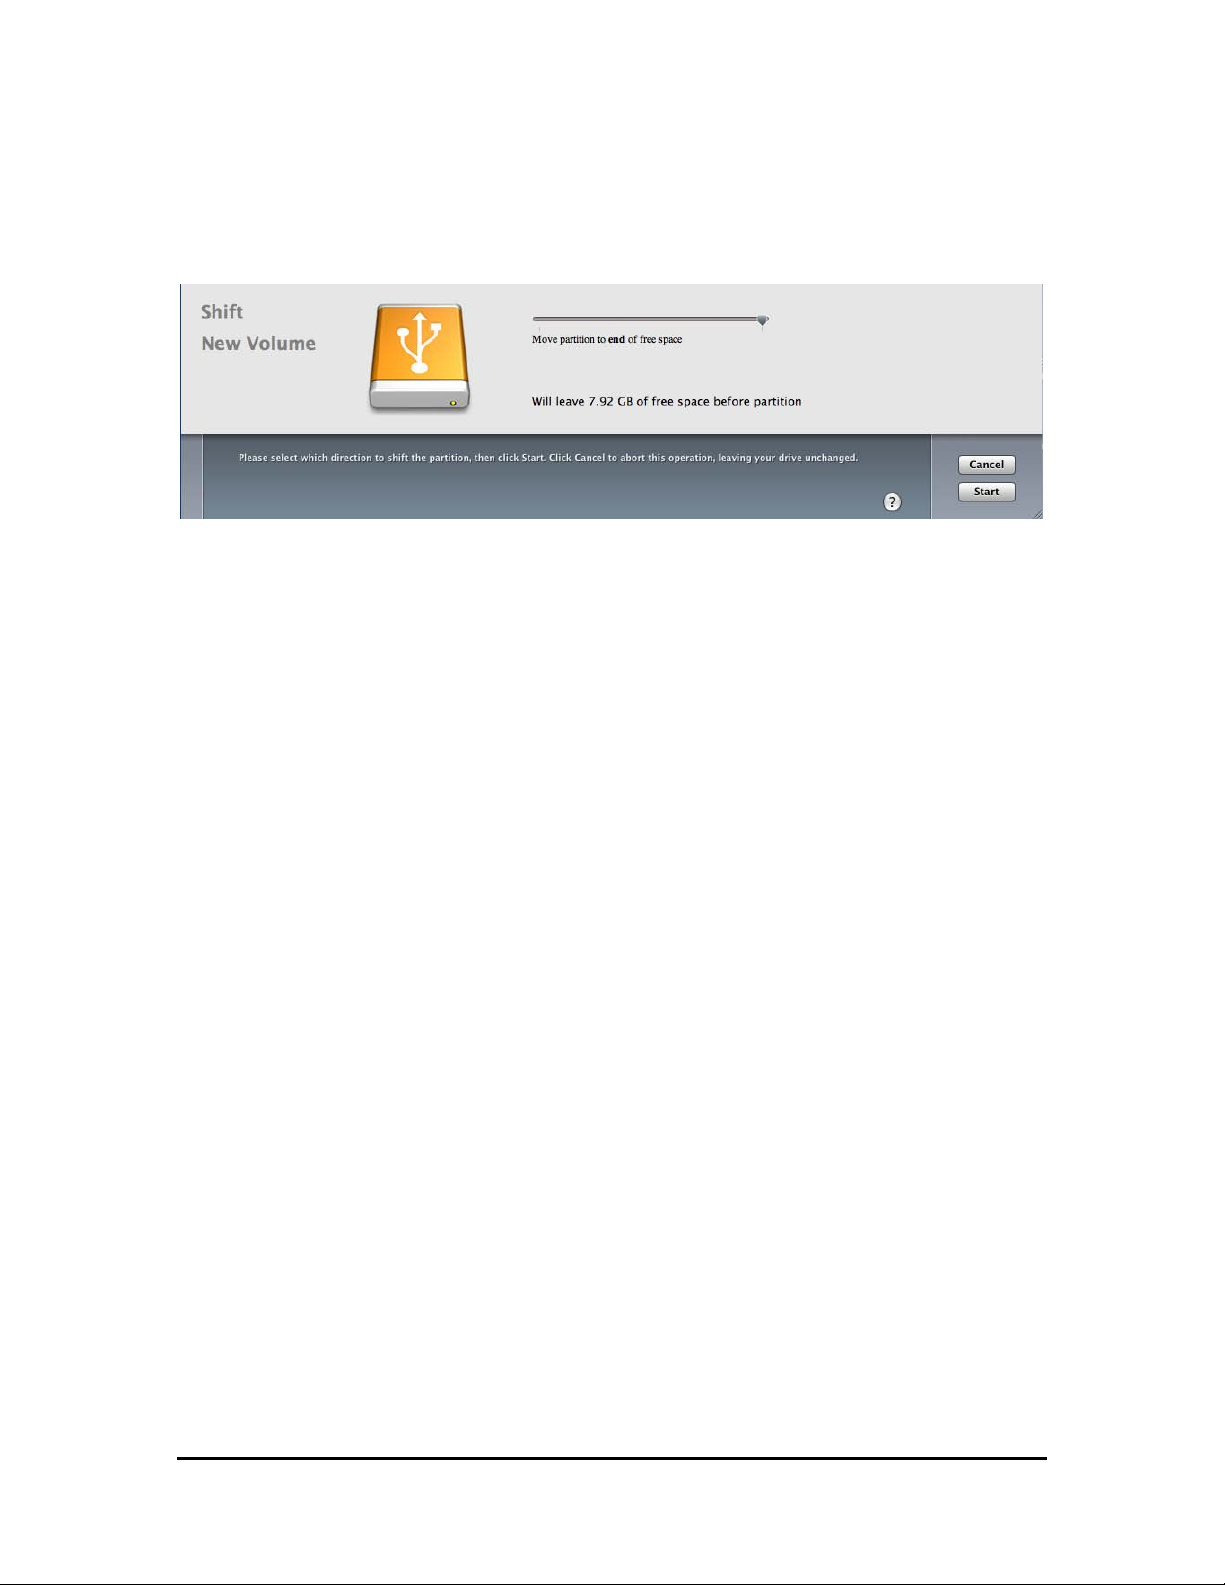
If you want to shift the partition to move the space to start or end of current
volume, move the slider.
Once you have selected a direction you will be presented with the following
dialog:
“Move partition to start of free space”. Will leave free space after the partition.
if you move the slider to left:
“Move partition to end of free space”. Will leave free space before the partition.
Click the Start button to proceed.
Page 66
Drive Genius 2 User Guide
Repartition
Drive Genius 2 User Guide 66
After the shift
Prosoft recommends that you back up your data before using the shift
function of Drive Genius 2; that way, if anything goes wrong, you will
be able to recover the data. Once started, the shift process cannot be
interrupted.
Page 67
Drive Genius 2 User Guide
Repartition
Drive Genius 2 User Guide 67
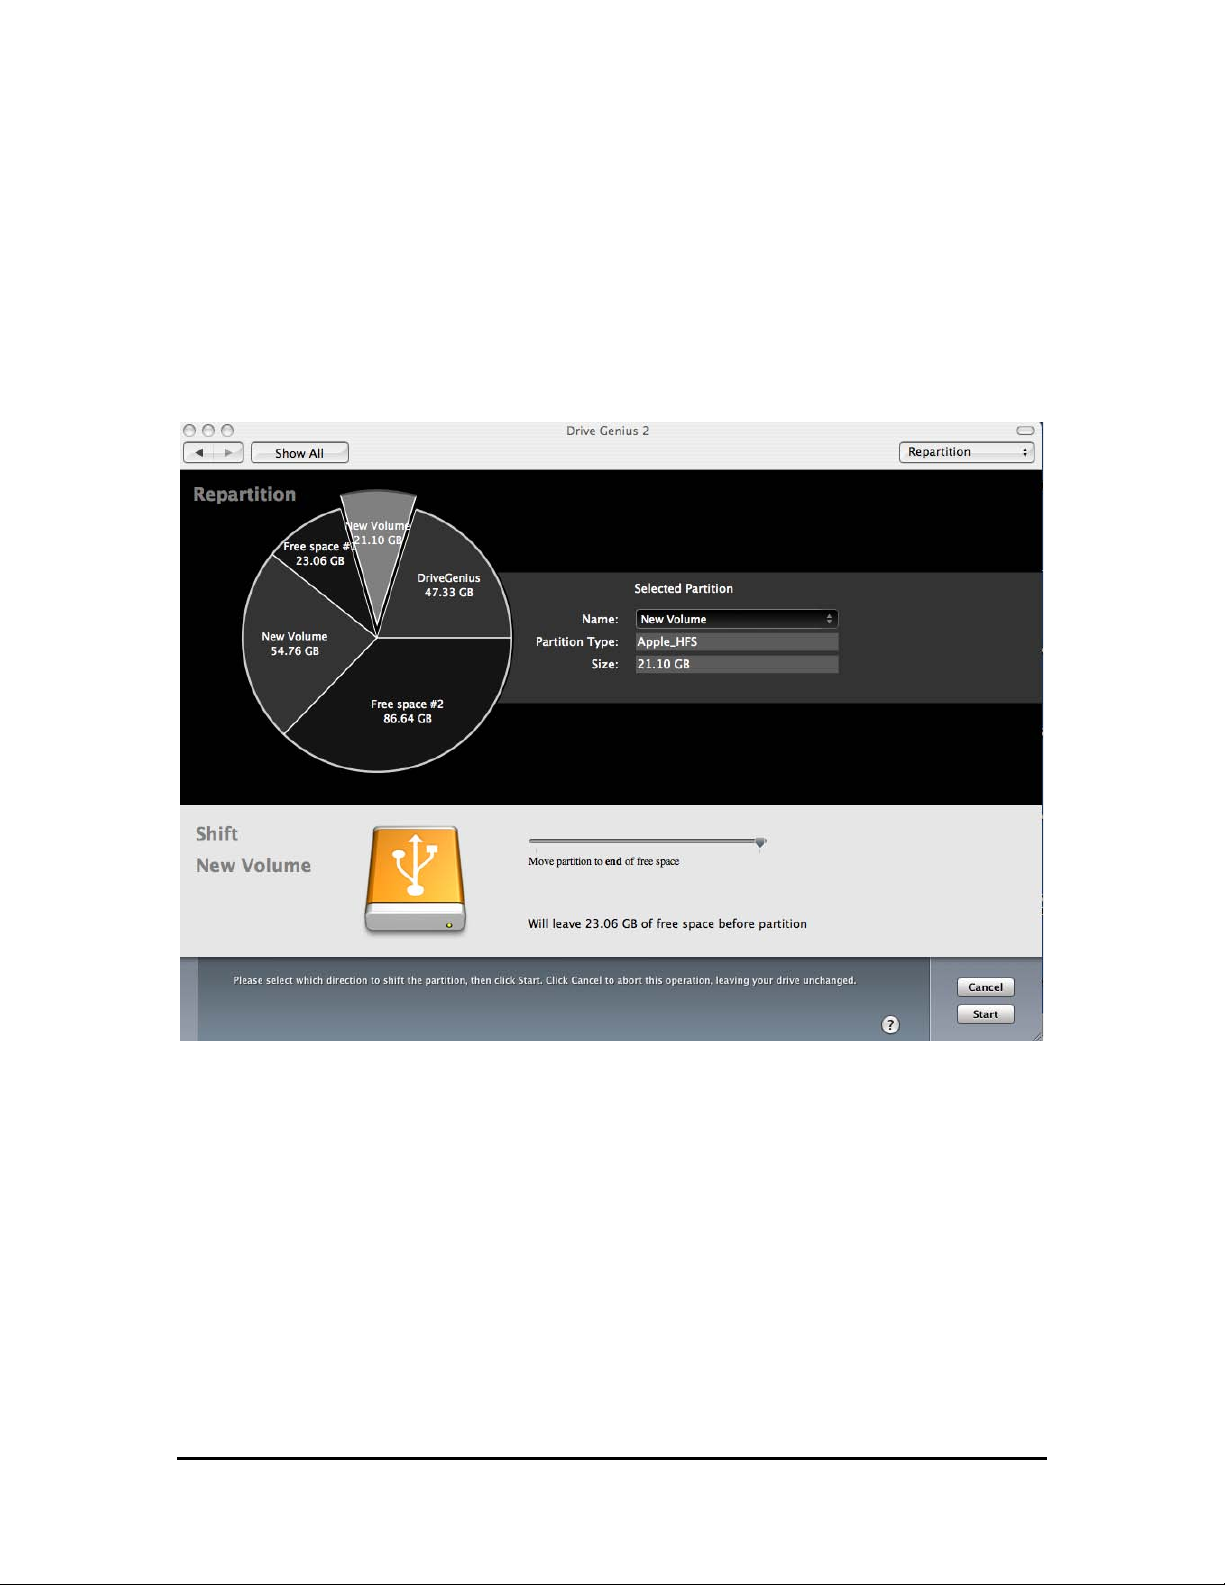
Using Partition Shifting before expanding a volume
To expand a volume, in the Repartition pie chart you will need to have free space
adjacent (counterclockwise) to the volume you want to expand. You cannot
expand a volume if there is no Apple_Free space counterclockwise to it. If the
Apple Free_Space is clockwise to the volume you want to expand, you will need
to shift the volume before expanding the volume.
The second partition needs to be shifted
As an example: To expand the 47.33GB volume, the 21.10GB volume will need
to be shifted counterclockwise; this will shift the 23.06GB of Free Space adjacent
to the 47.33GB Drive Genius volume. To do this, select the 21.10GB partition
and click the Shift button. Then click the Start button. When completed, the newly
moved partition can be expanded.
Page 68
Drive Genius 2 User Guide
Repartition
Drive Genius 2 User Guide 68
Creating and Deleting Volumes
Drive Genius 2 allows you to create or delete a volume on your hard drive. The
Delete operation deletes a volume and destroys all its data. This partition will be
marked as "free space" until you create a new volume or expand an existing
volume.
To Delete a volume:
Select the volume you want to delete by clicking on it.
Click the button.
Once you delete a volume, the data will not be available for further
use.
To create a new volume, free space must exist on the drive. If there is no free
space, you will need to use resize to shrink a current volume, to open up free
space for the volume creation process.
Page 69
Drive Genius 2 User Guide
Repartition
Drive Genius 2 User Guide 69
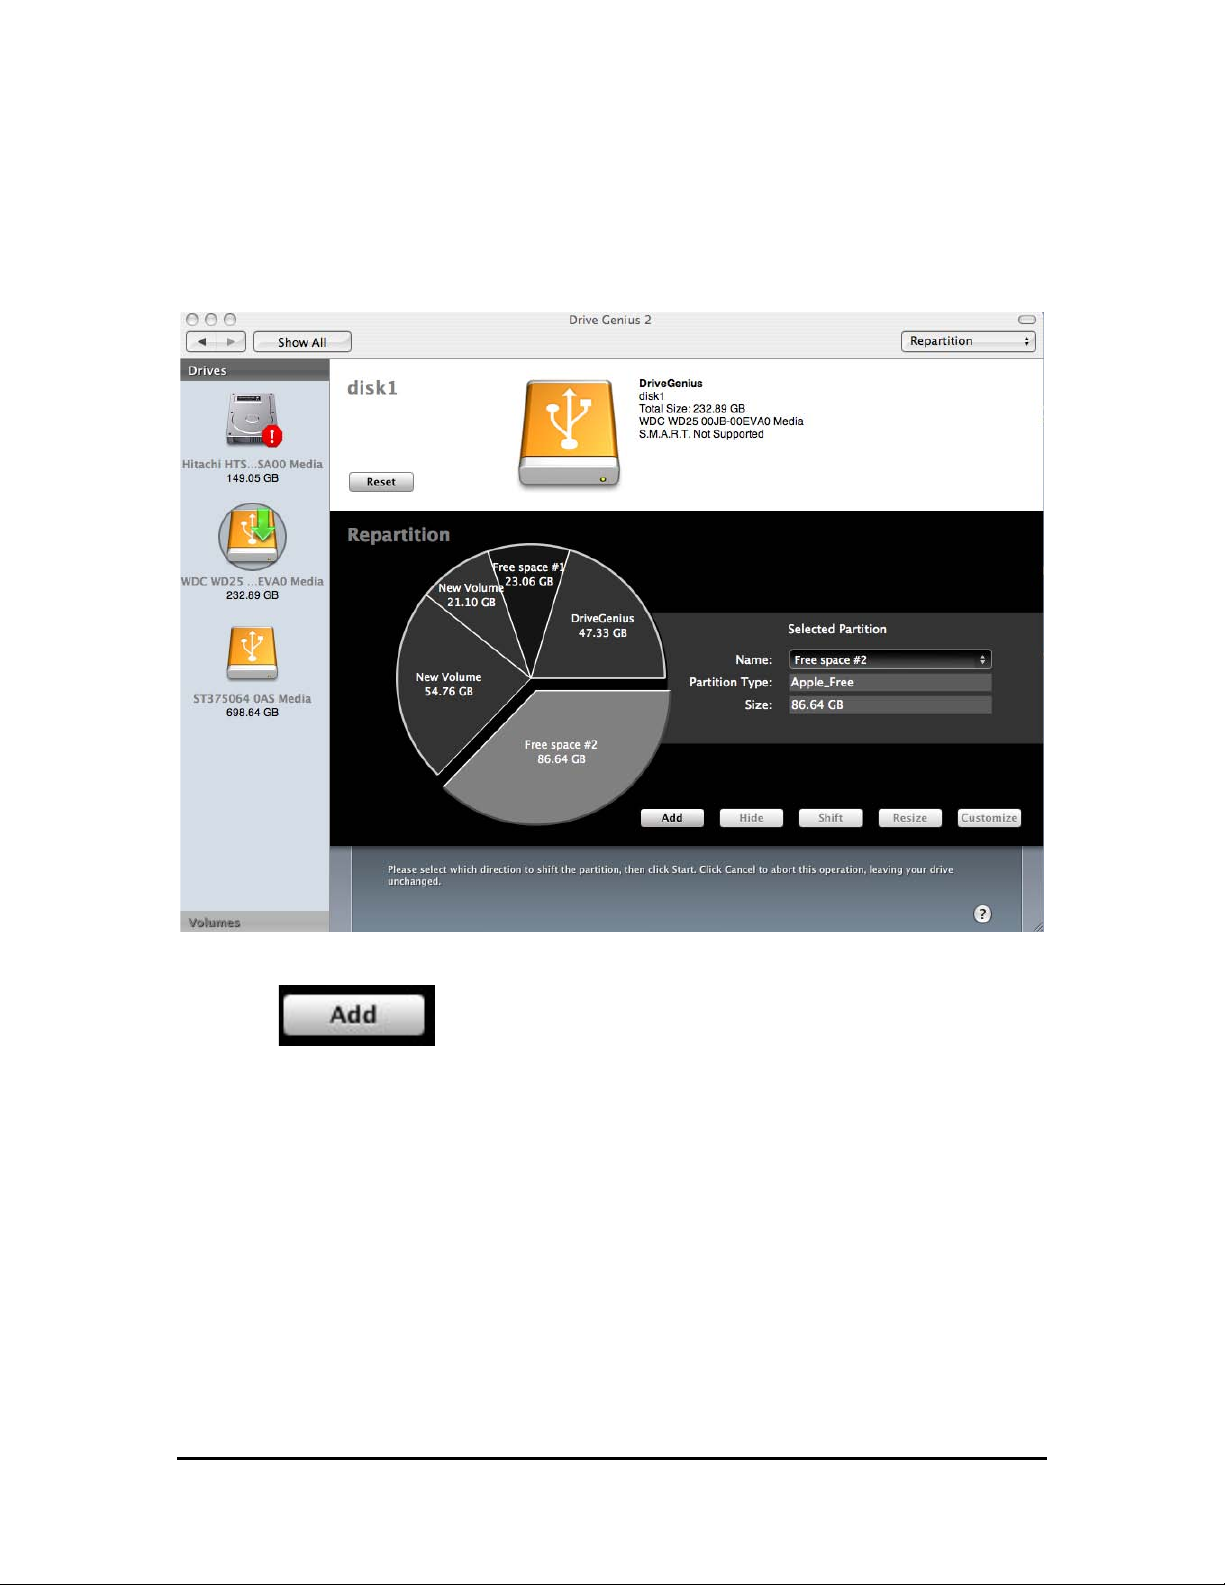
To Create a volume:
Select the free space partition or volume you want to create a new volume on.
Selecting a free space to create a volume
Click the button.
Page 70
Drive Genius 2 User Guide
Repartition
Drive Genius 2 User Guide 70
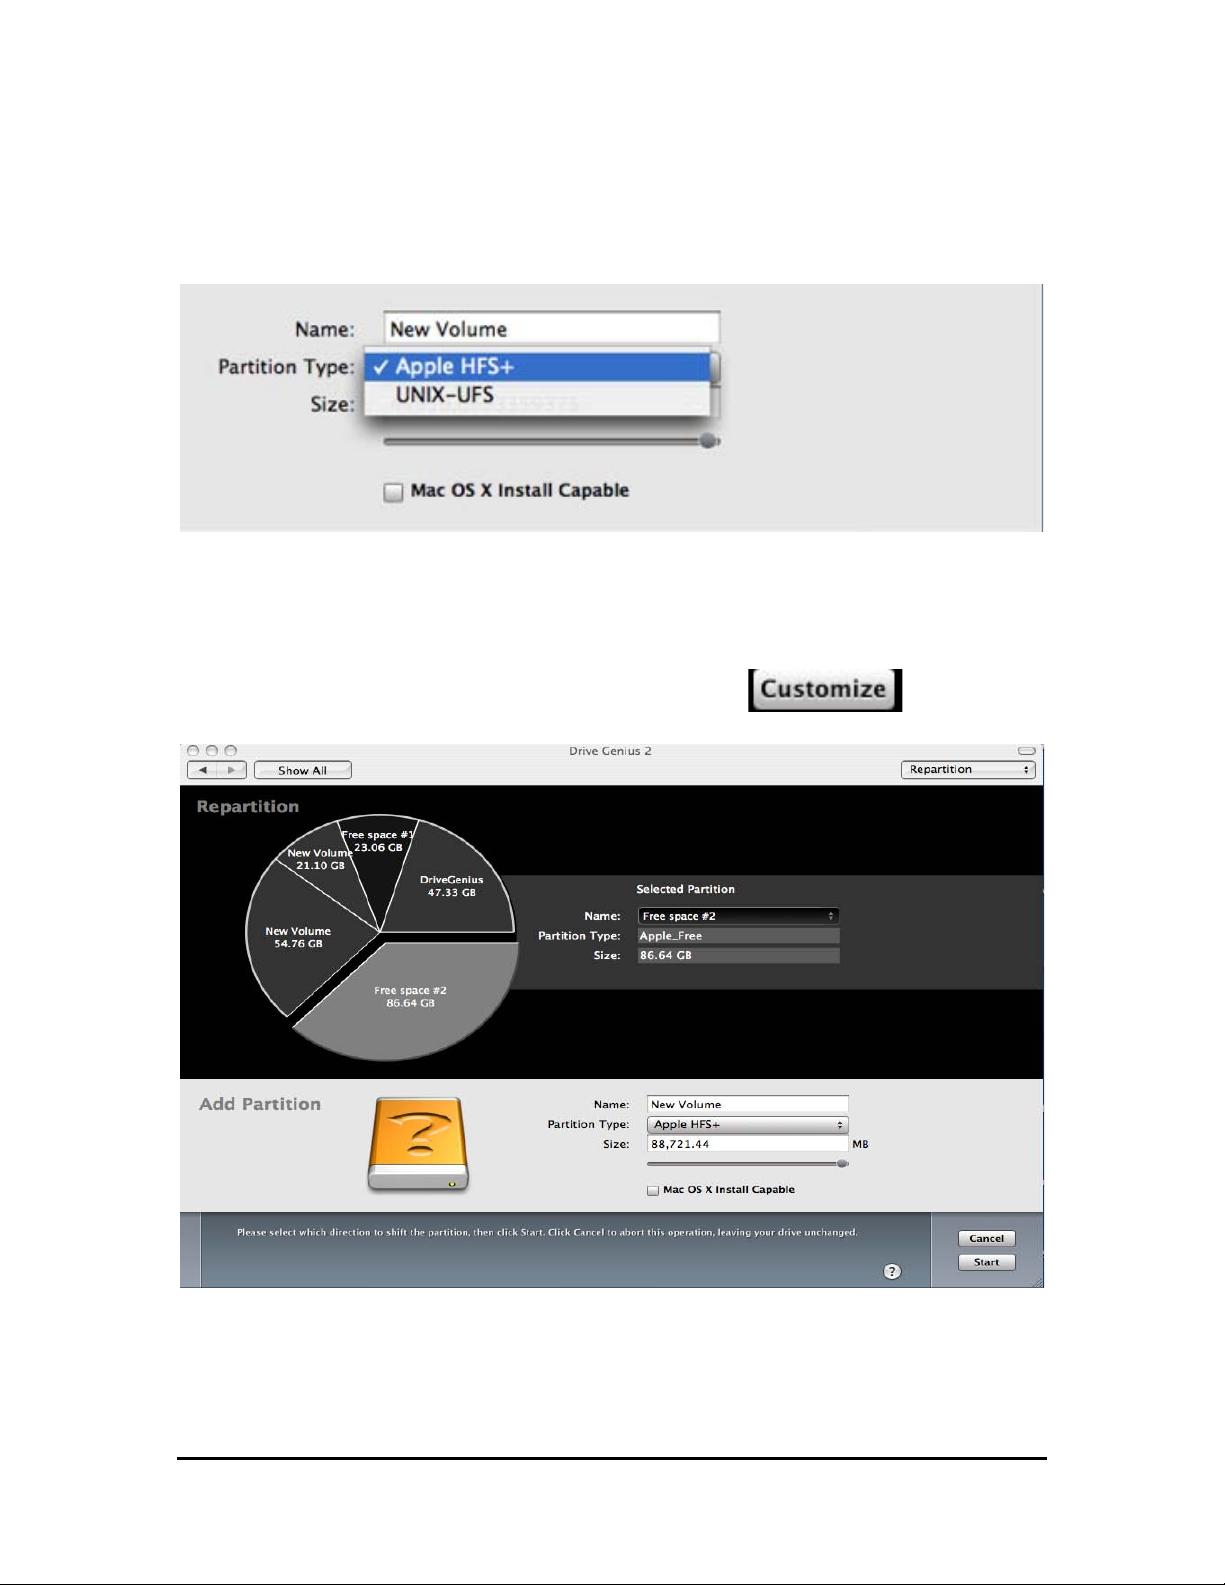
Use the slider to select the new size of your volume. You can also assign a
Name to the new volume and select Partition Type.
Partition Type Window
If you are running the application on the hard drive instead of the bootable DVD,
you can customize your new volume (icons used with the kind permission of
http://www.iconizer.com/) by selecting the Customize icon.
Create volume window
Click the Start button to proceed.
To cancel, click on the Cancel button.
Page 71
Drive Genius 2 User Guide
Repartition
Drive Genius 2 User Guide 71
Resetting the Partition Map
After performing device-to-device disk copy using hardware such as Disk
Jockey™ from Diskology™, the partition map on your new hard drive will not
allow full access to all the space. For example, if you use Disk Jockey to copy a
20GB drive to a brand new 60GB drive, the 60GB drive will show up on the
Macintosh as a 20GB drive. Using Drive Genius 2 to reset the partition map
allows you to reclaim the 40GB of extra space.
To reset the partition map:
Click the button.
Page 72
Drive Genius 2 User Guide
Repartition
Drive Genius 2 User Guide 72
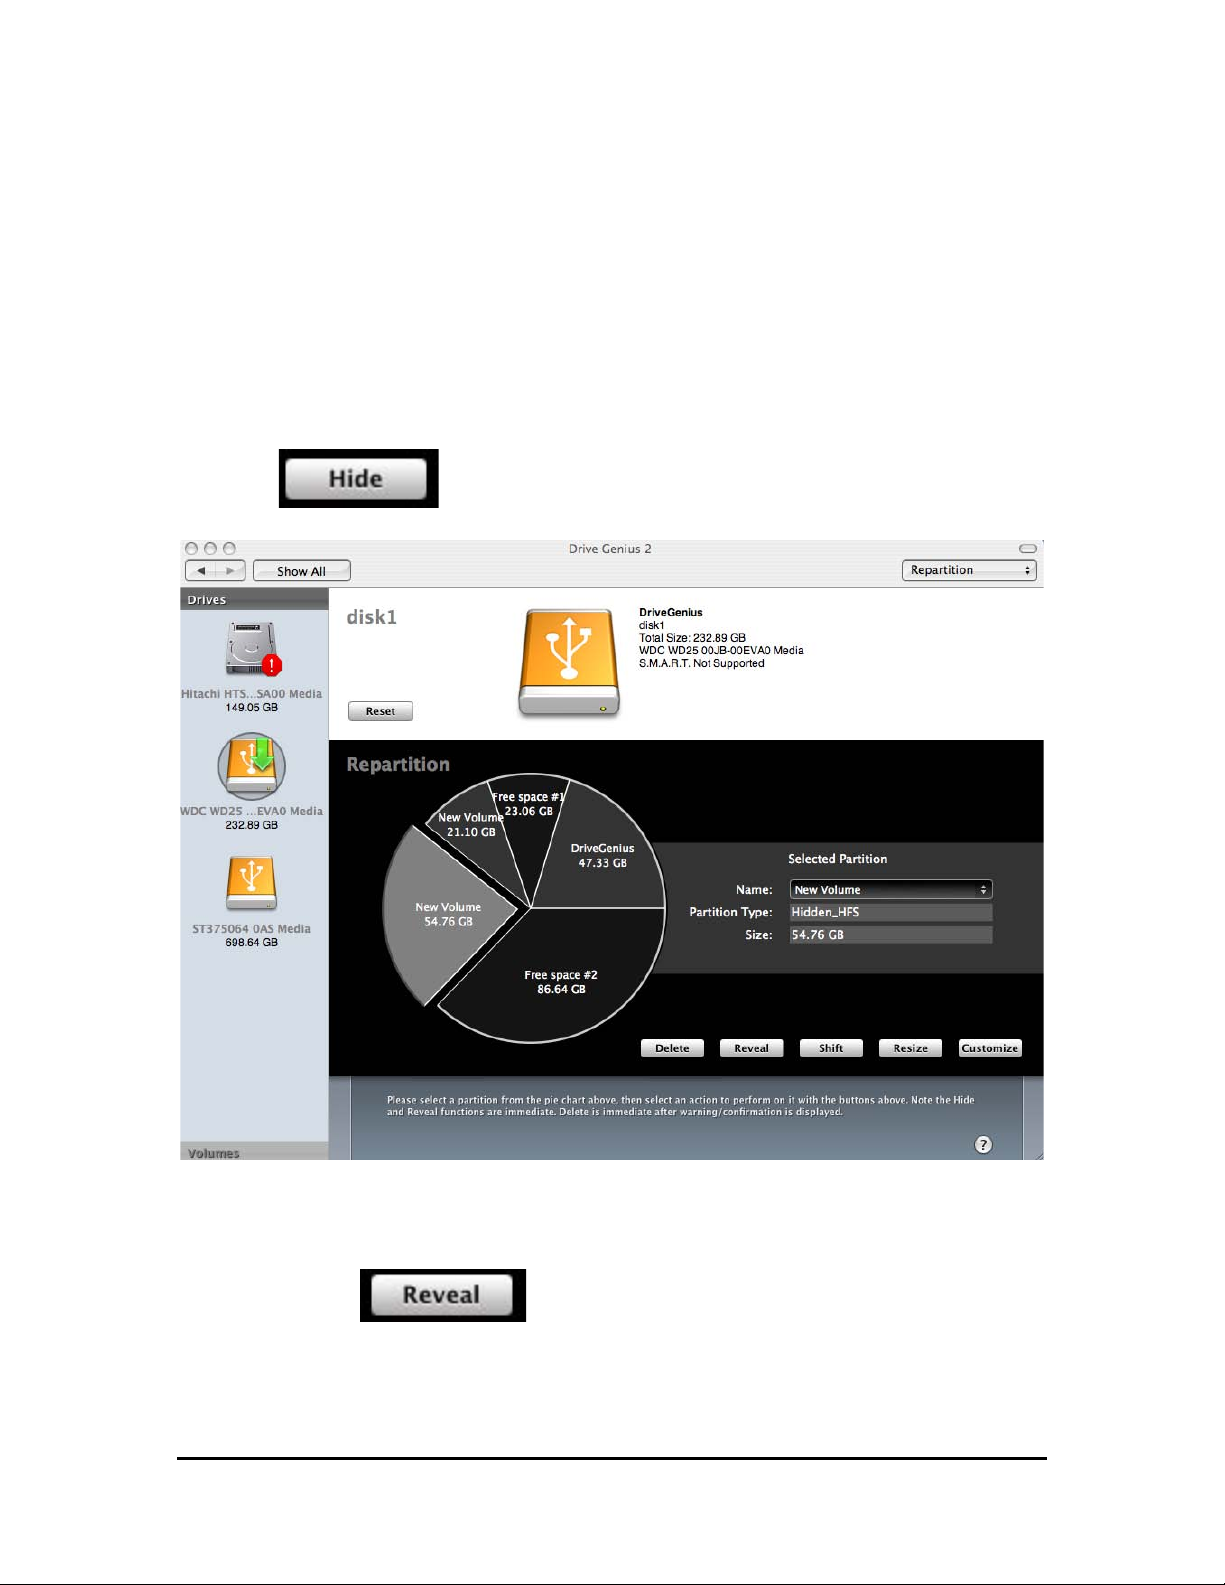
Hiding and Revealing Volumes
You can use Drive Genius 2 to hide and reveal volumes on your hard drive. The
Hide volume operation allows you secure volumes against unwanted user
access. Hidden volumes will not be visible under normal circumstances and will
not mount automatically.
To Hide a volume:
Click the button.
After applying the hide function
To Reveal a volume:
Click the Reveal button.
Page 73

Drive Genius 2 User Guide
Questions and Answers
Drive Genius 2 User Guide 73
Q. Should the sleep mode be disabled prior to running the Duplicate or
Defrag?
A. Yes, if the sleep mode is activated during a delicate write operation this could
result in data loss. ( Always, be sure to backup your hard drive first)
Q. Why can’t I run the Defrag, Duplicate or Repair when launching Drive
Genius from my hard drive?
A. In some cases, in order for Drive Genius to run certain operations Drive
Genius must unmount the drive. Therefore it is recommended you boot to the
Drive Genius DVD.
Q. What is the “Mac OSX Install capable” option in the Repartition>Add
operation?
A. The "Mac OSX install capable" option leaves 128MB of free space before a
partition so you can install OS X on that part. This is required by Apple's installer.
Q. In Repartitioning, you list UNIX-UFS, are there any restrictions for
selecting this?
A. Yes, UNIX-UFS Volumes cannot be added, hidden, resized, or customized.
However, UFS Volumes can be shifted or deleted to manipulate free space.
Q. Does Drive Genius 2 work with MSDOS/bootcamp?
A. No, MBR and MSDOS Partition formats are not supported by Drive Genius 2
and cannot be selected.
Q. Can Drive Genius 2 copy the active startup volume/device to another
hard drive?
A. No, Drive Genius 2 requires the source and the target volumes to be
unmounted before proceeding with the duplication. Use the OS X boot DVD to
copy your main drive.
Q. Does the target volume/device have to be *larger* than the source
volume/device?
A. Yes, the target volume has to be the same or larger than the source volume.
Q. Will Drive Genius 2 report a problem if the source volume/device is
corrupted?
A. No. Since Drive Genius 2 uses a bit-by-bit copy, every problem will be copied
over.
Q. Will Drive Genius 2 work with RAID drives?
A. No. The current version of Drive Genius 2 will not be work any RAID arrays.
Page 74

Drive Genius 2 User Guide
Questions and Answers
Drive Genius 2 User Guide 74
Q: Can I use Drive Genius 2 on OS 9 partitions?
A: Drive Genius 2 is designed to work with OS X partitions. Using Drive Genius 2
on OS 9 volume will remove the ability to start up OS 9 from that partition. Drive
Genius 2 does not affect the data on OS 9 volumes at all.
Q: I am trying to resize a volume on the startup disk, and Drive Genius 2
gives an error with the message “Unable to unmount”. What gives?
A: In order to modify a volume on the startup disk, you will need to startup from
another disk, and run Drive Genius 2 there. Alternatively, you can purchase a
bootable DVD from us.
Q: I have 2 partitions with data on my drive. Can I merge them into one
partition?
A: Drive Genius 2 cannot do volume merging for now. We are looking into adding
the feature in a future version.
Q. Does Drive Genius 2 ‘partitioning without erasing feature’ mean I do not
need to backup my data?
A. Changing information on a volume involves some risk. Drive Genius 2
endeavors to ensure that there is no possibility of data corruption during the
resizing process. No safety system can beat the security of having a backup.
Q. If I hide a partition using Drive Genius 2, is the partition secure?
A. No, the partition can be easily made visible again by using Drive Genius 2.
The hidden mode is designed as a simple/convenient way to hide your data from
prying eyes.
Q. I notice there are a few tiny partitions created on my HD when I ran Drive
Genius 2 partitioning feature. What are they for? What can I do with them?
A. Unfortunately, the small partitions were created by Apple (OS 10.3 or higher).
We have no control over it. Disk Utility leaves big gaps between partitions both
in front and behind the space used by volumes. Drive Genius 2 exposes these
tiny volumes when it works on the partition map. Drive Genius 2 does not create
them, and you can use it to expand a volume or two, to take over them.
Q. I need technical support help, what should I do?
http://prosoftengineering.com/contact_us.php
Tel: 925.426.6306
Fax: 925.426.6309
Page 75

Drive Genius 2 User Guide
Advanced Information about optimization and fragmentation
Drive Genius 2 User Guide 75
The following document is a discussion of optimization and defragmenting. The
content of this is based on a web page apple publishes on their own site which
can be found at http://docs.info.apple.com/article.html?artnum=25668
Drive optimization is a process in which the physical locations of files
on a volume are "streamlined." Files and metadata are re-arranged in
order to improve data access times and minimize time moving a hard
drive's head.
Files can become "fragmented" over time as they are changed and saved and as
the volume is filled, with different parts of a single file stored in different locations
on a volume. The process of collecting file fragments and putting them "back
together" is known as optimization.
Do I need to optimize?
You probably won't need to optimize at all if you use Mac OS X. Here's why:
Hard drive capacity is generally much greater now than a few years ago. With
more free space available, the file system doesn't need to fill up every "nook and
cranny." Mac OS Extended formatting (HFS Plus) avoids reusing space from
deleted files as much as possible to avoid prematurely filling small areas of
recently freed space.
Hard drive capacity is increasing. Real world analysis shows that users still
operate close to their total capacity. File size is increasing at a rate seemingly
higher than drive capacity is.
Regular use of a drive with the creation of media files from digital video cameras,
multi mega pixel images from still cameras and higher quality music files can and
will cause a drive to be operated near it’s total capacity.
Page 76

Drive Genius 2 User Guide
Advanced Information about optimization and fragmentation
Drive Genius 2 User Guide 76
Mac OS X 10.2 and later includes delayed allocation for Mac OS X
Extended-formatted volumes. This allows a number of small
allocations to be combined into a single large allocation in one area of
the drive.
Apple’s innovation has greatly improved this process. It should be stated that in
order for this to be successful it needs “a single large allocation in one area of the
drive” It is for this reason that the defragment module of the Genius range of
software focuses on creating exactly that.
Fragmentation was often caused by continually appending data to
existing files, especially with resource forks. With faster hard drives
and better caching, as well as the new application packaging format,
many applications simply rewrite the entire file each time. Mac OS X
10.3 Panther can also automatically defragment such slow-growing files. This
process is sometimes known as "Hot-File-Adaptive-Clustering."
This is correct. Fragmentation in the modern times is caused by the creation of
larger files, then deletion, copying and moving of files. This has a tendency
(caused by the "Hot-File-Adaptive-Clustering.") to create large chunks
interspersed with smaller available allocation areas. The technology developed in
the defragment module of the Genius range of software will move the file chunks
in order to join the many free ranges into one larger range… ready for the next
"Hot-File-Adaptive-Clustering."
Page 77

Drive Genius 2 User Guide
Advanced Information about optimization and fragmentation
Drive Genius 2 User Guide 77
Aggressive read-ahead and write-behind caching means that minor
fragmentation has less effect on perceived system performance.
Read-ahead caching is excellent at providing fast access to
information that is contained in the same track or neighboring tracks to
the data that was requested. It is not terribly useful on data that is fragmented
randomly across the entire platter.
For these reasons, there is little benefit to defragmenting.
The new technologies added by Apple to the HFS+ file system are an excellent
upgrade to the OS X operating system. To assist them has taken new thinking
and new development for Apple and for third party developers.
The defragment module of the Genius range of software was designed
specifically to augment the new capabilities of the OS X operating system.
Particular focus has been placed in creating “a single large allocation in one area
of the drive” as required by Apple.
Users who create and/or use large media files also benefit from “a single large
allocation in one area of the drive” in which to create the new file.
Mac OS X systems have hundreds of thousands of small files, most of
which are rarely accessed. Optimizing them is a major effort for very
little practical gain. There is also a chance that one of the files placed
in the "hot band" for rapid reads during system startup might be
moved during defragmentation, which would actually decrease performance.
If you think you might need to defragment, try restarting first.
This is good advice (as always). This would also be an ideal time to boot from the
Drive Genius 2 DVD to have a graphical view of file fragmentation given to you. It
may also be a good time to use the volume duplicate function to create a backup
of your important data.
Page 78

Drive Genius 2 User Guide
EXPANDING A DRIVE IN WINDOWS XP
Drive Genius 2 User Guide 78
To expand a disk in Windows XP after using Device Duplicate:
Running Windows XP with the new drive hooked up, open a command prompt
window by selecting Start Menu: Programs: Accessories: Command
Prompt
Run the Diskpart utility by typing in "diskpart".
List the volumes available on the system by typing "list volume" at the
prompt.
Select the volume to expand by typing in "select volume #" at the prompt where # is the volume number displayed in the volume list.
Expand the volume to include all free space on the disk directly after the selected
volume by typing "extend" at the prompt.
Unless DISKPART reported an error, the volume will be extended (type "list
volume" at the prompt again and it will show the new size of the volume).
Page 79

Drive Genius 2 User Guide
Moving the swap file in OS X
Drive Genius 2 User Guide 79
Copyright © 2004 Dave Bayer.
Subject to the terms and conditions of the MIT License.
Reprinted with permission.
This page is www.math.columbia.edu/~ bayer/OSX/swapfile/ Please
refer to this page for the most up to date version of this information.
Expert instructions
1. Download and read rc.swapfile, take responsibility for the method, and install
it as /etc/rc.swapfile
2. Redefine swapvolume in /etc/rc.swapfile, e.g. if df describes your swap
partition as
/dev/disk0s10 6280512 151776 6128736 2% /Volumes/Swap
then edit /etc/rc.swapfile to read
swapvolume=Swap
3. Edit /etc/rc to read
swapdir=/private/var/vm
if [ -f /etc/rc.swapfile ]; then . /etc/rc.swapfile; fi #
inserted locally
4. If the swap partition is on a non-IDE drive, type in a terminal window
sudo defaults write
/Library/Preferences/SystemConfiguration/autodiskmount
AutomountDisksWithoutUserLogin -bool true
5. Restart
Page 80

Drive Genius 2 User Guide
Moving the swap file in OS X
Drive Genius 2 User Guide 80
Tutorial Introduction
Moving the swapfile is the crux move, when installing a new release of OS X.
There is a lot of partial, conflicting advice on the web concerning how to and
whether to relocate the virtual memory swapfile to a separate partition. The
speedup is debatable but significant and free; showing the machine who's boss is
priceless. OS X is going to use a swapfile whether one moves it or not; a
decision to move the swapfile has nothing to do with the question of how much
memory to install.
If one tries to move the swapfile, there are various possible unintended
outcomes:
1. The system won't reboot.
2. The system behaves exactly as it did before, not moving the swapfile.
3. The system moves the swapfile as intended, except after forced reboots
(Control, Command, and Power keys), and doesn't completely recover on the
next normal restart.
4. The system sometimes moves the swapfile as intended, but sometimes
wreaks havoc on volume mounting and uses the wrong partition.
This tutorial explains how to figure out if and when a swapfile strategy is working,
and how to develop a swapfile strategy that avoids the above pitfalls. It began as
my synthesis of what I learned from the web and my experiments, and has
become a kind of moderated discussion, as I have learned from other peoples'
experiences with different configurations. I welcome further feedback; we all
benefit.
This is a good first hack for Unix novices, but one should read everything written
on the web about this topic with a healthy degree of skepticism, including
everything written here. Only believe what you can confirm for yourself.
Installations and permissions differ; upgraded systems don't behave like clean
installs, and because this hack isn't supported by Apple, no one is sure of all the
relevant variables. We're all trying to be helpful, but it is easy to make false
inferences from a few trials on a few machines. The only sensible approach is to
experiment with a clean install of OS X on a machine you can afford to mess up,
and determine exactly how your system behaves under a series of experiments.
Page 81

Drive Genius 2 User Guide
Moving the swap file in OS X
Drive Genius 2 User Guide 81
Familiarize yourself with how your system behaves when it is working properly,
so that you can tell the difference when it isn't working properly. Learn to write
bits of code by imitation, after reading nearby existing code. Then choose a
robust, safe, stress-tested method that you understand for moving the swapfile,
move your swapfile, and move on. If it were easier than this, it wouldn't be called
a hack.
A good resource for better understanding the Mac OS X boot process is System
Startup, found in Mac OS X Documentation. The Bourne shell system-
initialization scripts /etc/rc.boot and /etc/rc are run early in the boot process, but
after the option to enter single-user mode. We shall be modifying /etc/rc; if
imitation doesn't cut it for Bourne shell programming, go to original sources, and
read Steve Bourne's Introduction to the Unix Shell.
Partitioning
See Advantages of Multi-Partition Drives for a discussion of the advantages of
partitioning. Many believe that ideally, a swap partition should be on a separate
and very fast drive. Others, such as laptop users like myself, find it more practical
to put the swap partition on the boot drive. The fastest partition on a drive is the
first, or outer partition. One should place either the system or swap here, and the
other second, but this isn't mandatory. Once a partition fills to 85% of capacity, its
performance seriously degrades, so leave room on the system partition for future
growth. With developer tools and other third-party additions that must live with
the system, my OSX partition contains nearly 6 GB of files. For a while I arranged
my TiBook partitions Swap (3 GB), OSX (9 GB), OS9 (2 GB), User (41.4 GB),
and I put users and any third-party applications that I can on User. This proved
too tight for the OSX partition (Adobe products sometimes filled it with their cache
files) so when I moved to an 80 GB internal drive after a drive failure, I increased
OSX to 15 GB for good measure. If I'd had an on-the-fly repartitioning tool like
VolumeWorks, I would have done this sooner.
Page 82

Drive Genius 2 User Guide
Moving the swap file in OS X
Drive Genius 2 User Guide 82
A longstanding rule of thumb is to make the swap partition twice the size of
physical memory. I remember the gas lights era when this meant 32 MB for a 16
MB Unix machine, and we watched math computations use this 32 MB that
would have needed 1 GB if we hadn't compressed the program's internal data.
Then as now, when a single process begins to page-thrash, it is very painful to
watch. We walked away; no one has the patience to just sit there. The signature
is different when several processes collectively need more than physical
memory, but they each fit by themselves: Switching between processes is
slower, but one can stand to be in front of the machine. The signature is different
again for a memory leak. By definition the leaked memory is never used again,
so the process merrily marks as used far more than physical memory with no
noticeable performance hit, until swap runs out and the process goes splat.
The swap partition also makes a handy bootstrap partition. One can backup,
repartition, install a minimum system on Swap, boot from this system to restore
the other partitions, and then erase Swap and use it as a swap partition. This
argues for a size of at least 1.5 GB, to fit a minimum system and restore
software.
Alternatively, the Apple application Activity Monitor indicates for my system
memory a VM size of variable size, often around 4-5 GB. A smaller swap
partition than this will become the limiting factor for virtual memory. Use a swap
partition which is larger than this size, if you can afford the disk space. A bit
larger gives the file system room to turn around, but much larger is wasted.
The bottom line: If you need more than twice physical memory for your swap
partition, you know who you are. People who say they need more swap than this
probably have undiagnosed memory leaks, which are indeed being reported for
10.3.
Page 83

Drive Genius 2 User Guide
Moving the swap file in OS X
Drive Genius 2 User Guide 83
To move a user, e.g. me, to a User partition, type into into the Terminal
application
sudo ditto -v -rsrcFork /Users/me /Volumes/User/Users/me
Now open the NetInfo Manager application and edit the user me to reflect this
change:
home /Volumes/User/Users/me
Now remove the original directory in Terminal:
DVD /Users
sudo rm -rf me
You may need to temporarily give another user administrative priviledges to
finish moving the administrative user; I've had luck both ways. Leave
/Users/Shared alone, Adobe Acrobat 6 for example won't install without it.
Virtual Memory
How does virtual memory work, out of the box? The system-initialization script
/etc/rc contains the swapfile code
swapdir=/private/var/vm
if [ "${netboot}" = "1" ]; then
sh /etc/rc.netboot setup_vm ${swapdir}
fi
# Make sure the swapfile exists
if [ ! -d ${swapdir} ]; then
echo "Creating default swap directory"
mount -uw /
mkdir -p -m 755 ${swapdir}
chown root:wheel ${swapdir}
else
rm -rf ${swapdir}/swap*
fi
dynamic_pager -F ${swapdir}/swapfile
Page 84

Drive Genius 2 User Guide
Moving the swap file in OS X
Drive Genius 2 User Guide 84
In principle, to move the swapfile, one simply redefines swapdir at the start of this
code. The problem is that the partition Swap typically hasn't mounted yet.
To understand business as usual, type man df or man ls into the Terminal
application, to understand the Unix commands we're about to use. The space bar
moves forward through this documentation, and the Q key quits. Now type the
display free disk space command
df
Getting a listing of the form
Filesystem 512-blocks Used Avail Capacity Mounted on
/dev/disk0s12 18862272 12274896 6398760 66% /
devfs 202 202 0 100% /dev
fdesc 2 2 0 100% /dev
<volfs> 1024 1024 0 100% /.vol
/dev/disk0s10 6280512 151776 6128736 2% /Volumes/Swap
/dev/disk0s14 4183488 1126792 3056696 27% /Volumes/OS9
/dev/disk0s16 86823312 50578912 36244400 58% /Volumes/User
automount -nsl [380] 0 0 0 100% /Network
automount -fstab [394] 0 0 0 100%
/automount/Servers
automount -static [394] 0 0 0 100%
/automount/static
Note that the system's internal BSD name for my swap partition is /dev/disk0s10
and its Finder name is Swap; in all that follows, use instead of /dev/disk0s10 the
internal BSD name of your swap partition and instead of Swap the Finder name
of your swap partition.
Page 85

Drive Genius 2 User Guide
Moving the swap file in OS X
Drive Genius 2 User Guide 85
Now type the list directory contents command
ls -l /Volumes
Getting a directory listing of the form
drwxrwxrwx 18 root staff 612 5 Jan 14:29 OS9
lrwxr-xr-x 1 root admin 1 5 Jan 15:34 OSX -> /
drwxr-xr-x 7 admin staff 238 5 Jan 15:34 Swap
drwxrwxrwx 18 root staff 612 5 Jan 14:20 User
This is where the system mounts volumes; they look like directories, and indeed
the system can also put directories here, intentionally or as a result of swapfile
code gone haywire. Now type
ls -l /private/var/vm
Getting a directory listing of the form
drwx--x--x 8 root wheel 272 5 Jan 15:30 app_profile
-rw------T 1 root wheel 67108864 5 Jan 15:34 swapfile0
Note that the file swapfile0 was created at the time of the most recent boot, while
the directory app_profile is older. app_profile maintains information about
applications across boots, and probably shouldn't be moved unless your swapfile
hack works all of the time; I choose never to move app_profile. However,
swapfile0 is set up from scratch on every boot, and there is no harm in having
different boots choose different locations, as long as obsolete files are deleted.
Recognizing this is key to working out a graceful strategy for dealing with
exceptional boots.
Page 86

Drive Genius 2 User Guide
Moving the swap file in OS X
Drive Genius 2 User Guide 86
Editing
To edit /etc/rc, type into Terminal
DVD /etc
sudo cp rc rc.original
sudo pico rc
This changes directories to /etc, and as superuser makes a backup copy of rc
and edits rc using the pico command line editor. pico is a better choice than vi or
emacs for casual users, because its directions are printed on the bottom; ^
stands for the Control key. vi is more powerful but has a steeper learning curve.
emacs was abbreviated from "eight megabytes and constantly swapping" in an
era when that was real money; a cat walking across an emacs keyboard could
rearrange the orbits of the planets.
Alternatively, type into Terminal
sudo /Applications/TextEdit.app/Contents/MacOS/TextEdit
/etc/rc &
To edit as superuser with TextEdit, or install the demo or pay version of BBEdit
and choose Open Hidden... from its File menu, showing All Files.
It is a good idea, however, to be able to use a command line editor in a pinch. If
the /etc/rc file gets sufficiently messed up, the system may refuse to boot except
in single-user mode. One chooses to boot in single-user mode by pressing the
Command and S keys as the computer starts up; I have also been thrown into
single-user mode after adding a single misplaced space character to /etc/rc. The
computer screen is black with white text, and accepts any Unix command. If the
root device is mounted read-only, follow the directions given on-screen before
proceeding. One can run the pico command line editor, remove troublesome
insertions from the /etc/rc or /etc/fstab files, and reboot normally.
Page 87

Drive Genius 2 User Guide
Moving the swap file in OS X
Drive Genius 2 User Guide 87
Experimenting
How can one tell if Swap has mounted yet? Edit /etc/rc once, inserting the line
swapdir=/private/var/vm
if [ -f /etc/rc.swapfile ]; then . /etc/rc.swapfile; fi #
inserted locally
if [ "${netboot}" = "1" ]; then
sh /etc/rc.netboot setup_vm ${swapdir}
fi
This insertion is harmless by itself, because the file rc.swapfile doesn't exist yet.
When the file rc.swapfile exists, this line executes the contents of rc.swapfile
exactly as if it were inserted here. Any typos in rc.swapfile will still derail the
startup process, throwing us into single-user mode, but we will be able to recover
simply by renaming rc.swapfile:
DVD /etc
mv rc.swapfile rc.swapfile.off
reboot
Astronauts, pilots, and scuba divers practice emergency maneuvers until they
become routine; you may want to try single-user mode now. Create a file
/etc/rc.swapfile with contents
swapvolume = Swap
ConsoleMessage "swapvolume defined as ${swapvolume}"
and restart. There aren't supposed to be spaces around the equals sign, so this
will throw you into single-user mode. Recover.
To see console messages while booting, boot in verbose mode with the
Command and V keys. The screen will look like single-user mode while these
messages print.
Page 88

Drive Genius 2 User Guide
Moving the swap file in OS X
Drive Genius 2 User Guide 88
Now, we can imitate the existing code that determines if the swapfile exists.
Create a file /etc/rc.swapfile with contents
swapvolume=Swap
if [ -d /Volumes/${swapvolume} ]; then
ConsoleMessage "${swapvolume} available"
else
ConsoleMessage "${swapvolume} not available"
fi
and restart. This code prints a message to the system log file /var/log/system.log,
telling us whether or not /Volumes/Swap is present in the file system at the time
of the message. This code does not distinguish between a mounted volume and
a directory, an issue that will become significant later, but doesn't matter now.
To read these messages after a system restart, type into Terminal
grep Swap /var/log/system.log | tail
to see the last 10 lines of /var/log/system.log containing the word Swap. Confirm
that Swap doesn't mount in time for the swapfile code of /etc/rc, by looking for
lines of the form
Dec 23 16:37:59 localhost ConsoleMessage: Swap not
available
Read from the bottom up, paying attention to times and recalling your last boot
time.
A more cautious approach would have been to test rc.swapfile before restarting.
To do so, add to rc.swapfile the lines
#!/bin/sh
swapvolume=Swap
if [ -d /Volumes/${swapvolume} ]; then
ConsoleMessage "${swapvolume} available"
else
ConsoleMessage "${swapvolume} not available"
fi
echo "rc.swapfile is finished"
Page 89

Drive Genius 2 User Guide
Moving the swap file in OS X
Drive Genius 2 User Guide 89
In a terminal, change directories to the directory of your test version of
rc.swapfile, by typing DVD and a space, dragging rc.swapfile from the Finder into
the terminal window to paste its path, backspacing over "/rc.swapfile", and
pressing return. Now type
chmod +x rc.swapfile
./rc.swapfile
and study the error messages. The ConsoleMessage command is unavailable,
and will generate a message; we want to see the "rc.swapfile is finished"
message. Any other messages are a cause for concern. This only tests part of
our conditional logic; change the if to
if [ ! -d /Volumes/${swapvolume} ]; then
to toggle the logic and test again; remember to change it back. After testing,
there is no harm in leaving this extra code in place.
The simplest way to get Swap to mount in time after normal restarts is to add a
line to the system file /etc/fstab:
# fs_spec fs_file
fs_vfstype fs_mntops
#
# UUID=DF000C7E-AE0C-3B15-B730-DFD2EF15CB91 /export ufs
ro
# UUID=FAB060E9-79F7-33FF-BE85-E1D3ABD3EDEA none hfs
rw,noauto
# LABEL=This\040Is\040The\040Volume\040Name none msdos
ro
/dev/disk0s10 /Volumes/Swap hfs rw 1 2
Be sure to replace the BSD name /dev/disk0s10 with the BSD name that
corresponds to your swap partition.
There is a flaw, however, with this modification to /etc/fstab: BSD names are
created at boot time, and are not guaranteed to be consistent across boots. In
practice, it appears that the partitions on the boot device get numbered
consistently, but other devices get numbered in the order that they spin up.
However, even this is not documented as certain. See the discussion Topic: drive
numbering inconsistent /dev/diskXs10 ?.
Page 90

Drive Genius 2 User Guide
Moving the swap file in OS X
Drive Genius 2 User Guide 90
There are other, more stable ways of referencing Swap:
UUID=AC05CEB8-906A-3AB1-BD04-D0FC29B9C384 /Volumes/Swap hfs
rw 1 2
LABEL=Swap /Volumes/Swap hfs rw 1 2
Unfortunately, these are only understood by autodiskmount, and do not appear to
help us here. I could sometimes get these forms to work, but never to any
advantage for our purposes.
My preferred approach is patience: If Swap hasn't mounted in time, wait a few
seconds. Do not modify /etc/fstab. Instead, try a more elaborate version of
/etc/rc.swapfile:
swapvolume=Swap
if [ ! -d /Volumes/${swapvolume} ]; then
swapcount=1
ConsoleMessage "Waiting for ${swapvolume} to mount"
while [ "$swapcount" -le 30 ]; do
sleep 1
if [ -d /Volumes/${swapvolume} ]; then
ConsoleMessage "${swapvolume} mounted after
$swapcount seconds"
break
fi
swapcount=`expr $swapcount + 1`
done
fi
if [ -d /Volumes/${swapvolume} ]; then
ConsoleMessage "${swapvolume} available"
else
ConsoleMessage "${swapvolume} not available"
fi
Page 91

Drive Genius 2 User Guide
Moving the swap file in OS X
Drive Genius 2 User Guide 91
Observe now that if Swap is a partition on the boot drive or on an IDE drive, then
it mounts within a few seconds. Otherwise, Swap fails to mount. It turns out that
in OS X 10.3, these drives don't mount until a user logs in. See 10.3: A fix for
local drives not mounting until user login The fix is to type into a terminal
sudo defaults write
/Library/Preferences/SystemConfiguration/autodiskmount
AutomountDisksWithoutUserLogin -bool true
Now confirm that Swap mounts in time for the swapfile code of /etc/rc. Stress-test
this mechanism: Log out all users, wait for the system to quiet down, and perform
a forced reboot by pressing the Control, Command, and Power keys. Note that
Swap still mounts in time after forced reboots.
A forced reboot is an emergency procedure; OS X is a swarming anthill of
background processes, all of which get killed without ceremony by a forced
reboot. The system can end up in an unstable state, turning your hacking session
into a recovery session. It is essential to log out all users before testing forced
reboots; in particular, anyone logged in and using FileVault could get hosed.
There seems to be no completely safe protocol for testing forced reboots; the
same key combination while asleep simply wakes the computer, and a forced
reboot in single-user mode appears to skip the extra checks. Apparently, if we
know the boot is safe, the system also knows the boot is safe.
It is important to have sorted out how to mount the swap partition before trying to
move the swapfile, because moving the swapfile during these experiments can
make a mess that is difficult to clean up. If you tell the system to use
/Volumes/Swap before it mounts, it creates and uses a directory by the same
name, and later, Swap mounts as /Volumes/Swap 1. This is a truly famous
mishap for swapfile adventurers. From now on, the directory Swap passes the
test to see if Swap has mounted. One way to dig out of this hole is to rename the
Swap partition, comment out every reference to Swap, and reboot, so that Swap
becomes an unused directory that can be deleted. However, if this fix goes
poorly, you only compound the problem. It is better never to make this mistake in
the first place.
Page 92

Drive Genius 2 User Guide
Moving the swap file in OS X
Drive Genius 2 User Guide 92
For this reason, a safer test is
if [ -d /Volumes/Swap/.Trashes ]; then
because the invisible .Trashes directory exists on volumes, but not typically in
other directories.
Warning: Various people have dramatically sped up their boot times by patching
the behavior of BootCacheControl, as described in Topic: HOWTO: Slow 10.3.2
startup fix. I now recommend against this modification. I traced a problem to this
fix, where my restarts were hanging indefinitely at the "Login Window Starting"
prompt. I'm guessing my boot cache got out of sync. This makes sense; a cache
out of sync can wreak all manner of havoc. Apple couldn't get it working, took it
out, others discovered they could put it back in, it usually works... Know the
song? To remove this fix, type
sudo rm /usr/sbin/BootCacheControl
Moving the swapfile
We are now ready to try a patient, conservative strategy: Leave app_profile
alone. Move the swapfile if we can, but check first to see if we can, and do
something reasonable no matter what happens.
Page 93

Drive Genius 2 User Guide
Moving the swap file in OS X
Drive Genius 2 User Guide 93
Replace the contents of /etc/rc.swapfile with the code
##
# After the line in the system startup script /etc/rc
#
# swapdir=/private/var/vm
#
# insert the line
#
# if [ -f /etc/rc.swapfile ]; then . /etc/rc.swapfile; fi
# inserted locally
##
swapvolume=Swap
if [ ! -d /Volumes/${swapvolume}/.Trashes ]; then
swapcount=1
ConsoleMessage "Waiting for ${swapvolume} to mount"
while [ "$swapcount" -le 30 ]; do
sleep 1
if [ -d /Volumes/${swapvolume}/.Trashes ]; then
ConsoleMessage "${swapvolume} mounted after
$swapcount seconds"
break
fi
swapcount=`expr $swapcount + 1`
done
fi
if [ -d /Volumes/${swapvolume}/.Trashes ]; then
ConsoleMessage "Using ${swapvolume} for swapfile"
if [ -f ${swapdir}/swapfile0 ]; then
rm -rf ${swapdir}/swap*
fi
swapdir=/Volumes/${swapvolume}/.vm
else
ConsoleMessage "Unable to use ${swapvolume} for
swapfile"
fi
Page 94

Drive Genius 2 User Guide
Moving the swap file in OS X
Drive Genius 2 User Guide 94
Test this code under a variety of conditions. This code has been groomed by
various people, and has the following virtues:
• It leaves the existing code in /etc/rc alone, inserting new code that redefines
swapdir only if it can. To revert, or to temporarily turn off moving the swapfile,
rename /etc/rc.swapfile to /etc/rc.swapfile.off.
• It fails gracefully if Swap fails to mount, using instead the original swapfile
location.
• When it succeeds after a failure, it again works as intended, and deletes the
obsolete swap files from the original swapfile location.
• The name of the original swapfile location is not hard-wired into the insertion,
so this code is more likely to work without editing in future versions of /etc/rc.
• If a system update overwrites /etc/rc, we simply hook up /etc/rc.swapfile
again, following its commented directions.
If you can pick any more fleas off this code, however obscure, let me know. It is
intentionally intolerant of spaces in the name of the swap partition, because the
code in /etc/rc is similarly intolerant. One could instead define a symbolic link, to
permit spaces without further modifying /etc/rc, but it is simpler to not use
spaces. Simple is good.
If your swap partition is on your boot drive, you can probably get away with
shaving a few seconds off each normal restart by also modifying /etc/fstab, using
a BSD name like /dev/disk0s10. To me, this slight speedup doesn't seem worth
the potential risk.
Page 95

Drive Genius 2 User Guide
Moving the swap file in OS X
Drive Genius 2 User Guide 95
Alternatives
Further testing establishes that Swap is nearly always mounted by the end of
/etc/rc, after the SystemStarter call:
SystemStarter -gr ${VerboseFlag} ${SafeBoot}
exit 0
This is also true after forced reboots. Others have had success with simply
redefining swapdir, and moving the existing swapfile code in /etc/rc to just before
the exit line. However, SystemStarter calls a plethora of startup scripts, all of
which would then run without benefit of virtual memory. I cannot see any harm in
this, but as a mathematician I've learned that a lack of imagination is not a proof
of anything.
An alternative proposed by ptwithy on Mac OS X Hints, is extremely amusing:
Insert instead into /etc/fstab
/dev/disk0s10 /private/var/vm hfs rw 1 2
This has the distinct advantage of avoiding any need to edit /etc/rc; it mounts
Swap where /etc/rc already wants to put the swapfile. There are compelling
arguments for not modifying "Apple-owned" system files such as /etc/rc; one is
that Apple may overwrite your mods without warning on any future system
update. The disadvantage to this method is that it doesn't address the issues
raised by forced reboots. It can waste space on the root volume: After a forced
reboot, Swap is instead mounted as /Volumes/Swap, and the swapfile is placed
in the directory /private/var/vm. After the next normal restart, all is well again, but
the directory /private/var/vm is inaccessible, having been replaced in the
directory tree by the volume /private/var/vm, and its obsolete swap files hang
around unerased, choking the root volume. Also, this strategy effectively
maintains two versions of app_profile, one for forced boots. It also runs into the
BSD name issue; I could not get the alternative /etc/fstab forms to work here.
Page 96

Drive Genius 2 User Guide
Moving the swap file in OS X
Drive Genius 2 User Guide 96
Automated Solutions
There are various automated solutions out there for moving the swapfile. I prefer
to carefully understand all modifications to my system, so that I can debug
problems. However, the vast majority of people who move their swapfile are
going to rely on an automated solution they don't understand. If you've
understood this far, you share a responsibility to the community to go pick a
current automated solution and dissect it, and give the author feedback. In my
experience, the authors of these programs are extremely responsive. In addition,
if you see a "just use this program, it worked fine for me" post on the web, where
the author of the post gives no clue that they examined the changes to their
system, consider posting a followup with your analysis. Without such followups,
all anyone can safely assume is that the test system didn't curl blue smoke.
One example of an automated solution that provides beta support for OS X 10.3
behaves as follows, as of January 9, 2004: It presents a slick, confidenceinspiring user interface. (One shouldn't draw conclusions from this; the Cocoa
framework makes this easier than any non-programmer would believe possible.)
After the user selects the swap volume, it makes a backup copy of /etc/rc, and
make the following changes to /etc/rc:
It replaces the line
swapdir=/private/var/vm
with the lines
/sbin/autodiskmount
sleep 3
swapdir=/Volumes/Swap/vm
and it replaces the line
appprofiledir=/private/var/vm/app_profile
with the line
appprofiledir=/Volumes/Swap/vm/app_profile
Page 97

Drive Genius 2 User Guide
Moving the swap file in OS X
Drive Genius 2 User Guide 97
In testing, this worked for me, once after a normal restart and once after a forced
reboot. However, no option is provided to change the autodiskmount defaults for
non-IDE drives, so they could pose a problem. In my experience, the call to
autodiskmount is harmless, but has no appreciable effect on waiting times; the
volumes that are going to mount are already about to mount. Waiting 3 seconds
usually suffices, but I've experienced delays of up to 11 seconds, hence my
preference for a conditional loop. There is also no conditional code to notice if
Swap fails to mount, so this method could make one of the classic mounting
messes in /Volume, with no provision for cleaning it up.
Acknowledgements
Thanks to Adam, Rolf, and Kenneth "TigerKR" Roberts for helpful comments.
Kenneth's help was crucial in flagging the BSD name issue, finding the
workaround for non-IDE drives, and grooming the /etc/rc insertion.
Page 98

Drive Genius 2 User Guide
License Agreement/Trademark
Drive Genius 2 User Guide 98
PROSOFT Engineering, Inc. End User Software License
PLEASE READ THIS SOFTWARE LICENSE AGREEMENT "LICENSE" CAREFULLY BEFORE
USING THE SOFTWARE. BY USING THE SOFTWARE, YOU ARE AGREEING TO BE BOUND
BY THE TERMS OF THIS LICENSE. IF YOU DO NOT AGREE TO THE TERMS OF THIS
LICENSE, PROMPTLY RETURN THE SOFTWARE TO THE PLACE WHERE YOU OBTAINED
IT FOR A REFUND.
1. License. The software and any fonts accompanying this License whether on disk, in read only
memory, or on any other media (the "Prosoft Software") are licensed, not sold, to you by Prosoft
engineering, inc. ("Prosoft"). You own the media on which the Prosoft Software is recorded but
Prosoft and/or Prosoft's licensor(s) retain title to the Prosoft Software. The Prosoft Software in
this package and any copies which this License authorizes you to make are subject to this
License.
2. Permitted Uses and Restrictions. This License allows you to install and use the Prosoft
Software on any and all computers that the end user purchasing this software owns. This
License does not allow the Prosoft Software to exist on more than one computer at a time. You
may make one copy of the Prosoft Software in machine-readable form for backup purposes only.
The backup copy must include all copyright information contained on the original. Except as
permitted by applicable law and this License, you may not decompile, reverse engineer,
disassemble, modify, rent, lease, loan, distribute, sublicense, create derivative works from the
Prosoft Software or transmit the Prosoft Software over a network. You may, however, transfer
your rights under this License provided you transfer the related documentation, this License and a
copy of the Prosoft Software to a party who agrees to accept the terms of this License and
destroy any other copies of the Prosoft Software in your possession. Your rights under this
License will terminate automatically without notice from Prosoft if you fail to comply with any
term(s) of this License.
3. Limited Warranty on Media. Prosoft warrants the media on which the Prosoft Software is
recorded to be free from defects in materials and workmanship under normal use for a period of
ninety (90) days from the date of original retail purchase. Your exclusive remedy under this
paragraph shall be, at Prosoft’s option, a refund of the purchase price of the product containing
the Prosoft Software or replacement of the Prosoft Software which is returned to Prosoft or a
Prosoft authorized representative with a copy of the receipt. THIS LIMITED WARRANTY AND
ANY IMPLIED WARRANTIES AND/OR CONDITIONS ON THE MEDIA INCLUDING THE
IMPLIED WARRANTIES AND/OR CONDITIONS OF MERCHANTABILITY OR SATISFACTORY
QUALITY AND FITNESS FOR A PARTICULAR PURPOSE ARE LIMITED IN DURATION TO
NINETY (90) DAYS FROM THE DATE OF ORIGINAL RETAIL PURCHASE. SOME
JURISDICTIONS DO NOT ALLOW LIMITATIONS ON HOW LONG AN IMPLIED WARRANTY
LASTS, SO THIS LIMITATION MAY NOT APPLY TO YOU. THE LIMITED WARRANTY SET
FORTH HEREIN IS EXCLUSIVE AND IN LIEU OF ALL OTHERS, WHETHER ORAL OR
WRITTEN, EXPRESS OR IMPLIED. PROSOFT SPECIFICALLY DISCLAIMS ALL OTHER
WARRANTIES. THIS LIMITED WARRANTY GIVES YOU SPECIFIC LEGAL RIGHTS, AND
YOU MAY ALSO HAVE OTHER RIGHTS WHICH VARY BY JURISDICTION.
4. Disclaimer of Warranty on Prosoft Software. You expressly acknowledge and agree that use
of the Prosoft Software is at your sole risk. The Prosoft Software is provided "AS IS" and without
warranty of any kind and Prosoft and Prosoft's licensor(s) (for the purposes of provisions 4 and 5,
Prosoft and Prosoft's licensor(s) shall be collectively referred to as "Prosoft") EXPRESSLY
DISCLAIM ALL WARRANTIES, EXPRESS OR IMPLIED, INCLUDING, BUT NOT LIMITED TO,
THE IMPLIED WARRANTIES OF MERCHANTABILITY AND FITNESS FOR A PARTICULAR
PURPOSE. PROSOFT DOES NOT WARRANT THAT THE FUNCTIONS CONTAINED IN THE
Page 99

Drive Genius 2 User Guide
License Agreement/Trademark
Drive Genius 2 User Guide 99
PROSOFT SOFTWARE WILL MEET YOUR REQUIREMENTS, OR THAT THE OPERATION OF
THE PROSOFT SOFTWARE WILL BE UNINTERRUPTED OR ERROR-FREE, OR THAT
DEFECTS IN THE PROSOFT SOFTWARE WILL BE CORRECTED. FURTHERMORE,
PROSOFT DOES NOT WARRANT OR MAKE ANY REPRESENTATIONS REGARDING THE
USE OR THE RESULTS OF THE USE OF THE PROSOFT SOFTWARE OR RELATED
DOCUMENTATION IN TERMS OF THEIR CORRECTNESS, ACCURACY, RELIABILITY, OR
OTHERWISE. NO ORAL OR WRITTEN INFORMATION OR ADVICE GIVEN BY PROSOFT OR
AN PROSOFT AUTHORIZED REPRESENTATIVE SHALL CREATE A WARRANTY OR IN ANY
WAY INCREASE THE SCOPE OF THIS WARRANTY. SHOULD THE PROSOFT SOFTWARE
PROVE DEFECTIVE, YOU (AND NOT PROSOFT OR AN PROSOFT AUTHORIZED
REPRESENTATIVE) ASSUME THE ENTIRE COST OF ALL NECESSARY SERVICING,
REPAIR OR CORRECTION. SOME JURISDICTIONS DO NOT ALLOW THE EXCLUSION OF
IMPLIED WARRANTIES, SO THE ABOVE EXCLUSION MAY NOT APPLY TO YOU.
5. Limitation of Liability. UNDER NO CIRCUMSTANCES, INCLUDING NEGLIGENCE, SHALL
PROSOFT BE LIABLE FOR ANY INCIDENTAL, SPECIAL, INDIRECT OR CONSEQUENTIAL
DAMAGES ARISING OUT OF OR RELATING TO THIS LICENSE. SOME JURISDICTIONS DO
NOT ALLOW THE LIMITATION OF INCIDENTAL OR CONSEQUENTIAL DAMAGES SO THIS
LIMITATION MAY NOT APPLY TO YOU. In no event shall Prosoft's total liability to you for all
damages exceed the amount paid for this License to the Prosoft Software.
6. Export Law Assurances. You may not use or otherwise export or reexport the Prosoft Software
except as authorized by United States law and the laws of the jurisdiction in which the Prosoft
Software was obtained. In particular, but without limitation, none of the Prosoft Software may be
used or otherwise exported or reexported (i) into (or to a national or resident of) a United States
embargoed country or (ii) to anyone on the U.S. Treasury Department's list of Specially
Designated Nationals or the U.S. Department of Commerce's Table of Denial Orders. By using
the Prosoft Software, you represent and warrant that you are not located in, under control of, or a
national or resident of any such country or on any such list.
7. Government End Users. If the Prosoft Software is supplied to the United States Government,
the Prosoft Software is classified as "restricted computer software" as defined in clause 52.22719 of the FAR. The United States Government's rights to the Prosoft Software are as provided in
clause 52.227-19 of the FAR.
8. Controlling Law and Severability. This License shall be governed by the laws of the United
States and the State of California. If for any reason a court of competent jurisdiction finds any
provision, or portion thereof, to be unenforceable, the remainder of this License shall continue in
full force and effect.
9. Complete Agreement. This License constitutes the entire agreement between the parties with
respect to the use of the Prosoft Software and supersedes all prior or contemporaneous
understandings regarding such subject matter. No amendment to or modification of this License
will be binding unless in writing and signed by Prosoft.
Page 100

Drive Genius 2 User Guide
License Agreement/Trademark
Drive Genius 2 User Guide 100
"Drive Genius 2" and the Drive Genius 2 logo is a trademark of Prosoft
Engineering, Inc.
All other brand and product names are trademarks or registered trademarks of
their respective holders.
 Loading...