

Page 1
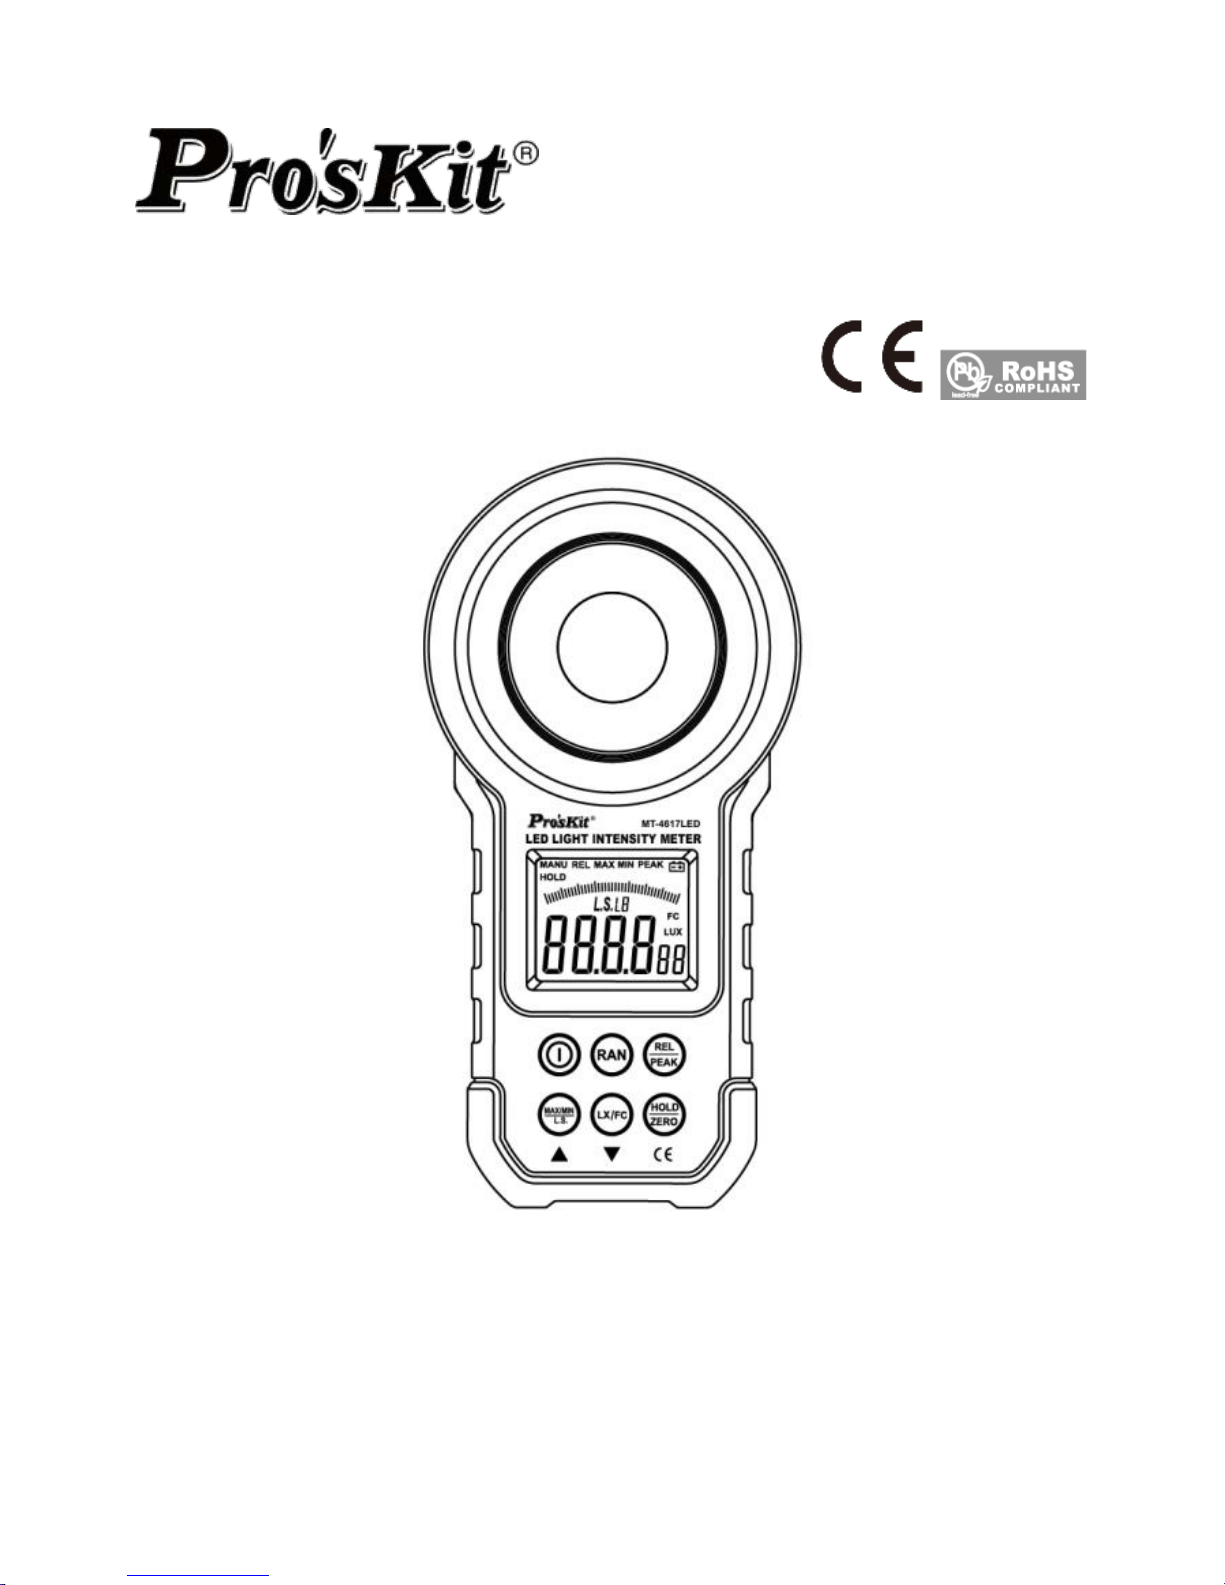
MT-4617LED LED Light Intensity Meter
User’s Manual
1st Edition, 2018
©2018 Prokit’s Industries Co., Ltd
Page 2
1
Introduction
Thank you for your purchase of the MT-4617LED Light Intensity Meter
designed and manufactured by our company. This meter will with
proper use, provide years of reliable service; therefore, it is
recommended that the user read carefully the user manual before using
the light meter and keep it in right place for reference.
Open-package inspection
Upon receipt of the light meter, inspect it to ensure no damage
happened during shipping. If the user finds obvious damage or
malfunction in operation, please contact the supplier.
Safety information
Warning
Do not use the light meter in the environment full of dusts or having gas
substances and flammable steam substances!
Safety mark description
This manual contains basic information for MT-4617LED safety
operation and maintenance. Please read carefully following safety
information before use.
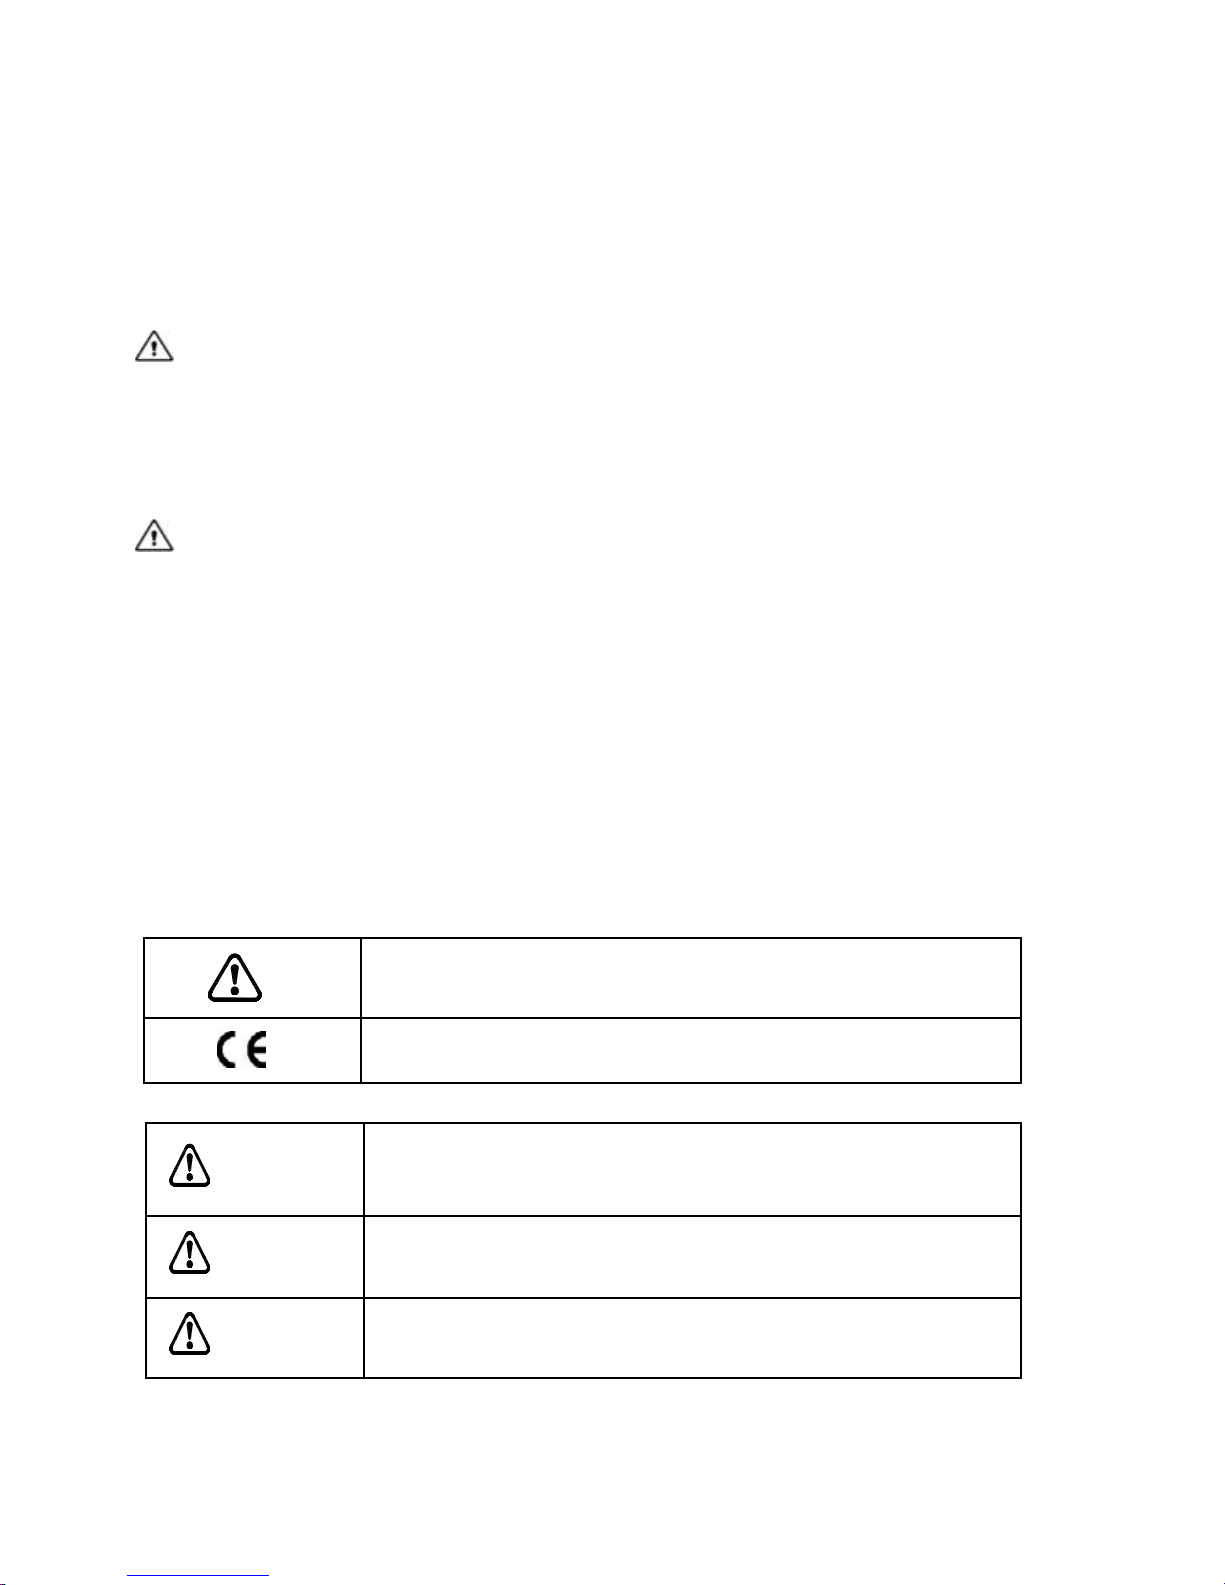
Table 1: Safety information
Important information which the user must read before
using the light meter
Mark of conformity
Table 2: Warning message
Warning
It indicates that incorrect operation will lead to
serious injury or even fatal accidents
Notice
It indicates that incorrect operation or negligence will
lead to meter damage or wrong measurement
results, etc.
Tips
Operation suggestions or prompts
Page 3

2
Operation considerations
User should observe the following notices to guarantee safe operation
and obtain optimum performance.
Preliminary check
Before initial use, please check if the light meter operates normally and
if it is damaged during storage and transportation. In case of any
damage, please contact the supplier.
Placement
Operation
environment
-10~50℃ (14~122°F)
<80%RH(non-condensed)
Storage
environment
-10~+50℃ (14~122°F)
<70%RH(non-condensed)
To avoid faults, please DO NOT place the light meter in following
environments:
3:Use
Notice
1. The operation temperature range for the light meter is -10-50℃
(14-122°F).
2. In order to avoid damage, especially falling accidents, handling and
use should be avoided during severe mechanical vibration.
Page 4

3
3. The light meter can only be calibrated and repaired by professional
personnel.
4. Before each use, the opto-sensor of light meter should be checked
for damage and dust. Make sure the meter is in good, smooth and
clean condition. If one or more functions of the light meter are
irregular or not ready for operation, avoid using the meter.
5. During the operation of the light meter, the meter measurement value
should not be at OL for a long time.
6. Keep the meter out of direct sunlight to guarantee its normal
operation and long-term service life.
7. If the meter is subject to effect of intensive electromagnetic field,
its functions will be affected.
8. Only use batteries specified in technical data.
9. Batteries should avoid dampness. If the low battery symbol appears
on the display, the user should replace batteries.
Tips
1. The sensitivity of the optical detector will be lessened due to
operation conditions or time. It is recommended to make periodic
calibration to maintain the basic accuracy.
2. Please keep original package for future mailing (such as for light
meter calibration).
Page 5

4
Introduction
Product description
The MT-4617LED Light Intensity Meter has a friendly human-machine
interface and can be activated by a simple press of keys. The buzzer
activates upon key press to notify that it is effective. It designed for
measuring all visible light produced by all color of LED, fluorescent
lamp, metal-halide lamp, high voltage sodium lamp or electric
incandescent lamp. You can choose different types of light source
according your needs and set the light source parameters according to
the need as well.
Outstanding features:
Automatic and manual range switching;
Can measure a variety of different colors of light.
Inquiry function for maximum and minimum values;
Data hold function;
Peak value measurement function;
Relative value measurement function;
Zero calibration function;
3 1/2 bit LCD display, with analog bar display;
Fc/Lux unit conversion function;
Outrange indication (When the measured value exceeds the
current range, LCD will display the signal “OL” to indicate that the
range is overreached);
High precision. Measurement range (0.00~200000Lux);
Low battery indication;
Key tone and mute selection;
Auto power-off function (The machine will be powered off
automatically keys are not operated for more than 10 minutes)
Compact design, durable, and portable.
Page 6
5
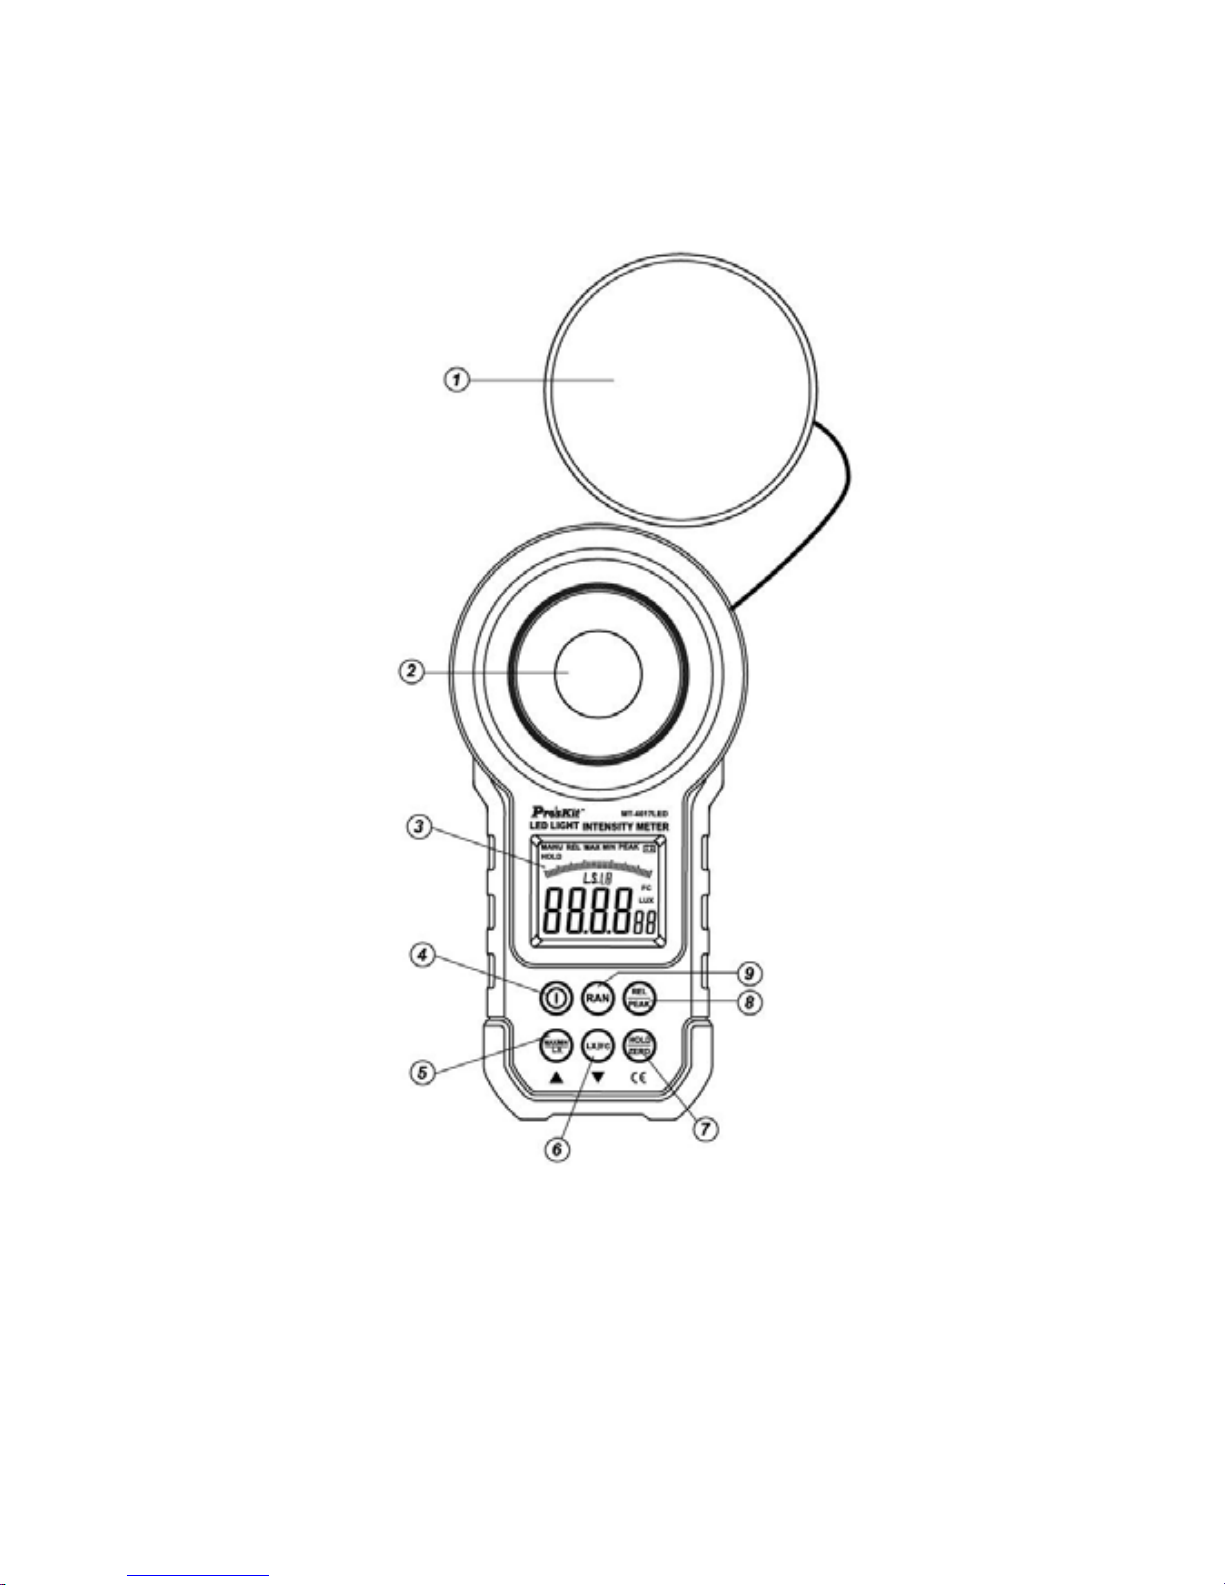
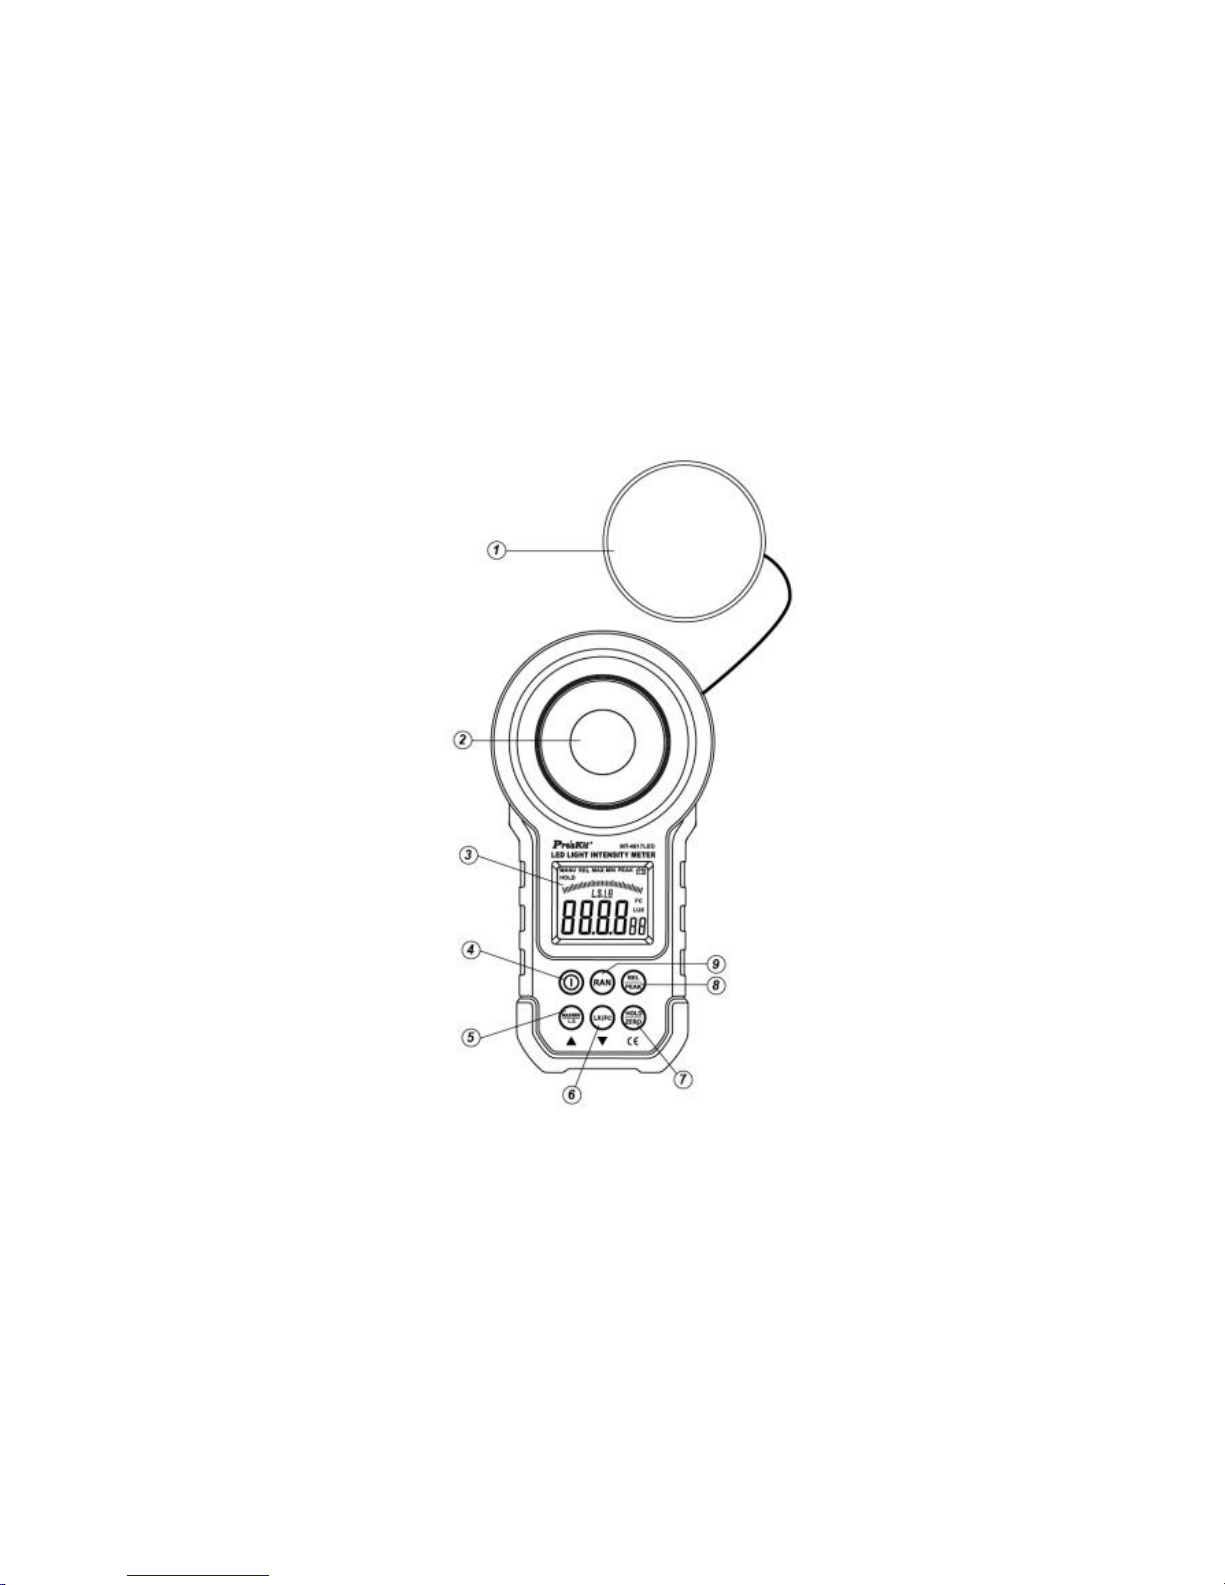
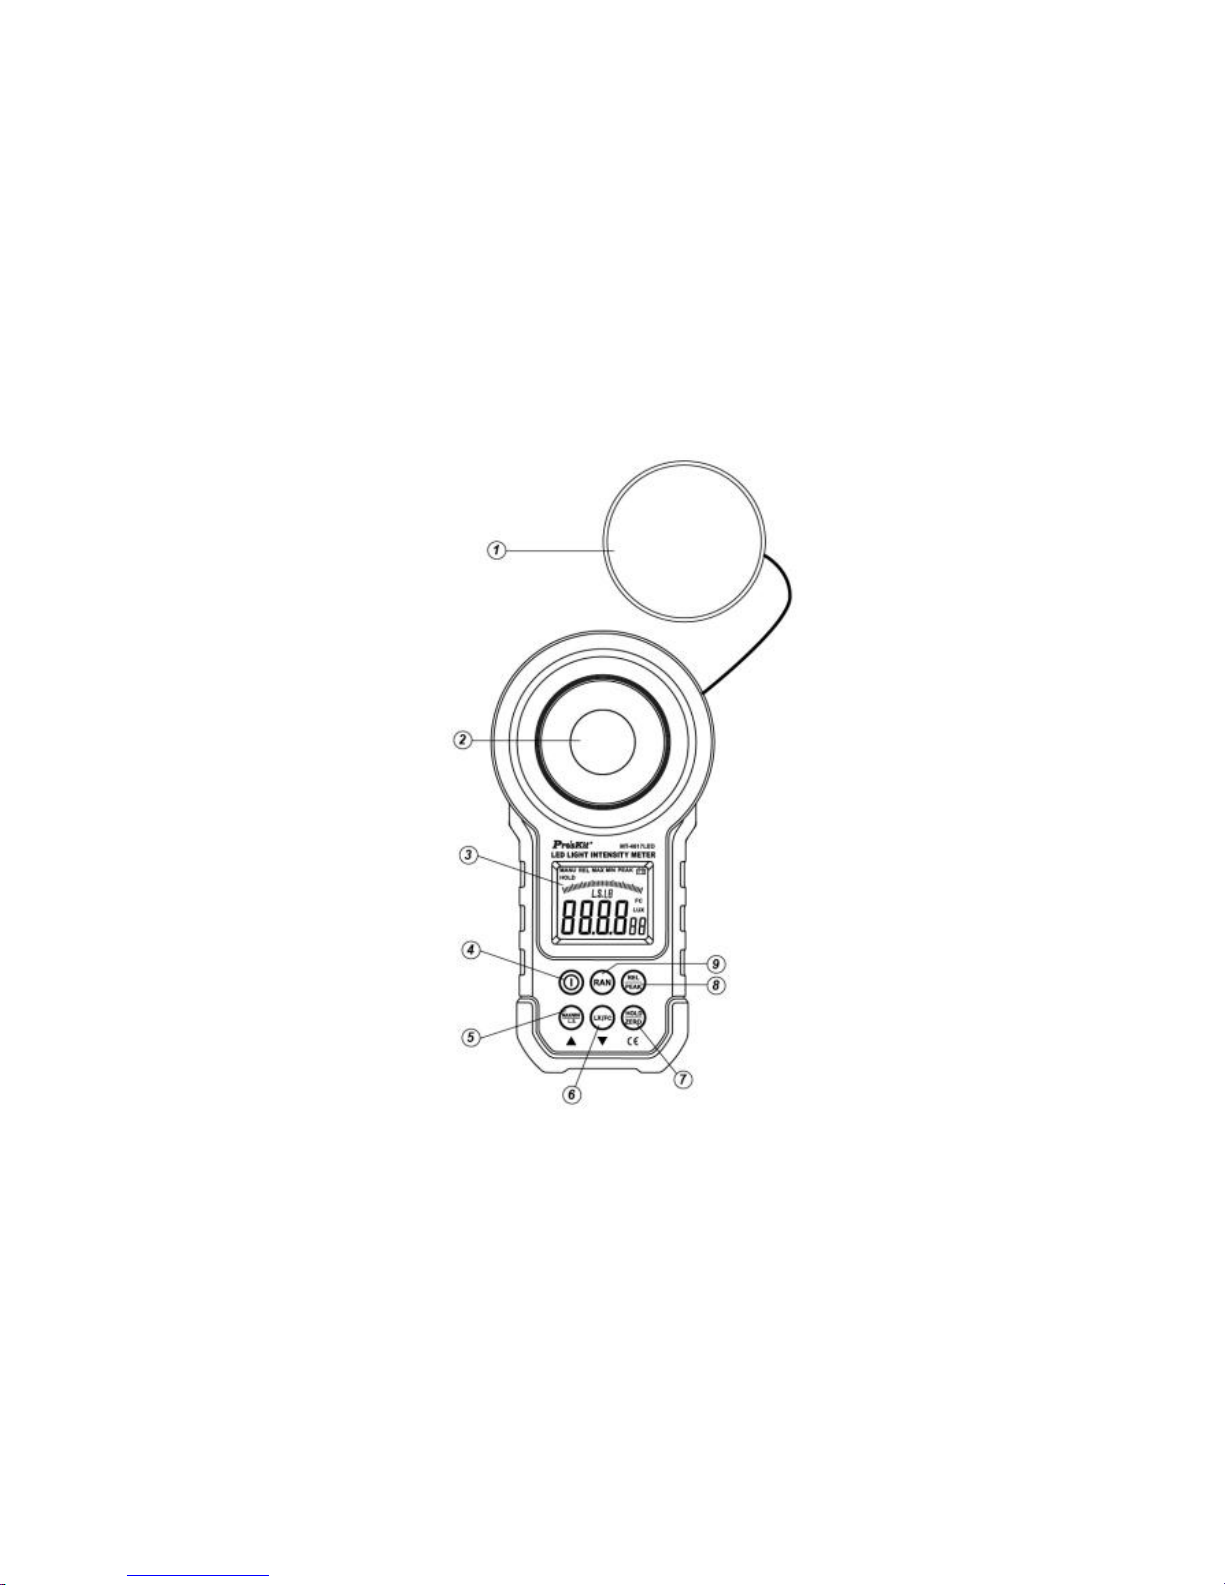
Name and function of components
Plan view
1. Opto-sensor protection cover
2. Opto-sensor
3. LCD display screen
4. Compound key for main power and touch tone:
Power on/off: Short press the key to activate the instrument and long
press for 1 second to shut it down.
Touch tone on/off: Under working mode short press the key to turn
the touch tone on and off. Default is key with tone.
Page 7
6
5. max and min values inquiry key
6. Lux/Fc unit conversion key
7. Compound key for data hold and zero calibration:
Data hold: Short press the key to enter/exit data
hold mode.
Zero calibration: Long press for 1 second to perform
Zero calibration function.
8. Compound key for relative value and peak value measurement:
Relative value measurement: short press the key to enter/exit
relative value measurement mode.
Peak value measurement: long press for 1 second to enter/exit peak
value measurement mode.
9. Key for manual range switching: Short press the key for 20.00Lux
200.0Lux 2000Lux 20000Lux 200000Lux (or 20.00Fc
200.0Fc 2000Fc 20000Fc) circulation; Long press for 1 second
to exit manual range switching mode.
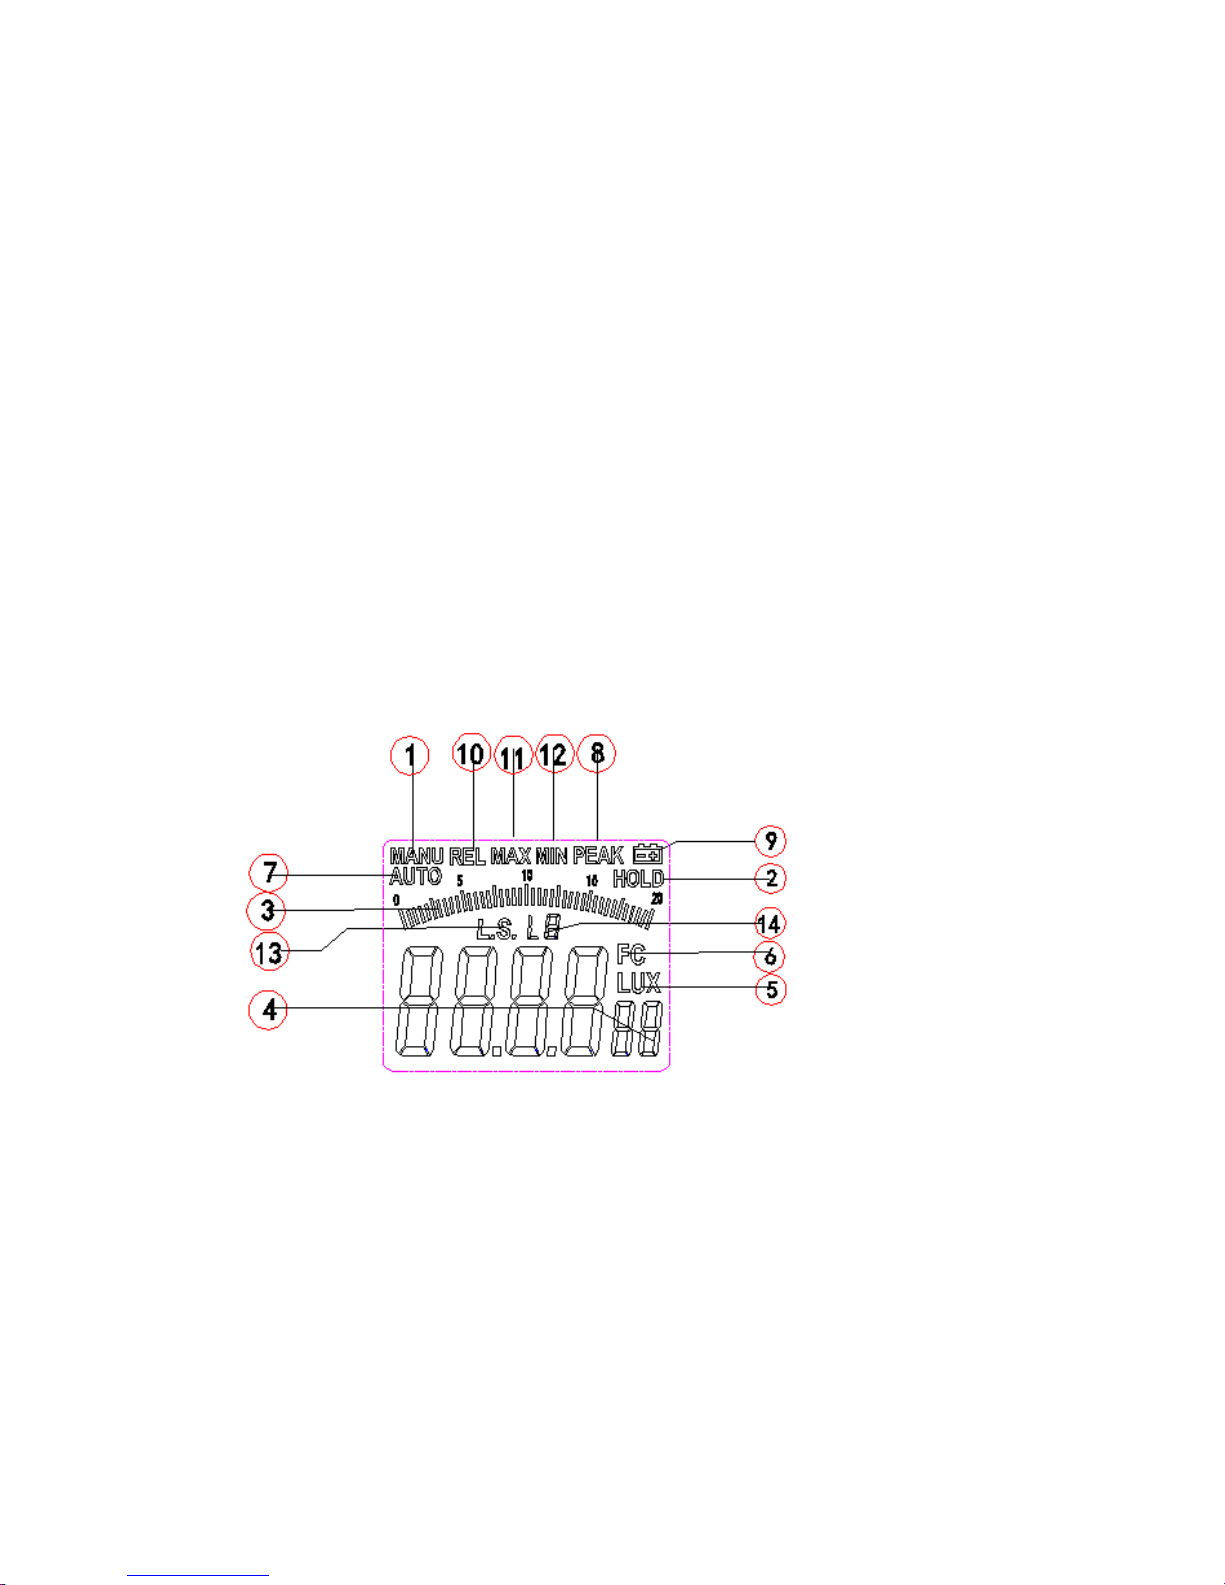
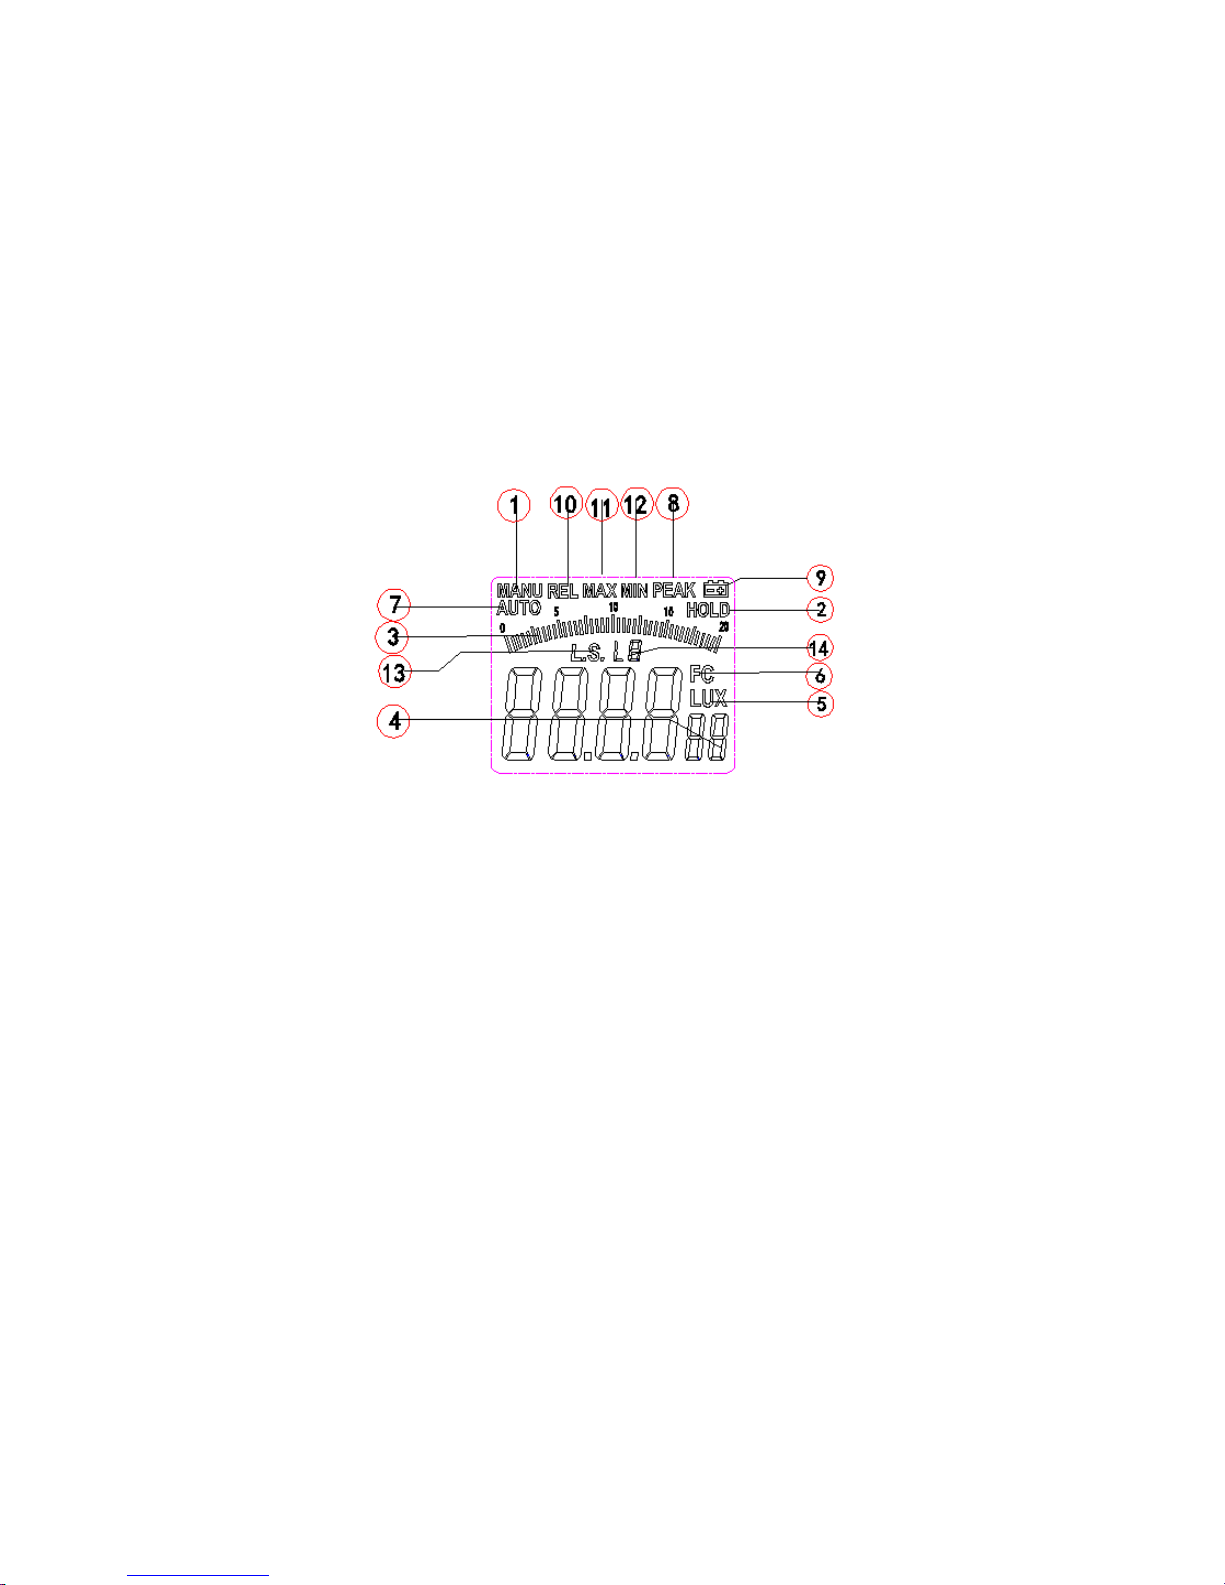
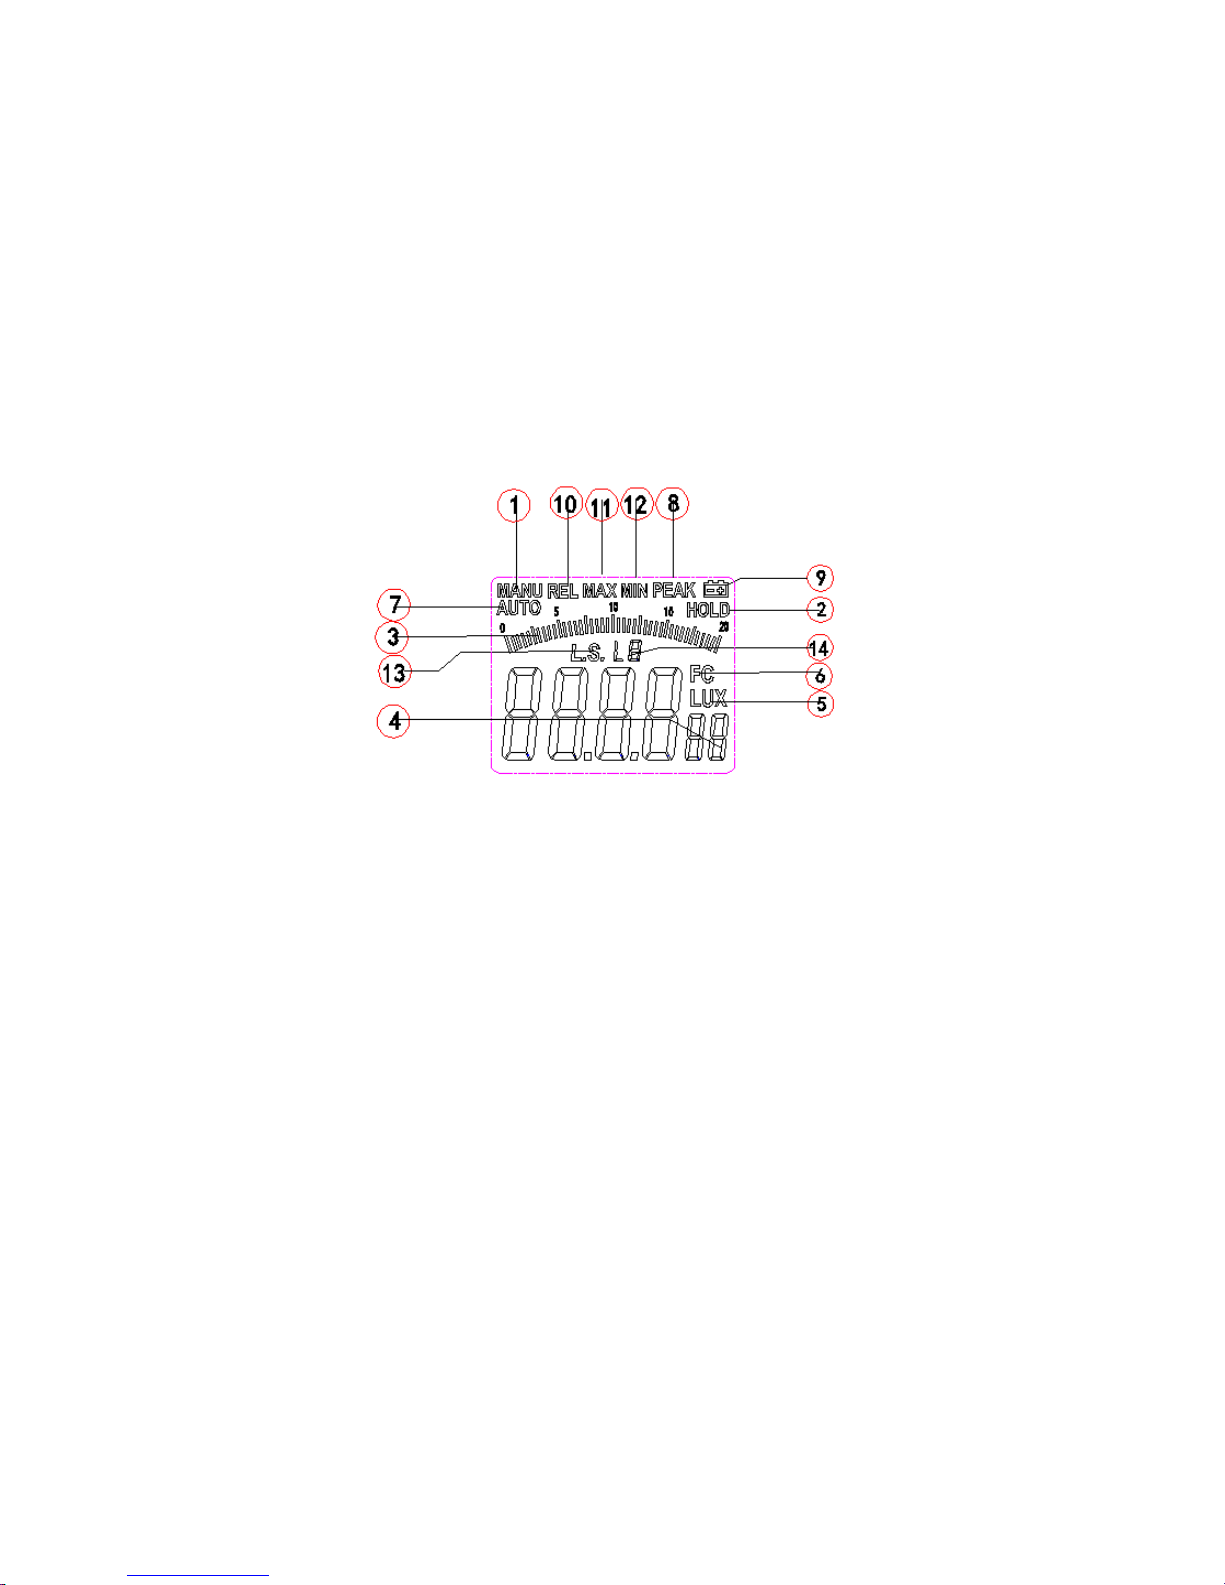
LCD display interface
1. Prompt for manual range switching mode
2. Prompt for data hold mode
3. The analog bar shows the current measurement value information.
4. The digit shows the current measurement value information.
5. Lux unit
6. FC unit
Prompt for auto measurement mode
7. Prompt for peak value measurement mode
Page 8

7
8. Prompt for low battery
9. Prompt for relative value measurement mode
10. Prompt for max and min values inquiry
11. Select light source.
12. Light source code.
2 Measurement methods
Notices prior to measurement
Warning
1: Do not use the light meter in environments full of dusts or
having gas substances and flammable steam substances!
2: Do not use the light meter for measurement in the place
with high temperature and high humidity.
3: Do not use the light meter in environments with intense infrared or
ultraviolet rays!
Tips
1: The opto-sensor of this meter is designed by simulating the sensitive
curve of light obtained through human eyes. The spectral coverage is
between 320mm and 730mm. When it is used for measurement
within the infrared range, there will be a large data deviation.
2: The opto-sensor is calibrated by common electric incandescent lamp
required by CIE under the color temperature of 2854°K; the provided
reading number may be different for the spectrum of other lamps.
3: The reference level of light source test is at the top of the spherical
surface illuminated.
4: The optical detector should be exposed to light for 2 minutes before
measurement.
5: Influence of tester's shadow and other factors on the optical detector
should be avoided.
Action principles
Concepts of illuminance scales
One lux indicates the illuminance from a surface of one square meter,
all points of which are one meter from a uniform source of one candela.
Page 9

8
One foot-candle (Fc) indicates the illuminance from a surface of one
square foot, all points of which are one foot from a uniform source of
one candela.
Unit conversion for illuminance scales
1 Fc = 10.764 Lux
1 Lux = 0.09290 Fc
Conversion formula for illuminance and light intensity
E = I / r
2
E --- illumination value (Unit: Lux);
I --- Light intensity of the light source(Unit: cd);
r --- Distance from the luminous surface of light source to the optical
detector (Unit: m).
During the measurement, the minimum distance between the luminous
surface of light source and the opto-sensor should be more than 15
times greater than maximum size of the luminous surface (or
opto-sensor).
Typical practice cases
Remove the protection cover of the MT-4617LED multi-functional light
meter sensor and place it at right angle to the light source.
Press and hold the MT-4617LED power key ④ for a short time to
power on the light meter. The LCD screen will illuminate(about 5
seconds)with the buzzer beeping twice, and “AUTO” will appear on the
middle of LCD display. This indicates that the auto measurement mode
is ON.
Press and hold the manual range switching key ⑨ of the MT-4617LED
for a short time, “MANU” will appear on the top left position of the LCD
display, indicating that the manual range switching mode has been
activated. In this mode, each time press and hold the key for a short
time, the meter will switch to 20.00Lux—> 200.0Lux—> 2000Lux—>
Page 10

9
20000Lux—>200000Lux (or 20.00Fc—>200.0 Fc—>2000 Fc—>20000
Fc) in sequence; pressing the key for one second will result in the
inscription “MANU” disappearing from top left position of LCD display,
replaced by “AUTO” appearing on the top left position, to indicate that
the meter has switched the manual range switching mode to the auto
range switchover.
Press and hold the REL/PEAK key ⑧ of the MT-4617LED for a short
time, “REL” will appear on the top left position of the LCD interface,
indicating the activation of the relative value measurement mode. Press
and hold the key ⑧ for a short time again, the device will exit the
relative value measurement mode and return to the original
measurement mode, and “REL” on the top left position of the LCD
interface will disappear; pressing the key for one second will lead to the
peak measurement mode, “PEAK” and “MANU” will appear on top right
position of LCD display; press and hold the key for one second once
again, “PEAK” will disappear from the top right position of the LCD
interface, and “AUTO” will appear in the middle of LCD, and the mode
will return to auto measurement mode.
Press and hold max/min value inquiry key ⑤ for a short time, “MAX”
will appear on top position of LCD interface, switching the device to the
max/min value inquiry mode; in this mode, each short press of the key
causes the mode to change from MAX to MIN or from MIN to MAX;
press and hold the “MAX/MIN” key ⑤ for one second, “MAX/MIN” on
top position of the LCD interface will disappear, and the mode will exit.
Press and hold the data hold/zero calibration key ⑦ of the
MT-4617LED for a short time to enter the data hold mode, which will be
indicated by the apparition of “HOLD” on the top left position of the LCD
interface; press and hold the key for a short time once again, “HOLD”
will disappear from the top left position of the LCD interface, and the
device will exit the data hold mode.
Page 11

10
In any mode with sensor covered, press and hold data hold/zero
calibration key ⑦ for one second, “ADJ” will appear on the LCD
interface, and the device will enter the zero calibration mode: several
seconds later “ADJ” will disappear from the LCD interface, and the
device will exit the data hold mode and return to auto measurement
mode.
Tips
1: The reference position of light source test is at top of sphere surface
under light.
2: In various measurement modes, analog bar in the middle of the LCD
screen will change with figures of Nixie tubes.
3: When reading, existing data can be locked by pressing and holding
“HOLD/ZERO” key for a short time;
4: In zero calibration mode, the opto-sensor must be covered by
opto-sensor visor before calibration.
Applications
Application of manual switchover of range measurement mode
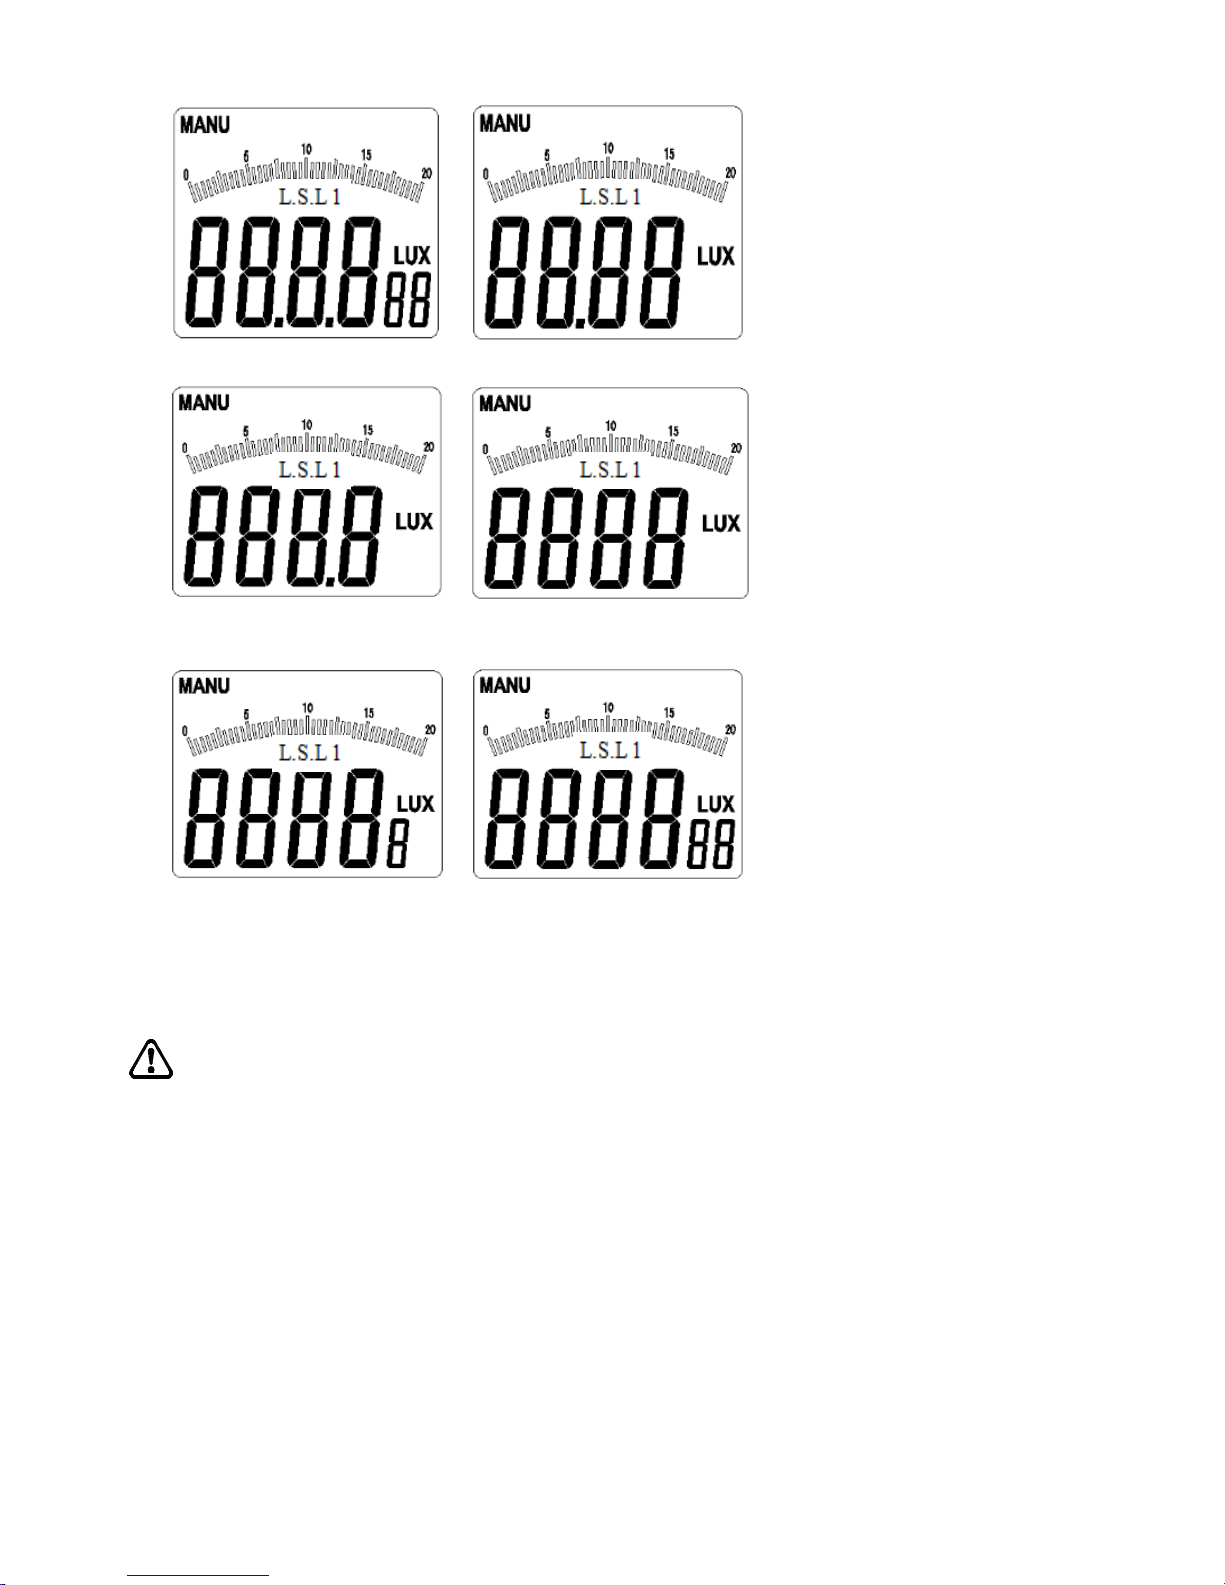
Long press the RAN key, “MANU” will appear on the top left position
of the LCD, it means the meter is in the manual measurement mode
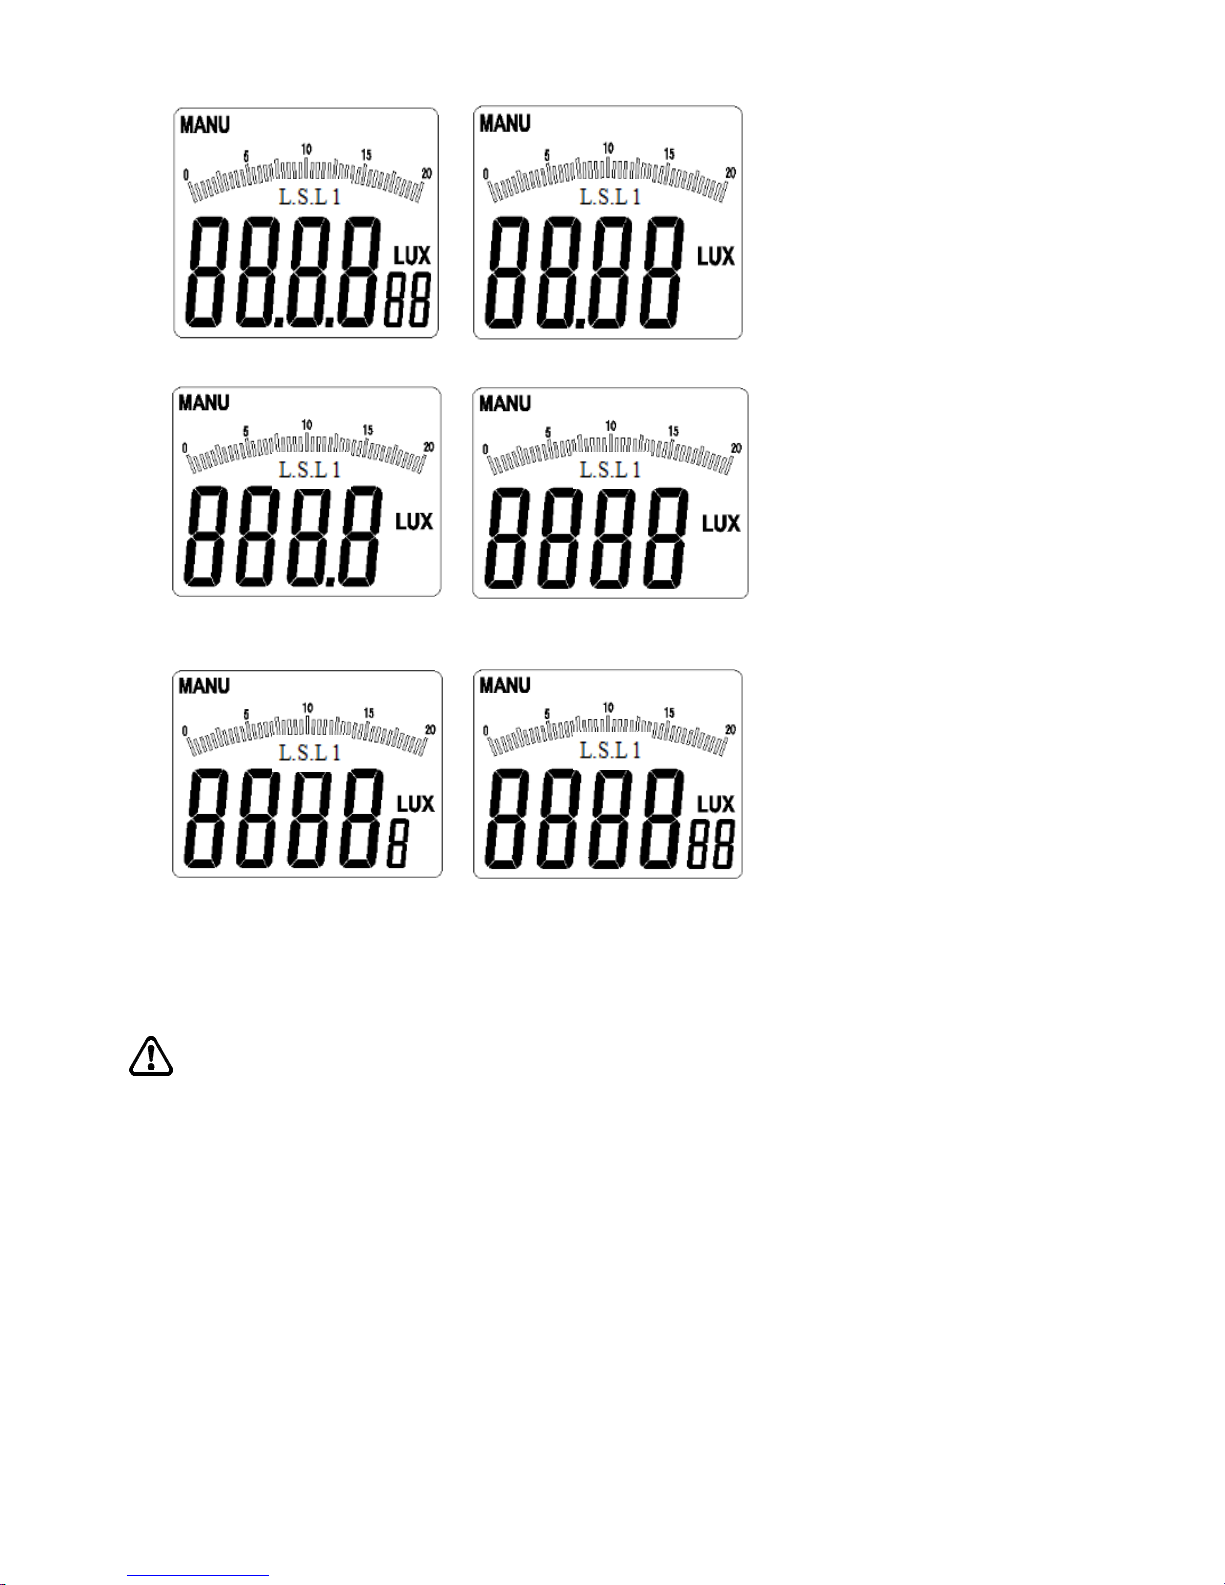
(as shown in figure 3-1-1);
When in manual measurement mode, long press RAN key for each
time, it will switch to 20.00Lux 200.0Lux 2000Lux 20000Lux
200000Lux (or 20.00Fc—>200.0 Fc—> 2000 Fc—>20000 Fc) in
sequence;
Press and hold RAN key for one second, “MANU” will switch to
“AUTO” on the top left position of the LCD, the device will return to
auto range measurement mode;
Page 12
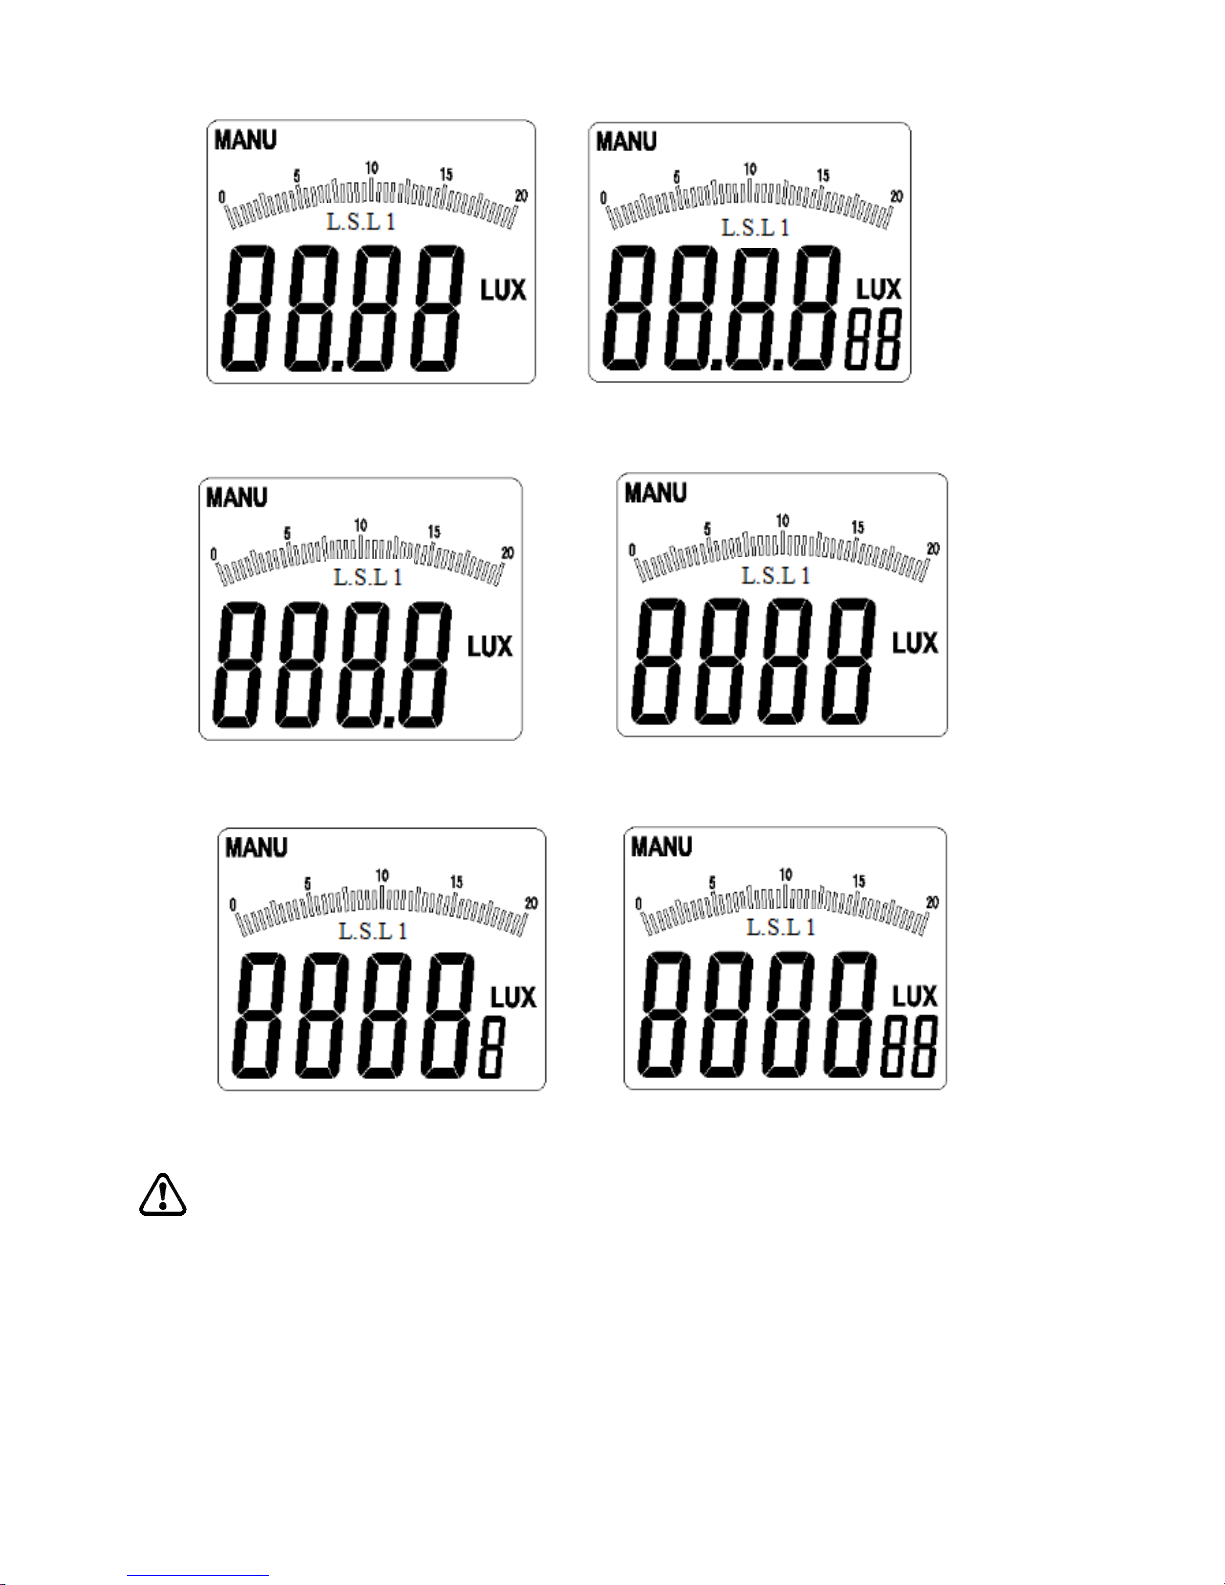
11
Figure 3-1-1 20.00Lux interface
200.0Lux interface 2000Lux interface
20000Lux interface 200000Lux interface
Tips
1: Only in peak value measurement mode, relative value measurement
mode and max/min value inquiry mode, will it be effective to press
RAN key for a short time.
2: In relative value measurement mode and max/min value inquiry mode,
press and hold the key for one second, it will return to auto
switchover of range.
Page 13

12
3: In peak value measurement mode, data hold mode and zero
calibration modes, it will be effective to press and hold RAN key for a
long time.
4: In this mode, when measurement value exceeds present range, “OL”
will appear on LCD interface to indicate over-range, and the user
should switch over the measurement range at this time.
Application of relative/peak value measurement mode
Press and hold REL/PEAK key for a short time (composite key for
relative/peak value measurement), “REL” will appear on the top left
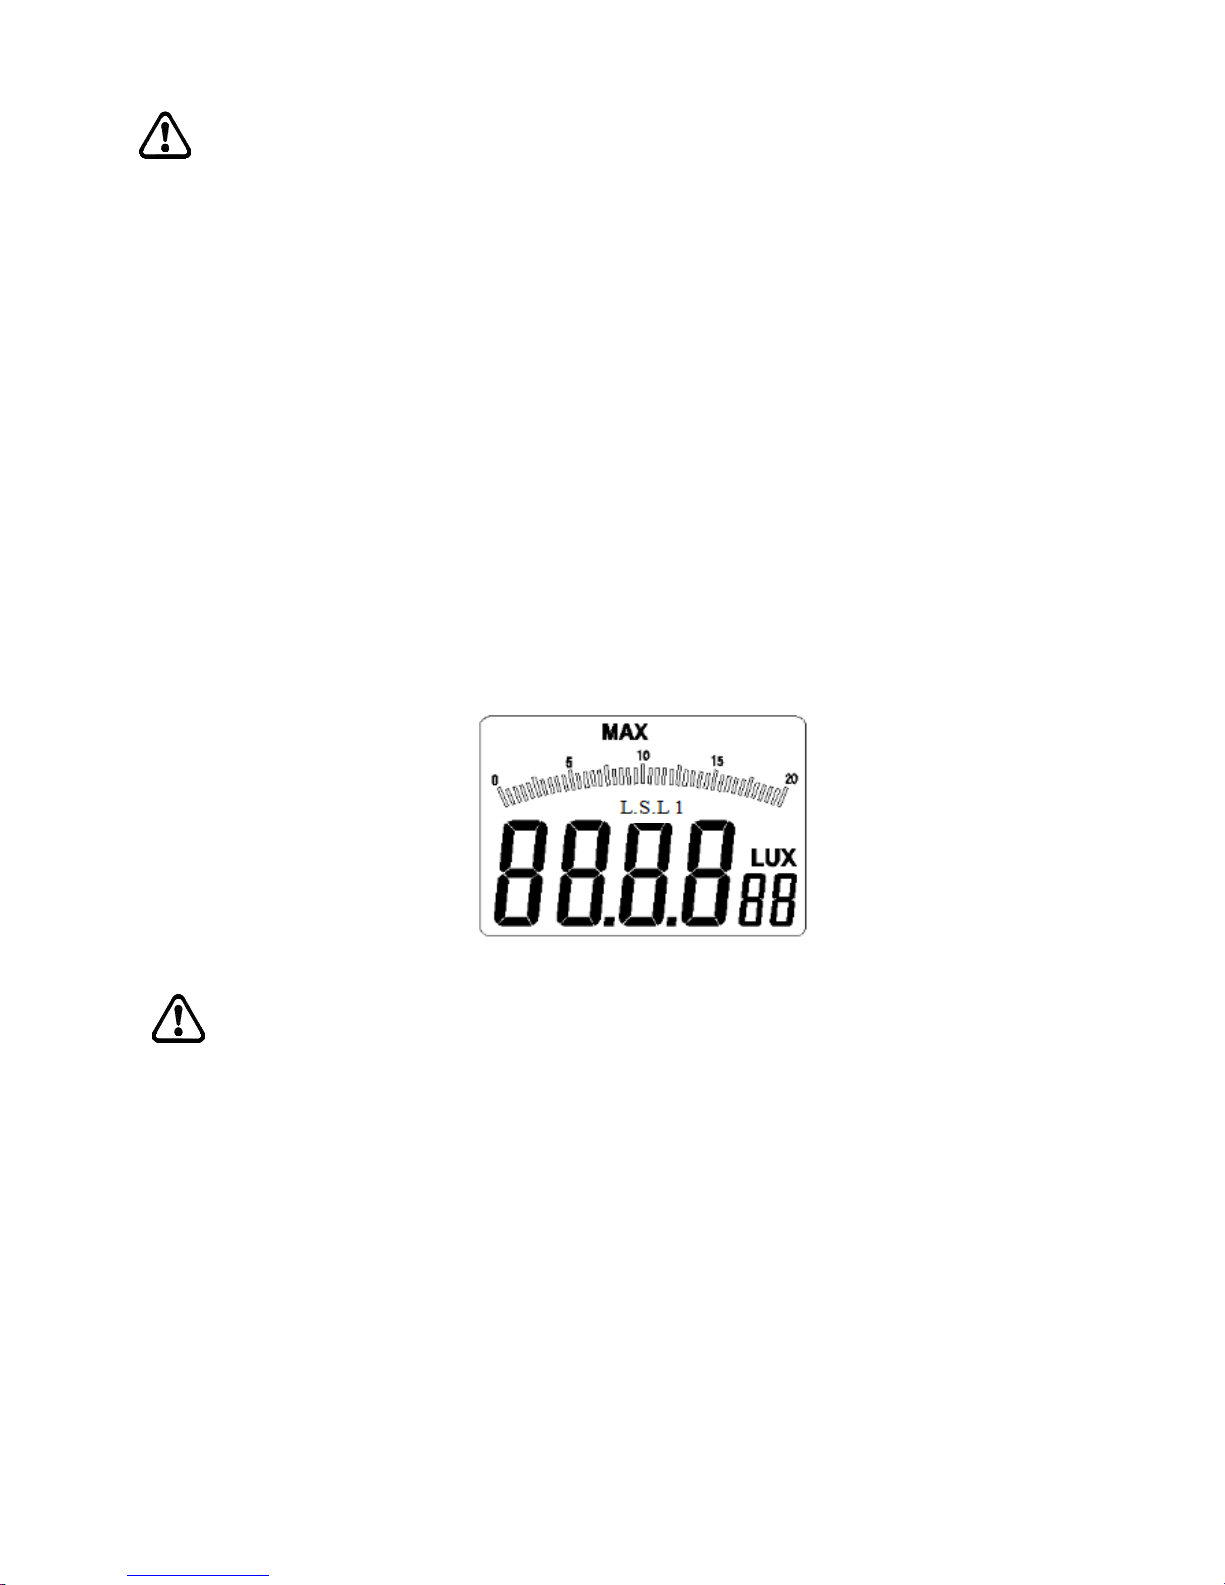
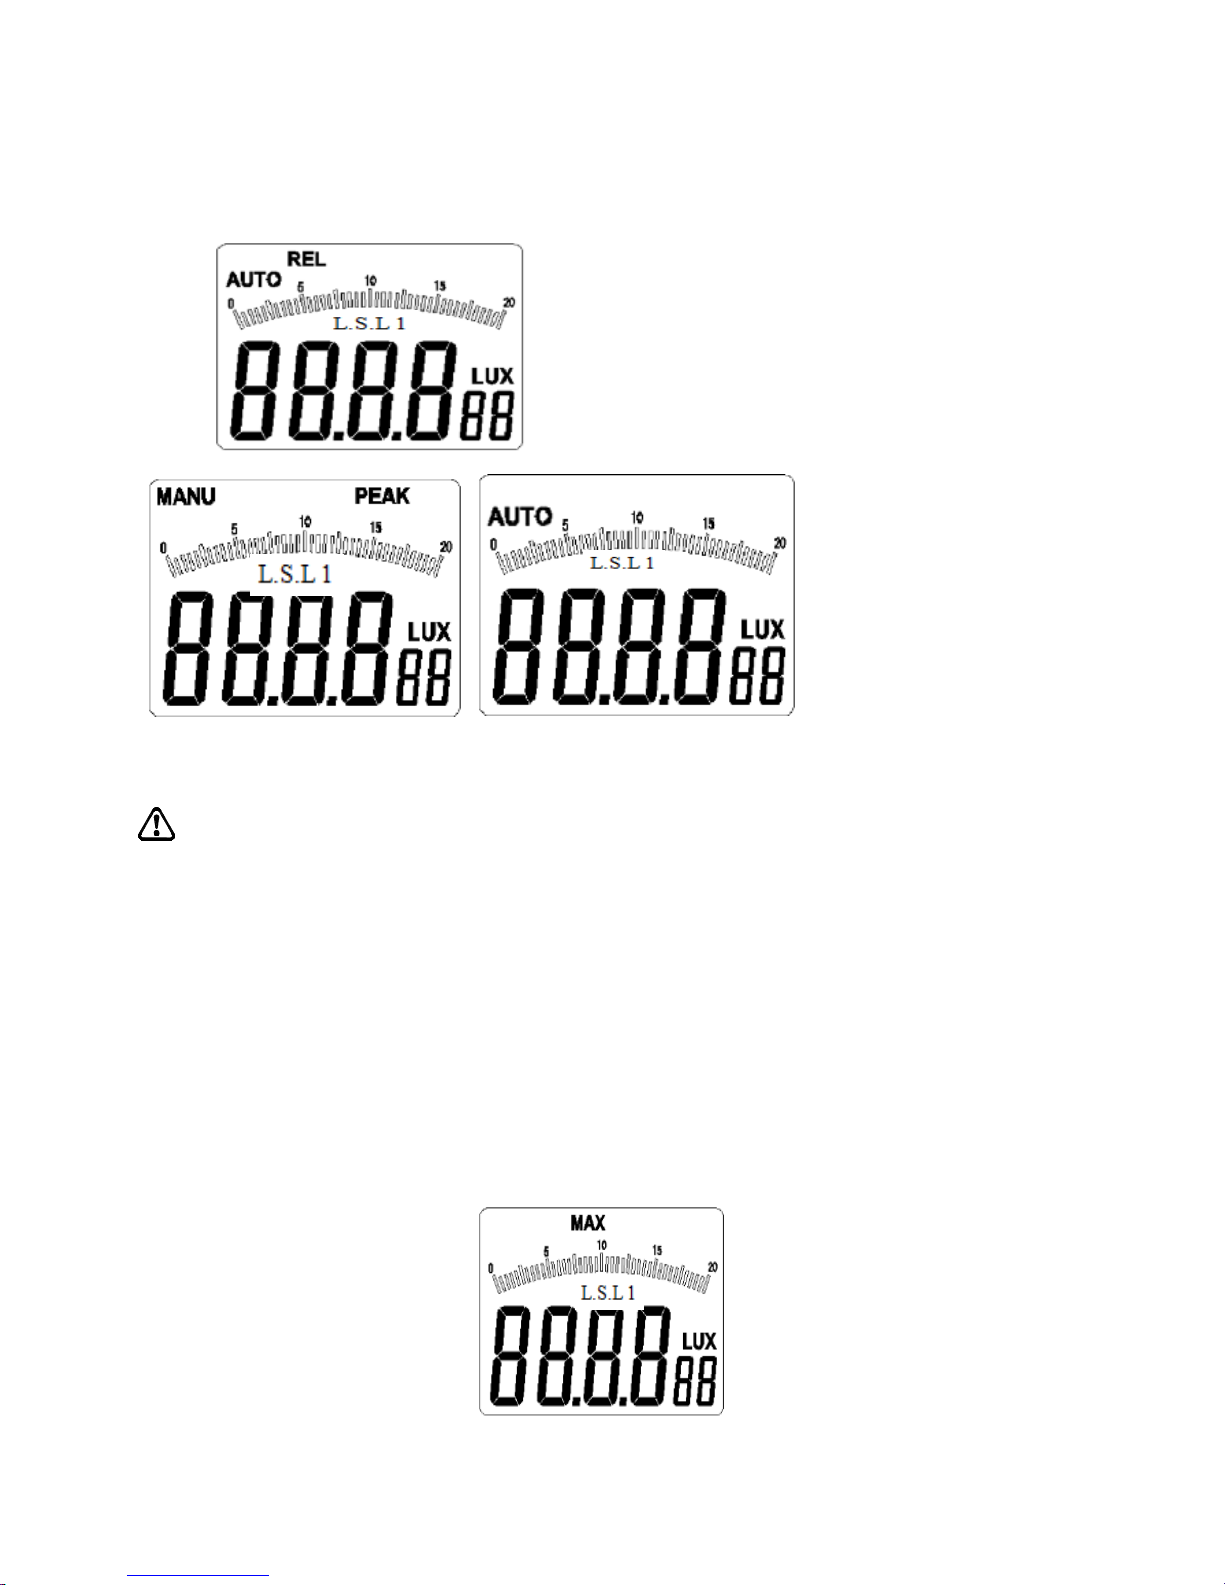
position of the LCD interface (as shown in figure 3-1-2A), and the
device will enter the relative value measurement mode;
Press and hold REL/PEAK key for a short time again, “REL” on the
top left position of the LCD interface will disappear, and the device
will exit the relative value measurement mode and return to
original measurement mode;
Press and hold “REL/PEAK” key for one second, the device will
enter the peak value measurement mode, “PEAK”LCD will appear
on the top right position of the LCD interface, and at the same time,
“MENU” will appear on the top left position of the LCD interface (as
shown in figure 3-1-2B);
Press and hold the key once again for one second, “PEAK” on top
right position of LCD interface will disappear, and “AUTO” will
appear on the middle of LCD interface, and the device will exit the
peak value measurement mode and return to auto measurement
mode (as shown in 3-1-2C).
Figure 3-1-2A Figure 3-1-2B Figure 3-1-2C
Page 14
13
Tip
1: Only in auto measurement mode, peak value measurement mode,
max/min value inquiry mode and data hold mode, it will be effective
to press and hold REL/PEAK key for a short time.
2: In non-zero calibration mode, press and hold “REL/PEAK” for one
second, the device will enter the peak value measurement mode.
Application of maximum/minimum value inquiry mode
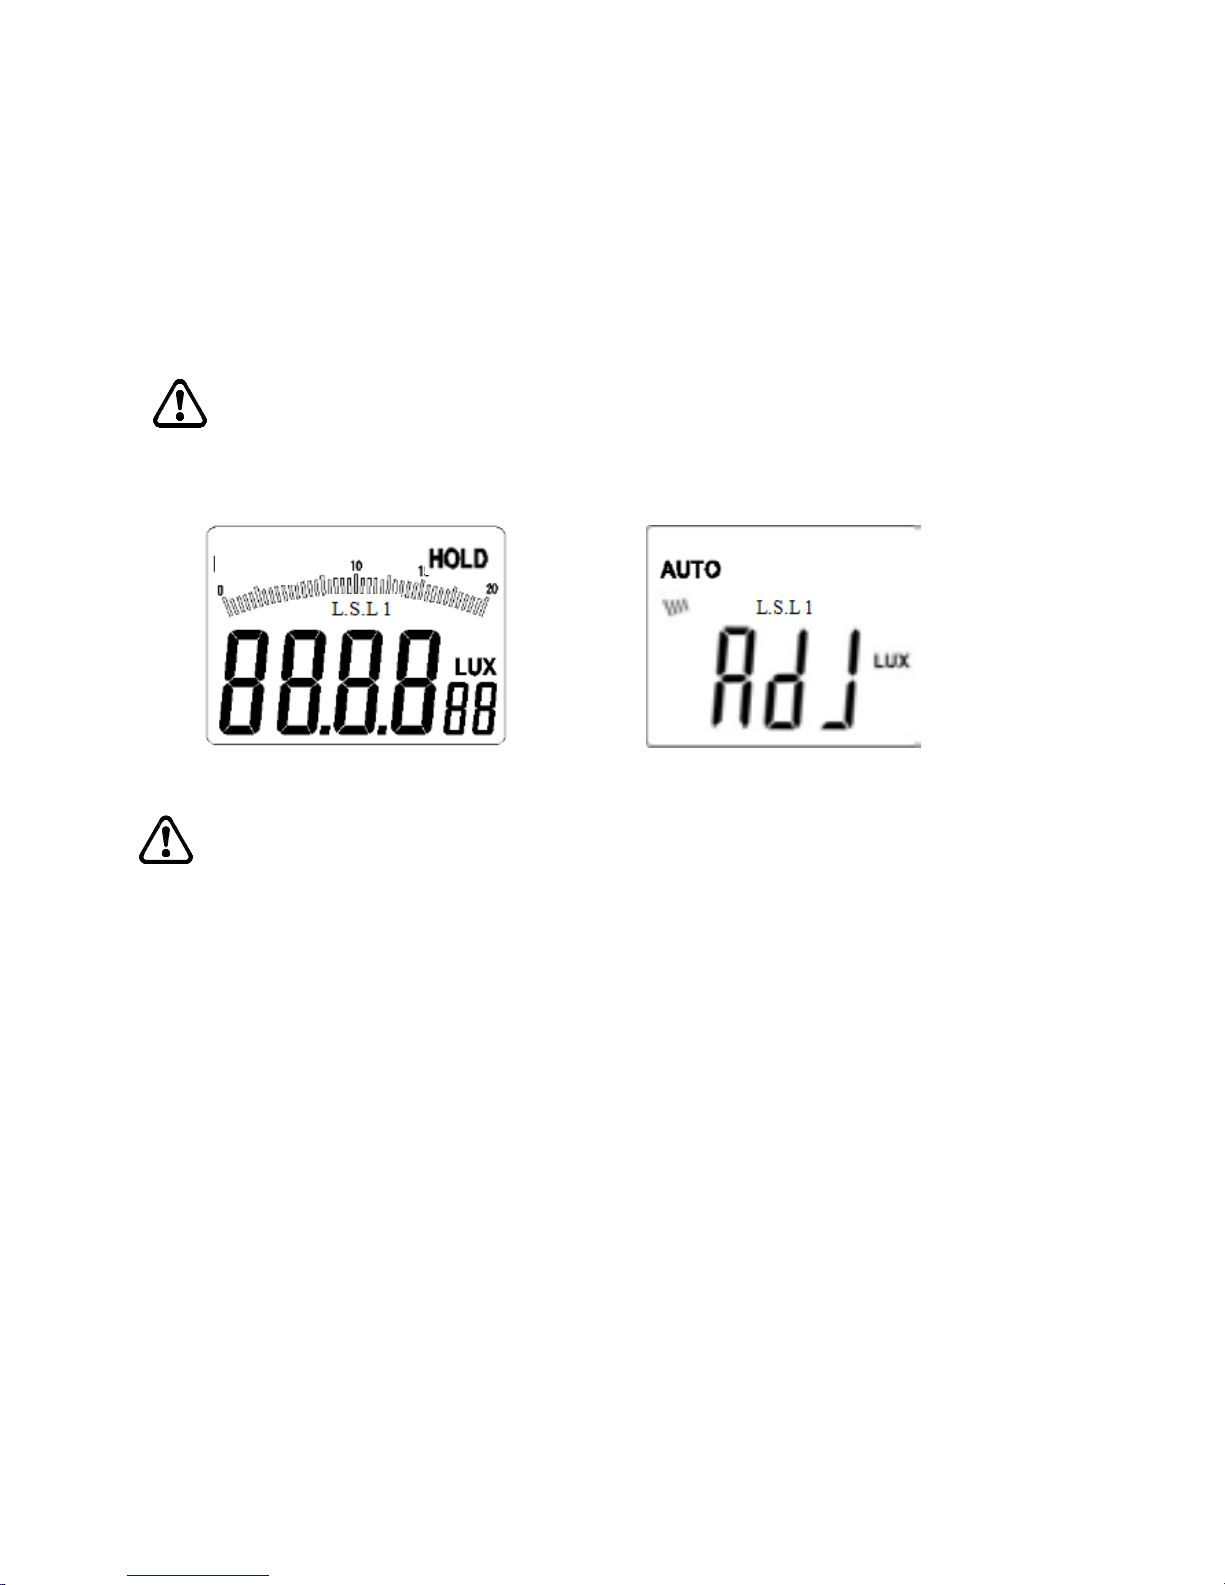
Press and hold “MAX/MIN” key for a short time, “MAX” will appear on
top LCD interface (as shown in figure 3-1-3);
In max/min value inquiry mode, press “MAX/MIN” key once, you will
switch MAX to MIN or MIN to MAX;
Press and hold “MAX/MIN” for one second, “MAX/MIN” on top LCD
interface will disappear, and the max/min value inquiry mode will exit.
Figure 3-1-3
Tips
In non-zero calibration mode, press and hold “MAX/MIN” key for a short
time to use the max/min value inquiry functions;
Application of data hold and zero calibration mode
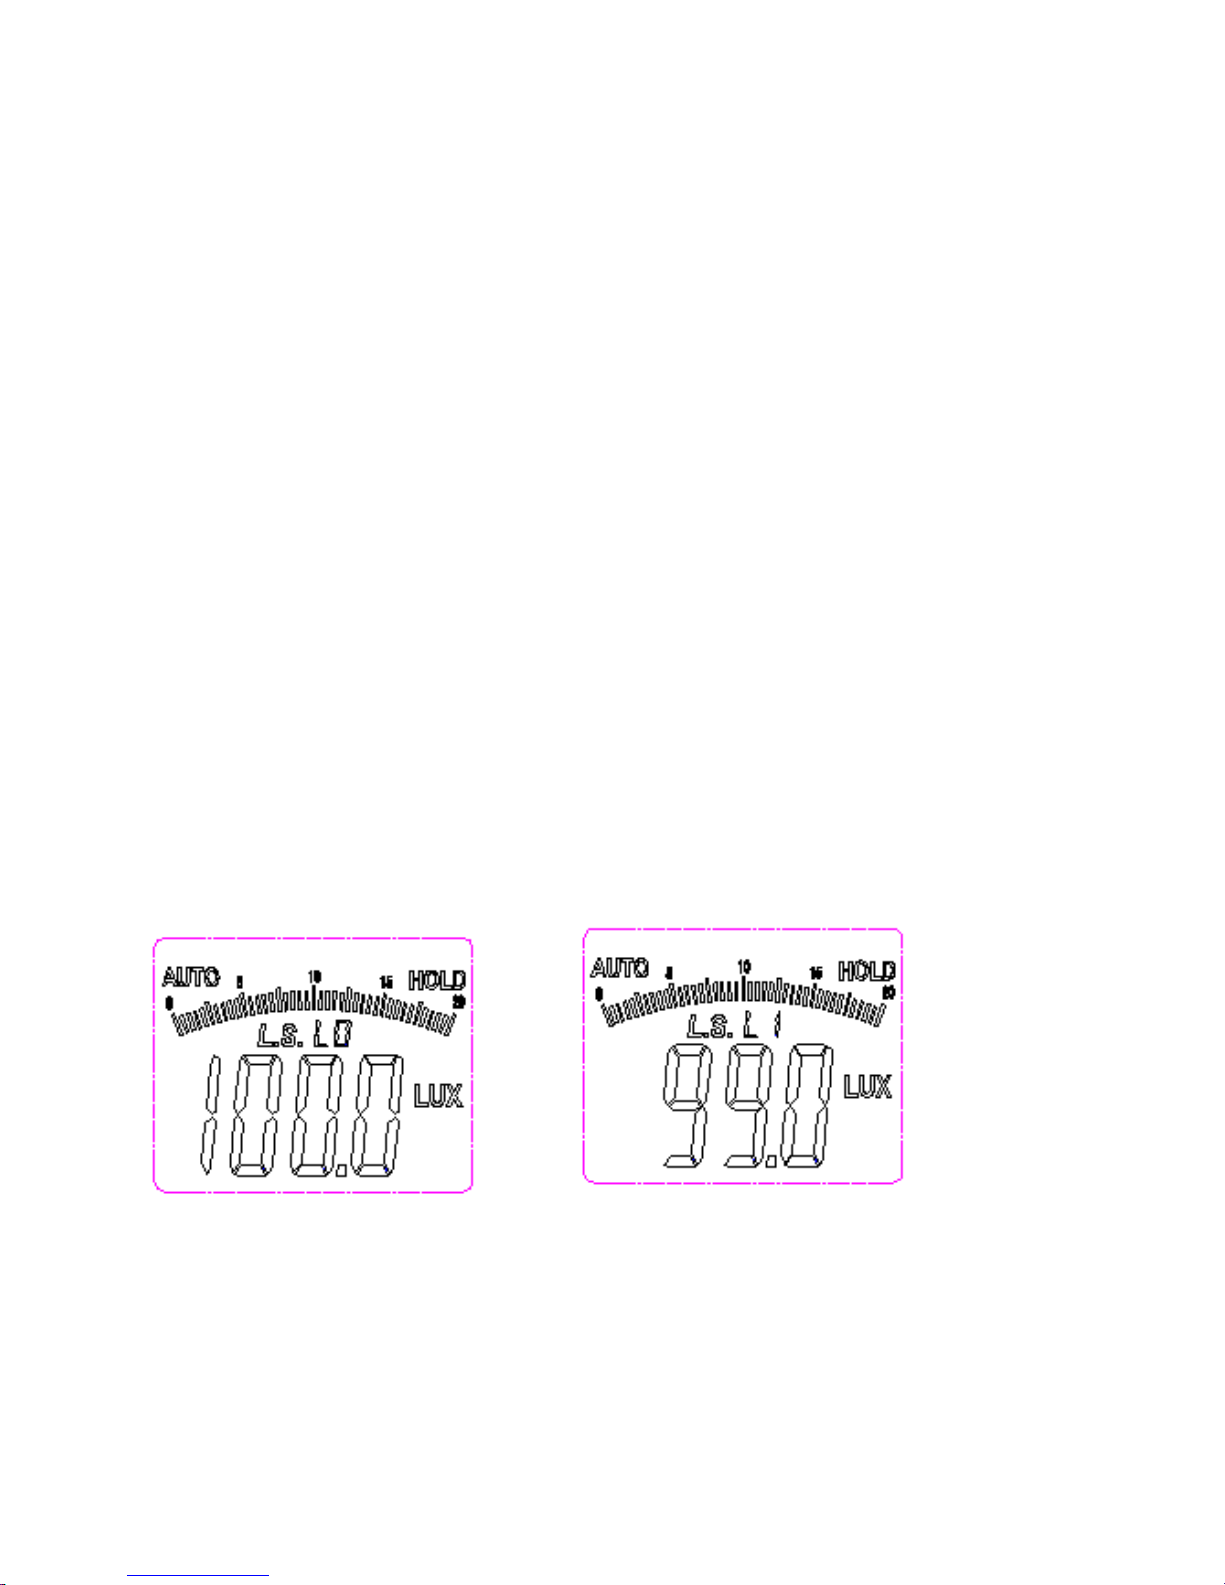
Press and hold “HOLD/ZERO” key for a short time, “HOLD” will
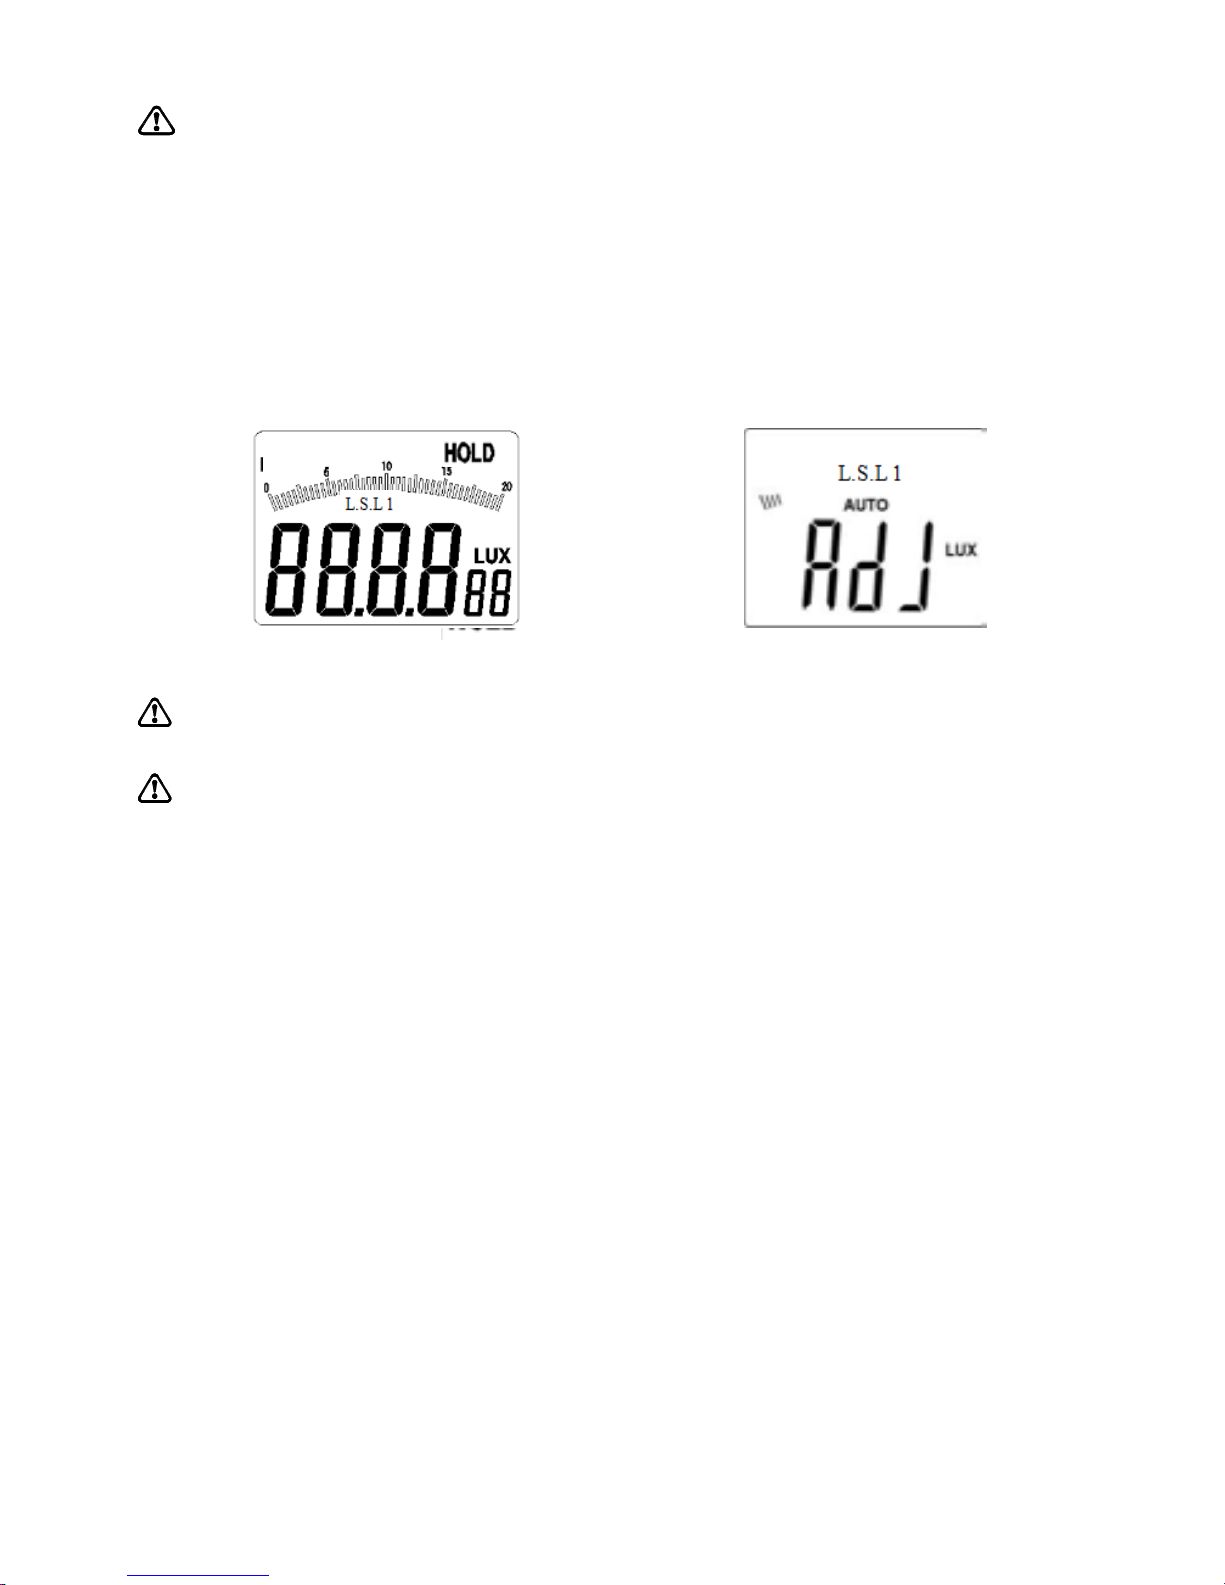
appear on the top left position of the LCD interface (as shown in
3-1-4A), then the device will enter the data hold mode;
Press and hold the key again, “HOLD” on the top left position of
the LCD interface will disappear, and the meter will exit the data
hold mode;
Page 15
14
Cover the opto-sensor with the visor, and press and hold
“HOLD/ZERO” key for one second, “ADJ” will appear on LCD
interface (as shown in figure 3-1-4B), then the device will enter
the zero calibration mode. Several seconds later, “ADJ” on LCD
interface will disappear, and zero calibration mode will
automatically exit and return to auto measurement mode.
Notice
Before zero calibration, the opto-sensor must be covered with the
opto-sensor visor.
Figure 3-1-4A Figure 3-1-4B
Tips
1. In non-zero calibration mode, press and hold “HOLD/ZERO” key
for a short time to enter the data hold mode.
2. Zero-calibration can be made in any mode.
Application of light source selection mode
1 Selection of light source:
1.1 Long press “MAX/MIN/L.S.” key for one second, “L.S.LN”
will flashes for light source selection
1.2 Light source selection mode, please short press
“MAX/MIN/L.S.” or “Lx/Fc” key to select light source from
L0~L9
L0 for standard light
L1 for LED white
L2 for LED red
L3 for LED yellow
L4 for LED green
Page 16
15
L5 for LED blue
L6 for LED purple
1.3 Press the “HOLD/ZERO” key to confirm, and then
measure
2 Light source parameter setting
2.1 Long press “MAX/MIN/L.S.” key for one second, “L.S.LN”
will flashes for light source selection
2.2 Light source selection mode, please short press
“MAX/MIN/L.S.” or “Lx/Fc” key to select light source from
L0~L9
2.3 Short press “RAN” key again to change the light source
parameter to meet your need.
2.4 Long press “MAX/MIN/L.S.” to save the new Light source
parameter,and then go into measurement mode;
2.5 Default setting of light source parameter:
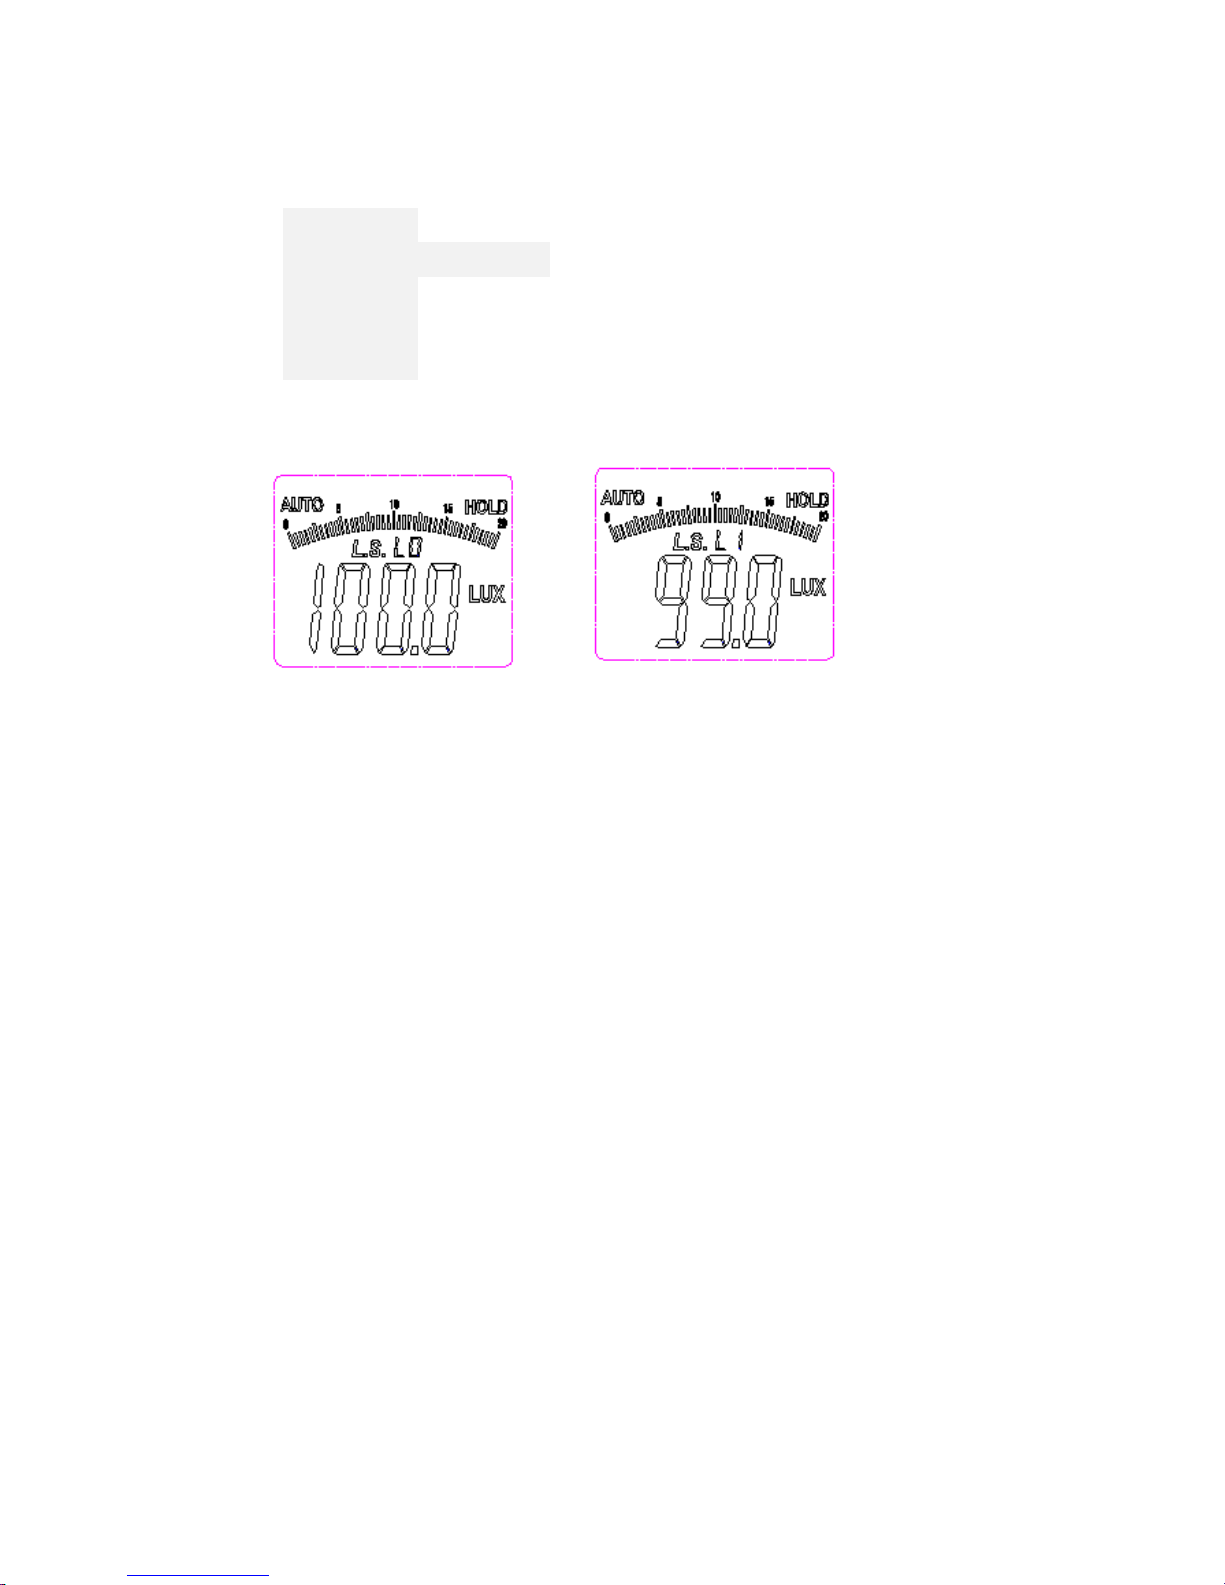
L0—> standard light source:1.000
L1—>LED white:0.990
L2—>LED red:0.516
L3—>LED yellow:0.815
L4—>LED green:1.216
L5—>LED blue:1.475
L6—>LED purple:1.148
L7--L9—> standard light source:1.000, you can reset
the L7~L9 parameters according your need, but highly
recommend keeping L0-L9 parameter as standard.
Other Functions
Auto power-off
If there is no action on keys of the MT-4617LED for a long time, the
meter will automatically power off about 10 minutes later.
Page 17
16
Technical Data
‧Temperature range:
Operation:-10~50°C, max 80 % HR(Non-Condensed)
Storage:-10~50°C,max 80 % HR (Non-Condensed)
(removing batteries)
‧Sampling rate: ≥2 times/s。
‧Display: 3½ digits, 1999 counts, with analog bar display;
‧Sensor: silicon photoelectric diode
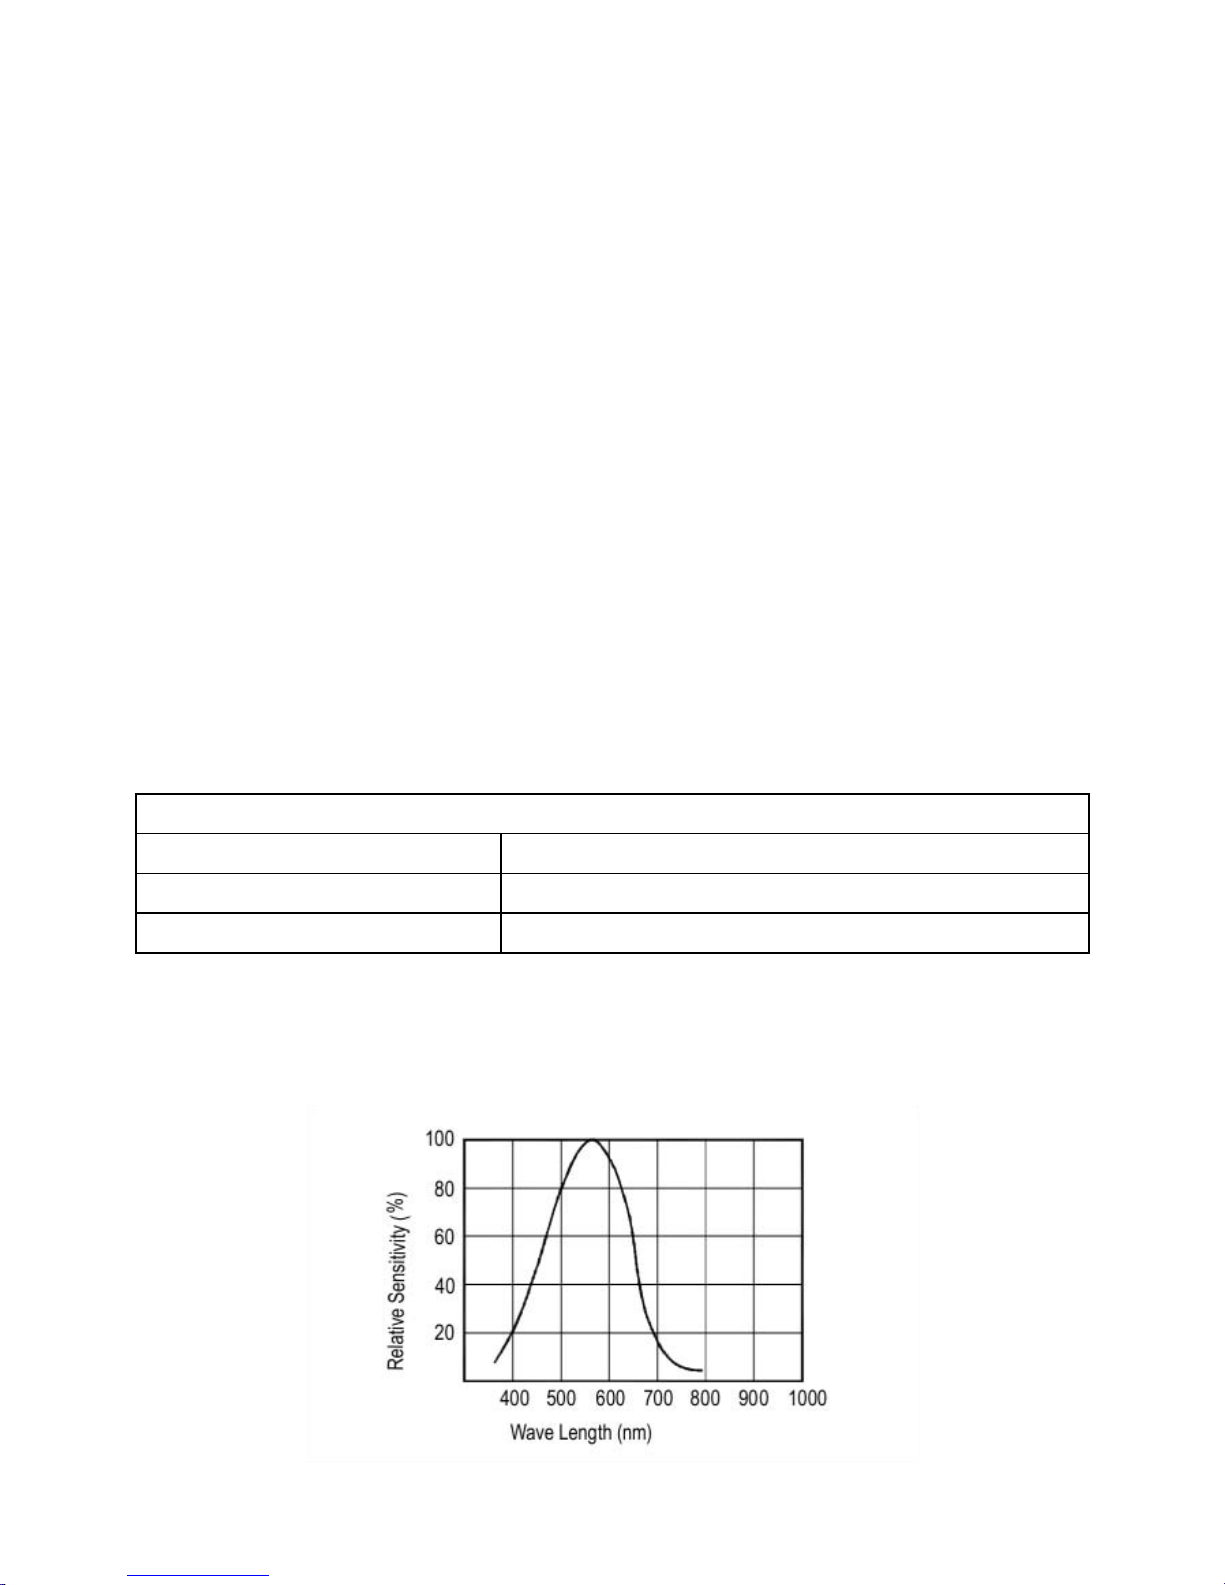
‧Measured spectral range: 320~730nm
‧Measurement ranges: 20, 200, 2000, 20000, 200000, Lux20, 200,
2000, 20000 FC
‧Operating environment: indoor use
‧Height: 2000m highest
‧Battery life: Approx. 200 hours
‧Power supply: 1×9 V,IEC 6LR61
‧Dimensions (H×W×D): 170 mm×85 mm×45 mm
‧Accuracy: ±3% (calibrated with incandescent lamps in
2854K) ±6% other visible light source
Cosine angle deviation characteristics
Cosine angle
Deviations
30°
±2%
60°
±6%
Tips: cosine angle is corrected in accordance with JIS C 1609:1993 and
CNS 5119 Grade A General Specification.
‧Luminous sensitivity characteristics:
Page 18
17
Maintenance and Service
Service
Notice
When the meter seemingly fails during operation, following steps should
be followed to check the fault problem:
1: Check batteries. If “ ” appears on the LCD display, batteries
should be replaced.
2: Repair on the meter should be performed by service centers or other
qualified service professionals.
Cleaning
First wipe the meter with a damp soft cloth with clean water or neutral
detergent and then with a dry cloth.
Notice
1: Please make sure the light meter is turned off before cleaning.
2: Do not use benzene, alcohol, acetone, ethyl ether, ketones, thinners
and gasoline, etc. in cleaning, because they will transform or fade
the light meter.
3: The light meter can only be used again when it is completely dry after
cleaning.
Battery replacement
If the battery symbol appears on the LCD accompanied by buzzer alarm,
batteries must be replaced.
Batteries should be replaced as follow:
Turn off the meter;
Remove the screw on the back of the meter and open the battery
compartment;
Remove exhausted batteries;
Replace new batteries observing polarity;
Replace the battery compartment cover and secure the
compartment screw.
Warning
1: Do pay attention to the right polarity of battery when putting in or
replacing batteries. In case of polarity reversal, the light meter will be
damaged, and can even cause explosion or fire.
Page 19
18
2: Never connect one polarity of the battery to the other one with wire,
nor throw batteries into fire, or it will cause an explosion.
3: Do not attempt to dismantle the battery! The battery’s intensively
alkaline electrolyte is corrosive and endangers the user. In case of
contact of the electrolyte with skin or clothes, immediately rinse
touched parts with clean water; in case of contact of the electrolyte
with eyes, immediately rinse eyes with clean water and seek medical
advice.
Notice
1: The light meter should be turned off before replacing batteries.
2: Use batteries specified in technical data only.
3: If the meter is not to be used for a long time, take out the batteries. In
case the meter is polluted due to battery leak, the meter should be
sent by post to the manufacturer for cleaning and checking.
4: For disposal of used batteries, follow existing specifications on
battery recycling, reuse and treatment.
Reference Table for Illumination Standard of Various locations Fc
illuminance value can be obtained from Lux illumination value divided
by 10.764
Schools:
Iluminance
(Lux)
Locations
1500~300
Drafting classroom, sewing classroom, computer
classroom
750~200
Classroom, laboratory, practice workshop, research
room, reading room, stack room, office, staff lounge,
conference room, health center, restaurant, kitchen,
pantry, radio room, printing room, switchboard room,
guard room, indoor stadium
300~150
Large classroom, auditorium, storage cabinet room,
lounge, staircase
150~75
Corridor, elevator corridor, toilet, duty room, workers
room, bridge, school outdoor playground
75~30
Warehouse, garage, fire escape
Page 20
19
Office:
Iluminance
(Lux)
Locations
2000~1500
Design office, clerk's office
1500~750
Hall information channel (daytime), parlor,
drawing office, punching, typing
750~300
Calculator room, conference room, printing room,
switchboard room, control room, reception room,
recreation room, restaurant
300~150
Stack room, entertainment room, dining room,
lounge, guard room, elevator (passway),
washroom, toilet
150~75
Tea room, changing room, warehouse,
nightwatchmen office (entrance)
75~30
Fire escape
Factories:
Iluminance
(Lux)
Locations
3000~1500
Ultra-precision operation, design, drafting, precision
inspection
1500~750
Design office, analysis, assemble line, coating
750~300
Packaging, measurement, surface treatment,
warehouse office
300~150
Dyeing, casting, electrical room
150~75
Entrance and exit, corridor, information channel,
staircase, dressing room, toilet, 、operation
warehouse
75~30
Fire escape, warehouse, outdoor power equipment
(loading and unloading, inventory move operation)
Page 21
20
Hospital:
Iluminance
(Lux)
Locations
10000~5000
Visual function test chamber (ophthalmology
lightroom)
1500~750
Operating room
750~300
Consulting room, treatment room, pharmacy room,
prescription room, drug store, dissection room,
pathological bacteria room, emergency rooms,
maternity ward, dean’s office, offices, nursing room,
conference room
300~150
Ward, medicine room, bed reading, medicine
changing, plaster bandage for fractures, infant room,
record room, waiting room, consulting room,
outpatient corridor
150~75
Locker room, physical therapy room, X-ray room,
ward corridor, medicine room, sterilization room, ward
room, stairs, endoscopy room
75~30
Animal room, dark room (photo), fire escape
Hair salon:
Iluminance
(Lux)
Locations
1500~750
Haircut, perm, hair dyeing, cosmetics
750~300
Shave, hairdressing, lobby registration counter,
makeup
300~150
Toilet in salon
150~75
Corridor, stairways
Page 22

21
Hotel, restaurant, recreation ground:
Iluminance
(Lux)
Locations
1500~750
Counter
750~300
Halfway, banquet hall, business room, parking lot,
kitchen
300~150
Restaurant, toilet, a large Japanese-style room
150~75
Recreation room, corridor, stairways, guest room,
bathroom, accent lighting for gardens, changing room
75~30
Fire escape
Shop, department store:
Iluminance
(Lux)
Locations
3000~750
Indoor display, decorative window display,
demonstration area, checkout counter, packaging
table
750~300
Elevator lobby, escalators
300~150
Discussion room, dressing room, toilet, stairs,
walkways
150~75
Lounge, general lighting in store
House:
Iluminance
(Lux)
Locations
2000~750
Handcraft, tailoring
1000~500
Writing, work
750~300
Reading, makeup, kitchen table, processing area,
telephone
300~150
Wash sink, entertainment room, living room, family
reunion, entrance (inside) mirror
150~70
Wardrobe, bedroom, bathroom, stairs, corridor
75~30
Doorplate, mailbox, doorbell key, terrace
Page 23
22
MT-4617LED LED 照度計使用說明書
聲明
根據國際版權法,未經允許和書面同意,不得以任何形式複製本說明書的任何內容。
本說明書在將來的版本中如有更改,恕不另行通知。
安全聲明
小心或注意
“小心”或”注意”標誌表示會對儀錶或設備造成損壞的狀況和操作。
它要求在執行此操作時必須小心,如果不正確執行此操作或不遵循此操作步驟,則
可能導致儀錶或設備損壞。在不滿足這些條件或沒有完全理解的情況下,請勿繼續
執行小心標誌所指示的任何操作。
警告
“警告”標誌表示會對用戶造成危險的狀況和操作。
它要求在執行此操作時必須注意,如果不正確執此行操作或不遵守此操作步驟,則
可能導致人身傷害或傷亡。在不滿足這些條件或沒有完全理解的情況下,請勿繼續
執行警告標誌所指示的任何操作。
安全資訊
警告
請勿在存在爆炸性氣體物質、可燃蒸汽物質及充滿粉塵的環境中使用本儀錶!
安全符號說明
本說明書包含安全操作和維護的基本要素。使用前,請仔細閱讀下面的安全資訊。
表 1:安全資訊
用戶在使用前必須閱讀的重要資訊
符合歐盟 CE 安全規範
表 2:警告資訊
警告
表明錯誤的操作將導致嚴重的傷害甚至死亡事故發生
注意
表明錯誤的操作或疏忽將導致儀錶損壞或測量結果錯
誤等
提示
操作建議或提示
Page 24

23
操作注意事項
遵從以下注意事項,確保安全操作和獲得最佳的性能。
1. 首次使用前,請檢查照度計是否工作正常,確認在存儲和運輸期間沒有受到
損壞。
2. 使用環境:溫度-10°C~50°C;濕度<80%RH(無凝露)
3. 存放環境:溫度-10°C~50°C;濕度<70%RH(無凝露)
4. 為避免故障,請不要使照度計處於高溫或高濕、腐蝕性或爆炸性氣體、強電
磁或強振動、粉塵的環境。
5. 為避免損壞,搬運及使用過程中應避免劇烈機械振動,尤其避免發生跌落事
故。
6. 只有專業人員才能對本照度計進行校準和維修。
7. 在每次使用前,都要檢查照度計的光感測器有無磨損、有無粉塵。請確保照
度計的光感測器是處於光滑完好、潔淨的狀態。如果照度計的一個或多個功
能不正常或沒有為工作準備就緒,則不得使用照度計進行測量工作。
8. 在使用照度計時,不能長期使儀錶測量值處於溢出狀態(OL)。
9. 要避免日光暴曬。只有這樣才能保證儀錶的功能正常和長久的使用壽命。
10. 如果儀錶受到極強電磁場的作用,則其功能會受影響。
11. 電池注意避免受潮。若顯示幕顯示電池欠壓提示符,則必須更換電池,只允許
使用技術資料中指定電池型號。
12. 光檢測器的靈敏度會因使用條件或時間而降低。建議您將儀錶做定期校正,
以保證精確度。
13. 請您妥善保管原始包裝,以便今後郵寄之用(如對照度計校準時)。
概述
MT-4617LED多功能照度計的人機介面十分友好,按鍵操作便捷,顯示效果直觀形
象,可測量LED燈、螢光燈、金屬鹵化燈、高壓鈉燈或白熾燈等光源發出的可見光,
廣泛運用於家庭、辦公室、倉庫、廣場、
汽車、照明、LED製造、畜牧業、種植、攝影等室內場所, 量測範圍達200000 Lux/20000
FC, 您可以選擇各種不同類型的光源,也可以依需求設置需要的光源參數。
功能特點
1. 自動和手動切換量程;
2. 可測量多種不同顏色的 LED 光源;
3. 最大、最小值查詢功能;
4. 資料保持功能;
5. 峰值測量功能;
6. 相對值測量功能;
7. 零點校準功能;
Page 25
24
8. 3 1/2 位元 LCD 顯示,帶類比條顯示
9. 單位轉換功能 Fc/Lux
10. 超量程顯示“OL”,提示超量程;
11. 精度高,測量範圍寬(0.00~200000Lux);
12. 電池欠壓指示;
13. 按鍵音和靜音選擇;
14. 自動關機功能(超過 10 分鐘無按鍵操作即自動關閉電源)
15. 結構緊湊,牢固耐用,便於攜帶
儀錶面板說明
① 光感測器保護蓋
② 光感測器
③ LCD 顯示幕
④ 電源、按鍵音複合按鈕:
開/關電源:短按開機,長按 1S 關機;
開啟/關閉按鍵音:工作模式,短按開啟/關閉按鍵音,開機默認有按鍵音。
⑤ 最大最小值查詢模式按鈕。
⑥ 單位轉換按鈕:
勒克司/英尺燭光(Lux/ Fc)
MT-4617 平面图
Page 26
25
⑦ 資料保持、零點校準複合按鈕:
資料保持:短按,進入/退出資料保持模式
零點校準:長按 1S,執行零點校準功能
⑧ 相對值測量、峰值測量複合按鈕:
相對值測量:短按,進入/退出相對值測量模式
峰值測量:長按 1S,進入/退出峰值測量模式
⑨ 手動切換量程按鈕:
短按,進入手動量程狀態,按一下跳到下一量程。
長按超過 1 秒,則退出手動量程模式。
LCD 顯示介面
1. 手動切換量程模式提示符號
2. 資料保持模式提示符號
3. 類比條顯示當前測量值資訊
4. 數位顯示當前測量值資訊
5. Lux 單位符號
6. Fc 單位符號
7. 自動測量模式提示符號
8. 峰值測量模式提示符號
9. 電池電壓低電提示符號
10. 相對值測量模式提示符號
11. 最大值查詢模式提示符號
12. 最小值查詢模式提示符號
13.光源選擇提示符號
14.光源設定值代碼
測量方法
測量前的注意事項
警告
1:請勿在存在爆炸性氣體物質、可燃蒸汽物質及充滿粉塵的環境中使用本儀錶!
Page 27

26
2:請勿在高溫、高濕場所下測量。
3:請勿在強紅外線或紫線環境中使用本儀錶!
提示
1. 本儀器光感測器類比人眼對光的敏感曲線而設計,光譜範圍為 320~730nm。
若處於紅外線區域測量,則資料將偏差較大。
2. 光感測器在 2854 °K 色溫條件下依照 CIE 普通白熾燈進行校準;對其他類燈
的光譜,所提供的讀數可能不同。
3. 光源測試參考准位在受光球面正頂端。
4. 測量前使光檢測器曝光 2 分鐘後,方可開始測量。
5. 要防止測試者的人影和其他因素對光檢測器的影響。
作用原理
各照度標度的概念
1 勒克司(流明)是與光強為一燭光的燈垂直距離 1 米處,面積為 1 平方米的表面上接
受的照度。
1 英尺燭光 (Fc) 是與光強為一燭光的燈垂直距離 1 英尺處,面積為 1 平方英尺的表
面上接受的照度。
照度標度單位轉換:
1 Fc = 10.764 Lux;
1 Lux = 0.09290 Fc。
光照度與發光強度的換算公式:E = I / r 2
式中:E --- 光照度值(單位:Lux);
I --- 光源的發光強度(單位:cd);
r --- 光源發光面到光檢測器之間的距離(單位:m)。
測定時,要求光源發光面和光感測器之間的最小距離應大於光源發光面(或光感測
器)最大尺寸的 15 倍。
測試實例 (典型練習實例)
1 站在某一光源下,取下多功能照度計感測器保護蓋並將它與光源垂直放置。
2 短按電源鍵開機,此時 LCD 屏全顯(約 1 秒),同時蜂鳴器鳴響兩聲,LCD
屏左上角顯示“AUTO”字樣,儀器進入自動測量模式。
3 短按手動切換量程 RAN 鍵,LCD 左上方顯示“MANU”字樣進入手動切換量
程模式,進入手動切換量程功能後每次短按該鍵,則按 20.00Lux 200.0Lux
2000Lux 20000Lux 200000Lux (或 20.00Fc 200.0 Fc 2000 Fc20000 Fc
迴圈;長按該鍵 1 秒,LCD 左上方的“MANU”字樣熄滅,LCD 左上角顯示
Page 28

27
“AUTO”字樣,退出手動切換量程功能,返回自動切換量程。
4 短按相對值測量、峰值測量 REL/PEAK 複合鍵,LCD 介面左上方顯示“REL”
字樣,進入相對值測量模式,再次短按該鍵則退出相對值測量模式,LCD 介
面左上方“REL”字樣熄滅,返回原來的測量模式;
5 長按相對值測量、峰值測量複合鍵 1 秒,進入峰值測量模式,LCD 介面右上方
顯示“PEAK”和“MANU”字樣,再次長按該鍵 1 秒,LCD 右上方的
“PEAK”字樣熄滅,LCD 左上角顯示“AUTO”字樣,返回自動測量模式。
6 短按最大最小值查詢 MAX/MIN 鍵,LCD 介面正上方顯示“MAX”字樣,進入
最大最小值查詢模式,最大最小值查詢模式下,每次短按該鍵,則按 MAX
MIN 迴圈切換;長按“MAX/MIN”鍵 1 秒,LCD 介面正上方的
“MAX/MIN”字樣消失,退出最大最小值查詢模式。
7 短按資料保持、零點校準 HOLD/ZERO複合鍵, LCD 介面左上方顯示“HOLD”
字樣,進入資料保持模式,再次短按該鍵,LCD 介面左上方的“HOLD”字樣
消失,退出資料保持模式;
8 在任何模式下蓋住感測器,長按資料保持、零點校準複合鍵 1 秒,LCD 介面顯
示“ADJ”字樣,進入零點校準模式,幾秒後 LCD 介面顯示的“ADJ”字樣消
失,自動退出零點校準模式,返回自動測量模式。
提示
‧ 光源測試參考准位在受光球面正頂端。
‧ 在各種測量模式下,LCD 正中間的類比條都會隨著數碼管的數位的變化
而相應地變化。
‧ 讀數時,可短按“HOLD/ZERO”鎖定當前資料;
‧ 在進行零點校準時,一定要將光感測器保護蓋蓋住光感測器,方可進行。
‧ 當完成測試時,將感測器保護罩蓋回,以保護濾光片和感測器。
具體應用
手動切換量程測量模式應用
1. 短按 RAN 鍵(手動切換量程鍵),進入手動切換量程,LCD 左上方顯示
“MANU”字樣(如下圖所示);
2. 進入手動切換量程功能後每次短按 RAN 鍵,則按
20.00Lux—>200.0Lux—>2000Lux—>20000Lux—>200000Lux(或 20.00Fc—>200.0
Fc—>2000 Fc—>20000 Fc)迴圈;
Page 29
28
3. 長按 RAN 鍵 1 秒,LCD 左上方的“MANU”字樣熄滅,LCD 左上角顯示
“AUTO”字樣,退出手動切換量程功能,返回自動切換量程;
提示
1. 在峰值測量、相對值測量和最大最小值查詢模式下短按 RAN 鍵方有效。
2. 在相對值測量模式和最大最小值查詢模式下長按該鍵 1秒, 則返回自動切換量
程。
3. 在峰值測量模式、資料保持模式和零點校準模式下長按 RAN 鍵無效。
4. 在此模式中,當測量值超過當前量程時,LCD 顯示“OL”,提示超量程。此
時用戶應切換測量量程;
相對值與峰值測量模式應用
1. 短按 REL/PEAK 鍵(相對值測量、峰值測量複合鍵),LCD 介面左上方顯示
“REL”字樣(如下圖 3-1-2A 所示),進入相對值測量模式;
2. 再次短按 REL/PEAK 鍵則退出相對值測量模式,LCD 介面左上方“REL”字樣
熄滅,返回原來的測量模式;
200.0Lux 文
2000Lux 文件
20000Lux 文件界
200000Lux
20.00Lux 文件界
Page 30
29
3. 長按“REL/PEAK”鍵 1秒,進入峰值測量模式,LCD 介面右上方顯示“PEAK”
字樣,同時 LCD 左上方顯示“MENU”字樣(如圖 3-1-2B 所示);
4. 再次長按該鍵 1 秒,LCD 右上方的“PEAK”字樣熄滅,LCD 左上方顯示
“AUTO”字樣,返回自動測量模式(如圖 3-1-2C 所示)。
圖 3-1-2A
提示
1. 在自動測量模式、峰值測量模式、最大最小值查詢模式和資料保持模式下短
按 REL/PEAK 鍵方有效。
2. 在非零點校準模式下長按“REL/PEAK”鍵 1 秒,均能進入峰值測量模式。
最大最小值查詢模式應用
1. 短按“MAX/MIN/LS”鍵,LCD 正上方顯示“MAX”字樣(如圖 3-1-3 所示),
進入最大最小值查詢模式;
2. 最大最小值查詢模式下,每次短按“MAX/MIN”鍵,則按 MAX<—>MIN 迴圈
切換;
3. 長按“MAX/MIN”鍵 1 秒,LCD 介面正上方的“MAX/MIN”字樣消失,退出
最大最小值查詢模式。
圖 3-1-2B
圖 3-1-2C
图 3-1-3
Page 31
30
提示
在非零點校準模式下,短按 MAX/MIN”鍵均有效,都可進行最大最小值查詢功能;
資料保持與零點校準模式應用
1. 短按“HOLD/ZERO”鍵,LCD 介面右上方上方顯示“HOLD”字樣(如圖
3-1-4A 所示),進入資料保持模式;
2. 再次短按該鍵,LCD 介面左上方的“HOLD”字樣消失,退出資料保持模式;
3. 將光感測器保護蓋蓋住光感測器,長按“HOLD/ZERO”鍵 1 秒,LCD 介面顯
示“ADJ”字樣(如圖 3-1-4B 所示),進入零點校準模式,幾秒後 LCD 介面顯
示的“ADJ”字樣消失,自動退出零點校準模式,返回自動測量模式。
注意
在零點校準前,一定要將光感測器保護蓋蓋住光感測器,方可進行。
提示
1. 在非零點校準模式下,短按“HOLD/ZERO”鍵均有效,都可進入資料保持模
式。
2. 在任何模式下都可進行零點校準。
光源選擇模式應用
1. 光源選擇:
長按“MAX/MIN/L.S.”鍵 1 秒,LCD 介面的“L.S.LN”字元跳動表示進入光
源選擇模式,此時短按“MAX/MIN/L.S.”或“Lx/Fc”鍵,則光源在 L0 到 L9
之間變化,按"HOLD/ZERO"鍵確定,進入正常測量模式;即可進行測量。
2. 光源參數設定:
2.1. 長按“MAX/MIN/L.S.”鍵 1 秒,LCD 介面的“L.S.LN”字樣的“N”字元
跳動表示進入光源選擇模式,此時短按“MAX/MIN/L.S.”或“Lx/Fc”
鍵,則光源在 L0 到 L9 之間變化;選擇需要設置的光源代碼 L0~L9
2.2. 短按“RAN”鍵,則“N”字元停止跳動,參數值跳動,表示進入參數設
置模式,此時短按“MAX/MIN/L.S.”或者“Lx/Fc/CD”鍵可以改變參數
值;
2.3. 再短按“RAN”鍵,則進入光源選擇模式,“N”字元跳動,參數值不跳
動,依次來回切換;
2.4. 長按“MAX/MIN/L.S.”鍵 1 秒,則保存設置完的光源參數值進入正常測
量模式;
圖 3-1-4A
圖 3-1-4B
Page 32
31
3. 光源參數預設值:
L0—>標準光源 A:1.000
L1—>LED 白色光:0.990
L2—>LED 紅色光:0.516
L3—>LED 琥珀色(黃色)光:0.815
L4—>LED 綠色光:1.216
L5—>LED 藍色光:1.475
L6—>LED 紫色光:1.148
L7--L9—>默認標準光源 A:1.000
(建議:如需要修改光源參數最好選擇 L7~L9 參數修改)
其他功能
靜音功能
短按電源/按鍵音複合銨鈕開啟或關閉按鍵音。
自動關機功能
在 10 分鐘內無任何操作,儀錶將自動關機。
技術資料
1. 溫度範圍:
工作:-10~50 ℃,最大 80 %的相對濕度(非凝結)。
儲存:-10~50 ℃,最大 80 %的相對濕度(非凝結)(取掉電池)。
2. 採樣速率:≥2 次/秒。
3. 顯示幕:3½ 位元,最大讀數 1999,帶類比條顯示;
4. 感測器: 矽光電二極體
5. 測量光譜範圍:320~730nm
6. 測量範圍:20、200、2000、20000、200000 Lux
20、200、2000、20000 FC
7. 使用環境:室內使用
8. 海拔: 最高 2000m
9. 電池壽命:大約 200 小時
10. 電源:1×9 V,IEC 6LR61
11. 尺寸(高×寬×深):170 mm×85 mm×45 mm
12. 精度:±3%(在 2854K 時依照普通白熾燈校準),±6% 其他可見光光源
Page 33
32
注:余弦角度依照 JIS C 1609:1993 和 CNS 5119 A 級通用規範修正。
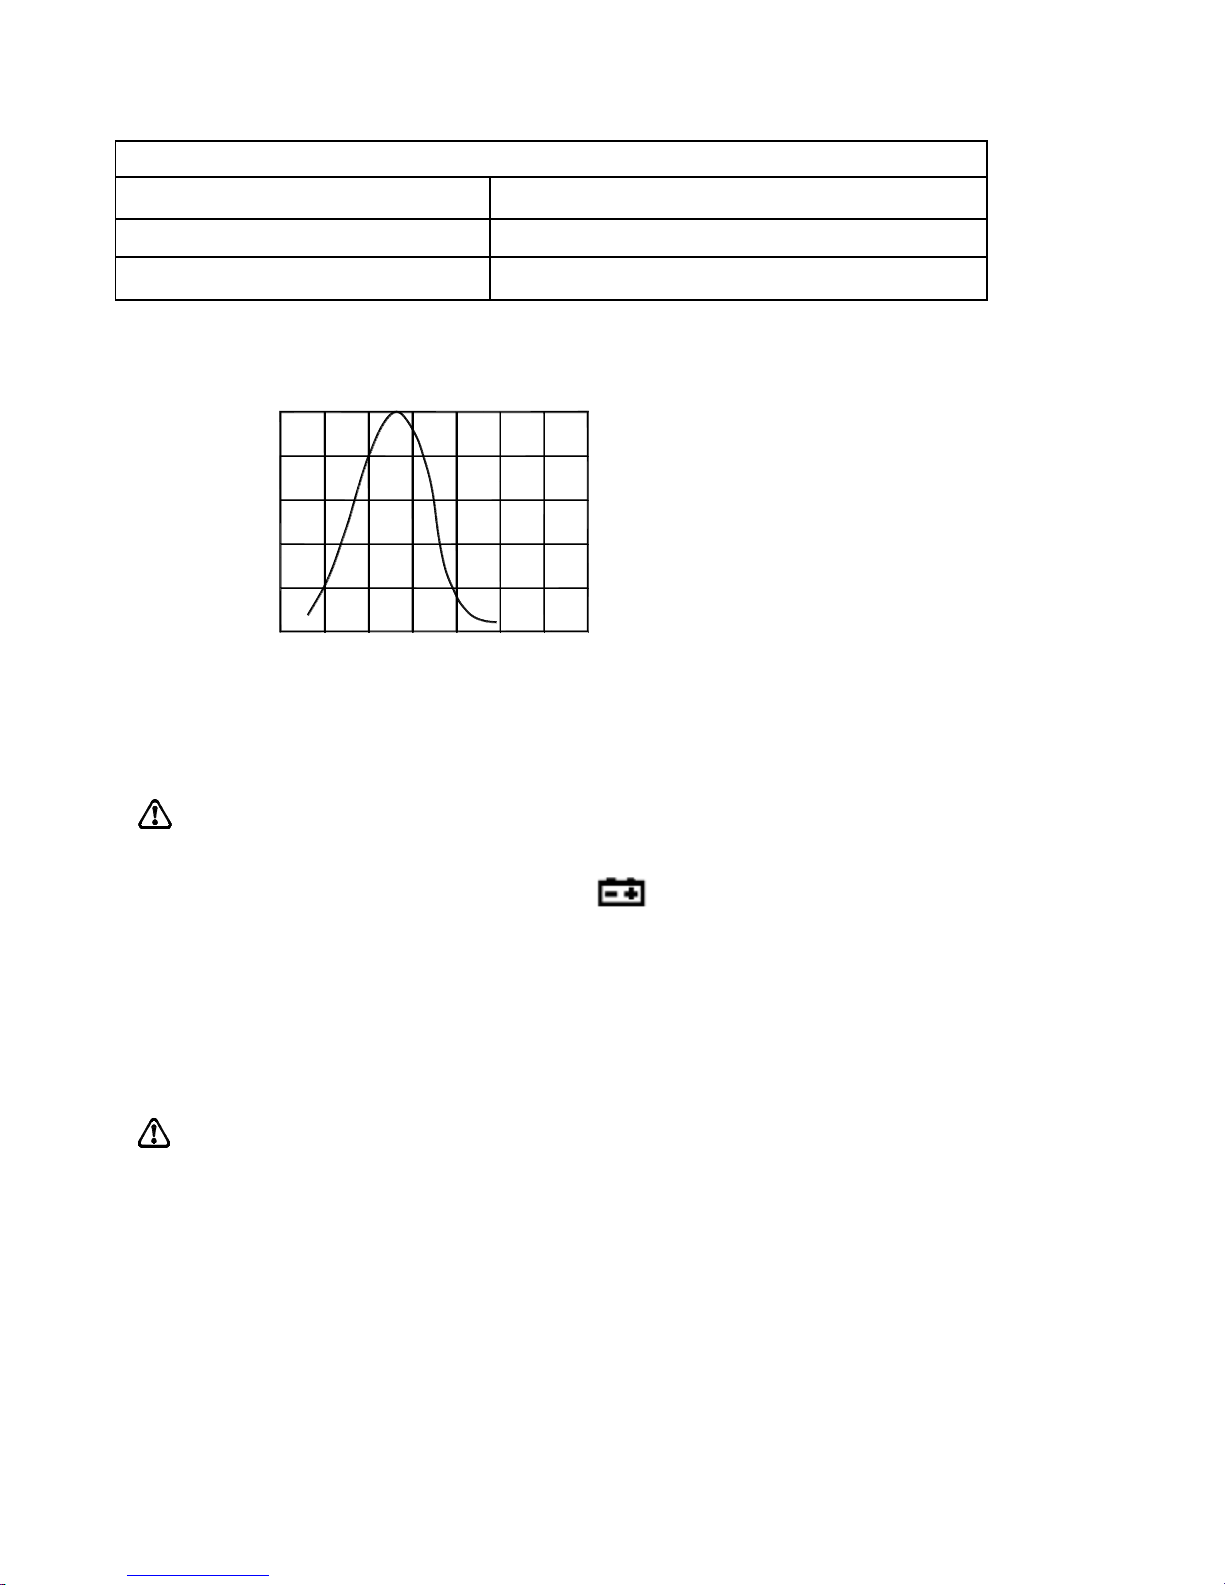
光靈敏度特性:
20
400
80
60
40
100
900600500 800700 1000
Relative Sensitivity (
%)
Wave Length (nm)
維護和維修
維修
注意
如果儀錶在使用過程中似乎存在故障,應執行下列步驟確定問題的根源:
1. 檢查電池。當液晶顯示幕上出現“ ” 符號時應立即更換電池。
2. 查閱操作說明確定操作步驟是否有誤。
3. 儀錶的維修必須由經廠家授權的服務中心或其他具備資格的儀器維修人員承
擔。
清潔
先用沾有清水或中性清潔劑的軟布擦拭探測儀,最後用幹布擦幹。
注意
1. 在進行清潔工作之前,請您確保設備已經關機。
2. 在清潔工作中,請勿使用苯類,酒精,丙酮,乙醚,酮,稀釋劑,汽油等,這
些會造成設備變形或退色。
3. 在清潔之後要等到設備完全乾燥之後,方可繼續使用。
更換電池
如果顯示幕上出現電池符號閃爍(LCD 介面⑨)則必須更換電池。更換電池步驟如
下:
1. 將儀錶關機;
2. 擰儀錶備背面的螺釘,揭開儀錶的電池格蓋罩;
余弦角度偏差特性
余弦角度
誤差
30°
±2%
60°
±6%
Page 34
33
3. 取出耗盡的電池;
4. 按照正確的極性安裝新的電池;
注意
1. 在更換電池之前,必須將儀錶關機。
2. 只能夠使用在技術資料中指定的電池。
3. 如果在較長時期內不使用儀錶,則要將其中的電池取出來。
4. 在處理廢舊電池時,必須遵照現行的關於電池回收、再利用和處理的規定。
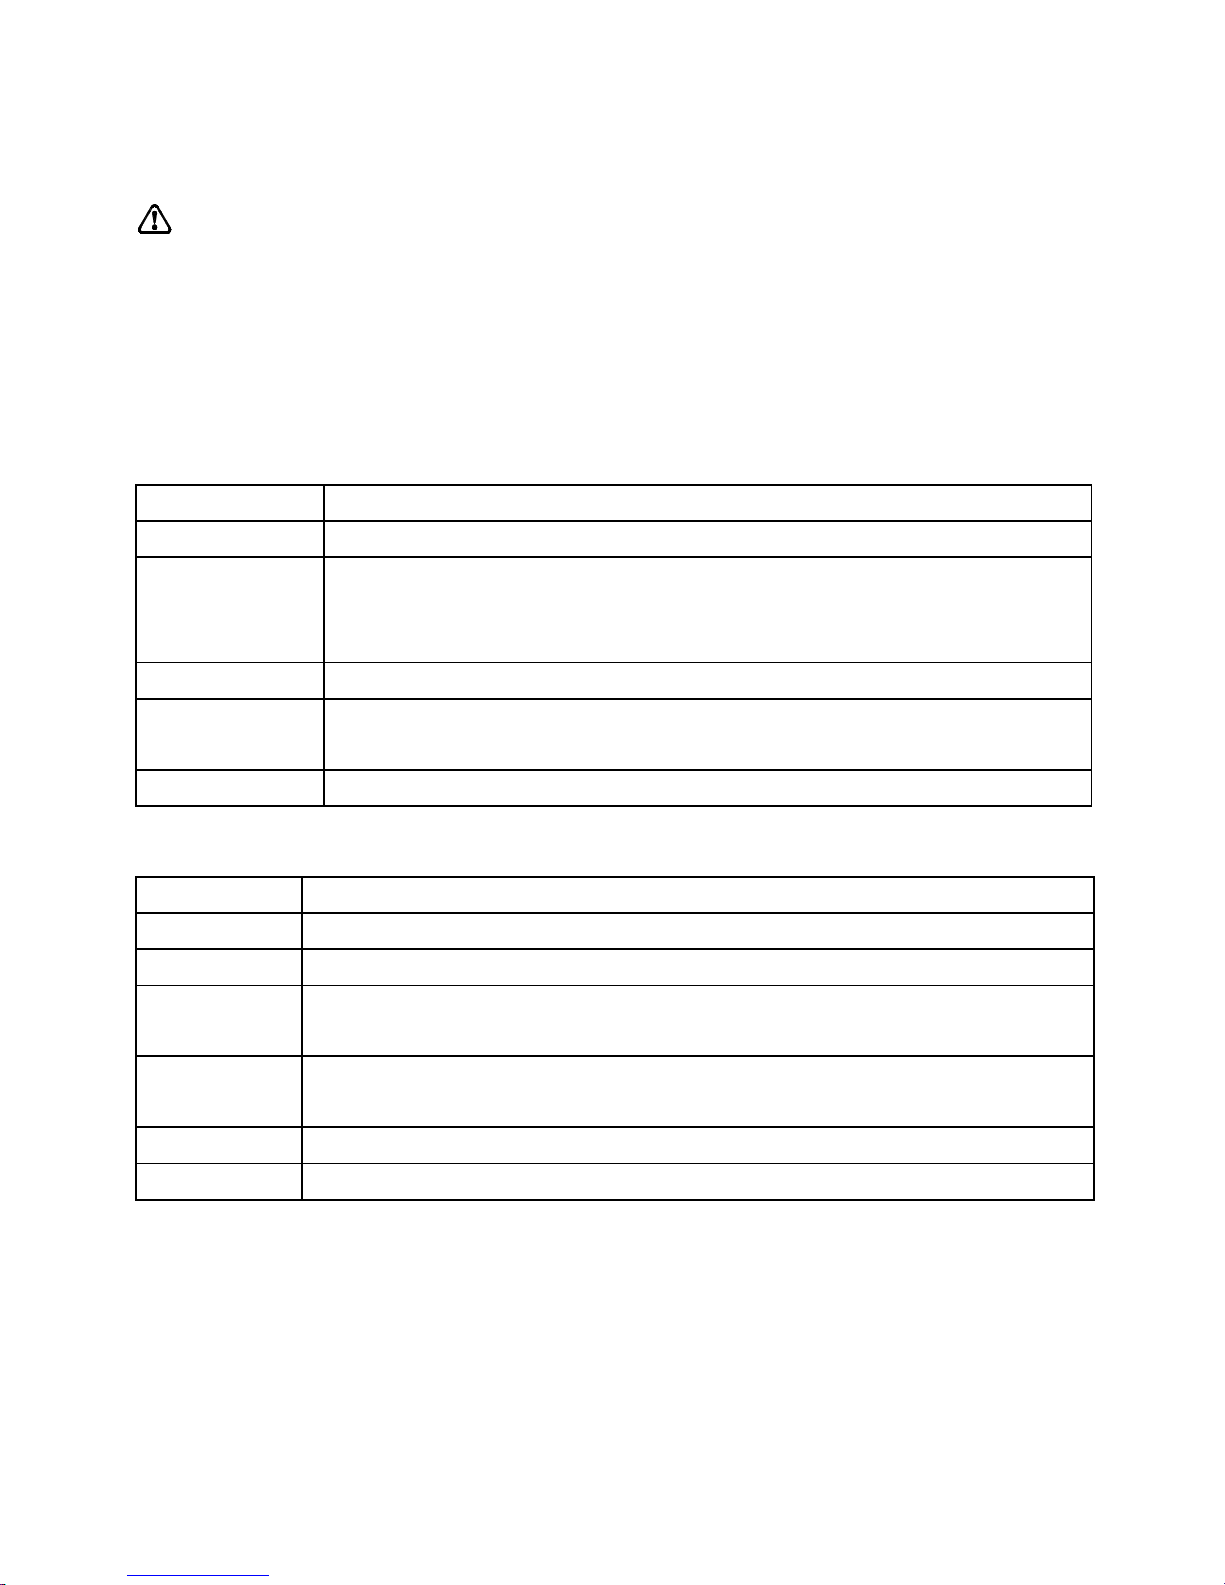
各種場所照度標準參考表
將 Lux 照度值除以 10.764,即可求得 Fc 照度值。
學校:
照度(Lux)
場所
1500~300
製圖教室、縫紉教室、電腦教室
750~200
教室、實驗室、實習工廠、研究室、圖書閱覽室、書庫、辦公
室、教職員休息室、會議室、保健室、餐廳、廚房、配膳室、
廣播室、印刷室、總機室、守衛室、室內運動場
300~150
大教室、禮堂、貯櫃室、休息室、樓梯間
150~75
走廊、電梯走道、廁所、值班室、工友室、天橋、校內室外運
動場
75~30
倉庫、車庫、安全梯
事務所:
照度(Lux)
場所
2000~1500
設計室、事務室
1500~750
大廳通道(白天)、營業室、製圖室、打卡、打字
750~300
計算器室、會議室、印刷室、總機室、控制室、招待室、娛樂室、
餐廳
300~150
書庫、娛樂室、餐廳教室、休息室、警衛室、電梯(走道)、盥洗室、
廁所
150~75
喝茶室、更衣室、倉庫、值夜室(入口處)
75~30
太平梯
Page 35
34
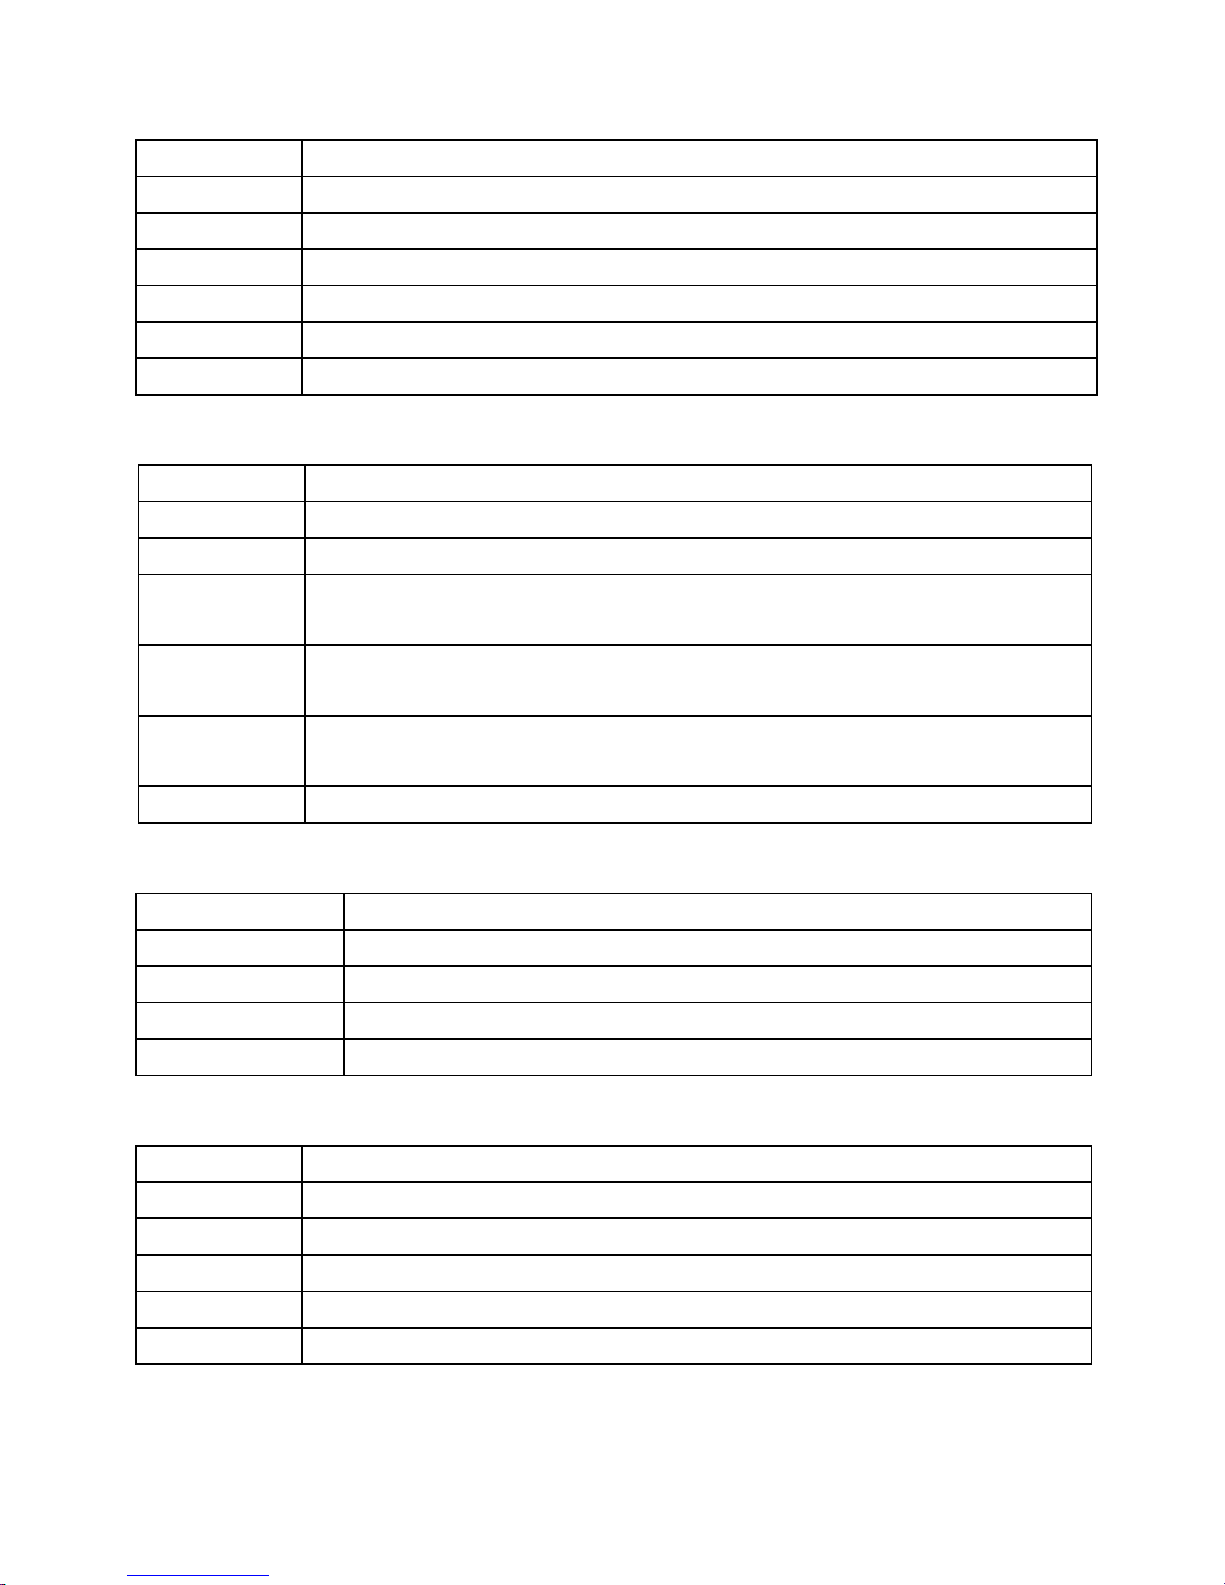
工廠:
照度(Lux)
場所
3000~1500
超精密作業、設計、製圖、精密檢查
1500~750
設計室、分析、組立線、塗裝
750~300
包裝、計量、表面處理、倉庫辦公室
300~150
染色、鑄造、電氣室
150~75
進出口、走廊、通道、樓梯、化粧室、廁所、附作業場倉庫
75~30
太平梯、倉庫、屋外動力設備(裝卸貨、存貨移動作業)
醫院:
照度(Lux)
場所
10000~5000
視機能檢查室(眼科明室)
1500~750
開刀房
750~300
診療室、治療室、制藥室、配藥室、藥局室、解剖室、病理細菌
室、急救室、產房、院長室、辦公室、護士室、會議室
300~150
病房、藥品室、病床看書、換藥、骨折石膏包紮、嬰房、紀錄室、
候診室、會診室、門診走廊
150~75
更衣室、物療室、X 光室、病房走廊、藥品室、滅菌室、病房室、
樓梯、內視鏡室
75~30
動物室、暗室(照片)、太平梯
理髮院:
照度(Lux)
場所
1500~750
剪燙髮、染整發、化妝
750~300
修臉、洗髮、前廳掛號台、整裝
300~150
店內廁所
150~75
走廊、樓梯
旅館、飯店、娛樂場:
照度(Lux)
場所
1500~750
櫃檯
750~300
玄關、宴會場、事務室、停車處、廚房
300~150
餐廳、洗手間、日式大房間
150~75
娛樂室、走廊、樓梯、客房、浴室、庭院重點照明、更衣室
75~30
太平梯
Page 36
35
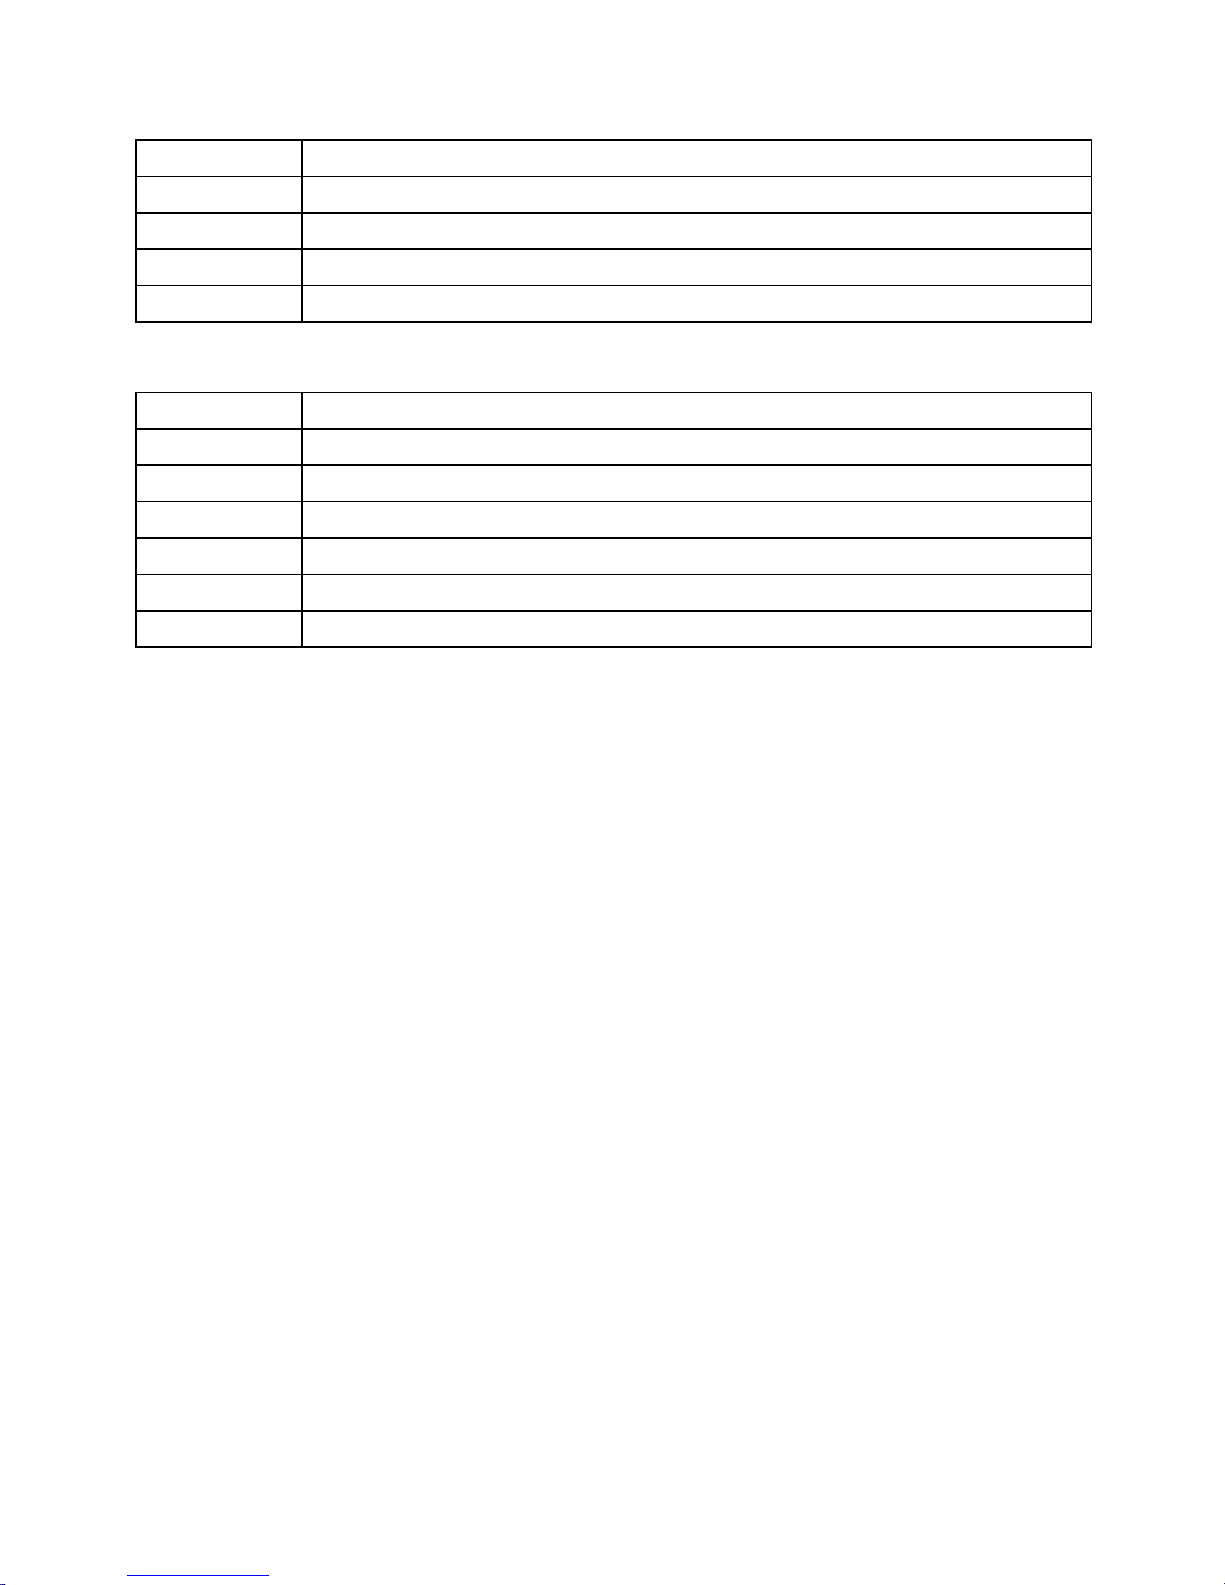
商店、百貨店:
照度(Lux)
場所
3000~750
室內陳列、飾窗陳列、示範表演場所、結帳櫃檯、包裝台
750~300
電梯大廳、電扶梯
300~150
商談室、化粧室、廁所、樓梯、走道
150~75
休息室、店內一般照明
住家:
照度(Lux)
場所
2000~750
手工藝、裁縫
1000~500
寫作、作業
750~300
讀書、化妝、廚桌、調理、電話
300~150
洗水槽、娛樂室、客廳、團聚、玄關(內側)鏡子
150~70
衣櫃、寢室、廁所、樓梯、走廊
75~30
門牌、信箱、門鈴鈕、陽臺
Page 37
36
MT-4617LED-C LED 照度计使用说明书
声明
根据国际版权法,未经允许和书面同意,不得以任何形式复制本说明书的任何内容。
本说明书在将来的版本中如有更改,恕不另行通知。
安全声明
小心或注意
“小心”或”注意”标志表示会对仪表或设备造成损坏的状况和操作。
它要求在执行此操作时必须小心,如果不正确执行此操作或不遵循此操作步骤,则
可能导致仪表或设备损坏。在不满足这些条件或没有完全理解的情况下,请勿继续
执行小心标志所指示的任何操作。
警告
“警告”标志表示会对用户造成危险的状况和操作。
它要求在执行此操作时必须注意,如果不正确执此行操作或不遵守此操作步骤,则
可能导致人身伤害或伤亡。在不满足这些条件或没有完全理解的情况下,请勿继续
执行警告标志所指示的任何操作。
安全信息
警告
请勿在存在爆炸性气体物质、可燃蒸汽物质及充满粉尘的环境中使用本仪表!
安全符号说明
本说明书包含安全操作和维护的基本要素。使用前,请仔细阅读下面的安全信息。
表 1:安全信息
用户在使用前必须阅读的重要信息
符合欧盟 CE 安全规范
表 2:警告信息
警告
表明错误的操作将导致严重的伤害甚至死亡事故发生
注意
表明错误的操作或疏忽将导致仪表损坏或测量结果错
误等
提示
操作建议或提示
Page 38

37
操作注意事项
遵从以下注意事项,确保安全操作和获得最佳的性能。
1. 首次使用前,请检查照度计是否工作正常,确认在存储和运输期间没有受到
损坏。
2. 使用环境:温度-10°C~50°C;湿度<80%RH(无凝露)
3. 存放环境:温度-10°C~50°C;湿度<70%RH(无凝露)
4. 为避免故障,请不要使照度计处于高温或高湿、腐蚀性或爆炸性气体、强电
磁或强振动、粉尘的环境。
5. 为避免损坏,搬运及使用过程中应避免剧烈机械振动,尤其避免发生跌落事
故。
6. 只有专业人员才能对本照度计进行校准和维修。
7. 在每次使用前,都要检查照度计的光传感器有无磨损、有无粉尘。请确保照
度计的光传感器是处于光滑完好、洁净的状态。如果照度计的一个或多个功
能不正常或没有为工作准备就绪,则不得使用照度计进行测量工作。
8. 在使用照度计时,不能长期使仪表测量值处于溢出状态(OL)。
9. 要避免日光暴晒。只有这样才能保证仪表的功能正常和长久的使用寿命。
10. 如果仪表受到极强电磁场的作用,则其功能会受影响。
11. 电池注意避免受潮。若显示屏显示电池欠压提示符,则必须更换电池,只允许
使用技术数据中指定电池型号。
12. 光检测器的灵敏度会因使用条件或时间而降低。建议您将仪表做定期校正,
以保证精确度。
13. 请您妥善保管原始包装,以便今后邮寄之用(如对照度计校准时)。
概述
MT-4617LED多功能照度计的人机接口十分友好,按键操作便捷,显示效果直观形象,
可测量LED灯、荧光灯、金属卤化灯、高压钠灯或白炽灯等光源发出的可见光, 广
泛运用于家庭、办公室、仓库、广场、
汽车、照明、LED制造、畜牧业、种植、摄影等室内场所, 量测范围达200000 Lux/20000
FC, 您可以选择各种不同类型的光源,也可以依需求设置需要的光源参数。
功能特点
1. 自动和手动切换量程;
2. 可测量多种不同颜色的 LED 光源;
3. 最大、最小值查询功能;
4. 数据保持功能;
5. 峰值测量功能;
6. 相对值测量功能;
7. 零点校准功能;
Page 39
38
8. 3 1/2 位 LCD 显示,带模拟条显示
9. 单位转换功能 Fc/Lux
10. 超量程显示“OL”,提示超量程;
11. 精度高,测量范围宽(0.00~200000Lux);
12. 电池欠压指示;
13. 按键音和静音选择;
14. 自动关机功能(超过 10 分钟无按键操作即自动关闭电源)
15. 结构紧凑,牢固耐用,便于携带
仪表面板说明
① 光传感器保护盖
② 光传感器
③ LCD 显示屏
④ 电源、按键音复合按钮:
开/关电源:短按开机,长按 1S 关机;
开启/关闭按键音:工作模式,短按开启/关闭按键音,开机默认有按键音。
⑤ 最大最小值查询模式按钮。
⑥ 单位转换按钮:
勒克司/英尺烛光(Lux/ Fc)
MT-4617 平面图
Page 40
39
⑦ 数据保持、零点校准复合按钮:
数据保持:短按,进入/退出数据保持模式
零点校准:长按 1S,执行零点校准功能
⑧ 相对值测量、峰值测量复合按钮:
相对值测量:短按,进入/退出相对值测量模式
峰值测量:长按 1S,进入/退出峰值测量模式
⑨ 手动切换量程按钮:
短按,进入手动量程状态,单击跳到下一量程。
长按超过 1 秒,则退出手动量程模式。
LCD 显示接口
1. 手动切换量程模式提示符号
2. 数据保持模式提示符号
3. 模拟条显示当前测量值信息
4. 数字显示当前测量值信息
5. Lux 单位符号
6. Fc 单位符号
7. 自动测量模式提示符号
8. 峰值测量模式提示符号
9. 电池电压低电提示符号
10. 相对值测量模式提示符号
11. 最大值查询模式提示符号
12. 最小值查询模式提示符号
13.光源选择提示符号
14.光源设定值代码
测量方法
测量前的注意事项
警告
1:请勿在存在爆炸性气体物质、可燃蒸汽物质及充满粉尘的环境中使用本仪表!
Page 41

40
2:请勿在高温、高湿场所下测量。
3:请勿在强红外线或紫线环境中使用本仪表!
提示
1. 本仪器光传感器模拟人眼对光的敏感曲线而设计,光谱范围为 320~730nm。
若处于红外线区域测量,则数据将偏差较大。
2. 光传感器在 2854 °K 色温条件下依照 CIE 普通白炽灯进行校准;对其他类灯
的光谱,所提供的读数可能不同。
3. 光源测试参考准位在受光球面正顶端。
4. 测量前使光检测器曝光 2 分钟后,方可开始测量。
5. 要防止测试者的人影和其他因素对光检测器的影响。
作用原理
各照度标度的概念
1 勒克司(流明)是与光强为一烛光的灯垂直距离 1 米处,面 积为 1 平方米的表面上接
受的照度。
1 英尺烛光 (Fc) 是与光强为一烛光的灯垂直距离 1 英尺处,面 积为 1 平方英尺的表
面上接受的照度。
照度标度单位转换:
1 Fc = 10.764 Lux;
1 Lux = 0.09290 Fc。
光照度与发光强度的换算公式:E = I / r 2
式中:E --- 光照度值(单位:Lux);
I --- 光源的发光强度(单位:cd);
r --- 光源发光面到光检测器之间的距离(单位:m)。
测定时,要求光源发光面和光传感器之间的最小距离应大于光源发光面(或光传感
器)最大尺寸的 15 倍。
测试实例 (典型练习实例)
1 站在某一光源下,取下多功能照度计传感器保护盖并将它与光源垂直放置。
2 短按电源键开机,此时 LCD 屏全显(约 1 秒),同时蜂鸣器鸣响两声,LCD
屏左上角显示“AUTO”字样,仪器进入自动测量模式。
3 短按手动切换量程 RAN 键,LCD 左上方显示“MANU”字样进入手动切换量
程模式,进入手动切换量程功能后每次短按该键,则按 20.00Lux 200.0Lux
2000Lux 20000Lux 200000Lux (或 20.00Fc 200.0 Fc 2000 Fc20000 Fc
循环;长按该键 1 秒,LCD 左上方的“MANU”字样熄灭,LCD 左上角显示
Page 42

41
“AUTO”字样,退出手动切换量程功能,返回自动切换量程。
4 短按相对值测量、峰值测量 REL/PEAK 组合键,LCD 接口左上方显示“REL”
字样,进入相对值测量模式,再次短按该键则退出相对值测量模式,LCD 接
口左上方“REL”字样熄灭,返回原来的测量模式;
5 长按相对值测量、峰值测量组合键 1 秒,进入峰值测量模式,LCD 接口右上方
显示“PEAK”和“MANU”字样,再次长按该键 1 秒,LCD 右上方的
“PEAK”字样熄灭,LCD 左上角显示“AUTO”字样,返回自动测量模式。
6 短按最大最小值查询 MAX/MIN 键,LCD 接口正上方显示“MAX”字样,进入
最大最小值查询模式,最大最小值查询模式下,每次短按该键,则按 MAX
MIN 循环切换;长按“MAX/MIN”键 1 秒,LCD 界面正上方的
“MAX/MIN”字样消失,退出最大最小值查询模式。
7 短按资料保持、零点校准 HOLD/ZERO组合键, LCD接口左上方显示“HOLD”
字样,进入数据保持模式,再次短按该键,LCD 接口左上方的“HOLD”字样
消失,退出数据保持模式;
8 在任何模式下盖住传感器,长按数据保持、零点校准组合键 1 秒,LCD 接口显
示“ADJ”字样,进入零点校准模式,几秒后 LCD 接口显示的“ADJ”字样消
失,自动退出零点校准模式,返回自动测量模式。
提示
‧ 光源测试参考准位在受光球面正顶端。
‧ 在各种测量模式下,LCD 正中间的模拟条都会随着数码管的数字的变化
而相应地变化。
‧ 读数时,可短按“HOLD/ZERO”锁定当前数据;
‧ 在进行零点校准时,一定要将光传感器保护盖盖住光传感器,方可进行。
‧ 当完成测试时,将传感器保护罩盖回,以保护滤光片和传感器。
具体应用
手动切换量程测量模式应用
1. 短按 RAN 键(手动切换量程键), 进入手动切换量程,LCD 左上方显示
“MANU”字样(如下图所示);
2. 进入手动切换量程功能后每次短按 RAN 键,则按
20.00Lux—>200.0Lux—>2000Lux—>20000Lux—>200000Lux(或 20.00Fc—>200.0
Fc—>2000 Fc—>20000 Fc)循环;
Page 43
42
3. 长按 RAN 键 1 秒,LCD 左上方的“MANU”字样熄灭,LCD 左上角显示
“AUTO”字样,退出手动切换量程功能,返回自动切换量程;
提示
5. 在峰值测量、相对值测量和最大最小值查询模式下短按 RAN 键方有效。
6. 在相对值测量模式和最大最小值查询模式下长按该键 1 秒, 则返回自动切换量
程。
7. 在峰值测量模式、数据保持模式和零点校准模式下长按 RAN 键无效。
8. 在此模式中,当测量值超过当前量程时,LCD 显示“OL”,提示超量程。此
时用户应切换测量量程;
相对值与峰值测量模式应用
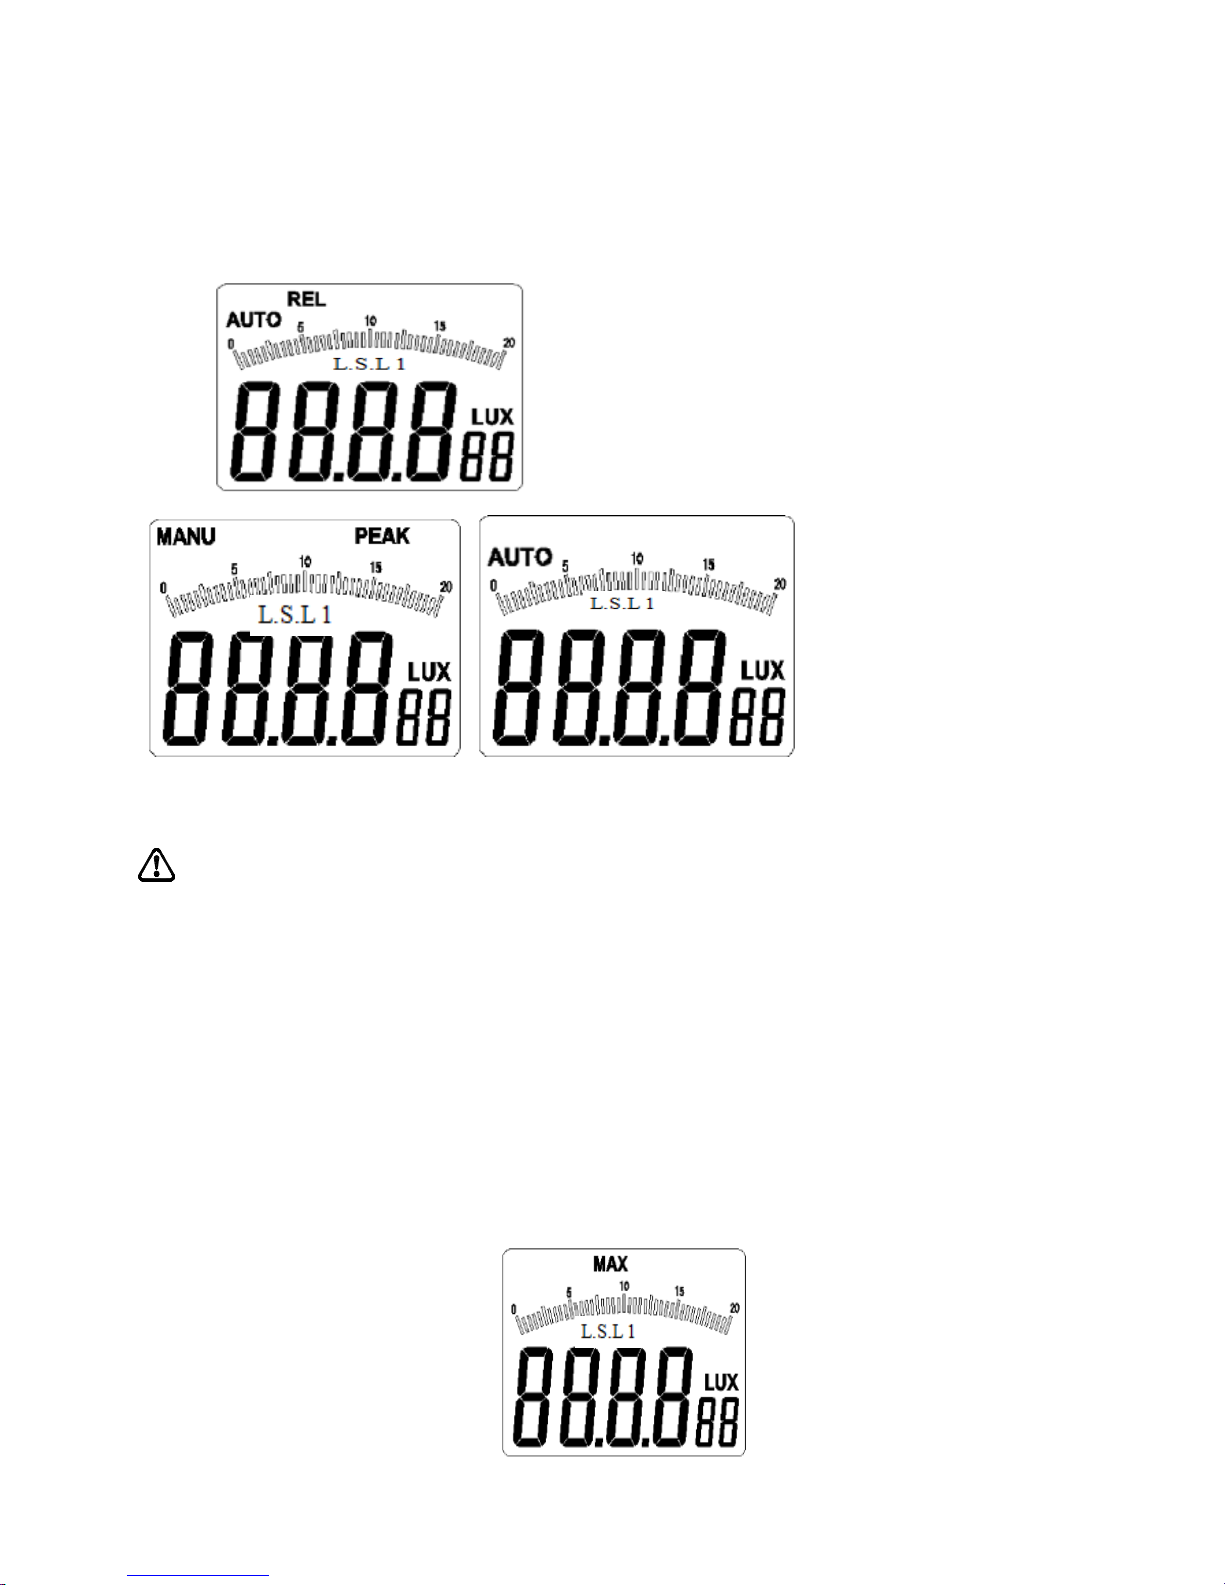
1. 短按 REL/PEAK 键(相对值测量、峰值测量组合键), LCD 接口左上方显示
“REL”字样(如下图 3-1-2A 所示),进入相对值测量模式;
2. 再次短按 REL/PEAK 键则退出相对值测量模式,LCD 接口左上方“REL”字样
200.0Lux 文
2000Lux 文件
20000Lux 文件界
200000Lux
20.00Lux 文件界
Page 44
43
熄灭,返回原来的测量模式;
3. 长按“REL/PEAK”键 1秒,进入峰值测量模式,LCD 接口右上方显示“PEAK”
字样,同时 LCD 左上方显示“MENU”字样(如图 3-1-2B 所示);
4. 再次长按该键 1 秒,LCD 右上方的“PEAK”字样熄灭,LCD 左上方显示
“AUTO”字样,返回自动测量模式(如图 3-1-2C 所示)。
图 3-1-2A
提示
1. 在自动测量模式、峰值测量模式、最大最小值查询模式和数据保持模式下短
按 REL/PEAK 键方有效。
2. 在非零点校准模式下长按“REL/PEAK”键 1 秒,均能进入峰值测量模式。
最大最小值查询模式应用
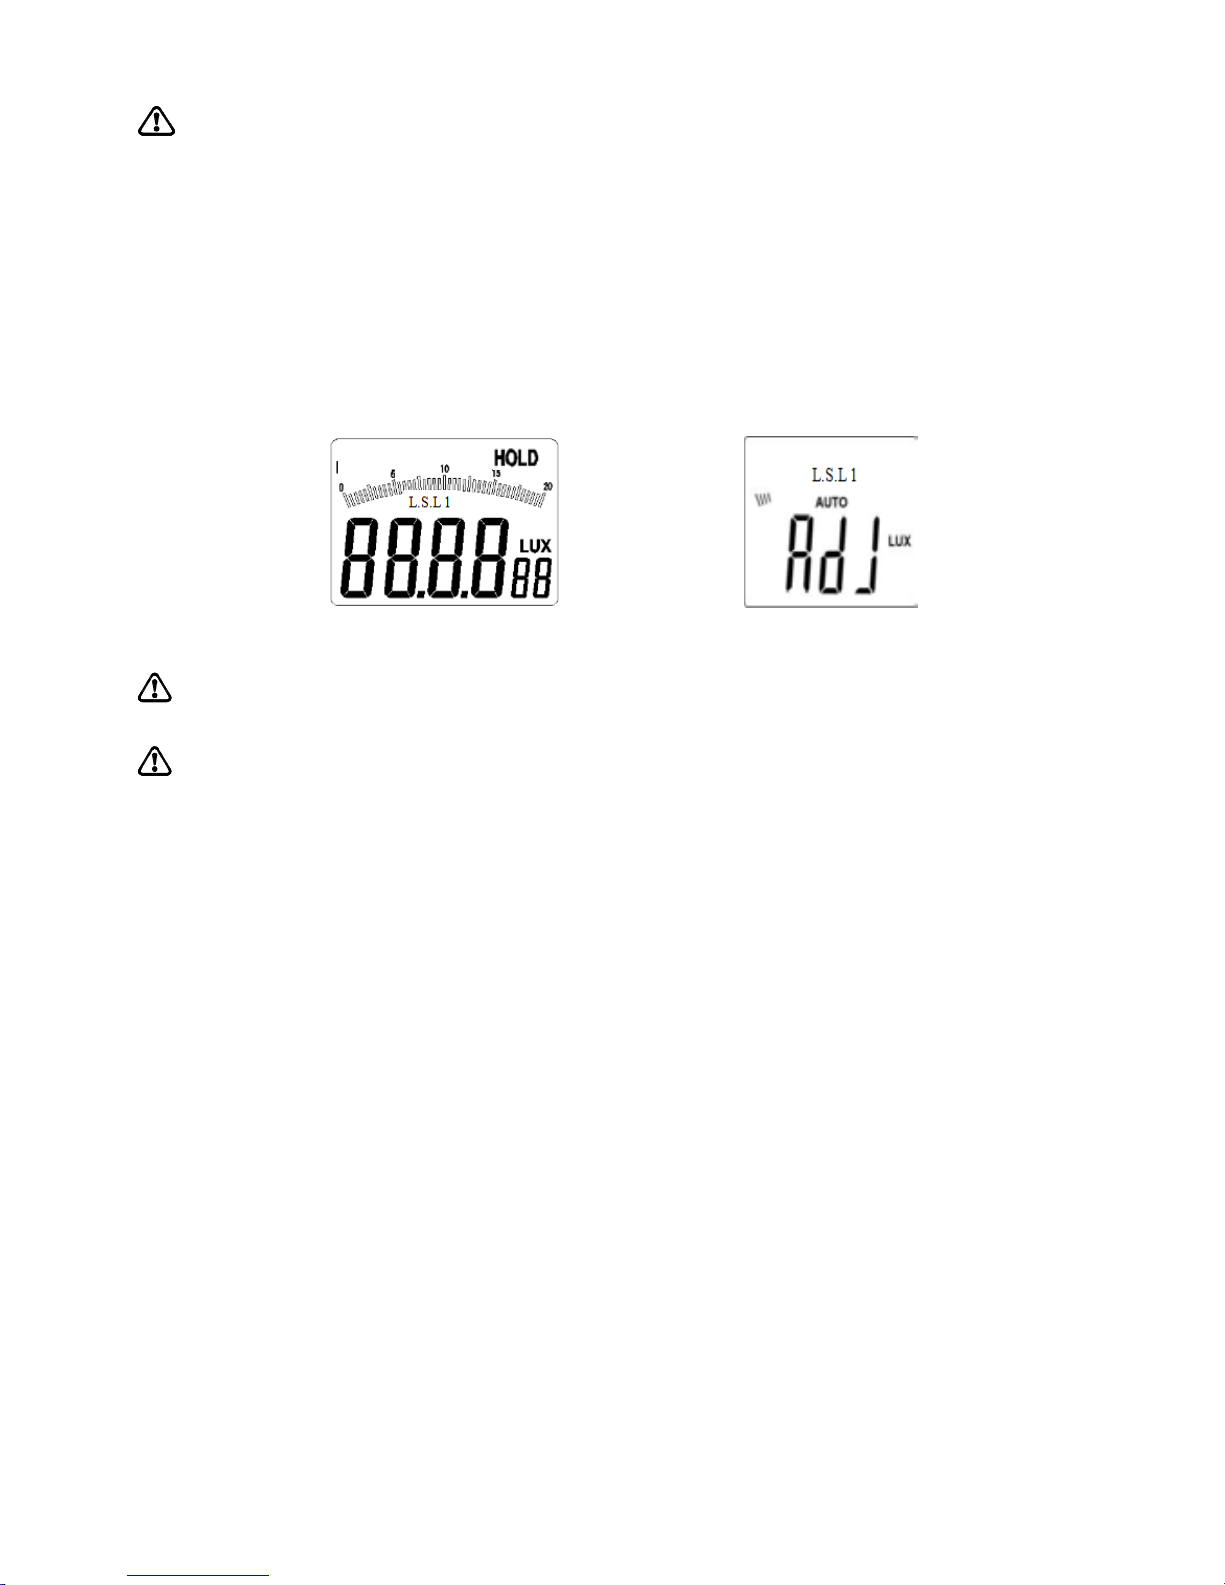
1. 短按“MAX/MIN/LS”键,LCD 正上方显示“MAX”字样(如图 3-1-3 所示),
进入最大最小值查询模式;
2. 最大最小值查询模式下,每次短按“MAX/MIN”键,则按 MAX<—>MIN 循环
切换;
3. 长按“MAX/MIN”键 1 秒,LCD 界面正上方的“MAX/MIN”字样消失,退出
最大最小值查询模式。
圖 3-1-2B
圖 3-1-2C
图 3-1-3
Page 45
44
提示
在非零点校准模式下,短按 MAX/MIN”键均有效,都可进行最大最小值查询功能;
数据保持与零点校准模式应用
1. 短按“HOLD/ZERO”键,LCD 接口右上方上方显示“HOLD”字样(如图
3-1-4A 所示),进入数据保持模式;
2. 再次短按该键,LCD 接口左上方的“HOLD”字样消失,退出数据保持模式;
3. 将光传感器保护盖盖住光传感器,长按“HOLD/ZERO”键 1 秒,LCD 接口显
示“ADJ”字样(如图 3-1-4B 所示),进入零点校准模式,几秒后 LCD 接口显
示的“ADJ”字样消失,自动退出零点校准模式,返回自动测量模式。
注意
在零点校准前,一定要将光传感器保护盖盖住光传感器,方可进行。
提示
1. 在非零点校准模式下,短按“HOLD/ZERO”键均有效,都可进入数据保持模
式。
2. 在任何模式下都可进行零点校准。
光源选择模式应用
1. 光源选择:
长按“MAX/MIN/L.S.”键 1 秒,LCD 界面的“L.S.LN”字符跳动表示进入光
源选择模式,此时短按“MAX/MIN/L.S.”或“Lx/Fc”键,则光源在 L0 到 L9
之间变化,按"HOLD/ZERO"键确定,进入正常测量模式;即可进行测量。
2. 光源参数设定:
2.1. 长按“MAX/MIN/L.S.”键 1 秒,LCD 界面的“L.S.LN”字样的“N”字符
跳动表示进入光源选择模式,此时短按“MAX/MIN/L.S.”或“Lx/Fc”键,
则光源在 L0 到 L9 之间变化;选择需要设置的光源代码 L0~L9
2.2. 短按“RAN”键,则“N”字符停止跳动,参数值跳动,表示进入参数
设置模式,此时短按“MAX/MIN/L.S.”或者“Lx/Fc/CD”键可以改变参数
值;
2.3. 再短按“RAN”键,则进入光源选择模式,“N”字符跳动,参数值不
跳动,依次来回切换;
2.4. 长按“MAX/MIN/L.S.”键 1 秒,则保存设置完的光源参数值进入正常
测量模式;
图 3-1-4A
图 3-1-4B
Page 46
45
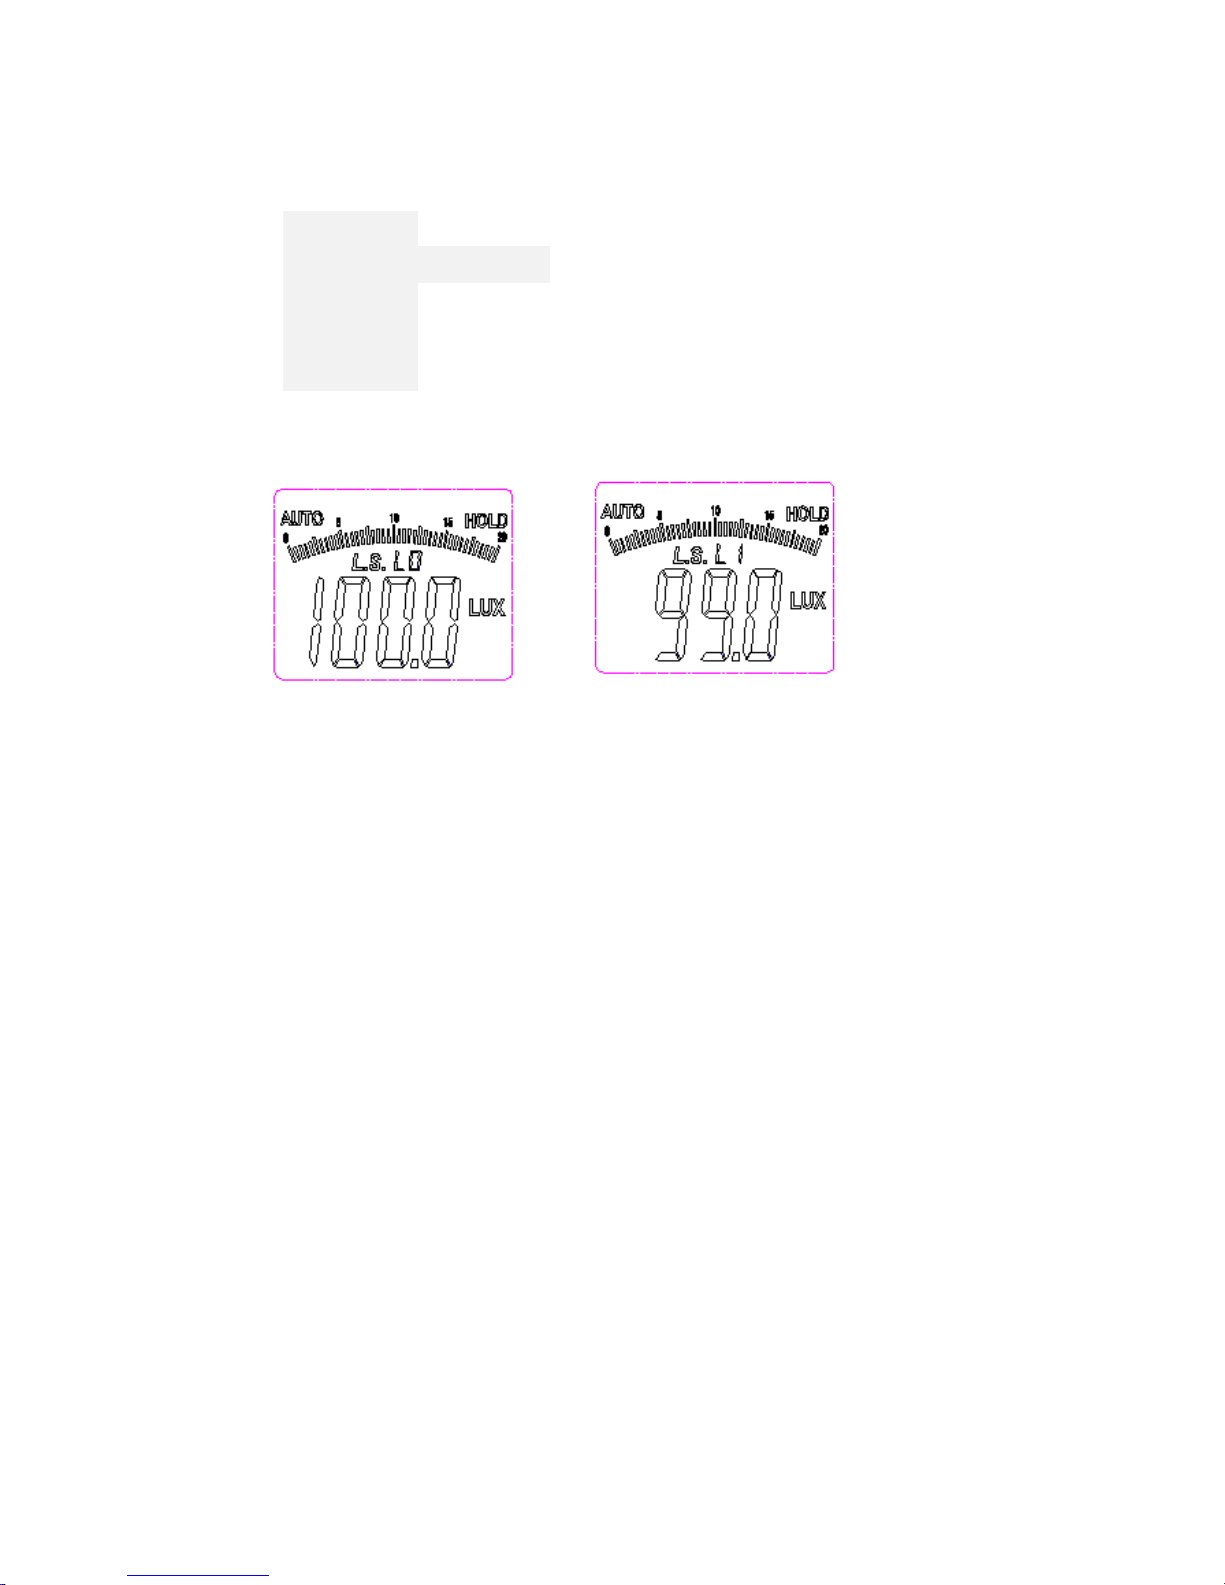
3. 光源参数默认值:
L0—>标准光源 A:1.000
L1—>LED 白色光:0.990
L2—>LED 红色光:0.516
L3—>LED 琥珀色(黄色)光:0.815
L4—>LED 绿色光:1.216
L5—>LED 蓝色光:1.475
L6—>LED 紫色光:1.148
L7--L9—>默认标准光源 A:1.000
(建议:如需要修改光源参数最好选择 L7~L9 参数修改)
其他功能
静音功能
短按电源/按键音复合铵钮开启或关闭按键音。
自动关机功能
在 10 分钟内无任何操作,仪表将自动关机。
技术数据
1. 温度范围:
工作:-10~50 ℃,最大 80 %的相对湿度(非凝结)。
储存:-10~50 ℃,最大 80 %的相对湿度(非凝结)(取掉电池)。
2. 采样速率:≥2 次/秒。
3. 显示屏:3½ 位,最大读数 1999,带模拟条显示;
4. 传感器: 硅光电二极管
5. 测量光谱范围:320~730nm
6. 测量范围:20、200、2000、20000、200000 Lux / 20、200、2000、20000 FC
7. 使用环境:室内使用
8. 海拔: 最高 2000m
9. 电池寿命:大约 200 小时
10. 电源:1×9 V,IEC 6LR61
11. 尺寸(高×宽×深):170 mm×85 mm×45 mm
12. 精度:±3%(在 2854K 时依照普通白炽灯校准),±6% 其他可见光光源
Page 47
46
注:余弦角度依照 JIS C 1609:1993 和 CNS 5119 A 级通用规范修正。
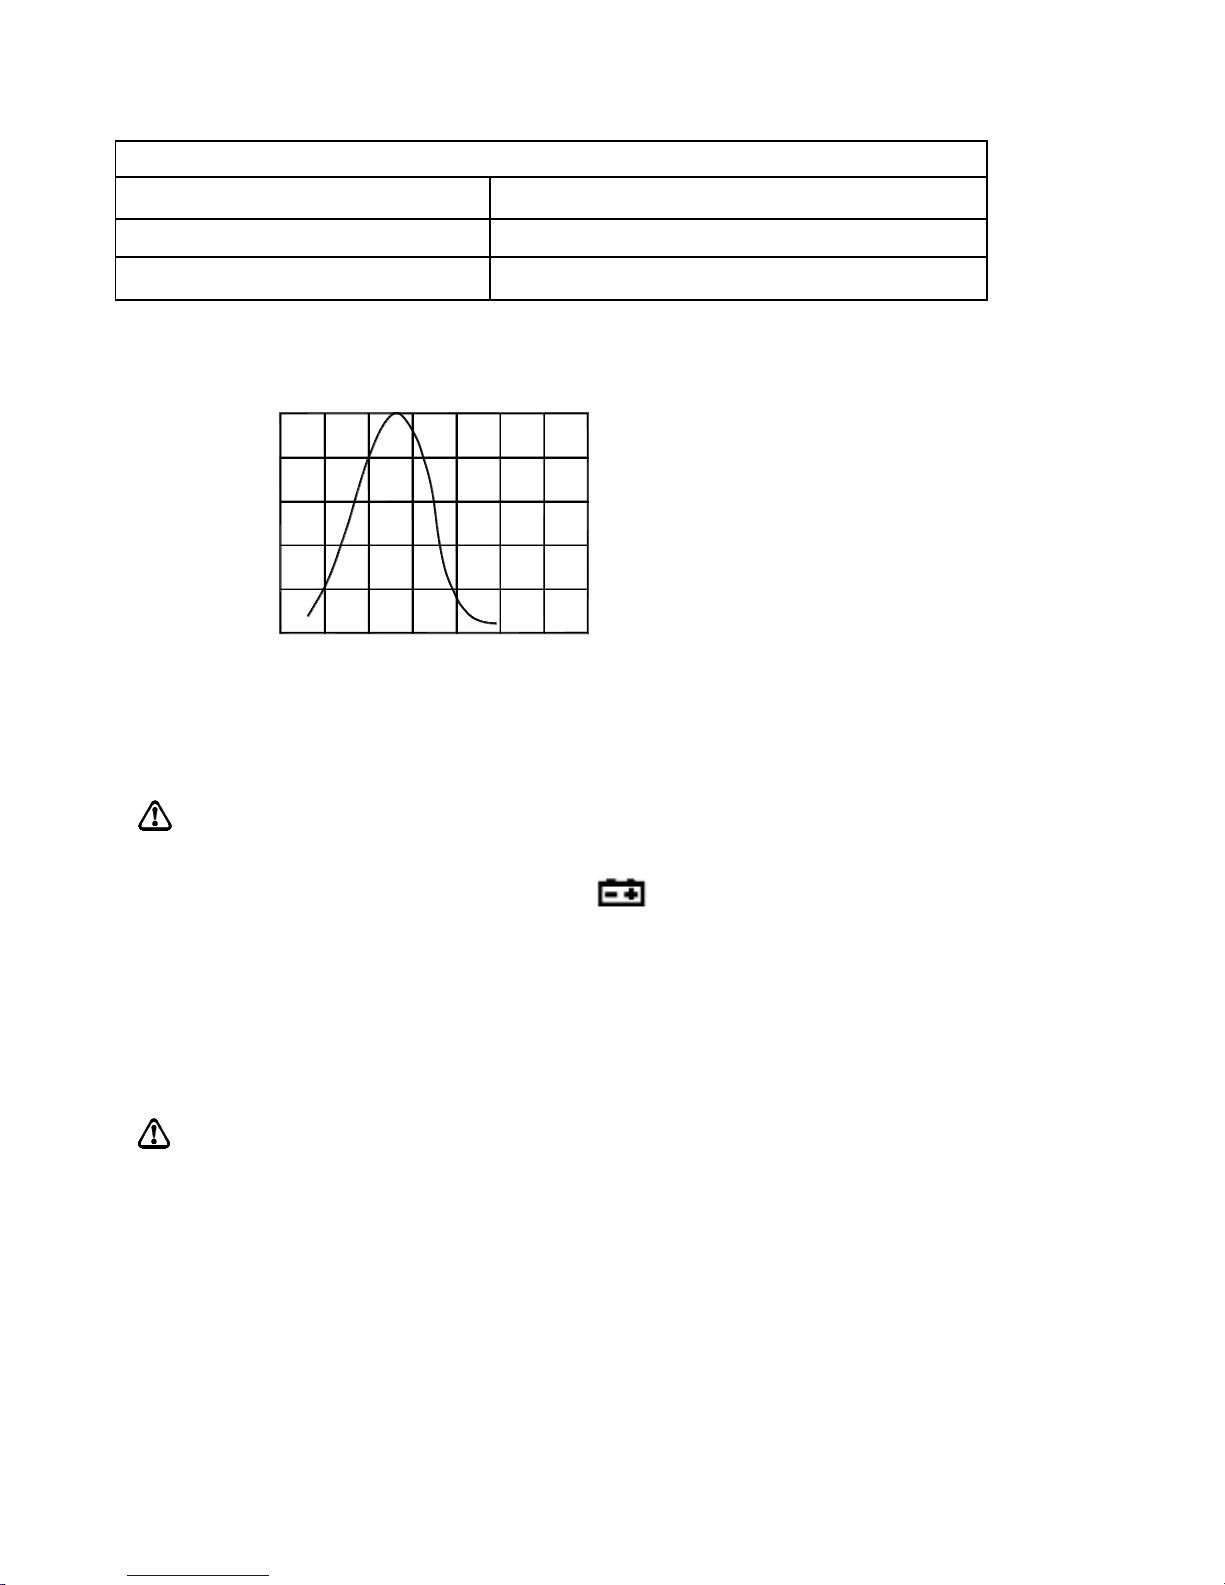
光灵敏度特性:
20
400
80
60
40
100
900600500 800700 1000
Relative Sensitivity (
%)
Wave Length (nm)
维护和维修
维修
注意
如果仪表在使用过程中似乎存在故障,应执行下列步骤确定问题的根源:
1. 检查电池。当液晶显示屏上出现“ ” 符号时应立即更换电池。
2. 查阅操作说明确定操作步骤是否有误。
3. 仪表的维修必须由经厂家授权的服务中心或其他具备资格的仪器维修人员承
担。
清洁
先用沾有清水或中性清洁剂的软布擦拭探测仪,最后用干布擦干。
注意
1. 在进行清洁工作之前,请您确保设备已经关机。
2. 在清洁工作中,请勿使用苯类,酒精,丙酮,乙醚,酮,稀释剂,汽油等,这
些会造成设备变形或退色。
3. 在清洁之后要等到设备完全干燥之后,方可继续使用。
更换电池
如果显示屏上出现电池符号闪烁(LCD 接口⑨)则必须更换电池。更换电池步骤如
下:
1. 将仪表关机;
2. 拧仪表备背面的螺钉,揭开仪表的电池格盖罩;
余弦角度偏差特性
余弦角度
误差
30°
±2%
60°
±6%
Page 48
47
3. 取出耗尽的电池;
4. 按照正确的极性安装新的电池;
注意
1. 在更换电池之前,必须将仪表关机。
2. 只能够使用在技术数据中指定的电池。
3. 如果在较长时期内不使用仪表,则要将其中的电池取出来。
4. 在处理废旧电池时,必须遵照现行的关于电池回收、再利用和处理的规定。
各种场所照度标准参考表
将 Lux 照度值除以 10.764,即可求得 Fc 照度值。
学校:
照度(Lux)
场所
1500~300
制图教室、缝纫教室、计算机教室
750~200
教室、实验室、实习工厂、研究室、图书阅览室、书库、办公
室、教职员休息室、会议室、保健室、餐厅、厨房、配膳室、
广播室、印刷室、总机室、守卫室、室内运动场
300~150
大教室、礼堂、贮柜室、休息室、楼梯间
150~75
走廊、电梯走道、厕所、值班室、工友室、天桥、校内室外运
动场
75~30
仓库、车库、安全梯
事务所:
照度(Lux)
场所
2000~1500
设计室、事务室
1500~750
大厅通道(白天)、营业室、制图室、打卡、打字
750~300
计算器室、会议室、印刷室、总机室、控制室、招待室、娱乐室、
餐厅
300~150
书库、娱乐室、餐厅教室、休息室、警卫室、电梯(走道)、盥洗室、
厕所
150~75
喝茶室、更衣室、仓库、值夜室(入口处)
75~30
太平梯
Page 49
48
工厂:
照度(Lux)
场所
3000~1500
超精密作业、设计、制图、精密检查
1500~750
设计室、分析、组立线、涂装
750~300
包装、计量、表面处理、仓库办公室
300~150
染色、铸造、电气室
150~75
进出口、走廊、通道、楼梯、化妆室、厕所、附作业场仓库
75~30
太平梯、仓库、屋外动力设备(装卸货、存货移动作业)
医院:
照度(Lux)
场所
10000~5000
视机能检查室(眼科明室)
1500~750
开刀房
750~300
诊疗室、治疗室、制药室、配药室、药局室、解剖室、病理细菌
室、急救室、产房、院长室、办公室、护士室、会议室
300~150
病房、药品室、病床看书、换药、骨折石膏包扎、婴房、纪录室、
候诊室、会诊室、门诊走廊
150~75
更衣室、物疗室、X 光室、病房走廊、药品室、灭菌室、病房室、
楼梯、内视镜室
75~30
动物室、暗室(照片)、太平梯
理发院:
照度(Lux)
场所
1500~750
剪烫发、染整发、化妆
750~300
修脸、洗发、前厅挂号台、整装
300~150
店内厕所
150~75
走廊、楼梯
旅馆、饭店、娱乐场:
照度(Lux)
场所
1500~750
柜台
750~300
玄关、宴会场、事务室、停车处、厨房
300~150
餐厅、洗手间、日式大房间
150~75
娱乐室、走廊、楼梯、客房、浴室、庭院重点照明、更衣室
75~30
太平梯
Page 50

49
商店、百货店:
照度(Lux)
场所
3000~750
室内陈列、饰窗陈列、示范表演场所、结账柜台、包装台
750~300
电梯大厅、电扶梯
300~150
商谈室、化妆室、厕所、楼梯、走道
150~75
休息室、店内一般照明
住家:
照度(Lux)
场所
2000~750
手工艺、裁缝
1000~500
写作、作业
750~300
读书、化妆、厨桌、调理、电话
300~150
洗水槽、娱乐室、客厅、团聚、玄关(内侧)镜子
150~70
衣柜、寝室、厕所、楼梯、走廊
75~30
门牌、信箱、门铃钮、阳台
Page 51
50
中国地区产品保固卡
购买日期
店章
公司名称
联络电话
电子邮箱
联络地址
产品型号
□ MT-4617LED-C
※ 在正常使用情况下,自原购买日起 12 个月免费维修保证(不含耗材、消耗品)。
※ 产品保固卡需盖上店章、日期章,其保固效力始生效。
※ 本卡请妥善保存,如需维修服务时,请出示本卡以为证明。
※ 保固期满后,属调整、保养或是维修性质之服务,则酌收检修工时费用。若
有零件需更换,则零件费另计。
产品保固说明
保固期限内,如有下列情况者,维修中心则得酌收材料成本或修理费(由本公司
维修人员判定):
• 对产品表面的损伤,包括外壳裂缝或刮痕
• 因误用、疏忽、不当安装或测试,未经授权打开产品修理,修改产品或者任
何其它超出预期使用范围的原因所造成的损害
• 因事故、火灾、电力变化、其它危害,或自然灾难所造成的损害。
非服务保证内容:
• 机件本体外之消耗品:如电池...等消耗品
• 机件本体之外之附配件:如耳机麦克风,等附配件。
超过保证期限之检修或服务,虽未更换零件,将依公司保固维修政策酌收服务
费。
制造商:宝工实业股份有限公司
地 址:台湾台北新北市新店区民权路 130 巷 7 号 5 楼
电 话:886-2-22183233
E-mail: [email protected]
生产商:上海宝工工具有限公司
地址:上海市浦东新区 1365 弄 25 号
原产地:中国 上海
销售公司:深圳畅联贸易有限公司
地址:深圳市福田区红荔西路上步工业区 403 栋东座 5 楼
电话:0755-83692415 传真:0755-83692143
400 服务热线:400-1699-629
E-mail: [email protected]
Page 52

51
宝 工 实 业 股 份 有 限 公 司
PROKIT’S INDUSTRIES CO., LTD
http://www.prokits.com.tw
Email: [email protected]
©2018 Prokit’s Industries Co., LTD. All rights reserved 2018001(C)
 Loading...