

Page 1
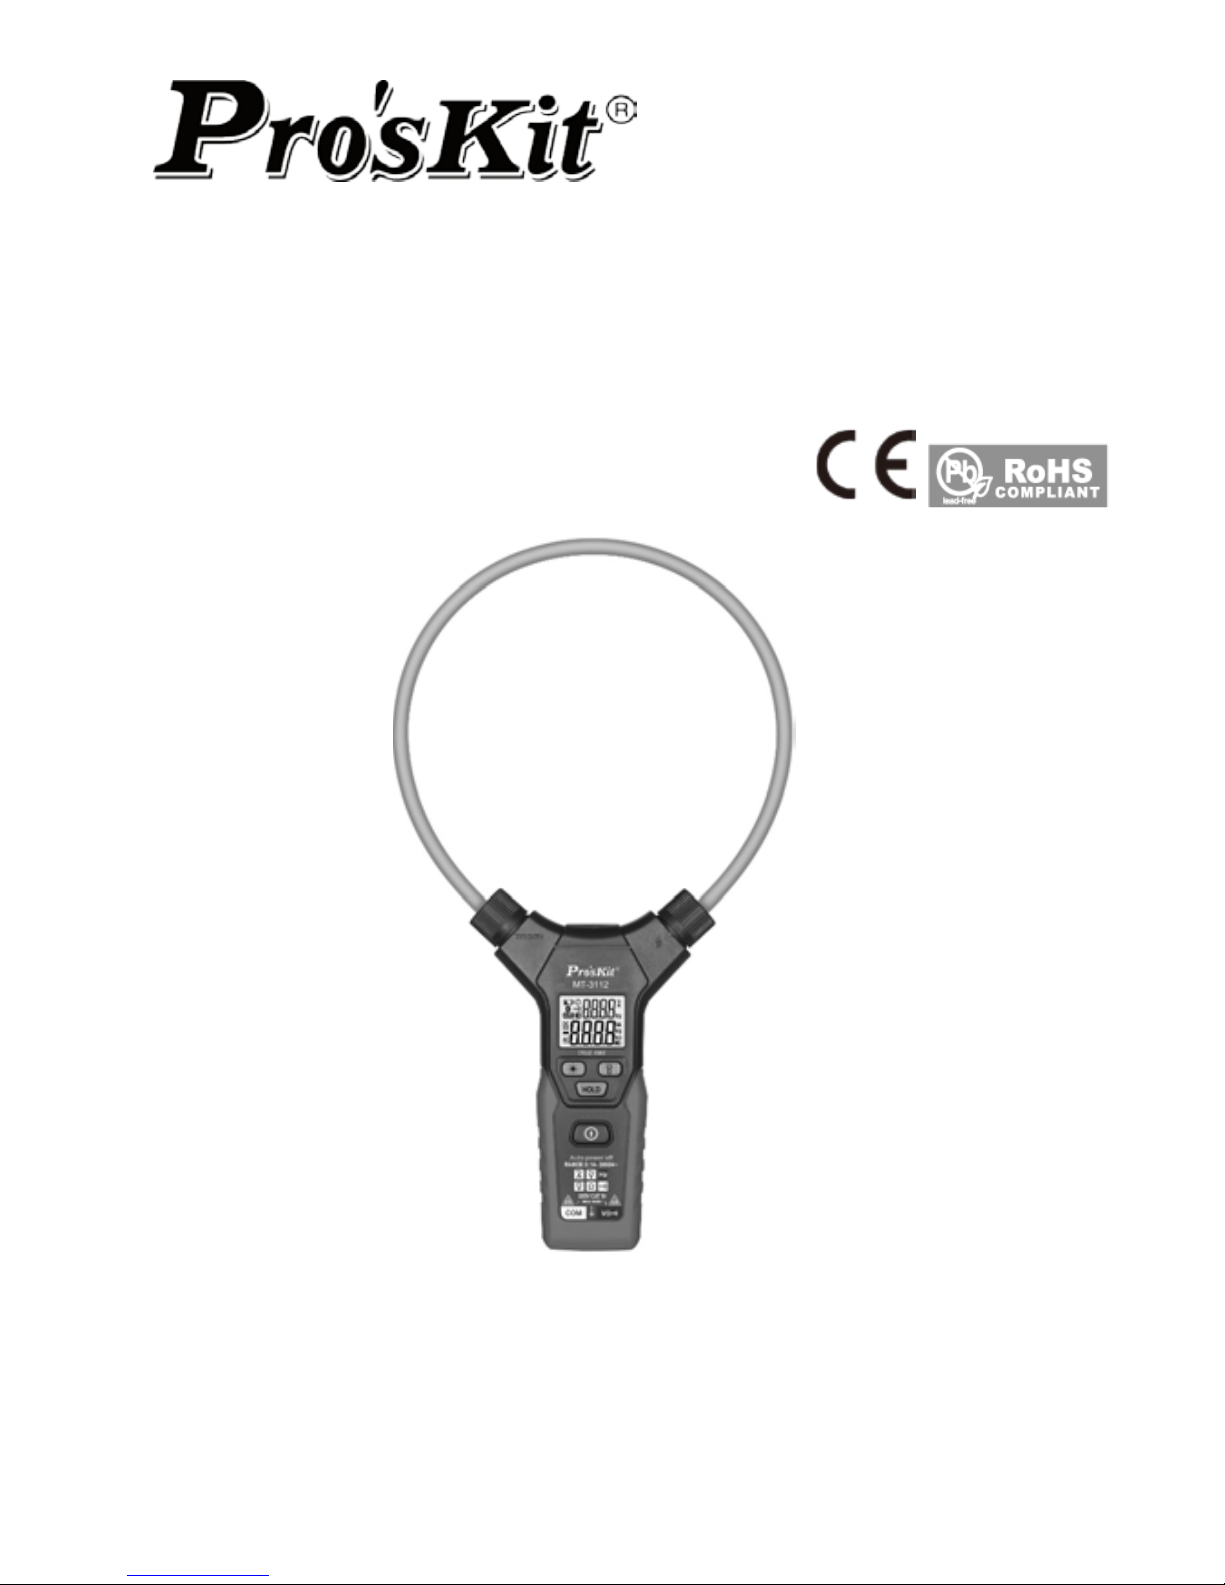
MT-3112
3 5/6 Smart True-RMS Flex Clamp Meter
User’s Manual
1st Edition,
©2016 Copyright by Prokit’s Industries Co., Ltd.
Page 2
1
1.Statement
In accordance with the international copyright law, without permission or
written consent, any information contai ned in this manual sh all not be duplica ted
in any form. This manual is subject to change in its future versions without further
notice.
1.1 Safety Notices
Caution
The sign “Caution” indicates any state or operation that may cause damages to the
instrument or device.
It requires the operation to be performed with due caution. If the operation is not
correctly performed, or the steps of the operation are not followed, the instrument or
device may be damaged. Unless these conditions are satisfied or fully understood, no
related operation as indicated in the sign “Caution” shall be done.
Warning
The sign “Warning” indicates any state or operation that may cause dangers to the
user.
It requires the operation to be performed with due caution. If the operation is not
correctly performed, or the steps of the operation are not followed, bodily injuries or
deaths may arise. Unless these conditions are satisfied or fully understood, no related
operation as indicated in the sign “Warning” shall be done.
Befor e u s ing the in st rumen t, Please read this manual carefully and pay
atten tion to th e re l e v an t safety warn ing information.
2.Safety Information
The instrument is designed according to the safety requirements of the international
safety standards EN61010-1, EN61010-2-032 and EN61326-1 regarding the electronic
testing instruments. It is designed and made in strict accordance with the EN61010-1,
EN61010-2-032, EN61326-1,CAT IV 600V over voltage safety standard and class of
pollution 2.
Page 3

2
3.Safety O perat i on S peci f ication
Warning: To avoid such possible safety accidents as electric shock
or bodily injury, please strictly observe the following guidelines:
Prior to the use of the instrument, please carefully read the manual, and pay special
attention to the rel ated safety warni ng information herein. T he instrument shall be
used in stringent conformity to the instructions contained herein, or else the
protection function supplied by the instrument may be impaired or damaged.
Prior to the use of the instrument, please check the outer casing for crack or the
plastic parts for damage; c heck the insulating layer for damage; c heck whether or
not there is any exposed metal or sign of wear; and check the co nnectivity. If any
defect is detected, the instrument shall not be used any more.
Prior to the use of the instrument, please check the insulati ng layer of the flexibl e
clamp for damage; if any, do not use it any longer;
Prior to the use of the instrument, please measure a given voltage with the
instrument, to confirm whether or not it is in good condition;
Please use the instrument according to the measureme nt type and rated value of
voltage or current as indicated on the instrument or in the manual.
Please observe the local and national safety rules. Wear the personal protective
equipment (such as the rubber gloves, face masks, flame-retardant clothes etc
approved), to avoid injuries caused by electric shock or electric arc due to the
exposed dangerous live conductors.
The voltage applied between the input termi nals or between any terminal and the
ground point shall not exceed the rated value as indicated on the instrument.
Measure with due caution a voltage going beyond 30V (AC true effective value),
42V (AC peak value) or 60V (DC). The voltage of this kind may cause the danger of
electric shock.
When the low battery power is indicated on the instrument, the battery shall be
promptly replaced, to avoid measuring errors.
Never use the instrument in an environment containing explosive gas or vapor
around or a wet environment.
When using the pen, please hold it with fingers at the back of the probe finger
protection device.
Page 4
3
To make measurement, connect the zero line or ground line, and then the firing line;
to finish measurement, disconnect the firi ng line, and then the zero li ne and groun d
line.
Before opening the outer casing or battery cover, remove the pen from the
instrument. Never use the instrument with the instrument disassembled or the
battery cover opened.
To meet the requirements of the safety standards, the instrument shall be used with
the pen supplied. If the pe n is damaged, it shall be replaced with one of the sam e
type and the same electrical specification.
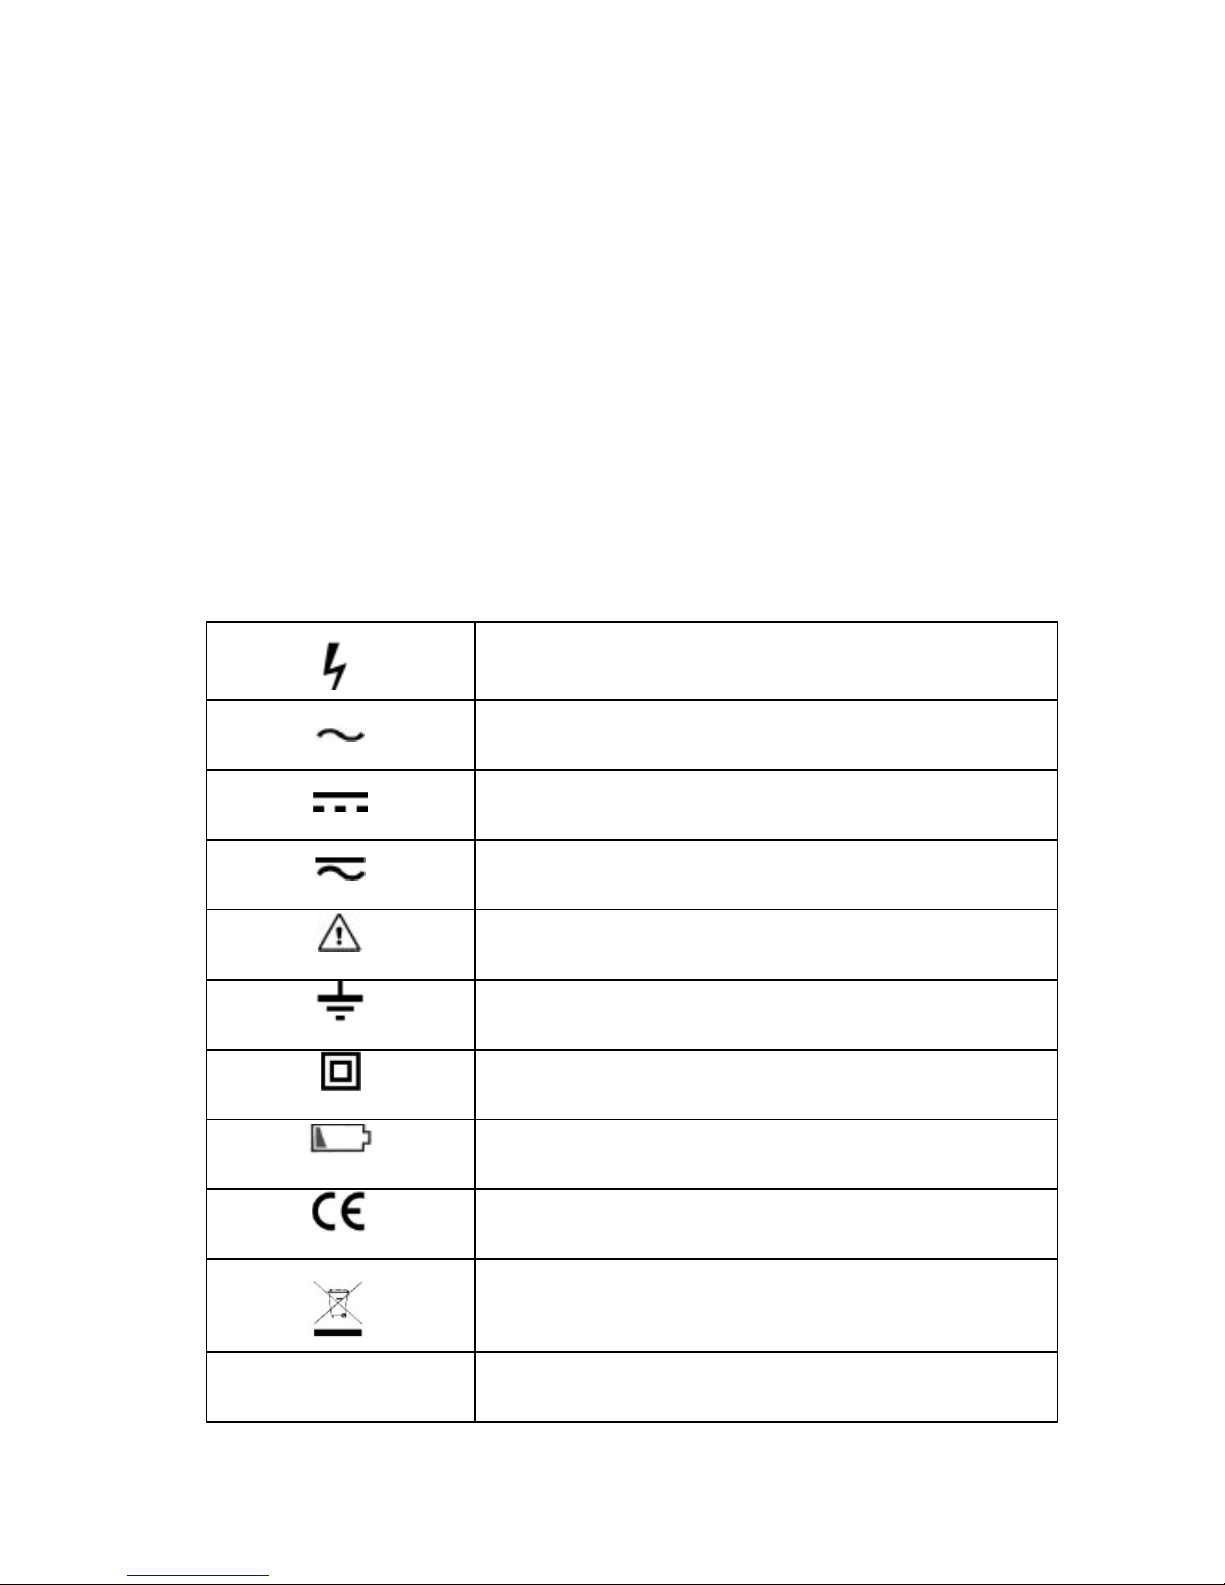
4.Electrical Symbols
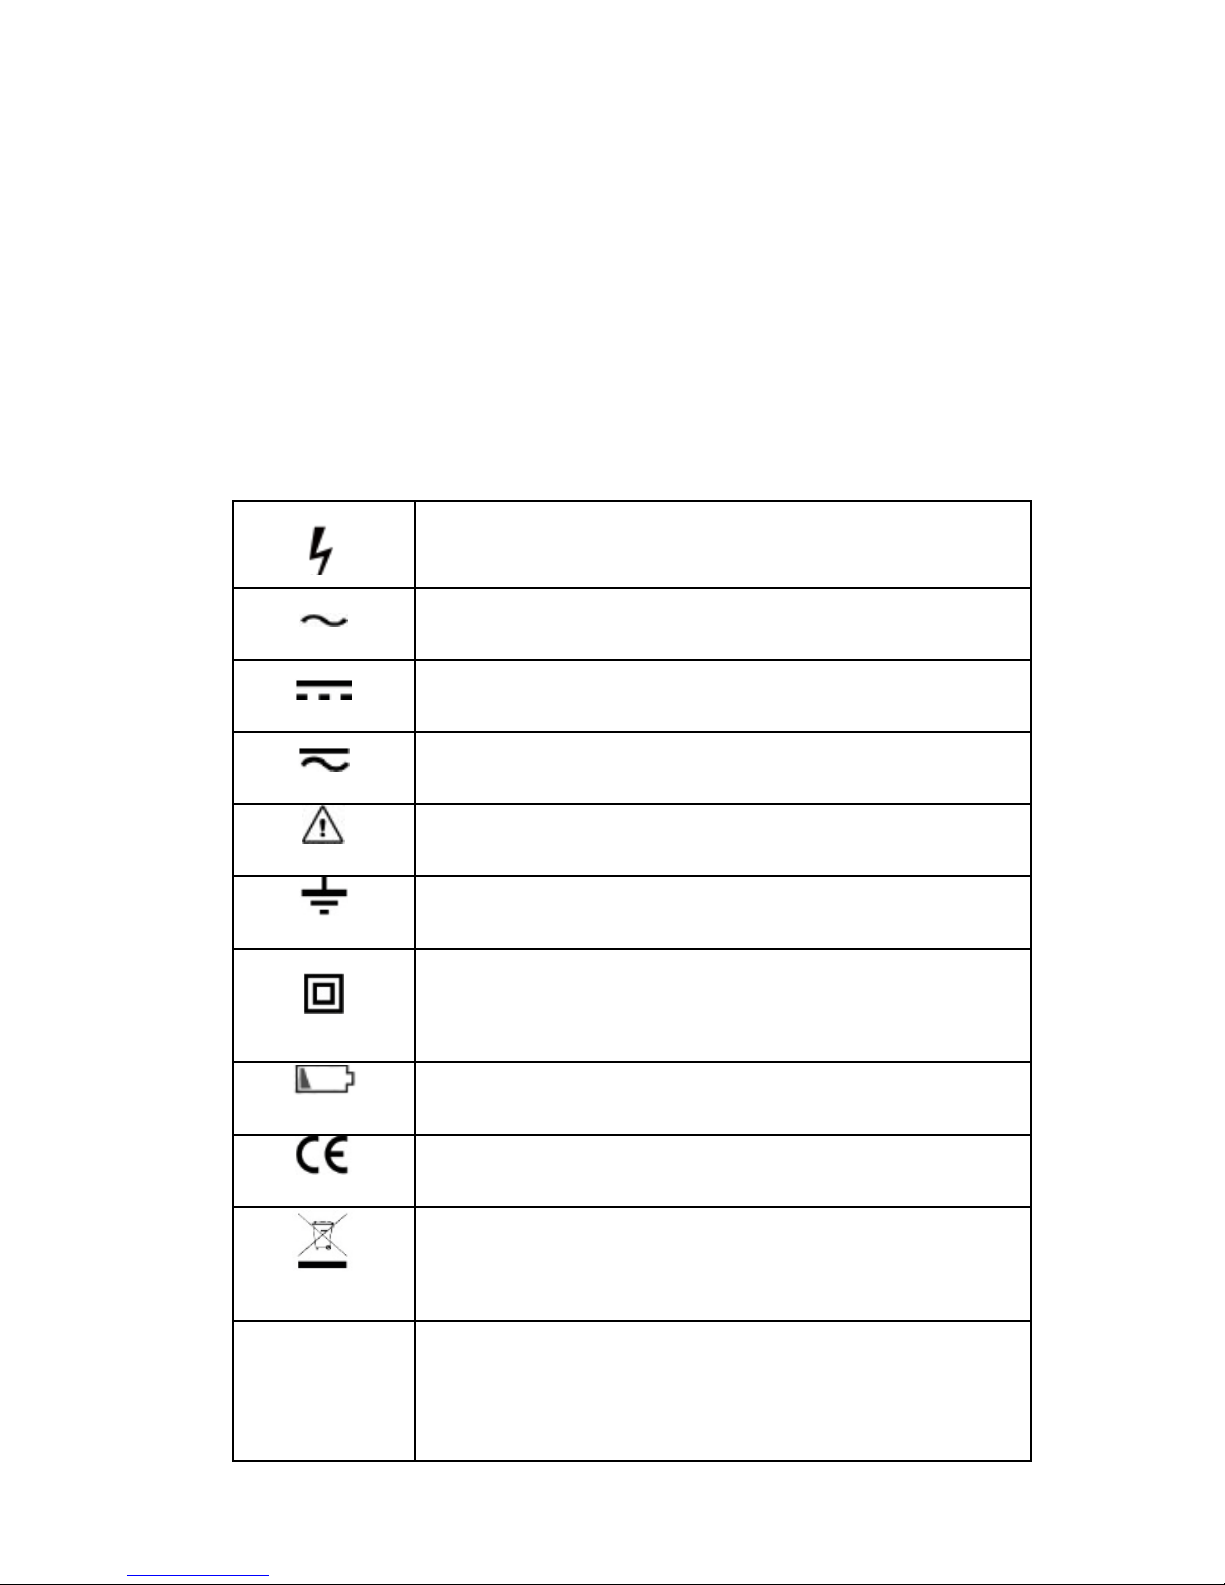
High voltage warning
AC (Alternating current)
DC (Direct current)
AC or DC
Warning, important safety signs
Ground
Equipment with double insulation or reinforced insulation
protection
Low battery
Conform with European Union standard
It shows that do not discard this electrical/electronic
product into household garbage.
CAT III
1000V
CAT III measurement is applicable for testing and
measuring circuits connecting to the distribution section
of building low voltage power supply.
Page 5
4
CAT IV
600V
CAT IV measurement is applicable for testing and
measuring circuits connecting to the distribution section
of building low voltage power supply.
5.Overview
This instrument is a smart digital flexible clamp meter. It can be used for measuring
the direct voltage, alternating voltage, alternating current, frequency, resistance and
connectivity. Besides, it may identify the measured signals automatically, without the
need for the user to choose the measuring function.
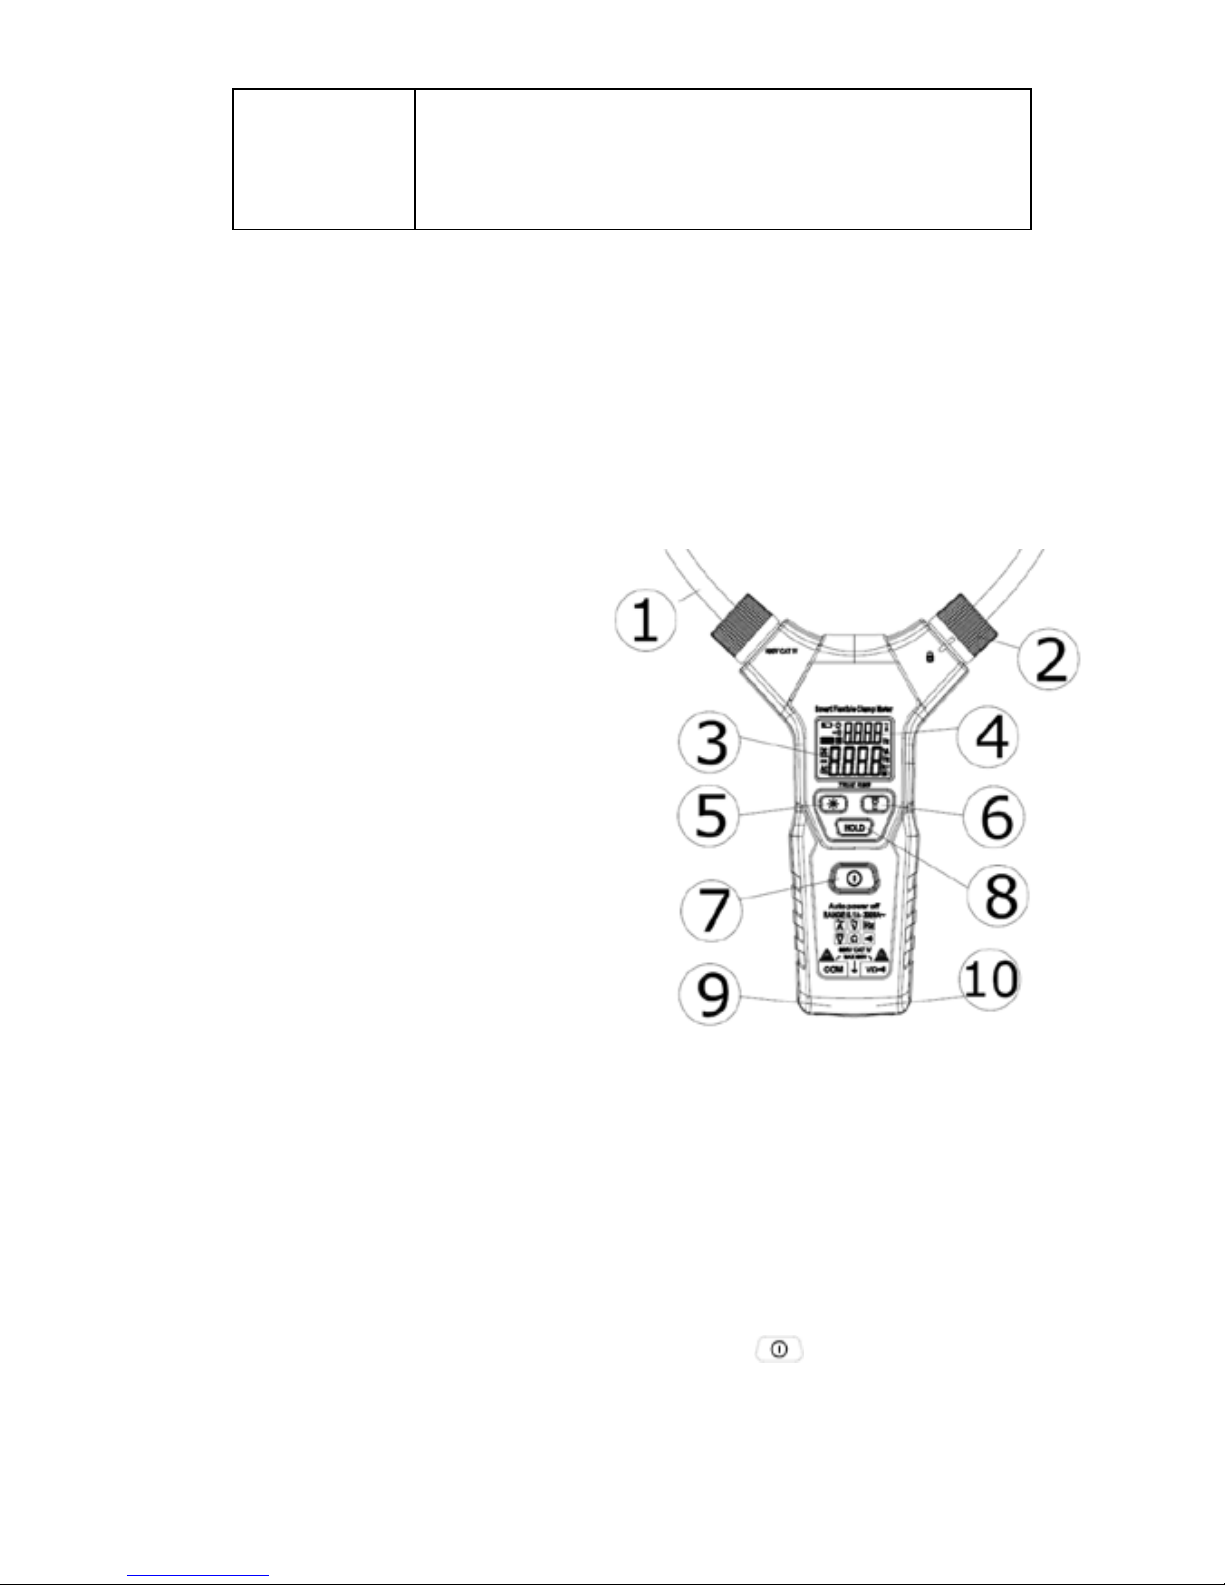
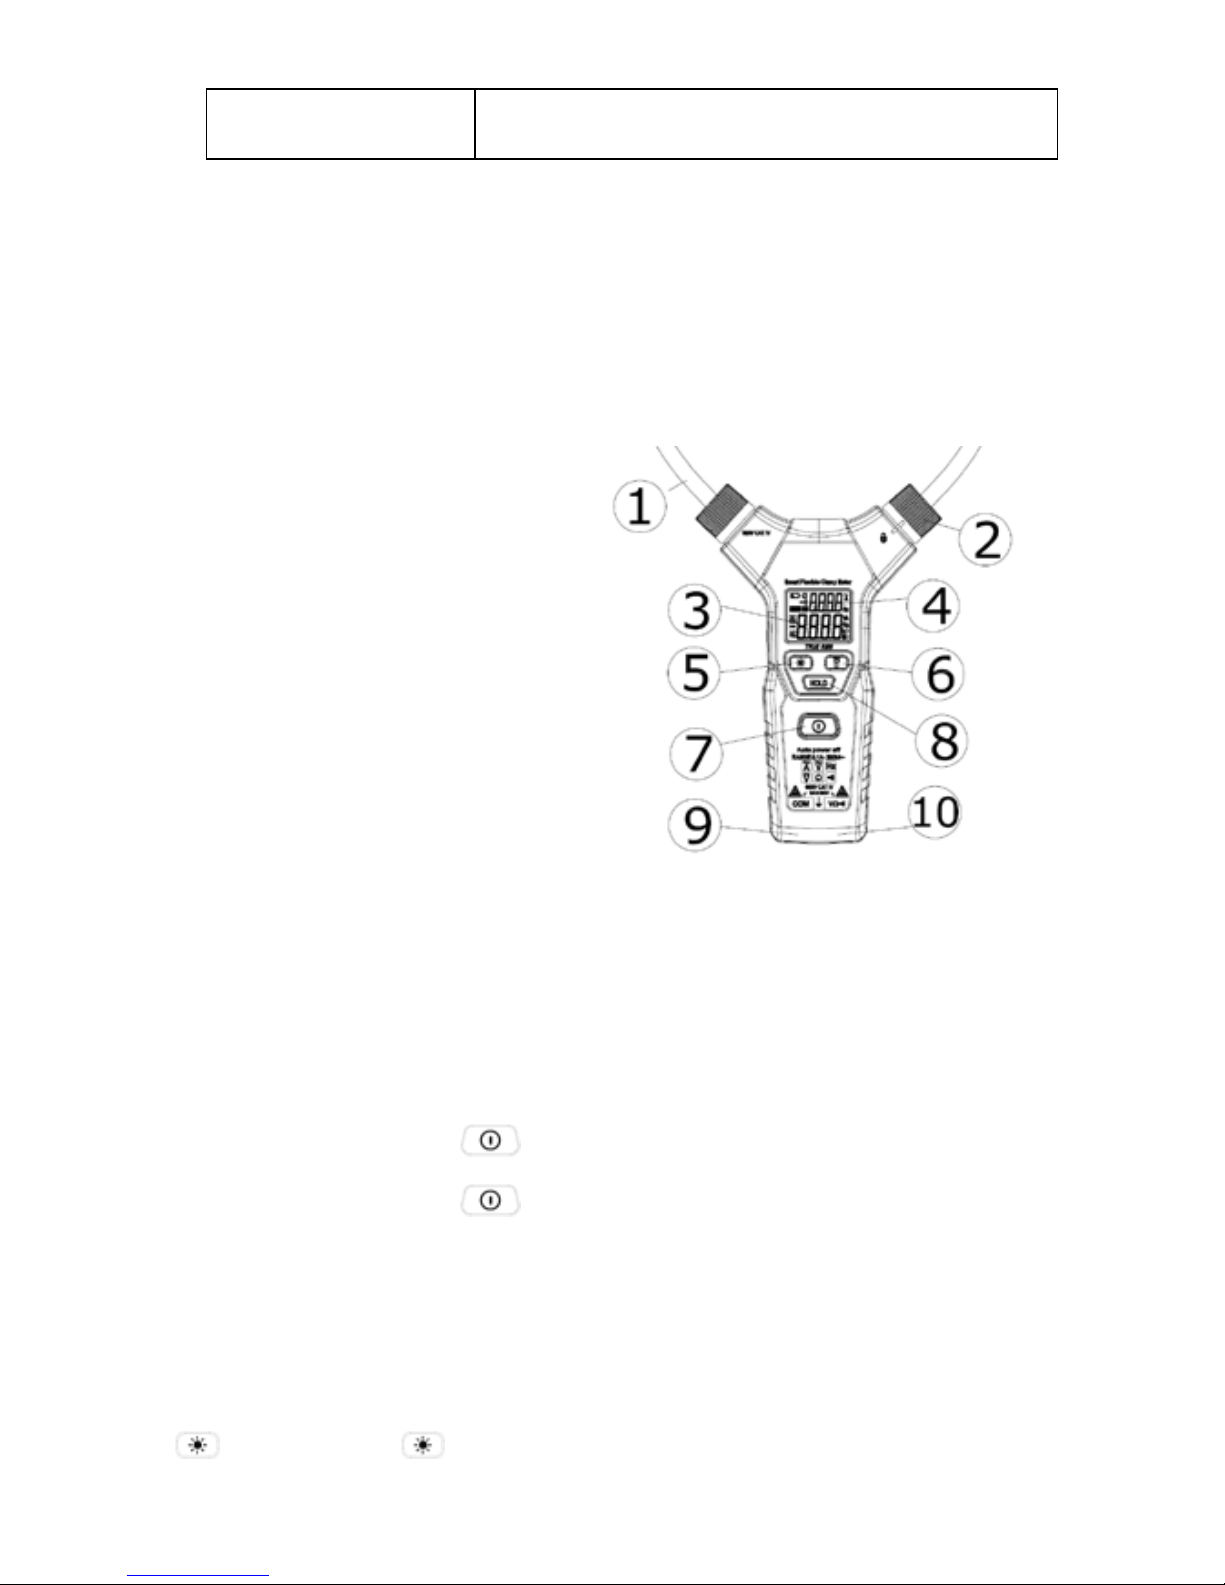
6.Panel Description
①flexible clamp, used for
measuring alt ernating curre nt
②flexible clamp bonnet lock
③main display
④auxiliary display
⑤backlight button
⑥illuminating lamp button
⑦power on-off button
⑧data hold button
⑨COM input jack
⑪ V input jack
7.Instrument operation
This instrument is a smart digital flexible clamp meter. So its operation is very simple.
Its working dispenses with the need for function selection. It can identify the measured
signals, take measurements, and display the measuring results automatically.
Power on/off
Power on: with the device in the off state, press the button, and keep it pressed,
until the buzzer produces the sound “di”.
Page 6
5
Power off: with the device in the on state, press the button, and keep it pressed,
until the buzzer produces the sound “di”.
Auto Shut-down Function
If no button is pressed, and no signal is input, the device will turn off automatically
within five minutes.
Backlight Function
Press the button to turn on the backlight; press the button again to turn off the
backlight.
Illumination Function
Press the button to turn on the illumination lamp; press the button again to
turn off the illumination lamp.
Data Hold Function
Press the button to enable the data hold function, with the symbol “H” shown
on the display; press the button again to disable the function.
AC/DC Voltage/ Resistance Measurement/ Connectivity
1) Press the power button to turn on the device;
2) Insert the red pen into the V jack, and the black pen into the COM jack;
3) Connect the pens in parallel to the circuit, power source or resistance to be
measured. The device detects AC voltage, DC voltage or resistance automatically;
4) When the resistance is measured, if the resistance is smaller than about 50Ω, the
built-in buzzer will make a sound;
5) The measuring results are read from the display. When the DC voltage is measured,
the display will also show the voltage polarity of the test point of the red pen;
6) When the AC voltage is measured, the frequency will also be shown on the auxiliary
display;
7) At the end of measurement, press the power button to turn off the device.
Note:
The device’s automatic detection order:
AC voltage DC voltage AC current Resistance and connectivity
Warning: To avoid such possible safety accidents as electric shock or bodily injury,
please strictly observe the safety work guidelines.
Page 7
6
AC Current Measurement
1) Press the power button to turn on the device;
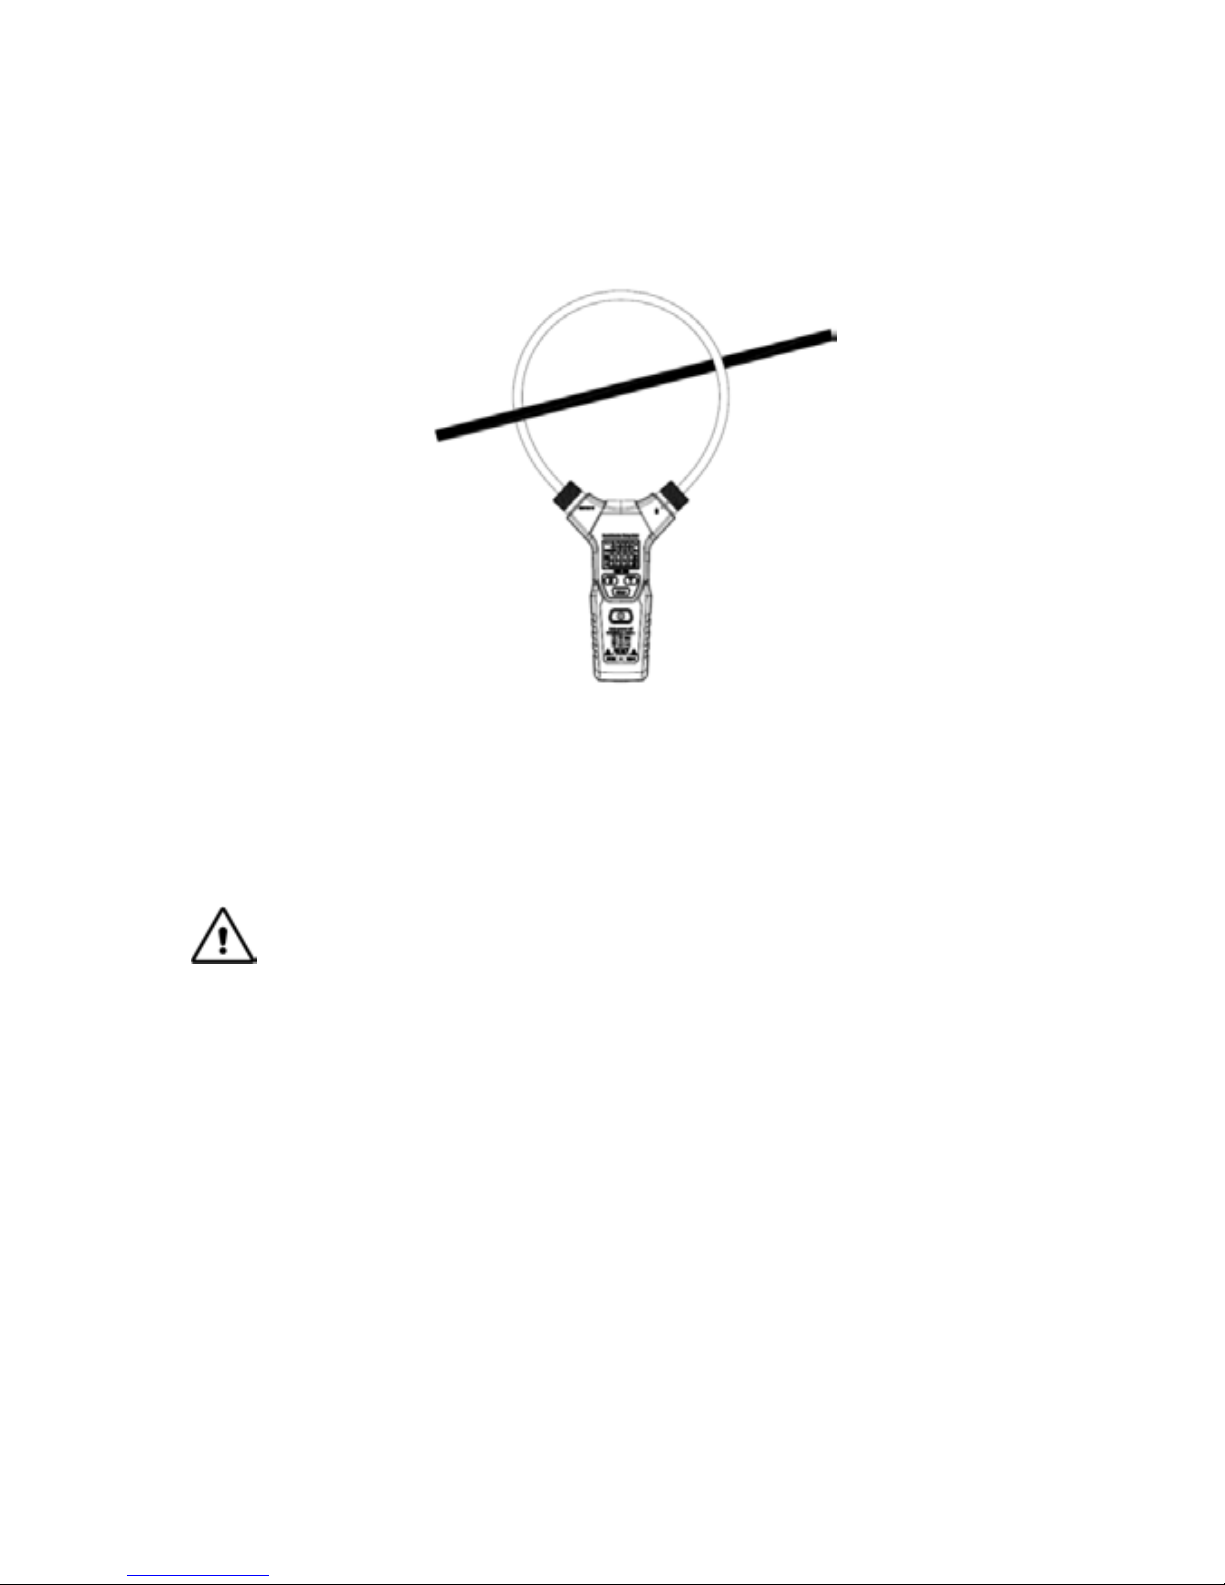
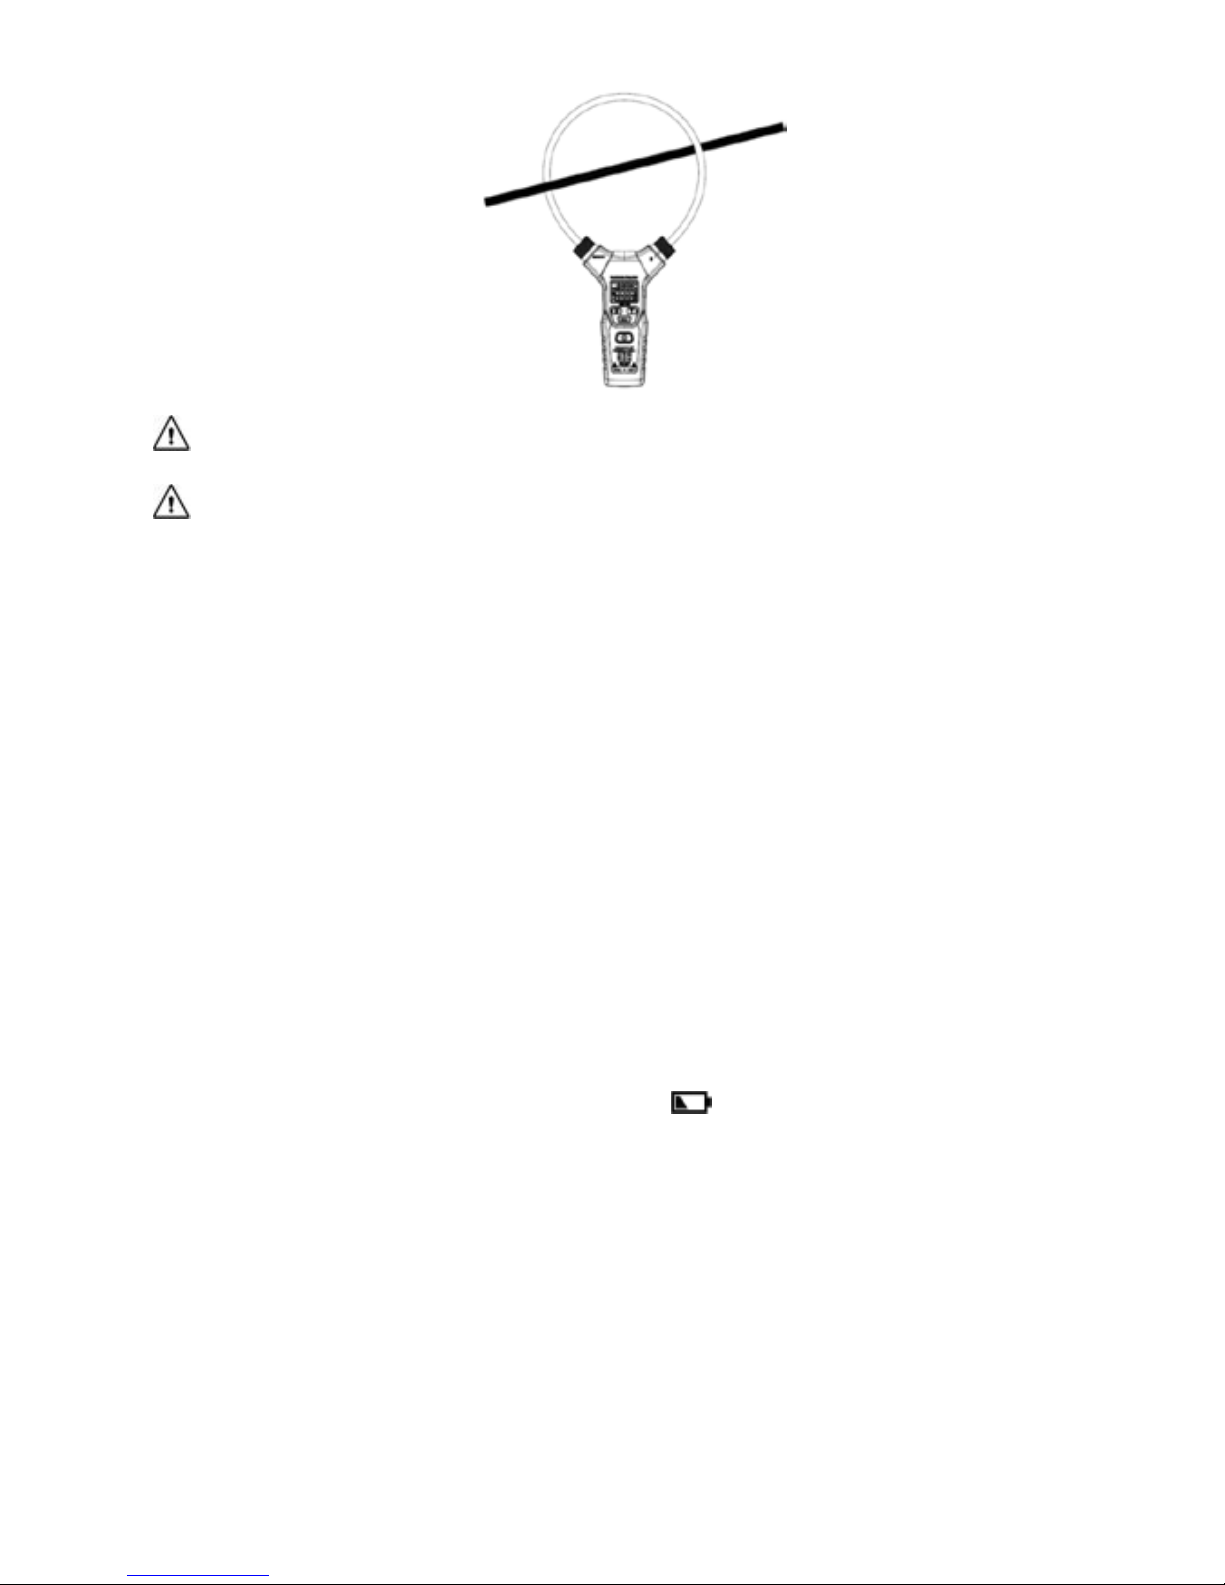
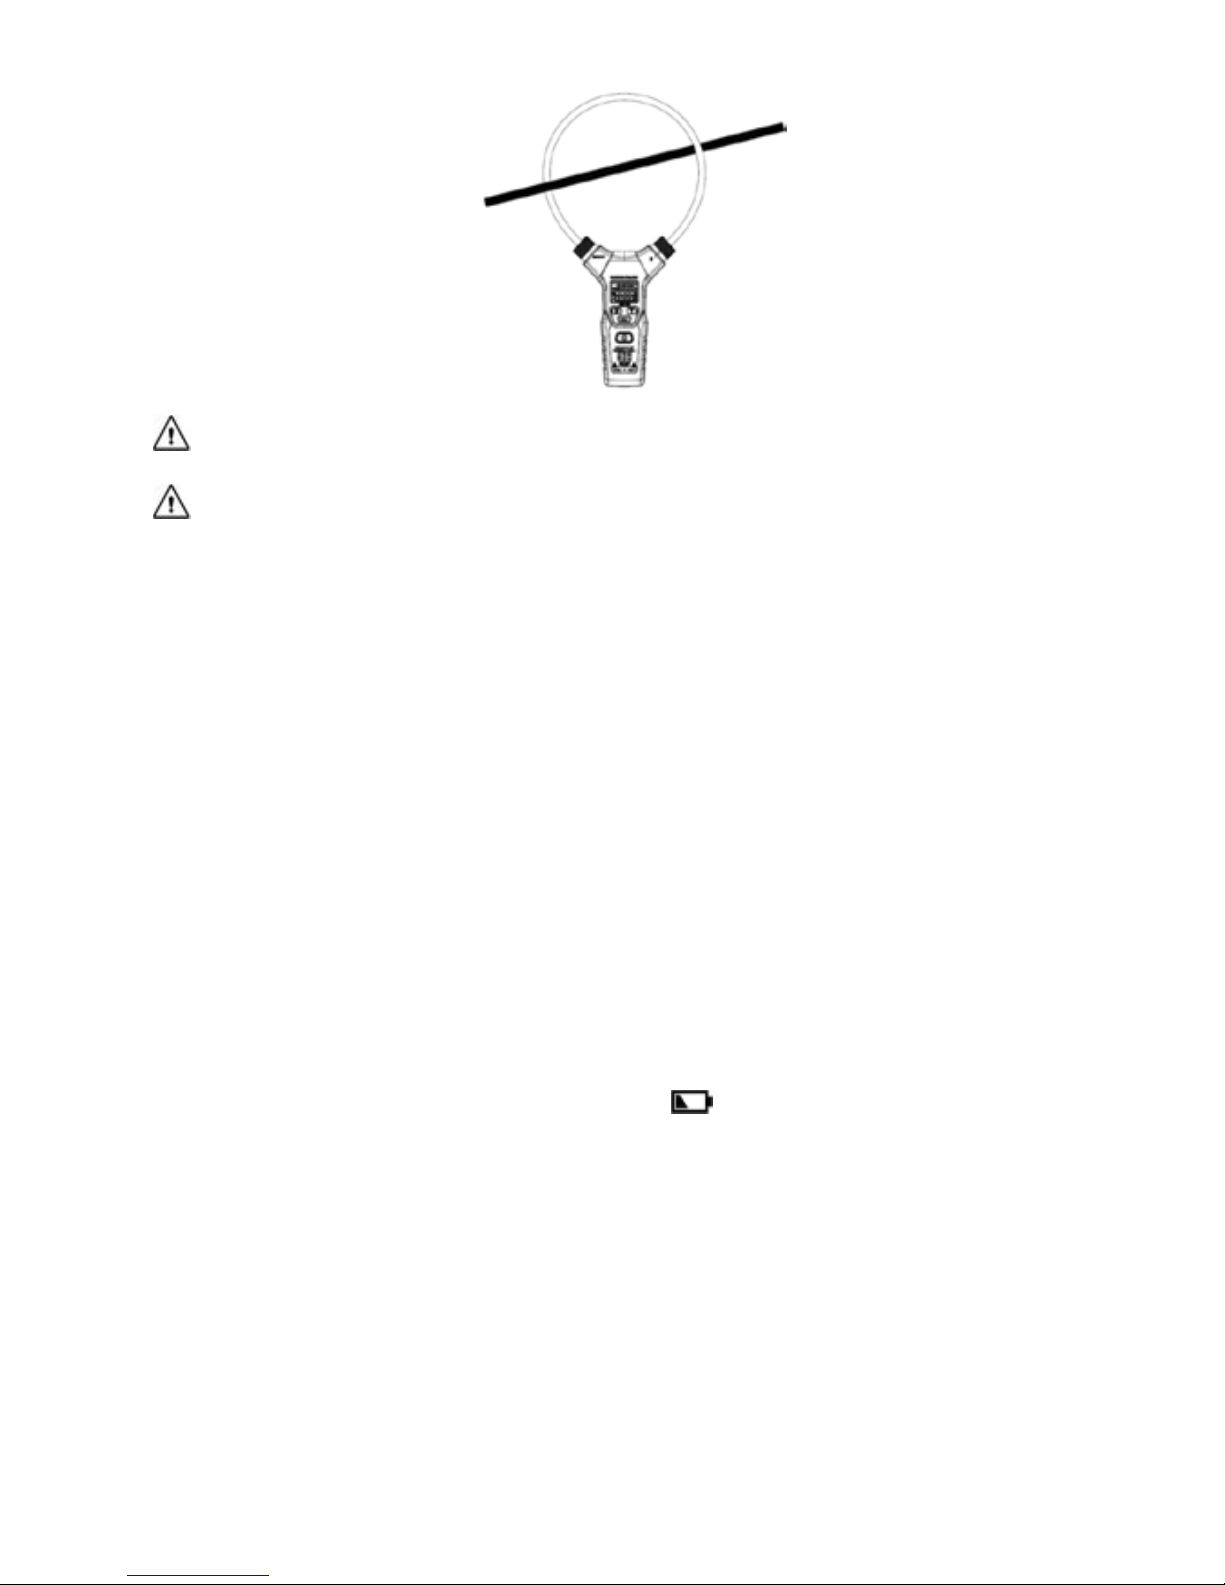
2) Release the flexible clamp bonnet lock, allow the flexible clamp to go round the
tested wire or conductor, insert the flexible clamp into the bonnet lock, and lock the
bonnet lock (see the figure below);
3) The device identifies and measures the DC current automatically;
4) The current is shown on the main display, and the frequency is shown on the
auxiliary display;
5) In the event of current measurement, if both V jack and COM jack measure the
voltage or resistance, then the main display will show the voltage or current, and the
auxiliary display will show the current instead of the frequency;
6) At the end of measurement, press the power button to turn off the device.
Warning: To avoid such possible safety accidents as electric shock or bodily
injury, please strictly observe the safety work guidelines.
Note: It needs much time for zero return after current measurement. This arises from
the measuring circuit for true RMS. It is normal.
8.General Technical Indicators
Environmental conditions for service:
EN61010-1, EN61010-2-032, EN61326-1,CAT IV 600V, class of pollution 2;
Height above sea level: < 2000 m;
Temperature and humidity of working environment: 0~40℃(<80% RH, ignored at <10
℃);
Temperature and humidity of storage environment: (-10~60℃, with battery removed);
Page 8
7
Temperature coefficient: 0.1x accuracy/ ℃;
Allowable maximum voltage between measuring terminal and ground: DC 600V or AC
effective value;
Sampling rate: around 3 times per second;
Display: LCD;
Over range indication: “OL” displayed;
Low battery voltage indication: “
” will be shown on the display, when the
battery voltage is lower than the normal working voltage;
Input polarity indication: the symbol “-” is automatically displayed;
Power source: 3x1.5V AAA battery;
Overall dimension: 324x178x30mm.
Accuracy Indicator
The accuracy applies within one year of calibration.
Reference conditions: ambient temperature 18℃~28℃, relative humidity≤80%.
DC Voltage
Range
Resolution
Accuracy
6V
0.001V
± (0.8% +3
Digits
)
60V
0.01V
600V
0.1V
Minimum DC voltage measurement: 0.2V (DC);
Input impedance: 2MΩ;
Maximum input voltage: 600V DC or AC effective value.
AC Voltage
Range Resolution
Accuracy
45~65Hz
40~45,65~2000Hz
6V
0.001V
± (1.2% +3Digits) ± (2.0% + 5Digits)
60V
0.01V
600V
0.1V
Page 9
8
Minimum AC voltage measurement: 0.5V (AC);
Input impedance: 2MΩ;
Maximum input voltage: 600V DC or AC effective value;
Frequency domain: 40Hz~2000Hz, true RMS.
Other frequencies are not validated yet.
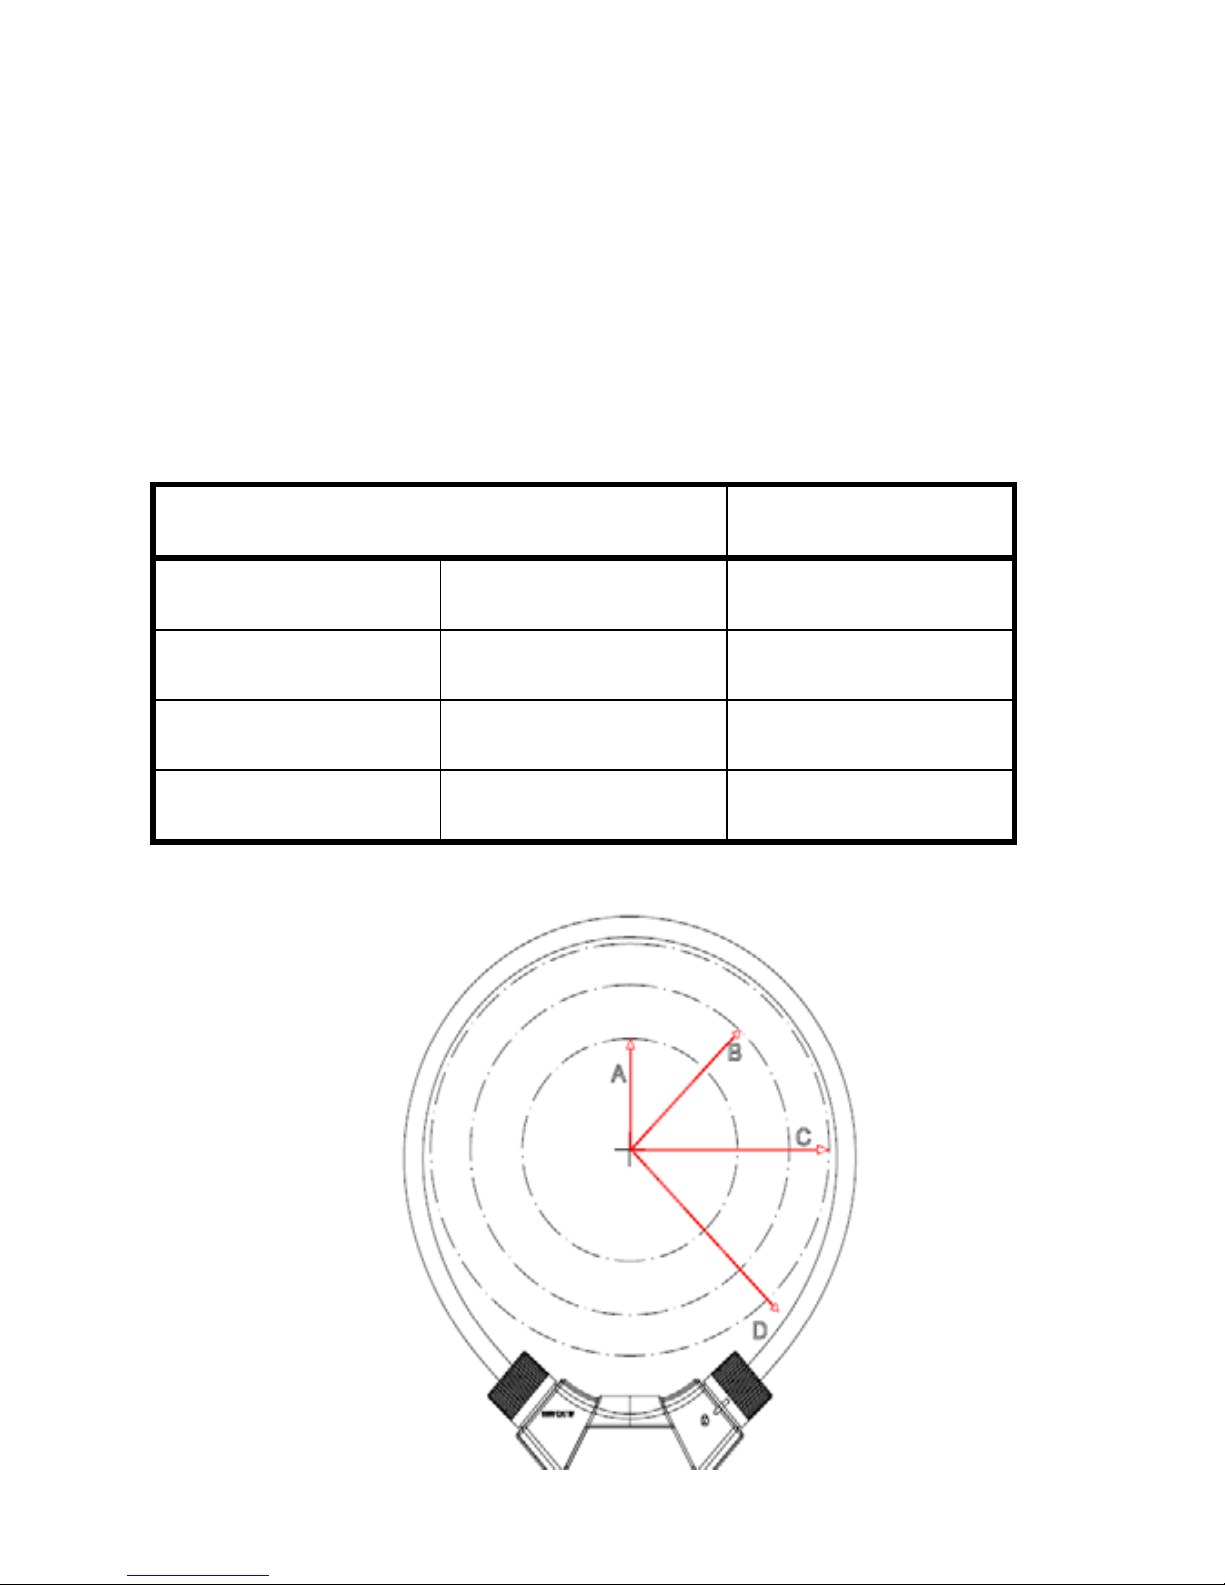
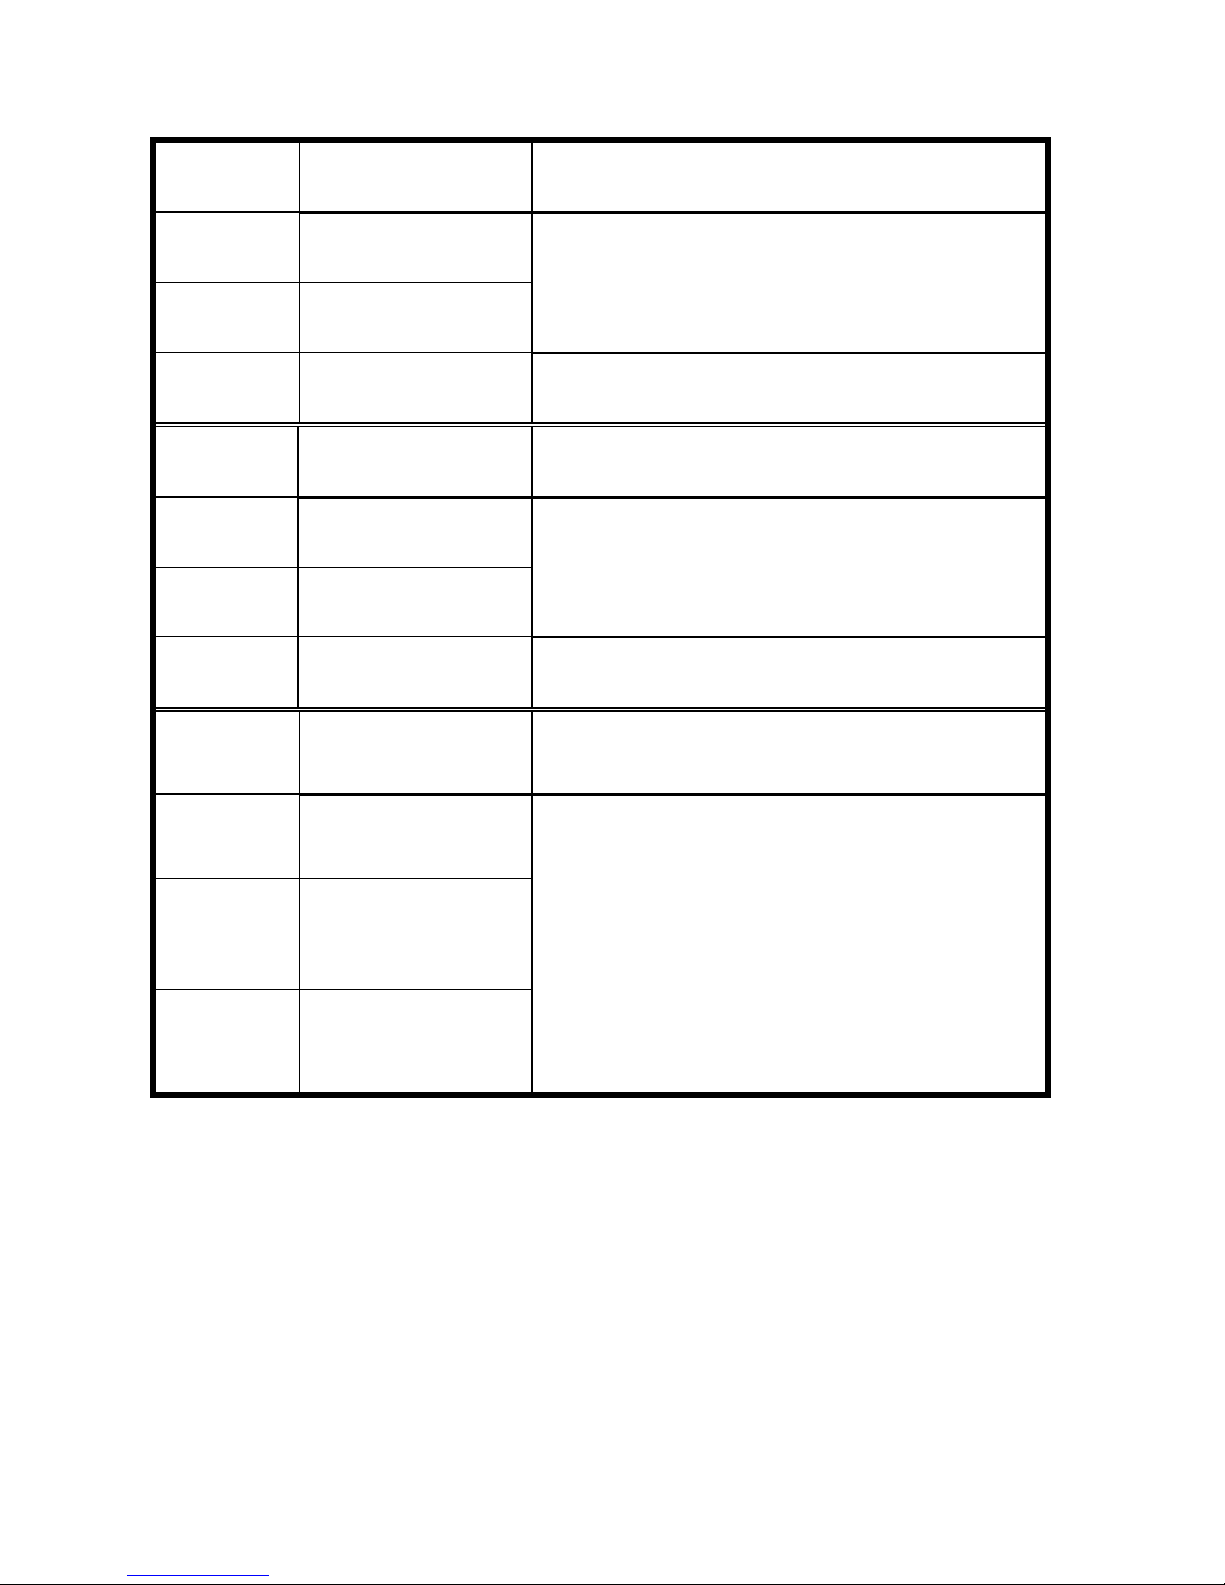
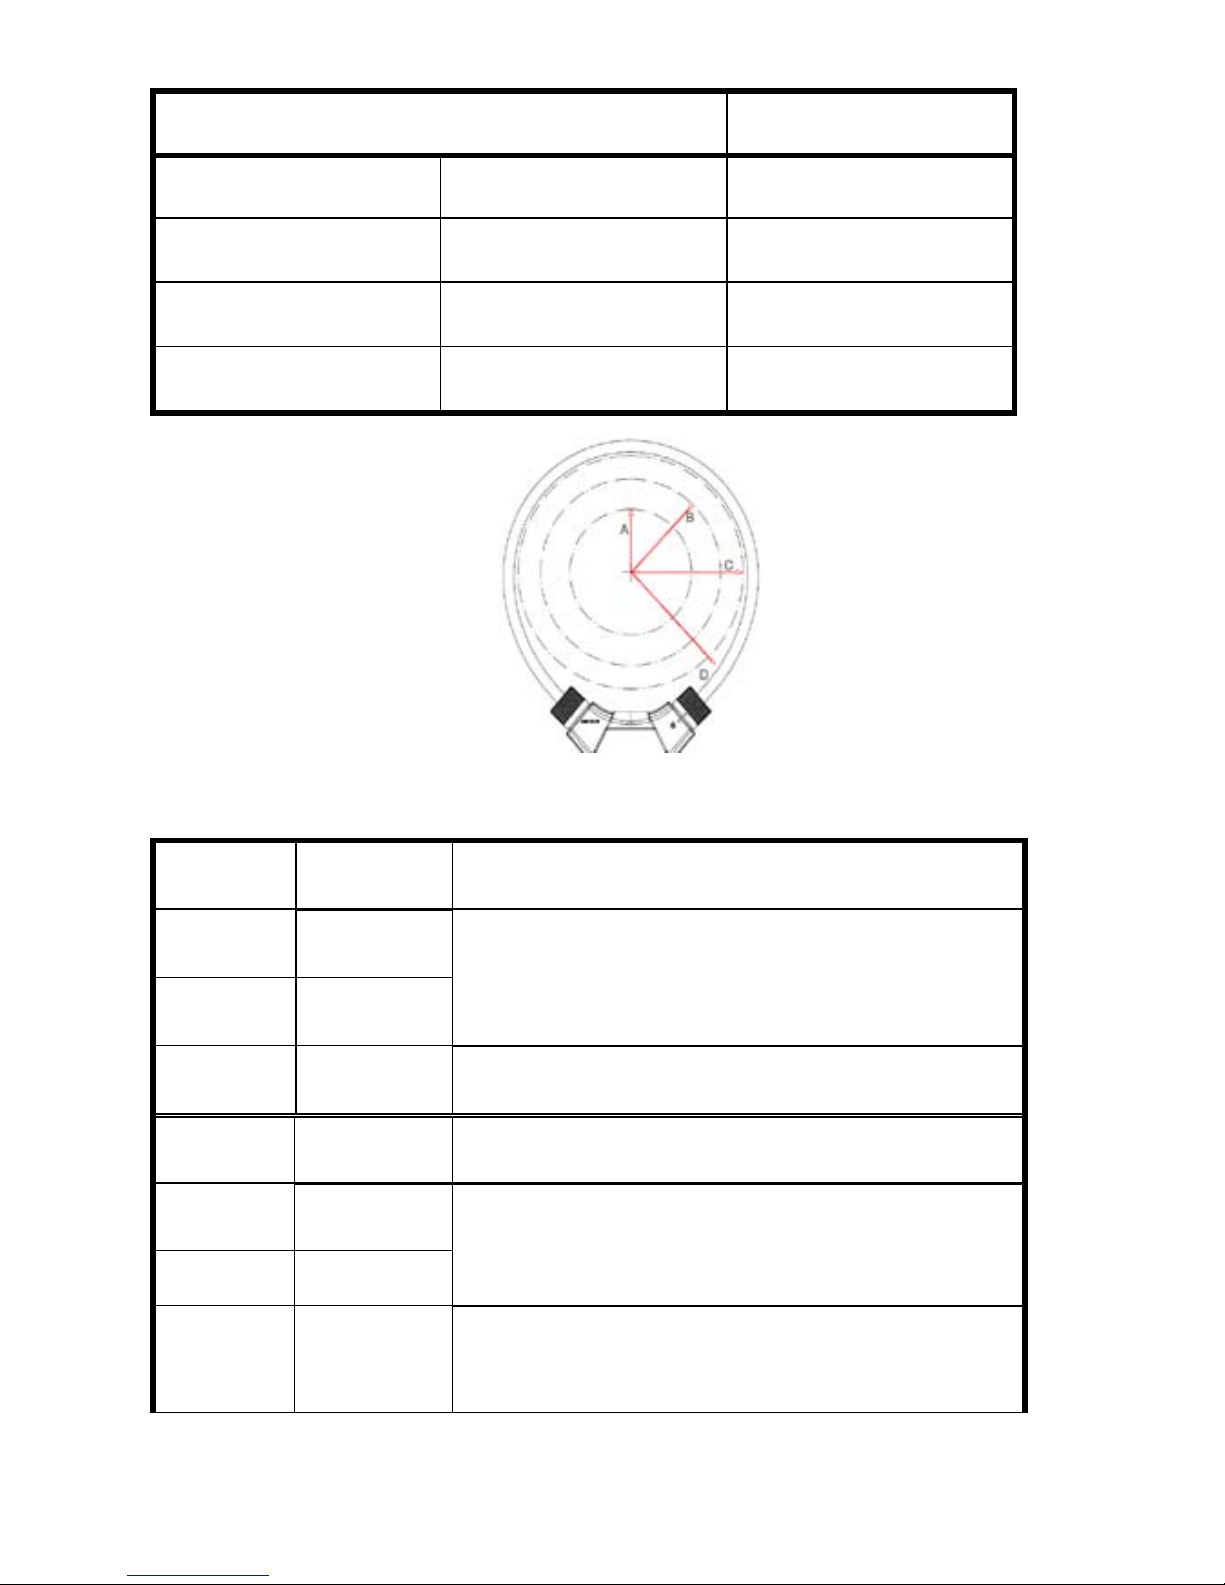
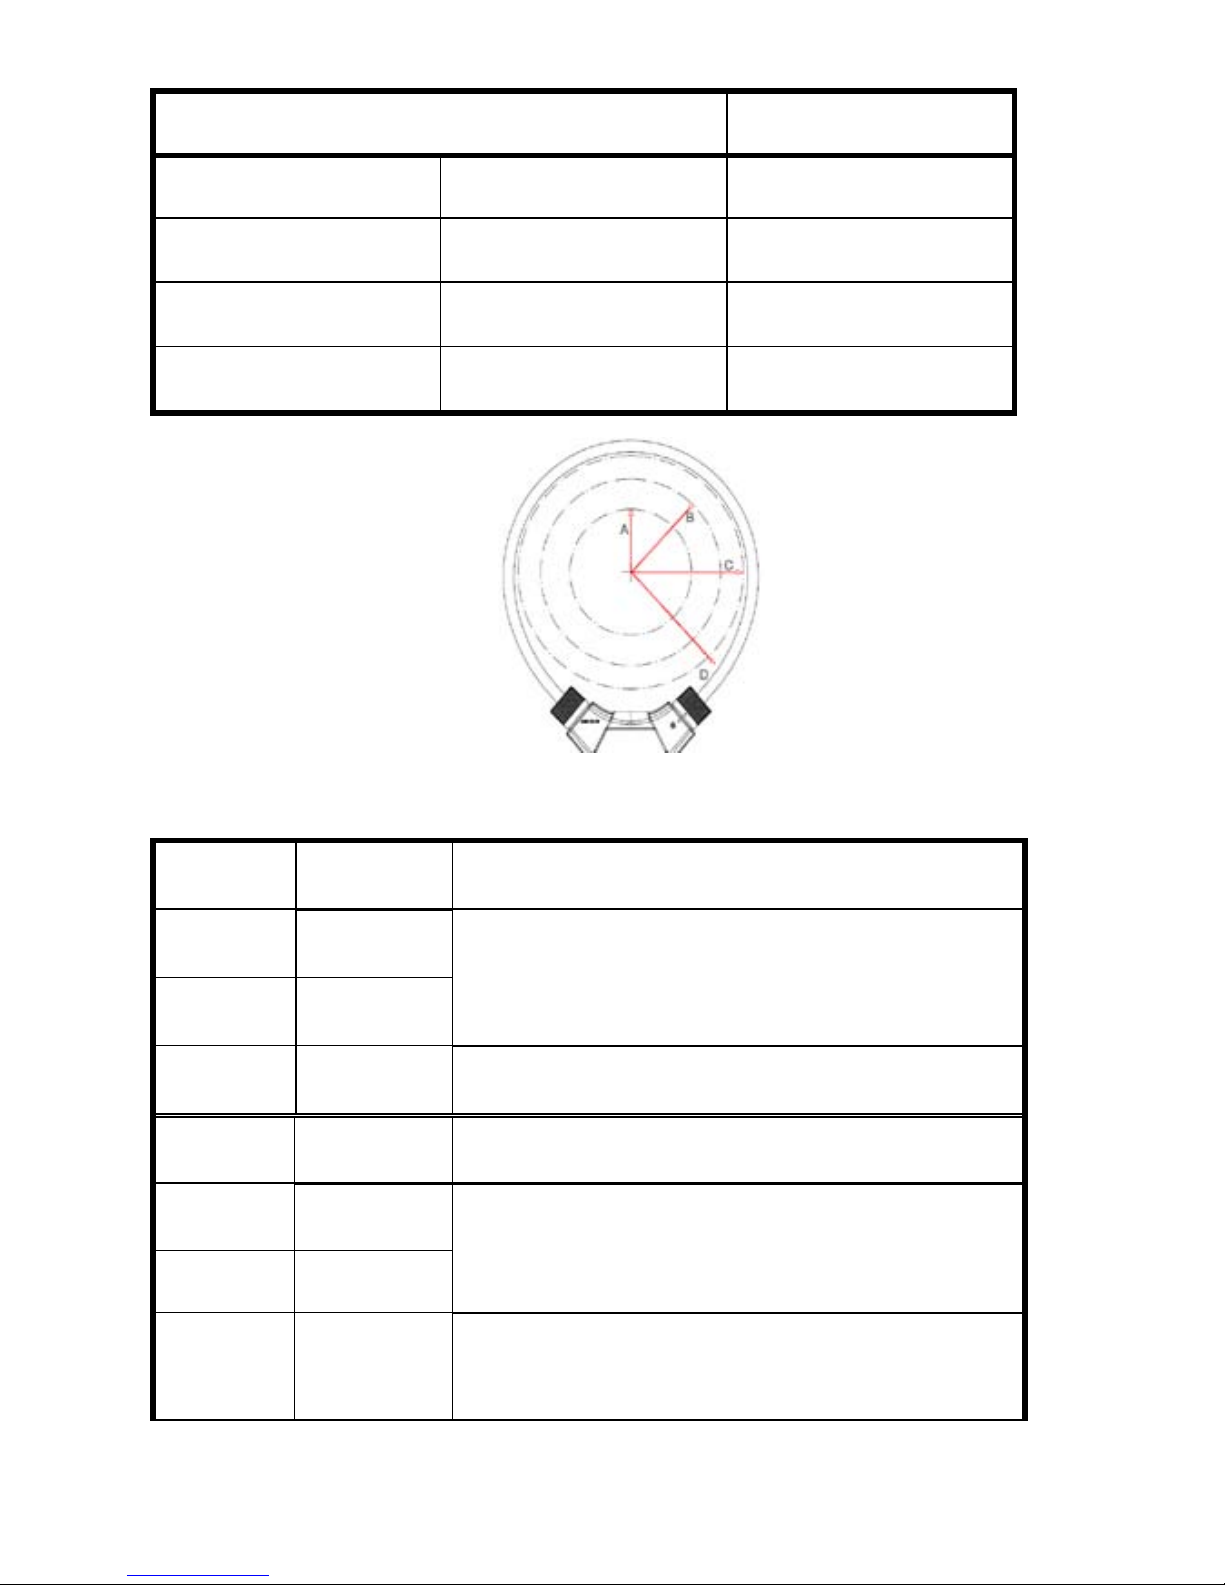
Position Error of Flexible Clamp
The precision and position error refers to the error of measurement taken at the best
measuring position, within the range of working temperature and humidity, in the
absence of interference from external electric field or magnetic field.
Optimum Measuring Range
Position Error
A
35 mm
±0.5%
B
50 mm
±1.5%
C
60 mm
±2.0%
D
>60 mm
±5.0%
Page 10
9
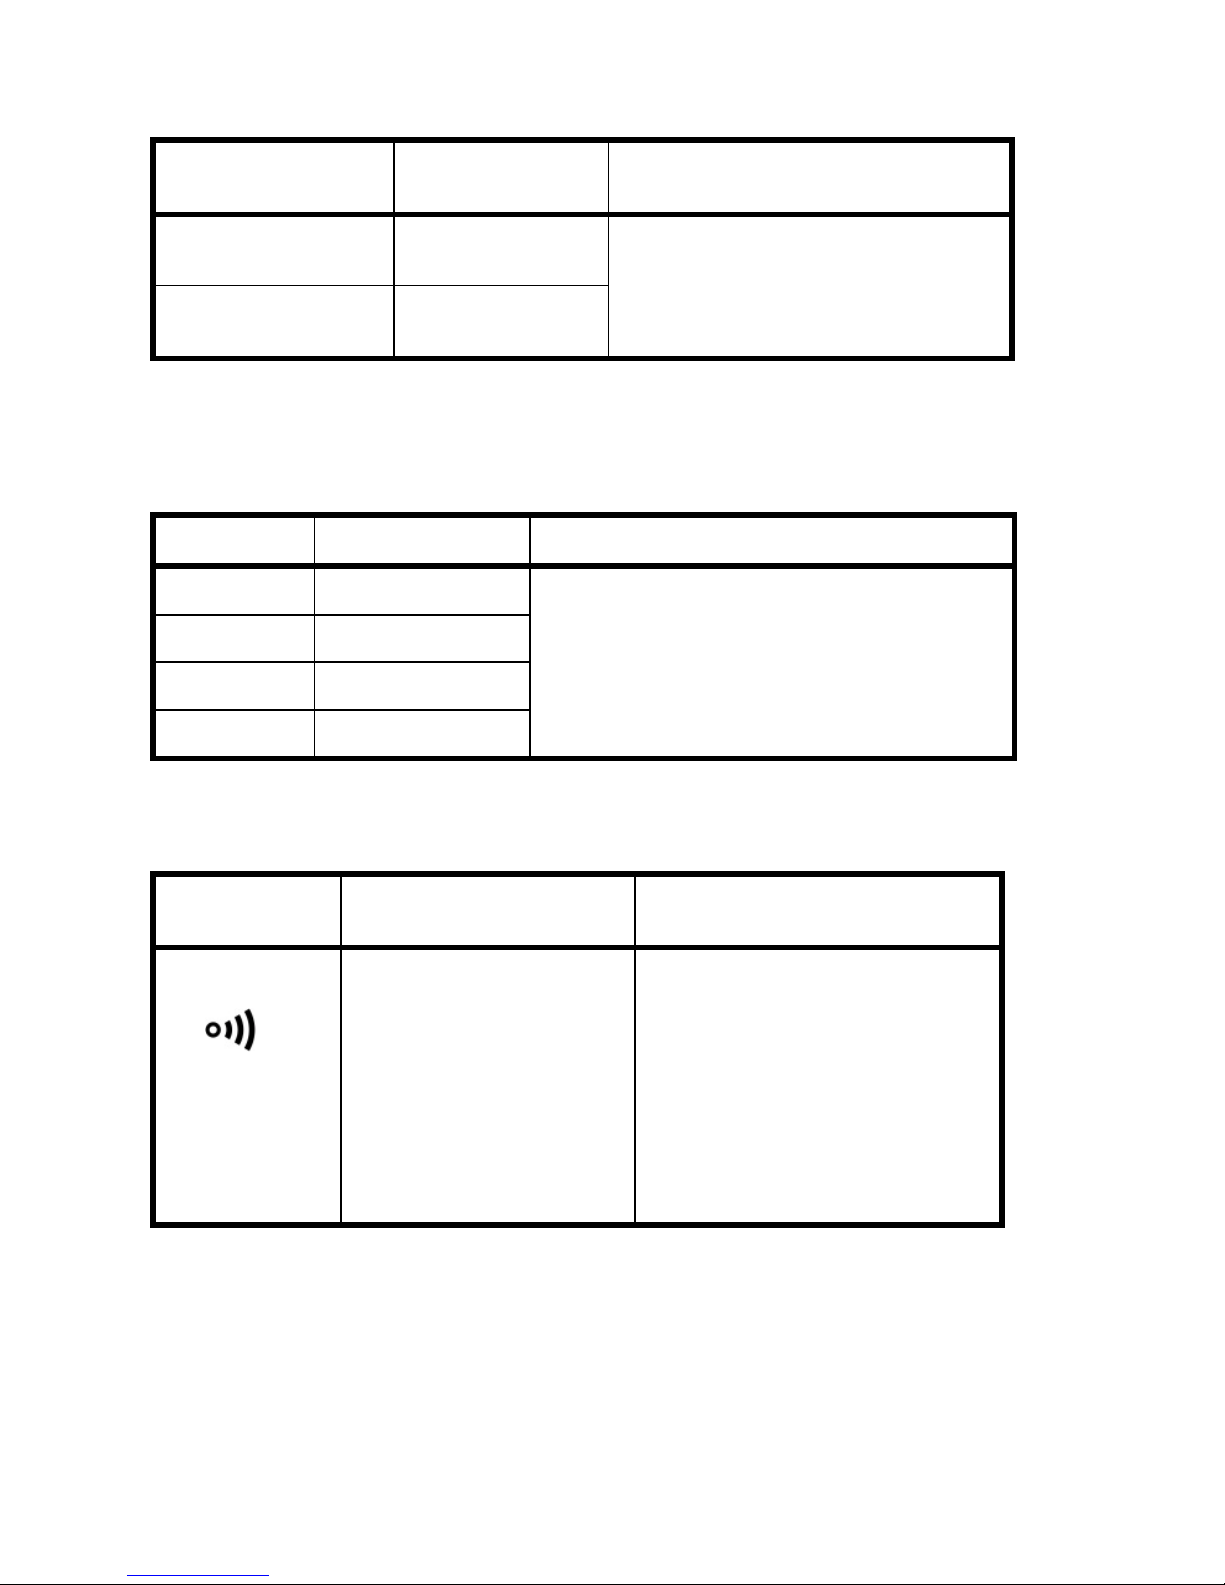
AC Current
Range
Resolution
Accuracy (40~65Hz)
60A
0.01A
± (1.5% +5 Digits)
(<10A: ± (2.0% +10 Digits))
600A
0.1A
3000A
1A
± (2.0% +5 Digits)
Range Resolution Accuracy (65~200Hz)
60A
0.01A
± (2.5% +5 Digits)
600A
0.1A
3000A
1A
± (3.0% +5Digits)
Range Resolution Accuracy (200~1,000Hz)
60A
0.01A
≤1000A ± (3.0% +5Digits)
>1000A Reference resources
600A
0.1A
3000A
1A
Minimum AC current measurement: 0.1A. 0 is displayed when the measured value is
smaller than 0.1A.
Maximum measured current: effective value of AC 3,000A.
Frequency domain: 40Hz~1000Hz, true RMS
Page 11
10
Frequency
Range Resolution Accuracy
40~1000Hz
0.1Hz
± (0.5% +2 Digits)
1kHz~10kHz
1Hz
Current channel: sensitivity 3A, range40~1kHz;
Voltage channel: sensitivity 0.5V, range40~10kHz.
Resistance
Range
Resolution
Accuracy
6kΩ
0.001 kΩ
± (1.0%+3Digits)
60kΩ
0.01 kΩ
600kΩ
0.1 kΩ
6MΩ
0.001MΩ
Input protection: max. 600V DC or AC effective value.
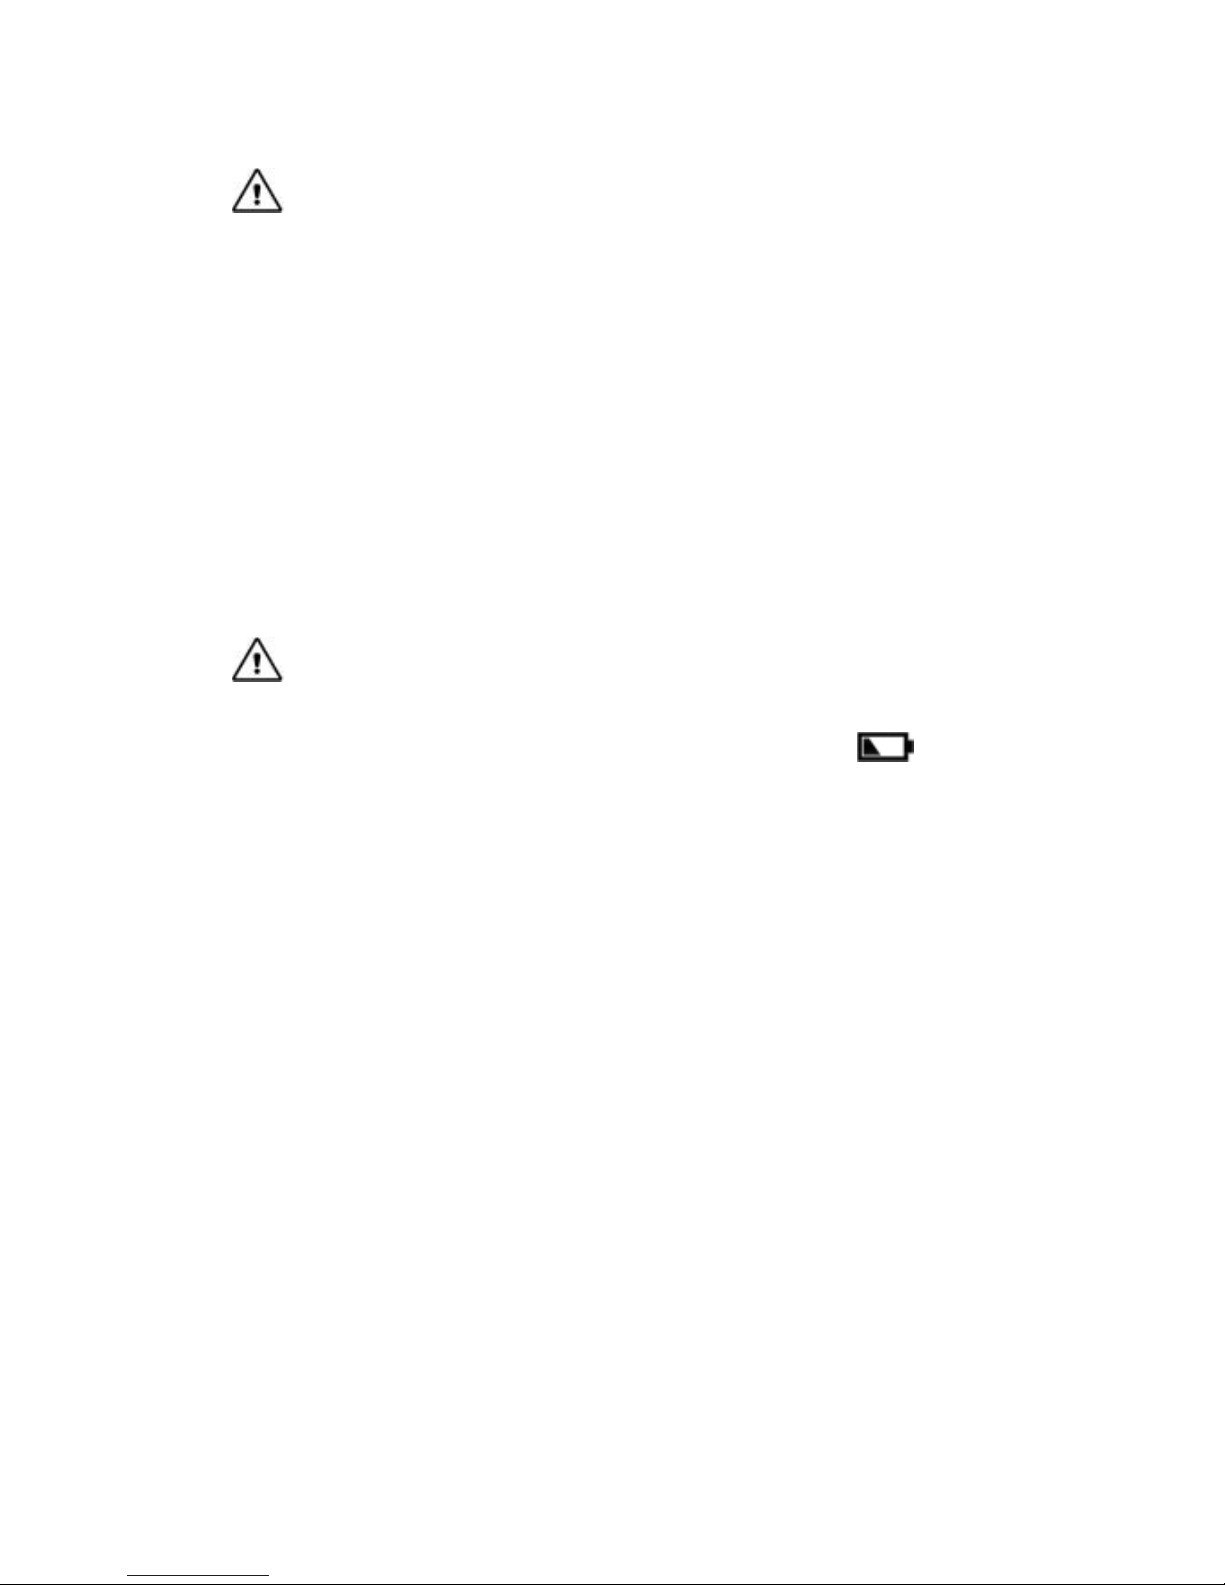
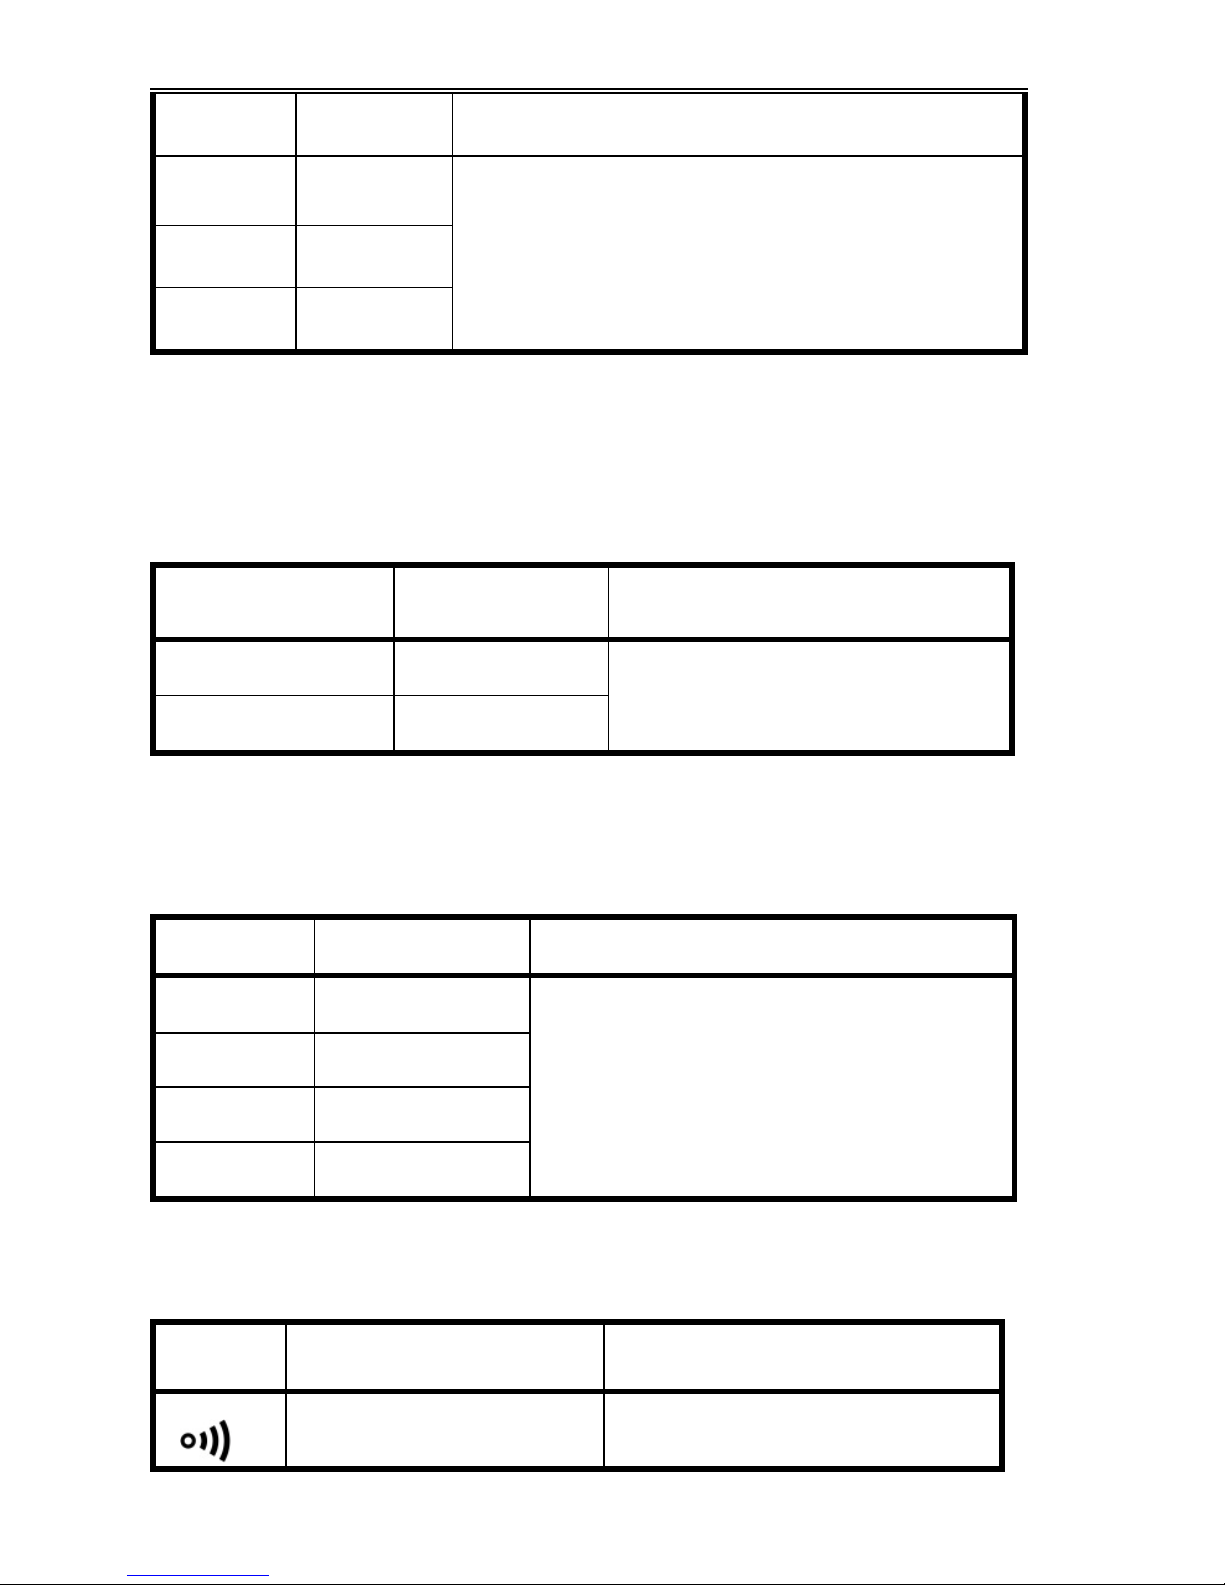
Connectivity
Function
Description
Testing Environment
When the built-in
buzzer sounds, the
measured resistance
is less than 50Ω.
Tested current: around
1mA; open-circuit voltage:
around 0.8V.
Input protection: max. 600V DC or AC effective value.
9.Instrum ent Maint e nanc e
This section provides the basic maintenance information. If you are not an experienced
Page 12
11
maintainer, and are not acquainted with the calibration, performance testing and
maintenance, your attempt to maintain the device is not recommended.
Warning
To avoid any possible electric shock, fire or bodily injury:
If the battery cover or back cover is opened, never use the device for any
measurement;
Remove the input signal before cleaning the device;
Use the specified replacement parts. The device shall be maintained by
the quali fied technical staff.
General Maintenance
Use the wet cloth and a small amount of detergent to clean the outer casing
of t he devic e. Never use any abrasive or chemical solvent.
Battery Replacement
Warning
To avoid any electric shock or bodily injury due to wrong reading, the
battery shall be promptly replaced, when the symbol“
” appear on
the devic e’s display.
To ensure safe operation and maintain the product, the battery shall be
removed if the device will not be used for a long time, to avoid any damage
to the product due to elect ric leakage of the bat te r y.
Only use the fuse tube of the specified amperage, fuse rating , voltage
rating and fusing rate.
To avoid any electric shock or bodily injury, before opening the back cover
for replacing the battery, turn off the device, and disconnect the pens from
the measured circuit.
Replace the battery by following the steps below:
T urn off the device;
Disconnect the pens from the measured circuit, and remove them from the
device;
Unscrew with the screwdriver the screw fixing the battery cover, and
remove th e battery cover;
Remove the old battery, and place a new one;
Replace the battery cover, and tighten the screw.
Page 13

12
MT-3112 3 5/6 智慧型真有效值柔性鉗錶使用說明書
1.聲明
根據國際版權法,未經允許和書面同意,不得以任何形式複製本說明書的任何內容。本說明
書在將來的版本中如有更改,恕不另行通知。
警告
“警告”標誌表示會對用戶造成危險的狀況和操作。要求在執行此操作時必須注意,如果不正確執
此行操作或不遵守此操作步驟,則可能導致人身傷害或傷亡。在不滿足這些條件或沒有完全理解
的情況下,請勿繼續執行警告標誌所指示的任何操作。
2.安全資訊
使用儀錶前,請仔細閱讀說明書並注意有關安全警告資訊。
儀錶根據國際安全標準 EN61010-1, EN61010-2-032,EN61326-1對電子測試儀器的安全要
求而設計的。儀錶的設計與製造嚴格遵守 EN61010-1, EN61010-2-032, E N613 26-1,CA T IV 6 00V
過壓安全標準和污染等級 2 規定。
3.安全工作規範
警告:為了避免可能的觸電或人身傷害等安全事故,請切實遵守以下的規範:
使用儀錶之前,請仔細閱讀本說明書,並特別注意安全警告資訊。嚴格遵守本手冊的操作使
用本儀錶,否則儀錶所提供的保護功能可能會遭到破壞或削弱。
使用儀錶之前,請檢查儀錶外殼是否存在裂紋或塑膠件損壞,檢查表筆絕緣層是否損壞,是否
有外露金屬或有磨損跡象,檢查表筆連通性,若有請勿再使用。
使用儀錶之前,請檢查柔性鉗絕緣層是否損壞,若有請勿再使用。
使用儀錶之前,請用儀錶測量一個已知電壓來驗證儀錶是否正常。
請按儀錶或手冊上指定的測量類別、電壓或電流額定值使用儀錶。
請遵守當地和國家的安全規範。穿戴個人防護用品(如經認可的橡膠手套、面具和阻燃衣物
等),以防危險帶電導體外露時遭受電擊和電弧而受傷。
在輸入端子之間或在任何一個端子與接地點之間施加的電壓不能超過儀錶上標明的額定值。
Page 14
13
測量超出 30V 交流真有效值,42V 交流峰值或 60V 直流時,請特別小心。該類電壓會有電
擊的危險
當儀錶電池電量低指示符出現時,請及時更換電池,以防測量錯誤。
切勿在有爆炸性氣體或蒸汽周圍或潮濕的環境中使用儀錶。
使用表筆時,請將手指握在探頭護指裝置的後面。
測量時,請先連接零線或地線,再連接火線;斷開時,請先斷開火線,再斷開零線和地線。
打開外殼或電池蓋之前,請將儀錶上的表筆移除。切勿在儀錶拆開或電池蓋打開的情況下使
用儀錶。
儀錶只能和所配備的表筆一起使用才符合安全標準的要求。如表筆破損需更換,必須換上同
樣型號和相同電氣規格的表筆。
4.安全符號
高壓警告
AC(交流電)
DC(直流電)
交流電或直流電
警告,重要安全標誌
接地
設備由雙重絕緣或加強絕緣保護
電池電量不足
符合歐洲共同體(European Union)標準
說明不得將此電氣/電子產品丟棄在家庭垃圾中。
CAT. III 1000V III 類 1000V 過電壓保護
Page 15
14
CAT. IV 600V IV類 600V 過電壓保護
5.概述
本儀錶是一款智慧型數字柔性鉗形表。可以測量直流電壓、交流電壓、交流電流、頻率、電阻及
連通性,並且能夠自動識別測量信號,不需要使用者選擇測量功能。
6.面板說明
①柔性鉗,用於測量交流電流
②柔性鉗鎖扣
③主顯
④副顯
⑤背光鍵
⑥照明燈鍵
⑦電源開關鍵
⑧數據保持鍵
⑨COM 輸入插孔
⑨ V 輸入插孔
7.使用儀錶
本儀錶是一款智慧型數字柔性鉗形表,所以使用操作非常簡單,測量時不需要進行功能選擇,儀
錶會自動識別測量信號,然後測量並顯示測量結果。
開機/關機
開機:在儀錶關機狀態下,按 鍵並保持,直到蜂鳴器“嘀”一聲,再鬆開。
關機:在儀錶開機狀態下,按 鍵並保持,直到蜂鳴器“嘀”一聲,再鬆開。
自動關機功能
在無任何按鍵操作,同時無任何信號輸入時,儀錶會在約 5 分鐘內自動關機。
背光功能
按 鍵開啟背光;再按 鍵關閉背光。
Page 16
15
照明功能
按 鍵開啟照明燈;再按 鍵關閉照明燈。
資料保持功能
按 鍵開啟資料保持,顯示幕顯示“H”字元;再按 鍵關閉資料保持。
交直流電壓/電阻測量/連通性檢測
1. 按下電源鍵,打開儀錶的電源。
2. 將紅表筆插在 V 插孔,黑表筆插在 COM 插孔。
3. 將表筆並聯到待測電路、電源或電阻上。儀錶自動判別交流電壓、直流電壓、電阻。
4. 當測量電阻時,電阻小於約 50Ω時,內置蜂鳴器發聲。
5. 從顯示幕讀取測量結果。測量直流電壓時,顯示幕同時顯示紅色表筆測試點的電壓極性。
6. 測量交流電壓時,頻率將同時顯示在副顯。
7. 測量結束,按下電源鍵,關閉儀錶電源。
儀錶自動檢測的順序:
交流電壓 直流電壓 交流電流 電阻及通斷
警告:為了避免可能的觸電或人身傷害等安全事故,請切實遵守安全工作規範
交流電流測量
1. 按下電源鍵,打開儀錶的電源。
2. 將柔性鉗的鎖扣鬆開,將柔性鉗繞過被測導體或導線,然後將柔性鉗插入鎖扣,將鎖扣鎖緊
(如下圖所示)。
3. 儀錶自動識別交流電流,並測量。
4. 電流顯示在主顯,頻率同時顯示在副顯。
5. 在測量電流時,如果 V 插孔和 COM 插孔同時在測量電壓或電阻,則主顯顯示電壓或電阻;
副顯示則顯示電流,頻率則不顯示。
6. 測量結束,按下電源鍵,關閉儀錶電源。
Page 17
16
警告:為了避免可能的觸電或人身傷害等安全事故,請切實遵守安全工作規範
注意:測量電流後回零比較慢,這是由於真有效值測量電路引起的,是正常現象。
8.通用技術指標
使用環境條件:
EN61010-1, EN61010-2-032, EN61326-1,CAT IV 600V,污染等級 2
海拔高度< 2000 m
工作環境溫濕度:0~40℃(<80% RH,<10℃時不考慮)
儲存環境溫濕度:-10~60℃(<70% RH, 取掉電池)
溫度係數:0.1×準確度/℃
測量端和地之間允許的最大電壓:600V 直流或交流有效值
採樣速率:約 3 次/秒。
顯示:液晶顯示幕
超量程指示:顯示“OL”。
電池低壓指示:當電池電壓低於正常工作電壓時,“ ”將顯示在顯示幕上。
輸入極性指示:自動顯示“−”號
電源: 3x1.5V AAA 電池
外形尺寸:324x178x30mm
準確度指標
準確度在校準後一年內適用。
基準條件:環境溫度 18℃至 28℃、相對濕度不大於 80%。
Page 18

17
直流電壓
量程 解析度 準確度
6V 0.001V
±(0.8% 讀數 +3 字)
60V 0.01V
600V 0.1V
最小直流電壓測量:0.2V 直流電壓
輸入阻抗:2MΩ
最大輸入電壓:600V DC 或 AC 有效值。
交流電壓
量程 解析度
準確度
45~65Hz 40~45,65~2000Hz
6V 0.001V
±(1.2%讀數 +3 字) ±(2.0%讀數 +5 字)
60V 0.01V
600V 0.1V
最小交流電壓測量:0.5V 交流電壓
輸入阻抗:2MΩ
最大輸入電壓:600V DC 或 AC 有效值。
頻率範圍:40Hz~2000Hz ,真有效值回應。
其它頻率未驗證。
柔性鉗位置誤差
精度和位置誤差是在沒有外部的電場或磁場干擾,在工作溫濕度範圍內,在最佳測量位置所測量
的誤差。
Page 19
18
最佳測量範圍 位置誤差
A 35 mm
±0.5%
B 50 mm
±1.5%
C 60 mm
±2.0%
D >60 mm
±5.0%
交流電流
量程 解析度 準確度(40~65Hz)
60A 0.01A
±(1.5%讀數 +5 字)
(<10A±(2.0%讀數 +10 字)
600A 0.1A
3000A 1A ±(2.0%讀數 +5 字)
量程 解析度 準確度(65~200Hz)
60A 0.01A
±(2.5%讀數 +5 字)
600A 0.1A
3000A 1A ±(3.0%讀數 +5 字)
Page 20
19
量程 解析度 準確度(200~1000Hz)
60A 0.01A
≤1000A ±(3.0%讀數 +5 字)
>1000A 參考
600A 0.1A
3000A 1A
最小交流電流測量:0.1A,當測量值小於 0.1A 時顯示 0。
最大測量電流:3000A 交流電流有效值。
頻率範圍:40Hz~1000Hz,真有效值回應。
頻率
量程 解析度 準確度
40~1000Hz 0.1Hz
±(0.5%讀數 +2 字)
1kHz~10kHz 1Hz
電流通道:靈敏度 3A,測量範圍 40~1kHz
電壓通道:靈敏度 0.5V,測量範圍 40~10kHz
電阻
量程 解析度 準確度
6kΩ 0.001 kΩ
±(1.0% 讀數 +3 字)
60kΩ 0.01 kΩ
600kΩ 0.1 kΩ
6MΩ 0.001MΩ
輸入保護:最大 600V DC 或 AC 有效值。
蜂鳴通斷
功能 說明 測試環境
當內置蜂鳴器發聲時,被
測電阻小於約 50Ω。
測試電流:約 1mA;開路電壓:約
0.8V。
Page 21
20
輸入保護:最大 600V DC 或 AC 有效值。
9.儀錶維護
本節提供基本的維護資料,除非您是有經驗的維修人員且有相關的校準、性能測試以及維修
資料,否則不要嘗試去維修本儀錶
警告
為了防止可能發生的觸電、火災或人身傷害:
在電池蓋或後蓋打開時,請勿使用儀錶進行任測量操作。
清潔儀錶前先移除輸入信號。
應使用指定的替換零件。請經過認可的技術人員維修儀錶。
一般維護
用濕布和少量洗滌劑清潔儀錶外殼, 請勿用研磨劑或化學溶劑。
更換電池
警告
為避免錯誤的測量讀數,儀錶顯示幕出現 “ ”符號時,應及時更換電池。
儀錶長期不用時,請取出電池,以防電池漏電對產品造成儀錶損壞。
為避免電擊或人身傷害,在打開後蓋更換電池之前,應關機並確保表筆已從測量電路斷開。
請按照以下步驟更換電池:
關閉儀錶電源。
將表筆與被測量電路斷開,並從儀錶移走。
用螺絲刀旋鬆固定電池蓋的螺釘,取下電池蓋。
取下舊電池,換上新的電池。
裝上電池蓋,上緊螺釘
Page 22

21
MT-3112 3 5/6 智能型真有效值柔性钳表使用说明书
1.声明
根据国际版权法,未经允许和书面同意,不得以任何形式复制本说明书的任何内容。本说明
书在将来的版本中如有更改,恕不另行通知。
警告
“警告”标志表示会对用户造成危险的状况和操作。要求在执行此操作时必须注意,如果不正确执
此行操作或不遵守此操作步骤,则可能导致人身伤害或伤亡。在不满足这些条件或没有完全理解
的情况下,请勿继续执行警告标志所指示的任何操作。
2.安全信息
使用仪表前,请仔细阅读说明书并注意有关安全警告信息。
仪表根据国际安全标准 EN61010-1, EN61010-2-032,EN61326-1对电子测试仪器的安全要
求而设计的。仪表的设计与制造严格遵守 EN61010-1, EN61010-2-032, EN613 26-1,CA T IV 600V
过压安全标准和污染等级 2 规定。
3.安全工作规范
警告:为了避免可能的触电或人身伤害等安全事故,请切实遵守以下的规范:
使用仪表之前,请仔细阅读本说明书,并特别注意安全警告信息。严格遵守本手册的操作使
用本仪表,否则仪表所提供的保护功能可能会遭到破坏或削弱。
使用仪表之前,请检查仪表外壳是否存在裂纹或塑料件损坏,检查表笔绝缘层是否损坏,是否
有外露金属或有磨损迹象,检查表笔连通性,若有请勿再使用。
使用仪表之前,请检查柔性钳绝缘层是否损坏,若有请勿再使用。
使用仪表之前,请用仪表测量一个已知电压来验证仪表是否正常。
请按仪表或手册上指定的测量类别、电压或电流额定值使用仪表。
请遵守当地和国家的安全规范。穿戴个人防护用品(如经认可的橡胶手套、面具和阻燃衣物
等),以防危险带电导体外露时遭受电击和电弧而受伤。
在输入端子之间或在任何一个端子与接地点之间施加的电压不能超过仪表上标明的额定值。
测量超出 30V 交流真有效值,42V 交流峰值或 60V 直流时,请特别小心。该类电压会有电
Page 23
22
击的危险
当仪表电池电量低指示符出现时,请及时更换电池,以防测量错误。
切勿在有爆炸性气体或蒸汽周围或潮湿的环境中使用仪表。
使用表笔时,请将手指握在探头护指装置的后面。
测量时,请先连接零线或地线,再连接火线;断开时,请先断开火线,再断开零线和地线。
打开外壳或电池盖之前,请将仪表上的表笔移除。切勿在仪表拆开或电池盖打开的情况下使
用仪表。
仪表只能和所配备的表笔一起使用才符合安全标准的要求。如表笔破损需更换,必须换上同
样型号和相同电气规格的表笔。
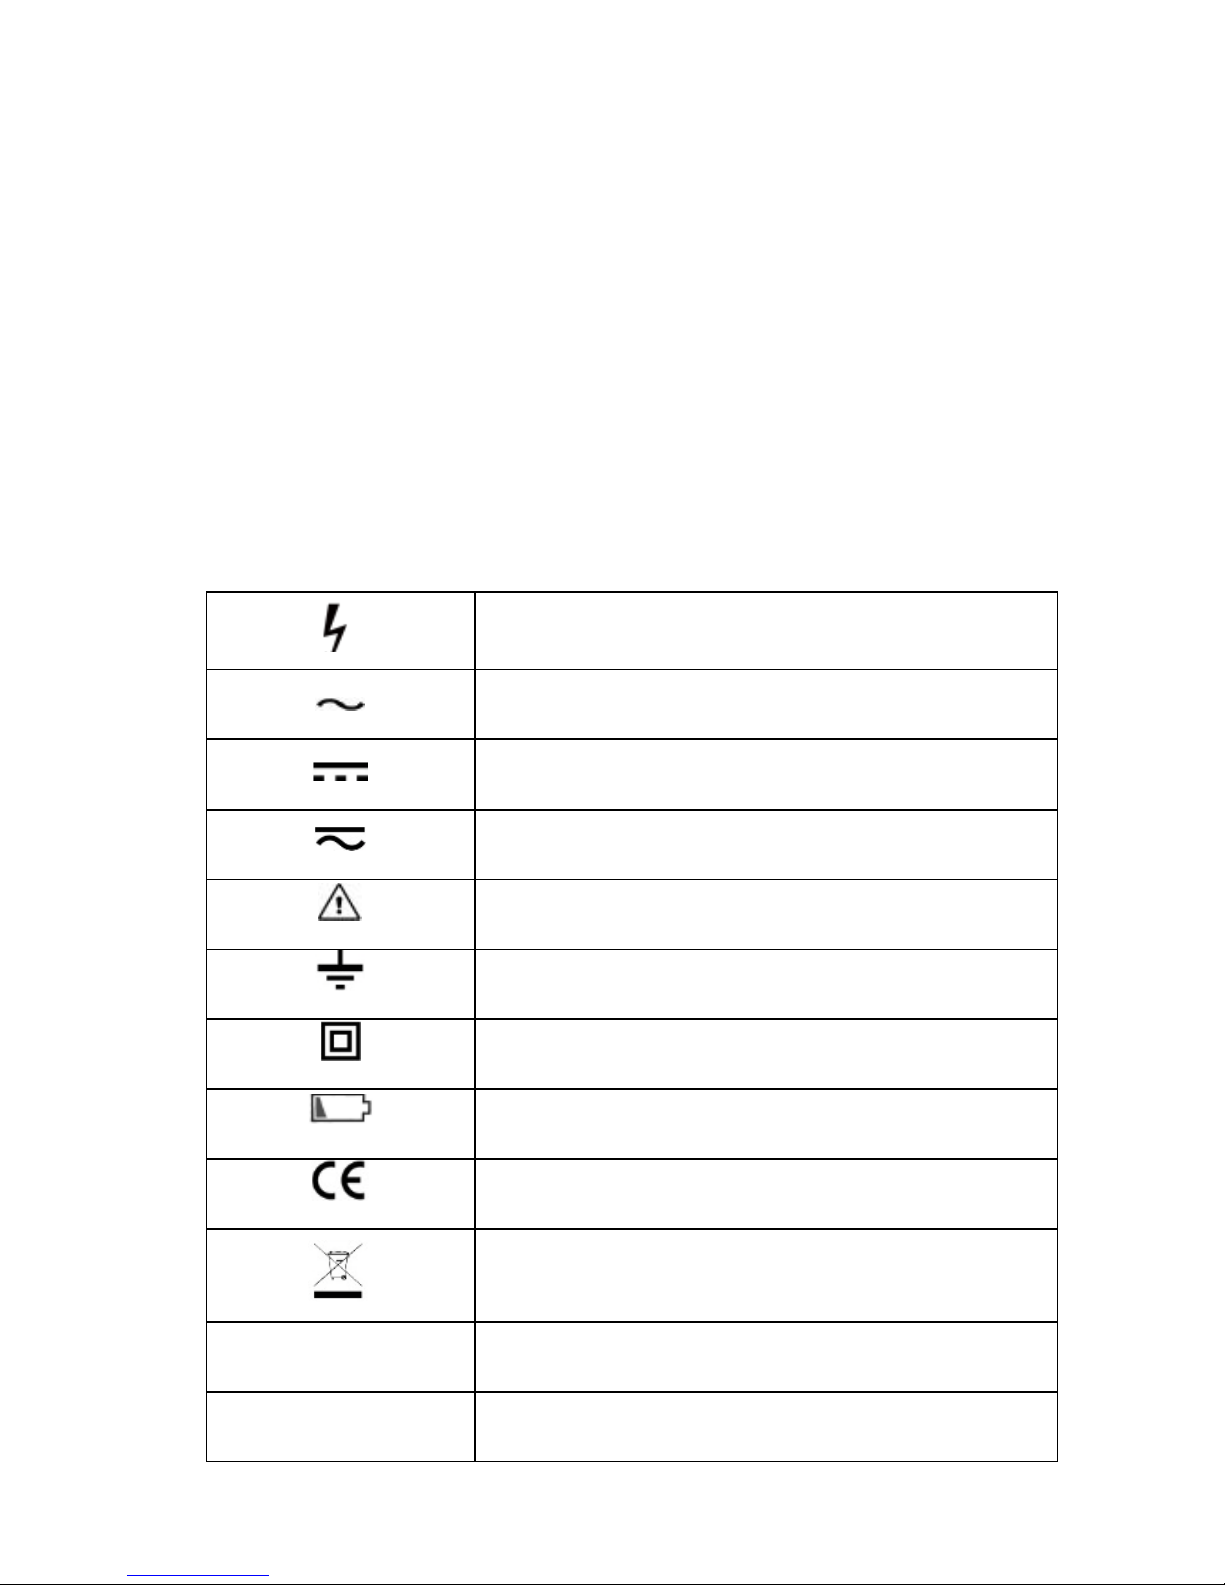
4.安全符号
高压警告
AC(交流电)
DC(直流电)
交流电或直流电
警告,重要安全标志
接地
设备由双重绝缘或加强绝缘保护
电池电量不足
符合欧洲共同体(European Union)标准
说明不得将此电气/电子产品丢弃在家庭垃圾中。
CAT. III 1000V III 类 1000V 过电压保护
CAT. IV 600V IV类 600V 过电压保护
Page 24
23
5.概述
本仪表是一款智能型数字柔性钳形表。可以测量直流电压、交流电压、交流电流、频率、电阻及
连通性,并且能够自动识别测量信号,不需要使用者选择测量功能。
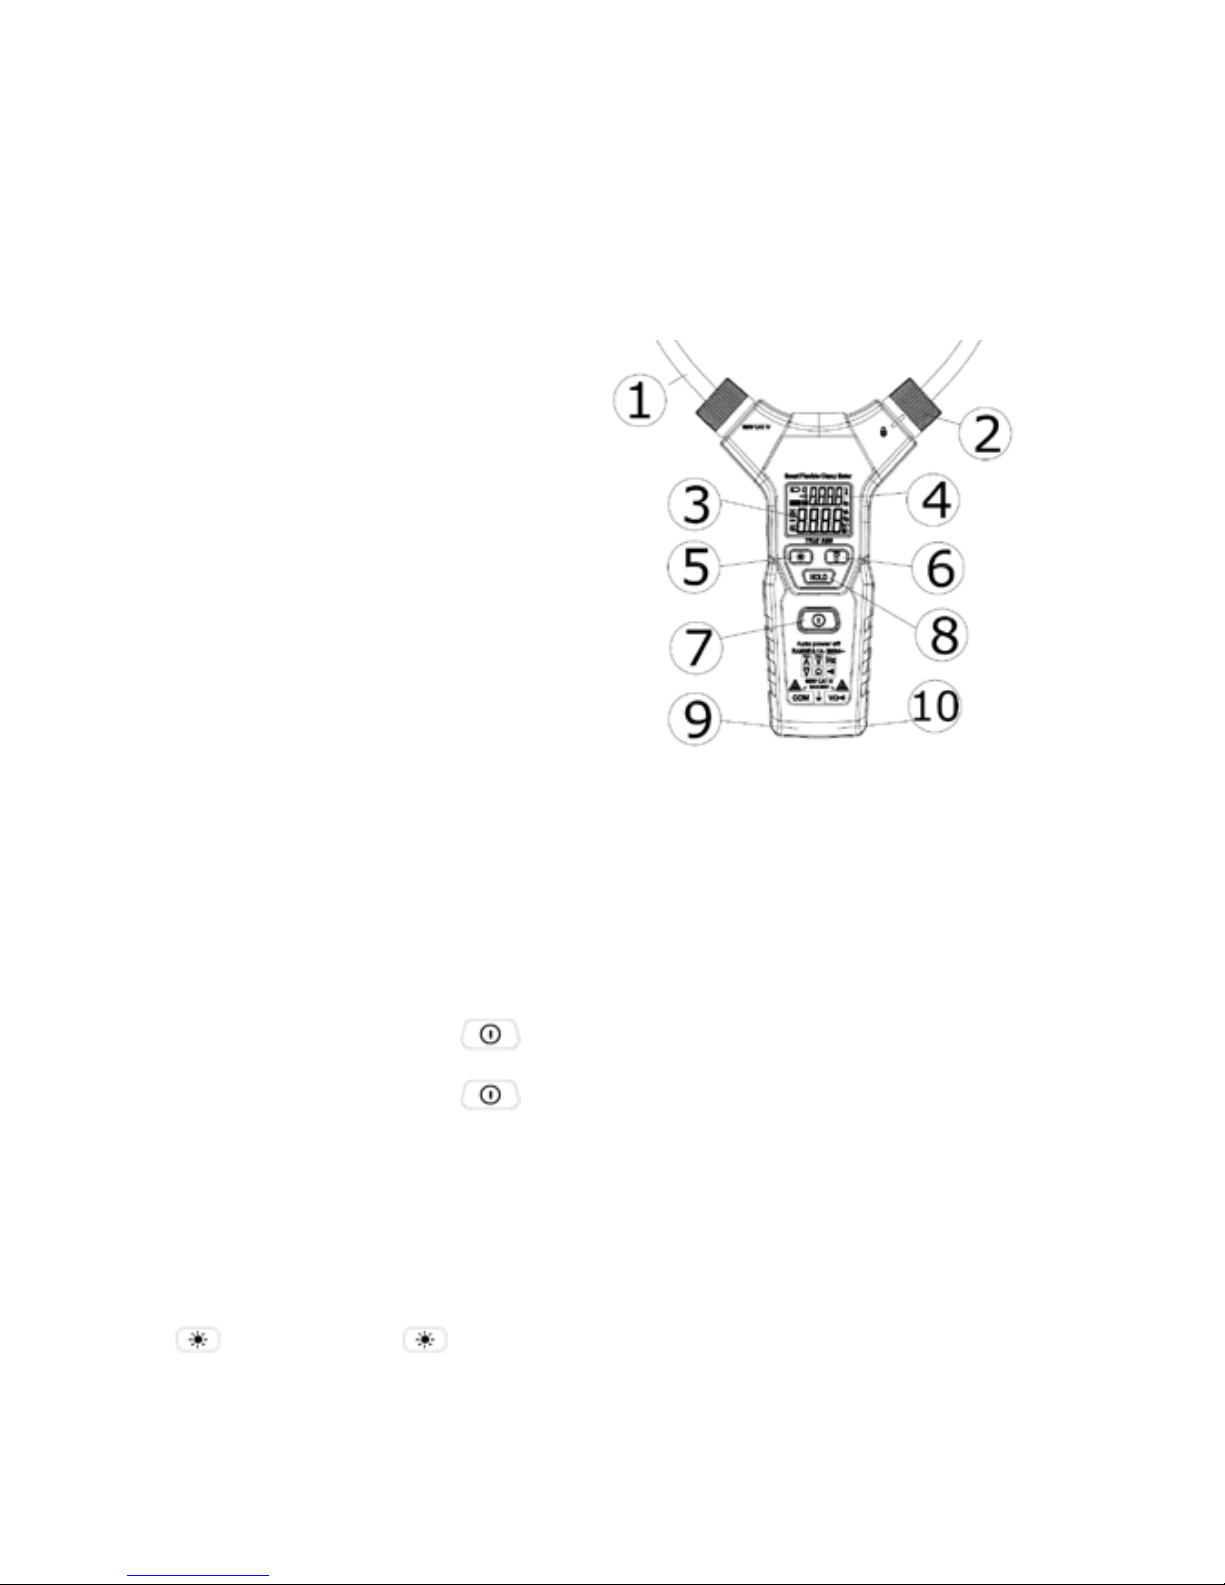
6.面板说明
①柔性钳,用于测量交流电流
②柔性钳锁扣
③主显
④副显
⑤背光键
⑥照明灯键
⑦电源开关键
⑧数据保持键
⑨COM 输入插孔
⑨ V 输入插孔
7.使用仪表
本仪表是一款智能型数字柔性钳形表,所以使用操作非常简单,测量时不需要进行功能选择,仪
表会自动识别测量信号,然后测量并显示测量结果。
开机/关机
开机:在仪表关机状态下,按 键并保持,直到蜂鸣器“嘀”一声,再松开。
关机:在仪表开机状态下,按 键并保持,直到蜂鸣器“嘀”一声,再松开。
自动关机功能
在无任何按键操作,同时无任何信号输入时,仪表会在约 5 分钟内自动关机。
背光功能
按 键开启背光;再按 键关闭背光。
Page 25
24
照明功能
按 键开启照明灯;再按 键关闭照明灯。
数据保持功能
按 键开启数据保持,显示屏显示“H”字符;再按 键关闭数据保持。
交直流电压/电阻测量/连通性检测
8. 按下电源键,打开仪表的电源。
9. 将红表笔插在 V 插孔,黑表笔插在 COM 插孔。
10. 将表笔并联到待测电路、电源或电阻上。仪表自动判别交流电压、直流电压、电阻。
11. 当测量电阻时,电阻小于约 50Ω时,内置蜂鸣器发声。
12. 从显示屏读取测量结果。测量直流电压时,显示屏同时显示红色表笔测试点的电压极性。
13. 测量交流电压时,频率将同时显示在副显。
14. 测量结束,按下电源键,关闭仪表电源。
仪表自动检测的顺序:
交流电压 直流电压 交流电流 电阻及通断
警告:为了避免可能的触电或人身伤害等安全事故,请切实遵守安全工作规范
交流电流测量
7. 按下电源键,打开仪表的电源。
8. 将柔性钳的锁扣松开,将柔性钳绕过被测导体或导线,然后将柔性钳插入锁扣,将锁扣锁紧
(如下图所示)。
9. 仪表自动识别交流电流,并测量。
10. 电流显示在主显,频率同时显示在副显。
11. 在测量电流时,如果 V 插孔和 COM 插孔同时在测量电压或电阻,则主显显示电压或电阻;
副显示则显示电流,频率则不显示。
12. 测量结束,按下电源键,关闭仪表电源。
Page 26
25
警告:为了避免可能的触电或人身伤害等安全事故,请切实遵守安全工作规范
注意:测量电流后回零比较慢,这是由于真有效值测量电路引起的,是正常现象。
8.通用技术指标
使用环境条件:
EN61010-1, EN61010-2-032, EN61326-1,CAT IV 600V,污染等级 2
海拔高度< 2000 m
工作环境温湿度:0~40℃(<80% RH,<10℃时不考虑)
储存环境温湿度:-10~60℃(<70% RH, 取掉电池)
温度系数:0.1×准确度/℃
测量端和地之间允许的最大电压:600V 直流或交流有效值
采样速率:约 3 次/秒。
显示:液晶显示屏
超量程指示:显示“OL”。
电池低压指示:当电池电压低于正常工作电压时,“ ”将显示在显示屏上。
输入极性指示:自动显示“−”号
电源: 3x1.5V AAA 电池
外形尺寸:324x178x30mm
准确度指标
准确度在校准后一年内适用。
基准条件:环境温度 18℃至 28℃、相对湿度不大于 80%。
Page 27

26
直流电压
量程 分辨率 准确度
6V 0.001V
±(0.8% 读数 +3 字)
60V 0.01V
600V 0.1V
最小直流电压测量:0.2V 直流电压
输入阻抗:2MΩ
最大输入电压:600V DC 或 AC 有效值。
交流电压
量程 分辨率
准确度
45~65Hz 40~45,65~2000Hz
6V 0.001V
±(1.2%读数 +3 字) ±(2.0%读数 +5 字)
60V 0.01V
600V 0.1V
最小交流电压测量:0.5V 交流电压
输入阻抗:2MΩ
最大输入电压:600V DC 或 AC 有效值。
频率范围:40Hz~2000Hz ,真有效值响应。
其它频率未验证。
柔性钳位置误差
精度和位置误差是在没有外部的电场或磁场干扰,在工作温湿度范围内,在最佳测量位置所测量
的误差。
Page 28
27
最佳测量范围 位置误差
A 35 mm ±0.5%
B 50 mm ±1.5%
C 60 mm ±2.0%
D >60 mm ±5.0%
交流电流
量程 分辨率 准确度(40~65Hz)
60A 0.01A
±(1.5%读数 +5 字)
(<10A±(2.0%读数 +10 字)
600A 0.1A
3000A 1A ±(2.0%读数 +5 字)
量程 分辨率 准确度(65~200Hz)
60A 0.01A
±(2.5%读数 +5 字)
600A 0.1A
3000A 1A ±(3.0%读数 +5 字)
Page 29

28
量程 分辨率 准确度(200~1000Hz)
60A 0.01A
≤1000A ±(3.0%读数 +5 字)
>1000A 参考
600A 0.1A
3000A 1A
最小交流电流测量:0.1A,当测量值小于 0.1A 时显示 0。
最大测量电流:3000A 交流电流有效值。
频率范围:40Hz~1000Hz,真有效值响应。
频率
量程 分辨率 准确度
40~1000Hz 0.1Hz
±(0.5%读数 +2 字)
1kHz~10kHz 1Hz
电流通道:灵敏度 3A,测量范围 40~1kHz
电压信道:灵敏度 0.5V,测量范围 40~10kHz
电阻
量程 分辨率 准确度
6kΩ 0.001 kΩ
±(1.0% 读数 +3 字)
60kΩ 0.01 kΩ
600kΩ 0.1 kΩ
6MΩ 0.001MΩ
输入保护:最大 600V DC 或 AC 有效值。
蜂鸣通断
功能 说明 测试环境
Page 30
29
当内置蜂鸣器发声时,被
测电阻小于约 50Ω。
测试电流:约 1mA;开路电压:约
0.8V。
输入保护:最大 600V DC 或 AC 有效值。
9.仪表维护
本节提供基本的维护资料,除非您是有经验的维修人员且有相关的校准、性能测试以及维修
数据,否则不要尝试去维修本仪表
警告
为了防止可能发生的触电、火灾或人身伤害:
在电池盖或后盖打开时,请勿使用仪表进行任测量操作。
清洁仪表前先移除输入信号。
应使用指定的替换零件。请经过认可的技术人员维修仪表。
一般维护
用湿布和少量洗涤剂清洁仪表外壳, 请勿用研磨剂或化学溶剂。
更换电池
警告
为避免错误的测量读数,仪表显示屏出现 “ ”符号时,应及时更换电池。
仪表长期不用时,请取出电池,以防电池漏电对产品造成仪表损坏。
为避免电击或人身伤害,在打开后盖更换电池之前,应关机并确保表笔已从测量电路断开。
请按照以下步骤更换电池:
关闭仪表电源。
将表笔与被测量电路断开,并从仪表移走。
用螺丝刀旋松固定电池盖的螺钉,取下电池盖。
取下旧电池,换上新的电池。
装上电池盖,上紧螺钉
Page 31
30
中国地区产品保固卡
购买日期
店章
公司名称
联络电话
电子邮箱
联络地址
产品型号 MT-3112
※ 在正常使用情况下,自原购买日起主机保修一年,发热芯保修三个月(不含配件、易
耗品)。
※ 产品保固卡需盖上店章、日期章并填写产品序号,其保固效力始生效。
※ 本卡请妥善保存,如需维修服务时,请同时出示本保固卡,如无法出示,视为自动
放弃。
※ 我司产品实行计算机编码,它将作为我司产品保固的依据,每抬产品均有独立的编
码,为了您能得到最好的服务,请勿损坏撕毁该编
※ 保固期满后,如需维修之性质,则酌收检修工时费用。若有零件需更换,则零件费
另计。
保修说明
一、 保固期限内,如发生下列情况,本公司需依实际状况酌收材料成本或修理费(由本公
司维修人员判定):
• 产品表面的损伤,包括外壳的破裂或刮痕
• 因误用、疏忽、不当安装或测试,未经授权私自打开产品修理,修改产品或者
任何其它超出预期使用范围的原因所造成的损害
• 因意外因素或人为因素(包括搬运、挤压、碰撞、高温、输入不合适电压、腐蚀
等不可抗力因素)导致的故障或损坏。
• 因使用非宝工导致的故障及损坏。
二、非服务保证内容
• 本机主体外之配件:如烙铁头、吹风嘴、手柄、保险丝等配件。
• 任何因自然磨损、超负荷工作而引起的损坏。
二、 超过保固期限仍需检修,虽未更换零件,将依本公司保固条款酌收工时服务费用。
服务电话: 0755 83692415 / 83692986 /83246594 / 83247554
服务传真: 0755 83692143
Page 32

31
©2016Prokit’s Industries Co., Ltd. All rights reserved. 2016001
 Loading...