

Page 1
ITEM:
5800300
DESCRIPTION:
User Assembly and Operation Manual
Part One
Safe Use and Operation Page 1
Part Two
Parts Identification Page 2
Part Three
Assembly and Installation Page 3
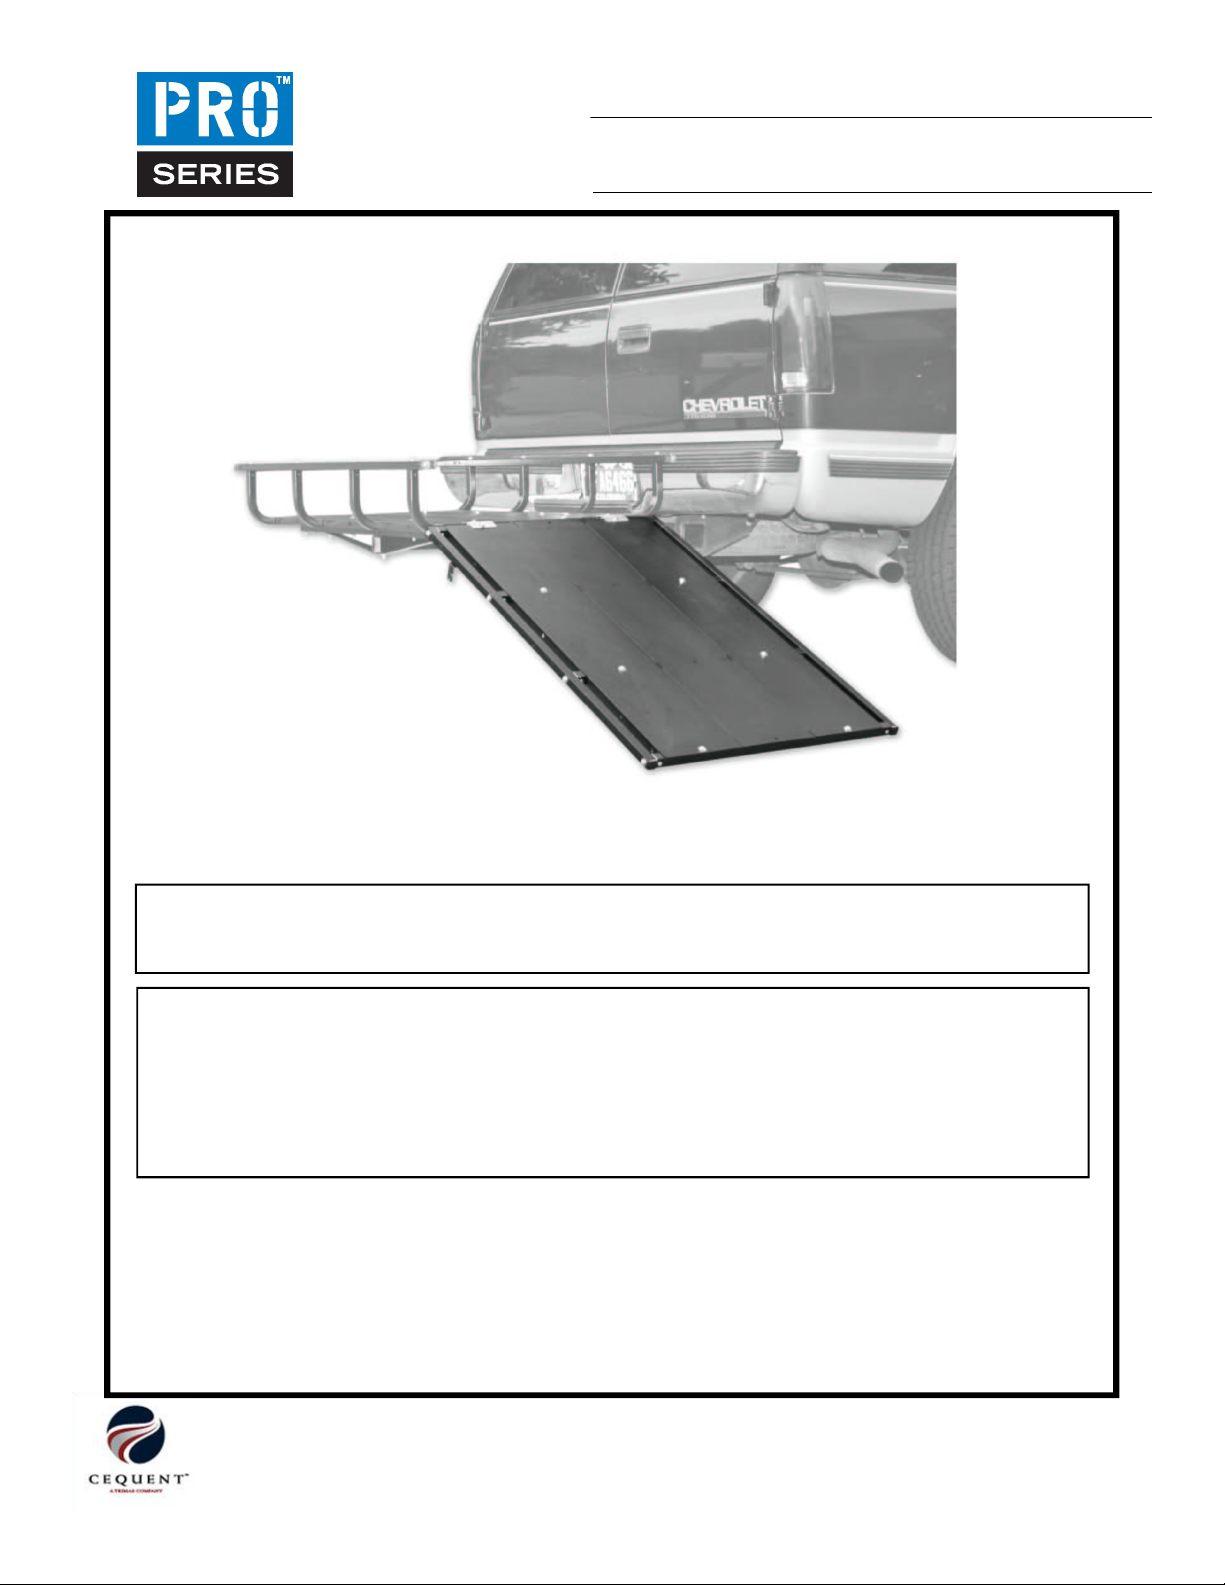
GearCage™ Ramp
Operation Tips:
• Keep this manual for future reference.
• Recommended for use with the GearCage™ SP Cargo Rack.
Safe Use & Operation
Be sure to follow these guidelines to prevent possible hazards from misuse.
• When operating the vehicle, the ramp must be either removed, secured in the upright position, or
positioned to lay flat on the GearCage™ SP Cargo Rack.
• Always secure the hinge bolts with locking nuts that are furnished with the Ramp Accessory so that at
least two (2) threads protrude through the nut’s nylon insert. Failure to do so may result in loss of ramp
from carrier in transit, property damage and bodily injury.
We warrant this product to the first consumer to be free from defect in material and workmanship for one year (Please retain your sales
slip for your records). Any product or part thereof found to be defective within that period will be replaced without charge provided that:
(1) the product was not misused; (2) no alterations or modifications were made; (3) its failure resulted from a defect in material or
workmanship and not from normal wear expected in the use of the product; (4) the product or part is delivered, freight prepaid, to
Cequent Performance Products Inc. Please contact Cequent Performance Products Inc., toll free, at 888-521-0510 to get a return
authorization number prior to return. Manufacturers only obligation shall be to replace such products or parts proved to be defective.
U.S. And International Patent Numbers: 6,409,203; 6,609,725; 6,945,550;6,910,609; Patents Pending
If this product was purchased from a dealer, all documentation MUST be furnished to the customer.
Cequent Performance Products
47774 Anchor Court West
Plymouth, MI 48170
Technical Service: (888) 521-0510
Page 1 of 4
5800300N 11-5-09 Rev D
Printed in China
Page 2
5800300
GearCage™ Ramp
Parts List
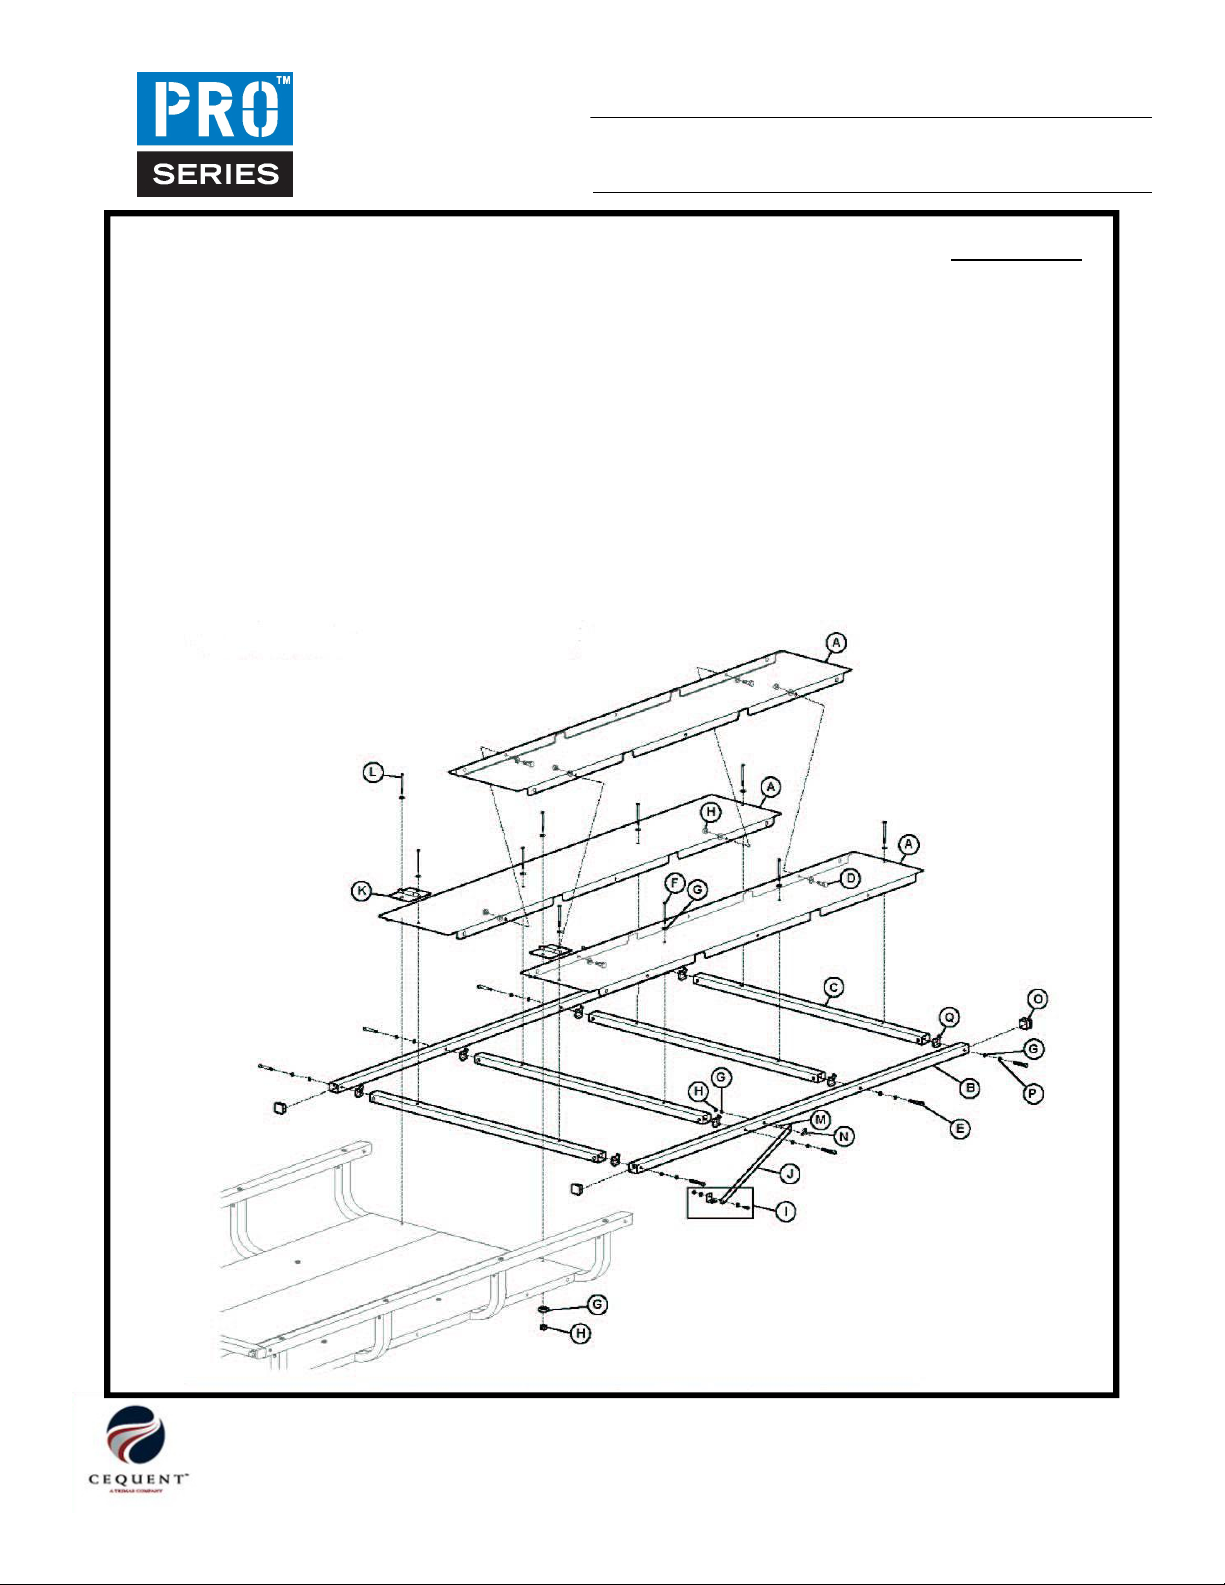
Item Description Quantity
A Base Panels 3
B Side Tubes 2
C Cross Tubes 4
D 1/4" x 3/4" Bolts 5
E 1/4" x 2" Bolts 8
F 1/4" x 1-1/2" Bolts 8
G 1/4" Washers 31
H 1/4" Nyloc Nuts 16
I Ramp Stop Bracket Assembly 1
J Ramp Stop Lever 1
K Hinges 2
L 1/4" x 2-1/2" Bolts 2
M Lynch Pin 1
N Pin Clip 1
O End Caps 4
P 1/4" Split Ring Lock Washers 8
Q Seal Gaskets 8
Tools Needed
7/16" Wrench
7/16" Socket
If you are missing any items, contact your
sales agent if the product was assembled by
them. If not, or if purchased from Cequent
Performance Products Inc., please contact us
at 1-888-521-0510 .
Cequent Performance Products
47774 Anchor Court West
Plymouth, MI 48170
Technical Service: (888) 521-0510
Page 2 of 4
5800300N 11-5-09 Rev D
Page 3

GearCage™ Ramp Assembly
1. Place the Cross Tubes (C) between the Side Tubes (B)
so that the ends of the Cross Tubes (C) line up with the
holes in the Side Tubes (B). Insert a Seal Gasket (Q) into
each end of each Cross Tube (C).
Install a 1/4" x 2" Bolt (E) with a 1/4" Washer (G) and 1/4"
Split Ring Lock Washers (P) through the Side Tube (B) and
into the pin nuts in the end of each Cross Tube (C).
Securely tighten all hardware.
Side Tube (B)
Seal
Gaskets (Q)
¼” Flat washer (G)
2. Use a 1/4" Nyloc Nut (H) and a 1/4" Washer (G) to install
the Lynch Pin (M) in the 3/8" hole in the Side Tube (B).
Secure the pin with the Pin Clip (N).
¼” Nyloc Nut (H)
¼” Flat washer (G)
Cross Tube (C)
¼” x 2” long bolt (E)
¼” Lock washer (P)
5800300
GearCage™ Ramp
4. Place the center Base Panel (A) between the two (2)
outside panels. Use a 1/4" x 3/4" Bolt (D), two (2) 1/4"
Flat Washers (G) and a 1/4" Nyloc Nut (H) at each of the
four (4) locations to secure this panel to the outside
panels.
Firmly tighten all hardware.
Center Panel (A)
¼” Flat washers (G)
¼” Nyloc Nuts (H)
Lynch
Pin (M)
Pin Clip (N)
3. Orient the outside Base Panels (A) to the Ramp Tube
Assembly. Place the Hinges (K) over the end holes in the
outside Base Panels (A) nearest the Lynch Pin hole. Install
eight (8) 1-1/2" x 1/4" Bolts (F) with 1/4“ Washers (G) to
secure the outside Base Panels (A) and Hinges (K) to the
Ramp Tube Assembly. Do not tighten these bolts completely
at this time.
¼” x 1-1/2”
Long Bolts (F)
Hinges (K)
¼” Flat washer (G)
Cequent Performance Products
47774 Anchor Court West
Plymouth, MI 48170
Technical Service: (888) 521-0510
Outside Base
Panels (A)
Lynch Pin
Hole
¼” x ¾” Long Bolts (D)
¼” Flat washers (G)
5. Insert the Plastic End Caps (O) in the ends of the Side
Tubes (B).
Plastic End Caps (O)
Plastic End Caps (O)
Page 3 of 4
5800300N 11-5-09 Rev D
Page 4

Install Ramp On GearCage™ Cargo Rack
6. Remove the tube on the passenger side of the
GearCage™. Remove the bolts that mount the outside
panels on the GearCage to the U-Tube. Install a 1/4” x 21/2" Bolt (L), two (2) 1/4" Washers (G) and a 1/4" Nyloc Nut
(H) through each Ramp Hinge to secure the Ramp to the
GearCage™.
5800300
GearCage™ Ramp
WARNING!
When installing the 1/4” x 2-1/2" Bolts (L) with 1/4"
Nyloc Nuts (H), always make sure that at least two (2)
threads protrude through the nut. Failure to do so may
cause the Ramp to separate from the carrier in transit,
resulting in property damage, and bodily injury.
¼” x 2-1/2” Long Bolts (L)
¼” Flat washers (G)
Ramp
Assembly
¼” Flat washers (G)
¼” Nyloc Nuts (H)
GearCage ™ Cargo Rack
7. Remove the bolt that secures the second Side Rail from
the end of the GearCage™. Place the bracket from the
Ramp Stop Bracket Assembly (I) over the hole and reinstall
the bolt.
8. Place the hole in the rounded end of the Ramp Stop
Lever (J) over the hole in the vertical side of the bracket
and secure it in place with the hardware from the Ramp
Stop Bracket Assembly (I).
Use the Pin Clip (N) to secure the other end of the
Ramp Stop Lever to the Lynch Pin (M) installed in
Step 2.
Pin Clip
Ramp Stop
Lever
Ramp Stop Bracket
Assembly Hardware
Cequent Performance Products
47774 Anchor Court West
Plymouth, MI 48170
Technical Service: (888) 521-0510
WARNING!
When operating the vehicle, the ramp must be either
removed, secured in the upright position as shown, or
positioned to lay flat on the GearCage™ Cargo Rack.
Page 4 of 4
5800300N 11-5-09 Rev D
 Loading...