


Proscend 120
VDSL2 Router
User Manual
Version 0.01

Proscend 120 VDSL2 Router User Manual V0.01 1
TTaabblleess ooff CCoonntteennttss
1 INTRODUCTION ........................................................................................................................................ 3
1.1 F
EATURES
................................................................................................................................................... 3
1.2 S
PECIFICATION
............................................................................................................................................. 4
1.3 D
EVICE REQUIREMENTS
................................................................................................................................. 5
2 GETTING TO KNOW THE DEVICE ............................................................................................................... 6
2.1 P
ARTS CHECK
.............................................................................................................................................. 6
2.2 F
RONT PANEL
.............................................................................................................................................. 7
2.3 R
EAR PANEL
................................................................................................................................................ 7
3 CONNECTING YOUR DEVICE ...................................................................................................................... 9
3.1 C
ONNECTING THE HARDWARE
........................................................................................................................ 9
4 GETTING START WITH THE WEB PAGES .................................................................................................. 11
4.1 A
CCESSING THE WEB PAGES
......................................................................................................................... 11
4.2 C
OMMONLY USED BUTTONS
......................................................................................................................... 14
4.3 H
ELP INFORMATION
.................................................................................................................................... 15
4.4 T
ESTING YOUR SETUP
.................................................................................................................................. 16
4.5 D
EFAULT DEVICE SETTINGS
........................................................................................................................... 17
5 BASIC SETUP ........................................................................................................................................... 18
5.1 D
EVICE CONFIGURATION
............................................................................................................................. 18
5.2 I
NTERNET PORT
......................................................................................................................................... 19
5.2.1 PPPoE connection .......................................................................................................................... 20
5.2.2 DHCP (Dynamic IP Configuration) ................................................................................................. 21
5.2.3 Static IP Configuration ................................................................................................................... 22
5.3 L
OCAL PORT
.............................................................................................................................................. 23
6 ADVANCED SETUP .................................................................................................................................. 24
6.1 D
YNAMIC
DNS .......................................................................................................................................... 24
6.2 F
IREWALL
................................................................................................................................................. 26
6.3 S
TATIC ROUTES
.......................................................................................................................................... 27
6.4 D
YNAMIC ROUTES
...................................................................................................................................... 28
6.5 UPNP ...................................................................................................................................................... 29
6.6 V
IRTUAL SERVER
........................................................................................................................................ 30
6.7 IP QOS .................................................................................................................................................... 32
6.7.1 QoS Scheduler ................................................................................................................................ 32
6.7.2 QoS Policy ...................................................................................................................................... 33
6.8 P
ORT-BASED
VLAN ................................................................................................................................... 34
7 MANAGEMENT ....................................................................................................................................... 35

Proscend 120 VDSL2 Router User Manual V0.01 2
7.1
R
EMOTE MANAGEMENT
.............................................................................................................................. 35
7.2 S
YSTEM RESET
........................................................................................................................................... 36
7.3 F
IRMWARE UPGRADE
.................................................................................................................................. 37
7.4 N
ETWORK STATUS
...................................................................................................................................... 38
7.5 S
AVE CONFIGURATION
................................................................................................................................ 39
7.6 D
IAGNOSTIC
.............................................................................................................................................. 40
7.7 T
IME
........................................................................................................................................................ 41
8 TROUBLESHOOTING ............................................................................................................................... 42
8.1 T
ROUBLESHOOTING SUGGESTIONS
................................................................................................................. 42
8.2 D
IAGNOSING PROBLEM USING IP UTILITIES
..................................................................................................... 44
8.2.1 Ping................................................................................................................................................ 44
8.2.2 Nslookup ........................................................................................................................................ 44

Proscend 120 VDSL2 Router User Manual V0.01 3
1 Introduction
The Proscend 120 is a VDSL2 Router that complies with various VDSL/VDSL2 standards and provides
unprecedented broadband service over a single pair of copper wire. It integrates four ports 10/100
Base-T/TX Ethernet switch that can easily connect to any PC or LAN in home or small office
environments. Quality of multimedia service is ensured with its powerful traffic control and management
over layer 2 or 3. While the NAT/PAT technologies share the broadband connection to all its LAN
clients for all prevailing Internet applications, the embedded firewall keeps out those malicious attacks
and intrusions. Network management is implemented so it can be easily configured and managed by
the service provider. The Proscend 120 delivers a compact, cost-effective and innovative solution to its
customers.
This User Manual will show you how to connect your Proscend 120 VDSL2 Router and how to
customize its configuration to get the most out of your device.
1.1 Features
The list below contains the main features of the device and may be useful to users with knowledge of
networking protocols. The chapters throughout this guide will provide you with enough information to
get the most out of your device.
The features include:
High Speed Data Transmission on Twisted Copper Pair Wire
Service providers can deploy VDSL rapidly over existing wire infrastructure (POTS line)
Support mandatory and optional features of VDSL2 (G.993.2) standard
Support VDSL2 profiles, 8a/8b/8c/8d, 12a/12b, 17a and 30a
Support the speed of downstream or upstream up to 100Mbps
Support bridge and router mode
Interchangeable between Bridge and Router mode
Network address translation (NAT) functions to provide security for your LAN and multiple PCs
surfing Internet simultaneously.
Network configuration through DHCP Server and DHCP Client
Services including IP route, QoS and UPnP
Built-in four-port 10/100BaseTX Ethernet switch for PC or LAN connection
Supports USB host interface for connecting USB storage devices
Configuration and management with Telnet through the Ethernet interface, and remote Telnet
through VDSL interface

Proscend 120 VDSL2 Router User Manual V0.01 4
Firmware upgradeable through HTTP
User-friendly configuration program accessed via a web browser
1.2 Specification
Hardware Specifications
LAN Interface
•
Four port 10/100BaseT Ethernet Switch (4 * RJ-45 connectors), IEEE 802.3u with MDI/MDIX
auto-detection
•
Integrated 802.11b/g WLAN Access Point
•
Integrated USB slave and host ports
WAN VDSL2 Line Interface
•
Comply with VDSL2 and support 8a/8b/8c/8d, 12a/12b, 17a and 30a
•
Connection Loops: One (pair wire)
•
Connector: RJ-11
Indicators
•
PWR – Red Blink: Only occur when you open the modem, it will become green after 5s.Red On: boot
fail
Green On: device is powered on
•
DSL – Green LED indicates VDSL2 connection
•
PPP – Green On: establish a PPP connection
Red On: PPP disconnection
•
LAN – Green LED indicates LAN connection
•
USB – GREEN LED indicates USB connection
OAM&P
•
Local: Web management
•
Remote: Web Management
Environment
•
Operation Temperature: 0°C ~ 40°C
•
Operation Humidity: 5% ~ 95%
•
Storage Temperature: -20 ~ +85°C
•
Storage Humidity: 5%~95%
Power
•
AC/DC Switching supply : AC Input :100~240V 50/60Hz DC Output :12V 1.5Amp

Proscend 120 VDSL2 Router User Manual V0.01 5
1.3 Device Requirements
In order to use the Proscend 120, you must have the following:
DSL service up and running on your telephone line
Instructions from your ISP on what type of Internet access you will be using, and the addresses
needed to set up access
Need one or more computers, each containing an Ethernet card (10Base-T/100Base-T network
interface card (NIC)).
For system configuration, using the supplied web-based program: a web browser such as Internet
Explorer v4 or later, or Netscape v4 or later. Note that version 4 of each browser is the minimum
version requirement – for optimum display quality, use Internet Explorer v5, or Netscape v6.1
Note
NoteNote
Note ::::
You do not need to use a hub or switch in order to connect more than one Ethernet PC to the device.
Instead, you can connect up to four Ethernet PCs directly to the device using the ports labeled LAN1 to
LAN4 on the rear panel.

Proscend 120 VDSL2 Router User Manual V0.01 6
2 Getting to know the device
2.1 Parts Check
In addition to this document, your package should arrive containing the following:
DSL Modem Package Contents
The device
Ethernet RJ-45 Cable
USB Cable
DSL RJ-11 Line Cable
Power adapter
User’s Manual CD

Proscend 120 VDSL2 Router User Manual V0.01 7
2.2 Front Panel
Connector and LED definitions from right to left:
Label Color
Function
USB
connector N/A
It is USB 2.0 interface and connects to the USB storage.
PWR
Green/Red
Red Blink: Only occur when you open the modem, it will become green after 5s.
Green On: device is powered on
Red On: boot fail
DSL
Green
On: DSL link reaches showtime, which means that your
device has successfully
connected to your ISP’s DSL network.
Off: DSL link not in showtime, your device has not successfully connected to
your ISP’s DSL network.
Blink: Try to connect to ISP’s DSL network
PPP
Green/Red
Green On: establish a PPP connection
Red On: PPP disconnection
LAN
Green
On: LAN link established and active
Off: No LAN link
Blink: Data being transmitted
USB
Green
On: USB link established and active
Off: No USB link
2.3
Rear Panel

Proscend 120 VDSL2 Router User Manual V0.01 8
Connector definition definitions from right to left:
Label Function
Power Switch ON/OFF switch for DC power input
Power Jack Connects to the supplied power adapter
USB port (slave) Connects the device via USB cable to your PC
RES A reset button to reset the device or reset to default settings
LAN1 ~ LAN4 Connects the device via Ethernet to your devices in LAN
DSL Jack Connects to the ISP’s DSL network

Proscend 120 VDSL2 Router User Manual V0.01 9
3 Connecting your device
This chapter provides basic instructions for connecting the device to a computer or LAN and to the
Internet.
In addition to configuring the device, you need to configure the Internet properties of your computer(s).
This chapter assumes that you have already established a DSL service with your Internet service
provider (ISP). These instructions provide a basic configuration that should be compatible with your
home or small office network setup. Refer to the subsequent chapters for additional configuration
instructions.
3.1 Connecting the Hardware
This section describes how to connect the device to the power outlet and your computer(s) or network.
Before you begin, turn the power off for all devices. These include your computer(s), your
LAN hub/switch (if applicable), and the device.
The diagram below illustrates the hardware connections. The layout of the ports on your device may
vary from the layout shown. Refer to the steps that follow for specific instructions.

Proscend 120 VDSL2 Router User Manual V0.01 10
Overview of Hardware Connections
Step 1. Connect the DSL cable and optional telephone line
Connect one end of the provided phone cable to the port labeled DSL on the rear panel of the device.
Connect the other end to DSL outlet.
Step 2. Connect the Ethernet cable
Connect up to four single Ethernet computers or to a HUB/Switch directly to the device via Ethernet
cable(s).
Note that the cables do not need to be crossover cables, the switch provides MDI and MDIX
auto-detection.
Step 3. Attach the power connector
Connect the AC power adapter to the Power connector on the back of the device and plug the adapter
into a wall outlet or power strip. Turn on and boot up your computer(s) and any LAN devices such as
hubs or switches.
Step 4. Configure your Ethernet PCs
You must also configure the Internet properties on your Ethernet PCs. See Configuring Ethernet PCs
section.
Next step
After setting up and configuring the device and PCs, you can log on to the device by following the
instructions in chapter “Getting Started with the Web pages”. The chapter includes a section called
Testing your Setup, which enables you to verify that the device is working properly.
Proscend 120 VDSL2 Router User Manual V0.01 11
4 Getting Start with the Web pages
The DSL Modem includes a series of Web pages that provide an interface to the software installed on
the device. It enables you to configure the device settings to meet the needs of your network. You can
access it through a web browser on a PC connected to the device.
4.1 Accessing the Web pages
To access the web pages, you need the following:
A laptop or PC connected to the LAN or WLAN port on the device.
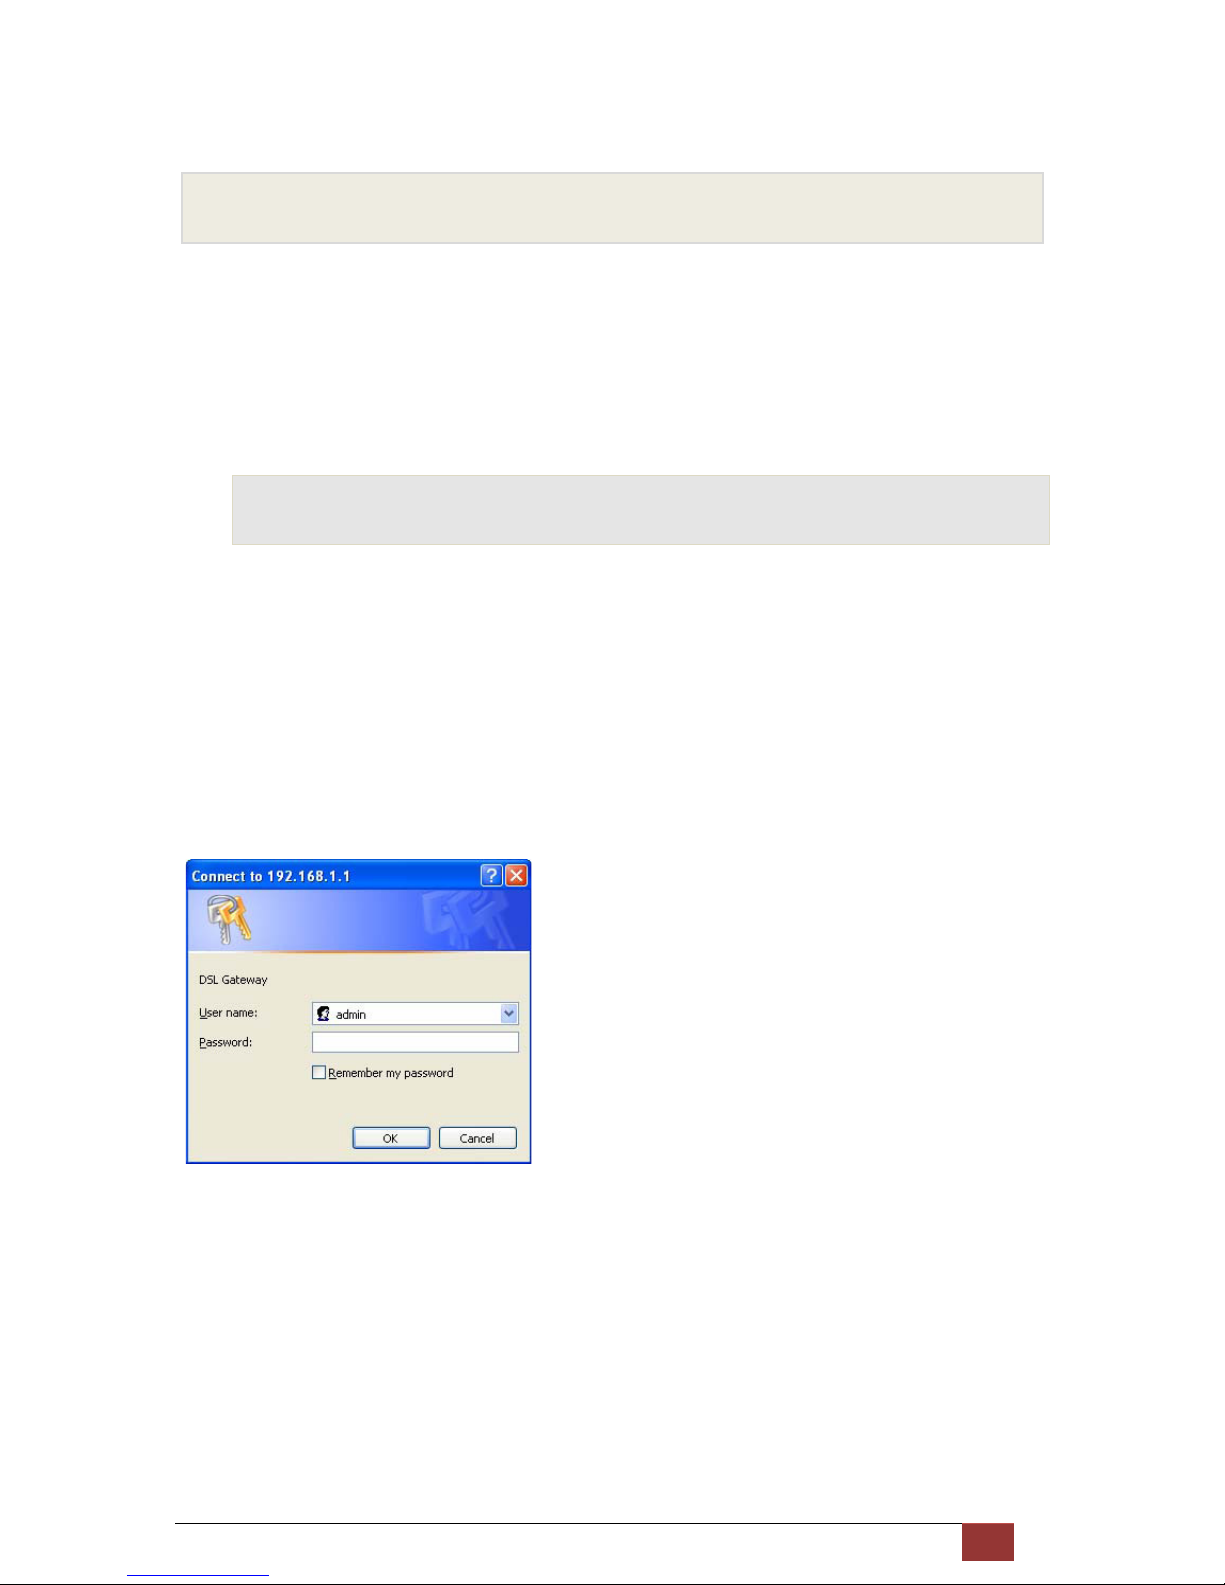
A web browser installed on the PC. The minimum browser version requirement is Internet Explorer v4
or Netscape v4. For the best display quality, use latest version of Internet Explorer, Netscape or Mozilla
Firefox. from any of the LAN computers, launch your web browser, type the URL, http://192.168.1.1 in
the web address (or location) box, and press [Enter]. The default IP address of the device is
192.168.1.1. Then enter the default username and password: admin/admin to access the configuration
web page, if you have not changed the username and password.
The home page opens displaying the Internet Port Configuration page of device:

Proscend 120 VDSL2 Router User Manual V0.01 12
Home – Internet Port Configuration
The Menu comprises:
It provides the basic configuration of the system. It includes sub menus, Device
Configuration, Internet Port, Local Port. By default, the page of Internet Port is
displayed after the login.
Advanced Setup: provides information about the current configuration of various
system features with options to change the configuration. It includes the sub menus
Dynamic DNS, Firewall, Static Routes, Dynamic Routes, UPnP, Virtual Server, IP QoS,
and Port-Based VLAN.
Management: provides the administration utilities such as Remote Management, System Reset,

Proscend 120 VDSL2 Router User Manual V0.01 13
Firmware Upgrade, Network Status, Save Configuration, Diagnostic and Time Zone.

Proscend 120 VDSL2 Router User Manual V0.01 14
4.2 Commonly used buttons
The following buttons are used throughout the web pages:
Button Function
You could click this button to refresh the information on this current page
again so that you could get the real time information.
This button appears on every configuration page.
Click on this button if at any time you decide that you do not want to
change the existing settings.
check button – these appear on many configuration pages.
You will be asked to check if you want this feature be selected.
This button appears on every configuration page.
Click on this button once you are through with the changes and decide to
save the made changes.
You may need to browse to find a file which needs to
be uploaded for new
configuration.
This button allows you to upgrade to the new configuration file attached
using the Browse button.
The following terms are used throughout this guide in association with these buttons:
Click – point the mouse arrow over the button, menu entry or link on the screen and click the left mouse
button. This performs an action, such as displaying a new page or performing the action specific to the
button on which left mouse button is clicked.
Select – usually is used when describing which radio button to select from a list, or which entry to
select from a drop-down list. Point the mouse arrow over the entry and left-click to select it. This does
not perform an action – you will also be required to click on a button, menu entry or link in order to
proceed.

Proscend 120 VDSL2 Router User Manual V0.01 15
4.3 Help information
To view the help, click the desired menu or submenu. The related help information
appears in a separated page.

Proscend 120 VDSL2 Router User Manual V0.01 16
4.4 Testing your Setup
Once you have connected your hardware and configured your PCs, any computer on your LAN should
be able to use the device’s DSL connection to access the Internet.
To test the connection, turn on the device, wait for 30 seconds and then verify that the LEDs are
illuminated as follows:
LED Behavior
Power (PWR) Red Blinking when you open the modem, it will become
green after 5s. Then the device is powered on If Red On
means boot fail
LAN Solid green to indicate that the device can communicate
with your LAN.
DSL Flashing on/off while trying to SYNC UP with ISP CO
site.
Solid green to indicate that the device has successfully
established a connection with your ISP.
LED Indicators
If the LEDs illuminate as expected, test your Internet connection from a LAN computer.
To do this, open your web browser, and type the URL of any external website (such as
http://www.yahoo.com).
If the LEDs do not illuminate as expected, you may need to configure your Internet access settings
using the information provided by your ISP. If the LEDs still do not illuminate as expected or the web
page is not displayed, see Troubleshooting section or contact your ISP for assistance.

Proscend 120 VDSL2 Router User Manual V0.01 17
4.5 Default device settings
In addition to handling the DSL connection to your ISP, the DSL Modem can provide a variety of
services to your network. The device is preconfigured with default settings for use with a typical home
or small office network.
The table below lists some of the most important default settings; these and other features are
described fully in the subsequent chapters. If you are familiar with network configuration, review these
settings to verify that they meet the needs of your network. Follow the instructions to change them if
necessary. If you are unfamiliar with these settings, try using the device without modification, or contact
your ISP for assistance.
We strongly recommend that you contact your ISP prior to changing the default
configuration.
Option Default Setting Explanation/Instructions
User/Password admin/admin User name and password to access the device
LAN Port
IP Address
Assigned static IP address:
192.168.1.1
Subnet mask: 255.255.255.0
This is the IP address of the LAN port on the
device. The LAN port connects the device to your
Ethernet network. Typically, you will not need to
change this address. See Local Network section.
DHCP
(Dynamic Host
Configuration
Protocol)
DHCP server enabled with the
following pool of addresses:
192.168.1.10 through
192.168.1.250
The device maintains a pool of private IP
addresses for dynamic assignment to your LAN
computers. To use this service, you must have set
up your computers to accept IP information
dynamically, as described in DHCP Server section.

Proscend 120 VDSL2 Router User Manual V0.01 18
5 Basic Setup
5.1 Device Configuration
The Device Configuration Page of the device allows you to configure the device to work as router or
bridge.
Device Configuration
To configure the Device Mode:
Select Route Mode or Bridge Mode from the list.

Proscend 120 VDSL2 Router User Manual V0.01 19
5.2 Internet Port
You can configure your internet connection from this page. This page displays the details of existing
internet connection, if any. This page contains all of options that could establish a connection to your
Telco or ISP.
Before configuring the device, you should ask for and get the following information from your
ISP:
Connection Protocol: PPPoE (dynamic IP assignment), DHCP (dynamic IP assignment) or Static
IP address from ISP.
If the connection protocol is “fixed IP address”, need more information about subnet mask, default
gateway, and DNS server.
NAT: Disabled or Enabled
Default Route: Disabled or Enabled
IGMP: Disabled or Enabled
PPP User Name and Password (also known as Broadband User Name and Password)

Proscend 120 VDSL2 Router User Manual V0.01 20
5.2.1 PPPoE connection
This web page allows you to configure the device to establish a connection through PPPoE protocol.
Internet Port – PPPoE (Dynamic IP assignment)
To configure the PPPoE settings:
Select the Multiple-PPPoE (Dynamic IP onfiguration) to be used as Protocol.
Enter name in the Interface Name
Enter the username and password provided from your Telco or ISP and enter the password again
in the Confirm Password field again to double check the password.
Enter name in the Service Name and AC Name.
Select the Authentication Type, PAP or CHAP
Select the Packet Size (MTU) from the list
Select the minutes from Disconnect after Idle minutes to disconnect the PPPoE connection if
there is no traffic for that minutes.
Enter the VLAN ID if the traffic is tagged with VLAN ID.
Click to Enable NAT.
Click to Add Default Route
Click to Enable IGMP if need
Click Add and then click Save to save the configuration, otherwise click New to configure it again.

Proscend 120 VDSL2 Router User Manual V0.01 21
5.2.2 DHCP (Dynamic IP Configuration)
This web page allows you to configure the device to establish a connection through DHCP client
protocol. The Dynamic IP Configuration means “get an IP address automatically”.
Internet Port - DHCP (Dynamic IP Configuration)
To configure the DHCP (Dynamic IP Configuration) settings:
Select the DHCP (Dynamic IP Configuration) to be used as Protocol.
Enter the VLAN ID if the traffic is tagged with VLAN ID.
Click to use Static DNS (Domain Name Server) and then enter the IP addresses of Primary DNS
and Secondary DNS. Usually, the information of DNS sever will be given from DHCP server in
ISP site.
Click to enable NAT if need
Click to enable IGMP if need
Click Save to save the configuration

Proscend 120 VDSL2 Router User Manual V0.01 22
5.2.3 Static IP Configuration
This web page allows you to set the fixed IP address in the Internet (WAN) port.
Internet Port – Static IP Configuration
To configure the Static IP settings:
Select the Fixed IP Configuration to be used as Protocol.
Enter the VLAN ID if the traffic is tagged with VLAN ID.
Enter the IP address, Submask, Gateway, Primary DNS address and Secondary DNS address.
Click to enable NAT if need
Click to enable IGMP if need
Click Save to save the configuration

Proscend 120 VDSL2 Router User Manual V0.01 23
5.3 Local Port
This page allows you to setup the Local Network (LAN) connection.
Local Port Configuration
To configure the Local Port settings:
Enter the device IP address.
Enter the Subnet Mask : The subnet mask determines the number of computers are allowed in
this network. Usually a class (255.255.255.0) is satisfactory for a local network.
Click to enable DHCP server to assign IP addresses to the client.
Enter the start of the IP address for DHCP client users. The default value is 192.168.1.10. Please
make sure there is no fixed IP address within the rage of DHCP IP pool, otherwise the DHCP
client may not get the IP address correctly.
Enter the number of IP addresses (users) allowed to use the DHCP service.
Select the lease time. A DHCP client gets the IP address with a lease time. When the lease time
is expired, the client must connect to the DHCP server to request the dynamic IP address again.
Enter the IP address of WINS (Windows Internet Naming Service). The WINS provides a
distributed database for registering and querying dynamic computer name-to-IP address in a
routed network environment. It means WINS provides easy configuration and administration of
Windows-based TCP/IP networks. If you do not use WINS server, leave it as blank.
Click Save to save the configuration

Proscend 120 VDSL2 Router User Manual V0.01 24
6 Advanced Setup
6.1 Dynamic DNS
The device provides Dynamic Domain Name System (DDNS) feature. The DDNS lets you assign a
fixed host and domain name to a dynamic Internet IP address. It is useful when you are hosting your
own website, FTP server and other server applications behind the device. Before you can use this
feature, you need to sign up for DDNS service from the DDNS service provider like dyndns.org (refer to
www.dyndns.org).
Dynamic DNS Configuration
To configure the Dynamic DNS (DDNS) page:
Click to enable Dynamic DNS feature
Enter your registered account name (host name) and select the DDNS service provider from the
pull down list if you find your DDNS service provider from the list.
Enter your account name (full registered host name) if your DDNS service provider is not
supported in the above pull down list.
Enter your username and password for login which you register the account name in the DDNS
service provider.

Proscend 120 VDSL2 Router User Manual V0.01 25
Click to enable Wildcard. If you like to have an unregistered hostname followed by the registered
hostname and domain name to work as well.
Click to enable the Mail Exchanger. If you like that others send emails to your DDNS name will be
redirected to the mail server you specified in the Mail Exchanger field.
Click to enable Backup MX if you need to back up the mail exchanger’s address while you login
the DDNS service provider every time.
Click Save to save the configuration.
Click Update to update the DDNS service or click Refresh to refresh display.

Proscend 120 VDSL2 Router User Manual V0.01 26
6.2 Firewall
The device provides firewall feature to protect the device.
Firewall Configuration
Global Setting
Check to enable “Block Request From Wan Port”
Check to enable “Block Ping From Wan Port”
Check to enable “Block PPTP, L2TP, IPSec Request”
Check to enable DMZ and enter the IP address of DMZ host
Click Save to save the configuration
Besides, A DMZ (DeMilitarized Zone) host is a computer on your network that can be accessed from
the Internet regardless of NAT, port forwarding and IP filter settings. A DMZ is often used to host Web
servers, FTP servers etc that need to be accessible from the Internet.

Proscend 120 VDSL2 Router User Manual V0.01 27
6.3 Static Routes
The device provides to add the routing rules manually.
Static Routes Configuration
Global Setting
Enter the IP address of Destination Host/Network
Enter the Subnet Mask related the Destination Host/Network that packets to those IP addresses
will be forwarded to the gateway.
Enter the IP address of Gateway
Enter the number of Metric
Click Add to add this routing rule
The added routing rule will be shown in the table. Click Delete All to remove all entries or click
Delete to remove the specified entry.
Click Routing Table to get the current routing table.

Proscend 120 VDSL2 Router User Manual V0.01 28
6.4 Dynamic Routes
The device provides to set RIP, RIPv2 Authentication, Split-Horizon and Poison-Reverse.
Dynamic Routes Configuration

Proscend 120 VDSL2 Router User Manual V0.01 29
6.5 UPnP
The device provides UPnP feature..
UPnP Configuration
Global Setting
Check to enable “UPnP”
Click Save to save the configuration

Proscend 120 VDSL2 Router User Manual V0.01 30
6.6 Virtual Server
The device provides port mapping to local host for incoming packets. Virtual server enables you to run
a server on your local network that can be accessed from the Internet. You need to set up port
forwarding rule to tell the device on which computer the server is held. When port forwarding is enabled,
your router (the device) routes all the inbound traffic on a particular port to the chosen computer on your
network.
Virtual Server Configuration
Global Setting
Select the application (port). If it is not listed in default, click Define Application to add your own
application as below figure.
Enter the IP address of Server IP Address in your local network.
Click Add to add this rule
The added port forwarding rule will be shown in the table. Click Delete All to remove all added
entries or click Delete to remove the specified entry.
To define the application
Enter the Application name
Select the Protocol (TCP, UDP, or ICMP) used by the application
Check if you want to forward the Single port or a Range of ports
Enter the Port number (Range) from start to end
Click Add to add this application into the selection list

Proscend 120 VDSL2 Router User Manual V0.01 31
Virtual Server Configuration – Define Application

Proscend 120 VDSL2 Router User Manual V0.01 32
6.7 IP QoS
The page provides to configure the four different priority queues (High, Middle, Low and Default) and
provide bandwidths to them separately. Besides, setup the checking rules to determine the packets to
each queue. That will help to provide better bandwidth efficiently and serve important packets like voice,
email, FTP and so on in higher priority with more bandwidth.
6.7.1 QoS Scheduler
The page provides to enable upstream and/or downstream QoS and configure the four different priority
queues (High, Middle, Low and Default) and provide bandwidths to them separately.
IP QoS – QoS Scheduler
Global Setting
Check to Enable Upstream (packets from LAN to Internet) QoS.
Select Auto in Bandwidth that the device will get the sync up upstream bandwidth and determine
the bandwidth used for QoS. Select the Manual in the Bandwidth and then enter the bandwidth in
Kbps used for QoS.
Enter the Priority Percentage for High, Medium, and Low queues. The rest of percentage will be
assigned to Default queue automatically.
Check to Enable Downstream (packets from LAN to Internet) QoS.
Select Auto in Bandwidth that the device will get the sync up downstream bandwidth and
determine the bandwidth used for QoS. Select the Manual in the Bandwidth and then enter the
bandwidth in Kbps used for QoS.
Enter the Priority Percentage for High, Medium, and Low queues. The rest of percentage will be
assigned to Default queue automatically.
Click Save to save the configuration

Proscend 120 VDSL2 Router User Manual V0.01 33
6.7.2 QoS Policy
This page provides to setup the rule to check the packet and put it into the right priority queue.
IP QoS – QoS Policy
Global Setting
Select the Packet Type (TCP or UDP).
Enter the Source IP Address and/or Port Number if any.
Enter the Destination IP Address and/or Port Number if any.
Select the Priority Queue for this packet.
Click Add to create this rule.
In the above figure, it shows the any packet with destination IP address,192.168.1.100 and port
number, 20 will be put into medium queue.
Select the specified entry in the QoS policy table and click Delete to remove the rule.

Proscend 120 VDSL2 Router User Manual V0.01 34
6.8 Port-Based VLAN
The page provides port-based VLAN configuration. In default, the LAN1 to LAN4 are grouped together
as a single Ethernet environment. But you could enable VLAN feature and get up to 4 separated
Ethernet environments. Besides, each VLAN can associate with VLAN ID in the Internet (WAN) port.
Those packets does not match the VLAN ID in below figure will be sent to default group (Routing
Group).
Port-Based VLAN Configuration
Global Setting
Enter the value of WAN VLAN ID in Bridge Group 1, 2 and 3
Select the LAN ports from LAN1 to LAN4 for each Bridge Group.
Click Save to save the configuration.

Proscend 120 VDSL2 Router User Manual V0.01 35
7 Management
7.1 Remote Management
This page allows you to setup the remote management capability which is useful to check and
configure the device from remote site.
Management Configuration – Remote Management
Global Setting
The default username/password is admin/admin. You could enter the new username, password in
the Password and Confirm Password fields and then click Change Login Password to change it.
Check and enter the port number of WEB to allow login request from remote site by WEB
browser.
Check to enable Restrict Management from LAN, the default is disabled. Enter the MAC
addresses that you allow them to access the device if this feature is enabled.
Click Save to save the configuration

Proscend 120 VDSL2 Router User Manual V0.01 36
7.2 System Reset
This page allows you to reboot the device with current settings or factory default settings.
Management Configuration – System Reset
Global Setting
Click Reboot to reboot the device with current settings
Click Default Reset to reboot the device with factory default settings

Proscend 120 VDSL2 Router User Manual V0.01 37
7.3 Firmware Upgrade
This page allows you to upgrade the firmware of the device to get more features and Improvements
Management Configuration – Firmware Upgrade
Global Setting
Click Browse to specify the location of firmware
Click Upgrade to start the upgrade procedure. The device will reboot automatically when the
firmware is loaded completely.

Proscend 120 VDSL2 Router User Manual V0.01 38
7.4 Network Status
This page shows the network status and most important information about LAN, WAN protocol, and
VDSL.
Management Configuration – Network Status

Proscend 120 VDSL2 Router User Manual V0.01 39
7.5 Save Configuration
This page allows you to save current configuration into file in your PC or load the configuration from PC.
Management Configuration – Save Configuration
Global Setting
Click Save and follow the system instructions to save configuration profile into file
To load the configuration profile from file, click Browse to specify the location of file and click Load
to load the configuration profile into the device. The device will reboot automatically when the
configuration is loaded.

Proscend 120 VDSL2 Router User Manual V0.01 40
7.6 Diagnostic
This page allows you to ping a remote IP or domain name to test the Internet connection working fine or
not.
Management Configuration – Diagnostic
Global Setting
Enter the IP address or Host name (domain name)
Click ping to start the diagnostic process.

Proscend 120 VDSL2 Router User Manual V0.01 41
7.7 Time
This page allows you to setup the time zone and get the real time clock from Internet.
Management Configuration – Time Zone Configuration
Global Setting
Select the your local Time Zone from the list
Check to use the Daylight Saving Time
Enter the NTP server domain name in the Primary NTP Server and Secondary NTP Server fields
which provide the real time network clock
Enter the value of Update Interval to sync up the clock with NTP server
Click Save to save your settings
Click Update to get the real time clock now

Proscend 120 VDSL2 Router User Manual V0.01 42
8 Troubleshooting
This chapter suggests solutions for problems you may encounter in installing or using the device, and
provides instructions for using several IP utilities to diagnose problems.
Contact Customer Support if these suggestions do not resolve the problem.
8.1 Troubleshooting suggestions
Troubleshooting Suggestions
Problem Troubleshooting Suggestion
LEDs
Power LED does not illuminate after
product is turned on.
Verify that you are using the power cable provided with the
device and that it is securely connected to the device and a
wall socket/power strip.
Internet LED does not illuminate after
phone cable is attached.
Verify that a standard telephone cable (called an RJ-11
cable) like the one provided is
securely connected to the DSL
port and your wall phone port. Allow about 30 seconds for the
device to negotiate a connection with your ISP.
LINK LAN LED does not illuminate after
Ethernet cable is attached.
Verify that the Ethernet cable is securely connected to your
LAN hub or PC and to the device. Make sure the PC and/or
hub is turned on.
Verify that your cable is sufficient for your network
requirements. A 100 Mbit/sec network (10BaseTx) should
use cables labeled CAT 5. A 10Mbit/sec network may
tolerate lower quality cables.
Internet Access
My PC cannot access the Internet Run a health check on your device. Use the ping utility
(discussed in the following chapter) to check whether your
PC can communicate with the device’s LAN IP address (by
default 192.168.1.1). If it cannot, check the Ethernet Cabling.
If you statically assigned a private IP address to the
computer, (not a registered public address), verify the
following:
Check that the gateway IP address on the computer is
your public IP address. If it is not, correct the address

Proscend 120 VDSL2 Router User Manual V0.01 43
or configure the PC to receive IP information
automatically.
Verify with your ISP that the DNS server specified for
the PC is valid. Correct the address or configure the
PC to receive this information automatically.
My LAN PCs cannot display
web pages on
the Internet.
Verify that the DNS server IP address specified
on the PCs is
correct for your ISP. If you specified that the DNS server be
assigned dynamically
from a server, then verify with your ISP
that the address configured on the device is correct,
and then
you can use the ping utility to test connectivity with your ISP’s
DNS server.
Web pages
I forgot/lost my user ID or password.
If you have not changed the password from the default, try
using “admin” as both the user ID
and password. Otherwise,
you can reset the device to the default configuration by
pressing three times the Reset Default button on the
front panel of the device. Then, type the default
User ID and password shown above.
WARNING: Resetting the device removes any custom
settings and returns all settings to their default values.
I cannot access the web pages from my
browser.
Use the ping utility, discussed in the following section, to
check whether the PC can communicate with the device’s
LAN IP address (by default 192.168.1.1). If it cannot, check
the Ethernet cabling.
Verify that you are using Internet Explorer or Netscape
Navigator v4.0 or later.
Verify that the PC’s IP address is defined as being on the
same subnet as the IP address assigned to the LAN port on
the device.
My changes to the web pages
are not being retained.
Be sure to use the Confirm Changes function after any
changes.

Proscend 120 VDSL2 Router User Manual V0.01 44
8.2 Diagnosing Problem using IP Utilities
8.2.1 Ping
Ping is a command you can use to check whether your PC can recognize other computers on your
network and the Internet. A ping command sends a message to the computer you specify. If the
computer receives the message, it sends messages in reply. To use it, you must know the IP address
of the computer with which you are trying to communicate.
On Windows-based computers, you can execute a ping command from the Start menu. Click the Start
button, and then click Run. In the Open text box, type a statement such as the following:
ping 192.168.1.1
Click OK. You can substitute any private IP address on your LAN or a public IP address for an Internet
site, if known.
If the target computer receives the message, a Command Prompt window is displayed:
If the target computer cannot be located, you will receive the message Request timed out.
Using the ping command, you can test whether the path to the device is working (using the
preconfigured default LAN IP address 192.168.1.1) or another address you assigned.
You can also test whether access to the Internet is working by typing an external address, such as that
for www.yahoo.com (216.115.108.243). If you do not know the IP address of a particular Internet
location, you can use the nslookup command, as explained in the following section.
From most other IP-enabled operating systems, you can execute the same command at a command
prompt or through a system administration utility.
8.2.2 Nslookup
You can use the nslookup command to determine the IP address associated with an Internet site name.
You specify the common name, and the nslookup command looks up the name in on your DNS server
(usually located with your ISP). If that name is not an entry in your ISP’s DNS table, the request is then

Proscend 120 VDSL2 Router User Manual V0.01 45
referred to another higher-level server, and so on, until the entry is found. The server then returns the
associated IP address.
On Windows-based computers, you can execute the nslookup command from the Start menu. Click the
Start button, and then click Run. In the Open text box, type the following:
Nslookup
Click OK. A Command Prompt window displays with a bracket prompt (>). At the prompt, type the name
of the Internet address that you are interested in, such as www.microsoft.com.
The window will display the associate IP address, if known, as shown below:
There may be several addresses associated with an Internet name. This is common for web sites that
receive heavy traffic; they use multiple, redundant servers to carry the same information.
To exit from the nslookup utility, type exit and press [Enter] at the command prompt.
 Loading...