

Page 1
LED TV
RLED2445A-B
INSTRUCTION MANUAL
Page 2
Table of Contents
Caution
Important Safety Pr ecaut ions
Wal l Mount Installa tion
TV Bracket assembly
Top/Si de panel diagram
Remote Controller
Battery Installat ion
Using the Remote Cont rol
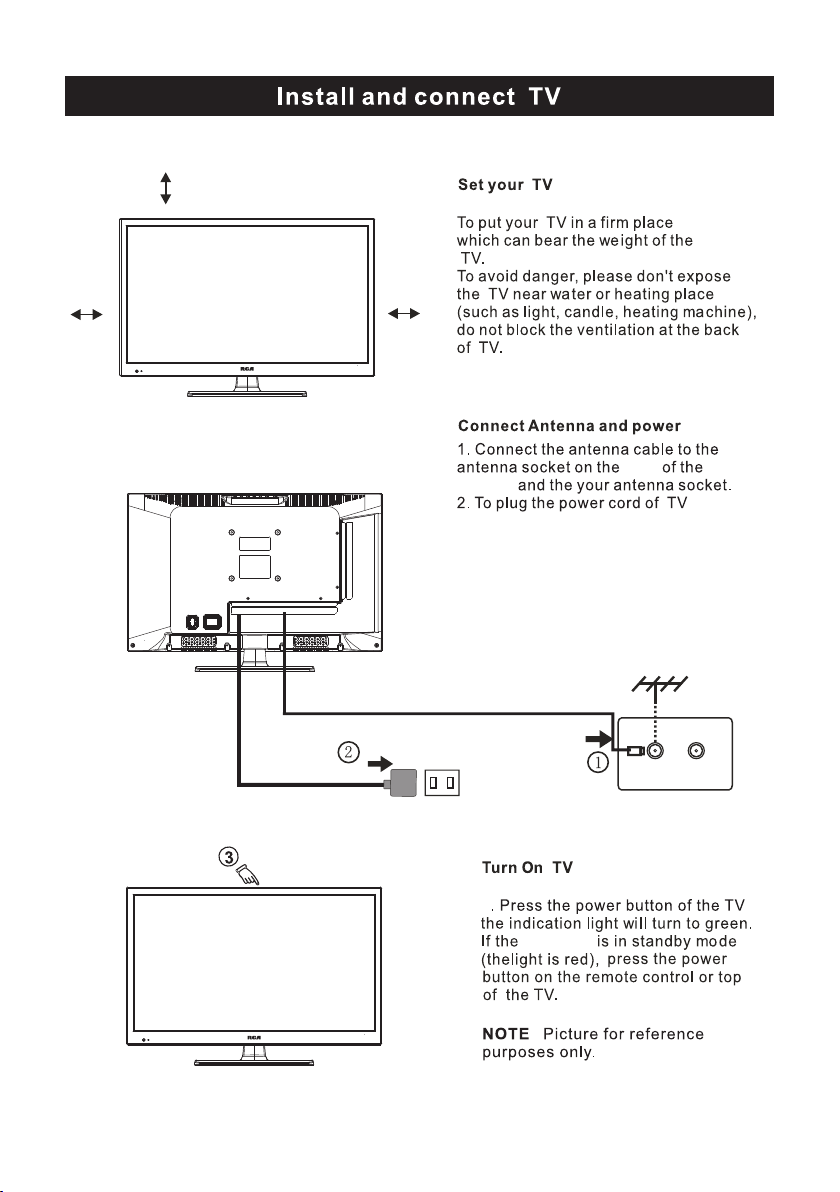
Install TV
Set your TV
Connect Antenna and po wer
Turn On TV
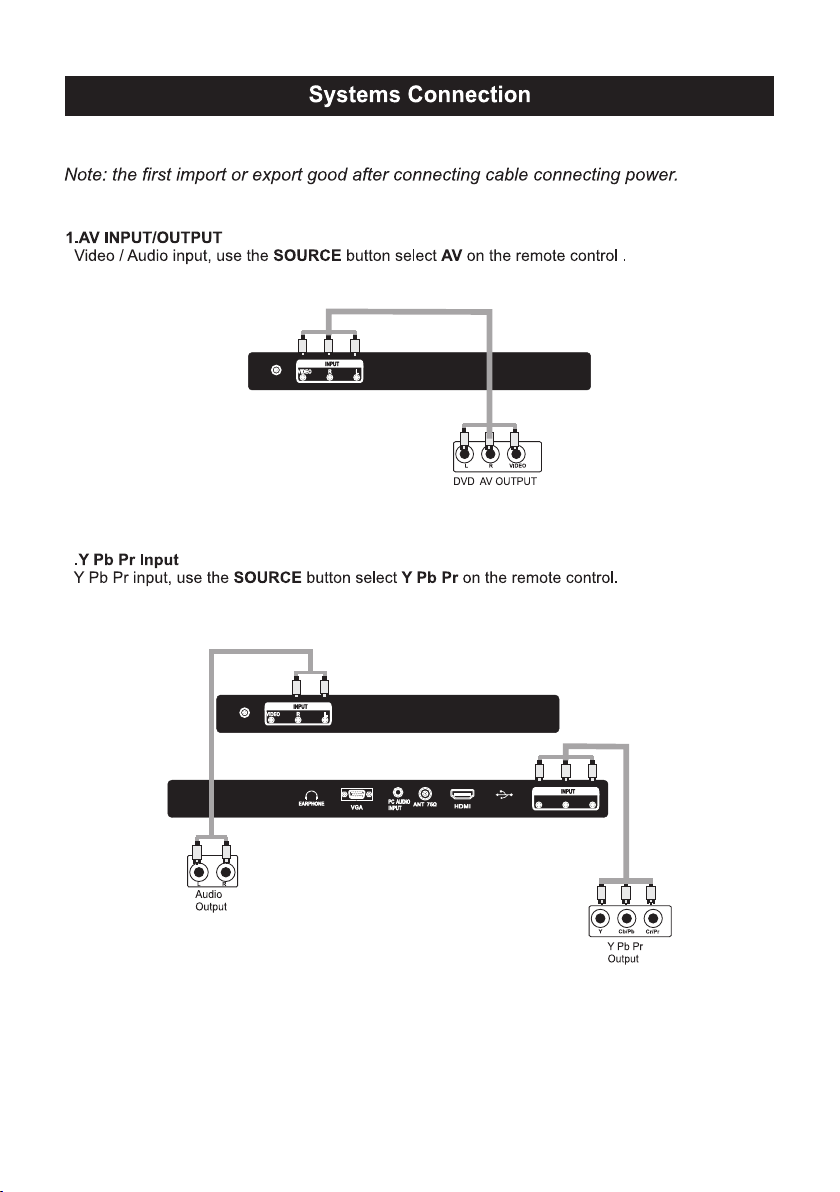
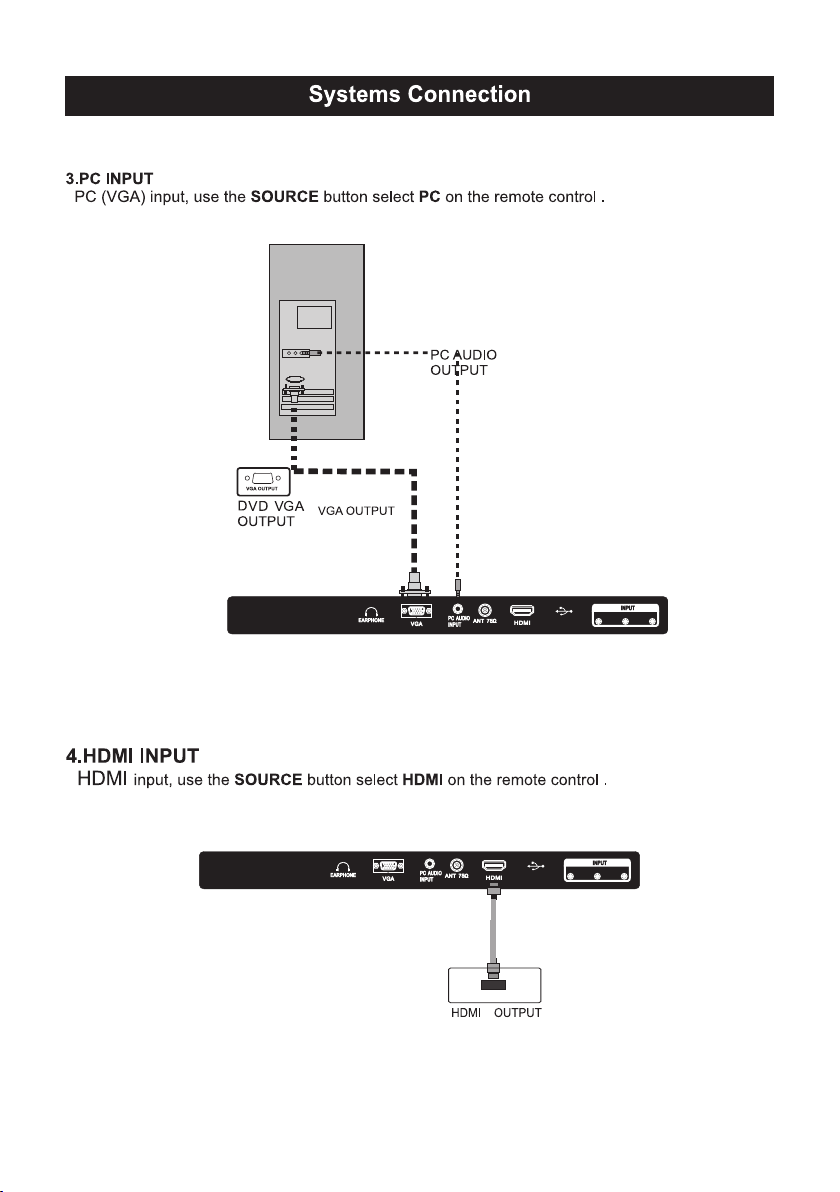
Systems Conn ection
Select Input S ource
Picture Menu
Audio Menu
Channel Menu
Parental Menu
Setup Menu
Help
Specifications
2
3
4
5
6-7
8
9
10
12
13-29
13-15
16-17
18-20
21-25
26-29
30
31
1
Page 3
Caution
The ligh tening fl ash w ith ar row head s ymb ol, wi thi n an equ ila teral tri angle is
intend ed to alert t he us er to th e pre senc e of un -ins ula ted "d ang erous vol tage"
within t he produc ts en clos ure t hat ma y be of suff icie nt ma gnit ude t o constit ute a
risk of el ectric sh ock t o the pe rso ns.
The excl amation p oin t with in an e quil ate ral tr ian gle is i nte nd to alert t he user to
the pres ence of imp ort ant op era ting a nd ma inte nan ce (se rvi cing) ins tructio ns in
the lite rature ac com pany ing t he app lia nce.
Co rr ect d isp osa l of t his Pro duc t
W ast e Electri cal & E lect ron ic Equ ipm ent (W EEE )
You r product i s designe d and m anuf act ured w ith h igh qu ali ty materi als and
compon ents whic h can b e recy cle d and re use d.
This sym bol means t hat e lect ric al and e lec tron ic eq uipm ent , at their en d-of-li fe,
should b e dispose d of se para tel y from y our h ouse hol d wast e.
Please d ispose of t his e quip men t at you r loc al com mun ity wa ste
collec tion/re cyc ling c ent re.
In the Eur opean Uni on th ere ar e sep arat e col lect ion s yste ms fo r used elec trical
and elec tronic pr odu cts. P lea se hel p us to c onse rve t he env iro nment we li ve in!
234
Page 4
Page 5
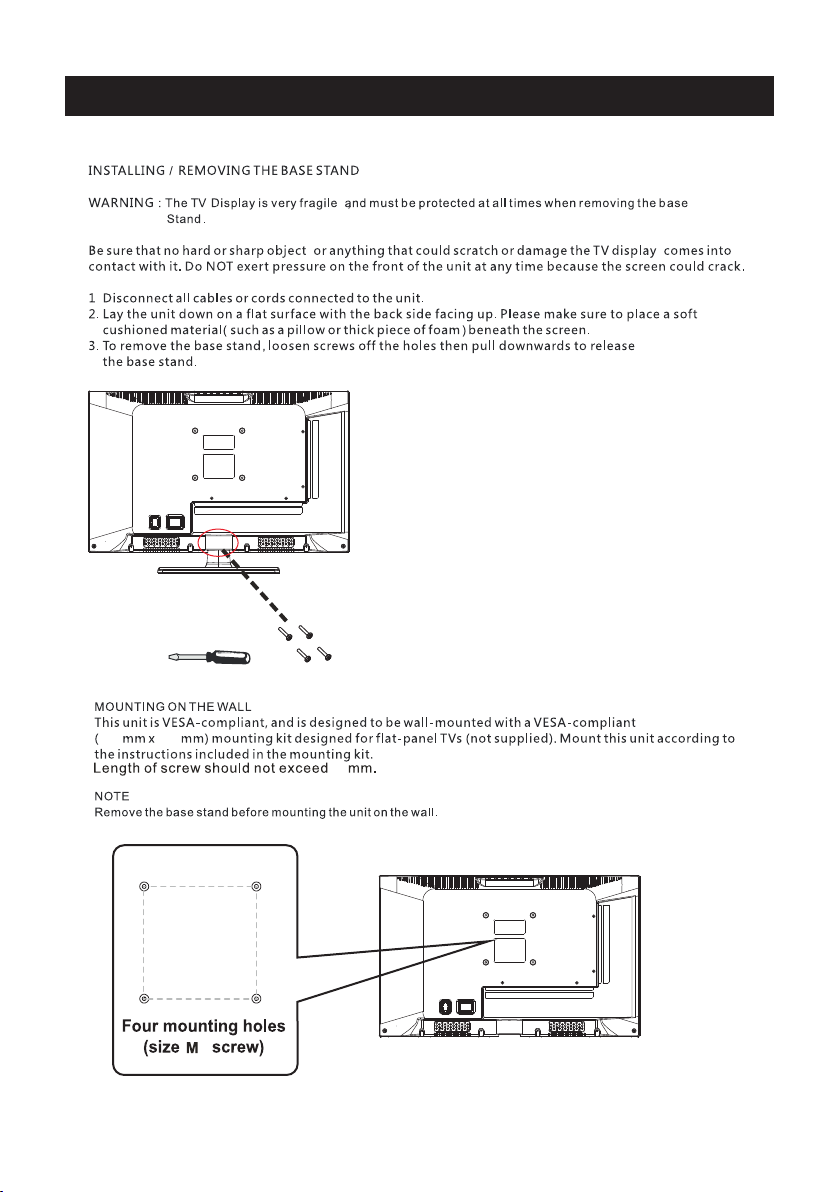
Wall Mount Installation
100 100
3.9 5” x 3.95 ”
8
3.95”
3.95”
4
Page 6
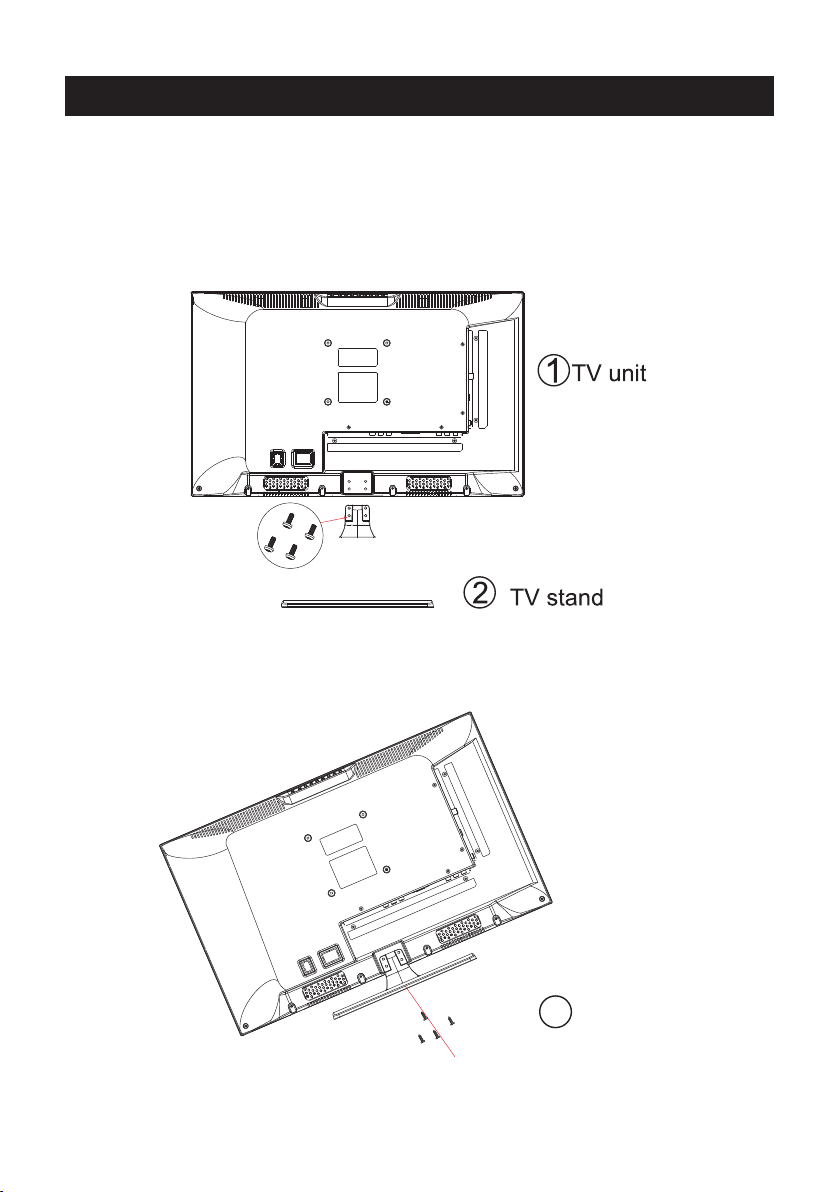
TV Bracket assembly
1.Match the TV unit into the stand, then hold the TV stand,
revolve and lock the tv unit tightly as the arrowhead point.
2.Fix the screws into the TV stand after installing the tv
unit and tv stand.
3
screws
5
Page 7
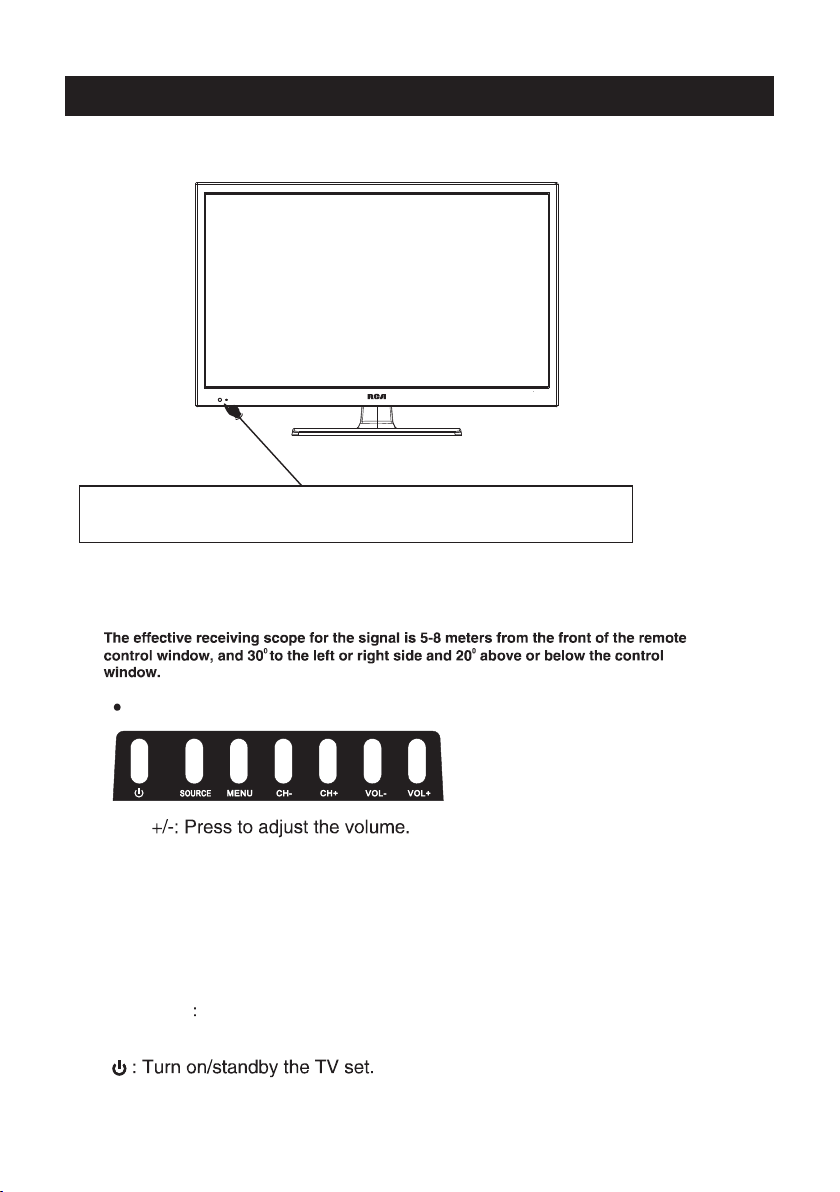
Top panel diagram
(IR) Infrared Receiver: Receives IR signals from the remote control.
(Power on/Standby) LED Indicator: Press
Indicator on(Red) Standby mode
Indicator on(Green) Power on mode
to turn on and off
The functions of the bu ttons o n the are as follows:TV
VOL
CH+/-:When watching TV: select channels.
MENU:
1.Pre ss Menu.
2.Pre ss SOURCE to e nter.
3.Use C H+/- to shif t UP/DOWN.
4.Pre ss SOURCE to c onfirm, the n press VOL+ /-t o adjust.
5.Pre ss SOURCE to c onfirm
SOURCE External signal input selection and confirm the
item selected.
6
Page 8
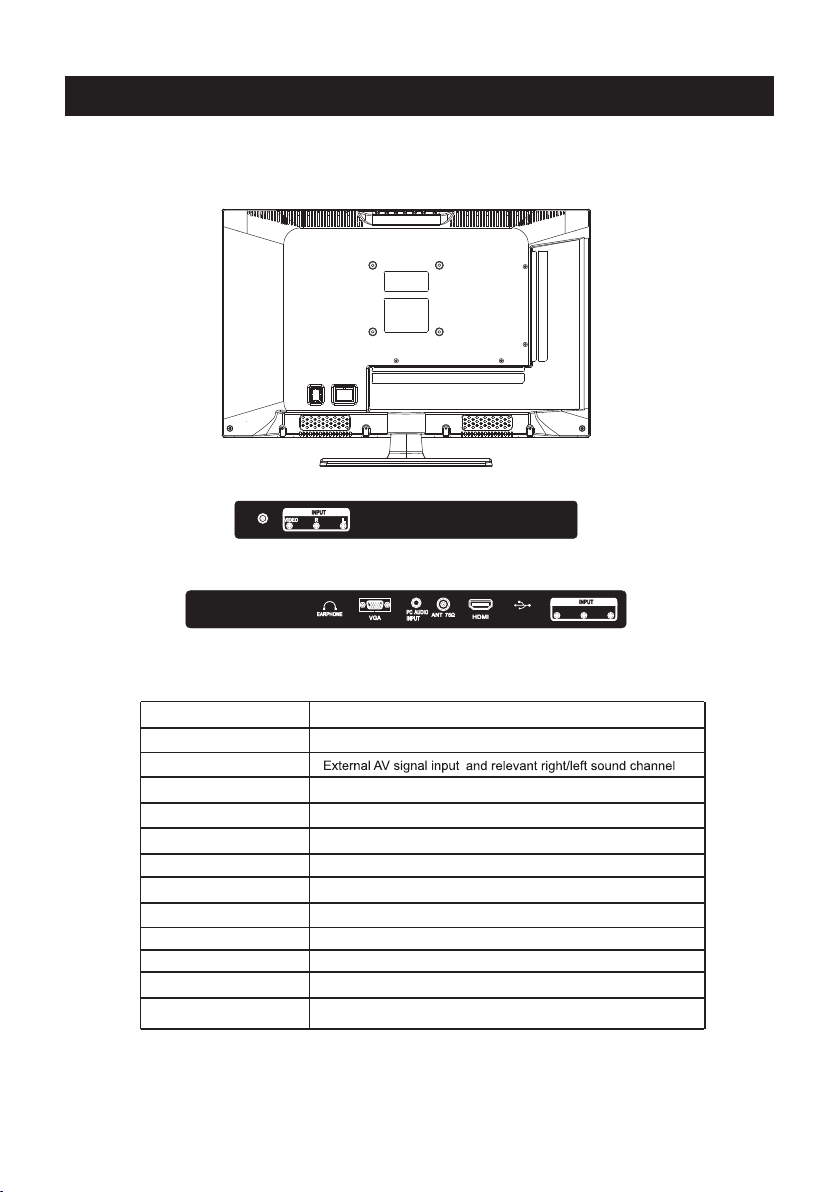
Side Panel Diagram
COAXIA L
(Left Side)
(Back Side)
Serv ice Port
Y Pb Pr
Name
COAXIA L
AV INPUT
EARPHO NE
VGA IN
PC AUDIO IN
ANT 75 Ω
HDMI IN
Service Port
YPbPr
Function Description
Digita l Audio Ou tput
Earpho ne output
VGA signal from computer output
PC audio input
Connect to ANT or cable source
Connect to HDMI of DVD or other equipment
For Upgr ade U se
Connect to the composite terminal of your DVD/VCR
7
Page 9
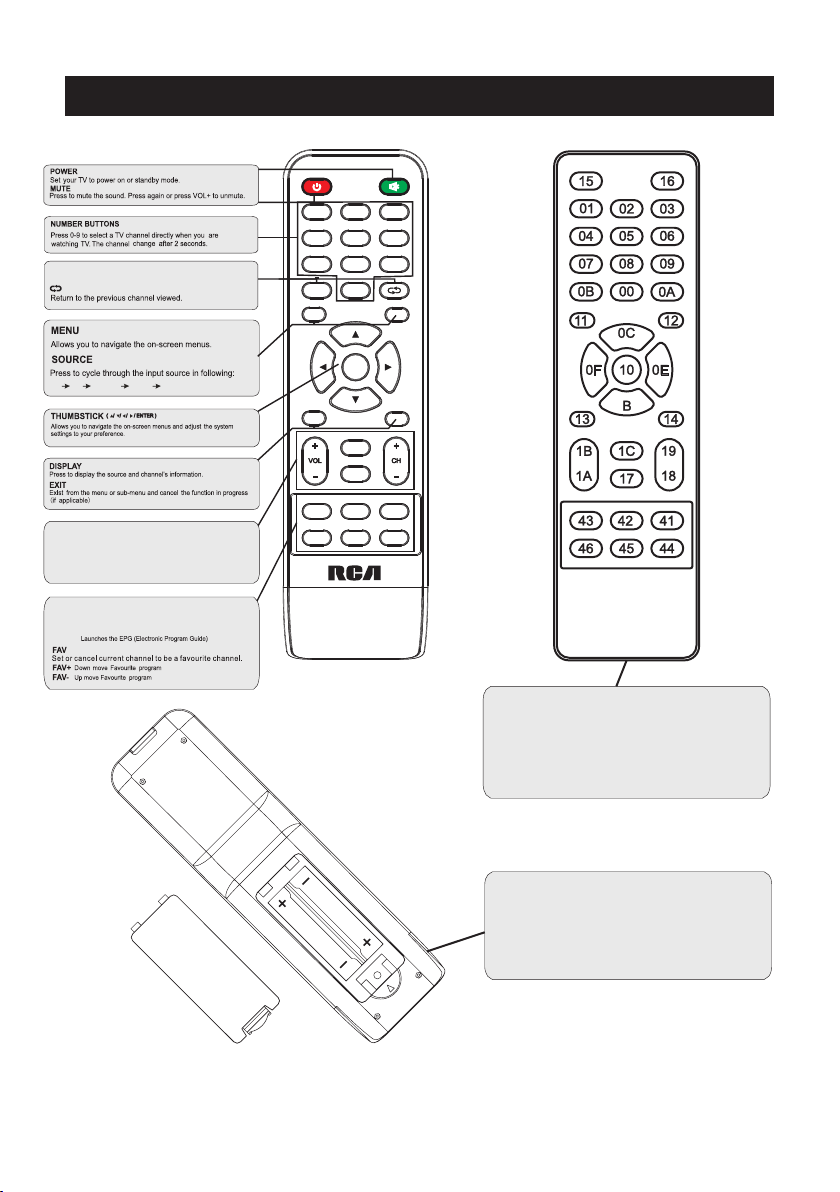
Remote Controller
Pres s "-" to ent er a prog ram numb er fo r multi ple prog ram
chan nel, su ch as 2-1 et c.
TV AV YPb P r HDMI PC
CH +/- : Pr ess to sc an thr ough or to selec t a chann el.
V +/-: Pr ess to i ncrea se / decr ease the sound level .
S.MODE: Press to cycle through the different sound settings
P.MODE: Press to cycle through the different picture settings
SLEEP: Select amount of time before TV turn
automatically.
Pres s to selec t the au dio mode ,you can selec t ster eo,
MTS:
Mono, or SAP( seco nd audi o progr am).
GUIDE:
off
1
2
5
4
7
8
0
MENU
EXIT DISPLAY
SLEEP MTS GUIDE
FAV FAV- FAV+
SOURCE
ENTER
MODE
P.
MODE
S.
3
6
9
Univer sal r emot e cod e
This is th e cod e for re mot e control o f
RLED24 45A -B,i f you w ant to chan ge to a
univer sal r emot e con trol,yo u can e dit
this cod e int o your u niv ersal rem ote c ontrol.
(1)Ope n the batte ry com par tmen t cov er
on the bac k side
(2)Ins ert two 1.5 V batt eri es of AAA ty pe
with cor rect pola rity
(3)Clo se the batt ery co mpa rtme nt co ver
on the bac k side
Universal Remote C ontrol co de:007F
(Univ ersal Remo te control i s not includ ed)
8
Page 10
10cm
10cm 10cm
LED TV
3
side
indic ator
9
Page 11
COAXIA L
2
COAXIA L
Y Pb Pr
Serv ice Port
10
Page 12
11
Serv ice Port
Serv ice Port
Y Pb Pr
Y Pb Pr
Page 13

Select Input Source
Source
TV
AV
YPbPr
HDMI
PC
Press SOURCE but ton t o dis pla y the i npu t source list,
Press ▼ / ▲ or SOURCE bu tto n to se lec t the i nput source you want to,
Press ENTER butt on to e nte r the i npu t source,
Press EXIT butto n to qu it.
12
Page 14
Main Menu Operation
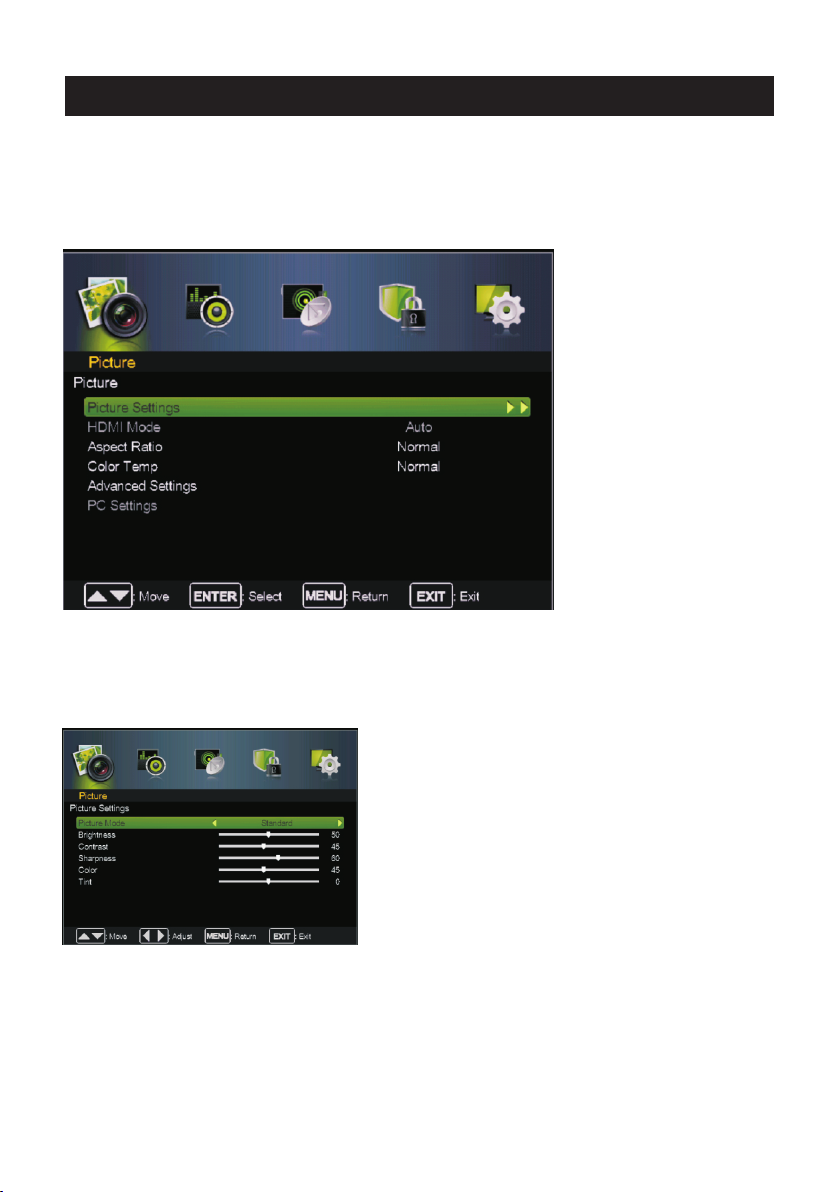
Picture Menu
Pre ss MENU butto n to di spl ay th e mai n menu.
Pre ss ◄ / ► button sel ect P ICT URE i n the m ain menu,then p ENTER / ▼
ress to enter.
1. Press ▼ / ▲ butt on to s ele ct th e opti on tha t you w ant to adjust in the PICTU RE me nu.
2. Press Ente r/◄ / ► b utt on to a dju st.
3. Aft er fi nishin g you r adj ustm ent, P res s MENU butt on to save and re turn bac k to th e pre vious menu.
Pic ture Settin gs
Pre ss ▼ / ▲ button to se lec t Pic ture Mod e, then pre ss Enter / ►butt on to en ter s ub-m enu.
Pre ss ▼ / ▲ button to se lec t Pic ture Mod e, then pre ss◄ / ► butt on to s ele ct.
(Av ail abl e Pic ture mode: Sta ndard,Mov ie,U ser, Vi vid ).
TIP S: You ca n pre ss PM ODE b utton to change the Pictu re Mod e dire ctly.
13
Page 15
Main Menu Operation
Brightness/ Color/ Tint
Press ▼ / ▲ button to se lec t opt ion , the n press ◄ / ► button to adjust .
Brightness Adju st th e opt ica l fib er output of the entire pi ctu re, i t wil l effect the dar k reg ion o f the p ict ure .
Contrast Adjust t he hi ghl igh t int ensity of the picture, b ut th e sha dow o f the p icture is invariable .
Sharpness Aadj ust t he pe aki ng in t he de tail of the picture .
Color Adjust the sa tur ati on of t he co lor based on your own like .
Tin t Use i n com pen sat ing color changed with t he tr ans mis sio n in the NTSC code.
HDMI Mode
Pre ss ▼ / ▲ button to se lec t HDM I Mod e, th en pre ss◄ / ► butt on to sele ct Auto ,Vid eo or PC.
It is aviliable on ly in H DMI In put.
Aspect Ratio
Pre ss ▼ / ▲ button to se lec t Aspe ct Ra tio , then press◄ / ► button to se lec t.
(Av ail abl e Aspe ct Ra tio : Normal,Wide,C ine ma, Zoo m).
Normal Auto mati cal ly ad jus t Aspect R ati o bas ed on TV size and TV p rog ram .
Wide Use to watch wi de sc ree n con ten t.
Cinema Stre tch es im age a t edg es bu t keeps a clear image in the c ente r.
Zoom Expands ima ge to fi ll scre en. Top an d butt on maybe cut off.
Color Tem p
Change the overa ll co lor c ast o f the p ictu re.
Pre ss ▼ / ▲ button to se lec t , then pre ss◄ / ► butt on to s ele ct No rma l/Wa rm/C oo l.
Color Temp
Normal Produce s a viv id im age .
Warm Pro duces a red-hued image .
Cool Pro duces a ge ntl e blu e-h ued i mage.
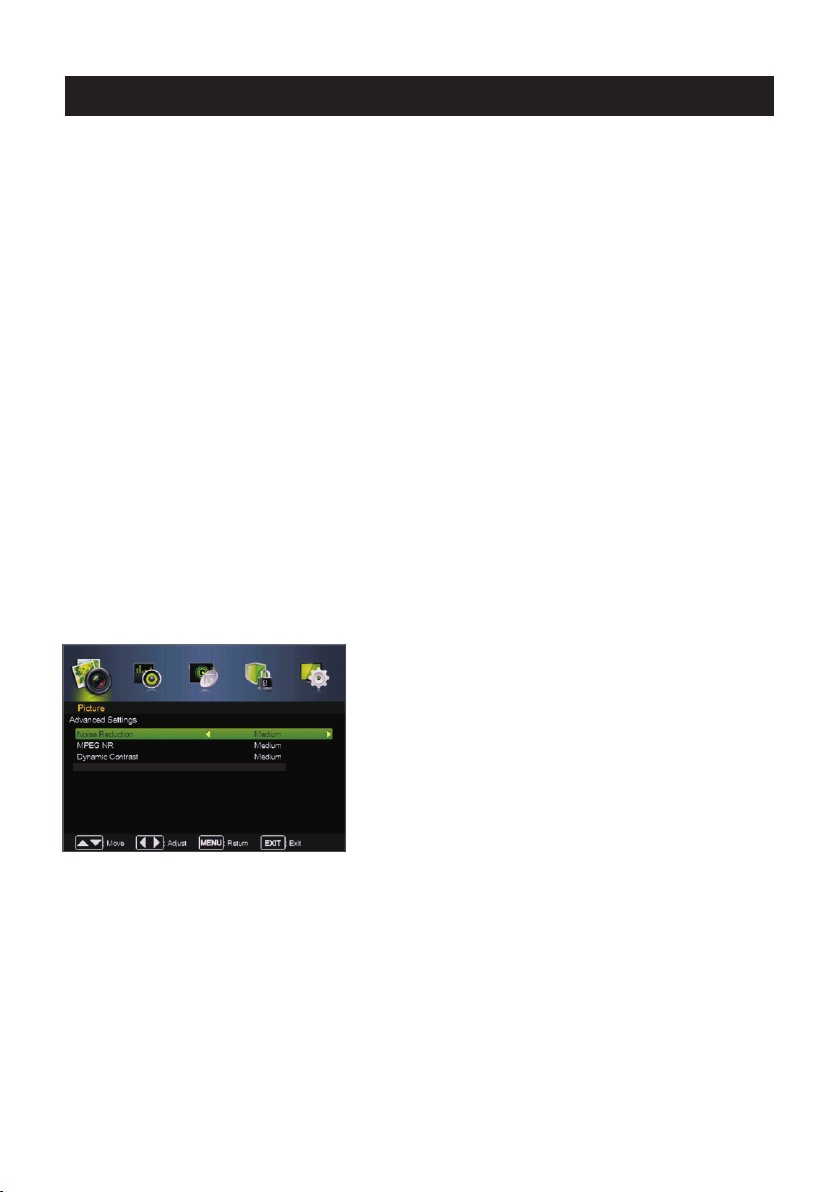
Advanced Settin gs
Adjust advance d vid eo fe atu res to fine tune the pictu re.
Pre ss ▼ / ▲ button to se lec t , then pre ss Enter / ► butt on to en ter s ub-m enu.
Advanced Setti ngs
Contrast/ Shar pne ss/
Noise Reductio n
Set opti ons to red uce v ide o noi se.
Pre ss ▼ / ▲ button to se lec t , then pre ss◄ / ► butt on to s ele ct .
Noise Reductio n
Off S ele ct to tu rn off video noise detecti on.
Low Dete ct and red uce l ow vi deo n ois e.
Medium Dete ct an d red uce m ode rate video noise.
High Detect and re duc e enh anc ed vi deo noise.
Mpeg NR
Set opti ons to red uce M PEG n ois e.
Pre ss ▼ / ▲ button to se lec t , then pre ss◄ / ► butt on to s ele ct .
Noise Reductio n
Off S ele ct to tu rn off MPEG noise dete cti on.
Low Dete ct and red uce l ow MP EG no ise .
Medium Dete ct an d red uce m ode rate MPEG noise.
High Detect and re duc e enh anc ed MP EG noise.
14
Page 16

Main Menu Operation
Dynamic Contra st
Automaticall y adj ust p ict ure d eta il and brightness .
Press ▼ / ▲ button to se lec t , then press◄ / ► butt on to s ele ct .
(Av ail abl e Aspe ct Ra tio : Off, Low, Med ium ,Hi gh) .
PC Settings
to select PC sourc e.
Press
INPUT
ENU to enter the mai n men u,t hen p res s button to select P ICT URE m enu .
Press
M ◄ / ►
Press to enter and pres s to select PC Setti ngs .
ENTER / ▼ ▼
Press ▼ / ▲ button to se lec t PC Se tti ngs , then press◄ / ► button to .adjust
Hposition
Adjust the horiz ont al po sit ion o f the p icture.
Vposition
Adjust the verti cal p osi tio n of th e pic ture.
Phase
Minimize horiz ont al di sto rti on.
Clock
Minimize verti cal s tri pes i n the s creen image.
Auto Adj ustment
Adjust to the PC sig nal t imi ng au tom ati cally.
Press ENU / button to ent er.
M ►
Dynamic Contra st
15
Page 17

Main Menu Operation
Audio Menu
Pre ss MENU butto n to di spl ay th e mai n menu.
Pre ss ◄ / ► button sel ect A UDIO in th e mai n menu,then p ENTER / ▼
ress to enter.
1. Press ▼ / ▲ butt on to s ele ct th e opti on tha t you w ant to adjust in the AUDIO m enu .
2. Press Ente r/◄ / ► b utt on to a dju st.
3. Aft er fi nishin g you r adj ustm ent, P res s MENU butt on to save and re turn bac k to th e pre vious menu.
Audio Mode
Audio ModePress ▼ / ▲ button to se lec t , then press Enter / ► but ton t o ent er su b-menu.
Sound Mode
Press ▼ / ▲ button to se lec t Sou nd Mo de, t hen press◄ / ► button to sel ect .
(Av ail abl e Sou nd mo de: S tandard, Soft, Us er, Dy nam ic) .
You ca n cha nge t he value of Treble,B ass a nd Ba lan ce wh en th e sound is in User mode.
TIPS: You can press SM ODE b utt on on t he re mot e control to change t he So und M ode d ire ctl y.
Treble/Bass/B ala nce
Press ▼ / ▲ button to se lec t opt ion , the n press ◄ / ► button to adjust .
16
Page 18

Main Menu Operation
Audio Effect
Pre ss ▼ / ▲ button to se lec t , then pre ss◄ / ► butt on to s ele ct On o r Off.
Audio Effec t
AVL
Set the auto volum e con tro l.
Pre ss ▼ / ▲ button to se lec t AVL , th en pre ss◄ / ► bu tto n to se lec t On or O ff.
Analog Languag e
Configure s the m ulti -tra ck so und .
It is only availab le in ATV.
Pre ss ▼ / ▲ button to se lec t , then pre ss◄ / ► butt on to s ele ct
Analog Languag e Mono,S tereo or S ap.
Mono Sets the s oun d to mo no.
Ste reo Sets th e soun d to ste reo wh en ste reo is n ot av ail abl e, the sound is automati cal ly sw itc hed to mono.
Sap Sets the so und to the s eco nd au dio p rogram.
Dig ita l Langua ge
Select the langu age s upp orte d by the c hos en di gita l channel
. It is av ail abl e Onl y in DTV.
Pre ss ▼ / ▲ button to se lec t , then press◄ / ► butto n to se lec t
Digita l Langua ge English , .
Dig ita l Audio Output
Send the audio outp ut typ e of co ax or o pti cal te rm ical.
Pre ss ▼ / ▲ button to se lec t , then pre ss◄ / ► butt on to s ele ct Off,R AW or P CM.
Digita l Audio Outp ut
EQ Settin gs
Adjust the curve o f 7 ban ds eq ual ize r.
Pre ss ▼ / ▲ button to se lec t , the n pre ss Enter / ►butt on to ente r sub -me nu.
EQ Settings
Fre nch ,Spanis h
EQ Mode
Press ▼ / ▲ button to se lec t EQ Mo de, t hen p ress◄ / ► button to select .
(Av ail abl e EQ mo de: O ff,Rock ,Po p,J azz ,Us er) .
17
Page 19

Main Menu Operation
Channel Menu
Pre ss MENU butto n to di spl ay th e mai n menu.
Pre ss ◄ / ► button to se lec t CHA NNE L in th e main menu,then p ENTER / ▼ .
1. Press ▼ / ▲ butt on to s ele ct th e opti on tha t you w ant to select in the CHANN EL me nu.
2. Press Ente r butt on to en ter s ub-m enu.
3. Press MENU butt on to re turn b ack to the p rev ious menu.
Sig nal Type
Signal Type
Pre ss ▼ / ▲ button to se lec t , then p res s ◄ / ► butt on to se lec t Air or Cable.
Auto Search
Auto Search
Pre ss ▼ / ▲ button to se lec t , th en pre ss Ente r / ►butt on to sta rt th e auto searching.
ress to enter.
It will search ana log c han nel s fir st, then digital chan nel s.
Before execute a uto c han nel s ear ch, please confirm yo ur an ten na ty pe is Ai r or Ca ble.
Wro ng se tti ng of S ign al Type mayb e cau se fi ndi ng no c han nel.Found numbers do n ot in clu de
encryption pro gra ms.
18
Page 20
Main Menu Operation
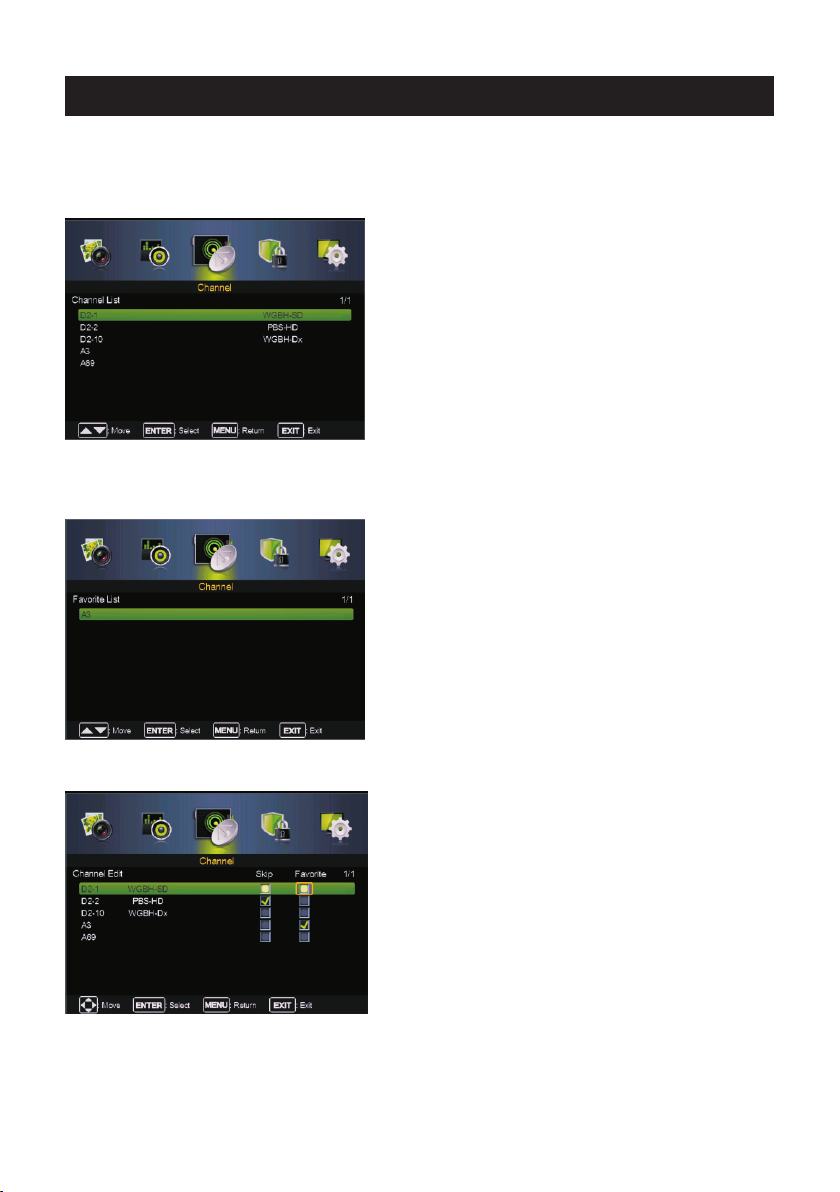
Channel Lis t
Channel ListPre ss ▼ / ▲ button to se lec t , the n pre ss Enter / ►butt on to ente r sub -me nu.
You can view all th e cha nne ls an d cho ose o ne qu ickly.
Press ▼ / ▲ button to hi ghl igh t a cha nne l and p ress ENTER to view it .
Favorite List
All of your favori te ch ann els a re li ste d in this menu,and yo u can c hoo se th em qu ick ly.
Favorite ListPress ▼ / ▲ button to se lec t , t hen p res s Enter / ►button to enter s ub- men u.
Channel Edit
Skip Set the chann el to b e ski ppe d whe n using CH+/CH- to view ch ann els .
Favorite Set the c han nel t o you r fav orite list.
Press ▼ / ▲ button to se lec t the c han nel y ou want to set.
Press ◄ / ►button to h igh lig ht co rre sponding item,and pr ess E NTE R to se t or ca ncel.
Channel EditPress ▼ / ▲ button to se lec t , then press Enter / ► but ton t o ent er su b-menu.
19
Page 21

Main Menu Operation
Channel Label
Channel LabelPre ss ▼ / ▲ button to se lec t , then pre ss Enter / ► butt on to en ter s ub-m enu.
Label Rename lab el of t he ch ann els .
Press ▼ / ▲ button to se lec t the c han nel a nd ENTER to enter the edit s tat e.
Press ▼ / ▲ button to se lec t the c har act er, press◄ / ► to move the curs or.
20
Page 22

Main Menu Operation
Parental Menu
Pre ss MENU butto n to di spl ay th e mai n menu.
ress to enter.
Pre ss ◄ / ► button sel ect PA RENTAL in th e mai n men u,t hen p E NTE R / ▼
1. Press ▼ / ▲ butt on to s ele ct th e opti on tha t you w ant to adjust in the PAR ENTAL menu.
2. Press Ente r/◄ / ► b utt on to a dju st.
3. Aft er fi nishin g you r adj ustm ent, P res s MENU butt on to save and re turn bac k to th e pre vious menu.
Default passwo rd is 0 000 ,an d if fo rge t what you set, pleas e cal l the s erv ice c ent er.
21
Page 23

Main Menu Operation
Change Passwor d
Press ▼ / ▲ button to se lec t , then press Enter / ►b utt on to e nte r sub -me nu.
Change Passwor d
At first you shoul d ent er th e cor rec t old password,then e
Keypad Lock
Set to prevent it fr om be ing u sed b y you ng ch ildren,or other u nex pec ted u sag e.
Press ▼ / ▲ button to se lec t then press◄ / ► butt on to s ele ct On o r Off.
Keypad Lock,
System Lock
Set to lock the usin g of sp eci fie d sou rce .
Press ▼ / ▲ button to se lec t then press◄ / ► butto n to se lec t On or O ff.
System Lock,
Source lock
Press ▼ / ▲ button to se lec t Sou rce ,th en press ENTER button to s et th e Sou rce l ock .
Unrated Block
Press ▼ / ▲ button to se lec t Unr ate d Blo ck then press◄ / ► button t o sel ect O n or Off.,
Source lockPress ▼ / ▲ button t o sel ect , then press Ente r / ►bu tto n to en ter s ub-menu.
nter a 4-digital n umb er yo u wan t to se t twi ce.
22
Page 24

Main Menu Operation
Rating Setup
Rating Setup
Press ▼ / ▲ button to se lec t , then press Ente r / ►bu tto n to en ter s ub-menu.
US
For the United Sta tes , the r ati ng se tting basically incl ude t he fo llo win g opt ions: MPAA ,TV.
MPAA
This system defi nes t he ra tin g con trol which come from MPAA ru les .
Ratin g
G General audien ce. Al l age s adm itt ed.
PG Parental guid anc e sug ges ted .Some material may not b e sui tab le fo r chi ldren.
PG 13 Parents stro ngl y cau tio ned . Some material may be ina ppr opr iat e for c hildren under 13.
R Restricte d. Ch ild ren u nde r 17 re quire accompanying p are nt or a dul t gua rdian.
NC 17 No one 17 and unde r adm itt ed.
X Adult audience o nly.
Define
23
Page 25

Main Menu Operation
US TV Rating
The TV rat ing c omp ose o f two a spects: age-bas ed an d con ten t-b ase d.
Age
TV-Y Gene ral a udi enc e FV
TV-Y7 Parental gu ida nce s ugg est ed D Suggestive dia log ue
TV-G Parents stro ngl y cau tio ned L St ron g lan guage
TV-PG Retricted S S exu al si tuations
TV-14 No one 17 and und er ad mit ted V Violence
TV-MA Adu lt au die nce o nly
Note: Th e con ten t rat ing s will increase dep end ing o n the l eve l of th e age-based rating. Fo r exa mpl e,
a program with a TV-P G V(v iol ence) rating may co nta in mo der ate v iol ence, while a TV- 14 V( vio len ce)
rating may conta in in ten se vi ole nce . So locking a higher leve l opt ion w ill a uto matically cause lock ing
the options that h as mo re se nsi tiv e lev el.
Define Content Define
Fantasy vio len ce
24
Page 26
Main Menu Operation
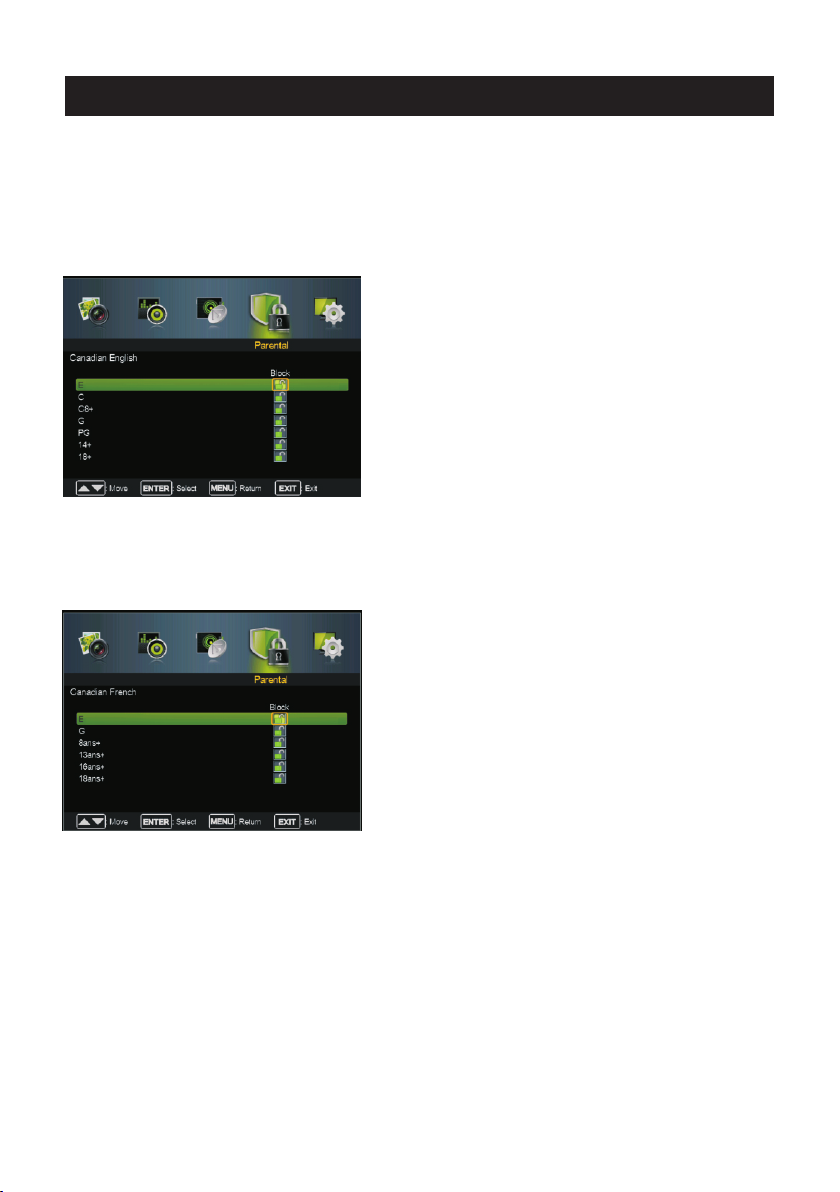
Canada
For Canada, the ra tin g set tin g inc lud e the following opt ion s: En gli sh Ra tin g, French Rating.
Canadian Engli sh
These ratings ar e for p rog ram s whi ch ar e using English rat ing s yst em.
Rating Defined a s
E No Rating
C Children
C8+ Children 8 years and older
G General programming
PG Pa rental guidanc e
14+ Viewers 14 and older
18+ Adult programming
Canadian Frenc h
The ratings are for programs which are using French rating system.
Rating Defined a s
E No Rating
G General
8 ans+ Not recommended for
younger children
13 ans+ Not recommended for
children under age 13
16 ans+ Not recommended for
ages under 16
18 ans+ This program is restricted
to adults
Downl oad Rat ing
Control the RRT5 s ett ing w hich are valid only at som e dig ita l cab le ch annels.
Clear D ownlo ad Data
Select to clear th e pre vio us do wnl oad able rating data.
25
Page 27

Main Menu Operation
Setup Menu
Pre ss MENU butto n to di spl ay th e mai n menu.
Pre ss ◄ / ► button sel ect S ETU P in th e mai n menu,then p ENTER / ▼
ress to enter.
1. Press ▼ / ▲ button to s ele ct th e opt ion t hat you want to adjust in th e SET UP me nu.
2. Press Enter/◄ / ► b utt on to a dju st.
3. After finishin g you r adj ust men t, Press MENU button to sa ve an d ret urn b ack t o the previous menu.
Menu language
Adjust TV Men u opti ons.
Pre ss ▼ / ▲ button to se lec t then pre ss◄ / ► butt on to s ele ct
Menu language, English / Españo l/ Fra nçai s .
Menu Transparen cy
Adjust the tra nsparen cy of th e OSD (o n scre en dis pla y) me nu.
Pre ss ▼ / ▲ button to se lec t then p res s◄ / ► bu tto n to se lect.
Menu Transparen cy,
(Av ail abl e : 0%,2 0%,4 0%,6 0%,8 0% ,100%).
Blu e Back
Set the screen bac kgro und co lor b lue o r not w hen n o valid signal inpu t. Wh en an alo g TV input and
has no signal, sno w noi se wi ll di spl ay if th is option is cleare d.
Pre ss ▼ / ▲ button to se lec t Blue Ba ck th en pre ss◄ / ► bu tto n to se lect On or Off.
Audio Only
When you highlig ht th e ite m, th e sys tem will note you that “Pre ss any k ey to e xit a udio only ”,
and if you are sure no t nee d to vi ew (b ack lig ht is tu rned off),
S to confi rm. As th e att enti on, if you want to wake up th e vid eo, p lea se pre ss any key.
elect Yes
Menu Transparen cy
,
26
Page 28
Main Menu Operation
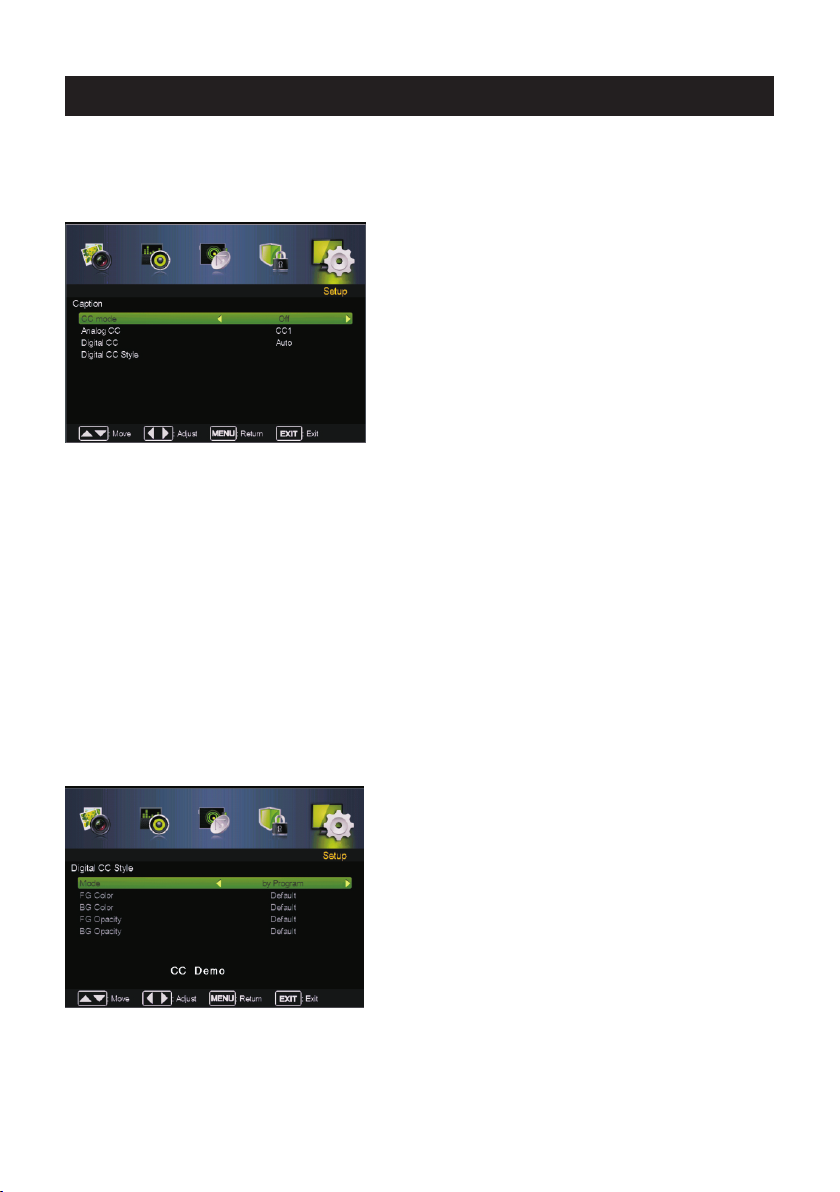
Caption
Adjust Closed Ca pti oni ng se tti ngs . Only available un der T V and AV source.
Press ▼ / ▲ button to se lec t , then press Enter / ► but ton t o ent er su b-menu.
CC Mode
Turn Clo sed C apti oning on/off.
Pre ss ▼ / ▲ button to se lec t , then pre ss Off , On or O n Mute .
Analog CC
Set Closed Capti oni ng fo r sta nda rd(a nalog) program .
Pre ss ▼ / ▲ button to se lec t Ana log C C re ss ◄ / ► button to select.
Ava ila ble
( Analog CC: CC1 / CC2 / C C3 / CC 4 / TEX T1 / TEX T2 / TE XT3 / TEXT4 ).
CC1,2,3,4 Disp lay s corre spo ndi ng ca pti on channel of a analog pro gra m.
(Usually be set to C C1 fo r mos t pro gra ms.)
Text1 ,2,3 ,4 Dis pla ys co rre spo nding text servic e cha nne l of a an alo g pro gram.
Dig ita l CC
Set Closed Capti oni ng fo r dig ita l pro gram.
Pre ss ▼ / ▲ button to se lec t Dig ita l CC re ss ◄ / ► bu tton to select.
Ava ila ble
( Digita l CC:Auto / Serv ice 1 / Serv ice2 / S erv ice 3 / Serv ice4 / Service5 / Se rvi ce6 ).
Service1,2,3 ,4,5 ,6 The se are diffe rent s erv ice d ata c han nel s.
Dig ita l CC Style
Pre ss ▼ / ▲ button to se lec t , then pre ss Enter / ► butt on to en ter s ub-m enu.
Digita l CC Style
Caption
CC Mode
,p
,p
Mode
Set the look of digi tal C los ed Ca pti oni ng. Automatic uses b roa dca ste r’s s tyl e.
Pre ss ▼ / ▲ button to se lec t Mod e,
ress ◄ / ► button to sel ect. by Cus tom o r by Pro gram .
If set to by Custom, D igi tal C C Sty le is a vailable.
p
27
Page 29
Main Menu Operation
FG Color
Adjust the color o f the d igi tal C los ed Ca ptioning font.
Press ▼ / ▲ button to se lec t ,
Ava ila ble
( Black ,White , Red , G ree n , Blu e ,Yell ow , Cy an, M age nta ).
BG
Adjust the digit al Cl ose d Cap tio nin g background color.
Press ▼ / ▲ button to se lec t ,
Ava ila ble
( Black ,White , Red , G ree n , Blu e ,Yell ow , Cy an, M age nta ).
FG Opacity
Adjust the trans par enc y of th e dig ita l Closed Captioni ng fo nt.
Press ▼ / ▲ button to se lec t ,
Ava ila ble
( Sol id , Fl ash ing , Tr ans luc ent, Transparent ).
BG
Adjust the digit al Cl ose d Cap tio nin g background transpa ren cy.
Press ▼ / ▲ button to se lec t B ,
Ava ila ble B
( So lid , F las hin g , Tran slu cent, Transparen t).
FG Color:by Prog ram ,
Color
FG Color:by Prog ram ,
FG Opacity:by Pr ogr am,
Opacity
G Opacity:by Pro gra m,
FG Color p
FG Color p
FG Opacity p
G Opacity p
ress ◄ / ► button to sel ect .
ress ◄ / ► button to sel ect .
ress ◄ / ► button to sel ect .
ress ◄ / ► button to sel ect .
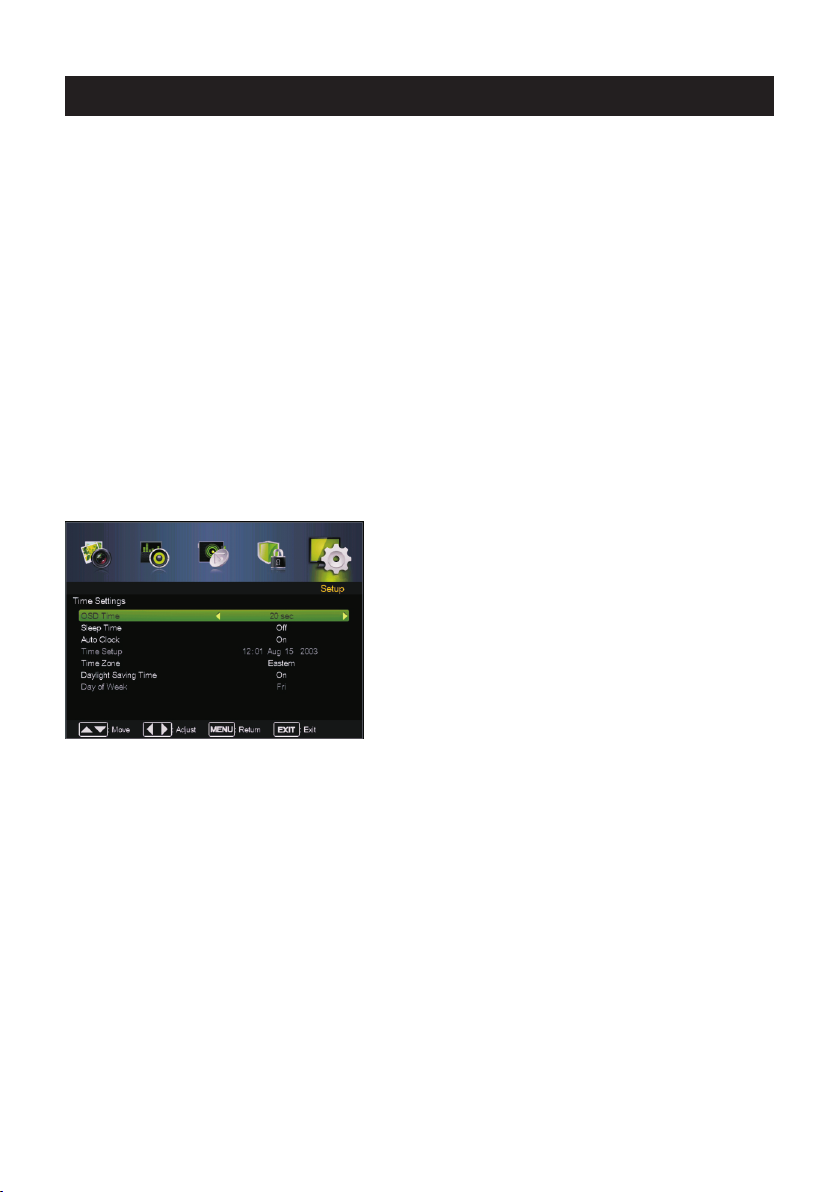
Tim e Set tin gs
OSD Time
Press ▼ / ▲ button to se lec t ,
( OSD Time:Off ,10 sec ,20 sec,30sec,60s ec) .
Ava ila ble
Sleep Ti me
Set a timer for the TV t o tur n off autom ati cal ly.
Press ▼ / ▲ button to se lec t ,
Sleep Time
Ava ila ble
( Sleep Time:Off ,1 0mi n, 20 min, 30min, 60min , 90m in, 1 20m in, 1 50m in, 180min).
Auto Clock
Press ▼ / ▲ button to se lec t Auto C loc k ,
If set it to ON , the TV wil l syn c the local clock accord ing t o the D TV br oad casting time automat ica lly.
Otherwise you ca n set t he ti me ma nua lly.
Tim e Set up
Set Aut o Clo ck to O ff, then you can s et th e tim e man ual ly .
Note: In the case of l oss o f pow er, th e clo ck setting will be lost.
Tim e Zon e
Select your time z one .
Press ▼ / ▲ button to se lec t ◄ / ►
ress butto n to se lec t.
Ava ila ble
( Eastern ,Centr al , Mo unt ain , P aci fic , Alaska , Hawaii ,Samo a, Ne wfo und lan d ,At lantic).
Tim e Zon e:
Tim e Set tings Press ▼ / ▲ button to se lec t , then press Enter / ► but ton t o ent er su b-menu.
OSD Time
Tim e Zon e,p
press ◄ / ► button to se lec t.
ress ◄ / ► button to sel ect .
p
ress ◄ / ► button to sel ect O n or Off.
p
28
Page 30
Main Menu Operation
Daylight Savin g Tim e
Set the daylight s avi ng ti me fo r you r are a.
Pre ss ▼ / ▲ button to se lec t ,
Day of Wee k
The TV wil l cal cul ate c urre nt day of week accord ing to th e time .
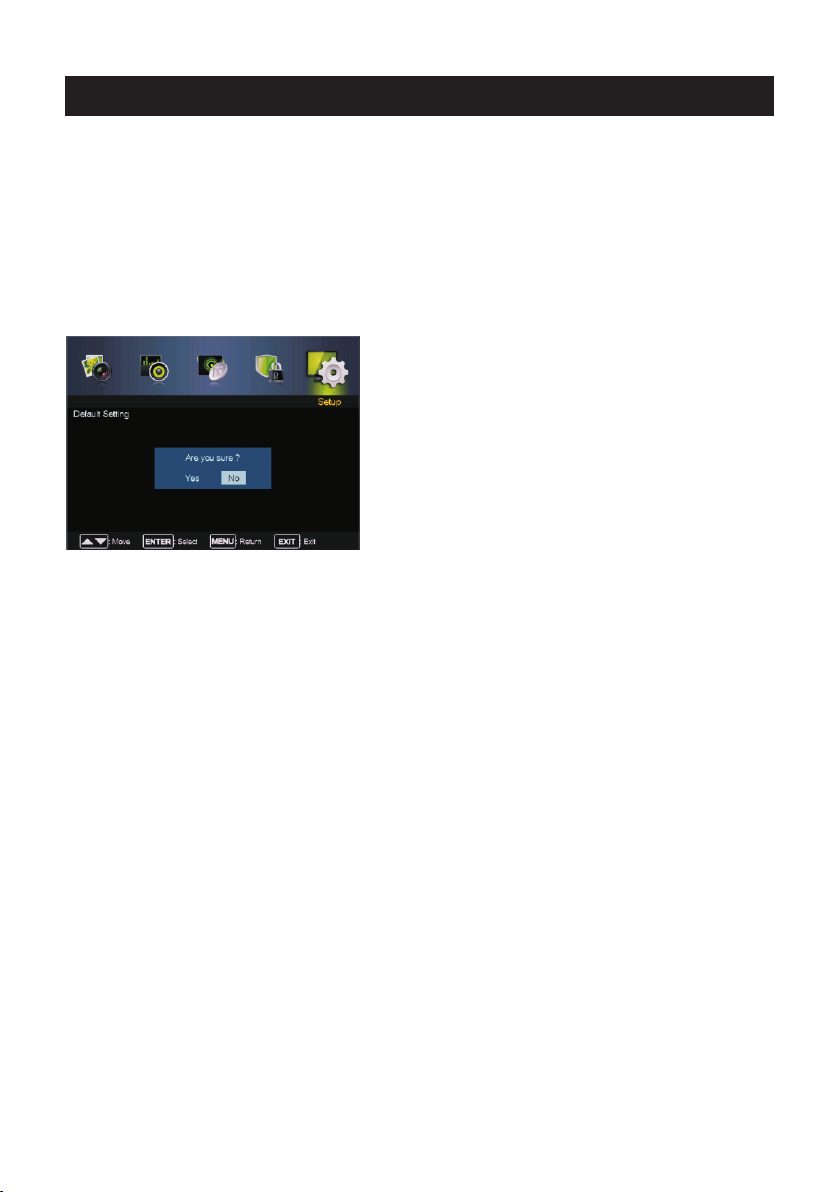
Default Settin g
Reset TV to fac tory defa ult.
Pre ss ▼ / ▲ button to se lec t , then press Enter / ►b utt on to e nte r sub -menu.
Default Settin g
If you are s ure to rese t,p ress Ye s to re set.
Daylight Savin g Time p
ress ◄ / ► button to sel ect O n or Off.
29
Page 31
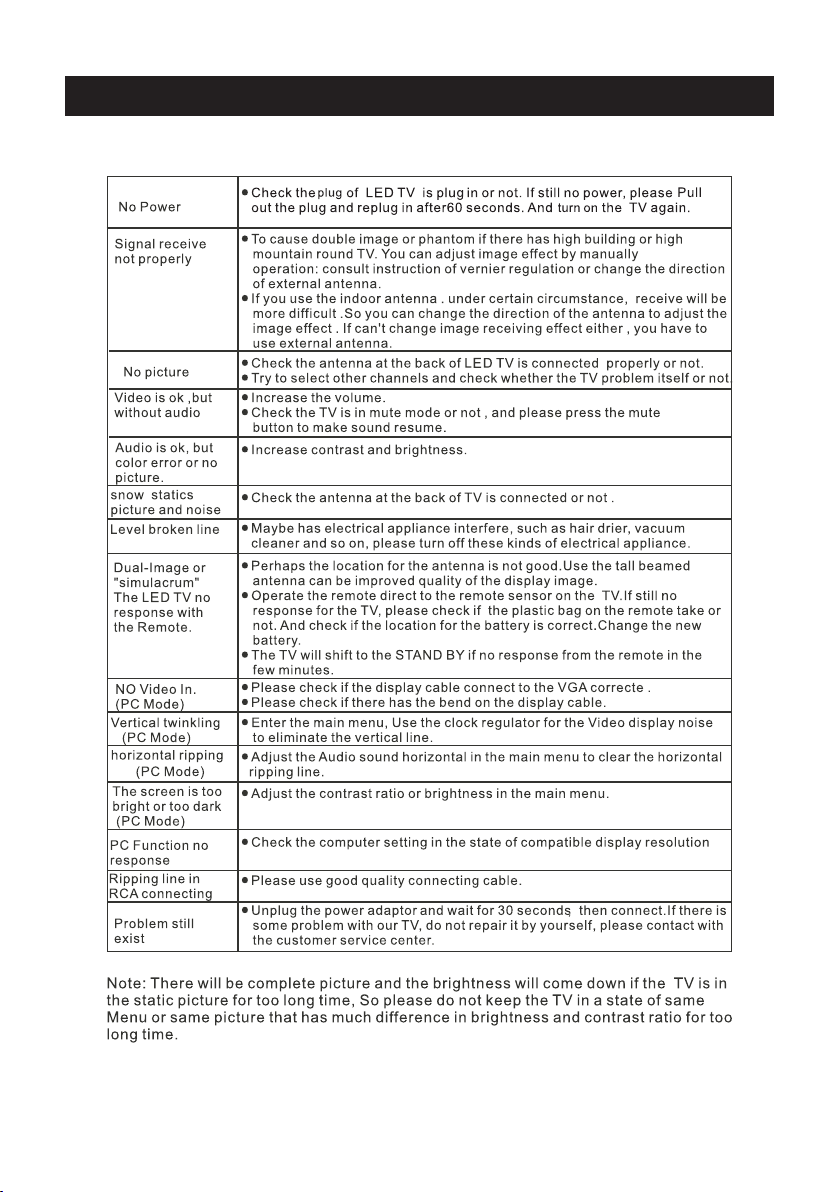
Help
30
Page 32
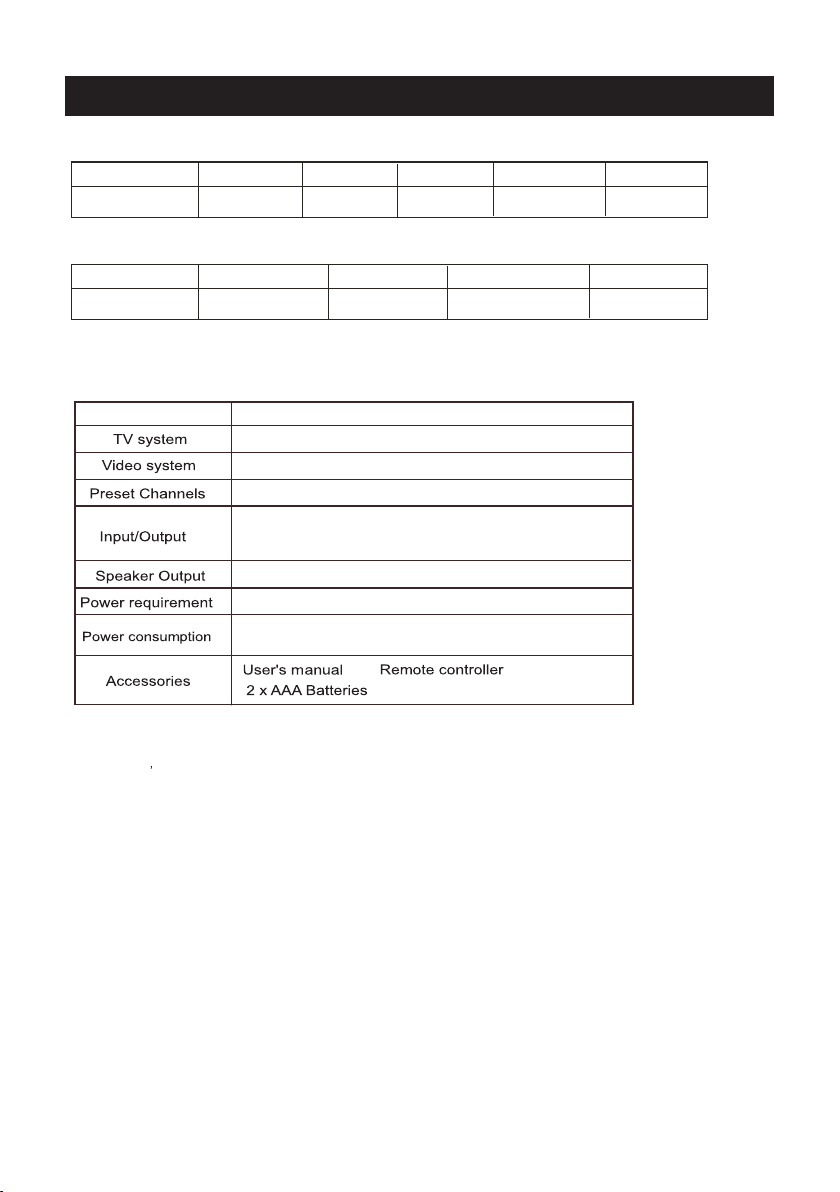
VGA
Resolution
Vert ical fr equen cy hz
640 x480 800X 600 102 4x768
HDMI
Format
Vert ical fr equen cy hz
480 i /P
60H Z
Parameter specification
Specifications
60H Z60H Z60H Z
576 i /P
50H Z 50 HZ/60 HZ
136 0x768
60H Z
720 P
192 0x108 0
60H Z
108 0 i/P
50H Z/60H Z
Screen Siz e
24”
NTSC / ATSC
PAL, NTSC
1253
IN: TV, AV, YPbP r, PC AUDI O,VG A, HDM I.
OUT: CO AXIAL ,EARP HONE.
5W+5W
AC 100-240V~ 50/ 60H z
48W
NOTE:
This user s ma nua l is fo r ref ere nce o nly .Specications are subj ect t o cha nge
without no tic e
31
 Loading...