

Page 1

VCR
User’s Manual
MODEL PSVR71
Page 2
Safety Information
WARNING
To reduce risk of fire or
shock hazard, do not
expose this product to
rain or moisture.
Cautions
WARNING
RISK OF ELECTRIC SHOCK
DO NOT OPEN
This symbol indicates important
instructions accompanying the
product.
Caution: To reduce the risk of electric shock, match the wide blade of plug to wide slot,
and fully insert.
Attention: Pour éviter les chocs électriques, introduire la lame la plus large de la fiche
dans la borne correspondante de la prise et pousser jusqú au fond.
Refer to the identification/rating label located on the back panel of your product for its
proper operating voltage.
FCC Regulations state that unauthorized changes or modifications to this equipment may
void the user’s authority to operate it.
Cable TV Installer: This reminder is provided to call your attention to Article
820-40 of the National Electrical Code (Section 54 of the Canadian Electrical Code, Part
1) which provides guidelines for proper grounding and, in particular, specifies that the
cable ground shall be connected to the grounding system of the building
as close to the point of cable entry as practical.
TO REDUCE THE RISK OF ELECTRIC SHOCK, DO NOT REMOVE
COVER (OR BACK). NO USER SERVICEABLE PARTS INSIDE.
REFER SERVICING TO QUALIFIED SERVICE PERSONNEL.
This symbol indicates “dangerous
voltage” inside the product that presents
a risk of electric shock or personal injury.
Care and Cleaning: Use a soft cloth or the dusting attachment of your vacuum cleaner to dust
your VCR. Remove dust from the ventilation holes.
Plastic surfaces are easily scratched and can be marred by alcohol and
various solvents. Avoid excessive use of oil-based furniture polishes since
the materials used in the cabinet will accumulate more dust. A
nonabrasive, antistatic cleaner/polisher is recommended.
Product Registration
Please fill out the product registration card and return it immediately. Returning the card allows us to contact you if needed.
Keep your sales receipt to obtain warranty parts and service and for proof of purchase. Attach it here and record the serial and model
numbers in case you need them. The numbers are located on the back of the product.
Model No. _________________________________________
Serial No. _________________________________________
Purchase Date: _____________________________________
Dealer/Address/Phone: __________________________________________________________________________________
PSVR71
_________________________________________________________________________________________
VCR Plus+ system and PlusCode are registered trademarks of Gemstar Development Corporation.
The VCR Plus+ System is manufactured under the license from Gemstar Development Corporation.
COMMERCIAL ADVANCE and MOVIE ADVANCE are registered trademarks of SRT, Inc.; a Jerry Iggulden invention
licensed in association with Arthur D. Little Enterprises.
i
Page 3

Table of Contents
Safety Information ........................................................................ i
First Things First ............................................................................ 3
Setting Up the VCR ..................................................................... 7
Using the Menus to Set Up Features ................................................ 8
Language ............................................................................................. 8
Cable Box Setup............................................................................... 9
VCR Channels List ......................................................................... 10
Auto Channel Searching ......................................................... 10
Changing the Signal Type ......................................................... 11
Adding or Removing Channels .............................................. 12
Time and Date ................................................................................ 12
Auto Clock Set Feature .......................................................... 12
Setting the Time Zone ............................................................. 13
Setting Daylight Savings ........................................................... 14
Setting Time and Date Manually ............................................ 15
VCR Plus+ Programming System Channels ............................. 16
VCR Plus+ System Worksheet .................................................. 17
Additional Set Up Features ............................................................... 18
Remote VCR1/VCR2 Option ...................................................... 18
Auto Play .......................................................................................... 19
Auto TV/VCR .................................................................................. 19
EnergySaver ..................................................................................... 20
Front Panel (VCR Display) ........................................................... 20
Tape Speed ....................................................................................... 20
VCR Basics .....................................................................................21
Remote Buttons ................................................................................... 22
Component Buttons ..................................................................... 22
VCR Function Buttons .................................................................. 23
TV Function Buttons ..................................................................... 24
Playing a Tape ........................................................................................ 25
Automatic Rewind ......................................................................... 25
Tape Eject ......................................................................................... 25
Recording ......................................................................................... 26
Recording........................................................................................ 27
Express Recording (XPR) .................................................................. 28
Program Express.................................................................................. 29
Timer Recording .................................................................................. 29
Timer Recording With the VCR Plus+ System ........................ 31
Stopping a Timer Recording ........................................................ 32
Reviewing and Clearing Programs.............................................. 33
Editing a Timer Program ............................................................... 33
Recording Broadcast Stereo TV or SAP
(Second Audio Program) ................................................................ 34
Recording Audio Only................................................................... 34
Playing Back Audio Only ............................................................... 35
Using Two VCRs for Copying and Editing Tapes ............................ 35
Using Dual Remote with AutoEdit .................................................. 36
1
Page 4

Table of Contents
Program The Remote ............................................................... 37
Testing the Remote ............................................................................. 38
Programming the Remote to Control a TV,
Satellite Receiver, or Cable Box ................................................... 38
Programming the Remote to Control
an Auxiliary Component ................................................................ 40
Other Features ............................................................................43
Commercial Advance .......................................................................... 44
Marking ............................................................................................. 45
Playback ............................................................................................ 46
Display .............................................................................................. 46
Movie Advance ..................................................................................... 47
Picture Search Options ...................................................................... 49
Forward and Reverse Search....................................................... 49
Slow Motion .................................................................................... 49
Frame Advance ............................................................................... 50
Variable Speed Using the Shuttle Ring................................. 50
Index Search .................................................................................... 51
Zero Search..................................................................................... 52
Pro-Tect Plus™ Locking Feature...................................................... 52
Tracking .................................................................................................. 52
Time Counter....................................................................................... 53
On-Screen Displays ............................................................................. 53
Audio Set-Up Features ....................................................................... 54
Reception ......................................................................................... 54
Tape Playback........................................................................................ 55
Connections................................................................................... 57
Jacks and Cables................................................................................... 58
Choosing a VCR Connection ............................................................ 59
TV With RF Jack Only ................................................................... 60
TV With Audio/Video Jacks ......................................................... 61
TV With Audio/Video Jacks and Cable Box ............................. 62
TV With RF Jack and Digital Satellite Receiver ....................... 63
TV With Audio/Video Jacks and Digital Satellite Receiver ... 64
Reference ........................................................................................ 65
Front Panel ............................................................................................ 66
Display Panel ......................................................................................... 67
Back Panel ............................................................................................. 68
Questions and Answers About Commercial Advance ................. 69
Troubleshooting Tips ........................................................................... 70
How to Find Your TV’s Video Input Channel ................................. 73
Specifications ........................................................................................ 74
Cleaning the VCR ................................................................................. 74
Warranty ............................................................................................... 75
Glossary ................................................................................................. 76
Index ....................................................................................................... 77
2
Page 5

First Things First
Welcome to your new VCR...
To help you get started using your VCR with as
little reading as possible, we’ve put all the basic
information needed in the first three sections. To
help you along, there’s even a QuickSet Guide which
walks you through several set-up steps at once.
Getting Started
Before this first step, though, learning about
the time and date, your remote control’s features,
working with channels, and basic video tape
operations are essential to get all you can out of the
VCR. Once you are comfortable with these features,
feel free to refer to other sections because they
cover the more detailed information.
First Things First
1
➣
Setting Up the VCR
2
➣
VCR Basics
3
➣
Recording
4
➣
What Remains?
The final sections of this manual contain playback
and recording information, a detailed connections
section, and a reference section including
troubleshooting tips, warranty information, and an
index.
Program The Remote
5
5
Other Features
6
➣
➣
Connections
7
7
➣
Reference
8
READ ME!
These note boxes give you tips for your
new video cassette recorder.
3
Page 6
First Things First
VCR
TV
CABLE/
ANTENNA
CABLE, CABLE BOX, OR ANTENNA
3 CH. 4
IN FROM
ANT.
VIDEO
OUT
R-AUDIO-L
OUT TO TV
VHF/UHF
MONO
IN 1
TV • VCR
ON OFF
INPUT EJECT RECORD
PLAY/PAUSE
FWREW
STOP
S
T
O
P
P
A
U
S
E
T
V
A
U
X
D
V
D
S
A
T
•
C
A
B
L
E
- T
R
A
C
K
IN
G
+
R
E
C
O
R
D
F
R
.A
D
V
E
D
IT
P
L
A
Y
F
O
R
W
A
R
D
R
E
V
E
R
S
E
S
P
E
E
D
G
O
B
A
C
K
V
O
L
V
O
L
S
E
A
R
C
H
M
U
T
E
I
N
F
O
M
E
N
U
O
K
C
L
E
A
R
G
U
ID
E
A
N
T
E
N
N
A
1
2
3
4
5
6
7
89
0
IN
P
U
T
V
C
R
1
V
C
R
2
O
N
• O
F
F
C
H
+
C
H
-
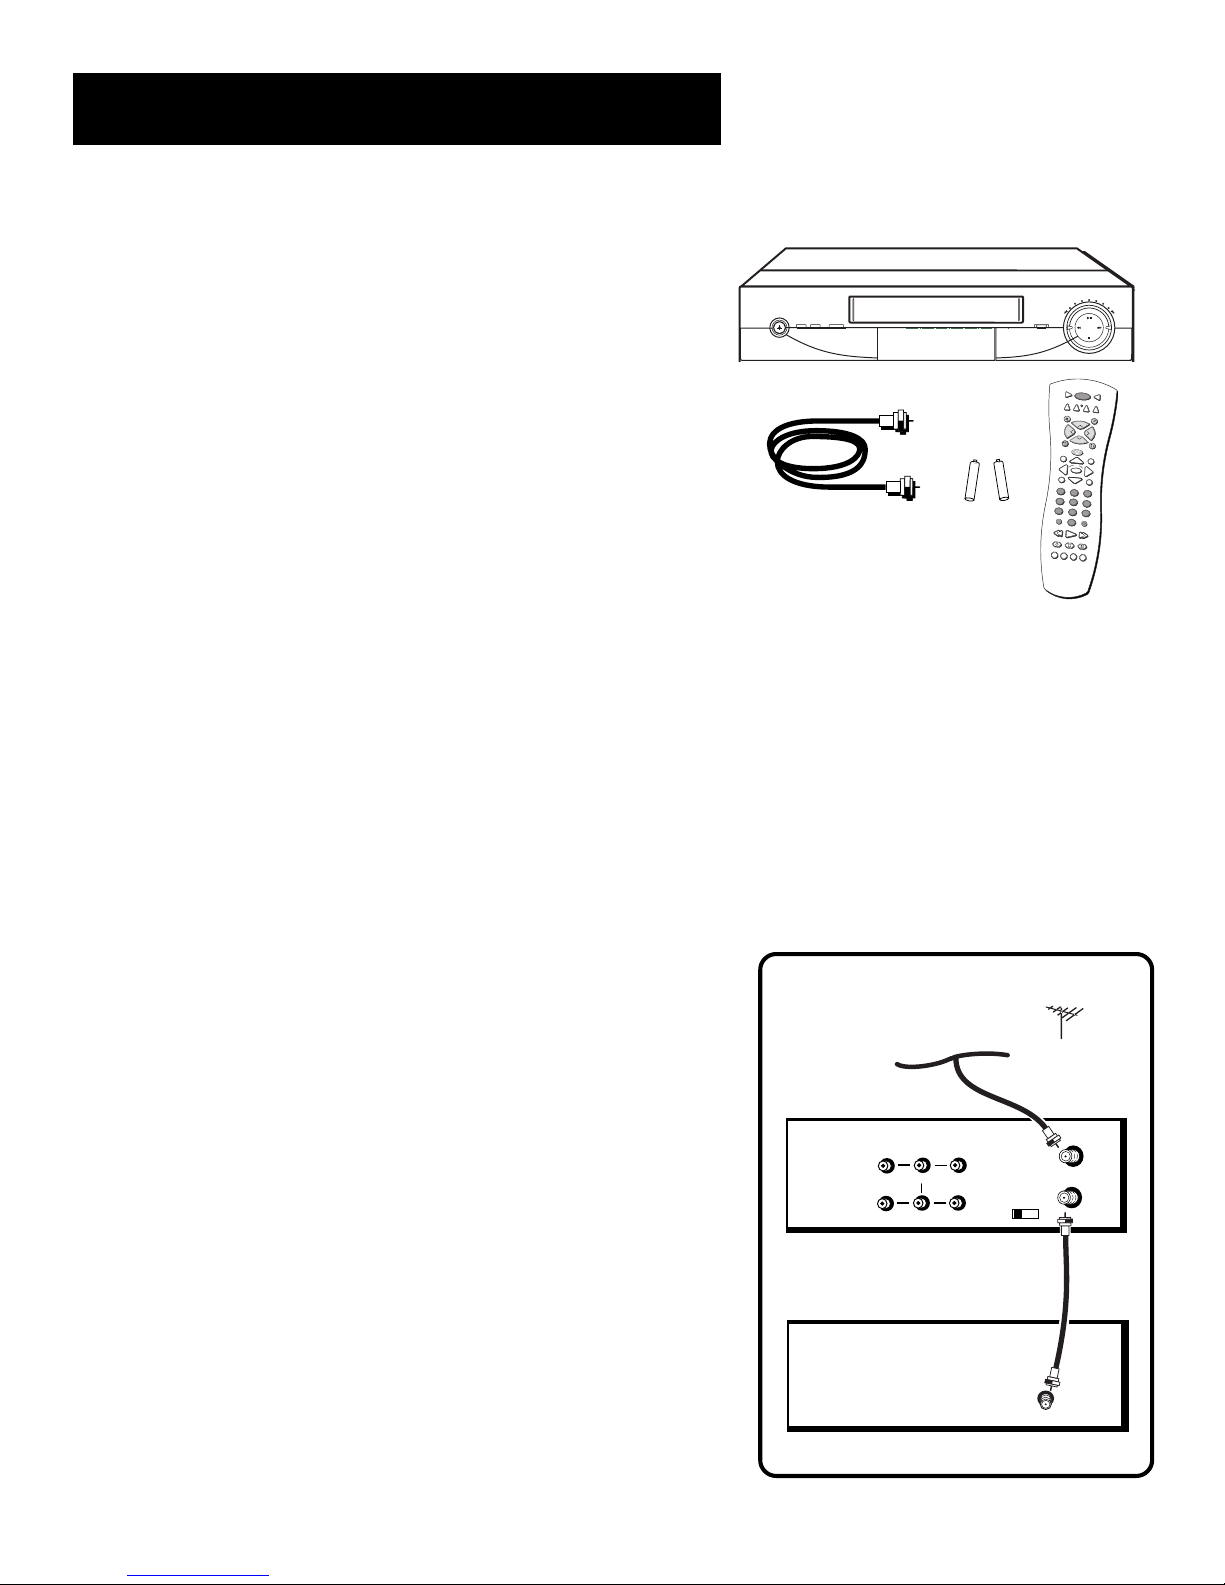
Step 1: What’s In the Box?
The following items come packed in the box:
• VCR
• Remote control
• RF coaxial cable
• 2 “AA” Batteries
Step 2: Install Batteries In the
Remote Control
Follow these steps whenever you need to install or change the
batteries in your VCR’s remote.
1. Remove the cover of the battery compartment.
2. Place the batteries into the remote’s back panel. Match the positive
(+) and negative (–) ends of each battery to the diagram inside the
battery compartment.
3. Replace the cover.
Step 3: Connect Your VCR
If you connect your VCR to your home antenna or cable system and
then to your TV, use the VCR’s IN (FROM ANT.) and OUT (TO TV)
jacks for a good signal as shown to the right.
+ -
+ -
If you have a TV with AUDIO/VIDEO jacks, use the jacks for a better
connection. Refer to the section,
Connections
the back of the manual, for additional connection options.
Step 4: Plug In the VCR
Your VCR’s power cord has a plastic band strung through the blades.
Remove plastic band before plugging the cord into the power outlet.
To remove band, cut with a pair of scissors and pull it free of the
blades. Once the plastic is removed, match the wide blade of the
power cord to the wide slot in the AC outlet. Be sure to insert the plug
completely.
4
, toward
Page 7
First Things First
Step 5: Tune the TV
Tune the TV to the VCR viewing channel. The VCR viewing channel is
channel 3 or 4 or the TV’s video input.
• If you connect your VCR using the IN (FROM ANT.) and OUT (TO
TV) jacks with RF coaxial cable, set the 3 CH 4 switch to channel
3 or channel 4 — the channel you want to use on your TV.
• If you connect your VCR using the AUDIO/VIDEO jacks
with audio/video cables, select the TV’s video input with
the remote’s TV and INPUT buttons to see the signal. See page 59
for more information about your TV’s input channel.
Step 6: Turn On the VCR
Press ON • OFF on the VCR’s front panel or VCR1 on the remote
control to turn on the VCR. The first time you turn the VCR on, a menu
screen appears. This is the start of a QuickSet Guide which helps you
pick different options for your VCR.
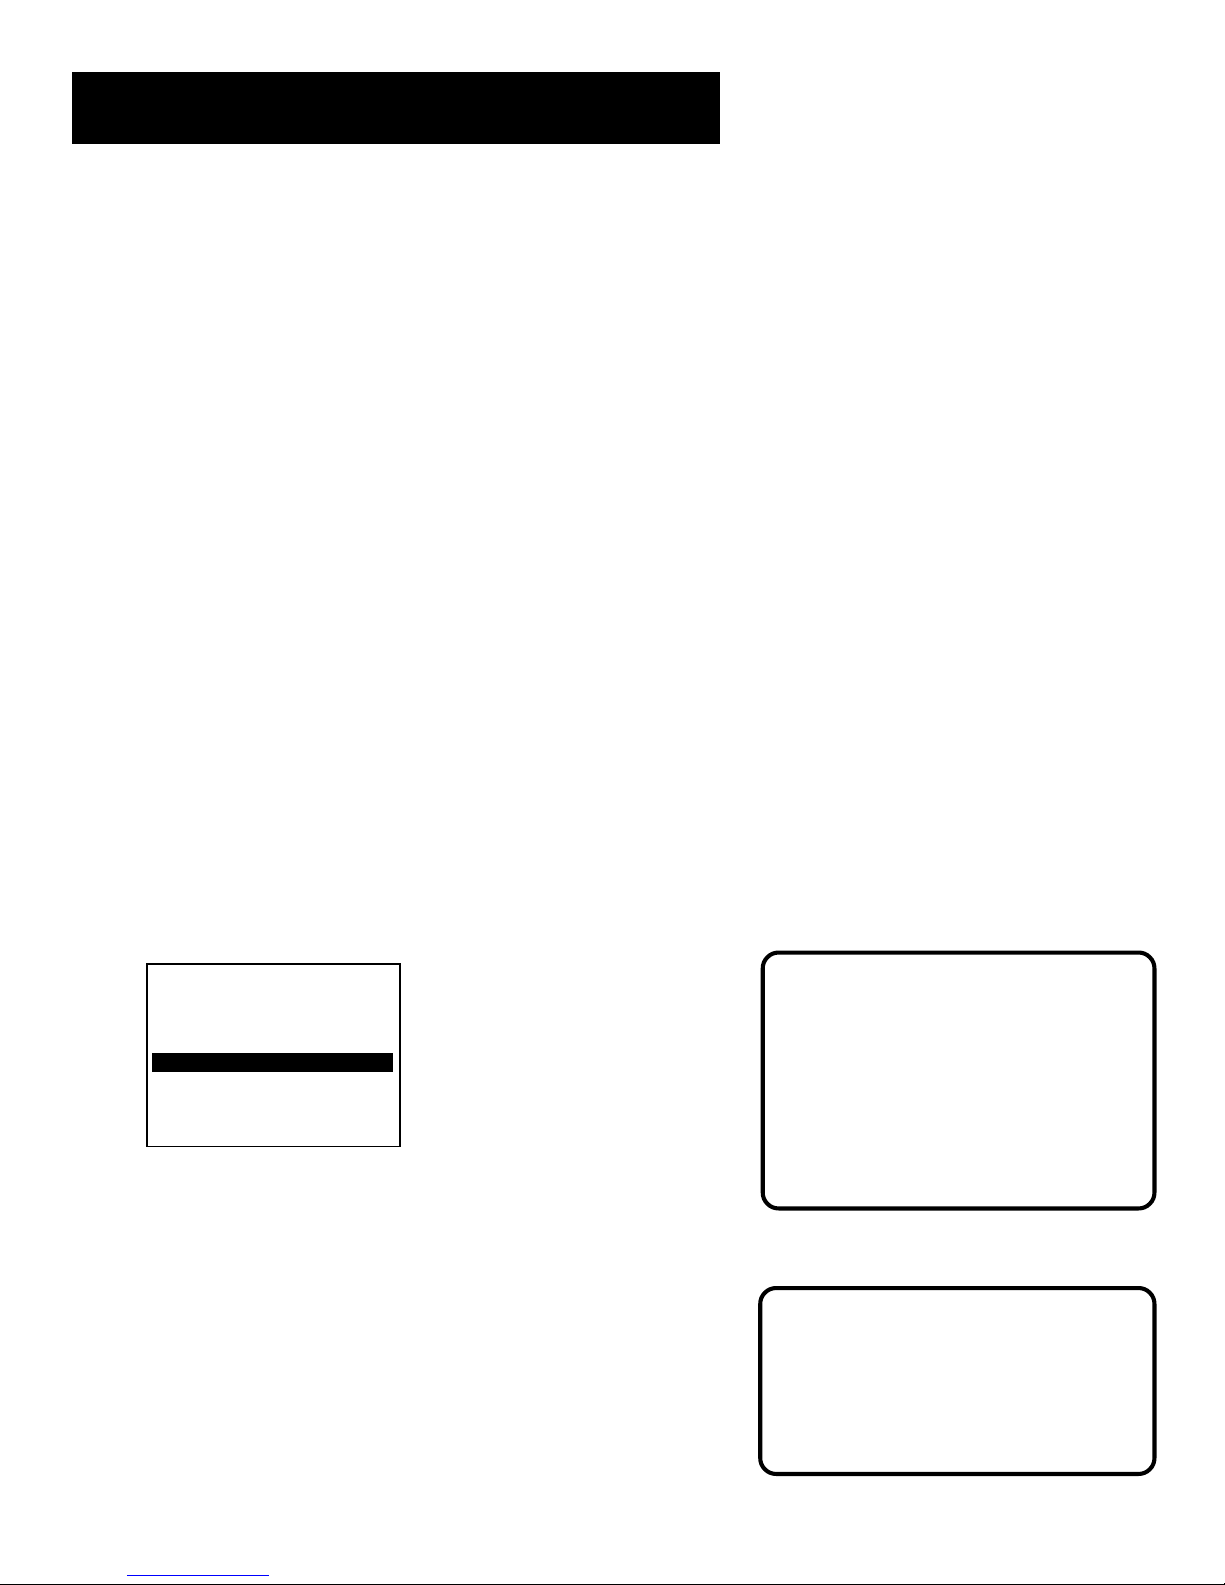
Step 7: Using the QuickSet Guide
The QuickSet Guide is an automated procedure that helps you set up
your VCR. The first time you turn on your VCR, the first screen of the
Guide appears.
Select a language.
Choisissez une langue.
1 English
2 Francais
1. Press 1 for English, or 2 for Français (French).
The remaining menus throughout the set up will appear in the chosen
language. Just follow the step-by-step procedures until the interactive
setup is complete.
If the menu does not appear:
• Make sure the TV is tuned to the same channel as the 3 CH 4
switch or the TV’s video input “channel” (see page 59 for more
information).
˜
VCR Viewing Channel
When using the ANTENNA jacks to
connect your VCR, tune your TV to
channel 3 or 4.
When using the audio/video jacks to
connect your VCR, tune your TV to
the TV’s video input.
QuickSet Guide
If you choose not to use the QuickSet
Guide to set up the VCR, you can exit
now and return to the Guide through
Setup in the VCR MAIN MENU.
(Continued on next page)
5
Page 8
First Things First
• Make sure the VCR indicator is on in the VCR display if you
connected your VCR using the IN (FROM ANT.) and OUT (TO TV)
jacks.
• Check your connections.
If you choose to set up your VCR options individually rather than
setting them up in the Quickset Guide, then go to the next section.
Step 8: Access the Menus
The MENU, arrow and number buttons on the remote control
let you access, select, and change your VCR’s preferences. For
example, to turn the Auto Play feature on or off (see
VCR
for more information about Auto Play):
Setting Up the
Using the Arrow Buttons
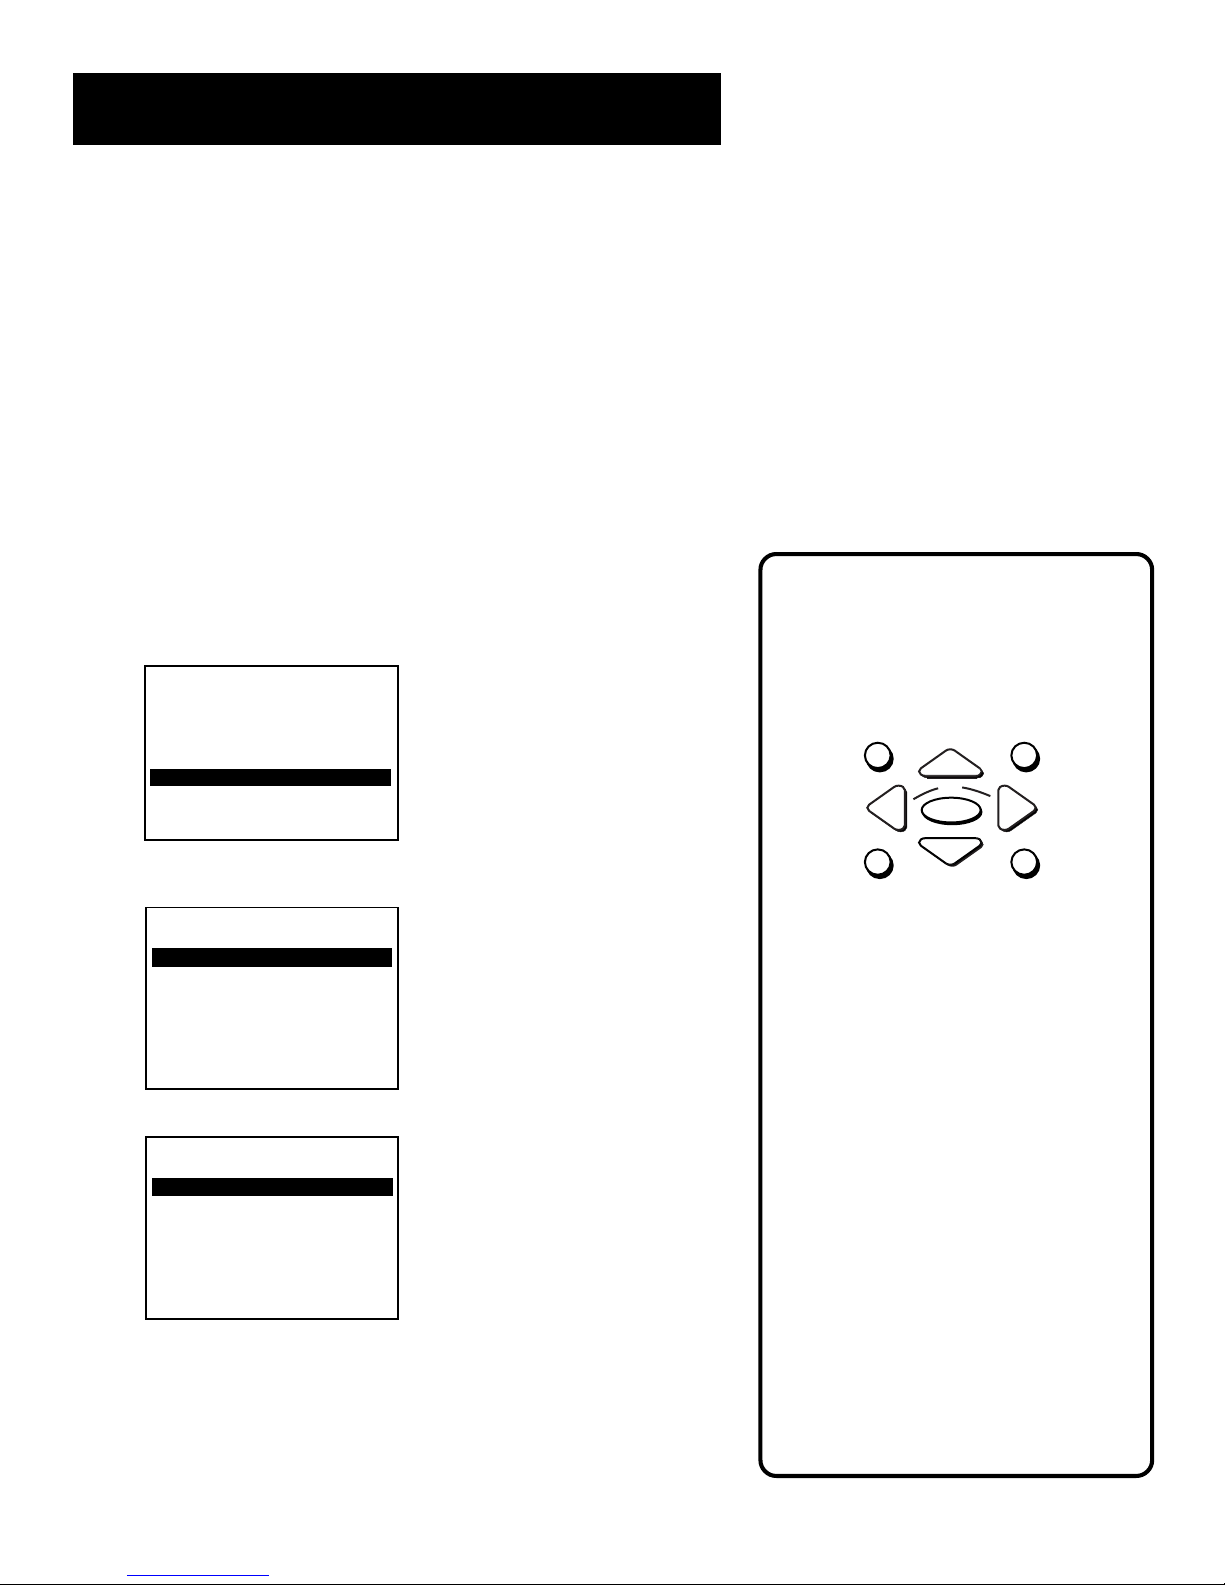
1. Press MENU to display the VCR MAIN MENU.
VCR MAIN MENU
1 VCR Plus+
2 Timer Recordings
3 Time
4 Channels
5 Setup
6 Preferences
7 Audio
8 Language
0 Exit
2. Press 6 to display the PREFERENCES menu
PREFERENCES
1 Remote Control: VCR1
2 Auto Play: ON
3 Auto TV/VCR: ON
4 EnergySaver: 2:00
5 Front Panel: AUTO
6 Tape Speed: SLP
7 Commercial Advance
0 Exit
.
3. Press 2 to switch BETWEEN Auto Play to ON or OFF.
PREFERENCES
1 Remote Control: VCR1
2 Auto Play: ON
3 Auto TV/VCR: ON
4 EnergySaver: 2:00
5 Front Panel: AUTO
6 Tape Speed: SLP
7 Commercial Advance
0 Exit
4. When you have made your choice, press 0 on the remote to exit
the Preferences menu and 0 to exit the Main Menu.
Once you understand how to use the menus, move on to the next
section.
Use the menu, arrow and OK buttons
on the remote control to access and
select menu items.
GUIDE INFO
K
O
MENU CLEAR
Pressing the MENU button will bring
up the Main Menu. When menus are
displayed, you can either select the
item you want by pressing the same
number button on the remote, or by
using the up and down arrows to
scroll through items highlighting
them. If you scroll through menu
items, you must press the OK button
to select it.
You also set some of the VCR’s
features (e.g., setting the clock) using
the on-screen displays and the remote
control arrow buttons in this way.
You also use the left and right arrows
when setting up a timer program.
These buttons move from one
location to another, such as moving
from hours to minutes
6
Page 9

Setting Up the VCR
Set-up features
Below is a list of features that need to be set up to get
the most out of your VCR. Many of these menus are
covered during the QuickSet Guide, but if you ever
want to change a menu, refer to this section.
• Language Selection
• Cable Box Set Up
• VCR Channel List Set Up
(Auto Channel Search)
• Time Zone and Daylight Savings
(Auto Clock)
• Manually Setting Time and Date
• VCR Plus+ Programming System Channels
• Remote VCR1/VCR2 Feature
• Auto Play
First Things First
1
➣
Setting Up the VCR
2
➣
VCR Basics
3
➣
Recording
4
➣
Program The Remote
5
5
➣
• Auto TV/VCR
• EnergySaver
• Front Panel Brightness
• Preferred Tape Speed
Other Features
6
➣
Connections
7
7
➣
Reference
8
7
Page 10
Setting Up the VCR
Using the Menus to Set
Up Features
You set up features by using the menu system as discussed in the
previous section. Each feature that appears in the QuickSet Guide is
explained in this section as well as a few other features you should set
up before you begin using your VCR.
Language
Selecting your preferred language determines how the on-screen
displays will appear. To change the language:
1. Press MENU to display the VCR MAIN MENU.
VCR MAIN MENU
1 VCR Plus+
2 Timer Recordings
3 Time
4 Channels
5 Setup
6 Preferences
7 Audio
8 Language
0 Exit
2. Select 8 to chose the LANGUAGE menu.
LANGUAGE
Select a language.
1 English
2 Francais
Press MENU to continue
˜
3. Select English or Français (French).
8
Is Something Missing?
Not all the VCR screens are shown in
this manual when explaining the
features.
Page 11
Setting Up the VCR
Cable Box Setup
This setup applies only when all channels are received through the
cable box.
1. Press MENU to display the VCR MAIN MENU.
VCR MAIN MENU
1 VCR Plus+
2 Timer Recordings
3 Time
4 Channels
5 Setup
6 Preferences
7 Audio
8 Language
0 Exit
2. Press 4 to display the CHANNELS menu.
CHANNELS
1 Auto Channel Search
2 Add/Remove Channels
3 Signal Type: CABLE
4 VCR Plus+ Channel List
5 Cable Box Setup
0 Exit
3. Press 5 to display the CABLE BOX SETUP menu. Then select one of
the three choices.
CABLE BOX SETUP
Do you use your cable
box to receive ALL
channels or only SOME
channels?
1 ALL channels
2 Only SOME channels
3 Cancel setup
4. If you selected ALL channels, enter the output channel of your
cable box, usually 03, 04, or video line input and press MENU.
CABLE BOX SETUP
On what channel does
the VCR receive signals
from the cable box?
(usually 3, 4, or Video)
--
Enter 01-13 or INPUT
Press MENU to cancel
Make sure you enter a “0” before entering single-digit numbers.
To select Video Input, press the INPUT button on the remote.
Cable Box Setup
ALL channels: enter two numbers for
output channel of your cable box or
press INPUT for Video Input.
Only SOME channels: if you only use
the cable box to tune premium
channels.
Cancel setup: select to cancel.
(Continued on Next Page)
9
Page 12
Setting Up the VCR
CABLE BOX SETUP
The VCR will now
receive all signals
from the cable box
on channel 04.
Press MENU to continue
Once you complete the setup, the on-screen menus confirm
that the VCR will receive all signals on the designated channel.
VCR Channels List
If you use a cable box for
all channels
, this step is not necessary.
Your VCR may come with a channel list preset at the factory. Even
though your VCR may come with such a list, it’s possible that you
will want to add or delete certain channels depending on whether
they are active.
Auto Channel Searching
1. Press MENU to display the VCR MAIN MENU.
VCR MAIN MENU
1 VCR Plus+
2 Timer Recordings
3 Time
4 Channels
5 Setup
6 Preferences
7 Audio
8 Language
0 Exit
2. Press 4 to display the CHANNELS menu.
CHANNELS
1 Auto Channel Search
2 Add/Remove Channels
3 Signal Type: CABLE
4 VCR Plus+ Channel List
5 Cable Box Setup
Auto Channel Search
0 Exit
3. Press 1 to display the AUTO CHANNEL SEARCH menu.
10
Use the Auto Channel Search feature
to place all available channels in
memory.
If you ever change cable or antenna
signals, you may need to Auto Channel
Search again.
Page 13
Setting Up the VCR
AUTO CHANNEL SEARCH
What type of signal
are you using?
1 Cable TV
2 Antenna
3 Detect Automatically
0 Cancel
4. Select one of the three AUTO CHANNEL SEARCH options.
•
Cable TV
•
Antenna
•
Detect Automatically
searches for cable stations from a single channel
searches for local broadcast stations on all channels
will make this decision for you
AUTO CHANNEL SEARCH
Now scanning channel 14
Press any key to cancel
The VCR begins scanning for the available channels—this takes
about one to two minutes. When the scan is complete, the VCR
tunes to the lowest channel number available. At this point,
pressing CHAN + or - on the remote should only select active
channels.
Changing the Signal Type
This feature is useful if your cable signal goes out; it allows you to
switch to a regular antenna for alternate television reception.
1. Press MENU to display the VCR MAIN MENU.
2. Press 4 to display the CHANNELS menu.
3. Press 3 to change the Signal Type between Cable and Antenna.
When you are finished, press 0 to exit back to the Main Menu
and 0 again to exit to normal viewing.
Detect Automatically
A strong cable or antenna signal in
your area may cause Auto Detect to
mis-detect. If this should happen,
select 1 or 2 for the system you have.
11
Page 14
Setting Up the VCR
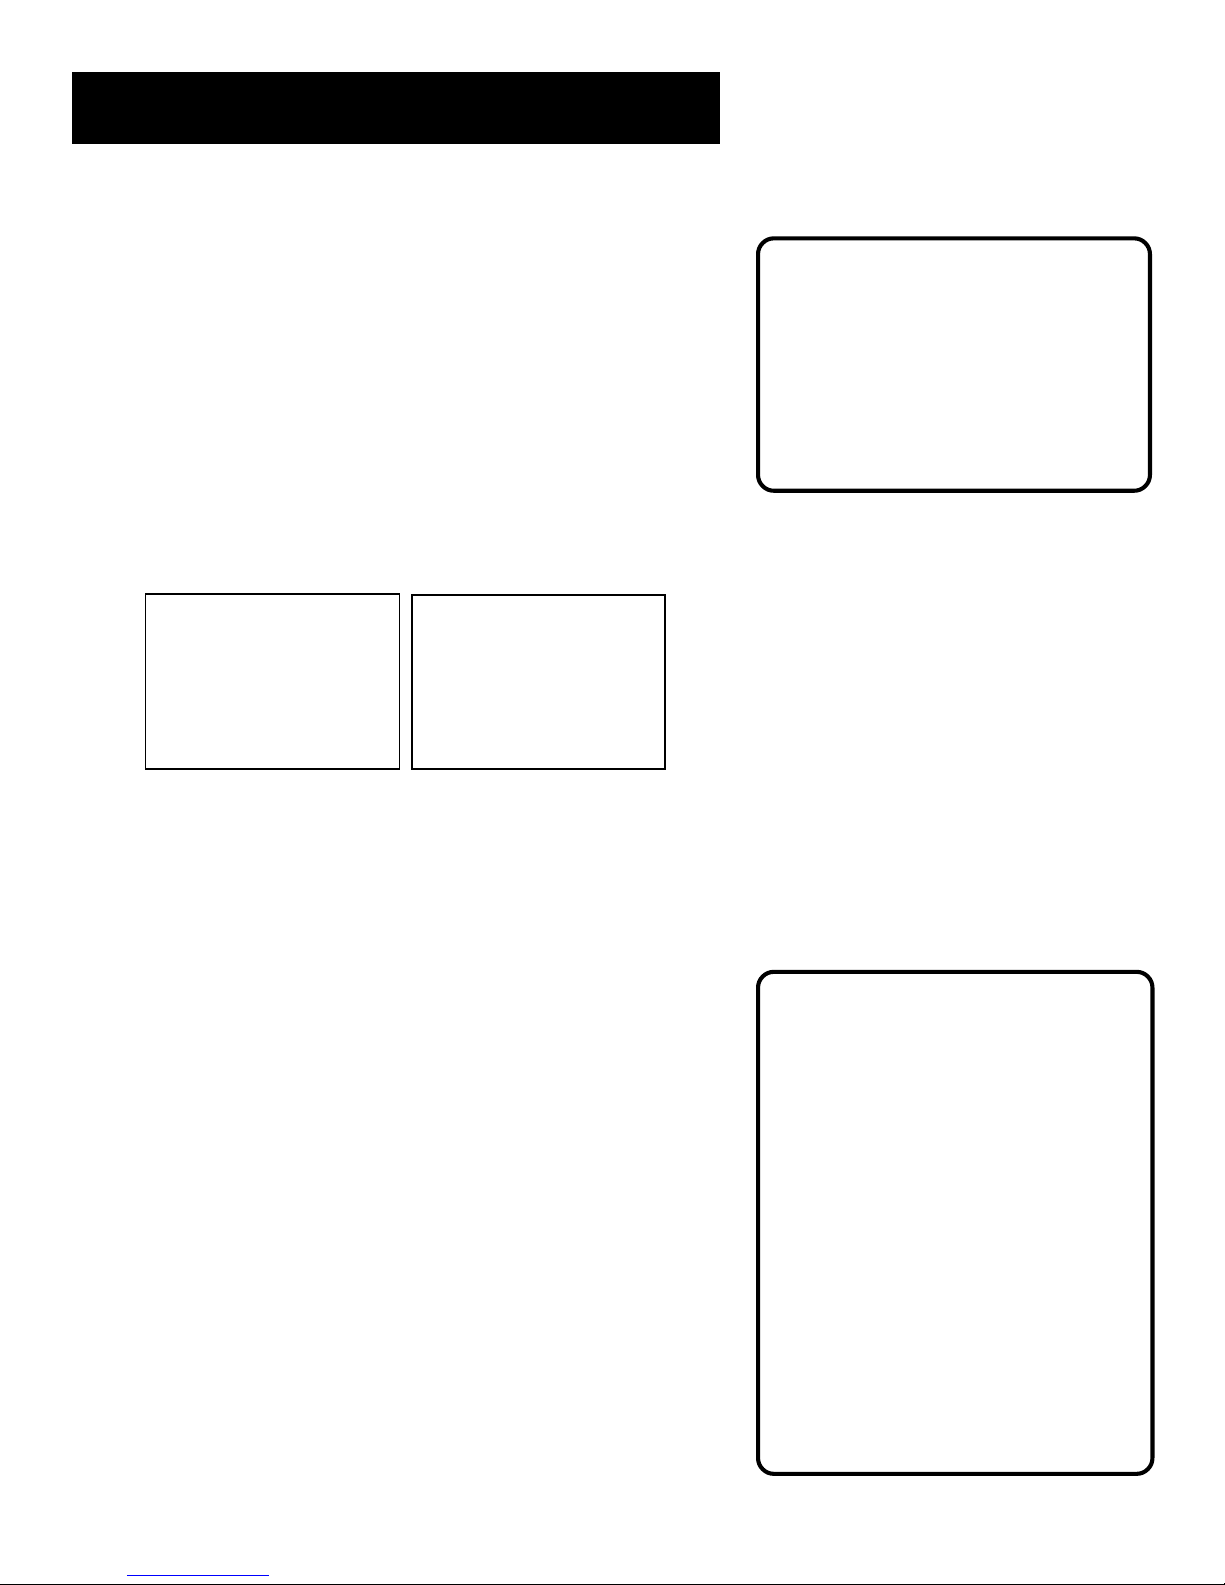
Adding or Removing Channels
You may want to add or remove channels after you auto channel
search, especially if channels have weak signals or content you don’t
want to watch. To achieve this:
1. Press MENU to display the VCR MAIN MENU
2. Press 4 to display the CHANNELS menu
3. Press 2 to display the ADD/REMOVE CHANNELS screen. Use the
CHANNEL + or - buttons on the remote or enter a specific channel
number with the number buttons to go to the channel you want to
add or remove.
ADD/REMOVE CHANNELS
Channel 115
is presently ADDED
Press CLEAR to remove
Press MENU to exit
ADD/REMOVE CHANNELS
Channel 115
is presently REMOVED
Press INFO to add
Press MENU to exit
Once you have reached your selection, the screen will tell you if
the channel is currently in your viewing list. Press CLEAR to
remove a channel. Press INFO to add a channel. Once you are
completed, you can press MENU to exit out of the menus.
Selecting Channels
The CHANNEL + and - buttons access
those channels which are active in
your VCR channel list.
You can still access channels not in
the channel list by using the number
buttons on the remote.
Time and Date
The VCR gives you two ways to set the time and date; manually and
the Auto Clock feature. Using Auto Clock enables the VCR to update
the clock each time you turn off the VCR. The Auto Clock feature is
advantageous because it updates the time for you automatically.
Auto Clock Set Feature
The Auto Clock feature is set to ON by default at the factory. In the ON
setting, the VCR looks for a channel carrying XDS (Extended Data
Services) information and updates the clock using the Coordinated
Universal Time. There are certain steps which are required, such as
Auto Channel Search, setting the Time Zone, and setting the DaylightSavings feature, before the Auto Clock feature works.
12
Auto Clock Info
With a cable box, the VCR will not
reset the clock after a power outage
unless the cable box is set to the
channel carrying the broadcast signal.
If Auto Clock Set is unsuccessful, try
tuning the VCR (or cable box) to a
channel carrying Extended Data
Servises (XDS) information (usually
PBS), then turn the VCR off. If the
time does not set within 10 minutes,
set the time and date manually
through the Time menu.
Check local cable system or TV
stations for availability of channels
with XDS information.
Page 15
Setting Up the VCR
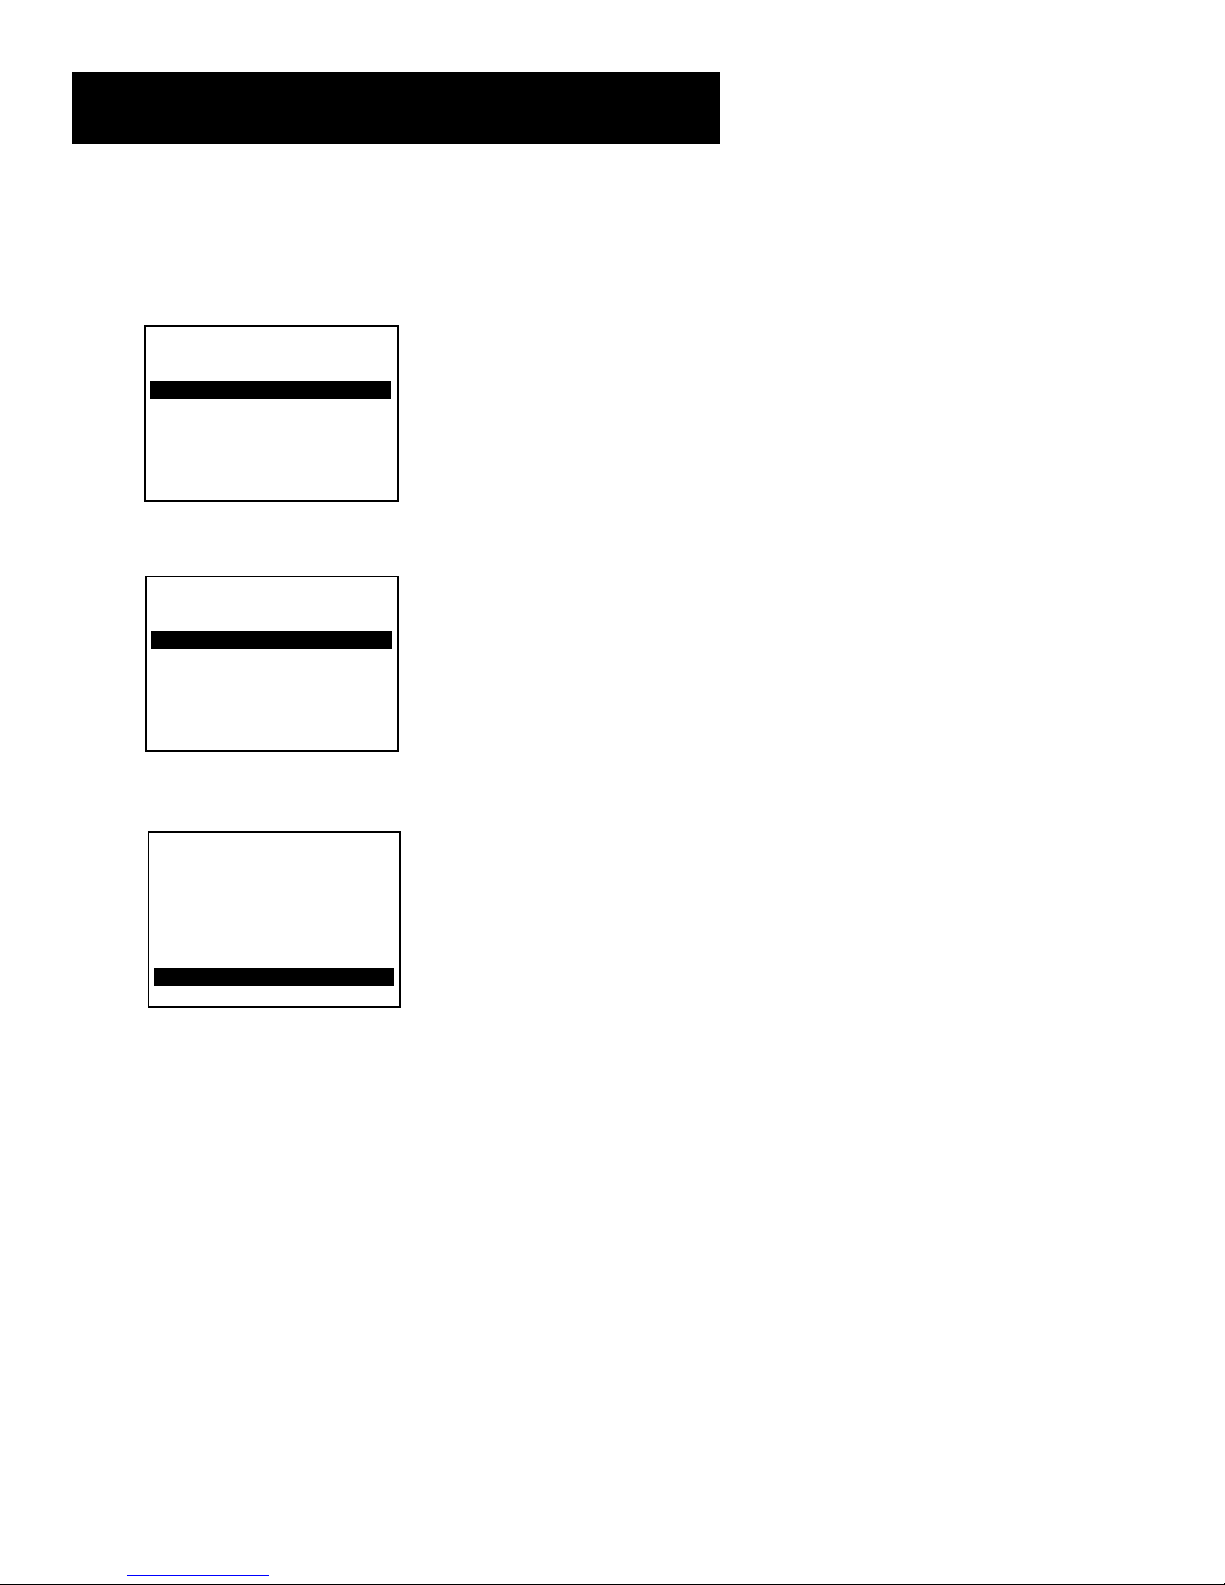
Setting the Time Zone
1. Press MENU to display the VCR MAIN MENU.
VCR MAIN MENU
1 VCR Plus+
2 Timer Recordings
3 Time
4 Channels
5 Setup
6 Preferences
7 Audio
8 Language
0 Exit
2. Press 3 to display the TIME menu.
TIME
1 Set Time and Date
2 Auto Clock Set: ON
3 Set Time Zone
4 Set Daylight Savings
0 Exit
3. Press 3 to display the SET TIME ZONE screen.
SET TIME ZONE
What is your Time Zone?
1 Eastern
2 Central
3 Mountain
4 Pacific
5 Alaska
6 Hawaii
7 Automatic
Press MENU to continue
4. Select your time zone.
If you select Automatic for your time zone, the VCR sets the clock
using the first Coordinated Universal Time information it finds. If
the time is not correct, select another time zone or set the time and
date through the menu system.
13
Page 16
Setting Up the VCR
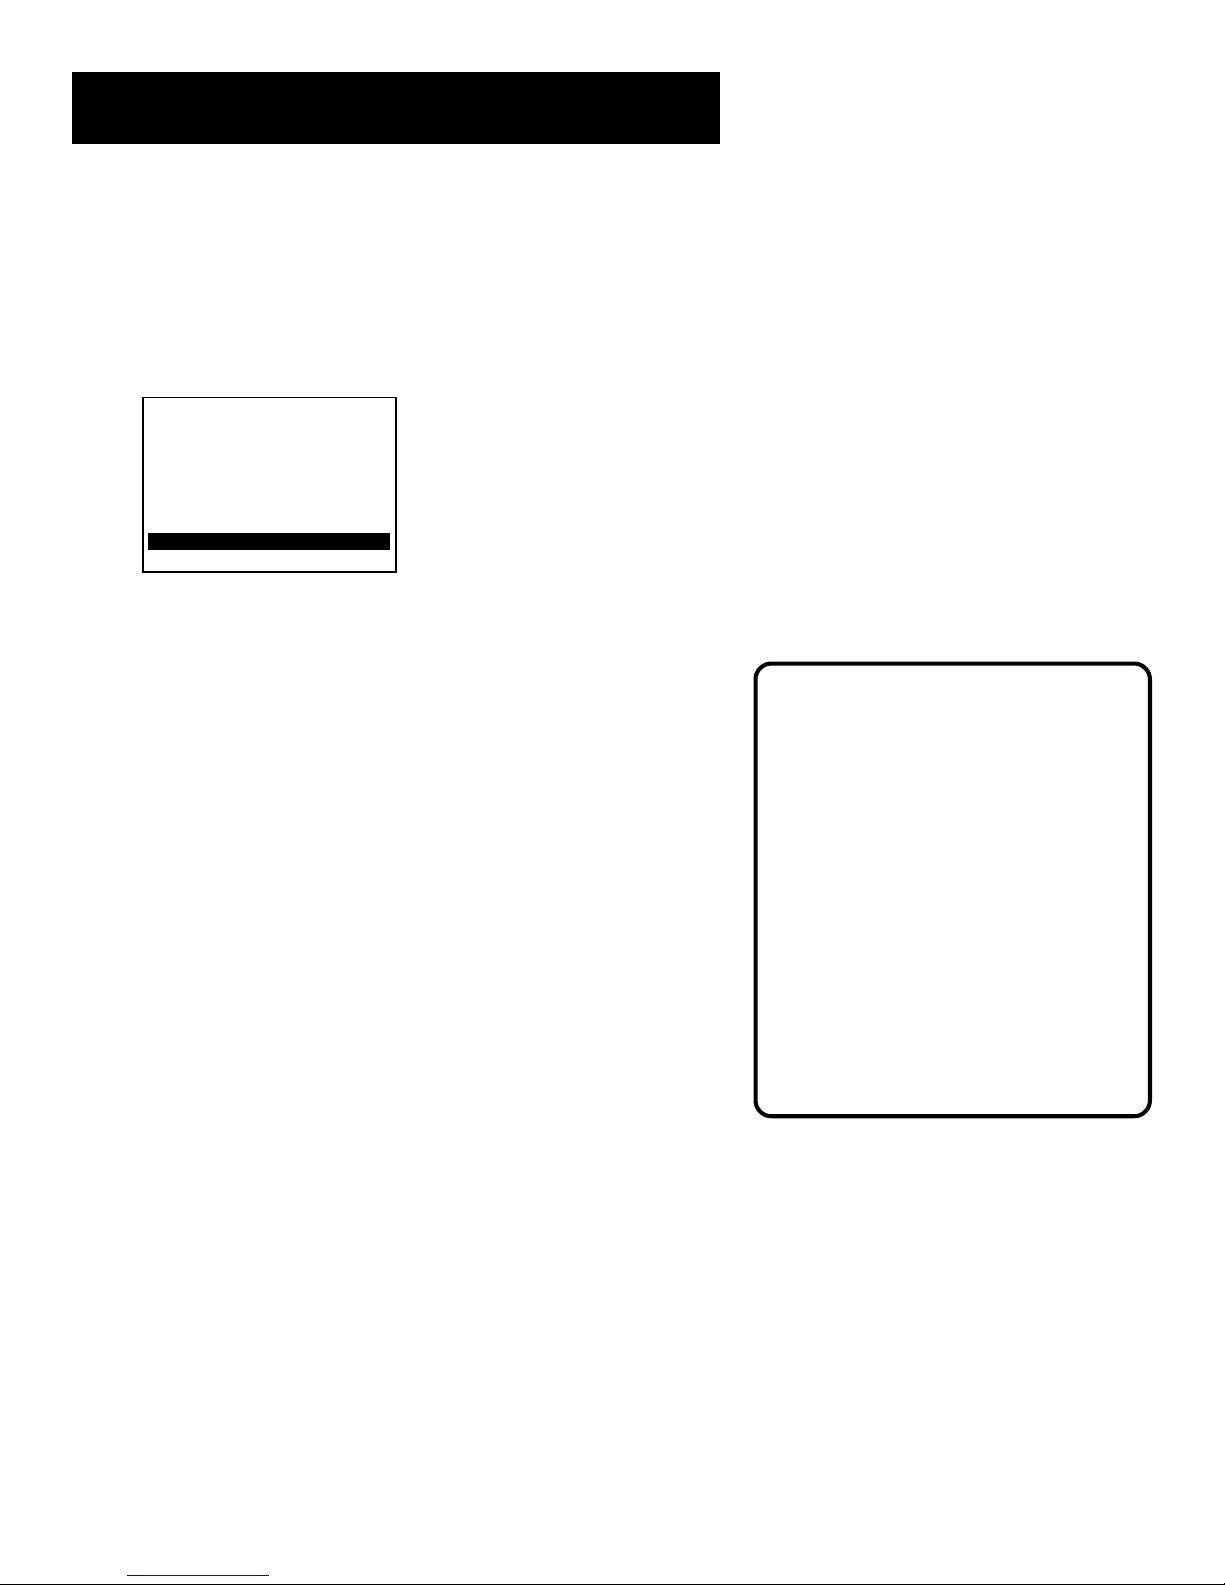
Setting Daylight Savings
1. Press MENU to display the VCR MAIN MENU.
2. Press 3 to display the TIME menu.
3. Press 4 to display the SET DAYLIGHT SAVINGS menu.
SET DAYLIGHT SAVINGS
Does your area observe
Daylight Savings Time
from April to October?
1 Yes, DST is observed
2 No
3 Automatic
Press MENU to continue
4. Select one of the options.
• DST stands for Daylight Savings Time.
• If you choose Automatic, the VCR sets the clock using the DST
information broadcast in the signal (channel).
Spring forward; Fall backward
In the Spring, Daylight-Savings begins
on the first Sunday in April. Because
the clock automatically changes from
2 a.m. to 3 a.m. (forward one hour),
remember to include the extra hour
for timer recordings falling within this
time frame.
In the Autumn, Daylight-Savings ends
on the last Sunday in October. The
VCR clock automatically changes
from 2 a.m. to 1 a.m. (back one hour).
Therefore, it can affect your recording
length.
14
Page 17
Setting Up the VCR
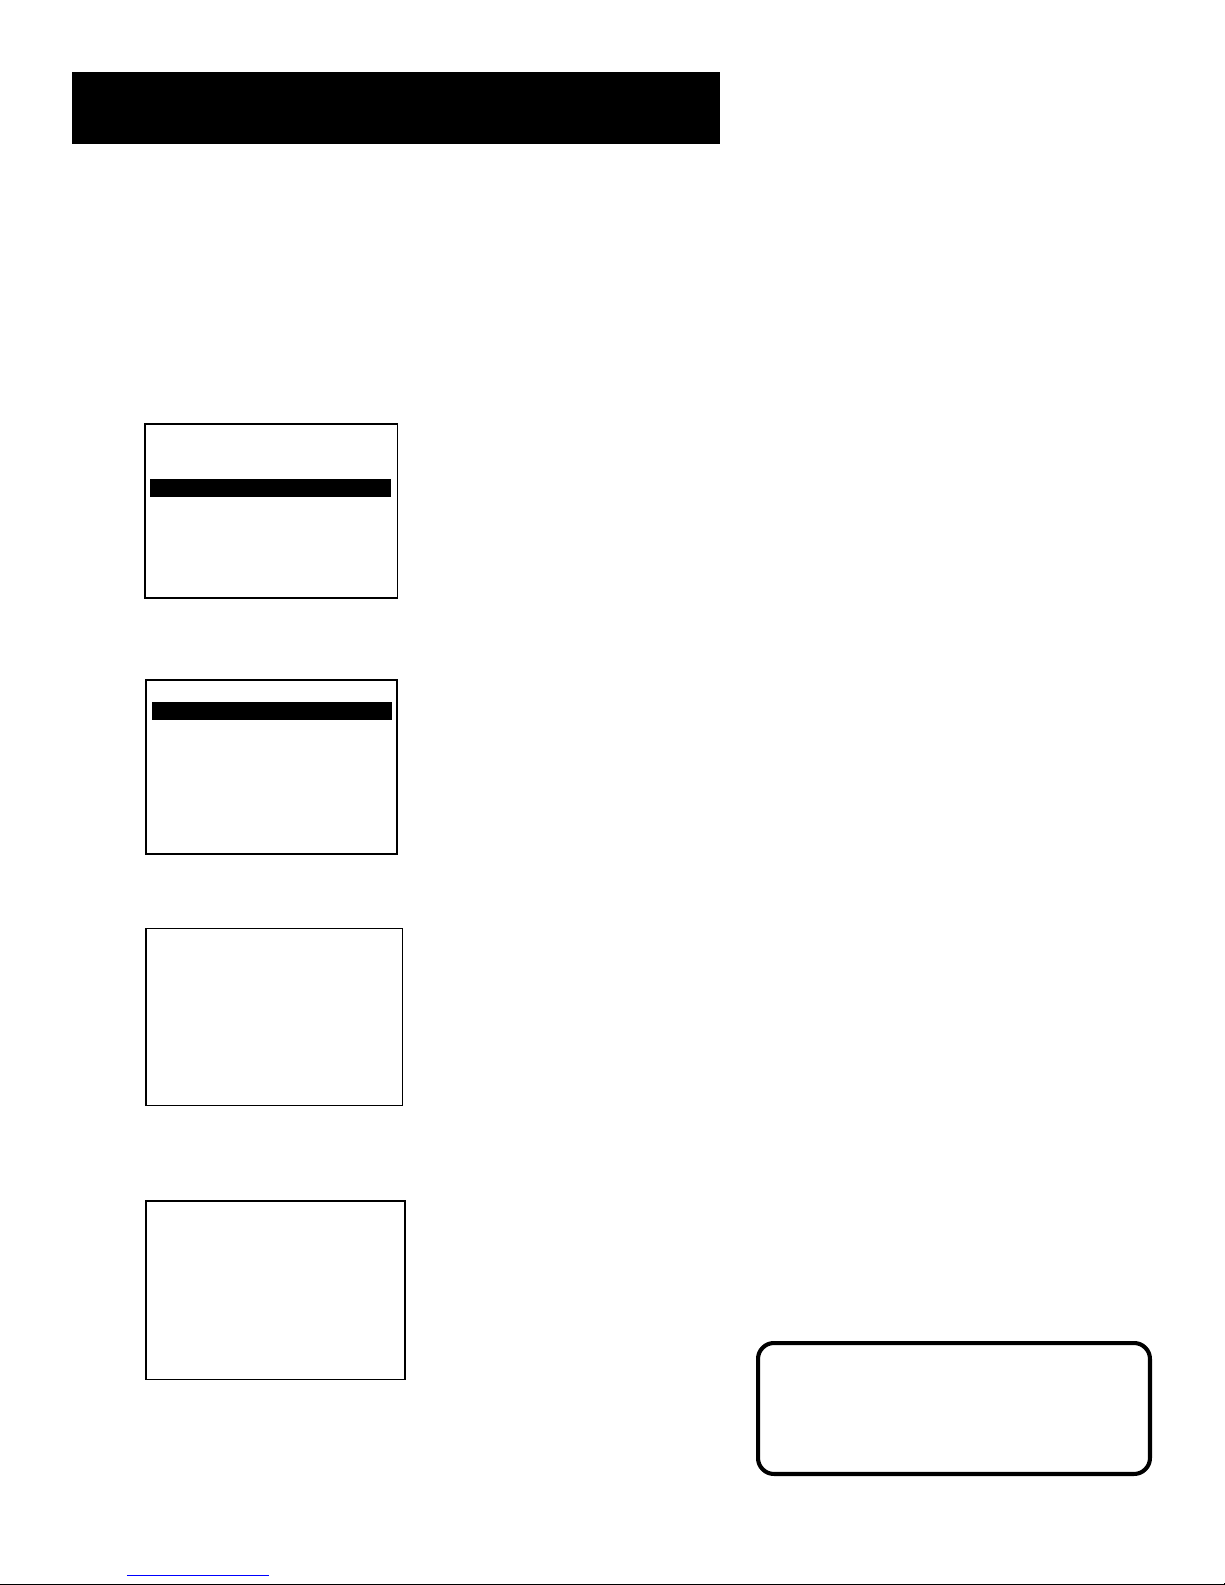
Setting Time and Date Manually
If the Auto Clock Set was unsuccessful, set the clock through the TIME
menu option. The Auto Clock Set feature is set to OFF automatically
when you set the clock this way.
1. Press MENU to display the VCR MAIN MENU.
VCR MAIN MENU
1 VCR Plus+
2 Timer Recordings
3 Time
4 Channels
5 Setup
6 Preferences
7 Audio
8 Language
0 Exit
2. Press 3 to display the TIME menu.
TIME
1 Set Time and Date
2 Auto Clock Set: OFF
3 Set Time Zone
4 Set Daylight Savings
XDS Time Data was
not found.
0 Exit
3. Press 1 to display the SET TIME AND DATE menu.
SET TIME AND DATE
Time --:- (hh:mm)
Date --/--/--
Press MENU to cancel
4. Enter the data using the number buttons. Press 0 before single-digit
numbers and follow the on-screen directions to exit the menus.
SET TIME AND DATE
Time 12:34 PM
Date 11/18/99 Thursday
Press CLEAR to correct
Press MENU to set
Time/Date Display
Pressing INFO displays the time and
date on the screen temporarily.
15
Page 18

Setting Up the VCR
VCR Plus+® Programming System
Channels
Using VCR Plus+ programming system can make programming timer
recor dings f or cab le or off-air antenna easier , but y ou have to put in a
little time right no w to set up a channel list. A w orksheet and
abbreviated codes for typical cable services in the U.S. and Canada
are provided.
1. Press MENU to display the VCR MAIN MENU.
VCR MAIN MENU
1 VCR Plus+
2 Timer Recordings
3 Time
4 Channels
5 Setup
6 Preferences
7 Audio
8 Language
0 Exit
2. Press 4 to display the CHANNELS menu.
CHANNELS
1 Auto Channel Search
2 Add/Remove Channels
3 Signal Type: CABLE
4 VCR Plus+ Channel List
5 Cable Box Setup
0 Exit
3. Press 4 to display the VCR Plus+ system Channel List screen.
VCR+ Channel My Channel
5 - 4 - 3 -> -> -> - 2 - 1 --
Use CH+/- to select
Press 0-9 to change
Press MENU to save
4. Enter the data following the on-screen directions using your
worksheet.
Two-Digit VCR Plus+ System
Channel Numbers for
Cable TV (Canadian List)
35 American Movie Classics
39 Arts &-Entertainment
57 Black Entertainment
54 Bravo
42 Cable News Network
45 Cinemax
98 Cinemax 2
37 The Discovery Channel
53 The Disney Channel
63 Entertainment Television
34 ESPN Sports Network
47 The Family Channel
33 Home Box Office
95 Home Box Office 2
96 Home Box Office 3
51 The Learning Channel
46 Lifetime
58 The Movie Channel
48 Music Television
49 The Nashville Network
38 Nickelodeon
64 Nostalgia Television
99 Quality Value Cable
41 Showtime
97 Showtime 2
59 Sports Channel
52 Turner Network Television
44 USA-Network
62 Video Hits 1
93 Viewer’s Choice 1
94 Viewer’s Choice 2
55 WGN Chicago
43 WTBS Atlanta
60 WWOR-New York
See next page for Canadian List
VCR+ Channel My Channel
5 46
4 - 3 -> -> -> 23
2 - 1 --
Use CH+/- to select
Press 0-9 to change
Press MENU to save
Screen used is for an example only.
VCR Plus+ system is a registered trademark of Gemstar Development Corporation.
The VCR Plus+ system is manufactured under the license from Gemstar Development Corporation.
16
VCR Plus+ Programming
System Channel List
Refer to your local television list for a
complete VCR Plus+system channel
list for your viewing area or contact
your cable company. Using the list
may save you some time.
Page 19
Setting Up the VCR
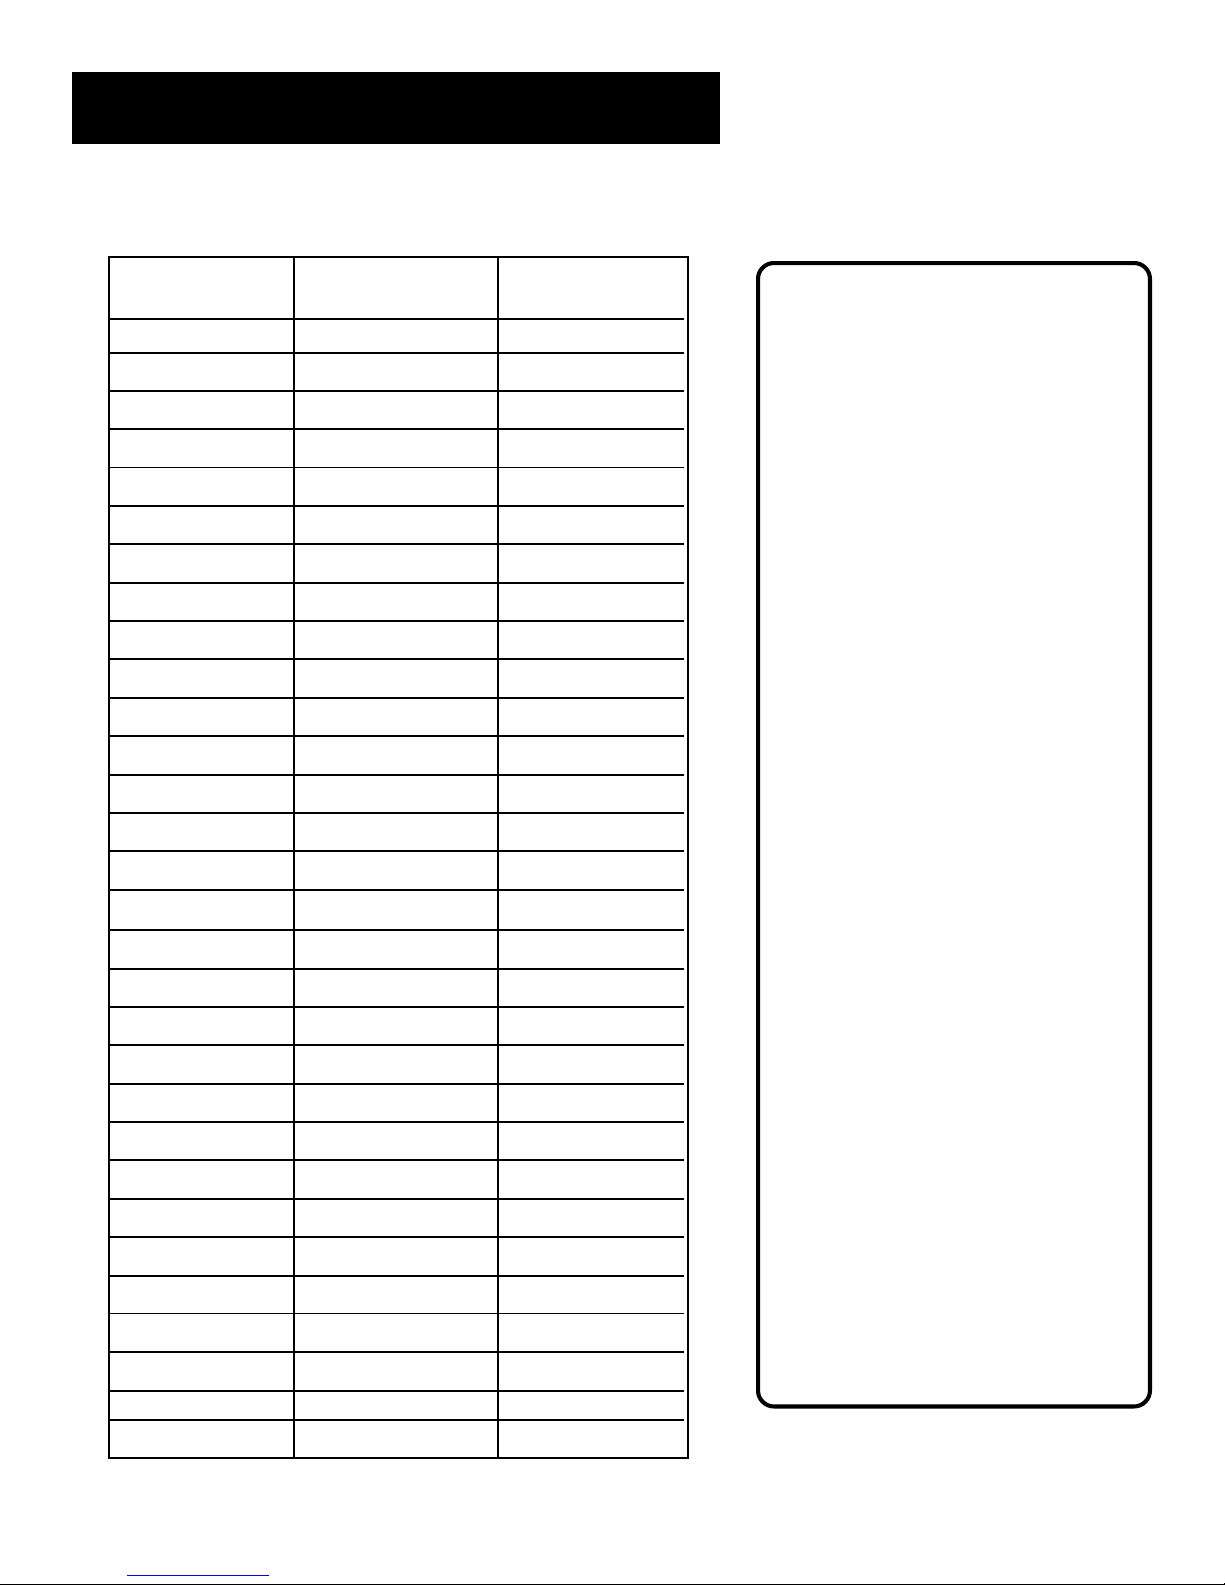
VCR Plus+ System Worksheet
Broadcast or
Cable-TV Station
Name
VCR Plus+ Channel
Hbo 33
ESPN 34
Number**
Channel Number
You Receive the
Station On*
Two-Digit VCR Plus+ System
Channel Numbers for
Cable TV (Canadian List)
67 Allarcom Pay Television/
Superchannel
44 Arts & Entertainment
72 Cable News Network-
Headline News
61 Cable News Network
70 Canadian Home Shopping
Network
56 Canal Famille
69 Cathay International
Television Inc.
68 Chinavision Canada Corp
60 Country Music Television
63 Family Channel
62 First Choice
96 First Choice Two
97 First Choice Three
99 First Choice Four
90 House of Commons
91 La Chaine Francaise
51 The Learning Channel
65 MeteoMedia/The Weather
Network
48 MuchMusic Network
55 MusiquePlus
52 Nashville Network
73 Newsworld/CBC
53 Le Reseau des Sports
43 The Sports Network
64 Super Ecran
37 Super Ecran B
98 Super Ecran C
66 Telatino Network
46 TV5 Montreal
92 Viewer’s Choice 1
93 Viewer’s Choice 2
94 Viewer’s Choice 3
95 Viewer’s Choice 4
71 Vision TV: Canada’s
Faith Network
38 Youth TV, Canada Inc.
* Check your local or cable listing for the channel number you receive this station on.
** Check your local listing for broadcast or VCR Plus+ channel number assigned.
17
Page 20
Setting Up the VCR
Additional Set Up Features in
the PREFERENCES Menu
The features in this section are all accessed through the PREFERENCES
menu.
1. Press MENU to display the VCR MAIN MENU.
VCR MAIN MENU
1 VCR Plus+
2 Timer Recordings
3 Time
4 Channels
5 Setup
6 Preferences
7 Audio
8 Language
0 Exit
2. Press 6 to display the PREFERENCES menu.
PREFERENCES
1 Remote Control: VCR1
2 Auto Play: ON
3 Auto TV/VCR: ON
4 EnergySaver: 2:00
5 Front Panel: AUTO
6 Tape Speed: SLP
7 Commercial Advance
0 Exit
Now you are ready to select an item
from the menu to set up.
Remote VCR1/VCR2 Option
The VCR’s remote control unit can operate up to two compatible
ProScan, RCA, or GE VCRs. Most compatible VCRs automatically
respond to the VCR1 button without being programmed. If you own
two compatible VCRs, test them to see if the VCR1 button turns on
both VCRs. If it does, then you may want to program this VCR to
respond to the VCR2 button on the remote.
18
Remote Control Option
Remember you must press VCR1 or
VCR2 on the remote—whichever you
selected in the menu—before the
remote will operate the VCR.
Page 21
Setting Up the VCR
In the preferences menu, press 1 to select the Remote Control feature.
Then press the VCR2 button to change.
PREFERENCES
< PRESS VCR2 TO CHANGE >
2 Auto Play: ON
3 Auto TV/VCR: ON
4 EnergySaver: 2:00
5 Front Panel: AUTO
6 Tape Speed: SLP
7 Commercial Advance
0 Exit
PREFERENCES
1 Remote Control: VCR2
2 Auto Play: ON
3 Auto TV/VCR: ON
4 EnergySaver: 2:00
5 Front Panel: AUTO
6 Tape Speed: SLP
7 Commercial Advance
0 Exit
The VCR will only respond to the VCR2 button. To change the remote
setting back to VCR1, display the PREFERENCES menu, press 1, and
then press the VCR1 button on the remote.
Auto Play
This feature allows the VCR to automatically start playing when you
insert a tape with the safety tab removed. Press 2 to switch between
ON or OFF.
• Select ON if you want a tape with its safety tab removed to start
playing automatically when the tape is inserted.
• Select OFF if you
to start playing automatically.
do not
want a tape with its safety tab removed
Auto TV/VCR
This feature controls whether the TV/VCR switch changes
automatically to the VCR mode, when the VCR is turned on.
Press 3 to switch between ON and OFF.
• Select ON if you want the VCR to switch to the VCR mode when
the VCR is turned on or a cassette is inserted.
you connect the IN FROM ANT. and OUT TO TV jacks of your
VCR and TV and watch your VCR on channel 3 or 4 of your TV.
• Select OFF if you want the VCR to remain in the TV mode. This is
useful if you watch your VCR on the TV’s video input and you
don’t want your antenna/cable signal interrupted by the VCR.
This only applies if
Auto TV/VCR
Pressing TV•VCR on the VCR
(ANTENNA on remote) will still switch
between the VCR and TV modes.
VCR mode: VCR indicator in the display
panel lights.
TV mode: VCR indicator turns off.
19
Page 22

Setting Up the VCR
EnergySaver
By default, this VCR automatically turns off after two hours of
inactivity. Press 4 to change the time delay or to disable the feature.
• OFF: The VCR will remain turned on until you shut it off.
• 1:00, 2:00, or 3:00: The VCR turns off after one, two, or three
hours of inactivity.
Thirty seconds before shutting off, the VCR will warn you with a
screen reading, “The VCR will turn off in 30 seconds. Press any key
to cancel.”
If you use the VCR’s tuner instead of your TV to tune channels, you
may want to turn this feature off.
Front Panel (VCR Display)
You can change the brightness level of the fluorescent display panel on
the front of the VCR. Press 5 to switch between the options.
• AUTO brightens the display when the VCR is on and dims the
display when the VCR is off.
• BRIGHT keeps the display bright.
• DIM keeps the display at a low brightness level.
Tape Speed
You can select a preferred tape speed for recording. The speed you
select appears in the display panel and in the timer and VCR Plus+
recording menus. Press 6 to switch between SP and SLP.
You can override the preferred tape speed:
• Press the SPEED button on the remote.
• Set the tape speed in the timer or VCR Plus+ recording menu.
When you turn off the VCR, the tape speed reverts to the one you
have selected.
Tape Speeds
SP (Standard Play)
Gives the best quality recording, but
fewer programs can be recorded on
the tape. Special effects such as pause,
slow motion, picture search, and
frame advance work well when you
play back tapes recorded in
this speed.
SLP (Super Long Play)
Gives three times the recording time
of tapes recorded in SP. Special effects
such as pause, slow motion, picture
search, and frame advance work well
when you play back tapes recorded in
this speed.
20
Recording Times
Cassette S P SLP
T-120 2Hr 6Hr
T-160 2Hr/40Min 8H r
Page 23

VCR Basics
learn the basics To
get you started
These VCR basics should be enough for you to
begin enjoying your VCR. Learning the remote
control functions, playing a recorded tape, and
recording a program should do just that.
However, there are other features that enhance
the enjoyment of your VCR, but they aren’t
necessary to get you started. If you want to learn
more about your VCR, just keep reading.
First Things First
1
➣
Setting Up the VCR
2
➣
VCR Basics
3
➣
Recording
4
➣
Program The Remote
5
5
Other Features
6
➣
➣
Connections
7
7
➣
Reference
8
VCR Basics tells you what you need to
know in order to watch a movie or tape
your favorite show.
21
Page 24
VCR Basics
STOP PAUSE
TV
AUX
DVD
SAT
• CABLE
- TRACKING +
RECORD
FR.ADV
EDIT
PLAY FORWARDREVERSE
SPEED
GO BACK
V
O
L
V
O
L
SEARCH
MUTE
INFO
MENU
OK
CLEAR
GUIDE
ANTENNA
1
2
3
4
5
6
7
89
0
INPUT
VCR1
VCR2
ON • OFF
CH +
CH -
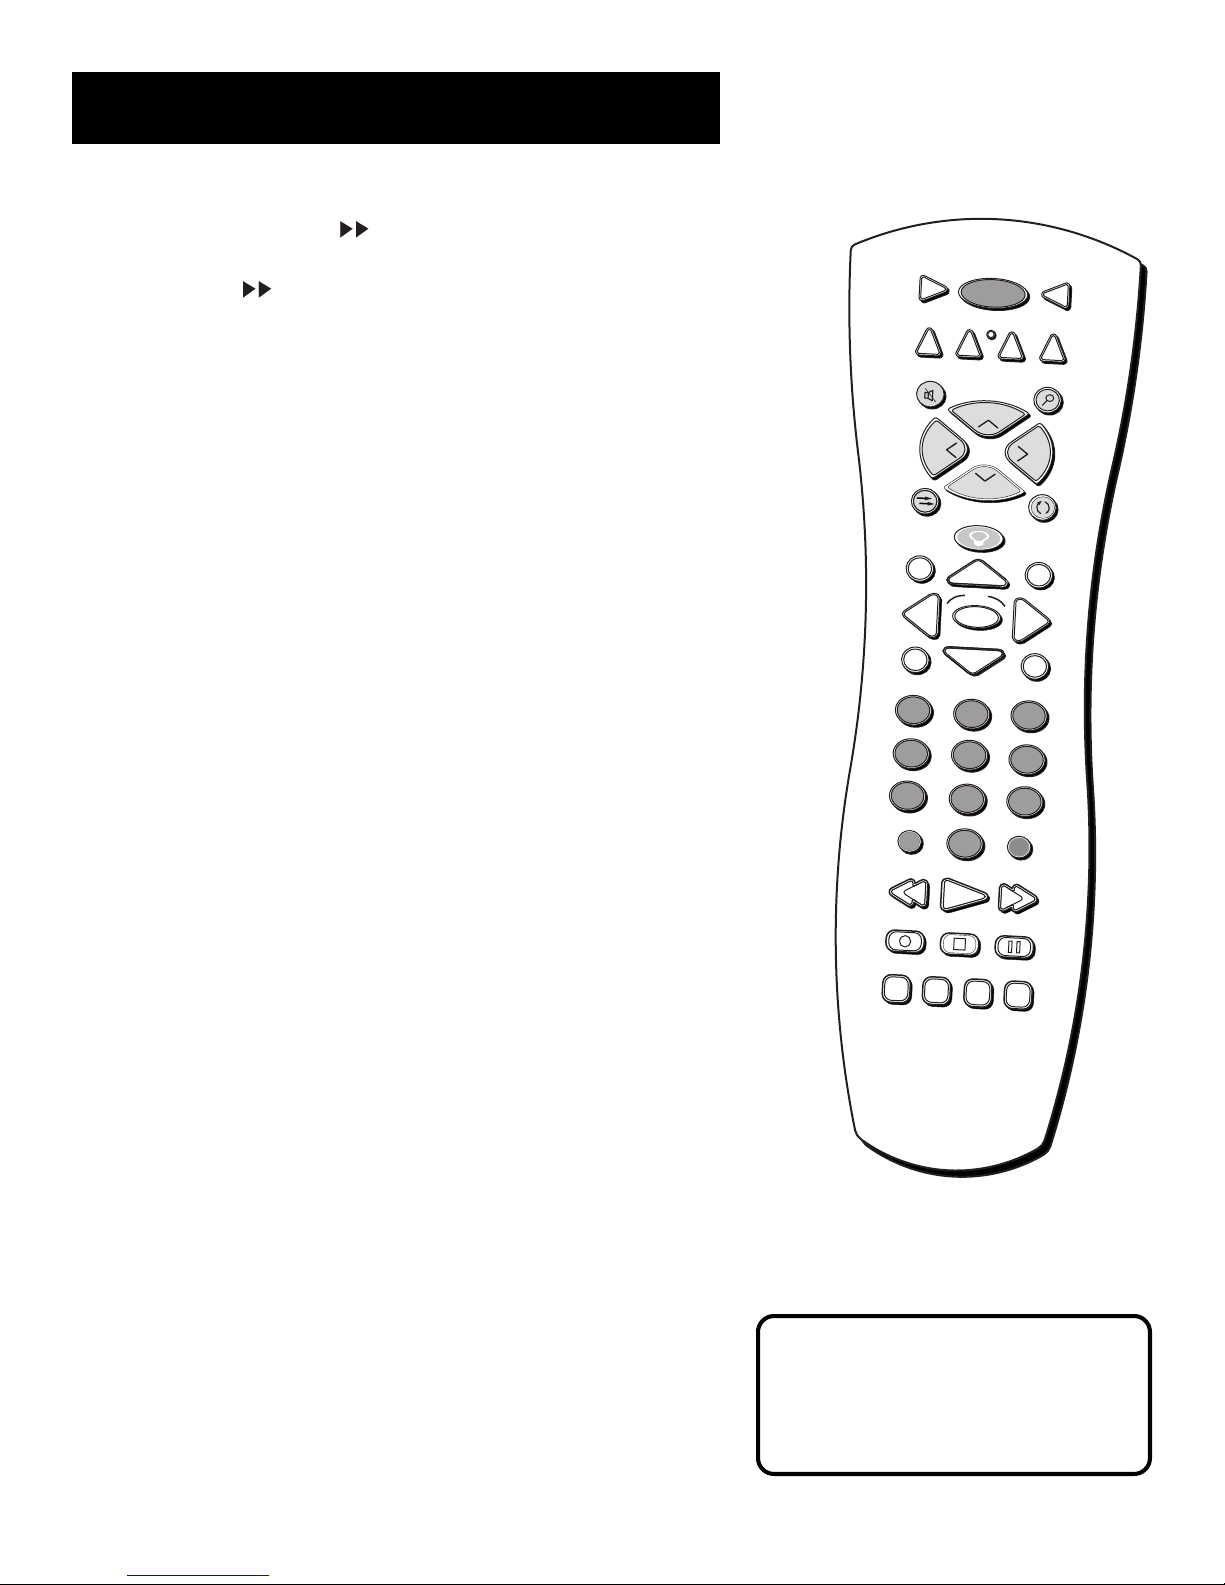
Remote Buttons
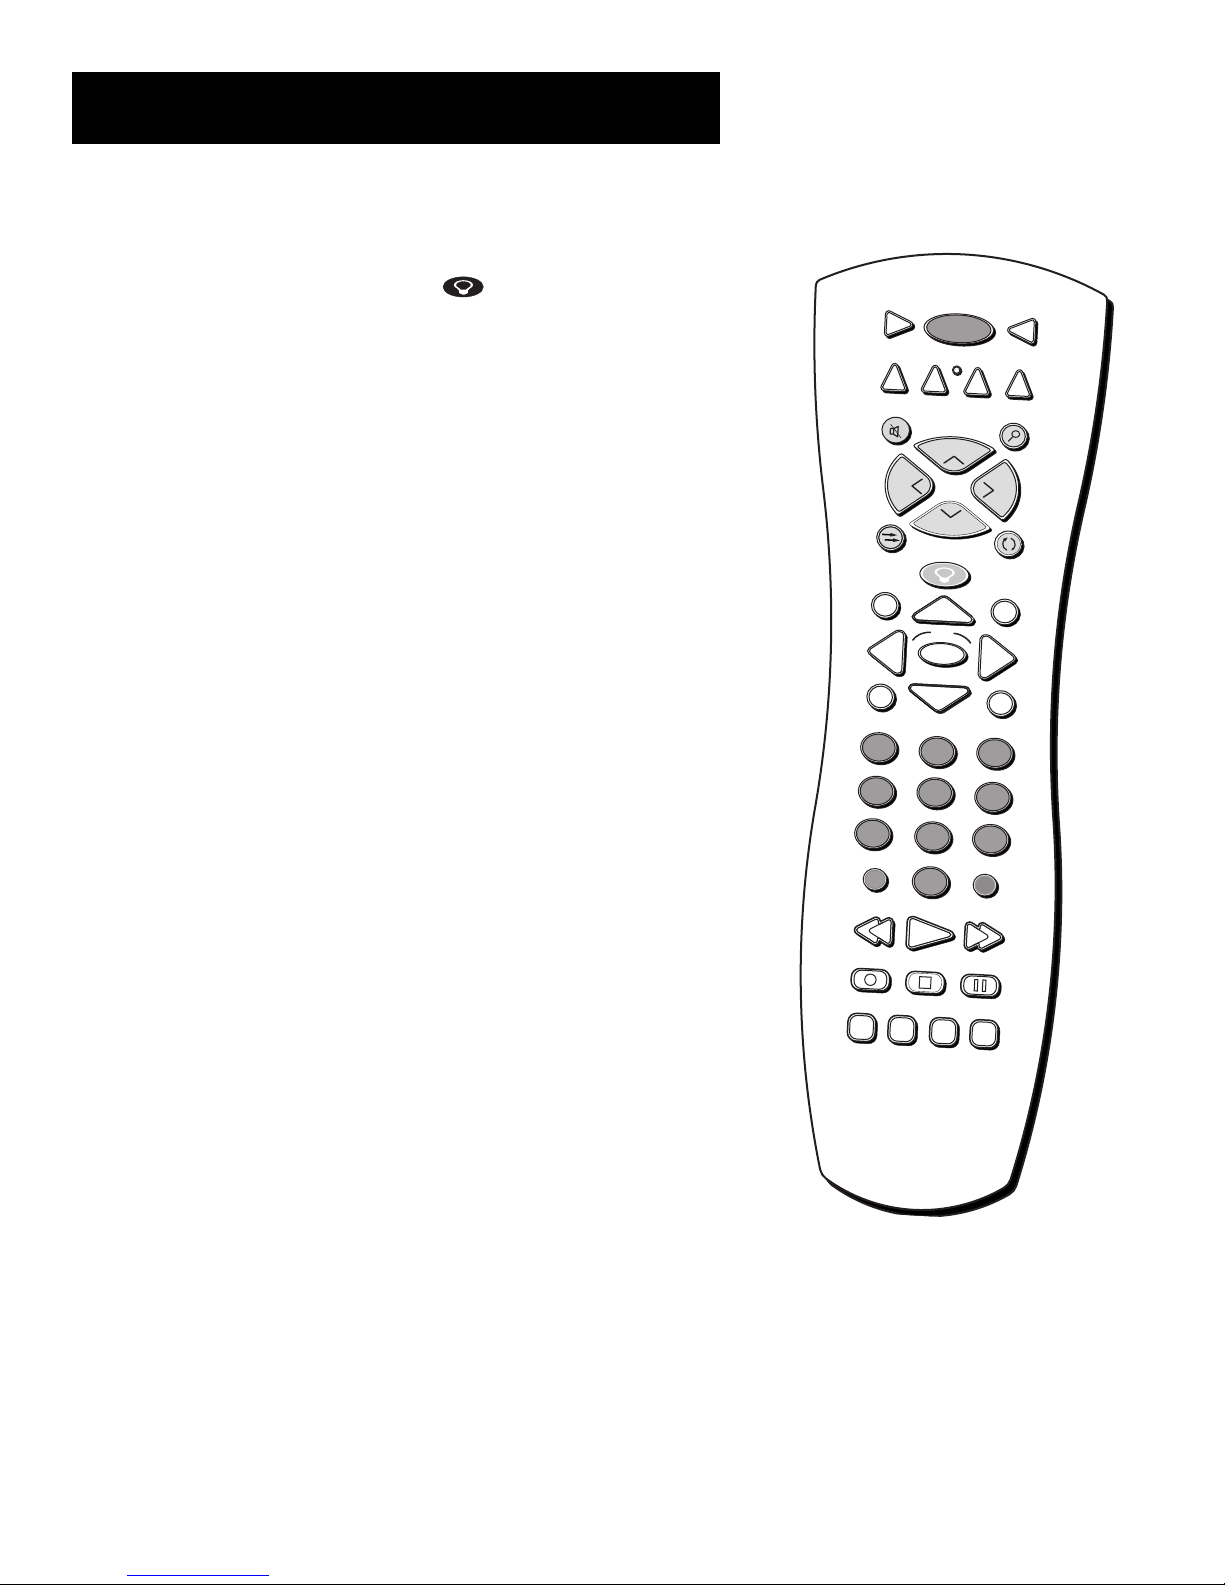
Your backlit remote has a light button ( ) that glows in the dark.
Press this button to light the buttons on the remote. The remote buttons
remain lit when they are pressed within a few seconds of each other.
If a button is not pressed within approximately seven seconds, the light
turns off to conserve battery power.
The remote control is capable of controlling more than just your VCR.
If you have compatible ProScan, RCA, or GE components, you may be
able to control them without having to program the remote.
Component Buttons
AUX Turns on a compatible RCA or ProScan amplifier/receiver or
audio/video receiver. Can be programmed to control a ProScan or RCA
auxiliary component.
DVD Controls a compatible ProScan, RCA, or GE DVD player. Use
arrow and OK buttons to move around and select items in DVD’s
menu system.
ON•OFF Turns VCR on or off when remote is set to control the VCR.
Also turns other compatible components on or off.
SAT•CABLE Turns on a compatible ProScan, RCA, or GE satellite
receiver and sets the remote to control the receiver. Can be
programmed to control different brands of receivers. Used with the
ON•OFF button to turn on a compatible cable box (if programmed)
and sets the remote to control the cable box.
TV Turns on a compatible ProScan, RCA, or GE TV and sets the remote
to control the TV. Also used with the ON•OFF button to turn on a
different brand of TV (if programmed) and sets the remote to control
the TV.
VCR1 Turns on a compatible ProScan, RCA, or GE VCR and sets the
remote to control the VCR.
VCR2 Turns on a compatible ProScan, RCA, or GE VCR and sets
remote to control VCR when it has been set up. Used with ON•OFF
button to turn on a compatible ProScan, RCA, or GE LaserDisc player
and sets remote to control the player.
22
Page 25

VCR Basics
VCR Function Buttons
ANTENNA Switches the picture signal so that it either comes from the
VCR or cable/antenna system. Turns VCR indicator in VCR display
panel on or off.
Arrow Buttons ( ) Allow you to move through the menus, enter
data, and change settings of selected features.
CH + and – Selects next higher or lower channel in the VCR’s channel
memory.
CLEAR Resets time counter to 0:00:00. Allows you to change entries
when setting the clock or a timer recording.
EDIT Simultaneously pauses and unpauses two VCRs when dubbing.
FORWARD Fast forwards the tape when the VCR is stopped. Searches
forward through a tape during playback. Starts slow motion during
play-pause and increases slow-motion speed.
FR.ADV (Frame Advance) Advances the tape one frame at a time
during play-pause.
GO BACK Switches between two channels. Select one channel and
then select another using the number buttons. Press GO BACK to
switch between the two channels.
INFO Shows the status displays on the TV screen.
INPUT Selects between the line inputs and the VCR’s tuner. Line input
refers to the signal coming from the component connected to the
audio/video input jacks on the back or front of the VCR.
MENU Displays and accesses menu system.
Numbers (0 through 9) Select a channel up to 99 by pressing two
numbers. Select a cable channel over 99 by pressing and holding 1
until 1 – – appears on the screen. Then press the other two numbers.
ON•OFF Turns the VCR off or on.
PAUSE Pauses playback or recording. Press PAUSE again to return to
playback or recording.
PLAY Plays a tape.
RECORD Starts VCR recording. Also used for express recording.
REVERSE Rewinds the tape when the VCR is stopped. Searches
backward through a tape during playback. Starts slow motion during
play-pause and decreases slow-motion speed.
23
Page 26
VCR Basics
STOP PAU SE
TV
AUX
DVD
SAT • CABLE
- TRACKING +
RECORD
FR.ADV
EDIT
PLAY FORWARDREVERSE
SPEED
GO BACK
V
O
L
V
O
L
SEARCH
MUTE
INFO
MENU
OK
CLEAR
GUIDE
ANTENNA
1
2
3
4
5
6
7
89
0
INPUT
VCR1
VCR2
ON • OFF
CH +
CH -
SEARCH Displays MOVIE ADVANCE screen for prerecorded
movies or displays index and Zero search menus on TV screen. Starts
COMMERCIAL ADVANCE skipping during playback
SPEED Selects a recording speed (SP or SLP).
STOP Stops the current VCR function such as record, playback,
rewind, or fast forward.
TRACKING - and + Let you manually reduce the streaks that may
appear on the picture during play or slow motion. Reduces picture
“jitter” during stop-action (paused) playback.
TV Function Buttons
ANTENNA Switches between antenna system on some TVs.
CH + and – Selects next higher or lower channel in the TV’s
channel memory.
CLEAR Removes menus or status displays from the screen.
GO BACK Switches between two channels. Select one channel and
then select another using the number buttons. Press GO BACK to
switch between the two channels.
GUIDE Displays channel guide on some TV’s.
INFO Shows the TV’s status displays on the TV screen.
MUTE Reduces volume to minimum level.
Numbers (0 through 9) Select a channel up to 99 by pressing two
numbers. Select a cable channel over 99 by pressing and holding 1
until 1 – – appears on the screen. Then press the other two numbers.
ON•OFF Turns the TV on and off.
VOL < and > Raises and lowers sound of TV.
TV Buttons
The TV buttons may not control all
features of all models of ProScan,
RCA, and GE TVs.
24
Page 27
VCR Basics
Playing a Tape
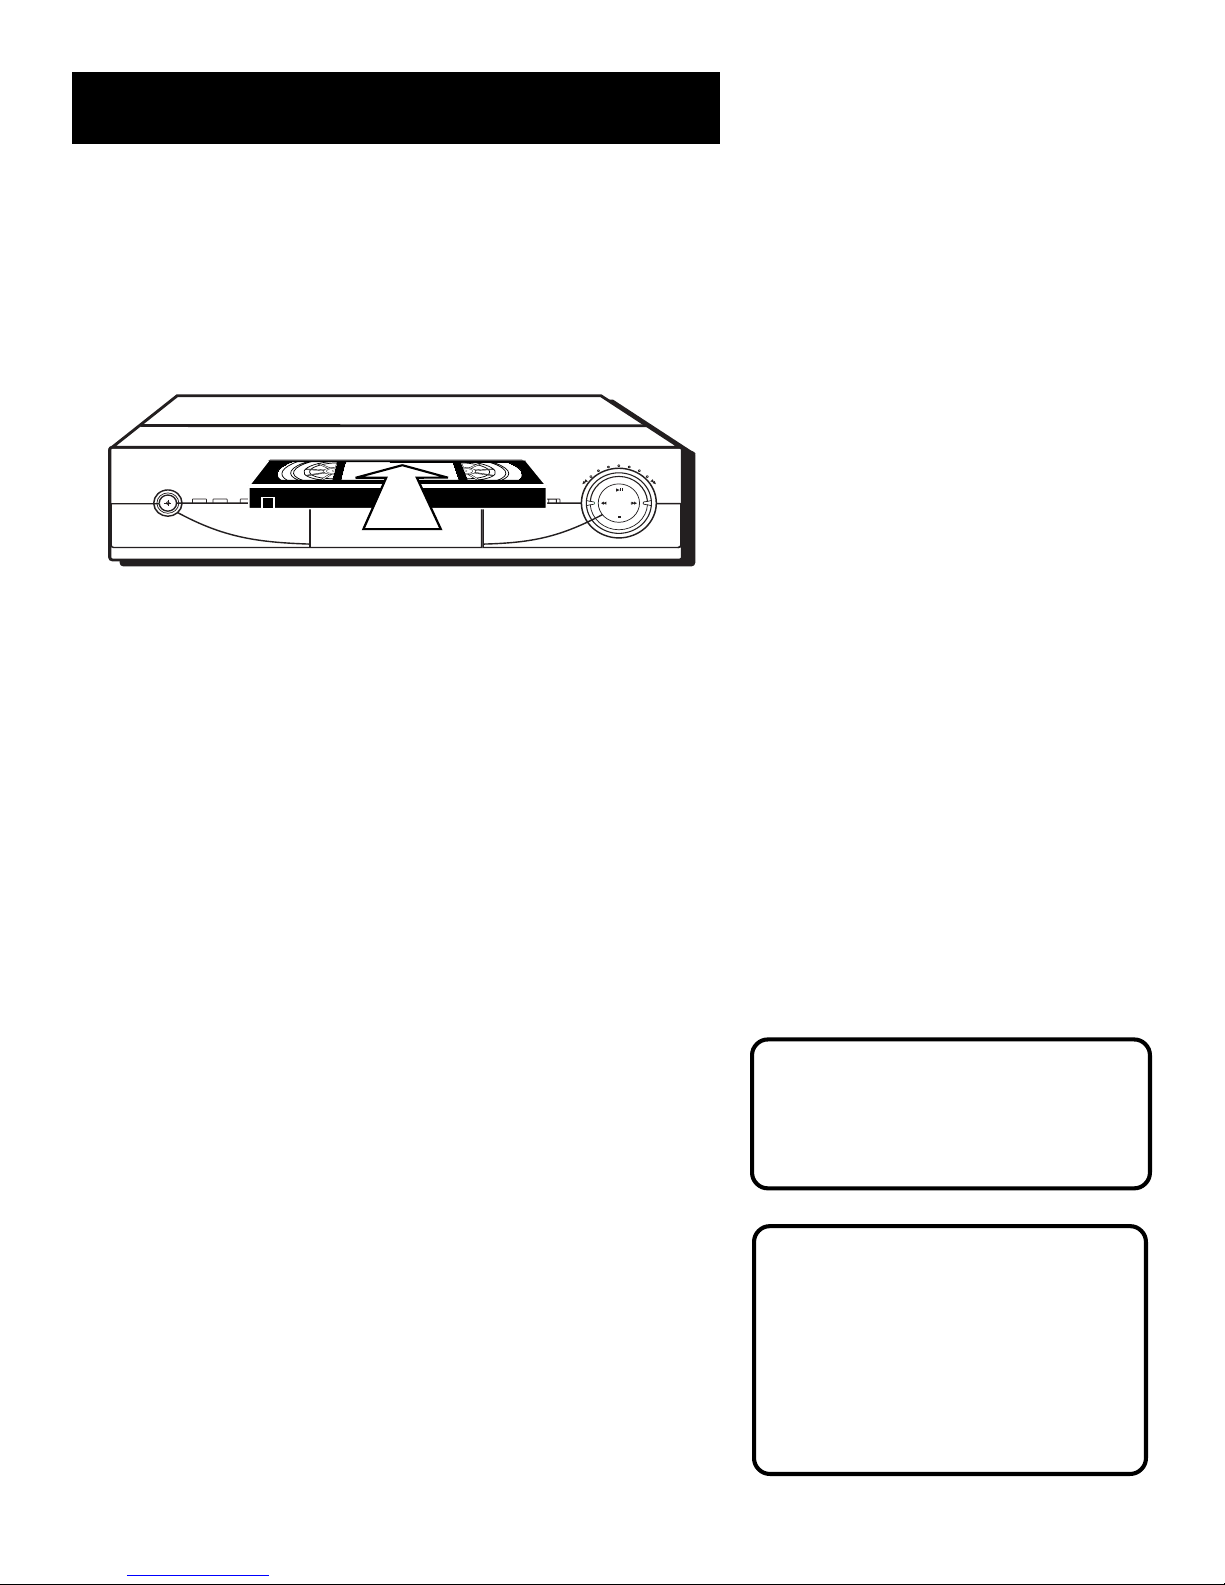
1. Tune the TV to your VCR viewing channel
(3, 4, or TV’s video input).
2. Insert a tape in the VCR.
ON OFF
TV • VCR
INPUT EJECT RECORD
PLAY/PAUSE
FWREW
STOP
If the Auto Play feature is set to ON, the tape automatically begins
playback (if the safety tab on the cassette is removed).
• Press FWD or REV (FORWARD or REVERSE on the remote) to
position the tape.
• Press PLAY (if necessary) to begin tape play.
• Press PAUSE for stop action.
• Press TRACKING up or down (TRACKING + or – on the remote)
to remove any streaks from the picture, if necessary.
• Press STOP to stop playback.
Automatic Rewind
The VCR automatically rewinds the tape if it reaches the end of the
tape during playback. While rewinding, you can press ON•OFF and
the VCR will turn off after rewinding.
Tape Eject
Pause
If you pause, the VCR automatically
switches from pause to stop after a
few minutes to reduce tape wear.
Press EJECT on the VCR when it is stopped to eject the tape.
Automatic Tracking
The VCR has automatic tracking
which adjusts the picture when playing
back a tape recorded on another VCR.
Automatic tracking is turned on
whenever a tape is inserted or the
VCR’s power is turned on.
25
Page 28
VCR Basics
Recording
If you want to record something that you’re watching, you can use
basic recording.
1. Set the tape speed by pressing the SPEED button on the remote.
(See “Tape Speed” in
about tape speeds.)
2. Press the RECORD button to begin recording.
3. Press STOP to stop recording.
If you just want to pause the recording for a short time (like during
a commercial), press PAUSE instead of STOP.
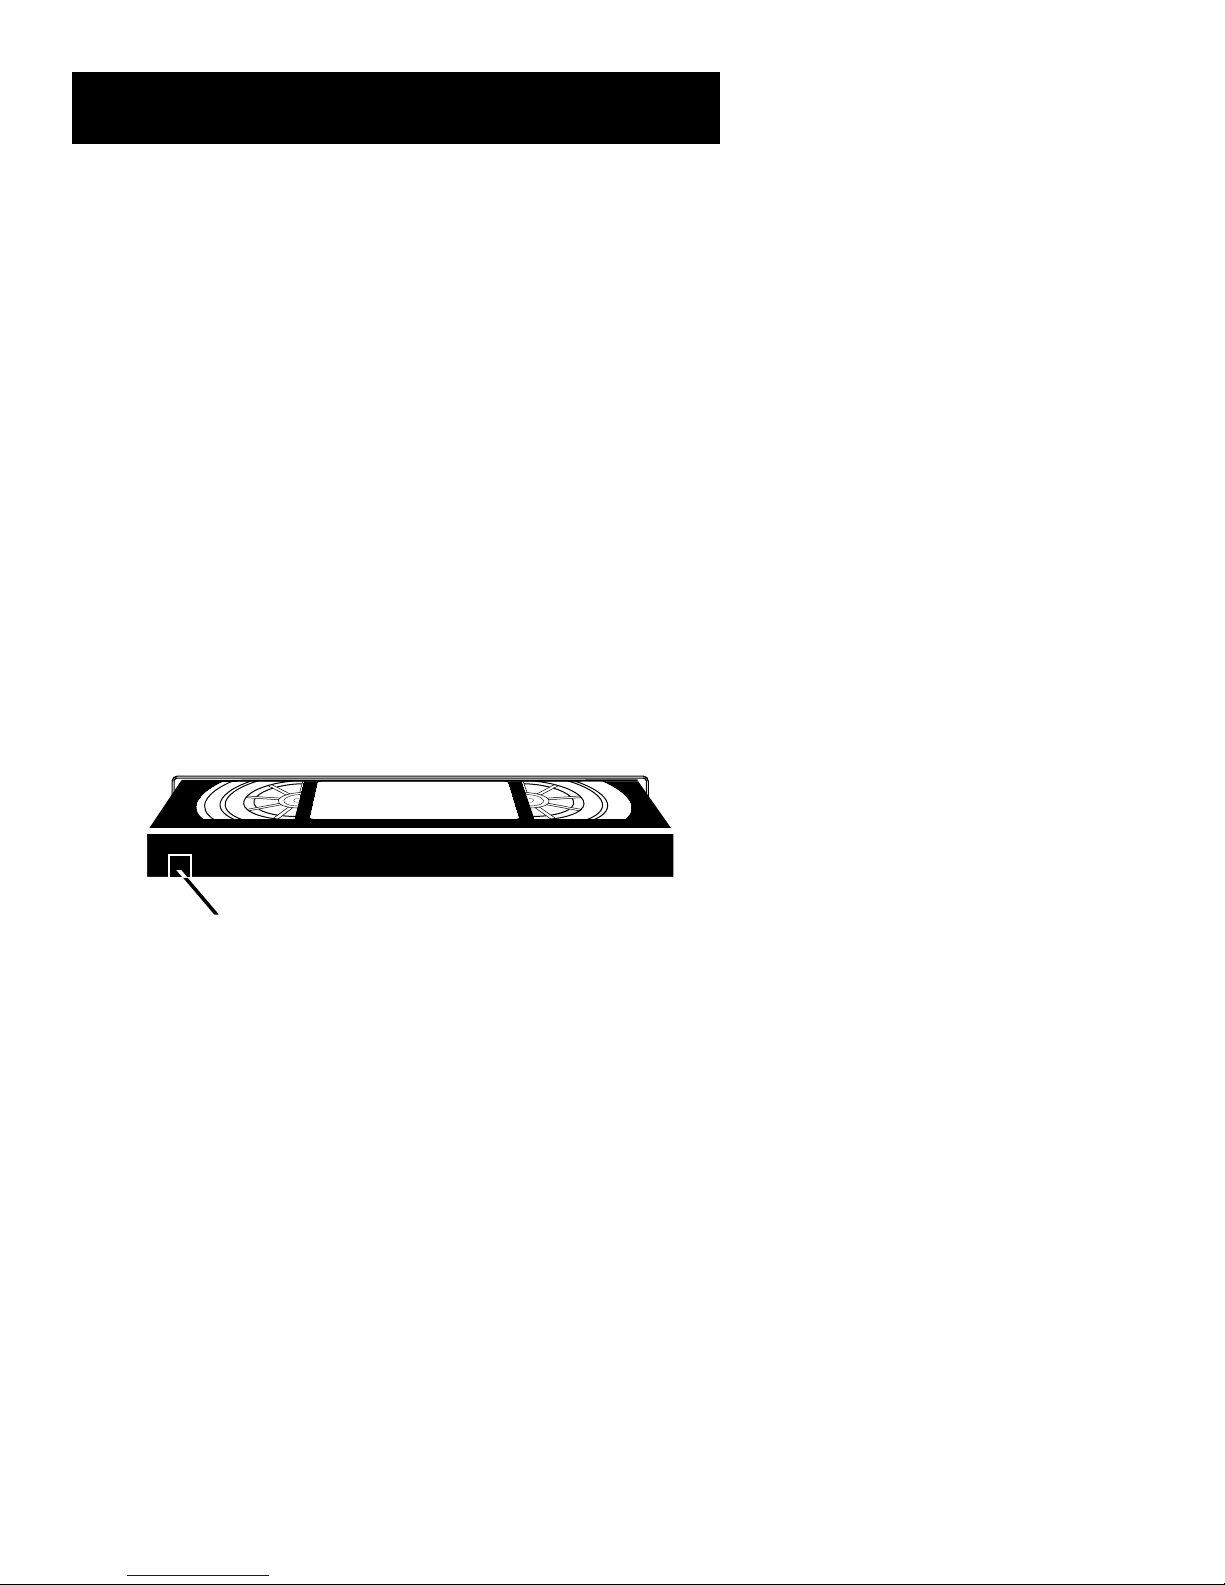
Check the Safety Tab
No matter which recording option you use, make sure there is a tape
in the VCR, and that the tape’s safety tab is in place. You cannot
record on a tape with the safety tab removed.
Setting Up the VCR
section for information
Safety Tab
If the safety tab is removed and you want to record over it, simply
cover the hole with vinyl tape.
26
Page 29

Recording
Several Recording
Options
Now that you’ve gone through the necessary steps to
operate your VCR, I’ll explain the different recording
features that are available to suit your needs.
Recording Features:
• Recording (explained in
VCR Basics section)
• Express Recording
• Program Express Recording
• Timer Recording
• Timer Recording with the VCR Plus+
Programming System
First Things First
1
➣
Setting Up the VCR
2
➣
VCR Basics
3
➣
Recording
4
➣
• Broadcast Stereo or Second Audio
Program (SAP)
• Audio Only Recording
• Copying and Editing Tapes
Program The Remote
5
5
Other Features
6
➣
➣
Connections
7
7
➣
Reference
8
27
Page 30
Recording
Recording Features
There are five ways to record programs:
• Recording lets you press one button to start recording a program
(See
VCR Basics
• Express Recording (XPR) allows recording to start while a program
is being watched, and automatically stops recording after a
designated period of time.
• Program Express lets you program a timer recording using the
VCR’s front panel controls.
• Timer Recording allows the VCR to be programmed for automatic
recording, starting and stopping at a predetermined time.
• Timer Recording with VCR Plus+ allows the VCR to be
programmed to record just by entering a PlusCode programming
system number found in some TV program guides.
section).
Express Recording (XPR)
Use express recording when you want to quickly record the remaining
portion of the program you are watching.
1. Press the SPEED button on the remote if you want to override the
preferred Tape Speed setting.
2. Press the RECORD button to begin recording.
3. Repeatedly press the RECORD button to set up the recording
duration.
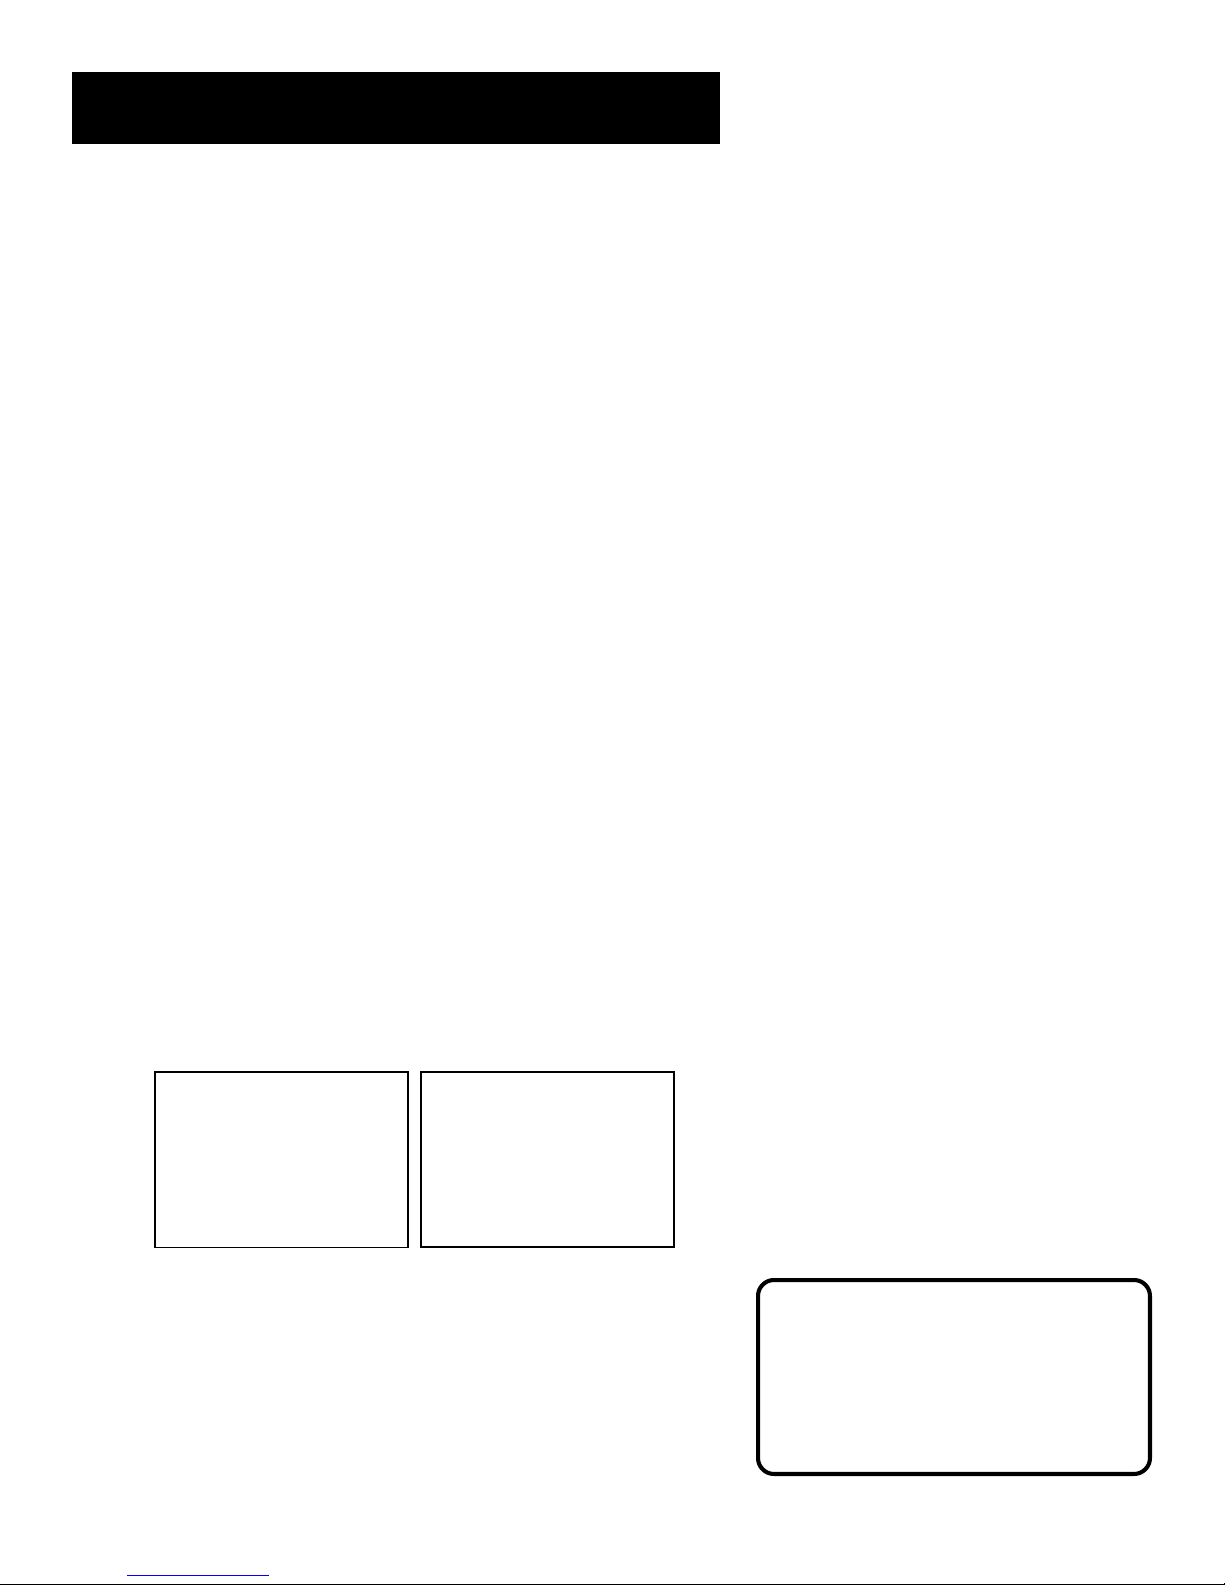
Rec Ch 36
Record Length 0:00
Press REC to set length
Each time you press the RECORD button, you add 30 minutes to the
recording time (up to 4 hours).
Rec Ch 36
Record Length 1:30
Press REC to set length
Express Recording (XPR)
The VCR continues to record for the amount of time you indicate, and
then automatically turns off.
To stop an express recording, press and hold STOP for several seconds
until STOP appears.
28
Express recording is a great way to
tape the last quarter of the game, or
the last part of a movie when you have
to leave.
Page 31
Recording
Program Express
Program Express allows you to quickly program the VCR for a
complete one-time recording using the VCR’s control panel instead of
the on-screen menus. The VCR automatically turns off at the end of
the recording. You can use the arrow keys on the remote control or the
VCR’s front panel to move through these menus.
1. Insert a tape with the safety tab in place. Make sure the clock is set
correctly.
2. Open the control door in the lower left corner of the VCR’s front
panel.
3. Press PROG. EXP. to activate the display. The channel number
flashes in the display panel.
4. Use the up
and down arrow buttons to choose a channel,
then press PROG. EXP. to select it.
5. Repeat step 4 to enter START time, END time, DATE of recording,
and tape SPEED information.
6. Press PROG. EXP. when SAVE flashes in the display. SAVED
appears to let you know the program is set.
Use the up and down arrow buttons to review or cancel
your entries.
7. Turn off the VCR.
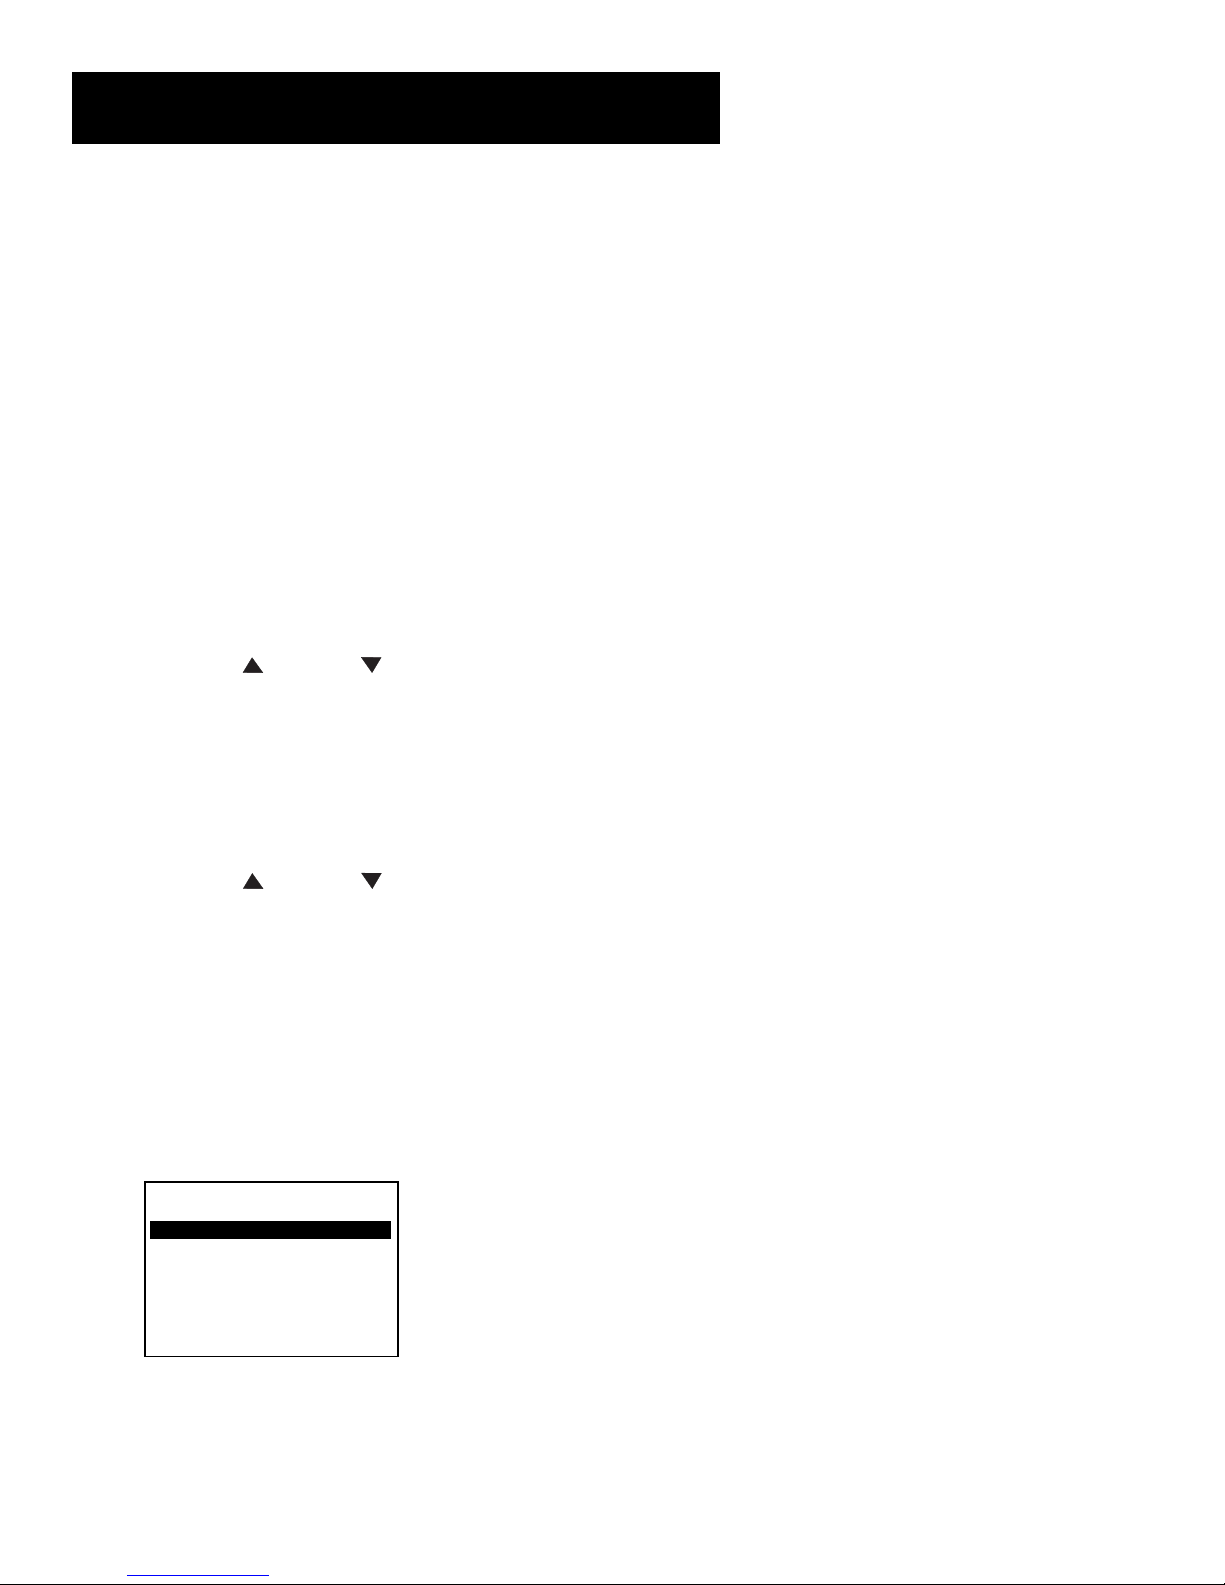
Timer Recording
You can set up as many as eight timer recording programs.
1. Press MENU to display the VCR MAIN MENU.
VCR MAIN MENU
1 VCR Plus+
2 Timer Recordings
3 Time
4 Channels
5 Setup
6 Preferences
7 Audio
8 Language
0 Exit
2. Press 2 to display the TIMER RECORDINGS menu.
29
Page 32
Recording
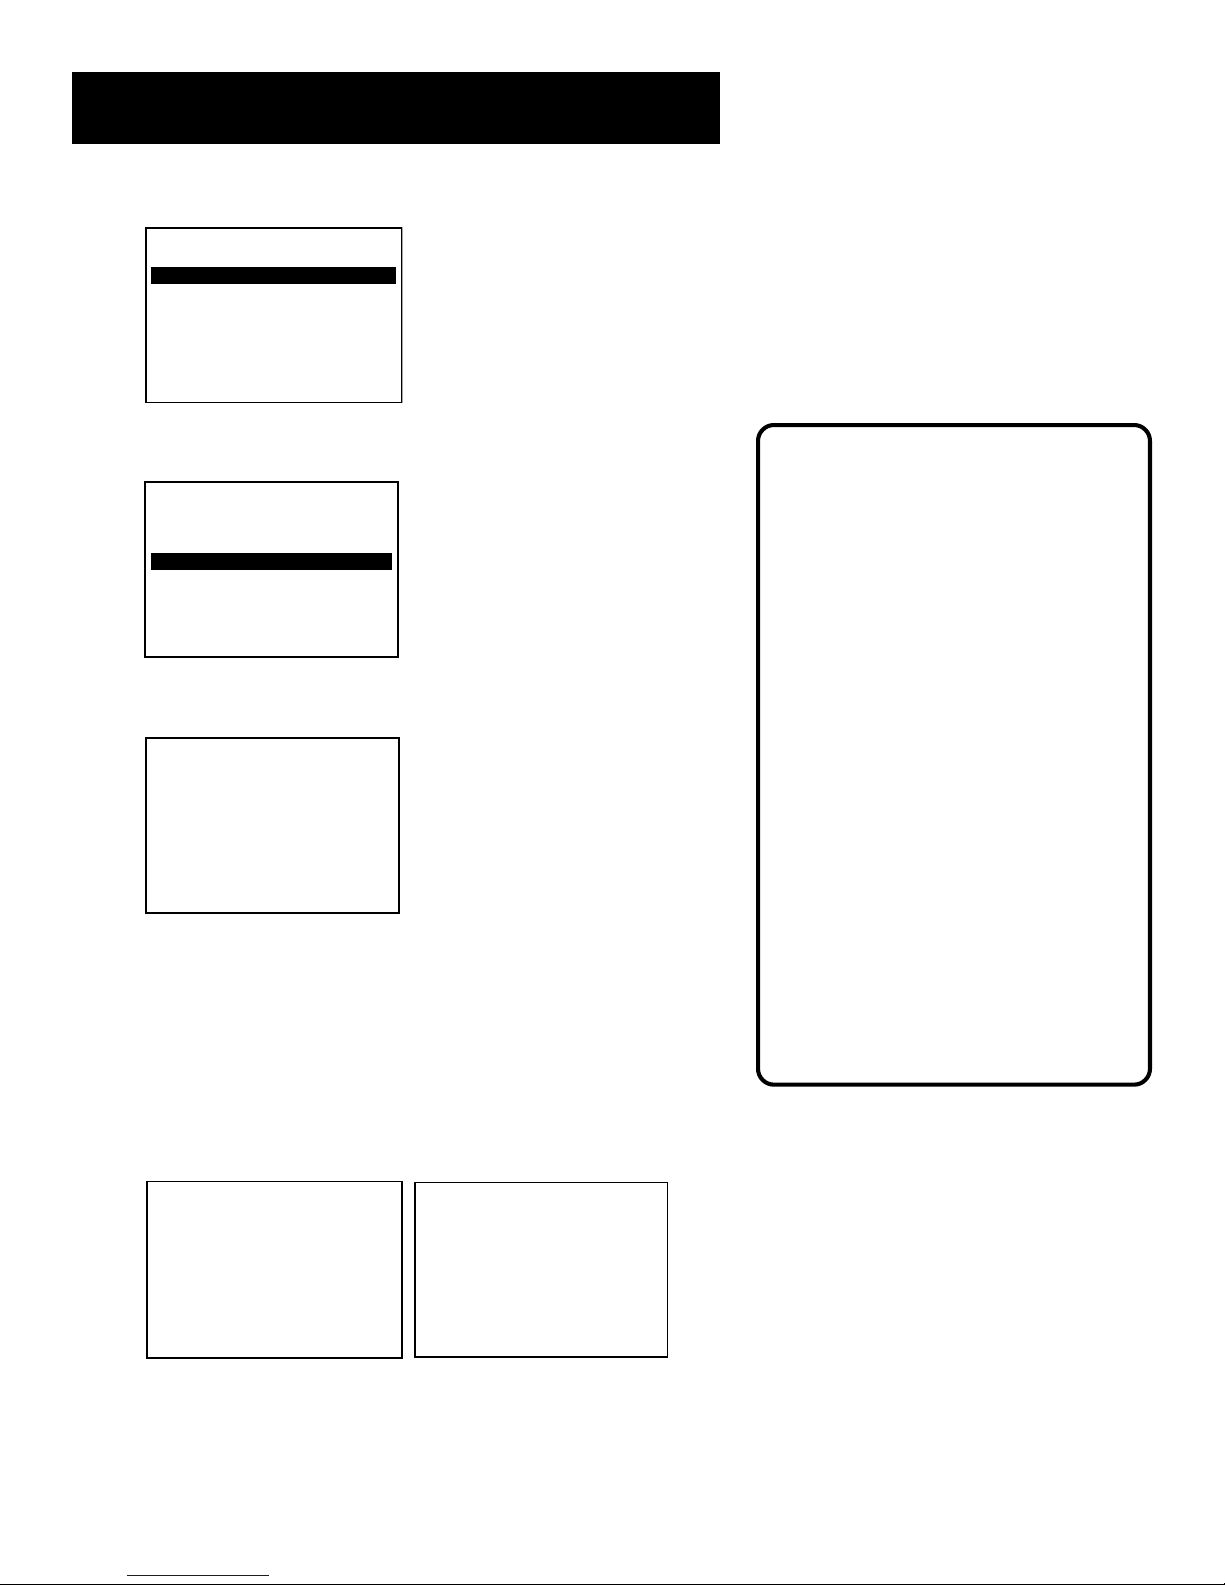
TIMER RECORDINGS
1 Create a New Program
2 Review Existing Progs.
3 Use VCR Plus+ Code
0 Exit
3. Select 1 to create a New Program.
Timer Recording Information
How often should this
program record?
1 One time
2 Daily (every day)
3 Weekdays (M-F)
4 Weekly (once per week)
0 Cancel
4. Select how often you want the program to record.
Program 1 (One time)
Channel -Start Time --:-End Time --:-Start Date --/--/-Tape Speed SLP
Press MENU to cancel
5. Enter the data for the program with the number buttons.
The data includes the channel number (press INPUT to select the
line input), start time including AM or PM, and end time. The start
date is automatically entered based on the VCR clock. Both the
date and speed can be changed.
Clock must be set correctly.
Insert a tape with the safety tab in
place and enough tape to record
the program.
The output of your cable box appears
in the Channel item of the timer
recording menu if you’ve set up the
VCR for a cable box for all channels.
PROGRAMS OVERLAP appears if you
have entered two programs where the
times overlap.
TIMER appears in the display when
you turn off the VCR and a timer
recording has been set. TAPE flashes if
there is no tape in the VCR.
For cable box or satellite receiver,
turn it on and tune it to the channel
you want to record before the
recording is to begin.
6. Review the information to make sure it is correct, and then press
MENU to save.
Program 1 (One Time)
Channel 03 Cable
Start Time 08:00 PM
End Time 09:30 PM
Start Date 11/18/99 Thu
Tape Speed SLP
1=SP 2=SLP
Press CLEAR to correct
Press MENU to save
30
Program 1 has been saved
Remember to insert a
recordable tape and
turn the VCR off before
the program start time.
Press MENU to continue
Page 33
Recording
Timer Recording With the VCR Plus+
Programming System
You can use VCR Plus+ to simplify timer programming by using the
PlusCode programming number shown in your local television
programming guide.
Setting Up the Channel List
If you did not set up the VCR Plus+ channel list, you can do it now.
1. Display the CHANNELS menu from the VCR MAIN MENU.
2. Display the VCR Plus+ Channel List menu.
3. Go to
Setting Up Your VCR
if you need more information on
setting up your VCR Plus+ channel list.
Using the VCR Plus+ Programming System
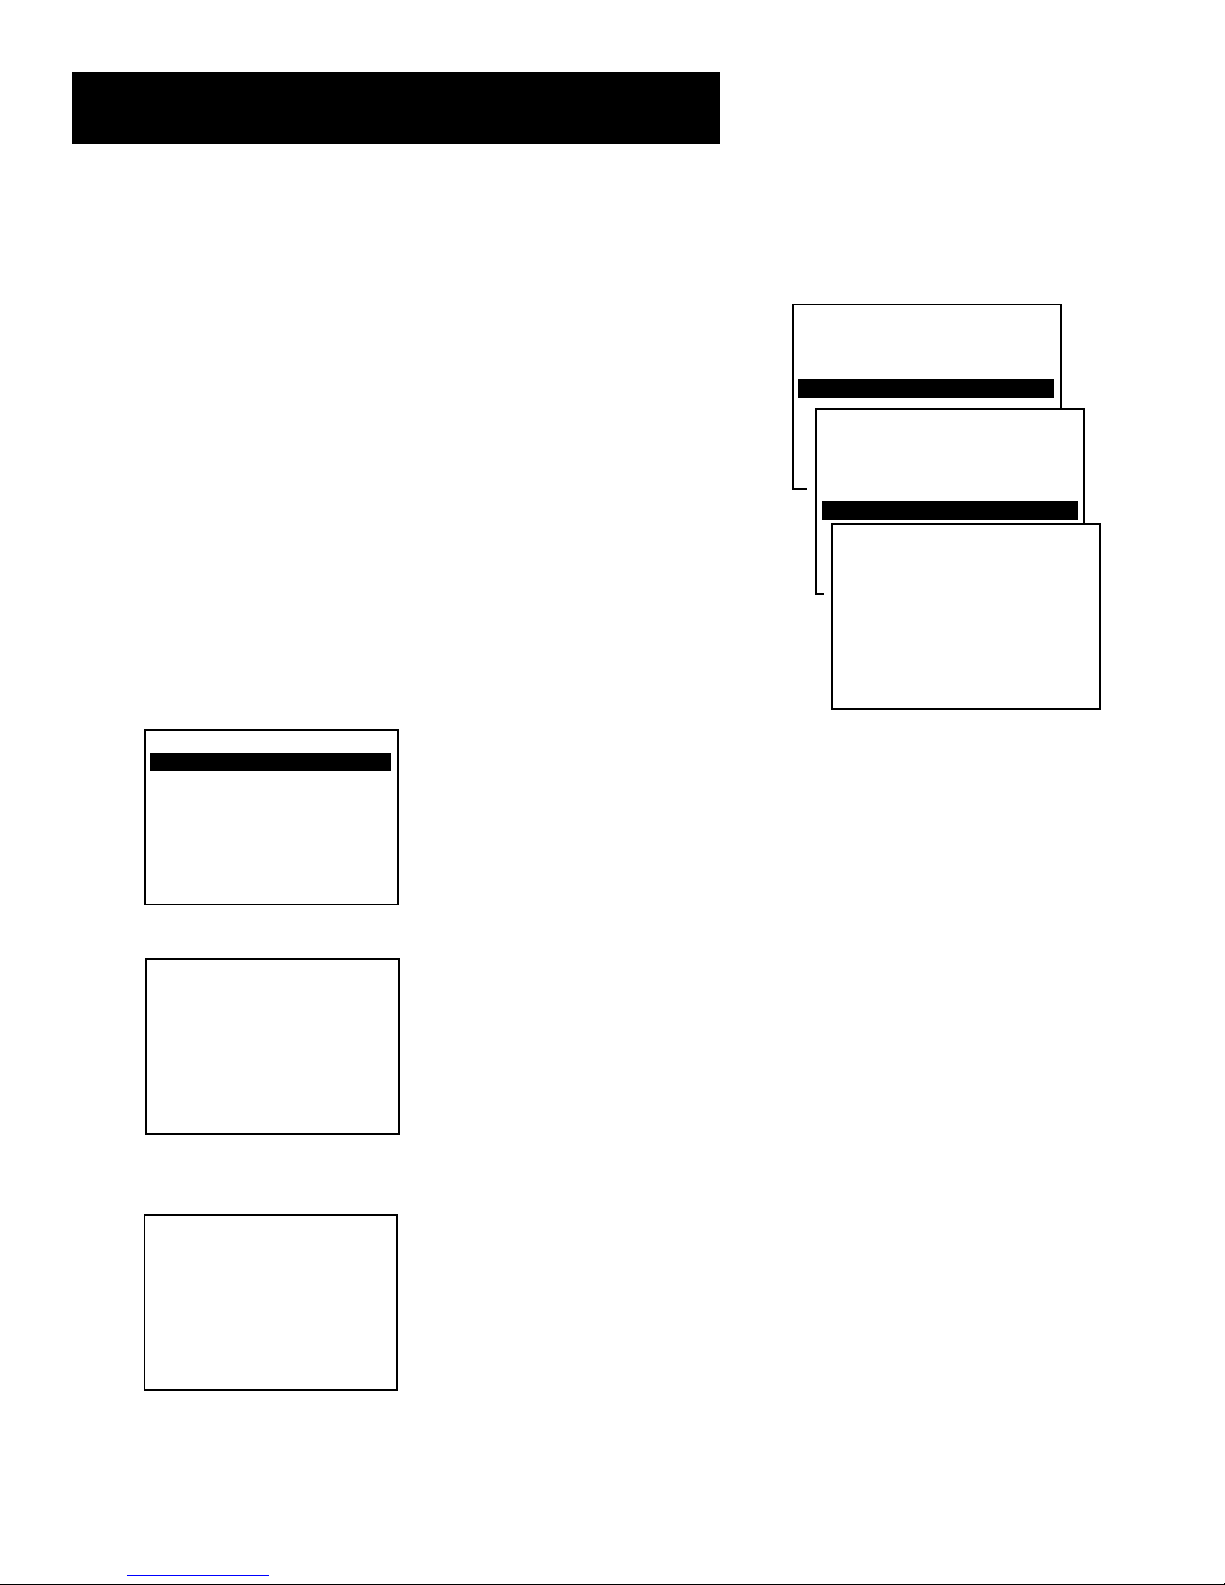
1. Press MENU to bring up the VCR MAIN MENU.
VCR MAIN MENU
1 VCR Plus+
2 Timer Recordings
3 Time
4 Channels
5 Setup
6 Preferences
7 Audio
8 Language
0 Exit
VCR MAIN MENU
1 VCR Plus+
2 Timer Recordings
3 Time
4 Channels
5 Setup
6 Preferences
CHANNELS
7 Audio
8 Language
1 Auto Channel Search
0 Exit
2 Add/Remove Channels
3 Signal Type: CABLE
4 VCR Plus+ Channel List
5 Cable Box Setup
VCR+ Channel My Channel
5 46
4 --
0 Exit
3 -> -> -> 23
2 - 1 --
Use CH+/- to select
Press 0-9 to change
Press MENU to save
2. Press 1 to display the VCR PLUS+ system menu.
VCR PLUS+
Enter PlusCode Number
(from TV listing)
_
Press MENU to cancel
3. Enter the VCR PlusCode® system shown in your local television
programming guide (
VCR PLUS+
Enter PlusCode Number
(from TV listing)
12876
Press CLEAR to correct
Press MENU when done
Screen shown is just an example
).
4. Press MENU to enter the VCR PlusCode system number.
PlusCode is a registered trademark of the Gemstar Development Corporation.
The VCR Plus+ system is manufactured under the license from Gemstar Development Corporation.
Continued on Next Page
31
Page 34
Recording
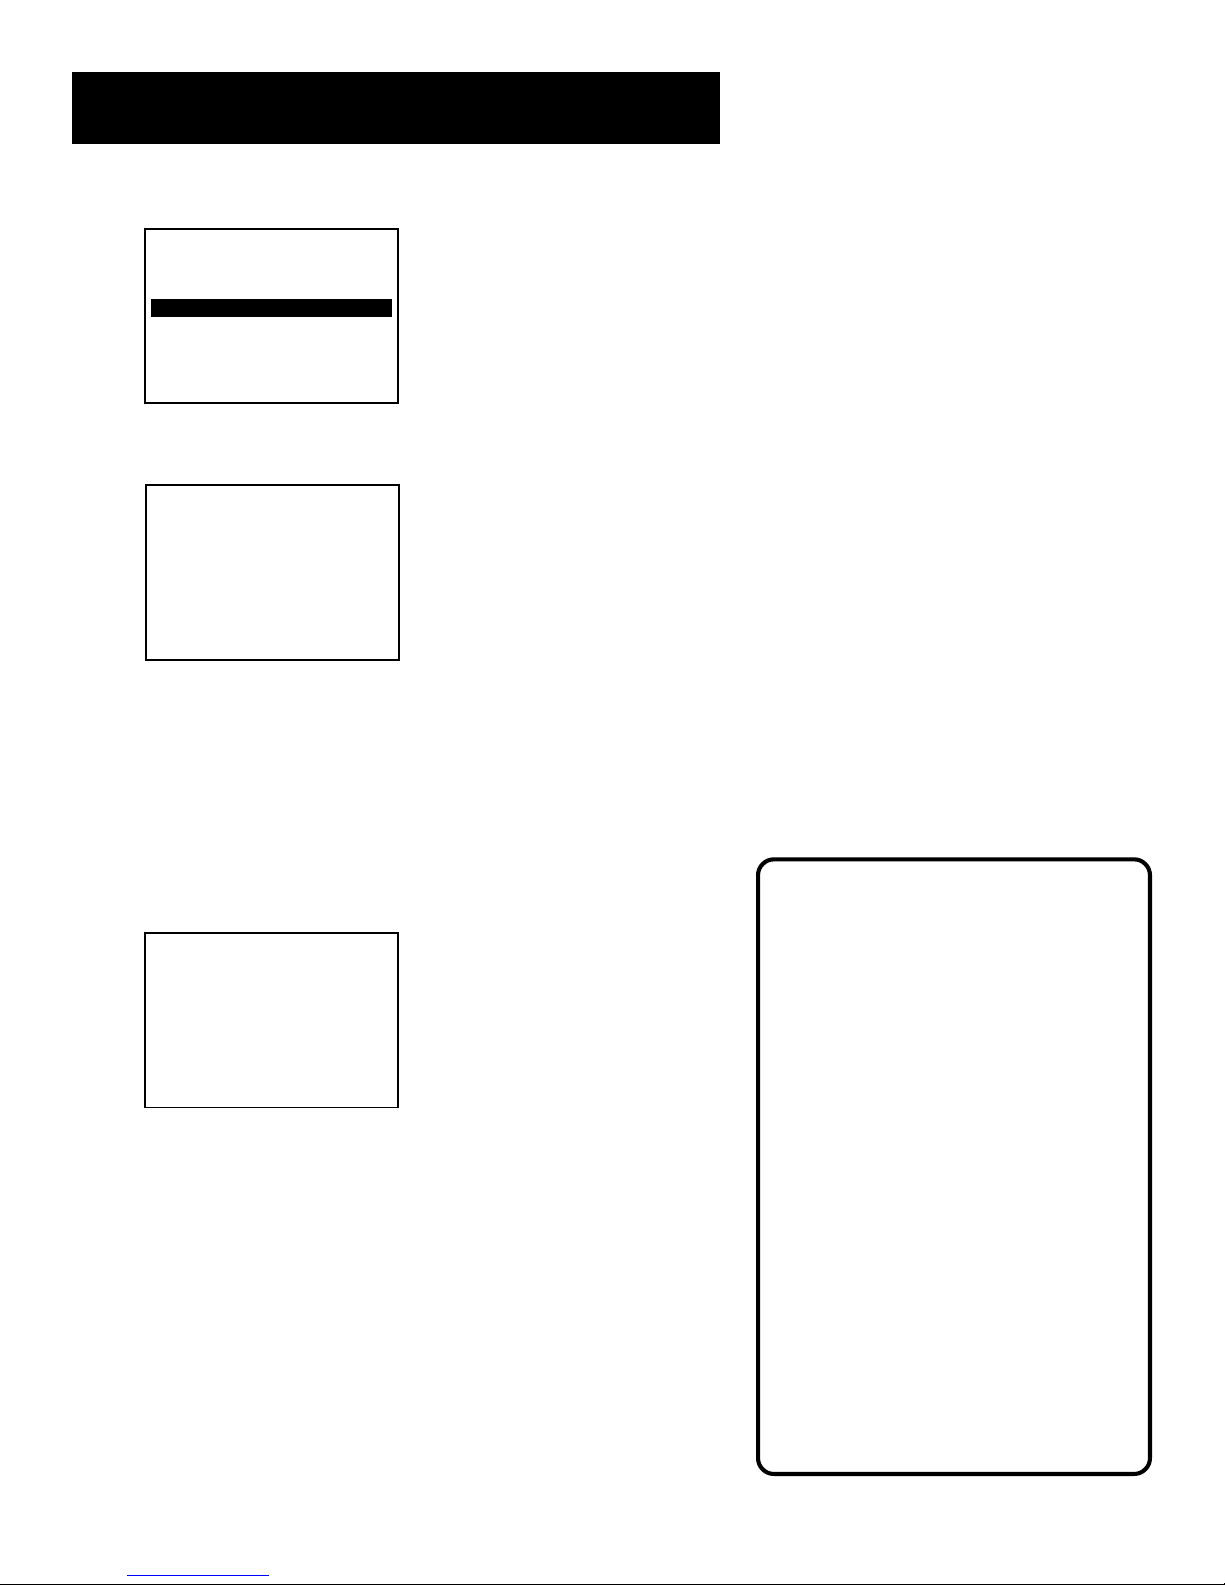
How often should this
program record?
1 One time
2 Daily (every day)
3 Weekdays (M-F)
4 Weekly (once per week)
0 Cancel
5. Indicate how often you want the program to be recorded.
Program 1 (One time)
Channel 03 Cable
Start Time 08:00 PM
End Time 09:30 PM
Start Date 11/18/99 Thu
Tape Speed SLP
Press CLEAR to adjust
Press MENU to save
6. Change the speed with the SPEED button on the remote or
the program end time with the CLEAR button on the remote
(if necessary).
Changing the end time comes in handy when you are recording a
program, such as a sporting event, that may exceed the scheduled
broadcast time.
7. Press MENU to save the program.
Program 1 has been saved
Remember to insert a
recordable tape and
turn the VCR off before
the program start time.
Press MENU to continue
Stopping a Timer Recording
To stop or cancel a timer recording in progress (even an express
recording):
• Press and hold the STOP button for several seconds until STOP
appears.
VCR Plus+ Recording
Clock must be set correctly.
Insert a tape with the safety tab in
place and enough tape to record the
program.
UNRECOGNIZED NUMBER...
PLEASE RE-ENTER appears when the
VCR does not recognize the PlusCode
number.
PROGRAMS OVERLAP appears if you
have entered two programs where the
times overlap.
TIMER appears in the display when
you turn off the VCR and a timer
recording has been set. TAPE flashes if
there is no tape in the VCR.
32
For a cable box, turn it on and tune it
to the channel you want to record
before the recording is to begin.
Page 35
Recording
Reviewing and Clearing Programs
To review programs that you have already set up:
1. Press 2 when the VCR MAIN MENU is displayed to display the
TIMER RECORDINGS menu.
TIMER RECORDINGS
1 Create a New Program
2 Review Existing Progs.
3 Use VCR Plus+ Code
0 Exit
2. Press 2 to display the Review Existing Progs. screen.
Program 1 (One time)
Channel 104 Cable
Start Time 12:00 AM
End Time 01:30 AM
Start Date 11/18/99 Thu
Tape Speed SLP
Press INFO to edit
Press CLEAR to erase
Press MENU for next prog
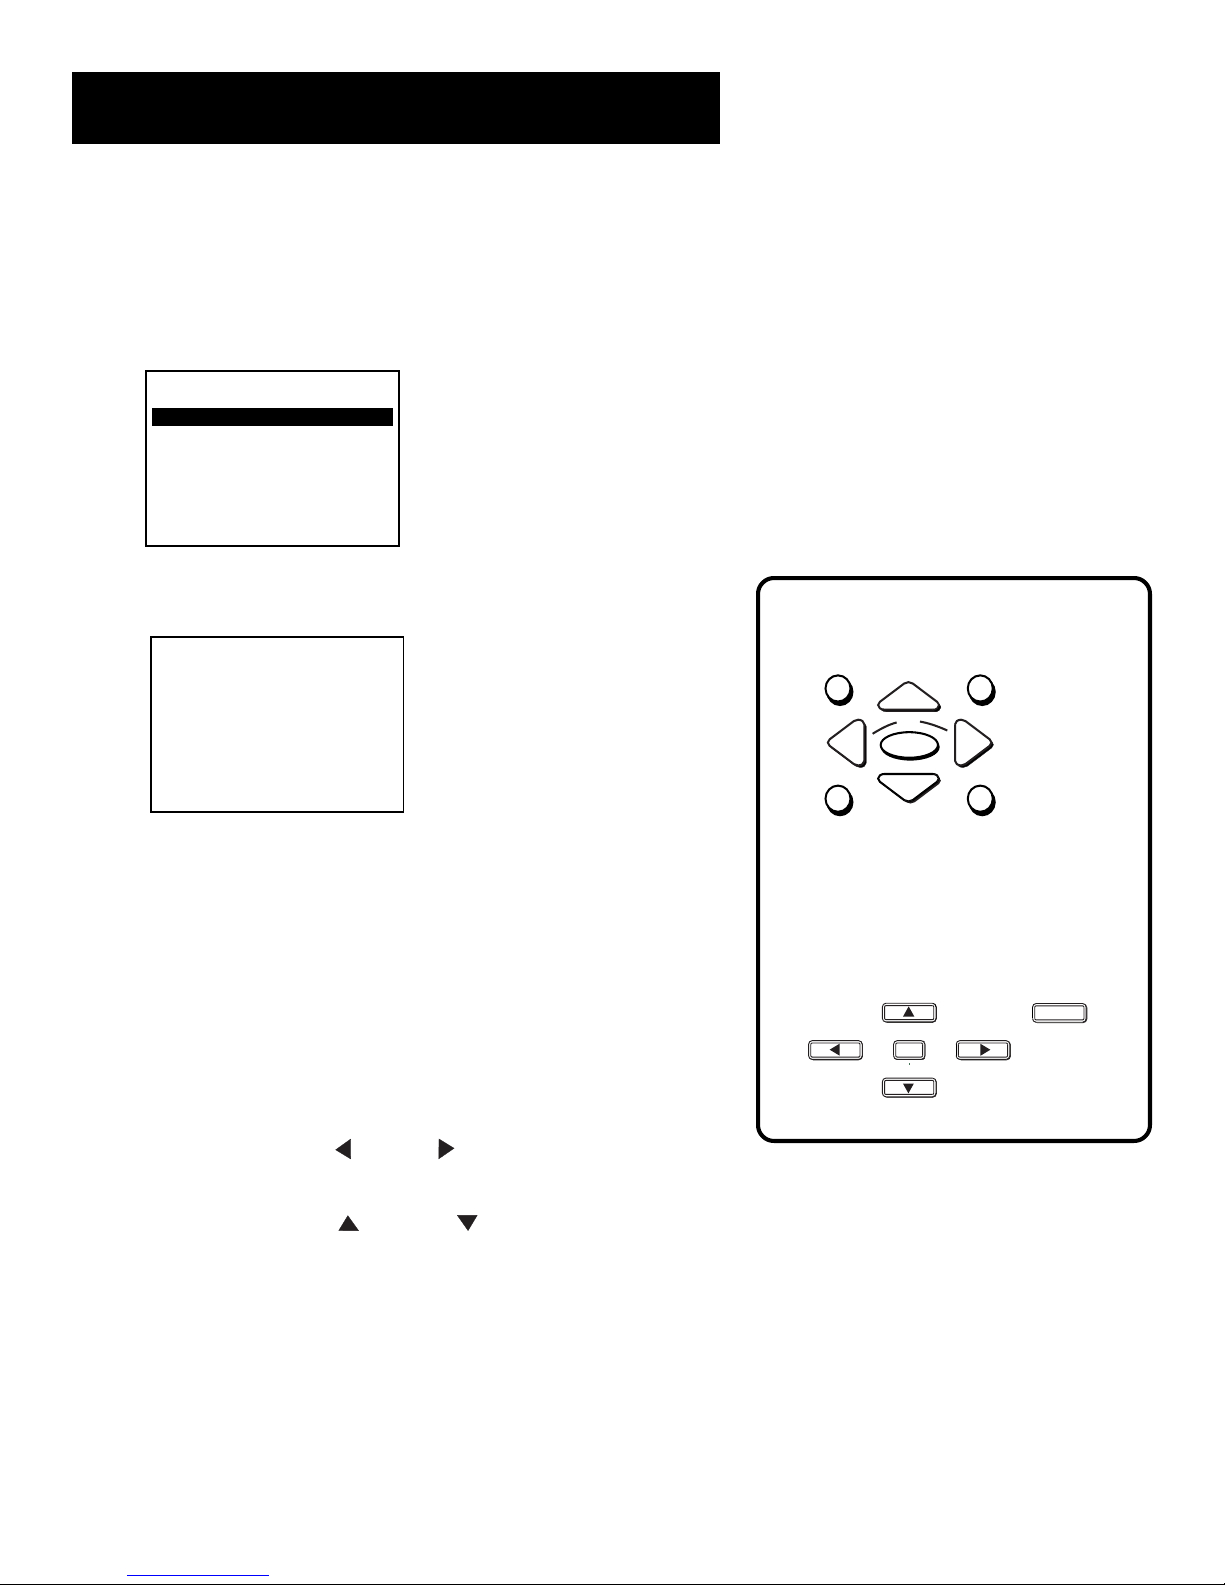
Remote Control Buttons
GUIDE INFO
K
O
3. Press INFO to edit, CLEAR to erase, or MENU to see the next
program.
Editing a Timer Program
Instead of having to delete and reenter a timer program, you can
edit incorrect entries of the program.
1. Display the program you want to edit, and press INFO.
2. Indicate how often you want the program to be recorded.
3. Use the CLEAR or left and right buttons to move the cursor
to the item you want to change.
4. Use the number or up and down buttons to enter the
correct information in the program.
5. When you have made your correction(s), press MENU to save
the timer program.
MENU CLEAR
Front Panel Buttons
CHANNEL
TRACKING
CLEAR
MENU
CHANNEL
INFO
PROG. EXP.
33
Page 36
Recording
VCR
3 CH. 4
IN FROM
ANT.
VIDEO
OUT
R-AUDIO-L
OUT TO TV
VHF/UHF
MONO
IN 1
AMPLIFIER/
RECEIVER
LEFT
RIGHT
PHONO TUNER TAPE AUX
IN
OUT
Recording Broadcast Stereo TV
or SAP (Second Audio Program)
Some TV programs are broadcast with stereo audio or SAP (Second
Audio Program).
1. Turn on the TV and tune it to the VCR viewing channel (either 3, 4,
or TV’s video input).
2. Insert a tape with safety tab in place.
3. If your VCR viewing channel is 3 or 4, make sure the VCR
indicator appears in the VCR’s display panel. If not, press TV•VCR
on the VCR or ANTENNA on the remote to turn it on.
4. Press the SPEED button on the remote if you want to override the
preferred Tape Speed setting. The tape speed indicator appears on
the TV screen.
5. Select the channel or line input to be recorded.
6. Set the Reception: STEREO/MONO/SAP feature for the type of
audio you want to record. See
AUDIO
1 Reception: STEREO
2 Tape Playback: HI-FI
0 Exit
Other Features s
ection.
7. Press RECORD to start recording.
8. Press STOP when you are finished.
Recording Audio Only
You can record audio only from another audio source connected to
either the AUDIO IN 1 (R and L/MONO) jacks on the back of the VCR
or the jacks on the front of the VCR.
Recording audio only will erase
anything that was previously
recorded on the tape.
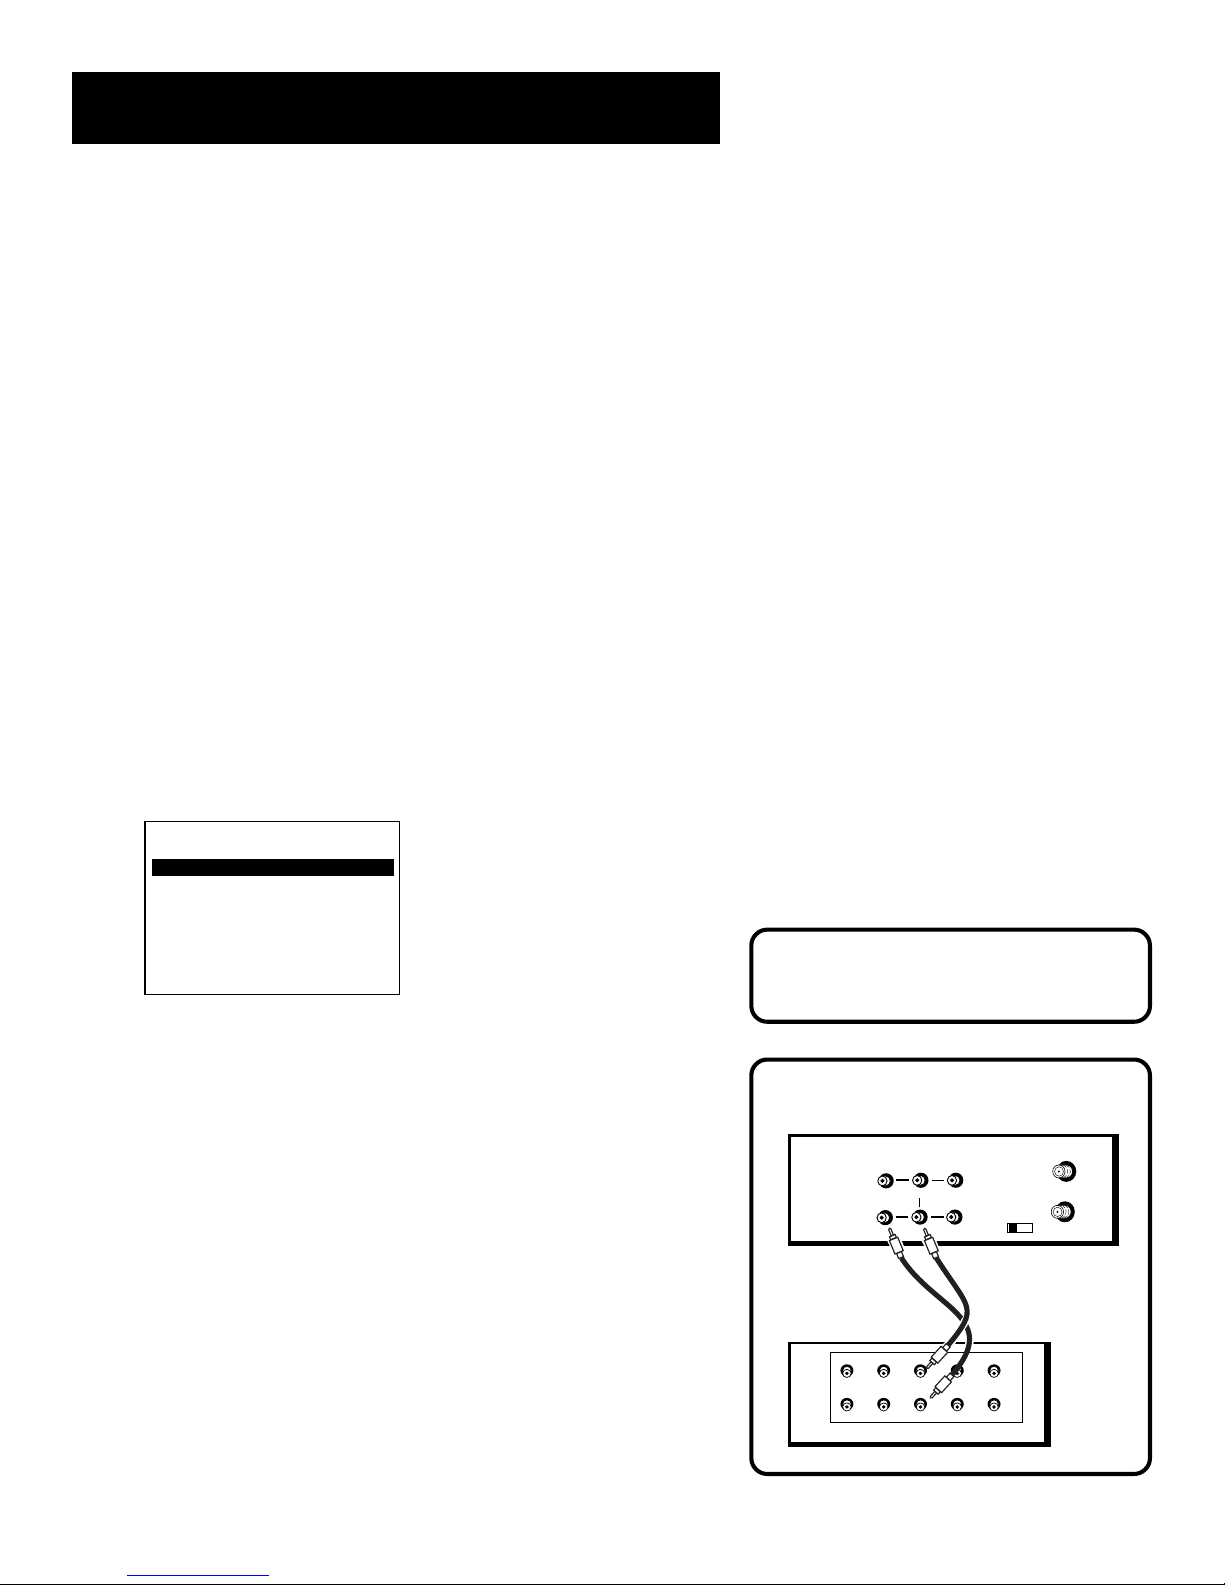
Audio Connection
1. Press the INPUT button once to record from the back AUDIO IN
jacks. L1 will appear in the VCR’s display panel.
Press the INPUT button twice to record from the front AUDIO IN
jacks. L2 will appear in the VCR’s display panel.
34
Page 37
Recording
2. Press the SPEED button on the remote if you want to override the
preferred Tape Speed setting.
3. Start audio source playing and press RECORD to begin recording.
4. Press STOP when you are finished.
Playing Back Audio Only
To get stereo sound, connect the AUDIO OUT jacks of the VCR to the
appropriate input on your amplifier or receiver. Do not use the phono
input. Refer to your amplifier or receiver user’s guide.
Using Two VCRs for Copying and
Editing Tapes
Use one VCR as the
recording VCR
playback VCR
.
and the other as the
1. Turn on the TV and VCRs.
2. Tune the TV to the VCR viewing channel (either 3, 4, or TV’s video
input).
3. If you connected your VCR using the IN FROM ANT. and OUT TO
TV jacks, tune
on the back of the
recording VCR
playback VCR
to channel 3 or 4—the one selected
.
If you have connected your VCR using the audio/video jacks, press
INPUT on the
recording VCR’s
remote to select the line input.
Select L1 for the jacks on the back of the VCR or L2 for the jacks
on the front.
4. Insert the tape you want to copy into the
blank tape with safety tab in place into the
5. Press PLAY on the
playback VCR
to begin playback. When you
playback VCR
recording VCR
. Insert a
.
reach the point on the tape or program where you want to begin
copying, press PAUSE. You may need to adjust the tracking.
6. Press the RECORD button, then press PAUSE, on the
recording VCR
7. Press the PAUSE buttons on
.
both VCRs
at the same time to begin
copying the tape.
Caution:
The unauthorized recording of
satellite broadcasts, television
programs, or other copyrighted
materials may infringe the rights
of others.
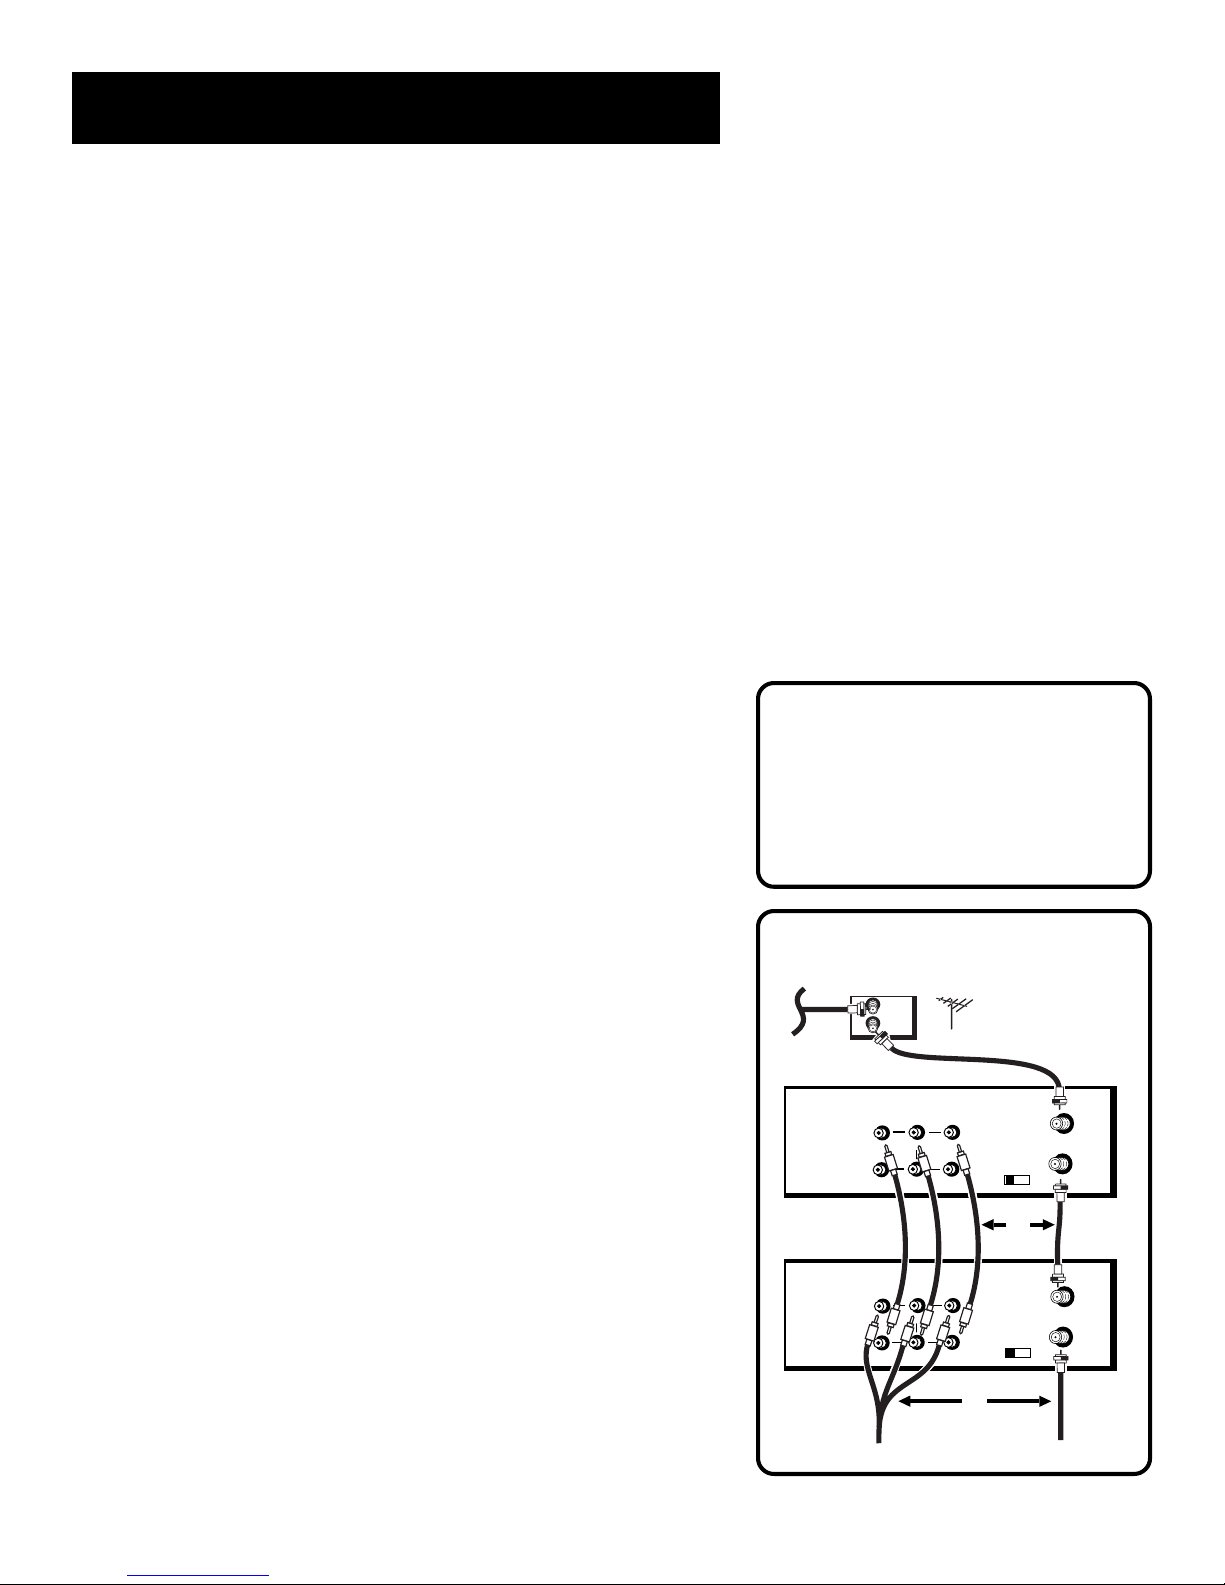
Two VCR Connection
CABLE BOX
I
OU
OR ANTENNA
PLAYBACK VCR
VIDEO
R-AUDIO-L
OUT
IN 1
RECORDING VCR
R-AUDIO-L
OUT
IN 1
MONO
MONO
VIDEO
OR
IN FROM
ANT.
VHF/UHF
OUT TO TV
3 CH. 4
OR
IN FROM
ANT.
VHF/UHF
OUT TO TV
3 CH. 4
TO TV
TO TV
35
Page 38

Recording
8. To edit segments that you do not want to copy:
• Press PAUSE on
• Locate the next segment you want to copy on
using FWD, REV, and PLAY, and then press PAUSE.
• Press PAUSE on
9. Press STOP on
recording VCR
both VCRs
both VCRs
at the same time to resume copying.
when you are finished.
to pause copying.
playback VCR
by
Using Dual Remote with AutoEdit
Use this VCR as the
on the remote as described in
other compatible VCR as the
to VCR1.
1. Follow step 1–4 in the “Using Two VCRs for Copying and Editing
Tapes.”
2. Press VCR1 on remote to control
(REC), then PAUSE, to put recording VCR in pause mode.
3. Press VCR2 on remote to control
playback VCR
Setting Up the VCR
recording VCR
and set it to respond to VCR2
section. Use your
, which should respond
recording VCR
playback VCR
. Press RECORD
.
4. Use FORWARD, REVERSE, and PLAY to locate the point where
you want to begin copying. Press PAUSE while VCR is playing to
put
playback VCR
5. Press EDIT on remote to start the VCRs copying.
6. Press EDIT again when you want to pause copying.
7. Repeat step 4–6 as needed.
8. Press VCR1, STOP, then VCR2, STOP, when you are finished.
in pause mode.
36
Page 39

Program the Remote
Controlling your
other components...
The remote’s TV and SAT•CABLE buttons can be
programmed to control other brands of remote
controllable TVs, digital satellite receivers, and cable
boxes. The remote is already programmed to operate
most ProScan, RCA, and GE televisions and satellite
receivers.
First Things First
1
➣
Setting Up the VCR
2
➣
The AUX button can be programmed to control a
ProScan or RCA auxiliary component.
VCR Basics
3
➣
Recording
4
➣
Program The Remote
5
5
Other Features
6
➣
➣
Connections
7
7
➣
Reference
8
37
Page 40
Program the Remote
TV
ON•OFF
SAT•CABLE
C
H
+
C
H
-
STOP
PLAY
REVERSE
CLEAR
FORWARD
About Programming the
Remote
The universal remote’s TV and SAT•CABLE buttons can be
programmed to control other brands of remote controlled TVs,
digital satellite receivers, and cable boxes. Your remote is already
programmed to operate most ProScan, RCA, and GE televisions as well
as digital satellite receivers.
The AUX button can be programmed to control a ProScan or RCA
auxiliary component.
Testing the Remote
To determine whether the universal remote needs to be programmed,
turn the component on (such as a TV), point the remote at the TV and
press the TV button. Then press ON•OFF, CH +, or CH - to see if the
TV responds to the remote commands. If the TV does not respond,
then the remote control needs to be programmed.
Programming the Remote to
Control a TV, Satellite Receiver,
or Cable Box
The remote features Code Search, a technology that largely automates
the programming process. Follow these steps to program the remote to
control a TV, digital satellite receiver, or cable box.
1. Turn on the component you want to control (TV, digital satellite
receiver, or cable box).
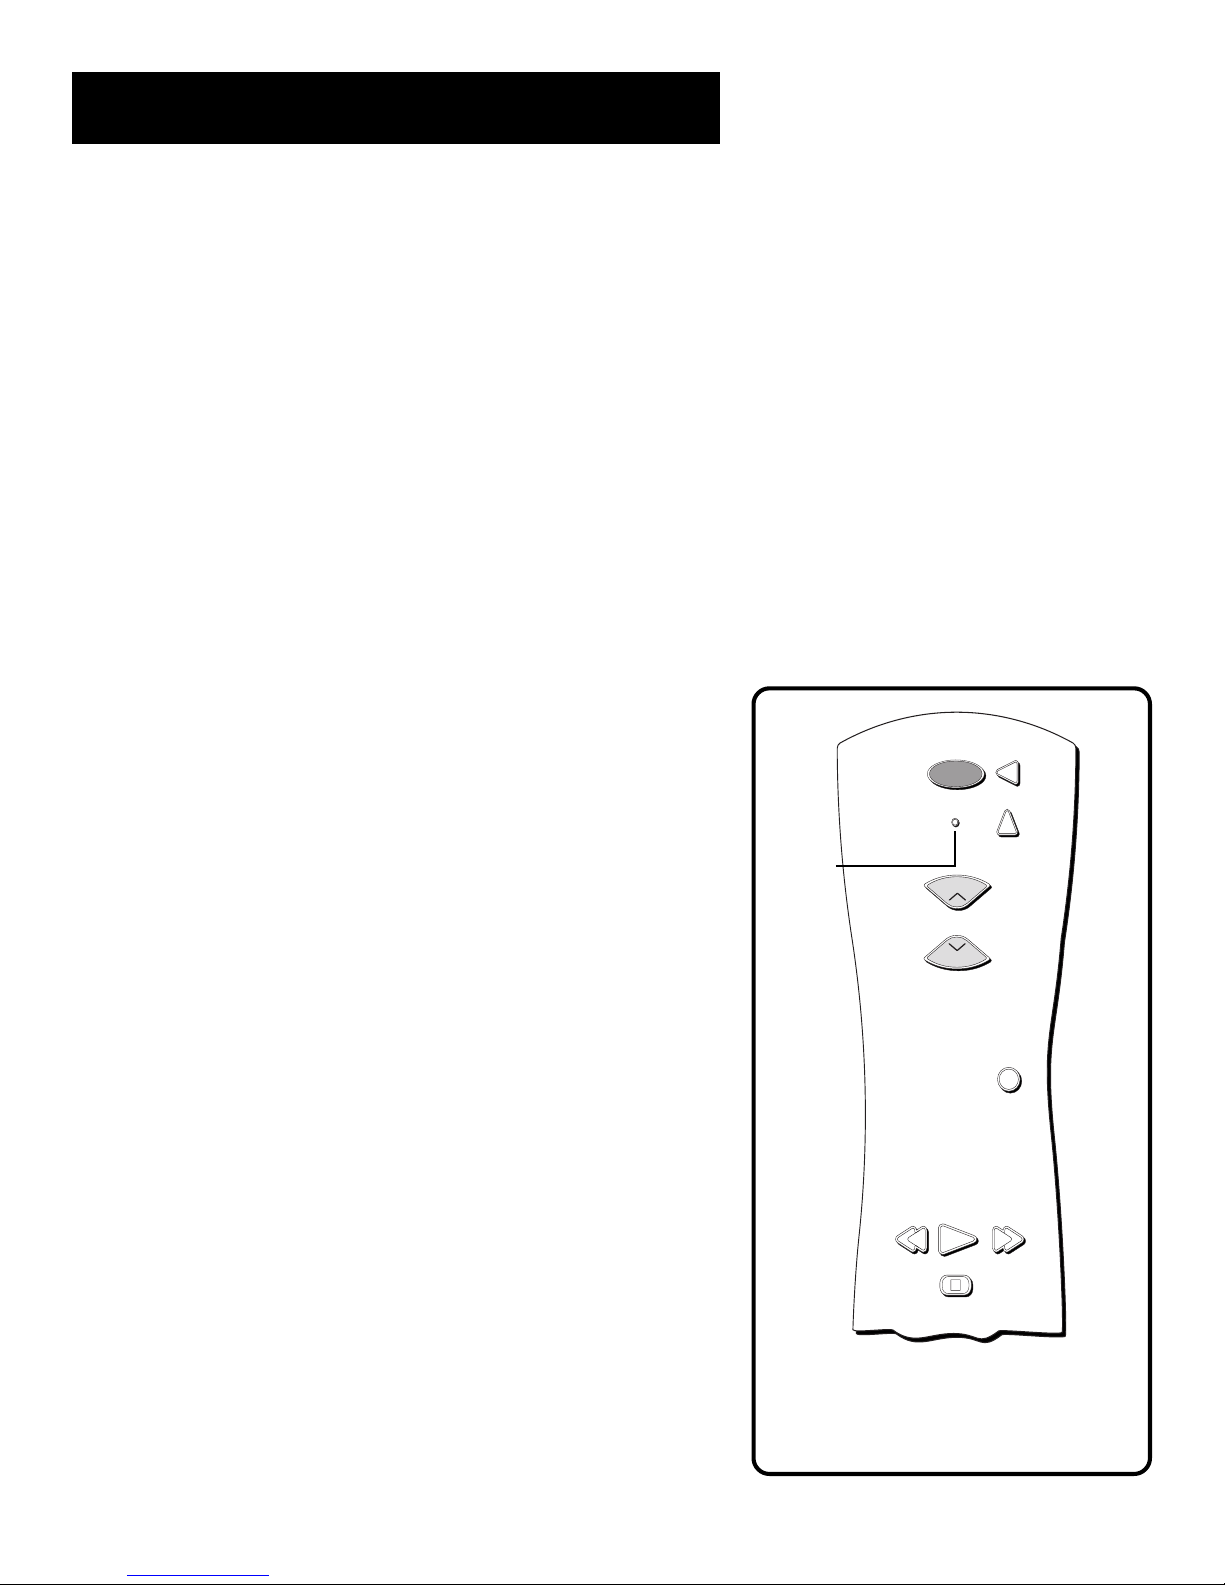
2. Press and hold the button you want to program (TV or
SAT•CABLE). While holding the component button, press and
hold ON•OFF until the LED on the remote flashes, then release
both buttons.
3. Press and release PLAY, then wait five seconds.
The remote searches through a set of codes. If, after five seconds,
the component does not turn off, press PLAY again to tell the
remote to search the next set of codes.
You can press FORWARD to individually search through the last
ten codes that were transmitted when you pressed PLAY.
LED
Yo u ’ll use these buttons when you
program the remote to control a TV,
digital satellite receiver, or cable box.
38
Page 41

Program the Remote
4. Repeat step 3 until the component turns off or you have
searched through all of the codes.
To cancel Code Search, press and hold CLEAR until the LED
turns off.
There are 20 total sets of codes. If the device does not turn off
after pressing PLAY 20 times, the remote cannot control that
particular component.
If the component you want to control
1. Press and release REVERSE, then wait two seconds. Repeat this
step until the component turns back on. This means the remote
has identified the correct code.
2. To finish, press and hold STOP until the LED turns off.
does
turn off:
Using Direct Entry
Direct Entry is another way to program your remote if the Automatic
Code Search is unsuccessful.
1. Turn on the component to be programmed.
2. Look up the brand and code number(s) for the component in the
code list on page 41.
3. Press and hold the button on the remote you want to program.
4. Enter the code from the list on page 41.
5. Release the button, and then press ON•OFF to see if the
component responds to the remote commands. If it doesn’t, try
pressing the component button and then ON•OFF again.
6. Repeat these steps using the next code listed for your brand if
you get no response.
This remote may not operate all
models and/or brands of components.
Note the difference between the VCR
and other component’s on-screen
displays to determine which one the
remote is operating.
Operating Components
After programming the remote, see which buttons operate your
component.
1. Point the remote at the component, and press its corresponding
button on the remote.
2. Experiment to see which buttons operate your component. Try
pressing buttons that relate directly to the component.
39
Page 42
Program the Remote
ON•OFF
C
H
+
C
H
-
PLAYREVERSE
FORWARD
AUX
Programming the Remote to
Control an Auxiliary Component
Your remote can also control the brands of the equipment listed, such
as a radio, CD player, tape player, or phonograph. It is already
programmed to control some ProScan and RCA amplifiers and audio/
video receivers.
1. Turn on the component to be programmed.
2. Look up your component’s code number on the code list.
3. Press and hold the AUX button.
4. Enter the 4-digit code from the code list on the next page.
5. Release the AUX button and press ON•OFF or CHAN up or down
to see if the auxiliary component responds to the remote
commands.
Operating the Auxiliary Component
After you have programmed your remote, see which buttons will
operate your component.
1. Point the remote at the component and press AUX. If it does not
turn on, press AUX and then ON•OFF.
2. You may want to experiment to see which buttons will operate
your component. Try pressing buttons, such as play, REVERSE, and
FORWARD.
Yo u ’ll use these buttons when you
program the remote to control an
auxiliary component.
Auxiliary Component Codes
ProScan/RCA/Dimensia
AM/FM 0003
Auxiliary Component 0004
Phono 0005
Tape 1 0006
40
This remote may not operate all
models of the brands that are shown.
Page 43

Program the Remote
TV
ABEX ............................................................................. 1172
Admiral .............................................................. 1001, 1173
Adventura ..................................................................... 1174
Aiko ............................................................................... 1016
Alleron .......................................................................... 1046
Amtron ......................................................................... 1038
Akai ................................................................................ 1002
Anam National ................................................. 1003, 1038
AOC ....................... 1004, 1005, 1006, 1007, 1175, 1176
Audiovox ...................................................................... 1038
Belcor ............................................................................ 1004
Bell & Howell......................................... 1001, 1083, 1162
Bradford........................................................................ 1038
Brokwood .................................................................... 1004
Candle .......................................... 1004, 1006, 1008, 1174
Capehart ....................................................................... 1175
Celebrity ....................................................................... 1002
Centurio ....................................................................... 1009
Citizen ......................................... 1004, 1006, 1008, 1016,
............................................ 1038, 1105, 1171, 1174, 1177
Clairton ........................................................................ 1176
Colortyme ........................................................ 1004, 1006
Concerto ........................................................... 1004, 1006
Contec/Cony ................... 1012, 1013, 1014, 1038, 1176
Craig .............................................................................. 1038
Crown ................................................................ 1038, 1171
Curtis-Mathes ...................................... 1000, 1004, 1006,
....................................................... 1015, 1105, 1162, 1171
CXC .............................................................................. 1038
Daewoo ................................................. 1004, 1005, 1006,
............................................ 1016, 1017, 1018, 1127, 1171
Daytron ................................................... 1004, 1006, 1171
Dimensia .......................................................................1000
Dumont ............................................................. 1004, 1151
Dynatech ...................................................................... 1178
Electronband ..................................................... 1002, 1176
Electrohome .................... 1003, 1004, 1006, 1019, 1022
Emerson ............... 1004, 1006, 1012, 1014, 1023, 1024,
..................... 1025, 1026, 1027, 1028, 1029,1030, 1031,
.................... 1032, 1033, 1034, 1035, 1036, 1037, 1038,
.................... 1039, 1041, 1042, 1043, 1044, 1046, 1047,
.......... 1123, 1124, 1162, 1171, 1176, 1177, 1179, 1191
Envision .............................................................. 1004, 1006
Fisher ...................... 1048, 1049, 1050, 1051, 1162, 1180
Fujitso ............................................................................ 1046
Funai ................................................................... 1038, 1046
Futuretec ...................................................................... 1038
GE .............. 1000, 1003, 1004, 1006, 1022, 1052, 1054,
........... 1055, 1087, 1164, 1165, 1166, 1167, 1168, 1181
Gibralter ............................................................ 1004, 1151
Goldstar ....................................... 1004, 1005, 1006, 1012
........... 1019, 1056, 1057, 1058, 1155, 1156, 1171, 1172
Grundy .................................................... 1038, 1046, 1171
Hallmark ............................................................ 1004, 1006
Harvard .........................................................................1038
Hitachi .................... 1004, 1006, 1012, 1013,1059, 1060,
........... 1061, 1135, 1136, 1137, 1138, 11391140, 1141,
........... 1142, 1143, 1144, 1145, 1146, 1148, 1150, 1179
IMA ................................................................................ 1038
Infinity ........................................................................... 1062
Janeil .............................................................................. 1174
JBL .................................................................................. 1062
JCB ................................................................................. 1002
JC Penney ................................... 1000, 1004, 1005, 1006,
................................ 1008, 1022, 1052, 1054, 1058, 1063,
............ 1064, 1072, 1087, 1105, 1128, 1171,1172,1181
Jensen ................................................................. 1004, 1006
JVC ............................................... 1012, 1013, 1054, 1060,
........... 1065, 1066, 1067, 1089, 1157, 1158, 1159, 1182
Kawasho ................................................. 1002, 1004, 1006
Kaypani .......................................................................... 1175
Kenwood ................................................ 1004, 1006, 1019
Kloss Novabeam ........................ 1068, 1069, 1174, 1183
KTV ................................... 1038, 1070, 1171, 1176, 1177
Loewe ............................................................................ 1062
Logik .............................................................................. 1083
Luxman .............................................................. 1004, 1006
LXI .......................................................... 1000, 1006, 1049,
................................ 1062, 1071, 1072, 1073, 1162, 1181
Megatron ........................................................... 1006, 1059
Magnavox .................................... 1004, 1006, 1008, 1019,
.......... 1062, 1068, 1069, 1074, 1075, 1076, 1077, 1088,
........... 1089, 1130, 1131, 1132, 1133, 1134, 1183, 1184
Majestic ......................................................................... 1083
Marants ......................................................................... 1062
Marantz ........................................ 1004, 1006, 1062, 1078
MEI ................................................................................. 1176
Memorex .......................... 1001, 1006, 1082, 1083, 1162
MGA ............................................ 1004, 1005, 1006, 1019,
............................................ 1022, 1051, 1079, 1080, 1082
Midland ............................... 1054, 1151, 1171, 1172, 1181
Minutz ............................................................................. 1052
Mitsubishi ...................................... 1004, 1005, 1006, 1019,
.............. 1022, 1051, 1079, 1080, 1081, 1082, 1082, 1125
Montgomery Ward ....................................................... 1083
Motorola .............................................................. 1003, 1173
MTC ......................... 1004, 1005, 1006, 1105, 1176, 1178
Multitech ............................................................. 1038, 1178
Multivision ...................................................................... 1084
NAD ............................................... 1006, 1071, 1072, 1185
NEC ..................................... 1003, 1004, 1005, 1006, 1089
NIKKO ................................................................. 1006, 1016
NTC ................................................................................ 1016
Onwa ............................................................................... 1038
Optimus .......................................................................... 1185
Optonica .............................................................. 1095, 1173
Orion ................................................................... 1035, 1191
Panasonic ....................................... 1003, 1054, 1062, 1170
Philco ............. 1003, 1004, 1005, 1006, 1008, 1012, 1019,
.............. 1062, 1068, 1069,1074, 1075, 1077, 1183, 1184
Philips ............ 1003, 1004, 1008, 1012, 1019, 1062, 1068,
................ 1069, 1074, 1075, 1076, 1086, 1087, 1088, 089
Pilot ...................................................................... 1004, 1171
Pioneer ...........1004, 1006, 1090, 1091, 1092, 1179, 1185
Portland .............................. 1004, 1005, 1006, 1016, 1171
Price Club ...................................................................... 1105
Prism ............................................................................... 1054
ProScan ................................................................ 1000, 1181
Proton ................................. 1004, 1006, 1012, 1093, 1175
Pulsar ............................................................................... 1151
Pulser .............................................................................. 1004
Quasar ........................................... 1003, 1054, 1070, 1094
Radio Shack/Realistic ................. 1000, 1004, 1006, 1012,
................................... 1038, 1049, 1095, 1162, 1171, 1172
RCA .................................... 1000, 1003, 1004, 1005, 1006,
........................ 1007, 1019, 1096, 1098, 1099, 1100, 1101,
.............. 1102, 1103, 1129, 1179, 1181, 1187, 1188, 1190
Rhapsody ........................................................................ 1176
Runco .............................................................................. 1151
Sampo ................................. 1004, 1006, 1171, 1172, 1175
Samsung ........................................ 1004, 1005, 1006, 1012,
....................... 1015, 1019, 1104, 1105, 1106, 1171, 1172
Samsux ............................................................................ 1171
Sansui .............................................................................. 1191
Sanyo .............................................. 1004, 1048, 1049, 1050,
................................... 1080, 1107, 1108, 1162, 1169, 1180
Scotch ............................................................................. 1006
Scott ............... 1004, 1006, 1012, 1024, 1035, 1038, 1046
Sears .............................................. 1000, 1004, 1006, 1013,
...................... 1019, 1046, 1048, 1049, 1050, 1051, 1066,
.............. 1071, 1072, 1109, 1110, 1162, 1180, 1181, 1189
Sharp ............................................. 1004, 1006, 1012, 1029,
....................... 1095, 1111, 1112, 1113, 1122, 1171, 1173
Shogun ............................................................................ 1004
Signature ................................................... 1001, 1083, 1115
Simpson .......................................................................... 1008
Sonic ................................................................................ 1176
Sony ................................................................................. 1002
Soundesign ......................... 1004, 1006, 1008, 1038, 1046
Squareview ..................................................................... 1189
SSS ......................................................................... 1004, 1038
Starlite ............................................................................. 1038
Supre-macy .................................................................... 1174
Supreme .......................................................................... 1002
Sylvania ..........1004, 1006, 1008, 1019, 1062, 1068, 1069,
... 1074, 1075, 1076, 1077, 1088, 1116, 1161, 1183, 1184
Symphonic ................................................ 1033, 1038, 1189
Tandy ............................................................................... 1173
Tatung ................................................................... 1003, 1178
Technics .......................................................................... 1054
Techwood ................................................. 1004, 1006, 1054
Teknika .......... 1004, 1005, 1006, 1008, 1012, 1013, 1016,
.............. 1038, 1046, 1076, 1082, 1083, 1105, 1170, 1171
Telecaption ..................................................................... 1117
TMK ...................................................................... 1004, 1006
Toshiba .......................................... 1049, 1071, 1072, 1089,
.................................. 1105, 1109, 1117, 1118, 1160, 1162
Totevision ....................................................................... 1171
UniversalL ........................................................... 1052, 1087
Victor ................................................................... 1066, 1182
Vidtech ...................................................... 1004, 1005, 1006
Viking ............................................................................... 1174
Wards...................... 1000, 1001, 1004, 1005, 1006, 1019,
............. 1024, 1033, 1046, 1052, 1062, 1068, 1069, 1074,
. 1075, 1076, 1083, 1087, 1088, 1095, 1119, 1120, 1184
Yamaha ........................................... 1004, 1005, 1006, 1019
Zenith .................................. 1004, 1151, 1152, 1153, 1154
Cable Box
ABC ................ 5002, 5003, 5004, 5005, 5006, 5007, 5053
Antronix .............................................................. 5008, 5009
Archer ................................................... 5008, 5009, 5010, 5011
Cabletenna ............................................................................ 5008
Cableview .............................................................................. 5008
Century ................................................................................. 5011
Citizen .................................................................................... 5011
Colour Voice .............................................................. 5012, 5013
Comtronics ................................................................ 5014, 5015
Contec ................................................................................... 5016
Eastern ................................................................................... 5017
Garrard .................................................................................. 5011
GC Electronics ..................................................................... 5009
Gemini ............................................................. 5018, 5019, 5049
General Instrument ............................................................ 5003
Hamlin ........................................ 5020, 5021, 5022, 5035, 5045
Hitachi .................................................................................... 5003
Hytex ...................................................................................... 5002
Jasco ....................................................................................... 5011
Jerrold ........ 5003, 5005, 5007,5018, 5023, 5024, 5046, 5053
Magnavox............................................................................... 5025
Memorex ............................................................................... 5026
Movie Time ..................................................... 5002, 5027, 5028
NSC .................................................................. 5002, 5027, 5028
Oak .................................................................... 5002,5016, 5029
Panasonic .................................................................... 5048, 5052
Paragon .................................................................................. 5026
Philips ........ 5011, 5012, 5013, 5019, 5025, 5030, 5031, 5032
Pioneer ........................................................................ 5033, 5034
Pulsar ...................................................................................... 5026
RCA .................................................................. 5047, 5049, 5052
Realistic ....................................................................... 5009, 5049
Regal ............................................................................ 5022, 5035
Regency ................................................................................. 5017
Rembrandt ............................................................................ 5003
Runco ..................................................................................... 5026
Samsung ...................................................................... 5014, 5034
Scientific Atlanta .................................. 5006, 5036, 5037, 5038
Signal ............................................................................ 5014, 5018
Signature ................................................................................ 5003
SL Marx .................................................................................. 5014
Sprucer .................................................................................. 5052
Starcom ............................................................ 5007, 5018, 5053
Stargate ....................................................................... 5014, 5018
Starquest ................................................................................ 5018
Tandy ...................................................................................... 5040
Teleview ................................................................................. 5014
Tocom .............................................................. 5004, 5023, 5041
Toshiba ................................................................................... 5026
Tusa ......................................................................................... 5018
TV86 ....................................................................................... 5027
Unika ................................................................ 5008, 5009, 5011
United Artists ....................................................................... 5002
United Cable ........................................................................ 5053
Universal ............................................... 5008, 5009, 5010, 5011
Videoway ............................................................................... 5044
Viewstar ................................................ 5015, 5025, 5027, 5040
Zenith ............................................................... 5026, 5050, 5051
Satellite Receiver
Chapparal ................................................................... 5056, 5057
Drake .......................................................................... 5058, 5059
GE DSS ....................................................................... 5000, 5001
General Instuments ....................................... 5060, 5061, 5062
Panasonic DSS ...................................................................... 5075
Primestar DBS ...................................................................... 5076
Proscan DSS .............................................................. 5000, 5001
RCA DSS .................................................................... 5000, 5001
Realistic .................................................................................. 5063
Sony DSS ............................................................................... 5072
STS1 ........................................................................................ 5064
STS2 ........................................................................................ 5065
STS3 ........................................................................................ 5066
STS4 ........................................................................................ 5067
Toshiba ................................................................................... 5068
Toshiba DSS .......................................................................... 5073
Uniden DSS ........................................................................... 5069
Auxiliary
(For some PROSCAN, RCA, GE and Dimensia brands only)
AM/FM ................................................................................... 0003
Auxiliary Component ......................................................... 0004
CD .......................................................................................... 0007
DSS1 ....................................................................................... 0008
DSS2 ....................................................................................... 0011
DVD ....................................................................................... 0010
Phono ..................................................................................... 0005
41
Page 44

Page 45

Other Features
features to enhance
VCR operation
• Commercial Advance
• Movie Advance
• Picture Search Options
• Pro-Tect Plus™ Locking
• Tracking
• Time Counter
• On-Screen Displays
• Audio Reception
First Things First
1
➣
Setting Up the VCR
2
➣
VCR Basics
3
➣
Recording
4
➣
• Audio Tape Playback
Program The Remote
5
5
Other Features
6
➣
➣
Connections
7
7
➣
Reference
8
43
Page 46
Other Features
Commercial Advance
®
Commercial Advance is patented technology that detects and marks
most commercials on your tape for any recording that is more than 15
minutes long. After recording, the VCR rewinds the tape to the
beginning of the recording and determines where the commercials are
located. It then marks the beginning and end of the detected
commercial segments, and when finished, returns the tape to the end of
the recording. It does not erase commercials from the tape.
During playback, the VCR automatically skips the detected commercial
segments, or you can chose to manually skip them. This feature reduces
three minutes of commercials to approximately 8-12 seconds of fast
forwarding in the SLP speed. You can select a background display of
blue or see the video as the commercials are skipped.
Because television signals do not indicate where commercials are
located, this feature finds and marks them through a set of formulas
based on how television is broadcast today. Since television stations
broadcast differently and insert their own commercials, you may
experience some variations in this feature’s effectiveness. Station
promotions, identifications, and announcements are not considered
commercials, but might be skipped. For more information, see
“Questions and Answers About Commercial Advance ” in the
Reference
section. All of the COMMERCIAL ADVANCE features are
accessed through the Commercial Advance menu.
1. Press MENU to display the VCR MAIN MENU.
VCR MAIN MENU
1 VCR Plus+
2 Timer Recordings
3 Time
4 Channels
5 Setup
6 Preferences
7 Audio
8 Language
0 Exit
2. Press 6 to display the PREFERENCES menu.
COMMERCIAL ADVANCE is a registered trademark of SRT, Inc.
44
Page 47
Other Features
PREFERENCES
1 Remote Control: VCR1
2 Auto Play: ON
3 Auto TV/VCR: ON
4 EnergySaver: 2:00
5 Front Panel: AUTO
6 Tape Speed: SLP
7 Commercial Advance
0 Exit
3. Press 7 to display the COMMERCIAL ADVANCE menu.
COMMERCIAL ADVANCE
1 Marking: ON
2 Playback: AUTO
3 Display: BLUE
0 Exit
Now you can select one of the COMMERCIAL ADVANCE features.
COMMERCIAL ADVANCE Marking
Press 1 to turn commercial Marking: ON or OFF.
• Select ON, and the VCR will mark commercials within
approximately 30 seconds for the following types of recording:
— Timer, Timer with VCR Plus+, or Express Recording Sets the
VCR to automatically mark commercials after the power is
tuned off.
— Recording Allows the VCR to prompt you to mark the
commercials when you’ve stop the recording.
The VCR is waiting to
mark commercials in the
program you recorded.
1 Mark them now
2 Mark them later
3 Don't mark commercials
The VCR will begin
marking in 30 seconds...
• Select OFF and the VCR will not mark the commercials.
45
Page 48

Other Features
COMMERCIAL ADVANCE Playback
Press 2 to switch between Playback: AUTO and MANUAL.
• Select AUTO to have the VCR automatically advance through the
blocks of marked commercials.
It works with most 30, 45, and 60-second commercials.
A commercial group starting with the first two minutes or last two
minutes of a recording will not automatically be skipped.
A commercial will not be skipped if a recording starts in the
middle of a commercial segment, one isolated commercial is
shown without others, or a commercial is longer than one minute.
Press FWD on the VCR (FORWARD on remote) to scan through
the commercial.
Part of a recorded program may be skipped if the program segment
is between commercials and less than one minute or there are
frequent dark and quiet scenes. If part of the program is skipped,
rewind the tape to the beginning of the skipped program segment
and press PLAY.
• Select MANUAL and the VCR won’t advance through the blocks
of marked commercials until you press SEARCH.
If you press SEARCH during playback of material other than
commercials, the VCR advances to the end of the next “marked”
commercial block and resumes playback.
The VCR resumes playback when it reaches the end of the marked
commercials.
COMMERCIAL ADVANCE Display
Press 3 to switch between Display: BLUE or VIDEO.
• Select BLUE to display a blue background when the VCR advances
through the block of marked commercials.
• Select VIDEO to display the recorded video when the VCR
advances through the block of marked commercials.
46
Page 49
Other Features
MOVIE ADVANCE
®
MOVIE ADVANCE helps you locate certain parts of prerecorded
movies (rented or purchased). This feature works two ways: 1) you can
go to the beginning of the movie, or, 2) you can skip from one preview
to the next. MOVIE
ADVANCE works only on cassettes recorded in
the SP speed with the safety tab removed.
1. To select MOVIE ADVANCE, insert a tape with the safety tab
removed and press SEARCH. The following menu appears:
What type of tape
is this?
1 Purchased/Rented Movie
2 Home Recording
3 Other
Press CLEAR to cancel
2. Press 1 if the tape is a purchased or rented movie,
press 2 if it’s a recording made at home, or press 3 if
it’s something else, you don’t know, or you do not want
to select MOVIE ADVANCE.
Pressing 2 or 3 gives the same response and takes you to a
different search feature. If you accidentally make a wrong
selection, press STOP•EJECT on the VCR (STOP on remote) and
reinsert the tape. Press SEARCH.
If you press 1, the MOVIE ADVANCE menu appears.
MOVIE ADVANCE
Would you like to go to
the start of the movie
or to the next preview?
1 Go to movie
2 Go to preview
Press CLEAR to cancel
3. Press 1 to advance directly to the beginning of the movie or press
2 to view the first (next) preview.
MOVIE ADVANCE is a registered trademark of Aurthur D. Little Enterprises, Inc.
MOVIE ADVANCE works only on
cassettes recorded in the SP speed
with the safety tab removed.
47
Page 50
Other Features
• Press 1 to Go To Movie. The following screen appears with
a blue background.
MOVIE ADVANCE
Searching for start
of movie...
Press STOP to cancel
When the movie is found, the following screen is displayed:
MOVIE ADVANCE
The movie is ready.
Press PLAY to start.
Press STOP to cancel
This display will time out after a few minutes and the VCR will enter the Stop mode.
• Press 2 to Go To Preview. The following screen appears with
a video background:
Searching for preview
Press SEARCH to reverse
Press STOP to cancel
When a preview is detected, the VCR cues it and begins playing.
Press SEARCH for next
48
Preview Search Note
Any time during the preview search
mode, pressing SEARCH will reverse
the search direction.
Page 51

Other Features
Picture Search Options
The most basic way to search during playback is using the FORWARD
or REVERSE buttons (FWD and REV on the VCR). This section contains
several other options available for searching a tape.
Forward and Reverse Search
You can search a tape during playback. Sound is turned off during
picture search. Search works well for tapes recorded at the SP or SLP
speed.
1. Press FORWARD (FWD) to search forward or REVERSE (REV) to
search in reverse.
2. Press FORWARD (FWD) or REVERSE (REV) again or press PLAY to
return to normal playback.
Slow Motion
You can view a tape during play or play-pause using slow motion.
Slow motion works well for tapes recorded at the SP or SLP speed.
1. In pause mode, press FORWARD (FWD) or REVERSE (REV) to start
slow-motion playback.
2. Press FORWARD (FWD) to increase or REVERSE (REV) to decrease
the speed of the search.
3. Use TRACKING + or – to remove any streaks from the picture.
4. Press PLAY to return to normal playback.
The VCR switches automatically from slow-motion playback to
stop after a few minutes.
49
Page 52

Other Features
Frame Advance
Frame advance lets you view one-stop action frame after another
during playback. Frame advance works well for tapes recorded at the
SP or SLP speed.
1. Press PAUSE on the remote (PLAY/PAUSE on the VCR) to freeze the
action.
2. Press FR.ADV on the remote each time you want to view the next
frame of the scene.
3. Press PAUSE or PLAY on the remote (PLAY/PAUSE on the VCR) to
return to normal playback.
Variable Speed Using the Shuttle Ring
The shuttle ring on the VCR’s front panel allows variable speed
searching during playback. The picture is best for tapes recorded in
the SP or SLP speed.
1. In play or still mode, turn the shuttle ring—clockwise for forward
or counterclockwise for reverse—to begin searching. The farther
you turn the dial, the faster the search speed.
2. Press PLAY/PAUSE to turn off the shuttle feature and return to
normal playback.
Additional Notes on the Shuttle Dial:
• In the stop mode, turn the shuttle ring more than half way
clockwise to start fast forward and turn the shuttle ring more than
halfway counterclockwise to start rewind.
• Some noise or streaks in the picture are normal during searching.
• After three minutes in still or slow, the VCR will go into stop mode.
50
Insert Tape:
Don’t forget to insert a recorded
tape when using the search features.
Page 53
Other Features
Index Search
The VCR has a “VHS Index Search System” that automatically records
an index mark on the tape every time you start a recording. During
playback you can locate the program you want to play by the number
of index marks or by scanning. The VCR will search forward or reverse
from the location you are on the tape.
To Search:
1. Press STOP.
2. Press SEARCH on the remote to display the INDEX SEARCH screen
on the TV screen.
3. If you want to search through a certain number of index marks,
press two number buttons to enter the number of marks you want
to search. Press CLEAR on the remote to correct an entry.
4. Press FORWARD (FWD) to search forward or REVERSE (REV) to
search in reverse. The VCR will locate your index mark and begin
playback. If you did not enter a specific index number, the VCR
will locate the next index mark and begin playback.
INDEX SEARCH
Press REV or FWD
to begin scanning
OR
enter a specific
index number
_ _
Press SEARCH to exit
INDEX SEARCH
Searching for
index number 12...
Press STOP to cancel
INDEX SEARCH
Searching for
index marks...
Press STOP to cancel
5. Press STOP to stop index searching.
Some index marks may be missed by the VCR:
• A mark too close to your location on the tape.
• The mark at the beginning of a recorded segment of five minutes
or less.
• The first index mark on the tape when you start at the beginning of
the tape.
51
Page 54
Other Features
Zero Search
The Zero Search feature enables the VCR to quickly return to a counter
reading of 0:00:00 anywhere on the tape. This is especially convenient
when you want to repeat a segment of the tape several times.
1. Go to the beginning of the program you wish to return to.
2. Press CLEAR twice to reset the counter to 0:00:00.
3. Continue playing the tape.
4. Press STOP.
5. Press SEARCH on the remote until the ZERO SEARCH screen
appears on the TV screen.
6. Press REVERSE (REV) to return to 0:00:00 on the tape.
7. Press STOP to stop zero searching.
Pro-Tect Plus™ Locking Feature
To disable the usage of the VCR, or to protect your timer recordings,
you can lock the VCR so that the buttons on the VCR or remote won’t
work.
ZERO SEARCH
Current tape counter is
2:17:25
Press REV to go to
0:00:00
Press SEARCH to exit
ZERO SEARCH
Searching for
0:00:00...
Press STOP to cancel
• To Lock: Press and hold either the remote control’s ON•OFF,
VCR1, or VCR2 button (whichever controls your VCR) until LOCK
appears in the display. LOCK appears when the feature is activated
and if you attempt to turn on the VCR while the feature is on.
• To unlock the feature and turn on the VCR: Press and hold either
the remote’s ON•OFF, VCR1, or VCR2 button (whichever button
your VCR is set to respond to) until LOCK disappears.
Tracking
Your VCR has automatic tracking which removes the streaks or noise
from the picture. Automatic tracking is activated when you insert a
tape or turn on the VCR. Occasionally you may need to manually
adjust tracking, especially if the tape was recorded on a different VCR.
Use the TRACKING buttons to remove the streaks or noise. You can
also use tracking when you PAUSE a tape to reduce jittering of the
picture.
When you manually adjust the picture, automatic tracking is turned
off. To turn automatic tracking back on, ejec t the tape and re-insert it.
Tracking has no effect during recording—only playback.
Locking Your VCR:
If a timer recording is programmed,
make sure your VCR is turned off.
Locking your VCR prevents the VCR
from being accidentally turned on.
52
Page 55
Other Features
Time Counter
The time counter shows the actual time it takes to record a program or
play back a segment of a recorded tape. It helps locate the beginning
or end of programs you taped. The time counter resets to 0:00:00
whenever the tape is ejected from the VCR.
For example, if you record a 30–minute program at the beginning of
the tape and you want to go to the end of that program to begin
another recording, you would:
1. Press INFO twice to display only the time counter.
2. Press CLEAR to reset the time counter to 0:00:00.
3. Press FORWARD (FWD) to forward the tape until the time counter
reads 0:30:00.
4. Press STOP. This is the approximate end of the program. (You may
want to press PLAY to verify.) Now, you can begin recording at this
spot.
5. Press INFO twice to remove the time counter from the screen and
return to the normal display mode.
Hours
Minutes
Seconds
Stop Ch 05 0:30:00
1
0:30:00
On-Screen Displays
The INFO button shows the status of the VCR (Stop, Play Record, etc.),
channel number, time counter, date, time, and tape speed on the TV
screen. The date and time must be set before they can be displayed.
1. Press INFO to see the on-screen displays. The current time is
displayed in the VCR’s display panel.
2. Press INFO again to have only the time counter remain on
the screen. The time counter is displayed in the VCR’s display
panel.
3. Press INFO again to have no displays appear on the TV screen. The
time counter remains in the VCR’s display panel. This is useful for
dubbing tapes.
4. Press INFO again to return to the normal display. The current time
is displayed in the VCR’s display panel.
Turning off the VCR also resets the displays.
11/18/99 Thu 01:30PM SLP
On-screen
display (times
2
0:30:00
Time counter only
(does not time out)
3
No displays will appear
(useful for dubbing)
53
Page 56
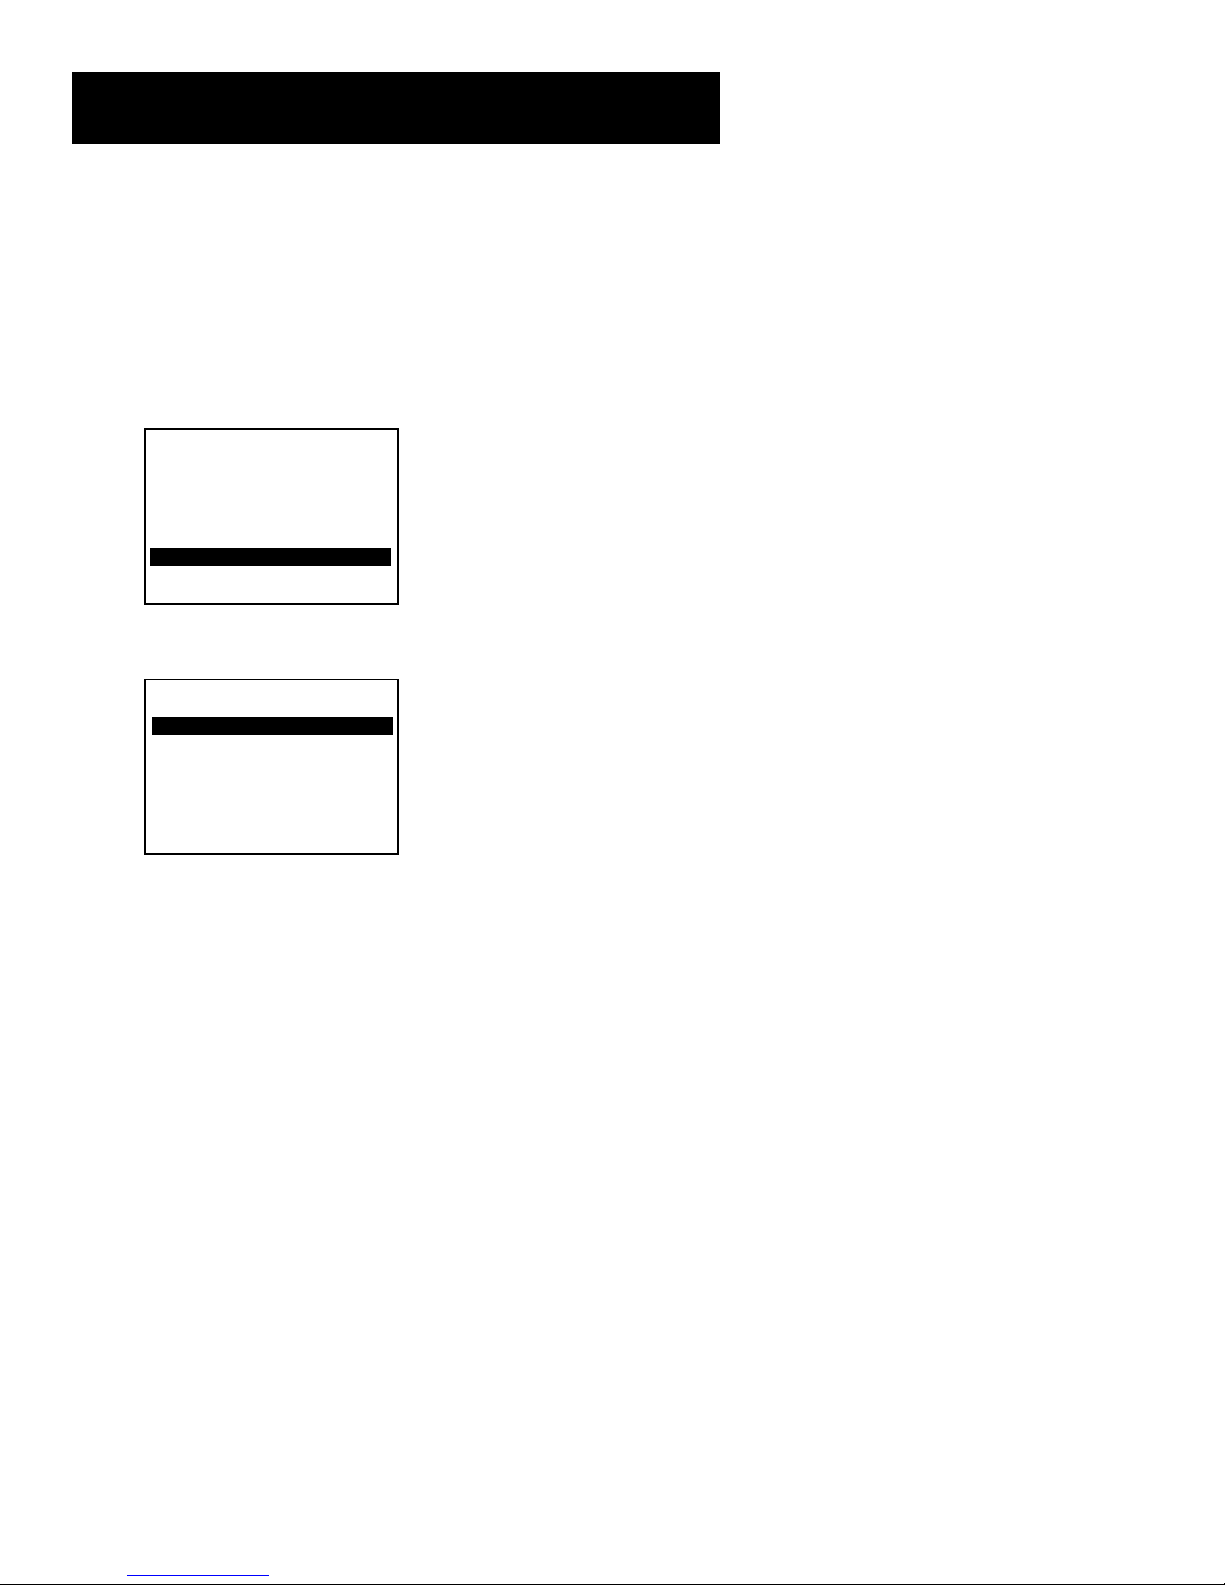
Other Features
Audio Set-Up Features
The audio setup features affect your tape playback and recordings. The
features in this section are accessed through the AUDIO menu and are
shown in the displays below.
1. Press MENU to bring up the VCR MAIN MENU.
VCR MAIN MENU
1 VCR Plus+
2 Timer Recordings
3 Time
4 Channels
5 Setup
6 Preferences
7 Audio
8 Language
0 Exit
2. Press 7 to display the AUDIO menu.
AUDIO
1 Reception: STEREO
2 Tape Playback: HI-FI
0 Exit
Now you are ready to select an item from the menu to set up.
Reception
Some TV programs are broadcast with stereo audio or a second audio
program (SAP) which offers a second language. The Reception feature
lets you select the type of audio you want to record. Press 1 to switch
between Reception: STEREO, MONO, and SAP.
• Select STEREO for normal or stereo broadcast TV recording. The
STEREO indicator lights when the station you are tuned to is
broadcasting stereo.
• Select MONO if the stereo signal is weak and the sound is too
noisy.
• Select SAP to record a second audio program instead of the
normal audio on both the hi-fi and linear tracks. The SAP indicator
lights when the station you are tuned to is broadcasting SAP.
54
Page 57

Other Features
Tape Playback
The VCR records the same audio on both the Hi-Fi stereo and linear
tracks on the tape. Hi-Fi sound is recorded on separate left and right
stereo channels. Monaural sound is recorded on the linear track. Press
2 to switch between Tape Playback: HI-FI, LINEAR, and MIX.
To enjoy Hi-Fi sound, connect your VCR to a stereo television or
amplifier/receiver using the audio jacks. The Tape Playback feature lets
you select which audio you play back.
• Select HI-FI to play back sound recorded on the Hi-Fi tracks and
for normal use. The Hi-Fi indicator lights.
• Select LINEAR to play back the sound recorded on the linear
monaural track, such as a second audio program (SAP), or a
dubbed voice-over.
• Select MIX to play back the sound recorded on both the linear
track and the Hi-Fi track, sound-on-sound. The Hi-Fi indicator
lights.
55
Page 58

Page 59

Connections
Things to Know Before
Connecting Components
Protect Your Components
from Power Surges
• Connect all components before plugging any
power cords into the wall outlet.
• Always turn off the TV and other components
before you connect or disconnect any cables.
Position Cables Correctly to Avoid
Audio Hum or Interference
• Insert all cable plugs firmly into their jacks.
First Things First
1
➣
Setting Up the VCR
2
➣
VCR Basics
3
➣
Recording
4
• Place the audio/video cables to the sides of the
TV’s back panel instead of straight down the
middle after you connect your components.
• Try not to coil any twin-lead cables and keep
them away from the audio/video cables as much
as possible.
• Make sure all antennas and cables are properly
grounded. Refer to the Safety Tips sheet packed
with your unit.
Protect Your Components from
overheating
• Do not block ventilation holes in any of the
components. Arrange the components so that
air can circulate freely.
• Do not stack components.
➣
Program The Remote
5
5
Other Features
6
➣
➣
Connections
7
➣
Reference
8
• Allow adequate ventilation when placing your
components in a stand.
• Place an amplifier or satellite receiver on the
top shelf of the stand so heated air rising from it
will not flow around other components.
57
Page 60
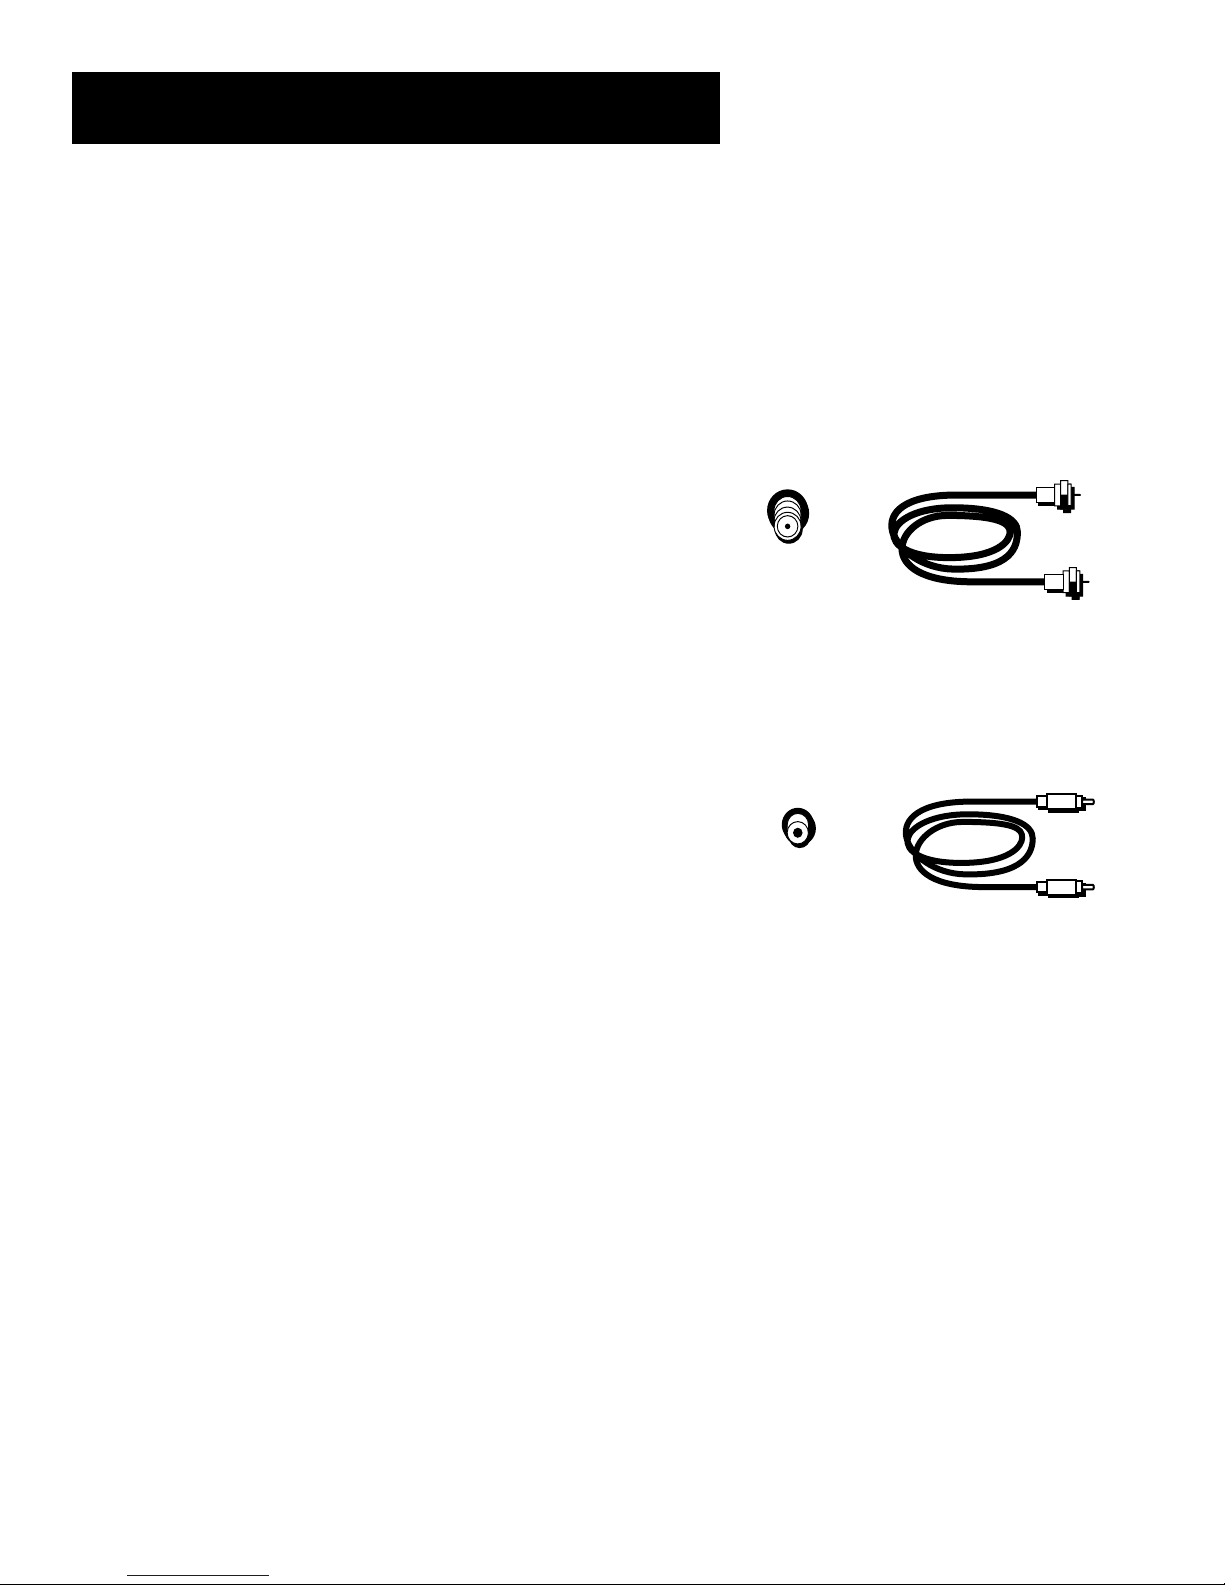
Connections
Connecting Your VCR
Refer to these pages to help you connect your VCR.
Jacks and Cables
RF Jacks and Antenna Cables (F-type)
The RF jacks provide good picture and mono sound quality, and must
be used if audio/video connections are not available for your TV.
These jacks are required for antenna or cable-TV connections. The RF
jacks on the VCR are labeled IN FROM ANT. and OUT TO TV. The
antenna cable supplied with your VCR is used to connect the VCR’s
OUT TO TV jack and your TV’s antenna input.
Audio/Video Jacks and Cables (RCA-type)
The audio/video jacks provide very good picture and sound quality,
and can be used if your TV has audio/video input jacks.
These jacks are used for most audio/video connections between
components. The VCR audio/video jacks are color coded (yellow for
video, red for right audio, and white for left audio). If your TV only has
one input for audio (mono), you may need a Y-adapter to hear sound
from both channels.
RF Jack
Audio/Video Jack
58
Page 61

Connections
Choosing a VCR Connection
There are several different ways to connect your VCR, depending on
whether or not you have cable service, and if you have a cable box, and
whether some of the channels are scrambled, and maybe you have a
satellite receiver along with cable (but no cable box), or a satellite receiver
and no cable or...well, you get the picture.
Five connections are described in this section and one of them should
provide you with a VCR connection that works.
• TV with RF jack only
• TV with audio/video jacks
• TV with audio/video jacks and cable box to unscramble pay
channels only
• TV with RF jack and satellite receiver
• TV with audio/video jacks and satellite receiver
If you need to connect additional components not shown in the diagrams
here (and are unsure of how to connect them), refer to the instruction
manual that came with that particular component.
Advantages of Audio/Video Cable
Connections
Using a simple antenna cable connection gives you good picture quality. If
your television has audio/video jacks, I highly recommend using them to
get even better picture quality and stereo sound when recording and
playing back videotapes. These connections give you more convenient
operation by not having to share the TV’s antenna signal.
Don’t Forget About the
Auto TV/VCR Feature
The TV/VCR switch controls whether the picture signal is coming from the
VCR or the TV.
You can set the Auto TV/VCR feature to ON when using only the IN FROM
ANT. and OUT TO TV jacks and OFF when using the AUDIO/VIDEO
output jacks—so your TV signal is not interrupted when the VCR is turned
on. You can change the setting manually by using the TV•VCR button on
the VCR or the ANTENNA button on the remote.
59
Page 62
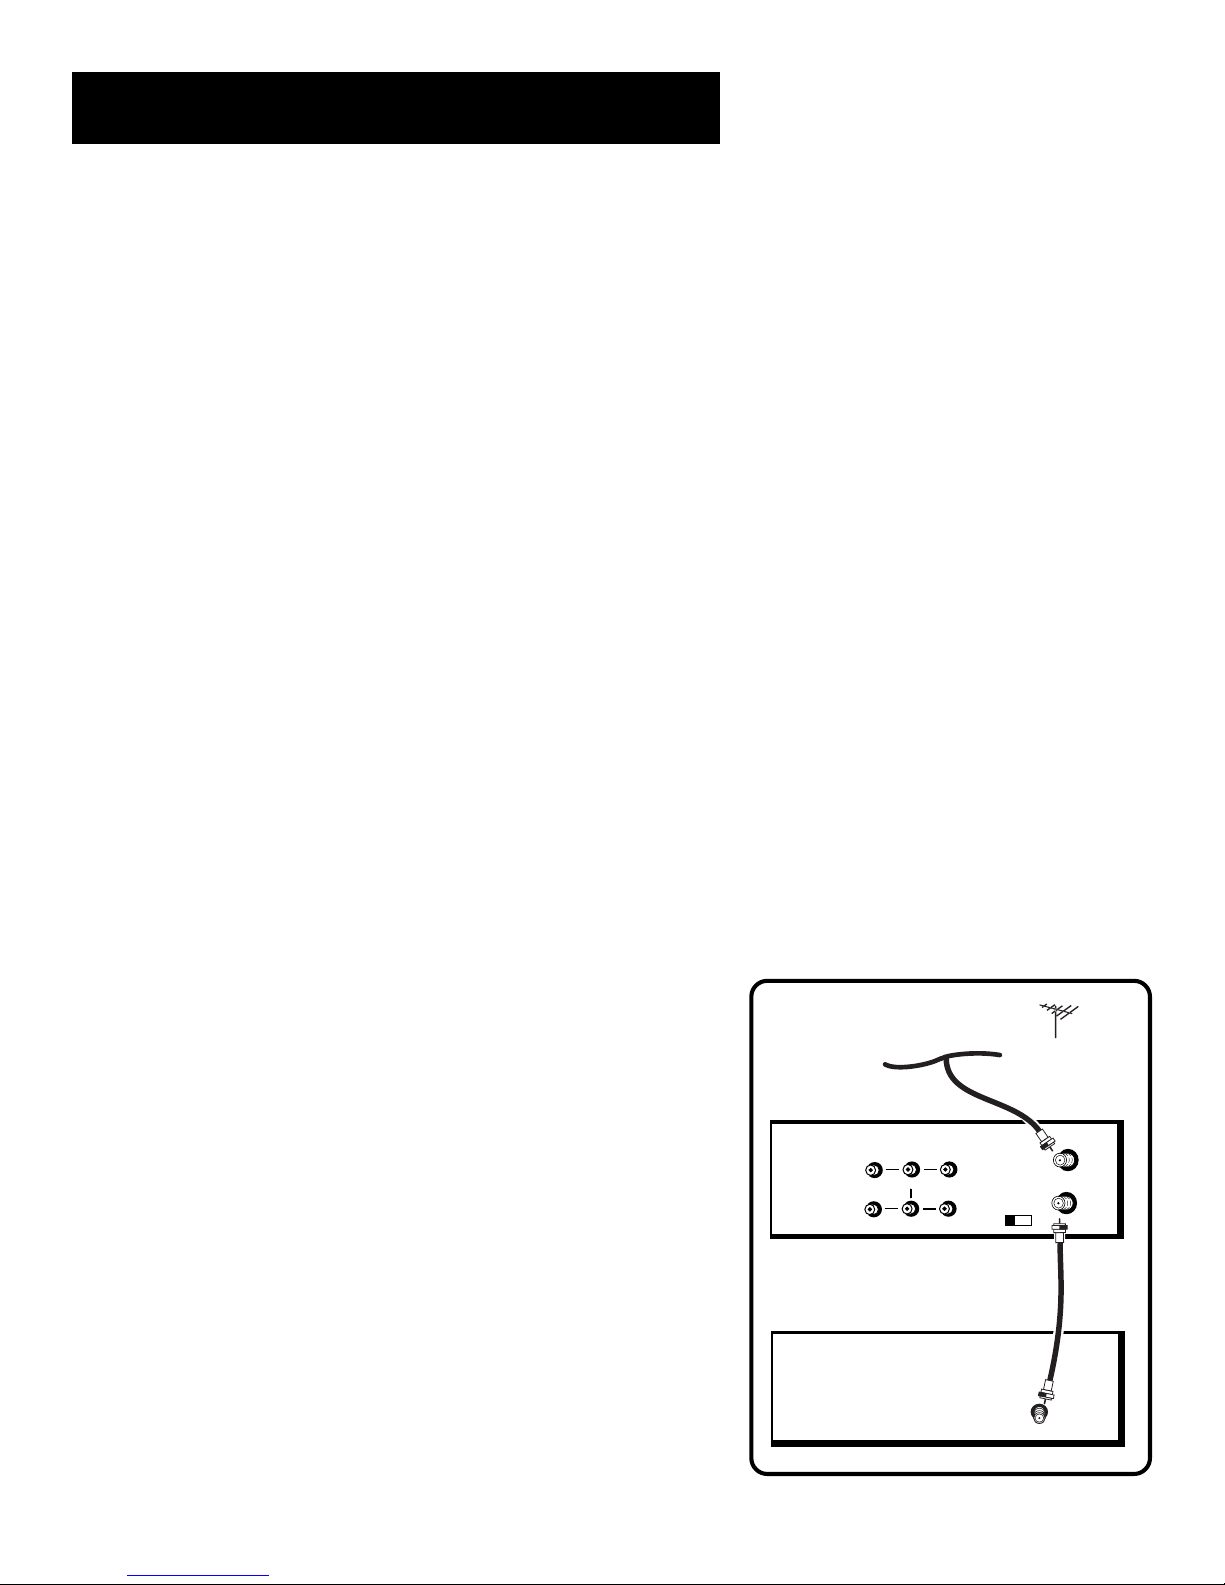
Connections
TV With RF Jack Only
This connection assumes:
• You are connecting antenna, cable, or cable box system.
• Your television has only an RF input jack.
This connection provides:
• Mono sound playback from VCR.
• Record one channel while watching another (except when
using a cable box for all channels).
To use this connection, you must have:
• One coaxial cable for cable or antenna connection; two cables
for a cable box
To connect:
1. Connect cables as shown.
2. Return to
First Things First
, then follow the steps.
Using This Connection
Tune your TV to channel 3 or 4, whichever one you selected with
the 3CH.4 switch on the back of the VCR.
Auto TV/VCR Setting:
• Set the Auto TV/VCR feature to ON.
To play a tape:
1. Insert a tape.
2. If necessary, press PLAY.
To record one program and watch another:
1. Begin recording a program using one of the recording features.
2. Press the TV•VCR button on the VCR (ANTENNA on remote)
and select a different channel on the TV.
CABLE, CABLE BOX, OR ANTENNA
VCR
R-AUDIO-L
OUT
IN 1
VIDEO
MONO
IN FROM
ANT.
VHF/UHF
OUT TO TV
3 CH. 4
60
TV
CABLE/
ANTENNA
Page 63
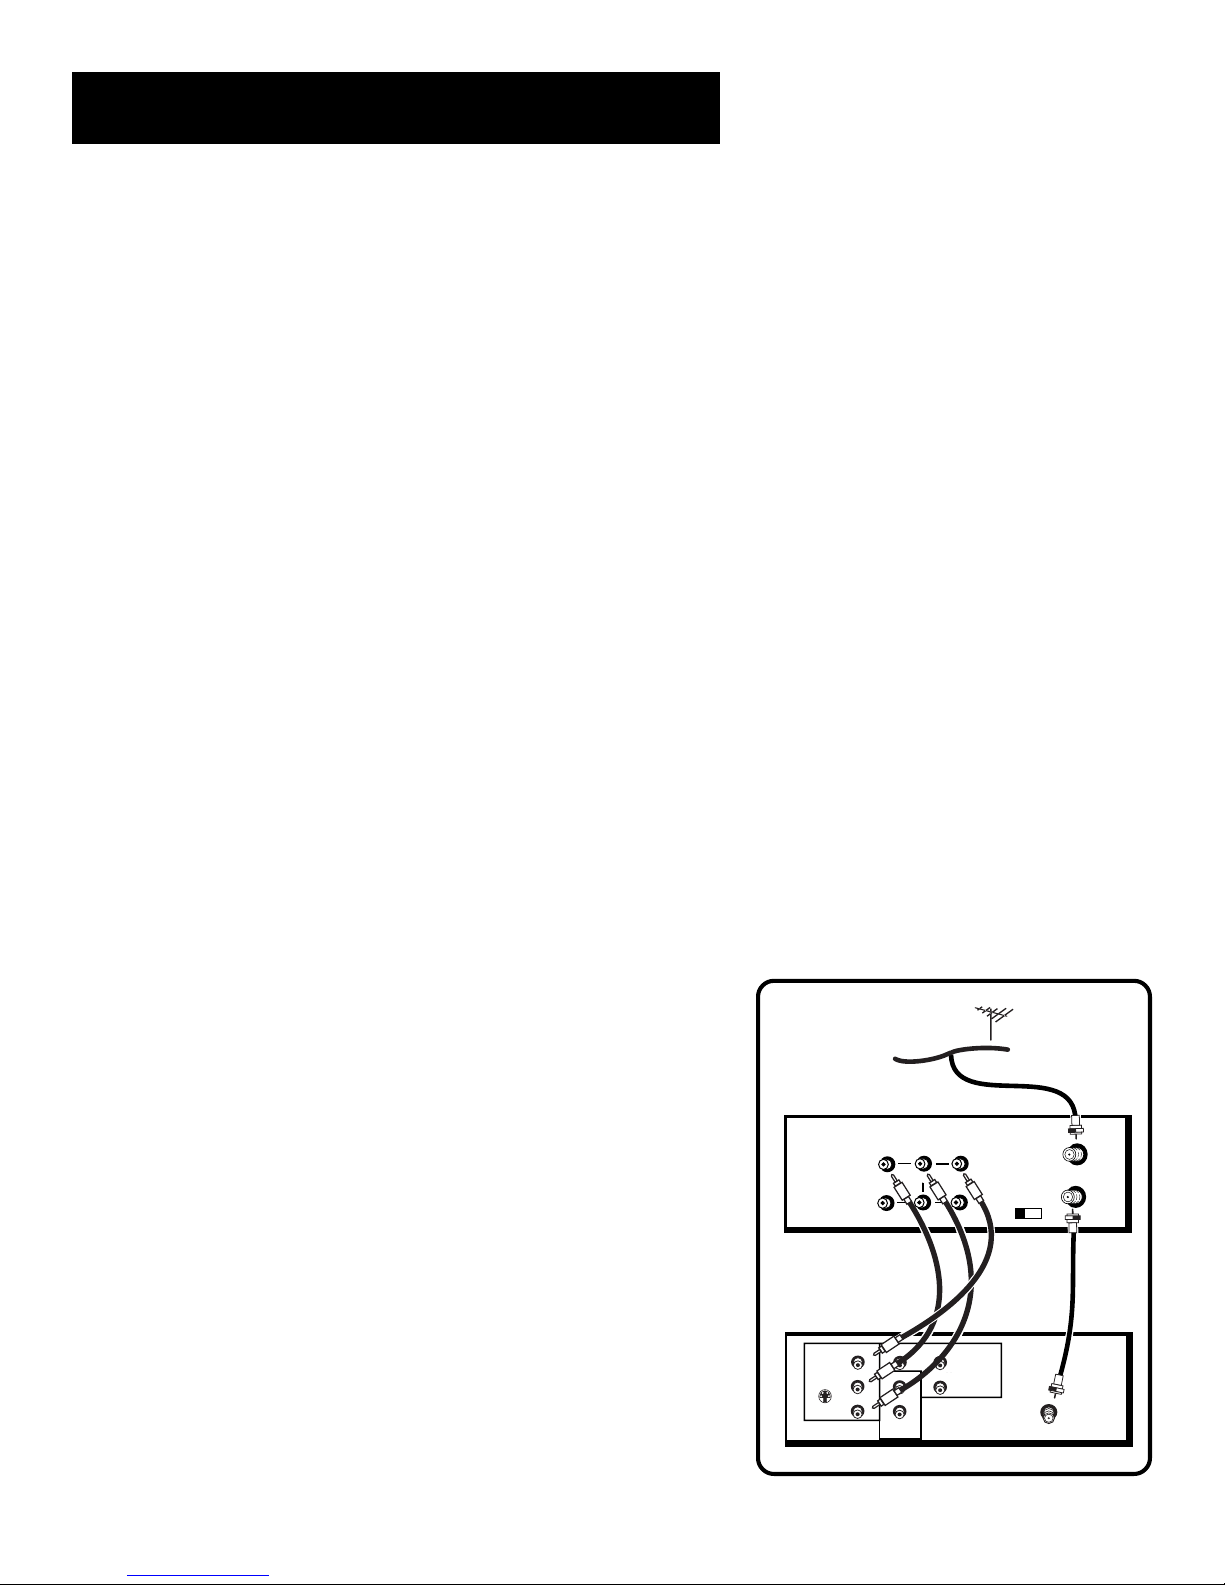
Connections
VCR
TV
3 CH. 4
IN FROM
ANT.
VIDEO
OUT
R-AUDIO-L
OUT TO TV
VHF/UHF
MONO
IN 1
INPUT 1
VIDEO
R
L/MONO
S-VIDEO
AUDIO
OUTPUT
R
L
INPUT 2
VIDEO
R
L/MONO
CABLE/
ANTENNA
CABLE, CABLE BOX, OR ANTENNA
TV With Audio/Video Jacks
This connection assumes:
• You are connecting an antenna, cable, or cable box system.
• Your television has audio/video jacks.
This connection provides:
• Stereo sound playback from VCR.
• Record one channel while watching another (except when using a
cable box for all channels).
To use this connection, you must have:
• (1) coaxial cable for cable/antenna connection; (2) for cable box
• (3) audio/video cables
To connect:
1. Connect cables as shown.
2. Return to
Using This Connection
Tune your TV to its video input channel. Use of TV•VCR button on the
VCR (ANTENNA on remote) is not required.
Auto TV/VCR Setting:
• Set the Auto TV/VCR feature to OFF.
To play a tape:
1. Insert a tape.
2. If necessary, press PLAY.
To record one program and watch another:
1. Begin recording a program using one of the recording features.
2. Select a different channel on the TV.
First Things First
, then follow the steps.
61
Page 64
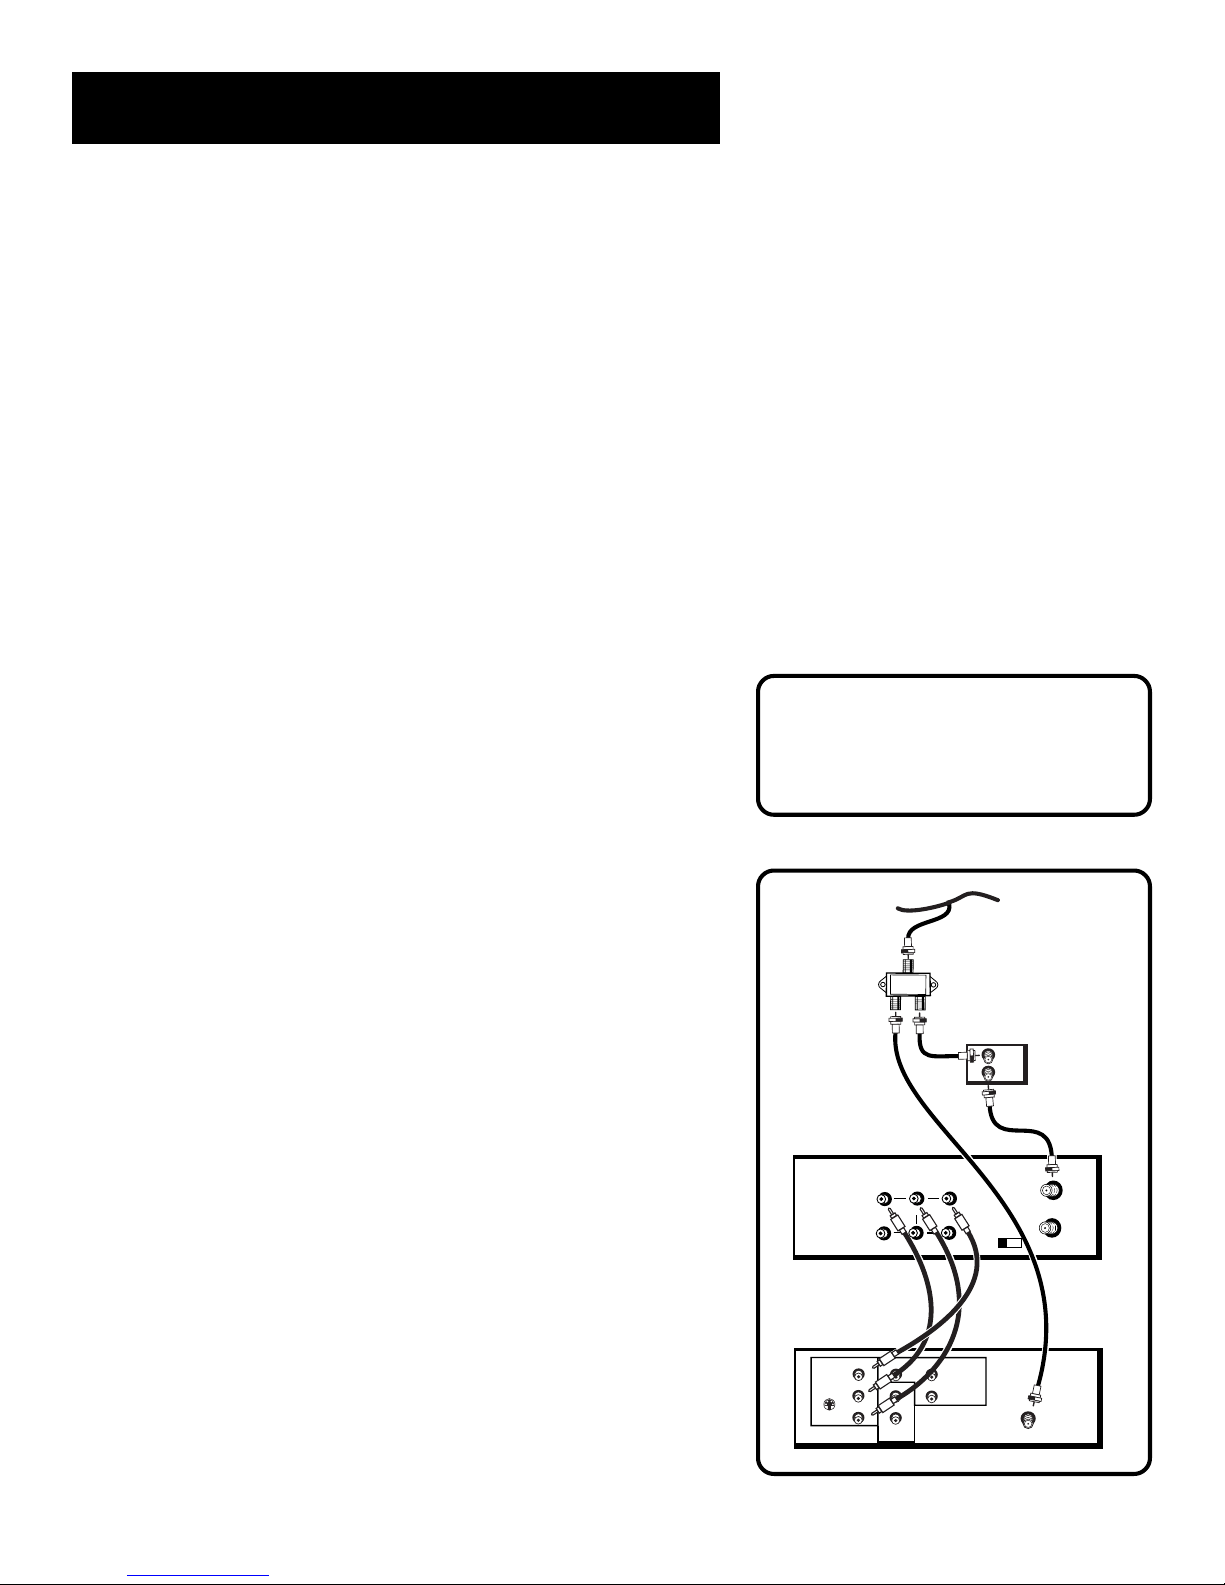
Connections
VCR
TV
3 CH. 4
IN FROM
ANT.
VIDEO
OUT
R-AUDIO-L
OUT TO TV
VHF/UHF
MONO
IN 1
INPUT 1
VIDEO
R
L/MONO
S-VIDEO
AUDIO
OUTPUT
R
L
INPUT 2
VIDEO
R
L/MONO
CABLE/
ANTENNA
CABLE
CABLE BOX
SPLITTER
I
OU
TV With Audio/Video Jacks and Cable
Box to Unscramble Pay Channels Only
This connection assumes:
• You are using a cable box only to unscramble premium channels.
• Your TV has audio/video input jacks.
This connection provides:
• Stereo sound playback from VCR.
• Recording a scrambled or unscrambled channel through the cable
box while watching an unscrambled channel.
To use this connection, you must have:
• (3) coaxial cables
• (3) audio/video cables
• (1) splitter
All scrambled channels must be
viewed through the VCR.
To connect:
1. Connect cables as shown.
2. Return to
First Things First
, then follow the steps.
Using This Connection
Tune your TV to its video input channel. Use of TV•VCR button on the
VCR (ANTENNA on remote) is not required.
Auto TV/VCR Setting:
• Set the Auto TV/VCR feature to OFF.
To play a tape:
1. Insert a tape.
2. If necessary, press PLAY.
To record a scrambled or unscrambled program and watch
another unscrambled program:
1. Begin recording a scrambled or unscrambled program through the
2. Select an unscrambled channel on the TV.
cable box using one of the recording features.
For Cable Box Setup, select ALL
channels (see Setting Up the VCR).
62
Page 65
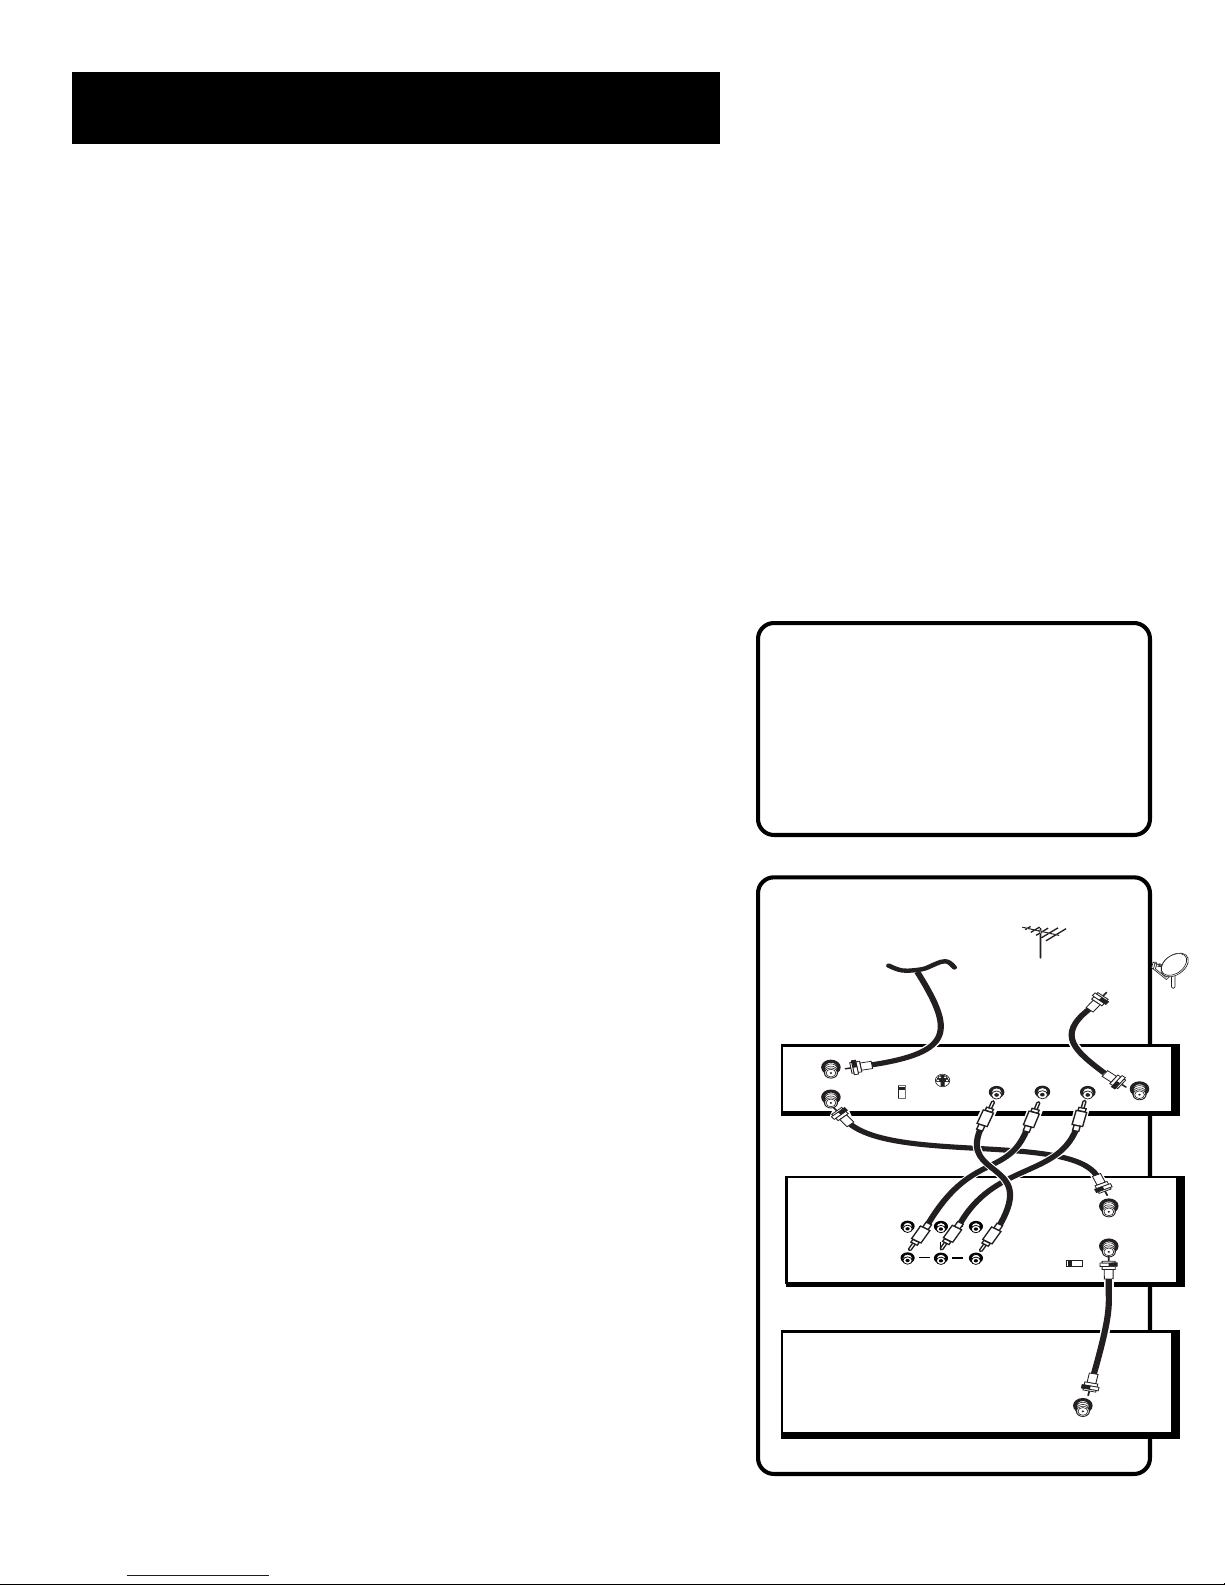
Connections
3 CH. 4
VIDEOR-AUDIO-L
IN 1
OUT
IN FROM
ANT.
OUT TO TV
VHF/UHF
MONO
SATELLITE RECEIVER
VCR
TV
SATELLITE
CABLE,CABLE BOX OR ANTENNA
IN FROM ANT
OUT TO
CH
CH
SATELLITE
IN
S-VIDEO
L
R
AUDIO
VIDEO
CABLE/
ANTENNA
TV With RF Jack and Digital Satellite
Receiver
This connection assumes:
• You have a basic digital satellite system and your TV does not have
audio/video input jacks.
This connection provides:
• Mono sound playback from VCR, recording from a satellite
receiver, and recording one off-air or cable channel while
watching another.
To use this connection, you must have:
• (4) coaxial cables and (3) audio/video cables
To connect:
1. Connect cables as shown.
2. Return to the
Using This Connection
• Tune your TV to channel 3 or 4, whichever one you selected with
the 3CH.4 switch on the back of the VCR.
First Things First Section
, then follow the steps.
Caution
The unauthorized recording of
satellite broadcasts, television
programs, or other copyrighted
materials may infringe the rights
of others.
• To record and watch off-air or cable, tune your VCR to channel 3
or 4 whichever one you selected with the CH3/CH4 switch on the
back of the receiver. Turn off receiver.
• To watch and/or record from the digital satellite receiver, tune your
VCR to its line input (L1 if you have connected the receiver to the
back jacks or L2 for the front jacks).
Auto TV/VCR Setting:
• Set the Auto TV/VCR feature to ON.
To play a tape:
1. Insert a tape.
2. If necessary, press PLAY.
To record one off-air or cable program and watch another
1. Turn off the digital satellite receiver and begin recording a program
using a recording feature.
2. Press TV•VCR on the VCR (ANTENNA on remote) and select a
different channel on the TV.
To record a digital satellite receiver program
1. Turn on the receiver, tune the VCR to its line input, and begin
recording a program using a recording feature.
63
Page 66
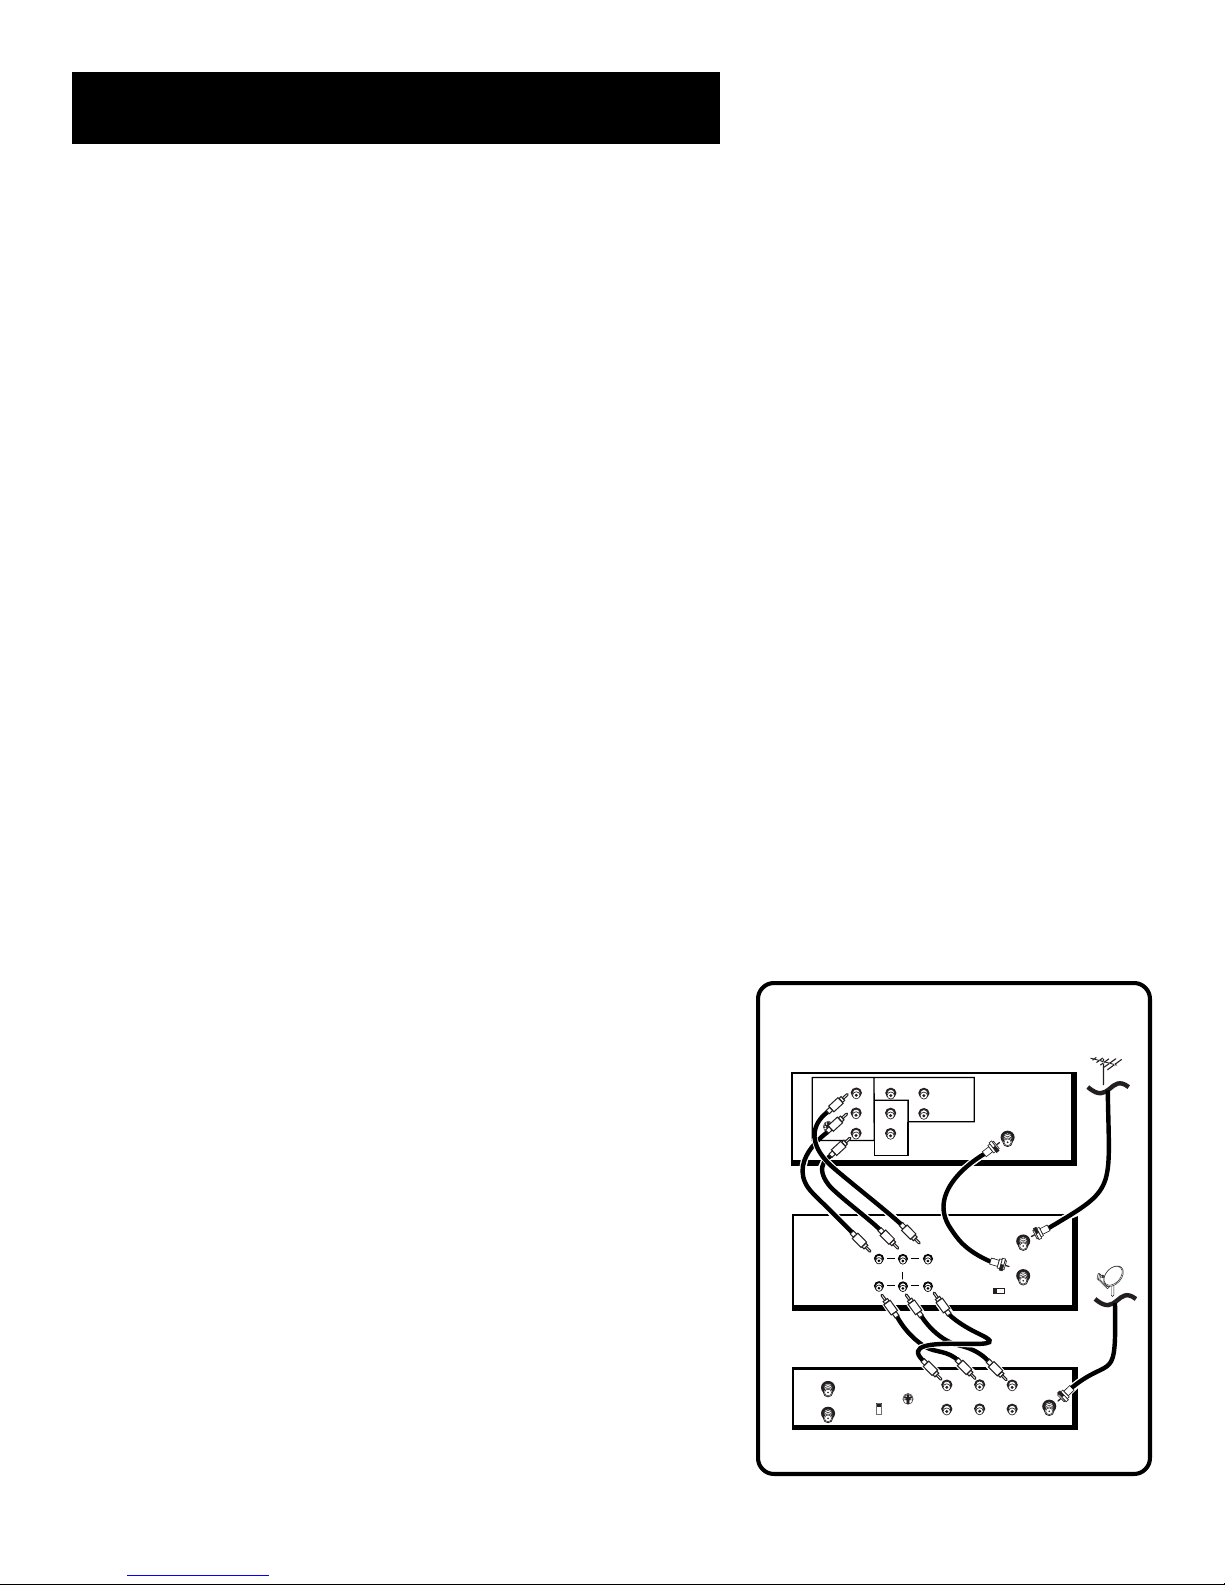
Connections
VCR
SATELLITE
SIGNAL
CABLE OR
ANTENNA
IN FROM ANT
OUT TO TV
CH
CH
SATELLITE
IN
S-VIDEO
L
R
AUDIO
VIDEO
3 CH. 4
VIDEOR-AUDIO-L
IN 1
OUT
IN FROM
ANT.
OUT TO TV
VHF/UHF
MONO
TV
CABLE/
ANTENNA
INPUT 1
VIDEO
R
L/MONO
S-VIDEO
AUDIO
OUTPUT
R
L
INPUT 2
VIDEO
R
L/MONO
SATELLITE RECEIVER
TV With Audio/Video Jacks and Digital
Satellite Receiver
This connection assumes:
• You have an advanced digital satellite system and your TV has
audio/video input jacks.
This connection provides:
• Stereo sound playback from VCR, recording from receiver while
watching cable or off-air channel, and recording one cable or offair channel while watching another.
To use this connection, you must have:
• (3) coaxial cables and (6) audio/video cables
To connect:
1. Connect cables as shown.
2. Return to the
First Things First Section
, then follow the steps.
Using This Connection
• Tune your TV to its video input to record (or watch) the VCR or
satellite receiver.
• To record from the digital satellite receiver, tune your VCR to its
line input (L1 if you have connected the receiver to the back jacks
or L2 for the front jacks).
Auto TV/VCR Setting:
• Set the Auto TV/VCR feature to OFF. Use of TV•VCR button on the
VCR (ANTENNA on remote) is not required.
To play a tape:
1. Insert a tape.
2. If necessary, press PLAY.
To record one off-air or cable program and watch another:
1. Begin recording a program using a recording feature.
2. Select a different channel on the TV.
To record a digital satellite receiver program and watch a cable
or off-air channel:
1. Turn on the receiver, tune the VCR to its line input, and begin
recording a program using a recording feature.
2. Select a different channel on the TV.
64
Page 67

Reference
This section gives you some additional information
about the VCR, including a description of the unit’s
controls and display.
You also will find a Troubleshooting Tips section, which
might help to resolve some of those simple problems.
Finally, this section contains your warranty information.
First Things First
1
➣
Setting Up the VCR
2
➣
VCR Basics
3
➣
Recording
4
➣
Program The Remote
5
5
Other Features
6
➣
➣
Connections
7
7
➣
Reference
8
65
Page 68
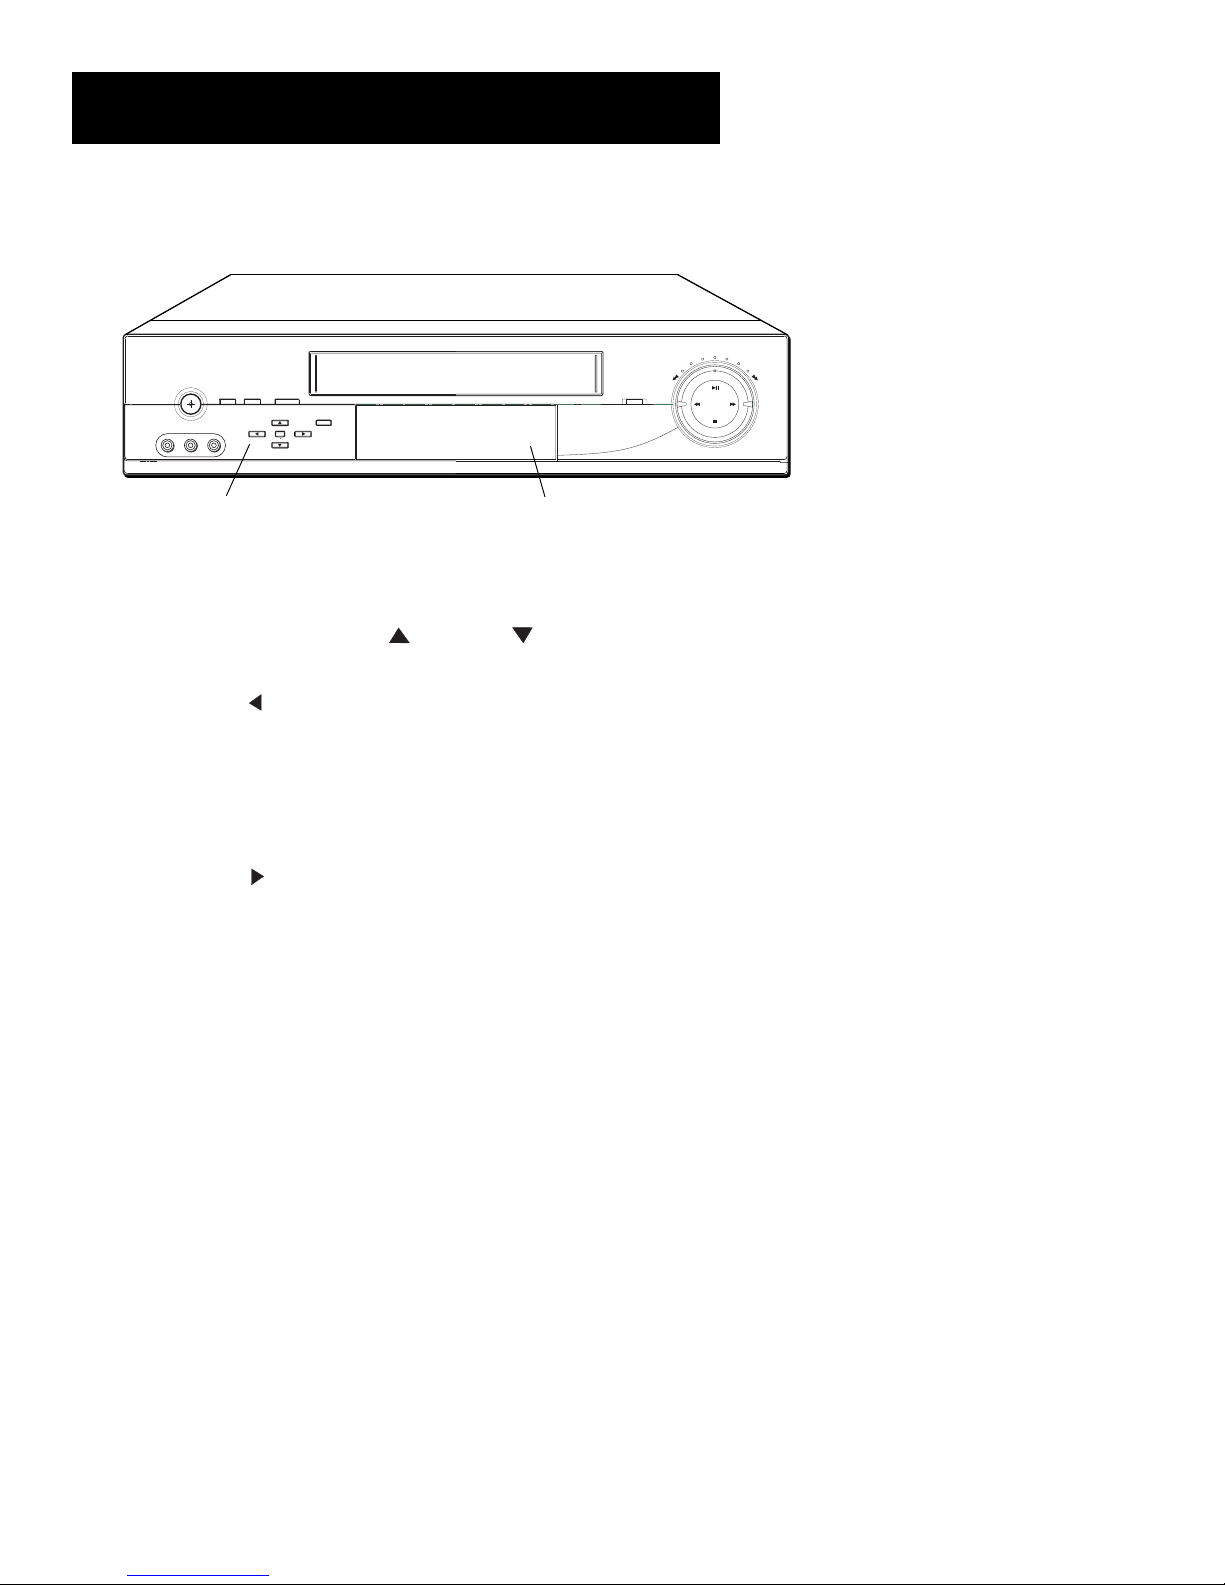
Reference
Front Panel
ON . OFF
TV.VCR
R
-AUDIO-
VIDEO
L
MONO
EJECT
INPUT
CHANNEL
TRACKING
INFO
CLEAR
MENU
CHANNEL
(Front Panel door open)
RECORD
PROG. EXP.
Remote Sensor
PLAY/PAUSE
REV FWD
STOP
AUDIO (R and L MONO) and VIDEO In Jacks Receives signals from another component like a VCR or camcorder
when it is connected to these jacks. Use INPUT to select L2 to record from these jacks.
CHANNEL•TRACKING and Up and Down Selects next higher or lower channel in the VCR’s channel memory.
Adjusts tracking when a tape is playing. Used for program express and moving through menu system.
CLEAR and Left Resets time counter to 0:00:00. Allows you to change entries when setting the clock or programming
the timer. Used for program express and navigating through the menu system.
EJECT Ejects the tape.
FWD Forwards the tape when the VCR is stopped. Searches the picture forward during playback. Starts slow motion
during play-pause and increases slow-motion speed.
INFO and Right Displays information on the TV screen. Used for program express and navigating through the menu
system.
INPUT Selects between the line inputs and VCR’s tuner. Line input refers to the signal coming from the component
connected to the audio/video input jacks on the back or front of the VCR.
MENU Displays and accesses VCR’s menu system on the TV screen.
PLAY/PAUSE Plays a tape. Pauses action for viewing during playback. Pauses recording to prevent recording of
unwanted scenes.
PROG. EXP. Used for program express.
ON•OFF Turns the VCR on or off.
RECORD Starts VCR recording. Used for express recording.
Remote Sensor Receives signals from the remote control. Aim the remote at this sensor.
REV Rewinds the tape when the VCR is stopped. Searches the picture in reverse during playback. Starts slow motion
during play-pause and decreases slow-motion speed.
Shuttle Ring Turn clockwise to search forward or counterclockwise to search in reverse. Turn farther (over halfway)
clockwise to fast forward or farther counterclockwise to rewind.
STOP Stops the normal functions such as record, playback, rewind, fast-forward, or pause.
TV•VCR Switches the picture signal so that it either comes from the VCR or the TV cable/antenna signal.
66
Page 69
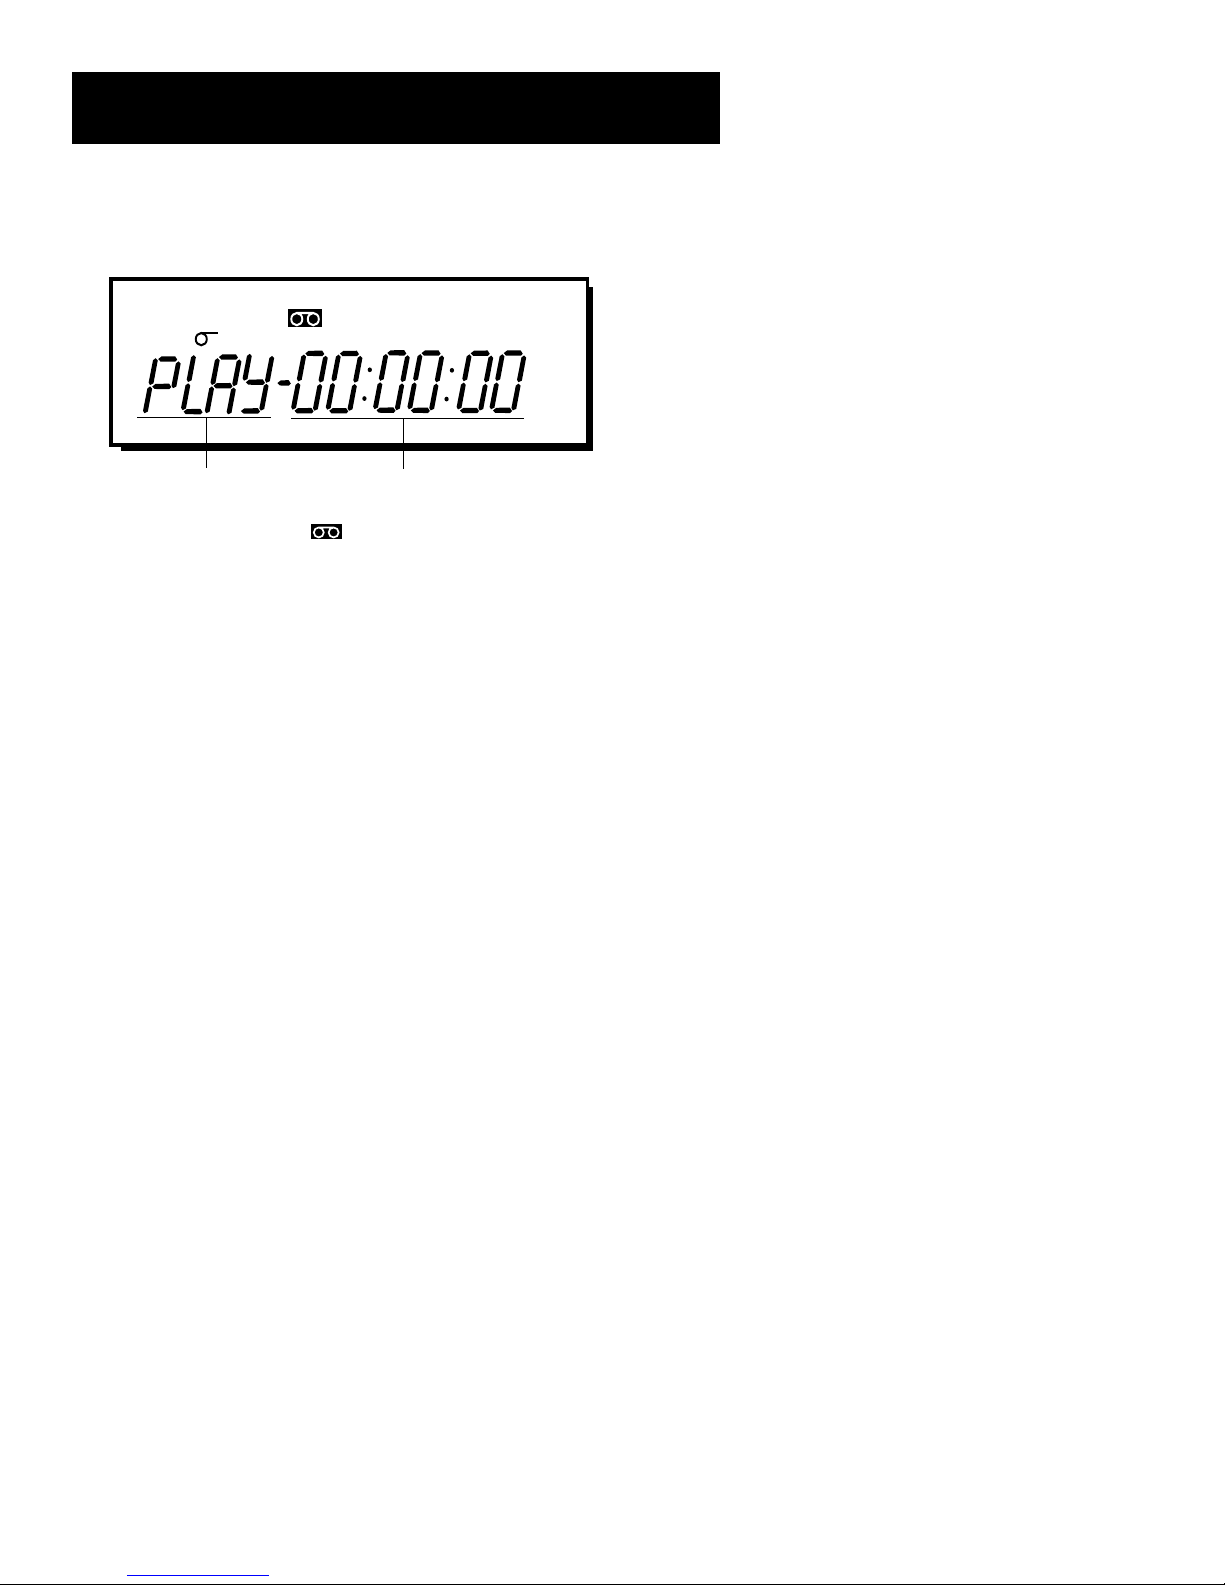
Reference
Display Panel
SAPSLPVCR Hi-Fi STEREO
AM
PM
Functions
Cassette-In Indicator ( ) Cassette is inserted in VCR. Flashes when timer recording set and no tape in VCR.
Clock/Counter Displays current time or time counter or channel numbers when switching channels.
Function Displays:
BYE Power off
CHAN, START, END, DATE, SPEED, SAVE, and SAVED Appear during program express.
FFWD Fast forward
HELLO Power on
LOCK Appears for Pro-Tect Plus™ locking feature
OVERLAP Timer programs overlap
PLAY Tape is in playback mode.
REC Record
REW Rewind
SRCH+ Forward picture search
SRCH– Reverse picture search
STILL Playback is paused; still-frame displayed
SLOW Tape playing back in slow motion
STOP Tape is in stop mode
TAPE Timer recording set, VCR turned off, and no tape in VCR
T-REC Timer recording in progress
X-REC Express recording in progress
Clock/Counter
Hi-Fi Indicator Lights when HI-FI or MIX is selected in the audio menu.
Speed Indicator (SP or SLP) Displays the recording speed.
SAP Indicator Lights when SAP is selected in the audio menu and Reception menu is set to SAP.
STEREO Indicator Lights when the station you are tuned to is broadcasting stereo and Reception menu is set to STEREO.
VCR Indicator (Applies only if the VCR Viewing Channel is 3 or 4). Press the TV•VCR on the VCR (ANTENNA on remote)
to turn on or off.
• VCR indicator on: Picture from VCR.
• VCR indicator off: Picture from TV channel.
67
Page 70
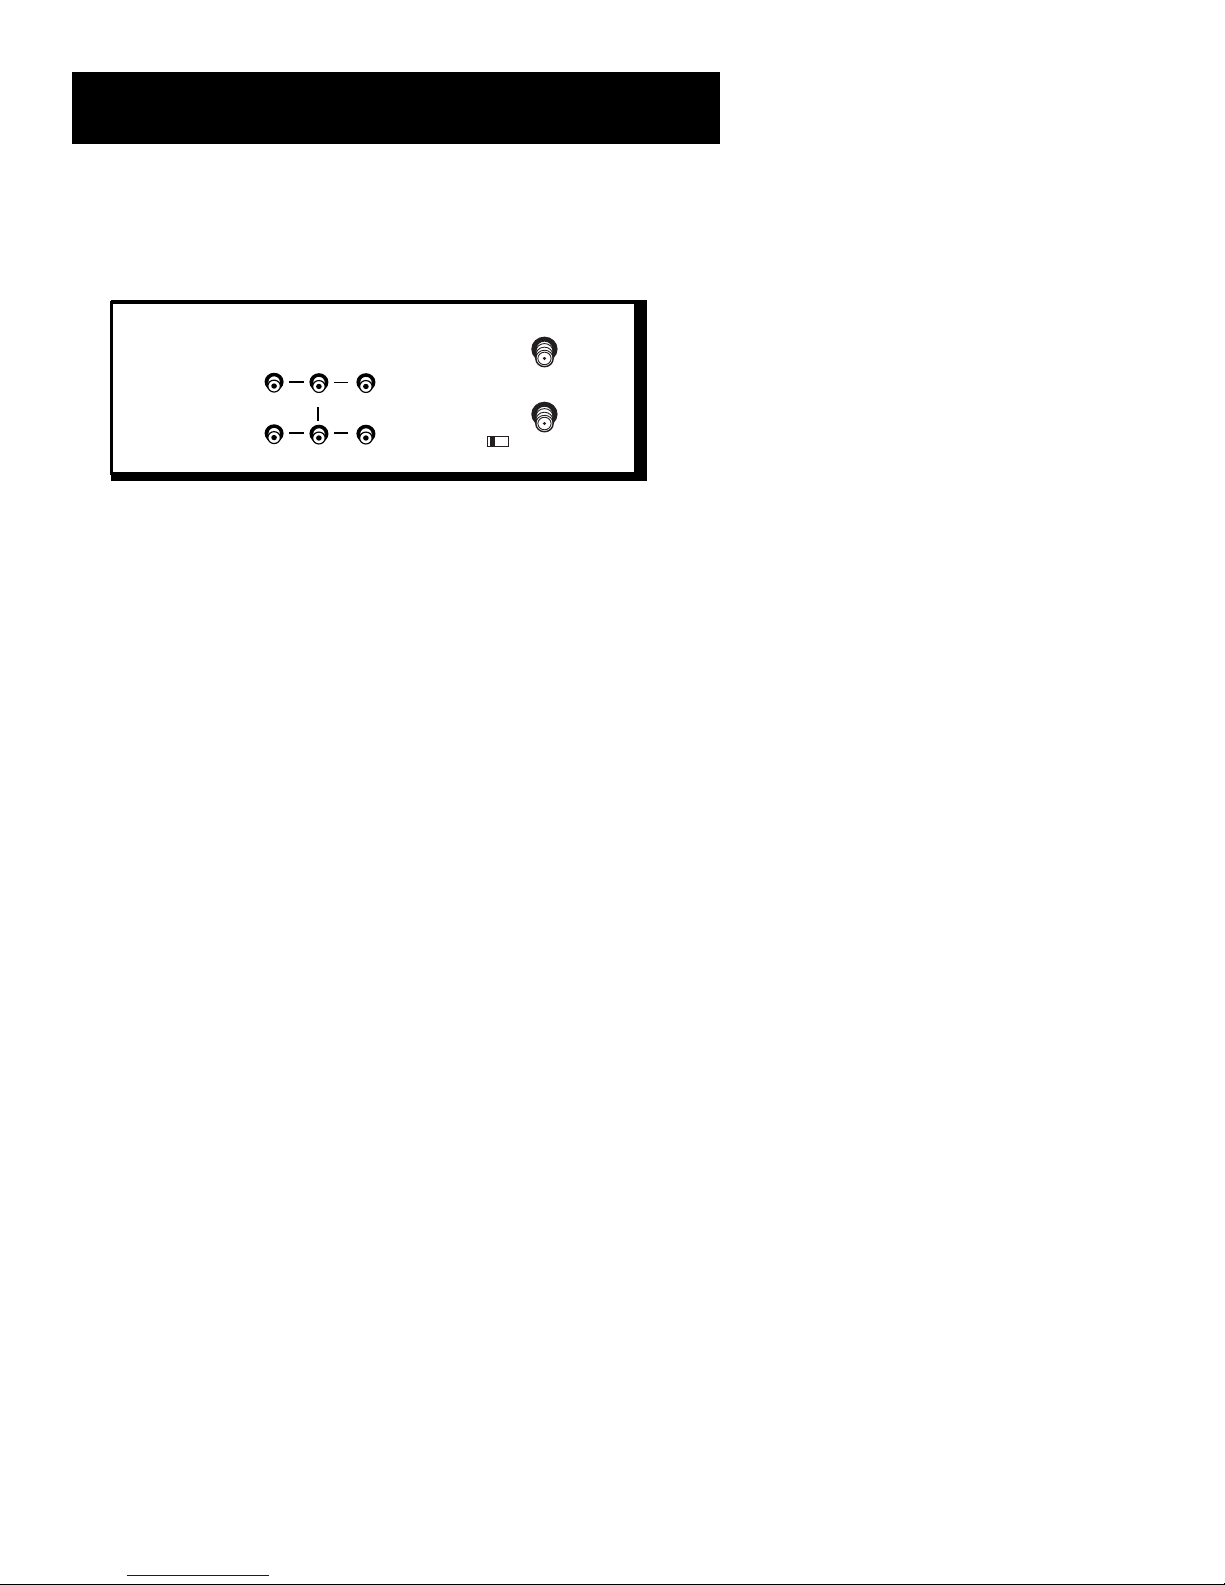
Reference
Back Panel
IN FROM
ANT.
VHF/UHF
OUT TO TV
3 CH. 4
OUT
IN 1
VIDEOR-AUDIO-L
MONO
3CH.4 Switch Selects the channel to which you will tune the TV to
see the VCR picture if you connect the VCR using one of the basic
hookups.
AUDIO (R and L/MONO) and VIDEO IN 1 Jacks Receives signals
from another component, like a VCR or camcorder, when it is
connected to these jacks. Use INPUT to select L1 to record from
these jacks.
AUDIO (R and L) and VIDEO OUT Jacks Sends signals from VCR
to another component, like a TV or VCR, when it is connected to
these jacks.
IN FROM ANT. Jack Receives a signal from an antenna or cable
system when attached.
OUT TO TV Jack Passes signal to TV using the cable supplied.
68
Page 71

Reference
Questions and Answers About
COMMERCIAL ADVANCE
Will commercials be scanned through only on playback of recordings?
Yes. The VCR does not rewind and mark commercial segments until after recording is finished.
How fast does the COMMERCIAL
breaks?
In SLP tape speed, a 3-minute commercial break is scanned through in approximately 8-12 seconds. In SP, it takes about
25-35 seconds.
Are commercials still recorded if I want to watch them?
Yes. The recorded program, including commercials, can be viewed by setting the Playback feature to MANUAL.
What if the VCR scans forward through part of my program?
Simply rewind the tape to just before the skipped segment, and press PLAY to view the program.
Once a recording has been marked, does COMMERCIAL
time the tape is played?
Yes. If the Playback feature is set to AUTO, the marked commercials should be skipped each time the tape is played in a
COMMERCIAL ADVANCE VCR.
After marking commercials, is the tape left at the beginning or end of the
recording?
The tape is left at the end of the recording so it is in position to begin additional programmed recordings.
Does the marking process interfere with other programmed recordings?
ADVANCE VCR scan through the commercial
ADVANCE work each
No. If two or more recordings are programmed together without sufficient time to mark the first recording, marking will
take place after all recordings are completed.
What happens if the marking process is interrupted?
Marking can be interrupted to allow use of the VCR. Marking will resume again when the VCR’s power is turned off as
long as the tape has not been ejected from the VCR.
Does COMMERCIAL ADVANCE work in all recording speeds?
Yes, COMMERCIAL ADVANCE works in SP and SLP.
Will COMMERCIAL ADVANCE marked recordings work in non-Commercial
Advance VCRs?
A COMMERCIAL ADVANCE marked recording will play in a non-commercial advance VCR, but commercials will not
automatically be skipped.
69
Page 72

Reference
Troubleshooting Tips
No power
• Check to make sure it is plugged into an operating outlet.
• Check to make sure your connections are correct.
VCR does not respond to remote
• Press VCR1 (VCR2) to set remote to control the VCR.
• Check to make sure there are no objects between the VCR and remote.
• The batteries may need changing.
• Make sure to press the VCR1 or VCR2 button on the remote to operate the VCR—whichever one corresponds to the Remote
VCR1/VCR2 setting.
• Remove batteries for at least one minute, then replace them. This resets the remote, so it may require reprogramming.
Remote no longer controls a ProScan, RCA, or GE TV
• Press TV to set remote to control a compatible TV.
• Check to make sure the remote is programmed to control an ProScan, RCA, or GE TV.
Poor or no picture for normal TV viewing
• Check to make sure the VCR indicator is off.
• Check to make sure the TV is switched to an active channel.
• Check to make sure the antenna connections are secure and correct.
Noisy or no picture during playback
• Press TV•VCR on VCR (ANTENNA on remote) to turn VCR indicator on.
• Check TV channel selected (3 or 4) to make sure it matches the channel selected with 3CH.4
back of VCR.
• Check to make sure the TV’s fine tuning is correct for the channel you have selected.
• Check video cable connections between VCR and TV monitor.
• Check to make sure the TV monitor is set to video input.
• Try another tape.
• Some noise/streaks are normal during search, stop action, frame advance, and slow-motion playback.
switch on
Streaks in picture during normal playback
• Press one of the TRACKING buttons to move streaks up or down for the best picture.
• Check to make sure the tape is of good quality and not worn out.
Time counter not working or time counter not working in search modes
• The time counter does not advance during unrecorded portions of tape. When an unrecorded segment of tape is encountered, the
time counter will hold its count until recorded material is detected again.
• A minus (–) will appear in front of the time if you rewind the tape farther back than a counter reading of 0:00:00.
70
Page 73

Reference
Will not record or play
• Check to make sure there is a tape in the VCR.
• Try ejecting and reinserting the cassette.
• Check to make sure the tape is not broken.
• Check to make sure the VCR is not in pause mode. Press PAUSE or PLAY to return to normal playback.
• Check the Pro-Tect Plus™ feature.
Will not record
• Check to make sure the safety tab is intact.
Rewind does not operate
• Check to make sure the tape is not already rewound.
VCR Plus+ or timer recording not made or wrong program
recorded
• Check to make sure the correct VCR Plus+ code is entered.
• Check to make sure the cable box or satellite receiver was turned on when recording was to begin.
• Check to make sure the program was entered correctly (wrong channel or times).
• Power interruption. Reset the clock.
• Check to see if time and date are correct—including AM/PM.
• Check to make sure the program did not exceed the tape’s length or the tape was not rewound beforehand.
• Check to make sure the VCR was turned off at the time recording was to start.
• Check to make sure there was a tape in the VCR and the cassette’s safety tab was intact.
• VCR ejects cassette when the end of the tape is reached during a timer recording.
• Check to make sure VCR Plus+ setup was completed correctly.
Clock shows incorrect time or date
• Power interruption. Automatic clock set was not turned on or did not work properly. Check time zone and
daylight-savings settings.
• Make sure VCR or cable box is tuned to channel carrying XDS information.
• Auto clock set is not supported by digital satellite receivers. Set the clock manually.
Time did not adjust for daylight-saving time
• Check to make sure daylight-saving feature is set correctly.
VCR makes noise when stopped
• VCR is removing tape from heads. This is normal. The head cylinder inside the VCR will continue to rotate for
a few minutes after you put the VCR in the stop mode.
Will not AUTO CHANNEL SEARCH active channels correctly
• Check to make sure the antenna connections are secure and correct.
• Check to make sure the Signal Type: CABLE/ANTENNA feature is set correctly.
• If Detect Automatically was selected for the Signal Type in the AUTO CHANNEL SEARCH menu, try using
either CABLE TV or ANTENNA instead.
• May not be necessary if using a cable box for all channels. Contact your local cable company for more
information.
71
Page 74

Reference
Tape plays back in slow motion
• Press PLAY to return to normal playback.
Cassette with safety tab removed does not start to play automatically
• Check to make sure the Auto Play ON/OFF feature is set to ON.
TIMER or TAPE indicator flashes
• Check to make sure there is a cassette in the VCR when a timer recording is set.
Time counter disappears during searching
• This is normal.
On-screen menus appear in English or French
• Check LANGUAGE feature.
No stereo sound during playback
• Check to make sure the Tape Playback feature is set to HI-FI to hear stereo sound during playback.
• Must use the AUDIO/VIDEO jacks on the back of the VCR to hear stereo sound.
Stereo audio too noisy
• Stereo signal is weak. Set Reception: STEREO/SAP/MONO feature to MONO.
• Press one of the TRACKING up or down buttons to minimize the noise.
Index and Zero Search features do not operate
• Check to see if MOVIE ADVANCE feature is activated.
Cannot access MOVIE ADVANCE feature
• The video cassette must have the safety tab removed and the recording must be in SP speed.
• Home recording was selected for the tape type in the on-screen displaty. Eject cassette and reinsert.
VCR forwards through commercials or momentarily displays a blue
screen during playback
• Commercial Advance feature is set to AUTO. Set it to MANUAL.
Commercial Advance feature does not mark commercials when:
• The marking feature is set to OFF in the commercial advance menu. Set it to ON.
• A recording is less than 15 minutes or the commercial is longer than one minute.
• A single isolated commercial can not be marked.
• Recording started in the middle of a commercial segment.
• A commercial group within the first or last two minutes of a recording.
• Accuracy and effectiveness can vary depending on the program content and the characteristics of the commercials.
• A commercial is between 30-and-45 seconds and 45-and-60 seconds.
• Effectiveness may vary when local television stations insert their own commercials.
Commercials recorded even though Commercial advance feature was
set to ON.
• Commercial advance is designed to record the commercials, mark them, and then skip over them during playback.
72
Page 75
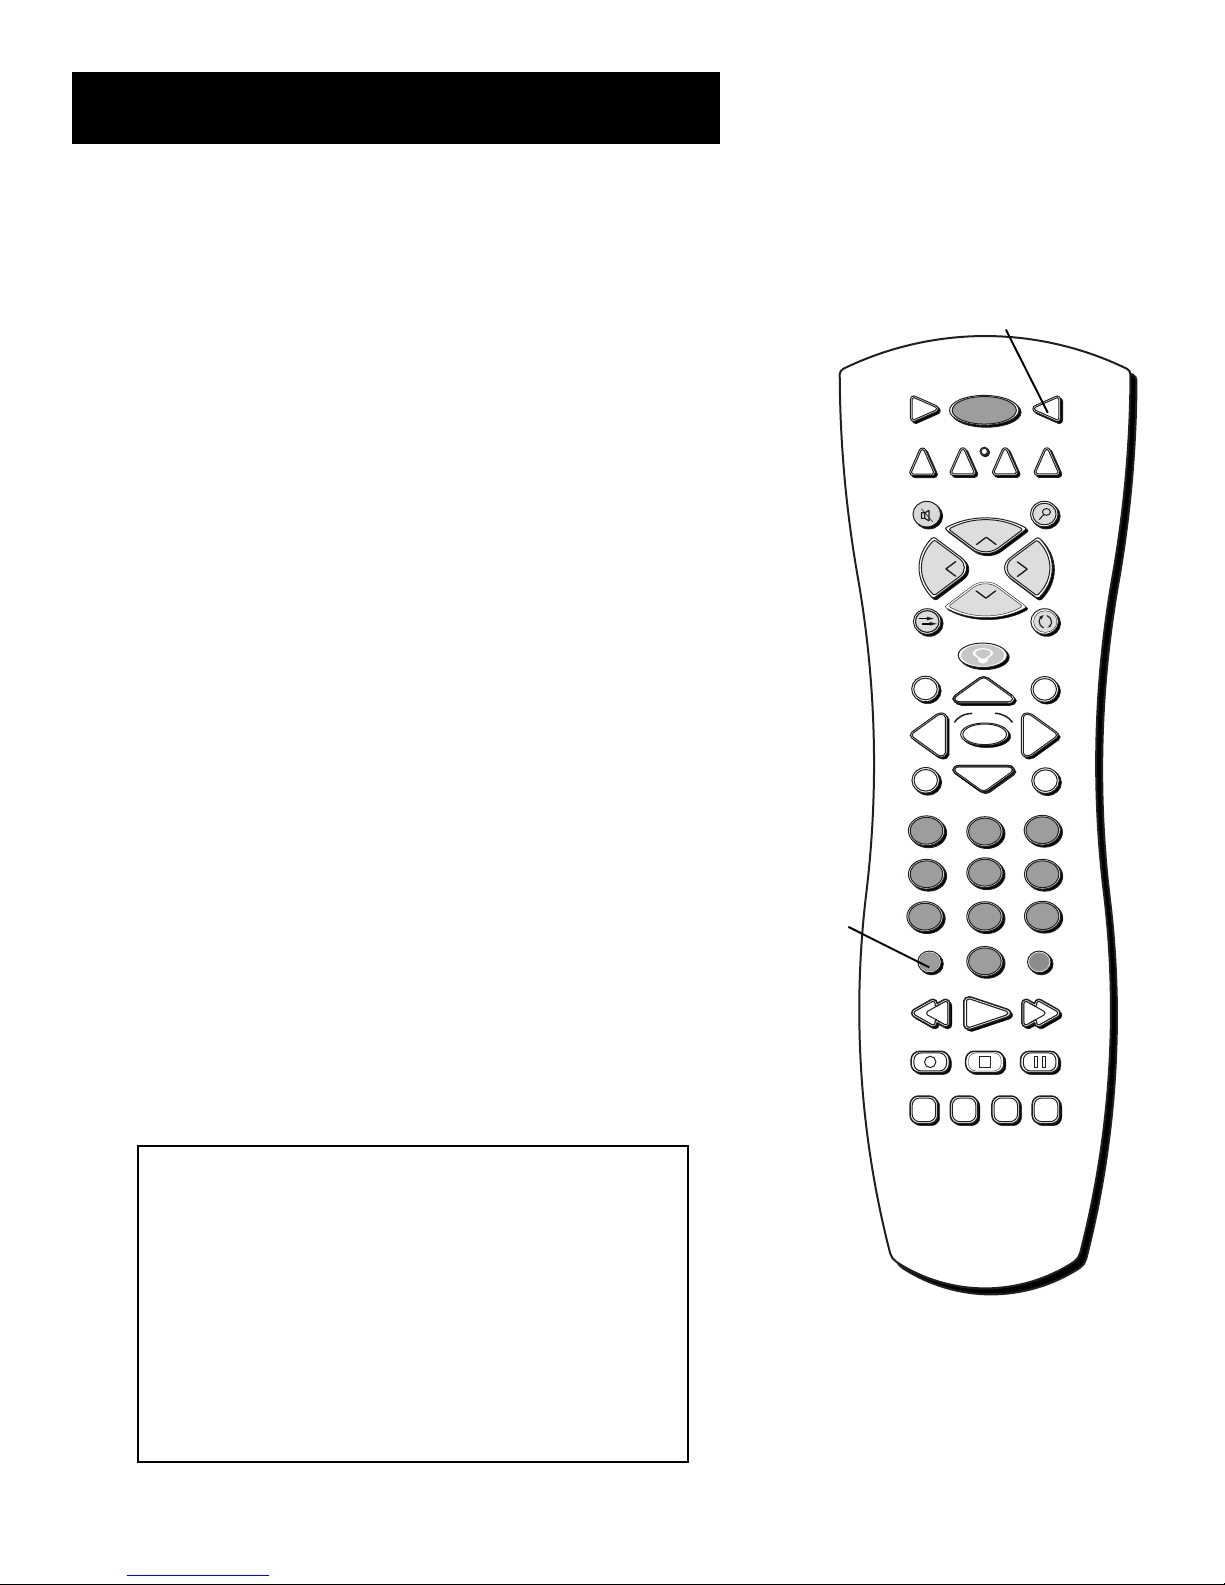
Reference
How to Find Your TV’s
Video Input Channel
You need to tune your TV to the Video Input Channel if you are using
the VCR’s AUDIO/VIDEO OUT jacks to connect to the TV’s AUDIO/
VIDEO INPUT jacks. You must select this “channel” before you can
see the VCR’s menus, the cable or antenna reception, and the content
that’s on a tape.
VCR1
DVD
TV
Button
ON • OFF
VCR2
AUX
TV
SAT • CABLE
The Video Channel on TVs varies for different brands and different
models. Below are some steps to try:
• If your TV brand is RCA, GE, or PROSCAN, press the TV button on
the remote control that came with the VCR. Then press the INPUT
button on the remote.
• If you have another brand of TV, consult the section, Programming
The Remote, to see if the VCR’s remote control can be set to
control your TV. If so, follow the step above.
If those options do not work, try the following ideas. You might access
the Video Input Channel by:
• pressing a button on the remote (see table below)
• selecting the channel from the TV’s menu system
(see table below)
• tuning directly to the channel by selecting a specific channel
number (see table below)
• going through all the channels in the channel list by pressing the
channel up or down buttons on the TV.
INPUT
Button
SPEED
GUIDE
MENU
1
4
7
MUTE
L
O
V
INPUT
RECORD
SEARCH
CH +
V
O
L
CH -
GO BACK
INFO
OK
CLEAR
3
2
5
6
89
0
ANTENNA
PLAY FORWARDREVERSE
STOP PAUSE
Some common scenarios are listed in the Video Input Channel
Variations table that follows:
Video Input Channel Variations
Button/Switch Button on the Channel
on the TV TV Remote Number
VIDEO VID 1 00
SIGNAL LINE 90
VID 1 VID 91
VID 2 VIDEO 92
S-VID S-VID 93
S-VIDEO INPUT VID 1
S-VIDEO VID 2
SOURCE
AUX
- TRACKING +
EDIT
FR.ADV
73
Page 76

Reference
Specifications
Format: VHS
Record/Playback Video: 4-head
System: Audio: VHS Hi-Fi record/playback
system
Video Signal System: EIA standard: NTSC color
Antenna: 75-ohm external VHF/UHF combined
antenna terminal
Tuner: USA: 181 channels capability*
(125 cable channels)
Canada: 178 channels capability*
(122 cable channels)
Type: AutoProgramming frequency synthesis
Power Requirement: 120V AC, 60 Hz
Power Consumption: 23 watts (standby < 3.3 watts)
Dimensions: 3.7 inches high (93 mm)
17 inches wide (430 mm)
11.8 inches deep (300 mm)
Weight: 8.2 pounds (3.7 kg)
Other: Automatic head cleaner
Storage Temperature - 22˚F to +149˚F
Range: (-30˚C to +65˚C)
Operating +41˚F to +104˚F
Temperature Range: (+5˚C to +40˚C)
*Check your cable company‘s compatibility requirements.
Cleaning the VCR
Use a soft cloth or dusting attachment of your vacuum cleaner to dust
your VCR. Remove dust from the ventilation holes on the top, back,
sides, and bottom of the cabinet.
Plastic surfaces are easily scratched and can be marred by alcohol and
various solvents. Avoid excessive use of oil-based furniture polishes
since the materials used in the cabinet will accumulate more dust. We
recommend using a nonabrasive, antistatic cleaner and polisher.
74
Specifications are subject to change.
Page 77

Reference
Limited Warranty
What your warranty covers:
Any defect in materials or workmanship.
For how long after your purchase:
• 6 months for labor charges.
• One year for parts.
The warranty period for rental units begins with the first rental or 45 days from date of shipment to the rental firm,
whichever comes first.
What we will do:
• Pay any Authorized ProScan VCR Service Center the labor charges to repair your VCR.
• Pay any Authorized ProScan VCR Service Center for the new or, at our option, refurbished replacement parts
required to repair your VCR.
How you get service:
• Take your VCR to any Authorized ProScan VCR Service Center. To identify your nearest Authorized ProScan VCR
Service Center, ask your dealer, look in the Yellow Pages, or call 1-800-PROSCAN.
• Show the Authorized Service Center Representative your evidence of purchase date or first rental.
• Pick up your VCR when repairs are completed.
What your warranty does not cover:
• Customer instruction. (Your Owner’s Manual clearly describes how to install, adjust, and operate your VCR.
Any additional information should be obtained from your dealer.)
• Installation and related adjustments.
• Signal reception problems not caused by your VCR.
• Damage from misuse or neglect.
• Cleaning of video/audio heads.
• Batteries.
• A VCR that has been modified or incorporated into other products or is used for institutional or other
commercial purposes.
• A VCR purchased or serviced outside the U.S.A.
• Acts of God, such as but not limited to lightning damage.
Product Registration:
• Please complete and mail the Product Registration Card packed with your VCR. It will make it easier to contact
you should it ever be necessary. The return of the card is not required for warranty coverage.
How State Law relates to warranty:
• This warranty gives you specific legal rights, and you also may have other rights that vary from state to state.
If you purchased your VCR unit outside the United States:
• This warranty does not apply. Contact your dealer for warranty information.
75
Page 78

IndexReference
Glossary
AutoEdit Lets you control two VCRs simultaneously with a single
remote. Useful when making a copy of a video tape.
A/V Cables & Jacks Commonly called “RCA-type” cables. Improves
picture and sound quality. Required for stereo audio.
Code Search Simplifies programming the remote control by not
requiring you to identify and enter a code to operate a component.
Commercial Advance Lets you skip commercials during video
tape playback.
EnergySaver Automatically turns the VCR off after a (user definable)
period of inactivity, cutting energy consumption.
Express Recording (XPR) A method of timer recording that lets you
tape the remaining portion of a program.
Movie Advance Helps you locate certain parts of prerecorded
movies (rented or purhased).
Program Express Lets you quickly program a timer recording using the
VCR’s front panel buttons instead of the on-screen menu.
Pro-Tect Plus™ Allows you to “lock” the VCR so that the front panel
and remote control buttons don’t work. Useful for protecting timer
recordings.
QuickSet Guide An interactive, menu-based guide which helps you
set up a number of your VCR’s features. Also accessible through the
main on-screen menu.
SAP (Second Audio Program) A second sound track that may be
included with a stereo broadcast. Usually used for foreign language
dubs of programs.
Shuttle Ring A control on the VCR’s front panel that allows variable-
speed control of picture search.
VCR Channels List A “list” of channels you want the VCR to be able
to tune when using the CH+/- buttons.
VCR Plus+ Simplifies timer recording by entering a PlusCode
Programming Number from an available TV listing.
XDS Extended Data Services—a system where time information is
encoded in a TV broadcast, allowing the VCR’s clock to be set
automatically.
XPR See
Express Recording
.
76
Page 79

Index
Index
A
Accessories
included 4
ADD/REMOVE CHANNELS screen 12
ANTENNA button
19, 23, 34, 59, 60, 61, 62, 63, 64
Arrow buttons 6, 22, 23, 66
Audio
playback type 54
selecting 54
Audio code list 40
Audio features, set up 54
AUDIO menu 54
Audio only
playing back 35
recording 34
Audio/Video (A/V) jacks
5, 34, 35, 58, 59, 61, 62, 64, 66, 68, 73
Auto channel search 10
Auto clock feature 12
Auto play feature 19, 25
Auto TV/VCR feature
19, 59, 60, 61, 62, 63, 64
AutoEdit feature 36
Automatic rewind 25
Automatic tracking 25, 52
AUX button 22, 40
AUX button codes 41
Auxiliary component codes 40
Auxiliary component codes for remote 41
B
Back panel jacks 68
Back-lit remote 22
Basic recording 26
Basics, learning 21
Batteries
installing in the remote 4
Broadcast stereo TV recording 34
BYE display 67
C
Cable box codes 41
Cable box setup 9
Cables
positioning 57
types of 58
Cassette-in indicator 67
CH + and - buttons 23, 24, 38, 40
CHAN buttons 11
Channel 3/4 Switch 68
Channel 3/4 switch 5, 60, 63
CHANNEL buttons 12, 66
Channel, VCR viewing 5
Channels, adding/removing 12
CHANNELS menu 9, 11, 16, 31
Choosing a VCR connection 59
CLEAR button 23, 24, 32, 39, 51, 53, 66
Clearing timer programs 33
Clock display 67
Code search feature 38
Codes for remote 41
COMMERCIAL ADVANCE 43, 44
display 46
marking 45
menu 45
playback 46
questions and answers 69
Component buttons 22
Connecting your VCR 4
Connections 57
audio/video cable 59
choosing 59
TV with A/V jacks, cable box to unscra 62
TV with A/V jacks 61
TV with A/V jacks, satellite receiver 64
TV with RF jack only 60
TV with RF jack, satellite receiver 63
two VCRs 35
Controls
back panel 68
front panel 66
Copying and editing tapes 35
77
Page 80

Index
D
Date and time setting 12
Design specifications 74
Display panel 67
Displays, on screen 53
Dual remote with AutoEdit 36
DVD button 22
E
EDIT button 23, 36
Editing timer programs 33
EJECT button 25, 66
Eject, tape 25
EnergySaver feature 20
Express Recording (XPR) 28
F
F ADV button 23
Fast forward (shuttle ring) 50
FFWD display 67
FORWARD button
23, 25, 38, 40, 46, 49, 51, 53
FR ADV button 50
Frame advance 50
Front panel controls 66
FWD button 36, 46, 49, 51, 53, 66
I
IN (FROM ANT) jack
4, 5, 6, 19, 35, 58, 59, 60, 63, 68
Included accessories 4
Index search 51
Indicators in display panel 67
INFO button 15, 23, 24, 33, 53
INPUT button 5, 23, 30, 34, 35, 66, 73
J
Jacks
Audio/Video (A/V) 73
Jacks, types of 58
L
L1 indicator 34, 35, 63, 64
L2 indicator 34, 35, 63, 64
LANGUAGE menu 8
LED on remote 38
Left and right buttons 33, 66
Light button 22
LOCK display 52, 67
Locking feature 52
M
G
Glossary 76
GO BACK button 23, 24
GUIDE button 24
H
HELLO display 67
Hi-Fi indicator 67
78
MENU button
6, 8, 9, 10, 11, 12, 13, 14, 15, 16, 18, 23,
29, 30, 31, 32, 33, 44, 54, 66
MOVIE ADVANCE 47
MUTE button 24
N
Number buttons 6, 15, 23, 24
Page 81

Index
O
OK button 22
ON•OFF button 22, 23, 24, 38, 40, 52, 66
On-screen displays 53
OUT (TO TV) jack
4, 5, 6, 19, 35, 58, 59, 60, 63, 68
Overheating 57
OVERLAP display 67
P
PAUSE button 23, 25, 26, 35, 36, 50, 52
Picture search options 49
PLAY button
23, 25, 35, 36, 38, 46, 49, 50, 60,
61, 62, 63, 64
PLAY display 67
PLAY/PAUSE button 50, 66
Playing a tape 25
Plugging in the VCR 4
PlusCode number 31
POWER button 25
Power surges 57
PREFERENCES menu 18, 19, 44
Pro-Tect Plus locking feature 52
Problem solving 70
PROG EXP button 29, 66
Programming the remote 37
cable boxes 38
satellite receivers 38
TVs 38
Programming the remote to Control an Audio
compone
auxiliary component 40
PROGRAMS OVERLAP message 30, 32
R
REC button 36
REC display 67
Reception: STEREO/MONO/SAP feature 34, 54
RECORD button 23, 26, 28, 34, 35, 36, 66
Recording
audio only 34
basic 26
broadcast stereo TV 34
copying and editing tapes 35
Express (XPR) 28
options 27
program express 29
SAP 34
speeds 20
timer 29
timer with VCR Plus+ 31
Remote
buttons 22
installing batteries 4
programming for other components 38
sensor 66
Remote codes 41
Remote codes (other components) 41
Remote VCR1/VCR2 18
Removing/adding channels 12
REV button 36, 66
REVERSE button 23, 25, 39, 40, 49, 51, 52
Review programs screen 33
Reviewing timer programs 33
REW display 67
Rewind (shuttle ring) 50
Rewind, automatic 25
Q
QuickSet guide 5, 8
79
Page 82

Index
S
Safety tab 19, 26, 29
SAP indicator 67
SAP, recording 34
SAT•CABLE button 22, 38
Satellite receiver codes 41
Search
forward 49
reverse 49
SEARCH button 24, 46, 51, 52
Sensor, remote 66
Set up
auto play feature 19
auto TV/VCR feature 19
cable box 9
daylight-savings 14
EnergySaver feature 20
features in PREFERENCES menu 18
front panel (VCR display) feature 20
language feature 8
remote VCR1/VCR2 option 18
tape speed feature 20
time and date 12
time and date manually 15
time zone 13
using menu system 8
VCR Plus+ channels 16
Shuttle ring 50, 66
Signal type
changing 11
selecting 11
Skipping commercials 43
SLOW display 67
Slow motion 49
SLP indicator 67
Solving problems 70
SP indicator 67
Specifications 74
Speed
SLP 20
SP 20
SPEED button 20, 24, 26, 28, 32, 35
Speed indicators 67
Speeds, recording 20
SRCH+ and – display 67
STEREO indicator 67
STILL display 67
STOP button
24, 26, 28, 32, 34, 35, 36, 39, 51,
52, 53, 66
STOP display 67
Stopping a timer recording 32
T
T-REC display 67
Tab, safety 26
TAPE display 30, 32, 67
Tape eject 25
Tape playback feature 55
Tape playback: HI-FI/LINEAR/MIX 55
Tape, playing a 25
Tape speeds 20
Time and date setting 12
Time counter 53
Time counter display 53, 67
Time display on TV 53
TIME menu 13, 14, 15
Time setting
set daylight saving 14
set time zone 13
TIMER display 30, 32
Timer programs
clearing 33
editing 33
reviewing 33
Timer recording 29
stopping 32
Timer recording (VCR Plus+) 31
TIMER RECORDINGS menu 29, 33
Tips, troubleshooting 70
Tracking 52
TRACKING buttons 24, 25, 49, 52, 66
Troubleshooting tips 70
80
Page 83

Index
TV button 5, 22, 38, 73
TV codes for remote 41
TV function buttons 24
TV•VCR button
19, 34, 59, 60, 61, 62, 63, 64
TV’s video input channel 73
U
UNRECOGNIZED NUMBER... message 32
Up and down buttons 29, 33
V
Variable speed search 50
VCR button 5
VCR channels list 10
VCR function buttons 23–24
VCR indicator 19, 34, 67
VCR MAIN MENU
5, 6, 8, 9, 13, 15, 18, 29, 31, 33, 44, 54
VCR Plus+
channel list menu 16, 31
channels 16
PlusCode number 31
recording 31
system channel numbers 16
VCR PLUS+ menu 31
worksheet for channels 17
VCR viewing channel 5, 25
VCR1 button 18, 19, 22, 36, 52
VCR2 button 18, 22, 36, 52
Viewing channel 5, 67
VOL buttons 24
Z
Zero search 52
X
X-REC display 67
XDS (extended data services) information 12
81
Page 84
An RCA Entertainment Product
If your VCR needs service, please contact your dealer or the
nearest Service Center from the yellow pages. Please do not send
any products to the Indianapolis address listed in this manual or
on the carton. This will only add delays in service for your product.
10330 North Meridian Street
Indianapolis, IN 46290
©1998 Thomson Consumer Electronics, Inc.
Trademark(s)® Registered
Marca(s) Registrada(s)
Printed in Japan
TOCOM 1540764A
VQTS 3546 (A)
As an ENERGY STAR® Partner, Thomson Consumer
Electronics has determined that this product or
product model meets the ENERGY STAR® guidelines
for energy efficiency.
 Loading...