

ProScan PS8600P User Manual
USER
RISK OF ELECTRIC SHOCK
DO NOT OPEN
TO REDUCE THE RISK OF ELECTRIC SHOCK, DO
NOT REMOVE THE COVER (OR BACK). NO USER-
SERVICEABLE PARTS ARE INSIDE. REFER
SERVICING TO QUALIFIED SERVICE PERSONNEL.
This symbol indicates
'dangerous voltage" inside the
product that presents a risk of
electric shock or personal injury.
,_ This symbol indicates
important instructions
accompanying the product.
CAUTION: DVD PLAYERS USE A VISIBLE LASER BEAM WHICH COULD
CAUSE HAZARDOUS RADIATION EXPOSURE IF DIRECTED.
BE SURE TO OPERATE THE PLAYER CORRECTLY AS
INSTRUCTED.
CAUTIONS
Caution: To prevent electric shock, match wide blade of plug to
wide slot, fully insert.
Attention: Pour eviter les chocs electriques, introduire la lame la
plus large de la fiche dans la borne correspondante de la prise et
pousser jusqO au fond.
This product satisfies FCC regulations when shielded cables and
connectors are used to connect the unit to other equipment. To
prevent electromagnetic interference with electric appliances, such
as radios and televisions, use shielded cables and connectors for
connections.
I=CC NOTE (for U.S.A.):
This equipment has been tested and found to comply with the limits for a
Class B digital device, pursuant to Part 15 of the FCC rules. These limits are
designed to provide reasonable protection against harmful interference in a
residential installation. This equipment generates, uses and can radiate radio
frequency energy and, if not installed and used in accordance with the
instructions, may cause harmful interference to radio communications.
However, there is no guarantee that interference will not occur in a particular
installation. If this equipment does cause harmful interference to radio or
television reception, which can be determined by turning the equipment off
and on, the user is encouraged to try to correct the interference by one or
more of the following measures.
• Reorient or relocate the receiving antenna.
• Increase the separation between the equipment and receiver.
• Connect this equipment into an outlet on a circuit different from that to
which the receiver is connected.
• Consult the dealer or an experienced radio/TV technician for help.
This class B digital apparatus meets all requirements of the Canadian
Interference--Causing Equipment Regulations.
Product Registration
Please fill out the product registration card and return it immediately.
Returning this card allows us to contact you if needed.
Keep your sales receipt to obtain warranty parts and service and for proof of
purchase. Attach it here and record the serial and model numbers in case you
need them. The numbers are located on the back of the player.
Model No. PS8600P
Serial No.
Purchase Date:
Dealer/Address/Phone:
WARNING
To reducE; the risk of fire or shock hazard, do
not expose this DVD player' to rain or
moisture.
CAUTION
THIS PRODJCT UTILIZES A LASER. USE
OF CONTROLS OR ADJUSTMENTS OR
PERFORM,_NCE OF PROCEDURES
OTHER THAN THOSE SPF-CIFIED HEREIN
MAY RESUL.T IN HAZARDOUS RADIATION
EXPOSURE. DO NOT OPEN COVERS AND
DO NOT REPAIR YOURSELF. REFER
SERVICIr, IG TO QUALIFIED PERSONNEL.
Note:
This unit can be used only where the power
supply is AC 120 V, 50-60Hz. It cannot be
used elsewhere.
Note:
This DVD player is designed and
manufactured to respond to the Locale
Management Information. If the Locale
number of a DVD disc does not correspond to
the Locale number of this DVD player, this
DVD player cannot play the disc. The Locale
number for this DVD player is Locale #1.
Note:
This device is protected by LJ.S.patent
numbers 4,631,603 and 4,577,216 and
4,819,098 and other intellecl:ual property
rights. The use of Macrovision's copy
protection :ethnology in the device must be
authorized by Macrovision and is intended
for home and other limited pay-per-view
uses only, unless otherwise authorized in
writing by Macrovision. Reverse engineering
or disassembly is prohibited.

Before You Begin ...............................................................................3
A Short 61ossary of DVD Terminology .....................................................................4
A (luick Tour of the Remote .......................................................................................5
Types of Disc That the Player Can Play ....................................................................8
Connections ........................................................................................ 9
Connecting Your DVD Player ...................................................................................10
Jacks and Cables......................................................................................................10
Choosing a Connection ..........................................................................................11
DVD Player + TV without AIV Input Jacks ...........................................................12
DVD Player + TV with AN Input Jacks ..................................................................13
DVD Player + IV + Audio/Video Receiver ............................................................14
DVD Player + TV + Dolby Digital Receiver ...........................................................15
DVD Player + "IV + VCR ..............................................................................................16
Connect the AC Power Cord ....................................................................................17
Setting Up the Menu Language ..............................................................................17
Playing DVDs .................................................................................... 19
Loading and Playing a DVD ......................................................................................20
To Load and Play a DVD ........................................................................................20
DVD Playback Features ..............................................................................................21
Chapter Scan ............................................................................................................21
Fast Motion Playback (Picture Scan) ................................................................21
Freeze Frame and Frame Advance .....................................................................21
Slow Motion Playback (In Freeze Frame Mode) ............................................21
Repeating Play .........................................................................................................22
Selecting Specific Scenes on a DVD ..................................................................22
Selecting a Title Number ..................................................................................22
Selecting a Chapter Number ...........................................................................23
Using the Elapsed Time .....................................................................................23
Selecting a Title Using the 6UIDE Button .......................................................24
Using a DVD's Author Menu ................................................................................24
Using the Subtitle Feature ...................................................................................26
Changing the Subtitle Language (On the Player) ....................................26
Changing the Audio Language ...........................................................................26
Changing the Camera Angle ...............................................................................27
Using the Marker Feature .....................................................................................27
Storing a Marker During DVD Playback ......................................................27
Playing a Marked Part .......................................................................................28
Clearing a Marker ...............................................................................................29
Playing Karaoke Discs ............................................................................................29
Playing Audio CDs .......................................................................... 31
Loading and Playing an Audio CD .........................................................................32
To Load and Play an Audio CD ............................................................................32
Dolby Digital is a trademark of Dolby Laboratories Licensing Corporation. Toble of Contents 1
Audio CD Playback Features ....................................................................................32
Skipping Tracks ........................................................................................................32
Repeating Play .........................................................................................................33
Selecting a Specific Track .....................................................................................33
Program Playback ...................................................................................................34
Deleting Programmed Tracks..........................................................................34
Playing Video CDs...........................................................................35
Loading and Playing aVideo CD.............................................................................36
To Load and Play a Video CD...........................................................................36
If the Video CD Has Playback Control ..............................................................36
Bypassing Playback Control .................................................................................37
Video CD Playback Features .....................................................................................37
Skipping Tracks........................................................................................................37
Repeating Play .........................................................................................................38
Selecting a Specific Track .....................................................................................38
Changing the Audio Channel Output ...............................................................39
Program Playback ...................................................................................................39
Program Playback with Playback Control ...................................................40
Deleting Programmed Tracks ..........................................................................40
Using the Setup Menu ................................................................... 41
Setting Up the Rating Level .....................................................................................42
Unlocking the Rating Level ......................................................................................43
Selecting the Initial Audio Language ....................................................................43
Selecting the Initial Subtitle Language ................................................................45
Selecting the "IVScreen Setting ..............................................................................46
Turning the On-Screen Messages ON/OFF ...........................................................47
Changing the Menu Language ................................................................................48
Setting Up Surround Sound Speakers...................................................................49
Language Code Chart .................................................................................................50
Reference .......................................................................................... 51
Programming the Remote Control .........................................................................52
Controlling a TV...................................................................................................52
Controlling a Satellite Receiver ......................................................................55
Controlling a VCR ...............................................................................................56
Front Panel Controls ...................................................................................................59
Front Panel Messages .................................................................................................59
Front Panel Display .....................................................................................................60
Back Panel......................................................................................................................61
Care and Maintenance ...............................................................................................62
Troubleshooting ...........................................................................................................63
Limited Warranty .........................................................................................................65
Index ................................................................................................................................68
2 Table of Contents
THERE'S ALWAYS A CATCH
Because DVD is a new technology, we recommend
that you take some time right now to read
through this manual and familiarize yourself with
the player.
i KNOW, YOU REALLY WANT TO
GET GOING
I know that you'd rather use your DVD player
than read about it, so rve divided this manual up
into sections that address how to use each type of
disc that you can play on your player: DVDs,Audio
CDs, andVideo CDs. So, you don't have to read all
of the book at once.
READ THE FIRST TWO SECTIONS
FIRST
The first two sections,"BeforeYou Begin" and
"Connections" include key information to get you
started in the right direction. I suggest that you
read at least these two sections before you do
anything; then you can go back to the sections
that discuss the features as you want to use them.
A SHORT GLOSSARY OF DVD
TERMINOLOGY
Angles When making a DVD, the studio can incorporate various
camera angles which you can select by using the ANGLE button on
the remote. Note that not all DVDs contain multiple camera angles.
Author Menu The Author menu is the menu on a disc that allows
you to change settings for that disc. We call it the "Author" menu
because its features are "authored" by the maker of the disc, and may
vary from disc to disc.
Chapter Each Title on a DVD can be divided into chapters (similar to
tracks on an audio CD).
Dolby Digital This format is used when 5.l-channel audio signals
are recorded onto the digital track of film. It provides five separate
(discrete) channels: left, right, center, left rear, right rear, and common
subwoofer.
If you have a Dolby Pro Logic Surround decoder, you will obtain the
full benefit of Pro Logic from the same DVD movies that provide full
5.1-channel Dolby Digital soundtracks, as well asfrom titles with the
Dolby Surround mark.
Title A DVD may contain several different titles; for example, if a
disc contains four different movies, each might be considered a title
(and each may have several Chapters within it).
Subtitling Because so much information can be stored on a DVD,
many discs may contain foreign languagesubtitles.
4 Before YouBegin
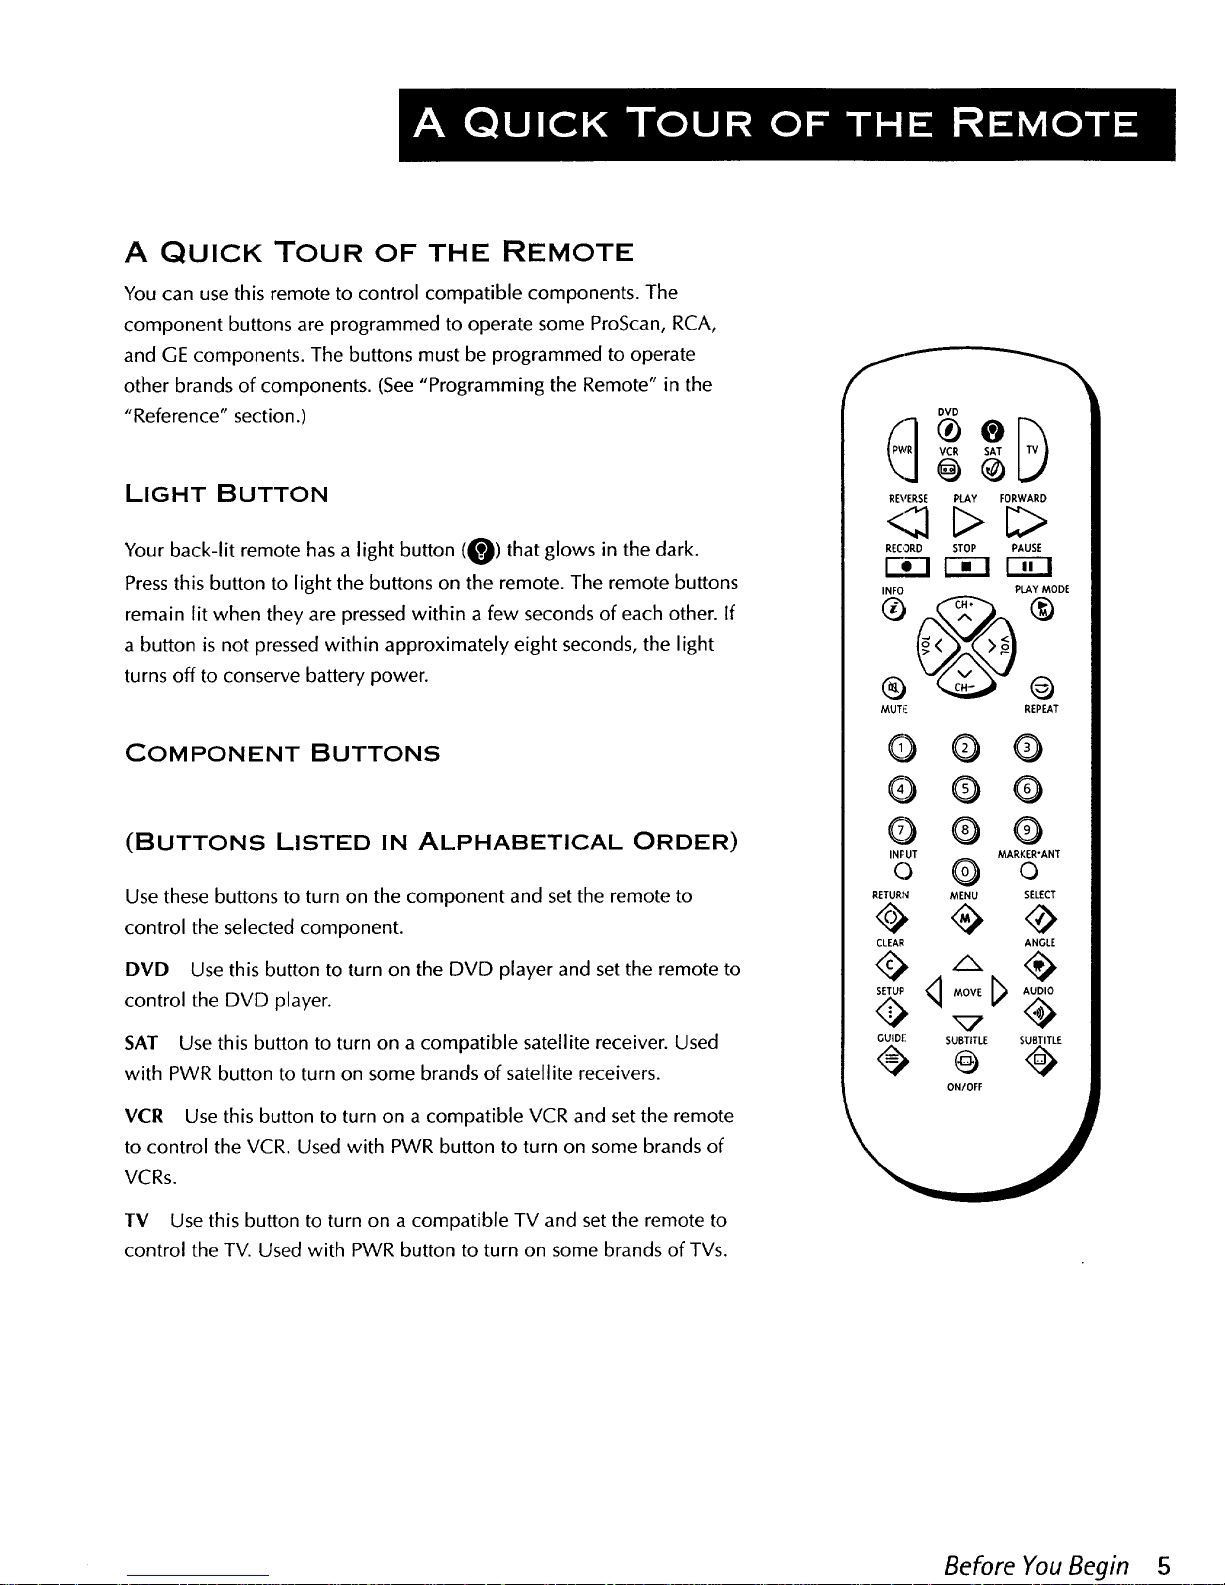
A QUICK TOUR OF THE REMOTE
You can usethis remote to control compatible components. The
component buttons are programmed to operate some ProScan, RCA,
and GE components. The buttons must be programmed to operate
other brands of components. (See"Programming the Remote" in the
"Reference" section.)
LIGHT BUTTON
Your back-lit remote has a light button (0) that glows in the dark.
Pressthis button to light the buttons on the remote. The remote buttons
remain lit when they are pressed within a few seconds of each other. If
a button is not pressed within approximately eight seconds, the light
turns off to conserve battery power.
COMPONENT BUTTONS
(BUTTONS LISTED IN ALPHABETICAL ORDER)
Use these buttons to turn on the component and set the remote to
control the selected component.
DVD Use this button to turn on the DVD player and setthe remote to
control the DVD player.
SAT Use this button to turn on a compatible satellite receiver. Used
with PWR button to turn on some brands of satellite receivers.
VCR Use this button to turn on a compatible VCR and set the remote
to control the VCR. Used with PWR button to turn on some brands of
VCRs.
TV Use this button to turn on a compatible TV and set the remote to
control the TV. Used with PWR button to turn on some brands of TVs.
OVD
VCR SAT
REVERSE PLAY FORWARD
RECORD STOP PAUSE
r,--i r-_! l-_rl
INFO PLAY MODE
® @
MUTF. REPEAT
0@0
0@@
0 0 0
INFUT MARKER'ANT
O O O
RETURt',I MENU SELECT
CLEAR ANGLE
q MOVE [_ AUDIO
GUIDE SUBTITLE SUBTITLE
ON/OFF
Before You Begin 5
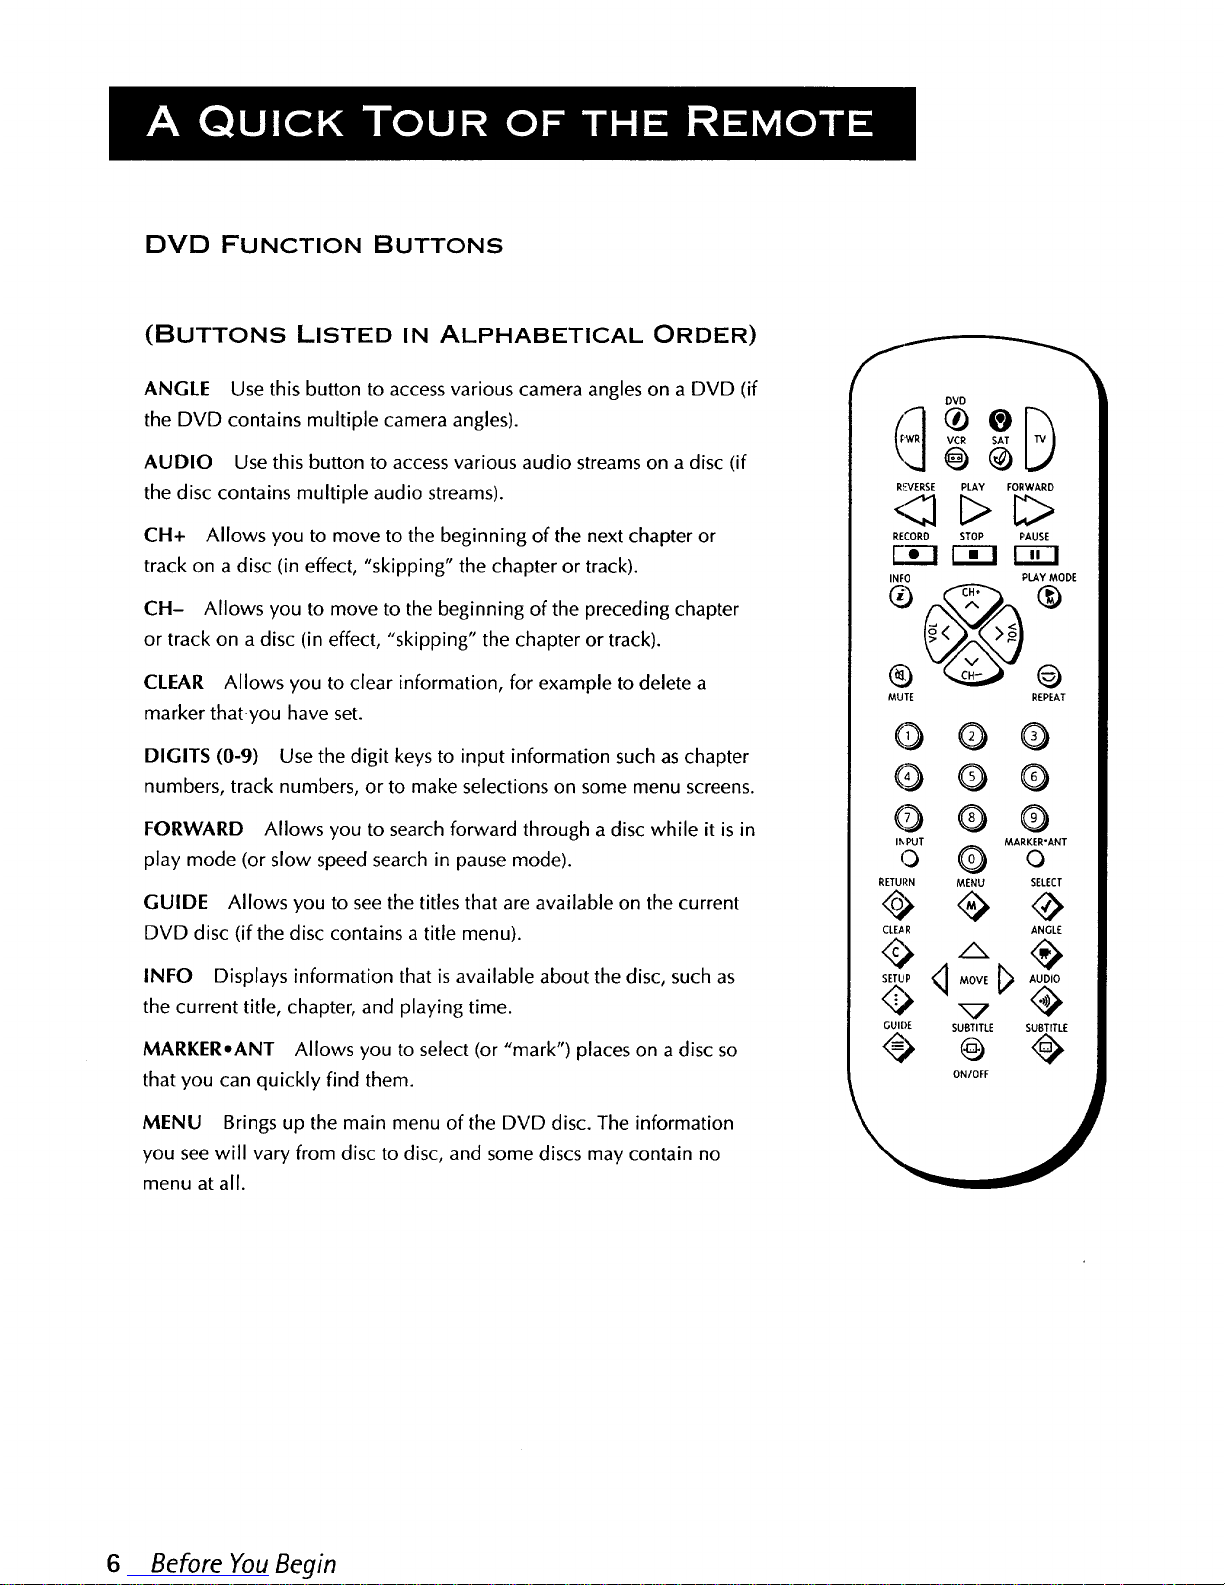
DVD FUNCTION BUTTONS
(BUTTONS LISTED IN ALPHABETICAL ORDER)
ANGLE Use this button to access various camera angles on a DVD (if
the DVD contains multiple camera angles).
AUDIO Use this button to accessvarious audio streams on a disc (if
the disc contains multiple audio streams).
CH+ Allows you to move to the beginning of the next chapter or
track on a disc (in effect, "skipping" the chapter or track).
CH- Allows you to move to the beginning of the preceding chapter
or track on a disc (in effect, "skipping" the chapter or track).
CLEAR Allows you to clear information, for example to delete a
marker thatyou have set.
DIGITS (0-9) Use the digit keys to input information such as chapter
numbers, track numbers, or to make selections on some menu screens.
FORWARD Allows you to search forward through adisc while it is in
play mode (or slow speed search in pause mode).
GUIDE Allows you to seethe titles that are available on the current
DVD disc (if the disc contains a title menu).
INFO Displays information that isavailable about the disc, such as
the current title, chapter, and playing time.
MARKERoANT Allows you to select (or "mark") places on a disc so
that you can quickly find them.
MENU Brings up the main menu of the DVD disc. The information
you see will vary from disc to disc, and some discs may contain no
menu at all.
VCR SAT
RI-VERSE PLAY FORWARD
C>C>
RECORD STOP PAUSE
_ t-i-! 13_]
INFO PLAY MODE
® ®
® Q
MUTE REPEAT
O O Q
O 00
O 0 0
IF.PUT MARKER'ANT
O Q 0
RETURN MENU SELECT
CLE._R ANGLE
_ MOVE _ AUDIO
GUIDE SUBTITLE SUBTITLE
ON/OFF
6 Before You Begin
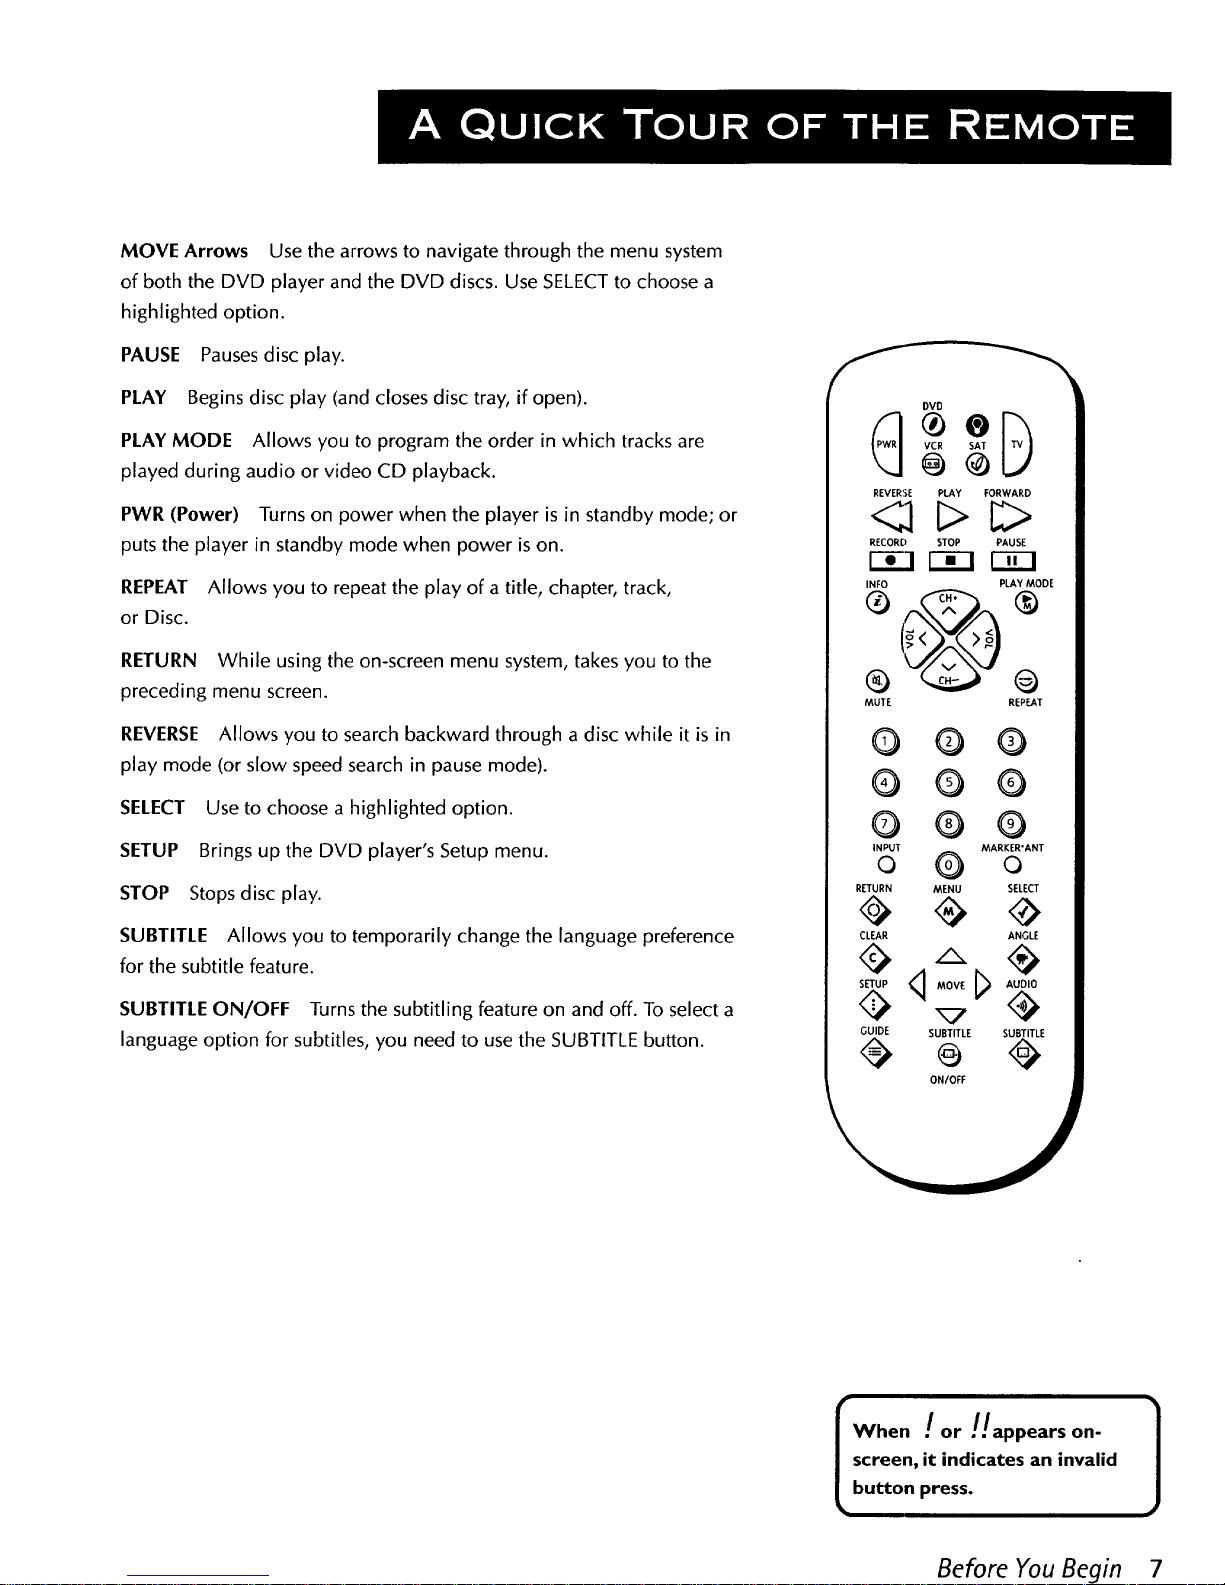
MOVE Arrows Use the arrows to navigate through the menu system
of both the DVD player and the DVD discs. Use SELECT to choose a
highlighted option.
PAUSE Pauses disc play.
PLAY Begins disc play (and closes disc tray, if open).
PLAY MODE Allows you to program the order in which tracks are
played during audio or video CD playback.
PWR (Power) Turns on power when the player is in standby mode; or
puts the player in standby mode when power is on.
REPEAT Allows you to repeat the play of a title, chapter, track,
or Disc.
RETURN While using the on-screen menu system, takes you to the
preceding menu screen.
REVERSE Allows you to search backward through a disc while it is in
play mode (or slow speed search in pause mode).
SELECT Use to choose a highlighted option.
SETUP Brings up the DVD player's Setup menu.
STOP Stops disc play.
SUBTITLE Allows you to temporarily change the language preference
for the subtitle feature.
SUBTITLE ON/OFF Turns the subtitling feature on and off. To select a
language option for subtitles, you need to use the SUBTITLE button.
DVD
VCR SAT
REVERSE PLAY FORWARD
RECORD STOP PAUSE
•_.3 r-i-1 _
INFO
®
®
MUTE
PLAY MODE
®
@
REPEAT
O O Q
@ @ @
0 0 Q
INPUT MARKER'ANT
o Q o
RETURN MENU SELECT
CLEAR ANGLE
o0,0
GUIDE SUBTITLE SUBTITLE
ON/OFF
When ! or !./appears on- ]
screen, it indicates an invalid
button press.
Before You Begin 7
INSTALLING BATTERIES IN THE
REMOTE
1. Open the battery door on the back of the remote.
2. Insert four, fresh, AAA-size batteries. Make sure that the polarities
(+ and -) are aligned correctly.
3. Replace the battery door.
IMPORTANT BATTERY INFORMATION
If you're not going to use the remote for a month or more, be sure
to remove the batteries because they can leak and cause damage.
Dispose of batteries in the proper manner, according to federal,
state, and local regulations.
Any battery may leak electrolyte if mixed with a different battery
type, if inserted incorrectly, if all batteries are not replaced at the
same time, if disposed of in fire, or if an attempt is made to charge
a battery not intended to be recharged.
Discard leaky batteries immediately. Leaking batteries can cause
skin burns or other personal injury.
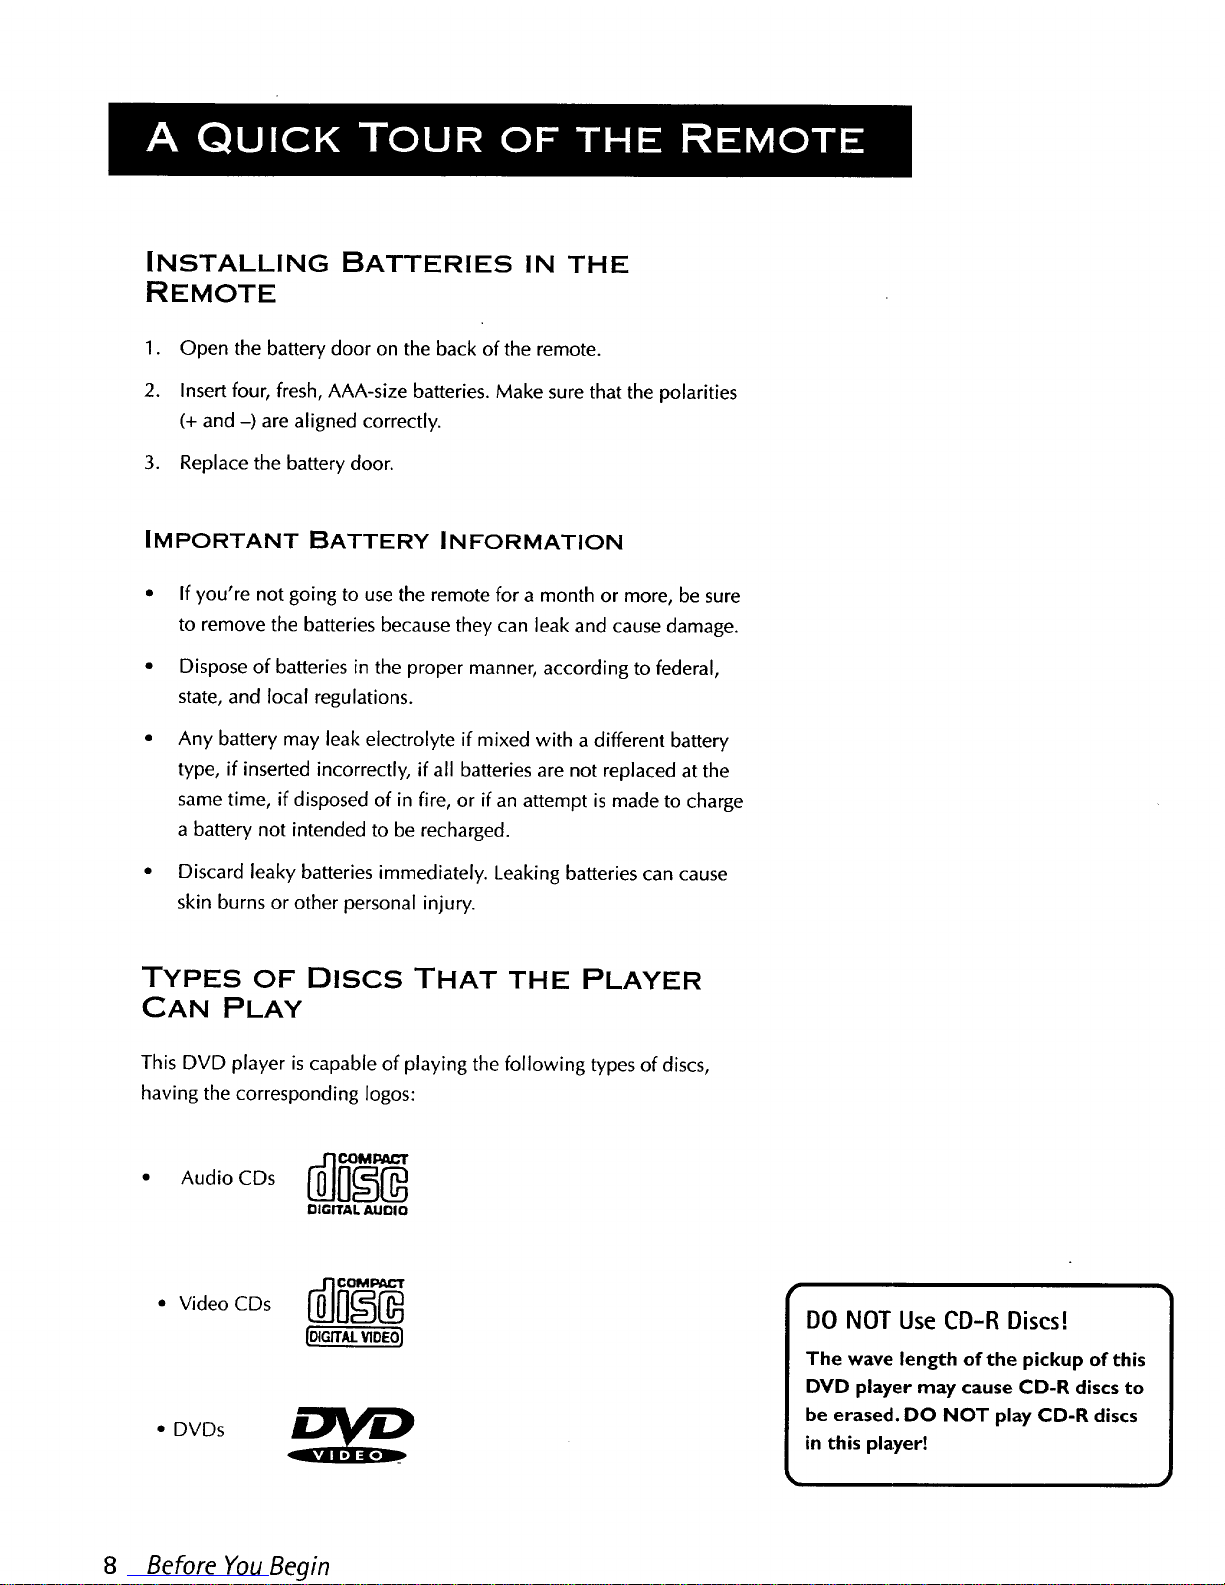
TYPES OF DIscs THAT THE PLAYER
CAN PLAY
This DVD player is capable of playing the following types of discs,
having the corresponding Iogos:
Audio CDs
DIGITAL AUOIO
• Video CDs
• DVDs
DO NOT Use CD-R Discs!
The wave length of the pickup of this
DVD player may cause CD-R discs to
be erased. DO NOT play CD-R discs
in this player!
8 Before You Begin
A FEW THINGS YOU SHOULD KNOW
Before you connect your DVD player, there are a
few things that you need to know.
Protect Your Components from Power Surges
• Connect all components before plugging any
power cords into the wall outlet.
Always turn off the DVD player, TV, and other
components before you connect or disconnect
any cables.
Position Cables Correctly to Avoid Audio Hum or
Interference
• Insert all cable plugs firmly into their jacks.
Place the audio/video cables to the sides of the
TV's back panel instead of straight down the
middle after you connect your components.
Try not to coil any twin-lead cables and keep
them away from the audio/video cables as
much as possible.
• Make sure all antennas and cables are properly
grounded.
Protect Your Components from Overheating
• Do not block ventilation holes in any of the
components.Arrange the components so that
air can circulate freely.
• Do not stack components.
• Allow adequate ventilation when placing your
components in a stand.
JACKS AND CABLES
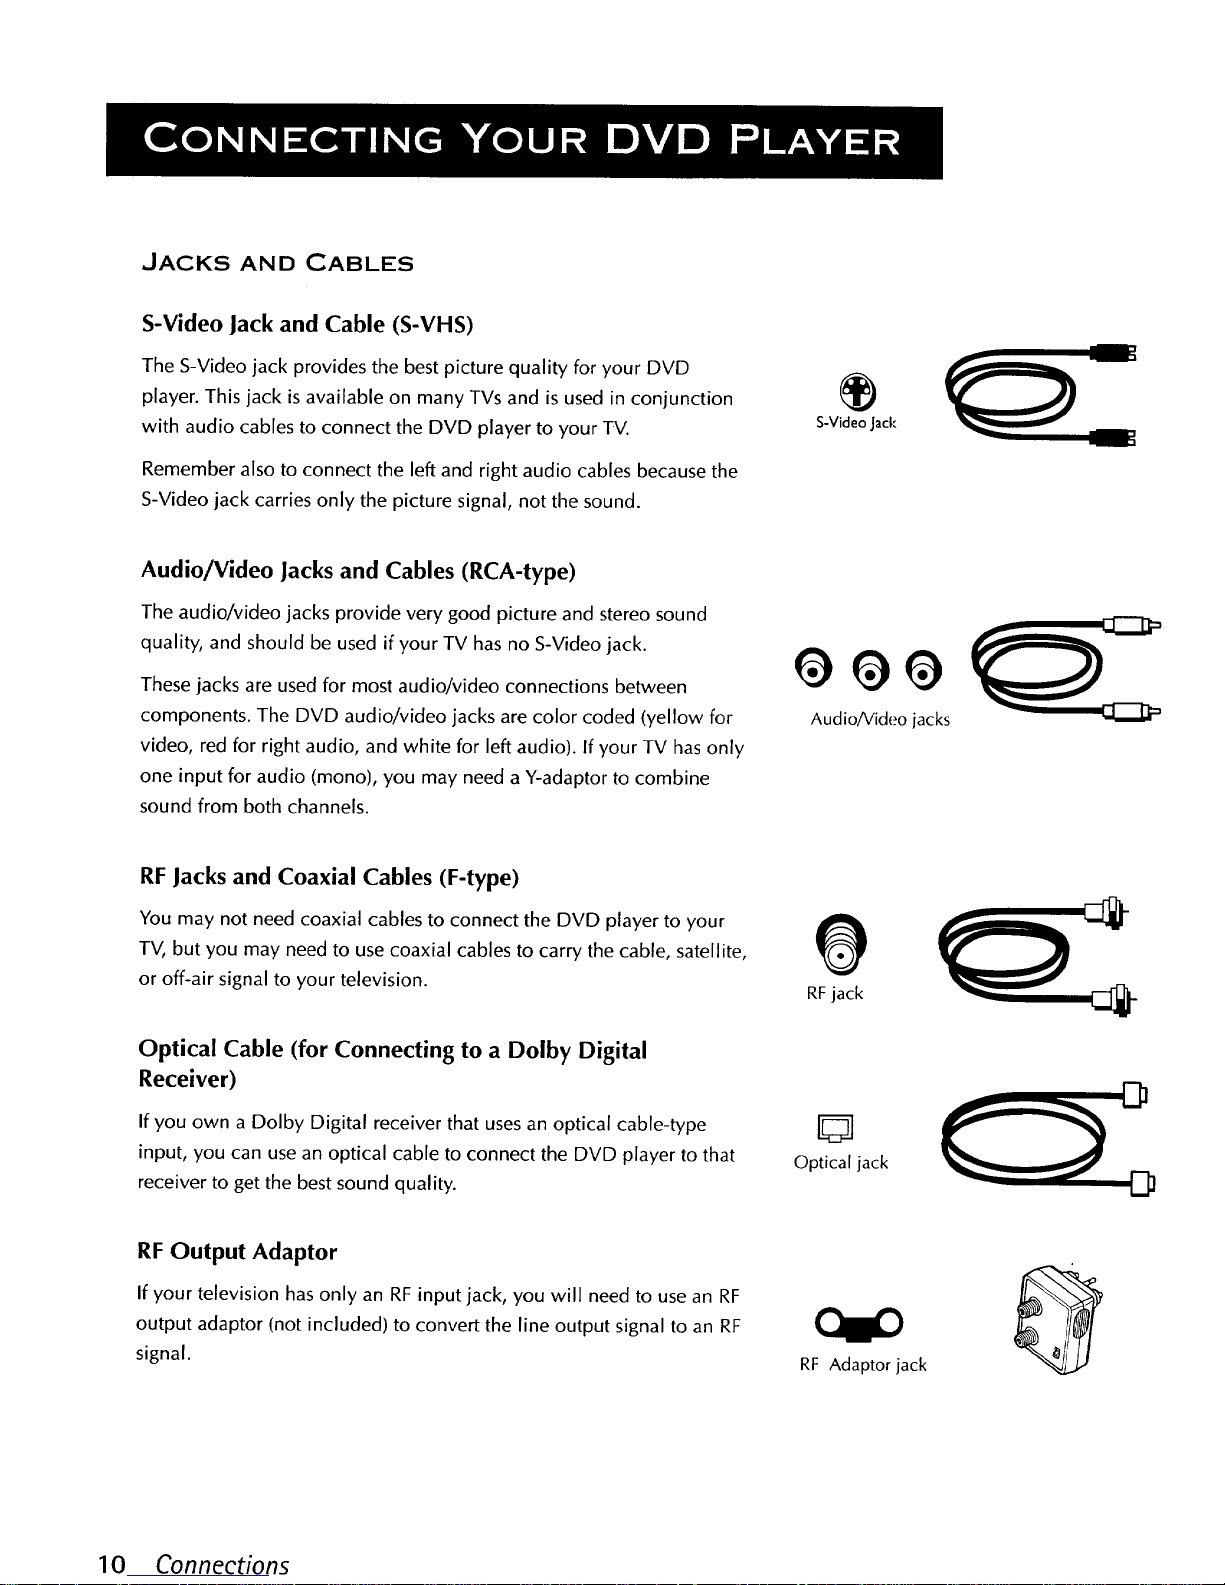
S-Video Jack and Cable (S-VHS)
The S-Video jack provides the best picture quality for your DVD
player. This jack is available on many TVs and is used in conjunction
with audio cables to connect the DVD player to your TV.
Remember also to connect the left and right audio cables because the
S-Video jack carries only the picture signal, not the sound.
®
S-Video Jack
Audio/Video Jacks and Cables (RCA-type)
The audio/video jacks provide very good picture and stereo sound
quality, and should be used if your TV has no S-Video jack.
These jacks are used for most audio/video connections between
components. The DVD audio/video jacks are color coded (yellow for
video, red for right audio, and white for left audio). If your TV hasonly
one input for audio (mono), you may need a Y-adaptor to combine
sound from both channels.
Audio/Video jacks
RF Jacks and Coaxial Cables (F-type)
You may not need coaxial cables to connect the DVD player to your
TV, but you may need to use coaxial cables to carry the cable, satellite,
or off-air signal to your television.
Optical Cable (for Connecting to a Dolby Digital
Receiver)
If you own a Dolby Digital receiver that uses an optical cable-type
input, you can use an optical cable to connect the DVD player to that
receiver to get the best sound quality.
RF jack
5
Optical jack
D
D
RF Output Adaptor
If your television hasonly an RF input jack, you will need to use an RF
output adaptor (not included) to convert the line output signal to an RF
signal.
RF Adaptor jack
10 Connections
CHOOSING A CONNECTION
The following pages show examples of connections commonly used
to connect the DVD player with a TV and other components. Refer
to your TV, VCR, Audio/Video Receiver, or Dolby Digital Receiver
owner's manual for more information on hooking up your specific
components.
DVD Player + TV without A/V Input Jacks .................... 12
If your television only has antenna (RF)inputs, you will need to get an
RF output adaptor in order to connect the DVD player. This connection
gives you a good quality picture and sound.
DVD Player + TV with A/V Input Jacks (and/or S-Video) .. 13
If your television has AN input jacks use them to connect your DVD
for better quality picture and sound. (For the best quality picture, use
the S-Video input if your television hasone.)
DVD Player + TV + Audio/Video Receiver .................... 14
If your television has an S-Video input, and you have an Audio/Video
Receiver, use this connection to get the best quality picture and sound.
DVD Player + TV + Dolby Digital Receiver ................... 15
If your television has an S-Video input, and you have a Dolby Digital
Receiver (with optical-type jack), use this connection to get the best
quality picture and sound.
DVD Player + TV + VCR ............................................... 16
If you want to include a VCR in your connection scheme, this shows
you one possible connection.
FINISHING THE CONNECTION
After you have connected all of the components, you will need to
attach the power cord, and setthe on-screen menu language
(see page 17 for more information).
on't Forget to Plug It In 1
er you've connected the components,
on't forget to plug in the DVD player.
Connections 11
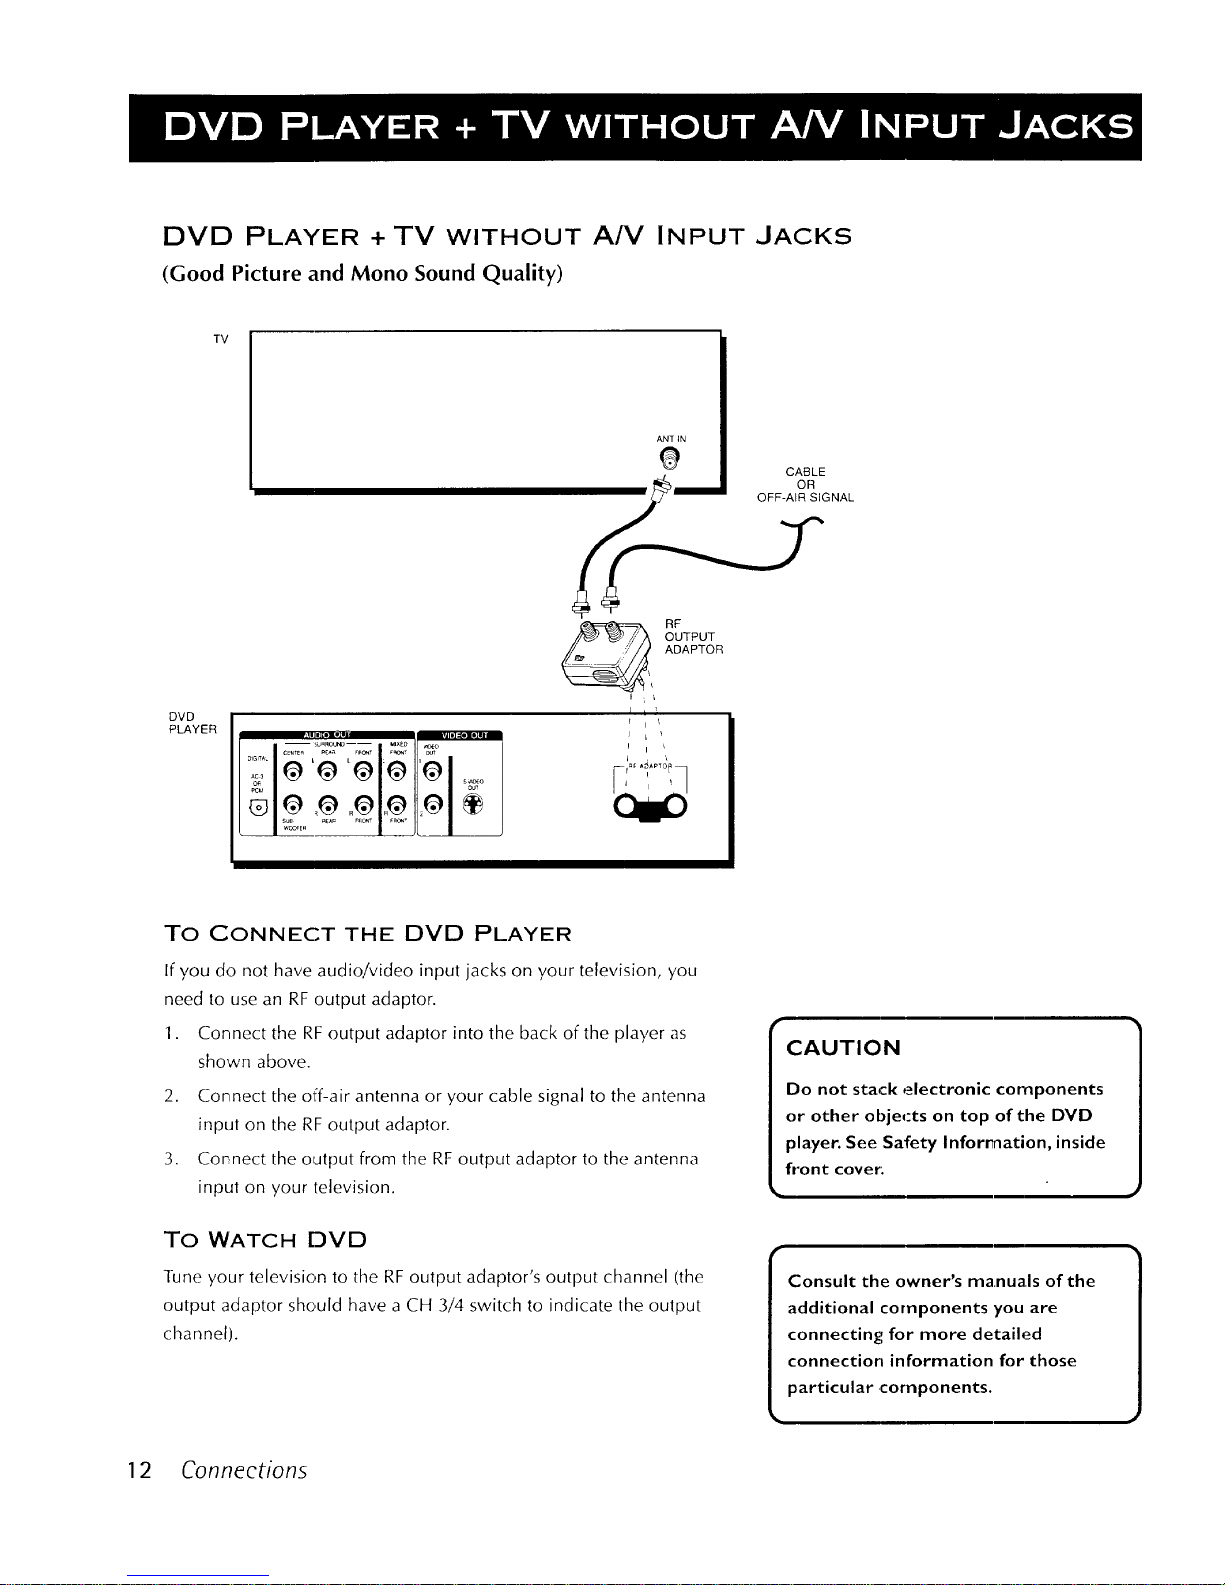
DVD PLAYER + TV WITHOUT AN INPUT JACKS
(Good Picture and Mono Sound Quality)
DVD
PLAYER
TV
ANT IN
CABLE
__ RF
OUTPUT
ADAPTOR
P I
To CONNECT THE DVD PLAYER
If you do not have audio!video input jacks on your television, you
need to use an RF output adaptor.
1. Connect the RF output adaptor into the back of the player as
shown above.
2. Connect the off-air antenna or your cable signal to the antenna
input on the RF output adaptor.
3. Cornect the output from the RF output adaptor to the antenna
input on your television.
CAUTION
Do not stack electronic components
or other objects on top of the DVD
player. See Safety Information, inside
front cover'.
To WATCH DVD
Tune your television to the EF output adaptor's output channel (the
output adaptor should have a CH 3/4 switch to indicate the output
channel).
Consult the owner's manuals of the
additional components you are
connecting for more detailed
connection information for those
particular ,components.
12 Connections
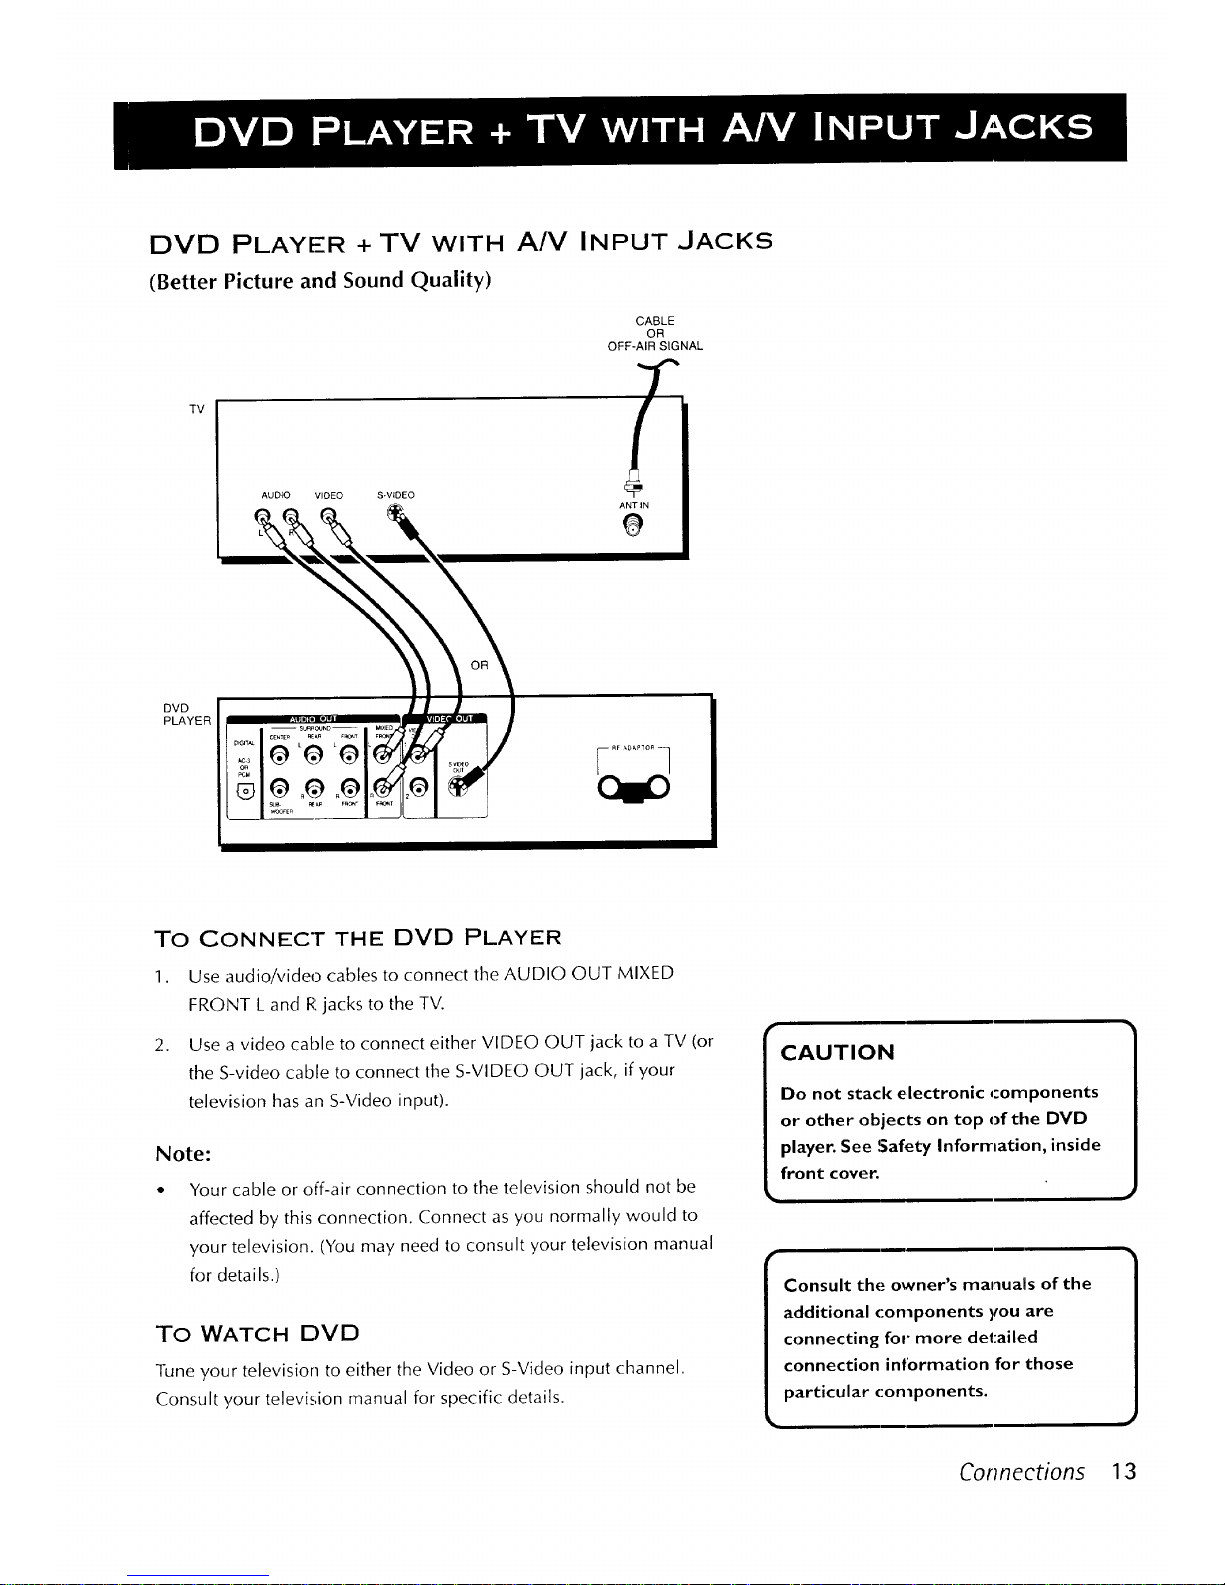
DVD PLAYER + TV WITH AN INPUT JACKS
(Better Picture and Sound Quality)
CABLE
OR
OFF-AIR SIGNAL
TV
AUDIO VIDEO S-VIDEO
DVD
PLAYER
TO CONNECT THE DVD PLAYER
1. Use audio/video cables to connect the AUDIO OUT MIXED
FRONT L and R jacks to the TV.
2. Use a video cable to connect either VIDEO OUT jack to a TV (or
the S-video cable to connect the S-VIDEO OUT jack, if your
television has an S-Video input).
Note:
• Your cable or off-air connection to the television should not be
affected by this connection. Connect as you normally would to
your television. (You may need to consult your television manual
for details.)
To WATCH DVD
Tune your television to either the Video or S-Video input channel.
Consult your television manual for specific details.
CAUTION
Do not stack electronic components
or other objects on top of the DVD
player. See Safety Information, inside
front cover.
Consult the owner's manuals of the
additional components you are
connecting for more detailed
connection information for those
particular (:omponents.
Connections 13
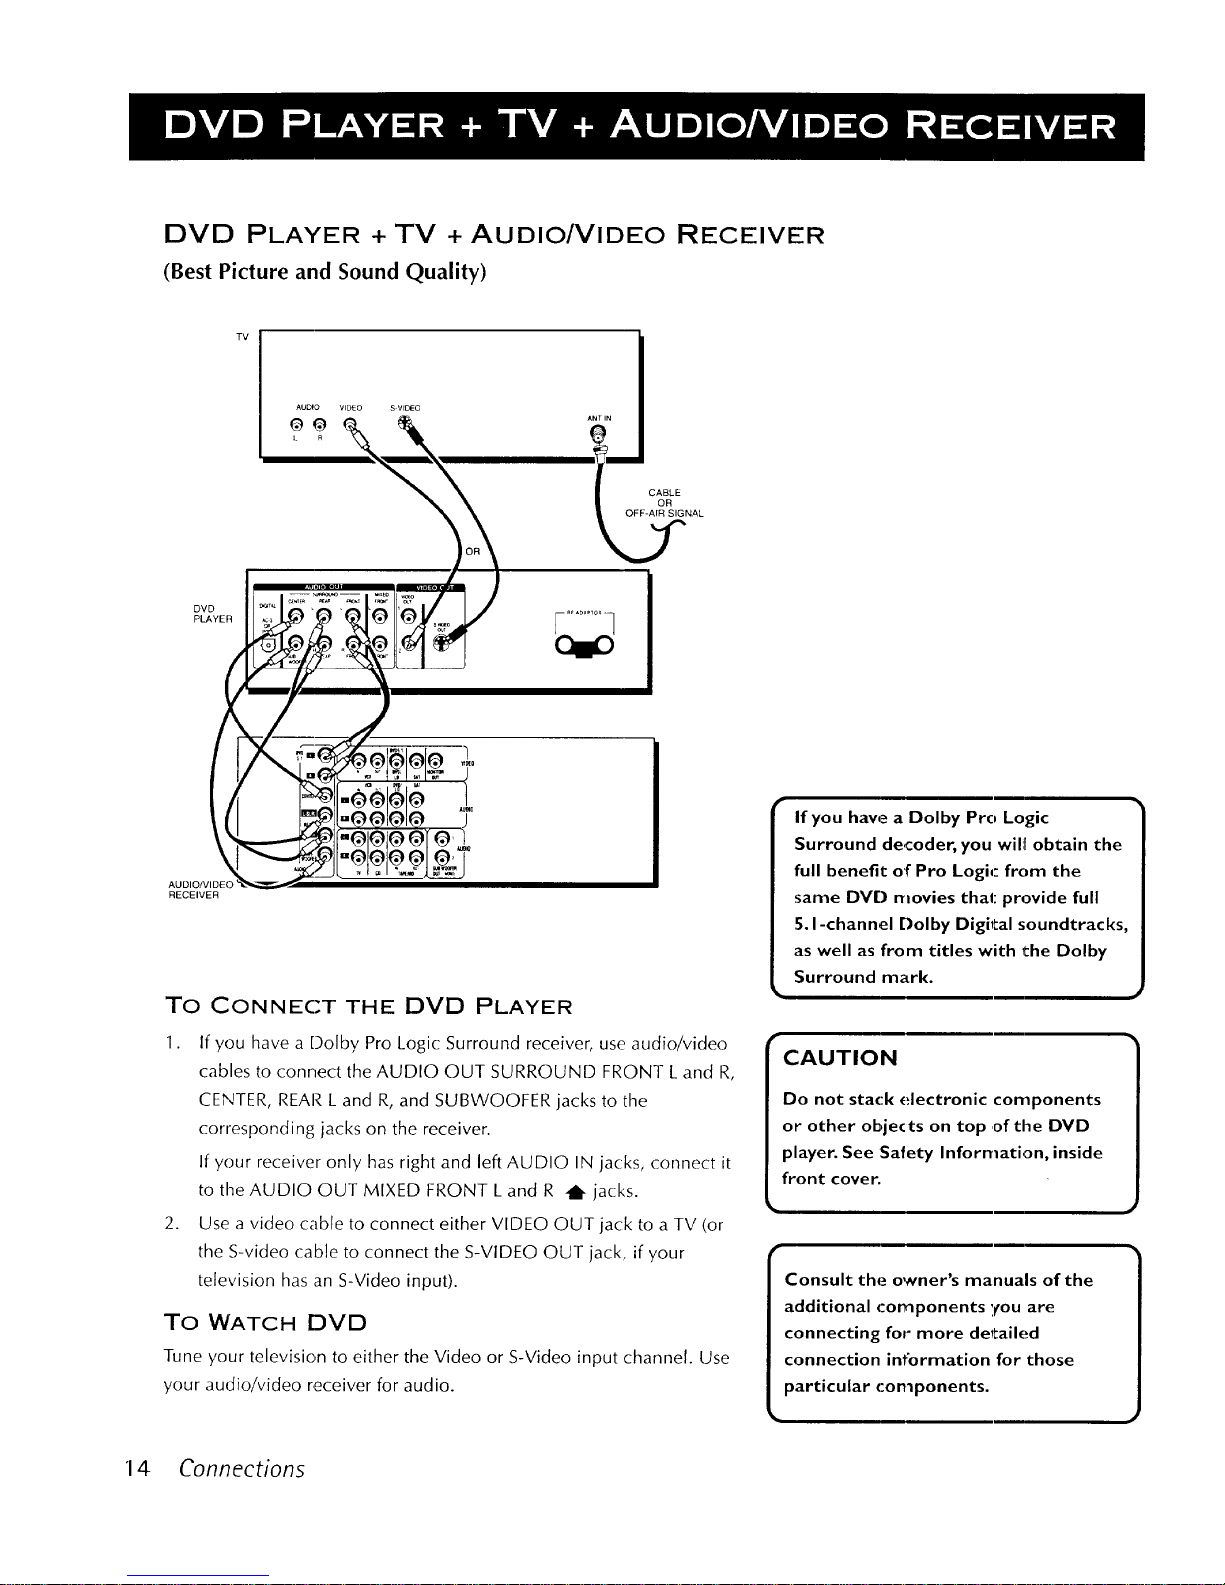
DVD PLAYER + TV + AUBIONIDEO RECEIVER
(Best Picture and Sound Quality)
TV
AUDIO VIDEO S VIDEO
k R
CABLE
OR
OFF-AIR SIGNAL
DVD
AUDIONIDEC
RECEIVER
TO CONNECT THE DVD PLAYER
1. If you have a Dolby Pro Logic Surround receiver, use audio/video
cables to connect the AUDIO OUT SURROUND FRONT L and R,
CENTER, REAR L and R, and SUBWOOFER jacks to the
corresponding jacks on the receiver.
If your receiver only has right and left AUDIO IN jacks, connect it
to the AUDIO OUT MIXED FRONT L and R / jacks.
2. Use a video cable to connect either VIDEO OUT jack to a TV (or
the S-video cable to connect the S-VIDEO OUT jack, if your
television has an S-Video input).
To WATCH DVD
Tune your television to either the Video or S-Video input channel. Use
your audio/video receiver for audio.
If you have a Dolby Pro Logic
Surround decoder, you wil_ obtain the
full benefit of Pro Logic from the
same DVD movies that: provide full
5. I-channel Dolby Digital soundtracks,
as well as from titles with the Dolby
Surround mark.
CAUTION
Do not stack electronic components
or other objects on top of the DVD
player. See :Safety Information, inside
front cover.
Consult the owner's manuals of the
additional components 'you are
connecting for more detailed
connection intbrmation for those
particular components.
14 Connections
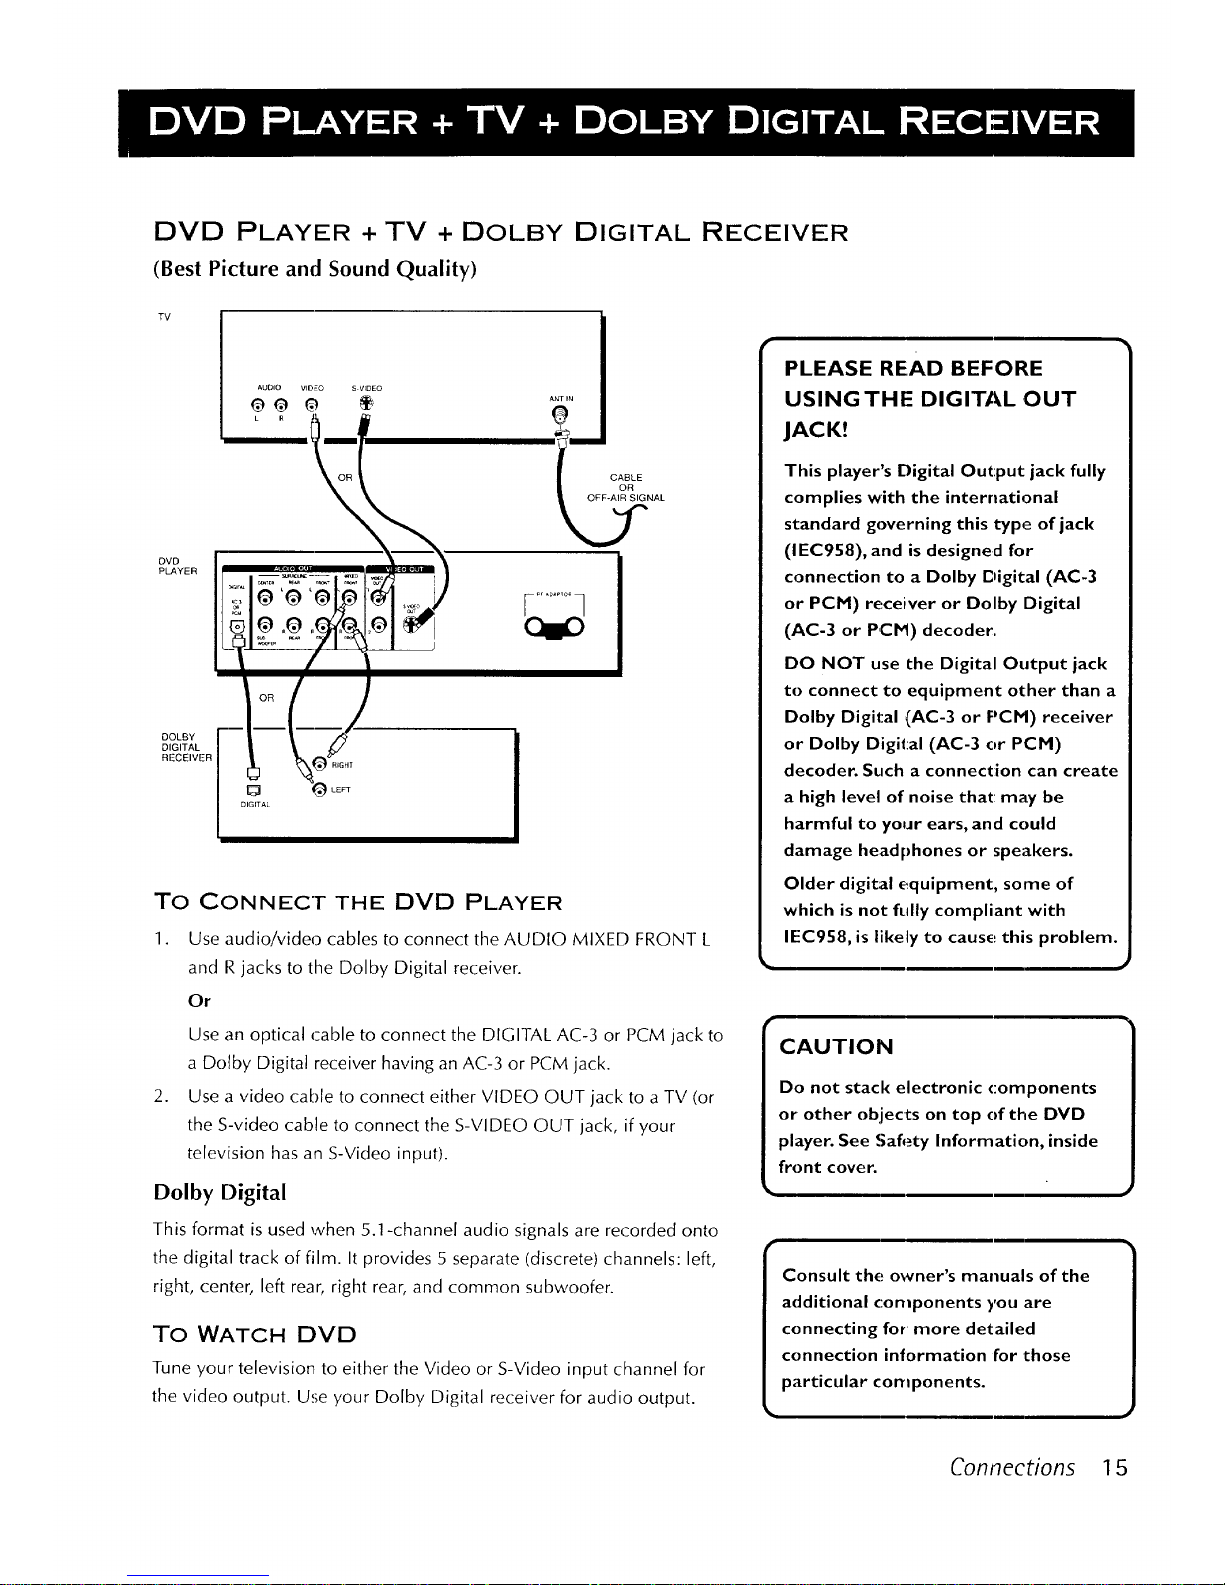
DVD PLAYER + TV + DOLBY DIGITAL
(Best Picture and Sound Quality)
TV
AUDIO VID£O S V_DEO
OR
PLAYER i.i._.=._.
DIGITAL
RECEIVER
AL
C _)8RLE AL
To CONNECT THE DVD PLAYER
1.
Use audio/video cables to connect the AUDIO MIXED FRONT L
and P,jacks to the Dolby Digital receiver.
Or
2.
Use an optical cable to connect the DIGITAL AC-3 or PCM jack to
a Dotby Digital receiver having an AC-3 or PCM jack.
Use a video cable to connect either VIDEO OUT jack to a TV (or
the S-video cable to connect the S-VIDEO OUT jack, if your
television has an S-Video input).
Dolby Digital
This format is used when 5.1-channel audio signals are recorded onto
the digital track of film. It provides 5 separate (discrete) channels: left,
right, center, left rear, right rear, and common subwoofer.
To WATCH DVD
Tune your televisior_ to either the Video or S-Video input channel for
the video output. Use your Dolby Digital receiver for audio output.
RECEIVER
PLEASE READ BEFORE
USINGTHE DIGITAL OUT
JACK!
This player's Digital Out:put jack fully
complies with the international
standard governing this type of jack
(IEC958), and is designed for
connection to a Dolby Digital (AC-3
or PCM) receiver or Dolby Digital
(AC-3 or P,CH) decoder.
DO NOT use the Digital Output jack
to connect to equipment other than a
Dolby Digital (AC-3 or PCM) receiver
or Dolby Digital (AC-3 or PCM)
decoder. Such a connection can create
a high level of noise that: may be
harmful to your ears, and could
damage headphones or speakers.
Older digital equipment, some of
which is not fully compliant with
IEC9S8, is likely to cause this problem.
m
CAUTION
Do not stack electronic components
or other objects on top of the DVD
player. See Safety Information, inside
front cover.
Consult the owner's manuals of the
additional c:omponents you are
connecting for more detailed
connection information for those
particular components.
Connections 15
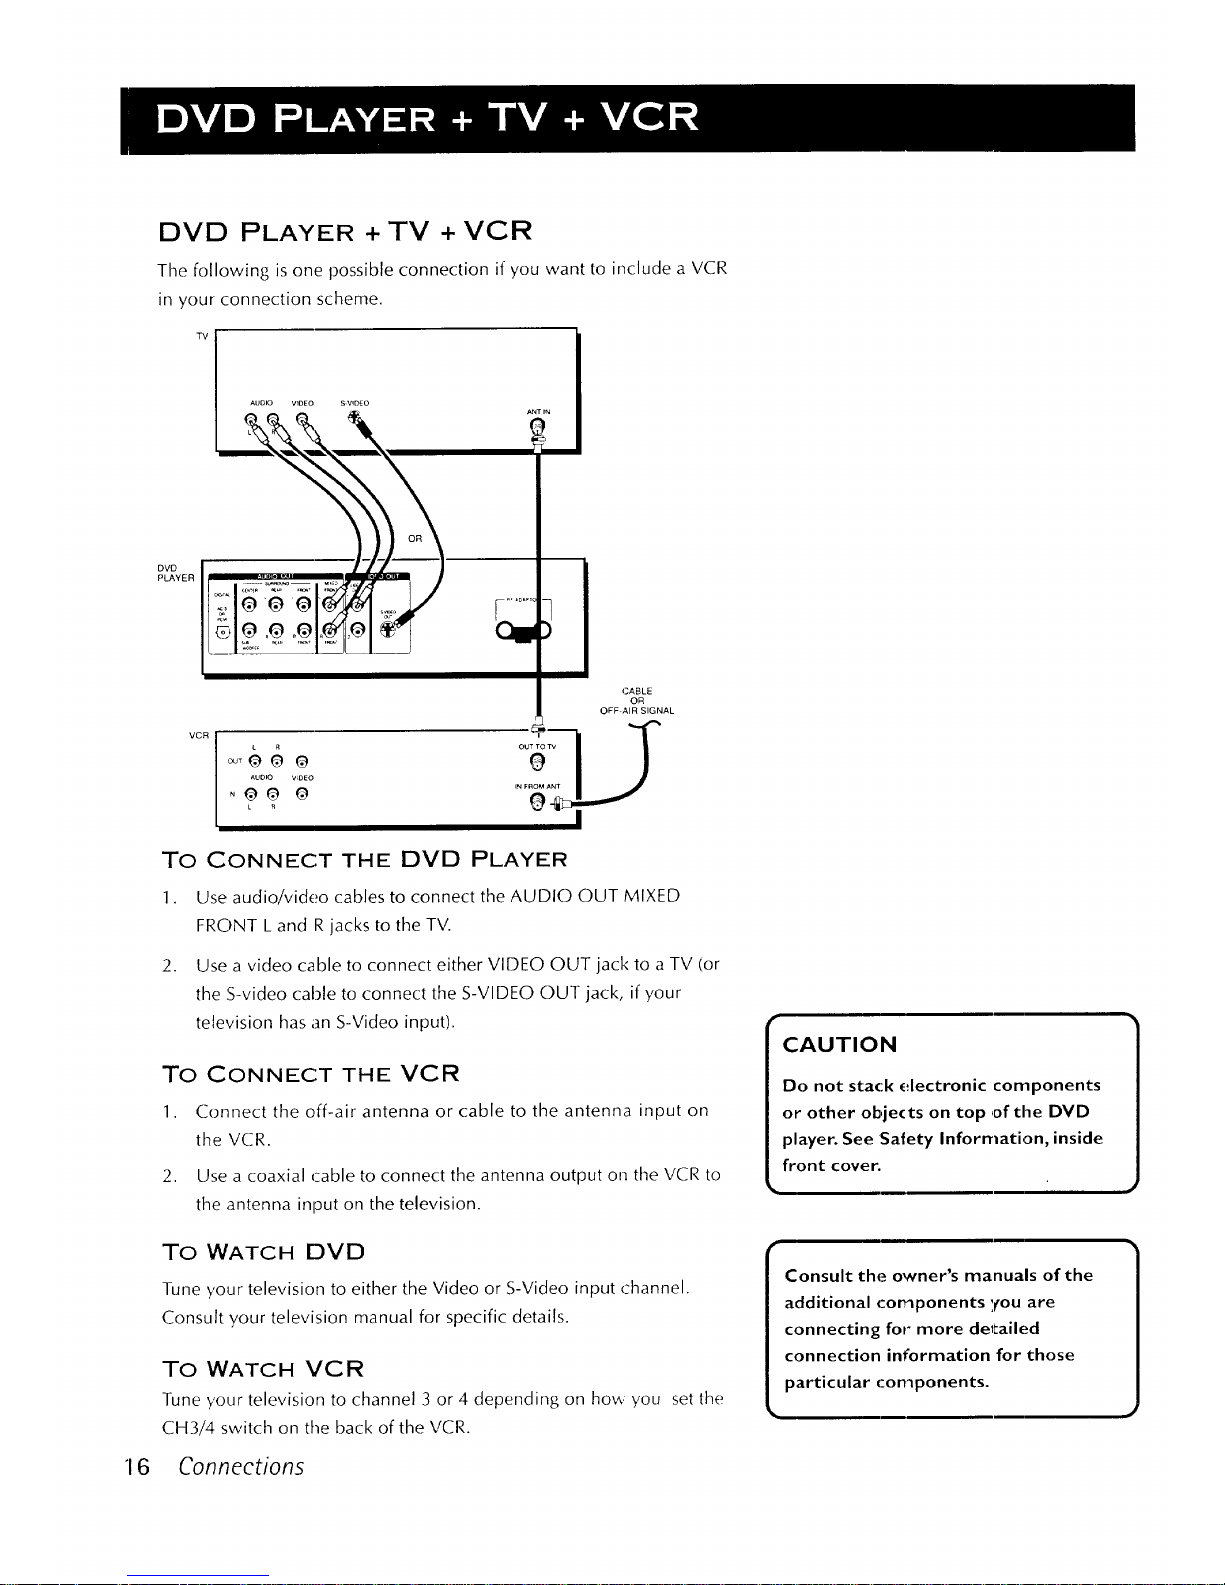
16
DVD PLAYER + TV + VCR
The following is one possible connection if you want to include a VCR
in your connection scheme.
TV
DVD
PLAYER
Auolo VIOEO SVqOEO
L
Jii
o,oooN.121
vcR[...._8o
AUDIO VIDEO
L
ANT rN
GABLE
OR
OFF AIR SIGNAL
7
!
To CONNECT THE DVD PLAYER
1. Use audio!video cables to connect the AUDIO OUT MIXED
FRONT L and R jacks to the TV.
2. Use a video cable to connect either VIDEO OUT jack to a TV (or
the S-video cable to connect the S-VIDEO OUT jack, if your
television has an S-Video input).
To CONNECT THE VCR
1. Connect the off-air antenna or cable to the antenna input on
the VCR.
2. Use a coaxial cable to connect the antenna output on the VCR to
the antenna input on the television.
To WATCH DVD
Tune your television to either the Video or S-Video input channel.
Consult your television manual for specific details.
To WATCH VCR
Tune your television to channel 3 or 4 depending on how you set the
CH3/4 switch on the back of the VCR.
Connections
CAUTION
Do not stack electronic components
or other objects on top of the DVD
player. See Saiety InforlTlation, inside
front cover.
r •
Consult the owner's manuals of the
additional cor_ponents you are
connecting for more deltailed
connection information for those
particular components.

Jl
CONNECT THE AC POWER CORD
After you have connected the components, you need to connect the
AC power cord. Connect the AC power cord to the back of the DVD
player ancl to an AC power outlet (AC120 V, 50-60 Hz).
SETTING UP THE MENU LANGUAGE
By default, the menu language is set to English. If you want to change
the menu language, go to the Setup menu and select the "Menu
Language" option.
NOTE: Make, suJe that the p_'ug is fully seated
in the DVD play(_.r.
OTHER LANGUAGE OPTIONS
The Menu Language feature changes the language only for the text on
the menu screens. There are other language options available for
subtitling and audio.
For more information on these language options, see "Using the Setup
Menu."
MENU SYSTEM NAVIGATION TOOL
The menu system has an on-screen navigation tool located in the
lower right-hand corner, indicating which arrows you can press to
point to menu options.
The arrows that are [it up represent the arrow buttons on the remote or
front panel that are currently available. When the crosshair (+) is lit,
you can press the SELECT button to select the option current[},
highlighted in the menu screen.
Connections 17

A NEW WAY OF LOOKING AT
THINGS
In this :section you learn how to use your DVD
player to play DigitaIVideo Discs (DVDs for short).
As a little up-front information, you should know
that although some of the remote buttons look
the same as those you would use with aVCR or CD
player, the functions work somewhat differently. So,
take some time now to find out how to play DVDs,
and then you can sit back and enjoy all of the
features it has to offer you.
ALSO KEEP IN MIND...
In order for some of the player's features to work,
the DVDs that you use must be encoded with
specific: information. For example, a disc must
contain subtitles in order for the player to show
them to you.
REGIONAL CODING
Both the DVD player and the discs are coded by
region.These regional codes must match in order
for the disc to play. If the codes do not match, the
disc will not play.This player's regional code is
Locale # I.
LOADING AND PLAYING A DVD
Before you load a disc, make sure that it is compatible with the player.
Note that the following discs CANNOT be used with this player:
• Laserdisc
• CD-I, CD-ROM, CD-R, DVD-ROM
• Mini Disc
° Discs recorded using other broadcast standards
(i.e. PAL or SECAM)
• CD-G discs play audio only, not graphics
To LOAD AND PLAY A DVD
Make sure that you have properly connected the DVD player (see
"Connections") and the player is turned on before you begin.
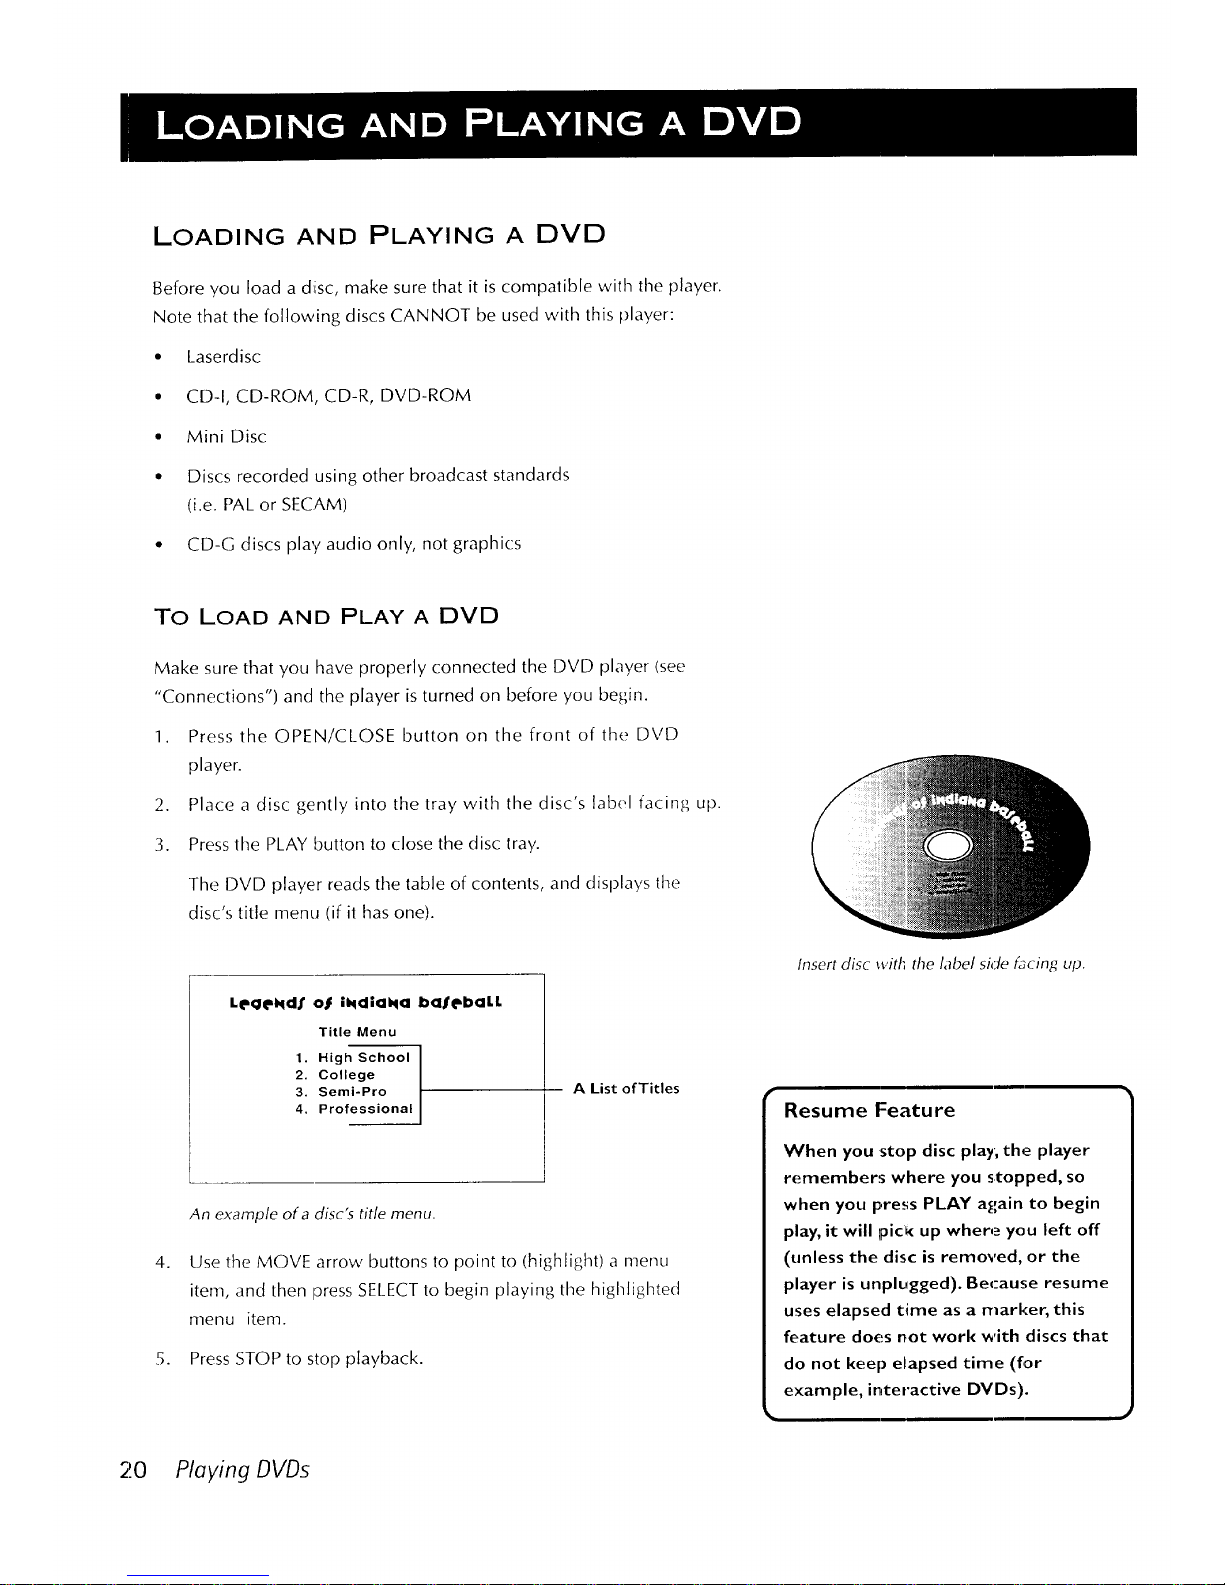
1. Press the OPEN/CLOSE button on the front of the DVD
player.
2. Place a disc gently into the tray with the disc's label facing up.
3. Press the PLAY button to close the disc tray.
The DVD player reads the table of contents, and displays the
disc',,; title menu (if it has one).
Le, Qe, INld.l' ot |kldia_€l baIC'batt
Title Menu
1. High School
2. College
3. Semi-Pro
4. Professional
A List of Titles
An example of a disc's title menu.
4. Use the MOVE arrow buttons to point to (highlight) a menu
item, and then press SELECT to begin playing the highlighted
menu item.
5. Press STOP to stop playback.
Insert disc with the label side facing up.
Resume Feature
When you :stop disc play, the player
remembers where you stopped, so
when you press PLAY again to begin
play, it will pic_ up where you left off
(unless the disc is removed, or the
player is unplugged). Because resume
uses elapsed time as a marker, this
feature does not work with discs that
do not kee I) elapsed time (for
example, interactive DVDs).
20 Playing DVDs
 Loading...