

ProScan PS52682, PS60682 Owner's Manual
Models PS52682 and
PS60682
Features
2
Features
First-Time Operation
3
Unpack TV and Accessories
3
Connect an Antenna or Cable-TV System
3
Install the Batteries in Remote Controls
4 Turn on TV
4 Auto-Help Displays
5
(Optional) Converge the TV
6
AutoProgram
TV’s Channel Memory Scan List
6 Add or Erase Channels to Channel Memory
7
Set the Clock
Detailed Operating Instructions
8-11
12
13
14-15
16
17
18-21
22-36
37
38-39
40
Remote
Control(TV
Functions)
Front Panel Controls
MAIN MENU and HELP MENU
Freeze, Zoom, and Pan (Main Picture)
DVE (Digital Video Effects) (Main Picture)
Channel Guide
PIP (Picture-In-Picture) Operation
Audio Section (AUDIO ADJUST Menu)
VIDEO ADJUST Menu
MEMORY MENU
SETUP MENU (Basic Functions)
Monitor Panel and Connections
58-59 Monitor Panel
60 Tips to Read Before Connecting Components
61
Home Antenna Connections
62-63 Cable-TV Connections
64 Programming Remote to Control Cable Box
65
Cable-TV Information and Channel Chart
Optional Accessories
74-75 Accessory Cables
75-76 Accessory Order Form
Reference Section
77
Design Specifications
77 Cleaning and Care
78-79 Trouble Checks
79 Warranty
80-81 Index (Alphabetical)
82-83 Quick-Reference Guide (Inside Back Cover)
41
42
43
44-45
46-47
48-49
50
51
52
53
54-55
56-57
Changing Antenna Input
Priority Channels
VCR/Cable Setup
SCHEDULER
Programming Channel Memory Scan List
Channel Labeling
Parental Control
SPECIAL ITEMS Menu (Basic Functions)
SLEEPTIMER
Using Remote to Control Laser Disc Player
Programming Remote to Control VCR’s
Programming Remote to Control
Audio Equipment
66-67
68
69
70-7
1
72-73
VCR Connections
Laser Disc Player Connections
Camcorder Connections
Amplifier or Cassette Tape Deck
External or Surround Speakers
AUDIO SETUP MENUS
The individual setup
menus allow you to
adjust individual
features for the
audio mode
Press the MENU button
to display the MAIN
MENU
on the TV screen.
Press the + or - button
to highlight the desired
function, then press the
MENU
button to enter or
adjust that function.
When one of the menus
shown at the right
appears, repeatedly
press the + or - button
to highlight the desired
function, and then press
the MENU button to
enter or adjust that
function or display the
next menu.

PROsCAN@
So advanced. Yet so simple.”
We’re building our reputation on products that are so advanced, they’re
simple.
complexity, we have a very simple solution. It’s called
State-of-the-art technology that real people can use.
Thank you for choosing ProScan. And welcome to our company-wide
commitment to your complete satisfaction and viewing enjoyment.
If you want all the benefits of the latest technology, without the
ProScan.
This page folds open to display the menus. We
designed this page so that you could leave it open
and use it as a quick-reference guide while
reviewing the manual.
7
A
If you suspect that liquid has entered the TV, unplug it
immediately and have it inspected by an Authorized TV
Servicenter. Turning it off is not enough - your TV has
power applied to some circuits even when the TV is turned
off.
A
The lightning flash
and arrowhead
w‘tiin
the triangle is
a
warning sign
alerting you of
‘dangerousvoitage’
inside the product
that presents a risk
of electric shock.
RISK OF ELECTRIC SHOCK
00 NOT OPEN
CAUTION: TO REOUCETHE RISK
OF ELECTRICAL SHOCK, DO NOT
REMOVE COVER IOR BACK). NO
USER-SERVICEABLE PARTS
INSIOE. REFER SERVICING TO
WALIFIEO SERVICE PERSONNEL
A
The
wlamation
point within the
triangle is a warning
sign alerting you of
important
instructions
accompanyingthe
product.
Caution:
Maintain electrical safety. Powerline-operated
equipment or accessories connected to this unit should bear
the UL listing mark or CSA certification mark on the
accessory itself and should not have been modified so as to
defeat the safety features. This will help avoid any potential
hazard from electric shock or fire. If in doubt, contact
qualified service personnel.
Your TV operates on 120
v&s,
60 Hz AC power (normal
house power) and has a polarized AC plug. Because one
blade of the plug is wider than the other, the plug fits into the
wall socket only one way. Do not defeat the safety feature of
this plug. If you need an extension cord, make sure it is
polarized.
Caution:
To prevent electric shock, do not use
the polarized plug on this TV with an extension
cord, receptacle, or other outlet unless both
blades can be fully inserted to prevent blade
exposure. Match wide blade of plug to wide slot,
fully insert.
Mise En Garde:
Pour prkvenir les chocs
Blectriques, ne pas utiliser la fiche polarisCe de cet
appareil avec une rallonge, une prise de courant
ou une autre sortie, B moins que les lames ne
puissent
&tre
instrkes & fond saris qu’aucune partie ne soit
la&Be
il d&ouvert. Introduire la lame la plus large de la
fiche dans la borne correspondante de la prise et pousser
jusq6 au fond.
All operating controls and their functions are identified and
explained in this manual. For warranty service or routine
maintenance, contact the nearest Authorized ProScan TV
Servicenter. All servicing and adjustments to electrical
components should be done by a qualified service technician.
Warning:
To prevent fire or shock hazard, do not
expose this TV to rain or moisture.
Note to Cable TV Installer: This reminder is provided to call your attention
to Article 820-40 of the National Electrical Code (Section 54 of the Canadian
Electrical Code, Part 1) which provides guidelines for proper grounding and,
in particular, specifies that the cable ground shall be connected to the
grounding system of the building as close to the point of cable entry as
practical.
Mail Your Registration Card Today
A
Product Registration Card
is packed with your set. Please
fill out the card and return it immediately.
Your prompt submission of this card confirms your right to
the protection available under the terms and conditions of
the warranty and also allows us to contact you should it ever
become necessary.
With your card on file, we can also help you in the event of
loss or theft by verifying your ownership.
If you did not receive a
Product Registration Card,
please
contact your dealer.
Attach Your Sales Receipt Here and File at Home For
Future Reference
To obtain warranty parts and service, you must show your
sales receipt (or other evidence of purchase) to your
Authorized ProScan TV Servicenter.
Tape or staple your sales receipt to this manual so you will
have it handy should service ever be needed. Do not mail
your sales receipt to us. File it at home with your owner’s
manual for future reference.
Record Vital Information Here
No other set has the same serial number as yours. You will
find the serial number and the model number on the back of
your set.
Make sure you record both numbers below so that you will
have them in case your set is stolen or if you need a
complete description for identification.
Model Number:
Serial Number:
Purchase Date:
Dealer Name/Address/Phone:
Your
ProScan
technology. It’s technology tailored to you. Features
designed to deliver viewing and listening enjoyment beyond
television is more than state-of-the-art
One Minute Manual
l
l
expectations. Innovation and simplicity of operation become
one-ProScan.
Improving Your Image
l IDTV (Improved Definition TV): High tech video processing
gives you twice the number of video scan lines as conventional
TVs for superior picture quality.
l
A Cleaner Picture:
The Digital Comb Filter reduces distortion
and extends resolution.
l
Greater Contrast:
Dynamic Gamma Correction automatically
extends the dynamic range of the luminance signal, producing
blacker blacks and whiter whites.
l Increased Clarity: Edge Replacement enhances image edges.
That along with dynamic focus give you crisp clean details-with up
to 600 lines of horizontal resolution.
Sound Thinking
l Flexibility: Eight different audio modes built right into the TV.
From basic stereo, to Dolby* 3 stereo, to Dolby* prologic, and all
the steps between. For details, see pages 22-36.
l
On-Screen Graphic Equalizer
permits precise adjustment of
seven frequency bands to complement your room’s acoustics.
For details, see pages 26-27.
l
10 Watts Per Channel **
l
dbx*** Noise Reduction
l
Second Audio Program (SAP)
For details, see page 30.
*Dolbv is a registered trademark of Dolbv Laboratories Licensing Corn.
**RM’s ratingrinto 8 ohms, 50 to
20,OOO~Hz
*3db, with less than
-
1% THD.
***dbx is a registered trademark of Carillon Electronics Corp.
Creative Entertainment
l
DVE (Digital Video Effects)
and solarization effects on the large picture.
l
Advanced Color Picture-in-Picture
watch two programs at once. You can swap, freeze, move, or pan
either picture-for viewing convenience. You do not need a VCR
or external video source for additional picture. For details see
pages 18-21.
l Zoom
l Pan
l
l
l
l Commercial
l
l
l
l
* Check your cable company’s compatibility requirements.
-
enlarges any desired video image for a closer look. Also
changes the size of the inset Picture-In-Picture. For details, see
pages 14-15 and 18.
-
allows you to move across the enlarged video image to
select any portion for viewing. For details, see pages 14-15.
Channel Guide
-displays a still picture from 12 different channels
at one time for a quick review of available programs.
For details, see page
Channel Labeling
17.
lets you label channels with one of over 100
built-in labels or create your own five-character label. For details,
see pages 48-49.
Scheduler
allows you to enter up to three separate programs to run
only once or to run at the same time every week. The TV will turn
on, tune to the selected channel, and turn off-all automatically.
For details, see pages 44-45.
Skip
Sleep Timer
Parental Control
For details, see page 11.
For details, see page 52.
For details, see page 50.
Previous Channel Feature
181 Channel Tuning Capability in U.S.A.*
see page 65.
lets you control the speed of mosaic
For details, see page 16.
using two tuners lets you
For details, see page IO.
For details,
l
l
l
l
l
l Auto Demos For details, see page 51.
Networking
Gold Plated Phono Jacks for Superior Performance:
l Two Sets of Audio/Video Inputs including S-VIDEO for VCR,
pages 66 and 68-69.
l
l
l
l
Other Connections to Expand Your System:
l
l
l
At Your Command
Your
l
l
At Your Service
Our Human Touch policy offers all these valuable benefits:
l
l
l
On-Screen Menus
AutoProgramming
for operation of all features.
automatically searches for and stores all active
channels. Eliminates the need for manual set-up. For details, see
page
46.
Frequency Synthesis Tuning
each
channel.
Automatic VCR Setup:
ready for VCR play: Both TV and VCR turn on, and TV tunes
automatically and accurately tunes
With the push of a button, your TV is
to
the correct channel or input. For details, see page 43.
Automatic Cable Box Setup:
is ready for cable box operation: Both TV and cable box
With the push of a button, your TV
turn
on,
and TV tunes to the correct channel or input.
For details, see page 43.
On-Screen Clock/Channel Display
Picture and Audio Reset
For details, see pages 38-39.
For details, see page 7.
Laser Disc Player, Camcorder etc. For details, see
One Set of
AudioNideo
Outputs
including S-video for video
dubbing. For details, see pages 67 and 69.
One Set of Volume-Controlled Audio Outputs
(Hi
Fi)
to retain
remote volume when connected to an external amplifier. For
details, see page 70.
One Volume-Controlled
SURROUND
Audio Output jack
to
connect surround sound to an external amplifier. For details,
see page 71.
One Volume-Controlled
CENTER
Audio Output jack
to connect
center sound to an external amplifier. For details, see page 71.
Four Speaker Jacks
to allow hook up of optional external or
surround sound speakers. For details, see page 73.
Dual RF Inputs
to allow direct connection of up to two basic
cable, cable box, or other RF sources. For details, see pages
41 and 61-63.
Front-Mounted Stereo Headphone Jack
for private listening
with optional headphones. For details, see pages 12 and 25.
ProScan
The ProScan Universal Remote:
a channel. It operates all major
player functions. It
television includes two remote controls.
Operation
ProScan
also
operates the basic functions of 60 different
is as easy as entering
TV, VCR, and
LaserDisc
VCR brands and 28 different brands of cable boxes, eliminating the
need for additional remotes.
The ProScan Simple Remote:
6 buttons control most TV
functions for the ultimate in simplicity.
l-800-ProScan:
Call our information service Monday through
Friday, 7 a.m. to 7 p.m. EST, year round.
Nationwide Authorized Independent Service Centers
ProScan Limited Warranty for U.S.A.:
parts and labor for one year, picture tube for two years.
see page 79. A separate warranty for Canada is enclosed with all
televisions sold in Canada.
In-home service of
all
2-
The steps below will help you get your TV connected and
working quickly. The page numbers on which you can
find detailed instructions for each of these steps are also
listed for your convenience.
1
Unpack TV and accessories.
The accessories that came packed with your TV include
two remote controls, six AAA batteries, antenna adapter,
four wing nuts, and a VCR shelf.
3 Grasp the shipping brackets and gently pull the back cover
up and out until the locating pins enter the alignment holes.
Keep the back cover tight against the cabinet by holding the
shipping bracket on the right side. Then attach wing nut to
built-in hole screw in hole
#l.
Hand tighten.
4 Hold left shipping bracket and attach wing nut to built-in
screw in hole #2. Hand tighten.
,_* +, @<d vi+
( sp s ~6%
*, ,;* <,* ”
Back Extended
6, ~,#;*,*>p a‘,,
$lin*o*~‘-~
i _\ “‘.
Place
included VCR
shelf here.
Note: The VCR shelf allows
you to position a VCR or other
component on top of your TV.
Simply place the shelf on top of
your TV as
shown above,
and
then
place
the
VCR on the shelf.
2 Extend back cover.
Your projection TV has been specially designed with a
collapsible back cover. This design makes it easier for you
to move the TV through doorways because the collapsed
back makes the TV narrower. After the TV is positioned
in your home, you can easily extend the back cover to its
normal operating position by following the instructions
below.
1
Remove the four wing nuts from the literature bag.
2 Remove the two screws (labeled A) from the shipping
brackets. You will use these screws later in step 6.
Back Collapsed
Alignment
Hole for
Locating
Pin
, Alignment
Hole for
Locating
Pin
I
Reinsert
other two
screws here
Wooden Rail
56Attach remaining wing nuts to screws in holes #3 and
#I4
to
ensure stability and best picture quality.
Remove the shipping brackets from the back cover and
attach them to the wooden rail with the two screws (A) from
step 2.
Reinsert the other two screws from the shipping
brackets into the back of the TV as shown, so they will be
available in case you need to move your TV and want to
collapse the back again.
3 Connect an antenna or cable-TV system.
Most antenna or cable-TV systems can be connected as
shown here.
* :
*
< :
‘_
.
;.
CONVERTER
I.
l
Details for connecting a home antenna to your TV are on
page 61.
l
Details for connecting a cable-TV system to your TV are on
pages 62-63.
l
Details for connecting a VCR to your TV are on
pages 66-67.
l
Details for connecting a laser disc player to your TV are on
page 68.
4 Install the batteries in remote controls.
l
Details are on page 8.
(continued on next
page)
-3
5
Turn on the
TV,
select a channel, and adjust the volume.
Plug the TV’s power cord into a wall outlet or suitable
power strip outlet.
To turn on the TV, press the
TV
button on the master
remote or press the
POWER
button on the simplified remote.
When using either one of the remotes, remember to point it
at the front of the TV.
N
Button
Number
Buttons
CHANNEL Buttons
VOLUME Buttons
3
Press the
VOLUME
up or down button to adjust the volume
to a desired level.
4 Press the CHANNEL up or down button to select
the
next
channel in memory. You can also press two number
buttons to select a channel. Some channels were
programmed into the channel memory at the factory, so
pressing
CHANNEL
up or down stops at only these channels.
When you start the autoprogramming feature
described on
page
6, your set will automatically scan through all
channels and place the active channels for your area into
its channel memory.
6
Make sure auto-help displays are turned on.
Your TV has a complete menu system that allows you to
perform most functions using only the simplified remote.
Whenever one of the menus appears on the TV screen,
auto-help displays appear on the bottom of the screen if the
Auto Help: on/off function is set to on.
If the auto-help displays do not automatically appear on
your TV screen, the instructions in the next column explain
how to turn them on.
4
Press MENU
button to display
MAIN MENU.
-
Help displays
automatically
appearon -
screen.
To turn on auto-help displays:
1
Press MENU to display
the MAIN MENU.
2 Repeatedly press - or
to highlight
Setup
in
white.
-
3 Press
MENU again to
display the SETUP
menu.
4 Repeatedly press
-
or + to highlight the
Auto help: on/off
function in white.
5
Press MENU again to
turn the Auto help:
on/off
function to
on.
-I
Note:
The menus will automatically disappear from the screen
after a few seconds if no button is pressed. To quickly remove
them, press the
CLEAR
button on the master remote or press the
-
or + button to highlight the
Done
function and then press
MENU
.
Power Interruption Protection Feature
In the first few months of operation, it is normal for your TV
to occasionally shut down and immediately turn itself on
again. The picture tubes in this TV (as in all TV’s) operate at
a very high voltage and at times may arc internally. Your TV
will recognize what is happening and will automatically shut
down. This protects the TV’s memory from locking up or, in
some cases, being erased. After a shut down occurs, the
following message will briefly appear on the screen.
Note: This message will also be displayed briefly if power is interrupted
due to a loss of power to the TV, such as in an electrical storm or a
brown-out situation.
7 (Optional) Converge your TV.
Your projection TV has three color projection tubes-one for
red, one for green, and one for blue. When mixed together in
the proper proportion, the output of these three color tubes
can produce many colors. To produce these colors, the
beams must be precisely aligned over each other so that the
colors can be mixed. The process of aligning these picture
beams is called “convergence”.
Over a period of time, the picture tubes can drift out of
alignment due to normal bumps and vibrations or moving the
TV. If you move your TV or notice colored rings or halos
around objects in the picture, you may want to converge
(align) the colors.
To simplify convergence, an on-screen menu is provided that
allows you to display a test pattern of lines on the screen.
Properly converged, the lines appear white-which is actually
a combination of the output of the three color tubes.
The
position of the green lines is stationary. The positions of the
red and blue lines are adjustable. When properly adjusted,
the red and blue lines should lie directly over the green lines
to produce single white lines.
To Converge (Align) the Colors.
1
Turn on the TV and select a channel that is active in your
area. Allow the TV to operate at least ten minutes before
converging.
2 Display the CONVERGENCE menu.
1
Press
MENU to display
the MAIN MENU.
2
Repeatedly press - or
to highlight Video
-
Adjust in white.
3 Press
MENU
again
to
display the VIDEO
ADJUST menu.
4 Repeatedly press - or
+ to highlight
Projection setup in
white.
5 Press
MENU again to
display the
CONVERGENCE menu.
3 When properly converged, all three colors in the pattern (red,
blue, and green) should align to form white lines. If you see
any red or blue lines in the pattern, you can move them to
align with the green lines by following the steps in the next
column.
Single white vertical line
4
5
6
Adjust
horizontal
convergence.
1
Press + or-to select (underline)
the red horizontal function.
---)
2
heSS
MENU
to
red horizontal
convergence.
3
Press + to move
the line to the
to move the line
4 Press MENU again to return to the CONVERGENCE menu.
z !:’ : ‘:
5 Repeat steps l-3 above to adjust the
blue horizontal
function.
Note: When adjusting convergence make sure the red and blue lines
are exactly centered on green line in order to form a white line.
Adjust
vertical
convergence.
1
Press + or - to select (underline)
the
red vertical
function.
-)
2
Press MENU to
3
Press + to move
press -to move
the line down.
4
Press MENU again to return to the CONVERGENCE menu.
5 Repeat steps l-3 above to adjust the
blue vertical
Note:
When adjusting convergence make sure the red and blue lines
are exactly centered on the green line in order to form a white line.
When you are finished, press the CLEAR button on the remote
control, or press the -button to highlight
Done
and then press
the MENU button to remove the menu from the screen.
(continued on next page)
-3
8
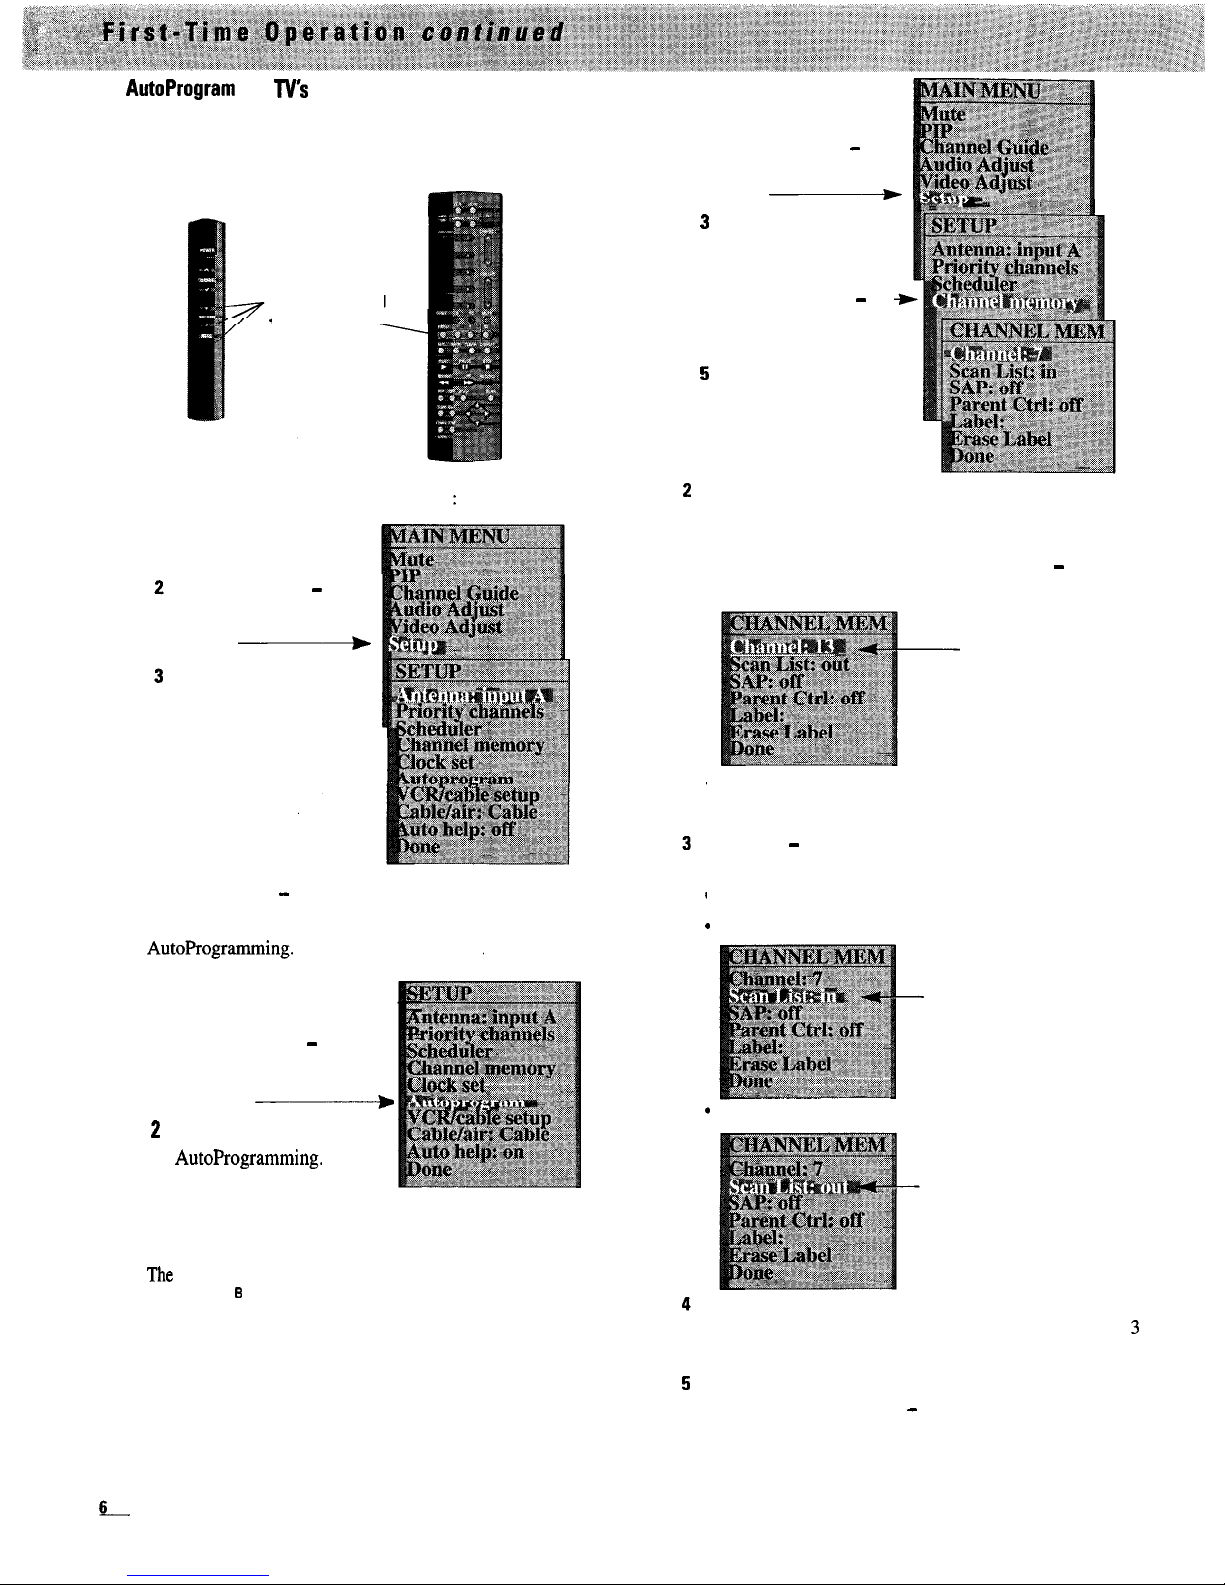
AutoProgram
the
TV’s
channel memory scan list.
The channel memory scan list is the list of TV channel
numbers your TV will stop on when you press the CHANNEL
up or down button. You can program any list of channels
into the channel memory.
MENU Button and
t and -Buttons
1
Press
MENU
to display
the MAIN MENU.
2 Repeatedly press - or
+ to highlight
white.
3
Press
MENU
-
Setup
again to
in
display the SETUP
menu.
4 Repeatedly press - or-
+ to highlight
memory in white.
5
Press
MENU
Channel
again to
display the CHANNEL
MEM menu.
1
To1start the TV autoprogramming itself:
Press MENU to display
the MAIN MENU.
Repeatedly press - or +
to highlight Setup in
white.
Press
h
MENU
again to
display the SETUP
menu.
2 Repeatedly press - or + to highlight
the Autoprogram
function in white. Then press MENU to start the TV
AutoProgramming.
1
Repeatedly press - or + to
Details are on page 46.
highlight Autoprogram in
white.
2
Press MENU to start
-+
AutoProgramming.
Notes:
The
Active Channels
display will appear on the TV
screen.
The TV will automatically program all channels for
and then
ANT
a
input (even if you only have one antenna input
ANT
connected).
9
Add or erase channels to the channel memory scan list.
You can add and erase channels from the channel memory
scan list as desired. Details are on page 47.
1
Display the CHANNEL MEM (memory) menu on the TV
screen.
6-
A
input
Press the
MENU
button to select (underline) the
Channel
function. Enter the number of the channel you want to add
or erase from the channel memory scan list. Press + to
enter a channel with a higher number or press
-
to enter a
channel with a lower number.
Press t to enter a
channel with a higher
number.
Press-to enter e
channel with a lower
number.
Press MENU again to exit (remove underline) the Channel
function.
Then press - to highlight the
Then press
MENU
to add or erase the channel from the
Scan List: out/in
function.
channel memory scan list.
Press MENU to select Scan List: in to add a channel.
To add a channel to
the channel memory
scan list.
Press MENU to select Scan List: out to erase a channel.
To erase a channel
from the channel
memory scan list.
To erase or add other channels, press + to go back up the
menu to the
Channel
function. Then repeat steps 2 and 3
for each channel you want to add or erase.
When you are finished, press the
master remote or press the
then press the
MENU
button to remove the menu from the
CLEAR
button on the
-
button to highlight
Done
and
screen.
Note: The
menu will automatically disappear from the screen
within a few seconds if no button is pressed.
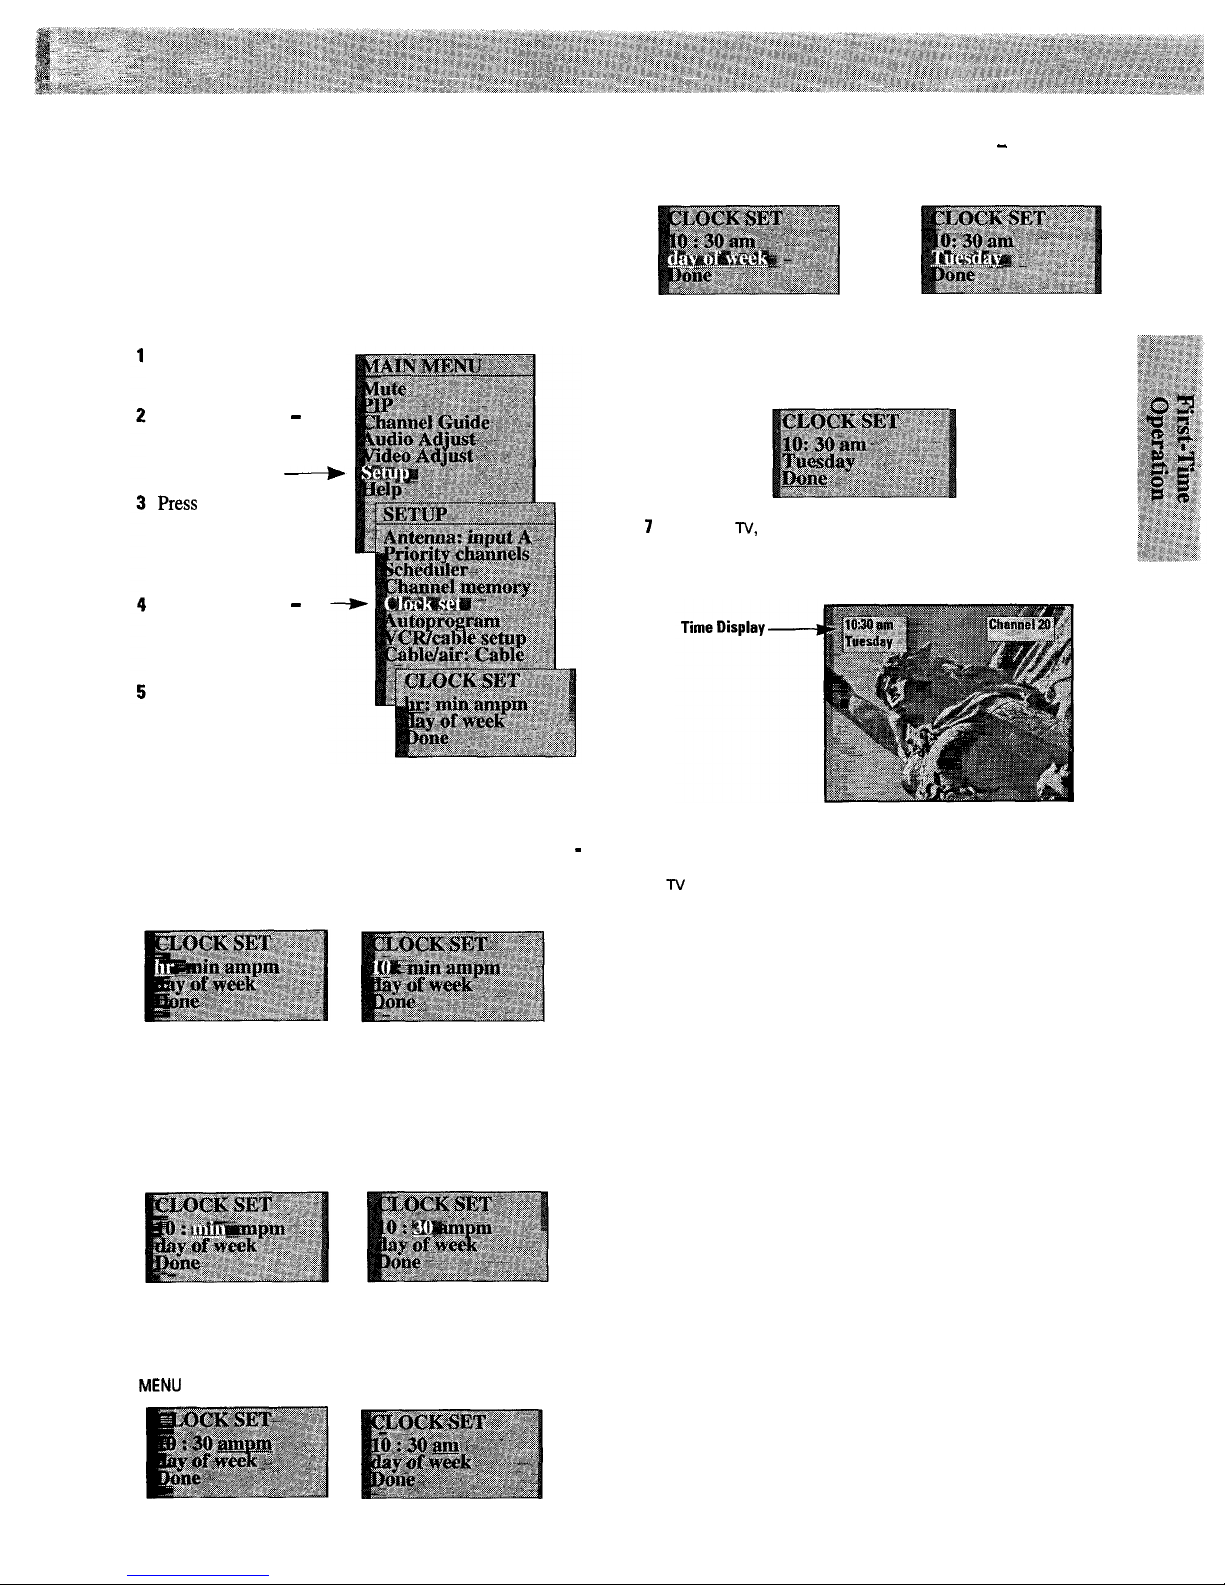
10 Set the clock.
The clock must be set before the time will automatically
appear on the TV screen. Once the time is set, it will
automatically appear whenever you turn on the TV,
change channels or press the DISPLAY button. The clock
must also be set before you can use some of the special
features, such as the scheduler.
1
Display the
CLOCK SET
menu on the TV screen.
Press MENU to display
the MAIN MENU.
Repeatedly press - or
+ to highlight the
Setup
function.
---+
Press
MENU
again to
display the
SETUP
menu.
Repeatedly press - or
+ to highlight the
Clock set
function.
Press MENU to display
the CLOCK SET
menu.
Note: The
CLOCK SET
menu will automatically disappear from the
screen within a few seconds if no button is pressed.
2
Press
MENU
to select (highlight)
hr,
and then press + or
-
to enter the correct hour.
3
Press
MENU
again to exit (remove highlight) the
hr
function, and then press + to select (underline)
min.
Press MENU to select (highlight) min, and then + or-to
enter the correct minutes.
4
Press
MENU
to exit (remove highlight) the
min
function,
and then press + to select (underline)
ampm.
Press
MENU
to select
am
or
pm.
5
Press + to select (underline)
day of week.
Then press
MENU
to enter (highlight) the day. Press + or - to enter the
correct day of the week.
6
Press MENU to exit (remove highlight) the day of the week
function. Then press + to select (underline) Done and then
press MENU to start the clock.
7
Press the
TV,
DISPLAY or CHANNEL up or down button to see
if the
correct time and day of the week appear on the TV
screen along with the channel number display.
11
The correct time will now appear on the screen
whenever you change channels or press the
DISPLAY
or
TV
button.
Notes: The
CLOCK SET
menu will automatically disappear from
the screen within a few seconds if no button is pressed. If the
CLOCK SET
menu disappears from the screen before you have
finished setting the clock, none of the settings will be saved. You
must enter the time and the day of the week, and then select
Done.
Then press the
MENU
button to start the clock.
To correct the time or day of the week, follow the steps above for
the part you want to correct.
Then press the + button to select
(underline)
Done
and press
MENU
to enter your change.
If power is interrupted for an extended time, you will need to
reset the clock.
Review menus and other features.
When you feel comfortable with your TV and remote
controls, review the menus. Most of the menus are
shown inside the front cover. You can fold this page out
for quick reference while reading the manual.
The Help function on the MAIN MENU offers a variety of
help screens to assist you in the connection and
operation of your TV. Details are on page 13.
The rest of this manual can be used as a reference guide
with detailed information about each operating control,
menu, and function. There is an alphabetical index in
the back for your convenience.
Inside of the back cover is a quick-reference operating
guide. This page is designed so it can be removed from
the manual.
7
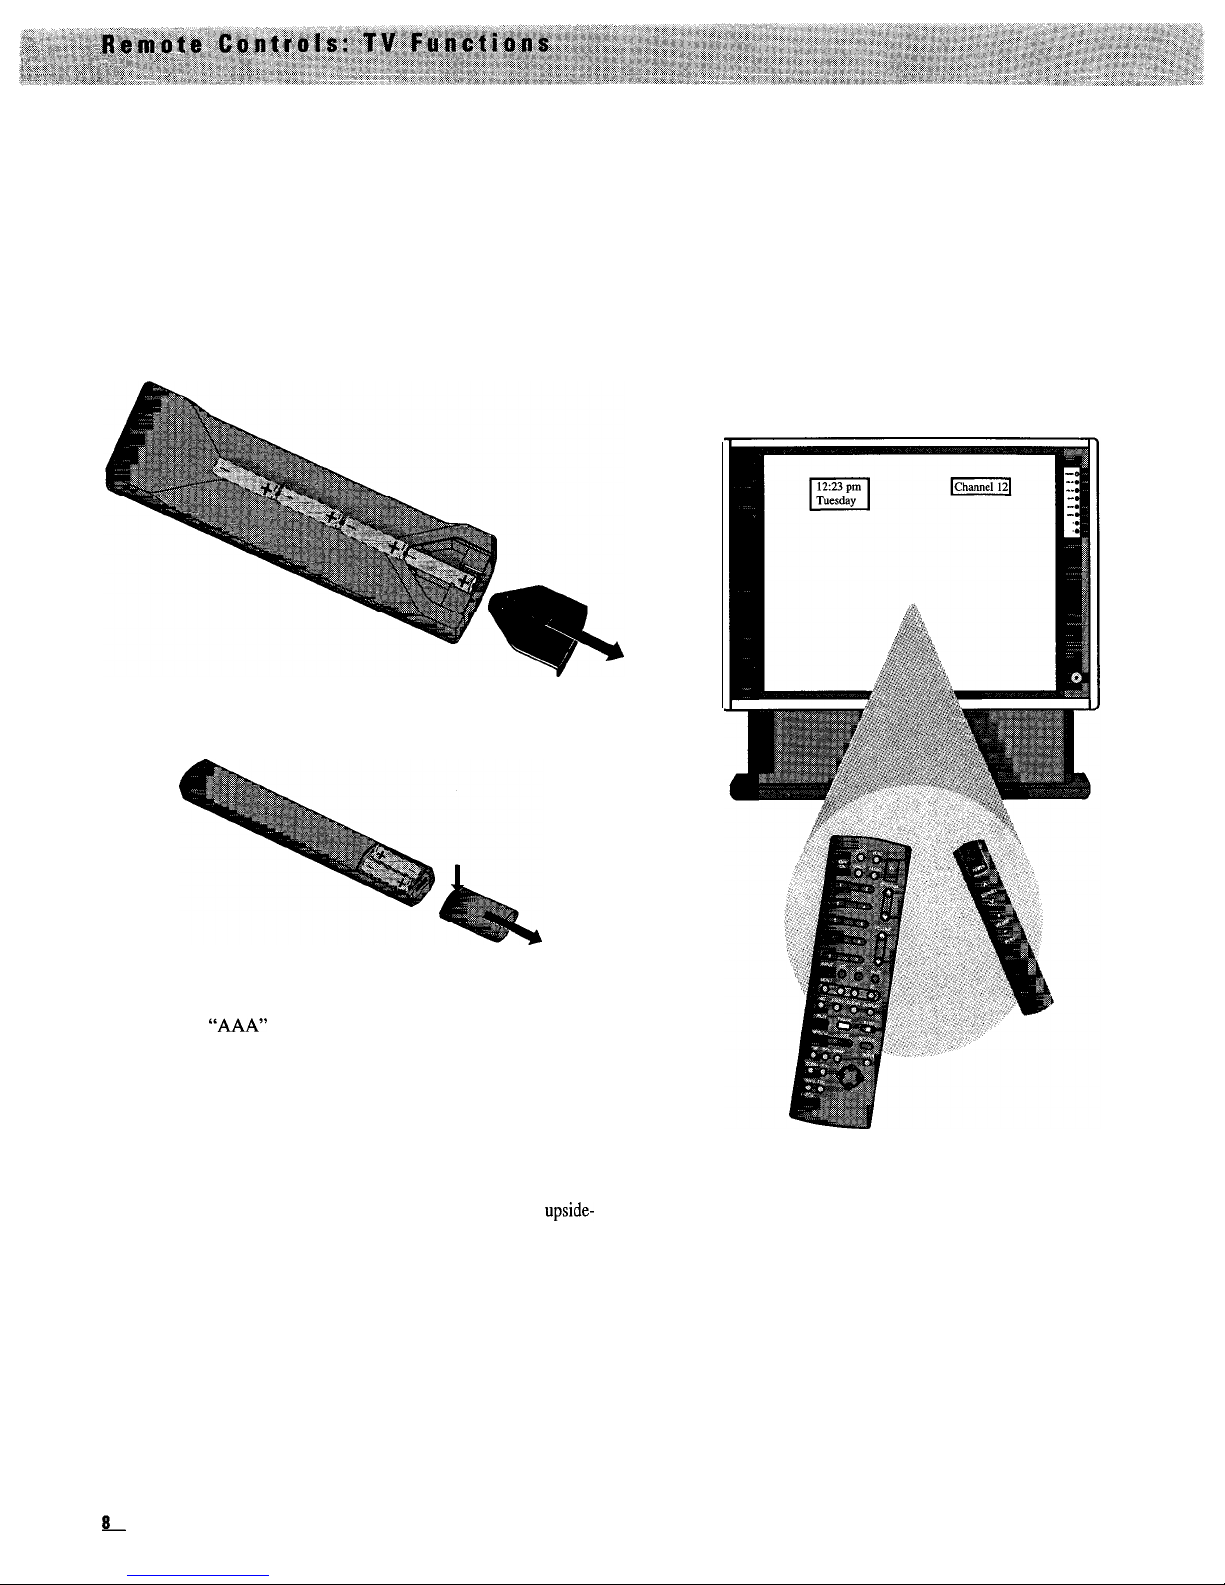
Operating Remote Controls
Before attempting to operate either one of the remote
controls, install the batteries as shown below.
Installing/Replacing Batteries
1
Turn each remote control face down.
2 Press down on the ridged area of each battery cover and slide
it off.
3 Install the “AAA” batteries in each compartment as shown.
4 Replace the covers and turn remotes over (face up).
Notes: Replace the batteries when the TV fails to respond to the remote
control.
If you programmed your master remote to control other components, you
may have to reprogram the code numbers when you change batteries.
Try not to press any buttons while changing batteries.
Never place anything heavy on top of the remote control or lay it upside-
down. This may accidentally depress the buttons for a long time and
discharge the batteries.
Do not mix new and used batteries or different brands of batteries.
If battery leakage occurs, wipe up the liquid inside the compartment and
replace the batteries with new ones.
Using the Remote Controls
Aim either remote control at your TV’s remote control
sensor (located behind the TV screen). The remote
controls produce an invisible (infrared) beam that travels
in a straight line much as the beam of a flashlight. For this
reason, when operating either one of the remote controls,
you must point it directly at the front of the TV without
objects between that can block the infrared light beam.
Aim remote at your TV’s remote control sensor
(located behind the TV screen).
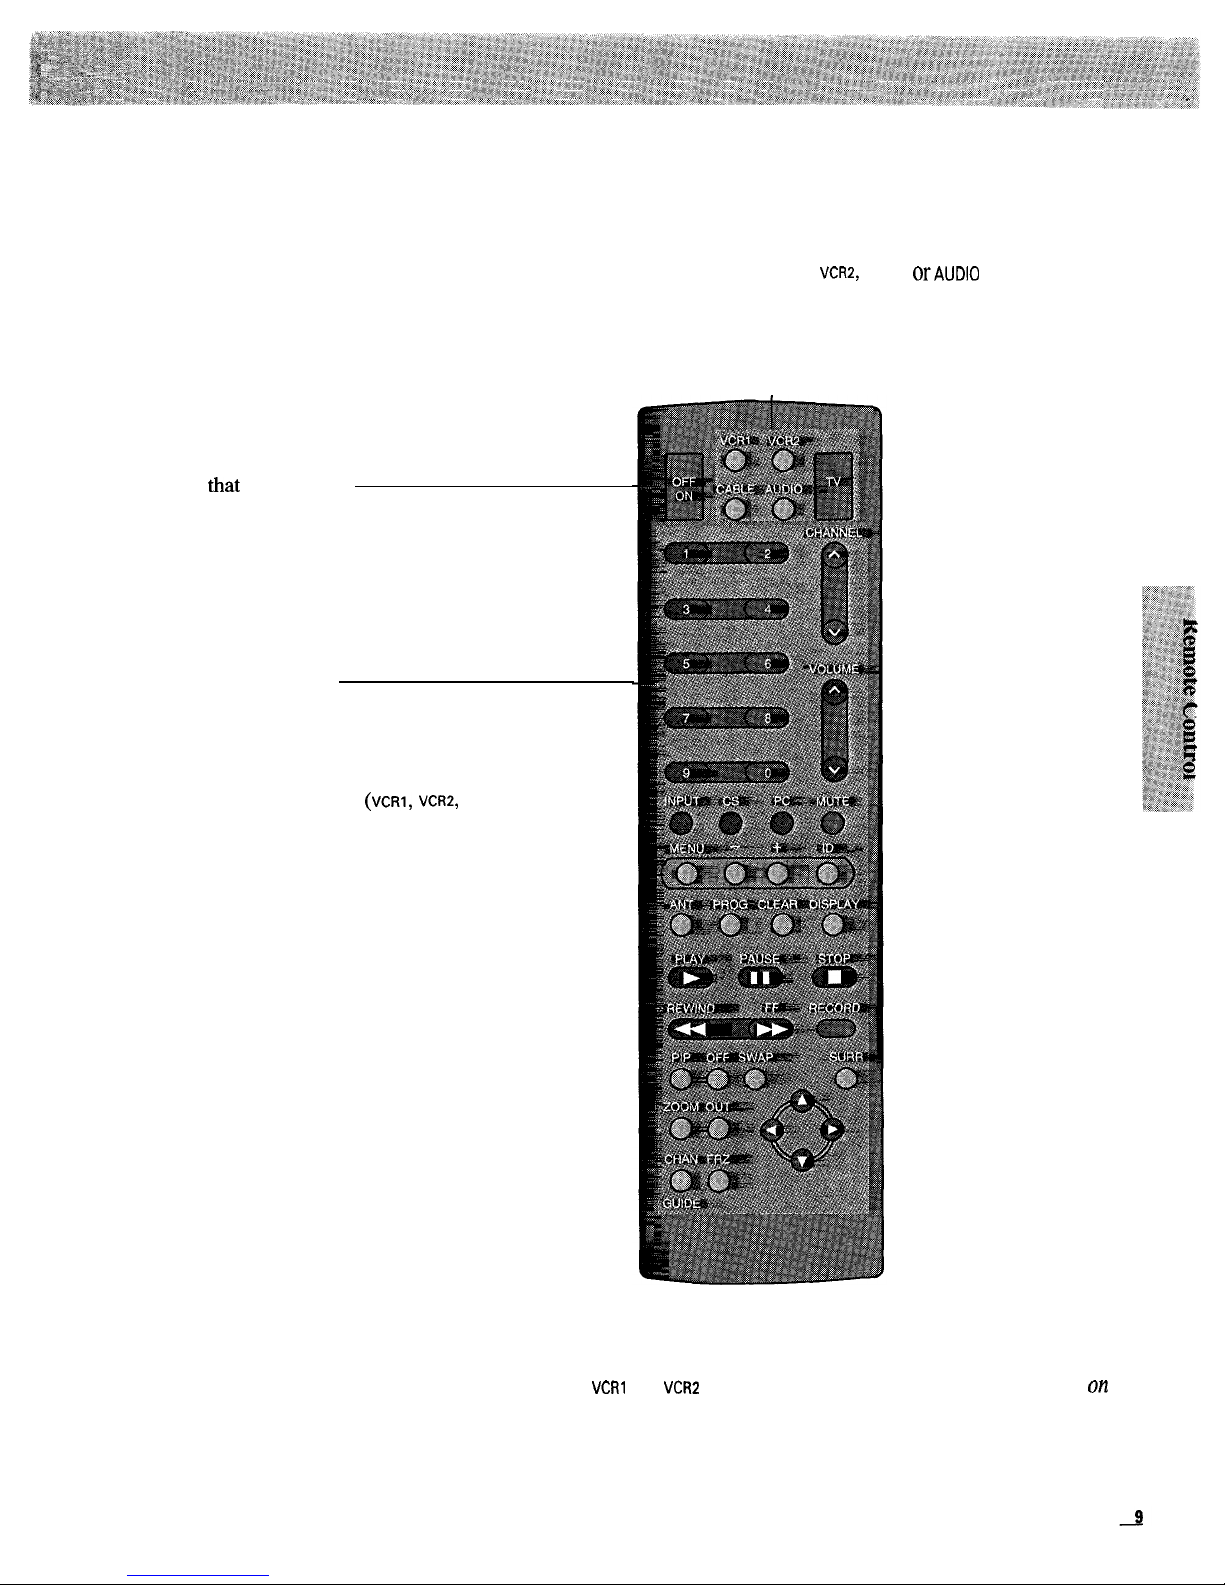
Basic Operation Theory (for master remote control)
Step 1
Component Buttons
First press one of these five component buttons to tell the remote control which
component you want to control. You can program the VCRI,
VCRP,
CABLE,
OrAuDIo
buttons to control most brands of equipment.*
1
Step 2
Then press the
OFF/ON
button to turn on or
off
that
component.
Note: The TV and some other components will
automatically turn on when you press the button in
Step 1.
Step 3
Function Buttons
These function buttons can now be used to
control the basic functions of the
component you selected in Step 1. To
control a different component, first press
its component button
(VCRI, VCR~,
CABLE,
AUDIO, or IV), and then press the desired
function button.
Note: Not all components have functions that can be
controlled by these buttons, but you can experiment
with your particular component to discover exactly
which buttons will control it.
* The N button automatically controls your TV-no additional programming is required.
l Details for programming the
VCRI
and
VCR~
buttons to control other brands of VCR’s are
olt
page 5.5.
l Details for programming the AUDIO button to control audio equipment are on page 56.
l Details for programming the CABLE button to control cable boxes are on page 64.
The
ProScan
master remote that came packed with your
TV also controls most brands of VCR’s and cable-TV
boxes. The buttons shown below can be used to operate
your TV. The rest of the buttons are used to control VCR’s,
LaserDisc
players, audio equipment, or cable boxes and are
For added convenience, the simplified six-button remote
also lets you control most of the TV’s operations and
functions using the advanced menu system.
o-
19
0
1lV Button
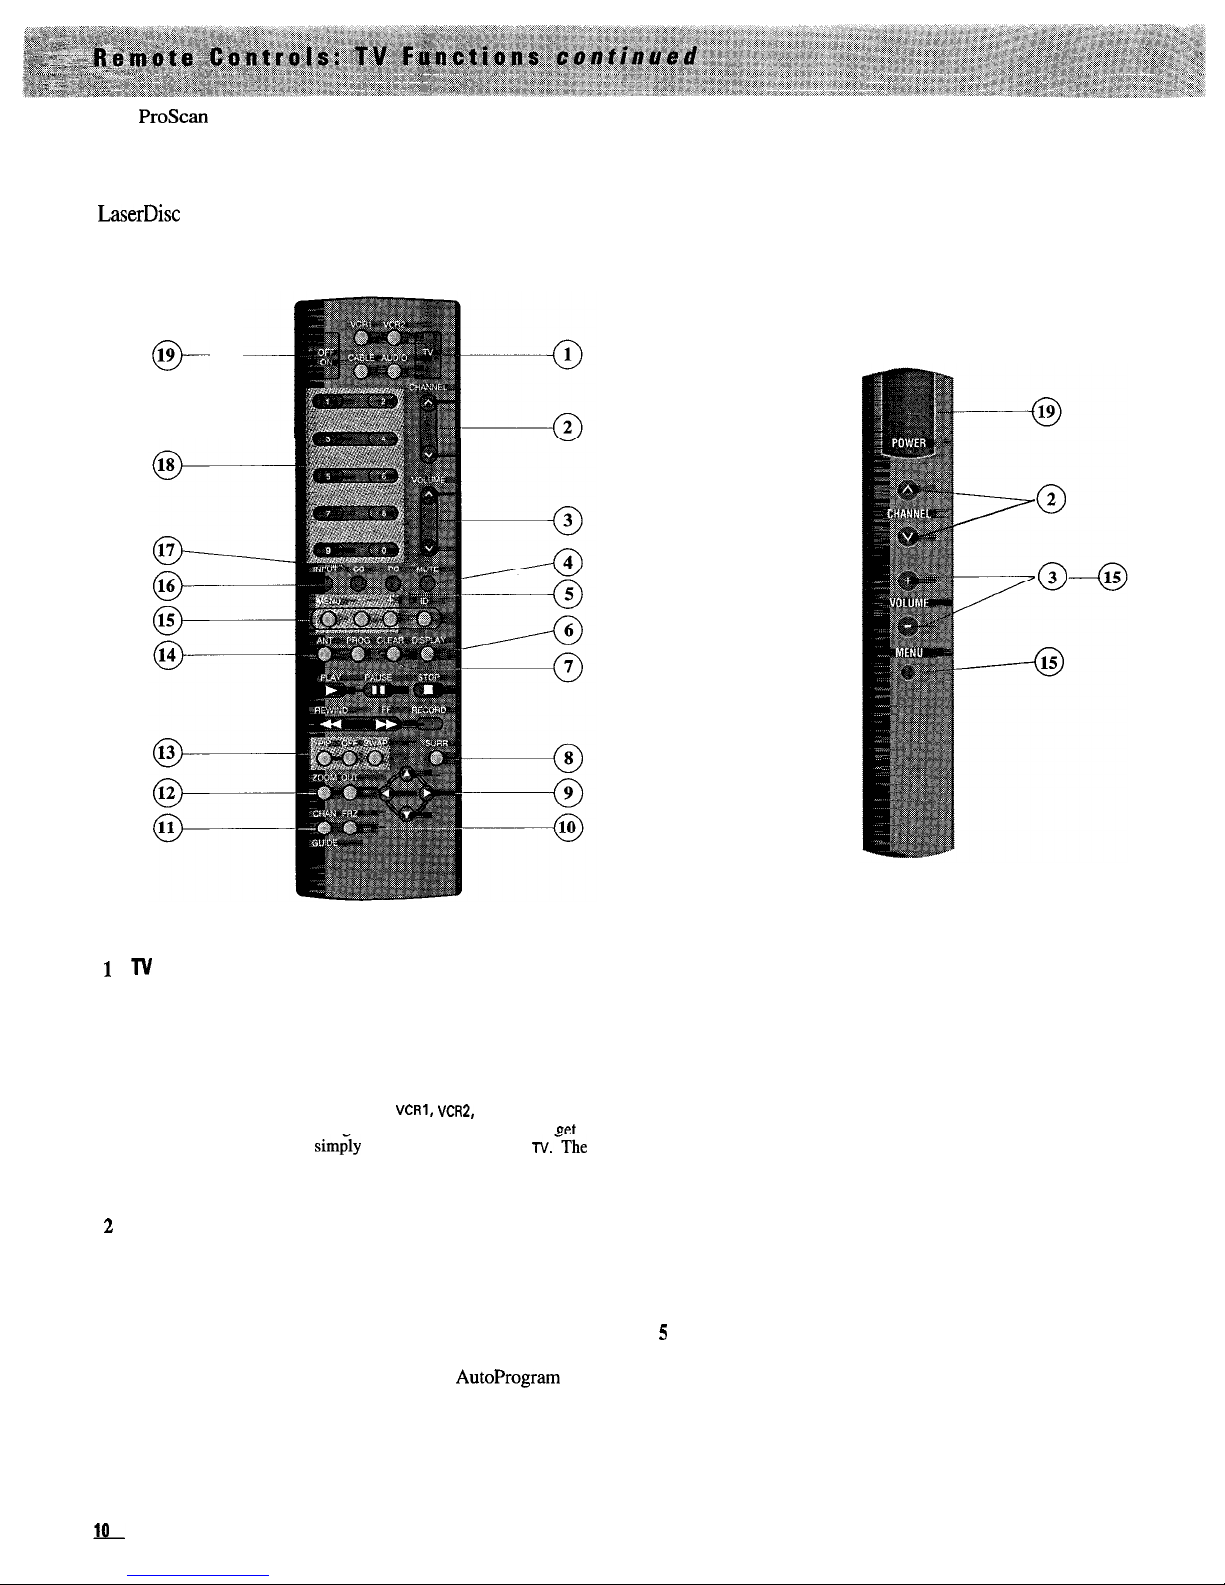
turns on TV and puts remote in “TV Mode” so
that the other remote buttons will control the TV. Also
displays time (if clock has been set) and channel number on
the TV screen.
Important Note:
Most buttons on the master remote control will
not control the TV unless the remote is in the “TV Mode”. If
another component button (such
as VCRI, VCRS,
CABLE
,
or
AUDIO
)
is
Dressed. the remote will no longer be in the “TV Mode”.
To
get
back into the “TV Mode”, sirnay press the button labeled rv.-The
remote will go back into the “TV Mode” and will control the TV
again.
0
2
CHANNEL Buttons
Press CHANNEL up to see the next higher channel in memory,
or press CHANNEL down to see the next lower channel in
memory.
Your TV will automatically program active channels for
your area into memory when you start the AutoProgram
feature
described
on
page
46.
You can also add or remove
individual channels from memory
as described on page
47.
0
3
0
4
VOLUME Buttons
Press VOLUME up to increase volume, or press VOLUME down
to decrease volume. The volume display will automatically
appear on the screen when you press the
VOLUME
buttons.
MUTE Button
Press MUTE to quickly reduce sound to its minimum level
without affecting the picture. This is very useful during
telephone calls or other interruptions. When sound is muted,
the word
Mute
will appear on the screen for a few seconds to
let you know you have muted the TV. To restore sound,
press
MUTE
again or press
VOLUME
up.
0
5 PC (Previous Channel) Button
Pressing the
PC
button causes the TV to change back to the
last-tuned channel. This is useful should you want to
monitor two channels.
To operate, select the first channel you want to watch. Then
select the other channel by pressing two number buttons.
The TV will now change back and forth between the two
channels each time you press the
PC
button.
0
6
DISPLAY Button
displays time (if clock has been set) and
channel number on the TV screen.
0
7
CLEAR Button
Pressing
CLEAR
quickly clears the screen of all on-screen
display messages (except
Mute).
It is also used to cancel the
commercial skip count-down clock.
0
8 SURR (Surround) Button
lets you switch between the eight
audio modes (STEREO, EXPANDED STEREO, DOLBY 3 STEREO,
PROLOGIC, PHANTOM PROLOGIC, MATRIX SURROUND, HALL
SURROUND, or STADIUM SURROUND). Details are on
pages 22-36.
0
9 Arrow Buttons
let you pan across the picture when it is
zoomed in.
Details are on pages 14-15.
They also let you
move the small picture around the
screen
during PIP
(Picture-In-Picture) operation.
Details are on pages 18-I 9.
0
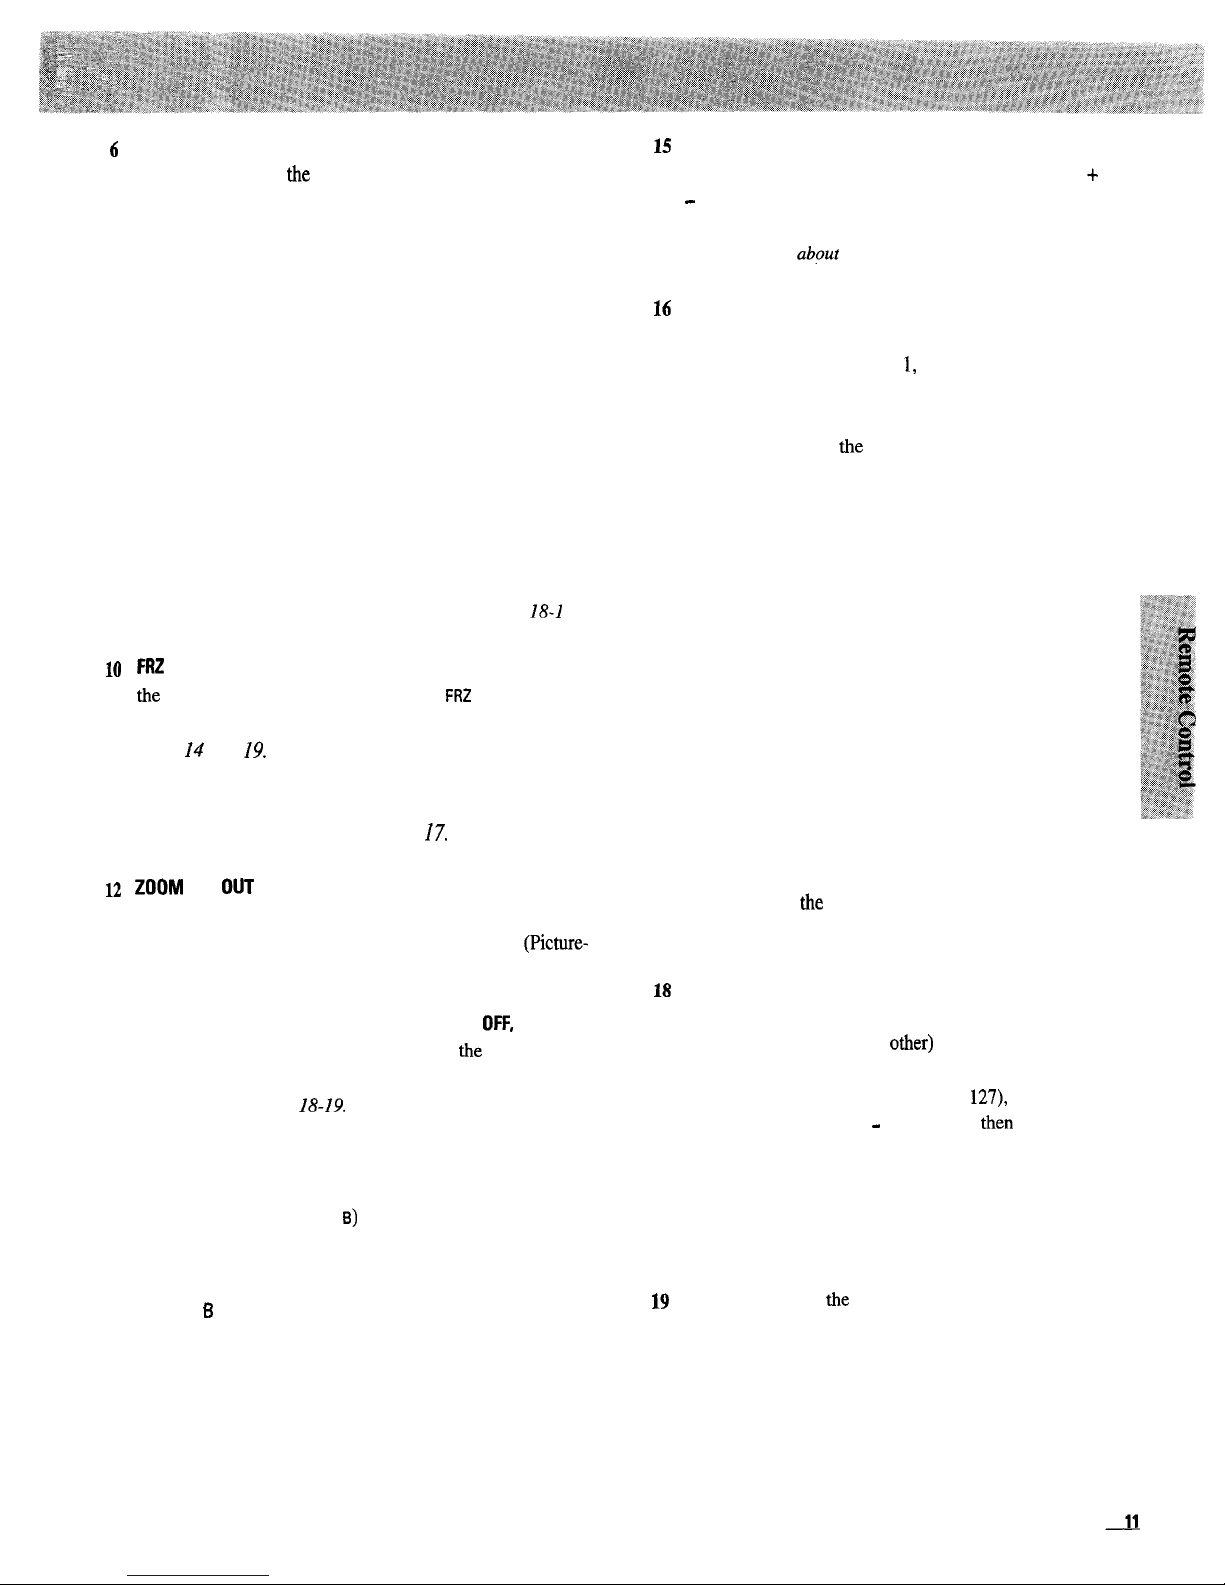
10
FRZ (Freeze) Button
lets you freeze the picture. When using
the PIP (Picture-In-Picture) function, the
FRZ
button only
freezes the small inset picture.
Details are on
pages I4 and 19.
0
11
CHAN (Channel) GUIDE Button
lets you display 12 channels
at the same time.
Details are on page
I7.
0
12
ZOOM
and OUT Buttons
let you make the picture larger and
smaller.
Details are
on
pages 14-15.
These buttons also let
you change the size of the small picture during PIP (Picture-
In-Picture) operation.
Details are on pages 18-l 9.
0
13 PIP (Picture-In-Picture) Control Buttons (PIP, OFF, and
SWAP)
are used to display two pictures on the TV screen at
once. The little picture can be switched with the big picture.
Details are on pages 18-19.
0
14 ANT (Antenna) Button
Because your TV has two different antenna inputs on the
back (labeled ANT A and ANT
13)
you can connect more than
one antenna or signal source. Press the
ANT
button to switch
from one input to the other.
Antenna
6
appears with the channel number in the channel
number display when you are watching whatever is
connected to the
ANT
B
input.
Details are on page 41.
0
15 MENU Button and -and + Buttons
Press MENU once to display the MAIN MENU, then press
+
or
-
to highlight the function you want. Next press MENU
again to enter or adjust that function or display the next
menu.
Details about using eachfunction begin on page 13.
0
16 INPUT Button
lets you quickly view signals from the
INPUT
jacks. Pressing this button switches the TV from its current
channel directly to channel 9
1,
and then to channel 92.
Channel 91 lets you view the signal from a component
connected to the
INPUT 1
jacks and channel 92 accesses the
INPUT 2 jacks. Press
the
CHANNEL up or down button to
return to normal channels.
0
17 CS (Commercial Skip) Button
Use this button when you want to scan other channels
during a commercial break. When a program break occurs,
press
cs
once before changing channels. The TV will
count down 30 seconds on the screen and then
automatically switch back
to
the original channel you were
watching.
Press
cs
twice if you want the TV to count down 60
seconds. Each additional press will add another 30 seconds
to the count-down time (up to four minutes) and then each
additional press will add another 60 seconds to the
countdown time (up to 60 minutes).
To cancel, press CLEAR. The countdown clock will
disappear from the screen, and the TV will stay tuned to the
channel it was on when you pressed
CLEAR
.
0
18 Number Buttons
let you select channels directly instead of
using the CHANNEL buttons. Always press two number
buttons (first one, then the other) to select a channel. For
example, press 0 then 6 for channel 6.
To select a 3-digit cable channel (like 127), press and hold
number button 1 until
I-
-
appears, and then press two
more number buttons.
Your
TV will tune up to channel
number 128 when the
Cable/Air
function is set to Cable.
Check with your cable company to determine which
channels are available in your area.
0
19 OFF/ON Button
on the master remote turns the TV off and
on. The
POWER
button on the simplified remote turns the
TV off and on.
Time and Day-of-Week Display shows
the current time and day of the week
(after the clock is set) whenever you
turn on the TV, change channels, or
press the DISPLAY button on the
master remote control.
Channel Number Display shows the channel number whenever you
turn on the TV, change channels, or press the DISPLAY button on
the master remote. Antenna B appears with channels from the ANT
E
input. This display also shows PIP (Picture-In-Picture), channel
label, and sleep timer information when they are activated.
VOL ”
u
CHA&
MENU a-
+*
0
1
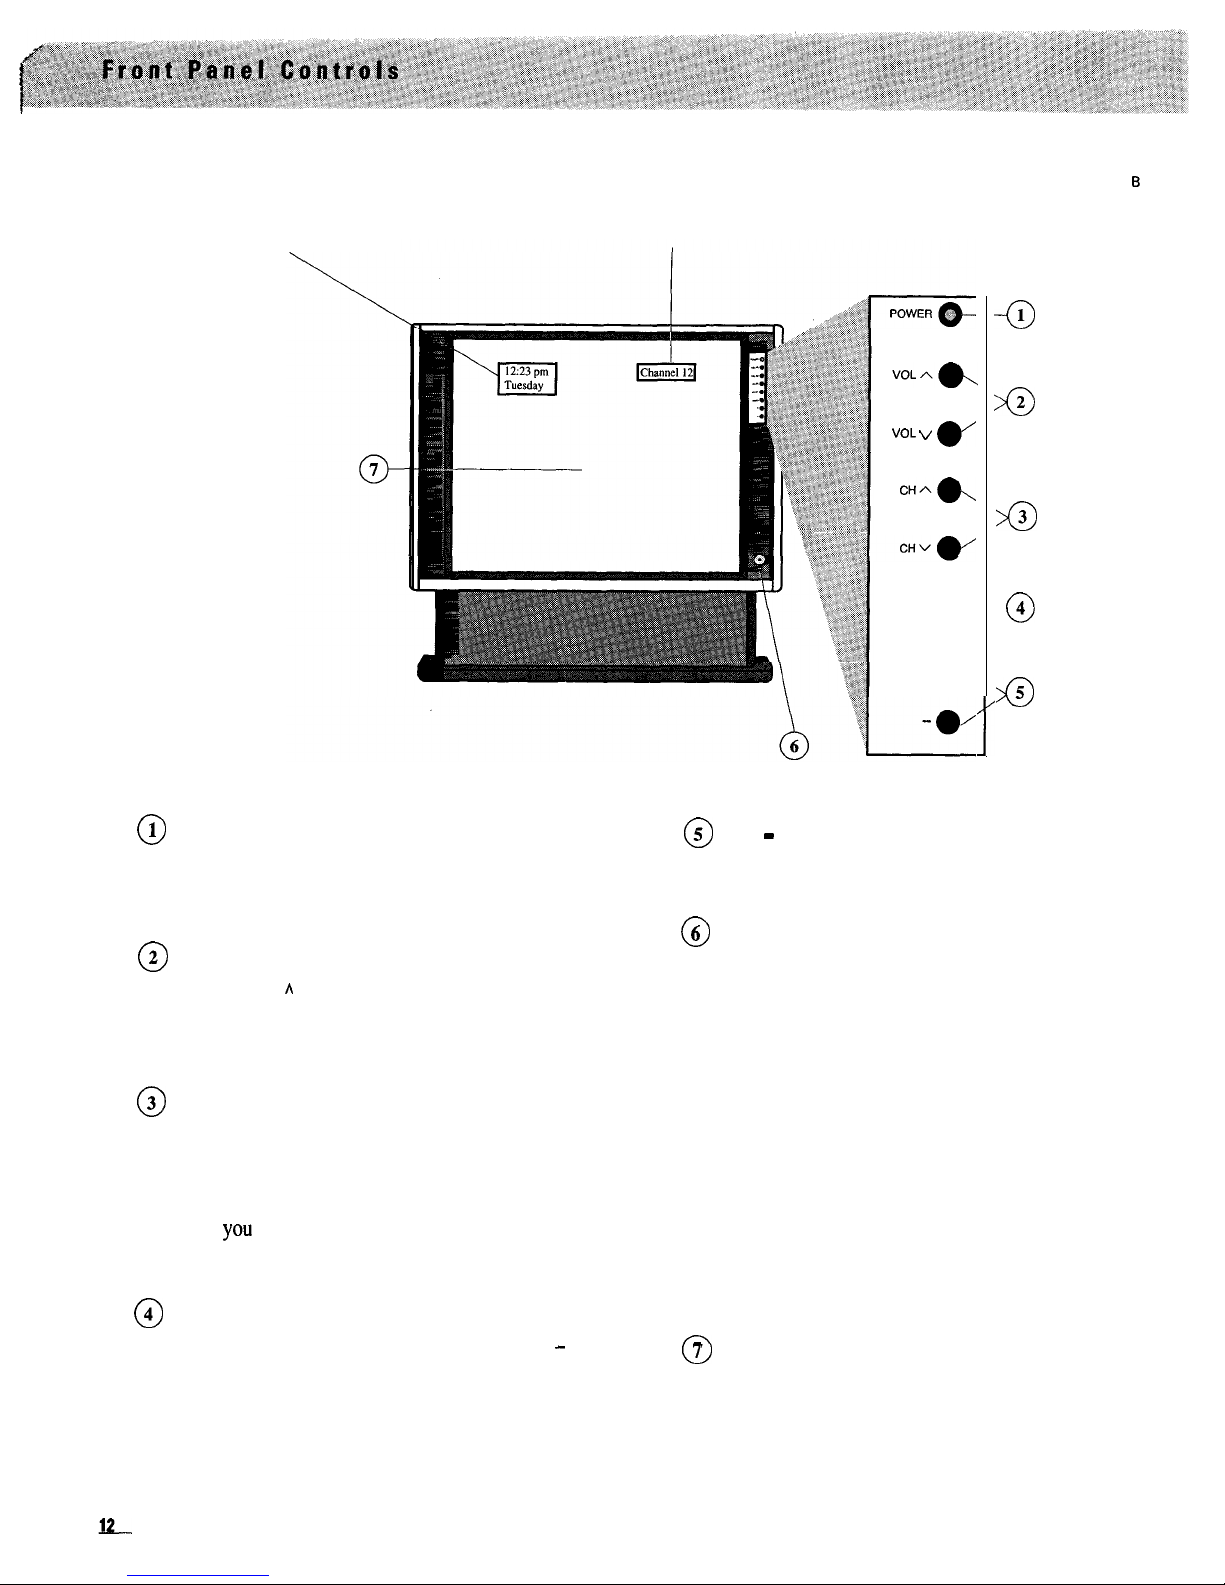
POWER Button and Indicator
Press once to turn on TV. Press again to turn off TV.
The power indicator lights whenever the TV is
turned on.
0
2 VOLUME Buttons
Press VOLUME A to increase volume, or press
VOLUME v to decrease volume. The volume display will
automatically appear on the screen when you press a
VOLUME
button.
0
3 CHANNEL Buttons
Press CHANNEL A to see the next higher channel in
memory, or press CHANNEL v to see the next lower
channel in memory. Your TV will automatically
program channels into the channel memory for you
when
you
start the Autoprogram feature described on
page 46. You can also add or erase individual channels
as described on page 47.
0
4 MENU Button
Press MENU to display the MAIN MENU. Use + and - and
MENU to select and adjust other menu functions.
Details about using each menu function begin on
page 13.
1
-0
1
>o
2
>o
3
-4
0
>o
5
0
5 + and - Buttons
Use these buttons after you have pressed the MENU
button to enter or adjust functions.
0
6
Stereo Headphone Jack
This headphone jack lets you connect optional
headphones to listen to the audio from the PIP
(Picture-In-Picture) at the same time others are
listening to the audio from the main picture. You can
also enjoy private listening to the audio from the
main picture without disturbing others. If the plug on
your headphones does not fit this jack, adapters are
available from your local electronics supply store.
Plugging in headphones will not automatically mute
the sound from the TV. This special feature enables
someone with a hearing impairment to attach a set of
headphones, adjust the headphone volume, and enjoy
a program with others in the same room listening at a
lower volume. You can also enjoy private listening.
Details are on page 25.
0
7
Remote Control Sensor (behind TV screen)
Receives commands from the remote controls. When
using a remote control, point it toward this sensor.
Details are on page 8.
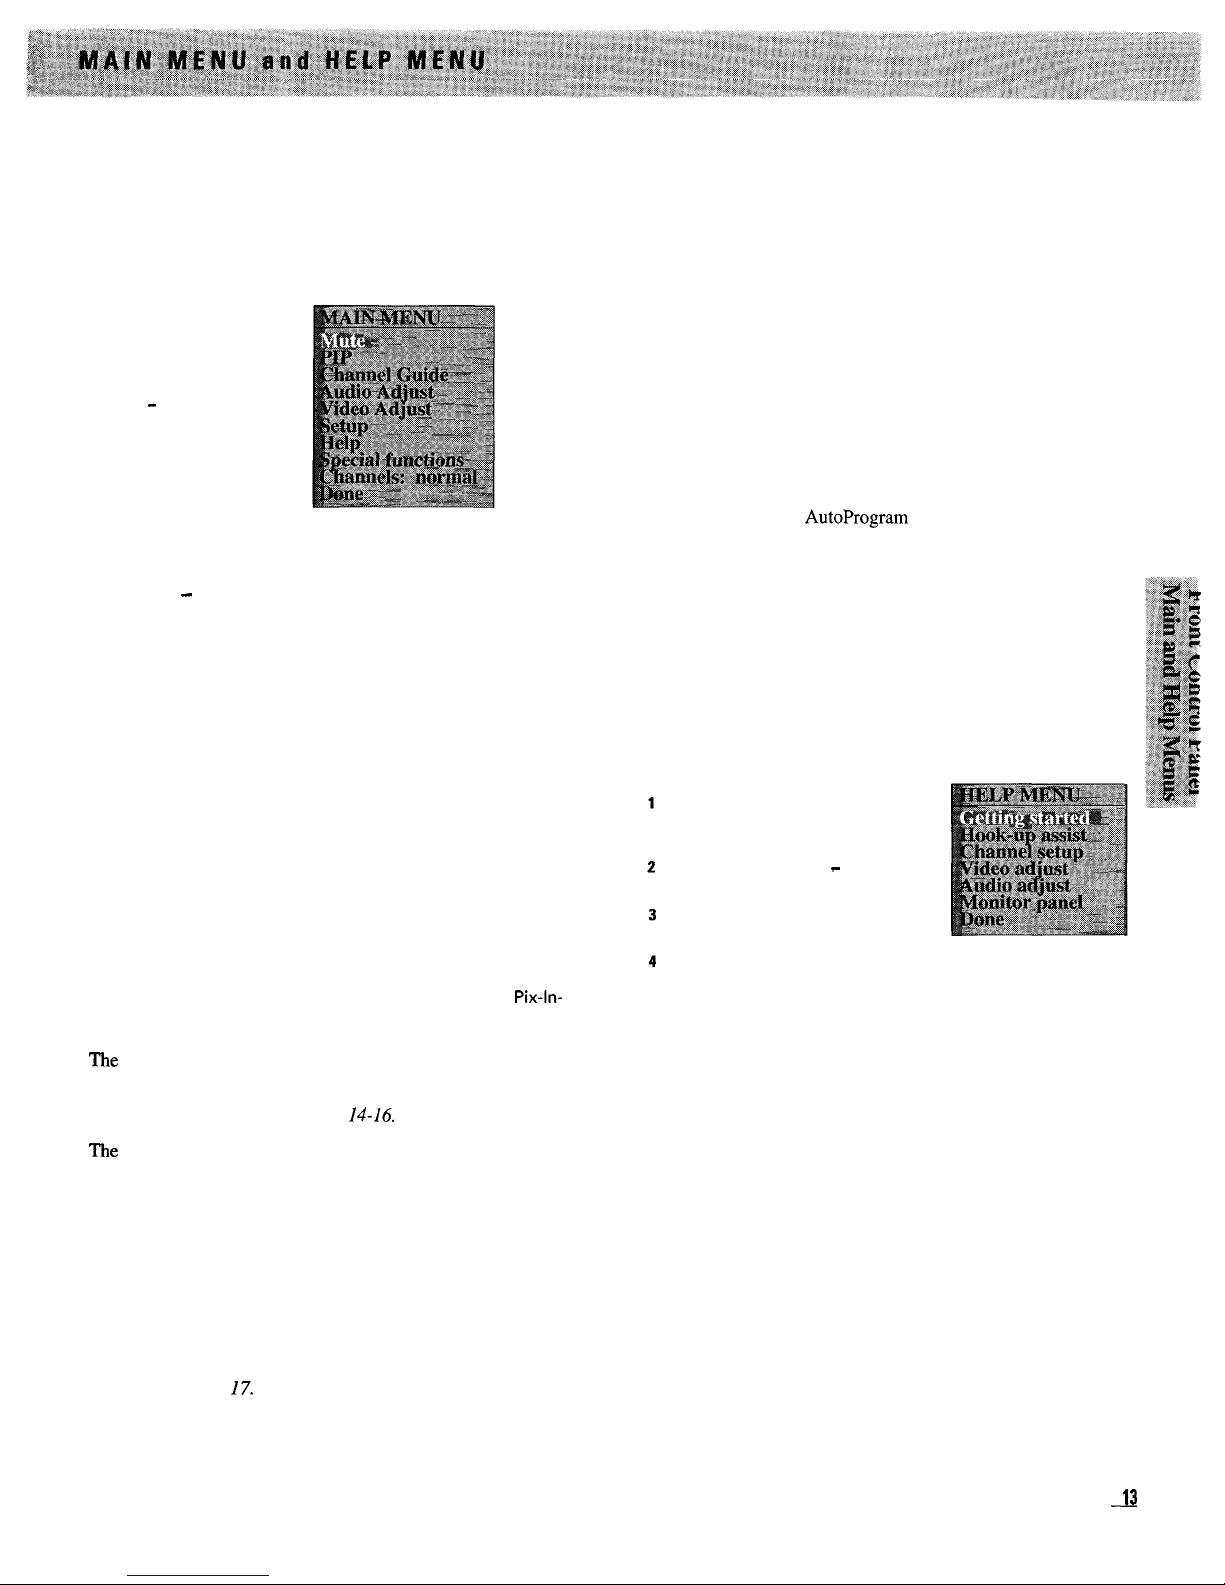
Your TV’s advanced menu system allows you to select and
operate any of the TV’s functions through the MAIN MENU
using either remote control or the TV’s front control panel.
Several of the TV functions (such as mute, freeze, zoom,
PIP, channel guide, etc.) can be directly accessed using
buttons on the master remote control.
1 Press the MENU
button to display the
MAIN MENU.
2 Repeatedly press the
+ or - button to
highlightthe desired
function in white.
3 Press the MENU
button again to enter
or adjust the function.
Pressing the - button moves the highlight down the screen
(one item per press).
Pressing the + button moves the highlight up the screen
(one item per press).
Pressing the MENU button when a function is highlighted
allows you to enter or change that function.
After a few seconds, the MAIN MENU will disappear from the
screen if no button is pressed. To exit the menu quickly,
highlight Done and then press MENU or press the CLEAR
button on the master remote control.
Mute
reduces the TV’s sound to a minimum level. Press the
MENU
button when
Mute
is highlighted to mute the sound.
The
PIP
(Picture-In-Picture) function displays one of two
Pix-ln-
Pix
menus.
l
The
first
Pix-In-Pix
menu lets you freeze, zoom, pan, and apply
special effects to the main picture. It also lets you turn on the
PIP feature.
14-16.
l
The
second
Pix-In-Pix
menu allows you to swap, freeze, move,
adjust the size of the small inset picture and select which
picture’s (PIP or main) audio the headphone jack will receive.
Details about operating PIP are on pages 18-21.
Channel Guide
continually displays small pictures across the TV
screen. Only the channels (normal or priority) selected with the
Channels: normal/priority function in the MAIN MENU will appear.
Details are on page 17.
The Audio Adjust
menu
allows
you to adjust the equalizer, adjust
the headphone’s volume, adjust right and left balance, select one
of eight different audio modes (each with individual setup
features), and set the volume limit of your TV.
Details are on
pages 23-36.
The Video Adjust
menu allows you to adjust the color, tint,
contrast, brightness, sharpness, color temperature, noise
reduction, and turn auto color on or off for the TV’s picture.
Details are on page 37.
The Setup
menu allows you to select the antenna input, setup a
priority channel scan list, program the scheduler, edit the channel
memory, set the clock, AutoProgram the scan list, setup your
VCR and cable channels, set cable/air function, and turn on or
off the auto-help screens that appear at the bottom of the screen.
Details begin on page 40.
The
Help
function offers a variety of on-screen instructions and
diagrams to assist you in the operation and connection of your
TV. To enter the HELP MENU and display the help screens, follow
the instructions below.
Press the MENU button when Help is
highlighted to display the HELP
MENU.
Repeatedly press the + or - button to
highlight the desired help function.
Press the MENU button again to
enter a help screen.
Then press + to continue or MENU to
exit a help screen.
Notes: The
HELP
MENU
and help screens will remain on the TV screen
until you exit the
Help
function.
Special functions
allow you to activate the sleep timer, set the
time-reminder feature, and start TV demonstrations (auto, IDTV,
and sleep). You can also save your personalized audio and video
settings to
be
recalled later or return audio and video to factory
settings.. You can select Closed Captioning to display the audio
portion of a program as text or show current program
information.
Details are on page 38-39.
The Channels: priority/normal
function switches the channel
memory scan list between normal and priority channels.
Details
are on page 42.
13
Anytime you are watching a TV program (or a VCR tape
through your TV), you will be able to use the special
features described below. The PIP (Picture-In-Picture)
feature must be turned off to use these features on the
main picture.
Note: These features can also be used on the small inset PIP picture.
Details are on pages 18-21.
Freeze and Zoom
with master remote control
PIP and OFF
Buttons ,
ZOOM and
OUT Buttons
.
-Arrow Buttons
-- FRZ (Freeze) Button
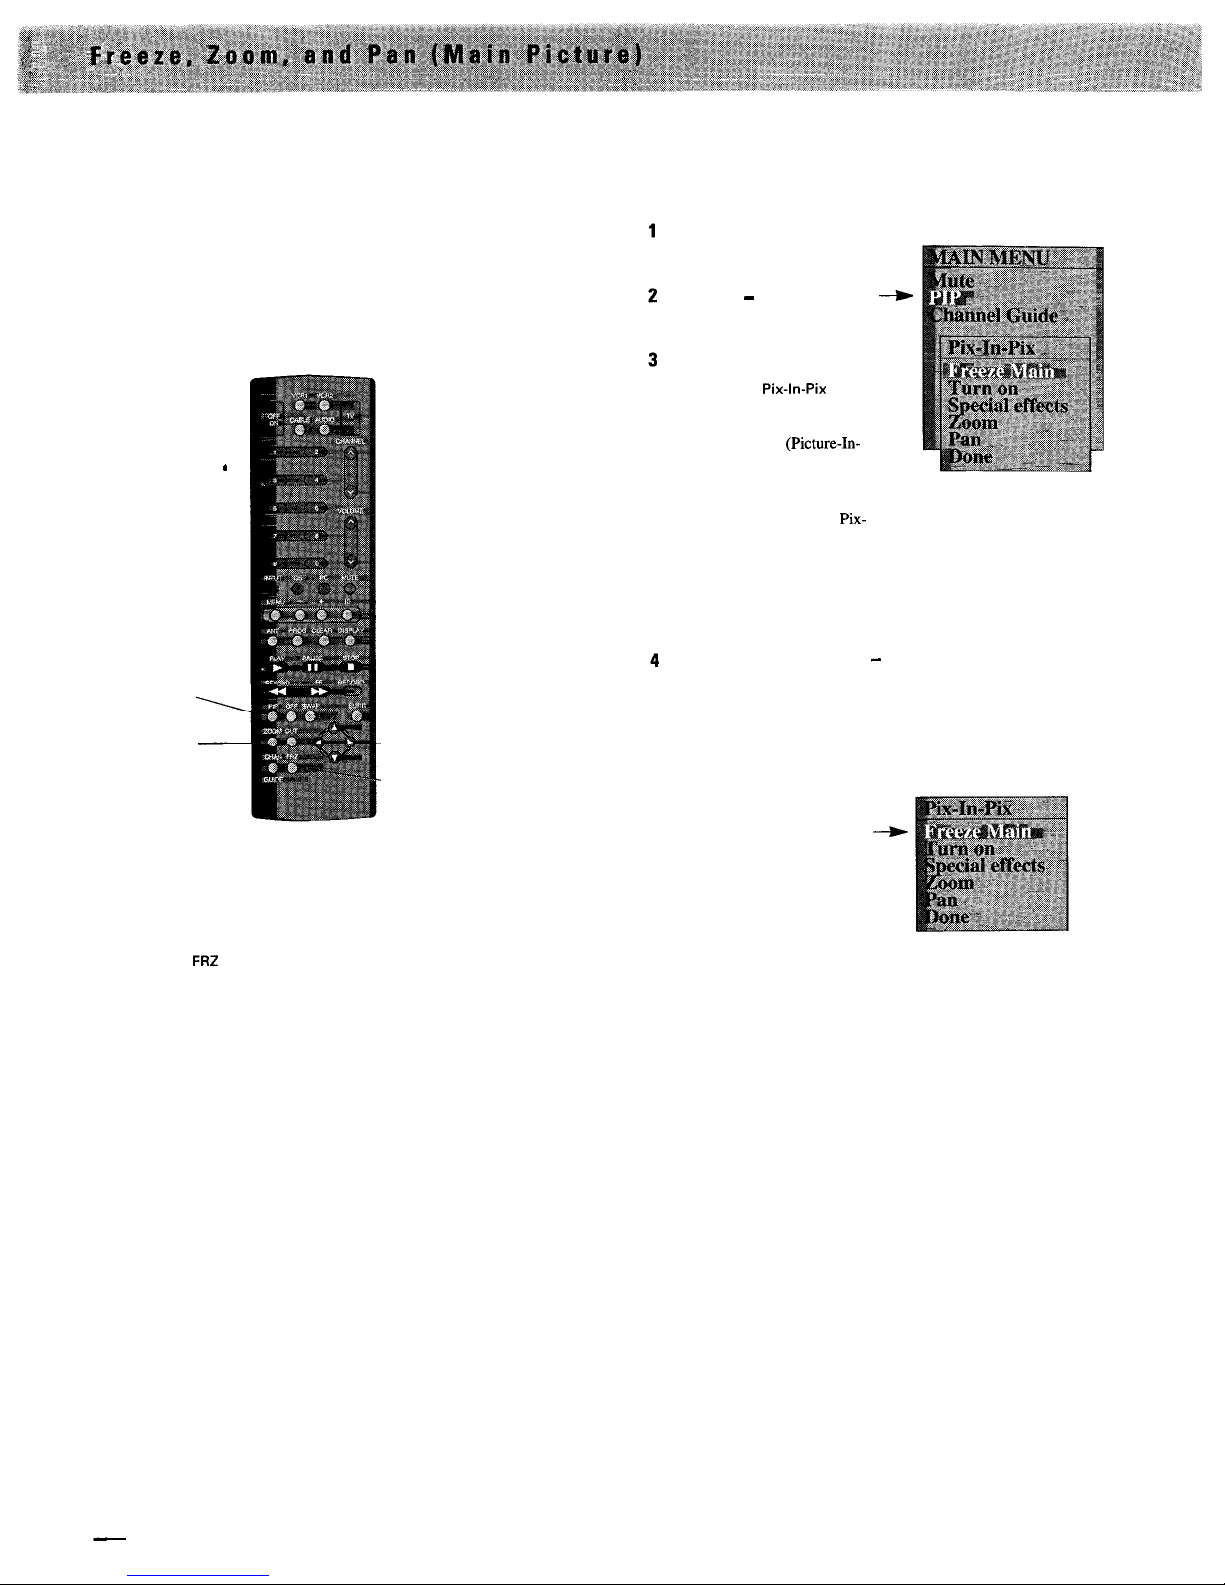
To Freeze the Picture
1
Press the
FRZ
(freeze) button to freeze the picture. Freeze
does not affect the audio
portion
of the program.
2 Press the
FRZ
button again (or the
OFF
button) to return to
normal video.
Note:
If
the PIP
(picture-in-picture) feature is turned on, pressing
FRZ
will freeze the small inset picture.
To Zoom and Pan the Main Picture
1
If the PIP (Picture-In-Picture) feature is turned on, press the
OFF
button to turn it off.
2 Press and hold
ZOOM
until the desired zoom amount is
reached.
3 After you have zoomed in, press the arrow buttons to move
(pan) around the screen. Sometimes you may want to freeze
the picture first and then zoom in, or you can zoom in and
then freeze the picture.
4 To reduce the zoom amount and return to normal size, press
and hold
OUT
or press the
OFF
button.
Freeze and Zoom
with menus
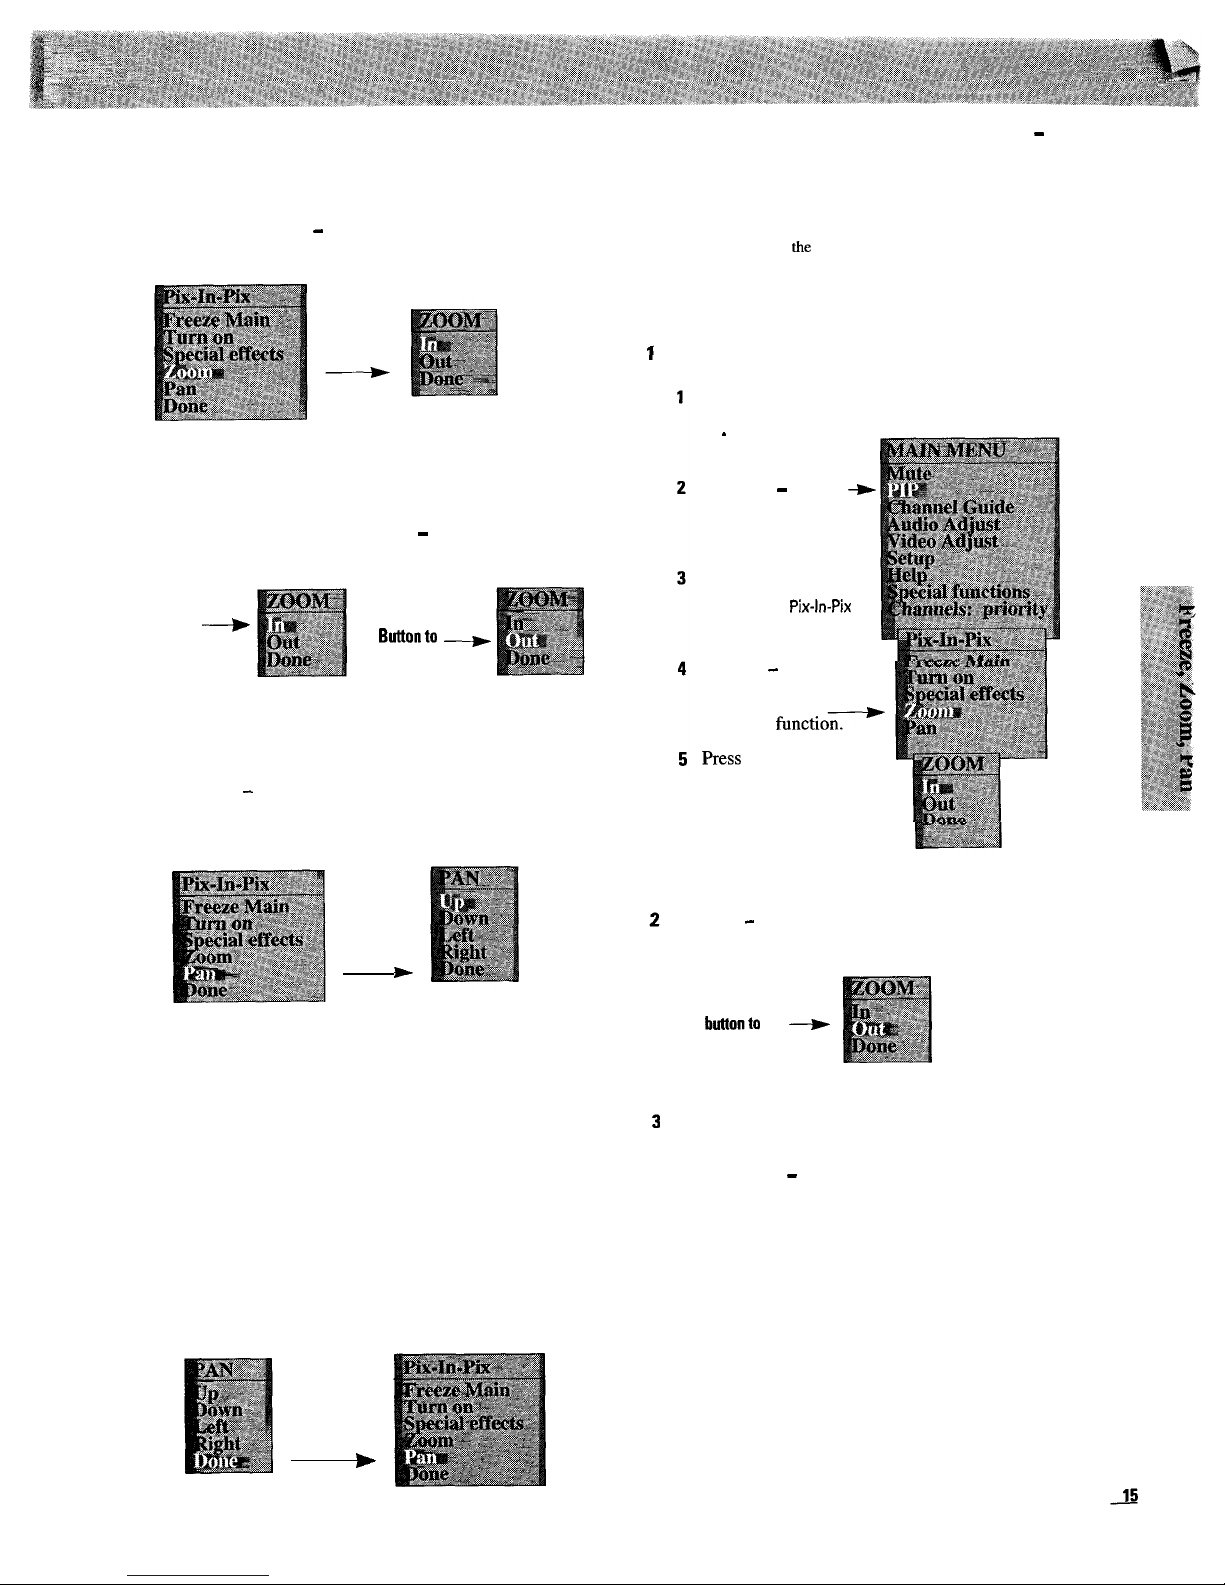
To Freeze the Main Picture
Press MENU to display
the MAIN MENU.
Press the - or + button to
--w
highlight the
PIP
function.
Press
MENU
again to
display the
pix-In-pix
menu.
Note: If the PIP
(Picture-In-
Picture) feature is turned on,
this menu will not appear.
The other Pix-In-Pix menu
will appear instead of the
Pix-
In-Pix menu shown. To turn
off Pix-In-Pix, highlight the
Turn off function and then
press the MENU button.
Repeatedly press the + or - button to highlight the
Freeze
Main
function. Press the
MENU
button to freeze the
picture. Press the
MENU
button again to return to normal
video.
Press MENU Button to
--b
freeze picture. Press
again to return to
normal video.
Notes: Sometimes you may want to freeze the picture first and then
zoom in or you can zoom in and then freeze the picture.
(continued on next page)
14
To
Zoom end Pan the Main Picture
1
Display the Pix-In-Pix menu
“To Freeze the Main Picture” on the previous page.
Repeatedly press the + or
-
button to highlight the
Zoom
function. Press the
MENU
button to display the
ZOOM
menu.
ZOOM Menu
Press MENU Button is Displayed
2 Press and hold the
MENU
button until the desired zoom amount
is reached. To zoom back out, press the
-
button to highlight
the
Out
function and then press and hold the
MENU
button.
Press and
hold MENU
-
Button to
Zoom In.
Press and
hold MENU
Buttonto --)
Zoom Out.
3 If you want to move (pan) around the picture after you have
zoomed in, repeatedly press the + or-button to highlight
Done and press the
MENU
button to return
to
the
Pix-In-Pix
menu. Press the - or + button to highlight the Pan function,
and then press the
MENU
button to display the
PAN
menu on
the TV screen.
*
PAN Menu
Press MENU Button is Displayed
l
Repeatedly press the + or-button to highlight the
PAN
function you want to use. Then press and hold the
MENU
button to move around the screen.
l
Up
moves you to the top of the picture.
l
Down
moves you to the bottom of the picture.
l
Left moves you to the left side of the picture.
l
Right
moves you to the right side of the picture.
l
When you are finished panning around the screen,
repeatedly press the -t or-button to highlight
Done
and
press the
MENU
button to return to the
Pix-In-Pix
menu.
Press MENU Button
Pix-In-Pix Menu
4 When you are finished, repeatedly press the + or
-
button to
highlight
Done
and press the
MENU
button to remove the
Pix-In-Pix
menu from the TV screen.
Note: The menu will automatically disappear after a few seconds if no
button is pressed. You can also quickly remove the menu from the
screen by pressing
the
CLEAR button on the master remote control.
To Turn Off Zoom and Pan
Display the
ZOOM
menu.
Press
MENU to
display the MAIN
_
MENU.
Press the - button
+
to highlight the
PIP
function.
Press
MENU
again to
display the
pix-In-pix
menu.
Press the - or +
button to highlight
the Zoom
functio?
Press
MENU
again to
display the
ZOOM
menu.
Press the - button to highlight the Out function on the
ZOOM
menu. Then press and hold the
MENU
button to zoom out.
Press and
hold MENU
buttonto --w
zoom all the
way out.
When you are finished, press the -button to highlight
Done
and press the MENU button to return to the Pix-In-Pix menu.
Then press the - button to highlight
Done
on the
Pix-In-Pix
menu, and press the
MENU
button to remove it from the
screen.
Notes: The menu will automatically disappear after a few seconds if no
button is pressed. You can also quickly remove the menu from the
screen by pressing the CLEAR button on the master remote control.
You can quickly return the picture to normal by pressing the OFF button
on the master remote control.
is Displayed
1
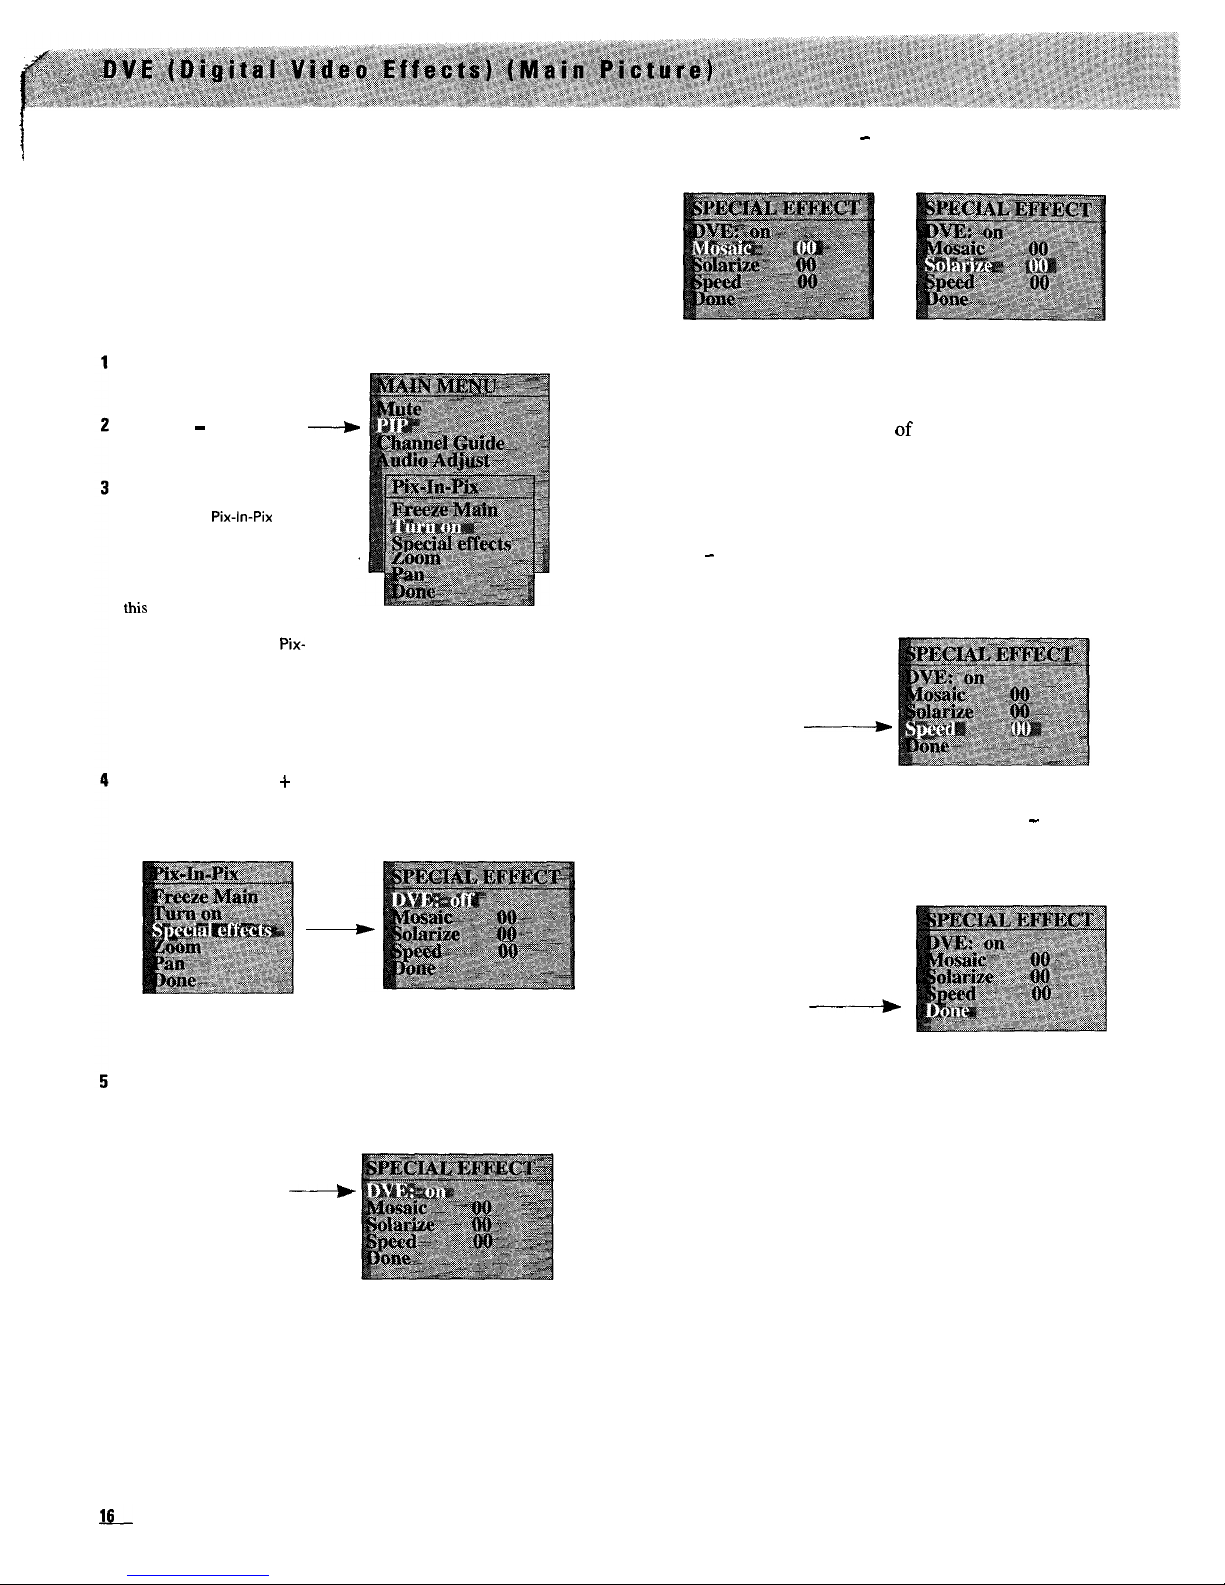
Your TV is capable of producing DVE (Digital Video
Effects) on the main picture. You can select a mosaic or
solarization effect or a combination of both. The speed of
the picture can also be controlled.
To Use DVE (Digital Video Effects)
with menus
Press MENU to display
the MAIN MENU.
Press the - button to
4
highlight the
PIP
function.
Press
MENU
again to
display the
pix-in-pix
menu.
Note: If the PIP (Picture-InPicture) feature is turned on,
this
menu will not appear.
The other Pix-In-Pix
menu
will appear. To turn off
Pix-
In-Pix,
highlight
the Turn off
function and then press the
MENU button or press the OFF
button on the master remote
control.
Repeatedly press the + or -button to highlight the
Special
effects function. Press the MENU button to display the SPECIAL
EFFECT
menu.
Press MENU to display
SPECIAL EFFECT menu.
Press the MENU button to turn the DVE function on.
Press MENU to turn
___t
DYE function on.
6 Repeatedly press the + or - button to highlight the digital
effect you want (Mosaic or Solarize).
Mosaic Effect
Solarize Effect
When the effect
(Mosaic
or
Solarize)
is highlighted, repeatedly
press the
MENU
button to select the amount of effect you want.
l
You can increase the amount
of
mosaic effect from 00 to 07.
l
You can increase the amount of solarization effect from 00
to
04.
7
Select the speed of the digital effect. Repeatedly press the
+ or - button to highlight the
Speed
function. Then press the
MENU
button to increase the speed from 00 (picture is frozen)
to 08.
Press MENU to
increase the
speed of the
digital effect.
___)
8 When you are finished, repeatedly press the + or
-
button to
highlight
Done,
and then press the
MENU
button to remove the
SPECIAL EFFECT
menu from the TV screen.
Press MENU to
remove the
menu from the
screen.
------b
Note: The menu will automatically disappear after a few seconds if no
button is pressed. You can also quickly remove the menu from the screen
by pressing the CLEAR button on the master remote control.
To Cancel DVE (Digital Video Effects)
To cancel the DVE effects on the picture, display the
SPECIAL EFFECT menu, and press the MENU button to turn the
DVE: on/off function to off.
Note: You can also quickly turn off the digital effects by pressing the OFF
button on the master remote control.
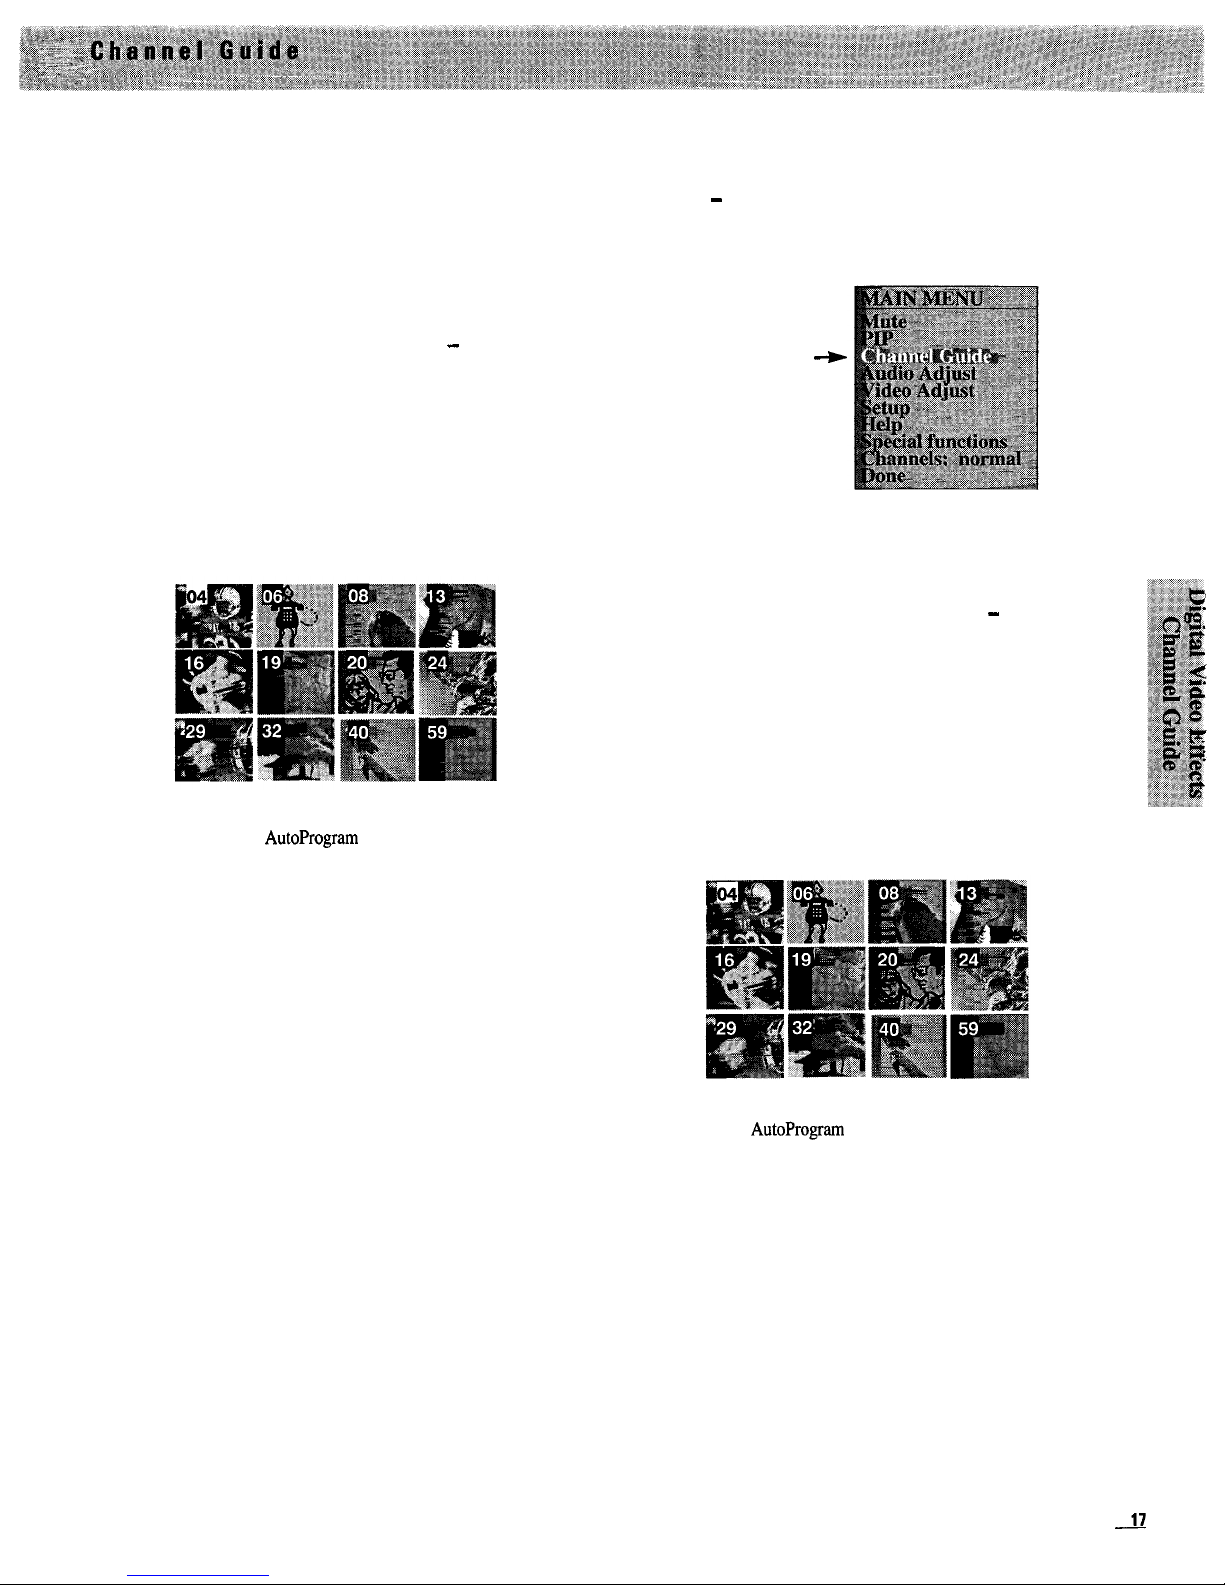
Starting Channel Guide
with master remote control
To start channel guide, press the
CHAN
(channel)
GUIDE
button
on the master remote control.
l
The screen will display all the channels that are
programmed into the channel memory scan list, 12 at a
time.
l
To see the next 12 channels, press the + button.
l
To see the previous 12 channels, press the - button.
l
Each little screen will display a stop-action picture that will
be continuously updated.
l
While the 12 channels are on the screen, you can use the
ZOOM
button to enlarge the picture and then use the arrow
buttons to pan around the screen. To return to normal size,
press and hold
OUT.
Note: When using the
ZOOM
feature, you will see a mosaic effect as
the picture is made larger.
Notes:
Some channels were programmed into the channel memory
scan list at the factory. These are the channels that will appear during
channel guide unless you AutoProgram the channel memory or add and
erase channels as described on pages 46-47.
If the
Channels: normal/priority
function is
set to priority,
only the
channels in the priority channel scan list will appear. See
page 42 for
details.
Stopping Channel Guide
l
To select one of the channels being displayed in the channel
guide, press the
CHANNEL
up or down button to highlight the
channel number (white box with black numbers), and then
press the MENU button. This will stop channel guide and
take you directly to the channel you selected.
l
Another way to stop channel guide is to press the
CHAN
(channel) GUIDE button again.
Starting Channel Guide
with menus
Press the MENU button to display the MAIN MENU. Then press
the + or - button to highlight the
Channel Guide
function.
Press
MENU
again to start displaying the channels on the
screen.
1
Press MENU to display
the MAIN MENU.
2 Repeatedly press the
-
-button to highlight
Channel Guide.
3 Press MENU again to
start Channel Guide.
-w
l
The screen will display all the channels that are
programmed into channel memory scan list, 12 at a time.
l
To see the next 12 channels, press the + button.
l
To see the previous 12 channels, press the - button.
l
Each little screen will display a stop-action picture that will
be continuously updated.
l
While the 12 channels are on the screen, you can use the
ZOOM
button on the master remote control to enlarge the
picture and then use the arrow buttons to pan around the
screen. To return to normal size, press and hold
OUT
on the
master remote control.
Note: When using the
ZOOM
feature, you will see a mosaic pattern as
the picture is made larger.
Notes:
Some channels were programmed into the channel memory scan
list at the factory. These are the channels that will appear during channel
guide unless you AutoProgram the channel memory or add and erase
channels as described on pages 46-47.
If
the Channels: normal/priority
function is
set to priority,
only the
channels in the priority channel scan list will appear.
See page 42 for
details.
Stopping Channel Guide
To select one of the channels being displayed in the channel
guide, press the
CHANNEL
up or down button to highlight the
channel number (white box with black numbers), and then
press the
MENU
button. This will stop channel guide and take
you directly to the channel you selected.
17
Because your TV has two separate tuners, you can watch two
different channels at the same time with the touch of a
button. You can swap the big and little picture, move the
little picture around the screen, enlarge or reduce the size of
the little picture, or freeze the little picture.
f--Big Picture
Channel 6
little Picture
Channel
8
Two Football Games
on Different Channels
You can also connect another video source (such as a VCR)
and watch one TV channel and the input from the VCR.
Connecting a video camera or camcorder lets you use the PIP
feature as a surveillance system for a baby’s room while you
watch TV.
Details on using other video sources with PIP are
on the next page.
Using PIP (Picture-In-Picture)
with master femofe
control
1
Turn on the TV and select the channel you want to watch on the
big picture. Press the
PIP
button to turn on the little picture.
Press the
CHANNEL
up or down button or two number buttons to
select a channel on the little picture.
Channel Display
showing PIP Channel
One Channel on Big
Picture
Different Channel on
little Picture
Notes: The remote must be in the “TV mode” when you press the
PIP
button. To put the remote in the “TV mode”, press the TV button.
After you press the
PIP
button, pressing the
CHANNEL
up or down button
will automatically change channels on the small picture.
PIP
will appear
in the channel number display.
To change channels on the big picture, press the N button and then
CHANNEL
up or down or two number buttons. To change channels on
the little picture, press the
PIP
button and then
CHANNEL
up or down or
two number buttons.
I&-
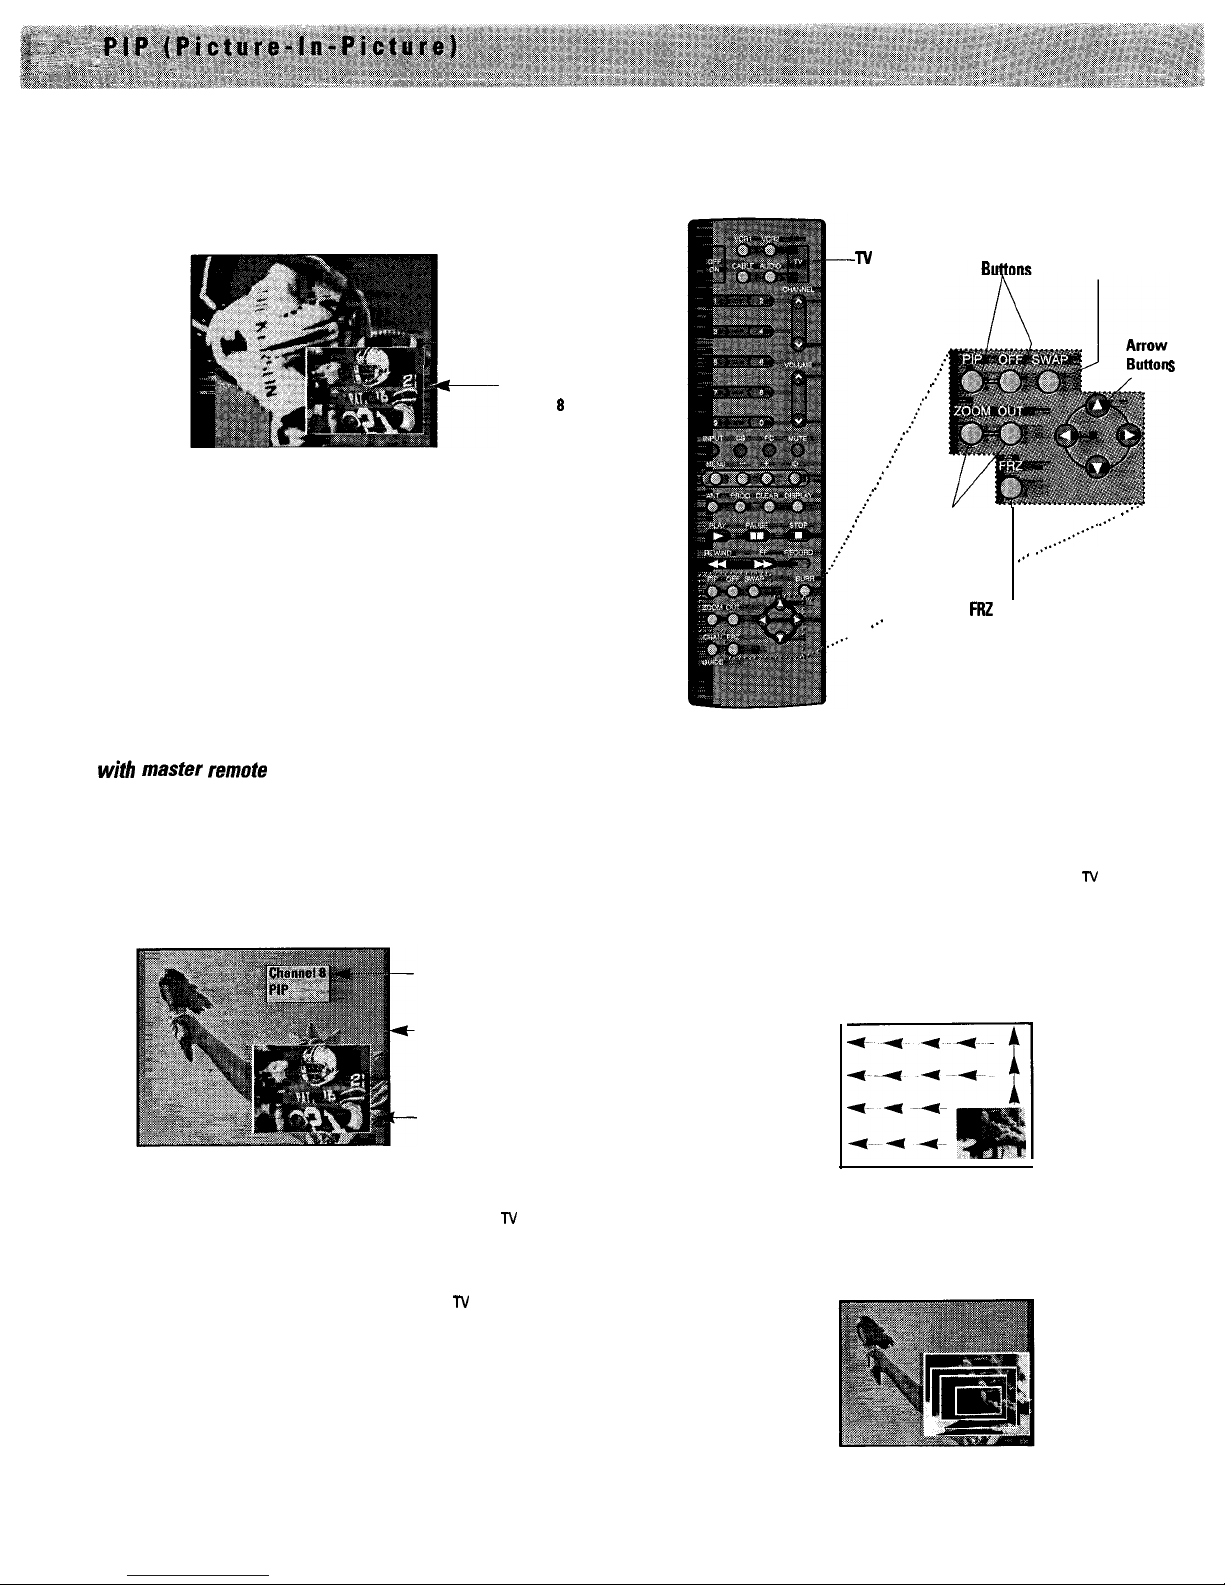
PIP Buttons on Master Remote Control
-W
Button
PIP and OFF
SWAP Button
i
.:.
S
:.
.:’
.:-
.:.
.:.
.:*
.:.
:.
.:’
ZOOM end
OUT Buttons
.,.-
.
..’
.
..-
..N*”
.
..*
. . . .
. . . .
. . .
. . . .
. . . .
. . . .
. . . .
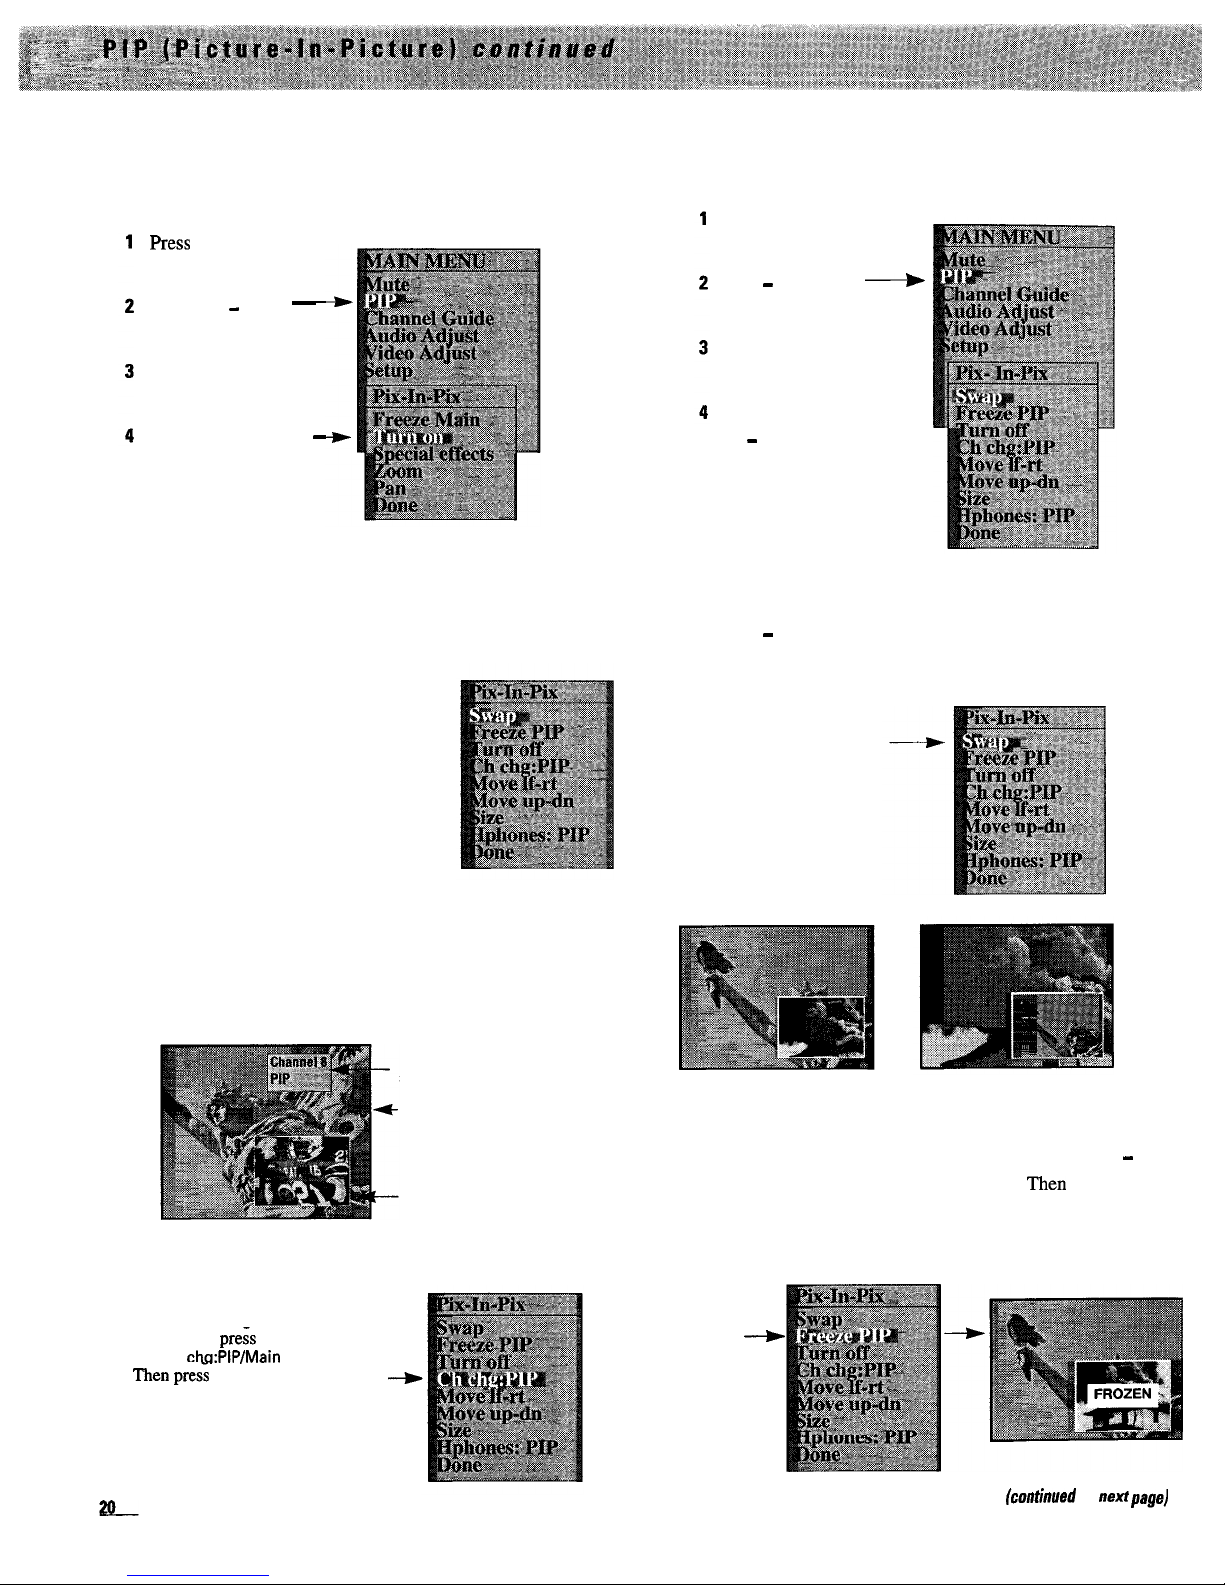
FRZ
(FREEZE) Button
. . . .
.
..’
2 Whenever you have the PIP feature turned on, you can move,
enlarge, reduce, freeze, or swap the big and little picture.
Note: The remote must be in the “TV mode” to operate the special PIP
functions. To put the remote in the “TV mode”, press the TV button.
l
To move the small picture anywhere on the screen, press and
hold one of the four arrow keys to move the small picture in
that direction.
l
Repeatedly press
ZOOM
to enlarge the size of the small picture
or OUT to reduce the size of the small picture. Five sizes are
available.
(continued on next page)
l
Press SWAP to
switch the small picture with the main picture.
Using Other Video Input Sources with PIP
The PIP (Picture-In-Picture) feature can be used with
video sources (such as VCR’s and camcorders) that are
connected to the INPUT
1
or INPUT 2 jacks on the back of the
TV. You can only view the picture from one set of INPUT
jacks at a time. The picture from the
INPUT
jacks can be
viewed on either the large picture or the small picture.
Note: S-VHS video
can only be viewed on
the
main picture. If
you plan
on viewing the picture from the
INPUT
jacks in the small picture and have
connected S-VHS, be sure to also connect the normal video cable to the
VIDEO INPUT
jack.
l Press
FRZ
to freeze the small picture. Press
FRZ
again to
return to an action picture.
f-
TV Channel on
Big Picture
Video Input from
other source
You can still
use all of the PIP features when viewing a picture
from another video source.
Cancelling PIP (Picture-In-Picture)
Press the OFF button to turn off PIP and remove the little
picture from the screen.
To see the signal from a source connected to the
INPUT
jacks, first
press
PIP
and then repeatedly press the
INPUT
button or press two
number buttons to select channel 91 or 92. If you have added
channel 91 or 92 to your channel memory scan list
on page 47, you can use the CHANNEL up or down button.
l
Select channel 9 1 if the other video source is connected to the
TV’s INPUT I jacks.
l
Select channel 92 if the other video source is connected to the
TV’s INPUT 2 jacks.
Notes: If you want to watch signals from two other video sources (such
as two VCR’s or a VCR and camcorder), connect one VCR to the
ANT
connector on the back of the TV as shown on page 66.
Then select
channel 3 or 4 (the same channel to which the
CH3/CH4
switch on the
VCR is set) to see the signal from that VCR.
If you are controlling your VCR with the
VCRI
or
VCR2
button on the
remote control, make sure the
VCR/cable
function
described on page 43
matches the channel you want to watch the VCR’s signal on.
To Hear Sound from the Small Picture
To hear the audio from the small picture, plug optional
headphones into the stereo headphone jack on the front
panel of the TV. You can also adjust the volume of the
headphones. Details are on page 25.
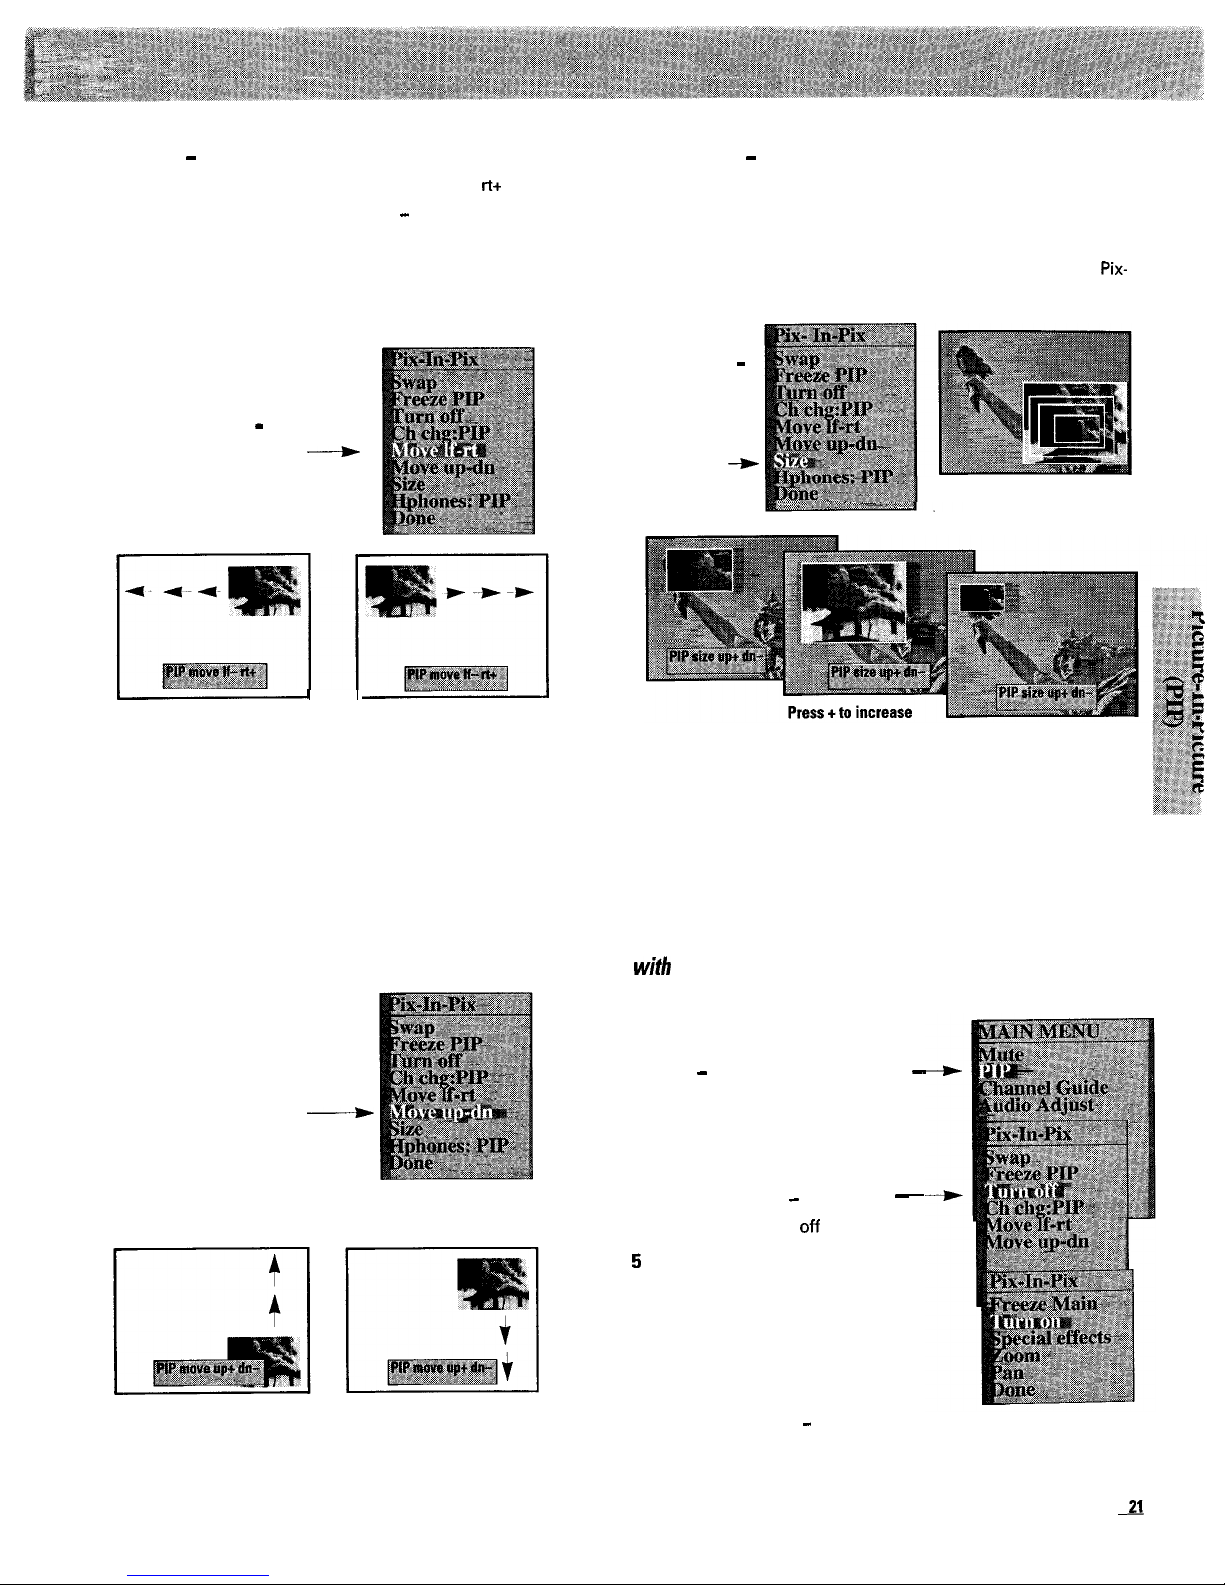
Using PIP (Picture-In-Picture)
3 Whenever you have the PIP feature turned on, you can move,
with menus
1
Turn on the TV and select the channel you want to watch on the
big picture. Display the Pix-In-Pix menu
Press
MENU to display
the MAIN MENU.
Press + or - to
highlight
PIP
-
function.
Press MENU to display
the Pix-In-Pix
Press MENU again to
menu.
-
turn on PIP.
enlarge, reduce, freeze, or swap the big and little picture with
the Pix-In-Pix menu.
Press MENU to display
the MAIN MENU.
Press - or + to
highlight
PIP
e
function.
Press MENU to display
the Pix-In-Pix
menu.
Repeatedly press +
or - to highlight the
function you want to
use, and then press
MENU.
After the small picture appears the
automatically change to a new
Pix-In-Pix
Pix-In-Pix
menu will
menu.
You can use this menu to:
l
Swap
the big and small picture.
l
Freeze the small picture.
l
Turn
off the small picture.
l
Ch
chg
(change channel) of either the
main or small picture.
l
Move
the small picture anywhere on
the screen.
l
Size: Change size of small picture.
l
Hphones:
Select whether the audio
from the headphone jack is from the
small picture or main picture.
2 To change channels on the small picture, press the
CHANNEL
up
or down button. The Pix-In-Pix menu will automatically
disappear from the screen.
Channel Display
showing PIP
One Channel on Big
Picture
Different Channel on
Small Picture
l To swap the large and small.picture: Repeatedly press
the + or - button to highlight the
Swap
function. Then press
the MENU button. Press the MENU button again to swap the
pictures again.
Repeatedly press the +
or-button to highlight
the Swap function. Then
press MENU.
Press MENU to swap pictures. Press MENU again to swap again.
l
To freeze the small picture:
button to highlight the Freeze PIP function.
MENU
button to freeze the small picture. Press the
Repeatedly press the + or
Then
press the
MENU
button again to return to an action picture.
-
Note: To change channels on the
big picture,
the Ch cha:PIP/Main
Then
function
CHANNEL up or down button. The
press
+ or-to highlight
function.
press
MENU to change this
to Ch chg:Main. Press the
--w
menu will disappear from the
screen.
Press MENU
to freeze the
PIP picture.
--w
fcontieued on next page)
l
To move the small picture left or right:
Repeatedly press
the + or - button to highlight the
Move If-rt
function. Then
press the MENU button to display the PIP move If-
rt+
display
on the TV screen.
Press and hold the - button to move the
small picture to the left or the + button to move the small
picture to the right. Pressing the MENU button will return
you to the Pix-In-Pix menu.
Repeatedly press the + or
-
button to highlight the Move If-rt
__)
function. Then press MENU.
-I
L
Press and hold -button to move
Press and hold + button to move
small picture to the left.
small picture to the right.
l To move the small picture up or down: Repeatedly press
the + or -button to highlight the
Move up-dn
function. Then
press the MENU button to display the PIP move up+ dn- display
on the TV screen. Press and hold the + button to move the
small picture up or the -button to move the small picture
down. Pressing the MENU button will return you to the
Pix-In-Pix
menu.
Repeatedly press the +
or-button to highlight
the Move up-dn function.
d
Then press MENU.
Press and hold + button to
Press and hold -button to
move small picture up.
move small picture down.
l
To change the size of the small picture:
Repeatedly press
the + or - button to highlight the
Size
function. Then press
the MENU button to display the PIP size up+ dn- display on
the TV screen. Press the + button to increase the size of the
small picture or the -button to reduce the size of the small
picture. Pressing the MENU button will return you to the
Pix-
In-Pix
menu.
Repeatedly
press the + or
-
button to
highlight the
Size function.
Then press
+
MENU.
Five sizes are available.
the small picture size. Press -to decrease the
small picture size.
4 When you are finished, press the + or -button to highlight
Done.
Then press MENU to remove the menu from the screen.
Note: The menu will automatically disappear from the screen in a few
seconds if no button is pressed.
To turn off PIP
with menus
1
Press MENU to display the MAIN
MENU.
2 Press - or + to highlight PIP
-
function.
3
Press MENU again to display the
Pix-In-Pix
menu.
4 Repeatedly press - or + to
-
highlight the
Turn
off function.
5
Press
MENU
again to turn off PIP.
The small picture will disappear.
The other
Pix-In-Pix
menu will
appear on the TV.
Note: This menu will disappear
within a few seconds if no button is
pressed. To remove
the menu,
repeatedly press + or - to highlight
Done.
Then press the
MENU
button to
remove
the menu.
21
Your TV is equipped
with
built-in advanced audio
B
technology. The AUDIO ADJUST menu
puge
24 will allow you to adjust the equalizer, adjust the
headphone’s volume, adjust right and left balance, select
one of eight different audio modes (each with individual
setup features), and set the volume limit of your TV.
Before you select one of the eight audio modes or adjust
the AUDIO ADJUST menu, follow the steps below.
1
Select your room speaker arrangement from one of the
following pictures.
2 Select the audio mode that is compatible with your audio
source and speaker arrangement.
modes begin on page 28.
3 After selecting the audio mode, adjust the
mode to your personal preference.
menus begin on page 28.
Details on selecting audio
SETUP
menu for that
Details on adjusting setup
If you have external right and left front speakers
to the speaker connectors labeled EXTERNAL on the back of
your TV,
or Dolby* 3 stereo mode.
External right and left front speakers connected
YOU
will want to choose the
Stereo, stereo expand,
connected
Note: You may save your personalized adjustments for each
menu by using the
MEMORY MENU
as
described on page 39.
SETUP
l
Select the
stereo sound whenever it is broadcast.
Note: In some fringe viewing areas, the stereo signal may not be
strong enough for quality reception. The signal may drift, or the
reproduction may become noisy. Should this occur, change the
A No additional speakers connected
stereo/mono function on the STEREO SETUP menu to Mode: mono to
receive clearer, cleaner sound.
l
Select the
dimension to stereo broadcasts.
TV
I
l
Select the
encoded source and add a center channel. This center channel
makes the actor’s voice appear to come from the TV screen
regardless of where you are sitting in the room. Dolby 3 stereo
provides a left, right, and center channel sound.
If you do not have any external speakers connected to the
speaker connectors on the back of your TV, you will want
to choose the Stereo, Stereo expand, or
Prologic
phantom
mode.
Note: The TV’s audio mode is set to
l
Select the
Stereo
mode so your TV will automatically produce
stereo sound whenever it is broadcast.
l
Select
the Stereo expand
dimension to stereo broadcasts.
l Select the
automatically produce clearer dialog and better stereo imaging
when stereo is broadcast.
Note: In some fringe viewing areas, the stereo signal may not be strong
enough for quality reception. The signal may drift, or the reproduction
may become noisy. Should this occur, change the
function on the STEREO SETUP menu to Mode: mono to receive clearer,
cleaner sound.
Prologic
Phantom mode so your TV will
Details are on page 28.
Prologic phantom
at the factory.
Details are on page 28.
mode to add greater depth and
Details are on page 29.
Details are on pages 34-35.
Mode:
stereo/mono
page 31.
Note: Dolby 3 stereo works best with Dolby surround encoded
material, but will produce clearer dialog and better stereo imaging
even on normal stereo material.
*“Dolby” and the double-D symbol are trademarks of Dolby Laboratories
Licensing Corporation.
Manufactured under license from Dolby Laboratories Licensing
Corporation.
Additionally licensed under one or more of the following patents: U.S.
numbers 3,632,886, 3,746,792 and 3,959,590; Canadian numbers
1,004,603
Stereo
mode so your TV will automatically produce
Stereo expand
Dolby 3 stereo
and
1.037.877.
Details are on page 28.
Mode:
Details are on page 28.
mode to add greater depth and
Details are on page 29.
mode to take a Dolby* surround
Details are on
C
External right, left, and surround speaker(s) connected
If you have external right and left speakers connected to
the speaker connectors labeled EXTERNAL on the back of
your TV, and another speaker(s) connected to the speaker
connector(s) labeled SURROUND, you will want to choose the
Prologic, Matrix surr, Hall surr, or Stadium surr mode.
t
Connect these speakers to
speaker connectors labeled
f
EXTERNAL
on the back of the TV.
Connect this speaker(s) to
F
speaker connector(s) labeled
SURROUND on the back of the
TV.
3
l Select the
Prologic
mode to fully utilize a Dolby surround
encoded source. Prologic produces a more realistic “theater-
like” sound experience in the home by using dedicated center,
right, left, and surround channels. Prologic also electronically
decodes the predominant audio channel and automatically
emphasizes that channel’s volume. The result is greater
perceived channel separation and the sensation of wider and
more realistic three-dimensional sound.
pages 32-33.
Note: Prologic works best with Dolby surround encoded material, but
will produce clearer dialog and better stereo imaging even on normal
stereo material.
l
Select the
Matrix surr
(surround) mode to simulate surround
sound from a mono broadcast.
Details are on page 36.
l
Select the
Hall surr
(surround) mode to hear surround sound
from a stereo broadcast and create the effect of being in a large
room. Details are on page 36.
l Select the Stadium surr (surround) mode to hear surround
sound from a stereo broadcast and create the effect of being in
a stadium.
Details are on page 36.
D
External surround speaker(s) connected
Connect this speaker(s) to speaker
F
connector(s) labeled SURROUND
on the back of the
TV.
7
Surround
El
Speaker
(Elevated)
If you have external speaker(s) connected to the speaker
connector(s) labeled SURROUND, you will want to choose
the
Prologic
phantom, Matrix
surr,
Hall surr, or Stadium surr
mode.
l Select the
Prologic
phantom mode if you have only
connected a surround speaker(s) and no external right or left
speakers. Prologic phantom uses the prologic decoder, but
splits the center channel between left and right. It then uses
the TV’s internal speakers for left, right, and center sound.
Details are on pages 34-35.
Note: Prologic phantom works best with Dolby surround encoded
material, but will produce clearer dialog and better stereo imaging
even on normal stereo material.
l Select the Matrix surr (surround) mode to simulate surround
sound from a mono broadcast. Details are on page 36.
l Select the Hall surr (surround) mode to hear surround sound
from a stereo broadcast and create the effect of being in a
large room. Details are on page 36.
l
Select the
Stadium surr
(surround) mode to hear surround
sound from a stereo broadcast and
create the effect of being
in a stadium. Details are on page 36.
 Loading...