

ProScan PS35652 Owner's Manual
Features
Model PS35652
First-Time Operation
O3
Detailed Operating Instructions 19 SleepTm_er
4_7 Remote Conrail (TV Fnnclk)ns) 20 Alarm
8 Freeze and Zoom 21 Changing Anlenna Input _'_
8 Channel Guide 22 Labeling Channels
9 Fronl Panel Conlrols 23 Parenlal Control _'1
10 Video Menu 24-25 Programmirig Channel Memory _
I I Audio Menu 26 Seiting up VCR Channels _,,,,,
"_ _ 27 _ _
I_-1 Graphic Equalizer Selling tip Cable Box Channel
14 Stereo Broadcasls and SAP 28-29 Operating Piclure-in-Picture m
15 Expanded Stereo 30-31 Programming Remote Io Conlrol VCRs _"
16-17 Adjusting Ii)r Best Surround Audio 32_33 Programming Renlote 1o Control 0_
18 Selup Menu Audio Equipment
Optional Accessories
34-35 Accessory Cab]es
35-36 Accessory Order Form
37 Optional Speakers _
._.=
Monitor Panel and Connections
38*39 Monitor Panel 46-47 =
4(1 Tips io Read Bel_are Connecting Components 48-49 I_
g
41 Home Antenna Connections 50°51 _
42-43 Cable-TV Conneclions 52-53 _ _"
44 Programming Remote to Control Cable Box
"I
45 CableoTV lnffm_mtion and Channel (Thart
ra_
VCR Connections
Camcorder Connections
Amplifier or Cassette Tape Deck
External or Surround Speakers
Reference Section
54.55 Trouble Checks
55 Warranly
56 Design Specilications r._
56 Cleaning md Care _ _'a
57 Index (Alphabetical) _.
585'-) Quick Refl_,re,ice Guide (Inside Back Cover) _ R
@
y Precautions
Pi
If you suspect that liquid has entered the TV, unplug it
immedialely and have it inspected by an authorized TV
Servicenter. Turning it off is not enough - your TV has power
applied to some circmts even when/he TV is turned off.
Mail YourEnrollmentCardToday
A
CAnTION TO RFDUC[ THE RISK
Or _L[CYRICA[ SHOCK DO NOr
R_MOVE COVFR I0£ BACKI NO
USFR £FRVtCFAt_[[ PARTS
N£1EIE REFER SI_RVICINEi ltl
QnALIn_D SERVICE P_!_SON_EI_
r_ rntwlnm me
( +_n_tes _ W_[lllll_
s*gn a_e_mg you _l
rmormnt
_ructm+/_
acc_mnal_vm_ _1_
rolsact
Caution: Maintain electrical safety. Powerline-operated
equipment or accessories connected m this unit should bear
the UL listing mark or CSA certification mark on the
accessory itself and should not have been modified so as to
defeat the satitt 3 features. This will help avoid any potential
hazard from electric shock or fire If in doubt_ contact
qualified service personnel.
Your TV __perates on 120 volts. 60 Hz AC power, normal
house power_ and has a polarized AC plug. Because one blade
of the plug is wider than the other, the plug fits into the wall
socket only one way. Do not defeat the safety feature of this
plug If you need an extension cord. make sure it is polarized.
Cautiun: To prevent electric shock, do not use the
polarized plug onthis TV with an extension cord,
receptacle, or other" outlet unless bofl_ blades can
be fully inserted to prevent blade exposure.
Mise En Garde: Pour prdvenir les chocs
_Slectriques,ne pas miliser la fiche polarisde de cet
]k,x"_n,_) appareil avec une rallonge, une prise de courant
_ou une autre sortie, h moins que les lames ne
puissem etre insdrdes aTtfond sans qu'aucune paine ne soil
laiss,Se a ddcouve0
All operating conm)ls and their functions are identified and
explained in this manual. For warranty ,,ervtce or routine
maintenance, contact the nearest Authorized ProScan TV
Servicemer. All servicing and adjustments to electrical
componen[s should be done by a qualified service technician.
Warning: To prevent fire or shock hazard, do not
expose this TV to ram or moisture,
Note to ('able TV Installer: This reminder is provided lo call your aiienlion
to Al_icle 820-22 ol the Nanonal Electrical Code _ectlon 54 of the Canadian
Electrical Code Part 1t which provides guidelines/or pmt'_'r grounding and.
in particnlar, specl|les that the cable ground shall be connected to tile
grounding sy_aem ol the building as close to the point of cable entr_ _
practical.
A ProScan Owner's Club Enrollment Card is packed with
your set. Please fill out the card and return it immediately,
Your name then will be enrolled in the next drawing, which
takes place every three months. If your name is drawn, you
will be reimbursed tor the full purchase price of your new
ProScan product (restricted to residents of USA only).
Your prontpt submission of this card confirms your right to
the protection available under the terms and conditions of the
warram_ and also allows us to contact yon in the unlikely
issuance of a safety modification.
With ) our card on file, we can also help you in the event of
loss or theft by verifying your ownership.
If you did not receive a ProScan Owner's Club Enrolhrtent
Card. please contact your dealer.
Attach Your Sales Receipt Here and File at Home For Future
Reference
To obtain warramy parts and service, you must show your
sales receipt ',or other evidence of purchase) to your
Authorized ProScan TV Servicenler.
Tape or staple your sales receipt to this manual so you wilt
have it handy should service ever be needed. Do not niail
your sales receipt to us. File it at home with your owner's
manual fl_rfuture relm'ence.
Record Vital Information Here
No other sei has the same serial number as yours. You will
find the serial number and the model number on the back of
your set €and pre-printed on your Enrollment Card).
Make sure you record both numbers below so that you will
have them in case your set is stolen or in case you need a
complete description for any other reason.
Model Ntl nber: PS35652
Serial Number:
Purchase Date:
Dealer NametAddress/Phorie:
Door Open
/
/
VideoMenu
Audio Menu
Main Menu
I EXPAND STEREO OFF
STEREO/SAP/MONO
........0FF/DOLBY/MATRIX]
HALL]STADIUM
- OFF/ON
.... 0N/OFF
/
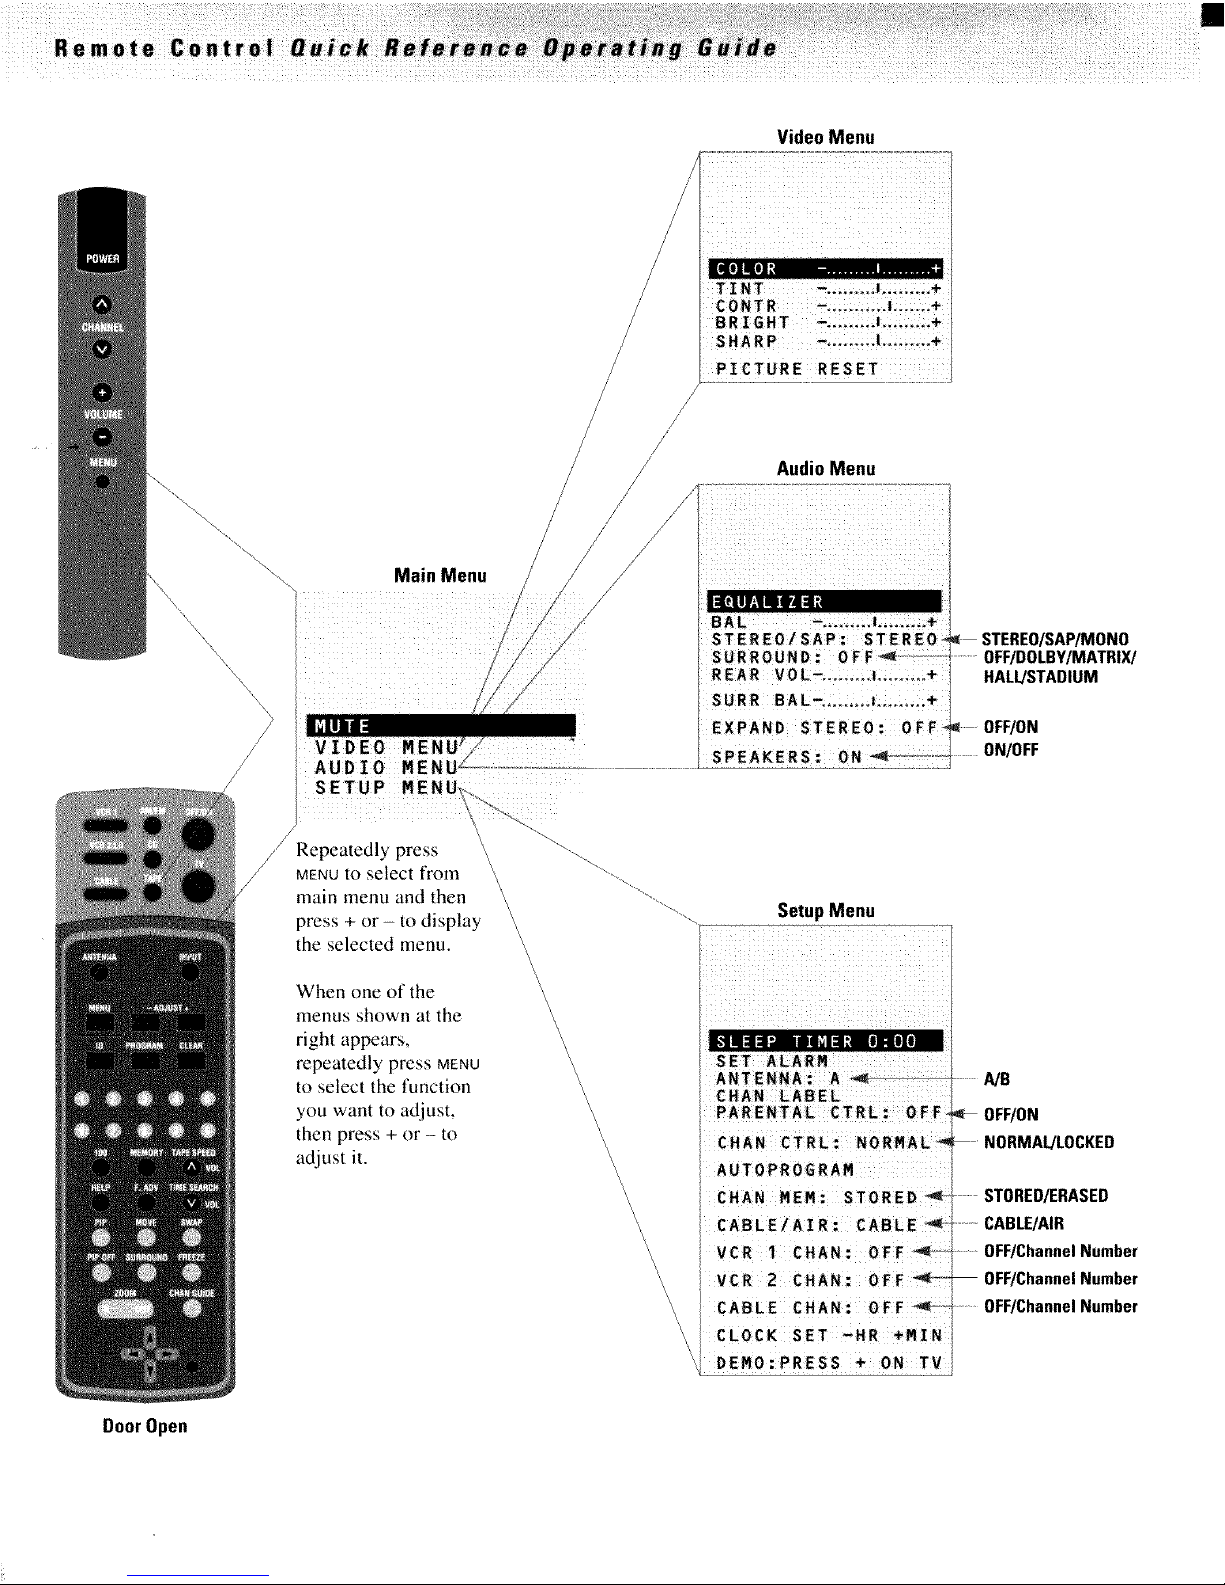
// Repeatedly press \
// MENU to select from
main menu and then
press + or - to display
the selected menu,
When one of the
menus shown at the
right appears,
repeatedly press MENU
to select the function
you want to adjust,
then press + or - to
adjust it.
Setup Menu
PARENTAL CTRL: OFF,,
A U T 0 P R 0 G R AM
CHAN MEM: STORED_ .............
CABLEIAIR: CABLE ............
VCR I CHAN: OFF _- -
CABLE CHAN: _ ............
CLOCK SET _HR ÷MIN
DEMO:PRESS + ON TV
A]B
OFF/0N
NORMAL]LOCKED
STORED/ERASED
CABLE/AIR
OFF/Channel Number
0FF/Channel Number
OFF/Channel Number

PROSCAN+
So advanced. Yet so simple. "+
+
We're building our reputation on products that are so advanced, they're
simple, If you want all the benefits of the latest technology, without the
complexity, we have a very simple solution. It+s called ProScan,
State-of-the-art technology thai real people can use+
Thank you fk>rchoosing ProScan. And welcome to our company-wide
commitment to your complete satisfaction and viewing en.joyment.
This page lolds open to display the remote control
buttons and menus. We designed this page so that
you could leave it of_n and use it as a quick-
relerence guide while rexiewing the manual,
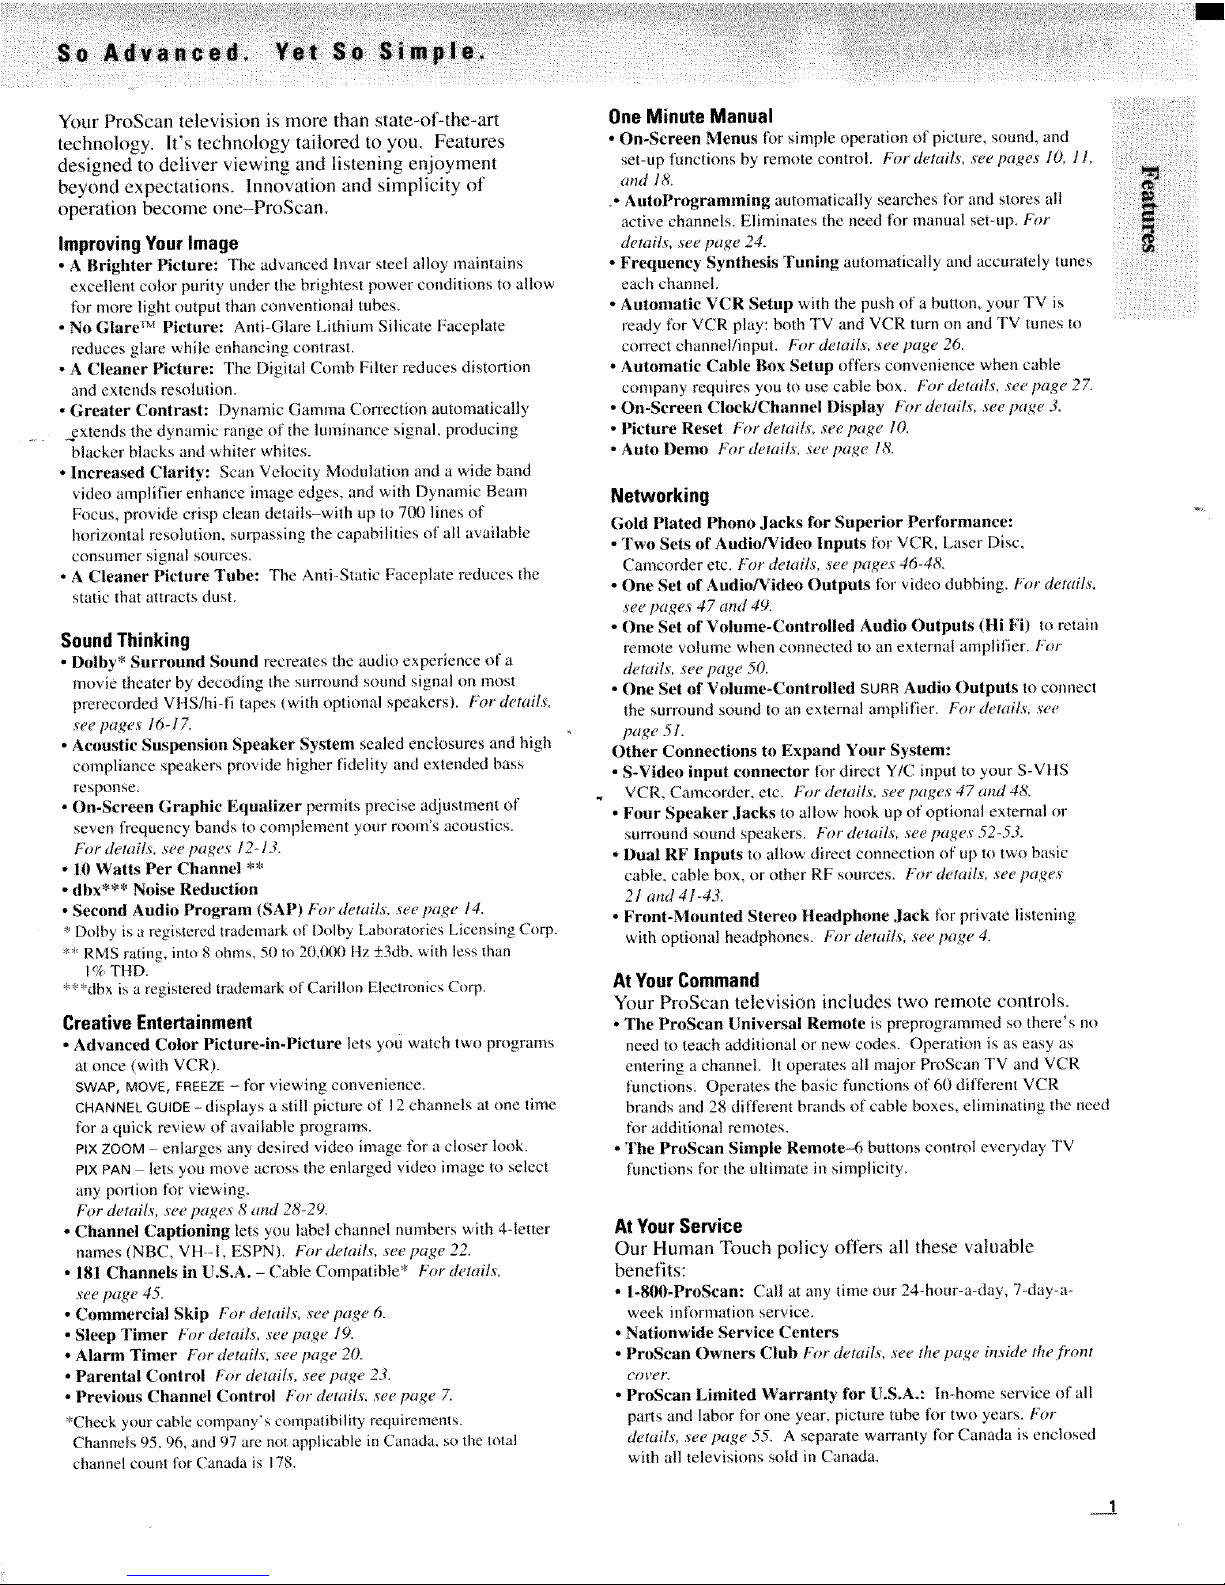
Your ProScan television is more than state-of-the-art
technology. It's technology tailored to you, Features
des gned to deliver viewing and listening enjoyment
beyond expectations. Innovation and simplicity of
operation become one-ProScan.
Improving Your Image
• A Brighter Picture: The advanced Invar steel alloy maintains
excellent color purity under the brightest power conditions to allow
fi>r more light output than conventional tubes
• No Glare _v Picture: Anti-Glare Lithium Silicate Faceplate
reduces glare while enhancing contrast,
• A Cleaner Picture: The Digital Comb Filter reduces distortion
and extends resolution.
• Greater Contrast: Dynamic Gamma Correction automatically
_xtends the dynamic range of the lmninance signal producing
blacker blacks and whiter whites.
• Increased Clarity: Scan Velocity Modulation and a wide band
video amplifier enhance inaage edges, and with Dynamic Beam
Focus, provide crisp clean details-with up to 700 lines of
horizontal resolutitm, surpassing the capabilities of all available
consumer signal sources
• A Cleaner Picture Tube: The Anti-Static Faceplate reduces the
static that attracts dust.
SoundThinking
• Dolhy* Surround Sound t_crcates the audio experience of a
movie theater by decoding the surround sound signal on most
prerecorded VHS/hi-fi tapes (with optional speakers). For details,
see pages 16-17.
• Acoustic Suspension Speaker System sealed enclosures and high
compliance speakers provide higher fidelity and extended bass
response,
• On-Screen Graphic Equalizer permits precise adjustment of
seven frequency bands to complement your room's acoustics.
For details, see pagt s 12.13.
* Il! Watts Per Channel **
• dbx*** Noise Reduction
• Second Audio Program (SAP) f))r details, see page 14.
* Dolby is a registered Irademark of Dolby Laboratories Licensing Corp.
*" RMS rating into 8 ohms, 50 to 20,000 ttz ±3db, with less than
I+i_ THD.
**_'dbx is a registered trademark of Carilhm Elecmmics Corp.
CreativeEntertainment
• Advanced Color Picture-in-Picture lets you watch two programs
at once (with VCRL
SWAP, MOVE, FREEZE-- lor viewing convenience.
CHANNEL GUIDE +displays a still picture of 12 channels at one time
for a quick review of available programs.
plx ZOOM - enla+ges any desired vide() image for a closer look.
PIX PAN lets you move across the enlarged video image to select
any portion tbr viewing+
For derails, see pages 8 and 28-29.
• Channel Captioning lets you label channel numbers with 4+letter
names (NBC+ VH 1+ESPN). For details, see page 22.
• 181 Channels in U.S.A. - (?able Compatible* For derails,
see page 45.
• Commercial Skip Far details, see page 6.
• Sleep Timer l,'or details, see page 19,
• Alarm Timer For derails, see page 20.
• Parental Control For details+ see page 23.
• Previous Channel Control For details, see page Z
*Check you+"cable company's compatibility requirements+
Channels 95, 96+ and 97 are not applicable in Canada, so the total
channel count fl_r Canada is 178.
OneMinute Manual
• On-Screen Menus for simple operation of picture+ sound, and
set+up functions by remote control. For details, see pages 10, I l,
and 18.
.• AutoProgramming automatically searches li)r and stores all
active channels. Eliminates the need for manual set-up. Far
details, see page 24.
• Frequency Synthesis Tuning automatically and accurately tunes
each channel.
• Automatic VCR Setup with the push of a button, your TV is
ready for VCR play: both TV and VCR turn on and TV tunes to
correct channel!input. For details, seepage26.
• Automatic (';able Box Setup offers convenience when cable
company requires you to use cable box. Far details, see page 27.
• On-Screen Clock/Channel Display I;)_r details+ see page 3.
• Picture Reset l+'or&_tails, seepage 10.
• Auto Demo lV)_r details, see page 18.
Networking
(;old Plated Phonn Jacks for Superior Perf_wmance:
• Two SeN of Audio/Viden Inputs fi)r VCR, Laser Disc.
Camcorder etc. IQ_r detail_, :_ee pages 46+4&
• One Set of Audio/video Outputs for video dubbing, For &,mils+
see pages 47 and 49.
• One Set of Volume-Cnntrolled Audio Outputs (Hi Fi) to retain
rernote volume when connected to an external amplifier. For
derails, see page 50.
• One Set of Volume-Contrnlled SURR Audio Outputs to connect
the surround sound to an external amplifier. /:_n+details, see
page 51.
Other Connections to Expand Your System:
• S-Video input connector for direct Y/C input to your S-VtIS
VCR+ Camcorder. etc. For details, ,_ee pages 47 and 48,
• Four Speaker Jacks to allow hook up of optional external or
surround sound speakers. For &?tails, see pages 52-53.
• Dual RF Inputs to allow direct connection of up to two basic
cable, cable I-a)x, or other RF s()urces. For details, see pages
21 and 41-43.
• Frnnt-Mounted Stereo Headphone ,lack liar private listening
with optional headphones. Far details, see page 4.
At Your Command
"four ProScan television includes two remote controls.
• The ProScan Universal Remote is preprogrammed so therc's no
need to teach additional or new codes. Operation is as easy as
entering a channel. It operates all major ProScan TV and VCR
functions. Operates the basic functions of 60 dift_zrent VCR
brands and 28 different brands of cable boxes_ eliminating the need
for additional remotes.
• The ProScan Simple Remote-6 buttons control everyday TV
functions for the ultimate in simplicity_
AtYourService
Our Human Touch policy offers all these valuable
benefits:
• 1-800-ProSean: Call at any time our 24-hour-a-day. 7-day-at
week information service.
• Nationwide Service Centers
• ProScan Owners Club/_)n +details, see the page insMe the [?ont
covet2
• ProScan Limited Warranty for U,S.A.: In-home service of all
parts and labor fi_r one year, picture tube ff)r two years. For
details, see page 55. A separate warranty for Canada is enclosed
with all televisions sold in Canada.
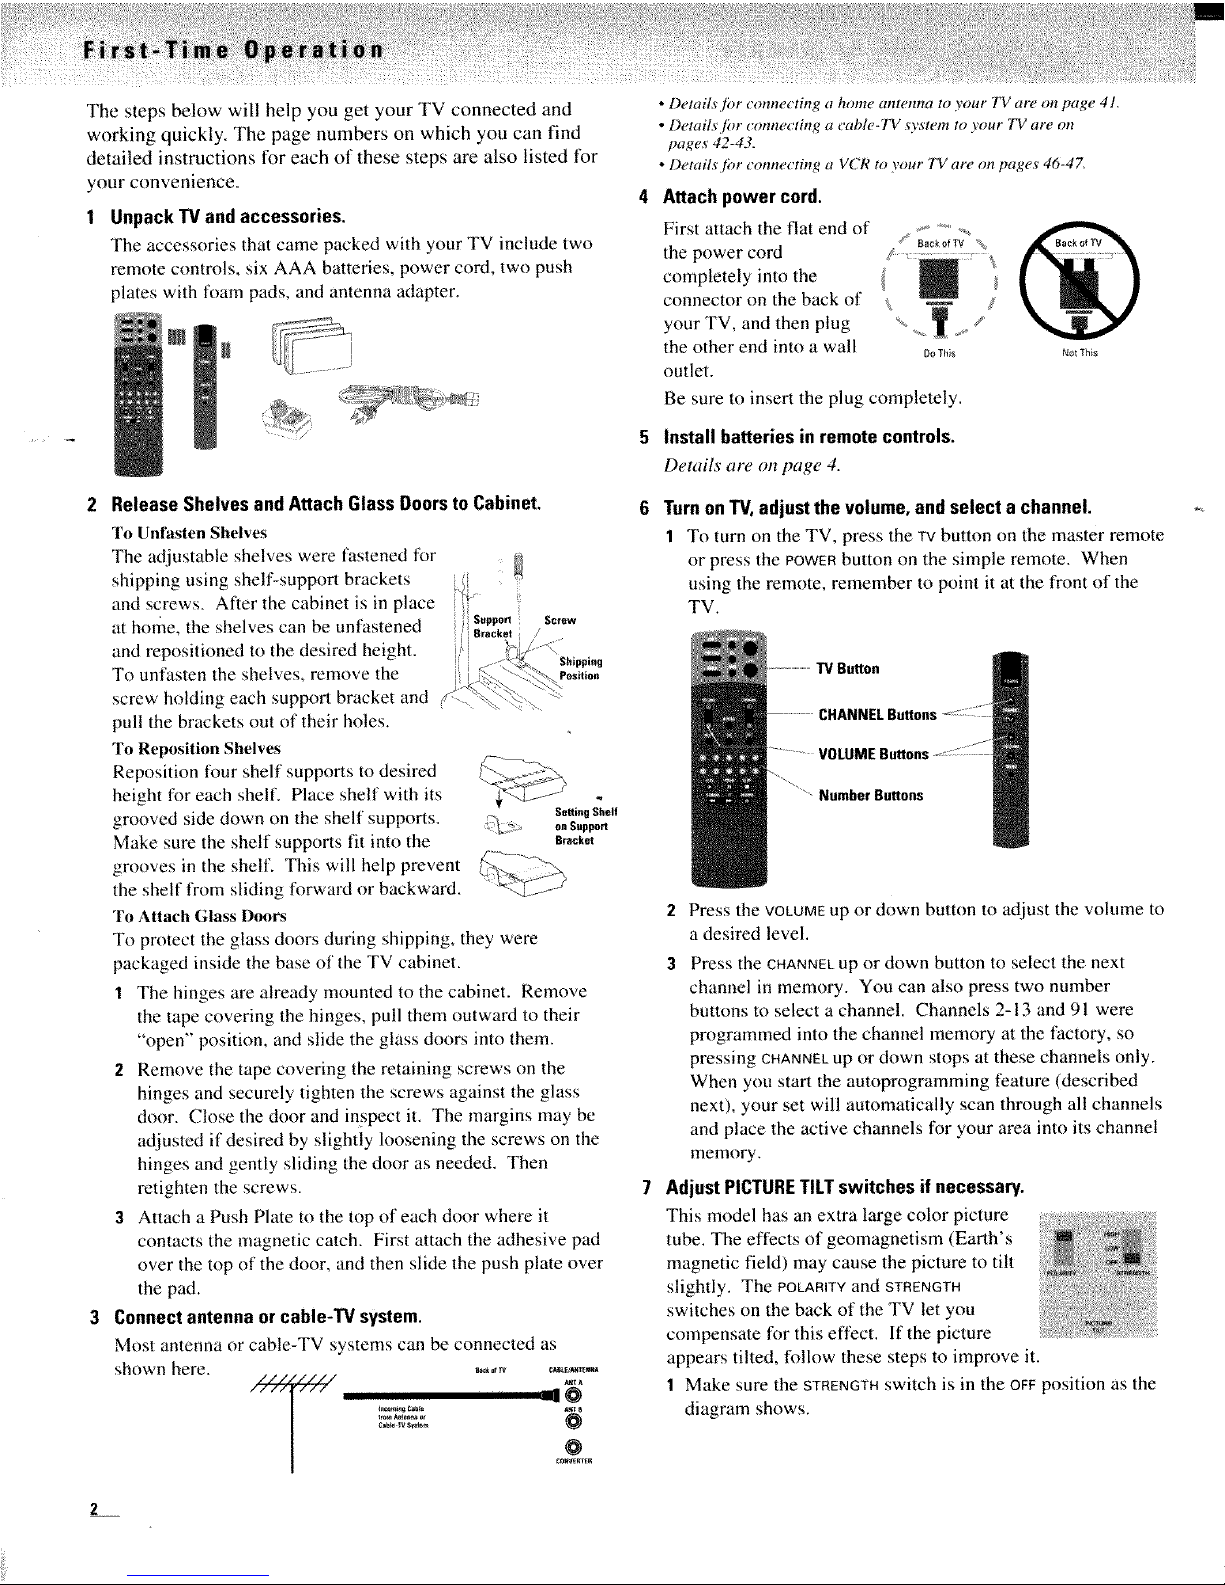
The steps below wil! help you get your TV connected and
working quickly. The page numbers on which you can find
detailed instructions for each of these steps are also listed for
your convenience.
I UnpackW and accessories.
The accessories that came packed with your TV include two
remote controls, six AAA batteries, power cord, two push
plates with foam pads, and antenna adapter,
2 ReleaseShelves andAttach GlassDoorstoCabinet.
To Unfasten Shelves
The adjustable shelves were fastened for
shipping using shelf-support brackets
and screws. After lhe cabinet is in place
at home, the shelves can be unfastened sum,0, _s_,,,,,
and reposifioned to the desired height. _ Shipping
To unf_sten the shelves, remove the eo_io.
screw holding each suppoll bracket and
pull the brackets out of their holes.
To Reposition Shelw.s
Reposition four shelf supports to desired
height tk_reach shelf. Place shell' with its
grooved side down on the shelf' supports. S_.gSh*.
on Support
Make sure the shelf supports lit into the Bra_:ket
grooves in the shel£ This will help prevent
the shelf from sliding forward or backward.
To Attach (;lass Doors
To protect the glass doors during shipping, they were
packaged inside the base of the TV cabinet.
1 The hinges are already mounted to the cabinet. Remove
the tape covering the hinges, pull them outward to their
"()pen" position, and slide the glass doors into them.
2 Remove the tape covering the retaining screws on the
hinges and securely tighten the screws against the glass
door. Close the door and inspect it. The margins may be
adjusted if desired by slightly loosening the screws on the
hinges and gently sliding the door as needed. Then
retighten the screws.
3 Attach a Push Plate to the top of each door where it
contacts the magnetic catch. First attach the adhesive pad
over the top of the door, and then slide the push plate over
the pad.
3 Connect antenna or cable-TV system.
Most antenna or cable-TV systems can be connected as
shown here. _*_, _,._..,
@
• Details,]or connecting a home antenna to your TF are on page 41.
• Derails[or connecting a table-TV _ystem to your TV are on
pages 42-43.
• Derails/or connecting a VCR to your TV a_ _ on pages 46-4Z
4 Attach power cord.
First attach the fiat end of ........ .,, _
8_ek of TV %
the power cord / .........
completely into the
connector on the back of _
your TV, and then plug .......
the other end into a wall DoTh_ N0tThi_
outlet.
Be sure to insert the plug completely.
5 Install batteriesin remotecontrols.
D_,tailsare on page 4.
Turn on TV, adjust the volume, and select a channel.
1 To turn on the TV, press the TV button on the master remote
or press the POWERbutton on the simple remote. When
using the remote, remember to point it at the front of the
TV.
_rBugons
2 Press the VOLUMEup or down button to adjust the volume to
a desired level.
3 Press the CHANNELup or down button to select the next
channel in memory. You can also press two number
buttons to select a channel. Channels 2-13 and 91 were
programmed into the channel memory at the factory, so
pressing CHANNELup or down stops at these channels only.
When you start the autoprogramming feature (described
next), your set will automatically scan through all channels
and place the active channels for your area into its channel
memory.
Adjust PICTURE TILT switches if necessary.
This model has an extra large color picture
tube. The effects of geomagnetism (Earth's
magnetic field) may cause the picture to tilt
slightly. The POLARITYand STRENGTH
switches on the back of the TV let you
compensate for this effect. 1t7the picture
appears tilted, follow these steps to improve it.
1 Make sure the STRENGTHswitch is in the oFg position as the
diagram shows.
L
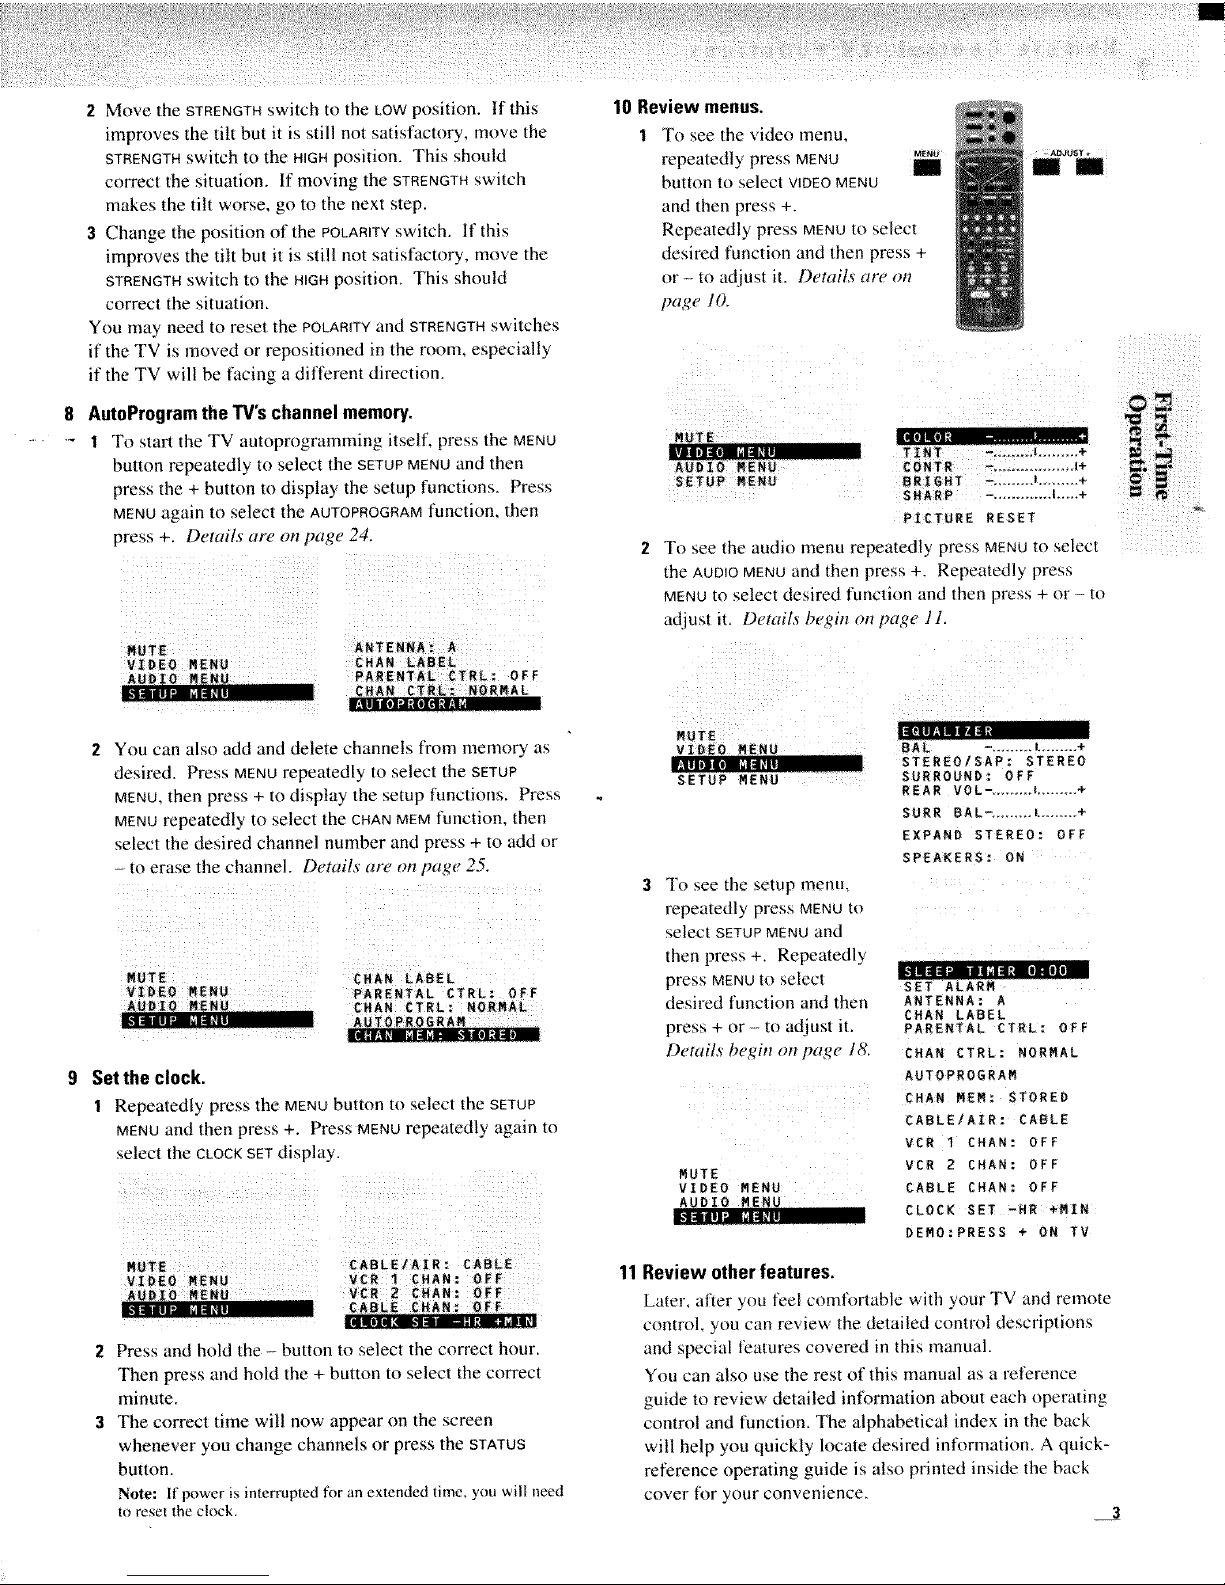
2 Move the STRENGTHswitch to the LOWposition. If this
improves the tilt but it is still not satisfactory, move the
STRENGTHswitch to the HIGHposition. This should
correct the situation, If moving the STRENGTHswitch
makes the tilt worse, go to the next step.
3 Change the position of the POLARITYswitch, If this
improves the tilt but it is still not satisfactory, move the
STRENGTHswitch to the HtGHposition. This should
correct the situation.
You may need to reset the POLARITYand STRENGTHswilches
if the TV is moved or reposinoned in the room_ especially
if the TV will be facing a differenl direclion,
8 AutoProgramthe TV'schannel memory.
'- 1 To start the TV autoprogranmfing itself, press the MENU
button repeatedly to select the SETUPMENUand thmq
press the + button Todisplay the setup functions, Press
MENUagain to select the AUTOPROGBAMfunction, then
press +. Details are on page 24.
MUTE
VIDEO MENU
AUDIO MENU
ANTENNA: A
CHAN LABEL
PARENTAL CTRL: OFF
_HAN _TRL_ NORMAL
You can also add and delete channels fi'om memory as
desired. Press MENUrepeatedly _oselect the SETUP
MENU.then press + to display the setup functions. Press
MENUrepeatedly to select 1heCHANMEMfunction, then
select the desired channel number and press + m add or
to erase the channel. Details are on ;m_e 25.
MUTE
VIDEO MENU
CHAN LABEL
PARENTAL CTRL: OFF
CHAN CTRL: NORMAL
Setthe clock.
1 Repeatedly press the MENUbulion IOselect the SETUP
MENUand then press +. Press MENUrepeatedly again to
select the CLOCKSETdisplay.
MUTE CABLE/AIR: CABLE
VIDEO MENU VCR I CHAN: OFF
AUDIO MENU V£R 2 CHAN: OFF
___ : :-, -
2 Press and hold the - button to select the correct hour.
Then press and hold the + button to select the correct
minute.
3 The correct time will now appear on the screen
whenever you change channels or press the STATUS
button.
Note: If power is interrupted R_ranextended time, you will need
to reset the c|_'k.
10 Review menus.
1 To see the xideo menu,
repeatedly press MENU
button to select VIDEOMENU
and then press +.
Repeatedly press MENUto select
desired function and then press +
or- to adjust it. Details are on
page 10.
ii! ii!ii !
(
CBNTR _ +
BRIGHT-/ ...... L ,i- -+
SHARP ". .................
PICTURE RESET
To see the audit) menu repeatedly press MENUto select :
the AUDIOMENUand then press +. Repeatedly press
MENUto select desired function and then press + or - to
adjust it. Details begin on page 1 l,
ii I _ i
CuTe
V 0 e_NU
=_':-z--',==. • ....
SETUP MENU
_' !ii i i_
STEREO/SAP: STEREO
SURROUND: OFF
REAR VOL-. ...... I......... +
SURR BAL-, ....... I......... +
EXPAND STEREO: OFF
SPEAKERS: ON
To see the setup menu,
repeatedly press MENUto
select SETUPMENUand
then press +. Repeatedly
press MENUto select
desired function and then
press + or -- to adjust it.
Details begin on page 18.
MUTE
VIDEO MENU
SET ALARM
ANTENNA: A
CHAN LABEL
PARENTAL CTRL: OFF
CHAN CTRL: NORMAL
AUTOPROGRAM
CHAN MEN; STORED
CABLE/AIR: CABLE
VCR I CHAN: OFF
VCR 2 CHAN: OFF
CABLE CHAN: OFF
CLOCK SET -BR_MIN
DENO:PRESS + ON TV
11 Review otherfeatures.
Later, after you feel comfortable with your TV and remote
control, you can review the detailed control descriptions
and special features covered in this manual.
You can also use the rest ot this manual as a reference
guide to review detailed information about each operating
control and function. The alphabetical index in the back
will help you quickly locate desired infl)rmation. A quick-
leference operating guide is also printed inside the back
cover for your convenience.
3
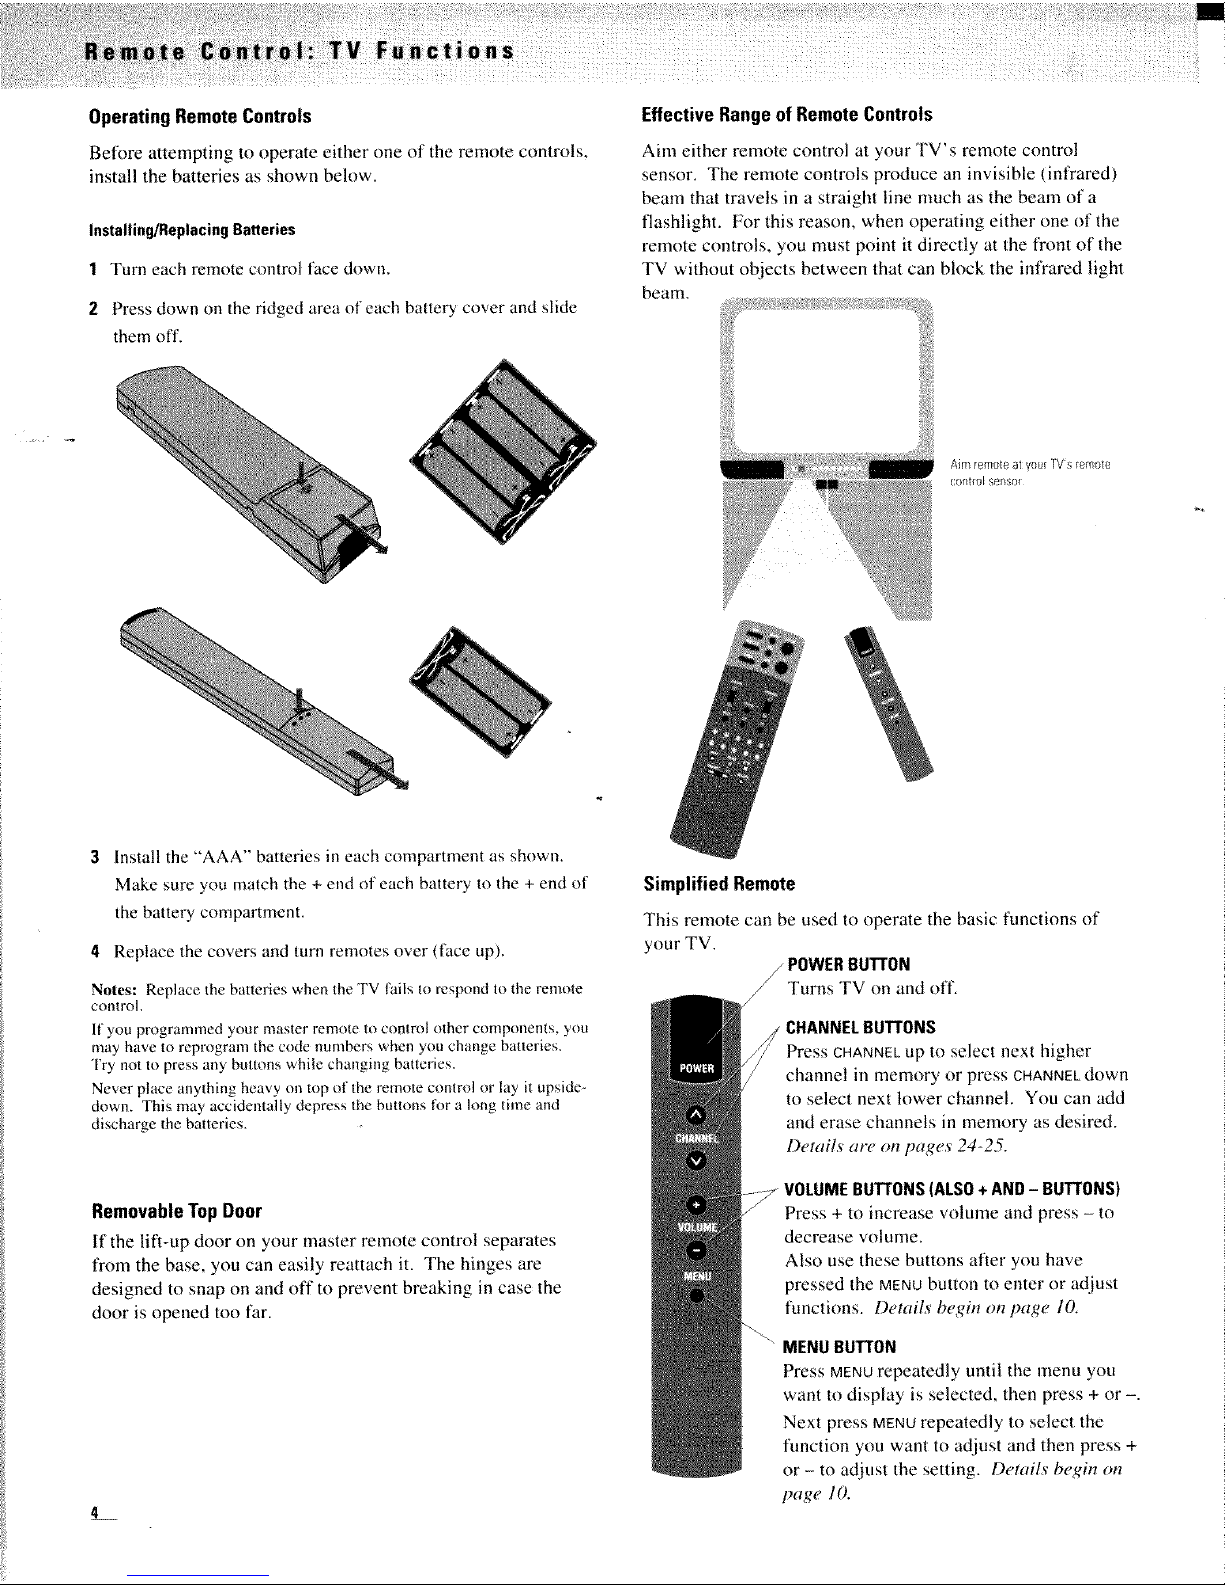
Operating Remote Controls
Before attempting to operate either one of the remote controls.
install the batteries as shown below.
Installing/Reptacing Batteries
1 Turn each remote control face down.
2 Press down on the ridged area of each battery cover and slide
them off.
EffectiveRangeof RemoteControls
Aim either remote control at yore" TV's remote control
sensor. The remote controls produce an invisible (inlYared)
beam that travels in a straight line nmch as the beam of a
flashlight. For this reason, when operating either one of the
remote controls, you must point it directly at the front of the
TV without objects between that can block the infrared light
beam.
Aim remote at yool IV'stemo[e
corl_fo_s_.iI,s(iI
3 Install the "AAA'" batteries in each compartment as shown.
Make sm'e you match the + end of each battery to the + end of
the battery compartment.
4 Replace the covers and turn remotes over (fi_ce up).
Notes: Replace the batteries when the TV fifils to respond to lhe remote
contlY)l,
If you programmed your master remote to control other components, you
may have to reprogram the code numbers when you change batteries.
Try not to press any buttons while changing batteries
Never place anything heavy on top of the remote control or lay it upside-
down. This may accidentally depress the buttons fl)r a long time and
discharge the baneries,
Removable Top Door
If the lift-up door on your master rernote control separates
from the base, you can easily reattach it. The hinges are
designed to snap on and off to prevent breaking in case the
door is opened too far,
L
Simplified Remote
This remote can be used t() operate the basic functions of
your TV.
//POWER BUTTON
// Turns TV on and off.
CHANNELBUTTONS
Press CHANNELnp to selecl next higher
channel in memory or press CHANNELdown
to select next lower channel. You can add
and erase channels in memory as desired.
Details are on pages 24-25.
VOLUMEBUTTONS(ALSO+ AND - BUTTONS)
Press + to increase vohune and press - to
decrease volume.
Also use these buttons alter you have
pressed the MENUbutton to enter or adjust
functions. Details begin on page 10,
MENUBUTTON
Press MENUrepeatedly until the menu you
want to display is selected, then press + or -.
Next press MENUrepeatedly to select the
function you want to adjust and then press +
or - to adjust the setting. Derails begin on
page 10.
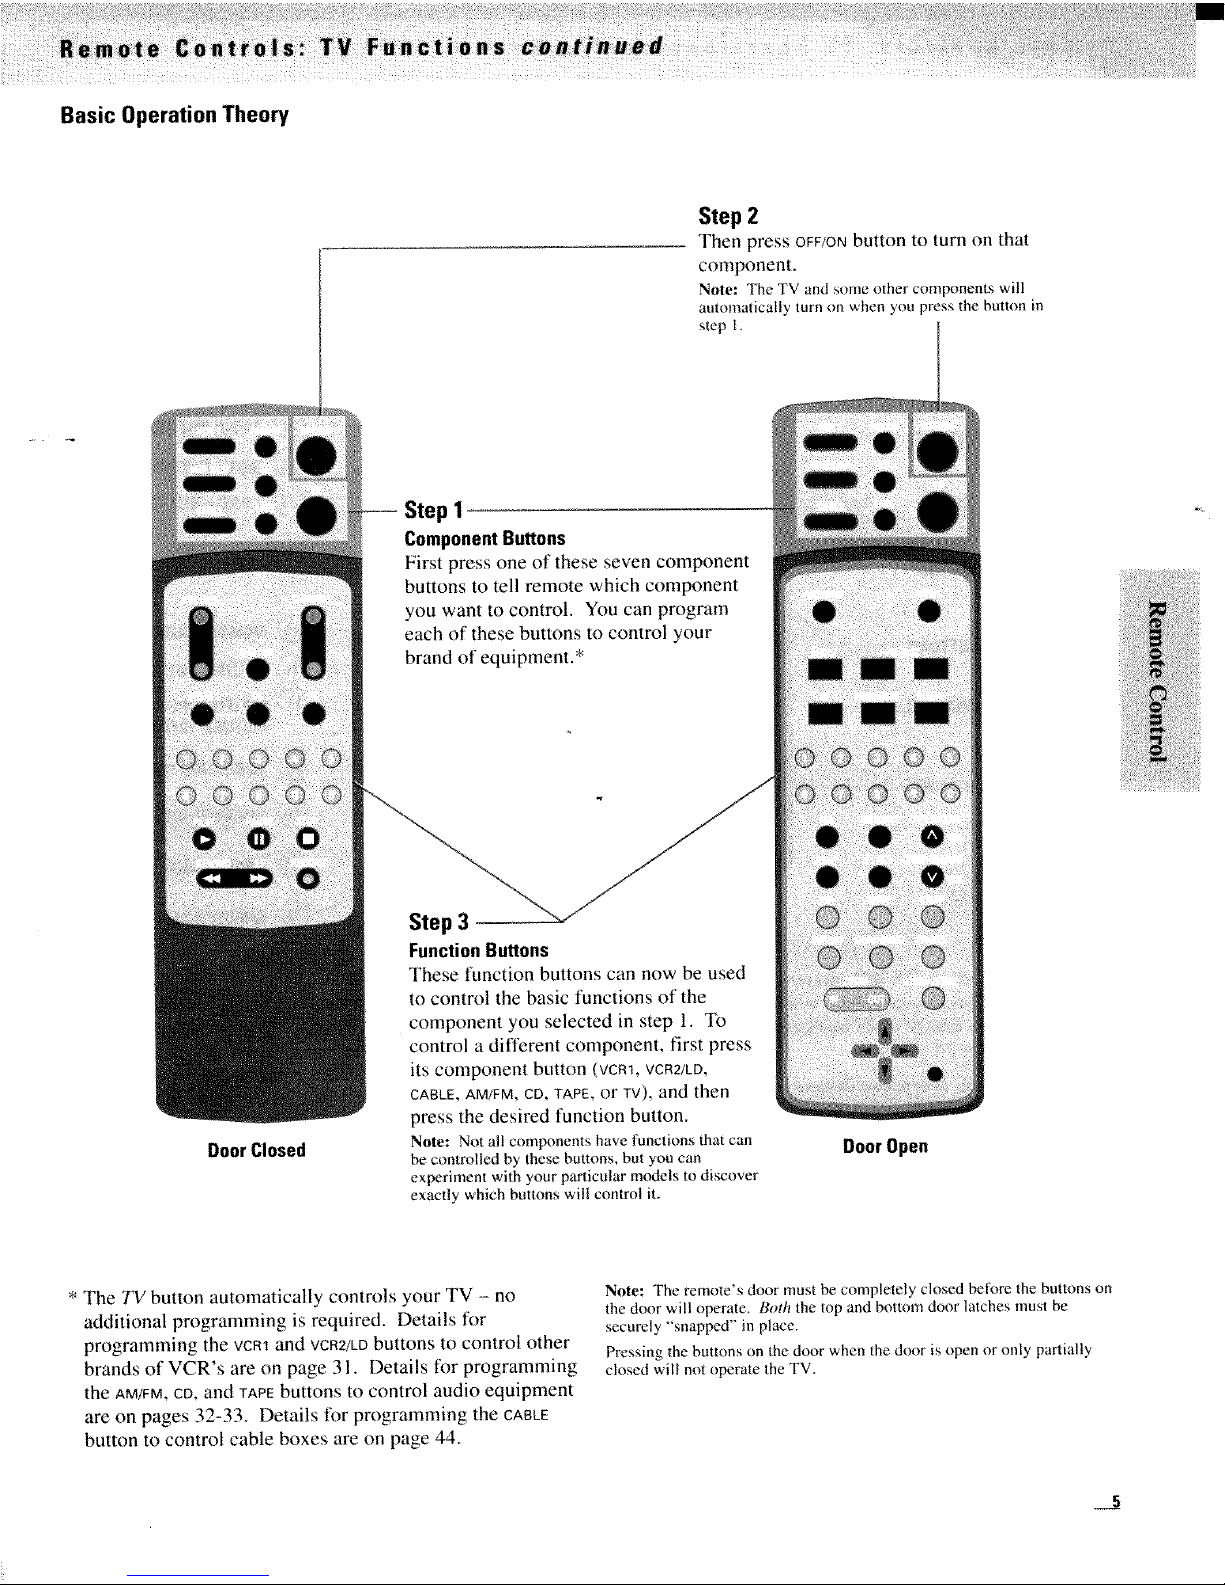
Basic Operation Theory
Step 2
Then press OFF/ONbutton to turn on that
component.
Note: The TV and some od/er components will
automatically turn on when you press the button in
step I.
Door Closed
1
ComponentButtons
First press one of these seven component
buttons to tell remote which component
you want to control. You can program
each of these buttons to control your
brand of equipment.*
Step 3
FunctionButtons
These function buttons can now be used
to control the basic functions of the
component you selected in step 1. To
control a different component, first press
its component button (vcm, VCR2/LD,
CABLE, AM/FM, CD TAPE, or TV), and then
press the desired function button.
Note: Not all components have functions that can
l_z controlled by these buttons, but you can
experiment with your particular models to discover
exactly which buttons wilt control iL
DoorOpen
* The TV button automatically controls your TV - no
additional programming is required. Details for
programming d'le vcm and VCR2/LObuttons to control other
brands of VCR's are on page 3 I. Details tbr programming
the AM/FM,CO,and TAPEbuttons to control audio equipment
are on pages 32-33. Details for programming the CABLE
button to control cable boxes are on page 44.
Note: The rcmote's door must be completely closed beIk)re the bunons on
the dr×)r wilt operate_ Both the hop and bottom door latches must be
securely °°snapped" in place.
Pressing the buttons on the door when the door is open or only partially
closed will not operate the TV.
.... Remote
_iiii:ii_i_!'i ,i_! ,i _ i i_ _(i _ _ _i __ ii _I!IQIi_II_II_I
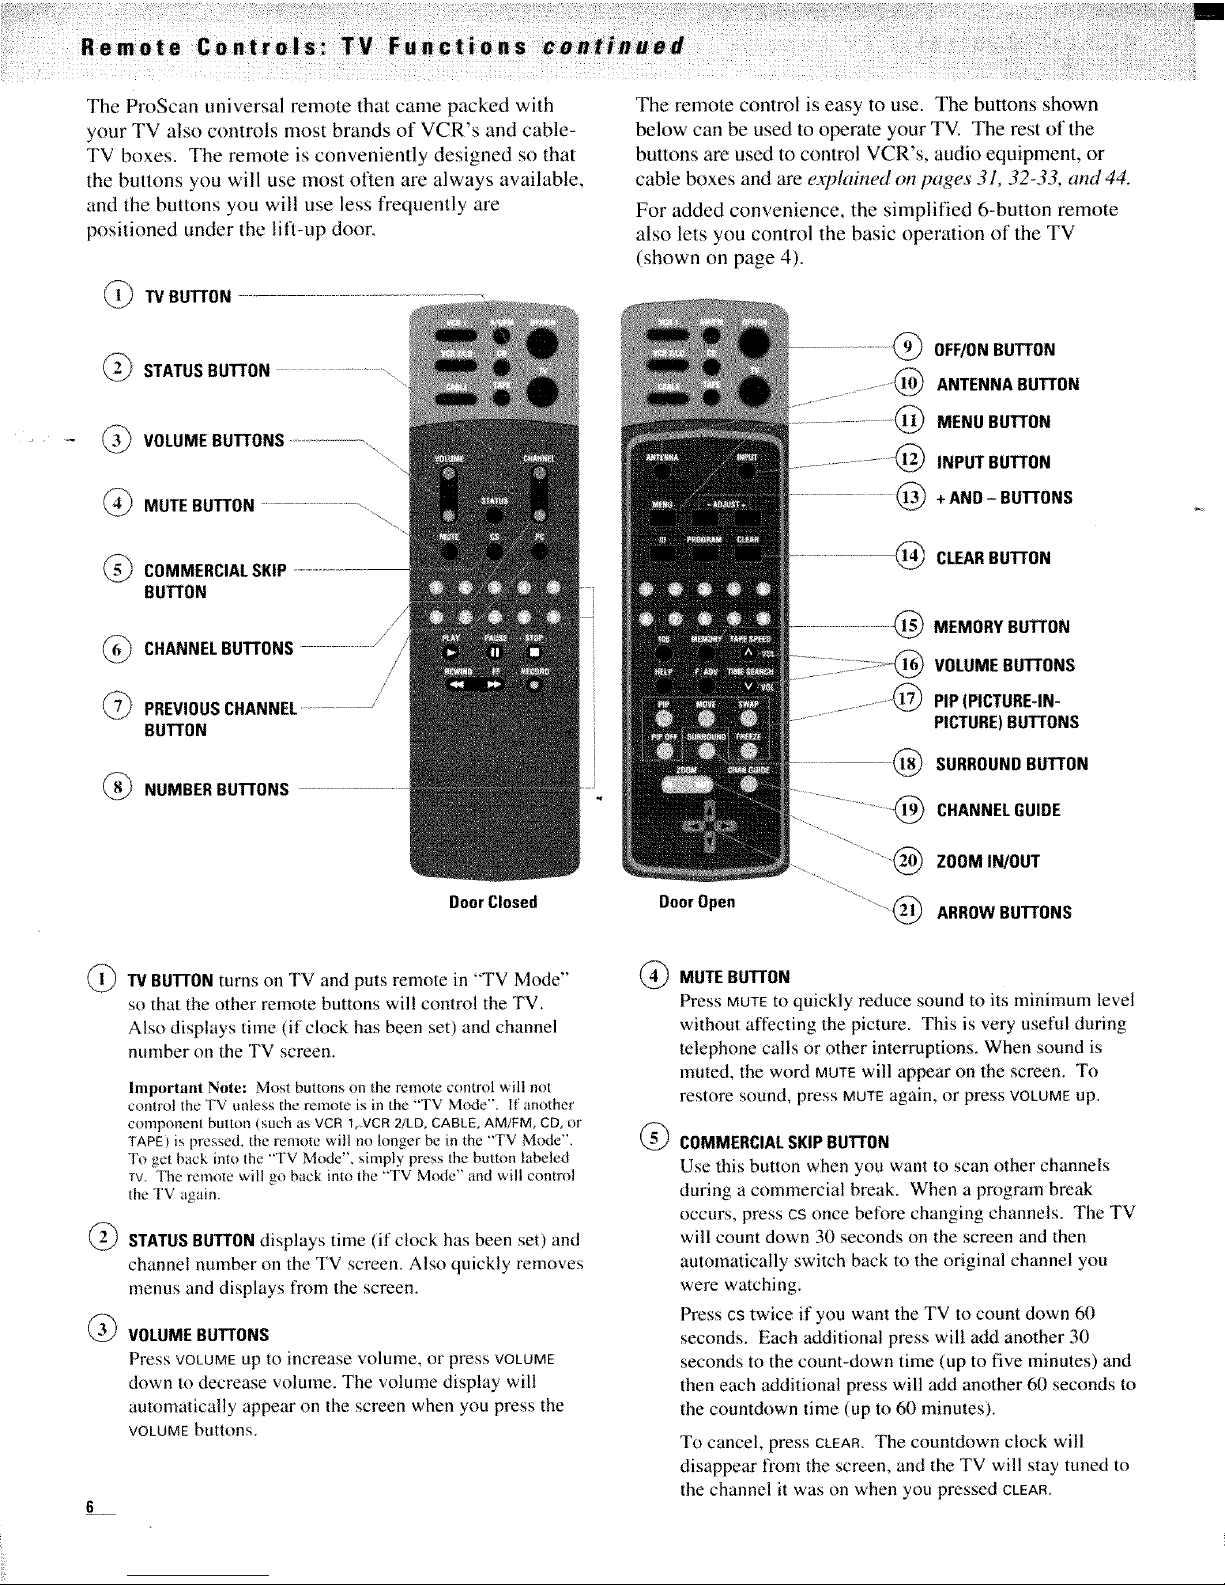
The ProScan universal remote that came packed with
your TV also controls most brands of VCR's and cable-
TV boxes. The remote is conveniently designed so that
the buttons you will use most often are always available,
and the buttons you will use less frequently are
positioned under the lift-up door.
@TV BUTTON
(2j_ STATUS BUTTON ......................
_.3) VOLUME ......................................
BUTTONS
MUTE BUTTON ...........................................
_.5_) COMMERCIAL SKIP
BUTTON
_) CHANNELBUTTONS
/
/
(7_ PREVIOUSCHANNEL.....
/
BUTTON
_) NUMBER BUTTONS
Door Closed
G
TVBUTTONturns on TV and puts remote in "TV Mode"
so that the other remote buttons will control the TV.
Also displays time (if clock has been set) and channel
nmnber on the TV screen.
Important Note: Most buttons on the remote control will not
control the TV unless tbe remote is in the "q'V Mode". If another
componenl burton (such as VCR 1,VCR 2/LD, CABLE, AM/FM, CD, Ot
TAPE} is pressed, the remo|e will no longer be in the "TV Mode".
To get back into the "TV Mode". shnply press the button labeled
rv. The remote wil! go back into the "TV Mode '_and will control
the TV again.
STATUSBUTTONdisplays time (if ctock has been set) and
channel number on the TV screen. Also quickly removes
menus and displays from the screen.
VOLUMEBUTTONS
Press VOLUMEup to increase volume, or press VOLUME
down to decrease volume. The volume display will
automatically appear on the screen when you press the
VOLUMEbuttons.
The remote control is easy to use. The buttons shown
below can be used to o_rate your TV. The rest of the
buttons are used to control VCR's, audio equipment, or
cable boxes and are e._plained on pages 31, 32-33, and44.
For added convenience, the simplified 6-button remote
also lets you control the basic operation of the TV
(shown on page 4).
OFF/ON BUTTON
................_.._ ANTENNA BUTTON
MENU BUTTON
.................(1_ INPUT BUTTON
+ AND - BUTTONS
CLEARBUTTON
MEMORY BUTTON
VOLUME BUTTONS
....................... PIP (PICTURE-IN-
PICTURE) BUTTONS
SURROUND BUTTON
CHANNEL GUIDE
DoorOpen
ZOOM IN/OUT
.............. ARROW BUTTONS
®
MUTEBUTTON
Press MUTEto quickly reduce sound to its minimum level
without affecting the picture. This is very useful during
telephone calls or other interruptions. When sound is
muted, the word MUTEwill appear on the screen. To
restore sound, press MUTEagain, or press VOLUMEup.
COMMERCIALSKIPBUTTON
Use this button when you want to scan other channels
during a commercial break. When a program break
occurs, press cs once belt)re changing channels. The TV
will count down 30 seconds on the screen and then
automatically switch back to the original channel you
were watching.
Press cs twice if you want the TV to count down 60
seconds. Each additional press will add another 30
seconds to the count-down time (up to five minutes) and
then each additional press will add another 60 seconds to
the countdown time (up to 60 minutes).
To cancel, press CLEAR.The countdown clock will
disappear from the screen, and the TV will stay tuned to
the channel it was on when you pressed CLEAR.

®
@
®
®
®
®
CHANNELBUTTONS
Press CHANNELtip to see the next higher channel in
memory, or press CHANNELdown to see the next lower
channel in memory. Channels 2 through i3 and 91 were
programmed into the channel memory for you at the
factory.
Your TV will automatically program active channels for
yore- area into memory when you start the AutoProgram
feature described on page 24. If desired, you can also
add or erase individual channels as described on
page 25,
PREVIOUSCHANNELBUTTON
Pressing the PCbutton causes the TV to change back to
the last-tuned channel. This is useful should you want to
monitor two channels.
To operate, select the first channel you want to watch.
Then select the other channel by pressing two number
buttons. The TV will now change back and forth
between the two channels each time you press the PC
button.
NUMBERBUTTONSlet you select channels directly instead
of using the CHANNELbuttons. Always press two number
buttons (first one, then the other) to select a channel. For
example, press 0 then 6 tbr channel 6.
To select a 3-digit cable channel (like 127), press and
hold number button 1 until "1 - -" appears on the screen.
Then press the other two numbers. Your TV will tune up
to cable channel number 128 when the CABt.E/AtRfunction
is set to CABLE. Check with your cable company to
determine which channels are available in your area.
You can also select a 3-digit channel by pressing the I(X)
button and then pressing two mole number buttons.
0FF/ONBUTTONturns off the TV.
ANTENNABUTTON
Because your TV has two different antenna inputs on the
back (labeled ANTAand ANTB) yOU can connect more
than one antenna or signal source. Press the ANTENNA
button to switch from one input to the other.
The color of the channel number on the screen indicates
which antenna input you are watching. Tile channel
numbers are blue for ANTA and yellow for ANTa. If the
channel numbers are blue, you are watching whatever is
connected tothe ANTA input on the back of the _/W. If
the channel numbers are yellow, you are watching
whatever is connected to the ANTB input on tile back of
the TV. Details" are on page 21,
MENUBUTTON
Press MENUrepeatedly until the menu you want to display
is selected, then press + or -. Next press MENU
repeatedly to select the function you want to adjust and
then press + or - to adjust the setting. Details about
using each,fimction begin on page lO.
®
@
@
@
®
®
INPUTBUTTONlets you quickly view signals from the
INPUT.jacks. Pressing this button switches the TV from
its current channel directly to channel 90, then channel
91, then channel 92. Channel 90 lets you see the signals
coming from a device that is connected to the S-WDEO
connector. Channel 91 accesses the INPUT1 jacks and
channel 92 accesses the INPUT2,jacks.
+ AND - BUTTONS
Use these buttons after you have pressed the MENU
button to enter or adjust functions.
CLEARBUTTON
Pressing CLEARquickly clears the screen of all on-screen
display messages (except mute and parental control). It
is also used to cancel the Commercial Skip count-down
clock and to erase channel labels.
MEMORYBUTTON
Press MEMORYto return the video adjustments (color,
factorytint,contrast, brighmess, and shaqmess)to their originalsettings.
VOLUMEBUTTONS(TVMODE)
This is anextra pair of VOLUMEbuttons located inside the
door to allow volume adjustment when the door is open.
haveUse thesetokeepbUtt°nSclosingWhenthelabeldoor.ingchannels so you don't
Note: The remote must be in the TV mode tbr Ihese buttons to
control the volume. When the remote is in _heVCR m(_le, these
are the TAPE SPEED and TIME SEARCH buuons,
PIP(PICTURE-IN-PICTURE)CONTROLBUTTONS are used to
display two pictures on the TV screen at once. The little
pictme can be moved, fiozen, or switched with the big
picture, Details are on pages 28-29.
SURROUNDBUTtON the function
changes
SURROUND
between ON and OFF. Details" are on pages 16-17.
CHANNELGUIDElets you display several channels at the
same time. Details are on page 8.
ZOOMIN/0UT lets you make the picture bigger. Details'
are on page 8.
ARROWBUTTONS you move picture when
let around it is
zoomed in. Also let you move small picture around the
screen during picture-in-picture.
7
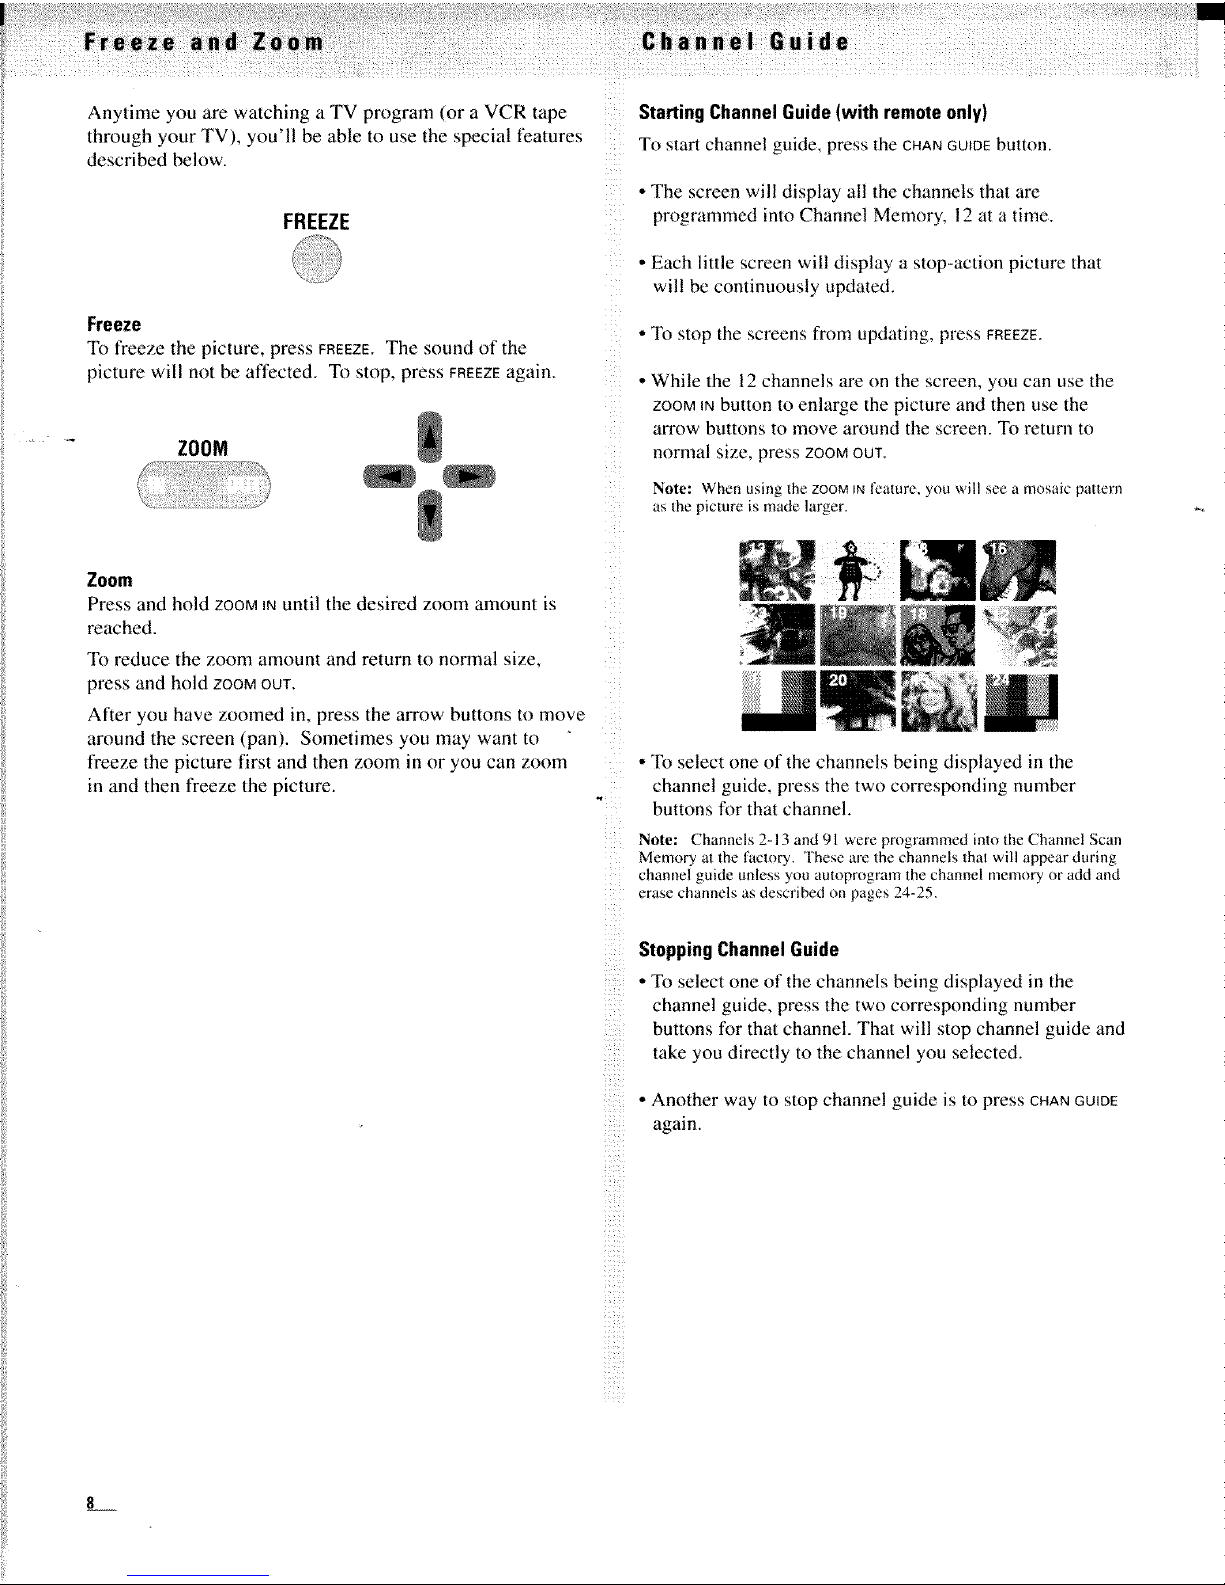
Anytime you are watching a TV program (or a VCR tape
through your TV), you'll be able to use the special features
described below.
FREEZE
Freeze
li) freeze the picture, press FREEZE.The sound of the
picture will not be affected. To stop, press FREEZEagain.
.... ZOOM
Zoom
Press and hold ZOOMiNuntil the desired zoom amount is
reached.
To reduce the zoom amount and return to normal size,
press and hold zoom OUT.
After you have zoomed in, press the arrow buttons to move
around the screen (pan). Sometimes you may want to
fleeze the picture first and then zoom in or you can zoom
in and then freeze the picture.
StartingChannelGuide(with remoteonly)
To start channel guide, press the CHANGUIDEbutton.
• The screen will display all the channels that are
programmed into Channel Memory, 12 at a time.
• Each little screen will display a stop-action picture that
will be continuously updated.
• To stop the screens from updating, press FREEZE.
• While the 12 channels are on the screen, you can use the
ZOOMINbutton to enlarge the picture and then use the
arrow buttons to move around the screen. To return to
normal size, press ZOOMOUT.
Note: When using the ZOOM_N fealure, yon will see a mosaic pattern
as the picture is made larger.
iiii
i_i_I!7
ii i_ii
Z IZ_
• To select one of the channels being displayed in the
channel guide, press the two corresponding number
buttons for that channel.
Note: Channels 2-13 and 9l were programmed into the Channel Scan
Memory at the factory. These are the channels thai will appear during
channel guide unless yon auioprogram the channel memory or add and
erase channels as described on pages 24-25.
StoppingChannelGuide
• To select one of the channels being displayed in the
channel guide, press the two corresponding number
buttons for that channel. That will stop channel guide and
take you directly to the channel you selected.
• Another way to stop channel guide is to press CHANGUIDE
again.
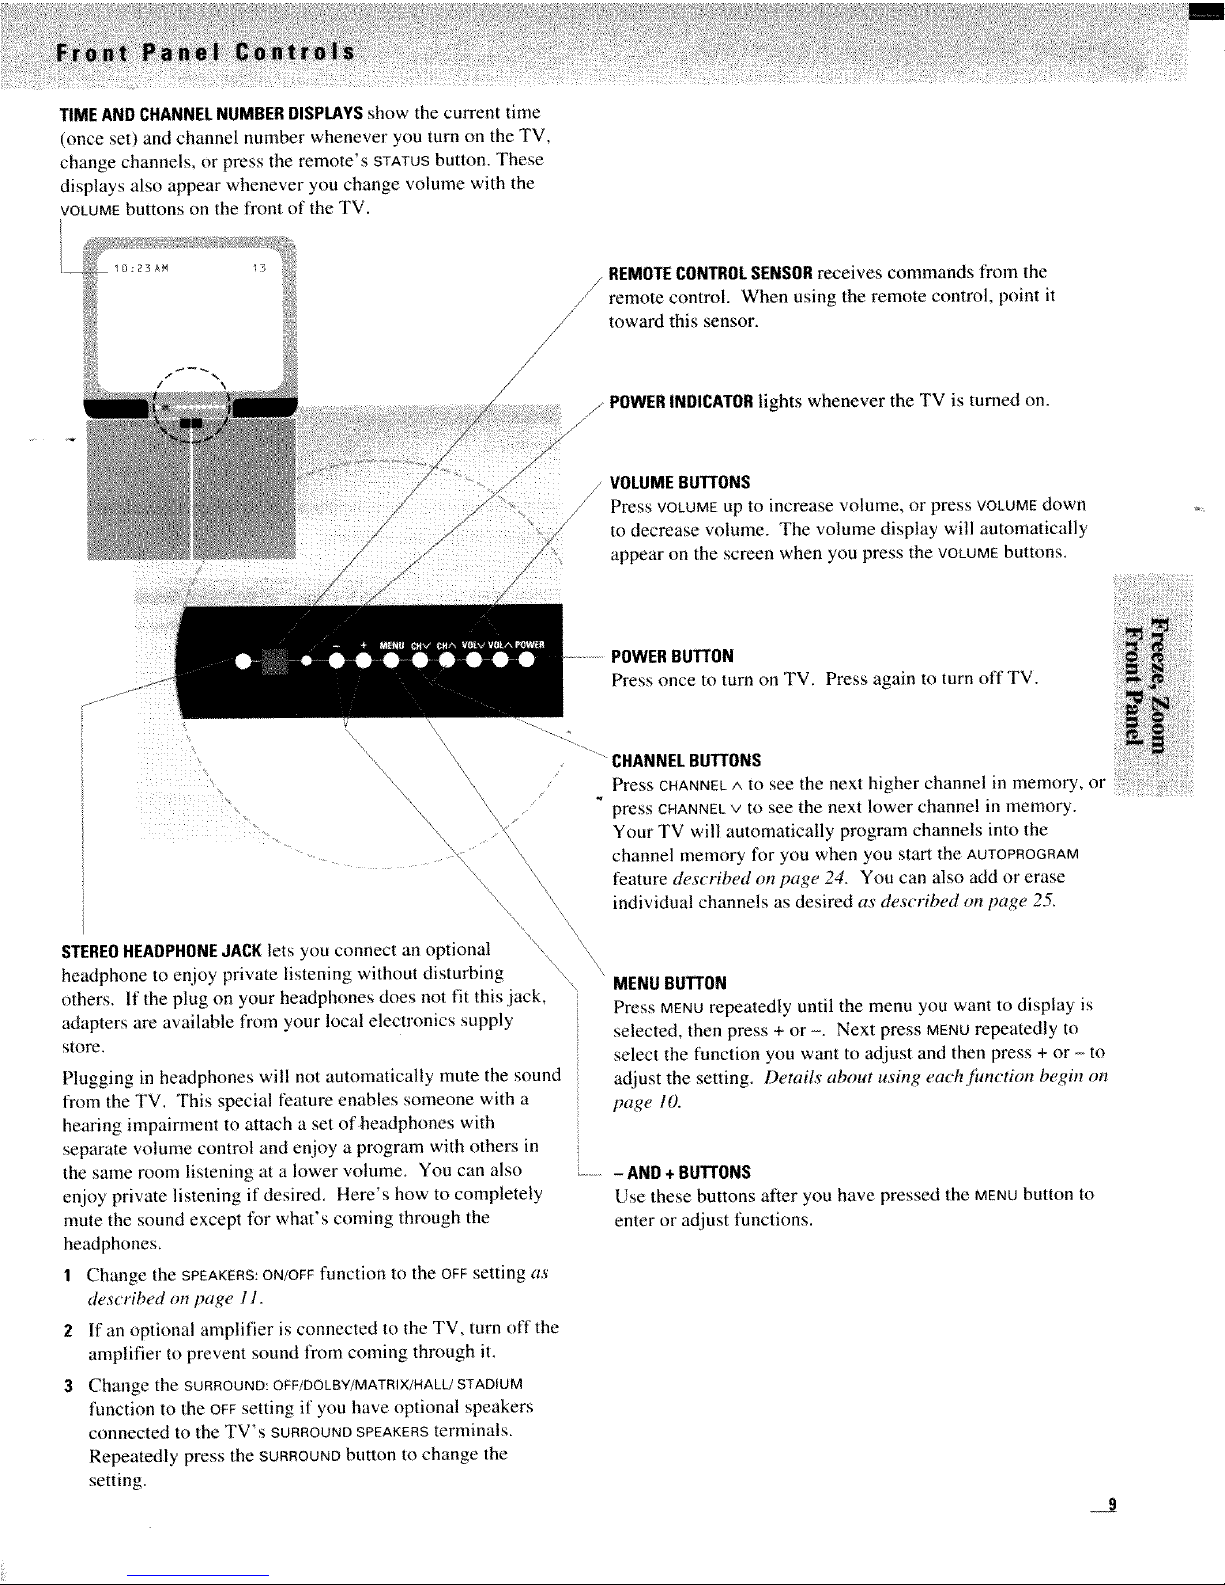
TIME AND CHANNELNUMBERDISPLAYSshow the current time
(once set) and channel number whenever you turn on the TV,
change channels, or press the remote's STATUSbutton. These
displays also appear whenever you change volume with the
VOLUMEbuttons on the fi'ont of the TV.
j REMOTECONTROLSENSORreceives commands from the
/ remote control. When using the remote control, point it
toward this sensor.
/ \
_,/POWER INDICATORlights whenever the TV is turned on.
/ VOLUMEBUTTONS
,/ Press VOLUMEup to increase volume, or press VOLUMEdown
to decrease volume. The volume display will automatically
appear on the screen when you press the VOLUMEbuttons.
POWERBUTTON
Press once to mm on TV+ Press again to turn off TV.
\
\\
\\ •
\
\\
\
"\
STEREOHEADPHONEJACK lets you connec! an optional _, \
\ \\
headphone to enjoy private listening without disturbing '\,
others, ff the plug on your headphones does not fit this jack,
adapters are available from your local electronics supply
store+
Plugging in headphones will not automatically nmte the sound
fi'om the TV. This special fizature enables someone with a
hearing impairment to attach a set of headphones with
separate volume control and enjoy a program with others in
the same room listening at a lower volume. You can also
enjoy private listening if desire& Here's how to completely
mute the sound except for what's coming through the
headphones.
I Change the SPEAKERS:ON/OFFfunction to the OFFsetting as
described on page 11.
2 If an optional amplifier is connected to the TV, turn off the
amplifier to prevent sound from coming through it.
.......CHANNELBUTTONS
Press CHANNEL/',to see the next higher channel in memory, or
press CHANNELV tO see the next lower channel in memory,
Your TV will automatically program channels into the
channel memory for you when you start the AUTOPROGRAM
feature described on page 24. You can also add or erase
individual channels as desired as described on page 25.
MENU BUTTON
Press MENUrepeatedly until the menu you want to display is
selected, then press + or -. Next press MENUrepeatedly to
select the function you want to adjust and then press + or - to
adjust the setting. Details about using each fimction begin on
page 10.
........... AND + BUTTONS
Use these buttons after you have pressed the MENUbutton to
enter or adjust functions.
Change the SURROUND: OFF/DOLBY/MATRIX/HALIJ STADIUM
function to the OFFsetting if you have optional speakers
connected to the TV's SURROUNDSPEAKERSterminals,
Repeatedly press the SURROUNDbutton to change the
setting.
J
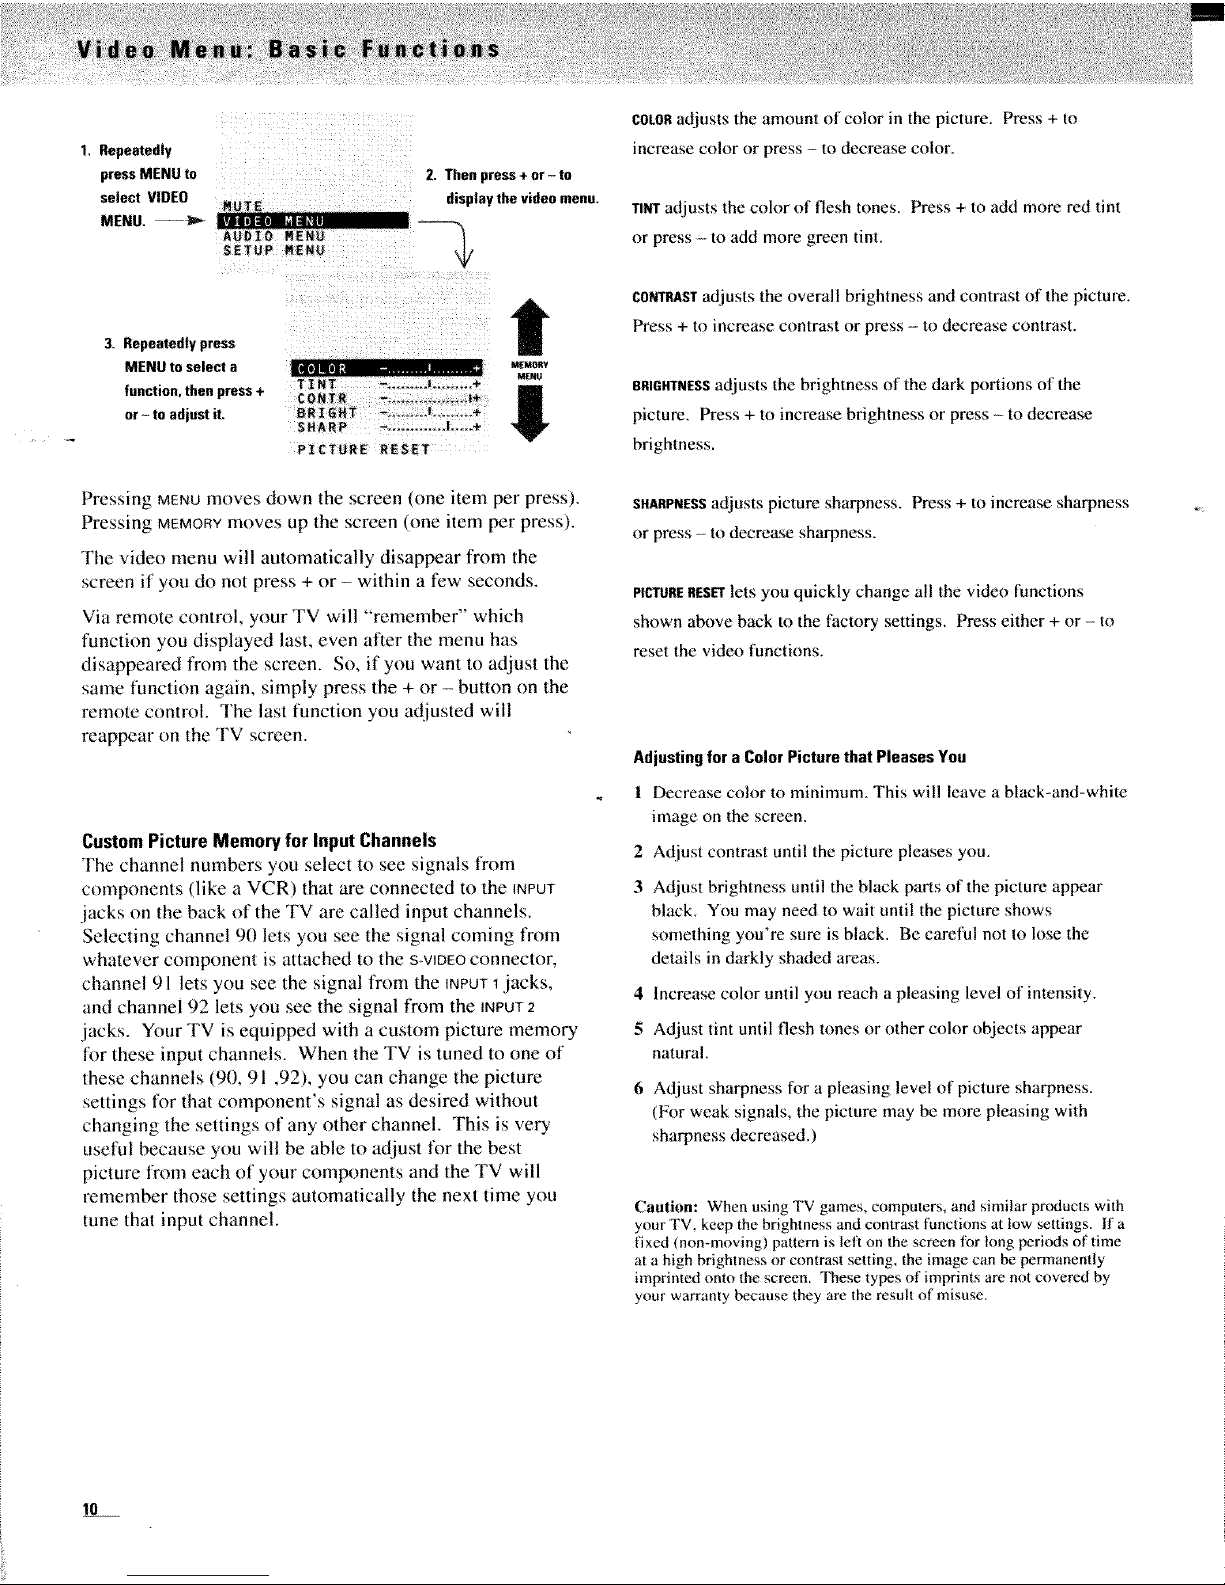
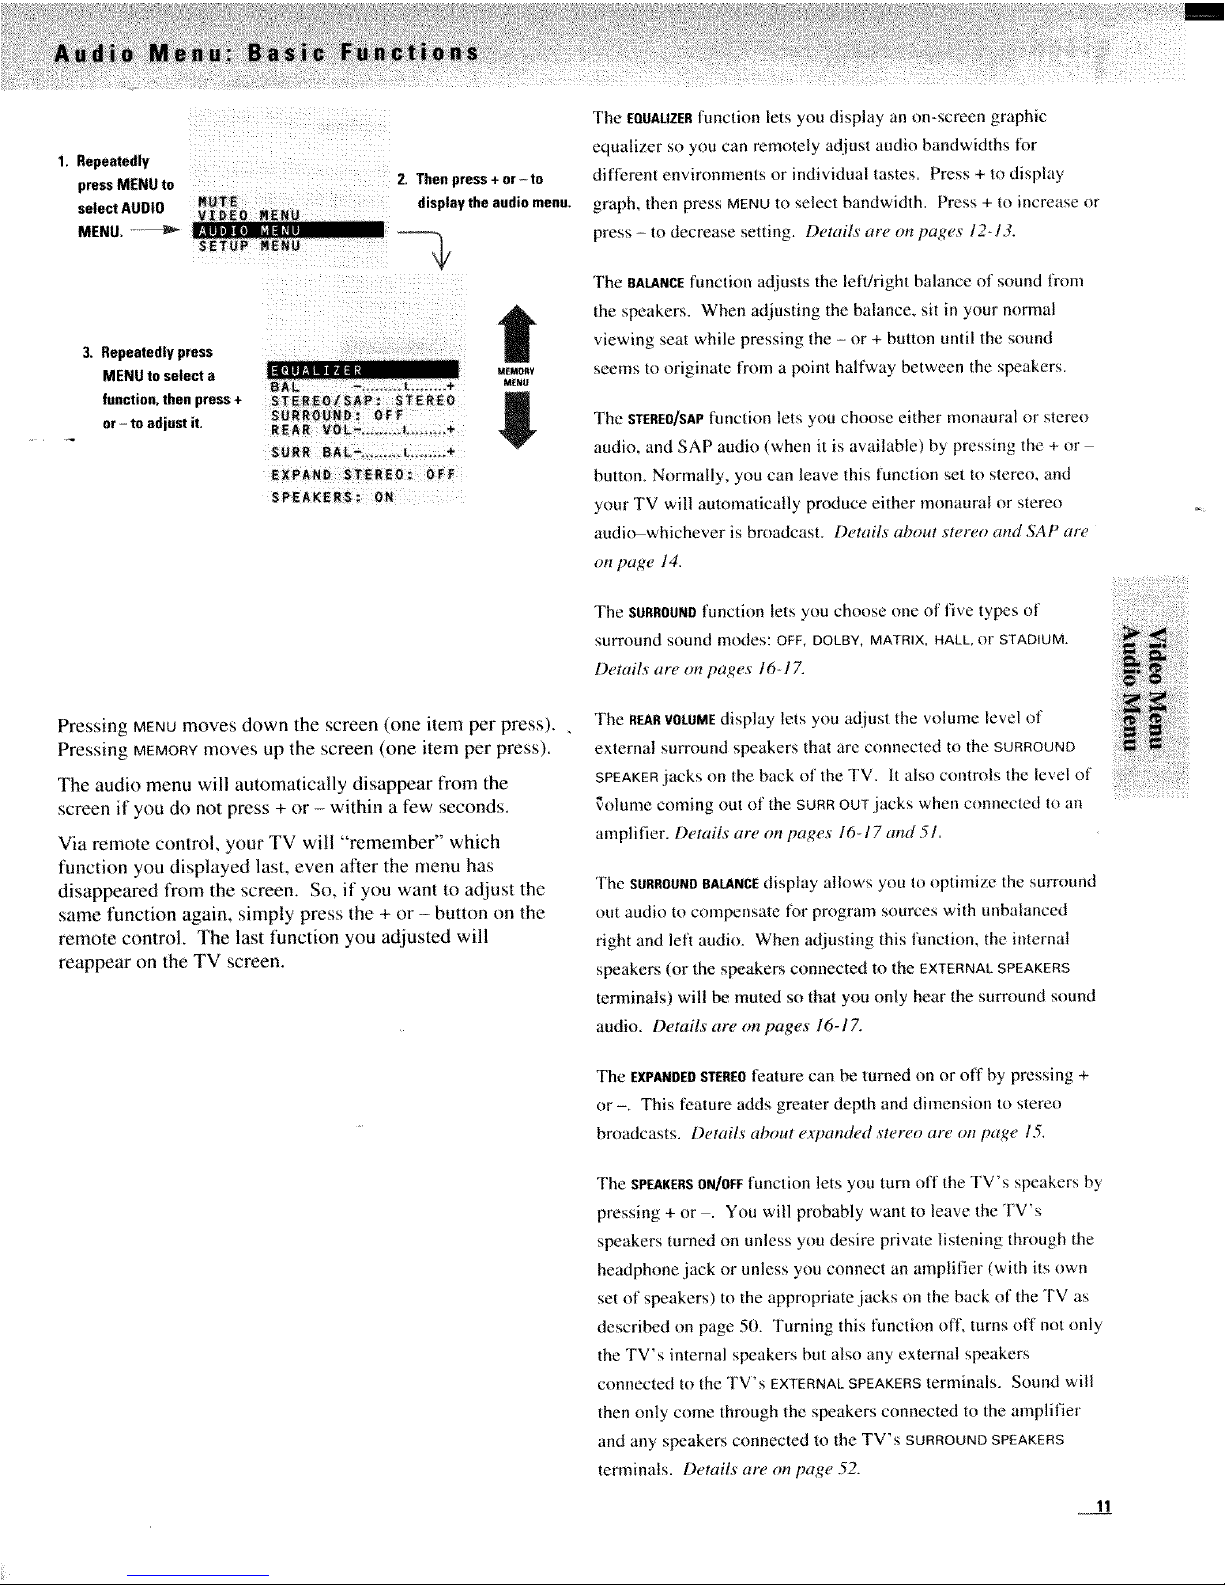
1. Repeatedly
press MENU to
select VIDEO
MENU,
& Repeatedly press
MENU to select a
function, then press +
or - to adjust it.
Pressing MENUmoves down the screen (one item per press).
Pressing MEMORYmoves up the screen (one item per press).
'File video menu will automatically disappear t¥om the
screen if you do not press + or - within a few seconds.
Via remote control, your TV will "remember" which
flmction you displayed last, even after the menu has
disappeared t¥om the screen. St), if you want to adjust the
same function again, simply press the + or - button on the
remote control The last function you adjusted will
reappear on the TV screen.
CustomPictureMemoryfor InputChannels
The channel numbers you select to see signals from
components (like a VCR) that are connected to the _NPUT
jacks on the back of the TV are called input channels.
Selecting channel 90 lets you see the signal coming from
whatever componenl is attached to the s VIDEOconnector,
channel 91 lets you see the signal from the INPUTt jacks,
and channel 92 lets you see the signal from the INPUT2
jacks. Your TV is equipped with a custom picture memory
li)r these input channels. When the TV is tuned to one of
these channels (90, 91 ,92), you can change the picture
settings fl)r that component's signal as desired without
changing the settings of any other channel. This is very
useful because you will be able to adjust for the best
picture fmnl each of your components and the TV will
remember those settings automatically the next time you
tune that input channel.
COLORadjusts the amount of color in the picture. Press + to
increase color or press - to decrease color.
TINTadjusts the color of flesh tones. Press + to add more red tint
or press - to add more green tint.
CONTRASTadjusts the overall brightness and contrast of the picture.
Press + to increase contrast or press - to decrease contrast.
BRIGHTNESSadjusts the brightness of the dark portions of the
picture. Press + to increase brightness or press to decrease
brightness.
SHARPNESSadjusts picture sharpness. Press + to increase sharpness
or press - to deere&'¢2 sharpness.
PICTURERESETlets you quickly change all the video functions
shown above back to the factory settings. Press either + or - to
reset the video functions.
Adjusting for a Color Picture that Pleases You
l Decrease coh)r to minimum, This will leave a black-and-white
image on the screen.
2 Adjust contrast until the picture pleases you.
3 Adjust brightness until the black parts of the picture appear
black. You may need to wait until the picture shows
something you're sure is black. Be careful not to lose the
details in darkly shaded areas.
4 Increase color until you reach a pleasing level of intensity.
5 At[just tint until flesh tones or other color objects appear
natura!.
6 Adjust sharpness for a pleasing level of picture sharpness.
(For weak signals, the picture may be more pleasing with
sharpness decreased.)
Caution: When using TV games, computers_ and similar products with
your TV. keep the brightness and contrast functions at low settings. If a
fixed (nommoving) pattern is left on the screen (or long periods of time
at a high brightness or contrast setting, the image can be permanently
imprinted onto the screen. These types of imprints are not covered by
your warranty because they are the result of misuse.
10
, Re.ea.ed,yii ii¸!i ii! iii i¸i
pressMENUto 2. Thenpress+ or-to
displaytheaudiomenu.
selectAUDIO
MENU,.............._ [-_7--_ 1t
i
3. Repeatedlypress
MENUtoselecta
function,theepress+
or- to adjust it,
M_IMffJ_Y
MENU
Pressing MENUmoves down the screen (one item per press). ,
Pressing MEMORYmoves up the screen (one item per press).
The audio menu will automatically disappear from the
screen if you do not press + or - within a few seconds.
Via remote control, your TV will "remember" which
function you displayed last, even after the menu has
disappeared t¥om the screen. So, if you want to adjust the
same function again, simply press the + or - button on the
remote control. The last function you adjusted will
reappear on the TV screen,
The EQUALIZERtunction lets you display an on-screen graphic
equalizer so you can remotely adjust audio bandwidths ti_r
dill?rent environments or individual tastes. Press + to display
graph, then press MENUto select bandwidth. Press + to increase or
press = m decrease setting. Details ar_, on pages 12-13.
The BALANCEfunction adjusts the lefffright balance of sound from
the speakers, When adjusting the balance, sit in your normal
viewing seat while pressing the - or + button until the sound
seems to originate l¥om a point halfway between the speakers.
The STEREO/SAPfunction lets you choose either monaural or stereo
audio, and SAP audio (when it is available) by pressing the + or
button, Normally, you can leave this function set to stereo, and
your TV will automatically produce either monaural or stereo
audio whichever is broadcast. Details about stereo and SAP are
on page 14.
The SURROUNDfunction lets you choose one of five Lvpes of
surround sound modes: OFF, DOLBY, MATRIX, HALL, or STADIUM.
Details are on pages 16-1Z
The REARVOLUMEdisplay lets you adjust the volmne level of
external surround speakers that are connected to the SURROUND
SPEAKERjacks on the back of the TV. It also controls the level of
_olume coming out of the SOaR OUTjacks when connected to an
amplifier. Derails are on pages 16-17 and 51
Fbe SURROUNDBALANCEdisplay allows you to optimize the surround
out audio to compensate for program sources with unbalanced
right and left audio. When adjusting this functiom ihe internal
speakers (or the speakers connected to the EXTERNALSPEAKERS
terminals) will be muted so that you only hear the smTound sound
audio. Delaits are on pages 16-1Z
The EXPANDEDSTEREOfeature can b,e turned on or off by pressing +
or -. This feature adds greater depth and dimension to stereo
broadcasts, Details about expanded _'tereo are on page 15,
The SPEAKERSON/OEFfunction lets you turn off the lV's speakers by
pressing + or . You will probably want to leave the TV's
speakers mined on unless you desire private listening through the
headphone .jack or unless you connect an amplifier (with its own
set of speakers) to the appropriate jacks on the back of the TV as
described on page 50. Turning this function o_t\ turns off not only
the TV's internal speakers but also any external speakers
connected to the TV's EXTERNALSPEAKERSterminals. Sound will
then only come through the speakers connected to the amplifier
and any speakers connected to the TV's SURROUNDSPEAKERS
terminals• Details are on page 52.
11
The EQUALIZERfunction lets you display an on-screen
graphic equalizer so you can remotely adjust audio
bandwidths for different environments or individual tastes.
Adjusting the graphic equalizer is primarily a matter of
personal taste. The adjustments can be thought of as more
precise tone controls that allow certain characteristics of
the audio to be changed without affecting others. For
example, if someone enjoys sharp, clean horns (brass),
increasing the 4.5 kHz control can bring them out. Using a
conventional treble control would also increase vocals and
high-frequency noise, which might be an undesirable
side-effect.
' -The equalizer also gives control of the center range that
bass and treble controls do not affect. Since vocal
frequencies are in these center ranges, tone controls have
little effect on them. The center bands not only give
control of vocals, but allow selective vocal ranges to be
controlled. For example, reducing the 4(X) ttz and 1 kHz
bands can soften a strident male vocalist, and increasing
the 2 kHz and 4.5 kHz controls can bring a subtle female
w,)ice tbrward. Adjusting the 1 kHz and 2 kHz bands can
add intelligibility to a speaker or singer under certain
circumstances.
The equalizer can also be used to compensate for either
deficiencies or excesses in the way the system or room
reproduces the music. Most common problems are "dull"
and "live" rooms that have too little or too much treble and
"live" rooms of certain sizes that have standing waves that
boom. Experimentation can help find the nearest band to
correct such problems. A room with a sofa and many
drapes, for example, might benefit from increasing the 4.5
kHz and 10 kHz bands. Live rooms with wood floors and
few furnishings commonly boom or resonate in the upper
bass range. Adjusting the 150 Hz band could control that
without taking away good, deep bass that a conventional
bass control would reduce.
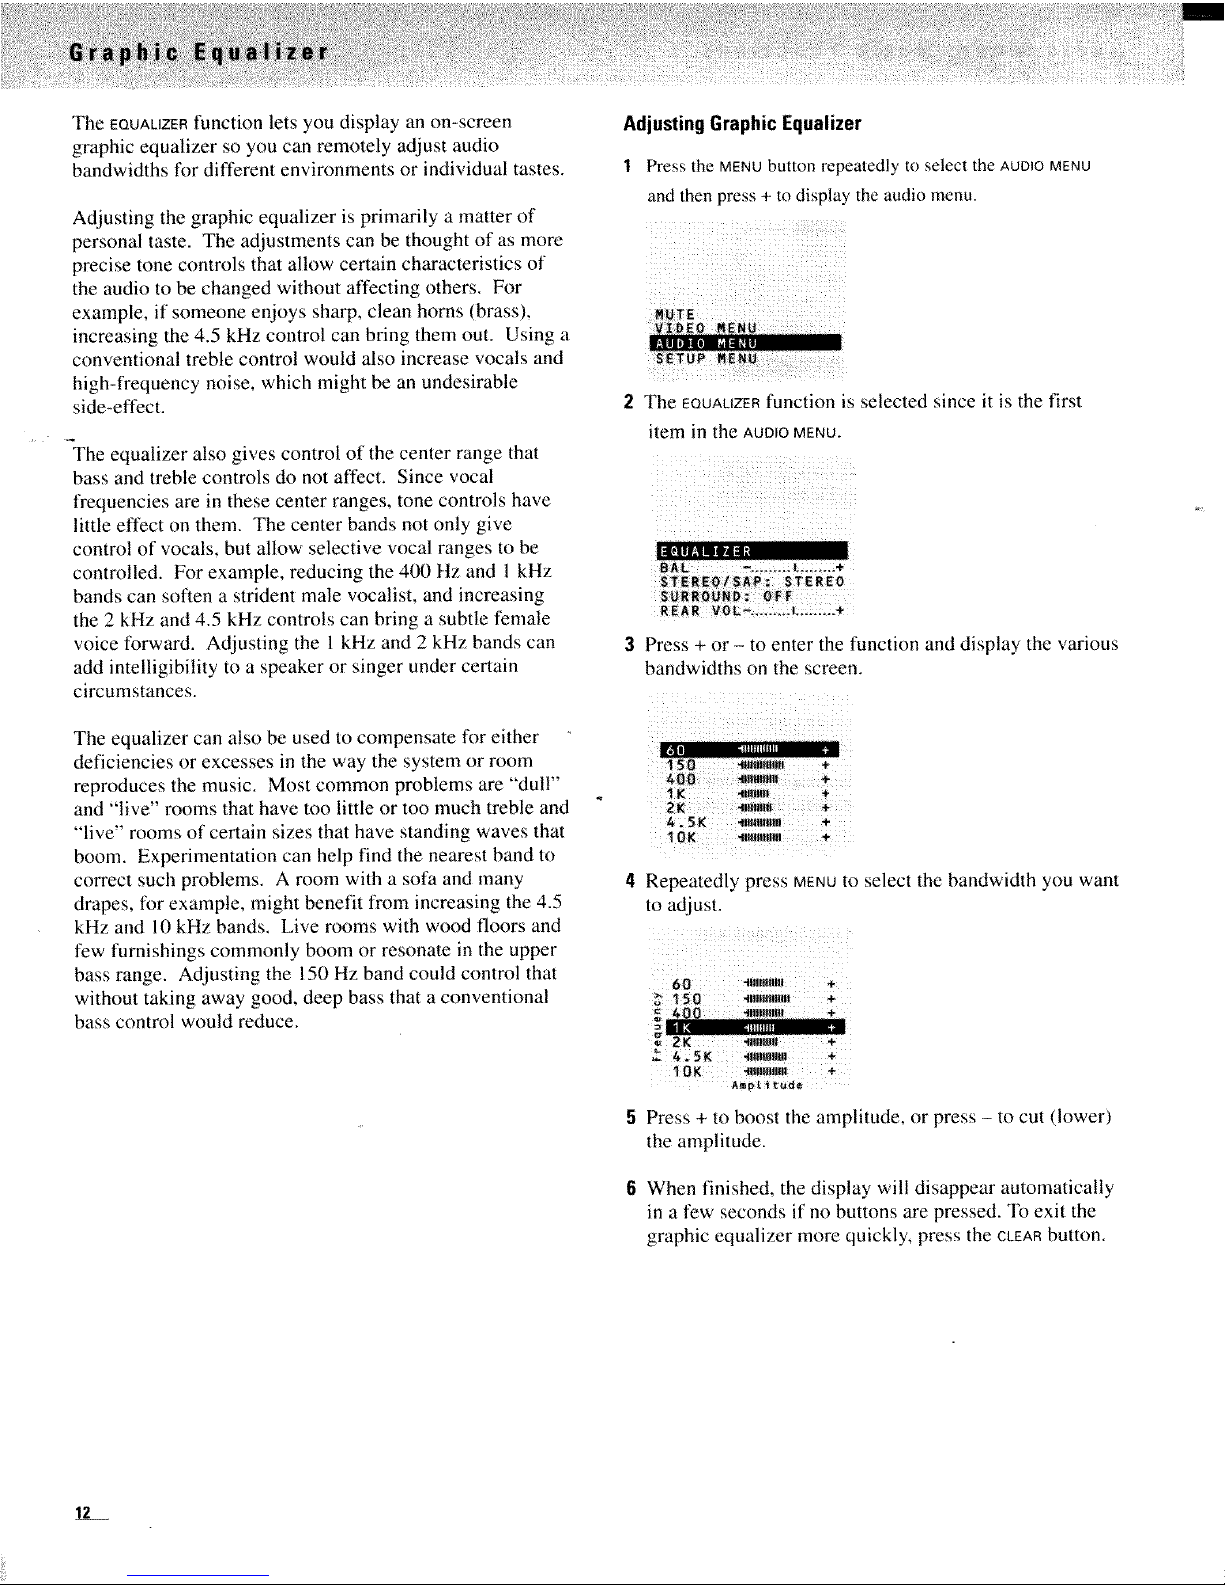
AdjustingGraphic Equalizer
Press the MENUbutton repeatedly to select the AUDIOMENU
and then press + to display the audio menu.
The EQUALIZERfunction is selected since it is the first
item in the AUDIOMENU.
REAR
Press + or - to enter the function and display the various
bandwidths on the screen.
IK +
2K ÷
4,,5K .lltllMIIIII 4,
Repeatedly press MENUtO
tO adjust.
150 -mim'_i,i +
400 _mi_! +
m|. ,111111
_2K +
1OK _tlmN!! I +
Ampt _tOd_
select the bandwidth you want
Press + to boost the amplitude, or press - to cut (lower)
the anaplitude.
When finished, the display will disappear automatically
in a few seconds if no buttons are pressed. To exit the
graphic equalizer more quickly, press the CLEARbutton.

60 Hz
150 Hz
400 Hz
"_._ w
1.3=
Cr TM
4.5 kHz
10 kHz
60 Hz...Gives these low, "real" bass sounds more or less
impact. This area is where many systems and/or prograrns
are weak, Increasing this control can overcome such
deficiencies, lowering it can reduce "muddiness".
150 Hz.,.Affects the loudness of bass. These mid-bass
frequencies sound the loudest, and most systems reproduce
them well, Increasing the control gives the bass more
"punch", lowering it can help reduce "booming".
400 Hz...Affects the fullness of some instruments and
lower w_cals. Since this is the basic frequency range of
music, increasing this control adds fullness to these
sounds, reducing it makes them sound thinner.
! kHz...Stmngly affects the "f_wwardness" and "presence"
of vocals and most instruments. Increasing this control can
help project these sounds or make a vocalist easier to
understan& Reducing it can soften strident music.
2 kHz...Strongly affects the harmonics (overtones) of
voices and some instruments. This frequency is most
easily heard by the ear. Increasing this control will project
most instruments and vocals: reducing it helps control
brilliance and allows more subtle sounds in the other
ranges to be heard.
4.5 kHz...Affects harmonics (overtones) of voices and
some instruments, particularly brass and strings.
Increasing this control makes these instruments and vocals
sharper and brighter. Reducing it can help control
excessively "lispy" vocals or shrill instruments.
10 kHz...Affects the highest, most delicate harmonics of
some instruments such as strings and the overall content of
others such as cymbals and drum snares. Increasing this
control brings out this "crispness" in cymbals and
"sweetness" in strings and gives the music "atmosphere",
Reducing it can help control noise and hiss.
13
Receiving Stereo Broadcasts
Your TV is fully capable of reproducing stere() sound from
TV stations mmsmitting stereo sound in your area. All you
have to do to enjoy stereo sound is to make sure the TV's
STEREO/SAPfunction is set to STEREO so the TV can receive
stereo broadcasts.
Normally this function can be left in the STEREOmode.
Your TV will then automatically reproduce either stereo or
monaural sound, whichever is broadcast.
In some fringe viewing areas, however, the stereo signal
may not be strong enough for quality reception. The signal
may drift, or the reproduction may become noisy. Should
-that occur, change the STEREO/SAPfunction to the MONO
mode to receive clearer, cleaner sound.
Helpful tlint: Some television stations transmit a "pilot" signal that
makes your TV think it's receiving stereo, even though the broadcast
signal is monaural The "pilot" signal will nmke the stereo indicator
apF_ear on the screen next to the channel number, however, you will not
be able to hear stereo sound. If the stereo indicator appears but you can
not hear stereo sound, check with the television station to inquire
whether the program being broadcast is in true stereo or monaural audio,
Resetting the Audio Function to Receive Stereo
with or without remote
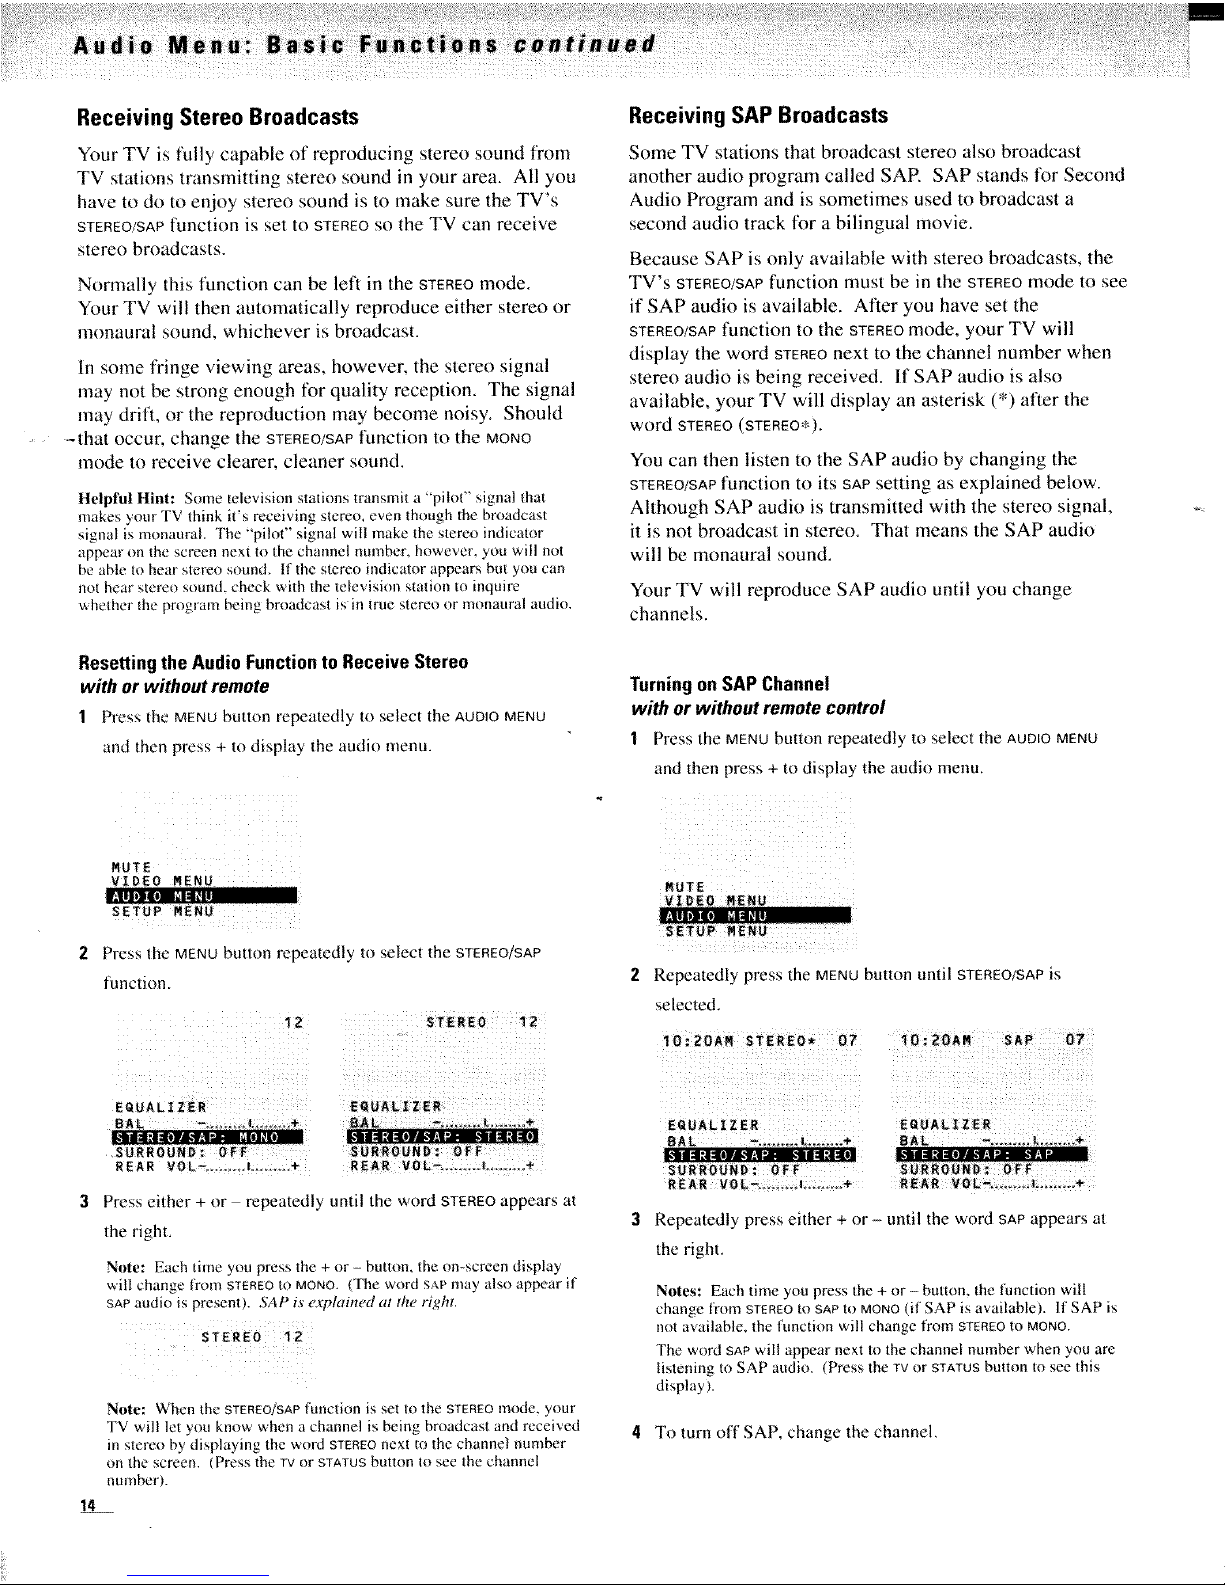
1 Press tile MENUbutton repeatedl_ to select the AUDIOMENU
and then press + to display the audio menu.
2 Press Ihe MENU button repeatedly to select the STEREO/SAP
function.
12 STEREO 12
EQUALIZER EQUALIZER
REAR VOL-. ........ I......... +
14
Press either + or repeatedly until the word STEREO appears al
the right,
Note: Each time you press the + or- button, the on-screen display
will change from STEREOto MONO, (The word SAt' may also appear if
SAPaudio is present). SAP i,_explained at the right.
STEREO _Z
i
Note: When the STEREO!SAPfunction is set to the STEREOmode. your
FV will let you know when a channel is being broadcast and received
in stereo by displaying the word STEREOnext to the channel number
on the screen, (Press the TVor STATUSbutton to see the channel
numbcl).
Receiving SAP Broadcasts
Some TV stations that broadcast stereo also broadcast
another audio program called SAR SAP stands tor Second
Audio Program and is sometimes used to broadcast a
second audio track lbr a bilingual movie.
Because SAP is only available with stereo broadcasts, the
TV's STEREO/SAPfunction must be in the STEREOmode to see
if SAP audio is available. Alter you have set the
STEREO/SAP function to the STEREO mode, your TV will
display the word STEREO next to the channel number when
stereo audio is being received. If SAP audio is also
available, your TV will display an asterisk (*) alter the
word STEREO(STEREO*).
You can then listen to the SAP audio by changing the
STEREO/SAPfunction to its SAPsetting as explained below.
Although SAP audio is transmitted with the stereo signal,
it is not broadcast in stereo. That means the SAP audio
will be monaural sound.
Your TV will reproduce SAP audio until you change
channels.
TurningonSAP Channel
with or without remotecontrol
1 Press the MENU button repeatedly to select the AUDIOMENU
and theu press + to display the audio menu.
_ i ii _ i_ i _i_ii _i_
i _iiii(!iiii i !i!iiii
!_UTE
Repeatedly press the MENUbutton until STEREO/SAPis
selected.
REAR VOW-L; ; :;1 L :_.,÷
Repeatedly press either + or - until the word SAPappears at
the right.
Notes: Each time you press the + or - buttom the tunction will
change from STEREOto SAP to MONO(it"SAP is available). If SAP is
not available, the function will change fi'om STEREOto MONO.
The word SAP will apDear next to the channel number when you are
listening to SAP audio. (Press the TVor STATUSbutton to see this
display).
4 To turn off SAP, change the channel,

Expanded Stereo
Your TV includes an Expanded Stereo feature which adds
greater depth and dimension to stereo broadcasts. Your TV
electronically increases lhe audio separation perception of
the speakers so you perceive an "expanded" more spacious
stereo sound effect.
Although you can easily turn the expanded stereo feature
on and off as desired, you may prefer to leave it turned on.
That way your TV will automatically process and expand
the stereo signals whenever a stereo broadcast is received
(or whenever a stereo tape is played through a stereo VCR
connected to the TV's audio/video jacks labeled INPUT).
_cause this feature expands stereo sound, it processes
only stereo signals. If a TV program is broadcast in mono
instead of stereo, your TV will automatically reproduce
monaural audio. You will not be able to hear Expanded
Stereo because expansion has no effect on monaural audio.
Stereo expansion enhances the ambience of music and
program material. Dramatic effects of spatial enhancement
can be experienced with music. Talk shows with
background crowd noise also benefit from expansion by
engulfing the listener in a wider sound field than would be
experienced without expanded stereo. The effect will vary
with program material.
The perception of greater stereo separation is created by
cancelling the cross-coupled sound from the right speaker
that arrives at the left ear (and the left speaker that arrives
at the right ear). Like stereo headphones, stereo expansion
isolates the left and right signals that arrive at the ears. As
a result, the speakers seem to be farther away from the TV.
Notes: The Expanded Stereo feature will have no effect unless the
program is broadcast in stereo.
When the Expanded Stereo feature is turned on. some sound will be
heard from each swaker regardless of the BALANCEcontrol setting.
ResettingtheAudio Functionto Hear ExpandedStereo
with or without remote
Press the MENU button relatedly to select the AUDIO MENU
and then press + to display the audio menu,
!
Press the MENU button repeatedly to select the EXPAND STEREO
display,
EeUALIZER EQUALIZER
8AL _,LL; t_;2,. ; +
STEREO/SAP : STEREO
SURROUND_ OFF
REAR _OL-_._ _J_ _, _+
iii=i_iiiiii ii:iiii iiii
ill r,! llltil,1111_lllemoill
SPEAKERS:
BAL -_ ...... L...... ÷
STEREO!SAP: STEREO
SURROUND : OFF
REAR VOL-_ ;:..L-.;...+
SURR BAL-. L...... I......... ÷
ll:l "=t.'iililil I =ililli i'1
SPEAKERS: ON
Press either + or- to turn on Expanded Stereo. Each time
you press the + or - button, the on-screen display will change
fronlON to OFF,etc.
To Hear Expanded Stereo
1 Tile STEREO/SAPfunction
must be set to STEREO.Yon ....
will not hear expanded
stereo if this function is set
to MONO or SAP. Details are
on page t4.
The EXPAND STEREO
function must be set to ON.
You will not hear expanded
stereo if this function is set
tO OFF.
EQUALIZER
REAR VOL-,;L _i_._ _
A stereo signal must be
present, You will not hear expanded stereo on TV programs if
the TV station is broadcasting inonaural audio.
You can. however, hear expanded stereo if yon play a stereo
tape on a stereo VCR that is connected to the TV's
audio/video jacks labeled iNPUT+
Normally, you can leave the STEREO/SAP function set to
STEREOand the EXPANDSTEREO function set to ON, Your TV
will then automatically produce either expanded stere() or
monaural sound, whichever is broadcast.
lj
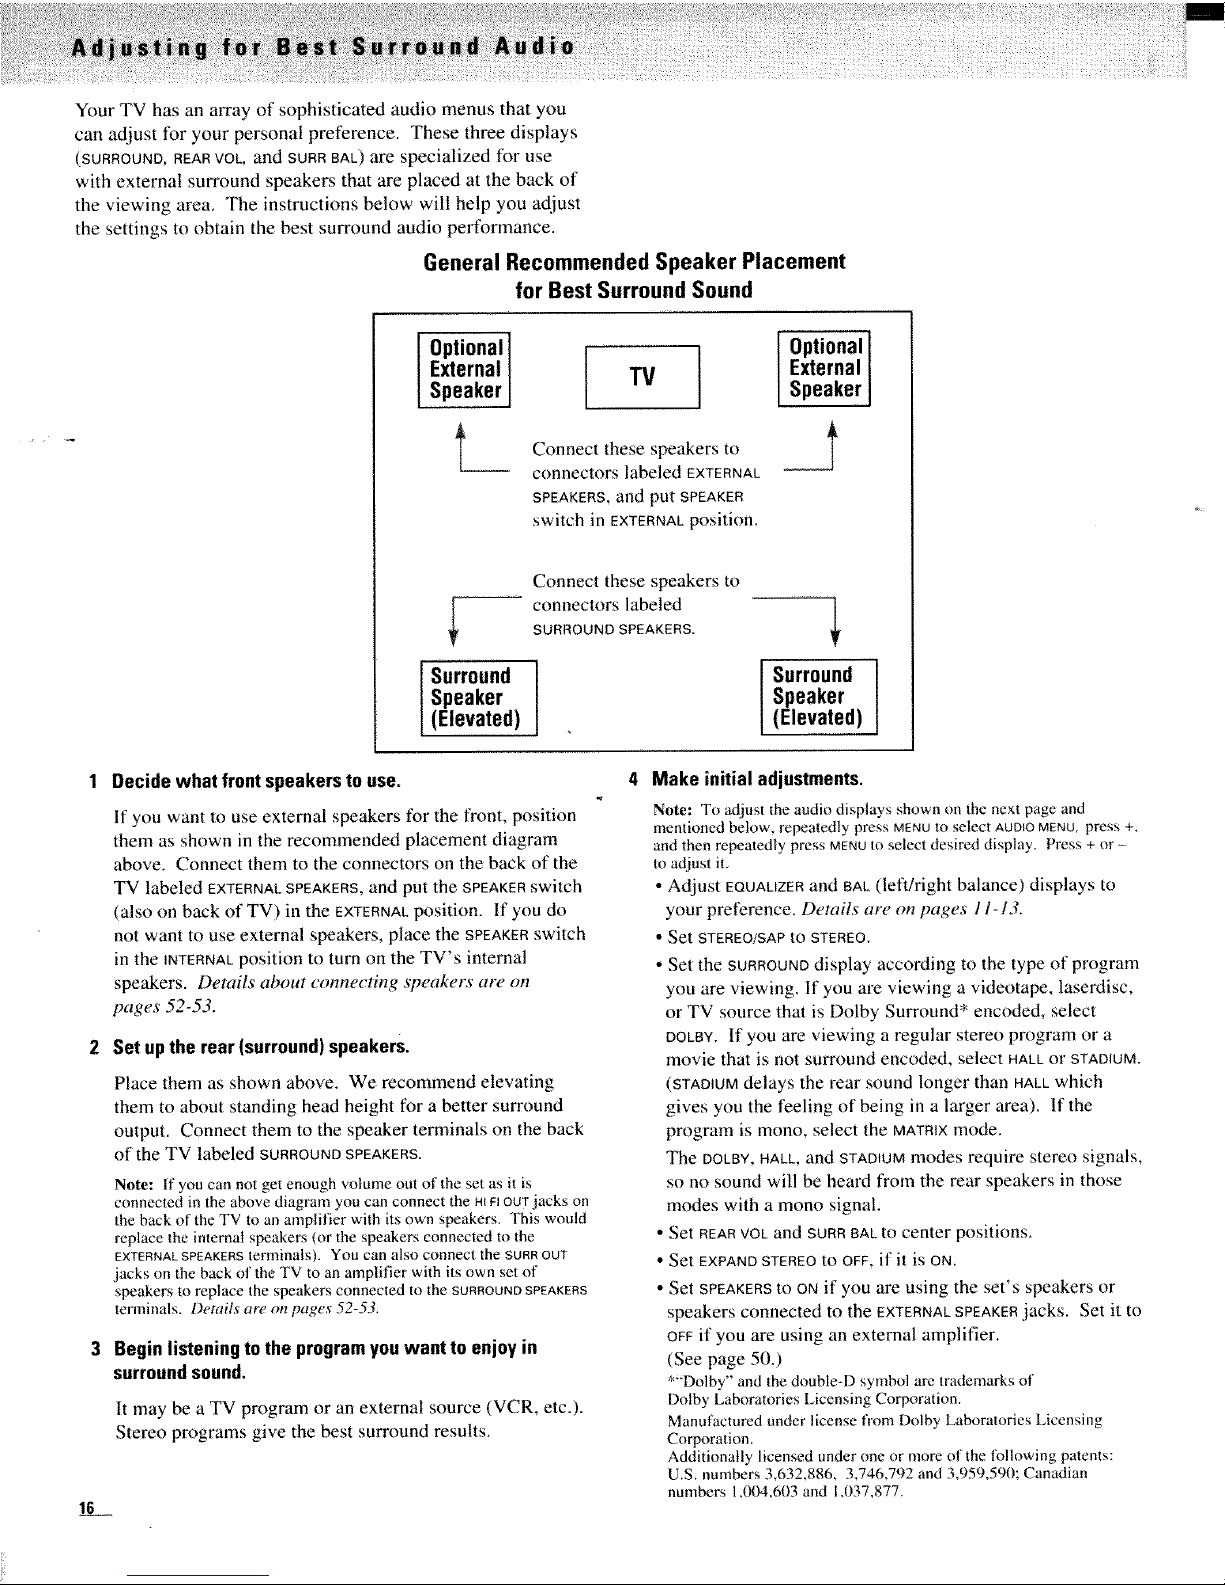
Your TV has an array of sophisticated audio menus that you
can adjust for your personal preference. These three displays
(SURROUND, REAR VOL, and SURR BAL) are specialized for use
with external surround speakers that are placed at the back of
the viewing area, The instructions below will help you adjust
the settings to obtain the best surround audio performance.
General Recommended Speaker Placement
for Best Surround Sound
Optional ] j
External TV
Speaker
Surround
Speaker
(Elevated)
Connect these speakers to
connectors labeled EXTERNAL
SPEAKERS, and put SPEAKER
switch in EXTERNALposition.
Connect these speakers to
connectors labeled
SURROUND SPEAKERS.
Optional
External
Speaker
_I
I urround
Speaker
(Elevated)
I
16
1 Decide what front speakers to use.
If you want to use external speakers for the front, position
them as shown in the recommended placement diagram
above. Connect them to the connectors on the back of the
TV labeled EXTERNALSPEAKERS,and put the SPEAKERswitch
(also on back of TV) in the EXTERNALposition. If you do
not want to use external speakers, place the SPEAKERswitch
in the INTERNALposition to turn on the TV's internal
speakers. Details about connecting speakers are on
pages 52-53.
2 Set up the rear (surround) speakers.
Place them as shown above. We recommend elevating
them to about standing head height for a better surround
output. Connect them to the speaker terminals on the back
of the TV labeled SURROUNDSPEAKERS.
Note: If you can not get enough volume out of the set as it is
connected in the aN)ve diagram you can connect the HtElOUTjacks on
the back of the TV to an amplifier with its own speakers. This would
replace the internal speakers (or the speakers connected to the
EXTERNALSPEAKERSterminals). You can also connect the SURROUT
jacks on the back of the TV to an amplifier with its own set of
speakers to replace the speakers connected to the SURROUNDSPEAKERS
terminals. Details are on pages 52-53,
Beginlistening to the programyouwant to enjoy in
surroundsound.
It may be a TV program or an external source (VCR, etc.).
Stereo programs give the best surround results.
Make initial adjustments.
Note: To attjust the audio displays shown on the next page anti
mentioned below repeatedly press MENUtOselect AUDIOMENU,press +,
and then repeatedly press MENUto select desired display. Press + or --
to adjust it.
• Adjust EQUAUZERand 8AL(left/fight balance) displays to
your preference. Details are on pages 11-13.
• Set STEREO/SAP to STEREO,
• Set the SURROUNDdisplay according to the type of program
you are viewing. If you are viewing a videotape, laserdisc,
or TV source that is Dolby Surround* encoded, select
DOLBY. If you are viewing a regular stereo program or a
movie that is not surround encoded, select HALLor STADIUM.
(STADIUMdelays the rear sound longer than HALLwhich
gives you the feeling of being in a larger area), If the
program is mono, select the MATRIXmode,
The DOLBY,HALL,and STADIUMmodes require stereo signals,
so no sound will be heard front the rear speakers in those
modes with a mono signal,
• Set REARVOLand SURR8ALto center positions,
• Set EXPANDSTEREOto OFF,if it is ON.
• Set SPEAKERSto ONif you are using the set's speakers or
speakers connected to the EXTERNALSPEAKERjacks. Set it to
OFFif you are using an external amplifier,
(See page 50,)
*"Dolby" and the double-D symbol are trademarks of
Dotby Laboratories Licensing Corlx_ration.
Manufactured under license fiom Dolby Laboratories Licensing
Corporation.
Additionally licensed under one or more of the following patenls:
ILLS_numbers 3,632,886, 3,746,792 and 3,959,590; Canadian
numbers I,(XM,603and 1,037,877.
 Loading...