

ProScan PS35310 Owner's Manual
Features
First-Time Operation
Detailed Operating Instructions
4 Remote Control (TV Functions)
8 Picture in Picture (PIP) Operation
10 Front Panel Controls
11 Video Menu
12 Audio Menu
13 Stereo and SAP Broadcasts
14 Expanded Stereo
15 Setup Menu
16 Closed Captioning
Optional Accessories
30 Accessory Cables
31 Accessory Order Form
17
18
19
20
21
23
24
25
26
28
!o
: 2 <
i¸_ii_i!!!i!):i'
Sleep Timer ......
Alarm
Labeling Channels
Parental Control
Programming Channel Memory
Setting up VCR Channels e_
Changing Antenna Input
Setting up Cable Box Channel
Programming Remote to Control VCRs
Programming Remote to Control Audio
iiii_J_iiiiiiiiiiiiiiii_i
!iii_i!i;!iiiiiiiiiiiiii
P
r_
Monitor Panel and Connections
33 Tips Before Connecting
35 Monitor Panel
36 Home Antenna Connections
37 Cable-TV Connections
37 Programming Remote to Control Cable Box
38 Cable-TV Information and Channel Chart
Reference Section
48 Trouble Checks
50 Warranty
51 Design Specifications
52 Cleaning and Care
Index (Inside Back Cover)
Quick-Reference Guide (Inside Back Cover)
41
43
44
45
46
VCR Connections
Camcorder Connections
Amplifier or Cassette Tape Deck
LaserDisc Players, Computers
External or Surround Speakers
_ii!!iiiiiiiiiiii_iii!!
=1
g
@
iiiiiiii!ii
ili{ii_iiiii_iiiiil
iiii_ii!ii_
ii!_iiiiiii{i
_iiiii_'iiiiijii!ii'i_,'i
iiiiiiiiiiiiiiy!i.....
_!ii!i!ii_!!ii;iii!{!i

WARNING
To reduce risk of fire or shock
hazard, do not expose this
TV to rain or moisture.
DO NOl OPEN
TO REDUCE THE RISK OF ELECTRIC SHOCK, DO
NOT REMOVE COVER (OR BACK). NO USER
SERVICEABLE PARTS INSIDE. REFER SERVICING
TO QUALIFIED SERVICE PERSONNEL.
This symbol indicates
"dangerous voltage" inside
the product that presents a
risk of electric shock or
personal injury.
This symbol indicates
_ mportant instructions
accompanying the
product.
CAUTION: To reduce the risk of electric shock, match wide
blade of plug to wide slot, fully insert.
ATTENTION: Pour 6viter les chocs _lectriques, introduire la
lame la plus large de la fiche dans la borne correspondante de
la prise et pousser jusqfl au fond.
Do not defeat the safety feature of the plug. The wide blade fits into the
wall socket only one way. If you need an extension cord, make sure it
matches the plug of the TV.
Operate TV only on 120 volts, 60 Hz AC power (normal house power).
For safety reasons, make sure any equipment or accessories connected to
this product bears the UL listing mark or the CSA certification mark. If in
doubt, contact qualified service personnel.
FCC Regulations state that unauthorized changes or modifications to this
equipment may void the user's authority to operate it.
Note To Cable TV Installer
This reminder is provided to call your attention to Article 820-40 of the
National Electrical Code (Section 54 of the Canadian Electrical Code,
Part 1) which provides guidelines for proper grounding and, in particular,
specifies that the cable ground shall be connected to the grounding system
of the building as close to the point of cable entry as practical.
Product
Registration
Please fill out the product registration card and return it immediately.
Returning this card allows us to contact you if needed.
Keep your sales receipt to obtain warranty parts and service and for proof
of purchase. Attach it here and record the serial and model numbers in
case you ever need them. The numbers are located on the back of the TV.
Model No.
Serial No.
Purchase Date:
Dealer / Address / Phone:
PROSCAN
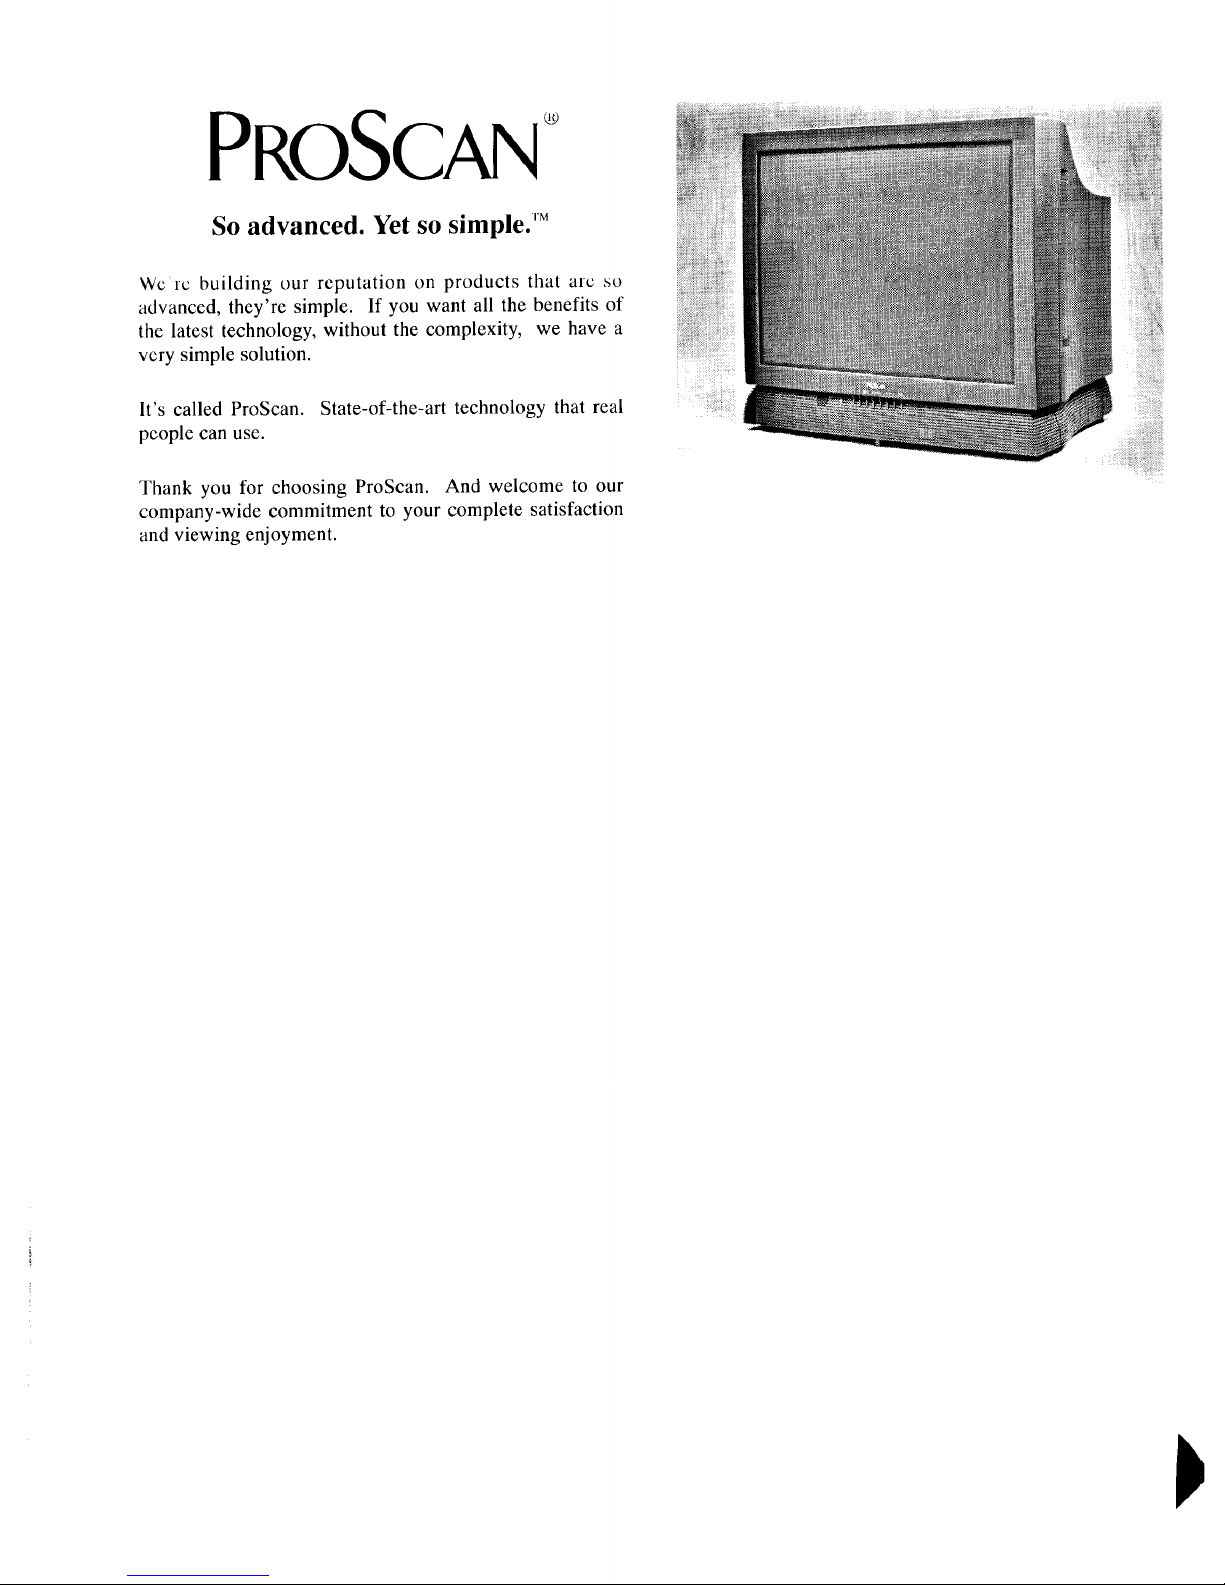
So advanced. Yet so simple. 'M
Wcrc building our reputation on products that alc so
advanced, they're simple. If you want all the benefits of
the latest technology, without the complexity, we have a
very simple solution.
It's called ProScan. State-of-the-art technology that real
people can use.
Thank you for choosing ProScan. And welcome to our
company-wide commitment to your complete satisfaction
and viewing enjoyment.
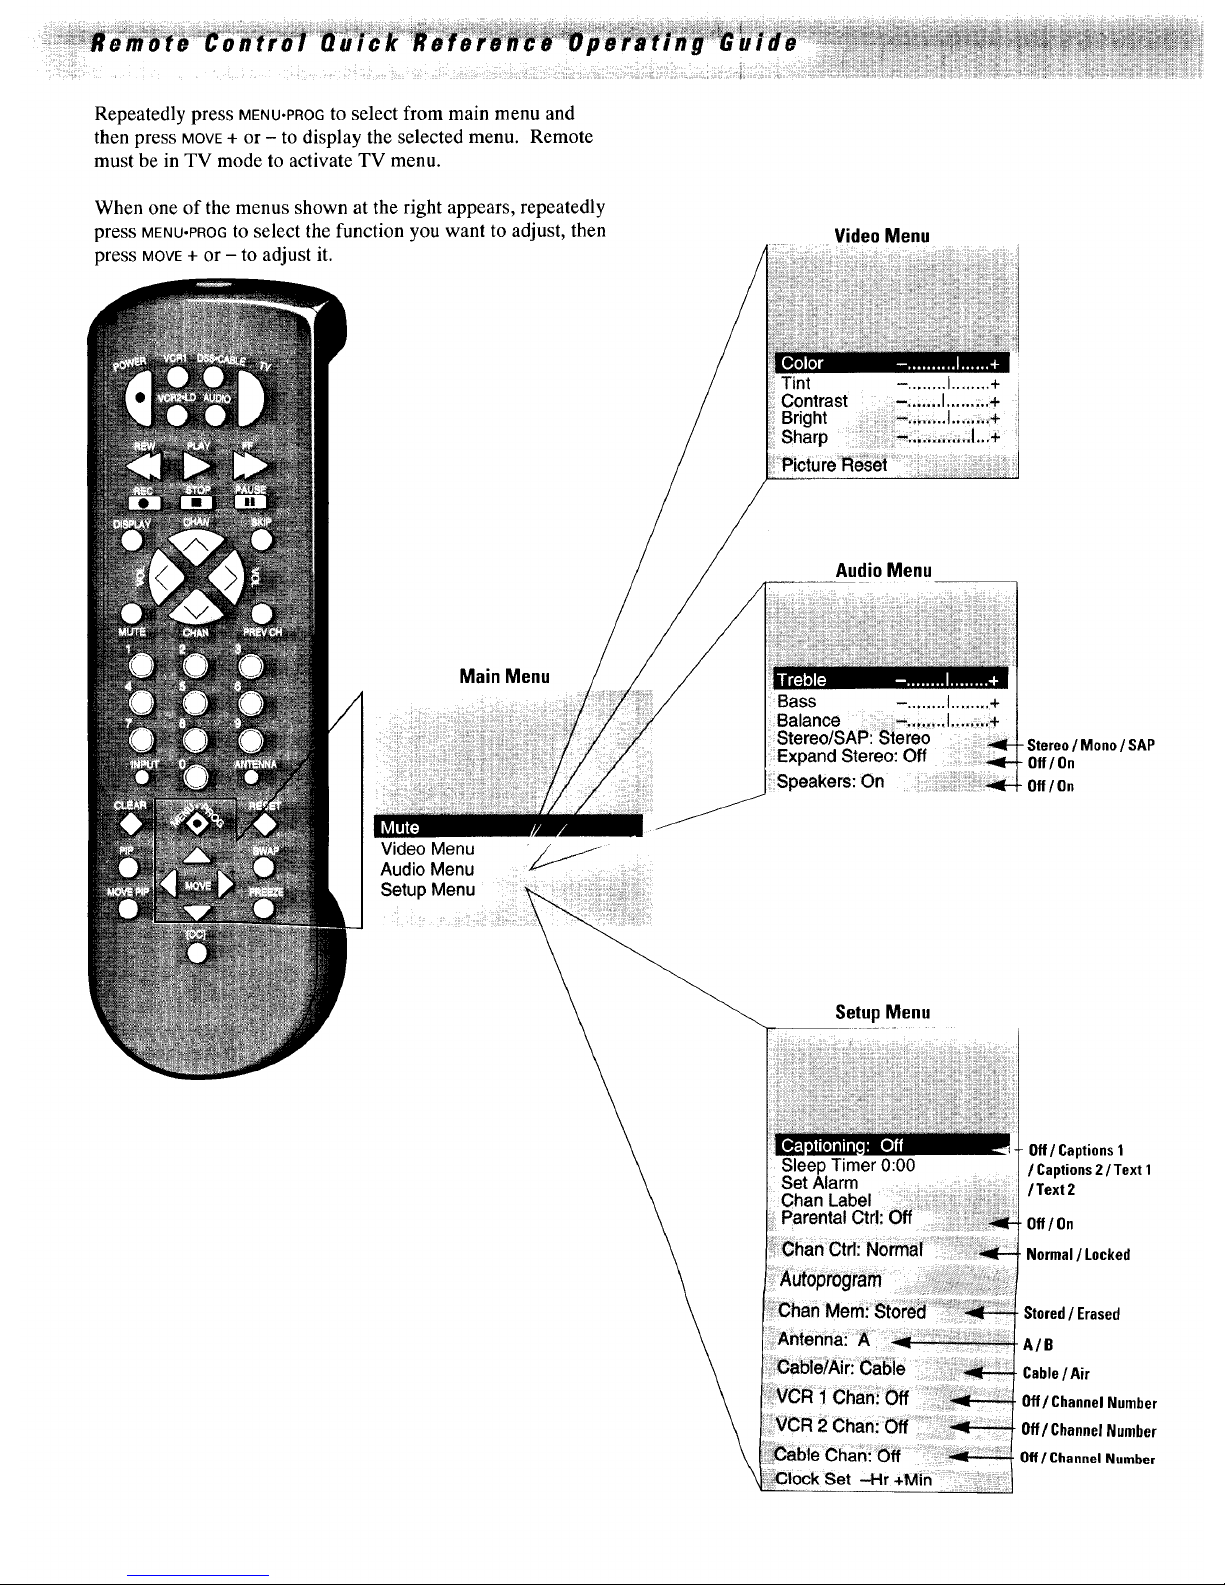
RepeatedlypressMENU.PROGtoselectfrommainmenuand
thenpressMOVE+or- todisplaytheselectedmenu.Remote
mustbeinTVmodetoactivateTVmenu.
Whenoneofthemenusshownattherightappears,repeatedly
pressMENU.PROGtoselectthefunctionyouwanttoadjust,then
pressMOVE+ or- toadjustit.
Main Menu
Video Menu
Audio Menu
Setup Menu
VideoMenu
, Tint -. ....... I........+
Contrast -.,,., I......_,.÷
Bright
Sharp .... _:;,;i_;;I..;÷
AudioMenu
Bass -. ....... I........ +
Expand Stereo:Off
Speakers: On
SetupMenu
Sleep Timer 0:00
Set Alarm
Chan Label
Parental C
- Stereo/ Mono / SAP
Off/On
Off/On
Off/Captions 1
/Text 1
/ Text 2
. Off/On
. Normal/ Locked
Stored/ Erased
A/B
Cable/ Air
Off/Channel Number
Off/Channel Number
Off / Channel Number

_ ,_ So Advanced. Yet So Simple
Your ProScan television is more than state-of-the-art
technology. It's technology tailored to you. Features
designed to deliver viewing and listening enjoyment
beyond expectations. Innovation and simplicity of
operation become one-ProScan.
Improving Your Image
• A Cleaner Picture: The Digital Comb Filter extends resolution
and minimizes color interference patterns for greater detail.
• No Glare TM Picture: Anti-Glare Lithium Silicate Faceplate
virtually eliminates glare while enhancing contrast.
• Increased Clarity: Up to 560 lines of horizontal resolution,*
surpassing the capabilities of all available signal sources.
* through S-VIDEO connector.
SoundThinking
• 5 Watts Per Channel *
• Second Audio Program (SAP) For details, see page 13.
• RMS rating, into 8 ohms, 50 to 20,000 Hz _+3db,with less than
1% THD.
CreativeEntertainment
• Advanced Color Picture-in-Picture lets you watch two programs
at once (with VCR).
• Channel Labeling lets you label channel numbers with up to
4-letter names (eg. NBC, VH-1, ESPN). For details, seepage 19.
OneMinute Manual
• On-Screen Menus for simple operation of picture, sound, and
set-up functions by remote control. For details, see pages 11-14.
• AutoProgramming automatically searches for and stores all
active channels. Eliminates the need for manual set-up. For
details, see page 21.
• Frequency Synthesis Tuning automatically and accurately tunes
each channel.
• Automatic VCR Setup with the push of a button, your TV is ready
for VCR play: both TV and VCR turn on and TV tunes to correct
channel/input. For details, seepage 23.
• Automatic Cable Box Setup offers convenience when cable
company requires you to use cable box. For details, seepage 25.
• On-Screen Clock/Channel Display For details, seepage 3.
• Picture Reset For details, seepage 11.
Connections
Gold Plated Phono for Superior Performance:
• Two Sets of Audio/Video Inputs for VCR, Laser Disc player,
Camcorder etc. For details, see pages 43-45.
• One Set of Audio/Video Outputs for video dubbing. For details,
see pages 42-44.
• One Set of Volume-Controlled Audio Outputs (HI-Pl) to retain
remote volume when connected to an external amplifier. For
details, see page 44.
Other Connections to Expand Your System:
• S-Video input connector for direct input from your S-VHS VCR,
Camcorder, etc. For details, see pages 42 and 43.
• Four Speaker Jacks to allow hook up of optional external
speakers. For details, seepages 46-47.
• Dual RF Inputs to allow direct connection of up to two basic
cable, cable box, or other RF sources. For details, seepages
36-38.
• Front-Mounted Stereo Headphone Jack for private listening with
optional headphones. For details, seepage 10.
At Your Command
• The PROSCANUniversal Remote is preprogrammed so there's no
need to teach additional or new codes. Operation is as easy as
entering a channel. It operates all major ProScan TV and VCR
functions. Operates the basic functions of 81 different VCR
brands and 39 different brands of cable boxes, eliminating the need
for additional remotes.
• The PROSCANSimple Remote-6 buttons control everyday TV
functions for the ultimate in simplicity.
AtYour Service
Our Human Touch policy offers all these valuable
benefits:
• 1-800-PROSCAN Call our information service any time
Monday - Friday, 9:00 A.M. to 6:00 P.M. EST.
• Nationwide Independent Authorized Service Centers
• PRoSCAN Limited Warranty for U.S.A. In-home service of all
parts and labor for one year, picture tube for two years. For
details', see page 50.
rst_Time 0p
The steps below will help you get your TV connected and
working quickly. The page numbers on which you can find
detailed instructions for each of these steps are also listed
for your convenience.
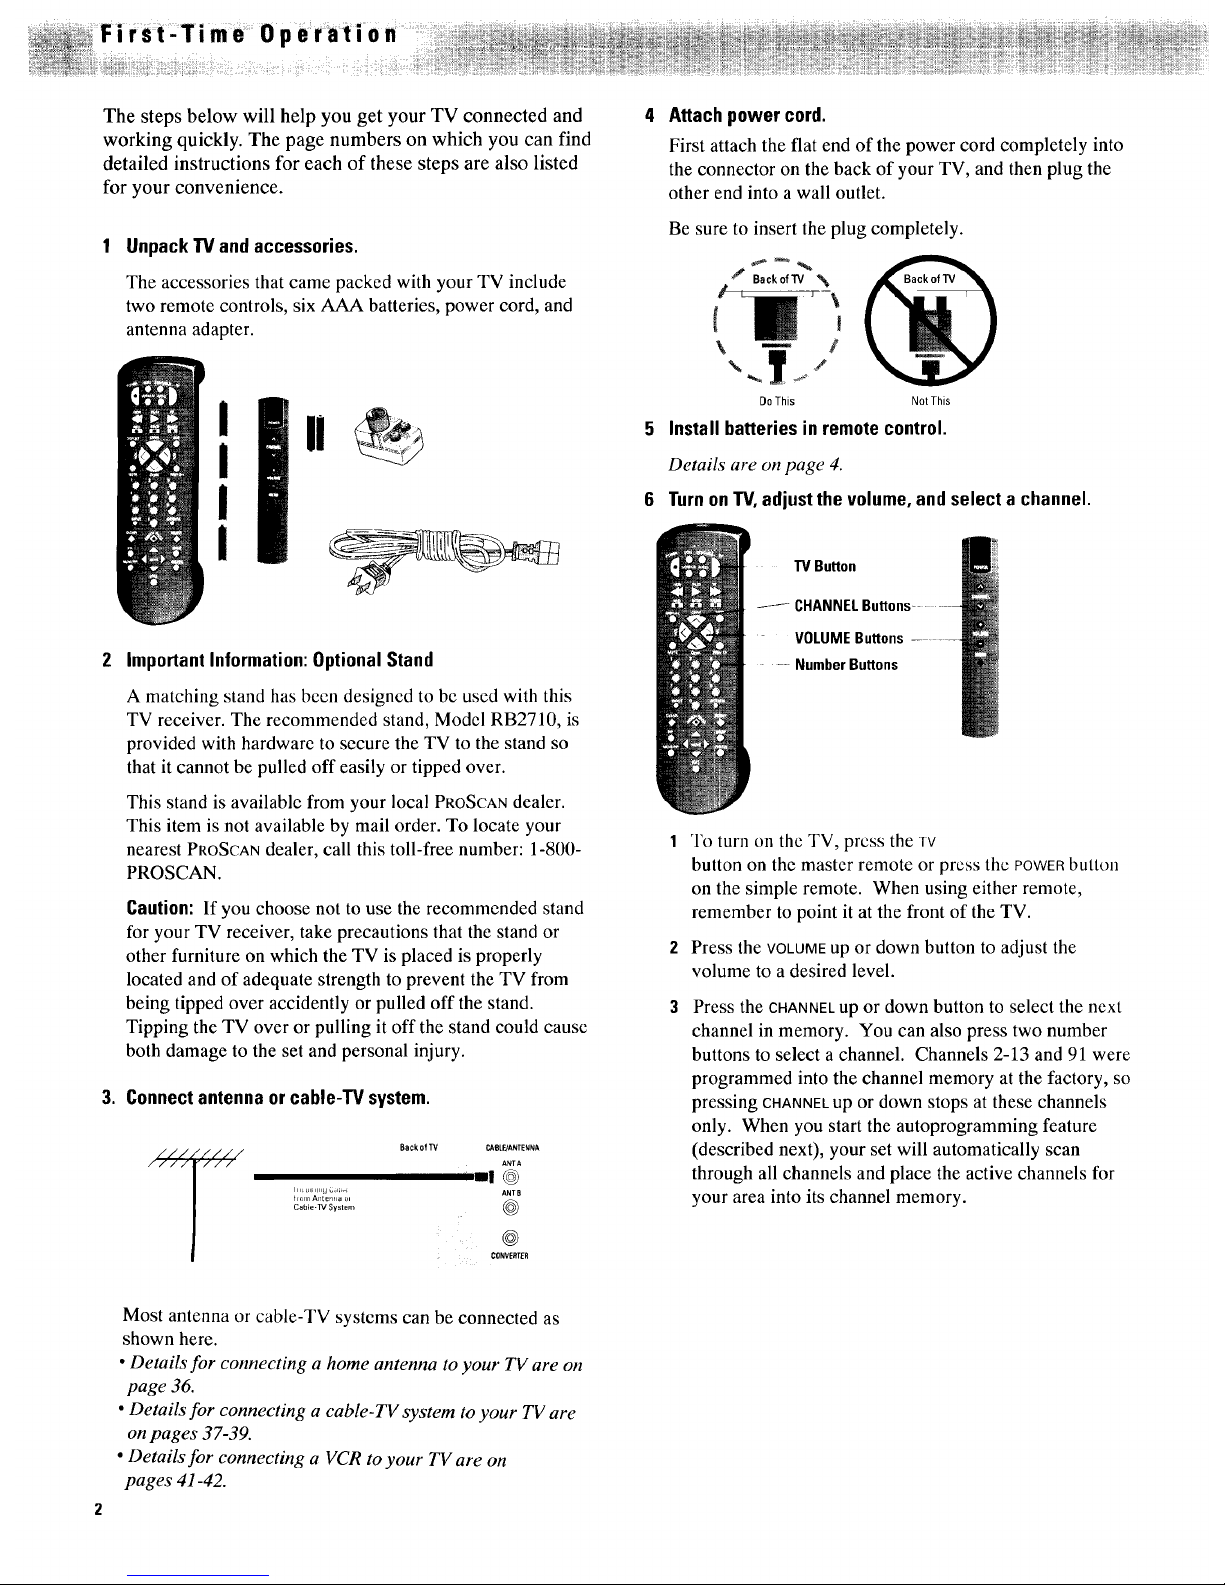
1 UnpackTVand accessories.
The accessories that came packed with your TV include
two remote controls, six AAA batteries, power cord, and
antenna adapter.
2 ImportantInformation:OptionalStand
A matching stand has been designed to be used with this
TV receiver. The recommended stand, Model RB2710, is
provided with hardware to secure the TV to the stand so
that it cannot be pulled off easily or tipped over.
This stand is available from your local PROSCAN dealer.
This item is not available by mail order. To locate your
nearest PROSCAN dealer, call this toll-free number: 1-800-
PROSCAN.
Caution: If you choose not to use the recommended stand
for your TV receiver, take precautions that the stand or
other furniture on which the TV is placed is properly
located and of adequate strength to prevent the TV from
being tipped over accidently or pulled off the stand.
Tipping the TV over or pulling it off the stand could cause
both damage to the set and personal injury.
3. Connectantennaor cable-TV system.
/_ i ANTA
ill:I! @
_r(irll Arltenrl_ 01
CaUle-]VSystem @
@
CONVErtER
Attach power cord.
First attach the flat end of the power cord completely into
the connector on the back of your TV, and then plug the
other end into a wall outlet.
Be sure to insert the plug completely.
Back ofTV _,
%
DoThis Not This
5 Install batteriesin remotecontrol.
Details are on page 4.
6 TurnonTV,adjustthe volume,and select a channel.
TV Button
-J CHANNELBt
VOLUMEButtons
-- NumberButtons
To turn oll the TV, press the Tv
button on the master remote or press the POWERbuttol]
on the simple remote. When using either remote,
remember to point it at the front of the TV.
Press the VOLUMEup or down button to adjust the
volume to a desired level.
Press the CHANNEL up or down button to select the next
channel in memory. You can also press two number
buttons to select a channel. Channels 2-13 and 91 were
programmed into the channel memory at the factory, so
pressing CHANNELup or down stops at these channels
only. When you start the autoprogramming feature
(described next), your set will automatically scan
through all channels and place the active channels for
your area into its channel memory.
Most antenna or cable-TV systems can be connected as
shown here.
• Details for connecting a home antenna to your TV are on
page 36.
• Details for connecting a cable-TV system to your TV are
on pages 37-39.
• Details for connecting a VCR toyour TVare on
pages 41-42.
7 AutoProgramtheTV's channel memory.
To start the TV autoprogramming itself, press the MENU
button repeatedly to select the SETUPMENUand then
press the + button to display the setup functions. Press
MENUagain to select the AUTOPROGRAMfunction, then
press +. Details are onpage 15.
Chan Ctrl: Normal
You can also add and delete channels from memory as
desired. Press MENUrepeatedly to select the SETUP
MENU,then press + to display the setup functions. Press
MENUrepeatedly to select the CHANMEMfunction, then
select the desired channel number and press + to add or
-to erase the channel. Details are on page 15.
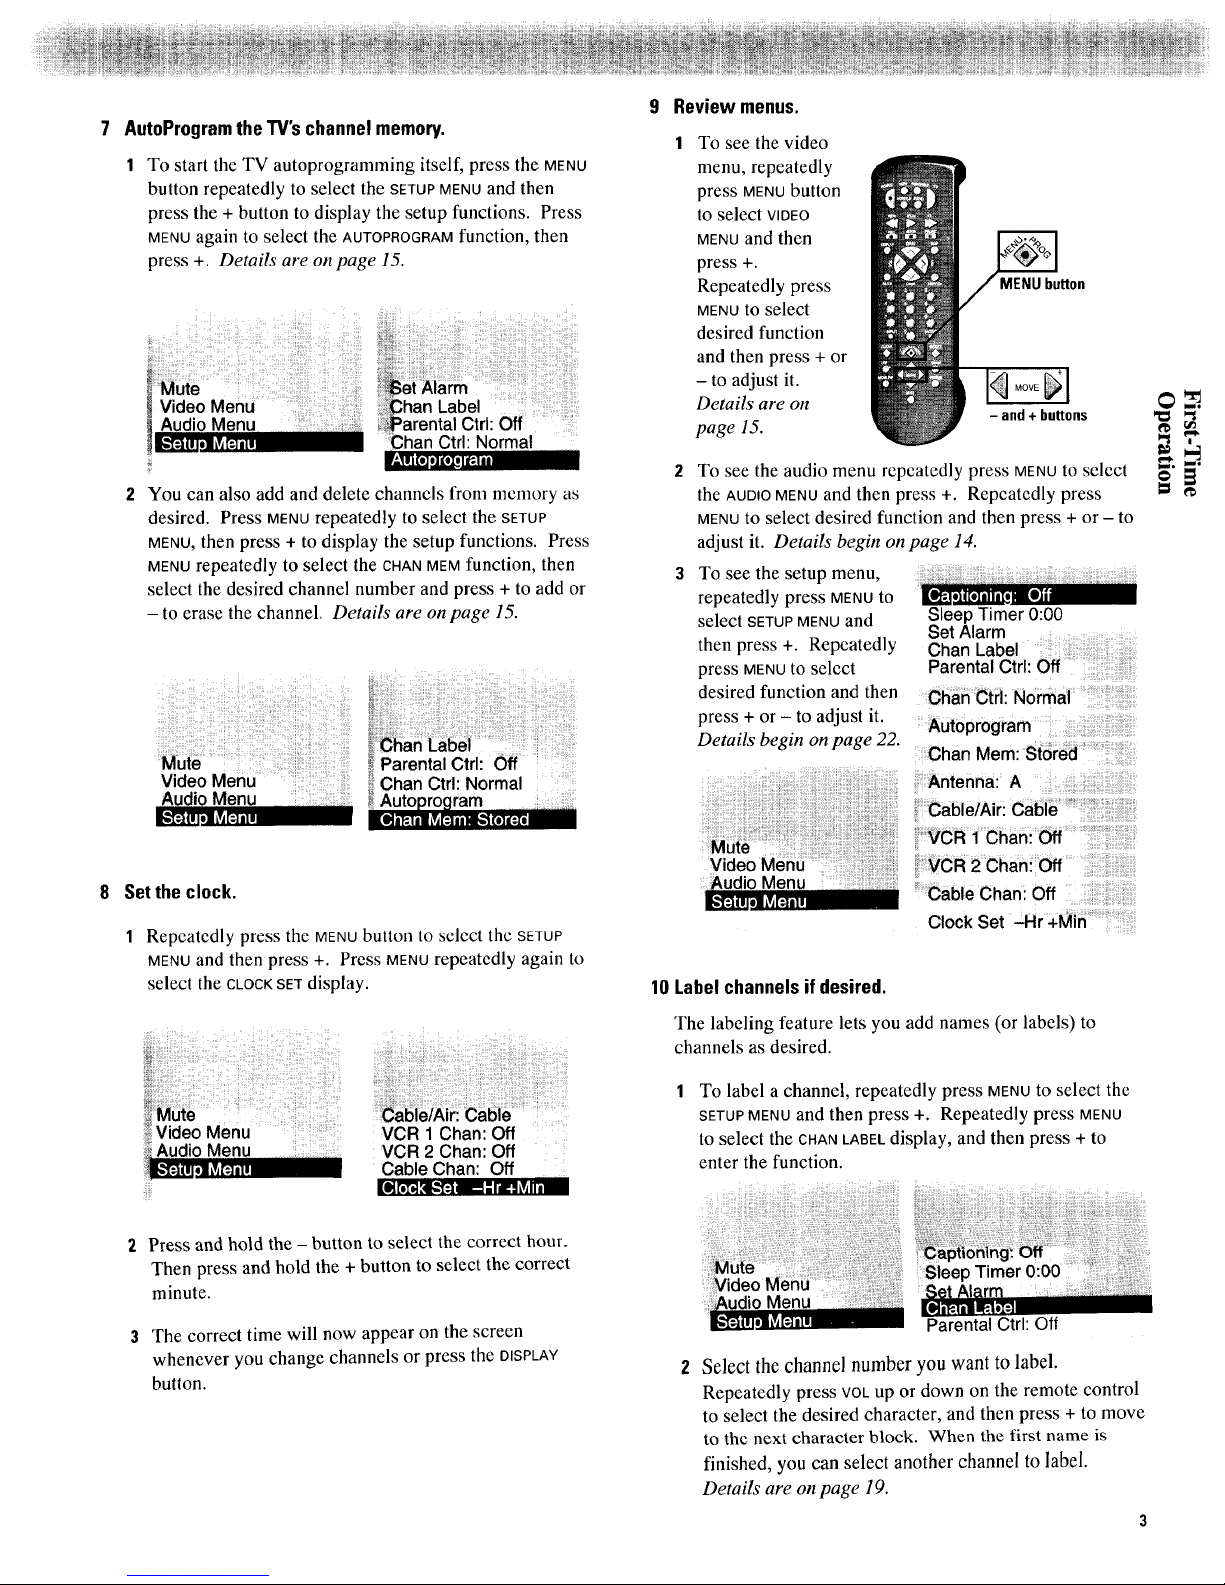
9 Review menus.
1 To see the video
menu, repeatedly
press MENUbutton
to select VIDEO
MENUand then
press +.
Repeatedly press
MENUto select
desired function
and then press + or
- to adjust it.
Details are on
page 15.
MENU button
- and + bu_ons
To see the audio menu repeatedly press MENUto select
the AUD*OMENUand then press +. Repeatedly press
MENUto select desired function and then press + or - to
adjust it. Details begin on page 14.
To see the setup menu,
repeatedly press MENUto
select SETUPMENUand
then press +. Repeatedly
press MENUto select
desired function and then
press + or - to adjust it.
Details begin on page 22.
Sleep Timer 0:00
Set Alarm ..................
Chan Label
Parental Ctr: Off
Cfi_fi etri: Nor_ai
Chan Mem: Sterna
O.'2!.
f'b
Set the clock.
1 Repeatedly press the MENUbutton to select the SETUP
MENUand then press +. Press MENUrepeatedly again to
select the CLOCKSET display.
!iliii:i!i !!iil iiiiiii!iiiii!iiii iii!;i_iiiii!(i
VCR 1 Chan: Off .....
VCR 2 Chan: Off
Cable Chan: Off
_,udioMenu
2 Chan! Off
Cable Chan Off
Clock Set _Hr ÷Mifi'
10 Label channels if desired.
The labeling feature lets you add names (or labels) to
channels as desired.
To label a channel, repeatedly press MENUto select the
SETUPMENUand then press +. Repeatedly press MENU
to select the CHANLABELdisplay, and then press + to
enter the function.
2 Press and hold the - button to select the correct hour.
Then press and hold the + button to select the correct
minute.
3 The correct time will now appear on the screen
whenever you change channels or press the DISPLAY
button.
Parental Ctrl: Off
Select the channel number you want to label.
Repeatedly press VOLup or down on the remote control
to select the desired character, and then press + to move
to the next character block. When the first name is
finished, you can select another channel to label.
Details are on page 19.
Operating Remote Control
Before attempting to operate either one of the remote controls,
install the batteries as shown below.
Installing/ReplacingBatteries
1 Turn the remote control face down.
2 Press down on the ridged area of each battery cover and slide
it off.
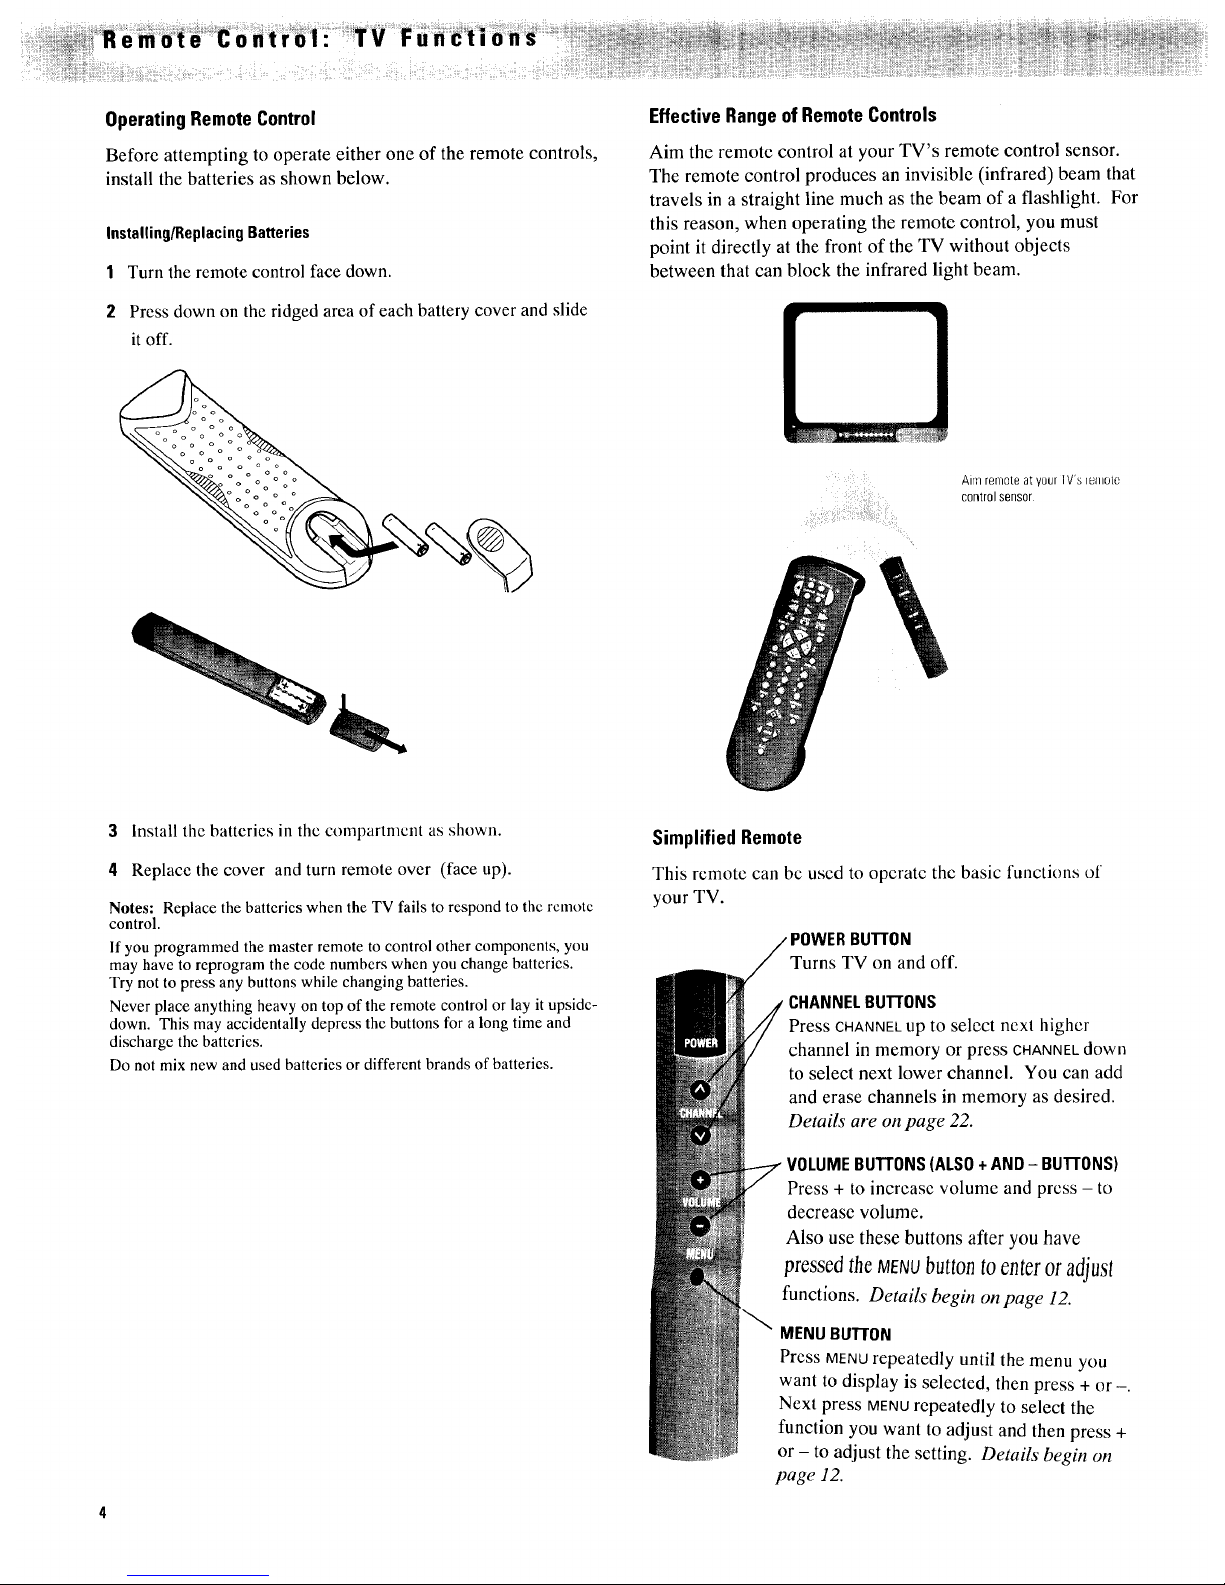
EffectiveRangeof RemoteControls
Aim the remote control at your TV's remote control sensor.
The remote control produces an invisible (infrared) beam that
travels in a straight line much as the beam of a flashlight. For
this reason, when operating the remote control, you must
point it directly at the front of the TV without objects
between that can block the infrared light beam.
Airn remotea[ yourlV's i_lllO[O
controlsensor
3 Install the batteries in the comt)artmcnt as shown.
4 Replace the cover and turn remote over (face up).
Notes: Replace the batteries when the TV fails to respond to the remote
control.
If you programmed the master remote to control other components, you
may have to reprogram the code numbers when you change batteries.
Try not to press any buttons while changing batteries.
Never place anything heavy on top of the remote control or lay it upside-
down. This may accidentally depress the buttons for a long time and
discharge the batteries.
Do not mix new and used batteries or different brands of banerics.
Simplified Remote
This remote can bc uscd to operate the basic functions of
your TV.
BUTTON
Turns TV on and off.
CHANNELBUTTONS
Press CHANNELup to select next higher
channel in memory or press CHANNELdown
to select next lower channel. You can add
and erase channels in memory as desired.
Details are on page 22.
ME BUTTONS(ALSO+AND - BUTI'0NS)
Press + to increase volume and press - to
decrease volume.
Also use these buttons after you have
pressedtheMENUbuttontoenteror adjust
functions. Details begin on page 12.
MENUBUTTON
Press MENU repeatedly until the menu you
want to display is selected, then press + or -.
Next press MENUrepeatedly to select the
function you want to adjust and then press +
or - to adjust the setting. Details" begin on
page 12.
!i_!_i_i_ii!!!il,iiR e mote C o ntrol : _TV
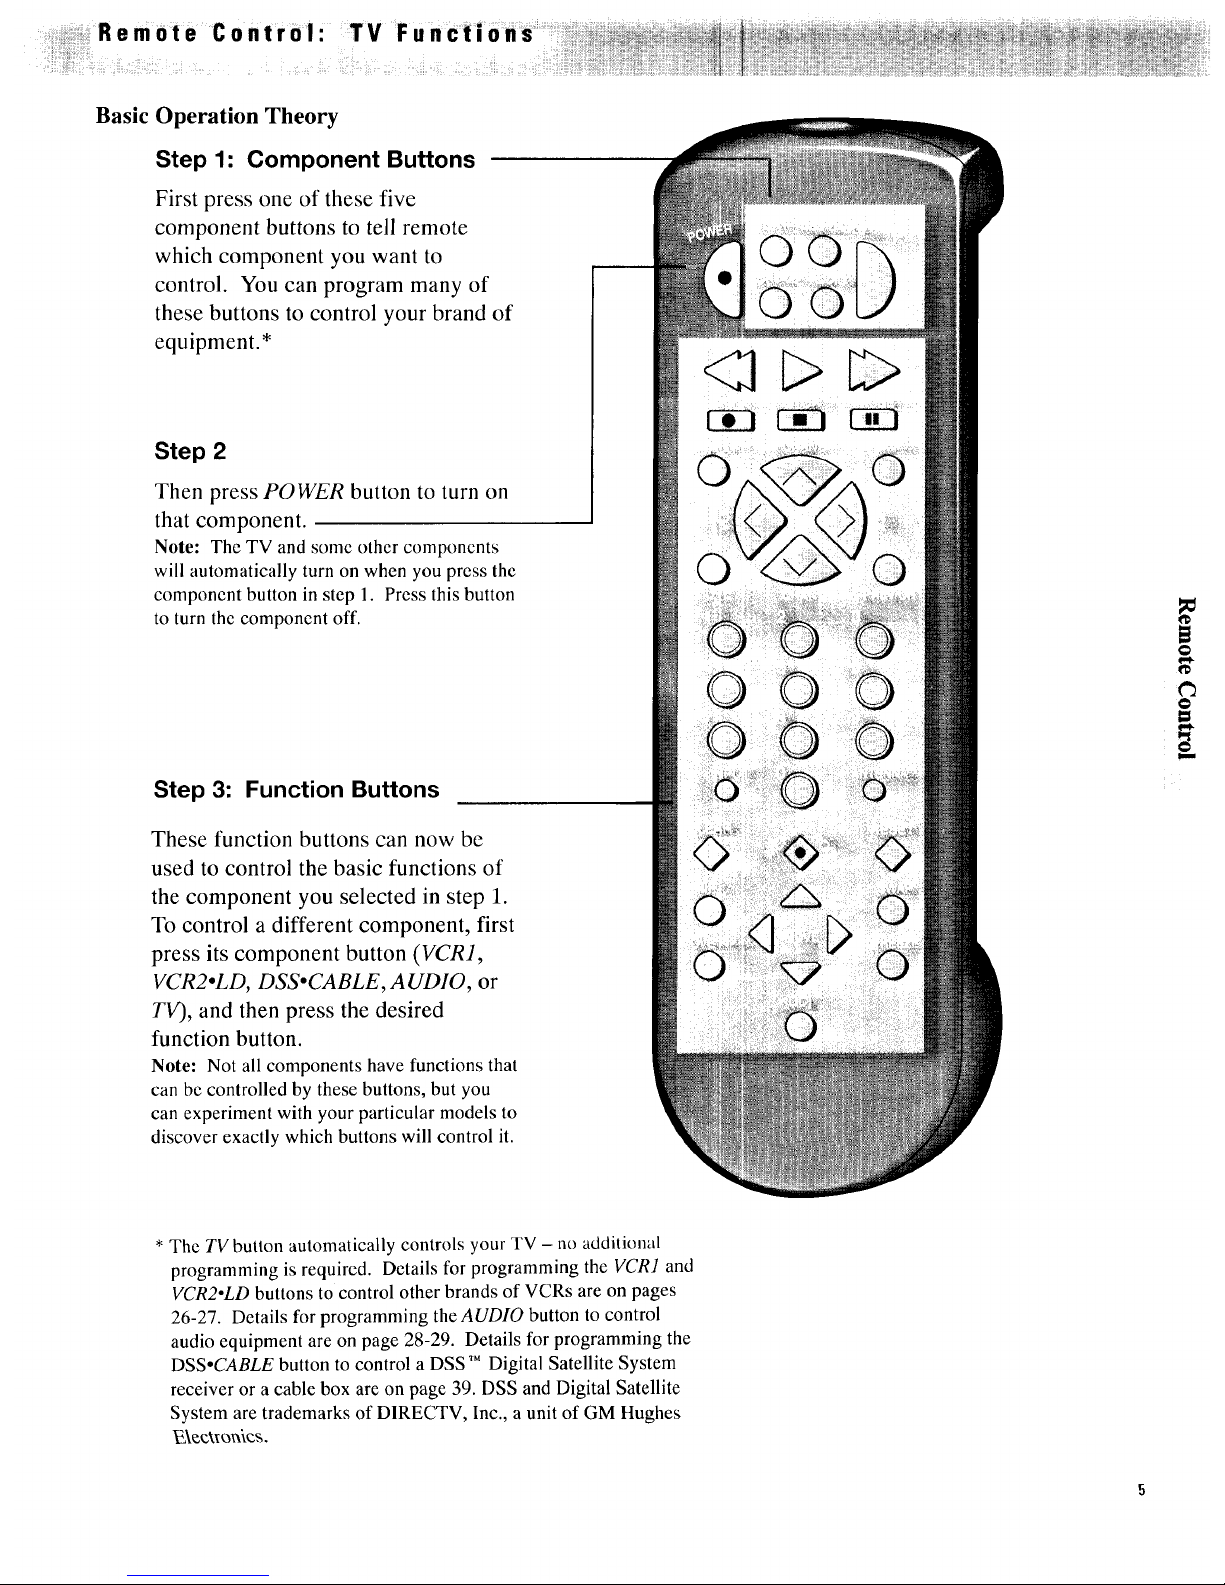
Basic
Operation Theory
Step 1: Component Buttons
First press one of these five
component buttons to tell remote
which component you want to
control. You can program many of
these buttons to control your brand of
equipment.*
Step 2
Then press POWER button to turn on
that component.
Note: The TV and some other components
will automatically turn on when you press the
component button in step 1. Press this button
to turn the component off.
Step 3: Function Buttons
These function buttons can now be
used to control the basic functions of
the component you selected in step 1.
To control a different component, first
press its component button (VCR1,
VCR2oLD, DSSoCABLE, A UDIO, or
TV), and then press the desired
function button.
Note: Not all components have functions that
can be controlled by these buttons, but you
can experiment with your particular models to
discover exactly which buttons will control it.
m
* The TV button automatically controls your TV - no additional
programming is required. Details for programming the VCR1 and
VCR2oLD buttons to control other brands of VCRs are on pages
26-27. Details for programming the AUDIO button to control
audio equipment are on page 28-29. Details for programming the
DSSoCABLE button to control a DSS TMDigital Satellite System
receiver or a cable box are on page 39. DSS and Digital Satellite
System are trademarks of DIRECTV, Inc., a unit of GM Hughes
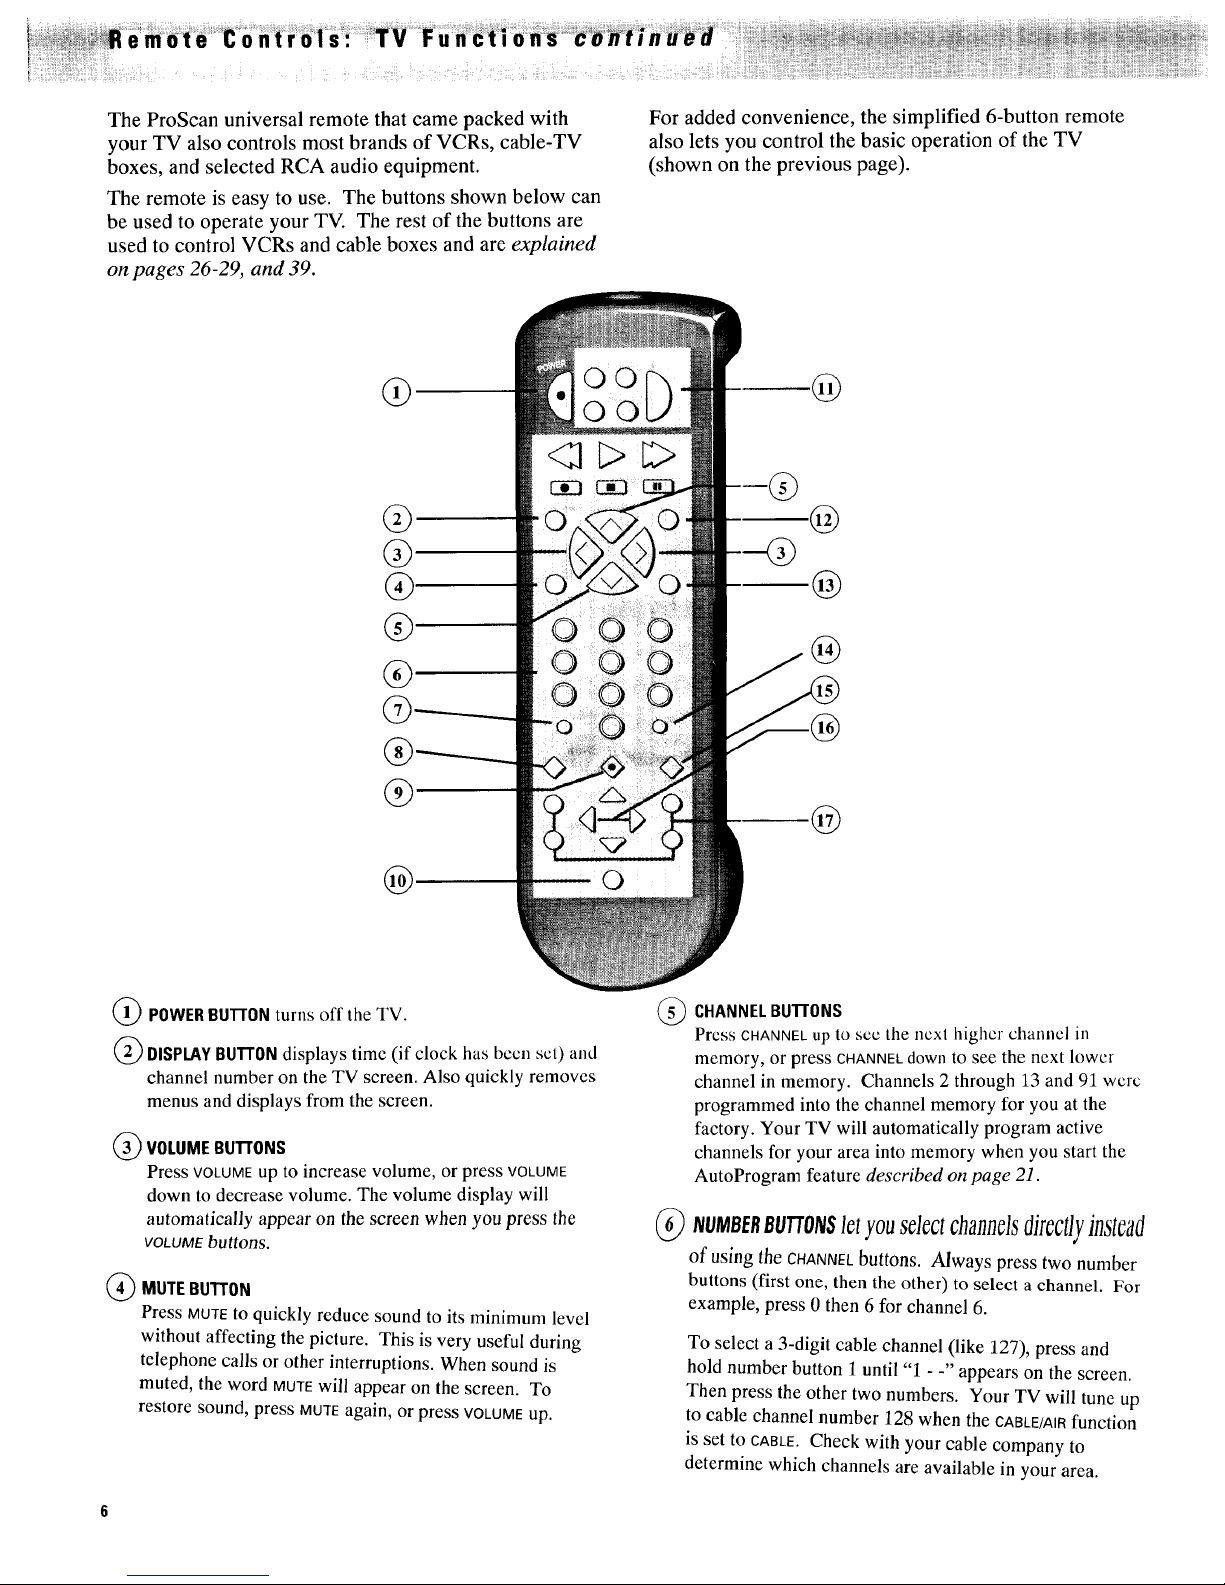
The ProScan universal remote that came packed with
your TV also controls most brands of VCRs, cable-TV
boxes, and selected RCA audio equipment.
The remote is easy to use. The buttons shown below can
be used to operate your TV. The rest of the buttons are
used to control VCRs and cable boxes and are explained
on pages 26-29, and 39.
For added convenience, the simplified 6-button remote
also lets you control the basic operation of the TV
(shown on the previous page).
®
®
@
@
@
@
(_) POWERBUII'ONturns off the TV.
@ DISPI.AYBUTTONdisplays timc (if clock has I)ccn set) and
channel number on the TV screen. Also quickly removes
menus and displays from the screen.
VOLUMEBu'rroNs
Press VOLUMEup to increase volume, or press VOLUME
down to decrease volume. The volume display will
automatically appear on the screen when you press the
VOLUME buttons.
MUTEBUTTON
Press MUTE tOquickly reduce sound to its minimum level
without affecting the picture. This is very useful during
telephone calls or other interruptions. When sound is
muted, the word MOTEwill appear on the screen. To
restore sound, press MUTE again, or press VOLUME up.
@
CHANNELBUTI'ONS
Prcss CHANNEL up to see the next highc] challne] ill
memory, or press CHANNEL down to see the next lower
channel in memory. Channels 2 through 13 and 91 were
programmed into the channel memory for you at the
factory. Your TV will automatically program active
channels for your area into memory when you start the
AutoProgram feature described on page 21.
NUMBERBUTTONSlet you select channelsdirectlyJnslcad
of using the CHANNELbuttons. Always press two number
buttons (first one, then the other) to select a channel. For
example, press 0 then 6 for channel 6.
To select a 3-digit cable channel (like ]27), press and
hold number button 1 until "1 - -" appears on the screen.
Then press the other two numbers. Your TV will tune up
to cable channel number 128 when the CABLE/AIRfunction
is set to CABLE.Check with your cable company to
determine which channels are available in your area.
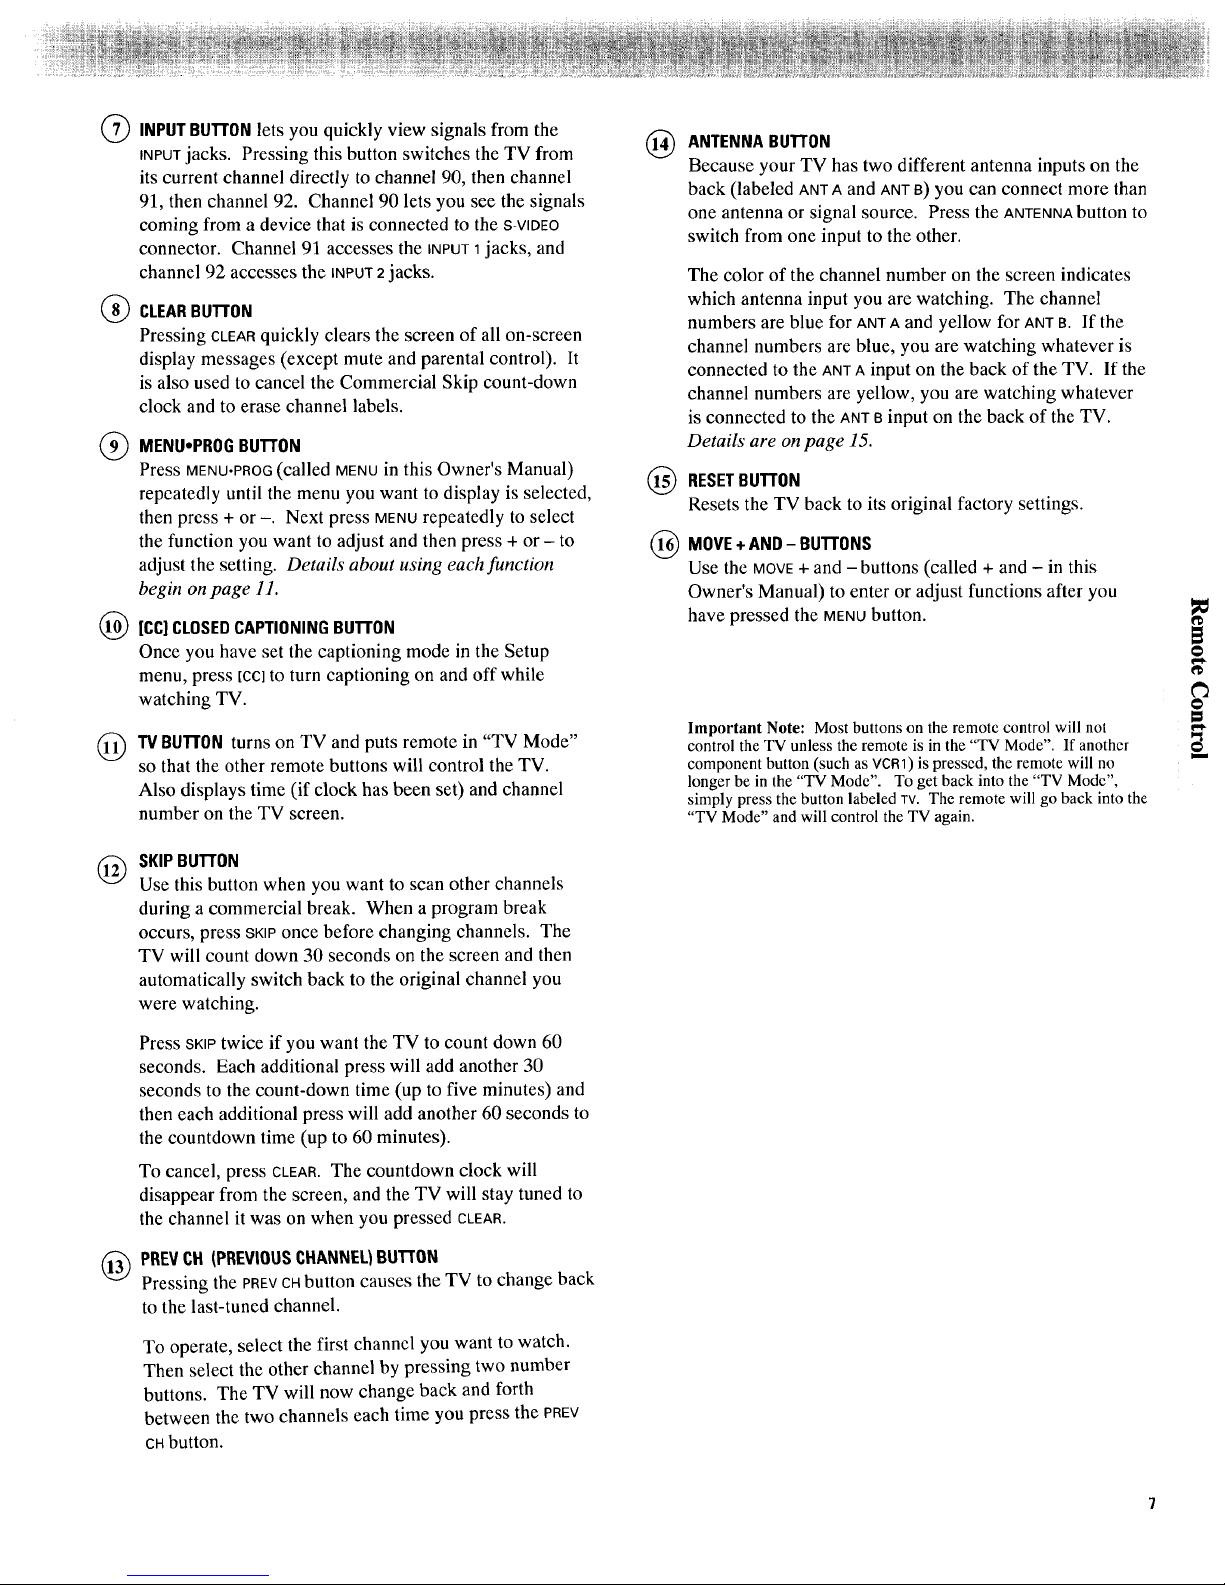
(_) INPUTBUTTONlets you quickly view signals from the
INPUTjacks. Pressing this button switches the TV from
its current channel directly to channel 90, then channel
91, then channel 92. Channel 90 lets you see the signals
coming from a device that is connected to the S-VIDEO
connector. Channel 91 accesses the iNPUTqjacks, and
channel 92 accesses the INPUT2 jacks.
CLEARBUTTON
Pressing CLEARquickly clears the screen of all on-screen
display messages (except mute and parental control). It
is also used to cancel the Commercial Skip count-down
clock and to erase channel labels.
(_ MENU.PROG BUTTON
Press MENUopROG(called MENU in this Owner's Manual)
repeatedly until the menu you want to display is selected,
then press + or-. Next press MENUrepeatedly to select
the function you want to adjust and then press + or - to
adjust the setting. Details about using each function
begin on page 11.
(_ [CC]CLOSEDCAPTIONINGBUTTON
Once you have set the captioning mode in the Setup
menu, press [ccl to turn captioning on and off while
watching TV.
(_) "13/BUTTONturns on TV and puts remote in "TV Mode"
so that the other remote buttons will control the TV.
Also displays time (if clock has been set) and channel
number on the TV screen.
@
SKIPBUTTON
Use this button when you want to scan other channels
during a commercial break. When a program break
occurs, press SKIPonce before changing channels. The
TV will count down 30 seconds on the screen and then
automatically switch back to the original channel you
were watching.
Press SKIPtwice if you want the TV to count down 60
seconds. Each additional press will add another 30
seconds to the count-down time (up to five minutes) and
then each additional press will add another 60 seconds to
the countdown time (up to 60 minutes).
To cancel, press CLEAR. The countdown clock will
disappear from the screen, and the TV will stay tuned to
the channel it was on when you pressed CLEAR.
(_ PREVCH (PREVIOUSCHANNEL}BUTTON
Pressing the PREVCHbutton causes the TV to change back
to the last-tuned channel.
To operate, select the first channel you want to watch.
Then select the other channel by pressing two number
buttons. The TV will now change back and forth
between the two channels each time you press the PREV
ca button.
®
®
®
ANTENNA BUTr0N
Because your TV has two different antenna inputs on the
back (labeled ANTA and ANTB) yOU can connect more than
one antenna or signal source. Press the ANTENNAbutton to
switch from one input to the other.
The color of the channel number on the screen indicates
which antenna input you are watching. The channel
numbers are blue for ANTAand yellow for ANTB. If the
channel numbers are blue, you are watching whatever is
connected to the ANTA input on the back of the TV. If the
channel numbers are yellow, you are watching whatever
is connected to the ANTBinput on the back of the TV.
Details' are on page 15.
RESETBUTTON
Resets the TV back to its original factory settings.
MOVE+ AND - BUTTONS
Use the MOVE+ and - buttons (called + and - in this
Owner's Manual) to enter or adjust functions after you
have pressed the MENUbutton.
Important Note: Most buttons on the remote control will not
control the TV unless the remote is in the "TV Mode". If another
component button (such as VCR1) is pressed, the remote will no
longer be in the "TV Mode". To get back into the "TV Mode",
simply press the button labeled TV. The remote will go back into the
"TV Mode" and will control the TV again.
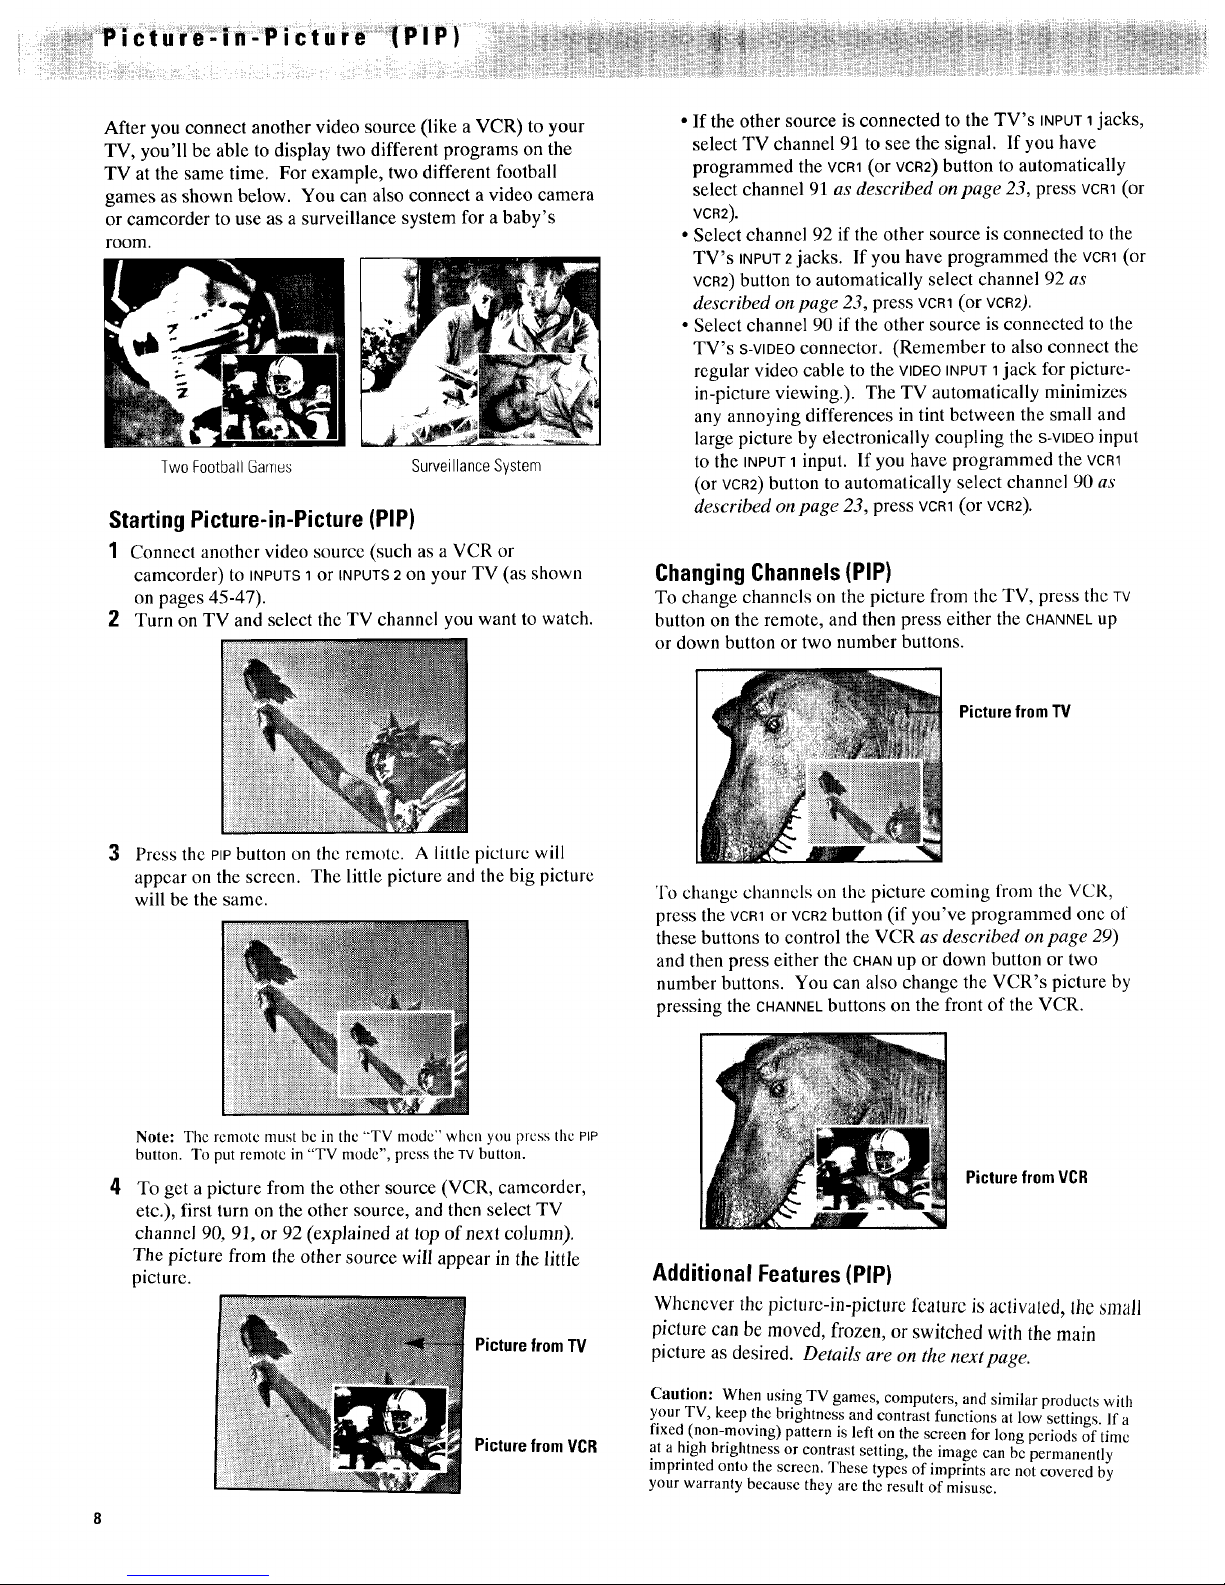
After you connect another video source (like a VCR) to your
TV, you'll be able to display two different programs on the
TV at the same time. For example, two different football
games as shown below. You can also connect a video camera
or camcorder to use as a surveillance system for a baby's
room.
I-we Football Games
SurveillanceSystem
Starting Picture-in-Picture (PIP)
1 Connect another video source (such as a VCR or
camcorder) to INPUTS1 or iNPUTS2 on your TV (as shown
on pages 45-47).
2 Turn on TV and select the TV channel you want to watch.
•If the other source is connected to the TV's INPUTIjacks,
select TV channel 91 to see the signal. If you have
programmed the vcm (or VCR2)button to automatically
select channel 91 as described on page 23, press veal (or
VCR2).
• Select channel 92 if the other source is connected to the
TV's iNPUT2 jacks. If you have programmed the VCR1(or
VCR2)button to automatically select channel 92 as
described on page 23, press veal (or VCR2).
• Select channel 90 if the other source is connected to the
TV's S-VIDEOconnector. (Remember to also connect the
regular video cable to the VIDEOINPUT1jack for picturc-
in-picture viewing.). The TV automatically minimizes
any annoying differences in tint between the small and
large picture by electronically coupling the S-ViDEOinput
to the INPUT1input. If you have programmed the VCR1
(or VCRa)button to automatically select channel 90 as
described on page 23, press Veal (or VCRZ).
Changing Channels (PIP)
To change channels on the picture from the TV, press the TV
button on the remote, and then press either the CHANNELup
or down button or two number buttons.
Picture from TV
3
Press the PIPbutton on the remotc. A little picture will
appear on the screen. The little picture and the big picture
will be the samc.
To change channels on thc picture coming from the VCR,
press the veto or Yea2 button (if you've programmed one of
these buttons to control the VCR as described on page 29)
and then press either the CHANup or down button or two
number buttons. You can also change the VCR's picture by
pressing the CHANNELbuttons on the front of the VCR.
Note: The remote must bc in the "TV mode" when you press the PIP
button. To put rcmotc in "TV mode", press the TVbutton.
To get a picture from the other source (VCR, camcorder,
etc.), first turn on the other source, and then select TV
channel 90, 91, or 92 (explained at top of next column).
The picture from the other source will appear in the little
picture.
PicturefromTV
PicturefromVCR
Picture from VCR
Additional Features (PIP)
Whcncver thc picture-in-picture fcaturc is aclivalcd, lhc small
picture can be moved, frozen, or switched with the main
picture as desired. Details" are on the next page.
Caution: When using TV games, computers, and similar products with
your TV, keep the brightness and contrast functions at low settings. If a
fixed (non-moving) pattern is left on the screen for long periods of time
at a high brightness or contrast setting, the image can bc permanently
imprinted onto the screen. These types of imprints are not covered by
your warranty because they are the result of misuse.
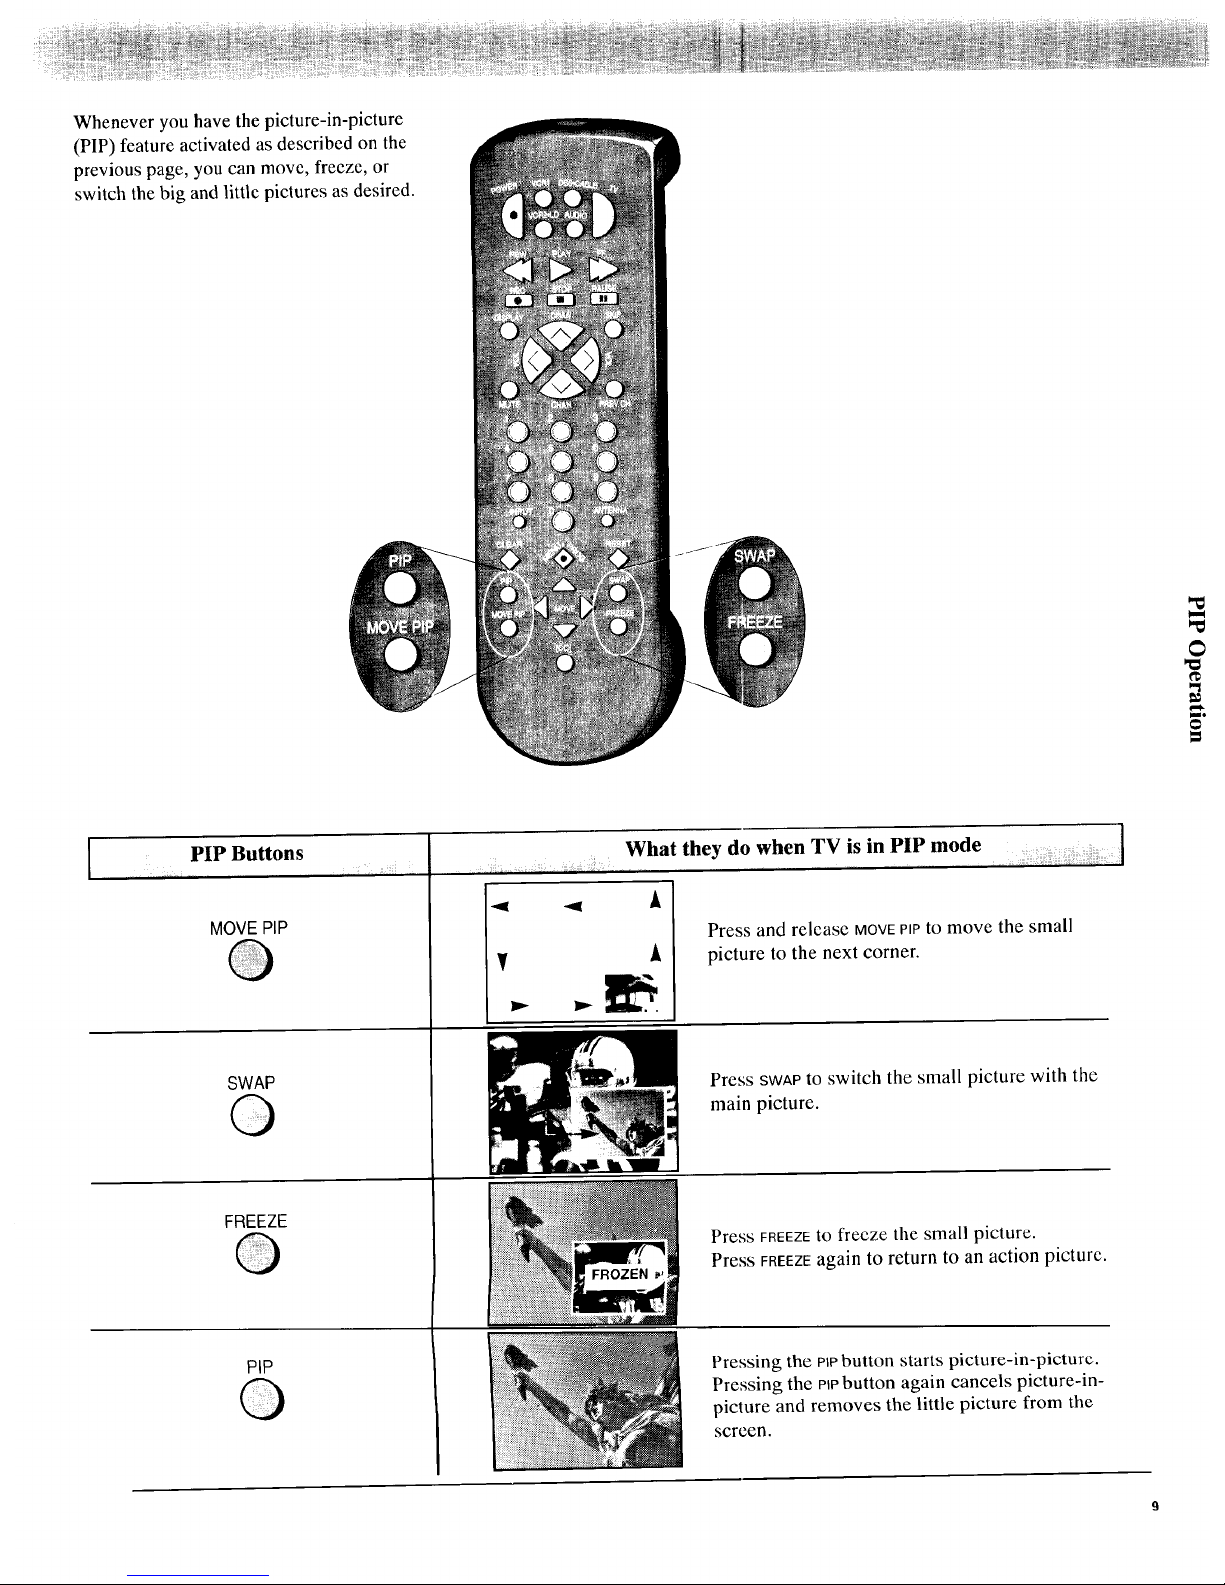
Whenever you have the picture-in-picture
(PIP) feature activated as described on the
previous page, you can move, freeze, or
switch the big and little pictures as desired.
©
ul
=
I
PIP Buttons
MOVE PIP
SWAP
©
FREEZE
PIP
........: What they do when TV is in PIP mode.... ,]
A
Press and release MOVEPIPto move the small
A
picture to the next corner.
Press SWAPto switch the small picture with the
main picture.
Press FREEZE10 freeze the small picture.
Press FREEZEagain to return to an action picture.
Pressing the PIPbutton starts picture-in-picture.
Pressing the PIPbutton again cancels picture-in-
picture and removes the little picture from the
screen.
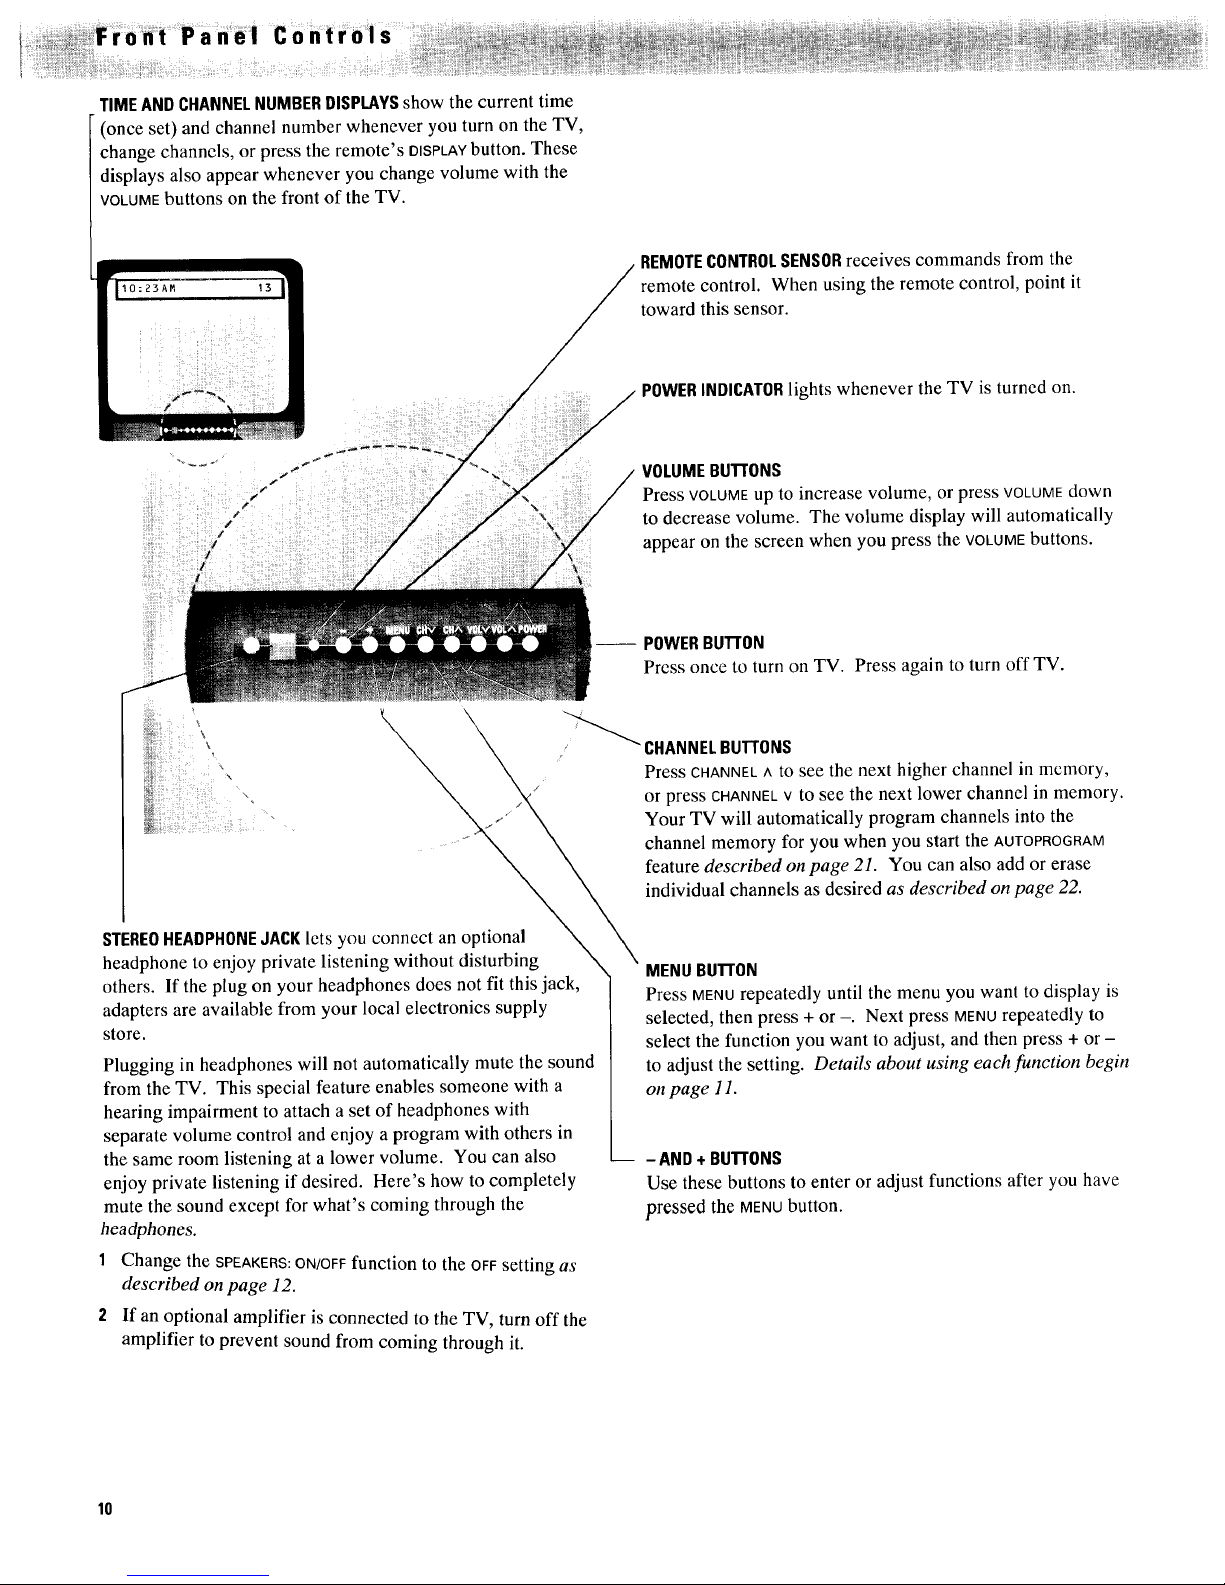
TIMEANDCHANNELNUMBERDISPLAYSshow the current time
(once set) and channel number whenever you turn on the TV,
change channels, or press the remote's OISPLAYbutton. These
displays also appear whenever you change volume with the
VOLUMEbuttons on the front of the TV.
REMOTECONTROLSENSORreceives commands from the
remote control. When using the remote control, point it
toward this sensor.
/
/
/
/
/
/ POWERINDICATORlights whenever the TV is turned on.
VOLUMEBUTrONS
Press VOLUMEup to increase volume, or press VOLUMEdown
to decrease volume. The volume display will automatically
appear on the screen when you press the VOLUMEbuttons.
POWERBuTroN
Press once to turn on TV. Press again to turn off TV.
k, \
\
\
\
\
\
\
\
-'_"_ CHANNELBUTrONS
Press CHANNEL A to see the next higher channel in memory,
or press CHANNELv to see the next lower channel in memory.
Your TV will automatically program channels into the
channel memory for you when you start the AOrOPROGaAM
feature described on page 21. You can also add or erase
individual channels as desired as described on page 22.
STEREOHEADPHONEJACK lets you connect an optional
headphone to enjoy private listening without disturbing
others. If the plug on your headphones does not fit this jack,
adapters are available from your local electronics supply
store.
Plugging in headphones will not automatically mute the sound
from the TV. This special feature enables someone with a
hearing impairment to attach a set of headphones with
separate volume control and enjoy a program with others in
the same room listening at a lower volume. You can also
enjoy private listening if desired. Here's how to completely
mute the sound except for what's coming through the
headphones.
1 Change the SPEAKERS: ON/OFF function to the OFF setting as
described on page 12.
2 If an optional amplifier is connected to the TV, turn off the
amplifier to prevent sound from coming through it.
MENU BUTrON
Press MENUrepeatedly until the menu you want to display is
selected, then press + or -. Next press MENUrepeatedly to
select the function you want to adjust, and then press + or -
to adjust the setting. Details" about using each function begin
on page 11.
-- - AND+ BUTI'ONS
Use these buttons to enter or adjust functions after you have
pressed the MENUbutton.
10
_ ,_i_:_,_Video Menu_ Basic Functions
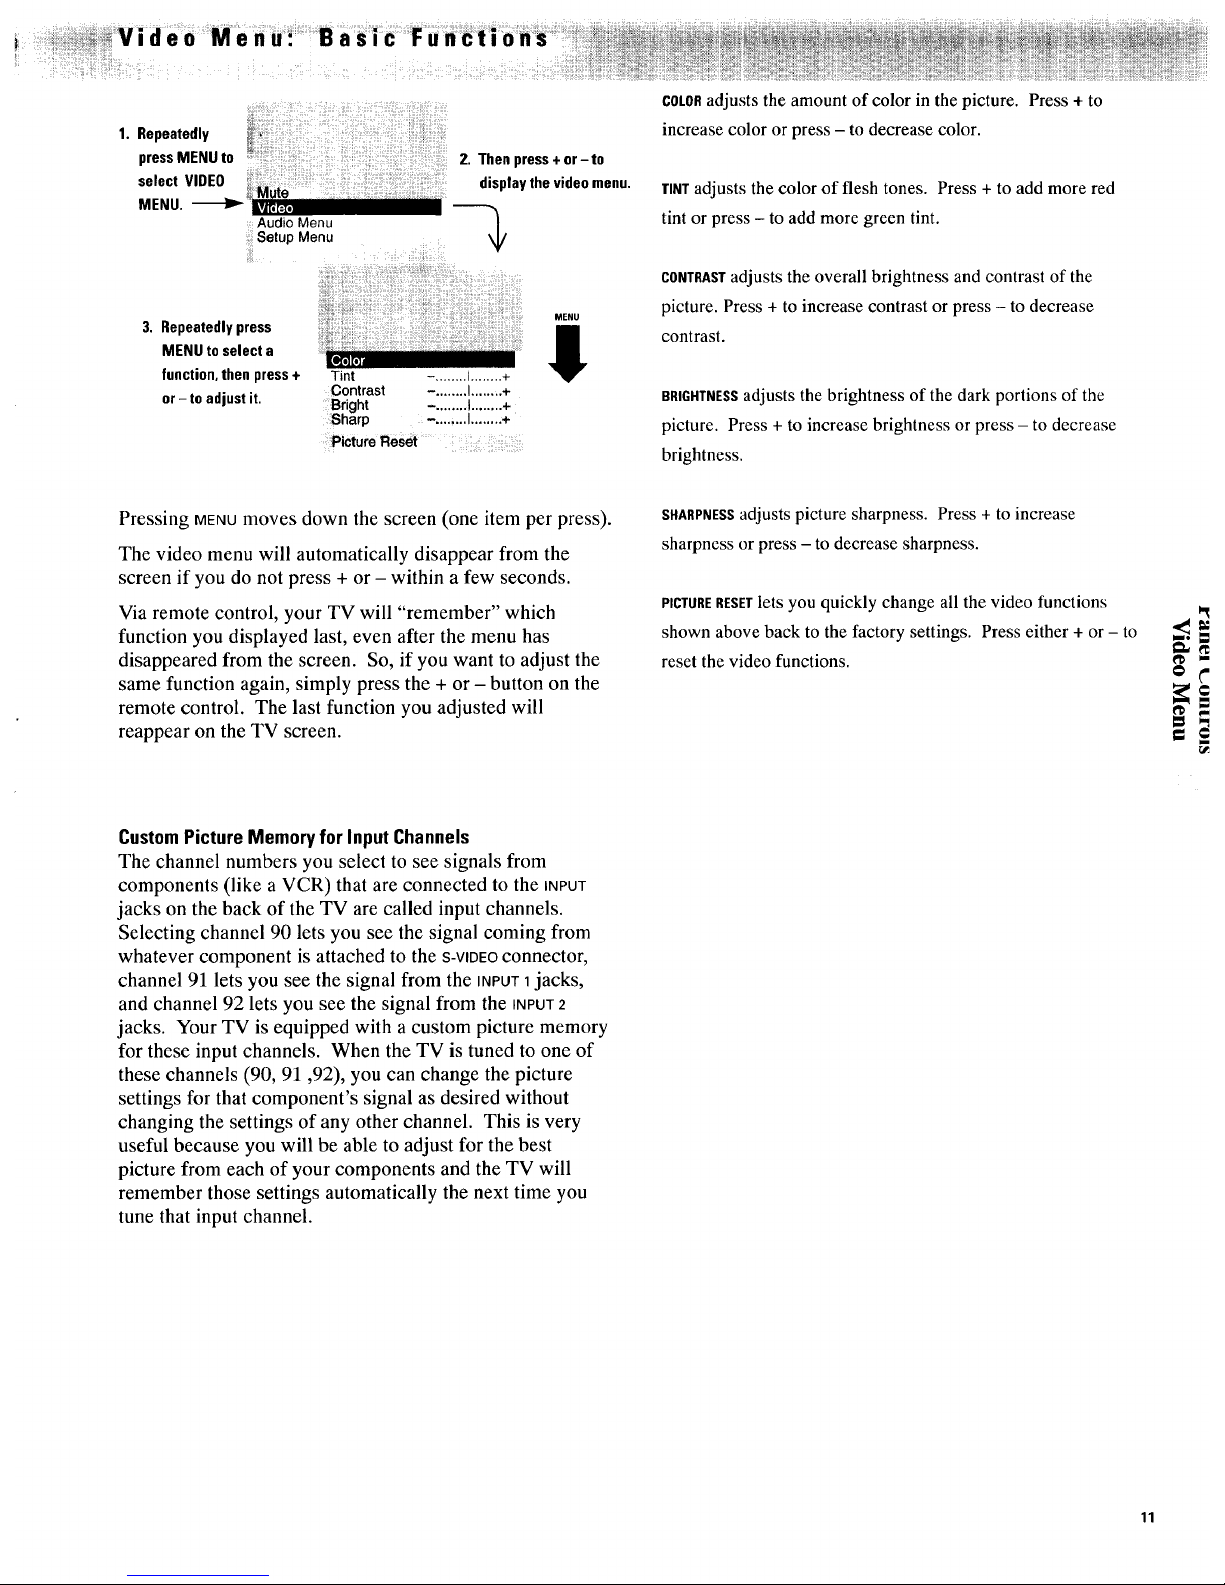
1. Repeatedly
pressMENU to
select VIDEO _Mute
MENU, _ ILvj[.t=z, I Ill
Audio Menu
Setup Menu
2. Then press+ or-to
displaythe videomenu.
MENU
3, Repeatedlypress
MENU to select a _ , • _'
41
I[IPlil[.:
function, then press + Tint -, ....... I........ +
Contrast -. ....... I........ +
or- to adjust it. Bright -. ....... !........ +
Sharp -. .......I........+
Picture Reset
COLORadjusts the amount of color in the picture. Press + to
increase color or press - to decrease color.
TINTadjusts the color of flesh tones. Press + to add more red
tint or press - to add more green tint.
CONTRAST adjusts the overall brightness and contrast of the
picture. Press + to increase contrast or press - to decrease
contrast.
BRIGHTNESS adjusts the brightness of the dark portions of the
picture. Press + to increase brightness or press - to decrease
brightness.
Pressing MENUmoves down the screen (one item per press).
The video menu will automatically disappear from the
screen if you do not press + or - within a few seconds.
Via remote control, your TV will "remember" which
function you displayed last, even after the menu has
disappeared from the screen. So, if you want to adjust the
same function again, simply press the + or - button on the
remote control. The last function you adjusted will
reappear on the TV screen.
SHARPNESS adjusts picture sharpness. Press + to increase
sharpness or press - to decrease sharpness.
PICTURE RESETlets you quickly change all the video functions
shown above back to the factory settings. Press either + or - to
reset the video functions.
O
CustomPictureMemoryfor Input Channels
The channel numbers you select to see signals from
components (like a VCR) that are connected to the INPUT
jacks on the back of the TV are called input channels.
Selecting channel 90 lets you see the signal coming from
whatever component is attached to the S-VIDEOconnector,
channel 91 lets you see the signal from the INPUT1jacks,
and channel 92 lets you see the signal from the INPUT2
jacks. Your TV is equipped with a custom picture memory
for these input channels. When the TV is tuned to one of
these channels (90, 91,92), you can change the picture
settings for that component's signal as desired without
changing the settings of any other channel. This is very
useful because you will be able to adjust for the best
picture from each of your components and the TV will
remember those settings automatically the next time you
tune that input channel.
11
• iii_iiii!iili ii%ilqi¸iC!!i_iiii!i!iiiiii iCi!iiiiii!!!iii_iiiilii i!iiiiii!!!!iiiiiii¸¸ill ¸¸ii
_i iiiiiii_!iil;i;i!_:;i_:i:ii!i!iil;ii!;!!!;¸ ii:_:i:;i,ilil;Ji:i_iiiii_ii:iiiil;iii:!!i;;:;_i!
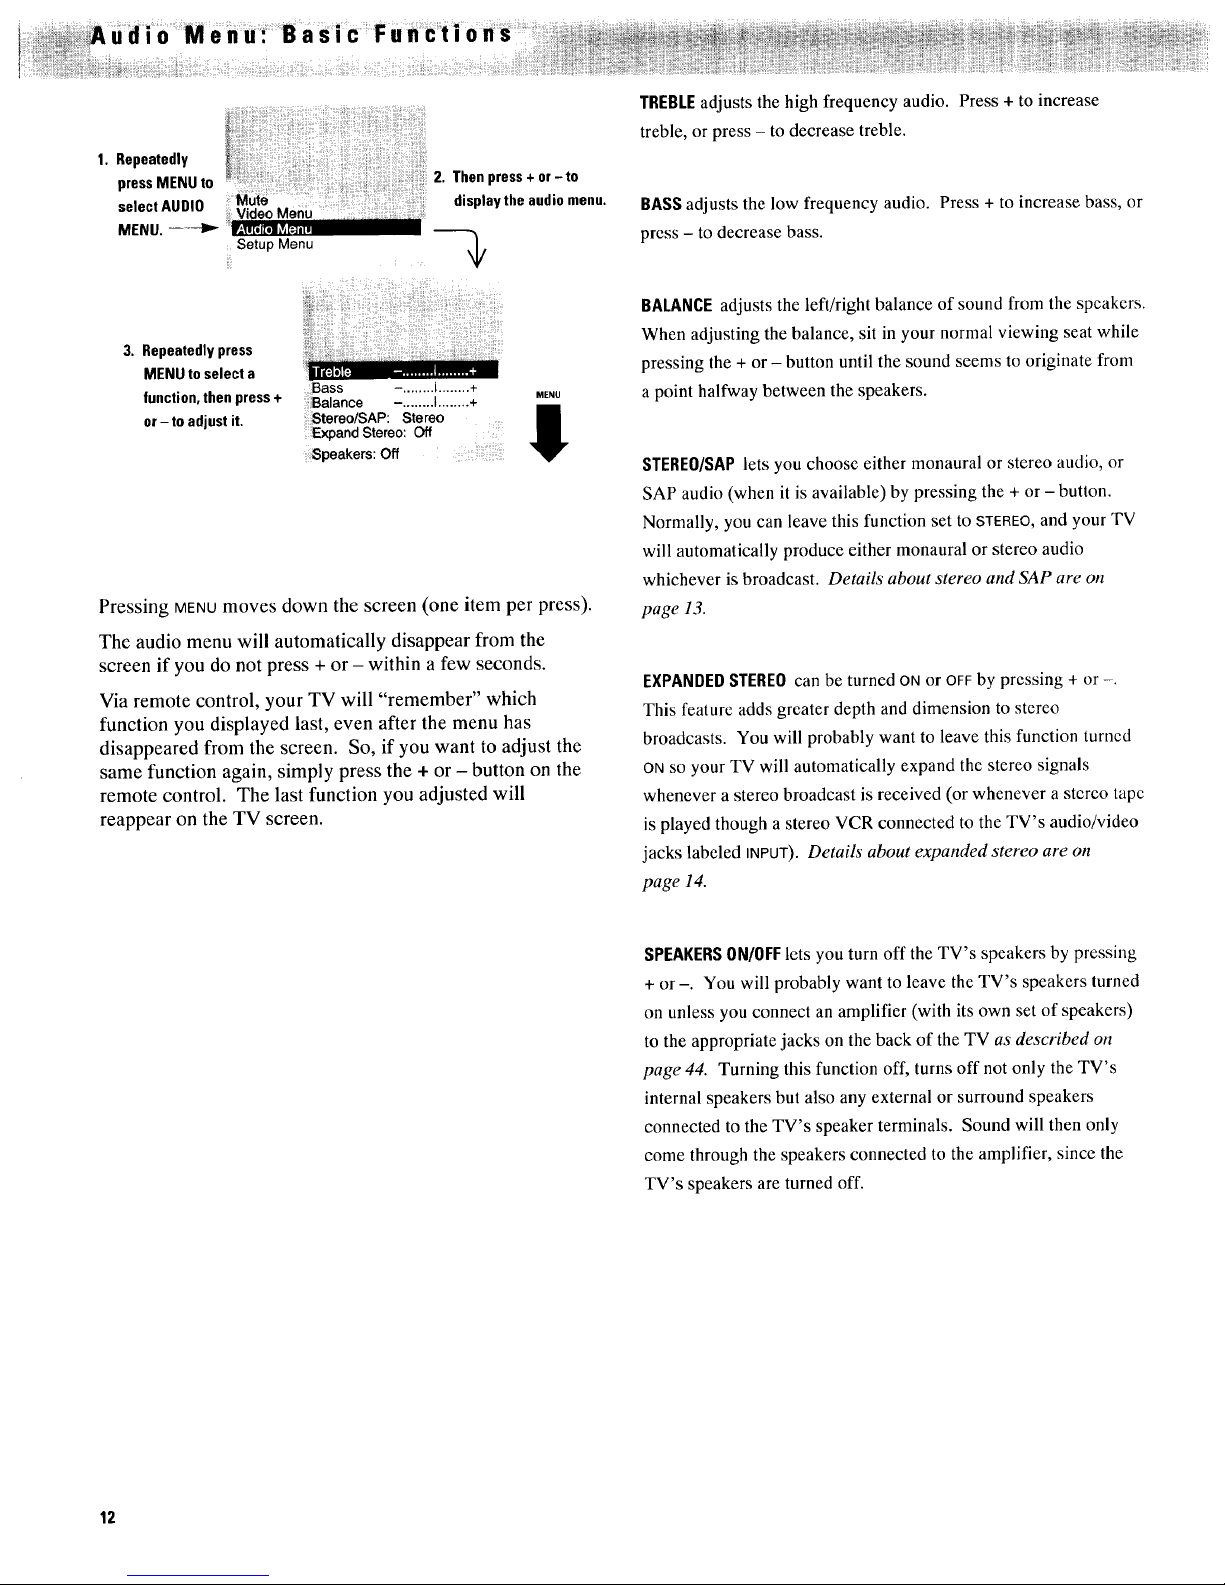
1. Repeatedly
pressMENUto 2. Thenpress+or-to
selectAUDI0 displaytheaudiomenu.
VideoMenu
MENU.-----tP,-l'l_[ll[liill[4ili
Setup Menu ,I,
3. Repeatedlypress
MENU to select a
function, then press+
or-to adjust it.
....iBass -. ....... 1........ +
!ii!iBalance -........I........+ MENU
iiiStereo/SAP:Stereo
iiilExpand Stereo:Off il
0
;iiiiSpeakers:Off
Pressing MENUmoves down the screen (one item per press).
The audio menu will automatically disappear from the
screen if you do not press + or - within a few seconds.
Via remote control, your TV will "remember" which
function you displayed last, even after the menu has
disappeared from the screen. So, if you want to adjust the
same function again, simply press the + or - button on the
remote control. The last function you adjusted will
reappear on the TV screen.
TREBLEadjusts the high frequency audio. Press + to increase
treble, or press - to decrease treble.
BASS adjusts the low frequency audio. Press + to increase bass, or
press - to decrease bass.
BALANCEadjusts the left/right balance of sound from the speakers.
When adjusting the balance, sit in your normal viewing seat while
pressing the + or - button until the sound seems to originate from
a point halfway between the speakers.
STEREO/SAPlets you choose either monaural or stereo audio, or
SAP audio (when it is available) by pressing the + or - button.
Normally, you can leave this function set to STEREO,and your TV
will automatically produce either monaural or stereo audio
whichever is broadcast. Details about stereo and SAP are on
page 13.
EXPANDEDSTEREOcan be turned ON or OFF by pressing + or -.
This feature adds greater depth and dimension to stereo
broadcasts. You will probably want to leave this function turned
ONso your TV will automatically expand the stereo signals
whenever a stereo broadcast is received (or whenever a stereo tape
is played though a stereo VCR connected to the TV's audio/video
jacks labeled INPUT). Details about expanded stereo are on
page 14.
SPEAKERSON/OFFlets you turn off the TV's speakers by pressing
+ or -. You will probably want to leave the TV's speakers turned
on unless you connect an amplifier (with its own set of speakers)
to the appropriate jacks on the back of the TV as described on
page 44. Turning this function off, turns off not only the TV's
internal speakers but also any external or surround speakers
connected to the TV's speaker terminals. Sound will then only
come through the speakers connected to the amplifier, since the
TV's speakers are turned off.
12
Receiving Stereo Broadcasts
Your TV is fully capable of reproducing stereo sound from
TV stations transmitting stereo sound in your area. All you
have to do to enjoy stereo sound is to make sure the TV's
STEREO/SAPfunction is set to STEREOSO the TV can receive
stereo broadcasts.
Normally this function can be left in the STEREOmode.
Your TV will then automatically reproduce either stereo or
monaural sound, whichever is broadcast.
In some fringe viewing areas, however, the stereo signal
may not be strong enough for quality reception. The signal
may drift, or the reproduction may become noisy. Should
that occur, change the STEREO/SAPfunction to the MONO
mode to receive clearer, cleaner sound.
Helpful Hint: Some television stations transmit a "pilot" signal that
makes your TV think it's receiving stereo, even though the broadcast
signal is monaural. The "pilot" signal will make the stereo indicator
appear on the screen next to the channel number, however, you will not
be able to hear stereo sound. If the stereo indicator appears but you can
not hear stereo sound, check with the television station to inquire
whether the program being broadcast is in stereo or monaural audio.
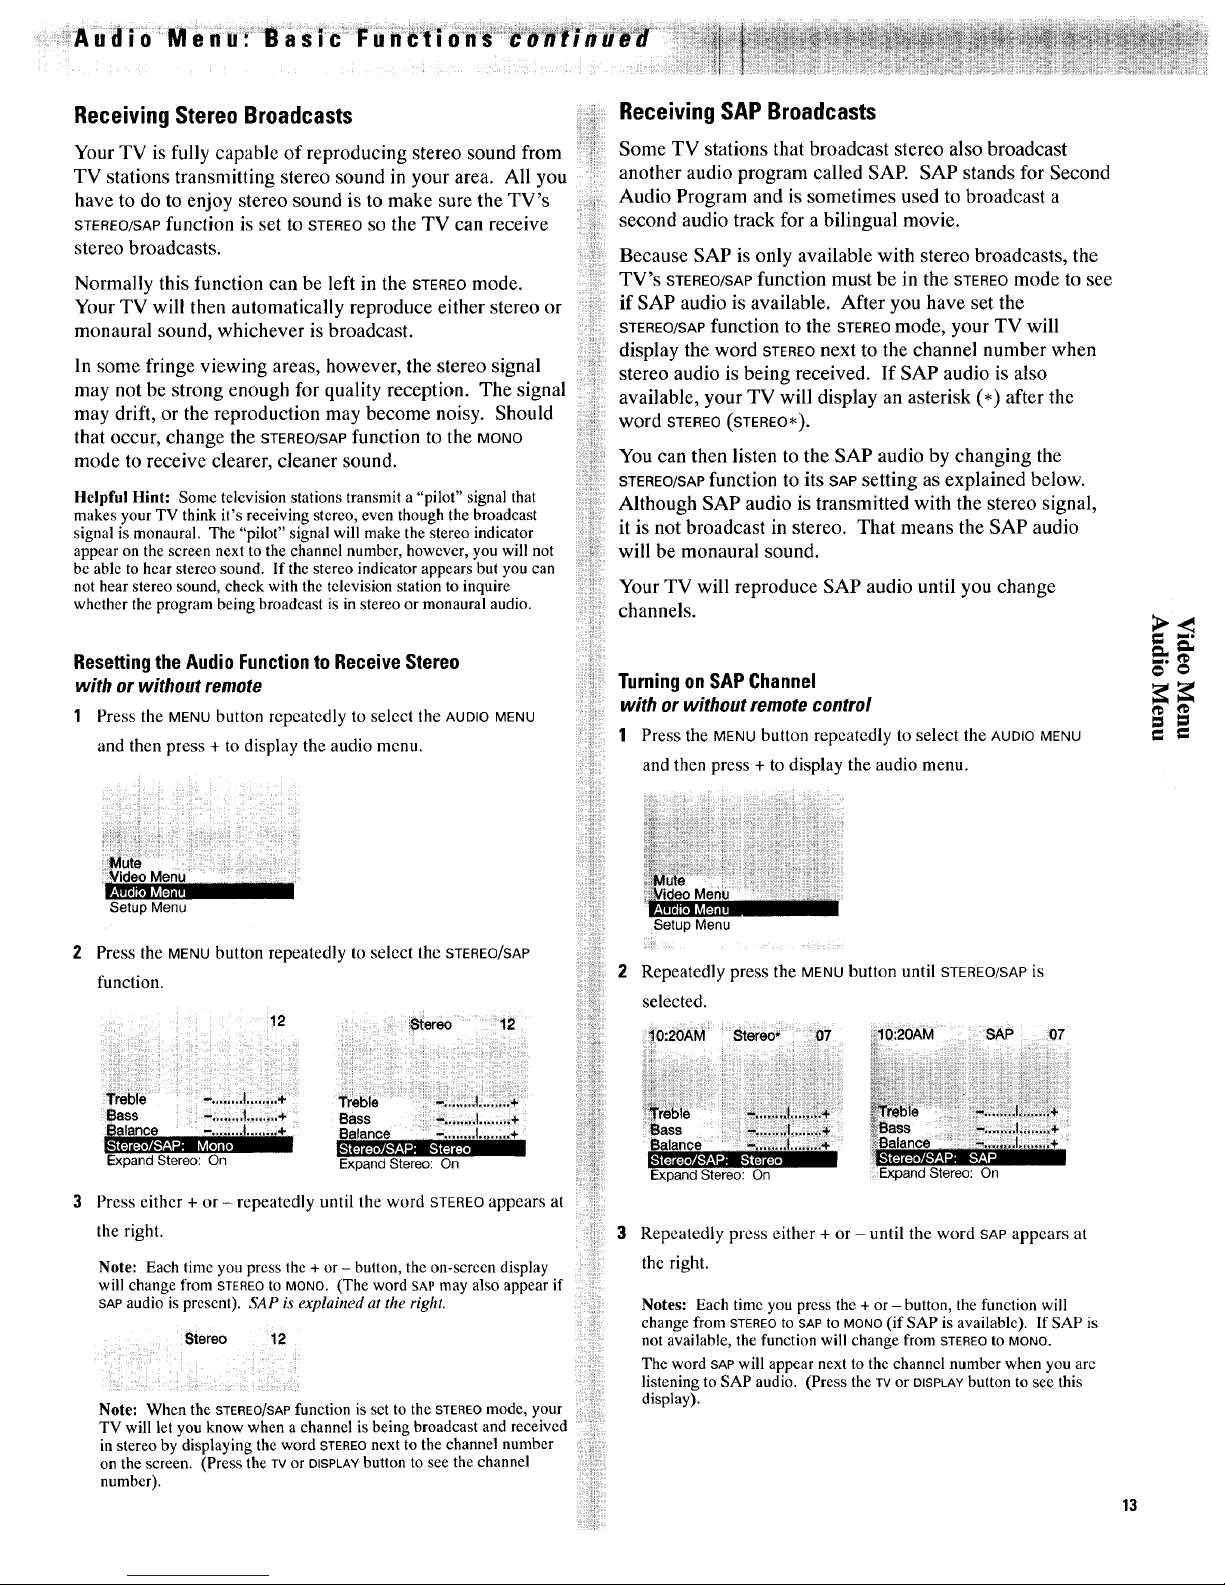
Resettingthe AudioFunctionto Receive Stereo
with orwithout remote
1 Press the MENUbutton repeatedly to select the AUDIOMENU
and then press + to display the audio menu.
Setup Menu
Press the MENU button repeatedly to select the STEREO/SAP
function.
12 _tereo 12
ii!iiiiiiiii!i;ii?
_i!i!!!iiiiii!i_i!i!i
!i!ii_iii?!i;_
_ _!!!_!_!ii__
!iiiiiiii_i!!i!:ill
_%i%1
;i i ii!iiiiiii! :!il
iiii:ii:ii!;ii!i!:i_
Receiving SAP Broadcasts
Some TV stations that broadcast stereo also broadcast
another audio program called SAE SAP stands for Second
Audio Program and is sometimes used to broadcast a
second audio track for a bilingual movie.
Because SAP is only available with stereo broadcasts, the
TV's STEREO/SAPfunction must be in the STEREOmode to see
if SAP audio is available. After you have set the
STEREO/SAPfunction to the STEREOmode, your TV will
display the word STEREOnext to the channel number when
stereo audio is being received. If SAP audio is also
available, your TV will display an asterisk (*) after the
word STEREO (STEREO*).
You can then listen to the SAP audio by changing the
STEREO/SAPfunction to its SAPsetting as explained below.
Although SAP audio is transmitted with the stereo signal,
it is not broadcast in stereo. That means the SAP audio
will be monaural sound.
Your TV will reproduce SAP audio until you change
channels.
Turningon SAPChannel
with or without remote control
1 Press the MENU button repeatedly to select the AUDIOMENU
and then press + to display the audio menu.
Setup Menu
Repeatedly press the MENUbutton until STEREO/SAPis
selected.
10:20AM Stereo* 07 :10:20AM SAP 07
#£.
===
Treble -........I........+
Bass -. .......I........+
Balance -. .......I........+
ExpandStereo: On
Treble -...a...! ........ +
Bass -. ....... I........ +
Balance -. ....... I........ +
Expane Stereo: On
Press cithcr+ or - repeatedly until the word STEREOappears at
the right.
Note: Each timc you press the + or - button, the on-screen display
will change from STEREOto MONO. (The word sAP may also appear if
SAP audio is present). SAP is explained at the right.
Stereo 12
Note: When the STEREO/SAPfunction is set to the STEREO mode, your
TV will let you know when a channel is being broadcast and received
in stereo by displaying the word STEREOnext to the channel number
on the screen. (Press the Iv or DISPLAYbutton to see the channel
number).
i'
'Treble -......J ...... L÷
Bass -...,;...I ........ ÷
Balance -,.,,_..J ....... .+
Expand Stereo: On
Ba anee
ExpandStereo: On
Repeatedly press either + or until the word SAP appears at
the right.
Notes: Each time you press the + or - button, the function will
change from STEREOto SAP tO MONO(if SAP is available). If SAP is
not available, the function will change from STEREOto MONO.
The word SAP will appear next to the channel number when you arc
listening to SAP audio. (Press the TVor O_SPLAYbutton to see this
display).
13
Expanded Stereo
Your TV includes an Expanded Stereo feature which adds
greater depth and dimension to stereo broadcasts. Your TV
electronically increases the audio separation perception of
the speakers so you perceive an "expanded" more spacious
stereo sound effect.
Although you can easily turn the expanded stereo feature
on and off as desired, you may prefer to leave it turned on.
That way your TV will automatically process and expand
the stereo signals whenever a stereo broadcast is received
(or whenever a stereo tape is played through a stereo VCR
connected to the TV's audio/video jacks labeled INPUT).
Because this feature expands stereo sound, it processes
only stereo signals. If a TV program is broadcast in mono
instead of stereo, your TV will automatically reproduce
monaural audio. You will not be able to hear Expanded
Stereo because expansion has no effect on monaural audio.
Stereo expansion enhances the ambience of music and
program material. Dramatic effects of spatial enhancement
can be experienced with music. Talk shows with
background crowd noise also benefit from expansion by
engulfing the listener in a wider sound field than would be
experienced without expanded stereo. The effect will vary
with program material.
The perception of greater stereo separation is created by
cancelling the cross-coupled sound from the right speaker
that arrives at the left ear (and the left speaker that arrives
at the right ear). Like stereo headphones, stereo expansion
isolates the left and right signals that arrive at the ears. As
a result, the speakers seem to be farther away from the TV.
Notes: The Expanded Stereo feature will have no effect unless the
program is broadcast in stereo.
When the Expanded Stereo feature is turned on, some sound will be
heard from each speaker regardless of the BALANCE control setting.
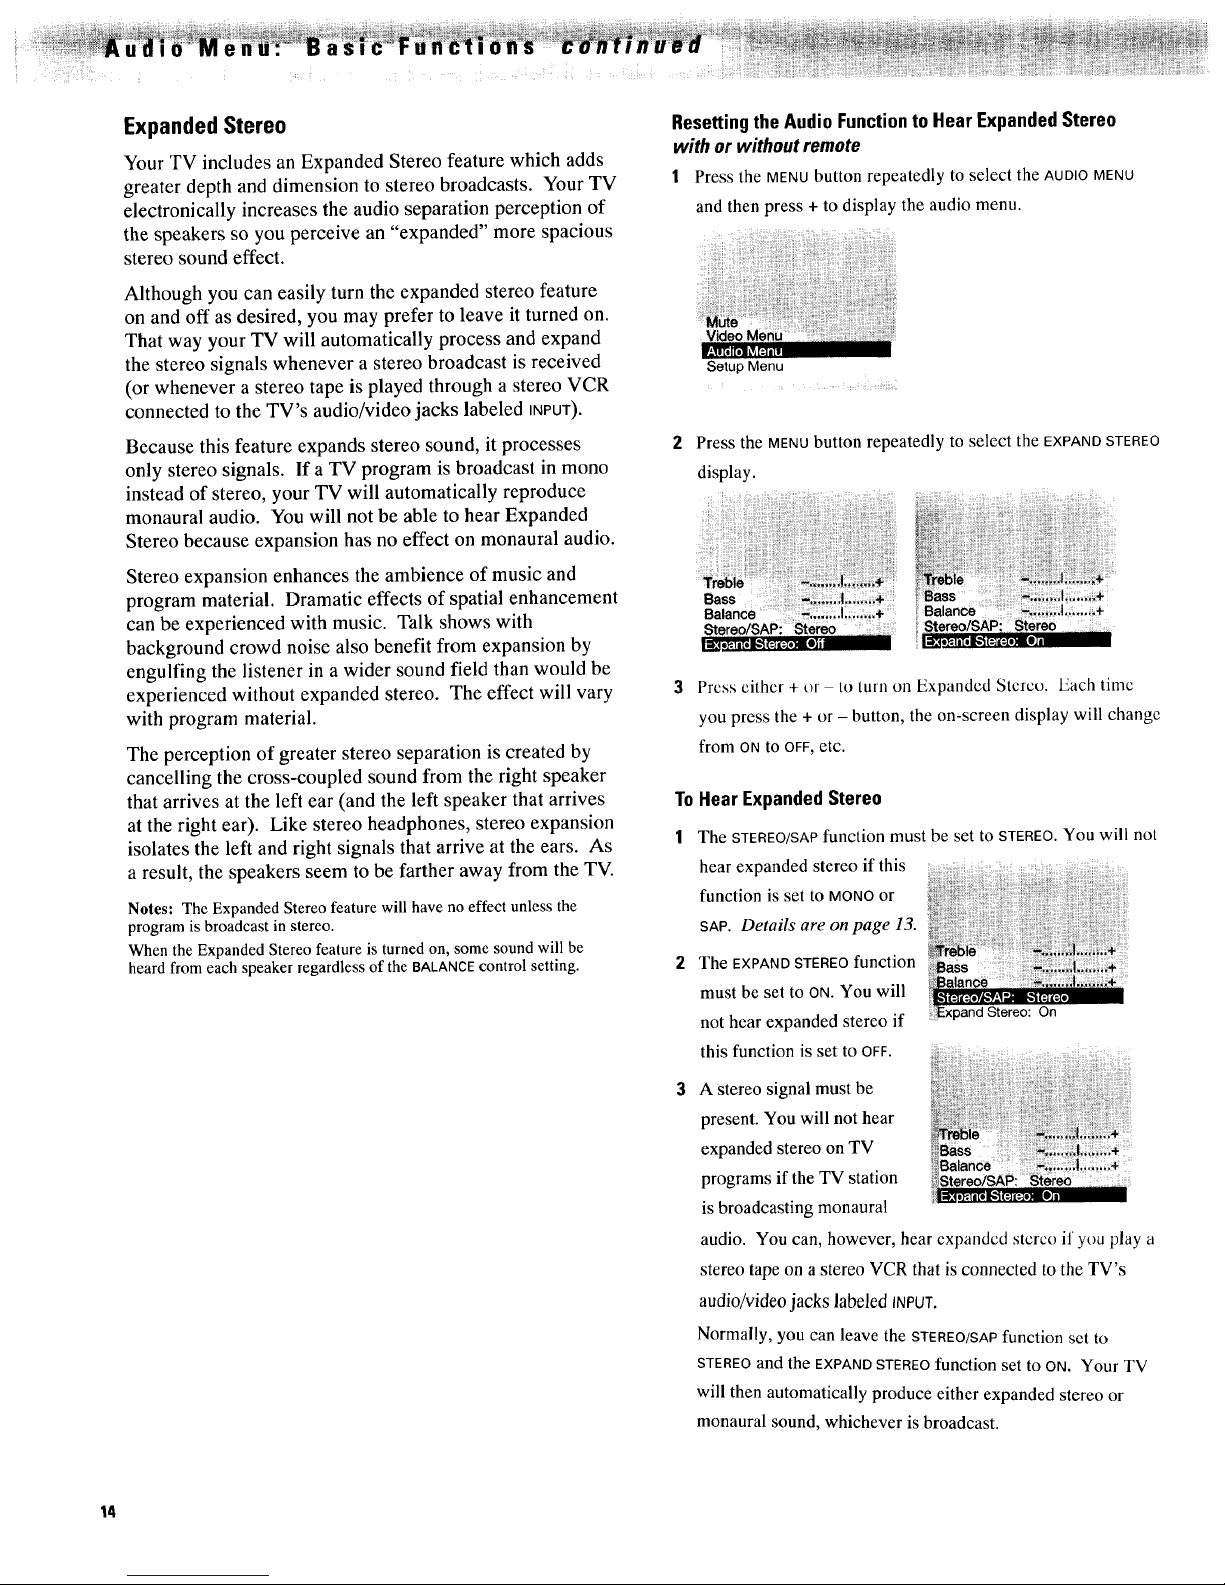
Resetting the Audio Function to Hear Expanded Stereo
with or without remote
1 Press the MENUbutton repeatedly to select the AUDIOMENU
and then press + to display the audio menu.
Setup Menu
Press the MENUbutton repeatedly to select the EXPANDSTEREO
display.
To
1
Stereo/SAPi Stereo Stereo/SAP: stereo
Press either + t)r to turn on Expanded Stereo. Each time
you press the + or - button, the on-screen display will change
from ONto OFF,etc.
Hear Expanded Stereo
The STEREO/SAPfunction must be set to STEREO.You will not
hear expanded stereo if this
function is set to MONO or
SAP. Details are on page 13.
The EXPAND STEREO function
must be set to ON.You will
not hear expanded stereo if On
this function is set to OFF. ..........
A stereo signal must be
present. You will not hear
expanded stereo on TV
programs if the TV station
is broadcasting monaural
audio. You can, however, hear expanded stereo if you play a
stereo tape on a stereo VCR that is connected to the TV's
audio/video jacks labeled INPUT.
Normally, you can leave the STEREO/SAPfunction set to
STEREOand the EXPAND STEREO function set to ON. Your TV
will then automatically produce either expanded stereo or
monaural sound, whichever is broadcast.
14
 Loading...