

Page 1
Model:PLED4616A
Page 2
CONTENTS
14
16
18
19
22
25
1
2
2
3
3
6
7
3
4
8
9
7
8
8
9
9
4
5
5
6
11
12
12
12
SAFETY
PRECAUTION
IMPORTANT
SAFETY
INSTRUCTION
ACCESSORIES
GETTING
STARTED
5
CONTROL
REFERENCE
GUIDE
WALL MOUNT
INSTALLATION
INITIAL SETUP
TV SETUP
CONNECTIONS
Remote Control
Front View
Back View
Side View
Antenna Connection
AV Connection
YPbPr Connection
HDMI Connection
VGA Connection
Headphone Connection
Power Cord Connection
Coax(SPDIF) Connection
Putting The Unit On A Proper Place
Source Selection
Turning The Unit On For The First Time
Picture Menu
Audio Menu
Time Menu
Setup Menu
LOCK(Parental) Menu
TV(CHANNEL) Menu
1
English
10
7
9
Page 3

CONTENTS
26
10
28
11
12
29
DISPL AY
MODE
SPECI FICATION
TROUB LESHOOT ING
GUIDE
PC Formats
Video Formats
TV Symptom
SAFETY CLASS :This is an IEC safety class I product
and it must be grounded for safety.
27
Page 4
*
SAFETY PRECAUTION
CAUTION
•
•
•
WAR NING:
PLACEMENT INFORMATION
SAFE TY INFORMATION
RATING PLATE LOCATION
FCC STATEMEN TS
WARNING:
1
CAUT IO N MARKING W AS LOCATE D AT T HE REAR
OF THE A PP ARATUS.
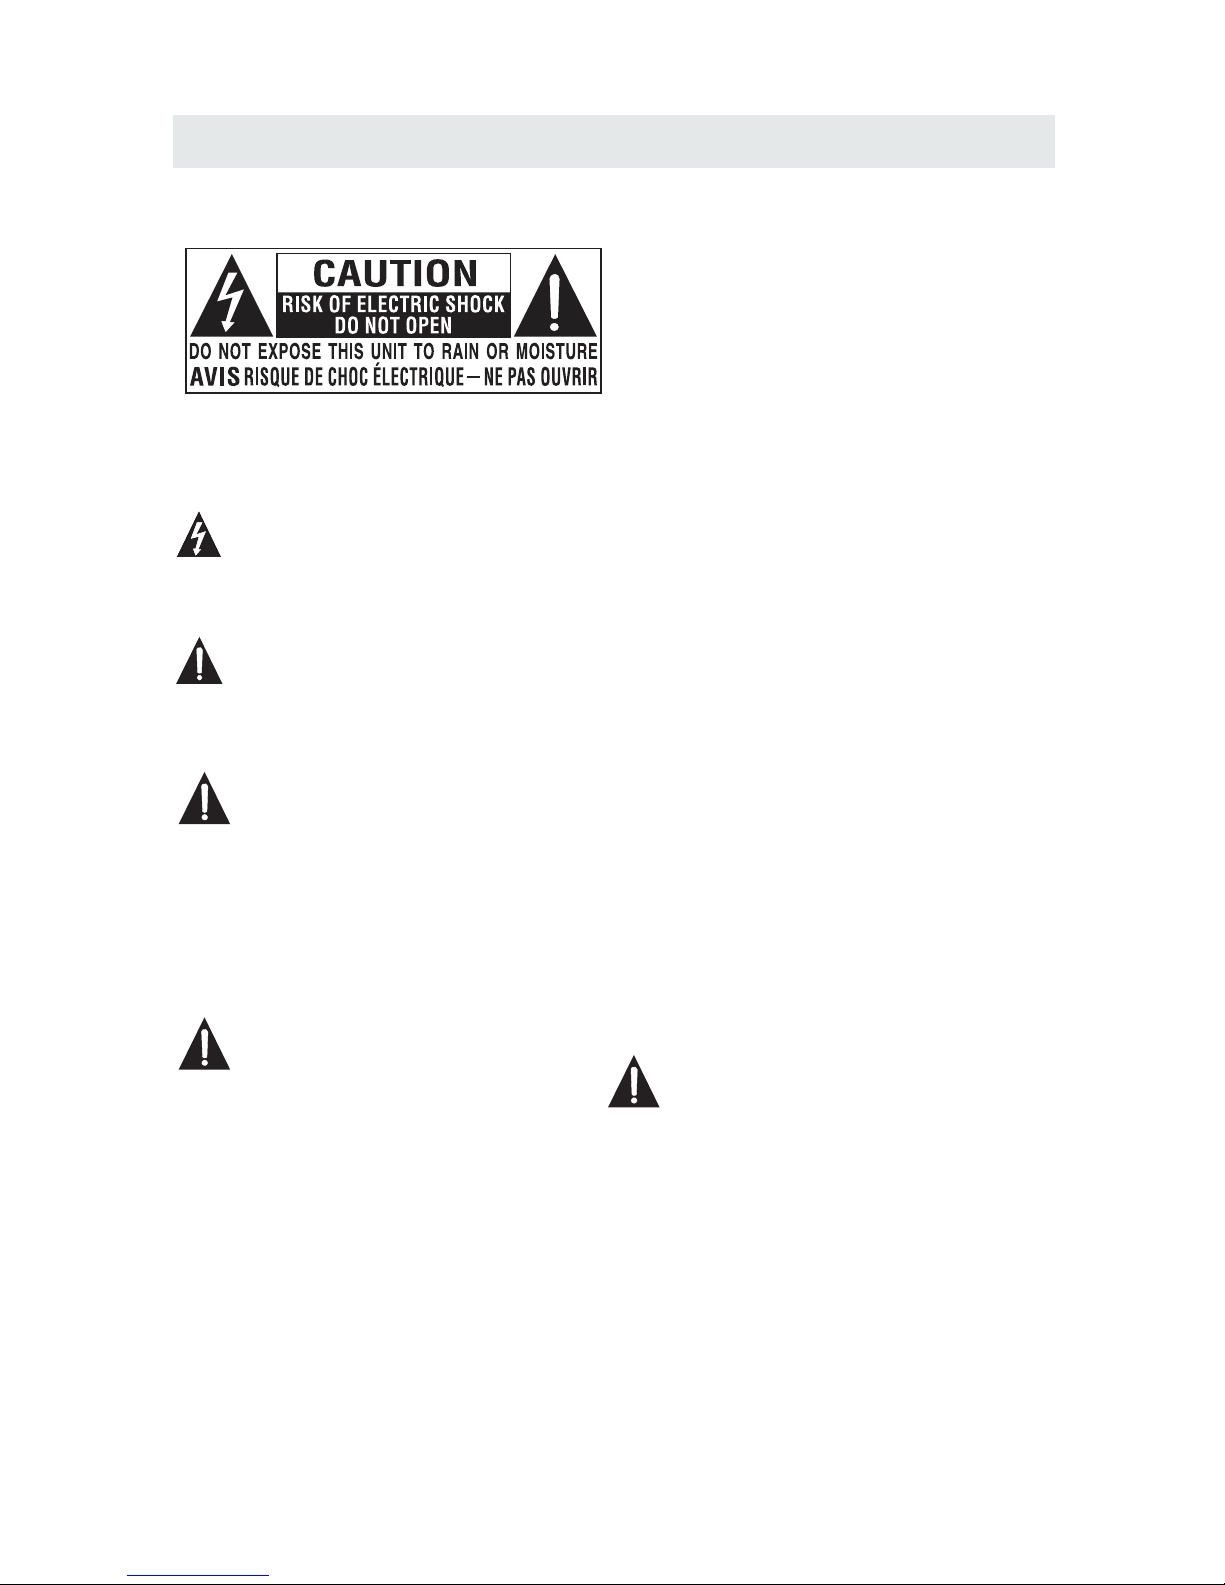
WARNING: TO REDUCE THE RISK OF ELECTRIC
SHOCK,DO NOT REMOVE COVER(OR BACK)
NO USER SERVICEABLE PARTS INSIDE.
REFER SERVICING TO QUALIFIED SERVICE
PERSONNEL.
The lightning flash with arrowhead symbol,
within an equilateral triangle,is intended to
alert the user to the presence of uninsulated
“dangerous voltage”within the product's enclosure
that may beof sufficient magnitude to constitute a
risk of electric shock to persons.
The exclamation point within an equilateral
Triangle is intended to alert the user to
The presence of important operating and
maintenance (servicing) instructions in the literature
accompanying the appliance.
DANGER O F EXPLOSION I F BATTERY IS
INCORR ECTLY REPLA CED. REPLACE ONLY
WITH THE S AME OR EQUIVA LENT TYPE.
USE OF CON TROLS OR ADJU STMENTS OR
PERFOR MANCE OF PROC EDURES OTHE R
THAN THO SE SPECIFIE D MAY RESULT IN
HAZARD OUS RADIATI ON EXPOSURE .
•
•
TO REDUC E THE RISK OF FIR E OR ELECTRIC
SHOCK, D O NOT EXPOSE TH IS APPLIANC E TO
RAIN OR MO ISTURE.
TO REVEN T FIRE OR SHOCK H AZARD, DO NOT
EXPOSE T HIS UNIT TO RAI N OR MOISTURE . DO
NOT PLAC E OBJECTS FIL LED WITH LIQU IDS ON
OR NEAR TH IS UNIT.
SHOULD A NY TROUBLE OC CUR, DISCON NECT
THE AC POW ER CORD AND REF ER SERVICIN G
TO A QUALI FIED TECHNI CIAN.
Do not use t his unit in pla ces that are ex tremely
hot, col d, dusty or hum id.
Do not res trict the air flow of this un it by placing it
somewh ere with poor a irflow, by covering it w ith
a cloth, b y placing it on b edding or carpeting.
When con necting or di sconnecting the AC pow er
cord, gr ip the plug and n ot the cord itself. Pulling
the cord m ay damage it an d create a hazard.
When you a re not going to u se the unit for a l ong
period o f time, disco nnect the AC power cord.
The rati ng plate is loc ated on the rea r of the unit.
NOTE: Th is unit has bee n tested and fo und to comply
with the l imits for a Cla ss B digital de vice, pursuant
to Part 15 o f the FCC Rules . These limit s are designed
to provi de reasonab le protection agains t harmful
interf erence in a res idential installat ion.
This uni t generates , uses and can radiate rad io
freque ncy energy an d, if not insta lled and us ed in
accord ance with the i nstructions, may cause harmful
interf erence to rad io communication. Ho wever, ther e
is no guar antee that in terferenc e will not occur in a
partic ular instal lation. If th is unit does cause harmf ul
interf erence to rad io or television recep tion, which
can be det ermined by tu rning the unit off and on, the
user is en couraged to t ry to correct the interference
by one or mo re of the follo wing measures:
- Reorie nt or relocat e the receiving antenn a.
- Increa se the separa tion between the unit and
receiv er.
-Conne ct the unit int o an outlet on a ci rcuit different
from tha t to which the re ceiver is con nected.
- Consul t the dealer or a n experie nced radio/ TV
techni cian for help .
Changes or modificat ions to this
unit not expressly app roved by the party respon sible
for compliance could v oid the user authority
to operate the unit.
•
•
•
•
Page 5

IMPORTANT SAFETY INSTRUCTIONS
2
1)Read th ese instructions.
2)Keep th ese instructions.
3)Heed al l warnings.
4)Follo w all instructions.
5)Do not us e this apparatus near wa ter.
6)Clean o nly with a dry cloth.
7)Do not bl ock any venti lation op enings.
Instal l in accordance with the
manufa cturer's instructi ons.
8)Do not in stall near any heat sour ces such
as radia tors, heat re gisters, stoves, or
other ap paratus (In cluding a mplifiers ) that
produc e heat.
9)Do not de fect the safe ty purpose of the
polari zed or grounding-typ e plug.
A polari zed plug has two blades wi th one
wider th an the other.
A ground ingtype plug has two bla des
and a thir d grounding prong.
The wide b lade or the thi rd prong is
provid ed for your saf ety.
If the pro vided plug does not fit in to your
wall out let, consul t an electrician for
replac ement of the ob solete ou tlet.
10)Prot ect the power cord from be ing walked on
or pinch ed particularly at plu gs, conveni ence
recept acles, and th e point where they exit
from the a pparatus.
11)Only u se attachme nts / accessories spec ified
by the man ufacturer .
12)Use on ly with the car t, stand,
tripod , bracket, or t able
specif ied by the manu facturer,
or sold wi th the appara tus.
When a car t is used, use ca ution when
moving t he cart / appar atus combination to
avoid in jury from tip -over.
13)Unpl ug this apparatus duri ng lightnin g
Storms o r when unused f or long per iods of
time.
14)Refe r all servicing to quali fied servic e
person nel. Servicing is requ ired when the
appara tushas been damaged in a ny way,
such as th e power cord or p lug is dama ged,
liquid h as been spilled or objec ts have falle n
into the a pparatus, t he apparatus has been
expose d to rain or mois ture, does not operate
normal ly, or has been dropped.
15)To pre vent electr ic shock, ensure the gro unding
pin on the A C cord power plug is secur ely
connec ted.
Page 6
ACCESSORIES
Please check and identify the supplied accessories.
.... ..... ...................... ..... ..... ................. ..... ..... ..... ................. ..... ..... ........ .... .....
.... ..... ...................... ..... ..... ................. ..... ..... ..... ................. ..... ..... ............
.... ..... ...................... ..... ..... ................. ..... ..... ..... ................. ..... ..... .......
GETTING STARTED
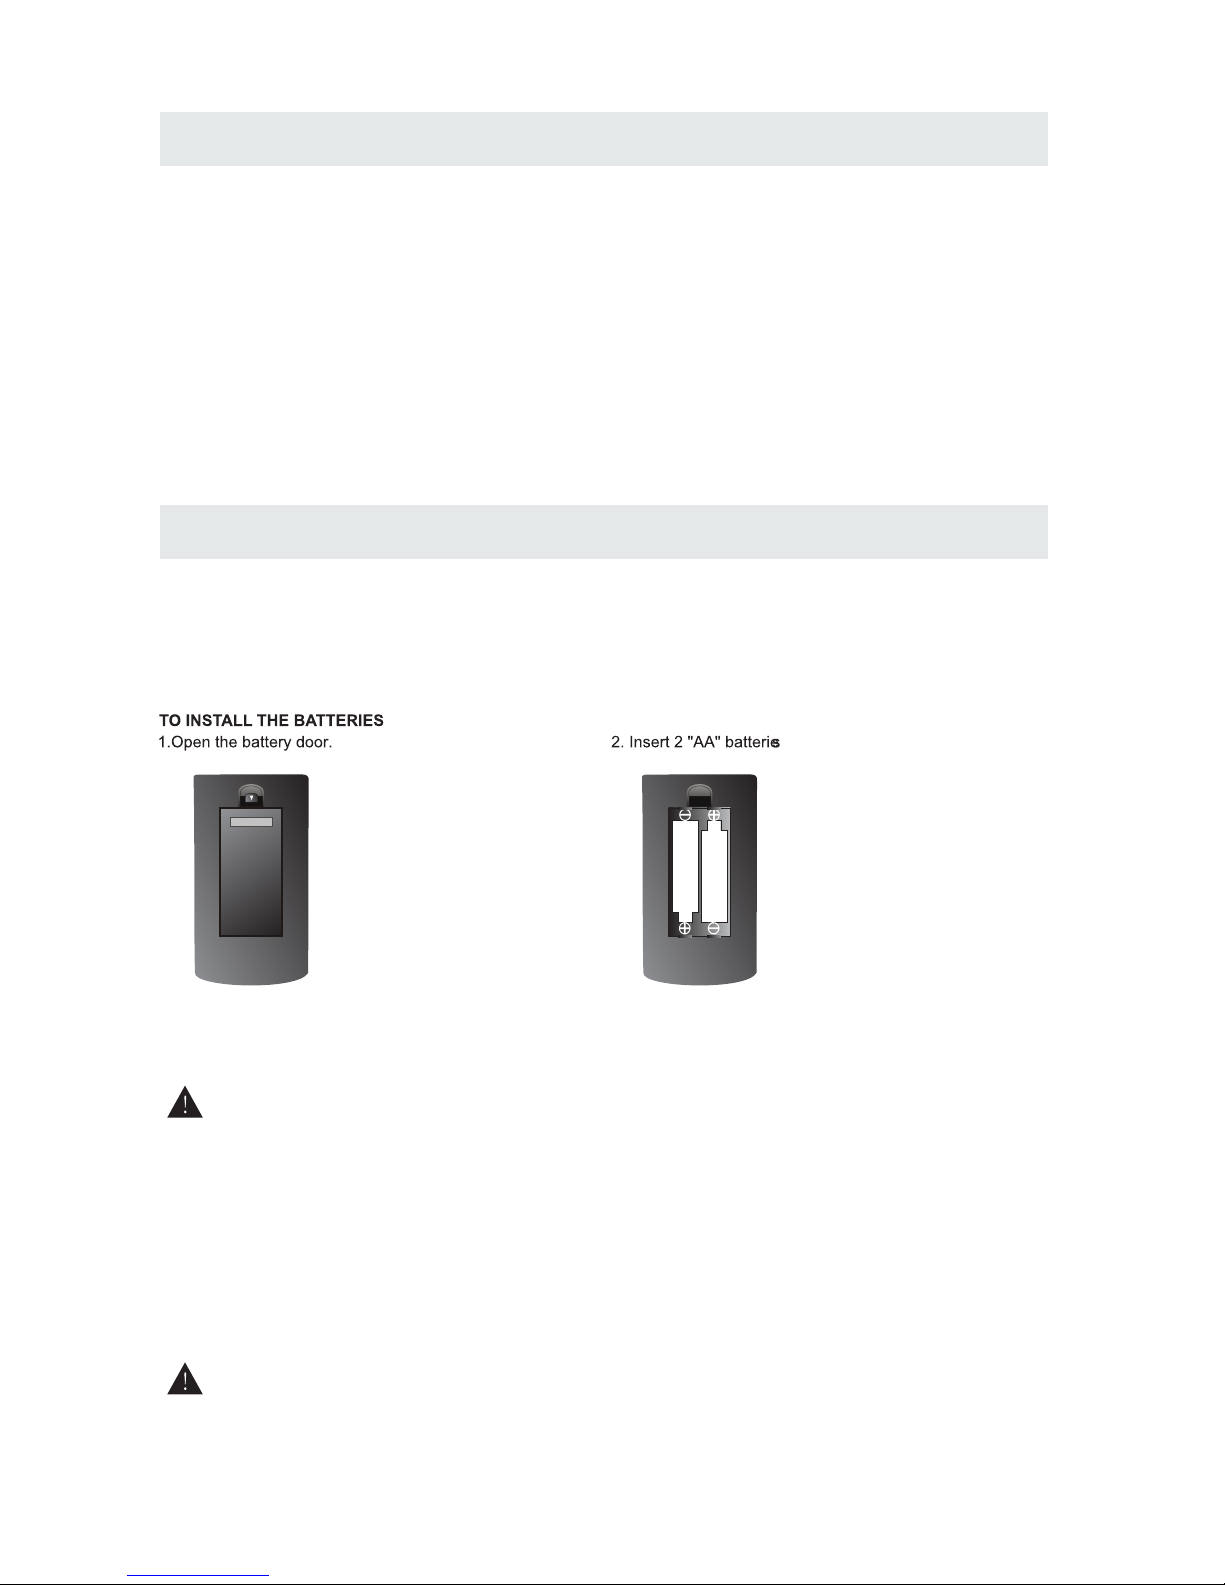
USIN G THE REM OTE CONTROL
BATTERY REPL ACEMENT
CAUTION
: Da ng er of explo sion if bat ter y is in correct ly r eplac ed .
NOT ES
WARNING :
3
x 2
x 1
x 1
x 1
Remo te c ontrol ............... ......... ......... ......... .................... ......... ......... ............................. .....
Remote c ontrol
Batter y(AA)
Warran ty Card
Instru ction Manual
·Point th e remote control at the re mote sensor located on t he unit.
·When the re is a strong ambient lig ht source, th e perform ance of the inf rared remote sensor
·may be deg raded, ca using unrel iable ope ration.
·The reco mmended e ffective di stance for re mote oper ation is abou t 16 feet (5 meters).
When the b atteries become weak , the operating distan ce of the remote control i s greatly
reduce d and you wil l need to repla ce the batt eries.
·If the rem ote control is not going t o be used for a long time, rem ove the batte ries to avo id
damage c aused by ba ttery leaka ge corros ion.
·Do not mix o ld and new ba tteries. Do n ot mix ALKALINE, stand ard (CARBON -ZINC) or
rechar geable (N ICKEL-CAD MIUM) bat teries.
·Always r emove bat teries as soo n as they become weak.
·Weak bat teries can leak and seve rely dama ge the remote c ontrol.
Do not dis pose batteries in a fire . Batteries m ay explod e or leak.
Batter ies shall not be exposed t o excessive heat such as s unshine, fire or the lik e.
Base stand and 6 screws
.... ..... ...................... ..... ..... ................. ..... ..... ..... ................. .
x 1
Screw driver
.... ..... ...................... ..... ..... ................. ..... ..... ..... ................. ..... ..... ............
x 1
Page 7
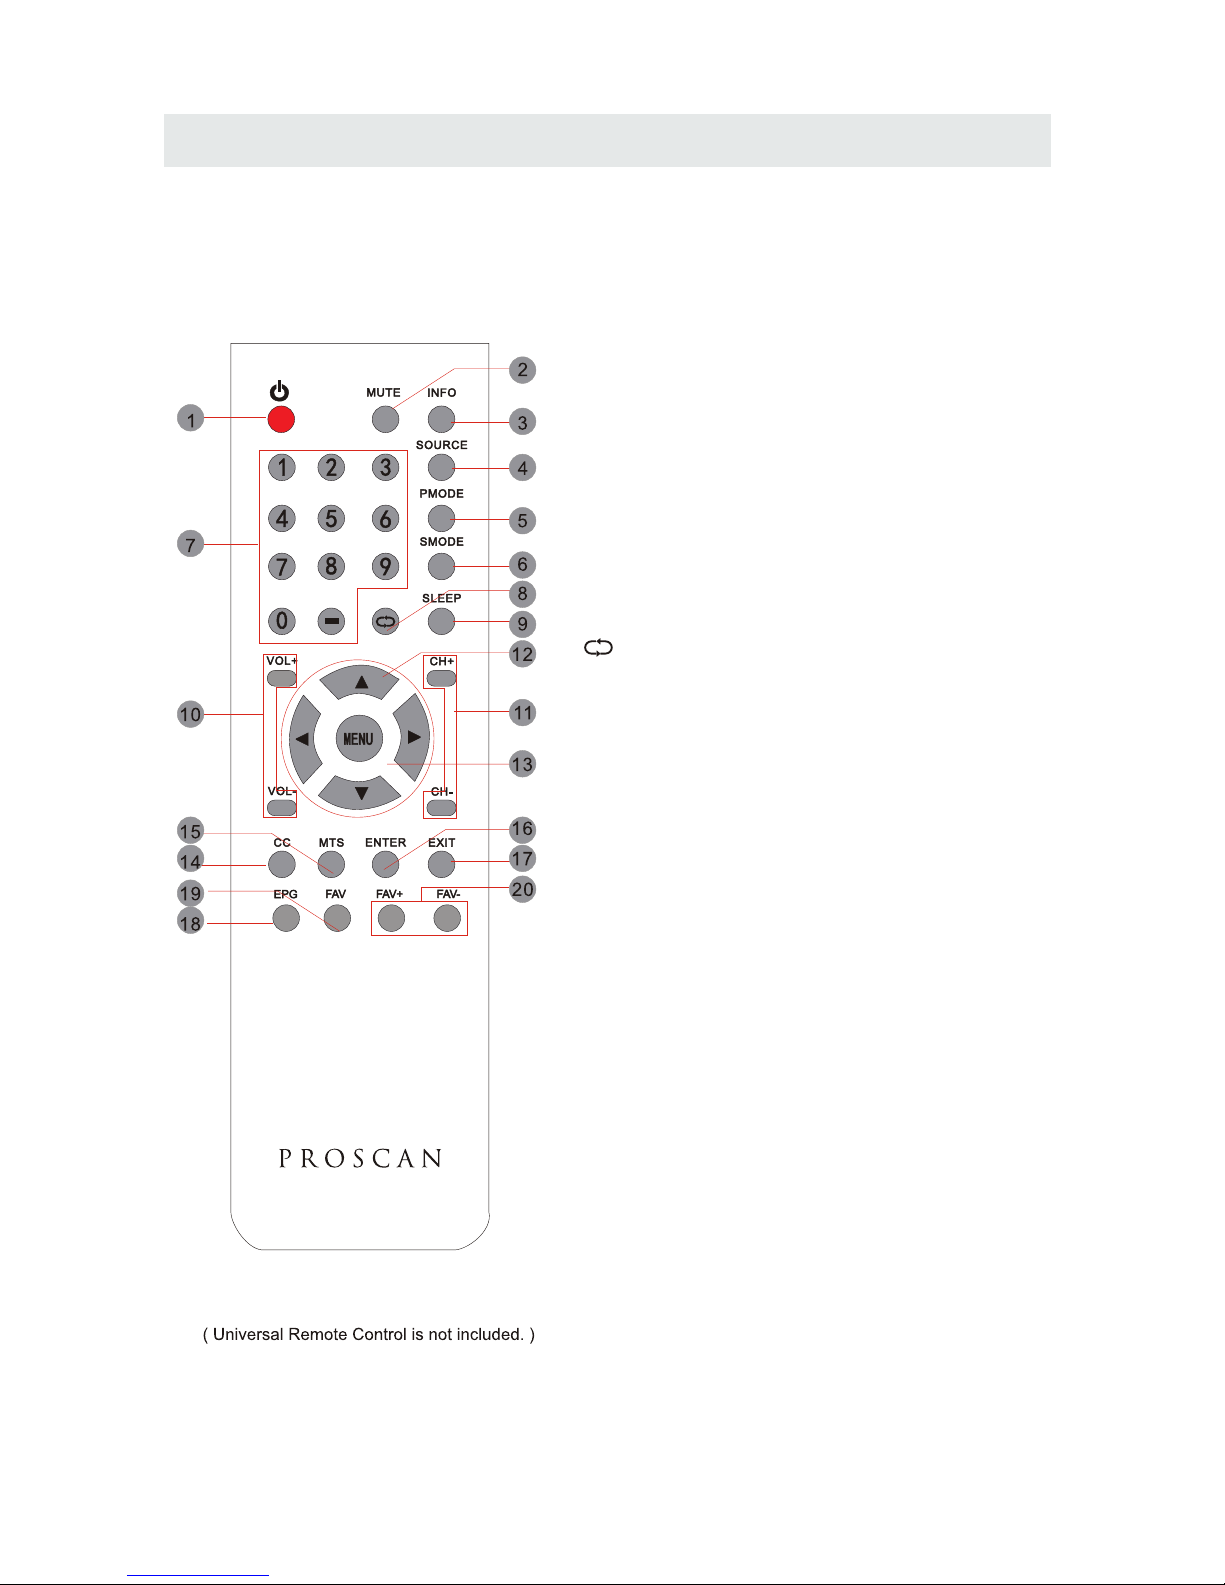
CONTROL REFERENCE GUIDE
4
REMOTE CONTROL
Universal Remote Code: 1218
1.STANDBY
To switch on the TV or make the TV into
standby mode.
2.MUTE
Press this button to mute or restore sound.
3.INFO
Show the information of the program you are watching.
4.SOURCE
Press this button to select an input source.
5.PMODE
Press this button to select a picture mode for different
picture qualities.
6.SMODE
Press this button to select sound setting for different
sound effects.
7.0-9
Allows you to change the channel of the TV.
8.
Switches back and forth between the current and
previous channels.
9.SLEEP
To select the amount of time before your TV turns
Off automatically.
10.VOL+/VOLIncreases/Decreases the Volume control.
11.CH+/CHSkips to the next/previous channel on TV mode.
12.UP/DOWN/LEFT/RIGHT
Moves the cursor upward/downward/to the left/to the right
when making a selection.
13.MENU
Displays the OSD Menu of the TV.
14.CC
Press the button to enter into the CC mode.
15.MTS
To change among STEREO, MONO and SAP. If there is no
second language available for the signal received, LED
Display audio will output to mono.
16.ENTER
Press to confirm selections on a menu screen.
17.Exit
Press this button to exit the on screen display.
18.EPG
Press this button to select the electronic programme
guide in DTV mode.
19. FAV
Press this button to show the favourite list.
20. FAV+/FAVPress this button to go through the FAV channel list.
Page 8
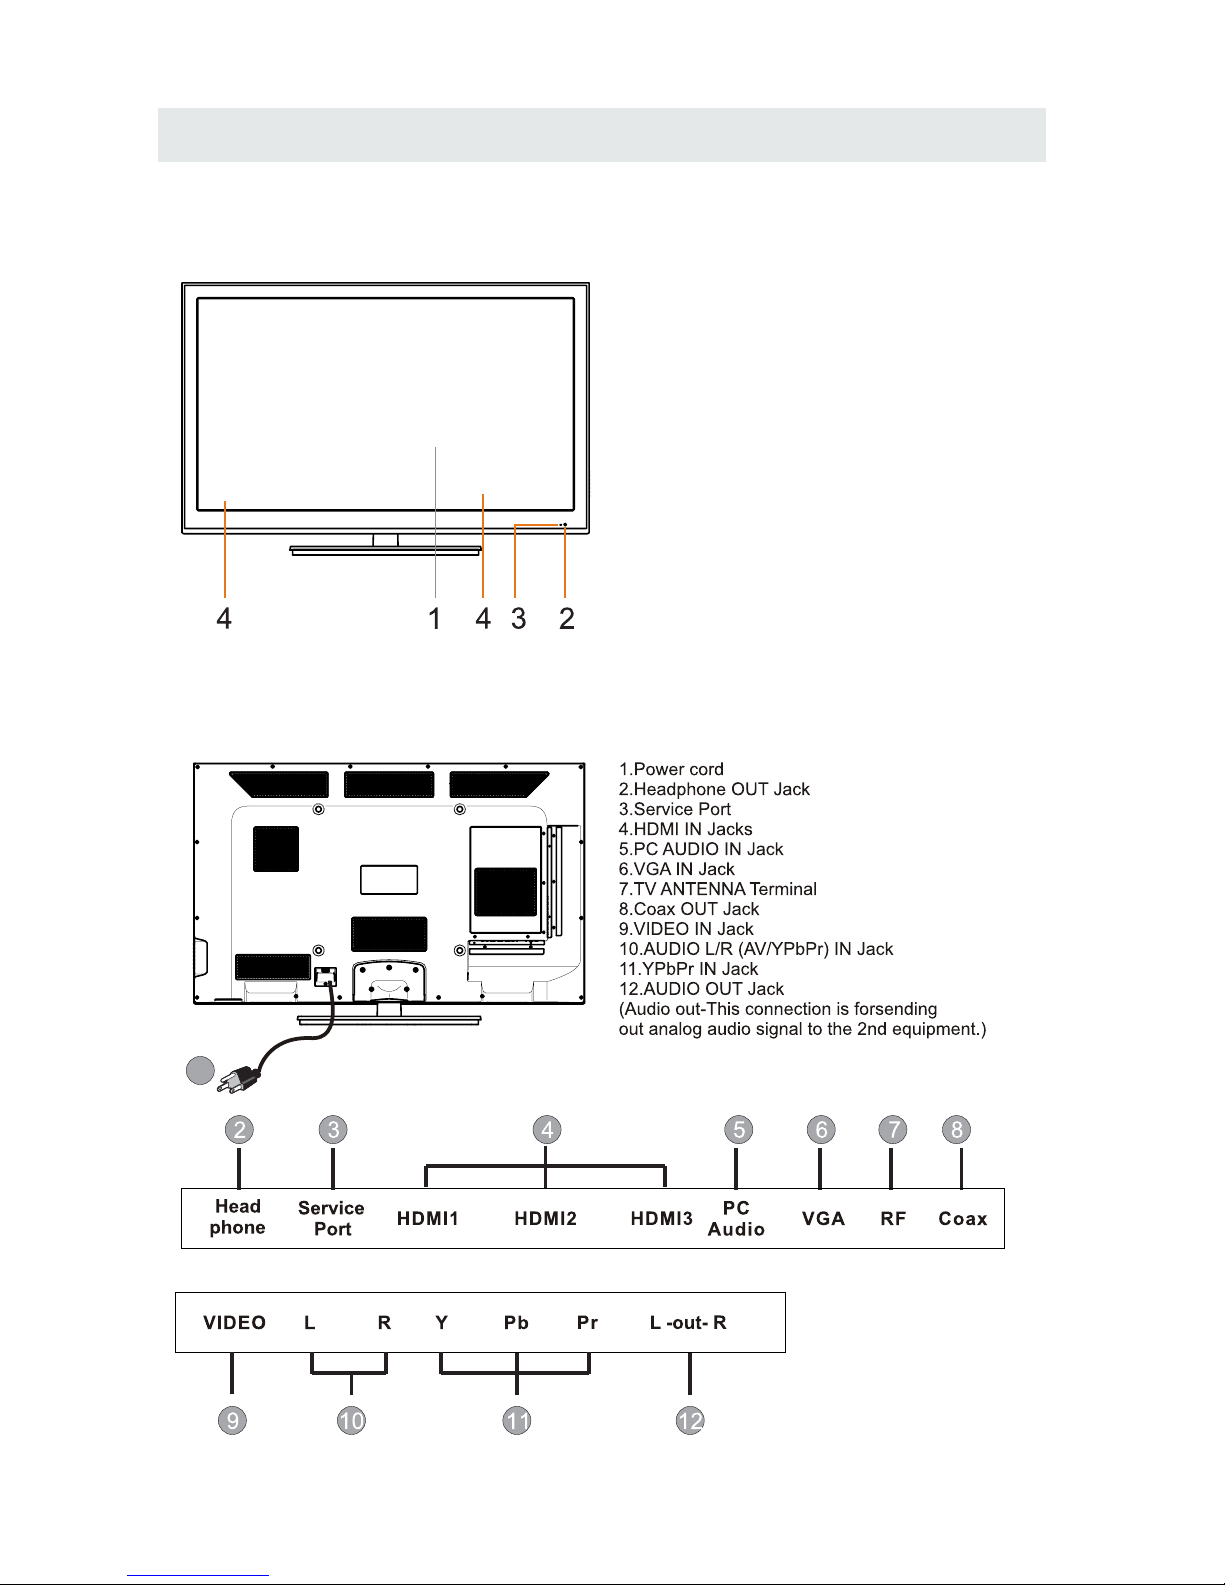
CONTROL REFERENCE GUIDE
FRONT VIEW
5
BACK VIEW
1.Color Screen
2.Remote Sensor
Do not block this sensor or the
remote control will not work.
3.Standby Indicator
Indicates whether the unit is ON
or in STANDBY (OFF) mode.
Light in red: The unit is in STANDBY.
Light in blue:The unit is turned ON.
4. Speakers
1
Page 9
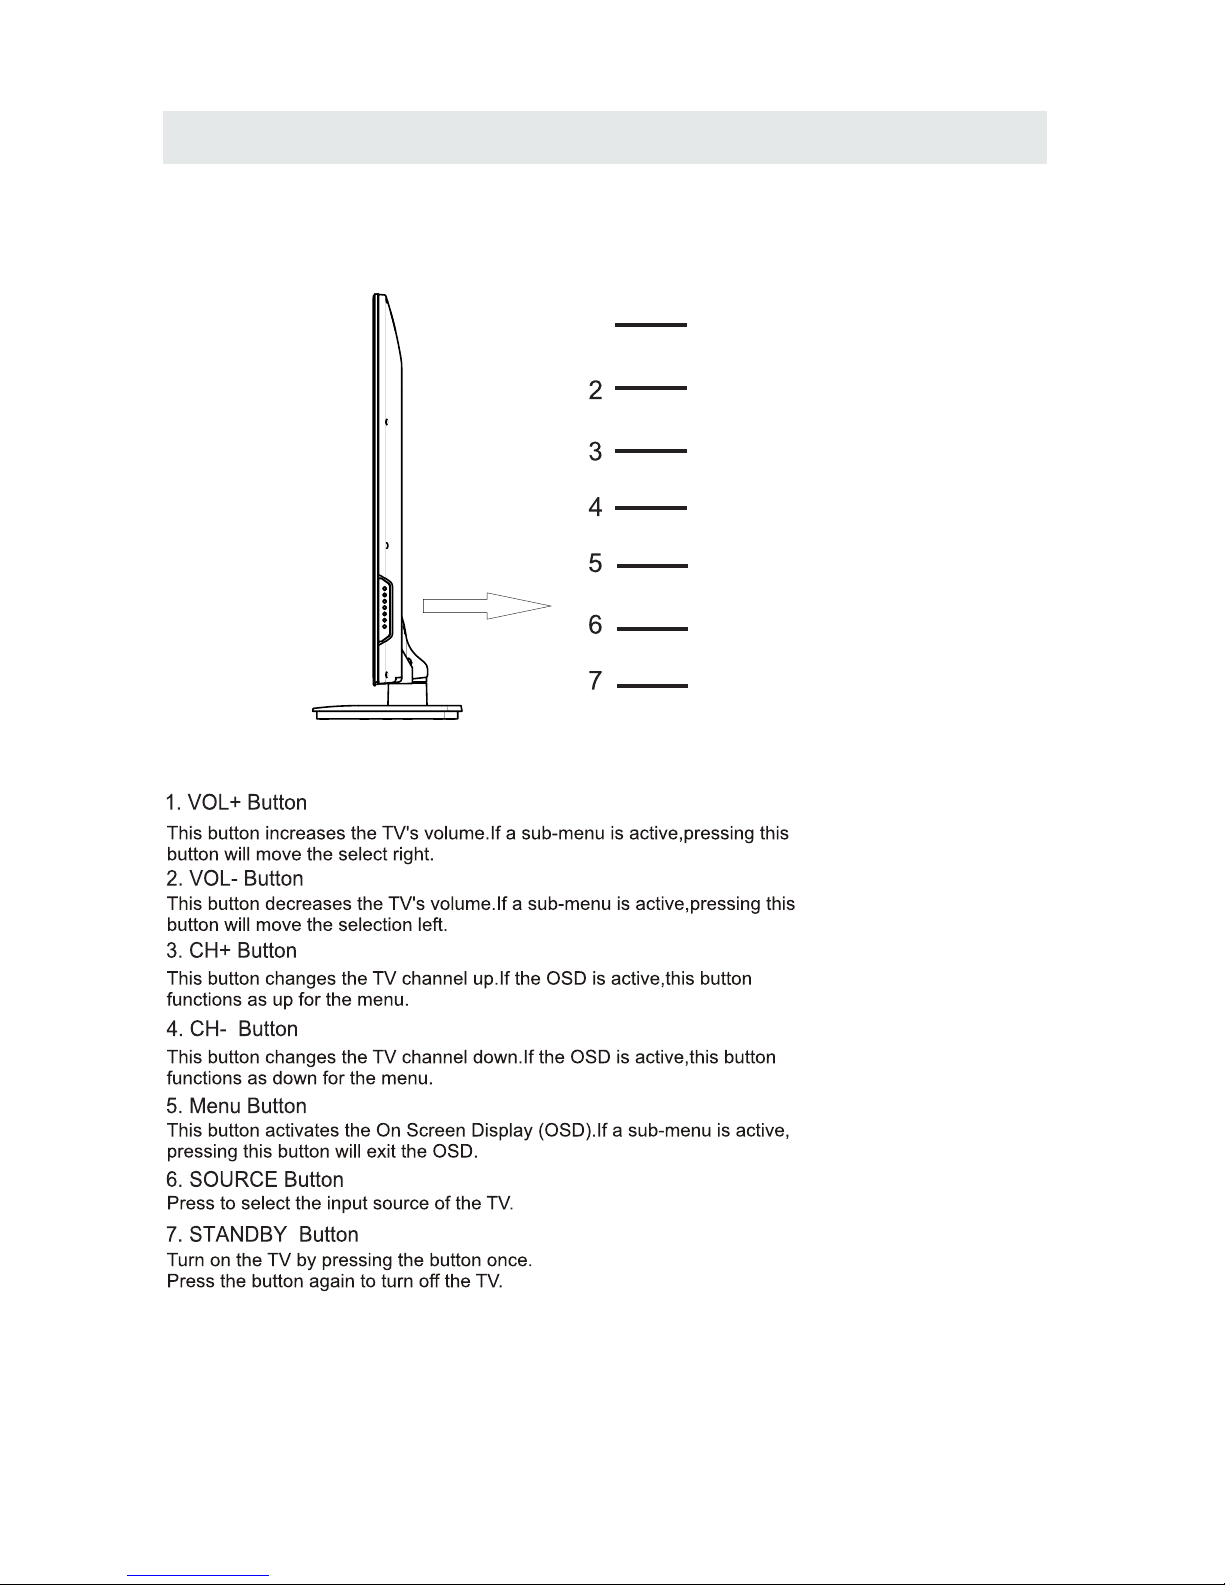
CONTROL REFERENCE GUIDE
6
SIDE VIEW
1
VOL+
VOL-
CH+
CH-
MENU
SOURCE
STANDBY
Page 10
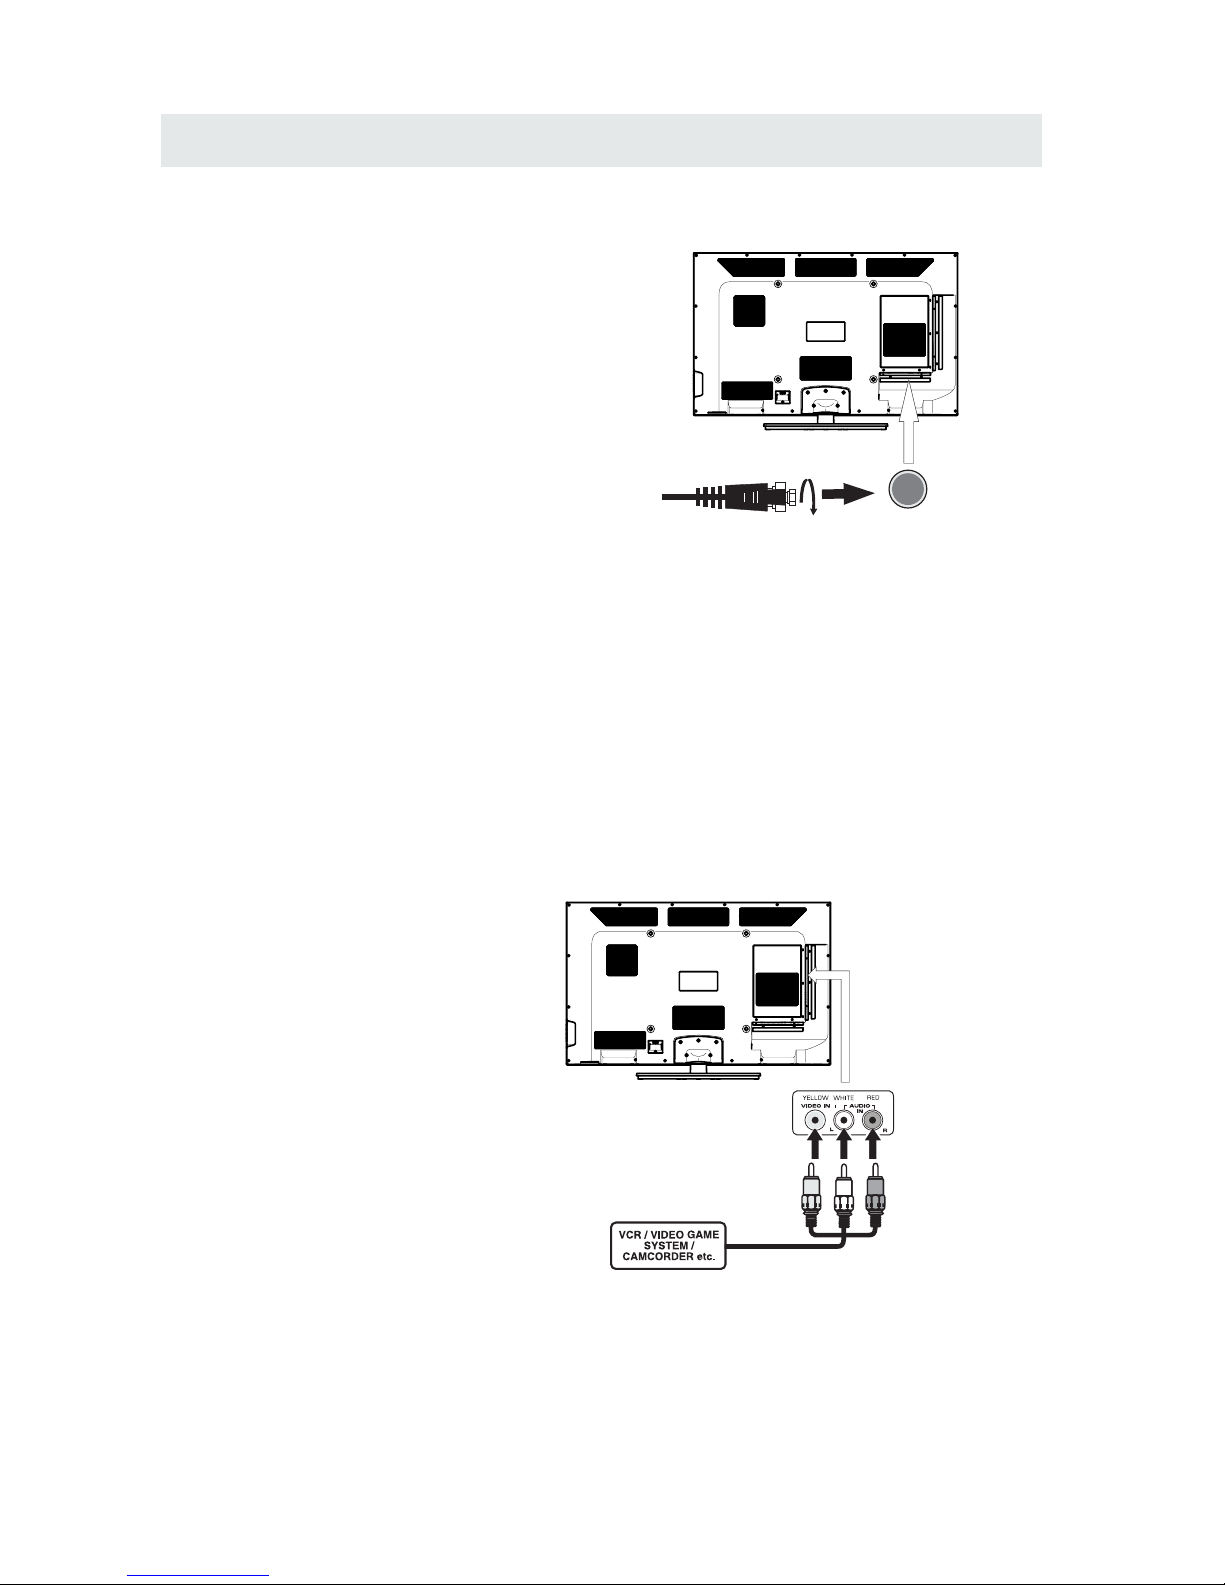
CONNECTIONS
CONNECTING A T V ANTENNA / CABLE / S A TELLITE
To view television channels cor rec tly, a signal must
be receive d from one of the following source s:
- An indoor or outd oor aerial antenna
- A ca ble system
- A satellite system
Fo r receiv ing over-the -ai r TV broa dca sts , we
reco mme nd th at yo u use an exter nal f ixe d anten na.
Sh oul d you req uire th e use of a te mpo rar y antenna,
pl ease ensure that you purc has e an antenna with
su fficient ability to receive in wea k signal areas.
On ly wh en you are in cl ose p ro ximity to a tr ans mit ter
wi ll a tempora r y antenna reprodu ce a si gnal as
st rongl y as a fixed antenna.
To connect to other equipmen t such as a VCR, camcord er, satellite system or cable, etc.
CONNECTING AN A/V DEVICE
NOTE
CONNECTING DEVICES WITH A COMPOSITE (YELLOW RCA-T YPE)
VIDEO OUTPUT
Connecting to a VCR / Video Game System / Camcorder
AUDIO VIDEO OUT
NOTE
To con nec t A/V d evi ces such as a VCR, video game sys tem o r cam corde r.
Co nnect the AUDI O / VIDEO cable (not included) as shown.
Ma ke s ure you c onn ect t he ca ble f ro m the o the r equ ipm ent ( and ) to thi s uni t
Pl eas e re fer t o the user manual
fo r the other equipmen t for
mo re infor mation.
Sa te llite, cable or TV anten na
ca bl e to TV A NTENN A
term inal (cabl e not included)
To AUDI O / VIDE O
IN j ac ks
To AU DI O / VIDEO
OU T jacks
7
(AV in)
Page 11
CONNECTIONS
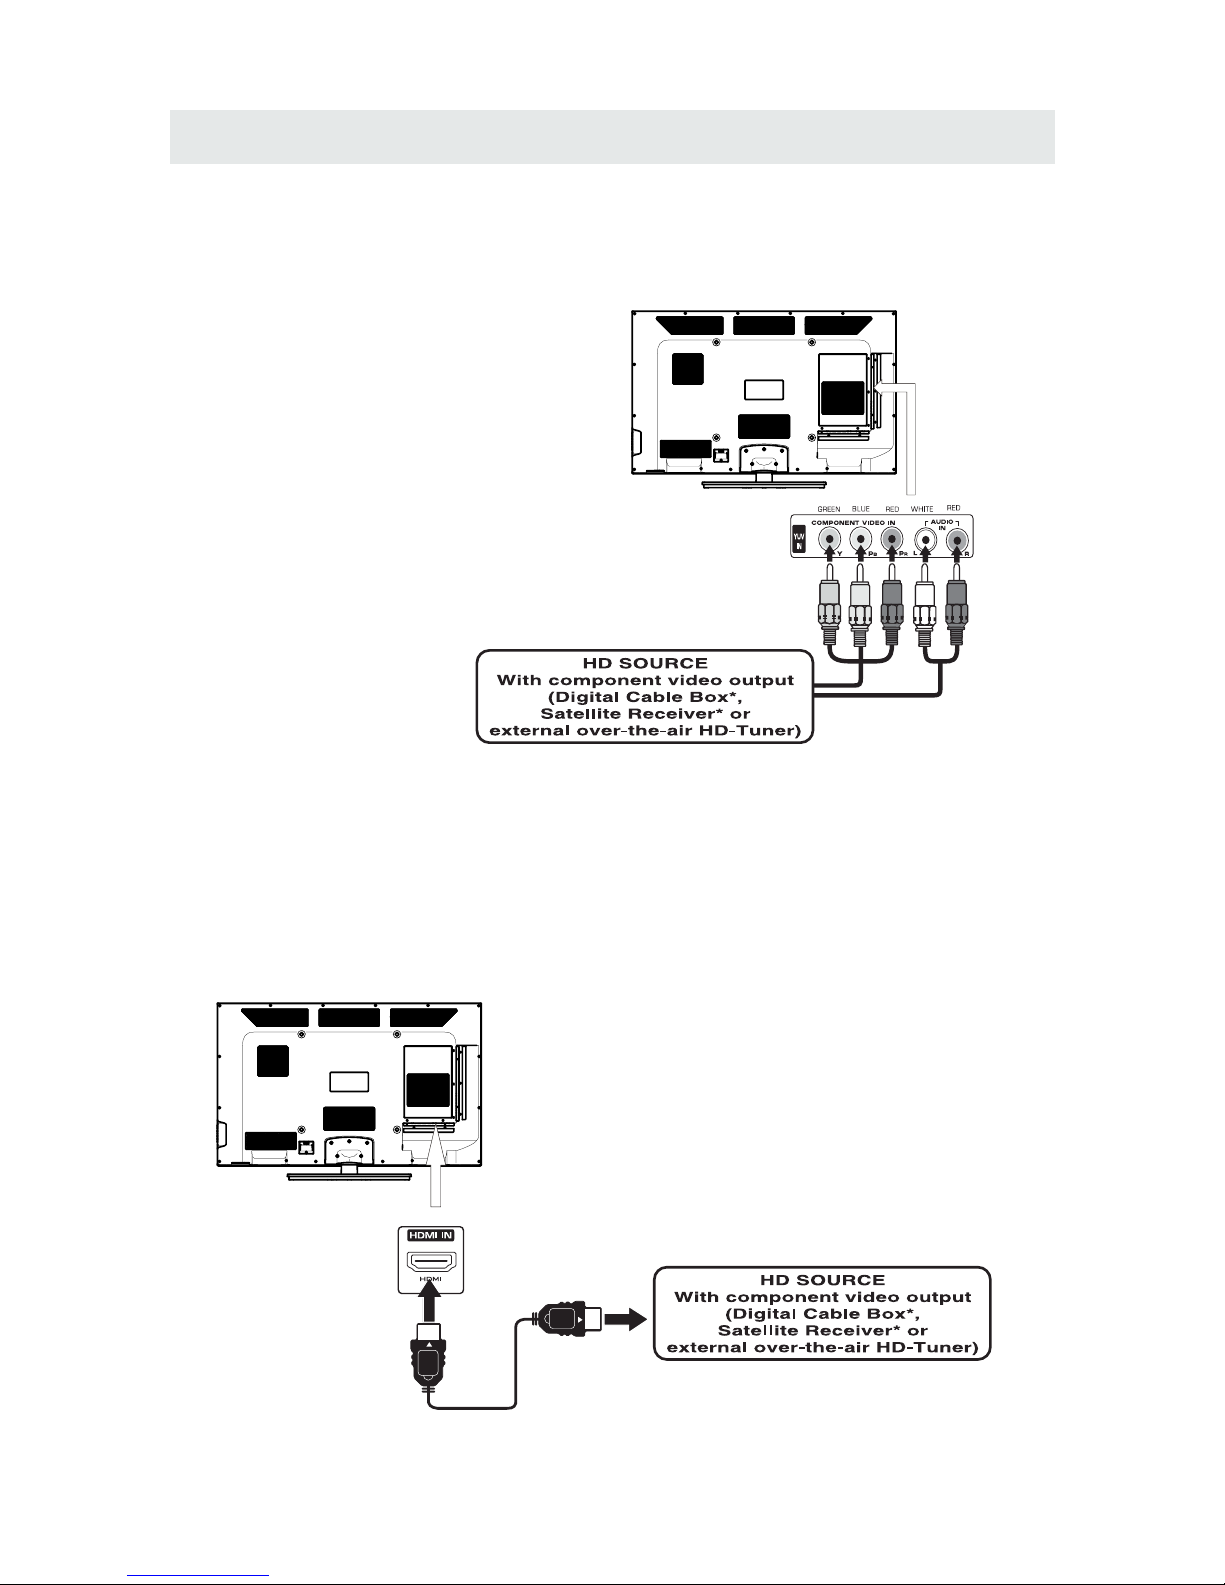
CONNECTING A HIGH- DEFINITION (HD) SOURCE USING CONNECTION
NOT E
COMPONENT
High -Defini tion (HD) Devic es with compo nent video ou tput must be conne cted to the Y input.
Conn ect the compone nt video cabl e and audio cabl e (not included ) as shown.
Ma ke sur e yo u conne ct the co mp one nt v ideo ca ble and a udio ca ble from th e other e quipmen t
When connecting a DVD player to the tel evision,
the picture res olution is sol ely dependent upon
the res olution suppor ted by th e DVD player attached.
DVD player resolut ion s var y from 480i to 1080i.
and this televisio n can suppor t DVD players up to
a maximum resoluti on of 1080i.
PbPr
* May require a subscription
fo r receiving HD channels,
ch eck with your cable/satellite
se r vic e provider for details.
To CO MPONE NT
VI DE O OUT jac ks
CONNECTING A HIG H-DEFINITION (HD) SOURCE USING HDMI CONNECTION
HDMI (H igh Defini tion Multi media Inter face) supp orts both video and audio on a singl e digital con nection
fo r us e with DV D playe rs, DT V, set-t op box es a nd ot he r digit al AV devi ces. HD MI w as de ve loped t o pr ov ide
the tec hn ologi es of High Ban dwidt h Digital Con tent Protect ion (HDCP) as we ll as Digi tal Visu al Inter face
(D VI ) in one sp ecifi catio n. HDCP i s us ed to protect d igita l content t ransm itted and rec eived b y
DVI- compl ia nt or HDMIcomplian t displays .
HDMI ha s the capabil it y to suppor t stan dard, enhanc ed or high-de finition video plu s standard to
mult i-cha nn el surro un d-sou nd audio. HDM I features in clude unco mpresse d digital video, a bandwid th of
up to 2.2 gigab ytes per seco nd (with HDT V signals), one connecto r (instead of severa l cables and
conn ector s), and communicatio n between the AV sou rc e and AV devi ces such as DTVs.
To HDMI
IN jack
To HDMI
ja ckOUT
To COMPONENT
VIDEO IN jacks
AU DI O IN jacks
To COMPONENT AUDIO
OU T ja cks
Co nn ect the H DMI cab le ( not i nc lud ed ) as
sh ow n:
Ma ke sur e yo u conne ct the ca bl e from th e
so ur ce equipme nt ( ) to this unit
( ).
HD MI OU T
HD MI IN
HDMI CABLE
(NOT INCLUDED)
(COMPONENT OUT and AUDIO OUT)to the unit COMPONENT IN.
COMPONENT IN
8
To COMPONENT
Page 12
CONNECTIONS
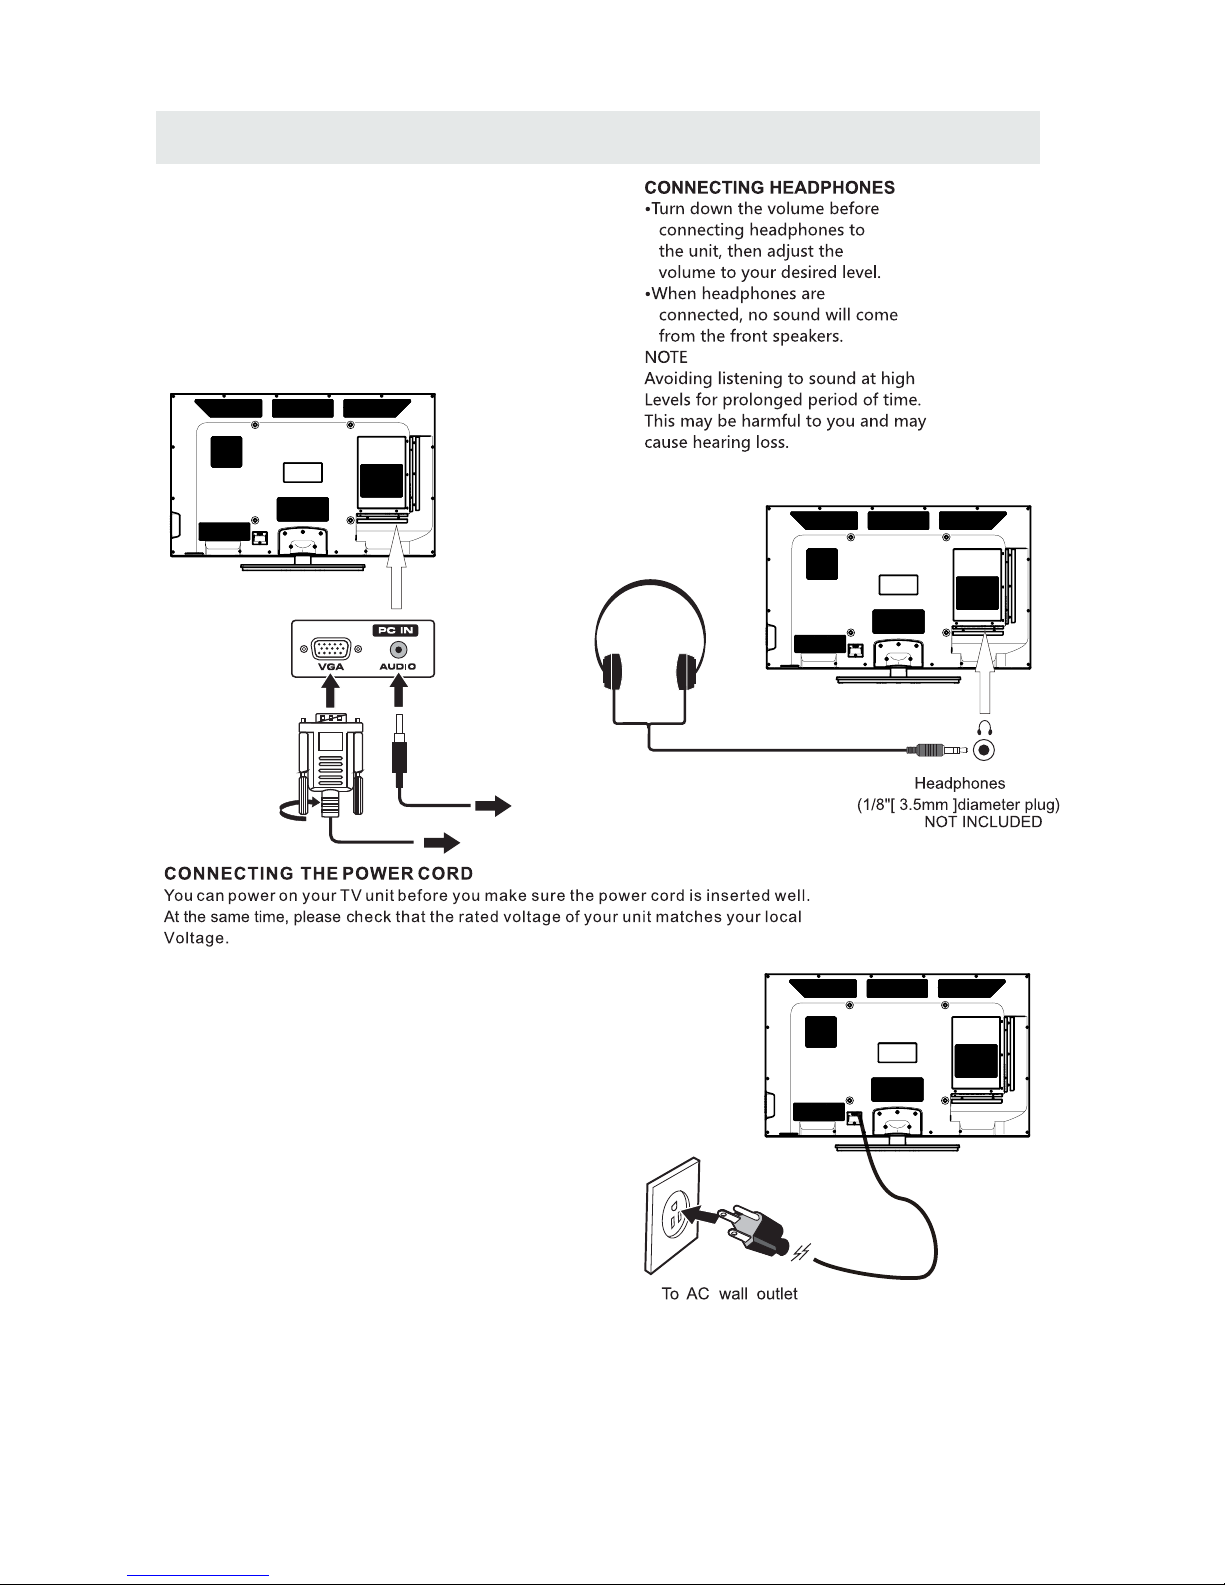
CONNECTING A
AUDI O - PC O UT
VGA AUDI O - PC I N
PC
VGA
Co nn ect the 15-pin D-SUB PC/ VG A connec to r
from your compute r to the 15 -pin D-S UB PC/VGA
in pu t on this unit using a monitor ca ble and an
au di o cable (no t included) as shown.
Ma ke sur e yo u conne ct the ca bl e from th e co mpute r
( an d ) to this uni t
( and ).
TO PC Connector
TO AUDIO OUT jacks
NOT E
• Insert the powe r plug fully into the socket outlet
If the power plug is loose it could generate heat and
cause fire
Do not tou ch the powe r plug wi th a wet hand
This may cau se electrical shock
Do not use any power cord ot her than that prov ided
with this TV This may cau se fire or elect rical shoc k
Do not d amage the power cord
A dama ged cord may ca use fire or ele ctric al shock
• Do not move the TV with the cord plugged in the
socket outlet.
• Do not place a heavy objec t on the cord or pl ace
the cord near a high-te mperature object.
• Do not twist the co rd , bend it excessively, or stretch it.
• Do not pull on the cord . Hold onto the power plug body when disco nnectin g cord.
• Do not use a damaged power plug or socket o utlet.
.
( ,
.)
.
( .)
. ( .)
.
( ).
•
•
•
connected to prevent electrical shock.
Ensure that the power plug is easily accessible.
Ensure the earth pin on the power plug is securely
•
•
9
Page 13
Set up
12
6
Tim
e
Soun d Mo de
Ba ss
Treble
Ba la nce
Surround
St andard
Mo ve Se lect Return
MEN U
50
50
50
Of f
Pict ure Audio
Au dio Language
En glish
SP DI F Ty pe
PC M
CONNECTIONS
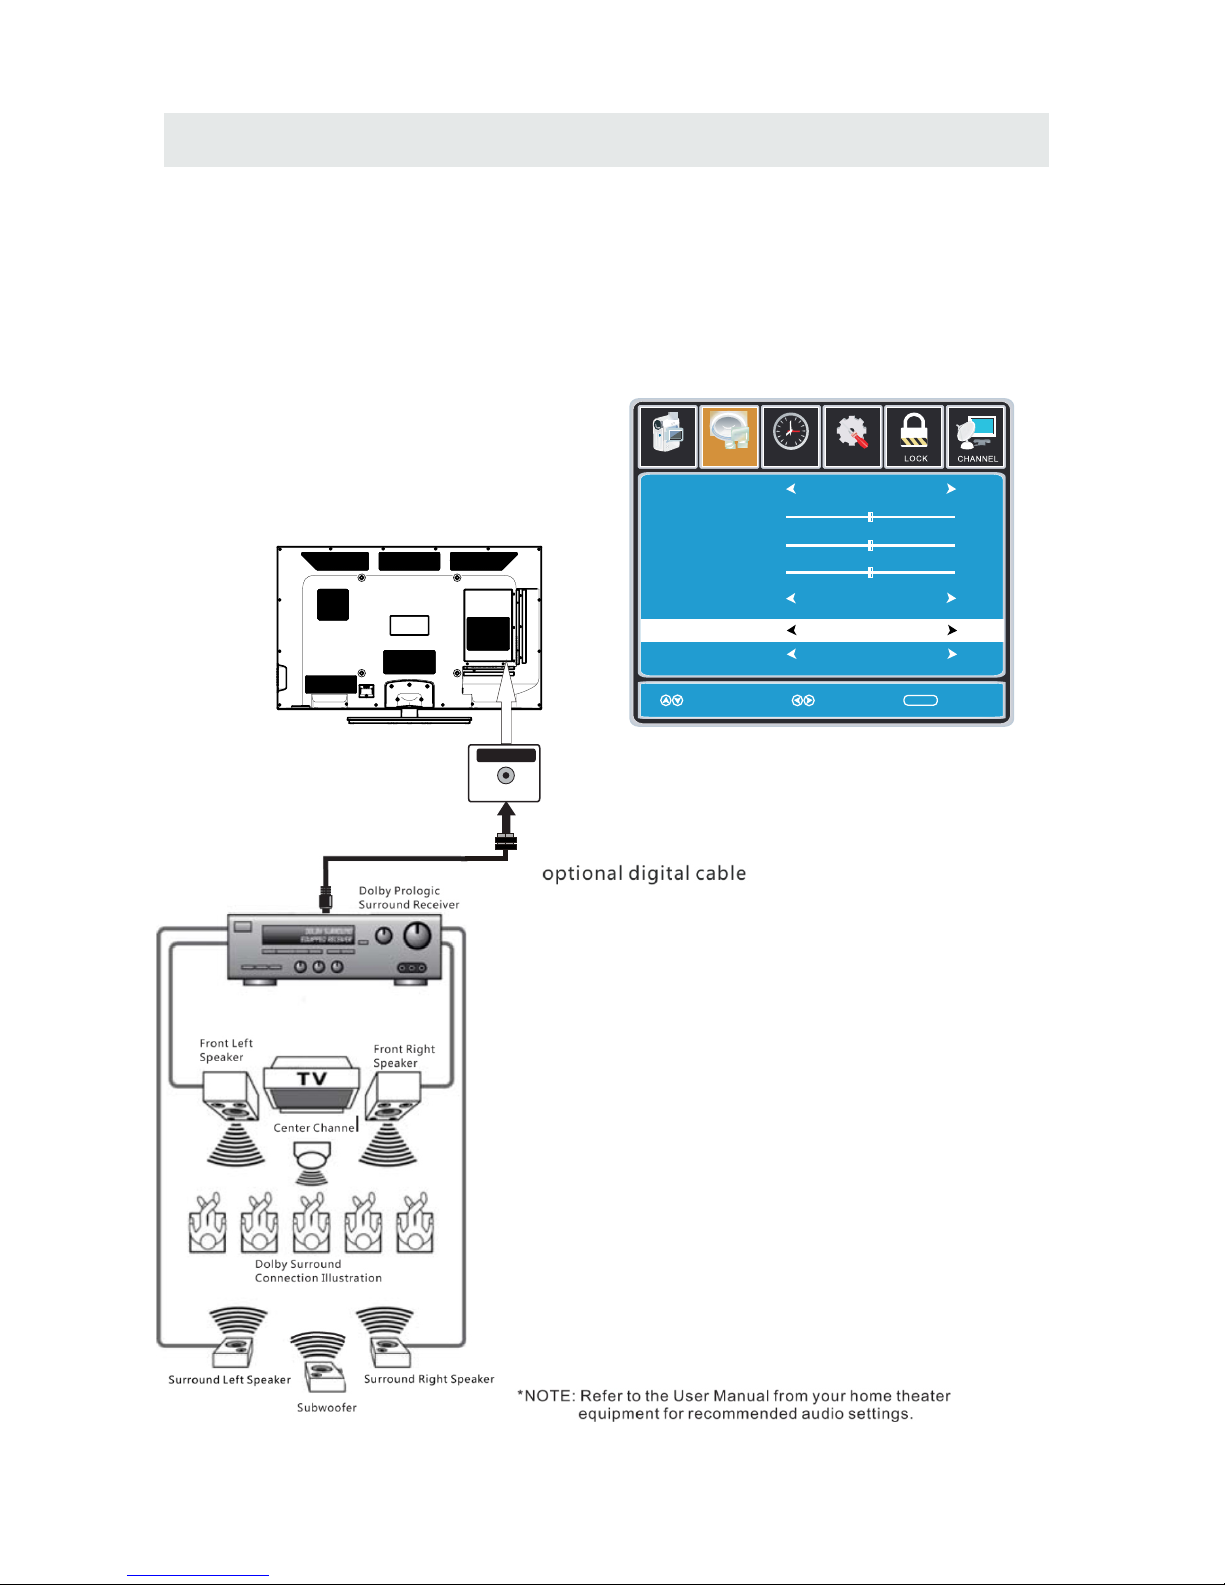
Connection to a Home Theater Audio System
For BEST audio performance
Connecting to a Home Theater System
Dolby Digital can deliver optimal 2 channel
stereo or surround sound with five discrete
full range channels plus a sixth channel for
a subwoofer.
Enjoy optimal sound reproduction from your
system with a Dolby Digital amplifier that
incorporates a digital coaxial input. Connect
an optional digital cable directly to the
television’s Coax audio output to listen
through all inputs except VGA.
(The VGA does not support digital audio)
How To Setup Digital Output
Press the MENU button on the remote control
Press the right ► arrow button to select AUDIO
Press the down ▼ arrow button to highlight
SPDIF type right ► Raw or PCM
10
Coax
SPD IF OUT
Page 14
WALL MOUNT INSTALLATION
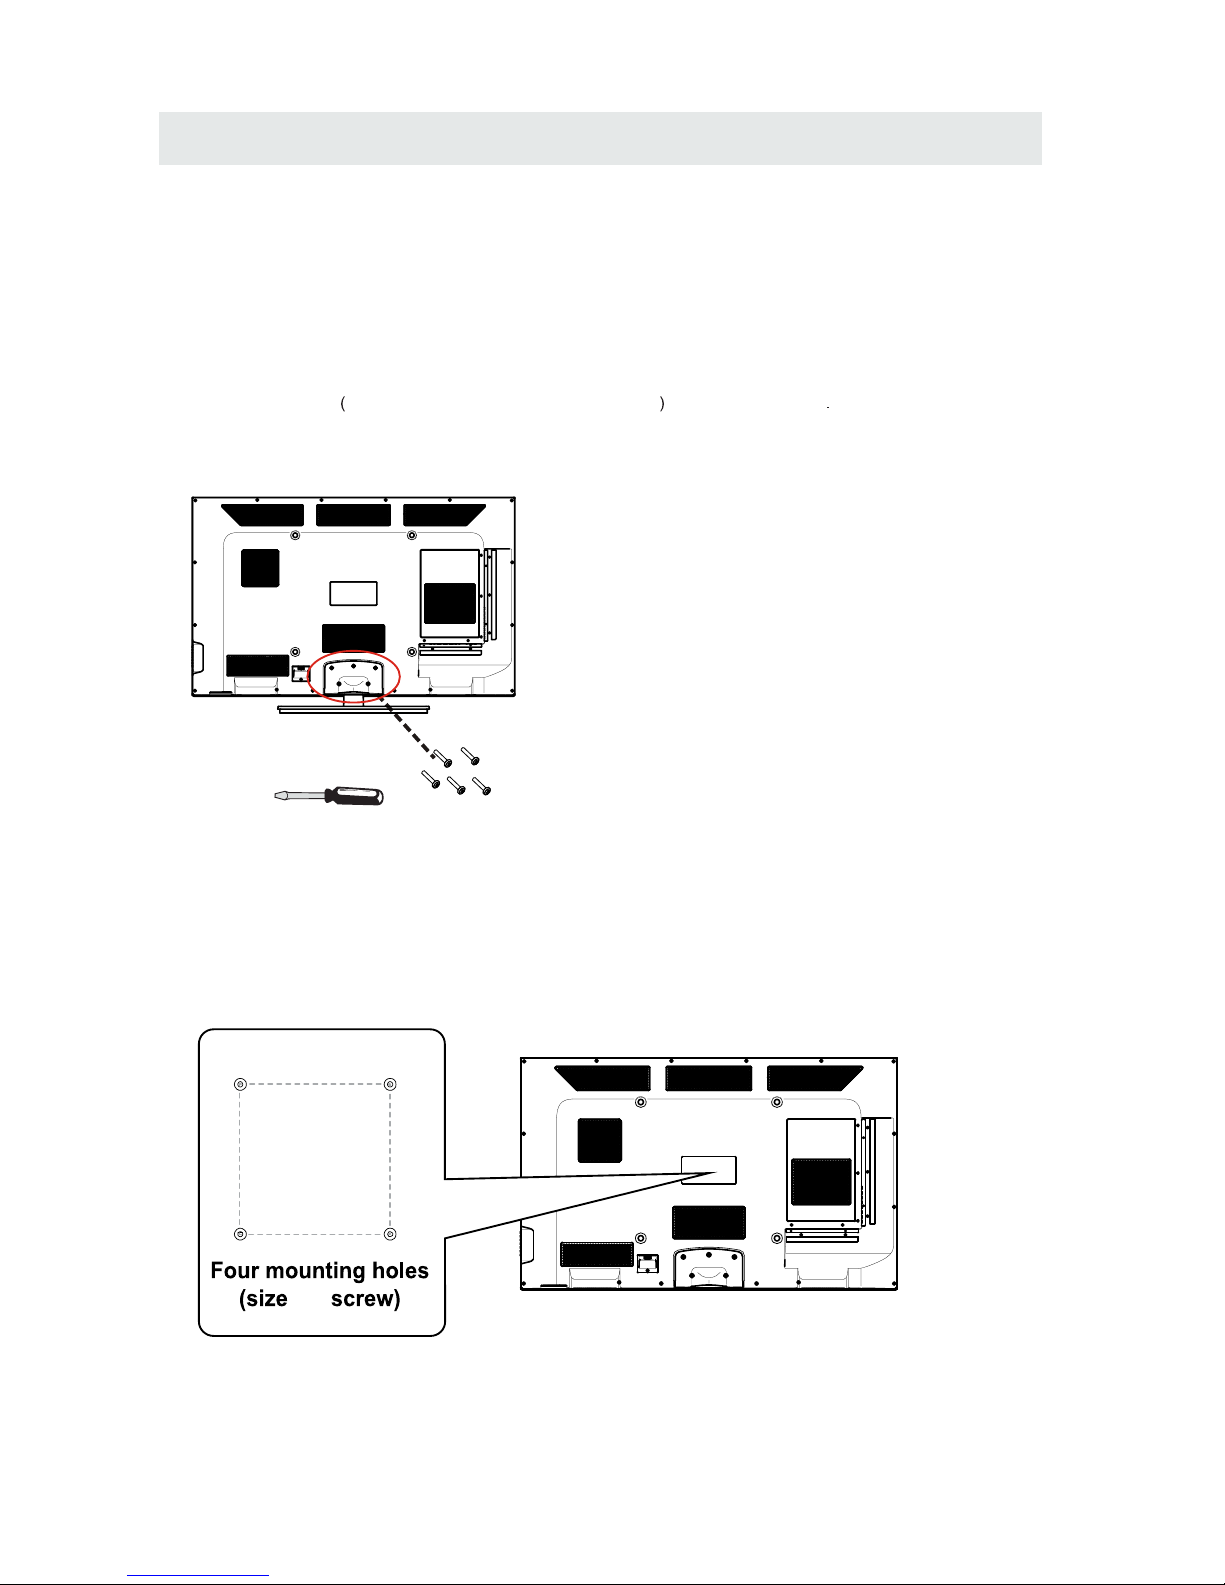
INSTALL ING REMO VING THE BASE STAND
WAR NING/: The LCD D ispla y is v ery f ragil e and must b e protect ed at all t imes wh en removi ng the ba se
Stan d
Be sure that no ha rd or sharp object or anythin g that could scr atch or damage the LED displa y comes into
cont act with it Do NOT ex ert pressure on th e front of t he unit a t any time because t he screen could crack
1 Di sconnect all cable s or cords connected to the unit
2 La y the uni t down on a flat surface with t he back side facing up Please make sure to pla ce a soft
cushioned material such as a pillow or thick piece of foa m beneath the sc reen
3 To remove th e base stan d loosen screws off th e holes then pull downwards to release
the base s tand
,
.
. .
. .
. .
. ,
.
MO UN TING ON THE WALL
NOT E
Remove the bas e sta nd before mou nting th e unit on the wal l.
This un it is VESA-co mpliant, and is designed to be wall-m ounted wit h a VESA-compl iant 16”x 16 ”
(400mm x 400m m) mounting kit desig ned for fla t-panel TVs (not supplied) . Mount this unit according to
the instructio ns included in the mount ing kit.
Length of screw should not exceed 10 mm.
11
16”
16”
M6
Page 15
INITIAL SETUP
Wh en you tur n on your television set for
th e fir st ti me, be sure to place i t on a solid
st abl e surface.
To avo id da nge r, do not ex pose the TV
to water, or a heat source
(e .g. lamp, candle, radiator).
Do not obstruct the ventilation grid
at t he rear and be sure t o lea ve su ffi cie nt
ga ps around the unit.
PUTTING THE UNIT ON A PROPER PLACE
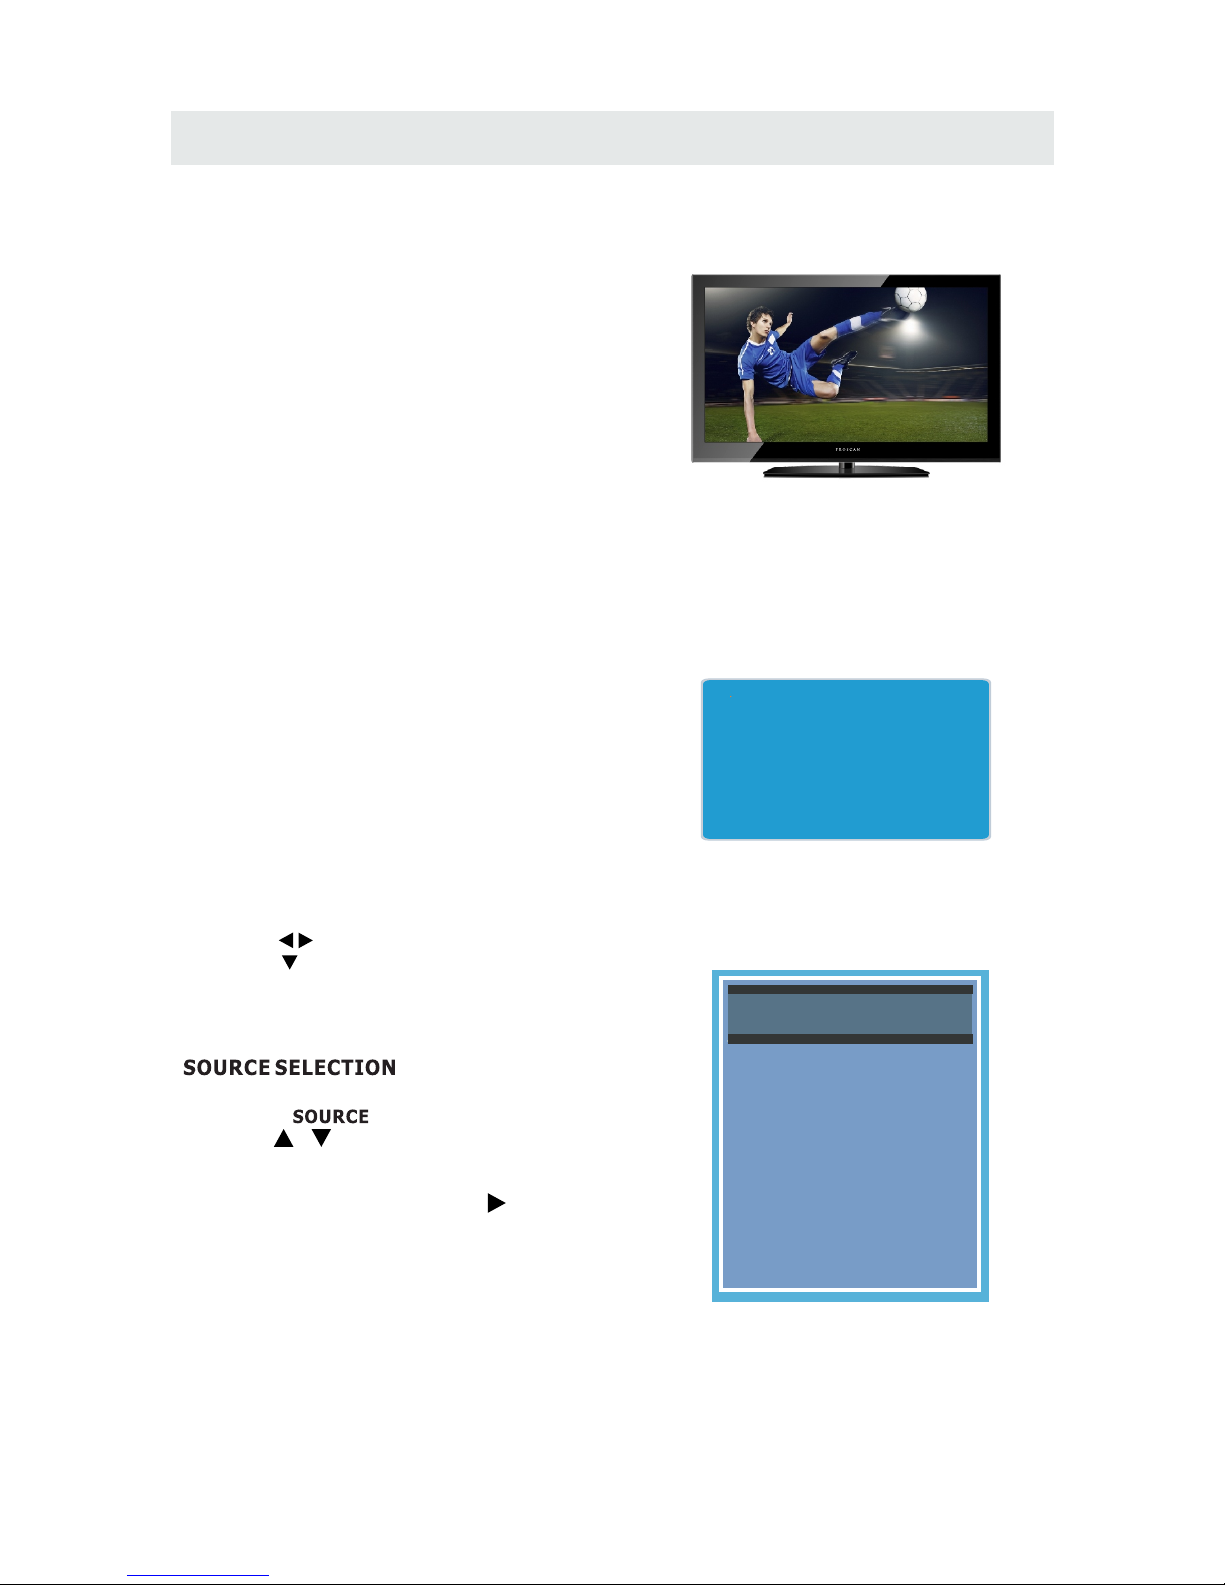
TURNING THE UNIT ON FOR THE FIRST TIME
Af ter you have initi ally co nne cted your TV
antenna or cable,
tu rn the televi sion ON.
A scree n will display a sking you t o run a
to se arc h and rec eive
available loca l digital cha nne ls.
It is he re whe re you wi ll select ant enna options
an d run .
Channels wi ll be s tored in th e TV tuner.
Press th e bu tto n on the rem ote co ntrol.
Pr ess t he button t o hig hlight AI R/C ABLE .
Channel Auto Scan
Channel Auto Scan
MENU
Please run
Channel Auto Scan
Using the buttons, scroll to highlight chaneel mode.
1. Press the button on the remote contr ol.
2.
and select any of th em us ing the button o r
the bu tton.
ource
Note:
Before wat chi ng please make sur e all necessary
cables and devices are connected.
ENT ER
Us e or button to select the optionsthe
(T he sc reen will change to yo ur desired s ).
INPUT SOURCE
(TV,AV,Component, HDMI1,HDMI2,HDMI3,VGA)
12
TV
AV
Component
HDMI1
HDMI2
HDMI3
VGA
Page 16
INITIAL SETUP
AIR.
Set up
12
6
Tim
e
Pict ure Audio
Ca ble Sy st em
Au to
MENU
St art to Sc an
Mo ve Ne xt Return
Set up
Mo ve Ne xt Ret urn
MENU
Pic ture Audio
12
e
miT
RF C H
Fo und
7
4
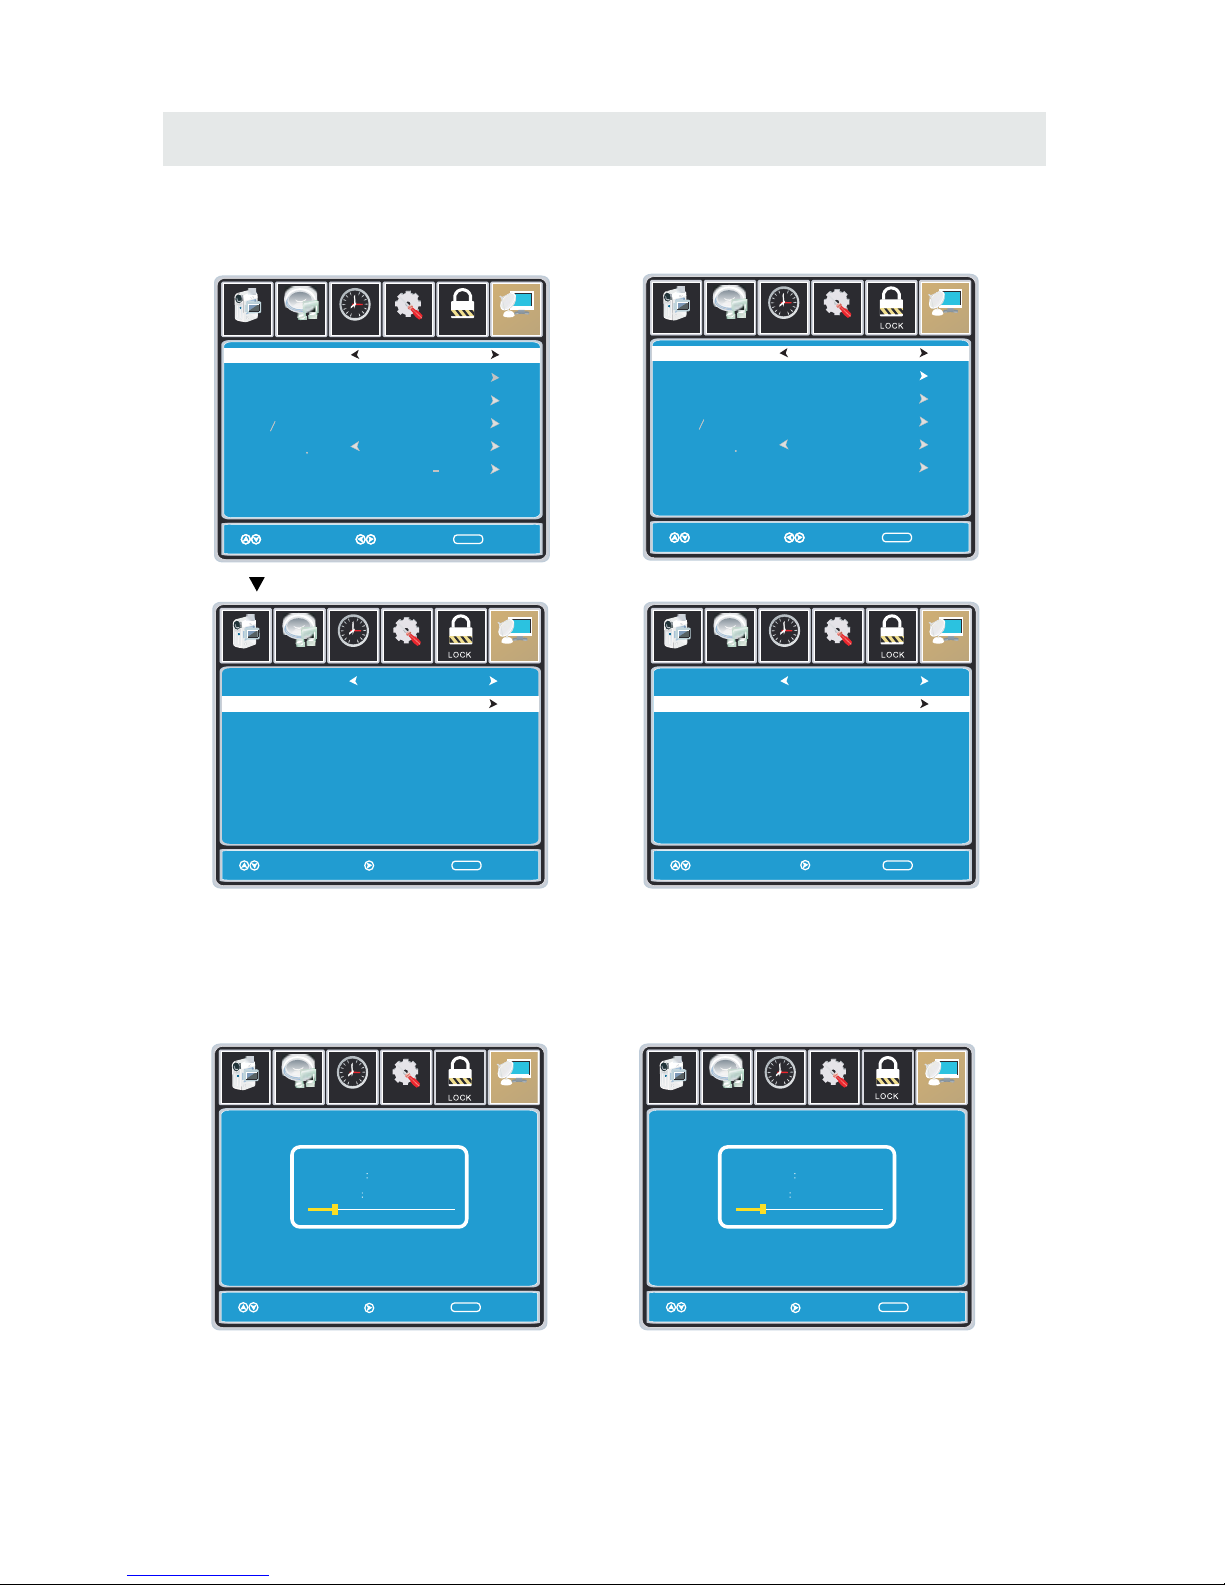
Air Mode: Select wh en connect ed to an
in door/ out door anten na.
AIR
Setu p
LOC K
12
6
Tim
e
Pict ure Audio
CHAN NEL
Air /C able
Au to Sc an
Fa vor it eFa vor it e
Sho w Hi deSho w Hi de
Ch an nel NoCha nnel No
Ch ann el la belCh ann el la bel
DT V Sign alDT V Sign al
Air
Se lec t ReturnMo ve
MENU
KO CEKO CE LBLB
Mo ve
MENU
Setu p
12
6
Tim
e
Pict ure Audio
Air /C able
Au to Sc an
Fa vor it eFa vor it e
Sho w Hi deSho w Hide
Ch an nel NoCha nnel No
Ch ann el la belCha nnel la bel
DT V Sign alDT V Sign al
Ca ble
Se lec t ReturnMov e
MENU
Mo ve
MENU
Cable Mode: Select if you subsc ribe to
a pay telev isi on serv ice includ ing satel lite .
CABLE
How to Navigate
Set up
12
6
Tim
e
Pict ure Audio
Ca ble Sy st em
Au to
MENU
St art to Sc an
Mo ve Ne xt Return
Set up
Mo ve Ne xt Ret ur n
MENU
Pic ture Audio
12
6
e
miT
RF C H
Fo und
7
4
CHAN NEL
CHAN NELCHAN NEL
CHAN NEL
CHAN NEL
Press the button to highlight
Using the ◄► button to highlight CABLE.
Press the ▼ button to select AUTOSCAN then
press the ► button to enter the submenu and
press the ► button to start Channel Auto Scan.
Press the ▼ button to select AUTOSCAN.
Press the ENTER button and the cursor will move
up and CABLE SYSTEM will be displayed next.
Press ► the button to select STD > IRC > HRC >
Auto (Auto is recommended).
Press the ▼ button to select Start to Scan
and press ENTER to start Channel Auto Scan.
Channel Auto Scan may take several minutes
to complete.
Channel Auto Scan may take several minutes
to complete.
NOTE: For cable or satellite users with no TV antenna, there no need to run Channel Auto Scan.
Connect your cable or satellite set top box to one of the available inputs on the TV for viewing.
13
Page 17
TV SETUP
Set up
12
6
Tim
e
Pic ture Audio
Picture Mo de
Co nt ra st
Brightness
Co lo r
Tin t
Sh ar pnes s
Co lo r Tem p.
St andard
No rmal
Mo ve Ad just Return
MEN U
50
50
50
0
50
Pictu re
PICTURE MENU
Set up
12
6
Tim
e
Pic ture Audio
Picture Mo de
Co nt ra st
Brightness
Co lo r
Tin t
Sh ar pnes s
Co lo r Tem p.
St andard
No rmal
Mo ve Se le ct Return
MEN U
50
50
50
0
50
Set up
Par ental
12
6
Tim
e
Pic ture Audio
TV
Picture Mo de
Co nt ra st
Brightness
Co lo r
Tin t
Sh ar pnes s
Co lo r Tem p.
St andard
No rmal
Mo ve Ad just Return
MEN U
50
50
50
0
50
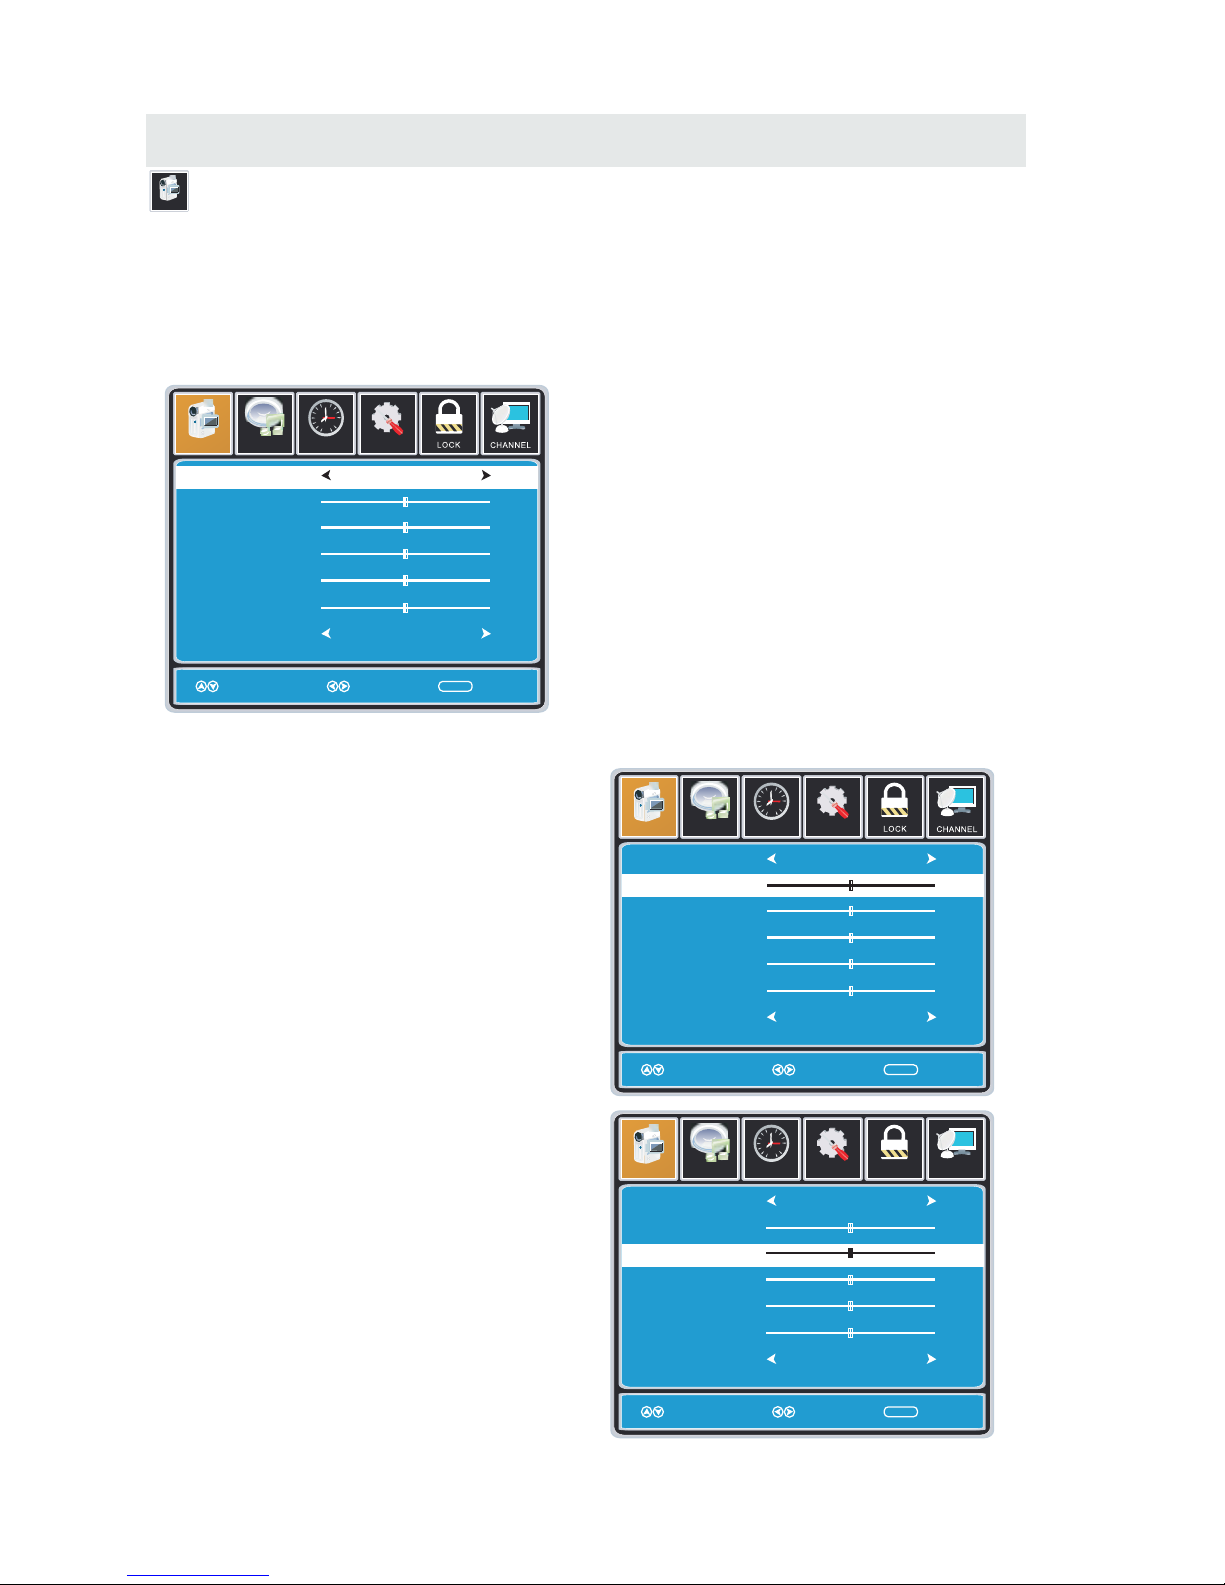
The PICTURE menu offers options to enhance and refine the picture displayed on your TV
based on ambient room light and personal preferences.
Adjustment options include contrast, brightness, color, tint, sharpness and Color Temp.
How to Navigate:
Press the MENU button on the remote control. Navigate using the ◄► buttons to select PICTURE.
Press the ▼ button to highlight ,
then press the ► button to select your viewing
preference from 4 factory options:
STANDARD > DYNAMIC > MILD > USER.
The STANDARD setting is recommended for most
viewing environments.
Depending on the ambient light level in the room,
you may find one of the other options
more pleasing.
To make more critical picture adjustments based on your own preferences in USER:
Use the ▼ button to highlight Contrast.
Navigate using the ◄► buttons to
increase or decrease contrast intensity.
Use the ▼ button to highlight Brightness.
Navigate using the◄► buttons to
increase or decrease overall brightness.
14
Page 18
TV SETUP
Pictu re
PICTURE MENU
Set up
12
6
Tim
e
Pic ture Audio
Picture Mo de
Co nt ra st
Brightness
Co lo r
Tin t
Sh ar pnes s
Co lo r Tem p.
St an dard
No rmal
Mo ve Ad ju st Re tu rn
MEN U
50
50
50
0
50
Set up
12
6
Tim
e
Pic ture Audio
Picture Mo de
Co nt ra st
Brightness
Co lo r
Tin t
Sh ar pnes s
Co lo r Tem p.
St an dard
No rmal
Mo ve Ad ju st Re tu rn
MEN U
50
50
50
0
50
Set up
12
6
Tim
e
Pic ture Audio
Picture Mo de
Co nt ra st
Brightness
Co lo r
Tin t
Sh ar pnes s
Co lo r Tem p.
St an dard
No rmal
Mo ve Ad ju st Re tu rn
MEN U
50
50
50
0
50
Set up
12
6
Tim
e
Pic ture Audio
Picture Mo de
Co nt ra st
Brightness
Co lo r
Tin t
Sh ar pnes s
Co lo r Tem p.
St an dard
No rmal
Mo ve Ad ju st Re tu rn
MEN U
50
50
50
0
50
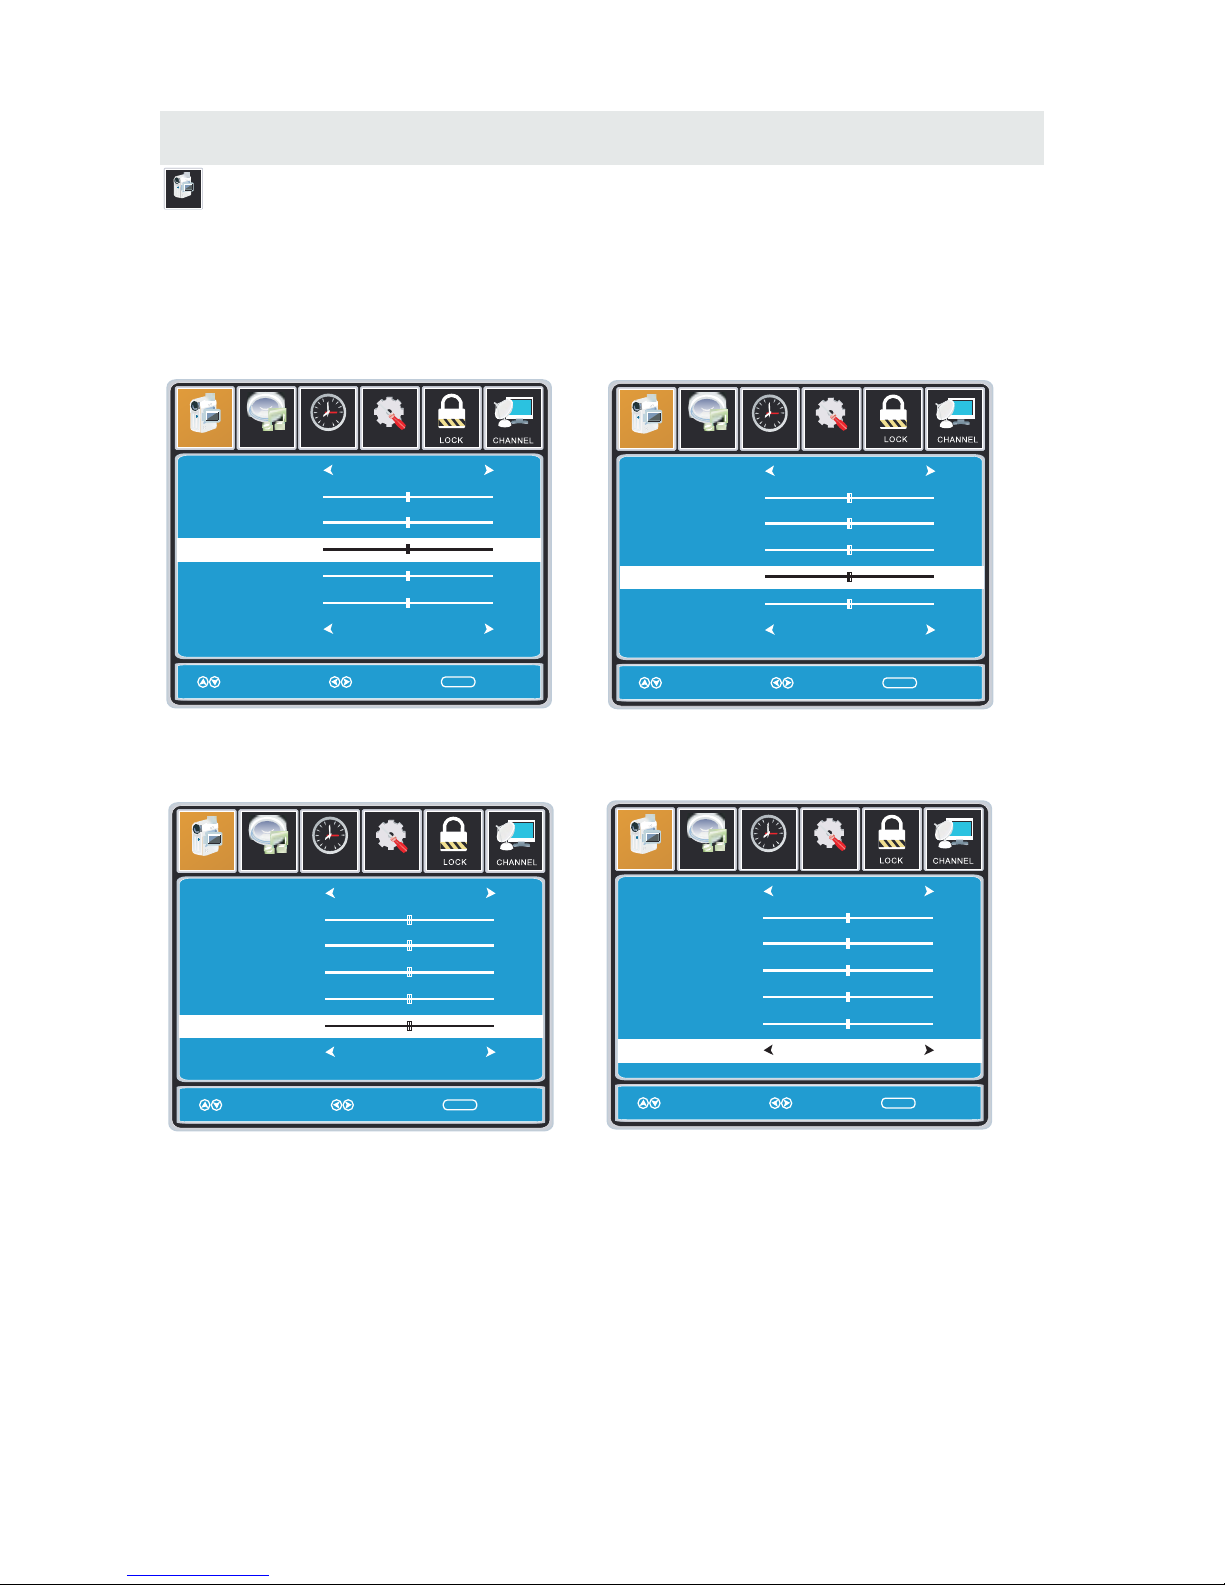
The PICTURE menu offers options to enhance and refine the picture displayed on your TV
based on ambient room light and personal preferences.
Adjustment options include contrast, brightness, color, tint, sharpness and color temp.
Press the MENU button on the remote control. Navigate using the ◄► buttons to select PICTURE.
Use the ▼ button to highlight Color.
Navigate using the ◄► buttons to
increase or decrease color intensity.
Use the ▼ button to highlight Tint.
Navigate using the ◄► buttons to adjust colors
toward green or reddish tint.
Use the ▼ button to highlight Sharpness.
Navigate using the ◄► buttons to soften or
view crisper edges in the picture.
Use the ▼ button to highlight Color Temp.
Navigate using the ◄► buttons to select COOL
(more bluish tone), NORMAL or WARM.
The default setting is NORMAL.
WARM mode will provide color that is calibrated
to D6500° Kelvin, the standard color that
broadcast stations and the Motion Picture
industry consider as the most accurate to
view programming.
Note:
When adjustments are completed, you may select another menu by pressing
the Menu button.
15
Page 19
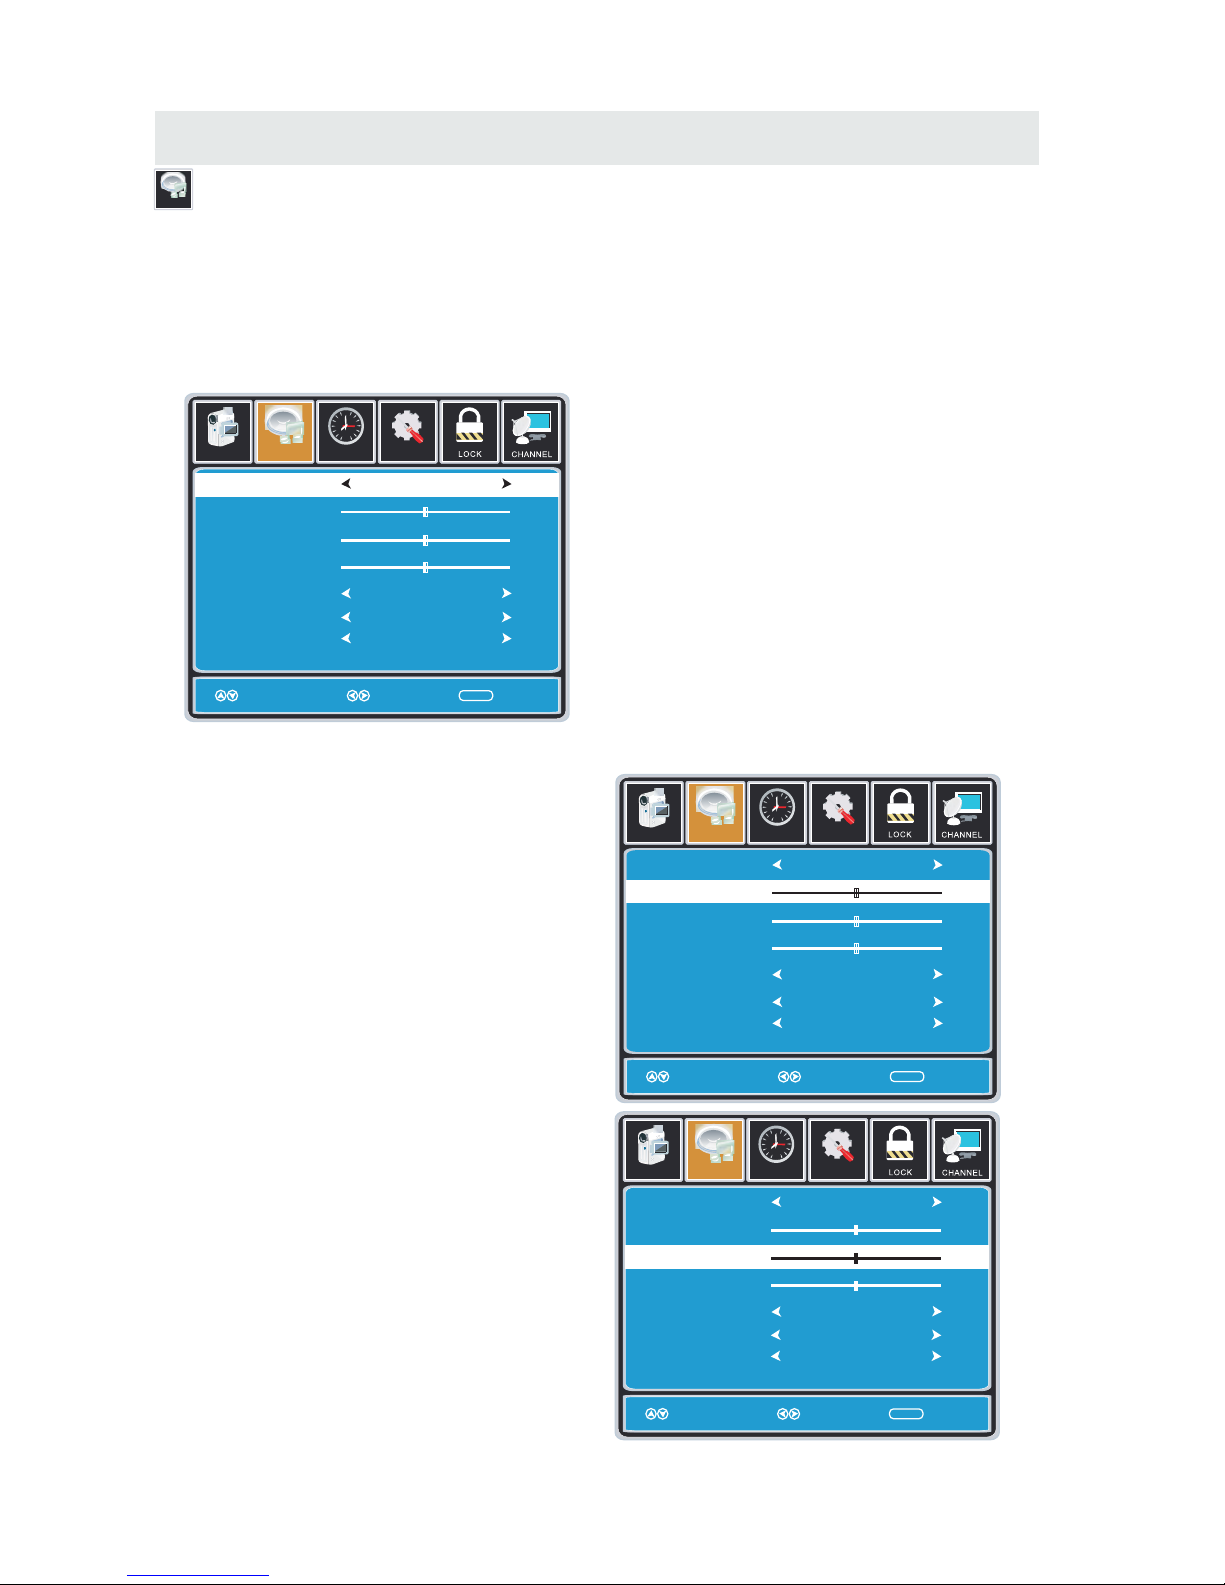
TV SETUP
AUDIO MENU
Audio
Set up
12
6
Tim
e
Soun d Mo de
Ba ss
Treble
Ba la nce
Surround
Au dio Language
St andard
En glish
Mo ve Se le ct Return
MEN U
50
50
0
Of f
Pict ure Audio
Set up
12
6
Tim
e
Soun d Mo de
Ba ss
Treble
Ba la nce
Surround
St andard
Mo ve Adj us t Ret ur n
MEN U
50
50
0
Of f
Pict ure Audio
Set up
12
6
Tim
e
Soun d Mo de
Ba ss
Treble
Ba la nce
Surround
St andard
Mo ve Adj us t Ret ur n
MEN U
50
50
0
Of f
Pict ure Audio
How to Navigate:
Press the MENU button on the remote control. Navigate using the ◄► buttons to select AUDIO.
The AUDIO menu offers options to make sound enhancements while listening through the built-in
speakers and personal preferences.
Adjustment options include bass, treble, balance, surround, SPDIF Type and audio language.
Press the ▼ button to highlight SoundMode,
then press the ► button to select your sound
preference from 4 factory options:
STANDARD > MUSIC > MOVIE > USER.
The STANDARD setting is recommended for most
sound environments.
Depending on the surroundings in the room,
you may find one of the other options
more pleasing.
To make more critical audio adjustments based on your own preferences in USER:
Use the ▼ button to highlight Bass.
Navigate using the ◄► buttons to
increase or decrease low frequency intensity.
Use the ▼ button to highlight Treble.
Navigate using the ◄► buttons to
increase or decrease high frequency intensity.
SP DI F Ty pe
PC M
Au dio Language
En glish
SP DI F Ty pe
PC M
Au dio Language
En glish
SP DI F Ty pe
PC M
16
Page 20
TV SETUP
Set up
12
6
Tim
e
Soun d Mo de
Ba ss
Treble
Ba la nce
Surround
St andard
Mo ve Se lect Return
MEN U
50
50
0
Of f
Pict ure Audio
Set up
12
6
Tim
e
Soun d Mo de
Ba ss
Treble
Ba la nce
Surround
St andard
Mo ve Adj us t Return
MEN U
50
50
0
Of f
Pict ure Audio
Set up
12
6
Tim
e
Soun d Mo de
Ba ss
Treble
Ba la nce
Surround
St andard
Mo ve Se lect Return
MEN U
50
50
0
Of f
Pict ure Audio
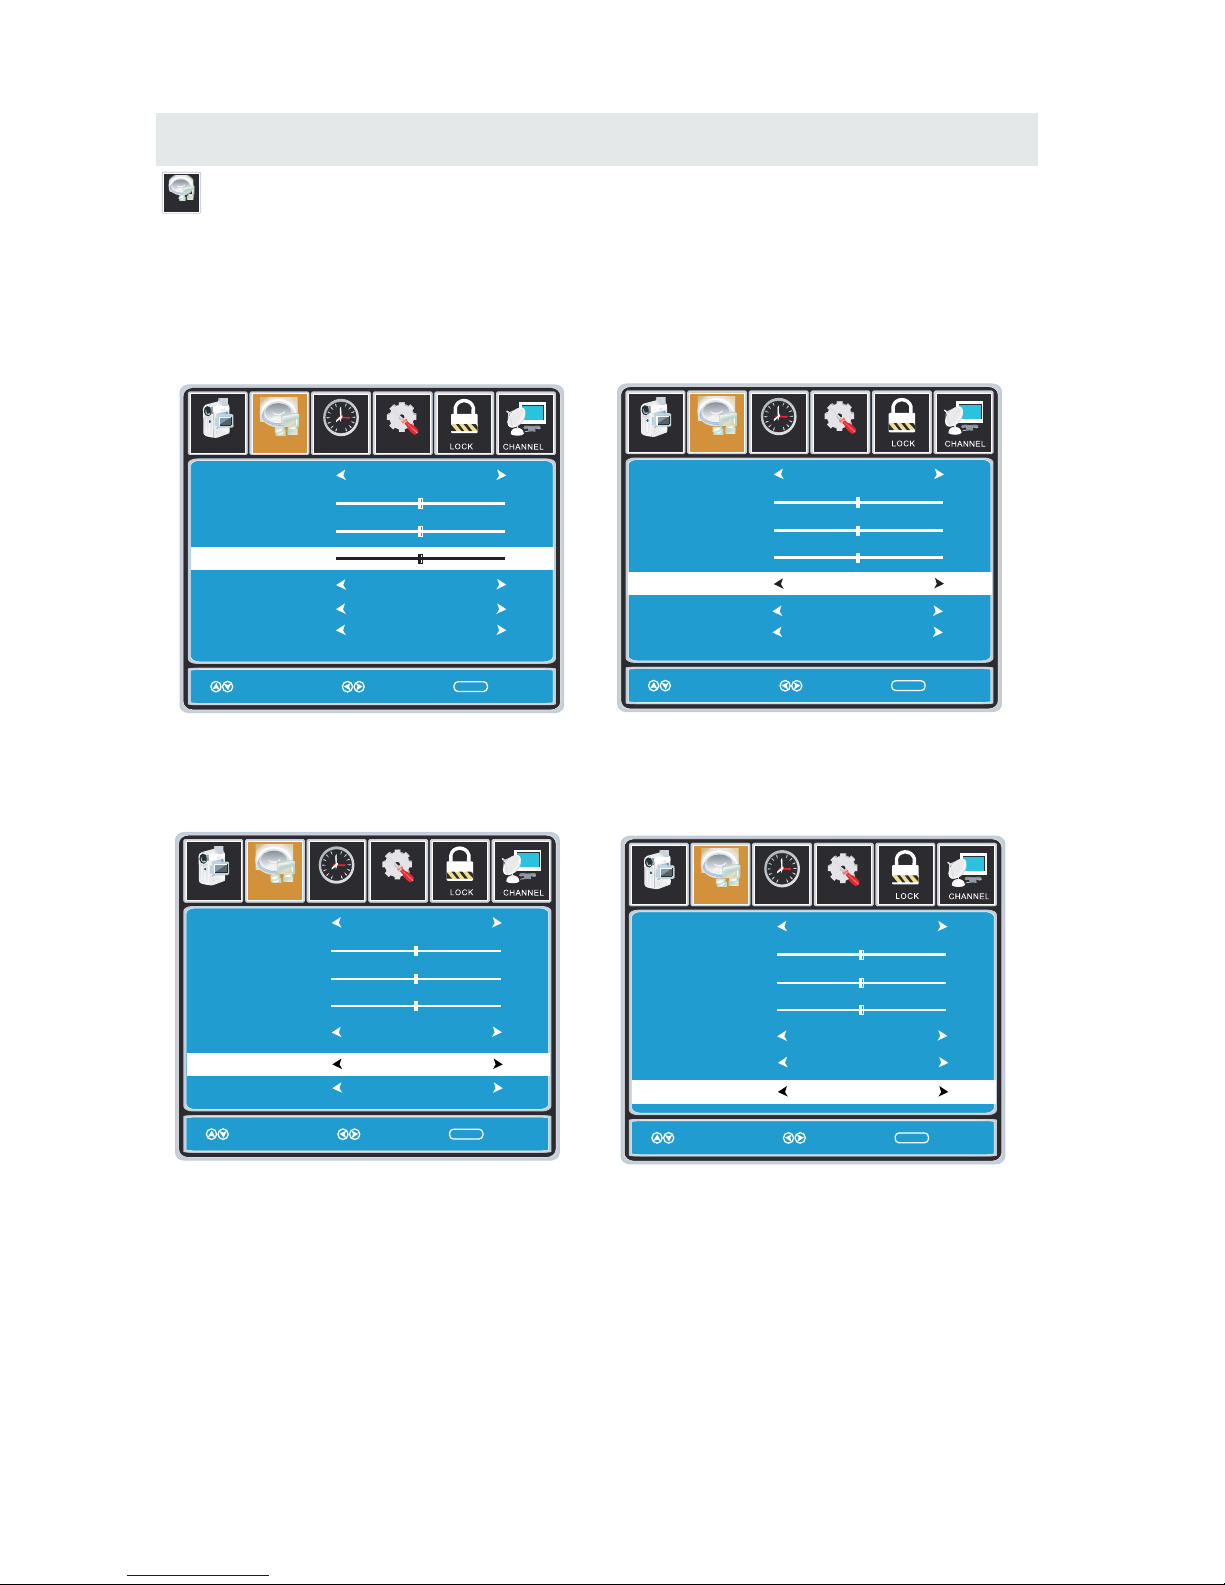
AUDIO MENU
Audio
How to Navigate:
Press the MENU button on the remote control. Navigate using the ◄► buttons to select AUDIO.
The AUDIO menu offers options to make sound enhancements while listening through the built-in
speakers and personal preferences.
Adjustment options include bass, treble, balance, surround ,SPDIF Type and audio language.
Note:
When adjustments are completed, you may select another menu by pressing
the Menu button.
Use the ▼ button to highlight Balance.
Navigate using the ◄► buttons to adjust sound
towards the right or left speaker.
Use the ▼ button to highlight Surround.
Navigate using the ► button to turn the
dimensional surround effect ON or OFF.
(for built-in speakers only).
Use the ▼ button to highlight Audio Language.
Navigate using the ◄► buttons to select to listen
to an alternative language broadcast
(if available) English > French > Spanish .
You may select an alternative language using
the remote control by pressing MTS)
Au dio Language
En glish
SP DI F Ty pe
PC M
Au dio Language
En glish
SP DI F Ty pe
PC M
Au dio Language
En glish
SP DI F Ty pe
PC M
Set up
12
6
Tim
e
Soun d Mo de
Ba ss
Treble
Ba la nce
Surround
St andard
Mo ve Se lect Return
MEN U
50
50
0
Of f
Pict ure Audio
Au dio Language
En glish
SP DI F Ty pe
PC M
Use the ▼ button to highlight SPDIF Type.
Navigate using the ► button to adjust.
17
Page 21
TV SETUP
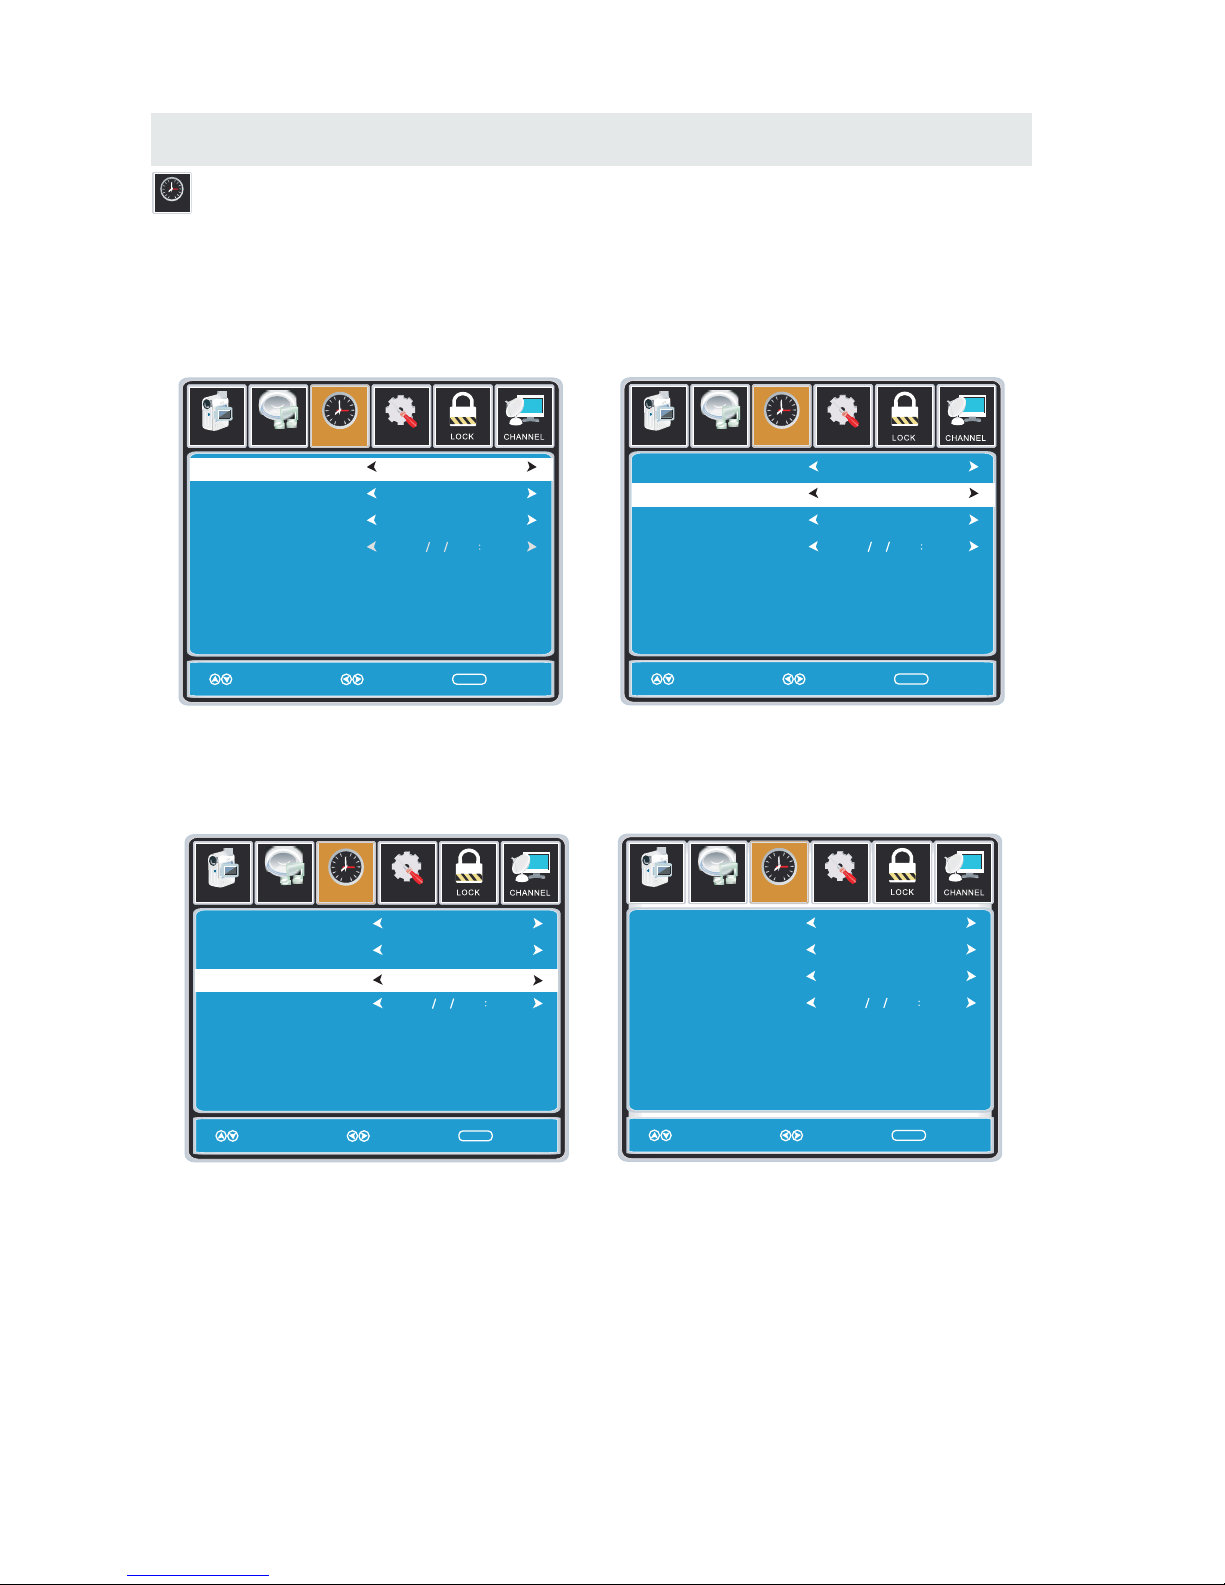
TIME MENU
12
6
Tim
e
Set up
Sl ee p Tim er
Tim e Zone
Da yl ig ht S av in g Time
Cl ock
Mo ve Se lect Return
MEN U
Pic ture
Of f
Pa cific
Of f
200 7 1 0 31 04 04 PM
12
6
Tim
e
Audio
Set up
Sl ee p Tim er
Tim e Zone
Da yl ig ht S av in g Time
Cl ock
Mo ve Se lect Return
MEN U
Pic ture
Of f
Pa cific
Of f
200 7 1 0 31 04 04 PM
12
6
Tim
e
Audio
Set up
Sl ee p Tim er
Tim e Zone
Da yl ig ht S av in g Time
Cl ock
Mo ve Se lect Return
MEN U
Pic ture
Of f
Pa cific
Of f
200 7 1 0 31 04 04 PM
12
6
Tim
e
Audio
Set up
Sl ee p Tim er
Tim e Zone
Da yl ig ht S av in g Time
Cl ock
Mo ve Se lect Return
MEN U
Pic ture
Of f
Pa cific
Of f
200 7 1 0 31 04 04 PM
12
6
Tim
e
Audio
Press the MENU button on the remote control. Navigate using the ◄► buttons to select TIME.
How to Navigate:
The TIME menu includes adjustment of settings for your local time zone and daylight savings time.
The clock will adjust automatically after the initial Channel Auto Scan of available broadcast
channels in your area.
Note:
When adjustments are completed, you may select another menu by pressing
the Menu button.
Use the ▼ button to highlight SleepTimer,
then press the ► button to select among:
5min, 10min, 15min, 30min, 45min, 60min,
90min, 120min, 180min, 240min and off.
Use the ▼ button to highlight TimeZone,
then press the ► button to select among:
EASTERN > CENTRAL > MOUNTAIN >
PACIFIC > ALASKA > HAWAII.
Use the ▼ button to highlight
Daylight Saving Time.
Navigate using the ◄► buttons to turn
this feature on or off.
Clock: Display the time at present.
18
Page 22
TV SETUP
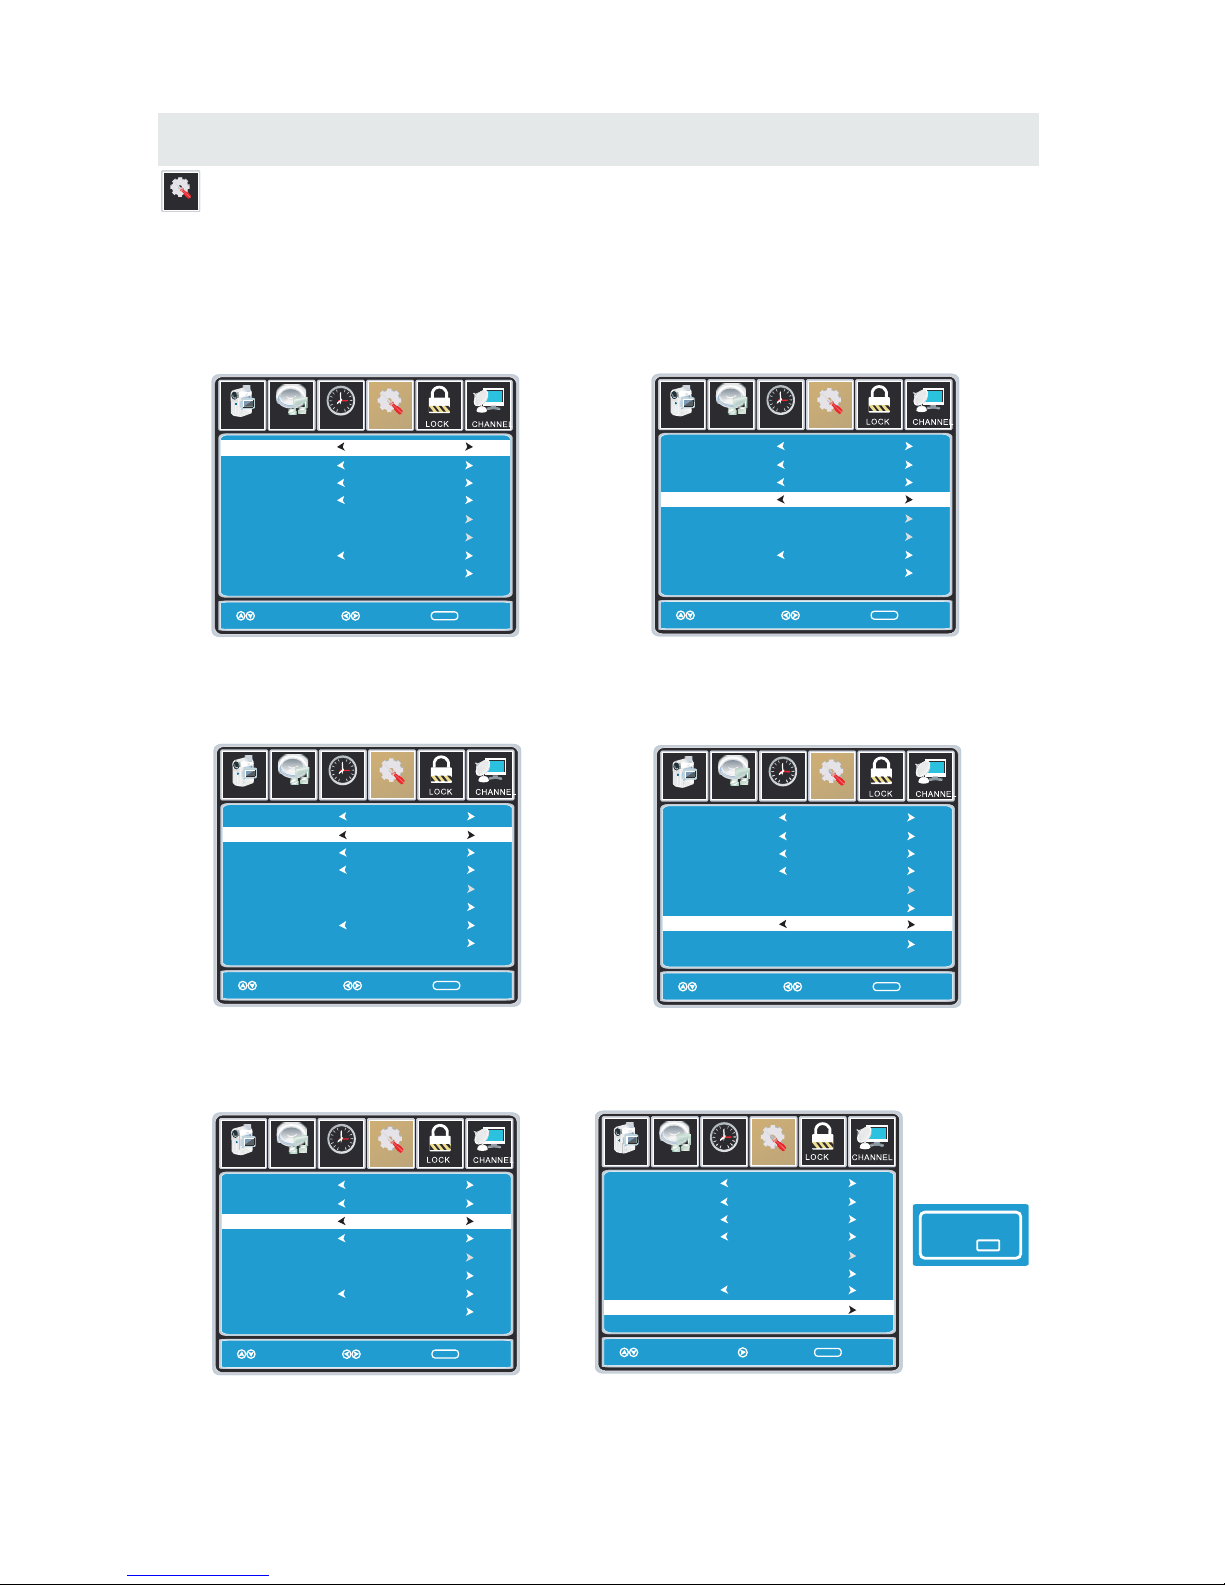
SETUP MENU
Setu p
Lock
12
6
Time
Chan nel
Men u Lan gua ge
Tran spar enc y
Zoo m Mo de
Noi se Re duc tion
Adv ance
Clo se Ca pti on
XVS
Res tore Def aul t
Eng lish
Mov e Sele ct Ex it
MENU
Pict ure
Off
Nor mal
Off
Setu p
Audio
On
12
6
Time
Men u Lan gua ge
Tran spar enc y
Zoo m Mo de
Noi se Re duc tion
Adv ance
Clo se Ca pti on
XVS
Res tore Def aul t
Eng lish
Mov e Sele ct Return
MENU
Pict ure
Off
Nor mal
Off
Setu p
Audio
On
Lock
12
6
Time
Chan nel
Men u Lan gua ge
Tran spar enc y
Zoo m Mo de
Noi se Re duc tion
Adv ance
Clo se Ca pti on
XVS
Res tore Def aul t
Eng lish
Mov e Sele ct Ex it
MENU
Pict ure
Off
Nor mal
Off
Setu p
Audio
On
12
6
Time
Men u Lan gua ge
Tran spar enc y
Zoo m Mo de
Noi se Re duc tion
Adv ance
Clo se Ca pti on
XVS
Res tore Def aul t
Eng lish
Mov e Sele ct Return
MENU
Pict ure
Off
Nor mal
Off
Setu p
Audio
On
Lock
12
6
Time
Chan nel
Men u Lan gua ge
Tran spar enc y
Zoo m Mo de
Noi se Re duc tion
Adv ance
Clo se Ca pti on
XVS
Res tore Def aul t
Eng lish
Mov e Sele ct Ex it
MENU
Pict ure
Off
Nor mal
Off
Setu p
Audio
On
12
6
Time
Men u Lan gua ge
Tran spar enc y
Zoo m Mo de
Noi se Re duc tion
Adv ance
Clo se Ca pti on
XVS
Res tore Def aul t
Eng lish
Mov e Sele ct Return
MENU
Pict ure
Off
Nor mal
Off
Setu p
Audio
On
Lock
12
6
Time
Chan nel
Men u Lan gua ge
Tran spar enc y
Zoo m Mo de
Noi se Re duc tion
Adv ance
Clo se Ca pti on
XVS
Res tore Def aul t
Eng lish
Mov e Sele ct Ex it
MENU
Pict ure
Off
Nor mal
Off
Setu p
Audio
On
12
6
Time
Men u Lan gua ge
Tran spar enc y
Zoo m Mo de
Noi se Re duc tion
Adv ance
Clo se Ca pti on
XVS
Res tore Def aul t
Eng lish
Mov e Sele ct Return
MENU
Pict ure
Off
Nor mal
Off
Setu p
Audio
On
1212
6
Time
Men u Lan gua ge
Tran spar enc y
Zoo m Mo de
Noi se Re duc tion
Adv ance
Clo se Ca pti on
XVS
Res tore Def aul t
Eng lish
Mov e Sele ct Ex it
MENU
Pict ure
Off
Nor mal
Off
Setu p
Audio
On
6
Time
Men u Lan gua ge
Tran spar enc y
Zoo m Mo de
Noi se Re duc tion
Adv ance
Clo se Ca pti on
XVS
Res tore Def aul t
Eng lish
Mov e Sele ct Return
MENU
Pict ure
Off
Nor mal
Off
Setu p
Audio
On
1212
6
Time
Men u Lan gua ge
Tran spar enc y
Zoo m Mo de
Noi se Re duc tion
Adv ance
Clo se Ca pti on
XVS
Res tore Def aul t
Eng lish
Mov e Sele ct Ex it
MENU
Pict ure
Off
Nor mal
Off
Setu p
Audio
On
6
Time
Men u Lan gua ge
Tran spar enc y
Zoo m Mo de
Noi se Re duc tion
Adv ance
Clo se Ca pti on
XVS
Res tore Def aul t
Eng lish
Mov e Next Return
MENU
Pict ure
Off
Nor mal
Off
Setu p
Audio
On
Are you sure ?
No
Yes
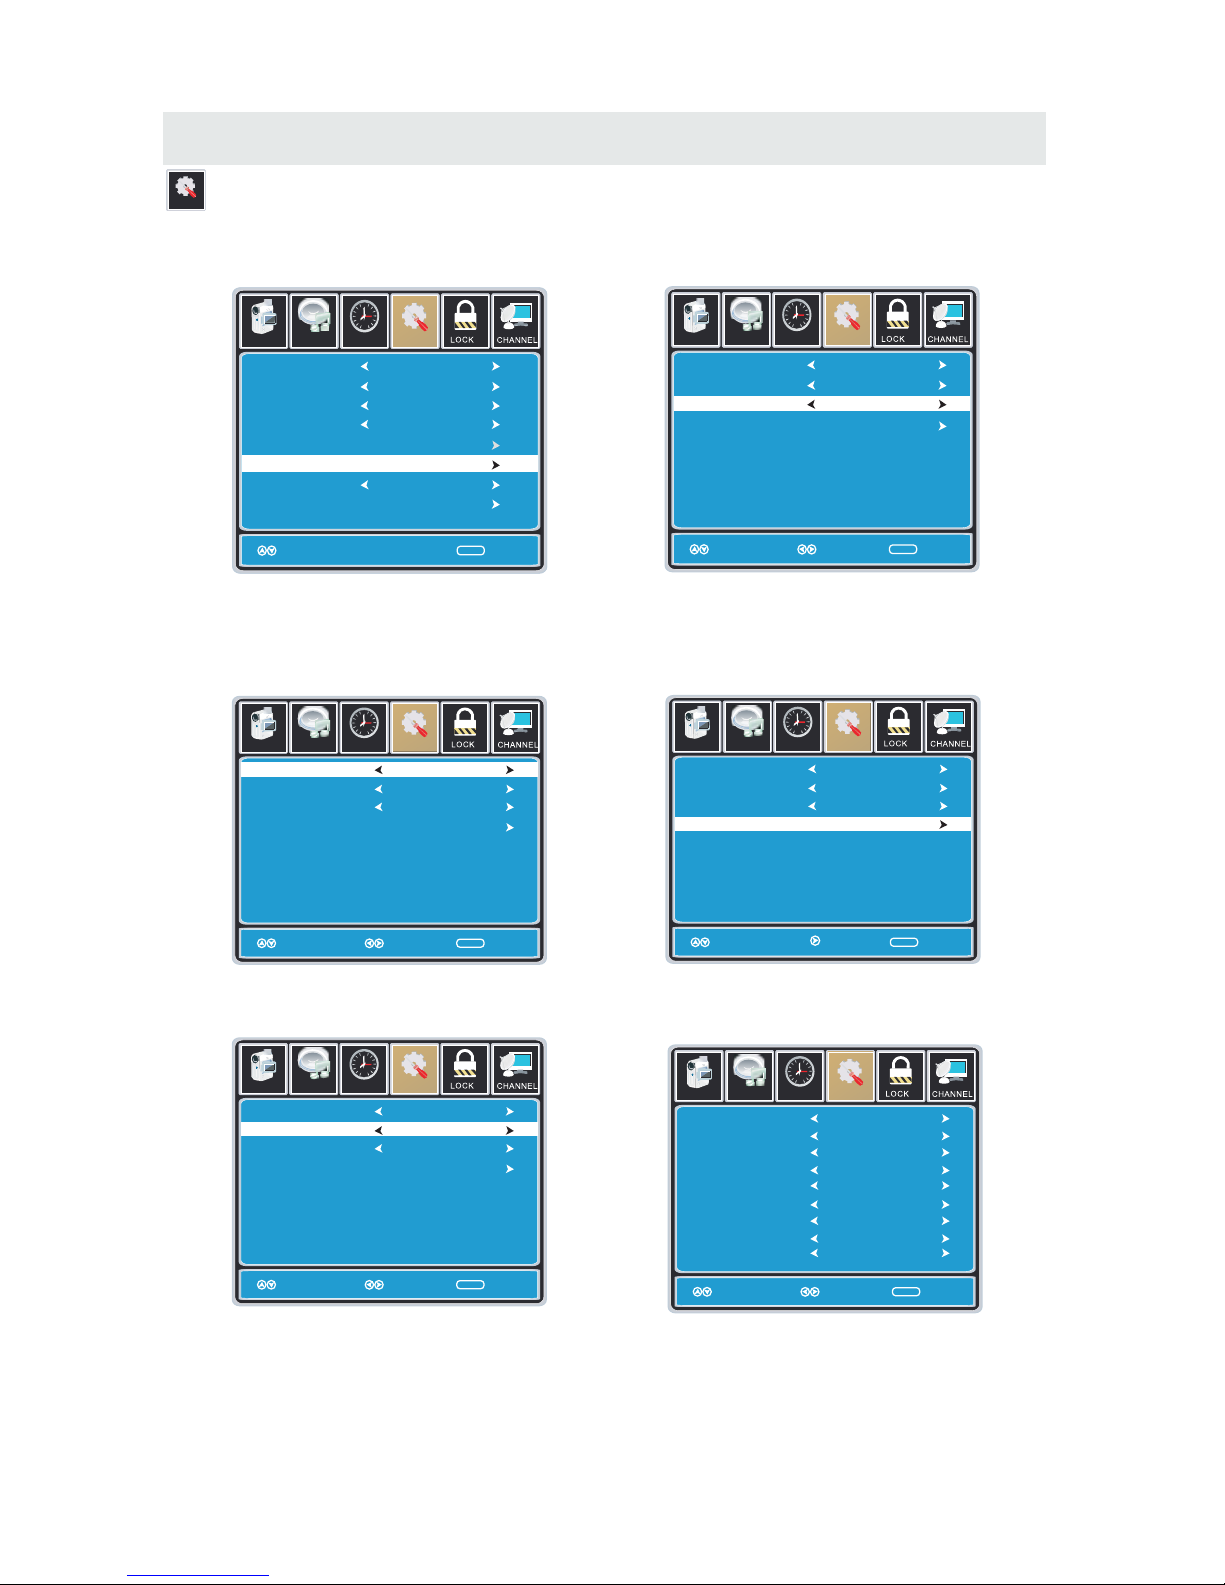
Press the MENU button on the remote control. Navigate using the ◄► buttons to select SETUP.
How to Navigate:
In the SETUP menu you may change the initial set up of preferences that include settings for
language, menu display, computer monitoring, closed captions, enhancement of black detail
in the picture and resetting your TV back to its factory default status.
Use the▼ button to highlight Menu Language,
Press the ► button to select the language
you prefer among English, French and Spanish.
Use the ▼ button to highlight Noise Reduction.
Navigate using the ◄► buttons to reduce video
noise: Middle > Strong> Off > Weak
Default setting: Middle)
Use the ▼ button to highlight Transparency.
Navigate using the ◄► buttons to turn Off or On
the translucent effect of the OSD.
Use the ▼ button to highlight XVS.
Navigate using the ◄► buttons to select:
Off > On. XVS provides noticeable black detail
enhancement that may be preferred.
When
prompted,
Select "Yes"
to confirm.
Use the ▼ button to highlight Zoom Mode.
Navigate using the ◄► buttons to select the
viewing mode: Normal > Wide > Zoom > Cinema.
Use the ▼ button to highlight Restore Default.
Press the ► button to automatically set all
adjustments back to their original settings.
19
Page 23
SETUP MENU
Setu p
12
6
Time
CC Mod e
Bas ic Sel ect ion
Adv ance d Se lect ion
Opt ion
On
Mov e
MENU
Pict ure
CC1
Ser vice 1
Setu p
Audio
Sel ect Return
12
6
Time
CC Mod e
Bas ic Sel ect ion
Adv ance d Se lect ion
Opt ion
On
Mov e
MENU
Pict ure
CC1
Ser vice 1
Setu p
Audio
Sel ect Return
12
6
Time
CC Mod e
Basi c Sel ect ion
Adv anced Se le cti on
Opt io n
On
Mov e
MENU
Pict ure
CC 1
Ser vice 1
Setup
Audio
Se lec t Return
12
6
Time
CC Mod e
Bas ic Sel ect ion
Adv ance d Se lect ion
Opt ion
On
Mov e
MENU
Pict ure
CC1
Ser vice 1
Setu p
Audio
Nex t Re turn
12
6
Time
Mod e
Fon t S tyle
Fon t S ize
Fo nt E dge Sty le
Fon t E dge Colo r
FG Col or
BG Col or
FG Opa cit y
BG O paci ty
Ret urn
MENU
Pict ure
Set up
Audio
Cus tom
Def ault
Def ault
Def ault
Def ault
Def ault
Def ault
Def ault
Def ault
Mo ve
Se lec t
TV SETUP
Lock
12
6
Time Chan nel
Men u Lan gu age
Tran sparenc y
Zoo m Mo de
Noi se Re ducti on
Adv ance
Clo se Ca pt ion
XVS
Res tore Def ault
Eng lish
Mo ve Se le ct Ex it
MENU
Pict ure
Off
Nor mal
Off
Setup
Audio
On
12
6
Time
Men u Lan gu age
Tran sparenc y
Zoo m Mo de
Noi se Re ducti on
Adv ance
Clo se Ca pt ion
XVS
Res tore Def ault
Eng lish
Mo ve Ne xt Return
MENU
Pict ure
Off
Nor mal
Off
Setup
Audio
On
The SETUP menu includes adjustments for activating the Closed Caption feature for display
on the television and customizing CC display types and font styles.
How to Navigate:
Press the MENU button on the remote control.
Navigate using the ◄► buttons to select SETUP.
Press the▼ button to highlight Closed Caption
then press the ► button to select from the
following options.
Use the ▼ button to highlight Advance Selection.
Navigate using the ◄► buttons to select
Service 1 - 6.
Use the ▼ button to highlight CC Mode.
Navigate using the ◄► buttons to select
Off > On > CC on Mute.
Use the ▼ button to highlight Option.
Press the ► button to enter a menu with options
to cus tomize text fonts, colors and opacities.
Use the ▼ button to highlight Basic Selection.
Navigate using the ◄► buttons to select
CC 1-4, Text 1-4.
Note:
When adjustments are completed, you may select another menu by pressing
the Menu button.
20
Page 24
TV SETUP
SETUP MENU
Setu p
Set up
12
6
Tim
e
Picture Audio
Clo ck
Pha se
Aut o
Mov e Adj ust
MENU
50
50
50
0
H - pos
V - pos
Set up
12
6
Tim
e
Picture Audio
Clo ck
Pha se
Aut o
Mov e Adj ust
MENU
50
50
50
0
H - pos
V - pos
Set up
12
6
Tim
e
Picture Audio
Clo ck
Pha se
Aut o
Mov e Adj ust
MENU
50
50
50
0
H - pos
V - pos
Set up
12
6
Tim
e
Picture Audio
Clo ck
Pha se
Aut o
Mov e Next
MENU
50
50
50
0
H - pos
V - pos
Lock
12
6
Time
Chan nel
Men u Lan gua ge
Tran spar enc y
Zoo m Mo de
Noi se Re duct ion
Adv ance
Clo se Ca pti on
XVS
Res tore Def ault
Eng lish
Mov e Sele ct Ex it
MENU
Pict ure
Off
Nor mal
Off
Setu p
Audio
On
12
6
Time
Men u Lan gua ge
Tran spar enc y
Zoo m Mo de
Noi se Re duct ion
Adv ance
Clo se Ca pti on
XVS
Res tore Def ault
Eng lish
Mov e Sele ct Return
MENU
Pict ure
Off
Nor mal
Off
Setu p
Audio
On
Set up
12
6
Tim
e
Picture Audio
Clo ck
Pha se
Aut o
Mov e Adj ust
MENU
50
50
50
0
H - pos
V - pos
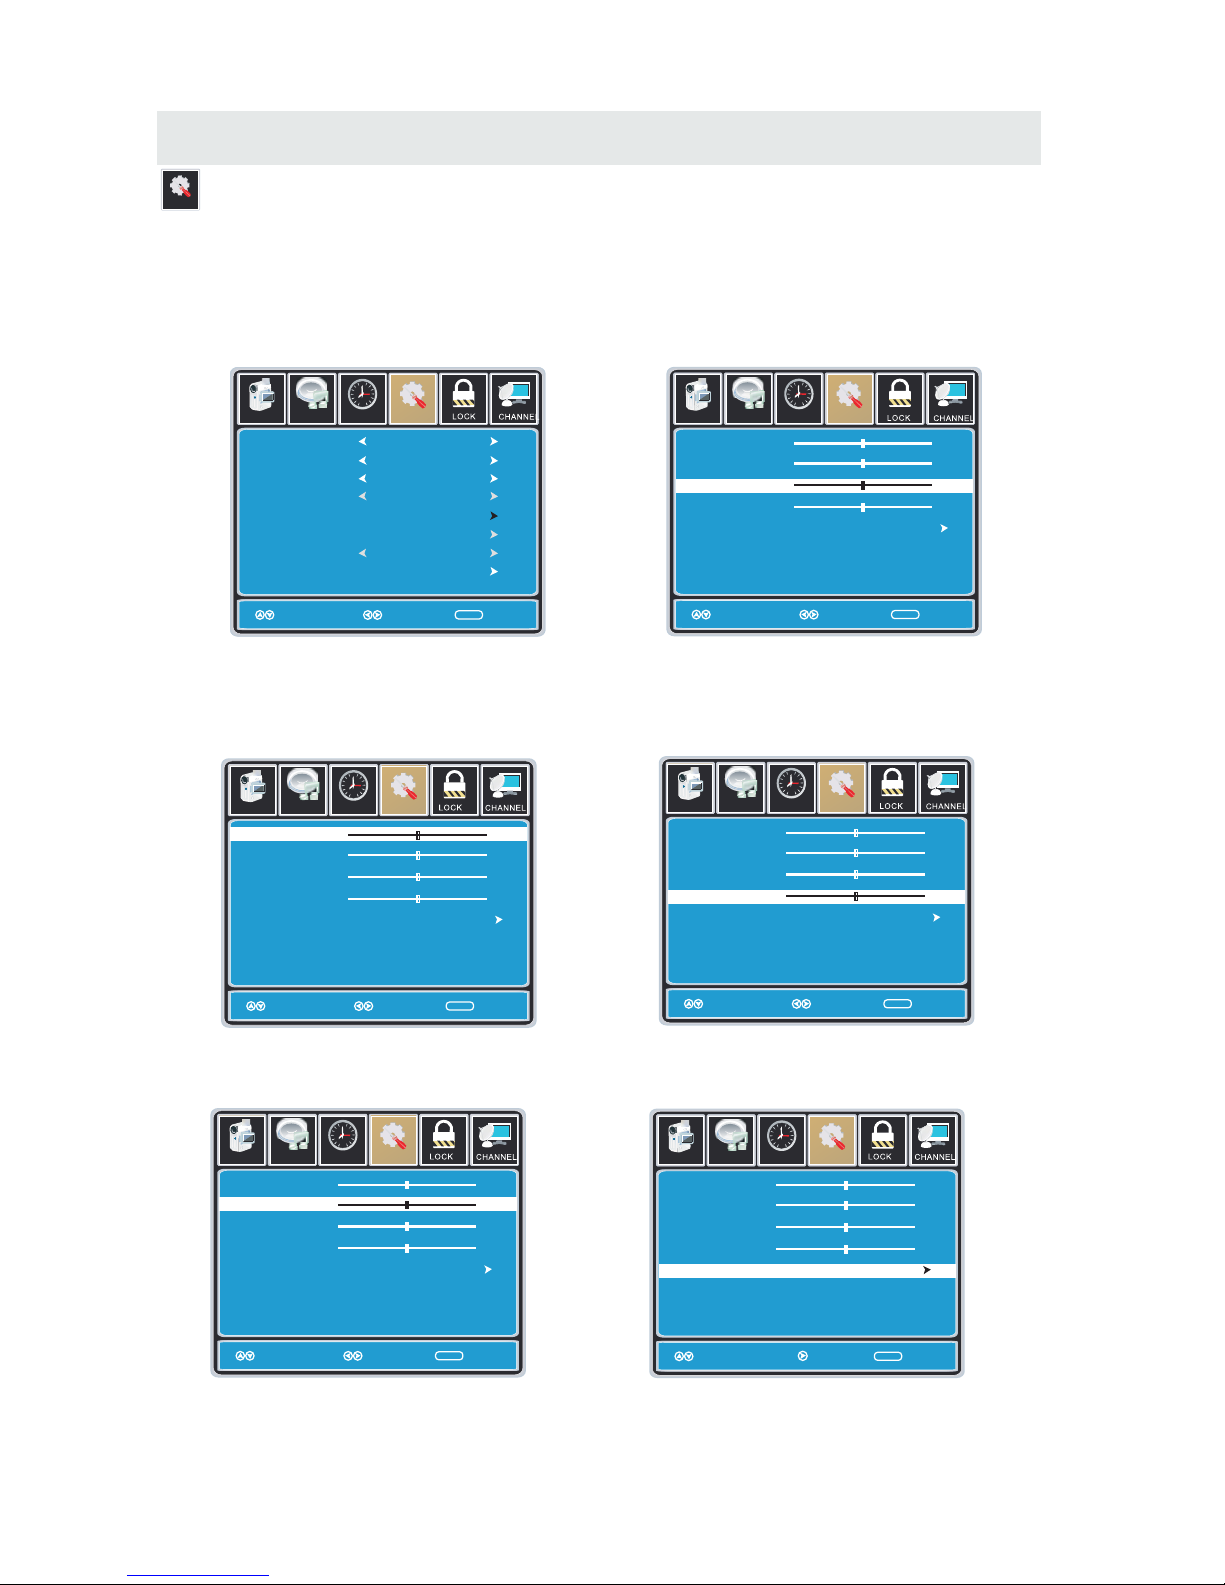
In the SETUP menu you may adjust the position of images displayed on screen once you connect
an input signal from your PC.
If your PC system uses a standard signal mode, the screen will adjust automatically.
Connect an optional 3.5mm audio cable for stereo sound.
How to Navigate:
After connecting to a PC, press the SOURCE button and highlight VGA, then press the ENTER
button.
Press the MENU button on the remote control
and navigate using the ◄► buttons to select
SETUP. Press the ▼ button to highlight
Advanced, then press the ►button to select
from the following options.
Use the ▼ button to highlight Clock.
Navigate using the ◄► buttons to control the
width of the image.
Use the ▼ button to highlight H-POS.
Navigate using the ◄► but tons to adjust the
position of images displayed from side to side.
Use the ▼ button to highlight Phase.
Navigate using the ◄► buttons to improve focus
and image stability.
Use the ▼ button to highlight V-POS.
Navigate using the ◄► buttons to adjust the
position of images displayed up and down.
Use the ▼ button to highlight AUTO.
Press the ► button to automatically adjust the
display to the best setting.
21
Ret urn
Ret urn
Ret urn
Ret urn
Ret urn
Page 25
TV SETUP
Lock
LOCK(PARENTAL) MENU
Set up
12
6
Tim
e
Pic ture Audio
Ente r Pas sw or d
Re tu rn
MEN U
0 9~
Set up
12
6
Tim
e
Pic ture Audio
Ch an ge Password
Sy st em Lock
US
Ca na da
Re se t RRT
RR T Setting
Se le ct
Re tu rn
MEN U
On
Mo ve
Set up
12
6
Tim
e
Pic ture Audio
Ch an ge Password
Sy st em Lock
US
Ca na da
Re se t RRT
RR T Setting
Ne xt
Re tu rn
MEN U
On
Mo ve
Set up
12
6
Tim
e
Pic ture Audio
En te r New Pas sw or d
Co nf ir m Pas sw or d
Re tu rn
MEN U
0 9~
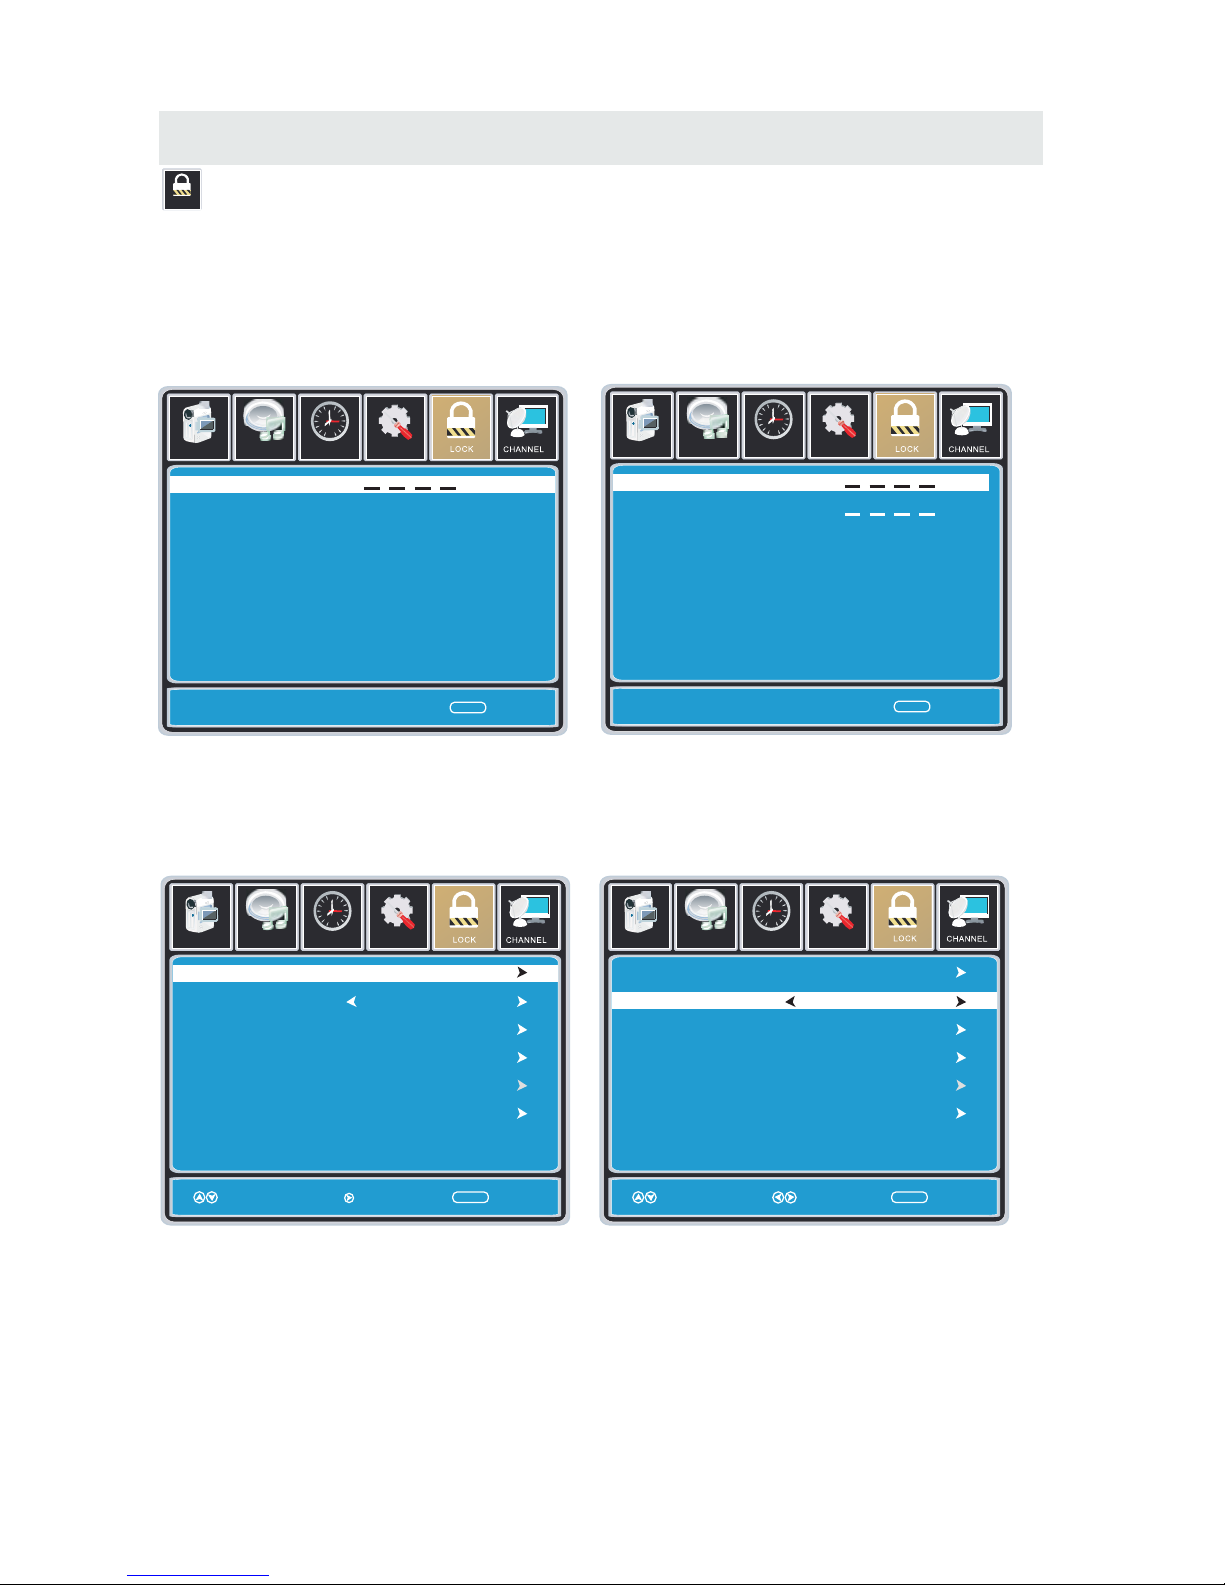
In the LOCK(PARENTAL) menu you may block television by inputting passwords.
To gain access and select your preferences within the LOCK(Parental) menu
make certain your input is set to TV.
Press the MENU button on the remote control. Navigate using the ◄► buttons to select Parental.
How to Navigate:
Press the ▼ button to highlight
Enter Password. Enter your 4 digit code
(factory default code is "0000")
unless previously changed.
Use the numeric buttons to input a new
4 digit code by two times.
To change the password, press the ► button
to display a screen to enter your new password,
then confirm again.
To make changes to PARENTAL controls,
Highlight SYSTEM LOCK then press
the ► button to ON.
NOTE:
RRT Setting and Reset RRT are not user's adjustable settings.
22
Page 26
TV SETUP
Lock
LOCK(PARENTAL) MENU
Set up
12
6
Tim
e
Pict ure Audio
TV
MPA A
Mov e
MENU
N A
Se lec t
Set up
12
6
Tim
e
Pict ure Audio
TV
MPA A
Mov e
MENU
N A
Ne xt
Set up
12
6
Tim
e
Pict ure Audio
MENU
Blo ck Pres s ENT ER to lock or unl ock
TV RATI NG
TV Y
TV Y 7
TV G
TV P G
TV 1 4
TV M A
AL L FV V S L D
Ne xt Mo ve
N/ A
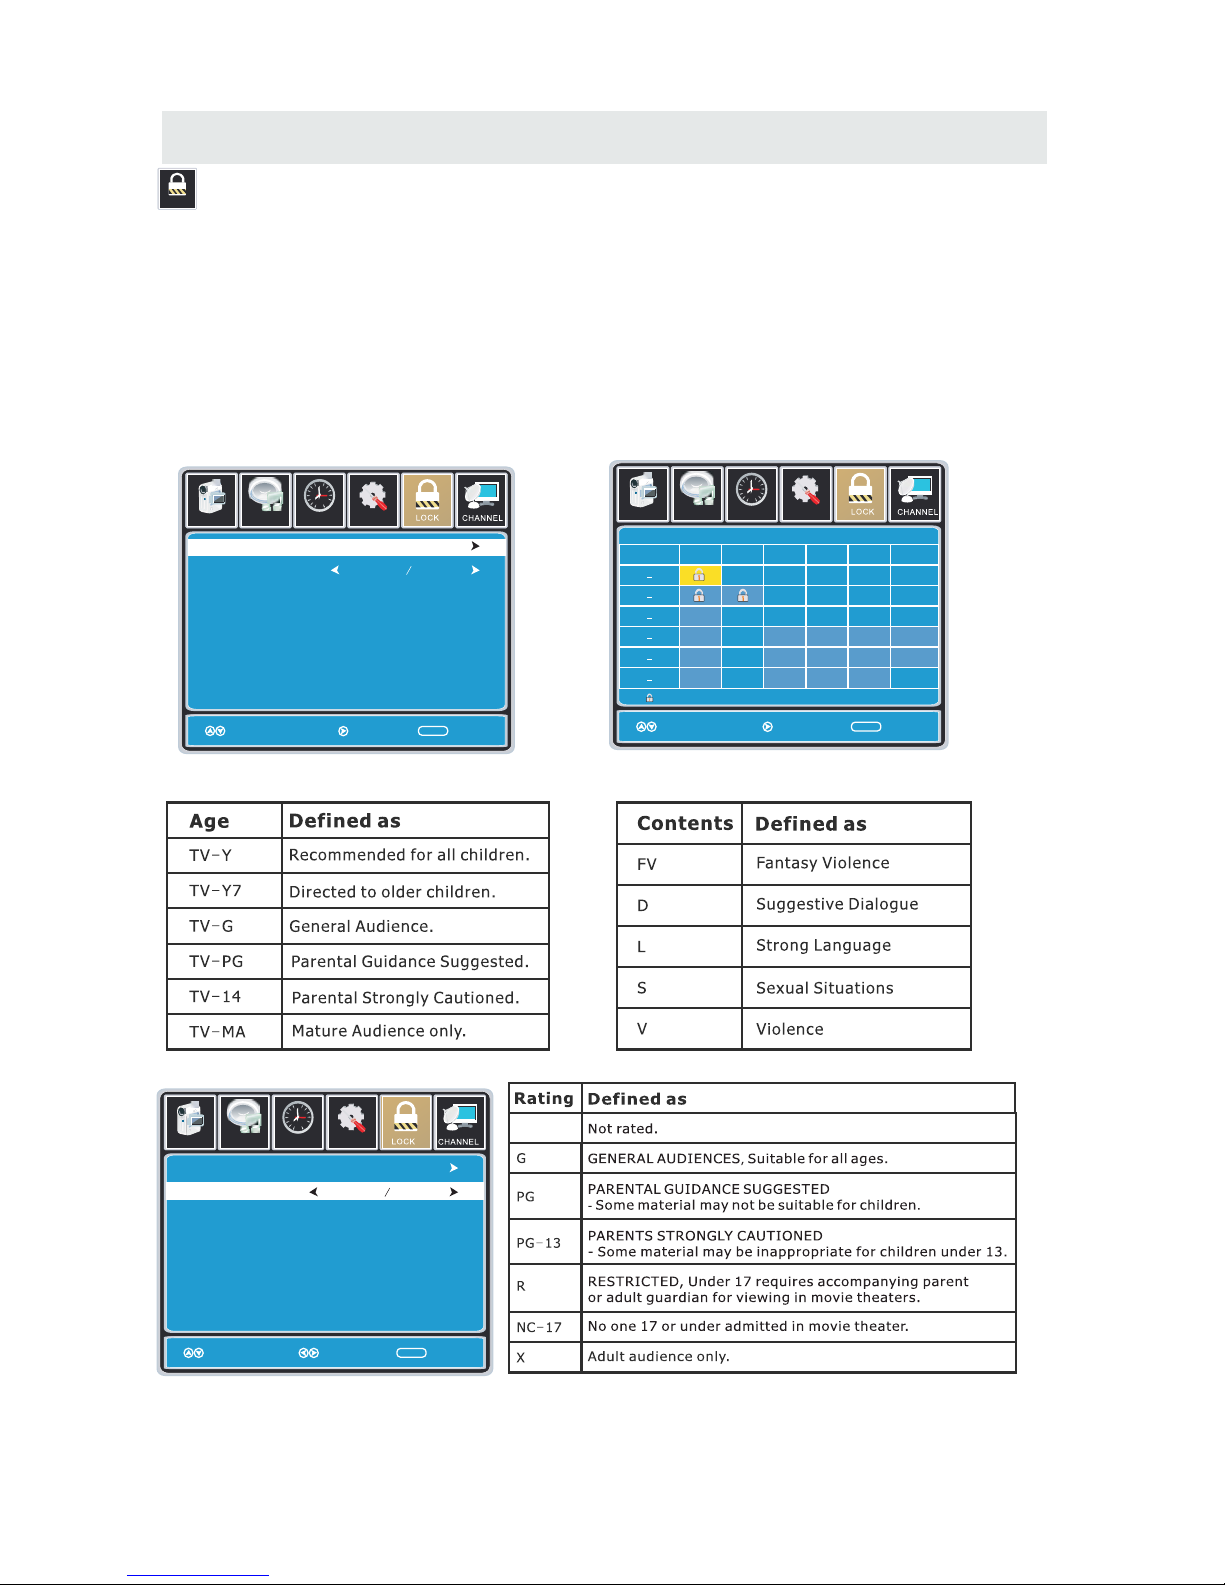
In the LOCK(PARENTAL) menu you may block television and movie programming based on
U.S TV and movie rating guidelines. To gain access and select your preferences
within the LOCK(Parental) menu make certain your input is set to TV.
How to Navigate:
Press the MENU button on the remote control. Navigate using the ◄► buttons to select LOCK
(Parental).
Press the ▼ button to highlight ENTER PASSWORD. Enter your 4 digit code
(factory default code is "0000") unless previously changed.
To set parental controls for television programming or DVD movies, press the ▲▼buttons to
highlight US. Navigate using the ◄► buttons to highlight TV/MPAA menu.
Highlight TV, then press the ► button to enter the TV Ratings menu to select your preference.
Highlight MPAA then press the ► button repeatedly to select your movie rating preference.
23
Ret urn
Ret urn
Ret urn
Page 27
TV SETUP
Lock
LOCK(PARENTAL) MENU
Set up
Ca nad a E ngli sh
Ca nad a F renc h
Mo ve
Se lec t Return
MENU
Pict ure Audio
12
6
Tim
e
G
G
Set up
Ca nad a E ngli sh
Ca nad a F renc h
Mo ve
Se lec t Return
MENU
Pict ure Audio
12
6
Tim
e
G
G
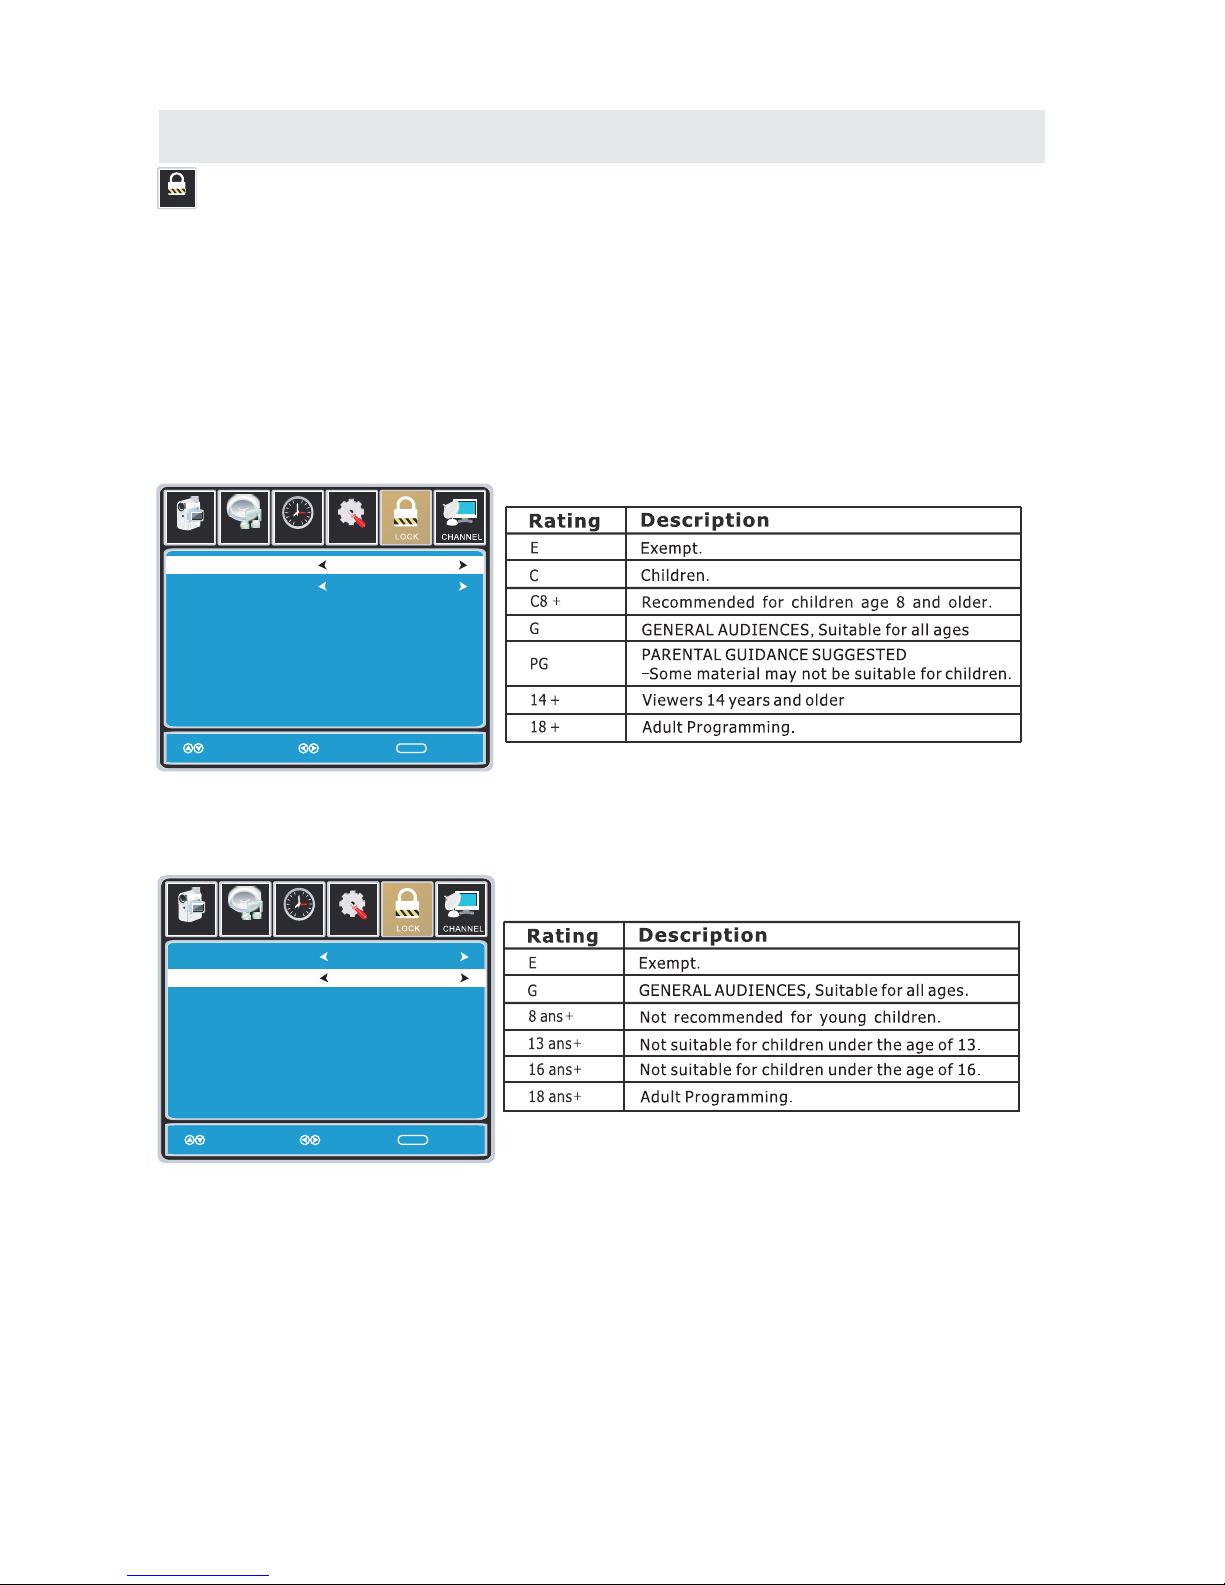
In the LOCK(PARENTAL) menu you may block television and movie programming based on
Canadian TV and movie rating guidelines. To gain access and select your preferences
within the LOCK(Parental) menu make certain your input is set to TV.
How to Navigate:
Press the MENU button on the remote control. Navigate using t he ◄► buttons to select Parental.
Press the button to highlight ENTER PASSWORD. Enter your 4 digit code
(factory default code is "0000") unless previously changed.
To set parental controls for television programming or DVD movies, press the ▲▼ buttons to
highlight Canada.Navigate using the◄► buttons to highlight Canada English/Canada French menu.
Navigate using the ▼ button to highlight CANADA ENGLISH, then press the ► button repeatedly
to select your ratings preference.
Navigate using the ▼ button to highlight CANADA FRENCH, then press the ► button repeatedly
to select your ratings preference.
NOTE:
When adjustments are completed, you may select another menu by pressing
the Menu button.
24
Page 28
TV SETUP
TV(CHANNEL) MENU
Chan nel
Setu p
12
6
Tim
e
Pict ure Audio
Air /C able
Au to Sc an
Fa vor it e
Ch an nel N o
Ch ann el Lab le
DT V S ig na l
Air
Mo ve Nx et Return
MENU
50 3
KO CE LB
Goo d
Set up
12
6
Tim
e
Pict ure Audio
Mo ve Pre ss 扙NT ER Ch ang e Re tur n
MENU
Channel Program Name Favorite
ATSC 1
ATSC 2
ATSC 3
KO CE HD
KO CE SD
KO CE LB
2 0
14 1
14 2
14 3
50 1
50 2
66 0
50 3
Prev Next
Setu p
12
6
Tim
e
Pict ure Audio
Air /C able
Au to Sc an
Fa vor it e
Ch an nel N o
Ch ann el Lab le
DT V S ig na l
Air
Mo ve Ne xt Return
MENU
50 3
KO CE LB
Goo d
Set up
12
6
Tim
e
Pict ure Audio
Mo ve Pre ss 扙NT ER Ch ang e Re tur n
MENU
Channel Program Name Add/Delete
Prev Next
66 0
ATSC 1
ATSC 2
ATSC 3
KO CE HD
KO CE SD
KOCE LB
2 0
14 1
14 2
14 3
50 1
50 2
50 3
Setu p
12
6
Tim
e
Pict ure Audio
Air /C able
Au to Sc an
Fa vor it e
Ch an nel N o
Ch ann el Lab le
DT V S ig na l
Air
Mo ve Ne xt Return
MENU
50 3
KO CE LB
Goo d
Set up
12
6
Tim
e
Pict ure Audio
Mo ve Ne xt
MENU
K B B C - D T
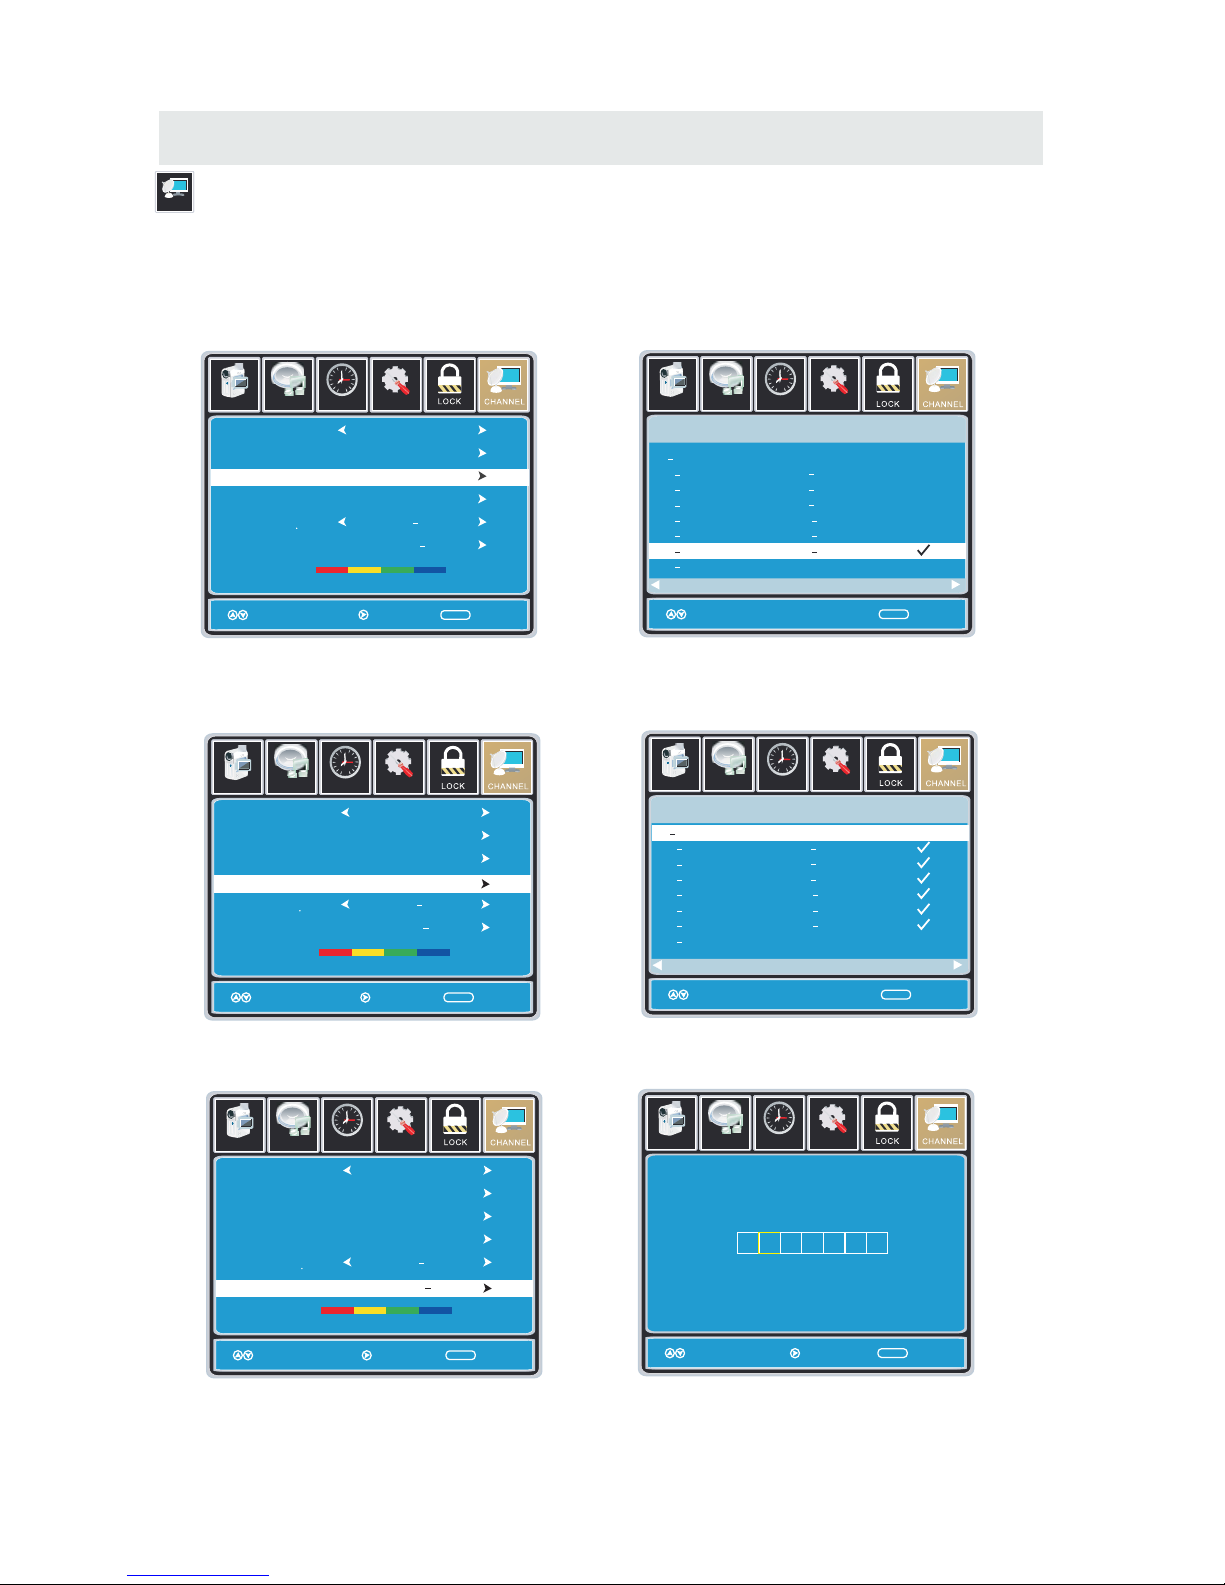
The TV(CHANNEL) menu provides for the setup of your television to receive TV channels, store
your favorites, add or skip channels and label them by their call letters.
How to Navigate:
Press the MENU button on the remote control. Navigate using the ◄► buttons to select TV.
Press the ▼ button to highlight your preferences.
Highlight FAVOURITE to add channels to your Favorites List. Navigate using the ▲▼◄► buttons
to select channels to be added or deleted from your list. Press the ENTER button to add or delete
a channel. A checkmark indicates a channel has been added. You may also display your favourite
list from the remote control by pressing FAV.
Highlight to select Show/Hide or skip channels already in memory. Navigate using the ▲▼◄►
buttons to access the list of available channels. Press the ENTER button to change the channels
status. A checkmark indicates a channel has been added.
Highlight CHANNEL LABEL to name or rename a broadcast channel. Navigate using the ► button
to enter the screen menu to re-label a channel. Use the ▲▼ buttons to spell out each letter,
number or character. Use the ◄► buttons to advance to the next space.
Sho w/Hi de
Sho w/Hi de
Sho w/Hi de
25
Ret urn
Page 29
DISPLAY MODE
PC FORMATS
H i o aor z nt l
Sc ning F eq enan r u cy
Res l io
o ut n
(KHz)
Vert c l
i a
Sc n n e e
an i g Fr qu ncy
(Hz)
Format
640 480
00 6
008
00 6 0
8 0
024 681 7
13
60 76
8
7. 74
31. 5
X
X
X
X
X
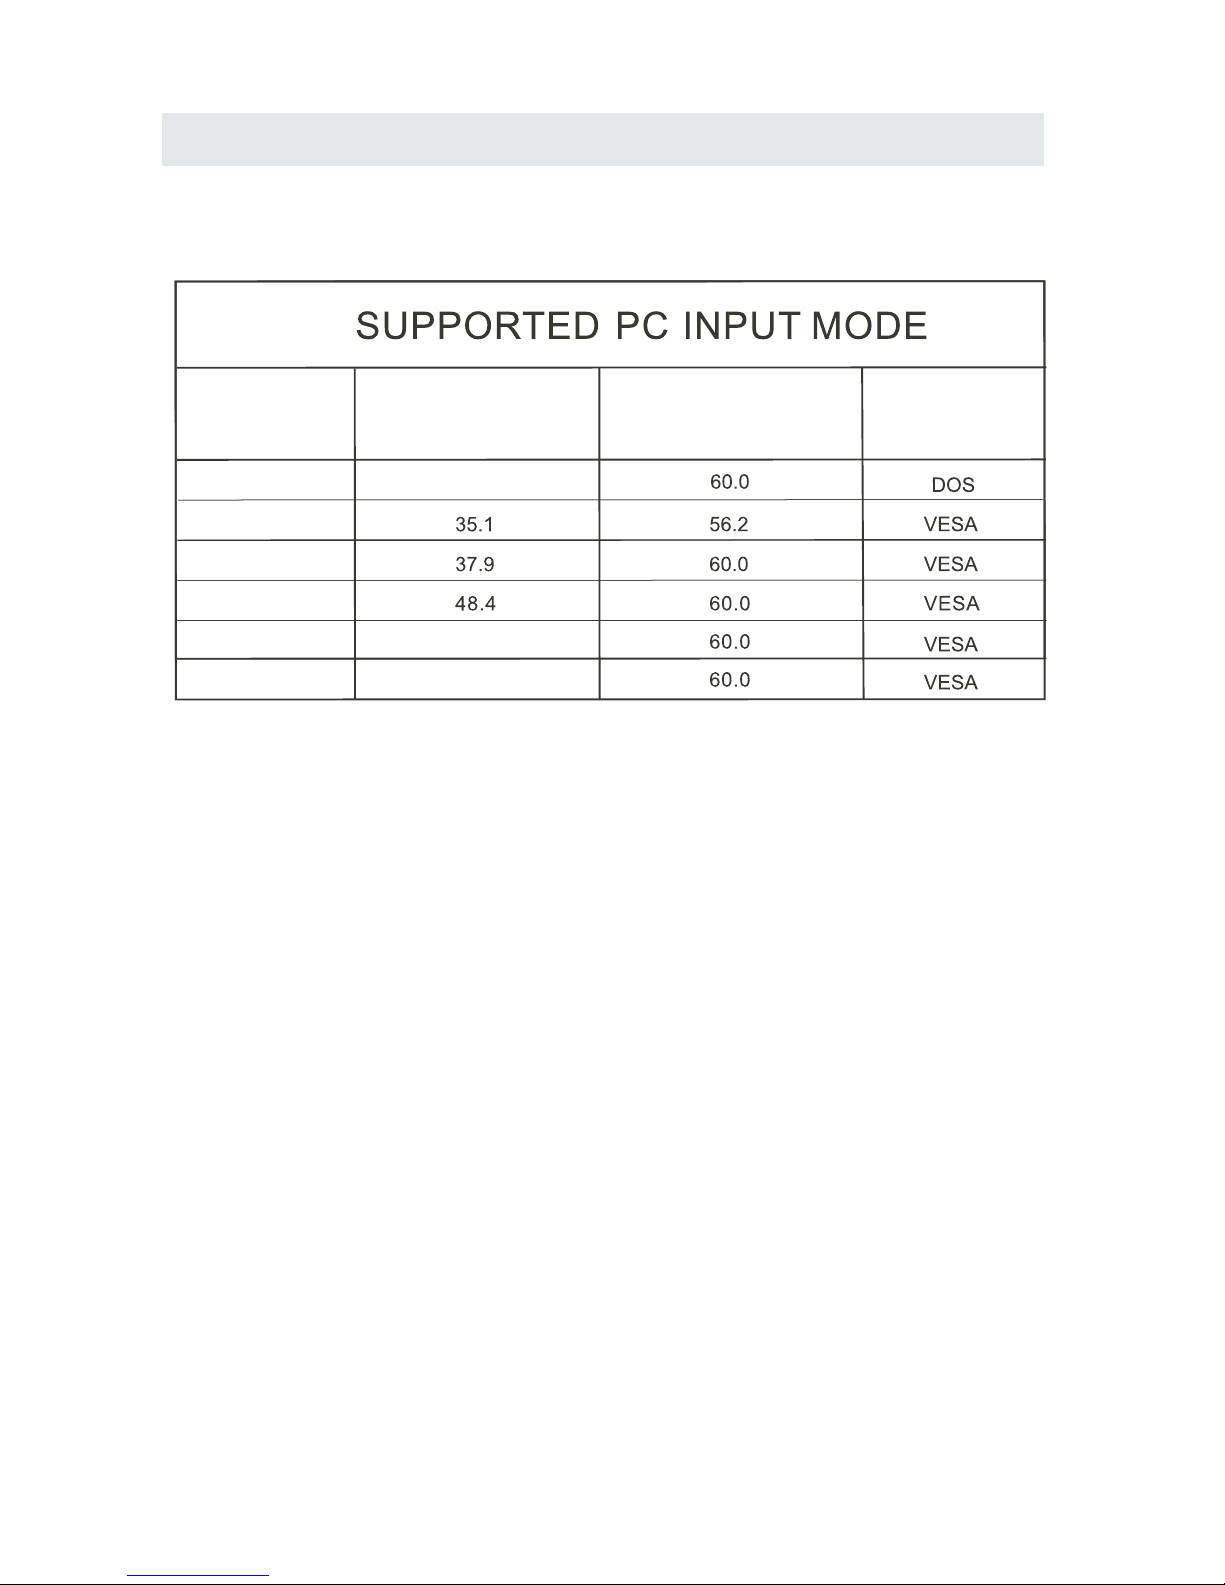
NOTE:
This product does not support the display mode not listed above.
In order to achieve the best display effect, please select the above-listed
6 display modes input signal.
Because of the difference of display drivers output signal
(especially non-standard signal output), the display image may appear little
disturbance which can be adjusted on the PC menu.
To prolong this unit's service life, please set your computer to power management mode.
26
2 819 0 x 10 0
66.6
Page 30
DISPLAY MODE
VIDEO FORMATS
SUPPORTED COMPONENT / HDMI INPUT MODE
Horizontal
Scanning Frequency
Vertical
Scanning Frequency
Format
(Hz)
720 480
720 480
1280 720
1280 720
1920 1080
31. 47
15. 734
37. 5
45
31. 25
33. 75
59. 94
59. 94
50
60
50
60
480 p
480 i
1080 i
720 p
720 p
1080 i
e iR so
lut
on
X
X
X
X
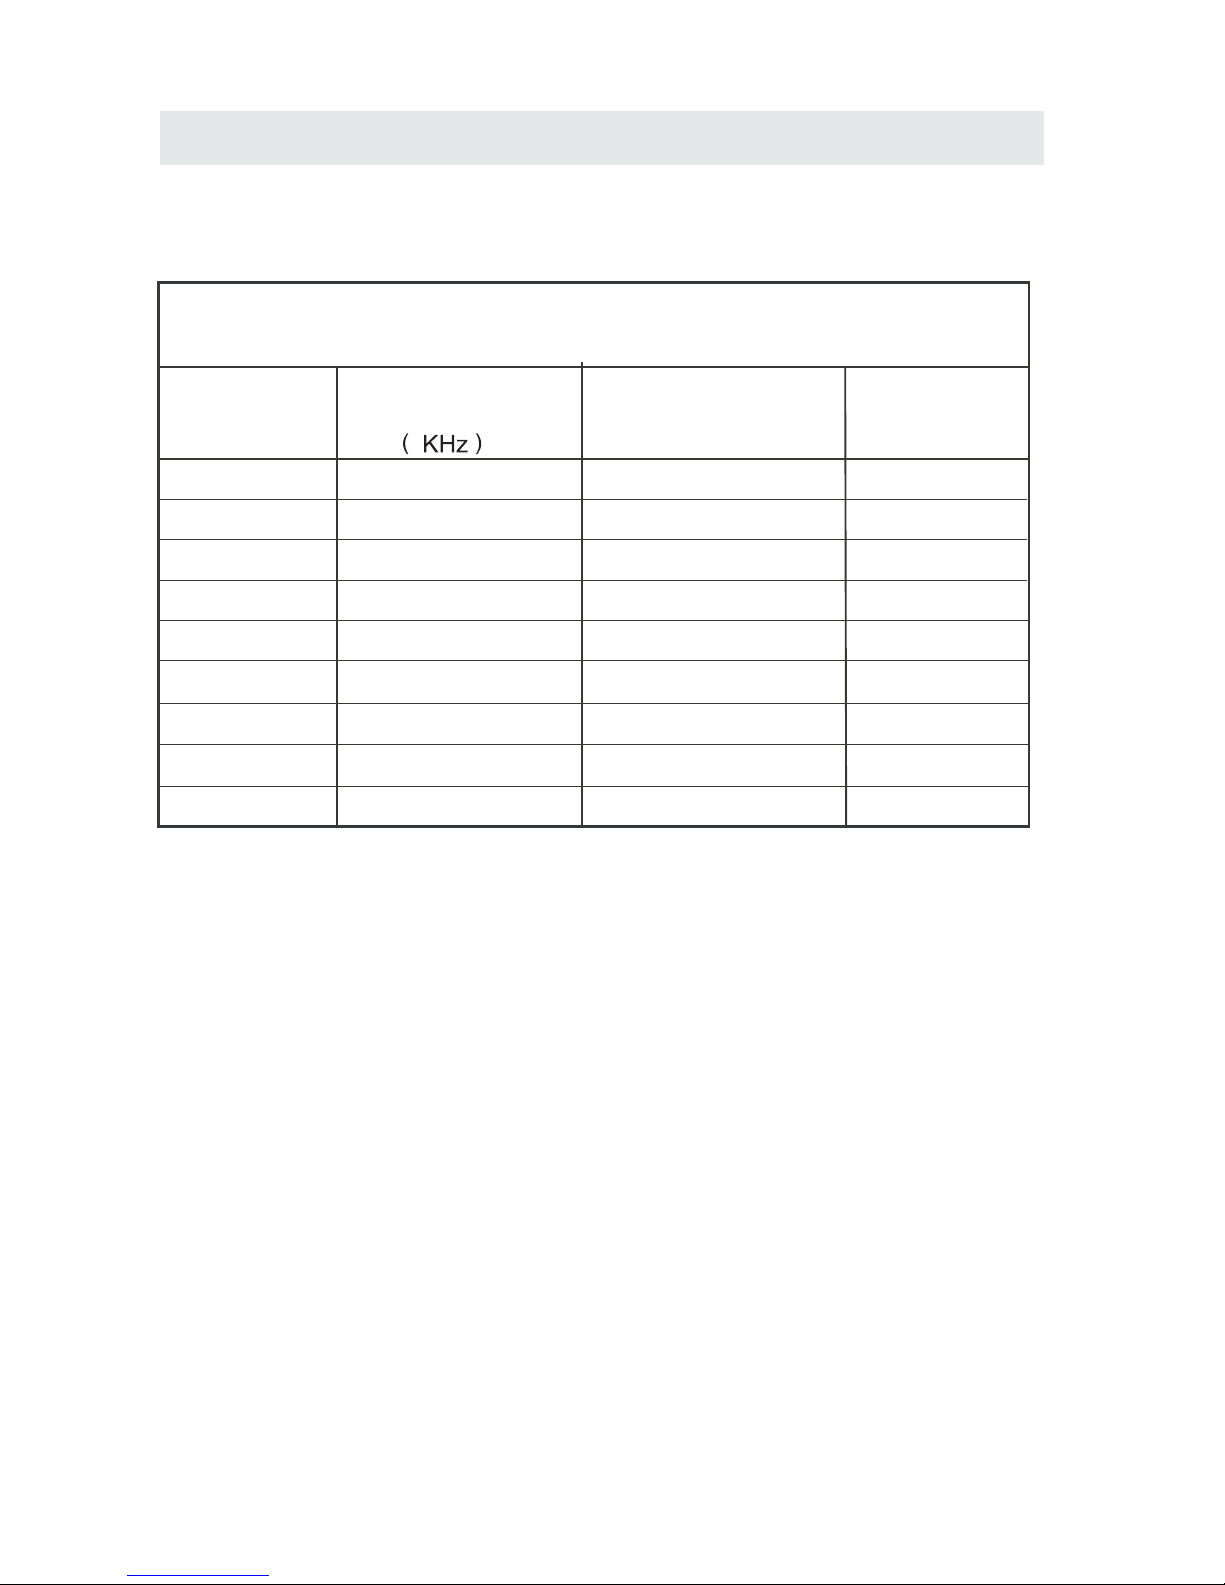
The above listed formats are also related to the AV devices you are about to connect.
Before you connect this unit with others please read all instructions carefully and
make sure all necessary cables are connected.
.
This unit may be incompatible with some other formats which are not meet the
above conditions.
NOTE:
1920 1080
X
X
1920 1080
X
1920 1080
X
1080 p
1080 p
1920 1080
X
1080 p
50
60
24
27
56. 25
67. 50
27
Page 31
SPECIFICATION
This manual is only for your reference.
Specifications are subject to update without prior notice.
28
46”LED TV
Panel Type LED Panel
46 inches
Diagonal Size
Screen Format 16 9:
Color System
ATSC/QAM/NTSC
Model Description
Panel
Resolution 1920 x 1080
View Angle
Response Time
Contrast
Brightness
Maximum Color
400 nit
4000:1
16.7M colors
Sound Output
RF Input 75 ohm external terminal
HDMI Input
Video 480i 480p 720p 1080i, 1080p.: , , ,
Audio Two channel linear PCM 32 44 1 and 48kHz 16 20 and 24 bits: , . , ,
PC RGB Input-
D sub 15pinG 0 7Vp p 75ohms: . - ,
B 0 7Vp p 75ohms: . - ,
R 0 7Vp p 75ohms: . - ,
Power Requirement
Input /
Output
Jacks
Systems
Power
Sound System
M
Audio System
BTSC
L/R Speaker:10 W+ 10W
Composite Video Input
Component Y Pb Pr Input/
Sound Input
PC AUDIO: For PC RGB Audio input
500mV rms, Impedance: 20k ohms
RCA
Y: 1.0 Vp-p, 75ohms, 0.3V negative sync
Pb: 0.7Vp-p, 75ohms
Pr : 0.7Vp-p, 75ohms
100-240V~ 50/60Hz
178(H)/178(V)
122 W
1.0 Vp-p, 75ohms RCA
AV AUDIO: For CVBS/COMPONENT Audio input
Rated Power Consumption
6.5 ms
Page 32

SYMPTOM CAUSE AND REMEDY( )
TV
Bad
Picture
(snow,
multiple
images
distortion,blurry)
No sound.
Black
and
White
picture.
No picture or sound.
Coloredpatches of
picture.
Panel function key does
not respond correctly.
• Check the location of the antenna and adjust it if necessary.
• Make sure the antenna cable is firmly connected.
• Make sure all input cables are firmly connected.
• Increase the volume.
• Check the PICTURE setting within the PICTURE menu.
• Make sure the unit is plugged in and turned on.
• Make sure that the ATV mode is selected.
• Try a new channel to check for possible station trouble.
• Make sure the antenna is connected properly.
• Increase the volume.
•
• Make sure all cables are firmly connected.
• Check for local interference.
• Make sure there are no unshielded electrical devices nearby
that are causing interference.
• Turn the TV off for 30 minutes, then try it again.
• Under the influence of electrostatic phenomenon, the product
may malfunction and require usertopowerreset.
• Unplug and re-plug the AC power cord.
TROUBLESHOOTING GUIDE
• Check to make sure the program you are watching is broadcast
in Color and not Black & White.
• Check
whether the mute function has been activated on the
Remote Control.
The display monitor's
panel goes hot.
• LED TV takes inside lighten phosphor. It may increase the
temperature of the screen in some occasions. It's not a defect.
Unusual dots
• Black dots and Bright points may appear on the LED screen.
This is a structural property of the LED panel and is not a defect.
Stripes on screen
• Adjust the impulse phase may decrease stripes. RGB in( )
The top of the monitor
• It may occur during long-time working. It's not a defect.
gets hot.
Make sure the antenna or audio/video source device is
working properly.
Unable to select a
certain channel.
The channel may be skipped. Choose this channel by
directly selecting the but tons from the rem ote control.
•
Disorder display
at power on.
••This may be caused because of a very shor t interval
between POWER OFF and ON.
Unplug the power and restart.
29
 Loading...