

Page 1

Model:PLED3216A
Page 2

CONTENTS
English
SAFETY
1
PRECAUTION
IMPORTANT
SAFETY
2
INSTRUCTION
ACCESSORIES
3
GETTING
4
STARTED
CONTROL
5
REFERENCE
GUIDE
CONNECTIONS
6
Remote Control
Front View
Back View
Side View
Antenna Connection
AV Connection
YPbPr Connection
HDMI Connection
VGA Connection
Headphone Connection
Power Cord Connection
Coax(SPDIF) Connection
1
2
3
3
4
5
5
6
7
7
8
8
9
9
9
10
WALL MOUNT
7
INSTALLATION
INITIAL SETUP
8
TV SETUP
9
Putting The Unit On A Proper Place
Source Selection
Turning The Unit On For The First Time
TV(CHANNEL) Menu
Picture Menu
Audio Menu
Time Menu
Setup Menu
LOCK(Parental) Menu
11
12
12
12
13
14
15
16
17
18
Page 3

CONTENTS
10
11
12
DI SPLA Y
MO DE
SP ECIF ICA TIO N
TR OUBL ESH OOTI NG
GU IDE
PC Formats
Video Formats
TV Symptom
19
20
21
22
SAFETY CLASS :This is an IEC safety class I product
and it must be grounded for safety.
Page 4
SAFETY PRECAUTION
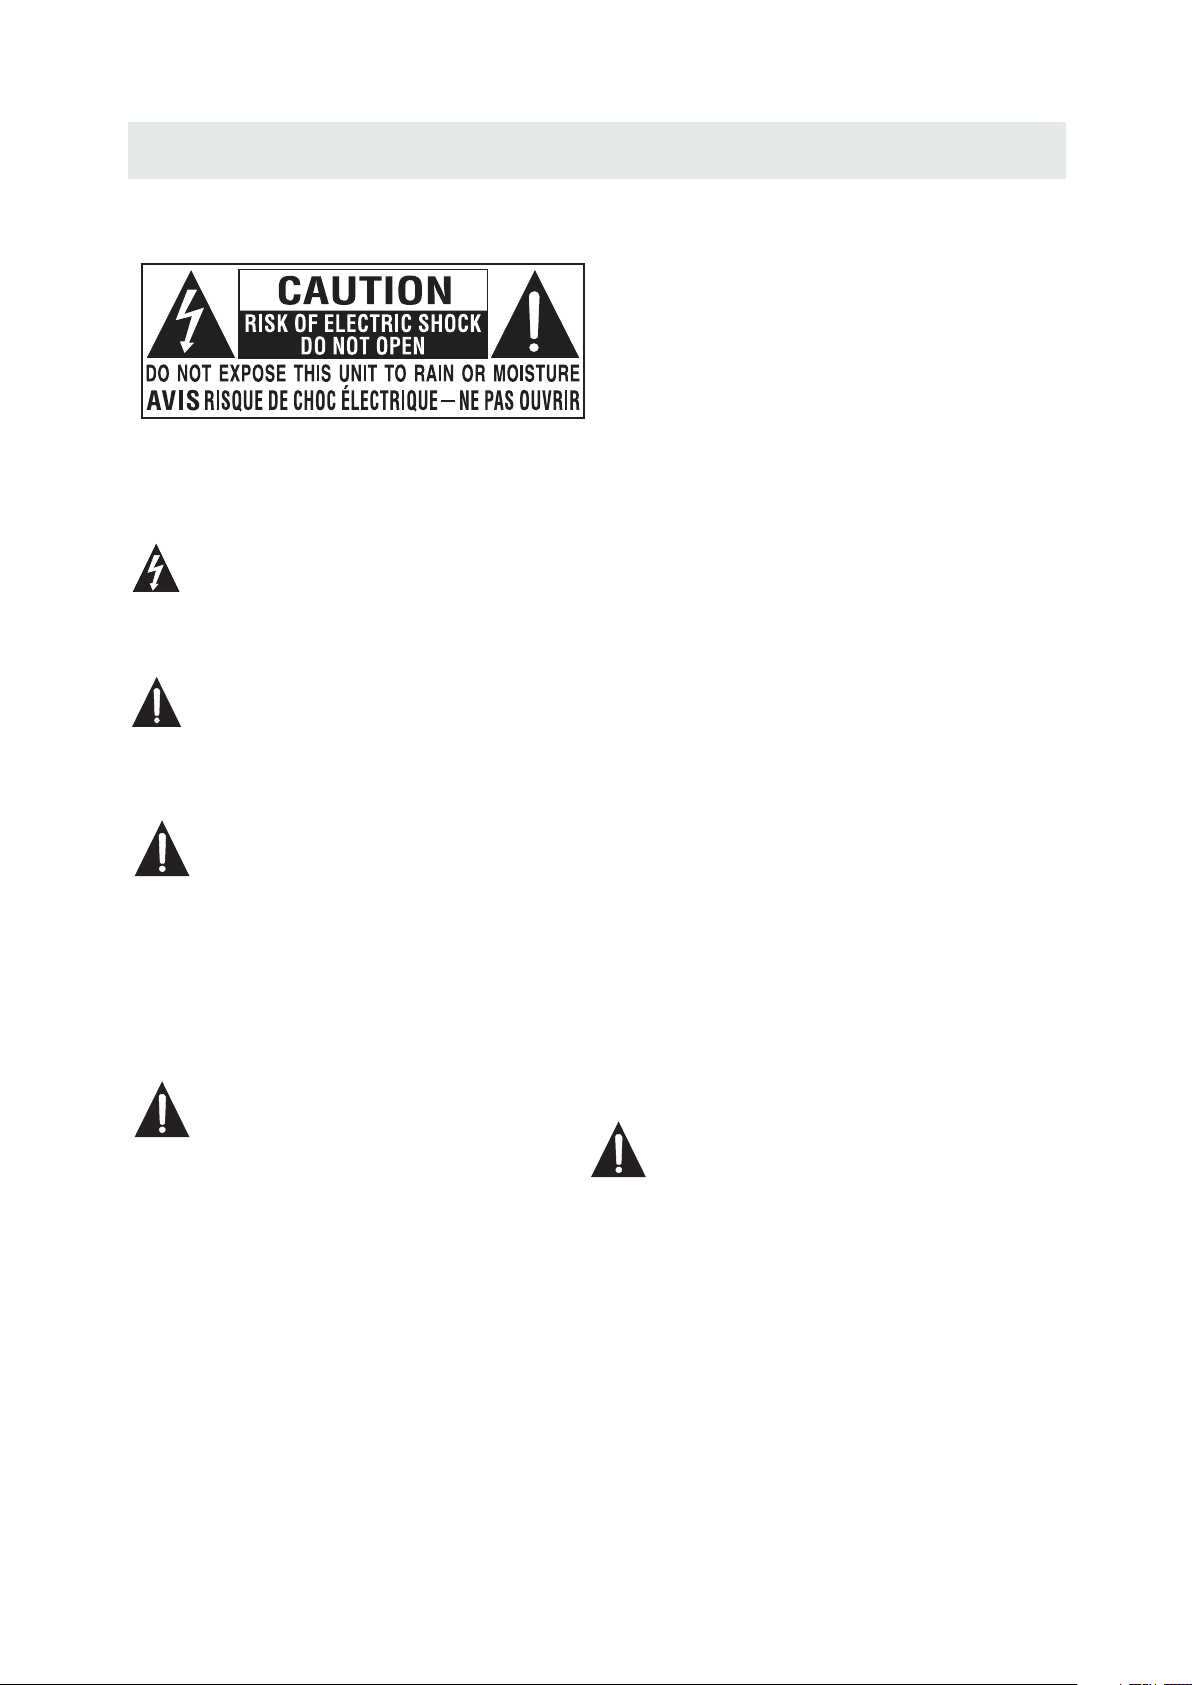
CAUT ION MARKING W AS LOCATE D AT T HE REAR
*
OF THE A PPARATUS.
WARNING: TO REDUCE THE RISK OF ELECTRIC
SHOCK,DO NOT REMOVE COVER(OR BACK)
NO USER SERVICEABLE PARTS INSIDE.
REFER SERVICING TO QUALIFIED SERVICE
PERSONNEL.
The lightning flash with arrowhead symbol,
within an equilateral triangle,is intended to
alert the user to the presence of uninsulated
“dangerous voltage”within the product's enclosure
that may beof sufficient magnitude to constitute a
risk of electric shock to persons.
The exclamation point within an equilateral
Triangle is intended to alert the user to
The presence of important operating and
maintenance (servicing) instructions in the literature
accompanying the appliance.
CAUTION
•
DANG ER OF EXPLOSI ON I F BATTERY I S
INCO RR ECTLY REP LACED. REPL ACE ONLY
WITH T HE S AME OR EQUI VA LENT TYPE .
•
USE OF C ON TROLS OR AD JU STMENTS O R
PERF OR MANCE OF PR OCEDURES OT HER
THAN T HO SE SPECIF IE D MAY RESUL T IN
HAZA RDOUS RADIA TION EXPOSU RE.
WARNING:
TO RED UC E THE RISK OF F IR E OR ELECTR IC
•
SHOC K, DO NOT EXPOS E TH IS APPLIA NC E TO
RAIN O R MO ISTURE.
TO REV EN T FIRE OR SHO CK H AZARD, DO N OT
•
EXPO SE THIS UNIT TO R AI N OR MOISTU RE . DO
NOT PL AC E OBJECTS F IL LED WITH LI QU IDS ON
OR NEA R TH IS UNIT.
•
SHOU LD ANY TROUBL E OCCUR, DISC ONNECT
THE AC P OW ER CORD AND R EFER SERVIC ING
TO A QUA LI FIED TECH NI CIAN.
PLACEMENT INFORMATION
•
Do not u se this unit in p laces that ar e extreme ly
hot, c ol d, dusty or h umid.
•
Do not r estrict the a irflow of thi s unit by pla ci ng it
some where with po or airflo w, b y coverin g it w ith
a clot h, by placing i t on bedding or c arpetin g.
SAFETY INFORMATION
•
When c onnecting o r disconn ec ting the AC p ow er
cord , grip the plug a nd not the cord i tself. Pu ll ing
the co rd may damage i t and create a ha zard.
•
When y ou are not goin g to use the unit f or a long
peri od of time, dis connect the A C power cor d.
RATING PLATE LOCATION
The ra ti ng plate is l ocated on the r ear of the un it .
FCC STATEMENTS
NOTE : Th is unit has b een tested an d found to comp ly
with t he l imits for a C lass B digita l device, pur suant
to Par t 15 o f the FCC Rul es. These lim its are des ig ned
to pro vide reason able prot ec tion agai ns t harmful
inte rference in a r esidentia l install at ion.
This u nit generat es, uses and ca n radiate r ad io
freq uency energ y and, if not ins talled an d us ed in
acco rdance with t he instruct ions, may c au se harmfu l
inte rference to r adio commun ication . Ho wever, th er e
is no gu arantee tha t interfere nce will no t oc cur in a
part icular inst allation. I f this unit d oe s cause har mf ul
inte rference to r adio or telev ision rec ep tion, whi ch
can be d etermined b y turning the u nit off and o n, t he
user i s encourage d to try to corre ct the inte rf erence
by one o r more of the fol lowing meas ures:
- Reor ient or reloc ate the recei ving ante nn a.
- Incr ease the sepa ration betw een the uni t an d
rece iver.
-Con nect the unit i nto an outlet o n a circuit d if ferent
from t ha t to which th e receiver is c onnecte d.
- Cons ult the deale r or an exper ie nced radi o/TV
tech nician for he lp.
WARNING:
Chan ges or mo dific ations to t his
unit n ot expr essly a pproved b y the par ty responsible
for co mplia nce cou ld void the u ser aut hority
to ope rate th e unit.
1
Page 5

IMPORTANT SAFETY INSTRUCTIONS
1)Rea d these instr uctions .
2)Kee p these instr uctions .
3)Hee d all warning s.
4)Fol low all instr uctions .
5)Do no t use this appa ratus nea r wa ter.
6)Cle an only with a dr y cloth.
7)Do no t block any ven tilatio n op enings.
Inst all in accord ance with t he
manu facturer' s instruc ti ons.
8)Do no t install nea r any heat so ur ces such
as rad iators, hea t registers , stoves, o r
othe r apparatus ( Includi ng a mplifie rs) that
prod uce heat.
9)Do no t defect the sa fety purpos e of the
pola rized or grou nding-t yp e plug.
A pola rized plug ha s two blade s wi th one
wide r than the othe r.
A grou ndingtype p lug has two b la des
and a th ird groundi ng prong.
The wi de blade or the t hird pron g is
prov ided for your s afety.
If the p rovided plu g does not fi t in to your
wall o utlet, cons ult an electr ician for
repl acement of th e obsolet e ou tlet.
10)Pr otect the pow er cord fro m be ing walke d on
or pin ched partic ularly at p lu gs, conve nience
rece ptacles, an d the point whe re they exi t
from t he apparatu s.
11)On ly use attach ments / acces sories sp ec ified
by the m anufactur er.
12)Us e only with the c art, stand,
trip od, bracket , or table
spec ified by the ma nufacture r,
or sol d with the appa ratus.
When a c art is used, us e caution whe n
movi ng the cart / app aratus comb ination t o
avoi d injury from t ip-over .
13)Un plug this app aratus du ri ng lightn ing
Stor ms or when unus ed for long p er iods of
time .
14)Re fer all servi cing to qua li fied serv ice
pers onnel. Serv icing is re qu ired when t he
appa ratushas be en damage d in a ny way,
such a s the power cor d or plug is da ma ged,
liqu id has been spi lled or obj ec ts have fal len
into t he a pparatu s, the appara tus has bee n
expo sed to rain or mo isture, doe s not opera te
norm ally, or has be en droppe d.
15)To p revent elec tric shoc k, e nsure the g ro unding
pin on t he AC cord powe r plug is sec ur ely
conn ected.
2
Page 6
ACCESSORIES
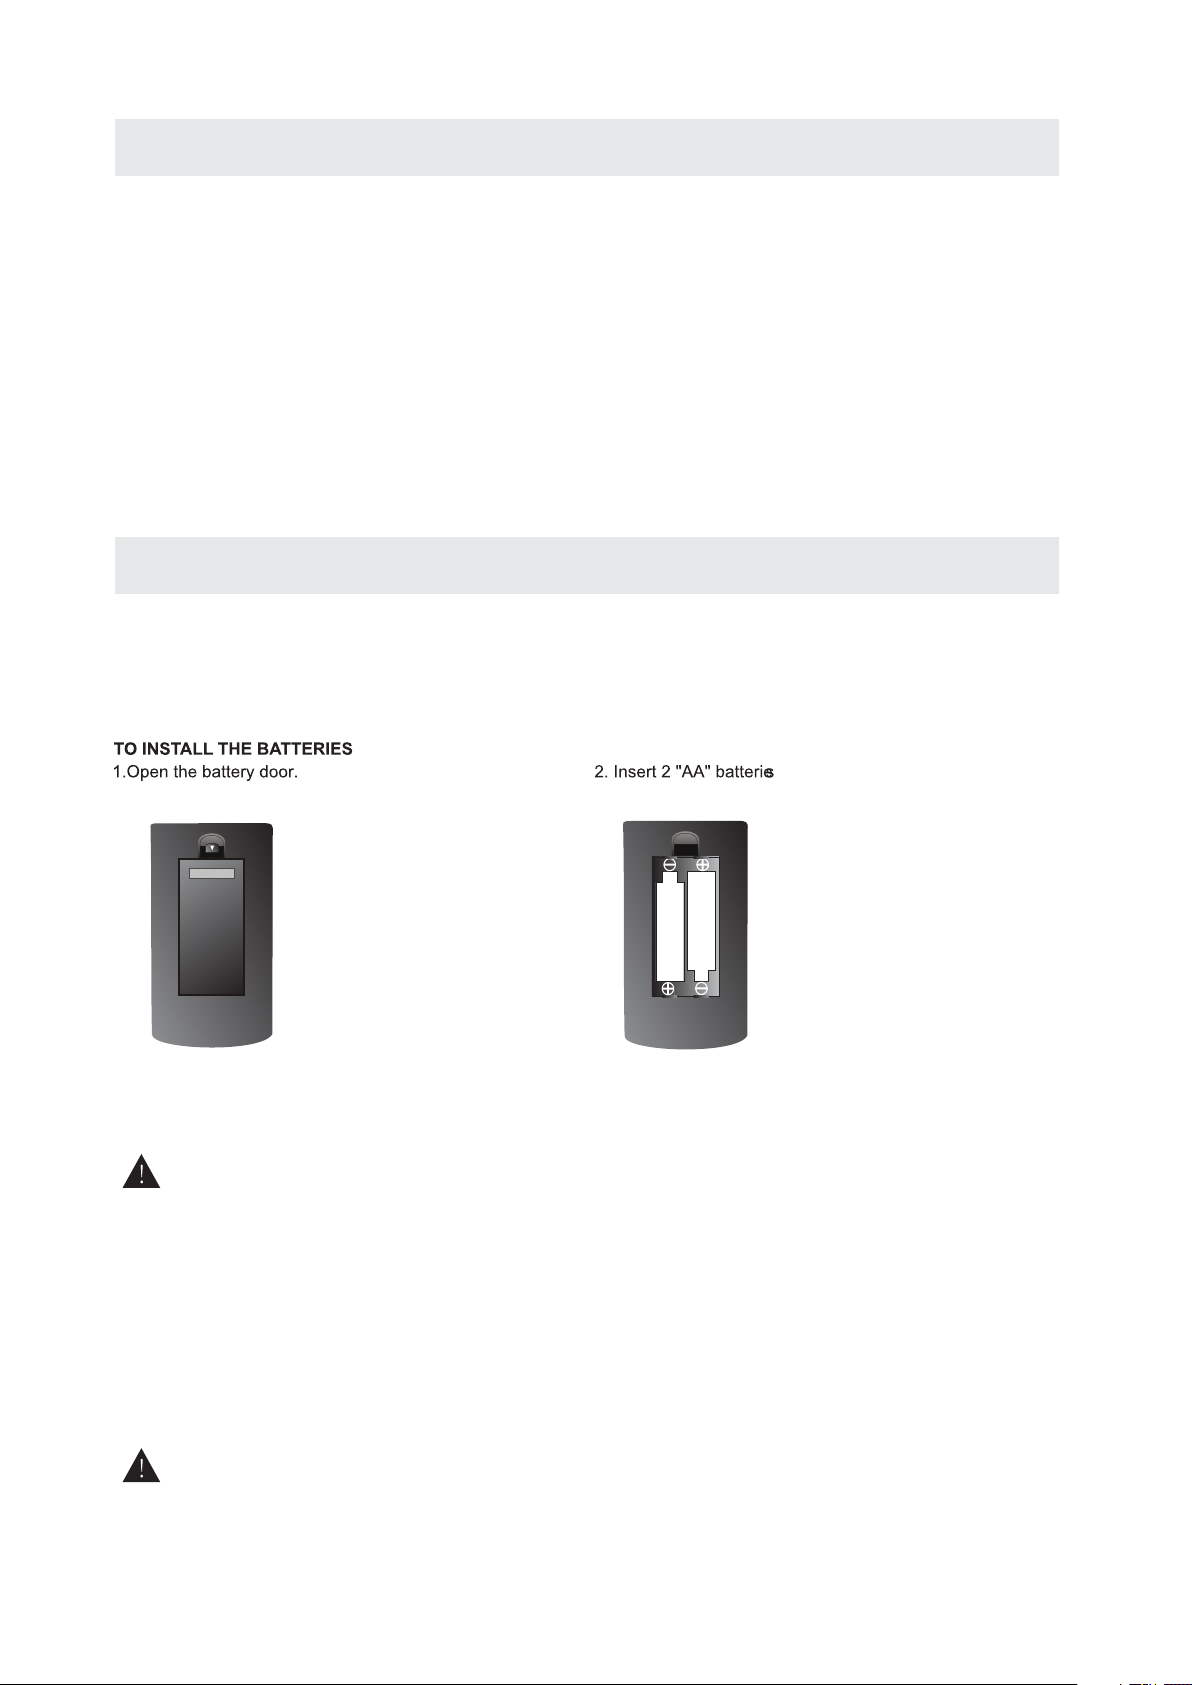
Please check and identify the supplied accessories.
Remo te c ontrol .. .. ......... ......... ......... ......... .. ....... .. ......... ......... ......... .. ....... .. ......... ......... .......
Remo te contro l
x 1
Batt ery(AA)
Warr anty Card
Inst ruction Man ual
Base stand and 4 screws
Screw driver
.. .. ..... ..... ..... ..... ..... ....... ..... ..... ..... ..... ..... ....... ..... ..... ..... ..... ....... ..... ..... ... .. .. .....
.. .. ..... ..... ..... ..... ..... ....... ..... ..... ..... ..... ..... ....... ..... ..... ..... ..... ....... ..... ..... ..... ..
.. .. ..... ..... ..... ..... ..... ....... ..... ..... ..... ..... ..... ....... ..... ..... ..... ..... ....... ..... ..... ..
.. .. ..... ..... ..... ..... ..... ....... ..... ..... ..... ..... ..... ....... ..... ..... ..... ..... ...
.. .. ..... ..... ..... ..... ..... ....... ..... ..... ..... ..... ..... ....... ..... ..... ..... ..... ....... ..... ..... ..... ..
GETTING STARTED
USING THE REMOTE CONTROL
·Poin t the remote co ntrol at th e remote sens or locate d on t he unit.
·When t here is a stron g ambient l ig ht source , the perfo rm ance of the i nfrared r em ote senso r
·may be d egraded , ca using unr eliable o pe ration.
·The re commend ed e ffectiv e distance fo r remote op er ation is ab out 16 feet (5 me ters).
x 2
x 1
x 1
x 1
x 1
BATTERY REPL ACEMENT
When t he batterie s become we ak, the opera ting dist ance of the rem ote contr ol i s greatly
redu ced and you w il l need to rep lace the ba tt eries.
CAUTION
NOT ES
·If the r emote contr ol is not goi ng to be used for a l ong time, r em ove the bat teries to a vo id
dama ge caused b y ba ttery lea kage corr os ion.
·Do not m ix old and ne w ba tteries . Do not mix ALKA LINE, sta nd ard (CARB ON-ZINC ) or
rech argeabl e (N ICKEL-C ADMIUM) b at teries.
·Alwa ys remove b at teries as s oon as they bec ome weak.
·Weak b atteries ca n leak and se verely da ma ge the remo te control.
WARNING :
Do not d ispose batt eries in a fi re . Batteri es may expl od e or leak.
Batt er ies shall n ot be expos ed t o excessi ve heat suc h as s unshine , fire or the l ik e.
: Da nger of explo sion if bat ter y is in correct ly replac ed.
3
Page 7
CONTROL REFERENCE GUIDE
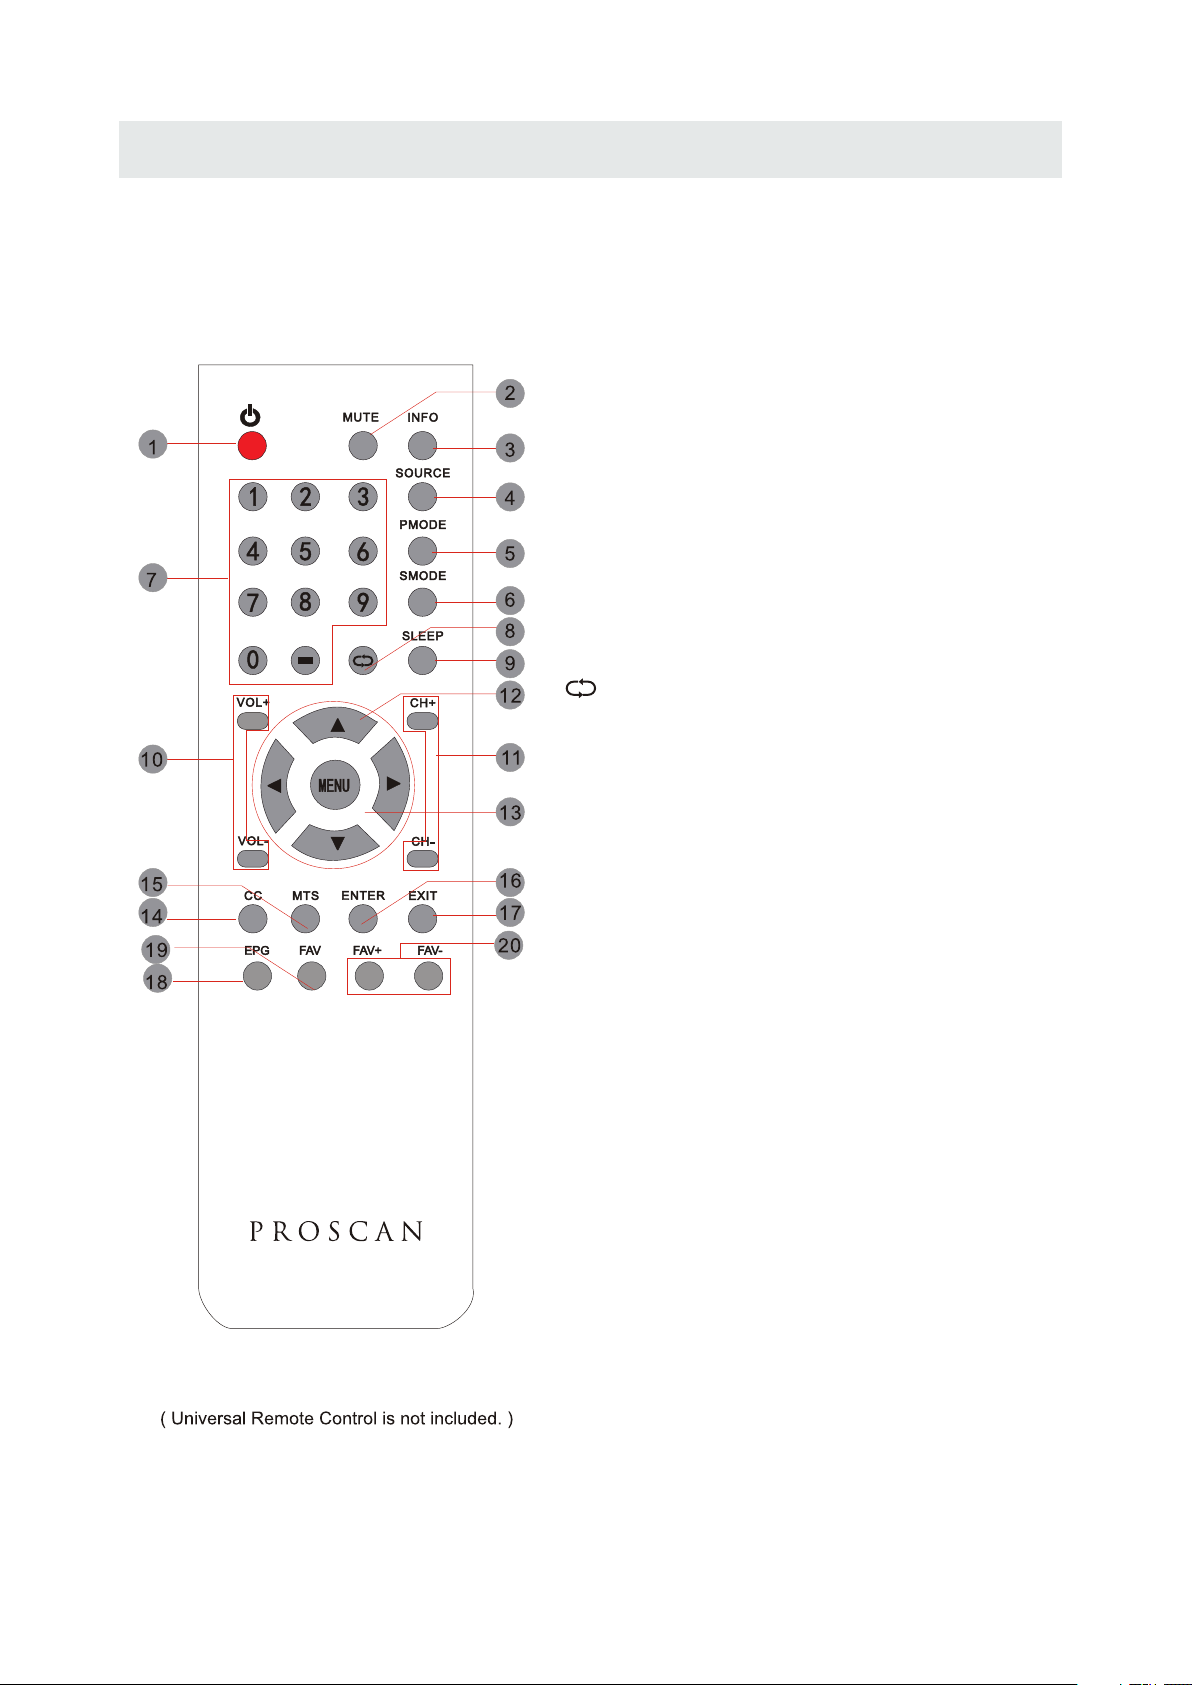
REMOTE CONTROL
1.STANDBY
To switch on the TV or make the TV into
standby mode.
2.MUTE
Press this button to mute or restore sound.
3.INFO
Show the information of the program you are watching.
4.SOURCE
Press this button to select an input source.
5.PMODE
Press this button to select a picture mode for different
picture qualities.
6.SMODE
Press this button to select sound setting for different
sound effects.
7.0-9
Allows you to change the channel of the TV.
8.
Switches back and forth between the current and
previous channels.
Universal Remote Code: 1218
9.SLEEP
To select the amount of time before your TV turns
Off automatically.
10.VOL+/VOLIncreases/Decreases the Volume control.
11.CH+/CHSkips to the next/previous channel on TV mode.
12.UP/DOWN/LEFT/RIGHT
Moves the cursor upward/downward/to the left/to the right
when making a selection.
13.MENU
Displays the OSD Menu of the TV.
14.CC
Press the button to enter into the CC mode.
15.MTS
To change among STEREO, MONO and SAP. If there is no
second language available for the signal received, LED
Display audio will output to mono.
16.ENTER
Press to confirm selections on a menu screen.
17.Exit
Press this button to exit the on screen display.
18.EPG
Press this button to select the electronic programme
guide in DTV mode.
19. FAV
Press this button to show the favourite list.
20. FAV+/FAVPress this button to go through the FAV channel list.
4
Page 8
CONTROL REFERENCE GUIDE
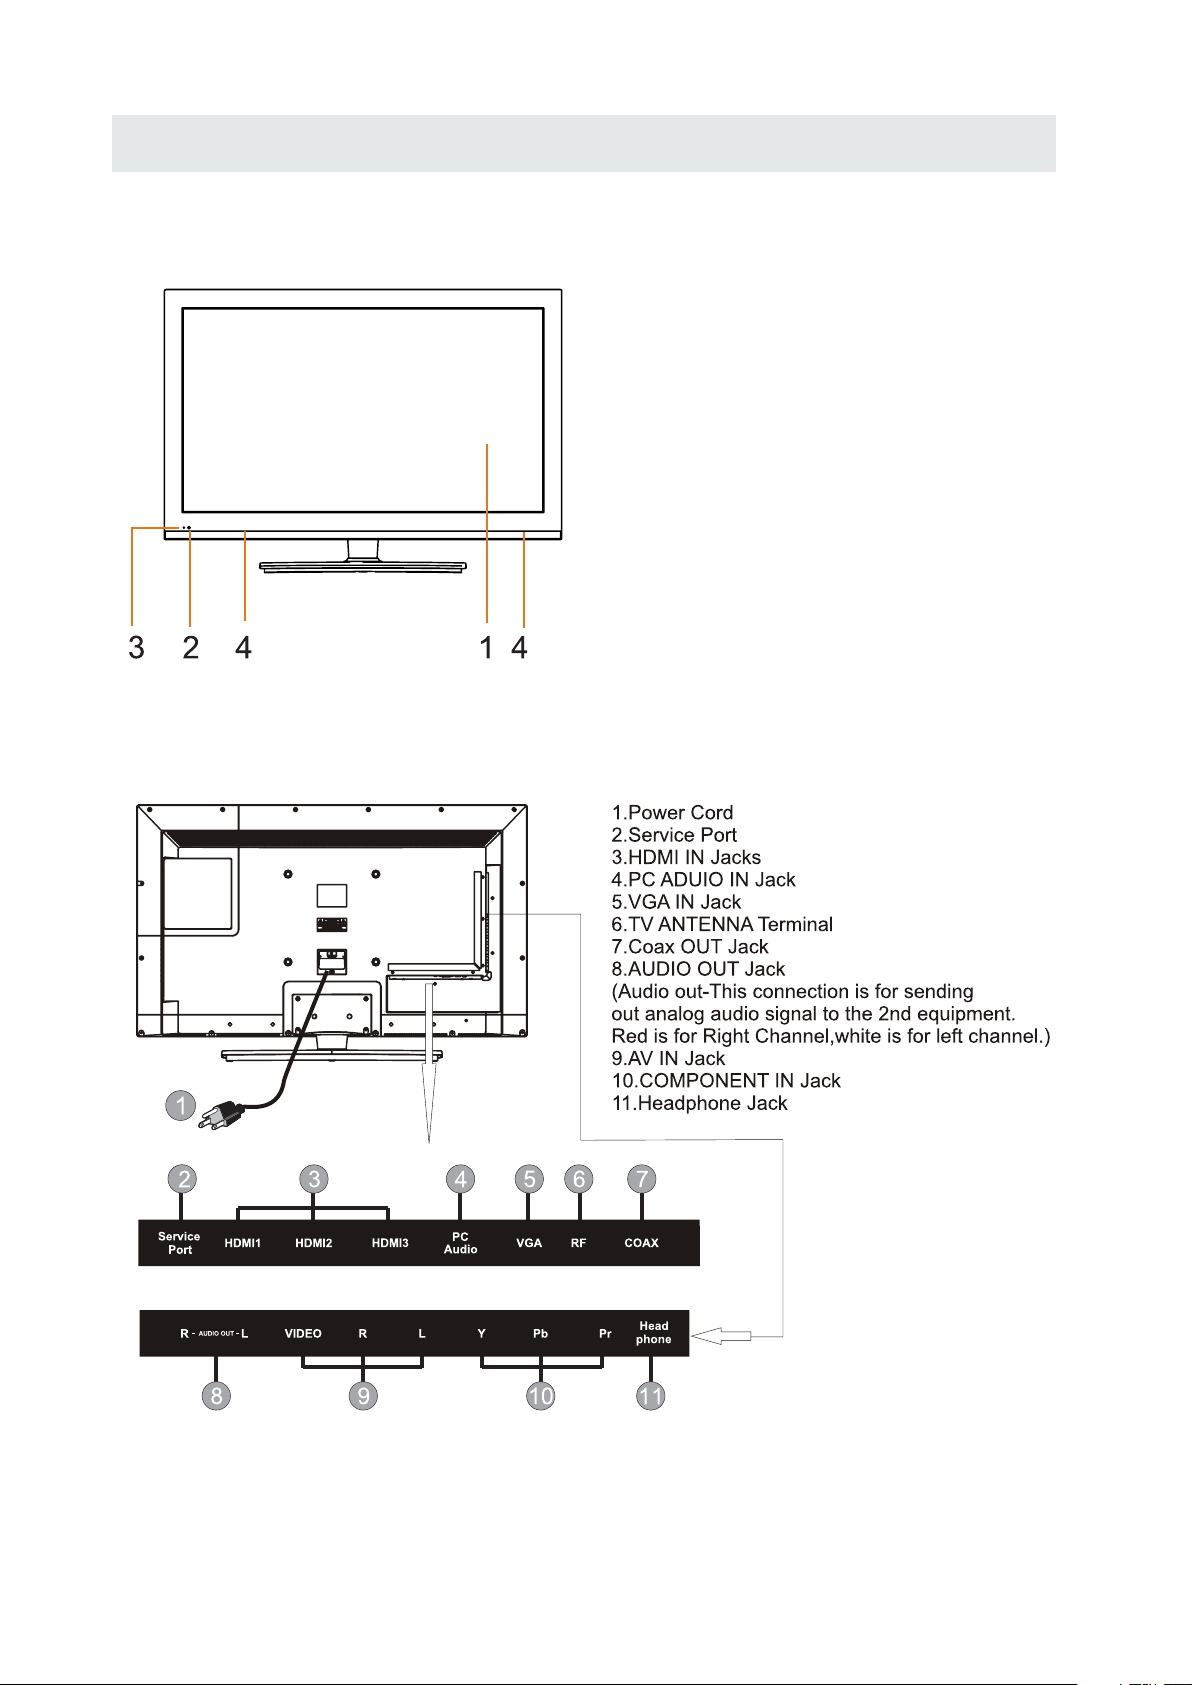
FRONT VIEW
1.Color Screen
2.Remote Sensor
Do not block this sensor or the
remote control will not work.
3.Standby Indicator
Indicates whether the unit is ON
or in STANDBY (OFF) mode.
Light in red: The unit is in STANDBY.
Light in blue:The unit is turned ON.
4. Speakers
BACK VIEW
5
Page 9
CONTROL REFERENCE GUIDE
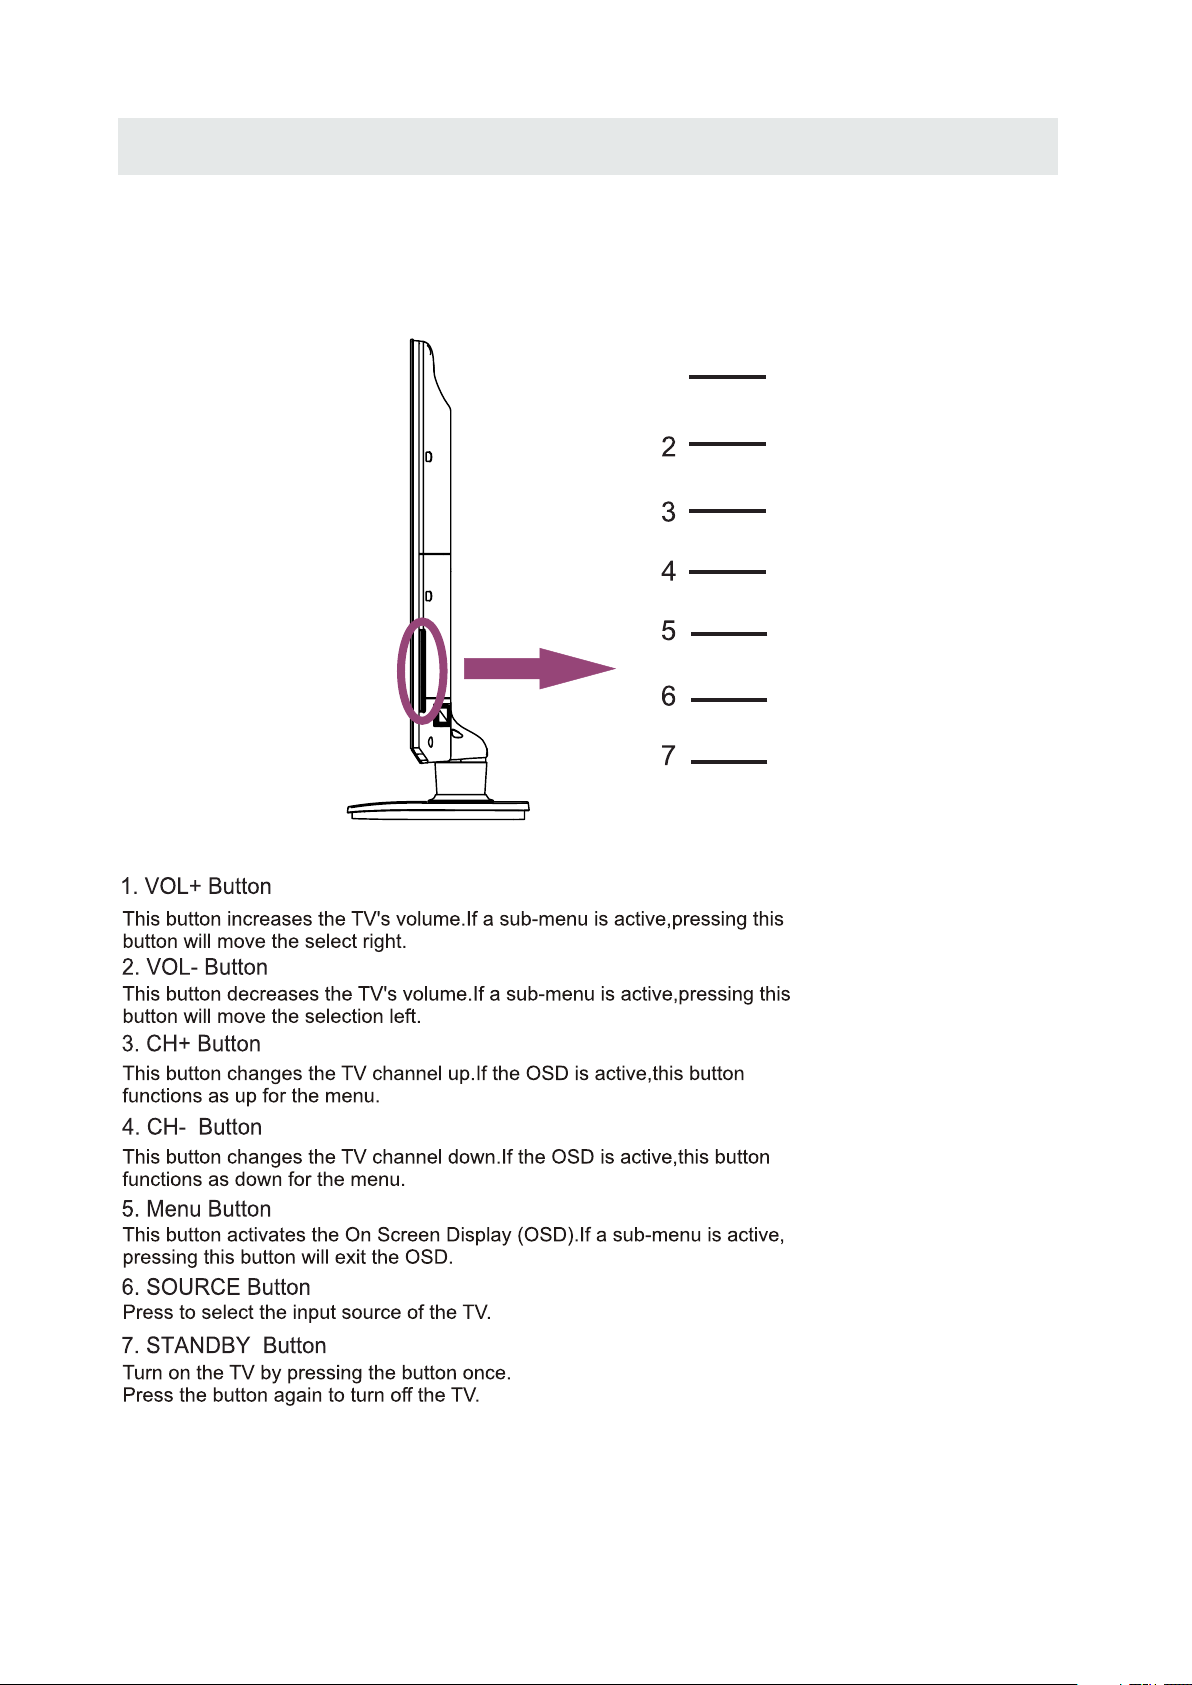
SIDE VIEW
1
VOL+
VOL-
CH+
CH-
MENU
SOURCE
STANDBY
6
Page 10
CONNECTIONS
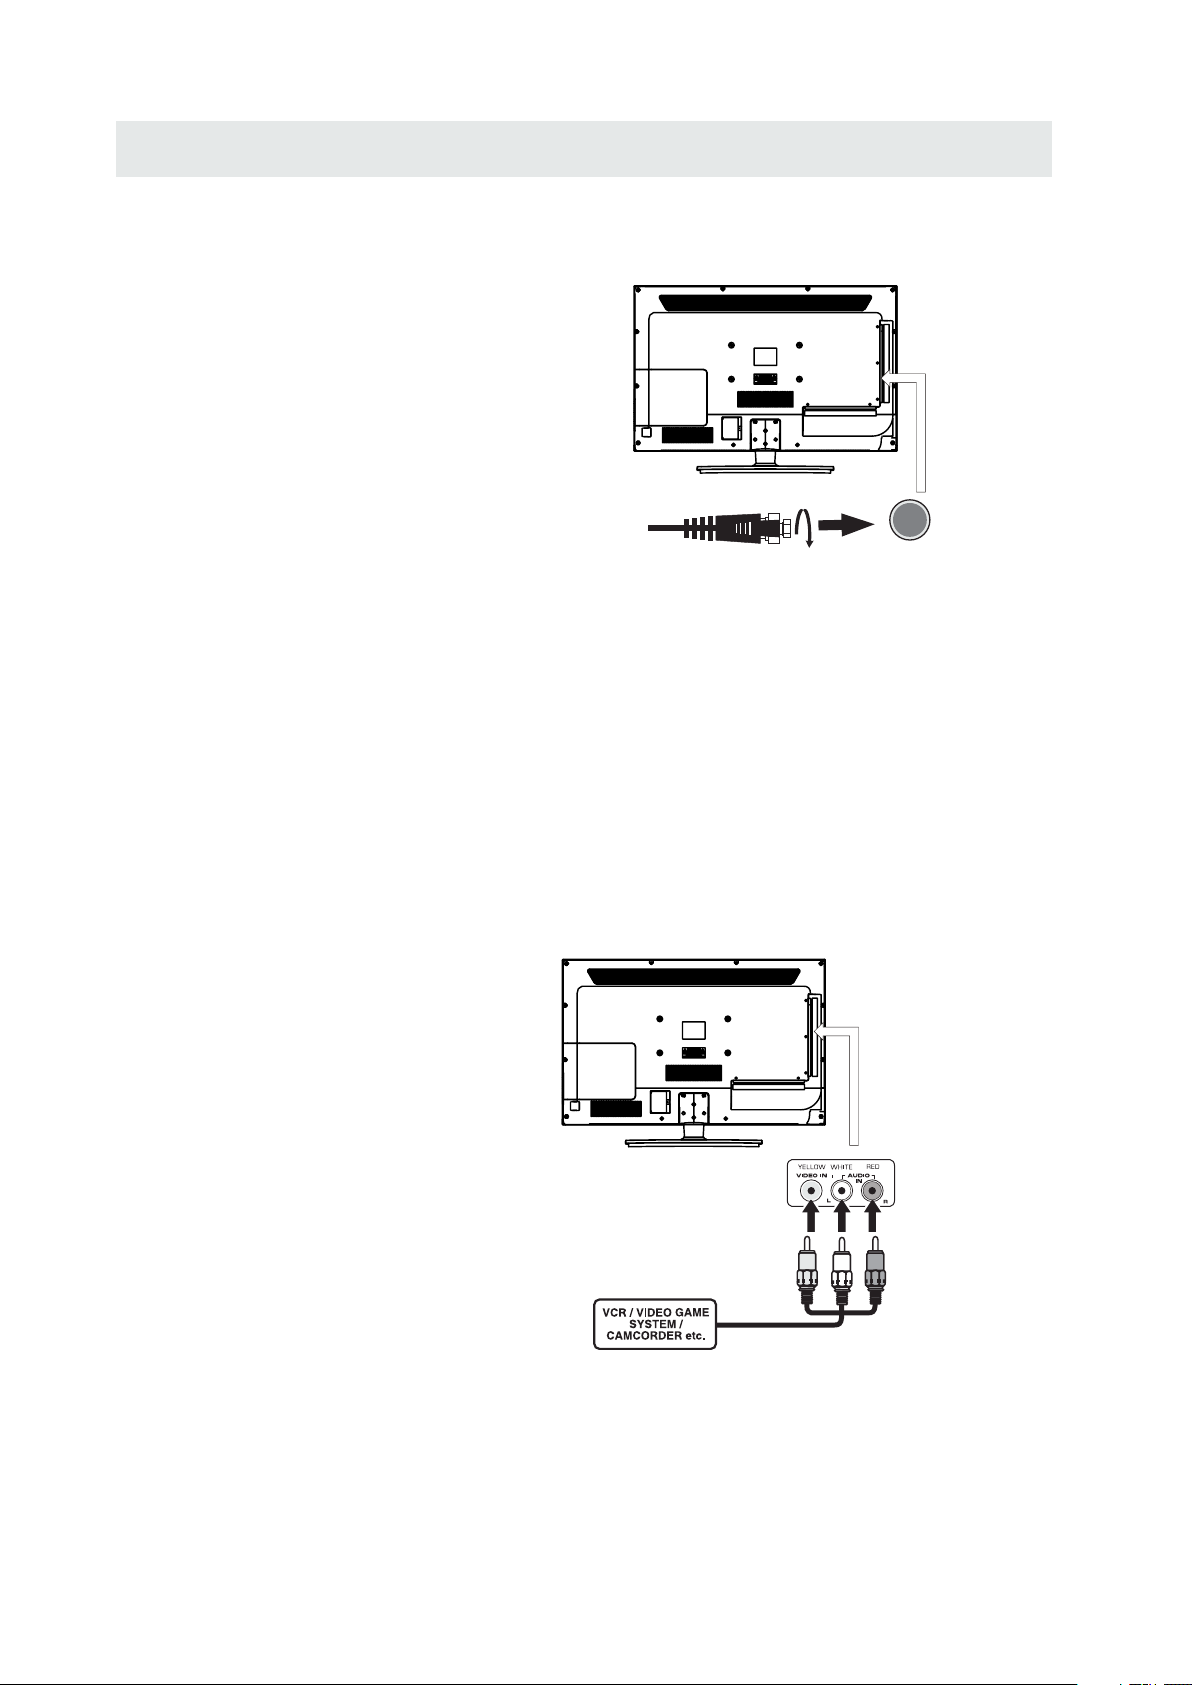
CONNECTING A TV ANTENNA / CABLE / S A TELLITE
To view te lev isi on cha nnels correctl y, a signal must
be receive d from one of the following source s:
- An indoor or outd oor ae ria l antenna
- A ca ble system
- A satellite sy ste m
NOTE
Fo r receiving ov er-the-air TV broa dca sts , we
reco mmend that yo u use an external fixe d antenna.
Sh oul d you req uire the use of a temporar y antenna,
pl ease ensure that you pu rchase an ante nna wi th
su fficient ability to receive in wea k sign al areas.
On ly wh en you are in cl ose p roximity to a transmit ter
wi ll a temporar y antenna reproduce a signal as
st rongly as a fixed an tenna.
CONNECTING AN A/V DEVICE
To connect to other equipment such as a VCR, cam corde r, satellite system or cab le, etc.
Sa te llite, cab le or TV ant enna
ca ble to TV A NTENN A
term inal (ca bl e not inclu ded)
CONNECTING DEVICES WITH A COMPOSITE (YELLOW RCA-TYPE)
VIDEO OUTPUT
To con nec t A/V d evi ces such as a VCR, video game system o r cam corder.
Connecting to a VCR / Video Game System / Camcorder
Co nnect the AUDI O / VIDEO cable (not included) as shown.
Ma ke s ure you connect the ca ble f rom the othe r equ ipm ent ( and ) to thi s unit
AUDIO VIDEO OUT
(AV in)
NOTE
Pl eas e refer to the user manual
fo r the other equipment for
mo re information.
To AUDIO / VI DE O
OU T jac ks
To AUDIO / VI DE O
IN j ac ks
7
Page 11
CONNECTIONS
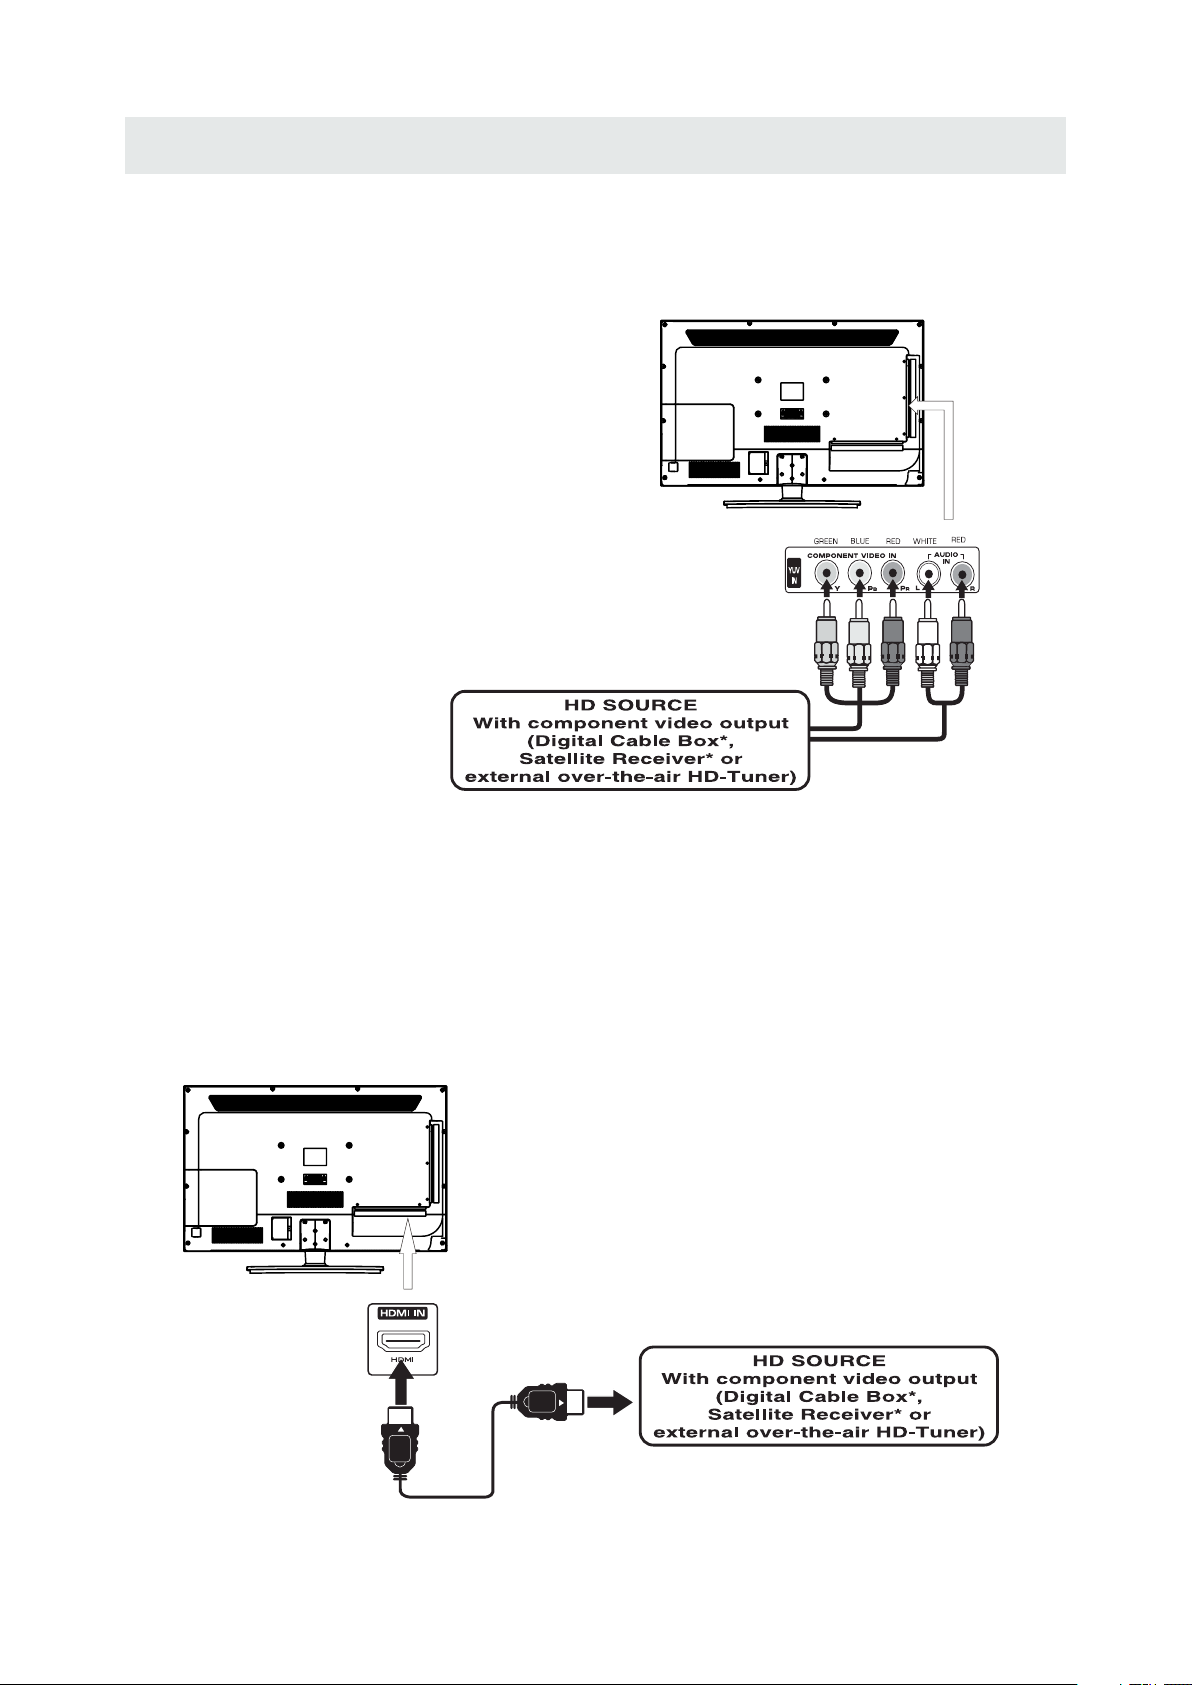
CONNECTING A HIGH-DEFINITION (HD) SOURCE USING CONNECTION
High -Defini tion (HD) Dev ices with compo nent video ou tput mus t be con nected to the Y input.
Conn ect the compo nent video cabl e and audio cabl e (not includ ed) as shown.
Ma ke sur e yo u conne ct the co mpone nt video ca ble and a udio ca ble from th e other e quipmen t
(COMPONENT OUT and AUDIO OUT)to the unit COMPONENT IN.
COMPONENT
PbPr
NOT E
When conne cti ng a DVD player to the telev ision,
the picture res olution is solely de pendent upo n
the res olution sup por ted by the DVD pla yer attache d.
DVD player resolut ion s var y from 480i to 108 0i.
and this televisio n can sup por t DVD pla yer s up to
a maximum resolution of 1080i .
* May require a subscription
COMPONENT IN
fo r receiving HD channels,
ch eck with your cab le/ sat ell ite
se r vic e prov ide r for det ail s.
To COMPONENT
VIDEO IN jacks
To COMP ONENT
VI DEO OUT jac ks
To COMPONENT AUDIO
OU T jacks
To COMPONENT
AU DI O IN jacks
CONNECTING A HIGH-DEFINITION (HD) SOURCE USING HDMI CONNECTION
HDMI (H igh Defi ni tion Mul timedia In ter face) su pports both vide o and audio on a sin gle digita l connecti on
fo r use with DV D playe rs, DT V, set-t op box es and ot her digit al AV devi ces. HD MI was de ve loped t o provide
the tec hnologi es of High Bandw idth Digit al Content Pr otection (HD CP) as well as D igita l Visual In te rfa ce
(D VI) in one sp ecifi catio n. HDCP i s us ed to protect d igita l content t ransm itted and rec eived b y
DVI- compl iant or HDMIc ompli an t displa ys.
HDMI ha s the capabil ity to suppor t stan dard, enha nc ed or high- definit ion vide o plus standa rd to
mult i-cha nnel surro und-sou nd audio . HDM I features in clude un compresse d digital video, a bandwid th of
up to 2.2 gigab ytes per se co nd (with HDTV sign als), on e connecto r (instead of severa l cables an d
conn ector s), and commu nicat io n betwee n the AV source and AV devi ce s such as DTVs.
Co nnect the H DMI cab le (not i nclud ed ) as
sh ow n:
Ma ke sur e yo u conne ct the ca ble from th e
so ur ce equip ment ( ) to this uni t
( ).
HDMI CAB LE
(NOT INCLUDED)
HD MI IN
HD MI OUT
To HDMI
IN jack
To HDMI
ja ckOUT
8
Page 12
CONNECTIONS
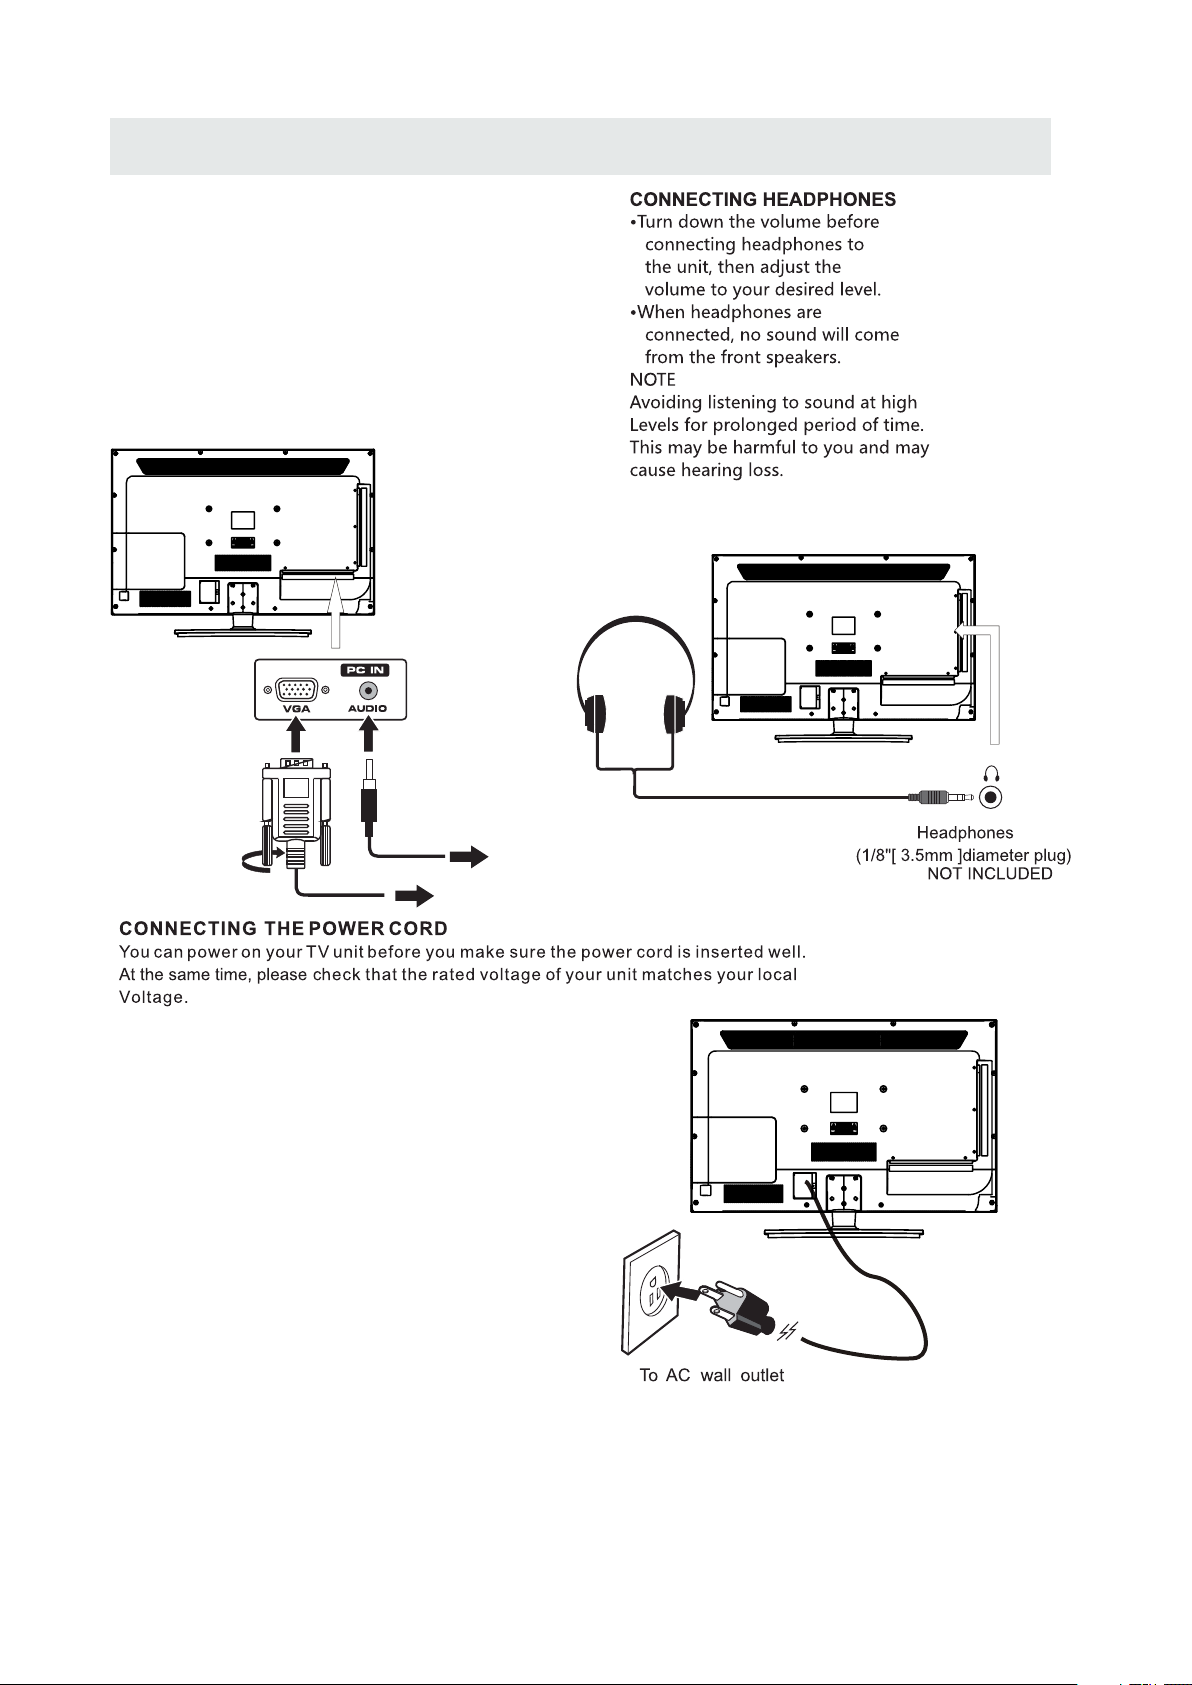
CONNECTING A
Co nn ect the 15- pin D-SU B PC/VGA connec tor
from yo ur compu te r to the 15 -pin D-S UB PC/VGA
in pu t on this unit us ing a monit or cable an d an
au di o cable (no t includ ed) as show n.
Ma ke sur e yo u conne ct the ca ble from th e compute r
( an d ) to this uni t
VGA
( and ).
VGA AUDI O - PC I N
AUDI O - PC OUT
PC
TO AUDIO OUT jacks
TO PC Connector
NOT E
• Insert the power plug fully into the socket outlet
( ,
If the power plug is loose it could generate heat and
cause fire
•
Ensure that the power plug is easily accessible.
•
Ensure the earth pin on the power plug is securely
connected to prevent electrical shock.
•
Do not touch the power plug with a wet hand
( .)
This may cause electrical shock
•
Do not use any power cord other than that provided
with this TV This may cause fire or electrical shoc k
•
Do not damage the power cord
( ).
A damaged cord may cause fire or electrical shock
• Do not move the TV with the cord plugged in the
socket outlet.
• Do not place a heavy objec t on the cord or pl ace
the cord near a high-temperature obje ct.
• Do not twist the cord , bend it excessively, or stretch it.
• Do not pull on the cord. Hold onto the power plug body when disconnecting cord.
• Do not use a damaged power plug or socket o utlet.
.)
. ( .)
.
.
.
9
Page 13
CONNECTIONS
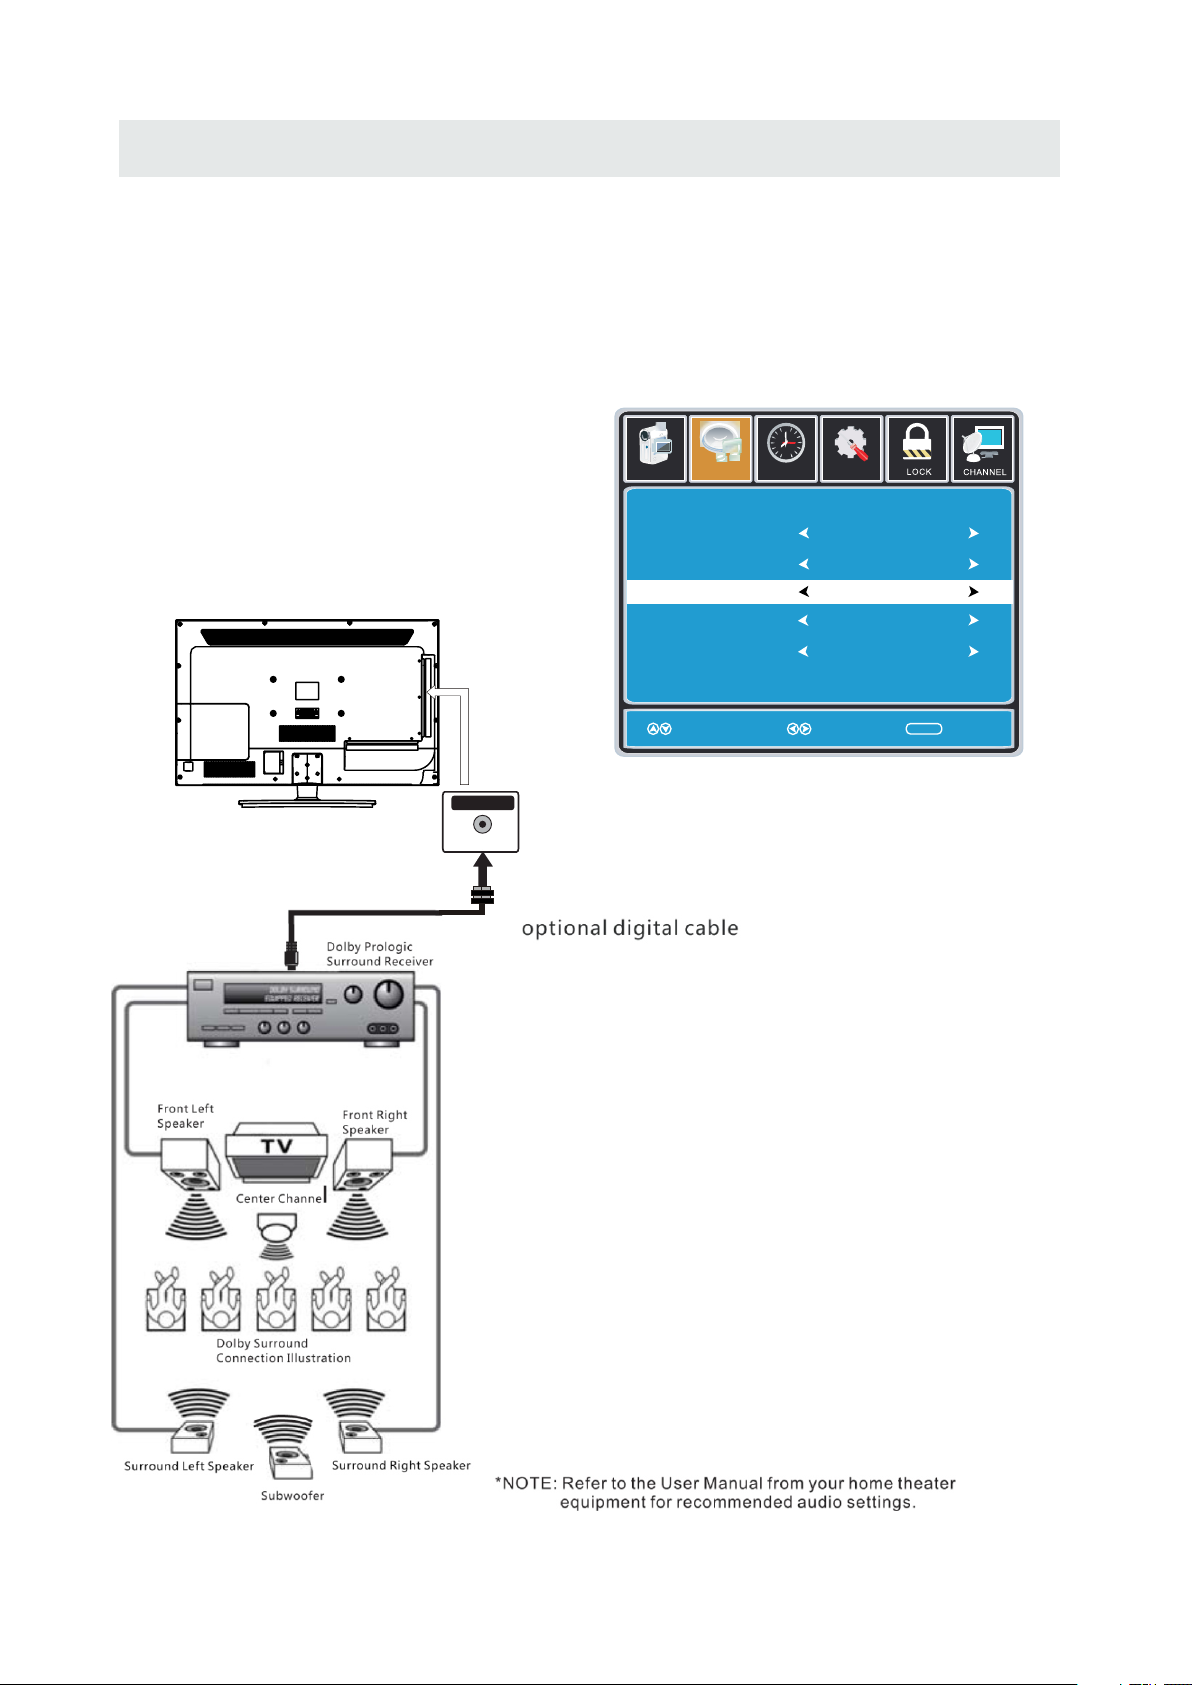
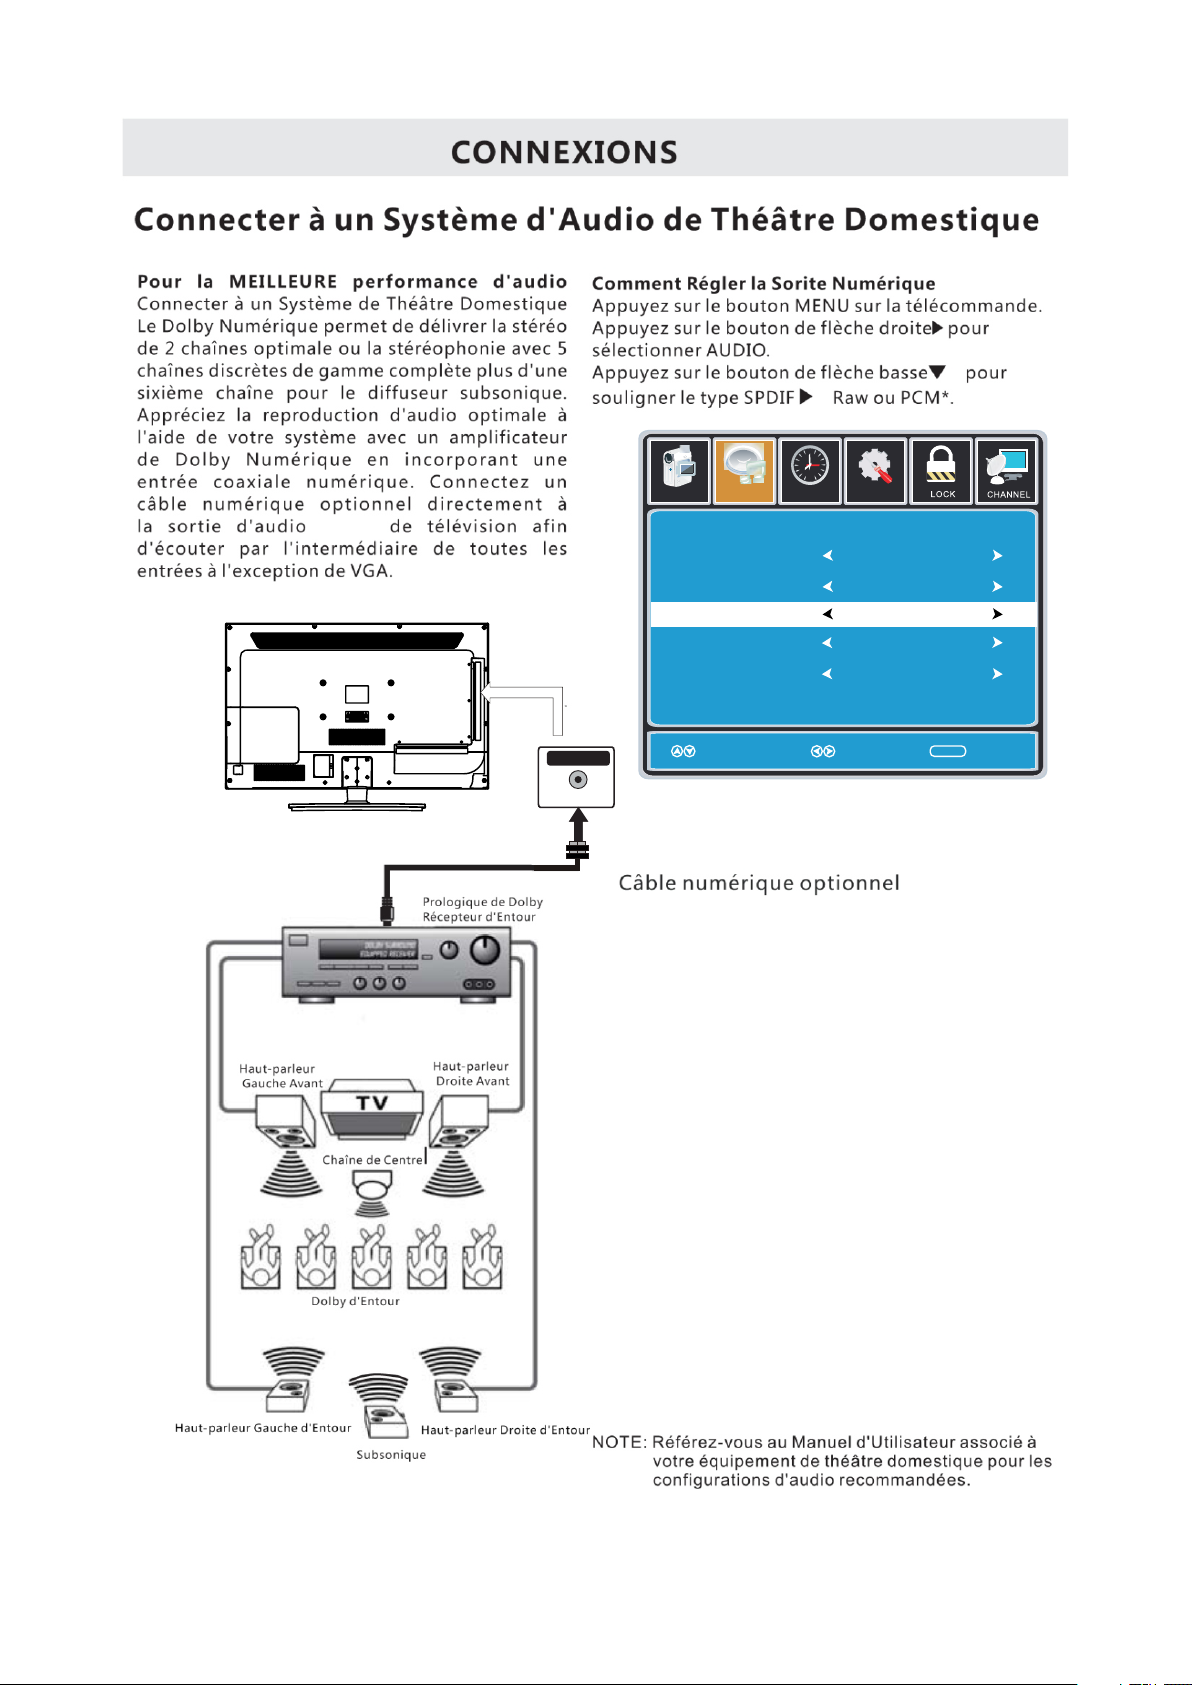
Connection to a Home Theater Audio System
For BEST audio performance
Connecting to a Home Theater System
Dolby Digital can deliver optimal 2 channel
stereo or surround sound with five discrete
full range channels plus a sixth channel for
a subwoofer.
Enjoy optimal sound reproduction from your
system with a Dolby Digital amplifier that
incorporates a digital coaxial input. Connect
an optional digital cable directly to the
television’s Coax audio output to listen
through all inputs except VGA.
(The VGA does not support digital audio)
SPD IF OUT
Coax
How To Setup Digital Output
Press the MENU button on the remote control
Press the right ► arrow button to select sound
Press the down ▼ arrow button to highlight
SPDIF type right ► Raw or PCM
12
6
Pict ure
Equalizer Se tt in gs
MTS
Audio Language
Digital Audio Outpu t
Surround Sound
AVL
Sound
Move Select Exit
Tim
Set up
e
Mono
English
PCM
Off
Off
MEN U
10
Page 14
WALL MOUNT INSTALLATION
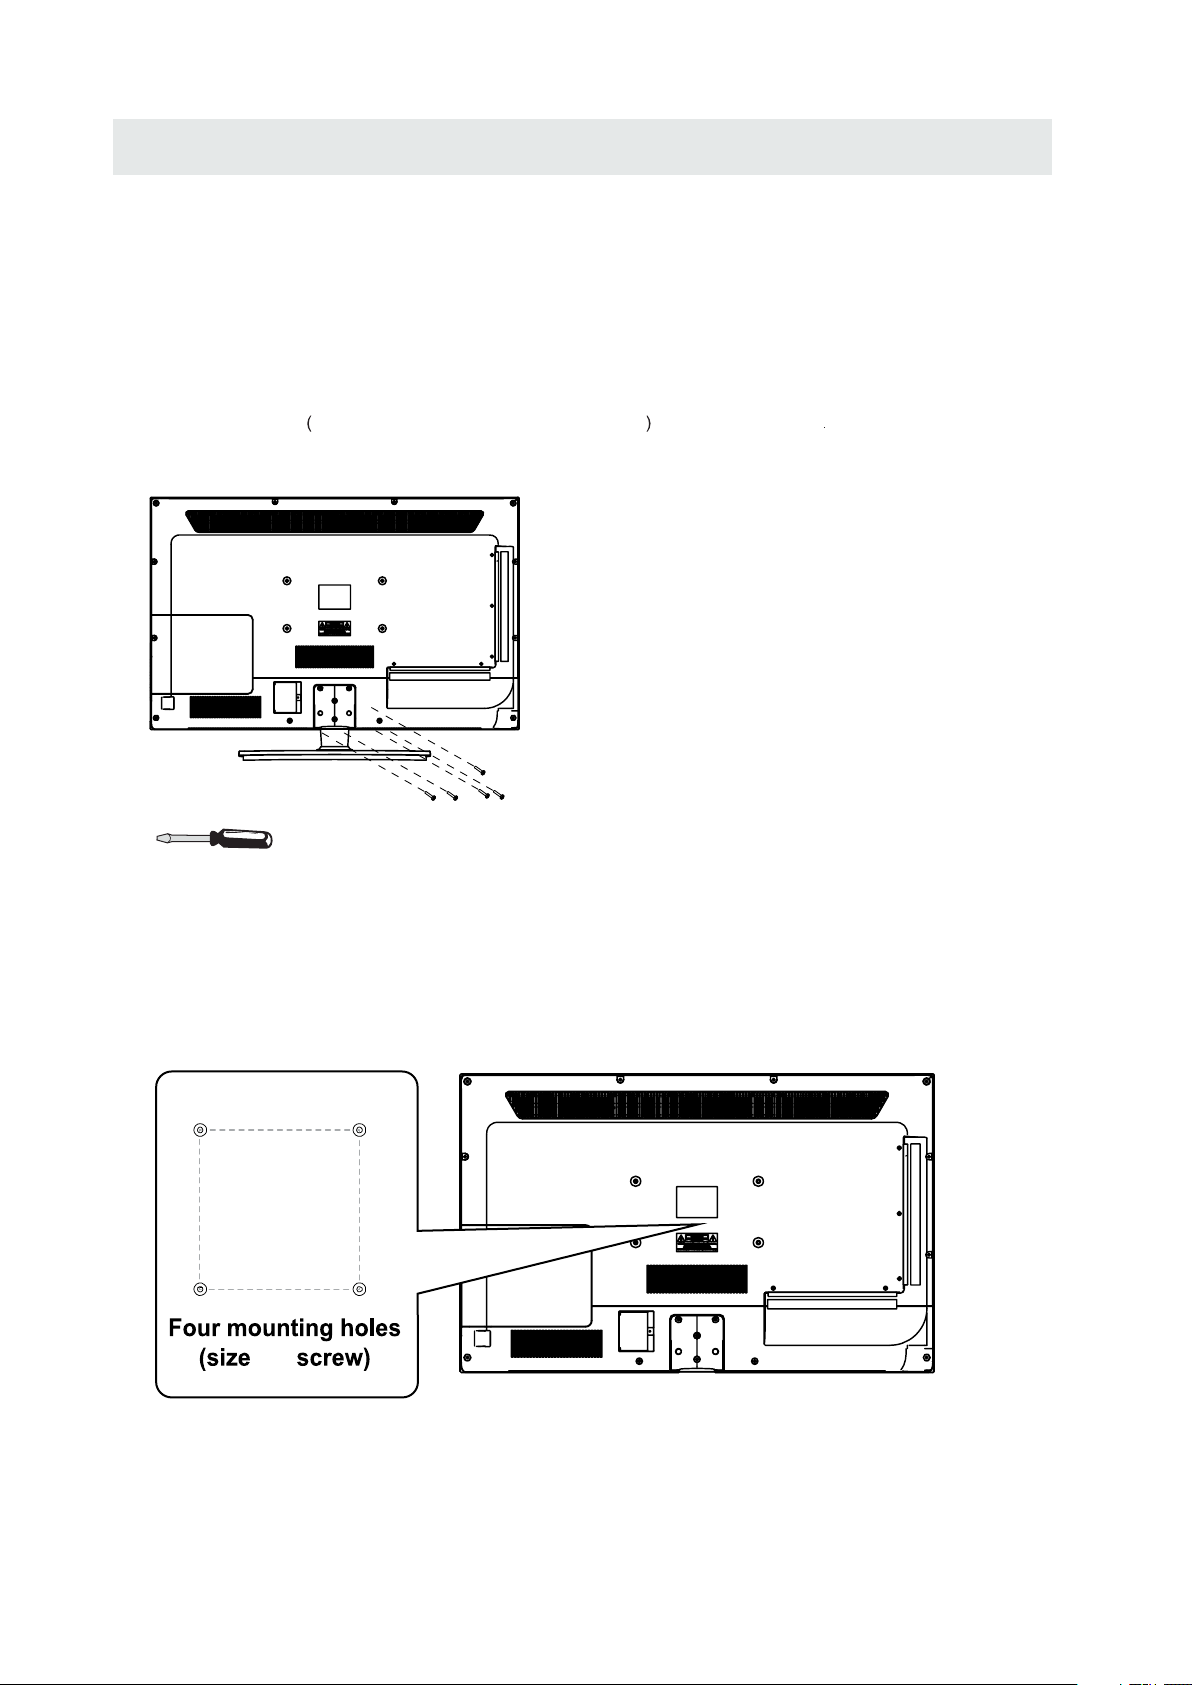
INSTALL ING REMOVING THE BASE STAND
WARNING/: The LED D ispla y is very f ragil e and must b e protect ed at all t imes wh en removing the ba se
.
Stan d
Be sure that no hard or sharp object or anything that could scratch or damage the LED displa y comes into
contact with it Do NOT exert pressure on th e front of t he unit a t any time because the screen could crack
. .
1 Disconnect all cables or cords connected to the unit
. .
2 La y the uni t down on a flat surface with t he back side facing up Plea se make sure to place a soft
cushioned material such as a pillow or thick piec e of foam benea th the screen
. ,
3 To remove the base stan d loosen screws off th e holes then pull downwards to release
the base s tand
. .
.
,
MO UNTING ON THE WALL
This un it is VESA-compliant, and is designed to be wall-m ounted with a VESA-compliant 8”x 4 ”
(200mm x 100mm) mounting kit de signed for flat-panel TVs (not suppli ed). Mount this unit according to
the instructions included in the mounting kit.
Length of screw should not exceed 14 mm.
NOTE
Remove the bas e stand befor e mounting th e unit on the wal l.
8”
4”
M4
11
Page 15
INITIAL SETUP
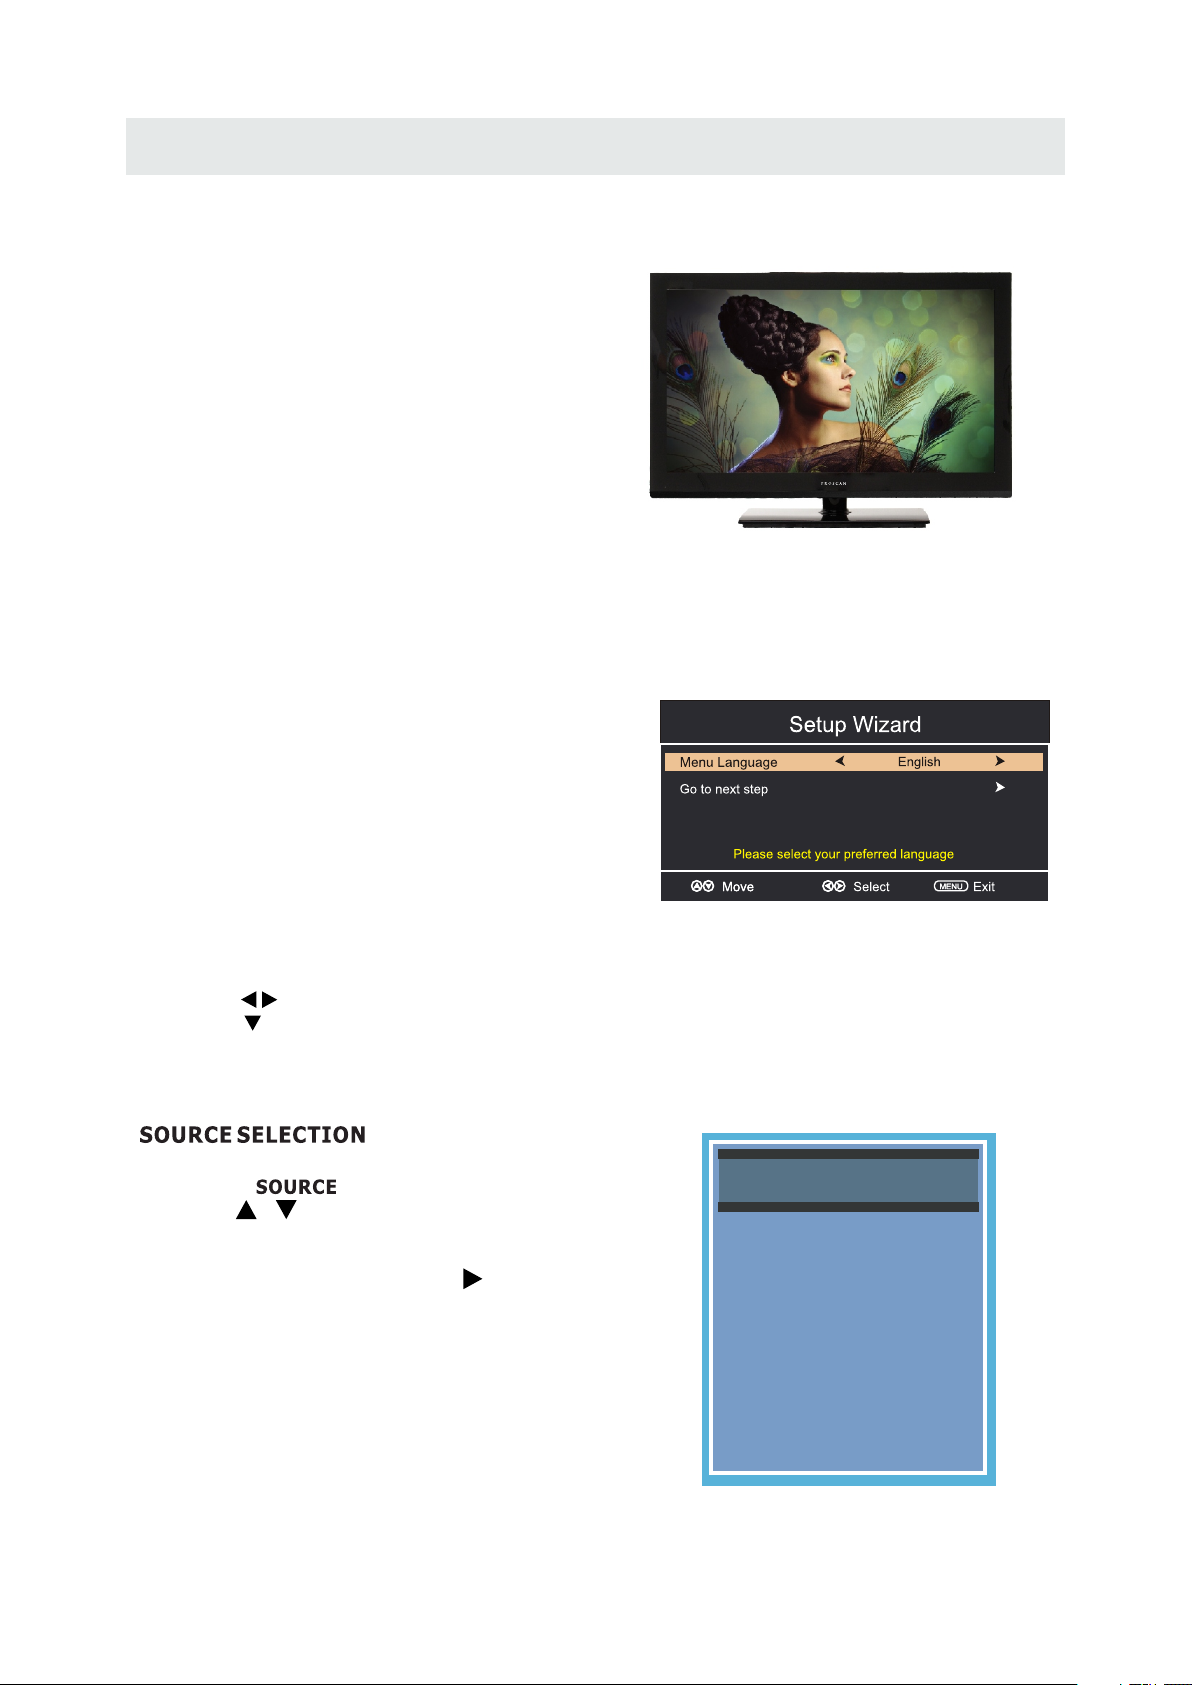
PUTTING THE UNIT ON A PROPER PLACE
Wh en you tur n on your television set for
th e fir st time, be sure to place i t on a solid
st abl e surface.
To avo id da nge r, do not ex pose the TV
to water, or a heat source
(e .g. la mp, ca ndl e, rad iator) .
Do not obst ruc t the ven til ati on gri d
at t he rear and be sure t o lea ve su ffi cient
ga ps around the unit.
TUR NIN G T HE UNI T ON FOR T HE FIRS T TIME
Af ter you have initially connec ted your TV
antenna or cable,
tu rn the television ON.
A screen will display asking you t o run a
Ch ann el Aut o Scan
available local digital cha nnels.
It is he re whe re you wi ll select ant enna options
an d run .
Channels wi ll be s tored in th e TV tuner.
Press the bu tto n on the rem ote control.
Using the buttons, scroll to highlight chaneel mode.
Pr ess the button t o hig hlight AI R/CABLE .
1. Press the button on the remote control.
2.
(TV,AV,YPBPR, HDMI1,HDMI2,HDMI3,PC)
and select any of th em using the button or
the bu tton.
(T he sc reen will change to yo ur desired s ).
Note:
Before wat chi ng please make sure all necessary
cables and devices are connected.
Ch ann el Aut o Scan
ME NU
Us e or button to select the optionsthe
ENT ER
to se arc h and rec eive
ource
Source Select
TV
AV
YPBPR
HDMI1
HDMI2
HDMI3
PC
12
Page 16
TV SETUP
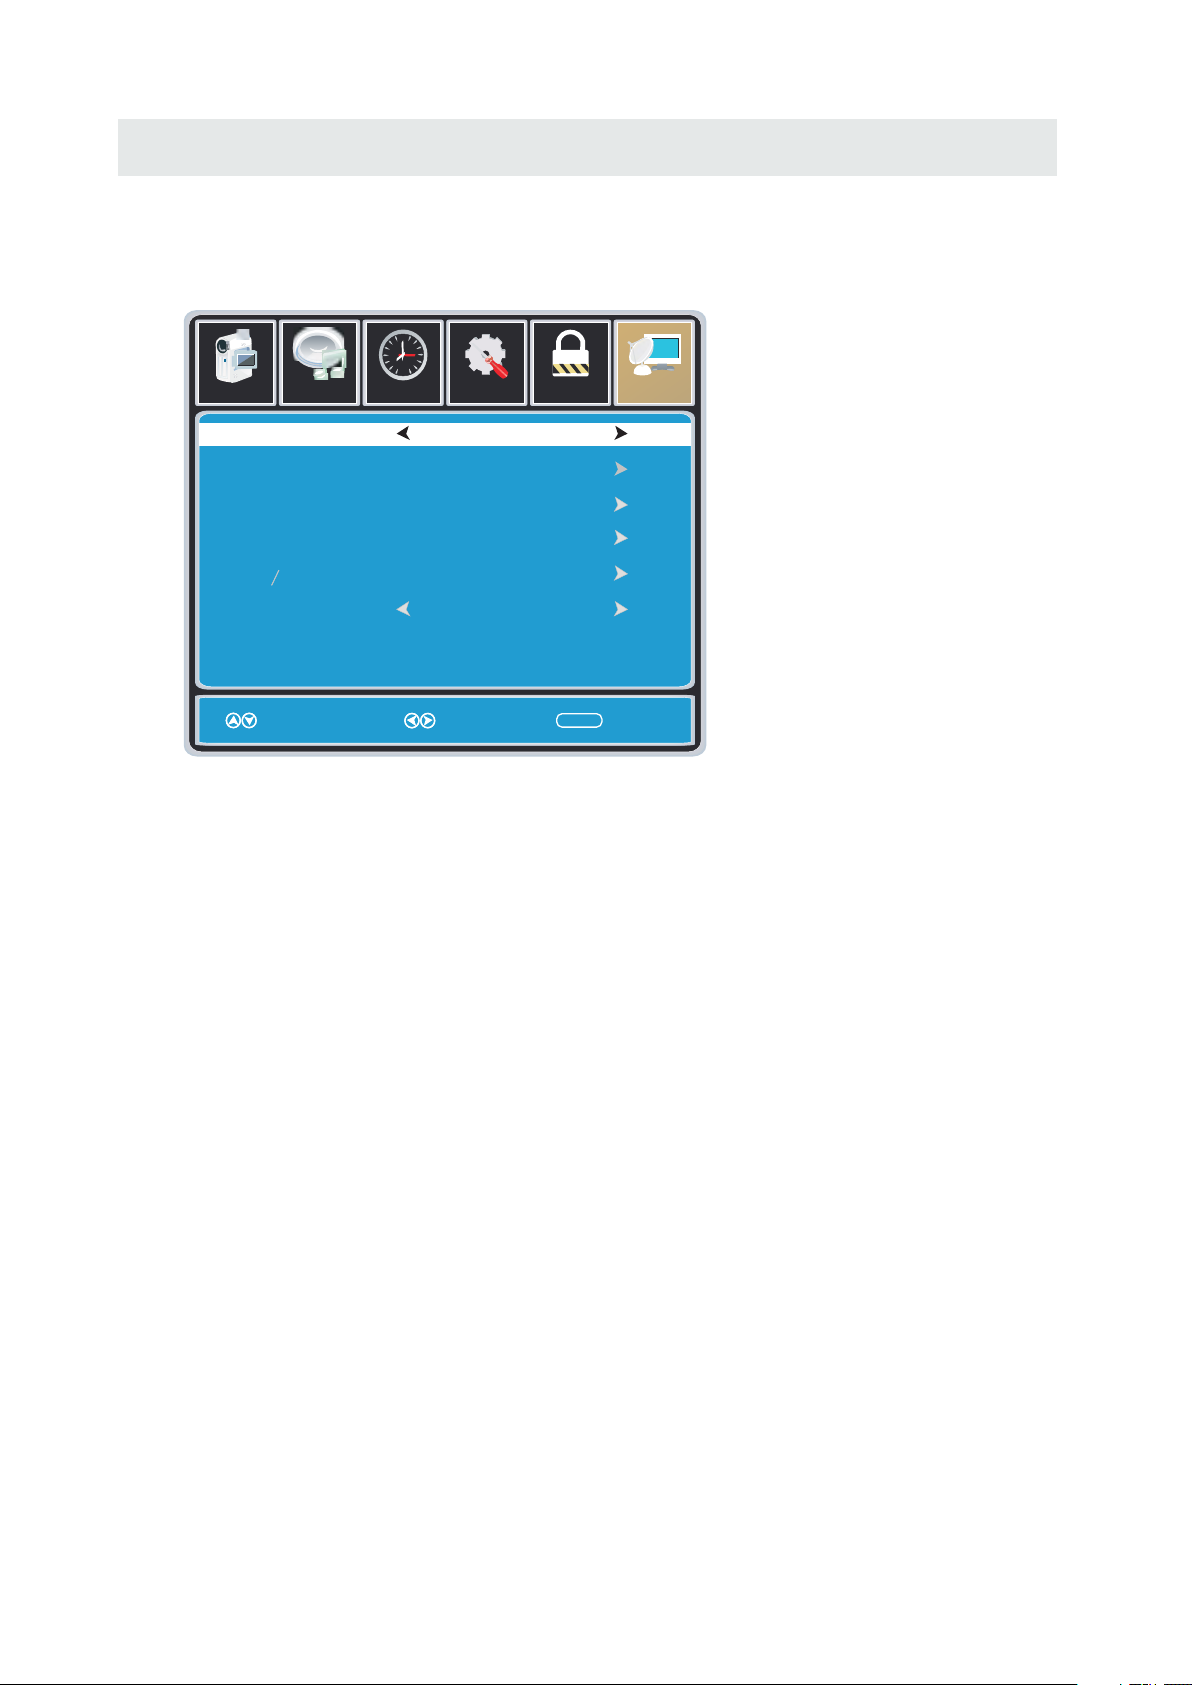
CHANNEL MENU
Press MENU button to display the main menu.
Press ◄ / ► button to select CHANNEL in the main menu,it will highlight the first option.
12
6
Pictu re Sound
Tim
Se tup
e
LO CK
CHA NN EL
Air /Cable
Air
Au to Scan
Fa vorit eFa vorit e
Ch ann el Li stCh ann el Li st
Show HideShow Hide
Ch ann el Nou mberCh ann el Nou mber
Ch annel la belCh annel la bel
MEN U
Mo ve
Se lect ExitMo ve
MEN U
AIR / CABLE
This feature allows you to switch between air (such as using antenna) and cable.
AUTO SCAN
This feature searches channels automatically for you.
FAVORITES
This feature gives the favorite list of channels added by you.
CHANNEL LIST
This feature shows the list of stored channels.
SHOW / HIDE
This feature tells you if you have chosen for channel to be skipped.
CHANNEL NUMBER
This feature tells you what channel you are currently on.
CHANNEL LABEL
This feature changes the name of the channel.
Please Note:
The channel options are only available when you select TV as your SOURCE.
When you open the OSD menu on other sources (HDMI, AV, Component, PC, Media) these
options will be grayed out.
13
Page 17
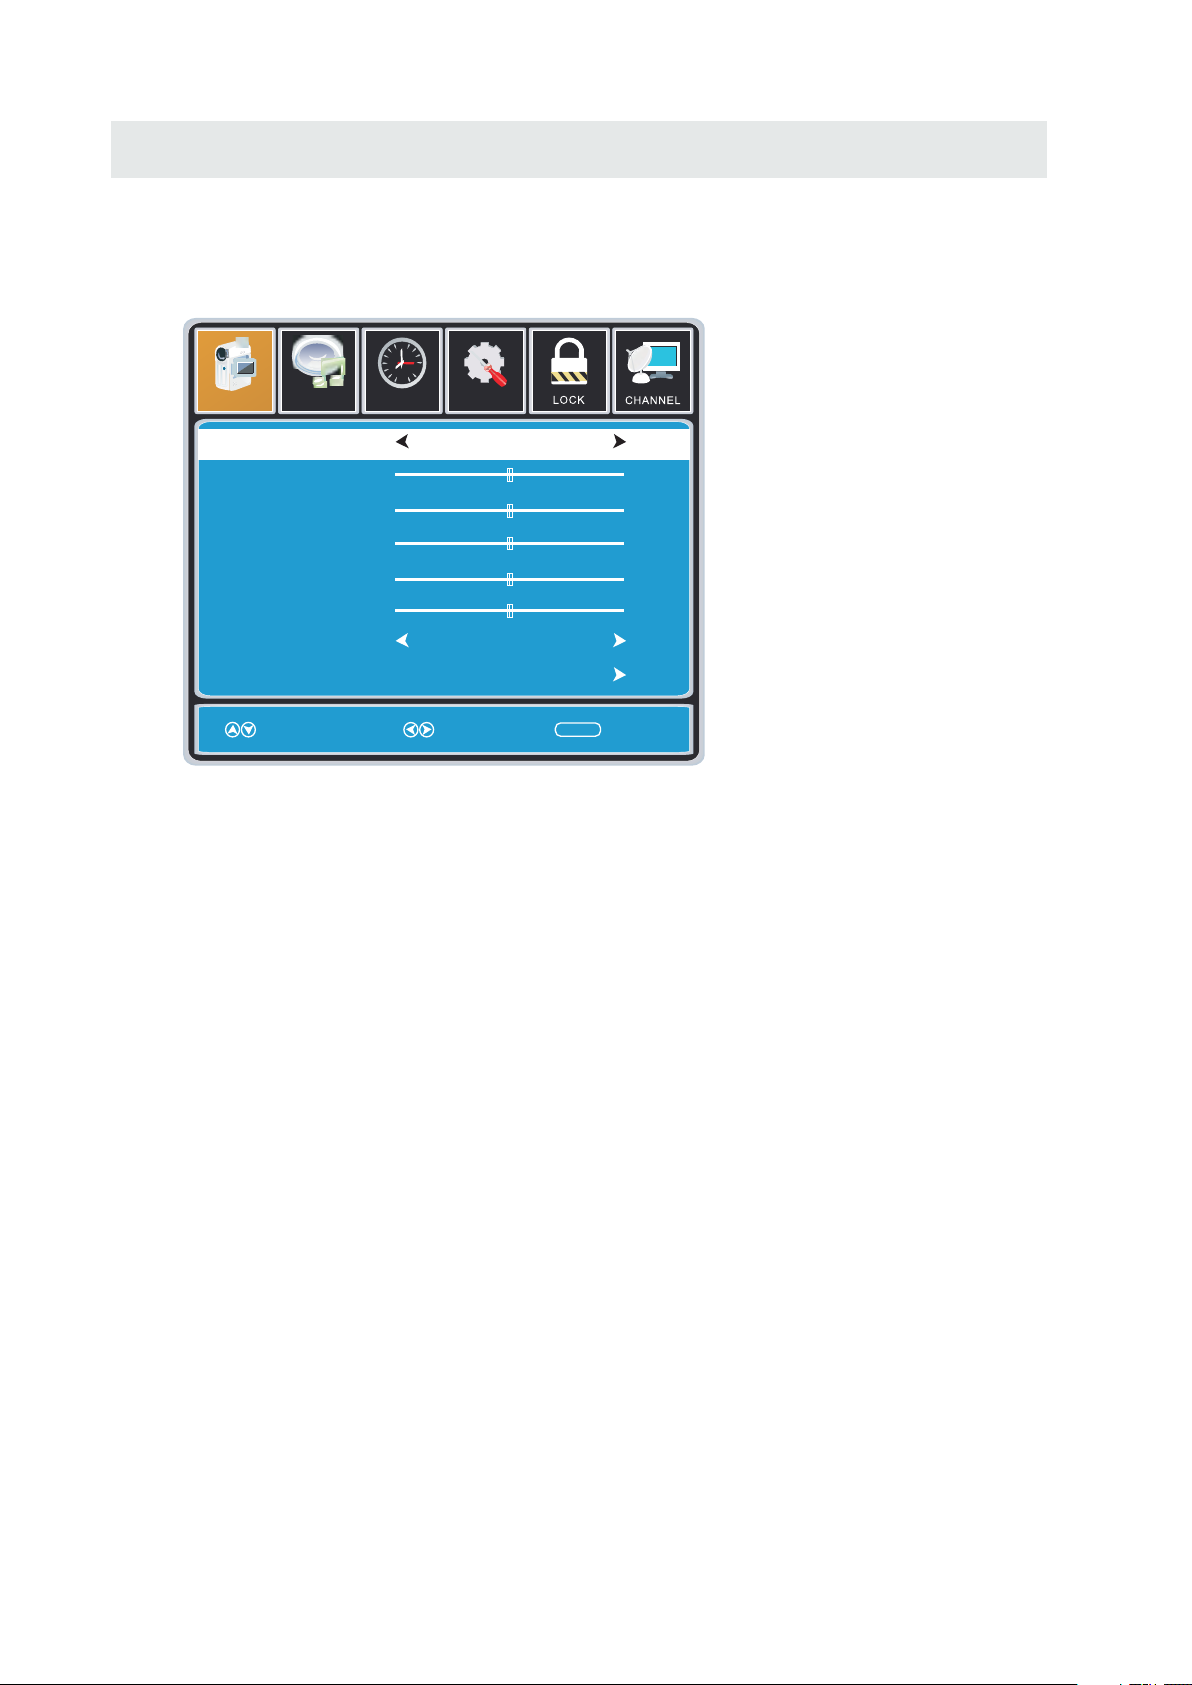
TV SETUP
PICTURE MENU
Press MENU button to display the main menu.
Press ◄ / ► button to select PICTURE in the main menu,it will highlight the first option.
12
6
Se tup
Pictu re
Sound
Tim
e
Picture Mod e
Brightn ess
Co ntr ast
Co lor
Tint
Sh arpne ss
Co lor Te mpe ratu re
Ad vanced Se tti ngs
Mo ve Se lect Exit
St andar d
50
50
50
0
50
No rmal
MEN U
PICTURE MODE
This feature changes various color modes for the TV.
BRIGHTNESS
This feature changes the picture's detail in dark colors.
CONTRAST
This feature changes the difference between dark and bright objects.
COLOR
This feature changes the amount of color in the picture.
TINT
This feature changes the white balance of the color.
SHARPNESS
This feature changes the picture quality.
COLOR TEMPERATURE
This feature adjusts the color temperature of the TV, giving warm, normal,
cool.
ADVANCED SETTINGS
a)ASPECT RATIO This feature changes the various aspects of the TV's video.
(Aspects include wide, zoom, cinema,normal).
b)NOISE REDUCTION This feature reduces general pixilation by blurring them.
c)DYNAMIC CONTRAST This feature allows the TV to automatically adjust the contrast of the
TV depending on the picture you are viewing.
14
Page 18
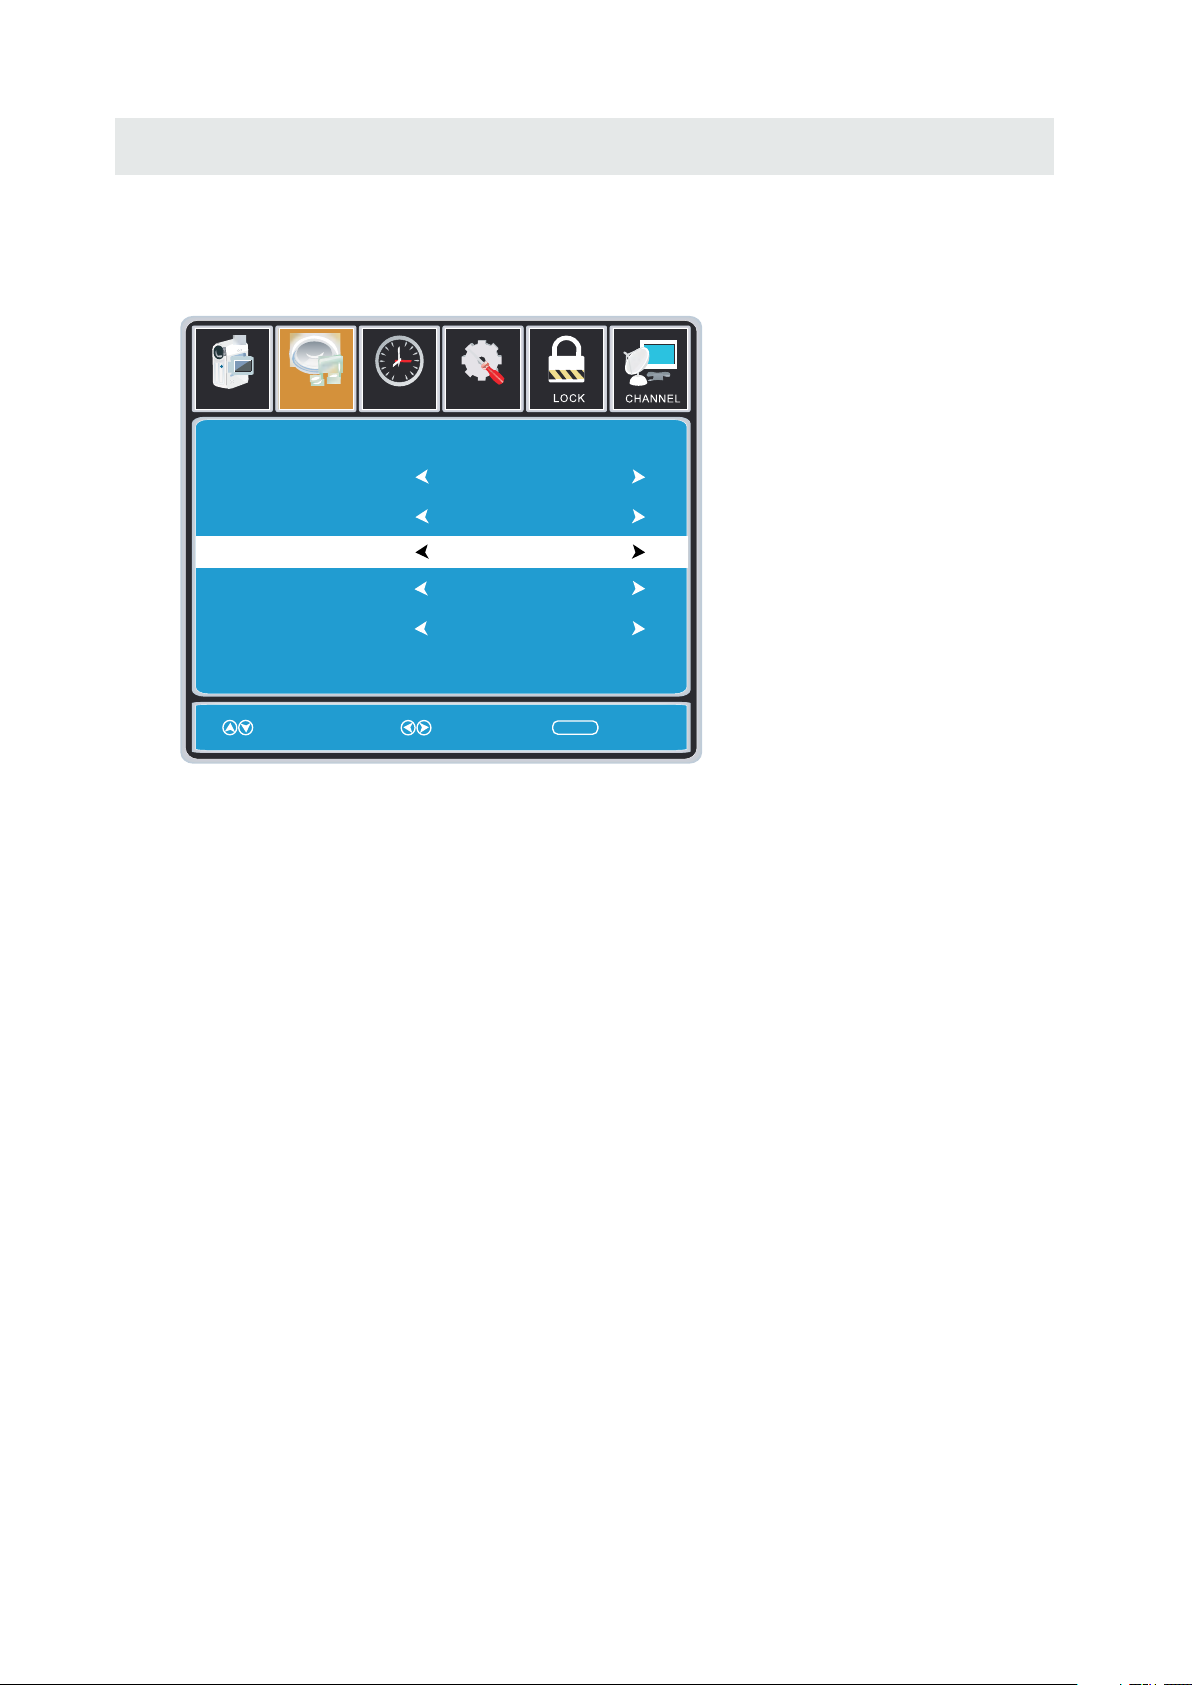
TV SETUP
SOUND MENU
Press MENU button to display the main menu.
Press ◄ / ►button to select SOUND in the main menu,it will highlight the first option.
12
6
Pictu re
Eq ual ize r Set tings
MT S
Sound
Tim
Se tup
e
Mono
Audio Language
Di git al Audio Out put
Surround Sound
AV L
Mo ve Se lect Exit
En glish
PC M
Of f
Of f
MEN U
EQUALIZER SETTINGS
This feature enables the internal equalizer of the speakers.
You can adjust the settings individually or use the presets (standard, music, movie, sports, user).
MTS
This feature adjusts the second audio programming in analog channels.
AUDIO LANGUAGE
This feature adjusts the digital second audio programming in digital channels.
DIGITAL AUDIO OUTPUT
This feature adjusts the digital audio output.
SURROUND SOUND
This feature adjusts the dimensional surround effect on or off (for built-in speakers only).
AVL
This feature adjusts the auto volume leveler enabling volume protection from overly loud
commercials.
Please Note:
AUDIO LANGUAGE and MTS are dependent on the broadcasting station's support and are only
available under the source TV.
15
Page 19
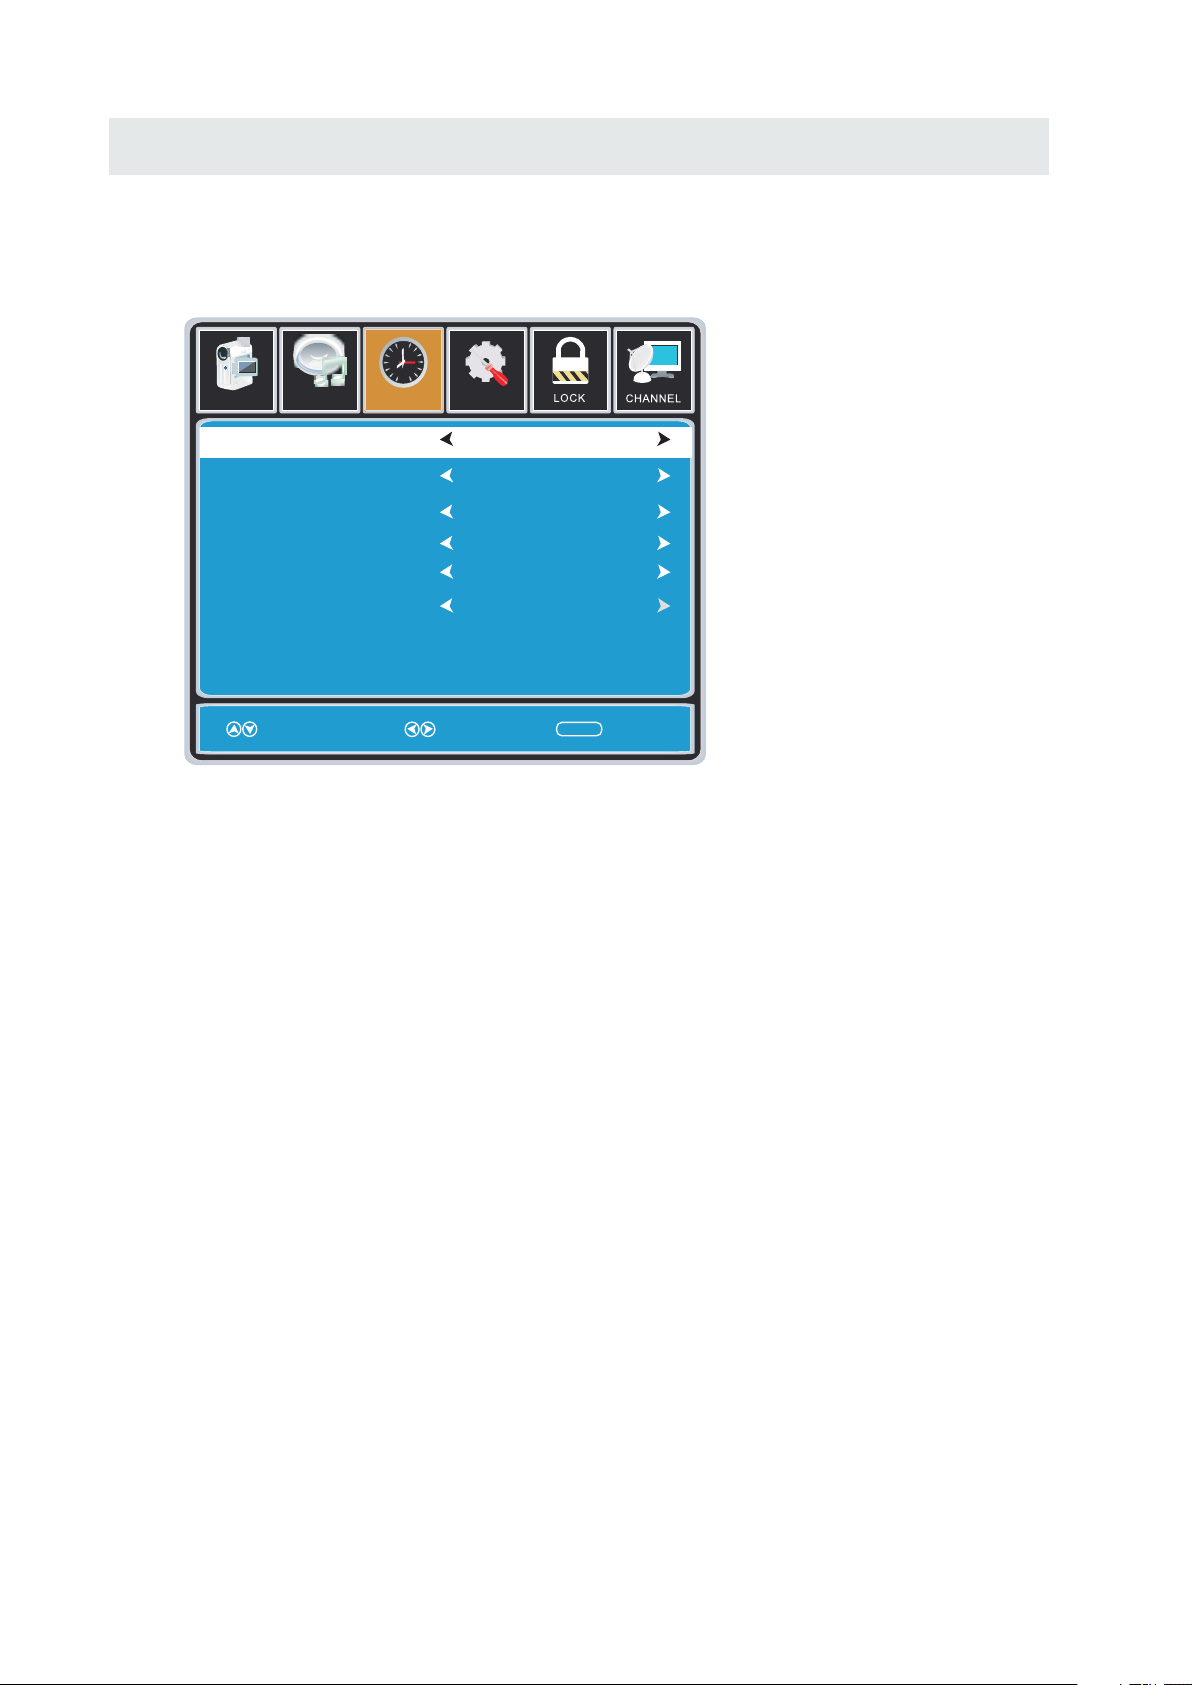
TV SETUP
TIME MENU
Press MENU button to display the main menu.
Press ◄ / ►button to select TIME in the main menu,it will highlight the first option.
12
6
Pictu re
Sound
Tim
Setup
e
Sl eep Time r
Time Zone
Da ylight Sa vin g Tim e
Time Format
Auto Clock
Cl ock
Mo ve Se le ct Exit
Of f
Pa cific
Of f
24 -hour
Of f
1980 /0 1/ 06 00:00
MEN U
SLEEP TIMER
This timer automatically turns off the TV at the designated time.
TIME ZONE
This option adjusts the global time zone for the TV.
DAYLIGHT SAVING TIME
This option toggles the daylight saving time feature.
TIME FORMAT
This option adjusts the display format for the time.(IE.Under 24 hour format 1PM would
display as 13:00).
AUTO CLOCK
This option enables the TV to sync time with the antenna.
(Put it on AUTO if you have an antenna attached to the TV.If you have CABLE or SATELLITE or
anything else please use make sure AUTO CLOCK is turned off)
CLOCK
This option adjusts the time and date of the TV.You need to disable AUTOCLOCK in order to
use this function.
Please Note:
The TIME function will only keep accurate time if the TV is plugged into a power source.
If the TV is unplugged or the power strip is turned off, the TV's time will not be accurate.
16
Page 20
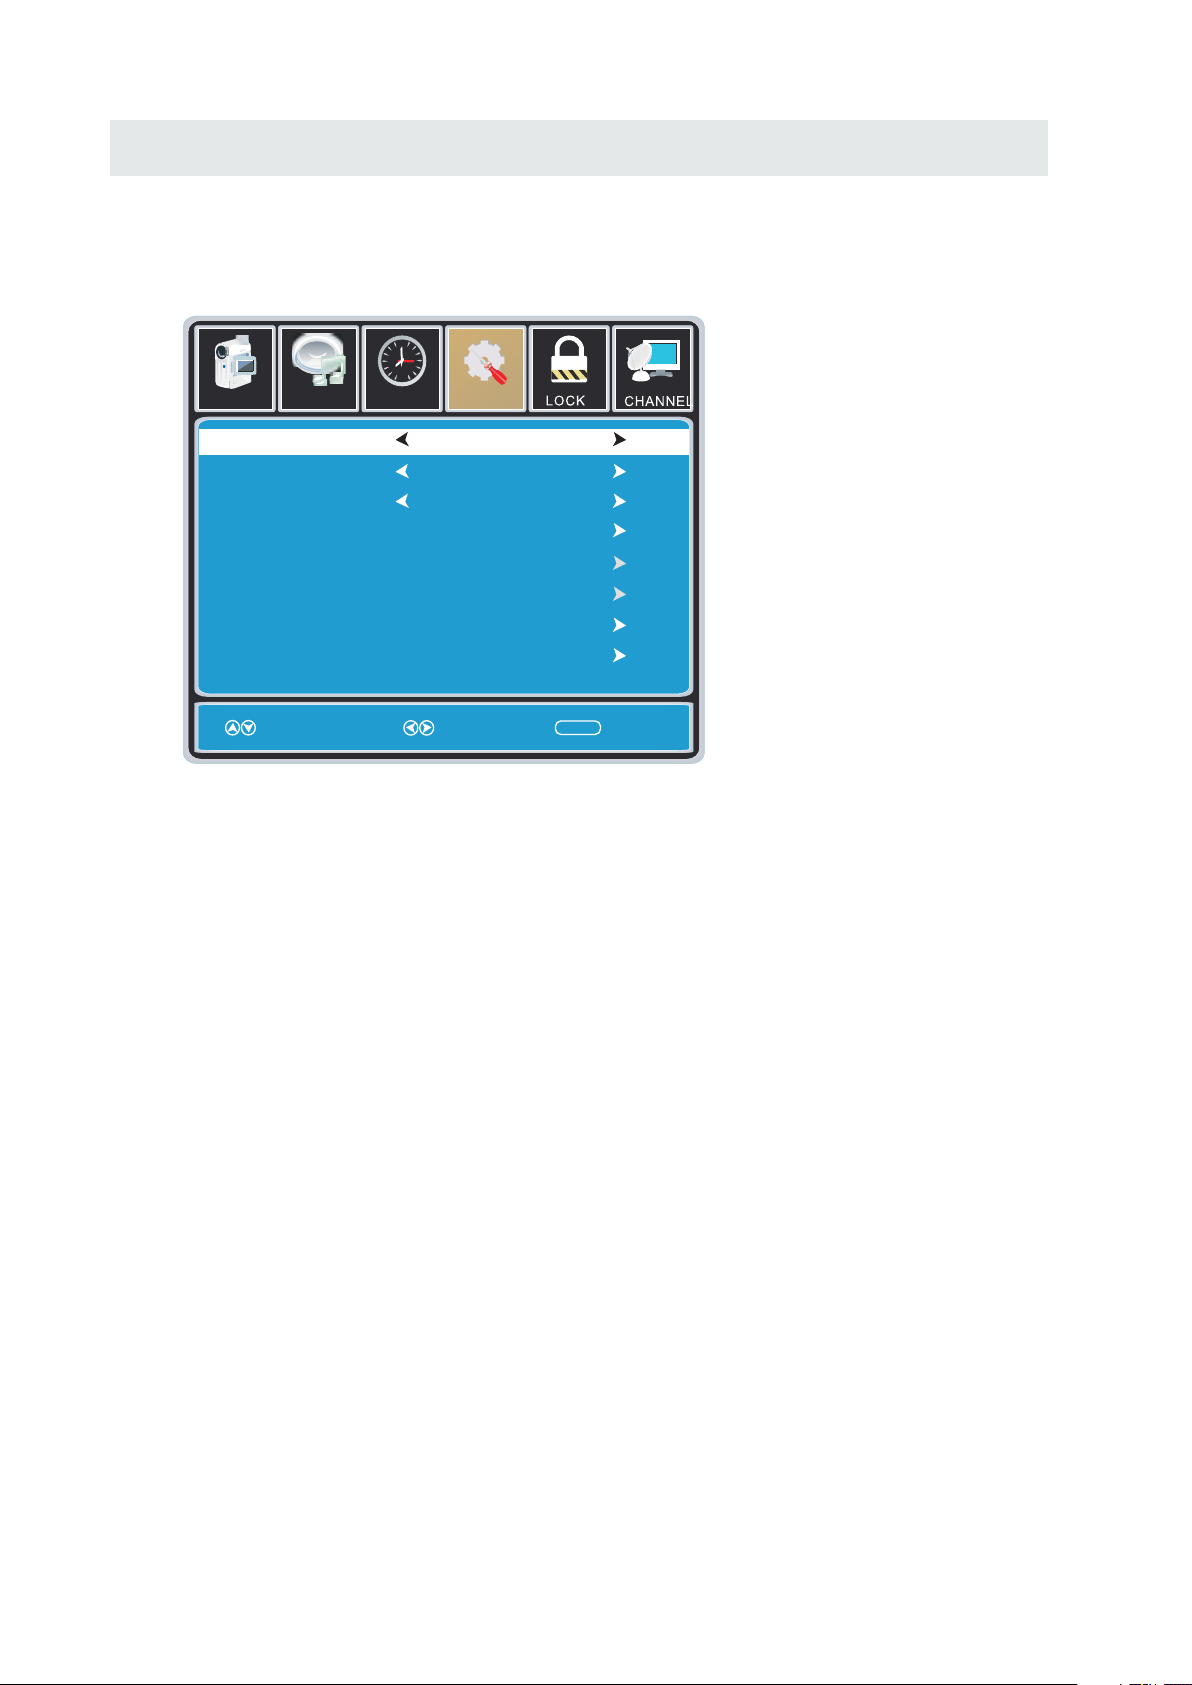
TV SETUP
SETUP MENU
Press MENU button to display the main menu.
Press ◄ / ► button to select SETUP in the main menu,it will highlight the first option.
12
12
6
6
Setup
Pictu re
Pictu re
Me nu Lan gua ge
Me nu Lan gua ge
Tra nspar enc y
Tra nspar ent
Zoom Mod e
OS D Tim eout
Cl osed Capt ion
No ise Reduc tio n
Ad vance
In put lab el
Cl ose Ca pti on
Ot her Set tin gs
XVS
Re store Def ault
Re store Def ault
Setup Wizard
Sound
Audio
Mo ve Sele ct Exit
Mo ve Sele ct Exit
Time
Time
Setup
En glish
En glish
Off
25 %
No rmal
60 S ec.
On
Lock
MEN U
MEN U
Ch ann el
MENU LANGUAGE
This option changes the language of the TV's OSD menu.
TRANSPARENT
This option changes the transparency of the menu allowing background TV images to show through.
OSD TIMEOUT
This option changes the time which the TV's OSD menu automatically goes off.
CLOSED CAPTION
This option displays words on the TV.
INPUT LABEL
This option changes the source names to your personal preference.
OTHER SETTINGS
This option adjusts miscellaneous options of the TV.
AUDIO ONLY-This option turns off the screen while the audio is still playing.
RESTORE DEFAULT
This option restores all the changes in the OSD menu back to the default factory settings.
SETUP WIZARD
This option enables the TV to show you the setup wizard of the TV again.
Please Note:
Closed captioning is only available under AV and TV ports.
Closed captioning depends on your TV program's support. Sometimes due to the TV channel
or the signal, closed captioning will not be available.
In United States, closed captioning under analog signals is CC1.
In United States, closed captioning under digital signal is Service1.
17
Page 21
TV SETUP
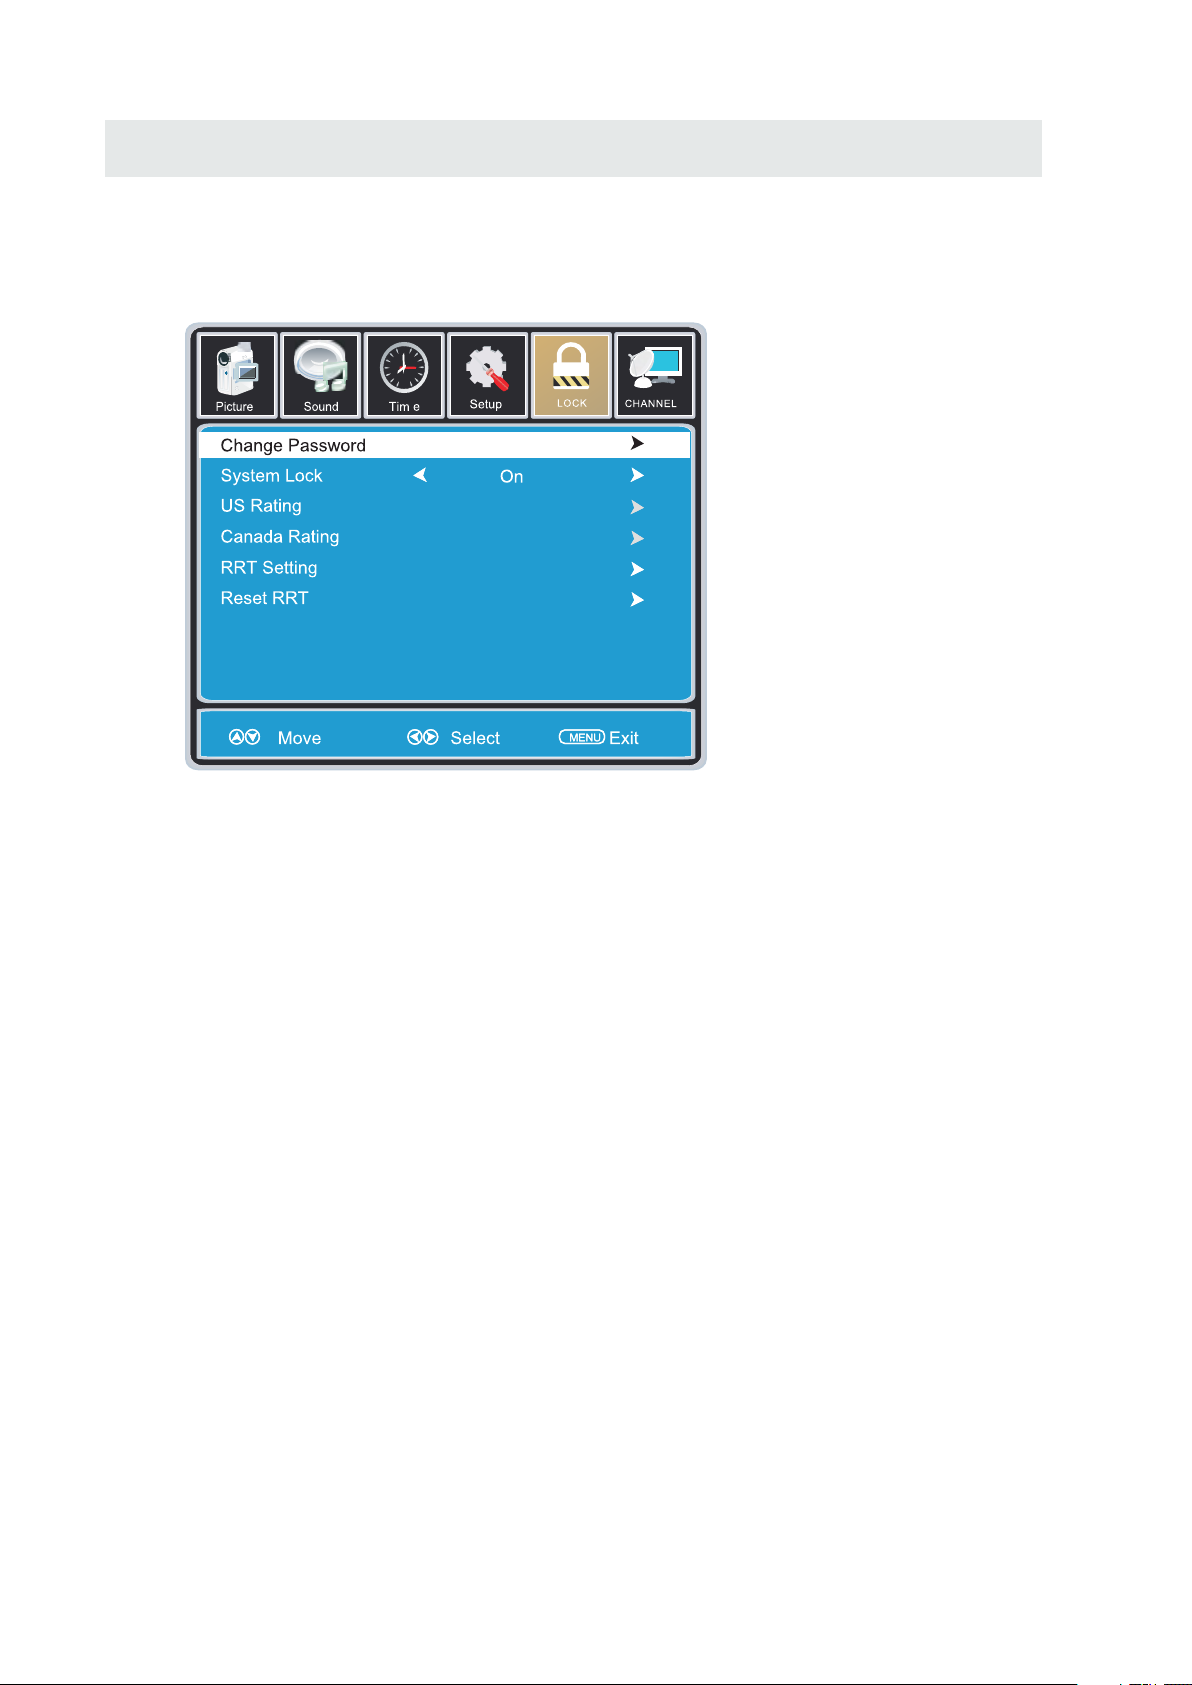
LOCK MENU
Press MENU button to display the main menu.
Press ◄ / ► button to select LOCK in the main menu,it will highlight the first option.
Press “0000” for the lock password.
12
6
CHANGE PASSWORD
This option allows you to change the LOCK menu password.
SYSTEM LOCK
This option enables parental locking and filtering for the TV.
US RATING
This option filters US TV programming and movies.
CANADA RATING
This option filters CANADA TV ratings.
RRT SETTING This feature is a downloadable rating filter based on TV broadcasts. With the transition of TV
broadcasts to digital, future changes, and enhancements in how TV shows are rated for content
are possible.
RESET RRT
This option resets the RRT5 settings.
Please Note:
Please refer to RATINGS EXPLAINED for more information on ratings definitions.
Downloadable rating and clear downloadable data might be grayed out depending on the Tvs
tations support.
RRT5 options are based on TV broadcasts, if it is grayed out, then it is not available in your region.
18
Page 22
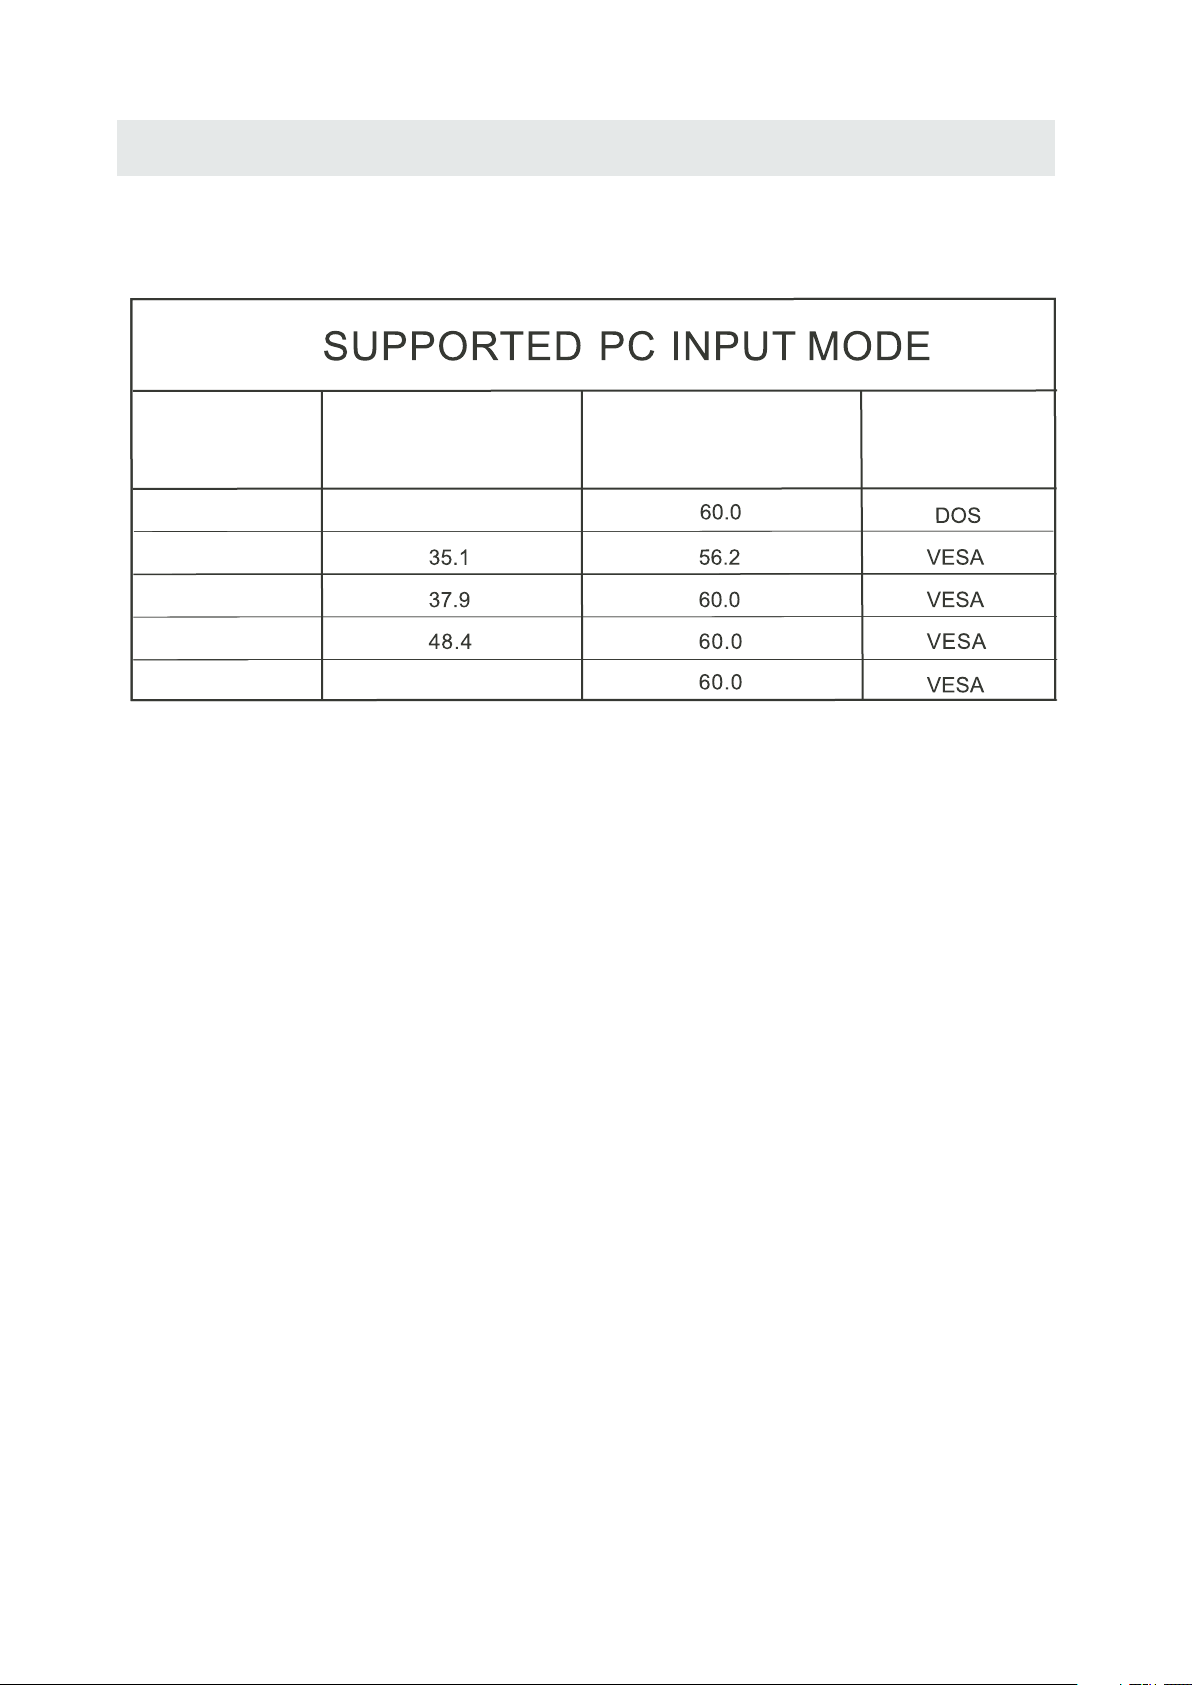
PC FORMATS
o ut n
Res l io
Sc ning F eq enan r u cy
DISPLAY MODE
H i o aor z nt l
(KHz)
i a
Vert c l
an i g Fr qu ncy
Sc n n e e
(Hz)
Format
X
640 480
X
00 6
X
8 0
00 6 0
X
024 681 7
13
X
60 76
008
8
31. 5
7. 74
NOTE:
This product does not support the display mode not listed above.
In order to achieve the best display effect, please select the above-listed
5 display modes input signal.
Because of the difference of display drivers output signal
(especially non-standard signal output), the display image may appear little
disturbance which can be adjusted on the PC menu.
To prolong this unit's service life, please set your computer to power management mode.
19
Page 23
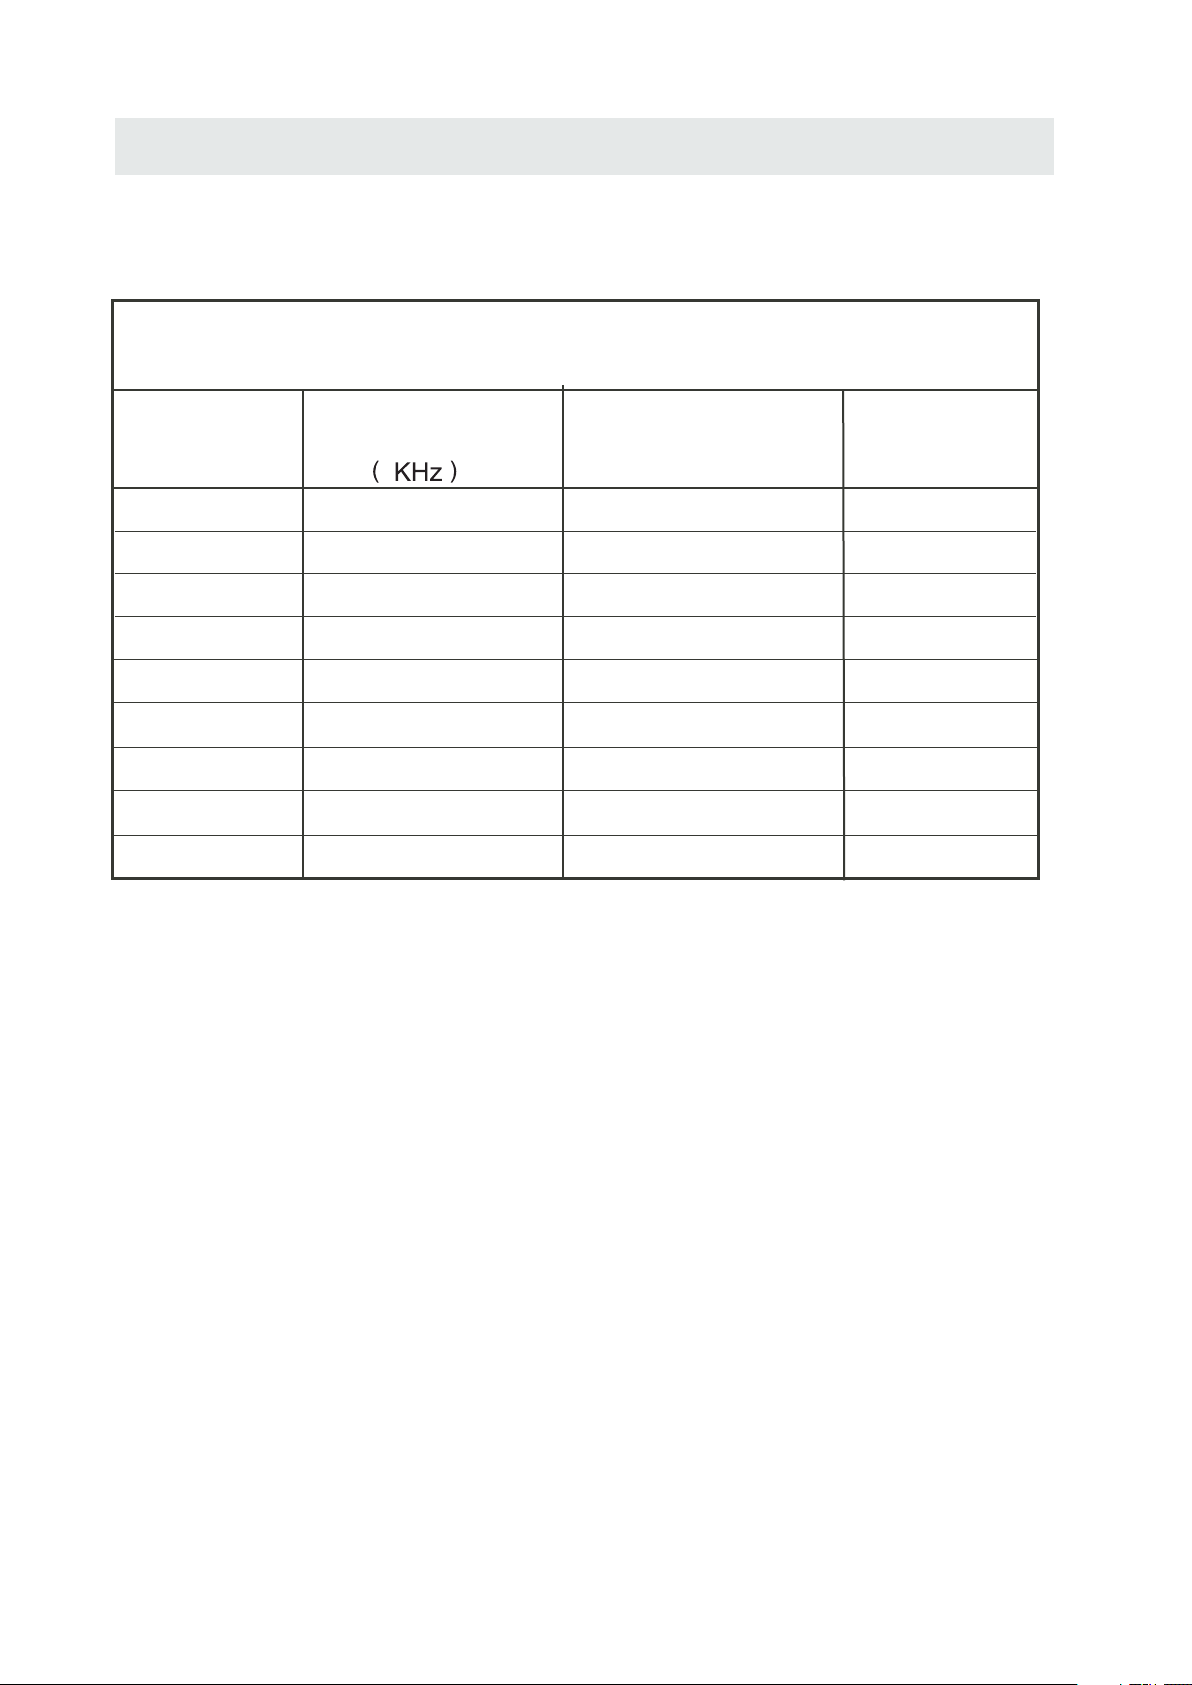
VIDEO FORMATS
SUPPORTED COMPONENT / HDMI INPUT MODE
DISPLAY MODE
e iR so
lut
on
X
720 480
X
720 480
1280 720
1280 720
1920 1080
1920 1080
1920 1080
1920 1080
1920 1080
X
X
X
X
X
X
X
Horizontal
Scanning Frequency
31. 47
15. 734
37. 5
45
31. 25
33. 75
27
56. 25
67. 50
Vertical
Scanning Frequency
(Hz)
59. 94
59. 94
50
60
50
60
24
50
60
Format
480 i
480 p
720 p
720 p
1080 i
1080 i
1080 p
1080 p
1080 p
NOTE:
The above listed formats are also related to the AV devices you are about to connect.
Before you connect this unit with others please read all instructions carefully and
make sure all necessary cables are connected.
.
This unit may be incompatible with some other formats which are not meet the
above conditions.
20
Page 24
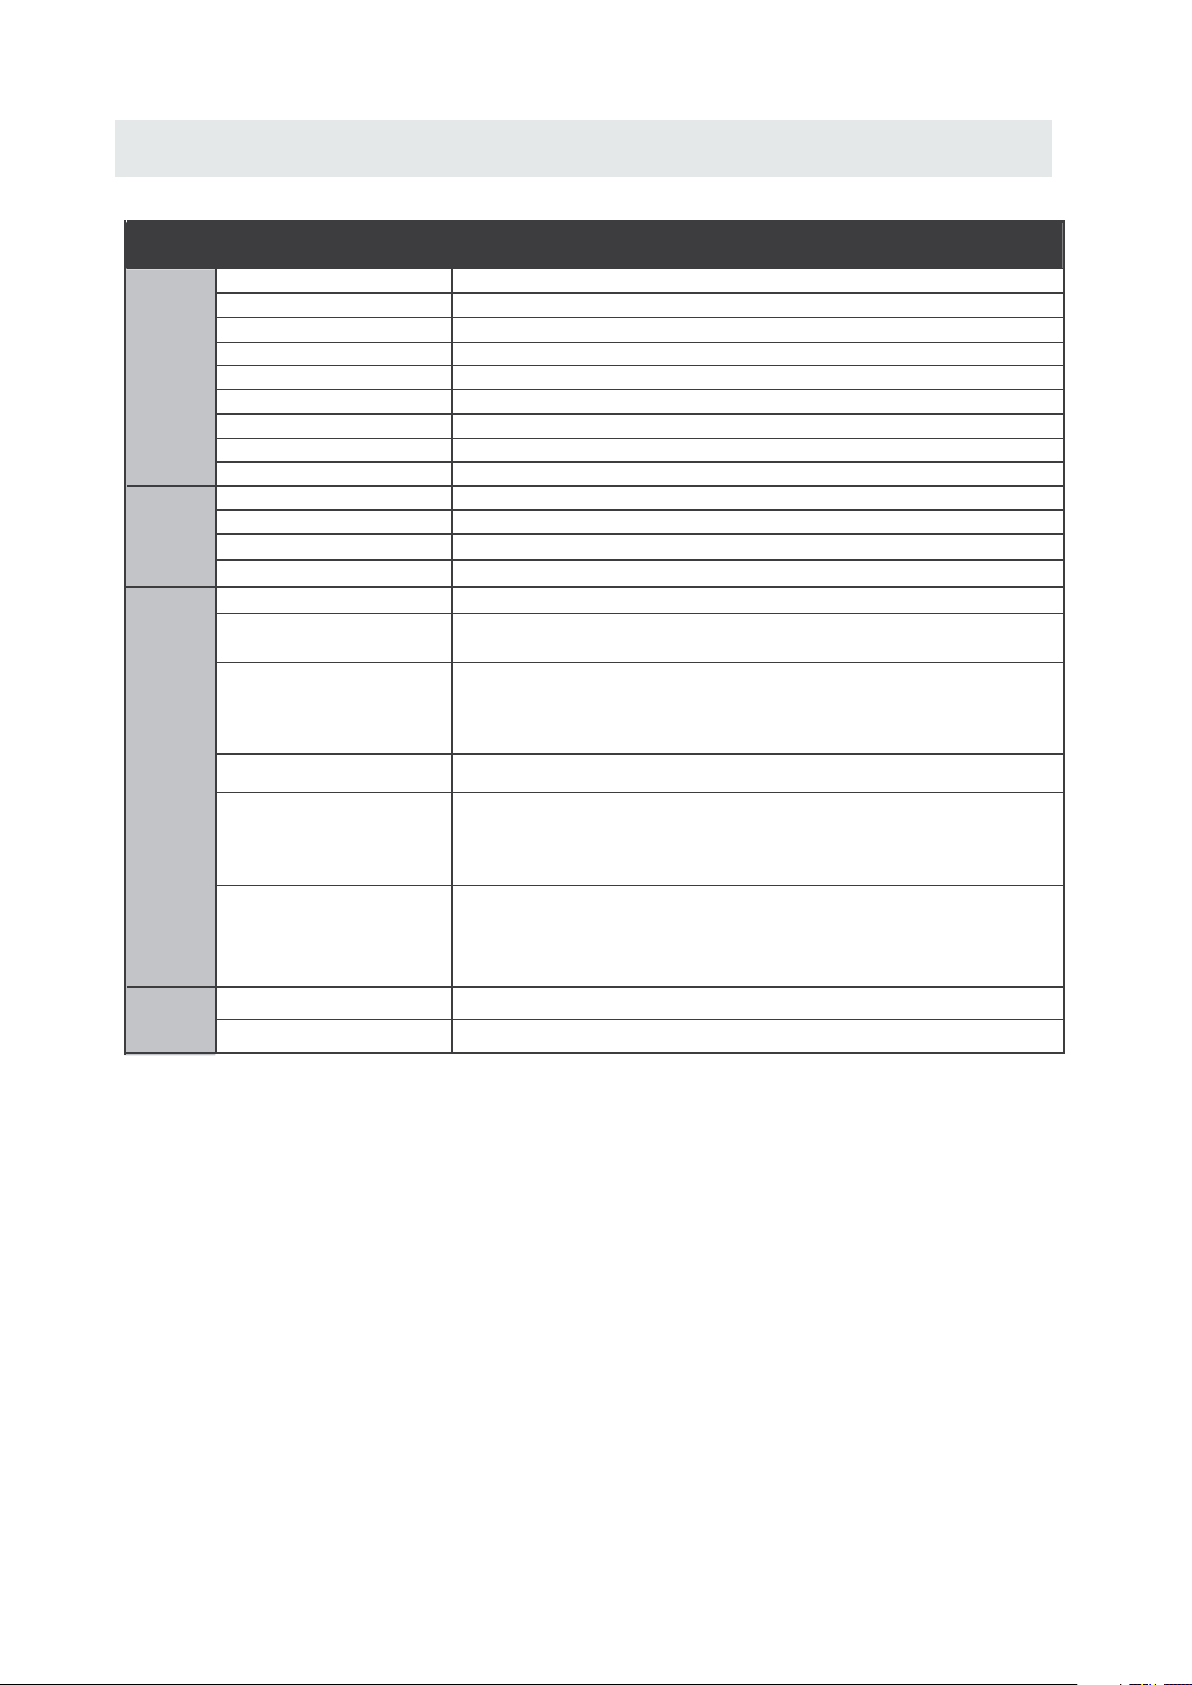
SPECIFICATION
Panel
Systems
Input /
Output
Jacks
Model Description
Panel Type LED Panel
Diagonal Size
Screen Format 16 9:
Resolution 1366 x 768
Brightness
Contrast
View Angle
Response Time
Maximum Color
Color System
Sound System
Audio System
Sound Output
RF Input 75 ohm external terminal
HDMI Input
PC RGB Input-
Composite Video Input
Component Y Pb Pr Input/
32 inches
350 nit
3000:1
178( H)/178(V)
6.5 ms
16.7M colors
ATSC/QAM/NTSC
M
BTSC
L/R Speaker:10 W+ 10W
Video 480i 480p 720p 1080i, 1080p.: , , ,
Audio Two channel linear PCM 32 44 1 and 48kHz 16 20 and 24 bits: , . , ,
D sub 15pinG 0 7Vp p 75ohms: . - ,
B 0 7Vp p 75ohms: . - ,
R 0 7Vp p 75ohms: . - ,
1.0 Vp-p, 75ohms RCA
RCA
Y: 1.0 Vp-p, 75ohms, 0.3V negative sync
Pb: 0.7Vp-p, 75ohms
Pr : 0.7Vp-p, 75ohms
32”LED TV
AV AUDIO: For CVBS/COMPONENT Audio input
PC AUDIO: For PC RGB Audio input
500mV rms, Impedance: 20k ohms
100-240V~ 50/60Hz
80 W
Power
Sound Input
Power Requirement
Rated Power Consumption
This manual is only for your reference.
Specifications are subject to update without prior notice.
21
Page 25

TROUBLESHOOTING GUIDE
SYMPTOM CAUSE AND REMEDY( )
TV
Picture
Bad
multiple
distortion,blurry)
No sound.
Black
picture.
and
(snow,
images
White
• Check the location of the antenna and adjust it if necessary.
• Make sure the antenna cable is firmly connected.
• Make sure all input cables are firmly connected.
• Increase the volume.
• Check
Remote Control.
• Check the PICTURE setting within the PICTURE menu.
• Check to make sure the program you are watching is broadcast
in Color and not Black & White.
whether the mute function has been activated on the
No picture or sound.
Coloredpatches of
picture.
Panel function key does
not respond correctly.
The display monitor's
panel goes hot.
Unusual dots
• Make sure the unit is plugged in and turned on.
• Make sure that the ATV mode is selected.
• Try a new channel to check for possible station trouble.
• Make sure the antenna is connected properly.
• Increase the volume.
•
Make sure the antenna or audio/video source device is
working properly.
• Make sure all cables are firmly connected.
• Check for local interference.
• Make sure there are no unshielded electrical devices nearby
that are causing interference.
• Turn the TV off for 30 minutes, then try it again.
• Under the influence of electrostatic phenomenon, the product
may malfunction and require usertopowerreset.
• Unplug and re-plug the AC power cord.
• LED TV takes inside lighten phosphor. It may increase the
temperature of the screen in some occasions. It's not a defect.
• Black dots and Bright points may appear on the LED screen.
This is a structural property of the LED panel and is not a defect.
Stripes on screen
The top of the monitor
gets hot.
Unable to select a
certain channel.
Disorder display
at power on.
• Adjust the impulse phase may decrease stripes. RGB in( )
• It may occur during long-time working. It's not a defect.
The channel may be skipped. Choose this channel by
•
directly selecting the buttons from the remote control.
••This may be caused because of a very short interval
between POWER OFF and ON.
Unplug the power and restart.
22
Page 26
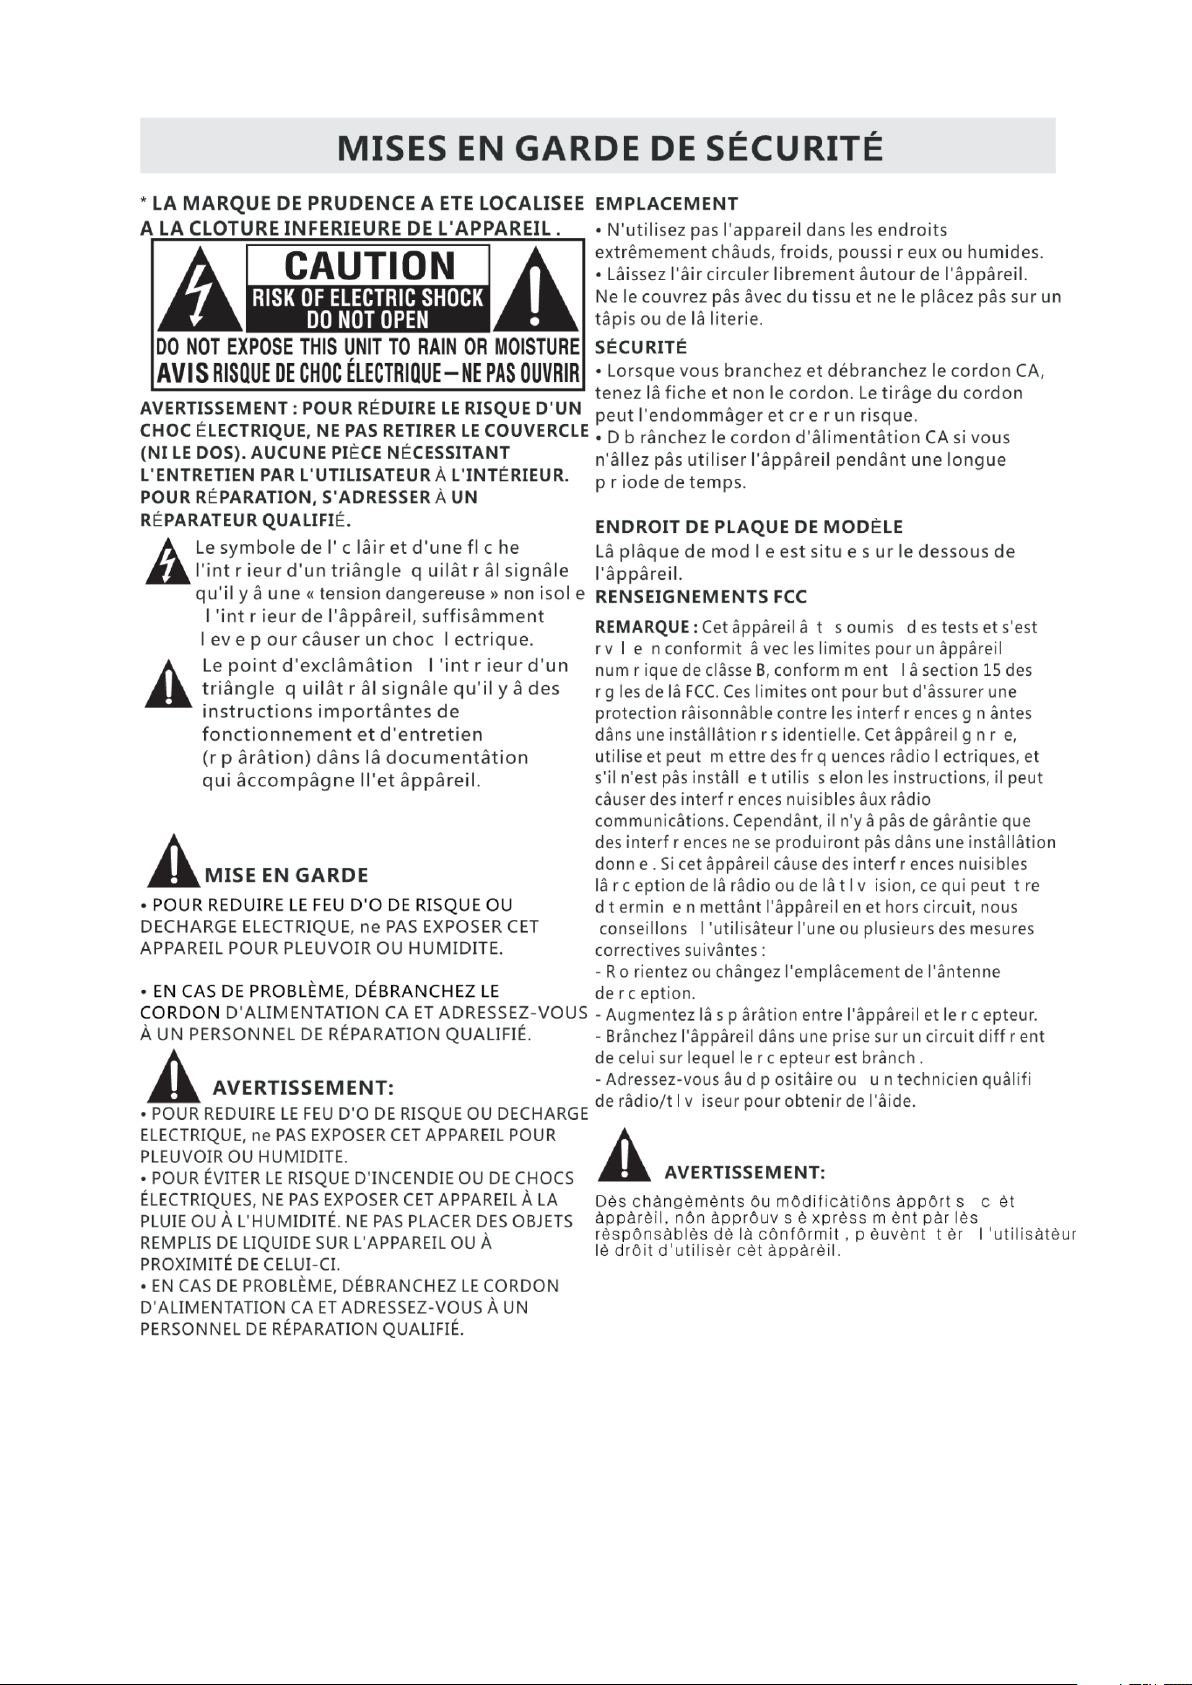
CONTENU
MISES EN
GARDE DE
1
SÉCURITÉ
CONSIGNES DE
SÉCURITÉ
2
IMPORTANTES
ACCESSOIRES
3
PRÉPARATIFES
4
GUIDE DE
RÉFÉRENCE
5
DES
COMMANDES
CONNEXIONS
6
Télécommande
Vue De Devant
Vue Arriere
Vue Arriere
Connexion Antenne
Connexion AV
Connexion Y Pb Pr
Connexion HDMI
Connexion VGA
Connexion Headphone
Branchement du cordon d'alimentation
Connexion Coax(SPDIF)
1
2
3
3
4
5
5
6
7
7
8
8
9
9
9
10
MONTAGE
7
MURAL
INSTALLATION
8
RAPIDE
RÉGLAGE
INITIAL
9
DU
TÉLÉVISEUR
Mise De L'appareil Dans Une Place Propre
Selection De Source
Mise En Circuit Initiale De L'Appareil
Menu Program(CHANNEL)
Menu Image
Menu Audio
Menu Heure
Menu Option
Menu Verro(LOCK)
11
12
12
12
13
14
15
16
17
18
Page 27

CONTENU
10
15
16
MODE
D'AFFICHAGE
CARACTÉRISTIQUES
GUIDE DE
D PANNAGEE
Formats Informatiques
Formats Vidéo
Symptôme TV
19
20
21
22
CLASSE DE SECURITE : C'est un produit de la classe
de sécurité I CEI et il doit être mis à la terre pour la sécurité.
Page 28
1
Page 29
2
Page 30
ACCESSOIRES
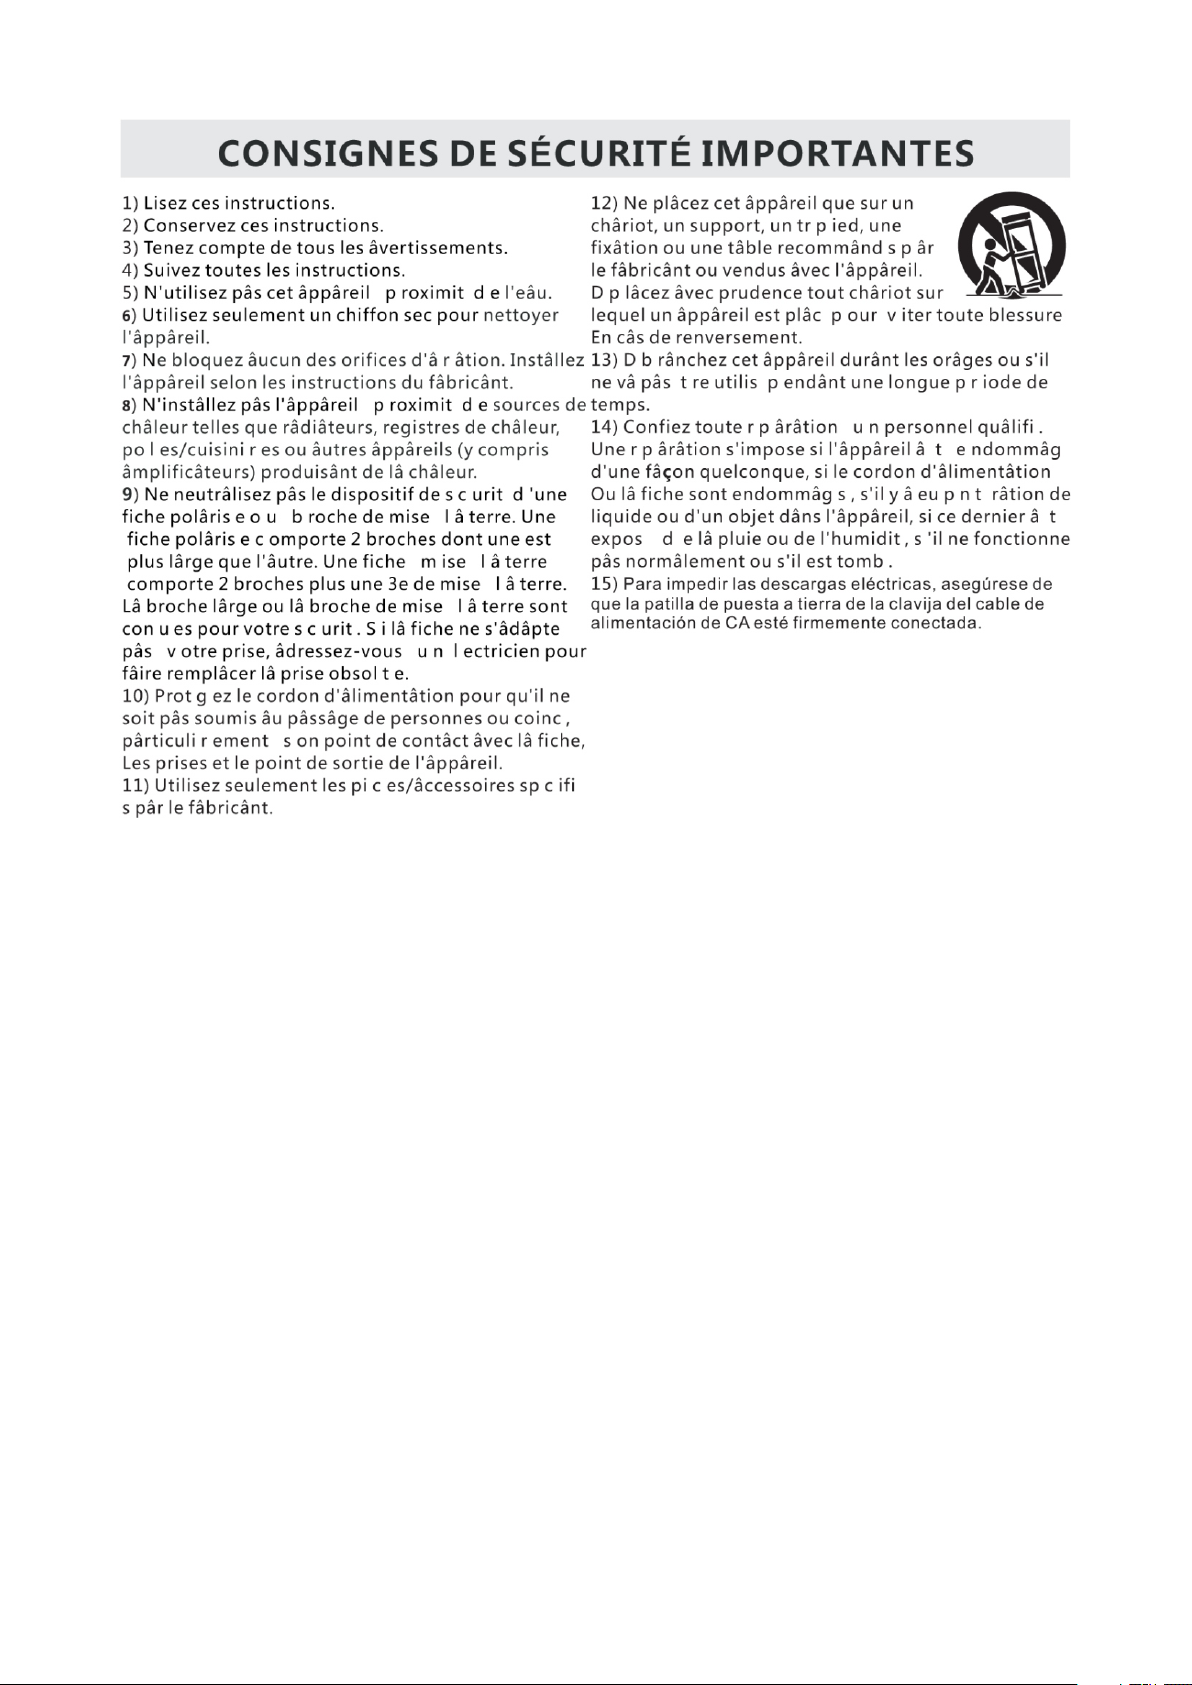
Veuillez v r ifier et identifier les âccessoires compris.
T l c ommânde
Piles AA
Gârântie Limitée
Manuel D'utilisation
Stand de base et de 4 vis
Tournevis
.... .. ....... .. ......... ......... ......... ......... .. ....... .. ......... ......... ......... .. ....... .. ......... ..
.. .. ..... ..... ..... ..... ..... ....... ..... ..... ..... ..... ..... ....... ..... ..... ..... ..... ....... ..... ..... ..... ..... ...
.. .. ..... ..... ..... ..... ..... ....... ..... ..... ..... ..... ..... ....... ..... ..... ..... ..... ....... ..... ....
.. .. ..... ..... ..... ..... ..... ....... ..... ..... ..... ..... ..... ....... ..... ..... ..... ..... ....... .....
.. .. ..... ..... ..... ..... ..... ....... ..... ..... ..... ..... ..... ....... ..... ..... ..... ..... ...
.. .. ..... ..... ..... ..... ..... ....... ..... ..... ..... ..... ..... ....... ..... ..... ..... ..... ....... ..... ..... ..... ..
x 1
x 2
x 1
.
x 1
x 1
x 1
PRÉPARATIFS
UTILISATION DE LA TÉLÉCOMMANDE
Pointez la télécommande vers le CAPTEUR DE TÉLÉCOMMANDE situé sur l'appareil.
Quand il y a une source légère, ambiante et forte, l'exécution du détecteur éloigné infrarouge peut
être d g râd , c âusânt l'op r âtion peu fiâble.
La distance efficace conseillée pour le fonctionnement de la télécommande est d'environ 16 pi (5 m).
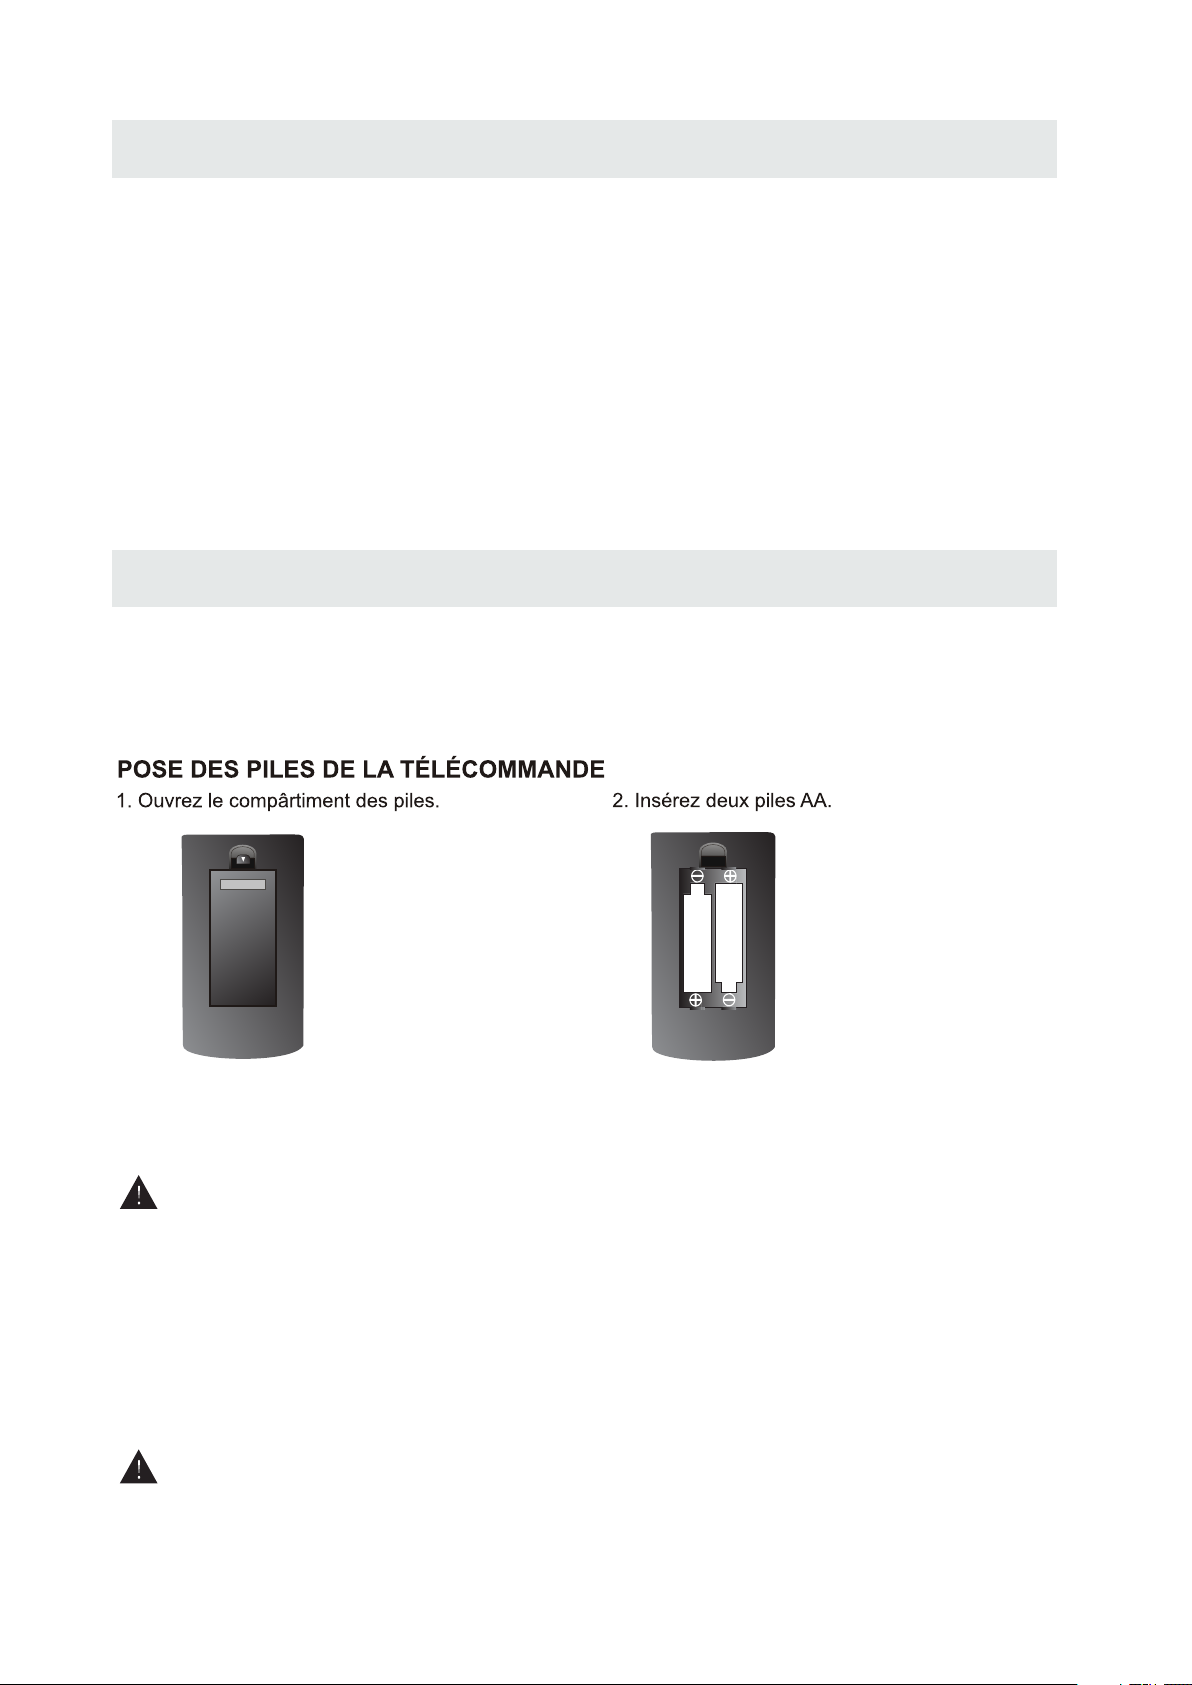
REMPLACEMENT DES PILES
Quând les piles s'âffâiblissent, lâ distânce de fonctionnement de lâ
t l c ommânde bâisse consid r âblement et il fâut les remplâcer.
MISE EN GARDE: Risque d'explosion si lâ pile est remplâc e p âr un mod l e incorrect.
REMARQUES:
Si vous n'allez pas utiliser la télécommande pendant une longue période de temps, retirez les piles pour
•
v iter le risque de corrosion en câs de fuite.
Ne mélangez pas ensemble des piles déjà utilisées et des piles neuves. Ne mélangez pas des piles
•
ALCALINES, stândârd (CARBONE-ZINC) et des piles rechârgeâbles (NICKEL-CADMIUM).
•
Retirez toujours les piles dès qu'elles commencent à s'épuiser.
•
Des piles affaiblies peuvent fuir et grandement endommager la télécommande.
AVERTISSEMENT:
•
Ne vous débarrassez pas de piles en les jetant dans un feu car elles pourraient fuir et/ou exploser.
Les piles ne seront pas exposées à la chaleur excessive comme le soleil, le feu ou l'aimé.
•
3
Page 31
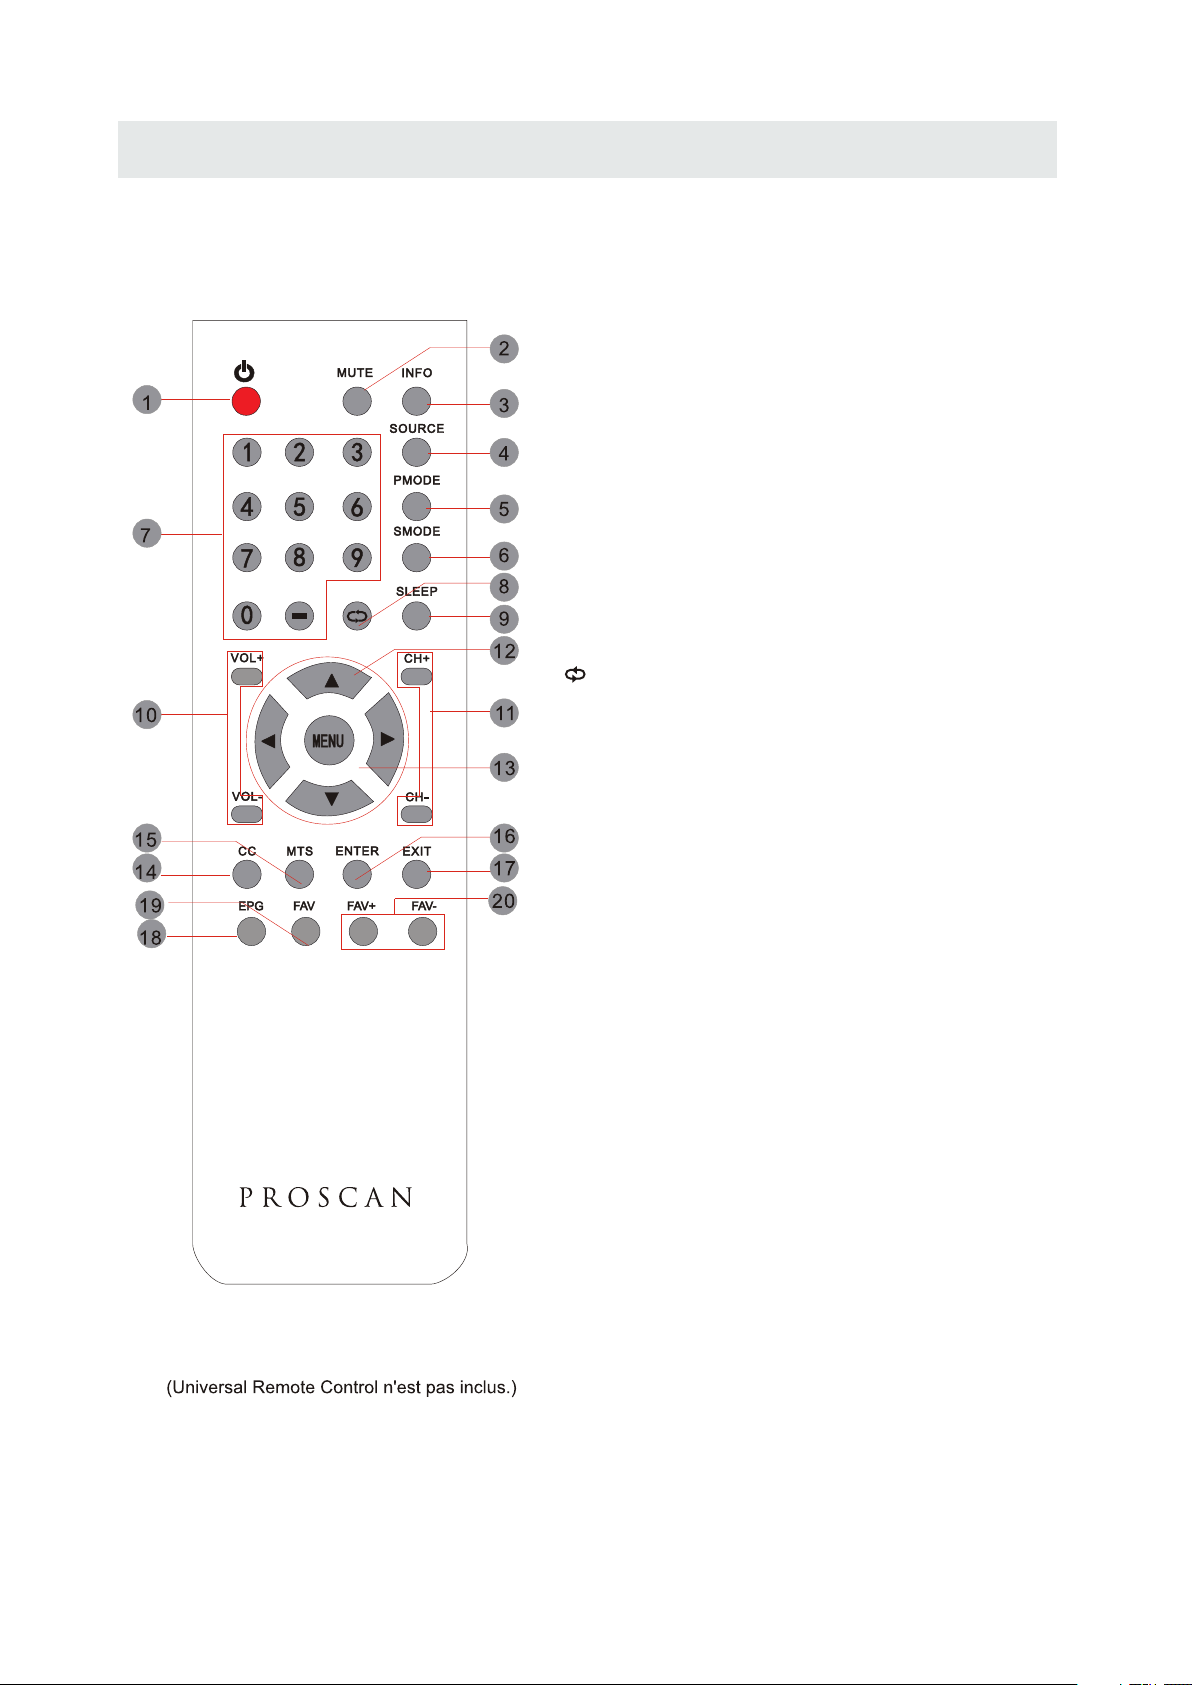
GUIDE DE R F R ENCE DES COMMANDES
TÉLÉCOMMANDE
1. EN VEILLE
Pour allumer la Télé ou mettre la Télé en mode veille.
2. MUTE
Appuyez ce bouton pour rendre le son muet ou restaurer le
son muet.
3. INFO
Affiche les informations du programme que vous
regardez.
4. SOURCE
Appuyez ce bouton pour sélectionner une entrée source.
5. PMODE
Appuyez ce bouton pour sélectionner un mode d'image
pour différents qualités d'images.
6. SMODE
Appuyez ce bouton pour sélectionner le réglage de son
pour différents effets sonores.
7. 0-9
Vous permet de changer la chaîne de la Télé.
8.
Changer entre les chaînes précédent et actuel.
9. SLEEP
Pour configurer la durée de temps avant que la Télé
s'éteigne automatiquement.
Universal Remote Code: 1218
10. VOL+/VOLAugmente/diminue le volume.
11. CH+/CHPour aller à la chaîne suivante/précédente en mode
Télé.
12. Haut/Bas/Gauche/Droite
Pour déplacer le curseur vers le haut/vers le bas/vers la
gauche/vers la droite quand vous faites un choix.
13. MENU
Affiche le Menu OSD de la Télé.
14. CC
Appuyez le bouton pour entrer en mode CC.
15.MTS
Pour changer entre STEREO, MONO et SAP. S'il n'y a
aucun langage valable pour le signal réceptionné,
l'audio de l'LED Display changera en mono.
16. ENTER
Appuyez sur pour confirmer les sélections sur un écran de menu.
17. EXIT
Appuyez ce bouton pour quitter ce qui est affiché à l'écran.
18. EPG
Appuyez sur ce bouton pour sélectionner le guide
électronique des programmes en mode DTV.
19. FAV
Appuyez sur ce bouton pour afficher la liste des favoris.
20. FAV+/FAVAppuyez sur ce bouton pour passer par la liste de
canaux FAV.
4
Page 32
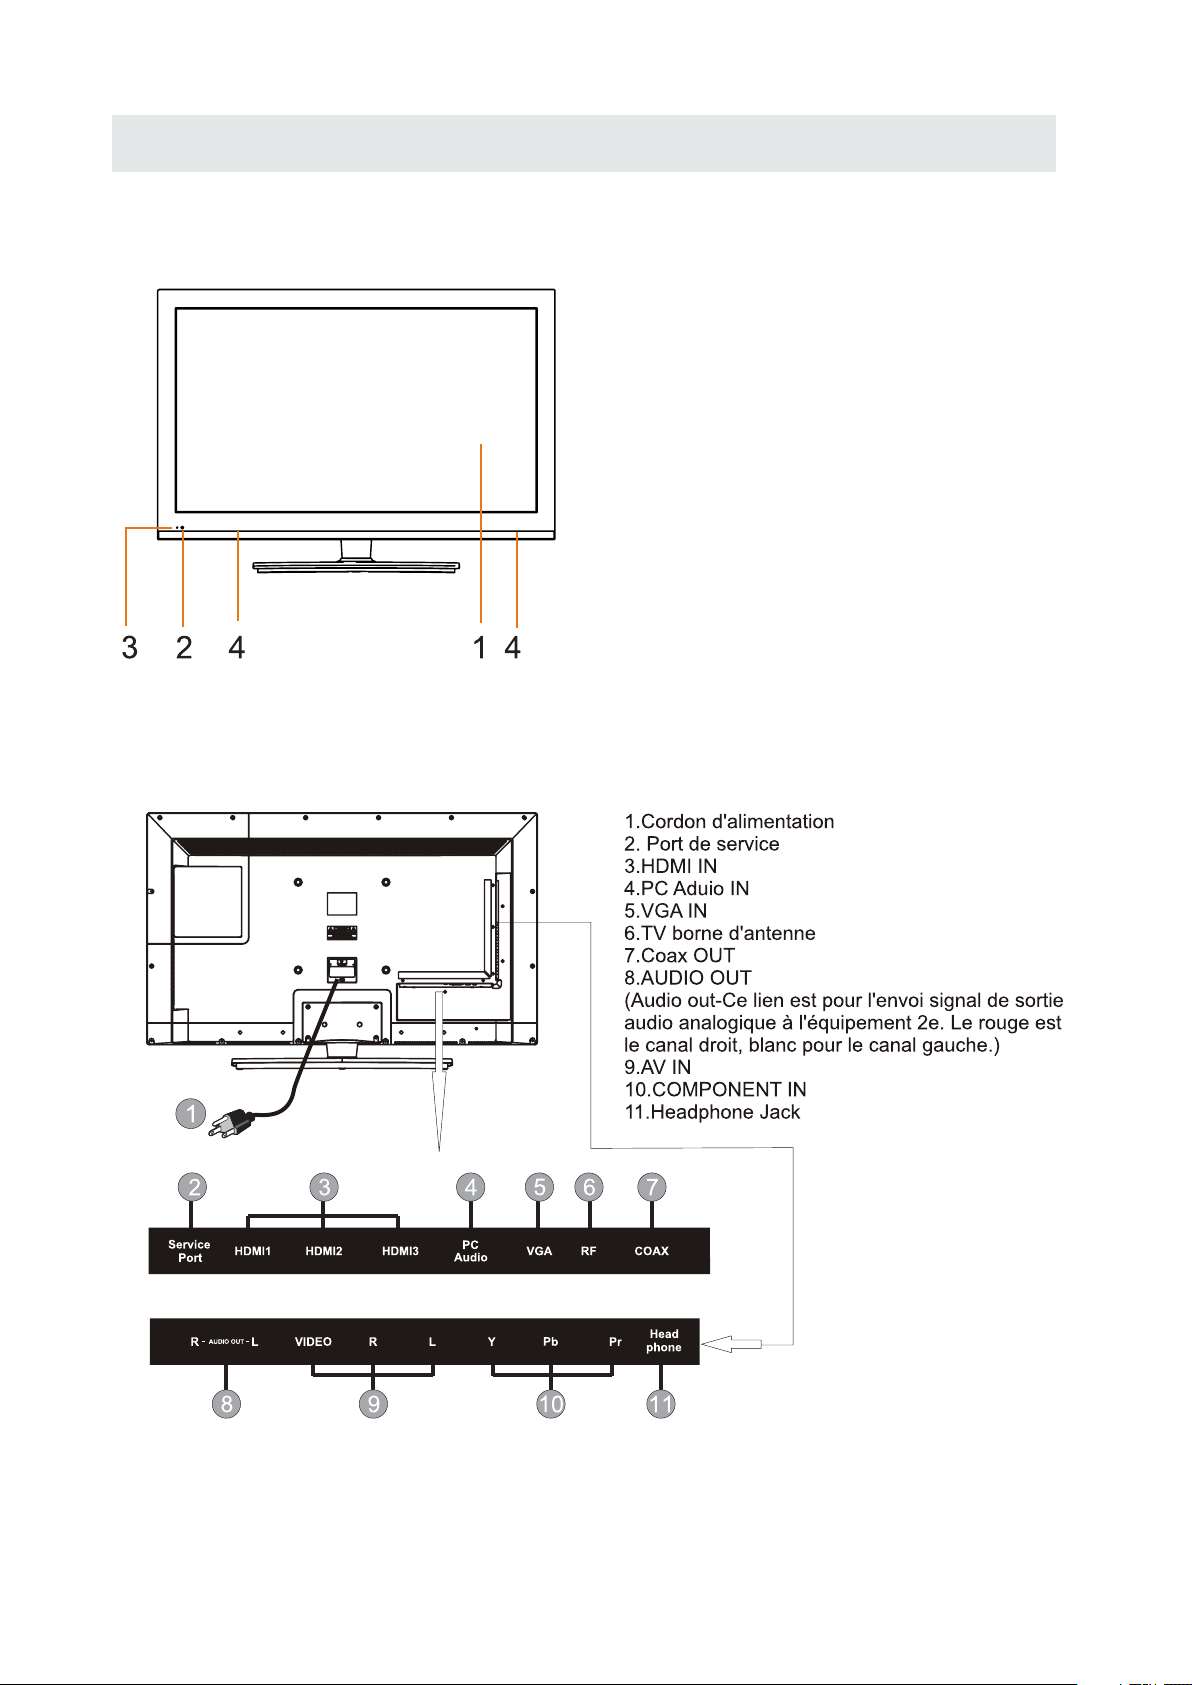
GUIDE DE R F R ENCE DES COMMANDES
VUE DE DEVANT
1. rân couleurà C.L.
2.Câpteur de t l c ommânde
Ne bloquez pâs l'âcc s c e câpteur
sinon lâ t l c ommânde ne
fonctionne pâs.
3.Indicâteur STANDBY
Indique si l'âppâreil est EN CIRCUIT
ou en mode de VEILLE (hors circuit).
Voyant allumé : L'appareil est en
standby.
Voyant éteint : L'appareil est allumé.
4. Hâut-pârleurs
VUE ARRIERE
5
Page 33
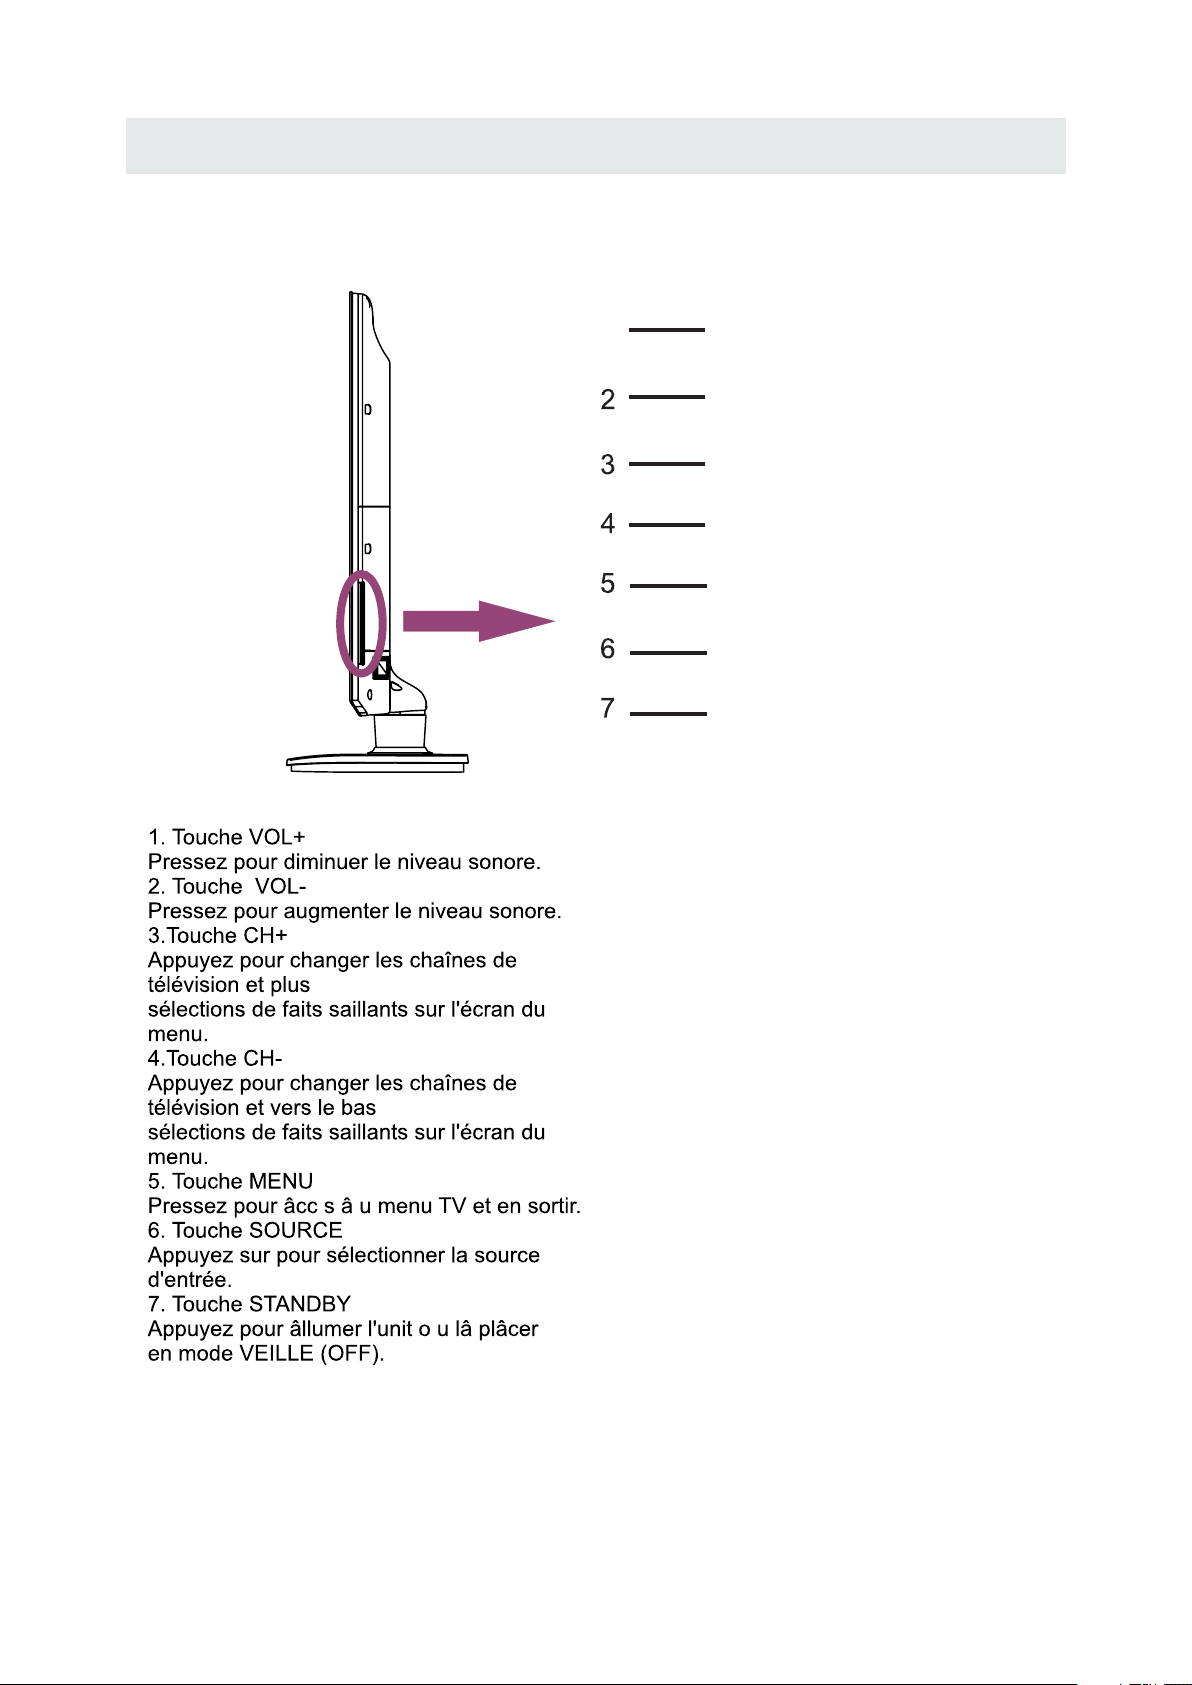
GUIDE DE R F R ENCE DES COMMANDES
VUE ARRIERE
1
VOL+
VOL-
CH+
CH-
MENU
SOURCE
STANDBY
6
Page 34
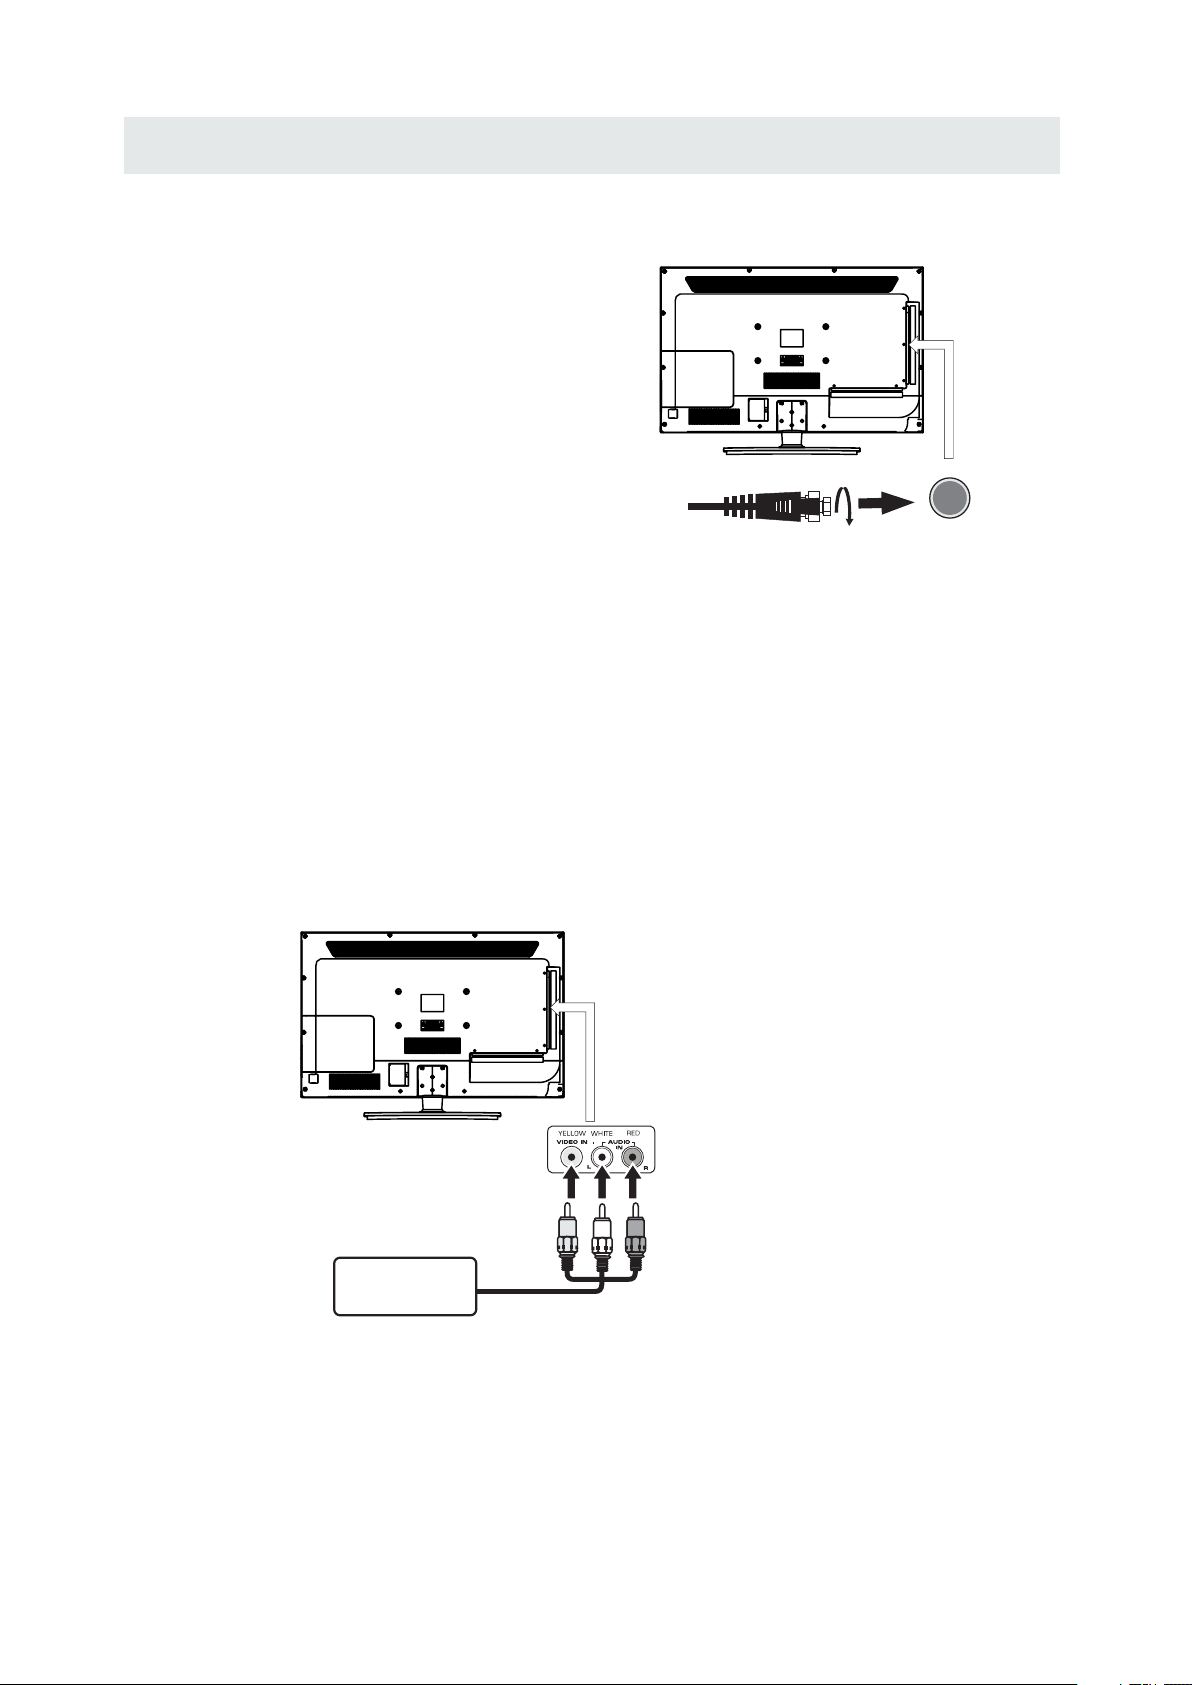
CONNEXIONS
CONNEXION D'UNE ANTENNE TV / CABLE / SATELLITE
Pour capter les cha nes de tel vision ad quatement,
il faut recevoir un signal provenant de l'une des
sources suivantes:
-Antenne int rieure ou ext rieure
-R seau de cablodistribution
-R seau satellitaire
REMARQUE
Nous conseillons l'utilisation d'une antenne fixe
ext rieure pour la r ception d' missions TV
provenant d'une antenne mettrice. Si vous devez
utiliser une antenne temporaire, assurez-vous d'en
acheter une d'une capacit suffisante pour capter
les signaux faibles. Une antenne temporaire ne
reproduit le signal aussi efficacement qu'une
antenne fixe que lorsque l'appareil est proche
d'un metteur.
CONNEXION D'UN COMPOSANT A/V
Raccordement d'un appareil auxiliaire tel que magn toscope,
cam scope, syst me satellite, cablodistribution, etc.
RACCORDEMENT D'APPAREILS SORTIE VIDEO COMPOSITE (JAUNE TYPE RCA)
Raccordement d'appareils A/V tels que magn toscope, jeu video ou cam scope :
Connexion un magn toscope / jeu video / cam scope
Raccordez un cable AUDIO / VIDEO (non compris) comme montr :
Assurez-vous de raccorder le cable ducomposant (AUDIO et VIDEO OUT) aux entr es
AV IN de cet appareil.
Cable de satellite, cablodistribution
ou antenne det l vision dans l
borne TV ANTENNA (cable non compris)
REMARQUE
Veuillez vous reporter au manuel d'utilisation du
composant auxiliaire pour de plus amples
renseignements.
Dans prises
AUDIO/VIDEO OUT
MAGN TOSCO PE/
JEU VID O/
CAM SCOPE, e tc.
Dans prises
AUDIO/VIDEO IN
7
Page 35
CONNEXIONS
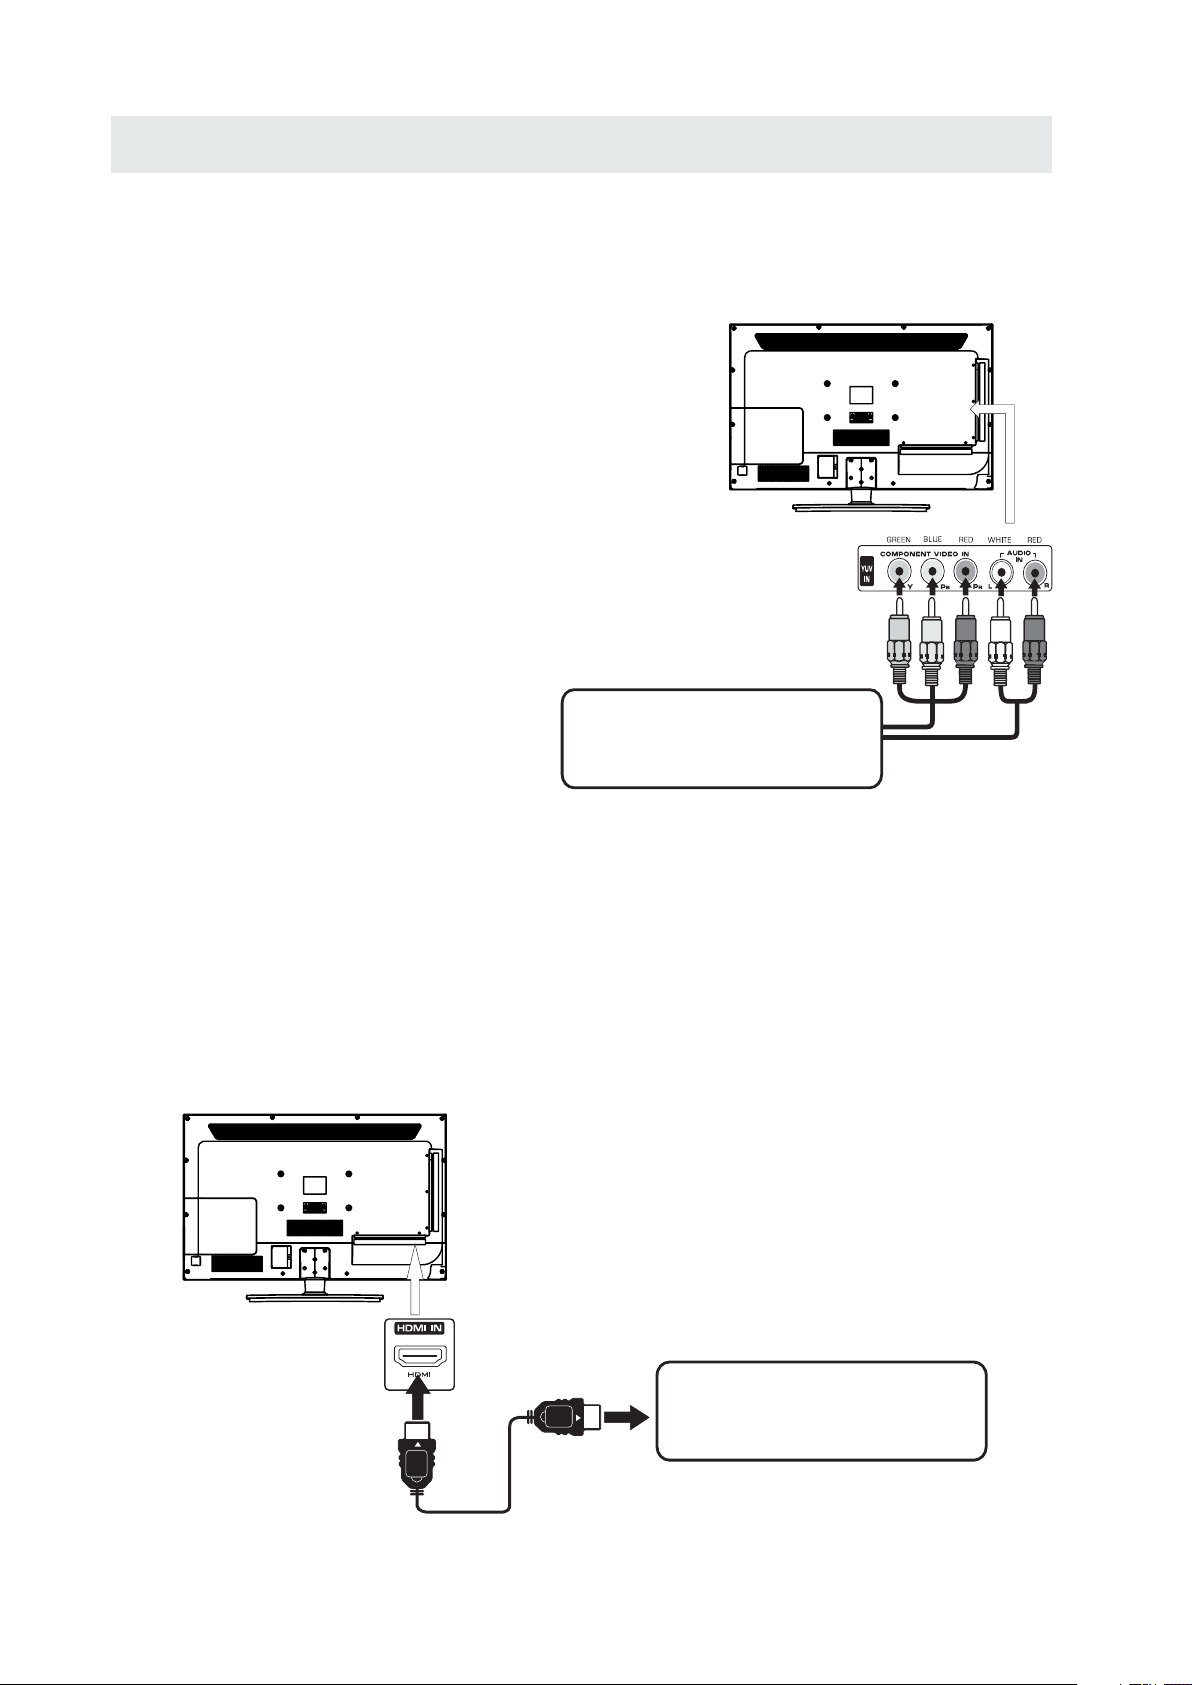
RACCORDEMENT D UNE ' SOURCE HAUTE DÉFINITION (HD) À L'AIDE D'UNE CONNEXION DE COMPOSANT
Les appareils haute d finition (HD) sortie vid o en composantes se raccordent l'entr e YUV :
Raccordez un c ble vid o en composantes et un c ble audio (non compris) comme montr
Assurez-vous de raccorder le c ble vid o en composantes et le c ble audio de l'appareil auxiliaire
(Y Pb Pr OUTet AUDIO OUT) cet appareil COMPONENT.
REMARQUE
Quand vous connectez un lecteur de DVD une
t l vision, la r solution de l'image ne d pend que de
la r solution support e par le lecteur de DVD branch
Les r solutions des lecteurs de DVD varient de
480i 1080i, et cette t l vision peut supporter des
lecteurs DVD jusqu' une r solution maximum
de 1080i.
*Peut exiger un abonnement pour
la r ception de cha nes HD.
V rifiez aupr s de votre fournisseur
de c blodistribution/satellite pour
de plus amples d tails.
Dans pris es VIDEO IN
en COMPOS ANTES
(YPbPr IN )
Dans pris es VIDEO OUT
en COMPOS ANTES
Dans pris es
AUDIO OUT
SOURCE HD s ortie vid o en
composa ntes (convert isseur de
c blodist ribution num ri que*, r cepteur
satelli te* ou syntonis eur HD de r ception
en direct a uxiliaire)
Dans pris es
AUDIO IN
RACCORDEMENT D'UNE SOURCE HAUTE DÉFINITION (HD) À L'AIDE D'UNE CONNEXION HDMI
La liaison HDMI (Interface multimédia haute définition) supporte les signaux vidéo et audio grâce à une
seule connexion numérique pour utilisation avec lecteurs DVD, téléviseurs numériques, boîtiers décodeurs
et autres appareils AV numériques. La liaison HDMI a été mise au point pour offrir les technologies de
protection de contenu numérique à bande passante élevée (HDCP) ainsi que l'interface vidéo numérique
(DVI) en une spécification. Le HDCP sert à protéger le contenu numérique émis et capté par des affichages
conformes à DVI ou HDMI.
La liaison HDMI permet le support de signal vidéo standard, amélioré ou haute définition plus le support de
signal audio allant de standard à ambiophonique multi-canaux. La liaison HDMI procure un signal vidéo
numérique non comprimé, bande passante jusqu'à 2,2 Go/s (à signaux HDTV), un connecteur (au lieu de
plusieurs câbles et connecteurs), et la communication entre la source AV et les appareils AV tels que des
téléviseurs numériques.
Raccordez un câble HDMI (non compris)
comme montré :
Assurez vous de raccorder le c ble
provenant de la source (HDMI OUT)
cet appareil (HDMI IN)
Dans pris e
HDMI IN
Cable HDM I
(not comp ris)
Dans pris e
HDMI OUT
8
SOURCE HD s ortie video en
composa ntes (convert isseur de
cablodi stribution nu m rique*, racep teur
satelli te* ou syntonis eur HD de racepti on
en direct a uxiliaire)
Page 36
CONNEXIONS
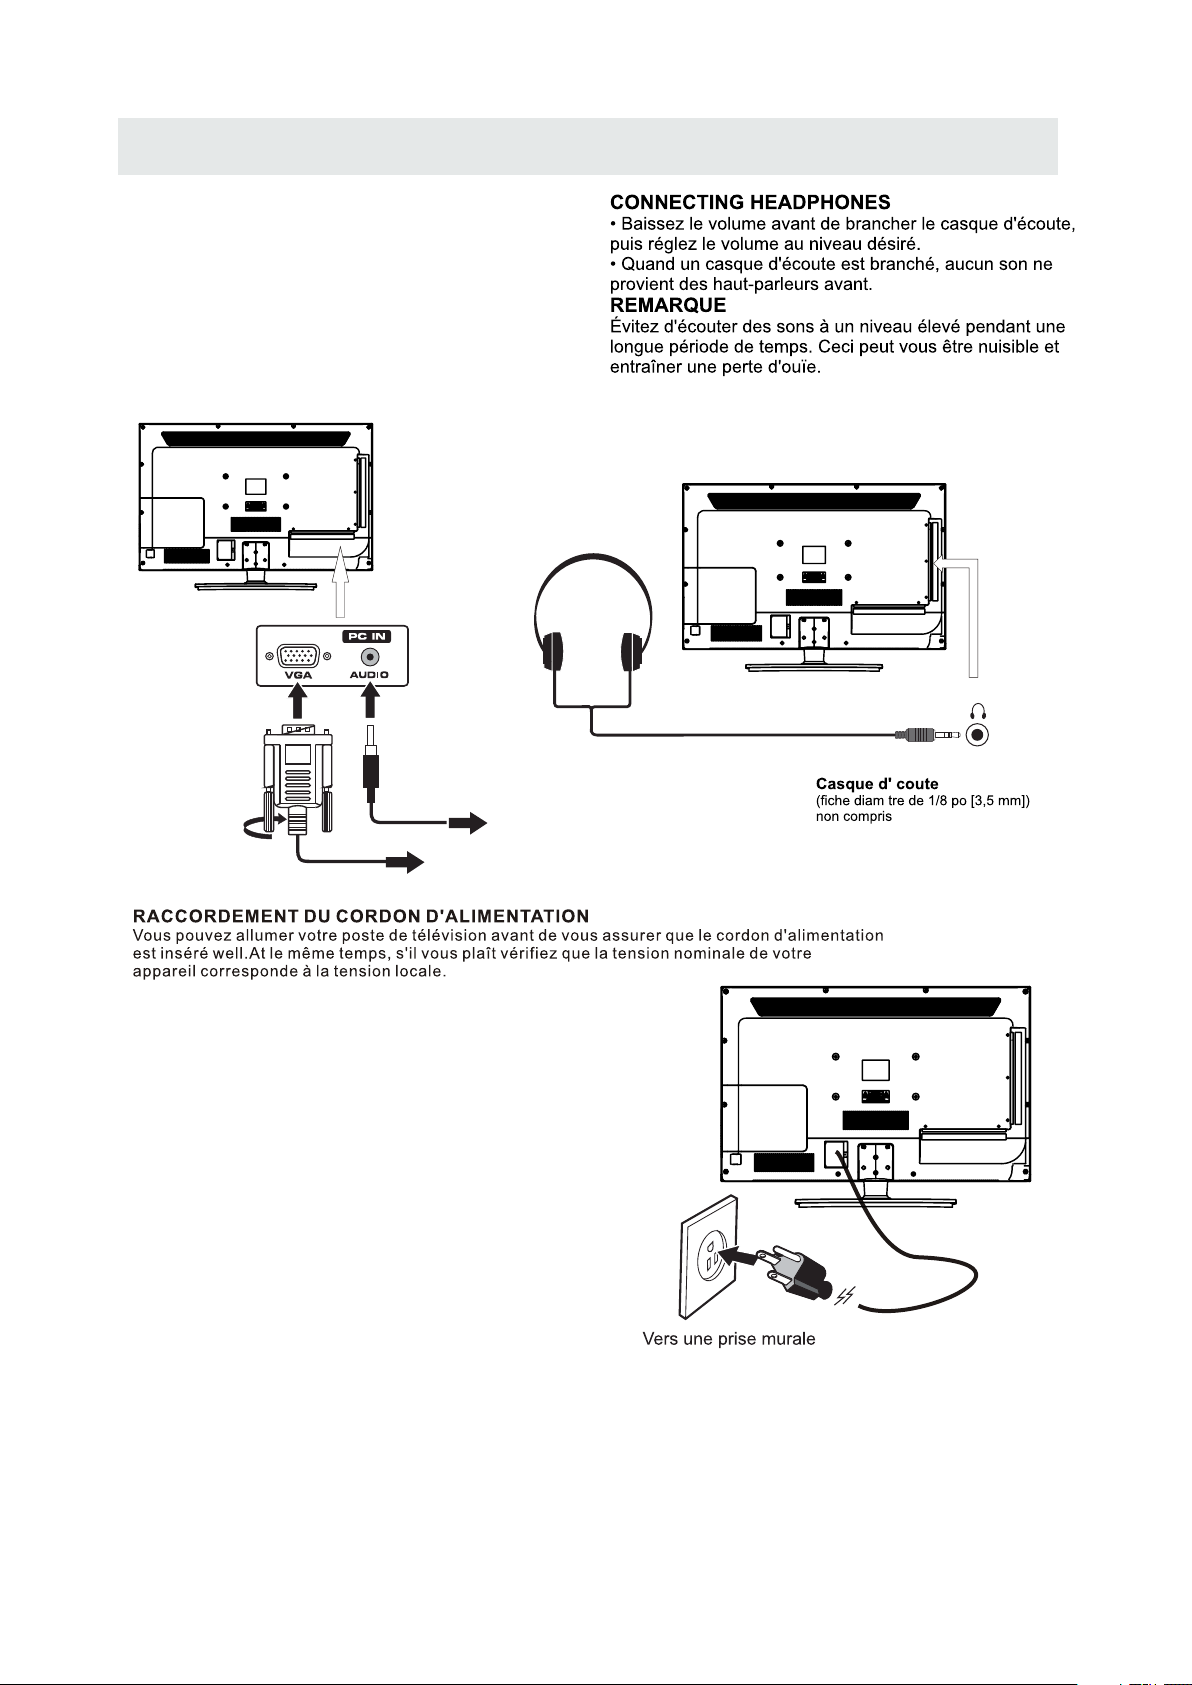
CONNEXION D'UN PC
Raccordez le connecteur D-SUB PC/VGA 15
broches de votre ordinateur l'entr e
D-SUB PC/VGA 15 broches sur cet appareil
l'aide d'un c ble pour moniteur et d'un c ble
audio (non compris) comme montr
Assurez-vous de raccorder le c ble de l'ordinateur
(PC Connector et AUDIO-PC out) cet appareil
(VGA et AUDIO - PC IN)
DANS PC AUDIO OUT
DANS LE CONNECTEUR DE PC
REMARQUE
• Inserte el enchufe de alimentaci n completamente
en la toma de corriente Si el enchufe estuviese flojo
podr a generar calor y causar un incendio.)
• Cerci rese de que el enchufe est f cilmente accesible
• Cerci rese de que el terminal de puesta a tierra del
enchufe de alimentaci n est conectado con seguridad
para evitar descargas el ctricas.
• No toque el enchufe de alimentaci n con las manos
h medas Esto podr a causar una descarga el ctrica.)
• No utilice ning n cable de alimentaci n que no sea el
suministrado con este TV.
(Esto podr a causar una descarga el ctrica.)
• No da e el cable de alimentaci n Un cable da ado
podr a causar un incendio o descarga el ctrica.)
• No mueva el TV con el cable de alimentación enchufado en una toma de corriente.
• No coloque ningún objeto pesado sobre el cable de alimentación,
ni coloque éste cerca de un objeto de gran temperatura.
• No retuerza el cable, no lo doble excesivamente, ni lo estire.
• No tire del cable. Sujételo por el enchufe de alimentación cuando vaya a desconectarlo.
• No utilice un enchufe de alimentación ni una toma de corriente dañados.
.
9
Page 37
Coax
Pict ure
Sound
Equalizer Se tt in gs
MTS
Audio Language
Digital Audio Outpu t
Surround Sound
AVL
Tim
12
6
Set up
e
Mono
English
PCM
Off
Off
SPD IF OUT
Coax
Move Select Exit
MEN U
10
Page 38
MONTAGE MURAL
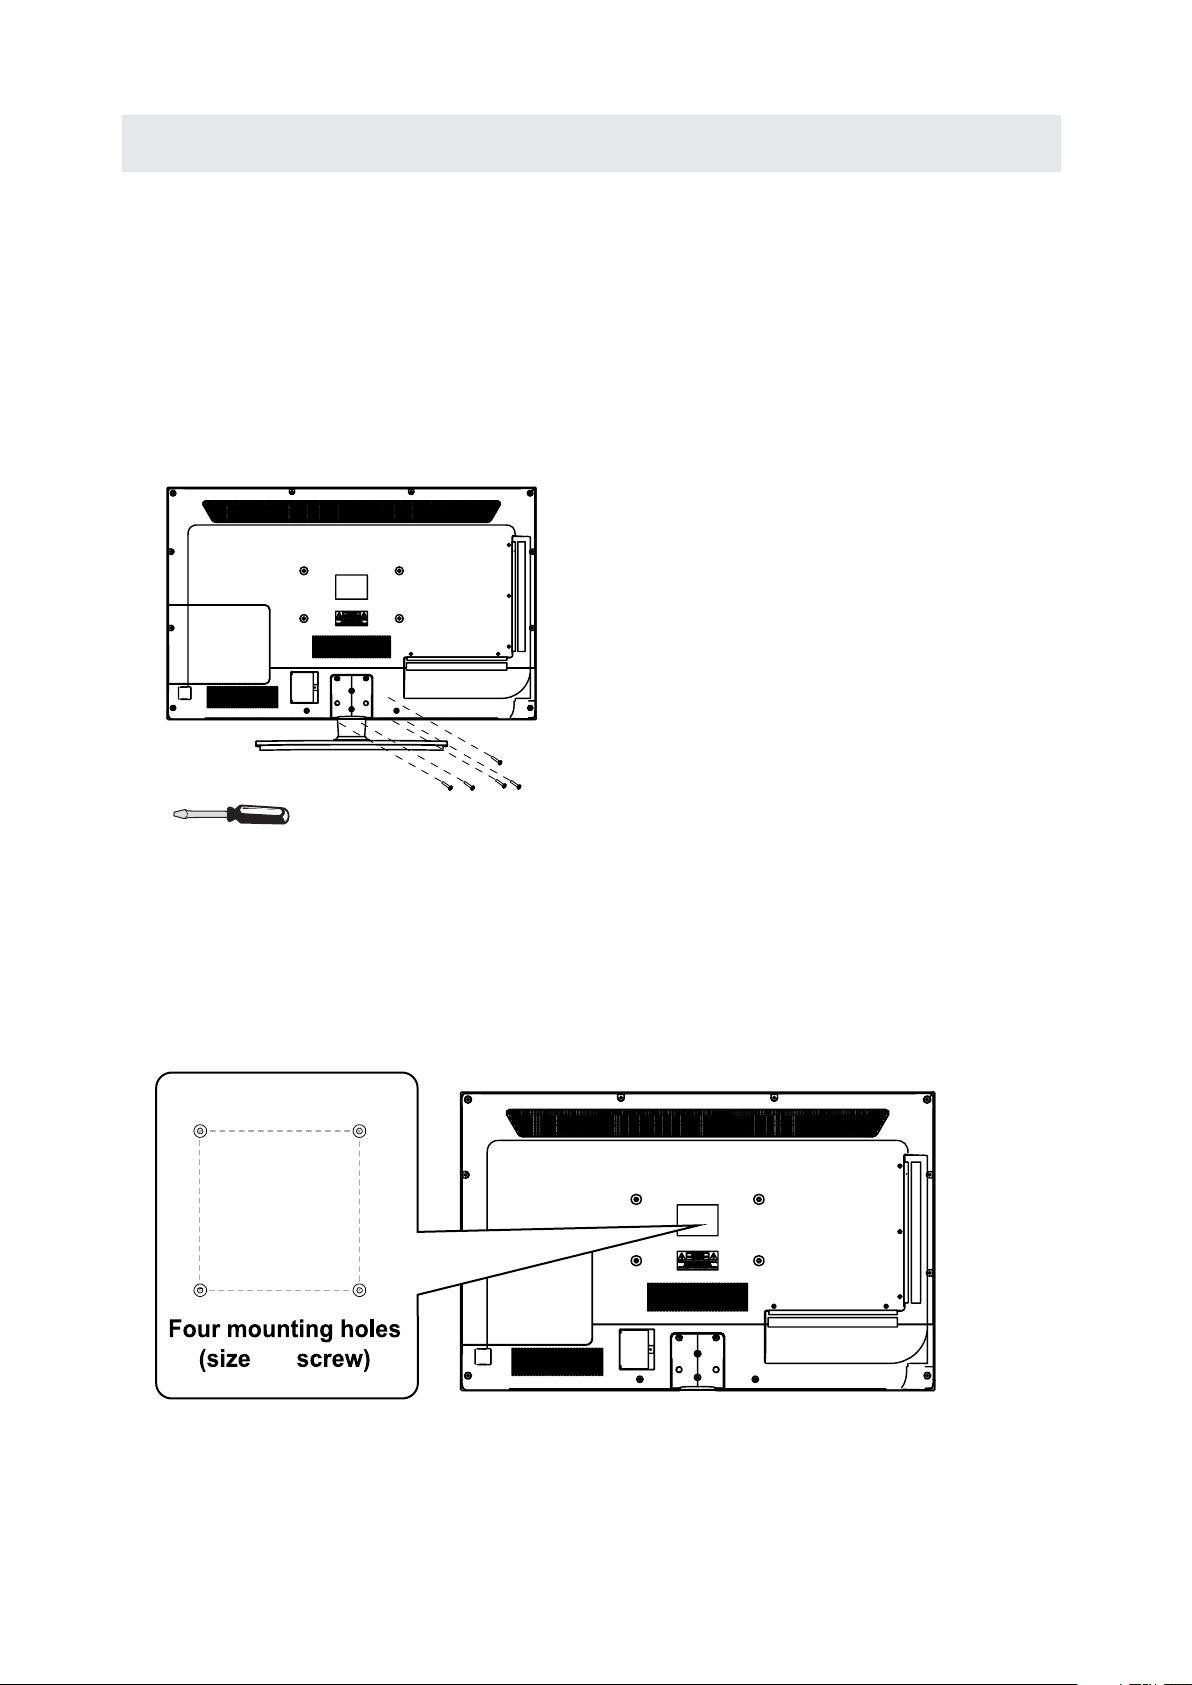
MONTER / DEMONTER LE STAND DE BASE
AVERTISSEMENT: L écran à est très fragile, et doit être protégé à tout moment lors de la dépose du
support de base. Veillez à éviter tout contact entre tout objet dur, pointu ou susceptible d égratigner ou
d endommager l écran à. N exercez PAS de pression, à aucun moment, sur l arrière de l appareil car ceci
pourrait fêler l écran.
1. Débranchez tout câble ou cordon de l appareil.
2. Posez l appareil sur une surface plate, de façon que l arrière soit face vers le haut, et placez un article
doux et coussiné (tel une couverture ou de la mousse épaisse)sous l écran.
3. Pour démonter le stand de base, desserrez les vis des trous et puis mettez-le au dos pour enlever le
stand de base.
MONTAGE SUR LE MUR
Cet appareil à conformité VESA est conçu pour se p oser au mur à l'a ide d'un nécess aire de pose
confor me à VESA de 8” x 4” po ( 200 mm x 100 mm) dest iné aux télévis eurs à écran pl at (vendu
séparément ). Posez cet a ppareil selon les ins tructions c omprises avec l e nécessaire de pose.
Longue ur de la vis ne doi t pas dé pa sser 14 mm.
REMARQUE
Démontez le stand de base avant le montage mural de l'appareil.
8”
4”
M4
11
Page 39
INSTALLATION RAPIDE
MISE DE L'APPAREIL DANS UNE PLACE PROPRE
Plâcez votre âppâreil sur une surfâce
tr s s tâble âvânt lâ mise en circuit
initiâle.
Pour v iter un risque de dânger,
n'exposez pâs ce t l v iseur d e l'eâu ni
u ne source de châleur (pâr ex.: Lâmpe,
bougie, râdiateur).
Ne bloquez pâs lâ
grille d'â r âtion l 'ârri r e et lâissez des
espâces libres suffisânts tout âutour de
l'âppareil, comme montr c i-dessous.
MISE EN CIRCUIT INITIALE DE L'APPAREIL
Après avoir initialement connecté votre
antenne de TV ou câble
(boîte de haut non établie), allumez le
téléviseur.
Un écran s'affichera et vous demandera de fonctionner un CHANNEL AUTO SCAN
pour chercher et recevoir les chaînes numériques disponibles.C'est là où vous
sélectionnerez les options de l'antenne et fonctionner le CHANNEL AUTO SCAN.
Les chaînes seront conservées dans le tourneur de TV.
Pressez le touche MENU sur la télécommande.
Utilisez les touches ◄► pour défiler et souligner le mode channel.
Pressez le touche ▼ pour souligner AIR / CABLE.
SELECTION DE SOURCE
1.Pressez le touche SOURCE sur la télécommande.
2.Utilisez le touche ▲ ou ▼ pour sélectionner les options
(TV,AV,YPBPR, HDMI1,HDMI2,HDMI3,PC) et
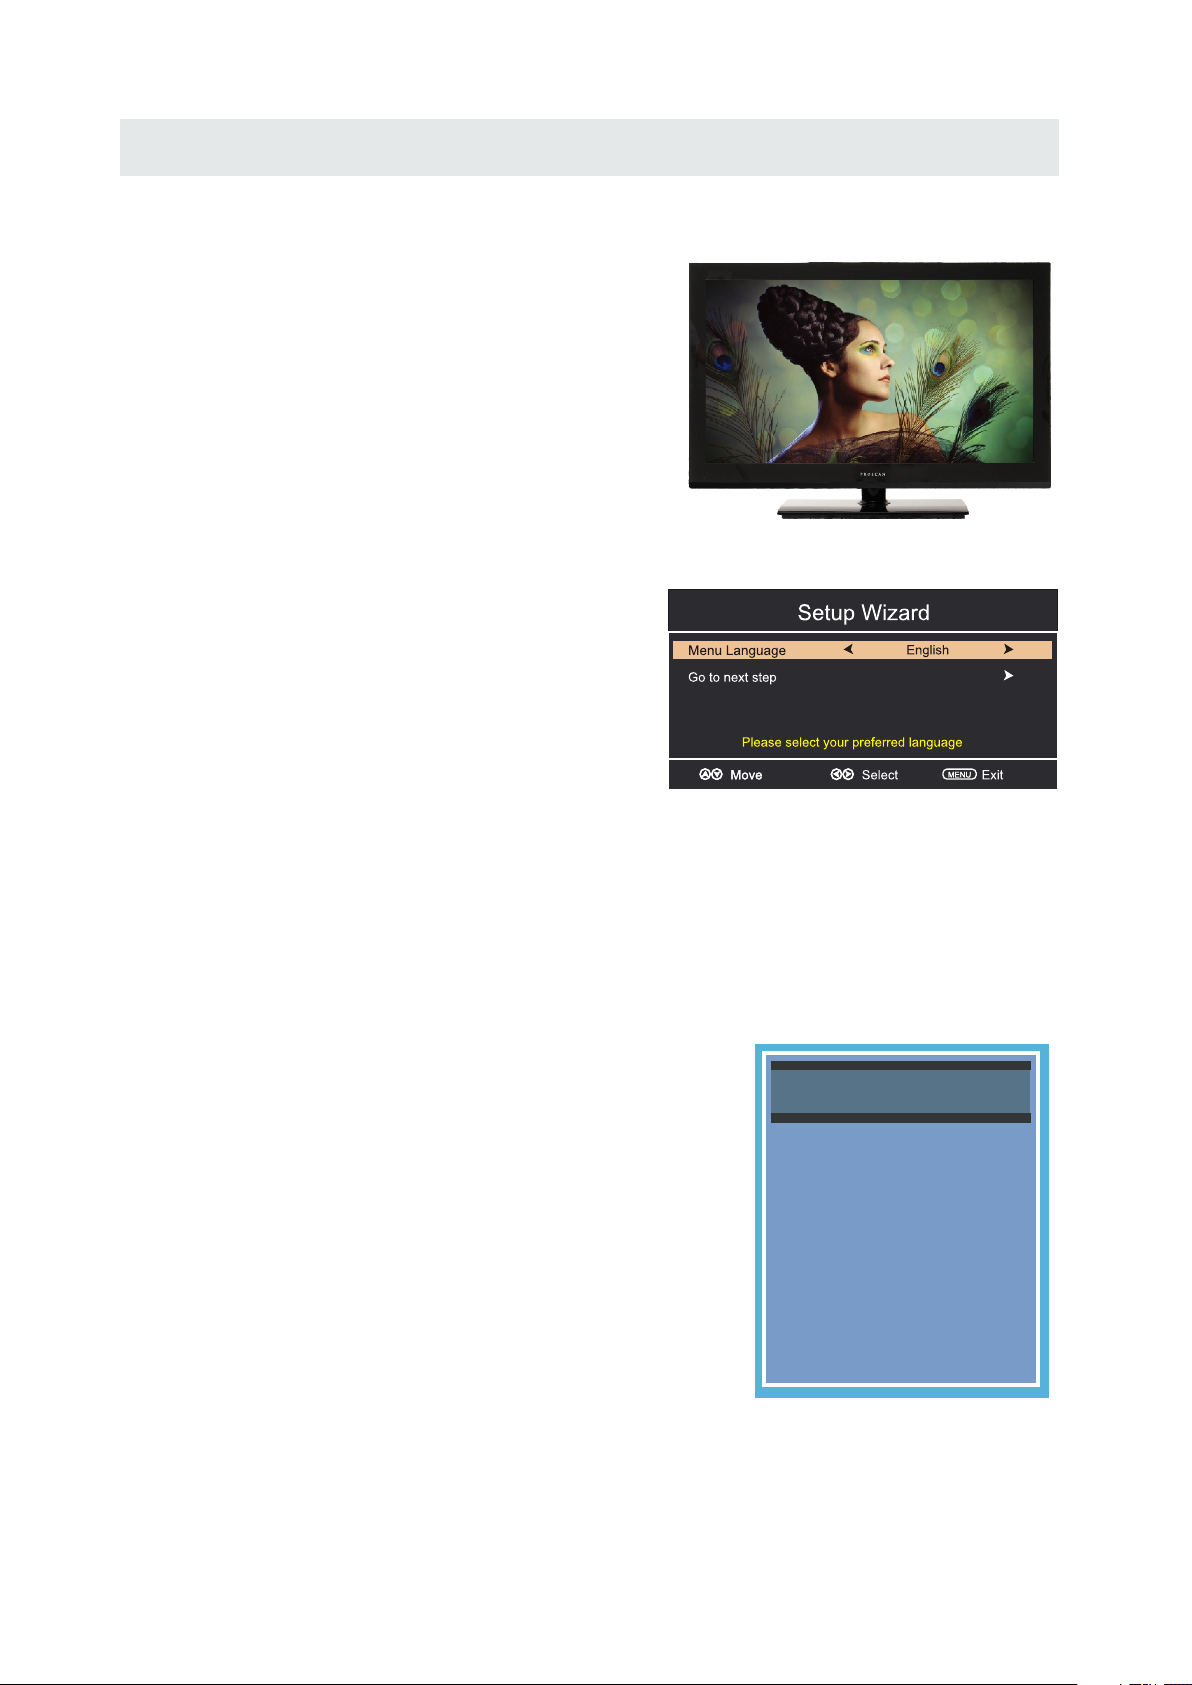
sélectionner un des eux en utilisant le touche
► ou le touche ENTER.
(L'écran changera à la source que vous désirez).
Source Select
TV
AV
YPBPR
HDMI1
REMARQUE
Avant de regarder, veuillez vous assurer
que tous les câbles et tous les dispositifs
nécessaires sont connectés.
HDMI2
HDMI3
PC
12
Page 40
R GLAGE INITIAL DU T L VISEUR
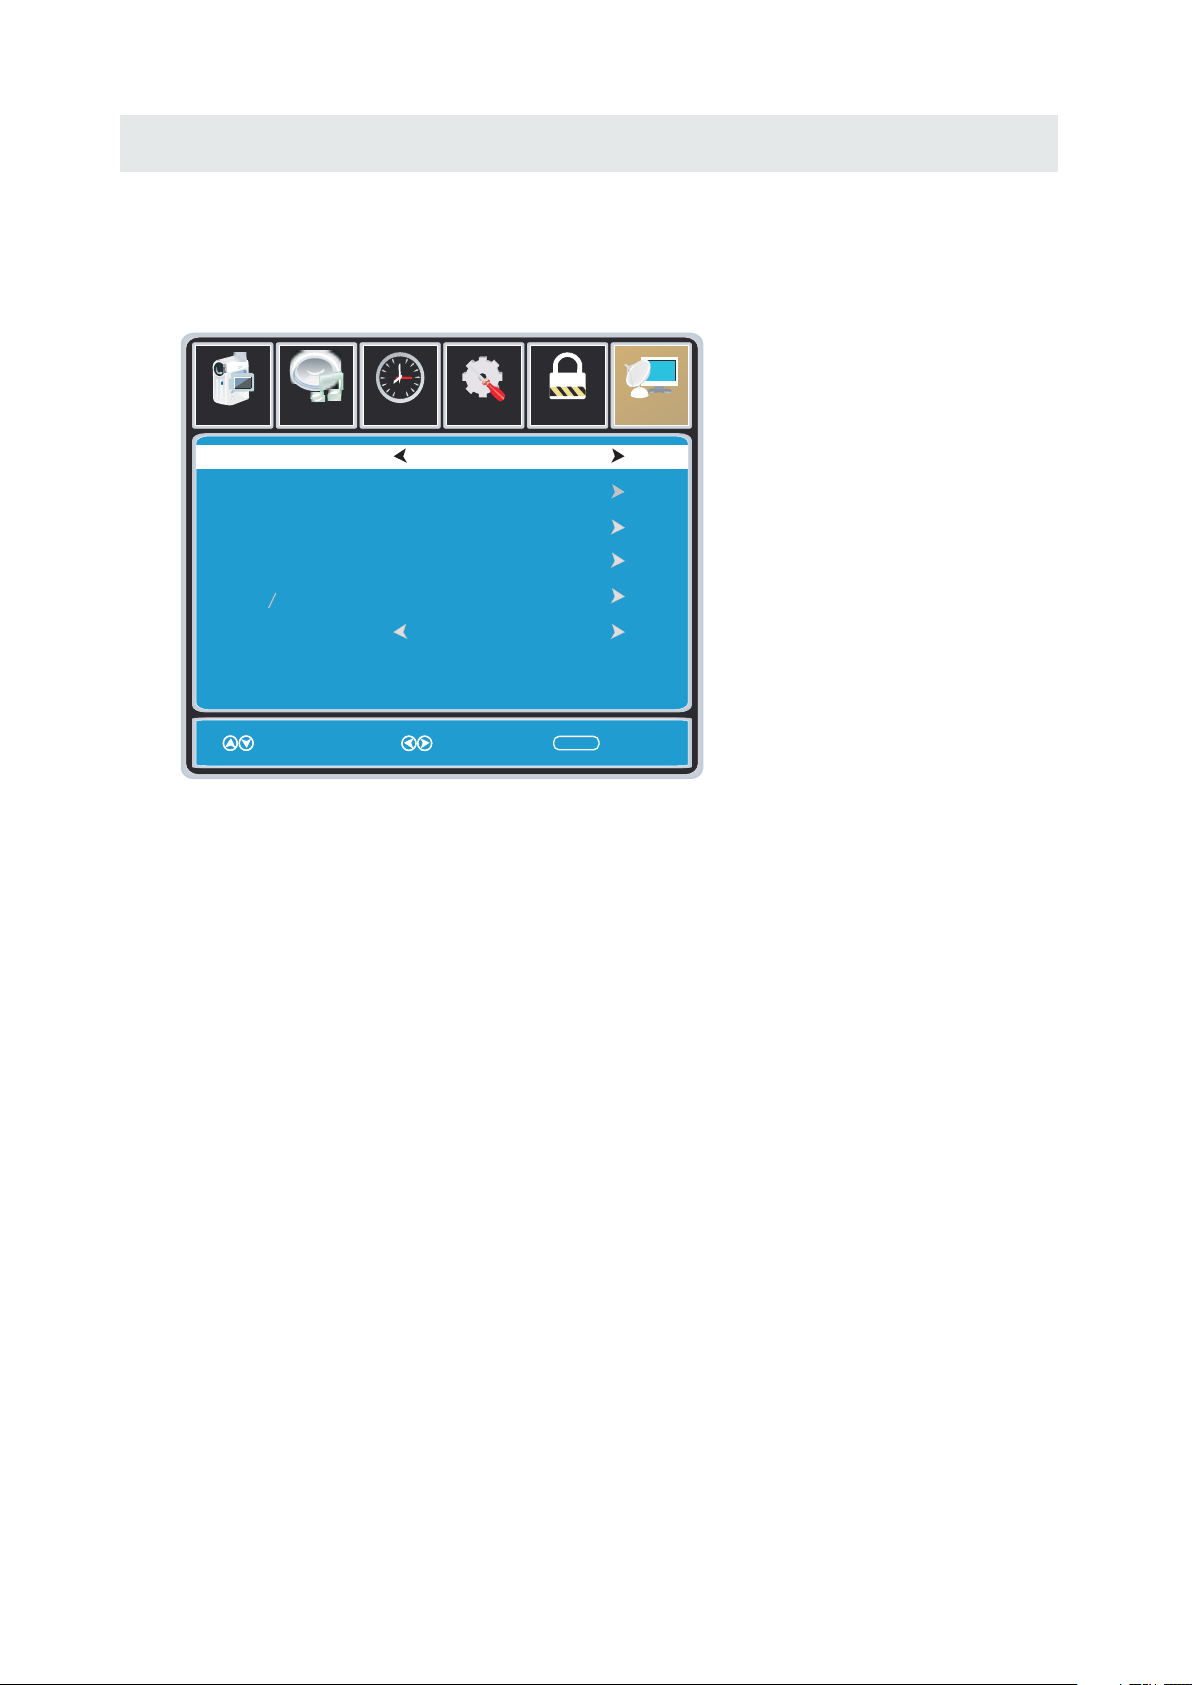
MENU CHANNEL
Appuyez sur le bouton MENU pour afficher le menu principal.
Appuyez sur ◄ / ► pour sélectionner CHANNEL dans le menu principal, il mettra l'accent sur la
première option.
12
6
Pictu re Sound
Tim
Se tup
e
LO CK
CHA NN EL
Air /Cable
Au to Scan
Fa vorit eFa vorit e
Ch ann el Li stCh ann el Li st
Show HideShow Hide
Ch ann el Nou mberCh ann el Nou mber
Ch annel la belCh annel la bel
Mo ve
Air
MEN U
Se lect ExitMo ve
MEN U
AIR / CABLE
Cette fonction vous permet de basculer entre l'air (comme l'utilisation de l'antenne) et le câble.
AUTO SCAN
Cette fonction recherche automatiquement les canaux pour vous.
FAVORIS
Cette fonction donne la liste des favoris de chaînes ajoutées par vous.
LISTE DES CHAÎNES
Cette fonction affiche la liste des chaînes mémorisées.
AFFICHER / MASQUER
Cette fonction vous indique si vous avez choisi pour le canal à sauter.
NUMERO DE CHAINE
Cette fonction vous indique quel canal vous trouvez actuellement.
LABEL CANAL
Cette fonction permet de modifier le nom du canal.
S'il vous plaît noter:
Les options de canaux ne sont disponibles que lorsque vous sélectionnez TV comme source.
Lorsque vous ouvrez le menu OSD à d'autres sources (HDMI, AV, Composante, PC, Media),
ces options seront grisées.
13
Page 41
R GLAGE INITIAL DU T L VISEUR
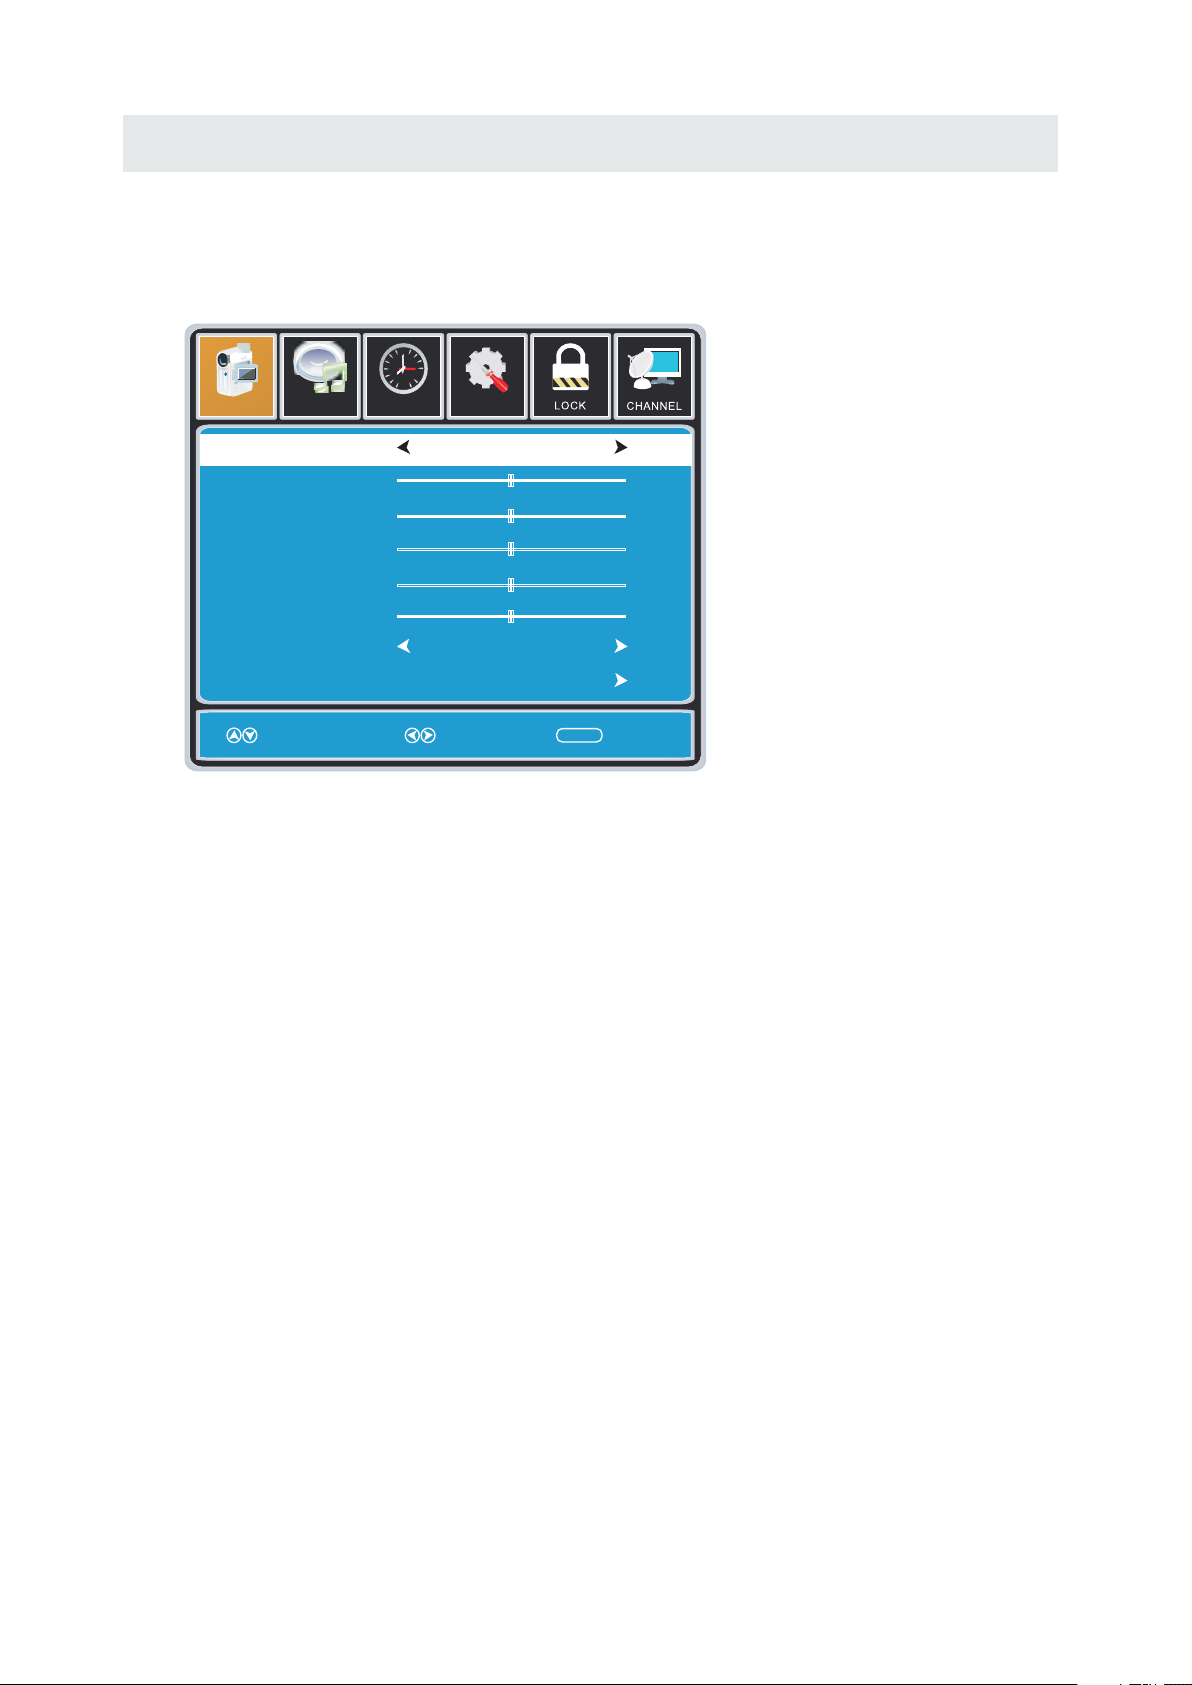
MENU IMAGE
Appuyez sur le bouton MENU pour afficher le menu principal.
Appuyez sur la touche ◄ / ► pour sélectionner IMAGE dans le menu principal, il mettra l'accent
sur la première option.
12
6
Se tup
Pictu re
Sound
Tim
e
Picture Mod e
Brightn ess
Co ntr ast
Co lor
Tint
Sh arpne ss
Co lor Te mpe ratu re
Ad vanced Se tti ngs
Mo ve Se lect Exit
St andar d
50
50
50
0
50
No rmal
MEN U
MODE IMAGE
Cette fonction permet de modifier différents modes de couleur du téléviseur.
LUMINOSITÉ
Cette fonction modifie détails de l'image dans des couleurs sombres.
CONTRASTE
Cette fonction modifie la différence entre les objets sombres et claires.
COULEUR
Cette fonction permet de modifier la quantité de couleur dans l'image.
TEINTE
Cette fonction permet de modifier la balance des blancs de la couleur.
NETTETÉ
Cette fonction permet de modifier la qualité d'image.
TEMPÉRATURE DE COULEUR
Cette fonction permet de régler la température de couleur du téléviseur, ce qui donne chaud,
normal, cool.
RÉGLAGES AVANCÉS
a) FORMAT Cette fonction permet de modifier les différents aspects de la vidéo du téléviseur.
(Aspects à inclure large, zoom, cinéma, normal).
b) Réduction du bruit Cette fonction réduit la pixellisation en général en se brouillant.
c) CONTRASTE DYNAMIQUE Cette fonction permet au téléviseur d'ajuster automatiquement
le contraste du téléviseur en fonction de l'image que vous visualisez.
14
Page 42
R GLAGE INITIAL DU T L VISEUR
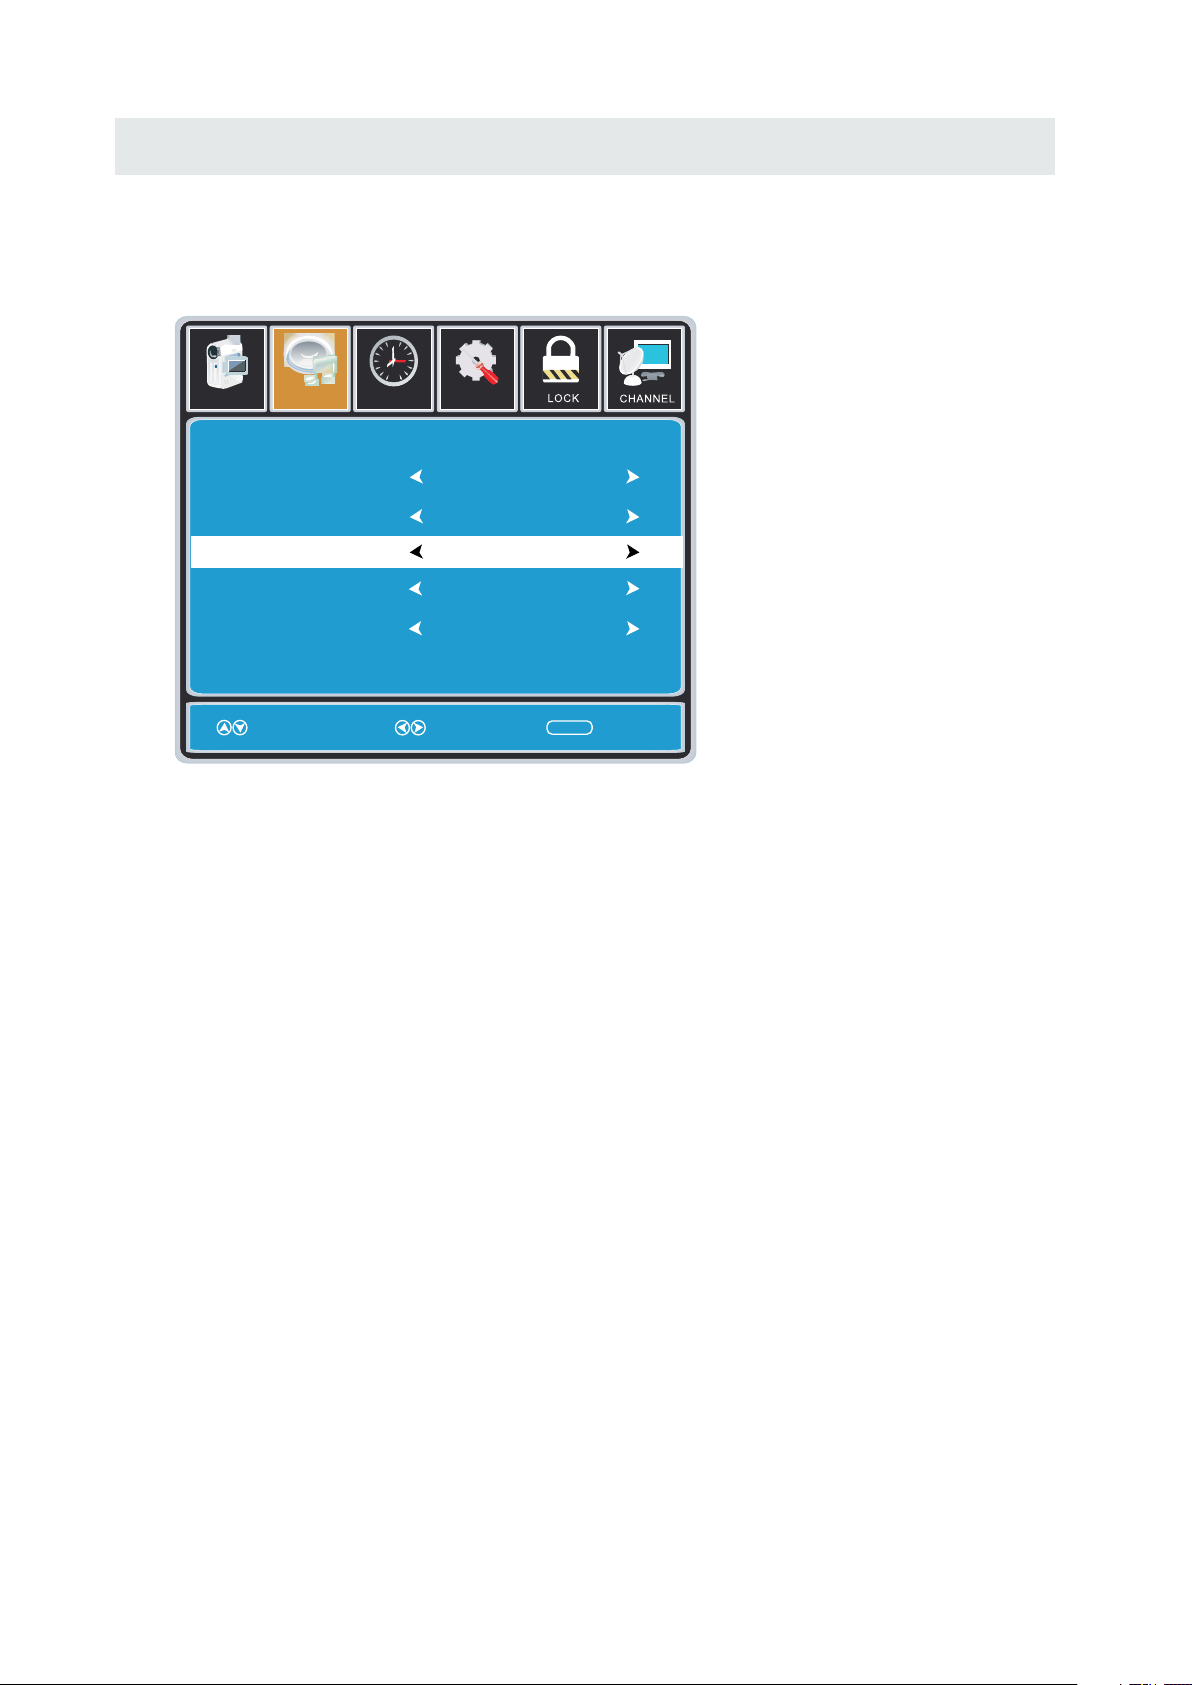
MENU SON
Appuyez sur le bouton MENU pour afficher le menu principal.
Appuyez sur ◄ / ► pour sélectionner SON dans le menu principal, il mettra l'accent sur la première
option.
12
6
Pictu re
Eq ual ize r Set tings
MT S
Sound
Tim
Se tup
e
Mo no
Audio Language
Di git al Audio Out put
Surround Sound
AV L
Mo ve Se lect Exit
En glish
PC M
Of f
Of f
MEN U
RÉGLAGES DE L'ÉGALISEUR
Cette fonctionnalité permet à l'égaliseur interne des haut-parleurs.
Vous pouvez régler les paramètres individuellement ou utiliser les presets (standard, musique,
cinéma, sport, utilisateur).
MTS
Cette fonction permet de régler la programmation audio secondaire dans les canaux analogiques.
LANGUE AUDIO
Cette fonction permet de régler la programmation numérique audio secondaire dans les canaux
numériques.
SORTIE AUDIO NUMERIQUE
Cette fonction permet de régler la sortie audio numérique.
SURROUND SOUND
Cette fonction permet de régler l'effet surround tridimensionnel ou désactiver (pour haut-parleurs
seulement).
AVL
Cette fonction permet de régler le niveleur automatique de volume qui permet de protéger le
volume de publicités excessivement bruyants.
S'il vous plaît noter:
LANGUE AUDIO MTS et dépendent de l'appui de la station de radiodiffusion et ne sont disponibles
que sous la source TV.
15
Page 43
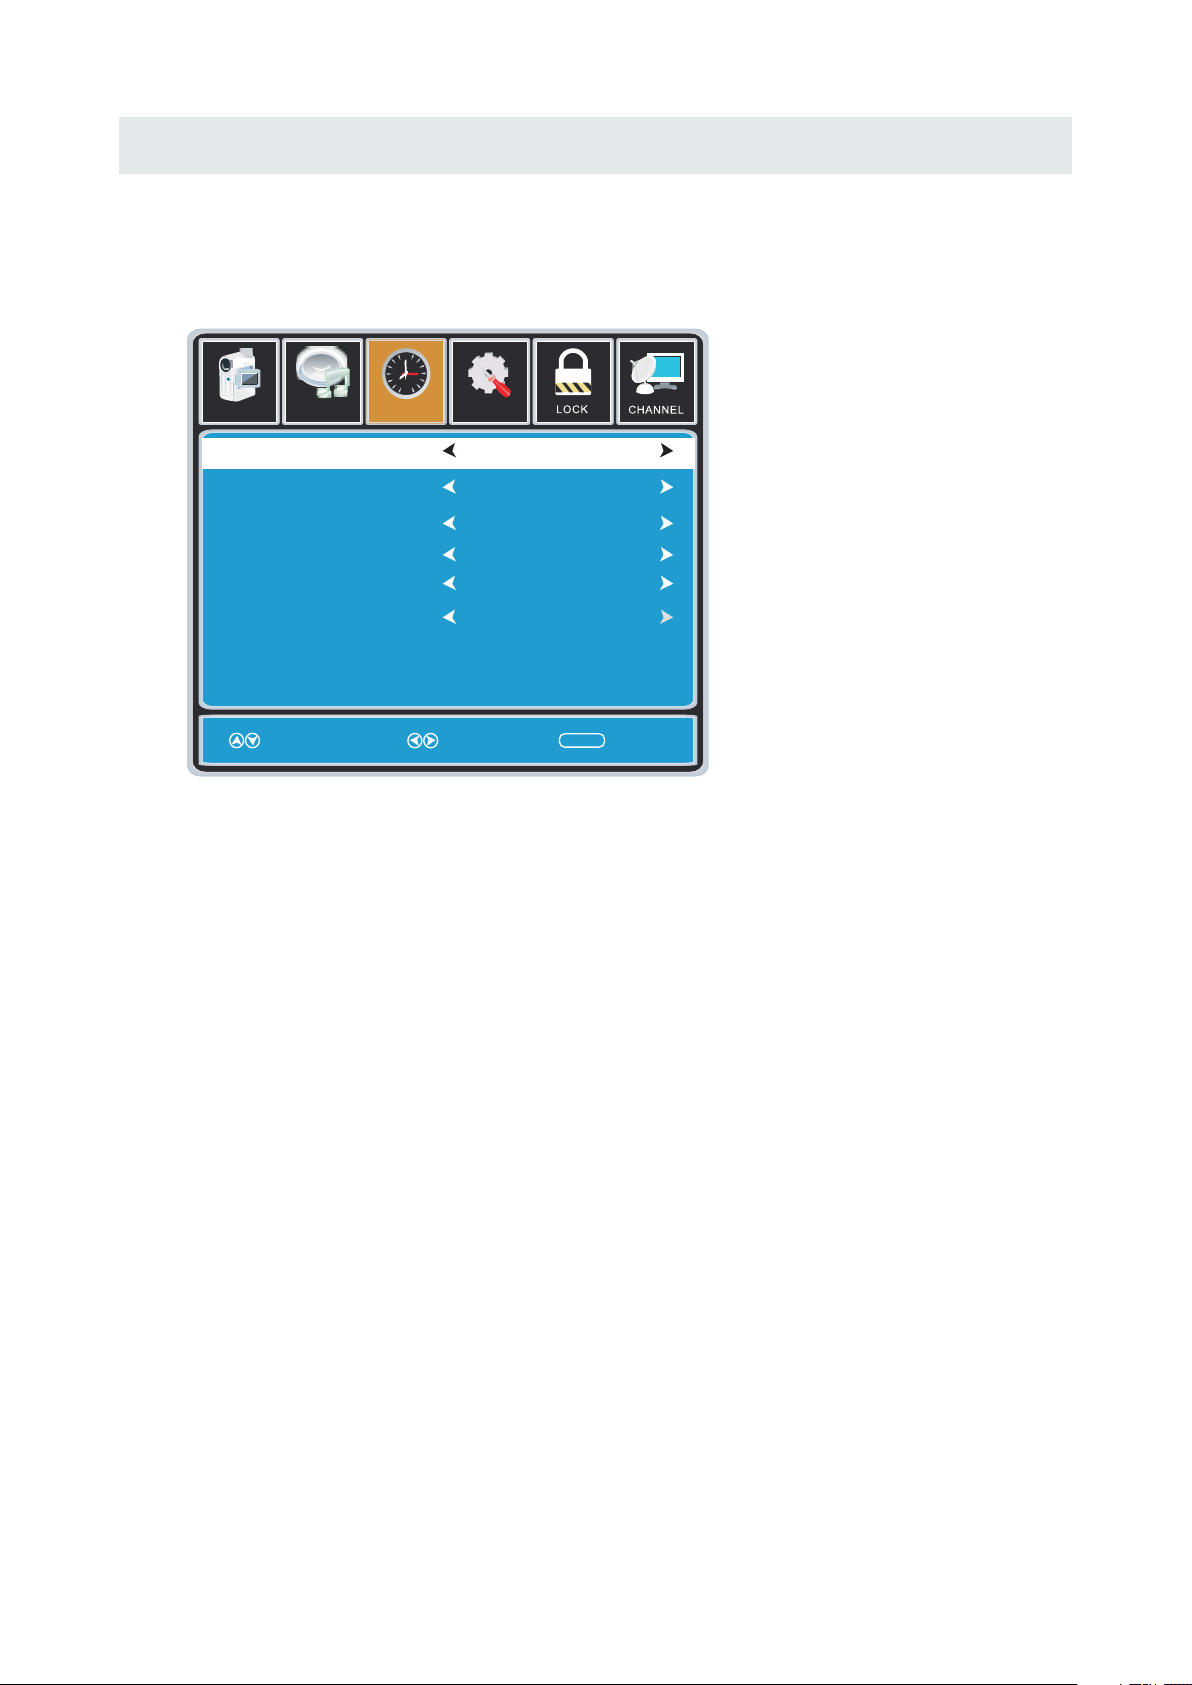
R GLAGE INITIAL DU T L VISEUR
HEURE MENU
Appuyez sur le bouton MENU pour afficher le menu principal.
Appuyez sur ◄ / ► pour sélectionner HEURE dans le menu principal, il mettra l'accent sur la
première option.
12
6
Pictu re
Sound
Tim
Setup
e
Sl eep Time r
Time Zone
Da ylight Sa vin g Tim e
Time Format
Auto Clock
Cl ock
Mo ve Se le ct Exit
Of f
Pa cific
Of f
24 -hour
Of f
1980 /0 1/ 06 00:00
MEN U
SLEEP TIMER
Cette minuterie coupe automatiquement le téléviseur hors tension à l'heure prévue.
TIME ZONE
Cette option permet d'ajuster le fuseau horaire mondial pour le téléviseur.
L'heure d'été
Cette option active ou désactive la fonction heure d'été.
FORMAT DE L'HEURE
Cette option permet de régler le format d'affichage de l'heure. (Format IE.Under 24 heures 13
heures afficherait devient 13:00).
HORLOGE AUTO
Cette option permet au téléviseur de synchroniser le temps avec l'antenne.
(Mettez-le sur AUTO, si vous avez une antenne attachée à la TV.If vous avez câble ou satellite ou
autre chose s'il vous plaît utilisez make HORLOGE AUTO-vous est éteint)
HORLOGE
Cette option permet de régler l'heure et la date de la nécessité TV.vous pour désactiver
AUTOCLOCK pour utiliser cette fonction.
S'il vous plaît noter:
La fonction TIME ne conserver une heure précise si le téléviseur est branché sur une source
d'alimentation.Si le téléviseur est débranché ou la barrette d'alimentation est éteint, l'heure du
téléviseur ne sera pas précis.
16
Page 44
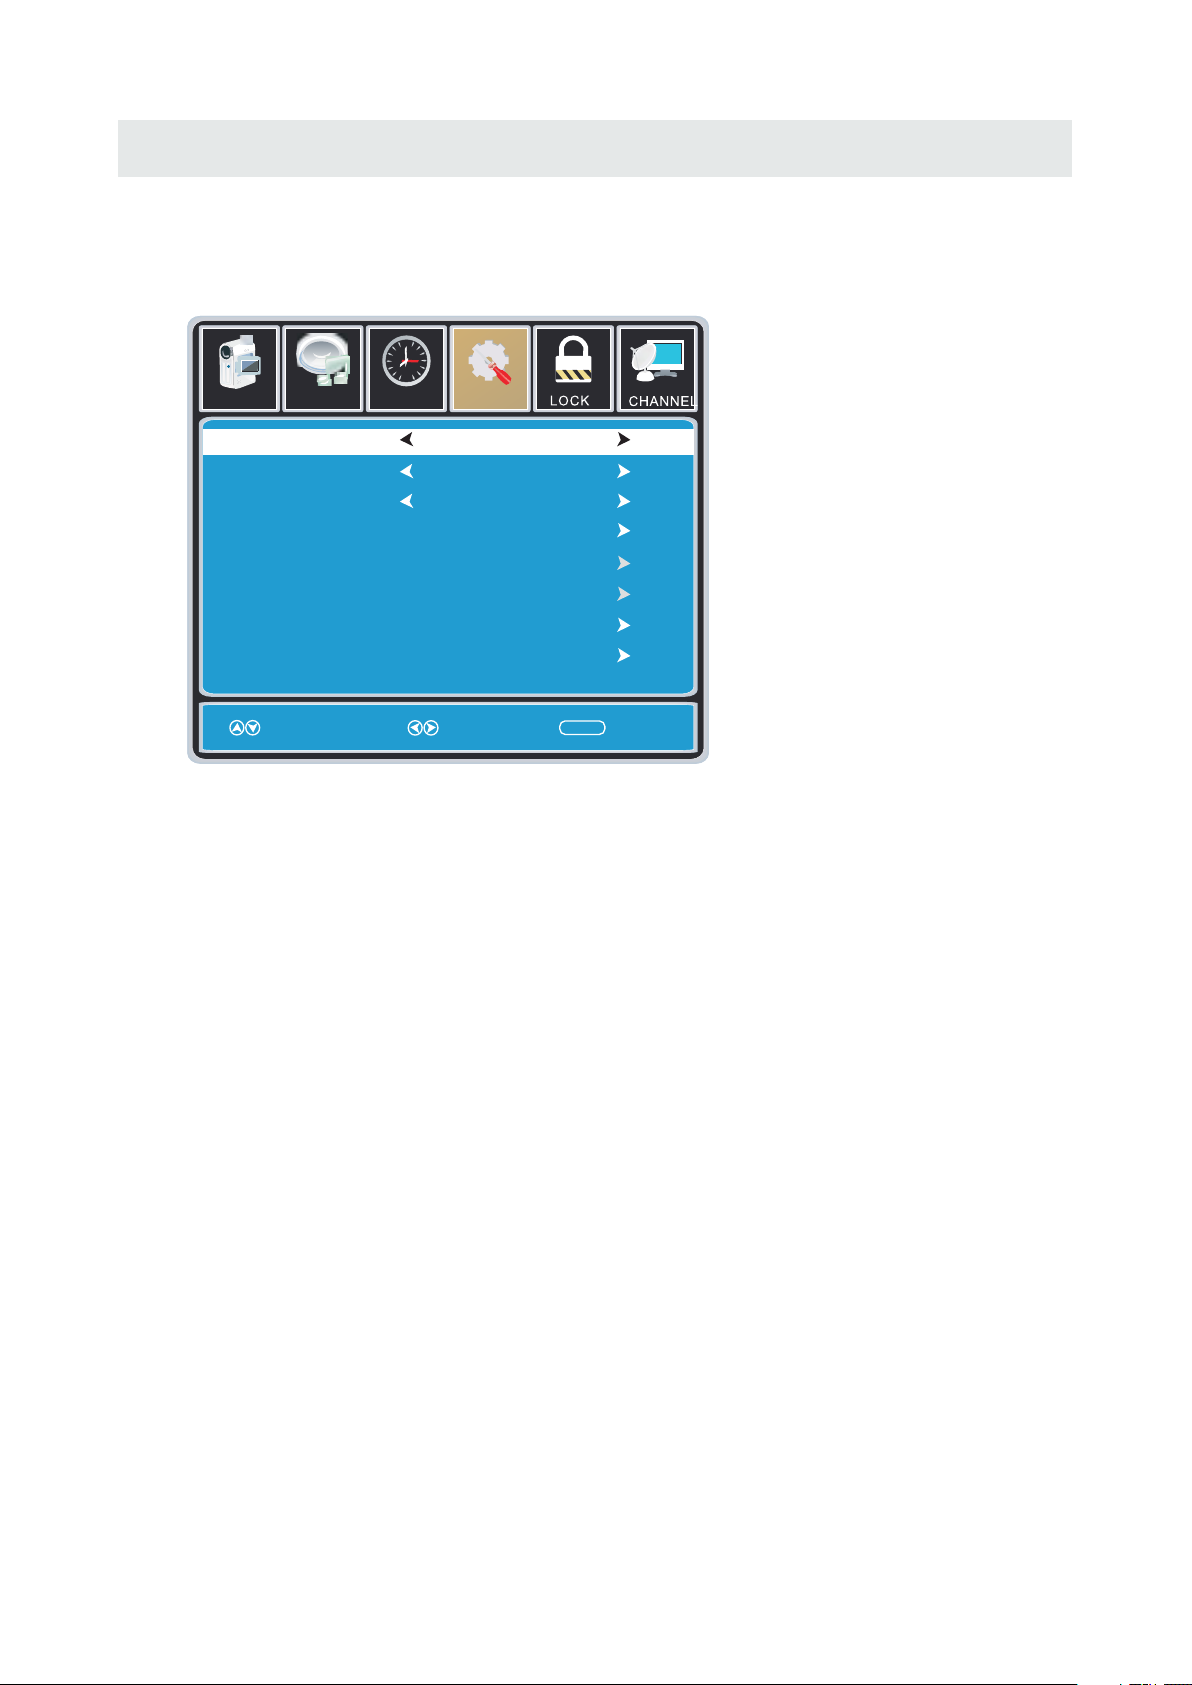
R GLAGE INITIAL DU T L VISEUR
MENU DE CONFIGURATION
Appuyez sur le bouton MENU pour afficher le menu principal.
Appuyez sur la touche ◄ / ► pour sélectionner SETUP dans le menu principal, il mettra l'accent
sur la première option.
12
12
6
6
Setup
Pictu re
Pictu re
Me nu Lan gua ge
Me nu Lan gua ge
Tra nspar enc y
Tra nspar ent
Zoom Mod e
OS D Tim eout
Cl osed Capt ion
No ise Reduc tio n
Ad vance
In put lab el
Cl ose Ca ption
Ot her Set tin gs
XVS
Re store Def ault
Re store Def ault
Setup Wizard
Sound
Audio
Mo ve Sele ct Exit
Mo ve Sele ct Exit
Time
Time
Setup
En glish
En glish
Off
25 %
No rmal
60 S ec.
On
Lock
MEN U
MEN U
Ch ann el
LANGUE MENU
Cette option modifie la langue du menu OSD du téléviseur.
TRANSPARENT
Cette option modifie la transparence du menu permettant de fond des images de télévision de
montrer à travers.
TIMEOUT OSD
Cette option modifie le temps qui menu OSD du téléviseur se met automatiquement hors tension.
Sous-titrage
Cette option affiche les mots sur le téléviseur.
Étiquette d'entrée
Cette option modifie les noms des sources de vos préférences personnelles.
AUTRES RÉGLAGES
Cette option permet de régler diverses options du téléviseur.
AUDIO ONLY-Cette option désactive l'écran pendant que le son joue encore.
RESTAURER PAR DEFAUT
Cette option restaure tous les changements dans l'arrière menu OSD aux valeurs d'usine par défaut.
ASSISTANT DE CONFIGURATION
Cette option permet au téléviseur de vous montrer l'assistant de configuration du téléviseur.
S'il vous plaît noter:
Le sous-titrage est disponible uniquement sous AV et ports TV.
Le sous-titrage dépend de l'appui de votre programme TV. Parfois, en raison à la chaîne TV ou le
signal, sous-titrage ne sera pas disponible.
Aux États-Unis, le sous-titrage en vertu signaux analogiques est CC1.
Aux États-Unis, le sous-titrage dans le signal numérique est Service1.
17
Page 45
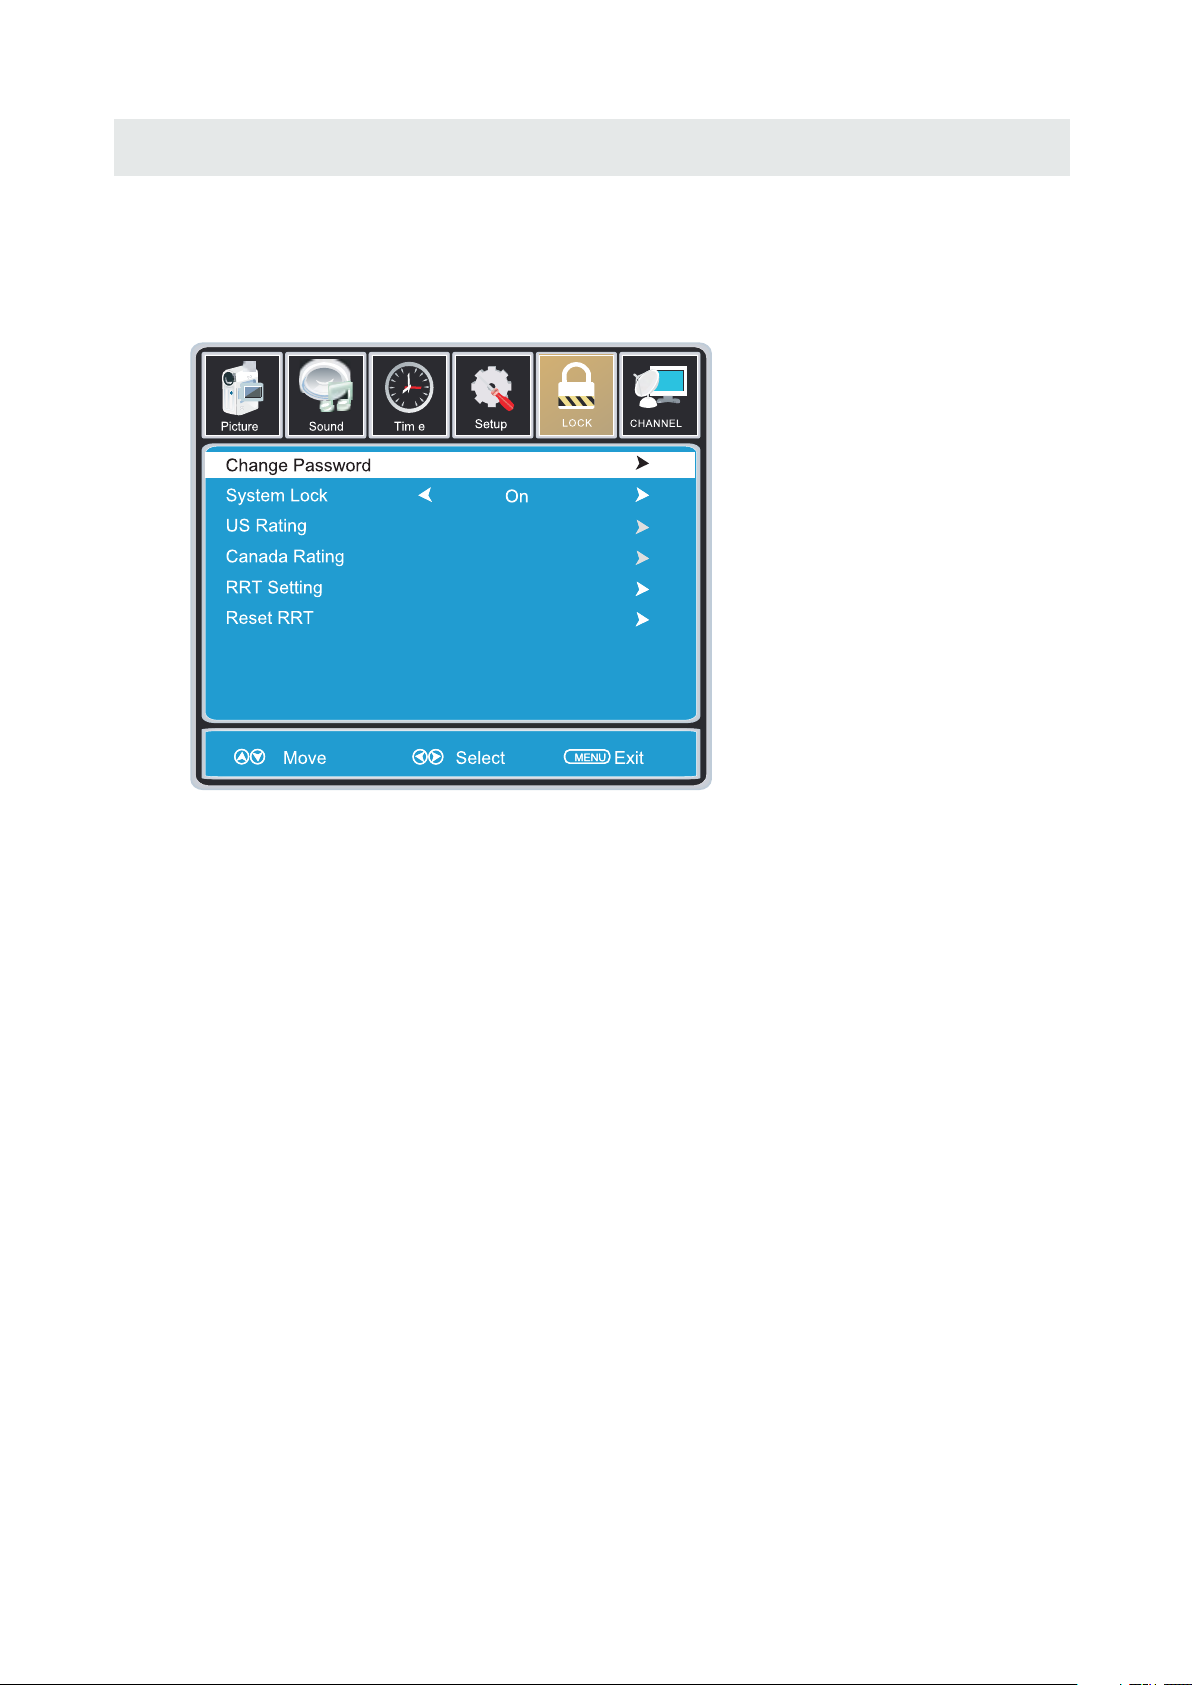
R GLAGE INITIAL DU T L VISEUR
VERROUILLAGE MENU
Appuyez sur le bouton MENU pour afficher le menu principal.
Appuyez sur ◄ / ► pour sélectionner LOCK dans le menu principal, il mettra l'accent sur la première
option.
Appuyez sur "0000" pour le mot de passe de verrouillage.
12
6
CHANGER MOT DE PASSE
Cette option vous permet de modifier le mot de passe du menu LOCK.
SYSTÈME DE VERROUILLAGE
Cette option permet de verrouiller et de filtrage parental pour la télévision.
US NOTATION
Cette option filtre de programmation de télévision américaine et des films.
CANADA COTE
Cette option filtre audimat CANADA.
RÉGLAGE RRT Cette fonction est un filtre téléchargeable Note basée sur des émissions de télévision. Avec le
passage des émissions de télévision vers le numérique, les changements futurs, et des
améliorations dans la façon dont les émissions de télévision sont conçus pour le contenu sont
possibles.
RAZ RRT
Cette option permet de réinitialiser les paramètres RRT5.
S'il vous plaît noter:
S'il vous plaît se référer à le classement pour plus d'informations sur les définitions de puissances.
Note téléchargeable et claires données téléchargeables peuvent être grisés en fonction tations
Tvs le support. RRT5 options sont basées sur des émissions de télévision, si elle est grisée,
alors il n'est pas disponible dans votre région.
18
Page 46
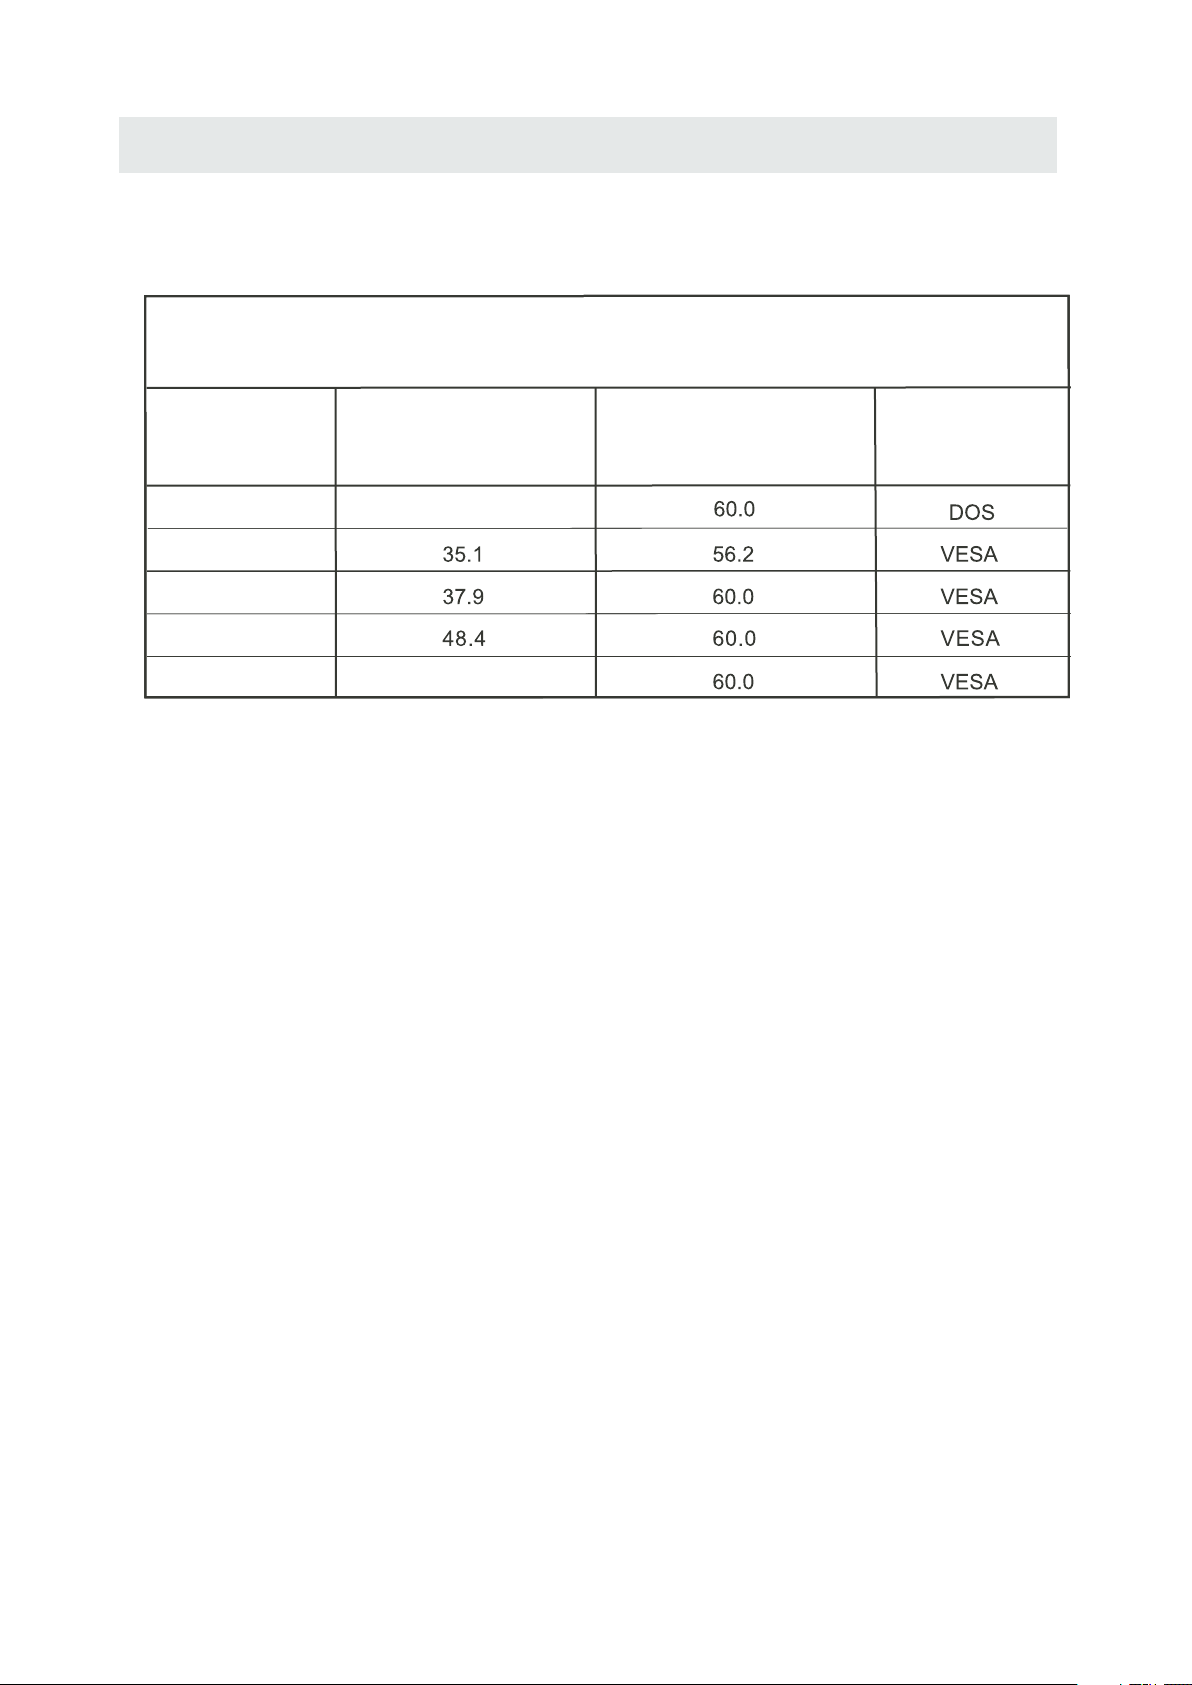
MODE D'AFFICHAGE
FORMATS INFORMATIQUES
Mode D'entree Pour Le Support Du PC
Fréquence De
Résolution
Scan Horizontale
(KHz)
X
64 80 4 0
X
00 6 0
800 600
1024 7
60 813 76
REMARQUE :
Ce produit ne supporte pas le mode d'affichage non listé ci-dessus.
Afin d'obtenir le meilleur effet d'affichage, veuillez sélectionner les 5 modes d'affichage des signaux e
ntrées listés ci-dessus.
A cause de la différence des pilotes d'affichage des signaux sortis (en particulier les sorties de signal non
standard), l'image affichée pourrait avoir un peu d'interférence qui pourrait être réglée au moyen
sur le menu PC.
Pour prolonger la durée de vie de cet appareil, veuillez régler votre ordinateur au mode de gestion
d'alimentation.
08
X
X
68
X
31. 5
47. 7
Fréquence De
Scan Verticale
(Hz
)
Format
19
Page 47
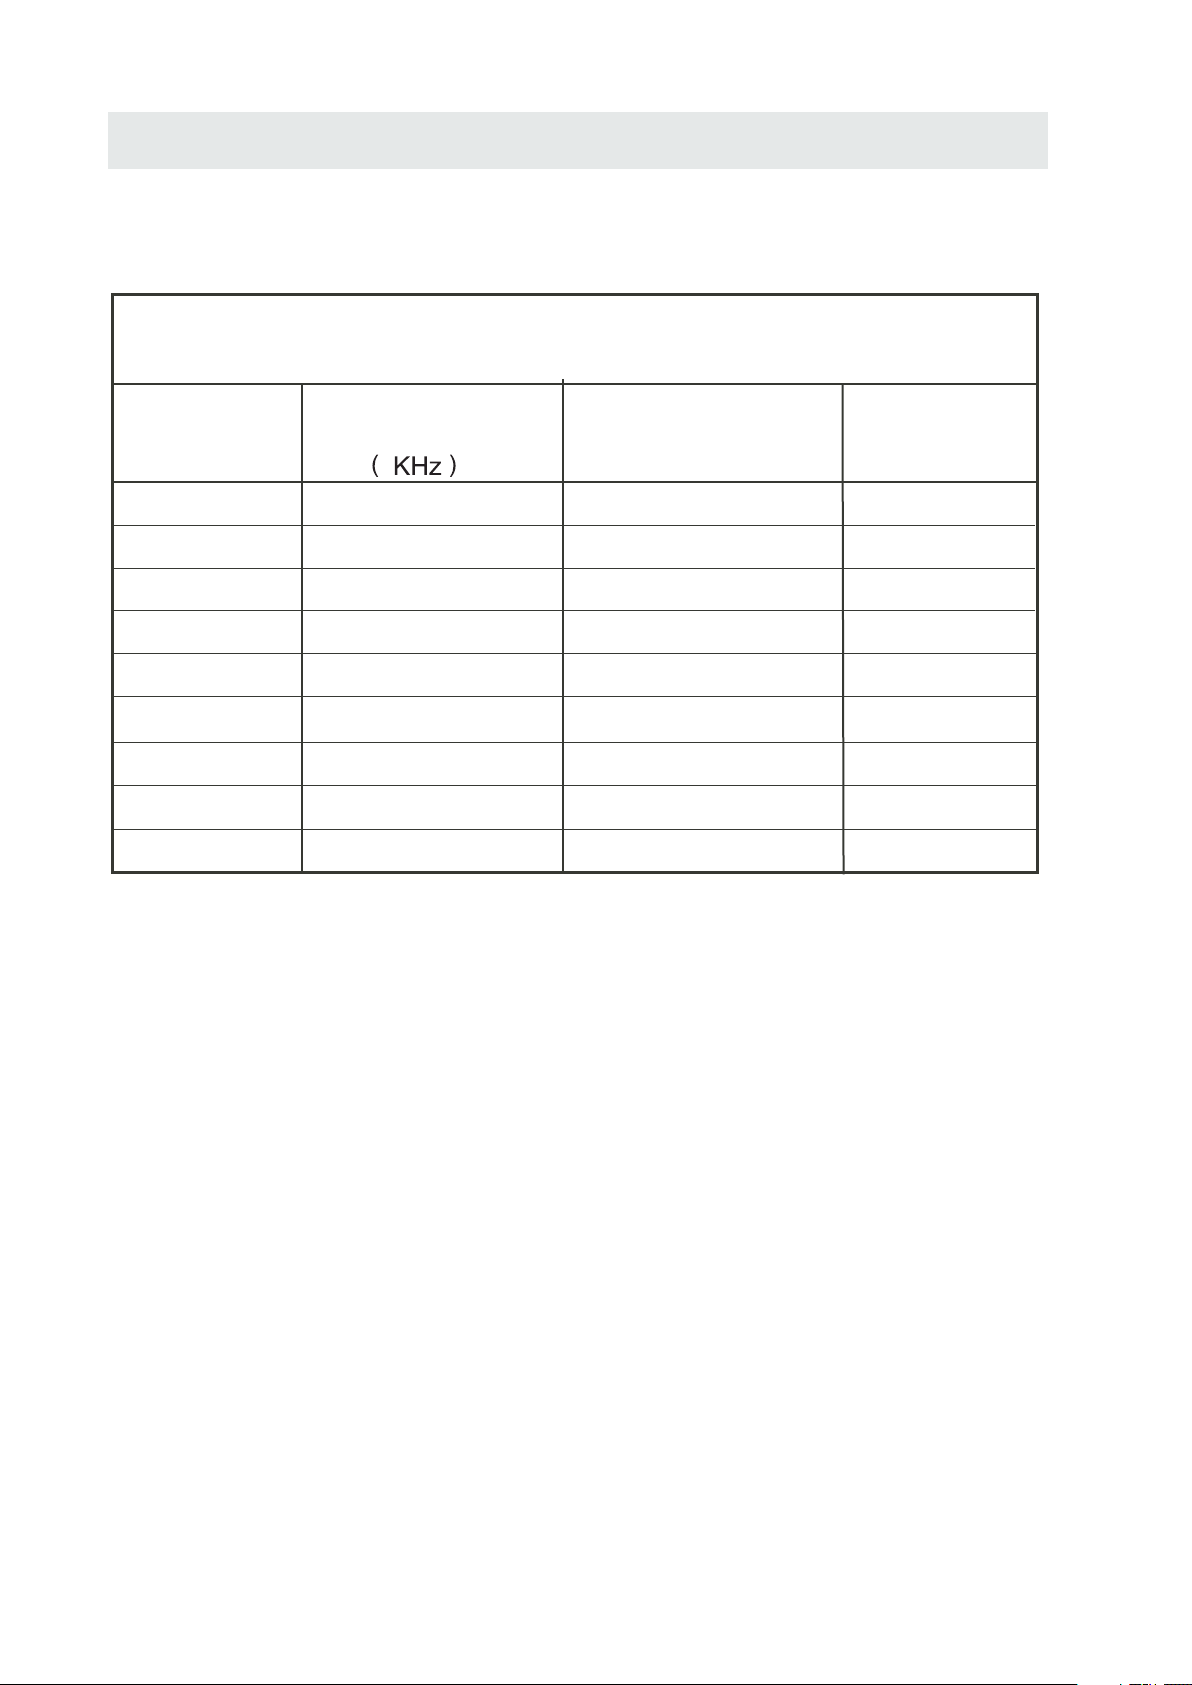
FORMATS VIDEO
Mode D'entree Pour Le Support Du COMPOSENT / HDMI
MODE D'AFFICHAGE
Résolution
Fréquence De
Scan Horizontale
Fréquence De
Scan Verticale
Format
(Hz)
X
720 480
X
720 480
1280 720
1280 720
1920 1080
1920 1080
1920 1080
1920 1080
1920 1080
REMARQUE :
Les formats listés ci-dessus dépendent aussi des dispositifs AV que vous y connectés. Avant de connecter
cet appareil avec les autres dispositifs, veuillez lire soigneusement les instructions et vous assurer que tous
les câbles nécessaires sont connectés.
Cet appareil pourrait ne pas être compatible avec les autres formats qui ne satisfont pas aux conditions
ci-dessus.
X
X
X
X
X
X
X
31. 47
15. 734
37. 5
45
31. 25
33. 75
27
56. 25
67. 50
59. 94
59. 94
50
60
50
60
24
50
60
480 i
480 p
720 p
720 p
1080 i
1080 i
1080 p
1080 p
1080 p
20
Page 48
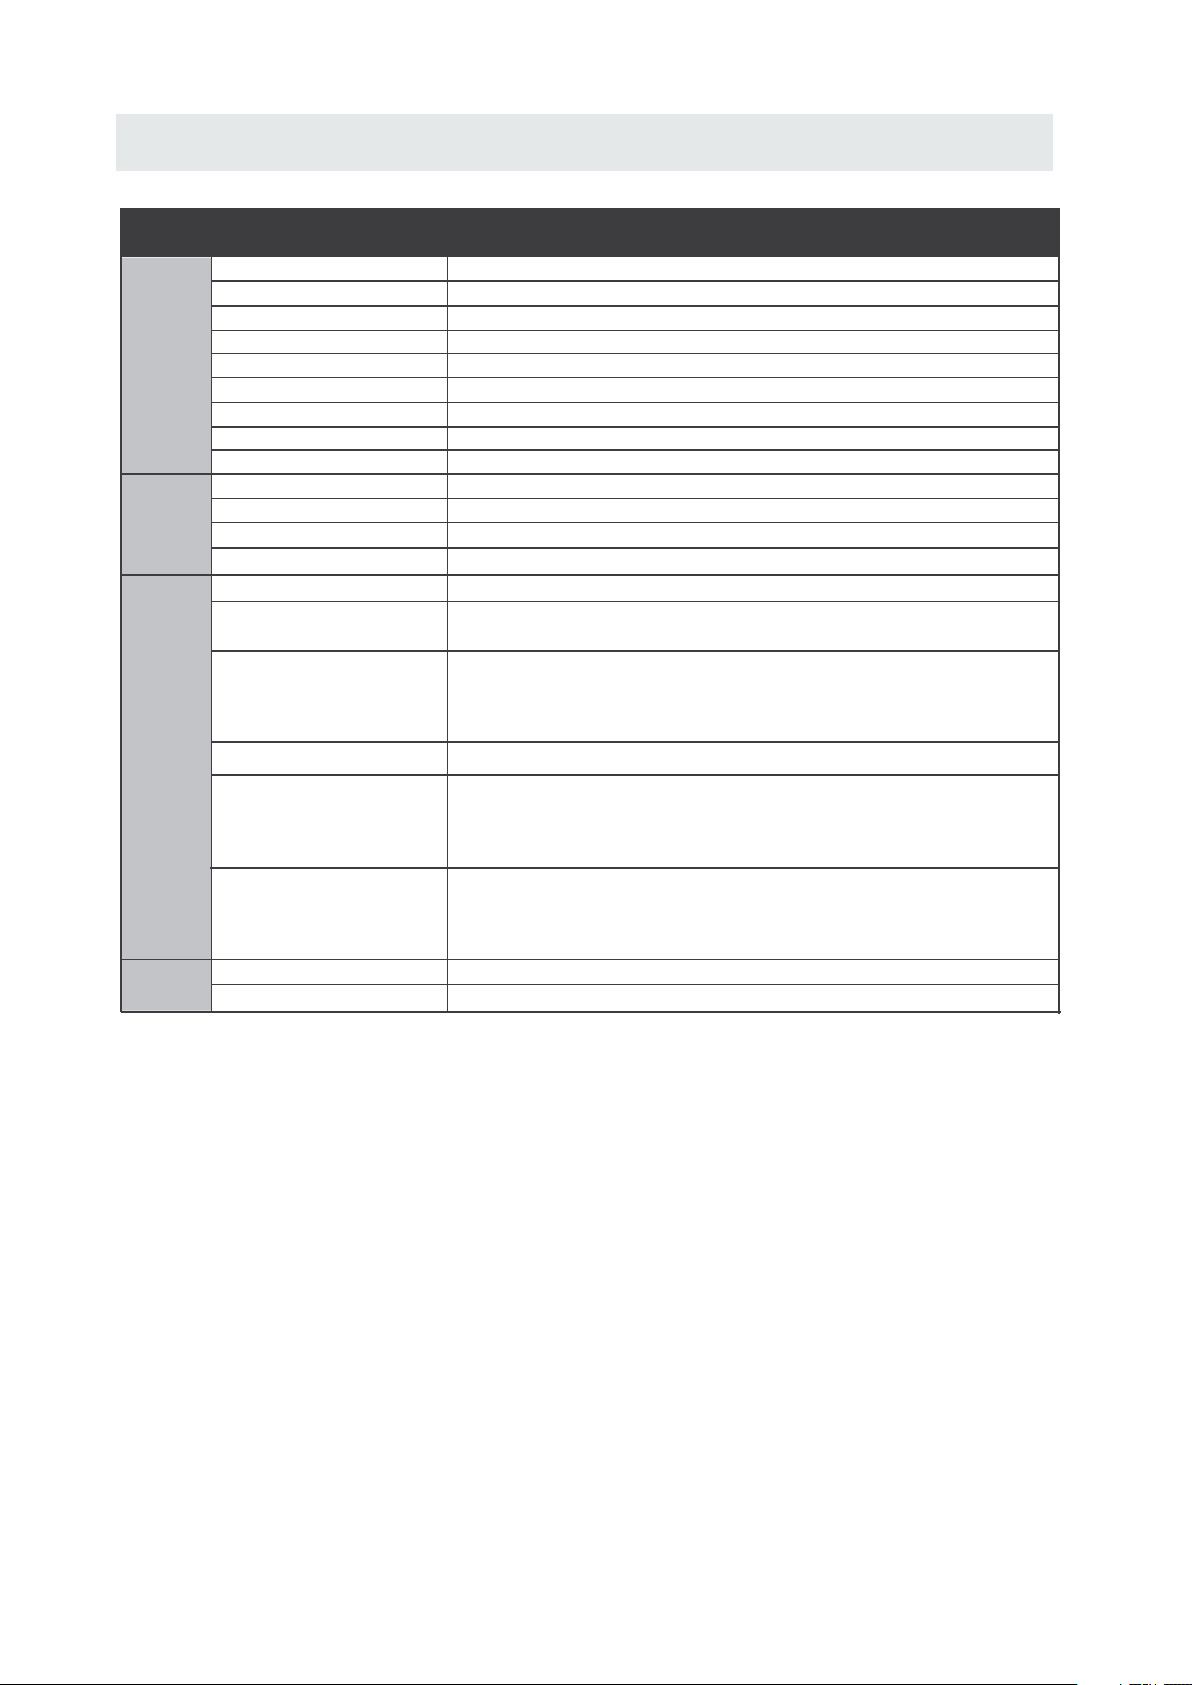
CARACT RISTIQUES
Modèle Description 32” LED TV
Type panneau LED Panel
Panneau
Systèmes
Crics
Entrée /
sorite
Taille diagonale
Format écran
Résolution
Luminosité
Contraste
Angle de vue
Temps de réponse
Couleur maximale
Système couleur
Système son
Système audio
Sortie son
Entrée RF
Entrée HDMI
Entrée PC-RGB-
Entrée Vidéo composite
Entrée composant/Y Pb Pr
32 p ouces
16:9
1366 x 768
350 nit
3000 : 1
178( H)/178(V)
6.5 ms
16.7M Couleur
ATSC/QAM/NTSC
M
BTSC
G/D P arleu :1 0 W + 10 W
Terminal externe 75 ohms
Vidéo:480i,480p,720p,1080i, 1080p.
Audio: Deux chaînes linéaires PCM 32, 44.1 et 48kHz, 16, 20 et 24 bits
D sub 15pinG 0 7Vp p 75ohms: . - ,
B 0 7Vp p 75ohms: . - ,
R 0 7Vp p 75ohms: . - ,
1.0 Vp-p, 75ohms RCA
RCA
Y: 1.0 Vp-p, 75ohms, 0.3V synchronique négatif
Pb: 0.7Vp-p, 75ohms
Pr : 0.7Vp-p, 75ohms
AV AUDIO: For CVBS and Component Audio input
PC AUDIO: For PC RGB Audio input
500mV rms, Impedance: 20k ohms
100-240V~ 50/60Hz
80 W
Alimentation
Entrée son
Exigence alimentation
Consommation d'énergie
*Ce manuel n'est que pour votre référence.
Les spécifications sont soumises à la mise à jour sans notice préalable.
21
Page 49
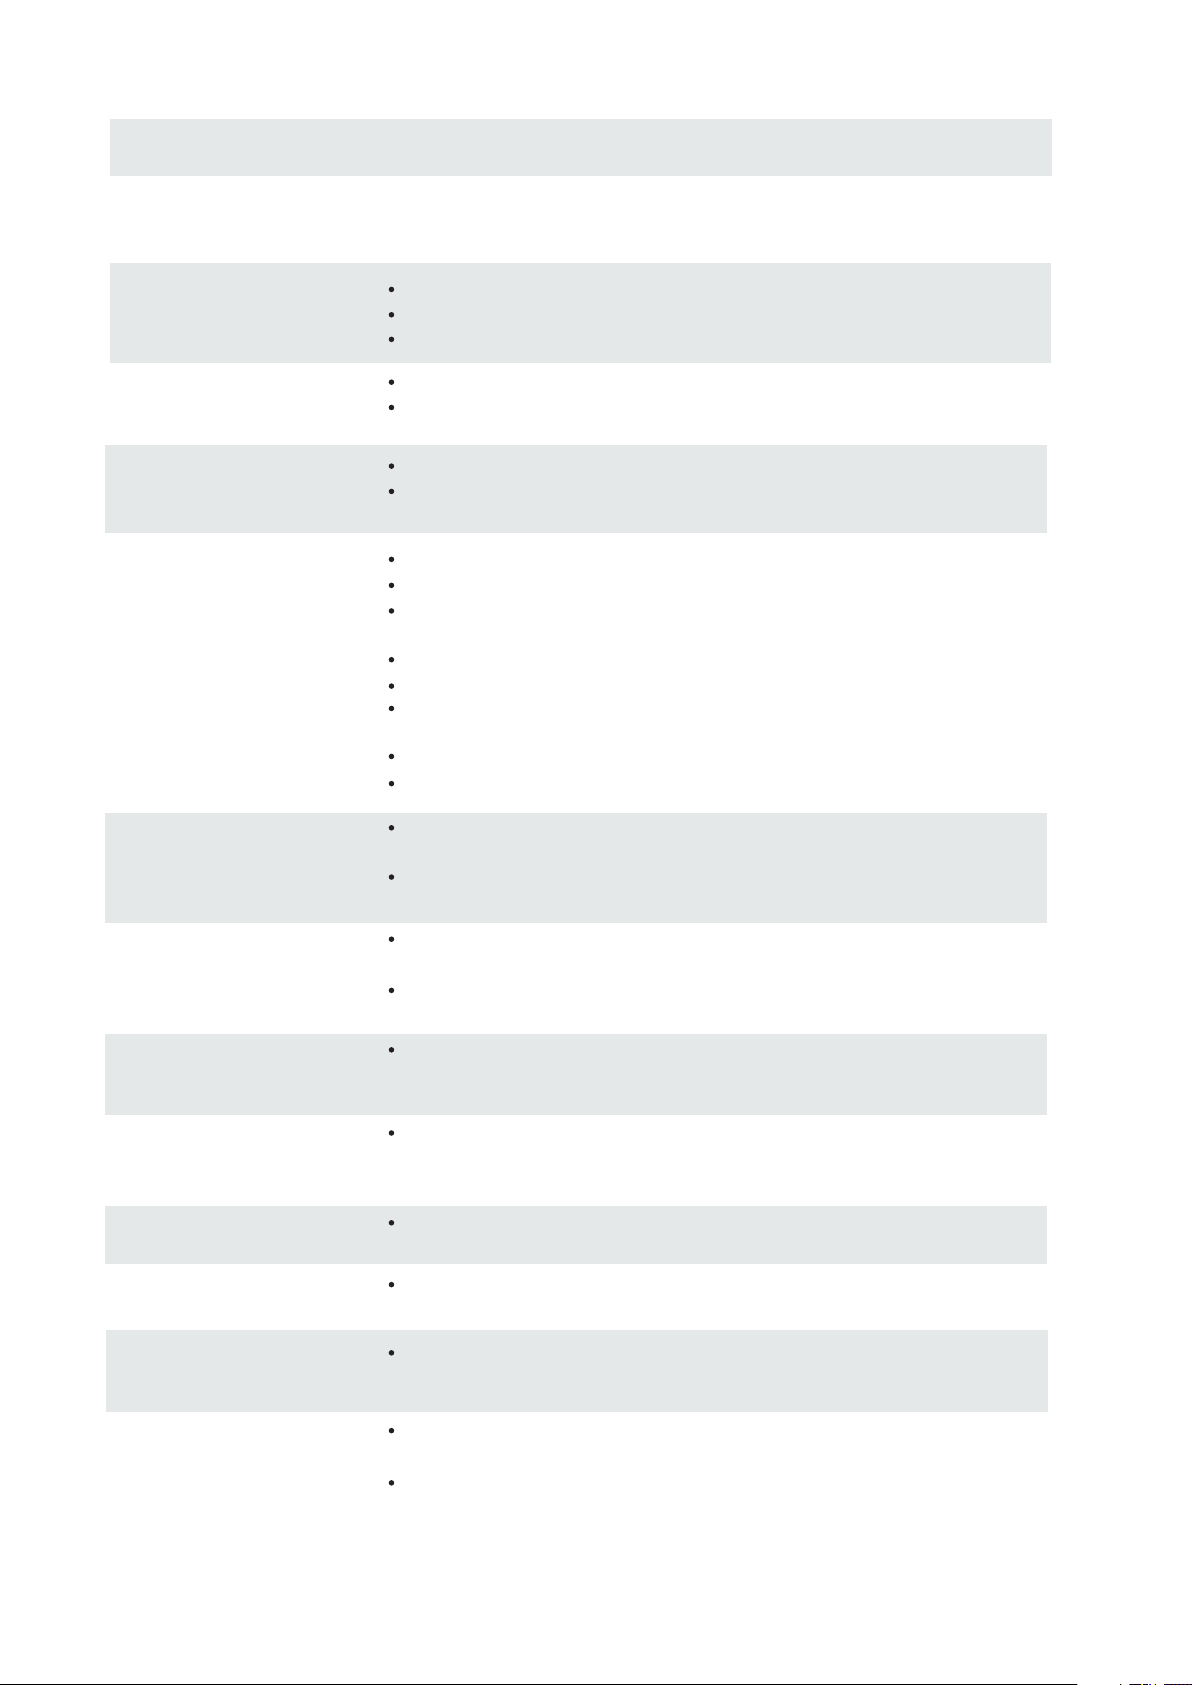
GUIDE DE D PANNAGE
SYMPTÔME
T L VISEUR
Image de mauvaise
qualit neige,
surimposition d'images,
distorsion, image floue)
Pas de so.
Image en
noir et blanc.
Ni image ni son.
CAUSE(ET SOLUTION)
Vérifier l'emplacement de l'antenne et la régler si nécessaire.
Câble d'antenne bien raccordé ?
Câbles d'entrée bien raccordés ?
Augmenter le volume.
V rifier si la fonction de coupure du son a t mise en service
avec la t l commande.
Vérifier le réglage de l'image sur le menu de réglage.
Vérifier si l'émission regardée est transmise en couleur et pas
en noir et blanc.
Appareil branché dans une prise CA ? Appareil mis en circuit ?.
Mode TV en service ?
Essayer une autre chaîne pour éliminer la possibilité d'un
dérangement de station.
Vérifier si l'antenne est raccordée correctement.
Augmenter le volume.
Vérifier si l'antenne ou la source audio/vidéo fonctionnent
correctement.
Vérifier si tous les câbles sont raccordés correctement.
Vérifier s'il y a des interférences locales.
Taches de couleur
sur l'image
Une touche de fonction
sur le panneau ne
fonctionne pas.
Le panneau de
surveillance d'écran
devient chaud
Points anormaux
Bandes à l'écran
Le haut de l'écran
devient chaud.
Impossible de
sélectionner une
certaine chaîne
Appareils lectriques non blind s causant des parasites
proximit ?
Mettre le téléviseur hors circuit pendant 30 minutes et
Essayer de nouveau.
Un ph nom ne d ' lectrostatique peut causer un d r glement;
mettre l'appareil hors circuit puis le remettre en circuit.
D brancher le cordon d 'alimentation CA et le brancher de
nouveau.
Le téléviseur LED prend à l'intérieur la lumière
phosphorique. Il pourrait augmenter la température de
l'écran dans quelques cas. Ce n'est pas un défaut.
Points noirs et points lumineux pourraient apparaître à
l'écran LED. C'est la propriété structurale du panneau
LED et ce n'est pas un défaut.
Le réglage de la phase d'impulsion pourrait réduire les
bandes (RGB in).
Il pourrait se survenir pendant un fonctionnement depuis
très longtemps. Ce n'est pas un défaut.
La chaîne pourrait être sautée. Choisissez cette chaîne en
sélectionnant directement les touches de la télécommande.
Affichage en désordre
lors d'allumer
Ce serait généré à cause de l'intervalle très courte entre
l'allumage et l'éteinte.
Débranchez l'alimentation et redémarrez.
22
 Loading...