

Page 1
32" LED TV
PLED3204A
Page 2

-1-
Contents
Safety and warnings.......................................................................................2-3
Introduction..................................................................................................4
Stand installation guide................................................................................. 5
................................................................................................... 6
Installation................................................................................................... 7-10
Remote Control............................................................................................11
Operation..................................................................................................... 12-16
Trouble Shooting...........................................................................................17
Wall Mount
Page 3
-2-
SA FETY AND WARNI NGS
IMPORTANT SAFETY INSTRUCTION
TO REDUCE THE RISK OF ELECTRIC SHOCK, DO
NOT REMOVE COVER (OR BACK).NO USER
SERVICEABLE PARTS INSIDE. REFER SERVICING
TO QUALIFIED SERVICE PERSONNEL.
RISK OF ELECTRIC SHOCK
DO NOT OPEN!
CAU TION
CAUT ION
1) Read these instructions .
2) Keep these instructions .
3) Heed all warnings.
4) Follow all instructions .
5) Do not use this Television near water.
6) Clean only with dry cloth.
7) Do not block any ventilatio n openings , install in
accordance with the instru ctions.
8) Do not install near any heat so urces such a s
radiations, heat registe rs, stoves , or other Television
(including amplifiers) t hat produc e heat.
9) Do not defeat the safety purp ose of the pol arized
plug. If the provided plug does not fit into y our
outlet, consult an electri cian for rep lacement o f the
obsolete outlet.
10) Protected the power cord f rom being wa lked on
or pinched particularly at p lugs, conv enience
receptacles, and the point w here they ex it from the
Television.
11) Only use attachments/accessories specified by
the manufactur er.
12) Unplug this Television during lighting storms or
when unused for long periods of time.
13) Refer all servicing to qua lified ser vice perso nnel.
Servicing is required when the Television has been
damaged in any way, such as; power-supply cord or
plug is damaged, liquid has be en spilled o r objects
have fallen into t he Television, the Television has
been exposed to rain or moistu re, does not o perate
normally, or h as been dropped.
14) Mains plug is used as the disconnect dev ice, the
disconnect device shall re main readi ly operabl e.
15) The ventilation should not be impeded by
covering the ventilation o penings wi th items, su ch as
newspapers, table-cloth, curtain s, etc.
16) No naked flame sources, such as lighte d candles,
should be placed on the Television.
17) Att ention sho uld be drawn to the environmental
aspects of battery disposal.
18) The use of Television in moderate climate.
19) The Television shall not be exposed to dripping
or splashing and that no objec ts filled wi th liquids ,
such as vases, shall be placed o n the Television.
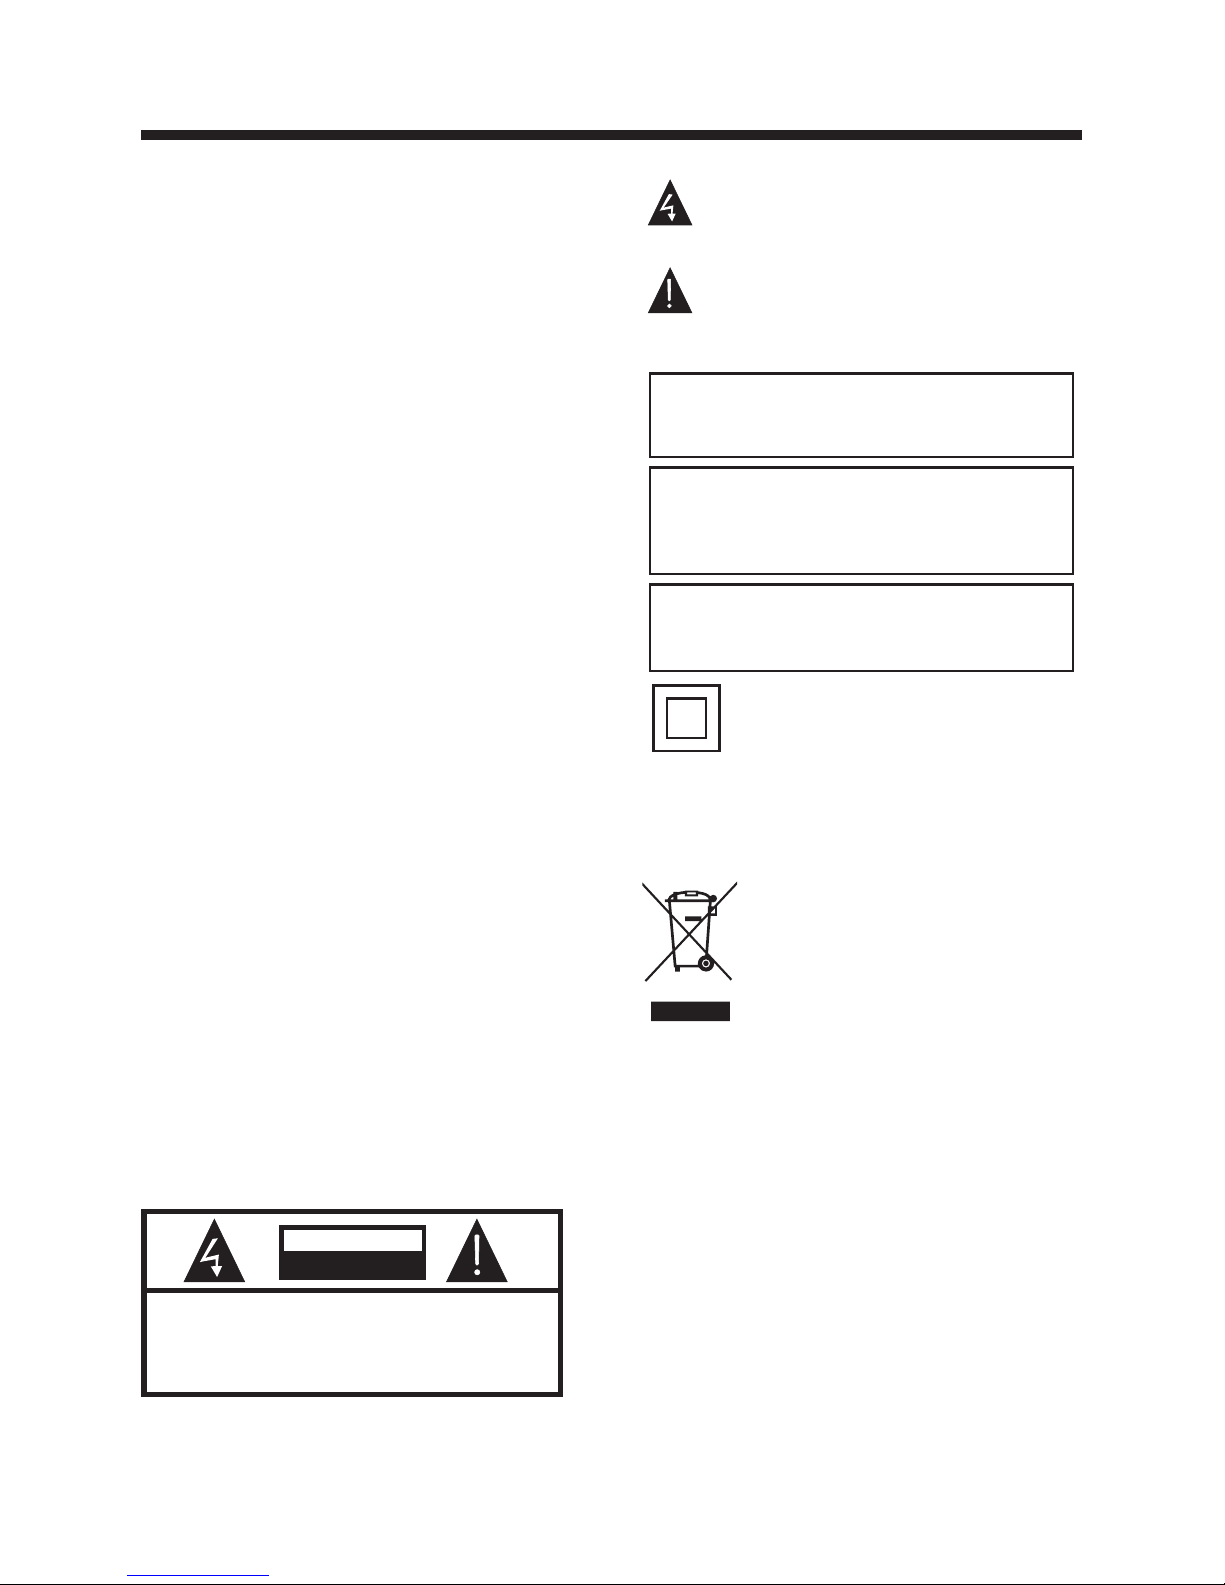
The symbol indicates that dangerous
voltages constituting a risk of electric shock
are present within this unit.
The symbol indicates that there are
important operating and maintenance
instructions in the literaturaccompanying this
unit.
To reduce the risk of fire or electric shock, do
not expose this Television to rain or moisture.
WARNING:
This symbol indicates that this product
incorporates double insulation between
hazardous mains voltage and user accessible
parts. When servicing use only
identical replacement parts.
This marking indicates that this product should
not be disposed with other household wastes
throughout the EU. To prevent possible harm to
the environment or human health from
uncontrolled waste disposal, recycle it
responsibly to promote the sustainable reuse of
material resources. To return your used device,
please use the return and collection systems or
contact the retailer where the product was
purchased. They can take this product for
environmental safe recycling.
The batteries shall not be exposed to
excessive heat such as sunshine, fire or the
like.
WARNING:
The excessive sound pressure from earphones
and headphones can cause hearing loss.
WARNING:
Page 4
-3-
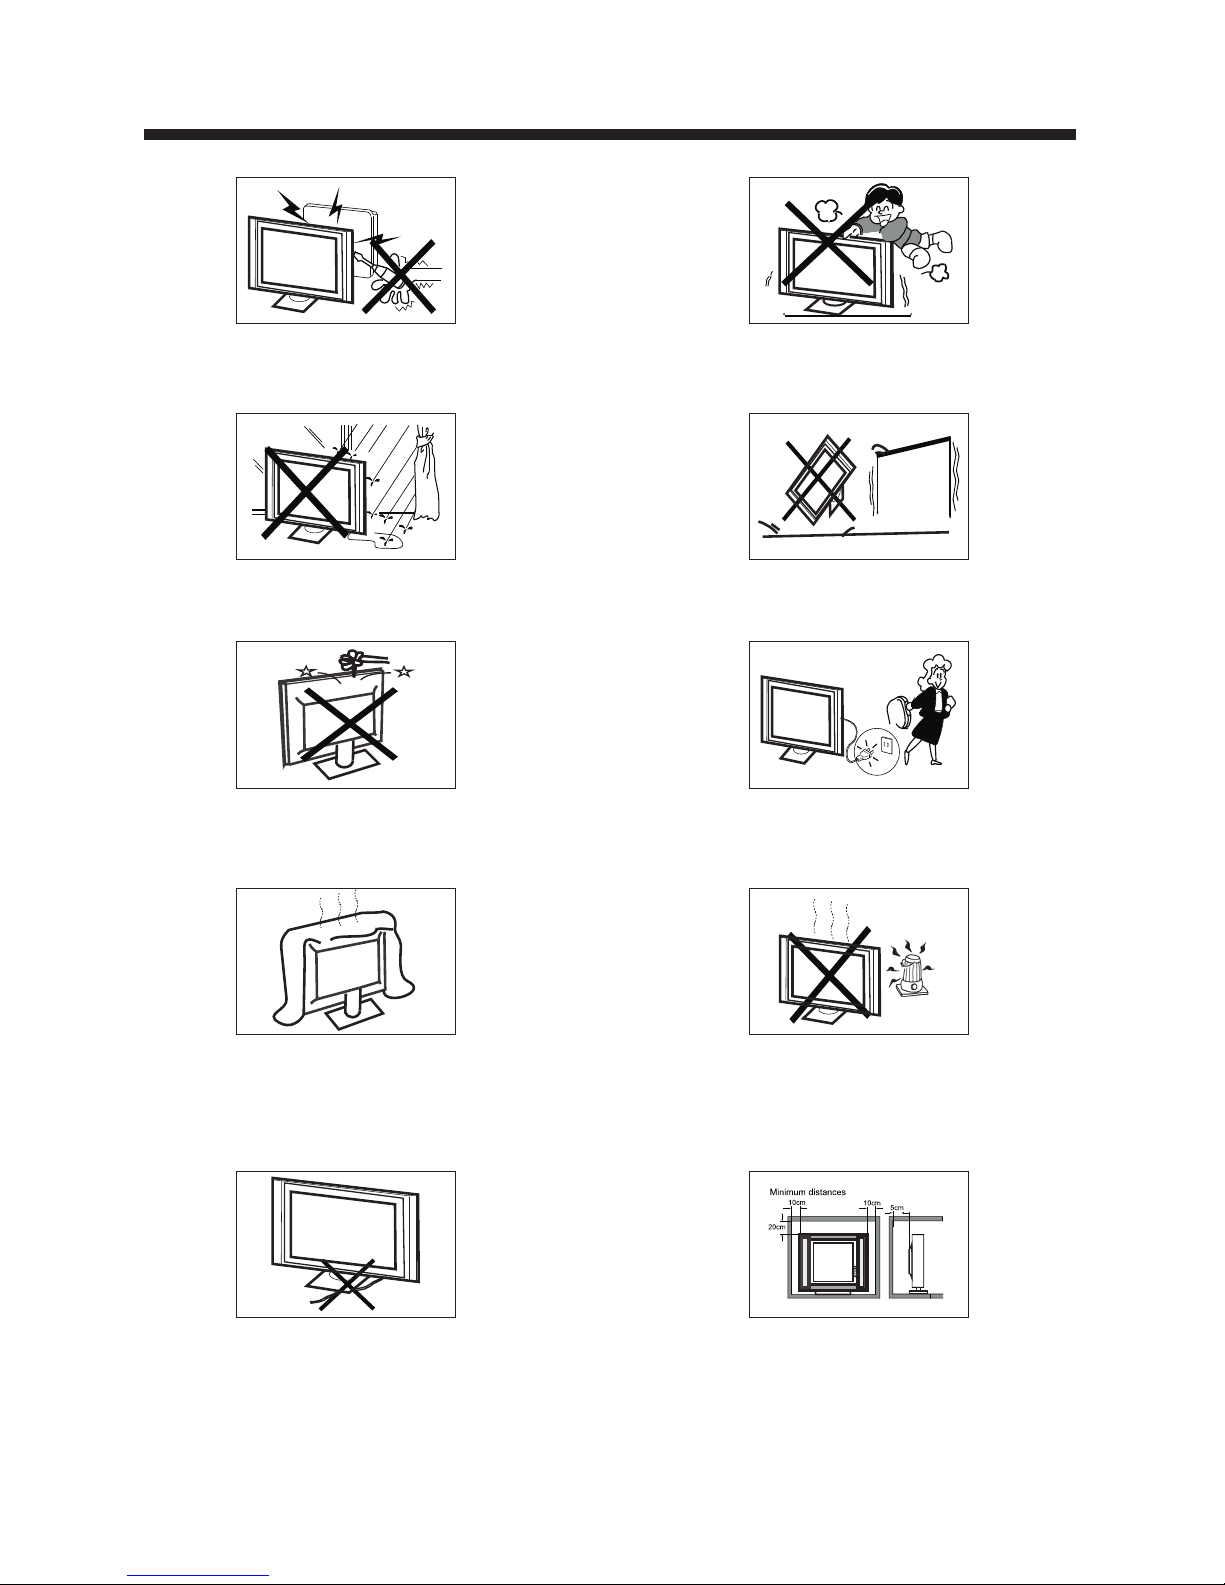
High voltages are used in the operation of this television
receiver. Do not the cabinet.
Refer servicing to qualified service personnel.
open
SA FETY AND WARNIN GS
To prevent fire or electrical shock hazard, do not expose
the television receiver to rain or moisture.
Do not drop or push objects into the television cabinet
slots or openings. Never spill any kind of liquid on the
television receiver.
Do not block the ventilation holes on the back cover .
Adequate ventilation is essential to prevent failure of
electrical components.
of the TV
Do not trap the power supply cord under the television
receiver s .' stand
Never stand on, lean on, or suddenly push the television or
its stand. You should pay special attention to children.
Serious injury may result if it falls.
Do not place your television on an unstable cart, stand,
shelf or table. Serious injury to an individual and damage
to the television may result if it falls.
/or
When the televi sion receiver is not u sed for a n
exte nded peri od of time, it is advi sable to disconn ect
the AC powe r cord fr om the AC outl et.
Avoid exposing the television receiver to direct sunlight
and other sources of heat. Do not stand the television
receiver directly on other products which give off heat,
e.g. video cassette players and audio amplifiers. Do not
place naked flame sources, such as lighted candles on
the television. or near
Dim:515*320m m(不包括 底座)
If the television is to be built into a compartment or similar
enclosure, the minimum distances must be maintained. Heat
build-up can reduce the life of your television, and can also
be dangerous.
Page 5

-4-
INTRODUCTION
Main features
Accessories
Infr ared Remo te Control.... ............ ....
1
User’s M anual ..... ..... ....... ..... ....... ....
1
Battery(AAA ).... ....... ..... ....... ..... ....... 2
Accessories
x 2
Resolution:
TV System:
Video Signal System:
Receiving Channel:
Horizontal definition (TV line)
16:9
NTSC
Cable :1-135/ Air: 2-69 (ATV&DTV)
x 1
High-Definition Multimedia Interface (HDMI) Input
Audio Input x 2
Composite Video Input >=350
x 1
YCb(Pb)Cr(Pr) >=400
Video Input >=400
x 1
Input Power Voltage:
AC 100-240V 50/60Hz
ATSC Digital system and NTSC Analog system
Headphone Output
x 1
x 1
Coaxial Output
x 1
USB Input
Aspect Ratio:
Viewing Picture Size (diagonal)
Power consumption:
Audio Output Power (THD 7%):
YCb(Pb)Cr(Pr) Input
Composite Video Input
Analog RGB (VGA) Input
1366x768
32 inches
75W
2x8W
Main parameter
■ Integrated ATSC TV tu ner for HDTV br oadca st recept ion
■ High b rightne ss prov ides a vivi d and brilliant pi cture
■ High d ynamic co ntrast ratio for d eeper blacks and b righter
whit es
■ Wide Screen as pect rati o (16:9 ) for a compl ete hom e
thea ter exper ience
■ HDMI i nput for tr ue digi tal conne ction
■ VGA port for co nnection to PC
■ Integrated Bu ilt-in stereo sp eaker system
■ Full -functi on remote contro l
Page 6
-5-
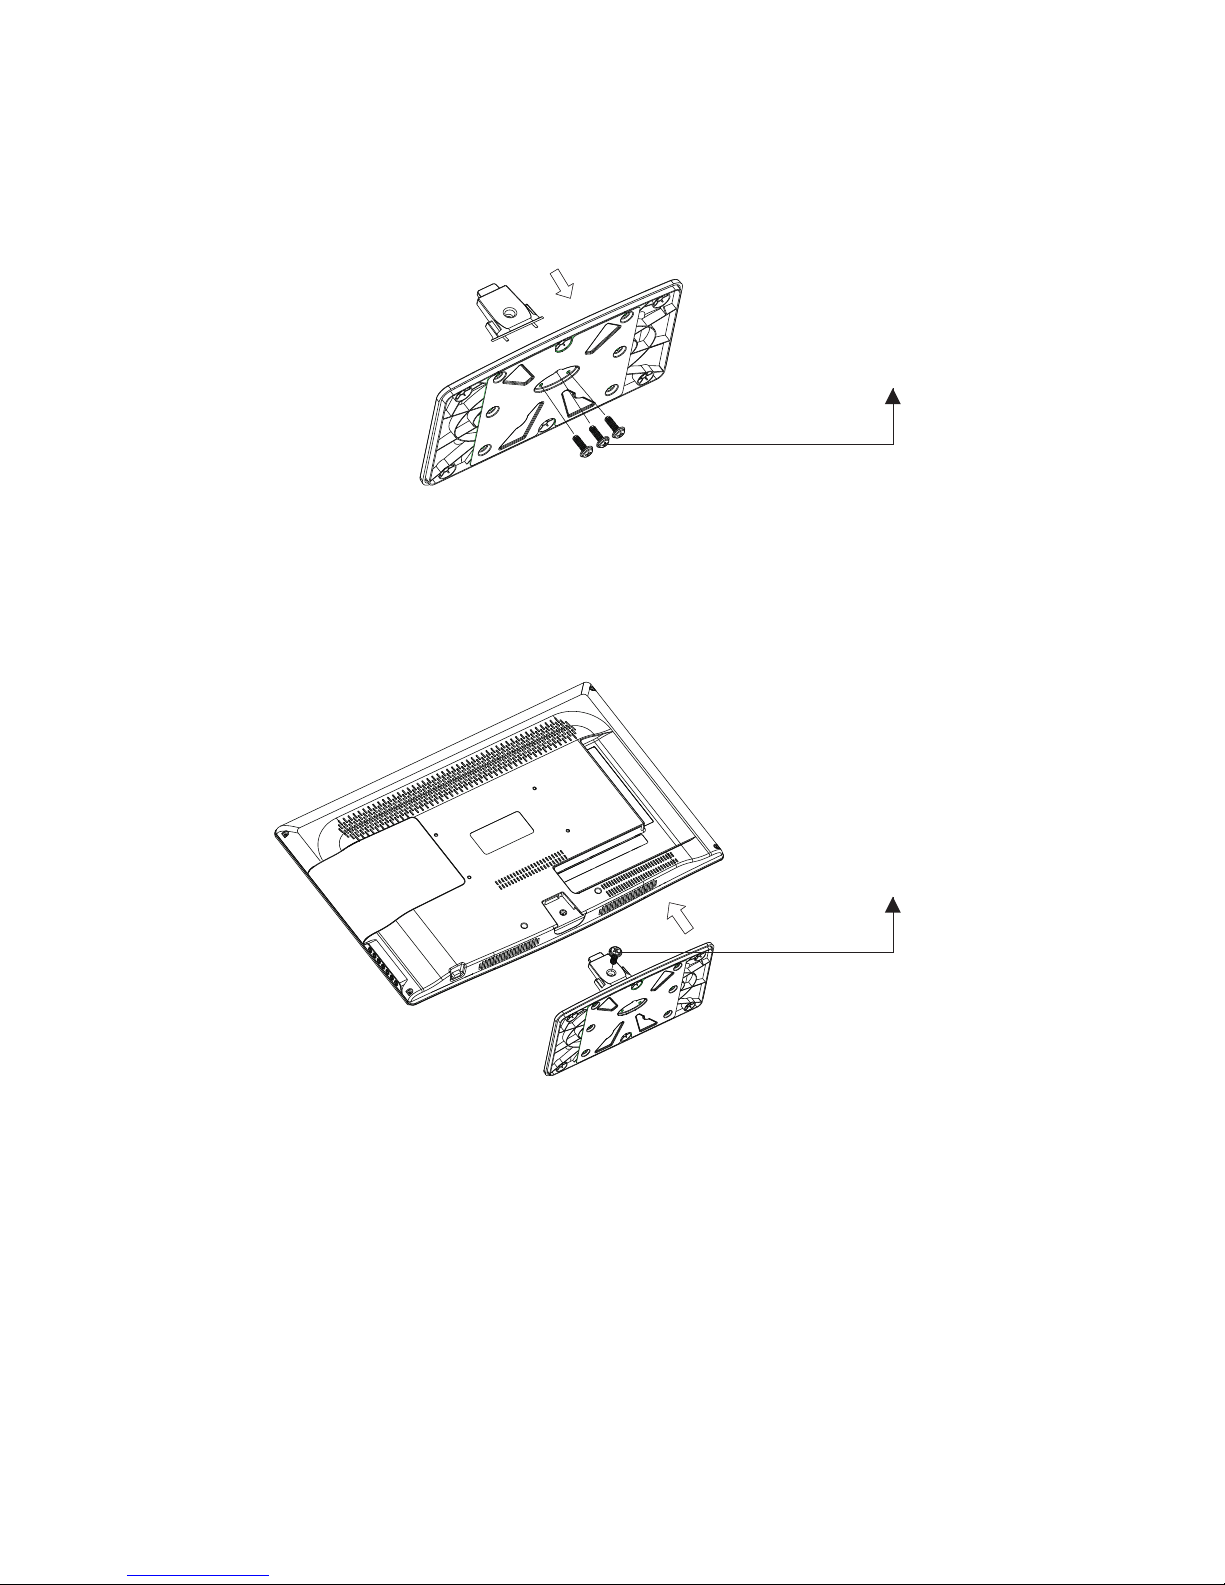
Base Stand Assembly Instructions
1. Attach the base stand neck to the base stand bottom with the included 3 screws.
2. Place the TV with the display side down on a flat surface. Use a cloth or the material from
the TV packaging to protect the screen.
3. Place the base stand neck in the slot on the bottom of the TV and push firmly upwards.
Attach with the included screw.
Screws x 3pcs
4x10PWB
Screw x 1pcs
4x22PWM
Page 7
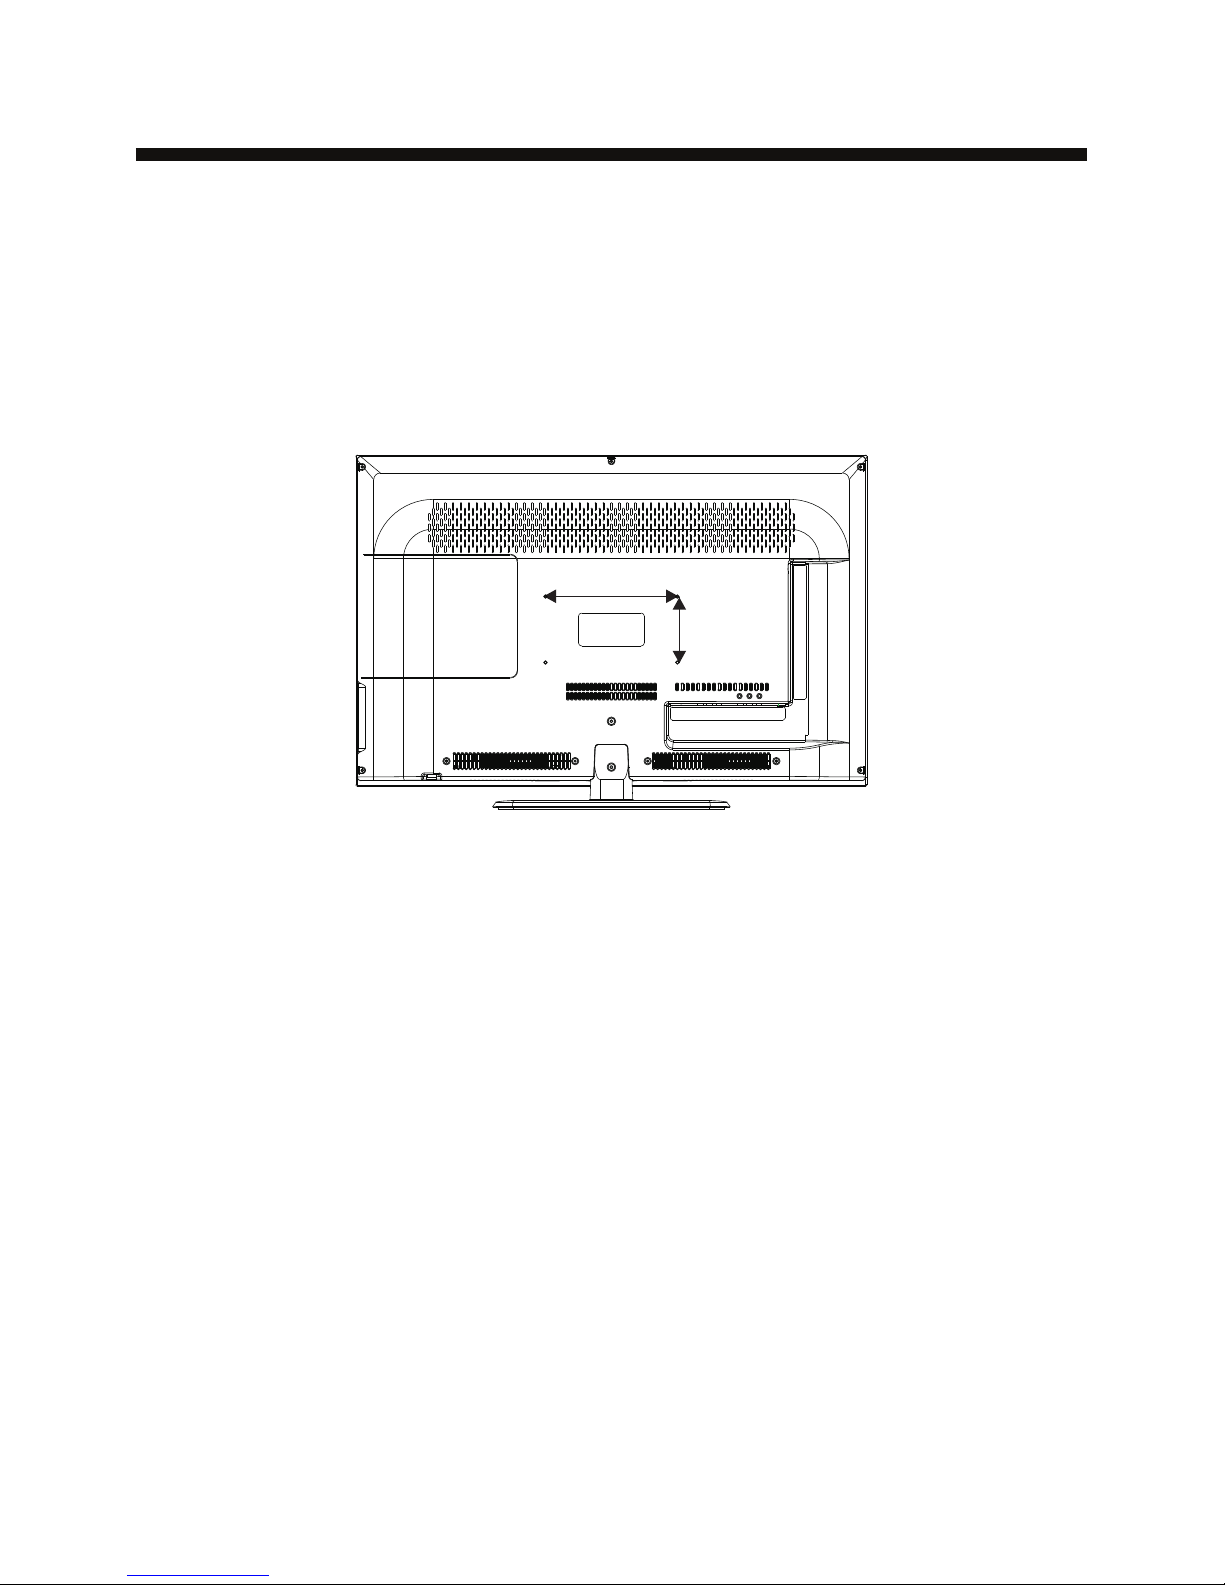
WALL MOUNT
Dimensions for Mounting Hole Pattern
A wall mount kit (purchased separately) would allow you to mount your PROSCAN
TV on the wall. For detailed information on installing the wall mount, refer
to the instructions provided by the wall mount manufacturer. It is strongly
recommended to contact a technician for professional assistance for wall mount
installation.
- This PROSCAN TV is compatible with a 200mm x 100mm mounting hole pattern.
- Do not mount your PROSCAN TV at more than a 15 degree tilt.
- Always use two people to mount the TV to a wall.
- Do not install your Wall Mount Kit while your TV is turned on. It may result in
personal injury due to electric shock.
- 4 pcs of type M4 screws are required for installing the wall mount bracket to
your PROSCAN TV. Do not use screws that are longer than 10 mm. Screws that
are too long may cause damage to the inside of the TV set.
- Do not fasten the screws too tight for this may damage the TV or cause the
TV to fall, resulting in personal injury. PROSCAN is not liable for these kinds of
incidents.
Instruction for Wall Mount
-6-
200m m
100m m
Page 8
-7-
INSTALLATION
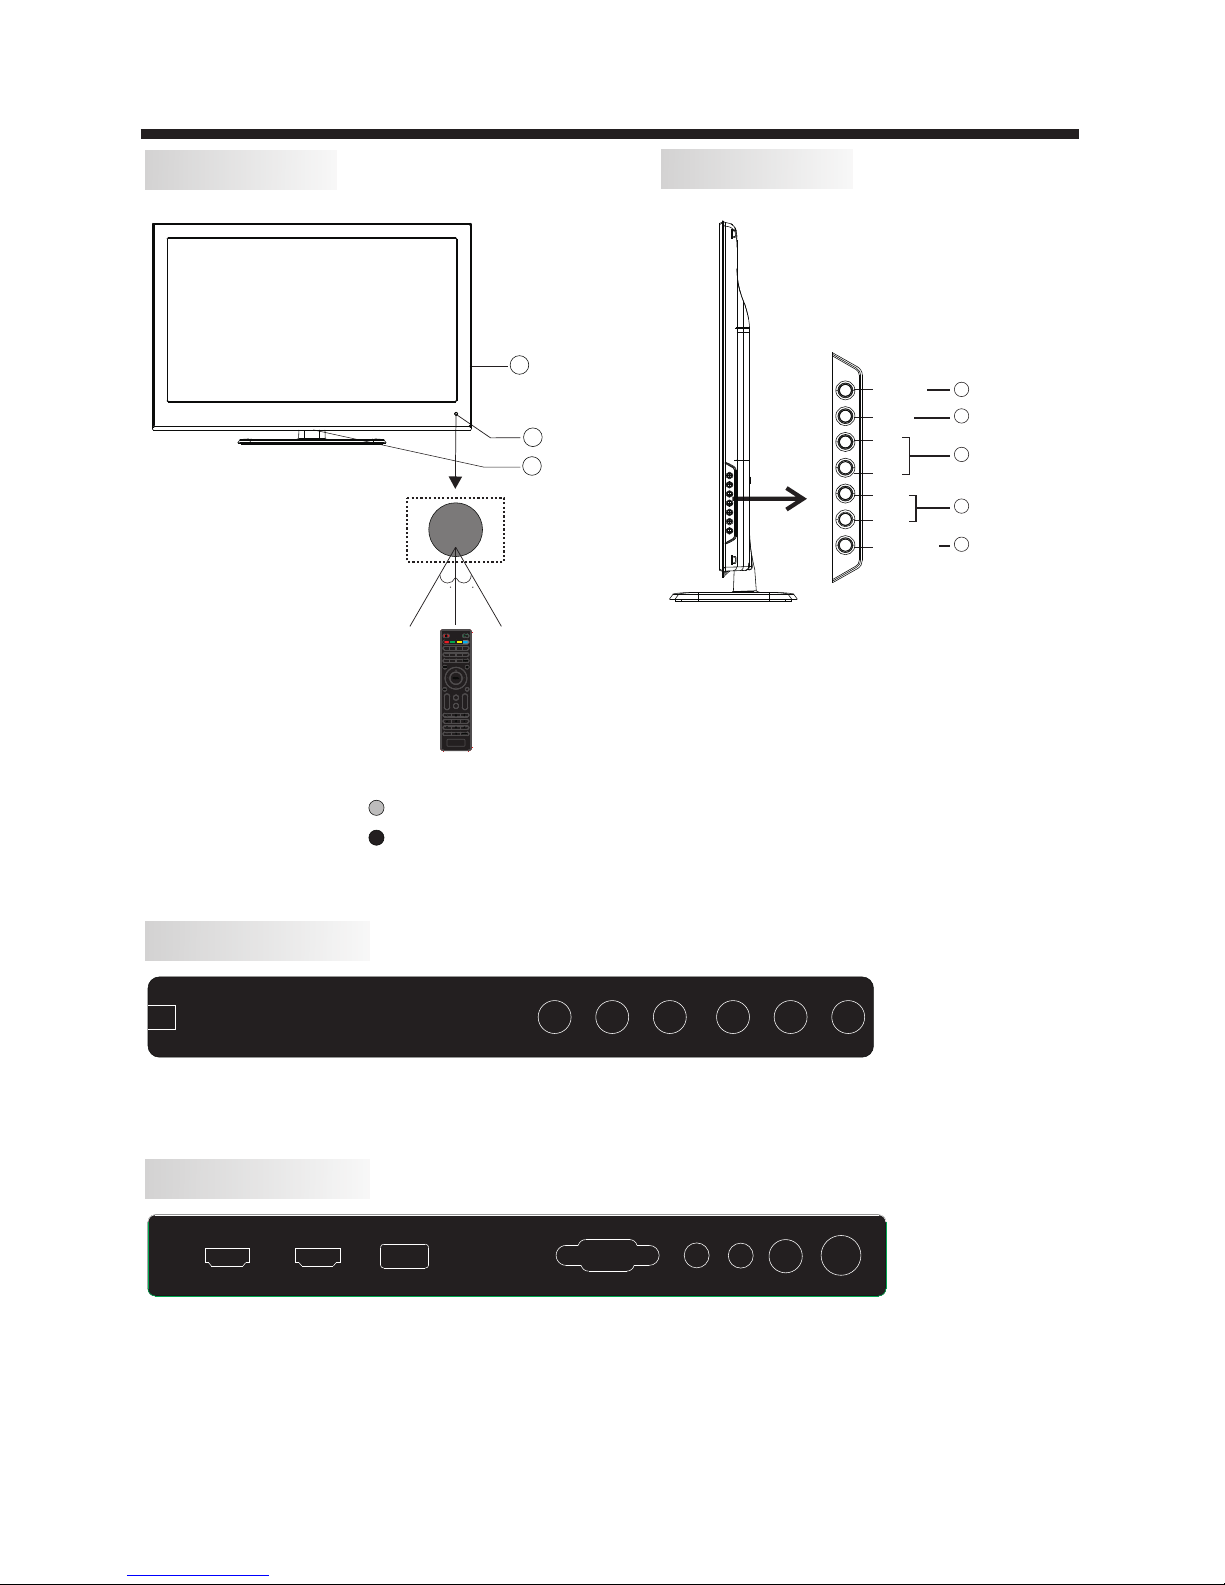
Front panel
1: Rem ote contr ol sensor.
2: Ind icator LE D: BLUE POWER ON.
RED STANDBY.
3:
Side p anel keys
1. SOURCE: Display the input source menu.
2. MENU: Display main MENU.
3. CH+/CH-: In TV mode, press "CH+" or "CH-" to
change the channel up and down. In MENU mode, press
"CH+" or "CH-" to select items in standby mode, press
"CH+" or "CH-" to turn on the TV.
4. VOL+/VOL-: Adjust sound level. In MENU mode,
press "VOL+ " or "VOL- " to adjust the item that you
selected.
5. STANDBY: Press this button to turn the unit ON
from STANDBY mode. Press it again to turn the set
back to STANDBY.
Side panel
30 30
3
1
2
SOU RCE
MEN U
CH+
CH-
VOL +
VOL -
STAN DBY
1
2
3
4
5
REAR Connections
SIDE Connections
All the terminals are (from left to right):
HDMI1, HDMI2, USB, VGA, HEADPHONE, PC AUDIO, COAXIAL, RF.
Note: 1. When HDMI1 has an input signal coming from a DVI source then the audio input signal must be
connected to the PC audio input.
2. When HDMI2 has an input signal coming from a DVI source then the audio input signal must be
connected to the YPbPr/AV audio input.
HDM I1 HDM I2
USB
VGA
HEA DPHON ERFPC AUD IO
COA XIAL
All the terminals are (from left to right):
POWER SOCKET, AV, AUDIO INPUT, YPbPr (COMPONENT) INPUT
Note: AV and YPbPr share the same audio input.
VOL CH
YPbPr
CC MTS VGA
DTV
STRENGTH
TV AV HDMI
EPG
CH LIST
FAV
TV
DISPLAY
S.M
P.M
Y Pb Pr
AV L R
AC- INPUT
100 -240V ~50/6 0Hz
Page 9
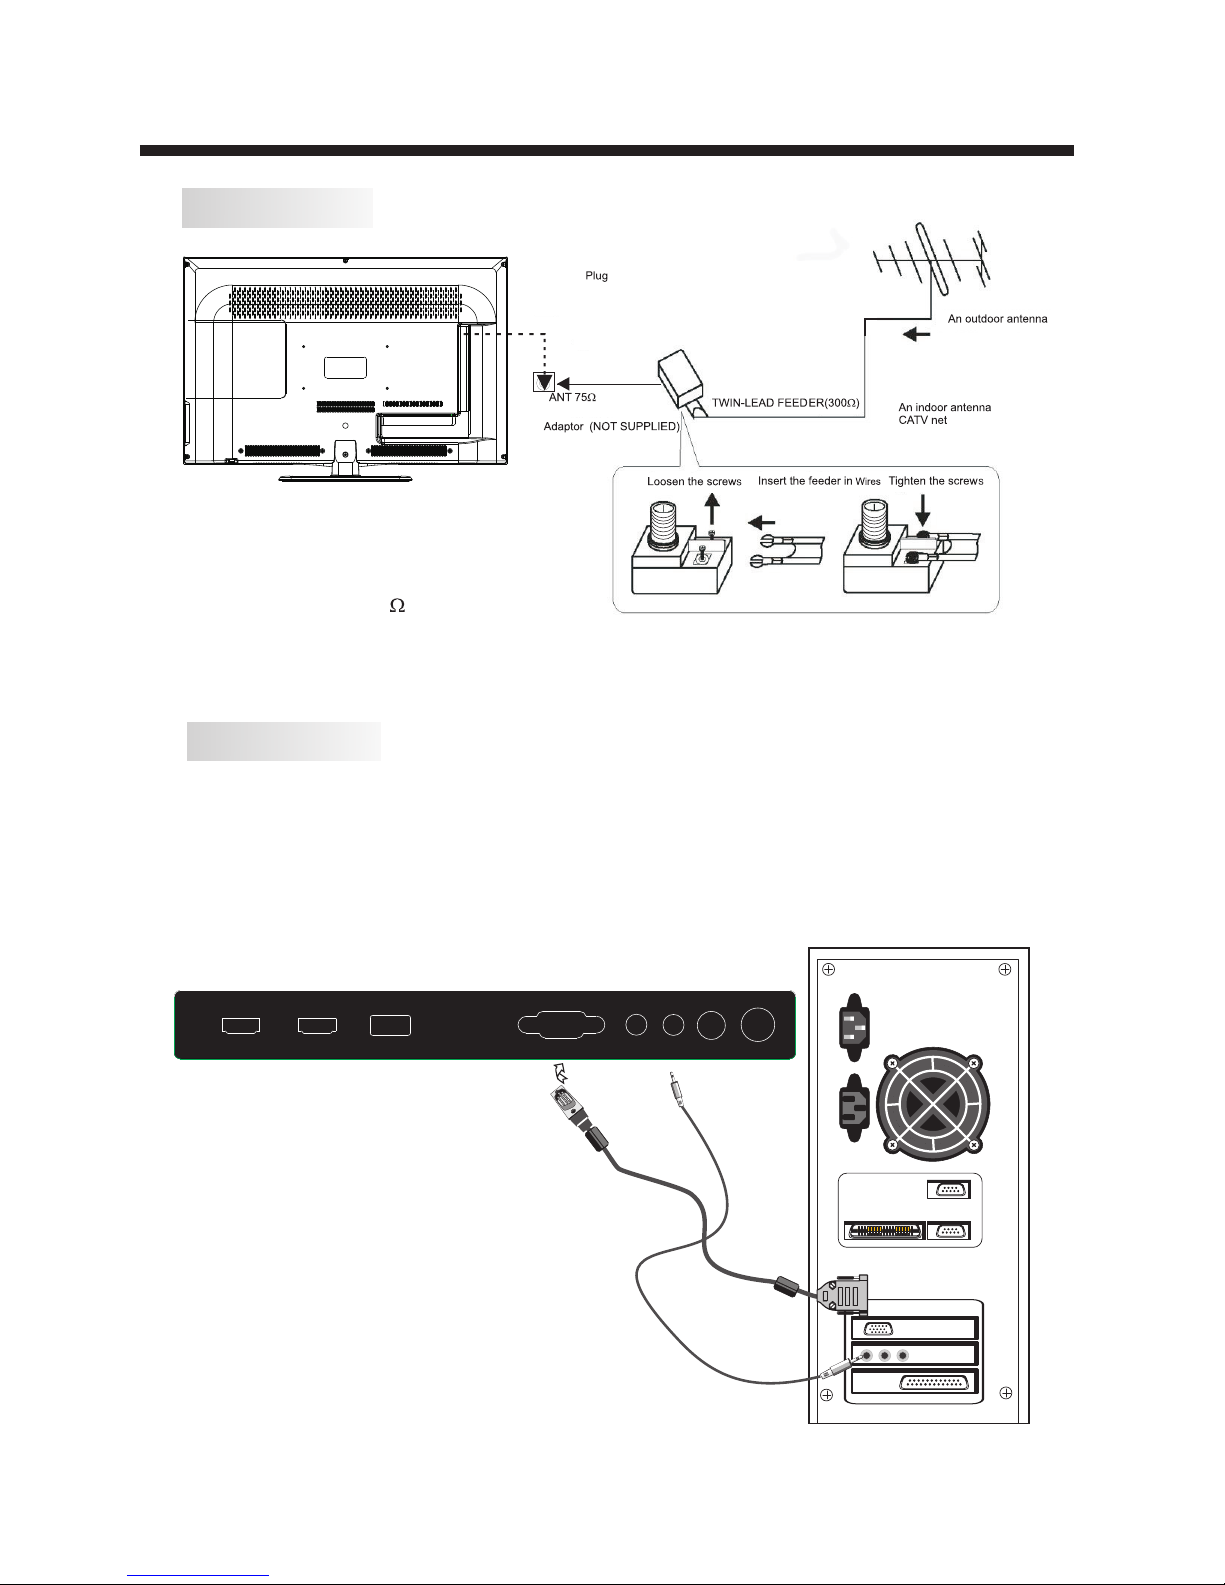
ANTENNA
INSTALLATION
Note:
Aerial connections: IEC (female).
Input impendance:75 unbalanced.
-8-
STEPS:
PC
HDM I1 HDM I2
USB
VGA
HEAD PHONERFPC AUDI O
COAX IAL
It is recommended that the TV and computer are off before making any of the connections.
1.Connect the VGA and audio cable.
2.Connect the power cord.
3.Power on the TV, switch to PC mode.
4.Power on the PC.
Page 10
PC
-9-
INSTALLATION
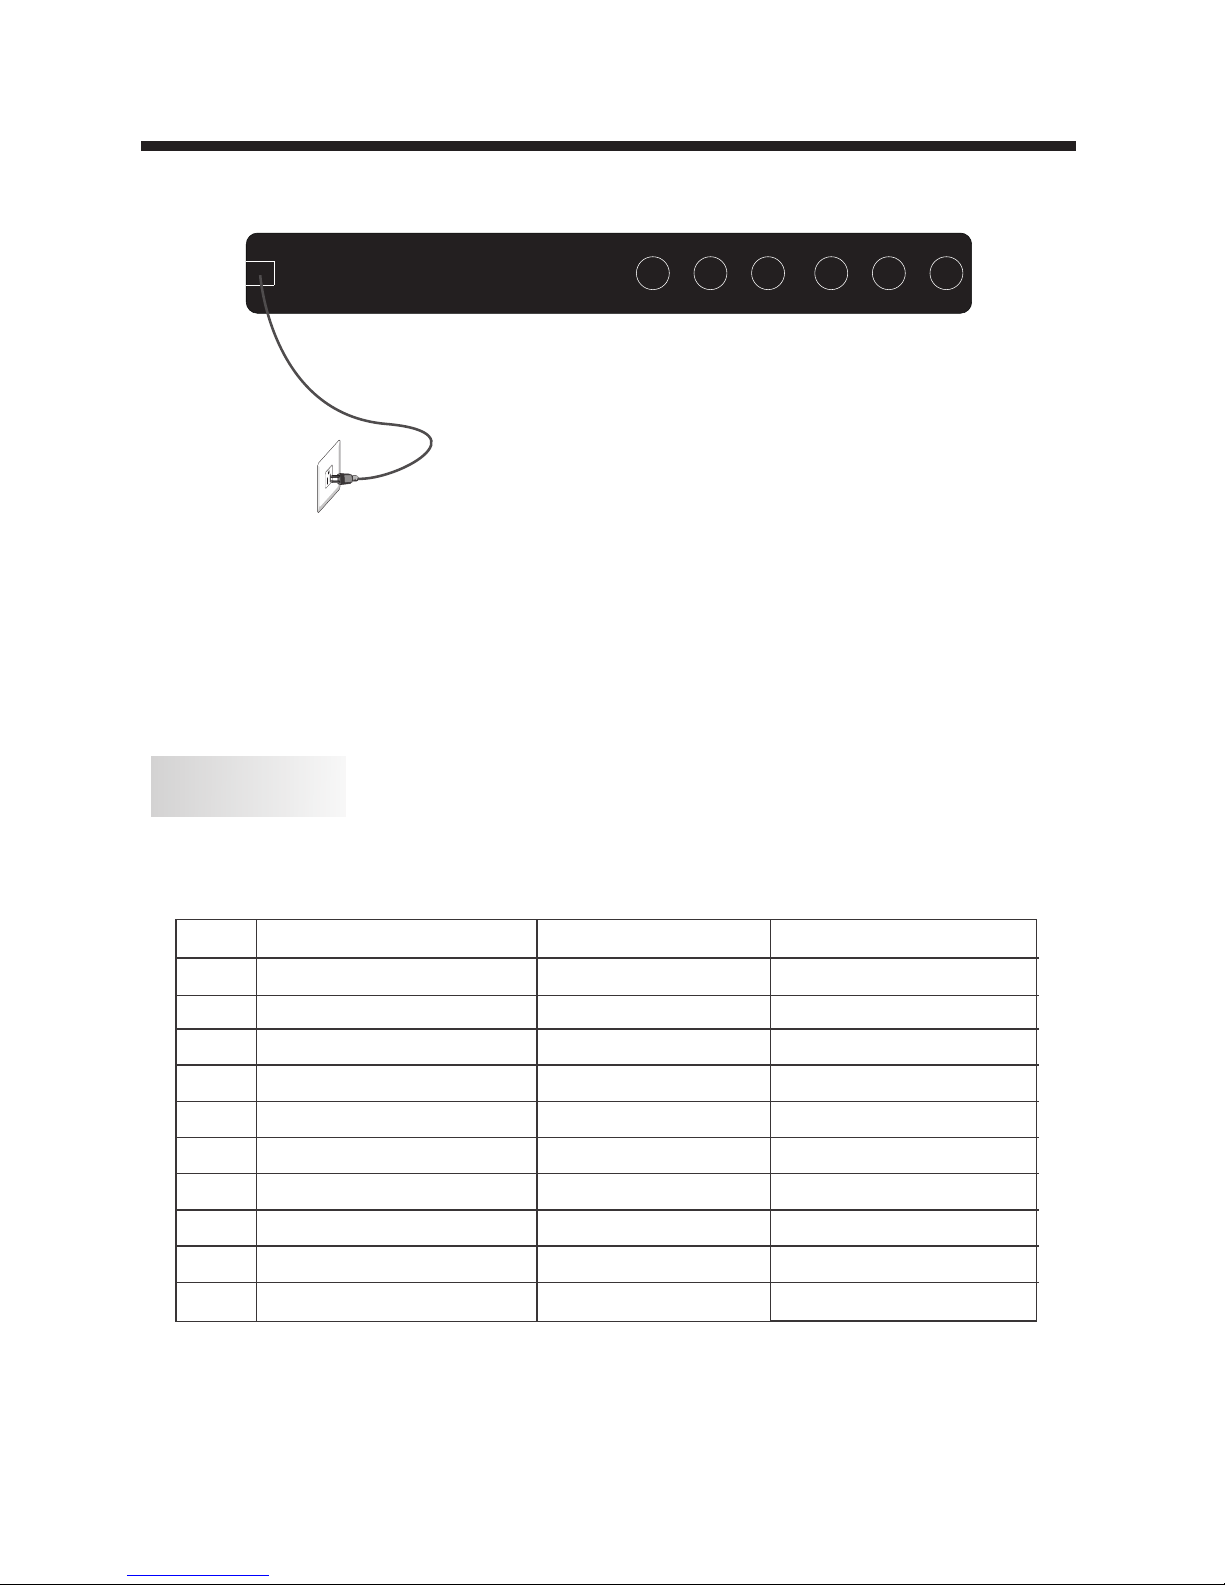
PRESET MODE
1
2
3
4
5
6
7
8
9
10
720*400
640*480
640*480
800*600
800*600
1024*768
1024*768
1024*768
1280*1024
1280*1024
70
60
75
60
75
60
70
75
60
75
31.47
31.47
37.50
37.88
46.88
48.36
56.48
60.02
63.98
80.00
RESOLUTION
V.Freq.(Hz) H.Freq.(KHz)
Y Pb Pr
AV L R
AC- INPUT
100 -240V ~50/6 0Hz
Page 11
INSTALLATION
-10-
AV EQUIPMENT
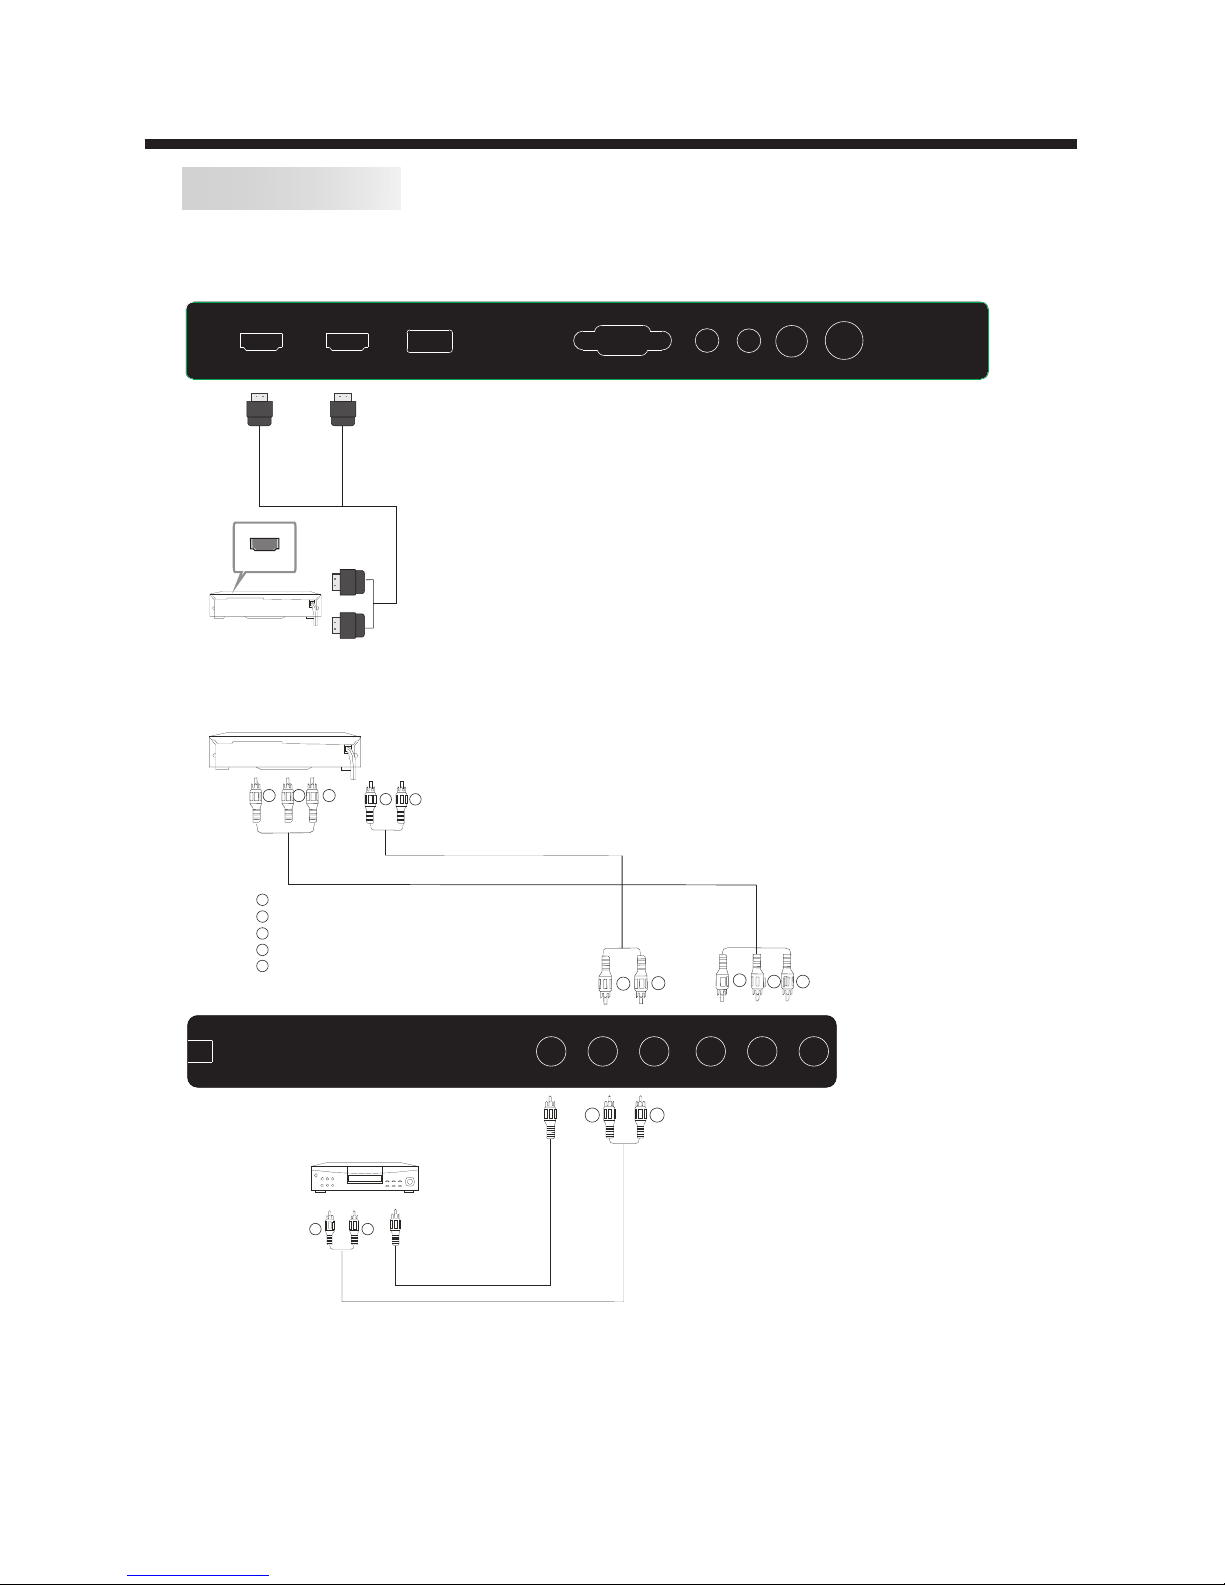
You can use the input terminals on the TV set as follows.
HDMI
HDM I1 H DMI2
USB
VGA
HEA DPHON ERFPC AUD IO
COA XIAL
Yellow (video)
White(audio L)
Red(audio R or Pr)
Y
W
R
W R
G
B
R
Blue(Pb)
Green(Y)
B
G
VIDEO EQUIPMENT with YPbPr
W
R
G
B
R
W
R
W R
TO AUD IO OUTP UTS
VID EO EQUI PMENT
TO VI DEO
OUT PUTS
The television's inputs can be connected to the following types of equipment: VCR, DVD player,
camcorder, video game or stereo system, etc.....
YPbPr can support these video formats:480i,576i,480p,576p,720p,1080i.
Y Pb Pr
AV L R
AC- INPUT
100 -240V ~50/6 0Hz
Page 12
-11-
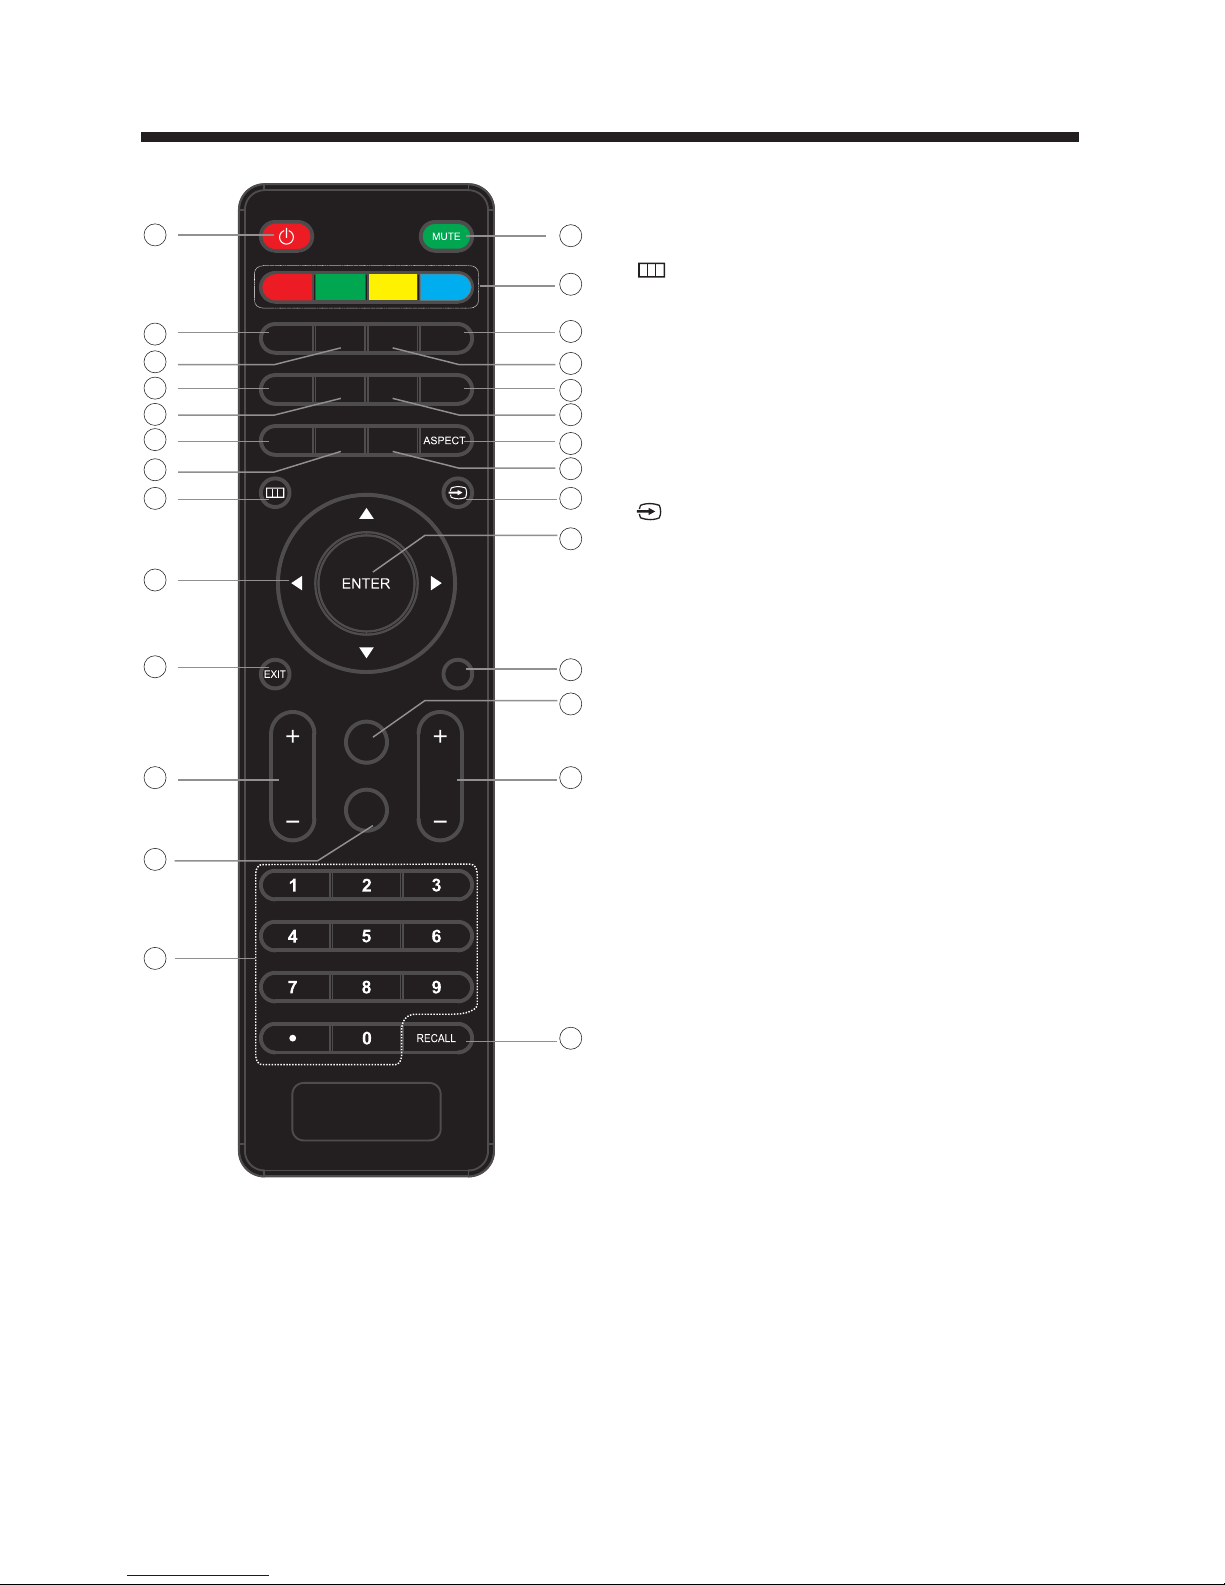
REMOTE CONTROL
1: POW ER
2: NUM BER KEY
3:
4: CUR SOR
5: EXIT
6: VOL+/-
7:
8:
Pres s to displa y and select the ava ilable video sou rces.
9: MUT E
10: RE CALL
11: E NTER
12: TV DISPLAY
13:
14: CH +/CH-
15: AS PECT
16: CH L IST
17: EP G
18: FAV
19: HD MI
20: AV
21: DT V STRENGTH
22: TV
23: YP bPr
24: CC
25: VG A
26: MT S
27: CO LOR KEYS
Reserve d keys
Pres s to turn the TV on or to turn off (stan dby).
Pres s to input th e channel number.
Pres s to displa y the on-screen me nu.
Use th e up, down, l eft, and right key s to move within the
menu.
Pres s to exit the o n-screen menu.
Pres s to adjust t he sound level.
Pres s to disabl e or enable the soun d.
Pres s to change t o the previously v iewed channel.
Pres s to confir m the selection.
Pres s to displa y/hide the progr am information .
Pres s to change t he channel.
Pres s to change t he picture aspec t ratio: Normal, Wide ,
Zoom, Cinema.
Pres s to displa y the channel list .
Pres s to displa y the channel guid e.
Pres s to access t he favorite chan nels list.
Pres s to direct ly switch to HDMI mo de.
Pres s to direct ly switch to AV mode.
Pres s to displa y the digital TV si gnal strength.
Pres s to direct ly switch to TV mod e.
Pres s to direct ly switch to Compo nent (YPbPr) mod e.
Pres s to enable /disable the clo sed captions.
Pres s to direct ly switch to VG A (PC input) mode.
Pres s to change t he audio languag e, if available.
P.M
Pres s repeate dly to select a pict ure mode: Vivid, Standa rd,
Spor ts, Movie , or Custom.
S.M
Pres s repeate dly to switch audi o modes: Standar d, News,
Musi c,Theat er, Spor ts or Cus tom.
VOL
CH
YPb Pr
CC MTS VGA
DTV
STR ENGTH
TV AV HDM I
EPG
CH LI ST
FAV
TV
DISP LAY
S.M
P.M
14
13
10
12
11
15
18
20
19
25
26
2
4
5
6
7
24
23
21
22
16
17
27
3 8
9
1
Universal Remote Code: 0X0707
Page 13
OPERATION
-12-
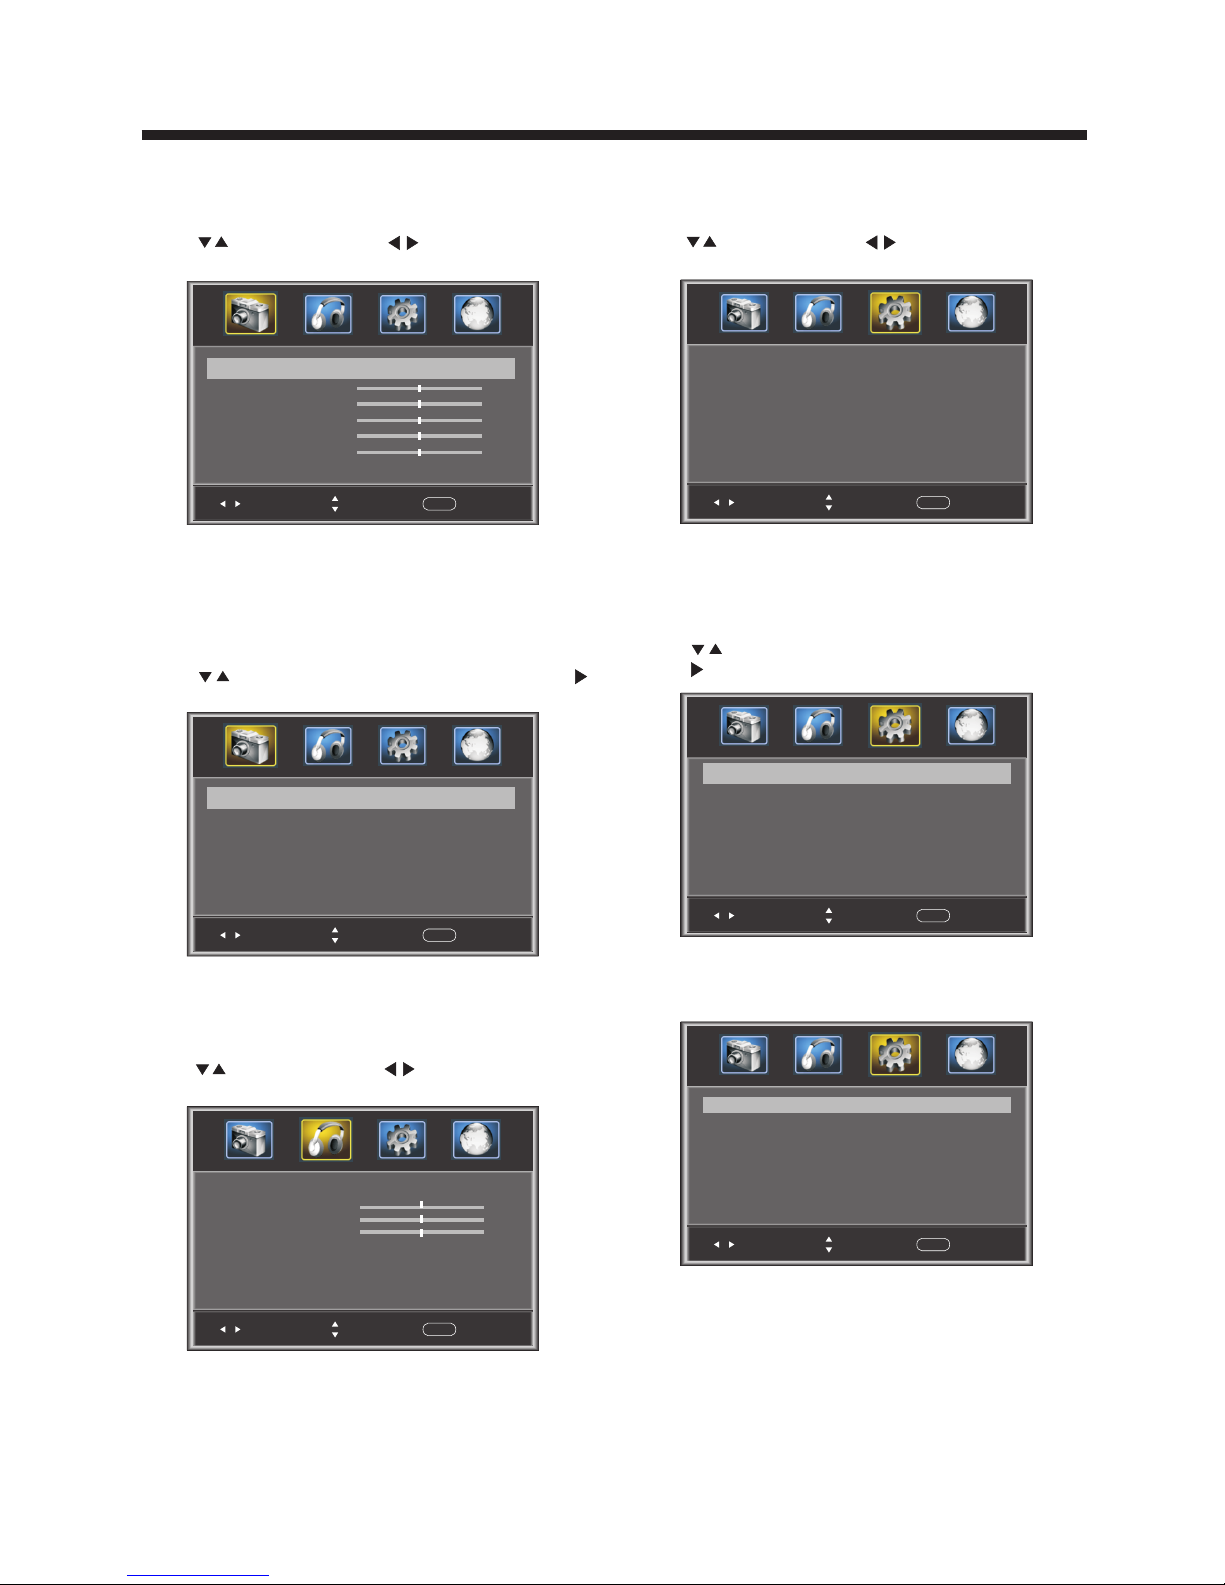
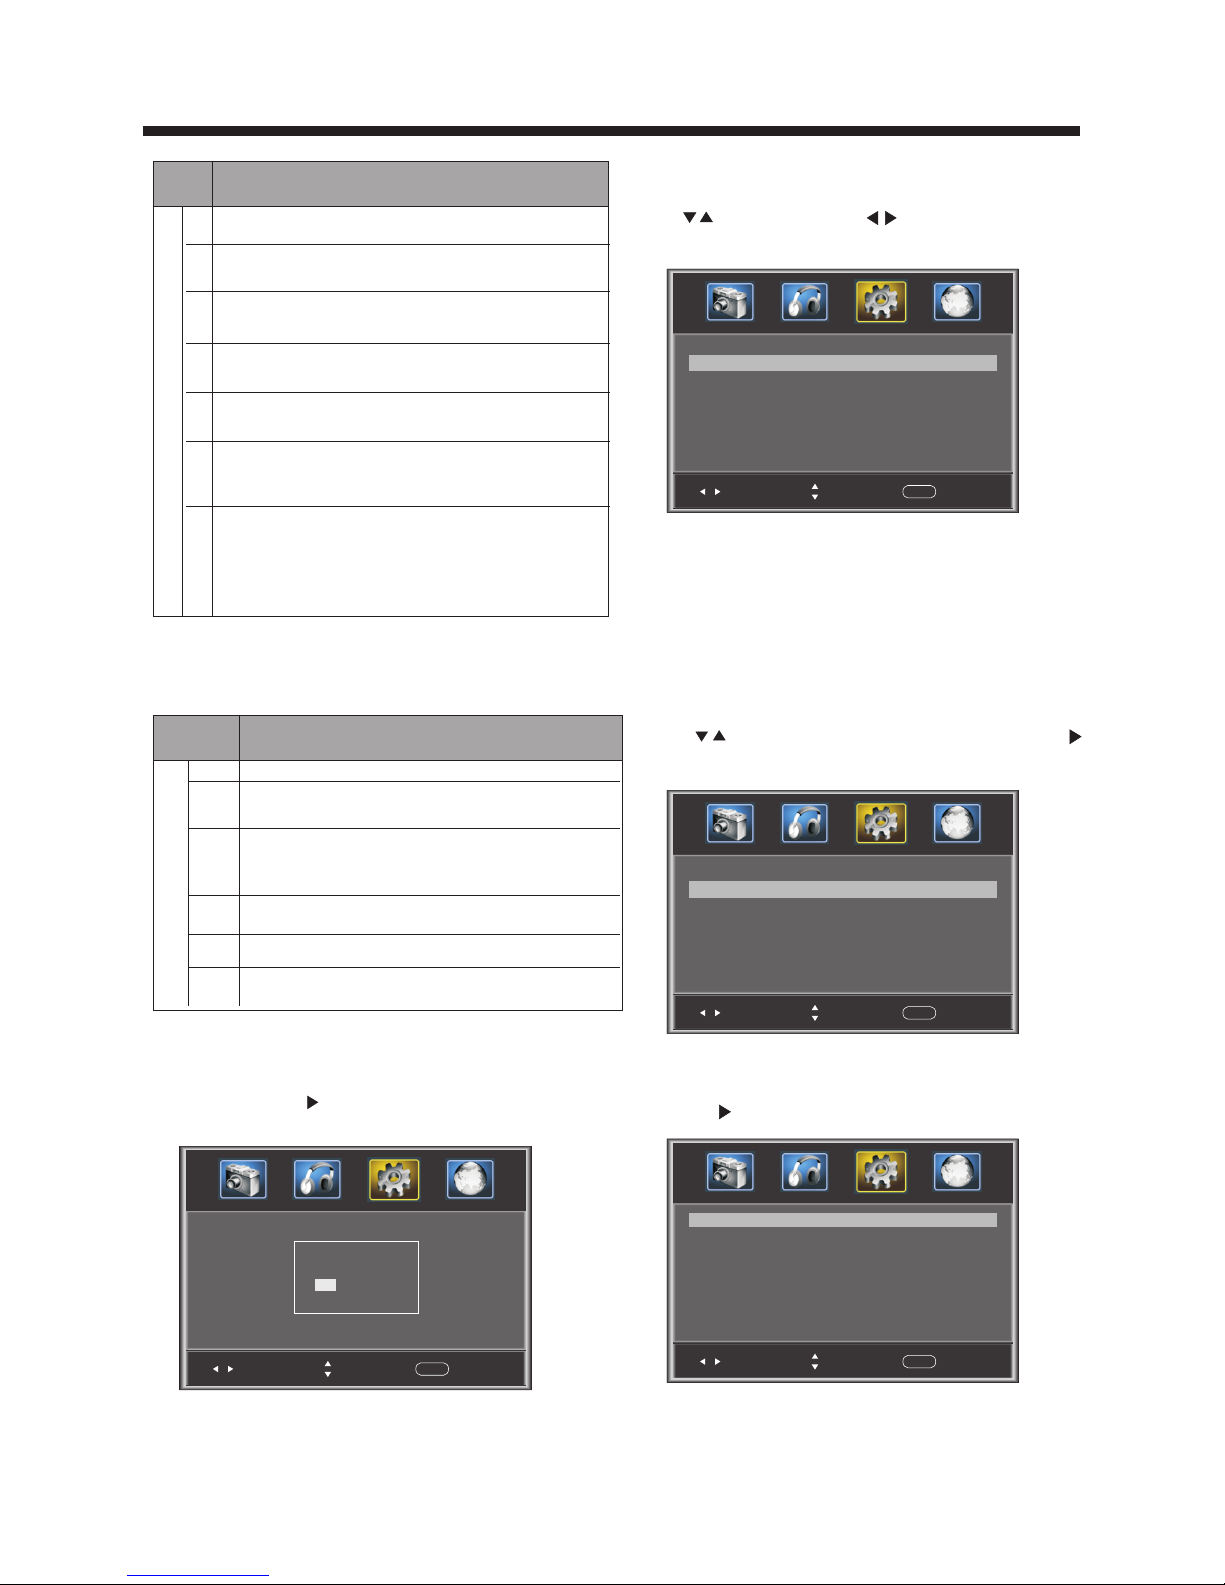
The first item of the MENU is PICTURE MENU.
You can adjust picture effect here, such as contrast,
brightness, etc.
Press to select and press to adjust. Press
MENU to exit.
1. PICTURE MENU
2. AUDIO menu
The second item of the MENU is AUDIO MENU.
You can adjust sound here.
Press to select and press to adjust. Press
MENU to exit.
3. SETUP MENU
The third item of the MENU is SETUP MENU.
You can setup system here.
Press to select and press to adjust. Press MENU
to exit.
Note :
Rest ore Defau lt: Reset all the se ttings to defaul t
valu e.
Note:
The item of Audio language is available in ATSC
program.
Pic ture Mo de
Sta ndard
Con trast
50
Bri ghtne ss
50
Col or
50
Tint
0
Sha rpnes s
Adv anced V ideo
50
Sel ect
Adj ust
Men u
Exi t
< >
>
Col or Temp. No rmal
Sel ect
Adj ust
Men u
Exi t
< >
Asp ect Wid e
Noi se Redu ction M iddle
< >
< >
Pres s button to s elect Adva nced Video and p ress
butt on. The scree n will display as fo llows:
Adva nced Video:
Sel ect
Adj ust
Men u
Exi t
Par ental C ontro ls
Time r
Clo sed Cap tion
Men u Setti ngs
VGA Se tting s
Res tore De fault
>
>
>
>
>
>
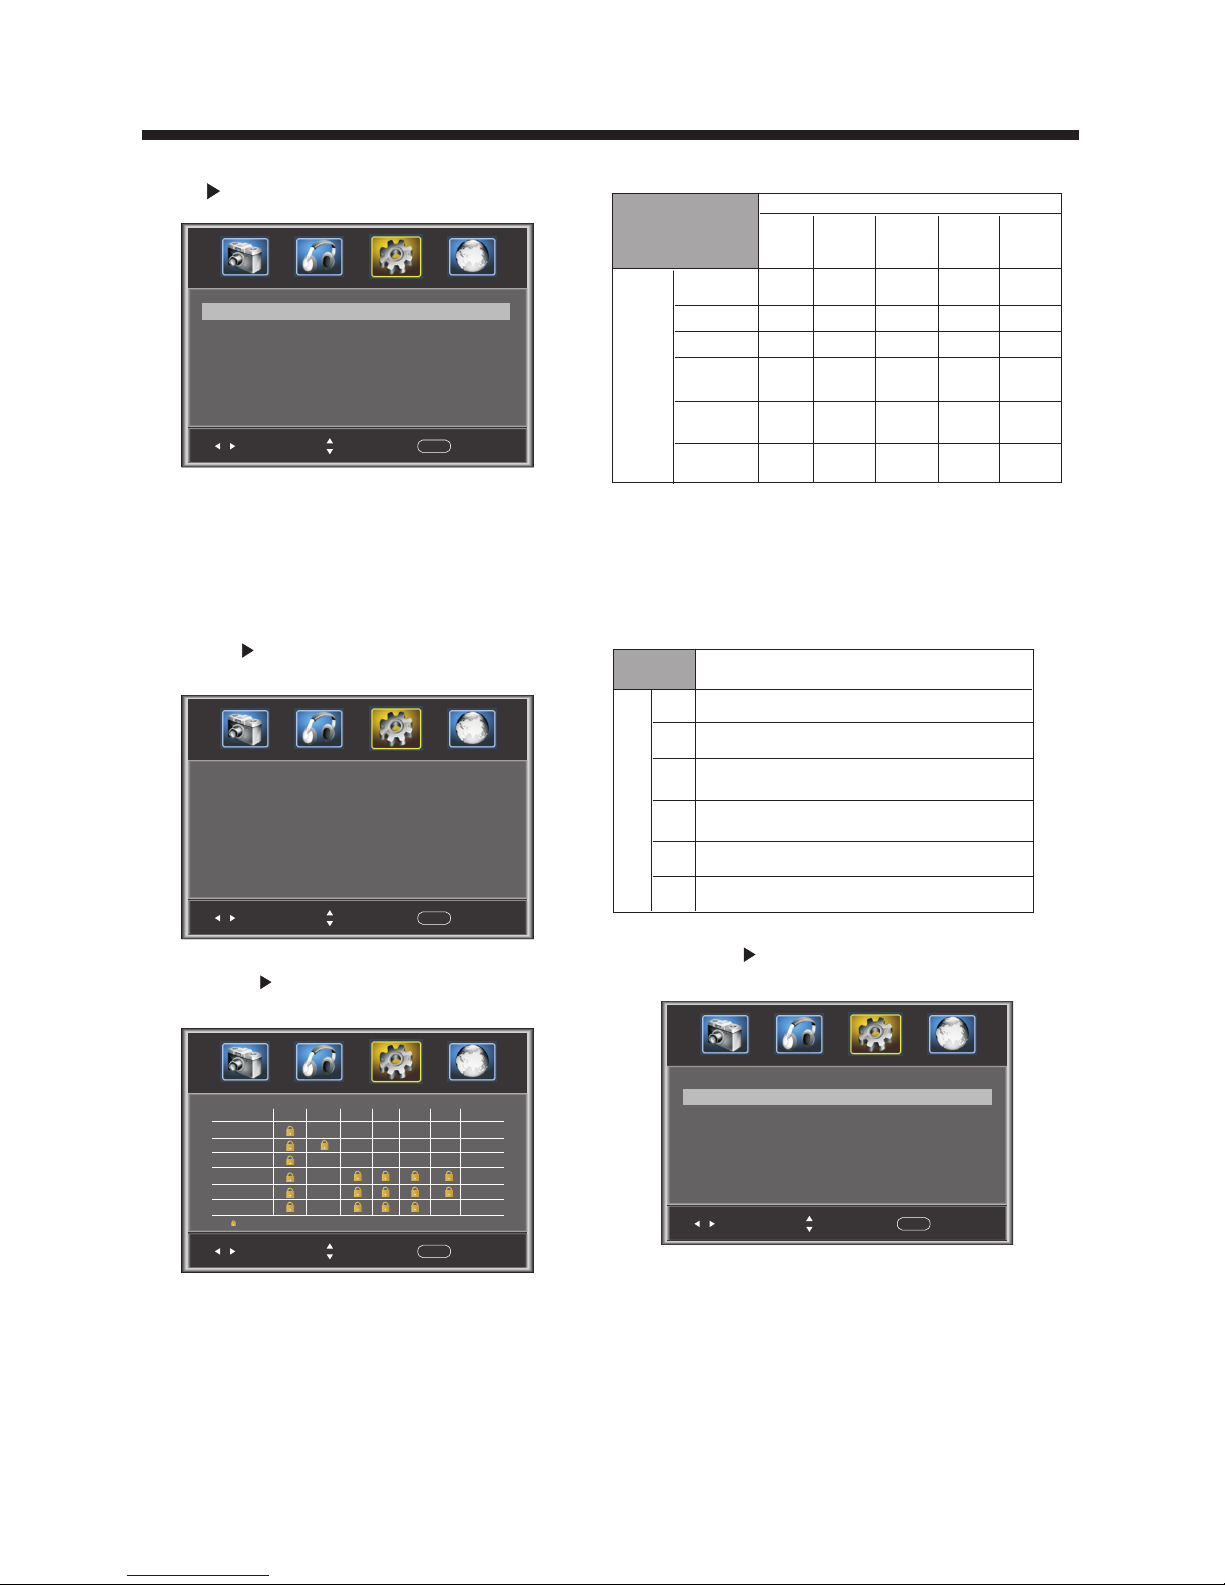
3.1. P arental Con trols:
Pres s button to s elect and
pres s button. The s creen will displ ay as follo ws:
Pare ntal Cont rols
Sel ect
Adj ust
Men u
Exi t
Ent er Pass word -- --
Inpu t the passw ord so th at the scre en shows the
menu . Factory d efault passwor d is 6666.
Pare ntal
Cont rol
Sel ect
Adj ust
Men u
Exi t
Cha nge pas sword
P.G switch
Off
US
Can ada
RRT se tting
Res et RRT
< >
< >
< >
< >
< >
>
Note:
If you want to adjust contrast, brightness, color,
or sharpness, the picture mode must return to
“Custom”status.
Sel ect
Adj ust
Men u
Exi t
Sou nd Mode Sta ndard
Bas s
50
Treb le
50
Bal ance
0
Sur round
AVL
Dig ital Ou tput PCM
Off
Off
< >
< >
< >
< >
Aud io Lang uage Engli sh
< >
Page 14
OPERATION
-13-
Chan ge Passwo rd:
Pres s button an d the scr een will di splay as follows :
2).N ew passwo rd: Inp ut the new pa sswor d
3).C onfirm pa sswor d: Input th e new password aga in
Sel ect
Adj ust
Men u
Exi t
New p asswo rd
Con firm pa sswor d
----
----
Old p asswo rd
----
1).O ld passwo rd: Inp ut the old pa sswor d
P.G switch :
When the switch is ON, the fo llowing
opti ons can be ad justed.
Pare ntal Cont rol
US: Pr ess butto n, and th e screen wi ll display as
foll ows:
Sel ect
Adj ust
Men u
Exi t
TV
MPAA N/A
>
< >
1):T V: Pres s button and the scr een will display a s
foll ows:
Sel ect
Adj ust
Men u
Exi t
TV ra ting
ALL FV V S L D
TV-Y
TV-Y 7
TV-G
TV-P G
TV-1 4
TV-M A
Blo ck Pre ss ENTE R to lock o r unloc k
And us e ENTER key t o switch lock/ unl ock
feature.
Pare ntal
Cont rol
Rat ing Con tent
FV
(Fa ntasy
vio lence )
V
(Vio lence )
S
(Se xual
sit uatio n)
L
(Ad ult
lan guage )
D
(Se xuall y
sug gesti ve
dia log)
Sug geste d
age
TV-Y (Al l
chi ldren )
TV-Y7 (Dire ct to
ord er chil dren)
TV-G( Gener al
aud ience )
TV-PG (Pare ntal
Gui dance
sug geste d)
TV-14 (Pare nts
str ongly
cau tione d)
TV-MA (Matu re
aud ience o nly)
X
X
X
X
X
X
X
X
X
X
X
X
Con tent
2).M PAA:swi tch the mov ie-ra ting cont rol level; N/A,
G,PG , PG-13,R ,NC-1 7,X.
Rat ing
Des cript ion
Age
G Ge ner al a udien ce s, All Ag es a dmi tted
PG
Par ental G uidan ce sugg ested . Some ma teria l may not b e
Sui table for c hildr en.
PG- 13
Par ents st rongl y cauti oned. S ome mat erial m ay be
Ina pprop riate f or chil dren un der 13.
R
NC- 17
X
Res trict . Under 1 7 requi res acc ompan ying pa rent or a du lt
gua rdian (age va ries in s ome jur isdic tions )
No on e 17 and un der adm itted .
X is an o rder ra ting th at is uni fied wi th NC-1 7 but may b e
enc oded in t he data o f order m ovies .
as fol lows:
Cana da: Press b utton and the scre en will display
1): Ca nada Engl ish: Switch the en glish rating con trol
level:EXEMP T,C,C8+,G, PG,14+,18+.
Sel ect
Adj ust
Men u
Exi t
Can ada Eng lish
Can ada Fre nch
EXE MPT
< >
EXE MPT
< >
Page 15
OPERATION
-14-
Rat ing
Des cript ion
Age
E Exe mpt: In clude s news, s ports , docum ents an d other i nform ation
pro gramm ing: ta lk show s, musi c video s, and va riety p rogra mming .
C Chi ldren : Inten ded for y ounge r child ren und er the ag e of 8 year s.
Pay s caref ul atte ntion t o theme s that co uld thr eaten t he ir sens e of
sec urity and wel l-bei ng.
C8+ C hildr en over 8 y ears ol d: Cont ains no p ortra yal of vi olenc e as the
pre ferre d, acce ptabl e, or onl y way to re solve c onfli ct; nor e ncour ag e
chi ldren t o imita te dang erous a cts whi ch they m ay see on t he scre en .
G Gen eral: C onsid ered ac cepta ble for a ll age gr oups, Ap pr opr iate
vie wing fo r the ent ire fam ily, con tains v er y lit tle vio lence , physi cal,
ver bal or em otion al.
PG Pa renta l Guida nce: In tende d for a gen eral au dienc e, but ma y no t be
sui table f or youn ger chi ldren ( under t he age of 8 ) becau se it cou ld
con tain co ntrov ersia l theme s or issu es.
14+ O ver 14 Years: Co ul d con tain th emes wh ere vio lence i s one of th e
dom inant e lemen ts of the s toryl ine But i t must be i ntegr al to the
dev el opme nt of plo t or char acter. L an gua ge usag e could b e profa ne
and n udity , p resen t withi n the con text of t heme.
18+ Ad ul ts: Int en ded f or v iewer s 18 y ear s an d older a nd m igh t co ntain
dep ictio ns of vio lence , which w hile re lated t o the dev elopm en t of
plo t, char acter o r theme s, are in tende d for adu lt view ing. Co ul d
con tain gr aphic l angua ge and po rtray als of se creta ry and nu dity.
2).C anada Fre nch: Switch the Fr ench-rating co ntrol
level: E, G,8AN S+,13 ANS+ ,16AN S+,18ANS+.
Rat ing
Des cript ion
Age
E Exe mpt pro gramm ing
G Gen eral :A ll ages a nd chil dren, c ontai ns mini mal dir ect vio le nce,
but m ay be int egrat ed into t he plot i n a humor ous or un reali stic
man ner .
8an s+ Gene ral but i nadvi sable f or youn g child ren :Ma y be view ed by a
wid e publi c audie nce, bu t could c ontai n scene s distu rbing t o
chi ldren u nder 8 wh o canno t disti nguis h betwe en imag inary a nd
rea l situa tions . Recom mende d for vie wing wi th pare n.
13a ns+ Ove r 13 year s: Coul d conta in scen es of fre quent v iolen t scene s
and i n tense v iolen ce.
16a ns+ Ove r 16 year s: Coul d conta in freq uent vi olent s cenes a nd viol ence.
18a ns+ Ove r 18 year s: Only f or adul t viewi ng. Cou ld cont ain fre quent
vio lent sc enes an d extre me viol ence.
Rese t RRT: Press button and th e screen will be
disp layed as fo llows:
RRT se tting : This is avail able only f or ATSC .
Sel ect
Adj ust
Men u
Exi t
Are y ou sure ?
NO
YES
Pre ss“ENTE R”Key To Sele ct
3.2 Timer
You can adjust timer here.
Press to select, and press to adjust. Press MENU
to exit.
Slee p Timer: you c an set the sl eep Timer .
Note :
Tim e zone, DST, and Clock are on ly for ATSC .
Sel ect
Adj ust
Men u
Exi t
Sle ep time r
Time z one
DST
Clo ck
199 9/12/ 31 04:0 3PM
Pac ific
Off
Off
< >
< >
< >
2) Opt ion: This is fo r editing t he CC fon t.
Pres s button an d the scr een will di splay as follows :
NOTE: This is available only for ATSC.
1) Advanc ed sele ction: This i s available only f or AT SC.
3.3 Cl osed Capt ion: Sw itching c lose ca ption mod e.
Pres s button to s elect Closed Cap tion and press
butt on. The scree n will display as fo llows:
Sel ect
Adj ust
Men u
Exi t
CC Mo de
Bas ic Sele ction
Adv anced S elect ion
Opt ion
Off
CC1
Ser vice 1
< >
< >
< >
>
Sel ect
Adj ust
Men u
Exi t
Mod e
Fon t style
Cus tom
Def ault
Fon t size Def ault
Fon t Edge st yle Def ault
Fon t Edge co lor Defau lt
FG co lor Def ault
BG co lor Defa ult
FG op acity Def ault
BG op acity Defa ult
< >
< >
< >
< >
< >
< >
< >
< >
Page 16
OPERATION
-15-
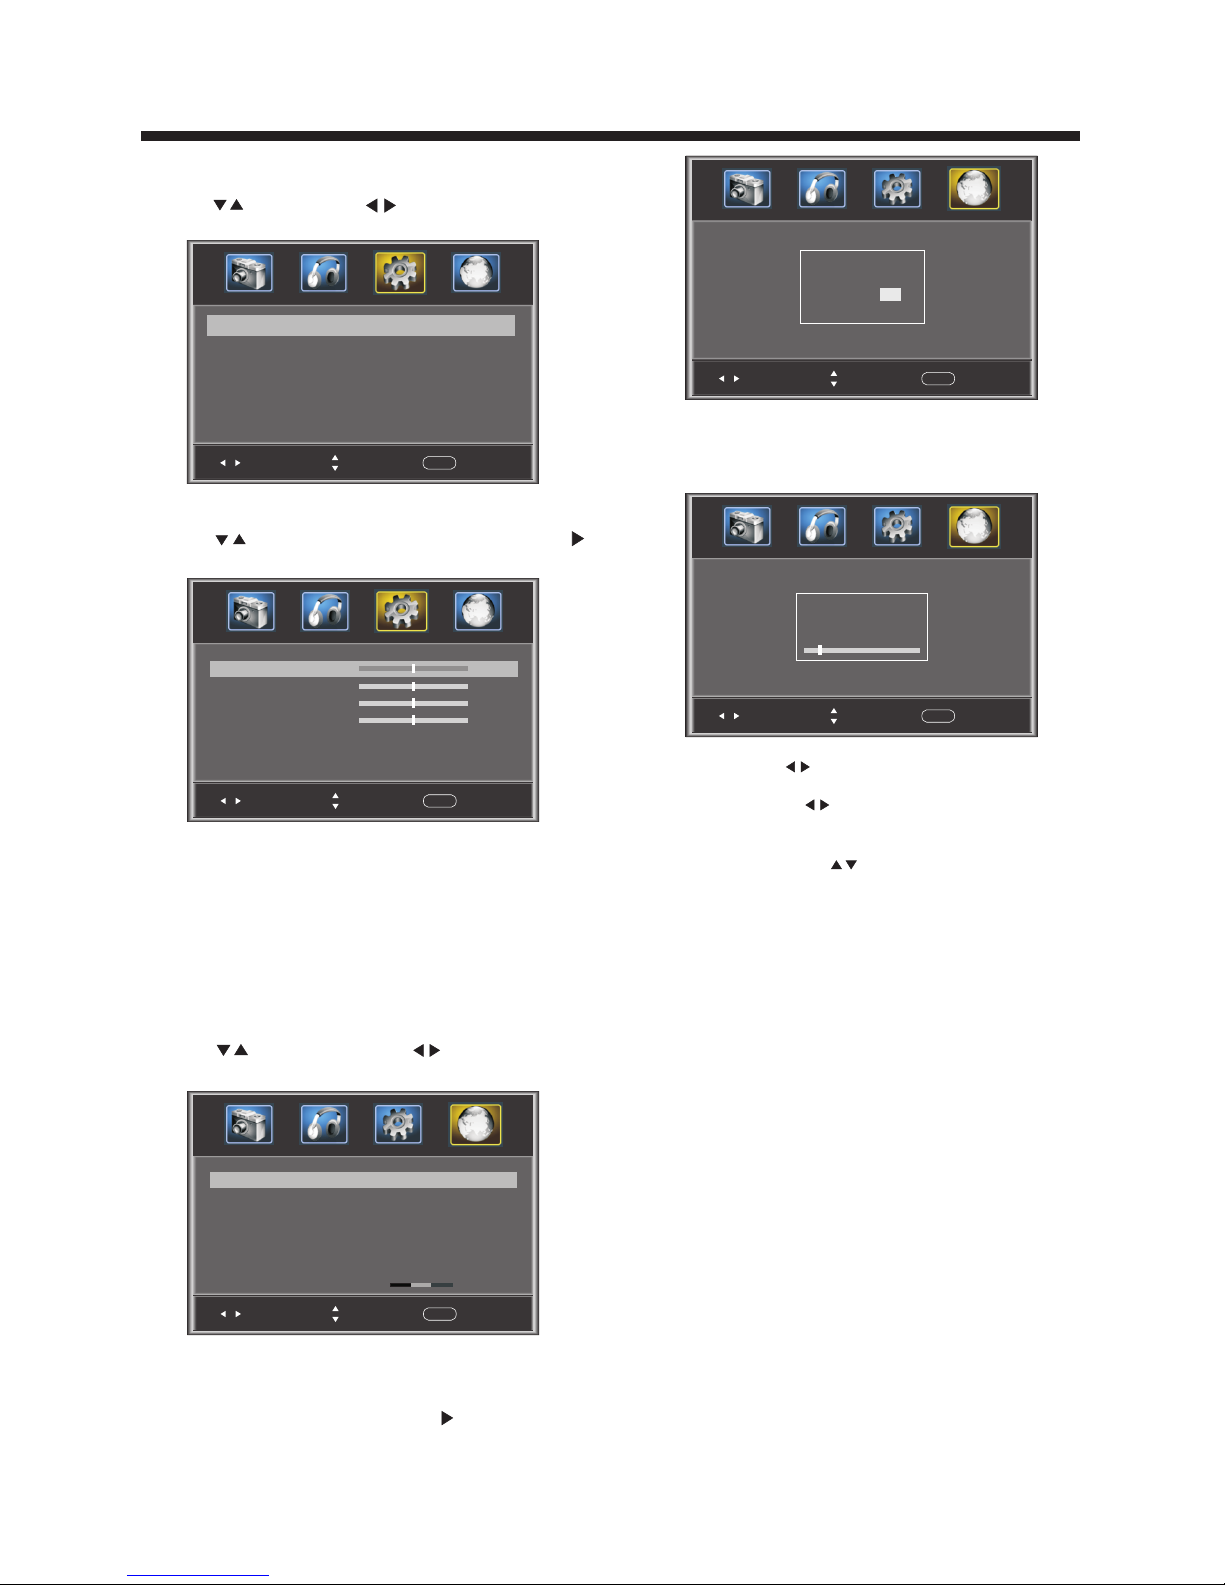
1). Air/Cable: Select Air TV signal or cable TV signal.
2). Auto Scan: If you selected Air on Air/Cable selection,
scanning all TV channels is required prior to starting
watching the TV programs. Press the button, and you
will see the following menu.
Select“yes”and press the ENTER button.
You will see the following screen that shows
progress of Auto Scan.
3). Favorite: Press button to choose/delete the
favorite channel .
4). Show/Hide: Press button to display or hide
the current channel.
5). Channel NO.: Display the current channel number.
6). Channel lable: Press button to edit the current
channel name.
7). DTV signal: Display DTV signal intension. It can't be
selected or adjusted.
Tran spare ncy 25%
Men u Langu age Eng lish
Sel ect
Adj ust
Men u
Exi t
< >
< >
3.5 VGA Setti ngs: This is avail able only in PC Mode .
1).H -Pos:Ad just th e horizon tal pos ition of th e screen.
2).V-P os:Ad just the ve rtica l positio n of the sc reen.
3).C lock: Fin e tune the screen wi dth.
4).P hase: Fin e tune the phase of th e screen.
This adjustment i s not required in no rmal case .
5).A uto: Auto ad just to fit t he scre en.
Pres s button to s elect VGA Sett ings and press
butt on. The scree n will disp lay as fo llows:
Sel ect
Adj ust
Men u
Exi t
H-p os
V-po s
Clo ck
Pha se
50
Aut o
50
50
50
>
4. Channel MENU
The fourth item of the MENU is Channel MENU.
You can adjust digital and analoge TV Channel.
Press to select and press to adjust.
Sel ect
Adj ust
Men u
Exi t
Air /cabl e
Aut o Scan
Air
Fav orite
Sho w/Hid e
Cha nnel NO.
Cha nnel La ble.
DTV s ignal : Good
2-1
< >
< >
>
>
>
>
Sel ect
Adj ust
Men u
Exi t
Are y ou sure ?
NO
YES
Pre ss“ENTE R”Key To Sele ct
Sel ect
Adj ust
Men u
Exi t
R F CH : 4
Fou nd: 4
Ana log: 1
Dig ital: 3
3.4 Me nu Settin gs
You can adjust Menu Settings here.
Press to select. Press to adjust. Press MENU
to exit.
Page 17
OPERATION
-16-
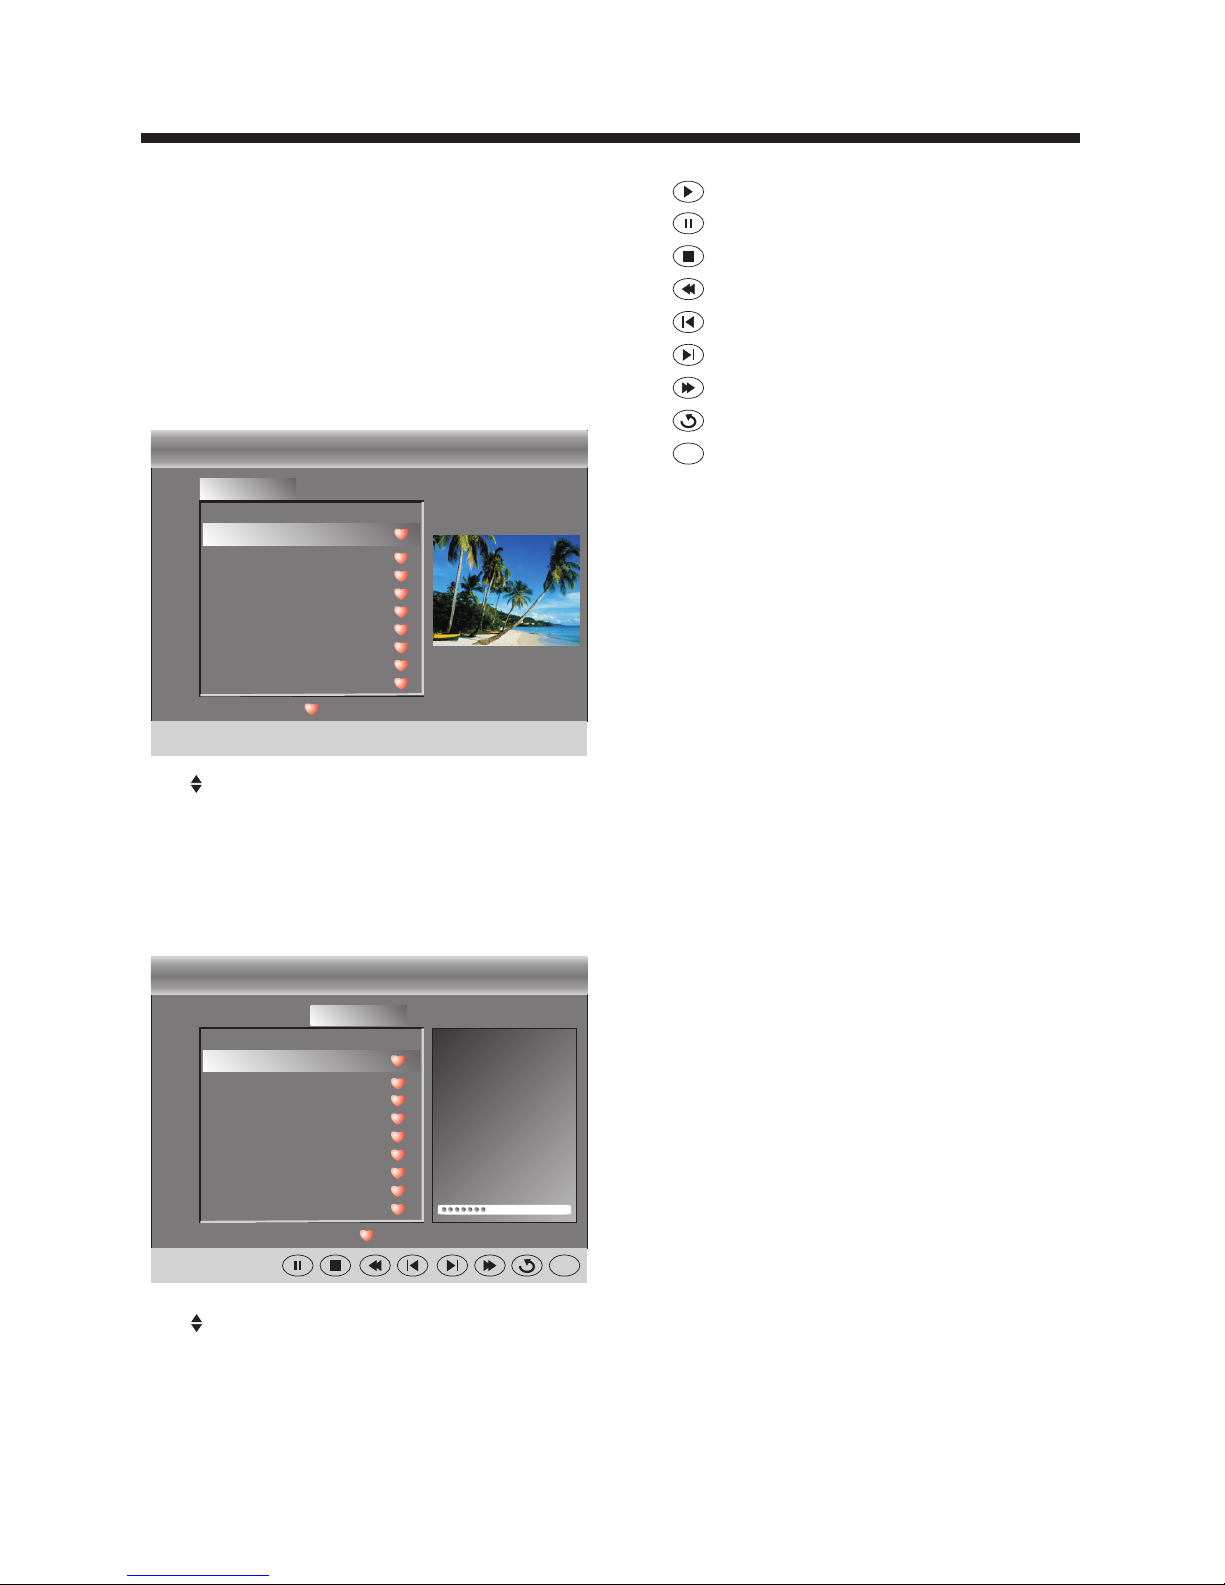
5. Multimedia MENU
With an e xtern al storag e devic e attache d to the USB input,
you ca n use the Mul timedia Menu to di splay JPEG pictu res
and pl ay MP3 musi c.
Befo re starti ng operation, ve rify that the USB st orage device
is usi ng the FAT32 fi le system format . Th is televi sion do es
not su pport NTF S or othe r formats . Pleas e use a high- speed
USB 2. 0 device wi th a maximum capac ity of 50GB.
1. Sel ect a Photo
The screen shown be low will be displa yed.
: pause
: stop
: fast backward
: previous
: next
: fast forward
: repeat all
: random play
Ran dom
2. Select Music
The screen shown below will be displayed.
USB
C:
Phot o Mus ic
..
Every th in g I do .m p3
C:\la og e\
:17 001 /0 18
Total s ize:3 .7 GB
Unu sed siz e: 3.7 GB
Seale d Wi th A Kis s. mp 3
.mp3
.mp3
.mp3
.mp3
.mp3
.mp3
.mp3
Eve rythi ng I do.m p3
Tit le:
Art ist:
Alb um:
Year :
Bit R ate: 12 8kbps
Pla y
05: 49 06:3 3
Ran dom
Use select the .jpg files or folders,
to display the photo or open the folder, EXIT to
stop playing or go to the menu.
press ENTER
press
previous
Use select the .mp3 files or folders, to
play or open the folder, EXIT to go to menu.
press ENTER
press the previous
USB
C:
Phot o Musi c
..
011. jp g
20081 22 22 17 88 78787.j pg
20081 .j pg
20087 .j pg
20287 .j pg
20787 .j pg
20087 .j pg
20787 .j pg
20087 .j pg
C:\ph ot o\
:17 001 /0 18
Total siz e: 3. 7 GB 1 02 4 x 768 372 .7 2K B
Unuse d si ze : 3. 7 GB 2006:0 7: 14 1 5: 37 :42
011. jp g
: play
Page 18
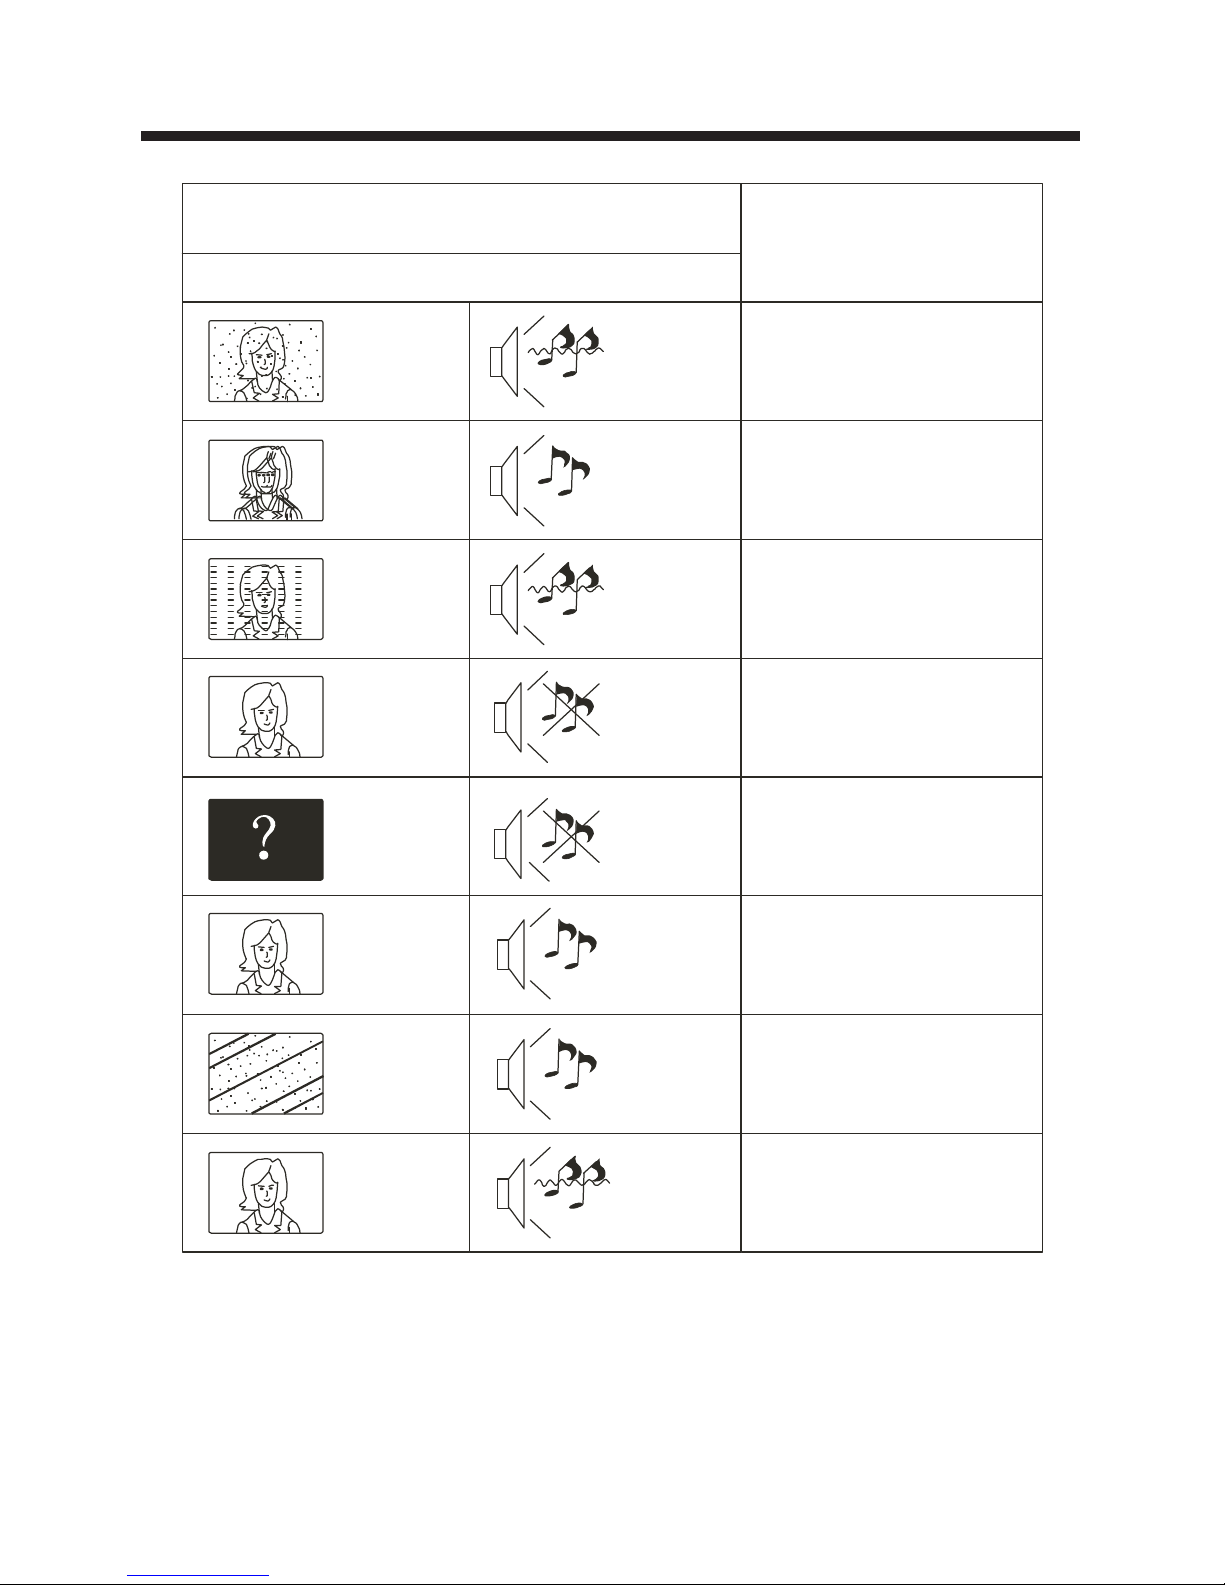
Picture Audio
Snow Noise
antenna posit ion, direction
or con nection
Inspection Check
Interference
Noise
electronic eq uipment,car/
moto rcycle, fluorescent li ght
Normal Picture
Mute
Volume (c heck if mut e is
activated or if t he audio system
conn ections a re not correct)
No picture Mute
Powe r cord is not i nserted
Powe r switch is n ot opened
Cont rast and br ightness/vol ume
setu p
Pres s standby k ey on the r emote
cont rol for ins pecting
No color Normal audio Col or contro l
Picture
breaking up
Normal audio
or weak
Retu ne channe l
No color
Noise
TVsystem
Normal audio
antenna posit ion, direction
or con nection
TR OUBL E SHOO TING
Trouble phenomenon Symptom
Ghost
-17-
The LCD TV panel is built with very high precision technology giving you fine picture details
in vibrant color. Occasionally, a few non-active pixels may appear on the screen as a fixed
point of red, green, blue, black or white. Please note this does not affect the performance of
the product.
Page 19

 Loading...