

Page 1
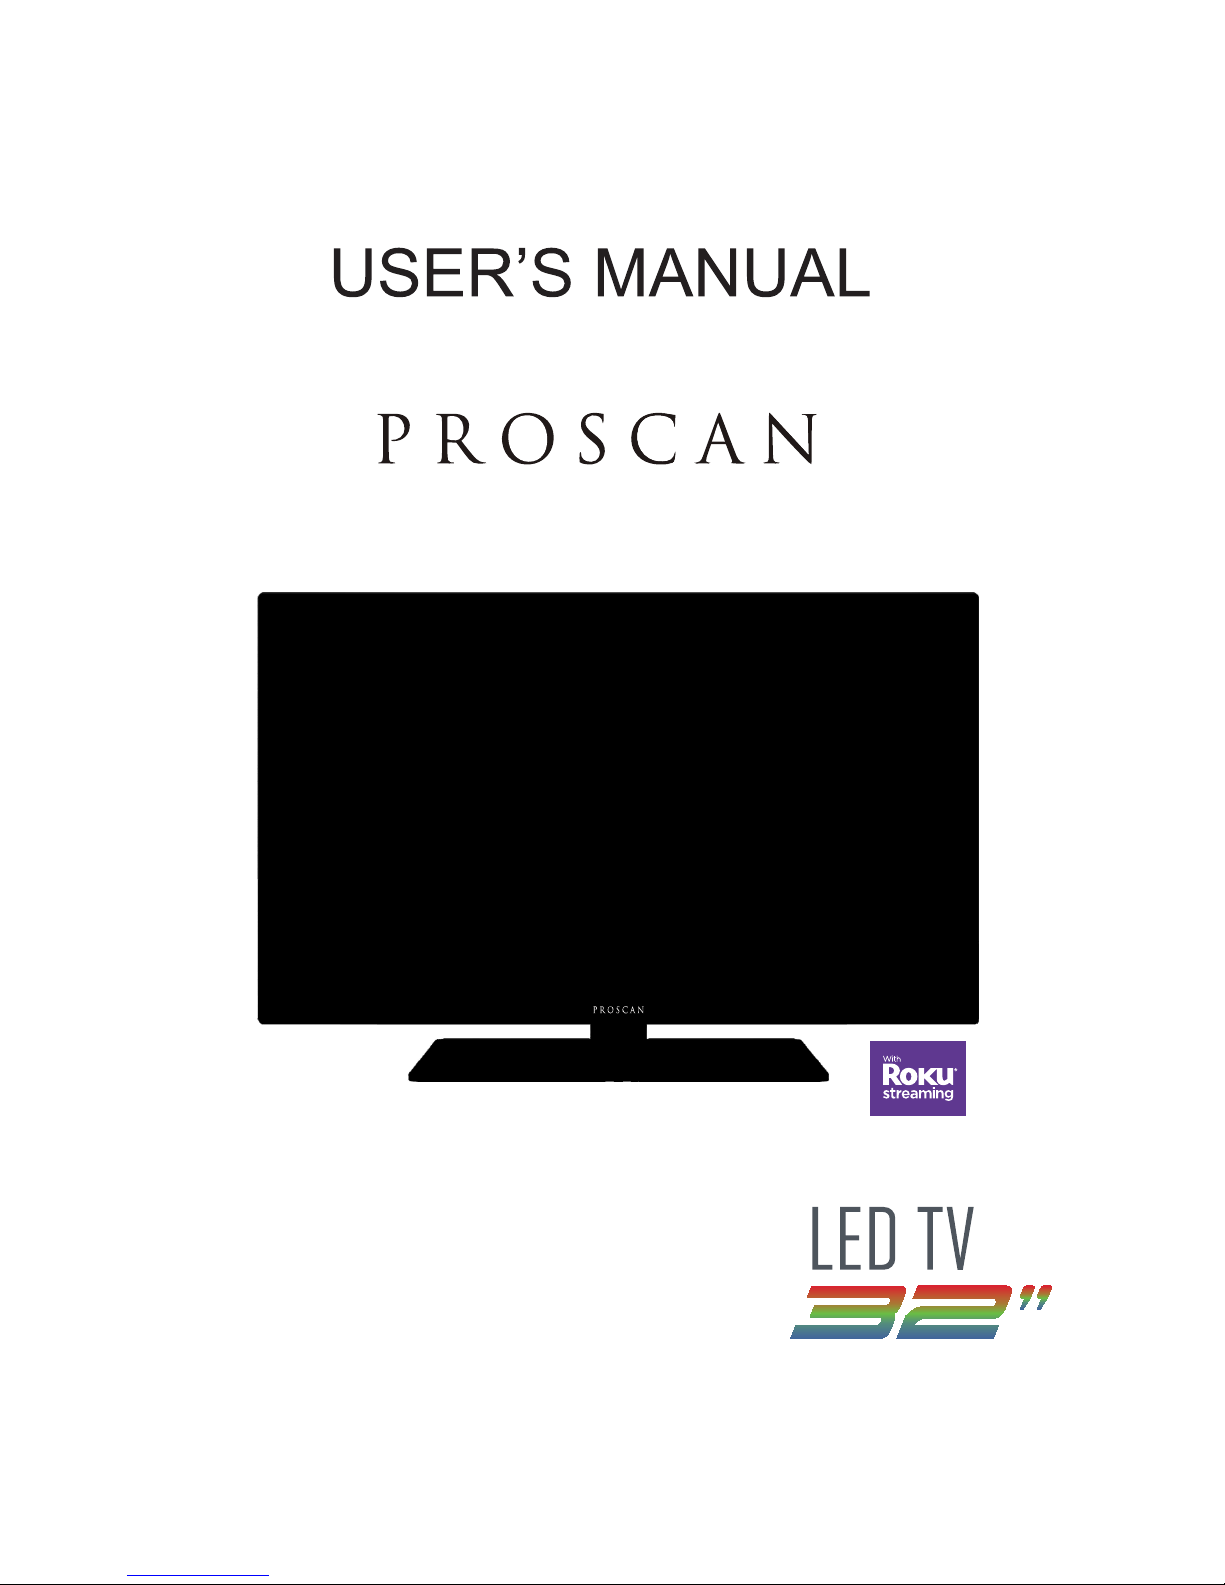
PLDED3231A-RK
Proscan Support: For service assistance or inquires with the Proscan TV,
please visit: www.curtcoint.com
Roku Support: For service assistance or inquires with the Roku Streaming
Stick,
please visit: www.roku.com/support
Note: The warranty for the Proscan TV and the Roku Streaminig Stick are
managed
exclusively by their respective companies. Please complete each warranty
independantly and submit to their respective parties.
Page 2

Contents
Introduction
Warning
Caution
Important Information
Attaching or Removing the Stand
Installing Batteries to the Remote Control
Identifying Front and Rear Panel
Connection Suggestion
Main Unit Description
Remote Control
OSD Basic Adjustment
How Do I Clean The TV
Troubleshooting
Specifications
FCC Compliance Statement
1
Roku Quick Start Guide
5&$ Warranty
Roku Important Product Information & Warranty
Page 3

Introduction
Thank you very much for purchasing your LED
TV. It serves as a normal colour TV
and a PC monitor. To enjoy your set fully from the very beginning, read this manual
carefully and keep it handy for future reference.
INSTALLATION
Locate the receiver in the room where direct light does not strike the screen. T
otal
darkness or a reflection on the picture screen can cause eyestrain. Soft and indirect
lighting is recommended for comfortable viewing.
Allow enough space between the receiver
and the wall to permit ventilation.
Avoid excessively warm
locations to prevent possible damage to the cabinet or
premature component failure.
This
TV can be connected to AC 100-240V~ 50/60Hz.
Do not i
nstall the TV
in a location near heat sources such as radiators, air ducts,
direct sunlight, or in closed compartments and closed areas. Do not cover the
ventilation openings when using the TV.
The indicator light will last for about 30 seconds after the power has been turned
off.
Wait until the indicator light goes out before repowering the TV.
6
User manual x1
Warranty card x1
Remote control x1
Battery (pair, AAA) x1
Accessories list for this TV set:
Roku Streaming Stick™
Page 4
Warning
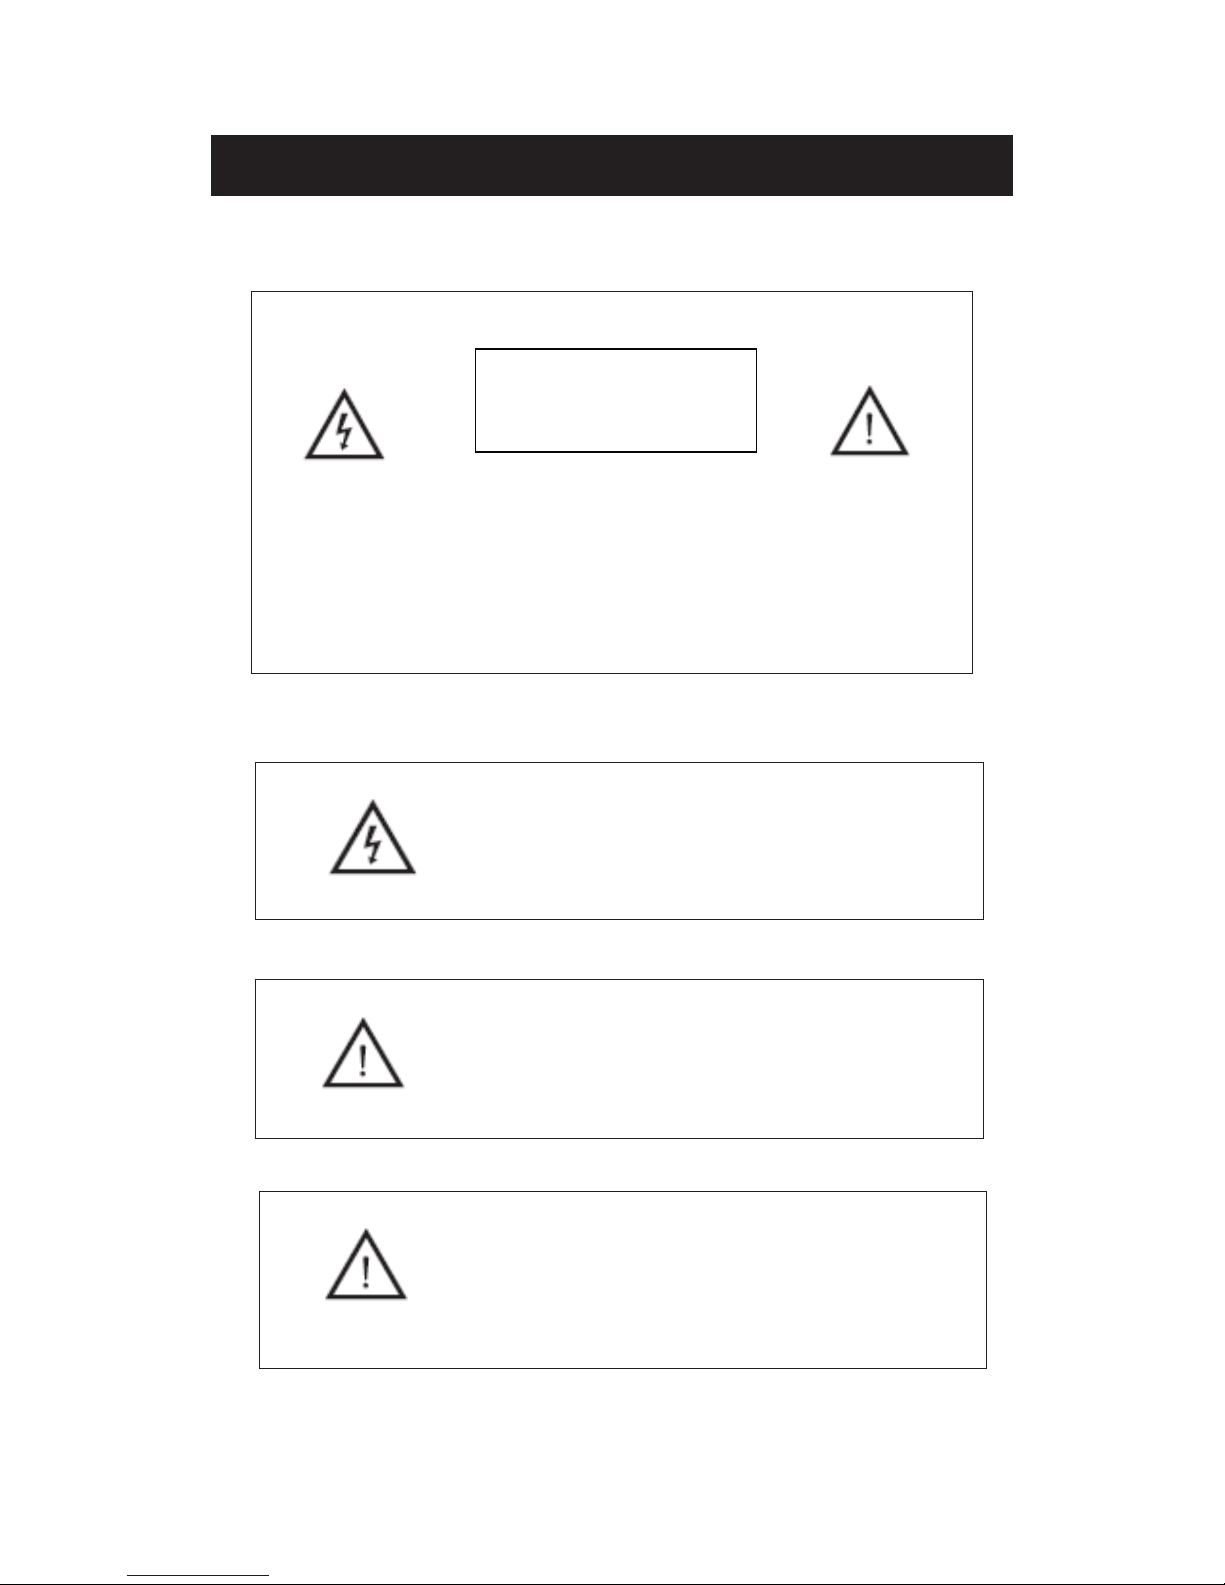
This symbol is intended to alert the user to avoid the risk
of electric shock. This equipment may only be disassembled
by qualified service personnel.
This symbol is intended to alert the user to the presence
of important operation and maintenance instructions in
the literature accompanying the equipment.
CAUTION: TO AVOID THE RISK OF ELECTRIC SHOCK.
DO NOT REMOVE COVER (OR BACK).
NO USER- SERVICEABLE PARTS INSIDE.
REFER SERVICING TO QUALIFIED SERVICE PERSONNEL
.
CAUTION
RISK OF ELECTRIC SHOCK
DO NOT OPEN
Class I structures of equipment should be connected to the grid
power output with a protective earth connection on the socket.
Power plug as a broken applianceˈ
broken installations should
be easy to operate.
Page 5
Caution
Caution
High voltages are used in the operation of this product.
- Do not open the product's casing. Refer servicing
to qualified service personnel .
Caution
To prevent fire or electrical shock hazard, do not expose
the main unit to
UDLQRUPRLVWXUH ˈdo not place objects
filled with liquids, such as vases, on the apparatus.
Caution
Do not drop or push objects into the television cabinet
slots or openings. Never spill any kind of liquid on the
television receiver.
Caution
Avoid exposing the main unit to direct sunlight and other
sources of heat. Do not stand the television receiver
directly on other products which give off heat: e. g. video
cassette players and audio amplifiers. Do not block the
ventilation holes in the back cover. Ventilation is essential
to prevent failure of electrical components. Do not squash
the power supply cord under the main unit or other heavy
objects.
Page 6
Caution
Caution
Never stand on, lean on or suddenly push the product
or its stand. You should pay special attention to
children.
Caution
Do not place the main unit on an unstable cart stand,
shelf or table. Serious injury to an individual and
damage to the television may result if it should fall.
Caution
When the product is not used for an extended period
of time, it is advisable to disconnect the AC power
from the AC outlet.
Caution
The LED panel used in this product is made of glass and
is therefore breakable. This product must not be dropped
or banged. If the LED Panel breaks be careful of being
injured by broken glass.
Page 7
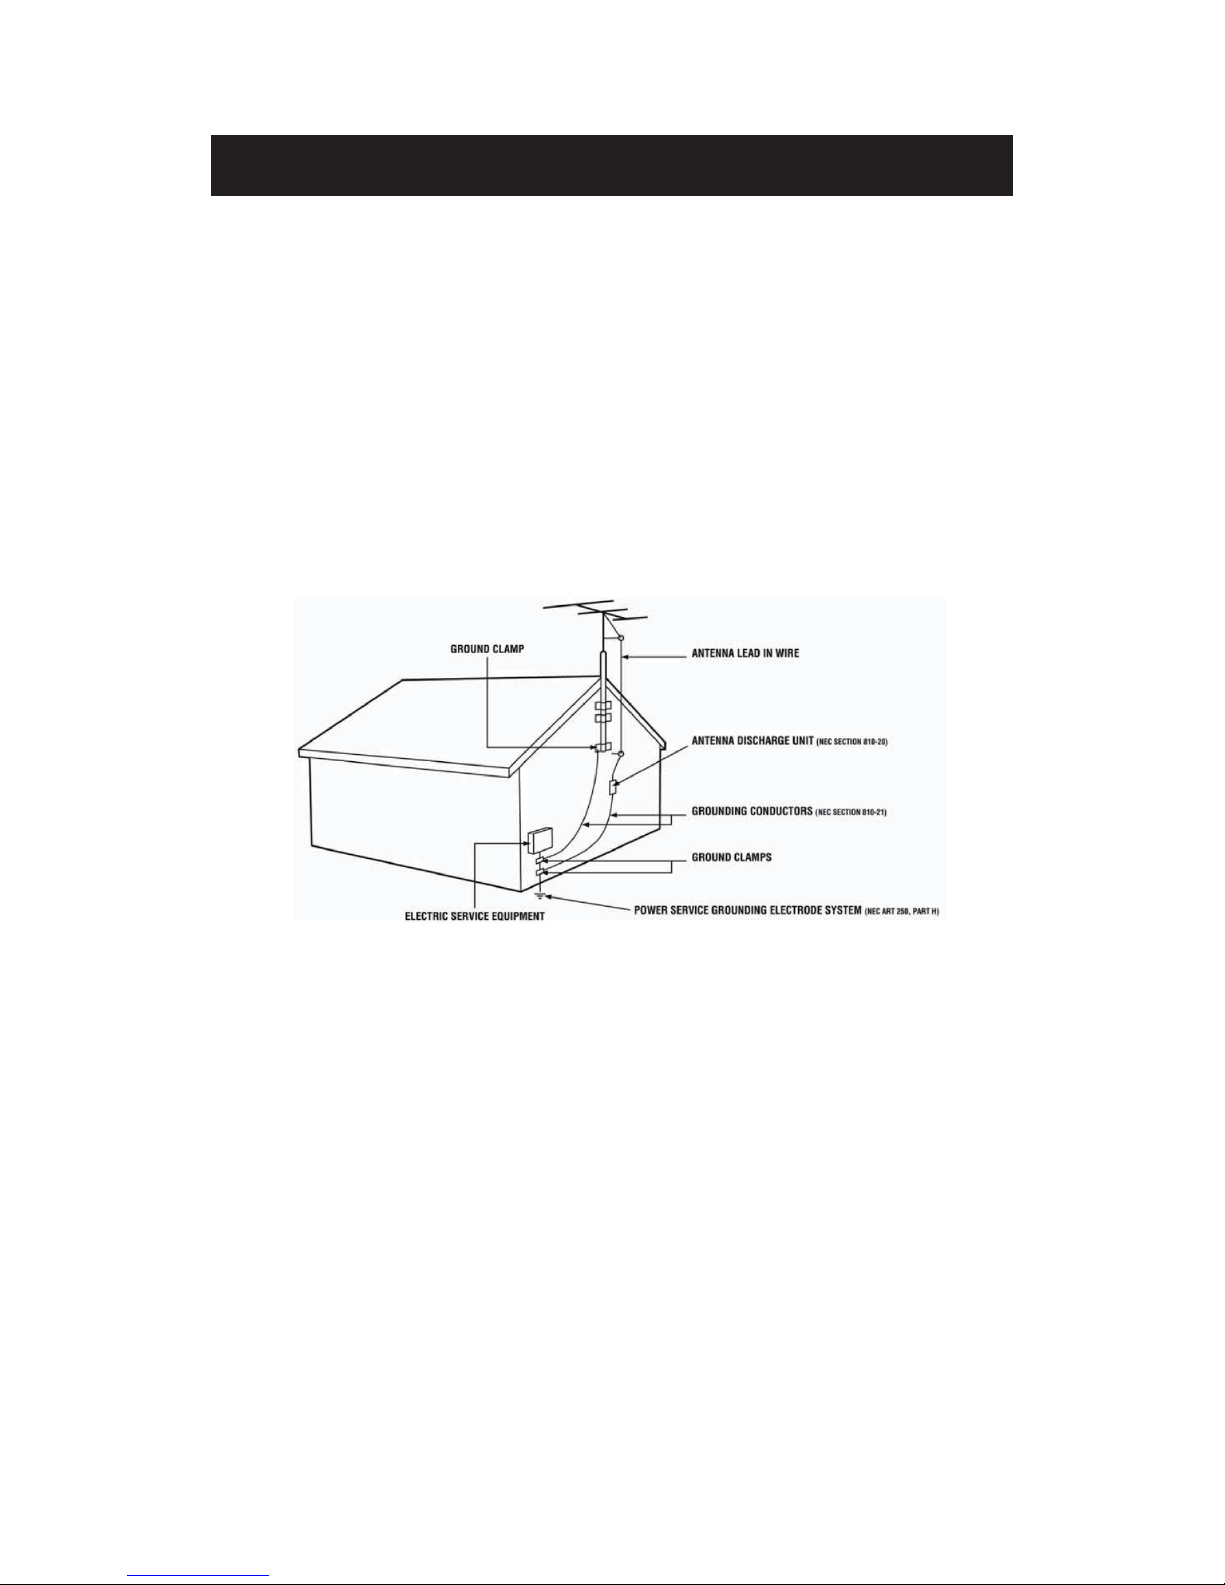
7HOHYLVLRQ$QWHQQD&RQQHFWLRQ3URWHFWLRQ
,PSRUWDQW,QIRUPDWLRQ
([WHUQDO7HOHYLVLRQ$QWHQQD*URXQGLQJ
If an outside antenna or cable system is to be connected to the TV, make sure that the antenna or
cable system is electrically grounded to provide some protection against voltage surges and
static charges. Article 810 of the National Electrical Code, ANSI/NFPSA 70, provides
information with regard to proper grounding of the mast and supporting structure, grounding of
the lead-in wire to an antenna discharge unit, size of the grounding conductors, location of
antenna discharge unit, connection to grounding electrodes, and requirements of the grounding
electrode.
/LJKWQLQJ3URWHFWLRQ
For added protection of the TV during a lightning storm or when it is left unattended or unused
for long periods of time, unplug the TV from the wall outlet and disconnect the antenna or cable
system.
3RZHU/LQHV
Do not locate the antenna near overhead light or power circuits, or where it could fall into such
power lines or circuits.
Page 8
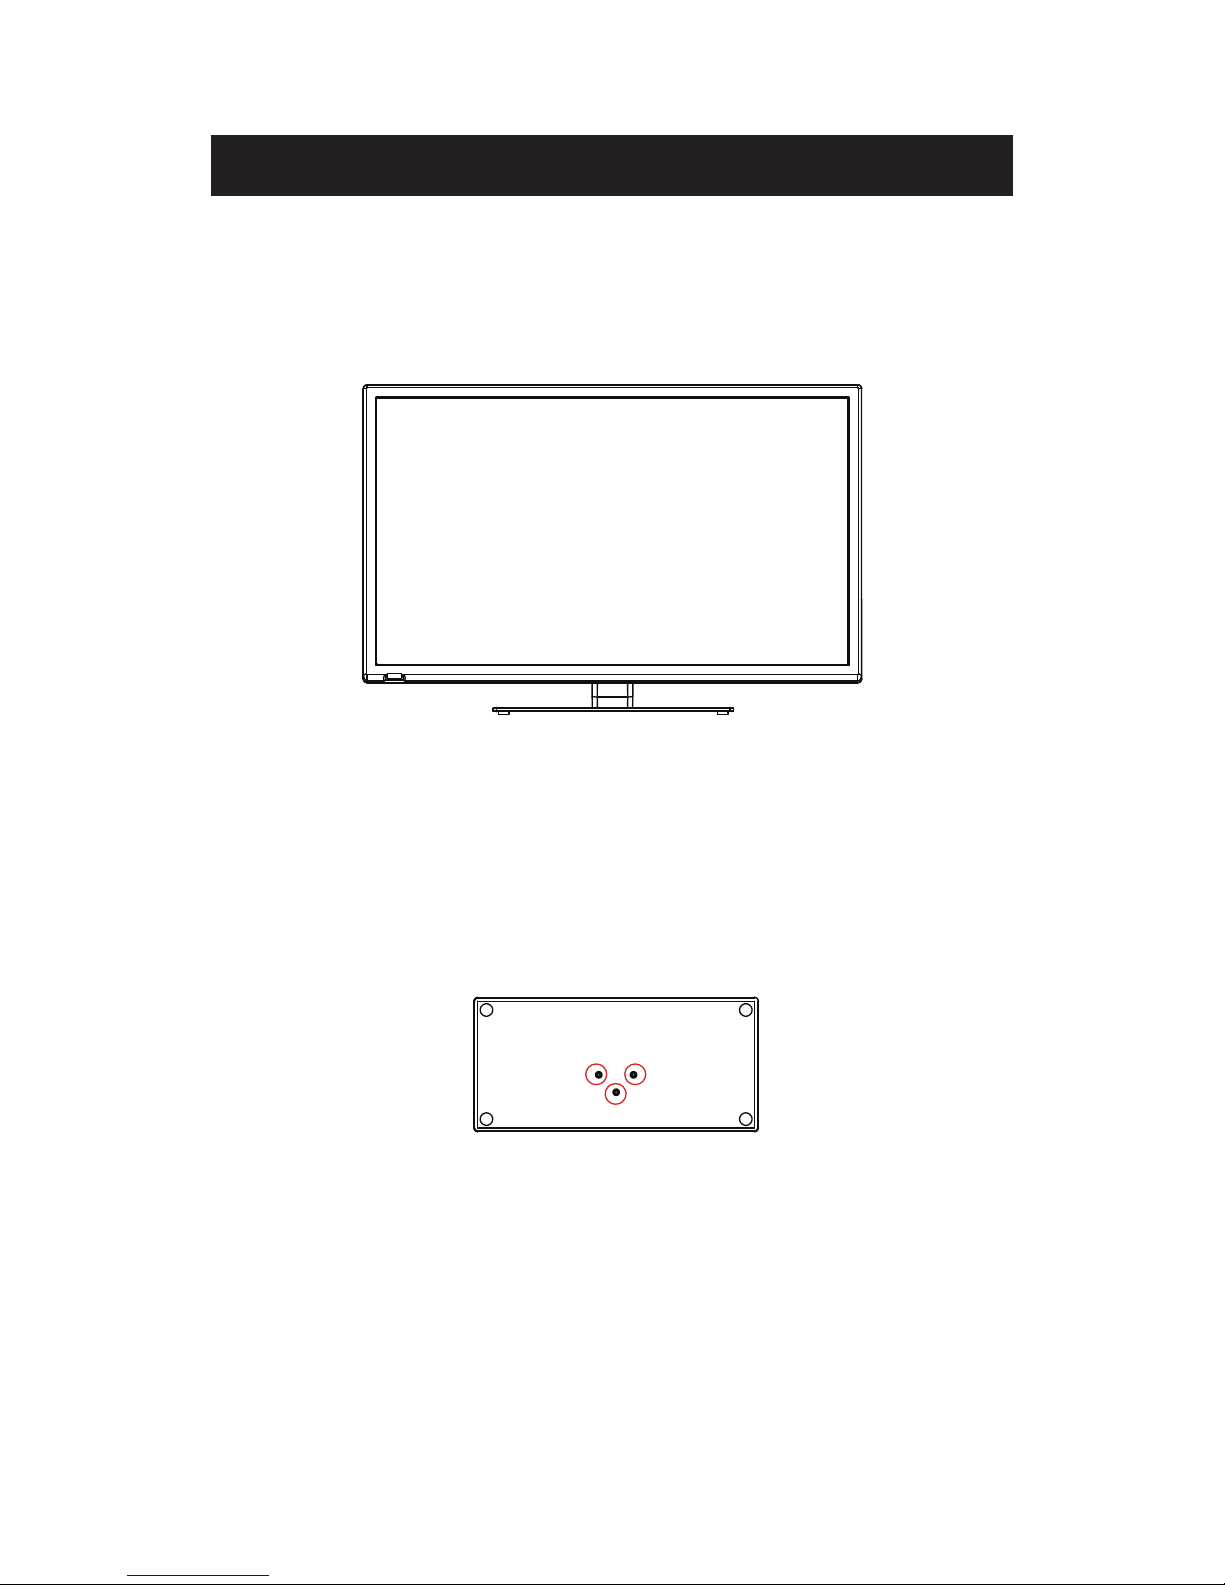
Attacthing or Removing the Stand
1.
To attach the base place the display unit flat on a table. Afterwards attach the stand onto
.dnats eht eruces ot swercs 3 eht ni wercS .dnats eht fo mottob eht
Page 9
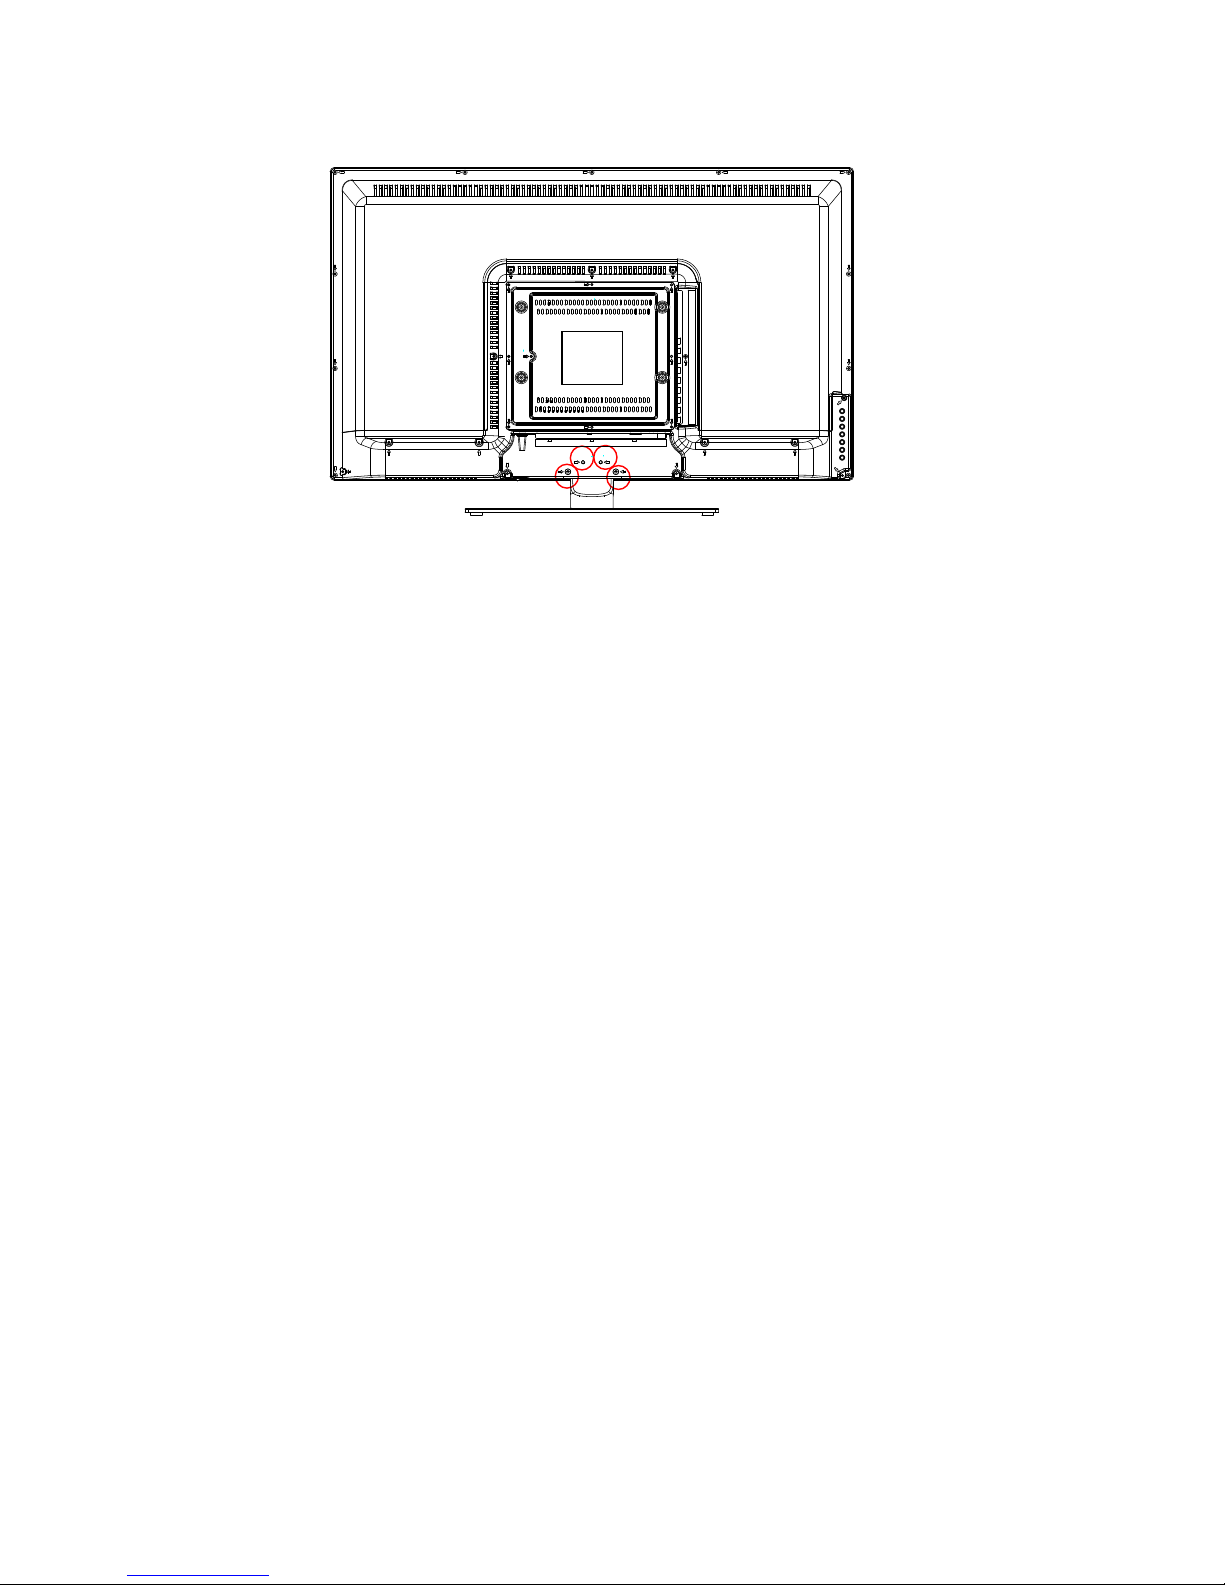
2. To remove the stand, remove the 4 screws in the area and the stand will come off.
Installing Batteries to the Remote Control
Please insert two AAA batteries into the remote control. Make sure that you match the (+)
and (-) symbols on the batteries with the (+) and (-) symbols inside the battery compartment.
Afterwards, re-attach the battery cover.
Please note:
Only use AAA batteries.
Do not mix new and old batteries. This may result in cracking or leakage that may pose a
fire risk or lead to personal injury.
Inserting the batteries incorrectly may also result in cracking or leakage that may pose a
fire risk or lead to personal injury.
Dispose the batteries in accordance with local laws and regulations.
Keep the batteries away from children and pets.
If the remote control is not used for a long time, remove the batteries.
Keep the remote control away from moisture, sunlight, and high temperatures.
Page 10
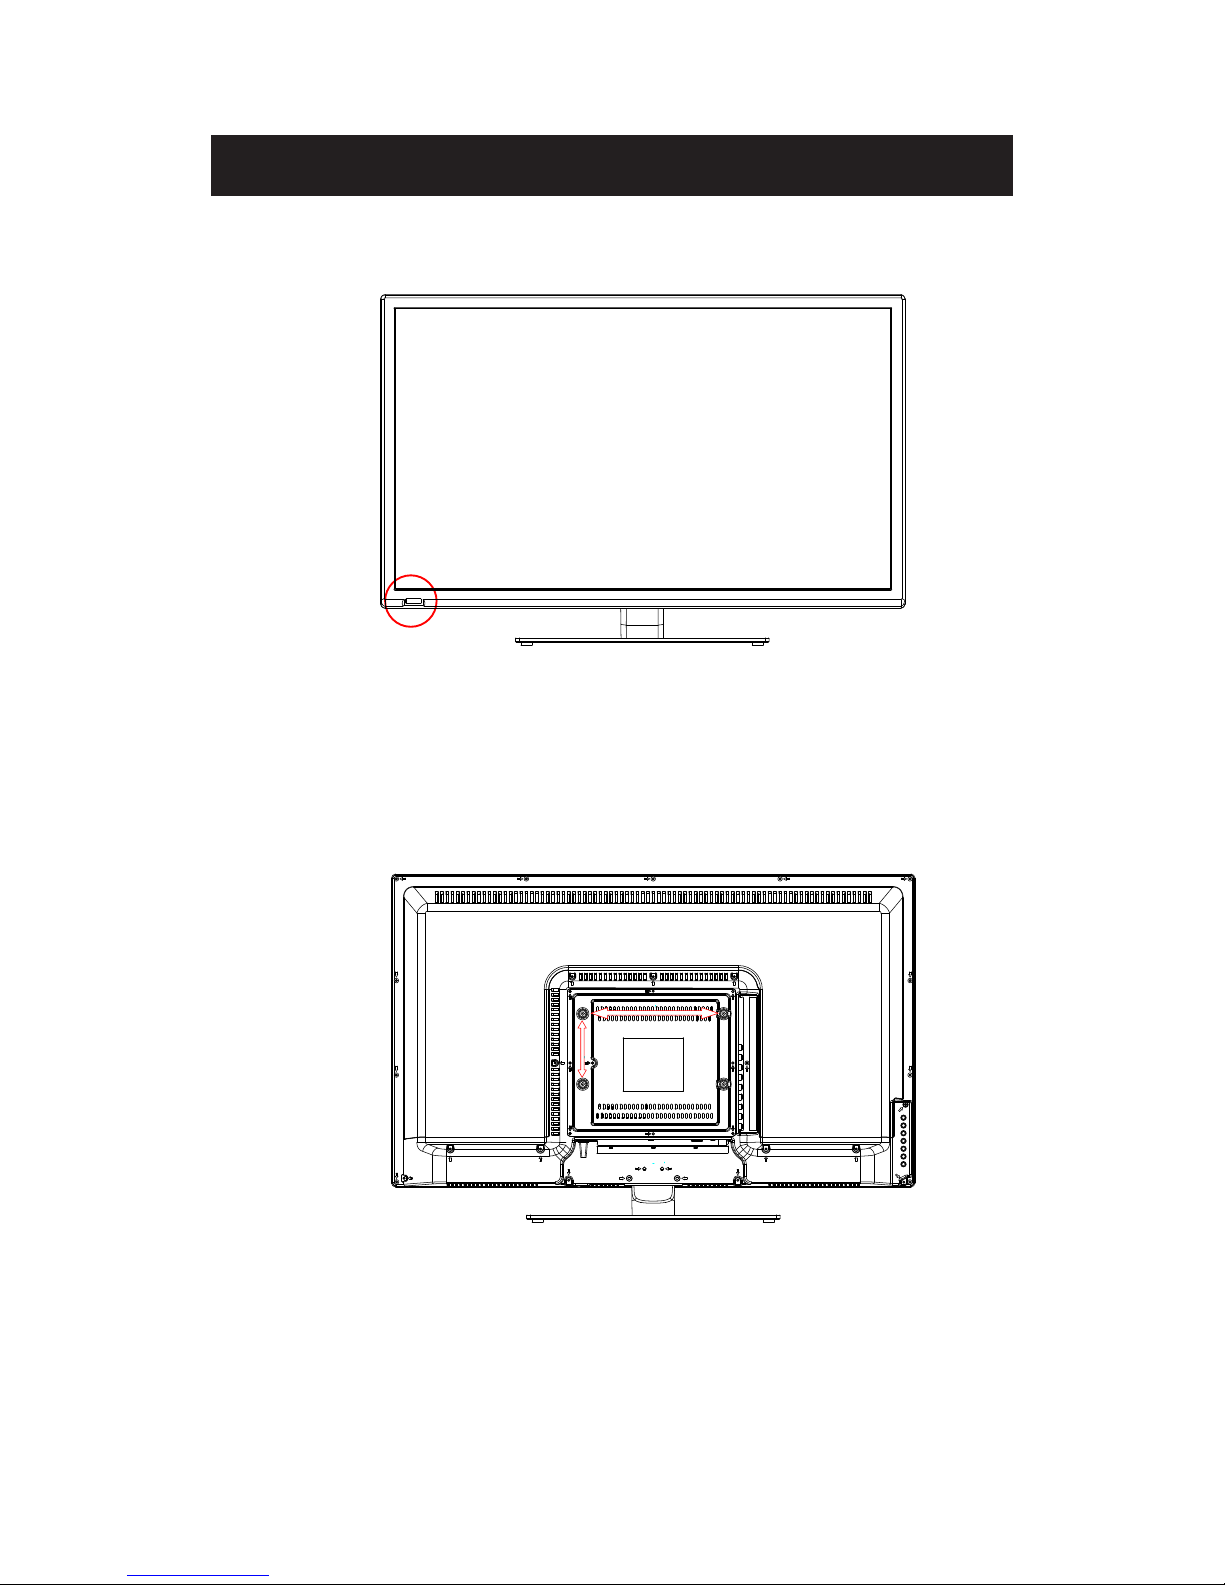
Identifying Front and Rear Panel
Front View
Rear View Mounting Pattern
INDICATOR LIGHT – The light is red when power is plugged in but the TV is not turned on.
The light turns blue when the TV is turned on. Because of the LED in the panel, the TV
might take 10 – 12 seconds to power on.
REMOTE SENSOR – The remote sensor receives all the commands from the remote control.
Mounting Specification : 100mm x 200mm using screw size M6. Length of screw should not
exceed 8mm. Please Note : The 8mm length of screw refers to how deep the screw can go
inside the mounting holes. When you’re buying screws, you should add the original 8mm to
the thickness of your mounting plate in order to get the total screw length.
Page 11
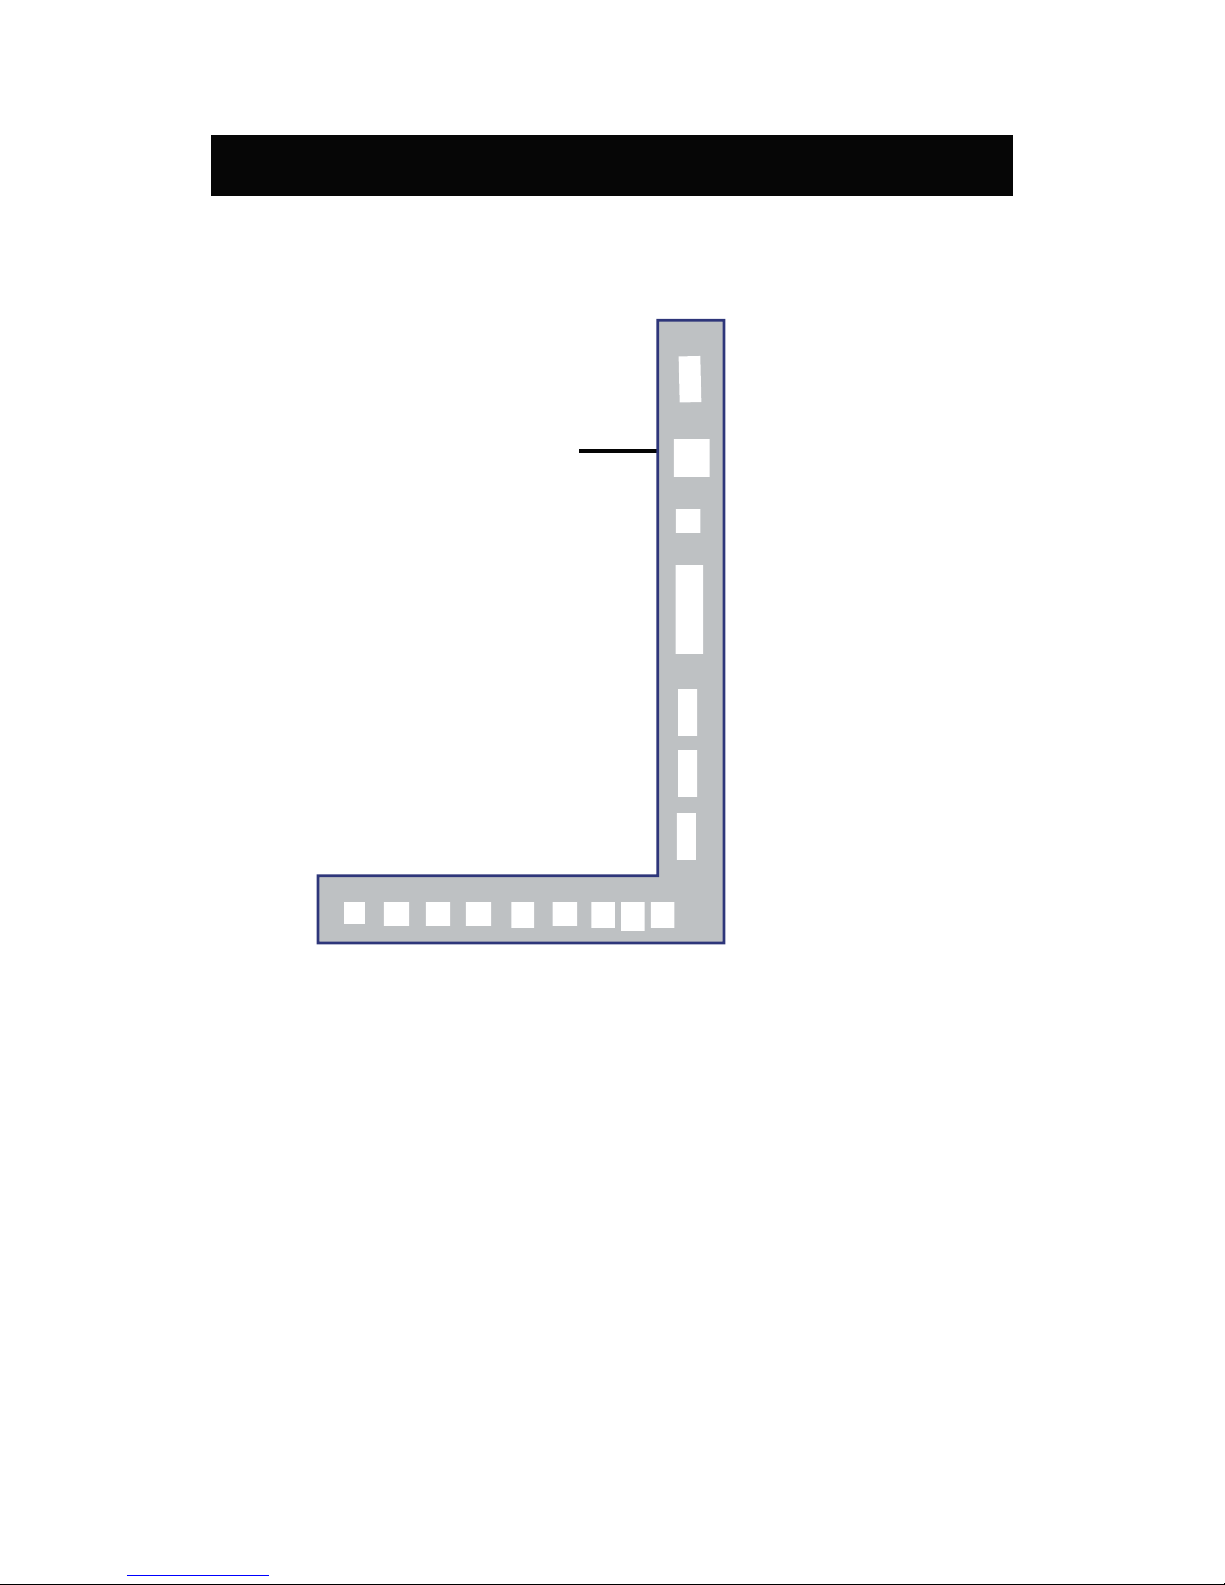
If You Have Digital Cable without Cable Box or Antenna…
Connection Suggestions
1.
Make sure the power of HDTV is turned off.
2. Connect the RF cable from your antenna or digital cable to the TV port on the
back of your HDTV.
3.
Turn on the HDTV.
4. Follow the first time on screen instructions.
Not all broadcasts are in High Definition (HD). Please refer to your local
broadcasting stations for more information.
The HDTV’s tuner is designed for HDTV therefore requires a stronger signal than
normal TVs. If you cannot achieve that signal level with your antenna or cable, your
HDTV might lose picture or sound.
Please Note:
10
or
Page 12
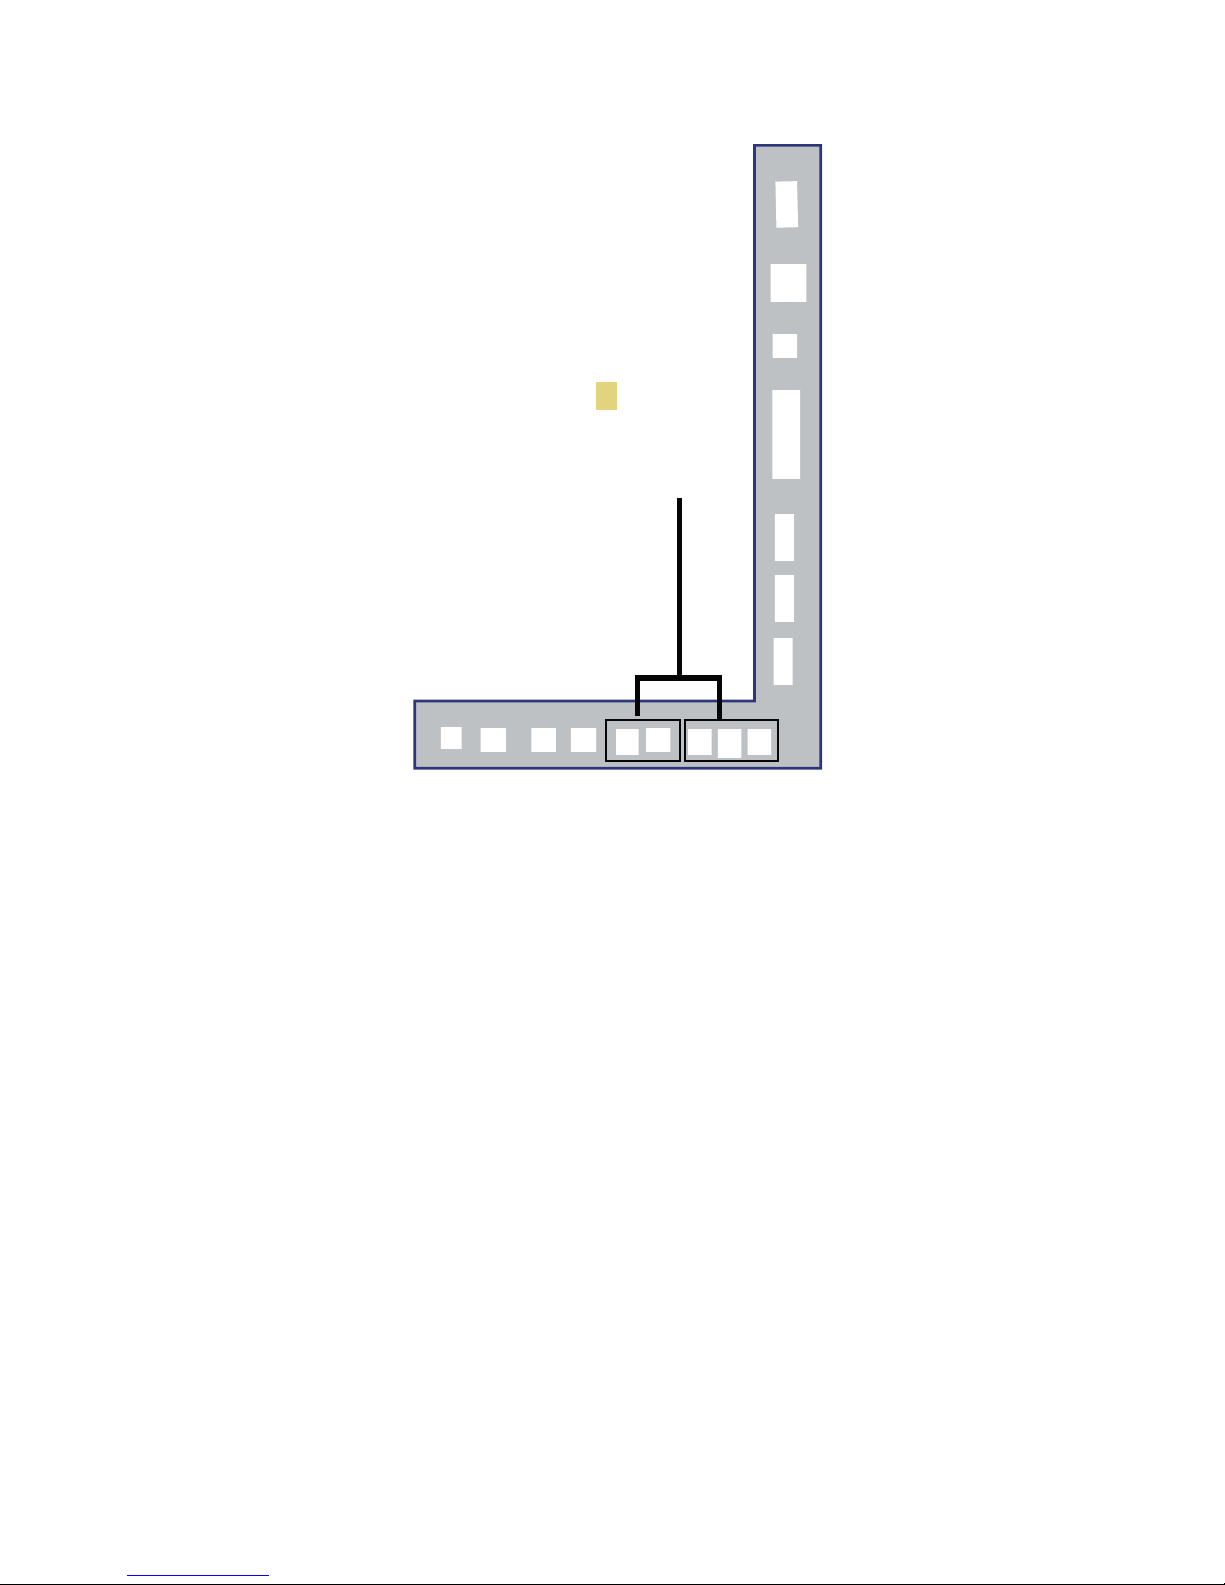
Connecting DVD Player with Component YPbPr…
1. Make sure the power of HDTV and your DVD player is turned off.
2. Obtain a Component Cable. Connect the green color connector to both your DVD
player and YPbPr’s green connector port on the back of your HDTV.
3. Connect the blue color connector to both your DVD player and YPbPr’s blue
connector port on the back of your HDTV.
4. Connect the red color connector to both your DVD player and YPbPr’s red connector
port on the back of your HDTV.
5. Obtain a RCA Audio Cable. Connect the white color connector to both your DVD
player and YPbPr’s white connector port on the back of your HDTV.
6. Connect the red color connector to both your DVD player and YPbPr’s red connector
port on the back of your HDTV.
7. Turn on the HDTV and your DVD player.
8. Use the remote control’s source button or the source button on the TV to switch to
YPbPr.
Please Note :
Sometimes DVD players will not automatically output to YPbPr. You will
need to configure your DVD player with AV connection first then switch to
YPbPr. Please reference the DVD player’s manual, to make sure the DVD
player is configured to output correctly to the TV.
This source shares audio jacks with composite video.
11
Page 13
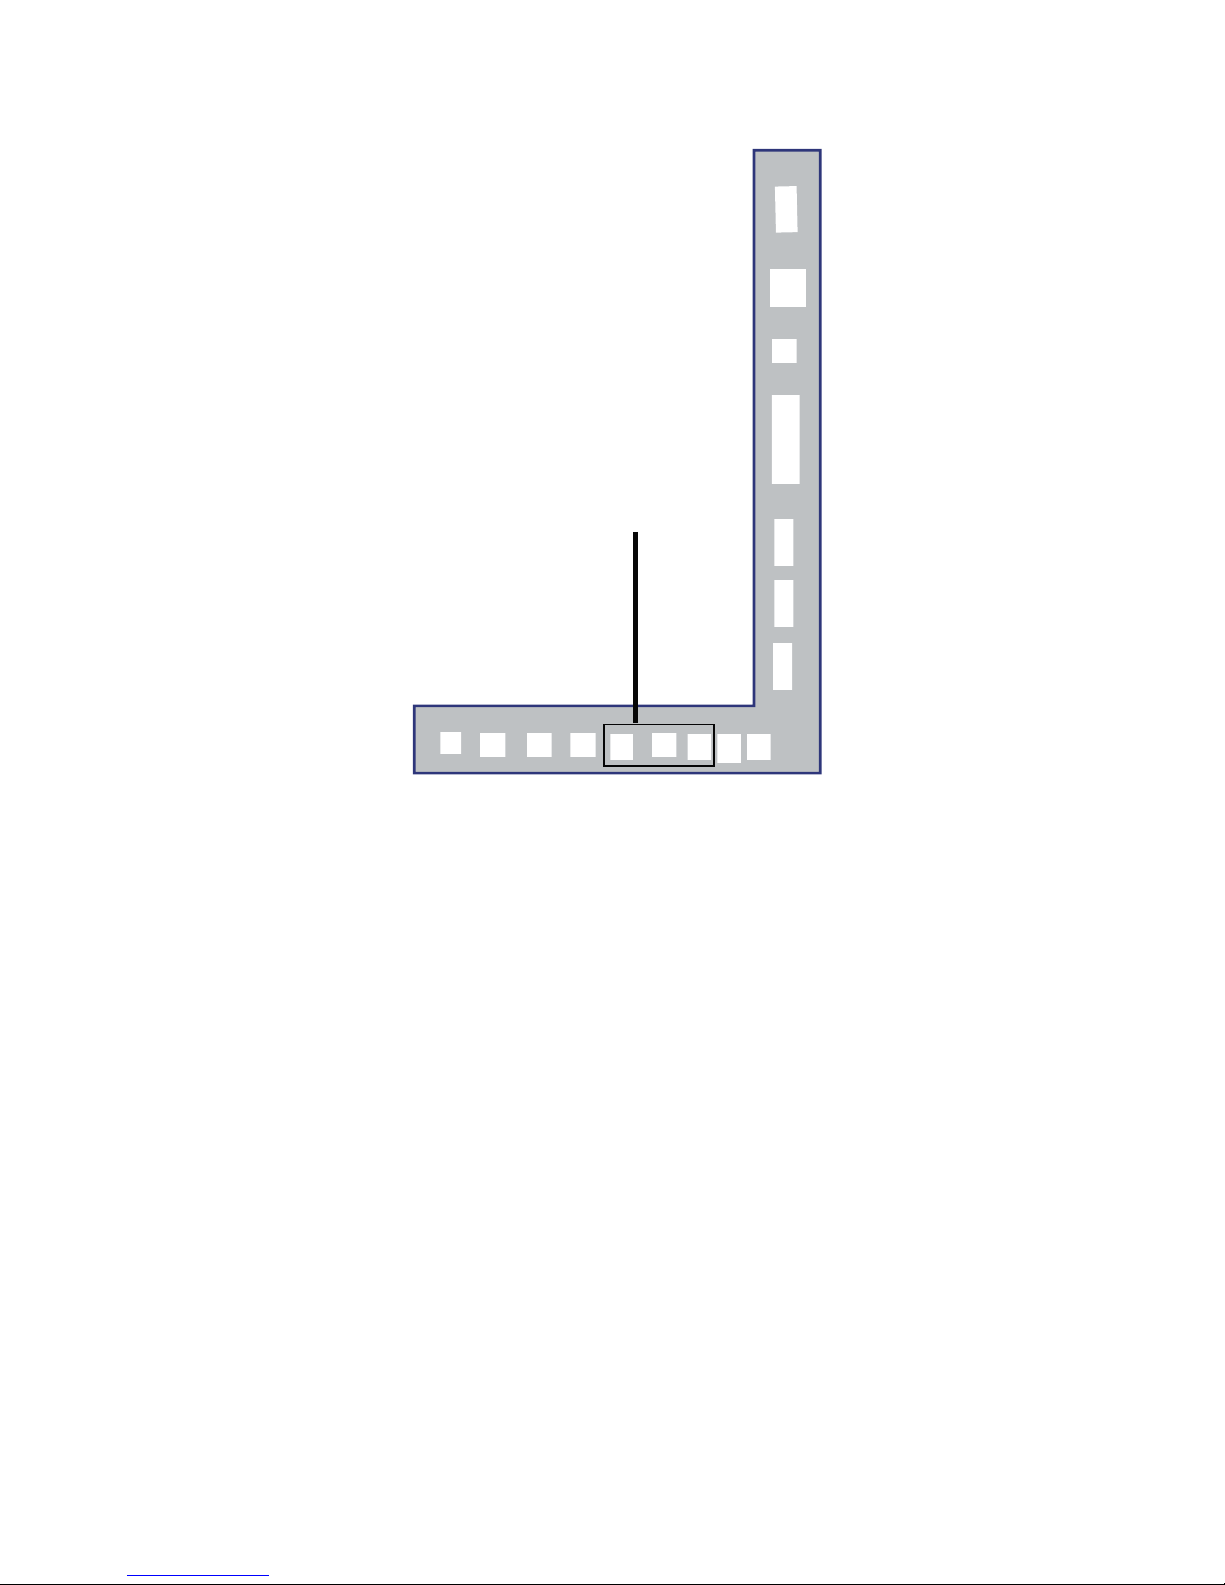
Connecting Wii™ with Composite…
1. Make sure the power of HDTV and your Wii™ is turned off.
2.
Obtain a Yellow Video Cable. Connect the Yellow Video connector to both your Wii™
and AV’s Yellow Video connector port on the back side of your HDTV.
3. Obtain a RCA Audio Cable. Connect the white color connector to both your Wii™
and AV’s white connector port on the back side of your HDTV.
4. Connect the red color connector to both your Wii™ and AV’s red connector port on the
back side of your HDTV.
5.
Turn on the HDTV and your Wii™.
6.
Use the remote control’s source button or the source button on the TV to switch to AV.
Please Note:
Make sure to read your Wii™ installation guide for further information.
This source shares audio jacks with YPbPr.
12
Page 14
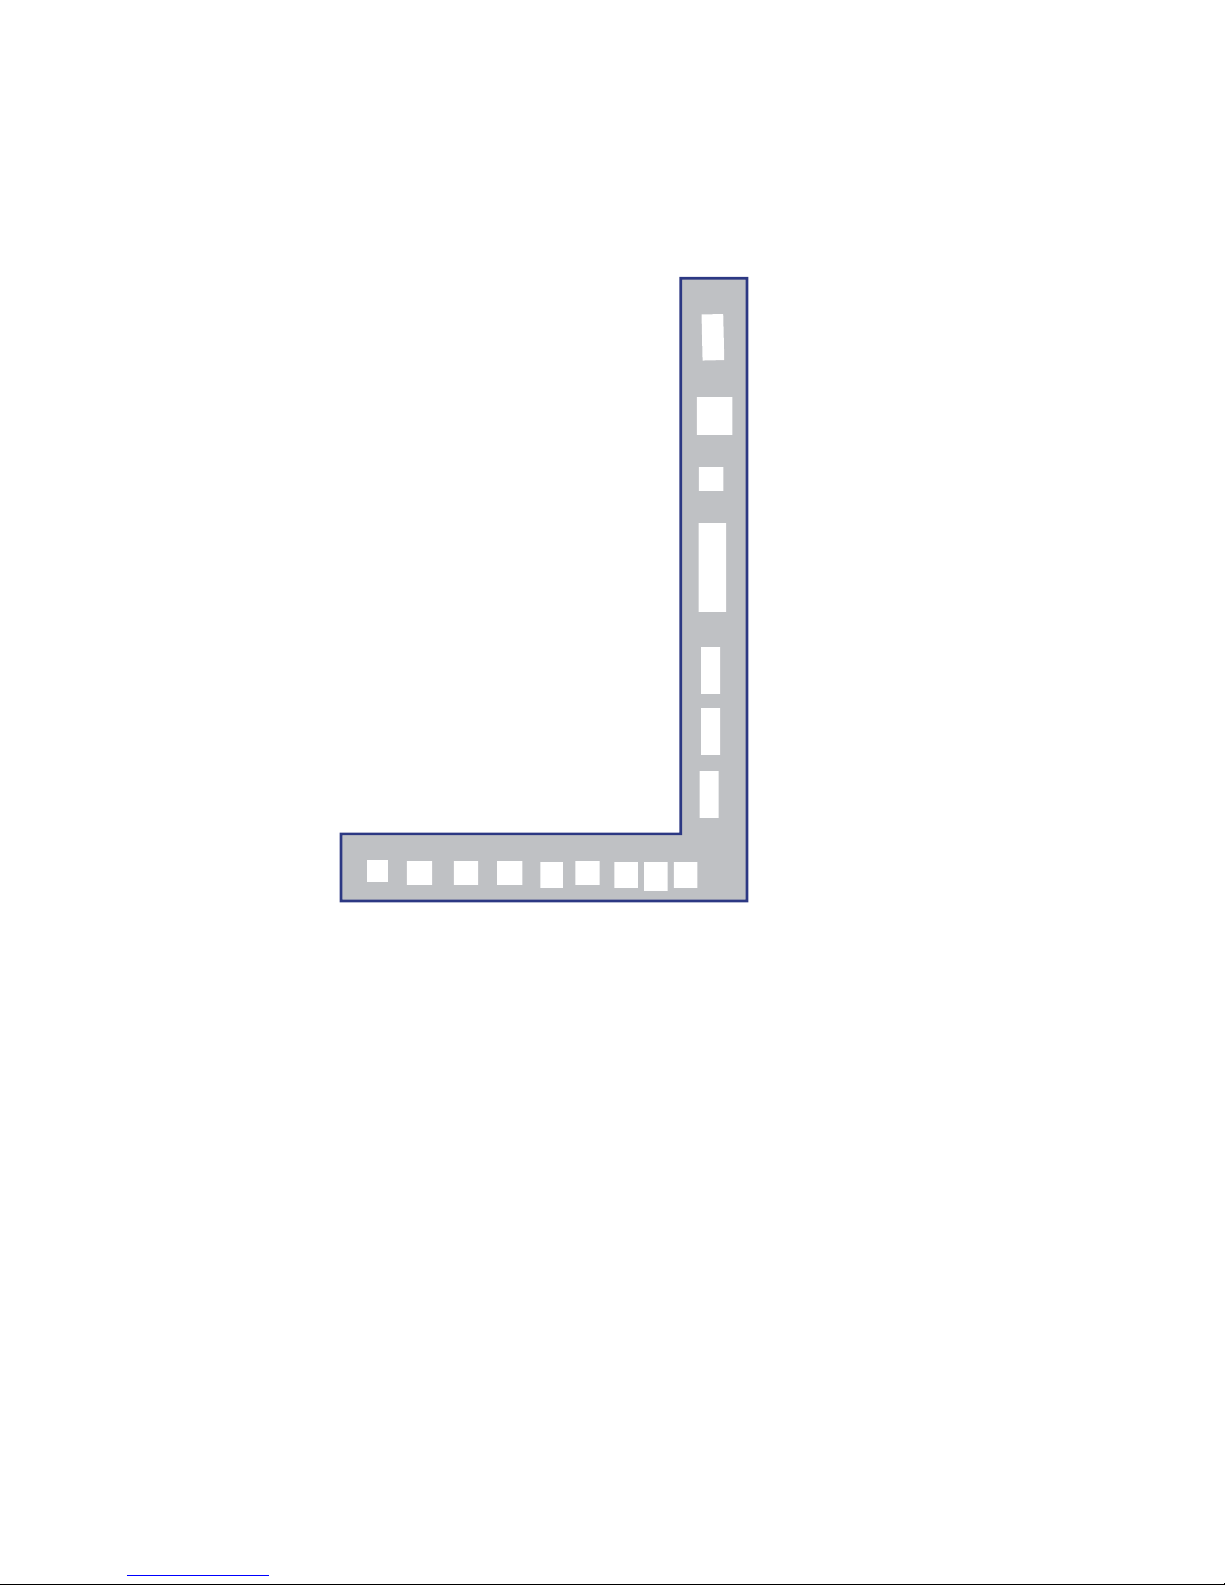
Connecting Cable or Satellite boxes with HDMI…
1. Make sure the power of HDTV
and your set-top box is turned off.
2. Connect a HDMI cable to the HDMI output of your set-top box and the other end to
the HDMI port on the back of your HDTV.
3. Turn on the HDTV and your set-top box.
4. Use the remote control’s source button or the source button on the TV to switch to
HDMI.
Please Note:
Please reference the set-top box’s manual, to make sure the set-top box is
configured to output correctly to the TV.
HDTV supports NEC’s universal remote code. Please look up NEC’s
codes in your universal remote’s hand book.
13
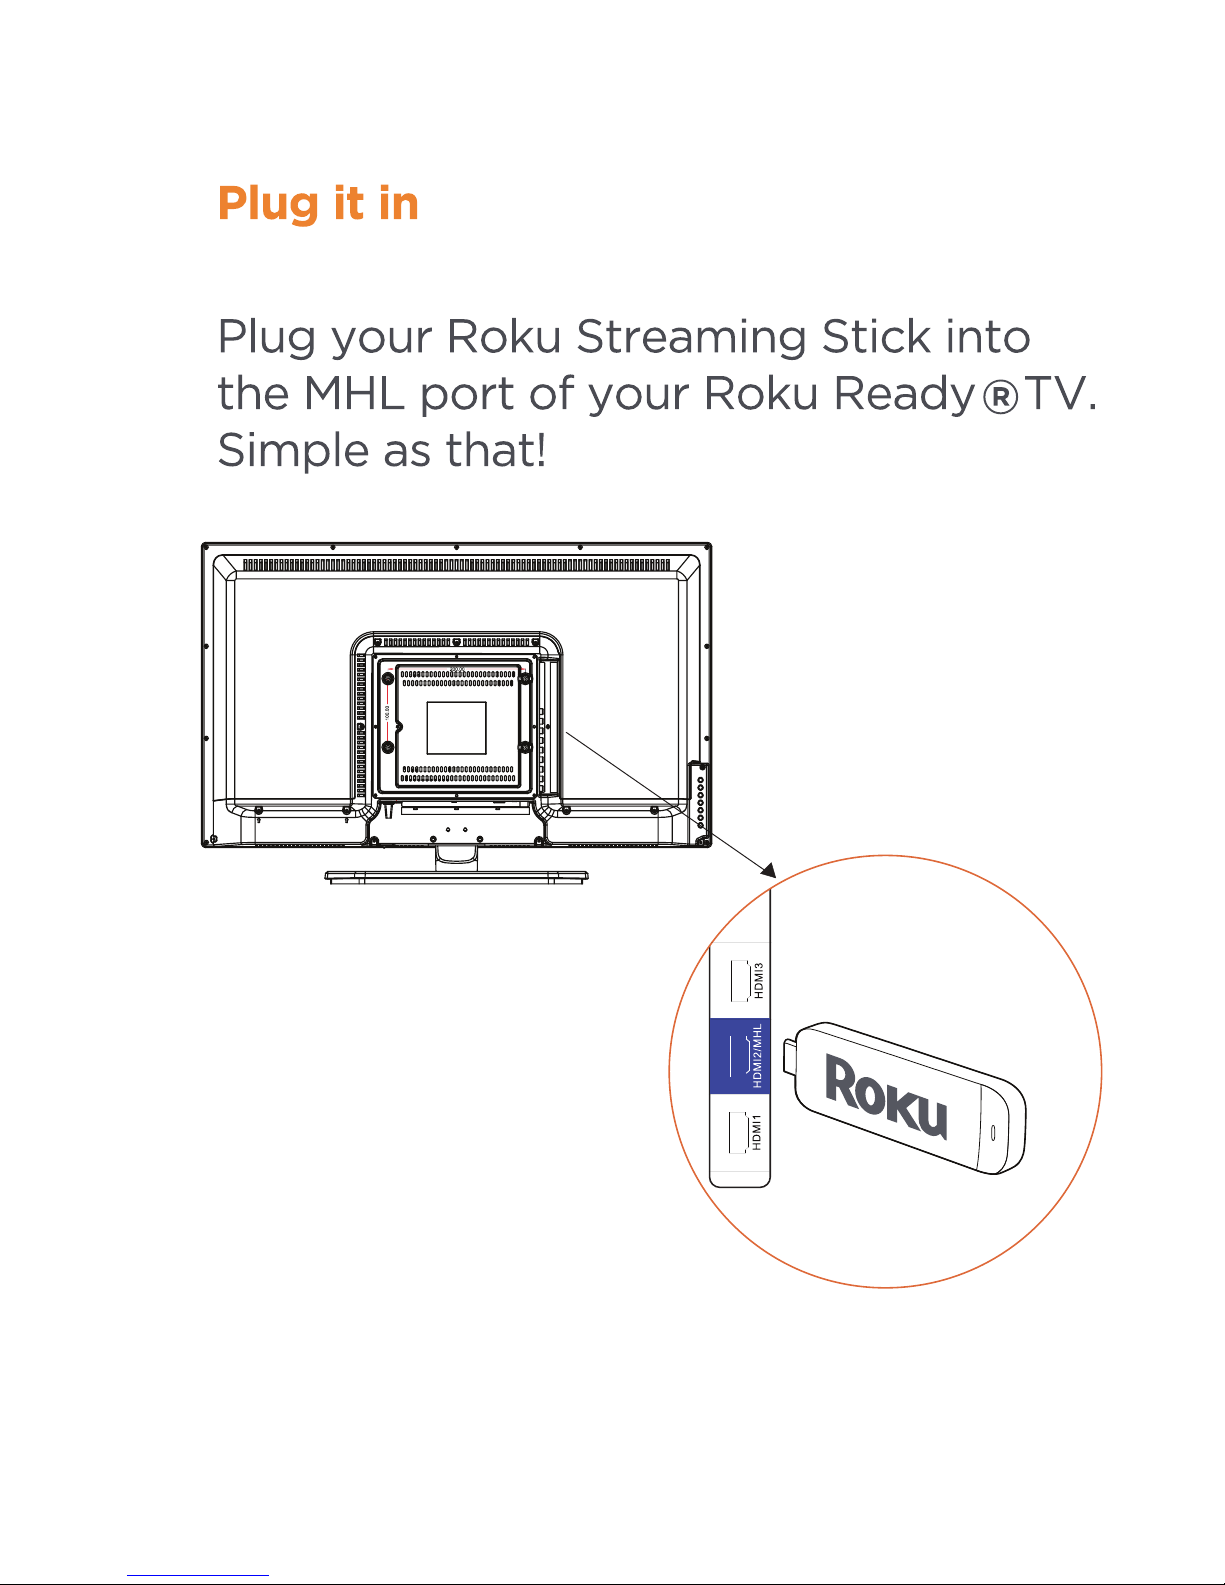
The HDMI2 port is MHL enabled. You can connect MHL devices, such as the Roku Streaming
Stick and compatible mobile phones and tablets.
Page 15
1. Make sure the power of HDTV and your PC is turned off.
2. Obtain a 15-pin D-Sub VGA cable; connect to the VGA output of your PC and the other
end to the VGA port on the back of your HDTV.
3. Obtain a 3.5 mm Mini-jack, connect to the audio out of your PC and the other end to the
VGA Stereo Input port.
4. Turn on the power of the HDTV and your PC.
5. Use the remote control’s source button or the source button on the TV to switch to PC.
6. Change your PC resolution to 1360x768 at 60hz refresh rate.
7. Press MENU to use the OSD’s PICTURE option.
8. Under the PICTURE option select PC Settings.
9. Under PC Settings use AUTO ADJUST to adjust the screen.
Please Note:
For the best results, please set your PC resolution to 1360x768 at 60 Hz. Please
refer to the PC or graphic card’s manual for further instructions on how to set your
resolution and refresh rate.
Please refer to your PC manual for video output requirements of the video card.
The VGA port of the TV features a power saving mode which will automatically
turn off the TV, if there’s no signal provided for more than 5 minutes.
14
Connecting to a PC with VGA and 3.5 mm minijack …
Page 16
Connecting a Digital Audio Receiver with Coaxial...
1.
Make sure the power of HDTV and your receiver is turned off.
2. Obtain a COAXIAL cable, connect it to your receiver’s COAXIAL digital
input and the COAXIAL connection on the LINE OUT port on the back of the
HDTV.
3. Turn on the HDTV and your receiver.
Please Note:
If you want pure digital stream for your receiver to decode, you must also
configure the TV’s OSD Sound->Digital Audio Out function. Make sure the
option is on 5.1CH.
If your receiver is making static noises when receiving 5.1CH, you must use
the PCM option instead.
Please reference the receiver’s manual as well, to make sure the receiver is
configured to receive signals correctly from the TV.
The TV’s COAXIAL out for 5.1CH is ONLY used for antenna/cable
connection. Any other incoming audio signal will be passed out of
COAXIAL in PCM format.
15
Page 17
Main unit description
Control Panel Button Function
TV Terminal Connections
1.HEADPHONE out terminal.
2. Line out terminal.
3. Coaxial out terminal.
4. AUDIO input terminal.
Audio input terminal for YPBPR and AV
5. Component input terminal.
OR Video input terminal
6. HDMI1 input terminal.
7. HDMI2/ MHL input terminal.
8. HDMI3 input terminal
9. VGA input terminal of simulation signal of PC.
10. PC AUDIO input terminal.
11. RF antenna.
12. USB input terminal
Only be used to upgrade .
16
VOL+
:
Increase volume; if OSD is active, functions as right in the menu;
in SOURCE menu, functions as ENTER.
VOL- : Decrease volume; if OSD is active, functions as left in the menu.
CH+ :
Change channel up; if OSD is active, functions as up in the menu
CH- :
MENU : Press to select the main menu.
SOURCE : Select the input signal.
POWER : Switch on when at standby mode or enter the standby mode.
Change channel down; if OSD is active, functions as down in
the menu.
Page 18

Remote control
POWER: Powe
r on/
off button, press once to turn the TV on and press
again to turn the TV off.
MUTE: Press this button to mute or restore sound.
MTS/AUDIO: When stereo program is received, press this key to
switch sound system between mono and stereo.
When SAP program is received, press this button to switch sound
system between mono and SAP
When stereo and SAP program is received, press this key to switch
among mono, stereo and SAP.
Press this key to show the list of audio languages available for the
current channel in ATSC.
ASPECT: Press to
adjust picture ratio.
PMODE: Select picture mode.
SMODE: Select sound mode.
0-9: Select and switch to a channel using 0 - 9.
-/--:
Switch the program digit.
DISPLAY: Display TV information.
EPG
Enter electronic program guide
AUTO: Adjust the picture automatically in pc mode.
SLEEP: Se
t the sleep timer.
OK: Enter the selected option or perform the selected operation.
SOURCE: Press to change signal source.
MENU: Press this button to enter the main menu.
CH+/CH-: Change the channel.
CC: Press this key to select the CC ,ON or OFF mode and CC on Mute .
INFO:
Press to obtain more information or access special options on Roku
VOL+/VOL-: Adjust the volume.
FAV: Switch between custom set "Favorite List"
F.LIST: Press this key to display the Favorite List mode.
C.LIST: Press this key to display the channel list mode.
17
1 2
3
4
5
6
7 8 9
0
INFO
DISPLAY
MTS/AUDIO
ASPECT PMODE SMODE
CH
MENU
SOURCE
OK
VOL
BACK
CC
FAV
F.LIST C.LIST
OTUAPEELS EPG
*
RECALL:
Press to change to the previously viewed channel.
Press to rewind, scroll left one page at a time
Press to Start or Pause Playback
Press to fast forward, scroll right one page at a time
BACK: Skips back approximately 7 seconds in the currently playing video
Press to return to Roku home screen
CURSOR: Use the up, down, left, and right keys to move within the menu.
*
Page 19
Installation Guide
Press MENU button to display the MAIN OSD MENU; Press / button to select the
MENU you want; Press ENTER button to enter the sub menu; Press / button to select the
option and then press / to adjust the value in the sub menu; You can press MENU button to
go back to the upper menu or EXIT button to close the OSD.
PICTURE
You can select the type of picture, which best corresponds to your viewing. Press the “MENU”
button to enter the OSD menu .Then
press “e/f” button to select the
“PICTURE” menu.
1. Press “d” button to select “Picture
Mode”, press “
e/f” button to select.
2. Press “c/d” button to select
“Brightness” and press the “e/f”
button to enter brightness adjustment
menu to adjust brightness.
3. Press “c/d” button to select
“Contrast” and press the “e/f” button
to enter contrast adjustment menu to
adjust contrast.
4. Press “c/d” button to select “Color” and press the “e/f” button to enter color adjustment
menu to adjust color.
5. Press “c/d” button to select “Tint” and press the “e/f” button to enter hue adjustment menu
to adjust tint.
Note:
The 'Tint' item is used in NTSC mode only.
6. Press “c/d” button to select “Sharpness” and press the “e/f” button to enter sharpness
adjustment menu to adjust sharpness.
7. Press “c/d” button to select “Color Temperature” and press the “e/f” button to select.
8. Press “c/d” button to select “Advanced Setting” and press the “ENTER/f” button to enter
sub-menu.
Page 20

a. Press “c/d” button to
“Aspect Ratio” and
“ e/f” button to
select.
b. Press “c/d” button to
“Noise Reduction”
and press the
button to select.
c. Press “c/d” button to
“Dynamic Contrast”
and press the
button to select “On” or
“Off”.
SOUND
You can select the type of sound, which best corresponds to your listening.
Press the
“MENU” button
to enter the OSD
menu .Then
press “e/f”
button to select
the “SOUND”
menu.
1. Press “d”
button to
select
“Equalizer
Settings”
and press
the
“ENTER/f” button to enter sub-menu.
a. Press “c/d” button to select “Equalizer Mode”. Press “e/f” button to select.
b. Press “c/d” button to select “150Hz”. Press “e/f” button to select.
c. Press “c/d” button to select “500 Hz”. Press “e/f” button to select.
d. Press “c/d” button to select “1K Hz”. Press
“e/f” button to select.
e. Press “c/d” button to select “5K Hz”.
Press“e/f” button to select.
f. Press “c/d” button to select “10K Hz”.
Press “e/f” button to select
g. Press “c/d” button to select “Balance”.
Press “e/f” button to select
select
press the
select
“e/f”
select
“ e/f”
Page 21

Note: The b
ǃcǃdǃeǃ
fǃg function it is
only available in USER m
ode.
2. Press “c/d” button to select “MTS” and press the “e/f” button to adjust.
Note: It is only available in ATV.
3. Press “c/d” button to select “Audio Language” and press the “e/f” button to adjust.
Note: It is only available in DTV.
4. Press “c/d” button to select “Digital Audio Output” and press the “e/f” button to adjust.
5. Press “c/d” button to select “AVL” and press the “e/f” button to select “On” or “Off”.
TIME
Press the “MENU” button to enter the OSD menu .Then press “ee/f” button to
select the “TIME” menu.
1. Press “d” button to select “Sleep Timer” and press the “e/f” button to enter sleep timer
adjustment menu to adjust sleep timer.
2. Press “c/d” button to select “Time Zone” and press the “e/f” button to enter time zone
adjustment menu to select the local time zone.
3. Press “c/d” button to select “Daylight Saving Time” and press the “e/f” button to select
“On” or “Off”.
4. Press “c/d” button to select “Time Format” and press the “e/f” button to select “12-hour”
or “24-hour”.
5. Press “c/d” button to select “Auto Clock” and press the “e/f” button to select “On” or
“Off”.
6. Press “c/d” button to select “Clock” and press the “ENTER/f” button to adjust.
Page 22

1. Press “d” button to select “OSD Language” and press the “e/f” button to select the OSD
language which you
desire.
2. Press “c/d” button to elect
“Transparent” and press
the “ e/f”
button to select.
3. Press “c/d” button to select
“OSD Timeout” the
button to
adjust OSD timeout.
4. Press “c/d” button to select
“Closed
Caption” and press the
“ENTER/f” button to enter
a. Press “c/d” button to select “CC Mode” the “e/f” button to adjust.
b. Press “c/d” button to select “Analog CC ” the “e/f” button to adjust.
c. Press “c/d” button to select “Digital CC” the “e/f” button to adjust.
d. Press “c/d” button to select “Option” the “ENTER/f” button to enter sub-menu.
Note: The cǃd function it is only available in DTV.
Note: The option is adjust the digital closed captioning setting.
SETUP
Press the “MENU” button to enter the OSD menu .Then press “e/f” button to select
the “Setup” menu.
“e/f”
sub-m
enu.
Page 23

(a). Press “c/d” button to select “Mode” the “e/f” button to adjust.
(b). Press “c/d” button to select “Font Style” the “e/f” button to adjust.
(c). Press “c/d” button to select “Font Size” the “e/f” button to adjust.
(d). Press “c/d” button to select “Font Edge Style” the “e/f” button to adjust.
(e). Press “c/d” button to select “Font Edge Color” the “e/f” button to adjust.
(f). Press “c/d” button to select “FG Color” the “e/f” button to adjust.
(g). Press “c/d” button to select “BG Color” the “e/f” button to adjust.
(h). Press “c/d” button to select “FG Opacity” the “e/f” button to adjust.
(i). Press “c/d” button to select “BG Opacity” the “e/f” button to adjust.
Note: All the option it is not available in Custom.
5. Press “c
c/d
” button to select “Input Label” and press the “ENTER/f” button to enter
sub-menu.
Note: The
source label is
Create labels
for the
devices
connected to
your TV.
6. Press
“
c/d
”
button to select
“Other
Settings”
and press
the “ENTER/f” button to enter
sub-menu.
Page 24
7. Press “c
c/d
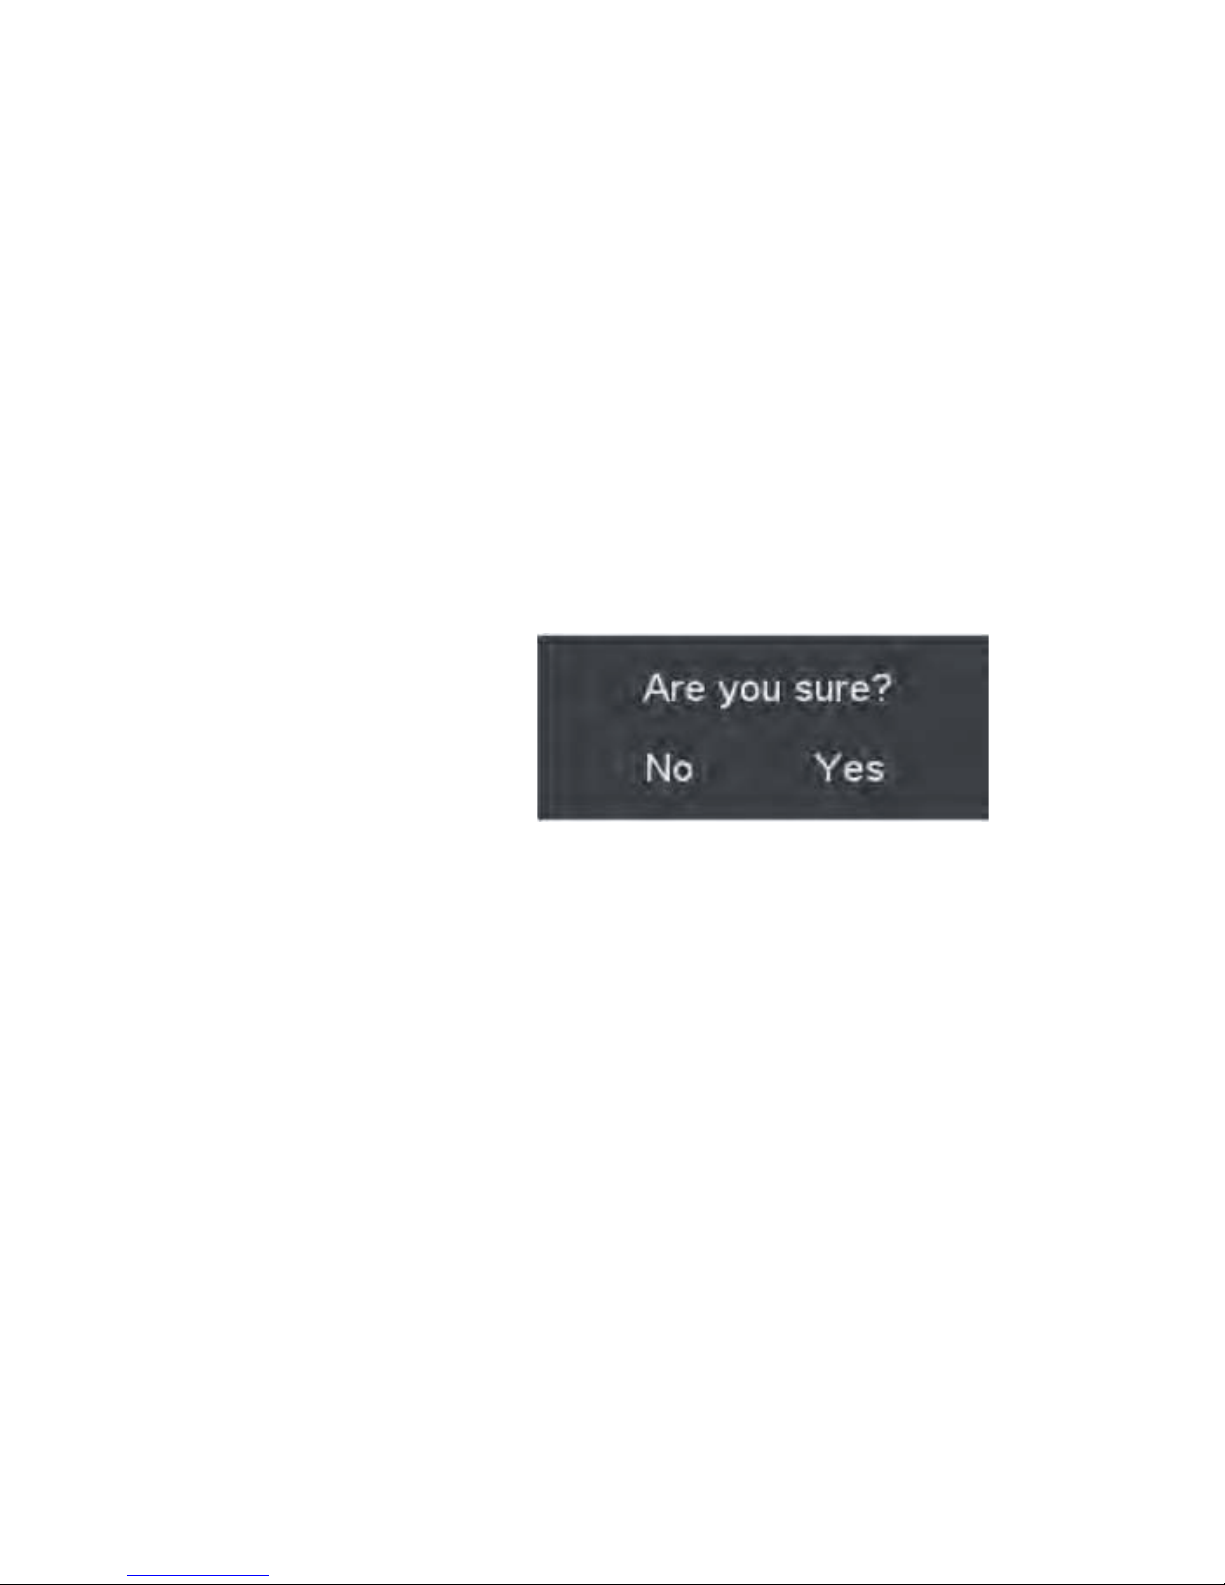
” button to select “Restore Default” and press the “ENTER/f”, Press “
e/f
”
button selecting “Yes” to restore all setting to default setting
default.
8. Press “
c/d
” button to select “Setup wizard” and press the
“ENTER” button to enter sub-menu.
a. Press “
c/d
” button to select “Menu Language” and press the “e/f” button to select
language.
b. Press “
c/d
” button to select “Go to next step” and press the “ENTER/f” button to enter
next step.
a. Press “c/d” button to select “Audio Only” the “e/f” button to select “On” or “Off”.
b. Press “c/d” button to select “Blue Screen” the “e/f” button to select “On” or “Off”.
When select “On”, only listen sound and the screen is black; When select “Off”ˈwatch
TV normally.
Page 25

c. Press “c
c/d
” button to select “Time Zone” and press the “e/f” button to select time zone.
d. Press “
c/d
” button to select “Daylight Saving Time” and press the “e/f” button to select
“On” or “Off”.
e. Press “
c/d
” button to select “Time Format” and press the “e/f” button to select “12-hour”
or “24-hour”.
f. Press “
c/d
” button to select “Go to next step” and press the “ENTER/f” button to enter next
step.
g. Pr
ess “
c
/d”
button to select
“Air/C
able”
and
pre
ss the “e/f” button to select “Air” or
“Cable”.
h. Press “
c/d
” button to select “Go to next step” and press the “ENTER/f” button to start auto
scan.
Note: Searching platform will take a long time. Please be patient!
Page 26

LOCK
Press the “MENU” button to enter the OSD menu .Then press “ee/f” button
to select the “Lock” menu.
1. Press “d” button to select “Enter Password” and press select digital button to enter.
Note: The default password is “0000”
2.
Press / button t
o selec
t “Change Password”, then press
“ENTER/f”
button
to
ad
jus
t
the va
lue.
If the password is changed, all of the passwords in the menu will be changed at the same time.
Note: If you forget your
password, you can use “1470”
to enter any menu locked.
3.
Press “c/d” button
to select “System Lock”
and press the “e/f”
button to select “On” or
“Off”.
4. Press / button to
select “Input Block”, then press
“ENTER/f” button to enter
sub-menu.
a.
Press “c/
d
” button to select “TV” and press the “e/f” button to select “Block”
or “Unblock”.
b.
Press “c/
d
” button to select “AV” and press the “e/f” button to select “Block”
or “Unblock”.
Page 27

c. Press “cc/
d
” button to select “Component” and press the “e/f” button to select
“Block” or “Unblock”.
d. Press “
c/d
” button to select
“HDMI” and press the “e/f”
button to select “Block” or
“Unblock”.
e. Press “
c/d
” button to select
“PC” and press the “e/f”
button to select “Block” or
“Unblock”.
5.
Press “c/d” button to select “US Rating” and press “ENTER/f” button to enter sub-menu.
a. Press “c/d” button to select “TV” and press “ENTER/f” button to enter sub-menu.
Press “
c/d
” button to select and press ĀENTERāto block or unblock.
b. Press “
c/d
” button to select “MP
AA” and press the “e/f” button to select
“Off/G/PG/PG-13/R/NC-17/X”.
6. Press “c/d” button to select “Canada Rating” and press “ENTER/f” button to enter sub-menu.
a. Press “
c/d
” button to select “Canada English” and press the “e/f” button to select
“Off/C/C8+/G/PG/14+/18+”.
b. Press “
c/d
” button to select “Canada French” and press the “e/f” button to select
“Off/G/8ans+/13ans+/16ans+/18ans+”.
7. Press “c/d” button to select “RRT Setting” and press “ENTER/f” button to enter sub-menu.
Page 28

Note: The item is available only when current stream has downloadable rating data.
8. Press “c/d” button to select “Reset RRT” and press “ENTER/f” button to reset.
Channel
Press the “MENU” button to enter the OSD menu .Then press “e/f” button to
select the “Channel” menu.
1.
Press “d” button to select
“AIR/CLABLE”
and press the
“e/f”button to select
Cable or AIR.
2. Press “c/d” button to
select “Auto
Scan” and press
the “
ENTER/f” button
e/f
“
ENTER” to do auto scan.
3. Press “c/d” button to
select “Favorite” and press
the “
ENTER/f” button to enter.
4. Press “c/d” button to select “Channel list” and press the “
ENTER/f
” button to enter.
5. Press “c/d” button to select “Show/Hide” and press the “
ENTER/f
” button to enter.
6. Press “c/d” button to select “Channel Number” and press the “
e/f” button to adjust.
7. Press “c/d” button to select “Channel Label” and press the “
ENTER/f” button to enter .
enter then press" " button
button to select "YES" and press
Page 29

1. Press “c/d” button to select “H-Pos” and press the “
e/f
” button to adjust.
2. Press “c/d” button to select “V-Pos” and press the “
e/f” button to adjust.
3. Press “c/d” button to select “Clock” and press the “
e/f” button to adjust.
4. Press “c/d” button to select “Phase” and press the “
e/f” button to adjust.
5. Press “c/d” button to select “Auto” and press the “
ENTER/f
” button to do auto adjust.
Note: The pictures in regard to function are provided for reference purposes only.
PC Setting
Press the “MENU” button to enter the OSD menu .Then press “e/f” button to select
the “Setup” menu. And then press
“d” button to select “PC Setting” and press the
“
ENTER/f
” button to enter sub-menu.
Page 30

How do I Clean the TV?
IMPORTANT
1. The power cable has to be removed from the socket before cleaning the TV.
2. Do not use volatile solvent (alcohol, rosin, and toluene) to clean the TV. These
types of chemicals might damage the housing and the LED glass.
Cleaning the bezel and remote control
1. Use a 100 cotton cloth or micro-fiber cloth for cleaning.
2. If the remote control or bezel is dirty to the point where you cannot simply dry
wipe it, please lightly dampen the wiping material (the wiping material cannot
be dripping wet, because if water drips into the panel it will cause
malfunction and possible permanent damage to the panel which will not be
covered under the warranty) with clean water and wipe again. Wipe the
display with a dry micro-fiber cloth or 100 cotton cloth afterwards.
Please Note :
• Make sure you wring the water out of the cloth before cleaning the
bezel or remote in order to prevent water from penetrating into the
electronics.
Cleaning the Screen
1. Use a 100 cotton cloth or micro-fiber cloth for cleaning.
2. The LED screen glass is extremely fragile. Do not scrape it with any mat e rial.
Do not press or tap the screen to avoid cracking. When the screen is dirty to the
point where you cannot simply dry wipe it, please lightly dampen the wiping
material with clean water and wipe again. Wipe the display with a dry
micro-fiber cloth or 100 cotton cloth afterwards.
Page 31
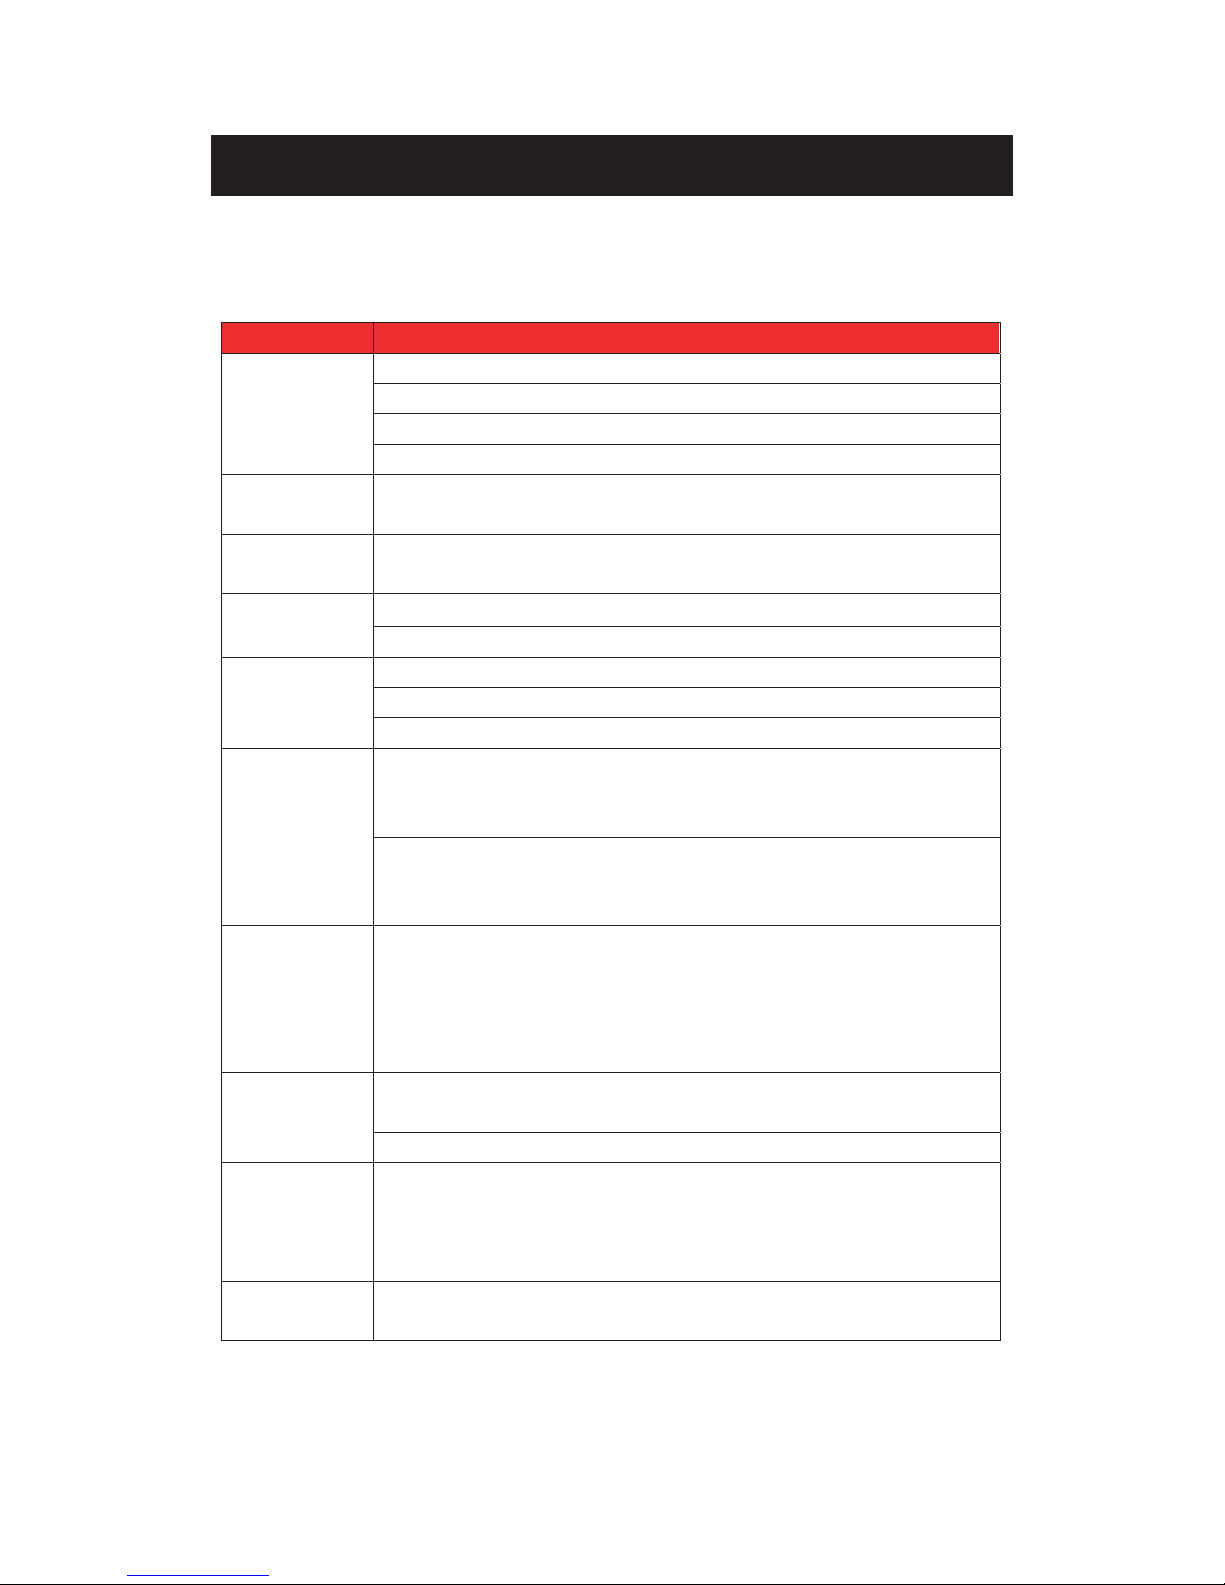
Troubleshooting
Problems Solutions
NO PICTURE
Connect power cord correctly.
Turn on power.
Connect video cable correctly.
Select the input signal source with proper cable connection with the source button.
ABNORMAL
COLORS
Match the colors on the cables to the ports off the back of the television. I.E. red cable to red colored
port.
PICTUR
E IS TOO
DARK
Adjust y
our
contr
ast, brightness and lamp settings from the OSD Menu. For adjust controls
AUDIO ONLY NO
PICTURE
Make sure you have connected both your video and audio cables.
The TV s tuner signal must not be lower than 65 .
PICTURE ONLY NO
AUDIO
Make sure the audio cable is connected.
Readjust your volume via the remote control.
The TV s tuner signal must not be lower than 65 .
REMOTE C
ONTROL
DOES NOT WORK
Tur
n off the TV, unplug it from the socket. Remove the batteries out of the remote for 30 minutes.
Press the remote buttons and the power button randomly for a good 2 seconds, and then reinstall the
batteries. Try the remote to see if it works. For battery removal instructions.
The TV s re mote sensor is also housed in the same place as the power indicator light. Please make
sure there is line of sight from the remote control s front sensor to the remote sensor of the TV.
CANNOT RECEIVE
SUFFICIENT
CHANNELS
THROUGH THE
ATSC/NTSC TUNER
The TV s tuner signal must not be lower than 65 . Change the direction of your antenna and rescan
your channels. If you have cable call up your cable company and ask about signal strength of your
local cable.
NO COLOR
Please adjust your picture setup and make sure the saturation and the RGB are not turned all the way
down. For adjustment controls.
The TV s tuner signal must not be lower than 65 . Check your signal.
WEAK SIGNAL OR
NO PROGRAM
SYMBOL ON
SCREEN
The TV s tuner signal must not be lower than 65 . Change the direction of your antenna and rescan
your channels. If you have cable call up your cable company and ask about signal strength of your
local cable.
TV’S UNIVERSAL
REMOTE CODE
This television follows NEC’s universal remote code. To find the actual code you must read
through your own universal remote’s guide book.
Troubleshooting
The following table contains the common problems and the solutions to these problems. Please check this list before
you contact the technicians.
Page 32
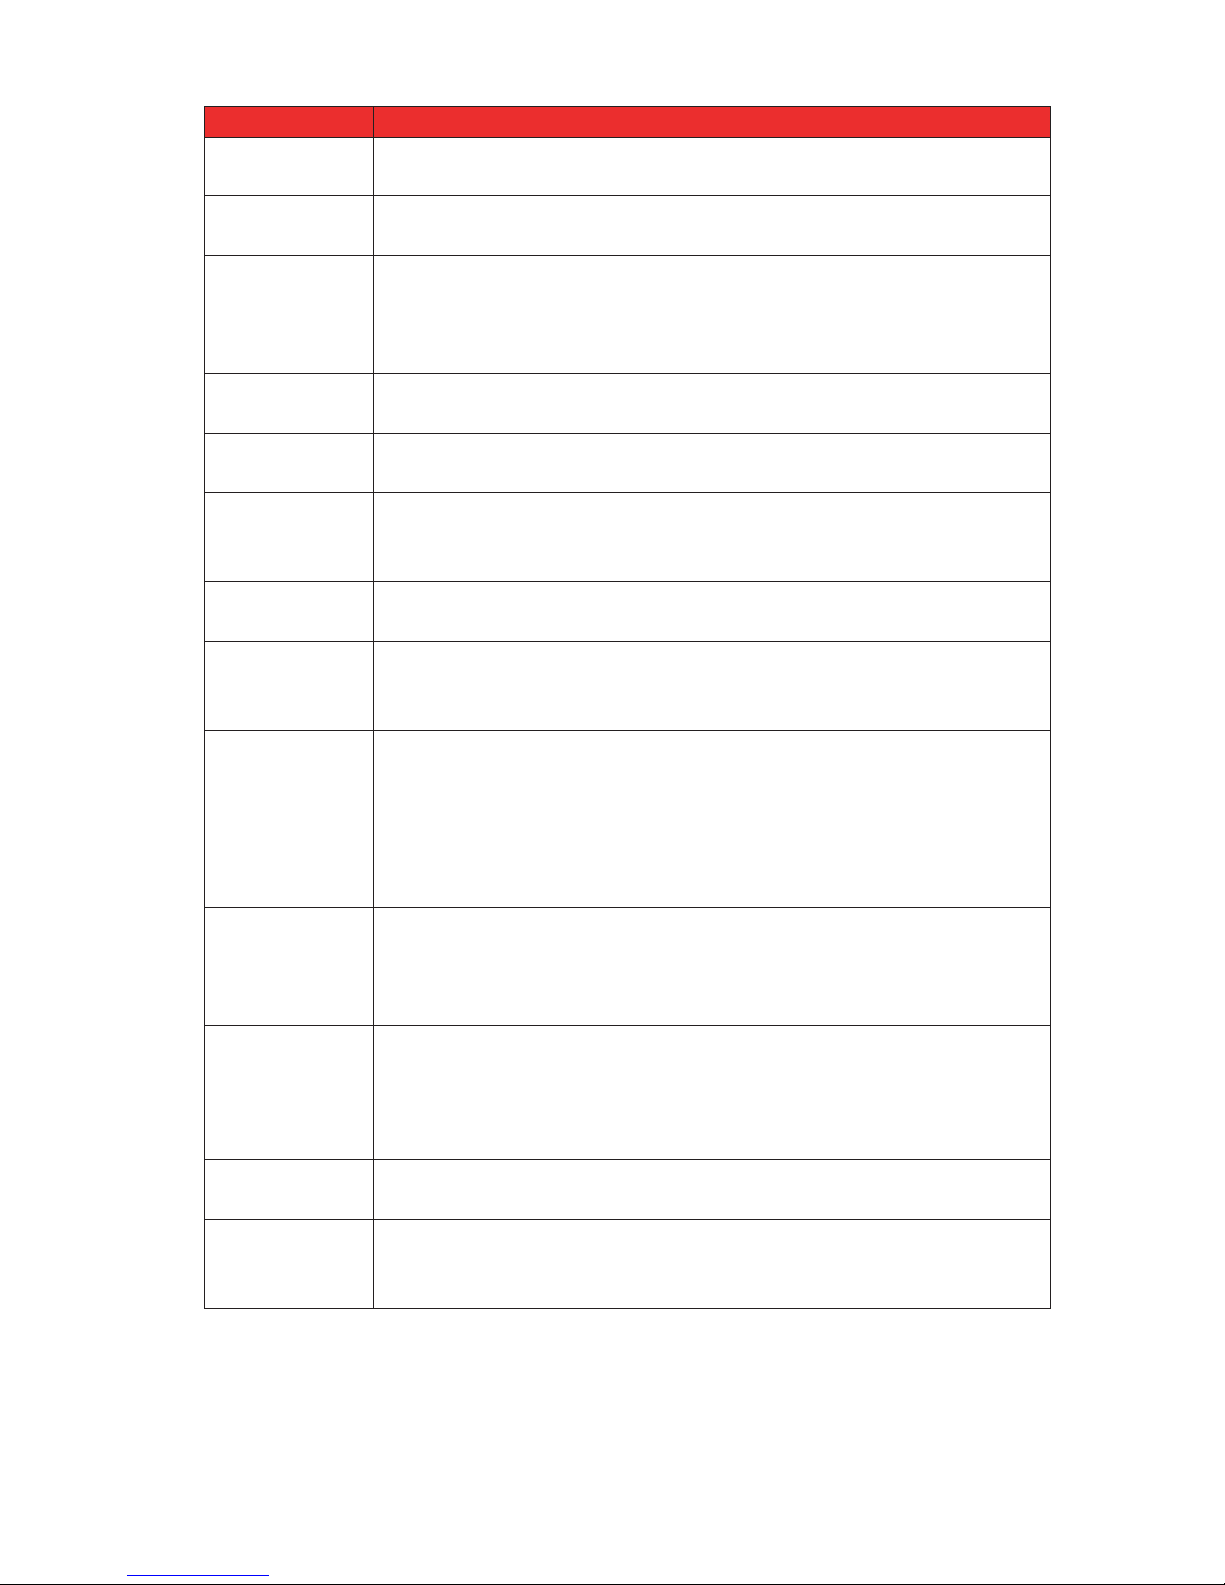
TV CHANNELS ARE
BLOCKED
Check your auto lock function’s settings inside the OSD. You may have locked up some channels but forgot
about them.
UNIVERSAL REMO
TE
CODE
This TV follows NEC’s univer
sal remote code. Please check your hand book for NEC’s codes then apply
them.
THE TV TURNS ON OR
OFF SLOWLY AND THE
SCREEN SHOWS UP
SLOWLY
This TV is a High Definition liquid crystal display panel TV. It requires a few more seconds than normal TVs
to power up and show the picture.
NO SOUND ON PC Make sure you have a 3.5 mm mini-jack cable connected from your pc’s sound output to the TV’s VGA
STEREO INPUT.
HDCP VIDEO SAYS NO
HDCP SUPPORT
Reboot your HDCP video device but turning them off and unplugging the power cord. Wait up to 8 minutes
to plug the power back in to see if it works or not.
HDCP
VIDEO HAS NO
AUDIO
Make sure you have a 3.5 mm mini-jack cable connected from your HDCP video device’s sound output to the
TV’s VGA STEREO INPUT. If your HDCP video device uses RCA AUDIO jacks, you’ll need to obtain a
RCA audio converted into 3.5 mm mini-jack cable.
CANNOT GET 1360X768
ON PC VGA
Make sure the TV is recognized as plug and play monitor. Try updating your video card’s drivers as well. If
that does not help, most likely you’ll need to upgrade your video card to a newer one.
PICTURE IS
DISTORTED OR HAS
ABNORMAL SOUND
This might be from interference from large electrical appliances, cars, motorcycles, or fluorescent lights. If
the TV is close to the wall, try moving the TV to another room in your house to see if the problem still occurs.
PICTUR
E DOES NOT
COVER THE ENTIRE
SCREEN
If you’re using HDMI or a TV digital channel make sure you use the ASPECT button to switch to 16:9 format.
If you are using VGA, use the AUTO ADJUST function to adjust to the screen. Please Note : If you are using
regular analog TV, AV, or component in 480i resolution, use the ASPECT button to switch to 16:9 in order to
fill up the screen. Please Note : This note this feature will distort the picture.
PICTURE QUALITY IS
HORRIBLE!!
For best image quality, view HD widescreen programs where possible. If HD content is not available view
“Standard Definition” from a digital source. Standard, analog TV will always be noticeable inferior to HD
because your TV has video that is many times better than old TV’s and so you can see interference and
deficiencies you did not KNOW you had.
PICTURE HAS PIXELS
THAT ARE
ALWAYS
DISPLAYING THE
SAME COLOR
Your TV is manufactured using an extremely high level of precision technology, however, sometimes some
pixels of your TV may not display. Pixels defects within industry specifications are inherent to this type of
product and do not constitute a defective product.
I CANNOT CHANGE
THE TIME MANUALLY
Your TV syncs time automatically according to your local TV channel. This function only works while the
TV’s tuner is connected to an ANTENNA.
BIG BLACK BOX IN
THE MIDDLE OF
SCREEN
You have turned on closed captioning and are using TEXT1 – TEXT4. Change the setting to CC1 or turn off
closed captioning and the box will disappear.
Problems Solutions
Page 33
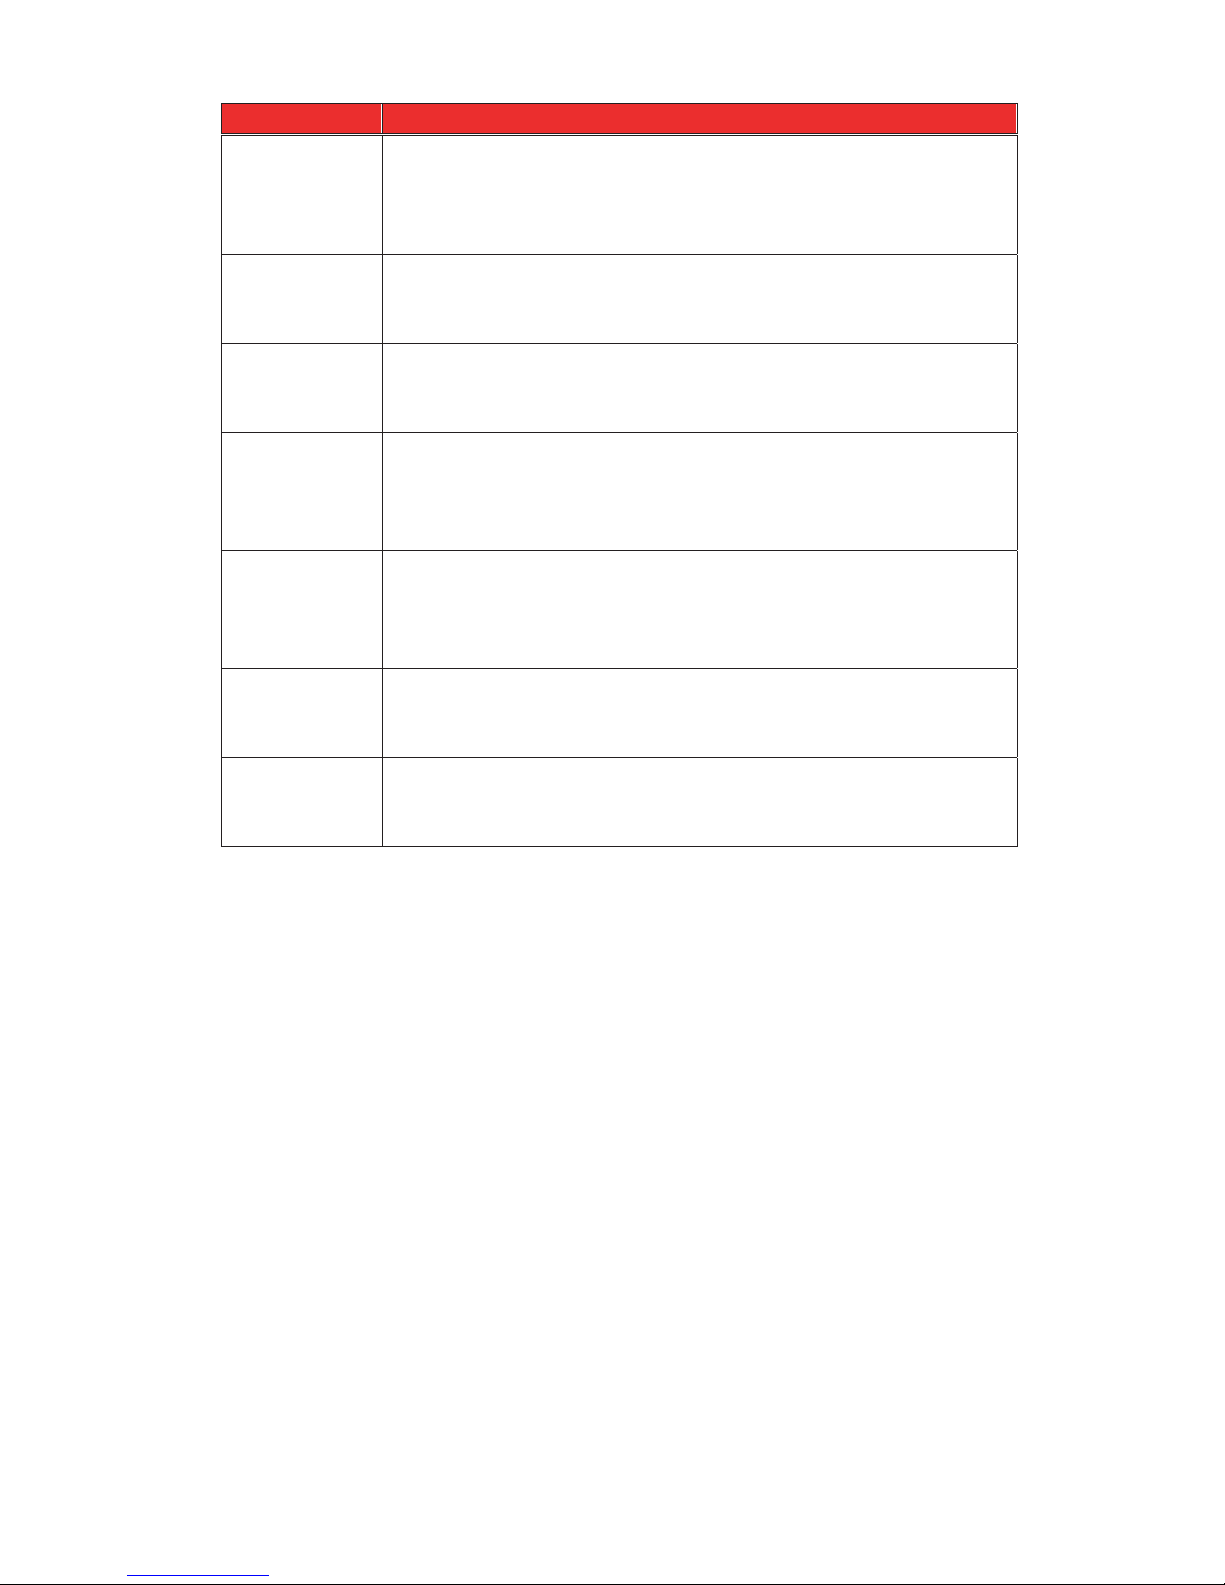
SWITCHING A
CHANNEL OR
SOURCE CHANGES
THE VOLUME
Different channels and inputs will sometimes have this effect because the channel signal’s own volume
is already loud. There is no way remove this completely. The TV has an AUTO VOLUME LEVEL
function that can combat this type of effect. Please make sure that function is turned on.
THERE IS NOISE OR
TRASH PIXELS
ON
THE SCREEN
When your TV’s resolution is higher than the digital channel’s broadcast resolution, the signal is
up-converted to match your TV’s resolution. Up-converting can cause this type of effect.
TIPS FOR HIGH
DEFINITION USERS
The TV is an ideal platform for viewing High Definition Content. The best image quality can be
achieved by HDMI, YPbPr (Component), then VGA. However, due to variances in broadcast
practices, it is possible some image distortions can occur.
TIPS FOR LETTERBOX
CONTENT USERS
Letterboxed (Widescreen) versions of DVD movies are most commonly formatted for standard 4:3 TVs.
The TV has the capability of expanding this content so the entire screen is filled at the expense of the
image proportion. To use this function press the aspect button on the remote control and cycle among
the available options.
I CANNOT FIND THE
VOLUME AND
CHANNEL CHANGING
BUTTONS
The buttons are represented by the buttons located on the remote control. changes the
channels and changes the volume.
TV TURNS OFF
AUTOMATICALLY
AFTER 5 MINUTES
The TV features a power saving mode which will automatically turn off the TV, if there’s no signal
provided for more than 5 minutes.
MY TV PICTURE IS
VERY DIM
Check to see if you are under POWER SAVING mode for your picture mode. Keep pressing the
PICTURE button on the remote control to cycle out of POWER SAVING.
Problems Solutions
Page 34
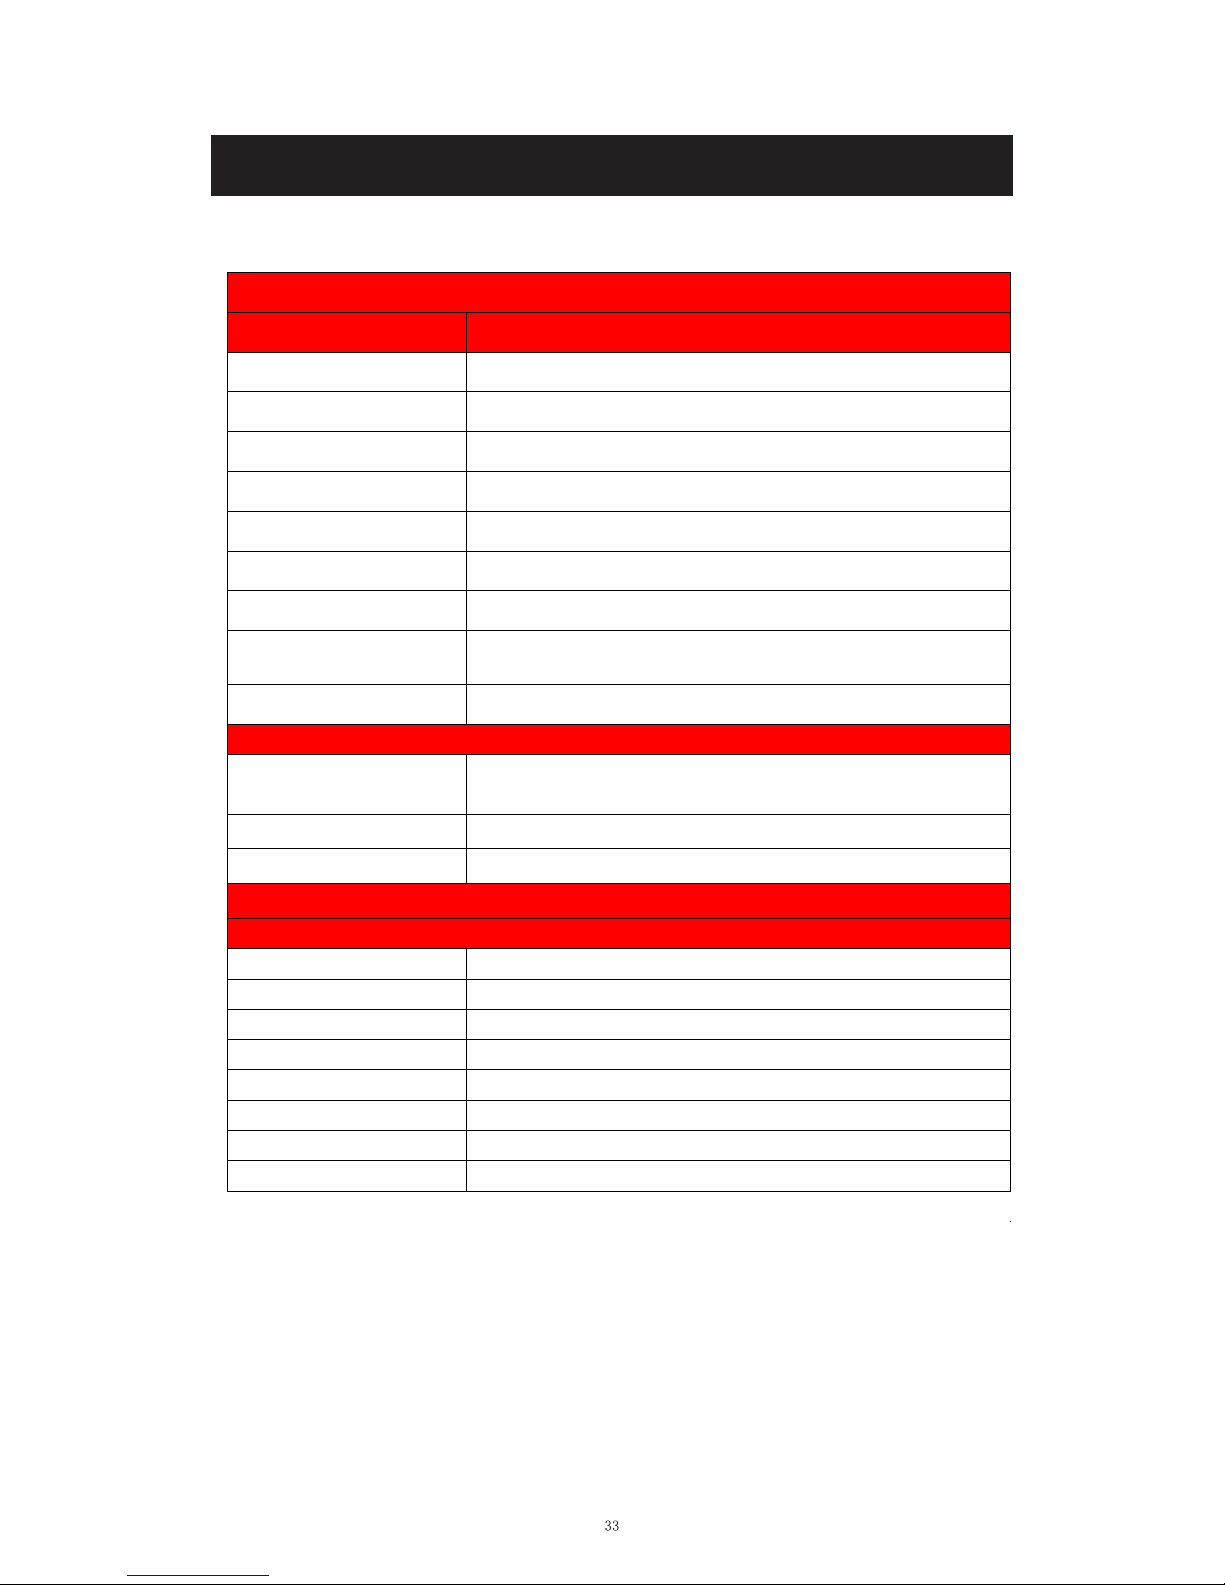
Specifications
Di
splay panel
Item
Illu
stration
Active
Area / Screen Size Diagonal 32 inches
1
neercsediW oitaR tcepsA 6:9
Pixel Pitch
0.51 (H) x RGB x 0.51 (V) um per one triad
Max.
of Pixels (Resolution) HD (1366 x 768 pixels) resolution
Brightness
250 nits (Typical)
Con
t
rast 1200:1 (Typical) with Auto Contrast Enhancement
Response
Time 8 ms (gray to gray)
Vi
ewing Angle
Typical 178/178 Degree
(Horizontal/Vertical)
Lamp Life of Backlight > 30,000hrs
TV
DISPLAY
Di
mension
29.25” x 17.49” x 3.53” (without stand)
29.25” x 19.51” x 6.69 ” (with stand)
We
ight 16.50 lbs
Power in
put AC 100 – 240V, 60/50 Hz, 3A(Max.)
Function
(1)Video
D
3 ecalretni-eD
2
:3 revocer emarF
Noise reducing core technology 3D
As
pect ratio Wide, Normal, Cinema, Zoom
a
mmaG dexiF ammaG
s
eY tsujda pmaL
Pict
ure mode Standard / soft / Power Saving / User/Dynamic
ssenprahS / tniT / roloC / tsartnoC / ssenthgirB tsujda oediV
Page 35
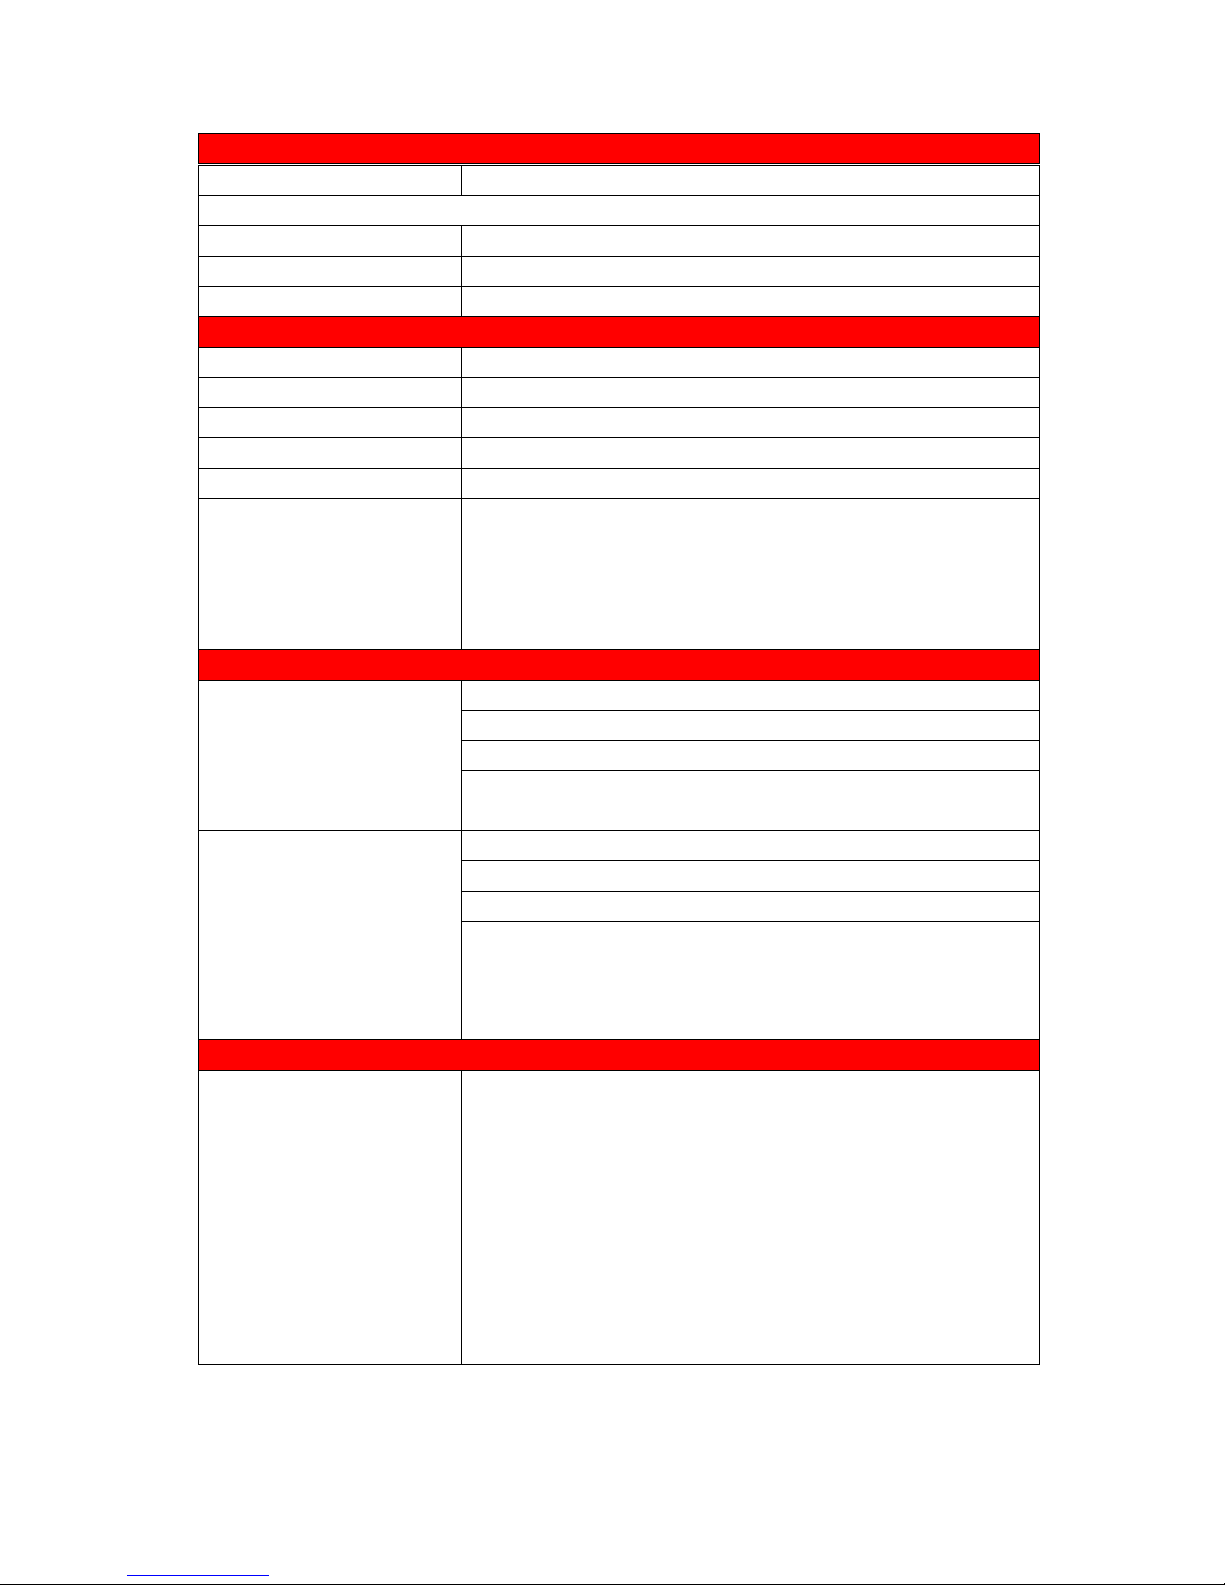
*Th
e product’s specifications may change without notice or obligation.
**This manual’s pictures and words are for references only and are subject to change without notice or obligation.
So
und Mode Music/Standard/ Movie/User/Sport
s
eY lortnoC emuloV otuA
150Hz/500Hz/1KHz/5KHz/10KHz/Balance e
noT
)
xaoc( seY tuO LAIXAOC
Spea
kers 6 watt per channel
(3) Gen
eral
)
ydaeR elbaC latigiD( MAQ / CSTA / CSTN renuT VT dirbyH
s
eY nacs otua lennahC
Sle
ep timer
W
1 rednU rewop ybdnatS
p
0801 / i0801 / p027 / p084 / i084 oediV-troppus gnimiT
PC
timing
1360*768@60 Hz (NATIVE)
1024*768@60
800*600@60
640*480@60
720x400@70
(4)NTSC/ATSC
NT
SC
Sound: Mono / Stereo / SAP
Fa
vorite Channel
V-c
hip
Cl
osed caption
(CC1-CC4, Text 1-Text 4)
AT
SC
Favorite Channel
V-c
hip
Vi
deo input format: 1080i, 720p, 480p, 480i
An
alog closed caption:
(CC1-CC4, Text 1-Text 4)
Digital closed caption:
(Service 1-Service 6)
(5
)I/O
1
input x TV Tuner (NTSC/ATSC),
1 input x AV,
1 input x YPbPr(audio shared with AV)
3 inputs x HDMI/HDCP (optional, HDCP audio shared with VGA Audio In),
1 input x VGA,
1 input x VGA Audio In,
1 output x COAXIAL (digital audio) out,
1 output x Headphone out,
(2)Audio
Off/
5mins/10mins/15mins/30mins/60mins/90mins/120mins/180mins/240mins
1 input x R/L Audio In (RCA interface)
1 intput x USB In (only for servise)
Page 36

FCC Compliance Statement
This device complies with Part 15 of the FCC Rules.
Operation is subject to the following conditions:
This device may not cause harmful interference
This device must accept any interference received, including interference that my cause
undesired operation.
Please Note: This equipment has been tested and found to comply with the limits for a Class B
digital device, pursuant to part 15 of the FCC Rules. These limits are designed to provide
reasonable protection against harmful interference in a residential installation. This equipment
generates uses and can radiate radio frequency energy and, if not installed and used in
accordance with the instructions, may cause harmful interference to radio communications.
However, there is no guarantee that interference will not occur in a particular installation. If
this equipment does cause harmful interference to radio or television reception, which can be
determined by turning the equipment off and on, the user is encouraged to try to correct the
interference by one or more of the following measures:
• Reorient or relocate the receiving antenna.
• Increase the separation between the equipment and the receiver.
• Connect the equipment into an outlet on a circuit different from that to which
the receiver is connected.
Caution: To comply with the limits for an FCC Class B computing device, always use the
signal cord and power cord supplied with this unit.
The Federal communications Commission warns that changes or modifications to the unit not
expressly approved by the party responsible for compliance could void the user s authority to
operate the equipment.
European Notice
Products with the CE marking comply with both the EMC Directive (89/336/EEC),
(93/68/EEC) and the Low Voltage Directive (72/23/EEC) issued by the Commission of the
European Community.
Page 37
Hi!
Let’s get started.
Page 38
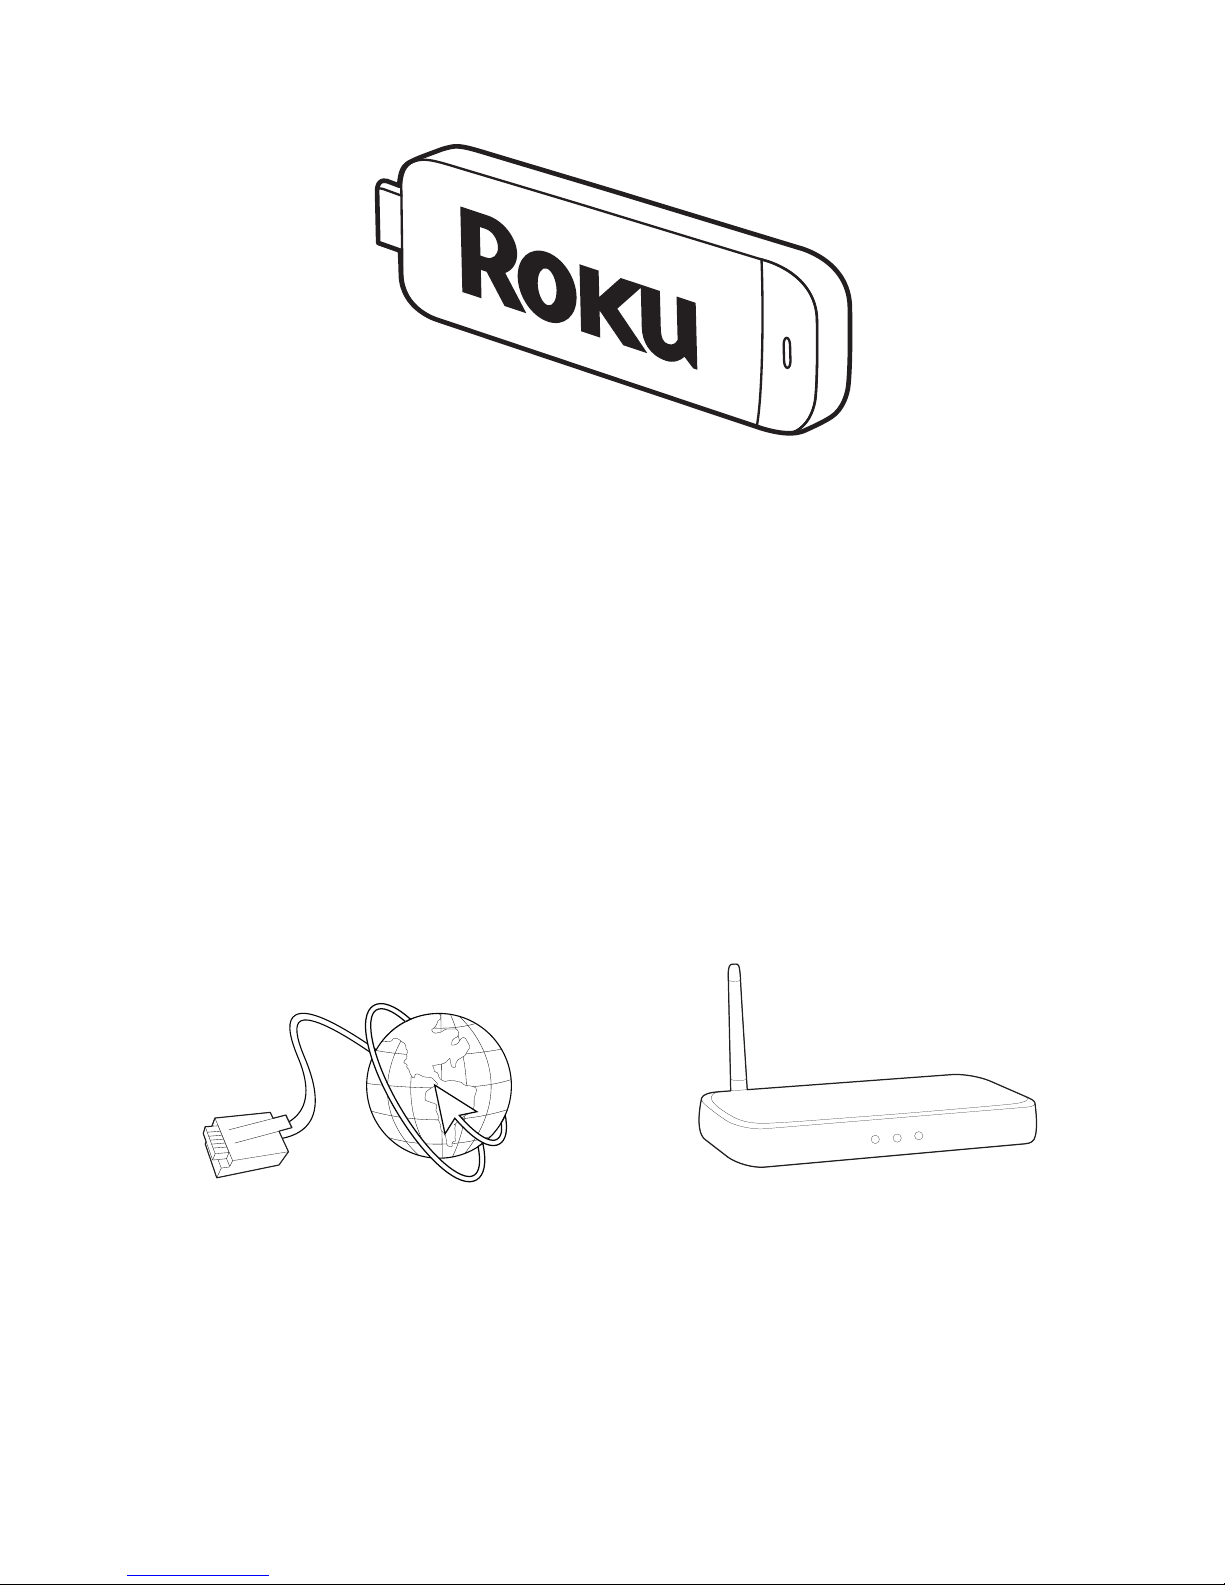
Rok
TM
u Streaming Stick
What
you need
High speed
Internet
Wi
reless Router
36
Page 39
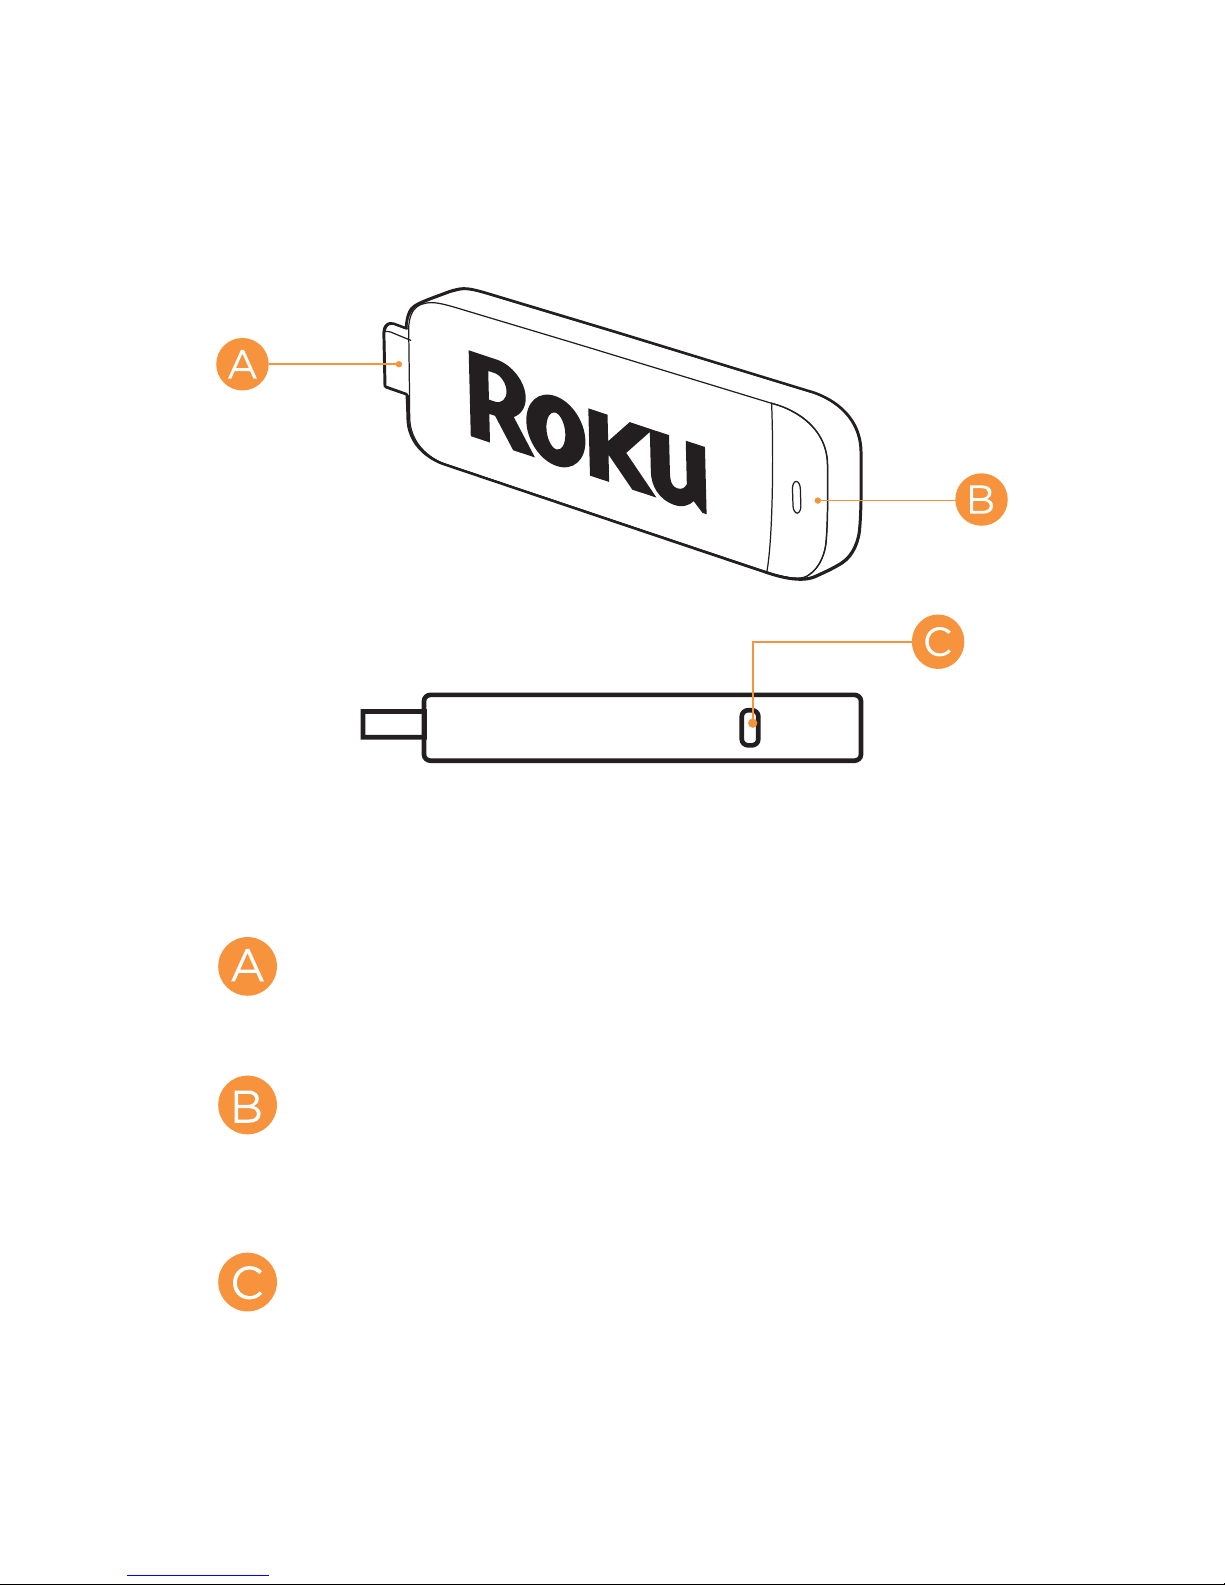
Know your
Streaming Stick
[MHL CONNECT
MHL port on the back of your TV.
[ST
when lit, or activity when ashing.
[RESET BUTTON] Used t
your Streaming Stick
ATUS LIGHT] Signies it is on
OR] Plugs into the
o reset
37
Page 40
Wh
at to do
38
Page 41

Connect t
o network
Now you can grab your remote
and jump right into guided
setup. Have your network name
and password ready and do the
following:
Select your netw
ork from the
list of available networks.
Enter your network password,
if you use one. Remember,
network passwords are case
sensitive.
39
Page 42
What to do
(c
ont.)
Complete guided setup
It’s the nal stretch and hooray—it’s
!
on-screen ins
Get the lat
Link the Rok
to your Roku account on your
computer.
tructions and you’ll:
est software.
u Streaming Stick™
40
Page 43

Your Roku account:
During setup, you’ll be
prompted to create
your Roku® account
online at roku.com/link. Your Roku
Streaming Stick™ will generate
a unique code that links your
player to your new account. Roku®
accounts are free and secure. And
while a valid credit card number is
required to create your account,
rest assured you will only be
charged if you authorize purchases
of channels and games from the
Roku Channel Store.
42
Page 44

Troubleshooting
Having tr
ouble completing setup?
Don’t worry: it’s usually an easy x.
If you cannot see a picture on
your TV:
Mak
e sur
e your TV is turned
on. (This tip could save you
some embarrassment.)
Make sur
e the video input
on your TV or home theater
receiver is set to match the
output (usually HDMI or MHL)
used with the Roku Streaming
Stick™. Most TVs have an Input button
(or a source button) on the remote
control to change video inputs.
43
Page 45

If you cannot c
onnect to your
wireless home network during
guided setup:
If you ar
e not getting 3 or
more signal-strength bars
above your wireless network,
adjust the location of your
Roku Streaming Stick™ and/
or wireless router. Make sure
there are no obstructions, like
cement walls, between your
Roku Streaming Stick™ and your
wireless router.
Make sur
correct wireless router name
on the “Wireless” screen.
e you select the
44
Page 46

Troubleshooting
ont.)
(c
Make sur
e you enter the
correct password, if your
network is security-enabled
(password is case sensitive).
If y
ou ha
SSID br
ve turned o
oadcasting on your
wireless router, you can add
your network by selecting
“My network is not shown”
from the “Wireless” screen.
If you cannot hear sound:
Make sur
e the connectors on
the cables between your TV
and home theater receiver
are pushed in all the way.
45
Page 47

(c
ont.)
Make sur
e the volume on your
TV or home theater receiver is
turned up and isn’t on mute.
46
Page 48

PROSCANISREGISTEREDINTHEUSA,CANADA,MEXICO,COLOMBIA,VENEZUELA&GUATEMALABYTECHNICOLORUSAINC.
TRADEMARKMANAGEMENTUSEDUNDERLICENSETO:CURTISINTERNATIONALLTD.
LIMITED PRODUCT WARRANTY
This quality product is warranted to be free from manufacturer’s defects in material and workman-ship, provided that the unit is used under the normal operating
conditions intended by the manufacturer. Should you have any problem with this product, please and it is highly recommended to visit our website at
www.curtisint.com
before you take any other steps as we have additional copies of instruction manuals, operating manuals and trouble shooting tips on our website
which gives you the answer on most of the questions you could have in operating the unit.
TERMS OF WARRANTY
C.I. Service Dept. warrants this product to be free from defects in materials and workmanship for 1 year on parts and labor. If you originally purchased your product
more than 1 year ago, a repair fee may apply. Nothing within this warranty shall imply that C.I. will be responsible or liable for any damage to any items placed in this
product, whether due to any defect of the product, or its use, whether proper or improper.
EXCLUSIONS
Save as herein provided, C.I. Service Dept. (Canada) or C.I. Service Dept. (USA), there are no other warranties, conditions, representations or guarantees, express or
implied, made or intended by C.I. or its authorized distributors and all other warranties, conditions, representations or guarantees, including any warranties, conditions,
representations or guarantees under any Sale of Goods Act or like legislation or statue is hereby expressly excluded. Save as herein provided, C.I. Service Dept.
(Canada) or C.I. Service Dept. (USA), shall not be responsible for any damages to persons or property, including the unit itself, howsoever caused or any consequential
damages arising from the malfunction of the unit and by the purchase of the unit, the purchaser does hereby agree to indemnify and save harmless C.I. from any claim
for damages to persons or property caused by the unit. Your warranty does not cover damages which are caused by: • Fire, accident, lightening, flood and/or other acts
of God • Faulty installation, set-up adjustments, improper antenna, inadequate signal reception, adjustment of consumer controls and/or improper maintenance • Failure
which results from misuse, abuse, neglect, mishandling, misapplication, and/or alteration.
TO OBTAIN REPAIRS UNDER THE TERMS OF THIS WARRANTY IF PUR CHASED IN THE UNITED STATES OF AMERICA
1. The original purchaser must present a copy of the original bill of sale and the service warranty card.
2. Any alterations, abuse, misuse, battery corrosion or accidental damage voids the warranty.
3. The warranty does not cover cabinets and accessories.
4. No warranty or insurance contained or set out shall apply when damage or repair is caused by power failure; damage in transit or when moving the unit; improper
power supply; use for commercial or industrial purposes; service calls resulting in customer education, etc.
5. The defective product should be mailed prepaid to:
Curtis International Ltd
100 Lakeview Parkway
Vernon Hills, IL, 60061
For service assistance and product information, please call: 1-800-968-9853.
6. C.I. reserves the right to repair or replace the parts which have become defective.
TO OBTAIN REPAIRS UNDER THE TERMS OF THIS WARRANTY IF PURCHASED IN CANADA
How to get service:
• Call 1-800-968-9853. Please have your unit’s date of purchase and model/serial number ready. The model/serial number information can be found on the back of your
unit.
• A representative will troubleshoot your problem over the phone.
• If it is that your unit requires service, the service location will be at the sole discretion of Curtis based upon the Curtis Limited Warranty statement. determined
• You will bear the transportation cost to and from the Service Centre (Unless you have made other arrangements with your dealer at the time of purchase whereby he
undertakes this responsibility)
• At the sole discretion of Curtis, Televisions are either consumer carry-in to an Authorized Curtis Service Centre or directly exchanged for a new or
refurbished/remanufactured unit.
• Proof of purchase in the form of an original bill of sale or receipted invoice from an Authorized Dealer which is evidence that the product is within the warranty period
must be presented to obtain warranty service.
©Curtis International Ltd.
315 Attwell Drive, Toronto, Ontario M9W 5C1 www.curtisint.com
Model No. Date Purchased Serial No.
Page 49
Roku S
TM
treaming Stick
Importan
e License Agreement
Th
The R
license. Use of the Roku Streaming Stick™ (“Streaming Stick”) constitutes acceptance
of as well as agreement to those license terms.
One (1)
Subject to
Limited Warranty:
Ro
United Stat
Limited W
R
workmanship under normal use for a period of o n e ( 1 ) y e a r from the date
of purchase (“Warranty Period”). If Roku determines that the Streaming Stick’s
hardware is defective, Roku will either repair the unit or replace the unit with either
a new or rebuilt Streaming Stick, at its option. If the Warranty Period has expired
or is otherwise not applicable (see Scope and Limitation on Warranty below), we
will return the Streaming Stick to you. More information about this warranty can
oku and third-party software license terms can be found at: www.roku.com/
Year Limited Hardware Warranty
the additional terms and conditions set forth below, Roku provides this
ku or from one of its authorized re-sellers or distributors; and
ku warrants the Streaming Stick hardware against defects in materials and
o
t Product Information
es and Canada.
arranty
Return and W
Please acc
before seeking warranty service. To return or obtain warranty service for a
number from a Cus
expir
e thirty days from issuance. Roku may attempt to troubleshoot a warranty-
ship your S
accessories, in either the original packaging or pa
of prot
Failure to return any of the accessories could result in a delay and/or result in an
invoice to you or credit to Roku for the missing accessories.
ection, to the Roku authorized distribution facility identified by the CSR.
arranty Service Process
ess and review the online help resources at www.roku.com/support
tomer Support Representative (CSR) at Roku. Customer Support
treaming Stick, freight prepaid, together with proof of purchase and all
48
Page 50

Important:ƫ
with your request: (a) model number, (b) serial number, (c) problem description, (d)
software version (located in the System Configuration menu), (e) date of purchase,
(f) place of purchase (re-seller or online place of purchase), and (g) return shipping
.!//ƫĨċċƫ+4!/ƫ.!ƫ*+0ƫ!,0! ĩċ
$!*ƫ!)%(%*#ƫ"+.ƫƫƫ*1)!.Čƫ,(!/!ƫ,.+2% !ƫ0$!ƫ"+((+3%*#ƫ%*"+.)0%+*ƫ
ope of and Limitation on W
Sc
The w
units as described in the Limited Warranty section above. This warranty does not cover
customer training or education, installation, set up adjustments, or signal reception
problems. This warranty also does not cover any issue related to the service provided
by your Service Provider, including but not limited to service disruption, changes
in service terms, changes in oerings, changes in format, or technical problems.
$%/ƫ3..*05ƫ +!/ƫ *+0ƫ +2!.ƫ )#!ƫ 1!ƫ 0+ƫ 0/ƫ +"ƫ + Čƫ % !*0Čƫ )%/1/!Čƫ 1/!Čƫ
negligence, commercial use or modification of, or to any part of, your Streaming Stick.
This warranty does not cover damage due to improper operation or maintenance,
connection to improper voltage supply or attempted repair by anyone other than a
facility authorized by Roku to service your Streaming Stick. This warranty does not
cover consumables (such as fuses and batteries).
Legal Notic
Feder
$%/ƫ !-1%,)!*0ƫ $/ƫ !!*ƫ 0!/0! ƫ * ƫ "+1* ƫ 0+ƫ +),(5ƫ 3%0$ƫ 0$!ƫ (%)%0/ƫ "+.ƫ ƫ (//ƫ ƫ
digital device, pursuant to Part 15 of the FCC Rules. These limits are designed to
provide reasonable protection against harmful interference in a residential installation.
This equipment generates, uses and can radiate radio frequency energy and, if not
installed and used in accordance with the instructions, may cause harmful interference
to radio communications. However, there is no guarantee that interference will not
occur in a particular installation. If this equipment does cause harmful interference to
radio or television reception, which can be determined by turning the equipment o
and on, the user is encouraged to try to correct the interference by one of the following
measures:
arranty on the Streaming Stick is limited to the repair or replacement of defective
es
al Communication Commission Interference Statement
arranty
đƫ!+.%!*0ƫ+.ƫ.!(+0!ƫ0$!ƫ.!!%2%*#ƫ*0!**ċ
đƫ*.!/!ƫ0$!ƫ/!,.0%+*ƫ!03!!*ƫ0$!ƫ!-1%,)!*0ƫ* ƫ.!!%2!.ċ
đƫ+**!0ƫ0$!ƫ!-1%,)!*0ƫ%*0+ƫ*ƫ+10(!0ƫ +*ƫƫ%.1%0ƫ %û!.!*0ƫ".+)ƫ0$0ƫ0+ƫ3$%$ƫ0$!ƫ
receiver is connected.
đƫ+*/1(0ƫ0$!ƫ !(!.ƫ+.ƫ*ƫ!4,!.%!*! ƫ. %+ĥƫ0!$*%%*ƫ"+.ƫ$!(,ċ
$%/ƫ !2%!ƫ +),(%!/ƫ 3%0$ƫ .0ƫ āĆƫ +"ƫ 0$!ƫ ƫ 1(!/ċƫ ,!.0%+*ƫ %/ƫ /1&!0ƫ 0+ƫ 0$!ƫ
following two conditions: (1) This device may not cause harmful interference, and (2)
this device must accept any interference received, including interference that may
cause undesired operation.
49
Page 51
a
FCC C
s
re
h
c
Wireless Radio Use:
a
b
IM
ution:
ponsible for compliance could void the user’s authority to operate this equipment.
annels 1 through 11.
nd.
PORTANT NOTE:
FCC Radiation Exposure Statement:
Thi
s equipment complies with FCC radiation exposure limits set forth for an
uncontrolled environment. This equipment should be installed and operated with
minimum distance 20cm between the radiator and your body.
This transmitter must not be co-located or operating in conjunction with any other
antenna or transmitter.
No
te to US model owner:
To com
removed from all US models.
The availability of some specific channels and/or operational frequency bands
are country dependent and are firmware programmed at the factory to match the
intended destination. The firmware setting is not accessible by the end user.
Industry Canada statement
This device complies with RSS-210 of the Industry Canada Rules. Operation is subject
to the following two conditions: (1) this device may not cause harmful interference,
and (2) this device must accept any interference received, including interference that
may cause undesired operation. The device for operation in the band 5150-5250 MHz
is only for indoor use to reduce the potential for harmful interference to co-channel
mobile satellite systems.
Sa
The
any electrical device, if used improperly, has the potential for causing fire, electrical
shock or personal injury. To help ensure accident-free operation, follow these guidelines:
ply with US FCC regulation, the country selection function has been completely
fety Precautions
Streaming Stick has been designed with the highest concern for safety. However,
e
ctrical outlet and disconnect any other cables immediately if the Streaming Stick
el
or the device functions in an abnormal manner, produces unusual sounds or smells or
becomes too hot to touch.
roku.com
/support.
50
Page 52
Use and Handling
of small children.
Stick or acc
humidity or direct sunlight.
w.roku.com
ww
essories.
trademarks or r
egistered trademarks of Roku, Inc.
51
 Loading...