

Page 1

Copyright 2010 Arfaian Export Import HGmbH, All rights reserved
Pro`s Pro P100
Stringing Machine
User`s Manual
Table of contents:
Pack list····················································· 2
Parts and functions····································· 3
Operating instructions································ 6
Maintenance and troubleshooting··············· 8
Page 2
Copyright 2010 Arfaian Export Import HGmbH, All rights reserved 2
Introduction
Dear customer,
Please read this manual carefully before using the stringing machine.
Pack list
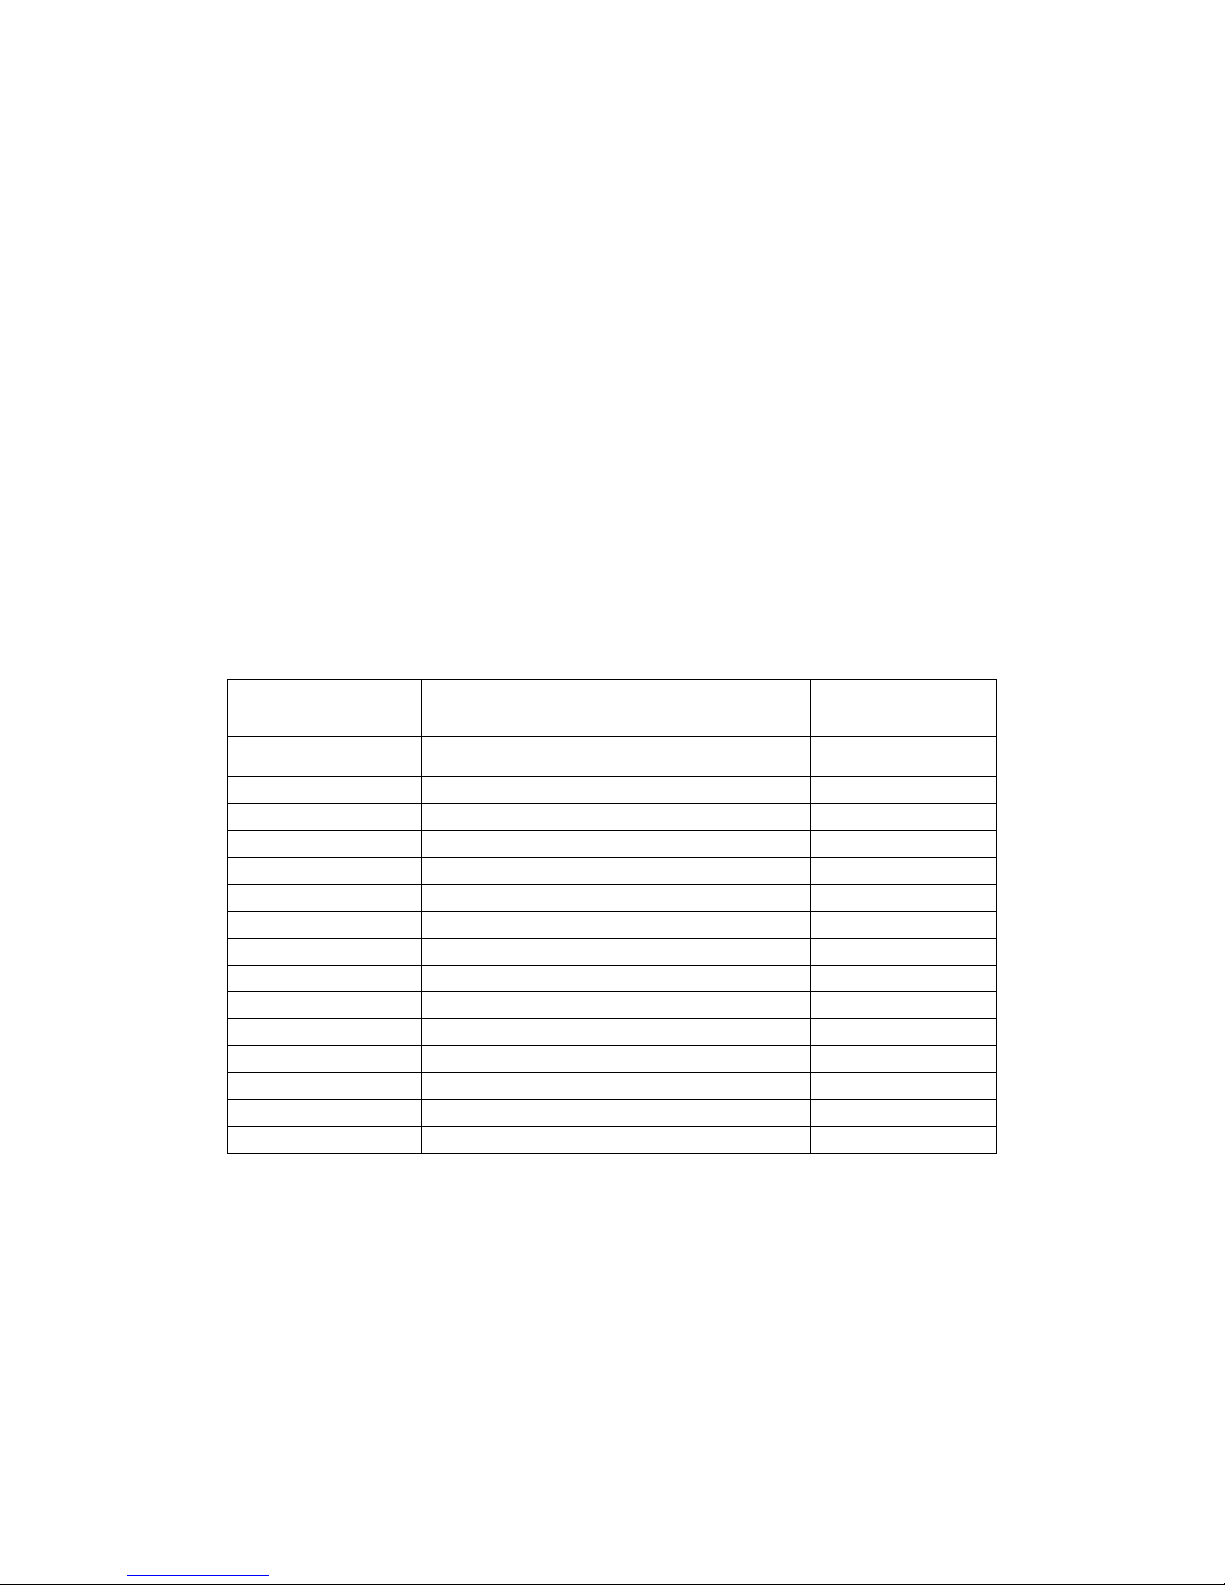
The Stringing Machine P-100 consists of 3 cartons. Its inner parts all
have a protective layer to defend against bumping or falling
The Stringing Machine Pro’s Pro P-100 detailed pack list:
Preface number
Parts name
Quantity
1
The Stringing Machine Host Head
one
2
The Cylinder Pipe
one
3
X Type Feet
one
4
The Butterfly Form Cover
one
5
Tool Dish
one
6
Pull Racket Hook Protect-slice
two
7
Plank Body
one
8
Tennis Swivel Clamp
two
9
14-17mm Open-mouth Wrench
one
10
4mm Hexangular Wrench
one
11
5mm Hexangular Wrench
one
12
6mm Hexangular Wrench
one
13
The Fuse (2 A)
one
14
Power Cable
one
15
Customer user manual
one
Page 3
Copyright 2010 Arfaian Export Import HGmbH, All rights reserved 3
Parts and Functions
I. Components
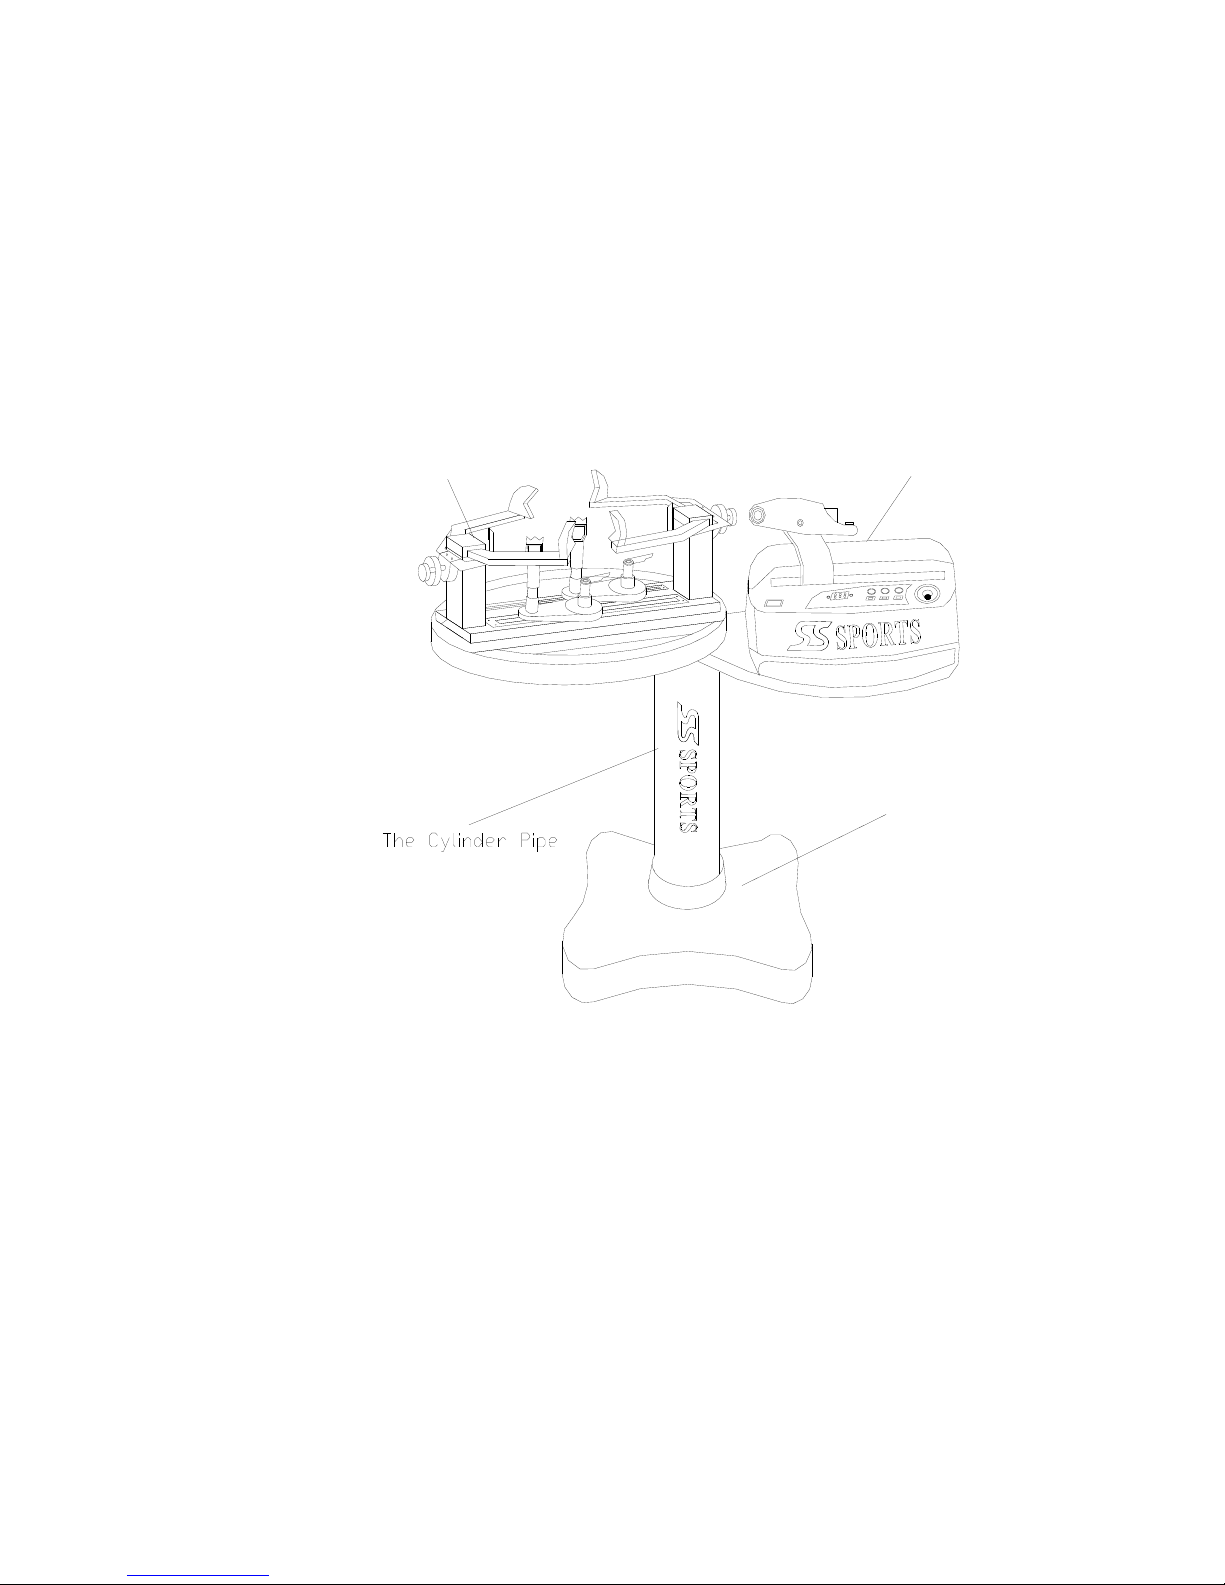
1. Structure illustration:
The St r i ngi ng Machi ne Hose
The Cl i p Racket Body
The X Type Feet
Page 4
Copyright 2010 Arfaian Export Import HGmbH, All rights reserved 4
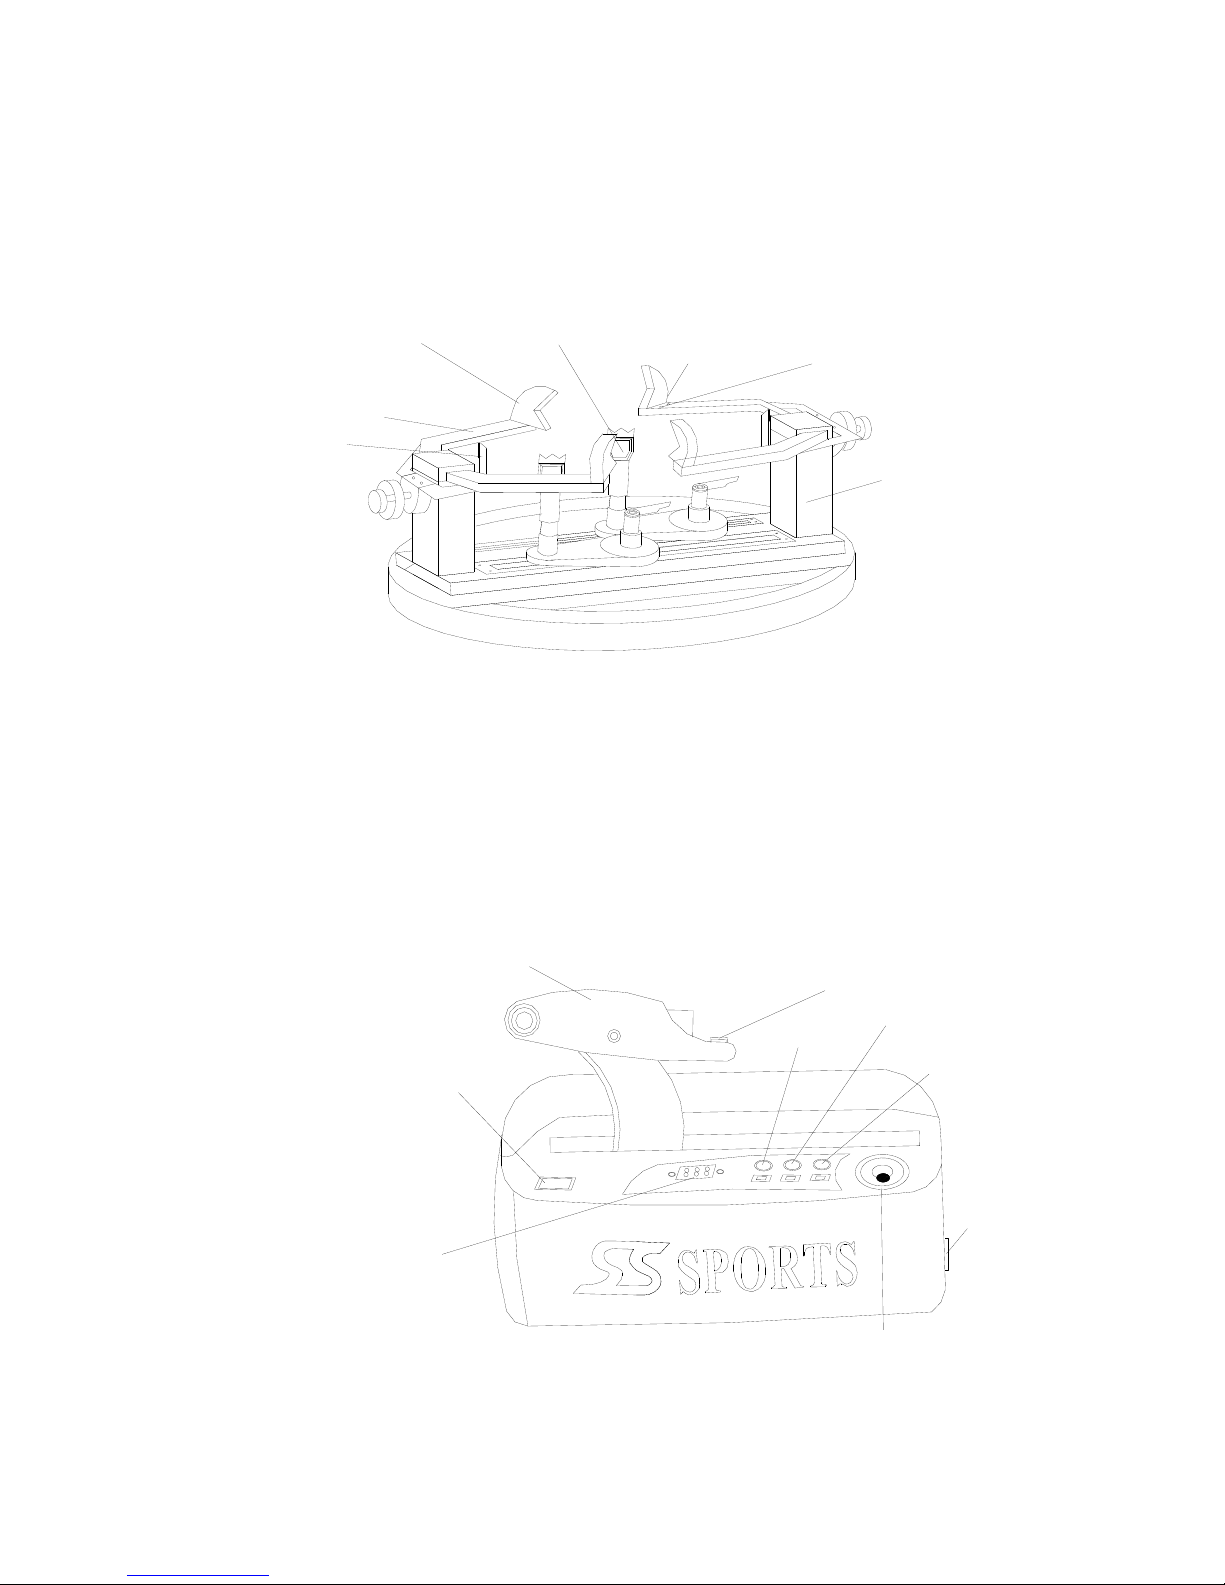
2. Clip Racket Body:
Badminton
clip racket
device
backbone hole
Racket
set pi n
Clip string
pin
Tennis clip
racket device
backbone hole
Clip racket device
Extend shrink arm
Racket
set pi n
Badminton
clip racket
device
backbone hole
Moves
t he col umn
3. Main Machine Host Head:
The St i ngi ng- devi ce
The St i ngi ng But t on
The St i ngi ng
But t on
LED Di spl ay
Devi ce
LB/ KG
Fast / Sl ow
Ti l
The Ri se- pound,
Fal l - Pound But t on
AC Power
Page 5
Copyright 2010 Arfaian Export Import HGmbH, All rights reserved 5
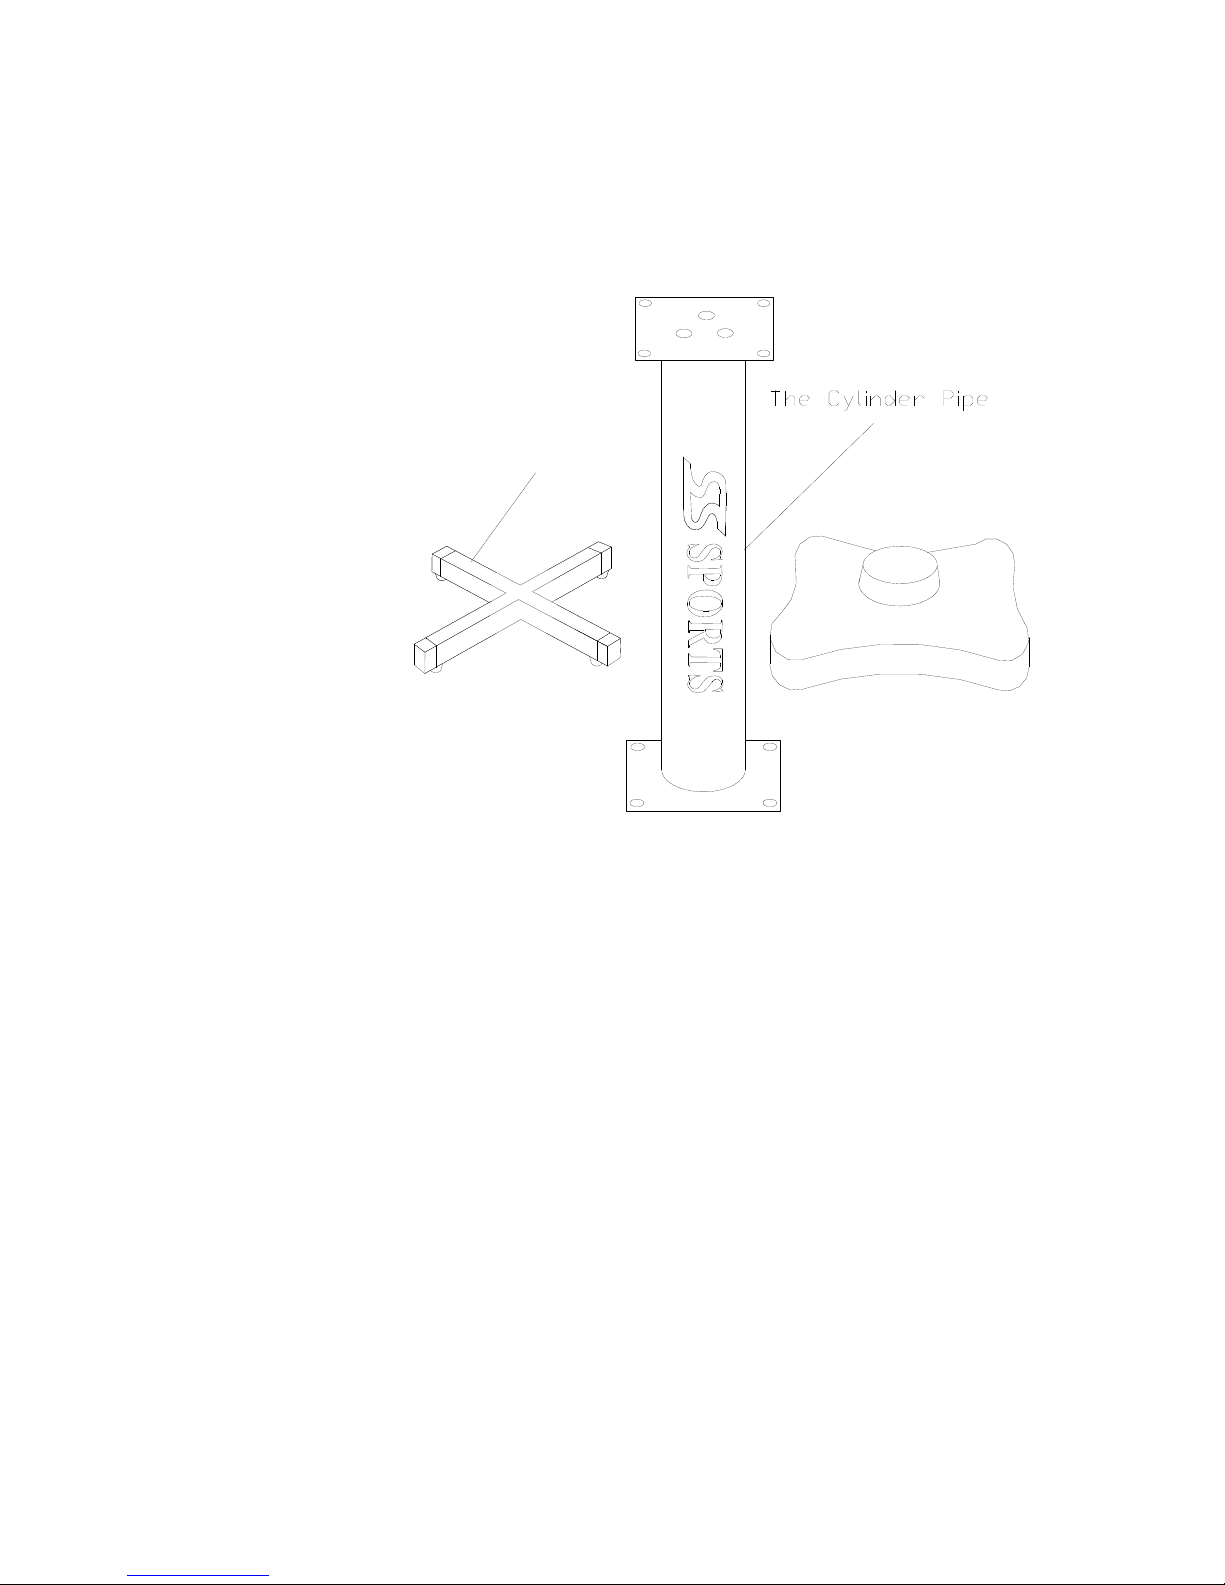
4. The Cylinder Pipe and X Type Feet:
The X Type Feet
5. Functions
Micro computer control straight line method
Multi position touch button
LED display for current computer pound, display range: 10
pounds to 90 pounds, 5 to 45 kg, precise measurement.
Fast pounds setting equipment, easy to operate.
High precision electronic pounds gauge adopted to test and
correct pounds value.
Special tie quickon button available.
It is possible to set fast string speed and slow string speed with
the “Fast/ Slow” button.
Specially designed string head, to clip string tightly without
damaging the string, wears well. It is fast and easy to put the
string in and out.
The left and right bracket arms hold the racket together, fast to
hold racket firmly without deforming the racket.
Suitable for any type of racket (including Tennis, Squash,
Badminton, Widebody, Extra Long Rackets) string.
Page 6

Copyright 2010 Arfaian Export Import HGmbH, All rights reserved 6
Operating instructions
Unpacking and assembly
1. Carefully unpack the machine and the accessories, lift them out of
the carton and check for any obvious damage. Check that all parts
are included. Please keep the original packaging.
2. Align the cylinder pipe feet link plank with the X type feet and fix
them together by tightening the screws
3. Adjust X Type feet mats to level the machine. Put the butterfly
form cover over the top of the cylinder pipe to cover the X Type
feet. Note- you have to unscrew and remove the Stringing
Machine Host link plank first.
4. Fix the Stringing Machine Host link plate back on top of the
cylinder pipe. Fix well.
Now fix the clip racket body to the main machine part.
Align the machine with the Stringing Machine host head. Tighten
the screws.
Note: To tighten the screws of the racket stringing machine at the steel
parts, you must lock them firmly when installing.
Pounds set and operation
A:Pounds set
1. Select the correct power supply (220V-50Hz) and plug in.
2. In Standby mode, the required pounds can be set with the
adjustment button on the machine host (LED display).
3. To increase the pounds rotate the pounds adjustment button
clockwise (LED display). To decrease the pounds rotate the pounds
adjustment button counterclockwise (LED display).
B:Changing from LB to KG
1. When the machine is switched on the LB indicator light comes on.
The default unit of measure when the machine is turned on is “LB”
(LED display).
Page 7

Copyright 2010 Arfaian Export Import HGmbH, All rights reserved 7
2. Press "KG / LB" button, and the "KG" indicator light will come on.
Then the machine unit of measure is “KG” (LED display).
C: Tie function
1. When the machine is switched on the LB indicator light comes on.
2. Press "Tie" button, LED pounds value will increase by 1-5 lbs
(below 30 pounds, an increase of 1-2 pounds; above 30 pounds, an
increase of 3-5 lbs)
D:Operation
1. When the machine is switched on the LB indicator light comes on.
LB is displayed on the LED. The machine is in standby mode.
2. There are 2 green stringing buttons on the machine, either one can
be used.
3. Gently press the string button once, this is the pull process.
Gently press the string button again, that is the back line process
to ease the tension.
After the normal operation of above A, B, C, D, set the pounds you need,
then you can put on the racket and string.
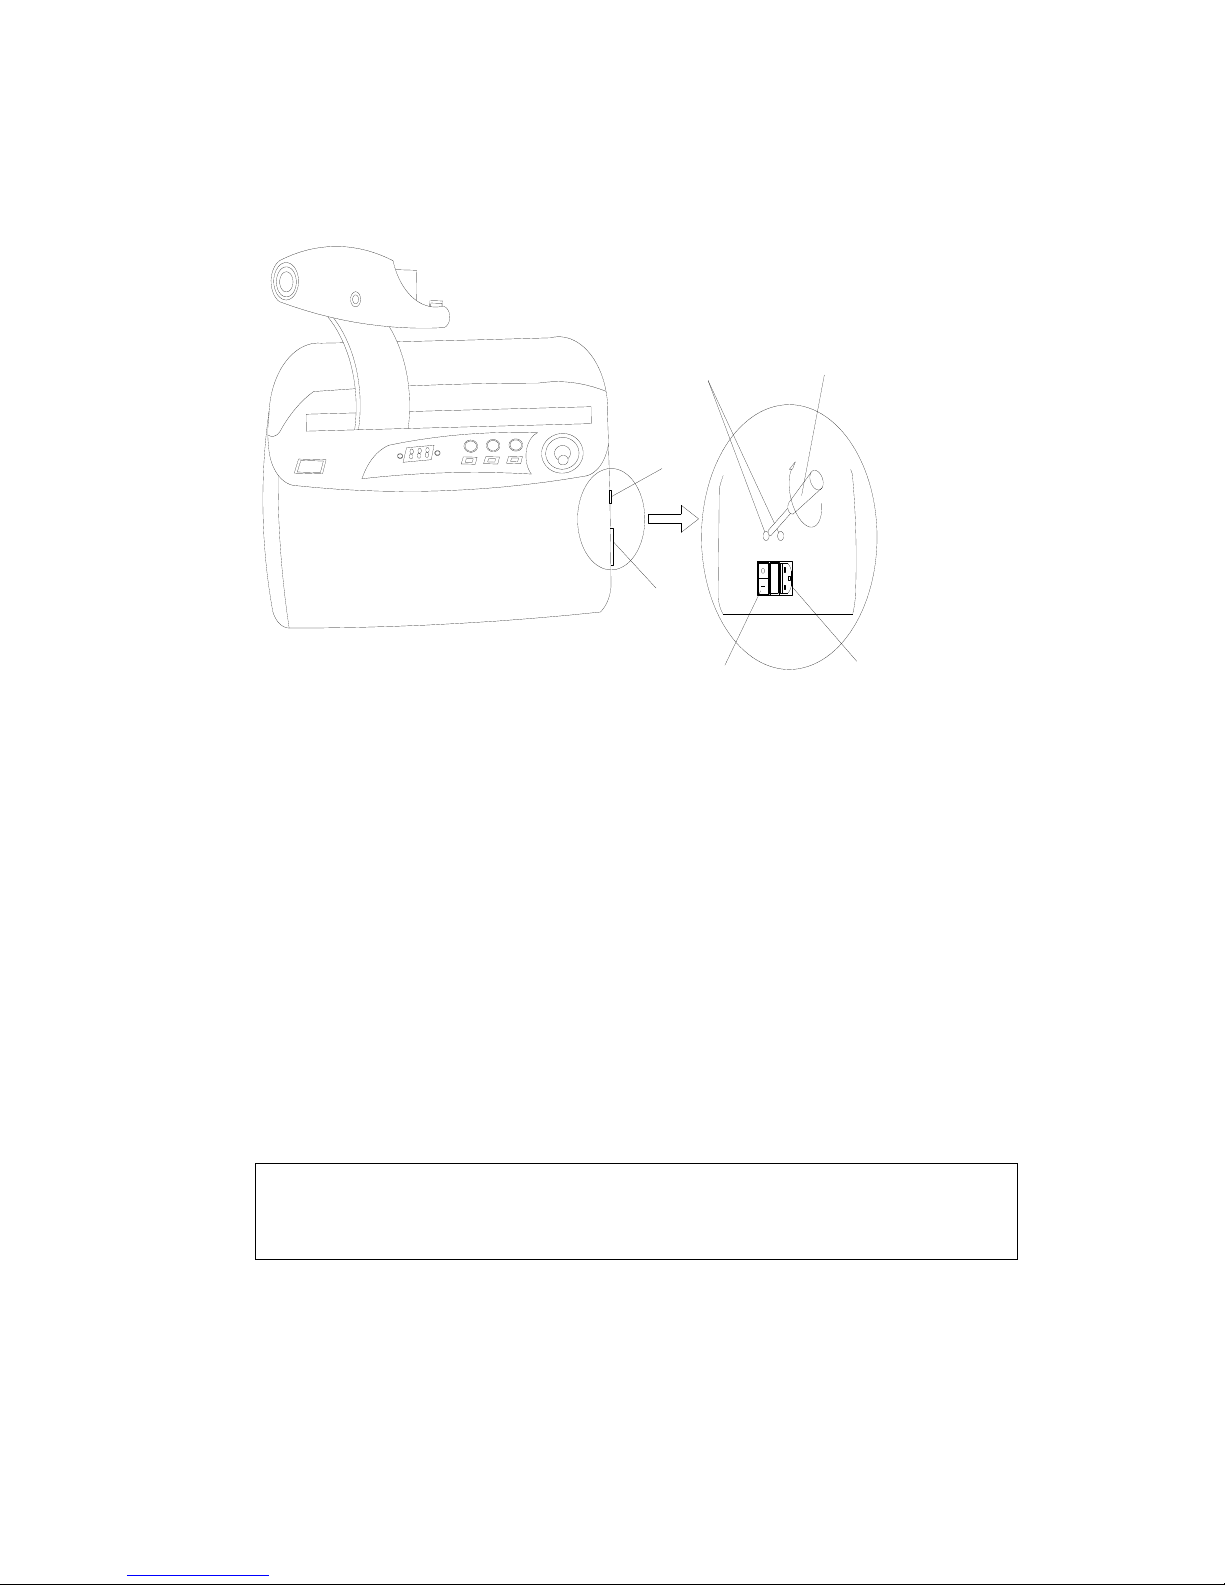
E: Calibration
Page 8
Copyright 2010 Arfaian Export Import HGmbH, All rights reserved 8
AC Power
SS SPORTS
Adj ust i ng wi ndow
Adj ust i ng wi ndow
Power swi t ch
AC socket
Adj ust i ng cl ockwi se, t he pounds
wi l l be up and vi ce ver sa.
Note – all parts of the stringing machine are adjusted and have
been tested. The machine is calibrated.
After assembly you can start stringing.
Warning
After connecting power supply, there is high pressure
electricity in the machine, don't open the machine casing.
Do not let minors play with the machine!
Page 9

Copyright 2010 Arfaian Export Import HGmbH, All rights reserved 9
Maintenance and troubleshooting
I. Maintenance
1. Keep the stringing machine in a dry and safe place, ensure to keep it
away from dust, grease, moisture and any type of heat.
2. Every six months inject a little amount of lubricant on the stringing
hook’s adjustment knob, the clip racket arm’s adjustment knob, the clip
racket body to turn part and the stringing-device’s steel ball part.
3. Don’t allow water, oil and the other acidic material and alkaline
material to enter the inside of the machine.
4. Use a little brush of soft cloth to clean the surface dust. Don’t use any
liquid or abrasive cleaners.
5. Please turn off the power switch and plug out power cable when not
used for some time.
II. Troubleshooting
1. If the power switch is on but the indicator does not light and the
machine does not work:
• There is no electricity or the power cable may be loose, please check
power and check power cable is securely plugged in.
• Check the Fuse. It may be burnt out. Replace the fuse if necessary.
• The machine inner part may be broken down. (Please contact your
dealer).
2. If the power switch is on and the indicator is lit but the machine still
does not work:
• The stringing-button has locked and doesn't move. (Please contact
your dealer)
• The drivers make bad contact or are damaged. (Please contact your
dealer)
• The machine inner part breakdown. (Please contact your dealer)
Page 10

Copyright 2010 Arfaian Export Import HGmbH, All rights reserved 10
3. The string slips through the stringing-device gripper or the string
clamp does not tightly grip the string:
• The stringing-device’s screw is loose, please lock tightly.
• The contact-part of the stringing device and string has oil stains,
please use alcohol and clean with a soft cloth.
4. When stringing, the pounds on the LED are not accurate.
• Please check whether the power supply voltage is too high or too low.
(Please connect with over 200W stable voltage).
• The machine inner part may be broken down. (Please contact your
dealer).
 Loading...