


NOTE:
Please ensure that you read
this instruction carefully
before attempting to
assembling or using this
product
Model :JX-206A
Cat No.# 9283457
Retain This
Manual for
Reference
OWNER'S
MANUAL
Utility Training Bench
Assembling &User Manual
Model : JX-206A
RETAILER: ARGOS
ADDRESS: 489-499 Avebury Boulevard
Saxon Gate West
Central Milton Keynes Bucks,
MK9 2NW

TABLE OF CONTENTS
TABLE OF CONTENTS.......................................................................................................1
IMPORTANT SAFETY NOTICES........................................................................................2
GENERAL INFORMATION..................................................................................................3
EXERCISE INFORMATION.................................................................................................4
WEIGHT BENCH EXERCISE GUIDE…………………………………………………………..12
ASSEMBLY INSTRUCTIONS.............................................................................................15
FOLDING THE BENCH FOR STORAGE USE ……………………………………………….20
EXPLODED DIAGRAM ………………………………………………………………………….22
PARTS LIST....................................................................................................................... 23

1
IMPORTANT SAFETY NOTICE
PRECAUTIONS
This exercise machine is built for optimum safety. However, certain precautions apply whenever
you operate a piece of exercise equipment. Be sure to read the entire manual before you assemble
or operate your machine. In particular, note the following safety precautions:
1. Keep children and pets away from the machine at all times. DO NOT leave children
unattended in the same room with the machine.
2. Only one person at a time should use the machine.
3. If the user experiences dizziness, nausea, chest pain, or any other abnormal symptoms STOP
the workout at once. CONSULT A PHYSICIAN IMMEDIATELY
4. Position the machine on a clear leveled surface. DO NOT use the machine near water or
outdoors.
5. Keep hands away from all moving parts.
6. Always wear appropriate workout clothing when exercising. DO NOT wear robes or other
clothing that could become caught in the machine. Running or aerobic shoes are also required
when using the machine.
7. Use the machine only for its intended use as described in this manual. DO NOT use attachments
not recommended by the manufacturer.
8. Do not place any sharp object around the machine. For your own safety, Always ensure that
there is at list 1 meter of free space in all directions around your product while you are exercise.
9. Disabled person should not use the machine without a qualified person or physician in
attendance.
10. Before using the machine to exercise, always do stretching exercises to properly warm up.
11. Never operate the machine if the machine is not functioning properly.
12. Examine the equipment termly especially for the easy damaged or worn parts, Safety level of the
equipment can only remain if it is examined regularly. Replace the defective comments
components immediately, keep the equipment out of use until repair.
13. Parents and others in charge of children should be aware of their responsibility because the
natural play instinct and the fondness of experimenting of children can lead to situations and
behavior for which the training equipment is not intended.
14. Before using the machine to exercise, always do stretching exercises to properly warm up.
15. A spotter is recommended during exercise.
16. Maximum Weight Capacity of the weight Bench:
Maximum user’s Weight :110kgs /242lbs.
Maximum Weight Capacity on uprights:80Kgs/176.2lbs( Including Bar and weights)
Maximum Weight Capacity on Leg Developer: 35Kgs/77lbs
17. Your product is intended for use in clean dry conditions, your should avoid storage in excessively
cold or damp places as this may lead to corrosion and other related problem that are outside our
control.
18. This product conforms to:
(BS EN957)-PARTS 1. 2. 4 class (H)- Home Use- Class ( C), It’s NOT suitable for
therapeutic purposes .
WARNING: BEFORE BEGINNING ANY EXERCISE PROGRAM, CONSULT YOUR

PHYSICIAN. THIS IS ESPECIALLY IMPORTANT FOR INDIVIDUALS OVER THE AGE
OF 35 OR PERSONS WITH PRE-EXISTING HEALTH PROBLEMS. READ ALL
INSTRUCTIONS BEFORE USING ANY FITNESS EQUIPMENT. ARGOS ASSUMES NO
RESPONSIBILITY FOR PERSONAL INJURY OR PROPERTY DAMAGE SUSTAINED BY
OR THROUGH THE USE OF THIS PRODUCT.
SAVE THESE INSTRUCTIONS.
2
GENERAL INFORMATION
QUALITY :
This exercise product has been designed and manufactured to comply with the latest (BS EN 957)
British and European Safety Standards .
CARE AND MAINTENANCE
1. Lubricate moving parts with light oil periodically.
2. Inspect and tighten all parts before using the machine.
3. The machine can be cleaned using a damp cloth and mild non-abrasive detergent. DO NOT use
solvents.
QUESTIONS:
Should you encounter any difficulty with assembly, operation or use of your exercise product or if you
think that you may have parts missing, Please contact with your retailer as below :
Retailer : ARGOS
ADDRESS: 489-499 Avebury Boulevard
Saxon Gate West
Central Milton Keynes Bucks,
MK9 2NW
CUSTOMER SUPPORT :
If you have any queries, please contact Argos directly.

3
EXERCISING INFORMATION
BEFORE YOU BEGINNING
How you begin to exercise will vary from person to person, If you have not exercised for a long
period of time, have been inactive for a while, or are severely overweight you MUST start slowly,
increasing your exercise time gradually, by perhaps only a few minutes for each session per week.
Combine a carefully structured nutritious diet with a simple but effective exercise routine and this can
help make you feel better, look better and will almost certainly enable you to enjoy life more.
AEROBIC FITNESS
Aerobic exercise is simply defined as any sustained activity that increase the supply of oxygen t your
muscles via the blood pumped by your heart, with regular exercise, your cardiovascular system will
become stronger and more efficient, Your recovery rate i.e. the time taken for your heart to reach its
normal level, will also decrease.
Initially you may only be able to exercise for a few minutes each day, Do not hesitate to breath
through your mouth should you need more oxygen. Use the “talk test”. If you cannot carry on a
conversation while exercising, you are working too hard! However, aerobic fitness will be gradually
built up with regular exercise, over the next six to eight weeks.
Do not be discouraged if it takes longer than this to begin to feel less lethargic, everyone is different
and some will achieve their targets quicker than others, work at your own, comfortable pace and the
results will come, The better your aerobic fitness the harder you will have to work to stay in your
target zone.
WARMING UP
A successful exercise programme consists of three parts. Warm up, Aerobic exercise and cool down.
Never start a training session without warming up, Never finish one without cooling down correctly.
Perform between five and ten minutes of stretching before starting your workout to prevent muscle
strains pull and cramps.
AEROBIC EXERCISE SESSION:
Those new to exercise should exercise no more than every other day to start with.
As your fitness level increases, increase this to 2 in every 7 days.

When you are comfortable with your routine, exercise for 6 days per week. Always take at list one
day off per week.
EXERCISE IN YOUR TARGET ZONE :
To ensure that your heart is working in its exercise target zone, you need to be able to take your
pulse, if you do not have a pulse monitor(either from the product you are using or a proprietary
independent unit) you will need to locate the pulse in your carotid artery. This is situated in the side
of the neck and can be felt by using the index and middle fingers.
Simply count the number of beat you feel in 10 seconds and then multiply by six to get your pulse
rate. This should be taken before you start to exercise for easy reference.
People who have a greater aerobic fitness, have a lower resting pulse level and will also be able to
exercise with a higher pulse level.
4
TARGET ZONE
To determine your target zone, see the chart below, if you are new to exercise and by definition unfit,
refer to the left column, If you exercise regularly and have good aerobic fitness, refer o the right
column.
USERS AGE
(Years)
UNCONDITIONED
(Target Zone A )
(Beats per minutes)
CONDITIONED
(Target Zone B)
(Beats per minutes)
20-24
145---165
155—175
25-29
140--160
150—170
30-34
135--155
145—165
35-39
130--150
140—160
40-44
125—145
135--155
45-49
120—140
130—150
50-54
115—135
125—145
55-59
110—130
120—140
60 and over
105—125
115--135
COOL DOWN

To decrease fatigue and muscle soreness, you should also cool down by walking at a show relaxed
pace for a minutes or so, to allow your heart rate to return to normal.
5
WARM-UP / COOL DOWN EXERCISE
A successful exercise session begins with warming up exercises and ends with exercises for cooling
down and relaxing. These warming up exercises prepare your body for the subsequent demands
made upon it. The cooling down / relaxation period after the exercise session ensures that you do
not experience any muscular problems. In the following you will find stretching exercise instructions
for warming up and cooling down. Please pay attention to the following points:
Carefully warm up every muscle group you will be using in the exercise session for about 5 to
10 minutes. The stretching exercises are carried out correctly if you feel a comfortable tension
in the corresponding muscle.
Speed does not play a role during the stretching exercises. Fast and jerky movements must
be avoided.
NECK EXERCISES
Tilt your head to the right and feel the tension in your neck. Slowly drop your head down to your
chest in a semi-circle and then turn your head to the left. You will feel a comfortable tension in your
neck again.
You can repeat this exercise alternately several times.
1

EXERCISES FOR THE SHOULDER AREA
Lift the left and right shoulders alternately, or lift both shoulders simultaneously.
6
ARM STRETCHING EXERCISES
Stretch the left and right arms alternately towards the ceiling. Feel the tension in your left and right
side. Repeat this exercise several times.
EXERCISES FOR THE UPPER THIGH
Support yourself by placing your hand on the wall, then reach down behind you and lift up your right
3
2

or left foot as close to your buttocks as possible. Feel a comfortable tension in your front upper thigh.
Maintain this position for 30 seconds if possible and repeat this exercise 2 times for each leg.
INSIDE UPPER THIGH
Sit on the floor and place your feet in such a way that your knees are facing outwards. Pull your feet
as close as possible to your groin. Now press your knees carefully downwards. Maintain this position
for 30-40 seconds if possible.
7
TOUCH TOES
Bend your trunk slowly forwards and try to touch your feet with your hands. Reach down as far as
possible to your toes. Maintain this position for 20-30 seconds if possible.
5
6
4

EXERCISES FOR THE KNEES
Sit on the floor and stretch out your right leg. Bend your left leg and place your foot on your right
upper thigh. Now try to reach your right foot with your right arm. Maintain this position for 30-40
seconds if possible.
EXERCISES FOR THE CALVES/ACHILLES TENDON
Place both hands on the wall and support your full body weight. Then move your left leg backwards
and alternate it with your right leg. This stretches the back of the leg. Maintain this position for 30-40
seconds if possible.
8
BASIC AEROBIC TRAINING PROGRAM
For your basic Aerobic Exercise routine we suggest that you try the following, remember breathe
correctly, exercise at your own pace and do not over-train as injury may result.
Week 1 & 2 Exercise 4 minutes at “A”
Warm Up 5—10Minutes Rest 1 minute
Cool Down 5 Minutes Exercise 2 minutes at “A”
Exercise slowly 1 minute
________________________________________________________________
Week 3 & 4 Exercise 5 minutes at “A”
Warm Up 5—10Minutes Rest 1 minute
8
7

Cool Down 5 Minutes Exercise 3 minutes at “A”
Exercise slowly 2 minutes
________________________________________________________________
Week 5 & 6 Exercise 6 minutes at “A”
Warm Up 5—10Minutes Rest 1 minute
Cool Down 5 Minutes Exercise slowly 4 minutes at “A”
Exercise slowly 3 minutes
________________________________________________________________
Week 7 & 8 Exercise 5 minutes at “A”
Warm Up 5—10Minutes Exercise 3 minutes at “B”
Cool Down 5 Minutes Exercise 2 minutes at “A”
Exercise Slowly 1 minute
Exercise 4 minutes at “A”
Exercise Slowly 3 minutes
________________________________________________________________
Week 9 & beyond Exercise 5 minutes at “A”
Warm Up 5—10Minutes Exercise 3 minutes at “B”
Cool Down 5 Minutes Exercise 2 minutes at “A”
Exercise Slowly 1 minute
Repeat entire cycle 2 or 3 times
________________________________________________________________
This is only suggested programme and may not suit every individual’s needs.
GETTING STARTED
You will often read about terms referring to exercise that may be confusing, Below are some of the
definitions that are regularly used.
Repetition - Commonly referred as “ REPS”.
This is a complete movement from start to finish.
Set-- This is a complete number of consecutive repetitions. i.e. 1 set of 10 reps.
Speed of motion- This is the relative speed of movement for r\each rep.
Fast is considered as 1 rep/second , medium is 1 rep/2second, slow is 1rep/4seconds
Intensity -------“How “hard” the exercise feel.
Low intensity = easy exercise. High Intensity = hard exercise
9
TRAINING PROGRAMMES::
You will achieve fast results, gaining a trimmer., Fitter body if you following these general rules.
Exercise regularly—do not skip workouts as consistency is the first key to success.
Do not be afraid perspire a little, This is a sign that you are working your body hard enough to
give fast result. Your will find “hard” exercise enjoyable.
Set yourself realistic goals, Do not be over-ambitious

BEGINNINGS PROGRAM
This is a short suggested programme which we suggest you use for no more than 3 weeks, to be
ideally performed every other day, but certainly not more than 4 times during the week.
This suggested routine is specifically for beginners or those who have not exercised for a
considerable time. The programme is designed to provide general improvement in muscle tone,
strength. Flexibility and co-ordination.
As the beginner, you should start with no more than 2 sets of 6 exercises for the following reps on
each of the Gym’s training stations.
10 REPS---Flat Bench Press
5 REPS—Incline Bench Press
10 REPS—Leg Extension
10 REPS---Leg Curl
Your rest interval between each set of reps should be 1 minutes
You should perform 2 SET of each exercise
Your exercise pace should be SLOW to MEDIUM
The resistance (weight) setting should be in position 1—3
This exercise programme should take you approximately 20Minutes.
Following this exercise programme with 5 minutes of proper cool down exercise
INTERMEDIATE EXERCISE
This is a slightly longer programmer which we suggest you use for next 6—8 weeks, to be ideally
performed not more than 5 times during the week.
This suggested routine is specifically for intermediate users or those that are familiar with exercise
routines, The programme is designed to increase muscle definition, build strength, aid flexibility and
co-ordination
The increase in exercise intensity and speed of repetitions is the key to your success at this stage.
For intermediate exercise we recommend 3 – 4 sets of 8 exercises for the following reps on each of
the Gym’s training stations.
15 REPS---Flat Bench Press
10 REPS—Leg Extension
15 REPS— Incline Bench Press
15 REPS-Leg Extension Following by Leg Curls
10
Your rest interval between each set of reps should be 1 minutes
You should perform 3—4 SETS of each exercise
Your exercise pace should be MEDIUM to FAST
This exercise programme should take you approximately 35--40Minutes.
Following this exercise programme with 5 minutes of proper cool down exercise
ADVANCED TRAINING

This is an open-ended programme, ideally performed not more than 4 times during the week,
preferably on alternate days.
This suggested routine is specifically for advanced users or those that are familiar with exercise
routines. The programme is designed to increase muscle mass and build strength.
The increase in exercise intensity, resistance levels and speed of repetitions is key to your on going
success.
For advanced training we recommend 4 sets of the each exercise for the following reps on each of
the gym’s training stations, however at this stage you may want to concentrate on specific body parts,
so as you are now fully familiar with the working of you gym you should be able to structure an
exercise programme to suit your own individual. Any specific advice should be sought through
specialist books.
20 REPS---Flat Bench Press
15 REPS— Leg Extension
15 REPS—Incline Bench Press
15 REPS – Leg Curl
15 REPS – Flat Bench Press
20 REPS-Leg Extension Following by Leg Curls
10 SLOW REPS – 2 SETS –Sit—Ups
Your rest interval between each set of reps should be 1 minutes
You should perform 4 SETS of each exercise
Your exercise pace should be MEDIUM to FAST
This exercise programme should take you approximately 40--50Minutes.
Following this exercise programme with 5 minutes of proper cool down exercise
11
WEIGHT BENCH EXERCISE GUIDE
WARNING! PLEASE READ BEFORE EXERCISE

When working out, do the following for each exercise: A. Select a desired resistance. B. Exhale while exerting/lifting.
And inhale while returning to the starting position in a slow and controlled manner. 1. Read all caution and warming
stickers before using this machine. 2 Before using, inspect this machine for loose, frayed, or worn parts. If in doubt,
do not use the machine until parts have been replaced. 3. Clips must be secured completely before using this
machine. 4. Children should not be permitted to use the machine. 5. Prior to beginning any exercise program it is
suggested to have a complete physical examination and obtain your physician’s approval of your conditioning
program. 6. We recommend that you always exercise with a partner or someone who can assist you, Should the
weight become too heavy for you to lift on your own.
Always warm-up your muscle before exercise. Easy stretching (without bouncing) and light calisthenics, for several
minutes, are recommended to prepare your body.
LEG CURL
MUSCLE EMPHASIS : HAMSTRINGS
1. Select a desired weight
2. Adjust the seat back pad to the flat or horizontal
position and secure with brace bar
3. Lie with your stomach against the back pad in the
flat position
4. Position the front of your knees slightly beyond the
aged of the seat pad .
5. Place the back of your ankles against the lower
round foam roller pads
6. Curl your legs back towards your buttocks while
pivoting from the knees.
7. Return to the start position in a slow and controlled
manner
LEG EXTENSION
MUSCLE EMPHASIS: QUADRICEPS
1. Select a desired weight
2. Adjust the seat back pad to the lat or horizontal
position and secure with the brace bar.
3. Sit on the seat pad in the upright position.
4. Align your knee joints with the pivot axis point of the
leg developer.
5. Place the top of your ankles against the lower
around foam roller pads.
6. Extend your legs forward, pivoting from the knees, to
a full extension
7. Return to the starting position in a slow and
controlled manner and repeat exercise
BUTTERFLY FLY
MUSCLE EMPHASIS: PECTORALIS
1. Select a desired weight
2. Adjust the seat back pad to the lat or horizontal
position and secure with the brace bar.
3. Place both feet securely onto the floor.
4. Lie on the bench and position arms under foam
rollers on fly arm as shown.
5. Raise arms until your two hands meet.
6. Return to the starting position in a slow and
controlled manner and repeat exercise.
Only for JX-206B (Cat#9283495)
12

MUSCLE CHART
Targeted muscle groups:
The exercise routine that is performed on this product will develop primarily lower body muscle
groups. These muscle groups are shown in gray color on the chart below.
A : Shoulder muscles B Pectoral muscles C : Bicep muscle D Abdominal muscles
FLAT BENCH PRESS
MUSCLE EMPHASIS: PECTORALIS
1. Select a desired weight
2. Adjust the seat back pad to the flat position and
secure with brace bar.
3. Lay on the seat pad with both feet securely onto
floor
4. Grasp the barbell with a shoulder width distance
and carefully remove it from the bar catches.
5. Lower the bar slowly until it touches your
mid chest section
6. Raise it to the starting position in a slow and
controlled manner and repeat the exercise.
INCLINE BENCH PRESS
MUSCLE EMPHASIS: PECTORALIS
1. Select desired weight
2. Adjust the seat back pad to the incline position and
secure with brace bar
3. Lay on the seat pad with both feet securely onto
floor.
4. Grasp the barbell with a shoulder width distance
and carefully remove it from the bar catches.
5. Lower the bar slowly until it touches your mid
chest section.
6. Raise it to the starting position in a slow and
controlled manner and repeat the exercise

E: Forearm muscles F Quadricep muscles G : Calf muscle H Trapezius muscles
I: Tricep muscles J Back muscles K :Gluteal muscles L Hamstring muscles
13
Exercise Note
----------------------------------------------------------------------------------

-------------------------------------------------------------------------------------------------
14
ASSEMBLY INSTRUCTION
HARDWARE PACK

15
ACCESSORY PART LIST
There are all accessories you will need to complete the assembly of your product.
The following accessories are supplied in a pack and should be checked before attempting assembly

16
ASSEMBLY INSTRUCTION

Tools Required Assembling the Machine: Two Adjustable Wrenches, and one Philips
Screw driver.
NOTE: It is strongly recommended this machine to be assembled by two or more people to
avoid possible injury.
Carefully unpack each component, checking against the part list that you have all the
necessary parts to complete the assembly of your product
PLEASE NOTE that some of the parts may be pre-fitted to major components. So please
check carefully before contacting Argos in any event.
STEP 1 (See Diagram 1)
A. Connect both Barbell Upright Support(#2) by Cross Beam(#3) in mid span, Align the hole
and secure each end of the Cross Beam(#3) with two M8×50mm Carriage Bolt(#17), two Φ
8mm Washer(#23) and two M8 Aircraft Nut(#26).
B. Place both Barbell Upright Support(#2) on the outside of the Rear Stabilizer(#1), Align the
hole and secure with two M8×82mm Carriage Bolt(#12), two Φ8mm Washer(#23) and two
M8 Aircraft Nut(#26).
C. Attach both Stabilizer Brackets(#13) to the outside of the Rear Stabilizer(#1) and to the inside
of both Barbell Upright Support(#2), Secure both Stabilizer Brackets(#13) with two Barbell
Upright Support(#2) with two M8×50mm Carriage Bolt(#17), two Φ8mm Washer(#23) and
two M8 Aircraft Nut(#26), Secure both Stabilizer Brackets(#13) to Rear Stabilizer(#1) with two
M8*45MM Carriage Bolts (#14), two Φ8mm Washer(#23) and two M8 Aircraft Nut(#26),
( Note: Do not tighten the bolt at this step. )
Diagram 1
Assembly Accessories 1
Part No Description QTY
12 M8×82mm Carriage Bolt 2
14 M8×45mm Carriage Bolt 2
17 M8×50mm Carriage Bolt 6
23 Φ8mm Washer 10
26 M8 Aircraft Nut 10
30 Lock Pin 2

17
STEP 2 (See Diagram 2)
A. Attach rear of Seat Pad Support(#4) to the Cross Beam(#3), Align the side hole and secure with
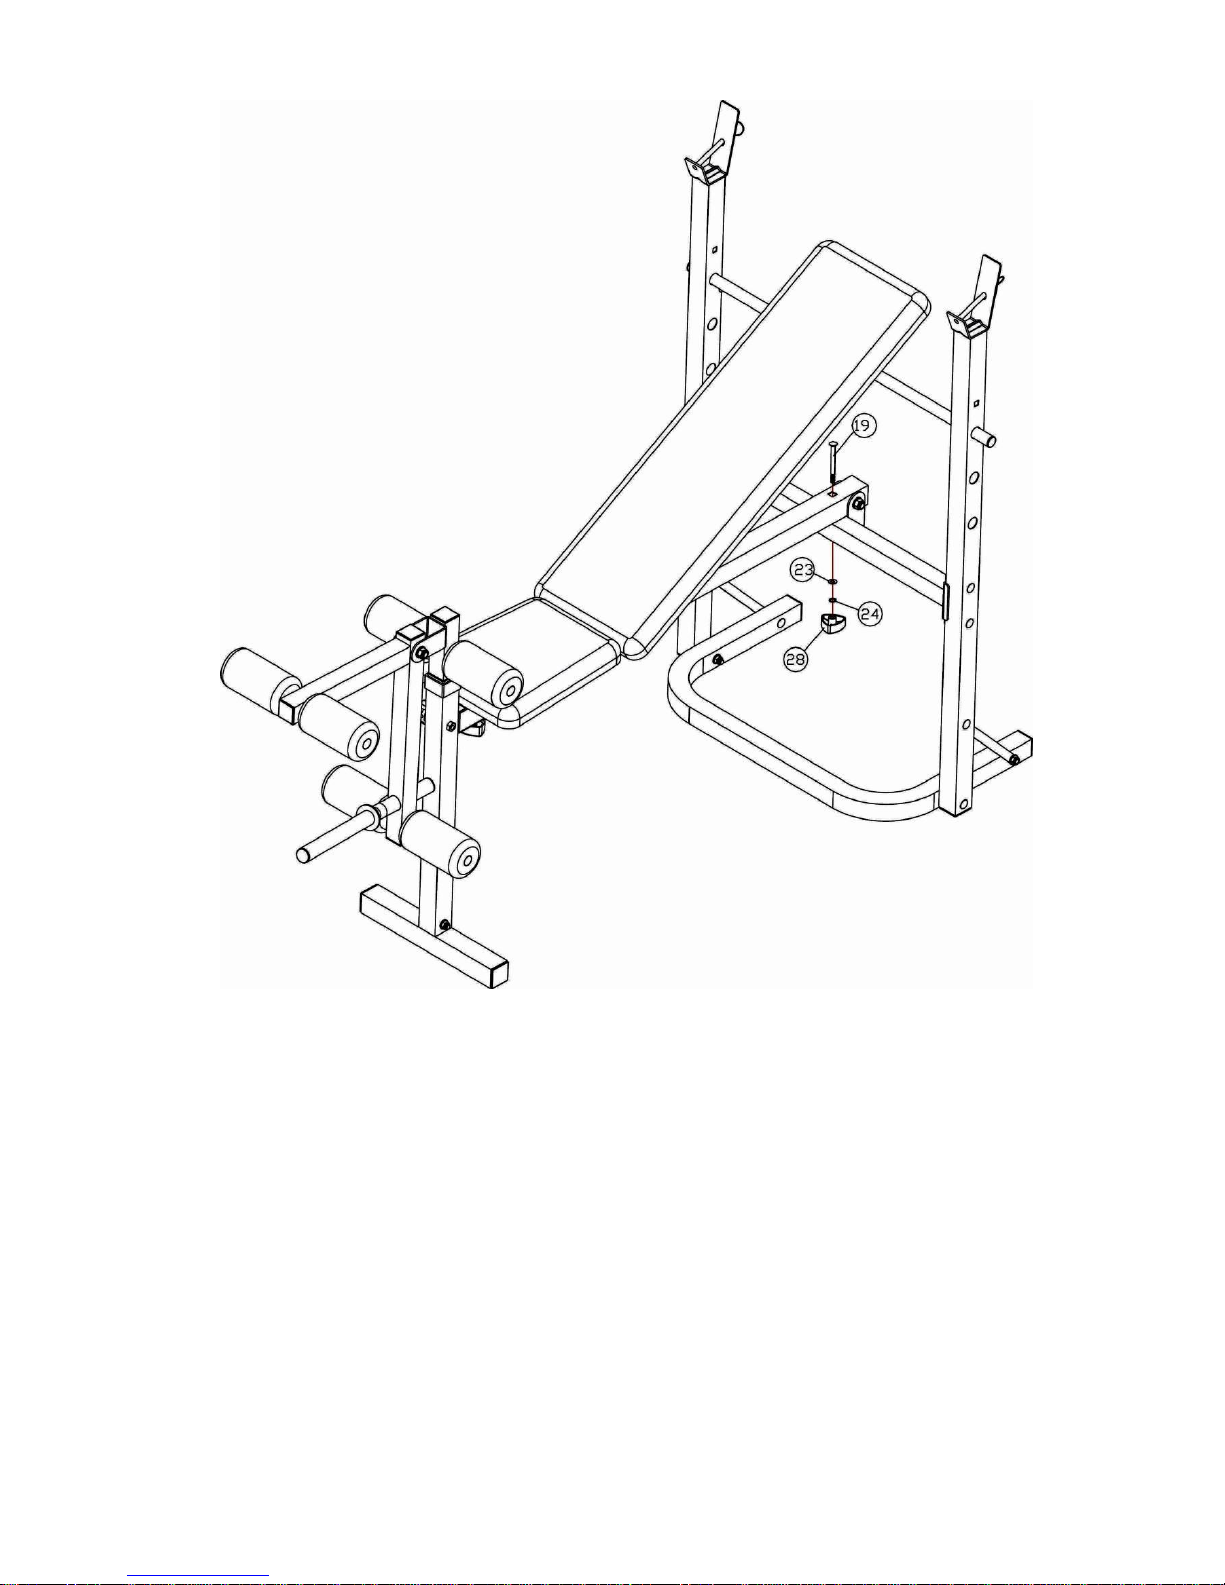
one M10×60mm Hex Bolt(#20), one Φ10mm Washer(#25) and one M10 Aircraft Nut(#29).Place
an M8×90mm Carriage Bolt(#19) in the upper hole and secure in position using one Φ8mm
Washer(#23),one Φ8mm Spring Washer(#24) and one M8 Triangle Knob(#28). Tighten securely
to lock the frame in position.
B. Attach Front Stabilizer(#5) to the bottom of the Front Upright Support(#6), Align the hole and
secure with one M8×50mm Carriage Bolt(#17),one Φ8mm Washer(#23) and one M8 Aircraft
Nut (#26).
C. Attach the Front Upright Support(#6) to the front of the Seat Pad Support (#4), Align the side
hole and secure with one M10×60mm Hex Bolt(#20), one Φ10mm Washer(#25) and one M10
Aircraft Nut (#29). Place an M8×55mm Carriage Bolt(#18) in the upper hole and secure in
position using one Φ8mm Washer(#23),one Φ8mm Spring Washer(#24) and one M8 Triangle
Knob(#28). Tighten securely to lock the frame in position.
D. Insert the Leg Developer Support (#7) into the upper openning of the Front Upright Support (#6),
select desired height and secure with one M8 Lock Knob(#27).
E. Attach the Leg Developer(#8) to the Leg Developer Support(#7), Align the hole and secure with
one M10×60mm Hex Bolt(#20), oneΦ10mm Washer(#25) and one M10 Aircraft Nut (#29),
attach two Nut Cover(#22) to the hex head of the BOLT and the NUT.
F. Slide three Foam Roll Tube(#9) into the hole on the Leg Developer Support(#7) and Leg
Developer(#8) with halfway. Attached six Foam Roll(#40) to each side of the Foam Roll Tube(#9).
Assembly Accessories 2
Diagram 2
Part No Description QTY
17 M8×50mm Carriage Bolt 1
18 M8×55mm Carriage Bolt 1
19 M8×90mm Carriage Bolt 1
20 M10×60mm Hex Bolt 3
22 Nut Cover 2
23 Φ8mm Washer 3
24 Φ8mm Spring Washer 2
25 Φ10mm Washer 3
26 M8 Aircraft Nut 1
27 M8 Lock Knob 1
28 M8 Triangle Knob 2
29 M10 Aircraft Nut 3
31 Spring Collar 1

18
STEP 3 (See Diagram 3)
A. Attach the Backrest Support(#11) to the Backrest Pad(#41) align the hole and secure with four
M6×38mm Hex Bolt(#16), and four Φ6mm Washer(#46).
B. Attach the Backrest Support(#11) to the Seat Pad Support (#4), Align the hole and secure with
M10×130mm Hex Bolt(#21), two Φ10mm Washer(#25) and two Bushing(#32). Securely to
remove all free-play but take care NOT too over tighten.
C. Attach the Seat Pad(#42) to the Seat Pad Support (#4), Align the hole and secure with two M8×
18mm Hex Bolt(#15) and two Φ8 Washer(#23).
D. The Backrest can be adjusted into 4 positions for convenient use. (Flat and 3 incline positions).
Please ensure that the Backrest Adjustment Rod(#10) is positioned UNDER the Backrest
Support(#11) and is secured into place in any one of the 3 adjustment holes in the Upright before
use.
Securely tighten all bolts and other fixings and your weight training bench is ready to use
Assembly Accessories 3
Diagram 3
Part No Description QTY
15 M8×18mm Hex Bolt 2
16 M6×38mm Hex Bolt 4
21 M10×130mm Hex Bolt 1
23 Φ8mm Washer 2
25 Φ10mm Washer 2
29 M10 Aircraft Nut 1
32 Bushing 2
46 Φ6mm Washer 4

19
FOLDING THE BENCH FOR STORAGE USE
1: Unscrew the rear M8 Triangle Knob(#28) and remove the M8×90mm Carriage Bolt(#19), Φ
8mm Washer(#23) and Φ8mm Spring Washer(#24).
20
2 . Lift the front of the main frame. Remove the Leg Extension Assembly by unscrewing the M8
Lock Knob (#27), Place this assembly to one side.
Now unscrew the FRONT M8 Triangle Knob(#28) along with the one Φ8mm Washer(#23) and
Φ8mm Spring Washer(#24). And fold down the Front Upright Assembly.

3 . Please ensure that the Bench is securely stored in either an upright or full flat position away
from children.
21
EXPLODED DIAGRAM

22

PART LIST
Key No.
Specification
QTY
Key No.
Specification
QTY
1
Rear Stabilizer
1
24
φ8mm Spring Washer
2 2 Barbell Upright Support
2
25
φ10mm Washer
5 3 Cross Beam
1
26
M8 Aircraft Nut
11
4
Seat Pad Support
1
27
M8 Lock Knob
1 5 Front Stabilizer
1
28
M8 Triangle Knob
2 6 Front Upright Support
1
29
M10 Aircraft Nut
4 7 Leg Developer Support
1
30
Lock Pin
2 8 Leg Developer
1
31
Spring Collar
1 9 Foam Roll Tube
3
32
Bushing
2
10
Backrest Incline Support
1
33
口 25×1.0mm End Cap
4
11
Backrest Support
2
34
φ19×1.0mm End Cap
6
12
M8×82mm Carriage Bolt
2
35
φ25×1.5mm End Cap
1
13
Stabilizer Bracket
2
36
Rubber Bumper
1
14
M8×45mm Carriage Bolt
2
37
口 33.4×1.2mm End Cap
4
15
M8×18mm Hex Bolt
2
38
口 38mm End Cap
6
16
M6×38mm Hex Bolt
4
39
38×33.4mm Sleeve
1
17
M8×50mm Carriage Bolt
7
40
Foam Roll
6
18
M8×55mm Carriage Bolt
1
41
Backrest Pad
1
19
M8×90mm Carriage Bolt
1
42
Seat Pad
1
20
M10×60mm Hex Bolt
3
43
Spring collar grip
2
21
M10×130mm Hex Bolt
1
44
φ19×1.5mm End Cap
2
22
Nut Cover
2
45
口 33.4×1.5mm End Cap
2
23
φ8mm Washer
15
46
Φ6mm Washer
4

23
RETAILER : ARGOS

ADDRESS: 489-499 Avebury Boulevard
Saxon Gate West
Central Milton Keynes Bucks,
MK9 2NW
 Loading...