


Pro-Player Plus™ User Manual
1) System Overview
2) Project Design
3) System Set Up
Connections
Configuring Master(s) and Slave(s)
4) The Web-Based Interface
5) System Network Settings
6) Pro-Player Plus Network Settings
7) Wi-Fi Network Settings
8) GEFEN Controls MultiPlay
9) Ultrasonic Rangefinder Configuration
10) DMX Lighting Control & Playback
11) Disable/Enable Playlist Mode
12) Put System to Sleep/Wake System Up
13) Switch System Type
14) MultiPlay
15) Types of Media
16) Loading Media
17) Playing Media
18) Live Camera View
19) Live WEB View
20) Video Content Creation Made Easy
21) A World of Software Programs

1) System Overview
Pro-Player Plus™ is designed to provide the end‐user with an EASY, FLEXIBLE and POWERFUL playback
control solution for displaying Standard Definition (SD), High Definition (HD) and 4K video content.
Flexible and Powerful
Pro-Player Plus Players can easily control:
Playback of video content file(s) on a single monitor
Playback of the same video content file simultaneously, in perfect sync, across multiple (up to
100) monitors - same image on all monitors
Playback of multiple video content files across multiple (up to 100) monitors - different images
on different monitors
Ease of Use
The single most important distinction between the Pro-Player Plus System and other video playback
systems is its incredible ease of use.
More Than a Media Player
In addition to controlling media playback, Pro-Player Plus Players can control other devices in sync with
your videos such as lighting fixtures, Pioneer receivers, touch‐screens, video switchers and custom‐built
devices. This is convenient for controlling lights and sound for trade show exhibits, museum exhibits,
sales demos, lobby displays and more.
24/7 Reliability
Pro-Player Plus is built upon an embedded Linux Operating System running on Intel’s latest NUC micro
computer platform designed to deliver years of round the clock reliability.
Each Player is a MASTER or a SLAVE
Each Pro-Player Plus Player can be configured and re‐configured by the user as either a MASTER or a
SLAVE.
Network Based System
Users can create small LAN(s) (Local Area Networks) that we refer to as GROUPS of players. Each of
these groups can be accessed and controlled separately from any WIFI-enabled smart device by simply
logging into that group’s router.

2) Project Design
Content creation and hardware configuration go hand in hand. You may have only one monitor on your
project, or you may have many. You may have only one video content file to display, or you may have
many. You may be displaying the same content on each monitor, or you may have different content on
different monitors. You can quickly see that project design can become varied and complex. It's
essential to think through and lay out your design ahead of time.
The following process will help clarify the scope of your project in terms of video playback equipment
requirements:
1) Determine how many Monitors/Pro-Player Plus (PP+) Players you will need for your project
* While it isn't always necessary, we highly recommend designating one Pro‐Player Plus Player
to each monitor involved in your project, because it gives you ultimate flexibility in content
playback on a per monitor basis. It allows the same or different content files to be played across
a variety of monitors in your choice of configurations, it enables last minute changes of
Master/Slave Configurations and it facilitates unexpected changes on‐site.
2) Determine how many Master/Slave GROUPS are needed
3) Determine which PP+ Player(s) will run as a MASTER or as a SLAVE
(Each player on each project must be configured by the user as either a Master or a Slave and
can be re-configured as necessary.)
HELPFUL DEFINITIONS:
MASTERS
When a PP+ Player is functioning as a MASTER, it is not synchronized to any other player.
A MASTER can run ...
as a full‐featured standalone media player that runs its own monitor autonomously on a SOLO
basis ... OR ...
as a full‐featured "MASTER" media player, running its own monitor content in addition to
controlling one or more SLAVE PP+ Players in its Group (attached to its same Group network)
SLAVES
When a PP+ Player is functioning as a SLAVE, it becomes a media player that is synchronized to and
controlled by a MASTER for multi‐monitor configurations such as video walls.
GROUPS (LANS)
Users can create small LANs (Local Area Networks) that we refer to as GROUPS of players. Each of
these groups can be accessed and controlled separately from any WIFI-enabled smart device by
simply logging into that group’s router. Each LAN/GROUP is comprised of one MASTER and one or
more SLAVES.

2) Project Design continued
The easiest way to make your project design/configuration is to lay it out on paper.

3) System Set‐Up
You Will Need:
Pro-Player Plus Player(s) and Power
Monitor(s)
Cables: HDMI, Mini‐Display Port, Cat5e (cable lengths are project‐specific)
Wireless/Wired Wi‐Fi Router (one router for each group; one Ethernet port per player )
Mounting Materials (heavy duty self-adhesive Velcro or wood screws depending on your
mounting method)
Connections:
Plug each PP+ Player into its power supply
Connect each PP+ Player to its designated monitor via HDMI cable/Mini‐Displayport
Connect each PP+ Player to a router via a Cat5e cable ... (Multi‐unit configuration)
Note: Each PP+ Player is small enough to be mounted directly on the back of the monitor. This can be
done with heavy duty self‐adhesive Velcro.

3) System Set‐Up continued
Configuring ‐ Master(s) and Slave(s)
When to Set Up PP+ Players in the Master/Slave Configuration:
When you'd like the Slave(s) to run video content simultaneously and in perfect sync with a Master.
(Master/Slaves all connect together on the same router to form a small computer network.)
When to Set Up PP+ Players Just in the Master Configuration:
If you’re using a separate player on each individual monitor and they each will be displaying different
stand‐alone content from each other, then configure each of these players as Masters. (Masters
running in a standalone mode do not connect together on the same network unless you’ve set their
static IP addresses to do so.)
Standard Set‐Up:
Connect your laptop and the player you’re configuring to the same network
Set your laptop’s IP to 192.168.168.75 network on any address other than 192.168.168.1
Open your browser and enter 192.168.168.1/switch into the url
When the configuration screen appears, select Master or Slave
You have the option of deleting ALL MEDIA FILES as well from this menu
Custom Set‐Up:
Once in the switch slave screen you can select a monitor number for the slave. The IP address will
change, so make note of the new IP address. The system will reboot and you will lose connection
because the IP address of the player has been changed.
Router Set‐up Notes:
Here are some suggestions as to how to set‐up your wireless router:
Router IP Address: 192.168.168.254 (never use 192.168.168.1)
SSID Name: XX‐Project (never assign same name to multiple routers' SSID)
DHCP Range: 192.168.168.100‐150 (50 users/devices on one network)
Internet Settings: leave at default settings (most routers will set this automatically when
plugged into the Internet)
Security: WPA2‐Personnel TKIP/AES
User Login: your choice
Password: your choice, must be 8 characters long
Label your router with all the settings so you and others can use easily

4) The Web-Based Interface
Access the web-based interface to control everything within a Master Player:
Connect the master player you’re communicating with and your laptop to the same network
Set your laptop to the 192.168.168.75 network on any address other than 192.168.168.1
Open your browser and enter in 192.168.168.1/proplayerplus. Login is either user/1234, or
admin/321p. If you’re using the supplied D‐Link wireless router and you would like to connect
via the wireless side, then select XXX‐ProPlayerPlus from the SSID and type in 321p321p for the
network password. (We suggest using a cable connection for faster connectivity.) The wireless
is a great choice for playback of videos & playlists.
When the web-based interface opens, you will see a list of tabs: (user/1234 only sees three tabs)

4) The Web-Based Interface continued
Media Manager is the tab where all things media are performed. You can play a file once or set the file
to loop. You can upload, download and delete files. You can see how much disk space is left via the
Storage Bar across the top of the media file list. The bar starts green and will turn yellow at 75% full and
red at 95% full. There are two unique views when logged in as an admin. List and Table are the two
views. Table shows every file separately so you can make changes to them individually. List view
compresses all files with the same name for easier viewing. The number of files is displayed by the
number of monitor icons, if a DMX file is present than you will see a bulb icon as well. From within the
media file list, you can arrange the view by any of the column types. They can be sorted alphabetically,
by size, by file type and by last edited simply by clicking on the column heading.

4) The Web-Based Interface continued
While in the Table View you will see four icons after each file:
The ( i ) icon will display information about the file, the gear icon is where you can make adjustments to
the file, the arrow icon is used to download the file and the X is to delete the file.
The gear icon allows user to rotate the video, 0, 90, 180 and 270 degrees. Users can also trim the start
and end points of a video file to change its playback length. Trim is independent on each file so when
using systems in the master slave setup you will need to trim every file separately.

4) The Web-Based Interface continued
Create Scene:
Scenes are collections of video files (and a DMX file if running lighting cues). If you have a three monitor
setup, e.g., Monitor‐1, Monitor‐2 and Monitor‐3, then creating one scene will include the three video
files (one for each player) and a DMX file, all under one name for easy playback. You can load each
player with different videos so each monitor will display something different even though you select
Scene1. You can also select the "send file to all monitors” and one file will be duplicated and
distributed to all players. This eliminates having to load three separate files.
JPG to Video: If you have a JPG and you want it to be displayed immediately, just place it on the root of
a USB thumb drive and insert into a master player. After 60 seconds the JPG will be converted into a
video and begin playing in loop mode.
Create Slideshow:
Slideshow is how users can create videos from a series of pictures. Users can set the photo duration,
the fade length from picture to picture as well as the resolution of the outputted video (1080 or 4K). All
pictures must be the same resolution and all must be horizontal/landscape mode. Users can also copy
all their photos into a folder named “slideshow” on the root of a USB thumb drive and insert it into a
master player. The player will create a video with a default fade of 1 sec and each photo will be
displayed for 4 seconds.

4) The Web-Based Interface continued
Create Playlist:
Playlists are collections of scenes/files and DMX file. If you have a project and you want a selection of
scenes/files to play one after the other, create a playlist by clicking on the Create Playlist tab. Enter a
name for the playlist, then select the scene/file from the dropdown menu. You can keep adding more
scenes/files by using the +Add Scene button.

4) The Web-Based Interface continued
Upload File:
Here is where you can upload a file directly into the system. It can be any type of file.
Refresh:
Does what it says, refreshes the list, not the browser. You may want to refresh your browser as well
after making changes to this tab such as uploading new files or creating a new scene.
Sync:
Forces the system to check the slaves media directory and sync it to the master media directory. By
default the system does this every 90 seconds but you may want immediate updating of the slaves
media directory.
Table View:
There are two unique views when logged in as an admin. List and Table are the two views. Table shows
every file separately so you can make changes to them individually. List view compresses all files with
the same name for easier viewing. The number of files is displayed by the number of monitor icons, if a
DMX file is present than you will see a bulb icon as well. By default, when you login as the admin you
will see the table view since we assume you want maximum editing capabilities.

5) System Network Settings
Here is where you set the system network settings such as DHCP or Static. The system network settings
is how you connect to a PP+ system from outside devices such as your smart phone or tablet. We
suggest leaving it set to DHCP and setting your router to hand out IP addresses in the 192.168.168.100150 range. This is not how PP+ communicates between each other. If you are required by an IT
department to use a specific IP and gateway then this is where you set it. For rental companies, if a
player comes back and you don’t know what the IP was set to then use the following feature to reset it:
IP Reset can be done by creating a text file with the name ipreset.txt and placing it on a USB thumb
drive in the root directory (no other files present)then inserting it into a master. After 60 seconds, it will
reset the players IP to 192.168.168.1.
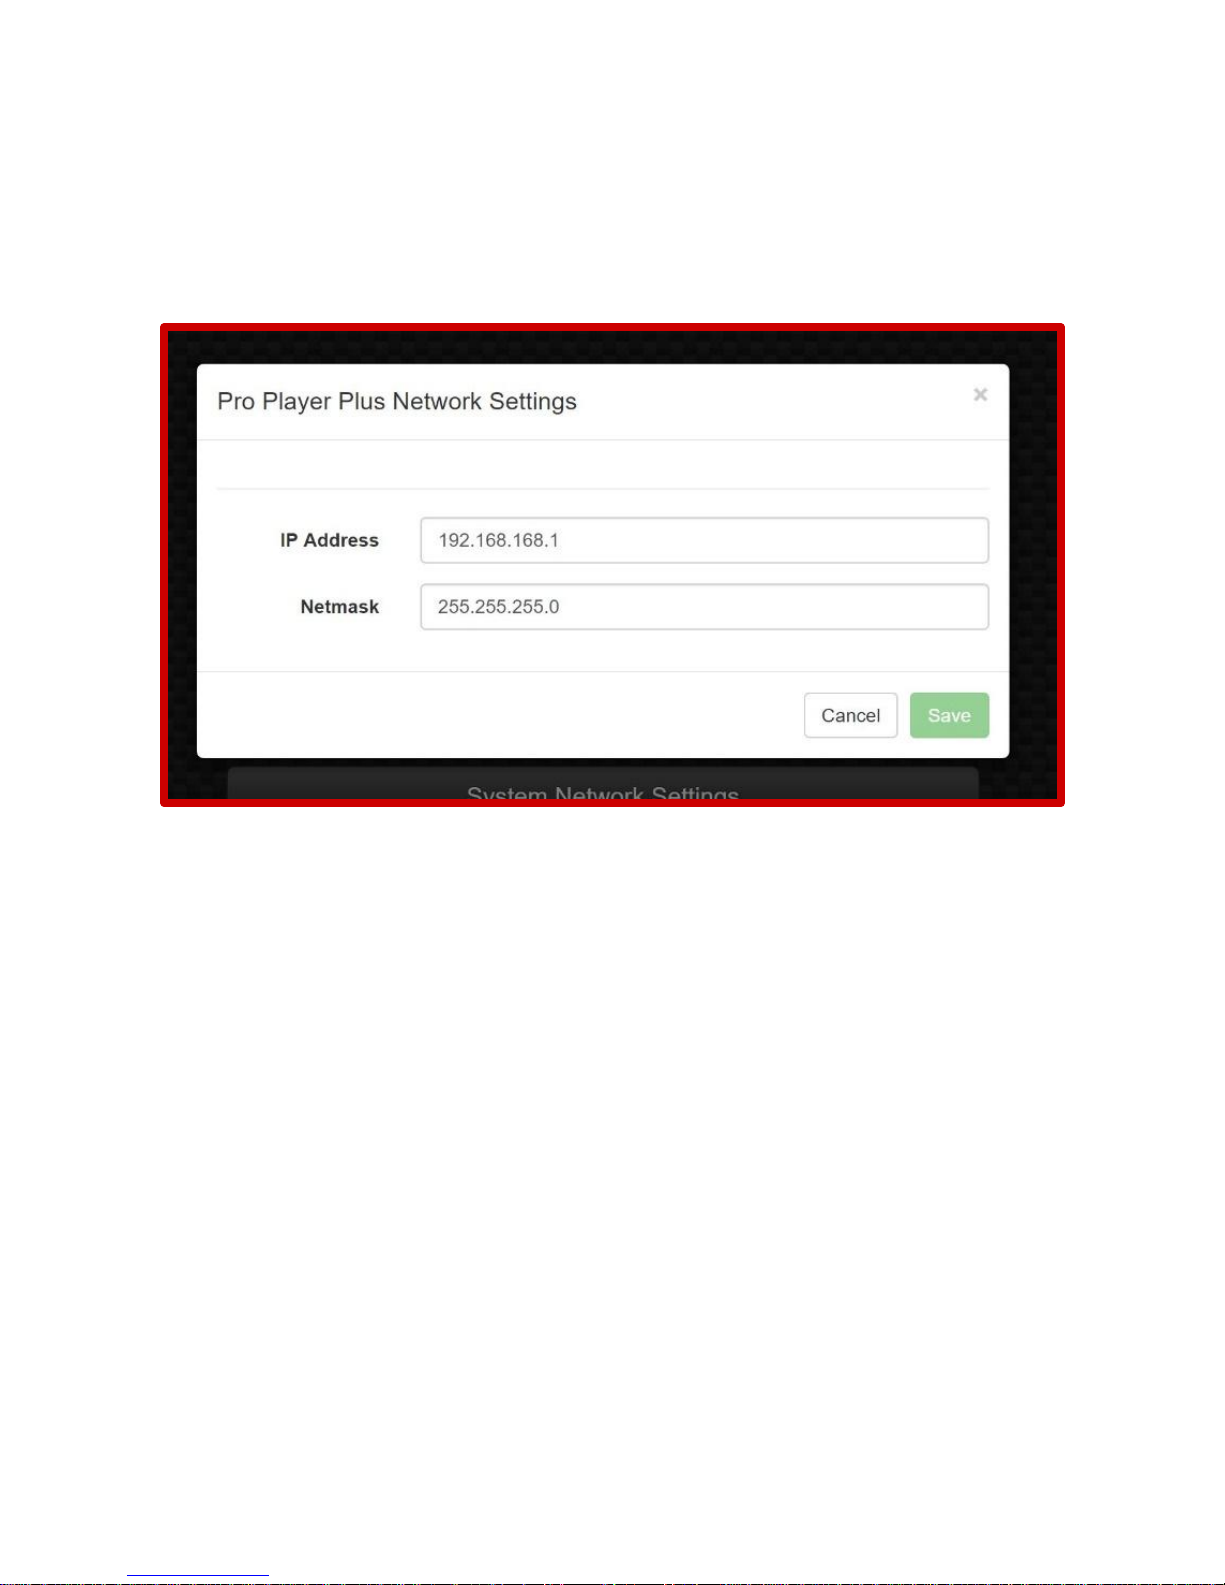
6) Pro-Player Plus Network Settings
Here is where you set the players network settings such as its IP address, and where you can set-up
multiple masters to all be on the same router and network. By default, a master is 192.168.168.1 but
you can set it to 192.168.168.2 – 100 here.

7) Wi-Fi Network Settings
Here is where you set the players Wi-Fi network settings such as its SSID name and password. By
default, a master is set to Admin Mode which is hard coded so all players will logon to a SSID of admin
with password of 321p321p. So if you set your cell phone to create a hotspot called admin with a
password of 321p321p then any master player will call into our VPN from the field.

8) GEFEN Controls
Designed to control the GEFEN 8x8 4K Matrix Switcher. There are four additional tabs, set the IP to
match the GEFEN's IP, route inputs to the outputs of the GEFEN, save the current routes to a preset and
recall presets.
Select one of the 8 inputs and which of the 8 outputs you’d like to send it to. The GEFEN will
immediately display the selection in the window located on the GEFEN. After saving your 8 choices
move to the save current routes as preset tab.
Select which preset you’d like to save your selections to. Then use the recall presets tab to call the
presets.

9) Ultrasonic Rangefinder Configuration
This is the tab where you can setup the trigger distance, delay time and scene play call for using this
external distance sensor.

10) DMX Recorder
This is the tab where you can record custom DMX files and save them to the system for playback. It
requires a PathPort DMX to Ethernet device to function. You set the DMX channel you want to use to
start and stop the recorder. Using external lighting console or software, you program that trigger
channel to go on at the beginning of the lighting sequence and go low when finished. The name of the
file will be saved to the system so you can assign it to play with the video scene/file that has the same
name. An example is test.dmx would play with test.mov when called to play. You will need to connect
the ENTTEC DMX dongle to the Master player only. Slaves do not support DMX playback at this time.

11) Disable/Enable Playlist Mode
This is the tab where you can switch on or off the playlist feature. It simply toggles the feature on or off.
You still need to launch a playlist from the Media Manager tab for it to begin playing.

12) Put System to Sleep / Wake System Up
This is the tab where you can switch the system on or off. Off is never really off, so we call it "Sleeping".
Sleeping displays black video and black DMX output so if you have monitors or projectors that have auto
sensing inputs, they will shut‐off. When you select Wake System Up, the Group file will begin playing
and your devices will turn on if equipped with auto‐sense.

13) Switch System Type
This is the tab where you can switch the system from a master to a slave. You can also remove all
unprotected media files here by selecting Remove All Media Files.

14) MultiPlay
This is the tab that opens an embedded program that can control multiple masters all from one screen.
You have the option to build 12 presets for each master. The presets can be played once or set to loop.
Users can also play any of the 12 files separately on each master. This gives users the flexibility to
trigger cues on one or all players from one screen. It is recommended that you open this from a device
with a native display of 1920x1080. You can open it on a phone however there isn’t enough screen real
estate to proper display all the information.
Multi‐Play allows users to trigger HD quality videos remotely from one main location/city to remote
locations. Unlike the Master/Slave set‐up, all systems are Masters and can be run locally as well as be
triggered remotely. This is a great way to synchronize the start of video playback from city to city while
still having local control of the PP+ device. A good example is video conferencing using WebEx. The
camera signals are fed to all cities so everyone can see and hear each other. Now it’s time to play a
corporate video in all cities and the WebEx bandwidth won’t allow for HD quality playback. VPN Play
allows the lead city to trigger local playback in High Definition. And, should the network go down, an
operator locally can play the video manually on cue. This is not a streamed signal and is guaranteed to
play for true professional show reliability.
In this picture you see the red LED next to each greyed box. That indicates no network connection is
available, the grey box is displaying video snow to also show no connectivity. In the upper right corner,
you see three icons, home, edit and trash can. The home icon is where you start to create a new
MultiPlay screen.
Clicking the edit icon of an existing page opens it for editing. Here is where you can change all the
variables such as notes, playback files, presets and page name. You can also add or delete master
players or change the IP address and names of the players.

14) MultiPlay continued
When first opening MultiPlay you will see a list of saved files. You can open, delete or edit directly from
this screen.
Reset System:
Does what it says, reboots the master system remotely. This is great for when systems are located
remotely and can’t be accessed directly.
User Manual:
Users can open this directly from any device logged onto a system.

15) Types of Media
The following file types can be displayed: MOV, MPG, MPEG, MP4, AVI, FLV, WMV & M4V
This list covers the vast majority of video file types used in production today. The system is capable of
extremely high bit rates (well over 50Mbps), so when encoding, you can keep your videos looking great.
Encoding is truly an art of its own. We suggest using the standards suggested within the software
applications you’re using and not creating custom settings. The Pro-Player Plus System depends upon
proper encoding in order to retrieve detailed information from a file such as its play length. Without
that info, a file will not play properly or may not play at all. The vast majority of problems are due to
improperly encoded files! If you’re going to synchronize your videos, you must use the same Codec &
encoding scheme on all of your media/video files. There are test files on the system that can be used to
determine if you are having system problems or encoding problems. Please test your system using the
included test files before assuming any fault with the system.

16) Loading Media
There are four ways to load your media files onto the system:
1. USB Auto‐copy
2. Web Browser Create Scene Tab
3. Web Browser Upload Tab
4. Samba Direct Access
USB Auto‐Copy Mode method is the easiest and fastest way to load media. Place all your media files in
the root directory of your USB device (thumb drive or external hard drive) and insert the drives USB
connector into the Base player. Be sure the drive is formatted as NTSF, exFAT, FAT32 & FAT. After 10
seconds the system will display the message “Loading Media” on all monitors. This may take awhile
depending on how much media you have to load. We suggest you do this with the entire system set‐up
(master and all slaves) since the master will distribute the files to all the slaves immediately and it will
begin playing the files upon completion of the loading. You can use the USB Auto‐copy feature to add
just one file or 100 files, plus it will immediately begin playing the last file loaded. This makes for an easy
way to change the default file on‐site.
Web Browser Create Scene Tab method is a great way to build a scene that is made up of differently
named files. Example: Let’s say you have a three monitor setup and you have three different videos
named “Product A”, “Product B” and “Product C” and you want them to play when you select the
“Products” scene/file. You would create a scene with the name “Products” and load the A, B & C files
using the Web browser Create Scene Tab. The system will take care of all the file remaining and
distribution automatically. You can also add DMX lighting during this process.
Web Browser Upload Tab method provides a way to upload one file at a time directly to the media
directory. This is good for single file substitutions or changes.
Samba Direct Access allows users of Windows and Apple computers to access the master’s media
directory directly from their computers. This is a great way to transfer large amounts of media to or
from players unattended.

17) Playing Media
There are four ways to trigger playback of your media files:
1. Playlist
2. Web Browser Media Manager
3. Trigger Switches
4. PowerPoint
Playlist Mode is the easiest way if you want to playback a list of files one after another. Go into the
Media Manager Web Browser tab and select create Playlist, select the “play playlist after creation” box
and create your playlist. Hit save and your playlist will begin playing.
Media Manager goes into the Media Manager Web Browser tab and select the scene/file you’d like to
play. If you select the play icon to the left of the file name the file will only play once. If you select the
looping icon the file will loop continually.
Trigger Switches Users can attached any NO/NC switch to our switch box and set what file will play
when the switch is closed.
PowerPoint This method of triggering scenes/files is for advanced users. The Windows platform is used
to communicate with PP+. This is done via Internet Explorer via a network connection. That said, you
must first be connected to the PP+ network either thru a wired or wireless connection. If wireless, then
connect to the SSID Proplayerplus (admin/321p) from the laptop/tablet running PowerPoint. Secondly,
you need to disable the Bing search engine and replace it with Google Chrome, making it your default
browser. Open the default PPTX file that every system comes with and rename it so as to prevent
changes to the original. Now go ahead and create your PowerPoint. Any object, picture, text or Icon
can be used to trigger a scene/file on PP+. To do that, select the object, picture, text or icon then go to
the insert tab and select “action”. A drop down menu will appear, select “macro”, another drop down
menu will appear. You can scroll thru and select video1‐video50. Your files on PP+ must be named the
same as the macro you’ve selected. You can select “groups" and “playlists” as well as scenes/files. Let’s
assume you’ve created a scene on PP+ called "video1”. To test the connectivity of PowerPoint, go to
the Developer's tab, select macros and scroll thru the list until you find the macro named “video1”, then
hit run. PP+ should launch “video1”. Keep in mind, it’s all about file name association between
systems.
To recap the three things you must check:
1. Are you connected from the PPT machine to PP+ via the network?
2. Did you create a scene/file on PP+ that matches the name “video1”?
3. Are you calling the proper macro in PPT named “video1”?
Advanced users can open and edit the macros to change the names of the macros and the files they call.

18) Live Camera View
This feature requires a Marshall VSX 255 encoder to function. Users can connect a live camera feed to
the Marshall encoder and play that feed on any monitor as if it was a video file. Setting up this feature
requires setting the Marshall IP Address (xxx.xxx.xxx.xxx) and then copy and paste that same setting in
the Create Scene Tab - Multicast IP Address line.

19) Live WEB View
This feature utilizes an internal browser to display a website. It is important that the URL is properly
copied into the webpage URL window. The best way is to go to the website and copy the URL and paste
it directly into the Webpage URL.

20) Video Content Creation Made Easy
It’s easy to create video content for your projects with the included software, Photo Stage Pro. A single
copy is provided with each player and is available for all operating systems. One great feature is that
you can import an entire folder of jpegs and, with one click, export them into a beautiful high definition
video, complete with dissolves. Another useful feature is the ability of Photo Stage Pro to handle every
type of video and still format available today and export them into one high definition video file as well.
You can even edit your video content and add text and effects.
Digital Signage can be created by simply using PowerPoint to create your message, include transitions
and then export as a video … insert your thumb drive into Master and you're done, it couldn’t be easier.

21) A World of Video Software Programs
Scores of video software programs on the market today can be used with Pro-Player Plus. There's also a
huge selection of cameras out there that record high definition video in one of the file formats that
Pro-Player Plus plays, allowing you to go directly from camera to monitor by just inserting a thumb drive
… it’s that easy!
 Loading...