

Page 1
, English
, Getting Started
3.0
,
14 Channel Expandable Mixer,Analog Polysynth,Graintable Polysynth,Digital Samplers,Mastering Tools,REX-loop Player,Drum Machine
,
ReBirth Input Device,Multiple Effects Processors,Combinator Device,Shelving and Parametric EQs,Master Song Sequencer,Pattern
Sequencer
,
64 Channel Audio Output,64 Channel ReWire Output,512 Band Vocoder,CV Processing Tools,Full Automation,To tal Recall
stand-alone music production instrument
Page 2

Operation Manual by Synkron: Anders Nordmark
The information in this document is subject to change without notice and does not represent a commitment on the part of Propellerhead Software AB. The software described herein is subject to a License Agreement and may not be copied to any other media expect as specifically allowed in the License Agreement. No part of this publication may be copied, reproduced or
otherwise transmitted or recorded, for any purpose, without prior written permission by Propellerhead Software AB.
Note: Trademarks referred to within the Reason product are the property of their respective trademark holders. None of these trademarks holders are affiliated with Propellerhead Software
AB or our products. The referrals to these trademarks do not in any way constitute trademark use. Nor does the use of these trademarks intend to explore the goodwill associated with these
trademarks.
C 2005 Propellerhead Software and its licensors. All specifications subject to change without notice. Reason is a trademark of Propellerhead Software. All other commercial symbols are
protected trademarks and trade names of their respective holders. All rights reserved.
Page 3
D
Table of Contents
Page 4
5 Installation
6 Welcome!
6 About the manuals
7 What is in the Reason package?
7 Requirements
8 About the Audio Hardware
9 About MIDI Interfaces
9 Upgrading vs. New Installations
10 Installing the Software
11 Setting Up
12 About this Chapter
12 First run - Reason Setup Wizard
13 About the Preferences
13 Setting up the Audio Hardware
15 Setting up MIDI
17 Setting the default song
19 Quick Tutorial
20 About this Chapter
20 Playing a Song
21 Creating a new song
26 Guided Tour
35 Common Operations and Concepts
36 About this Chapter
36 Conventions in the Manual
36 Making Settings
38 Tool Tips
38 Context menus
39 Undo
40 Window Techniques
43 Audio Basics
44 About this chapter
44 How Reason communicates with your audio hardware
45 About Sample Rates and Resolutions
46 About Audio Levels
46 Master Tune
47 Managing the Rack
48 About this Chapter
48 Navigating in the Rack
48 Creating Devices
49 Selecting Devices
49 Deleting Devices
49 Reordering Devices
50 Duplicating Devices
50 Cut, Copy and Paste
51 A Quick Note on Routing
54 Naming Devices
55 Folding and Unfolding
57 The Sequencer - Basics
58 About the Sequencer
59 Sequencer window handling
61 Managing Tracks
63 About the two Views
64 About the Ruler, Song Position and Locators
64 Transport Controls - Overview
65 Setting Up for Recording
65 Recording
67 Playback and Positioning
68 Mute and Solo
69 What else can I do in the sequencer?
2
TABLE OF CONTENTS
Page 5

71 Introduction to the Combinator
72 What is the Combinator device?
73 Creating a layered instrument Combi patch - a tutorial
75 About the Programmer
77 Using Pattern Devices
78 About this chapter
78 What are Pattern Devices?
79 Selecting Patterns
79 Programming a Pattern
80 Clearing a Pattern
80 Using Cut, Copy and Paste
81 Pattern Functions
83 The Browser
84 Background
85 About the Browser
86 Opening the browser
86 Browser elements
88 Navigating in the Browser
90 Cross-browsing patch files
92 Using the Search function
93 Opening files
93 Using Favorites
95 Handling Missing Sounds
97 Working with Patches
98 About Patches
98 Selecting a Patch
99 Saving Patches
100 Copying and Pasting Patches between Devices
100 Initializing Patches
101 Song File Handling
102 About Self-contained Songs
103 Song Information
104 Saving a Song
104 Publishing a Song
104 Opening a Song
104 Closing a Song
105 Creating a New Song
105 Creating a Default Song
106 Exporting as an Audio File
107 Index
TABLE OF CONTENTS
3
Page 6

4
TABLE OF CONTENTS
Page 7

1
D
Installation
Page 8

Welcome!
About the manuals
Thank you for purchasing Reason 3.0!
Version 3.0 is the third major update of Reason, and this time we have designed
the update with live playing in mind. With the powerful Combinator device, an
updated and expanded sound bank, a completely new Browser, the awesome
Remote technology and also a new range of mastering effect devices, we think
we have created a piece of music software that is just as well suited in the studio
as it is on stage.
Replacing expensive and easily outdated hardware with easy-to-use, cool
sounding software has always been our mission. And with Reason 3, we feel
that we have pushed the software synthesis concept one step further by bringing it on stage!
A strong driving force for us at “PropellerHeadQuarters” is the communication
with all the people around the world that use our applications for expressing
themselves. One meeting point for all of us is the song archives and message
boards on our web pages. This is a unique forum where professionals and beginners meet on equal terms to exchange music and ideas. Even more importantly, it’s a forum open to you! Share your experiences by communicating with
us and others and by uploading your songs for others to hear. We think you will
appreciate the feedback from other Reason users all over the world, just as
much as we appreciate the feedback we get from you.
So, see you on the Propellerhead web!
Yours truly,
The Propellerhead Software Team
www.propellerheads.se
This is the Getting Started manual, covering the basic features and procedures
in Reason. It also contains a tutorial section and a guided tour, to help you get
going with the program.
The more advanced features in Reason are described in the Operation Manual,
a file in Adobe Acrobat (".pdf") format. This and other pdf documents are installed with the program - you find them in the Documentation folder inside your
Reason application folder. The Operation Manual also contains reference descriptions of all Reason devices and commands.
To read the Operation Manual you will need the Adobe Acrobat
!
Reader application (version 5.0 or later). Since this has become
something of a household utility application, chances are you already have it installed on your computer. If not, run the Acrobat
Reader installer included on the Reason program disc.
About Mac and Windows
Reason runs under Mac OS X and Windows (for operating system details, see
below). All Reason packages contain program versions for both platforms. Everything said in the manuals applies to both platforms, unless explicitly stated.
If you are running Mac OS X, please note that there’s an additional menu called
the Reason menu, which is not present under Windows. This contains the Preferences menu item (otherwise found on the Edit menu).
Virtually all screenshots in the manuals are from the Windows ver-
!
sion of Reason. However, the contents of all windows and dialogs
are the same on both platforms.
6
INSTALLATION
Page 9

What is in the Reason
Requirements
package?
When you purchase Reason, the package contains the following items:
D
The Program Disc CD.
This contains the Reason installer, electronic documentation in Adobe Acrobat format, and an installer for Adobe Acrobat Reader. There will also be additional files such as promotional material, demo versions of other
Propellerhead Software products, etc.
D
The Factory Sound Bank CD.
This contains the Reason Factory Sound Bank, a large file containing samples, patches and loops for use with Reason. This is copied to your hard disk
the first time you launch Reason (see page 10 for more information).
D
The Orkester CD
This contains the Reason Orkester Sound Bank. This is also copied to your
hard disk the first time you launch Reason (see page 10 for more information).
D
The printed documentation.
D
The product authorization card.
This contains the license number required for the installation. Keep this card
in a safe place, in case you need to re-install Reason!
Below you will find the minimum requirements for running Reason:
!
Note that these are the minimum requirements! You will benefit
from a fast computer with a lot of RAM, since this will allow you to
use more devices at the same time.
Mac OS X
• G3, G4 or G5 processor, sufficiently fast to run Mac OS X 10.2.
• 256 MB RAM
•2 GB free hard disk space.
• CD-ROM drive.
• Mac OS X 10.2 or later.
•A MIDI interface and a MIDI keyboard recommended.
Windows
• Intel Pentium 3 or better. 300 MHz or faster.
• 256 MB RAM.
•2 GB free hard disk space.
• CD-ROM drive.
• Windows 2000/XP (or later).
• 256 color monitor (or better), 800x600 or larger.
•A 16 bit Windows compatible audio card, preferably with an ASIO or DirectX driver.
•A MIDI interface and a MIDI keyboard recommended.
INSTALLATION
7
Page 10

About the Audio Hardware
The audio hardware is the computer equipment that converts the digital signals
from Reason to analog audio signals (for connection to an amplifier, headphones, or similar). This equipment could be a standard stereo sound card, a
USB audio interface, the built-in audio hardware on a Macintosh or some more
advanced audio card with several inputs and outputs, digital connectors, etc.
Regardless of which, you need to make sure the hardware and its drivers are
properly installed:
Mac OS X
If you are using the built-in audio hardware of the Macintosh
In this case you don’t need to make any extra settings. Just connect the audio
output to your listening equipment (speakers, mixer, headphones or similar) and
make sure your Mac plays audio properly.
If you are using other audio hardware
You may want to use other audio hardware with Reason (e.g. an audio interface
with multiple outputs, digital connections, etc.). For this to be possible, the audio
hardware must be compatible with Mac OS X, that is, there must be a Mac OS
X driver available for the card.
1. Install the audio hardware and its drivers as described in its documentation.
2. Connect the stereo outputs of your audio hardware to your listening
equipment (speakers, mixer, headphones or similar).
For info about how to use multiple outputs (i.e. more than a stereo output),
see the Operation Manual pdf. For now, we stick to standard stereo connections.
3. If possible, test that audio plays back OK with the audio hardware.
With some audio hardware, a test application is supplied for this purpose.
Windows
D
If possible, you should use ASIO compatible audio hardware (i.e.
audio hardware for which there is an ASIO driver).
ASIO drivers generally provide better performance and lower latency (see
page 14).
D
If there is no ASIO driver available, you should make sure your audio card supports DirectX.
DirectX is a Microsoft protocol for handling audio and other multimedia aspects.
D
As a last resort, you could use audio cards that don’t support ASIO
or DirectX, provided that they are Windows compatible.
In this case, Reason will communicate with the audio hardware via MME
(Windows Multi Media Extensions). However, most often this results in large
latency values (see page 14), making real-time playback of instrument devices difficult or even impossible.
Regardless of which type of audio hardware or drivers you are using, you should
follow these basic steps:
1. Make sure you have the latest drivers for the audio hardware!
Please check the manufacturer’s web site for the latest versions.
2. Install the audio hardware and its drivers as described in its documentation.
3. Connect the stereo outputs of your audio hardware to your listening
equipment (speakers, mixer, headphones or similar).
For information about how to use multiple outputs (i.e. more than a stereo
output), see the Operation Manual pdf. For now, we stick to standard stereo
connections.
4. If possible, test that audio plays back properly with the audio hardware.
In the case of audio hardware with ASIO drivers, you will need some test application for this (often included with the audio hardware). If you are using DirectX or MME drivers, you can use Windows’ Media Player application for
this.
8
INSTALLATION
Page 11

About MIDI Interfaces
Upgrading vs. New
While it is possible to use Reason without an external MIDI controller (by playing
patterns and loops only, or drawing notes and automation in the sequencer), this
would not allow you to use the program to its full potential. From now on we assume that you are using a MIDI interface and some kind of external MIDI controller (typically a MIDI keyboard with a built-in USB interface).
D
When installing the MIDI interface and its drivers, follow the instructions in its documentation carefully.
D
While a MIDI interface with a single input is sufficient, you will
benefit from having two or more individual inputs.
This is especially true if you want to manipulate Reason parameters with additional MIDI control surface devices or use the program in conjunction with
an external, stand-alone sequencer, groove machine or similar.
• For some MIDI interfaces connected via USB, no driver installation is required. Just plug in the interface and you’re ready to go!
• For other, more advanced MIDI interfaces (or at least to take advantage of
more advanced features, like multiple inputs) you will need to install a driver.
Please consult the documentation that came with the interface for details.
MIDI Connections
D
Simply connect the USB cable from your keyboard to your computer.
Although many USB MIDI keyboards are “plug-and-play”, some may require
a driver to be installed. Consult the documentation that came with your MIDI
keyboard.
Or
D
Connect a MIDI cable from the MIDI Out on your MIDI keyboard (or
other MIDI controller) to a MIDI In on your MIDI interface.
This is sufficient to be able to play and record notes and controllers in Reason from the MIDI keyboard.
D
If you are not using a USB keyboard, you may also connect the MIDI
Out from the MIDI interface to the MIDI In on your MIDI keyboard.
This is not strictly necessary to use Reason, but it will enable two-way communication when you run the Reason Setup Wizard which appears the first
time Reason is launched (see page 12), or when using Auto-detect Surfaces in the Preferences. Whether auto-detection works or not depends on
the keyboard model.
If you have several MIDI control surfaces or similar that you want to
!
use, we recommend that you connect them to separate MIDI ports
(or directly to the computer using USB).
Installations
If you are upgrading from a previous version, please note the following:
D
Our recommendation is that you uninstall the previous version before installing the new one.
Under Windows, please use the Uninstall feature. Under Mac OS, just drag
the program files to the Trash. Uninstalling will ensure that there is no confusion between versions and that shortcuts and aliases point to the right files
etc.
INSTALLATION
9
Page 12

Installing the Software
Running the Installer
Now it’s time to install the actual Reason software:
D
Insert the Reason CD labeled “Program Disc” into your CD-ROM
drive.
What to do next depends on whether you are installing on a Mac or a Windows computer.
Windows:
1. On the CD-ROM, locate the file called “Install Reason” and double
click on it.
Under Windows, the installer may automatically start when you insert the
CD, depending on your system settings.
2. Follow the instructions on screen.
Before executing the installation of the software components, you will be
asked to specify a install location, and whether you wish to create a program
shortcut/alias on your desktop. When the installation is complete, you have
the option of launching Reason directly.
Mac OS:
On the Mac, there is only a folder called “Reason” - simply drag this to the Applications folder on your hard disk.
About the Sound Banks
The first time you launch Reason, you will be asked to insert the Reason Factory
Sound Bank and the Orkester Sound Bank. These each consist of one big file,
containing a large number of patches, samples and loops, serving as your main
supply of sounds (much like the sound ROM in a synthesizer).
These are copied to your hard disk and are required to run the program.
Launching the Program
Now, the Reason files have been installed in a folder on your hard disk. Under
Windows, all Reason related items have also been added to the Start menu and
possibly you will have a Reason shortcut on the Desktop.
1. Check for any ReadMe files in the Reason folder or on the Start
menu, and open and read these.
ReadMe files may contain important last minute information that didn’t make
it into this manual.
2. Launch the program by double clicking the Reason icon (or by selecting the Reason item from the Start menu).
3. First a Licensing Agreement is shown.
Read it through and click “Agree” to proceed.
4. You will now be asked to insert the Orkester CD in your CD-ROM
drive.
The Orkester Sound Bank will be then be automatically copied into the Reason Program folder. During this process, which will take a while, various
splash screens are shown, along with a progress meter.
5. Next, you will be asked to insert the “Factory Sound Bank” CD in
your CD-ROM drive.
The Factory Soundbank will also automatically be copied into the Reason
Program folder.
6. Fill in the authorization form that appears.
Your license number can be found on the product authorization card included in the package.
At this point a dialog appears, asking you whether you want to register your copy
of the program at the Propellerhead web site. Registering gives you immediate
access to various benefits such as free, extra sounds for Reason!
You must have a working Internet connection to be able to register
!
on-line.
D
If you click the Register Now button, your Internet browser will
launch and take you to the registration page on the Propellerhead
web site.
Follow the instructions on the web page. After finishing the registration, click
the Continue button in the installation dialog.
D
If you don’t want to register at this point, click the Later button.
You can register at any time by selecting Product Registration from the Contact menu (Mac) or Help menu (Windows) in Reason (or by going to
www.propellerhead.se/register).
This completes the installation and the program is opened, but a new dialog appears named “Reason Setup Wizard” which will guide you through the basic
settings needed to use Reason.
This is described in the “Setting Up” chapter so just leave things as they are for
now and go to the next chapter...
10
INSTALLATION
Page 13

2
D
Setting Up
Page 14
About this Chapter
This chapter describes the settings you need to make before you can start using
Reason. These are necessary in order to get any sounds from the program and
to be able to play and control Reason via MIDI.
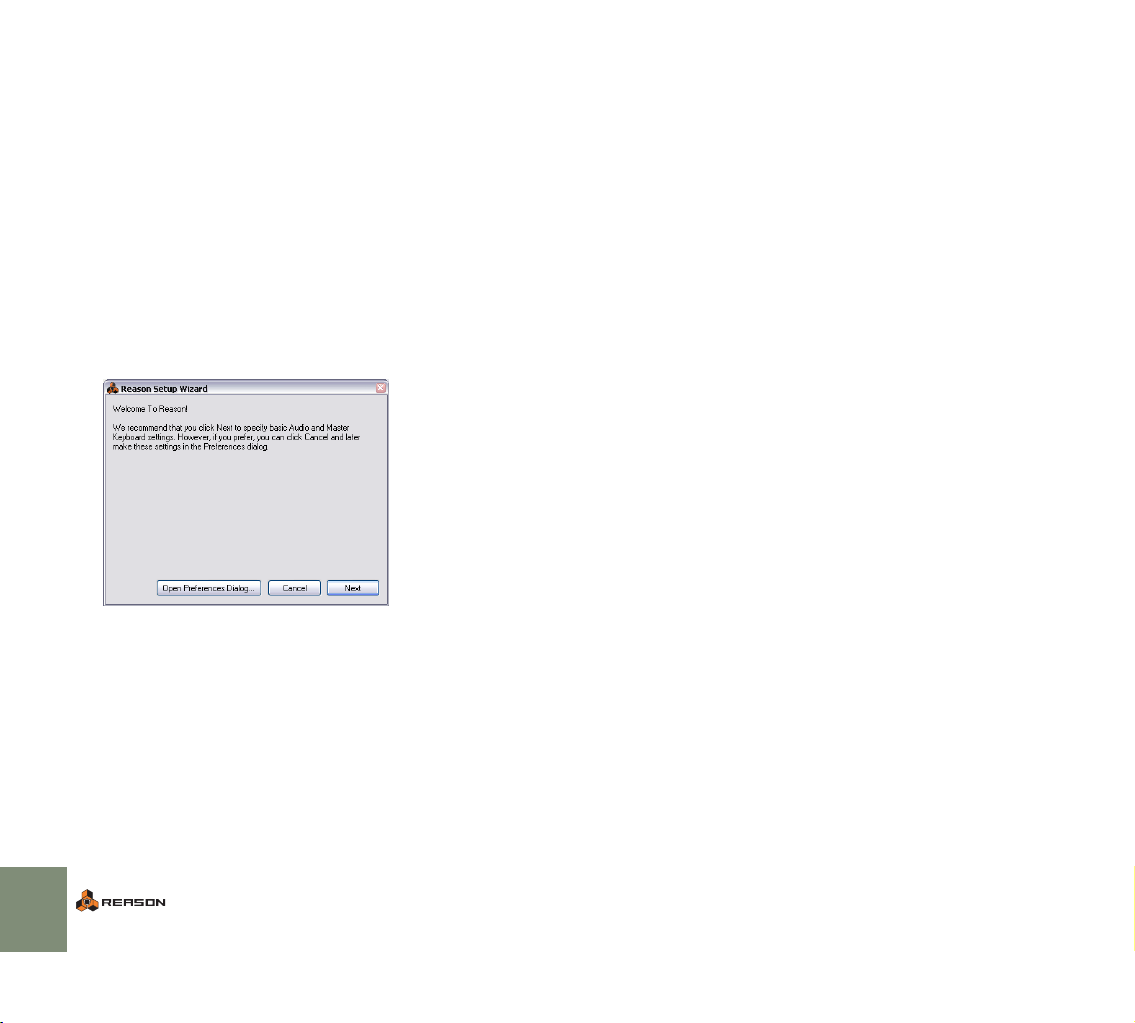
First run - Reason Setup Wizard
If you followed the instructions correctly in the last chapter, Reason should be
running, and the first dialog in the “Reason Setup Wizard” guide should be
open.
This only appears the very first time the program is run.
Note that any settings made in the Setup Wizard can always be
!
changed later in the Preferences!
Clicking Next will take you through a series of dialogs, where the following happens:
D
The Setup Wizard will first try to find a compatible audio driver.
It will automatically select the first compatible driver it finds. If this is the driver
you wish to use, fine. If it isn’t, select your preferred driver from the Audio Card
Driver pop-up. If you don’t know which driver to use, see page 13.
D
Next, Reason will try to auto-detect a master MIDI keyboard.
If one is found and you want to use this, click “Use” and proceed.
D
If Reason can't find the keyboard you have connected, or if you
clicked “Don't Use”, you will be asked to specify a master keyboard
manually.
This is done by first selecting a Manufacturer, and then a model. If your
model keyboard isn’t on this list select “Other” - see below.
For Reason to auto-detect a device you need two-way MIDI commu-
!
nication! Non-USB keyboard devices without a MIDI input can of
course still be added manually.
Note that your keyboard model is not necessarily one that Reason
!
“knows”. This is especially true for older models. You can still use
such a MIDI keyboard, by selecting “Other” from the Manufacturer
pop-up.
D
You will also have to specify a MIDI port to use.
This can be done manually or by playing a few notes on your keyboard.
D
Note that if you have additional remote control surface devices in
your setup, these will have to be added in the Preferences - see
page 13.
The Setup Wizard will only establish a connected master MIDI keyboard device.
If all went well, you should now have established audio and MIDI communication
- the basics needed to play back audio and to direct MIDI to Reason! Reason
will launch and bring up the default song.
However, if for any reason the Setup Wizard failed to establish the necessary
settings, or if you wish to add other devices etc., you have to make settings in
the Preferences.
Read on...
12
SETTING UP
Page 15

About the Preferences
Setting up the Audio
The basic settings for audio and MIDI are done in the Preferences dialog. This is
opened from the Edit menu (or, if you are running Mac OS X, from the Reason
menu).
The Preferences dialog.
✪
Described herein are only the most important settings in the Preferences. For information about other Preferences settings, see the
Operation Manual pdf.
Hardware
In case this wasn’t done in the Setup Wizard, you need to establish a connection between Reason and the audio hardware. This is done by selecting a driver
- a software component that acts like a link between the program and the audio
hardware. Proceed as follows:
1. In the Preferences dialog, use the pop-up menu at the top to select
the Audio page.
2. Pull down the Audio Card Driver pop-up menu and select one of the
options.
Which option to select depends on the platform and the audio hardware. If
an option is not applicable to your setup it will be greyed out in the dialog.
SETTING UP
13
Page 16
Mac OS X
D
Select the option that corresponds to the hardware you want to use
(the built-in audio connectors or some additional audio hardware
that you have installed).
Windows
D
If you are using audio hardware for which there is a specific ASIO
driver, you should select this.
With an ASIO driver written specifically for the audio hardware, Reason can
communicate more or less directly with the audio hardware. The benefits are
lower latency (see below) and possibly better support for additional hardware features such as multiple outputs.
D
If there is no specific ASIO driver, you should select the Direct
Sound driver for the audio hardware.
This makes Reason communicate with the hardware via Direct Sound (a part
of the Microsoft DirectX package). You need to have DirectX installed on
your computer, and there must be a Direct Sound driver for the audio hardware.
The Direct Sound driver for a Creative SoundBlaster PCI card selected.
D
If the audio hardware doesn’t support Direct Sound (i.e. there is no
Direct Sound driver available for the audio hardware), select the
MME driver.
This makes use of Windows Multimedia Extensions, the part of Windows
that handles audio, MIDI, etc. Using MME often results in larger latency values (see below).
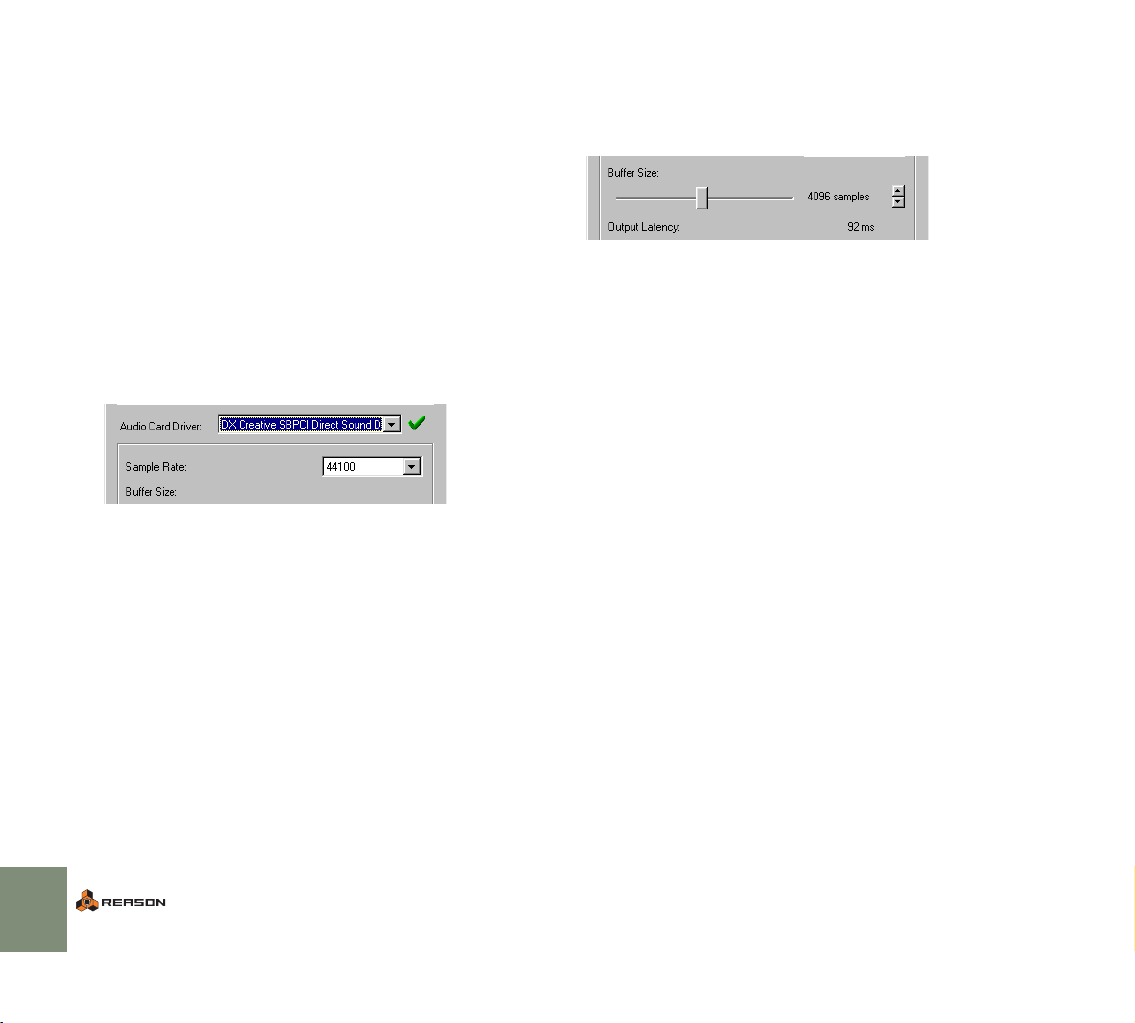
About Latency and other Audio Settings
In the audio page, you will find a number of additional settings for audio. The
most important ones are Buffer Size and the corresponding readout for Output
Latency.
Latency is the delay between when audio is “sent” from the program and when
you actually hear it. The latency in an audio system depends on the audio hardware, its drivers and their settings.
If the latency is large, you will notice that the sound is delayed when you play a
device from a MIDI keyboard. You may also notice that reactions are delayed
when adjusting controls on the device panels (for example, if you lower the volume of a device, you will not hear this immediately but after the latency time).
If you experience high latency values, you will need to make adjustments to your
configuration.
• If available, use the Buffer Size slider to lower the latency.
• If this is greyed out, you may be able to lower the buffer size in the control
panel for the audio hardware - click the Control Panel button to open this.
For more information, please consult the Operation Manual.
14
SETTING UP
Page 17
Setting up MIDI
In Reason, MIDI keyboards or remote control devices are called control surfaces. MIDI input from control surfaces is handled by a system called Remote.
Here are some of the main features:
D
You can use any number of control surfaces at the same time.
D
The program supports a large number of control surfaces out of the
box - knobs, faders and buttons on the surfaces are automatically
mapped to the most useful parameters on the Reason devices.
You don’t have to change the settings on the control surface to control different devices in Reason - if you change MIDI focus from a Subtractor track
to a Malström track, the control surface will automatically adapt.
You just set up your control surface once and for all for use with Reason the program handles the rest!
D
For control surfaces that are not natively supported at this stage,
you can use generic drivers.
With the generic drivers, you can use templates or settings compatible with
Reason 2.5, if available for the control surface.
Note however, that Remote drivers for additional control surfaces will be
added continuously - check our web page for more info.
D
By default, all control surfaces follow the sequencer MIDI input.
This means that you set MIDI input to a track in the sequencer to route the
control surface(s) to the track’s device in the rack.
D
You can lock a control surface to a specific device in the rack.
For example, you could have a master keyboard that follows MIDI input,
while another control surface is locked to the main mixer in the rack. This
way you can control levels and pans at all times. This is described in the Operation Manual.
D
You can use remote overrides to map a specific control on a surface
to a specific Reason parameter or function.
For example, you could override-map a knob or fader on your control surface
to the mixer’s master level fader. Or you could map buttons on your control
surface to control Reason’s transport (play, stop, record, etc.) at all times, regardless of which track has MIDI input in the sequencer. This is described in
the Operation Manual.
D Remote also supports some control surfaces with MIDI feedback.
If you have such a control surface and it is supported by Reason 3.0, you
can take full advantage of motorized faders, meters, displays, etc.
D Among the Reason documentation you will find a document called
“Control Surface Details”.
This contains useful information about the supported control surfaces.
In case you specified a master keyboard in the Setup Wizard, and you don't
have any other control surfaces, you don't have to do anything else. But if you
want to add additional control surfaces or edit your settings, this is done in the
Preferences.
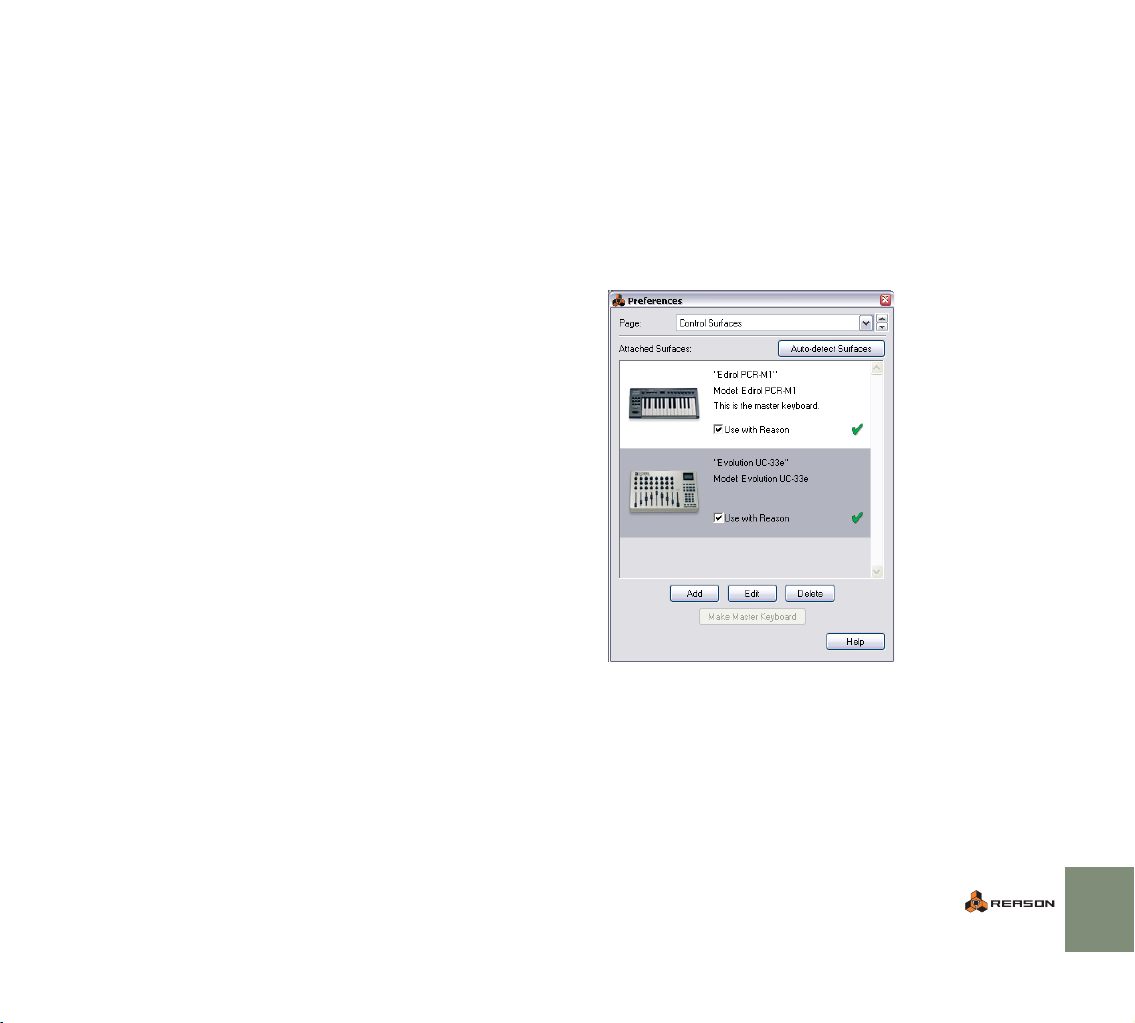
Adding a control surface
1. Open the Preferences dialog and select the Control Surfaces page.
2. If your control surface is connected via USB (or if you have made a
two-way MIDI connection), try clicking the Auto-detect Surfaces
button.
Reason scans all MIDI ports and tries to identify the connected control surfaces. Note that not all control surfaces support auto-detection.
All found surfaces are listed in the Attached Surfaces list.
3. To add a control surface manually, click the Add button.
This brings up a new dialog.
4. Select the manufacturer of your control surface from the Manufacturer pop-up menu.
If you can’t find it on the menu, see below.
5. Select the model of your control surface from the Model pop-up
menu.
If you can’t find it on the menu, see below.
SETTING UP
15
Page 18

6. An image of the selected control surface model is shown, often
along with some information text - read this carefully.
For some control surfaces, you need to select a specific preset to use the
surface with Reason - this is noted here.
7. Use the MIDI Input pop-up to select the input port to which you
have connected the surface.
If in doubt, you can click the Find button and then tweak a control or play a
key on the control surface to have Reason find the correct input port for you.
D Some control surfaces may have more than one MIDI Input pop-up
menu.
You need to select ports on all MIDI Input pop-up menus.
D Some control surfaces will have a MIDI Output pop-up menu.
In some cases this labeled “Optional” - then you don’t have to make a selection. In other cases, a MIDI Output is required. This is the case if the control
surface uses MIDI feedback - motor fader, displays, etc.
8. If you like, you can rename your control surface in the Name field.
9. Click OK to add the surface.
D Depending on the surface model, alerts may appear, reminding you
to select a specific preset etc.
In some cases, Reason can restore a preset in the control surface to factory
settings for you - you are then informed of this.
Finally you return to the Control Surfaces Preferences page, where your added
surface is now listed.
If your control surface model isn’t listed
If you can’t find your control surface listed on the Manufacturer or Model pop-up
menus when you try to add it, this means that there’s no native support for that
model. However, the program supports generic keyboards and controllers.
Here’s what to do:
D Select “Other” on the Manufacturer pop-up menu and then select
one of the three options on the Model pop-up menu.
or, if the Manufacturer is listed but not your specific model:
D Select one of the three “Other” options on the Model pop-up menu:
In both cases, the options are:
• Basic MIDI Keyboard
Select this is you have a MIDI keyboard without programmable knobs, buttons or faders. This is used for playing only (including performance controllers such as pitch bend, mod wheel, etc.) - you cannot adjust Reason device
parameters with this type of control surface.
• MIDI Controller
Select this if you have a MIDI controller with programmable knobs, buttons
or faders (but without keyboard).
You need to set up your control surface so that the controllers send the correct MIDI CC messages, depending on which Reason device you want to
control - check out the MIDI Implementation Chart in the Reason documentation. If your control surface has templates or presets for different Reason
2.5 devices, these can be used.
• MIDI Keyboard with Controls
Select this is you have a MIDI keyboard with programmable knobs, buttons
or faders. Again, you need to set your controllers to send the right MIDI CCs.
After selecting a model, proceed with selecting MIDI input as described above.
About the master keyboard
One of the control surfaces can be the master keyboard. This is like any other
control surface, but it must have a keyboard and it cannot be locked to a specific
Reason device (in other words, it always follows the MIDI input to the sequencer). This is the surface you use to play the instrument devices in Reason.
D The first surface with a keyboard that is added (or found by auto-
detect) is automatically selected to be the master keyboard.
This is shown in the Attached Surfaces list on the Preferences page.
D If you want to use another surface as master keyboard, select it in
the list and click the “Make Master Keyboard” button.
You can only have one master keyboard.
D If you don’t want to use any master keyboard at all, select the cur-
rent master keyboard surface and click the same button (which is
now labeled “Use No Master Keyboard”).
16
SETTING UP
Page 19
Other functions
D To edit a surface, double click it in the list (or select it and click
Edit).
This lets you change its name and MIDI port settings, if needed.
D To delete a surface, select it in the list and click Delete.
D You can turn off a surface by deactivating its “Use with Reason”
checkbox.
This could be useful if the surface is connected to your system but you only
want to use it with another program, etc.
D There is also an “Advanced MIDI” page in the Preferences.
This is only used for External Control MIDI buses and for MIDI Clock Sync input. All hands-on MIDI control is set up on the Control Surfaces page.
Setting the default song
Every time you start Reason, a simple default song opens. This default song contains a few devices and sequencer data and can be played. Every time you select “New” from the File menu, a default “template” song (without sequencer
data) is opened, with a few selected devices. This serves as a suitable starting
point for creating your own songs.
You can however decide exactly what you want the default song to look like, in
the following way:
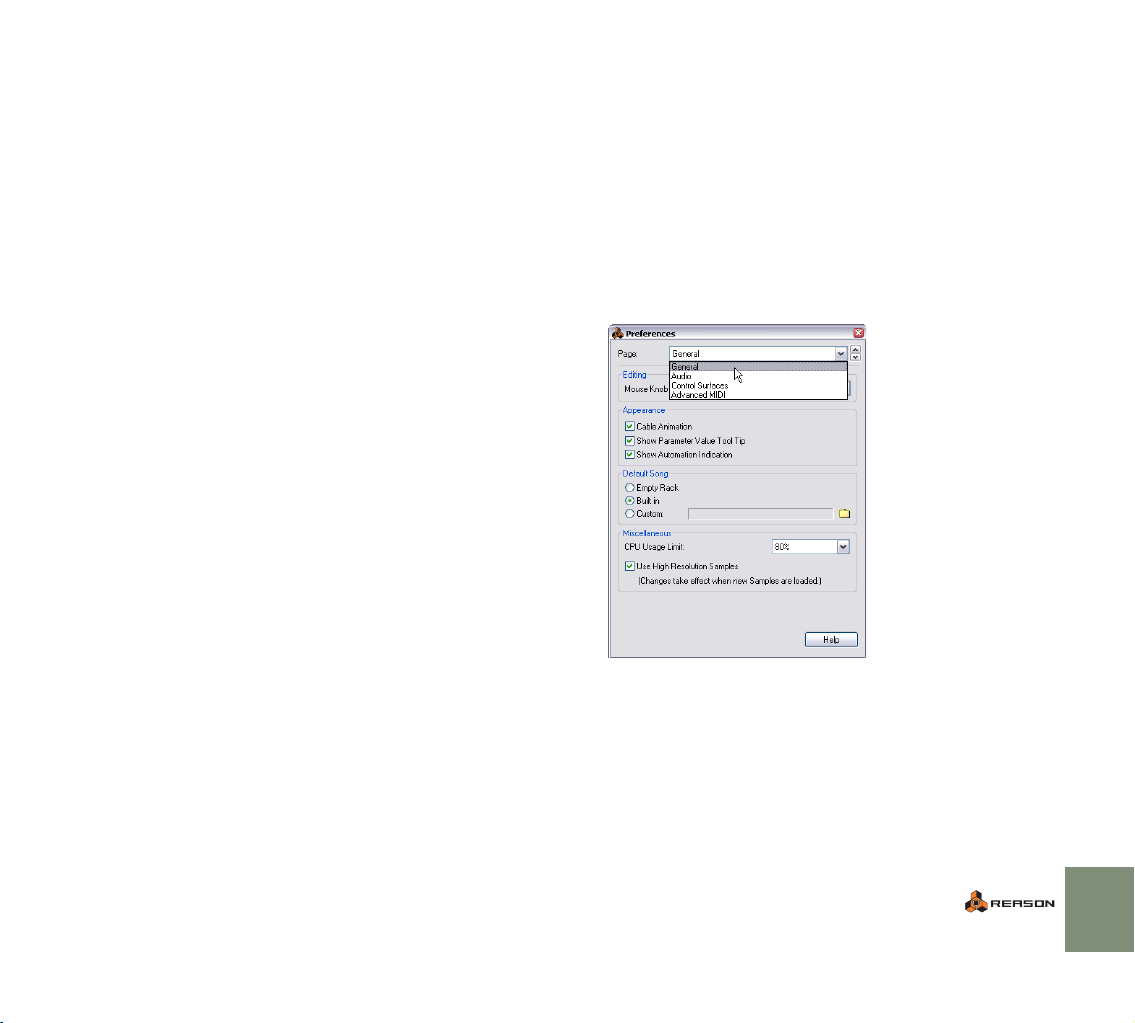
1. Open the Preferences dialog from the Edit menu (or Reason menu
if you are running Mac OS X).
2. Use the pop-up menu at the top of the Preferences dialog to select
the General page.
SETTING UP
17
Page 20
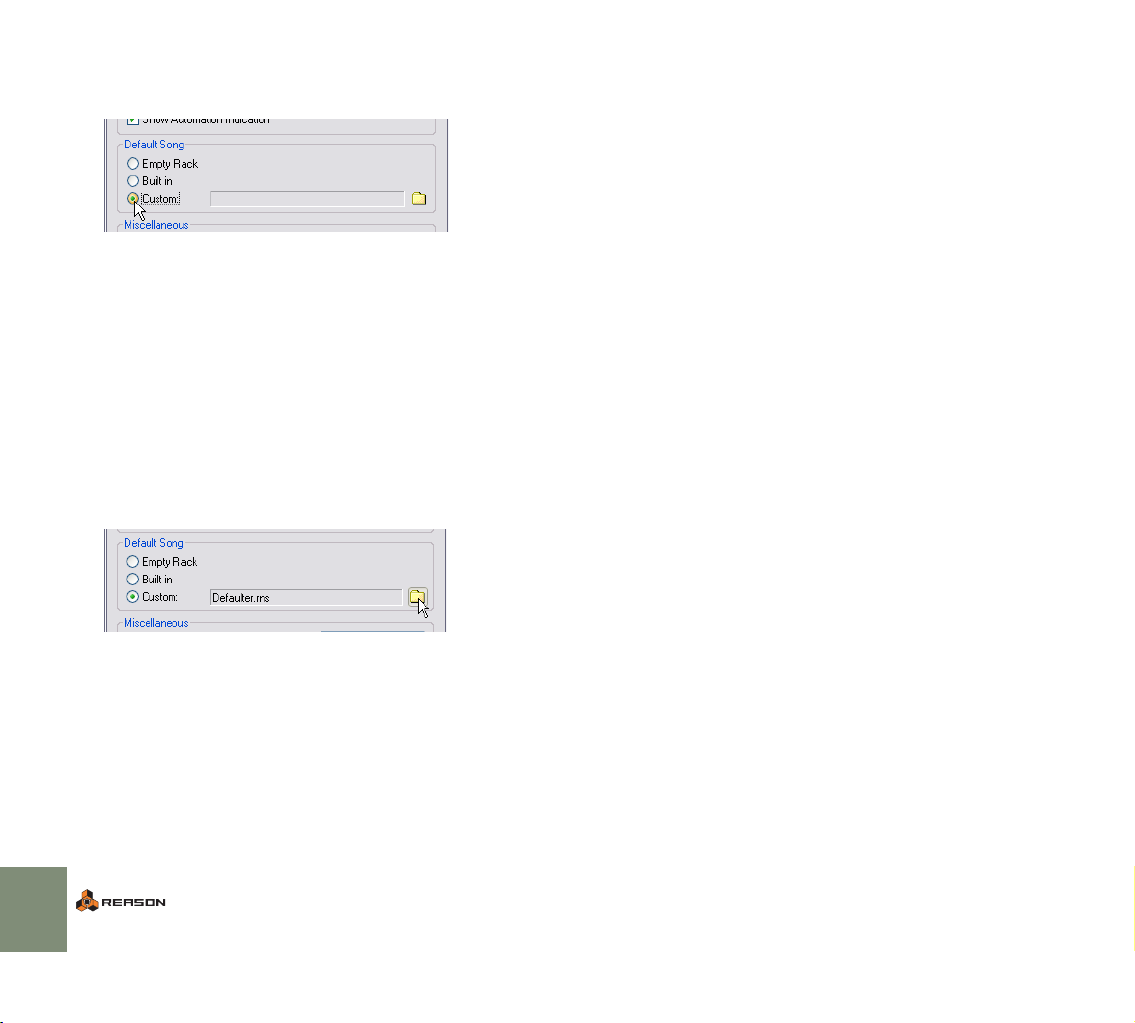
3. At the middle of this page, there is a section entitled “Default
Song”.
You have three choices: “Empty Rack”, Built In” and “Custom”.
Select which one you want to use by clicking the corresponding radio button.
• Empty Rack - This is an empty rack. Well, almost empty, since it contains the
Reason hardware interface.
• Built In - When this is selected, launching Reason will open a basic demo
song. Selecting “New” from the File menu will open a template song with a
few devices to start with, but no sequencer data.
Note that it is not possible to open these songs by regular means - via the
browser - since they are not “independent”.rns-files, and thus do not reside
anywhere in the Reason folder.
• Custom - This allows you to select a custom default song. Any Reason song
can be used, so if you often create songs using the same or similar device
setups, you can use a previously created song as the default song. This way,
all new songs you create will have the same device setup.
D To select a custom default song, click the Folder icon to the right
and browse to the desired Reason song.
The name of the selected song will then be displayed in the text box.
18
SETTING UP
Page 21

3
D Quick Tutorial
Page 22

About this Chapter
This chapter is a quick introduction to the basics in Reason, laid out as step-bystep tutorials. At the end of the chapter you will also find a “guided tour”, describing the different areas and devices in the program.
! Before you proceed with the tutorials, you should have connected
your equipment and made settings for audio and MIDI as described
in the previous chapters.
9. Near the top of the rack is a mixer device - make sure this is visible.
You may need to scroll the view using the vertical scrollbar to the right in the
rack (or the scroll wheel on your mouse, if it is equipped with one).
The scrollbar.
Playing a Song
1. If you haven’t launched Reason yet, do so.
2. Pull down the File menu and select Open.
The Song Browser dialog appears.
3. Navigate to the Reason program folder.
4. Open the Demo Songs folder and select the song “Tutorial
Song.rns”.
5. Click Open.
The document window for the song is displayed on screen. This consists of
a “virtual rack” with devices (this song contains four instrument devices and
two effects), a sequencer section and a transport panel.
6. Click the play button on the transport panel (at the bottom of the
window).
Playback starts. If everything is properly connected, you should now hear
Reason play!
The stop button. The play button.
7. Click the stop button to stop playback when you’ve heard enough.
Now, try out some real-time mixing:
8. Click the stop button again.
This moves the song position to the start of the song, allowing you to play
the song from the beginning again.
The Mixer.
If you look at the mixer, you will see that each mixer channel has a “tape strip”
next to the volume fader. If a device is connected to a mixer channel, the tape
strip is labeled with the device name. In this song, there are only four instrument
devices, so only the four first mixer channels are labeled.
10. Click the play button to start playback.
11. While the song is playing, click and drag the faders to adjust the
level of each instrument device.
12. Try changing the pan setting (stereo position) of a channel, by clicking the pan knob above the fader and dragging up or down.
Dragging up will turn the knob clockwise; dragging down will turn it counterclockwise.
20
QUICK TUTORIAL
Page 23
You may also want to add some effects to the music. In this song, there are two
effect devices connected: a delay and a chorus/flanger. These are connected as
send effects from the mixer, allowing you to specify how much of each mixer
channel signal should be sent to each effect.
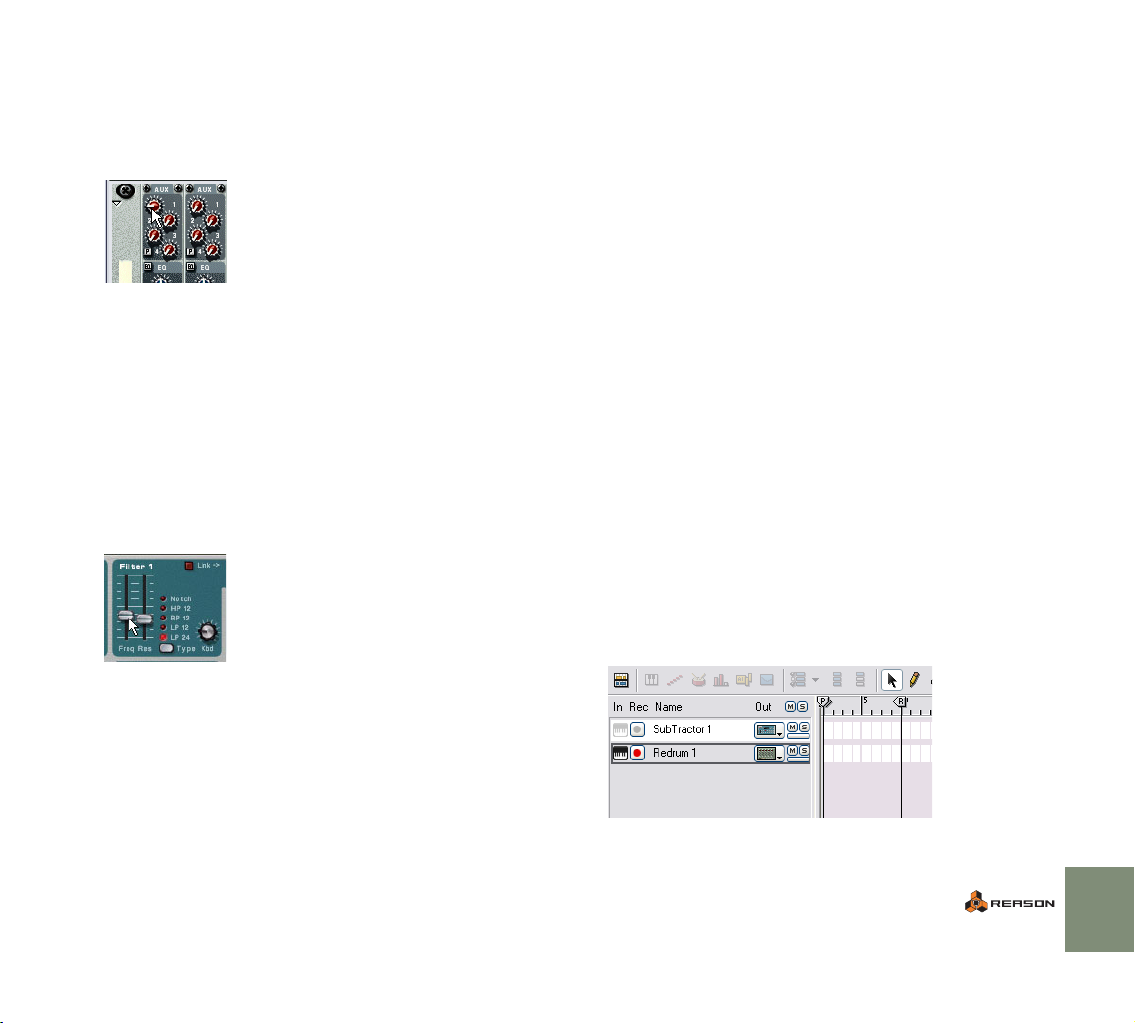
13. Raise the Aux send level knobs at the top of a mixer channel.
Send 1 is connected to the delay, while send 2 goes to the chorus/flanger.
The Aux sends.
Finally, let’s try tweaking some controls on an actual instrument device, to
change the sound. In this example we will use the Subtractor synthesizer device,
but all devices have parameters that can be adjusted on the device panels in the
same way.
Unless you have a very large screen, the Subtractor device isn’t visible right
now. You could use the scrollbar to scroll the rack down, but here’s a quicker
way:
14. In the sequencer area (above the transport panel), click on the
name “Subtractor” in the track list to the left.
The rack is automatically scrolled to bring the Subtractor device into view.
15. Try adjusting some parameters while the song is playing.
You may for example want to tweak the “Filter 1 Freq” slider, to change the
brightness of the synth bass sound.
Creating a new song
In this tutorial we will start with an empty rack, to let you add your own devices
“from scratch”.
1. If you like, close the current song by selecting Close from the File
menu.
You can have several song documents open in Reason at the same time, but
each song uses some memory and computing power, so it’s good practice
to close songs you don’t need.
2. Pull down the File menu and select Open.
3. Navigate to the Reason program folder and open the Template Documents folder.
4. Select the file “Empty Rack.rns” and click Open.
A song document window appears. This consists of an (almost) empty rack
and there are no tracks in the sequencer.
! Normally when you create a new song, you would select “New”
from the File menu. This command opens the default song (see
page 105). The built-in default song contains a few devices, but if
you have set things up so that the default song is “Empty Rack.rns”,
you can just select “New” from the File menu, and ignore step 1 - 4
above. See page 105 for instructions on setting up the default song.
5. Pull down the Create menu and select Mixer 14:2.
A mixer device is created in the rack.
! The reason why you should start with a mixer device, is that all sub-
sequent devices you add will then automatically be connected to a
mixer channel.
6. Pull down the Create menu and select Subtractor Analog Synth,
and then Redrum Drum Computer.
You have now added two instrument devices to the rack. If you look in the
sequencer, you will note that two tracks have automatically been added, one
for the synthesizer and one for the drum machine.
That concludes the first tutorial! Now, let’s move on to creating a Reason song
from scratch.
QUICK TUTORIAL
21
Page 24
Now you could try playing the Subtractor synth “live” (provided you have a MIDI
keyboard or similar hooked up):
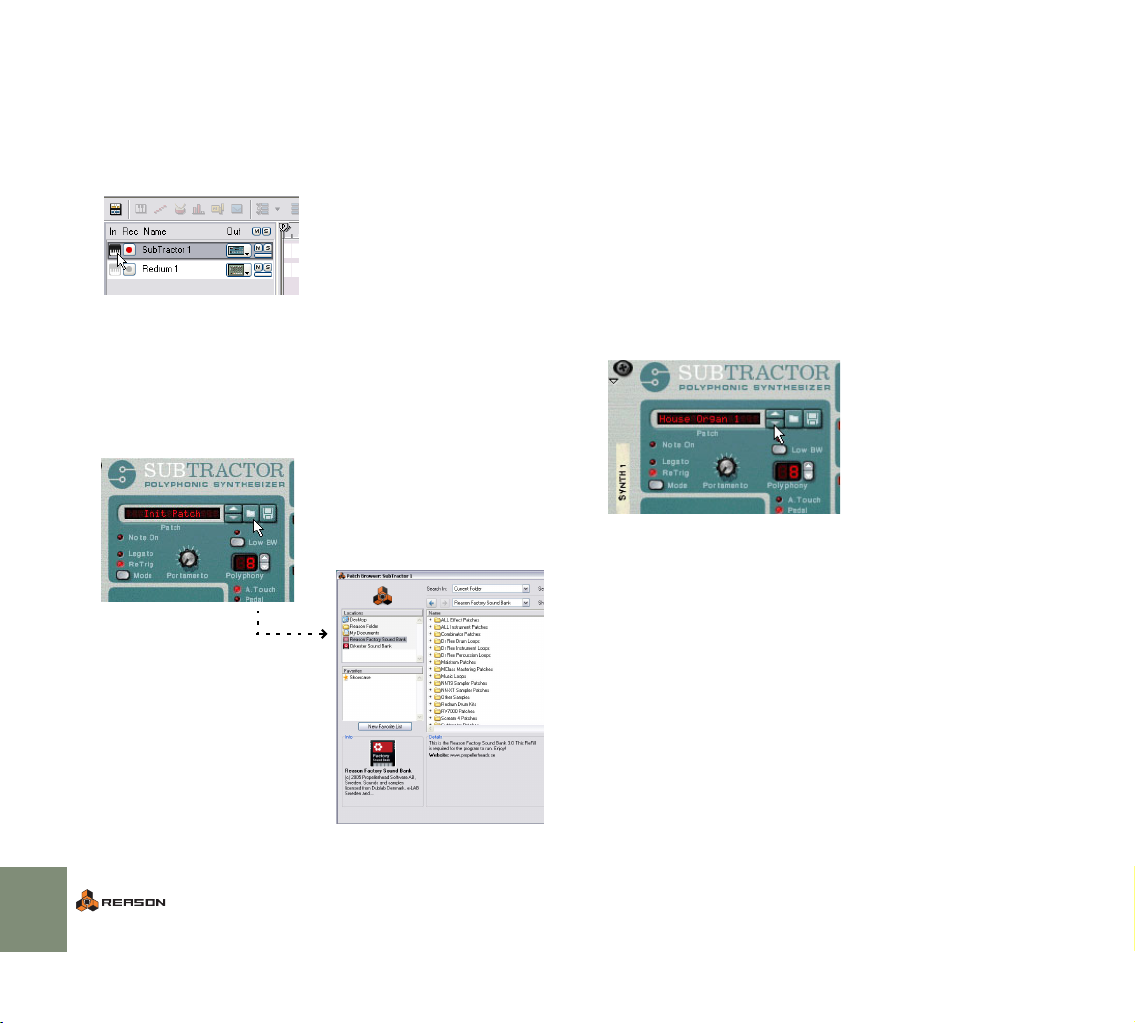
7. In the sequencer, click in the “In” column for the synthesizer track
(to the left of the name), so that a keyboard symbol is highlighted.
This symbol indicates that incoming MIDI is routed to the track. And since
the track is connected to the Subtractor device, any notes you play on your
MIDI keyboard will be sent to the synth.
MIDI routed to the Subtractor track.
8. Try playing your MIDI keyboard.
What you hear now is the default “Init” sound of the Subtractor, which may
not be so inspiring. You could start tweaking the parameters to create a
sound of your own, or you could select one of the included synth patches
(and tweak this to your liking):
9. Click the folder button on the Subtractor panel.
This opens the Patch Browser dialog.
10. In the Browser “Locations” list to the left, click on “Reason Factory
Sound Bank”.
This is one huge ReFill containing a large number of patches and samples
that are included with Reason when you purchase it.
11. Double click the folder “Subtractor Patches”.
This contains a number of folders with different sound categories.
12. Open one of the folders, and select a patch.
The patch is loaded in the background - you can try out the patch while playing you keyboard without closing the Browser. Try selecting other patches in
the Browser to audition them. Click OK to confirm a selection and to close
the Browser.
D Once you have selected a patch this way, you can step between the
patches in the same folder, by clicking the up and down arrow buttons next to the patch display.
Alternatively, you can click in the patch name display to bring up a context
menu with all the patches in the folder.
22
QUICK TUTORIAL
Page 25
It’s possible to play the drum machine device via MIDI in the same way, but let’s
try creating a pattern with the built-in pattern sequencer instead:
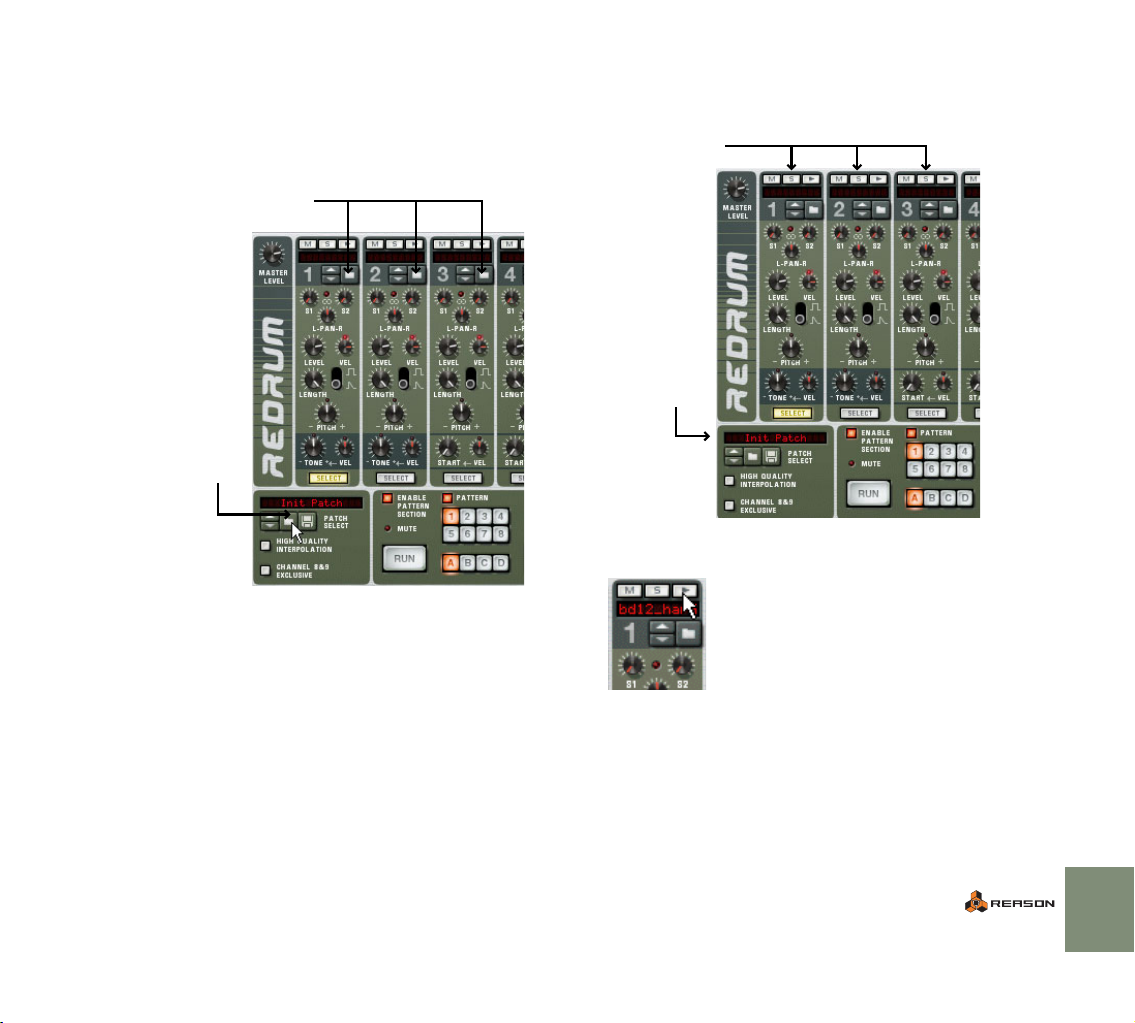
13. Click the folder button in the lower left corner of the Redrum panel.
This opens the patch browser for the drum machine, allowing you to select a
Redrum patch (a drum kit). Note that there are folder buttons for each drum
sound channel too - these let you add drum samples one by one and create
your own drum kits.
Load Sample buttons
The Select Patch button
14. Select a Redrum patch in the same way as you selected a Subtractor patch.
The patches are located in category folders within the folder “Redrum Drum
Kits” in the Reason Factory Sound Bank.
When you have selected a patch, you will note that a sample file name is displayed at the top of each drum sound channel in the drum machine. There may
also be different parameter settings for the different drum sounds - all these settings are part of a Redrum patch.
Drum sound channels
The selected patch
15. Try out the drum sounds by clicking the audition buttons at the top
of each drum sound channel.
Now, let’s start building a pattern. By default, the empty patterns have sixteen
steps, with each step corresponding to a sixteenth note (so that the length of a
pattern is one 4/4 bar). To make things simple, we’ll keep this setting for now.
16. Click the Run button on the Redrum device panel.
The pattern will start playing (as indicated by the running “LED” on the step
buttons at the bottom of the device panel). Nothing will be heard, since you
haven’t added any drum beats yet.
QUICK TUTORIAL
23
Page 26
17. Click the Select button for one of the drum sounds.
In Redrum, you add drum beats for one sound at the time.
18. Click on the first step button (marked 1).
The button lights up, indicating a drum beat.
Now try recording some synth notes in the sequencer:
22. Click in the In column for the synthesizer track in the sequencer so
that the MIDI connector symbol appears.
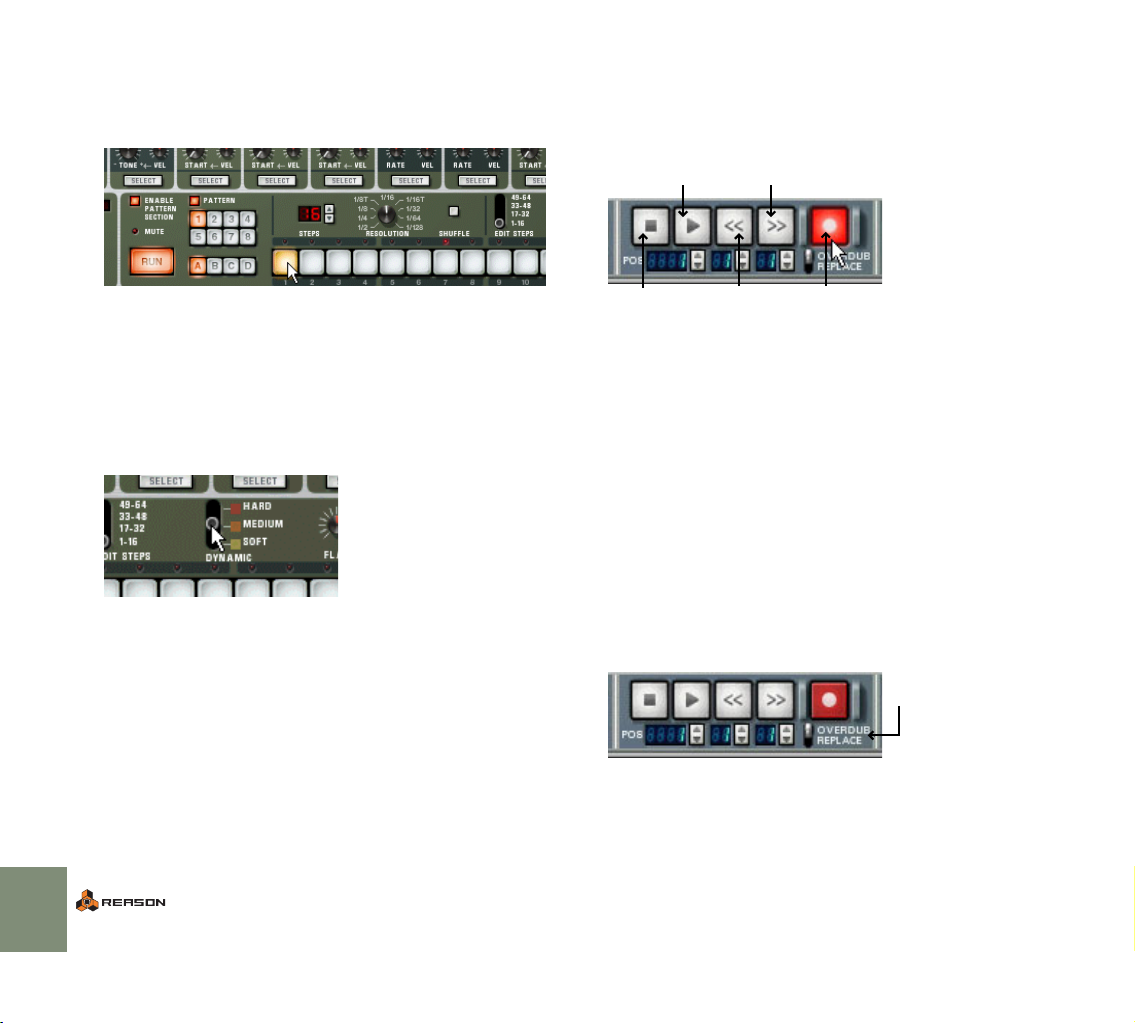
23. Click the record button in the transport panel.
The button lights up, indicating record standby mode.
The Play button The Fast Forward button
You will now hear the sound of the selected drum on the first beat of each bar.
19. Add more drum beats by clicking other step buttons.
Clicking a lit step button will remove the beat.
✪ You can add beats of different strength (velocity level) by adjusting
the Dynamic switch. Exactly how each sound is affected by different
velocity levels depends on the settings.
You can also adjust the dynamics “on the fly” by pressing [Shift] or
[Option] (Mac) / [Alt] (Windows) when you add beats. [Shift]-click
for hard beats, [Option]/[Alt]-click for soft beats.
20. Select another drum sound (by clicking its Select button) and proceed in the same way until you have a drum pattern you want to
use.
21. To stop the playback, click the Run button again.
The Stop button
24. Click the play button.
Recording is activated, and the drum machine pattern automatically starts
playing.
25. Play your MIDI keyboard while listening to the drum pattern.
26. When you’re done, click the stop button.
27. Click stop again to move the song position to the beginning of the
song.
You can also click and hold the rewind button.
28. Click play to listen to your recording.
Finally, let’s record some automation of a synthesizer parameter. In this example,
we automate the cutoff frequency of the filter (Filter 1 Freq), but you can automate any parameter you like.
29. Rewind the song to the beginning again.
30. Make sure the Overdub/Replace switch (just below the record button) is in the Overdub position.
This allows you to record more on the same track, without removing the previous recording.
31. Click the record button and then the play button.
Recording starts. You will hear the recorded synth notes being played back.
The Rewind button The Record button
The Overdub/Replace switch
24
QUICK TUTORIAL
Page 27
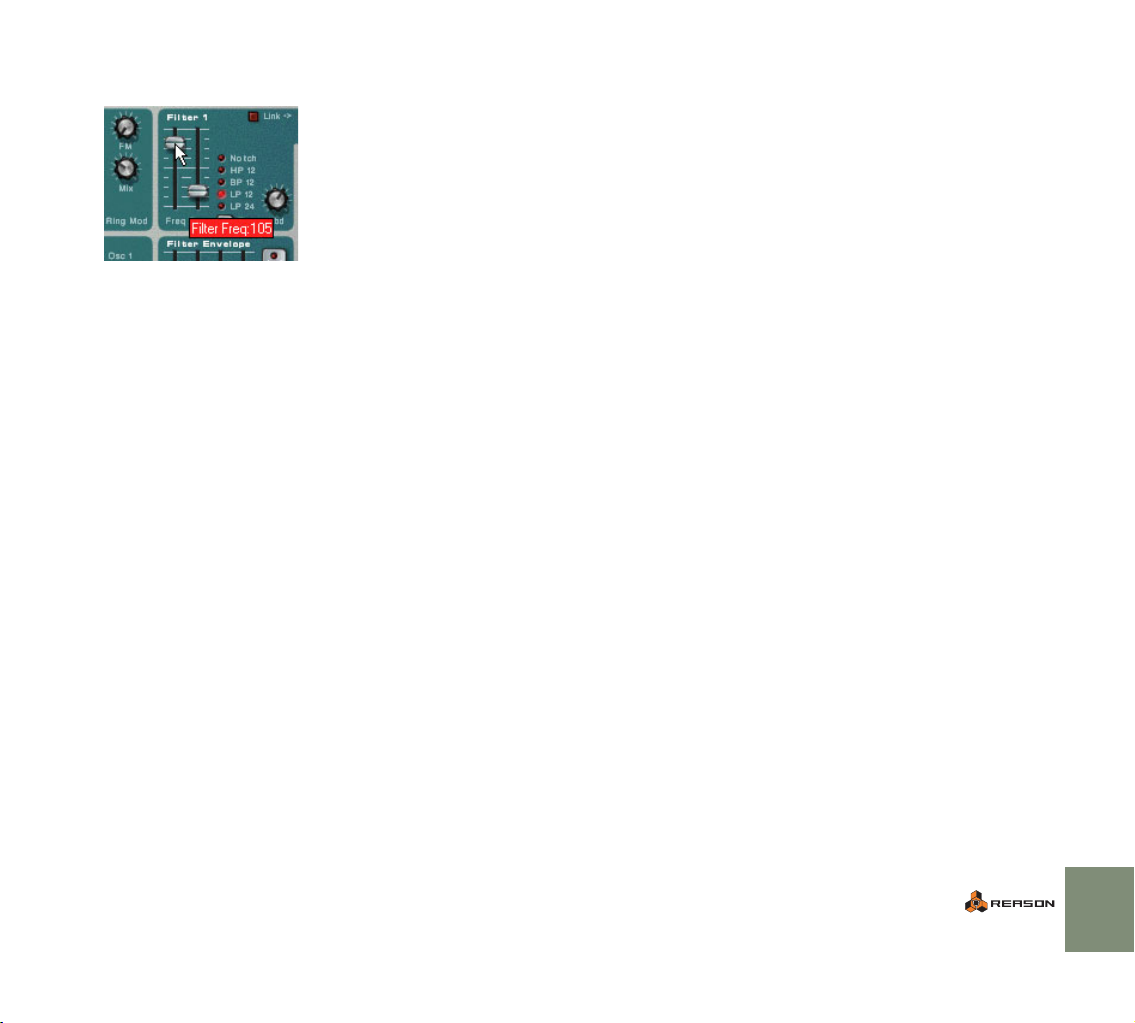
32. Click and drag the Filter 1 Freq slider on the Subtractor panel.
The changes you make will be heard immediately.
33. Click stop twice to end recording and go back to the beginning of
the song.
If you look at the Subtractor panel, you will note that there is a green frame
around the filter slider now. This indicates that the parameter is automated.
34. Play back the song again.
You will see the filter slider moving, exactly as you moved it during recording.
This concludes the second tutorial!
QUICK TUTORIAL
25
Page 28
Guided Tour
On the following pages you will find a brief “guided tour” through the program.
This helps you get familiar with the different devices and their uses.
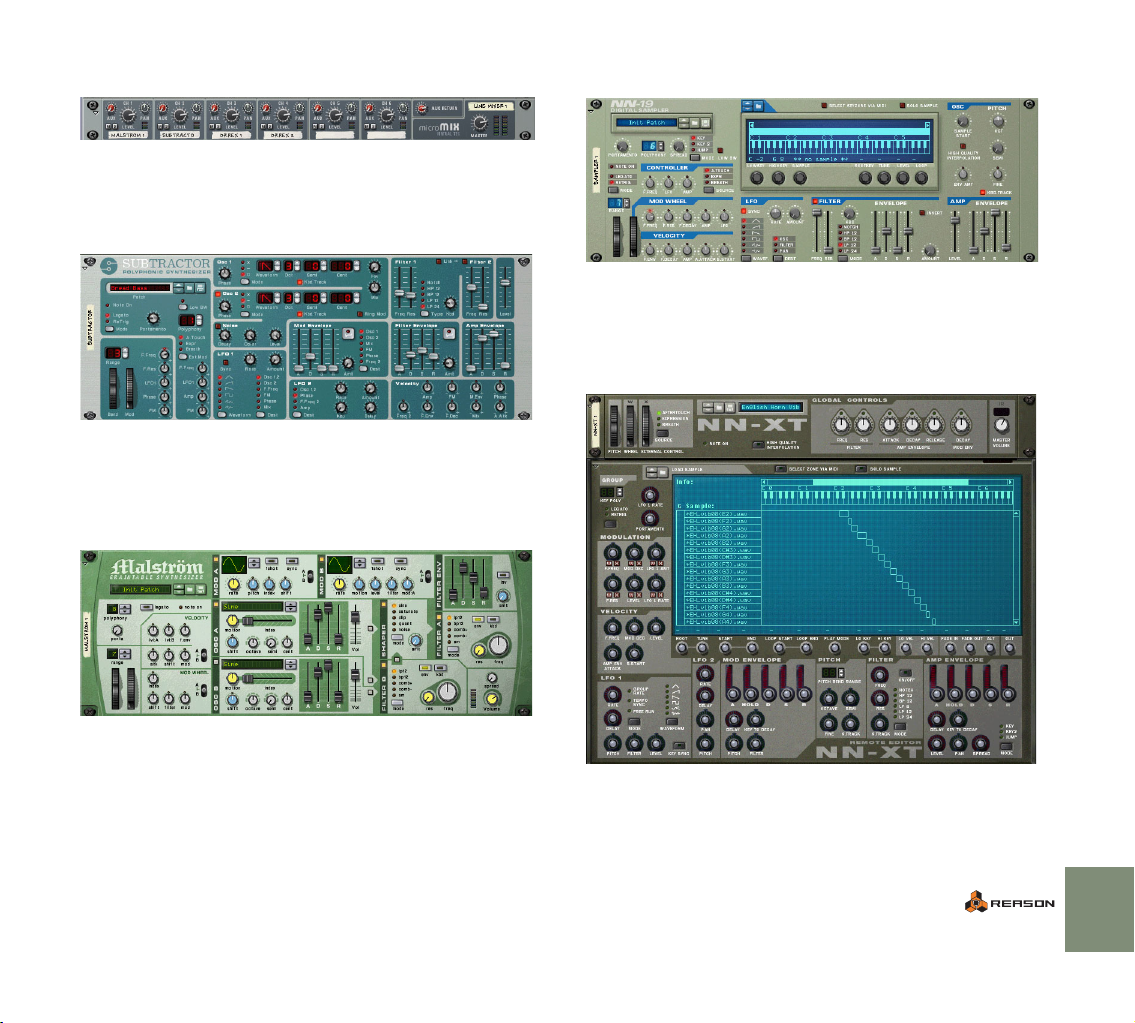
The Rack
This is the virtual rack, the heart of Reason. At the top of the rack you will always
find the Hardware Interface, which allows Reason to communicate with the audio hardware and MIDI interfaces. Below this, you can add as many different devices you want (or as many as your computer can handle). Read more about the
different devices below.
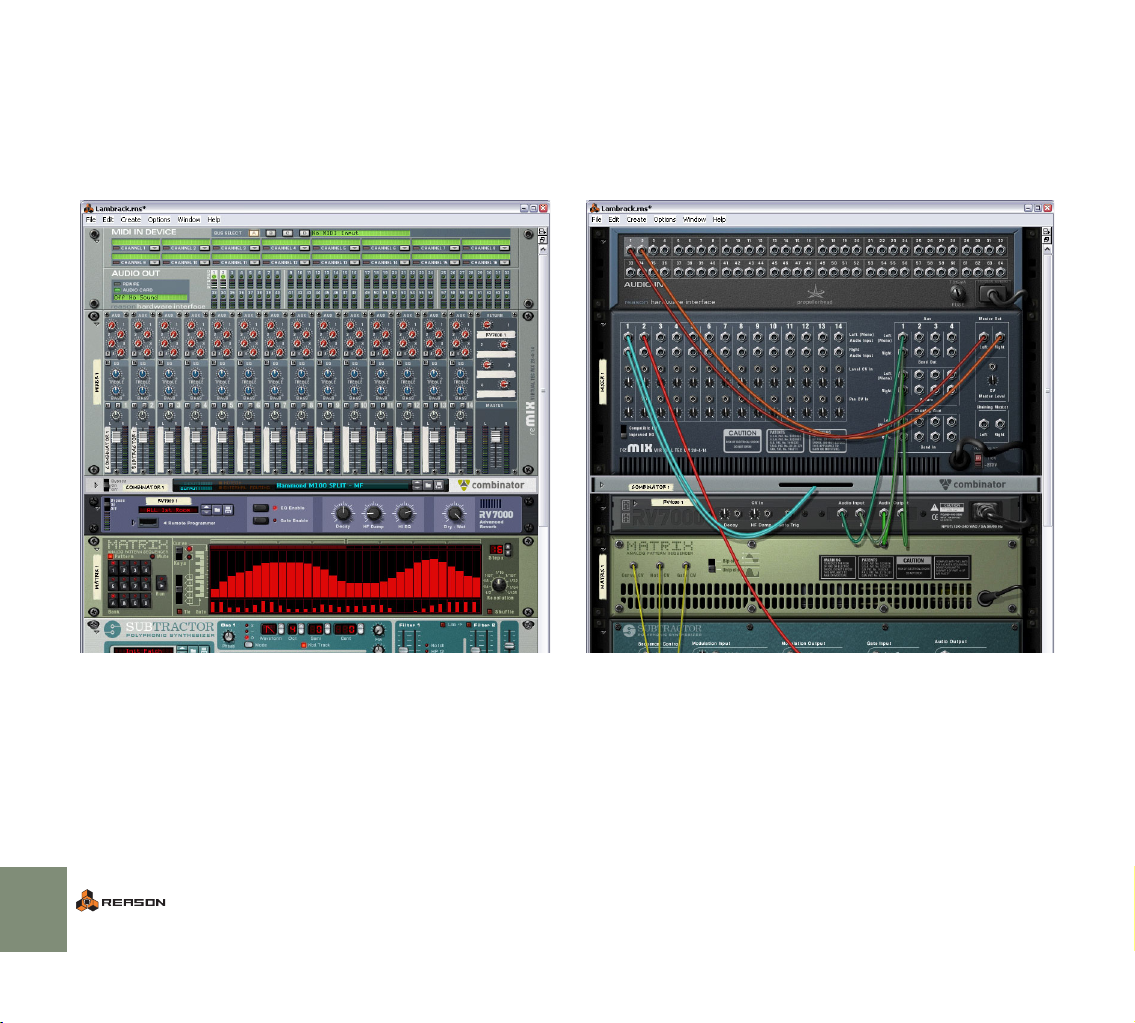
The Back
If you press [Tab] or select Toggle Rack Front/Rear on the Options menu, the
rack will be “turned” to show you the back.
Here, the back panel of each device in the rack is shown. As you can see, connections between devices are indicated by “virtual patch cables”. Connections
between instrument devices and mixers use red cables, connections to or from
effect devices use green cables and CV connections (Control Voltage, used for
controlling parameters or triggering sounds) use yellow cables. You can make
connections by clicking and dragging from one “socket” to another on the back
panels.
To turn the rack over again (to show the front panels), use the same command.
26
QUICK TUTORIAL
Page 29
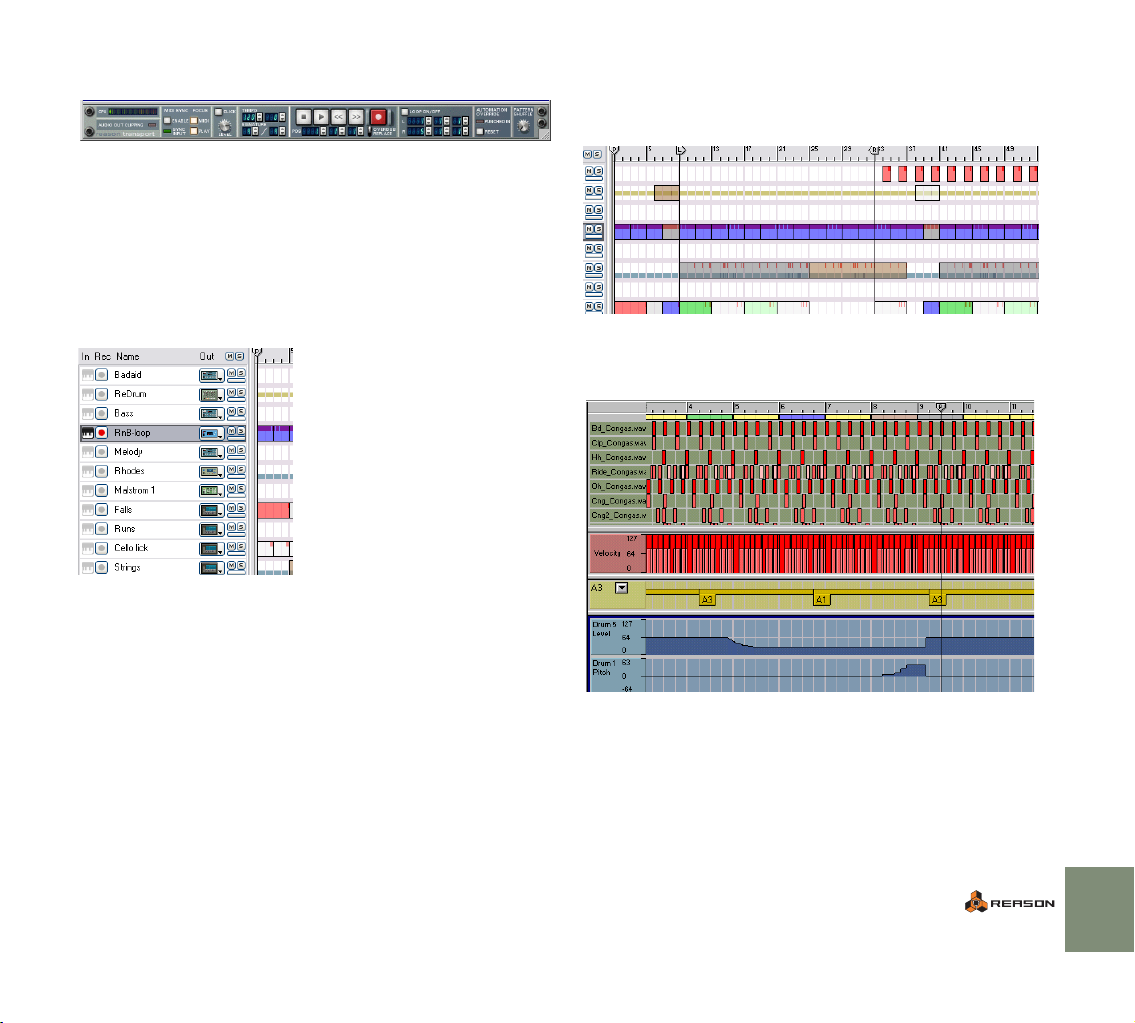
The Transport Panel
The panel at the bottom of each song document window is called the transport
panel. It contains transport controls and settings that are global for the song,
such as tempo and time signature, shuffle amount, CPU load indicator, etc.
The Sequencer
The sequencer is located in the area below the rack. This is where you record
and edit notes, controllers, device parameter automation and pattern changes.
The left part of the sequencer area is the track list, showing the names of the sequencer tracks. The columns in the track list allow you to connect tracks to devices, route MIDI and mute or solo tracks.
The track list.
The right part of the sequencer area has two main modes, the arrange view and
the edit view.
When the arrange view is selected, you will see the tracks lined up vertically,
with the recorded events indicated as colored bars (red for notes, yellow for pattern changes and blue for controllers). A ruler at the top of the view shows the
meter positions.
The sequencer with the arrange view selected.
When the edit view is selected, the right part of the sequencer area will contain
one or several lanes, showing the recorded data in detail. There are specific
lanes for editing notes, pattern changes, controller data, etc.
The edit view, with the drum lane, velocity lane, pattern lane and two controller lanes visible.
QUICK TUTORIAL
27
Page 30
The Devices
The following devices are available in Reason:
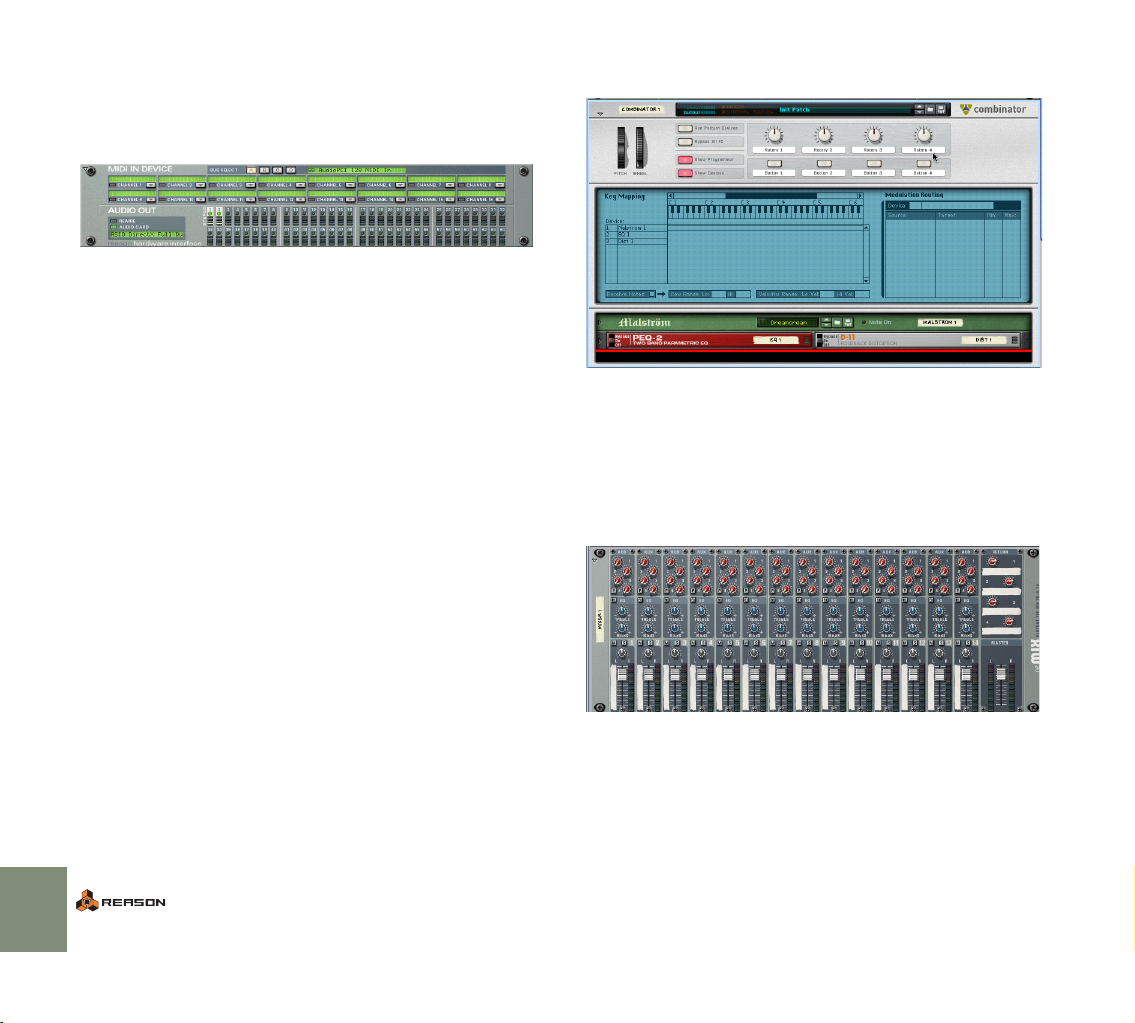
Reason Hardware Interface
This device handles Reason’s communication with your hardware.
The upper half of the hardware interface contains settings for MIDI input, allowing you to select a separate MIDI channel for each device when controlling Reason from an external multi-channel MIDI source.
! For standard MIDI control of one device at a time in Reason, you
don’t need to use the hardware interface (since the MIDI signals are
routed through the sequencer, as described in the tutorials earlier
in this chapter).
The lower half of the hardware interface contains audio output indicators with
level meters. This is where you connect different devices to different outputs on
your audio hardware. Reason supports up to 64 separate audio outputs. However, if you are only using audio hardware with standard stereo outputs, the connections to the audio hardware are automatically taken care of when you create
a mixer device at the top of the rack.
! The Reason Hardware Interface is “riveted” into the rack, and can-
not be removed.
Combinator
The Combinator allows you to create new “custom” devices by combining existing devices. Any combination of Reason devices can be added to the Combinator and then saved as a “Combi” patch. Example usage includes creating
layered instruments, instrument/effect combinations and effect chains. Devices
in a Combi can be mapped to velocity/key zones and the Combinator also features virtual knobs and buttons that can be assigned to any device parameter or
function.
Mixer 14:2
28
This is a mixer with fourteen stereo channels, four stereo effect sends and a basic two-band EQ section. By connecting the different devices to different mixer
channels (and the stereo output of the mixer to the hardware interface) you can
listen to all your devices at the same time, adjust levels and pan, add effects and
so on - just like on a physical mixer.
QUICK TUTORIAL
Page 31
Line Mixer 6:2
This is a simple mixer with 6 stereo channels and one stereo effect send/return.
It can be used in situations where basic mixing facilities will suffice. Ideal for mixing device outputs within Combinator patches.
Subtractor Analog Synth
The Subtractor is a polyphonic synthesizer laid out much like an advanced analog synth. It features two oscillators, two filters and a host of modulation functions, allowing for everything from fat basses to swirling pads and screaming
lead sounds.
Malström Synth
NN-19 Digital Sampler
The NN-19 allows you to load samples (Wave, AIFF, SoundFonts or REX files)
and create multi-sample patches by mapping samples across the keyboard.
Once you have loaded one or several samples, you can modify the sound using
synth-type parameters such as a filter, envelopes and an LFO.
NN-XT Digital Sampler
The Malström is a polyphonic synthesizer featuring two oscillators, two modulators, two filters, a waveshaper and a large number of modulation and routing options. It is based on the concept of Graintable Synthesis and makes it possible
to produce amazingly abstract, sharp, distorted, undulating sounds.
The NN-XT - just like the above mentioned NN-19 - lets you load samples
(Wave, AIFF, SoundFonts or REX files) and map these across the keyboard to
create multi-sample patches. The sound can then be modified using synth-type
parameters; two LFOs, two envelopes and a filter.
QUICK TUTORIAL
29
Page 32

In addition, the NN-XT also allows you to create layered sounds, where two or
more samples can be played simultaneously. This is done by mapping different
samples across the same keyboard range. Another useful feature is the possibility to set up velocity switched key maps. This lets you control which samples in
a layered key map will actually sound depending on how hard or soft you play on
your MIDI keyboard.
Dr. Rex Loop Player
The Dr.Rex Loop Player plays REX files - audio files created in ReCycle, another
Propellerhead Software product. ReCycle is a program designed especially for
working with sampled loops. By “slicing” a loop and making separate samples of
each beat, ReCycle makes it possible to change the tempo of loops without affecting the pitch and to edit the loop as if it were built up of individual sounds.
After loading a REX file into the Dr. Rex Loop Player, you can play it back in virtually any tempo, make settings for individual slices, extract MIDI playback data
and process the loop with the built-in filter, LFO and envelopes. You can also
play the individual slices via MIDI or from the sequencer - each slice has a specific note number (C1 for the first slice, C#1 for the next and so on). A number
of REX files are included in the Reason Factory Sound Bank.
Redrum Drum Computer
The Redrum is a sample-based drum machine with ten drum sound channels.
You can load samples (Wave, AIFF, SoundFont files and REX slices) individually
for each channel, or open patches, which are complete drum kits (a number of
which are included in the Reason Factory Sound Bank). Each sound channel
has settings for pitch, level, velocity response, etc.
There is a built-in pattern sequencer, allowing you to create classic drum machine patterns, complete with shuffle and flam options. It is also possible to use
Redrum as a sound module, playing it live from an external MIDI controller or
from the main Reason sequencer. You may for example have the pattern sequencer play a basic drum pattern, and add fills and extras in the main sequencer. As with the Dr.Rex loop player, each drum sound has a specific note
number (C1 for drum sound 1, C#1 for drum sound 2 and so on).
MClass Mastering effects
30
MClass Mastering Suite Combi.
QUICK TUTORIAL
Page 33

The MClass Mastering effects consists of four high quality sound processors,
suitable for (but not in any way restricted to) use as mastering effects, i.e. to process the final mixed output from Reason. The MClass effects can selected as a
Combi (with all four effects chained), or as individual effects. The Factory Sound
Bank contains MClass Combi patches with settings optimized for various mastering and sound enhancement applications. The MClass series of effects consists of the following effects:
MClass Equalizer
This is a two-band fully parametric equalizer, with added high and low shelving
bands and a low cut (rumble) filter. In addition there is a curve display giving
graphic feedback of your settings.
MClass Stereo Imager
This device splits the signal in low and high frequencies (user definable), allowing you to adjust the stereo width independently for the low and high bands. A
typical application is to make the high band wider, and the low band more narrow (mono).
MClass Compressor
This is a single-band compressor with features such as sidechain input, “soft
knee” compression, and adaptive release. It also differs from the COMP-01 in
that it doesn’t have automatic make-up gain, allowing for other applications than
simply keeping the level even.
MClass Maximizer
BV512 Vocoder
The BV512 is an advanced vocoder device with a variable number of filter bands
and a unique 1024-point FFT vocoding mode (equivalent of 512-band vocoding) for very precise and high quality vocoded speech. By connecting the
BV512 to two instrument devices, you can produce anything from vocoded
speech, singing or drums to weird special effects.
Scream 4 Sound Destruction Unit
This is an extremely versatile sound destruction device, featuring various kinds of
distortion, signal warping and transformation effects. There are three main sections: “Damage” (where you select a sound mangling algorithm and make settings), “Cut” (a three band EQ) and “Body” (a resonant body or cabinet
simulator, excellent for making the sound come alive).
RV7000 Advanced Reverb
The RV7000 is a high quality reverb processor with nine different reverb and
echo algorithms, ranging from rooms and halls to special effects. The RV7000
also contains an equalizer and a gate section, making it possible to get virtually
any kind of reverb character, including gated reverb.
This is a loudness maximizer, allowing you to significantly raise the perceived
loudness without risking clipping distortion. It consists of an input gain section, a
limiter section (with a “look ahead” function), a soft clip section and a level
meter.
QUICK TUTORIAL
31
Page 34

RV-7 Digital Reverb
CF-101 Chorus/Flanger
This is a reverb effect with ten different reverb algorithms, ranging from hall and
room simulations to special effects. You can fine-tune the effect with the knobs
on the device panel if you like. The reverb is normally used as a send effect.
DDL Digital Delay Line
This is a basic digital delay, useful for echoes, slapback, doubling, etc. The delay
time can be set in steps based on and synchronized to the current song tempo,
or in milliseconds for free-running delays. The maximum delay time is 2.0 seconds.
D-11 Foldback Distortion
The D-11 is a simple but highly effective distortion device, that can convert mellow synth sounds to screaming leads and basses, add grit and dirt to drum patterns or loops, etc.
ECF-42 Envelope Controlled Filter
This is a synth-style resonant filter with three different filter modes. You can either use it as a “static” filter (and vary the filter frequency on the device panel, or
via Control Voltage from another device) or use the built-in envelope to create
rhythmic filter effects of various kinds. The envelope can for example be triggered by a drum machine or the Matrix pattern sequencer.
The CF-101 does double duty as chorus (for making textures rich and swirly)
and flanger (for creating sweeping, metallic effects). You can use it as a send effect or as an insert effect (connected between an instrument device and a
mixer).
PH-90 Phaser
The PH-90 is a stereo phaser effect. It has six parameters available on the device panel, allowing you to create both subtle sweeping sounds and extreme,
swirling special effects.
UN-16 Unison
The UN-16 simulates the sound of several detuned voices playing the same
notes simultaneously, producing a rich chorus-like effect with the voices spread
across the stereo field if you like.
COMP-01 Compressor
This is a combined compressor and limiter. It will affect the dynamics of the
sound, by boosting low levels and attenuating loud sounds. Use it for keeping
levels even (from individual devices or the whole mix), for adding punch and
power to drums, etc.
32
QUICK TUTORIAL
Page 35

PEQ2 Two Band Parametric EQ
While the mixer device has basic two-band EQ on each channel, sometimes you
may need some more precise control over the tone color. For this purpose, you
can use the PEQ2. This device contains two independent parametric equalizers,
with controls for frequency, gain and Q value.
Spider Audio Merger & Splitter
This is not an effect device, but a utility. With the Spider Audio you can merge
up to four audio input signals into one output, as well as split one audio input
signal into four outputs. This makes audio signal routing much more flexible and
allows for very creative patching and connections.
Spider CV Merger & Splitter
Again, this is not an effect device, but a utility. With the Spider CV you can
merge up to four CV input signals into one CV output, as well as split CV or
Gate inputs into several outputs (one of which can be inverted). One use for the
Spider CV is to split Gate and Note CV to control several instrument devices
with one Matrix.
The Matrix Pattern Sequencer
The Matrix is a stand-alone pattern sequencer, somewhat similar to a vintage analog sequencer. A Matrix pattern can have between 1 and 32 steps, and for
each step you can specify which control voltage levels should be sent out from
the three separate CV outputs on the back of the device. If you like, you could
view this as having three separate pattern sequencers in one.
By connecting the Matrix to e.g. a synth device, you can have the pattern sequencer play the device (for a repeating synth pattern), or control various parameters, for rhythmic effects that you cannot obtain using the synth device alone.
ReBirth Input Machine
This device allows you to use Reason in conjunction with Propellerheads’ classic ReBirth application. The audio from ReBirth will be “streamed” via the ReWire protocol into Reason. By routing the different outputs on the ReBirth Input
Machine to different mixer channels, you can mix the sound of ReBirth with the
sound of Reason, add effects to separate ReBirth sounds, etc.
QUICK TUTORIAL
33
Page 36

34
QUICK TUTORIAL
Page 37

4
D Common Operations and Concepts
Page 38

About this Chapter
Making Settings
This chapter describes some general methods and techniques employed
throughout Reason. It also contains some terminology, useful for better understanding of the program and the manual. To make your work with Reason as effective and rewarding as possible, we recommend that you read this chapter.
Conventions in the Manual
This manual describes both the Macintosh version and the Windows version of
Reason. Wherever the versions differ, this is clearly stated in the text.
About Key Commands
In the manual, computer key commands are indicated by brackets. For example,
“press [Shift]-[C]” would mean “hold down the [Shift] key and press the [C]
key”. However, some modifier keys are different on Mac and PC computers, respectively. Whenever this is the case, the manual separates the commands with
“(Mac)” and “(Windows)” indications.
Since a large part of Reason is laid out like a “real” effect and synth rack, almost
all parameters are designed like their real world counterparts - mixer faders,
synth knobs, transport buttons, etc. How to make adjustments to these is described separately for each type of parameter below:
Knobs
To “turn” a knob, point at it, click the mouse button and drag up or down (as if
the knob was a vertical slider). Dragging upwards turns the knob to the right and
vice versa.
D If you press [Shift] and drag, the knob will turn slower, allowing for
higher precision.
You can also adjust the knob precision with the “Mouse Knob Range” setting on the General page in the Preferences dialog. This dialog is opened
from the Edit menu (or from the Reason menu if you are running Mac OS X).
D To reset a knob to its default value (usually zero, center pan or sim-
ilar), press [Command] (Mac) or [Ctrl] (Win) and click on it.
36
COMMON OPERATIONS AND CONCEPTS
Page 39

Sliders
To move a slider, click on the slider handle and drag up or down.
D You can also click anywhere on the slider to instantly move the han-
dle to that position.
D If you press [Shift] and drag, the slider will move slower, allowing
for higher precision.
Multi Mode Selectors
Some parameters allow you to select one of several modes. There are two different graphical representations of this in Reason:
This type of multi mode selector consists of a button with the different modes listed above.
You can either click the button to step through the modes or click directly on one of the
modes to select it. The currently selected mode is indicated by a lit LED.
Buttons
Many modes and functions are controlled by clicking buttons. Most of the buttons in Reason have a “built-in” LED, indicating whether the button is pressed or
not.
Numerical Values
In Reason, numerical values are displayed in alphanumeric readouts with “spin
controls” (up/down arrow buttons) on the side. There are two ways to change
numerical values:
D By using the up and down buttons on the spin controls.
To adjust a value in single steps, click on its up or down arrow button. To
scroll a value continuously, click on an arrow button and keep the mouse
button pressed.
D By clicking in the actual alphanumeric display and dragging up or
down with the mouse button pressed.
This allows you to make coarse adjustments very quickly.
This type of multi mode selector is a switch with more than two settings. To change mode,
click and drag the switch, or click directly at the desired switch position (just as when
adjusting a slider).
✪ This type of control is also used for some parameters that are not
purely “numerical” (e.g. reverb algorithms and synth oscillator
waveforms).
The position values on the transport panel can also be edited by double clicking
and typing a new position.
COMMON OPERATIONS AND CONCEPTS
37
Page 40

Tool Tips
If you position the pointer over a parameter on a device panel and wait a moment, a tool tip will appear. This displays the name of the parameter and its current value. This helps you fine-tune settings, set several parameters to the same
value, etc.
✪ You can turn off these tool tips by deactivating the option Show Pa-
rameter Value Tool Tip on the Preferences-General page.
Context menus
Context menus are “tailored” to contain the relevant menu items only, allowing
you to work quicker and more efficiently with Reason.
D To bring up a context menu, click with the right mouse button (Win-
dows) or press [Ctrl] and click (Mac).
If you are using a Macintosh with a two button mouse, you may want to set
this up so that clicking the right mouse button generates a [Ctrl]-click. This
way, you can right-click to bring up context menus.
Device Context Menus
If you click somewhere on a device in the rack (but not on a control), the context
menu will contain the following items:
• Cut, Copy, Paste and Delete Device items, allowing you to rearrange and
manage the devices in the rack.
•A Go To submenu, listing all devices connected to the current device. Selecting a device from the Go To submenu scrolls the rack to bring that device into view.
•A duplicate of the Create menu, allowing you to create new devices.
• If the device is pattern-based, there will be various pattern functions (Cut/
Copy/Paste, Clear, Shift, Randomize, etc). These affect the currently selected pattern in the device.
• If the device uses Patches, there will be functions for managing Patches.
• Depending on the device there may also be various device-specific functions available. For example, the drum machine device has functions for manipulating the pattern for the selected drum sound only, etc.
Parameter Context Menus
If you click on an automatable control (a synth parameter knob, a fader, etc), the
context menu will contain the following items:
• Functions for clearing and editing the recorded automation data for the control.
• Functions for associating computer keyboard commands and/or MIDI messages to the parameter (allowing you to remote control parameters from a
MIDI device or the computer keyboard).
“Empty Rack” Context Menus
If you click in an empty section of the rack, the context menu will contain the following items:
•A Paste Device item, allowing you to paste any copied or cut devices into
the rack.
•A duplicate of the Create menu, allowing you to create new devices.
38
The Dr. REX context menu.
The contents of the context menu depends on where you click. Basically, the following different context menu types are available:
COMMON OPERATIONS AND CONCEPTS
Sequencer Context Menus
If you click in the sequencer, the context menu will contain items related to editing Tracks, Groups and Events. The available items will differ depending on in
which area or lane you click (Track list, Key Edit lane, etc.), and depending on
whether you click on an event or not. For example, the sequencer context menus
contain functions for inserting or removing bars, adding tracks, and grouping,
changing or deleting events. See the Operation Manual pdf for details.
Page 41
Undo
Virtually all actions in Reason can be undone. This includes creation, deletion
and reordering of devices in the Rack, parameter value adjustments, editing in
the sequencer and tempo/time signature adjustments. You can undo up to 10
actions.
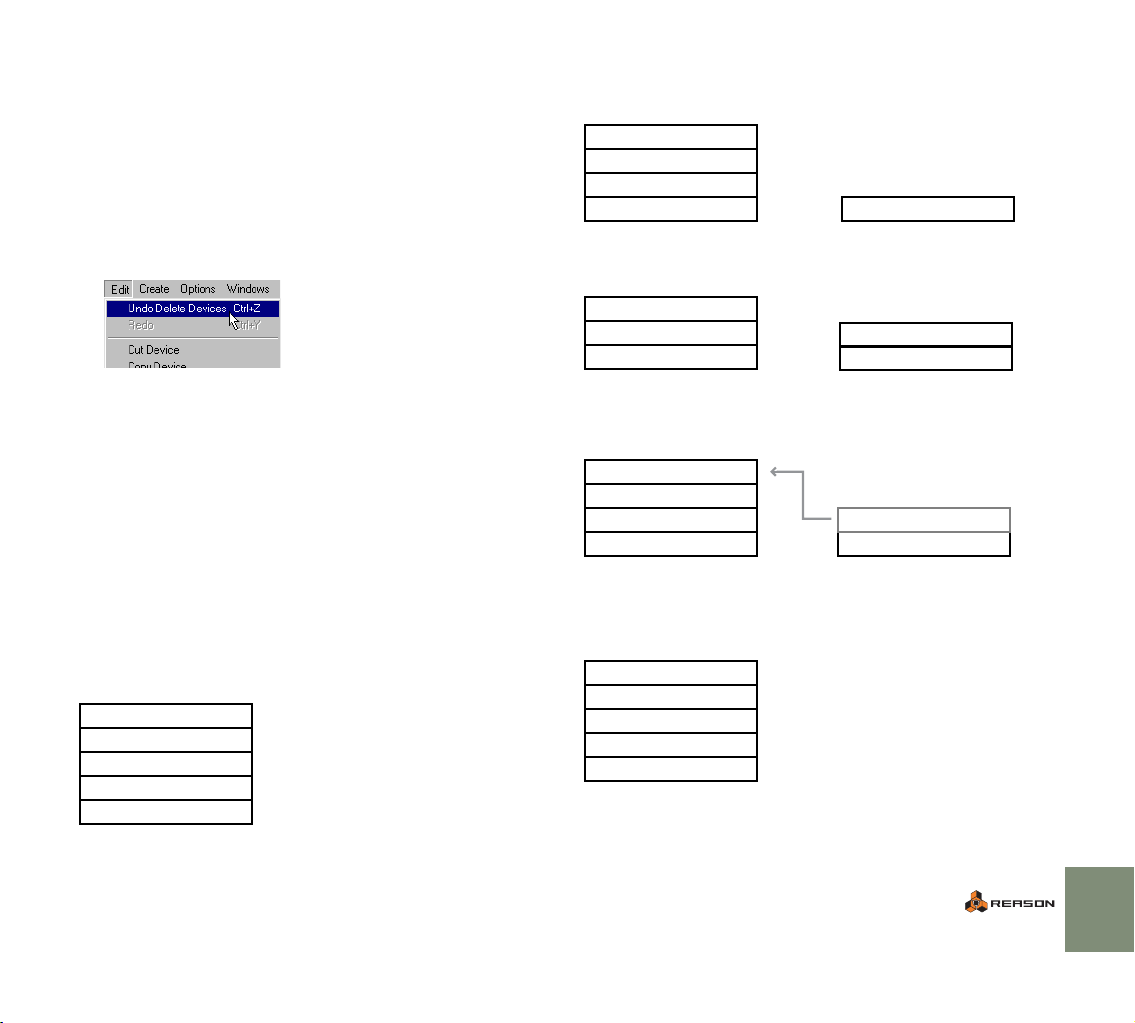
D To undo the latest action, select “Undo” from the Edit menu or
press [Command]/[Ctrl]-[Z].
The action to be undone is indicated next to the Undo command on the Edit
menu. For example, if your latest action was to delete some device(s) from
the Rack, the Edit menu will say “Undo Delete Devices”.
D To redo the last undone action (“undo the undo operation”), select
“Redo” from the Edit menu or press [Command]/[Ctrl]-[Y].
Similarly, the action to be redone is shown on the Edit menu.
About Multiple Undos
The concept of multiple undos may require an explanation: You can undo up to
10 actions, or in other words, Reason has an Undo History with up to ten steps.
Let’s say you have performed the following actions:
1. Created a mixer.
2. Created a synth device.
3. Adjusted the Amp Envelope Attack time on the synth.
4. Changed the panning for the synth device in the mixer.
5. Adjusted the playback tempo in the transport panel.
After these five actions, the Undo History will look as follows:
UNDO
5. Adjust tempo
4. Change pan
3. Adjust Attack
2. Create Synth Device
1. Create Mixer Device
If you now select Undo, your latest action (the tempo change) will be undone,
and moved to a “Redo list”:
UNDO
4. Change pan
3. Adjust Attack
2. Create Synth Device
1. Create Mixer Device
REDO
5. Adjust tempo
Selecting Undo again undoes the next action in the list (the panning adjustment):
UNDO
3. Adjust Attack
2. Create Synth Device
1. Create Mixer Device
REDO
4. Change pan
5. Adjust tempo
If you now select Redo, the last undone action will be redone. In this case, your
panning adjustment will be performed again (and added to the Undo History
again):
UNDO
4. Change pan
3. Adjust Attack
2. Create Synth Device
1. Create Mixer Device
REDO
4. Change pan
5. Adjust tempo
At this point, you still have the option to Redo the tempo change. But if you instead would perform another action (e.g. change the level of the synth device in
the mixer), this would become the action at the top of the Undo History - and the
Redo list would be cleared.
UNDO REDO
5. Change level
4. Change pan
3. Adjust Attack
2. Create Synth Device
1. Create Mixer Device
(empty)
Now you can no longer redo the undone tempo change!
COMMON OPERATIONS AND CONCEPTS
39
Page 42
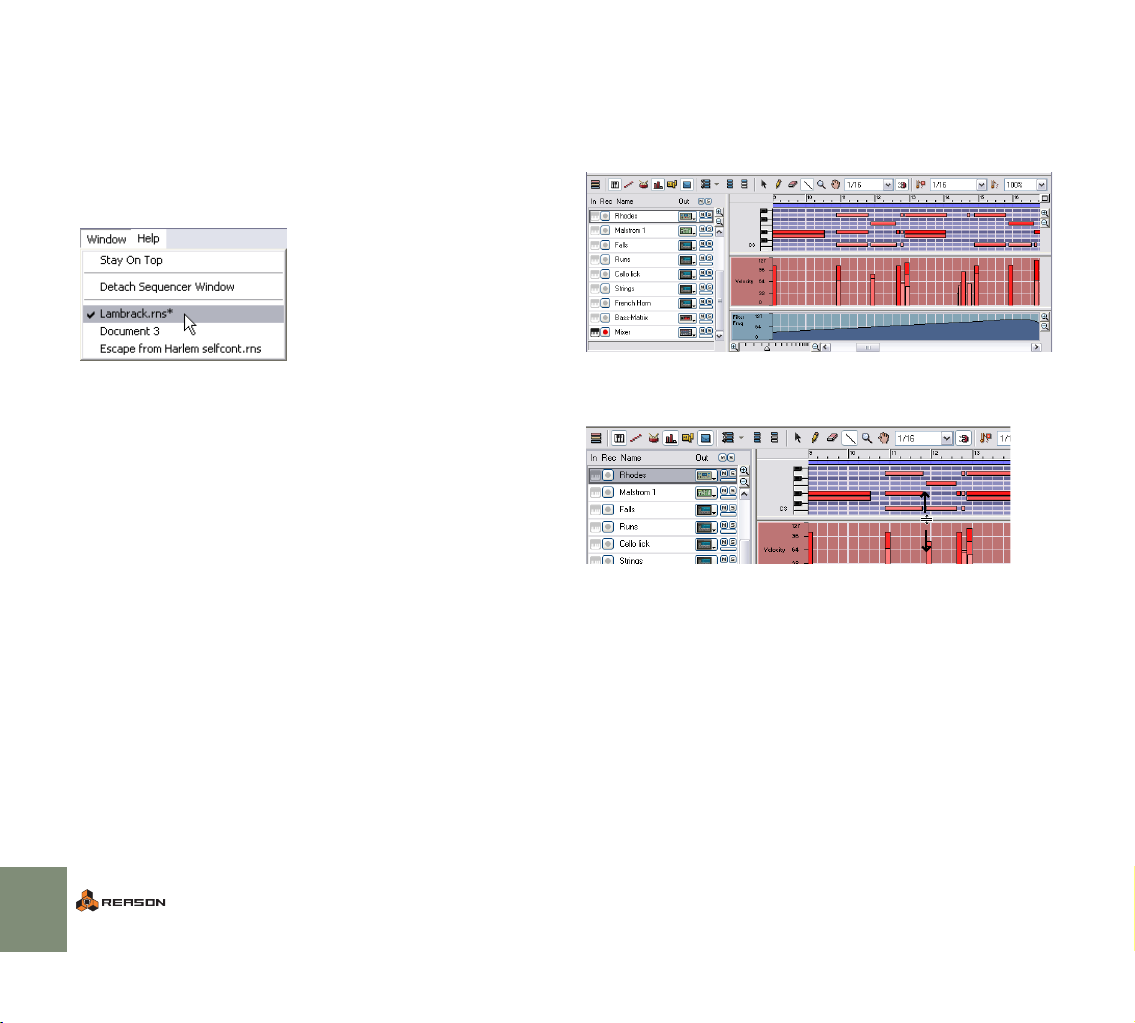
Window Techniques
Using more than one Reason Song window
You can have several Reason Songs open at the same time. Each will appear in
a separate Reason window, complete with rack, sequencer and transport bar areas. Each window can be moved, minimized and resized using standard Mac/
Windows procedures.
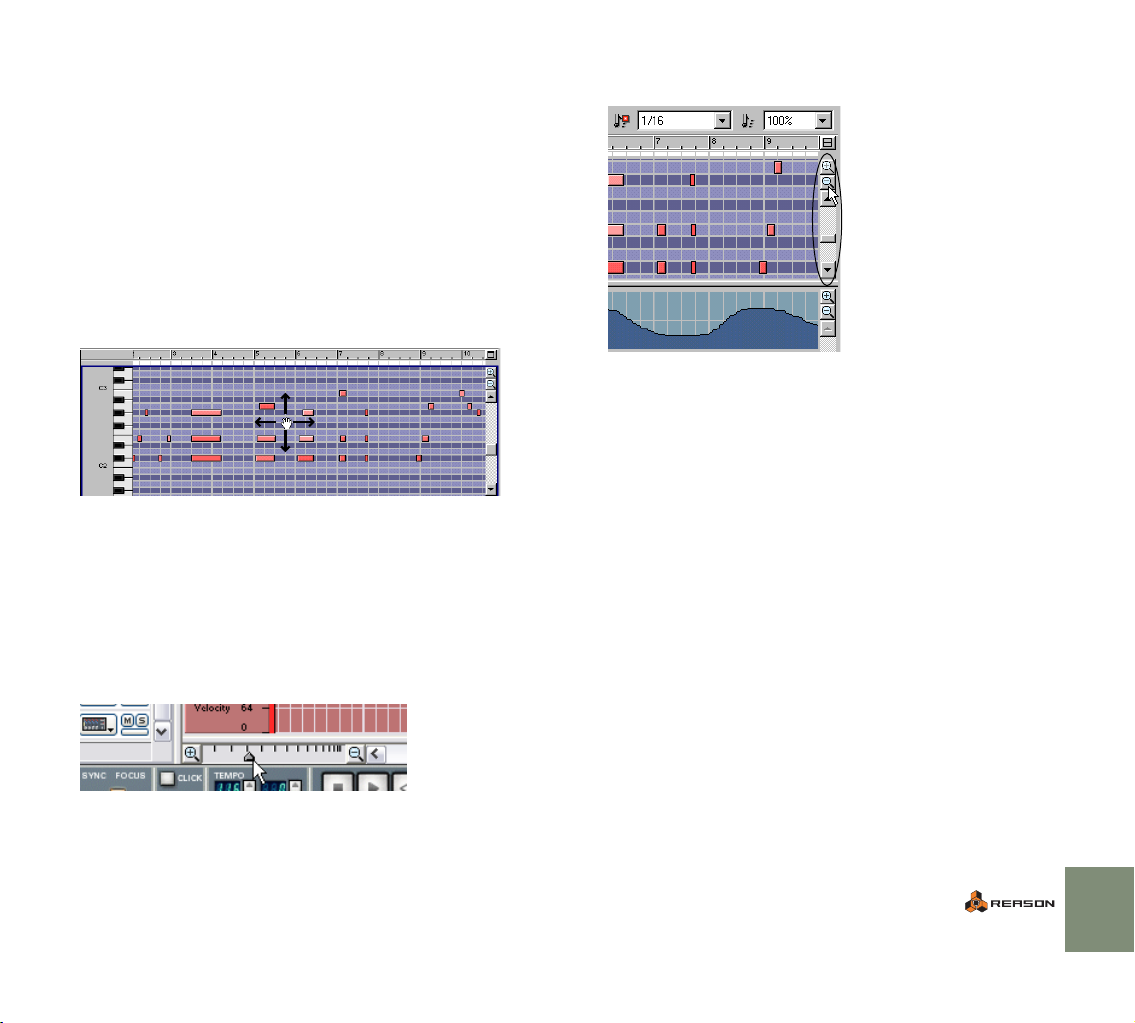
Views, Panes and Dividers
On screen, Reason is divided into different areas or “panes”. The most obvious
example is the rack and the sequencer area, but you will also find that the right
part of the sequencer area can be divided into several horizontal lanes (for editing different aspects of your recordings).
The borders between the lanes are called dividers. You can adjust the height of
the lanes by clicking on their divider and dragging up or down. Enlarging the upper lane will shrink the lower and vice versa.
Detaching the sequencer
You can detach the sequencer pane and turn it into a separate window. This allows you to make the sequencer wider than the rack and use the width of the
computer screen more effectively. See page 60.
40
COMMON OPERATIONS AND CONCEPTS
Page 43
Scrolling and Zooming
Reason offers a few different options for scrolling and zooming in the rack and
the sequencer.
Scrolling with the scrollbars
Whenever there is information “outside the screen”, horizontal and/or vertical
scrollbars will appear. For example, if there are more devices in the rack than can
be shown at one time, you will be able to scroll the rack up or down by using the
vertical scrollbar to the right of the rack.
Scrolling with the Hand tool
In the sequencer, you can also use the Hand tool for scrolling the view. Just select the Hand tool and click in a lane, keep the mouse button pressed and drag
in the desired direction.
Scrolling the Key edit lane with the Hand tool.
✪ You can scroll in any direction as long as the lane allows it (the Ve-
locity lane for example is only possible to scroll horizontally). By
holding down [Shift] while you drag however, you can limit the
scrolling direction to horizontal or vertical only.
Zooming with the magnification sliders
Some areas also allow you to zoom in or out using magnification controls. Either
click the “+” or “–” magnification icon to zoom in or out respectively, or click and
drag the magnification slider.
D Where applicable, different panes can be scrolled and zoomed indi-
vidually.
In the sequencer, there are separate view controls for the Key edit lane and the
Controller lane.
Zooming with the Magnifying Glass tool
Another way of zooming in the sequencer is to use the Magnifying Glass tool.
This tool lets you zoom in and out both horizontally and vertically just like the
magnification sliders do. However, the Magnifying Glass tool offers a few more
possibilities.
The following applies:
D By clicking once in a lane with the Magnifying Glass, you zoom in by
the same amount as when clicking the “+” icon on the magnification slider twice.
D To zoom out with the Magnifying Glass, click while keeping [Op-
tion] (Mac)/[Ctrl] (Windows) pressed.
You’ll notice that the “+” sign in the Magnifying Glass tool changes to a “-”
sign.
D If the lane has a vertical magnification slider as well, clicking with
the Magnifying Glass will also zoom in/out vertically by the same
amount as when clicking the“+” and ”-” icons on the magnification
slider once.
By holding down [Shift] when clicking, you disable vertical zooming.
COMMON OPERATIONS AND CONCEPTS
41
Page 44

D You can also click and drag with the Magnifying Glass to create a
selection rectangle.
The view will then be zoomed in so that the selected area fills the lane.
Enclosing these notes in a selection rectangle...
...will zoom in so that they fill the view.
Scrolling and zooming with the mouse wheel
If you’re using a mouse equipped with a scroll wheel, this can be used for the following scrolling and zooming operations:
D Scrolling up and down in both the rack and in the sequencer.
D By simultaneously holding down [Shift] you can scroll left and right
in the sequencer.
D By holding down [Command] (Mac)/[Ctrl] (Windows), you can zoom
in and out vertically in the sequencer.
D By holding down [Shift]-[Command] (Mac)/[Shift]-[Ctrl] (Windows),
you can zoom in and out horizontally in the sequencer.
42
COMMON OPERATIONS AND CONCEPTS
Page 45

5
D Audio Basics
Page 46

About this chapter
This chapter contains some useful information about how audio is handled by
Reason. Some of it may seem a bit technical, but we recommend that you read
it, to get the most out of Reason.
However, the number of outputs available depends on the number of outputs on
your audio hardware. For example, if you are using a standard sound card with
stereo outputs (or the built-in audio hardware on the Mac), only the first two outputs will be available. In the Hardware Interface device, the green indicators are
lit for all currently available outputs.
How Reason communicates with your audio hardware
Reason generates and plays back digital audio - a stream of numerical values in
the form of ones and zeroes. For you to be able to hear anything, this must be
converted to analog audio and sent to some kind of listening equipment (a set of
speakers, headphones, etc.). This conversion is most often handled by the audio
card installed in your computer (on the Macintosh you can use the built-in audio
hardware if you don’t have additional audio hardware installed).
To deliver the digital audio to the audio hardware, Reason uses the driver you
have selected in the Preferences dialog (see page 13). In the rack on screen,
this connection is represented by the Reason Hardware Interface.
The Hardware Interface is always located at the top of the rack.
! If you are using ReWire, Reason will instead feed the digital audio
to the ReWire master application (typically an audio sequencer program), which in turn handles the communication with the audio
hardware. This is described in the Operation Manual pdf.
The Reason Hardware Interface contains 64 output “sockets”, each with an indicator and a level meter. Each one of these indicators represents a connection to
an output on your audio hardware (or a ReWire channel to another application if
you are using ReWire - see the Operation Manual pdf).
In this case, a standard stereo audio card is used, and only the first two outputs (marked
“Stereo” on the device panel) are available.
Here, an audio card with eight outputs is used.
To send the sound of a device in the rack to a specific output, you route the device output to the corresponding “socket” on the Hardware Interface. This is
done by using the “virtual patch cables” on the back of the rack, as described on
page 51. In most cases, you will want to connect a mixer device to the Stereo
outputs (outputs 1 and 2).
44
AUDIO BASICS
Page 47

About Sample Rates and Resolutions
Sample rate and resolution are properties of digital audio, which determine the
quality of the sound. Generally, higher sample rate and resolution result in better
audio quality (but also larger audio files and higher demands on computer performance and audio hardware). This table shows some common sample rate/
resolution combinations:
Sample rate:|Resolution:|Comment:
|
22.05 kHz 8 bit Typically used in situations where small file
44.1 kHz 16 bit This is the format used on audio CDs (often
44.1 kHz –
96 kHz
To cater for all different situations, Reason supports multiple sample rates and
resolutions. This applies to the following areas:
24 bit These are formats used in professional studios
Playing back
Reason handles all internal audio processing in 32-bit floating point resolution.
However, the resolution of the output audio is determined by the audio hardware. That is, if you have a 24-bit audio card, Reason will create audio in 24-bit
resolution, and if you have a 16-bit audio card, audio will be in 16-bit resolution.
The playback sample rate can be specified in the Preferences-Audio dialog (accessed from the Reason menu or Edit menu depending on whether you are running Mac OS X or not):
size is more important than audio quality, such
as games, some multimedia applications,
sound files on the Internet, etc.
called “CD Quality audio”).
and high-end recording equipment.
About using high resolution audio
Reason has the capability to play back samples with practically any resolution.
This means that if for instance 24-bit samples are loaded in a sampler or the Redrum, playback of the samples can be in 24-bit resolution as well. If you are using such samples and want Reason to play them back in their original high
resolution, proceed as follows:
1. Open the Preferences from the Edit menu or Reason menu, and select the General page.
2. Under “Miscellaneous” at the bottom of the page, make sure the
option “Use High Resolution Samples” is checked.
If this is activated, and if your audio card supports it, Reason will play back high
resolution samples in their original resolution. If this option is not activated, Reason will play back all samples in 16-bit resolution, regardless of their original resolution.
Exporting audio
Reason can export audio, i.e. mix down the song or a section of the song as an
audio file (see page 106 for details). When you do this, you will be asked to
specify a resolution (16 or 24 bit) and sample rate (11–96 kHz) for the file.
✪ If you plan to open the exported file in another application, you
should select a format that is supported by the application. If you’re
uncertain, 16 bit/44.1 kHz is a safe bet.
Importing audio
When loading samples or ReCycle files into the samplers, the drum machine device or the loop player, Reason supports files of a large number of sample rates
and resolutions. You can use files of different formats in the same device - one
drum sound can be an 8-bit sample, the next a 16-bit sample, etc.
Note that the available options on this pop-up menu depend on which sample
rates are supported by the audio hardware. Most standard sound cards support
44.1 kHz and various lower sample rates, in which case you should select 44.1
kHz for best audio quality.
AUDIO BASICS
45
Page 48
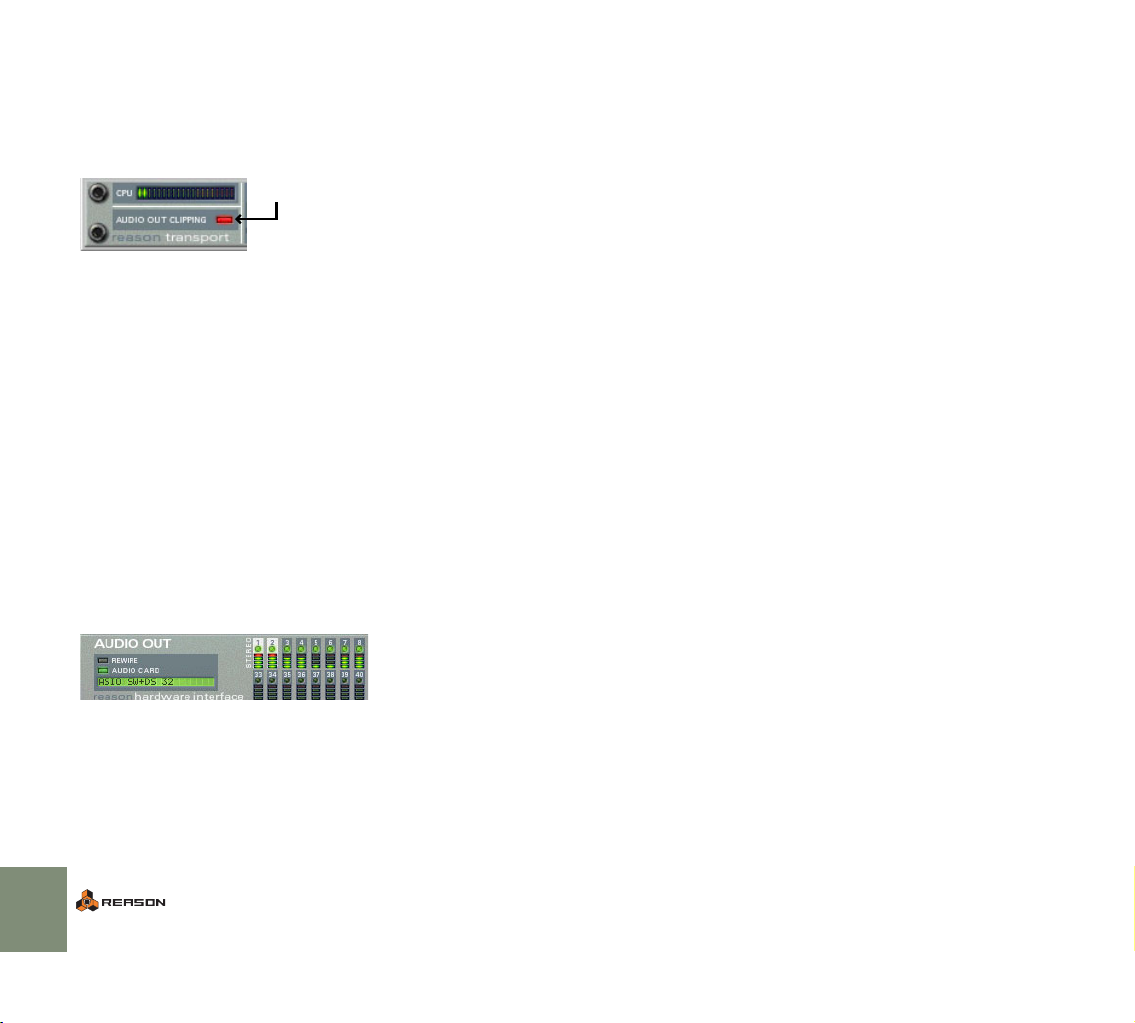
About Audio Levels
Master Tune
When playing back in Reason, you should keep an eye on the Audio Out Clipping indicator on the transport panel. If this lights up, the audio level is too high,
resulting in clipping (digital distortion).
The indicator will stay lit for a short
moment, to make it easier to spot.
D To remedy this, lower the master level on the mixer (or other device)
that is connected to the Hardware Interface, until Audio Out Clipping doesn’t light up on playback.
You could also use the MClass Maximizer to ensure that clipping never occurs - this is described in the Operation Manual pdf.
! Note that it doesn’t matter if the level meters on the individual de-
vices (effects, mixer channels, etc) “hit the red”. Clipping can only
occur in the Hardware Interface.
The technical reason for this is that internally, Reason uses high resolution floating point processing, which ensures high audio quality and virtually limitless
headroom. In the Audio Hardware device, the floating point audio is converted to
the resolution used by the audio hardware, and that’s where clipping may occur.
If you are using multiple outputs
If you are using audio hardware with more than two outputs, you may have different devices connected to different outputs in the Hardware Interface. If the Audio Out Clipping indicator lights up, you should play back the section again
while checking the Hardware Interface. Each output socket has a level meter - if
the red meter segment lights up, the output is clipping. Lower the output level of
the device connected to the clipping output, until no clipping occurs.
By default, Reason plays back a “middle A” at 440 Hz, which is the standard
tuning in most instruments. However, if you are playing Reason together with
other instruments, you may want to adjust the tuning:
1. Pull down the Edit menu (or Reason menu, under Mac OS X) and
select Preferences...
2. Use the pop-up menu at the top of the Preferences dialog to select
the Audio page.
3. Adjust the global tuning with the Master Tune control.
If you like, you can adjust this during playback. Note that this affects the tuning of all sound sources in Reason, including the drum machine and loop
player.
46
Clipping on the stereo outputs.
If you are using ReWire
If you are streaming audio to another application using the ReWire protocol,
clipping can not happen in Reason. This is because the conversion from floating
point audio happens in the other audio application. See the Operation Manual
pdf for more information about ReWire.
AUDIO BASICS
Page 49

6
D Managing the Rack
Page 50

About this Chapter
Creating Devices
As you have seen by now, the central part of Reason is the rack. This is where
you create and configure your devices, and make parameter settings. This chapter describes all the procedures for managing the rack, that is, procedures and
techniques common to all devices. Device parameter specifics are described in
the Operation Manual pdf.
Navigating in the Rack
If the rack contains more than a few devices, the whole rack will probably not
“fit” on screen. To scroll the rack up or down, use one of the following methods:
D Use the scrollbar to the right of the rack to scroll continuously up or
down.
D If you’re using a mouse equipped with a scroll wheel, you can use it
to scroll up or down.
D Use the Page Up/Page Down buttons on the computer keyboard to
move the view one “full screen” up or down.
D Use the Home or End buttons on the computer keyboard to scroll
the top or bottom of the rack.
D Pull down a device context menu and select another device from
the Go To submenu.
The rack scrolls to the device you select.
✪ When you select a device or its sequencer track (see page 61), Rea-
son will automatically scroll the rack to make the device visible.
Note that you can enlarge the rack area by clicking its lower edge (the divider
between the rack and the sequencer area) and dragging downwards. This will
shrink the sequencer area and make more of the rack visible (alternatively, you
can detach the sequencer from the rack altogether. This is described on page
60). You can also make the rack fill the window by clicking the maximize button
above the scrollbar to the right.
The rack maximize button.
To create a new device, select the desired item on the Create menu. This menu
is available both on the main menu bar and on the context menus (see page 38
for an introduction to context menus).
The Create menu on the main
menu bar and on a context
menu.
D The new device is added directly below the currently selected de-
vice in the rack.
If no device is selected, the new device is added at the bottom of the rack.
D When you add a new device, Reason attempts to route it in a logical
way.
For an introduction to the auto-routing features, see page 51.
D A new track will automatically be created in the sequencer, and
routed to the new device.
The track will have the same name as the device. MIDI input will also automatically be set to the new track, allowing you to immediately play the created device via MIDI (see page 54).
D By default, this only applies to instrument devices, not to mixers or
effect devices.
If you hold down [Option] (Mac) or [Alt] (Windows) when you create the device, the opposite is true, i.e. mixers and effect devices get new tracks but instrument devices don’t.
✪ You can also create devices by browsing patches - see page 72.
48
MANAGING THE RACK
Page 51

Selecting Devices
Deleting Devices
Some operations (e.g. cutting, copying and deleting devices) require that you
select one or several devices in the rack. This is done according to the following
rules:
D To select a single device, click on it in the rack.
The selected device is displayed with a colored border (based on the color
scheme selected for your operating system).
D To select several devices, hold down [Shift] and click.
In other words, [Shift]-clicking a device selects it without de-selecting any
other selected devices.
D To de-select all devices, click in the empty space at the bottom of
the rack.
D To de-select one of the selected devices, hold down [Shift] and click
on it.
Any other selected devices remain selected.
D You can also use the up and down arrow keys on the computer key-
board to select the device directly above or below the currently selected one.
When you use this method, Reason will automatically scroll the rack so that
the selected device is fully visible. This is a quick way to “step through” the
rack. Narrow devices (e.g. half-width devices such as the effects) are ordered left-to-right, i.e. pressing the down arrow key will step through the devices from left to right before moving on the next device row.
D If you hold down [Shift] when using the up or down arrow keys, the
currently selected device will remain selected.
This allows you to select a range of devices.
Adjusting a parameter in a device will automatically select it. In other words, you
never have to select a device before making settings.
To delete one or several devices, select them and use one of the following methods:
D Hold down [Command] (Mac) or [Ctrl] (Windows) and press [Back-
space] or [Delete].
D Select “Delete Device” from the Edit menu or the device context
menu.
You can also automatically delete devices when you delete sequencer tracks: If
there is a single sequencer track routed to a device, and you delete this track,
you will be asked whether you want to delete the device as well (see page 63).
! If you delete a device connected between two other devices, the
connection between these is automatically preserved.
! The Hardware Interface device at the top of the rack cannot be re-
moved.
Reordering Devices
You can rearrange the devices in the rack by moving them, in the following way:
1. If you want to move more than one device at the same time, select
the devices.
2. Click in the “handle” area of one of the devices.
For full width devices, this is the area to the left and right of the panel (between the rack fittings); for smaller devices you can click anywhere outside
the actual parameters.
3. With the mouse button pressed, drag the device(s) up or down in
the rack.
A thick red vertical line indicates where the device(s) will be positioned.
Note that the red line can be to the left of a device (indicating that the moved
device will be inserted before the other device) or to the right of a device (indicating that the moved device will be inserted after the other device).
MANAGING THE RACK
49
Page 52

In this example an RV-7 reverb device is moved:
In this case, the red line indicates that the reverb device will be inserted to the left of the
phaser.
This is the result. Note that the filter device is moved to the left, to fill out the gap.
! Moving devices in the rack does not affect the order of the se-
quencer tracks and vice versa.
Duplicating Devices
To make a copy of a device in the rack, hold down [Option] (Mac) or [Ctrl] (Windows) and drag it to a new position.
D If you hold down [Shift] when you duplicate the device, Reason will
attempt to automatically route it, just as when you move devices.
See page 51.
Cut, Copy and Paste
50
In this case, the red line indicates that the reverb device will be inserted to the right of the
chorus/flanger.
This is the result. All three devices are moved to the left, to fill out the gap.
4. Release the mouse button.
The device(s) are moved to the new position and the other devices in the
rack are adjusted to fill up the “gaps”.
! Note that if you start to move a device but change your mind, you
can abort the operation by pressing [Esc] while keeping the mouse
button pressed.
D If you hold down [Shift] when you move a device, Reason will at-
tempt to automatically re-route it.
See page 51 for more info on auto-routing.
MANAGING THE RACK
Selected devices can be moved or duplicated using the Cut, Copy and Paste
Device functions on the Edit menu or device context menu. For example, this allows you to copy one or several devices (such as an instrument device and all its
insert effects) from one Reason Song to another. The following rules apply:
D Cut and Copy affects all selected devices, and work according to the
standard procedures.
That is, Cut moves the devices to the clipboard (removing them from the
rack) while Copy creates copies of the devices and puts these on the clipboard, without affecting the rack.
D When you Paste devices, these are inserted into the rack below the
currently selected device.
If no device is selected, the pasted devices will appear at the bottom of the
rack.
D If you Copy and Paste several devices, the connections between
these are preserved.
D If you hold down [Shift] when you Paste a device, Reason will at-
tempt to automatically route it.
The rules are the same as when moving or duplicating devices by dragging.
See page 51.
Page 53

A Quick Note on Routing
! This section only describes the basics in routing. For detailed de-
scriptions of routing procedures and possibilities, see the Operation Manual pdf.
Reason allows for extremely flexible routing of audio and control signals between the devices in the rack. Basically, routing can be done automatically or
manually:
Automatic Routing
Auto-routing means that Reason makes all basic audio connections for a device,
in one go. As mentioned on the previous pages, auto-routing is automatically
performed when you create a new device, and when you move, duplicate or
paste devices with [Shift] pressed.
✪ If applicable, auto-routing is automatically done in stereo.
Creating Mixers
D The first created mixer device will be routed to the Stereo inputs on
the Hardware Device.
See the Operation Manual pdf for details.
Routing a device to the Mixer
D When you create an instrument device (synth, sampler, drum ma-
chine or loop player) it is automatically routed to the first available
mixer channel.
This makes it immediately available for use.
Routing a Send Effect to the Mixer
D When you have a mixer selected and create an effect device, it will
be connected as a send effect (to the first free Aux Send/Return).
Examples of effects that lend themselves well for use as send effects are reverb, delay and chorus.
Routing an Insert Effect between the Hardware Interface and
another device
D If you select the Hardware Interface and then create an effect, the
effect will be connected as an insert effect between the Hardware
Interface and whatever device was connected to the Hardware Interface inputs (normally the outputs of a a Mixer device).
This is the intended way to connect the MClass Mastering Suite Combi, at
the very end of the signal chain.
Auto-routing Devices after they have been Created
Here follows some additional rules about auto-routing devices that are already in
the rack:
D To reroute a device already in the rack, you can select it and use
Disconnect Device and Auto-route Device, both on the Edit menu.
D If you delete a device connected between two devices, the connec-
tion between the two remaining devices is automatically preserved.
A typical example would be if you have an effect device, connected as an insert effect between a synth and a mixer. If you delete the effect, the synth will
be routed directly to the mixer.
D When you move a device, connections are not affected.
If you instead would like the program to re-route the device according to its
new location in the rack, hold down [Shift] when you move it.
D When you duplicate devices (by dragging) or use copy and paste,
the devices are not auto-routed at all.
If you would like them to be automatically routed, hold down [Shift] when you
perform the operation.
Routing an Effect directly to a device (Insert)
D When you have an instrument device selected and create an effect,
that effect will be connected as an insert effect. That is, the signal
from the device will pass through that effect and to the mixer.
Examples of effects that work well as inserts are distortion, compression and
phaser.
MANAGING THE RACK
51
Page 54

Manual Routing
Audio connectors
CV connectors
To connect devices manually, you need to flip the rack around to see the back.
This is done by pressing [Tab] or selecting “Toggle Rack Front/Rear” from the
Options menu.
On the back of each device you will find connectors of two different types: audio
and CV (Control Voltage, used for controlling parameters - see the Operation
Manual pdf). Audio inputs and outputs are shown as large “quarter inch” jacks,
while CV input and output jacks are smaller. For now, we stick to audio connections.
There are two ways to route audio from one device to another: by connecting
“virtual patch cables” between inputs and outputs, and by selecting connections
from a pop-up menu:
Using Cables
! For the cables to be visible, the option “Show Cables” must be acti-
vated on the Options menu. See below.
1. Click on the desired input or output jack on one of the devices, and
drag the pointer away from the jack (with the mouse button
pressed).
A loose cable appears.
2. Drag the cable to the jack on the other device.
When you move the cable end over a jack of the correct type (audio/CV, input/output) it will be highlighted to show that a connection is possible.
3. Release the mouse button.
The cable is connected. If both input and output are in stereo and you connect the left channels, a cable for the right channel is automatically added.
! Dragging a cable to make a connection can be aborted by pressing
[Esc] while keeping the mouse button pressed.
✪ To give a better overview of the connections, the cables have differ-
ent colors. Connections to or from effect devices are different
shades of green, other audio connections are different shades of
red and CV connections are different shades of yellow.
! When the back is shown, you can still navigate in the rack by scroll-
52
MANAGING THE RACK
ing, by using the computer keyboard, etc. (see page 48).
Page 55

These cables are green, indicating effect device connections.
Disconnecting Devices
Again, there are two ways to disconnect devices:
D Click on one end of the cable, drag it away from the jack and drop it
anywhere away from a jack.
or
D Click on one of the connectors and select “Disconnect” from the
context menu that appears.
This cable is yellow, indicating a
CV connection.
D You can change an existing connection in the same way, by clicking
on one end of the cable and dragging it to another connector.
These cables are red, indicating connections
between instruments and mixer devices.
Using pop-up menus
1. Click (or right-click) on a connector.
A pop-up menu appears, listing all devices in the rack.
2. Move the pointer to the desired device (the device to which you
want to create a connection).
A submenu appears, listing all suitable input/output connections. For example, if you clicked on an audio output on a device, the hierarchical submenus
will list all audio inputs in all other devices.
D If a device is greyed out on the pop-up menu, there are no connec-
tions of the suitable kind.
3. Select the desired connector from the submenu.
The connection is created.
Hiding and Showing Cables
You can choose whether you want the patch cables to be visible or not, by activating or deactivating the Show Cables item on the Options menu. When the
cables are hidden, connectors in use are indicated by a colored dot:
Checking Connections
You can check to which device a jack is connected. This is especially useful if
the patch cables are hidden, but it is also practical if you have a lot of cables or
if the two devices are far from each other in the rack:
D Position the pointer over a connector and wait a moment.
A tool tip appears, showing the device and connector in the other end.
MANAGING THE RACK
53
Page 56

Routing MIDI to a Device
There are several ways to send MIDI from a control surface to a Reason device,
as described in the Operation Manual. However, in this book we stick to the
most common method: to route MIDI via the sequencer.
With this method, incoming MIDI (e.g. from your master keyboard) is sent to one
of the tracks in Reason’s sequencer. The sequencer will then pass it on to a device in the rack (the device to which the track is routed). This way, you can select
different devices for MIDI playback by directing the incoming MIDI to different
tracks in the sequencer.
Proceed as follows:
1. In the sequencer, locate the track that is connected to the device
you want to play.
If you are uncertain, you can pull down the Out pop-up menu for each track
and check to which device they are routed.
2. Click in the In column for the track.
A keyboard symbol is displayed, indicating that this track will receive MIDI
from the Master Keyboard.
Naming Devices
Each device has a “tape strip” showing the name of the device. When you create a new device it is automatically named according to the device type, with an
index number (so that the first Subtractor synthesizer you create is called “Synth
1”, the next “Synth 2” and so on). If you like, you can rename a device by clicking
on its tape strip and typing a new name (up to 16 characters).
For devices connected to a mixer, the device names are automatically reflected
on the vertical tape strips for the corresponding mixer channels (next to the mixer
channel faders). Similarly, tape strips below the Return knobs show the names
of the effect devices connected to the corresponding Return inputs.
54
3. Play the master keyboard to hear the sound of the device.
✪ On the panel of some instrument devices you will find a Note On in-
dicator. This blinks to indicate incoming MIDI notes.
✪ If your master keyboard have knobs or faders, try moving these.
For most keyboard models, these are automatically mapped to the
most useful parameters on the Reason devices, allowing you to
tweak the sound of instrument devices while you're playing. There
are also many other ways to use control surfaces to control parameters and functions in Reason - see the Operation Manual.
MANAGING THE RACK
Page 57

Note that the mixer channel tape strips show the name of the device directly
connected to the mixer! This means that if you have an instrument device routed
through an insert effect, the mixer channel tape strip will show the name of the
insert effect device (as this is the device directly connected to the mixer channel). In this case, you may want to rename the insert effect device, to indicate the
connected instrument.
The relation between device names and track names
When you create an instrument device, it automatically gets a track in the sequencer, with the same default name. Renaming a device will also rename the
corresponding sequencer track, and vice versa, if the following conditions are
met:
• The device and its track has the same name.
• There is only one track connected to the device.
Often, having the same name for the device and the track is the most practical
arrangement, since it makes it easier to keep track of which track plays what.
Should you want to rename the track or device independently, you need to disconnect the track from the device, rename and connect it again. How to connect
a track to a device is described on page 62.
Folding and Unfolding
If you don’t need to make settings for a device, you can fold it to make the rack
more manageable and avoid having to scroll a lot. This is done by clicking the arrow to the left of the device.
To unfold the device, click the arrow again.
D In rack rows with devices of smaller width, the fold/unfold arrow is
placed to the left of the leftmost device and affects all devices in
the row.
D If you hold down [Option] (Mac) or [Alt] (Windows) and click the ar-
row of an unfolded device, all devices in the rack will be folded.
Conversely, [Option]/[Alt]-clicking the arrow of a folded device will unfold all
devices.
D For folded devices, no parameters are shown and you cannot make
routing adjustments on the backside of the rack as long as the devices are folded.
However, if you want to make a connection to a folded device, you can drag
a cable to it and hold it there for a moment. This will cause the folded device
to automatically unfold and let you make the connection.
D Folded devices can be renamed, moved, duplicated and deleted just
like unfolded devices.
D For devices that use patches, you can select patches in folded mode
as well.
D Playback is not affected by folding.
MANAGING THE RACK
55
Page 58

56
MANAGING THE RACK
Page 59

7
D The Sequencer - Basics
Page 60

About the Sequencer
The sequencer is your main composition tool in Reason. This is where you
record notes, controllers, device parameter automation and pattern changes.
In this chapter you will find descriptions of all basic procedures; recording, playing back and handling sequencer tracks. For descriptions of editing, quantizing,
using groups, etc., please refer to the Operation Manual pdf.
The relation between the Sequencer and the
Rack
In the sequencer, data is recorded and played back on tracks (much like tracks
on a multi-track tape recorder).
The tracks are
listed in the
track list.
Recorded events on different tracks.
A track can be connected to an instrument device in the rack, so that data on the
track is sent to the device on playback. Each track can only be connected to one
device at a time, but it is possible to have several tracks that all play the same
device. Note also that when renaming a sequencer track (see page 61), the device to which it is connected automatically gets the same name - and vice versa.
The selected track “El
Bass” is also connected
to the device named “El
Bass”
It is possible to have tracks that are not connected to any device. Notes on a disconnected track will not be heard on playback (since there is no device to play
them). Similarly, it is possible to have instrument devices without sequencer
tracks.
The Main Sequencer vs. Pattern Sequencers
As described in the chapter “Using Pattern Devices”, the main sequencer interacts with the built-in sequencers in pattern devices in the following ways:
D The sequencer and all devices use the tempo, as set on the trans-
port panel.
D If you start playback for the main sequencer (on the transport
panel), all pattern devices will automatically start as well.
That is, provided the pattern sequencer isn’t disabled for a device (see page
78).
D Pattern changes will always happen at the start of a bar in the main
sequencer (regardless of the pattern lengths).
This only applies to pattern changes made “live” on the device panel. Pattern
changes played back from the sequencer will happen at their exact position.
See the Operation Manual pdf.
For details, see page 78.
58
The icons in this column indicate to which device type each track is connected.
THE SEQUENCER - BASICS
Page 61

Sequencer window handling
The sequencer area below the rack.
The basic window techniques in Reason have been described on page 40. Here
is a quick run-through:
D You can adjust the size of the sequencer area by dragging the di-
vider between the sequencer and the rack.
D Clicking the maximize button in the upper right corner will make
the sequencer area fill the whole document window.
D When editing the contents of a sequencer track, the right part of the
sequencer area can be divided into different lanes.
Typically, you would view the note information in one lane, controller curve in
another lane, etc. You can adjust the size of the lanes by dragging the dividers between them.
Here, the key lane, velocity lane and a controller lane are shown.
D You can scroll and change magnification in a number of ways, in-
cluding standard scroll bars and horizontal and vertical zoom controls, as well as with the Magnifying Glass tool, the Hand tool and a
mouse with a scroll wheel (see page 41).
Where applicable, different areas in the sequencer have separate scrollbars
and zoom controls.
The sequencer maximize button.
D You can also adjust the horizontal magnification in the sequencer
area by holding down [Command] (Mac) or [Ctrl] (Windows) and
pressing [+] or [–] (on the standard part of the computer keyboard,
not on the numeric keypad).
[Command]/[Ctrl]-[+] zooms in while [Command]/[Ctrl]-[–] zooms out.
THE SEQUENCER - BASICS
59
Page 62
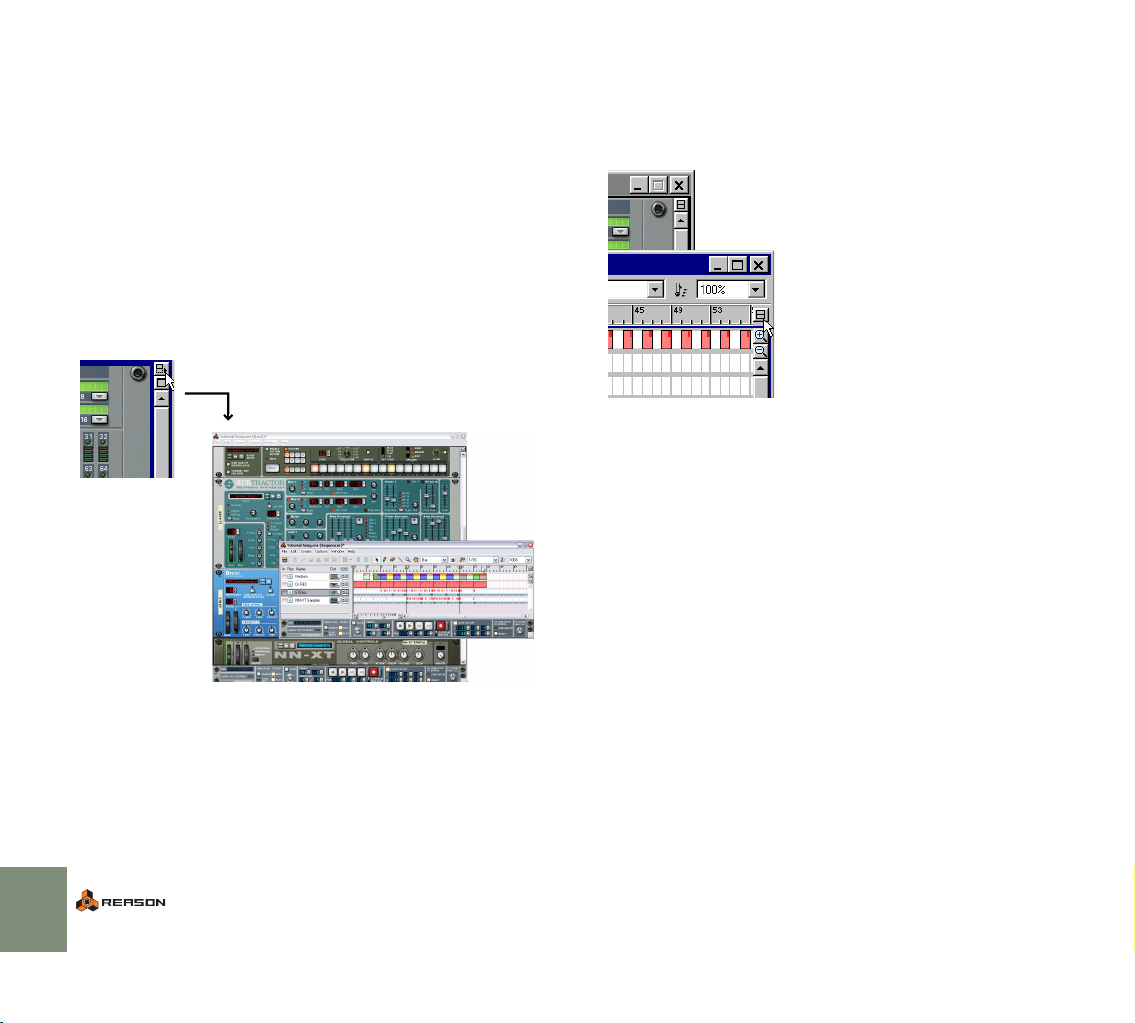
Working with the sequencer in a separate
window
The sequencer window can be detached from the rack and used in a separate
window. This could be useful for instance if you are working with a large number
of tracks or if you are viewing many sequencer lanes at once. Detaching the sequencer will then make it possible to view all tracks or lanes at once without having to resize the sequencer or scroll the view up and down to focus on a certain
track or lane
The separate sequencer window can be positioned and resized freely both horizontally and vertically using the basic windows techniques described on page
40.
D To detach the sequencer from the rack, either click the correspond-
ing button in the top right corner of the rack, or pull down the Windows menu and select “Detach Sequencer Window”.
Click this button...
D Similarly, to reattach the sequencer window to the rack, either se-
lect “Attach Sequencer Window” from the Windows menu or click
the button.
Note that the button for detaching the sequencer window is only available in
the rack. The button for reattaching the sequencer though, is available both
in the rack and in the sequencer.
60
THE SEQUENCER - BASICS
...to open the sequencer in a
separate window.
The Attach Sequencer button on the sequencer and, in the background, on the rack.
! Another way of reattaching the sequencer window is by closing it.
Note also that the rack is still the “main” window for the song,
which means that closing the song will close the sequencer window
as well.
About the Transport
You’ll notice that when detaching the sequencer from the rack, there will be two
instances of the transport on the screen - one in the rack and one in the sequencer window. This is for convenience since it allows you to control playback
and recording regardless of which window is the active one.
Should you wish however, you can fold one of the transports in the same manner
as with any other device in Reason. Folding and unfolding devices is described
on page 55.
✪ To make the rack or the sequencer the active window when they are
separated, you can use the key commands [Command]-[1] (Mac)/
[Ctrl]-[1] (Windows) and [Command]-[2] (Mac)/[Ctrl]-[2] (Windows)
respectively.
Page 63
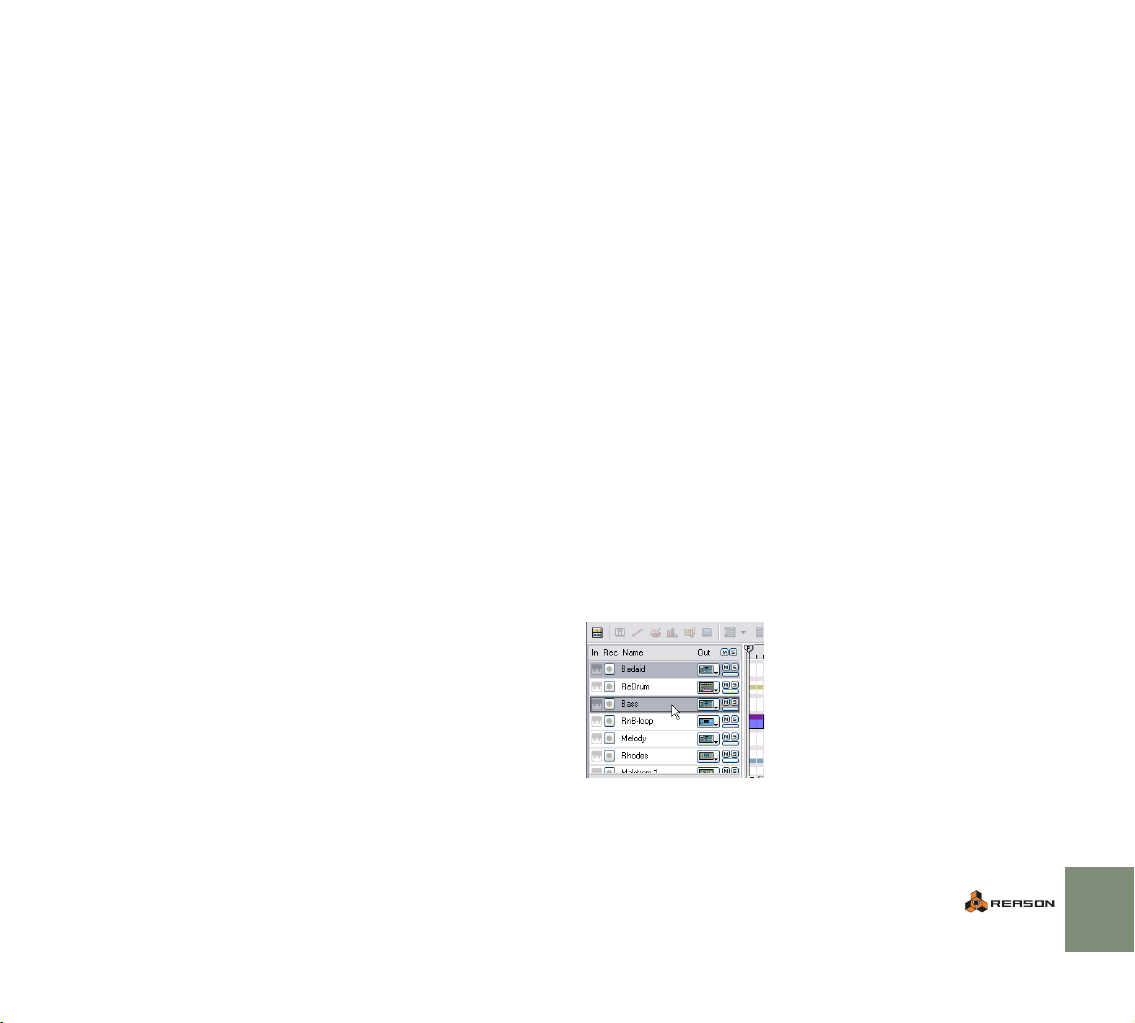
A note about using Reason with two monitors
If you have a computer system with two monitors, you can do the following:
D Use one monitor for viewing and managing the rack only.
D Detach the sequencer as described above, and dedicate one of your
monitors to the sequencer only.
To be able to use two monitors, you must have an operating system and a graphics card that supports it.
Please refer to the documentation for your operating system and possibly the
graphics card for instructions on how to set up your system for using two monitors.
Managing Tracks
Creating Tracks
As described on page 48, tracks are automatically created when you create instrument devices in the rack. Still, you may need to create additional tracks (e.g.
for recording effect device automation - see the Operation Manual pdf):
D To create a new sequencer track, pull down the Create menu and
select Sequencer Track (or select Create Sequencer Track from the
context menu in the sequencer).
The new track will appear below the currently selected track in the track list.
Initially, it will not be connected to any device (see below).
D You can also create a new sequencer track specifically for a device
by using the Create Sequencer Track for Device item on the device’s
context menu.
This works the same as when creating a new device, i.e. the new track is
connected to the device and has the same name.
Naming Tracks
You can rename a track by double clicking on its name in the track list and typing
in a new name. Note:
D If the track is connected to a device, the device will be renamed too.
Typically, after creating a new device, you can rename its sequencer track,
automatically changing the name of the device. The reverse is also true. That
is, renaming a device will also change the name of its sequencer track.
Selecting Tracks
To be able to manipulate a track or edit its contents, you need to select it. You
select a track by clicking on its name in the track list.
Selected tracks are highlighted in the list.
Selecting a track will automatically scroll the rack to bring the corresponding device into view.
THE SEQUENCER - BASICS
61
Page 64
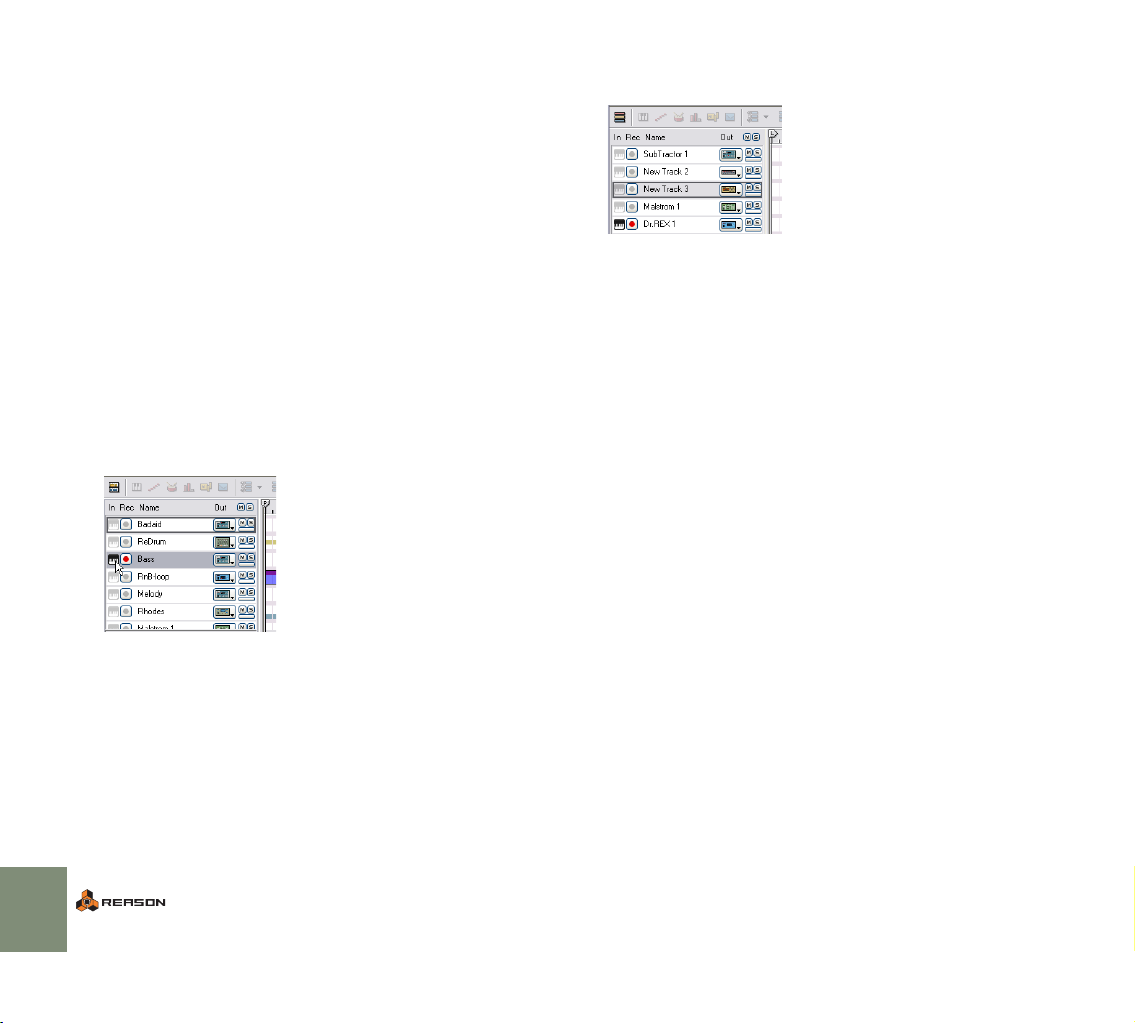
D You can also select the next or previous track in the list by using the
up and down arrow keys on the computer keyboard.
D It is possible to select several tracks, by pressing [Shift] and click-
ing.
This allows you to e.g. move or delete several tracks in one go. However, you
can only edit the contents of one track at a time (the top selected track will
be edited - see the Operation Manual pdf).
! Don’t confuse selecting a track with routing MIDI to a track (see be-
low).
Routing MIDI to a Track
The normal way of routing MIDI to a device in the rack is to go via the sequencer.
When MIDI is routed to a track in the sequencer, the notes and controller data
are automatically echoed to the corresponding device (the device to which the
track is connected - see below).
D To route incoming MIDI to a track, click in the In column (the key-
board icon to the left of the track name).
The keyboard symbol lights up, indicating that the track will receive MIDI
(provided that you have selected a MIDI Input port for the sequencer in the
Preferences-Control Surfaces dialog, as described on page 15). Only one
track at a time can have MIDI input. The track with MIDI input is automatically
record enabled, indicated by the Record symbol lighting up in the Rec column.
✪ You can record enable several tracks for automation recording -
this is described briefly on page 66.
D To connect a track to a device in the rack, pull down the pop-up
menu in the Out column and select one of the devices.
The symbol in the Out column indicates to which device type each track is connected.
✪ When you create an instrument device, a track is automatically cre-
ated and connected to the new device.
Moving Tracks
To move a track to another position in the list, click on the track name and drag
it up or down. To move several tracks at once, select them, click on one of them
and drag.
! The order of the tracks in the sequencer is independent of the de-
vice order in the rack.
Duplicating Tracks
To make copies of tracks, complete with all recorded data, use any of the following methods:
D Hold down [Option] (Mac) or [Ctrl] (Windows) and drag the track to
a new position in the track list.
D Bring up the context menu for the track and select Duplicate Track.
To bring up the context menu, [Ctrl]-click (Mac) or right-click (Windows) on
the track in the track list.
! Note that a duplicated track will be routed to the same device as the
original. You may want to mute one of the tracks or connect it to another device to avoid double notes, etc.
62
Disconnecting MIDI In
You can turn off incoming MIDI altogether by clicking on the MIDI keyboard symbol so that it is grayed out.
Connecting a Track to a Device
To the right of the track name you will find the Out column. During playback (and
when you play Reason via MIDI, this setting determines to which device each
track will send MIDI data.
THE SEQUENCER - BASICS
Page 65

Deleting Tracks
To delete one or several tracks, select them and press [Backspace] or [Delete].
D If the track to be deleted (and this track only) is connected to a de-
vice, the following alert message will appear:
Select one of the following options:
About the two Views
While the left part of the sequencer area always contains the track list, there are
two different view modes for the right part: Arrange View and Edit View. You
switch between the two views by clicking the button in the top left corner of the
sequencer area. The button changes appearance to illustrate which view is selected.
Arrange View
The Arrange
view selected.
Option
|
Delete Delete both the track and the connected device.
Keep Delete the track but keep the device in the rack.
Cancel Do not delete the track or the device.
Description
|
In the Arrange View, all tracks are shown, with colored bars indicating recorded
events. Use this mode to get an overview of your arrangement, and when you
want to perform large scale editing such as rearranging whole sections of your
song, etc.
Edit View
The Edit
view selected.
In the Edit View, you get a close-up look at the recorded events on a single track
at a time. When the Edit View is selected, the right part of the sequencer area
can be divided into several horizontal lanes, showing different types of events
(notes, REX slices, drum sounds, controllers, etc.). This is the view mode of
choice for fine editing of your recording, for when you want to draw notes, controllers and other events manually.
! For details about editing, see the Operation Manual pdf.
THE SEQUENCER - BASICS
63
Page 66
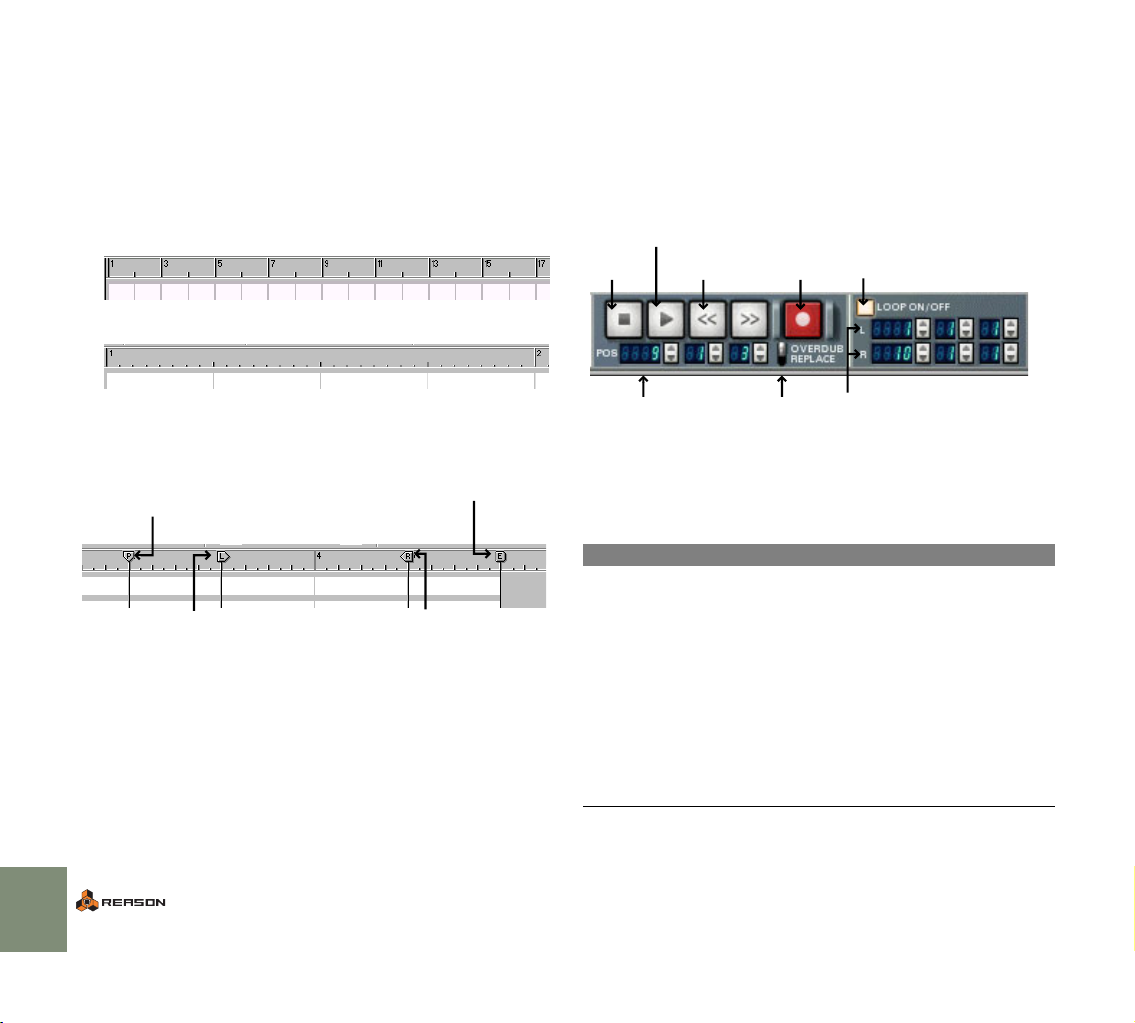
About the Ruler, Song
Transport Controls -
Position and Locators
Regardless of which view mode is selected, you will find a horizontal ruler at the
top of the sequencer display. This indicates the meter positions, that is, the positions in bars and beats.
D The numbering and detail of the ruler depends on the horizontal
magnification.
At a medium zoom setting, odd bars will be shown with a bar number and even bars will
be indicated by a mark.
If you have zoomed in fully, each bar will be numbered, and every 1/32 note position will
be indicated by a mark.
In the ruler, you will also find four different position markers, each with a separate
“flag”:
This is the song position,
indicating at which position
playback happens.
This is the left locator. When using the
Loop mode (see page 68), the left locator
governs the start position of the loop.
✪ The End (E) marker indicates the end of the song. The program uses
this information when exporting the song as an audio file and when
you scroll horizontally in the sequencer area.
Playback or recording will not stop at the End marker.
This is the End marker. This informs
Reason about where your song ends
(see the note below).
This is the right locator. When using the
Loop mode, this governs the end position
of the loop.
Overview
The transport panel is located at the bottom of each song document window.
This is where you activate playback, recording, fast forward/rewind, etc. Here is
a brief overview of the controls, to help you find your way in the recording and
playback procedures on the following pages.
Play
Stop
Song Position Overdub/Replace switch
Transport Key Commands
There are fixed computer keyboard combinations for the most important transport functions:
Function
|
Stop [0] on the numeric keypad or [Return]
Play [Enter] on the numeric keypad
Toggle Stop/Play Space bar
Go to previous bar/Rewind [7] on the numeric keypad
Go to next bar/Fast Forward [8] on the numeric keypad
Record [*] on the numeric keypad or hold
Go to Left Locator (Loop Start) [1] on the numeric keypad
Go to Right Locator (Loop End) [2] on the numeric keypad
Fast Forward
Rewind
(see page 66)
Record
Loop on/off (see page 68)
Left and Right Locator positions
(the boundaries of the loop - see
page 68).
Key command
|
[Command] (Mac) or [Ctrl] (Windows)
and press [Return]
64
THE SEQUENCER - BASICS
Page 67

Setting Up for Recording
Recording
Before you can start recording, you need to make some settings:
Tempo and Time Signature
The tempo and time signature settings are located on the transport panel.
D You can specify any tempo between 1 and 999.999 bpm (beats per
minute).
The tempo field to the right allows you to fine tune the tempo, in steps of 1/
1000 bpm.
The tempo set to
110.094 bpm.
You can also adjust the tempo (in bpm steps) by using the [+] and [–] keys on
the numeric keypad.
D You set the time signature by specifying a numerator (left value
field) and a denominator (right value field).
The numerator is the number of beats per bar, and the denominator governs
the length of a beat.
3/4 time selected.
Click
When you record, it is often necessary to have some sort of rhythmic guide to
help you keep time. The easiest way is to use the built-in metronome click:
When this is activated, you will hear a click on each beat, with an accent on the
downbeat of each bar. The click is played back during recording and playback.
You can adjust the volume of the click by using the Level knob.
✪ Sometimes it might be easier to use a drum machine pattern as a
rhythmic guide.
To record MIDI from an external MIDI instrument, proceed as follows:
1. Make sure MIDI is routed to the desired track, see page 62.
The track with MIDI input is always automatically record enabled.
2. Move the song position to where you want the recording to start.
Recording always starts at the song position.
To move the song position, drag the P marker or click directly in the ruler.
✪ You may want to start a few bars early to get time to start playing.
3. Click the record button or press [*] on the numeric keypad.
The record button lights up to indicate “Record Standby” mode.
4. Click the play button or press [Enter] on the numeric keypad.
Recording starts.
5. When you are done, click the stop button or press [0] on the numeric keypad.
Recorded notes are indicated as red “bars” in the Arrange window.
At this point, you may want to move the song position to the beginning of the recording (by rewinding or by moving the song position marker in the ruler), and
click the play button to listen to what you recorded. You can undo the recording
if you like.
D It is also possible to activate recording during playback (“punch
in”), by starting playback and then clicking the record button.
Similarly, you can deactivate recording without stopping playback (“punch
out”).
THE SEQUENCER - BASICS
65
Page 68

Recording more tracks
Once you have recorded something, you can continue recording on other
tracks, while hearing the first recording play back. Just remember to route MIDI
to the desired recording track.
D You can change the MIDI routing during recording if you like.
This is especially useful when recording in loop mode: record the first track,
then click in the In column for the next track you want to record, and so on.
Everything you record will be played back on the next loop lap.
For more info about the loop mode, see page 68.
Recording more on the same track - Overdub/
Replace
If you like, you can continue recording over the same area on the same track.
This can be useful for adding elements to a loop, for recording automation of
multiple controls or for replacing a faulty part of an otherwise good take.
Whether the previous recording is kept or removed depends on the Overdub/
Replace setting.
Replacing a section of a previous recording
If you have made a largely successful recording, in which only a section needs to
be redone, you can use Replace mode for this:
1. Select Replace mode.
2. Start playback at a position before the faulty section.
3. At the start of the section, activate recording.
4. Re-record the section.
5. At the end of the faulty section, deactivate recording or stop.
Record enabling several tracks
66
D In Overdub mode, the new recording is added to whatever was on
the Track before.
When you play back, you will hear both recordings. This is the mode to use
when you want to add elements to an existing recording (e.g. add controller
data to recorded notes).
D In Replace mode, the new recording replaces any previously re-
corded notes.
Only the notes in the actual recording area are replaced.
! It’s probably best to use Overdub mode as your default mode, to
avoid removing material by mistake.
! The Overdub/Replace switch affects notes only - not recorded con-
trollers! See the Operation Manual pdf for details.
THE SEQUENCER - BASICS
Although only one track at a time can have MIDI input, it is possible to record enable any number of tracks, by clicking in the Rec column for tracks.
The purpose of this is to enable automation recording for more than one track at
a time. This allows you to send controller messages from a control surface (or to
tweak parameters directly on the front panel) to record automation for devices
connected to these tracks even though they do not have MIDI input.
Automation recording is described in the Operation Manual pdf.
Page 69

Playback and Positioning
! If you are using ReWire, transport functions can be handled by ei-
ther application. See the Operation Manual pdf.
Play and Stop
D To play back from the current song position, click the play button or
press [Enter] on the numeric keypad.
D To stop playback, click the stop button or press [0] on the numeric
keypad.
If you click the stop button when the song is already stopped, the song position
is moved according to the following rules:
• If the song position is to the right of the left locator, it is moved to the left locator.
• If the song position is at the left locator or to the left of it, it is moved to the
start of the song.
• If the song position is at the start of the song, nothing happens.
This means you can always click twice on the stop button in stop mode, to return
to the beginning of the song.
D Adjust the song position numerically in the value display below the
transport buttons.
The song position is shown as three digits: bars, beats and sixteenth notes.
About Snap to Grid
The Snap on/off button.
The Snap value pop-up.
Positioning
The song position is indicated by the vertical line with the “P” marker in the ruler.
There are several ways to move the song position:
D Use the rewind and fast forward controls on the transport panel.
This moves the song position in steps of one bar (from its current position).
That is, if you just click once on the rewind/fast forward button, the song position will be moved exactly one bar back or forward. To move the song position several bars, click and hold the mouse button.
D Use the transport key commands on the numeric keypad.
See the table on page 64.
D Click and drag the P marker in the ruler, or click directly in the ruler
at the desired song position.
The resulting song position takes the Snap value into account, as described
below.
The Snap to Grid function (from now on called “Snap”) restricts movement to
specific positions. This is especially useful when you are editing in the sequencer (moving material, creating events, etc), but it will also affect the result of
moving the song position in the ruler.
To set up and activate Snap, proceed as follows:
1. Pull down the Snap pop-up menu and select a value.
If you select “Bar”, you will only be able to move the song position to the beginning of bars. The other options restrict movement to the corresponding
note values.
2. Activate Snap by clicking the button next to the pop-up menu.
In this example, Snap is activated and set to quarter notes. This means you can move the
song position to exact quarter note positions only.
THE SEQUENCER - BASICS
67
Page 70

Using the Loop
In loop mode, the sequencer will repeat a section over and over again, during
playback or recording. You specify the section to be looped by setting the left
and right locator:
D Set the left locator (the start of the loop) by dragging the “L” marker
in the ruler.
Or, you can hold down [Option] (Mac) or [Ctrl] (Windows) and click in the
ruler.
D Set the right locator (the end of the loop) by dragging the “R”
marker in the ruler.
Or, you can hold down [Command] (Mac) or [Alt] (Windows) and click in the
ruler.
! Note that Snap applies when moving the locators in the ruler, just
as with the song position.
Both locator positions can also be adjusted numerically on the transport panel.
D To activate the loop, click the Loop On/Off button so that it lights
up, or use the corresponding key command.
On a Mac this is [/], under Windows it’s [÷], both on the numeric keypad.
When you play back in loop mode, and the song position reaches the right locator, it will immediately jump back to the left locator. This way, the area between
the locators will be repeated continuously.
✪ Playing back in loop mode is useful to try out mixes and arrange-
ments, rehearse takes, etc. Recording in loop mode can be useful
for adding elements to a groove, one layer at a time. Just remember
to select Overdub mode if you are recording several layers on the
same track!
Mute and Solo
To mute a track means to silence it, so that no data is sent from the track during
playback. This can be very useful when you are trying out different versions of an
arrangement, for bringing elements in and out of the mix during playback, etc. To
solo a track means all other tracks are muted.
D To mute (silence) a track, click the corresponding Mute (M) button.
The notes and events on the muted track will not be heard on playback.
A red M button indicates a muted track.
To unmute the track, click the M button again. Several tracks can be muted
at the same time, in which case you can unmute them all by clicking the
“master” M button in the M column heading.
D To solo a track, click the corresponding Solo (S) button.
This mutes all other (unsoloed) tracks. Soloed tracks have green S buttons.
To turn solo off, click the green Solo button again.
Here, the track Redrum 1 is soloed (indicated by a green S button).
Several tracks can be soloed at the same time, in which case you can turn
off Solo for all of them by clicking the “master” S button in the S column
heading.
68
THE SEQUENCER - BASICS
Page 71

What else can I do in the sequencer?
This chapter has only touched briefly on the capabilities of the sequencer. In the
Operation Manual pdf you will find detailed descriptions of the following sequencer functions and procedures:
• Recording pattern changes and control automation.
• Rearranging recorded material in the Arrange View.
• Editing recorded notes, controllers and pattern changes.
• Quantizing and using grooves.
• Manual creation of notes and controllers.
• Using groups.
• Importing and exporting MIDI files.
THE SEQUENCER - BASICS
69
Page 72

70
THE SEQUENCER - BASICS
Page 73

8
D Introduction to the Combinator
Page 74
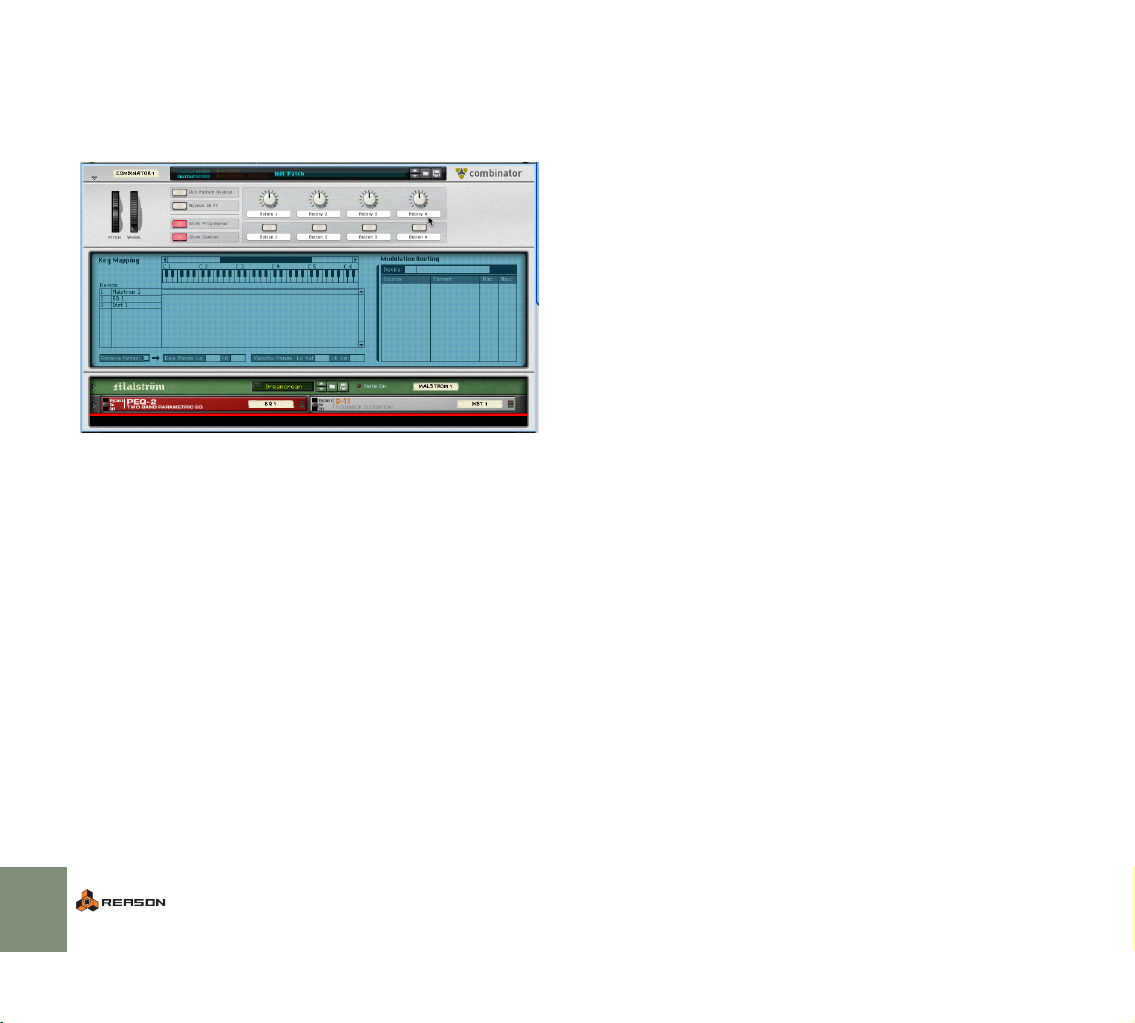
What is the Combinator device?
The Combinator is special device that allows you to save and recall any combination of Reason devices (instruments, effects, mixers etc.) and their internal
connections. A saved Combinator setup can be loaded as a patch, called a
“Combi”. The Combinator device itself acts as a container for the devices in a
Combi.
The basic idea behind the Combinator device is simple, but very powerful. Being
able to save multiple devices as a Combi enables you to instantly recall any type
of setup, however complex, as simply as loading a patch!
Some typical applications of the Combinator:
D Create split or layered multi-instruments.
Add any number of instrument devices (Subtractors, NN-XT’s etc.) and play
them as a single layered instrument. Instrument devices in a Combi can also
be assigned to specific keyboard/velocity zones.
D Save instrument/effect combinations.
Save an instrument together with your favorite effect(s).
D Create multi-effect devices.
You can create and save complex effect chains as Combis.
About the Combi patch format
The Combinator saves files in the Combi (.cmb) patch format. When you load a
Combi patch, all devices included in the Combi, their corresponding parameter
settings and internal audio and CV connections are instantly recalled.
The Factory Soundbank includes many preset Combi patches, divided into various categories. There are two basic types of Combis; Instrument and Effect
Combis.
• Effect Combis typically contain a “chain” of effect processors and are meant
to be connected to devices outside the Combi as an insert or send effect.
• Instrument Combis contain one or several instrument devices, and are
meant to be “played” like standard instrument devices. Instrument Combis
can also contain effect devices.
How to create Combinator devices
There are several ways you can create a Combinator device:
D By selecting “Combinator” from the Create menu.
This will create an empty Combinator device.
D By [Shift]-selecting several devices in the rack and then selecting
“Combine” from the Edit menu.
This will create a Combi containing the selected devices. The devices are removed from their original locations in the rack, into the Combinator holder.
D By selecting the “Create device by browsing patches” menu item
from the Create menu.
This allows you to browse for Combi patches - if you select a “.cmb” patch a
Combinator device will be created, containing the devices saved with the
Combi.
72
INTRODUCTION TO THE COMBINATOR
Page 75
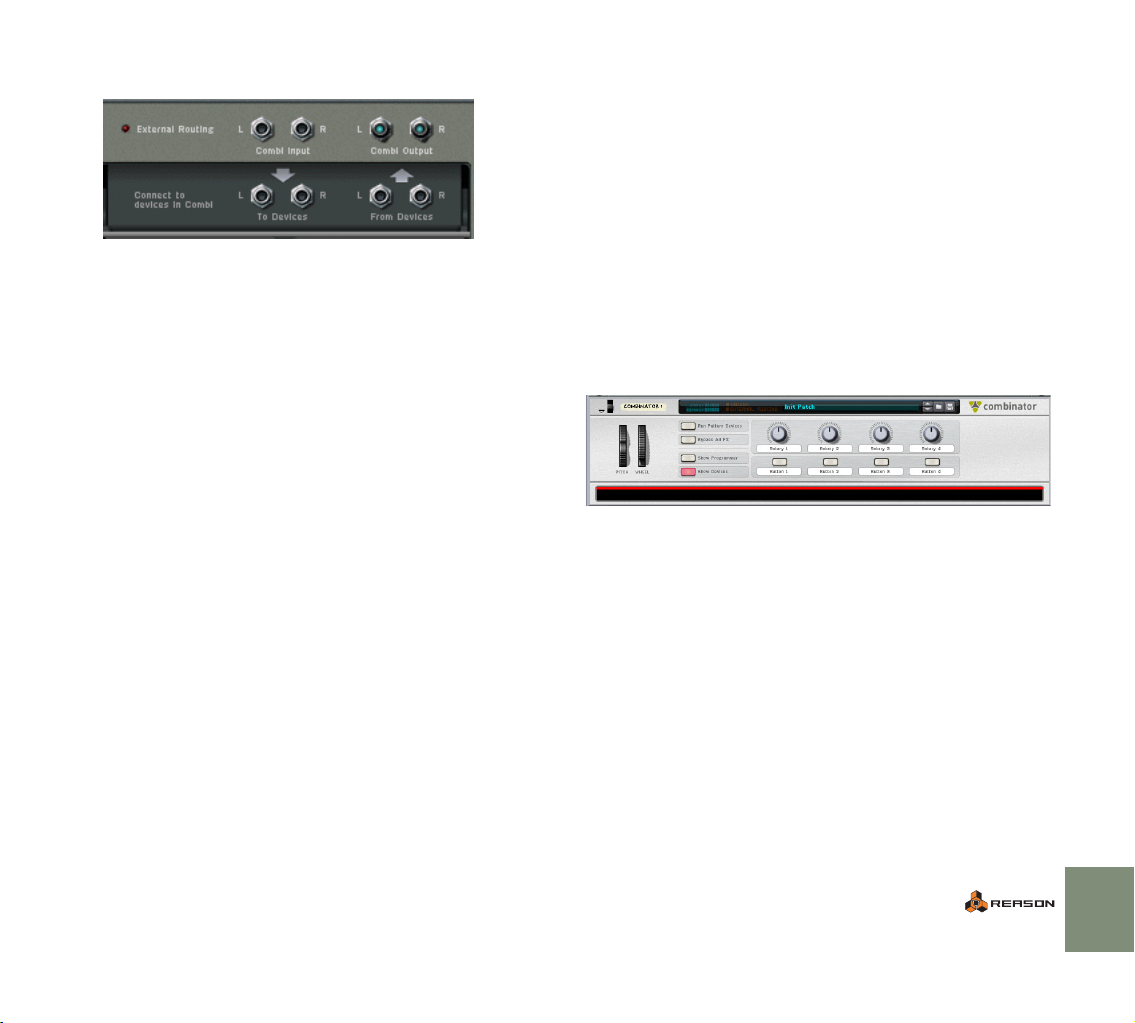
About external and internal audio routing
At the back of a Combinator you can find the following audio connectors:
D Combi L/R Outputs
This is the output of the Combinator, which is internally connected to the
“From Devices” connectors. This output connects with devices “outside” the
Combi, normally a mixer device.
D From Devices L/R inputs
This is where outputs from devices in a Combi are connected. A mono or
stereo output can be connected.
D Combi L/R Inputs
This is the input to the Combinator (used for effect Combis only). Internally
connected to the “To Devices” connectors.
D To Devices L/R outputs
These connect to an input on a device in the effect Combi.
D Normally, all audio connections to and from devices in a Combi
should pass via the To/From Device connectors.
While it is entirely possible to directly connect the output of a device in a
Combi to the input of a device outside the Combi, this is called an “External
Routing” connection and should be avoided if the Combi is to be completely
“self-contained”.
D If any device in a Combi uses external routing, this connection will
not be saved with the patch.
As a warning, an “External Routing” indicator will light up if such a connec-
tion is made.
For example, if a Combi contains three Subtractors (but no mixer), there would
be three mono outputs coming from devices in the Combi (the Subtractors). As
there are only two “From Devices” inputs, there is a problem. The solution is to
include a mixer device in the Combi and to connect the Subtractors to this. If the
output of the mixer is connected to the “From Devices” input, all three outputs
from the Subtractors (and more device outputs should you so wish) can be
passed via the Combinator interface, without external routing.
! Please refer to the Operation Manual chapter “The Combinator” for
a complete description of the available features.
Creating a layered
instrument Combi patch a tutorial
In this step-by-step tutorial we will show you how to create a simple Combi
patch, starting with an empty Combinator device. The objective is to create a
layered instrument Combi that includes both instrument and effect devices:
1. To make things easy to follow, start with an empty rack.
2. Select a mixer device from the Create menu - either a 14:2 or a Line
mixer - it doesn’t matter.
3. Create a Combinator by selecting “Combinator” from the Create
menu.
An empty Combinator device is added to the rack, and a Combinator sequencer track is created.
D The front panel consists of a narrow top panel (with a patch name
display and standard patch browse/save buttons), and below is the
Controller panel.
This panel contains (amongst other things) virtual knobs and buttons that
can be assigned to any device parameter or function contained in the Combi
(see page 75).
D The empty space at the bottom is the Combinator “rack”, where de-
vices added to the Combi will be located.
It is also used for adding devices to a Combi via drag and drop.
INTRODUCTION TO THE COMBINATOR
73
Page 76

If you flip the rack around, the Combi outputs have been auto-routed to inputs on
the mixer device, but as the Combi is currently empty there are no connections
to the “From Devices” inputs yet.
Let’s continue by adding a Line Mixer to the Combi.
4. Click in the empty space at the bottom of the Combinator so that a
red line appears.
This is called the insertion line. When this line is shown, the Combinator will
be the target destination for new created devices.
The insertion line.
5. Select a Line Mixer 6:2 device from the Create menu.
The mixer is added to the Combi. The master output of the Line mixer is autorouted to the “From Devices” connectors.
Now we have a good starting point for adding instrument devices - the added instruments will be auto-routed to the Line mixer device in the Combi.
For sake of example, let’s make a simple layered instrument Combi using two instrument devices; a NN-XT and a Malström.
6. Select the Line mixer by clicking it in the Combinator rack, or click
in the empty space at the bottom of the Combinator so that the insertion line appears.
Either method will ensure that the next device created will be added to the
Combi.
74
INTRODUCTION TO THE COMBINATOR
Page 77
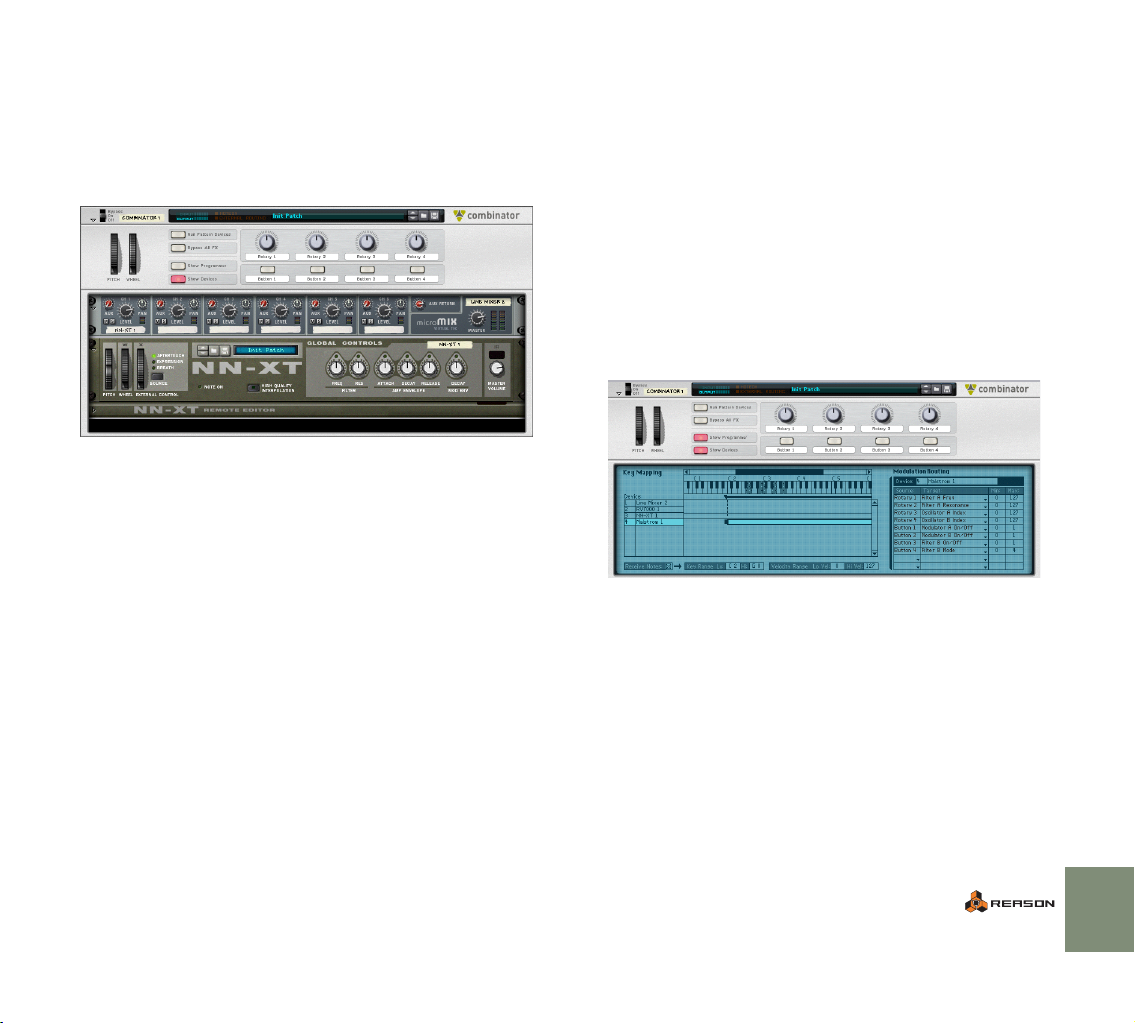
7. Select a NN-XT from the Create menu.
The NN-XT is added to the Combi, with its L/R Master outputs auto-routed
to the Line mixer. As you can see, the area below the Combinator Controller
panel encloses the devices in the Combi, like a “rack within the rack”. Also
note that when an instrument device is added to a Combi in this way, no corresponding sequencer track is created for the device as the incoming MIDI
is routed via the Combinator track (it is, however, possible to manually create independent tracks for devices in a Combi).
8. Select a patch for the NN-XT, for example a Piano.
9. Repeat step 6 and select a Malström device from the Create menu.
10. Select a patch for the Malström, for example a pad sound.
So now we have a Combi with three devices: a Line mixer, a NN-XT and a Malström.
11. With MIDI directed to the Combinator track, play a few notes.
As you can hear the two instrument devices are now layered!
D Try experimenting with different patches for the devices.
Many interesting textures and sounds can be created using layered instruments.
Naturally, you can layer more devices, as many as you like, using the same basic
technique.
Next, let’s add an effect device to the Combi. Given the setup, this could be
done in two ways:
• If you select one of the instrument devices and then create an effect, it will
be added as an insert effect to that instrument device.
• If you select the mixer and then create an effect, it will be added as a mixer
send effect.
12. In this case, let’s add a RV7000 reverb device as a send effect - select the mixer and choose the RV7000 effect from the Create menu.
The reverb is auto-routed as a send effect to the mixer. You can now add a
touch of reverb to the devices by tweaking the Aux send for the corresponding mixer channels.
13. Finally, save the setup as a Combi patch.
The next time you open this patch, the setup will open exactly as saved!
About the Programmer
The Combinator also features a Programmer with key and velocity zone mapping
and modulation routing capabilities. This section briefly describes the various elements of the Programmer:
D Click the “Show Programmer” button on the Controller panel to
bring up the Programmer panel.
The Programmer panel appears below the Controller panel. To the left you can find a Key
Mapping area with a list showing each device currently in the Combi.
D Clicking on an instrument device in the list selects it.
D Instrument devices (which receive MIDI Note data) are automati-
cally assigned a key and velocity range.
By default, the entire available key/velocity range is set (C-2 - G8 / 0-127).
INTRODUCTION TO THE COMBINATOR
75
Page 78
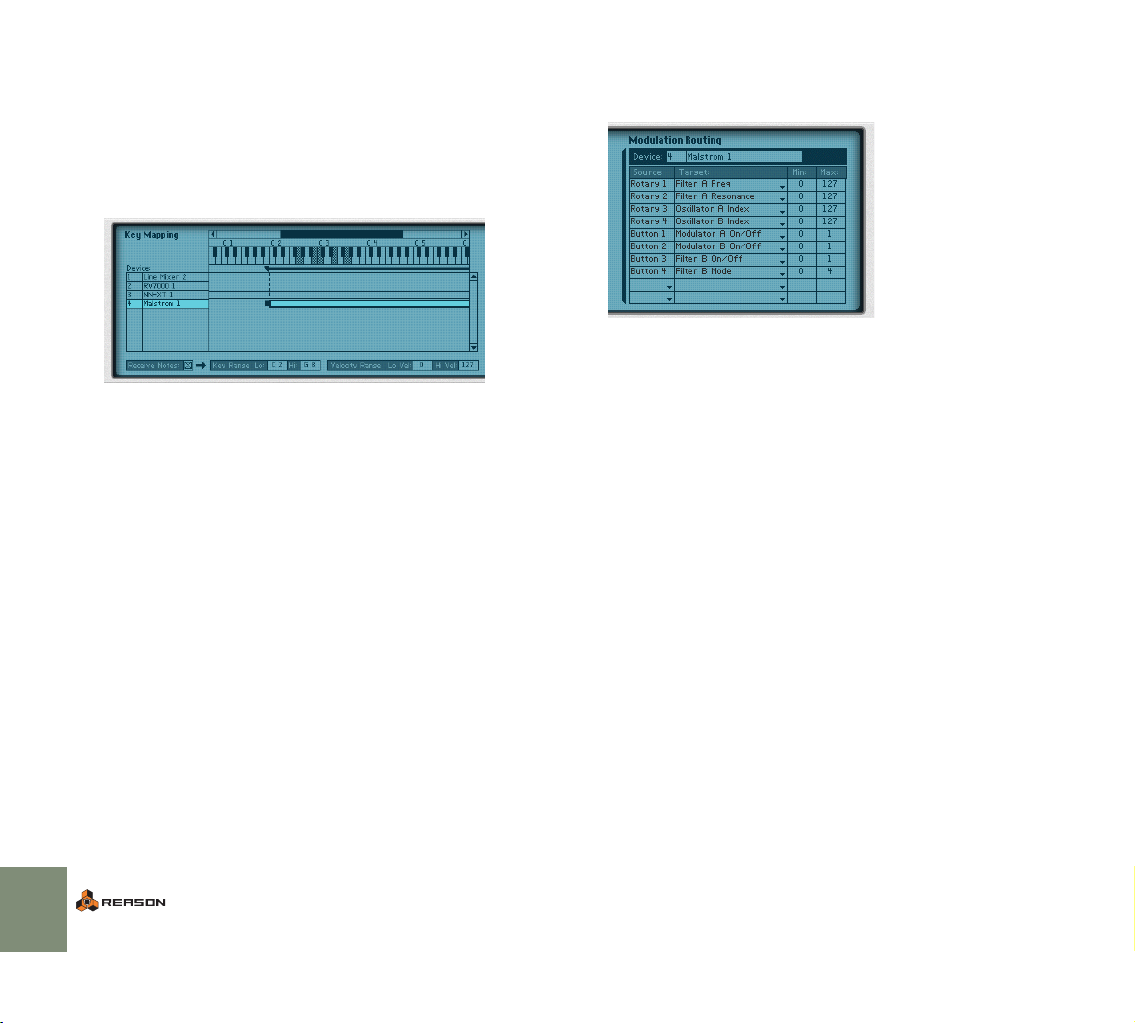
D You can change Key Range values by clicking in the Key Range Lo/
Hi fields and moving the mouse up or down with the mouse button
pressed.
The horizontal strips in the area below the keyboard reflects the set Key
Range for the corresponding instrument device. You can also change the
Key Range by dragging the end handles of the strip. By assigning Key
Ranges to instrument devices in a Combi, you can create splits, for example
where the lower octaves will play a bass sound and the upper ranges play a
string pad.
In this picture, notes from C2 and up will trigger the Malström, whereas notes below C2
will not.
D By clicking in the Velocity Lo Vel/Hi Vel fields and moving the
mouse up or down with the mouse button pressed you can assign a
velocity range for a selected instrument device.
By setting different velocity ranges for layered instrument devices you can
determine which device(s) will sound according to how hard or soft you play.
D The Modulation Routing section allows you to assign device param-
eters to the 4 Rotary knobs and 4 buttons on the Programmer
panel.
All the parameters of a selected device are available by clicking in the “Target” column. Selecting a parameter assigns it to the corresponding Rotary
knob or button. Buttons are used to toggle between two values (e.g. on/off),
and the Rotary knobs can be assigned to generate continuous values over a
specified range. The controls can be assigned multiple functions, e.g. a knob
can change the filter frequency for one device and the master volume for another device etc.
That concludes this introduction to the Combinator!
Check out the included Combi patches in the Factory Soundbank for more
ideas and tips on how the Combinator can be used.
For a complete description of the Combinator, please refer to the Combinator
chapter in the Operation manual pdf.
76
INTRODUCTION TO THE COMBINATOR
Page 79

9
D Using Pattern Devices
Page 80

About this chapter
As of this writing, Reason includes two pattern-based devices: the Redrum
drum computer and the Matrix Pattern Sequencer (additional pattern devices
may be added in upcoming versions). While these two devices are very different
in most ways, they handle patterns following the same basic rules, as described
in this chapter.
! For details about the respective devices, see the Operation Manual
pdf.
D You can also run a pattern device separately (without starting the
main sequencer or other pattern devices) by clicking the Run button
on the device panel.
This starts the built-in pattern sequencer in the device. To stop playback,
click the Run button again or click the Stop button on the Transport panel.
What are Pattern Devices?
A pattern device contains a built-in pattern sequencer. Unlike the main sequencer in Reason, a pattern sequencer repeatedly plays back a pattern of a
specified length. The typical example in the “real world” (as well as in Reason) is
a drum machine which plays drum patterns, usually one or two bars in length.
Having the same pattern repeat throughout a whole song may be fine in some
cases, but most often you want some variations. The solution is to create several
different patterns and program pattern changes (automatic switching from one
pattern to another) at the desired positions in the song.
How Pattern Devices integrate with the main
Sequencer
The built-in pattern sequencer in a pattern device interacts with the main Reason
sequencer in the following ways:
D The tempo set on the transport panel is used for all playback.
D If you start playback for the main sequencer (on the transport
panel), all pattern devices will automatically start as well (provided
their pattern sequencers haven’t been disabled - see below).
D You can mute and solo pattern device tracks in the sequencer.
If a pattern device has a track in the sequencer and you mute this track, the
pattern device will automatically be muted as well. This is indicated by a
Mute indicator on the device panel. Note that if several tracks are connected
to the pattern device, all of these must be muted for the device to be muted.
This Redrum device is muted.
The Run button on the Redrum drum computer.
D If you are running a pattern device separately and start playback of
the main sequencer, the pattern device will automatically restart in
sync with the sequencer.
D Pattern changes can be controlled by pattern change events in the
main sequencer.
In other words, you can record or create pattern changes in the main sequencer, and have them occur at the correct position on playback.
D If the pattern device has a built-in sound source (such as Redrum),
this can also be played by the main sequencer, or via MIDI.
You can combine the built-in pattern playback with playback from the main
sequencer or via MIDI. For example, this allows you to add variations or fills
to a basic pattern.
It is also possible to disable the pattern sequencer totally, converting the device to a pure sound module. This is done by deactivating the Enable Pattern
Section switch.
Read more about controlling devices from the main sequencer in the Operation
Manual pdf.
78
USING PATTERN DEVICES
Page 81

Selecting Patterns
Programming a Pattern
Each pattern device has 32 pattern memories, divided into four banks
(A, B, C, D).
The Bank and Pattern buttons for the Matrix pattern sequencer.
D To select a pattern in the current bank, click on the desired Pattern
button (1-8).
If you like, you can assign computer key commands and/or MIDI messages
to pattern selection. See the Operation Manual pdf.
D To select a pattern in another bank, first click the desired Bank but-
ton (A, B, C, D) and then click the Pattern button.
Nothing happens until you click the Pattern button.
The pattern change takes effect on the next downbeat according to the time signature set in the transport panel.
The Pattern Enable switch
The Pattern Enable switch in the Redrum and the Matrix.
Next to the Bank and Pattern buttons you will find an additional switch, which is
normally activated. If you click this to turn it off, the pattern playback will be disabled, starting at the next downbeat - exactly as if you had selected an empty (silent) pattern. For example, this can be used for bringing different pattern devices
in and out of the mix during playback.
The actual programming procedure differs for the different devices (see the Operation Manual pdf for descriptions of the Redrum and Matrix, respectively).
However, some basic principles are common for all pattern devices:
Steps
Patterns consist of a number of discrete steps. For each step, you can enter a
note, a CV value or various properties, depending on the device. When you run
the pattern, each step will be played back in turn and will play a sound or send
out the information programmed for this step. If you have ever used a drum machine, this will be obvious to you.
Pattern Length
For each pattern, you can specify a length, i.e. how many steps it should contain.
The maximum pattern length is different for different devices.
The pattern length selector for the Redrum (left) and the Matrix (right).
Pattern Resolution
The pattern resolution determines the length (note value) of the steps. When the
pattern resolution is set to 1/16, each pattern step will be a sixteenth note, when
set to 1/8, each step will be an eighth note, etc.
The Resolution control on the Matrix. As with the pattern length value, you can program
different resolution settings for different patterns.
If you change the resolution of an existing pattern, the audible effect will be a
change of pattern playback speed. This may seem strange at first, but if you
think about it, it’s logical:
USING PATTERN DEVICES
79
Page 82

Let’s say you have a 16 step pattern with resolution set to 1/16. The length of
each pattern step is then one sixteenth note, and the whole pattern plays back
over a whole 4/4 bar (16 sixteenth notes = one whole bar).
Now, if you change the resolution to 1/32, each step will be a 1/32 note - half its
original length. There are still sixteen steps. This means that the whole pattern
plays back over half a bar (16 * 1/32 = 1/2). In other words, the pattern plays
back at double speed.
Pattern Shuffle
Shuffle is a rhythmic feature, that gives the music a more or less pronounced
swing feel. It works by delaying all sixteenth notes that fall in between the eighth
notes.
Using Cut, Copy and Paste
By using the Cut, Copy and Paste Pattern commands on the Edit menu or device context menu, you can move or duplicate patterns between devices of the
same type. The following rules apply:
D Copy Pattern makes a copy of the currently selected pattern and
places the copy on the clipboard.
D Cut Pattern moves the currently selected pattern to the clipboard.
This is the same as first performing Copy Pattern and then Clear Pattern.
D Paste Pattern copies the pattern on the clipboard to the selected
pattern location in the selected device.
This overwrites the selected pattern with the one on the clipboard.
Straight sixteenth note pattern
Sixteenth note pattern with shuffle.
In Reason, you can activate or deactivate shuffle individually for each pattern in a
pattern device. However, the amount of shuffle is set globally with the Pattern
Shuffle control on the transport panel.
The Shuffle on/off switch in the Redrum (left) and the Pattern Shuffle control on the transport
panel (right).
Clearing a Pattern
To clear (empty) a pattern, select it and use the Clear Pattern command on the
Edit menu or device context menu.
! Note that clearing a pattern doesn’t affect the pattern length, reso-
lution or shuffle settings!
Transferring patterns between Reason songs
If you want to copy patterns between different Reason songs, you use copy and
paste:
1. Open both songs.
2. Select the pattern you want to copy.
3. Select Copy Pattern from the Edit menu or the device context menu.
You can also hold [Command] (Mac) or [Ctrl] (Windows) and press [C] to
copy.
4. Make the other song active.
This is done by clicking in the song window or by selecting the song from
the Windows menu.
5. Select the bank and pattern location to which you want to copy the
pattern.
Note that any pattern already stored in that location will be overwritten!
6. Select Paste Pattern from the Edit menu or the device context
menu.
You can also hold [Command] (Mac) or [Ctrl] (Windows) and press [V] to
copy.
✪ If you want to use the same patterns in several songs, you could ei-
ther create a “Pattern Supply” Reason song and copy patterns from
this, or program the patterns into your Default Song (see page 105).
80
USING PATTERN DEVICES
Page 83

Pattern Functions
When a pattern device is selected, you will find some specific pattern functions
on the Edit menu (and on the device context menu). Below the three basic types
of pattern functions are listed. However, the exact names and functionalities depend on the device type - refer to the Operation Manual pdf for details.
Shift
The Shift functions move the notes in a pattern one step to the left or right, or
transposes them one semitone up or down (depending on the device). This
function can be used for interesting rhythmic or melodic effects, or as a way to
rectify patterns for which the first step isn’t on the proper downbeat.
Randomize
The Randomize functions create random patterns. These can often be great
starting points and help you get new ideas.
Alter
The Alter functions modify existing patterns. Note that there must be something
in the pattern for the function to work on - using an Alter function on an empty
pattern will not do anything.
USING PATTERN DEVICES
81
Page 84

82
USING PATTERN DEVICES
Page 85

10
D The Browser
Page 86

Background
About ReFills
A ReFill is a kind of component package for Reason which can contain patches,
samples, REX files, Soundfonts and demo songs. If you like, you could compare
ReFills to ROM cards for a synthesizer. On your computer, ReFills appear as
large files with the extension “.rfl”.
All sounds included with Reason are embedded in two ReFills; “Reason Factory
Sound Bank” and “Orkester”, which were both copied to the Reason Program
folder during installation. Additional Propellerhead ReFills are available for purchase. You can also download ReFills from other Reason users on the Internet,
purchase them from other sample manufacturers, etc.
✪ Samples (Wave and AIFF files) are compressed to about half their
original file size when stored in ReFills.
In Reason, you can use the Browser to list and access the embedded sounds
and other components within the ReFills. just as if the ReFills were folders on
your hard disk.
Clicking on the ReFill in the Browser Locations list...
...opens it for navigation, just like a folder.
Furthermore, if a song makes use of components from ReFills, Reason will tell
you which ReFills are required.
Reason File Formats
The following table lists the file formats that you can browse and open using
Reason’s Browser:
File type|Extension|Description
|
Song .rsn This is the main document format in Reason. It
Published
Song
Combinator
Patch
Subtractor
Patch
Malström
Patch
NN19 Sampler Patch
NN-XT Sampler Patch
Redrum
Patch
RV7000
Patch
.rps A published song is a self-contained song in-
.cmb The Combinator (see page 72 for an introduction
.zyp This is a patch for the Subtractor synth device,
.xwv This is a patch for the Malström synth device, con-
.smp This is a patch for the NN19 Sampler device, con-
.sxt This is a patch for the NN-XT Sampler device,
.drp This is a patch for the Redrum drum machine de-
.rv7 This is a patch for the RV7000 reverb effect, con-
contains your music and the setup of the rack,
along with references to any used samples and
loops (or it can contain the actual samples and
loops, if you have made the song “self-contained”).
tended for playback only. It cannot be changed,
its components cannot be extracted and it is not
possible to export it as an audio file.
to this special device) can store/recall combinations of Reason devices. Combinator patches
(Combis) will save all panel settings (as well as
sample references if used) for all devices that are
part of the Combi. In addition, all routing (audio/
CV) between devices in the Combi are included
in the patch.
containing all panel settings. You store your synth
sounds by saving Subtractor patches.
taining all panel settings. You store your synth
sounds by saving Malström patches.
taining references to and settings for all used
samples, along with panel settings.
containing references to and settings for all used
samples, along with panel settings.
vice. It contains information about which drum
samples are used, along with all drum sound settings. In effect, a Redrum patch is a stored drum
kit.
taining all panel settings.
84
THE BROWSER
Page 87

File type|Extension|Description
|
Scream 4
Patch
REX files .rx2, .rcy or
Samples .wav or .aif The NN19 Sampler and the Redrum drum ma-
Soundfont
Bank
.sm4 This is a patch for the Scream 4 distortion effect,
.rex
.sf2 The Soundfont format was co-developed by E-mu
containing all panel settings.
REX files are created in another Propellerheads
application, the ReCycle loop editor. They contain
audio loops chopped into slices, with one slice for
each significant beat in the loop. By loading a
REX file into the Dr. Rex Loop Player device, you
can play back the loop in virtually any tempo (without affecting the pitch), manipulate individual
beats in the loop, extract timing info, etc.
Note that you can also load REX files into the
samplers and the Redrum drum machine.
chine play back samples, in Wave or AIFF format
with support for a large number of resolutions and
sample rates. You can use files of different formats in the same device - one drum sound can be
an 8-bit sample, the next a 16-bit sample, etc.
Systems and Creative Technologies and is used
with many audio cards and software synthesizers.
SoundFont banks store wavetable synthesized
sounds, allowing users to create and edit multisampled sounds in special Soundfont editing programs. The Soundfonts can then be played back
in wavetable synthesizers, typically on audio
cards, thereby effectively turning an ordinary
sound card into a sampler.
The NN-XT and NN19 Samplers and the Redrum
drum machine allow you to browse and load
Soundfonts. Regardless of which editing program
was used to create them, these banks are similarly and hierarchically organized, with folders for
instruments, presets, samples etc. The NN-XT,
NN19 and the Redrum lets you load individual
samples and presets from a Soundfont bank, but
not the complete Soundfont.
About the Browser
The Browser is a special file dialog that appears when you open songs or load
patches, samples or REX files, from within a ReFill or from regular file folders.
Apart from standard file folder browsing, the browser dialog offers you several
useful functions:
D Search for files by name and/or type - see page 92.
D Use “cross-browsing” to search for patches belonging to any type
of device.
For example, you open the browser from a Subtractor device to browse for a
suitable patch. But instead of limiting the Browser to show only Subtractor
patches, you can chose to browse for any type of instrument patch. If you select a patch with a different format than the device you “started” browsing
from, the original device will be replaced by the new device. See page 90.
D Create Favorite Lists containing shortcuts to your Favorite files for
instant access.
See page 93.
D Audition instrument patches, audio samples and loops on the fly.
D Save shortcuts to various locations on your local drive(s).
See page 89.
THE BROWSER
85
Page 88

Opening the browser
You can use any of the following commands to open the Browser dialog (what
file types you can browse for depends on which method you used to open the
Browser dialog):
D By selecting “Open” from the File menu.
This opens the Song Browser where you can select to open a saved Song.
D By selecting “Browse Patches” on the Edit menu with a patch de-
vice selected (or by clicking the “Browse Patches” button on a device panel).
This opens the Patch Browser allowing you to browse patches for the selected device. You can also use “cross-browsing” (see page 90) to select
patches for other device types.
D By selecting “Browse Samples” on the Edit menu with a sample de-
vice selected (or by clicking the “Browse Samples” button on a device panel).
This opens the Sample Browser, where you can browse for samples in the
supported audio formats.
D By selecting “Browse ReCycle/REX Files” on the Edit menu with a
Dr. Rex Loop Player selected (or by clicking the “Browse Loops”
button on a device panel).
This opens the REX File Browser, allowing you to browse for REX loops.
D By selecting “Import MIDI File” from the File menu.
This opens the MIDI File Browser, allowing you to browse for MIDI files.
D By selecting “Create device by browsing patches” from the Create
menu.
This allows you to browse patches for any device. When you select a patch
in the browser (without clicking “OK” in the browser dialog), the corresponding device is automatically created in the background, together with a corresponding sequencer track if an instrument patch is selected. See page 91.
Browser elements
The Patch Browser dialog.
Regardless of what browser mode is chosen (song/patch/sample etc.), the
Browser dialog basically contains the same main elements, although items may
be grayed out if not applicable. The dialog contains the following elements:
File and folder list
86
This is the main browser list, showing the contents in a selected root folder - see
page 88.
THE BROWSER
Page 89

Show pop-up menu
This is only available in the Patch browser (it is otherwise grayed out). It determines what patch types are shown in the files and folder list view and thus which
patches can be selected. See page 90.
Where pop-up menu
The field above the file and folder list displays the name of the currently selected
root folder.
• By clicking in the field a pop-up menu is shown, allowing you to move up in
the folder hierarchy (search results and Favorites lists, however, are shown
as “flat” lists with no folder hierarchy).
Back/Forward buttons
Locations list
This is a list of shortcuts to different locations. You can manually add any locations (on any local drive) to this list.
Selecting an item in this list will open the corresponding folder/ReFill as the root
in the main files and folder list - see page 88.
Favorites section
In the Favorites section of the dialog you can create folders containing shortcuts
to patches, samples or song files - see page 93.
Search pop-up and text field
These arrow buttons allow you to move between the browser locations opened
while browsing, much like pages in a web browser. When the browser dialog is
closed, the location list is cleared.
These items allow you to specify a search location and to enter a text string to
search for, respectively. The Search function is described on page 92.
THE BROWSER
87
Page 90

Info and details
The Info section in the left corner can show Song/ReFill splash images and the
Details section will show information about the item currently selected in the file
and folder list. Exactly which information is shown depends on the file type. For
example, samples or REX files contains information about the file format and
length of the selected file, while a selected song file can display comments from
the author (Song Information, see page 103), etc. If the selected file is part of a
ReFill, this will be indicated regardless of the file type.
Audition section
This section contains controls for auditioning samples and REX files - see page
89.
Select Previous/Next arrow buttons
These buttons allow you to move the current file selection up or down in the list.
In the Patch or Sample Browser, a selected file (patch or sample) is automatically loaded in the background.
Loading indicator
This icon will light up to indicate that a patch or sample is loading.
Navigating in the Browser
Here, the Patch Browser was opened from a Subtractor device, allowing you to browse for
Subtractor patches.
When navigating in the Browser, items are shown as a hierarchical list in a selected root folder, just like in your computer finder.
All folders and subfolders within a root folder are shown, but only files of the relevant type (i.e. songs/samples/patches etc.) can be viewed/selected in the
Browser. For example, if you have selected to browse samples for a NN-XT device, only audio samples will be shown in the Browser.
• Click on the plus sign (Win)/arrow (Mac) beside a closed folder to open it. If
the folder contains files of the relevant type, these will be shown.
• Double-clicking a folder in the list opens it as the root folder in the Browser.
• The Name, Modified, and Size columns show the name of the folder or file,
the modified date (files only) and the size (files only), respectively. Clicking
on a column header sorts the files accordingly (i.e. alphabetically, by date
saved or by file size).
• You can use the Back/Forward buttons to move between different locations
you have opened in Browser. When you close the Browser this location list
is cleared.
• The “Select Previous/Next” arrow buttons allow you to move between files in
the current list. Folders are skipped.
• The “Where” pop-up list allows you to move up in the folder hierarchy when
the Browser points to a specific folder location (see “About hierarchic and
flat lists” below).
88
THE BROWSER
Page 91

About hierarchic and flat lists
In certain circumstances the Browser will display a flat list without any folder hierarchy. In such cases there will be an extra “Parent” column displaying the parent folder location for all files. The “Where” pop-up will then contain a shortcut
to a selected file’s parent folder. Flat lists are shown in the following cases:
• When the Browser is showing a search result - see page 92.
• When the Browser is showing a Favorites folder list - see page 93.
• When the Browser is showing a browse list stored for a device in a saved
song - see page 93.
Using Locations
To help you to find your files quickly, you can add shortcuts to the folders used
to store your samples, patch files etc. to the list in the Locations section. By default, the Locations list contains five fixed locations; the computer Desktop, the
Documents folder, the Reason Program folder and the Factory/Orkester Sound
Banks.
D Selecting a Location in the list opens it as the root folder in the
Browser.
D To add a location, select a folder or ReFill in the main browser list
and drag it into the Locations list with the mouse button pressed.
Any new locations will be added below the list of fixed locations. Manually
added locations can be reordered by drag and drop.
D To remove a location, select it in the Locations list and press [Back-
space].
The default locations cannot be removed.
D Manually added locations are stored in the Preferences.
! If a stored location has been removed or is unavailable, a warning
triangle with an exclamation mark is shown before the location
name in the list.
Selecting and auditioning patches
In the Patch Browser, selecting a patch automatically loads it in the background
(i.e. with the Browser dialog still open). This allows you to preview patches before confirming a selection by clicking OK in the Browser.
• For instrument patches, make sure MIDI input is directed to the sequencer
track connected to the device you are browsing from. Play a few notes when
selecting a new patch to audition it.
• For effect patches you can activate loop playback before opening the Patch
Browser from the effect. Once the Browser dialog is open, you can browse
to a folder containing compatible patches and step through them to hear
how the patches affect the sound.
✪ You can also audition patches for any instrument or effect device -
not just the device you opened the browser from! See “Crossbrowsing patch files” on page 90.
Selecting and auditioning samples
For samples and REX loops you can use the Audition controls to preview the audio.
This is done in the following way:
D Select the file in the file list and click the Preview - Play button to
the right.
The file is played back. During playback, the Play button in the Audition section is relabeled to “Stop” - click this to stop playback.
D You can also activate the Autoplay checkbox and simply select the
file you want to audition.
The selected file is automatically played back. Again, click the Stop button to
stop playback.
About browsing large patches
As stated previously, when you are browsing patches (or samples), these are automatically loaded in the background when selected. Most of the time, this happens instantaneously. Bear in mind, however, that some files (especially big
Combinator patches, which can contain any number of devices and samples)
can take several seconds to load.
If you select a particularly large patch by mistake, you can abort the loading by
simply selecting another patch.
THE BROWSER
89
Page 92

Selecting multiple files
It is possible to select multiple files in the Browser, by using standard [Shift] or
[Ctrl] (Win)/[Command] (Mac) selection techniques. This, however, does not
mean that the selected files can be loaded.
There are basically two instances where selecting several files in the Browser
file list is relevant:
D It is possible to load several samples simultaneously into the NN-
XT and NN19 sampler devices.
See the NN19 and NN-XT chapters in the “Operation Manual” pdf for details.
D You can select several files to add them to a Favorites list in one go
- see page 93.
! In cases where several selected files (e.g. patches or songs) cannot
be loaded, the OK button in the Browser is grayed out.
Cross-browsing patch files
Cross-browsing patches is a powerful feature of the Patch Browser. It allows
you to browse for any type of patch (instrument or effect - see below), regardless of which device you opened the Browser from.
About instrument and effect patches
Patches are internally divided into two patch categories in the Browser; instrument patches and effect patches (the Browser “knows” what type of patch it is).
This is because instrument patches and effect patches are fundamentally different - instruments are played, and effects are used to process sound - and you
would logically browse for one or the other, but not both.
When browsing patches from an existing instrument device, the options on the
Show menu are:
• “XXX Patches” (where XXX is the device type you opened the Browser from,
e.g. NN-XT).
• “All Instruments” will show patches for any instrument device.
When browsing patches from an existing effect device, the options on the menu
are:
• “XXX Patches” (where XXX is the device type you opened the Browser from,
e.g. RV7000).
• “All Effects” will show patches for any effect device that uses patches, including Combi patches.
Cross-browsing - an example:
1. You are playing a Subtractor device but feel that the sound isn’t
quite what you had in mind, so you open the Browser to check out
some other patches.
2. After browsing Subtractor patches for a while, you still haven’t
found the type of sound you wanted, so you click the “Show” popup and select “All Instruments” from the menu.
Now you can select instrument patches for any device. You decide to
browse a folder containing Malström patches. You can use the Previous/
Next buttons to step through the files in the selected folder.
3. As soon as you select a Malström patch in the Browser, a Malström
device replaces the Subtractor in the background (the Browser is
still open).
The sequencer track which was previously connected to the Subtractor is
now connected to a Malström with the patch selected in the Browser
loaded.
D Note that the name of the sequencer track is not automatically
changed to reflect the new device.
This may or may not matter. If the track was named “Bass” (and it is a bass
sound you are looking for), this obviously works fine. But if the track was
named “Subtractor 1” and you end up with another device connected, it
might be better to rename the track to avoid confusion.
4. You can continue to browse patches and play your keyboard to audition them.
Each time you select a patch type belonging to a different device, a corresponding instrument device is created in the background, replacing the previous instrument.
5. When you have settled on a patch - for whatever instrument device
- click OK to confirm the selection and close the dialog.
Clicking Cancel will return to the same state as when opening the Browser.
D If you use cross-browsing for an effect patch it works in the same
way - selecting an effect patch of a different format will replace the
current effect in the background with a device of the selected format.
90
THE BROWSER
Page 93
Special instances of cross-browsing
There are a few instances when replacing an existing device by browsing might
lead to lost connections:
D When a device is replaced by another device type, audio connec-
tions may be lost.
An example is replacing an NN-XT (which can use up to 16 outputs) with a
Subtractor (which only has one output).
D When a device is replaced by another device type, CV connections
on the back panel may be lost.
The only connections that are retained between device types are Sequencer
Control CV/Gate in.
! If you encounter such situations and you want to restore the origi-
nal connections, use the “Undo” function. Browsing back to the
original device patch will not restore lost connections.
Create device by browsing patches
This allows you to browse for any kind of instrument or effect patch. This is essentially the same as cross-browsing, except that you do not start with an existing device.
1. Select “Create device by browsing patches...” from the Create
menu.
The Patch Browser opens.
2. On the “Show” pop-up menu there will now be two options; “All Instruments” and “All Effects”. Select an option according to the type
of device you wish to create.
3. When you select a patch, a corresponding device is created automatically together with a corresponding sequencer track.
MIDI input will be automatically set to the new track so that you can audition
the patch by playing your master keyboard.
4. The device will be auto-routed according to standard rules.
E.g. if it is an instrument device, it will be connected to the first available
mixer channel - see page 51.
5. Click OK when you have found the patch you wanted, to confirm the
creation of the new device and to close the Browser.
About patch formats and sampler devices
As both the NN-XT and NN19 sampler devices can load patches in the NN19
(.smp) and REX (.rx2/.rcy/.rex) formats, there has to be certain rules regarding
cross-browsing.
D The basic rule is that the Browser will load such patches into the
original device type (the device you opened the browser from),
whenever possible.
Thus, when the patch format is NN19 (.smp) or REX (.rx2/.rcy/.rex) and you
are browsing from an NN19 device, the patch will be loaded into this device.
D If you are browsing from any other type of device, these patch types
will be loaded into a NN-XT device.
D If you are using the “Create device by browsing patches” function a
NN19 (.smp) patch will create a NN19 device and a REX patch will
create a NN-XT device.
THE BROWSER
91
Page 94
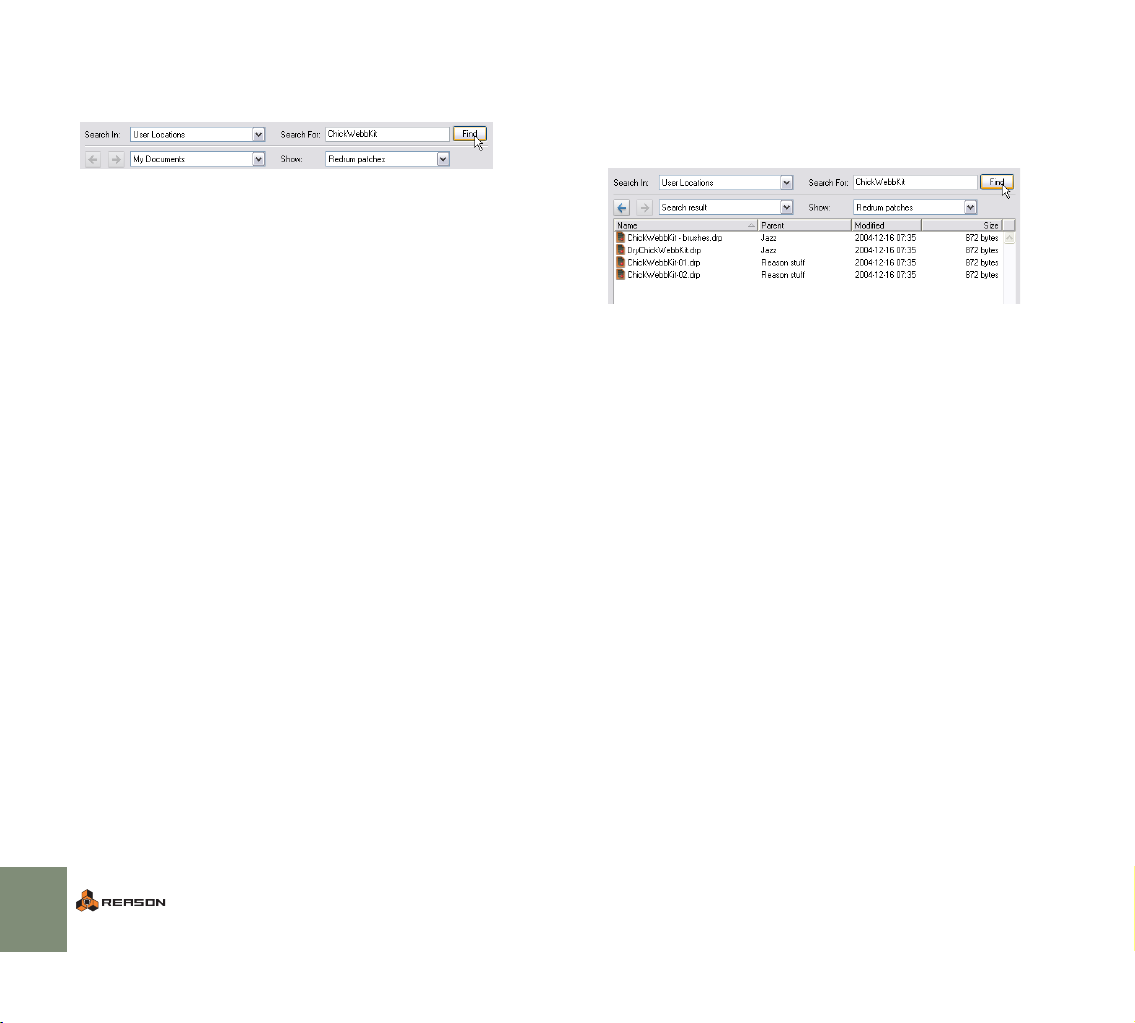
Using the Search function
The Search function allows you to search for files by name and/or type.
Search criteria
The Browser mode (patch, song etc.) determines what file type(s) you can
search for, just as when you are manually navigating in the Browser.
The Search in pop-up menu
This pop-up menu allows you to select where to search. The options are as follows:
• “Local disks” will perform a complete search of all local drives.
• “User Locations” will search all folders and ReFills stored in the Locations
list (except the Desktop).
• “Current Folder” will limit the search to the currently selected root folder (including subfolders).
The Search For text field
This is where you can enter a text string to search for.
D You can specify one or several words, whole or partial.
If you specify more than one word, the search will show results that match all
specified words. Text search is not case sensitive.
✪ Note that you don’t have to enter text to use the Search function.
Depending on the selected Browser (Patch, Sample etc.), you can
also simply search for files of the corresponding type in the selected location(s).
Executing the search
D Clicking the “Find” button will execute the search according to your
specifications.
After the search, the search result is shown as a flat list in the Browser, and
the Where pop-up field reads “Search result”.
D A new “Parent” column also appears, listing the name of the parent
folder for each file.
If you select a file you can pull down the Where pop-up above the file list and
select “Go to Parent folder” - this opens the parent folder for the selected
file.
The name of the containing folder is also part of the search result (given that it
contains files of the appropriate type). This means that if you are searching for
“Guitar”, all samples or patches with “Guitar” in the filename will be shown, but
also all samples or patches contained in folders with “Guitar” in the name.
D If you have searched for patches, you can select to show all patches
that match the search criteria by selecting to show “All Instruments” on the Show pop-up.
This will extend the search result to show all patches that matches the
search text. Note that you do not have to repeat the search to do this.
92
THE BROWSER
Page 95

Opening files
When you have navigated to the desired folder (on your hard disk or within a ReFill) and located the desired file, you open it by double clicking it in the file display or by selecting it and clicking the OK button.
As described earlier, patches and samples are loaded directly upon selection,
so clicking OK doesn’t actually “open” the file, it simply confirms the selection,
and closes the Browser dialog.
About browse lists
When you click OK to open a file from the Browser, the file and folder list shown
at that time is memorized for that device. This is called a “browse list”.
For patches (and to a certain extent samples) this list provides a specific functionality:
D The browse list is what applies when changing patches using the
Next/Previous Patch buttons on the front panel of a device (or from
patch selectors on a control surface).
It is also the active browse list that is shown on the patch list opened by
clicking in the patch name field for a device.
D For samples, the browse list applies when changing samples using
the Next/Previous Sample buttons on the front panel of a sampler
device.
What can a browse list contain?
D When you confirm a patch or sample selection by clicking OK in the
Browser, the resulting browse list will include the files contained in
all currently open folders in the Browser.
If you open the Browser again for the same device, the same file and folder
structure is shown.
D If you save the current song and reopen it, the items in the browse
will be shown as a “flat” list, and the “Where” pop-up field will
show “Document Browse List”.
In such cases, the Browser will show the “Parent” column, listing the names
of the containing folders. The Where pop-up will also contain the item “Go
to parent folder” for a selected file.
D A browse list could also be a Search result, or a Favorite list.
Favorite Lists provide a way of controlling/filtering which patches or samples
will be available on a browse list for a device - see below!
! Note that if you opened a patch after having used cross-browsing
(see page 90) or used the Search function (see page 92), the active
browse list could contain patches in different formats, and stepping
through patches from the device panel could change the device
type.
Using Favorites
Favorites provide a way to group and order files that may be physically located
anywhere on your local drives. Any file that can be loaded in Reason (songs,
patches, samples etc.) can be added to a Favorites folder. Only shortcuts to files
are added - the original files aren’t moved.
This is particularly useful for handling patches. By adding the patches you need
for a given situation to a Favorite list, you can determine exactly which patches
will be selectable for a device, and in what order. You can then sequentially step
through these using patch select buttons on your MIDI keyboard or control surface device. See page 94 for a practical example of this.
D To add a New Favorite List, click the “New Favorite List” button.
An empty folder is created, named “New Favorite List”. The Browser list remains unchanged. If you double-click the folder you can type in a new name
for the list.
D To add a file to the Favorite List, select it in the Browser and drag it
to the Favorite List folder.
You can also select multiple files using standard selection techniques [Shift] and/or [Ctrl] (Win)/[Command] (Mac) - and drag these into the folder
in the same way.
THE BROWSER
93
Page 96

D By selecting the folder, the currently selectable contents of the Fa-
vorite list is shown in the Browser list.
What is selectable/shown depends as usual on the current Browser mode.
If you select a Favorite List folder that contains samples, these will only be
shown if the Sample Browser is selected.
D When a Favorites list folder is selected in the Browser, an addi-
tional “Parent column” is shown (just like Search results), listing
the name of the containing folder for each file in the list.
Files in a Favorites list have an order, and can not be sorted by clicking the
column headers. However, they can be reordered by using drag and drop.
D To remove a file from a Favorite list, open the list, select the file and
press [Backspace].
This removes the shortcut only - the original file isn’t affected.
D To remove a Favorite List, select it in the Favorites section and
press [Backspace].
Using Favorites - a practical example
Here follows a practical example of how you can use Favorites for patch files:
You are preparing for a live gig as a keyboard player. You know the songs, and
you have chosen suitable patches (in various device formats) for each song.
You want to use Reason, but you want to able to switch to the right patch for
each song using your MIDI keyboard, and not have to worry about fiddling with
the computer during your performance.
Here is how this can be done by using Favorites:
1. Set up a Reason song with a mixer device (and send effects if desired).
2. Create an instrument device, for example a Combinator.
It doesn’t matter which instrument device you choose at this point. Just make
sure that MIDI input is set to this track in the sequencer.
3. Open the Patch Browser from the instrument device.
4. Click the “New Favorites List” button.
A new folder appears in the list. Double-click it and type in an appropriate
name.
5. Select to show “All Instruments” on the Show pop-up.
Now you can start locating the patches you need by navigating in the
Browser.
6. When you have located a patch that you need for the gig, drag it
from the Browser into the Favorites folder.
If this was a patch in a different format than the instrument you created, a device of this type will replace the original device.
7. Continue to add the patches in the same way until you have all the
patches you need.
8. When done, select the Favorites List folder.
The folder is opened in the Browser, listing all the patches you added.
9. Use drag and drop to order the patches according to the set list.
10. Select the first patch in the Favorites list and click OK.
The browser closes with the patch loaded.
D If you have a MIDI keyboard or control surface with programmable
buttons, you can assign a button to “Select next patch” on the device.
This is described in the Operation Manual pdf.
11. Save the Song.
12. At the gig, open the song, and the first patch will be loaded.
13. When the first song is finished, use the “next patch” button on the
device or on your MIDI keyboard and the next patch in the Favorites
list will be loaded!
94
THE BROWSER
Page 97

Handling Missing Sounds
Sampler patches, drum machine patches and Soundfonts contain references to
samples - files on your hard disk. The same is true for songs that contain samples (in sampler or drum machine devices) or REX files. If any of these files have
been moved, renamed or removed when you try to open the patch or song, Reason will alert you that files are missing:
Click one of the four buttons:
Option:
|
Search & Proceed
Proceed The song or patch will be opened, with sounds missing. This
Description:
|
Reason will search for the missing files in all Locations added
by the user and in all known ReFills.
• If all files are found, the song or patch will be opened without
further ado.
• If one or more files cannot be found, the Missing Sounds dialog will appear (see below).
Note that the file search will look at the file names only - files
that have been renamed will not be found!
means that sampler patches, drum machine patches and/or
loop players will not play back correctly.
On the device panels, missing samples are indicated with an
asterisk (*) before the file names:
The “Intruder” sample is missing.
The Missing Sounds dialog
This dialog appears if you clicked the Open Dialog button in the previous dialog,
or if you clicked the Search & Proceed button but the program couldn’t find all
missing sounds.
The main display in the dialog lists all missing files. The four columns show the
following properties:
Column|Description
|
Device Shows the name of the device in which the missing sound is used,
Sound Shows the name of the missing file.
Part of ReFill/Soundfont
Status When the dialog appears, all files will have the status “Missing”.
along with a device type icon.
If the missing file is part of a ReFill, or a Soundfont within a ReFill,
this column shows the name of the ReFill/Soundfont If there is an
URL (Internet address) associated with a ReFill, you can download
the necessary ReFill(s) from this dialog, as described below.
Files that are found by the auto-search function or manually replaced will be indicated as “Replaced”.
Open Dialog Opens the Missing Sounds dialog (see below).
Cancel Cancels the operation, i.e. no song or patch will be opened.
THE BROWSER
95
Page 98

Selecting
The Replace and Search Locations functions (see below) are performed on the
files that are selected in the list. This allows you to replace some files manually
(necessary if the files have been renamed or are outside the Locations), have the
program find other files automatically and skip the rest of the files.
D To select a file, click on it in the list.
You can use the standard [Shift] or [Ctrl] (Win)/[Command] (Mac) selection
techniques to select several files
D To select all files in the list, click the Select All button.
When the dialog first appears, all files in the list are selected.
Search Locations
If you click the Search Locations button, Reason will search for the selected files
in all Locations set up in the Browser (except the Desktop). If the program finds
a file with the matching name and file type, the new path is stored in the song/
patch and the file is shown as “Replaced” in the Status column.
D Since the file search looks at the file names, files that have been re-
named will not be found!
This also means that if your Locations contain several files with the same
name, the wrong sounds may be found.
Replace
Clicking the Replace button opens the browser dialog, allowing you to manually
locate each missing file. This allows you to use files that have been renamed.
The browser dialog will appear once for each selected file in the list. The name
of the file to look for is shown in the Browser window’s title bar.
Search In...
This function is useful when you need to replace a whole lot of samples and you
know where these samples are located. A typical example would be if you have
reorganized the folder structure on your computer, and the sample folder has
been moved in relation to the folder with a sampler patch or song.
D If you click “Locate”, the Browser opens, asking you to select the
sample directory, i.e. the folder in which you know that the samples
are located.
Select either the folder, or a sample in the folder. When you click OK, Reason will search in the selected folder (and its subfolders) only.
Download ReFill
If a missing sound is part of a ReFill (as indicated in the Part of ReFill Package
column), and there is a valid URL (Internet address) for this ReFill, you can
download the ReFill directly from this dialog (provided you have a working Internet connection):
1. Select the sound(s) that use the ReFill.
You should only select several sounds if they use the same ReFill.
2. Click the Download ReFill button.
This launches your Internet browser and takes you to the URL associated
with the ReFill.
3. A dialog appears, asking you to download the ReFill. Do so.
4. Click OK.
Reason automatically scans the downloaded ReFill and locates the files.
Proceeding
At any point, you can click the OK button to close the dialog and open the song
or patch. Note:
D For the files you have found (status “Replaced”), the new paths will
be stored in the song or patch.
However, you need to save the song or patch for the changes to become
permanent!
D If any file is still missing when you click OK, there will be sounds
missing in the song/patch.
Sometimes, you may want to proceed with sounds missing, and then remove
or replace the sounds from the device panels in the rack instead.
On the device panels, missing samples are indicated with an asterisk (*) before the file
names:
Clicking Cancel will abort the operation, i.e. the song or patch will not be
opened.
96
THE BROWSER
Page 99

11
D Working with Patches
Page 100
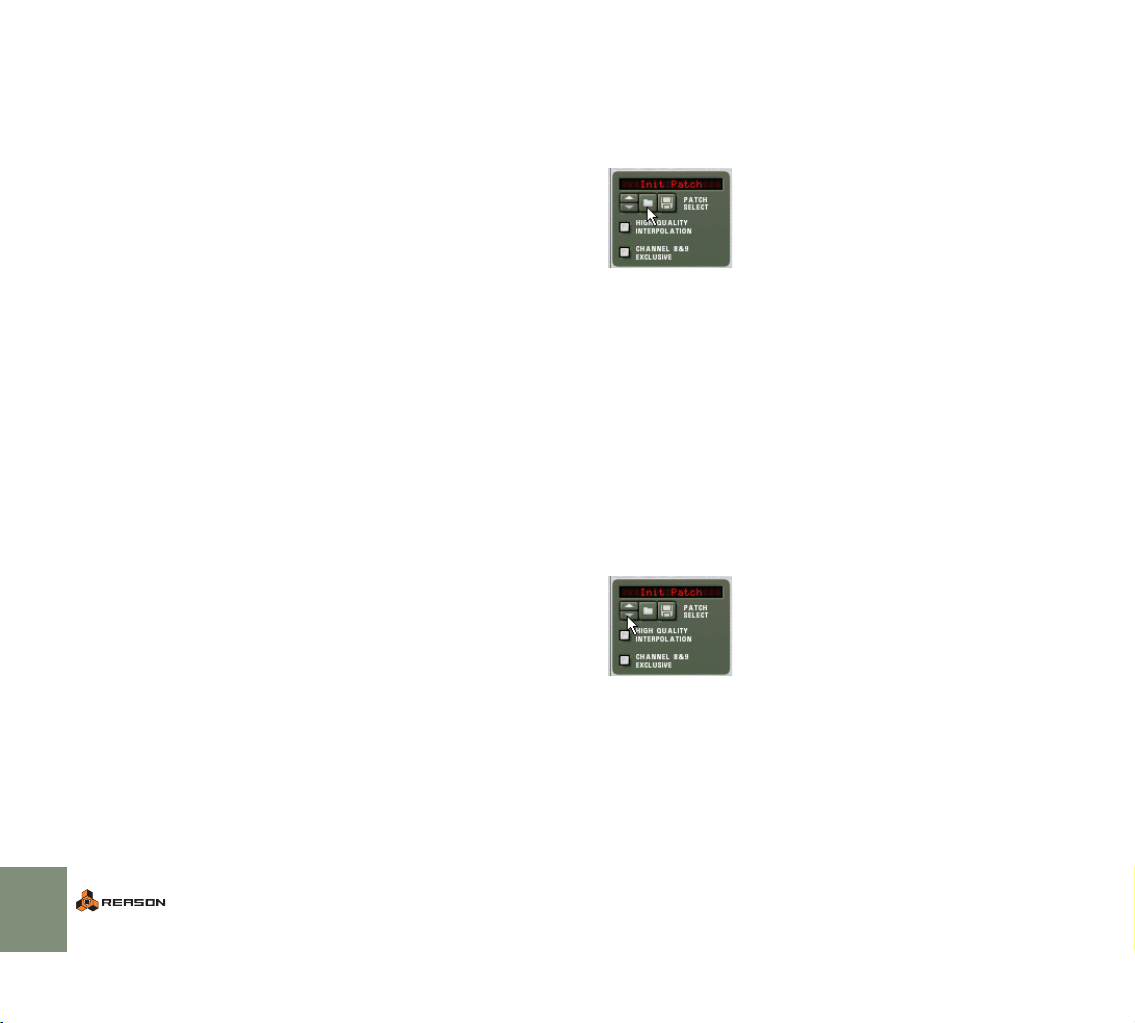
About Patches
Selecting a Patch
A Reason patch contains settings for a specific device. As explained in the
chapter “The Browser”, patches can either be separate files on your hard disk or
files embedded in a ReFill.
Eight device types use patches:
D Subtractor & Malström synth patches contain all settings on the de-
vice panel.
Selecting a patch brings up a new sound, just like when selecting programs
or patches on a hardware synthesizer.
D NN19 & NNXT sampler patches contain information about which
samples are used and their settings (key mapping, tuning, etc.),
plus the parameter settings on the device panel.
It is important to note that the sampler patch doesn’t contain the actual samples - only information about which sample files are used.
D Redrum drum computer patches contain a complete “drum kit”, that
is, information about which drum samples are used, together with
the parameter settings for each drum sound.
Again, the actual samples are not included in the patch, only file references.
Also note that Redrum patches are separated from Redrum patterns - selecting a new patch will not affect the patterns in the device.
D Scream 4 and RV7000 effect patches contain all settings on the re-
spective device panel.
Selecting a patch brings up a new sound, just like when selecting programs
or patches on a hardware effect device.
D The Combinator (Combi) patch format saves all settings and file
references for each device in the Combi, along with the Combinator’s own settings; key/velocity zones, modulation routing etc.
Any audio or CV routing from/to devices that are part of the Combi is also
saved.
! Note that patches for devices included in a Combi are not saved in-
dividually - e.g. if a Combi includes a Subtractor, and you have
tweaked its settings, these settings will be saved with the Combi,
but will not be saved as a separate Subtractor patch unless you do
so from within the Combi - see page 99.
! Apart from Combis, patches do not include information about any
routing done on the back of the device.
To select a patch for a device, use one of the following methods:
D Click the folder button in the Patch section on the device panel.
! Note: On the panels of the Redrum, NN19 and NNXT devices, there
are also other folder buttons, used for loading samples. Make sure
you click on the button in the Patch section (next to the patch name
display)!
D Select the Browse Patches item on the Edit menu or device context
menu.
Note that the Edit menu reflects which device is selected - in other words,
you must select the device for the corresponding Browse Patches item to
appear on the Edit menu.
In both cases, the Browser dialog appears, allowing you to locate and select the
patch, on the hard disk or within a ReFill.
D Once you have selected a patch, you can step between all the
patches in the same folder by using the arrow buttons on the device
panel.
Note that switching patches on a device can also change the actual device!
See “About browse lists” on page 93.
98
WORKING WITH PATCHES
 Loading...