

Page 1
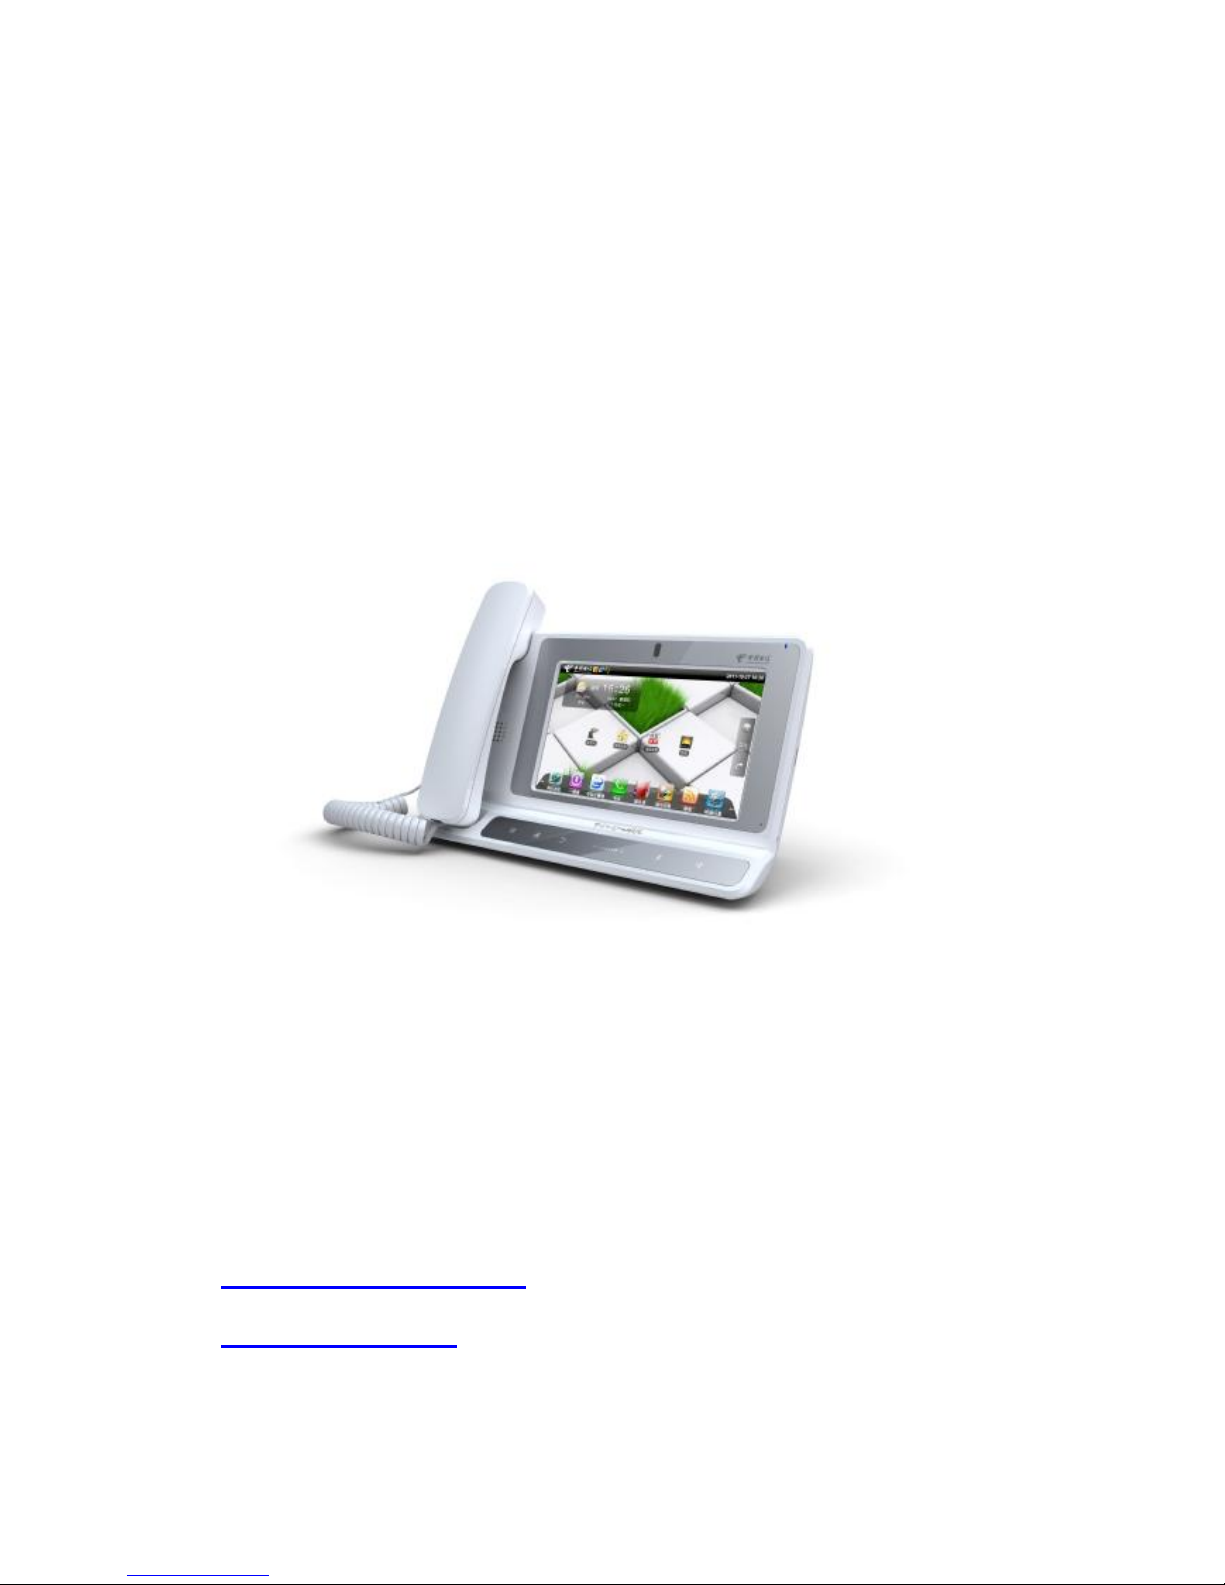
Media Phone
Quick User Guide
Shenzhen Proolin VoIP Tech.Ltd.
http://www.proolin.com
Page 2

CONTENTS
MEDIA PHONE................................................................................................................................................1
QUICK USER GUIDE .....................................................................................................................................1
PRODUCT OVERVIEW ................................................................................................. 错误!未定义书签。
CONNECTING CABLES ............................................................................................... 错误!未定义书签。
CONNECTING TO A WIFI NETWORK (OPTION) ...................................................... 错误!未定义书签。
SETTING NETWORK .................................................................................................... 错误!未定义书签。
CALL SETTING.............................................................................................................. 错误!未定义书签。
MAKING A CALL ........................................................................................................... 错误!未定义书签。
ANSWERING A CALL ................................................................................................... 错误!未定义书签。
CREATING A CONTACT ............................................................................................... 错误!未定义书签。
EXPORTING AND IMPORTING A PHONEBOOK...................................................... 错误!未定义书签。
IMPORTING FILES FROME USB DEVICE OR SD CARD ........................................ 错误!未定义书签。
SETTING TIME AND DATE...........................................................................................错误!未定义书签。
INSTALLING THIRD PARTY APPLICATIONS............................................................ 错误!未定义书签。
UNINSTALLING THIRD PARTY APPLICATIONS ...................................................... 错误!未定义书签。
SPECIFICATIONS.........................................................................................................................................13
Page 3
Media Phone Quick User Guide http://www.proolin.com
1
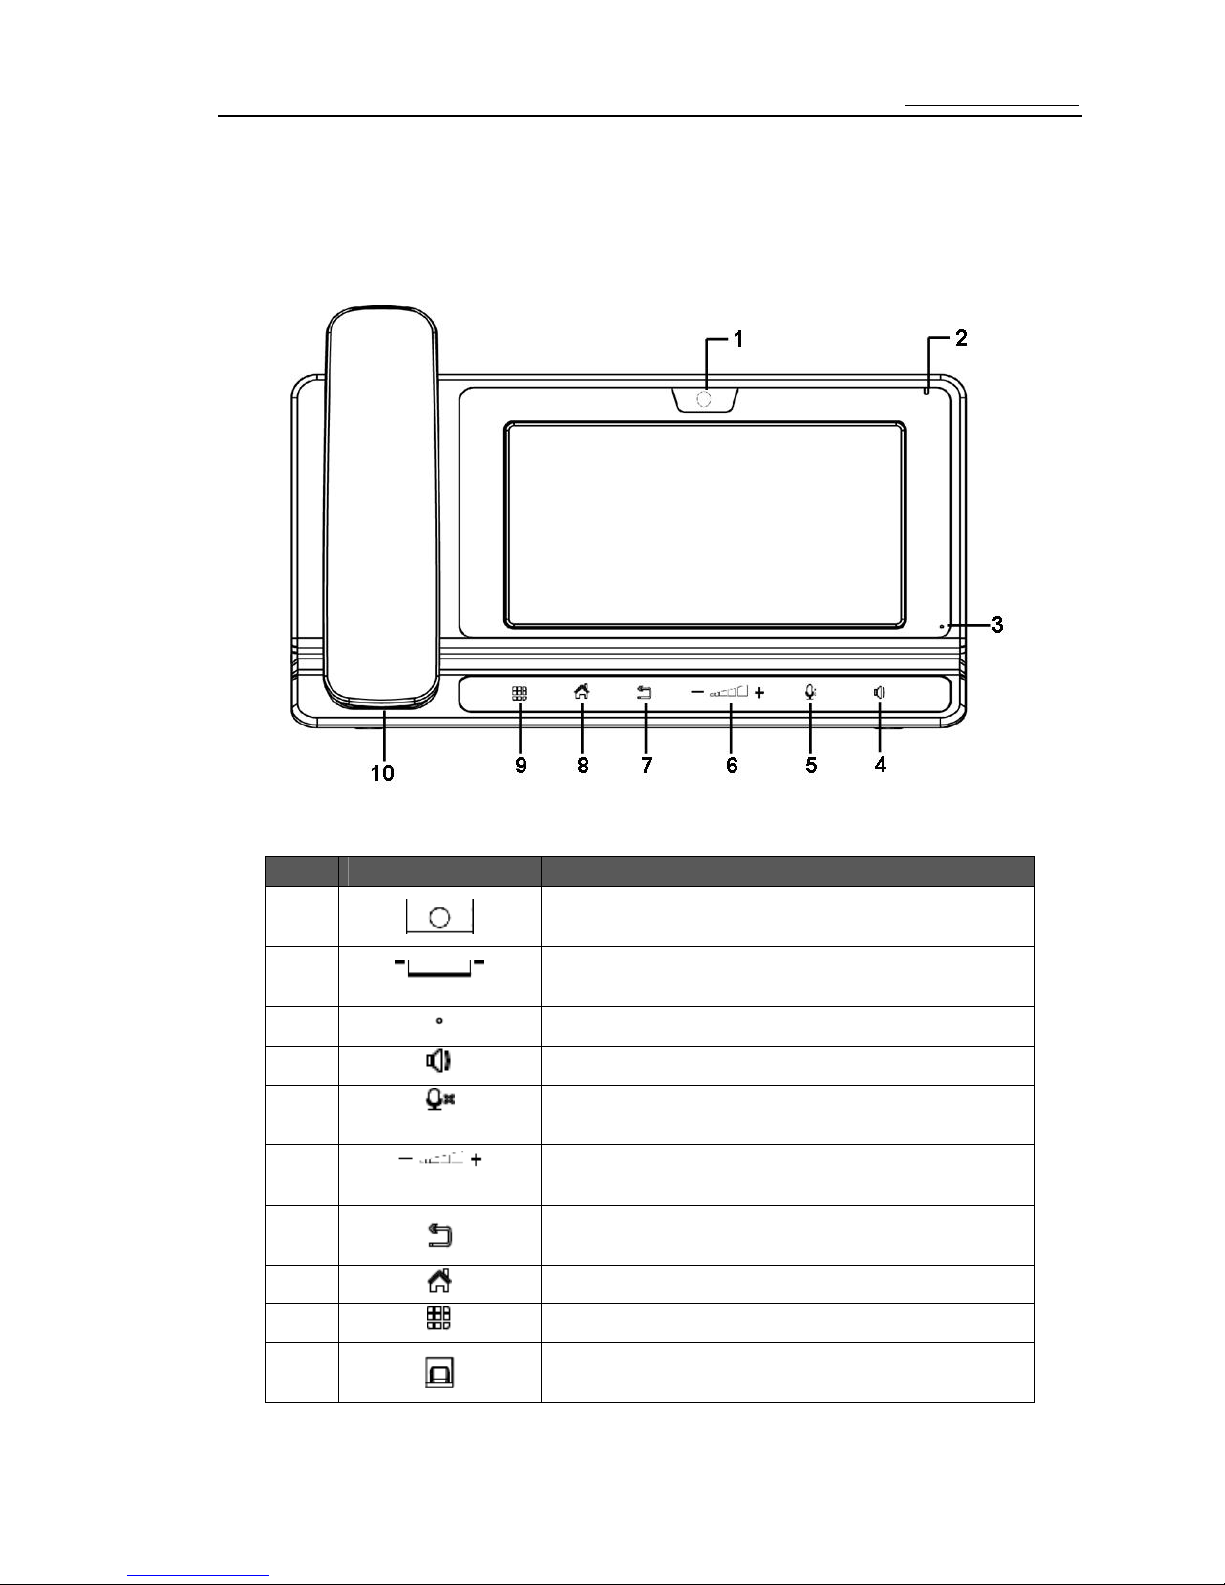
Product Overview
Front View
S/N Item Description
1
Camera. You can rotate the camera to adjust the
angle.
2
Power LED.
3
Microphone input jack
4
Handsfree Key.
5
Mute Key. Press to mute audio transmission locally
during calls.
6
Handset Interface.Volume key.
7
Back key. Press to return to the previous screen.
8
Home key. Press to display the home screen.
9
Menu key. Press to show the menu list.
10
Handset Interface.
Page 4
Media Phone Quick User Guide http://www.proolin.com
2
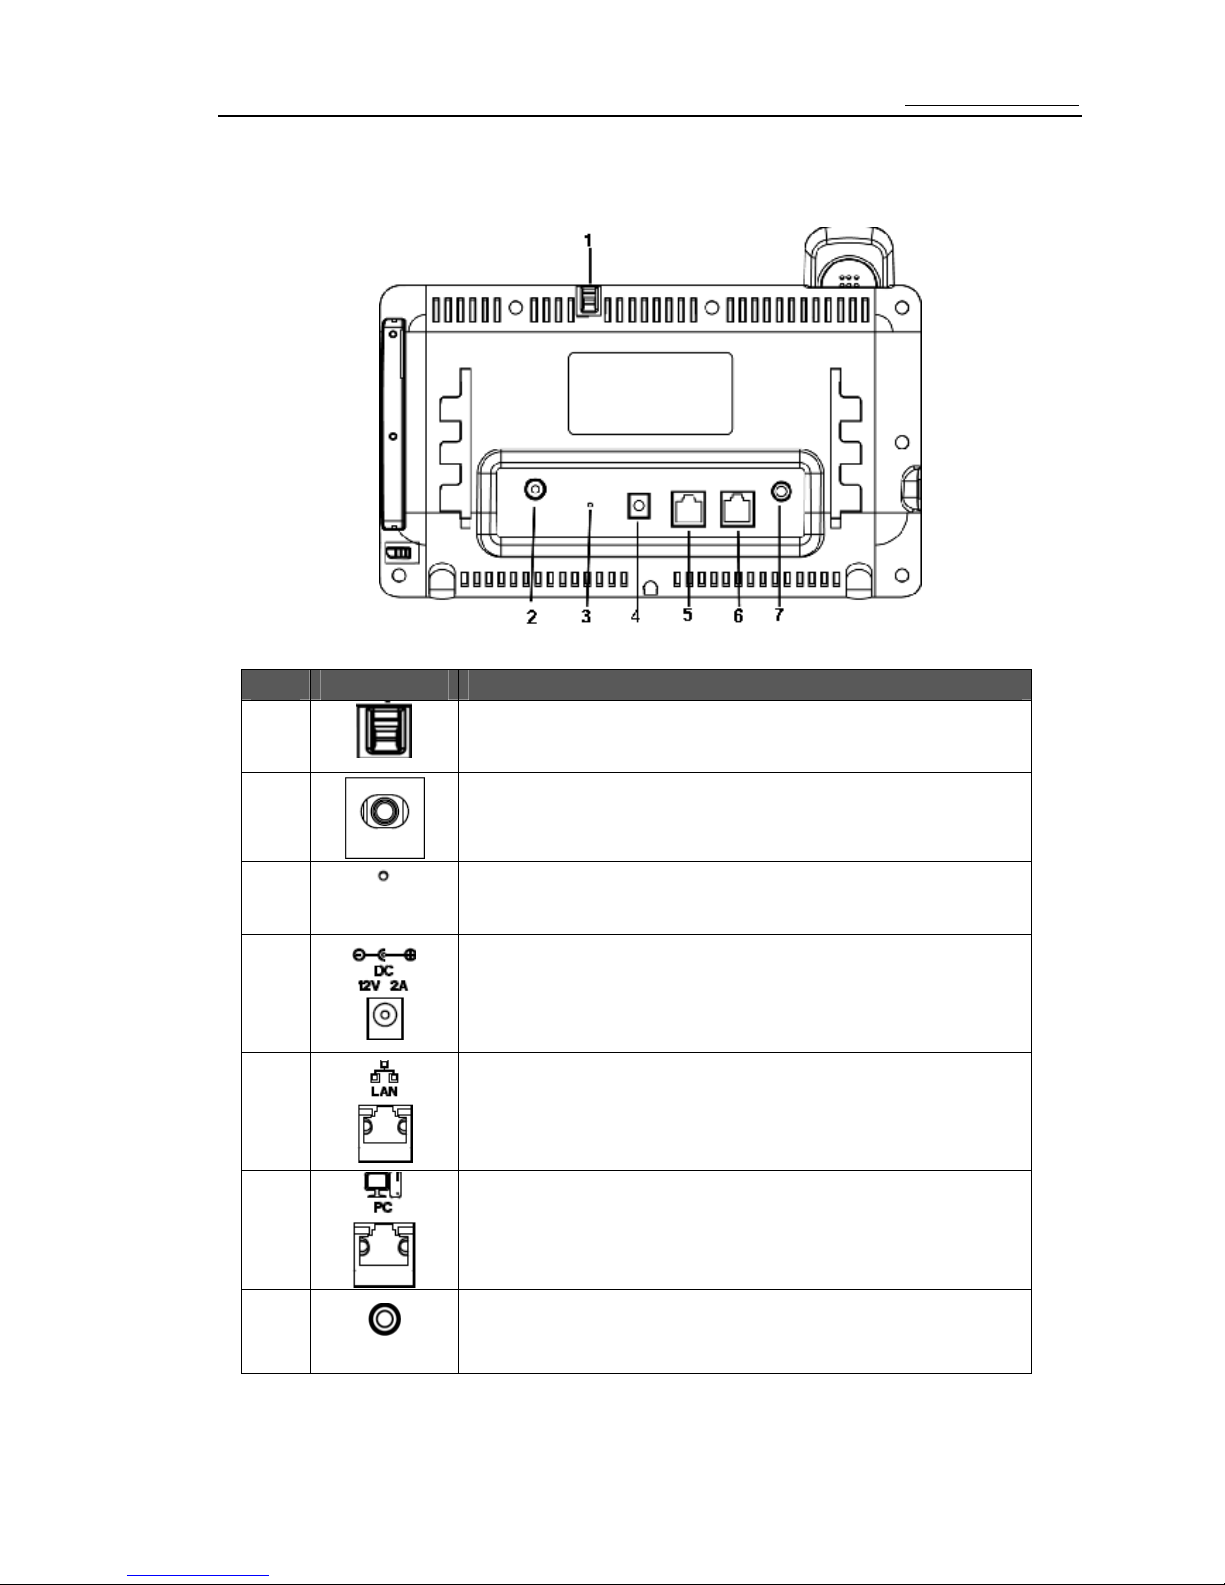
Rear View
S/N
Item Description
1
You can rotate the camera to adjust the angle.
2
Video output interface used to connect to the external
equipment (such as a television) and then output videos.
3
Reset port.
4
Power adapter interface used to connect to external power.
5
LAN interface used to connect to a network access device.
6
PC interface used to connect to a computer. When a computer
is connected to the media phone through this interface, the
media phone functions as a hub in the network.
7
Power Button
Page 5
Media Phone Quick User Guide http://www.proolin.com
3
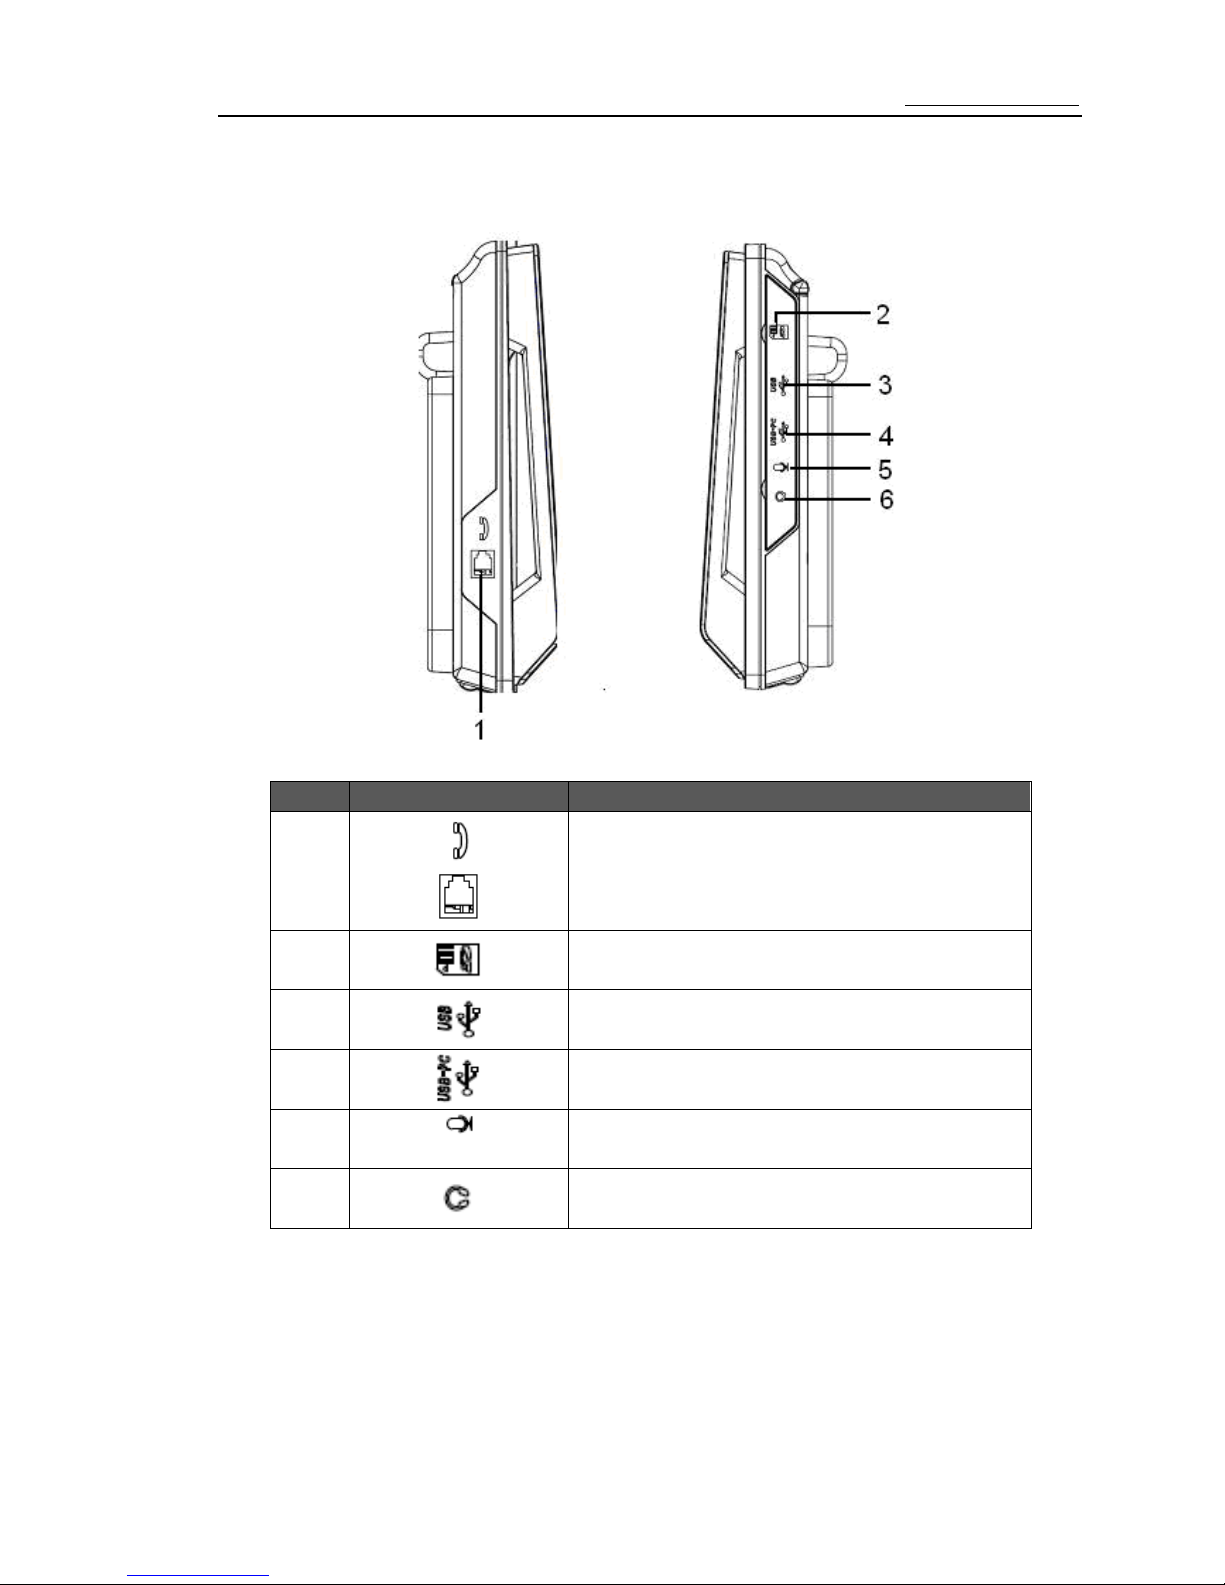
Side View
S/N Item Description
1
Handset Jack
2
Card slot for a microSD Card or an MMC.
3
USB ports used to connect USB devices.
4
USB ports used to connect PC.
5
Microphone port Enables you to connect an
external microphone.
6
Speaker port Enables you to connect an external
microphone.
Page 6
Media Phone Quick User Guide http://www.proolin.com
4
Connecting Cables
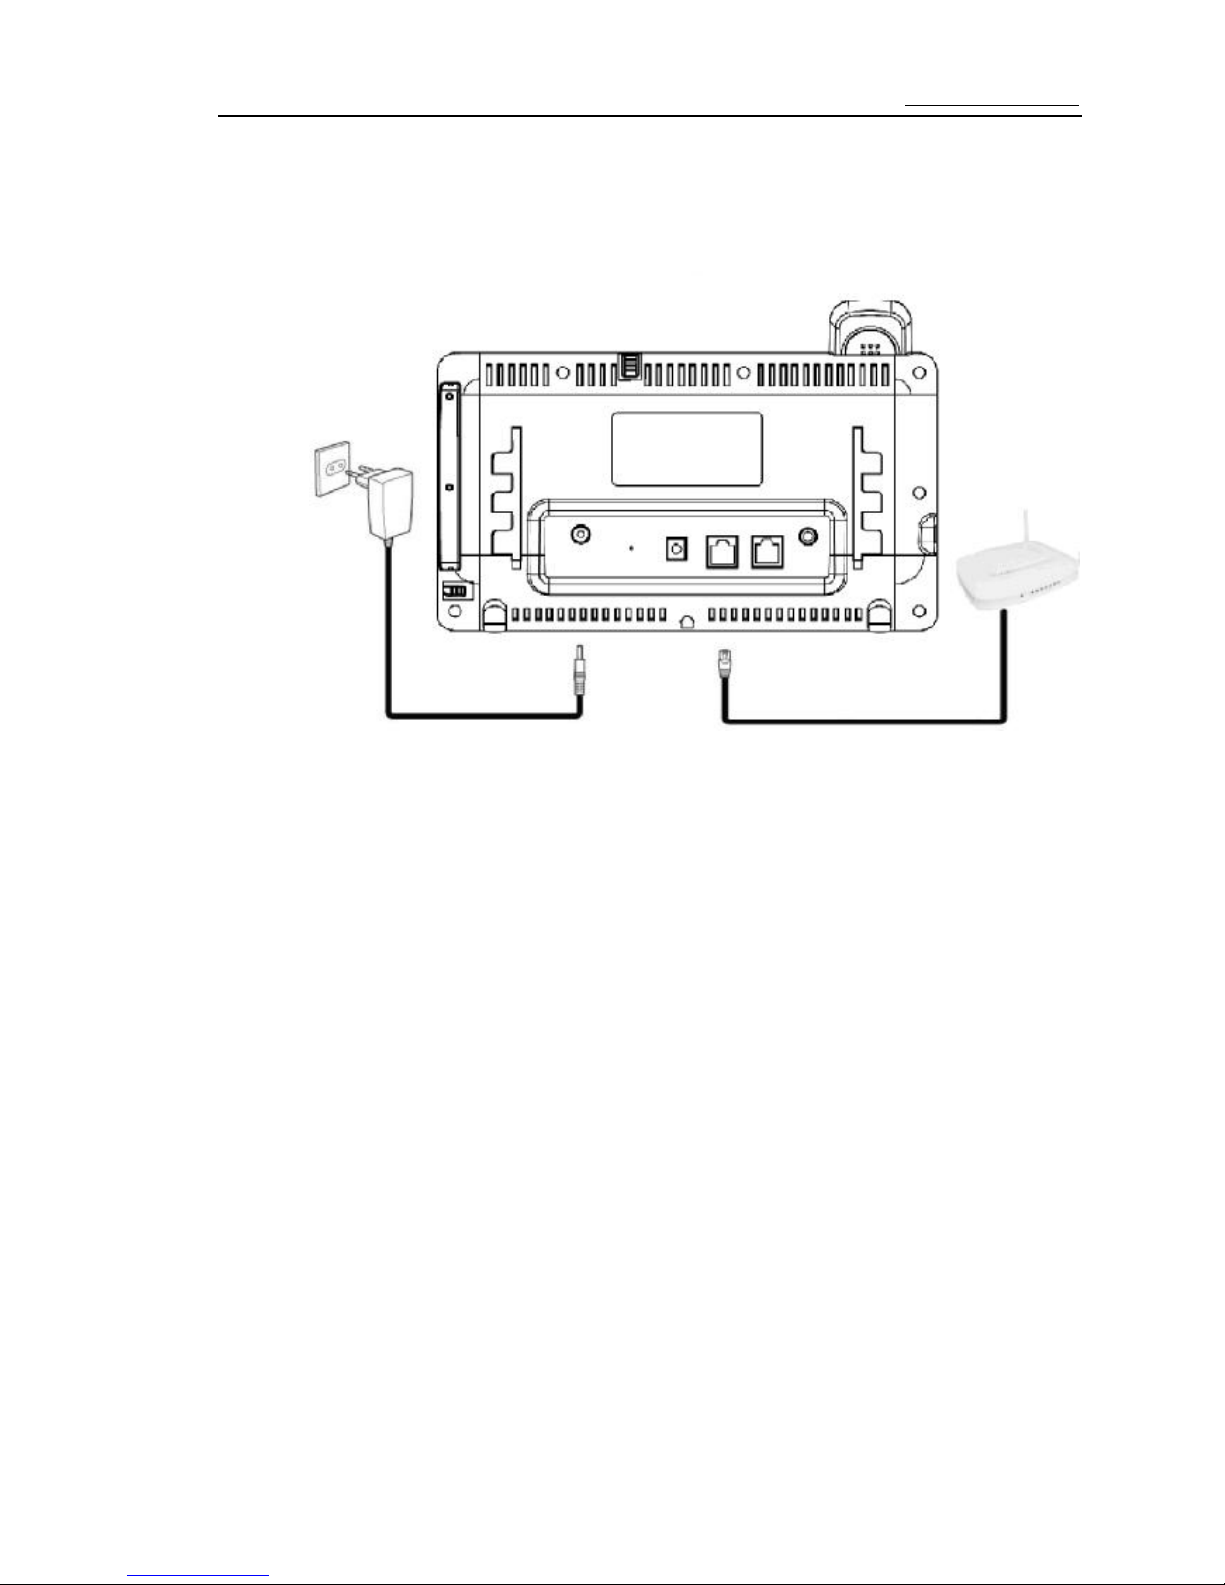
The following figure shows the cable connections.
To connect the cables, do as follows based on the preceding figure:
Step 1 Connect the handset to the phone with the handset cord.
Step 2 Connect the LAN interface on the media phone to an external network interface (such as
the network interface on the rear panel of the home gateway) with the network cable.
Step 3 Connect the power interface on the media phone to the alternating current (AC) power
socket with the power adapter.
Connecting to a WiFi Network (Option)
The media phone supports two modes for accessing a broadband network: through a wired
network or through a wireless network. By using the WiFi function, you can access a broadband
network through a wireless network.
Before accessing the Wi-Fi network, check the following:
Ø Your network access device (such as a home gateway) supports the WiFi function and allows
access of wireless devices.
Ø Between the media phone and the wireless access device to be connected, there is no
obstacle and the distance is within the coverage of the WiFi signals of the device.
To connect the WiFi, do as follows:
Step 1 In the Connect Type dropdown list select “WiFi” and click “Set WiFi config”.
Step 2 In the interface that displayed tip the “WiFi” select box , and select a WiFi.
Step 3 Input “user name”, “password” and click “OK”.
Page 7

Media Phone Quick User Guide http://www.proolin.com
5
After accessing the WiFi network, you will see an icon indicating the WiFi signal strength in the
status bar on the top of the touch screen.
Setting Network
The connect types of P7 is as follows:
l DHCP
l STATIC IP
l PPPoE
l WiFi
To set the network paraments, please follow the below steps:
1. Connect the LAN port of P7 and the port of a available router using a network
cable.
2. When you power on P7 first time, the Network Setting interface displayed. Or click
“Settings” on the desktop and choose “Network”.
3. In the “Connect Type” dropdown list, select one item according to your network..
l DHCP
If you select this type, P7 gets IP address automatically.
l STATIC IP
If you select this type, you need input IP address, network mask,
default gateway and DNS correctly.
l PPPoE
If you select this type, you need input your account and password that
you get from ISP.
l WiFi
If you select this type, please do the following steps:
Click “Set WiFi config”, select “Open WiFi”->Select a WiFi ->Input user
name and password>Click “OK”.
4. Click “Save” to save the configuration and click “Return” back to the desktop.
5.
Call Setting
Note:
1. The time parameter for the P7 register to the SIP server is 300s. Please make sure
the time parameter on the SIP server is same with P7. If the register time on SIP
server is set to 600s, 1000s or more, P7 will not be registered to the SIP Server.
2. In order to save the configuration successfully, the password cannot short than six
characters.
Page 8
Media Phone Quick User Guide http://www.proolin.com
6
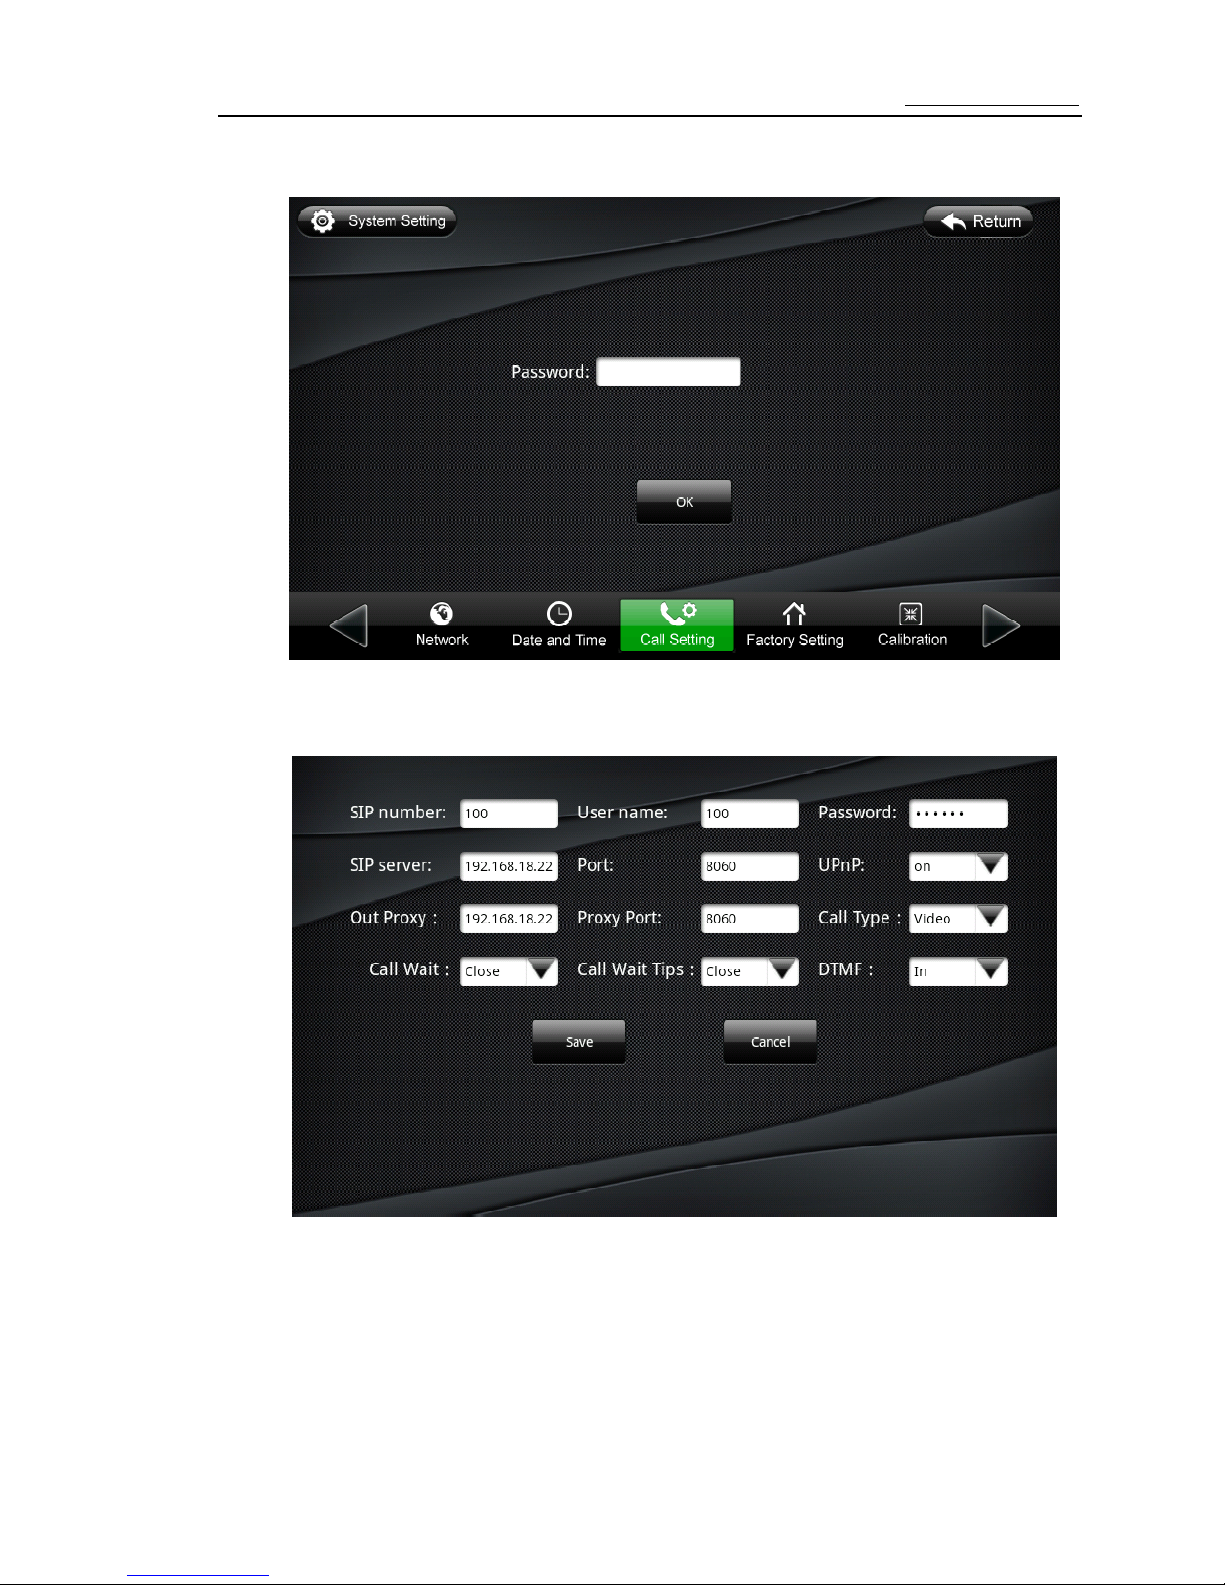
Steps:
Step 1 Click “Setting” on the desktop and choose “Call Settings”.
Step 2 Enter the password such as “000000”, and click “OK”.
Note: The default password of “call settings” is “000000”.
Step 3 Set the sip user register parameters according to your network.
Note:
1. The password must be not short than six characters.
2. You must input the Out Proxy, if you don’t have out proxy input the sip
server IP.
3. Make sure the port is same with the port on the sip server.
Step 4 Click “Save”.
Page 9
Media Phone Quick User Guide http://www.proolin.com
7
Making a Call
Making a Call by Dialing
To make a call , please following the bellow steps:
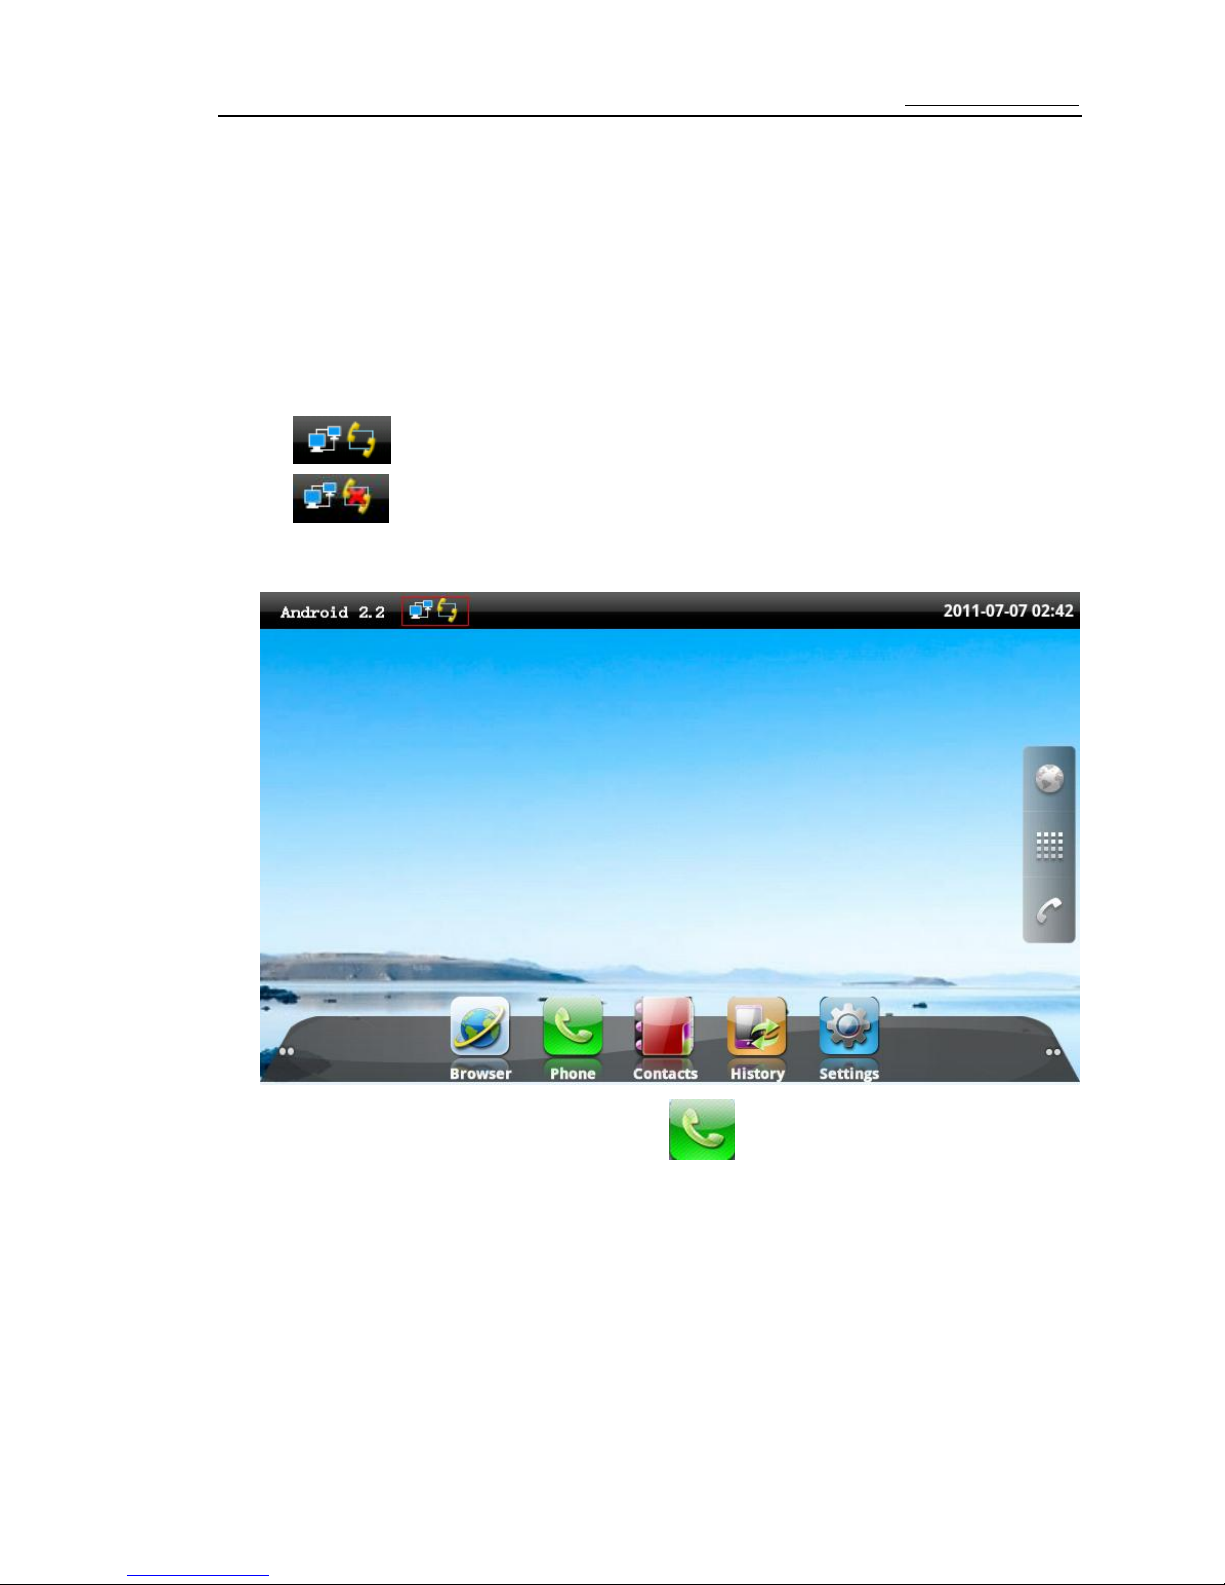
Step 1 Check the network status of P7 and make sure the status of icon on the up left of desktop is
normal.
Note:
1. the icon means that the status of sip and network is normal.
2. the icon means that the status of network is normal but the status of sip
is unnormal. Please check register parameters refer to the “Call Setting” step3 and
make sure the sip server is running.
Step 2 Pick up the handset or click the phone icon .
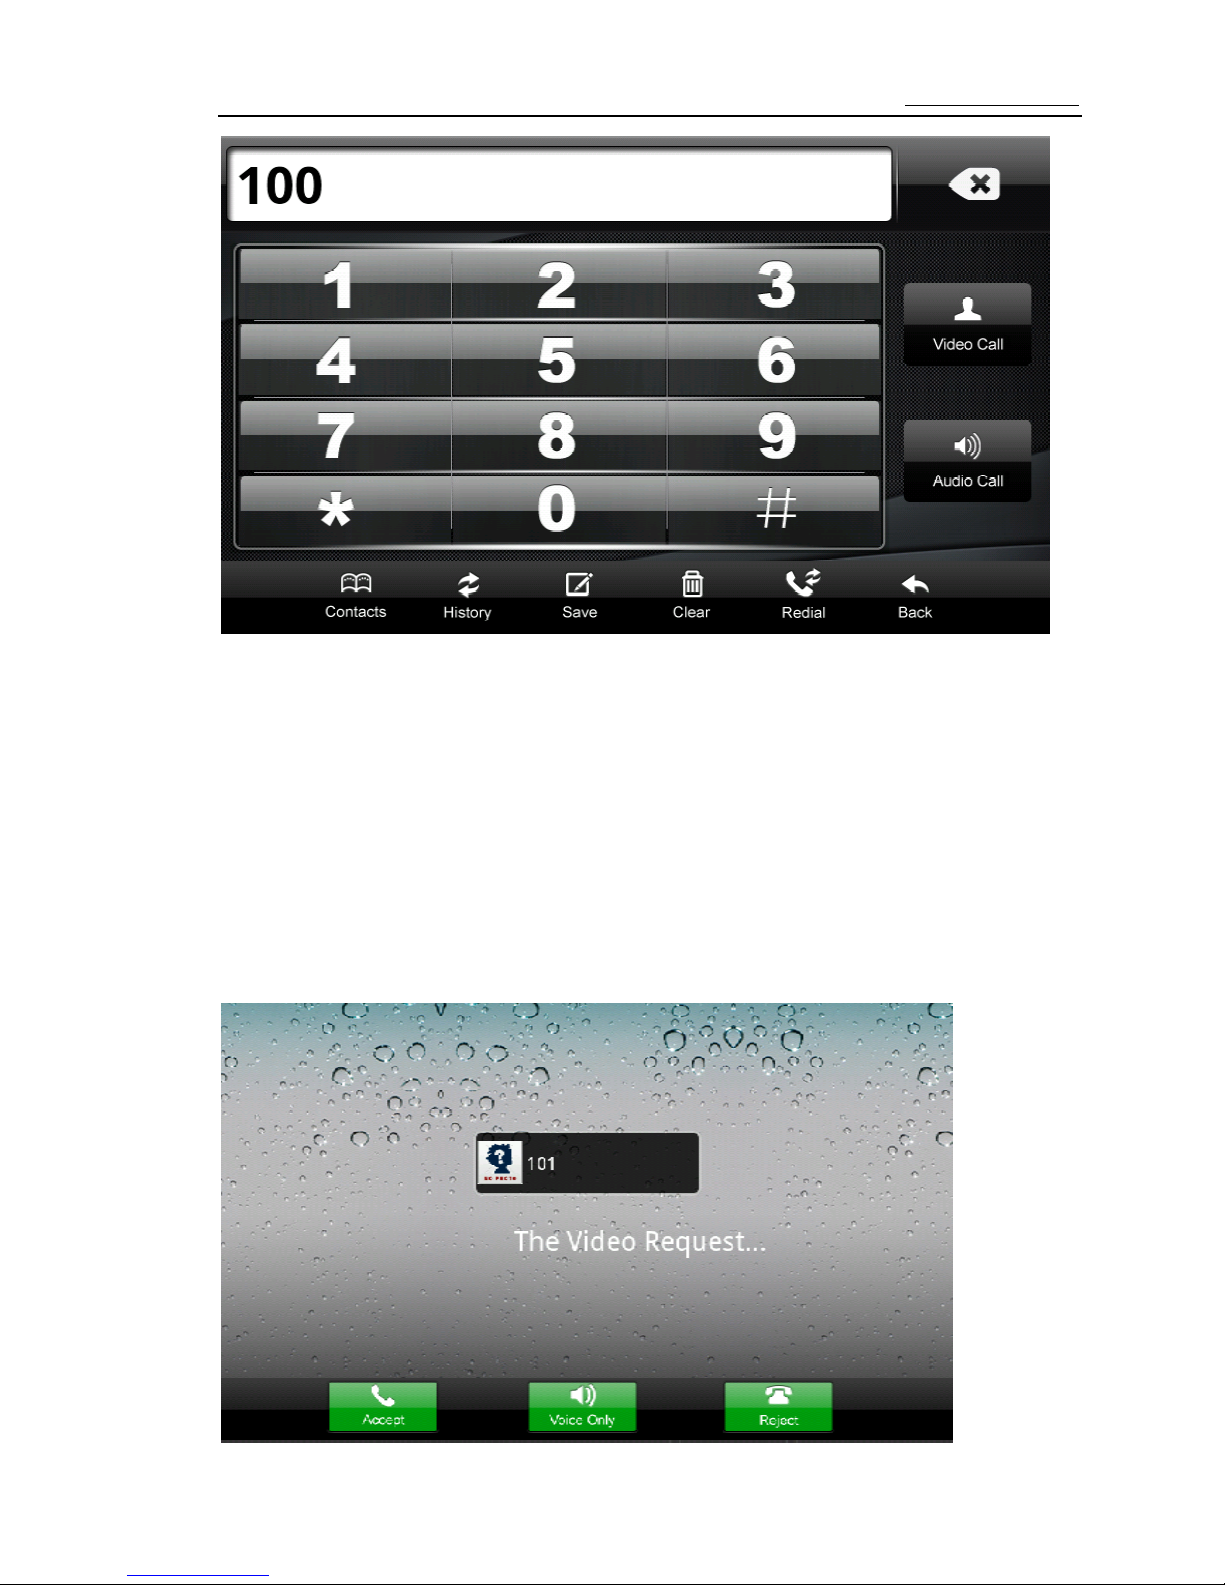
Step 3 In the dial-up interface dial the number and click “Video Call” or “Audio Call” to make a VoIP
call.
Page 10
Media Phone Quick User Guide http://www.proolin.com
8
Answering a Call
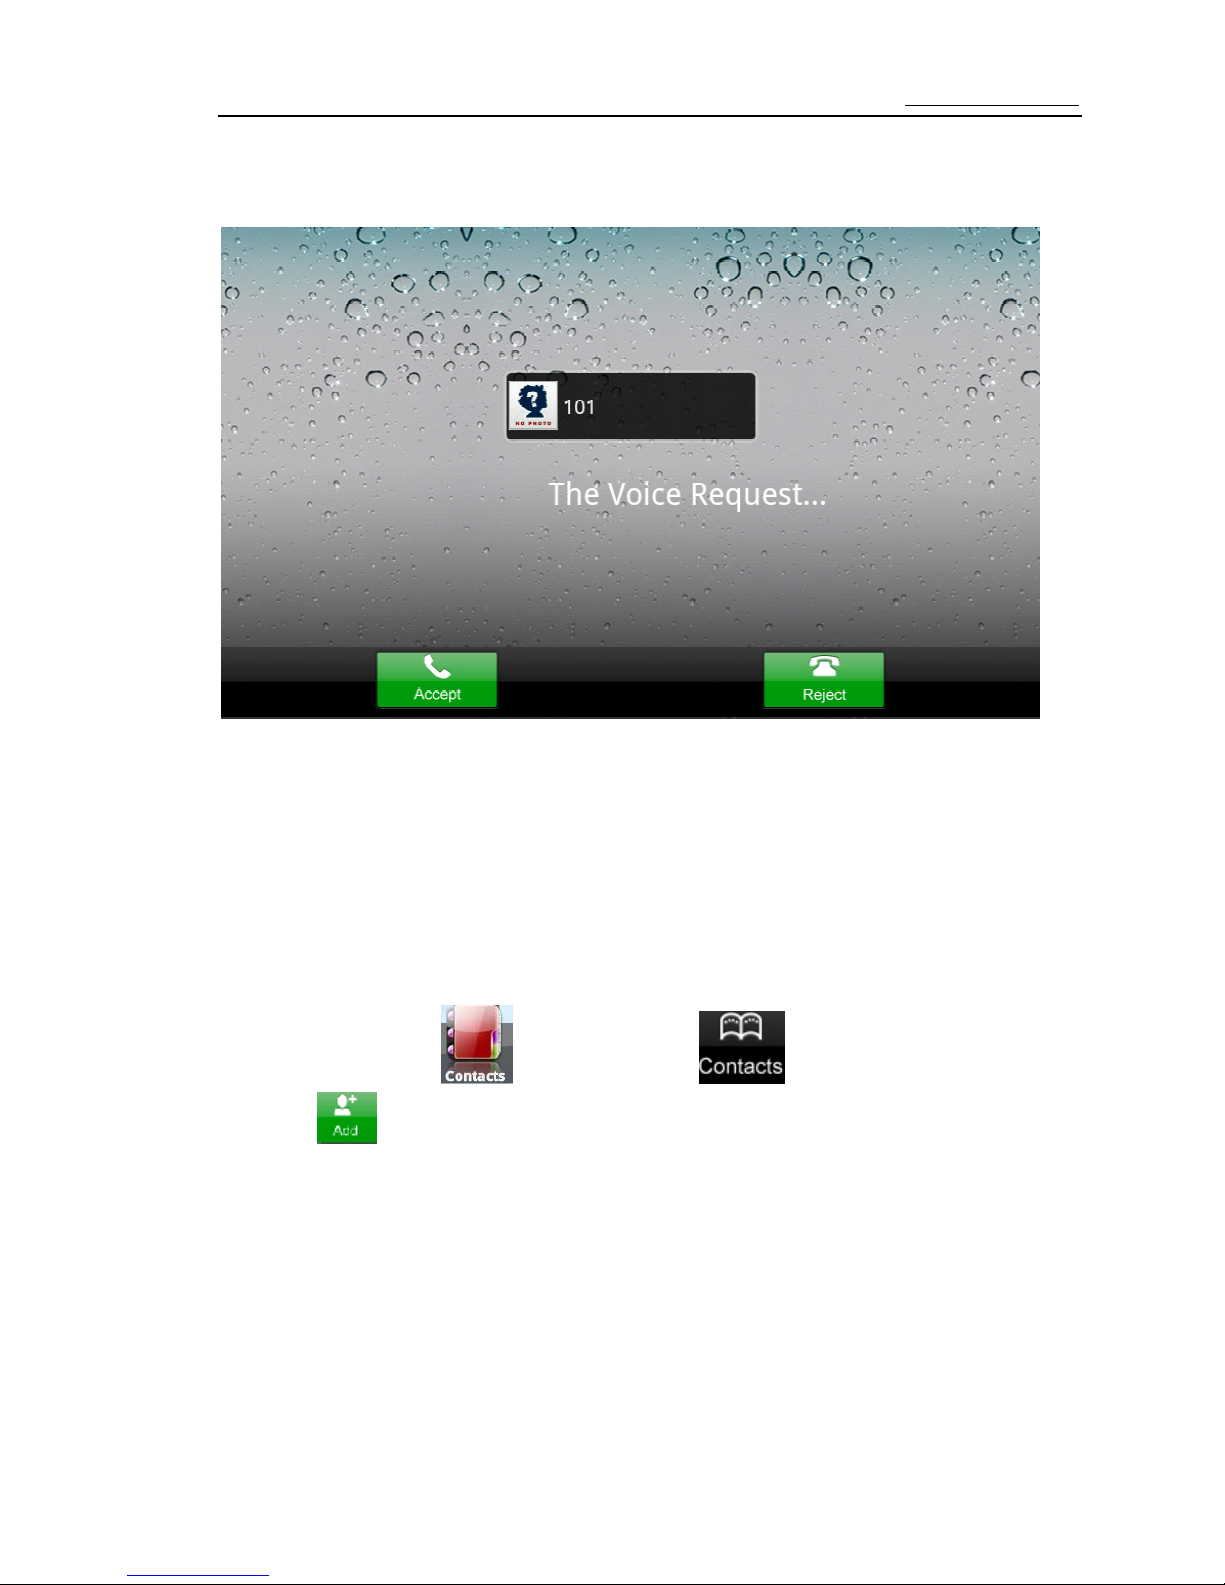
The media phone rings when a call is received.
If you have subscribed to the calling number identification service, the calling number appears on the screen. (If the
calling number is saved to the phonebook, the name and the number of the calling party appear on the screen.)
Answering a Video Call
Step 1 To answer a video call in video mode, tap Accept on the screen or pick up the handset.
Step 2 To answer a video call in audio mode, tap Voice Only on the screen.
Step 3 To reject an incoming call, tap Reject on the screen.
Page 11
Media Phone Quick User Guide http://www.proolin.com
9
Answering an Audio Call
Step 1 To answer an audio call, tap Accept on the touchscreen or pick up the handset.
Step 2 To reject an incoming call, tap Reject on thetouchscreen.
Note:
If you want to make or answer a PSTN call, you must make sure the Line port connect to a PSTN port
correctly and the sip must not be registered.
Creating a Contact
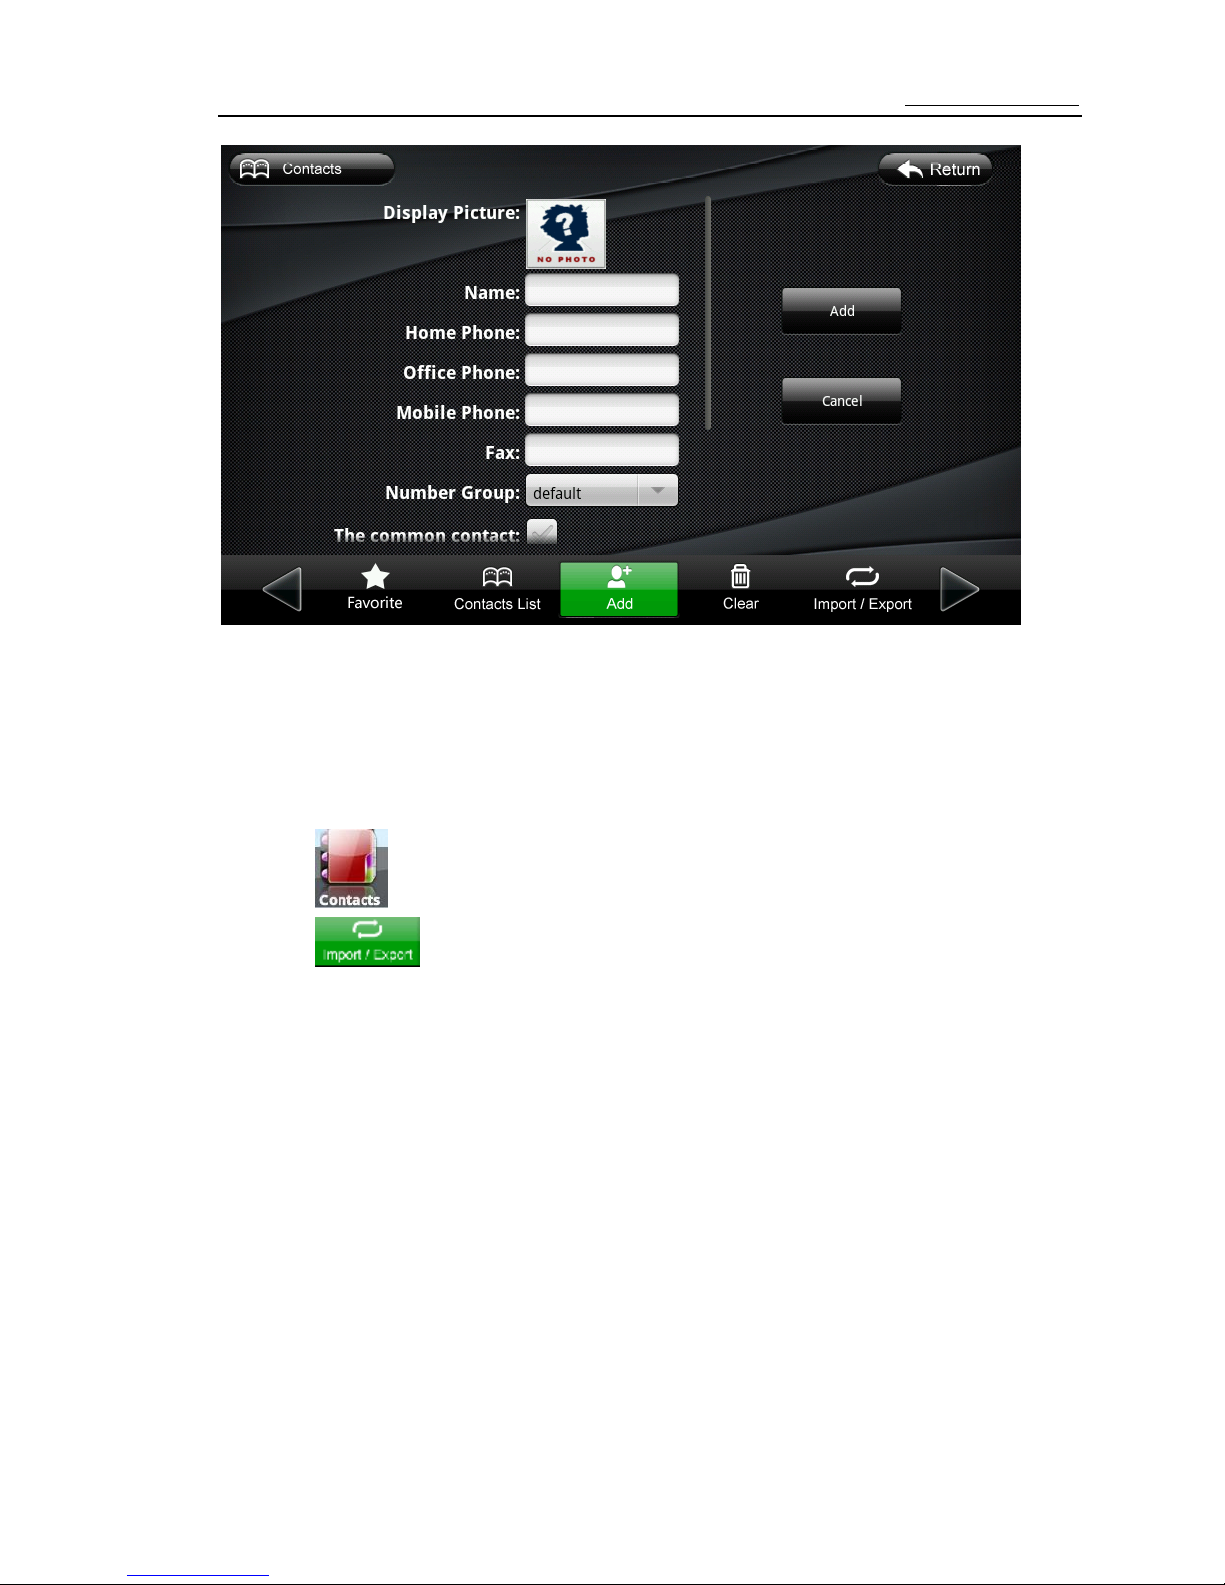
To create a contact, do as follows:
Step 1 On the desktop click or in dial window click display contact interface.
Step2 Click and input “Name”, ”Home phone”, “Office phone”, “Mobile phone” and select group ID, select
image ect.
Page 12
Media Phone Quick User Guide http://www.proolin.com
10
Step3 Click “Add”.
Exporting and Importing a Phonebook
To import records to the phonebook, do as follows:
Step 1 Tap on the home screen to display the list of functions.
Step 2 Tap to display the Import/Export screen.
Step 4 Select “Export To Sd card” to export the phonebook and click “OK”.
Step 5 Select “Import From Sd card” to imported the phonebook and click “OK”.
Importing Files frome USB Device or SD card
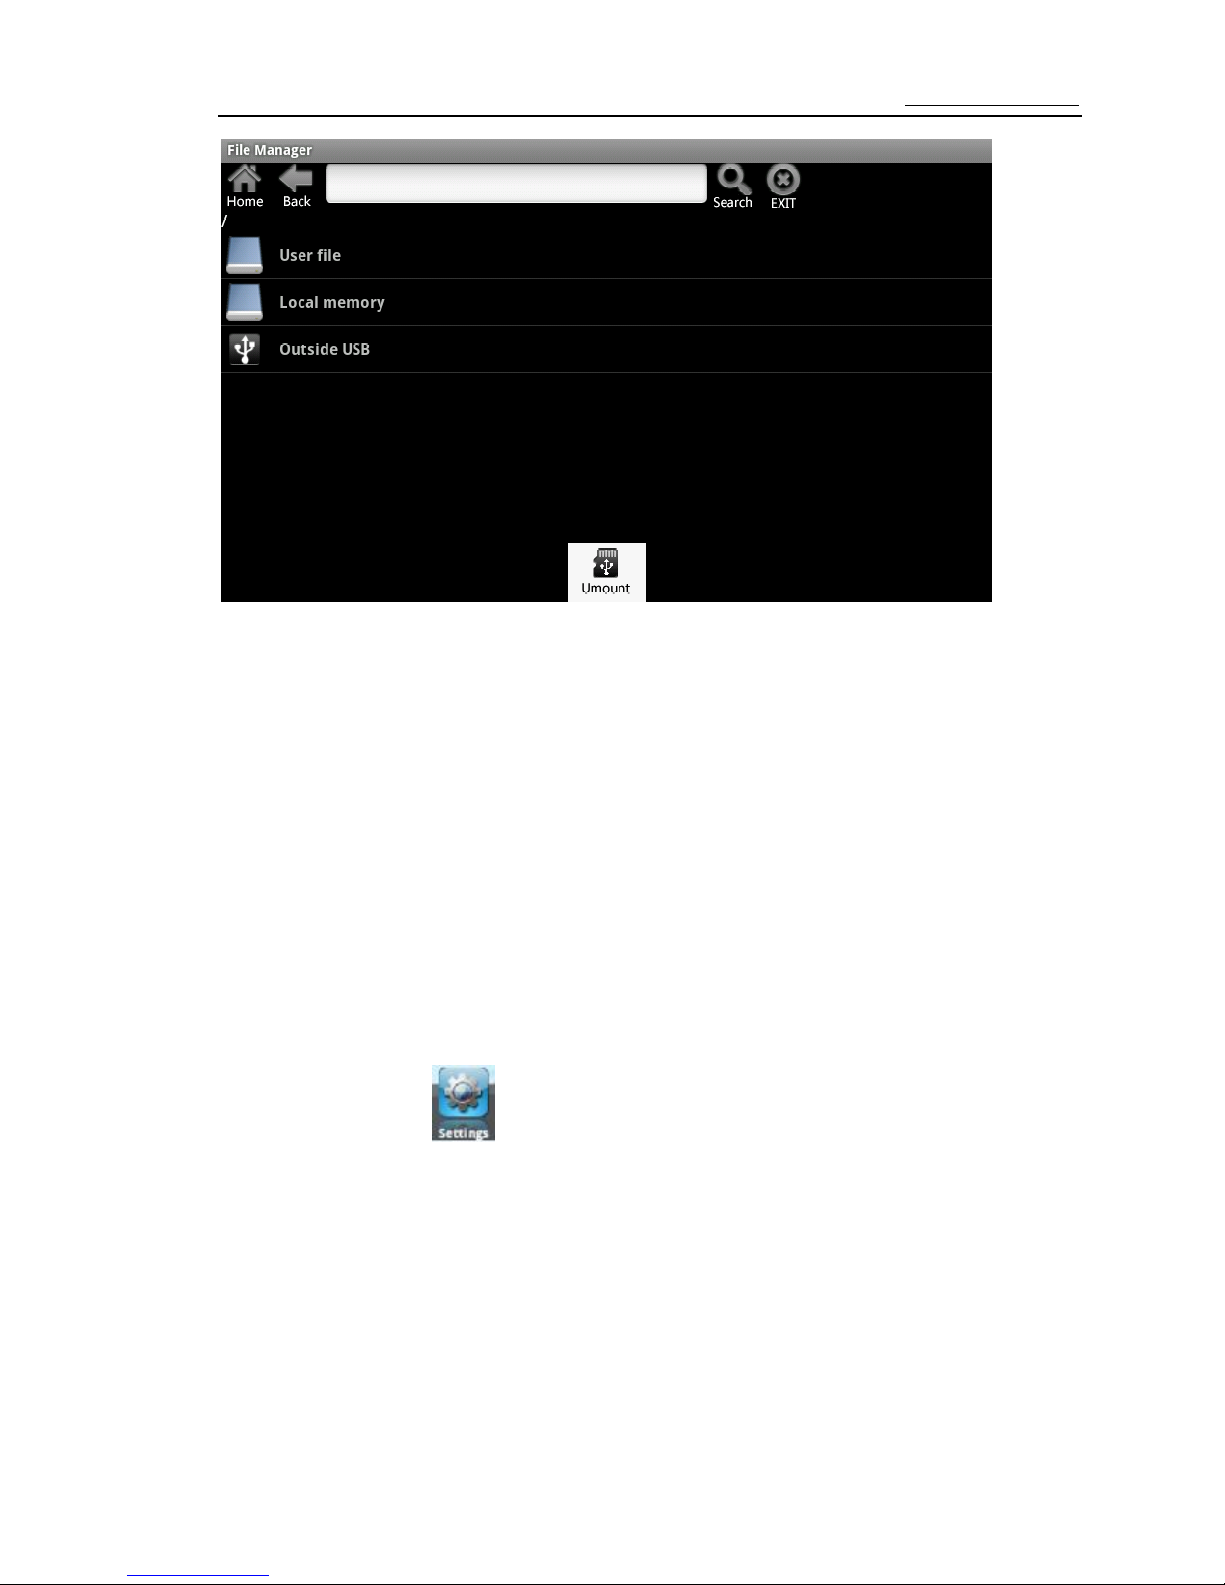
To import files in USB device or SD card to the local memory, do as follows:
Step 1 Connect the usb device or SD card to the media phone.
Step 2 In the window that displayed click “Outside USB” or “Outside SD card”.
Page 13
Media Phone Quick User Guide http://www.proolin.com
11
Step 3 In the files management window select a file that you want, click Import and select Import local memory.
The files will be imported automatically.
Note:
The media phone support the files format as follows:
1. Image
JPEG,GIF,PNG,BMP
2. Audio
mp3,ogg,wav,mid
3. Video
mp4,3gp,avi,flv,mkv,mov
Setting Time and Date
To set time and date, do as follows:
Step 1 On the desktop click .
Step 2 In the window that displayed select Date and Time.
Step 3 In the window that displayed you can set the time and date by hands or click Sync Date.
Installing Third party Applications
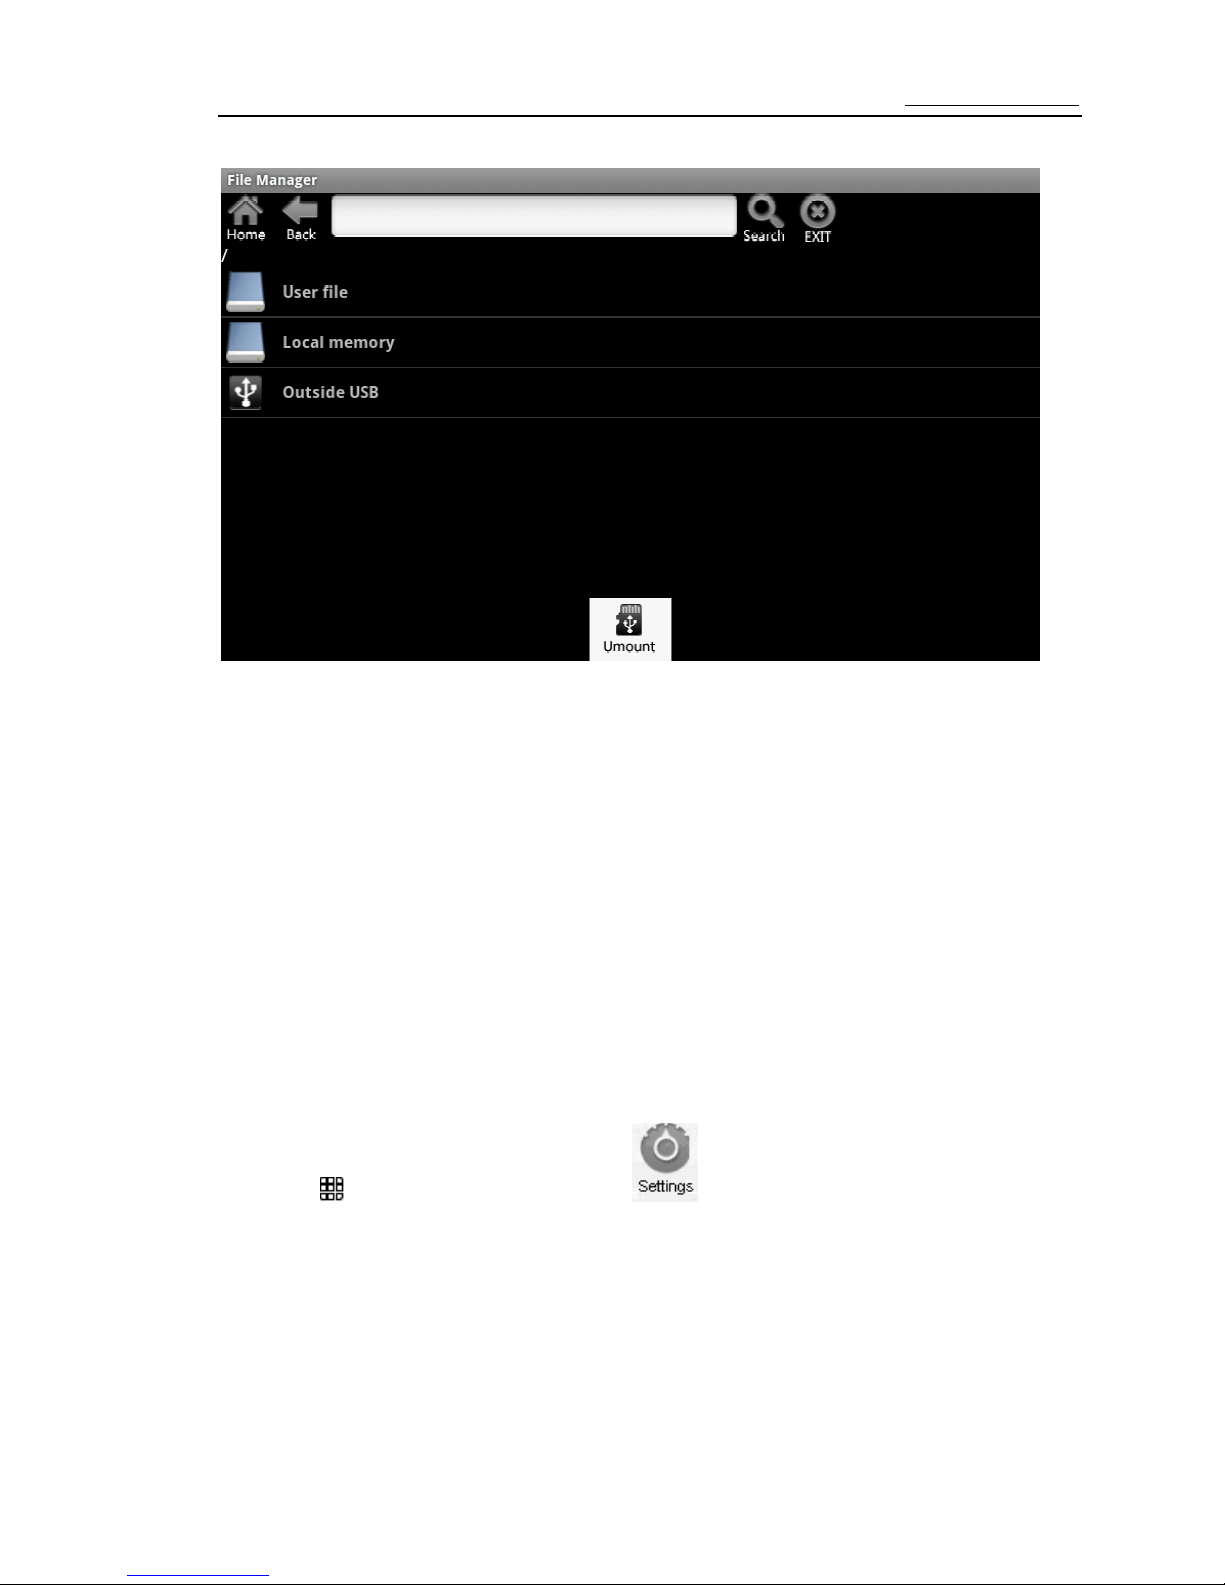
You can install the third party applications from usb device or SD card on the media phone.
Step 1 Connect the usb device or SD card to the media phone.
Page 14
Media Phone Quick User Guide http://www.proolin.com
12
Step 2 In the window that displayed click “Outside USB” or “Outside SD card”.
Step 3 In the files management window select an application install file that you want, click and install it following
the tips.
Note:
You must open some settings as follows when you install applications for the first time:
4. Click “OK” in the alarm interface.
5. Select “Unkown Resource” to allow install third party applications.
6. Click “OK”.
Step 4 Tip ”Install”. The system will install the application automatically.
Uninstalling Third party Applications
To uninstall the third party applications, do as follows:
Step1 Back to the desktop.
Step2 Click “ ” in the below of the screen and select .
Step3 Select “Application”->“Manage Application” in the display screen.
Step4 Click “All” to display all the applications that installed.
Step5 Select an application that you want to uninstall. In the display screen click “uninstall”.
Step6 Click “OK”.
Page 15
Media Phone Quick User Guide http://www.proolin.com
13
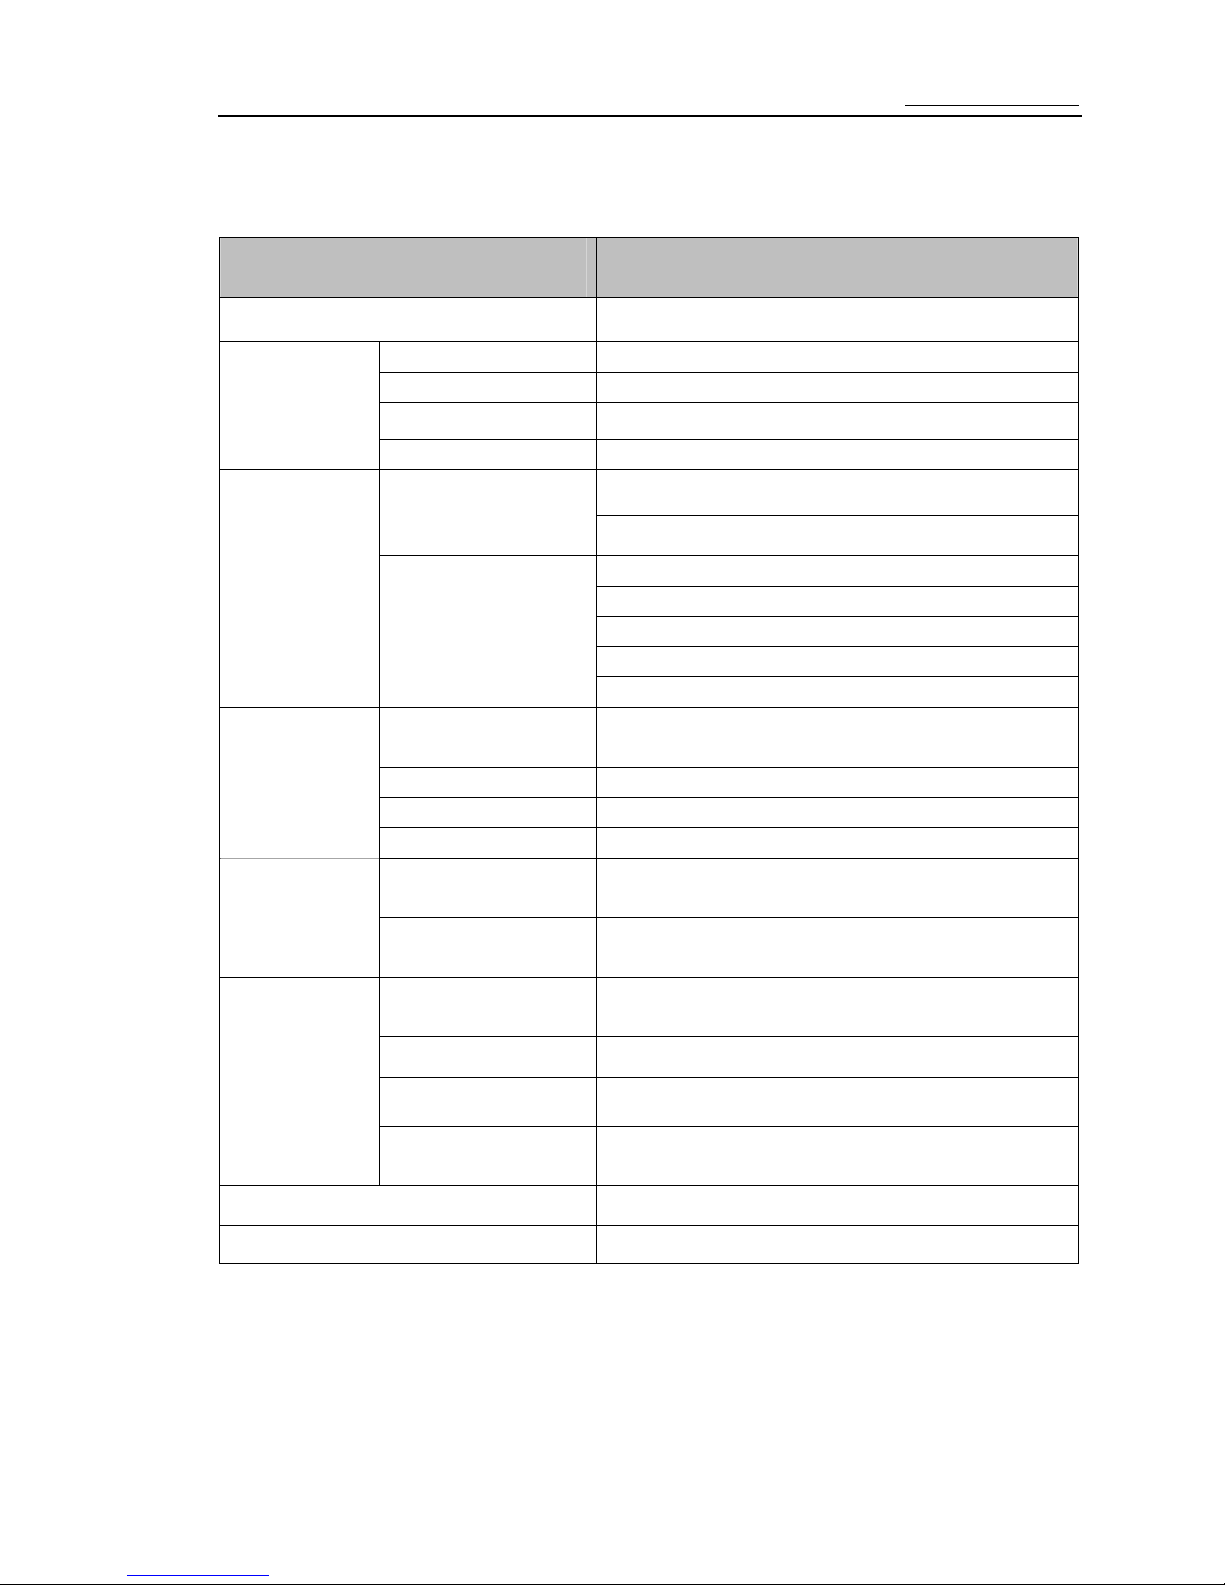
Specifications
Item Specifications
OS Android2.2
Memory 512MB
Storage 2G
Screen
7" Resistive touch screen, 800 x 480
Hardware
Camera 2M pixel
RJ45 × 2 10/100Mbps for LAN and PC
Internet
WiFi 802.11b/g/n
USB 2.0
Mini USB 2.0
SD card interface
Multiplexes with 3.5mm earphone jack
Interface
Others
CVBS Output
Communication
standard SIP 2.0
Video standard H.263, H.264
Audio standard G.711, G.729
Compliant
standards
Network standards TCP/IP, DHCP, PPPoE
Adapter
Working voltage: 110/220V AC, 12 V and 2 A DC
Working frequency: 50 Hz to 60 Hz
Power
Entire-device power
consumption <15W
Operating temperatur
e 0ºC~40ºC
Humidity
10%~80%
Minimum illumination
10lux
Environmental
parameters
Recommended illumin
ation >300lux
Packaging Detail
Media phone, Power Adapter, RJ45, Manual
Colour
Black
 Loading...