

Pronto 474, 472 User Manual
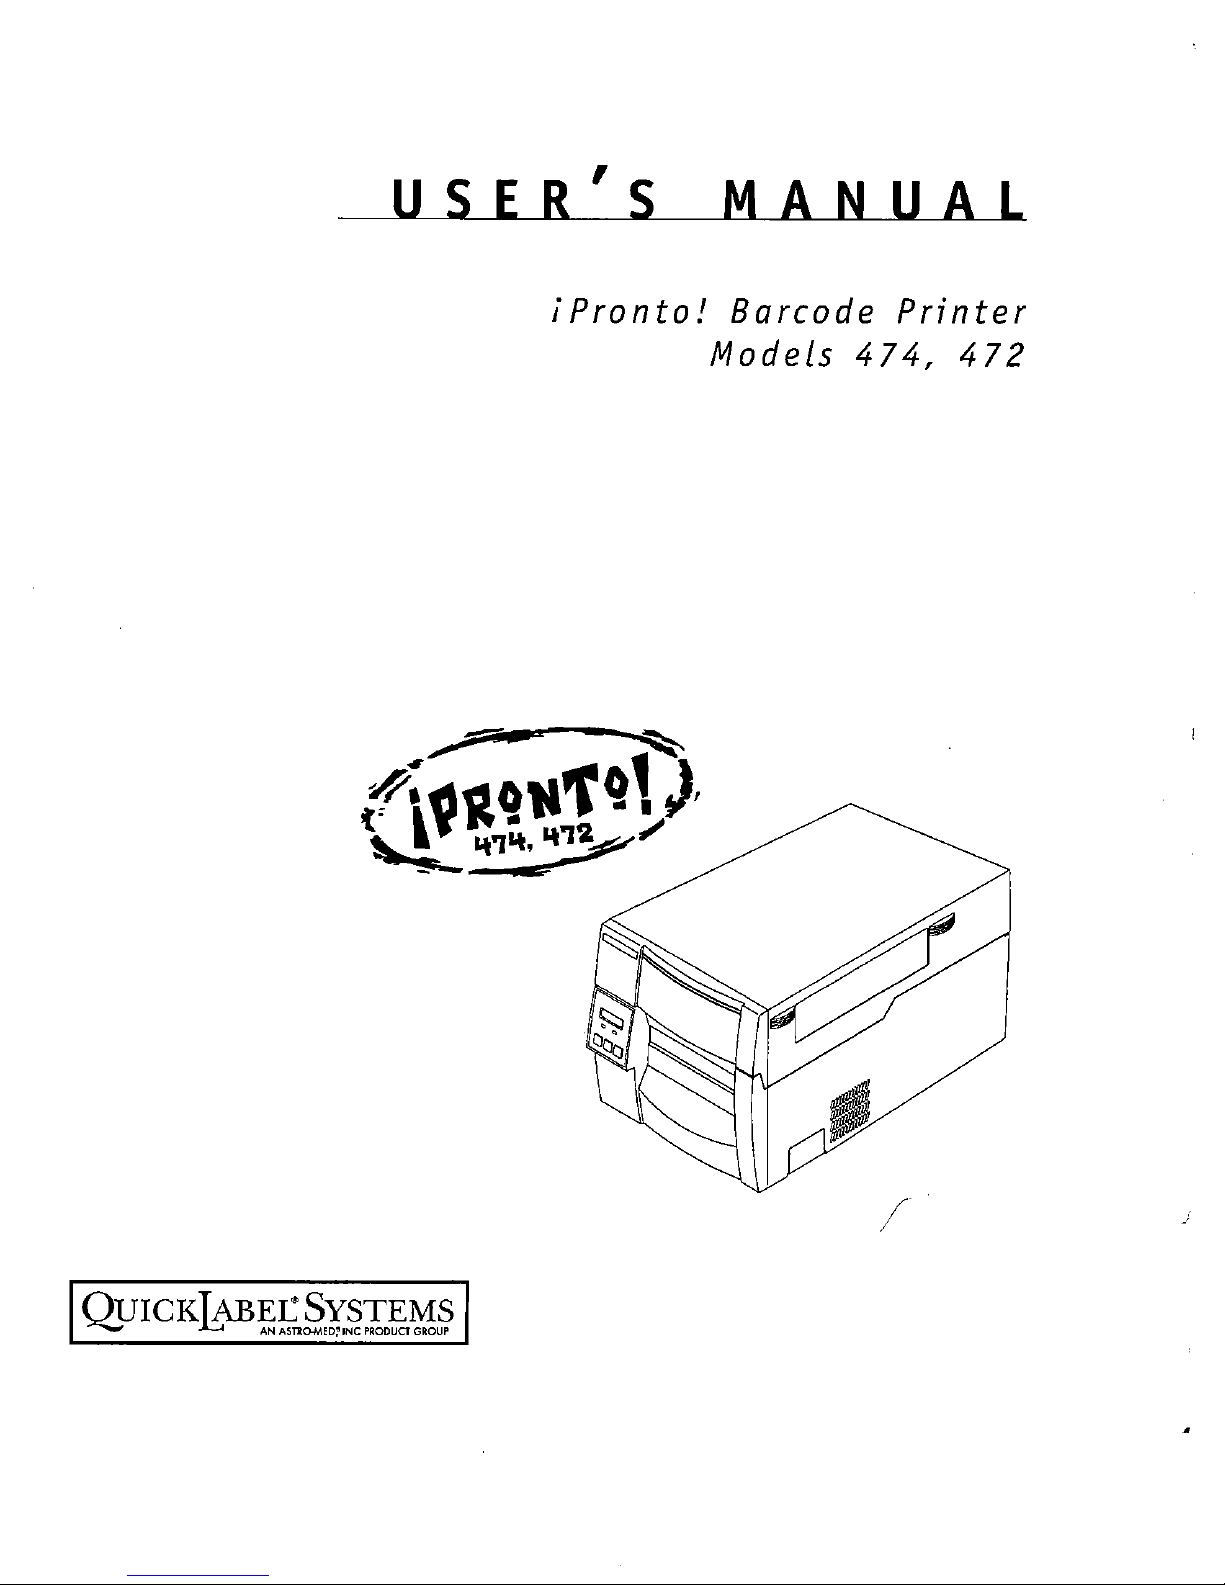
iPronto!
Barcode
Printer
Models
474,
472
/
•

478
Before
Operation
Copyright © 2001
This manual
is
copyrighted with all rights reserved. No part ofthis manual may be reproduced, transmitted,
transcribed, stored
in
a retrieval system, or translated into any languageinany formbyany meanswithout written
permission of
QuickLabel~
Systems. Pronto is a trademark of QuickLabel Systems. All other trademarks are the
property of their respective holders.
Limited
Lifetime
Warranty
QuickLabel Systems, an Astro-Med, Inc. product group warrants all non-wear components of this product against
defects in materials or workmanship for the lifetime of the product.
If
the customer discovers a defect, this defect
must be reported promptly to QuickLabel Systems. QuickLabel Systems will, at its option, repair or repiace the
defective component or product at no additional charge except as set forth below.
Repair parts and repiacement parts will be furnished on an exchange basis and will be either reconditioned or
new. All replaced parts become the property of QuickLabel Systems. Travel, freight, and other expenses related
to warranty repairs are not covered. This warranty is void
if
the product has been damaged by accident, abuse,
neglect or misapplication, or if the product has been improperly installed, or ifthe product has been modified
without the express written permission of QuickLabel Systems.
QuickLabel Systems warrants the printhead for a period
of30days from the dateofpurchase, contingent upon
the use of QUickLabel Systems thermal transfer ribbon. This specific printhead warranty does not apply to
printheads damaged by accident, abuse, neglect, misapplication, or the like.
QuickLabel Systems makes no warranty, either express
or
implied, with respect to this product's fitness for a
particular purpose. QuickLabel Systems is not responsible for your product ifit is lost or damaged in transit.
Ownership
Information
Use the space below to record the serial numberofyour product. The serial number is located on the rear panel
ofthe printer.
Serial
No.
2
Before
Operation
FCC COMPLIANCE STATEMENT
FOR AMERICAN USERS
This equipment has been tested and found to comply with the limits for a Class A digital
device, pursuant to Part 15
of
the FCC
RUles.
These limits are designed to provide
reasonable protection against harmful interference when the equipment
is
operated in a
commercial
environment.
This
equipment
generates,
uses,
and
can
radiate
radio
frequency
energy and, if not installed and usedinaccordance with the instruction manual, may cause
harmful interference to radio communications. Operation
of
this equipmentina residential
area is likely to cause harmful interference
in
which case the user will be required to correct
the interference at his own expense.
"DESIGNED AND MANUFACTURED TO BE EQUIVALENT TO EUROPEAN
STANDARD FOR ITE, EN60950."
3
Before
Operation
EMI COMPLIANCE STATEMENT
FOR CANADIAN USERS
This equipment generates and uses radio frequency energy and ifnot installed and used
properly,
that
is.instrict
accordance
with
the
manufacturer's
instructions,
may
cause
interference to radio and television reception. This digital apparatus does not exceed the
Class A limits for radio noise emissions from digital apparatus set out
in
the Radio
Interference Regulations of the Canadian Department of Communications. This equipment
is designed to provide reasonable protection against such interference
in
a residential
installation. However, there
is
no guarantee that interference will not occurina particular
installation.
If this equipment does cause interference to radio or television reception, which
can be determined
by
turning the equipment off and on, the user is encouraged to try to
correct
the
interferencebyoneormoreofthe
following
measures:
Reorientorrelocate
the
receiving
antenna.
Increase
the
separation
between
the
equipment
and
receiver.
Connect the equipment into an outlet on a circuit different from that to which the
receiverisconnected.
Consult the dealer or an experienced radiofTV technician for help.
CAUTION: Use shielded cables to connect this device to computers.
Any changes or modifications not expressly approved by the
grantee of this device could void the
users
authority to operate
the equipment.
ETAT DE CONFORMITE EMI A L'USAGE
DES UTILISATEURS CANADIENS
Cet equipment produit et utilise I'energie aradiofrequences et s'il n'est pas installe et utilise
correctment,
c'esstadireenaccord
strict
avec
les
instructionsdufabricant,ilrisque
de
provoquer des interferences avec la reception delaradio et de la television.
Le present appareil numerique n'emet pas de bruite radioelectriques depassant les limites
applicables aux appareils numeriques de
la
classe A prescrites dans Ie Reglement sur
Ie
brouillage radioelectrique edicte parIeministere des Communications du Canada.
Cet equipment est
con~u
pour fournir une protection satisfaisante contre de telles
interferences dans une installation residentielle. Cependant,
il
n'y a pas de garantie contre
les interferences avec les receptions radio ou
televison, provoquees par la mise en et hors
circuit de I'equipment; aussi,
il
est demande a I'utilisateur d'essayer de corriger I'interference
par
I'uneouplus
des
mesures
suivantes:
Reorienter I'antenne de reception.
Installer I'ordinateur autre part, par
egard pourIerecepteur.
Brancher I'ordinateur dans une prise de courant differente de
fa~on
ace que
I'ordinateur et
Ie
recepteur soient branches sur des circuits differents.
4

Before
Operation
Important Safety Instructions
1.
Read allofthese instructions and save them for later reference.
2.
Follow all warnings and instructions marked on the product.
3.
Unplug this product from the wall outlet before cleaning.Donot use liquidoraerosol cleaners.
Use a damp cloth for cleaning.
4.
00
not
use
this
product
near
water.
5.
Do not place this product onanunstable cart, stand or table. The product may fall, causing
serious damage to the product.
6.
Slots and openings on the cabinet and the back or bottom are provided for ventilation.
To ensure reliable operation ofthe product and to protect
it
from overheating, do not block or
cover these openings. The openings should never be blocked
by
placing the product on a bed,
sofa,
rugorother
similar
surface.
This
product
should
neverbeplaced
nearoroveraradiator
or
heat register. This product should not be placed in a built-in installation unless proper ventilation
is provided.
7.
This product should be operated from the type of power source indicated on the marking label.
If
you are not sure of the type of power availabie, consult your dealerorlocal power company.
8.
This product is equipped with a three-pronged plug, a plug having a third (grounding) pin. This
plug will only fit into a grounding-type power outiet. This is a safety feature.
if
you are unable to
insert the plug into the outlet, contact your electrician to replace your obsolete outlet.
Do
not
defeat the safety purpose ofthe grounding-type plug.
9.
Do not allow any1hing to rest on the power cord. Do not locate this product where the cord will be
walked on.
10.
If an extension cord is used with this product, make sure that the total of the ampere ratings on
the products plugged into the extension cord do not exceed the extension cord ampere rating.
Also, make sure that the total
of
all products plugged into the wall outlet does not exceed
15
amperes for 120V outlet and 7.5 amperes for 220V-240Voutlet.
11.
Never push objectsofany kind into this product through cabinet slots as they may touch
dangerous voltage points or short out parts that could result
in
a riskoffire or electric shock.
Never spill liquid of any kind on the product.
12.
Except as explained elsewhere in this manual, don't attempt to service this product yourself.
Opening and removing those covers that are marked "Do Not Remove" may expose you to
dangerous voltage points or other risks. Refer all servicing on those compartments to service
personnel.
13.
The mains plug on this equipment must be used to disconnect mains power. Please ensure that
the socket outlet is installed nearthe equipment and shall be easily accessible.
14.
Unplug this product from the wall outlet and refer servicing to qualified service personnel under
the following conditions:
A When the power cord or plug is damaged
or
frayed.
B.Ifliquid has been spilled into the product.
C.Ifthe product has been exposed to rain or water.
D.
Ifthe product does not operate normally when the operating instructions are followed.
Adjust only those controls that are covered by the operating instructions since improper
adjustment
of
other cOntrols may result in damage and will often require extensive work
by
a qualified technician to restore the product to normal operation.
E.
If
the product has been dropped or the cabinet has been damaged.
F.Ifthe product exhibits a distinct change in performance, indicating a need for service.
5
Before
Operation
Notice
1.
Before use, be sure to read this manual. And keep it handy for
reference when needed.
2.
The contentsofthis manual may change without prior notice.
3.
Reproduction, transfer, or transmissionofthe contents of this manual
without prior consent is strictly prohibited.
4.
We
are not liable for any damage resulting from the useofthe
information contained herein, regardless
of
errors, omissions, or
misprints.
5.
We
are not liable for any problems resulting from the useofoptional
products and consumable supplies other than the designated products
contained herein.
6.
Do not handle, disassemble or repair the parts other than those
specified
in
this manual.
7.
We
are not liable for any damage caused by user's erroneous useofthe
printer and inadequate environment.
8.
Data residinginthe printer is temporary. Therefore, all data will be lost
if
power is lost.
We
are not liable for any damage or lossofprofits caused
by data loss due to failures, repairs, inspections, etc.
9.
Please contact us if there are any mistakes or ambiguities within this
manual.
10.
If
there are missing or incorrectly collated pagesinthis manual, contact
us to obtain a new manual.
6
Before
Operation
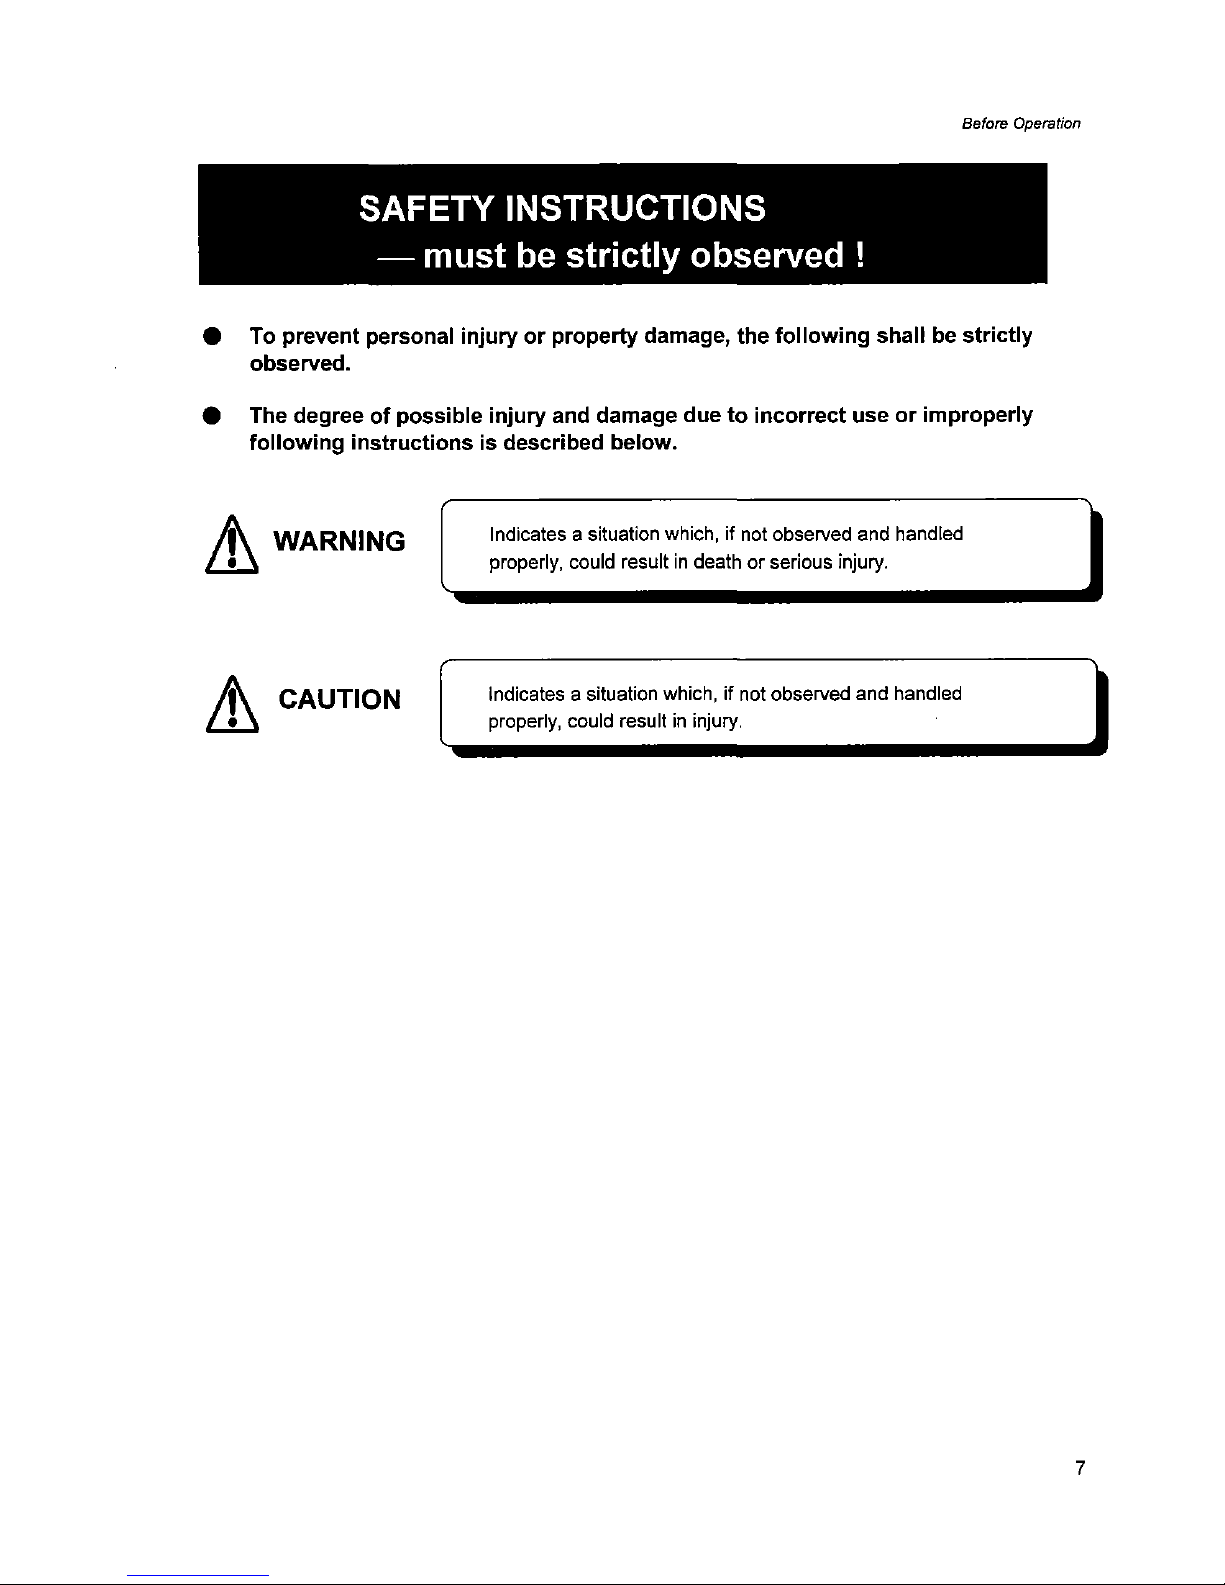
SAFETY INSTRUCTIONS
- must
be
strictly observed!
• To prevent personal injury or property damage, the following shall be strictly
observed.
• The degree
of
possible injury and damage due to incorrect use or improperly
following instructions is described below.
Lh
WARNING
Lt
CAUTION
Indicates a situation which, if not observed and handled
properly, could result
in
deathorserious injury.
Indicates a situation which, if not observed and handled
properly, could result
in
injury.
7
Before
Operation
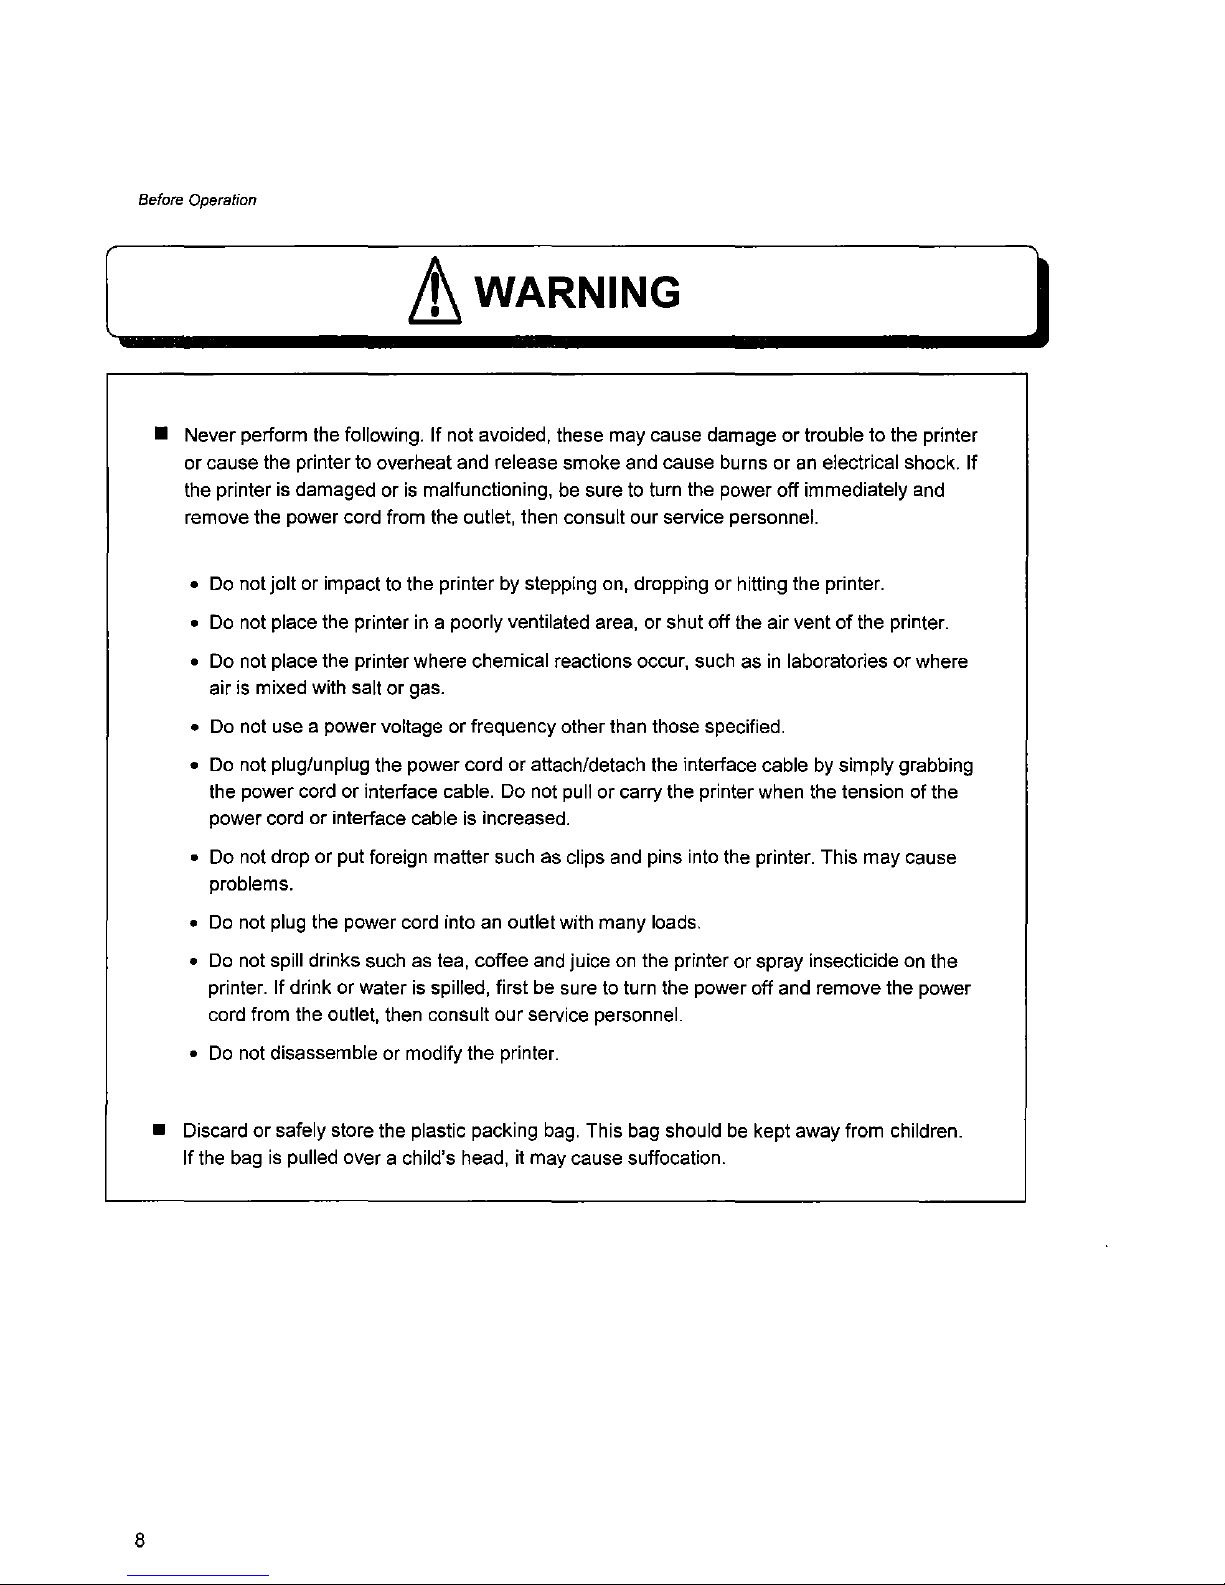
[
Lt_W_AR_N_IN_G
l
• Never perform the following. If not avoided, these may cause damageortrouble to the printer
or
cause the printer to overheat and release smoke and cause burns oranelectrical shock. If
the printer is damaged or
is
malfunctioning, be sure to turn the power off immediately and
remove the power cord from the outlet, then consult our service personnel.
•
Do
notjoltor impacttothe printer by stepping on, dropping or hitting the printer.
•
Do
not place the printerina poorly ventilated area, or shut off the air ventofthe printer.
• Do not place the printer where chemical reactions occur, such as
in
laboratoriesorwhere
air is mixed with salt
or
gas.
•
Do
not use a power voltage or frequency other than those specified.
•
Do
not plug/unplug the power cord or attach/detach the interface cable by simply grabbing
the power cord
or
interface cable. Do not pull or carry the printer when the tension of the
power cord or interface cable is increased.
• Do not drop or put foreign matter such as clips and pins into the printer. This may cause
problems.
•
Do
not plug the power cord into an outlet with many loads.
•
Do
not spill drinks such as tea, coffee and juiceonthe printer or spray insecticide on the
printer. If drink or water is spilled, first be sure to turn the power off and remove the power
cord from the outlet, then consult our service personnel.
•
Do
not disassemble or modify the printer.
• Discard
or
safely store the plastic packing bag. This bag should be kept away from children.
Ifthe bag
is
pulled over a child's head, it may cause suffocation.
8

Before
Operation
General Precautions
1.
Prior to operation,
read
the safety instructions carefully and observe them.
2.
Do
not drop or put foreign matter such as clips and pins into the printer. This may cause
problems.
3.
Be careful when moving or carrying the printer. Dropping the printer may cause injury or
property damage.
4.
Make sure if
you
open the top cover, itisopened all the way. If only partially open, the
cover could slam shut, possibly causing injury.
5.
When the coverisopen,becareful of the cornersofthe cover. They could cause injury.
6.
Do
not open the printer during printing.
7.
When cleaning the surface of the printer case, do not use the cloth thatissoaked
in
thinner, trichloroethylene, benzene, ketone or similar chemicals.
8.
Do
not use the printer where thereisa lotofoil, iron particles, or dust.
9.
Do
not spill liquids or spray insecticideonthe printer.
10.
Do
not jolt or impacttothe printer by stepping
on,
dropping or hitting the printer.
11.
Operate the control panel properly. A careless, rough handling may cause problems or
malfunction.
Do
not use such sharp-edged tool as a ballpoint pen for operation.
12.
Be
careful of the edgesofthe plates so injury or property damageispossible.
13.
Ifa problem occurs during printing, stop the printer immediately and unplug the power cord
from the outlet.
14.
When printer trouble occurs, do not try to dissemble
it.
Instead, consult our service
personnel.
9
Before
Operation
Precautions When I
nstalling~t_h_e_P_r_in_t;.;.e_r
_
1.
Priortooperation, read the safety instructions carefully and observe them.
2.
Do
not use or store the printer near fire, excessive moisture,indirect sunlight, nearanair
conditioner or heateror other sourceofunusually high or low temperature or humidity or
excessive dust.
3.
Do
not place the printer where chemical reactions occur, such asina laboratory.
4.
Do not place the printer where airismixed with salt or gas.
5.
The printer must sitona firm, level surface where thereisample ventilation. Never allow
the printer's air vent to be blocked
by
a wall or other object.
6.
Do
not put anythingonthe topofprinter.
7.
Do not place the printer near a radio or television, and do not use the same wall outiet for
the printer and radio or television. Radio or television reception could be adversely affected.
8.
Do
not use a power voltage or frequency other than those specified.
9.
Do
not put anythingonthe power cord or steponit.
10.
Do
not drag or carry the printer with the power cord or interface cable.
11. Avoid plugging the power cord intoanoutlet with many loads.
12.
Do
not bundle the power cord when inserting the plug.
13. Always grip the plug housing, not the cord,toplug/unplug the power cord.
14. Make certain the power
is
turned off before connecting/disconnecting the interface cable.
15. Avoid lengthening the signal cable or connectingitto any noise-producing device.Ifit
is
unavoidable, use the shielded cable or twisted pair for each signal.
16.
Place the printer near the outiet where the power cord can be unplugged easily to shut off
power.
17. Use the AC outiet that accepts a three-pronged plug. Otherwise, static electricity may be
generated and there will
be
danger of electric shock.
10
Before
Operation
Contents
Before Operation _
Limited Lifetime Warranty· . . . . . . . . . . . . . . . . . . . . . . . . . . . . . . . . . . . . . . . . . . . ...2
FCC
COMPLIANCE STATEMENT FOR AMERICAN USERS· 3
EMI
COMPLIANCE STATEMENT FOR CANADIAN USERS 4
Important Safety Instructions 5
Notice 6
Safety Instructions· 7
Warning·····
8
General Precautions 9
Precautions When Installing the Printer··
·10
Contents· . . . . . . . . . . . . . . . . . . . . . . . . . . . . . . . . . . . . . . . . . . . . . . . . . . . . . . . . . ...11
Main Features
13
Model Description 14
Chapter 1 Setup _
1 Confirmation of Carton Contents 16
2 Part Names and Functions
17
3 Connection to Power 20
4 Connection to a Computer·
21
Chapter 2 Printer Operation _
1 Power On/Off
24
2 Normal Operating Mode
26
3 Printer Setup Mode
27
4 Self-Test Mode
29
5 System Maintenance Mode· . . . . . . . . . . . . . . . . . . . . . . . . . . . . . . . . . . . . . . ...31
6 Returning to Factory Setting
34
11
Before
Operation
Contents
Chapter 3 Paper
and
Ribbon
_
1 Kinds of Paper . . . . . . . . . . . . . . . . . . . . . . . . . . . . . . . . . . . . . . . . . . ...36
2 Media Handling (When Using Front Sensors)
37
3 Media Handling (When Using Adjustable Sensor)
38
4 Paper Loading
39
5 Kinds of Ribbon
41
6 Ribbon Loading
42
Chapter4 Printer
Adjustments
_
1 Using Paper Other Than
the
Recommended (Head Offset Adjustments) . 46
2 Using Narrow Paper (Head Pressure Adjustments) . . . . . . . . . . . . . . . . . . .
..
47
3 Using Narrow Ribbon (Ribbon Tension Adjustments)
48
4 Adjustable Sensor· . . . . . . . . . . . . . . . . . . . . . . . "
49
5
Cleaning························································
50
Chapter 5 Troubleshooting _
1 Error Messages
52
2 Power Troubleshooting
56
3 Paper Feed Troubleshooting
57
4 Ribbon Feed Troubleshooting . . . . . . . . . . . . . . . . . ...58
5 Print Troubieshooting . . . . . . . . . .. . . . . . . . . . . . . . . . . . . . . . . . . . . . . . . . . . ...59
6 Interface Troubleshooting· . . . . . . . . . . . . . ....
60
Appendices _
1
Options··························································
62
2
Specifications·····················································
64
12
Before
Operation
Main Features
High-speed, high-quality printing
This printer adopts
both
a direct-thermal
and
thermal-transfer printing system with the line
thermal head
and
its unique controllC enables high-speed
and
high-quality printing.
Precision printing
for
additional value: 400dpi
New technologies such as the newly-developed 400dpi head
in
the Pronto 474, unique control
IC
and optimized driving technology for high-resolution printing are all available
on
QuickLabel
Systems label printers creating labels that are crisp, clear, easy-to-read
and
scan. Also, thanks
to
the additionai front (label) sensors,anamazingly
high
level of accuracy
canbeachieved; small
sized labels, miniature bar codes
and
small fonts are produced
on
demand andinthe correct
position leading to a reduction
in
cost, lead time and stock holding.
Powerful
control
language
A powerful yet simple to use control language
is
standardtoall
of QuickLabel Systems' label
printers allowing easy design of labels and bar codes. Alternatively, QuickLabel Systems provides
printer drivers for popular operating systems such as Windows
™
Easy operation
Thanks
to
the clam-shell mechanism, labels, media and ribbons are loaded easily and
maintenance such as
head
cleaningiscarried out smoothly.
Parallel and serial ports as
the
standard
The parallel port (Centronics)
in
additiontothe serial portisprovided as the standardtoenable
high-speed data transmitting
and
industry compatible connectivity.
Adjustable media
sensor
The moveable media detection sensor, standard
on
the Pronto 472
and
Pronto 474 allows
irregularly cut labels
and
tagstobe
used with ease. The sensors
can
also detect black registration
marks that are not at the edge of the media.
Trademark AcknoWledgement:
Windows:
Microsoft Corporation
13

Before
Operation
Model Description
This manualisprepared for two models, Pronto 472 and Pronto 474.
The main different points on the specifications between the two are shown below.
Model Print resolution
Printing speed Adjustable sensor
Pronto
472
203 dpi 2 - 71PS Standard
Pronto 474
400
dpi 1-
41PS
Standard
14
Chapter 1
Setup
1 ConfirmationofCarton Contents
2 Part Names and Functions
3 Connection to Power
4 Connection to a Computer
Chapter 1 Setup
15
Chapter1Setup
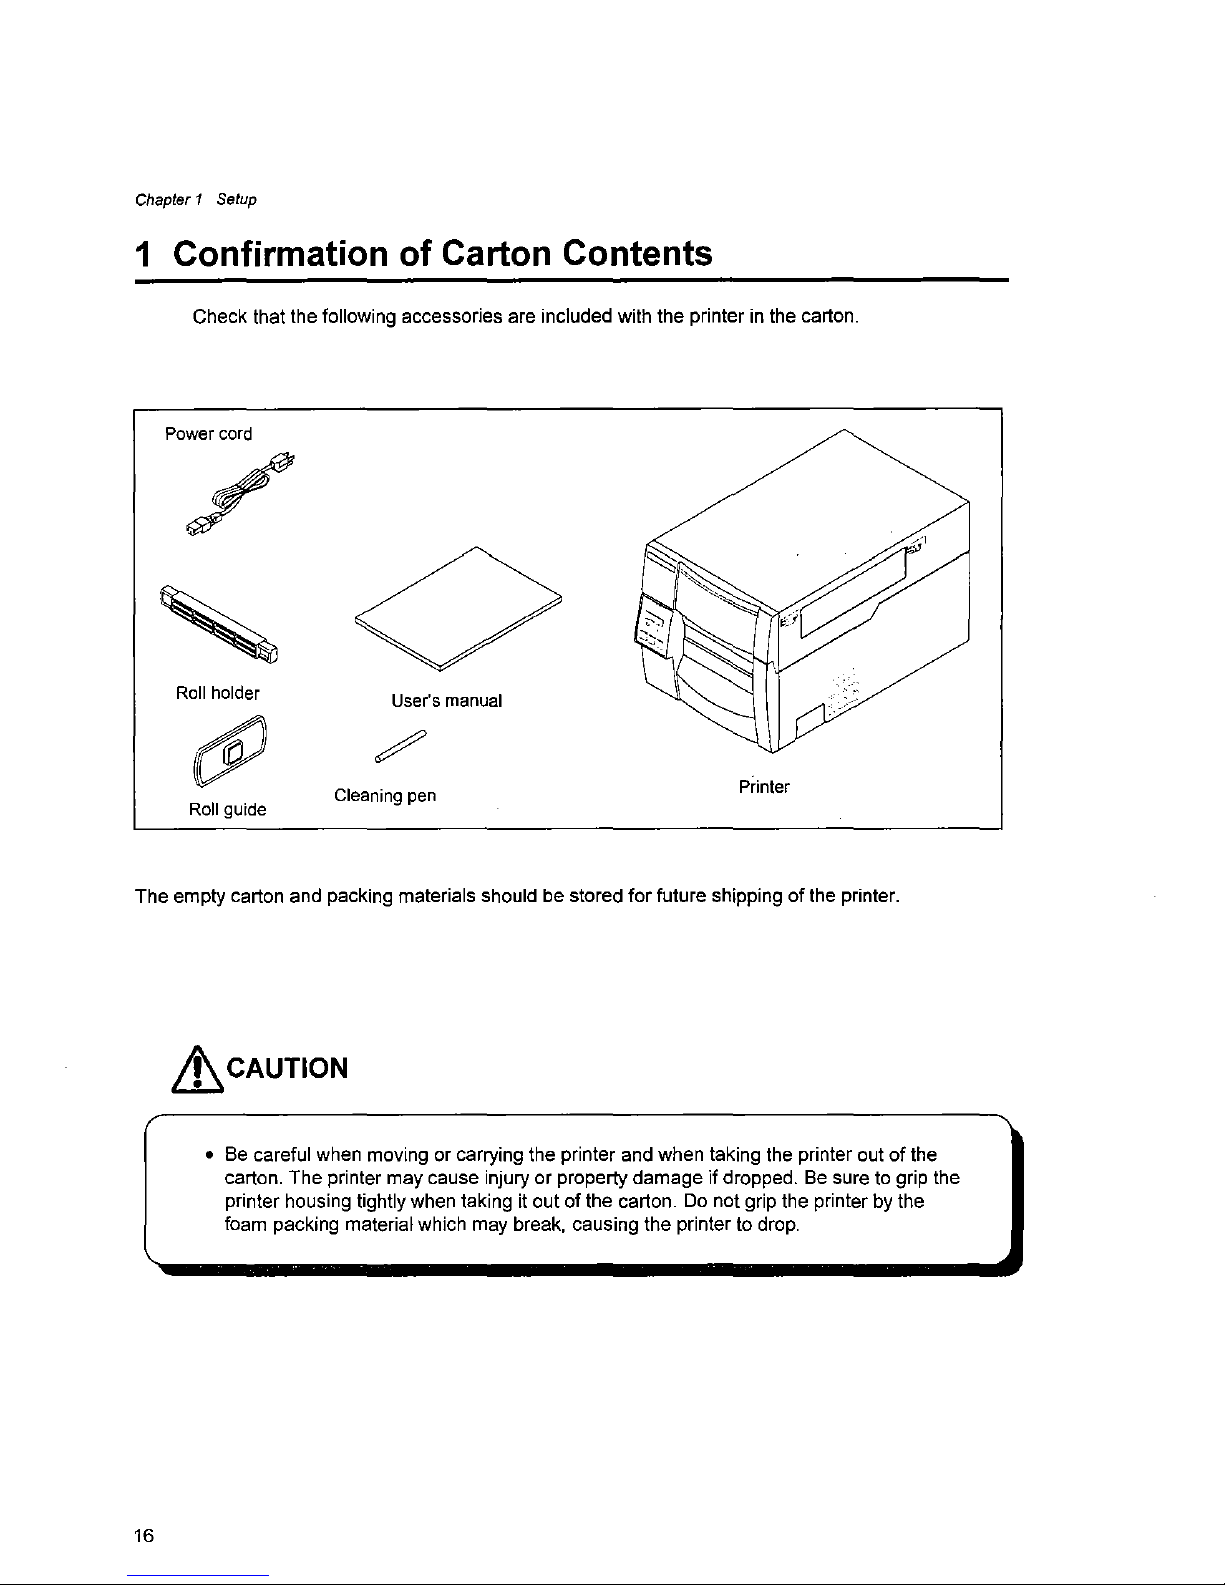
1 Confirmation of Carton Contents
Check that the following accessories are inciuded with the printer in the carton.
Power
cord
Roll
holder
Roll
guide
User's
manual
Cleaning
pen
Printer
The empty carton and packing materials should be stored
for
future shippingofthe printer.
~CAUTION
• Be careful when moving or carrying the printer and when taking the printer outofthe
carton. The printer may cause injury or property damage ifdropped.
Be
sure to grip the
printer housing tightly when taking it out of the carton. Do not grip the printer by the
foam packing material which may break, causing the printer to drop.
16
Chapter 1
Setup
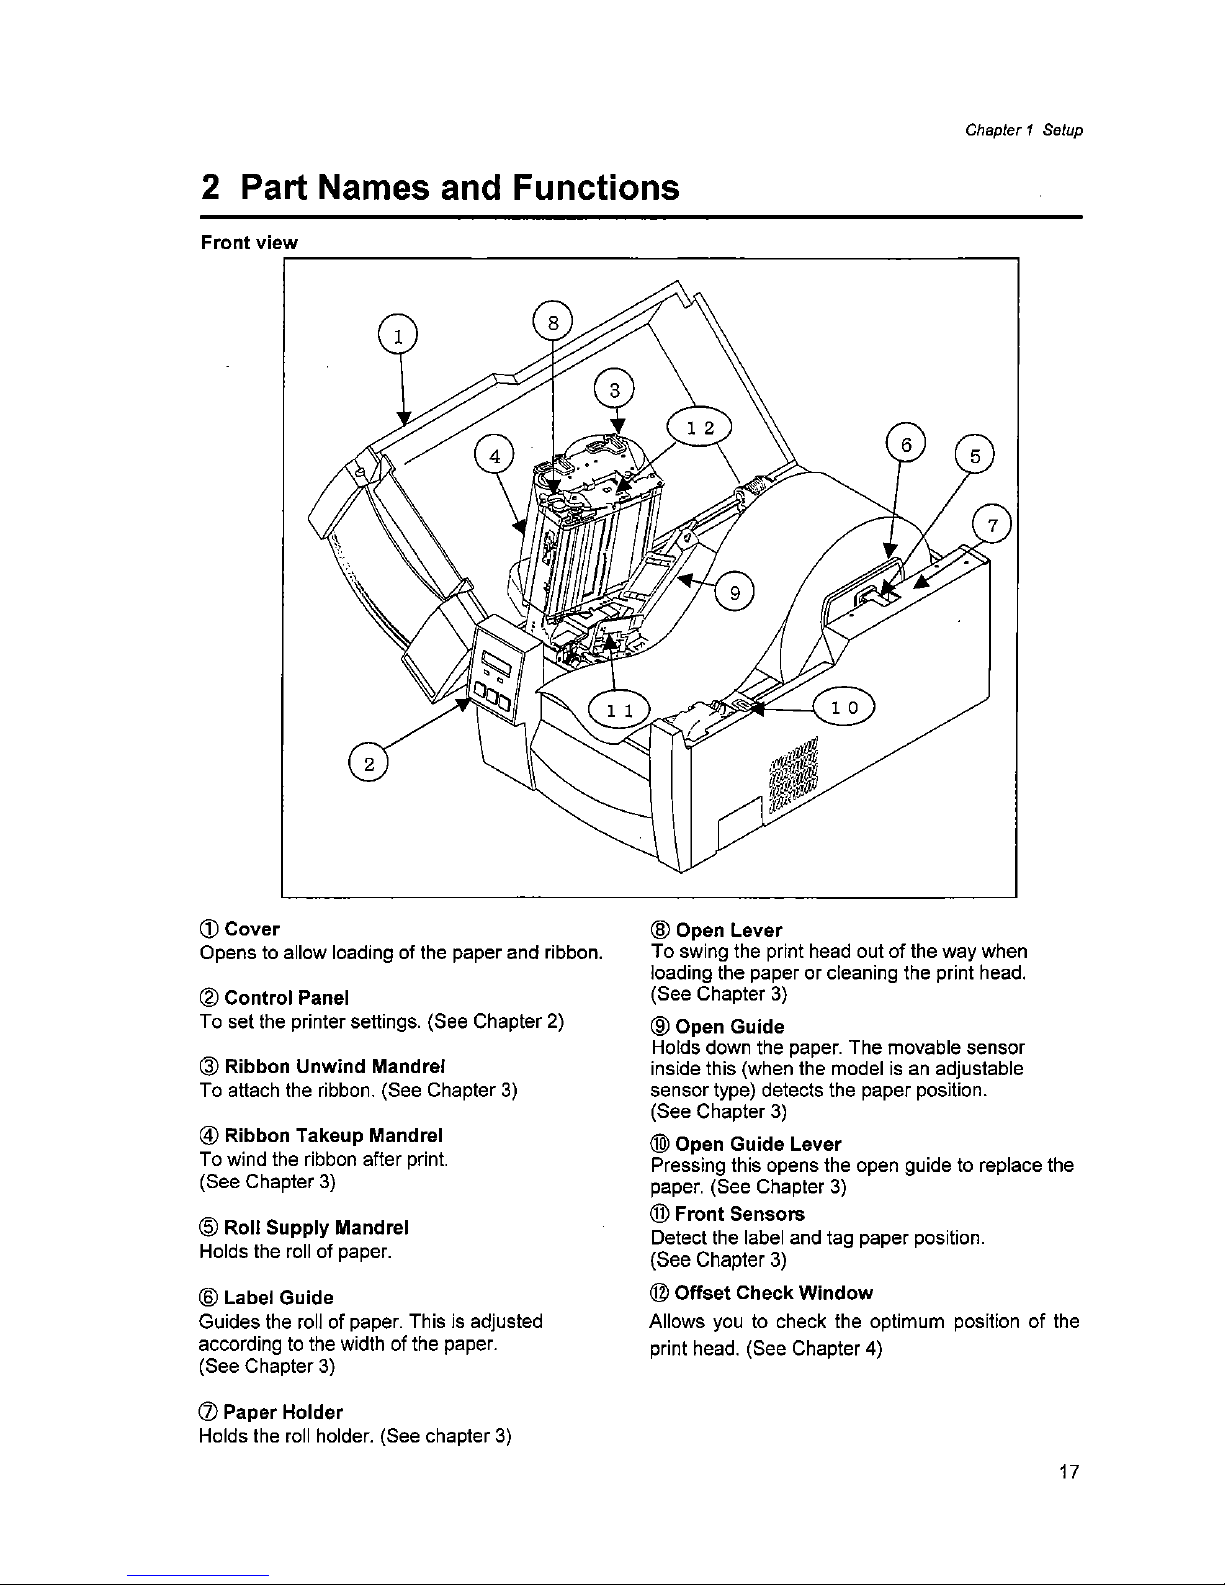
2 Part Names and Functions
Front
view
r-------------------------,
CD
Cover
Opens to allow loading of the paper and ribbon.
(g)
Control
Panel
To set the printer settings. (See Chapter 2)
® Ribbon
Unwind
Mandrel
To attach the ribbon. (See Chapter
3)
@ Ribbon Takeup Mandrel
To wind the ribbon after print.
(See Chapter
3)
@ Roll
Supply
Mandrel
Holds the roll of paper.
® Label
Guide
Guides the roll of paper. This is adjusted
according to the width of the paper.
(See Chapter
3)
(j) Paper
Holder
Holds the roll holder. (See chapter
3)
® Open
Lever
To swing the print head outofthe way when
loading the paper or cleaning the print head.
(See Chapter
3)
@OpenGuide
Holds down the paper. The movable sensor
inside this (when the model
isanadjustable
sensor type) detects the paper position.
(See Chapter
3)
@l
Open
Guide
Lever
Pressing this opens the open guide to replace the
paper. (See Chapter
3)
@
Front
Sensors
Detect the label and tag paper position.
(See Chapter
3)
@
Offset
Check
Window
Allows
you
to check the optimum positionofthe
print head. (See Chapter 4)
17
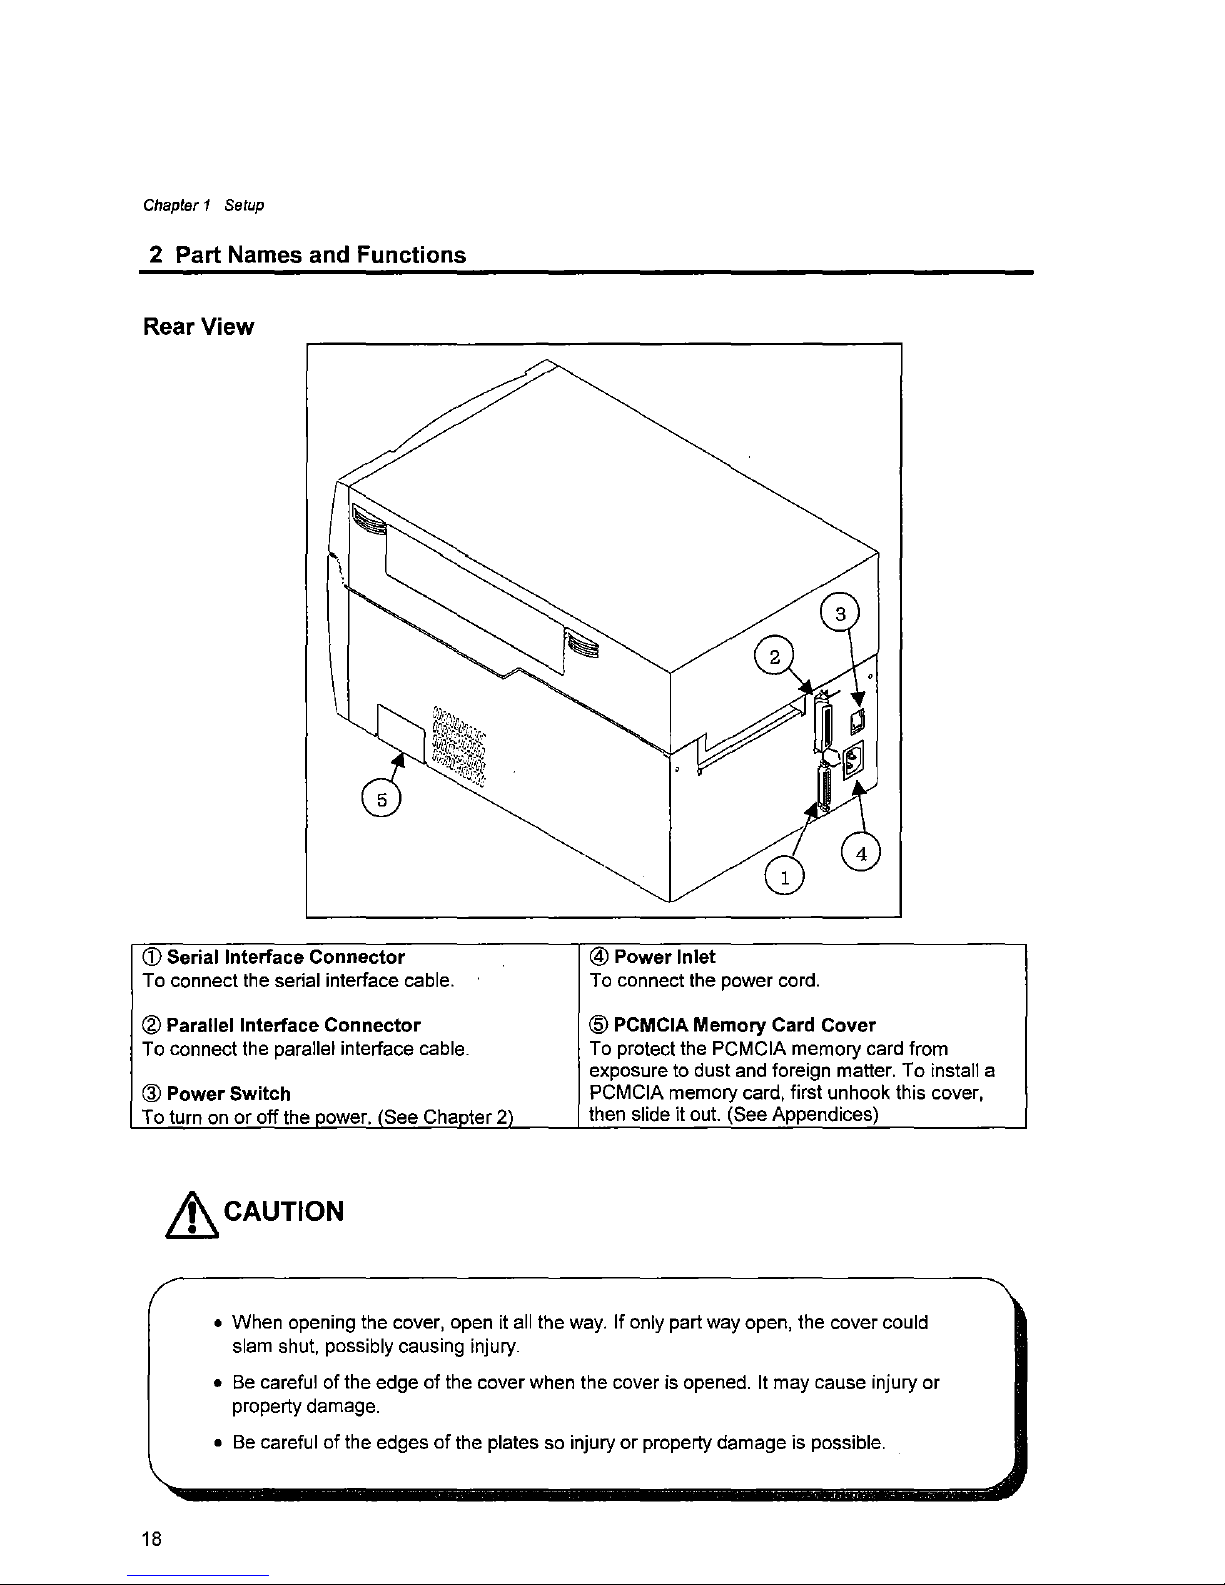
Chapter 1
Setup
2 Part Names and Functions
Rear View
CD
Serial Interface Connector
To connect the serial interface cable.
@ Parallel Interface Connector
To connect the parallel interface cable.
@ Power Switch
To turn on
or
off the power. (See Chapter
21
~CAUTION
@ Power Inlet
To connect the power cord.
@ PCMCIA Memory Card Cover
To protect the PCMCIA memory card from
exposure to dust and foreign matter. To install a
PCMCIA memory card, first unhook this cover,
then slide it out. (See Appendices)
• When opening the cover, open it all the way. If only part way open, the cover could
slam shut, possibly causing injury.
•
Be
careful of the edge of the cover when the cover is opened. It may cause injury or
property damage.
• Be careful
of
the edgesofthe plates so injuryorproperty damage is possible.
18

Control Panel
Chapter 1
Setup
2 Part Names and Functions
<D
LCD
Displays the current printer status, configuration
settings, or
an
error message.
@LEDs
One LEDisthe power indicator and the other
is
the error indicator.
@PauseKey
Temporariiy pauses printing.
® Feed Key
Feeds the oaoer.
@StopKey
Stops the printer operating.
@ Paper Gap
Adjustment
Control
To adjust the paper gap sensor sensitivity.
(j) Reflective
Mark
Adjustment
Control
To adjust the Reflective sensor sensitivity.
® LCD
Contrast
Adjustment
Control
To adjust the LCD contrast.
19
Chapter 1
Setup
3 Connection to Power
1.
Check that the power switchonthe printeristurned OFF.
2.
Connect the connector of the power cord to the power inletonthe printer.
3.
Insert the plug ofthe power cordinthe AC outlet.
Power
switch
Power
inlet
AC
outlet
~
CAUTION
• Use an AC outlet that accepts a three-pronged plug. Otherwise, static electricity
may
be generated and there will be dangerofelectric shock.
20
Chapter 1
Setup
4 Connection to a Computer
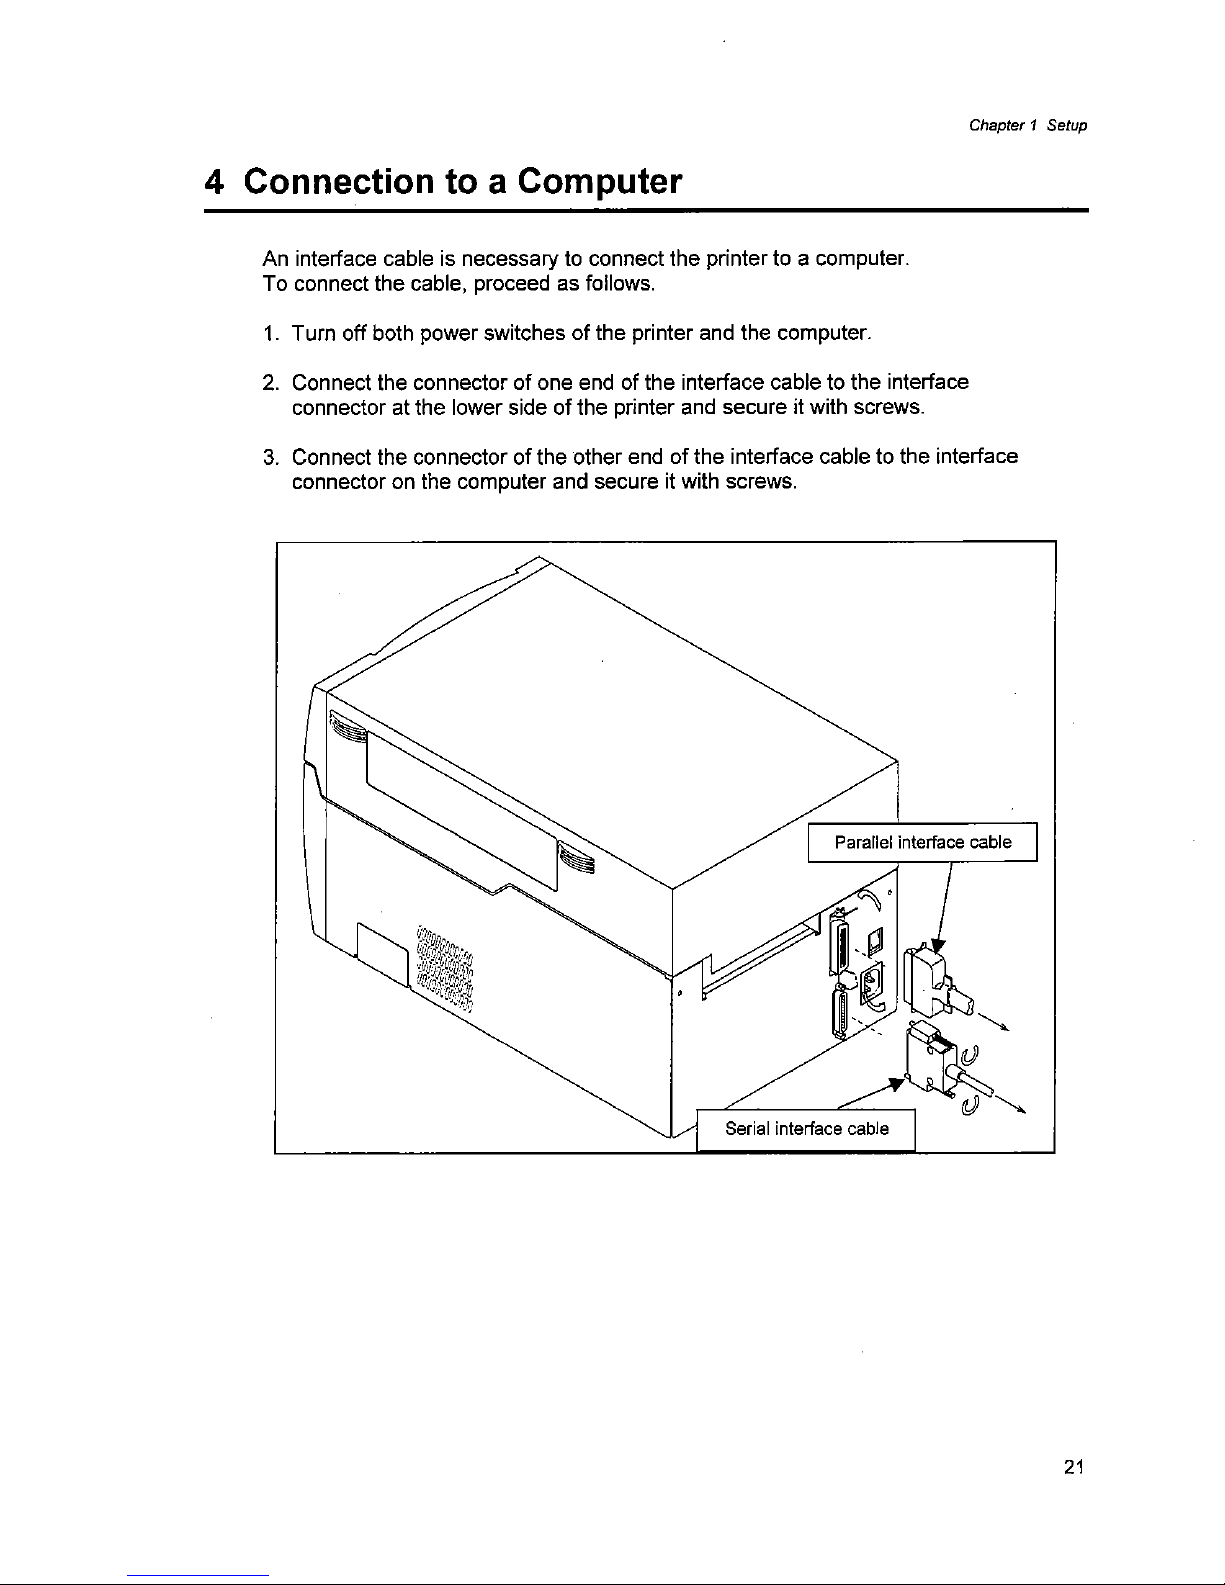
An interface cable is necessary to connect the printer to a computer.
To connect the cable, proceed as follows.
1.
Turn off both power switchesofthe printer and the computer.
2.
Connect the connectorofone end of the interface cable to the interface
connector at the lower side
of
the printer and secure it with screws.
3.
Connect the connectorofthe other endofthe interface cable to the interface
connector on the computer and secure it with screws.
Parallel interface cable
Serial interface cable
21

Chapter 1
Setup
22
Chapter 2
Printer Operation
1 Power On/Off
2 Normal Operating Mode
3 Printer Setup Mode
4 Self-Test Mode
5 System Maintenance Mode
6 Returning to Factory Setting
Chapter 2
Printer
Operation
23
 Loading...