

Page 1
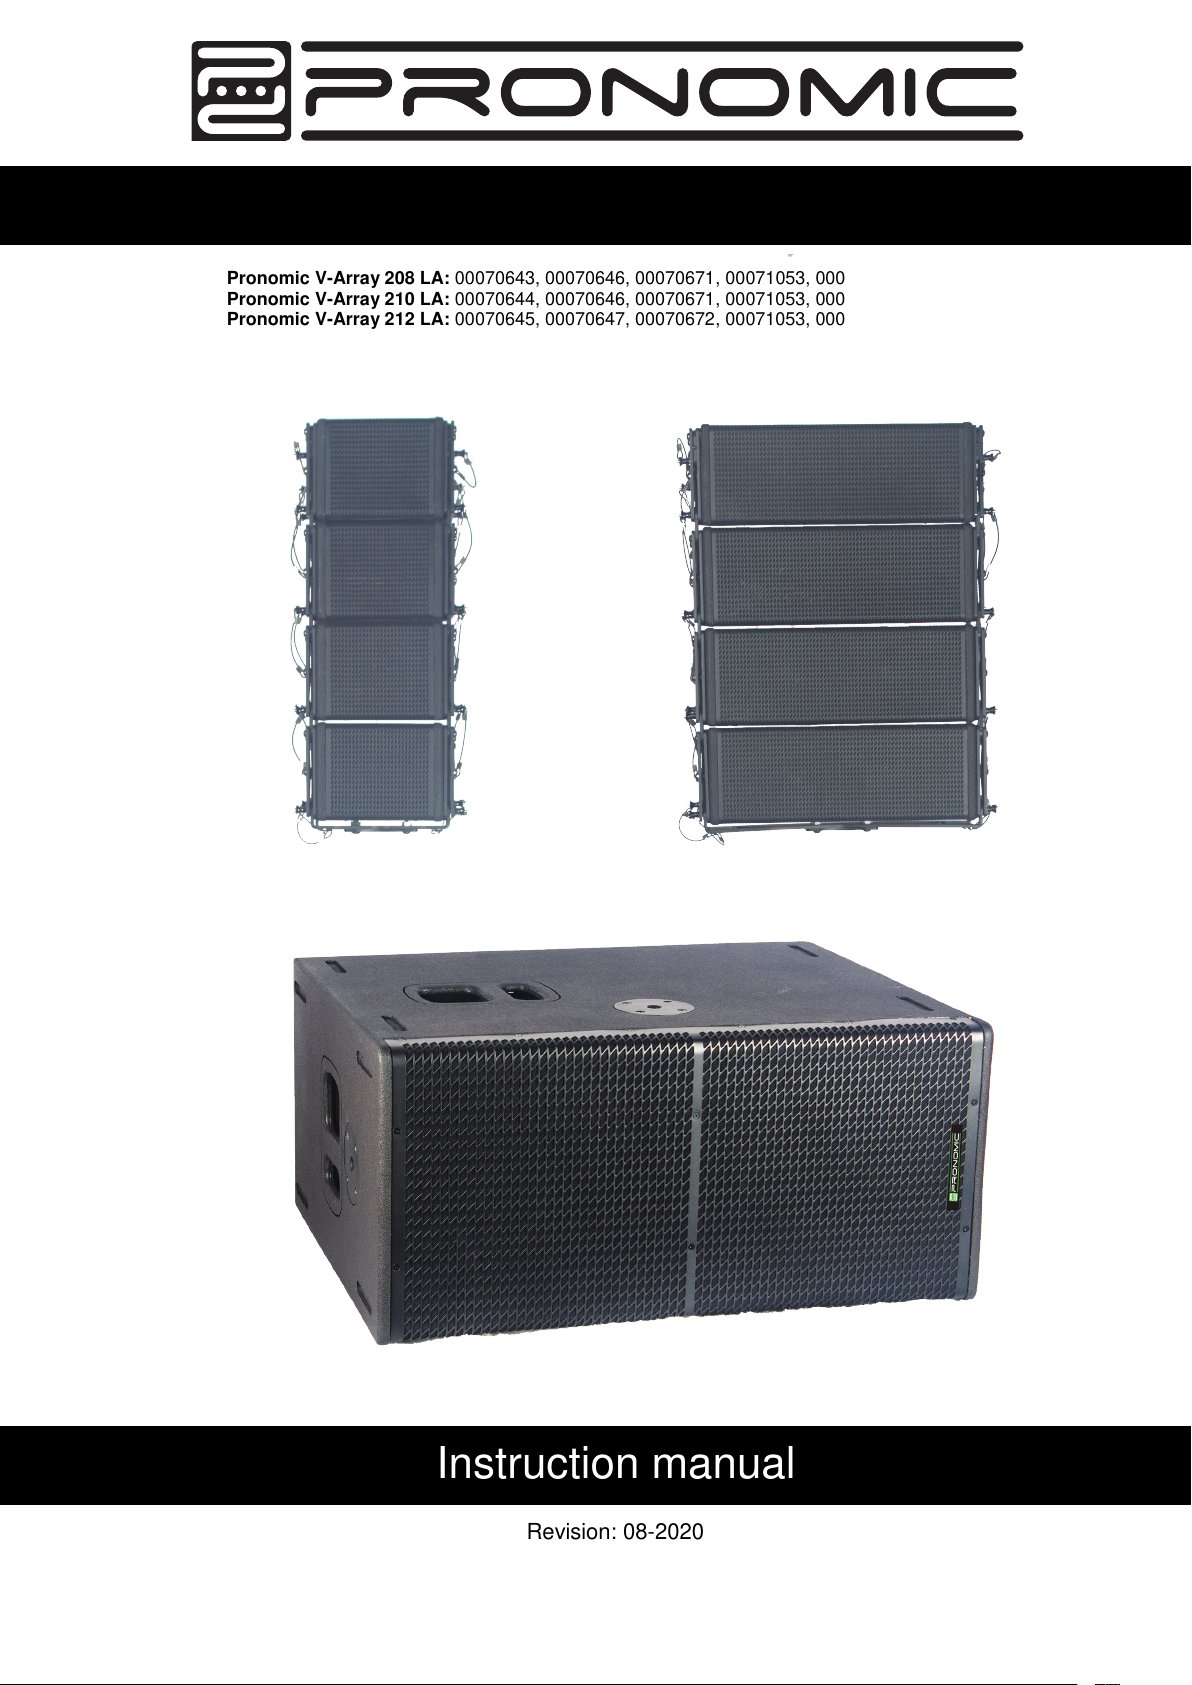
Pronomic V-Array 208 LA: 00070643, 00070646, 00070671, 00071053, 00071054, 00071052
Pronomic V-Array 210 LA: 00070644, 00070646, 00070671, 00071053, 00071054, 00071052
Pronomic V-Array 212 LA: 00070645, 00070647, 00070672, 00071053, 00071054, 00071052
Revision: 08-2020
Pronomic V-Array
Instruction manual
Page 2

V-Array
© 2020
This manual is protected by copyright. Reproduction of these operating instructions,
even in part, is only permitted with the permission of Musikhaus Kirstein GmbH. The
same applies to the reproduction or copying of images, even in modified form.
Content
Rear panel of the subwoofer ................................................................................. 3
Product description (Subwoofer) ......................................................................... 4
Product description (satellites) ............................................................................ 5
Wiring of the satellites ........................................................................................... 6
Connections ........................................................................................................... 7
DSP Presets Diagram ............................................................................................ 8
Subwoofer specifications ..................................................................................... 9
Specifications of the satellites ............................................................................ 10
Angling and plug-in connections of the satellites ............................................. 11
Bluetooth connection .......................................................................................... 12
Intended use ........................................................................................................ 12
Important safety instructions............................................................................... 12
Installation and operation ................................................................................... 12
Optional accessories ........................................................................................... 12
SIMPLIFIED EU DECLARATION OF CONFORMITY ........................................... 13
WEEE-Erklärung (Waste of Electrical and Electronic Equipment) ................... 13
1
Page 3
V-Array
serious injury if no precautionary measures are taken.
taken when handling the product.
the product.
considered gender-neutral.
Do not leave children unattended.
Thank you for choosing this product.
To ensure that you are fully satisfied with this product, please read this manual
carefully before using our product. Keep this manual in a safe place. The manual
must be passed on to all subsequent users.
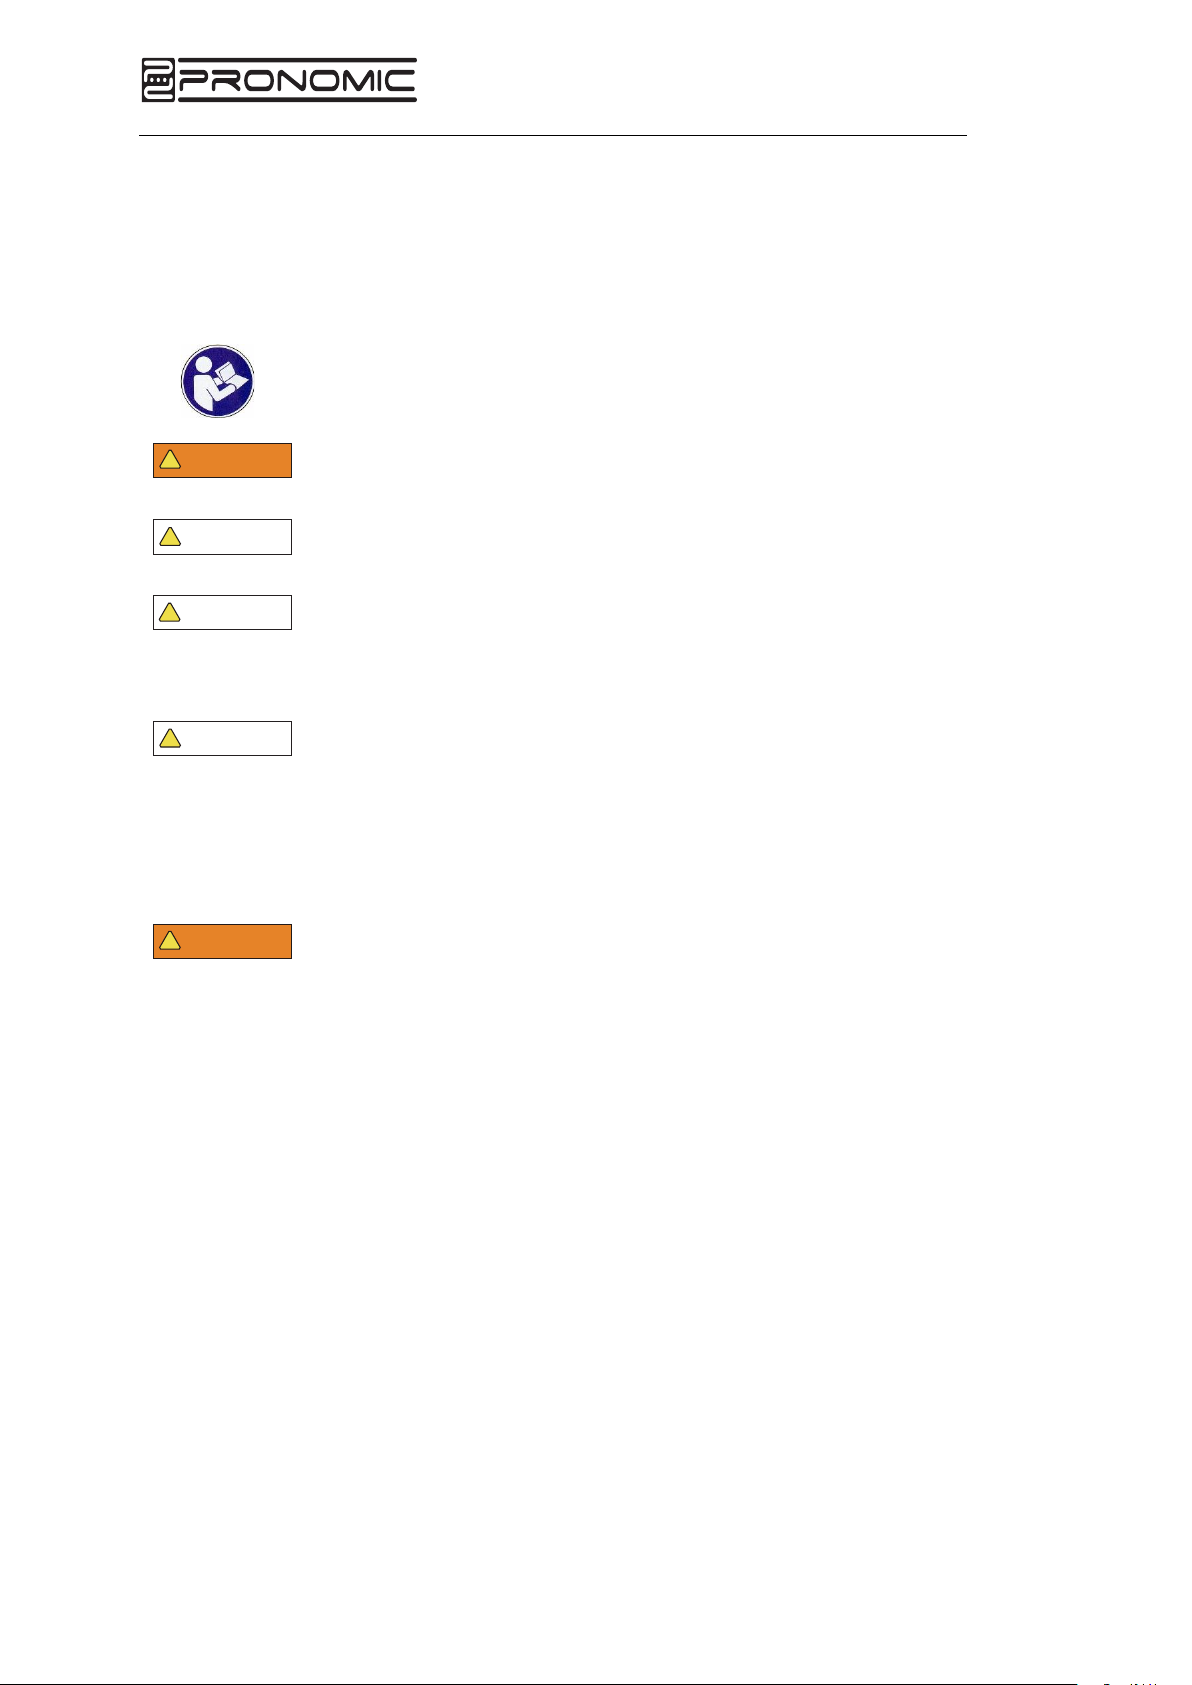
Observe operating instructions!
!
WARNUNG
The signal word WARNUNG indicates dangers which can lead to
HINWEIS
!
The signal word HINWEIS indicates general precautions to be
HINWEIS
!
!
Images and screen displays in this manual may differ slightly from
the appearance of the actual product, as long as this does not
have a negative effect on the technical properties and safety of
HINWEIS
!
!
All personal formulations in these operating instructions are to be
These operating instructions apply to persons who have been supervised or
instructed in the operation of the device by a person responsible for their safety and
who have demonstrated that they are capable of handling the device.
!
!
WARNUNG
Children should be supervised to ensure that they do not play
with the appliance.
All information in this manual has been checked to the best of our knowledge and belief.
However, neither the author nor the publisher can be held liable for any damages in
connection with the use of this manual.
Other product, brand and company names mentioned in this document may be the
trademarks of their respective owners. The user of this document is responsible for
compliance with all applicable copyright laws.
2
Page 4
V-Array
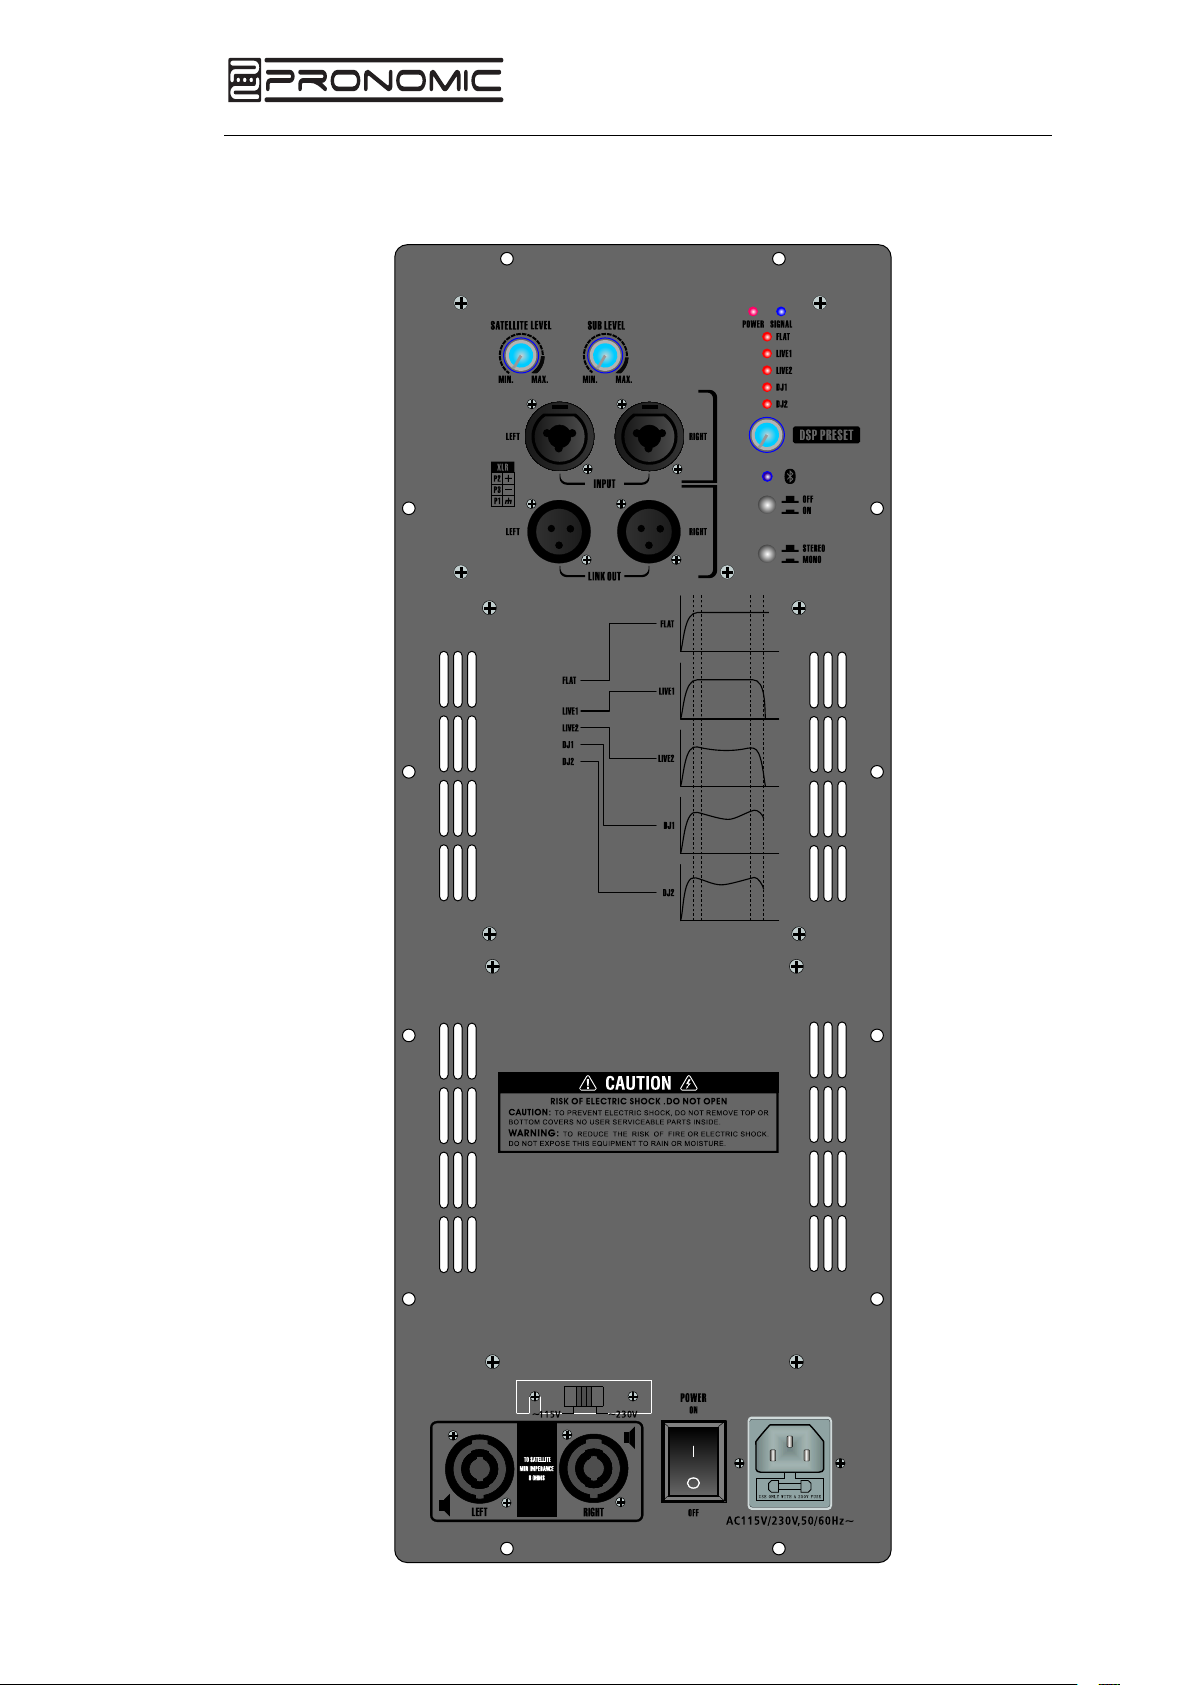
Rear panel of the subwoofer
1 2
4 4
5
9
10
10 11
3
6
7
5
8
12
3
Page 5

V-Array
Product description (Subwoofer)
1. volume control knob for satellites
With this control you can adjust the volume of the tops compared to the subwoofer
2. volume control knob for subwoofer
With this control you can adjust the volume of the subwoofer in comparison to the
satellites
3. DSP LEDs
These LEDs indicate which DSP preset is selected
4. line input
Use these combo jacks (XLR or 6.3mm jack) to connect sound sources to the
system such as a mixing console or other stereo sources
5. link output
With these XLR sockets you can continue to loop the input signal unamplified. This
allows you to use e.g. another system or another mixing console, etc.
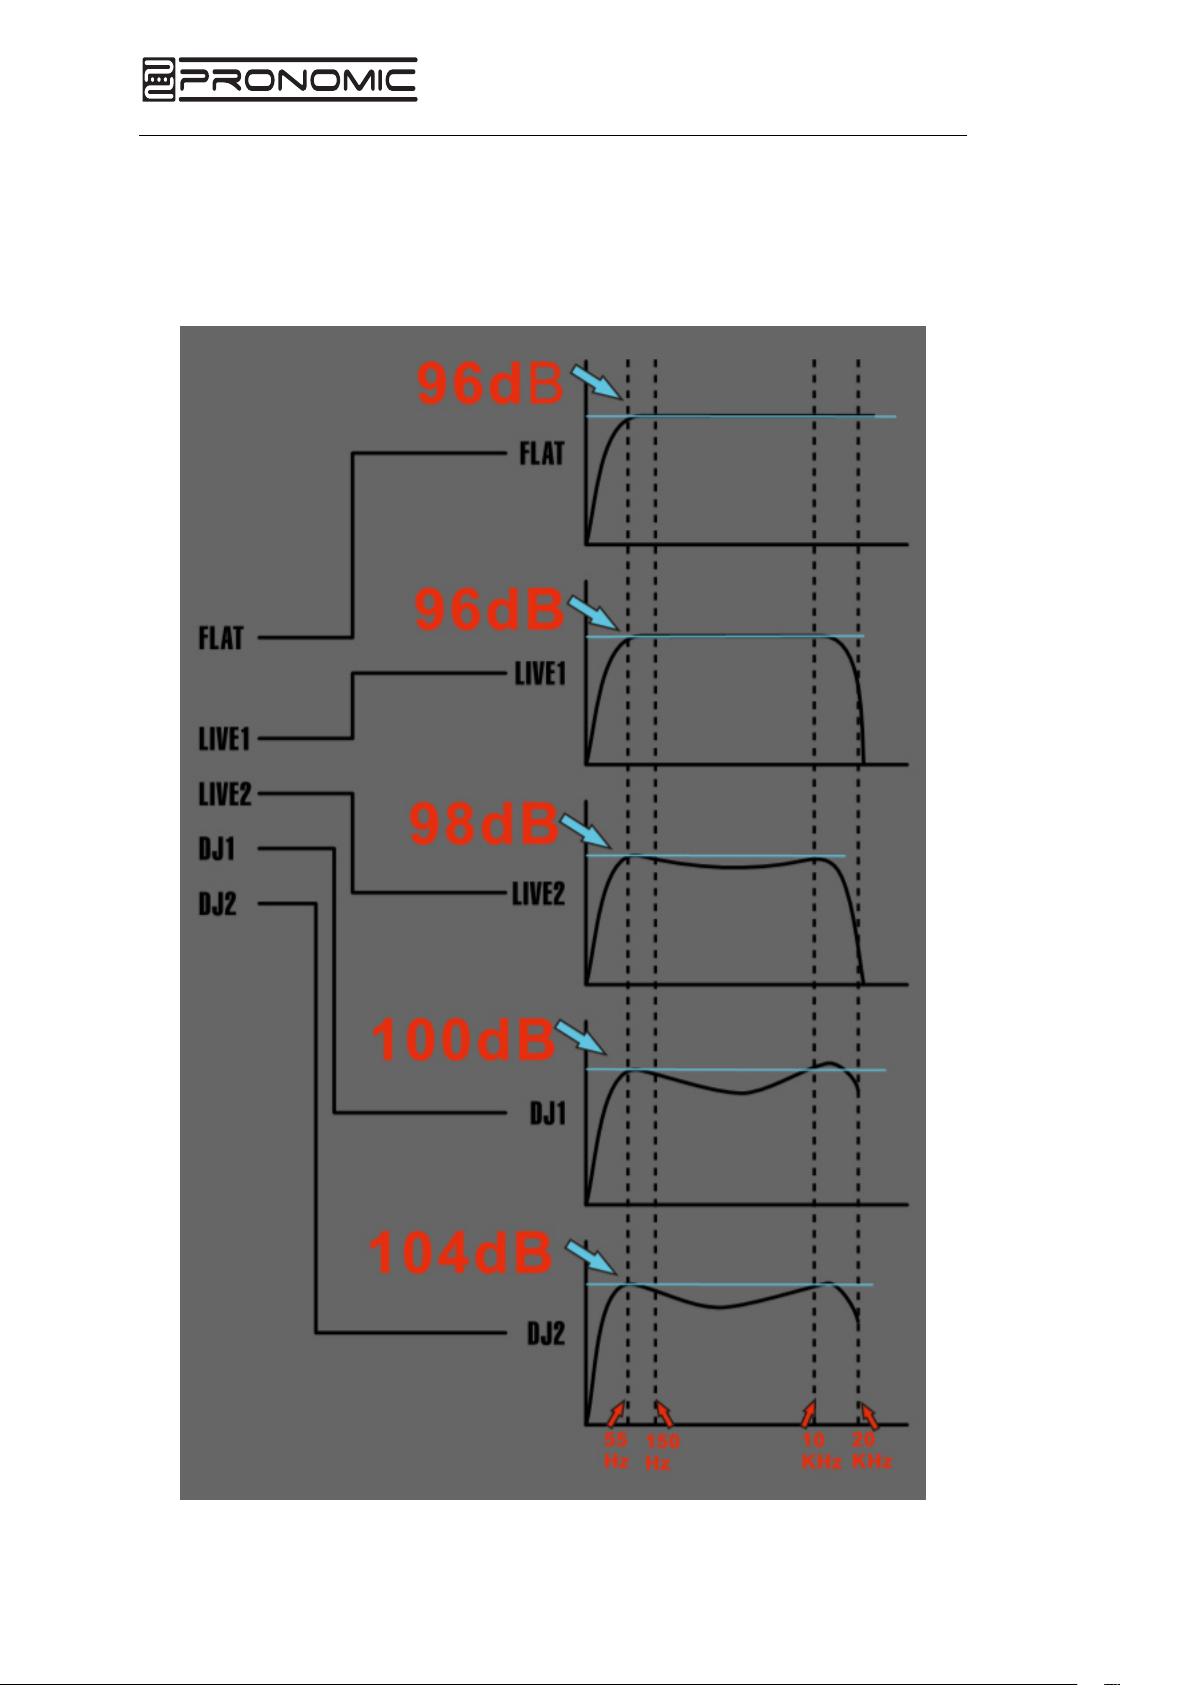
6. DSP Knob
With this control you can choose between the different DSP presets (see also item
DSP Presets Diagram). The following presets are available
Flat: LowCut
Live1: LowCut, HighCut
Live2: LowCut, HighCut, centre cut
DJ1: LowCut, HighCut, mid cut, bass boost
DJ2: LowCut, HighCut, mid cut, bass boost
7. bluetooth power button
With this button you can activate (press button - on) or deactivate (not pressed
button - off) the Bluetooth connection
8. stereo/mono button
Stereo (button not pressed): Input L routes the input signal to Output L, Input R
routes the input signal to Output R
Mono (button pressed): The mono sum of input L and R is routed to both outputs
9. voltage selector switch
Here the power supply can be adjusted for countries with 115V mains voltage.
!
WARNUNG
If the wrong voltage is selected, the system can be seriously damaged!
10. outputs for tops
Use these Speaker Twist sockets to connect your subwoofer with the satellites
11. on/off switch
This is the switch for power the product on and off
4
Page 6
V-Array
12. power plug & fuse
Use the mains cable supplied to connect the unit to a mains socket and thus supply
the unit with power
Only use the same fuse that is installed from the factory (250 Volt)
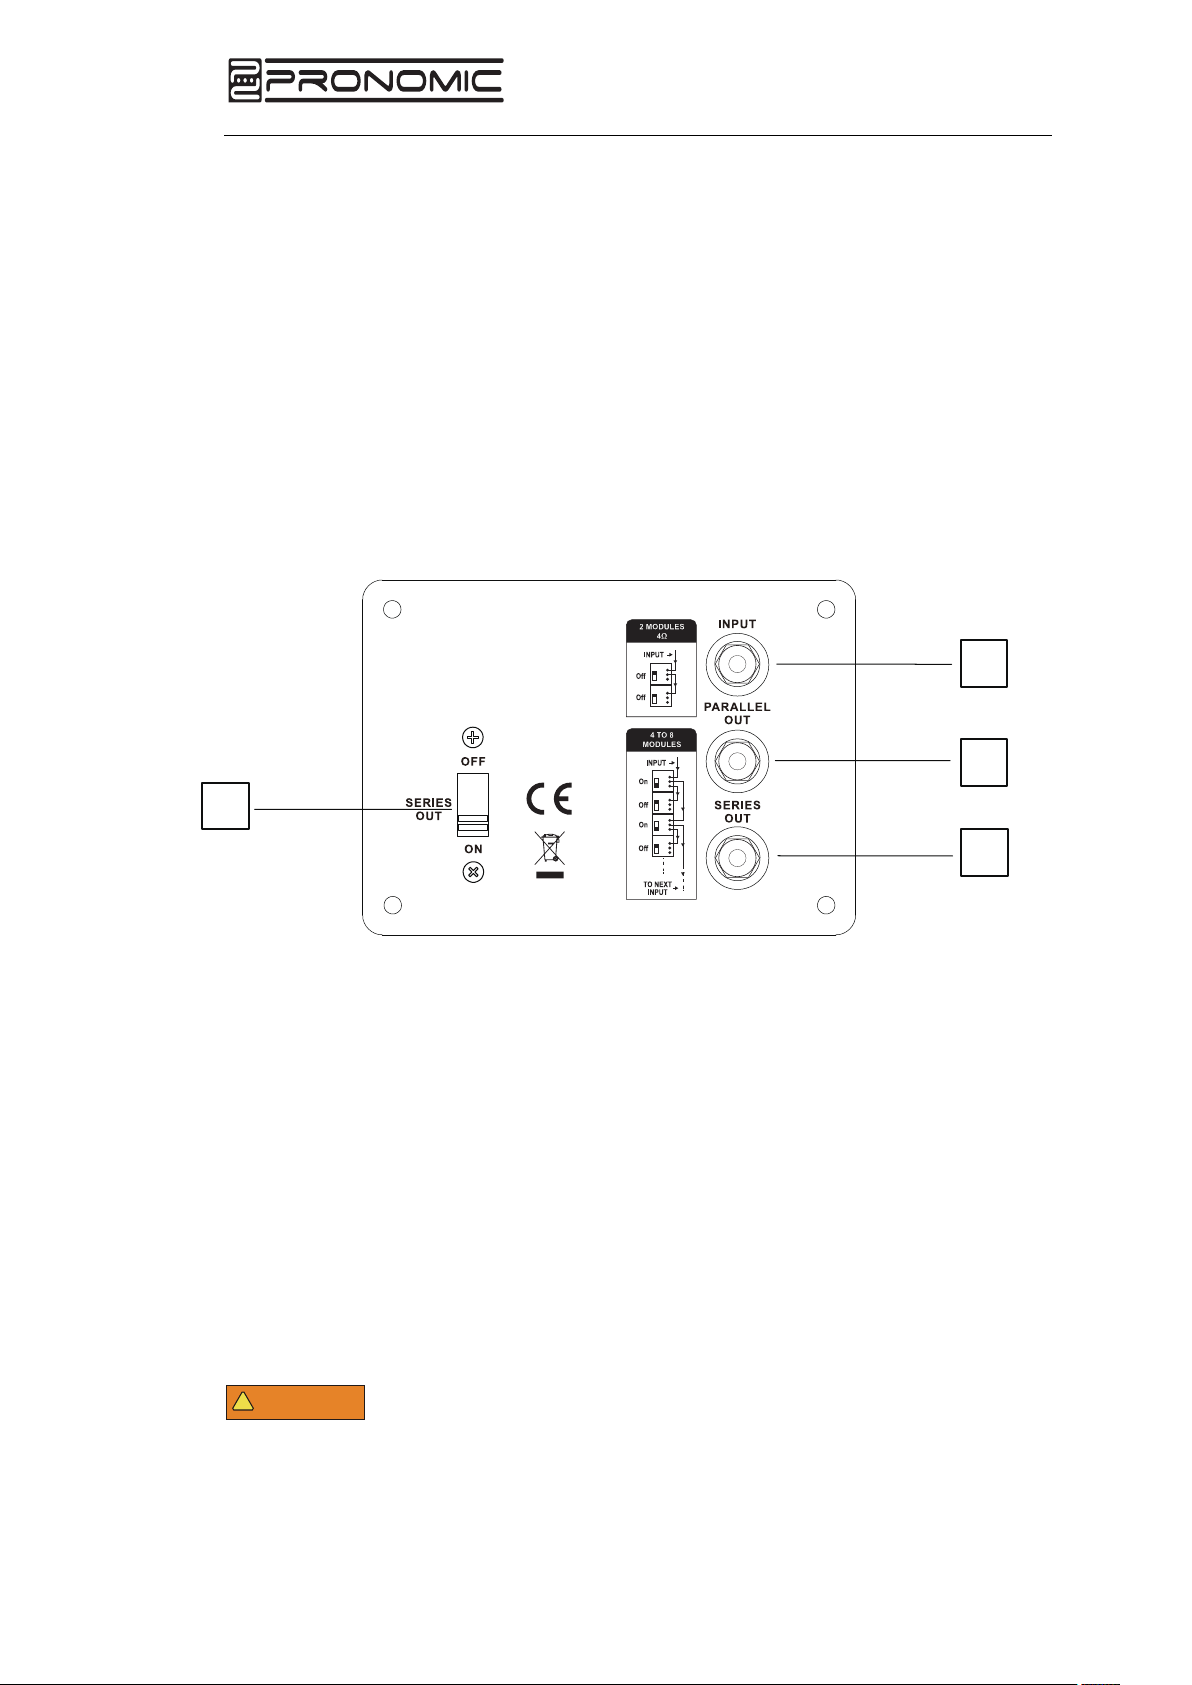
Product description (satellites)
4
1. Input
Input from subwoofer or previous element
2. Parallel output
Output for a parallel connection
3. Serial output
Output for serial connection
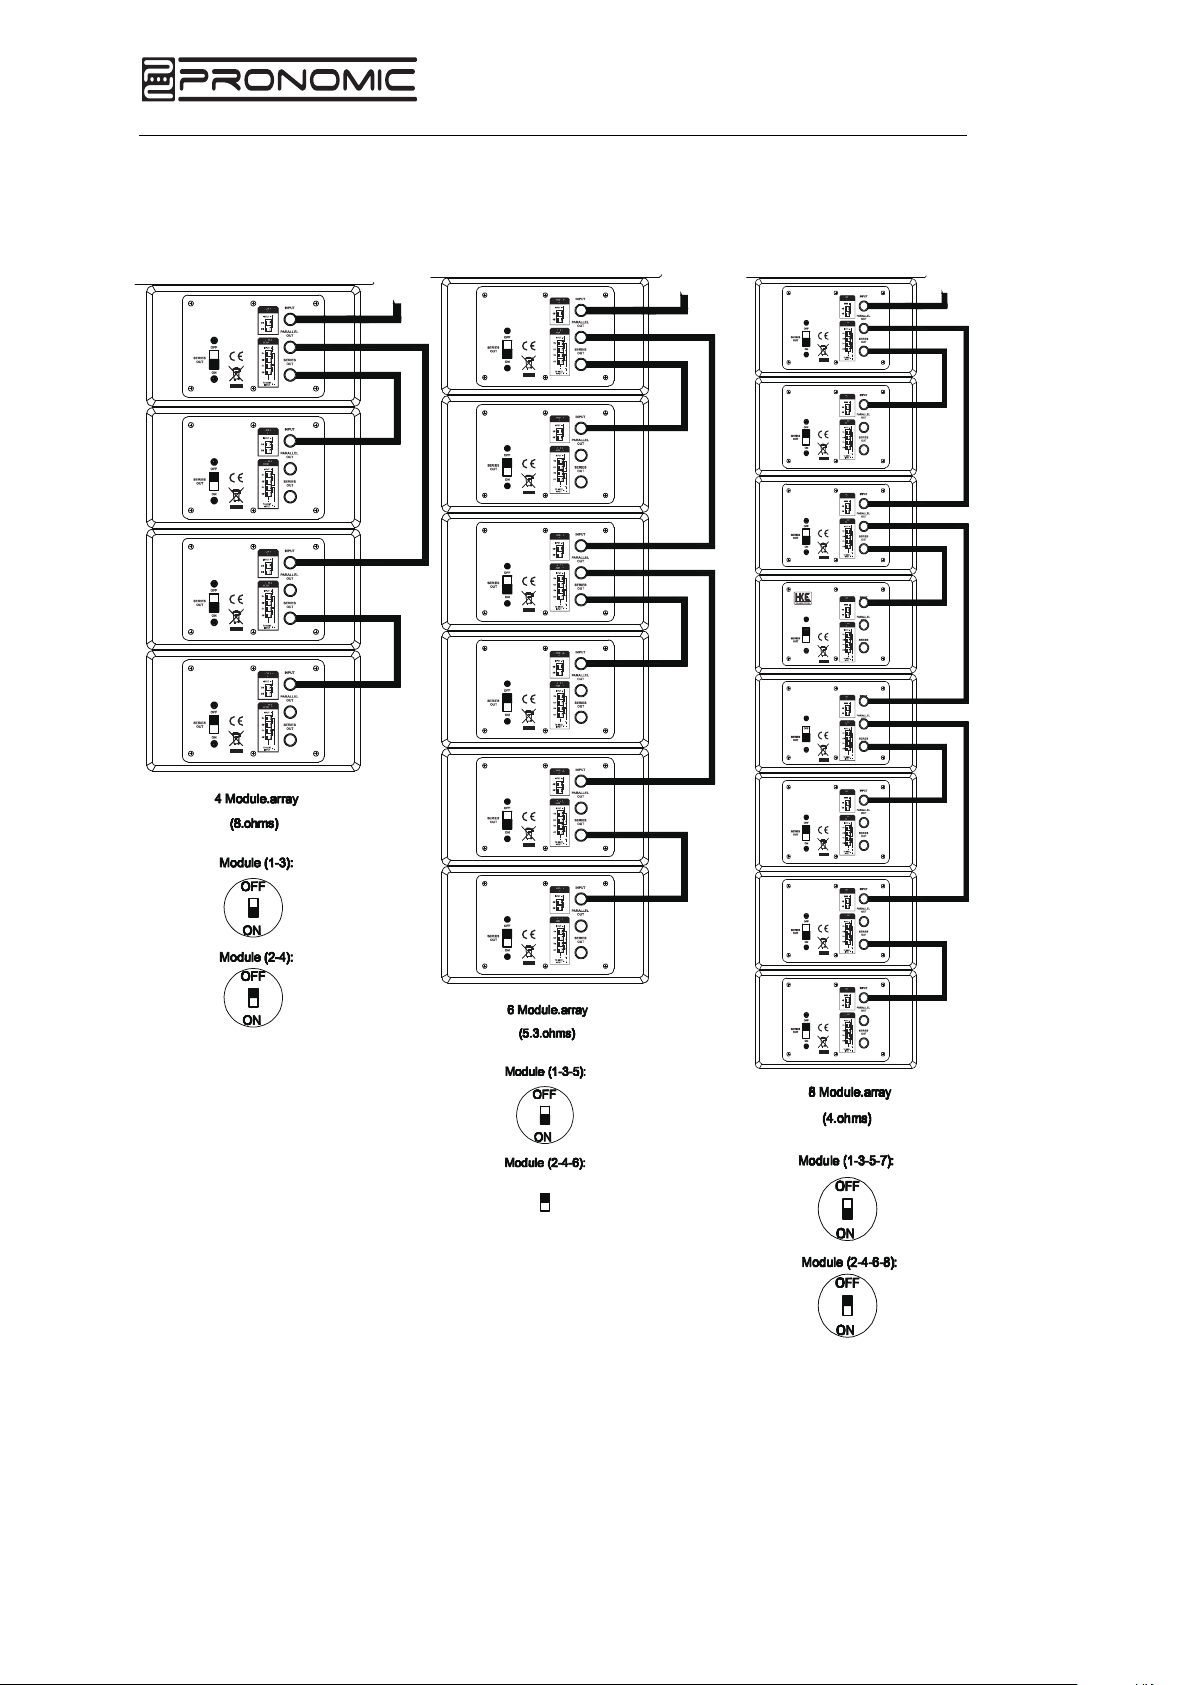
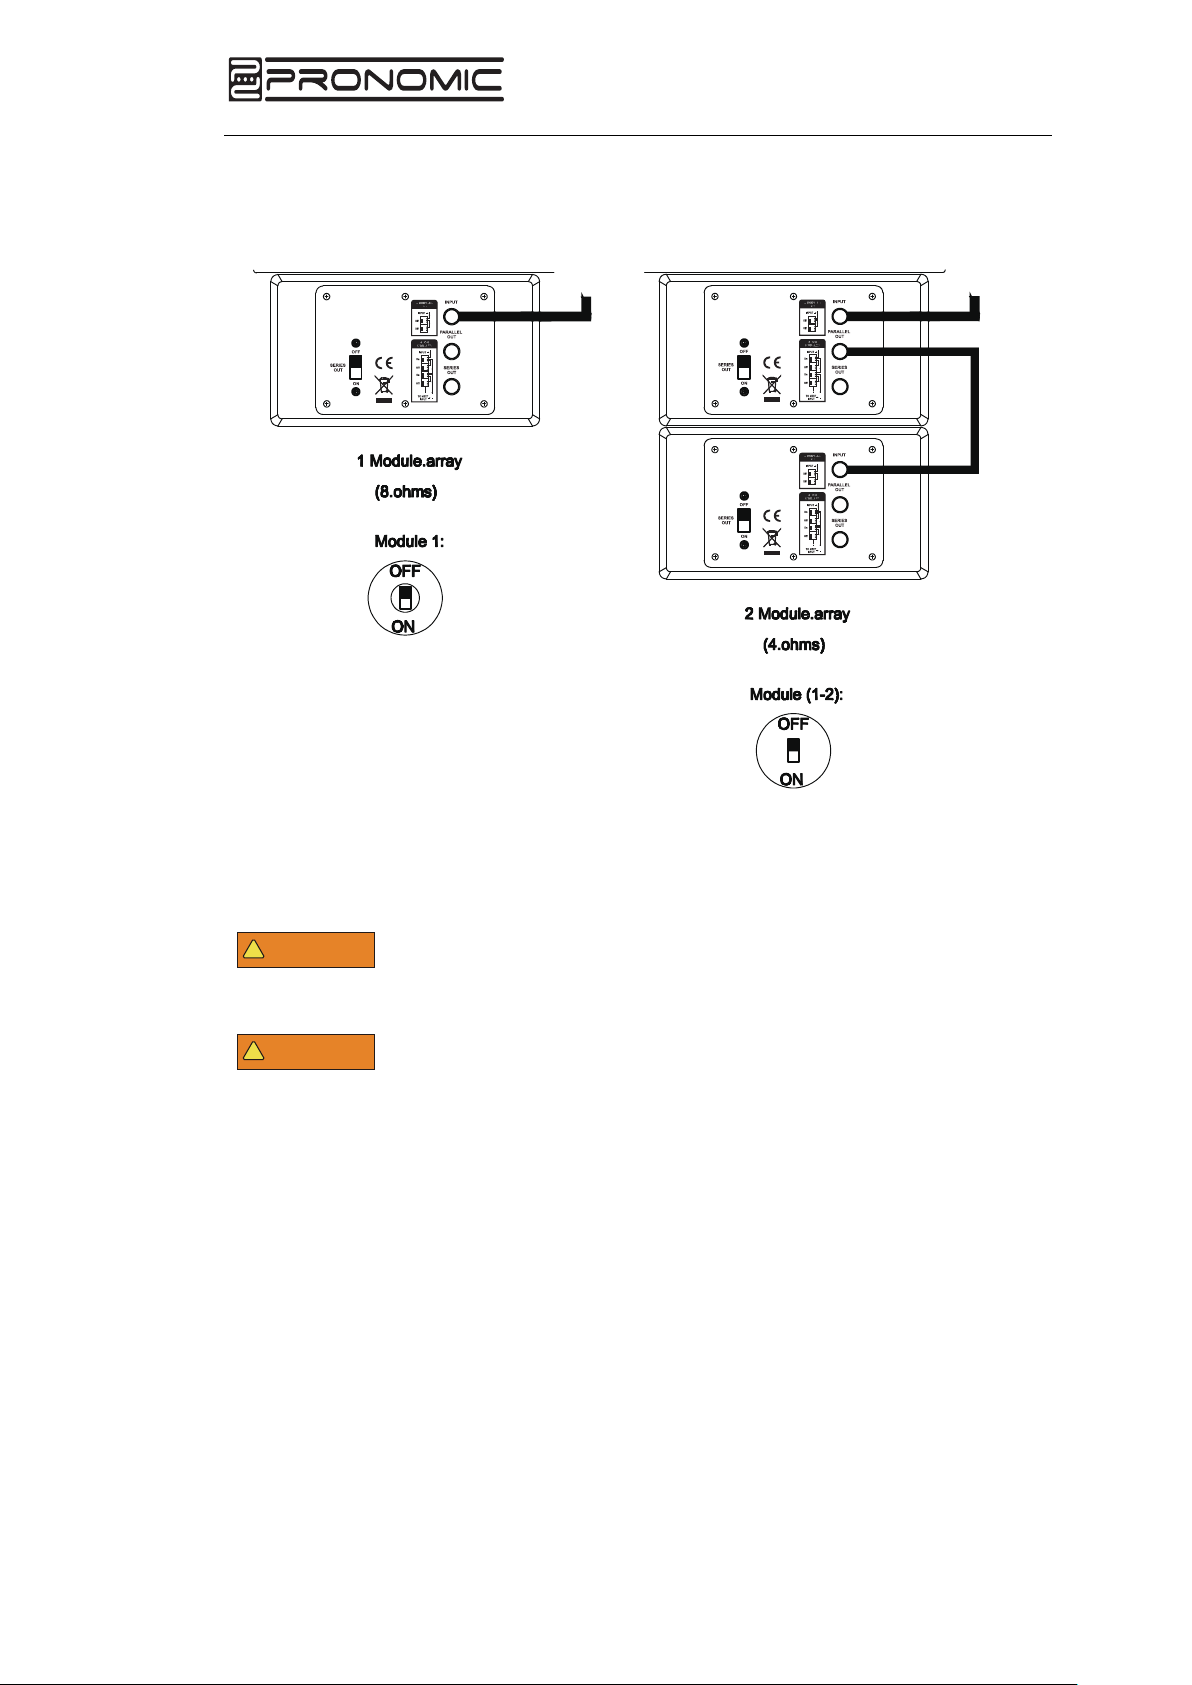
4. Serial output switch
Parallel or serial connection of the next element
Set the switch to the OFF position to connect the next element in parallel.
Set the switch to ON to connect the next element in series. The slide switch of the
last element must be set to OFF
!
WARNUNG
Only wire the satellites as described on the following pages
1
2
3
5
Page 7
V-Array
Wiring of the satellites
INPUT
INPUT
ALLY
SERIE S
INPUT
6
Page 8
over the power cord.
Security
!
WARNUNG
V-Array
INPUTINPUT
Before installing or removing the product, make sure that the
power cord is not connected to the mains.
!
WARNUNG
x The repair and installation of this unit must be carried out by qualified
personnel in compliance with the approved safety standards.
x Do not place objects that are heat sources on the product.
x Do not expose the appliance to water. Penetration of liquid can cause a short
circuit;
x If you are placing several units on top of each other, check that they cannot
fall down. Falls can destroy the units and cause serious physical injury.
Make sure that the product is set up so that no one can trip
Connections
Before using the product, make sure that your mains voltage matches the voltage
indicated on the product.
7
Page 9
V-Array
DSP Presets Diagram
8
Page 10

V-Array
Subwoofer specifications
9
Page 11

V-Array
Specifications of the satellites
10
Page 12
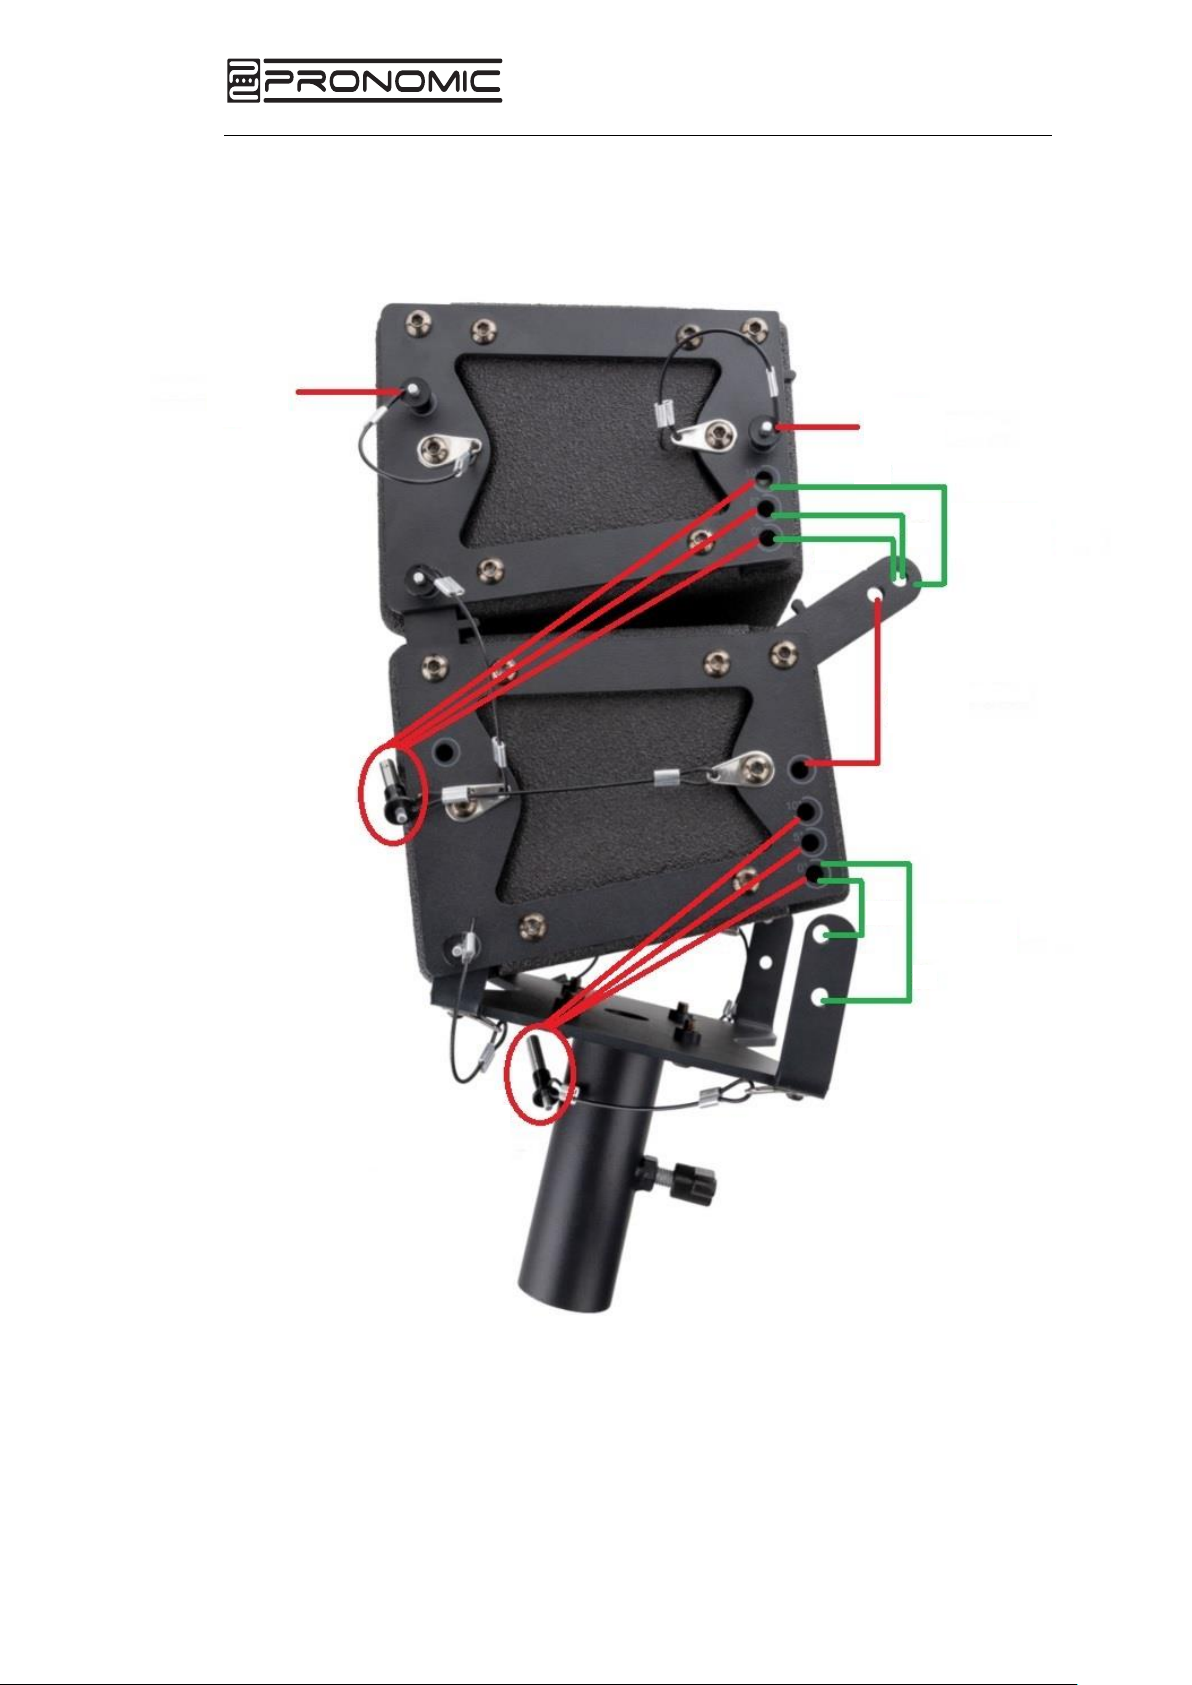
Angling and plug-in connections of the satellites
parked
position
For connection with
next element
x You can adjust the inclination of the satellites at the positions marked in
green
x The pins inserted in the picture are in a parked position and can be used to
connect to the next element if required
x To insert and remove the pins, the pins on the back of the pins must be
pressed
For connection with
next element
V-Array
parked
position
10°
adjustable
5°
0°
-10°
inclination
parked
position
adjustable
inclination
0°
11
Page 13

V-Array
Bluetooth connection
To connect a Bluetooth-enabled device such as a mobile phone or similar to the
system, press the Bluetooth button on the back of the subwoofer. The LED starts
flashing, confirming that Bluetooth is activated. Now look for the name Pronomic Varray in the connections of your Bluetooth enabled device and select it. The LED
changes from flashing to steady light, provided that the system has connected to
your device.
Intended use
Important safety instructions
x To avoid injury from electric shock, do not allow the cables, plugs or parts of
this product to come into contact with water or other liquids.
x Unplug the power cord before installing the product or replacing parts.
x Do not operate the product with a damaged cable or plug.
x If the fuse needs to be replaced, use an identical fuse
x Connect the power cord to a power outlet with a protective grounding.
Installation and operation
!
WARNUNG
Disconnect the unit from the power supply before
installation.
Optional accessories
As an alternative to attaching the satellites to the stand adapter, Pronomic also
offers flying frames for suspended mounting:
00070669 V-Array 104 flying frame suitable for 00070646 V-Array 104 TP top
00070670 V-Array 204 flying frame suitable for 00070647 V-array 204 TP top
!
WARNUNG
It is imperative that you observe the instructions supplied
for the assembly of the flying frame and the safety
instructions contained therein!
12
Page 14

V-Array
SIMPLIFIED EU DECLARATION OF CONFORMITY
Musikhaus Kirstein GmbH hereby declares that the radio system type [Pronomic VArray 208 SA Subwoofer, Pronomic V-Array 210 SA Subwoofer and Pronomic VArray 212 SA Subwoofer] complies with Directive 2014/53/EU.
The full text of the EU Declaration of Conformity is available at the following Internet
address
http://www.kirstein.de/docs/Konformitaetserklaerung/CE_Konformitaetserklaerung_
00070643.pdf
http://www.kirstein.de/docs/Konformitaetserklaerung/CE_Konformitaetserklaerung_
00070644.pdf
http://www.kirstein.de/docs/Konformitaetserklaerung/CE_Konformitaetserklaerung_
00070645.pdf
WEEE-Erklärung
(Waste of Electrical and Electronic Equipment)
Your product has been designed and manufactured using high quality materials and
components that can be recycled and reused. The symbol means that your product
must be disposed of separately from household waste at the end of its life.
Dispose of this unit at your local collection or recycling point.
Please help to protect the environment in which we all live.
All technical data and appearances can be changed without prior notice. All
information was correct at the time of printing. Musikhaus Kirstein GmbH does not
guarantee the correctness or completeness of the descriptions, photos or
statements contained in this manual. Printed colours and specifications may differ
slightly from the product. Products of Musikhaus Kirstein GmbH are only sold
through authorised dealers. Distributors and dealers are not representatives of
Musikhaus Kirstein GmbH and are not authorised to legally bind Musikhaus Kirstein
GmbH in any way.
Musikhaus Kirstein GmbH
Bernbeurener Str. 11
86956 Schongau - Germany
Phone: 0049-8861-909494-0
Fax: 0049-8861-909494-19
13
 Loading...