

Page 1
Ih r Pr od uk t wu rd e m it hoch we rt ig en Mat er ia li en un d K om pon en te n e nt wo rf en und h er ge st el lt , d ie r ec yc el ba r si nd u nd wie de r ve rw en de t w er de n
kö nn en . Di es es Sym bol bed eu te t, das s el ek tr is ch e und ele kt ronische Ge rä te am End e ihr er Nutz un gs da ue r vom H au sm ü ll getr en nt ent so rg t
we rd en mü ss en. Bi tt e en ts or ge n S ie d ie se s G er ät bei I hr er ö rt li chen ko mm un al en Samm el st el le od er im Re cy cl in g C en te r. B it te h el fe n Sie m it ,
di e Um w el t, in d er w ir l eben, zu er hal te n.
Tec hn is ch e Än de ru ng en un d Änd er un ge n im Er sc he in un gs bi ld vorb ehalt en . A ll e A ng ab en e nt sp re ch en dem S ta nd bei Dru ck le gung. Für die
Ri ch ti gk ei t u nd Vo ll st än di gk ei t der enthal te ne n Besc hr ei bunge n, Ab bi ld un ge n un d Ang ab en ü be rnimm t Mu si kh au s Kir st ei n Gm bH k ei ne rl ei
Ge wä hr. Abg eb il de te Fa rb en und Spe zi fi ka ti on en kö nn en ger in gf üg ig vom Pro du kt abw ei ch en . Mu si kh au s Kir st ei n Gm bH - Pro du kt e sind nur
üb er a ut or is ie rt e H än dl er erhä lt li ch . D is tr ib ut or en un d H än dl er s in d ke in e Ha nd lu ng sb ev ol lm äc ht ig te n von Musi kh au s K ir st ei n Gm b H u nd ha be n
ke in er le i B ef ug ni s, di e Musi kh au s Ki rs te in Gm b H in irg en de in er Wei se , se i es au sd rü ck li ch od er durch s ch lüssige s Han de ln , re ch tl ich z u
bi nd en . D ie se Bed ie nu ng sa nl ei tu ng ist u rh eb er re ch tl ic h ge sc hü tz t. Je de Verv ie lf äl ti gu ng , bz w. jed er Na ch dr uc k, auc h a us zu gs we is e, und jed e
Wi ed er ga be der A bb il du ng en, a uc h i n v er än de rt em Zust an d, ist nur m it sch ri ft licher Zu st immun g der F ir ma Mus ik ha us Kir st ei n G m b H g es ta tt et .
Yo ur pr od uc t is de signe d an d ma nu fa ct ured wi th ma te ri als and co m po ne nt s of high qual it y, whic h are recy cl ab le and c an be re used. Th e
sy m bo l m ea ns tha t yo ur prod uc t s ho ul d b e d is po se d of se pa ra te ly f ro m ho us ehold w as te whe n i t re ac he s i ts end of l if e. Pl ea se dis po se of t hi s
eq uipm e nt a t your l oca l co ll ec ti on po in t or recy cl in g ce nter. P le as e he lp to p ro te ct t he e nv ironm ent i n wh ich we all liv e.
Al l s pe ci fi ca ti ons and ap pe aranc es ar e s ub je ct to cha nge w it ho ut not ic e. All inf or ma ti on was cor re ct at tim e of p ri nt in g. Mu si khaus K ir st ei n
Gm bH doe s not guaran te e for the acc ur ac y or co m pl et en es s o f any des cr ip ti on , p ho to gr ap h or st at em en t co nt ai ne d in thi s m a nu al . P ri nt ed
co lo rs and sp ec if icati on s m ay var y sli gh tl y fr om pr od uc t. Pro du cts from Mu si kh au s Kirst ei n Gm bH ar e only sold thr ough aut ho ri ze d dealer .
Di st ri bu to rs an d de al er s ar e no t ag en ts of M us ik ha us Kirst ei n Gmb H and h av e n o a ut ho ri ty to b in d Mu si kh au s K ir st ei n Gm b H l eg al ly in a ny w ay .
Th is ma nu al is pro tected by cop yrigh t. Any co py in g or r ep ri nt , e ve n in ex ce rp ts, i s on ly all ow ed with written co ns en t of Mu si kh au s Kir st ei n
Gm bH. T he sa me a pplie s to r ep ro du ct io n or c op yi ng o f im ag es , ev en in alt er ed fo rm .
Musikhaus Kirstein GmbH
Bernbeurenerstr, 11
86956 Schongau
Germany
Email: [email protected]
Telefon/Phone: 0049-8861-909494-0
Telefax/Fax: 0049-8861-909494-19
www.kirstein.de
W EE Erklärung / W EEE declaration
11
00032760/00032761/00032762/00032763
Version 06/2024
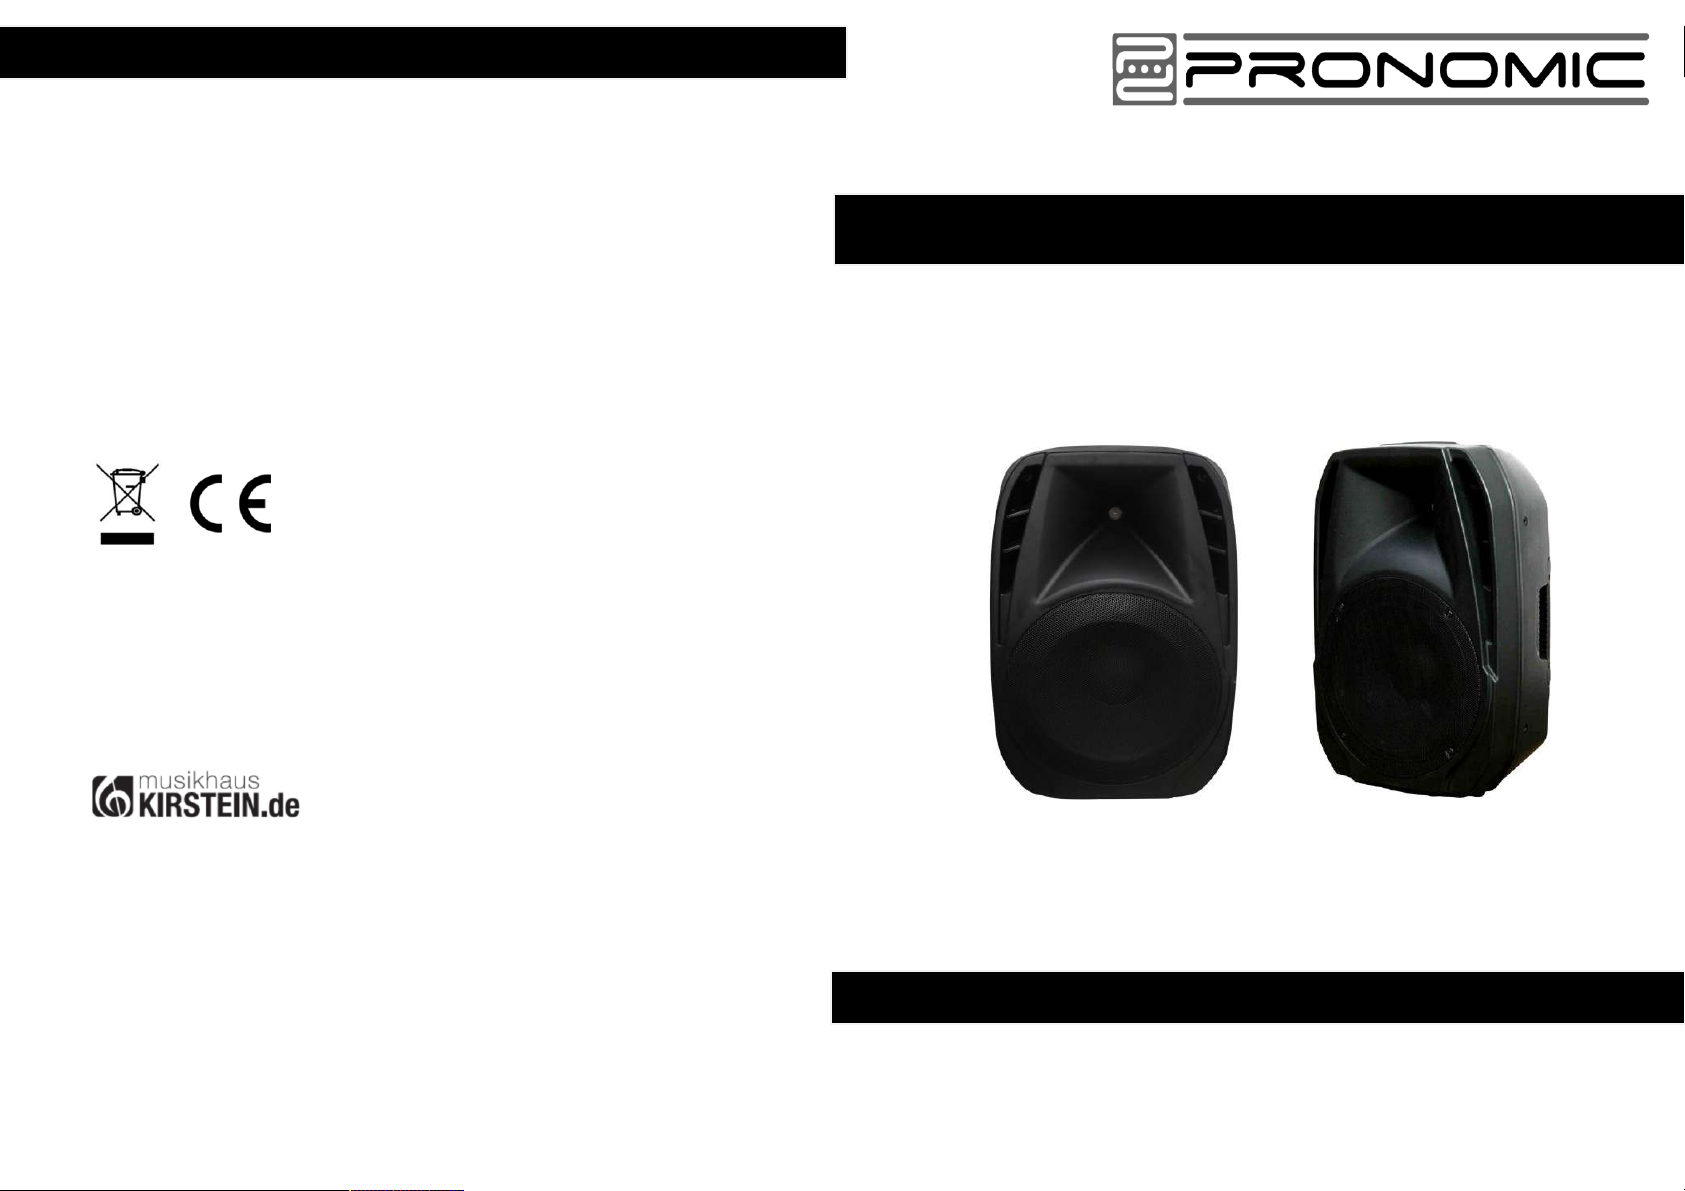
Pronomic PH12/15 Aktiv/Passivbox
Bedienungsanleitung / Users manual
Page 2
Einleitung:
Her z lichen D a nk,
dass Sie sich für die Pronomic PH12/PH15entschieden haben.
Wir wünschen Ihnen viel Spaß und Freude mit Ihrer neuen Pronomic PH12/PH15
Bi tte les en Sie d iese Anle itun g au fmer ksam, um di e prakt isch en F u nkti onen der
PronomicPH12/PH15voll nutzen zu können.
Auß erdem em pfehl en wi r I hnen, dieses Ha ndbuc h an einem sich eren und leicht
zug ä nglich e n Ort a ufzube w ahren, um s päter dari n n achsch l a gen zu k ö n nen.
Achtung !
Vor dem e rste n Einsch alten un d de r Inbet riebn ahme de s Ge r äts l esen Sie auf
jed en Fall die Sicher h eitsa nweisu ngen d u rch u m Ve r letzu n gen so wie B e schäd i gunge n
de s Ger ä ts zu vermei den.
Bedienungsanleitung (deutsch) ab Seite 2
Introduction
Thank you for your purchase of the PronomicPH12/PH15
We hope that you will enjoy the use of the Pronomic PH12/PH15
Pl ease read t hrou gh th is ma nual car eful ly bef ore b eginning t o use, so t hat you w ill b e ab le
to take f ull advantage of the PronomicPH12/PH15fe aturesand enjoy trouble-free
op erat ion for yea rs to c ome.
Ple ase keep this m a nual at a sa f e a n d dr y place where you e asily c an access i t.
Caution !
Be fore switchin g on th e instrumen t or devic e re ad caref ully t he s afet y i nstructions to avo id
se riou s in juri es or damage of the product.
Operators manual (english) -> start from page 6
D
E
U
T
S
C
H
E
N
G
L
I
S
H
1
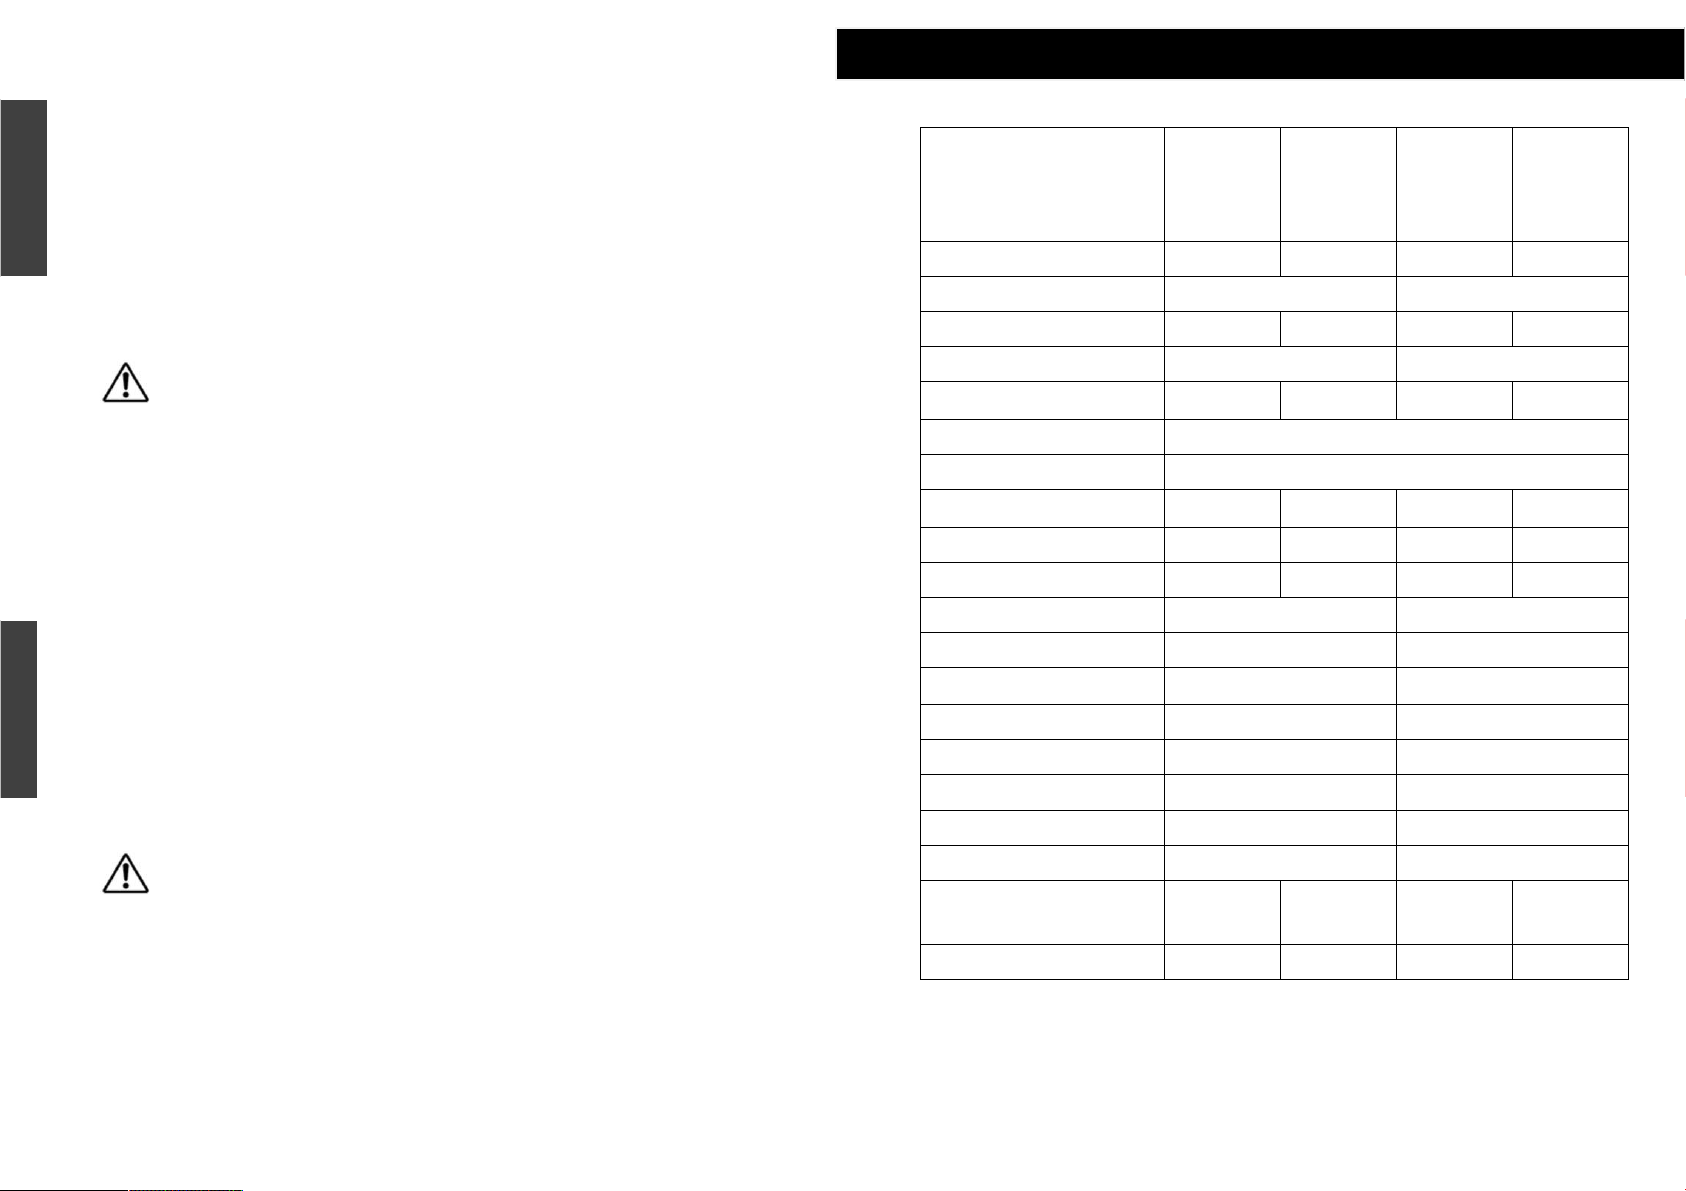
Bezeichnung
Type
Pronomic
PH12 passiv
Pronomic
PH15 passiv
Pronomic
PH12 MP3
Bluetooth
Pronomic
PH15 MP3
Bluetooth
Artikel / Article 00032760 00032761 00032762 00032763
USB/SD/Bluetooth nein / no ja / yes
Power (RMS/Peak) [W] 160/300 190/350 150/300 200/350
Netz / Net Power nein / no 110-230V/AC 50/60Hz
LS / Woofer
12”
2KSV40oz
15”
2.5KSV50oz
12”
2KSV40oz
15”
2.5KSV50oz
HT / Tweeter 1.35” Ti.Diap.Driver 8Ohm
Impedance 8 Ohm
Sensitivity [1W/m]
96dB
+/-2dB
97dB
+/-2dB
96dB
+/-2dB
97dB
+/-2dB
Frequency range 50Hz-17KHz 40Hz-17KHz 50Hz-17KHz 40Hz-17KHz
Max. SPL 108 dB 110 dB 108 dB 110 dB
Speaker Connector Speakon In/Out nein / no
MIC Input nein / no 1 x XLR / 1 x 6.35mm
Line Input nein / no
1 x XLR / 2x Chinch 1 x
3.5mm Stereo
Line (MIX) Output nein / no 1 x XLR
MIC level control nein / no ja / yes
LINE level control nein / no ja / yes
MASTER level control nein / no ja / yes
Equalizer nein / no 2-Band LOW / HIGH
Abmessungen (BxHxT)
Dimensions (WxHxD)
420 x 345
x 640
485 x 400
x 745
420 x 345
x 640
485 x 400
x 745
Weight 14kg 19kg 16kg 21kg
Technische Daten / Technical Data - Pronomic
10
Page 3
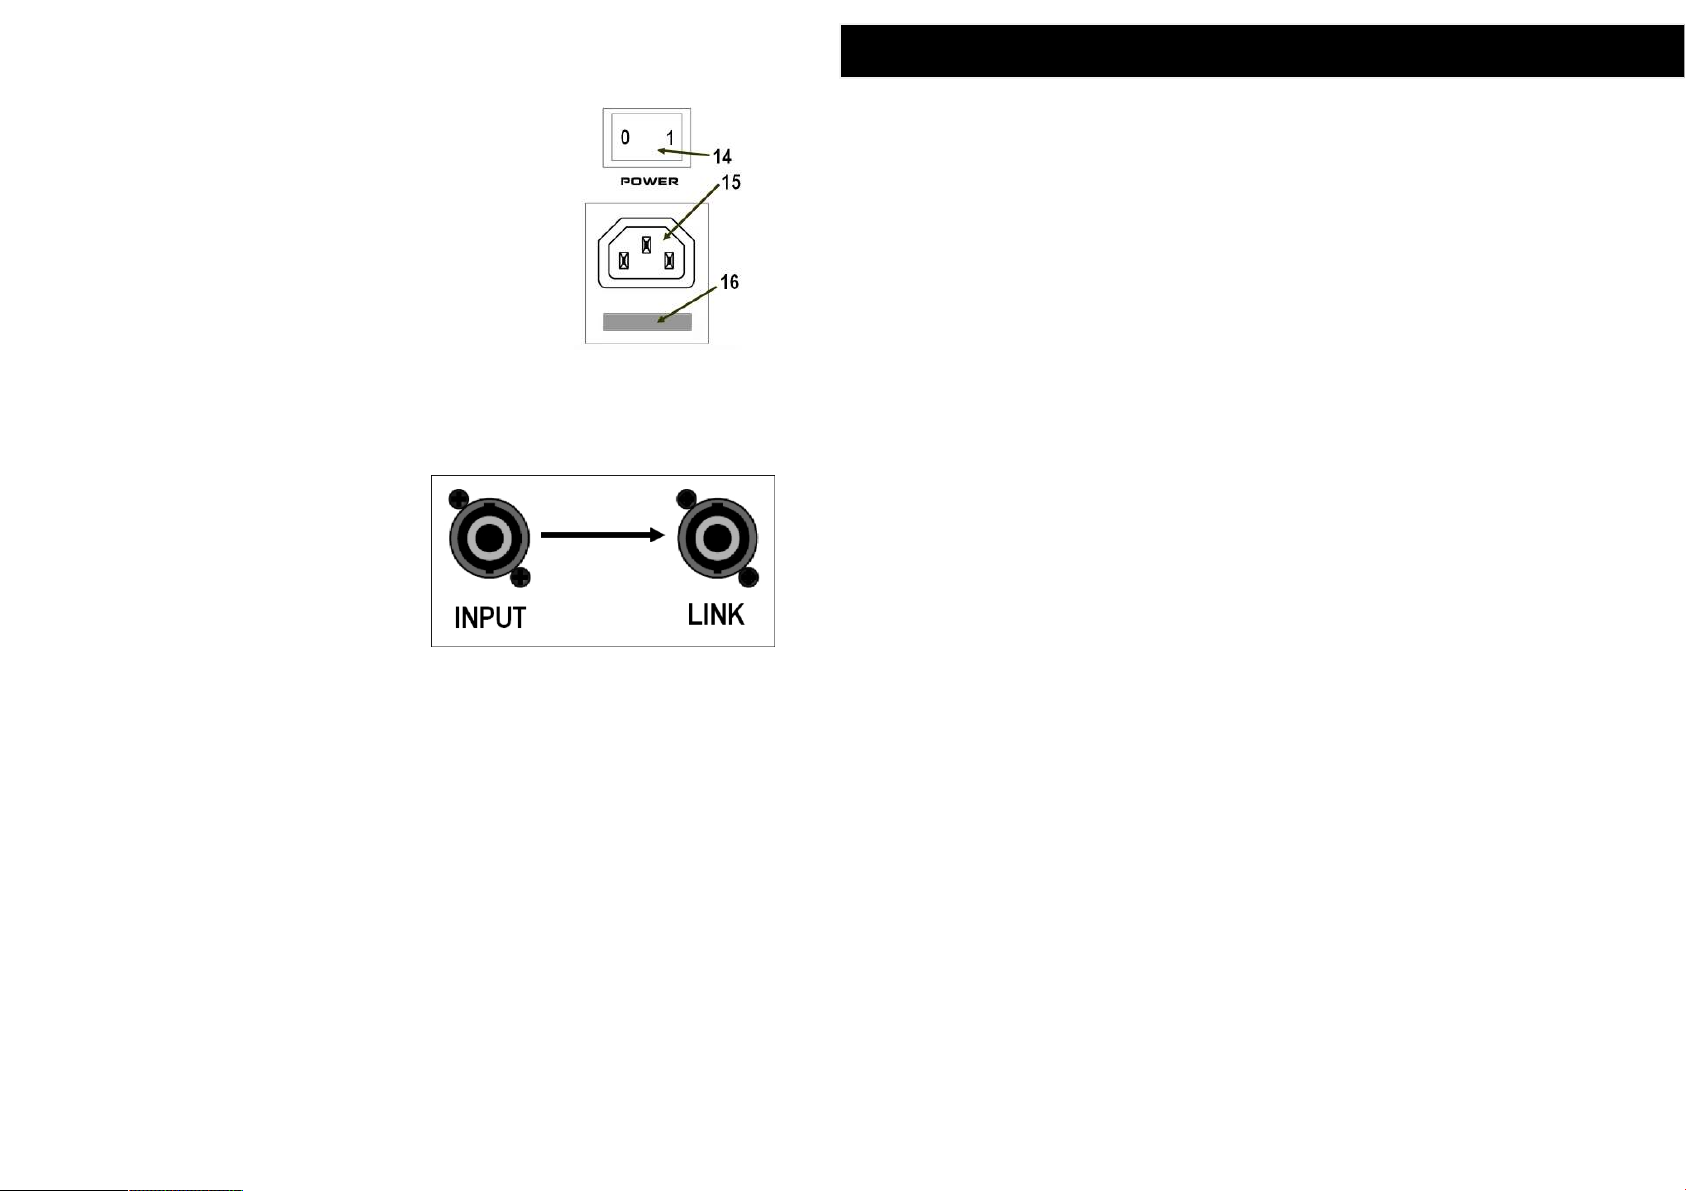
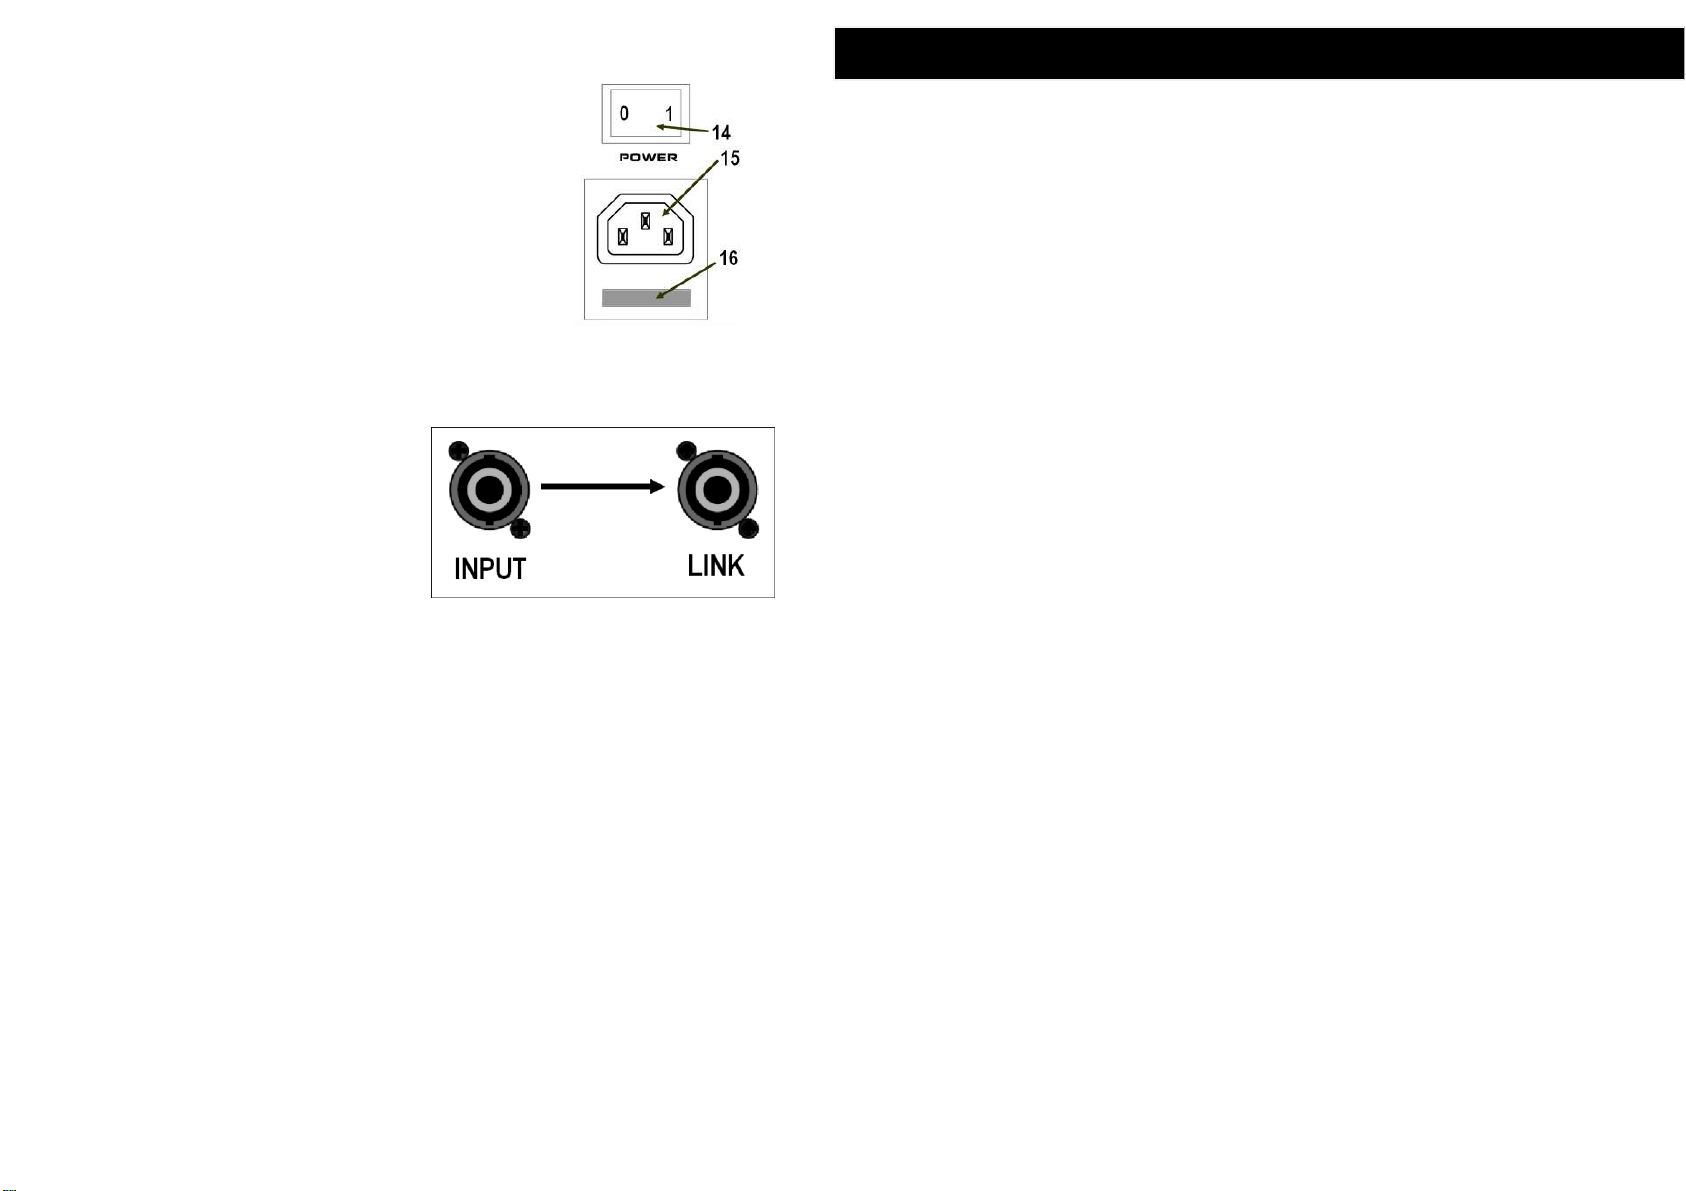
Power connectors / Fuse
14 Net switch p o w e r ON/OF F
15 Net cable c o nnecto r
16 Fuse
Connectors - passive Speaker
Inp u t – speak e r conne k t or
“Sp eakon ” - typ e
Lin k – spe a ker co nnekt or ( outpu t )
to con n ect an o ther s p eaker b ox .
Pl ease note total impe dance .
“Sp eakon ” - typ e
If y ou use ad ditio nal speak e rs connec t ed
by Link out put, pleas e che ck ov eral l impe danc e
an d com pare with amp lifi er dat a.
9
Vorsichtsmaßnahmen
BITTE SORGFÄLTIG DURCHLESEN, EHE SIE WEITERMACHEN
Warnung:
Bef olgen Sie unb eding t di e n a chfol g end b eschr i ebene n gru n dlege n den Vorsi chtsm a ßna h men, u m d ie G efah r e iner schwe rwieg enden Ver letzu ng oder so gar t ödlic her U nfäll e,
von elekt r ische n Sc h lägen , Kurzs c hlüss e n, Bes chädig ungen, Feuer oder sons t igen
Ge f ahren zu vermei den. Z u die sen Vor sicht s maßn a hmen ge hören die folg enden Pu n kte,
die jedoch ke i ne a bschl i eßend e Aufzä h lung dars t ellen :
Netzanchluss/Netzanschlusskabel(bei Geräten mit Netzanschluss/Netzadapter):
• Ver wen de n Sie auss chl ie ß li ch di e für das Ge rä t vorg esc hr i eb ene ri ch t ig e Net zs p an nun g. Die e rfo rde rl i ch e Sp a nn ung
fi nde n S ie auf dem Ty p en s ch i ld d es G erä ts.
• P rü f en Sie den Net zst eck er in re gel mäß ige n Ab stä nde n u nd e nt f er n en Si e e v en tue ll vo rha nde nen S tau b o d er
Sc h mu t z, de r sic h a nge sam mel t h abe n k ann .
• Ve rwe nde n Sie aus sc h li eßl ich die mi t ge lie fe r te n Ne tz k ab el/ St e ck er.
• Ve rle gen S ie das N et z ka bel nie mal s i n d er Näh e v on W är meq uel le n , e tw a He i zk örp ern ode r H eiz str ahl er n , b i eg e n S i e
es n ic ht üb erm äßi g und b es chä dig en Si e e s ni cht a u f son sti ge Weis e, st e ll en Sie k ein e s ch w er en Ge gen st ä nd e dara uf
un d ver le gen Sie es n ic ht an e in e r Ste ll e , wo jem and d ar auf tre ten , da rüb er s to lpe rn od er e tw as d ar ü be r rol le n kön nte .
• We n n Sie de n Net zs t ec ker au s dem G er ä t o d er d er Net zst eck do s e a b zi e he n, z ie hen Sie st ets a m St e ck e r s elb st un d
ni ema ls a m Ka b el . W en n Si e a m Ka bel z ieh en, k ann d ies es bes chä dig t w er d en .
• Z ie hen S ie ste ts de n Ne t zs tec ker au s de r Ne tzs tec kdo se h era us, w e nn das Ger ät län ger e Z eit n i ch t ben utz t w ird od er
wä hre nd ei n es Gew itt ers .
• S ch lie ßen Sie da s Ge r ät n ie mal s m i t ein em M ehr fac hst ec k ve r bi nde r a n ei n e S te ckd ose a n. Hie rd u rc h k a nn s ich d i e
Ton qu ali tä t v er sch le cht er n od er s ic h d ie Net zs tec kd ose üb er hit ze n.
Batteriebetrieb (bei Geräten mit Batterie):
• Ve rmi sch en Sie ke i ne alt en un d ne u en B att eri en – v er w en den S i e n ur Q ua l it äts pro duk te
• Ve rsu ch en Sie n ich t , n ich t- w ie der au fla dba re B att eri en au fzu lad en
• Ach ten S ie bei m W ech se ln der Ba tte ri e n au f d ie a m Ge rät g ek enn ze ich net e P ol ari tä t ..
• Sc hl ieß en Si e d ie B att er ien ni cht kur z, n eh men Sie di ese n ich t a use in and er, e rhi tz en S ie d ie B a tt eri en n ic ht u nd wer fen
Si e di e B att er i en n ich t in s Fe uer. Bat te rie n kön nen e xp lod ier en un d ern sth af t e Verl etz un gen v eru rs a ch en. .
• Das Wec hs e ln de r B att er ien s oll te d urc h ei nen Er w ac hse ne n erfo lg e n, l as sen Sie Ki nde r n ie m it Ba tte rie n spi el en.
• N eh men S i e die Ba tte ri e n he rau s w en n d as Ge r ät l ä ng e re Zei t nic ht ei nge sc h al tet w ird . Di e s beu gt de r Bes chä dig ung
du rch A us lau fen de r Ba tte ri e v or .
• Bat ter ie n m üs sen auf ei n e s ich er e, um wel ts cho nen de We ise g eso nd ert e nt sor gt wer de n. W er fen Sie di e se nic ht i n
de n Hau s mül l.
Önen verboten:
• Ve rsu ch en Sie n ich t, da s G erä t zu öff ne n od er Te il e im Inn ern zu z er leg en ode r si e a uf irg en dei ne We ise
zu v er änd er n . D as G erä t en thä lt k e in e Te ile , di e v om B e nu tze r ge w ar tet wer de n k ön nte n. We nn das Ger ät
ni ch t r ich ti g zu fun kt ion ie ren sc he int , ben ut zen S ie e s a uf k ei nen Fal l wei te r!
Gefahr durch Wasser:
• Ac hte n S ie dar auf , d ass das Ger ät ni cht dur ch Reg en n ass wir d, ver wen den Sie e s n ich t i n der N äh e von Wasse r oder
un ter feuc ht e n o der nass en Umg ebu ngs bed in g un g en und ste lle n Si e auc h kein e Beh ält er mi t F lüs sig kei te n d ara uf , d ie
he rau ssc hwa ppe n und in Öff nu n ge n hin ein fli eße n könn te.
• S ch l ie ßen Sie de n Net zst eck er ni e ma ls m it na sse n H än den an o d er zie hen Si e i hn h er a us .
Falls Sie etwas ungewöhnliches am Gerät bemerken:
• W enn d as Net zka bel au sge fra nst ist oder de r Net z st e ck e r bes chä dig t wir d, w en n es wäh ren d de r Ver w en d un g des
Ge rät s zu ei nem p löt zli che n Tona usf all k omm t, od e r wen n e s ein en u n ge w öh nli che n G eru ch ode r Rau ch e rz eug en sol lt e ,
sc hal ten Si e d en Ne tzs ch a lt er so for t au s , z ieh en Sie den N et zst eck er aus der Net zst ec k do se!
Bedienungsanleitung
2
Page 4
Aufstellort:
• S e tzen S i e da s G e rät n iem a ls ü b erm ä ßige m St aub ,
Vi bra t ion en od er ext rem e r Kä l te o d er Hi tze aus (etw a d urc h d irek te Son n ene inst rah l ung , di e Näh e ei ner Heiz ung ode r
La g eru n g t agsü ber i n e i nem gesc h los s ene n Fahrz eug) , um die M ögli chke it aus z usc h alt en, daß si ch d as Bed ienf eld
ve r zie ht o der Ba ute i le im Inner n b esc h ädi gt w erde n.
• B e tre iben Sie d a s G e rät nich t i n de r Näh e vo n F e rns ehge rät e n, R adio s, S ter e oan lage n, Mo b ilt e lef onen ode r ander en
el e ktr i sch en Ger ä ten . And e ren fall s k ann dur c h das Gerä t o der d i e an d ere n G erät e e in R ausc hen en t ste h en.
• S tell en Sie d as Gerä t nic h t a n e ine r i n sta bil en Pos iti on a b , wo es ve rseh ent lic h um s tür zen könnt e.
• E h e S ie da s G e rät b e weg e n, tren n en S ie a l le an g esch loss enen Ka belv erbi n dun g en a b .
• Ste lle n S ie das Ge r ät nic h t di r ekt an e i ne Wa nd (h alte n Si e eine n A bsta nd v o n mind este ns 3 cm von de r W and e i n), da
es ande rnfa lls auf gru n d unz ure i che nder L u ftz irk u lat ion z u ein er Ü b erh itz u ng d e s G erä ts kom men ka nn.
• St ell e n S i e ke i ne offen en Fl amme n , wie z. B . Ke rze n , auf dem Gerät ab . Ei ne of f ene Flam me könnt e umst ü rze n un d
ei n en Br a nd veru rsac hen.
Bedienung
Aufstellen und Montage
St e llen Sie d ie P rono m ic PH auf e i ner fes ten, ebe nen Gr undfl äche auf (Tis c h, Bode n, etc .)
ode r benu tzen Sie ei nen sta b ilen Boxen s tände r mit 35mm Rohrd urchme sser. A chten Sie
dar auf d ass alle B efest i gungs e lemen te fe st ange z ogen un d ges i chert s i nd.
Netzanschluss und Verkabelung
Verb inde n Sie das Ne tzka bel m it d er S trom vers orgu ng. Ver wend en Sie nur d ie f ür das
Ge r ät spez ifizi erte Netzs pannu ng (sie he techn. Daten) . Das Ger ät ist g eeign et für den
Bet r ieb an 110( 115 ) V/220( 2 3 0)V 5 0 /60Hz Netzen . Be nutzen Sie hierz u den
S
pan n ungsw a hl- scha l ter auf der R ücksei t e des Geräts .
Verbi nden Sie die Sign alqu ellen mi t geeig nete n Audi okabe ln (Kl inke , XLR) mit den Ein- und
Aus g angsb u chsen a u f der R ücksei t e des Gerätes . S c halten Si e d a s Ge rät e r st ein, w enn
Si e al le Verbin dung en herg este l lt h aben . Sch ließe n Sie je weil s n ur ein Kabe l an die Eingän g e mi t wa hlweis e XL R , 6. 3 5mm K l inke o der C h inch a n.
Üb erprü fen Si e alle Verbi ndung en. Bevor Sie da s Ger ät einsc halte n s telle n sie die Lin e/Mic Re g ler s owie di e Mast e r-Volume nregl er auf „0 “ . Schal ten S ie d i e A udioq uelle
ein . Stell en Sie die Regle r de r verwen deten Lin e/Mic - Eingä nge auf „ 12“ Uhr un d e r höhen
Sie la n g sam die G esamtl a utstärk e a uf d em gewü n s chten Level.
un d d as G erät
SD/ USB p l ayer is abl e to p lay MP3 a nd WAV aud io f i les.
In ser t SD-C ard or USB-Stick in card sl ot (2) or USB port (3). MODE key is swi tching pla yer
ON /OFF. PL AY/PAU SEwil lSTART /PAUSE pl ayin g the tracks at the actual posi tion in the
tr ack. By pr essi ng STOP playing is s topp ed a nd song/track no . 1 is sele cted .
Ke ys I<< or > >I allow to step bac kwar d/fo rward bet ween d iff eren t t racks. By constantly
pr essing I<< or > >Ikey s fa st rewi nd and fa st win d fu ncti on i s e xecuted . Ac
pl a ying tim e is shown o n th e displa y. By pre ssing ke y, c h ange pl aying m ode bet ween
RAN DOM, SIN G LE (on ly activ e track w ill b e pl ayed) and ALL ( all tr acks will be p layed on e
af ter the oth er).
Bluetooth:
-- -- . Blu etoo th sy mbol is flas hing wh en n o Blu etoo th con nect ion is connected. Swit ch on
you r Blue tooth d evice ( Mobil e Phon e, P layer ) and a ctiva t e Blueto oth “c onnec t devic e ”.
Wh en conne ctio n is m ade suc cessf ully wi th PH-Pl ayer Blu etoo th sym bol st ops fl ashi ng.
If there a r e an y probl ems read m a nual of your Blueto oth de vice . Al l keys li ke Start /Stop /…
ar e still ac tive for oper ation durin g Bluet ooth mod e.
Tu r n on t wo sp eakers,M P 3 scree n di s p lays " H I ",press MODE bu t t o n to B T mode , t h e sc r een
dis plays "bt",p r ess t h e TWS but t on of o ne of them,i t will autom a tical l y searc h and conn e ct to
the ot her one,a t this tim e the s c reen d isplay s " b t:bt" .Then conne c t yo u r phone.
Als o co uld c onnect you r ph o ne fir s tly an d th e n co nnect to t he o t her speake r by TWS butto n .
By pressing MODE button you can activate Bluetoothmode, display will show
ti ve t rack and
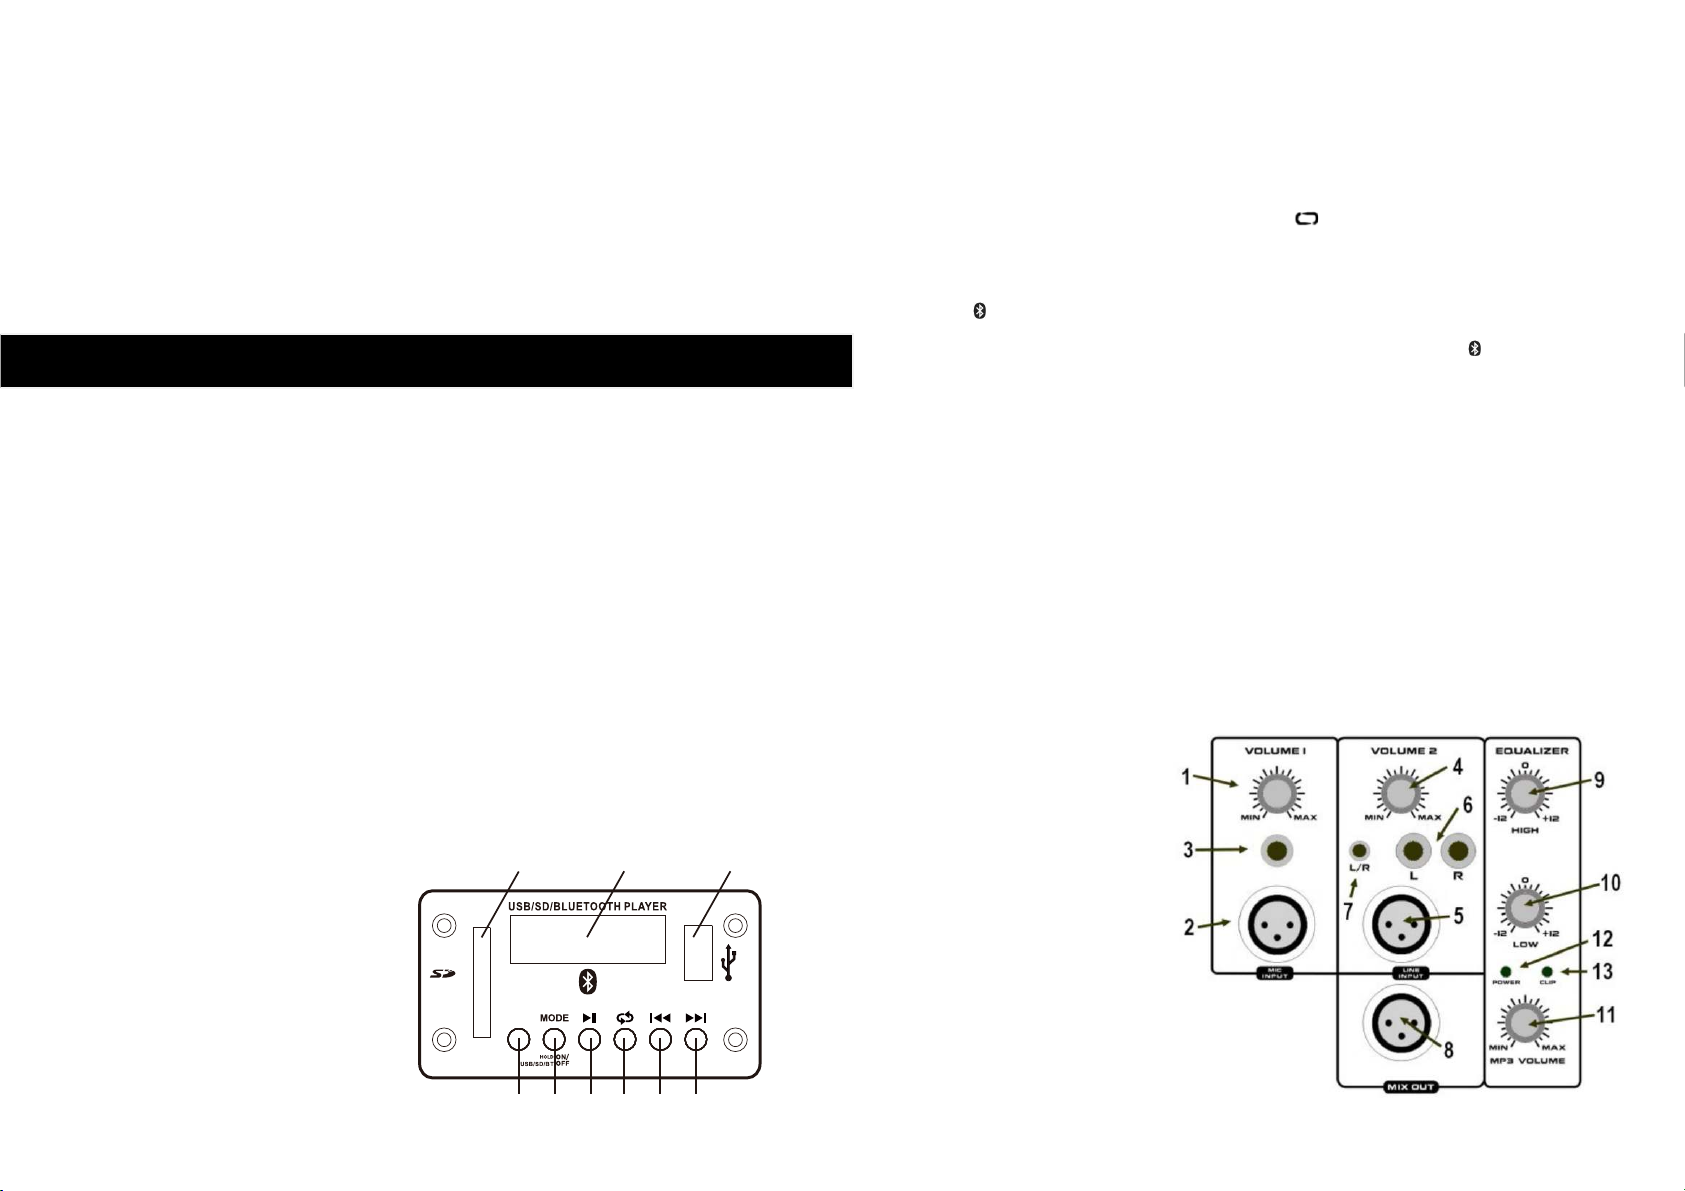
Connectors and operator elements
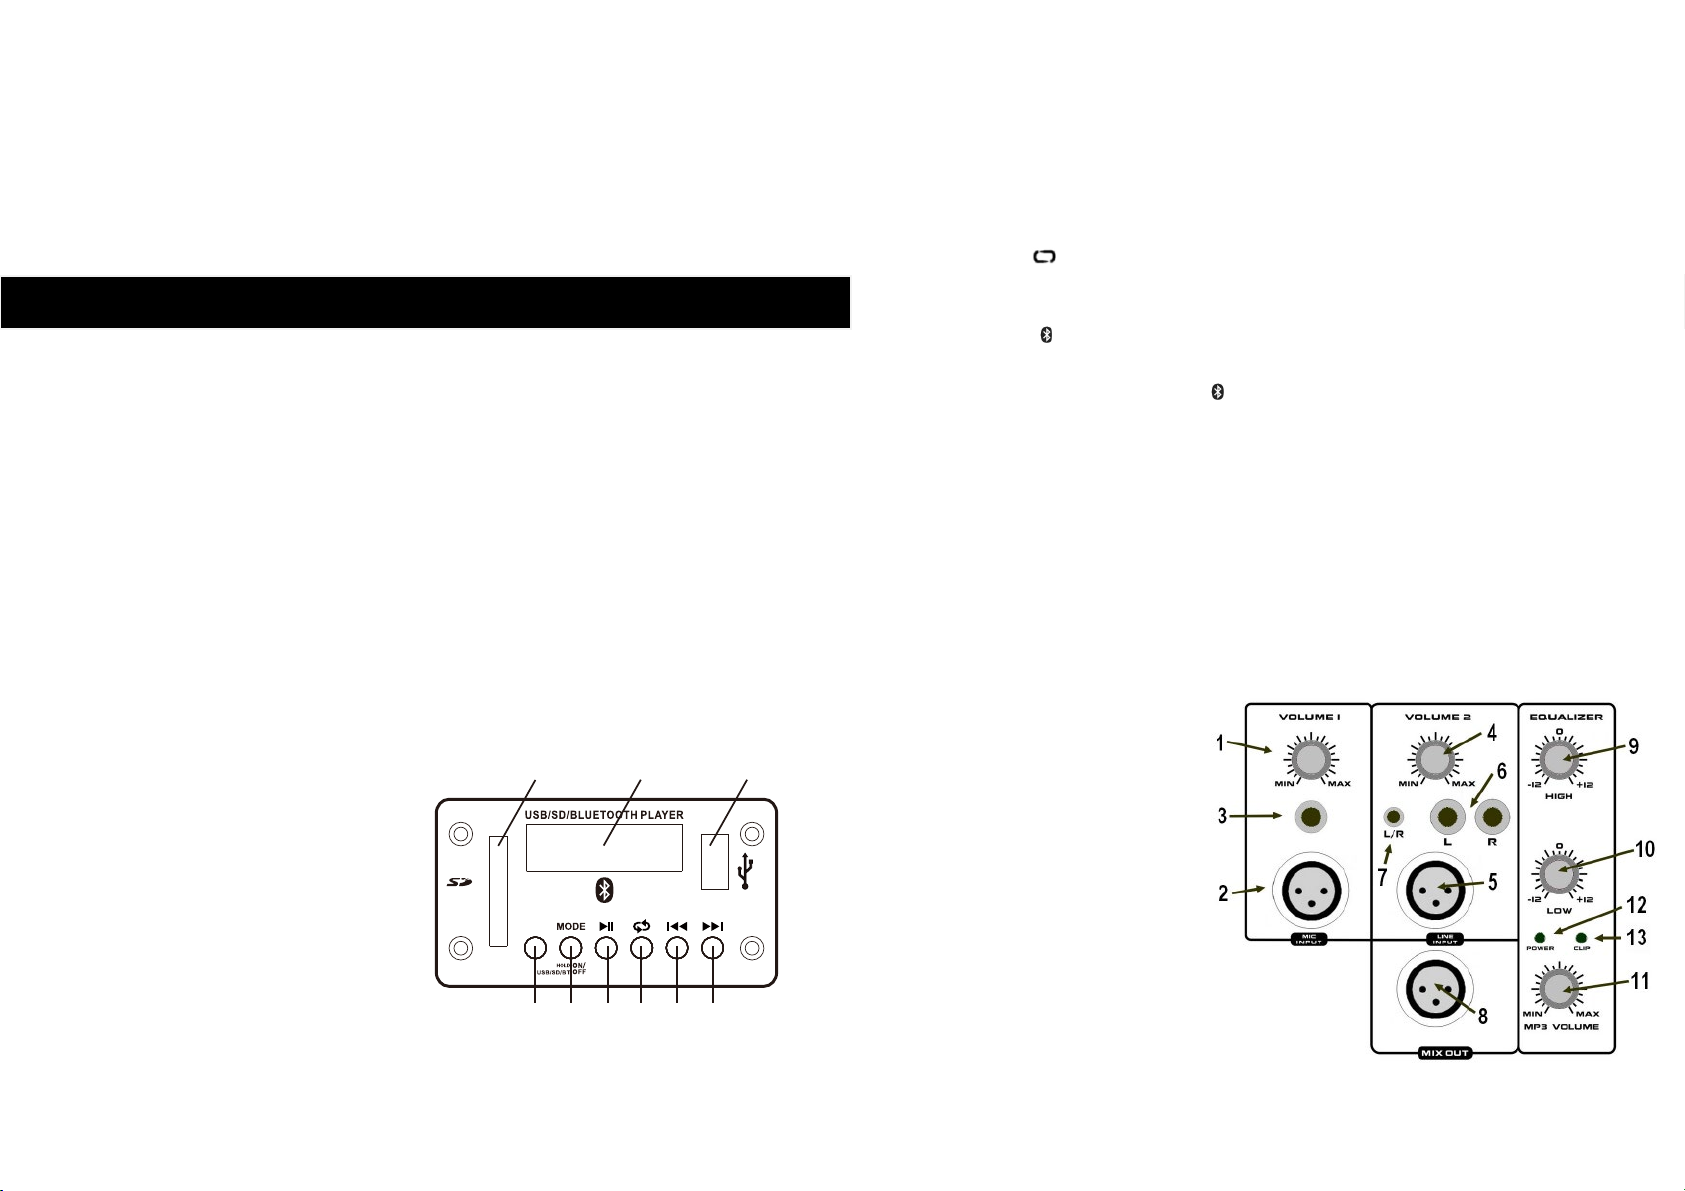
1 Volume microphone inp ut
2 X L R Micr o p h one i n p ut
3 M i cropho n e in p ut 6.35m m j a ck
4 Volume Line-In
5 Audio in put X LR Line -In
6 Audio inpu t C hinch Line -In
7 A udio I nput 3.5m m j ack
8 Audio ou t put - M i x Out XLR
9 Tone co n t r ol “HIGH”
10 To ne con t
11 Vo l u me MP3 Play e r
12 L E D p o w e r on
13 L ED Clip (o
rol “LOW”
ver l oad)
Bedienung des USB/SD-Players (nur PHxx MP3/Bluetooth)
1 D i splay
2 S D -Card-An s c hluss
3 U S B - A nschluss
4 T WS True wir ele ss lin king
5 S c halte r f ür Betri e bsmode An/ A us
6 P L AY/PA U S E / STOP-Taste
7 Ta s t e AB SP IE LM OD US
8 I << vorhe rgeh ender Tra ck/So ng
9 >>I näch ster Track/ Song
2
TWS
1 3
54 6 7 8 9
3
8
Page 5
Water warning:
• Do no t e xpo se the de vic e t o r ain , us e it n ear wa ter or i n dam p o r w et con dit io ns on i t co nta ini ng li qu i ds w hic h mi ght sp i ll
in to an y ope nin gs . N eve r ins ert or rem ov e a n el e ct ric pl u g wi t h we t han ds .
If you notice any abnormality:
• I f th e p owe r co rd o r p lug b e co mes fra yed or da m ag ed, or i f th ere is a s ud d en l oss of so und d uri ng us e o f t he de v ic e, or if
an y u nu sua l sme lls or smo ke s h ou l d ap p ea r t o b e cau sed b y i t, imm edi at e ly tur n off th e p o we r s wi tch , di s co nne ct th e
el ec tri c pl ug f ro m t he o ut let , an d ha ve t he dev ic e ins pe cte d b y qu ali fi ed se rv ice pe rs onn el .
Installation
Pl ace the s peak er on a so lid fl a t s urfac e (table , gro und, etc.) or u se a sol i d spea k er stand
wi t h 3 5mm fla nge. Make sure that a ll fix i ngs a re t ight.
Power connection and wiring
Ple a s e c o nnect th e p o wer c able to 110/2 2 0(230)V / AC 50 /60Hz power volta g e. Ma ke sure
th a t ne t vol tage is accor ding to tec hnica l da ta (se e page 1 0). Conne ct a ll inpu t/out put
si g nals with XLR and/ or 6.3 5mm jac k cab
le s . Do not conn ect mul tiple in p uts poss ibili ties
(e . g. MIC XLR / MIC 6. 35mm) with more t han o ne ca ble.
Af ter yo u fin ishe d all a udio conn ecti ons s et mast er vol ume to “0 ”. Switc h on aud io s ourc e
an d spea ker pow er. Set Mic/Li ne level t o 12 ò clock po sitio n a nd in creas e master v olum e to
co mfort able l evel.
Operation of USB/SD-Player (only PHxx MP3/Bluetooth)
Operation
7
Übersicht der Ein- und Ausgänge und Bedienelemente
1 Volume nreg ler Mik rofo neingan g
2 M i krofon e ingang XLR Mic Inp u t
3
Mik r ofone i ngang Klin k e 6 .35mm
4 Vo lum enregler Line-In
5 A udioei n gang X L R Line - In
6 A udioe i ngang C h inch L i ne-In L/
R
7 A udioein g a ng 3 , 5 mm Klink e
8 A u dioausgang MIX Out XLR
9 To n r e gler H ö h en “HIGH”
10 Tonr e gler Bäss e „L O W“
11 Volum e nregle r M P3 Playe r
12 LED Ne t z s pannung Ein
13 LED C l ip (Übe r lasta n teige )
De r P laye r s piel t Aud i ofil es der folge nden Fo rmate : MP3 und WAV
St ecke n Sie eine SD -Car d ode r einen U SB-S tick in ei nen d er S lots/Port s (2)ode r (3 ).
Mi t der Taste MODE schalten Sie de n Play er An/Aus. Mit de r Taste PLAY/PAU SE
sta rten bzw. unter brech e n s i e den Song/ Trac k an der a ktuel l en Po s ition . Di e Ta ste STOP
hä l t die Wied ergab e an, Tr ack 1 wird ausgew ählt.
Mi t de n Taste n I<< oder >>I navi giere n si e zwisch en den ei nzeln en Songs/ Tra cks. Drüc ken
Si e d ie Tasten I<< oder > >I l ange, so kön nen sie im sc hnellen R
üc k/Vor lauf im Lied
na vigie ren. D er a ktiv e Tr ack sowi e d i e akt uelle Spi elze it wird jewei ls im D ispl ay ange zeig t.
Mit de r Tast e wäh l en Si e zwis c hen de n Betri e bsarte n R ANDOM (zufäll i ge Wieder g abe
de r Tite l), SIN GLE (nur der akt uelle Tit el wird ge spiel t), sowi e A LL ( alle Ti tel werde n
hi ntere inan der a bges pielt ).
Bluetooth:
Mit der Taste MODE scha lte n Sie den Pl aye r auf Bluetooth, in der Anzeige
er schei nt -- -- , d as Blu etoot h-Ze ichen bli nkt wen n n och kein e Ve rbin dung a ufgeb aut ist .
Verwen den Sie ei n Blueto oth-G e rät ( Handy, Pl ayer) und sc halte n Si e dort Blue tooth ei n . Mit
„G erät verbinden “ (evt l. vor her „Ger ät such en“) st elle n S ie eine Verbi ndun g m it de m PHPl ayer h er, d as Blue toot h -Zei chen am PH-Pl ayer leu c htet dau erhaf t. Zu m Ve r-
bin d ungsau f b au be a chten Si e bi t te auc h die A n leitun g des Han d y o der Pl ayers. Di e Tas t e n
Sta rt/St o p/… a m Play er b l eiben auch im B l uetoo th-Be t rieb a ktiv.
4
1 D i splay
2 S D -Card-An s c hluss
3 U S B - A nschluss
4 T WS True wirele ss lin king
5 S c halte r f ür Betri e bsmode An/ A us
6 P L AY / PA U SE/ST O P-Tast e
7 Ta s t e AB SP IE LM OD US
8 I << vorhe rgeh ender Tra ck/So ng
9 >>I näch ster Track/ Song
TWS
2
65 7 8 9 10
1 3
Sch a lten Sie 2 Lau t sprec h er des PH -Seri e ein, d e r Bildsc h irm zeigt " H I" an. Drücke n Sie
nun d i e M O DE-Taste um in den B l u e tooth M o d u s zu wechseln, im Bi l d schirm w ird „bt“
ang e z e igt. D r ü cken Sie n u n die TW S-Taste eine s der L a u tspreche r u m eine automati s c he
Suc h e zu starten u nd ei n e Verbin d u ng zwis c h en be iden L ausprec h e rn he rzustel l e n u n d
som it Musik, et c . gleic h zeiti g ü ber beide Lautsp recher abs p ielen zu kön n en.
Nac h erfol g reich e r Verbi ndung wi rd im B ildsch irm "bt: b t" angez eigt. Jet z t können S ie I h r
Blu e tooth fä higes Ger ä t (z.B. Han d y) per Bluet o oth mit den La u tsprec h er v erbind e n.
Sie kö n n en auc h zuer s t I hr Bluet o o th-Gerät verbin d e n u n d dan n über die TWS-Tast e ei n e
Verbindu n g zum and e r en La u tsprech e r h e rstelle n .
Page 6
Netzanschluss und Absicherung
14 Netz schal t er Ein/ Aus
15 Netz kabel Kalt geräte steck e r
16 Fei ngerät esiche rung
Übersicht der Ein- und Ausgänge Passivbox
Inp ut – La utspr echera nschl u ss
(S peako n-ko mpati bel)
Lin k – Lau t sprec h erans c hluss zum
We iter schl efen an nä chst e Lau tspr echer Bo x (Sp eakon -komp atibe l)
Be i m Betr ieb mehr erer La utspr echer -Boxe n
di e über di e Link -Buc hsen mi tein ande r versc halt et s ind beac hten S ie bitte die res ulti erende
Ges amtim p edanz und v erglei chen Sie d iese mit de n A ngabe n für d e n ve rwend e ten
Verstärker.
5
Precautions
Please read carefully before proceeding
Warning:
Al ways f ollo w t he basic precau tion s li sted below to avoi d the p ossi bilit y o f s erio us injur y or
ev en deat h from e lectr ical sho ck, s hort -circ uiti ng, da mages , fire o r other hazar ds. Th ese
pr ecau tion s incl ude, but are n ot l imit ed to , t he f ollo wing :
Power supply / power cord (devices with power cords/power supplies):
• Onl y us e the vo lt a ge sp eci fi e d as c or rec t f or t he dev ice . The r eq u ir ed vol ta ge is pri nt ed on t he typ e p lat e of the d ev i ce .
Ch eck t he p ow e r ca ble fr om t im e t o t ime re gar din g d i rt , da ma ge or ot he r i nfl ue n ce .
• U se o n ly th e i ncl ude d p ow e r co rd / p owe r sup pl y o r ad apt or. D o not pl ace the p o we r cho rd n ea r hea t s our ces su c h a s
he ate rs or r ad iat ors , an d d o not ex ces si vel y b end o r o th erw ise da mag e the co rd , p lac e h eav y ob jec ts on i t, o r p la c e it in
a p osi ti on wh ere a nyo ne cou ld wal k on , t rip ove r, or ro ll an yt hin g o ver it .
• R em ove th e ele ct ric plu g f rom th e ou tle t wh e n the de vic e i s n ot to be u sed f or e x te nde d pe r io ds of tim e, or du rin g
el ec tri cal st orm s. Wh en rem ov ing t he ele ct ric plu g f rom th e de vic e o r a n out le t, alwa ys h ol d t he p lu g it se lf a nd no t
th e c o rd . P ul l in g by t he cor d c an d ama ge it .
• To av oi d gen era tin g unw ant ed no i se , m ak e s ure th e re is ad equ ate d is t an ce (5 0 cm o r m ore ) bet we e n th e AC p o we r
ad apt or a nd t he dev ice . Do n o t c ove r o r w rap the AC p o we r ada pto r w ith a c lot h or bla nke t.
Batteries / safety instructions (devices with batteries):
• Use o nly hi gh q ua lit y ba tte rie s – d o n o t m ix b at ter ie s w it h r ech ar gea bl e acc um ula tor s
• Do no t tr y to re cha rge non -re ch arg ea b le b att er ies
• Kee p a tt ent io n to the po lar it y wh en cha ng ing the bat te rie s (po la rit y is s ig ned on t he dev ic e)
• Do no t ca us e an e le ctr ic al shor t a t the bat te rie s, d o n ot ope n the ba tte ri es
• Cha ngi ng of ba tt eri es m ust n ot be don e by ch ild ren , do n ot le t chi ldr en p lay w ith bat te rie s
• R em ove ba tte rie s f r om the de v ic e wh en th e D evi ce i s not in us e fo r a lo nge r p e ri od
• B at ter ie s a re spe cia l was te , do n ot di s po se t hem wit h t he dom est ic w ast e
Location:
• Whe n set tin g up t he de vic e, ma ke su re t hat t h e A C ou tle t you are usi ng is eas il y a cc ess ib le. If s om e t ro ubl e o r
ma lfu nc t io n o ccu rs , i mme dia te l y t urn o ff th e p owe r sw itc h a nd d i sc onn ect th e p l ug fr o m t he out let . Ev en w h en the po wer
sw it ch i s t ur ne d of f, el ec trici ty is st ill fl ow in g to th e p rod uc t al l the mi ni mum leve l. Whe n you are not us ing the pr od uct
fo r a lo ng t im e , ma k e su r e t o u npl ug t he pow er c o rd f ro m t he wal l A C out let .
• Ina deq ua te ve nti la tio n ca n r esu lt i n o ver he ati ng , p oss ib ly cau sin g d ama ge to t he d ev ice (s ), or ev e n fi re .
• Do no t e xpo se the de vic e t o e xce ss i ve dus t o r v ibr ati on s, or e xtr em e co ld o r h eat (s uch as i n d ir ect s un lig ht, nea r a
he ate r, or in a ca r d uri ng the da y) t o p re ven t t he pos si bil it y of pa nel di sfi gur at ion or dam ag e to the in ter na l com po nen ts.
• Do no t p lac e t he dev ice in an u ns tab le pos iti on w her e it migh t ac ci den tal ly f all ov er.
• Do no t b loc k t he v en ts. T hi s de vic e ha s ve nt ila ti o n hole s a t t he bot tom /r ear to pr eve nt t he in ter na l tem per at ure
fr om bec om i ng to o hig h. In pa rti cul ar, do no t p lac e th e d evi ce on i ts si de or ups id e do wn. I na deq uat e ven ti lat io n
ca n re sul t in ov e rh eat in g, pos si bly ca usi ng d am age to the dev ic e(s ), or ev e n fi re .
• Do no t u se t he dev ic e in th e v i ci nit y o f a TV, rad io , s te r eo eq u ip men t, m obi le p ho ne, o r oth er ele ct ric dev ic es.
Do ing so ma y res ult i n n oi se, bo th in the de vic e i tse lf and in the TV or ra dio ne xt to it .
Connections and handling:
• Bef ore con ne cti ng t he dev ic e to ot her de vi ces , t ur n of f th e po wer f or al l de v ic es. B e fo re t ur nin g the pow er o n or off
fo r a ll d evi ce s , set al l vol um e lev el s t o m in i mu m. • D o no t us e th e d e vi ce or h ea dph one s for a lo ng p er iod of ti m e at
a h igh or unc om for tab le v ol u me l eve l, s inc e t hi s c an c aus e pe rma nen t he a ri ng l os s. If y ou e xp e ri enc e an y he ari ng los s
or rin gi ng in th e e ars , c on sul t a ph ysi ci an.
• D o no t r est yo ur wei ght on t he dev ic e or pl a ce hea vy o bje cts o n it , an d avo id use e xc ess ive fo rce on t he bu t to ns,
sw itc hes or con nec to r s
Do not open:
• D o no t o pen t he dev ice or att em p t to dis as s em ble t he int ern al p art s o r m odi fy t he m in an y wa y. T he de vic e c o nt ain s n o
us er- se rvi ca ble pa rts . If i t sh oul d ap pea r to be m alf un cti on i ng , dis co nti nue us e im me d ia tel y a nd ha ve i t in spe cte d by
qu al ifi ed se rv ice pe rso nn el.
Users manual
6
 Loading...