

Page 1
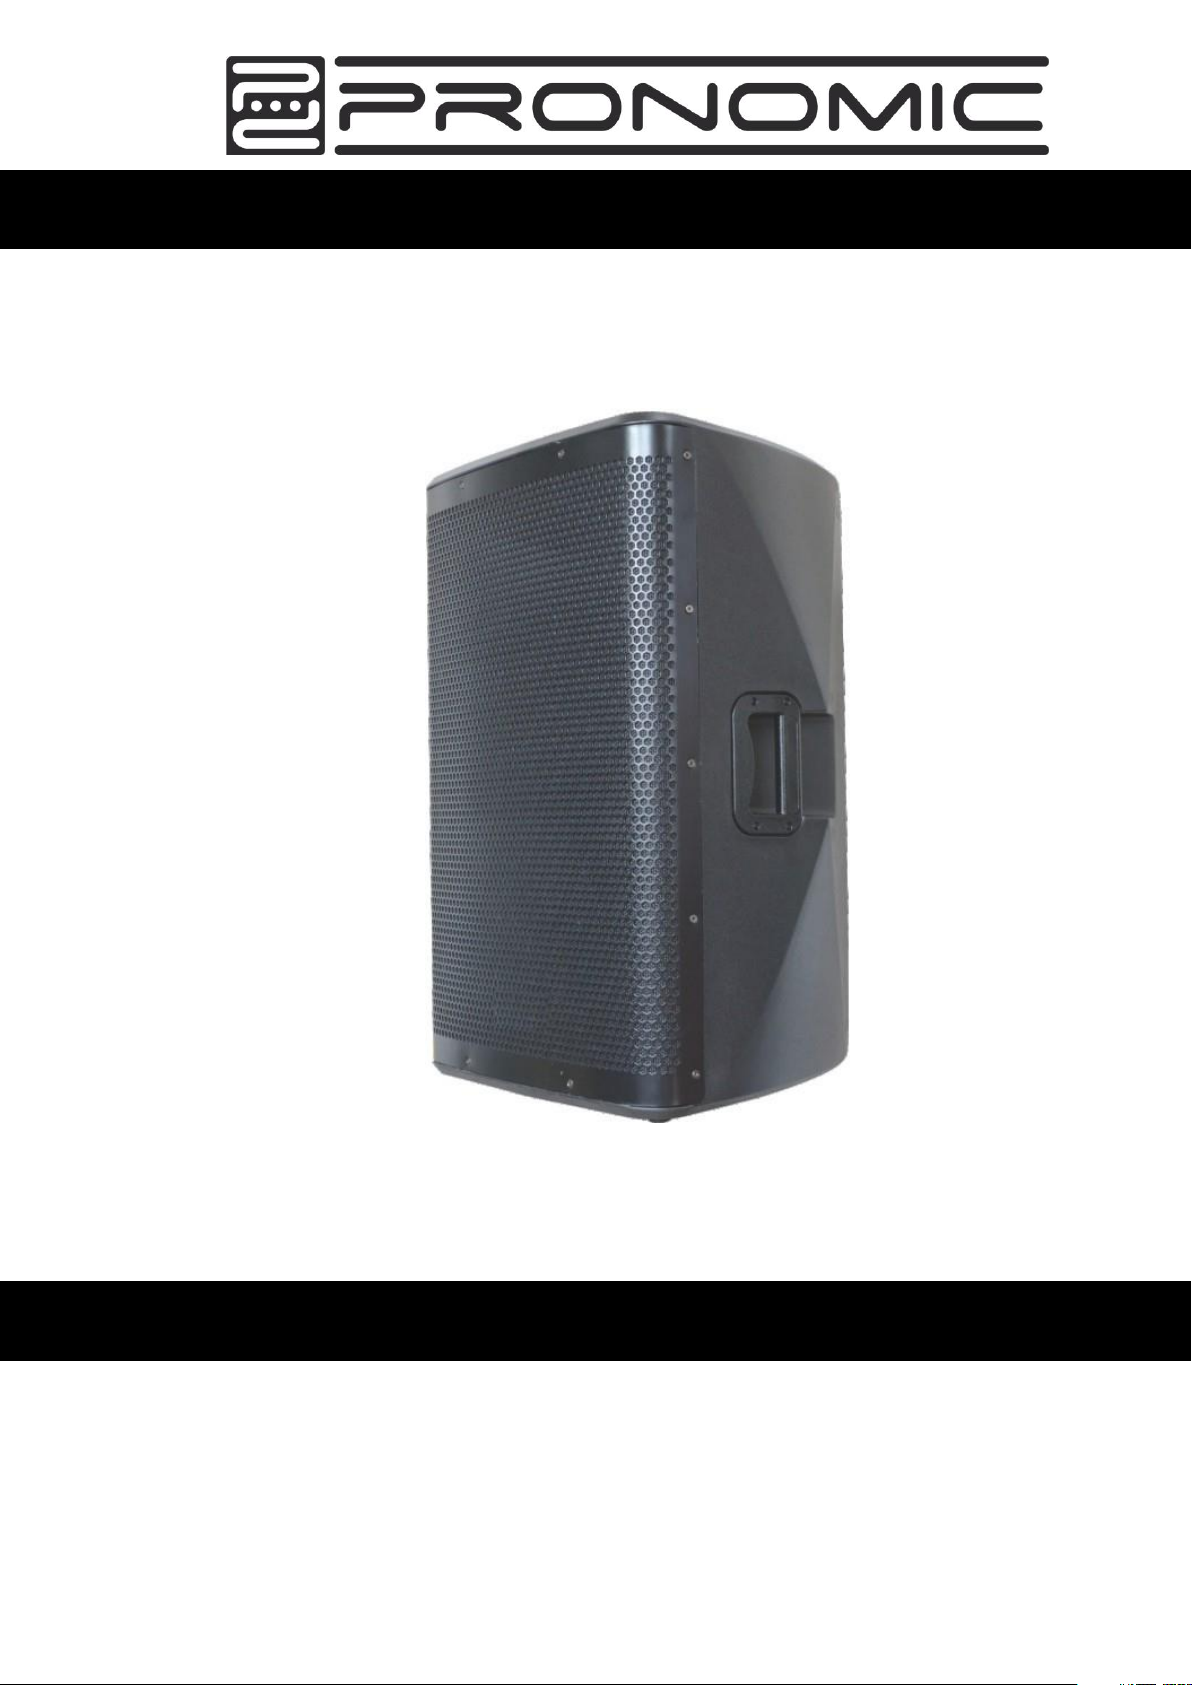
Active Speaker Pronomic C-Series
Operating Manual
Revision: *-11-2024
00063463 Pronomic C-208
00063464 Pronomic C-210
00063465 Pronomic C-212
00063466 Pronomic C-215
Page 2

Page 3

Pronomic C-Series
© 2024
This manual is protected by copyright. Any copying or reprint, even in excerpts, is
only allowed with written consent of Musikhaus Kirstein GmbH. The same applies to
reproduction or copying of images, even in altered form.
Contents
Technical Data ....................................................................................................... 3
Product Description .............................................................................................. 4
IMPORTANT SAFETY SYMBOLS
Power Supply ....................................................................................................... 8
SAFETY ............................................................................................................... 8
Connections ......................................................................................................... 9
Installation and Operation ..................................................................................... 9
CLEANING & MAINTENANCE ............................................................................... 9
SIMPLIFIED EU DECLARATION OF CONFORMITY ........................................... 10
WEEE Declaration (Waste of Electrical and Electronic Equipment) ............... 10
...................................................................... 7
2024-11-04 Pronomic C Series / ArtNr.: 00063463-66 1
Page 4
Pronomic C-Series
Follow the Operating Manual!
The signal word WARNING identifies hazards, which can result
without precautions in serious injury.
The signal word NOTE indicates general precautions, which should
be observed in handling the product.
Images used in this manual may differ slightly from the actual
product, as long as it has no adverse effect on the properties and
safety of the product.
All personal formulations in these instructions are to be considered
gender neutral.
Children should be supervised to ensure that they do not play with
the unit. Do not leave the children unattended.
Thank you for purchasing this product. To ensure you will be completely satisfied with this
product, read and understand this manual carefully before use. Keep the manual in a safe
place. The Operating Manual must be passed on to all subsequent users.
These operating instructions apply to persons who have been supervised or
instructed in the operation of the unit by a person responsible for their safety and
who have proven to be able to handle the unit.
All information contained in this Operating Manual is accurate to the best of our
knowledge and belief. Neither the author nor the publisher, however, can be held liable for
damages or losses that arise in connection with the use of this Operating Manual.
Other product, brand or company designations specified in this document are
possibly the trademarks of their respective owners. Compliance with all applicable
copyright laws is the responsibility of the user of this document.
2 Pronomic C Series / ArtNr.: 00063463-66 2024-11-04
Page 5
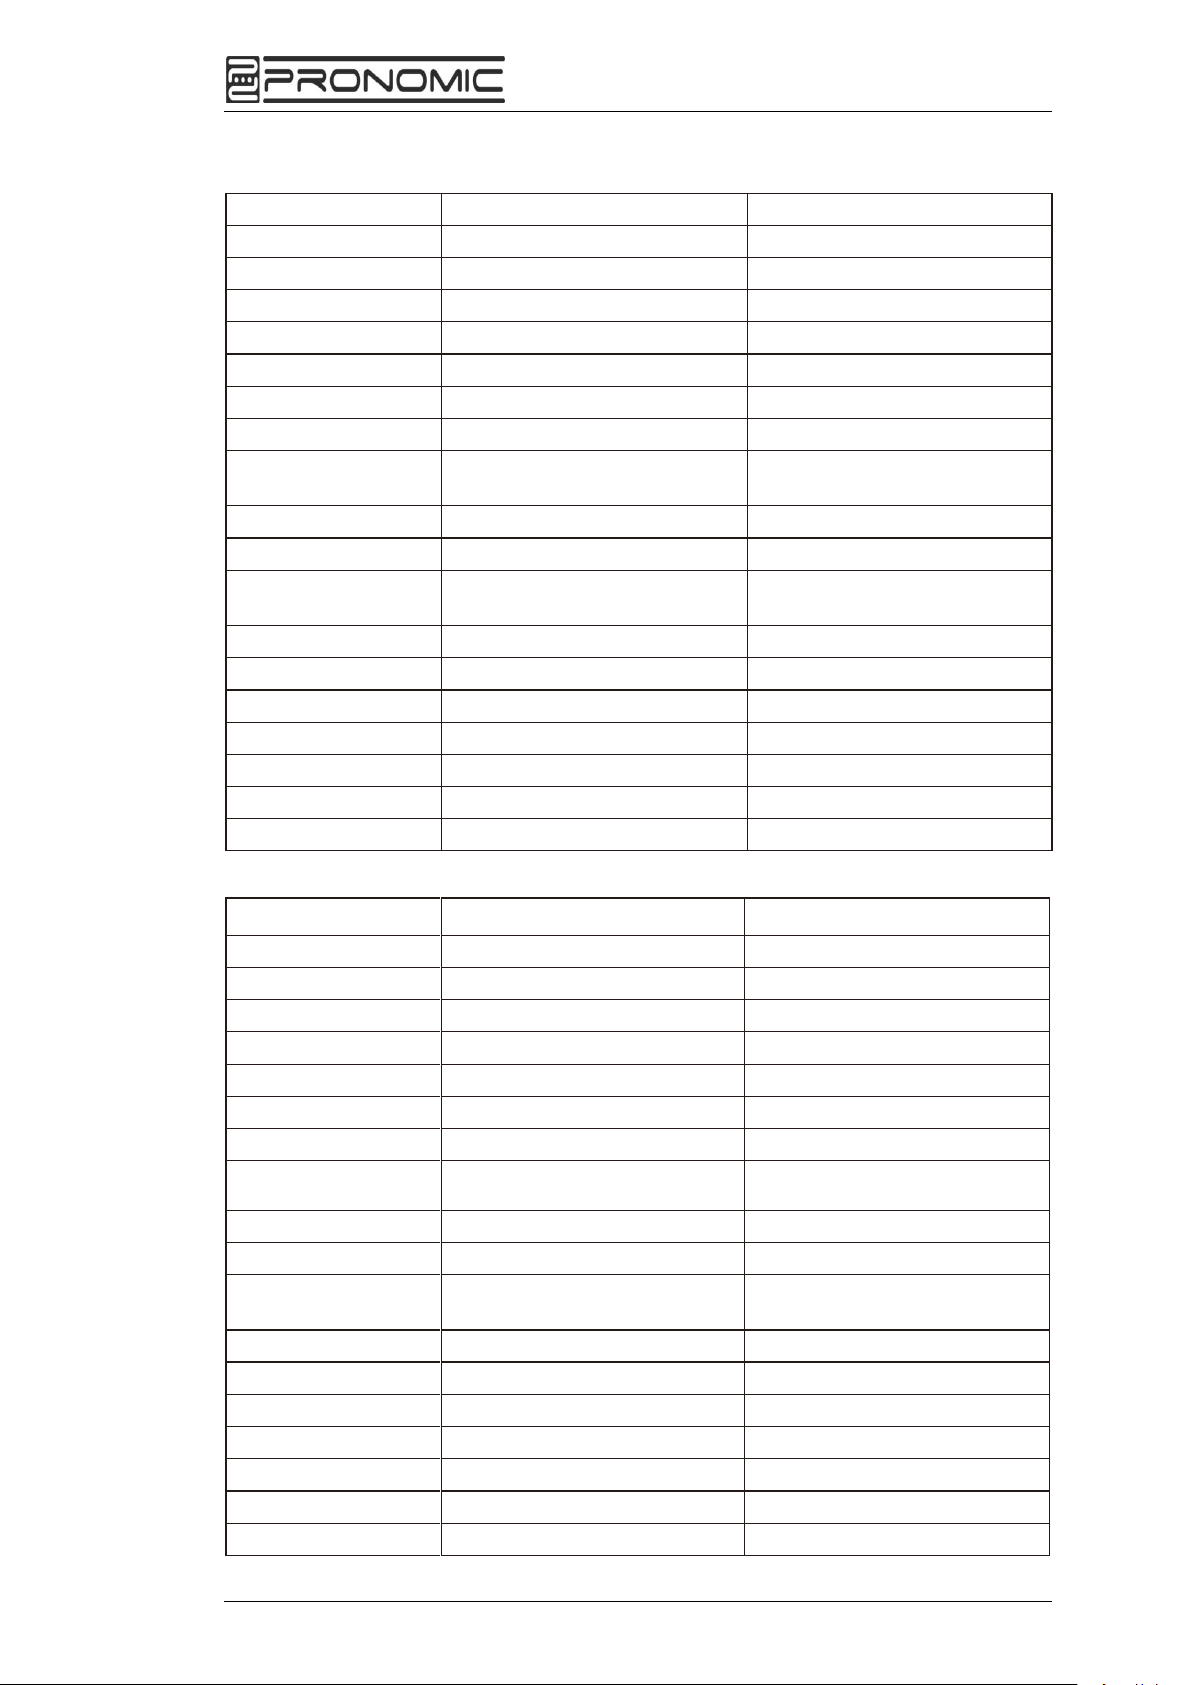
Technical Data
Model Pronomic C-208 MA, 8"
Pronomic C-210 MA, 10"
Type two Way BiAmp
two Way BiAmp
Frequency Response
70Hz-20KHz
65Hz-20KHz
Sensitivity (1m/1w)
91dB
92dB
Impedance 4Ω 4Ω
Woofer 1x8" 38mm 35OZ
1x10" 50mm 40OZ
Driver
1" Exit-1.0" Compression Drive
1" Exit-1.0" Compression Drive
SPL
117dB
118dB
DSP
48KHz Sampling frequency
24Bit
48KHz Sampling frequency
24Bit
Bluetooth Module Yes Yes
Bluetooth Frequency
2401.418 - 2480.498 MHz
2401.418 - 2480.498 MHz
Max. Transmission
Power (Bluetooth)
1mW / 0dBm
1mW / 0dBm
Amp Type Class D
Class D
Amp Power
LF175W+HF75W RMS
LF175W+HF75W RMS
Peak Power
LF 350W+HF 150W
LF 350W+HF150W
THD
<= 0.05%
<= 0.05%
Crossover 2.3KHz
2.3KHz
Dimension(WxHxD)
29 x 47 x 26,5 cm
34 x 53,5 x 32 cm
Weight
11,3kg
14,8 kg
Model
Pronomic C-212 MA, 12"
Pronomic C-215 MA, 15"
Type
two Way BiAmp
two Way BiAmp
Frequency Response
60Hz-20KHz
55Hz-20KHz
Sensitivity(1m/1w)
93dB
93dB
Impedance
4Ω 4Ω
Woofer
1x12" 65mm 50OZ
1x15" 75mm 60OZ
Driver
1.75"Titanium
1.75"Titanium
SPL
122dB
123dB
DSP
48KHz Sampling frequency
24Bit
48KHz Sampling frequency
24Bit
Bluetooth Module
Yes Yes
Bluetooth Frequency
2401.418 - 2480.498 MHz
2401.418 - 2480.498 MHz
Max. Transmission
Power (Bluetooth)
1mW / 0dBm
1mW / 0dBm
Amp Type
HF = Class AB, LF = Class D
HF = Class AB, LF = Class D
Amp Power
LF400W+HF100W RMS
LF400W+HF100W RMS
Peak Power
LF800W+HF200W
LF800W+HF200W
THD
<= 0.05%
<= 0.05%
Crossover
2.3KHz
1.9KHz
Dimension(WxHxD)
37,5 x 59,5 x 36,5 cm
45 x 69,5 x 39 cm
Weight
19,5 kg
25,2 kg
Pronomic C-Series
2024-11-04 Pronomic C Series / ArtNr.: 00063463-66 3
Page 6
Pronomic C-Series
Product Description
4 Pronomic C Series / ArtNr.: 00063463-66 2024-11-04
Page 7

Pronomic C-Series
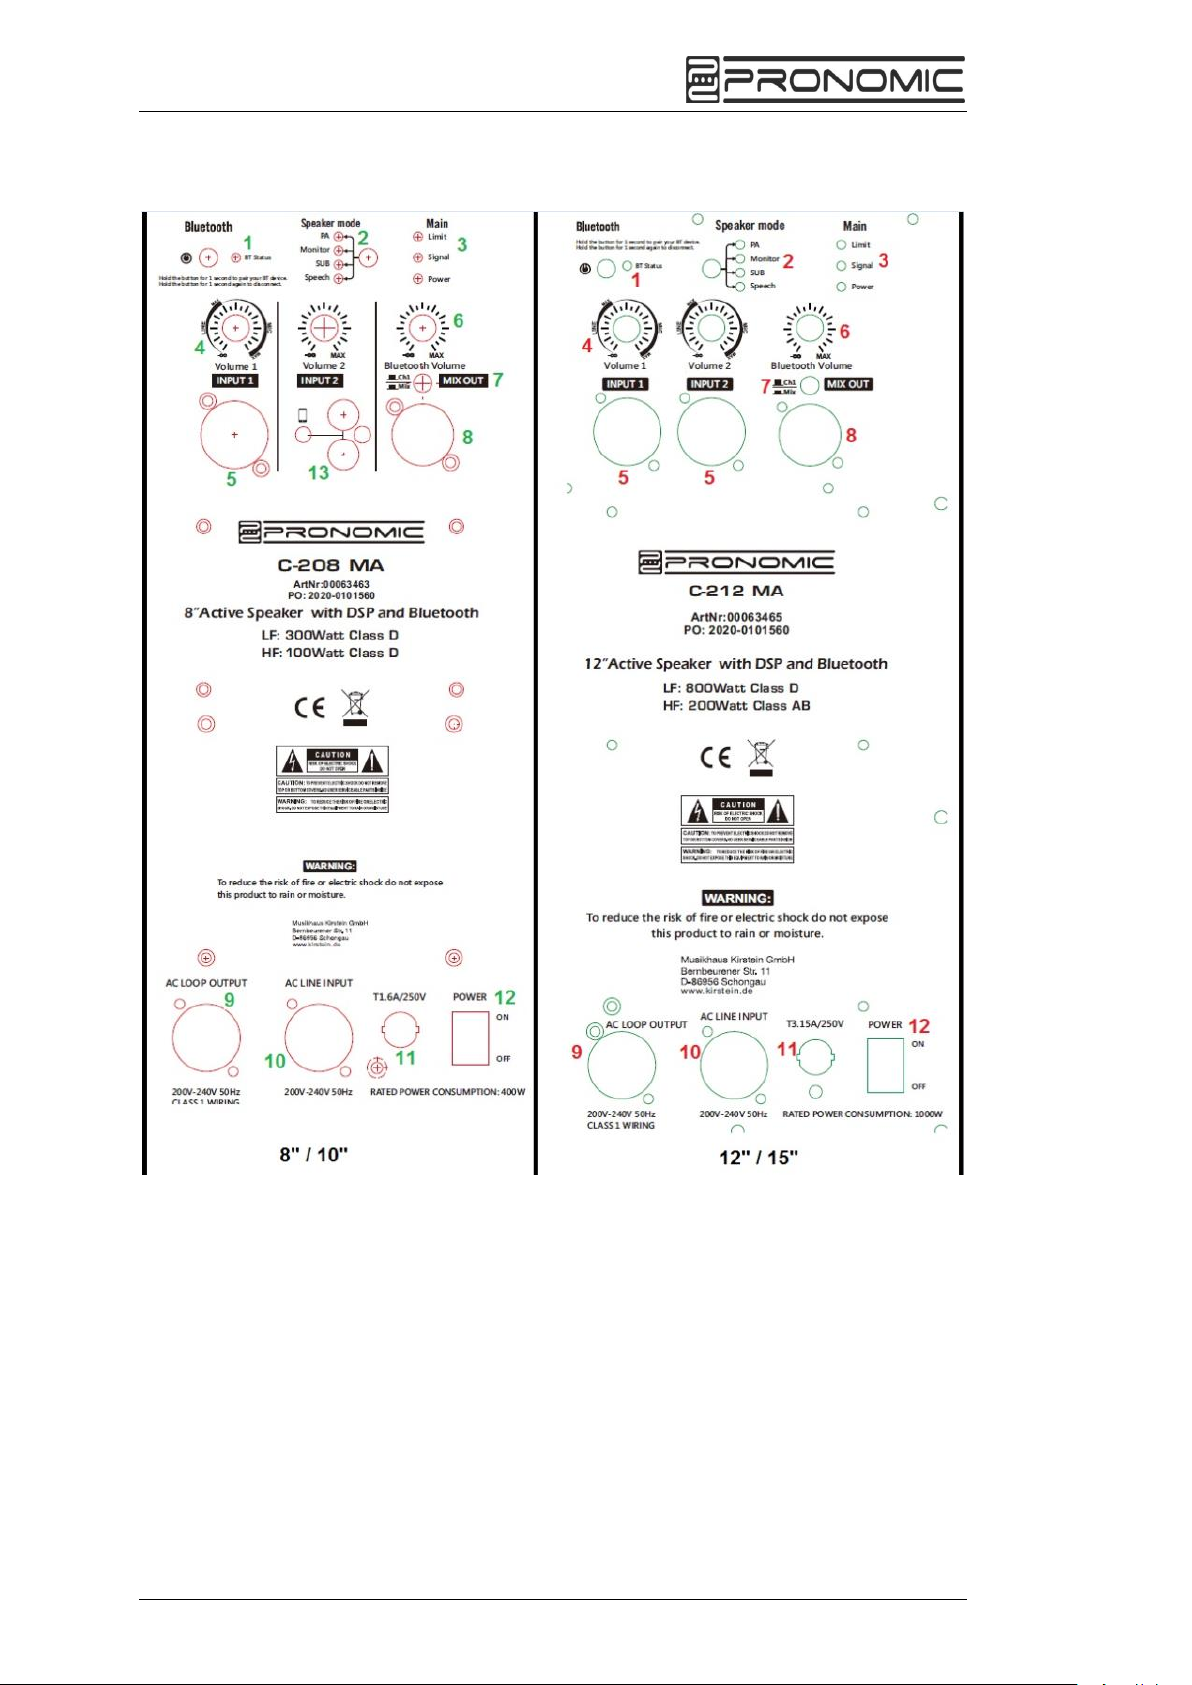
1. BLUETOOTH: C o nn ect ing y our B lue too th de vic e wit h t hi s
speaker
A. If loudspeaker is powered on, press the pair button for two seconds. The LED
starts blinking and the devices is searching for other BT-devices nearby.
B. Enable the Bluetooth function in your BT-devices (e.g. smartphone) and select
“ M I X ER-01” wh en t hi s is in di ca te d in y o ur di sp la y. When paired
successfully, the BT- LED on the Speaker panel is constantly on.
C. Turn your Bluetooth device's volume to its lowest l eve l.
D. Then start playing a song on your smartphone. It´s recommended to set the
Bluetooth device's volume now at its maximum.
E. Once your device is paired to the C-Series speaker, the speaker will
au to mat ic al ly remember the device for the next session. To re-connect it,
go to your Bluetooth settings and select "Connect “, to re-establish the
connection.
F. When you press the pair button for 2-3 seconds, the devices are
disconnected and the Bluetooth connecting is terminated.
2. SPEAKER MODE:
PA: This is the default setting for the Pronomic C-series. Use this setting when
your loudspeaker is being used on a speaker stand and facing towards your
audience.
Monitor: Use this setting when your loudspeaker is being used as a stage
monitor facing towards you or the stage.
SUB: This mode “cuts” off the lower frequencies of the loudspeaker to match
properly with an externally connected subwoofer.
Speech: Use this setting when your loudspeaker is being used for Speech only
or Spoken Word applications and the device is facing towards the audience.
2024-11-04 Pronomic C Series / ArtNr.: 00063463-66 5
Page 8

Pronomic C-Series
3. Main (LED-indicators)
LIMIT (Automatic amplitude limiter):
When the audio signal reaches a dangerous threshold for the transducers, this
circuit will automatically intervene by reducing the amount of signal in order to
protect the speaker and to avoid distortion. If this safety function is active, the
indicator lamp will flash.
SIGNAL: This LED indicates if a signal is received from the Combo /XLR input
Socket
POWER: LED signal to indicates, that the active speaker is switched on.
4. INPUT LEVEL: Ro ta ry B ut to n f or adjusting the level of each input.
The left area (from - ∞ to Line Max) controls the Line -In volume. The area on the
right regulates the microphone level. For the 12 "and 15" versions, the 2 Input
channels can be controlled by 2 separate rotary knobs.
5. INPUT:
Balanced input for the connection of signal sources like mixing consoles,
instruments, or microphones. Connections can be established using 6,3mm jack
plug or XLR connectors.
6. BLUETOOTH VOLUME:
Turn this rotary knob to adjust the input volume of your paired Bluetooth device.
7. MIX OUT SELECTOR:
When the (Mix) button is pressed, the set levels of Volume 1, Volume 2 and
Bluetooth Volume will be sent to the Mix-Out socket. If the (CH1) key is not pressed,
only the input signal from input 1 (regardless of volume control 1) is passed on
directly to the mix-out socket.
8. MIX OUT:
The signals (see point 7) can be forwarded to an external loudspeaker or subwoofer
via this XLR output. The DSP does not affect the output level.
9. AC LOOP OUTPUT:
200-240V 50/60Hz Max 7A.
10. AC LINE INPUT (Power supply):
Connect the included power cord to the AC input plug.
6 Pronomic C Series / ArtNr.: 00063463-66 2024-11-04
Page 9
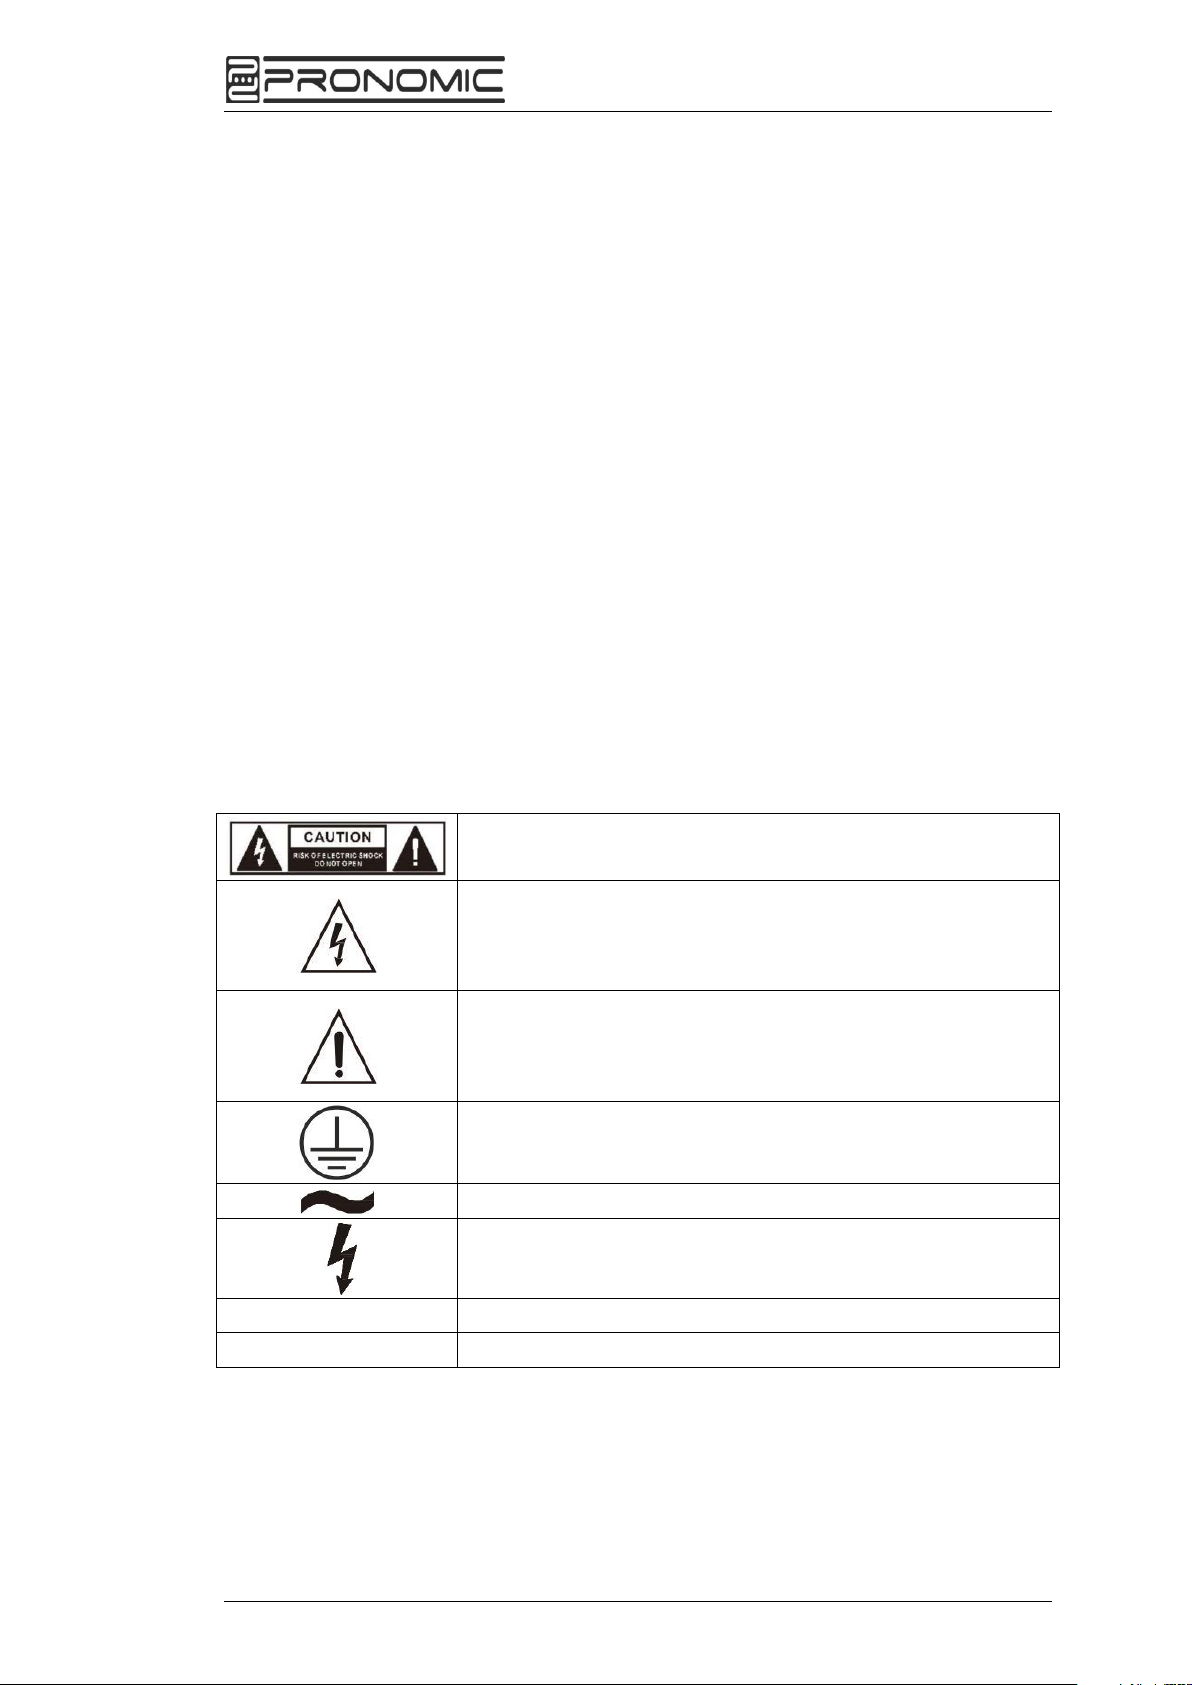
Pronomic C-Series
The symbol is used to indicate that some life-endangering
parts are built in this device. Even normal operating
conditions may be sufficient to constitute the risk of electric
shock or death.
The symbol is used in the service documentation to
indicate that for safety reasons specific components shall
only be replaced by the component specified in that
documentation.
Protective grounding conductor is built-in
Alternating current/voltage. (AC)
life-endangering parts
ON:
Indicates that the device is turned on.
OFF:
Indicates that the device is turned off.
11. FUSE holder
The fuse holder is containing a fuse, which protects the AC supplies circuit of the
unit.
Caution: if the fuse blew out, it should be replaced with the same type and
specification. If the fuse continues to blow out, please stop replacing it and refer
servicing to qualified person (electrician)
12. POWER SWITCH:
This switch turns on the system. It’s recommended to adjust the volume level to
the lowest setting before turning on the power switch.
13. AUX / Chinch Input
For connecting a CD-Player, Smartphone, Mixer signal by cable to the active speaker.
IMPORTANT SAFETY SYMBOLS
2024-11-04 Pronomic C Series / ArtNr.: 00063463-66 7
Page 10

Pronomic C-Series
Before fitting or removing the unit, ensure that the power cord
is disconnected from the mains.
Make sure that the unit is positioned in a way that no one can
stumble over the power cord.
Power Supply
Only use the Power supply cable, which is delivered with the goods.
By using other voltages than specified, the equipment can be irreparably damaged.
The equipment must be directly connected to the mains. No dimmer or adjustable
power supply may be used.
SAFETY
Danger of Hearing damage
This speaker component easily is generating high sound pressure levels (SPL)
sufficient to cause permanent hearing damage to performers, production crew and
audience members. Avoid prolonged exposure to SPL in excess of 85 dB;
Water & Moisture
To protect against electrical shock, do not immerse cord, plug or any part of this unit
in water or other liquids;
Heat
The apparatus should be located away from the heat source such as radiators,
stoves or other appliances that produce heat.
Ventilation
Do not block areas of ventilation opening. Violation might result in fire. Always install
in accordance with the manufacturer's instructions.
8 Pronomic C Series / ArtNr.: 00063463-66 2024-11-04
Page 11
Disconnect the device from the power supply before
installation and/or removal
Never immerse the device in liquids.
Power Cord and Plug
Pronomic C-Series
Protect the power cord from being walked on or pinched
convenience receptacles, and the point where they exit from the apparatus.
Do not defeat the safety purpose of the polarized or grounding-type plug. A
polarized plug has two blades with one wider than the other. A grounding type plug
has two blades and a third grounding prong. The wide blade or the third prong is
provided for your safety.
If the provided plug does not fit into your outlet, refer to electrician for replacement.
Fuse
To prevent the risk of fire and damaging the unit, please use only of the
recommended fuse type as described in the manual. Before replacing the fuse,
make sure the unit is switched off and disconnected from the AC outlet.
Electrical Connection
Improper electrical wiring may invalidate the product’s warranty.
particularly at plugs,
Connections
Before using the unit for the first time, ensure that your mains voltage corresponds
to voltage indicated on the unit
Installation and Operation
CLEANING & MAINTENANCE
Clean only with a dry cloth. Do not clean the plastic parts or surface enclosure with
solvents or petrochemical based cleaners.
2024-11-04 Pronomic C Series / ArtNr.: 00063463-66 9
Page 12

Pronomic C-Series
SIMPLIFIED EU DECLARATION OF CONFORMITY
Herewith Musikhaus Kirstein GmbH declares that the device/radio units
[Pronomic C-208 MA ]
[Pronomic C-210 MA ]
[Pronomic C-212 MA ]
[Pronomic C-215 MA ]
are in compliance with the EU directive 2014/53/EU. You can download the full CE
declaration of conformity for this item under download link:
http://www.kirstein.de/docs/Konformitaetserklaerung/CE_Konformitaetserklaerung_0
0063463.pdf
WEEE Declaration
(
Waste of Electrical and Electronic Equipment)
Your product has been designed and manufactured using quality materials and
components that are recyclable and reusable. The symbol means that your product
must be disposed separately from household waste at the end of its service life.
Dispose of this equipment at your local collection point or recycling center.
Please help to protect the environment in which we all live.
All specifications and appearances are subject to change without notice. All
information was correct at time of printing. Musikhaus Kirstein GmbH does not
guarantee for the accuracy or completeness of any description, photograph or
statement contained in this manual. Printed colors and specifications may vary
slightly from product. Products from Musikhaus Kirstein GmbH are only sold through
authorized dealer. Distributors and dealers are not agents of Musikhaus Kirstein
GmbH and have no authority to bind Musikhaus Kirstein GmbH legally in any way.
Musikhaus Kirstein GmbH
Bernbeurener Str. 11
86956 Schongau – Germany
Telefon/Phone: 0049-8861-909494-0
Telefax/Fax: 0049-8861-909494-19
[email protected]
10 Pronomic C Series / ArtNr.: 00063463-66 2024-11-04
Page 13
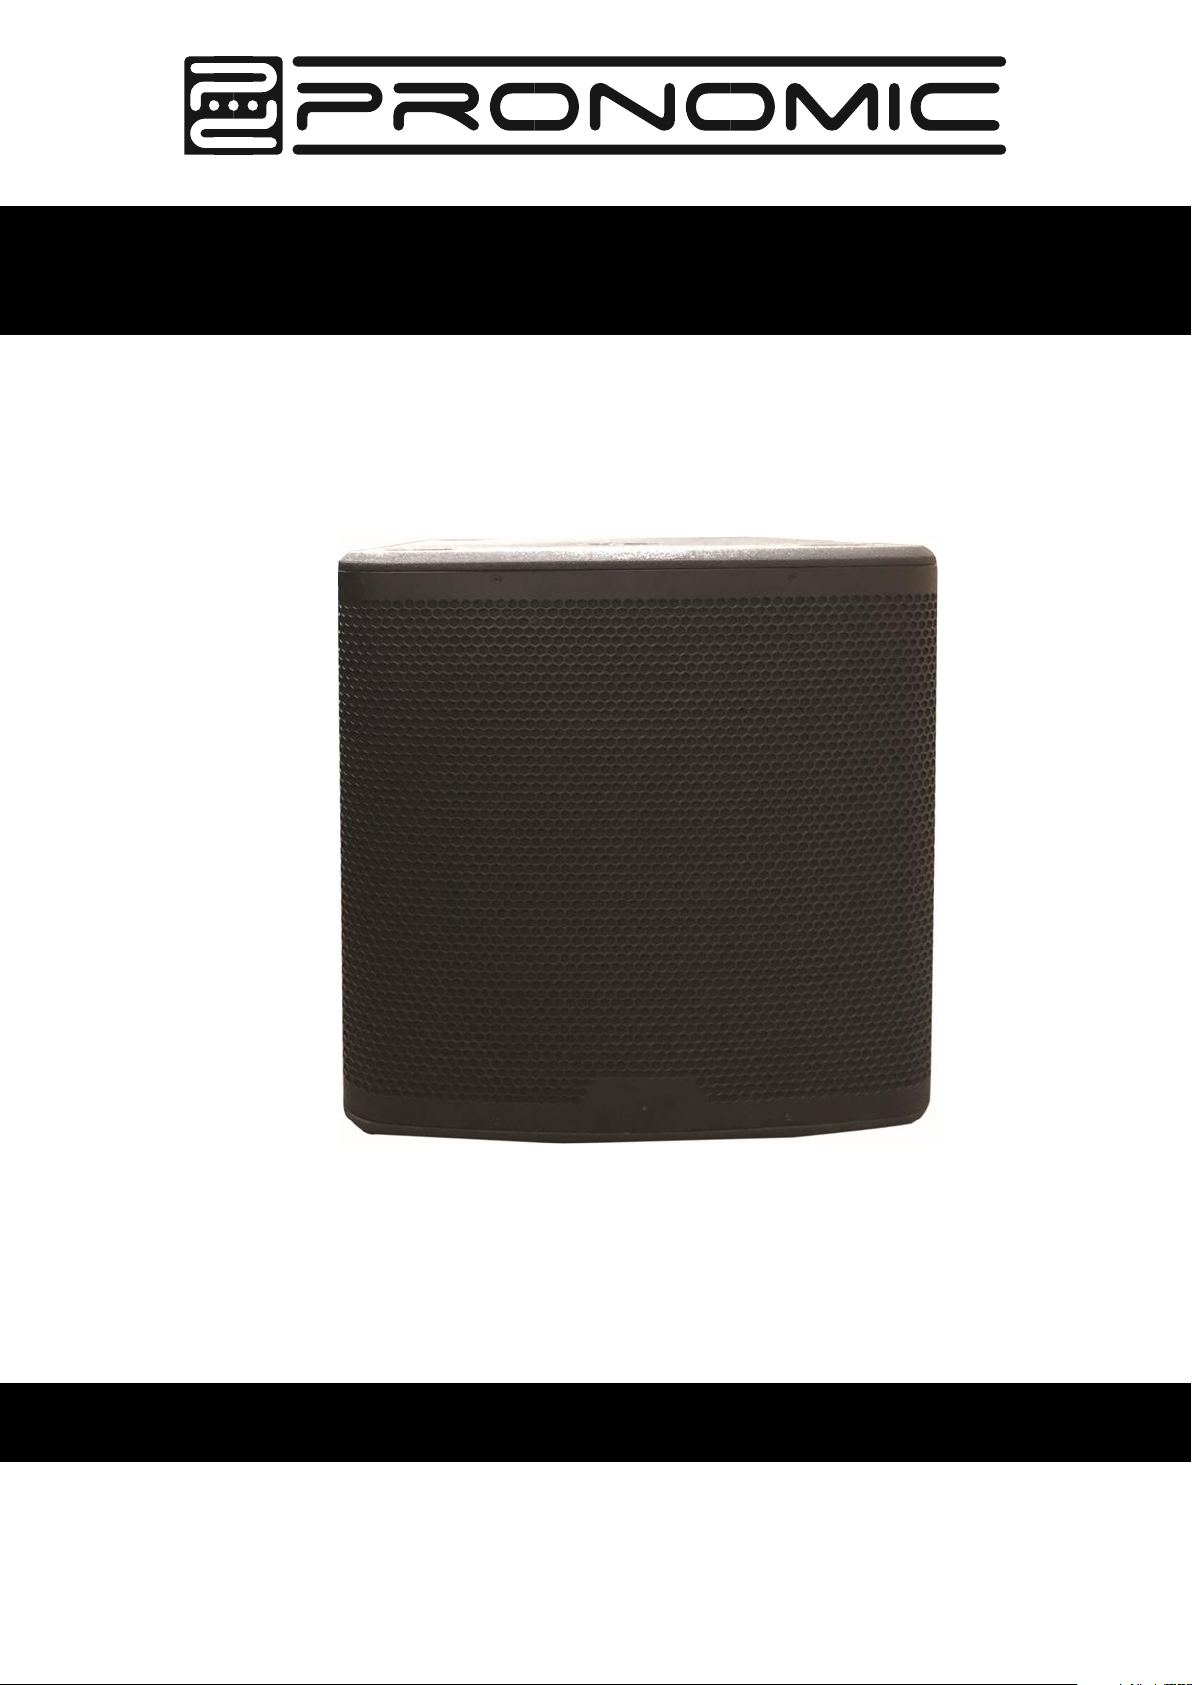
00073546 Pronomic C-118SA Subwoofer, active
00093139 Pronomic C-115SA Subwoofer, active
Operating instructions
Revision: 11-2024
c
Page 14

© 2020
These operating instructions are protected by copyright. Reproduction of these
operating instructions, even in part, is only permitted with the permission of
Musikhaus Kirstein GmbH. The same applies to the reproduction or copying of
images, even in modified form.
Content
Safety precautions ................................................................................................. 3
Additional precautions .......................................................................................... 3
Connections and functions ................................................................................... 4
Connections and functions ................................................................................... 5
DSP setting ............................................................................................................ 6
The correct cabling ................................................................................................ 7
The correct cabling ................................................................................................ 8
Technical specifications ....................................................................................... 8
WEEE Declaration .................................................................................................. 9
Page 15
Follow the operating instructions!
The signal word WARNING indicates hazards that can lead to
serious injuries if no precautionary measures are taken.
The signal word NOTE indicates general precautions to be
observed when handling the product.
Images and screen representations in these operating instructions
may differ slightly from the appearance of the actual product, as
long as this does not have a negative impact on the technical
characteristics and safety of the product.
All person-related formulations in these operating instructions are
to be regarded as gender-neutral.
Children should be supervised to ensure that they do not play
with the appliance. Do
not leave children unattended.
Thank you for choosing this product.
To ensure that you are fully satisfied with this product, please read these operating
instructions carefully before using our product. Keep these operating instructions in
a safe place. The operating instructions must be passed on to all subsequent users.
These operating instructions apply to persons who have been supervised or
instructed in the operation of the appliance by a person responsible for their safety
and who have demonstrated their ability to handle the appliance.
All information in these operating instructions has been checked to the best of our
knowledge and belief. However, neither the author nor the publisher can be held liable for
any damage in connection with the use of these operating instructions.
Other product, brand and company names mentioned in this document may be the
trademarks of their respective owners. Compliance with all applicable copyright laws
is the responsibility of the user of this document.
2
Page 16
Always place the appliance securely on a level surface to avoid
injury from the appliance falling over.
Do not place any devices that can heat up (e.g. lighting
equipment or fog machines) on the housing.
Never touch the mains cable or the unit when it is wet, as this
may cause an electronic shock.
The fuse may only be replaced by trained personnel. The unit
must be disconnected from the mains beforehand.
Safety precautions
Do not clean the plastic housing with solvents or other chemical-based cleaning
agents.
Keep the unit away from rain and moisture.
Damage caused by non-compliance with this user manual is not covered by the
warranty. The dealer accepts no liability for any resulting defects or problems.
Additional precautions
The unit is only intended for use in dry conditions.
Handle the mains cable and all connections to the mains with special care.
Before connecting, make sure that the mains cable is in perfect condition.
Only touch the mains cable by the plug.
Always plug in the mains plug last. Plugging in must be done without using force.
Before switching on, make sure that the mains plug is firmly connected to the
socket.
Avoid contact of the mains cable with other cables.
Only use fuses with the same rating. The correct fuse rating is indicated on the back
of the unit.
3
Page 17
Connections and functions
4
Page 18

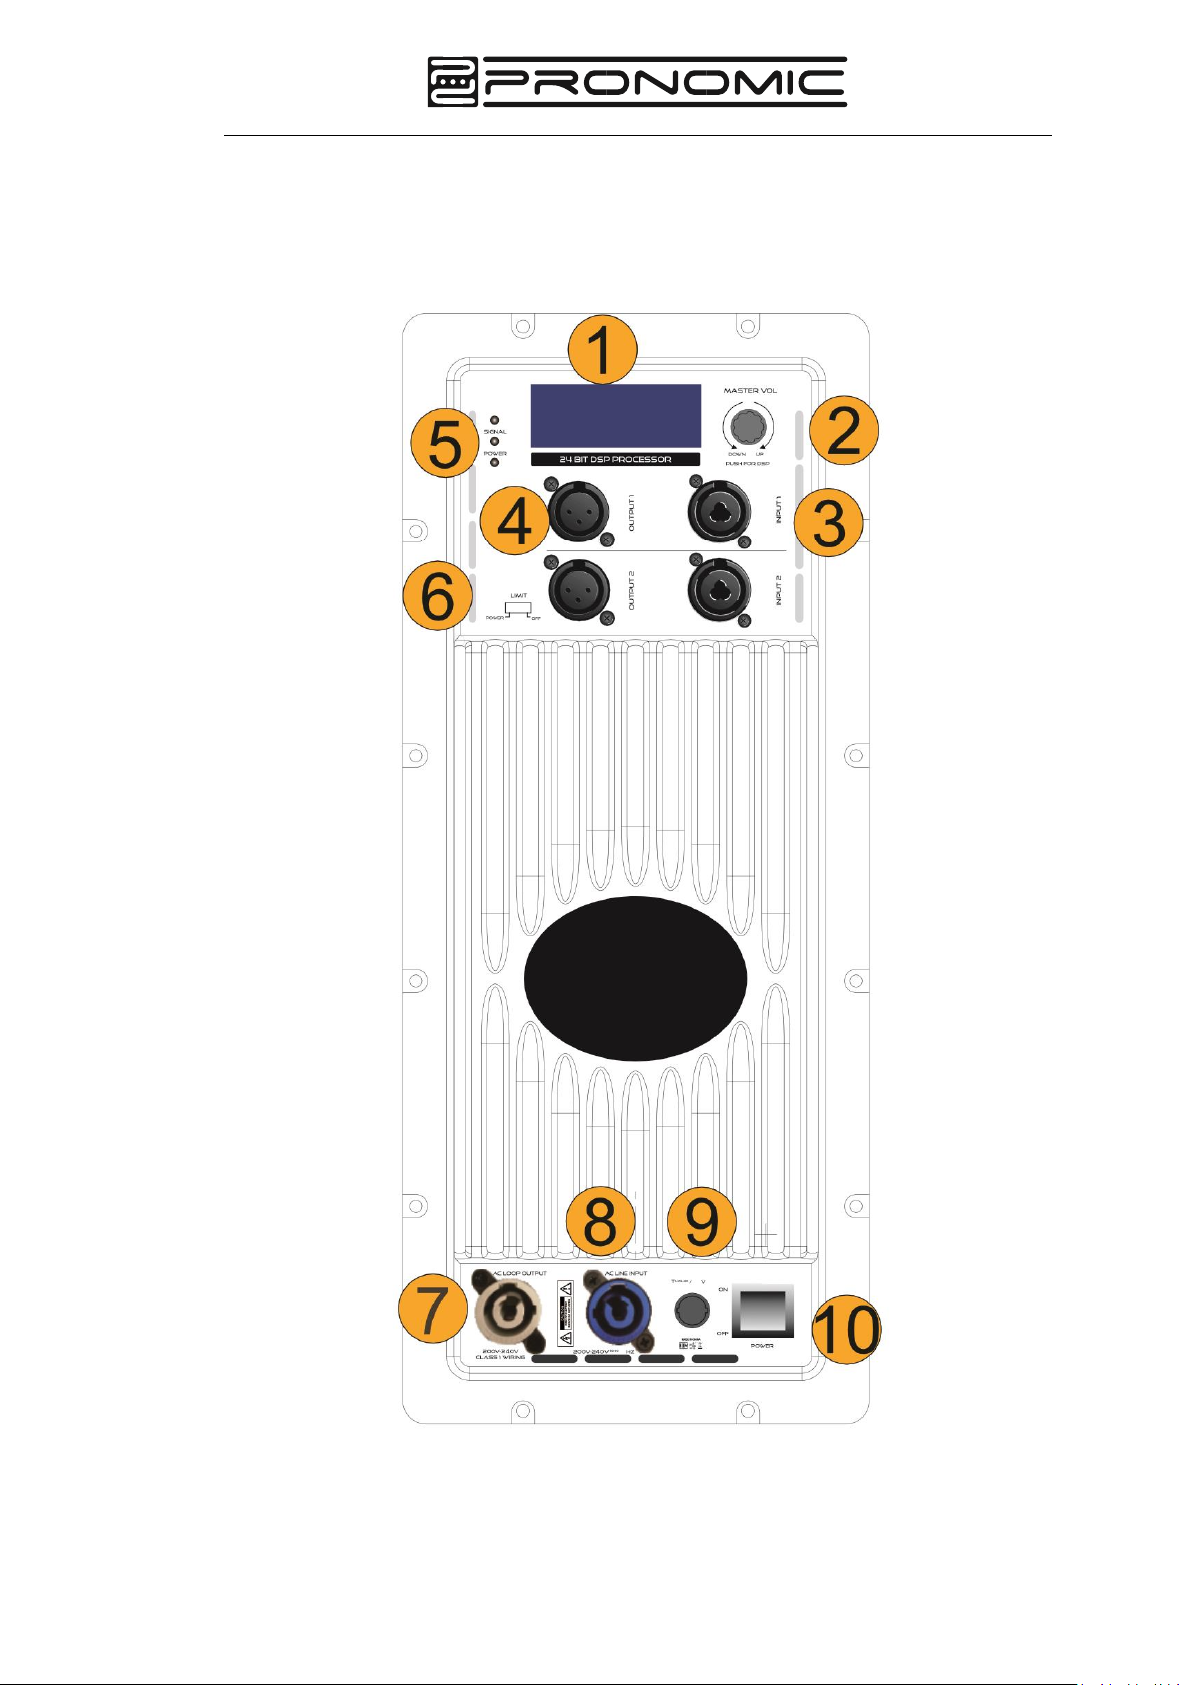
Connections and functions
1. LCD display: Display for DSP control and general display
2. Volume control: Controls the overall volume level
DSP: Scroll through the menu and select the available choices. Press the
Master VOL button to enter the DSP menu
3. Input: Balanced input for connecting signal sources such as mixers, feeds, etc.
The connection can be made via a 6.3mm jack plug or XLR plug
4. Output: XLR output sends the input signal to another speaker or subwoofer
5. Limiter:
(1) Limit: When the audio signal reaches the threshold that is dangerous for the
transducers, this circuit automatically intervenes by reducing the signal strength
to protect the speaker and to prevent distortion
(2) Signal: LED signal to indicate the input signal
(3) Power: LED signal to indicate mains voltage
6. LED switch: With this switch you can change the display option of the LED on
the front. If you switch it to the "Power" position, the light is constantly blue, if
you switch it to the "Limit" position, the light is red when the Input signal is too
high. To switch off the LED, please switch it to the "Off" position
7. AC Loop Output: 100-127V 50/60Hz Max 7A is used to connect to a second
subwoofer or external speaker to power 2 systems with one mains cable
8. AC Line Input: Used to connect to power sockets to supply power to the system
9. Fuse holder: Used to hold the fuse, which is a safety device that protects the
AC power supply circuit of the unit.
If the fuse is blown, it should be replaced with the same type with the same
specification by trained personnel
10. Power switch: This power switch turns the system on or off. Please set the
volume level to the lowest value before switching on the power switch
5
Page 19
Mode
Live
Music
DJ
C-Series
Low Pass
OFF
80 Hz
100 Hz
120 Hz
150 Hz
Delay
OFF
0-30ms
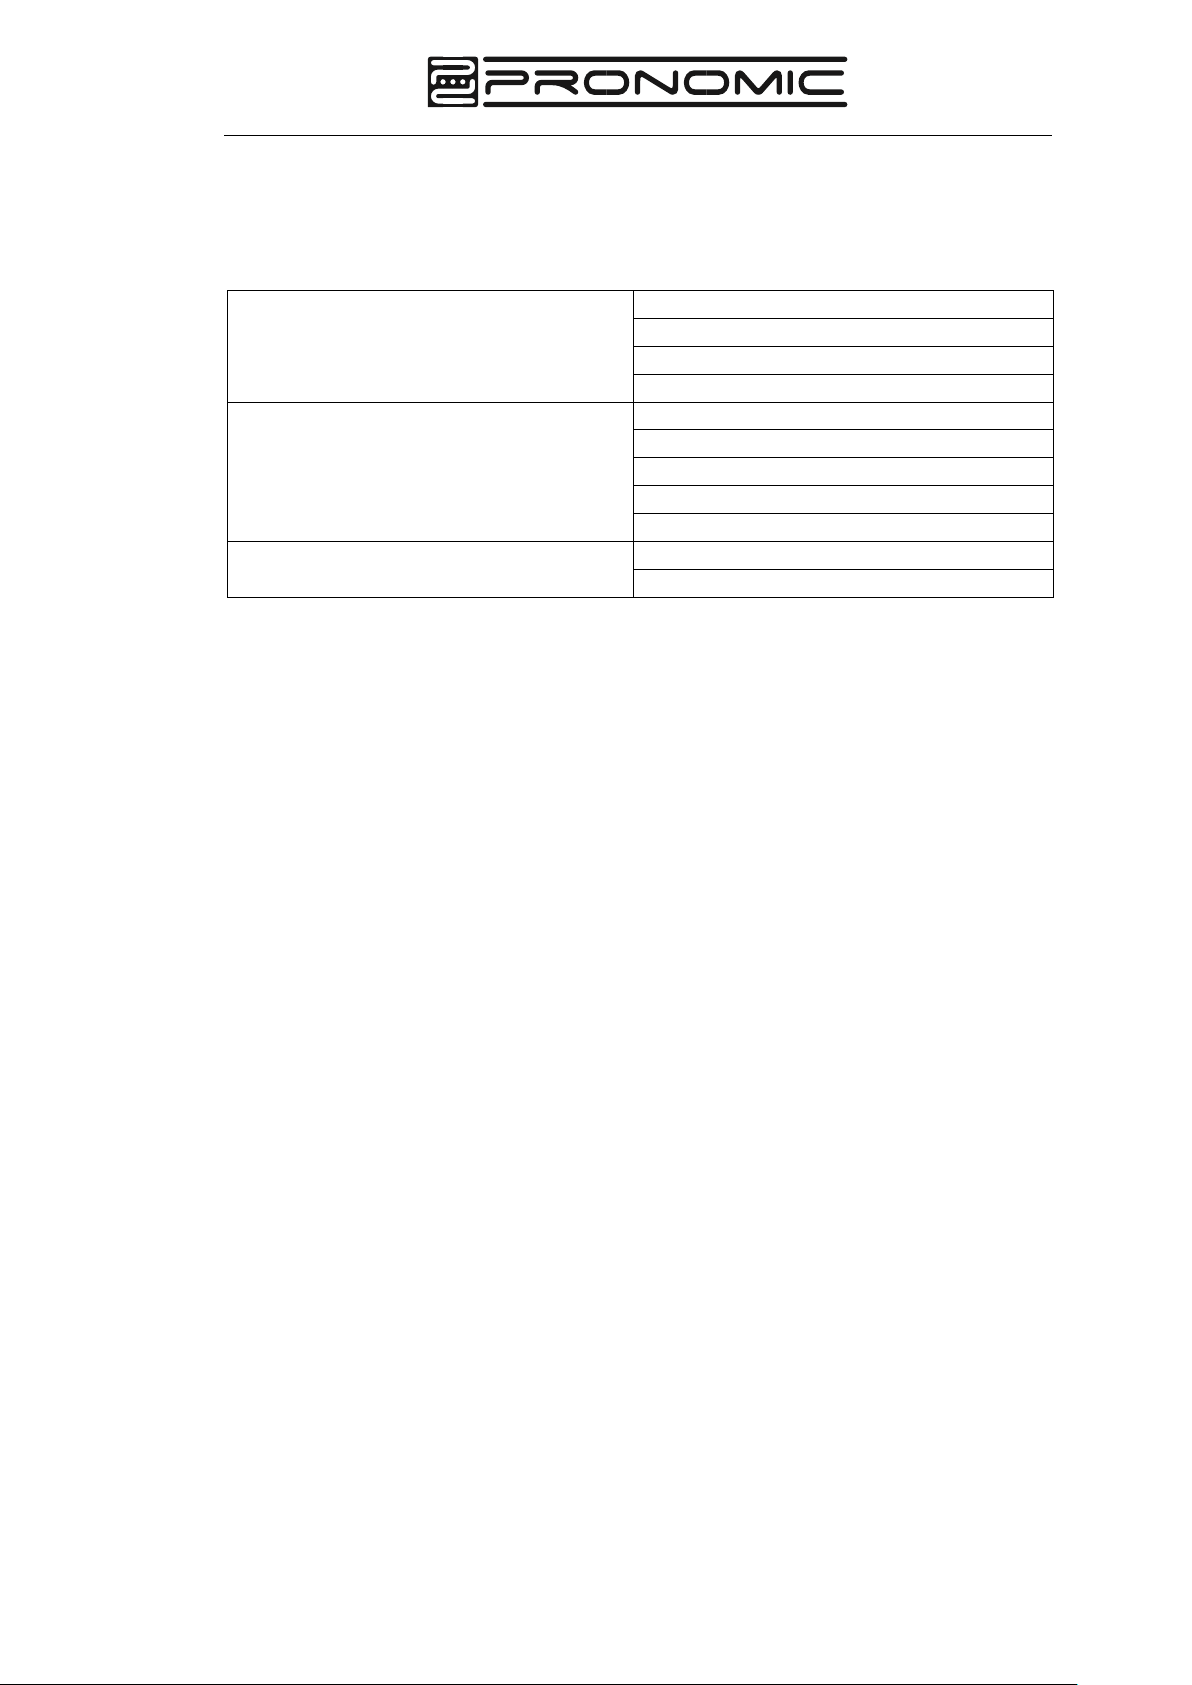
DSP setting
DSP Menu
The integrated DSP menu is used for individual sound configuration of the
subwoofer in order to be able to use it perfectly in different locations with different
setups.
Available options for this selection are: Live, Music, DJ and C-Series.
• Live: Very linear with very low cut-off frequency
• Music: Slight bass boost at 50 Hz
• DJ: Stronger bass boost at 50 Hz
• C-Series: Tuned filters for Pronomic C-Series speakers with low pass
at 150 Hz
Low Pass Menu
The additionally adjustable Low Pass is used to select the low pass frequency for
correct summing with a full range speaker. Available options for this selection are:
80Hz, 100 Hz, 120 Hz, 150 Hz.
Make sure that the Low Pass is set to "OFF" if you want to use the C-Series DSP
setup.
Delay:
Sets the delay time. This is used to compensate for the distance between speakers.
Polarity:
Polarity is used to compensate for time shifts in speaker setups whose individual
components (speaker cones) are not on the same axis. Room-related acoustic
cancellations can also be corrected.
If there is too little bass in the auditory impression, this can be corrected by
changing the polarity.
An exact correction of the phase position can only be achieved with the aid of
suitable measuring instruments.
The polarity can be reversed in the menu
6
Page 20
The correct cabling
7
Page 21
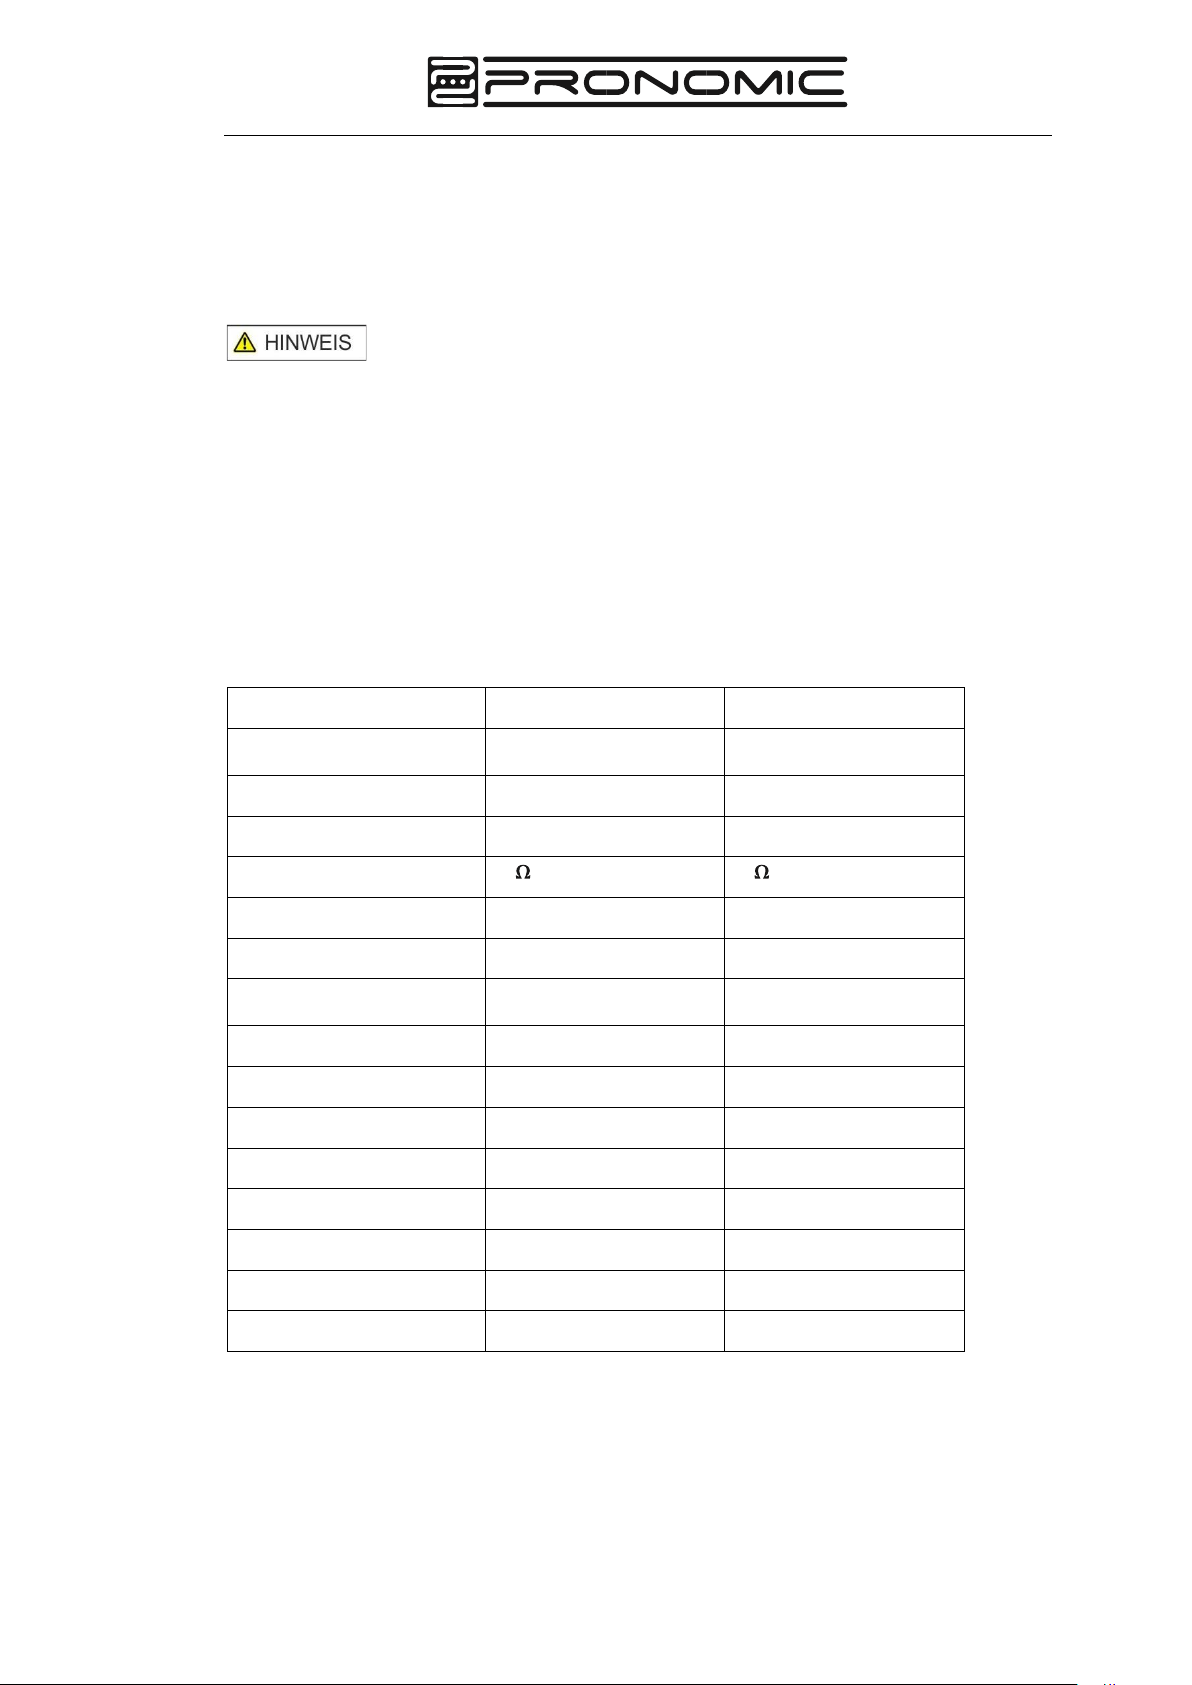
Modell
C-118SA
C-115SA
Typ
Aktiver SUB
Lautsprecher
Aktiver SUB
Lautsprecher
Frequenzbereich
30 Hz – 200 Hz
30 Hz – 200 Hz
Sensitivität (1m/1w)
96,5 dB
96,5 dB
Impedanz
4
4
Woofer
18 75 mm 80 OZ
15“ 75 mm 80 OZ
SPL
126 dB
124 dB
DSP
48 KHz SamplingFrequenz 24 Bit
48 KHz SamplingFrequenz 24 Bit
Verstärker Typ
Class D
Class D
Leistung RMS
800 Watt
800 Watt
Leistung PEAK
1600 Watt
1600 Watt
Trenn-Frequenz
Einstellbar siehe Seite 6
Einstellbar siehe Seite 6
Maße
625x755x655 mm
535X645X590
Gewicht
41 kg
35 kg
Main Voltage
200-240V
200-240V
Sicherung
6.3A, 500 Volt
6.3A, 500 Volt
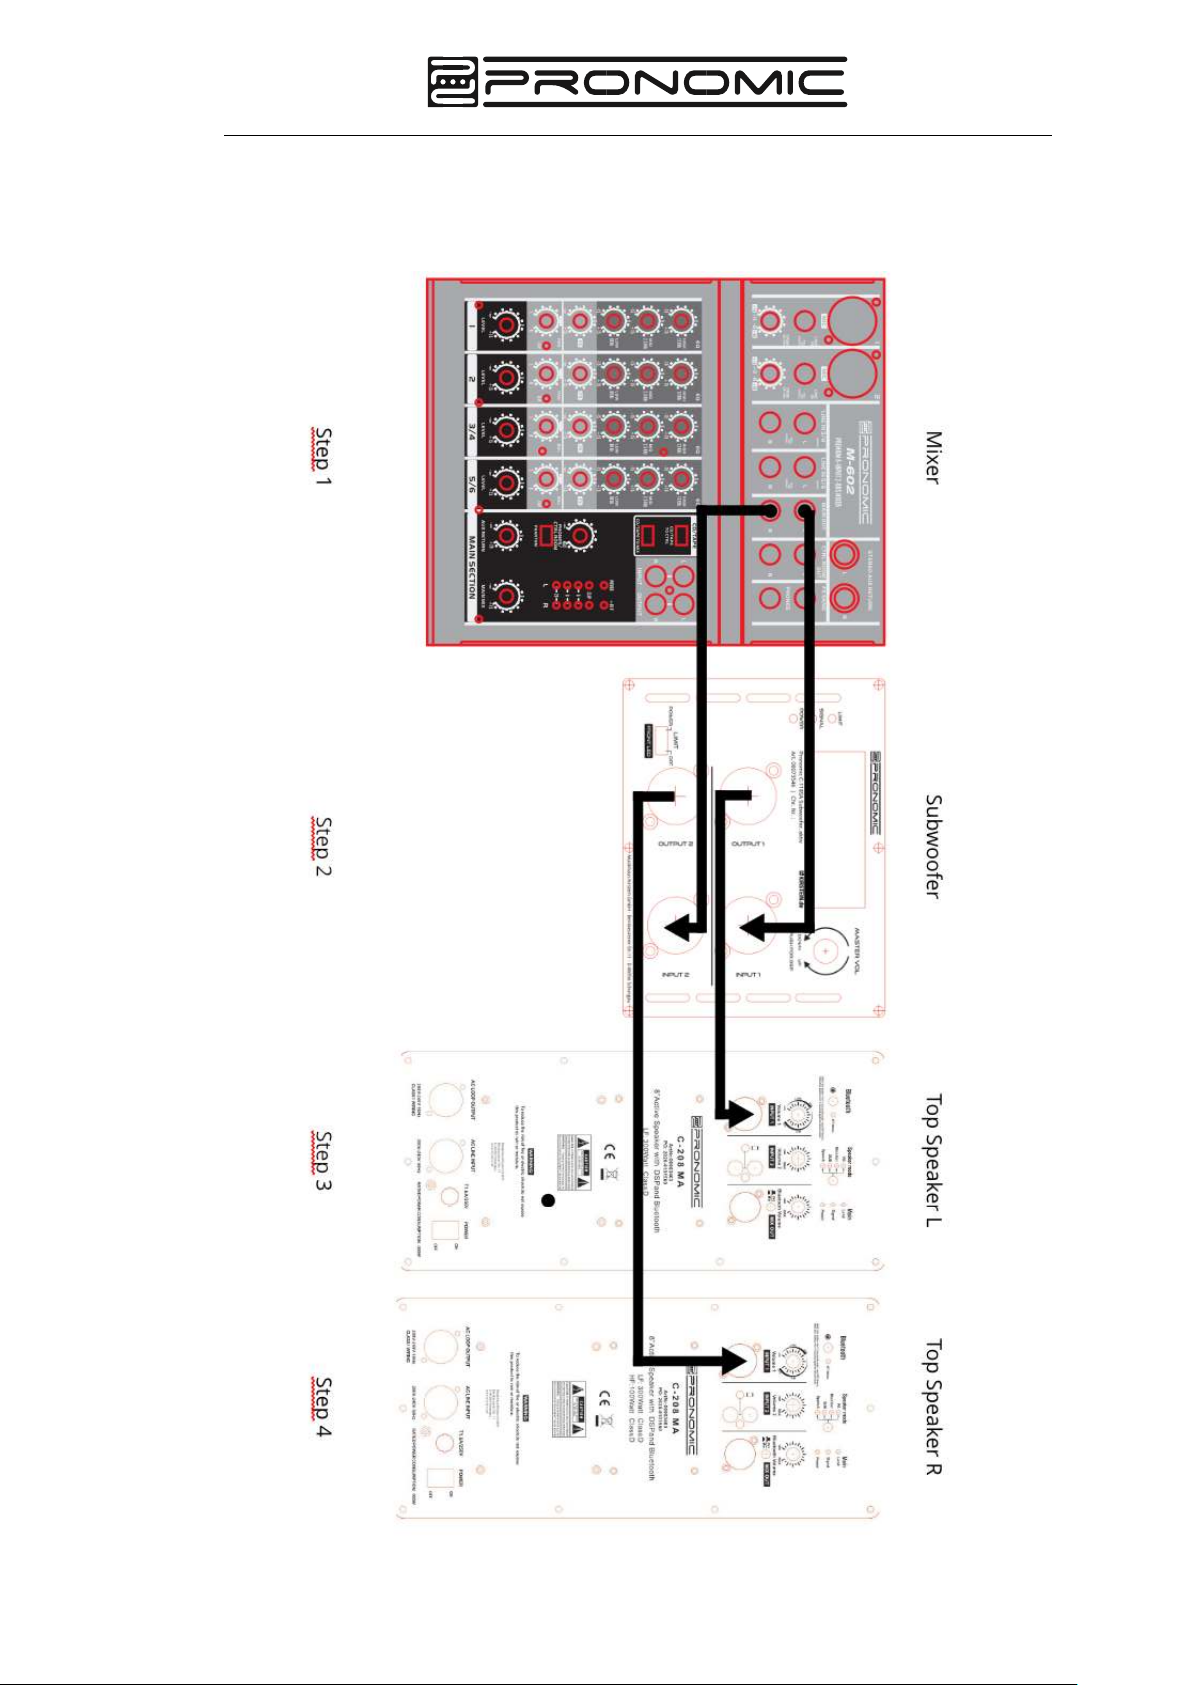
The correct cabling
First of all, connect the line outputs L and R of your mixer (step 1) to the line inputs 1
and 2 of the subwoofer (step 2).
Then connect the line outputs of the subwoofer (step 2) to the line inputs of your top
speakers (steps 3 and 4).
Technical specifications
8
Page 22
WEEE Declaration
(Waste of Electrical and Electronic Equipment)
Your product has been designed and manufactured using high quality materials and
components that are recyclable and reusable. The symbol means that your product
must be disposed of separately from household waste at the end of its life. Dispose
of this appliance at your local collection point or recycling centre.
Please help protect the environment in which we all live.
All technical data and appearances are subject to change without notice. All
information was correct at the time of going to press. Musikhaus Kirstein GmbH
does not guarantee the accuracy or completeness of the descriptions, photographs
or statements contained in this manual. Printed colours and specifications may differ
slightly from the product. Musikhaus Kirstein GmbH products are only sold through
authorised distributors. Distributors and dealers are not representatives of
Musikhaus Kirstein GmbH and are not authorised to legally bind Musikhaus Kirstein
GmbH in any way.
Musikhaus Kirstein GmbH
Bernbeurener Str. 11
86956 Schongau – Germany
Telefon/Phone: 0049-8861-909494-0
Telefax/Fax: 0049-8861-909494-19
[email protected]
9
 Loading...