

Pro Nets Technology WR750R User Manual
9
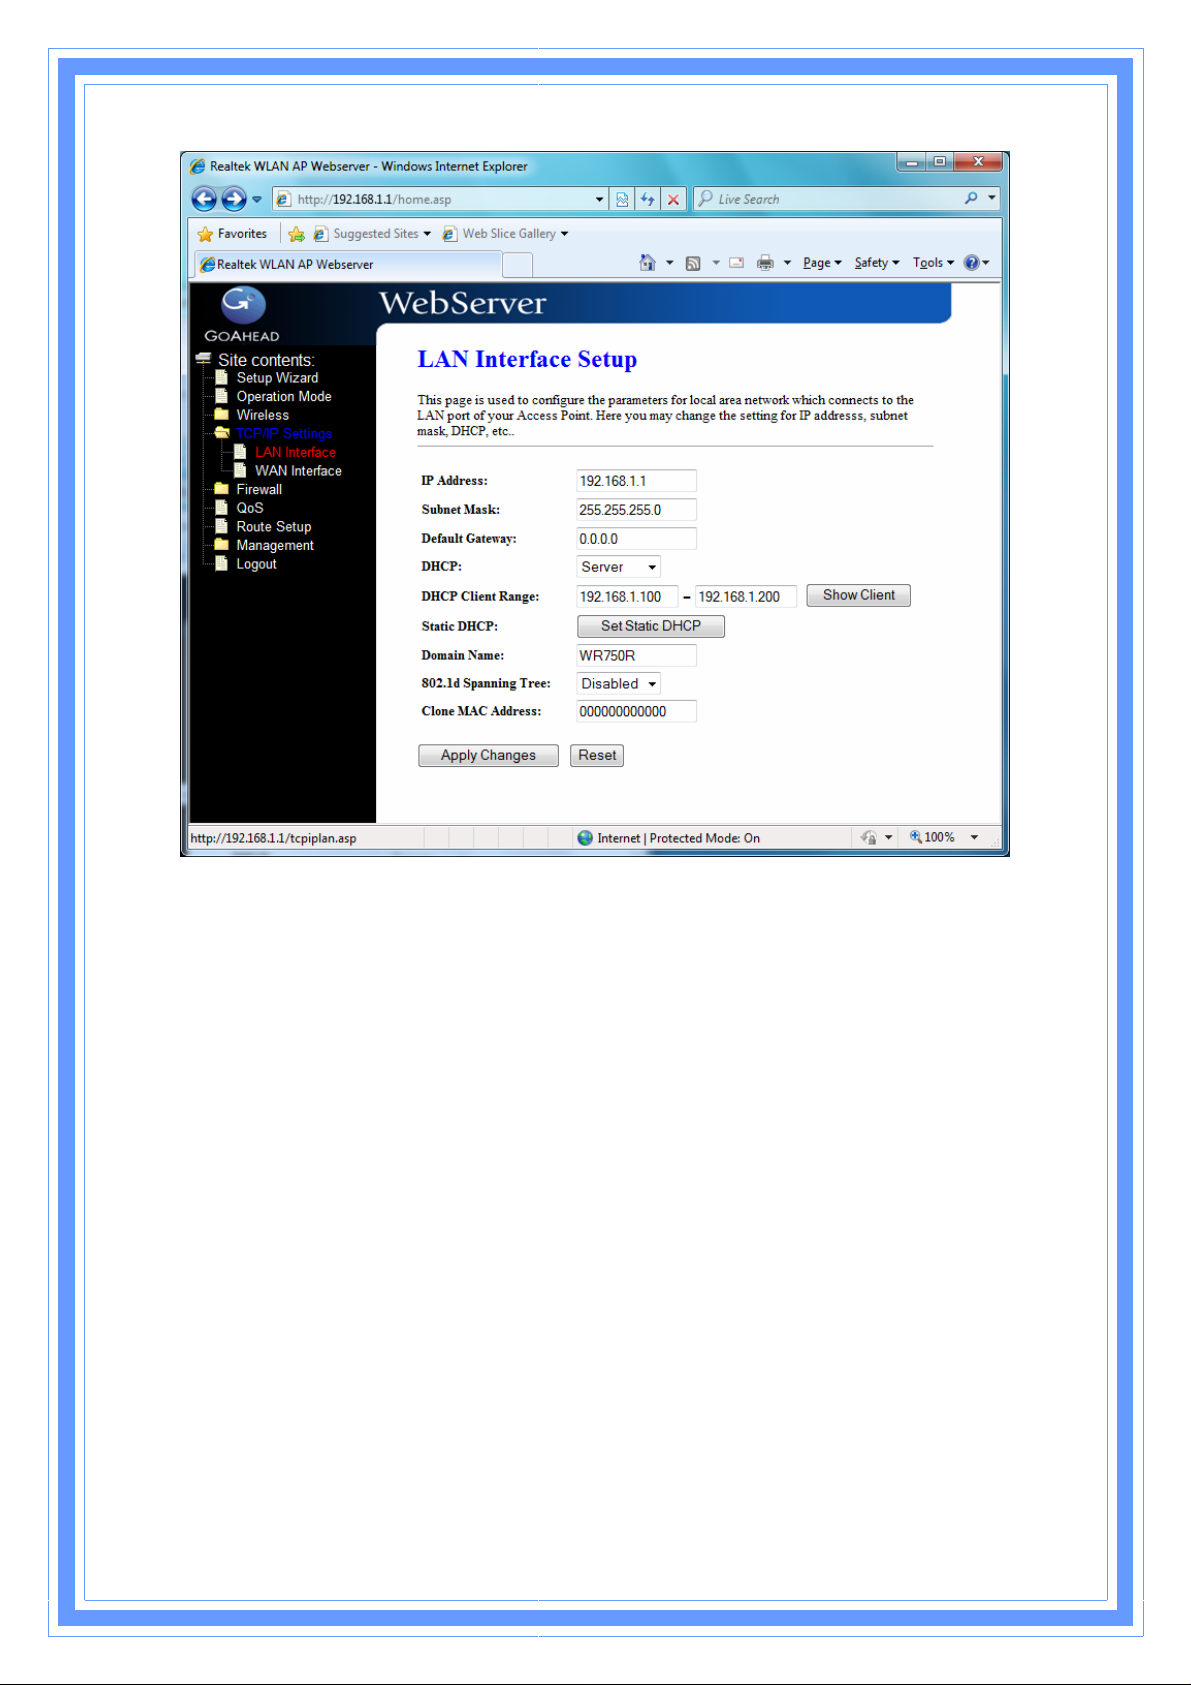
IP Address: Fill in the IP address of LAN interfaces of this WLAN Access Point.
Subnet Mask: Fill in the subnet mask of LAN interfaces of this WLAN Access Point.
Default Gateway: Fill in the default gateway for LAN interfaces out going data
packets.
DHCP: Click to select Disabled, Client or Server in different operation mode of wireless
Access Point.
DHCP Client Range: Fill in the start IP address and end IP address to allocate a range
of IP addresses; client with DHCP function set will be assigned an IP address from the
range.
Show Client: Click to open the Active DHCP Client Table window that shows the active
clients with their assigned IP address, MAC address and time expired information.
[Server mode only]
Static DHCP: Select enable or disable the Static DHCP function from pull-down menu.
[Server mode only]
Set Static DHCP: Manual setup Static DHCP IP address for specific MAC address.
[Server mode only]
Domain Name: Assign Domain Name and dispatch to DHCP clients. It is optional
field.
3

0
802.1d Spanning Tree: Select enable or disable the IEEE 802.1d Spanning Tree
function from pull-down menu.
Clone MAC Address: Fill in the MAC address that is the MAC address to be cloned.
3.5.1.1 Static DHCP Setup
This page allows you reserve IP address and assign the same IP address to the network
device with the specified MAC address any time it requests an IP address. This is almost
the same as when a device has a static IP address except that the device must still
request an IP address from the DHCP server.
IP Address: If you select the Set Static DHCP on LAN interface, fill in the IP address for
it.
MAC Address: If you select the Set Static DHCP on LAN interface, fill in the MAC
address for it.
Comment: Fill in the comment tag for the registered Static DHCP.
Static DHCP List: It shows IP Address MAC Address from the Static DHCP.
Delete Selected: Click to delete the selected clients that will be removed from the
Static DHCP list.
Delete All: Click to delete all the registered clients from the Static DHCP list.
Reset: Click the Reset button to abort change and recover the previous configuration
setting.
4
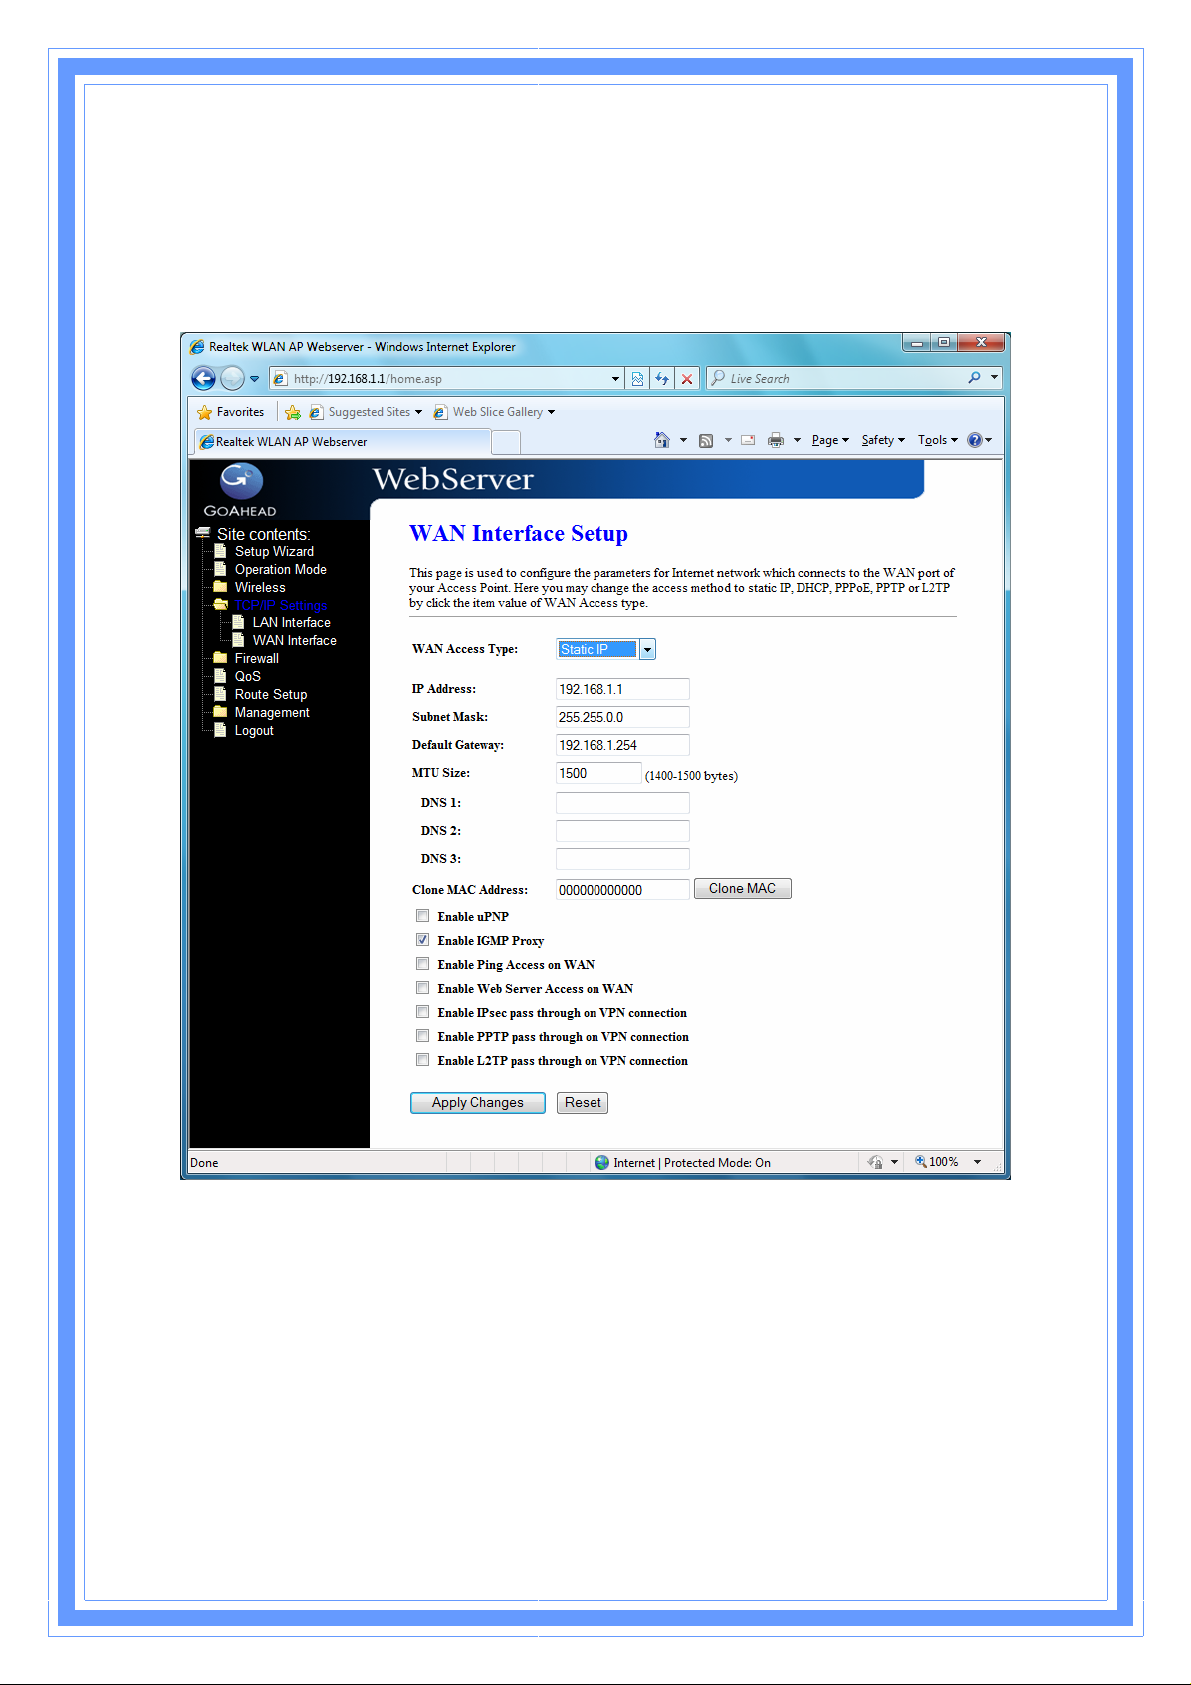
3.5.2 WAN Interface
This page is used to configure the parameters for wide area network that connects to the
WAN port of your WLAN Broadband Router. Here you may change the access method
to Static IP, DHCP, PPPoE or PPTP by click the item value of WAN Access Type.
[Static IP]
Static IP: Click to select Static IP support on WAN interface. There are IP address,
subnet mask and default gateway settings need to be done.
IP Address: If you select the Static IP support on WAN interface, fill in the IP address
for it.
Subnet Mask: If you select the Static IP support on WAN interface, fill in the subnet
mask for it.
Default Gateway: If you select the Static IP support on WAN interface, fill in the
default gateway for WAN interface out going data packets.
MTU Size: Fill in the mtu size of MTU Size. The default value is 1400.
41

2
DNS 1: Fill in the IP address of Domain Name Server 1.
DNS 2: Fill in the IP address of Domain Name Server 2.
DNS 3: Fill in the IP address of Domain Name Server 3.
Clone MAC Address: Fill in the MAC address that is the MAC address to be cloned.
Enable uPNP: Click the checkbox to enable uPNP function.
Enable IGMP Proxy: Click the checkbox to enable IGMP Proxy.
Enable Ping Access on WAN: Click the checkbox to enable WAN ICMP response.
Enable Web Server Access on WAN: Click the checkbox to enable web
configuration from WAN side.
Enable IPsec pass through on VPN connection: Click the checkbox to enable
IPSec packet pass through.
Enable PPTP pass through on VPN connection: Click the checkbox to enable
PPTP packet pass through.
Enable L2TP pass through on VPN connection: Click the checkbox to enable
L2TP packet pass through.
Apply Changes: Click the
configuration setting.
Reset: Click the
setting.
Reset
button to abort change and recover the previous configuration
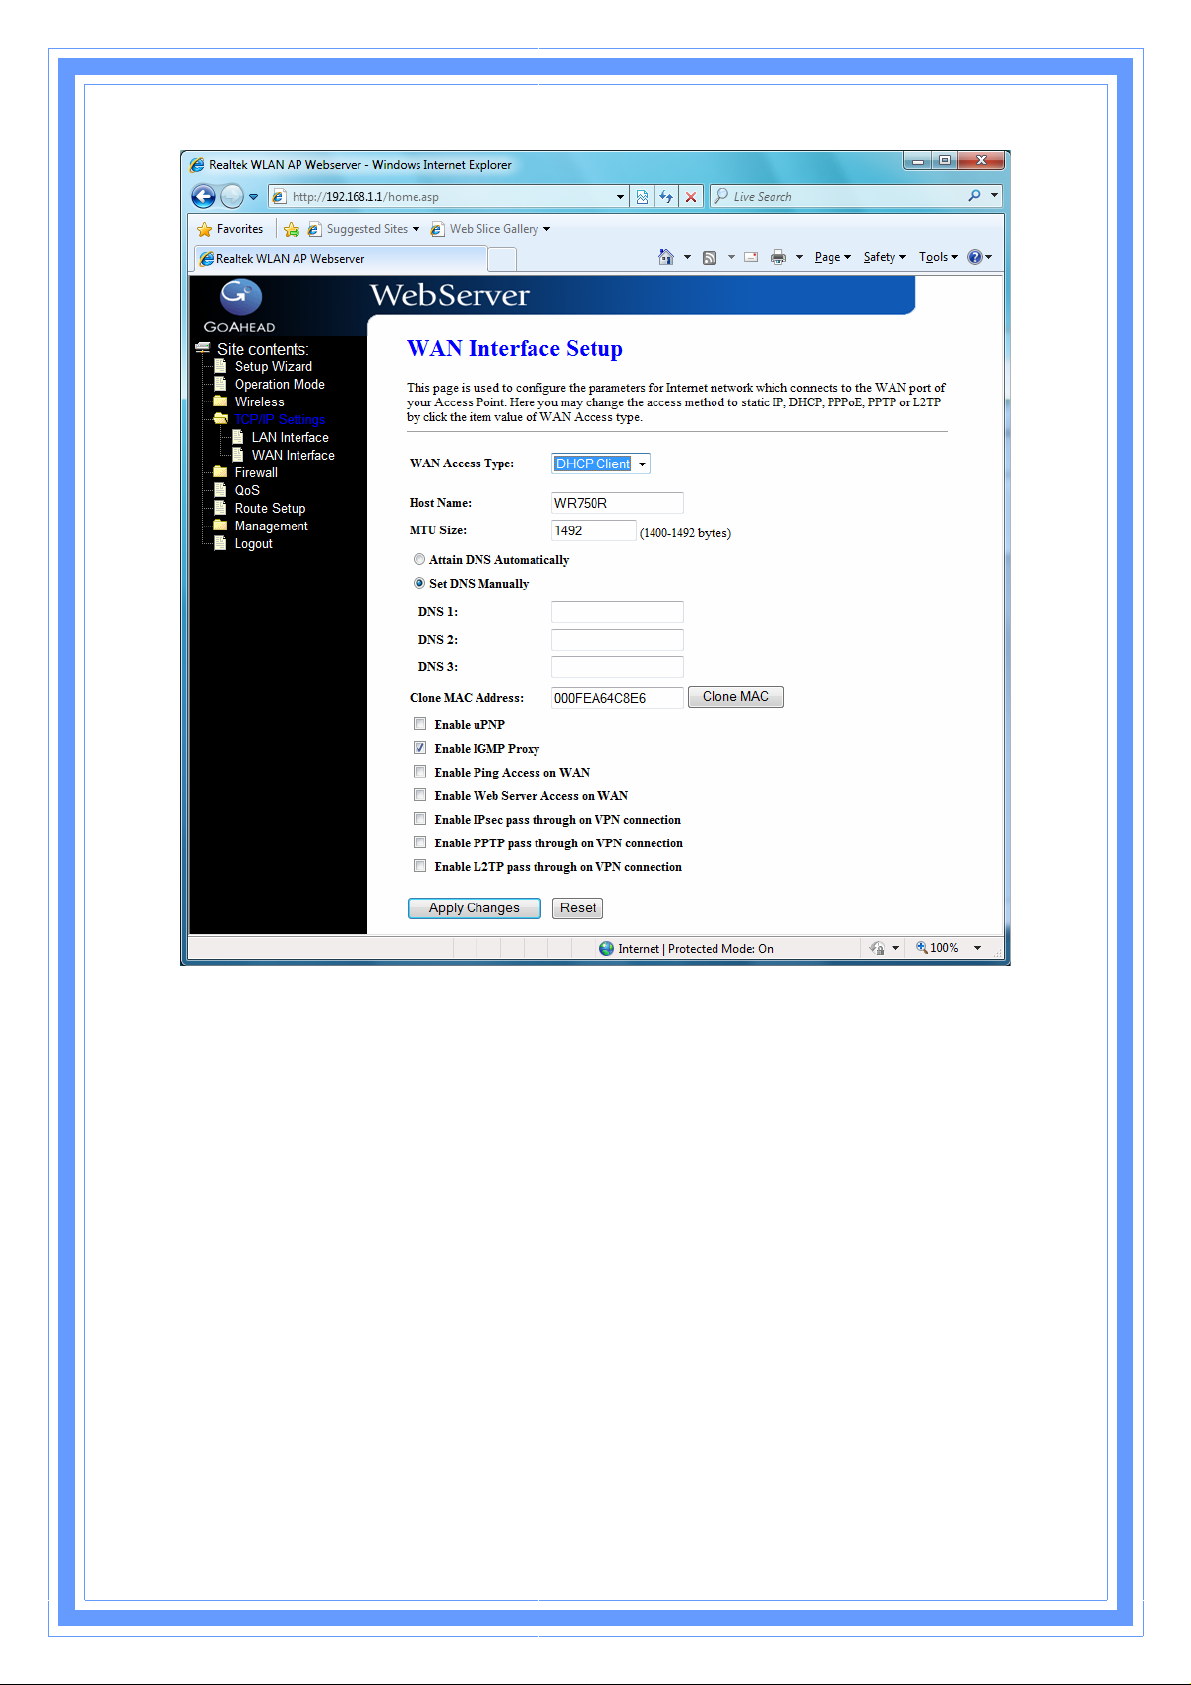
[DHCP Client]
Apply Changes
button to complete the new
4
3
DHCP Client: Click to select DHCP support on WAN interface for IP address assigned
automatically from a DHCP server.
Host Name: Fill in the host name of Host Name. The default value is empty.
MTU Size: Fill in the mtu size of MTU Size. The default value is 1400.
Attain DNS Automatically: Click to select getting DNS address for
Please select
Set DNS Manually: Click to select getting DNS address for
DNS 1: Fill in the IP address of Domain Name Server 1.
DNS 2: Fill in the IP address of Domain Name Server 2.
DNS 3: Fill in the IP address of Domain Name Server 3.
Clone MAC Address: Fill in the MAC address that is the MAC address to be cloned.
Enable uPNP: Click the checkbox to enable uPNP function.
Enable IGMP Proxy: Click the checkbox to enable IGMP Proxy.
Enable Ping Access on WAN: Click the checkbox to enable WAN ICMP response.
Enable Web Server Access on WAN: Click the checkbox to enable web
Set DNS Manually
if the
DHCP
support is selected.
DHCP
DHCP
support.
support.
4

4
configuration from WAN side.
Enable IPsec pass through on VPN connection: Click the checkbox to enable
IPSec packet pass through.
Enable PPTP pass through on VPN connection: Click the checkbox to enable
PPTP packet pass through.
Enable L2TP pass through on VPN connection: Click the checkbox to enable
L2TP packet pass through.
Apply Changes: Click the
configuration setting.
Reset: Click the
setting.
Reset
button to abort change and recover the previous configuration
Apply Changes
button to complete the new
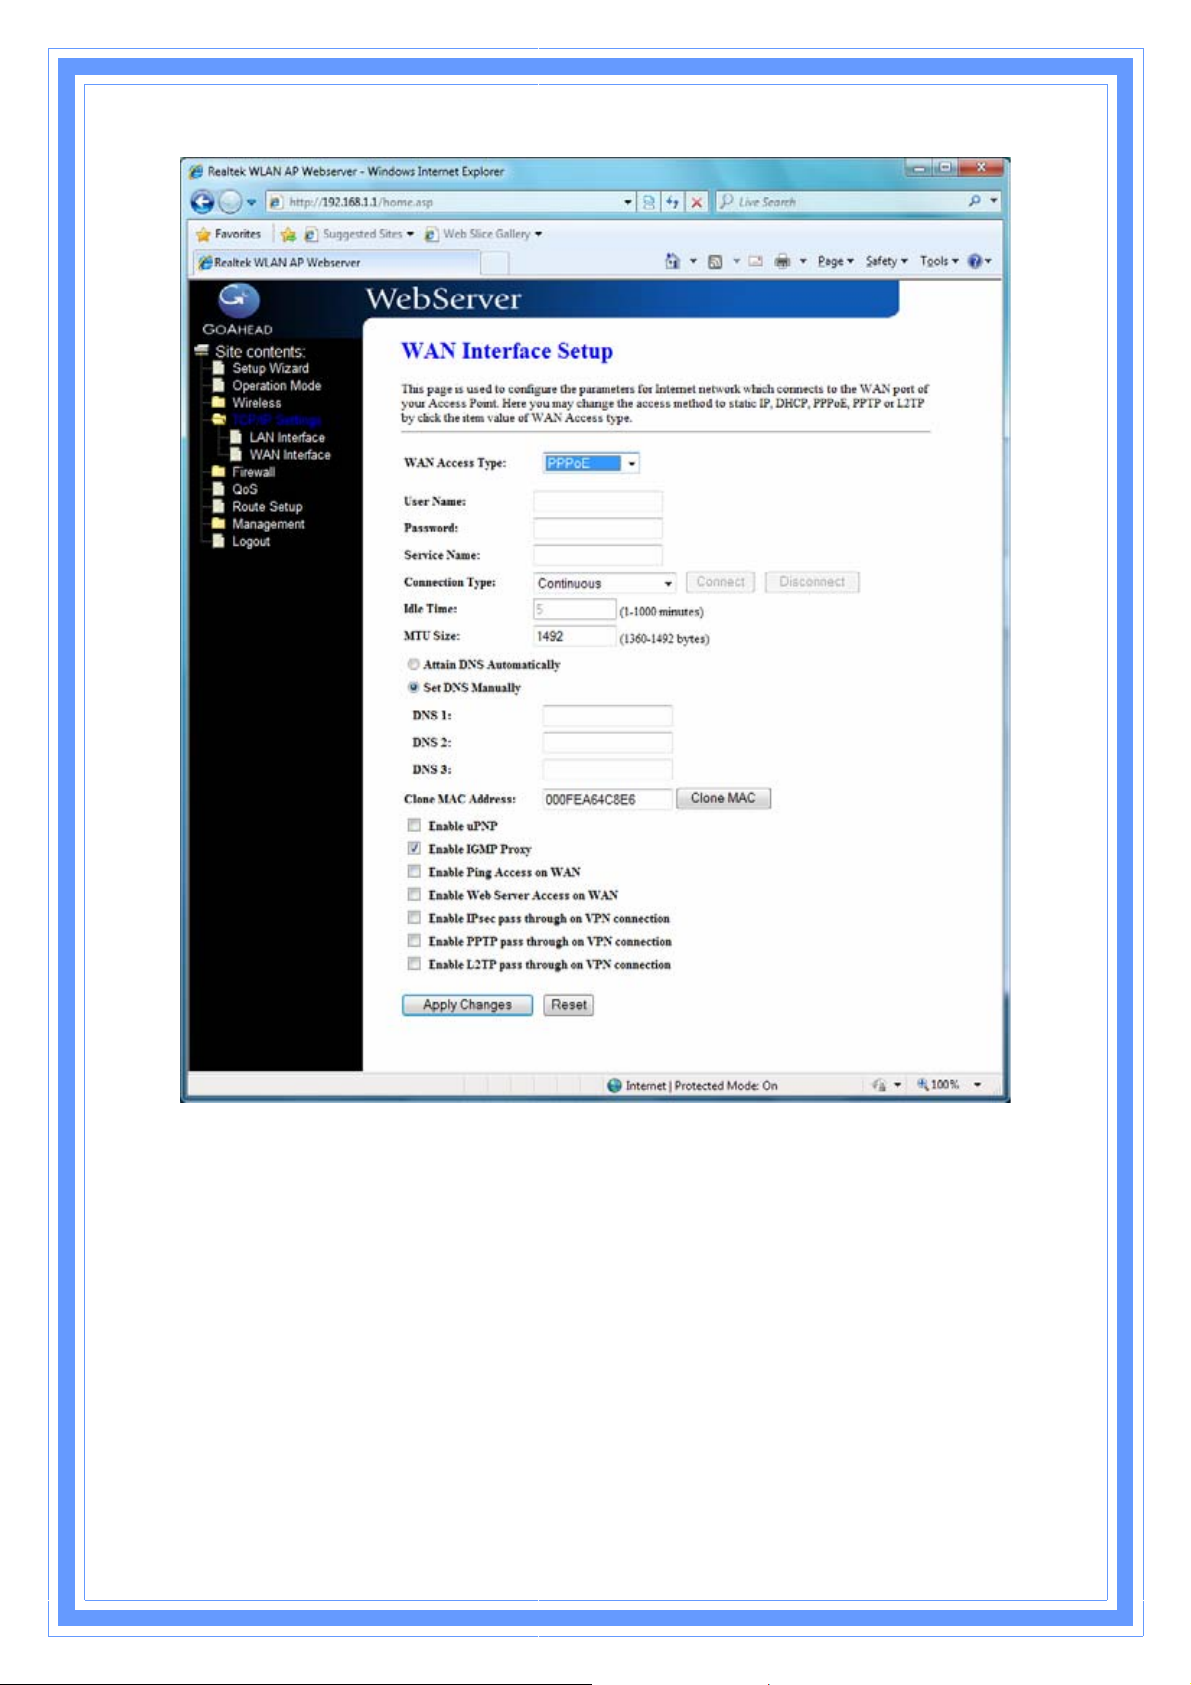
[PPPoE]
PPPoE: Click to select PPPoE support on WAN interface. There are user name,
password, connection type and idle time settings need to be done.
User Name: If you select the PPPoE support on WAN interface, fill in the user name
and password to login the PPPoE server.
Password: If you select the PPPoE support on WAN interface, fill in the user name and
password to login the PPPoE server.
Service Name: Fill in the service name of Service Name. The default value is empty.
Connection Type: Select the connection type from pull-down menu. There are
Continuous, Connect on Demand
Continuous
through PPPoE protocol whenever this WLAN AP Router is
and
Manual
connection type means to setup the connection
three types to select.
powered on.
Connect on Demand
connection through PPPoE protocol whenever you send the data
packets out through the WAN interface; there are a watchdog
implemented to close the PPPoE connection while there are no
data sent out longer than the idle time set.
Manual
the PPPoE protocol by clicking the
and clicking the
Idle Time: If you select the
the idle time for auto-disconnect function. Value can be between 1 and 1000 minutes.
MTU Size: Fill in the MTU size of MTU Size. The default value is 1400.
Attain DNS Automatically: Click to select getting DNS address for
Please select
Set DNS Manually
connection type means to setup the connection through
Disconnect
PPPoE
and
Connect on Demand
if the
DHCP
connection type means to setup the
Connect
button manually.
support is selected.
button manually,
connection type, fill in
DHCP
support.
4

5
Set DNS Manually: Click to select getting DNS address for
DNS 1: Fill in the IP address of Domain Name Server 1.
DNS 2: Fill in the IP address of Domain Name Server 2.
DNS 3: Fill in the IP address of Domain Name Server 3.
Clone MAC Address: Fill in the MAC address that is the MAC address to be cloned.
Enable uPNP: Click the checkbox to enable uPNP function.
Enable IGMP Proxy: Click the checkbox to enable IGMP Proxy.
Enable Ping Access on WAN: Click the checkbox to enable WAN ICMP response.
Enable Web Server Access on WAN: Click the checkbox to enable web
configuration from WAN side.
Enable IPsec pass through on VPN connection: Click the checkbox to enable
IPSec packet pass through.
Enable PPTP pass through on VPN connection: Click the checkbox to enable
PPTP packet pass through.
Enable L2TP pass through on VPN connection: Click the checkbox to enable
L2TP packet pass through.
DHCP
support.
Apply Changes: Click the
configuration setting.
Reset: Click the
setting.
Reset
button to abort change and recover the previous configuration
Apply Changes
button to complete the new
4
6
[PPTP]
PPTP: Allow user to make a tunnel with remote site directly to secure the data
transmission among the connection. User can use embedded PPTP client supported by
this router to make a VPN connection.
Get the WAN IP Automatically: Click to select PPTP Dynamic support on WAN
interface for IP address assigned automatically from a PPTP server.
IP Address: If you select the PPTP support on WAN interface, fill in the IP address for it.
Subnet Mask: If you select the PPTP support on WAN interface, fill in the subnet mask
for it.
Gateway: If you select the Static PPTP support on WAN interface, fill in t he gateway
4
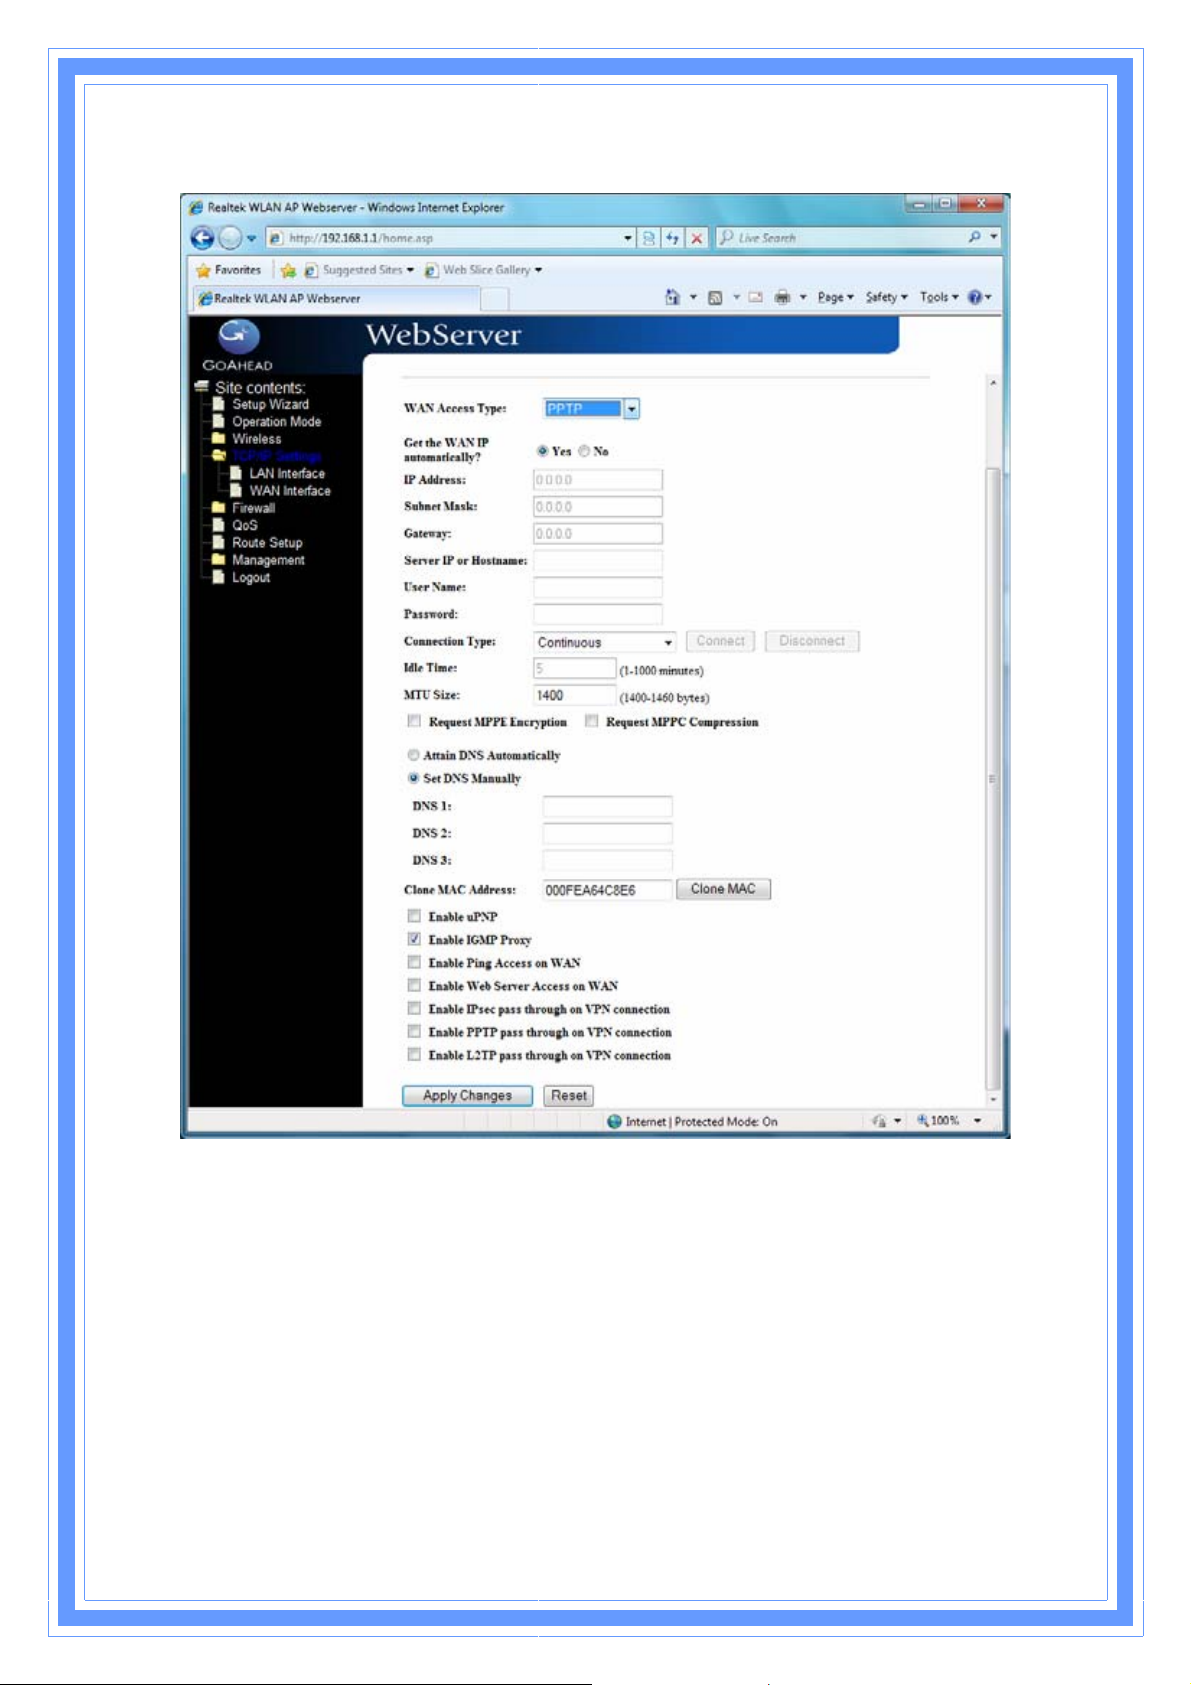
for WAN interface out going data packets.
Server IP Address : Enter the IP address of the PPTP Server.
Server Domain Name: Assign Domain Name and dispatch to PPTP servers. It is
optional field.
User Name: If you select the PPTP support on WAN interface, fill in the user name and
password to login the PPTP server.
Password: you select the PPTP support on WAN interface, fill in the user name and
password to login the PPTP server.
MTU Size: Fill in the mtu size of MTU Size. The default value is 1400.
Request MPPE Encryption: Click the checkbox to enable request MPPE encryption.
Attain DNS Automatically: Click to select getting DNS address for
PPTP
support.
47
 Loading...