


Network Type: There are two types, infrastructure and 802.11 Ad-Hoc mode. Under
Ad-Hoc mode, user can also choose the preamble type, the available preamble type
includes auto and long. In addition to that the channel field will be available for setup in
Ad-Hoc mode.
Tx Power: You can select the wireless output power here. If you’re not too far from AP
(good signal reception), you can select a lower output power to save energy; for a
distant access point, you can select a higher output power. It’s suggested to select
“Auto” to let setup utility decide the best output power for you.
Preamble: Select the preamble for Ad hoc mod e here. Available option are “Auto”
and “Long”.
RTS Threshold: User can adjust the RTS threshold number by sliding the bar or key in
the value directly. The default value is 2347.
Fragment Threshold: User can adjust the Fragment threshold number by sliding the
bar or key in the value directly. The default value is 2346.
Channel: Only available for setting under Ad-Hoc mode. User can choose the channel
frequency to start their Ad-Hoc network.
Authentication Type: There are 7 type of authentication modes supported by RaUI.
They are Open, Shared, LEAP, WPA, WPA-PSK, WPA2, WPA2-PSK.
Encryption Type: For open and shared authentication mode, the selection of
encryption type are None and WEP. For WPA, WPA2, WPA-PSK and WPA2-PSK
authentication mode, the encryption type supports both TKIP and AES.
802.1x Setting: It is an authentication for WPA and WPA2 certificate to server.
WPA Pre-Shared Key: This is the shared secret between AP and STA. For WPA-PSK
and WPA2-PSK authentication mode, this field must be filled with character longer than
8 and less than 32 lengths.
WEP Key: Only valid when using WEP encryption algorithm. The key must matched
AP’s key. There are several formats to enter the keys:
Î Hexadecimal – 40bits: 10 Hex characters
Î Hexadecimal – 128bits: 26 Hex characters.
Î ASCII – 40bits: 5 ASCII characters
Î ASCII – 128bits: 13 ASCII characters
Show Password: Check this box and all passphrases or security keys you inputted
will be displayed as you type, but not replace your input with asterisk.
Use 802.1x: If the access point you wish to connect requires 802.1x authentication,
please click on ‘Use 802.1x’ box, then click ‘802.1X’ tab to set 802.1x parameters.
3.3.2 Example to Add Profile in Profile
Step 1: Click Add in Profile function
30
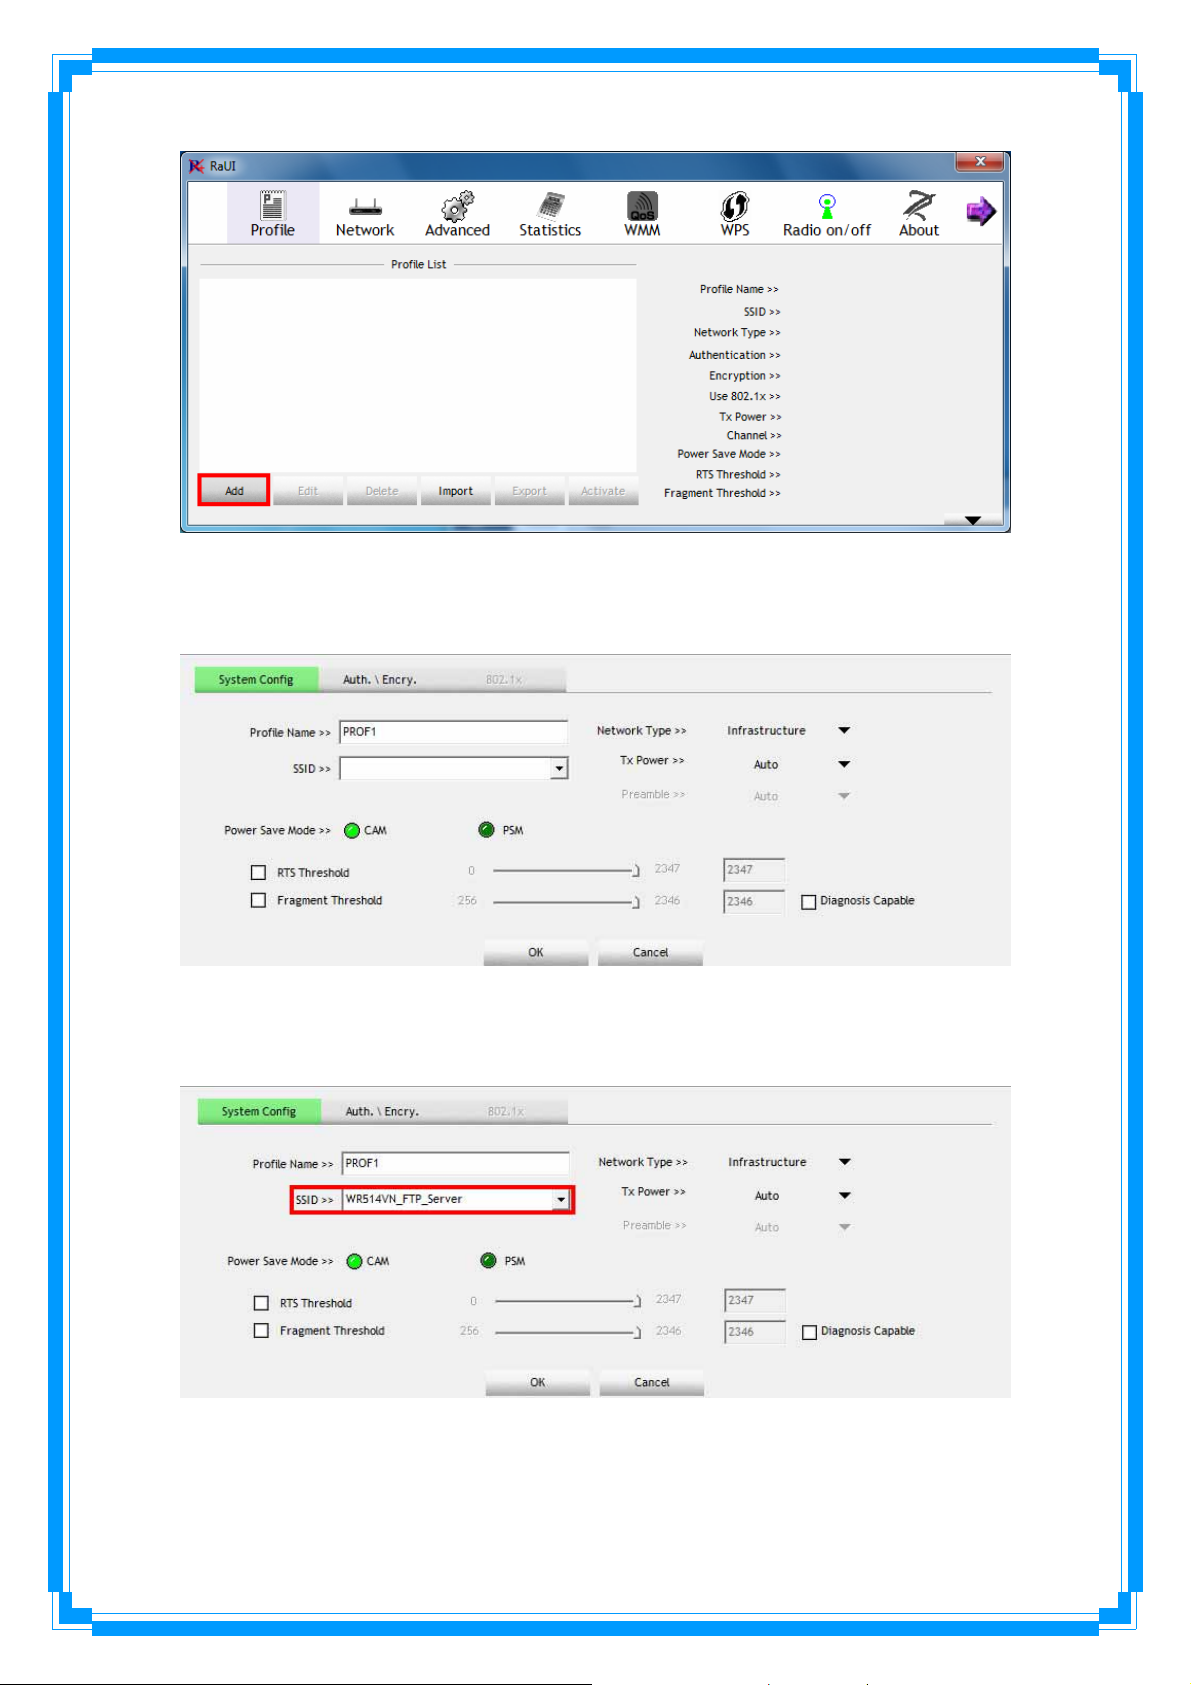
Step 2: Add Profile page will pop up.
Step 3: Change profile name to what you want to connect. Pull down the SSID and
select one intended AP. The AP list is the result of last Network.
31
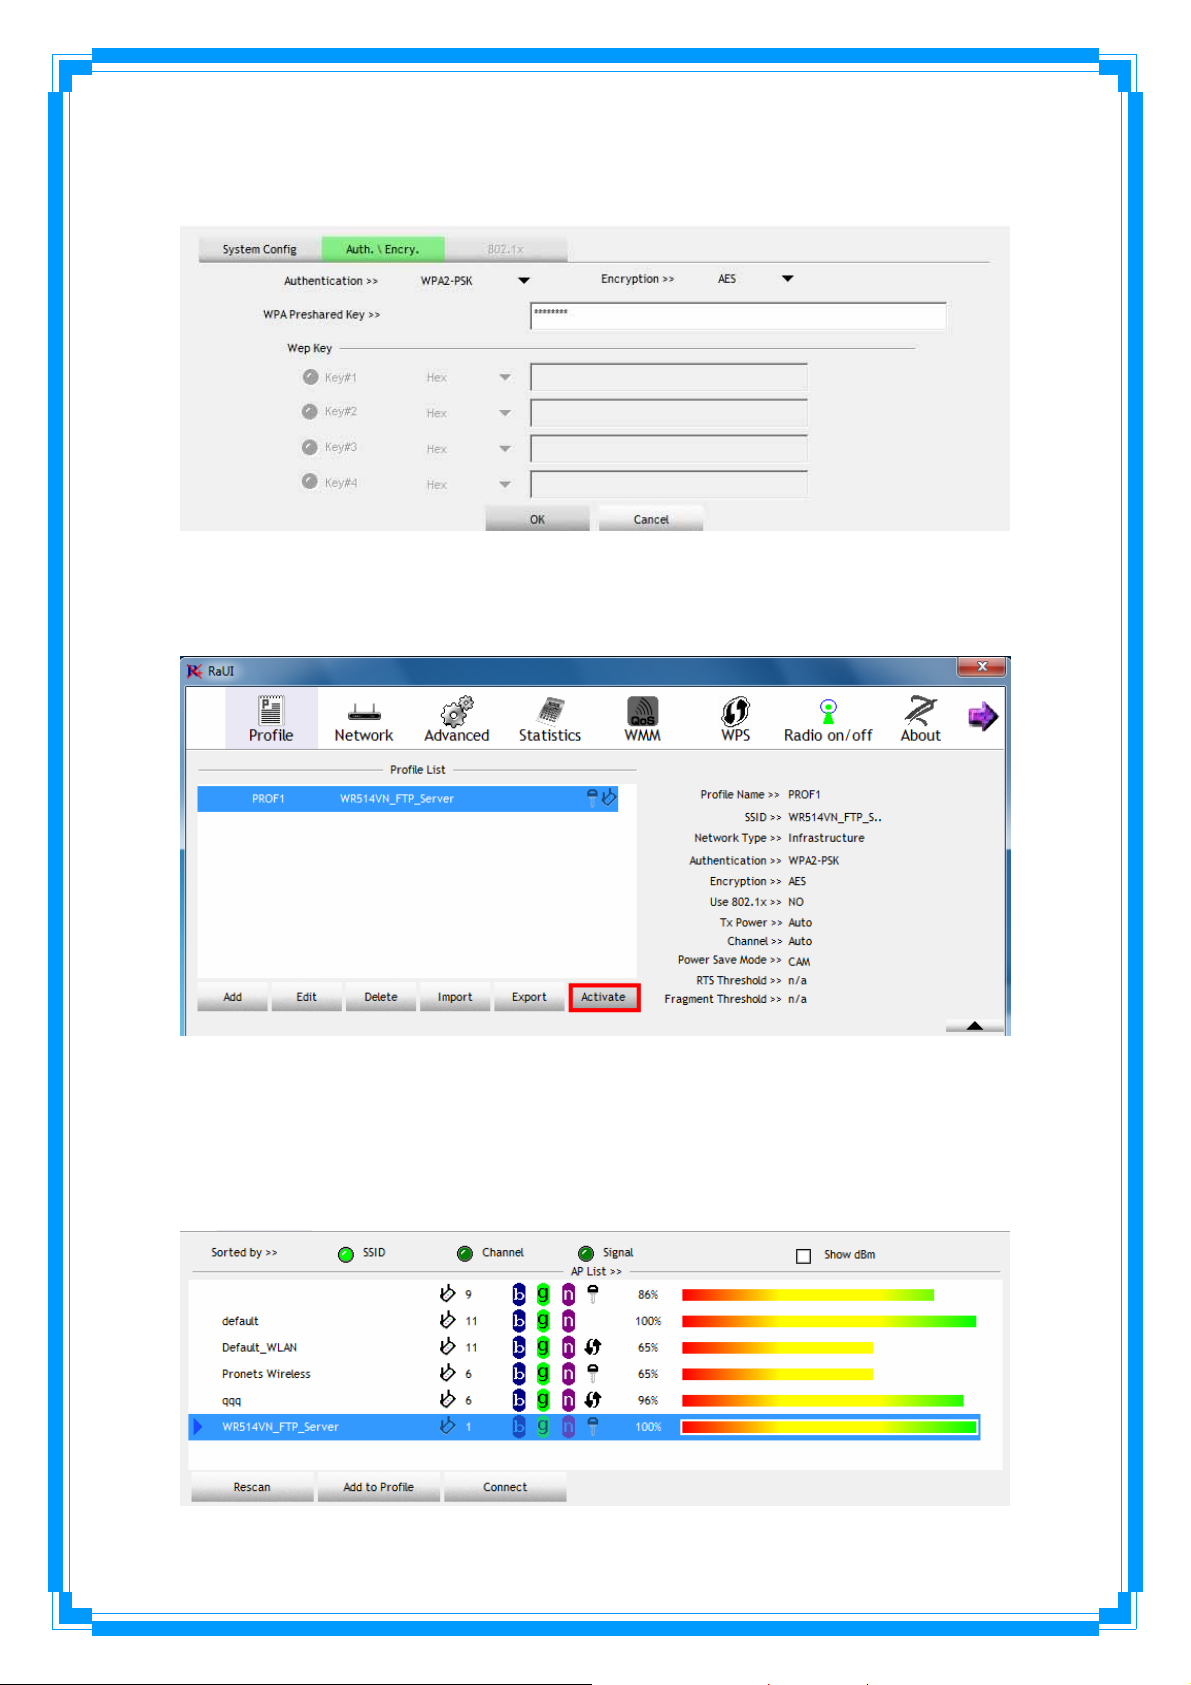
Step 4: To set authentication/encryption information for the access point, please click
“Auth.\Encry.” Tab.
Step 5: Then, you can see the profile which you set appear in the profile list. Click
“Activate” to activate the profile setting.
3.4 Network
Under the Network function, system will display the information of surrounding APs from
last scan result. List information includes SSID, BSSID, Signal, Channel, Encryption
algorithm, Authentication and Network type as below:
32
[Definition of each field]
Sorted by >>: You can decide how to sort all listed access point by SSID, Channel,
Signal (Signal strength).
Show dBm: Check this box to show the signal strength of access point, instead of
percentage.
Rescan: Click this button to rescan access points. You can click this button for several
times, if the access point you wish to use does not show in the list.
Add to Profile: You can store a specific access point to profile, so you can link to that
access point directly next time without inputting authentication key again.
Connect: Connect to a selected access point. You have to select an access point from
the list first and then click “Connect” to connect to the selected access point.
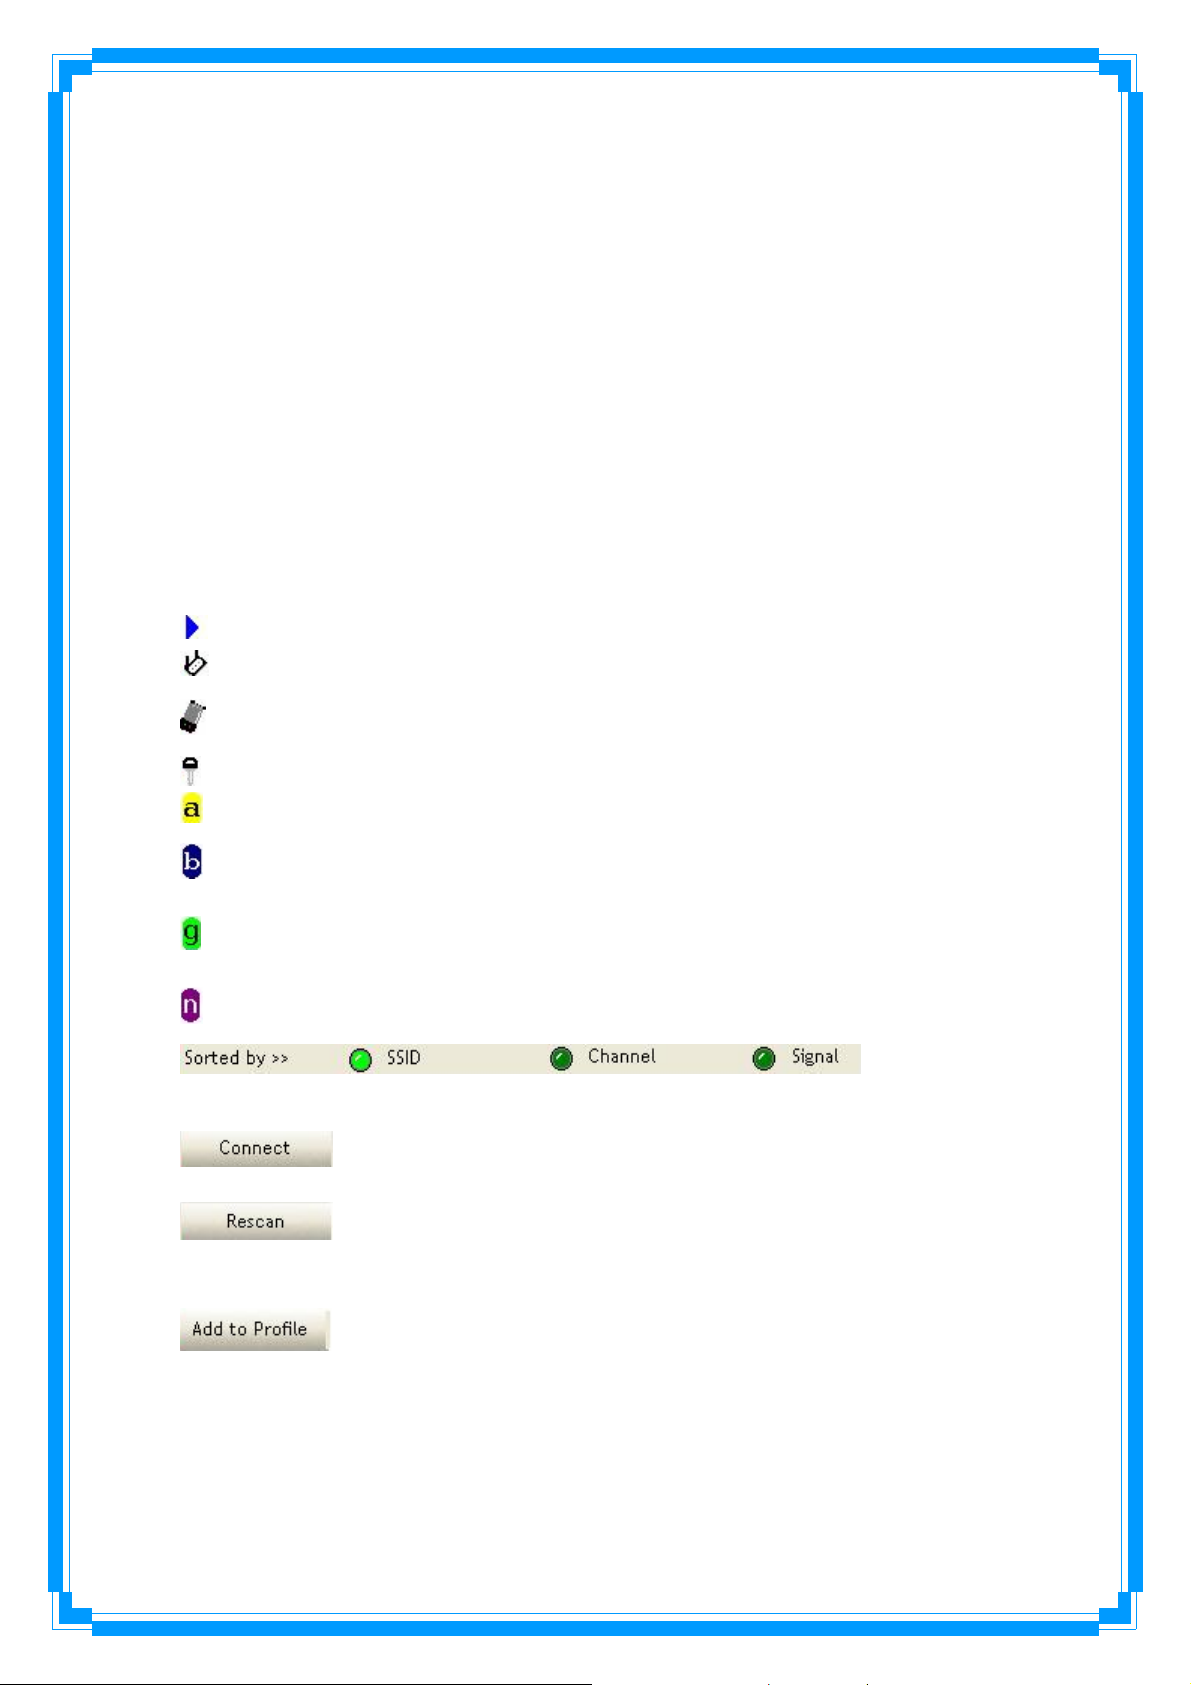
[Icons & Buttons]
Î Indicate connection is successful.
Î Indicate network type is infrastructure mode.
Î Indicate network type is Ad-Hoc mode.
Î Indicate security-enabled wireless network.
Î Indicate 802.11a wireless mode
Î Indicate 802.11b wireless mode.
Î Indicate 802.11g wireless mode.
Î Indicate 802.11n wireless mode.
AP lists are sorted by SSID, Channel, or Signal.
Î Command to connect to the selected network.
Î Issue a rescan command to wireless NIC to update information on
surrounding wireless network.
Î Add the selected AP to Profile setting. It will bring up profile page
Î Indicate the
and save user’s setting to a new profile.
[Connected Network]
(1) When RaUI first ran, it will select the best AP to connect automatically.
33
(2) If user wants to connect to other AP, He can click “Connect: button for the intended
AP to make connection.
(3) If the intended network has encryption other than “Not Use”, RaUI will bring up the
security page appropriate information to make the connection.
(4) When you double-click on the intended AP, you can see AP’s detail information.
3.5 Advanced
This wireless network card provides several advanced settings for experienced wireless
users. You can change these settings to increase data transfer performance, or change
operation mode.
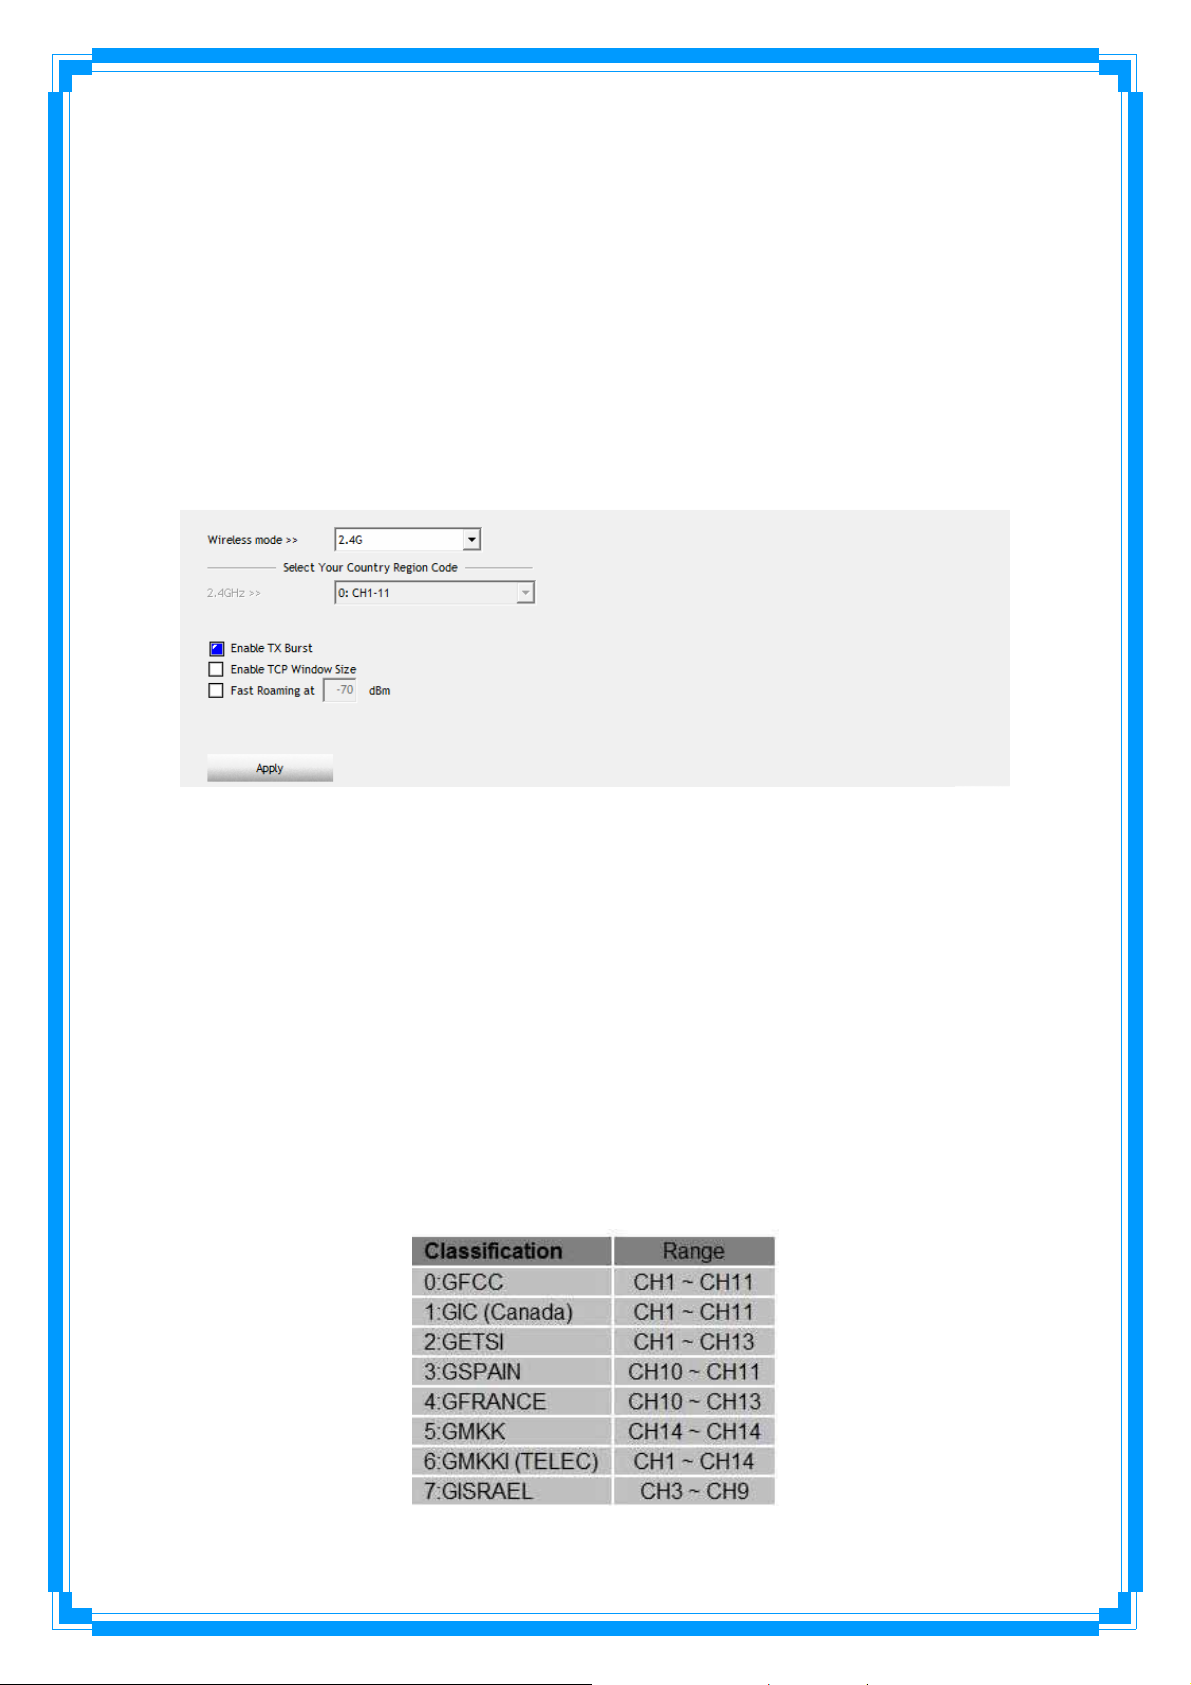
Wireless Mode: Select wireless mode. Support 2.4G only.
Enable Tx Burst: Ralink’s proprietary frame burst mode.
Enable TCP Windows Size: Enhance throughout.
Fast Roaming at: Fast to roaming, setup by transmit power.
Select your Country Region Code: The available channel differs from different
countries. For example: USA (FCC) is channel 1-11, Europe (ETSI) is channel 1-13. The
operating frequency channel will be restricted to the country user located before
importing. If you are in different country, you have to adjust the channel setting to
comply the regulation of the country. Supporting region code for this section has
CH1-11, CH1-13, CH10-11, CH10-13, CH14, CH1-14, CH3-9, and CH5-13. Please
refer to below Channel Classification and range, Country Channel list to select your
Country Region Code:
34

Figure 1: Channel Classification and range
Figure 2: Country Channel list
Apply: Save the save changes
Î Show the information of Status Section
Î Hide the information of Status Section
35
3.6 Statistics
The configuration utility provides information about network statistics and link status. If
you want to know how your wireless network card works, you can use these functions to
get detailed information about the wireless connection you’re using.
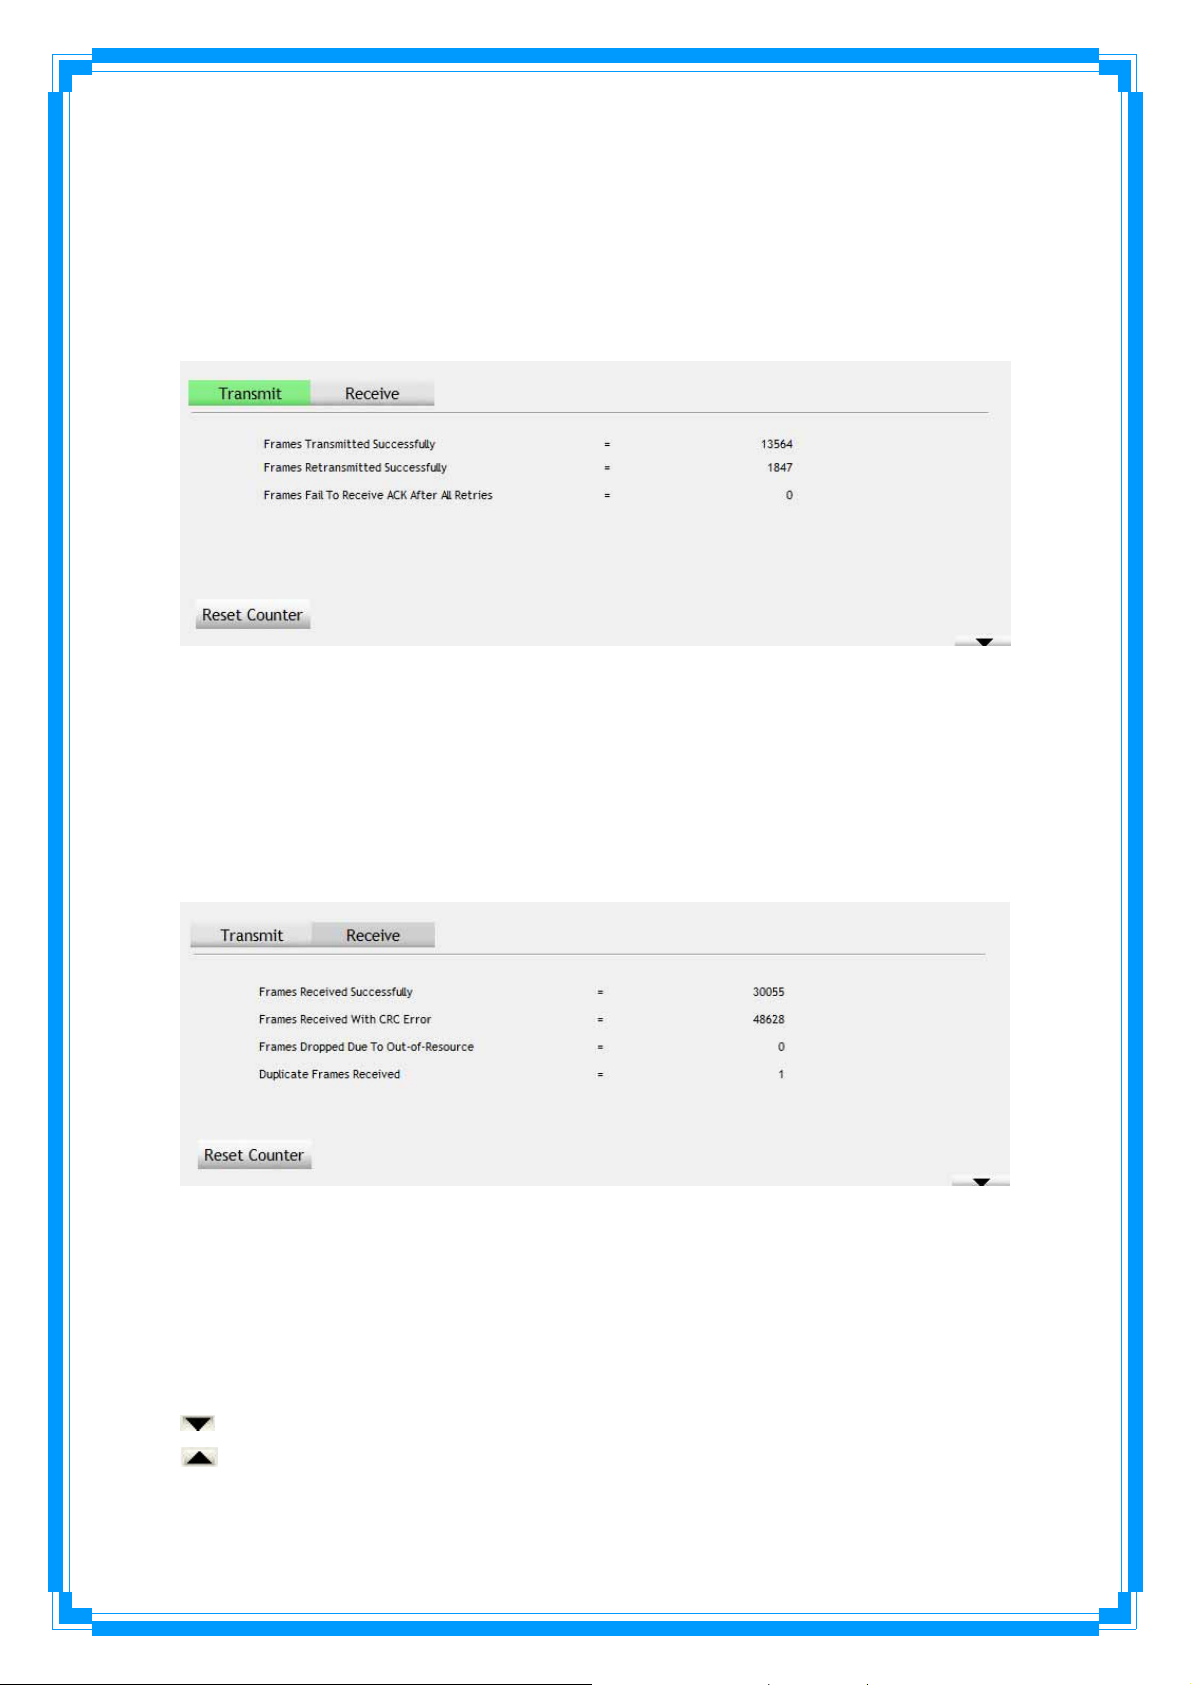
[Transmit Statistics]
Frames Transmitted Successfully: Frames successfully sent.
Frames Retransmitted Successfully: Successfully retransmitted frames numbers
Frames Fail To Receive ACK After All Retries: Frames failed transmit after hitting
retry limit.
Reset Counter: Reset counters to zero
[Receive Statistics]
Frames Received Successfully: Frames received successfully.
Frames Received With CRC Error: Frames receive with CRC error.
Frames Dropped Due To Out-Of-Resource: Frames dropped due to resource
issue.
Duplicate Frames Received: Duplicate received frames.
Reset Counter: Reset counters to zero
Î Show the information of Status Section
Î Hide the information of Status Section
36
All connection-related statistics is displayed here. You can click ‘Transmit’ or
‘Receive’ tab, to view the statistics of transmitted or received packets. You can also
click ‘Reset Counter’ button, to reset the statistics of all items back to 0.
3.7 WMM
This wireless network card provides WMM (Wi-Fi Multimedia) function, which can
improve the performance of certain network applications, like audio/video streaming,
network telephony (VoIP), and others. When you enable the WMM function of this
network card, you can define the priority of different kinds of data, to give higher
priority to applications which require instant responding. Therefore you can improve the
performance of such network applications.
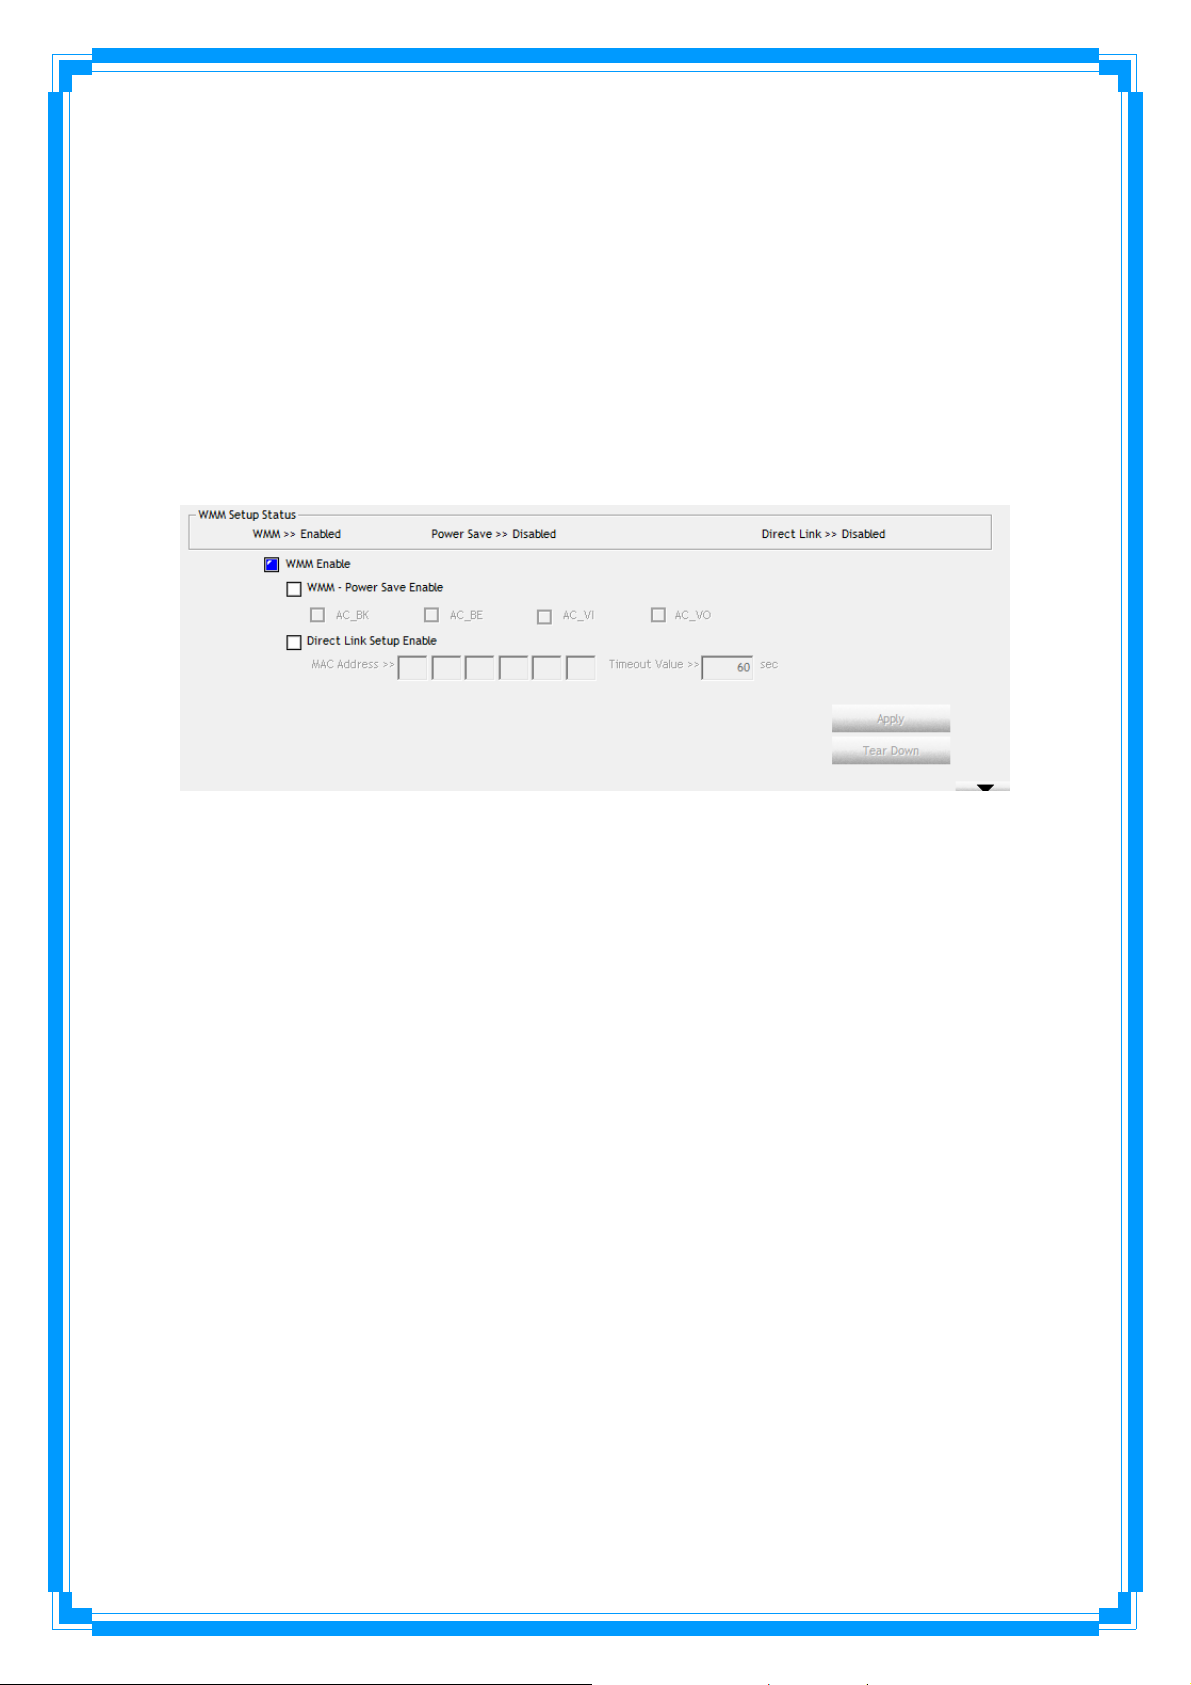
WMM Enable: Check this box to enable WMM function. Please click ‘Apply’ button
on the right of this check box after you check or uncheck this box, so corresponding
settings in this window will be activated or deactivated respectively.
WMM-Power Save Enable: Check this box to enable WMM power saving mode to
save energy, and let your computer’s battery live longer. You also have to select WMM
power save modes here:
AC_BE: Best Performance
AC_BK: Worst Performance
AC_VI: Video data has priority
AC_VO: Voice data has priority
Direct Link Setup Enable: If you have another WMM-enabled wireless device, you
can enter its MAC address here, then click ‘Apply’ button, and this network card will
establish a direct link to the wireless device you specified here.
You also have to specify the timeout value of this directly-linked wireless device. Valid
values are from 1 to 65535 (seconds), and input ‘0’ for infinity.
If you want to remove a specific wireless device from direct link table, select the device
and click this button to remove it.
[WMM Enable – Enable Wi-Fi Multi-Media]
If you want to use “WMM-Power Save” or “Direct Link Setup” you must enable WMM.
37
The setting methods of enabling WMM indicating as follow:
Step 1: Click “WMM Enable”
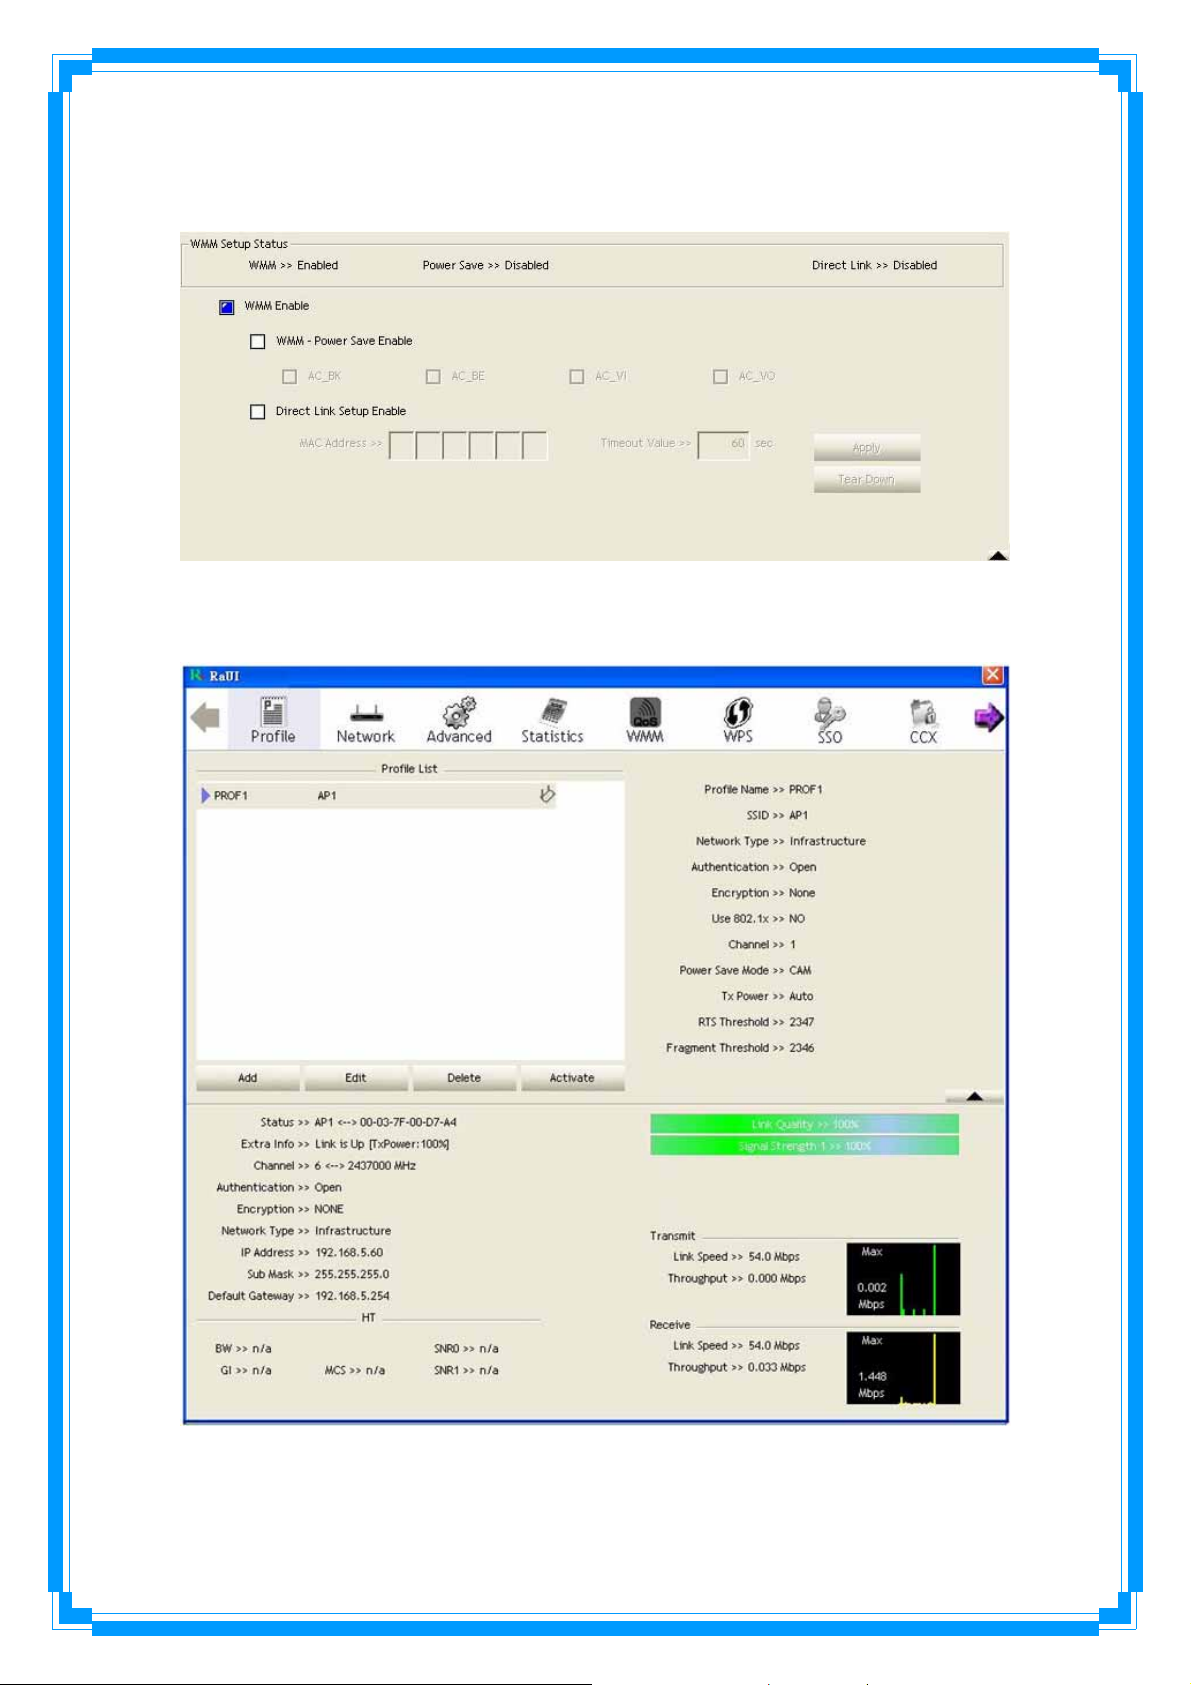
Step 2: Change to “Network” function. And add an AP that supports WMM features
to a Profile. The result will look like the below figure in Profile page.
[WMM-Power Save Enable – Enable WMM Power Save]
38
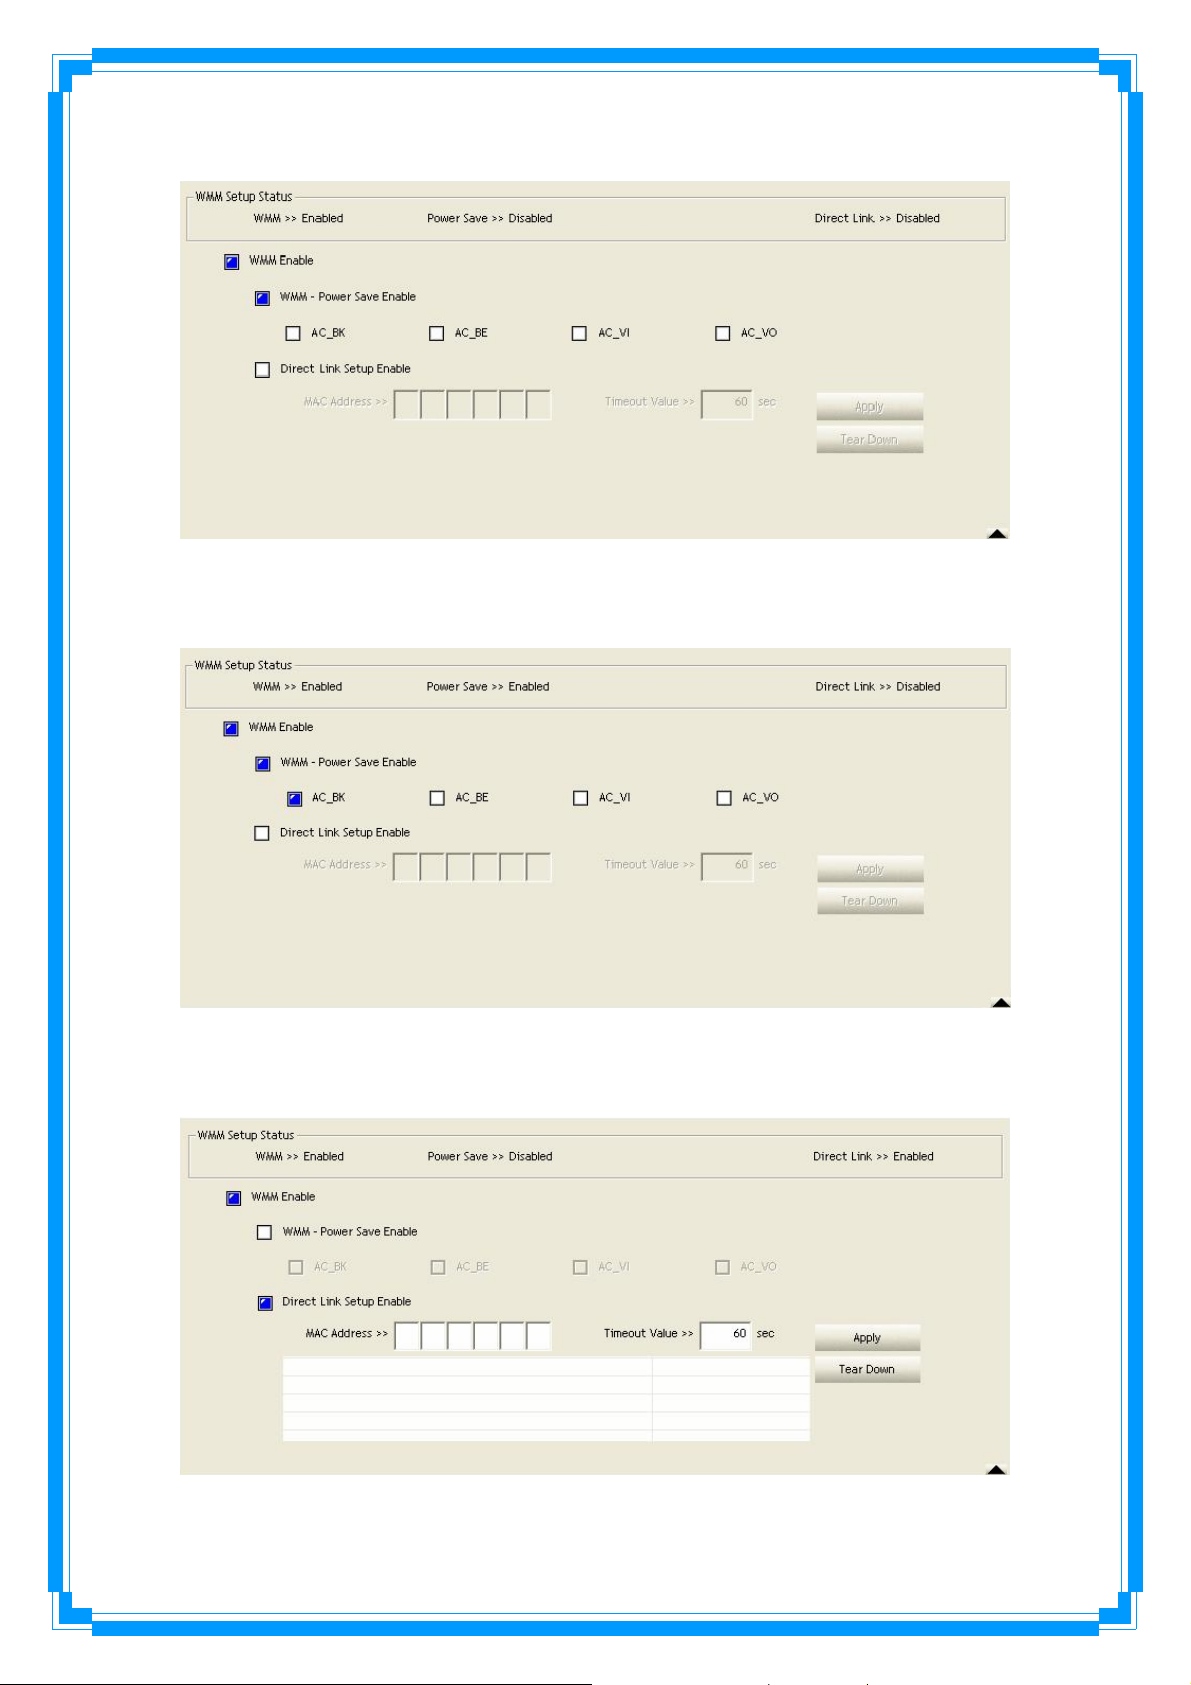
Step 1: Click “WMM-Power Save Enable”
Step 2: Please select which ACs you want to enable. The setting of enabling
WMM-Power Save is successfully.
[Direct Link Setup Enable – Enable DLS (Direct Link Setup)]
Step 1: Click “Direct Link Setup Enable”
Step 2: Change to “Network” function. And add an AP that supports DLS features to
39

a Profile. The result will look like the below figure in Profile page.
The Setting of DLS indicates as follow:
(1) Fill in the blanks of Direct Link with MAC address of STA. The STA must conform to 2
conditions as follow:
Î Connect with the same AP that support DLS features.
Î Have to enable DLS
40

(2) Timeout Value represent that it disconnect automatically after some seconds. The
value is integer. The integer must be between 0~65535. It represents that it always
connects if the value is zero. Default value of Timeout Value is 60 seconds.
(3) Click “Apply” button. The result will look like the below figure.
Describe “DLS Status” as follow:
(1) As the up figure, after configuring DLS successfully, show MAC address of the
41
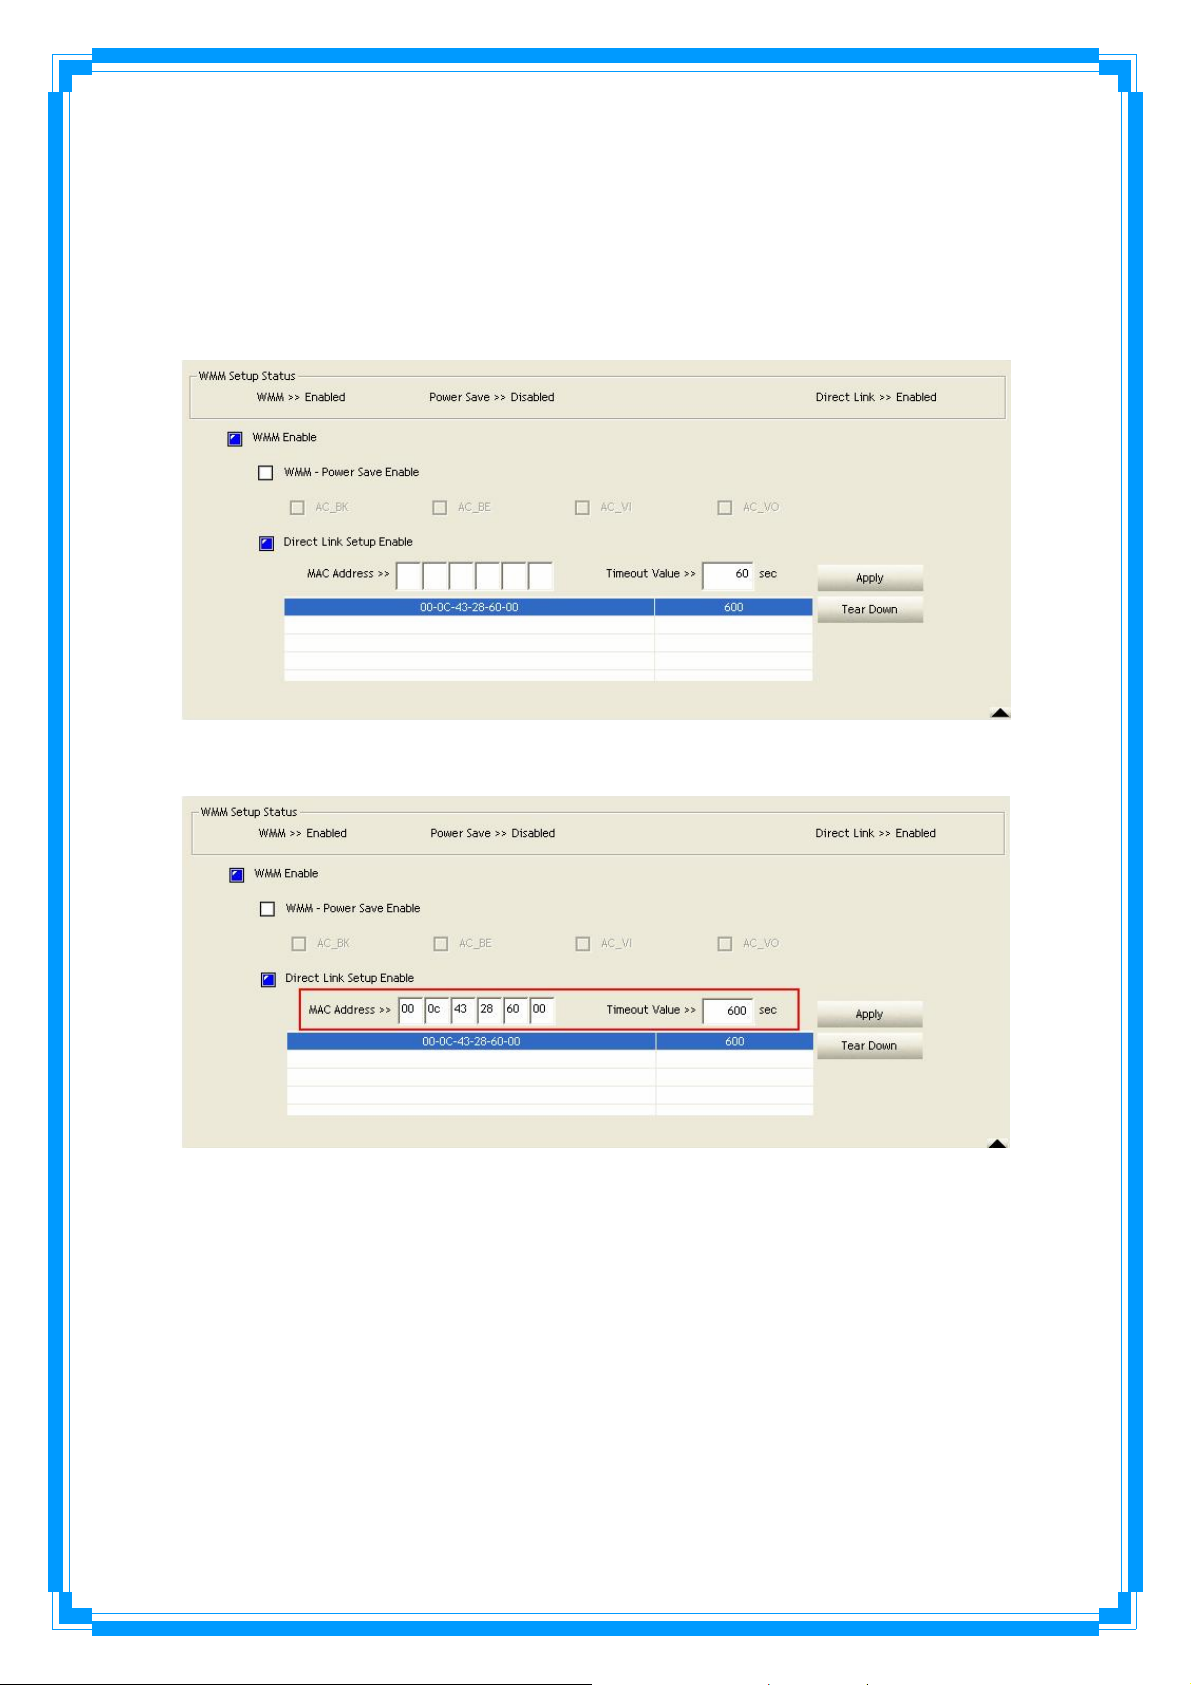
opposite side and Timeout Value of setting in “DLS Status”. In “DLS Status” of the
opposite side, it shows MAC address of itself and Timeout Value of setting.
(2) Display the values of “DLS Status” to “Direct Link Setup” as follow:
Step 1: In “DLS Status”, select a direct link STA what you want to show its values
in “Direct Link Setup”.
Step 2: Double-Click and the result will look like the below figure.
(3) Disconnect Direct Link Setup as follow:
Step 1: Select a direct link STA.
42

Step 2: Click “Tear Down” button. The result will look like the below figure.
3.8 WPS
Wi-Fi Protected Setup (WPS) is the latest wireless network technology which makes
wireless network setup become very simple. If you have WPS-enabled wireless access
point, and you want to establish a secure connection to it, you don’t have to configure
the wireless access point and setup data encryption by yourself. All you have to do is to
go to the WPS setup page of this wireless card, click a button, and then press a specific
button or enter a set of 8-digit code on the wireless access point you wish to establish a
secure connection - just three simple steps!
For older wireless access points, it’s possible to perform a firmware upgrade to become
a WPS-enabled access point. Since they may not have a hardware button to press for
WPS setup, you can use an alternative WPS setup method - input the pin code. Every
WPS-compatible wireless network card support pin code configuration method; you can
just input the code to wireless access point, and the wireless access point and wireless
43

network card will do the rest for you.
This wireless network card is compatible with WPS. To use this function, the wireless
access point you wish to connect to must support WPS function too. Now, please follow
the following instructions to establish secure connection between WPS-enabled wireless
access point and your wireless network card.
WPS Configuration: The primary goal of Wi-Fi Protected Setup (Wi-Fi Simple
Configuration) is to simply the security setup and management of Wi-Fi networks. Ralink
STA as an Enrollee or external Registrar supports the configuration setup using PIN
configuration method or PBC configuration setup using PIN configuration method or PBC
configuration method through an internal or external Registrar.
WPS AP List: Display the information of surrounding APs with WPS IE from last scan
result. List information includes SSID, BSSID, Channel, ID (Device Password ID),
Security-Enabled.
Rescan: Issue a rescan command to wireless NIC to update information on surrounding
wireless network.
Information: Display the information about WPS IE on the selected network. List
Information includes Authentication Type, Encryption Type, Config Methods, Device
Password ID, Selected Registrar, State, Version, AP Setup Locked, UUID-E and RF Bands.
PIN Code: 8-digit numbers. It is required to enter PIN Code into Regist rar using PIN
method. Each NIC Wireless has only one PIN Code of Enrollee.
Config Mode: Our station role-playing as an Enrollee or an external Registrar.
WPS Profile List: Display all of credentials got from the Registrar. List information
includes SSID, MAC address, Authentication and Encryption Type. If STA Enrollee,
credentials are created as soon as each WPS success. If STA Registrar, Ra UI creates a
new credential with WPA2-PSK/AES/64Hex-Key and doesn’t change until next
switching to STA Registrar.
Control items on WPS Profile List:
Î Detail: Information about Security and Key in the credential
Î Connect: Command t o connect to the selected network inside credentials. The
active selected credential is as like as the active selected Profile.
44

Î Rotate: Command to rotate to connect to the next inside credentials
Î Disconnect: Stop WPS action and disconnect this active link. And then select the
last profile at the Profile Page of RaUI if exist. If there is an empty profile page, the
driver will select any non-security AP.
Î Delete: Delete an existing credential. And then select the next credential if exist.
If there is an empty credential, the driver will select any non-security AP.
PIN: Start to add to Registrar using PIN configuration method. IF STA Registrar,
remember that enter PIN Code read from you Enrollee before starting PIN.
PBC: Start to add to AP using PBC configuration method.
★ When you click PIN or PBC, please don’t do any rescan within two-minute
connection. If you want to abort this setup within the interval, restart PIN/PBC
or press Disconnect to stop WPS connection.
WPS associate IE: Send the association request with WPS IE during WPS setup. It is
optional for STA.
WPS probe IE: Send the probe request with WPS IE during WPS setup. IT is optional
for STA.
Progress Bar: Display rate of progress from Start to Connected status.
Status Bar: Display currently WPS Status.
[WPS Information on AP]
WPS information contain authentication type, encryption type, config methods, device
password ID, selected registrar, state, version, AP setup locked, UUID-E and RF bands.
Authentication Type: There are three types of authentication modes supported by
RaConfig. There are Open, Shared, WPA-PSK, and WPA system.
Encryption Type: For Open and shared authentication mode, the selection of
encryption are None and WEP. For WPA, WPA2, WPA-PSK, and WPA2-PSK
authentication mode, the encryption type supports both TKIP and AES.
45

Config Methods: Correspond to the methods the AP supports as an Enrollee for
adding external Registrars. (A bitwise OR of values)
Device Password ID: Indicate the method or identifies the specific password that the
selected Registrar intends to use. AP in PBC mode must indicate 0x0004 within
two-minute Walk time.
Selected Registrar: Indicate if the user has recently activated a Registrar to add an
46

Enrollee. The values are “TRUE” and “FALSE”
State: The current configuration state on AP. The value are “Unconfigured” and
“Configured”.
Version: WPS specified version.
AP Setup Locked: Indicate if AP has entered a setup locked state.
UUID-E: The universally unique identifier (UUID) element generated by the Enrollee.
There is a value. It is 16 bytes.
RF-Bands: Indicate All RF bands available on the AP. A dual-band AP must provide it.
The values are “2.4GHz” and “5GHz”
3.9 SSO
Single Sign-On (SSO) is a session/user authentication process that permits a user to
enter one name and password in order to access multiple applications. The process
authenticates the user for all the applications they have been given rights to and
eliminates further prompts when they switch applications during a particular session.
(
Note:
This feature
doesn’t
available Windows7 and Vista OS)
Enable SSO Feature: Choose which SSO methods to log on
Use ID and Password in Winlogon: Use the ID and Password in
Windows logon.
Use ID and Password in Profile: Use the ID and Password in RaUI Profile
settings.
Prompt ID and Password Dialog: Use the ID and Password in pop-up
authentication dialog.
Enable Persistent Connection: Use DI and Password in the previous activate Profile
and not show any authentication dialog.
Profile List (only Support LEAP or EAP-FAST authentication):
Select Profile: Select a profile containing LEAP or EAP-FAST authentication.
Information of selected profile: Profile information, such as Profile name,
SSID or Authentication.
47
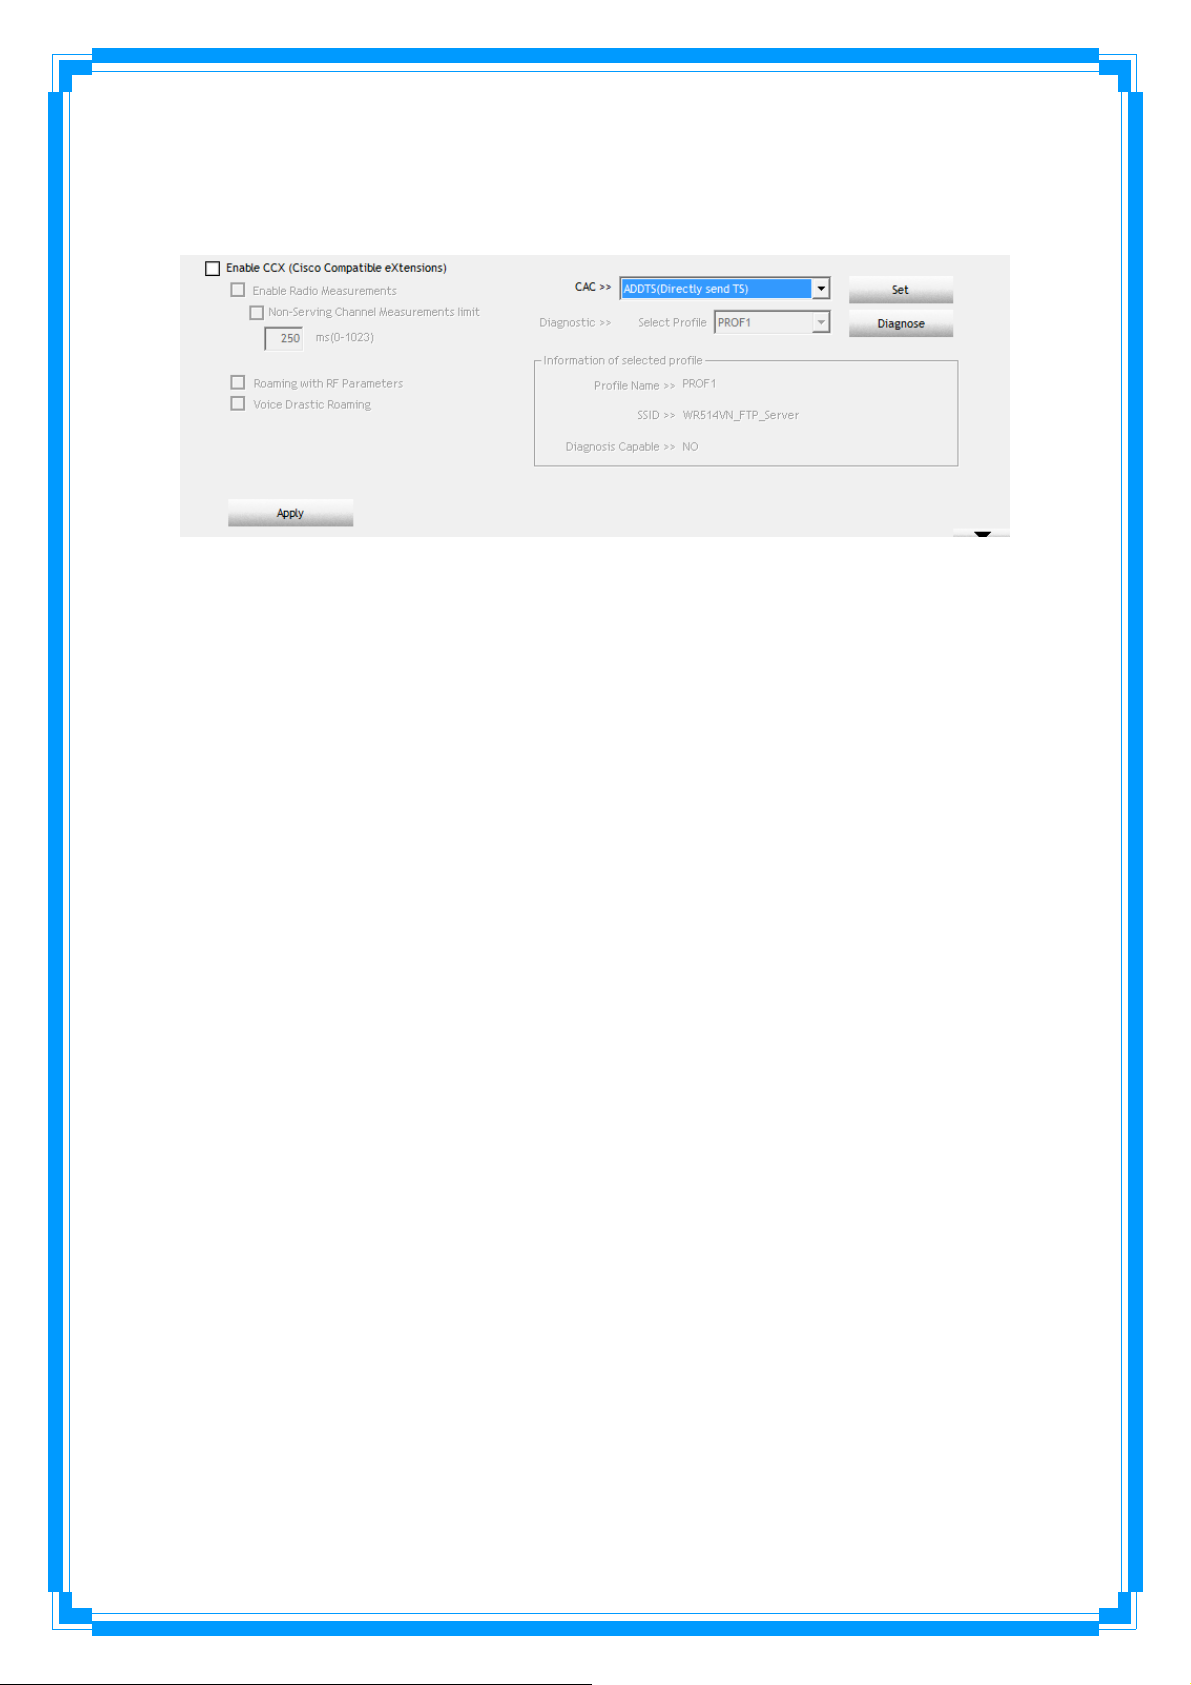
3.10 CCX
(
Note:
Enable CCX (Cisco Compatible eXtensions): Choose whether Cisco Compatible eXtensions are
supported or not.
This feature
Enable Radio Measurement: Enable the radio measurement, the non-serving channel
measurement limit is between 0~1023 milliseconds.
Roaming with RF Parameters: Roaming by a set of RF parameters from AP
Voice Drastic Roaming: Diagnose roaming function by voice traffic test.
doesn’t
available Windows7 and Vista OS)
CAC(Tolerance): Enable the call admission control.
Diagnostic: Select a profile which the user want to diagnose, then hit the Diagnose
button to perform the diagnostic test.
3.11 About
About function display the wireless card and driver version information.
48

(1) Connect to Ralink’s Website: WWW.RALINKTECH.COM
(2) Display Configuration Utility, Driver, and EEPROM version information
(3) Display Wireless NIC MAC Address.
3.12 Link Status
Link Status displays the detail information current connection
Status: Current connection status. If no connection, it will show Disconnected.
Otherwise, the SSID and BSSID will show here.
Extra Info: Display link status in use.
Channel: Display current channel in use.
Authentication: Authentication mode in use.
Encryption: Encryption type in use.
Network Type: Network type in use.
IP Address: IP address about current connection.
Sub Mask: Sub Mast about current connection.
Default Gateway: Default gateway about current connection.
Link Speed: Show current transmit rate and receive rate.
Throughout: Display transmits and receive throughput in unit of Mbps.
49

Link Quality: Display Connection quality based on signal strength and Tx/Rx packet
error rate.
Signal Strength 1: Receive signal strength 1, user can choose to display as
percentage or dBm format.
Signal Strength 2: Receive signal strength 2, user can choose to display as
percentage or dBm format.
HT: Display current HT Status in use, containing BW, GI, MCS, SNR0, and SNR1 value.
(Show the information only for 802.11n wireless card)
4. Soft-AP Function
Excepting become a wireless client of other wireless access points, this wireless card can
act as a wireless service provider also! You can switch this wireless card’s operating
mode to ‘AP’ mode to simulate the function of a real wireless access point by software,
and all other computers and wireless devices can connect to your computer wirelessly,
even share the internet connection you have!
Please follow the instructions in following chapters to use the AP function of your wireless
card.
4.1 Switch to AP mode and Basic Configuration
The operating mode of the wireless card is ‘Station Mode’ (becoming a client of other
wireless access points) by default. If you want to switch to AP mode, please right-click
Ralink utility icon, and select ‘Switch to AP Mode’.
After you select ‘Switch to AP Mode’, the Ralink utility icon will be changed to:
If you want to switch the wireless card back to station mode (become a client of other
wireless access points), click ‘Switch to Station Mode’.
A configuration window will appear after you switch the operation mode to ‘AP’, which
50

asks you to assign an existing network card with internet connection
After you click ‘OK’, you’ll see the basic configuration menu of the AP function.
SSID: Please input the SSID (the name used to identify this wireless access point) here.
Up to 32 numerical characters can be accepted here, excepting space.
Channel: Please select the wireless channel you wish to use. The number of channels
available here will vary depends on the setting of ‘Country Region Code’.
Wireless Mode: Select the operation mode of the access point here.
Use Mac Address: Click this button to use the MAC address of the wireless card as
SSID. A prefix ‘AP’ will be added automatically
Security Setting: Set the security options (wireless data encryption). Please refer to
51

chapter 4-2 ‘Security Settings’ for details.
Country Region Code: Please select the country code of the country or region you
live. Available options are 0-7, which will affect the available wireless channels you can
use:
0: FCC (US, Canada, and other countries uses
FCC radio communication standards)
1: ETSI (Europe)
2: SPAIN
3: FRANCE
4: MKK
5: MKKI (TELEC)
6: ISERAL (Channel 3 to 9)
7: ISERAL (Channel 5 to 13)
Please note that only change the country code if you are in different country. For
example: when operating this product in US, only channels 1~11 can be operated.
Selection of other channels is not permitted under FCC regulations.
No forwarding among wireless clients: Check this box and wireless clients will
not be able to share data with each other.
Hide SSID: Check this box and the SSID will not be broadcasted to the public. Your
wireless clients must know the exact SSID to be able to connect to your computer. This
option is useful to enhance security level.
Allow BW 40 MHz: Check this box to allow BW 40MHz capability.
Beacon(ms): You can define the time interval that a beacon signal should be send.
Default value is 100. Do not modify this value unless you know what will be affected.
TX Power: You can select the wireless output power here. Please select a proper output
power setting according to your actual needs. You may not need 100% of output power
if other wireless clients are not far from you.
Idle Time: Select the idle time for the wireless access point. Default value is 300. Do
not modify this value unless you know what will be affected.
To save changes, click ‘Apply’ button. Or you can click ‘Default’ to reset all values to
factory default value.
52

4.2 Security Settings
Authentication Type: Please select a wireless authentication type you wish to use.
Available options are ‘Open’, ‘Shared’, WPA-PSK’, ‘WPA2-PSK’, and ‘WPA-PSK /
WPA2-PSK’. If you want to disable wireless data encryption, you must select ‘Open’.
Encryption Type: Please select an encryption mode. The available options in this
setting item will vary depending on the authentication type you select. If you select ‘Not
Use’, data will not be encrypted and people with some networking knowledge will be
able to read the data you transfer with proper tool.
WPA Pre-shared Key: Please input the WPA pre-shared key here. Only clients with
the same pre-shared key you inputted here will be able to connect to your computer. This
setting is only available when you select one of WPA encryptions
Group Rekey Interval: You can specify the time interval to re-issue the key to your
wireless clients here. You can click the button ’10 seconds’ or ‘Kpackets’ to change the
unit of time interval. (every 10 seconds or a thousand data packets times the value you
specified in ‘Group Rekey Interval’ field).
Wep Key: Please input the WEP encryption key here when you select ‘WEP’ as
encryption type. There are 2 types of WEP key: Hex (number 0 to 9, and ASCII
characters A to F) and ASCII (all alphanumerical characters plus symbols). Please select
the type of WEP key first, and then input the WEP key according to the type of WEP key
you selected. If you want to use WEP 64 bits encryption, please input 10 characters if
you select HEX, or input 5 characters if you select ASCII. If you want to use WEP 128bits
encryption, please input 26
53

characters if you select HEX, or input 13 characters if you select ASCII. 128 bits
encryption
is safer then 64 bits, but the data transfer speed will be slightly reduced.
Show Password: Check this box and the WPA pre-shared key or WEP key you
inputted will be shown, but not replaced by asterisk (*).
When you finish with setting and want to save changes, click ‘OK’ button, or click
‘Cancel’ button to discard all changes you made.
4.3 Access Control
If you’re not going to open your computer and wireless resources to the public, you can
use MAC address filtering function to enforce your access control policy, so only
wireless clients with MAC address you defined by this function can be connected to your
software access point
Access Policy: Select the policy type of your access rule.
Disable: Allow any wireless client with proper authentication settings to connect to
this access point.
Allow All: Only allow wireless clients with MAC address listed here to connect to
this access point.
Reject All: Reject wireless clients with MAC address listed here to be connected to
54

this access point.
MAC address: Input the MAC address of the wireless client you wish to allow or reject
here. No colon (:) or hyphen (-) required.
Add: Add the MAC address you inputted in ‘MAC address’ field to the list
Delete: Please select a MAC address from the list, then click ‘Delete’ button to remove
it.
Remove All: Delete all MAC addresses in the list
4.4 MAC Table
If you want to see the list of all wireless clients connected to this access point, please
select ‘Mac Table’ tab from the utility
MAC Address: Displays the MAC address of this wireless client.
AID: The serial number of this wireless connection.
Power Saving Mode: Displays the capability of power-saving function of this
wireless client.
Status: Displays additional information of this wireless Connection, like current wireless
operating mode and data transfer rate.
4.5 Event Log
55
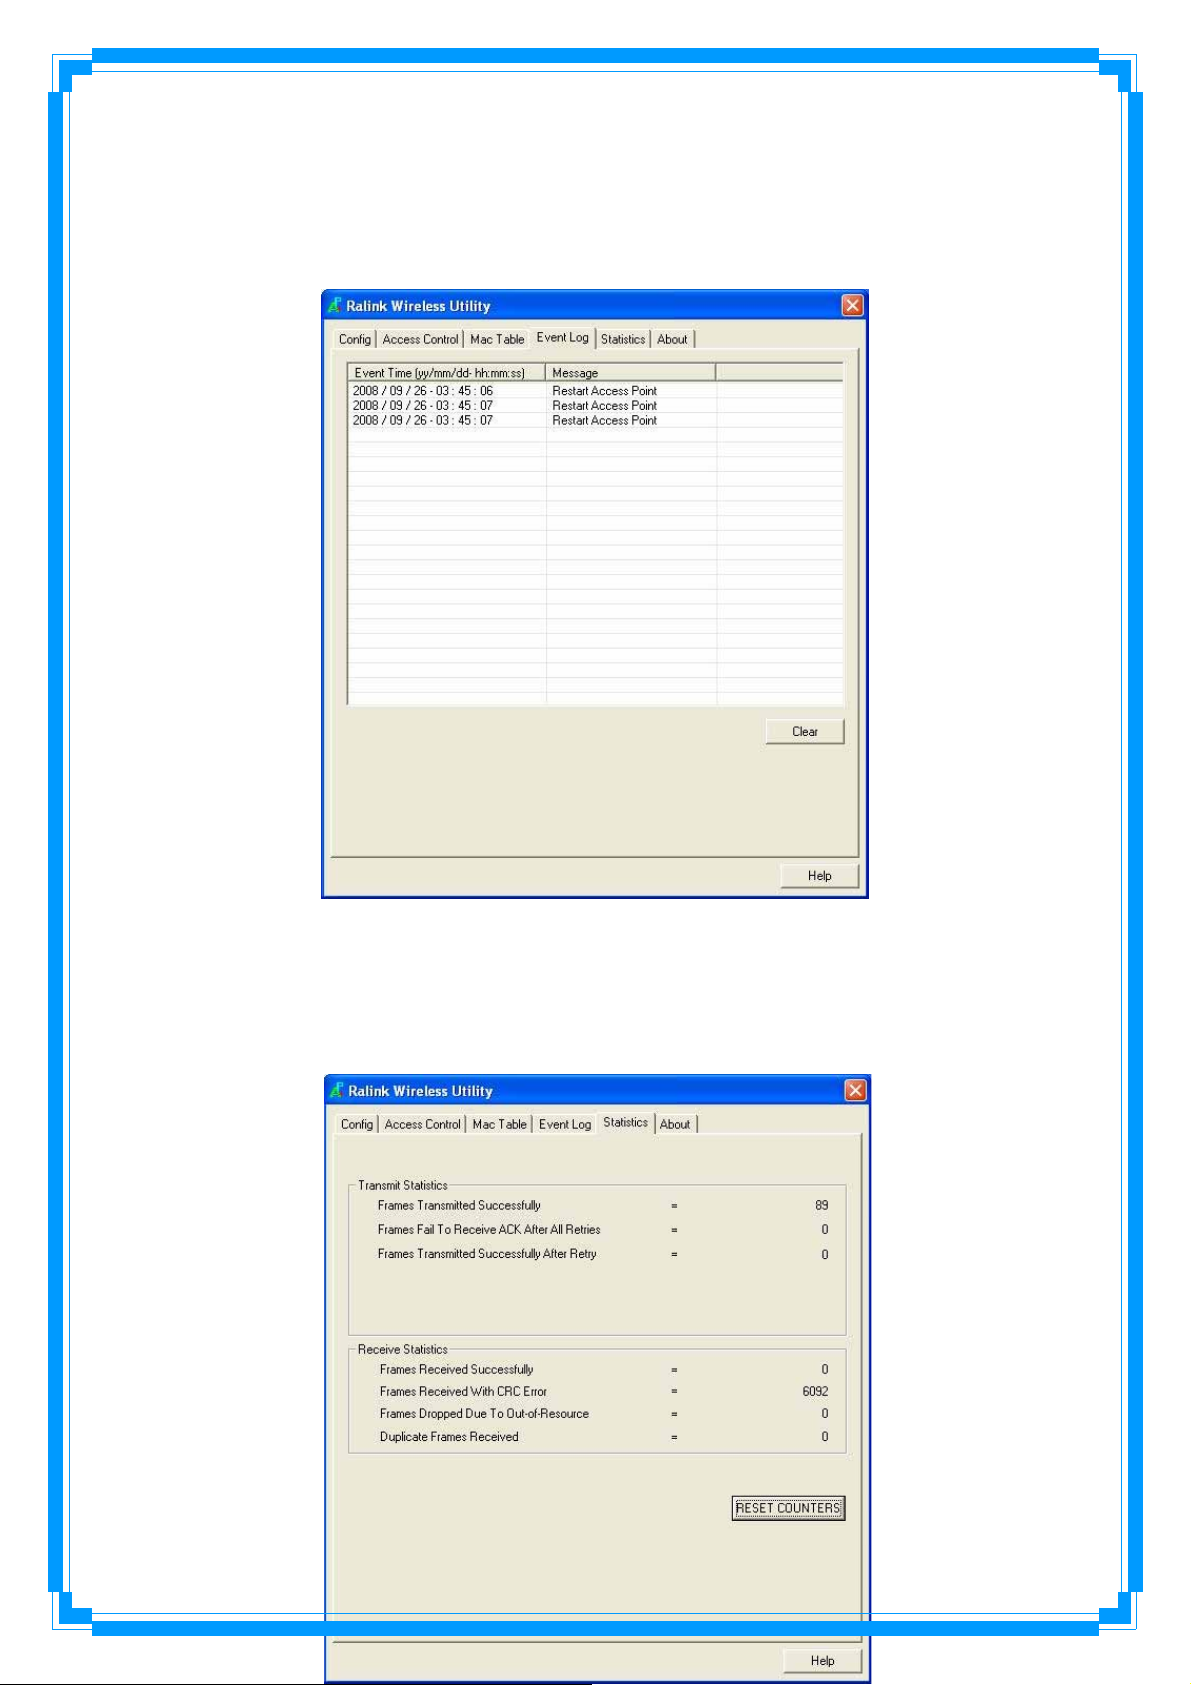
This software access point will log all wireless-related activities as a log. Click ‘Event
Log’ tab, and the event log will be displayed.
You can click ‘Clear’ to remove all entries in the log.
4.6 Statistics
If you want to know detailed information about how your software access point works,
click ‘Statistics’ tab, and the event log will be displayed. Click ‘RESET COUNTERS’
button to reset all
counters to zero.
56

4.7 About
The ‘About’ tab provides you the information about version number of the configuration
utility, driver, and other important information about your wireless access point.
57
 Loading...