

Pro Nets Technology WA25TD2 Users Manual
8. Access Management
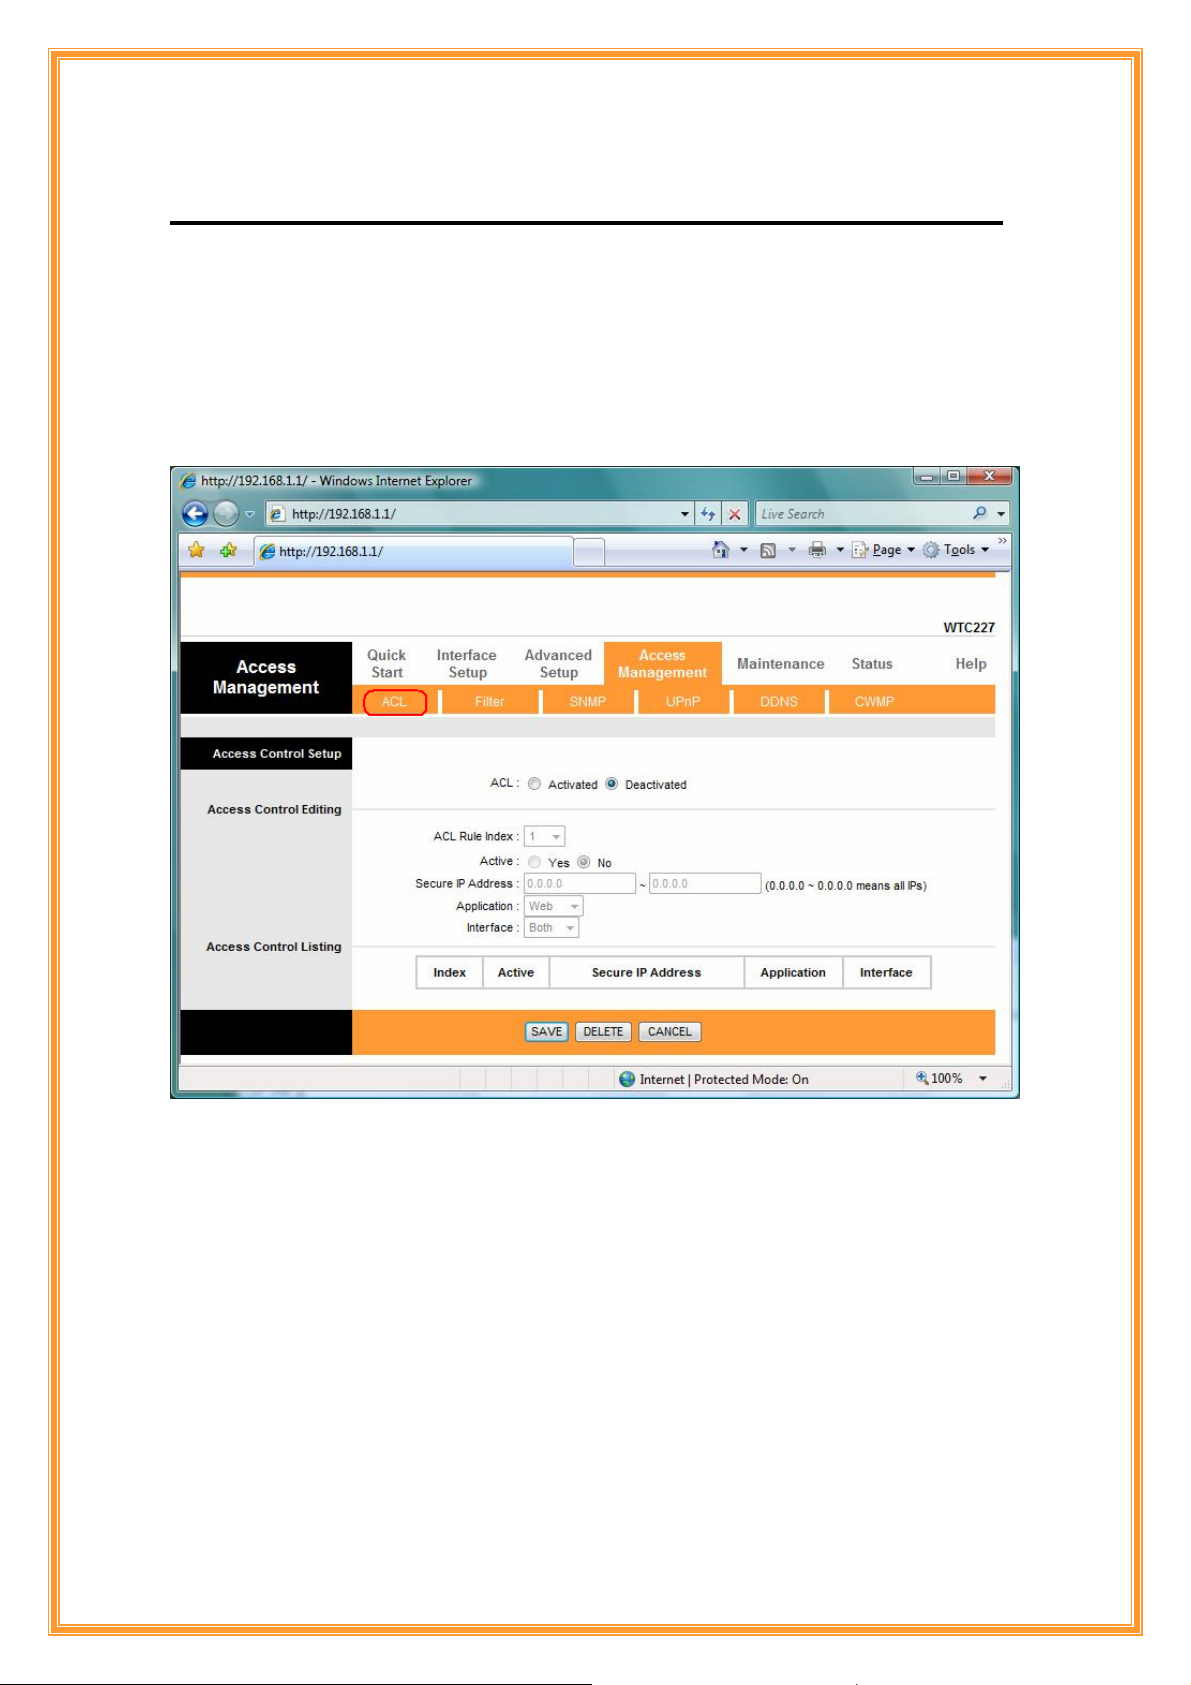
8.1 ACL
Go to Access Management Æ ACL to enable remote management. Access Control
Listing (ACL) is a management tool that acts as a filter for incoming or outgoing packets, based
on application. You may use telnet or Web to remotely manage the ADSL Router. User just
needs to enable Telnet or Web and give it an IP address that wants to access the ADSL Router.
The default IP 0.0.0.0 allows any client to use this service to remotely manage the ADSL Router.
ACL: There has Activated & Deactivated option. The default setting is Deactivated which
means all IP can access via router. If you choose Activated, you only can access via router by
listed IP addresses.
ACL Rule Index: Index number from 1 and up to 16.
Active: Once you choose Yes then you can access the IP via router.
Application: Each of these labels denotes a service that you may use to remotely manage the
Router. Choices are Web, FTP, Telnet, SNMP, Ping, ALL.
Interface: Select the access interface. Choices are WAN, LAN and Both.
61
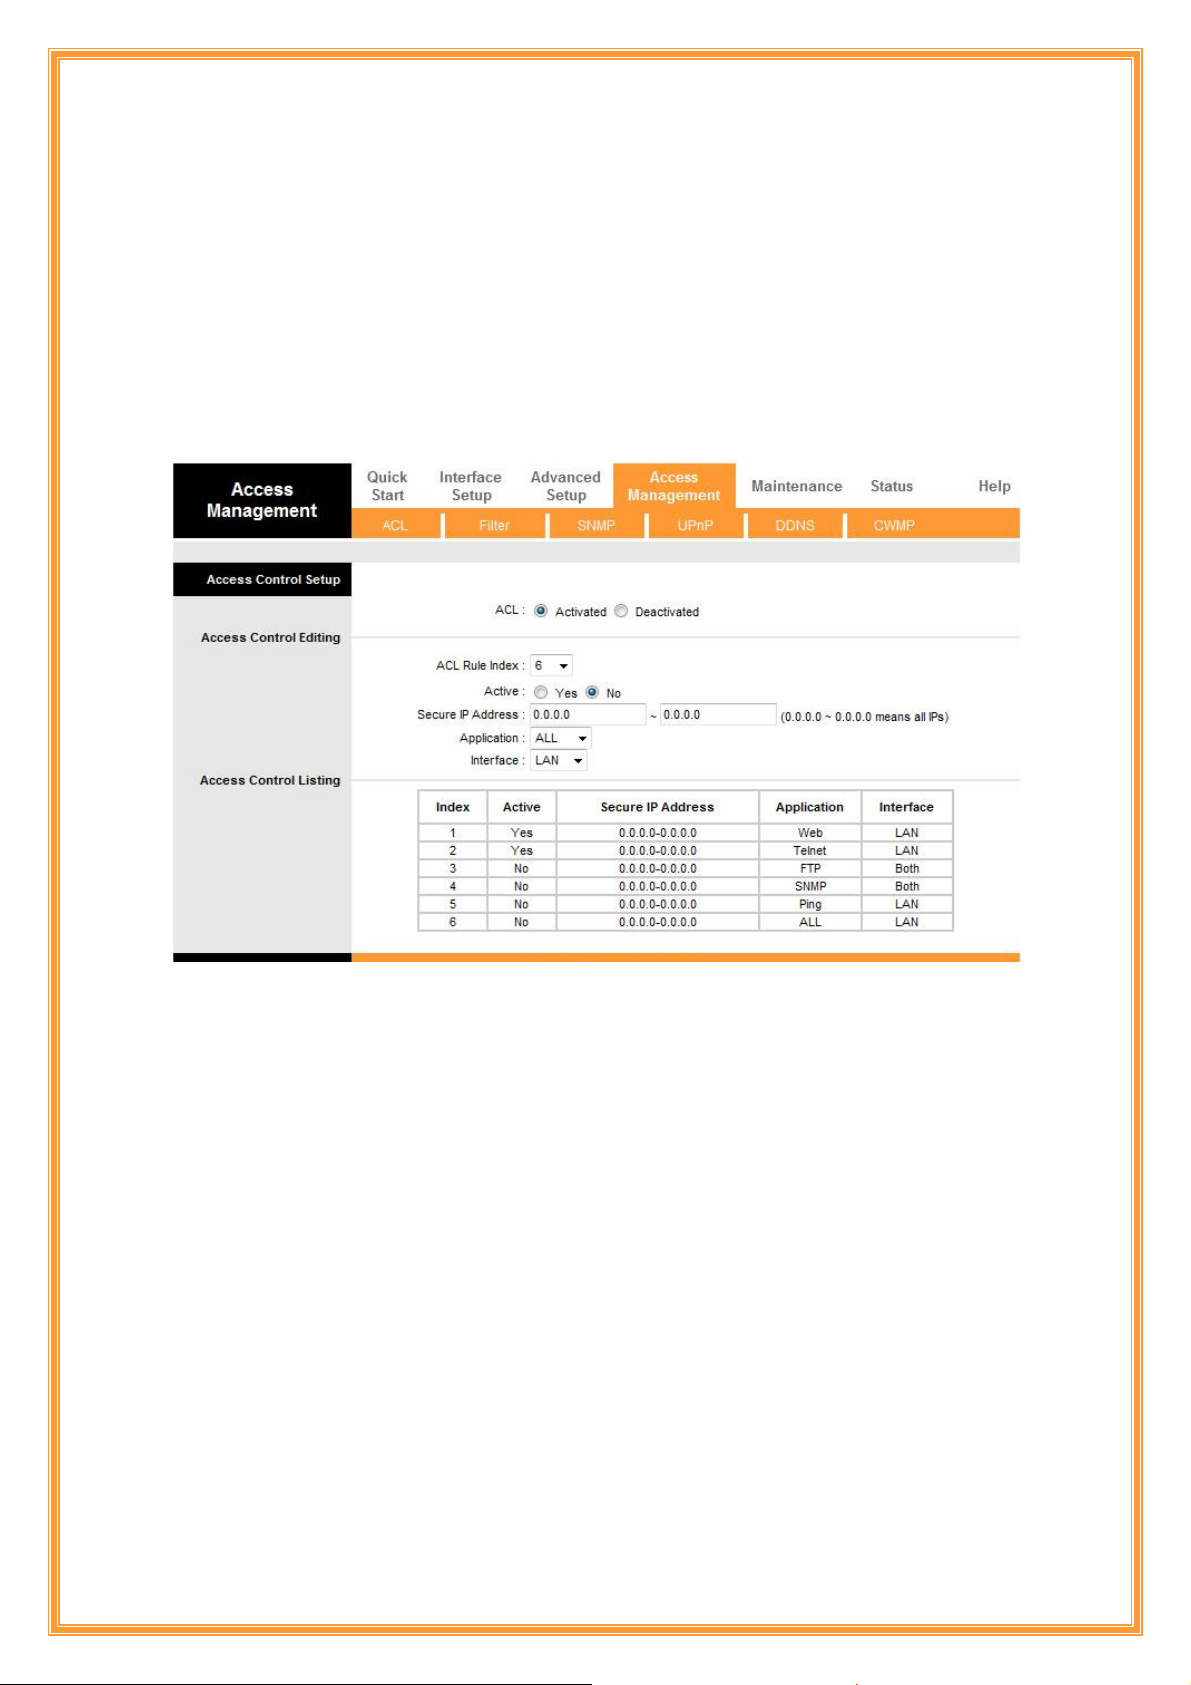
For Example:
How to set your ACL?
1. You must choose Activated to enable your ACL function.
2. Select the ACL Rule Index number (up to 16 number)
3. You can set the specific Secure IP address or set 0.0.0.0 for all IPs.
4. Choose the Application which you want to access for this ACL Rule index.
5. Select the Interface you want to access from.
6. After all settings are ready, click SAVE and continue next ACL Rule Index setting.
[Note]
1. You must set one ACL index to access your router via LAN interface. If you don’t, your
router cannot access other listed IP Address. (Refer to Index 1).
2. Remember! Once you active your ACL function, you only can access via router by listed
Secure IP Address.
8.2 Filter
The Router provides extensive firewall protection by restricting connection parameters to
limit the risk of intrusion and defending against a wide array of common hacker attackers. Go to
Access Management Æ Filter to set different IP filter rules of a given protocol (TCP, UDP, or
ICMP) and a specific direction (incoming, outgoing, or both) to filter the packets.
IP Filter is a more complex filtering tool, based more on IP and custom rules. Each of the indices
can hold six rules, and each interface can have four associated indices, allowing 24 rules per
interface. If all six rules in an index are Next rules, the data will be sent to the next index for
filtering.
62
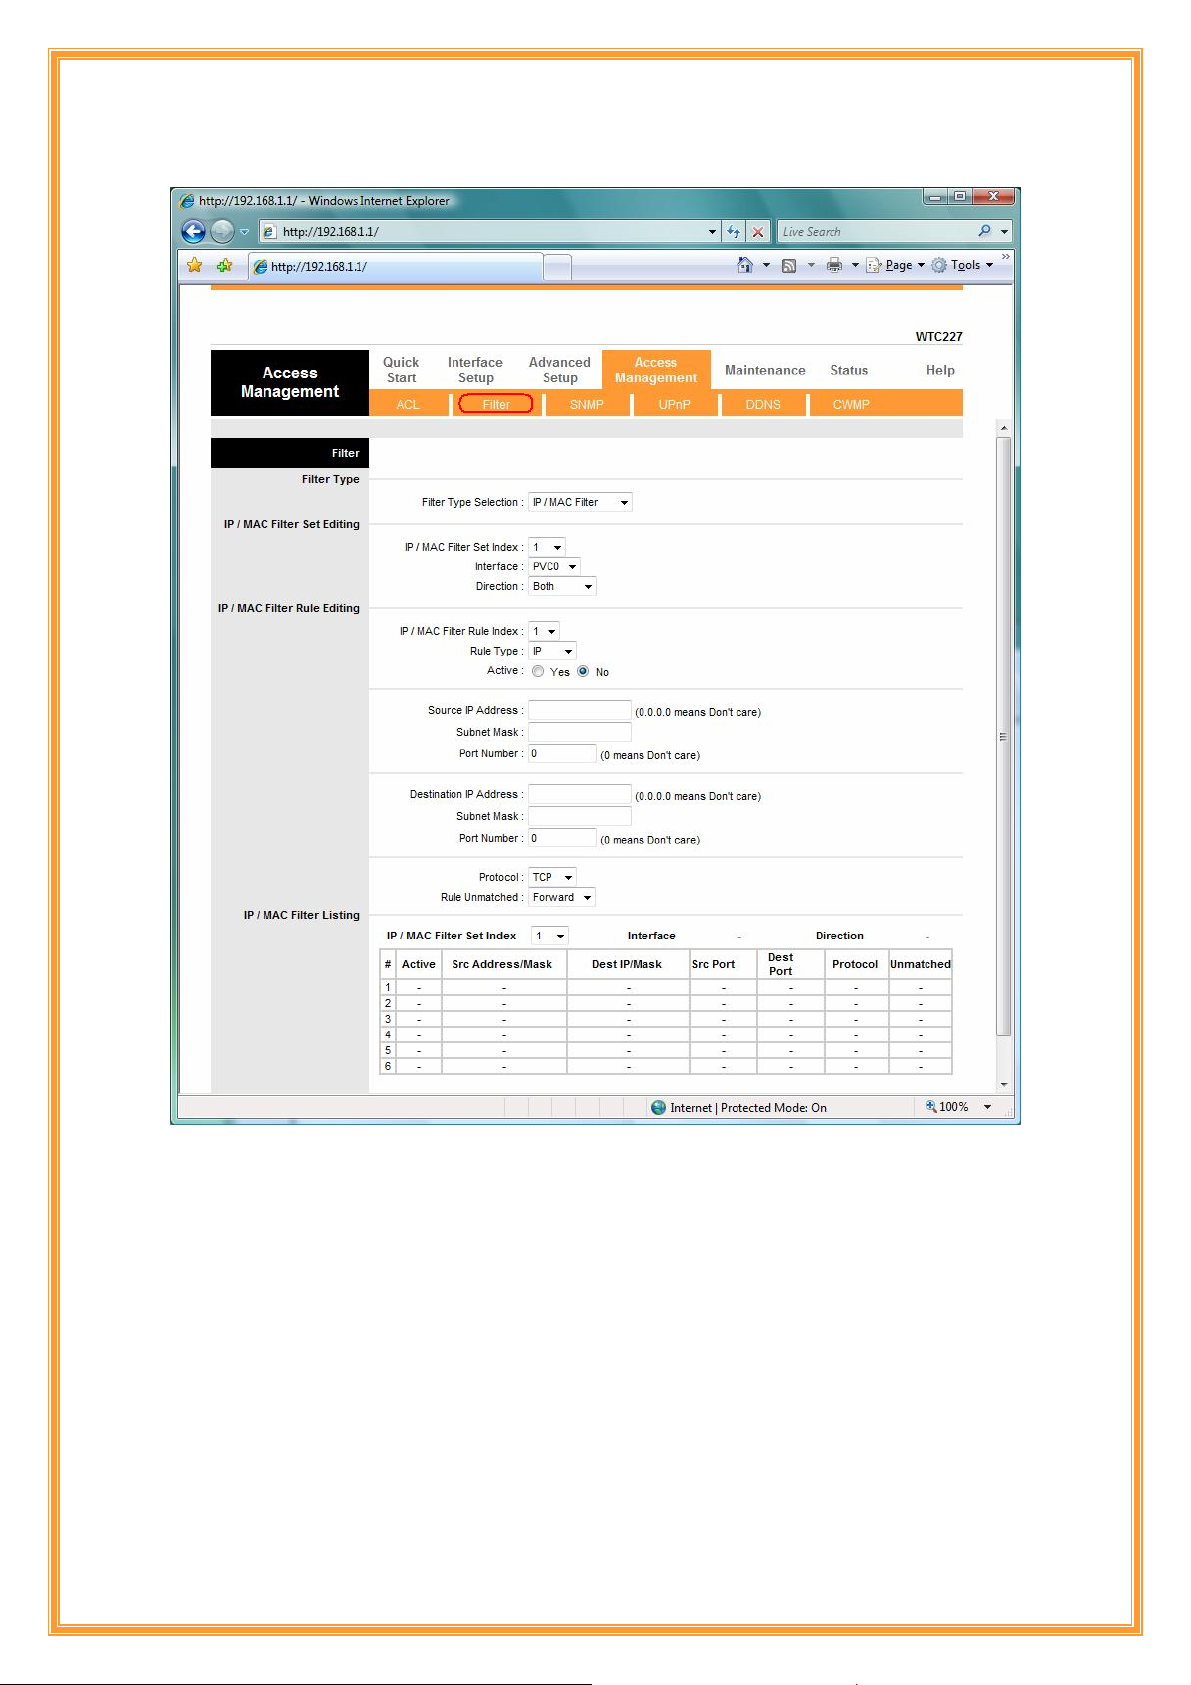
Filter Type: You can select IP/MAC Filter, Application, and URL Filter type.
IP/MAC Filter Set Index: The IP/MAC Filter Set Index from 1 to 12 and each index can set u p to
6 IP Filter.
Interface: Choices from PVC0 to PVC7 and LAN.
Direction: Choices are Both, Incoming and Outgoing. Select which direction of data flow you
wish to apply the filters to. Note that Incoming and Outgoing are from the point of view of your
router, relative to the interface you select. For WAN, data coming from outside your system is
considered Incoming and data leaving your system is Outgoing. For LAN, data leaving your
system is considered Incoming and data entering your system is Outgoing.
IP/MAC Filter rule Index: The IP/MAC Filter rule Index from 1 to 6.
63

IP/MAC Filter Rule Editing: Select the IP/MAC Filter Rule Index you wish to modify.
Active: Toggle this rule index on or off with Yes or No, respectively.
Source IP Address: Enter the source IP address you wish to deny access to your system.
Subnet Mask: Enter the subnet mask of the source IP address.
Port Number: Enter the port number of the source IP address. Note that 0 means all that ports
are allowed.
Destination IP Address: Enter the destination IP address that you wish to deny access to your
system.
Subnet Mask: Enter the subnet mask of the destination IP address
Port Number: Enter the port number of the destination IP address. Note that 0 means that all
ports are allowed
Protocol: Select the protocol to filter. Choices are TCP, UDP, and ICMP.
Rule Unmatched: Choices are Forward and Next. Select what happens to the data in question
if the rule you are currently editing is unmatched. Next means that the data is then compared to
the next IP filter rule. Forward means that the data will be allowed into your system. Note that a
Forward rule should be the last rule, as no data will be compared to rules after a Forward rule.
IP/MAC Filter Set Index: Select the IP/MAC filter set you wish to view.
For Example
Please follow below steps to set your IP Filter:
1. IP/MAC Filter Set Editing: Choose your IP/MAC Filter Set Index, Interface and Direction
options. Remember, Interface and Direction functions are affected with IP/MAC Filter Set
Index. EX: if your 1st index set of IP filter set PVC0 as Interface and Outgoing as Direction, so
the list of 1
st
IP Filter will be PVC0 and Outgoing as their settings.
2. IP/MAC Filter Rule Editing: Select the IP/MAC Filter Rule Index (up to 6 numbers for each
set index) and choose Active option. As below example, Source IP Address is
192.168.1.4, Subnet Mask is 255.255.255.255, Destination IP Address & Subnet Mask is
0.0.0.0, Port Number is 80. And, Protocol sets TCP. From this setting, it filters
192.168.1.14, so it cannot access the web. Notice, each IP Filter Set Index can has up to 6
filters IP. At “Rule Unmatched” option, you must choose NEXT until the last filter IP choose
Forward.
3. After every setting is done, click SAVE to continue next IP Filter Editing.
64
 Loading...