

Page 1

SANLink
8G FC/16G FC/10GBase-T/10G SFP+
Device driver software utility installation for Mac OS
Version 2.0
2
© 2015 PROMISE Technology, Inc. All Rights Reserved.
Page 2

Contents
IntroduCtIon 1
Install sanlInk2 drIver 2
Install sanlInk2 utIlIty 5
usIng the sanlInk2 utIlIty 6
usIng the sanlInk2 utIlIty for 10gBase-t and 10g sfP+ 6
usIng the sanlInk2 utIlIty for 8g and 16g fC 9
ChangIng the sfP+ module 14
InsertIng the w rong sFP+ tyPe 14
ContaCtIng teChnICal suPPort 15
Page 3

SANLink2 F2102/F2202/ E2002t/E2002p
Promise Technology
IntroduCtIon
This installation guide describes how to install the device driver and software utility for the SANLink2
F2102 (8G FC), F2202 (16G FC), E2002t (10GBase-T) and E2002p (10G SFP+) on a Mac computer
equipped with a Thunderbolt port. Download the driver and utility installation les from the PROMISE
website. The device driver should be installed before connecting the SANLink2 to the Mac. After the
driver is installed, go ahead and connect the SANLink2 according to the instructions in the Quick Start
Guide.
An additional download, the SANLink2 utility, is available from the PROMISE website. It is used for
monitoring device function and changing some settings such as port speed and topology. This is also
available from the website. The utility is not required for the device to be operational since all device
settings are auto-detect, and it is not necessary to manually change any setting for the SANLink2 to
function.
To download the device driver and utility:
1. Go to the PROMISE website at http://www.PROMISE.com/, click on Support near the top of the
page, select the Download Center option.
2. Use the two pull-down menus to rst choose the SANLink2 then the SANLink2 option.
3. Under the heading Download search results below:
• Click on the Drivers link and download the SANLink2 Mac driver.
• Click on the Utilities link and download the PROMISE SANLink2 Utility. (Optional)
1
Page 4

SANLink2 Driver and Utility Installation
SANLink2 8G FC/16G FC/10GBase-T/10G SFP+
Install sanlInk2 drIver
The driver installation procedure is the same for the SANLink2 F2102 (8G FC), F2202 (16G FC),
E2002t (10GBase-T) and E2002p (10G SFP+).
Download the SANLink2 Mac Driver from the PROMISE website at www.promise.com and follow the
steps below to install the driver for the SANLink2. You can then proceed to connect the SANLink2
according to the instructions in the Quick Start Guide.
To install the SANLink2 driver:
1. Unzip the SANLink2 Mac Driver le, open the folder and double-click on the driver package le.
The driver installation le icon looks like this
Note
The name of the driver installation package available from the website will
change periodically to reect the version as it is updated.
2. The driver installation menu appears. Click the Continue button to proceed with the driver
installation.
2
Page 5

SANLink2 F2102/F2202/ E2002t/E2002p
3. The new menu appears listing the space required for the installation. Note that you are not
allowed to choose the destination for the installed les. Click Install to proceed with the
installation.
Promise Technology
4. Since this is a software installation, you will be required to enter the Name and Password
information of the computer administrator. Enter this information and click on Install Software to
start the process.
3
Page 6

SANLink2 Driver and Utility Installation
5. Another pop-up dialog let’s you know that a system restart will be necessary. Click Continue
Installation to proceed.
SANLink2 8G FC/16G FC/10GBase-T/10G SFP+
6. When the driver is installed, a message appears letting you know that the installation succeeded.
Click on Restart to reboot the Mac.
Upon restarting, you can either install the utility or go ahead and connect the SANLink2 to your Mac
according to the instructions in the Quick Start Guide.
4
Page 7

SANLink2 F2102/F2202/ E2002t/E2002p
Promise Technology
Install sanlInk2 utIlIty
Download the SANLink2 Utility le (.dmg) from the PROMISE website at www.promise.com and follow
the steps below to install the utility for the SANLink2.
To install the SANLink2 utility, double-click on the SANLink2 Utility.dmg le.
The drag to install menu appears.
Drag the SANLink Utility icon into the Applications folder to install it.
5
Page 8

SANLink2 Driver and Utility Installation
SANLink2 8G FC/16G FC/10GBase-T/10G SFP+
usIng the sanlInk2 utIlIty
Using the SANLink2 Utility for 10GBase-T and 10G SFP+
To launch the application, open the Applications folder and double-click on the SANLink Utility icon.
By default, the application settings are locked. To view the connection status or to change settings you
will be required to enter the Name and Password information of the Mac administrator.
Once unlocked, the utility displays the connection status and topology for each port and allows the user
to change settings.
6
Page 9

SANLink2 F2102/F2202/ E2002t/E2002p
Promise Technology
Port1 and Port2 menu tabs
The port menus for the SANLink2 E2002t (10GBase-T) and E2002p (10G SFP+) present read only
information including MAC Address, Interface Name, Current Speed, MTU (maximum transmission
unit*) and SFP Type (10G Copper or 10G Optical)
SANLink2 E2002t (10GBase-T) port menu SANLink2 E2002p (10G SFP+) port menu
*The maximum transmission unit (MTU) is the size (in bytes) of the largest data unit allowed to pass onwards. To change
this setting in Mac OS, open System Preferences, click on the Network icon, click on the Advanced button. In a new menu,
select the Hardware tab and choose the Manually option for Congure, then set MTU as desired. Keep in mind that the
relevant switches and clients on the network will need to change this parameter to match or exceed the value chosen.
The two parameters that can be changed by the user are Setting Mode and TCP checksum for IP
version 4 (RFC 793).
The TCP checksum for IPv4 is enabled by default. To disable it, click the option Enable TCPv4
checksum to remove the check mark.
The Setting Mode is used for tweaking throughput performance to suit specic applications.
Specically it changes some parameters such as buffer size and interrupts that can be more or less
taxing to the CPU. The options are as follows:
Balanced: This is the default setting. It is congured for balanced receiving and transmitting with little or
no load on the CPU. For general use, not specic to an application.
Low Latency: This will add some load to the CPU but provide faster updates. This setting is appropriate
for network gaming or applications with low latency requirements.
High Throughput: This is optimized for very high transmitting and high receiving. This is place some
load on the CPU but less than Low Latency. This is appropriate for applications that require high
transmit rates for a single (or very few) connection.
Server: This is congured for multiple client connections, video server, backup server, le server, etc.
7
Page 10

SANLink2 Driver and Utility Installation
Device menu tab
The presents read only information including Driver version and Product Type (which model SANLink2
is connected).
SANLink2 Device menu
SANLink2 8G FC/16G FC/10GBase-T/10G SFP+
8
Page 11

SANLink2 F2102/F2202/ E2002t/E2002p
Promise Technology
Using the SANLink2 Utility for 8G and 16G FC
To launch the application, open the Applications folder and double-click on the SANLink Utility icon.
By default, the application settings are locked. To view the connection status or to change settings you
will be required to enter the Name and Password information of the Mac administrator.
Once unlocked, the utility displays the connection status and topology for each Fibre Channel port and
allows the user to change settings.
Port1 and Port2 menu tabs
The port menus for the SANLink2 F2102 (8G FC) and F2202 (16G) present read only information
WWPN, as well as the status of congurable parameters Current Speed, and Current Topology. See
the pages that follow for information about changing port settings.
9
Page 12
SANLink2 Driver and Utility Installation
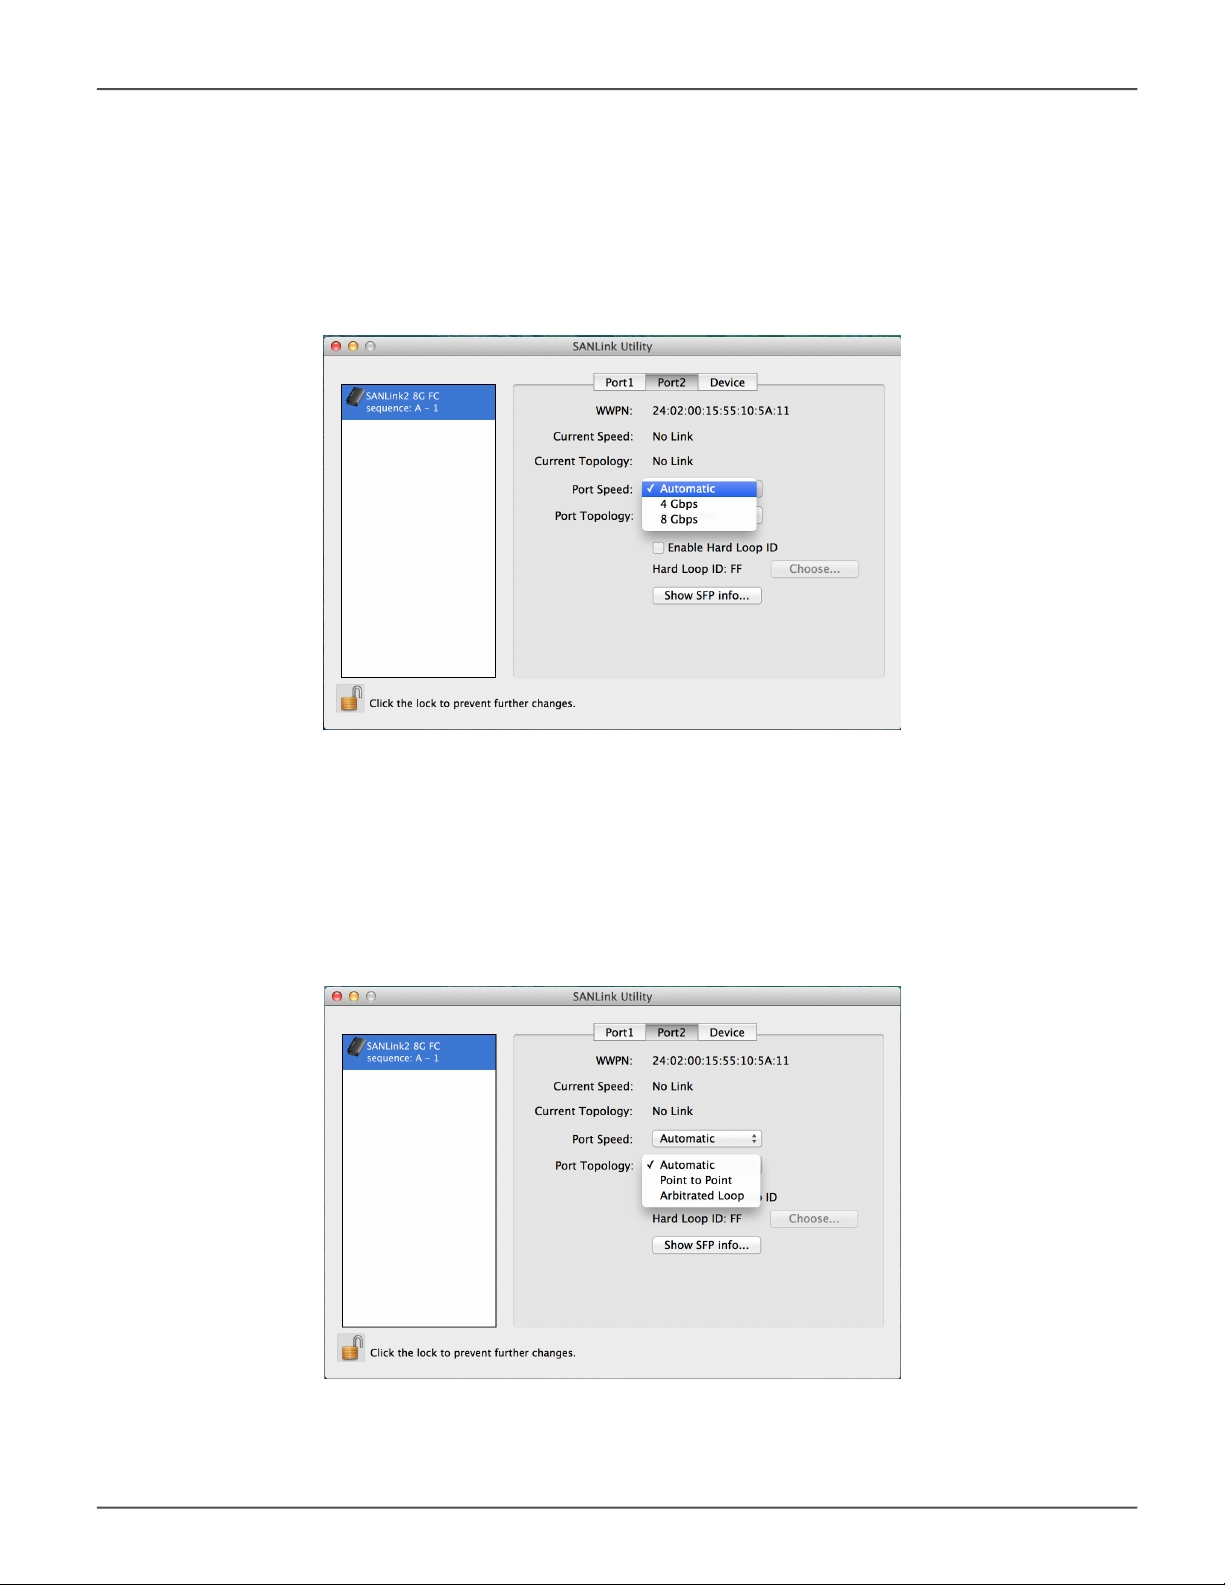
Port Speed
To change the port speed of a Fibre Channel port, in the port menu tab, use the pull-down menu to
choose 4Gbps, 8Gbps, 16Gbps (SANLink2 F2202 only) or Automatic (default).
Note that the port speed must be compatible with the port to which it is connected. If the other port is
hard set, the hard setting of the SANLink2 must match, if the other port is set to Auto it just has to be at
a speed it supports.
SANLink2 8G FC/16G FC/10GBase-T/10G SFP+
Topology
To change the topology of a Fibre Channel port, in the port menu tab, use the pull-down menu to
choose Point to Point, Arbitrated Loop or Automatic (default).
Note that the topology must match of the topology of the device to which it is connected or the
connection will fail.
10
Page 13

SANLink2 F2102/F2202/ E2002t/E2002p
Enable Hard Loop ID
To set a Hard Loop for the topology, in the port menu tab, click the Enable Hard Loop box to check
mark it, then click on the Choose button to select a Hard Loop ID in a new menu.
Promise Technology
SFP Information
To view basic information about the SFP+ module that is installed, click on the Show SFP Info button.
Click the Exit button to close the SFP information display.
Note that if the SFP+ module is changed, the SANLink2 will need to be restarted to refresh the
information displayed here.
11
Page 14

SANLink2 Driver and Utility Installation
Firmware
To update the SANLink2 rmware, rst download that latest rmware from PROMISE. Then use
the utility to update it. Note that all I/O function will cease and any drives attached through the
SANLink2 ports will be unmounted when the rmware is updated. So unmount any drives that will
be affect before proceeding to update the rmware.
SANLink2 8G FC/16G FC/10GBase-T/10G SFP+
Click the Update button and follow the menu prompts to locate the rmware le you downloaded and
install it in the SANLink2.
12
Page 15

SANLink2 F2102/F2202/ E2002t/E2002p
Queue Depth
SANLink2 F2102 and F2202 include Queue Depth conguration located in the Device tab of the utility
menu. This allows the user to set a maximum on the number of unexecuted commands from the OS
that are allowed to queue.
Promise Technology
To change the Queue Depth, use the pull-down menu to select a maximum number of OS commands
allowed to queue. Note that it is necessary to restart the device for the new setting to take effect.
Important
The Queue Depth setting on the storage must be equal to,
or greater than the Queue Depth setting on the SANlink2
device.
13
Page 16

SANLink2 Driver and Utility Installation
SANLink2 8G FC/16G FC/10GBase-T/10G SFP+
Changing the SFP+ module
The SFP+ modules for the two ports on SANLink2 can be changed in the case of a module failure or,
in the case of optical Ethernet, to change the type of ber optical cable used. If you do change the
module, rst make sure it is compatible with the SANlink2 you are using.
Inserting the wrong SFP+ type
If you do happen to insert an incompatible SFP+ module into a receptacle on the SANLink2, you will
see an error message when you launch the SANLink2 Utility. The message that appears is different
for the Fibre Channel models F2102 and F2202 than the message that appears if you insert the wrong
type of module in either the E2002p (10G SFP+) or E2002t (10GBase-T).
Wrong module type warning for SANLink2 8G FC/16G FC
Wrong module type warning for SANLink2 10G SFP+
14
Page 17

SANLink2 F2102/F2202/ E2002t/E2002p
Promise Technology
ContaCtIng teChnICal suPPort
PROMISE Technical Support provides several support options for PROMISE users to access
information and updates. We encourage you to use one of our electronic services, which provide
product information updates for the most efcient service and support.
Promise offers local Phone Support for SANLink2 during normal business hours Monday to Friday.
Please check the Contact Us page for phone numbers of local Phone Support and other contact
information.
PROMISE E-Support: https://support.PROMISE.com
PROMISE web site: http://www.PROMISE.com//
When you contact us, please have the following information available:
• Product model and serial number
• BIOS, rmware, and driver version numbers
• A description of the problem / situation
Return the product to your dealer or retailer or contact Promise technical support for instructions
before shipping the product.
15
 Loading...