

Page 1
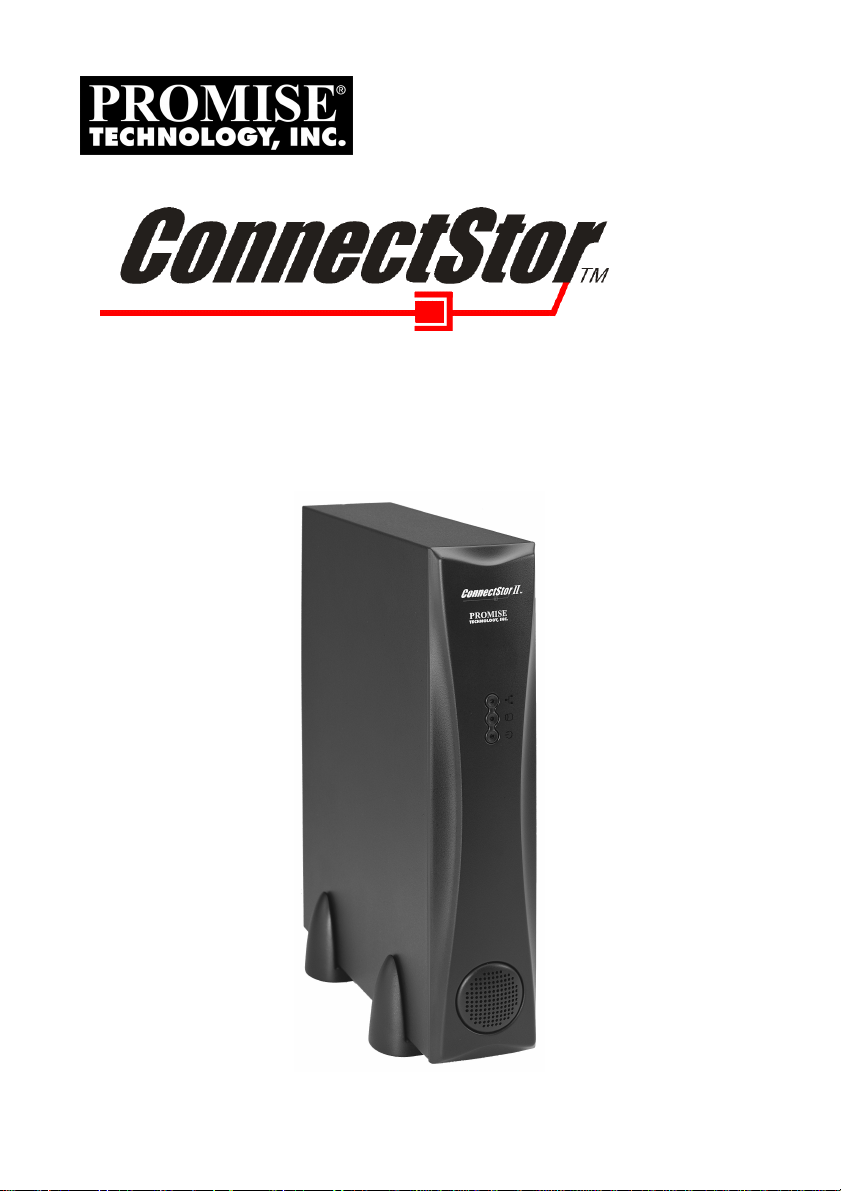
I
I
User Manual
Version 13.4
Page 2

ConnectStor II User Manual
Copyright
Copyright by Promise Technology, Inc. (“Promise”), 2001. No part of this manual may be
reproduced or transmitted in any form without the expressed, written permission of Promise.
Trademarks
All trademarks are the property of their respective holders.
Important data protection information
You should back up all data before installing any drive controller or storage peripheral.
Promise is not responsible for any loss of data resulting from the use, disuse or misuse of this
or any other Promise product.
Notice
Although Promise has attempted to ensure the accuracy of the content of this manual, it is
possible that this document may contain technical inaccuracies, typographical, or other errors.
Promise Technology, Inc. assumes no liability for any error in this publication, and for
damages, whether direct, indirect, incidental, consequential or otherwise, that may result from
such error, including, but not limited to loss of data or profits.
Promise provides this publication “as is” without warranty of any kind, either express or
implied, including, but not limited to implied warranties of merchantability or fitness for a
particular purpose.
The published information in the manual is subject to change without notice. Promise
reserves the right to make changes in the product design, layout, and driver revisions without
notification to its users.
Hard Disk Drive Selection Warning
This product of Hard Disk Drives are rated, input voltage 5/12 V DC, loading current 0.6/0.9
A maximum. TUV approved Hard Disk Drive is preferred for TUV compliance.
Hard Disk drive – Optional, compliant to UL Category NWGQ2, generic, two provided, input
voltage rated 5V DC/0.6A, 12V DC/0.9A maximum, minimum clearance from non-insulated
live parts 4.0 mm.
Power Cord Warning
For the power supply of this equipment, an approved power cord must be used. For a rated
current up to 2A and an equipment weight more than 3 kg (6.6 pounds), a power cord not
lighter than H05VV-F, 3G, 0.75mm
2
, must be used.
Lithium-Ion Battery Warning
CAUTION: Danger of explosion if battery is incorrectly replaced. Replace only with the
same or equivalent type recommended by the manufacturer. Dispose of used batteries
according to the manufacturer’s instructions.
ii
Page 3

Radio Frequency Interference Statement
This equipment has been tested and found to comply with the limits for a Class B digital
device, pursuant to Part 15 of the FCC Rules. These limits are designed to provide reasonable
protection against harmful interference in a residential installation. This equipment generates,
uses and can radiate radio frequency energy, and, if not installed and used in accordance with
the instruction may cause harmful interference to radio communications. However, there is no
guarantee that interference will not occur in a particular installation. If this equipment does
cause harmful interference to radio or television reception, which can be determined by
turning the equipment off and on, the user is encouraged to try to correct the interference by
one or more of the following measures:
• Reorient or relocate the receiving antenna.
• Increase the separation between the equipment and receiver.
• Connect the equipment into an outlet on a circuit different from that to which the
receiver is connected.
• Consult Promise Technology, Inc. or an experienced radio/TV technician for help.
This device complies with Part 5 of the FCC Rules. Operation is subject to the following
conditions: (1) This device may not cause harmful interference, and
(2) this device must accept any interference received, including interference that may cause
undesired operation.
NOTE: Only digital device equipment CERTIFIED CLASS B should be attached to this
equipment and that must have shielded cables.
iii
Page 4

ConnectStor II User Manual
Table of Contents
Chapter 1: Introduction.............................................................................................. 1
Key Features ...................................................................................................... 2
Specifications..................................................................................................... 3
Interface ..................................................................................................... 3
Enclosure ................................................................................................... 3
Physical/Environmental ............................................................................. 3
Chapter 2: Getting Started .........................................................................................5
Necessary Equipment for Installation ................................................................ 5
Information Type ....................................................................................... 6
Location ..................................................................................................... 6
Unpacking ConnectStor II ................................................................................. 7
Installing Hard Drives........................................................................................ 8
Connecting the ConnectStor II Hardware ........................................................ 11
Install the Mounting Foot Brackets.......................................................... 11
Connect the Network Cable ..................................................................... 11
Connect the Power Cord .......................................................................... 12
Power Switch ........................................................................................... 12
Assigning a Static IP Address .......................................................................... 12
Chapter 3: Configuration ......................................................................................... 15
Logging In........................................................................................................ 16
About ConnectStor II’s Configuration Menu................................................... 17
Changing or Viewing System Settings............................................................. 19
Changing Network Settings ..................................................................... 19
Changing Date/Time Settings .................................................................. 21
Configuring UPS Support........................................................................ 23
Configuring E-Mail Notification Options ................................................ 24
Changing IP Address Assignment Mode ......................................................... 26
Changing Language Setting ..................................................................... 27
Viewing Operating Status................................................................................ 28
User Options .................................................................................................... 29
Viewing Current Users............................................................................. 29
Creating a User......................................................................................... 30
Modifying a User ..................................................................................... 31
Deleting a User......................................................................................... 33
File Sharing...................................................................................................... 34
Viewing Current Shared Folders.............................................................. 34
Creating a New Shared Folder .................................................................35
Modifying Shared Folder Properties ........................................................ 36
Deleting an Existing Shared Folder ......................................................... 37
Sharing List...................................................................................................... 38
UNIX/Linux (NFS) Servers............................................................................. 39
iv
Page 5

Viewing Current Servers.......................................................................... 39
Creating New UNIX/Linux Servers ......................................................... 40
Deleting a UNIX/Linux Server ................................................................40
Password Server Options................................................................................. 41
Enabling Password Server Support.......................................................... 41
Disabling Password Server Support......................................................... 43
RAID Options.................................................................................................. 44
About RAID Arrays ................................................................................. 44
Viewing Current RAID Array Status ....................................................... 45
Viewing Physical Drive Status................................................................. 46
Changing RAID Level ............................................................................. 47
Halt / Reboot ConnectStor II ........................................................................... 49
Halting ConnectStor II............................................................................. 49
Remotely Rebooting ConnectStor II ........................................................ 49
Advanced Configuration Commands............................................................... 50
Updating System...................................................................................... 50
Restoring ConnectStor II to Default Settings........................................... 51
Using the Clone Feature........................................................................... 52
Exit Command ................................................................................................. 52
Chapter 4: Using ConnectStor II.............................................................................. 53
Mapping ConnectStor II to Individual PCs...................................................... 53
Windows XP ............................................................................................ 53
Windows 98, ME, NT4, 2000.................................................................. 58
UNIX/Linux............................................................................................. 61
Chapter 5: File Sharing Guidelines.......................................................................... 63
Microsoft Network (over TCP/IP or NetBEUI) ............................................... 63
UNIX/Linux Network (over TCP/IP) .............................................................. 64
Storage/File Sharing Models............................................................................ 65
User Access Sharing Model: An Example ............................................... 66
Chapter 6: Troubleshooting ..................................................................................... 69
Using the Front Panel Display ......................................................................... 69
Power Status LED Messages.................................................................... 69
General Troubleshooting Issues....................................................................... 71
TCP/IP Is Not Enabled in Windows 95/98/ME ....................................... 71
Cannot Find Workgroups in Windows 95/98/ME ...................................71
Cannot See ConnectStor II Over Network ............................................... 72
Cannot Find ConnectStor II in Network Neighborhood .......................... 72
Problems Mounting ConnectStore II on UNIX/Linux............................. 73
Appendix A: Limited Warranty ...............................................................................75
Disclaimer of other warranties ................................................................. 75
Your Responsibilities............................................................................... 76
Returning Product for Repair........................................................................... 77
Appendix B: Contacting Promise Support............................................................... 79
v
Page 6

ConnectStor II User Manual
Standard Conventions
NOTE: Supplementary material containing important
information
Screen messages:
Type of text Display
Normal Looks like this
Messages appearing on screen
Typed commands or text
Values you replace with type
File, path, and share names
Messages appearing on screen
“Text that you type”
“Values that you replace”
Filenames
vi
Page 7

Chapter 1: Introduction
Thank you for purchasing Promise Technology’s ConnectStor network attached storage
(NAS) subsystem. ConnectStor II takes full advantage of Promise Technology's leadership in
ATA RAID product design by providing RAID 0, 1 support for the latest low-cost Ultra
ATA/100 hard drives.
ConnectStor II offers users the ability to provide continuous data protection using two-drive
RAID 1 mirroring or to build increased storage capacity using RAID 0 striping of two drives.
Either way, users take advantage of the increased economy, performance, and capacity of
Ultra ATA drives for their particular network environment.
ConnectStor II houses file sharing protocols for Microsoft® Windows® 95, 98, NT4, 2000,
Me, XP; and Linux NFS 2.0/3.0, making it virtually a plug and work device with most major
network operating systems.
Best of all, you can easily manage and configure ConnectStor II from most major web-based
browsers (see Specifications). The password-protected management utility lets users and/or
network administrators customize ConnectStor II for direct connection to UNIX (NFS),
HTTP and SMB/CIFS (Windows) network protocols and includes a full suite of reporting
and monitoring tools.
1
Page 8

ConnectStor II User Manual
Key Features
The following are key features of the Promise ConnectStor II:
Drive Types
• Supports up to two 3.5-inch IDE drives (Ultra ATA, DMA, and EIDE)
• Supports Ultra ATA/133, Ultra ATA/100, Ultra ATA/66, Ultra ATA/33, EIDE, and
Fast ATA-2 speeds (UDMA 5/4/3/2/1/0 and DMA 2/1/0, respectively)
Status Indicators
• Power Status LED shows power on/off and system status
• Drive Activity LED displays drive activity (reads or writes)
• Network Activity LED displays individual network requests
Ultra ATA/100 Support
• 100MB/sec burst data transfers of Ultra ATA/133/100 drives
• Implements high-speed CRC error-checking
RAID 0 (Striping) Functions
• Links to two drives as a single large capacity drive volume
• With two drives, doubles sustained data transfer rate to speed up large file transfers
• Does not offer fault protection
RAID 1 (Mirroring) Functions
• Sends identical data to two installed drives
• Maintains access to data if a single drive fails
• Rebuilds data to replacement drive automatically
Network Support
• Built-in 10/100Mb/s Ethernet controller for high data transfers
• Supports popular network protocols: TCP/IP, NFS, SMB/CIFS
Configuration & Monitoring
• Easy setup and monitoring of ConnectStor II unit via web browser (requires MS
Internet Explorer 5 or higher, Netscape Navigator 4 or higher)
• IPassign™ utility to manually assign IP address IF network does not support
automatic IP address assignment (DHCP/BOOTP)
2
Page 9

Chapter 1: Introduction
Specifications
Interface
• Fits most 3.5-inch form factor Ultra ATA hard disk drives
(ConnectStor II model may or may not include installed hard drives)
• Standard ATA/IDE interface
• Built-in power, network activity, and drive activity LEDs
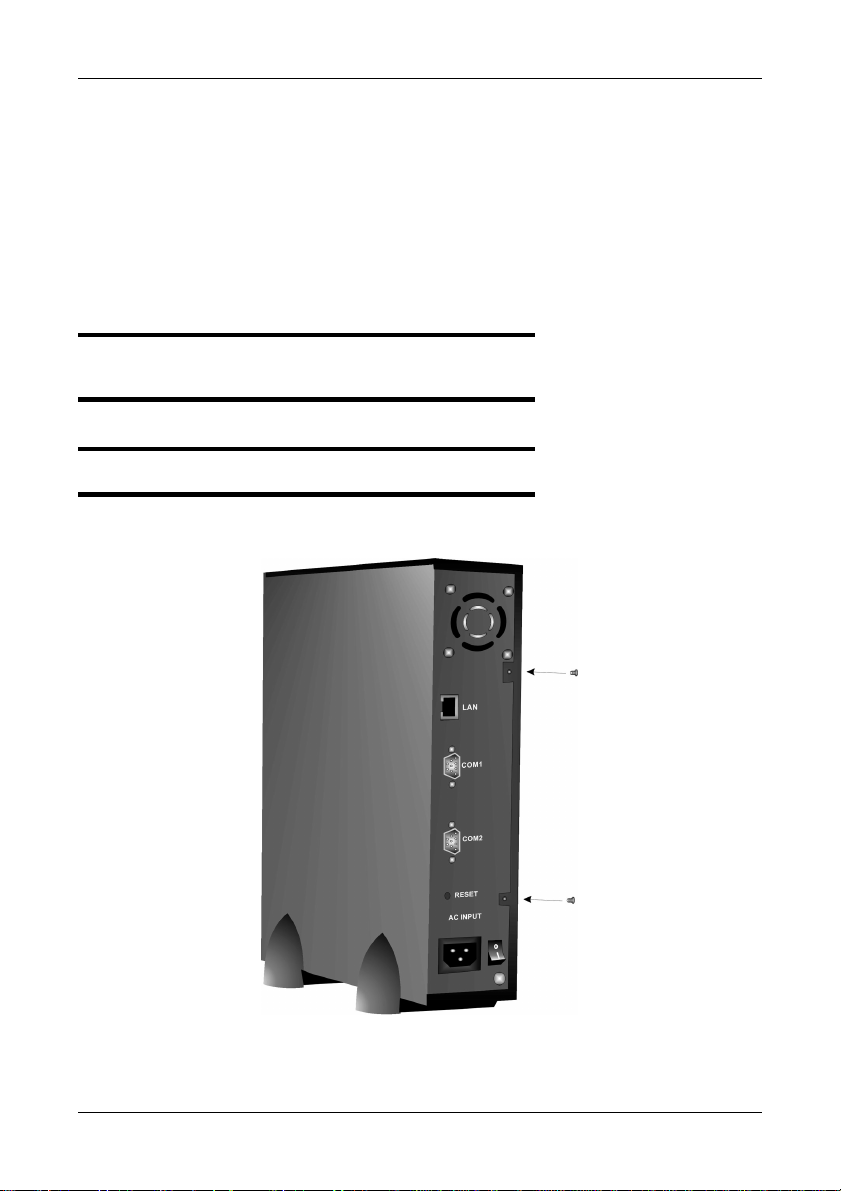
Enclosure
• Dedicated cooling fan
• 10/100BaseT connector
• Serial port (COM2) for optional use of APC-compatible Uninterruptible Power
Supply (UPS)
• Power on/off switch
• Internal automatic 110/220 power selector
• Vertically (standard) or horizontal mounting
Physical/Environmental
Dimensions
• Enclosure: 8.5 x 5.75 x 1.625 inches (21.59 x14.605 x 4.128 cm)
Operating Temperature
• 32°F to 113°F (0°C to 45°C)
Relative Humidity
• 10% to 95% (non-condensing)
Warranty
• Two years limited parts and labor
3
Page 10

ConnectStor II User Manual
NOTES
4
Page 11

Chapter 2: Getting Started
This section is designed to help prepare ConnectStor II for installation into your network.
Please read through this chapter carefully before attempting to install ConnectStor II.
Your ConnectStor II network attached storage system comes with all of the hardware and
software you need to connect it to your network quickly. It works on a 10Base-T/100BaseTX Ethernet network.
Getting the ConnectStor II storage system up and running consists of the following steps:
• Unpacking the ConnectStor II unit
• Installing Hard Drives
• Install ConnectStor II mounting hardware and cables
• Power on ConnectStor II unit
• Await hard drive initialization and bootup
• Assign IP address to unit (if necessary)
• Open web browser
• Customize ConnectStor II folders and/or user permissions
• Map individual PCs to ConnectStor II unit
• Begin saving and retrieving files to ConnectStor II
Necessary Equipment for Installation
You will need the following items before you can install and use your ConnectStor II network
attached storage system:
• A 10Base-T/100Base-TX Ethernet network.
• A Windows-based personal computer or workstation with a CD-ROM drive, a 1.4
MB floppy disk drive and a connection to your network. (Systems without a floppy
disk drive may download the installation utilities from the Promise Technology
website at http://www.promise.com.)
• A network hub, switch or router with a free port (for network connection) OR a
crossover cable if you are connecting ConnectStor II directly to a single computer.
• An available IP (Internet Protocol) address to be used by the ConnectStor II unit
(this may be automatically assigned by some networks or you may need to ask your
network administrator).
• The netmask address used on your network (this may be automatically assigned by
some networks or you may need to ask your network administrator).
• An assigned gateway address, if available (may be automatically assigned by some
networks or you may need to ask your network administrator).
5
Page 12

ConnectStor II User Manual
For convenience, record your ConnectStor II network attached storage system information as
described below:
Table 1: ConnectStor II System Information
Information Type Location
TLA Number Back of ConnectStor II unit
Serial Number Back of ConnectStor II unit
IP address for ConnectStor II Obtain from system administrator
Password Initial default is “password”
Subnet Mask Address Obtain from system administrator
Gateway Address1 Obtain from system administrator
Workgroup or Domain Name Get from system administrator
Ethernet Address2 Back of ConnectStor II unit
1
Required for Internet or Intranet access.
2
The Ethernet (MAC or hardware) address format is 00-01-55-XX-YY-ZZ, where X, Y and
Z represent a unique set of numbers.
6
Page 13

Chapter 2: Getting Started
Unpacking ConnectStor II
The ConnectStor II package should contain the following items:
• ConnectStor II enclosure
• Two (2) mounting foot brackets for vertical footprint
• Four (4) rubber feet for horizontal footprint
• ConnectStor II User's Guide
• (1) Power cord
• (1) Category-5 Ethernet cable with RJ-45 connectors
If any of the contents are missing or damaged, please contact your dealer or distributor
immediately.
Please take a moment to visit the Promise website (www.promise.com/warranty
registration of your ConnectStor II.
WARNING: ConnectStor II, like every other type of PC, is
subject to static electricity. Be sure that you are properly
grounded (Promise recommends that you wear an anti-static
strap, or place a free hand on a grounded object), before
installing.
) for online
7
Page 14
ConnectStor II User Manual
Installing Hard Drives
ConnectStor II is designed for rapid user installation of two (or one) unformatted Ultra
ATA/100 hard drives. Check each drive to insure that they are jumpered correctly as "master"
or "single" drive (see manufacturer's instructions and/or directions label on the drive).
If you install only one hard drive, ConnectStor II will automatically format it as a single-disk
RAID 0 array. If you install two hard drives, ConnectStor II will automatically format them
as a two-disk RAID 1 array.
You may later convert the RAID 1 two-disk array to a RAID 0 two-disk array (see page 47).
CAUTION: You cannot install one hard drive now and add
another hard drive later. If you intend to use two hard drives
with your ConnectStor II, install both of them now
NOTE: Promise recommends use of identical drives for best
performance and compatibility.
1. Unscrew the mounting screws that secure the cover of your ConnectStor II unit as
shown below:
8
Page 15
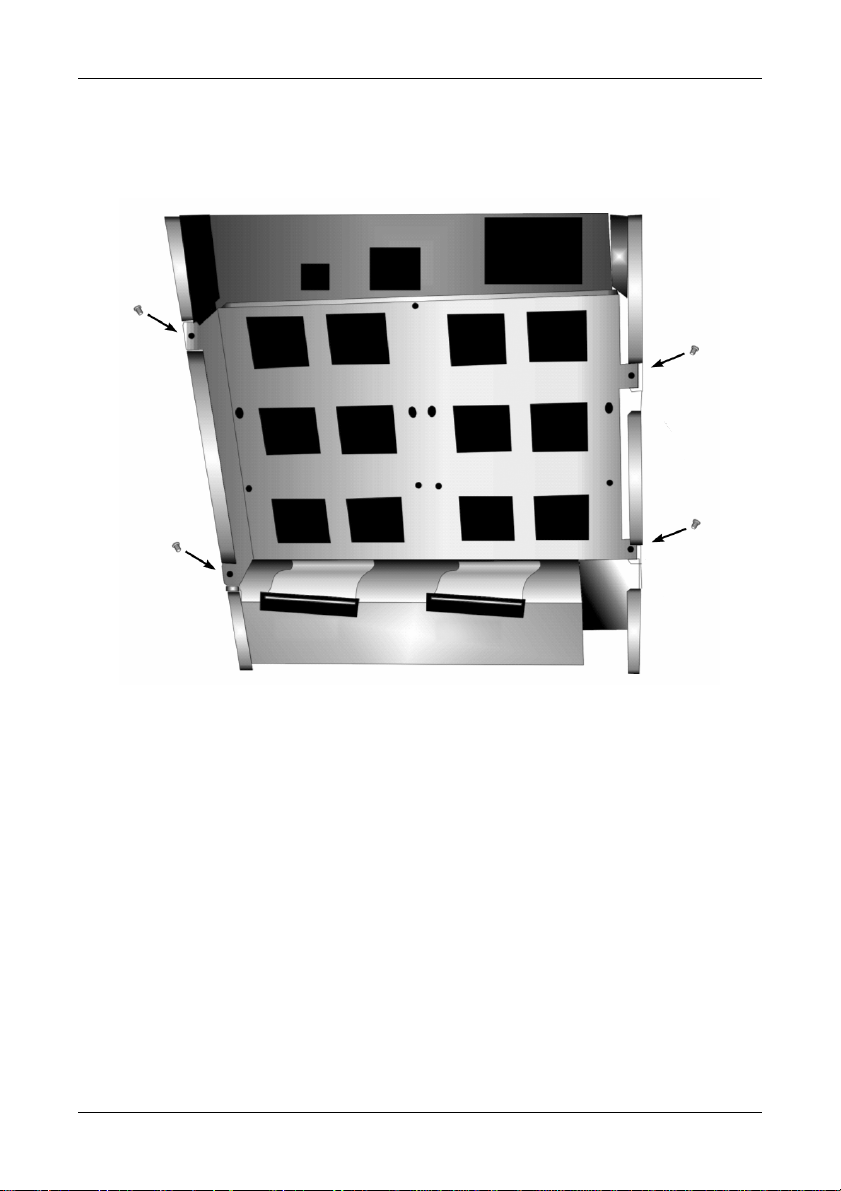
Chapter 2: Getting Started
2. Unscrew and remove the drive mounting tray from the ConnectStor II chassis as shown
below:
Top of ConnectStor II Unit
Disk 1 Disk 2
Bottom of ConnectStor II Unit
9
Page 16
ConnectStor II User Manual
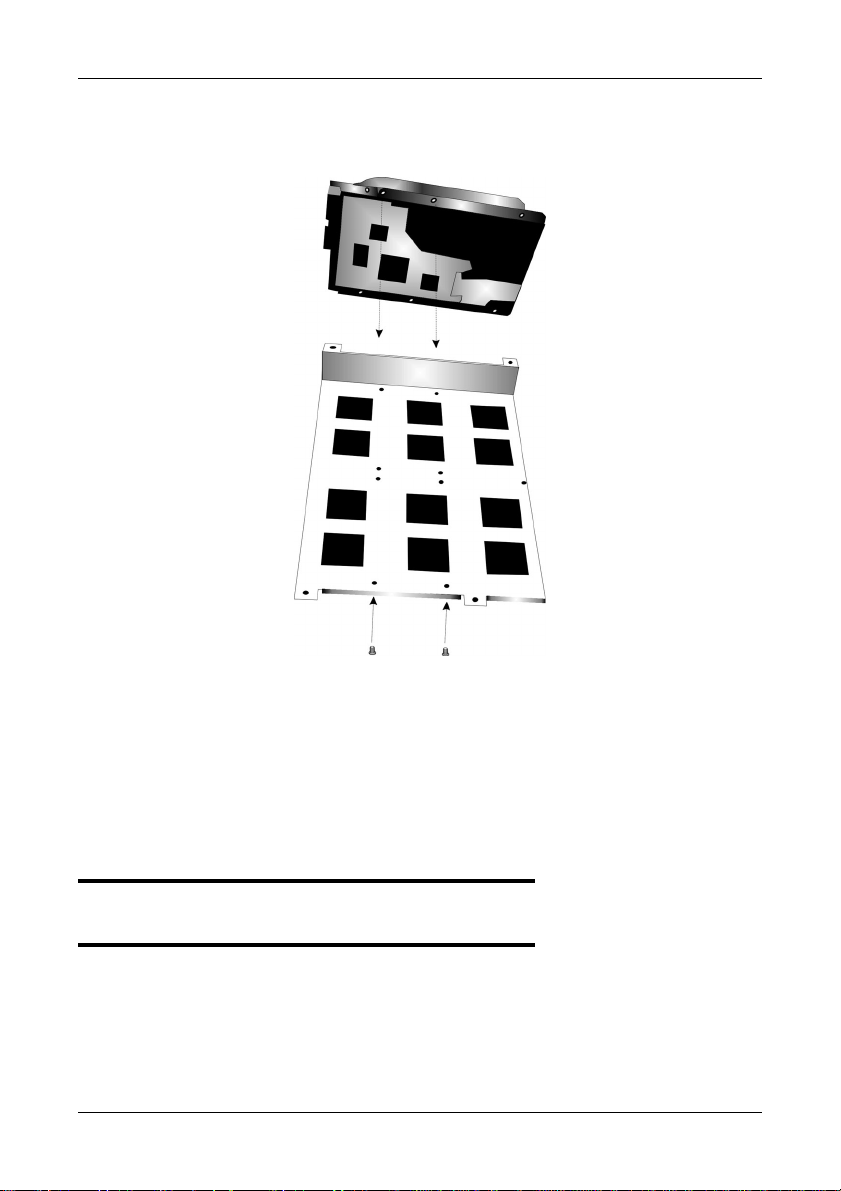
3. Position drive(s) over screw holes on platter. Secure using screws that go up underneath
and through the mounting tray and into the four screw holes on the bottom of each drive
as shown below:
4. Connect ATA cables and power supply connectors to each drive
5. Re-secure drive mounting tray to ConnectStor II with screws.
6. Replace the cover to your ConnectStor II unit and replace screws.
7. Power on ConnectStor II.
The first time the unit powers on with new drive(s), ConnectStor II will recognize the
unformatted drive(s). ConnectStor II will format the drive(s) and create a default RAID 0
array if there is only one drive present or RAID 1 array if there are two drives.
NOTE: A Supervisor can change the default RAID 1 array to a
two-drive RAID 0 array AFTER this initial configuration is
complete (see changing RAID setting on page 47).
10
Page 17

Chapter 2: Getting Started
Connecting the ConnectStor II Hardware
Install the Mounting Foot Brackets
The ConnectStor II unit may be mounted upright, or it may be mounted on its side.
To mount upright, slip the two clip-on brackets on to the bottom of the unit. Position one
bracket about one-inch (2.5 cm) from the front of the unit. Place the other mounting foot the
same distance from the back of the unit.
To mount the ConnectStor II on its side, attach the four rubber feet (buttons) to the side of the
unit.
Mounting Foot
Brackets
Connect the Network Cable
Connect one end of the (supplied) network cable to the LAN (Ethernet) connector located on
the back of the ConnectStor II unit. Connect the other end of the network cable to a network
hub.
11
Page 18
ConnectStor II User Manual
Connect the Power Cord
Connect one end of the power cord to the AC Power connector located on the back of the
ConnectStor II unit. Connect the other end of the power cable to a power source or
uninterruptible power supply.
NOTE: The ConnectStor II unit automatically recognizes and
switches to proper 110V or 220V settings.
Power Switch
Switch on the power to the ConnectStor II unit.
Assigning a Static IP Address
If your network has a DHCP (Dynamic Host Configuration Protocol) server, it will
automatically assign a dynamic IP address to your ConnectStor II. Proceed to
Chapter 3.
If your network does NOT automatically assign IP addresses to newly-attached networkready devices using a DHCP server, you MUST perform the following steps in order to
manually assign a unique, static IP address from a Windows-based PC:
1. Insert the CD to your CD-ROM drive.
2. Double-click the CD-ROM button.
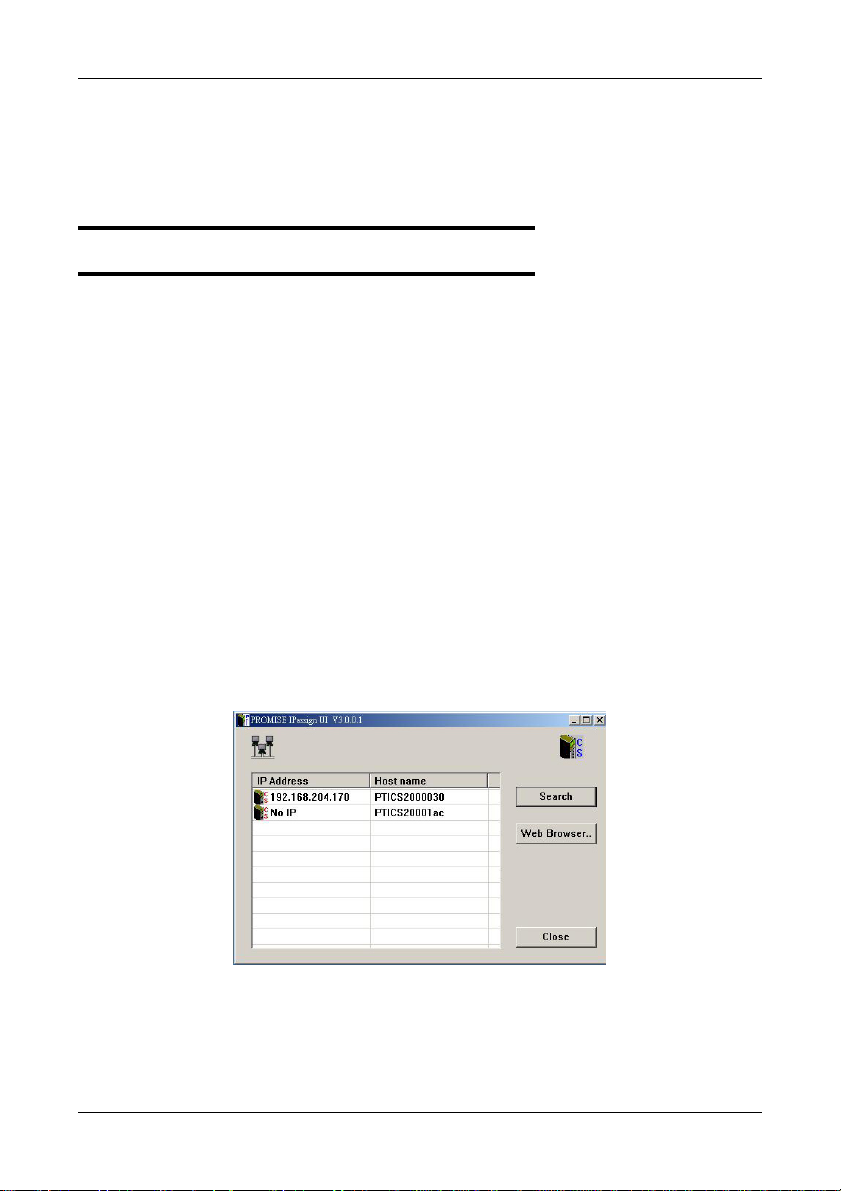
3. Open the directory and execute the program: IPassign version 3.0.0.1.
The IPassign dialog box displays all ConnectStor II units it finds on the network
(below).
4. Click the No IP entry, then click the Search button. The dialog box will show as
below.
12
Page 19
Chapter 2: Getting Started
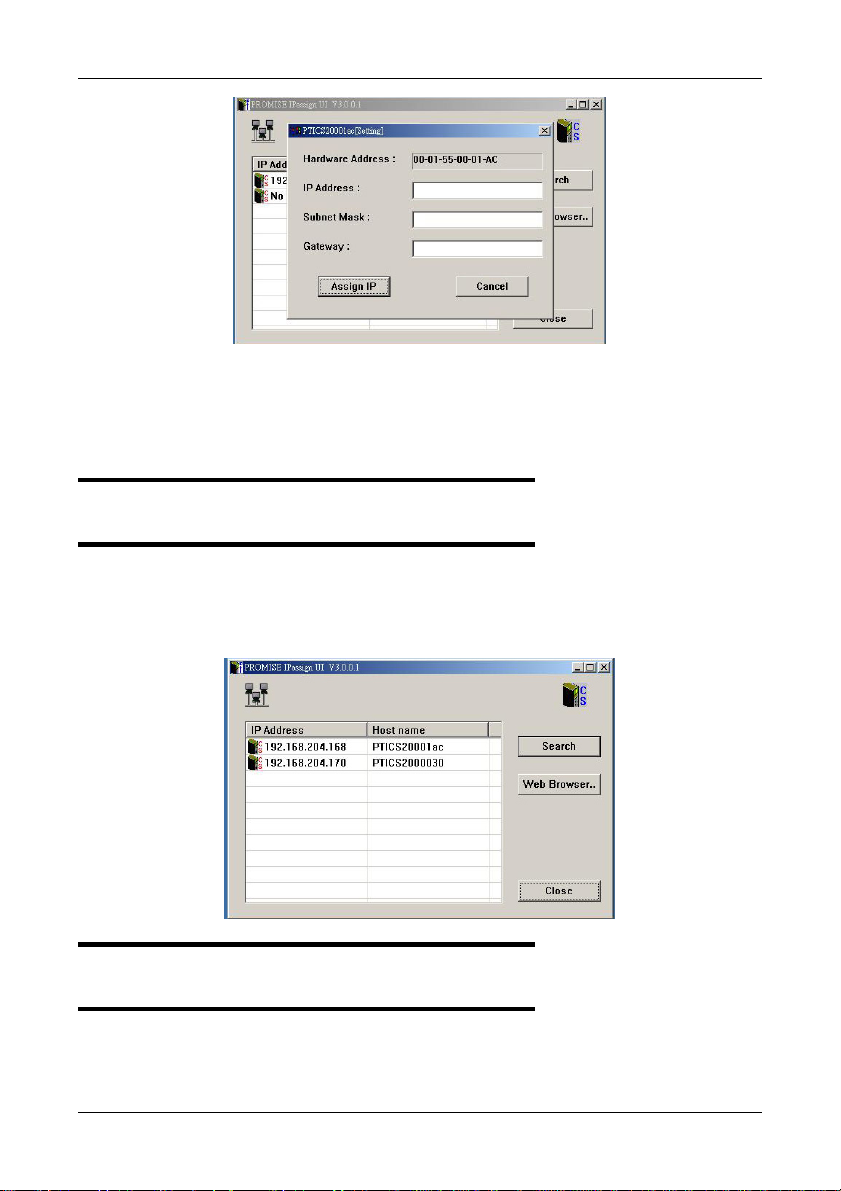
5. Type the IP address you want to use in the IP Address: field (above).
6. Type 255.255.255.0 in the Subnet Mask: field.
7. Type the IP address of your Gateway server in the Gateway: field.
8. Click the Assign IP button.
CAUTION: Check and recheck your entries in this menu.
Incorrect entries will prevent you from seeing the ConnectStor
II on your system.
After you click the Assign IP button, IPassign will verify that your settings are
correct and the requested IP address is not already in use. If everything is correct, the
IPassign dialog box will display the new IP address information (below).
NOTE: If there is no IP address assigned within ten minutes,
either through the APassign utility or the DHCP server, the
ConnectStor II will set its own IP address to 192.168.204.204.
13
Page 20
ConnectStor II User Manual
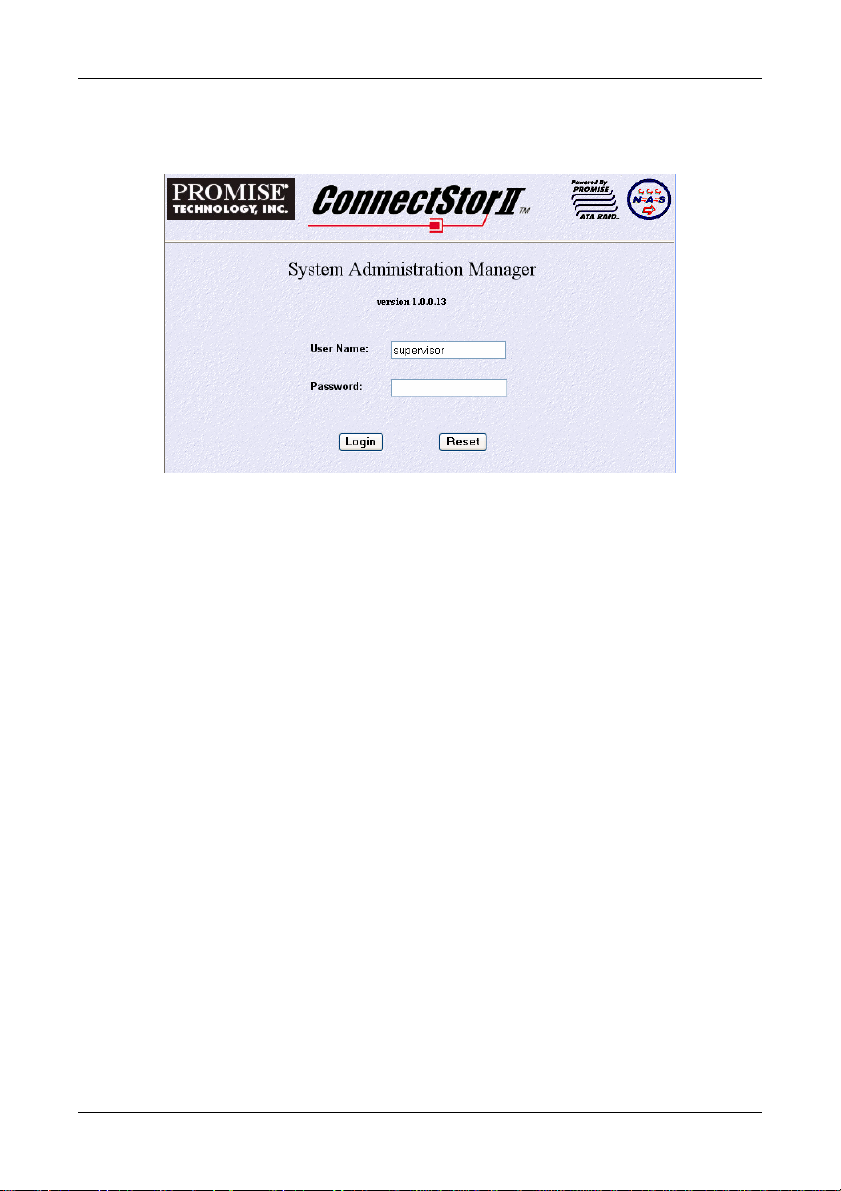
9. Choose an IP address and click the Web Browser button. The
ConnectStor II screen will display (below).
This verifies the successful assignment of a Static IP address.
14
Page 21

Chapter 3: Configuration
This section is designed to guide you in connecting to and using ConnectStor II’s built-in,
browser-based Configuration utility, the System Administration Manager.
Generally this utility will be used by a network administrator or individual responsible for
customizing ConnectStor II’s default internal file system and user rights settings for saving
and retrieving files. On ConnectStor II, this individual is known as the “supervisor”.
The System Administration Manager also controls hardware settings for system password
access, date/time stamp, email notification for specific events, use of uninterruptible power
supplies, operating system language compatibility.
Finally, the utility monitors ConnectStor II’s hardware status and drive array status. Since
most settings are immediately executed, please review this section in its entirety prior to using
the utility.
NOTE: If you wish to configure ConnectStor II for use with
UNIX-based or Linux-based servers, you must first connect to
ConnectStor II through a PC using an Internet browser, then
select the UNIX (NFS) option to specify the Host Name and
Export IP address information for your UNIX server. See page
39 for instructions.
15
Page 22
ConnectStor II User Manual
Logging In
1. From any Internet-connected Windows or Linux computer, open your browser of choice
(Internet Explorer v.5.0 or later, or Netscape Navigator 4.0 or later).
2. In the address bar of your browser, input the following:
http://x.x.x.x/admin/
where x.x.x.x is the IP address assigned to ConnectStor II as described in the previous
chapter
3. Press the Enter key.
NOTE: Remember multiple ConnectStor II units may exist on a
single LAN. Make sure you are using the correct IP address of
the ConnectStor II unit that you wish to configure.
4. Once the ConnectStor II unit corresponding to the IP address is found, the following
login screen should appear in your browser:
5. The default User Name supervisor will appear in the name field. Enter the correct
password in the password field. The default administrative password is password.
6. Click the Login button to enter or Reset button to cancel.
CAUTION: Because the ConnectStor II's password default is the same for all
units, Promise recommends that the supervisor change the password as soon
as possible after installation. See Modifying User Information on page 31 for
instructions.
NOTE: For future reference, the version number above the User Name field is
the firmware version number of your ConnectStor II unit.
16
Page 23
Chapter 3: Configuration
About ConnectStor II’s Configuration Menu
When the user/supervisor enters the Configuration Utility, the following screen should appear
below:
The Configuration Utility is divided into three main panels. The top panel simply identifies
the unit. Clicking the Promise Technology, Inc. logo links the user to the www.promise.com
website.
The left side panel contains the selection menu that accesses the different administrative
control settings as follows:
System Settings: allows supervisor to change network and support settings for hardware
and operating systems and monitor system status
User Options: allows supervisor to create, delete, or modify individual user rights to
access the unit and protect shared data folders
File Sharing: allows supervisor to create, delete, or modify shared data folders
Sharing List: allows users and supervisor to view shared and user’s folders, and
information about them
UNIX (NFS): sets up support for UNIX/Linux operating systems
Password Server: enables/disables support for remote password server for added file
protection
RAID Options: shows status of RAID array and allows changing selection of RAID
level
Halt/Reboot: lets supervisor halt or reboot the ConnectStor II unit
17
Page 24

ConnectStor II User Manual
Advanced: lets supervisor update internal operating system software, return system to
default settings, or clone the user settings from one ConnectStor II to additional units
Exit: logs user/supervisor out of Configuration utility and returns to logon window.
All entry fields and status displays are shown in the large information panel at lower right.
18
Page 25
Chapter 3: Configuration
Changing or Viewing System Settings
Selecting System Settings from the Configuration Menu will display several system-related
options for the user/supervisor as follows:
• Network Settings
• Date/Time Change
• UPS Options
• E-Mail Options
• IP Assignment
• Languages
• Operating Status
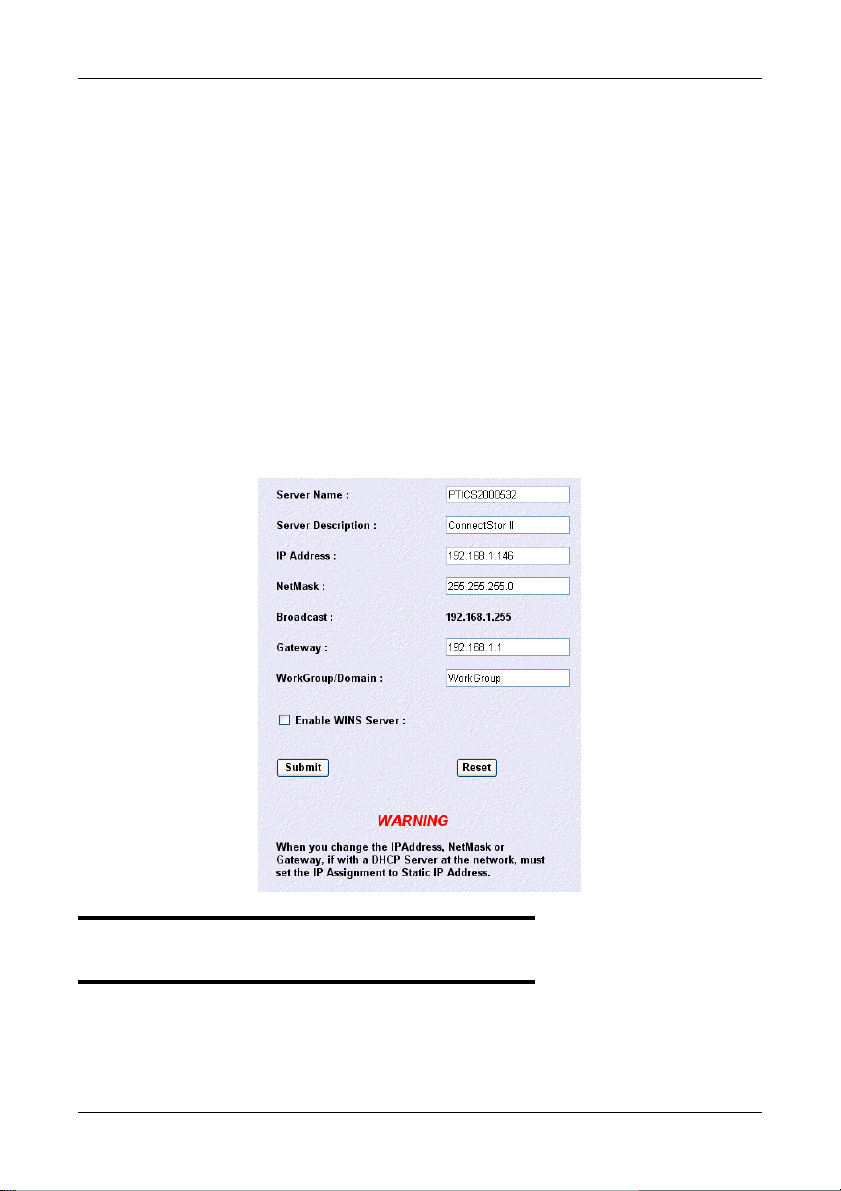
Changing Network Settings
The default selection under System Settings is Network Settings, which displays the
following screen in the information panel:
CAUTION: If there is a DHCP Server on the network, you must
set the IP Assignment to Static IP address before you change
the IPAddress, NetMask or Gateway. See page 26.
19
Page 26

ConnectStor II User Manual
You would change these settings if configuring ConnectStor II for use by a specific
department or workgroup that operates within a larger local area network. The numbers
shown above are merely examples. Consult your network administrator as to the correct
information to input in the appropriate fields as follows:
Server Name: allows the user to change the network name of the device as it appears on
the network
Server Description: allows user to provide a brief description of the unit and content it
may contain (such as an Accounting Data Server)
IP Address: allows user to set fixed IP address for the unit if NOT using a DHCP server
to assign the address dynamically
NetMask: typically the default address (255.255.255.0) unless you're creating a subnet
(a logical division of a physical network)
Broadcast: the address used to send data to all
network.
Gateway: address that links different parts of a network together (default is 0.0.0.0)
Workgroup/Domain: inputting a specific workgroup or domain name.
Enable WINS Server: checking the Enable box and entering the address of the WINS
Server (may not be available on your network) eliminates the need for network broadcast
requests to resolve computer names and IP addresses
1. When you have completed inputting information, click on the Submit button. A
confirmation window will appear.
2. Click OK button to confirm.
host servers on a particular logical
20
Page 27

Chapter 3: Configuration
Changing Date/Time Settings
For purposes of tracking ConnectStor II statistics such as uptime and events, the unit uses an
internal clock. After selecting Date/Time Change from the Configuration side menu, the
following will appear in the main information panel:
Setting Date/Time to Local
If the default date/time setting is NOT correct for your geographic area, you may click the
Set to Local Computer Date/Time button to reflect the local date/time as it appears on
your network. A confirmation window will appear. Click OK to confirm.
Setting Date/Time to Other Locations/Time Zones
1. Select other geographic settings by clicking the Other Date/Time Setting Locations
button. The following screen will appear:
21
Page 28

ConnectStor II User Manual
2. Click the down arrow in the Time Zone regions to select a different time zone as
shown below:
3. Select the Time Zone and enter the Date desired.
4. Click the Submit button. A confirmation window will appear.
5. Click OK to confirm.
NOTE: You may click the Return to Date/Time Change button
at any time without modifying the entries.
22
Page 29

Chapter 3: Configuration
Configuring UPS Support
Clicking the UPS Options heading from the Configuration Menu will display the current
UPS setting for your ConnectStor II. The unit will recognize the use of an APC-compatible
uninterruptible power supply in its internal operating system.
Note that the default for this setting is Disabled, as shown below in the information panel.
Enabling UPS
1. If using an UPS subsystem to provide power to ConnectStor II, click the Enable
Uninterruptible Power Supply radio button in the main information panel. The
screen below will appear:
2. Enter the number of minutes that you want ConnectStor II to continue to operate
after a power outage is detected. This should provide enough time for all users to
save or retrieve data so that no data is lost.
3. Click the Submit button. A confirmation window will appear.
4. Click OK to confirm.
23
Page 30

ConnectStor II User Manual
Configuring E-Mail Notification Options
Your ConnectStor II unit can send event notification messages to a designated email address
(typically the network administrator). Notification events include drive fail, low fan speed,
high temp., UPS power consuming, etc... The default for this setting is Disabled as shown
below:
Enabling E-Mail Notification
1. If you wish to send an email notice to a particular network supervisor or other user,
click the Enable E-Mail Notification radio button in the main information panel.
The screen below will appear:
2. Enter the E-Mail address of the individual mailbox receiving notification (such as
supervisor@mycompany.com).
3. Enter the IP address and SMTP Server Port Number of your network's mail server in
the windows shown above.
4. Click the Submit button. A confirmation window will appear.
5. Click OK to confirm.
24
Page 31

Chapter 3: Configuration
6. Clicking OK reveals screen below that verifies the new settings:
7. Click the Send Test E-Mail Notice button to send a test notice to the designated
address.
8. A pop-up window will appear indicating the test e-mail has been sent. Check the
mailbox of the specified address to make sure the notice has been received.
9. Click OK to return to the E-Mail Options window.
25
Page 32

ConnectStor II User Manual
Changing IP Address Assignment Mode
Each device on the network must have a unique IP address in order to be accessed and seen
by network users. If you have run the IPassign utility (see page 12), you have already found
at least one unique IP address for your network. It is possible to keep that address or to assign
new addresses each time ConnectStor II is booted up.
To change the way that ConnectStor II is assigned an IP address, choose IP Assignment from
the Configuration System submenu. The following screen will appear:
Setting Dynamic IP Address Assignment
By default, ConnectStor II works with a DHCP (Dynamic Host Configuration Protocol)
server that assigns a unique IP (Internet Protocol) address for ConnectStor II each time
the unit is booted or requires use of the IPassign program.
1. Make sure the Dynamic IP Address radio button is highlighted to Enable this
option.
2. Click Submit button. Confirmation window will appear.
3. Click OK to confirm.
Setting Static IP Address Assignment
To have ConnectStor II use one specific IP address, select the Static IP address radio
button. Be sure all Network IP settings are correct (see page 19). If you are unsure, select
Dynamic IP Address. Refer to the Troubleshooting section (see page 69) if you cannot
change the IP address.
26
Page 33

Chapter 3: Configuration
Changing Language Setting
ConnectStor II supports the use of file and folder names in a variety of world language
character sets. The default language set chosen by ConnectStor II is 850-Western European.
ConnectStor II allows supervisor to change this setting in order for network users of another
language set to correctly view and create folder and file names that use unique characters
without missing or incorrectly translating those characters.
1. Click on the Languages option in the Configuration menu. The following screen will
appear:
2. Highlight the radio button of the corresponding multilanguage character set which your
Windows, NT, or UNIX-based operating system uses.
3. Click the Submit button. A confirmation window will appear.
4. Click OK to confirm.
CAUTION: It may be impossible to open or delete files or folder
names created using unique characters of unsupported
language sets.
27
Page 34

ConnectStor II User Manual
Viewing Operating Status
The user/supervisor can remotely view real-time operating status of ConnectStor II's
hardware status, including CPU temperature, hard drive temperature, CPU and system fan
status, and RAID status.
Clicking on Operating Status selection from Configuration Menu will display the following in the information panel:
Temperature readings should be less than 122°F (50°C) in normal operation. If it is higher,
one of the fans may be failing or the air passage through the ConnectStor II may be blocked.
28
Page 35

Chapter 3: Configuration
User Options
This Configuration Menu selection allows the user/supervisor to configure individual user
access permissions for ConnectStor II. Clicking on User Options from the Configuration
Menu will exhibit the following selections:
Current Users: displays a listing of all users defined by the supervisor. The default is to
show supervisor as the only user with full data and configuration rights.
Create User: allows adding users and assigning access rights to folders created on the
ConnectStor II hard drive array.
Modify User: permits changing the access rights for a previously-created user
Delete User: removes a user from the system listing and prevents that username from
accessing protected data folders
Viewing Current Users
Clicking on Current Users from the User Options submenu will display a table listing current
defined users in ConnectStor II as follows:
The table shows user name, storage limit allocated for each user, storage space remaining,
and unique User ID number.
29
Page 36

ConnectStor II User Manual
Creating a User
1. Clicking on the Create User selection from the User Options submenu will display the
following screen in the information panel:
2. Type a user name and password for the new user.
3. Confirm the password by retyping it in the Confirm Password field.
4. Assign the Storage Limit amount for each user in Megabyte units (1000MB = 1GB). A
zero will allow the user to access all available storage capacity.
5. If the new user will access ConnectStor II from a Unix/Linux platform, check the Unix
User box and type a unique ID number in the User ID field.
NOTE: You may assign a User ID to a non-Unix/Linux user.
Check the Unix User box and type an ID number.
6. Click on the Create button. A confirmation window will appear.
7. Click OK to confirm.
NOTE: New users will immediately appear in the Current Users
listing after they are created.
30
Page 37

Chapter 3: Configuration
Modifying a User
Once you have created users, you may later wish to modify individual settings for storage
capacity and user passwords. Perform the following steps:
1. Clicking on the Modify User selection from the User Options submenu will display the
following table will appear in the information panel:
2. From the table, select the user you wish to modify and click the Modify button in the
Action column. The screen below will appear. You may click the Return to Modify
User button at anytime to return to the previous screen without making changes.
3. You may change the amount of storage capacity assigned in the Storage Limit field. A
zero will allow the user to access all available storage capacity.
31
Page 38

ConnectStor II User Manual
4. Checking the Change Password box will bring up a password confirmation window
below:
5. Enter new password and retype in the Confirm New Password field.
6. Click the Modify button to make changes or Reset button to cancel.
The Modify Users table will display immediately.
32
Page 39

Chapter 3: Configuration
Deleting a User
WARNING: When you delete a User, you also delete the
User's home directory and all data in that directory will be
permanently lost.
1. Clicking on the Delete User selection from the User Options submenu will display the
following table in the information panel:
2. From the table, select the user you wish to delete and click the Delete command under
the Action column.
3. A confirmation window will appear. Click the OK button.
4. The Delete User table will be redisplayed without the just-deleted user.
33
Page 40

ConnectStor II User Manual
File Sharing
This Configuration Menu selection allows the user/supervisor to configure individual data
folders and the type of security for each. Clicking on File Sharing from the Configuration
Menu will exhibit the following selections:
Current Folder(s): displays a listing of all data folders defined by the supervisor. The
default is that no folders are defined and users have access to the entire storage capacity
of the RAID array.
Create Folder: allows adding private data folders and assigning access rights to those
folders created on the ConnectStor II hard drive array.
Modify Folder: changes the access rights for a previously-created folder.
Delete Folder: removes a defined folder and its data from the hard drive array.
Viewing Current Shared Folders
Clicking on Current Folders from the File Sharing submenu will display a table listing
current defined folders on the ConnectStor II unit as follows:
The table above shows shared folder name, brief custom description of data (if included),
type of security permission, and a listing of all valid users for shared folders that employ User
Mode (a list of specific users is created for a given folder).
Below the table is a description of the space remaining on the hard drive.
34
Page 41

Chapter 3: Configuration
Creating a New Shared Folder
1. Clicking on the Create Folder selection from the File Sharing submenu will display the
following screen in the information panel:
2. Type a name in the Shared Folder field (required) and Description field (optional).
3. In the Permissions column, select the type of access as follows:
Read & Write All network users can save and retrieve data in the folder.
Read Only All network users can retrieve data in the folder, but cannot save files to the
folder or create subfolders.
User Mode Access to data is limited to list of Valid Users for that folder.
No Access The folder is locked and no user can retrieve data in the folder.
For example, in the Current Folders table shown on the previous page there are two
shared folders, Department and Department2. All users have read and write access to
these folders. The user victorp and supervisor are the only persons with access to folder
Victor. Nobody can access Folder LockUp.
4. If restricting folder access through User Mode, input the names of all valid users in the
Valid User column
5. Click on the Create button or Reset to cancel.
6. A confirmation window will appear. Click OK to confirm. Each new data folder will
appear in the Current Folders listing.
35
Page 42

ConnectStor II User Manual
Modifying Shared Folder Properties
Once you have created one or several data folders, you may later wish to modify individual
settings for security permission and/or valid user listing. Perform the following steps:
1. Clicking on the Modify Folder selection from the File Sharing submenu will display the
following table in the information panel:
2. From the table, select the folder you wish to modify and click the Modify button under
the Action column. The following screen will appear:
3. You may change any of the settings in the columns shown above. This means you may
change the type of Permission setting or add/remove valid users for User Mode access.
4. Click the Modify button. A confirmation window will appear.
5. Click OK to confirm.
NOTE: Click the Return to Modify Folder button at any time to
exit this screen.
36
Page 43

Chapter 3: Configuration
Deleting an Existing Shared Folder
1. Clicking on the Delete Folder selection from the File Sharing submenu will display the
following table in the information panel:
2. From the table, select the folder you wish to delete and click the Delete button under the
Action column. A confirmation window will appear.
3. Click OK to confirm.
WARNING: Be absolutely sure before you delete a folder. All
data in the folder will be lost as a result of deletion.
37
Page 44

ConnectStor II User Manual
Sharing List
The Configuration Menu selection allows the user/supervisor to view the individual data
folders and the type of security for each. Clicking on Sharing List from the Configuration
Menu will exhibit the following information.
Current Folder(s) on ConnectStor II: Displays a listing of all data folders. All folders
are defined by the supervisor. No folders are defined by default.
Shared Folders: Folders that are shared among multiple users. It includes the
folder name, description, permissions and valid users.
User’s Folders: Folders belonging to individual users. It includes the folder name,
description, user’s storage limit and remaining (free) storage capacity.
38
Page 45

Chapter 3: Configuration
UNIX/Linux (NFS) Servers
The UNIX (NFS) selection is used to either configure or view the Export IP address and Host
Name settings for UNIX or Linux-based network server(s) if used as the operating system.
From the main Configuration Menu displays the following choices:
Current Settings: allows users to view previously-configured settings for Export IP
address and Host Name of UNIX/Linux server(s) with access to ConnectStor II
Create: permits the supervisor to designate new or additional Export IP address and Host
Name of network UNIX/Linux server(s) so attached UNIX/Linux clients can access data
and storage capacity contained on the ConnectStor II unit
Delete: permits the supervisor to delete one or all Export IP addresses of UNIX/Linux
servers able to access the ConnectStor II unit
Viewing Current Servers
Clicking on Current Settings from the UNIX (NFS) submenu selection will display the
following table in the main information panel:
The table shows the designated Export IP address of the UNIX or Linux-based server and its
Host Name.
These settings cannot be changed. You must create a new one (see the next page). Delete the
old setting if you want to stop access by that particular UNIX/Linux server.
39
Page 46

ConnectStor II User Manual
Creating New UNIX/Linux Servers
1. Connect to the ConnectStor II unit from a major Internet browser. Type in the IP address
and password.
2. Once connected, click on Create from the UNIX (NFS) submenu selection. The
following screen will appear in the main information panel:
3. Enter the Export IP address and Host Name of each UNIX/Linux-based server that you
wish ConnectStor II to support on your network.
4. Click the Create button. A confirmation window will appear.
5. Click OK to confirm.
Deleting a UNIX/Linux Server
To revoke access for users of a particular UNIX/Linux server to the ConnectStor II unit,
simply delete its Host IP address as follows:
1. Click on Delete from the UNIX (NFS) submenu selection. The following screen will
appear in the main information panel:
2. Select UNIX server hostname you wish to remove and click Delete button. A
confirmation window will appear.
3. Click OK to confirm.
40
Page 47

Chapter 3: Configuration
Password Server Options
ConnectStor II can support use of a dedicated network server that manages and authenticates
user passwords and permissions. This arrangement provides the same level of protection for
data residing on the ConnectStor II unit as other critical resources on the network. In
addition, this can save valuable time since the passwords already exist elsewhere in the
system.
The default for this feature is Disabled since not all networks employ such a dedicated server
or you may want to customize access differently than provided by the password server if one
exists.
WARNING: Changing the Password Server setting at any time
will DELETE ALL
User account names (except for the supervisor)
User home directories
User Mode folders
UNIX Export IP settings
from ConnectStor II because access control will change
between the Password Server and ConnectStor II.
Enabling Password Server Support
1. To enable the Password Server setting, click on Password Server from the Configuration
side menu. The following screen will appear in the information panel:
2. Click on the Enable Password Server radio button. The following screen will appear
showing a Password Server IP Address field.
41
Page 48

ConnectStor II User Manual
3. Type the IP address of Password Server.
4. Click the Submit button. A confirmation window will appear.
5. Click OK to confirm. A second confirmation window will appear.
6. Click OK to confirm.
7. A confirmation page will appear indicating the Password Server is Enabled, as shown
below. Click Return to Password Server button to continue.
42
Page 49

Chapter 3: Configuration
Disabling Password Server Support
1. To enable the Password Server setting, click on Password Server from the Configuration
side menu. The following screen will appear in the information panel:
2. Click on the Disable Password Server radio button.
3. Click the Submit button. A confirmation window will appear.
4. Click OK to confirm. A second confirmation window will appear.
5. Click OK to confirm.
6. A confirmation page will appear indicating the Password Server is Disabled, as shown
below. Click Return to Password Server button to continue.
43
Page 50

ConnectStor II User Manual
RAID Options
This selection from the main Configuration menu allows the user/supervisor to view the
current status and RAID level of your ConnectStor II unit or to change the RAID
configuration. Clicking on RAID Options will reveal the following menu:
Status: displays the current status and RAID level of the array in your unit.
Setup: displays the alternative RAID configuration for the drives contained in your unit
About RAID Arrays
RAID 1 Mirroring
When ConnectStor II is first started, if two disk drives are installed, ConnectStor II
automatically creates a RAID 1 or Mirrored array. RAID 1 maintains identical data on
both drives. If one drive should fail, ConnectStor II will continue responding to data
requests from users. Data will not be lost. When a replacement drive is installed in place
of the failed drive, ConnectStor II automatically sends all data from the original working
drive to the replacement drive until the data on both drives matches each other.
RAID 0 Striping
When ConnectStor II is first started, if one disk drive is installed, ConnectStor II
automatically creates a RAID 0 or Striped array. With ConnectStor II, RAID 0 is used for
one or two drives. Their combined storage capacity appears as a single storage volume (or
drive).
Under RAID 0 with two drives, when a file is saved, ConnectStor II splits up blocks of
data and simultaneously sends different portions to both installed drives. When a file is
read or retrieved, ConnectStor II simultaneously accesses both drives to rebuild the splitup data. Using RAID 0 striping actually doubles the speed of sustained data transfers
(reads and writes) since two drives perform the work of one drive.
WARNING: There is no fault tolerance under RAID 0 striping. If
one drive should fail, all data from both drives will be lost. If
you are using RAID 0, backup your critical files elsewhere on
the network.
44
Page 51

Chapter 3: Configuration
Viewing Current RAID Array Status
Clicking on Status in submenu will display the Array Status window in the information panel
as shown below:
The Array Status above shows a ConnectStor II with a single disk drive. The Array Status
below shows a ConnectStor II with two disk drives.
The panel shows the type of RAID level being used, how the array is mapped or appears as a
virtual drive, stripe block size, Gigabyte Boundary (on or off, see page 48), storage capacity,
and functional status of the array.
45
Page 52

ConnectStor II User Manual
Viewing Physical Drive Status
Within the Array Status panel, drive icons are located at the left side of the statistics.
Click on an individual drive icon to reveal the Drive Status window as shown below:
Click on a drive icon
to see Drive Status.
The Drive Status panel identifies drive model, status (online or offline), physical capacity of
drive, IDE channel number, physical mapping of drive by ConnectStor II, and the type of
drive timing (for example, UDMA Mode 5 is an Ultra ATA 100 drive type).
Click on the paired drive array to return to the Array Status window.
46
Page 53

Chapter 3: Configuration
Changing RAID Level
During setup, if you installed only one hard drive, ConnectStor II formatted it as a single-disk
RAID 0 striped array. If you installed two hard drives, ConnectStor II formatted them as a
two-disk RAID 1 mirrored array.
You may convert two-disk array from RAID 1 to RAID 0 and vice versa.
WARNING: Changing RAID configuration at any time will
DELETE all data stored on the ConnectStor II unit. Make sure
you backup all folders and data PRIOR to changing this
setting.
1. To change RAID level, select Setup from the side menu. The following screen will
appear:
2. If you are going from a RAID 0 to a RAID 1, select ON or OFF for Gigabyte Boundary.
See the discussion on the next page.
3. Click on the Change RAID Level button. A confirmation window will appear.
4. Click OK to confirm. A confirmation window will appear.
5. Click OK to confirm. The browser will ask permission to close the window.
6. Close your browser window.
7. In your browser, reconnect to the ConnectStor II and log in.
ConnectStor II will reboot, and then automatically reconfigure and reformat the drives to
reflect the new RAID level (see below).
47
Page 54

ConnectStor II User Manual
The new RAID Options Status screen shows the new RAID level. Note that the array size
has doubled as a result of converting from RAID 1 to RAID 0.
WARNING: There is no fault tolerance under RAID 0 striping. If
one drive should fail, all data from both drives will be lost. If
you are using RAID 0, backup your critical files elsewhere on
the network.
Gigabyte Boundary
The Gigabyte Boundary feature is designed for fault tolerant arrays (RAID 1) in which a
drive has failed and the user cannot replace the drive with the same capacity or larger.
Instead, the Gigabyte Boundary feature permits the installation of a replacement drive that
is slightly smaller (within 1 gigabyte) than the remaining working drive (for example, a
20.5GB drive would be rounded down to 20GB). This can be helpful in the event that a
drive fails and an exact replacement model is no longer available. Without this feature
enabled, UltraTrak will NOT permit the use of a replacement drive that is slightly smaller
than the remaining working drive.
For the Gigabyte Boundary feature to work, the Gigabyte Boundary feature must be set to
ON when the original array is created. When enabled, the Gigabyte Boundary feature
rounds the drive capacity of all drives to the common whole GB drive size. For example,
with the Gigabyte Boundary feature enabled, the remaining working drives can be
20.5GB and the replacement drive can be 20.3, since all are rounded down to 20GB. This
permits the smaller drive to be used. Please note that users will lose a small amount of
available storage capacity from each drives in order to arrive at a common drive size.
48
Page 55

Chapter 3: Configuration
Halt / Reboot ConnectStor II
The user/supervisor may need to take ConnectStor II offline temporarily in the case of
removing/replacing hard drives or simply reboot the unit due to certain other network issues.
Clicking on the Halt/Reboot command from the Configuration side menu will display two
buttons: Halt ConnectStor II or Reboot ConnectStor II as seen below:
Halting ConnectStor II
1. Clicking the Halt ConnectStor II button will shut down the unit remotely. A
confirmation window will appear.
2. Click OK to confirm. A second confirmation window will appear.
3. Click OK to confirm. The browser will ask permission to close the window.
4. Close your browser window.
NOTE: To restart the ConnectStor II, turn the power switch off
and then on again.
Remotely Rebooting ConnectStor II
1. Clicking the Reboot button reboots the ConnectStor II operating system.
2. Click OK to confirm. A second confirmation window will appear.
3. Click OK to confirm. The browser will ask permission to close the window.
4. Close your browser window.
5. In your browser, reconnect to the ConnectStor II and login.
CAUTION: Users temporarily will be unable to access the unit's
data until the system reboots completely.
49
Page 56

ConnectStor II User Manual
Advanced Configuration Commands
The Advanced selection from the main Configuration menu will display the following
submenu:
Update System: is used to upgrade internal operating system software with current updates as they are available.
Set to Default: returns ALL ConnectStor II menu selections to their original default
settings.
Clone: Copies the user settings from one ConnectStor II to additional ConnectStor II
units. This is useful if you wish to add additional ConnectStor II units on the same
network and want to have the same user settings as those on the original unit.
Updating System
1. To upgrade ConnectStor II's operating system, obtain the latest ConnectStor II update
file. Visit the Promise website (www.promise.com) and go to Support then Download.
In the Select Product menu, select ConnectStor II.
2. Copy the file to any available Shared Folder on the ConnectStor II unit
3. Click the "Update System" command from the Advanced Configuration side menu. The
following screen will appear:
4. Input the name of the Shared folder and file name of the update file.
5. Click Update System button. A confirmation window will appear.
6. Click OK to continue. A second confirmation window will appear.
7. Click OK to continue.
NOTE: ConnectStor II will update its internal operating system with
the new file, then reboot. All current settings will be maintained.
50
Page 57

Chapter 3: Configuration
Restoring ConnectStor II to Default Settings
The network administrator may wish to restore the default settings of ConnectStor II. This is
necessary, for example, if moving the unit to a new network environment.
WARNING: Returning ConnectStor II to Default Settings will
DELETE ALL existing data and settings.
1. Click on Default Setting from the Advanced submenu selection.
2. The following table will be displayed showing the Default settings:
3. Click on "Return System to Default Settings" button.
4. A confirmation window will appear. Click OK to proceed or Cancel.
5. A second window will appear. Click YES to proceed or Cancel.
51
Page 58

ConnectStor II User Manual
Using the Clone Feature
The Clone feature copies the user options and password settings from one ConnectStor II unit
to another. You would use this feature when adding another ConnectStor II to a network that
already has one. This action greatly reduces setup time for the new unit.
For the purpose of cloning, the source unit is the one already in service. The target unit is
the one being added to the network. You begin the cloning procedure by logging into the
target unit first, then copying the settings from the source unit.
These two ConnectStor II units must be running Firmware version 1.0.0.10 or newer. The
version number appears on the Login page of the System Administration Manager. Download
and install the latest firmware release from the Promise website, as necessary.
WARNING: All current User accounts, User home directories,
User Mode folders, and all UNIX Export IP Settings on your
(the target) ConnectStor II will be DELETED. Use this feature
with caution.
The supervisor password for your (the target) ConnectStor II unit will NOT be changed.
Input the source ConnectStor II IP address and supervisor password below:
1. Click on Clone from the Advanced submenu selection.
2. In the Source IP address: and Source password: fields, enter the IP address and
supervisor password, respectively, of the source ConnectStor II that has the user settings
you want to copy to your (the target) ConnectStor II.
3. Click the Start button.
Exit Command
1. Selecting the Exit command from the Configuration side menu will reveal a Logout
button.
2. Click the Logout button to end the session and return to the main login screen.
52
Page 59

Chapter 4: Using ConnectStor II
Once you have successfully completed the ConnectStor II installation and configuration, the
network attached storage system is now available to your network users. Individual users will
first want to "map" their network PCs to the ConnectStor II unit in order to begin saving and
retrieving data. Next, users may wish to create common folders within the ConnectStor II
storage array.
Mapping ConnectStor II to Individual PCs
To begin using the ConnectStor II unit for network storage, each user must first map the
ConnectStor II unit to their computer. If the user has full read/write/change rights, he/she can
then create sub-folders or directories within all areas of ConnectStor II for which the user has
access.
These directions for mapping ConnectStor II will work with the following network
installations (contact your network administrator if you have any questions):
• Microsoft network using TCP/IP
• Microsoft network using NETBEUI (with TCP/IP also configured)
• NFS - Configure the UNIX/Linux Network Setup
Windows XP
1. Be sure that there is a folder on ConnectStor II for each user planning to map
ConnectStor II to his/her PC, and that the user has access rights to the folder (see page
36).
2. In Windows, click the Start button, click Search and then click Printers, computers, or
people in the dialog box (below, left). Click on A computer on the network (below,
right)
3. Type the ConnectStor II’s Server Name (see page 19) in the Computer name: field,
then click the Search button.
53
Page 60

ConnectStor II User Manual
Windows searches the network for a computer with the name you provided. The
ConnectStor II unit and its location information will appear as shown below:
4. Double-click on ConnectStor II to open the connection. The folders you have created
will appear (below).
54
Page 61

Chapter 4: Using ConnectStor II
Right-click on the folder you want to map to your computer (below, left).
Windows offers to connect the shared network folder (on the ConnectStor II) and assign
it an available drive letter on your PC.
5. Select the drive letter you want and click the Finish button. The connection dialog box
appears (below).
55
Page 62

ConnectStor II User Manual
Check the Reconnect at logon box. This action adds the ConnectStor II to the Network
Neighborhood and Windows Explorer each time the User logs on or reboots the PC,
provided the ConnectStor II’s IP address remains the same.
6. Type your User Name and Password in their respective fields and click OK. The
contents of the newly mapped directory are displayed (below).
At the same time, the new drive letter is added to your system under the My Computer
icon (below).
56
Page 63

Chapter 4: Using ConnectStor II
To access your mapped ConnectStor II folder from this point, double-click on the
networked drive icon.
By default, a user has full read/write/change rights to the ConnectStor II. He/she can
begin to save data, retrieve or delete data stored on a ConnectStor II array the same as
any other local or commonly shared network drive.
CAUTION: In most network installations, a supervisor will want
to restrict the access of some directories to certain users. See
File Sharing on page 34 if you wish to restrict such access.
57
Page 64

ConnectStor II User Manual
Windows 98, ME, NT4, 2000
1. Be sure that there is a folder on ConnectStor II for each user planning to map
ConnectStor II to his/her PC, and that the user has access rights to the folder (see page
35).
2. Use the Find Computer function. In Windows, click on the Start button, select Find
and then Computer to show Find Computer dialog box (see below).
3. Enter the ConnectStor II’s Server Name (see page 19) in the Named text field and then
click the "Find Now" button.
4. The ConnectStor II unit and its location information will appear as shown below:
5. Double-click on ConnectStor II to open the connection. The description of the mapped
drive will show “Drive_0.
58
Page 65

Chapter 4: Using ConnectStor II
6. Right click on the displayed drive folder to map each drive (see above).
NOTE: Actual folder name depends on names established
during file sharing. See page 34.
7. The following window will appear.
8. Select which available drive letter that ConnectStor II will occupy on your individual
computer in the Drive selection menu. Enter a description in the Connect As field, if
desired.
Check the Reconnect at logon box. This action adds the ConnectStor II to the Network
Neighborhood and Windows Explorer each time the User logs on or reboots the PC,
provided the ConnectStor II's IP address remains the same.
9. When finished with your selections, click the OK button to continue.
10. The ConnectStor II unit will appear in the Network Neighborhood, My Computer (see
below), and/or Windows Explorer views.
By default, a user has full read/write/change rights to the ConnectStor II. He/she can begin to
save data, retrieve or delete data stored on a ConnectStor II drive array just like using any
other local or commonly shared network drive.
59
Page 66

ConnectStor II User Manual
CAUTION: In most network installations, a supervisor will want to
restrict the access of some directories to certain users. See File
Sharing on page 34 if you wish to restrict such access.
If ConnectStor II is properly mapped to the user's computer, open Network Neighborhood,
My Computer, or Windows Explorer, double click on the Drive icon for ConnectStor II.
To access your mapped ConnectStor II folder from this point, double click on the networked
drive icon.
If the user has access rights to only certain shared folders, the user may save, retrieve, or
delete data in those folders only by double-clicking the folder. Optionally, the user may open
the folder and create additional sub-folders or directories if they have change rights to the
folder.
60
Page 67

Chapter 4: Using ConnectStor II
UNIX/Linux
Below is an example of configuring ConnectStor II for UNIX or Linux. Note that the IP
address and Linux host cited here are just examples.
The ConnectStor II is fully booted.
The ConnectStor II Server Name is PTICS2000532 (example only)
The ConnectStor II IP address 192.168.1.151 (example only)
The Workgroup/Domain is Workgroup
No Users have been defined.
Two folders have been created, TEST1 and TEST2, with Permissions of Read & Write, Valid
Users of Everyone
You are running RedHat Linux 7.2
You have logged-in as “root”
NOTE: This procedure is not dependent on the version of UNIX
or Linux OS.
1. In the System Administration Manager, click on Unix (NFS) and Create.
2. Type the IP address of the UNIX/Linux Host in the New Export IP Address: field.
Type the host name of the UNIX/Linux Host in the Host Name: field.
NOTE: You can find IP address and Host Name on the Linux
PC by running “Iconfig”.
3. In the mnt directory create a mount point (In our example we call it “Cs2”).
4. Using a text editor, edit the /etc/hosts file to append the IP address and the Server Name
(PTICS2000532, or example) of the ConnectStor II to allow communication between it
and the Linux Host.
5. In order for the ConnectStor II to communicate with a Local Host through a Firewall,
certain adjustments are necessary. There are three options:
• Option 1 disables the firewall (not recommended).
• Option 2 will permanently configure the “etc/sysconfig/ipchains” file. This file
contains information of what can come in and go out through the firewall.
• Option 3 executes a temporary command that will allow communication for the
current session only. After a reboot you must execute the command again.
61
Page 68

ConnectStor II User Manual
Option 1
Once booted into the Local Host, at the command line type “setup”. This action will
open the setup screen. Once in the setup screen, disable the firewall. Exit and save the
changes. Go on to Step 6.
Option 2
a. From the /etc]# prompt, run vi sysconfig/ipchains.
b. In the Editor, scroll down to the last line ending with "REJECT"
c. Asd the following line -A input -s 192.168.1.151 -d 0/0 -p udp -j ACCEPT.
d. Press ESC and type :wq! to write and quit the changes.
e. Run vi sysconfig/ipchains again and verify that the line:
-A input -s 192.168.1.151 -d 0/0 -p udp -j ACCEPT is there. To find it quickly,
type the following: cat sysconfig/ipchains from the /etc]# prompt.
f. Reboot the system for the new setting to take effect.
g. Go on to Step 6.
Option 3
a. From the /etc]# prompt, run vi sysconfig/ipchains.
b. In the Editor, scroll down to the last line ending with "REJECT"
c. Asd the following line -A input -s 192.168.1.151 -d 0/0 -p udp -j ACCEPT.
d. Press ESC and type :wq! to write and quit the changes.
e. Without rebooting, go on to Step 6.
6. At the /root]# prompt, run the following command:
mount -t nfs /192.168.1.151:/mnt/share /mnt/cs2
( “cs2” is the mount point in this example only)
7. Once you have successfully mounted the ConnectStor II to your mount point you can
access folders created on the ConnectStor II.
62
Page 69

Chapter 5: File Sharing Guidelines
Microsoft Network (over TCP/IP or NetBEUI)
Connection
Open the button Neighborhood on Desktop, and open the Workgroup to which the
ConnectStor II belongs. You will see the Name of the ConnectStor II.
Use the function Find->Computer at Start Menu and type in the Name of ConnectStor II to
search. If ConnectStor II and your computer have set up the “WINS Server Address”, you can
use the IP address of the ConnectStor II to search.
When you have found the ConnectStor II, open it to make your connection.
Storage/File Sharing
When you connect to ConnectStor II you will have one of two levels of access:
• Supervisor: The administrator's account.
• User: The normal user's account.
On the ConnectStor II, you may see a number of folders, each with specific access
permissions assigned to it:
Home – Each User has full access-rights to his Home folder. Guests do not have a Home
folder.
Read & Write – Any User can create/delete/modify data that he created in this folder.
UserMode->ReadShare – Any specified User can create/delete/modify data that he
created in this folder.
UserMode->WriteShare – Any specified User can create/delete/modify any of the data
in this folder.
ReadOnly – A User can only read the data in this folder.
NoAccess – No User can access data in this folder.
As a User, you will have access rights on the ConnectStor II, which will vary depending on
which folders you attempt to access.
63
Page 70

ConnectStor II User Manual
UNIX/Linux Network (over TCP/IP)
Connection
Note: If you run a Firewall service on your computer, verify that it can accept the RPC
packets. If it cannot accept the RPC packets, disable the Firewall.
1. If you use the DNS on your computer, use the DNS name of your computer as the
“HostName” in the ConnectStor II Configuration Menu “Unix (NFS) -> Create”.
2. Login as “root” and make a directory for the mount-point, such as “CS-II”.
3. Use the command “mount ConnectStor II’s IP: /mnt/share CS-II” to make a mount
to ConnectStor II.
Storage/File Sharing
When system administrator “root” has set up the mount to ConnectStor II, you will see two
directories under the mount-point.
Users – Users created by Configuration Menu on ConnectStor II have their “home”
directories in this directory.
Folders – Folders created by Configuration Menu on ConnectStor II are in this
directory.
The administrator must set your UID (Unix/Linux User ID) in Configuration Menu “User
Options->Create User”, and then you login as “Your Account” in your Unix/Linux system.
Home directory – Change path to mount-point/users, you can go into your home
directory, and have full access-permissions in it.
Folders – Change path to mount-point/folders, you will see all types of folder created on
ConnectStor II.
Set Folder Permissions as follows:
Read & Write – Access to this folder will be the same as a directory permission
drwxrwxrwx on Unix/Linux system with full access to all users.
ReadOnly – Access to this folder will be the same as a directory permission drwxr-xr-x
on Unix/Linux system with full access to the owner and read/execute access to other
users.
NoAccess – Access to this folder will be the same as a directory permission drwx------
on Unix/Linux system with full access to the owner but no access to other users.
The Root Account in your Unix/Linux system is mapped as a Guest Account on the
ConnectStor II.
64
Page 71

ConnectStor II User Manual
A group of users need the disk space to share (read & write) their data (users can modify data
created by others).
• In the Configuration Menu choose “File Sharing->Create Folders” to create a folder
named “ShareUserGroupWrite” with permission “User Mode-> WriteShare”.
• Add the users who can access the folder to the list of “Valid User.” Apply a Storage
Limit for each user if necessary.
User Access Sharing Model: An Example
Users:
a. “supervisor”
b. “peter”
c. “kevin”
d. “tony”
Folders:
a. “ShareForAll”
b. “ShareForGroup” with Valid User [supervisor, peter].
c. “SharePublic”
d. “ShareUserGroupRead” with Valid User [peter, tony].
e. “ShareUserGroupWrite” with Valid User [kevin, tony].
Access results for ConnectStor II’s users:
a. User “supervisor” from a Windows Network login, sees folders:
“supervisor” (home)...................... permitted
“ShareForAll” ............................... permitted
“ShareForGroup” .......................... permitted
“SharePublic”................................ permitted
“ShareUserGroupRead” ................... denied
“ShareUserGroupWrite” .................. denied
b. User “peter” from a Windows Network login, sees folders:
“peter” (home)............................... permitted
“ShareForAll” ............................... permitted
“ShareForGroup” .......................... permitted
“SharePublic”................................ permitted
“ShareUserGroupRead” ................ permitted
“ShareUserGroupWrite” ................... denied
66
Page 72

ConnectStor II User Manual
A group of users need the disk space to share (read & write) their data (users can modify data
created by others).
• In the Configuration Menu choose “File Sharing->Create Folders” to create a folder
named “ShareUserGroupWrite” with permission “User Mode-> WriteShare”.
• Add the users who can access the folder to the list of “Valid User.” Apply a Storage
Limit for each user if necessary.
User Access Sharing Model: An Example
Users:
a. “supervisor”
b. “peter”
c. “kevin”
d. “tony”
Folders:
a. “ShareForAll”
b. “ShareForGroup” with Valid User [supervisor, peter].
c. “SharePublic”
d. “ShareUserGroupRead” with Valid User [peter, tony].
e. “ShareUserGroupWrite” with Valid User [kevin, tony].
Access results for ConnectStor II’s users:
a. User “supervisor” from a Windows Network login, sees folders:
“supervisor” (home)...................... permitted
“ShareForAll” ............................... permitted
“ShareForGroup” .......................... permitted
“SharePublic”................................ permitted
“ShareUserGroupRead” ................... denied
“ShareUserGroupWrite” .................. denied
b. User “peter” from a Windows Network login, sees folders:
“peter” (home)............................... permitted
“ShareForAll” ............................... permitted
“ShareForGroup” .......................... permitted
“SharePublic”................................ permitted
“ShareUserGroupRead” ................ permitted
“ShareUserGroupWrite” ................... denied
66
Page 73

Chapter 5: File Sharing Guidelines
User “peter” from a NFS mount (UnixHost1), sees directories under
mount-point\:
users\supervisor................................. denied
users\peter (home) ......................... permitted
users\kevin......................................... denied
users\tony .......................................... denied
folders\ShareForAll....................... permitted
folders\SharePublic ....................... permitted
c. User “kevin” from a Windows Network login, sees folders:
“kevin” (home).............................. permitted
“ShareForAll” ............................... permitted
“ShareForGroup” .............................. denied
“SharePublic”................................ permitted
“ShareUserGroupRead” .................... denied
“ShareUserGroupWrite” ............... permitted
User “kevin” from a NFS mount (UnixHost1), sees directories under
mount-point\:
users\supervisor................................. denied
users\peter .......................................... denied
users\kevin (home) ........................ permitted
users\tony .......................................... denied
folders\ShareForAll....................... permitted
folders\SharePublic ....................... permitted
d. User “tony” from a Microsoft Network login, sees folders:
“tony” (home)................................ permitted
“ShareForAll” ............................... permitted
“ShareForGroup” .............................. denied
“SharePublic”................................ permitted
“ShareUserGroupRead” ................ permitted
“ShareUserGroupWrite” ............... permitted
User “tony” from a NFS mount (UnixHost2), sees directories under
mount-point\:
users\supervisor................................. denied
users\peter ......................................... denied
users\kevin......................................... denied
users\tony (home).......................... permitted
folders\ShareForAll....................... permitted
folders\SharePublic ....................... permitted
67
Page 74

ConnectStor II User Manual
NOTES
68
Page 75

Chapter 6: Troubleshooting
Using the Front Panel Display
The LED lights on the front panel of ConnectStor II provide cues for proper activity of the
unit. The front panel includes the following as shown below:
Network LED: is Green blinking or off indicating normal activity.
Drive LED: is Amber and blinks to show hard drive activity.
Power LED: is Green when lit and indicates unit is powered on and other status
messages as shown below:
Power Status LED Messages
Operation Power LED display Status
Power on Steady ON Normal
System Loading Steady OFF Normal
Bootup Steady ON Normal
Request an IP Single blinking light Normal
System Starting Double blinking light Normal
System Ready Steady ON Normal
System Halt Triple blinking light Special
Disk Error 4x blinking light Error
RAID Error 5x blinking light Error
69
Page 76

ConnectStor II User Manual
RAID Error Message
If the Power Status LED indicates a RAID Error (repeatedly blinks 5x), it means that you
have 2 drives in the ConnectStor II unit but they have different RAID settings. For
example, initially the ConnectStor II unit had 2 drives set as RAID 1, then one of them
failed. If you replace the failed drive with another drive which had previously been
configured as RAID 0, then your ConnectStor II unit contains 2 drives with different
RAID settings. Perform the following diagnostic steps:
1. From a supported web browser, use IPassign utility to enter a new IP.
2. Login to the ConnectStor II home page with “supervisor”.
3. Use “password” as login password.
4. Re-Configure your RAID setting.
5. If the RAID Error message continues, the unit may be at fault. Call Promise
technical support (see Appendix A: Contacting Technical Support).
Disk Error Message
If the Power Status LED indicates a Disk Error (repeatedly blinks 4x), there might be 2
possible errors:
• There is no disk is in the ConnectStor II unit.
• One or both drives in the ConnectStor II unit have failed.
Perform the following diagnostic steps:
1. Open the chassis. Identify the physical location of Drives 1 and 2 (see page 9).
2. First check the IDE cable and power supply cable going to the indicated drive and
make sure they are securely connected.
3. If drive cabling seems to be secure, you will need to replace the failed drive with a
drive of same or larger capacity.
70
Page 77

Chapter 6: Troubleshooting
General Troubleshooting Issues
Please read this section if you are having difficulty with the ConnectStor II installation or
configuration. If you still need help, contact technical support at www.promise.com or see
Appendix B for worldwide tech support contact information.
TCP/IP Is Not Enabled in Windows 95/98/ME
ConnectStor II works using TCP/IP protocol only. You will need your Microsoft Windows
installation CD-ROM if the necessary drivers have not been installed on your hard drive.
Follow this procedure to enable TCP/IP on your computer:
1. Close all other programs and applications.
2. Click on Start, select Settings, then select Control Panel. Click on the Network icon.
From the Configuration tab, choose Add.
3. Click on Protocol and then click Add. Your system will build an information database,
which may take a few minutes.
4. Choose Microsoft under Manufacturers. Choose TCP/IP under Network Protocols.
You may need to scroll down the list to find it; it should be the last item. Click OK.
5. Click on the Network Application window.
6. If your computer asks for the Microsoft Windows installation CD, insert it and click OK.
7. Once completed, Windows will ask if it can reboot your computer. Click Yes.
8. After the reboot is done, you are now ready to configure ConnectStor II. See page 15.
Cannot Find Workgroups in Windows 95/98/ME
To find your Workgroup, follow this procedure:
1. Right-click on Network Neighborhood. Select Properties from the pop-up menu. The
Network dialog box will appear.
2. Select the Identification tab. Your current workgroup appears in the Workgroup field.
Click OK to exit.
71
Page 78

ConnectStor II User Manual
Cannot See ConnectStor II Over Network
1. Make sure the ConnectStor II unit is connected to a power source and the Power light is
on. If necessary, check the power connection at both ends. Plug in the unit and power it
on.
2. If the unit is powered on, check the Network light. It should be on. If not, check your
network cable connection. Use the cable that came with the unit. Insert the cable into
Ethernet connector located on the back of ConnectStor II unit. Insert the other end into
10Base-T/100Base-TX Ethernet network connection on your network.
3. If the Network light still does not go on, be sure you are hooked into a hub or switch. Do
not connect the cable directly to your computer.
4. If both ends are connected and the light is still not lit, you may need a new cable, hub or
switch.
5. If cabling or switch hardware is NOT the problem, you will need to reset the unit's IP
address through the COM1 port.
a. Connect a standard null-modem cable to COM1 of ConnectStor II and any COM
port of a Windows-based PC.
b. Run a terminal program (like HyperTerminal built in to Windows) using the
settings 9600, no parity, 8, 1).
c. Press any key to prompt the opening "Login" screen. Type "supervisor" and the
current password to access the text-based Configuration Menu.
d. Next, select IP Assignment and set to Dynamic IP addressing -- this will allow you
to reboot from menu.
Cannot Find ConnectStor II in Network Neighborhood
1. Try all steps in the “Cannot Find the ConnectStor II Unit” section (above). If your unit
still does not appear, go to step 2.
2. Verify that your ConnectStor II unit is in the same workgroup as your computer. To do
this, go to Network Neighborhood and double-click on Entire Network. Look for your
ConnectStor II’s workgroup name. If it is there, double-click on your ConnectStor II’s
name, and it should appear.
3. If your ConnectStor II unit is still not there, click on Start, select Find/Search, then
select Computer. Type in your ConnectStor II Server name (see page 19). Click the
Find/Search button. Your computer will search for the ConnectStor II by name, and if
successful, display it. Double click on the unit’s name and your folders will appear.
4. If you are still unable to find your ConnectStor II, check the status lights on the front of
the cabinet. See “Using the Front Panel Display” on page 69.
72
Page 79

Chapter 6: Troubleshooting
Problems Mounting ConnectStore II on UNIX/Linux
If you are having problems mounting ConnectStor II and you see “RPC TIMEOUT” or
“Permission Denied” error messages from the UNIX/Linux Host, do the following:
• Verify the Server Name and IP address of the ConnectStor II. Then check the
sysconfig/ipchains file and the etc/hosts file to make sure that the IP and the Server
Name are accurate. In some instances when running a DHCP the dynamic IP address
may change, causing the problem.
• Verify the Host Name and IP address of the Linux Host.
Then check the Unix (NFS) Current Settings to make sure that the IP and the Host Name
are accurate. In some instances when running a DHCP the dynamic IP address may
change, causing the problem.
• Sometimes the server appears to be refusing the clients access, even though the client is
listed in the etc/hosts or etc/exports file. Typically, this happens because the server
takes the IP address of the client connecting to it and resolves that address to the fully
qualified domain name (FQDN), but the host name listed in the etc/hosts or etc/exports
file is not qualified. (For example, the server thinks that the client host name is
Raid.promise.com, but in the etc/hosts or etc/exports file it is just listed as Raid.)
• Another common problem is that the server’s perception of the Host Name / IP address
pairing is incorrect. This can occur because of an error in the etc/hosts file or in the
DNS tables. Ask your system administrator to verify that the pairing is correct.
73
Page 80

ConnectStor II User Manual
NOTES
74
Page 81

Appendix A: Limited Warranty
Promise Technology, Inc. (“Promise”) warrants that for two (2) years from the time of the
delivery of the product to the original end user:
a) the product will conform to Promise’s specifications;
b) the product will be free from defects in material and workmanship under
normal use and service.
This warranty:
a) applies only to products which are new and in cartons on the date of purchase;
b) is not transferable;
c) is valid only when accompanied by a copy of the original purchase invoice.
This warranty shall not apply to defects resulting from:
a) improper or inadequate maintenance, or unauthorized modification(s),
performed by the end user;
b) operation outside the environmental specifications for the product;
c) accident, misuse, negligence, misapplication, abuse, natural or personal
disaster, or maintenance by anyone other than a Promise or a Promiseauthorized service center.
Disclaimer of other warranties
This warranty covers only parts and labor, and excludes coverage on software items as
expressly set above.
Except as expressly set forth above, Promise disclaims
by statute or otherwise, regarding the product, including, without limitation, any warranties
for fitness for any purpose, quality, merchantability, non-infringement, or otherwise. Promise
makes no warranty or representation concerning the suitability of any product for use with
any other item. You assume full responsibility for selecting products and for ensuring that the
products selected are compatible and appropriate for use with other goods with which they
will be used.
Promise does not warrant
that any product is free from errors or that it will interface without
problems with your computer system. It is your responsibility to back up or otherwise save
important data before installing any product and continue to back up your important data
regularly.
No other document, statement or representation may be relied on to vary the terms of this
limited warranty.
any warranties, expressed or implied,
75
Page 82

ConnectStor II User Manual
Promise’s sole responsibility with respect to any product is to do one of the following:
a. replace the product with a conforming unit of the same or superior product;
b. repair the product;
c. recover the product and refund the purchase price for the product.
Promise shall not be liable for the cost of procuring substitute goods, services, lost profits,
unrealized savings, equipment damage, costs of recovering, reprogramming, or reproducing
of programs or data stored in or used with the products, or for any other general, special,
consequential, indirect, incidental, or punitive damages, whether in contract, tort, or
otherwise, notwithstanding the failure of the essential purpose of the foregoing remedy and
regardless of whether Promise has been advised of the possibility of such damages. Promise
is not an insurer. If you desire insurance against such damage, you must obtain insurance
from another party.
Some states do not allow the exclusion or limitation of incidental or consequential damages
for consumer products, so the above limitation may not apply to you.
This warranty gives specific legal rights, and you may also have other rights which vary from
state to state. This limited warranty is governed by the State of California.
Your Responsibilities
You are responsible for determining whether the product is appropriate for your use and will
interface with your equipment without malfunction or damage. You are also responsible for
backing up your data before installing any product and for regularly backing up your data
after installing the product. Promise is not liable for any damage to equipment or data loss
resulting from the use of any product.
76
Page 83

Appendix A: Warranty
Returning Product for Repair
If you suspect a product is not working properly, or if you have any questions about your
product, contact our Technical Support Staff through one of our Technical Services, making
sure to provide the following information:
Product model and serial number (required);
Return shipping address;
Daytime phone number;
Description of the problem;
Copy of the original purchase invoice.
The technician will assist you in determining whether the product requires repair. If the
product needs repair, the Technical Support Department will issue an RMA (Return
Merchandise Authorization) number.
Return ONLY the specific product covered by the warranty (do not ship cables, manuals,
diskettes, etc.), with a copy of your proof of purchase to:
USA and Canada: Promise Technology, Inc.
Other Countries: Return the product to your dealer or retailer.
You must follow the packaging guidelines for returning products:
Use the original shipping carton and packaging
Include a summary of the product’s problem(s)
Write an attention line on the box with the RMA number
Include a copy of proof of purchase
You are responsible for the cost of insurance and shipment of the product to Promise. Note
that damage incurred due to improper transport or packaging is not covered under the Limited
Warranty.
When repairing returned product(s), Promise may replace defective parts with new or
reconditioned parts, or replace the entire unit with a new or reconditioned unit. In the event
of a replacement, the replacement unit will be under warranty for the remainder of the
original warranty term from purchase date, or 30 days, whichever is longer.
Promise will pay for standard return shipping charges only. You will be required to pay for
any additional shipping options (such as express shipping).
Customer Service Dept.
Attn.: RMA # ______
1745 McCandless Drive
Milpitas, CA 95035
Contact them for instructions before shipping the
product.
77
Page 84

ConnectStor II User Manual
NOTES
78
Page 85

Appendix B: Contacting Promise Support
Promise Technical Support provides several support options for Promise users to access
information and updates. We encourage you to use one of our electronic services, which
provide product information updates for the most efficient service and support.
If you decide to contact us, please have the following information available:
Product model and serial number
BIOS and driver version numbers
A description of the problem / situation
System configuration information, including: motherboard and CPU type, hard drive
model(s), IDE/ATAPI drives & devices, and other controllers.
Technical Support Services
Promise Online
Web Site
USA Tech Support Center
E-mail Support support@promise.com
Fax Technical Support (408) 228-6401
Phone Technical Support (408) 228-6402
If you wish to write us for
support:
TM
http://www.promise.com
(tech documents, drivers, utilities, etc.)
Attention: Technical Support
7:30-5:30pm M-F Pacific Standard Time
Promise Technology, Inc.
Attn: Technical Support
1745 McCandless Drive
Milpitas, CA 95035 USA
79
Page 86

ConnectStor II User Manual
Promise Europe
E-mail Support support@promise.nl
Fax Technical Support +31 (0)40 256 9463
Phone Technical Support +31 (0)40 235 2600
If you wish to write us for
support:
Attention: Technical Support
8:30-5:00pm The Netherlands Time
Promise Technology Europe B.V.
Attn: Technical Support
Luchthavenweg 81-125
5657 EA Eindhoven, The Netherlands
Promise Taiwan
E-mail Support support@promise.com.tw
Fax Technical Support +886 3 578 23 90
Phone Technical Support +886 3 578 23 95 (ext. 8870)
If you wish to write us for
support:
Attention: Technical Support
9:00-6:00pm Taiwan Time
Promise Technology, Inc.
Attn: Technical Support
2F, No. 30, Industry E. Rd. IX,
Science-Based Industrial Park,
Hsinchu, Taiwan, R.O.C.
Promise China
E-mail Support support-china@promise.com
Fax Technical Support +86 (0) 10 6872 3940
Phone Technical Support +86 (0) 10 6872 3941
If you wish to write us for
support:
Attention: Technical Support
9:00-6:00pm China Time
Promise Technology China
Attn: Technical Support
Room 3213, No. 11
South Zhong Guan Cun Street
Hai Dian District Beijing 100081
P.R. China
80
 Loading...