

Page 1

Maxprep™ Liquid Handler
Operating Manual
Instructions for use of AS9100, AS9101, AS9200 and AS9201
TM509 | Revised 1/19
Page 2

Page 3

Table of Contents
1 Introduction ........................................................................................5
1.1 Maxprep™ Liquid Handler ........................................................................5
1.2 Product Use .............................................................................................6
1.3 Product Use Limitations ............................................................................6
1.4 Maxprep™ Liquid Handler Features ..........................................................6
1.5 Maxprep™ Liquid Handler Specifications ..................................................7
1.6 Product Components ...............................................................................9
1.7 Precautions ............................................................................................10
1.8 Safety Symbols and Marking ..................................................................11
1.9 Environmental Requirements (Operating, Shipping and
Storage Conditions) ...............................................................................13
2 Hardware Overview ..........................................................................15
2.1 Hardware Features .................................................................................16
2.2 UV Light (optional)...................................................................................17
2.3 Labware Carriers ....................................................................................18
3 Setting Up the Maxprep™ Liquid Handler .........................................23
3.1 Installing the Maxprep™ Liquid Handler ..................................................23
3.2 Switching On the Maxprep™ Liquid Handler ...........................................24
3.3 Shutting Down the Maxprep™ Liquid Handler ........................................24
3.4 Configuring the PC .................................................................................24
1 Maxprep™ Liquid Handler | TM509 | Revised 1/19
Page 4

Table of Contents
4 Maxprep™ Software .........................................................................25
4.1 ‘Home’ Screen .......................................................................................25
4.2 Software Settings ...................................................................................28
4.3 Administrator Settings .............................................................................31
5 Operating the Maxprep™ Liquid Handler ........................................... 53
5.1 Maintenance ...........................................................................................53
5.2 Methods .................................................................................................55
5.3 Starting a Method ...................................................................................56
5.4 Error Recovery ........................................................................................64
5.5 Reports ..................................................................................................67
5.6 Accessing Reports..................................................................................70
6 Cleaning the Maxprep™ Liquid Handler ............................................73
6.1 Weekly Cleaning .....................................................................................73
6.2 Dealing with Spills ..................................................................................75
7 Troubleshooting ................................................................................ 77
7.1 Errors and Warnings ...............................................................................78
7.2 Using a USB Flash Drive .........................................................................79
8 Instrument Service ............................................................................81
8.1 Service ...................................................................................................81
8.2 Maxprep™ Liquid Handler Service ..........................................................81
8.3 Instrument Disposal ................................................................................81
2 Maxprep™ Liquid Handler | TM509 | Revised 1/19
Page 5

Table of Contents
9 Warranties, Service Agreements and Related Products ....................83
9.1 Warranty .................................................................................................83
9.2 Warranty and Service Agreement Options ...............................................83
9.3 Related Products ....................................................................................86
10 Certificate of Decontamination ......................................................... 87
11 Appendix: Configuring the PC .........................................................89
11.1 Maxprep™ Liquid Handler and PC .......................................................89
11.2 Glossary ...............................................................................................90
11.3 Adjusting Volume Settings ....................................................................92
11.4 Configuring Date and Time Settings ......................................................92
11.5 Managing Local Windows® User Accounts ...........................................92
11.6 Managing Maxprep™ Access Levels for a Windows® User Account ...102
11.7 Managing the Current Active Account .................................................110
11.8 Shutting Down and Restarting ............................................................111
11.9 Connecting to a Network ....................................................................112
11.10 Adding a Network Printer ..................................................................113
3 Maxprep™ Liquid Handler | TM509 | Revised 1/19
Page 6

Table of Contents
4 Maxprep™ Liquid Handler | TM509 | Revised 1/19
Page 7

Introduction
1
1.1 Maxprep™ Liquid Handler
The Maxprep™ Liquid Handler provides automated methods for preprocessing of samples
prior to nucleic acid purification on the Maxwell® RSC and Maxwell® RSC 48 Instruments for a
range of research sample types. In addition, the Maxprep™ Liquid Handler provides a variety
of post-processing automated methods for handling and analysis of eluted nucleic acids. The
Maxprep™ Liquid Handler is designed for use by laboratory professionals. Up to 48 samples
can be prepared in a single preprocessing run.
The instrument is controlled through a graphical user interface running on a PC. The Maxprep™
Liquid Handler has the ability to record and report sample tracking and method run data. The
included automated and manual bar code readers can be used with the Maxprep™ Liquid
Handler to capture bar code information for samples and reagents. The Maxprep™ Liquid
Handler provides reports of the data gathered for instrument operations; reports can be printed
and exported to a storage location or a USB drive for transfer to a separate computer. Sample
tracking and run-specific information can also be tracked in the Promega Portal software to
facilitate information transfer between the Maxprep™ Liquid Handler and the Maxwell® RSC
and Maxwell® RSC 48 Instruments. Reports of information contained within the Promega Portal
software can be generated using the separate Portal Access reporting software (see Technical
Manual #TM549).
To start a run, select the appropriate method and follow the instrument setup instructions
displayed by the user interface including scanning or entering sample bar code information.
For preprocessing methods, the Maxprep™ Liquid Handler prepares the samples for addition
to Maxwell® RSC cartridges, adds samples to the cartridges, adds elution buffer to the elution
tubes, and transfers plungers to the Maxwell® deck trays. The deck trays containing prepared
cartridges are manually transferred to the appropriate Maxwell® instrument(s) for the purification
run where sample tracking information that was entered can be retrieved from the Promega
Portal software. For post-processing methods, the Maxprep™ Liquid Handler can start with
samples in Maxwell® deck trays or other labware options for a variety of handling and analysis
methods. Training on the use of the Maxprep™ Liquid Handler is provided during installation
(see Section 9.2, Warranty and Service Agreement Options).
5 Maxprep™ Liquid Handler | TM509 | Revised 1/19
Page 8

1.2 Product Use
The Maxprep™ Liquid Handler is exclusively designed to be used with Maxwell® RSC reagent
kits to perform automated preprocessing of samples prior to isolation of nucleic acids with the
Maxwell® RSC and Maxwell® RSC 48 Instruments. A variety of post-processing methods are
available with the Maxprep™ Liquid Handler that are compatible with reagents from a variety of
vendors.
The Maxprep™ Liquid Handler is for research use only.
1.3 Product Use Limitations
The Maxprep™ Liquid Handler is not intended for use with purification kits other than Maxwell®
RSC nucleic acid purification kits or with samples other than those defined within the product
limitations of the specific Maxwell® RSC kit being used. Post-processing methods provided with
the Maxprep™ Liquid Handler are tested for use with Promega reagents. It is the responsibility
of the end-users to internally verify/validate that these methods perform to their needs with
reagents from other vendors.
Introduction
1.4 Maxprep™ Liquid Handler Features
• Easy-to-use system
• Standardized sample preparation workflow
• Ability to create administrator-defined method variants
• Comprehensive technical support
• System controlled via PC and touch-screen monitor
• Run-specific and sample-specific reporting functionality
• Preprogrammed methods for preprocessing and post-processing of samples
• Included bar code reader and manual bar code scanner
6 Maxprep™ Liquid Handler | TM509 | Revised 1/19
Page 9

Introduction
1.5 Maxprep™ Liquid Handler Specifications
Instrument Specifications
Desktop PC
Communication
Weight
Dimensions (W × D × H)
Power Requirements
Operating
Temperature
Relative Humidity
Altitude
Storage
Temperature
Relative Humidity
UV Bulb (optional)
Regulatory
Compliance
CE Compliance
Windows® 10 Operating System with Ethernet connection to
instrument, wired connectivity to local network
Ethernet
Approximately 220lb (98.6kg)
42.1 × 27.8 × 33 inches (106.9 × 70.6 × 83.3cm)
height with door open: 48.4 inches (123cm)
Input: 100–240VAC, 50/60Hz, 5A
Output: 42VDC ± 5%, 600W max
250VAC, 5A, low breaking capacity, time-lag fuse (AC250V,
T5AL, 5 × 20mm)
15–35°C (59–95°F)
30% to 85% non-condensing
0–2,000m above sea level
–20° to 70°C
10% to 90% non-condensing
Average lifetime approximately 10,000 hours, length 9.2in
(233mm base face to face, diameter 15mm, 11W, 0.43A
current, 25.6V, UV-C, UV output 32W at 1 meter)
For Research Use Only. Not for use in Diagnostic Procedures.
Pollution degree 2.
Installation category II.
Indoor use only.
Main supply voltage fluctuations are not to exceed >10% of the
nominal supply voltage.
This instrument complies with the requirements of the EU
Directives for electromagnetic compatibility (EMC Directive)
and for electrical safety (LVD). Compliance with the relevant
directives was demonstrated by third-party testing to the
appropriate EN and IEC standards. The product bears the
CE mark on its label as evidence of compliance, and an EU
Declaration of Conformity for the product is available from
Promega on request.
7 Maxprep™ Liquid Handler | TM509 | Revised 1/19
Page 10

Introduction
1.5 Maxprep™ Liquid Handler Specifications (continued)
Pipetting Specifications
Liquid Level Detection
Independent Channels
Shaking
Pipetting
Specifications for
Channels
Gantry Bar Code Scanner Supported Symbologies.
1D Bar Codes
2D Bar Codes
UPC/EAN/JAN, Codabar, Interleaved 2 of 5, Code 39, Code 128,
Code 93
QR Codes
Capacitive Liquid Level Detection
Pressure Liquid Level Detection
3mm Orbit
Up to 2500rpm
Temperature range ambient to 105°C
Disposable
Tips Size Volume
50µl 1µl 5.0% 5.0%
300µl 10µl 5.0% 2.5%
1000µl 10µl 7.5% 3.5%
Accuracy
(%)
5µl 2.5% 2.0%
50µl 2.0% 1.0%
50µl 2.0% 1.0%
300µl 1.0% 1.0%
100µl 2.0% 1.0%
1000µl 1.0% 1.0%
Precision
(%CV)
8 Maxprep™ Liquid Handler | TM509 | Revised 1/19
Page 11

1.6 Product Components
PRODUCT CAT.#
Maxprep™ Liquid Handler, RSC Carriers AS9100
Maxprep™ Liquid Handler, RSC Carriers w/ UV Light AS9101
Maxprep™ Liquid Handler, RSC 48 Carriers AS9200
Maxprep™ Liquid Handler, RSC 48 Carriers w/UV Light AS9201
Cat.# AS9100 and AS9101 are provided with Maxwell® RSC-compatible 16-position deck tray carriers.
Cat.# AS9200 and AS9201 are provided with Maxwell® RSC 48-compatible 24-position front and back deck tray carriers.
Cat.# AS9101 and AS9201 are provided with an optional UV light in the Maxprep™ Liquid Handler.
Includes:
• 1 Maxprep™ Liquid Handler
• 3 10mm Sample Tube Carriers
• 3 12–13mm Sample Tube Carriers
• 3 15–17mm Sample Tube Carriers
• 1 Box of Maxprep™ 50µl Conductive Disposable Tips, Filtered (5 × 96)
• 1 Box of Maxprep™ 300µl Conductive Disposable Tips, Filtered (5 × 96)
• 1 Box of Maxprep™ 1000µl Conductive Disposable Tips, Filtered (5 × 96)
• 1 Box of Maxprep™ Reagent Reservoirs, 50ml (28 reservoirs)
• 2 Maxwell® Deck Tray Carriers
• 3 Reagent Reservoir Carriers
• 1 Utility Carrier (for Heater Shaker, tools and plates)
• 1 Tip and Plate Carrier
• 1 Heater Shaker
• 4 Plunger Tools
• 2 Gripper Paddles
• 1 Maxprep™ Accessory Kit
• 1 PC preloaded with Maxprep™ Software
• 1 Ethernet cable for connection of Maxprep™ Liquid Handler to PC
• 1 Power Cable for Maxprep™ Liquid Handler
• 1 Power Cord for PC
• 1 Power Cord for PC Monitor
• 1 Manual Bar Code Reader
• 2 Maxprep™ Plunger Holders
• 4 Maxprep™ 3-Position Reagent Tube Holders
Introduction
9 Maxprep™ Liquid Handler | TM509 | Revised 1/19
Page 12

1.7 Precautions
Important Safety Instructions. Save these instructions.
• Changes or modifications to this unit not expressly approved by the party responsible for
• This equipment has been designed and tested to CISPR 11 Class A. It may cause radio
• Do not use this device in proximity to sources of strong electromagnetic radiation (e.g.,
• Do not use this instrument for anything other than its designed purpose.
• Always disconnect the power to the instrument and the PC before cleaning or performing
• Do not disassemble unit.
• Ensure that any deck setup instructions are faithfully followed. Failure to do so may result in
Introduction
compliance could void the user’s authority to operate the equipment.
interference, in which case you may need to take measures to mitigate the interference.
unshielded intentional RF sources), as these may interfere with the proper operation.
routine maintenance.
damage to the instrument.
• Use only Promega Maxwell® RSC branded and supplied cartridges, plungers and elution
tubes. Use only Promega-supplied consumables (tips, troughs, preprocessing plates).
• Do not reuse cartridges, plungers or elution tubes.
• If the equipment is used in a manner other than that specified by Promega, the protection
provided by the equipment may be impaired.
• During some processing methods, the heated shaker at the back left corner of the instrument
becomes very hot. Do not touch.
• Do not attempt to lift or move the Maxprep™ Liquid Handler. The Maxprep™ Liquid Handler
should only be moved by a trained Promega representative.
• Equipment can be hazardous due to the use of chemical and biohazardous substances.
• Do not override the door sensor.
• This instrument can be used with potentially biohazardous materials. Use appropriate
personal protective equipment (e.g., gloves, safety goggles, lab coat, etc.) for handling and
disposing of biohazardous materials.
• Loading nonessential software programs on the PC supplied with Maxprep™ Liquid Handler
is not recommended. Promega cannot guarantee compatibility of the Maxprep™ Liquid
Handler software with other third-party software programs. Additional programs may also
cause the application to slow down.
• Do not use any software other than the Maxprep™ software to control the Maxprep™ Liquid
Handler.
10 Maxprep™ Liquid Handler | TM509 | Revised 1/19
Page 13

1.8 Safety Symbols and Marking
6422MA
Important Safety Instructions. Save these instructions.
Safety Symbols and Markings
Warning. Risk of personal injury to the operator or a
safety hazard to the instrument or surrounding area.
Warning. Hot surface. Burn hazard.
Warning. Biohazard.
Introduction
Warning. UV light hazard. Do not look directly at the
UV light.
11 Maxprep™ Liquid Handler | TM509 | Revised 1/19
Page 14

Introduction
AS4000
123456789
Maxwell
®
CSC
Promega BioSystems Sunnyvale, Inc.
645 N Mary Ave.
Sunnyvale, CA 94085 USA
Made in
USA
6006TA
14840TA
1.8 Safety Symbols and Marking (continued)
Symbols Explanation
Catalog Number
Serial Number
Manufacturer
Consult your local Promega Representative regarding
instrument disposal WEEE Directive (European Community
directive 2002/96/EC on Waste Electrical and Electronic
Equipment)
Test Certification
CE Compliance Marked
Representative in the European Community
Device is China RoHS-compliant
Important Information
12 Maxprep™ Liquid Handler | TM509 | Revised 1/19
Page 15

Introduction
1.9 Environmental Requirements (Operating, Shipping and
Storage Conditions)
Power
Requirements
Temperature
Humidity
Operating Altitude
The Maxprep™ Liquid Handler is intended for indoor use only. Wipe up spills immediately. To
avoid shortening the expected lifespan of the instrument, install in a location that meets the
following criteria:
• Locate on a sturdy, level surface capable of stably supporting 350lb.
• Avoid dusty areas.
• Choose a location that has good air circulation and is not exposed to direct sunlight.
• Avoid electrically noisy power sources (e.g., power generators).
• Do not install in a location where there is large temperature variability or high humidity.
• Do not position the instrument so that it is difficult to unplug from the power source.
• Do not place next to heat sources.
• Do not use near flammable gases or liquids.
100–240VAC, 50/60Hz, 5A
–20 to 70°C (shipping/storage), 15–35°C (operation)
30–85% relative humidity, non-condensing (operation)
10–90% non-condensing (storage)
<2000 meters
• Allow at least 6 inches (15.25cm) clearance on all sides of the Maxprep™ Liquid Handler.
• Do not place near other electrically sensitive instruments. Allow at least 6 inches (15.25cm)
on all sides of the Maxprep™ Liquid Handler.
• Connect the Maxprep™ Liquid Handler and PC to a power outlet. Promega recommends
that you plug the instrument and PC into an uninterruptible power supply.
13 Maxprep™ Liquid Handler | TM509 | Revised 1/19
Page 16

Introduction
Notes
14 Maxprep™ Liquid Handler | TM509 | Revised 1/19
Page 17

2Hardware Overview
The Maxprep™ Liquid Handler (Figure 1) is a fully enclosed four-channel pipetting system
designed to automate sample preprocessing and deck tray preparation for a variety of Maxwell®
RSC chemistries and post-processes for storage, normalization, and analysis of nucleic acid
eluates. The front of the instrument has a large door for access to the inside of the system. To
open the door, grip the handle, pull toward you, and then slide the door upwards. To close the
door, grip the handle, pull toward you, slide the door downwards, and then push the door
inwards at the bottom of its vertical motion. When the instrument is in operation, door locks
prevent access to the inside of the instrument. In the lower front corner of the instrument is the
power button. Press the power button to turn the instrument on/off.
Figure 1. Front of the Maxprep™ Liquid Handler.
15 Maxprep™ Liquid Handler | TM509 | Revised 1/19
Page 18

2.1 Hardware Features
14833T
The gantry system on the Maxprep™ Liquid Handler has four independently controlled pipetting
channels, which can support a 1µl to 1ml volume range using 50, 300 and 1000µl disposable
tips (Figure 2). These channels are capable of both pressure and capacitive liquid level sensing.
The pipetting channels of the instrument can retrieve tools to perform other tasks including
transferring Maxwell® RSC plungers to Maxwell® cartridges and moving plates within the
instrument. Included on the front arm of the gantry is a 1D/2D bar code reader that can
automate the process of reading tube bar codes that are loaded on the system in tube carriers.
Pipetting Channels
Hardware Overview
1D/2D Bar code reader
A
Figure 2. Gantry system on the Maxprep™ Liquid Handler. The gantry system on the
Maxprep™ Liquid Handler houses the four pipetting channels on the system. On the front
arm of the gantry is the 1D/2D bar code reader.
In the back left corner of the instrument are the heater shaker and the tool rack that houses the
gripper paddles and plunger tools (Figure 3). When placing the gripper paddles in the tool rack,
make sure the magnet and pins on each paddle are facing toward the center of the tool rack.
16 Maxprep™ Liquid Handler | TM509 | Revised 1/19
Page 19

Hardware Overview
A. B.
Figure 3. Heater shaker and tool rack. Panel A. The heater shaker is in the back left
corner of the Maxprep™ Liquid Handler. In front of the heater shaker is the tool rack that
houses the plunger tools and gripper paddles. Panel B. Plunger tools are shown at the top
of the image and gripper paddles at the bottom of the image. When placing gripper paddles
in the tool rack make sure the magnet and pins on each paddle are facing toward the center
of the tool rack.
2.2 UV Light (optional)
Maxprep™ Liquid Handler Cat.# AS9101 and AS9201 are provided with a UV light system. UV
lights are present on the top left and top right side of the instrument enclosure. The UV lights,
in addition to regular cleaning of the instrument, can be used for sanitization. A Sanitization
maintenance method is included in the Maxprep™ software to perform UV treatment of the
system for an administrator-defined time period. UV sanitization can only be performed with
the instrument door closed. If necessary, always replace the UV lights on the system with
Maxprep™ UV Lamp bulbs from Promega (Cat.# AS9310).
17 Maxprep™ Liquid Handler | TM509 | Revised 1/19
Page 20

Hardware Overview
2.3 Labware Carriers
Provided with the Maxprep™ Liquid Handler are a variety of carriers that hold the labware
needed to perform preprocessing and post-processing methods (Figure 4). The configuration
of the carriers on the instrument is designed to be consistent amongst Maxprep™ Liquid
Handler methods. The instrument platform is divided into 30 tracks. On the metallic plate at the
front of the instrument you can see the individual tracks with tracks 1, 5, 10, 15, 20, 25, and
30 indicated. The tracks are used as reference positions when placing carriers on the system.
To remove carriers from the instrument, grasp the handle on the carrier and pull it straight out
toward you, supporting the bottom of the carrier as you remove it from the system. When
adding carriers to the instrument, support the bottom of the carrier and place the back edge
of the carrier on the track positions at the front of the instrument; then slide the carrier straight
back until it touches the backstop of the instrument. Below is a table indicating the carriers
provided with the system and their track positions and functions.
Track
Carrier Type Number Provided
Utility Carrier 1 1–6 Static carrier (cannot be removed from system)
Maxwell® Deck
2 7–12
Tray Carriers (2)
[either 16-position
or 24-position deck
trays depending
on catalog number
purchased]
Positions Function
with heater shaker and tool rack at the back two
sites and two plate positions at the front two
sites.
Removable carriers that hold Maxwell® deck
14–19
trays. There are two types of Maxwell® Deck
Tray Carriers available: the Maxprep™ Carrier,
Maxwell® RSC, that is used for Maxwell® RSC
(16-position) Deck Trays, and the Maxprep™
Carrier, Maxwell® RSC 48 Front and Back, that
are used for Maxwell® RSC 48 (24-position)
Deck Trays. On the left top side of the carrier is
a removable magnet that interfaces with elution
tubes on the Maxwell® deck tray to help remove
residual resin from eluates when pipetting from
these positions. Underneath the deck tray are
two plate positions. For some methods, it may be
necessary to remove the magnet from the carrier
in order to use the plate positions.
A reagent carrier is placed between the Maxwell®
deck tray carriers to provide appropriate spacing
on the instrument.
Maxwell® RSC 48 deck tray carriers are keyed to
accept either the Maxwell® RSC Front deck tray
or Maxwell® RSC Back deck tray.
18 Maxprep™ Liquid Handler | TM509 | Revised 1/19
Page 21

Carrier Type Number Provided
Maxprep™
3 13, 20, 21 Removable reagent reservoir carriers hold
Reagent Carriers
Maxprep™
Carriers, Sample
Tubes
9
• Maxprep™ Carrier,
15–17mm Sample
Tubes (3)
• Maxprep™ Carrier,
12–13mm Sample
Tubes (3)
• Maxprep™ Carrier,
10mm Sample
Tubes (3)
Hardware Overview
Track
Positions Function
reagents required for each method run. These
carriers have four sites and each site can hold
either a Maxprep™ Reagent Reservoir, 50ml, or
Maxprep™ 3-Position Reagent Tube Holders.
22, 23, 24 Removable tube racks can hold primary sample
tubes and elution storage tubes. Provided with
the system are three types of tube carriers that
can accommodate a variety of tube types: large
diameter 15–17mm tubes (16), small diameter
12–13mm tubes (16), 1.5ml flip-cap tubes or
2.0ml screw-cap tubes (16).
Maxprep™ Carrier,
Tips and Plate
1 25–30 The tip carrier has a plate position at the back
site of the carrier and three tip rack positions
at the front three sites of the carrier. The types
of tips (50, 300, or 1000µl) are determined by
the method being run and are detailed in the
technical manuals for the chemistry methods.
19 Maxprep™ Liquid Handler | TM509 | Revised 1/19
Page 22

2.3 Labware Carriers (continued)
Hardware Overview
14835TA
Utility Carrier
Deck Tray Carrier
®
Maxwell
Reagent Carrier
™
®
Maxprep
Deck Tray Carrier
Maxwell
Reagent Carriers
™
Carriers, Sample Tubes
™
Maxprep
Maxprep
Carrier, Tips and Plate
™
Maxprep
Figure 4. Internal components of the Maxprep™ Liquid Handler. The hardware
components inside the Maxprep™ Liquid Handler. Carriers on the instrument can hold
primary sample tubes (10mm diameter, 12–13mm diameter or 15–17mm diameter),
Maxwell® deck trays (Maxwell® RSC 16-position deck trays [2], or Front and Back Maxwell®
RSC 48 24-position deck trays), processing plates, tips and Maxwell® RSC plunger racks.
The heater shaker device is capable of shaking incubation of samples in Nunc 2.0ml Deep
Well Plates as required by any individual processing method.
On the right side of the instrument, past track 30 is a waste position with a black removable tip
eject bar at the back and a calibration block at the front (Figure 5). Remove the tip eject bar from
the system for cleaning and as instructed during maintenance procedures. Underneath the tip
eject bar are two probes that are used for maintenance procedures. During these procedures,
the system will prompt the user to remove the tip eject bar to expose these probes. When
running preprocessing and post-processing methods on the instrument, the tip eject bar should
always be in place; make sure the tip eject bar is returned to the system in the orientation shown
in Figure 5. The pin on the waste position should fit in the small hole at the front of the tip eject
20 Maxprep™ Liquid Handler | TM509 | Revised 1/19
Page 23

Used tips should
be disposed of
appropriately
according to
your institution’s
procedures for
hazardous and
biohazardous
waste.
Hardware Overview
bar, the large cut out should be at the back of the instrument and the angled side of the tip eject
bar should be on the right side and facing downward toward the waste bin.
To the right of the waste position is a black removable plastic waste bin that is for disposal of
used tips. Waste bags are provided with the system to line the plastic waste bin and collect
used tips. Reorder Maxprep™ Waste Bags, Clear, from Promega (Cat.# AS9305). When
removing the waste bin, lift it out toward the right while angling up the right side of the bin to
avoid hitting the tip eject bar. Return the waste bin to the system by angling it under the tip eject
bar and placing the bin in position.
Tip Eject Bar
Calibration Block
Waste Basket
Figure 5. Waste position and plastic waste bin. To the right of the carriers is a waste
position that has a removable black tip eject bar as well as a calibration block. On the far
right side of the instrument is a removable black plastic waste bin that is used for disposal of
used tips.
21 Maxprep™ Liquid Handler | TM509 | Revised 1/19
Page 24

Hardware Overview
Notes
22 Maxprep™ Liquid Handler | TM509 | Revised 1/19
Page 25

Setting Up the Maxprep™ Liquid Handler
3.1 Installing the Maxprep™ Liquid Handler
The Maxprep™ Liquid Handler will be installed by a trained Promega representative. Prior
to installation, identify a location for the instrument that conforms to the environmental
requirements in Section 1.9 and the Maxprep™ Site Preparation Document sent by Promega.
We recommend connecting the Maxprep™ Liquid Handler, PC and Monitor to an uninterruptible
power supply. In order to use the Portal sample tracking functionality, it will be necessary to
connect the PC to your internal network. Prior to installation of the Maxprep™ Liquid Handler,
consult with your IT department to evaluate any concerns or limitations with connecting the
Maxprep™ Liquid Handler PC and any Maxwell® Tablet PCs to your network.
Recommended Domain policy settings when the Maxprep™ Liquid Handler PC is
connected to your internal network
Ensure that domain policies for the PC adhere to the following:
3
• Disable automatic Windows® updates.
• Virus scanning programs can interfere with the operation of the instrument. Please disable
virus scanning programs, manually perform virus scans, or schedule virus scanning outside
of working hours. When placed on a site domain, contact your IT department to ensure that
domain policies are amended such that the Maxprep™ software is excluded from virus
scanning software.
• Disable automatic power off, sleep or hibernation settings.
• Disable “Fast Startup”. Set the power button to Shut Down, not Sleep.
• Disable any other automatically or manually started software that would consume PC
resources during operation.
23 Maxprep™ Liquid Handler | TM509 | Revised 1/19
Page 26

Setting Up the Maxprep™ Liquid Handler
3.2 Switching On the Maxprep™ Liquid Handler
The Maxprep™ Liquid Handler has two power switches: a rocker switch that is located next to
the power cable connection behind the right access hatch, and a power button located on the
right front side of the instrument. After installation, the rocker switch behind the right access
hatch should be left in the on position.
Press the power button on the right front side of the Maxprep™ Liquid Handler to turn the
instrument “ON” (Figure 6). After turning the instrument on, wait at least one minute after the
green light on the gantry bar code scanner is illuminated before starting the Maxprep™
Application Software or any methods. Press the PC power button to turn the PC “ON”. Start the
Maxprep™ Application Software by double-clicking the icon on the PC desktop.
Figure 6. On/Off Switch.
3.3 Shutting Down the Maxprep™ Liquid Handler
1. Shut down the Maxprep™ Software by pressing the X in the upper right corner of the user
interface.
2. Turn the Maxprep™ Liquid Handler “OFF” by pressing the power button on the right front
side of the instrument.
3. Shut down the PC using the Windows® 10 shut down procedure: touch the Windows®
Start button in the lower left corner of the screen, select the power icon from the left side of
the Start menu, and select Shut Down.
4. When not in use for a prolonged period of time, the PC should be unplugged.
3.4 Configuring the PC
Your Maxprep™ Liquid Handler is controlled by Maxprep™ software running on a PC with a
touch-screen monitor. The PC should be configured to meet the needs of your site, including
adding users, specifying access-levels for users, connecting to a network and adding network
printers. Instructions for configuring the PC can be found in the Appendix of this user manual.
24 Maxprep™ Liquid Handler | TM509 | Revised 1/19
Page 27

Maxprep™ Software
4.1 ‘Home’ Screen
The ‘Home’ screen is the main launching pad for interaction with the functionalities built into the
Maxprep™ User Interface. The ‘Home’ screen (Figure 7) contains four buttons:
4
Start
Results
Maintenance
Pressing the Start button on the ‘Home’
screen will begin the process of preparing
a method run on the Maxprep™ Liquid
Handler (see Section 5.3, Starting a
Method).
The Results button opens the ‘Results’
Screen, where it is possible to review,
print and export any of the run reports
from previous chemistry and maintenance
processes that have been performed
on this instrument module (see Section
5.5, Reports, and Section 5.6, Accessing
Reports).
Pressing the Maintenance button opens
the ‘Maintenance’ screen. From this
screen you can perform Daily and Weekly
Maintenance tasks or a UV sanitization
of the system (if the system has been
purchased with the UV light option; see
Section 5.1, Maintenance).
25 Maxprep™ Liquid Handler | TM509 | Revised 1/19
Page 28

4.1 ‘Home’ Screen (continued)
Maxprep™ Software
Settings
The Settings button opens the ‘Settings’
screen, which includes functions to view
Instrument Info, Export Logs and set
administrator-specific instrument settings
with Administrator (only available to
users with Administrator-level access to
the Maxprep™ software; see Section
4.2, Software Settings, and Section 4.3,
Administrator Settings).
Figure 7. Maxprep™ software ‘Home’ screen. On the Maxprep™ ‘Home’ screen are
buttons to Start a method, view Results, run Maintenance methods, and adjust software
Settings.
26 Promega Spectrum CE System
14675CA
26 Maxprep™ Liquid Handler | TM509 | Revised 1/19
Page 29

Maxprep™ Software
The instrument name appears in the title bar of the user interface. The following navigation
buttons are displayed across the top of the user interface screen:
Home
From any screen other than the ‘Home’ screen,
touch this icon to return to the ‘Home’ screen.
Back
Portal
Portal Error
Minimize
Resize
Help
When active, pressing the Back button will return
the interface to the screen accessed prior to the
current screen.
When visible, the Portal icon indicates that the
Maxprep™ software is connected to the Portal
software.
When visible, the Portal icon with a red circle
containing an exclamation point indicates that the
connection to Portal software has been lost. Results
from the last run will be exported to Portal software
when the connection is restored. Disable Portal
sample tracking to run methods until connection is
returned, and then reactivate Portal sample tracking.
This button will minimize the Maxprep™ software to
an icon in the Windows® task bar. Select the task
bar icon to restore the Maxprep™ software screen.
The Resize button toggles between displaying the
Maxprep™ software maximized on the screen or
resized.
Access context-sensitive help by pressing this
button.
Exit
When active, pressing the Exit button will close
the Maxprep™ software and return users to the
Windows® Operating System.
27 Maxprep™ Liquid Handler | TM509 | Revised 1/19
Page 30
4.2 Software Settings
14644T
Within the Maxprep™ software it is possible for all users to access instrument-specific
information and export log files. In addition, users with Administrator-level access to the
Maxprep™ software can modify software options to tailor the behavior of the software to the
needs of their laboratory. Below are sections that describe the functionalities that are accessible
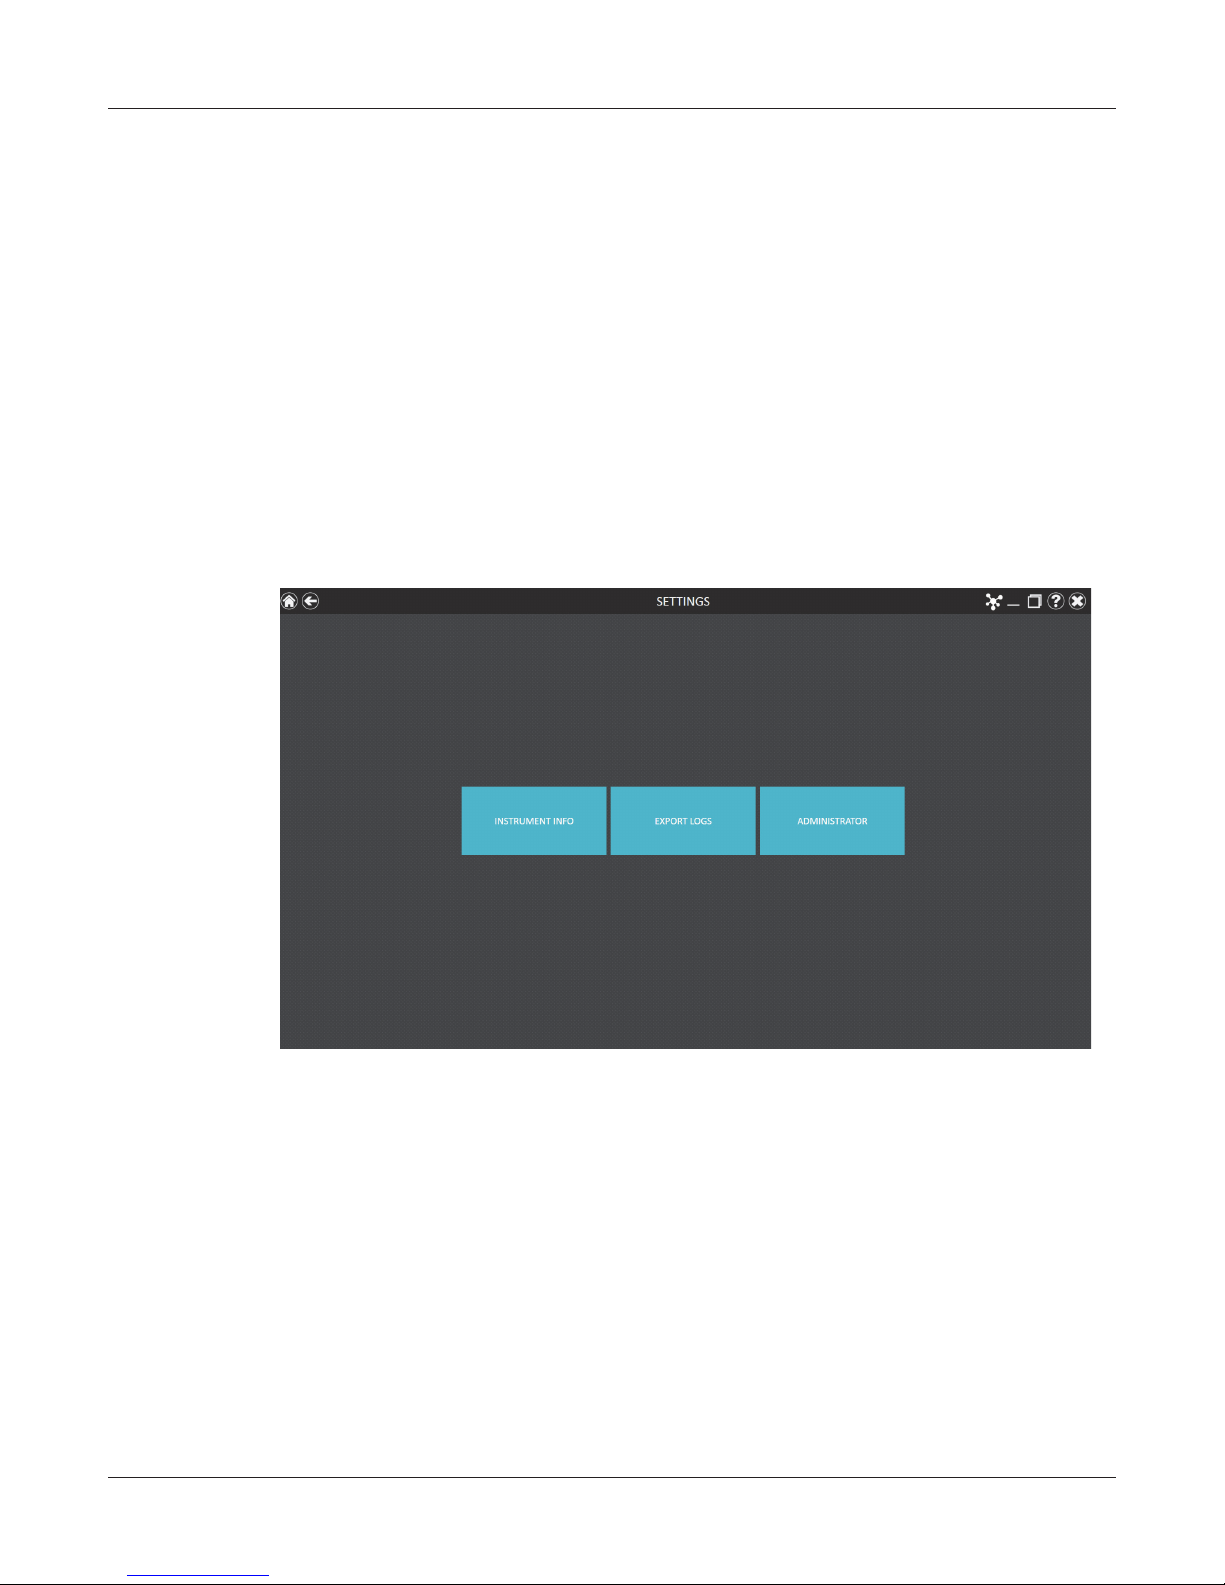
from the Settings button on the ‘Home’ screen of the Maxprep™ software.
The appearance of the ‘Settings’ screen (Figure 8) is tailored to the Maxprep™ software access
level assigned to the Windows® user account (see Appendix). A Windows® user account with
user-level access to the Maxprep™ software will see the buttons Instrument Info and Export
Logs. A Windows® user account with administrator-level access to the Maxprep™ software will
additionally see an Administrator button. From this screen the operator can access the
instrument functionalities described below.
Maxprep™ Software
Figure 8. Maxprep™ ‘Settings’ screen. From this screen various instrument-specific
functions can be accessed. The Administrator button will be displayed only for Windows®
user accounts with administrator-level access to the Maxprep™ software.
A
28 Maxprep™ Liquid Handler | TM509 | Revised 1/19
Page 31

Maxprep™ Software
Instrument Info
Touch the Instrument Info button to display software and instrument-specific information for
this Maxprep™ instrument on an ‘About Maxprep™’ screen (Figure 9). The information shown
on this screen includes:
• Maxprep™ Software Version: the Maxprep™ software version installed on the PC
• Maxprep™ Software Revision: the Maxprep™ software revision number of the software
version installed on the PC
• Instrument Software Version: the instrument control software version installed on the PC
• Maxprep™ Name: the name that an administrator has assigned to this instrument
• Maxprep™ Serial Number: the serial number of the Maxprep™ Liquid Handler
14645TA
Figure 9. ‘About Maxprep™’ screen. Instrument- and software-specific information are
displayed on the ‘About Maxprep™’ screen.
29 Maxprep™ Liquid Handler | TM509 | Revised 1/19
Page 32

4.2 Software Settings (continued)
Export Logs
The Export Logs button will export instrument logs for troubleshooting purposes. If in the
course of troubleshooting an instrument problem you are directed to export logs to send to
Promega Technical Services, press this button to generate instrument-specific log files.
1. Press the Export Logs button to display the ‘Export Logs’ screen (Figure 10, Panel A).
Select the path to which instrument logs should be exported.
2. Using the Yellow and Red rectangle buttons you can select the folder location where the
instrument logs will be saved. The current path is indicated by the yellow rectangles at the
top of the ‘Export Logs’ screen. Any folders present within the selected directory are
displayed as red rectangles in the main portion of the screen. Press the Drive\ button to
navigate to the drive location of the desired folder. Select the red folder buttons to navigate
to the desired folder location.
3. Once a path has been defined, press the OK button to export logs to the specified path, or
press Cancel to return to the ‘Settings’ screen without exporting logs.
Maxprep™ Software
4. After pressing OK, the ‘Export’ screen is displayed, indicating that the log files were
successfully exported to the specified path (Figure 10, Panel B). Press Open on the ‘Export’
screen to open the folder location containing the exported logs.
5. Press Done to close the ‘Export’ screen and return to the ‘Settings’ screen.
Instrument logs will be exported as a zip file to the path that was specified by the operator. The
zip file of the logs should be retrieved from the specified location and sent to a Promega
Technical Services representative for further troubleshooting.
A.
B.
14646TA
Figure 10. Export Logs. Panel A. The ‘Export Logs’ screen is displayed after pressing the
Export Logs button. Specify a path to which the instrument log files should be exported.
Press OK to export instrument logs to the specified location or Cancel to return to the
‘Settings’ screen without exporting logs. Panel B. After instrument log files are exported,
the ‘Export’ screen is displayed, indicating that logs have been saved to the specified path.
Press Open to view the folder location of the exported instrument log files. Press Done to
exit the ‘Export’ screen and return to the ‘Settings’ screen.
30 Maxprep™ Liquid Handler | TM509 | Revised 1/19
Page 33

4.3 Administrator Settings
Software settings for the Maxprep™ software can be accessed by Windows® user accounts
with administrator-level access to the Maxprep™ software using the Administrator button on
the ‘Settings’ screen. From the ‘Settings’ screen press the Administrator button to open the
‘Administrator’ screen.
The functions available from the ‘Administrator’ screen allow users with administrator-level
access to the Maxprep™ software to customize the behavior of the Maxprep™ software to
the needs of their laboratory. Buttons on the ‘Administrator’ screen allow the administrator to:
manage Methods installed in the software, import or delete Labware, Manage Kits installed in
the software, configure Preferences for the Maxprep™ software, define an Instrument Name
for this Maxprep™ Liquid Handler and view user-readable Audit Records. The behavior of each
button on the ‘Administrator’ screen is detailed below. Follow the instructions below to adapt
the behavior of the Maxprep™ software to the needs of the laboratory, or refer to any individual
subsection to address a specific setting.
1. To return to the ‘Home’ screen from any other screen, press the Home button in the upper
left corner of the screen. From the ‘Home’ screen of the Maxprep™ software (Figure 11)
press the Settings button.
Maxprep™ Software
Figure 11. Maxprep™ ‘Home’ screen. Selecting Settings opens the Maxprep™ ‘Settings’
screen.
31 Maxprep™ Liquid Handler | TM509 | Revised 1/19
Page 34

Maxprep™ Software
14644T
14568TA
4.3 Administrator Settings (continued)
2. If the current operator logged into the PC has administrator access rights within the
Note: If the
Administrator
button is not
visible, log out
of the Windows®
operating system
as this user and
log back in with
user credentials
that have
administrator
access rights
within the
Maxprep™
software.
Maxprep™ software, the ‘Settings’ screen (Figure 12) displays an Administrator button.
On the ‘Settings’ screen select the Administrator button to proceed to the ‘Administrator’
screen (Figure 13).
A
Figure 12. Maxprep™ ‘Settings’ screen. The Administrator button will only be visible if the
currently logged-in operator has administrator-level rights within the Maxprep™ software.
Figure 13. Maxprep™ ‘Administrator’ screen. The ‘Administrator’ screen is only visible
to operators with administrator-level rights to the Maxprep™ software and gives access to
customize the behavior of several aspects of the Maxprep™ system.
32 Maxprep™ Liquid Handler | TM509 | Revised 1/19
Page 35

Maxprep™ Software
Methods
View the methods currently installed in the Maxprep™ software on the ‘Methods’ screen
(Figure 14) by touching the Methods button from the ‘Administrator’ screen (Figure 13).
A
Figure 14. ‘Methods’ screen. This screen displays a list of the methods installed in the
Maxprep™ software. For entries with a folder icon, select the entry to view variant methods.
Use the filter check boxes on the left side of the screen to display only certain types of methods.
You can filter by:
• Method Type: Preprocessing or post-processing methods.
• Sample Type: DNA, RNA or Universal (total nucleic acid) sample types.
• Favorites: Only methods where the Favorites star icon to the left of the method is
highlighted.
• Keyword: Type in a word or word fragment to only show methods that contain that word in
the Name, Description or CatalogID field.
33 Maxprep™ Liquid Handler | TM509 | Revised 1/19
Page 36

Maxprep™ Software
4.3 Administrator Settings (continued)
For each method on the “Methods’ screen (Figure 14), the following are displayed:
Mark this method as a favorite for filtering purposes. Favorites are
displayed at the top of the list of methods.
When the folder icon appears in an entry it indicates that variant
methods have been created for this entry. Touch the entry to view
the existing variant methods.
Name
Description
Type
Sample Type
Catalog Number
Version Number
The name of the method
A description of the method
Indicates whether this is a preprocessing or post-processing
method
Indicates the target nucleic acid to which this method applies:
DNA, RNA or Universal (total nucleic acid) samples
The catalog number for the kit (if any) associated with the method
The version number of the method
Icon for creation of a new variant method based on the settings for
an existing method
Icon for editing an existing variant method
Icon for deletion of a method or variant method
Importing Methods
Only Administrators can add new methods, update, or delete existing methods. Administrators
can download new or updated methods from the Promega web site
(www.promega.com/resources/software-firmware/maxprep-liquid-handler-methods/)
Methods are provided as files with a .package extension. Follow the instructions below to import
a method into the Maxprep™ software.
1. Save the method (.package) file on the PC attached to the Maxprep™ Liquid Handler.
2. If not already running, start the Maxprep™ software by double-clicking the software icon on
the desktop.
3. Navigate to the ‘Methods’ screen (‘Home’ -> ‘Settings’ -> ‘Administrator’ -> ‘Methods’)
4. Press the Import... button on the top left side of the screen to open the ‘Methods’ file
browser screen (Figure 15).
34 Maxprep™ Liquid Handler | TM509 | Revised 1/19
Page 37

Maxprep™ Software
14648T
A
Figure 15. Method import file selection. Use the ‘Methods’ file browser to navigate to the
location of a method (.package) file. Valid import files are shown on the right side of the file
browser as blue rectangles (yellow when selected).
5. Within the ‘Methods’ screen, navigate to the location at which you saved the method
(.package) file. The current path will be shown in yellow boxes along the top of the window.
Select any aspect of the path to navigate to the desired folder. Press the Drive\ button to
select the drive in which to search. Folders within the current path are shown as red
rectangles on the left side of the screen. Valid method (.package) files will be shown as blue
rectangles (yellow when selected) on the right side of the screen.
6. Select the blue rectangle(s) corresponding to the desired (.package) file(s) to highlight, and
then press the OK button to import the selected methods.
Note: When importing the same version of an existing method, the imported method will
overwrite the existing method and all existing variants will be deleted. A warning is
displayed, indicating that the existing method and variants will be deleted. The warning will
ask whether you wish to proceed with import; press Yes to delete the existing method and
variants or No to cancel the import. New versions of methods will not overwrite existing
methods. To remove a previous version, delete the desired method by touching the X on the
right side of the method entry.
7. A screen will indicate successful import of the method(s) into the software. If import was
successful, the new method file(s) will appear in the list of method files on the ‘Methods’
screen.
35 Maxprep™ Liquid Handler | TM509 | Revised 1/19
Page 38

Maxprep™ Software
A
.B.
4.3 Administrator Settings (continued)
Variant Methods
Each of the methods on the Maxprep™ Liquid Handler can be customized by the administrator
to meet the processing needs of the laboratory. The administrator can create variants of
the default method that specify new default values, set minimum and maximum ranges and
determine whether values can be changed by users at run time for a variety of processing
options.
Creating a Variant Method
1. To create a new variant method, select the icon on an existing method entry to open the
‘Save-As Variant’ screen (Figure 16, Panel A). The new variant method will initially be
populated with the values from the original method or variant method. Changes made to the
method will be saved as a new variant method.
To edit an existing variant method, select the icon on an existing variant method entry
to open the ‘Edit Variant’ screen (Figure 16, Panel B). Changes made to the variant method
will modify the existing variant method.
Figure 16. Creating a variant method. Panel A. The ‘Save-As Variant’ screen allows the
administrator to create a new variant method based on the settings for an existing default or
variant method loaded in the Maxprep™ software. Panel B. The ‘Edit Variant’ screen allows the
administrator to edit the settings of an existing variant method.
2. Enter a name and description to identify the variant method in the Name: and Description:
fields.
14649TA
36 Maxprep™ Liquid Handler | TM509 | Revised 1/19
Page 39

Maxprep™ Software
3. Below the Description: field are groups of variables whose values can be modified by the
administrator. Touch the +/– icon to the left of the group to expand/hide any individual group
of accessible variables.
4. For each variable type, the following are listed:
a. Name: A description of the variable that is being set.
b. Value: The default value for this variable. If the default value falls outside of the allowable
range for the variable, the value will default to the nearest allowable value within the
range.
c. Min/Max: The range of values that are acceptable for this variable. Each method will
have an absolute Min/Max range that is set by Promega. The administrator can narrow
this range if desired to meet laboratory needs. The software will check that the entries
conform to the following conditions:
i. The minimum value is less than or equal to the maximum value.
ii. The minimum and maximum values are within the absolute range set by Promega.
iii. The default value is within the specified range.
If there is an issue with any of these conditions, the software will automatically reset the
offending value to the nearest allowable value within the range.
d. User Modifiable: A check box to indicate whether users can change the default value
during a run.
Note: Not all variables that can be specified in a variant method are available for users
to modify during a method run.
Information regarding the variables that can be set for method types or specific methods,
and the impact of these settings, can be found in Technical Manuals specific to
preprocessing or post-processing methods.
i. Preprocessing Methods for the Maxprep™ Liquid Handler Technical Manual #TM529.
ii. QuantiFluor® Dye Quantitation Methods for the Maxprep™ Liquid Handler Technical
Manual #TM531.
iii. Amplification Setup Methods for the Maxprep™ Liquid Handler Technical Manual
#TM526.
iv. Normalization, Dilution and Transfer Methods for the Maxprep™ Liquid Handler
Technical Manual #TM530.
5. The administrator can modify any of the accessible variables to meet the needs of the
laboratory workflow.
37 Maxprep™ Liquid Handler | TM509 | Revised 1/19
Page 40

Maxprep™ Software
4.3 Administrator Settings (continued)
6. Once all changes have been applied, touch the OK button to save the variant method. New
variant methods will be added to the list of variant methods in the folder (Figure 17).
15317TA
Figure 17. Appearance of variant methods. Administrator ‘Methods’ screen showing an
expanded method folder with a variant method.
In the list of methods, variant methods have the following information present:
Mark this method as a favorite so it is always sorted to the top of the
variant methods list.
Name
Description
The name of the method
A description of the method
Icon for creation of a new variant method based on the values set for
the specified variant method. Saves the resulting variant method as a
new entry.
Icon that allows editing of the values in an existing variant method.
Replaces the existing variant method with the newly entered values.
Icon for deletion of a variant method.
Once variant methods have been created by the administrator, they will be available for users to
run on the system (see Section 5.3, Starting a Method).
38 Maxprep™ Liquid Handler | TM509 | Revised 1/19
Page 41

Deleting Methods
Maxprep™ Software
Note: When
deleting a default
method from
the Maxprep™
software, a
warning will be
displayed to
confirm that you
wish to delete the
default method
and all variants of
that method.
To delete a method or variant method from the Maxprep™ software, press the X on the right
side of the method list entry to delete it. A ‘Warning’ screen will be shown asking whether the file
should be permanently deleted. Select Delete to permanently remove the file from the
Maxprep™ software or Cancel to return to the ‘Methods’ screen without deleting the method.
Labware
View the labware currently installed in the Maxprep™ software on the ‘Labware’ screen
(Figure 16) by touching the Labware button from the ‘Administrator’ screen (Figure 13).
Figure 18. ‘Labware’ screen. This screen displays a list of the labware installed in the
Maxprep™ software.
For each labware listed on the “Labware’ screen (Figure 16), the following are displayed:
Name
Description
Type
The name of the labware
Description of the labware
The type of labware (Plate, Tube, Maxwell® RSC deck tray, Maxwell® RSC 48 deck tray)
Icon for deletion of a labware
39 Maxprep™ Liquid Handler | TM509 | Revised 1/19
Page 42

Maxprep™ Software
4.3 Administrator Settings (continued)
Importing Labware
Only Administrators can import new labware into the Maxprep™ software. Administrators can
request new labware from Promega Technical Services (techserv@promega.com). Labware
definitions are provided in files with a .labware extension. Follow the instructions below to import
a labware import file into the Maxprep™ software.
1. Save the labware (.labware) file on the PC attached to the Maxprep™ Liquid Handler.
2. If not already running, start the Maxprep™ software by double-clicking the software icon on
the desktop.
3. Navigate to the ‘Labware’ screen (‘Home’ -> ‘Settings’ -> ‘Administrator’ -> ‘Labware’)
4. Press the Import... button on the top left side of the screen to open the ‘Labware Import’
file browser screen (Figure 19).
Figure 19. Labware import file selection. Use the ‘Labware Import’ file browser to navigate
to the location of a labware (.labware) file. Valid import files are shown on the right side of the
file browser as blue rectangles (yellow when selected).
40 Maxprep™ Liquid Handler | TM509 | Revised 1/19
Page 43

Maxprep™ Software
5. Within the ‘Labware Import’ file selection screen, navigate to the location at which you
saved the labware (.labware) file. The current path will be shown in yellow boxes along the
top of the window. Select any aspect of the path to navigate to the desired folder. Press the
Drive\ button to select the drive in which to search. Folders within the current path are
shown as red rectangles on the left side of the screen. Valid labware (.labware) files will be
shown as blue rectangles (yellow when selected) on the right side of the screen.
6. Select the blue rectangle(s) corresponding to the desired (.labware) file(s) to highlight, and
then press the OK button to import the selected labware.
Note: When importing the same or a new version of an existing labware, the imported
labware will overwrite the existing labware. During import a warning is displayed, indicating
that the existing labware will be deleted. The warning will ask whether you wish to proceed
with import; press Yes to delete the existing labware or No to cancel the import.
7. A ‘Labware Import’ selection screen is displayed (Figure 20) that enables the administrator
to determine which labware will be imported from the selected (.labware) file. This screen
displays the name of each labware type present in the (.labware) import file and check
boxes for whether the labware will be imported, the RCK file will be overwritten, and the
CTR file will be overwritten. If any labware within the file already exists in the Maxprep™
software, a red triangle with a white exclamation point is displayed to the left of the labware
type. When importing labware, unless instructed otherwise, it is recommended to leave the
check boxes for Import, RCK file and CTR file checked. To complete labware import press
the OK button, or to cancel import press the Cancel button.
Note: Separate instructions will be sent with the labware import file that describe how to
use the Maxprep™ Labware Management utility to determine the methods for which the
new labware will be available.
41 Maxprep™ Liquid Handler | TM509 | Revised 1/19
Page 44

Maxprep™ Software
4.3 Administrator Settings (continued)
Figure 20. ‘Labware Import’ Selection Screen. Use the check boxes on this screen to
determine which items will be imported and which labware files will be overwritten on import.
A red triangle with white exclamation point indicates that the specified labware already
exists in the Maxprep™ software.
Deleting Labware
To delete a labware from the Maxprep™ software, press the X on the right side of the labware
list entry. A ‘Warning’ screen will be shown asking whether the labware should be permanently
deleted. Select Delete to permanently remove the labware from the Maxprep™ software or
Cancel to return to the ‘Labware’ screen without deleting the labware.
Manage Kits
The ‘Manage Kits’ screen provides a forward-looking functionality for managing kit files that
work in concert with future Maxprep™ methods. Currently no methods exist that use this
functionality. When implemented, instructions will be provided for managing kits.
42 Maxprep™ Liquid Handler | TM509 | Revised 1/19
Page 45

Maxprep™ Software
Preferences
Administrators can view additional preferences available in the Maxprep™ software by pressing
the Preferences button on the ‘Administrator’ screen. The ‘Preferences’ screen displays a set
of four tabs that can be used by the administrator to adapt the functionality of the software to
the needs of the laboratory. Below are descriptions of the options that can be set on each of
these tabs.
‘Common Settings’ Tab
The ‘Common Settings’ tab on the ‘Preferences’ screen (Figure 21) provides administrators the
ability to specify the following options:
• Allow expired Maxwell kits: Checking this box allows users to run methods with kits that
have passed their expiration date. When this box is unchecked the software will not allow
expired kits to be used for any preprocessing runs.
• Require Maxwell Kit Lot Number: Checking this box will require users to enter a valid
Maxwell kit lot number for each preprocessing method.
• Allow deletion of results: When checked, this box will allow administrators to delete
extraction report files from the local database of run reports.
• Save aborted runs: When this box is checked, the software will save local run reports for
aborted runs of all instrument functions regardless of why they were aborted. If left
unchecked, any instrument functions that have been aborted will not generate a local run
report
• Export to PDF: Checking this box will create a PDF version of exported results in addition
to the tab-delimited text file version of the results.
• Export to Excel®: Checking this box will create an Excel® version of exported results in
addition to the tab-delimited text file version of the results.
• Auto Export: Report files can be automatically exported to an administrator-defined location
at the end of each method. Check the Auto Export box to enable this function, and then
select the text box below this option to specify the path to which exported results files
should be saved. An ‘Export Folder’ screen will open with the current path specified in
yellow rectangles. Select any aspect of the path to navigate to the desired folder. Press the
Drive\ button to select the drive in which to search. Folders within the current path will be
shown as red rectangles in the main area of the screen. Results will be exported as tabdelimited text files. If the options for Export to PDF or Export to Excel® have been enabled,
reports will also be exported in the selected format(s) to the specified drive location.
• Sanitize: Checking this box will display the UV Sanitization method in the list of
maintenance methods and allow the administrator to specify the time period for UV
sanitization when running the Sanitization maintenance method. After checking the box,
select the text box to specify the sanitization time (in minutes).
• Enforce Maintenance: Checking this box will require that users perform Daily or Weekly
maintenance before being able to run any methods on the Maxprep™ instrument.
43 Maxprep™ Liquid Handler | TM509 | Revised 1/19
Page 46

Maxprep™ Software
4.3 Administrator Settings (continued)
A prompt to save or discard changes made to the preferences is displayed when you navigate
away from the ‘Preferences’ screen.
A
Figure 21 ‘Common Settings’ tab on the ‘Preferences’ screen. From the ‘Common
Settings’ tab the administrator can allow use of expired kits, require entry of Maxwell® kit lot
information, allow deletion of results, specify whether reports from aborted runs should be
saved, specify the file format(s) for exported reports, specify whether and to where reports
will be automatically exported after a run, and set the visibility and sanitization duration
(optional, if UV light is installed) for the Sanitize maintenance method.
44 Maxprep™ Liquid Handler | TM509 | Revised 1/19
Page 47

Maxprep™ Software
‘Alarm Settings’ Tab
The ‘Alarm Settings’ tab on the ‘Preferences’ screen (Figure 22) provides administrators the
ability to specify whether the software will provide audible alarms for completed method runs
and error states. Available options are:
• Play sound when extraction is completed: Check this box to have the PC generate a
sound when a method run is completed.
• Play sound on error: Check this box to have the PC generate a sound if an error occurs
during a method run on the instrument.
A prompt to save or discard changes made to preferences is displayed when you navigate away
from the ‘Preferences’ screen.
A
Figure 22. ‘Alarm Settings’ tab on the ‘Preferences’ screen. From the ‘Alarm Settings’ tab
the administrator can specify whether audible alarms should be played on completion of a
method run or on error during a method run.
45 Maxprep™ Liquid Handler | TM509 | Revised 1/19
Page 48

Maxprep™ Software
4.3 Administrator Settings (continued)
‘E-mail Settings’ tab
The ‘E-mail Settings’ tab on the ‘Preferences’ screen (Figure 23) is where e-mail server details
are specified and administrators can determine when and to whom e-mail notifications will be
sent. It is necessary to fill out the user and server information on the ‘E-mail Settings’ tab in
order to use e-mail notifications. Required e-mail server information on the left side of the screen
includes:
• Username: The name of the user for the e-mail account that will send e-mail notifications.
• E-mail: The e-mail account that will send e-mail notifications.
Note: Contact
your IT
department
to provide the
information
required to
complete e-mail
settings.
• Password: The password for the e-mail account that will send e-mail notifications.
• SMTP Server: The SMTP server address for the e-mail account.
• Port: The port that should be used for the SMTP server.
• SSL Encrypted Connection: Check box indicating whether the e-mail account uses an
SSL Encrypted connection.
On the right side of the screen, the administrator can specify under what conditions and to
whom e-mail notifications will be sent. Options include:
• Send mail when method is completed: Check this box to have e-mails automatically sent
to the specified e-mail addresses when a method run has been completed.
• Send mail on error: Check this box to have e-mails automatically sent to the specified
e-mail addresses if an error state occurs during a method run.
• E-mail Recipients: Enter the e-mail address(es) separated by a space that will act as the
distribution list for e-mail notifications under the conditions that have been selected.
Upon completing the entries for e-mail settings you can test the validity of the settings by
pressing the Test Connection button. Pressing this button will attempt to send a test e-mail to
the e-mail account and e-mail recipients designated by the settings on this tab.
A prompt to save or discard changes made to preferences is displayed when you navigate away
from the ‘Preferences’ screen.
46 Maxprep™ Liquid Handler | TM509 | Revised 1/19
Page 49

Maxprep™ Software
14653TA
Figure 23. ‘E-mail Settings’ tab on the ‘Preferences’ screen. From the ‘E-mail Settings’
tab the administrator can specify e-mail server settings, under what conditions e-mail
notifications should be sent, and the distribution list to which e-mails should be sent. Use
the Test Connection button to check the settings entered on this screen.
47 Maxprep™ Liquid Handler | TM509 | Revised 1/19
Page 50

Maxprep™ Software
14654TA
4.3 Administrator Settings (continued)
‘Portal’ tab
The ‘Portal’ tab (Figure 24) presents settings for use of the Portal software to connect multiple
instrument modules for the purposes of sample tracking and data sharing. Information on this
tab will determine whether your system communicates with the Portal software and define the
server information necessary to connect to the Portal software.
Figure 24. ‘Portal’ tab on the ‘Preferences’ screen. The information entered on the ‘Portal’
tab determines whether Portal Sample Tracking is enabled on your system and allows entry
of the communications settings necessary to connect to the Portal software.
If you wish to share sample tracking and other method-specific data between multiple
modules, check the Enable Portal Sample Tracking check box on this tab. By default the Portal
software is installed on the PC connected to the Maxprep™ Liquid Handler (Cat.# AS9100,
AS9101, AS9200, AS9201). During installation of the Maxprep™ Liquid Hander the connection
information for the Portal software will be configured. In order for your system to communicate
with the Portal software, the following information is required:
• Server Name: Name of the server hosting the Portal software [Default = Maxprep-HP\
PromegaPortal]
• Database: Name of the SQL database containing Portal information [Default = Portal]
• Username: User name necessary to access the Portal software [Default = PortalLogin]
• Password: Password necessary to access the Portal software [Default = PortalLogin]
• Use Windows Authentication: Checkbox to indicate whether Windows authentication
should be used when accessing the Portal Software [Default = Unchecked]
48 Maxprep™ Liquid Handler | TM509 | Revised 1/19
Page 51

Maxprep™ Software
Once the Portal software information has been entered, press the Test Connection button
to determine whether the Maxprep™ software can successfully connect to Portal using
the information supplied. A message is displayed, indicating whether the connection was
successful. If unsuccessful, confirm that the connection information was correctly entered and
try again.
If communication to Portal is lost at any time during a method run, the resulting data will be
queued up for export to Portal when communication is re-established. If there are continuing
problems with export of a data set to Portal, press the Clear Pending Export button to clear
the data from the export process. This may help resolve persistent communication problems
with Portal that are caused by issues with the data. Data that has been cleared from export will
not be sent to the Portal software and will only exist in local reports.
A prompt to save or discard changes made to preferences is displayed when you navigate away
from the ‘Preferences’ screen.
Instrument Name
It is possible to define a unique identifying name for the Maxprep™ Liquid Handler. This name is
shown on the title bar of the Maxprep™ software ‘Home’ screen and is recorded in method run
reports.
1. From the ‘Administrator’ screen press the Instrument Name button to open the
‘Instrument Name’ screen.
2. On the ‘Instrument Name’ screen select the text box and enter the desired name for this
instrument (Figure 25). The instrument name should be entered following the procedures
and rules at your site.
3. Press the OK button to save the instrument name you have entered. An informational
message is displayed, indicating that the name of the instrument has been successfully
changed.
49 Maxprep™ Liquid Handler | TM509 | Revised 1/19
Page 52

Maxprep™ Software
14650T
4.3 Administrator Settings (continued)
4. If you do not wish to save any changes to the instrument name, press the Cancel button to
return to the ‘Administrator’ screen.
A
Figure 25. ‘Instrument Name’ screen. Use this screen to enter a name for this Maxprep™
Liquid Handler.
Audit Records
The Maxprep™ software contains a user-readable audit trail of all functions that have been
performed in the Maxprep™ software. Administrators have access to view and export the audit
records from the instrument through the Audit Records button on the ‘Administrator’ screen.
The ‘Audit Records’ screen displays a listing of all of the functions that have been performed
on the instrument (Figure 26). You can filter the audit records by pressing the buttons on the left
side to view records for functions performed today, this week, this month, the past 6 months,
this year or all functions performed over the life of the instrument. Press the column headers to
sort the records based on column contents. Press the desired row to see the audit message
from that particular record. Administrators can export all audit records for the selected date
range by pressing the Export button at the bottom left corner of the screen. The administrator is
required to specify a location to which the exported information should be saved.
1. Press the Export button on the ‘Audit Records’ screen.
2. Using the Yellow and Red rectangle buttons you can select the folder location (Figure 27)
where the method run reports will be saved.
The current path is indicated by the yellow rectangles at the top of the ‘Export Folder’
screen. Any folders present within the selected directory are displayed as red rectangles in
the white portion of the screen. Press the Drive\ button to navigate to the drive location of
the desired folder. Select red folder buttons to navigate to the specified folder location.
50 Maxprep™ Liquid Handler | TM509 | Revised 1/19
Page 53

Maxprep™ Software
3. Once the desired file path has been specified, press the OK button to export audit records
or press the Cancel button to cancel any changes. After pressing either OK or Cancel you
will be returned to the ‘Administrator’ screen.
Figure 26. ‘Audit Records’ screen. A user-readable record of events that have occurred in
the Maxprep™ software can be viewed by the administrator and exported to a specified
drive location from the ‘Audit Records’ screen.
Figure 27. ‘Export Folder’ screen. From the ‘Export Folder’ screen you can set the folder
location to which all displayed audit records will be exported.
51 Maxprep™ Liquid Handler | TM509 | Revised 1/19
Page 54

Maxprep™ Software
Notes
52 Maxprep™ Liquid Handler | TM509 | Revised 1/19
Page 55

Operating the Maxprep™ Liquid Handler
5.1 Maintenance
Maintenance is critical to ensuring performance of the Maxprep™ Liquid Handler over the life of
the instrument. Press the Maintenance button on the ‘Home’ screen (Figure 28) of the
Maxprep™ software to access the ‘Maintenance’ screen (Figure 29). Listed on the
‘Maintenance’ screen are methods designed to ensure your instrument is in working order. The
UV Sanitization method is also included depending on Administrator settings (see Section 4.3).
For each maintenance method, the date at which the method was last performed is listed.
5
Figure 28. ‘Home’ screen. Selecting the Maintenance button opens the ‘Maintenance’
screen from which maintenance methods for the Maxprep™ Liquid Handler can be run.
53 Maxprep™ Liquid Handler | TM509 | Revised 1/19
Page 56

5.1 Maintenance (continued)
14656TA
Operating the Maxprep™ Liquid Handler
Figure 29. ‘Maintenance’ screen. The ‘Maintenance’ screen lists the available maintenance
methods that can be run for the Maxprep™ Liquid Handler.
Daily and Weekly Maintenance
Daily Maintenance and Weekly Maintenance should be performed at their specified frequency,
and if the Administrator has chosen to enforce maintenance, the Daily and Weekly Maintenance
must be run at their specified frequency before any other methods can be run. The Daily
Maintenance method will test the pressure and conductive liquid level sensing performance of
the system. The Weekly Maintenance method will prompt the user to clean the instrument (see
Section 6.1, Weekly Cleaning) and then will test instrument calibration, pressure and conductive
liquid level sensing. Because the Weekly Maintenance method includes the functions tested in
the Daily Maintenance method, it is not necessary to run both Daily Maintenance and Weekly
Maintenance on the same day. When starting a Maintenance method, make sure to close the
door of the instrument before pressing the Proceed button. Perform the on-screen instructions
that are provided for each method. The gantry of the instrument can be freely moved from side
to side in order to facilitate performing the on-screen instructions. Make sure that the tip eject
bar has been removed from the Waste Position and that the door of the instrument is closed.
After the maintenance method is complete, replace the tip eject bar on the Waste Position. The
pin on the waste position should fit in the small hole at the front of the tip eject bar, the large cut
out should be at the back of the instrument and the angled side of the tip eject bar should be on
the right side and facing downward toward the waste bin.
54 Maxprep™ Liquid Handler | TM509 | Revised 1/19
Page 57

5.2 Methods
Operating the Maxprep™ Liquid Handler
UV Sanitization (Optional)
If you have a Maxprep™ Liquid Handler with the optional UV light you can run the UV
Sanitization method to perform a UV treatment for an amount of time designated in the
administrator preferences (see Section 4.3, Administrator Settings). The visibility of the UV
Sanitization Maintenance method is specified on the ‘Common Settings’ tab of the ‘Preferences’
screen (see Section 4.3, Administrator Settings).
The methods supplied with the Maxprep™ Liquid Handler can be used to perform
preprocessing of samples for a variety of Maxwell® RSC purification kits and to perform a variety
of post-processing processes (e.g., quantitation, PCR setup, qPCR setup, normalization, etc.).
Please refer to your specific Maxwell® RSC reagent kit and method type Technical Manuals
for information on method setup and variant method options. Two mechanisms for selecting a
method to run are enabled in the Maxprep™ software. Selection of a method from the list of
installed methods and administrator-defined variant methods can be used for method selection
as well as confirmation. Alternatively, for preprocessing methods, enter or scan the bar code
information on a Maxwell® RSC purification kit box. This will filter the list of methods to display
the appropriate installed preprocessing method(s) for that kit with subsequent selection and
confirmation being performed by the user.
55 Maxprep™ Liquid Handler | TM509 | Revised 1/19
Page 58

5.3 Starting a Method
14675CA
From the ‘Home’ screen (Figure 30) select the Start button to begin the process of running a
method.
Operating the Maxprep™ Liquid Handler
Figure 30. Maxprep™ software ‘Home’ screen. Selecting the Start button begins the
process of running a method on the Maxprep™ Liquid Handler.
56 Maxprep™ Liquid Handler | TM509 | Revised 1/19
Page 59

Operating the Maxprep™ Liquid Handler
The ‘Methods’ screen displays the list of methods installed in the Maxprep™ Software
(Figure 31). The following information is displayed for each method:
Mark this method or variant method as a favorite for filtering purposes.
When the folder icon appears in an entry it indicates that variant methods
have been created for this entry. Select the method entry to expand the
folder and view the available administrator-defined variant methods.
Name
Description
Type
Sample Type
The name of the method
A description of the method
Indicates whether this is a preprocessing or post-processing method
Indicates whether this method applies to DNA samples, RNA samples, or
Universal (total nucleic acid) samples
Catalog ID
Version
The catalog number for the kit (if any) associated with this method
The version number of this method
Use the filter check boxes on the left side of the screen to display only certain types of methods.
You can filter by:
• Method Type: Preprocessing or post-processing methods.
• Sample Type: DNA, RNA or Universal (total nucleic acid) sample types.
• Favorites: Only methods where the Favorites star icon to the left of the method is
highlighted.
• Keyword: Type in a word or word fragment to only show methods that contain that word in
the Name, Description or CatalogID field.
Once you have chosen a method to run, either select the method or variant to highlight or use
the alternative instructions below to select preprocessing methods based on preprocessing kit
bar code. A Proceed button will appear on the right side of the highlighted method entry. Press
the Proceed button to start the selected method.
57 Maxprep™ Liquid Handler | TM509 | Revised 1/19
Page 60

Operating the Maxprep™ Liquid Handler
14657TA
5.3 Starting a Method (continued)
Figure 31. Selecting a method to run from the ‘Methods’ screen. Select a method or
administrator-defined variant method from the ‘Methods’ screen. Once a method is selected
it will be highlighted in yellow. Press the Proceed button to start the method.
Alternative method selection for preprocessing methods
To select an appropriate preprocessing method for a Maxwell® RSC purification kit, touch the
text box at the top of the ‘Methods’ screen (Figure 31) and either scan or type the bar code on
the Maxwell® RSC reagent kit box indicated by the Scan Here label (Figure 32). The Maxprep™
software requires manual entry of bar codes in the following format: Product Catalog Number,
Kit Lot Number, Expiration Date in year-month format (example: AS13303221872020-05, where
the product catalog number is AS1330, the kit lot number is 322187 and the expiration date is
2020-05). Only if the bar code entered has this format will a method be selected. If applicable,
select any of the other variants that you wish to run to change the selection.
There are two possible warnings that can be displayed based on entry of kit bar code
information. For kits that have passed the expiration date, the Maxprep™ software will display
a warning that the kit is past expiration. If the administrator has allowed the use of expired kits,
the user can make the choice of whether to proceed with this method or not; otherwise, the
software will not allow the selection of a method based on a bar code that indicates the kit has
expired. When there is no corresponding method for a kit based on the bar code entry, the
software will display a warning of the issue. Check the Promega web site (www.promega.com/
resources/tools/maxprepmethod) to see if a method has been released for the kit.
58 Maxprep™ Liquid Handler | TM509 | Revised 1/19
Page 61

Operating the Maxprep™ Liquid Handler
12206TA
Figure Number
Note: The method
run will abort
immediately if
the door of the
Maxprep™ Liquid
Handler is open
when the Run
button is pressed.
Make sure to
close the door of
the Maxprep™
Liquid Handler
when starting a
method run.
Figure 32. Kit label indicating bar code to scan. Shown in the blue box is the bar code to
scan on the kit label for starting a purification run.
Once the bar code is correctly entered and the desired method or variant has been selected,
press the Proceed button to display the ‘Method Run’ screen (Figure 33). The name of the
selected method is shown in the title bar of the ‘Method Run’ screen. Summary information for
the method is displayed on the left side of the screen. To start the run, close the door of the
Maxprep™ Liquid Handler and press the Run button. If the Administrator has chosen to enforce
maintenance on the system, a warning will be displayed if a maintenance run has not been
performed prior to starting a method run.
59 Maxprep™ Liquid Handler | TM509 | Revised 1/19
Page 62

Operating the Maxprep™ Liquid Handler
14658TA
5.3 Starting a Method (continued)
Figure 33. ‘Method Run’ screen. At the top of this screen, the selected method is
indicated. A summary of the selected method is displayed on the left side of the screen.
Close the door of the instrument and press the Run button to start the selected method.
Once a method is started, you will be presented with a series of user interface screens. These
screens will request user input for various run-time variables (e.g., sample number, elution volume,
etc.) and will provide a detailed description of how to place the labware and samples needed on
the deck of the Maxprep™ Liquid Handler. More detailed information regarding the specifics of the
variables that need to be entered and the deck setup instructions for preprocessing, quantitation,
amplification and normalization can be found in the following Technical Manuals:
• Preprocessing Methods for the Maxprep™ Liquid Handler Technical Manual #TM529.
• QuantiFluor® Dye Quantitation Methods for the Maxprep™ Liquid Handler Technical Manual
#TM531.
• Amplification Setup Methods for the Maxprep™ Liquid Handler Technical Manual #TM526.
• Normalization, Dilution and Transfer Methods for the Maxprep™ Liquid Handler Technical
Manual #TM530.
Details for specific methods can be found in the method-specific Technical Manuals on the
Promega web site (www.promega.com).
Close the door of the Maxprep™ Liquid Handler when prompted after deck setup is complete
(Figure 34).
60 Maxprep™ Liquid Handler | TM509 | Revised 1/19
Page 63

Operating the Maxprep™ Liquid Handler
14659TA
A.
Figure 34. ‘Final Setup’ Screen. This is the last user interface screen displayed before the
Maxprep™ Liquid Handler starts processing samples. Close the instrument door before
pressing the Next button.
While the method runs, the method run screen will update with information regarding the current
step in the method and display a progress bar indicating progress through the method. On
the lower left side of the screen, you will see an Elapsed Time showing the amount of time the
method has been running. Press the Logs button during the run to see the instrument log file as
it is being generated.
61 Maxprep™ Liquid Handler | TM509 | Revised 1/19
Page 64

Operating the Maxprep™ Liquid Handler
5.3 Starting a Method (continued)
If for any reason you need to pause the instrument during a run, press the Pause button. The
instrument will finish the current step, and the door will unlock, allowing you access to the inside
of the instrument. When you are finished with the pause, close the instrument door and press
the Resume button to resume the run.
Note: The method run will abort immediately if the door of the Maxprep™ Liquid Handler is
open when the Resume button is pressed. Make sure to close the door of the Maxprep™
Liquid Handler when resuming a method run after a pause.
If you need to abort the method run currently in progress, press the Abort button.
If there is a need to perform an immediate stop of the Maxprep™ Liquid Handler during a run,
press the power button to power the instrument off. The method run will be aborted, and the
Any samples being
processed will be lost
if a run is aborted.
doors will unlock.
Completion of a Method
Methods can end through one of three mechanisms:
• The method completes successfully.
• The method is aborted by the user .
• The method is aborted as a result of an instrument error.
Method Completes Successfully
When the method completes successfully there will be a message indicating that the method
has completed successfully (Figure 35).
Figure 35. Message after method completion. Upon completion of the currently running
method, there will be a message indicating that the run has completed successfully.
62 Maxprep™ Liquid Handler | TM509 | Revised 1/19
Page 65

Used labware and
14661TA
reagents should
be disposed of
appropriately
according to
your institution’s
procedures for
hazardous and
biohazardous waste.
An aborted run
(initiated by the user
or due to instrument
error) will result
in the loss of all
processed samples.
Operating the Maxprep™ Liquid Handler
Open the door of the Maxprep™ Liquid Handler, store or discard any unused reagents. Remove
any sample tubes, Maxwell® deck trays, reagents and processing plates, and either discard or
store them appropriately.
A local report will be generated for the run containing run parameters, sample tracking
information, and user/system information. If the administrator has enabled Auto Export for
reports, the report files will be automatically exported to the administrator-specified file location.
To access local reports, from the ‘Home’ screen press the Results button (see Section 5.6.
Accessing Reports). If connected to the Portal software, run information will be saved to the
Portal software.
Method Aborted by the User or an Instrument Error
If the user presses the Abort button during a method, or if there is an instrument error that
causes the method to abort, a message is displayed, indicating that the instrument should be
powered off and any tips or tools be manually removed (Figure 36). If no tips or tools are loaded
on the pipetting channels it is not necessary to power the instrument off after an abort. There
can be many reasons why a user might choose to abort a method. Many instrument errors can
occur because of the presence of unexpected labware on the deck of the instrument. Always
use care when setting up the instrument, and confirm that the deck configuration specified by
the method setup instructions matches the physical layout of the instrument. After a method is
aborted, if the channels are wedged in a piece of labware and are not free to move, or if you are
unsure of whether the channels are free to move, power off the instrument and manually remove
any tips or tools from the pipetting channels. See Section 5.4, Error Recovery, for instructions on
manually resolving hardware issues.
For any physical crash of the instrument hardware, after resolving the issue and removing any
loaded tips or tools, check for visible damage to the pipetting channels. If there is no visible
damage, run the Weekly Maintenance method to check instrument functions and calibration.
Passing results from the Weekly Maintenance indicate that the instrument is clear to run again. If
Weekly Maintenance produces failing results, contact Promega Technical Service (techserv@
promega.com) to schedule a service visit.
Figure 36. Message after a method is aborted. If a method is aborted either by the user or
an instrument error, the ‘Manual System Recovery’ screen will be displayed.
63 Maxprep™ Liquid Handler | TM509 | Revised 1/19
Page 66

5.4 Error Recovery
In the event of an error that results in a physical crash of the system, it may be necessary to turn
the system power off and manually resolve any crashes as well as remove tips or tools that are
loaded on the system. Follow the instructions below for recovering from a physical crash of the
system.
1. Power off the Maxprep™ Liquid Handler by pressing the power button on the front right
side of the instrument.
2. Shut down the Maxprep™ software by pressing the X icon in the upper right corner of the
software.
Operating the Maxprep™ Liquid Handler
Used labware and
reagents should
be disposed of
appropriately
according to
your institution’s
procedures for
hazardous and
biohazardous waste.
3. Prior to resolving any hardware issues, open the door of the Maxprep™ Liquid Handler,
store or discard any unused reagents. Remove any sample tubes, Maxwell® Deck Trays and
processing plates, and either discard or store them appropriately.
4. Check to see if there is any visible damage to the pipetting channels of the Maxprep™
Liquid Handler. If there is visible damage, contact Promega Technical Services (techserv@
promega.com) to schedule a service visit prior to running the system again.
5. If there are any tips or tools loaded on the pipetting channels, you will need to remove these
manually.
a. With the Maxprep™ Liquid Handler powered off, push the pipetting channels up until
they are clear of any obstruction. Note: Wear appropriate personal protective equipment
(lab coat, gloves, safety glasses) when removing tips or tools from the system.
b. Remove carriers or labware to ensure free access to the pipetting channels.
c. When you eject the tip, any liquid will be released onto the deck. Place something under
the channels to catch tips and liquid.
d. Pull the pipetting channel downward to access the squeeze drive on the pipetting
channel (Figure 37).
e. Turn the squeeze drive in the direction indicated in Figure 37 to release the squeeze
motor. A spring on the pipetting channel will forcibly shuck the tip or tool once the
squeeze drive has been loosened.
f. Push the channel upwards so that it is clear to move side to side.
g. Repeat steps c–f for all pipetting channels that have a tip or tool loaded.
64 Maxprep™ Liquid Handler | TM509 | Revised 1/19
Page 67

Operating the Maxprep™ Liquid Handler
Figure 37. Squeeze Drive. Turn the squeeze drive in the direction indicated to release any
tools or pipette tips from the pipetting channels.
65 Maxprep™ Liquid Handler | TM509 | Revised 1/19
Page 68

Operating the Maxprep™ Liquid Handler
5.4 Error Recovery (continued)
6. Once all tips or tools have been released from the pipetting channels, discard any tips or
plungers and replace any tools in their appropriate tool holder (Figure 38). When plunger
tools are removed from the channels, confirm that the o-ring is still present on the plunger
tool before placing it back in the tool holder. When gripper paddles are removed from the
channels, replace them in the tool holder so that the pins and magnets are facing toward
the center of the tool holder.
Figure 38. Tool Holder. Replace any tools that have been removed from the pipetting
channels in their appropriate location on the left side of the instrument.
7. Press the power button to turn on the Maxprep™ Liquid Handler. Restart the computer.
Start the Maxprep™ software by double-clicking the Maxprep™ software icon on the
desktop.
8. From the ‘Home’ screen press Maintenance, and then run the Weekly Maintenance
method. This method will prompt you to clean the deck of the instrument and then will
check the calibration of the pipetting channels, the performance of the liquid level sensing
mechanisms and the integrity of the pipetting system.
9. If the Weekly Maintenance method proceeds to completion and the report indicates that
Weekly Maintenance has passed, you are clear to run further methods on the system.
10. If the Weekly Maintenance method does not complete, or the report indicates that Weekly
Maintenance has not passed, contact Promega Technical Services (techserv@promega.com)
to troubleshoot the issue and determine whether to schedule a service visit before running
the system again.
66 Maxprep™ Liquid Handler | TM509 | Revised 1/19
Page 69

5.5 Reports
14662TA
Operating the Maxprep™ Liquid Handler
Running a method results in the creation of a local report of sample tracking and run-specific
information. Reports will be automatically exported to an administrator-defined drive location if
Auto Export functionality has been enabled (see Section 4.3, Administrator Settings).
Local reports provide a mechanism for viewing information about method runs on a per method
basis. These reports can be accessed by selecting the Results button on the Maxprep™
‘Home’ screen.
A local report is generated after completion of a method run (Figure 39). Included in the local
report are sample tracking information, the final status of the method (Completed or Aborted),
the time the method was started, the length of time the method took to process, the operator ID
and the Maxprep™ Liquid Handler details (software version, firmware version, instrument name,
serial number, etc.). A second tab on the report displays the method-specific variable settings
that were used for this method.
Figure 39. ‘Report View’ screen. The ‘Report View’ screen displays a report generated
from the most recently run method. Included in this report are sample tracking information,
the final status of the method (Completed or Aborted), the time the method run was started,
the length of time the method took to process, the operator ID and additional instrument
information. A second tab on the report displays method-specific variable settings for this
method. In the upper left corner of the screen are Print and Export buttons that can be used
for printing or exporting report information.
Use the buttons on the left side of the ‘Report View’ screen to:
• Print reports using a printer that can be accessed by the PC.
• Export reports in tab-delimited text file format as well as Microsoft Excel® format and PDF
format depending on administrator settings (Figure 40).
67 Maxprep™ Liquid Handler | TM509 | Revised 1/19
Page 70

5.5 Reports (continued)
Operating the Maxprep™ Liquid Handler
Figure 40. ‘Export Result’ screen. When the Export button is pressed the user is asked to
navigate to the folder in which the report files should be saved.
Press the Export button to navigate to the file location where the report should be exported,
and then press the OK button. The Maxprep™ software exports reports in tab-delimited text
format as well as .xls format and .pdf format depending on administrator settings. You can use
Excel® viewer or PDF viewer to view the report.
68 Maxprep™ Liquid Handler | TM509 | Revised 1/19
Page 71

Operating the Maxprep™ Liquid Handler
14663TA
You can use the tab-delimited format file (*.txt) with Laboratory Information Management
Systems (i.e. LIMS). An example of the tab-delimited format file is shown in Figure 41.
Figure 41. Example of an exported text file in the tab-delimited format.
69 Maxprep™ Liquid Handler | TM509 | Revised 1/19
Page 72

5.6 Accessing Reports
14664TA
From the ‘Home’ screen of the Maxprep™ software, press the Results button to access
method reports and system maintenance reports. The ‘Results’ screen displays a listing of
the reports for the methods that have been run (Figure 42). You can filter reports by selecting
the buttons on the left side to view reports for runs completed Today, This Month, the past
Six Months, This Year or All Maxprep™ Liquid Handler runs completed over the life of the
instrument. You can also use the Method, System or All Types buttons on the left side of the
screen to toggle between report types.
Select the column headers to sort the reports based on column contents. Select the desired
row to see a detailed view of the report data from that method run (Figure 43). Administrators
can delete records from the software by pressing the X icon to the right of the desired report
row if the option to Allow Deletion of Results has been enabled in the software preferences
(see Section 4.3, Administrator Settings). Press the Export All button to export all reports to a
designated drive location in tab-delimited text format as well as .pdf and Excel® format as
specified by the Administrator (see Section 4.3, Administrator Settings).
Operating the Maxprep™ Liquid Handler
Figure 42. ‘Results’ screen. The ‘Results’ screen lists the reports from all of the methods
that have been run. Select any given report listing to see a detailed view of the report data
from that method run. Filter the displayed results using the Method, System or All Types
buttons on the left side of the ‘Results’ screen. Selecting a date range button on the left side
of the screen will filter the reports displayed based on their run date.
70 Maxprep™ Liquid Handler | TM509 | Revised 1/19
Page 73

Operating the Maxprep™ Liquid Handler
14662TA
Figure 43. Method report. An example of the sample tracking information present in a
method run report. The second tab on the report displays variables set during the run.
71 Maxprep™ Liquid Handler | TM509 | Revised 1/19
Page 74

Operating the Maxprep™ Liquid Handler
Notes
72 Maxprep™ Liquid Handler | TM509 | Revised 1/19
Page 75

Cleaning the Maxprep™ Liquid Handler
6.1 Weekly Cleaning
It is important to keep the Maxprep™ Liquid Handler clean during regular operation. It is
recommended to perform a full cleaning of the system as part of the Weekly Maintenance
Wear gloves
and appropriate
personal protective
equipment. If the
instrument is used
with biohazardous
materials, dispose
of any cleaning
materials used in
accordance with
your institutional
guidelines.
procedure. If samples or reagents have been spilled, it is important to clean the instrument
immediately to avoid damage or contamination of samples.
Follow the instructions below to perform a full cleaning of the Maxprep™ Liquid Handler.
• Do not remove the Maxprep™ Liquid Handler outer panels for cleaning. This will void the
warranty.
• Do not use a spray bottle to soak instrument surfaces with large volumes of liquid.
• Never allow liquids to remain on instrument surfaces for extended periods of time.
• Do not use bleach solutions for cleaning any instrument surfaces.
1. From the ‘Home’ screen, press the Maintenance button. Close the instrument door and
select the Weekly Maintenance item from the list of maintenance methods.
6
Used labware and
reagents should
be disposed of
appropriately
according to
your institution’s
procedures for
hazardous and
biohazardous waste.
2. Once the method has started, open the door of the instrument to clean the instrument.
While cleaning the instrument during the Weekly Maintenance method, it is possible to
manually move the gantry of the system left and right to access carriers and tip waste.
3. Remove any Maxwell® deck trays, samples and consumables from the Maxprep™ Liquid
Handler.
4. Remove the tip eject bar from the waste position (Figure 44) and clean with a disinfectant
spray such as Steris LpH® following the manufacturer’s instructions.
5. Remove the tip waste bin from the instrument (Figure 44). Remove the waste bag and
dispose of any used tips. Clean the tip waste container with disinfectant spray and then
rinse with water. Do not autoclave the tip waste bin.
6. Line the waste bin with a new waste bag. Reorder Maxprep™ Waste Bags, Clear, from
Promega (Cat.# AS9305). Return the waste bin to the system.
73 Maxprep™ Liquid Handler | TM509 | Revised 1/19
Page 76

Cleaning the Maxprep™ Liquid Handler
6.1 Weekly Cleaning (continued)
7. Perform the following instructions for each of the carriers that have a handle on the front.
a. Remove the carrier from the deck of the Maxprep™ Liquid Handler. To remove carriers,
grasp the handle on the carrier and pull it straight out toward you, supporting the
bottom of the carrier as you remove it from the system.
b. Clean the carrier and the deck area underneath the carrier with a disinfectant spray
such as Steris LpH® following the manufacturer’s instructions.
c. Replace the carrier at the same deck location from which it was removed. Support the
bottom of the carrier, and place the back edge of the carrier on the track positions at
the front of the instrument; then slide the carrier straight back until it touches the
backstop of the instrument.
Tip Eject Bar
Calibration Block
Waste Basket
Figure 44. Tip eject bar and plastic waste bin. To the right of the carriers is a waste
position that has a removable black tip eject bar as well as a calibration block. On the far
right side of the instrument is a removable black plastic waste bin that is used for disposal of
used tips.
8. Clean the four Pipetting Channels with a towel wetted with 70% ethanol.
9. Clean interior and exterior panels and door with a towel wetted with 70% ethanol.
10. Close the instrument door, and Press OK on the ‘Weekly Maintenance’ screen to proceed
with checking pipetting channel performance and instrument calibration.
11. Once the Weekly Maintenance method is complete, replace the tip eject bar on the waste
position. The pin on the waste position should fit in the small hole at the front of the tip eject
bar, the large cut out should be at the back of the instrument and the angled side of the tip
eject bar should be on the right side and facing downward toward the waste bin.
74 Maxprep™ Liquid Handler | TM509 | Revised 1/19
Page 77

6.2 Dealing with Spills
Wipe up any spills immediately. If any material spills in the instrument, wipe up the material with
a cloth dampened with 70% ethanol. Note that the reagents contain hazardous materials;
Bleach reacts
with guanidine
thiocyanate, which
may be present
in the Maxwell®
RSC Cartridges,
and should not be
added to any sample
waste containing
lysis solutions. Do
not use bleach to
clean Maxwell® RSC
reagent spills.
therefore, dispose of the cleaning materials according to your institutional guidelines. Wipe well
once visible material is removed. In case of spills in the instrument where there is a potential
biohazard, wipe up the spill with paper towels and wash the spill area with a detergent solution
such as Steris LpH® following the manufacturer’s instructions. Dispose of towels used according
to your institutional guidelines for biohazardous waste.
Cleaning the Maxprep™ Liquid Handler
75 Maxprep™ Liquid Handler | TM509 | Revised 1/19
Page 78

Cleaning the Maxprep™ Liquid Handler
Notes
76 Maxprep™ Liquid Handler | TM509 | Revised 1/19
Page 79

Troubleshooting
For questions not addressed here, please contact your local Promega Branch, Office or Distributor. Contact
information available at: www.promega.com. E-mail: techserv@promega.com
Symptoms Causes and Comments
PC touch screen does not appear
to be working
Cannot load new methods or
change method run parameters
Power failure during a run In the event of a power failure, turn off the instrument and the PC. When
Verify that the power cords are securely connected to the PC and
monitor.
Verify that the USB cable is securely connected between the PC and
monitor.
Restart the Maxprep™ Liquid Handler PC, and launch the Maxprep™
software. If the issue is not resolved, contact Promega Technical
Services for further assistance.
Only operators with administrator-level access to the Maxprep™
software have the ability to change certain functions. If you do not have
administrator-level access, contact your site administrator.
power has returned, turn the instrument and PC back on.
7
Communication failure with Portal
software
• An aborted run (due to power failure) will result in the loss of all the
samples.
• Do not attempt to repurify samples from an aborted run.
In the event of a communication failure with the Portal software, the software will not allow another method to be run until one of the following
two conditions are met:
• Communication is re-established to the Portal software.
• The administrator disables Portal sample tracking temporarily.
Contact your IT department to determine whether a network outage or
some other network communication failure has occurred and how to
resolve the issue.
77 Maxprep™ Liquid Handler | TM509 | Revised 1/19
Page 80

Troubleshooting
Symptoms Causes and Comments
Communication failure with Portal
software (continued)
Data from the run that occurred prior to communication failure will not
be lost. It will be exported to Portal software when communication is reestablished.
If Portal sample tracking has been disabled temporarily, remember to
start Portal sample tracking again when the communication issue has
been resolved.
If there is a persistent problem exporting a given set of data to the Portal
software, the administrator can access the Portal tab on the ‘Preferences’
screen (Section 4.3, Administrator Settings) and press the Clear Pending
Export button to discard the data currently being exported.
Instrument Connection Errors In the event that errors in instrument communication or functions are
observed when starting a method, a full restart of the system is required.
Shut down the Maxprep™ software, and turn off the Maxprep™ Instrument.
Restart the Maxprep™ Instrument and restart the Maxprep™ PC. When
the PC has finished rebooting, Restart the Maxprep™ software.
7.1 Errors and Warnings
Error Explanation
Initialization Failure: Access Denied, not a valid
Promega User, Please contact your system
administrator
Method: Aborted By User User aborted method.
A previous instrument task is still active. Please try
again later.
Promega User is not set up correctly in Windows®
Operating System. Consult the Appendix of this
Technical Manual and/or contact your administrator/IT
personnel to resolve this issue.
• An aborted run (initiated by the user) will result in
the loss of all the samples.
• Do not attempt to repurify samples from an
aborted run.
User tried to do something while previous run was
active. Wait for the current process to complete. If
error still persists, contact your IT administrator or
Promega Technical Services.
78 Maxprep™ Liquid Handler | TM509 | Revised 1/19
Page 81

Troubleshooting
Error Explanation
An error during method initialization. Unable to ping
instrument.
The Maxprep™ software is unable to communicate
with the Maxprep™ Liquid Handler. Make sure the
Maxprep™ Liquid Handler is on and wait until the
green light on the gantry bar code scanner is visible.
Shut down and restart the Maxprep™ software.
7.2 Using a USB Flash Drive
• When using a USB flash drive, insert it before running any method, and do not remove it until
the method is finished.
• Do not insert or remove a USB flash drive while instrument is running.
• Since USB flash drives may vary from vendor to vendor or from type to type, incompatibilities
can occur. If your USB flash drive is not detected after a few seconds or if you encounter any
issues with the USB flash drive, shut down and restart the PC. Also try a different brand of
USB flash drive.
• If the PC becomes unresponsive after inserting a USB flash drive, shut down and restart the
PC and the Maxprep™ Liquid Handler.
79 Maxprep™ Liquid Handler | TM509 | Revised 1/19
Page 82

Troubleshooting
Notes
80 Maxprep™ Liquid Handler | TM509 | Revised 1/19
Page 83

Instrument Service
8.1 Service
We recommend that the Maxprep™ Liquid Handler receive a preventive maintenance service
visit at least once a year.
8.2 Maxprep™ Liquid Handler Service
The Maxprep™ Liquid Handler is designed to provide years of consistent performance.
If a problem arises with your instrument, please contact Promega or your local Promega
representative for support. Visit the Promega Web site at: www.promega.com for the contact
information for the Promega branch or distributor nearest you. If further action is required, repair
options will be presented and an on-site service visit may be scheduled.
8
8.3 Instrument Disposal
Contact your local Promega Representative for disposal of the instrument. Please follow your
institutional and country-specific requirements to handle the disposal of accessories. Instrument
must be decontaminated prior to disposal.
81 Maxprep™ Liquid Handler | TM509 | Revised 1/19
Page 84

Instrument Service
Notes
82 Maxprep™ Liquid Handler | TM509 | Revised 1/19
Page 85

Warranties, Service Agreements and
Related Products
9.1 Warranty
Upon purchase of the Maxprep™ Liquid Handler, the instrument will be covered by a one-year
Standard Warranty. The Standard Warranty covers all parts and labor. After the warranty period
is over, the customer can continue to receive the same comprehensive service and support
from Promega as when the system was under warranty by purchasing one of the Warranty and
Service Agreement options listed in Section 9.2.
9.2 Warranty and Service Agreement Options
Instrument damage due to customer neglect or negligence are not covered by Warranties
or Service Agreements. Channel replacement due to instrument crashes are not covered by
Warranties or Service Agreements.
9
Maxprep™ Liquid Handler Premier Warranty Upgrade (Cat.# SA1391)
The Premier Warranty Upgrade includes all parts, labor and on-site service visits by a factorytrained service technician within 2 business days (where available). Additionally, it includes
one annual on-site Preventive Maintenance visit by a service technician. Additional Preventive
Maintenance visits are available separately.
Maxprep™ Liquid Handler Standard Service Agreement (Cat.# SA1392)
The Standard Service Agreement covers all parts, labor and on-site visits. The system will
be repaired and returned to original factory specifications. Preventive Maintenance visits are
available separately.
Maxprep™ Liquid Handler Premier Service Agreement (Cat.# SA1393)
The Premier Service Agreement includes all parts, labor and on-site visits. The system will be
repaired and returned to original factory specifications. A service technician will be on-site within
2 business days for repairs. Additionally, it includes one annual on-site Preventive Maintenance
visit by a service technician. Additional Preventive Maintenance visits are available separately.
83 Maxprep™ Liquid Handler | TM509 | Revised 1/19
Page 86

Warranties, Service Agreements and Related Products
9.2 Warranty and Service Agreement Options (continued)
Maxprep™ Liquid Handler Preventive Maintenance (Cat.# SA1396)
To keep the system operating at peak performance, we recommend that Maxprep™ Liquid
Handlers receive a Preventive Maintenance check at least every 12 months of use. During this
procedure, our qualified service personnel test the instrument, check parts for wear and replace
them as needed. Additionally, the system is aligned and functionality is verified. Documentation
for your files is provided. The Preventive Maintenance service is performed by scheduling an onsite Preventive Maintenance visit.
Warranty Benefit Standard Warranty Premier Warranty
Warranty Period
Parts and Labor
Shipping of Parts
Loaner Instrument
On-Site Support
Preventive Maintenance
Application Support
1 Year 1 Year
Yes Yes
Yes (UPS Ground, 5–7
business days)
No No
Yes (within 5 business days) Yes (within 2 business days)
No (available separately) Yes (1)
Yes (limit 2 visits) Yes (limit 3 visits)
Yes (UPS Overnight)
Maxprep™ Liquid Handler Installation Qualification and Operational Qualification
Cat.# SA1397, SA1398, SA1399
The Installation Qualification service product includes a series of formal instrument checks,
delivers written documentation of instrument functionality, and demonstrates that everything
ordered with the instrument is supplied and installed at the customer’s laboratory. This service
product must be delivered by a Promega representative who is certified to perform the
Installation Qualification. The service product involves a site visit to perform:
• Installation by qualified Promega personnel
• Inspection of shipping containers, instrument and accessories
• Comparison of items received vs. items on purchase order
• Inspection of laboratory conditions
• Review of all hazards and precautions with users
• Confirmation/installation of correct firmware version
• Testing of instrument run
• Recording and documenting installation and actions
84 Maxprep™ Liquid Handler | TM509 | Revised 1/19
Page 87

Warranties, Service Agreements and Related Products
The Operational Qualification service product demonstrates that the instrument functions
according to its operational specifications. This service product must be delivered by a Promega
representative who is certified to perform the Operational Qualification. The service product
involves a site visit to perform:
• Running of operational verification tests
• Documenting of all calibration and test results
• Training of customer(s) to operate the instrument
• Training of customer(s) to use the log book
• Completion of customer-specific log book, instrument sticker and OQ documentation
Limited Warranty and Service Guidelines
Pursuant to this Warranty, Promega warrants to the original purchaser of the Promega
Maxprep™ Liquid Handler that Promega will provide the parts and labor required for service
and repair of the instrument for one year from the date of purchase. Your Warranty includes
on-site service and repair of your instrument. This Warranty may be renewed, in one-year terms,
provided the renewal is requested prior to the expiration of the current Warranty or Service
Agreement.
Promega agrees, as its sole responsibility under this Warranty, and upon prompt notice
of a defect, to repair or replace (at Promega’s discretion) any instrument discovered to be
defective within the term of this Warranty. This Warranty does not include repair or replacement
necessitated by accident, neglect, misuse, unauthorized repair or modification of the instrument.
This Warranty and the remedies set forth herein are exclusive and in lieu of all other express
or implied warranties (including implied warranties of merchantability, fitness for a particular
purpose and noninfringement), and no other warranties shall be binding upon Promega. In no
event, shall Promega be liable for any special, incidental or consequential damages resulting
from the use or malfunction of this instrument or the system with which it is used.
Out-of-Warranty Service
Contact Promega or your local Promega representative. We will be happy to assist you by
telephone at no charge. Repair service will be quoted prior to any work being performed.
85 Maxprep™ Liquid Handler | TM509 | Revised 1/19
Page 88

9.3 Related Products
PRODUCT SIZE CAT.#
Maxwell® RSC Instrument 1 each AS4500
Maxwell® RSC 48 Instrument 1 each AS8500
Bar Code Reader, Maxwell® Systems 1 each AS3200
Maxprep™ UV Lamp 1 each AS9310
Maxprep™ Waste Bags, Clear 100/pack AS9305
Maxwell® RSC/CSC Deck Tray 1 each SP6019
Maxwell® RSC 48 Front Deck Tray 1 each AS8401
Maxwell® RSC 48 Back Deck Tray 1 each AS8402
Maxprep™ Carrier, Maxwell® RSC 1 each AS9402
Maxprep™ Carrier, Maxwell® RSC 48 Front 1 each AS9403
Maxprep™ Carrier, Maxwell® RSC 48 Back 1 each AS9404
Maxprep™ Liquid Handler, RSC Carriers 1 each AS9100
Maxprep™ Liquid Handler, RSC Carriers w/ UV light 1 each AS9101
Maxprep™ Liquid Handler, RSC 48 Carriers 1 each AS9200
Maxprep™ Liquid Handler, RSC 48 Carriers w/ UV light 1 each AS9201
1.1ml, Square-Well, V-Bottom Deep Well Plate 25/pack V6821
Nunc 2.0ml Deep Well Plates 60/pack AS9307
Maxprep™ 1000µl Conductive Disposable Tips, Filtered (3,840) 40/box AS9303
Maxprep™ 300µl Conductive Disposable Tips, Filtered (5,760) 60/box AS9302
Maxprep™ 50µl Conductive Disposable Tips, Filtered (5,760) 60/box AS9301
Maxwell® RSC Plunger Pack 1 each AS1670
Maxprep™ Reagent Reservoir, 50ml 28/pack AS9304
Maxprep™ Plunger Holder 1 each AS9408
Maxprep™ Carrier, 12–13mm Sample Tubes 1 each AS9405
Maxprep™ Carrier, 15–17mm Sample Tubes 1 each AS9406
Maxprep™ Carrier, 10mm Sample Tubes 1 each AS9407
Maxprep™ 3-Position Reagent Tube Holder 1 each AS9409
Maxprep™ Gripper Paddle 1 each AS9410
Maxprep™ Plunger Tool 1 each AS9411
Maxprep™ Reagent Carrier 1 each AS9412
Warranties, Service Agreements and Related Products
86 Maxprep™ Liquid Handler | TM509 | Revised 1/19
Page 89

Certificate of Decontamination
Disinfection and decontamination are required prior to shipping any instrument accessories for repair. Returned items
must be accompanied by a signed and dated Certificate of Decontamination, which must be provided in the shipping
box.
To disinfect and decontaminate: Wipe exposed surfaces of the accessories using a cloth dampened with 70%
ethanol. Follow immediately with a cloth dampened with deionized water. Repeat the procedure as many times as
required to effectively disinfect and decontaminate the instrument.
Failure to follow these decontamination guidelines, sign and return the Decontamination Form will result in
decontamination charges before the instrument will be serviced.
Select either (A) or (B):
A. I confirm that the returned items have not been contaminated by body fluids or by toxic, carcinogenic, radioactive
or other hazardous materials.
B. I confirm that the returned items have been decontaminated and can be handled without exposing personnel to
health hazards.
10
Circle the type of material used in the instrument: Chemical Biological Radioactive**
Briefly describe the decontamination procedure performed: _________________________________________________
____________________________________________________________________________________________________
____________________________________________________________________________________________________
Date: _______________________________________ Place: ________________________________________________
Signature: ____________________________________ Name (block capital letters): ______________________________
This instrument is certified by the undersigned to be free of radioactive contamination. (** The signature of a Radiation
Safety Officer is also required if the instrument was used with radioactive materials.)
Date: _______________________________________ Place: ________________________________________________
Signature: ____________________________________ Name (block capital letters): ______________________________
Title: _______________________________________________________________________________________________
87 Maxprep™ Liquid Handler | TM509 | Revised 1/19
Page 90

Certificate of Decontamination
Notes
88 Maxprep™ Liquid Handler | TM509 | Revised 1/19
Page 91

Appendix: Configuring the PC
11.1 Maxprep™ Liquid Handler and PC
The Maxprep™ Liquid Handler is controlled by Maxprep™ software on a PC and touchscreen
monitor that are provided with the system. This appendix describes the setup and configuration
options for the PC provided with the Maxprep™ Liquid Handler.
Your IT department or site Administrator should configure the PC according to the IT rules and
IT procedures pertinent to your site. The following is a set of guidelines for your IT personnel or
site Administrator.
We do not recommend loading additional programs onto the PC because these may interfere
with the instrument operation.
Some institutions require antivirus software installed on PCs within the institution. If installing an
antivirus program please ensure it is set to manual, not automatic, update.
11
Antivirus scanning will slow the performance of the PC and may affect the performance of the
Maxprep™ Liquid Handler while it is processing samples.
Additional recommendations:
• Disable automatic Windows® updates and virus scans.
• Disable automatic power off, sleep or hibernation settings.
• Disable “Fast Startup”. Set the power button to Shut Down, not Sleep.
• Disable any other automatically or manually started software that would consume PC
resources during operation.
• Ensure there are no domain policies that would overwrite any of the above settings.
Note: The PC that is provided with the Maxprep™ Liquid Handler is already configured for the
settings listed above.
Depending on your institution’s IT policy, you may or may not be able to configure or change the
settings for the PC if it is connected to your site network domain. Do not load other programs on
the PC because these may interfere with instrument operation.
89 Maxprep™ Liquid Handler | TM509 | Revised 1/19
Page 92

Appendix: Configuring the PC
11.1 Maxprep™ Liquid Handler and PC (continued)
The first time you use the Maxprep™ Liquid Handler and PC, you should check the
configuration of the following options. Settings can be changed later, if required, by following
these instructions again.
Information provided in this document is not meant to be a single instruction set for configuring
the PC. Rather, the instructions provided herein are intended to be used as individual
descriptions of how to configure various options within the PC environment. Perform the
instruction sets that are applicable to your particular site.
11.2 Glossary
For users who are unfamiliar with the Windows® 10 Operating system, this section describes
terms and actions common to this operating system.
‘Lock’ Screen: Windows® user accounts with password protection or network domain user
accounts need to sign in to the PC to access the Maxprep™ software. When the PC is started,
restarted or in a locked state, the ‘Lock’ screen will be displayed. If prompted on the ‘Lock’
screen, press Ctrl+Alt+Delete to access the login and password text boxes. Enter username and
password information, and then press return or the arrow key to sign in.
‘Desktop Screen’: The ‘Desktop’ screen (Figure 45) is the starting point for the instructions
provided in this document. The Task bar at the bottom of the ‘Desktop’ screen displays icons
that provide access to the various functions described in this document. On the left side of
the task bar are the Start button and the Search button. These buttons will be referenced
throughout this document.
90 Maxprep™ Liquid Handler | TM509 | Revised 1/19
Page 93

Appendix: Configuring the PC
14899T
Figure 45. The ‘Desktop’ screen. At the bottom of the ‘Desktop’ screen is the Task bar.
Access to the options and settings referenced in this document is provided by the Start and
Search buttons on the left side of the Taskbar. Swipe upward from the bottom of the screen
to expose the Task bar.
Start Menu: The Start menu (Figure 46) is the major access point for settings and functions on
the PC. The left side of the Start menu contains buttons for Accounts, Settings and Power.
A
Figure 46. The Start menu. The left side of the start menu displays buttons for Accounts,
Settings and Power (indicated with orange circles from top to bottom).
91 Maxprep™ Liquid Handler | TM509 | Revised 1/19
Page 94

Appendix: Configuring the PC
11.3 Adjusting Volume Settings
Volume settings on the PC can be adjusted through one of two means.
1. On the keyboard press Fn+F7 to mute the speaker, Fn+F8 to decrease the speaker volume,
or Fn+F9 to increase the speaker volume on the PC.
2. Press the Speaker icon on the right side of the task bar to open a volume slider. Use the
slider to increase, decrease or mute the speaker on the PC.
11.4 Configuring Date and Time Settings
The current date and time will be configured during installation of the Maxprep™ Liquid Handler.
After installation, if there is a need to change the Date, Time or Time Zone please contact
Promega Technical Services for information on how this can be accomplished.
11.5 Managing Local Windows® User Accounts
Operator credentials and access levels for the Maxprep™ Liquid Handler software are controlled
through assigning accounts in the Windows® operating system to one of two Promega accesslevel groups. The sections below detail the process of adding and removing local Windows®
user accounts that can be assigned to the access-level groups for the Maxprep™ Liquid
Handler software. The instructions for adding and removing local Windows® user accounts are
intended to be used when the Maxprep™ Liquid Handler is run as a stand-alone device (i.e., not
connected to a network domain). To connect to your site internet domain, consult with your IT
department and follow the instructions in Section 11.9, Connecting to a Network.
When your Maxprep™ Liquid Handler arrives, the PC will be configured with a Windows® user
account called Maxprep. This account is password protected (Default Password = Promega)
and is configured with Windows® administrator access rights as well as Maxprep™ Liquid
Handler software administrator access rights.
Note: If the PC is connected to your site internet domain, your IT department should be
consulted on how to add or remove users on the PC. Do not use these instructions if accounts
on your company domain are used to access the PC.
92 Maxprep™ Liquid Handler | TM509 | Revised 1/19
Page 95

Appendix: Configuring the PC
13912T
Creating Local Windows® User Accounts
If the Maxprep™ Liquid Handler system is run as a stand-alone device (i.e., not connected to
your site domain), you can create local Windows® user accounts on the PC for each user of the
system. To create a new user in the Maxprep™ Liquid Handler software, you will first have to
create a new account in Windows® 10 and then assign this account to one of the Maxprep™
Liquid Handler access-level groups. Below are instructions for creating a new, local account in
the Windows® 10 Operating System.
Notes:
1. If the PC is connected to your site internet domain, your IT department should be
consulted on how to add users to the domain that can be used on the PC. Do not use
these instructions to create a new local account on the PC if accounts on your
company domain are used to access the PC.
2. Only a Windows® user account with administrator-level access in Windows® can create
new local accounts in the Windows® Operating System.
1. Close the Maxprep™ Liquid Handler software if it is open. Click the X in the upper right
corner of the screen, and then confirm that you want to exit.
2. Click the Start button on the left side of the Task bar. Choose the Settings icon to open the
‘Windows Settings’ screen (Figure 47).
A
Figure 47. The ‘Windows Settings’ screen. The ‘Windows Settings’ screen provides
access to multiple functions that can be used to configure options and settings for the PC.
93 Maxprep™ Liquid Handler | TM509 | Revised 1/19
Page 96

Appendix: Configuring the PC
11.5 Managing Local Windows® User Accounts (continued)
3. Click the Accounts button on the ‘Windows® Settings’ screen to open the ‘Accounts’
screen (Figure 48).
A
Figure 48. ‘Accounts’ screen. Settings related to Windows® user accounts can be
managed from the ‘Accounts’ screen.
94 Maxprep™ Liquid Handler | TM509 | Revised 1/19
Page 97

Appendix: Configuring the PC
13926T
13927T
4. From the list on the left side of the screen, click the Family & other people button to
display account settings for this PC (Figure 49).
A
Figure 49. Managing accounts. Windows® user accounts can be created, removed and
managed from the Family & other people tab of the ‘Accounts’ screen.
5. To add a new user account, click the + sign next to the Add someone else to this PC
heading. This will open the ‘Create an account for this PC’ screen (Figure 50).
A
Figure 50. Creating a new account. Enter name and password information to define the
sign-in settings for a new Windows® user account on the ‘Create an account for this PC’
screen.
6. On the ‘Create an account for this PC’ screen, enter the username, password and
password hint for the new local user account where indicated. Then click Next to create the
new user account, and return to the ‘Accounts’ screen.
95 Maxprep™ Liquid Handler | TM509 | Revised 1/19
Page 98

Appendix: Configuring the PC
11.5 Managing Local Windows® User Accounts (continued)
7. The new user account should now be listed under the Other people heading on the
‘Accounts’ screen.
8. By default, the new user account will have user access level rights within the Windows® 10
operating system. If you desire the new user account to have administrator rights, click the
user account under the Other people heading to open options for that user (Figure 51).
A
Figure 51. Assigning account options. Touch any of the listed Windows® user accounts to
access options for changing the account type.
9. Click the Change account type button to open the ‘Change account type’ screen
(Figure 52). Using the drop-down menu under the Account type heading, choose whether
this user should have Administrator or Standard User access rights within the
Windows® 10 operating system. Click OK to save these changes or Cancel to discard the
changes for this user and return to the ‘Change account type’ screen.
Note: Changing the account type for a user only affects their access level in the
Windows® 10 operating system, not in the Maxprep™ Liquid Handler software. Follow the
instructions in Section 11.6 to change access level rights within the Maxprep™ Liquid
Handler software.
A
Figure 52. Changing account type. Use the drop-down menu on the ‘Change account
type’ screen to assign the selected Windows® user account Standard User or Administrator
access rights in the Windows® operating system.
96 Maxprep™ Liquid Handler | TM509 | Revised 1/19
Page 99

Changing the account
type for a user only
affects the access
level in the Windows®
10 operating system,
not in the Maxprep™
software. Follow
the instructions
in Section 11.6 to
change access level
rights within the
Maxprep™ software.
Appendix: Configuring the PC
10. You have now added a new account to Windows® 10. Click the X in the upper right corner
of the ‘Accounts’ screen to close the screen. Proceed to Section 11.6 to assign access
levels for the Maxprep™ Liquid Handler software to this new account, or repeat these steps
to create additional accounts.
Removing a Local Windows® User Account
If the Maxprep™ Liquid Handler system is run as a stand-alone device (i.e., not connected
to your site domain), you can remove local Windows® accounts on the PC that are no
longer necessary. Below are instructions for removing a local Windows® user account in the
Windows® 10 Operating System.
Notes:
1. Only a Windows® user account with administrator-level access in the Windows®
operating system can remove accounts.
2. If the PC is connected to your company internet domain, your IT department should be
consulted on how to limit access to the PC. Domain users logged into the PC will not
have access to run the Maxprep™ Liquid Handler software unless they have been
added to one of the Promega access groups (Section 11.6). Do not use these
instructions to remove an account from the PC if accounts on your company domain
are used to access the PC.
3. Make sure the local Windows® user account to be deleted is signed out of the PC
(refer to Section 11.7, Managing the Current Active Account).
1. Close the Maxprep™ Liquid Handler software if it is open. Click the X in the upper left
corner of the screen, and then confirm that you want to exit.
2. Confirm that the Windows® user account to be removed is not signed into Windows®. Click
the Start button on the left side of the Task bar. Choose the Accounts icon from the left side
of the Start menu to open the Account information popup (Figure 56). Other user accounts
will be listed and indicated as signed in if the account is currently signed in on the PC.
97 Maxprep™ Liquid Handler | TM509 | Revised 1/19
Page 100

Appendix: Configuring the PC
11.5 Managing Local Windows® User Accounts (continued)
14900TA
Figure 53. Account information popup. Accessed from the Start menu, the Account
information popup displays the Windows® user accounts on the PC and indicates which
accounts are signed in.
3. If the account to be removed is signed in on the PC, click that account name in the Account
information popup to switch to that account. Once you have changed to the account to be
removed, from the ‘Desktop’ screen, click the Start button in the lower left corner of the
screen. Choose the Accounts icon from the left side of the Start menu to open the Account
information popup. Click Sign Out to sign out of the account that will be removed.
4. After signing out, sign back into an account with administrator-level access in Windows®
operating system.
5. From the ‘Desktop’ screen, swipe upward from the bottom of the screen to expose the Task
bar, and then touch the Start button on the left side of the Task bar. Choose the Settings
icon to open the ‘Windows Settings’ screen (Figure 54).
98 Maxprep™ Liquid Handler | TM509 | Revised 1/19
 Loading...