

Page 1
Premium Metallic 8400mAh
Power Bank with Built-in
Micro-USB Cable & Dual USB Ports
volTag-8
TABLETS &
SMARTPHONES
Compatible
with
All
Charge 3 Devices
at the Same Time
Page 2

Charge your smartphones and tablets with this amazing, premium metallic 8400mAh
power bank. volTag-8 features a built-in Micro-USB cable, thus, you need not carry an
extra cable every time when you wish to charge your device. volTag-8 also features dual
USB ports, that allows you to charge two devices simultaneously. The premium metallic
finish adds on to the style. Charge your smartphone on-the-go with this sleek and
powerful power bank.
• volTag-8 Back-up Battery
• User Guide
• Capacity : 8400mAh
• Input: DC 5V, 1.5A
• Output: DC 5V/1A, 5V/2.1A
• Cable output: 5V/1A
• Built-in battery type :Li-polymer Battery
• Input Type: Micro-USB Input
• Output Type: 2 USB Charging Ports
• Charging Time: 5-6 hours
Introduction
Packaging Contents
Specification:
• Unique ShakeView Technology
• Premium Metallic Body
• Powerful 8400mAh Battery Capacity
• Rechargeable Li-Polymer Battery
• Lightweight
• Built-in Micro-USB Cable
• Dual USB Ports
• Universal Compatibility
Features:
English
1
Page 3
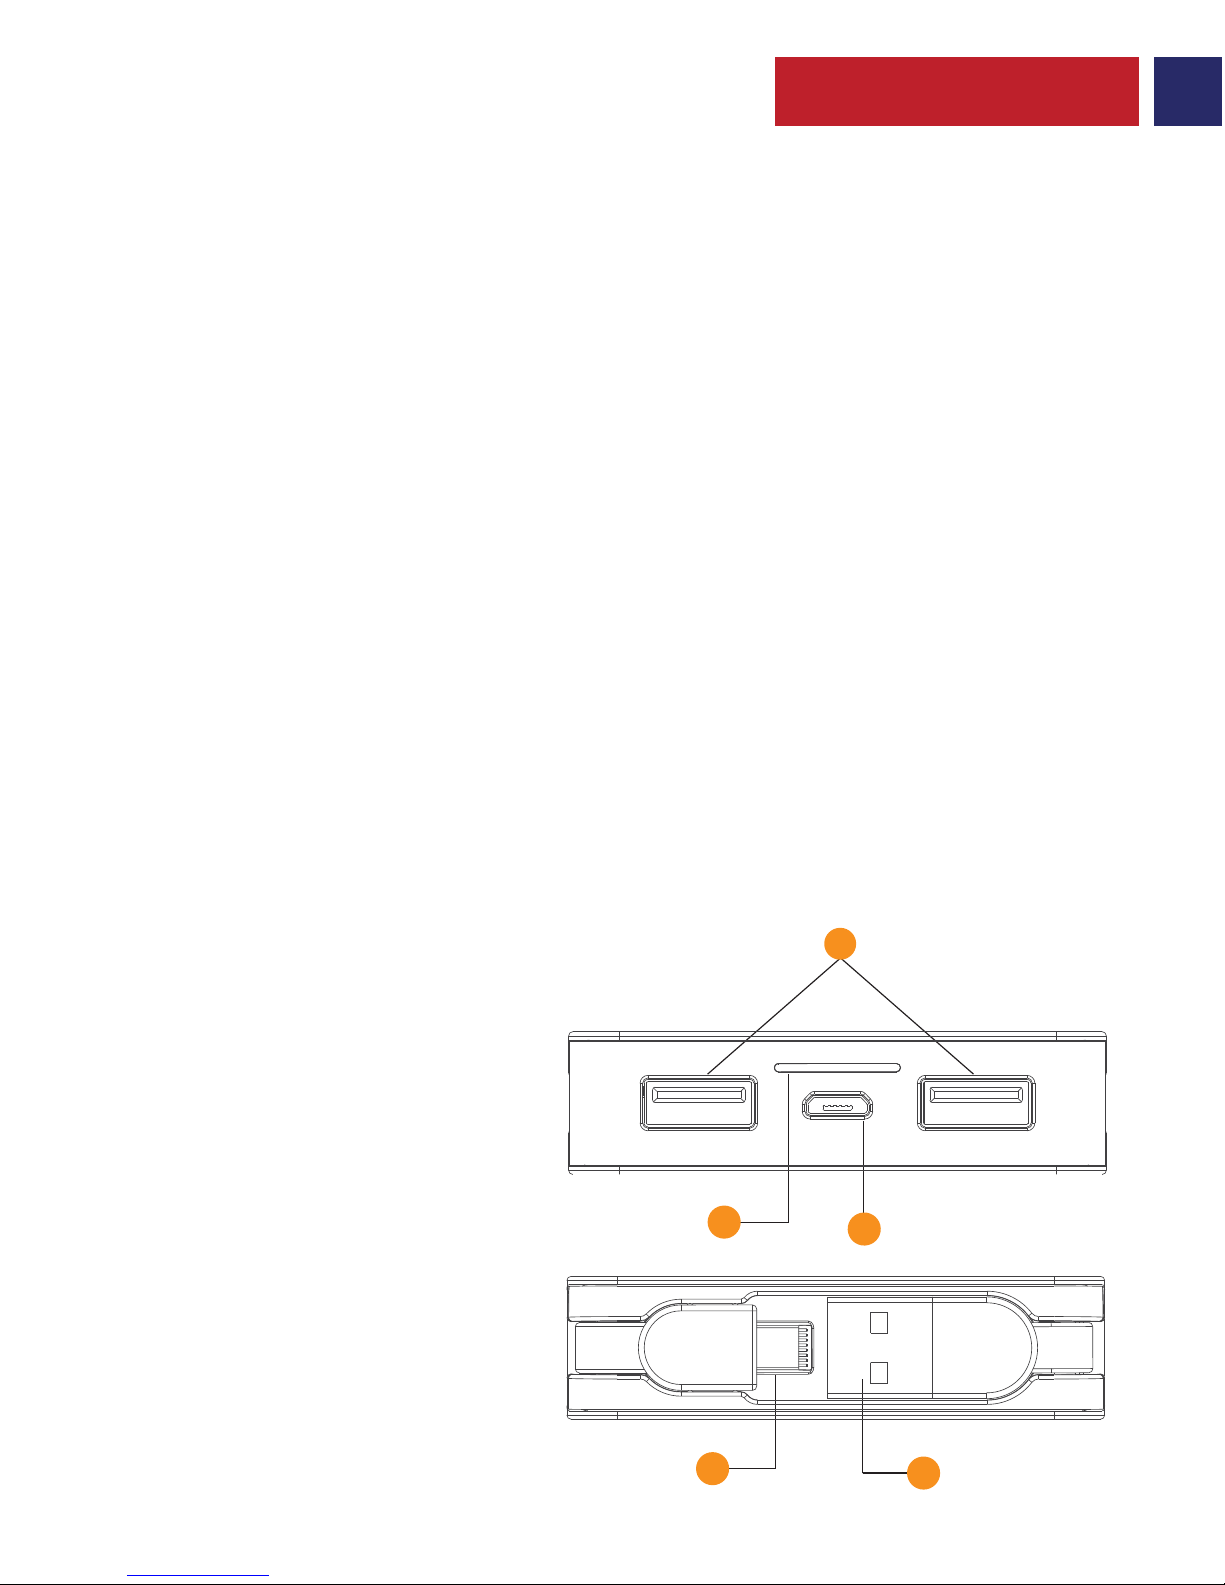
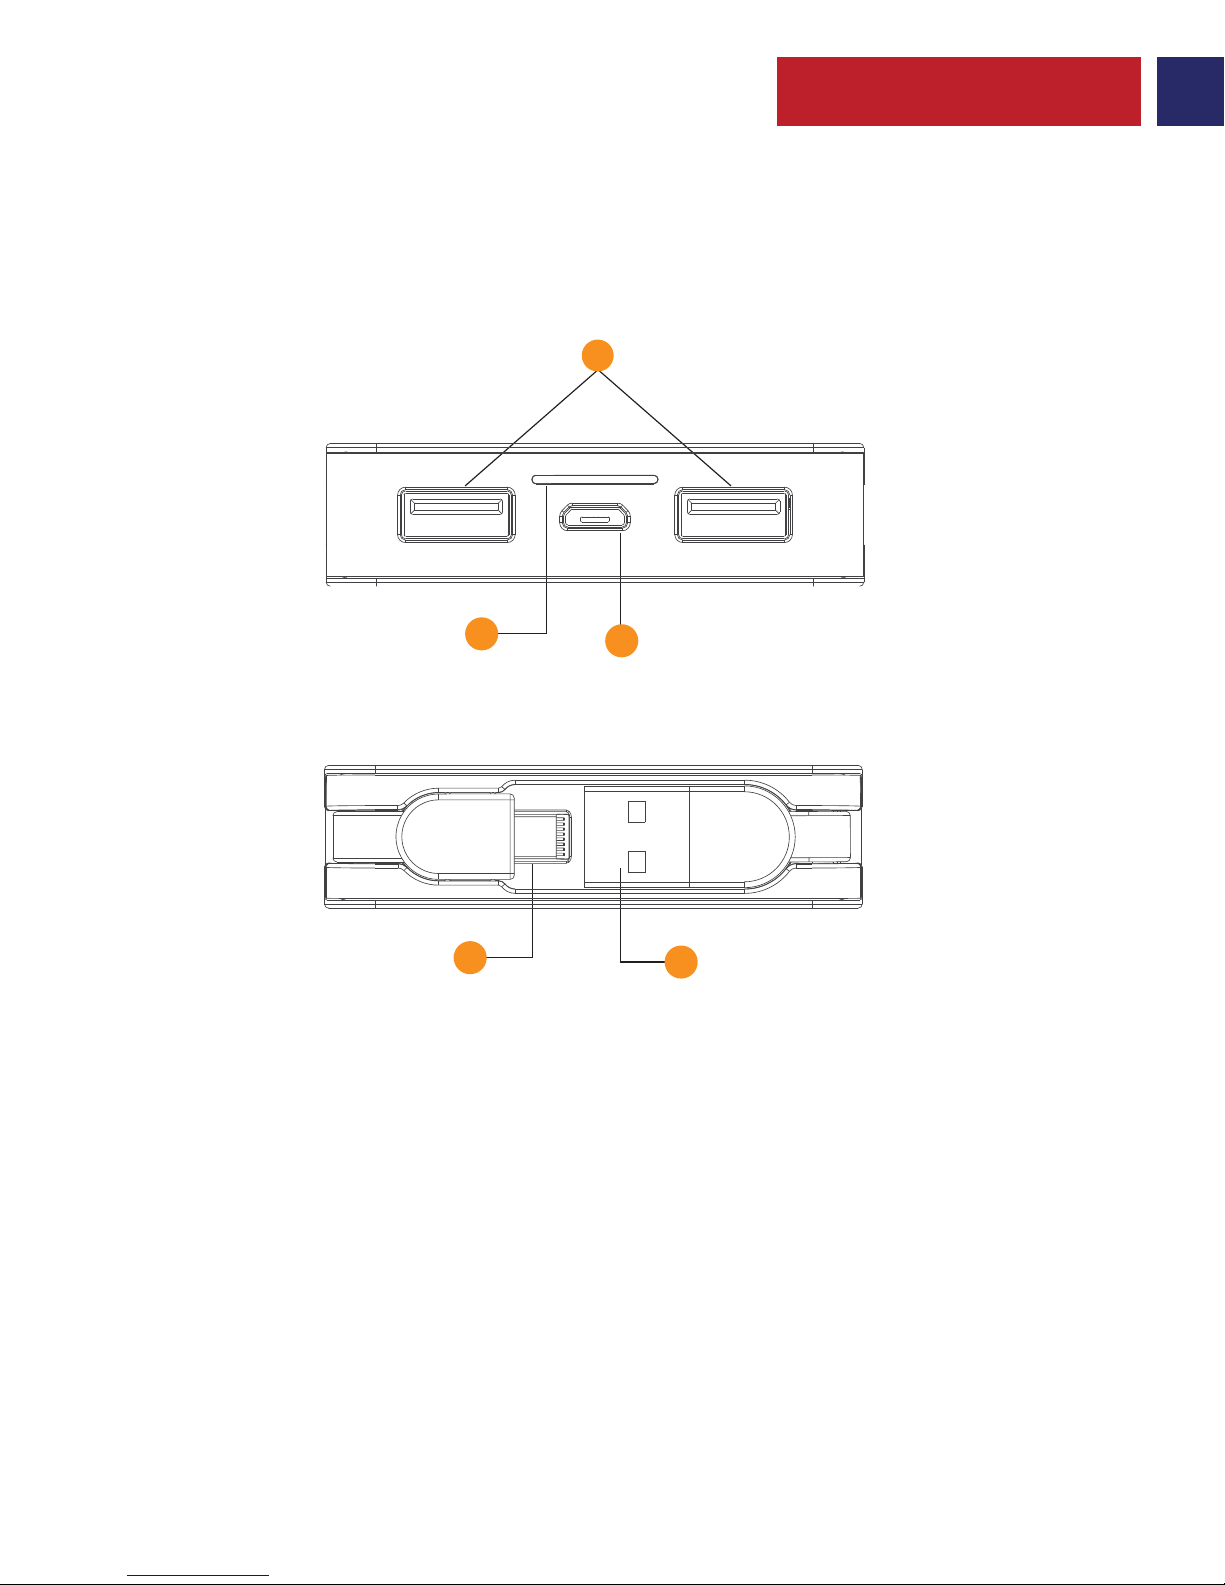
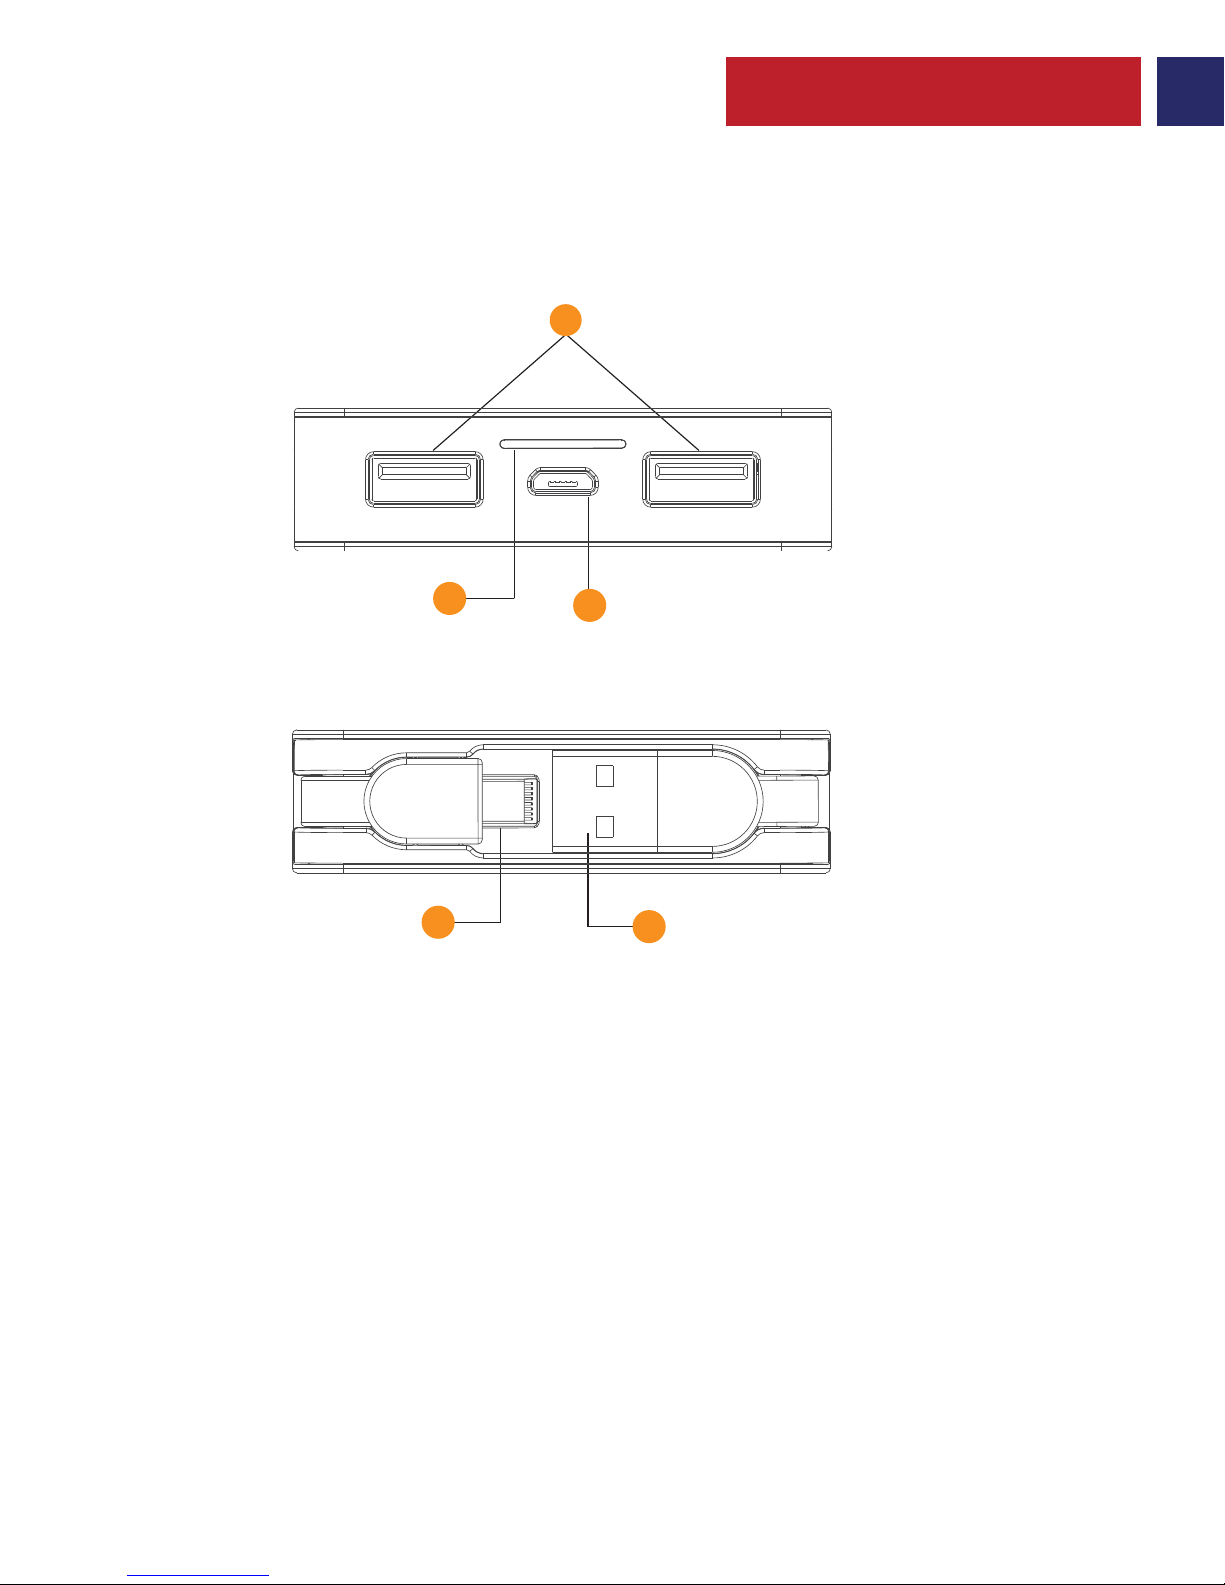
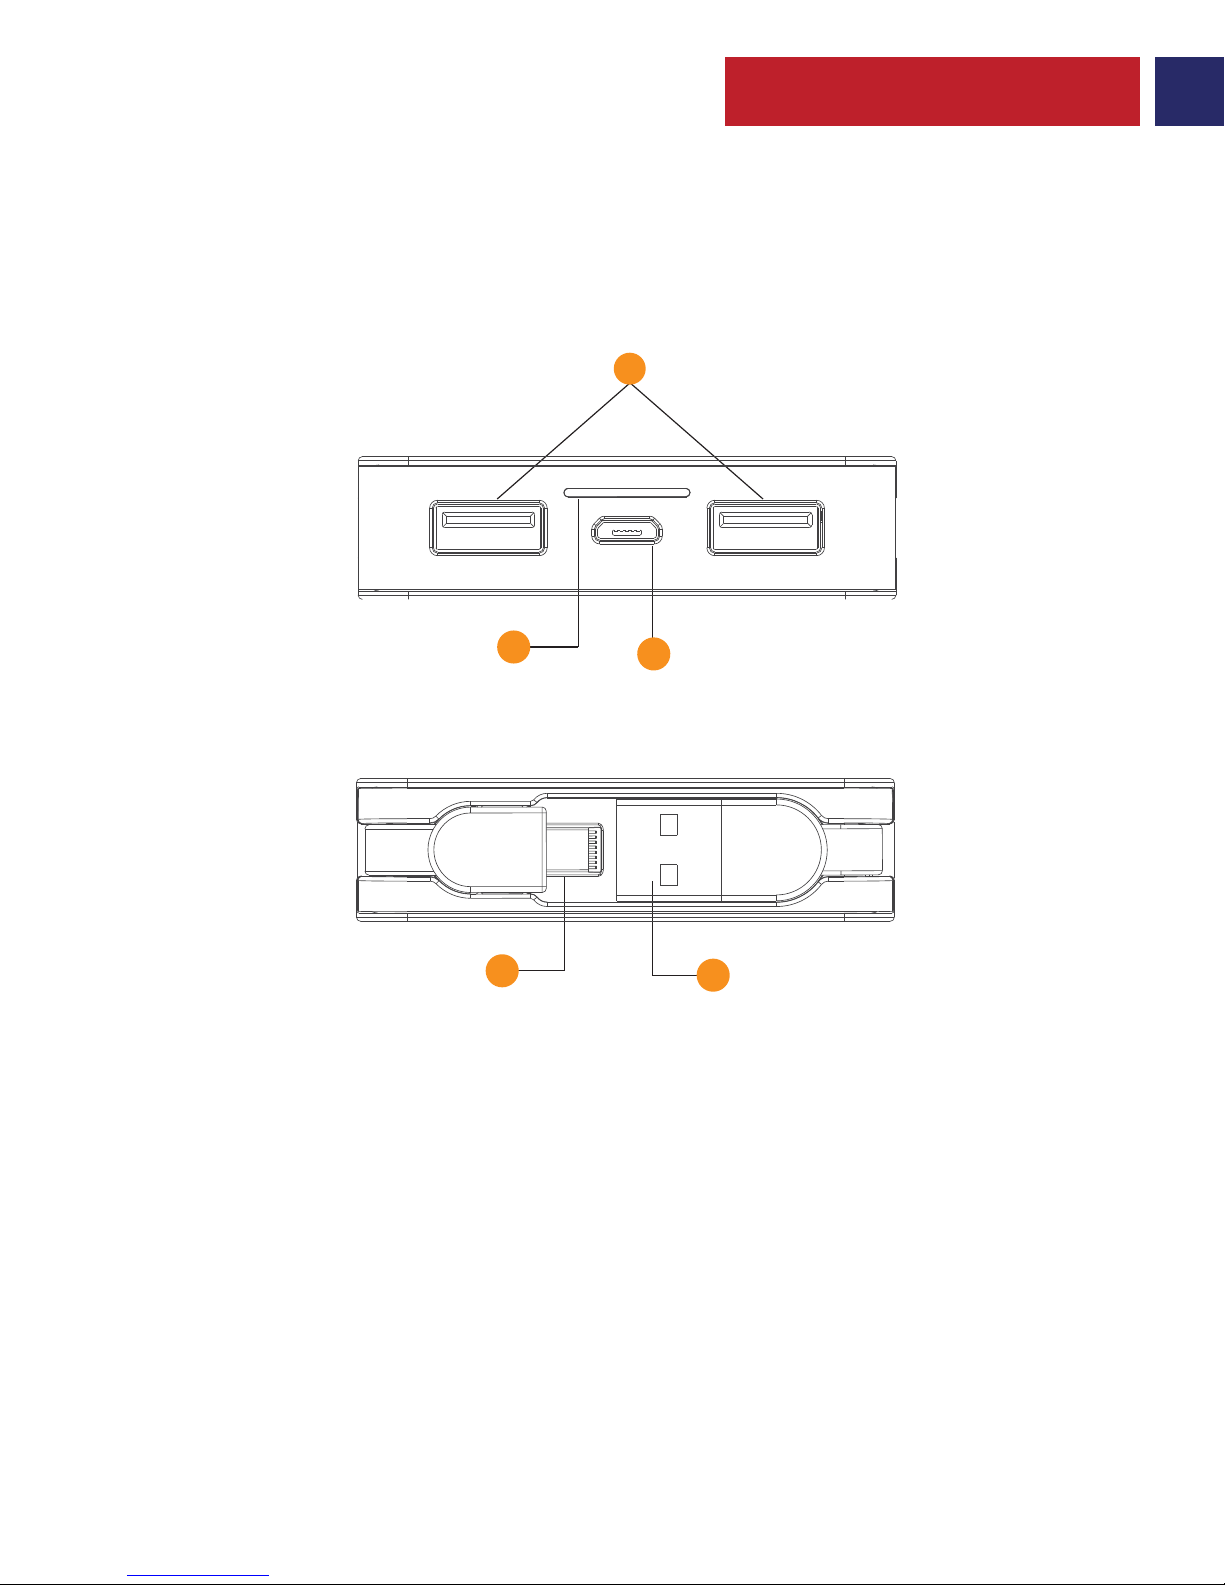
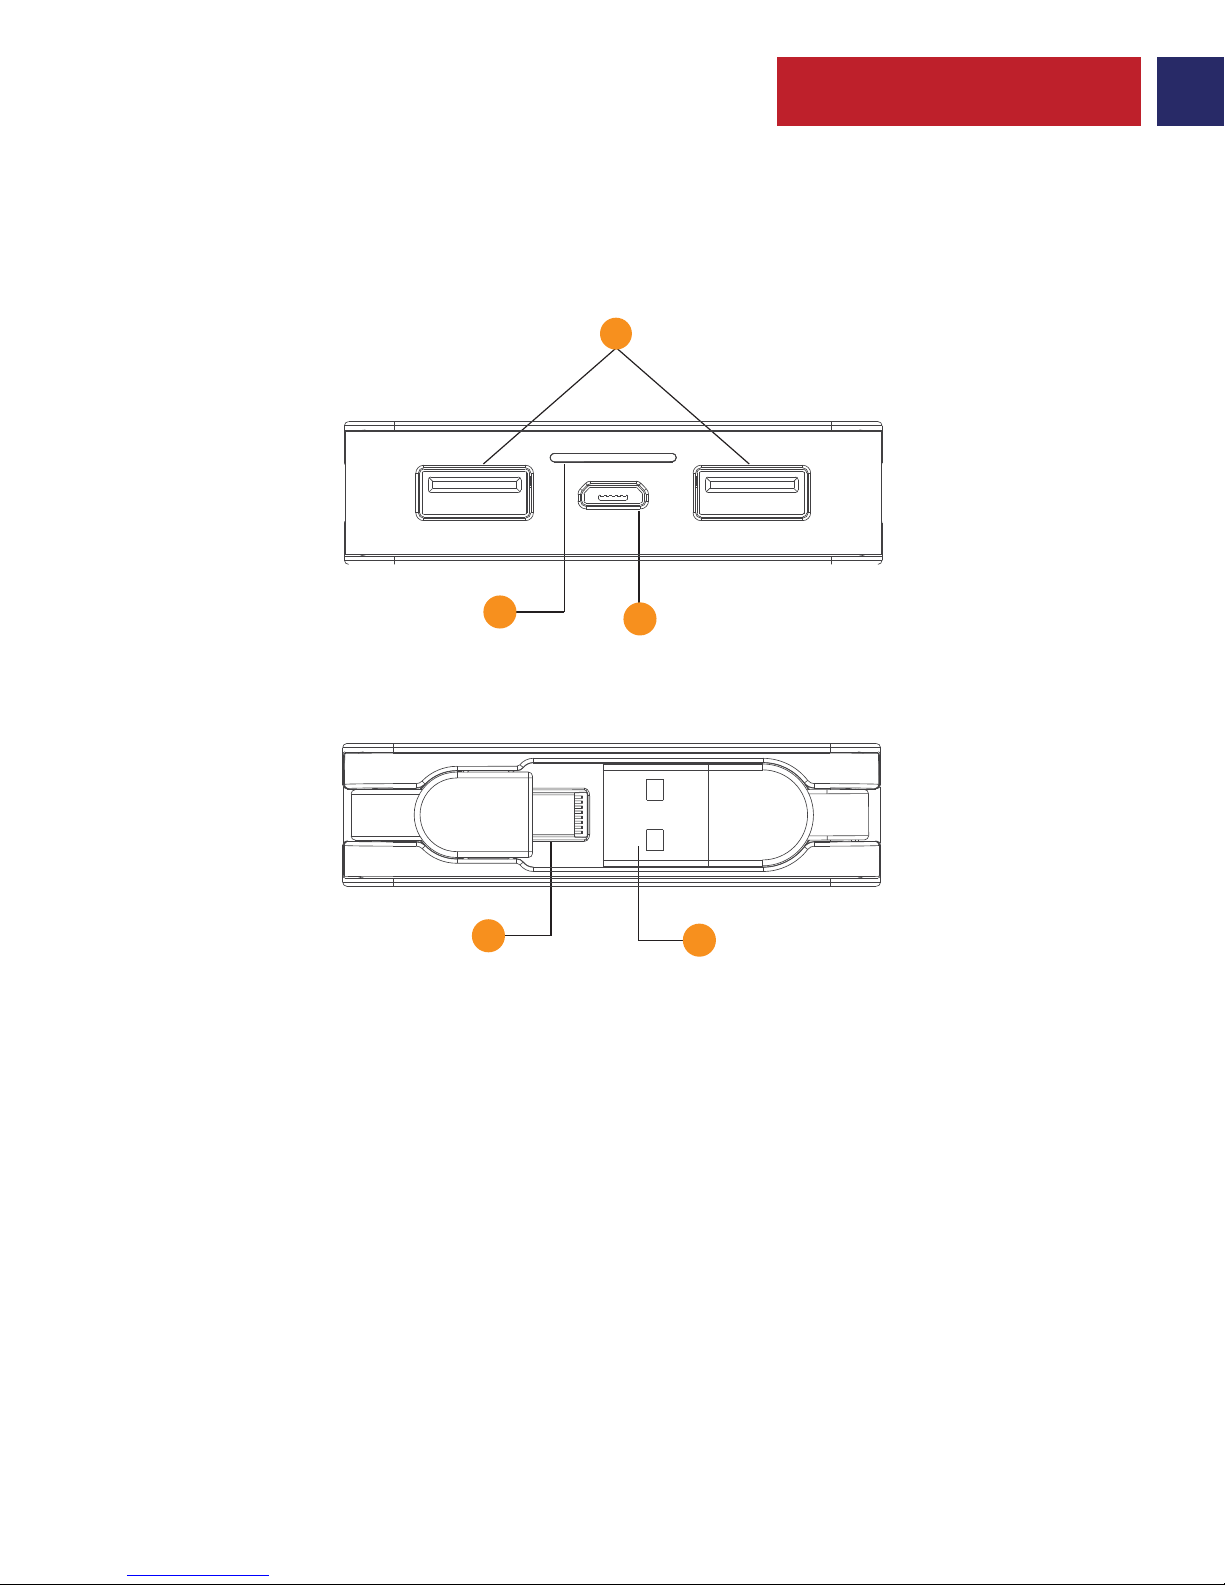
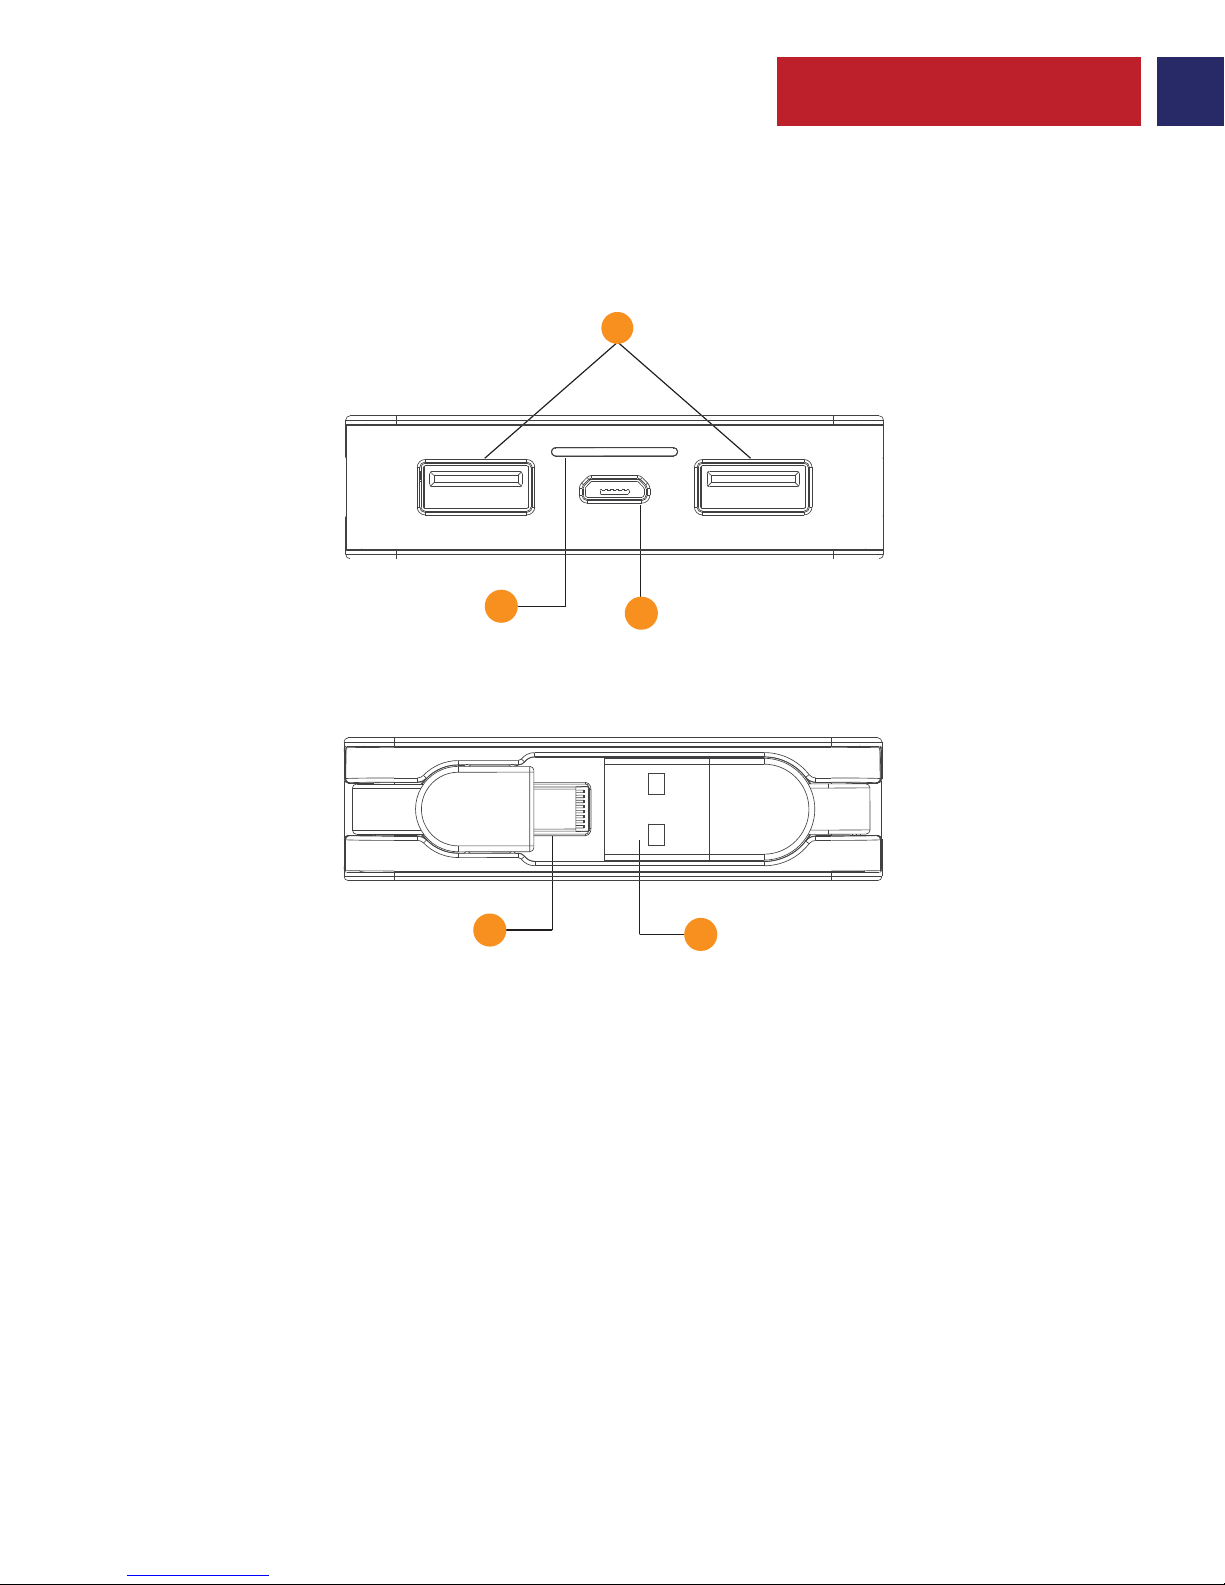
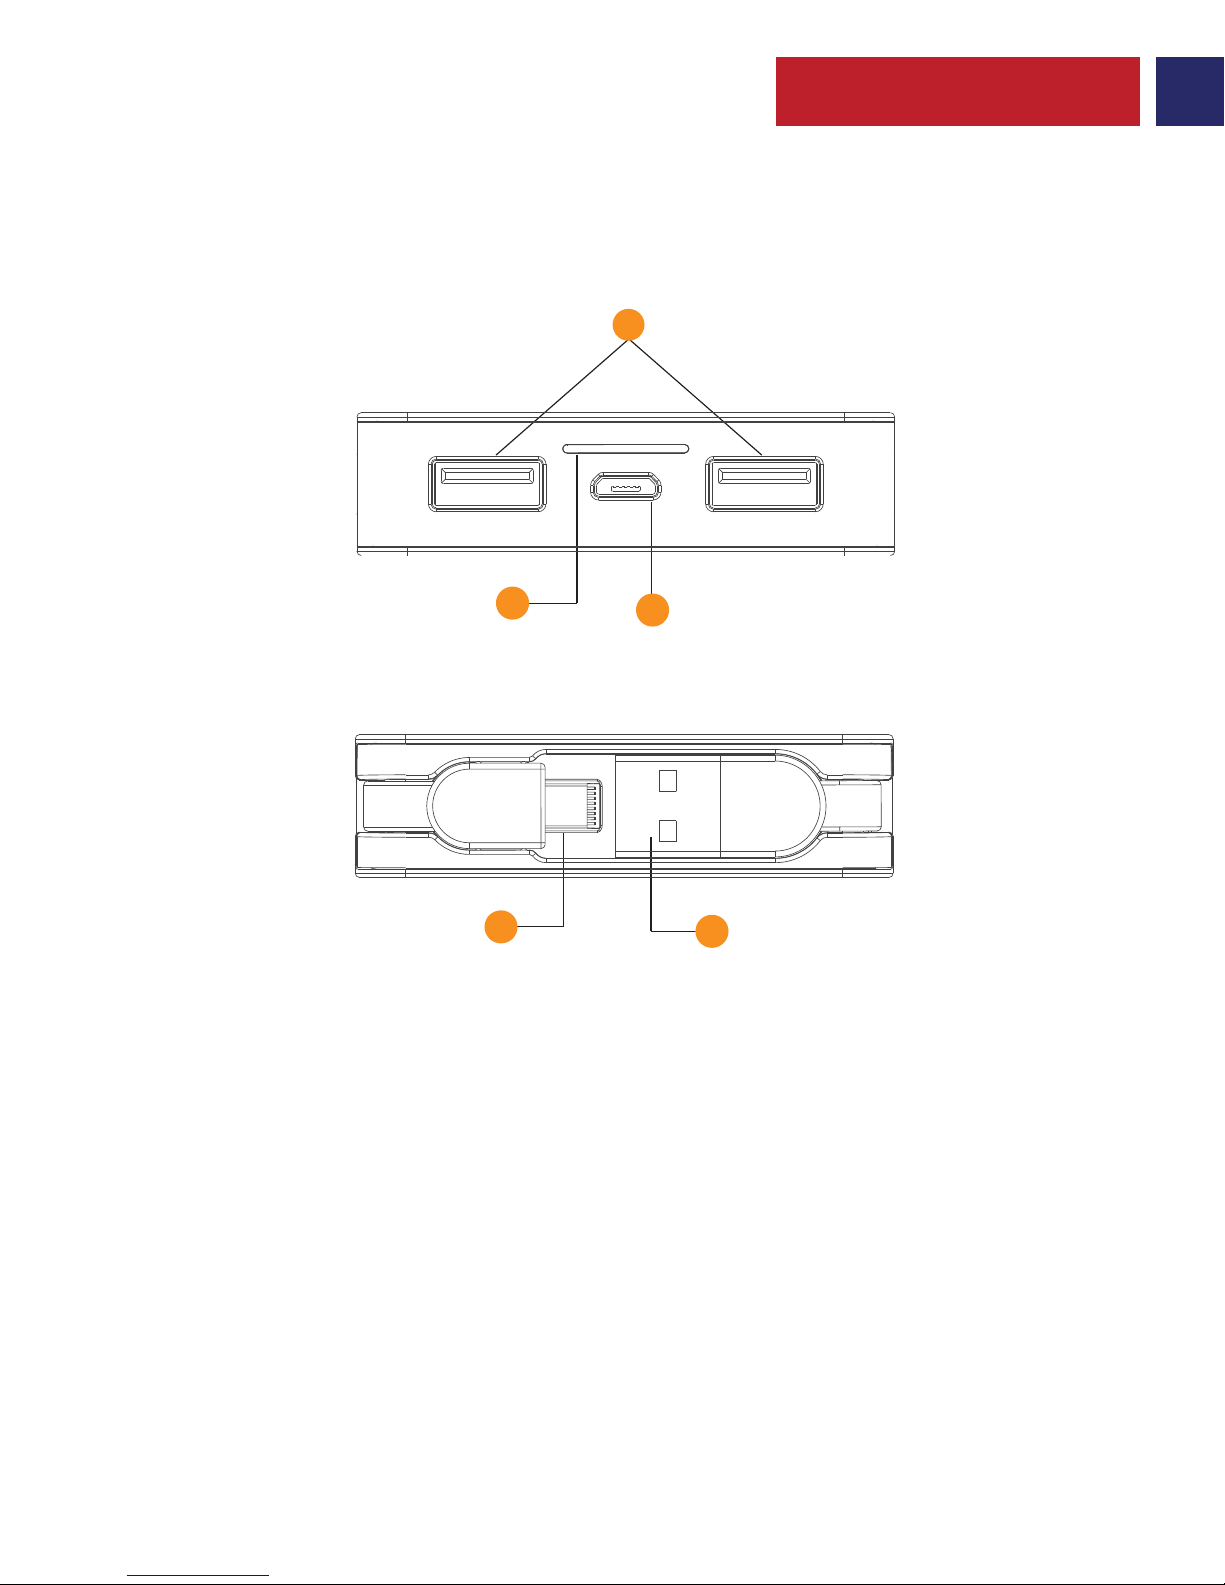
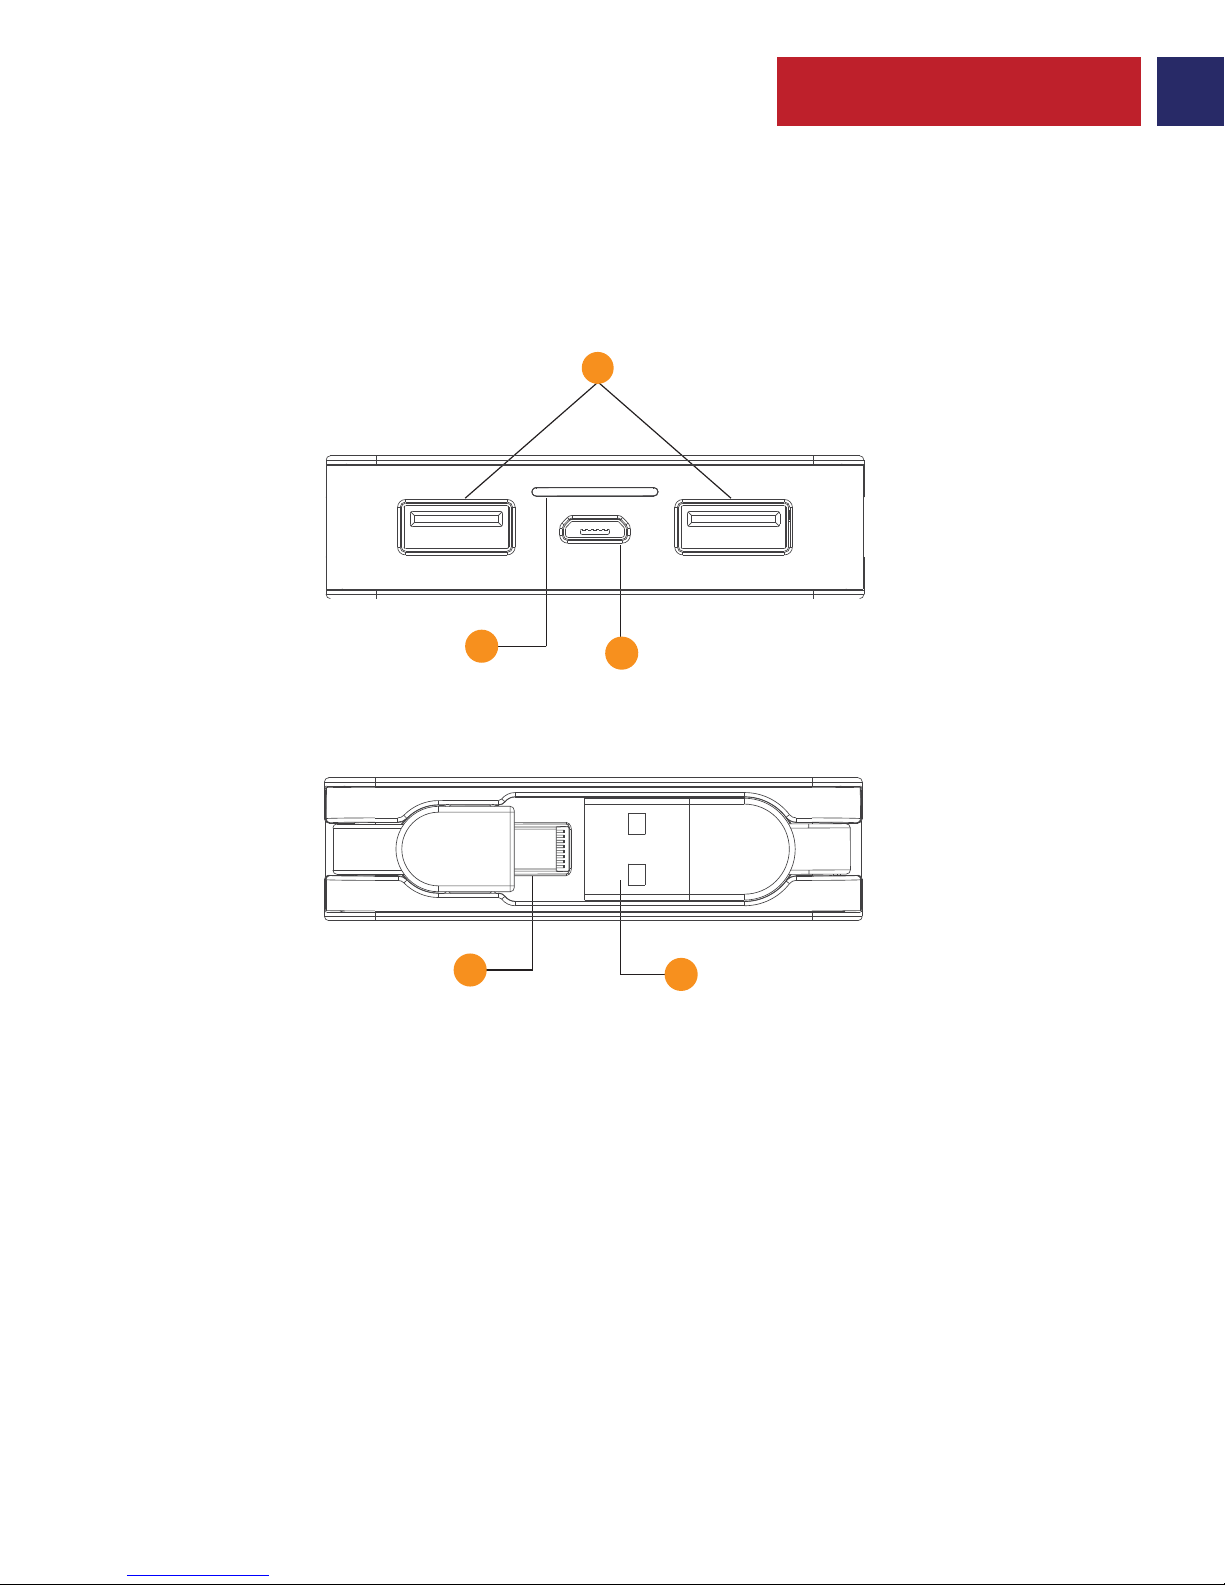
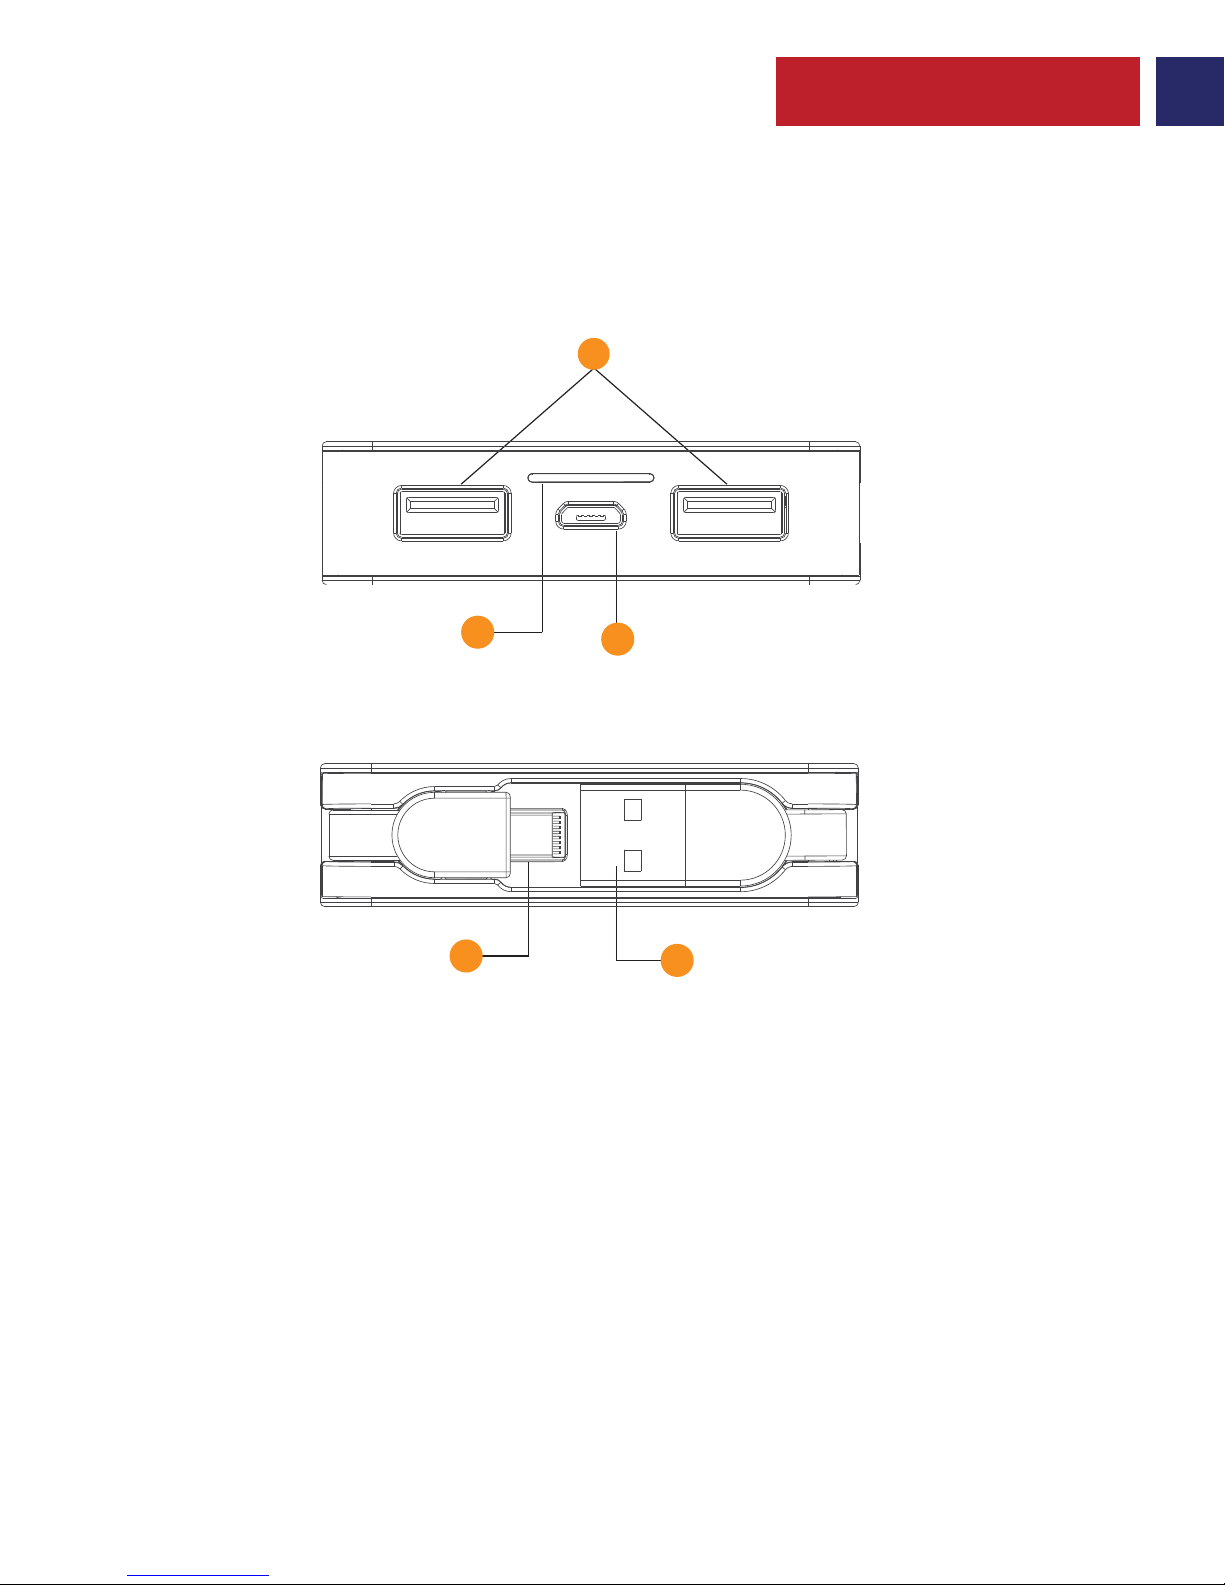
1. USB Output Ports
2. Micro-USB Input
3. Battery Level LED Indicator
4. Micro-USB Output
5. USB Charging Input
Appearance & Interface Description:
Please read all safety instructions and warnings thoroughly before using this product.
Improper use of this product may result in damage to this or attached products.
1. Do not disassemble the product or attempt to fix it.
2. Kindly use an original charging cable provided to charge the product.
3. Do not attempt to replace any part of this product or battery inside.
4. Do not crush, puncture, dispose of in fire, short the contacts or expose the
product to water or other liquids.
5. Do not connect input and output in reverse.
6. Do not store or use the product in a high temperature environment, including
intense sunlight or heat.
7. Avoid drops, bumps, abrasions and impacts.
8. If there is any reason to believe that there is damage to the product, discontinue
use immediately.
9. If you find that the product is too hot, is emitting an odor, or is deformed,
punctured or exhibits any suspicious or abnormal behavior, discontinue use
immediately and contact our customer service.
10. Always charge this product before extended storage.
Precautions
English
2
4
5
1
2
3
Page 4
Operation Instructions:
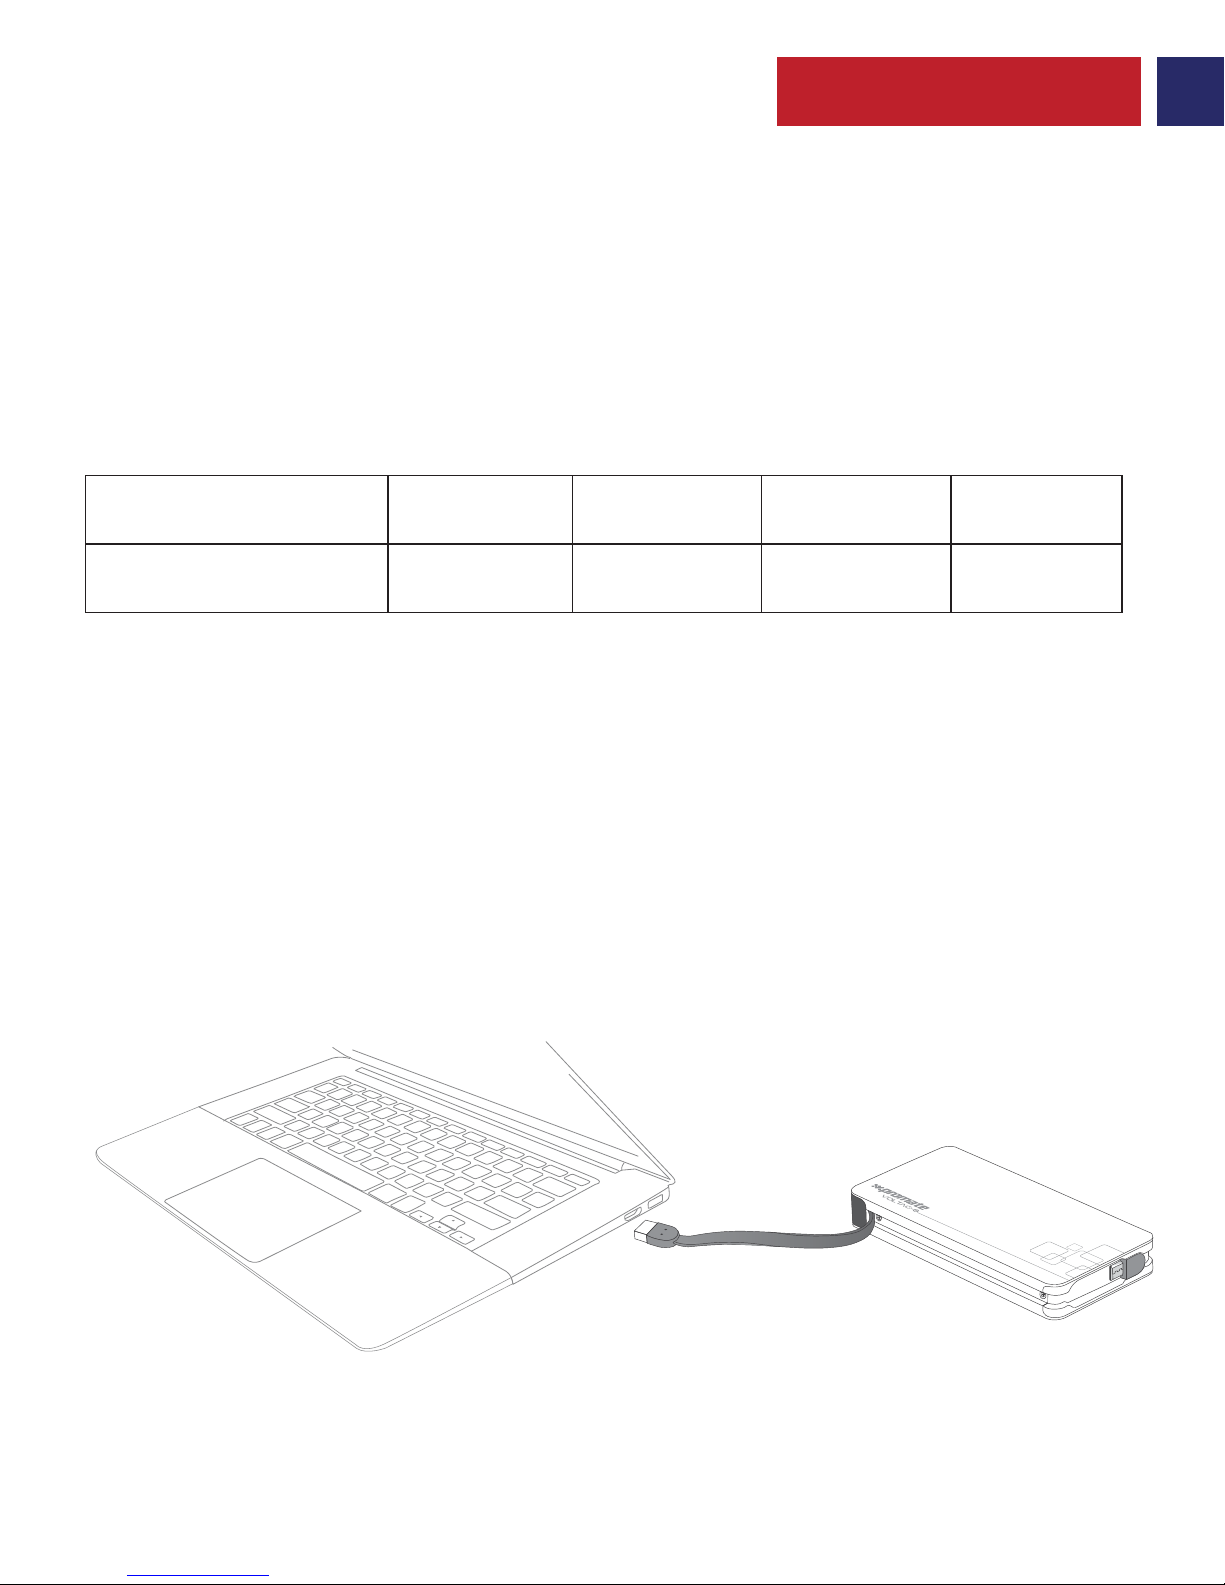
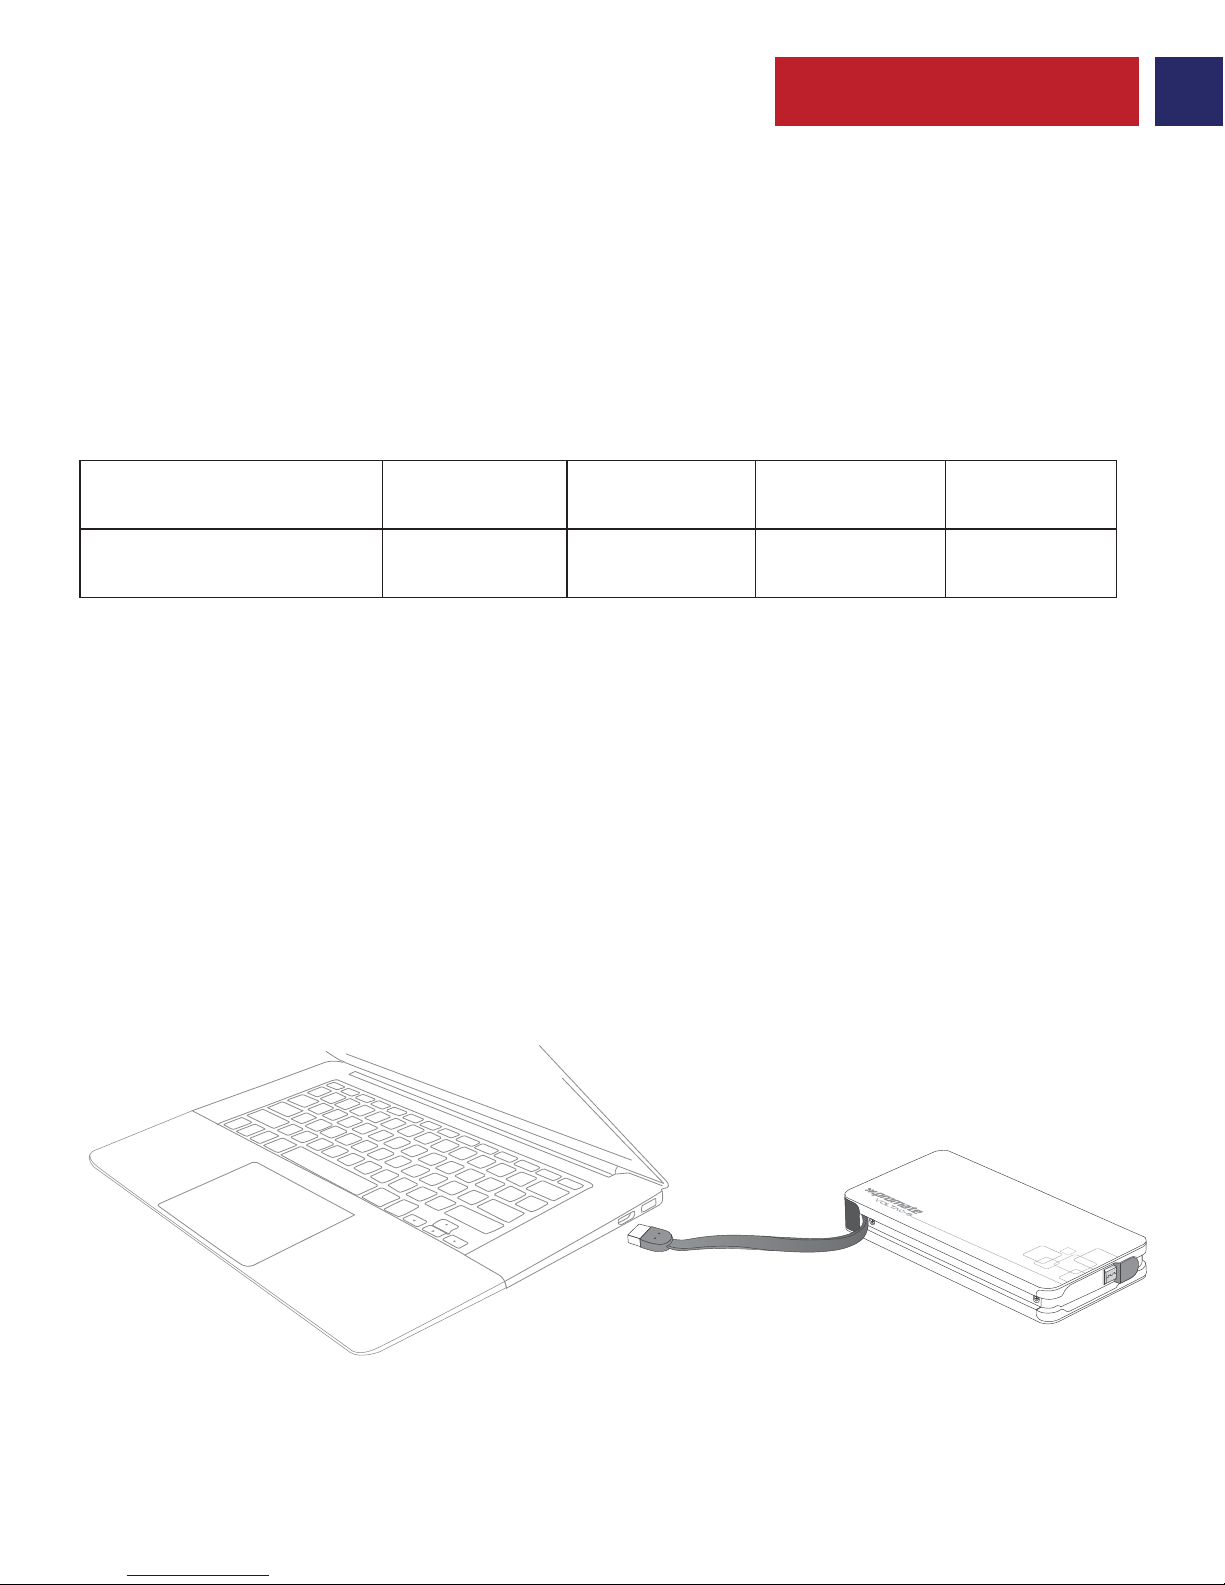
1. Checking the remaining power left in volTag-8 back-up battery
• volTag-8 has an innovative no button design. In order to view the remaining
power left, simply shake volTag-8 back-up battery forward and backward and view
the Battery Level LED Indicator.
2. Charging volTag-8 back-up battery
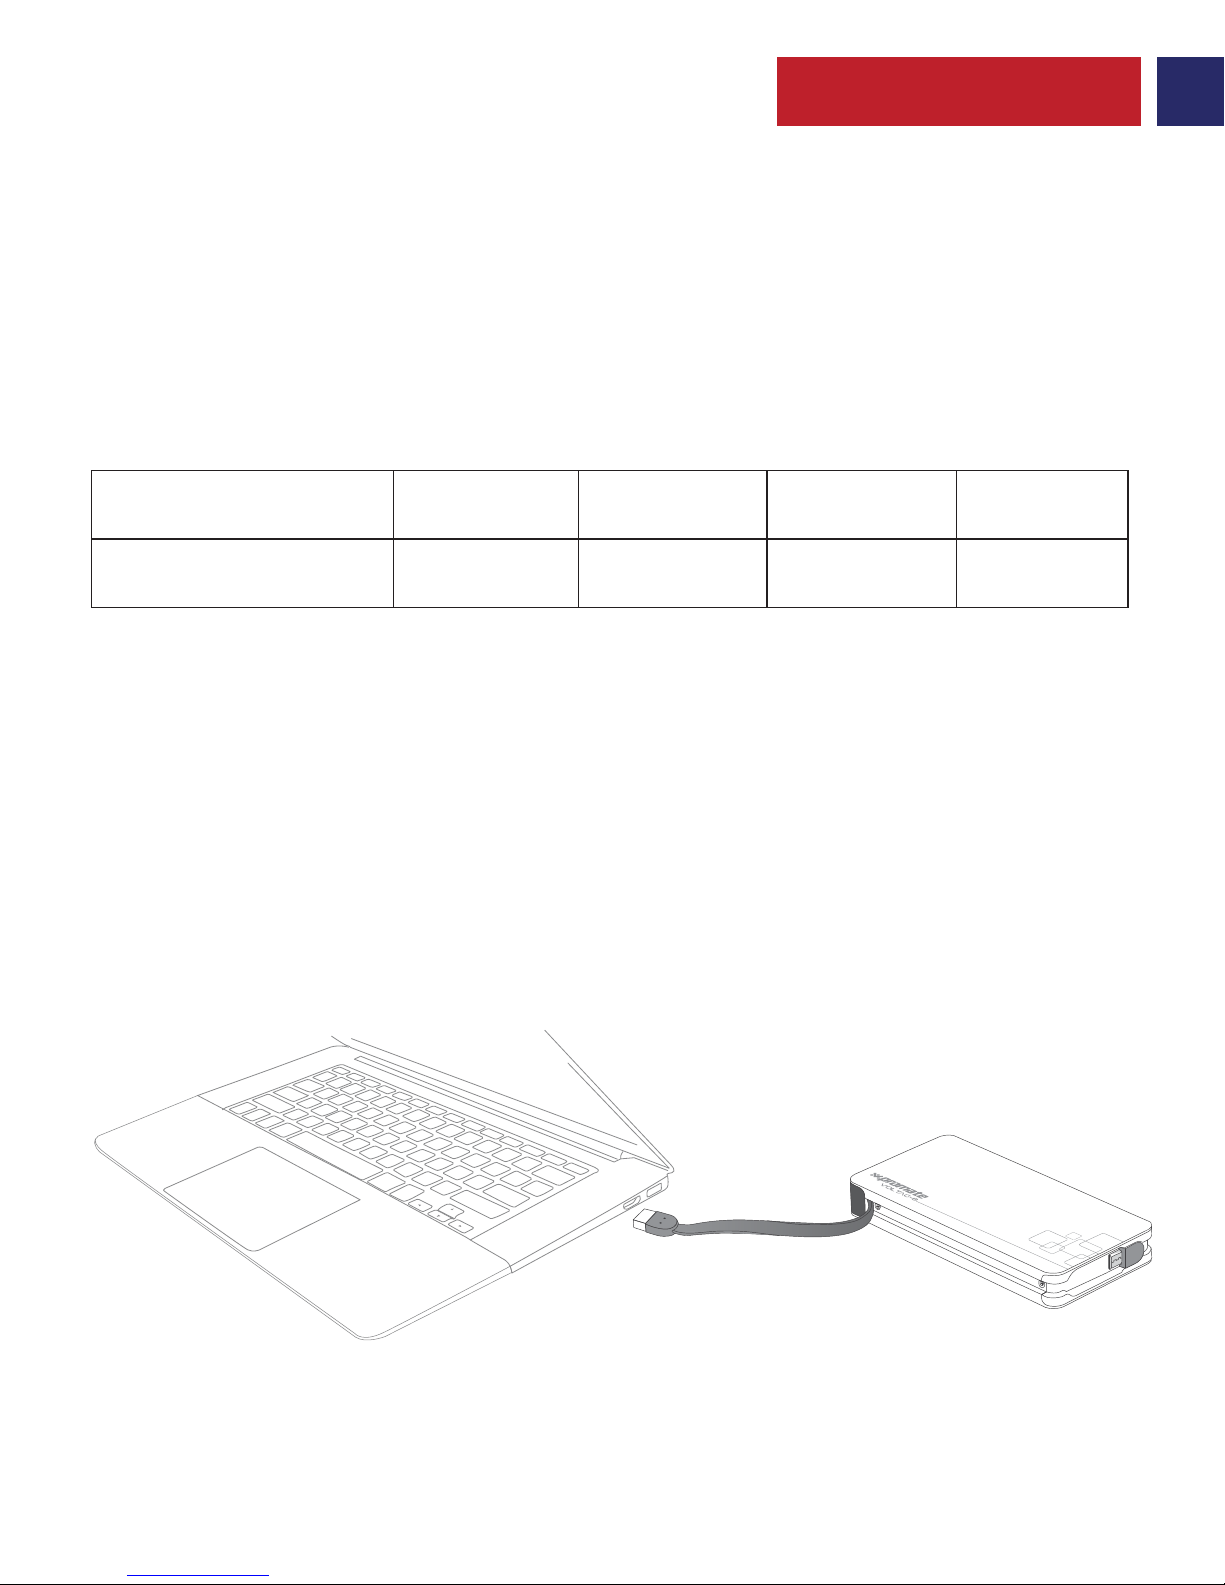
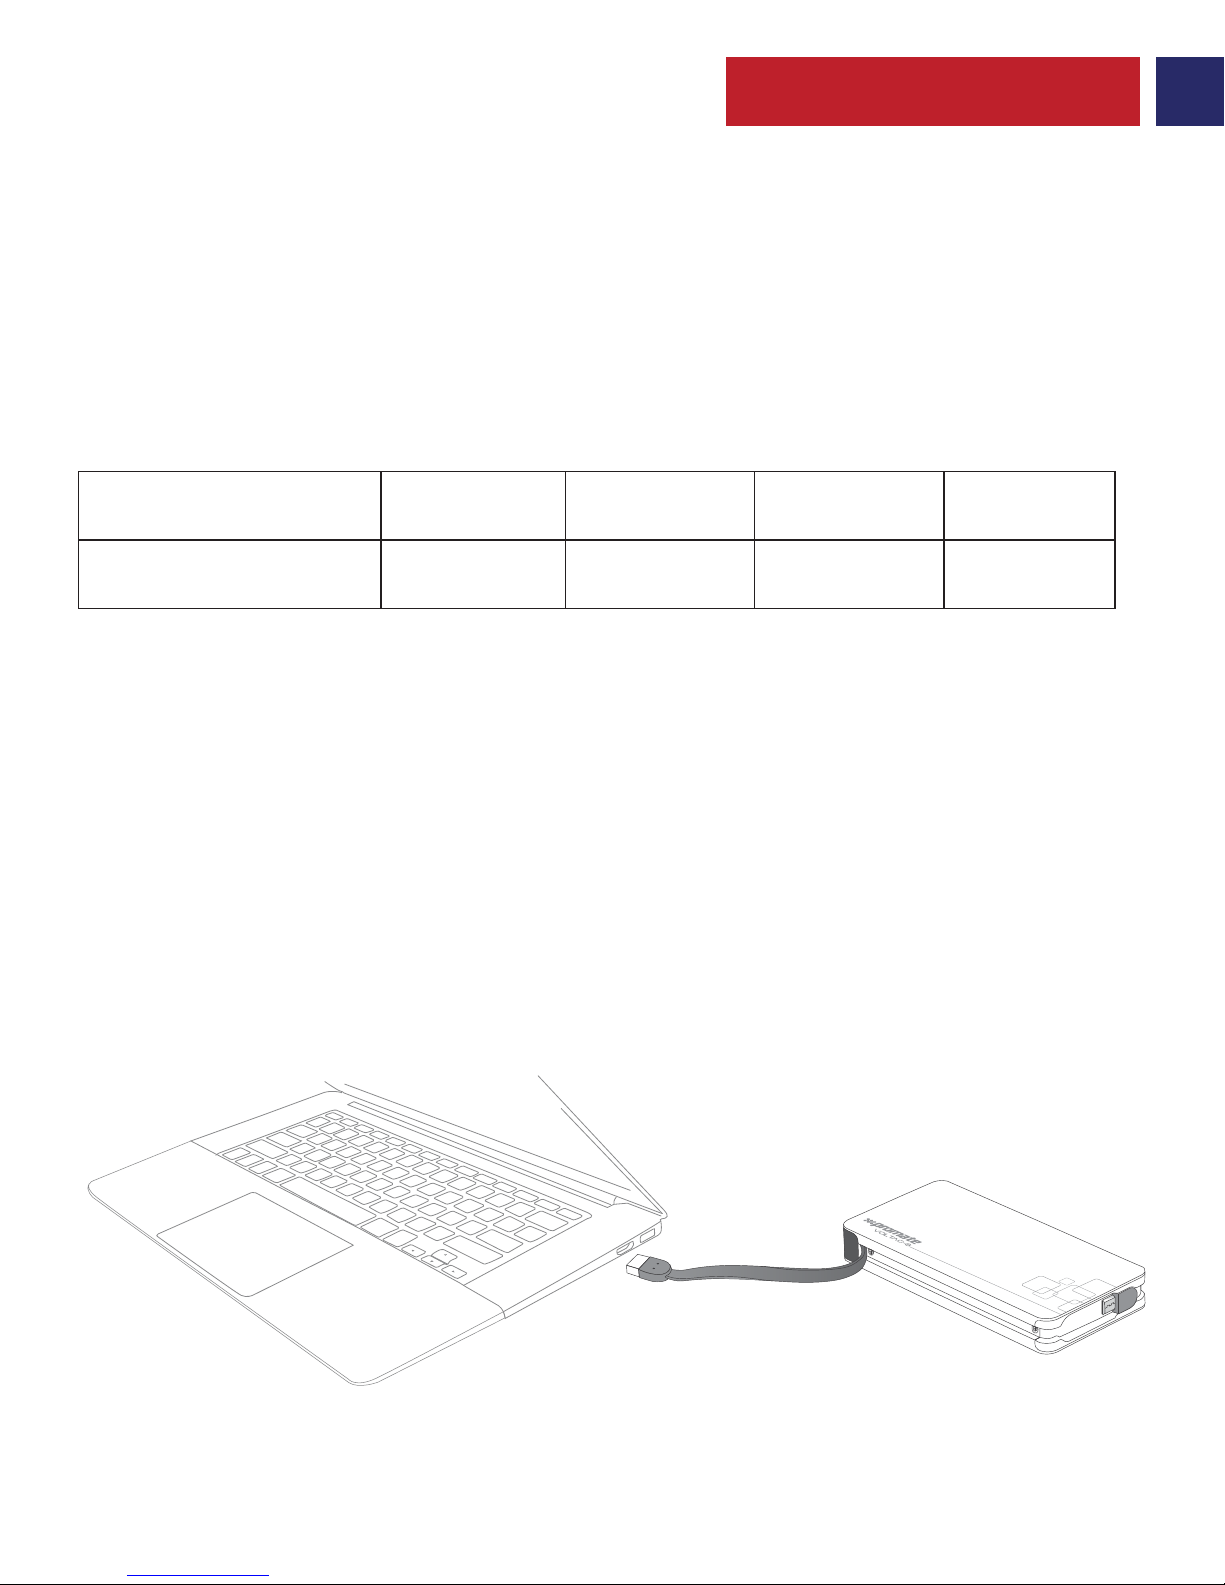
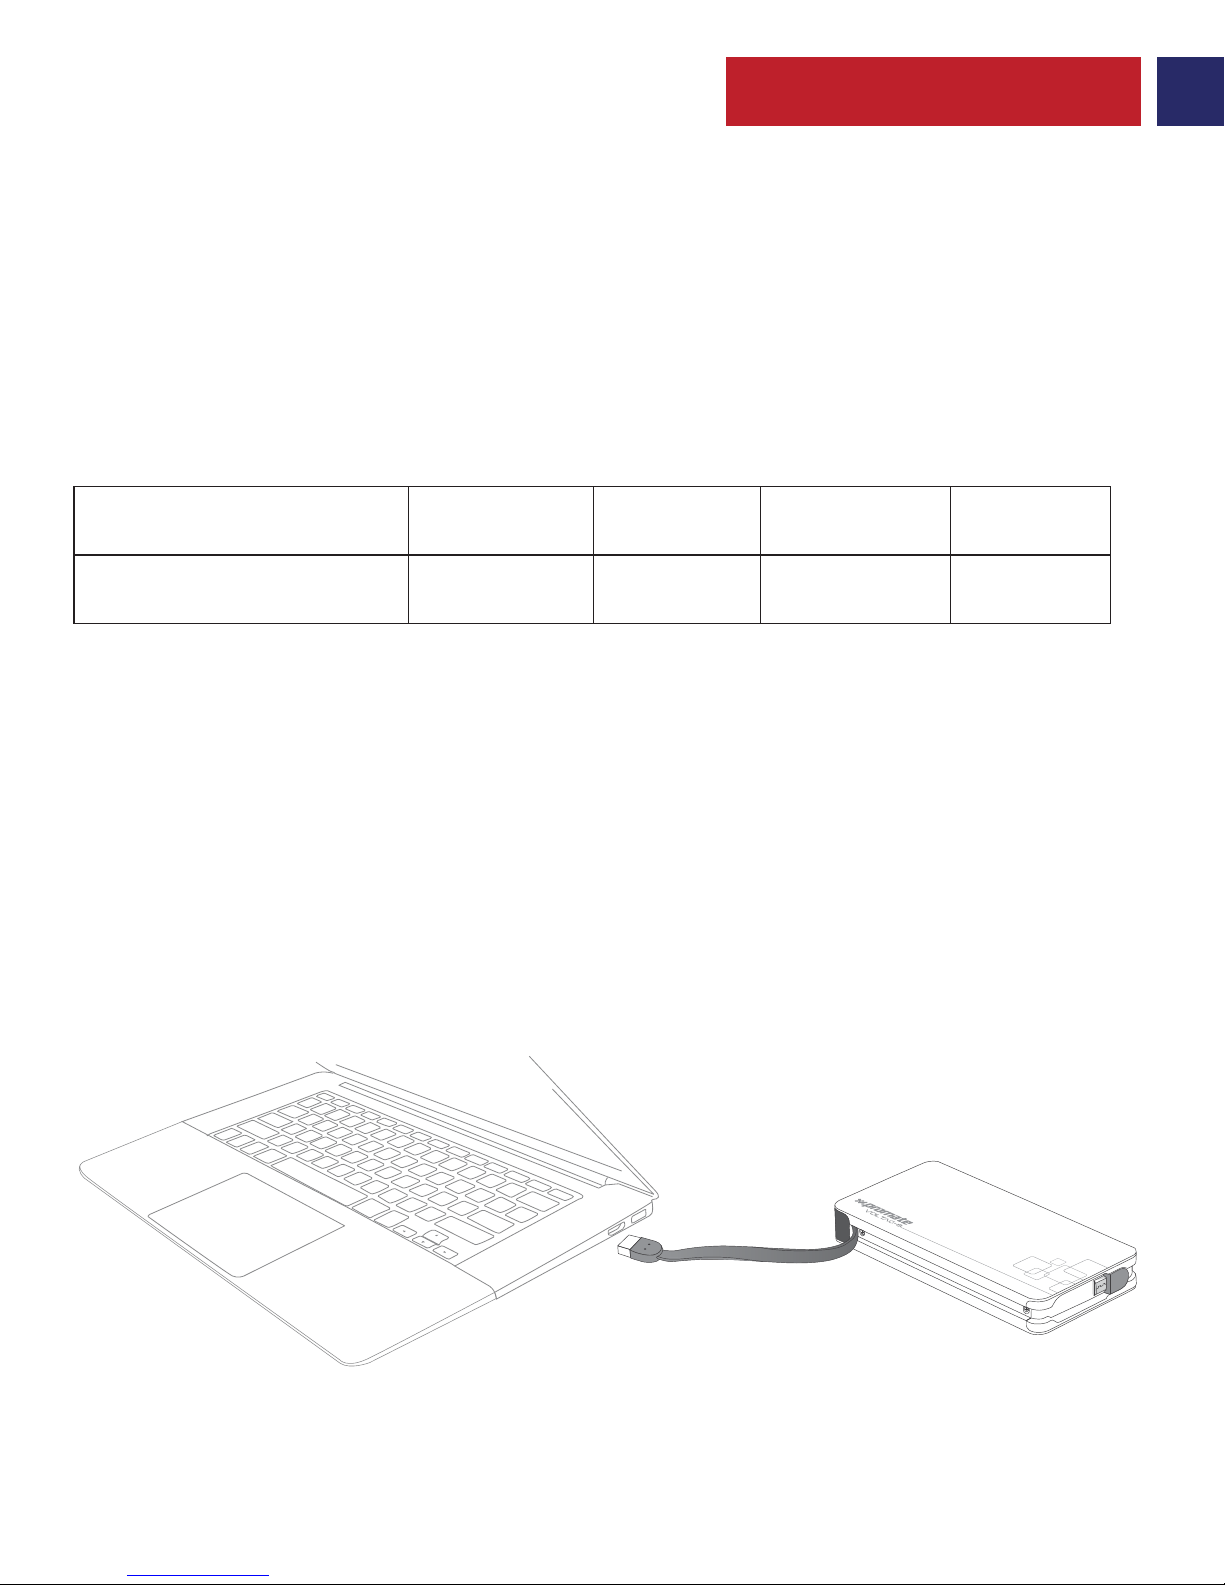
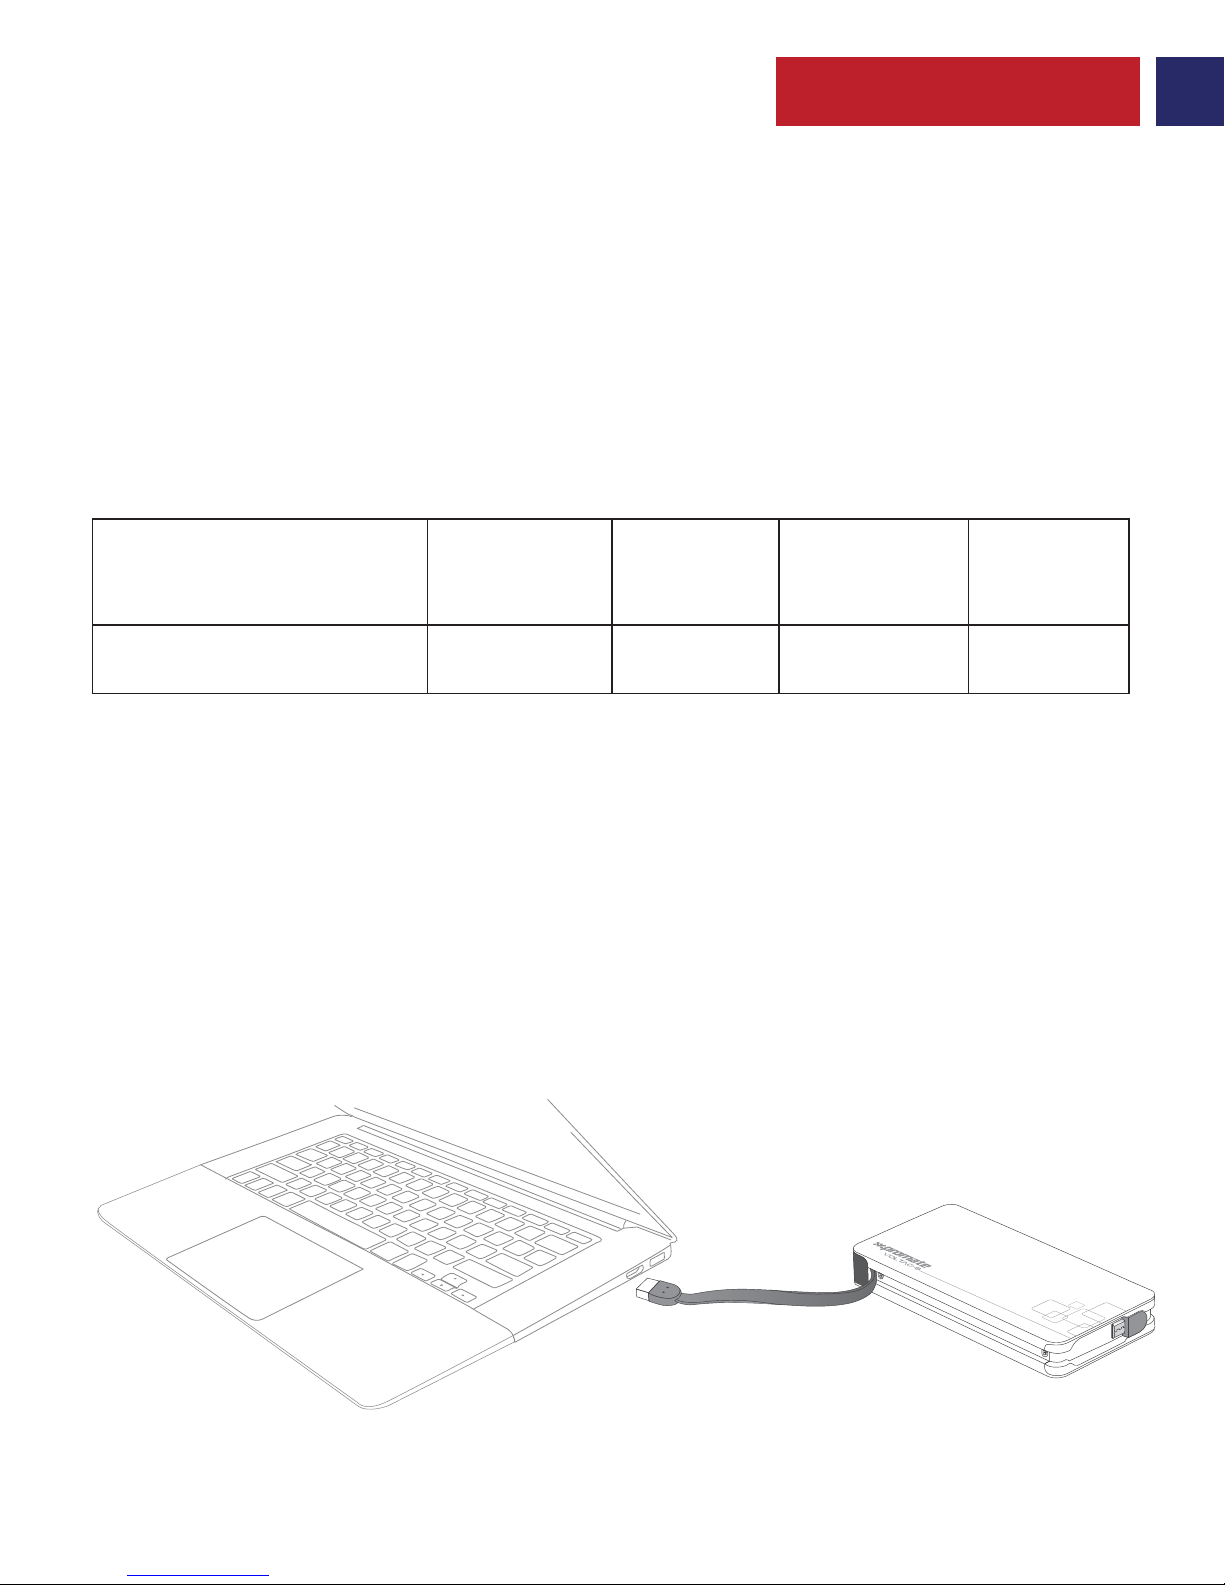
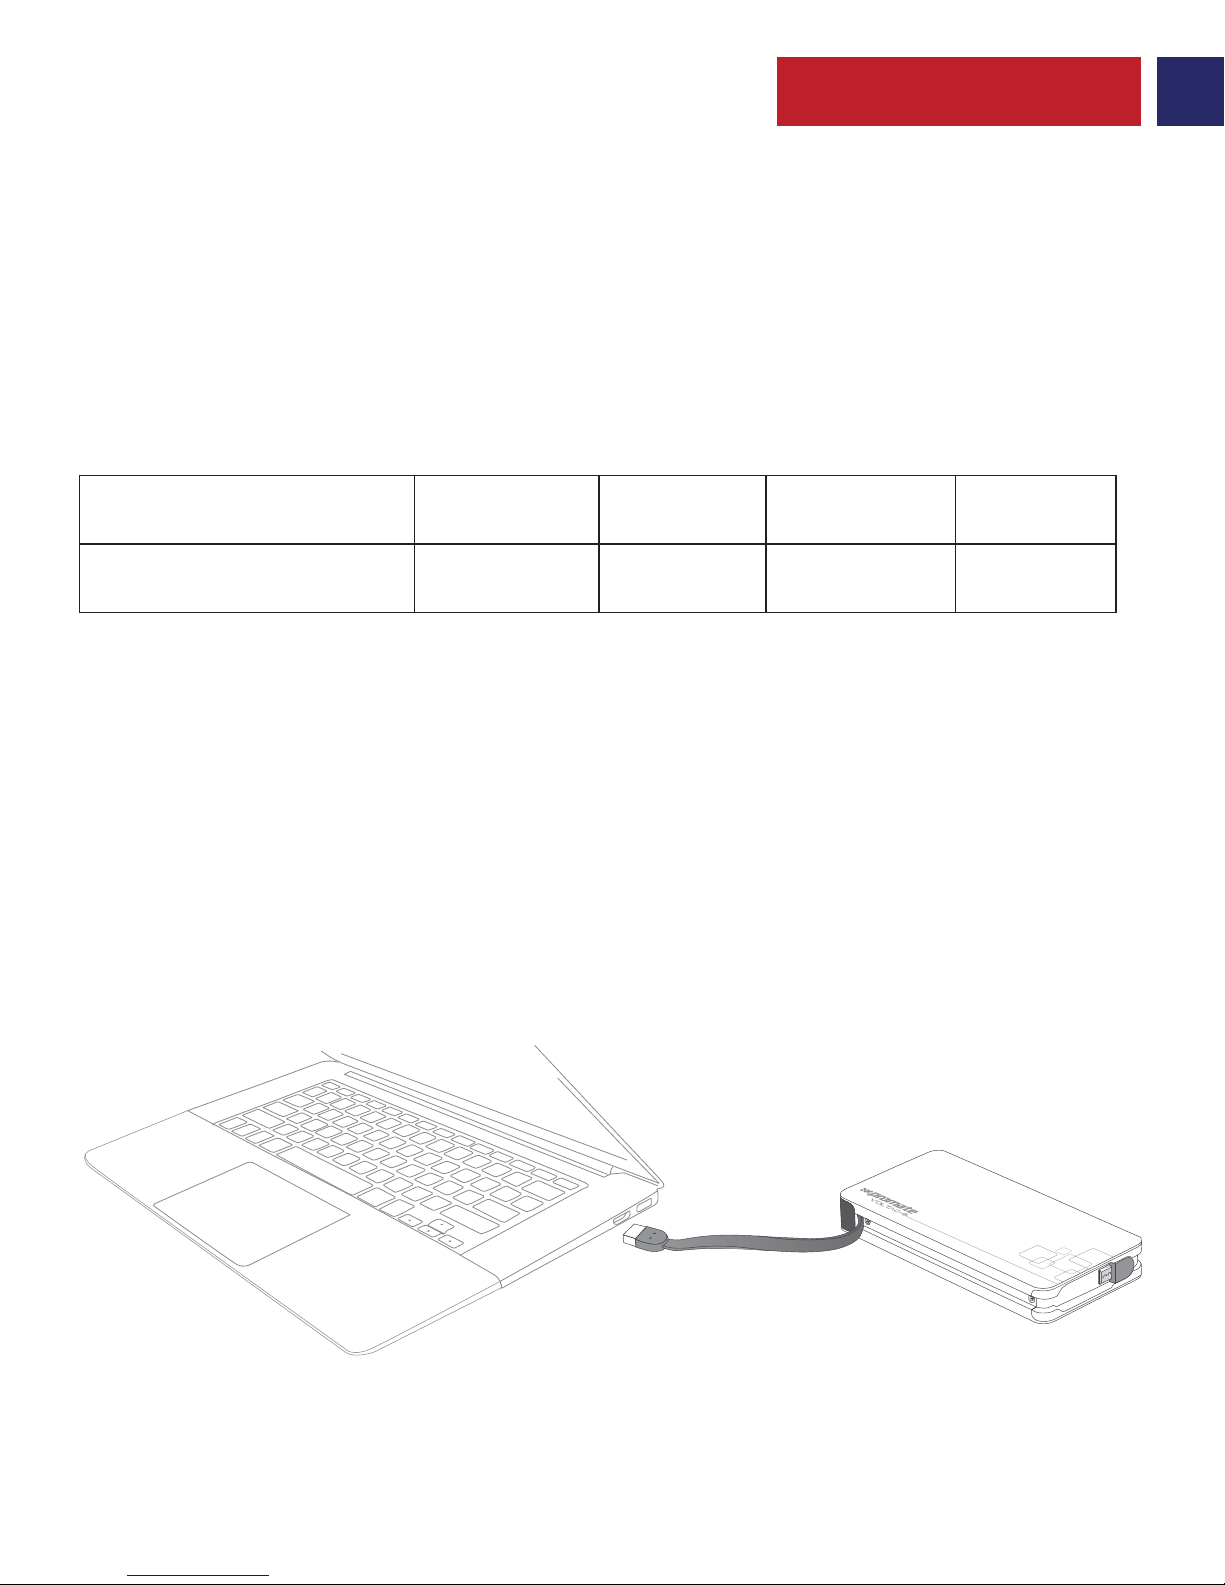
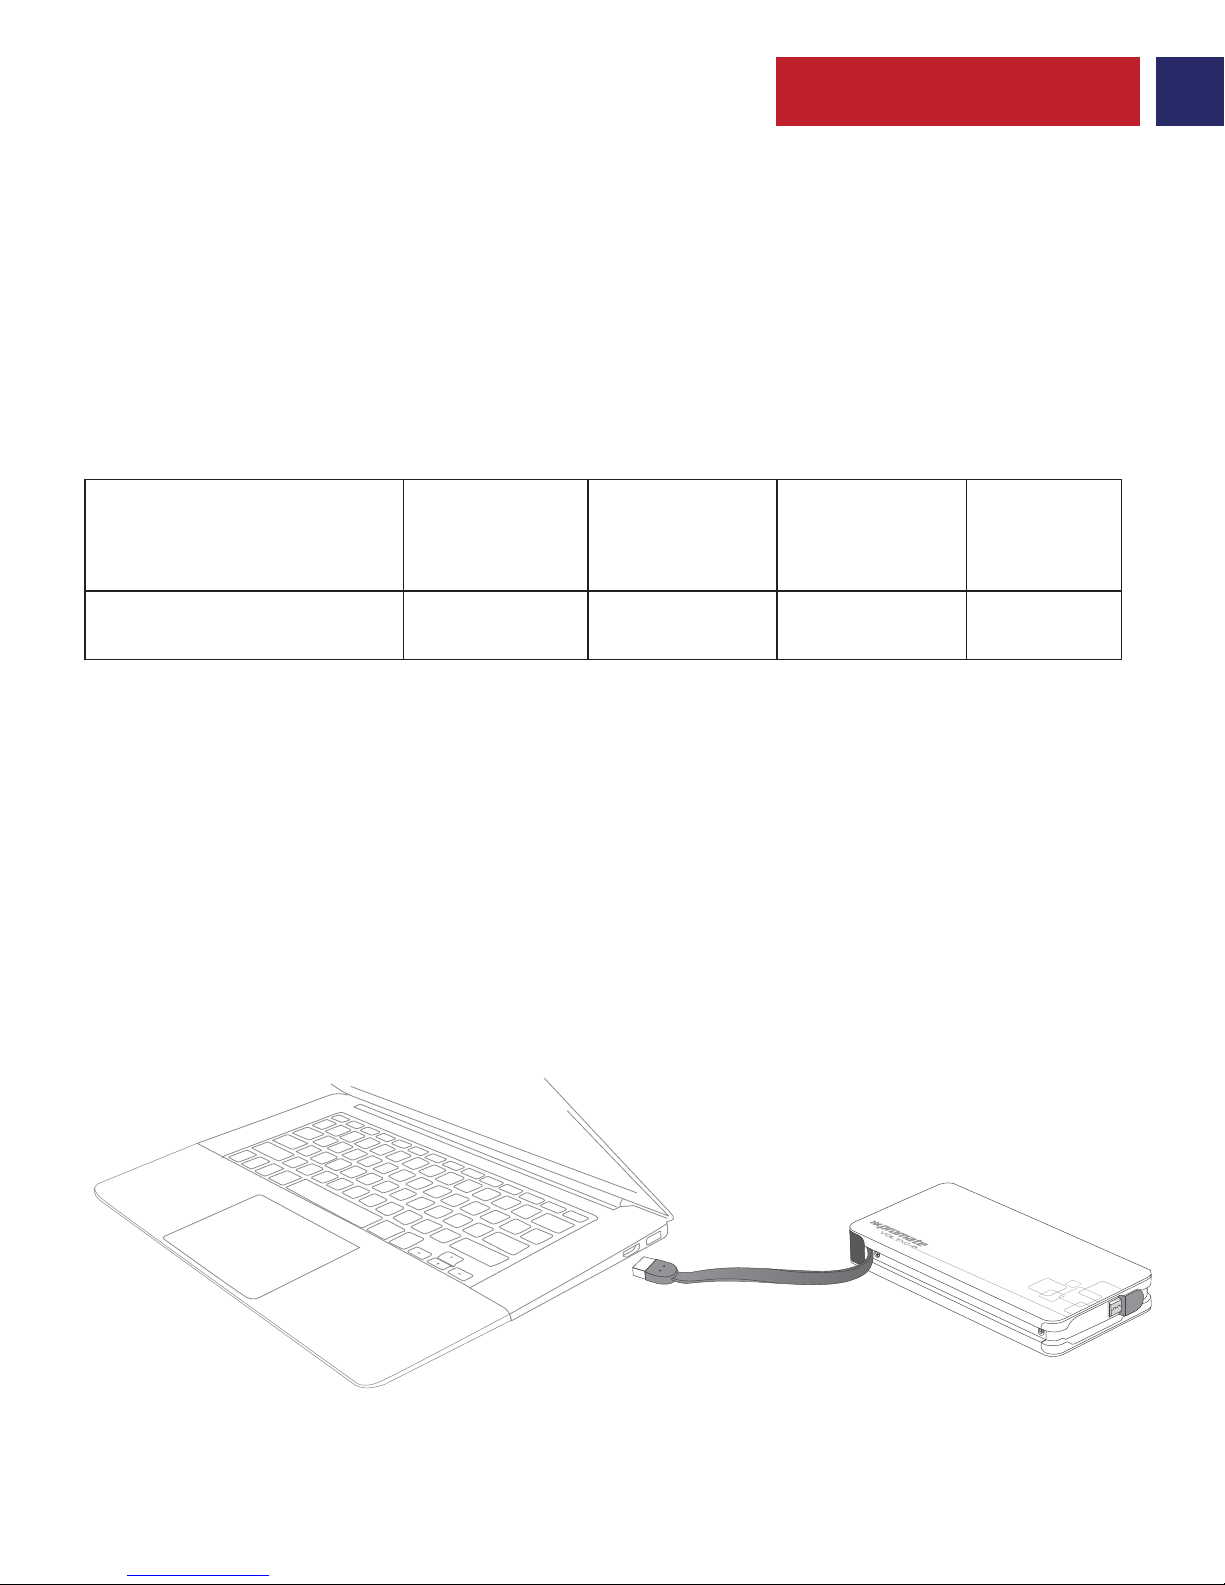
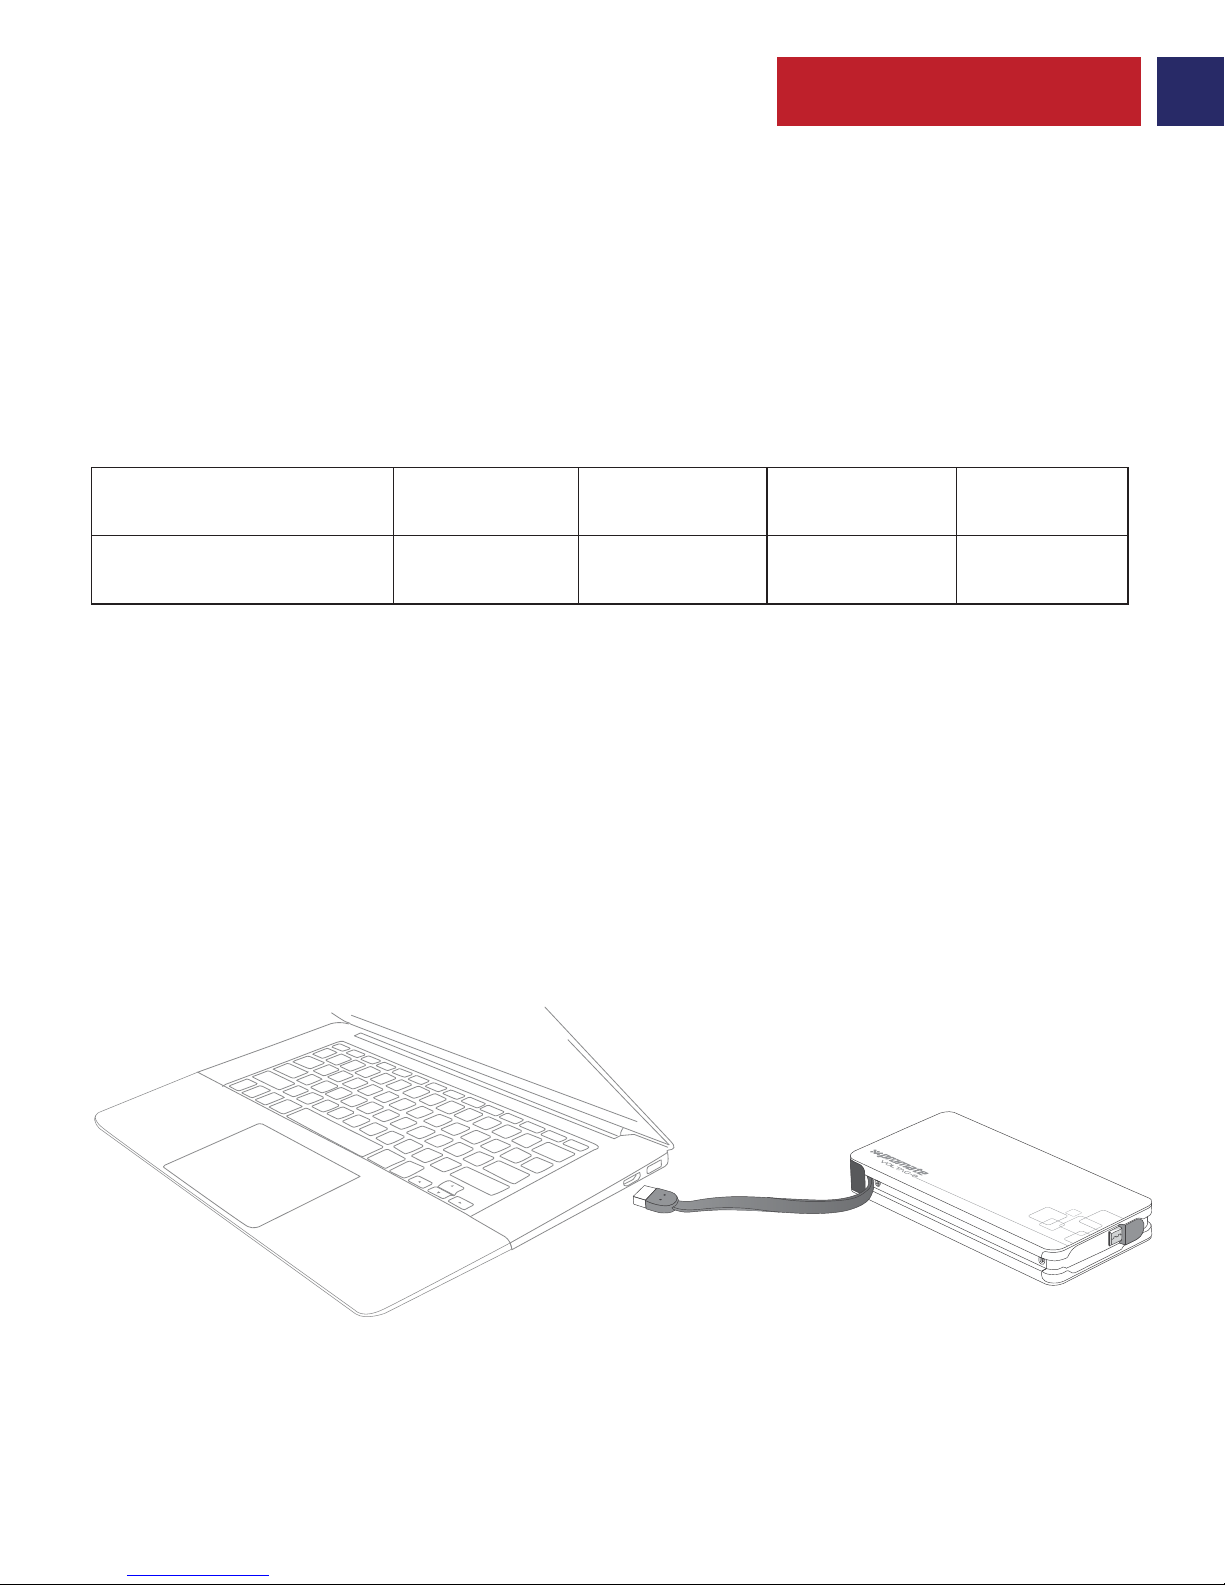
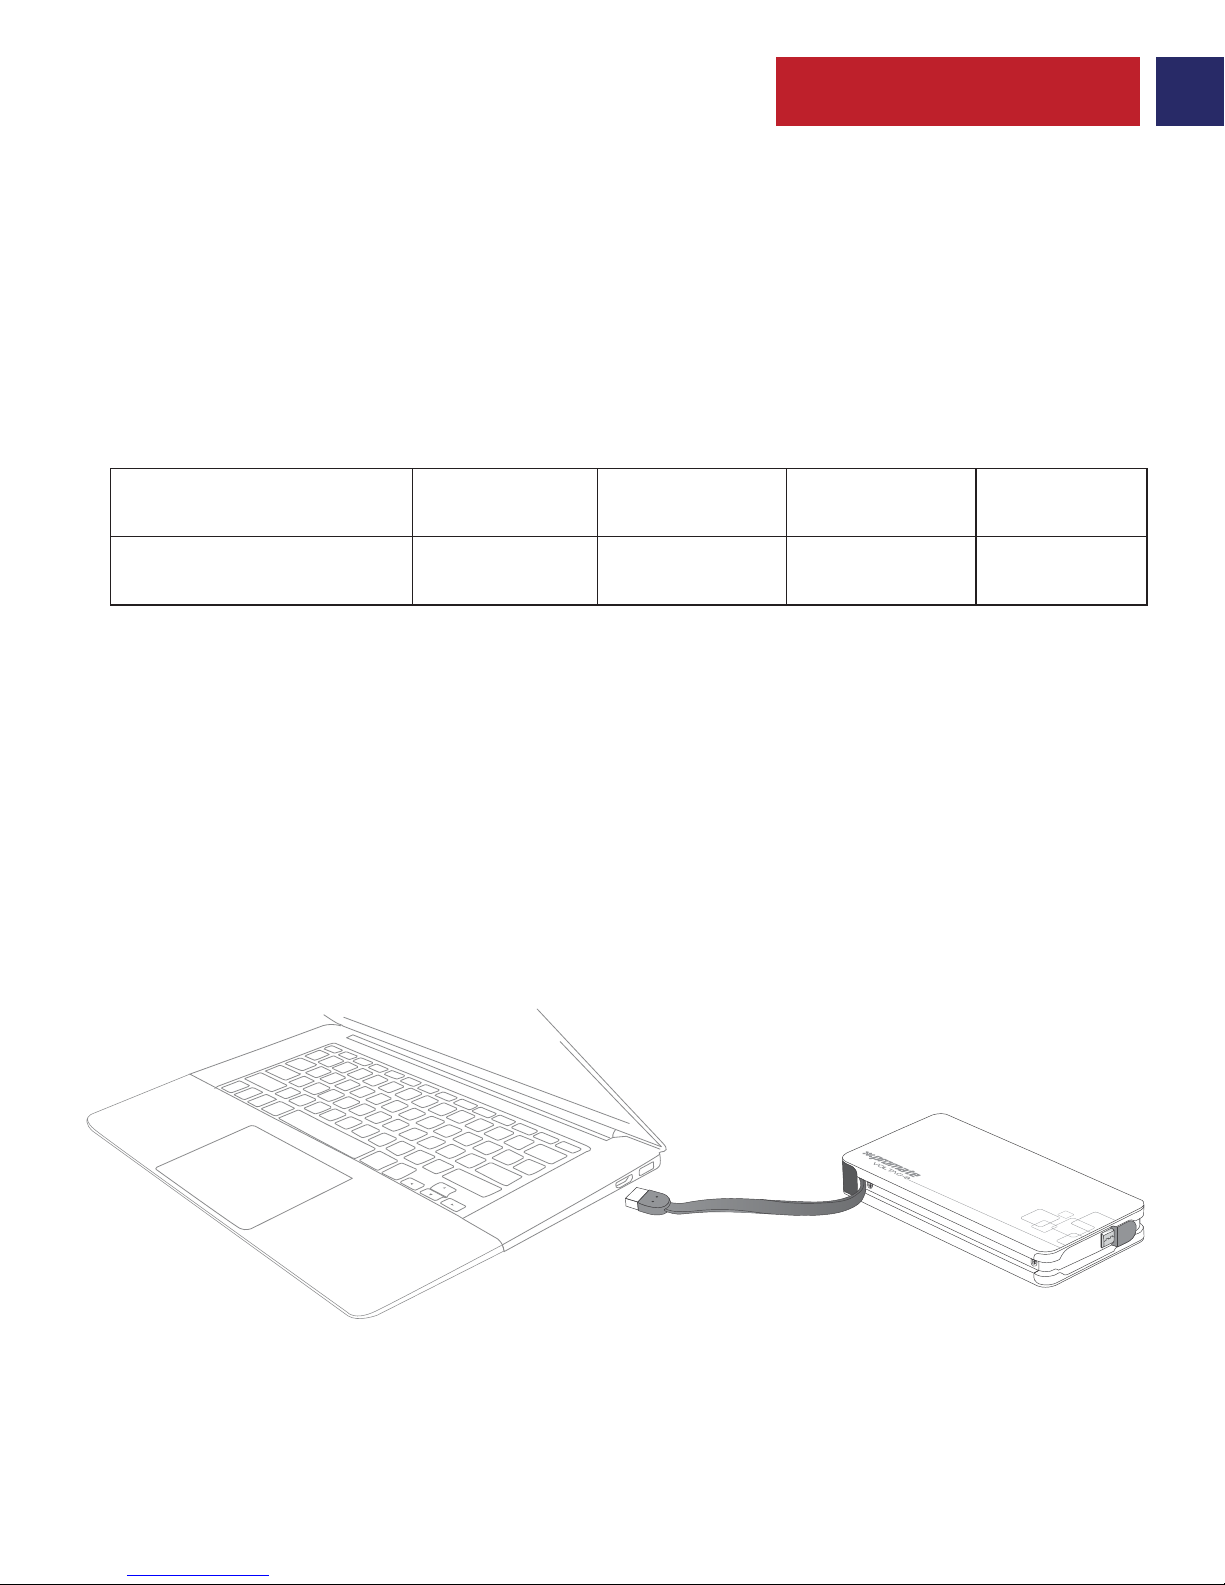
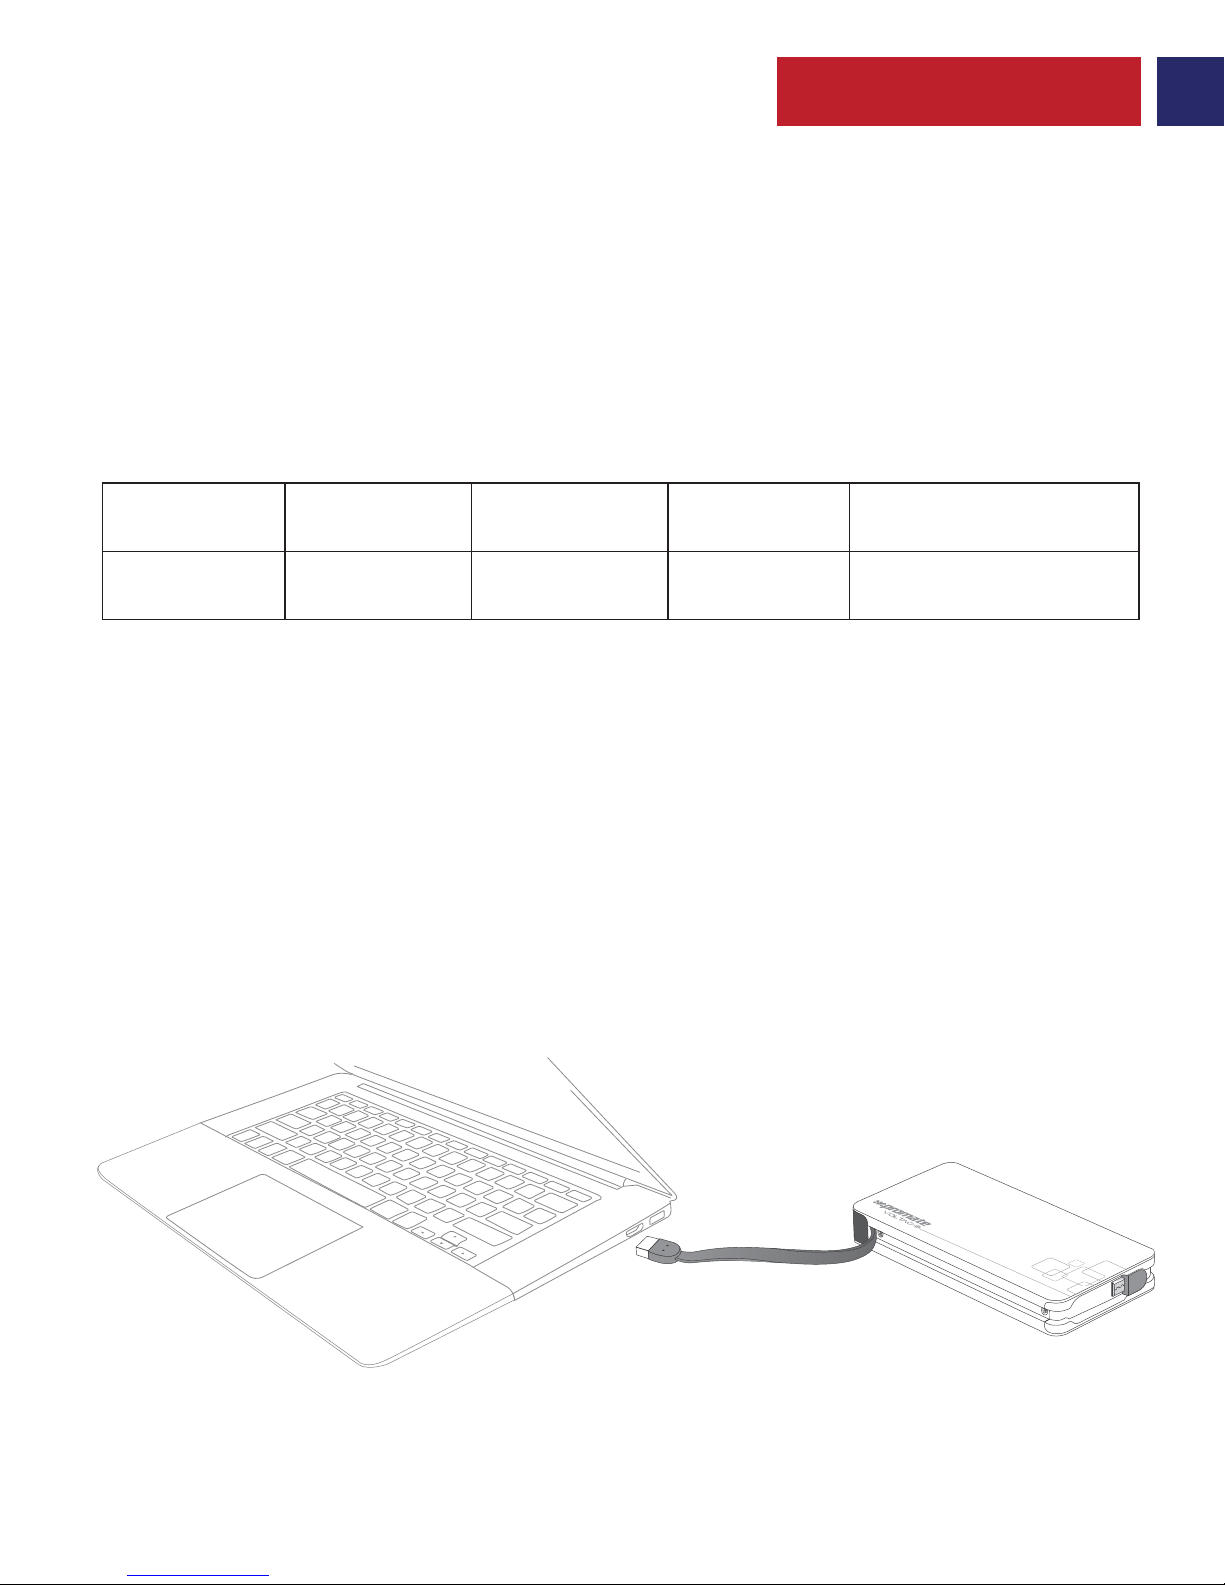
• Connect one end of the Micro-USB Cable provided to volTag-8 and the other
end to a Desktop/Laptop or a USB Power Adapter. The Battery Level LED Indicator’s
will light up indicating that the back-up battery is charging normally.
English
3
No. of LED’s Active 1
<=25% <=50% <=75% <=100%
2 3 4
% of Power remaining
Page 5
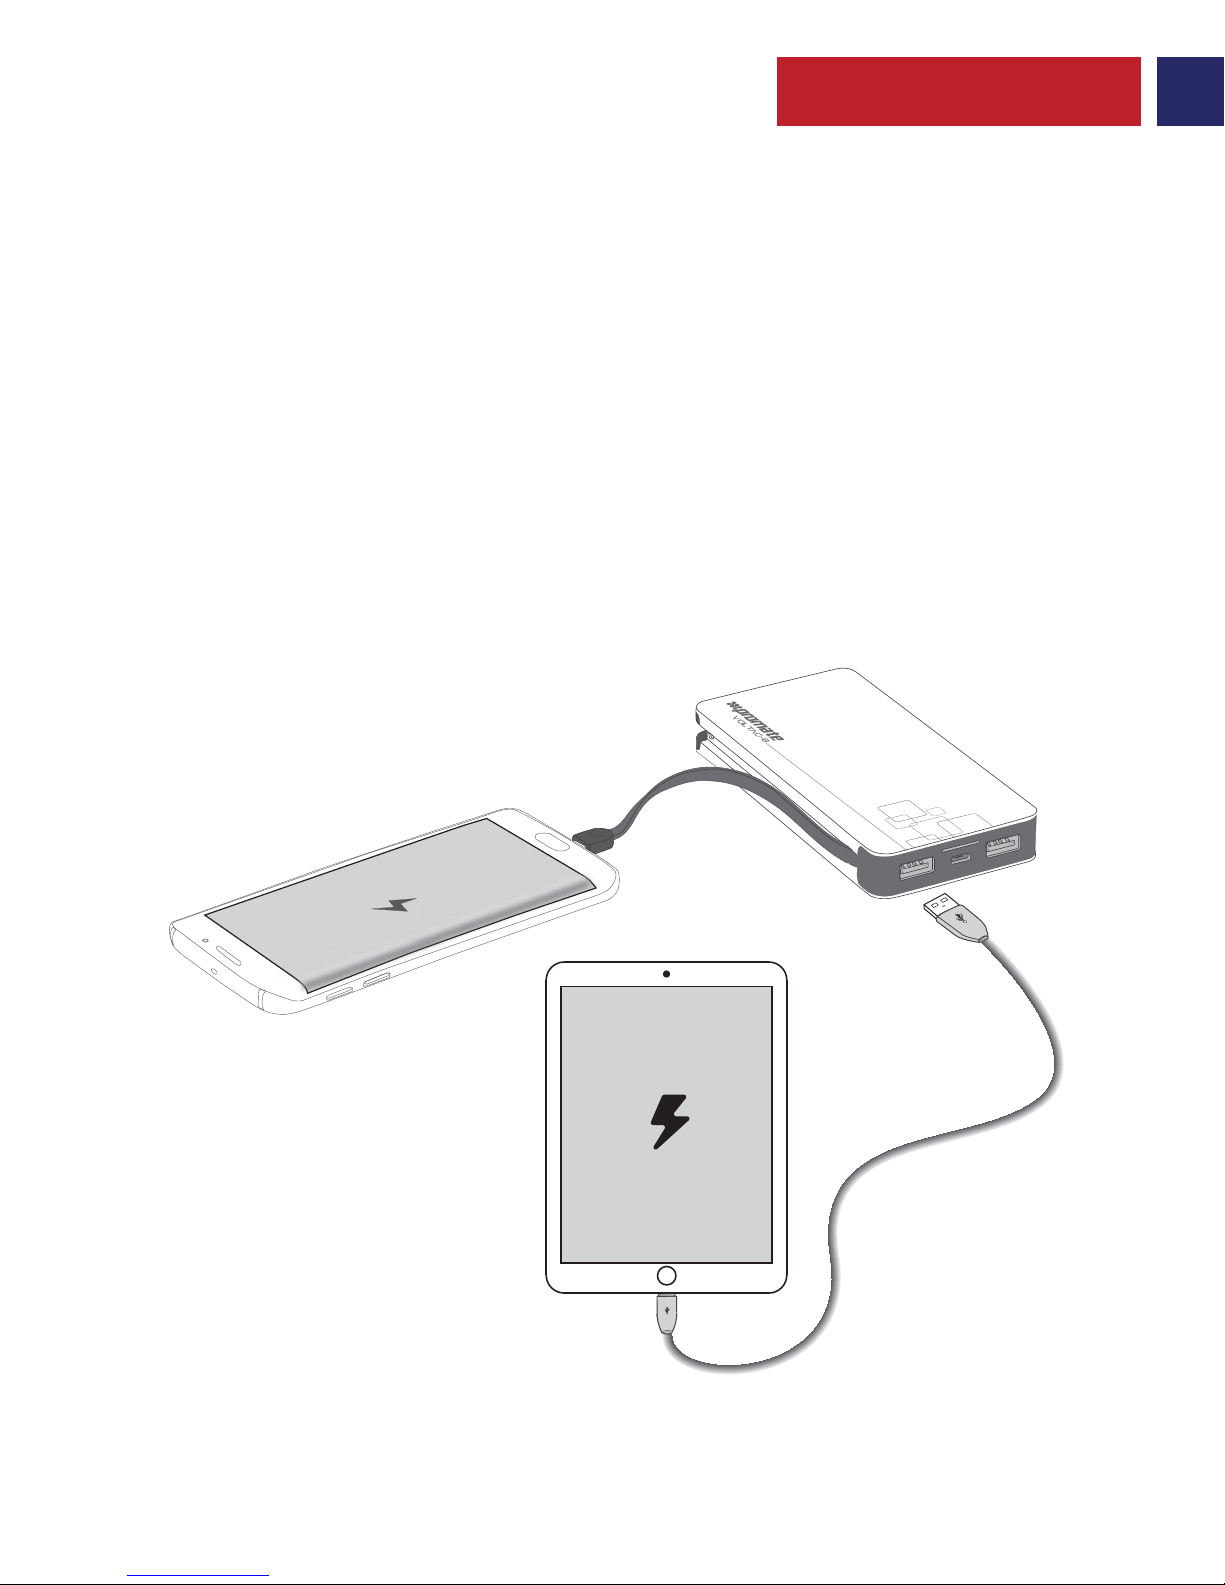
3. Charging USB chargeable devices using volTag-8
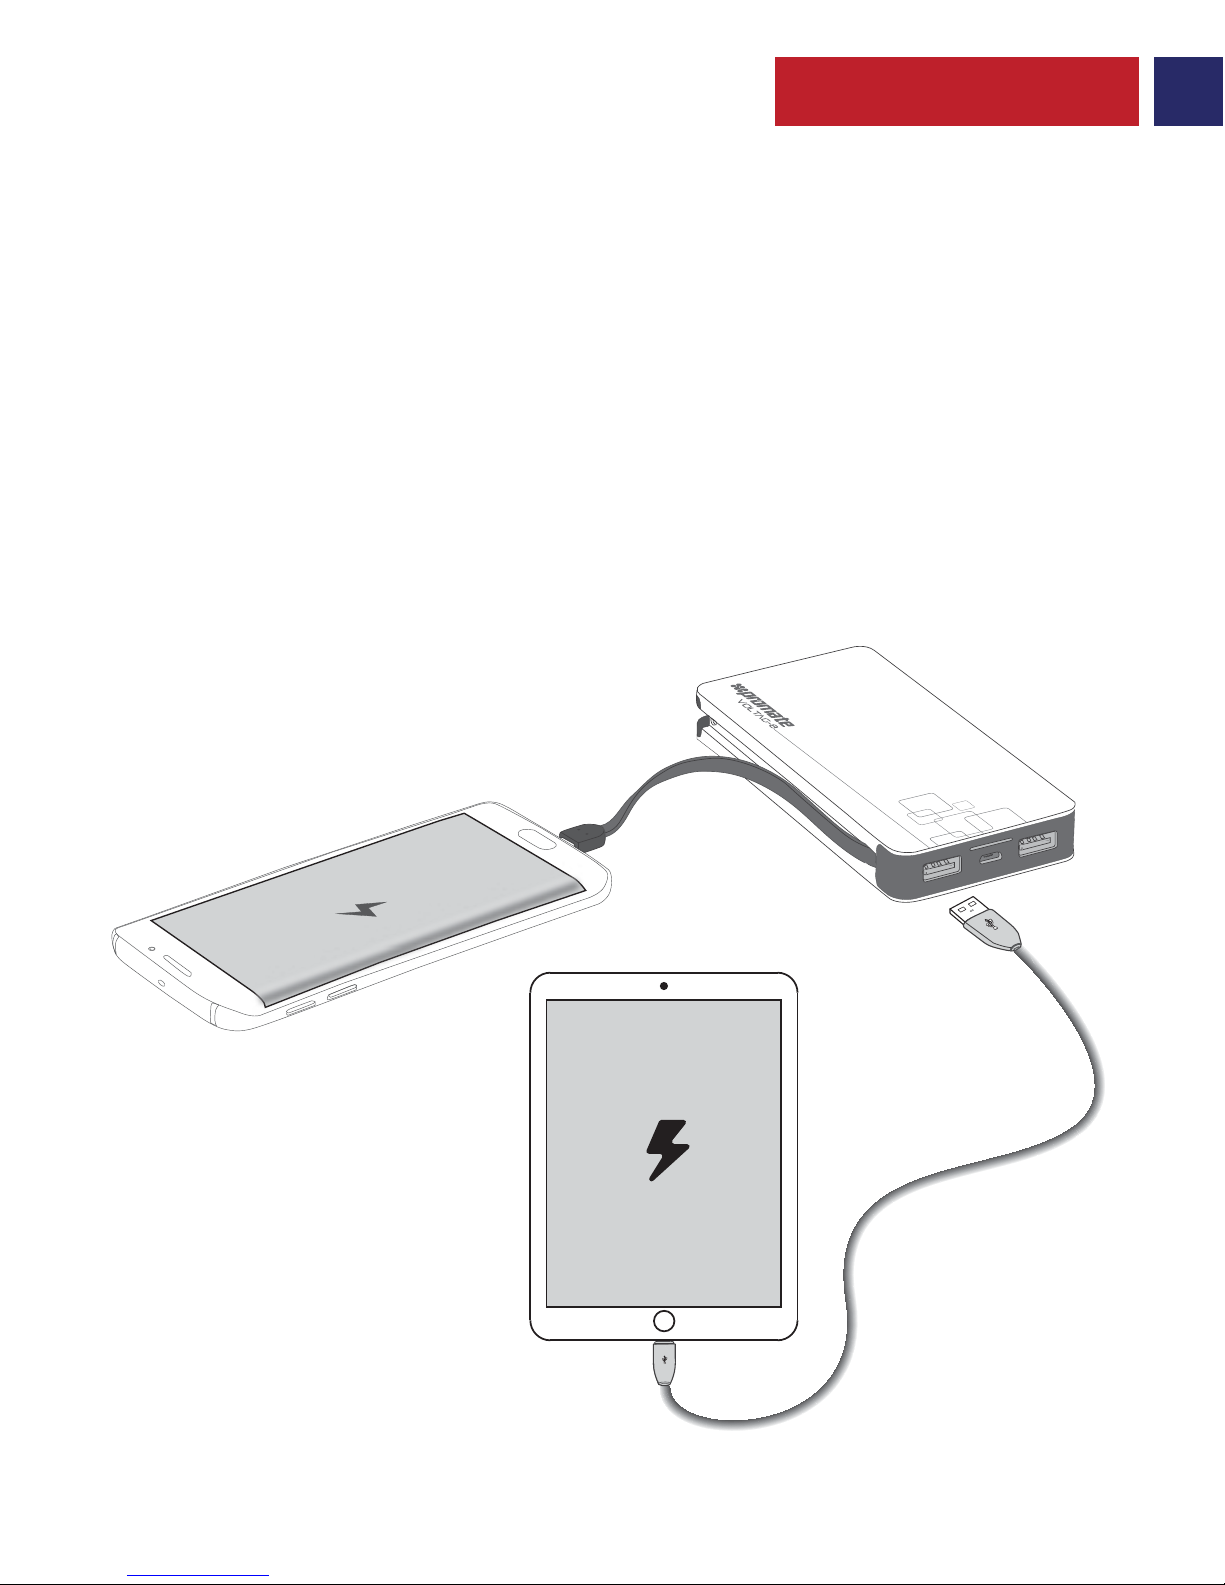
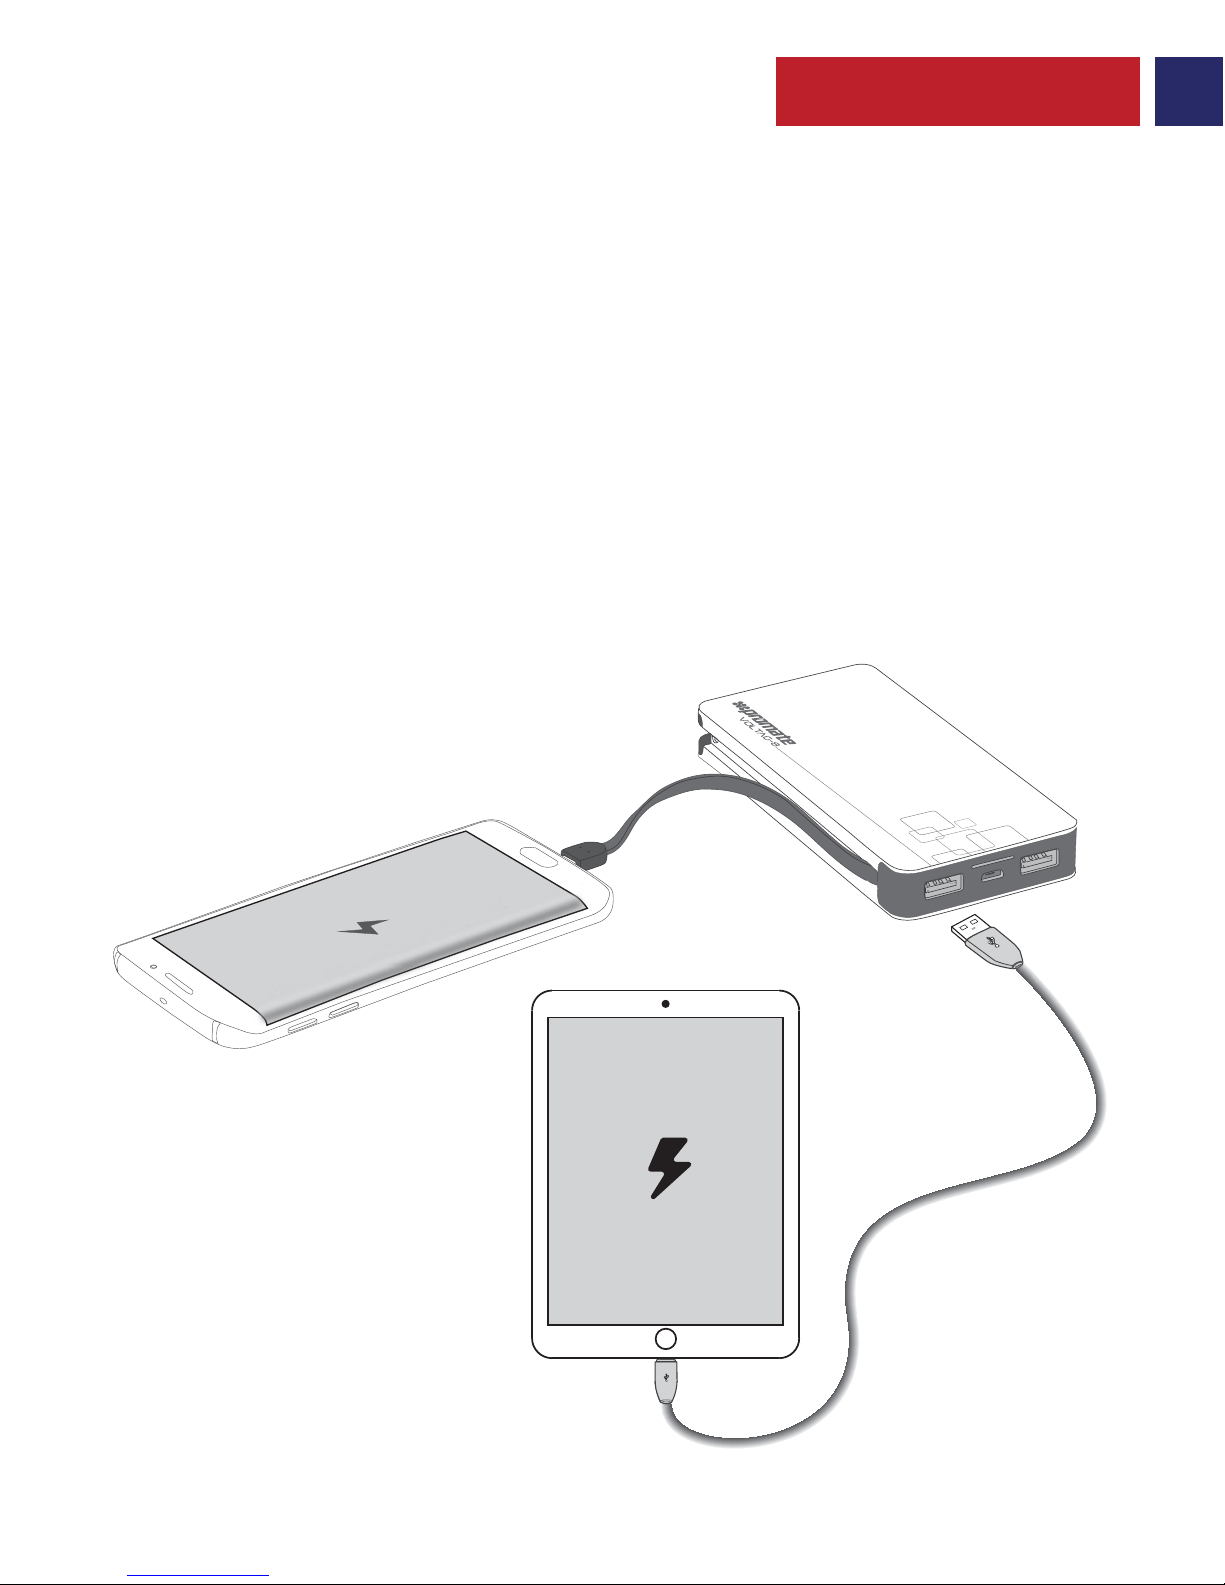
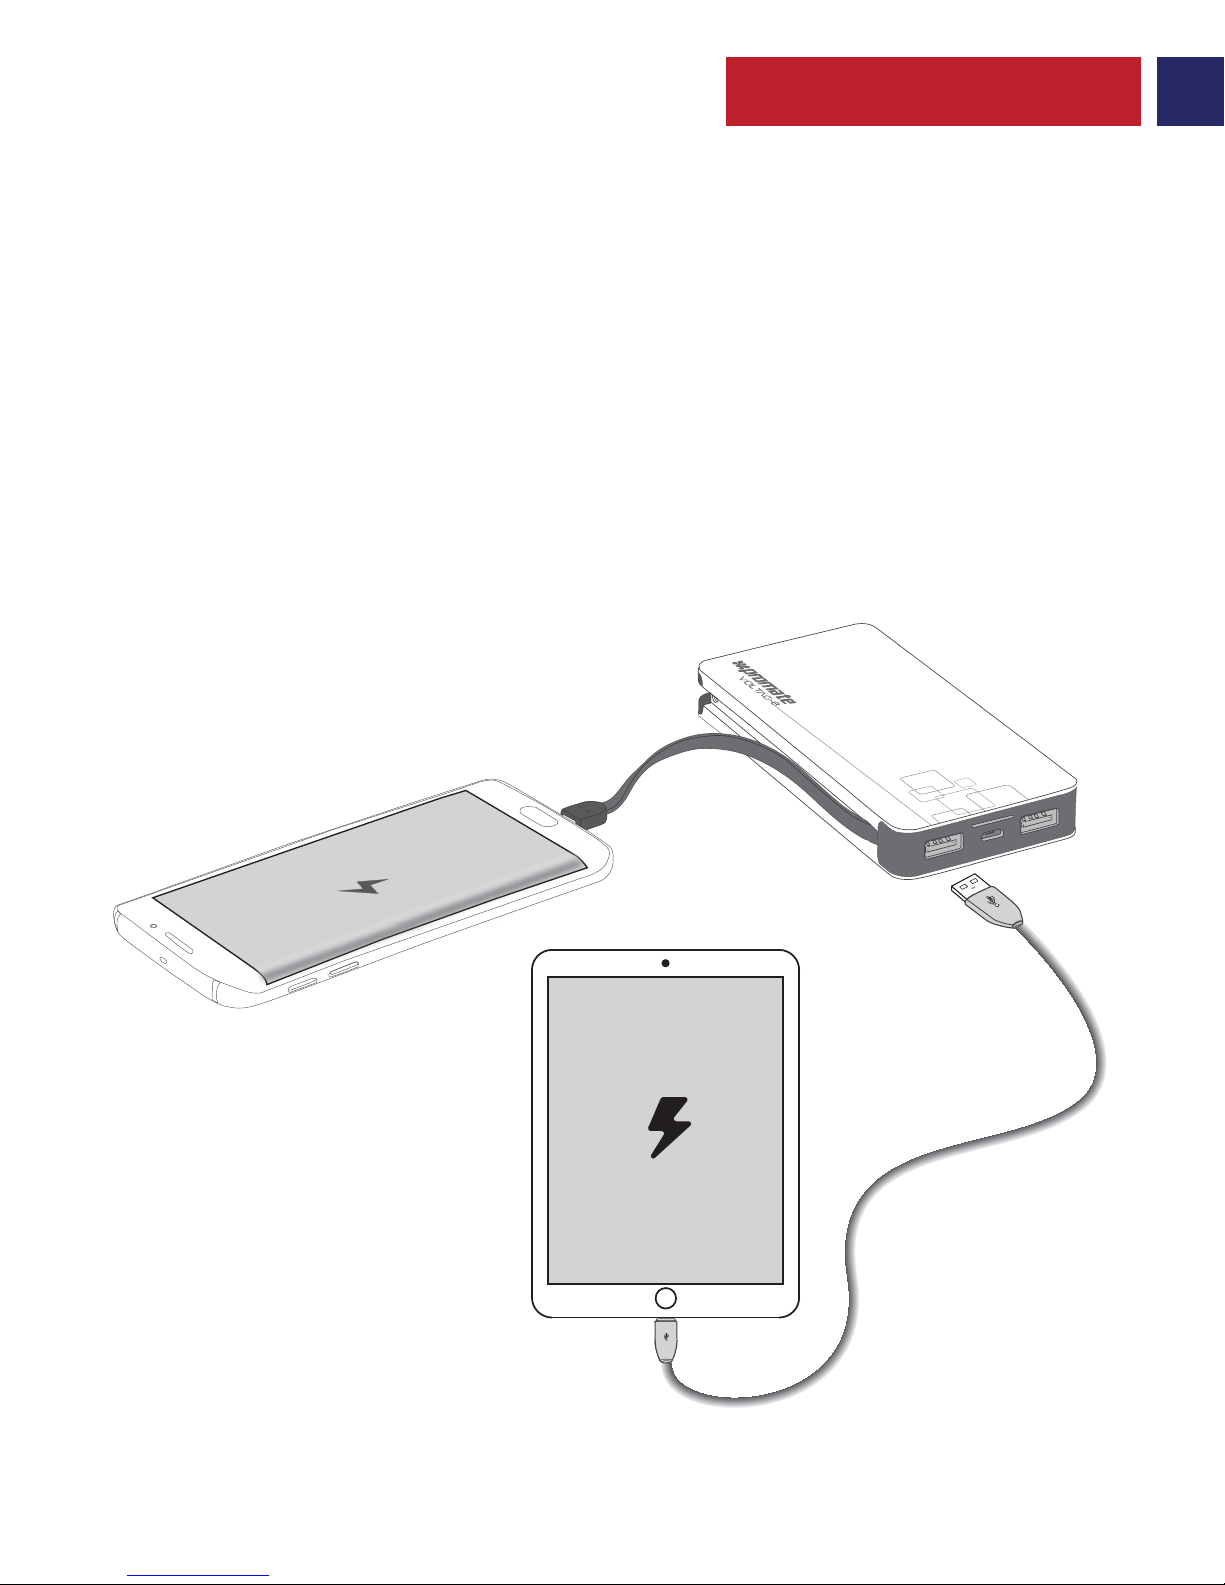
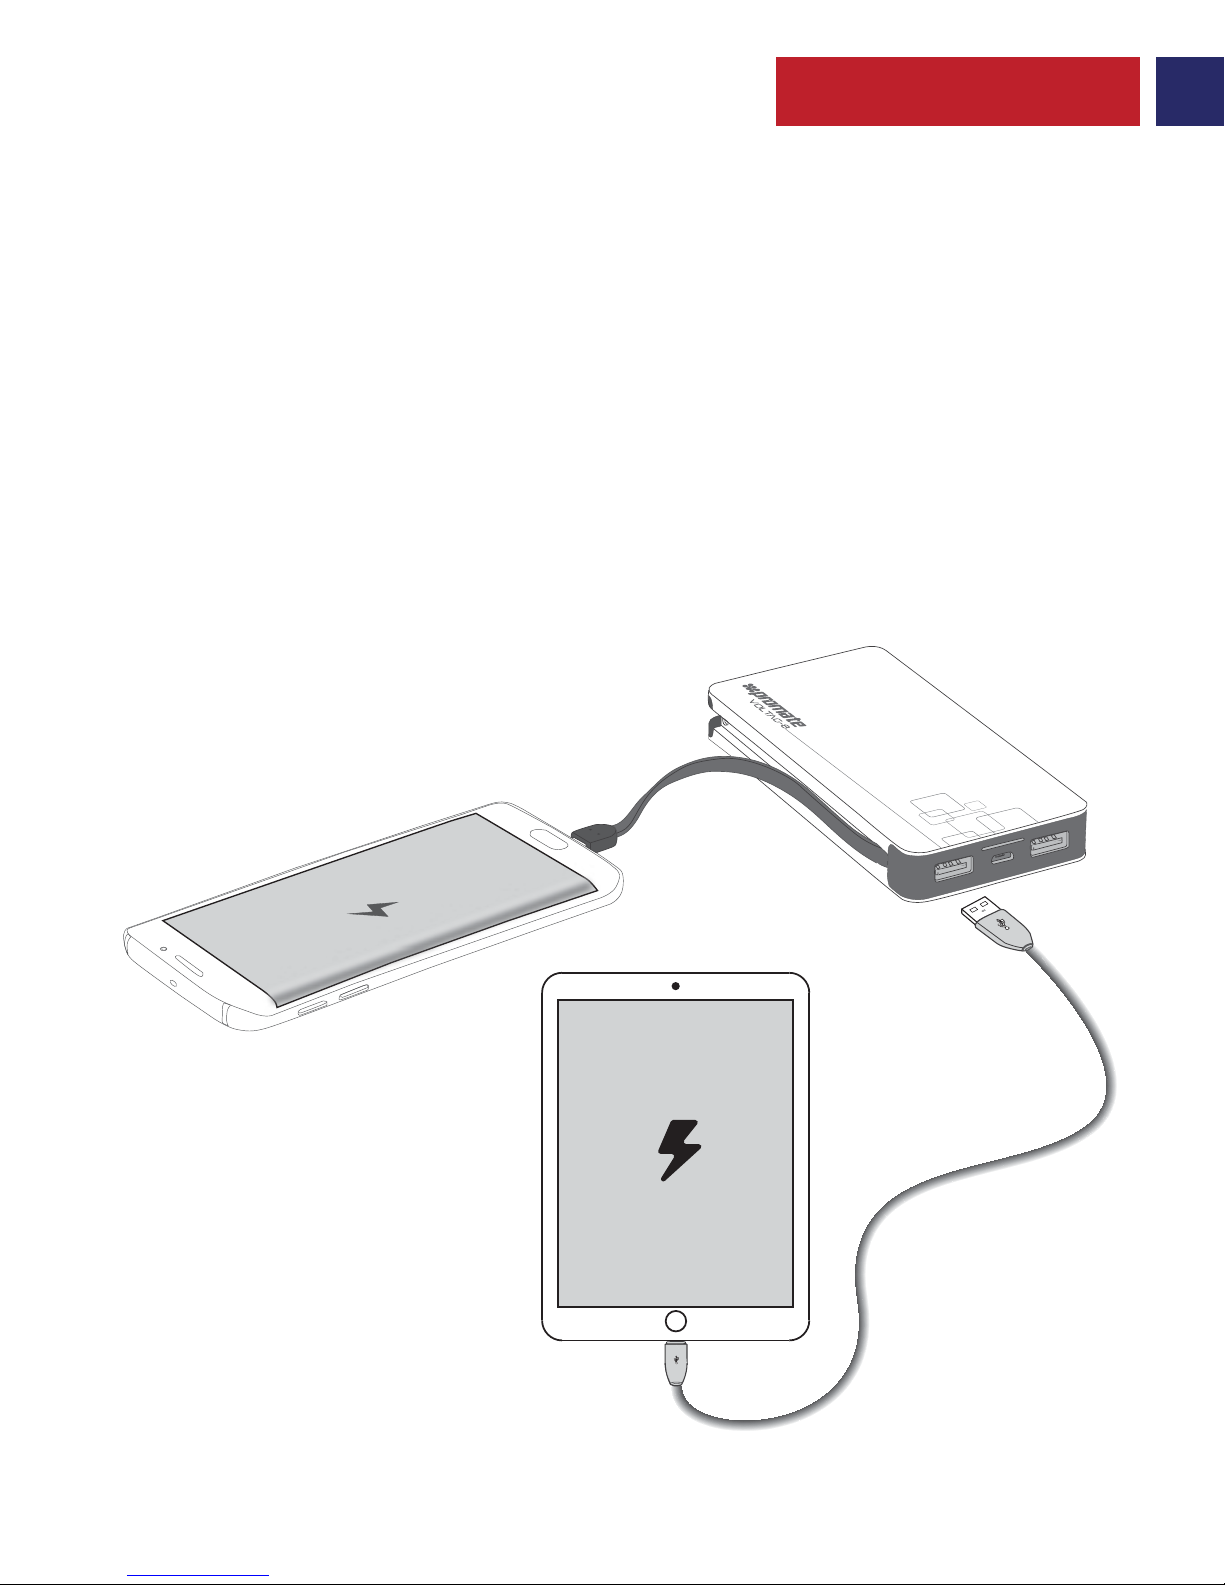
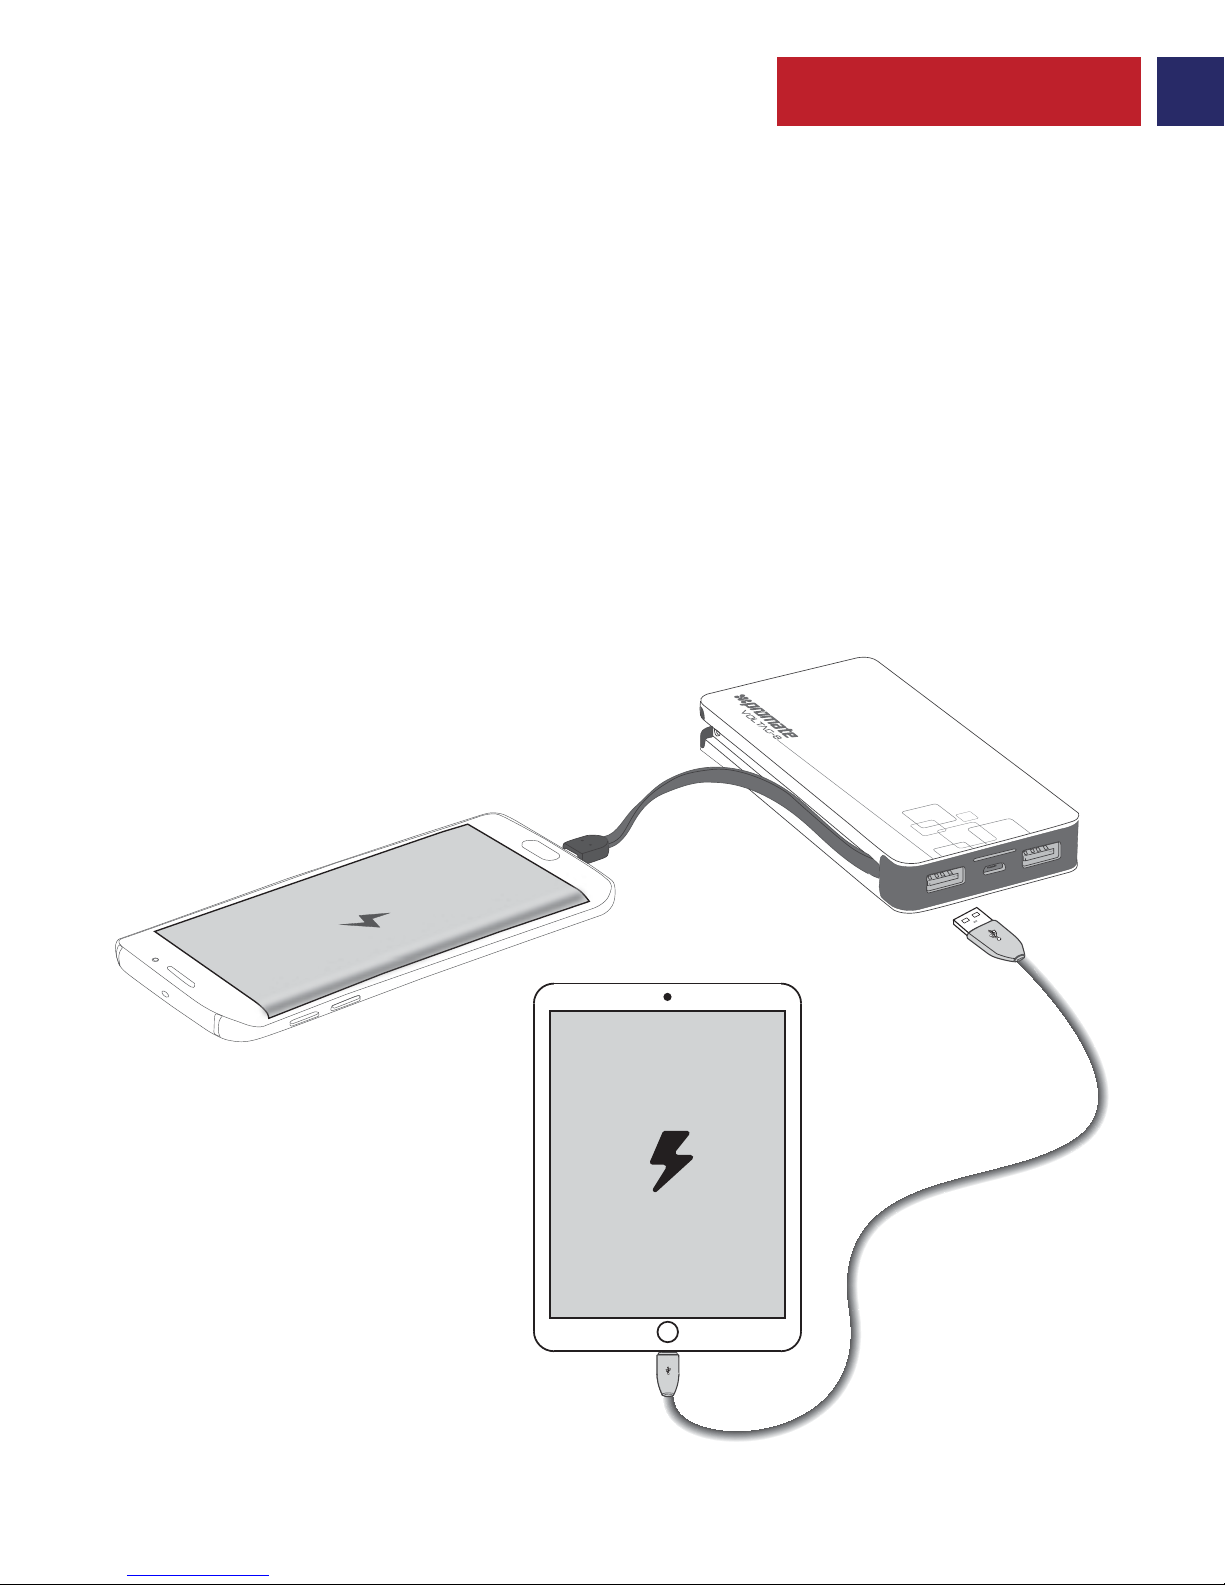
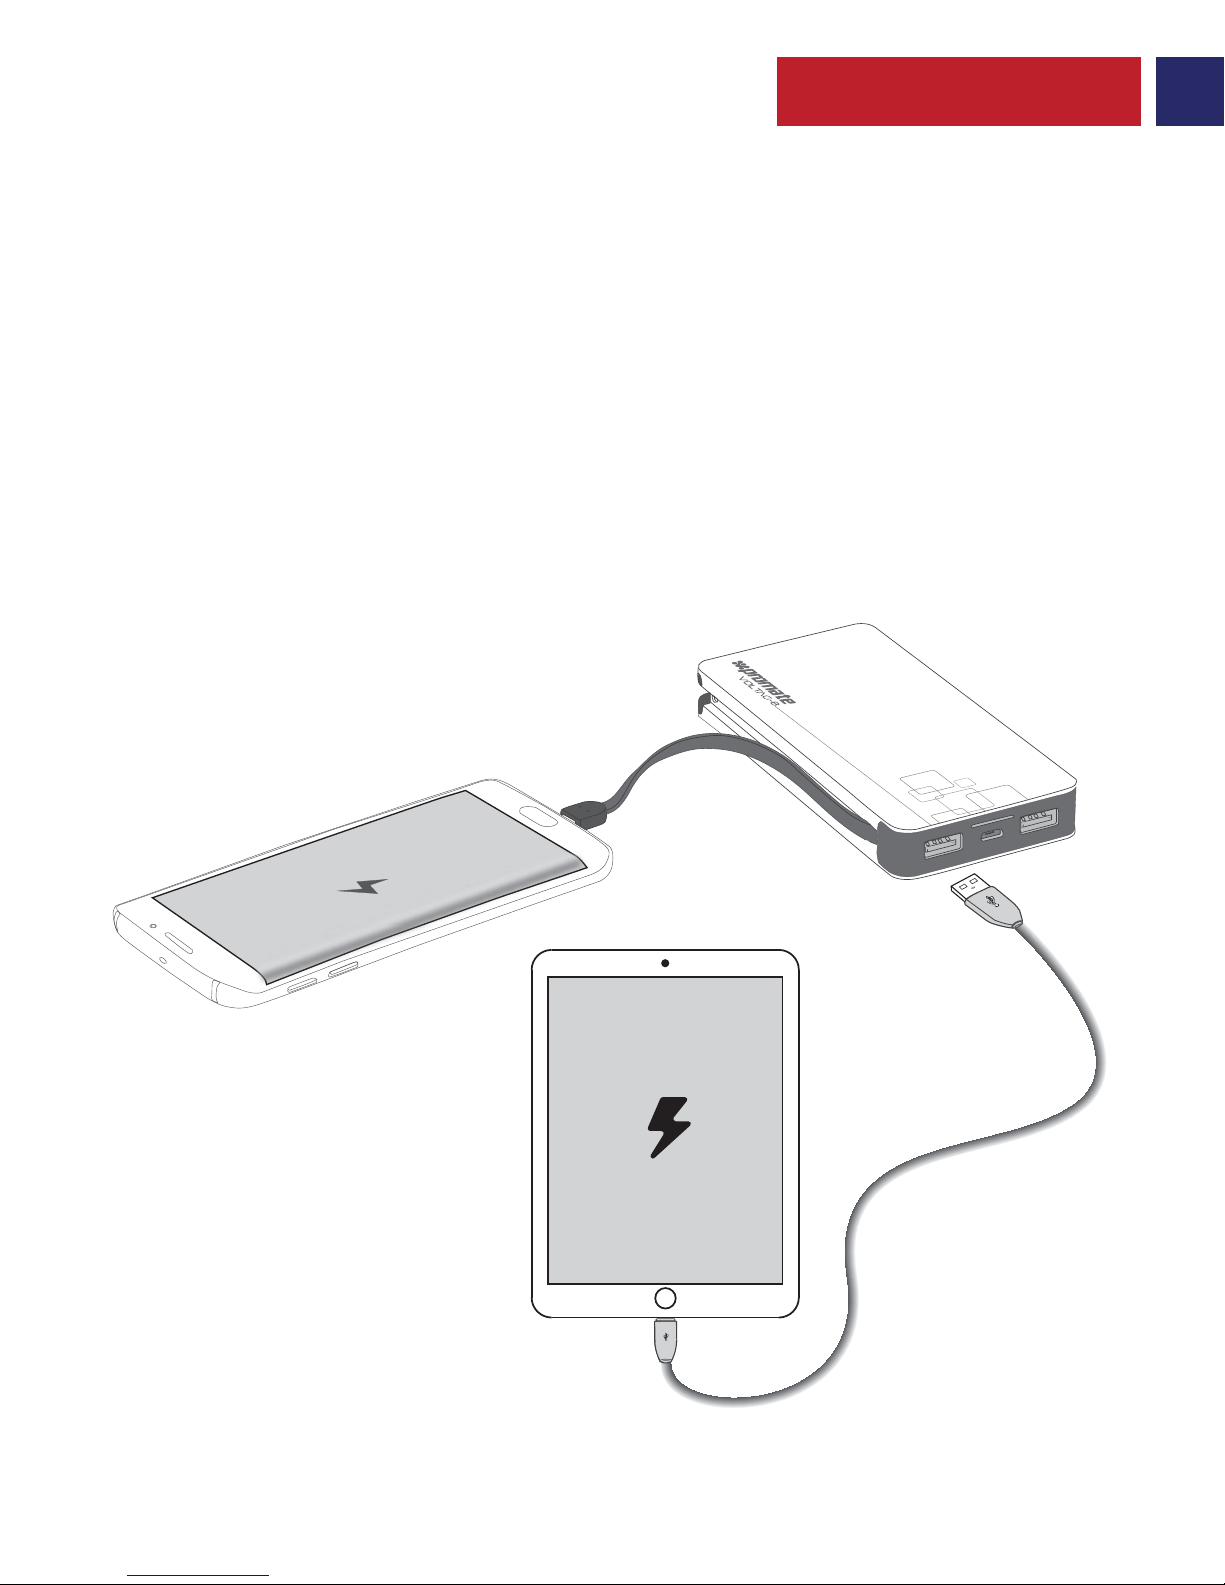
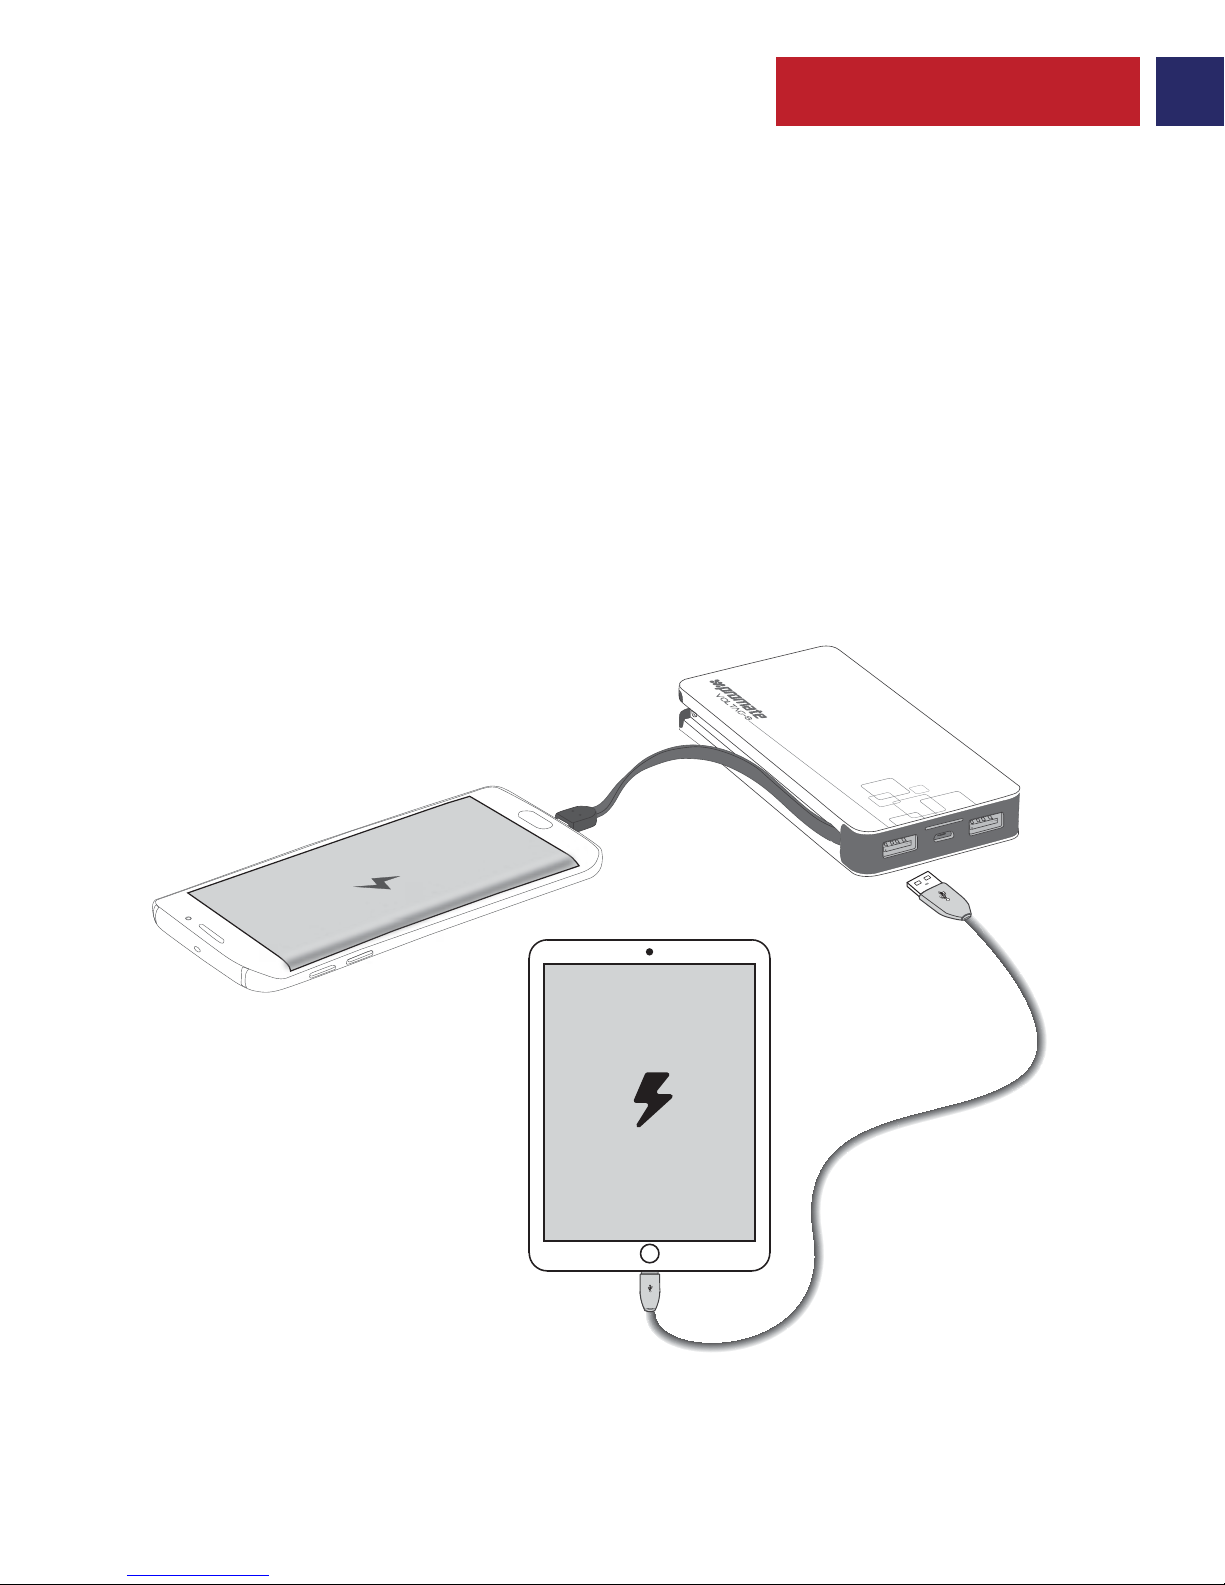
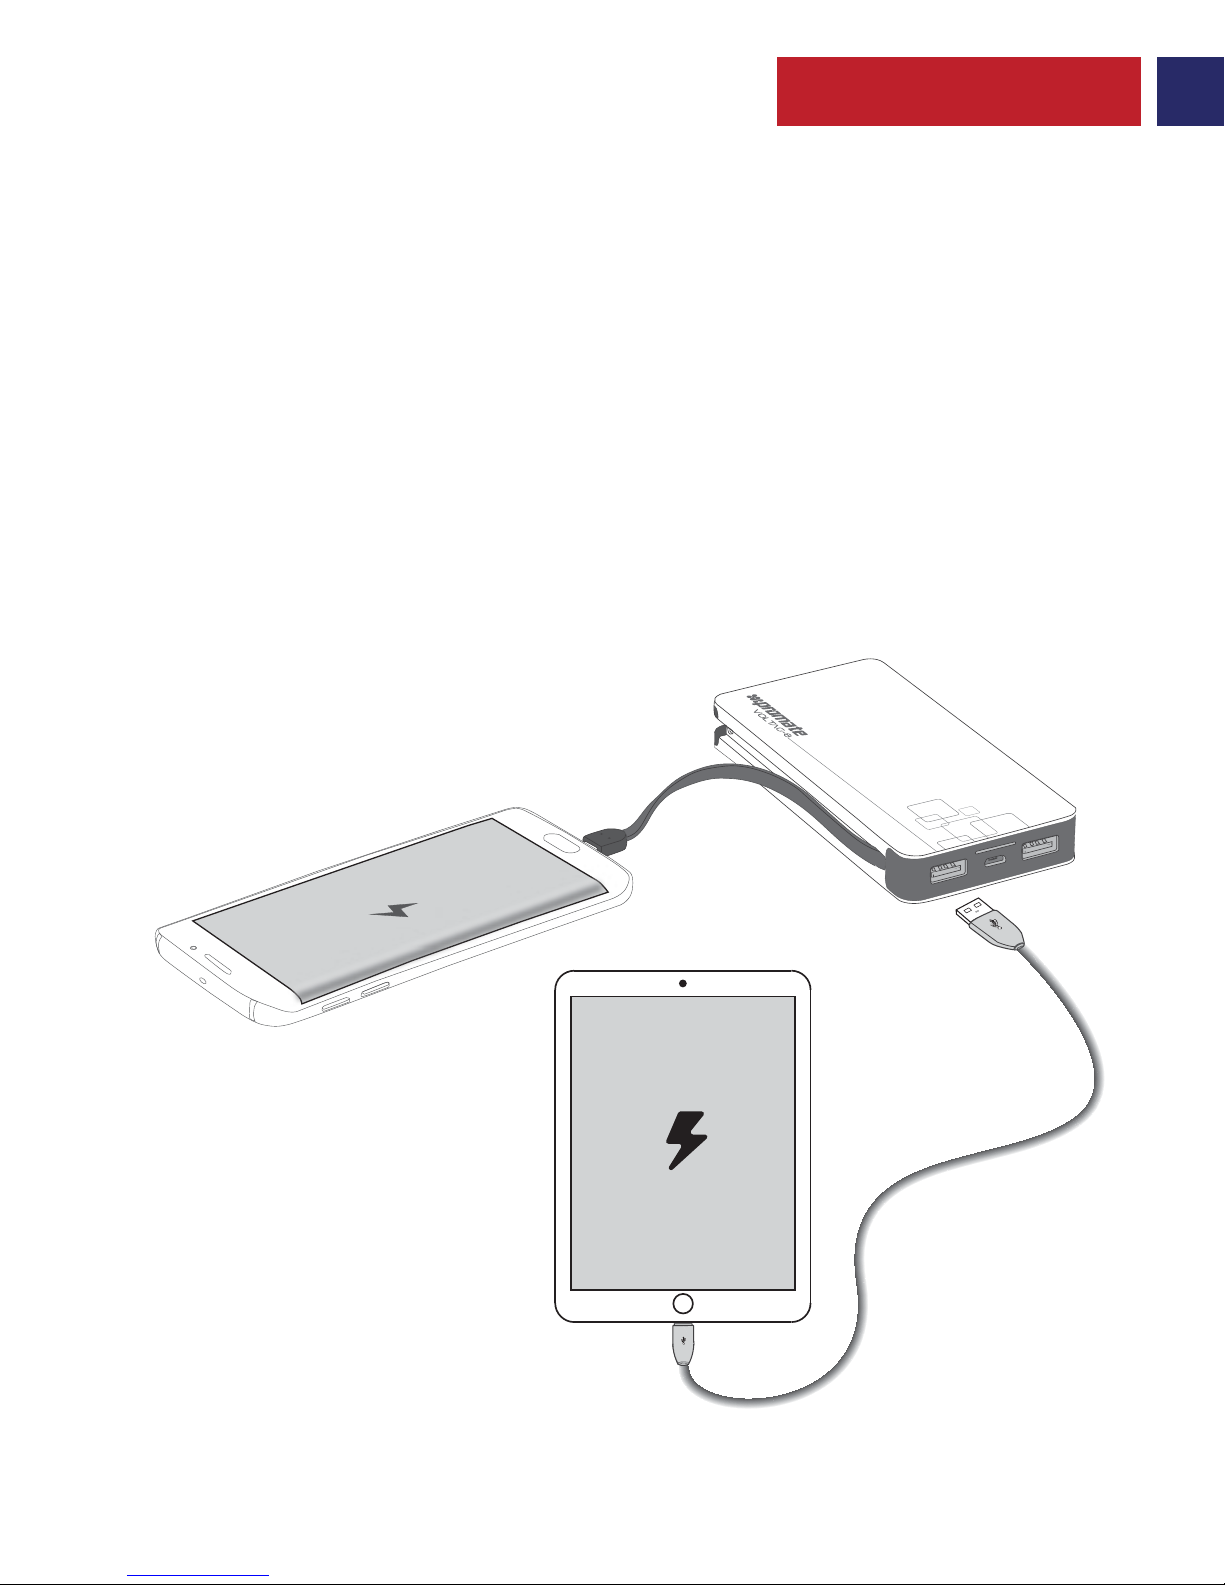
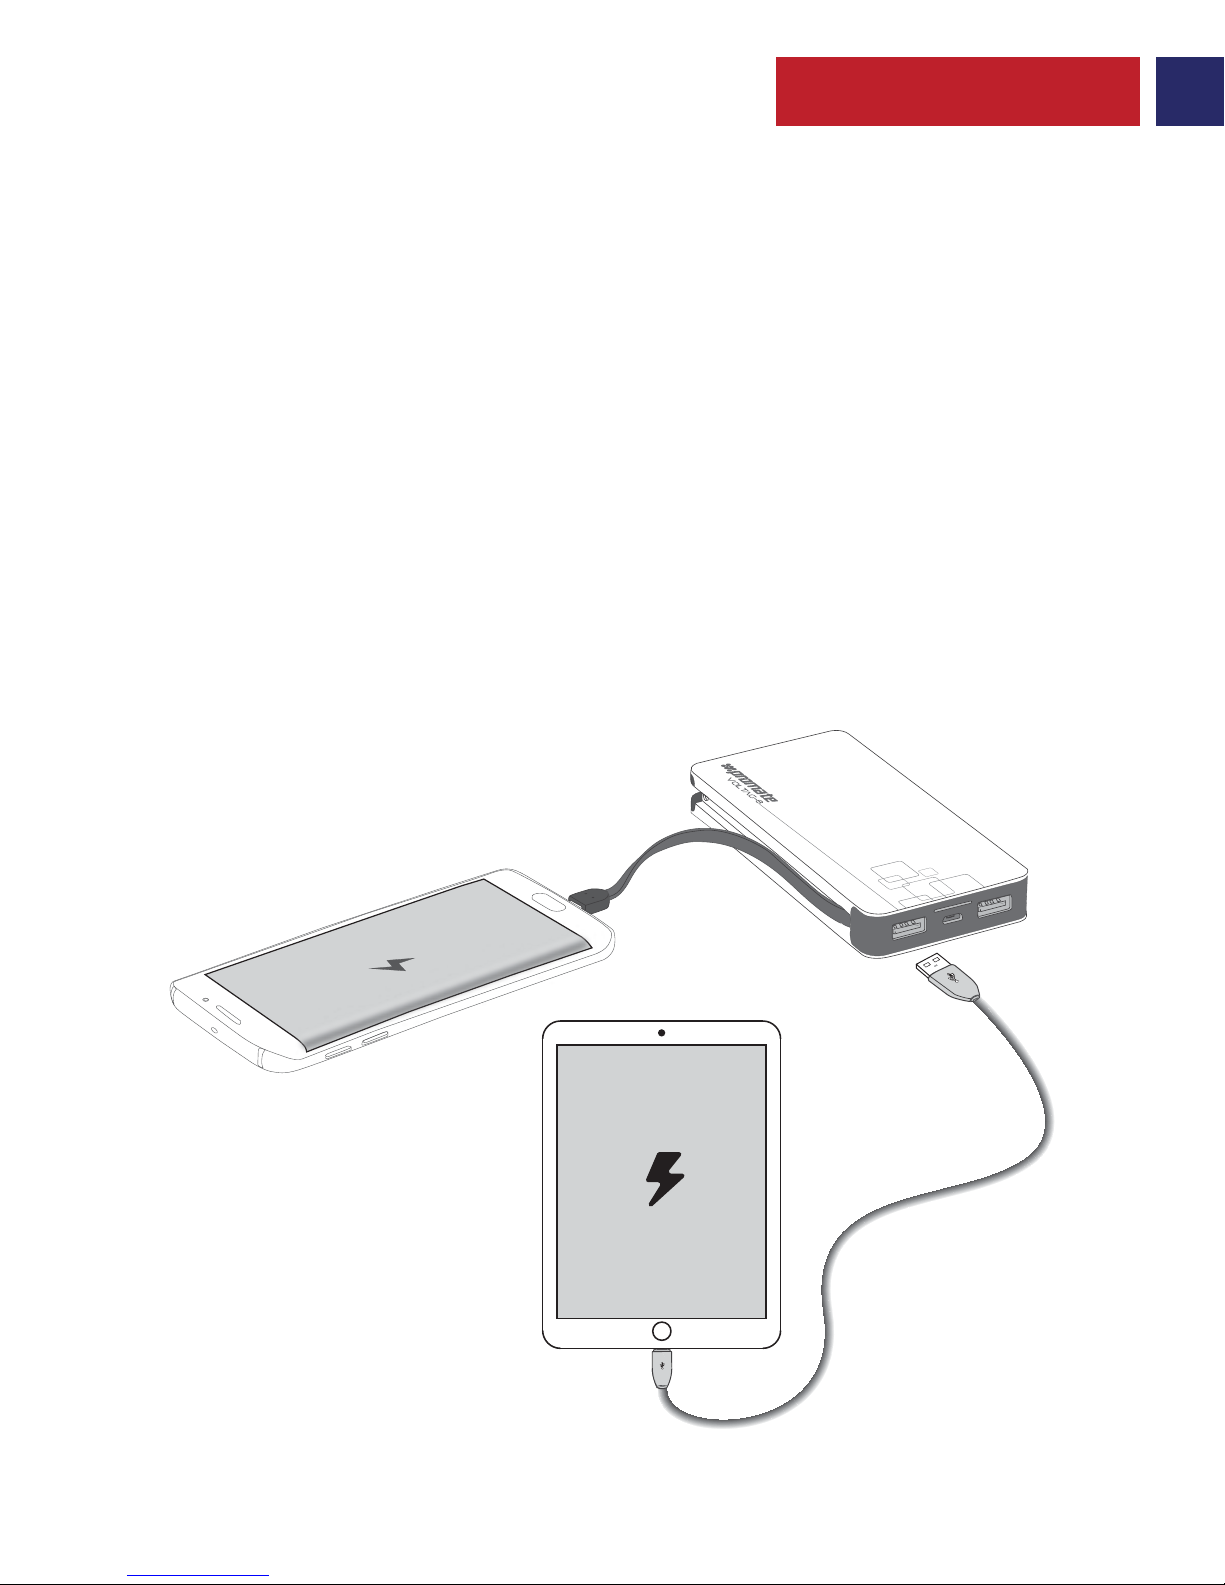
• Use the built-in Micro-USB Cable to charge Micro-USB Powered Devices
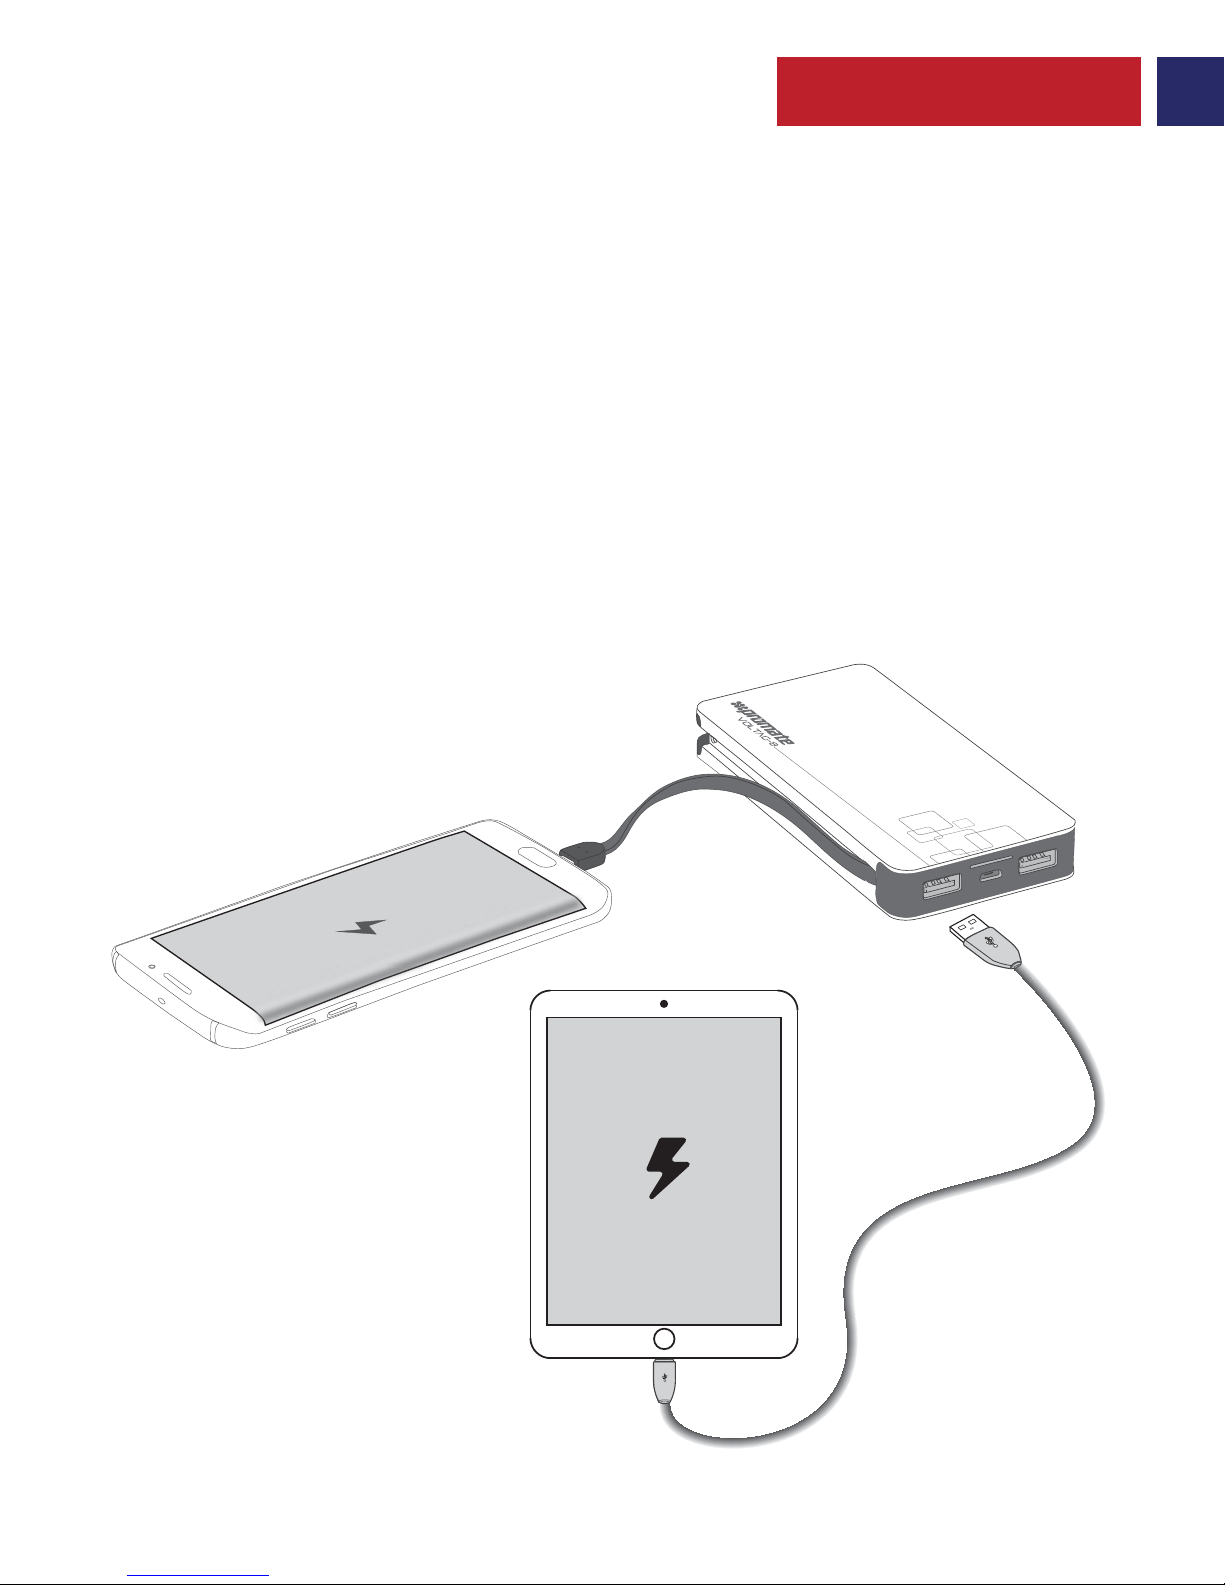
• Moreover, there are 2 USB ports available on volTag-8. Use the 1A port to
charge smartphones or the 1.5A output port to charge tablets. Plug the USB cable
into the required USB output port on volTag-8 back-up battery and the other end
into the device. The back-up battery would automatically start charging the
connected device.
English
4
Page 6
1. Puertos USB de salida
2. Entrada Micro-USB
3. Indicador LED del nivel de batería
4. Salida Micro-USB
5. Entrada de carga USB
Spanish
5
Apariencia y Descripción de la Interfaz
4
5
1
2
3
Page 7
Spanish
6
Instrucciones de uso y funcionamiento
1. Revisar la energía que queda en la batería de repuesto VolTag-8
• VolTag-8 presenta un innovador diseño sin botón. Para poder ver lo que
queda de carga, simplemente sacuda la batería de repuesto VolTag-8 hacia
adelante y hacia atrás y fíjese en el indicador LED de nivel de batería.
2. Cargar la batería de repuesto volTag-8
• Conecte uno de los extremos del cable Micro-USB a la batería volTag-8 y
el otro extremo a un ordenador/portátil o a un adaptador USB. El indicador LED
de la batería se encenderá como señal de que la batería se está cargando con
normalidad.
Número que aparece
en el LED
1
<=25% <=50% <=75% <=100%
2 3 4
Porcentaje de carga
remanente
Page 8
Spanish
7
3. Cargar dispositivos USB recargables usando VolTag-8
• Use el cable Micro-USB incorporado para cargar los dispositivos
electrónicos Micro-USB
• Además, existen dos puertos USB disponibles en la batería volTag-8. Use el
puerto 1A para cargar teléfonos inteligentes o el puerto de salida 1.5A para
cargar tabletas. Conecte el cable USB en el puerto de salida requerido en la
batería de repuesto VolTag-8 y el otro extremo en el dispositivo. La batería de
repuesto comenzará automáticamente a cargar el dispositivo conectado.
Page 9
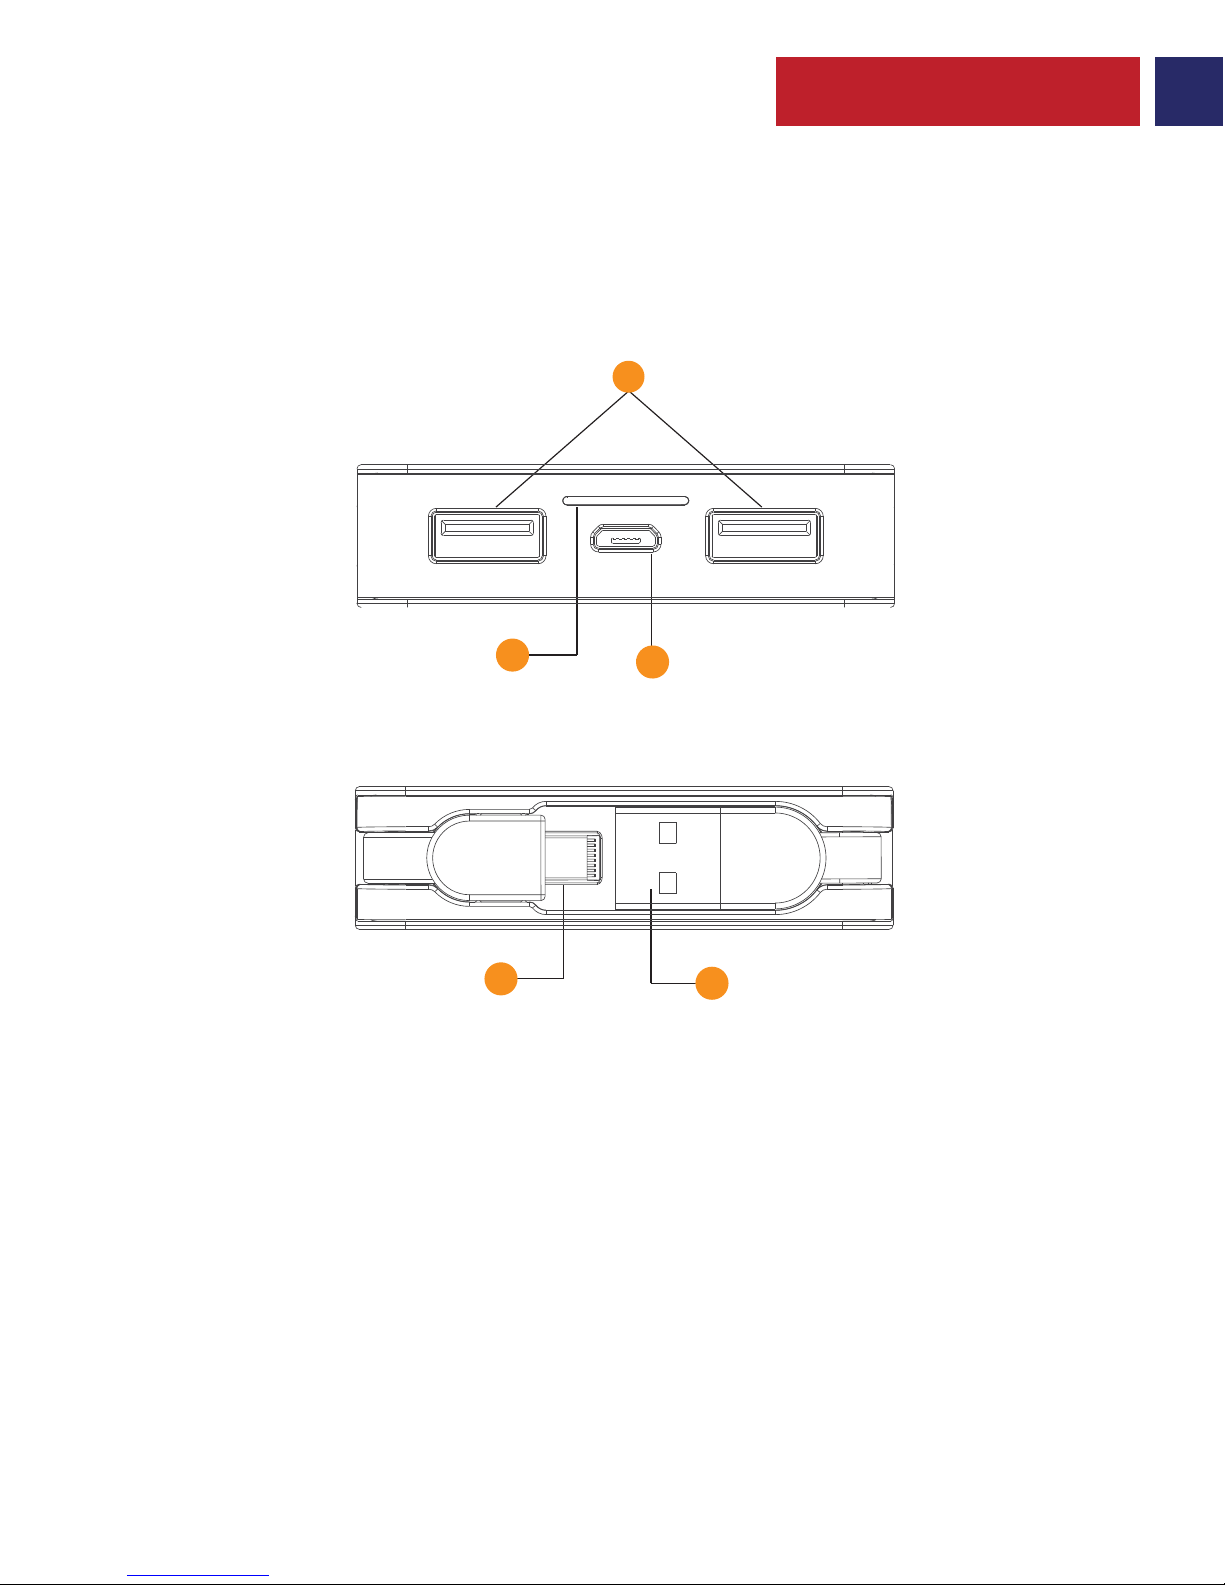
Apparence et description de l’interface
French
8
1. Ports de sortie USB
2. Entrée micro USB
3. Indicateur de niveau de batterie à LED
4. Sortie micro USB
5. Entrée de chargement USB
4
5
1
2
3
Page 10
French
9
Mode d’emploi
1. Comment vérifier l’énergie restante dans la batterie de sauvegarde volTag-8
• volTag-8 dispose d’une conception innovante sans bouton. Afin de vérifier
l’énergie restante, il suffit de secouer la batterie de sauvegarde volTag-8 d’avant
en arrière et d’observer l’indicateur de niveau de batterie à LED.
2. Comment charger de la batterie de sauvegarde volTag-8
• Branchez une extrémité du câble micro USB fourni au volTag-8 et l’autre
extrémité à un adaptateur de courant USB d’ordinateur de bureau ou portable.
L’indicateur de niveau de batterie à LED s’allumera, indiquant que la batterie de
sauvegarde charge normalement.
Nombre de LED actifs 1
<=25% <=50% <=75% <=100%
2 3 4
% d’énergie restante
Page 11
French
10
3. Comment charger des dispositifs rechargeables par USB en utilisant volTag-8
• Utiliser le câble micro USB intégré pour charger les dispositifs alimentés par
micro USB
• Il existe également 2 ports USB sur la batterie volTag-8. Employez le port 1A
pour charger des téléphones portables ou le port de sortie 1.5A pour charger des
tablettes. Branchez le câble USB au port de sortie USB requis sur la batterie de
sauvegarde volTag-8 et l’autre extrémité au dispositif. La batterie de sauvegarde
doit commencer à charger automatiquement le dispositif connecté.
Page 12
Portuguese
11
Descrição da aparência e interface
1. Portas de saída USB
2. Entrada Micro-USB
3. Indicador LED de nível de bateria
4. Saída Micro-USB
5. Entrada para carregamento via USB
4
5
1
2
3
Page 13
Portuguese
12
Instruções operacionais
1. Como verificar a energia restante da bateria reserva volTag-8
• volTag-8 possui um recurso inovador sem botões. Para verificar a energia
restante, simplesmente agite a bateria volTag-8 para frente e para trás e observe
o indicador LED de nível de bateria.
2. Como carregar a bateria reserva volTag-8
• Conecte uma ponta do cabo Micro-USB fornecido no volTag-8 e a outra
ponta no Desktop/Laptop ou em um adaptador de energia USB. Os indicadores
LED de nível de bateria acenderão indicando que a bateria reserva está
carregando normalmente.
N° dos LEDs ativos 1
<=25% <=50% <=75% <=100%
2 3 4
% de energia restante
Page 14
Portuguese
13
3. Como carregar dispositivos carregáveis via USB com o volTag-8
• Use o cabo Micro-USB integrado para carregar dispositivos carregados via
Micro-USB
• Além disso, o volTag-8 possui 2 portas USB disponíveis. Use uma porta 1A
para carregar smartphones ou a saída 1.5A para carregar tablets. Conecte o cabo
USB na saída USB correta da bateria reserva volTag-8 e a outra ponta no
dispositivo. A bateria reserva começará a carregar automaticamente o dispositivo
conectado.
Page 15
Romanian
14
Descriere Aspect și Interfață
1. Porturi de Ieșire USB
2. Micro-USB de Intrare
3. Indicator LED de Nivel al Bateriei
4. Micro-USB de Ieșire
5. Încărcare de Intrare USB
4
5
1
2
3
Page 16
Romanian
15
Instrucțiuni de Operare
1. Verificare alimentare rămasă în bateria de rezervă volTag-8
• volTag-8 are un design inovator fără buton. Pentru a vedea alimentarea
rămasă, pur și simplu agitați bateria de rezervă VolTag-8 înainte și înapoi și vedeți
Indicatorul LED de Nivel al Bateriei.
2. Încărcare baterie de rezervă volTag-8
• Conectați un capăt al cablului micro USB furnizat la volTag-8 și celălalt
capăt la un Desktop/Laptop sau un Adaptor de Alimentare USB. Indicatoarele
LED de Nivel al Bateriei se vor aprinde indicând faptul că bateria de rezervă se
încarcă în mod normal.
Nr. de LED-uri Active 1
<=25% <=50% <=75% <=100%
2 3 4
% de alimentare rămasă
Page 17
Romanian
16
3. Încărcarea dispozitivelor USB încărcabile, utilizând volTag-8
• Utilizați Cablul Micro-USB încorporat pentru a încărca Dispozitive de
Alimentare Micro-USB
• Mai mult decât atât, există 2 porturi USB disponibile pe volTag-8. Utilizați
portul 1A pentru a încărca smartphone-uri sau portul de ieșire 1.5A pentru a
încărca tablete. Conectați cablul USB în portul de ieșire USB adecvat pe bateria de
rezervă volTag-8 și celălalt capăt în dispozitiv. Bateria de rezervă va porni automat
încărcarea dispozitivului conectat.
Page 18
Описание внешнего вида и интерфейса
Russian
17
1. USB выходы
2. Микро-USB вход
3. LED-индикатор уровня заряда батареи
4. Микро-USB выход
5. USB вход для заряда
4
5
1
2
3
Page 19
Russian
18
Инструкция по эксплуатации
1. Проверка оставшегося заряда осталось в volTag-8 резервного
аккумулятора
• volTag-8 имеет инновационный дизайн, поскольку на нем отсутствуют
кнопки. Для того, чтобы посмотреть оставшийся заряд, просто встряхните
внешний аккумулятор volTag-8 по направлению вперед и назад и
посмотрите на LED-индикатор уровня заряда батареи.
2. Зарядка внешнего аккумулятора volTag-8
Подсоедините конец кабеля Micro-USB, поставляемого в комплекте, к
volTag-8 and the other end to a Desktop/Laptop or a USB Power Adapter. а
другой конец к настольному компьютеру/ноутбуку или USB-блоку питания.
LED-индикатор уровня заряда батареи загорится и покажет, что батарея
заряжается нормально.
Активные деления LED
индикатора уровня
заряда батареи
1
<=25% <=50% <=75% <=100%
2 3 4
% оставшегося заряда
Page 20
Russian
19
3. Использование volTag-8 с устройствами, заряжаемыми от USB
• Используйте встроенный кабель Micro-USB, чтобы зарядить
устройство, заряжаемое через Микро-USB.
• Более того, на volTag-8 есть 2 USB выхода. Используйте выход 1A для
зарядки смартфонов или 1.5A для зарядки планшетов. Включите кабель USB
в нужный USB-выход на внешнем аккумуляторе volTag-8, а другой конец в
устройство. Внешний аккумулятор начнет заряжать подключенное
устройство автоматически.
Page 21
Turkish
20
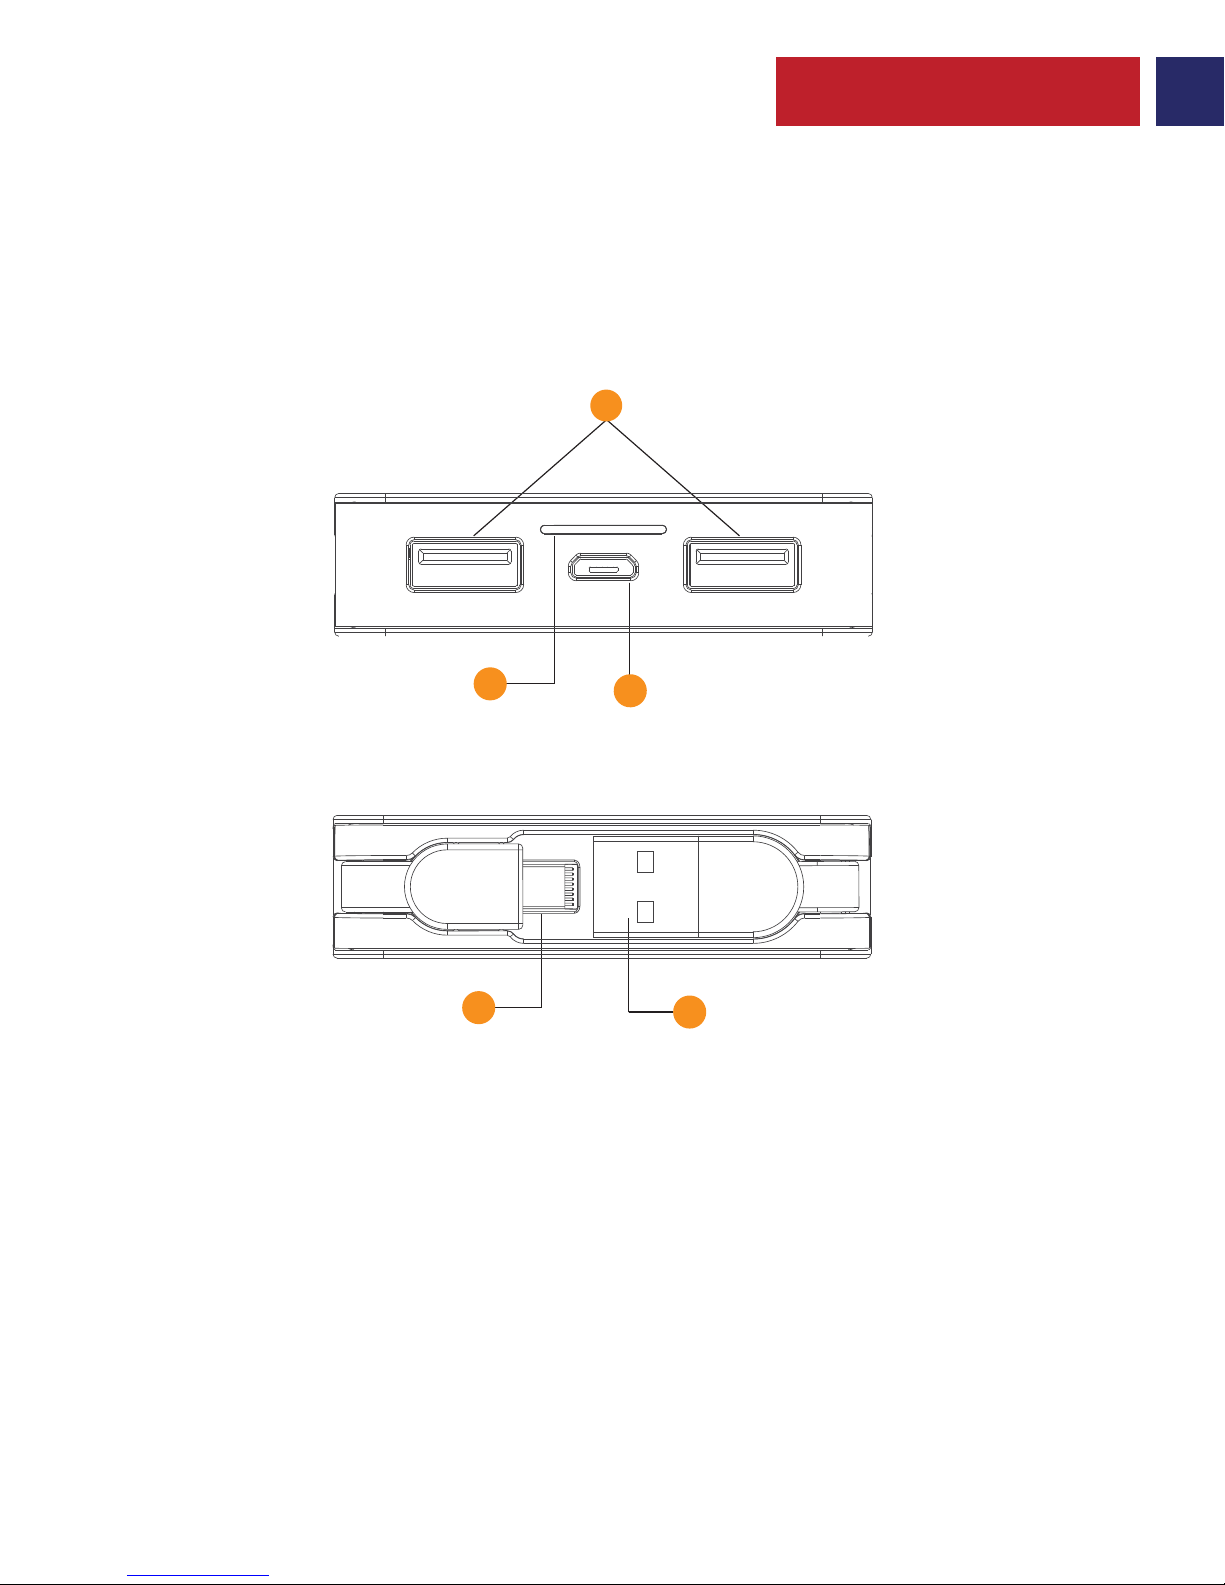
Görünüm & Arayüz Tanımları
1. USB Çıkış Yuvaları
2. Mikro-USB Girişi
3. Pil Seviyesi LED Göstergesi
4. Mikro-USB Çıkışı
5. USB Şarj Girişi
4
5
1
2
3
Page 22
Turkish
21
Kullanım Talimatları
1. volTag-8 yedek pilde kalan gücü kontrol etme
• volTag-8 çığır açan, düğmesiz dizayna sahiptir. Kalan gücü görmek için basitçe
volTag-8 yedek pili ileri ve geri sallayın ve Pil Seviyesi LED Göstergesine bakın.
2. volTag-8 yedek pili şarj etme
• Kutudan çıkan Mikro-USB kablosunun bir ucunu volTag-8'e ve diğer ucunu
da bir Masaüstü/Laptop'a veya bir USB Güç Adaptörüne bağlayın. Yedek pilin
normal şekilde şarj olduğunu gösteren, Pil Seviyesi LED Göstergeleri yanar.
Aktif LED sayısı 1
<=25% <=50% <=75% <=100%
2 3 4
Kalan Pil %'si
Page 23
Turkish
22
3. volTag-8'i kullanarak USB'den şarj olabilen cihazları şarj etme
• Bütünleşik Mikro-USB kablosunu kullanarak, Mikro-USB'den güç alan
cihazları şarj edin.
• Ayrıca, volTag-8'de 2 USB yuvası bulunmaktadır. 1A yuvasını akıllı telefonları
veya 1.5A çıkış yuvasını tabletleri şarj etmek için kullanın. USB kablosunu,
volTag-8 yedek pildeki uygun USB çıkış yuvasına takın, diğer ucunu da cihazınıza
takın. Yedek pil, bağlanan cihazı otomatik olarak şarj etmeye başlayacaktır.
Page 24
German
23
Aussehen und Beschreibung
1. USB Ausgangs-Port
2. Micro-USB Eingang
3. LED Batterieniveauanzeige
4. Micro-USB Ausgang
5. USB Ladeport
4
5
1
2
3
Page 25
German
24
Bedienungsanleitung
1. Überprüfen des verbleibenden Batteriestandes im volTag-8
• volTag-8 hat ein innovatives Design ohne Knöpfe. Um den verbleibenden
Batteriestand zu prüfen, schütteln Sie den volTag-8 einfach vor und zurück und
der LED Indikator zeigt den verbleibenden Batteriestand an.
2. Laden des volTag-8
• Stecken Sie ein Ende des Micro-USB Kabels in den volTag-8 und das
andere Ende in einen Desktop oder Laptop oder ein USB-Ladegerät. Die LED
Batterieniveauanzeige leuchtet und zeigt an, dass die Batterie normal lädt.
Anzahl aufleuchtender
LEDs
1
<=25% <=50% <=75% <=100%
2 3 4
% verbleibender Energie
Page 26
German
25
3. Aufladen von USB Geräten über den volTag-8
• Verwenden Sie das eingebaute Micro-USB Kabel um Geräte mit Micro-USB
Anschluss zu laden.
• Es gibt darüber hinaus noch 2 USB Anschlüsse am volTag-8. Verwenden Sie
den 1A Anschluss um Smartphones zu laden oder den 1.5A Anschluss um Tablets
zu laden. Stecken Sie das USB-Kabel in den entsprechenden USB-Port des
volTag-8 und das andere Endes des Kabels in das Gerät. Die Batterie des volTag-8
beginnt automatisch das angeschlossene Gerät zu laden.
Page 27
Chinese
26
外观与接口说明
1. USB 输出端口
2. Micro-USB 输入
3. 电池电量 LED 指示灯
4. Micro-USB 输出
5. USB 充电输入
4
5
1
2
3
Page 28
Chinese
27
操作说明
1. 检查 olTag-8 备用电池的剩余电量
• volTag-8 采用创新的无按键设计。要查看剩余电量,只需前后晃动
volTag-8 备用电池并查看电池电量 LED 指示灯。
2. 为 volTag-8 备用电池充电
• 将随包装提供的 Micro-USB 线缆的一端与 volTag-8 连接,另一端
与台式机/笔记本电脑或 USB 电源适配器连接。电池电量 LED 指示灯将亮
起,说明备用电池正在正常充电。
点亮 LED 灯数 1
<=25% <=50% <=75% <=100%
2 3 4
剩余电量百分比
Page 29
Chinese
28
3. 使用 volTag-8 为 USB 可充电设备充电
• 使用内置 Micro-USB 线缆为 Micro-USB 供电的设备充电
• 此外,volTag-8 配备 2 个可用的 USB 端口。使用 1A 输出口为智能
手机充电,或使用 1.5A 输出口为平板电脑充电。将 USB 线缆插入
volTag-8 备用电池上需要的 USB 输出接口,另一端插入设备。备用电池
将自动开始为已连接的设备充电。
Page 30
زا هدﺎﻔﺘﺳا ﺎﺑ USB ژرﺎﺷ ﻞﺑﺎﻗ یﺎھ هﺎﮕﺘﺳد ندﺮﮐ ژرﺎﺷ .3
رﺎﮐ Micro-USB ﺎﺑ ﻪﮐ ﯽﯾﺎھ هﺎﮕﺘﺳد ندﺮﮐ ژرﺎﺷ یاﺮﺑ ﯽﻠﺧاد Micro-USB ﻞﺑﺎﮐ زا •
ﺪﯿﻨﮐ هدﺎﻔﺘﺳا ﺪﻨﻨﮐ ﯽﻣ
ژرﺎﺷ یاﺮﺑ ﺮﭙﻣآ 1 هﺎﮔرد زا .ﺖﺳا دﻮﺟﻮﻣ volTag-8 یور USB هﺎﮔرد 2 ،ﻦﯾا ﺮﺑ هوﻼﻋ •
ﻞﺑﺎﮐ .ﺪﯿﻨﮐ هدﺎﻔﺘﺳا ﺖﻠﺒﺗ ندﺮﮐ ژرﺎﺷ یاﺮﺑ ﺮﭙﻣآ
1.5
ﯽﺟوﺮﺧ هﺎﮔرد زا ﺎﯾ ﺪﻨﻤﺷﻮھ ﻦﻔﻠﺗ ندﺮﮐ
ﻪﺑ ار ﺮﮕﯾد ﺮﺳ و ﺪﯿﻧﺰﺑ volTag-8 نﺎﺒﯿﺘﺸﭘ یﺮﺗﺎﺑ یور ﻪطﻮﺑﺮﻣ USB ﯽﺟوﺮﺧ هﺎﮔرد ﻪﺑ ار USB
هﺪﺷ ﻞﺼﺘﻣ هﺎﮕﺘﺳد ندﺮﮐ ژرﺎﺷ ﻪﺑ عوﺮﺷ رﺎﮐدﻮﺧ رﻮط ﻪﺑ نﺎﺒﯿﺘﺸﭘ یﺮﺗﺎﺑ .ﺪﯿﻨﮐ ﻞﺻو هﺎﮕﺘﺳد
.دﺮﮐ ﺪھاﻮﺧ
Persian
29
Page 31
volTag-8 نﺎﺒﯿﺘﺸﭘ یﺮﺗﺎﺑ رد هﺪﻧﺎﻤﯿﻗﺎﺑ یوﺮﯿﻧ ﯽﺳرﺮﺑ .1
یوﺮﯿﻧ هﺪھﺎﺸﻣ رﻮﻈﻨﻣ ﻪﺑ .ﺖﺳا ﻪﻤﮐد نوﺪﺑ ﻪﻧاروآﻮﻧ حﺮط ﮏﯾ یاراد volTag-8 •
LED ﺮﮕﻧﺎﺸﻧ و ﺪﯿھد نﺎﮑﺗ ﻮﻠﺟ و ﺐﻘﻋ ﻪﺑ ار volTag-8 نﺎﺒﯿﺘﺸﭘ یﺮﺗﺎﺑ ﺖﺴﯿﻓﺎﮐ ،هﺪﻧﺎﻤﯿﻗﺎﺑ
.ﺪﯿﻨﮐ هﺪھﺎﺸﻣ ار یﺮﺗﺎﺑ ناﺰﯿﻣ
volTag-8 نﺎﺒﯿﺘﺸﭘ یﺮﺗﺎﺑ ندﺮﮐ ژرﺎﺷ .2
ﺮﺗﻮﯿﭙﻣﺎﮐ ﻪﺑ ار ﺮﮕﯾد ﺮﺳ و volTag-8 ﻪﺑ ار هﺪﺷ ﻪﺋارا Micro-USB ﻞﺑﺎﮐ ﺮﺳ ﮏﯾ •
ﯽﻣ ﻦﺷور یﺮﺗﺎﺑ راﺪﻘﻣ LED یﺎھﺮﮕﻧﺎﺸﻧ .ﺪﯿﻨﮐ ﻞﺻو USB قﺮﺑ رﻮﺘﭘادآ ﺎﯾ پﺎﺗ ﭗﻟ/یﺰﯿﻣور
.ﺖﺳا یدﺎﻋ رﻮط ﻪﺑ نﺪﺷ ژرﺎﺷ لﺎﺣ رد نﺎﺒﯿﺘﺸﭘ یﺮﺗﺎﺑ ﺪھد ﯽﻣ نﺎﺸﻧ ﻪﮐ ﺪﻧﻮﺷ
لﺎﻌﻓ یﺎھ LED داﺪﻌﺗ
هﺪﻧﺎﻤﯿﻗﺎﺑ یوﺮﯿﻧ %
تﺎﯿﻠﻤﻋ یﺎھ ﻞﻤﻌﻟارﻮﺘﺳد
Persian
30
1
<=25% <=50% <=75% <=100%
2 3 4
Page 32
USB ﯽﺟوﺮﺧ یﺎھ هﺎﮔرد .1
Micro-USBیدورو .2
یﺮﺗﺎﺑ ناﺰﯿﻣ LED ﺮﮕﻧﺎﺸﻧ .3
Micro-USB ﯽﺟوﺮﺧ .4
USB ژرﺎﺷ یدورو .5
ﻂﺑار حﺮﺷ و ﺮھﺎظ
Persian
31
4
5
1
2
3
Page 33
ماﺪﺨﺘﺳﺎﺑ كﺮﺘﺸﻤﻟا ﻰﻌﺑﺎﺘﺘﻟا ﻞﻗﺎﻨﻠﻟ ﻦﺤﺸﻠﻟ ﺔﻠﺑﺎﻘﻟا ةﺰﮭﺟﻷا ﻦﺤﺷ - 3
8 -جﺎﺘﻟﻮﻓ
ةﺰﮭﺟأ ﻦﺤﺸﻟ وﺮﻜﻳﺎﻤﻟا كﺮﺘﺸﻤﻟا ﻲﻌﺑﺎﺘﺘﻟأ ﻞﻗﺎﻨﻠﻟ ﺞﻣﺪﻤﻟا ﻞﺑﺎﻜﻟا مﺪﺨﺘﺳا •
.ﺔﻗﺎﻄﻟﺎﺑ ﻞﻤﻌﺗ ﻰﺘﻟا وﺮﻜﻳﺎﻤﻟا كﺮﺘﺸﻤﻟا ﻲﻌﺑﺎﺘﺘﻟا ﻞﻗﺎﻨﻟا
ﻲﻠﻋ ﺎﺣﺎﺘﻣ كﺮﺘﺸﻤﻟا ﻲﻌﺑﺎﺘﺘﻟا ﻞﻗﺎﻨﻠﻟ (2) ناﺬﻔﻨﻣ ﻚﻟﺎﻨھ ﻚﻟذ ﻲﻟا ﺔﻓﺎﺿﻹﺎﺑو •
1.5A
ﺬﻔﻨﻤﻟا وأ ﺔﯿﻛﺬﻟا ﻒﺗاﻮﮭﻟا ﻦﺤﺸﻟ A 1 ﺬﻔﻨﻤﻟا مﺪﺨﺘﺳا , 8 -جﺎﺘﻟﻮﻓ
ﻰﻌﺑﺎﺘﺘﻟا ﻞﻗﺎﻨﻟا جﺮﺨﻣ ﻰﻓ كﺮﺘﺸﻤﻟا ﻲﻌﺑﺎﺘﺘﻟأ ﻞﻗﺎﻨﻟا ﻞﺑﺎﻛ ﻞﺧدا . حاﻮﻟﻷا ﻦﺤﺸﻟ
.زﺎﮭﺠﻟا ﻰﻓ ﺮﺧﻷا فﺮﻄﻟا و -8جﺎﺘﻟﻮﻔﻟ ﺔﯿطﺎﯿﺘﺣﻻا ﺔﻳرﺎﻄﺒﻟا ﻲﻠﻋ بﻮﻠﻄﻤﻟا كﺮﺘﺸﻤﻟا
.لﻮﺻﻮﻤﻟا زﺎﮭﺠﻟا ﻦﺤﺷ ﻰﻓ ﺔﯿطﺎﯿﺘﺣﻻا ﺔﻳرﺎﻄﺒﻟا أﺪﺒﺘﺳ و
Arabic
32
Page 34
8 - جﺎﺘﻟﻮﻔﻟ ﺔﯿطﺎﯿﺘﺣﻻا ﺔﻳرﺎﻄﺒﻟا ﻰﻓ ﺔﯿﻘﺒﺘﻤﻟا ﺔﻗﺎﻄﻟا ﺺﺤﻔﻟ - 1
ﺰﮭﺑ ﺔطﺎﺴﺒﺑ ﻢﻗ ، ﺔﯿﻘﺒﺘﻤﻟا ﺔﻗﺎﻄﻟا ﺔﻳؤﺮﻟ و .رز ﻼﺑ ﺮﻜﺘﺒﻣ ﻢﯿﻤﺼﺗ 8 -جﺎﺘﻟﻮﻔﻟ •
ىﻮﺘﺴﻣ ﺮﺷﺆﻣ ﻲﻟا ﺮﻈﻧا و ﻒﻠﺨﻟا و مﺎﻣﻷا ﻲﻟإ 8 -جﺎﺘﻟﻮﻔﻟ ﺔﯿطﺎﯿﺘﺣﻻا ﺔﻳرﺎﻄﺒﻟا
.ﺔﻳرﺎﻄﺒﻠﻟ ﺚﻌﺒﻨﻤﻟا ﻲﺋﺎﻨﺜﻟا مﺎﻤﺼﻟا ءﻮﺿ
8 -جﺎﺘﻟﻮﻔﻟ ﺔﯿطﺎﯿﺘﺣﻻا ﺔﻳرﺎﻄﺒﻟا ﺮﯿﯿﻐﺗ - 2
-جﺎﺘﻟﻮﻔﻟ هﺮﯿﻓﻮﺗ ﻢﺗ ىﺬﻟا وﺮﻜﻳﺎﻤﻟا – كﺮﺘﺸﻤﻟا ﻲﻌﺑﺎﺘﺘﻟأ ﻞﻘﻨﻟا ﻞﺑﺎﻛ فاﺮطأ ﺪﺣا ﻞﺻوأ
و , لﻮﻤﺤﻤﻟا بﻮﺳﺎﺤﻟا / ﻲﺒﺘﻜﻤﻟا بﻮﺳﺎﺤﻠﻟ رﺎﯿﺘﻟا ﻲﺋﺎﮭﻣ ﻲﻟا ﺮﺧﻵا فﺮﻄﻟا و 8
نأ ﻲﻟا اﺮﯿﺸﻣ ﺔﻳرﺎﻄﺒﻠﻟ ﺚﻌﺒﻨﻤﻟا ﻲﺋﺎﻨﺜﻟا مﺎﻤﺼﻟا ءﻮﺿ ىﻮﺘﺴﻣ ﺮﺷﺆﻣ ءﻲﻀﯿﺳ
.ﺎﻳدﺎﻋ ﺎﮭﻨﺤﺷ ﻢﺘﻳ ﺔﯿطﺎﯿﺘﺣﻻا ﺔﻳرﺎﻄﺒﻟا
: ﻞﯿﻐﺸﺘﻟا تﺎﻤﯿﻠﻌﺗ
Arabic
33
مﺎﻤﺼﻟا ءﻮﺿ دﺪﻋ
ﻂﺸﻨﻟا ﻲﺋﺎﻨﺜﻟا
ﺔﻗﺎﻄﻟا ﻦﻣ ﻲﻘﺒﺘﻣ %
1
<=25%
<=50%<=75%<=100%
234
Page 35
.كﺮﺘﺸﻤﻟا ﻲﻌﺑﺎﺘﺘﻟأ ﻞﻗﺎﻨﻠﻟ جﺮﺨﻤﻟا ﺬﻓﺎﻨﻣ – 1
.وﺮﻜﻳﺎﻤﻟا كﺮﺘﺸﻤﻟا ﻰﻌﺑﺎﺘﺘﻟا ﻞﻗﺎﻨﻟا ﻞﺧﺪﻣ – 2
. ﺔﻳرﺎﻄﺒﻠﻟ ﺚﻌﺒﻨﻤﻟا ﻲﺋﺎﻨﺜﻟا مﺎﻤﺼﻟا ءﻮﺿ ىﻮﺘﺴﻣ ﺮﺷﺆﻣ – 3
.وﺮﻜﻳﺎﻤﻟا كﺮﺘﺸﻤﻟا ﻲﻌﺑﺎﺘﺘﻟأ ﻞﻗﺎﻨﻠﻟ جﺮﺨﻤﻟا – 4
.كﺮﺘﺸﻤﻟا ﻰﻌﺑﺎﺘﺘﻟا ﻞﻗﺎﻨﻟا ﻦﺤﺷ ﻞﺧﺪﻣ – 5
ﻞﺻاﻮﺘﻟا تﺎﮭﺟاو و ﺮﮭﻈﻤﻟا ﻒﺻو
Arabic
34
4
5
1
2
3
Page 36

 Loading...