

Page 1
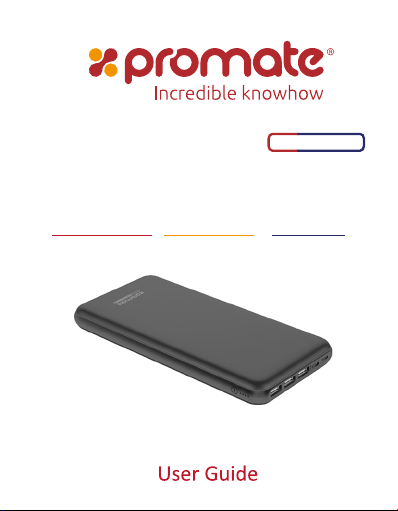
proVolta-30
30000mAh Ultra-Slim Power Bank with 3 Input Ports
& 4 Output Ports
3 USB Charging Ports • 2 Ways USB -C™ • Lithium Polymer
Page 2

Introduction
Carry just 1 cable to charge your power bank as well as your smartphone. Charge your Apple or
Micro-USB or USB-C device on-the-go with this powerful 30000mAh lithium polymer power
bank: proVolta-30. It features 3 ultra-fast USB charging ports to charge any USB chargeable device
and a USB-C port to charge your USB-C in a jiff. ProVolta-30 also includes Automatic
Voltage Regulation i.e. it provides an optimum output based on the device connected. ProVolta-30
is compatible with both smartphones & tablets
Packaging Contents
• ProVolta-30 back-up battery
• USB Charging Cable
• User Guide
Specifications
• Battery Capacity: 30000mAh
• Battery Type: Lithium Polymer
• Micro-USB Input: 5V, 2A
• Lightning Connector Input: 5V, 1.5A
• USB-C Input: 5V,2.6A
• USB Output 1: 5V, 2.4A
• USB Output 2: 5V 3A
• USB Output 3: 5V 3A
• USB-C Output: 5V, 3.0A
• Charging Time: 8 hours
Features
• Colossal Capacity: this 3 USB Ports 30000mAh Portable Power Bank Battery that charges an iPhone
7 over 6.5 times, iPhone 6s over 11 times, Samsung galaxy S8 7 times, tablets at least 3 times and
any other USB device multiple times.
• 3 Ultra-Fast USB Ports: Charge your devices via any of the 3 ultra-fast USB charging ports
• Lightweight & Portable: ProVolta-30 compact and easy to carry around
1
Page 3

• Automatic Voltage Regulation: ProVolta-30 features Automatic Voltage Regulation i.e. it provides
an optimum output based on the device connected.
• Charge 4 Devices: With ProVolta-30, charge 4 devices at the same time
• Compatibility: ProVolta-30 is compatible with all devices supporting USB charging.
• Safe & Reliable: ProVolta-30 features short-circuit & over-charging protection
Precautions:
Please read all safety instructions and warnings thoroughly before using this product. Improper use
of this product may result in damage to this or attached products.
1. Do not disassemble the back-up battery or attempt to fix it.
2. Kindly use an original charging cable provided to charge the product.
3. Do not attempt to replace any part of this Back-up battery or battery inside.
4. Do not crush, puncture, dispose of in fire, short the contacts or expose the battery to water or other
liquids.
5. Do not connect input and output in reverse.
6. Do not store or use the battery in a high-temperature environment, including intense sunlight or heat.
7. Avoid drops, bumps, abrasions and impacts.
8. If there is any reason to believe that there is damage to the battery, discontinue use immediately.
9. If you find that the battery is too hot, or is emitting an odour, or is deformed, punctured or exhibits
any suspicious or abnormal behaviour, discontinue use immediately and contact our customer service.
10. Always charge this product before extended storage.
Page 4
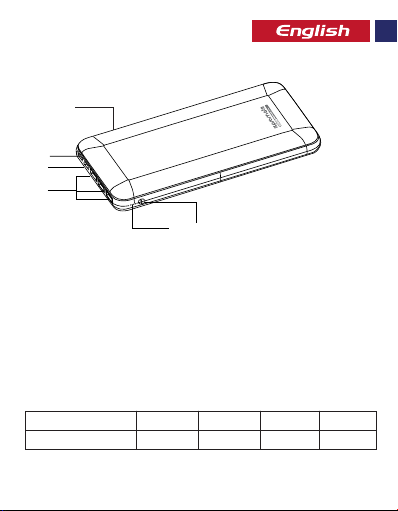
Appearance & Interface Description:
6
4
5
3
2 1
1. Power Button
2. Battery Level Indicator
3. 3 USB Charging Port
4. Lightning Input Port
5. USB-C™ Input Port
6. Micro-USB Input Port
Operation Instructions:
Checking the remaining power left in ProVolta-30 backup battery
• To view the remaining power left, press the power button once and see the Battery Level LED
Indicator.
No of LED’s Active 1 2 3 4
% of power remaining <=25% <=50% <=75% <=100%
30
2 3 4
Page 5
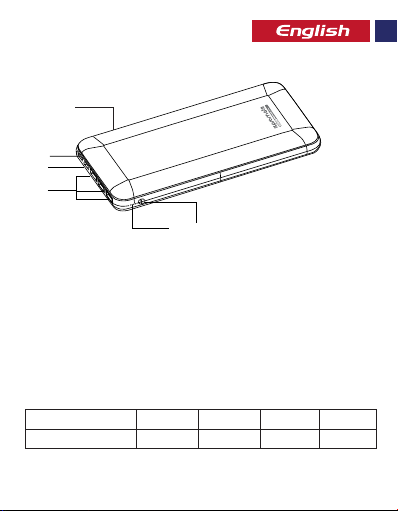
Appearance & Interface Description:
6
4
5
3
2 1
1. Power Button
2. Battery Level Indicator
3. 3 USB Charging Port
4. Lightning Input Port
5. USB-C™ Input Port
6. Micro-USB Input Port
Operation Instructions:
Checking the remaining power left in ProVolta-30 backup battery
• To view the remaining power left, press the power button once and see the Battery Level LED
Indicator.
No of LED’s Active 1 2 3 4
% of power remaining <=25% <=50% <=75% <=100%
30
3 4
Page 6
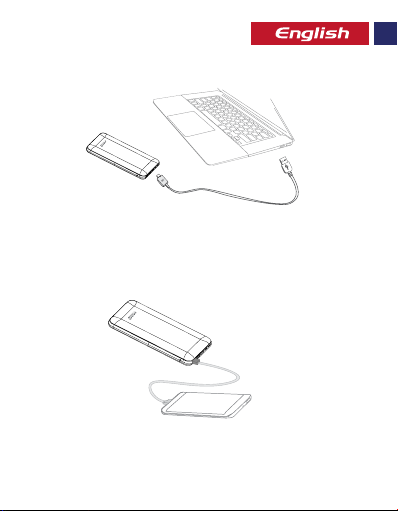
Charging ProVolta-30 backup battery
30
• Connect one end of the Micro-USB Cable to ProVolta-30 and the other end to a desktop/laptop or
a USB Power Adapter. The Battery Level LED indicators will light up indicating that the backup
battery is charging normally.
Charging USB chargeable devices using ProVolta-30
30
• Plug the USB cable into the USB charging output port on ProVolta-30 backup battery and the other
end into the device.
• Press the power button to charge your device.
4
Page 7
Correct disposal of this Product
(Waste Electrical & Electronic Equipment (WEEE)
Your product is designed and manufactured with high quality materials and components
which can be recycled and reused.
This symbol means that electrical and electronic equipment, at their end of-life should be
disposed of separately from your household waste.
Please dispose of this equipment at your local community waste
collection/recycling center.
This product complies with European safety and electrical interference directives
This product does not contain environmentally hazardous materials (lead, mercury,
cadmium, hexavalent chromium and brominated flammable agents: PBB and PBDE).
5 6 7 8 9 10
Page 8
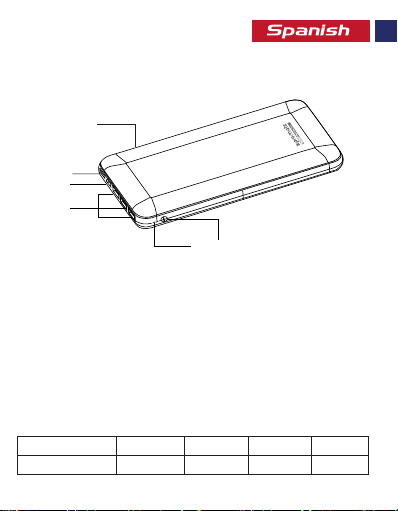
Appearance & Interface Description
6
4
5
3
2 1
1. Botón de Encendido
2. Indicador de Nivel de Batería
3. 3 puertos de carga USB
4. Puerto de entrada Lightning
5. Puerto de entrada USB-C™
6. Puerto de entrada Micro USB
Instrucciones de operación:
Comprobación de la energía restante en la batería de respaldo ProVolta-30
• Para comprobar la energía restante, pulse una vez el botón de Encendido y mire el indicador LED
de Nivel de batería.
Núm. de LED activos 1 2 3 4
% de energía restante <=25% <=50% <=75% <=100%
30
6 7 8 9 10
Page 9
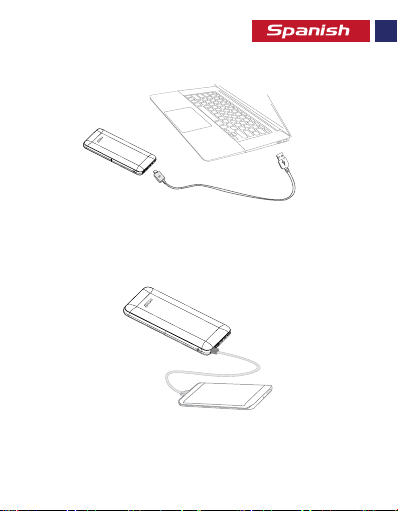
Carga de la batería de respaldo ProVolta-30
• Conecte un extremo del Cable Micro-USB al ProVolta-30 y el otro extremo a una computadora
de sobremesa o portátil o un adaptador de alimentación USB. Los indicadores LED del Nivel de
la Batería se encenderán indicando que la batería de respaldo se está cargando normalmente.
30
Carga de dispositivos cargables por el puerto USB con el ProVolta-30
30
• Conecte el cable USB en el puerto de salida de carga USB de la batería de respaldo ProVolta-30
y el otro extremo en el dispositivo.
• Pulse el botón de encendido para cargar el dispositivo.
7 8 9 10
Page 10
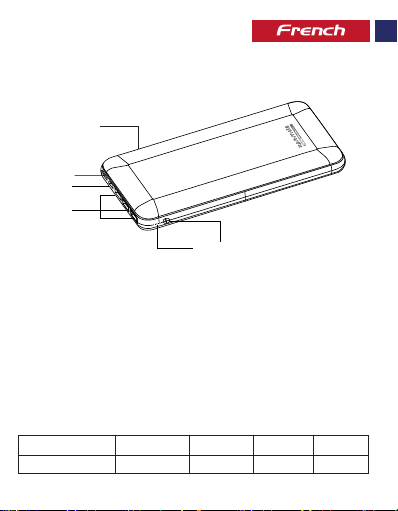
Aspect & Description Interface
6
4
5
3
1. Bouton de Marche
2. Indicateur du Niveau de Batterie
3. 3 Ports de Charge USB
4. Port d’Entrée Lightning
5. Port d’Entrée USB-C™
6. Port d’Entrée Micro-USB
Mode d’Emploi :
Vérification de la batterie de secours restante dans le ProVolta-30
• Pour visualiser la batterie restante, appuyez une fois sur le bouton de marche pour voir l’Indicateur
LED de Niveau de Batterie.
No de LED Actifs 1 2 3 4
% d’énergie restante <=25% <=50% <=75% <=100%
2 1
30
8 9 10
Page 11
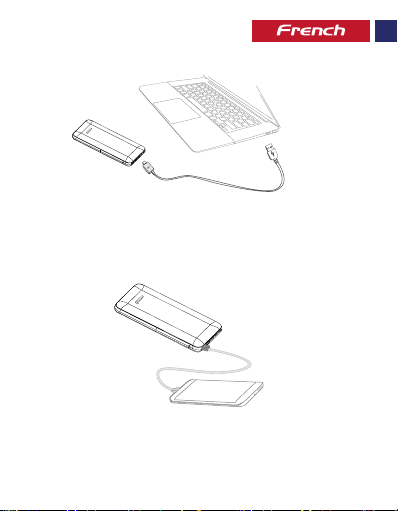
Recharge de la batterie de secours du ProVolta-30
30
• Connectez une extrémité du Câble du Micro-USB sur le ProVolta-30 et l’autre extrémité sur un
ordinateur portable/bureau ou un Adaptateur d’Alimentation USB. Les voyants LED du Niveau
de Batterie commencent à clignoter indiquant que la batterie de secours se charge normalement.
Chargement des périphériques USB compatibles à l’aide du ProVolta-30
30
• B ranchez une extrémité du câble USB sur le port de sortie du chargeur USB de la batterie de s
ecours de ProVolta-30 et l’autre extrémité sur l’appareil.
• Appuyez sur le bouton marche pour charger votre appareil.
9 10
Page 12
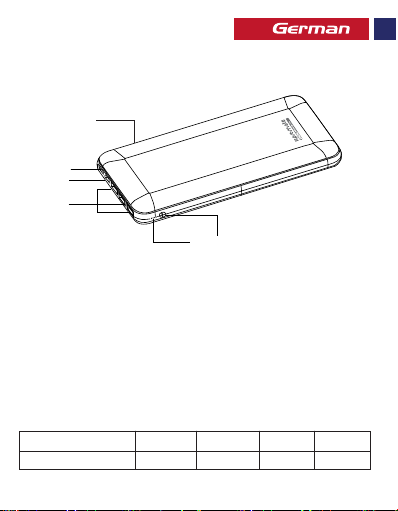
Aussehen & Schnittstellenbeschreibung
6
4
5
3
1. Einschalttaste
2. Batteriestandsanzeige
3. 3 USB-Ladeanschluss
4. Blitzeingang
5. USB-C™ -Eingang
6. Micro-USB-Eingang
Bedienungsanweisung:
Überprüfung der verbleibenden Leistung der ProVolta-30-Pufferbatterie
• Zur Ansicht der verbleibenden Leistung drücken Sie die Einschalttaste einmal und die LED-Batterie-
standsanzeige erscheint.
Keine der LEDs aktiv 1 2 3 4
% der verbleibenden Leistung <=25% <=50% <=75% <=100%
2 1
30
10
Page 13
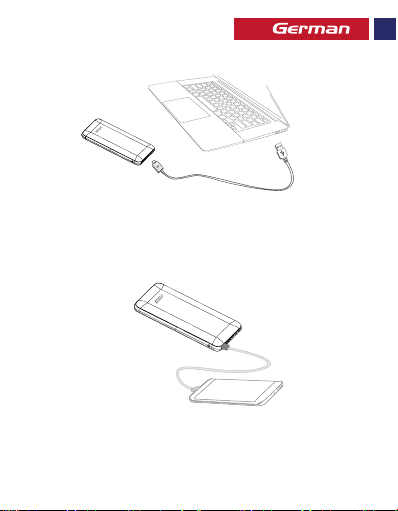
Laden der ProVolta-30-Pufferbatterie.
• Verbinden Sie das eine Ende des Micro-USB-Kabels mit dem ProVolta-30 und das andere mit eine
Desktop/Laptop oder einem USB-Stromadapter. Die LED-Batteriestandsanzeige leuchtet auf und
zeigt an, dass die Pufferbatterie normal geladen wird.
30
Laden von USB-aufladbaren Geräten mit ProVolta-30
30
• Stecken Sie das eine Ende des USB-Kabels in den USB-Ladeausgang der ProVolta-30-Pufferbatterie
und das andere in das Gerät.
• Drücken Sie die Einschalttaste zum Laden Ihres Gerätes.
11 12 13 14 15 16
Page 14
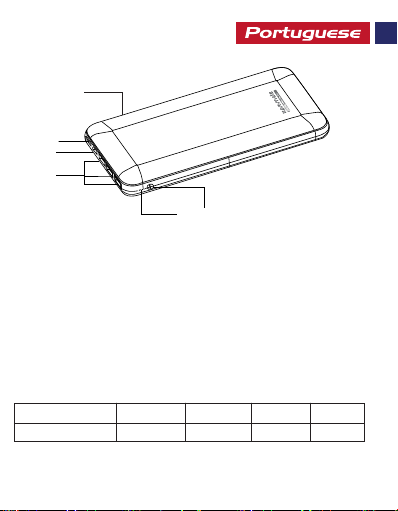
Aspeto e Descrição da Interface
6
4
5
3
2 1
1. Botão liga/desliga
2. Indicador do nível de bateria
3. 3 portas de entrada para USB
4. Porta de entrada de luz
5. Porta de entrada USB-C™
6. Porta de entrada para Micro-USB
Instruções de operação:
Verificando a carga restante na bateria de reserva do ProVolta-30
• Para ver a carga restante, pressione o botão uma vez e veja o indicador de LED de nível de bateria.
Número de LED acessos 1 2 3 4
% carga restante <=25% <=50% <=75% <=100%
30
12 13 14 15 16
Page 15
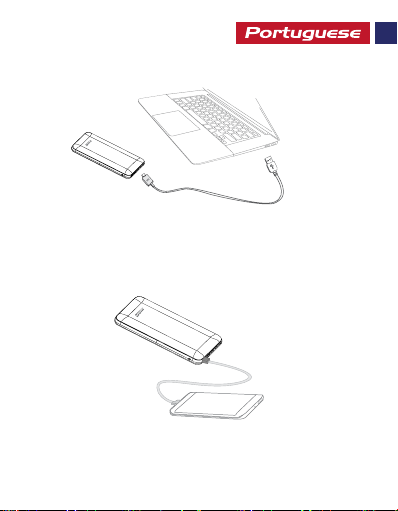
Carregando a bateria de reserva do ProVolta-30
30
• Conecte uma extremidade do cabo Micro-USB ao ProVolta-30 e a outra extremidade no seu
desktop/laptop ou em um adaptador de energia USB. Os indicadores de níveis de bateria irão acender
indicando que a bateria está sendo carregada normalmente.
Carregando dispositivos USB carregaveis usando o ProVolta-30
30
• Plugue o cabo USB na porta de saída da bateria de reserva do ProVolta-30 e plugue a outra
extremidade no aparelho
Pressione o botão liga/ desliga para carregar seu aparelho.
13 14 15 16
Page 16
Descrierea Aspectului Interfeței
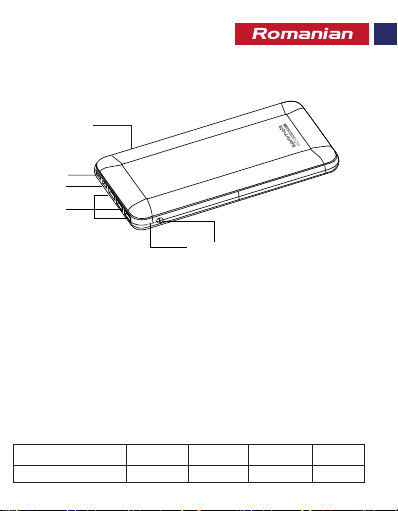
6
4
5
3
2 1
1. Butonul de pornire
2. Indicator pentru nivelul bateriei
3. Trei porturi USB de încărcare
4. Port intrare fulger
5. Port intrare USB-C™
6. Port intrare micro-USB
Instrucţiuni de folosire:
Verificarea energiei rămase în bateria de rezervă ProVolta-30
• Pentru a vizualiza nivelul energiei rămase, apăsați o dată butonul de pornire și vizualizați indicatorul
LED pentru nivelul bateriei.
Numărul de LED-uri aprinse 1 2 3 4
% de energie rămasă <=25% <=50% <=75% <=100%
30
14 15 16
Page 17
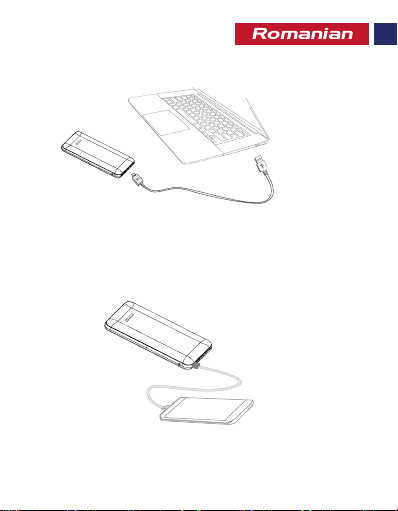
Încărcarea bateriei de rezervă ProVolta-30
30
• Conectați un capăt al cablului micro-USB la ProVolta-30 și celălalt la un desktop/laptop sau un
adaptor USB de alimentare. Indicatorii LED pentru nivelul bateriei se vor aprinde, indicând că
bateria de rezervă se încarcă normal.
Încărcarea dispozitivelor compatibile USB utilizând ProVolta-30
30
• Conectați cablul USB la portul USB de ieșire pentru încărcare de pe bateria de rezervă ProVolta-30
și celălalt capăt în dispozitiv.
• Apăsați butonul de pornire o dată pentru a vă încărca dispozitivul.
15 16
Page 18
16
Page 19
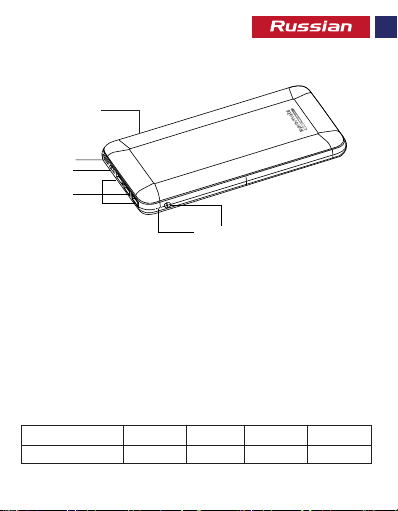
Внешний вид и описание интерфейса
6
4
5
3
1. Кнопка питания
2. Индикатор уровня заряда батареи
3. 3 порта зарядки USB
4. Входной порт Lightning
5. Входной порт USB-C™
6. Входной порт Micro-USB
Инструкция по эксплуатации:
Проверка оставшегося заряда резервной батареи ProVolta-30
• Чтобы просмотреть оставшийся заряд батареи, один раз нажмите на кнопку питания и
посмотрите на светодиодный индикатор уровня заряда батареи.
Кол-во активных LED 1 2 3 4
оставшийся заряд, в % <=25% <=50% <=75% <=100%
2 1
30
17 18 19 20 21 22
Page 20
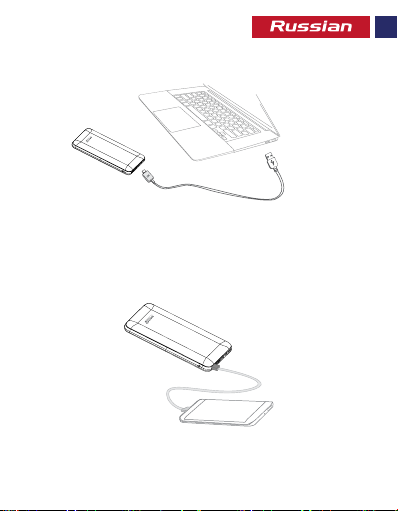
Зарядка резервной батареи ProVolta-30
30
• Подключите один конец кабеля Micro-USB к ProVolta-30, а другой - к ноутбуку/настольному
ПК или к адаптеру питания USB. Загорятся светодиодные индикаторы уровня заряда батареи,
что означает, что выполняется нормальная зарядка резервной батареи.
Зарядка устройств, заряжаемых от USB-порта, при помощи ProVolta-30
30
• Вставьте один конец кабеля USB в выходной порт зарядки USB на резервной батарее P
roVolta-30, а другой конец - в устройство.
• Нажмите на кнопку питания, чтобы начать зарядку устройства.
18 19 20 21 22
Page 21
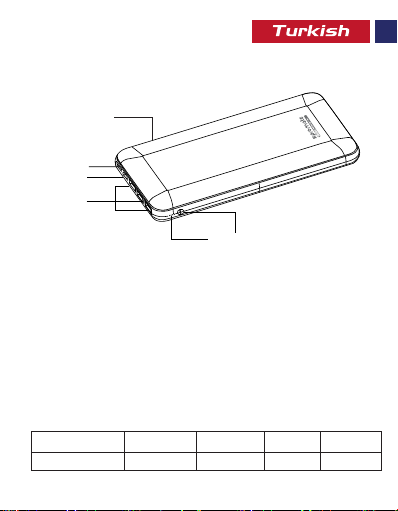
Görünüm ve Arayüz Açıklaması
6
4
5
3
1. Güç Düğmesi
2. Pil Seviyesi Göstergesi
3. 3 USB Şarj Çıkışı
4. Şarj Girişi
5. USB-C™ Girişi
6. Micro-USB Girişi
İşletim Talimatları:
ProVolta-30 yedek pilde kalan pili kontrol etme
• Kalan gücü görüntülemek için düğmeye bir kez bas ve Pil Seviye Göstergesine bak.
Aktif LED Sayısı 1 2 3 4
Kalan güç %si <=%25 <=%50 <=%75 <=%100
2 1
30
19 20 21 22
Page 22
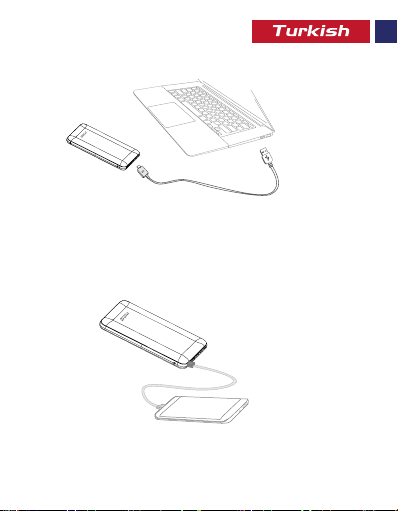
ProVolta-30 yedek pilin şarj edilmesi
30
• Micro-USB Kablosunun bir ucunu ProVolta-30’a, diğer ucunu bir masaüstü/dizüstü bilgisayara
veya bir USB Güç Adaptörüne bağlayın. Pil Seviyesi LED göstergelerinin yanması yedek pilin
normal bir şekilde şarj olduğunu gösterir.
ProVolta-30 kullanarak USB ile şarj edilebilen cihazları şarj etme
30
• USB kablosunu ProVolta-30 yedek pilin üzerindeki USB şarj çıkışına, diğer ucunu cihaza takın.
• Cihazınızı şarj etmek için güç düğmesine basın.
20 21 22
Page 23
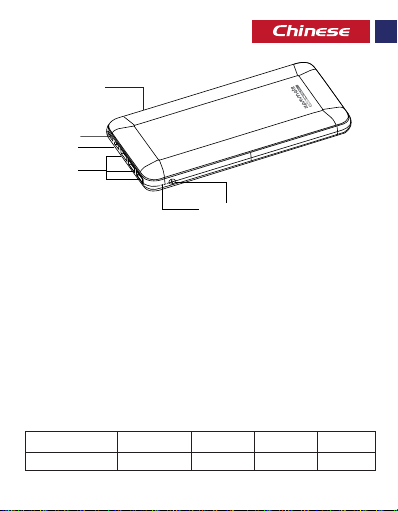
外观和接口说明
6
4
5
3
2 1
1. 电源按钮
2. 电池电量指示灯
3. 3 个USB充电端口
4. Lightning 输入端口
5. USB-C™输入端口
6. Micro-USB输入端口
操作说明:
检查ProVolta-30备用电池的残留剩余电量
• 要查看剩余电量,按一次电源按钮,即可查看电池电量LED指示灯。
亮起的LED灯数量 1 2 3 4
剩余电量 <=25% <=50% <=75% <=100%
30
21 22
Page 24
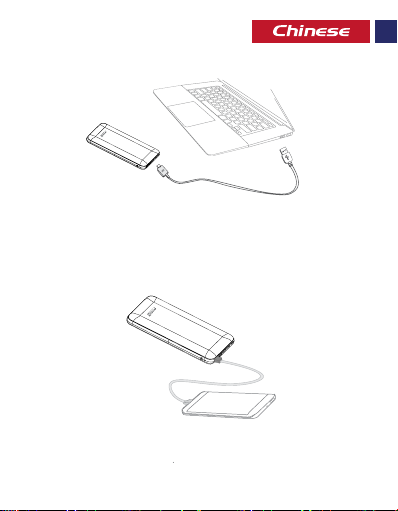
给ProVolta-30备用电池充电
30
• 将Micro-USB线的一端连接到ProVolta-30,另一端连接到台式机/笔记本电脑或USB电源
适配器。电池电量LED指示灯将亮起,表明备用电池在正常充电。
使用ProVolta-30给可通过USB充电的设备充电
30
• 将USB充电线插入ProVolta-30备用电池上所需的USB输出端口,另一端插入设备。
• 按电源按钮,即可给设备充电。
22
Page 25
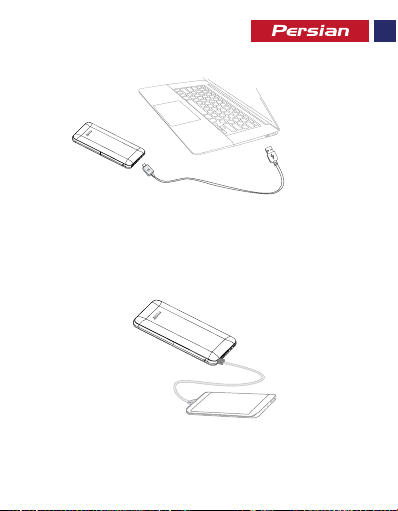
ProVolta-3 نﺎﺒﯿﺘﺸﭘ یﺮﺗﺎﺑ ندﺮﮐ ژرﺎﺷ
30
پﺎﺘﭙﻟ/یﺰﯿﻣور ﻪﻧﺎﯾار ﻪﺑ ار ﺮﮕﯾد ﺮﺳ و ProVolta-3 ﻪﺑ ار Micro-USB ﻞﺑﺎﮐ ﺮﺳ ﮏﯾ •
ﻪﮐ دﻮﺷ ﯽﻣ ﻦﺷور یﺮﺗﺎﺑ ناﺰﯿﻣ LED ﺮﮕﻧﺎﺸﻧ .ﺪﯿﻨﮐ ﻞﺻو USB قﺮﺑ رﻮﺘﭘادآ ﮏﯾ ﺎﯾ
.ﺖﺳا یدﺎﻋ ترﻮﺻ ﻪﺑ نﺪﺷ ژرﺎﺷ لﺎﺣ رد نﺎﺒﯿﺘﺸﭘ یﺮﺗﺎﺑ ﺪھد ﯽﻣ نﺎﺸﻧ
ProVolta-3 زا هدﺎﻔﺘﺳا ﺎﺑ USB ﺎﺑ ژرﺎﺷ ﻞﺑﺎﻗ یﺎھ هﺎﮕﺘﺳد ندﺮﮐ ژرﺎﺷ
30
ProVolta-30 نﺎﺒﯿﺘﺸﭘ یﺮﺗﺎﺑ یور USB ژرﺎﺷ ﯽﺟوﺮﺧ هﺎﮔرد ﻪﺑ ار USB ﻞﺑﺎﮐ •
.ﺪﯿﻨﮐ ﻞﺻو هﺎﮕﺘﺳد ﻪﺑ ار ﺮﮕﯾد ﺮﺳ و ﺪﯿﻧﺰﺑ
.ﺪﯿھد رﺎﺸﻓ ار شﻮﻣﺎﺧ ﻦﺷور ﻪﻤﮐد دﻮﺧ هﺎﮕﺘﺳد ندﺮﮐ ژرﺎﺷ یاﺮﺑ •
23 24 25
Page 26
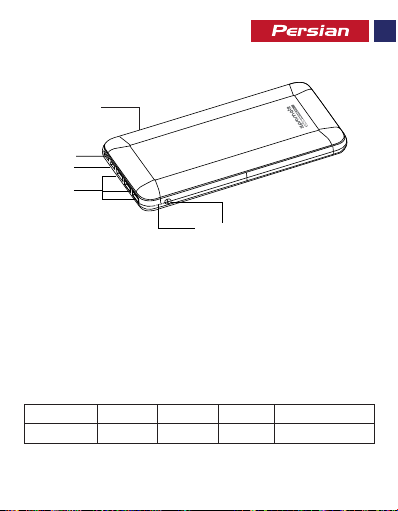
ﻂﺑار حﺮﺷ و ﺮھﺎظ
6
4
5
3
30
شﻮﻣﺎﺧ ﻦﺷور ﻪﻤﮐد .1
2 1
یﺮﺗﺎﺑ ناﺰﯿﻣ ﺮﮕﻧﺎﺸﻧ .2
USB ژرﺎﺷ هﺎﮔرد 3 . 3
Lightning یدورو هﺎﮔرد .4
™USB-C یدورو هﺎﮔرد .5
یدورو هﺎﮔرد .6
:تﺎﯿﻠﻤﻋ یﺎھ ﻞﻤﻌﻟارﻮﺘﺳد
ProVolta-3 نﺎﺒﯿﺘﺸﭘ یﺮﺗﺎﺑ رد هﺪﻧﺎﻤﯿﻗﺎﺑ یوﺮﯿﻧ ﯽﺳرﺮﺑ
ﺪﯿھد رﺎﺸﻓ رﺎﺑ ﮏﯾ ار شﻮﻣﺎﺧ/ﻦﺷور ﻪﻤﮐد ،هﺪﻧﺎﻤﯿﻗﺎﺑ یوﺮﯿﻧ هﺪھﺎﺸﻣ رﻮﻈﻨﻣ ﻪﺑ •
.ﺪﯿﻨﮐ هﺪھﺎﺸﻣ ار یﺮﺗﺎﺑ ناﺰﯿﻣ LED ﺮﮕﻧﺎﺸﻧ و
4 3 2 1 لﺎﻌﻓ یﺎھ LED داﺪﻌﺗ
100%=> 75%=> 50%=> 25%=> هﺪﻧﺎﻤﯿﻗﺎﺑ یوﺮﯿﻧ ﺪﺻرد
24 25
Page 27
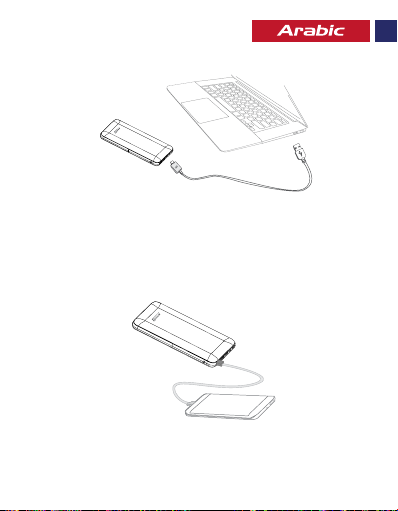
Provolta-30 ل ﺔﯿطﺎﯿﺘﺣﻻا ﺔﻳرﺎﻄﺒﻟا ﻦﺤﺷ
30
ﺮﺧﻵا فﺮﻄﻟاو Provolta-30 ﻰﻟإ USB -وﺮﻜﯿﻤﻟا ﻞﺑﺎﻛ ﻲﻓﺮط ﺪﺣأ ﻞﯿﺻﻮﺘﺑ ﻢﻗ •
تاﺮﺷﺆﻣ ءﻲﻀﺘﺳ . USB ل ﺔﻗﺎﻄﻟا لﻮﺤﻣ وأ لﻮﻤﺤﻤﻟا ﺮﺗﻮﯿﺒﻤﻜﻟا / ﺐﺘﻜﻤﻟا ﺢﻄﺴﺑ
.ﺔﻳدﺎﻋ ﺔﻘﻳﺮﻄﺑ ﻦﺤﺸﺗ ﺔﯿطﺎﯿﺘﺣﻻا ﺔﯾرﺎﻄﺒﻟا نأ ﯽﻟإ ﺮﯿﺸﯾ ﺎﻤﻣ ﺔﯾرﺎﻄﺒﻟا ىﻮﺘﺴﻤﻟ ﺪﯿﻠﻟا
Provolta-30 ماﺪﺨﺘﺳﺎﺑ ﻚﻟذ و ﻦﺤﺸﻠﻟ ﺔﻠﺑﺎﻘﻟا ةﺰﮭﺟﻸﻟUSB ﻦﺤﺷ
30
Provolta-30 ﯽﻠﻋ دﻮﺟﻮﻤﻟا USB أ جاﺮﺧإ ﺬﻔﻨﻤﺑ USB لا ﻞﺒﮐ ﻞﯿﺻﻮﺘﺑ ﻢﻗ •
.زﺎﮭﺠﻟا ﻲﻓ ىﺮﺧﻷا و ﺔﯿطﺎﯿﺘﺣﻻا ﺔﻳرﺎﻄﺒﻟﺎﺑ
.كزﺎﮭﺟ ﻦﺤﺸﻟ ﺔﻗﺎﻄﻟا حﺎﺘﻔﻣ ﻰﻠﻋ ﻂﻐﺿا •
25
Page 28
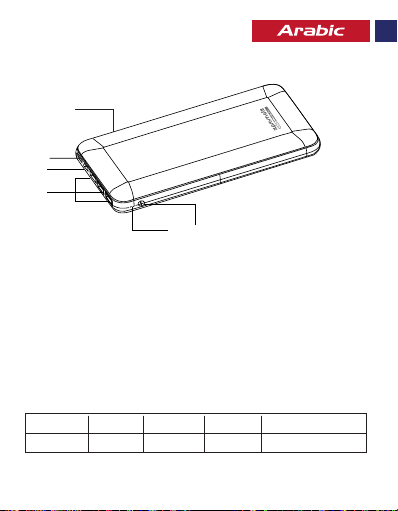
ﺔﮭﺟاﻮﻟا و ﺮﮭﻈﻤﻟا
6
4
5
3
2 1
30
ىﻮﻘﻟا حﺎﺘﻔﻣ .1
ﺔﻳرﺎﻄﺒﻟا ىﻮﺘﺴﻣ ﺮﺷﺆﻣ .2
USB ﻞﻟ ﻦﺤﺷ ﺬﻓﺎﻨﻣ 3 . 3
ةءﺎﺿﻻا تﻼﺧﺪﻣ ﺬﻔﻨﻣ .4
™USB-C لﺎﺧدﻹا ﺬﻔﻨﻣ .5
وﺮﻜﻳﺎﻤﻟا USB لا ﻞﺧﺪﻣ ﺬﻔﻨﻣ .6
ﻞﯿﻐﺸﺘﻟا تﺎﻤﯿﻠﻌﺗ
Provolta-30 ل ﺔﯿطﺎﯿﺘﺣﻻا ﺔﻳرﺎﻄﺒﻟا ﻲﻓ ﺔﯿﻘﺒﺘﻤﻟا ﺔﻗﺎﻄﻟا ﻦﻣ ﻖﻘﺤﺘﻟا
ىﻮﺘﺴﻤﻟ ﺮﻈﻧا و ةﺪﺣاو ةﺮﻣ ﺔﻗﺎﻄﻟا حﺎﺘﻔﻣ ﻰﻠﻋ ﻂﻐﺿا ﺔﯿﻘﺒﺘﻤﻟا ﺔﻗﺎﻄﻟا ضاﺮﻌﺘﺳﻻ •
ﺔﻳرﺎﻄﺒﻠﻟ LED ﺮﺷﺆﻤﻟا
4 3 2 1 ﻂﯿﺸﻨﻟا LED لا دﺪﻋ
=> 100% => 75% => 50% => 25% ىﻮﻘﻟا ﻦﻣ ﻲﻘﺒﺘﻤﻟا %
Page 29

 Loading...