

Page 1
Precise-180
4 Section Convertible Aluminium Alloy Tripod
with Integrated Monopod
3-Way Precision Head • 4kg Load Capacity • Secure Leg Locking System
Page 2

Introduction
Precise-180 is a combination of sturdiness and innovative technical features for
photographers and videographers alike. This Tripod is a 4-section tripod featuring
durable aluminum telescopic legs that offer stability and durability. This tripod’s key
feature is the center column mechanism, which allows the column to be extended
vertically with great fluidity and can be detached easily to be used as a monopod. This
makes it an extremely versatile tripod, suitable for a wide range of photography and
videography applications. Get twice as much functionality without carrying any extra
gear.
Packaging Contents
• Precise-180
• Carr y Case
• User Guide
Specifications
•MaximumHeight:178cm
•MinimumHeight:55cm
•FoldedHeight:53cm
•Sections:4
•LoadCapacity:4kgs
•Weight:1.73kgs
Features
• 3-Way Pan and Tilt Head:
andaccuratealignment.
• Secure Telescoping Legs:
thetelescoping tripodlegs,while thecenter brace addsstability byconnecting
thelegstomakethemmorerigid.
• Rapid Adjustment Center Column:
cameraheightadjustment.
• Quick-Release Plate:
unmountandalignyourcameratothetripodhead
• Bubble Level:
alwaays.
Thepanandtiltheadallowsforfluidcamerapositioning
Theflip-locksallowfor quickandsecureadjustmentof
Therapidcentercolumnallowsquickandeasy
The quickrelease plate is the quickest wayto mount or
Thebubblelevelensuresthatyourshotisalignedtothebestangle
.
1
English
Page 3

English
• Sure -Grip Rubber Feet: Get maximum traction on any surface for that impeccable
shot in any environment
• Monopo d Convertible: The rapid release column detaches to serve as an
adjustable 4-section monopod.
• Carrying Case with Shoulder Strap: Carry this tripod anywhere easily and without
any hassle using the provided carry case
Precautions:
Please read all safety instructions and warnings thoroughly before using this
product. Improper use of this product may result in damage to this or attached
products.
1. Do not disassemble the product or attempt to fix it.
2. Do not attempt to replace any part of this product.
3. Do not store or use the product in a high temperature environment, including
intense sunlight or heat.
2
Page 4
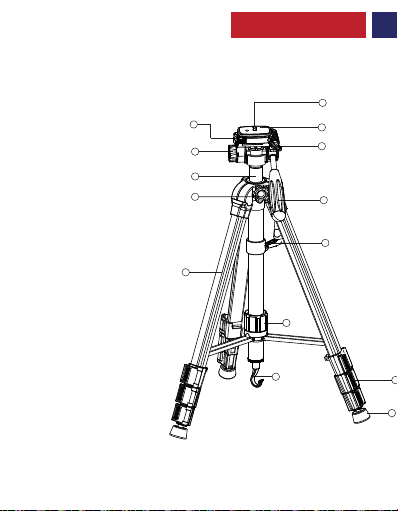
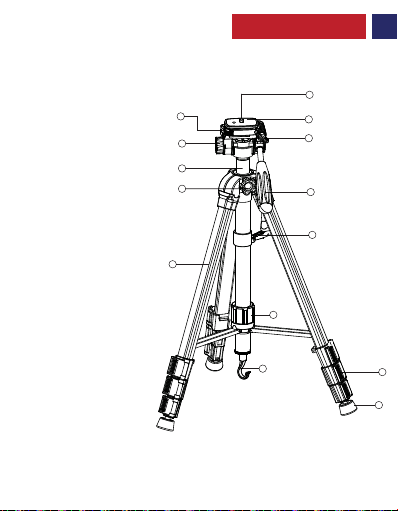
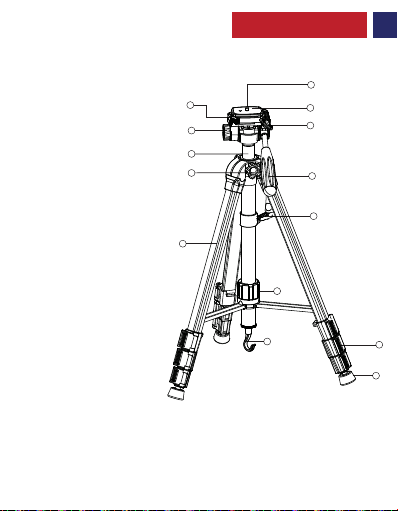
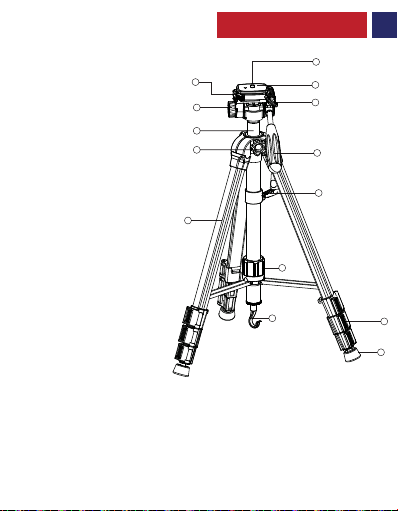
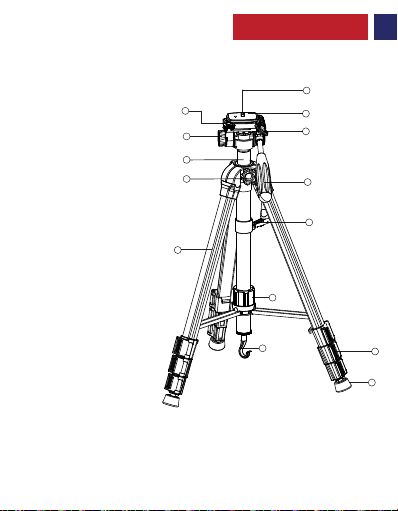
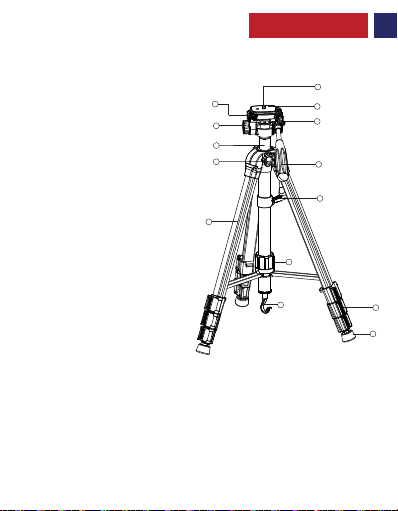
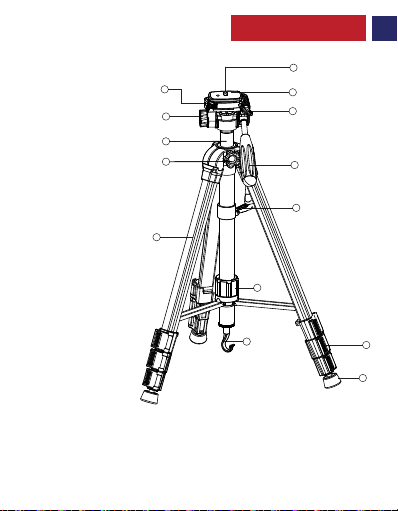
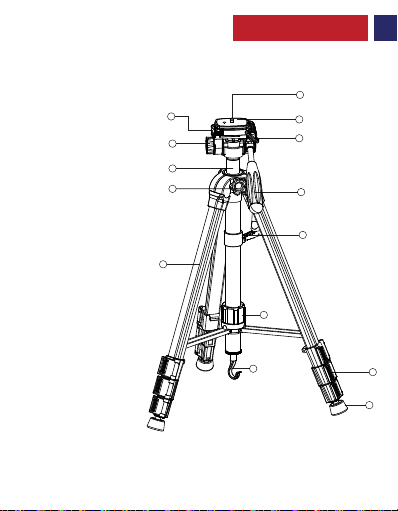
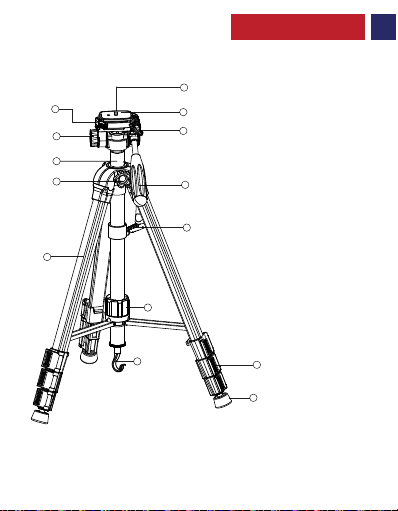
Appearance & Interface Description
1. Quick Release Lock
2. Mounting Screw
3. Mounting Plate
4. Vertical Tilt Lock Knob
5. Rapid Adjustment Center
Column
6. Handle
7. Center Column Locking Knob
8. Center Column Adjustment Lever
9. Grip Handle
10. Telescopic Legs
11. Center Column Lock
12. Gravity Hook
13. Secure Leg Locks
14. Rubber Feet
English
2
1
5
6
7
10
3
4
8
9
11
12
13
14
3
Page 5
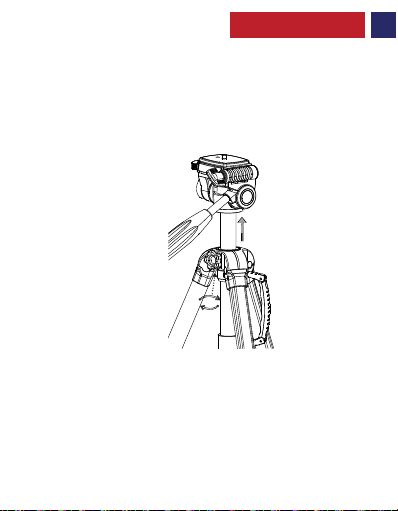
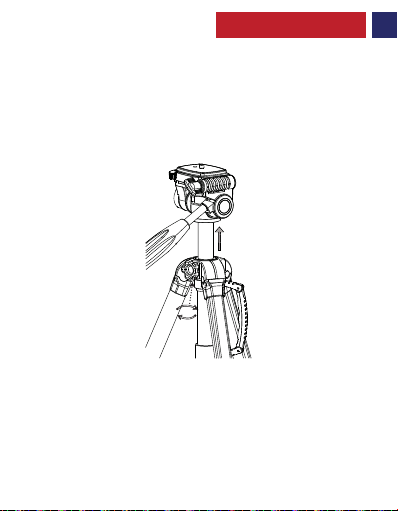
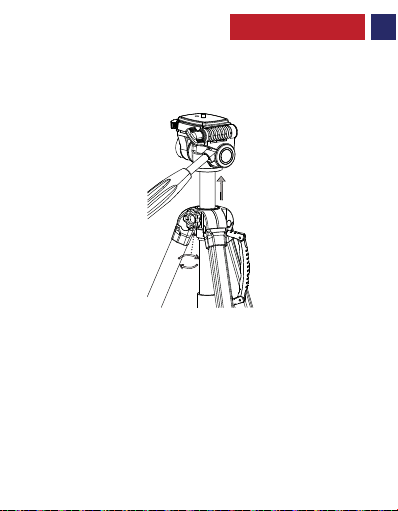
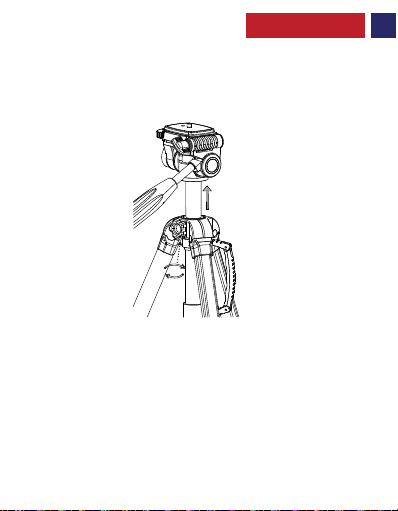
Operation Instructions
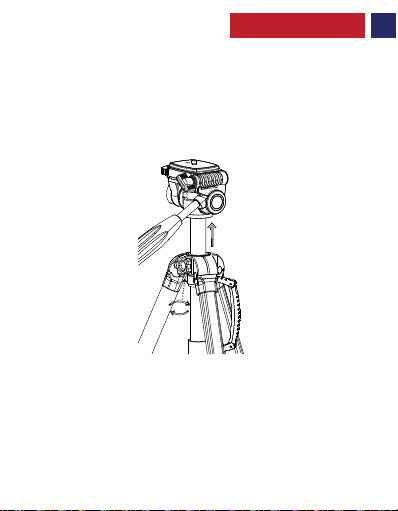
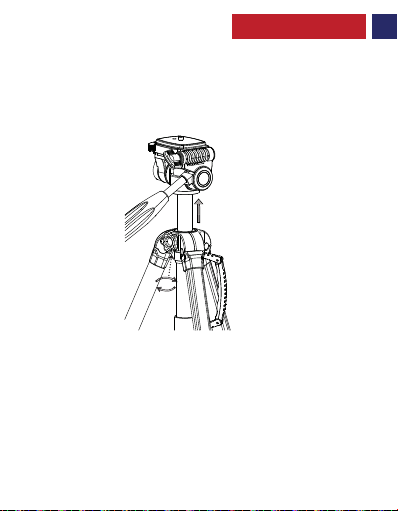
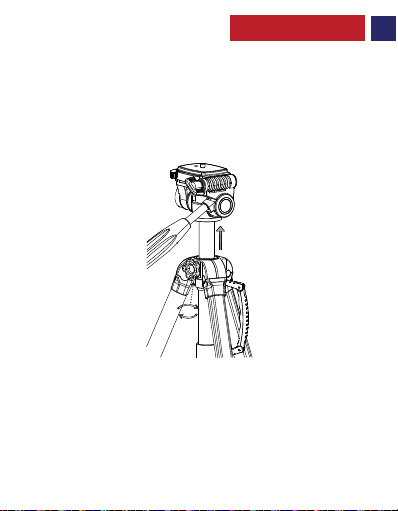
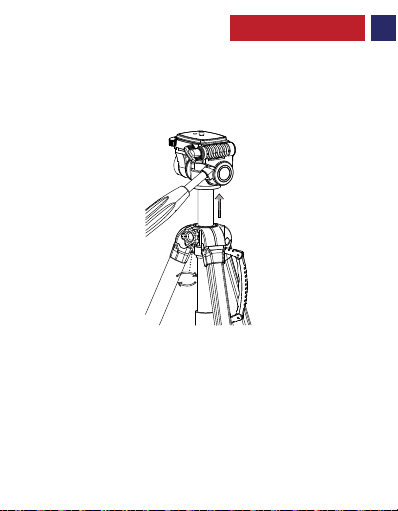
1. Adjusting the Height Of The Center Column:
• Loosen the Center Column Locking Knob.
• Elevate the center column to the desired height.
• Tighten the Center Column Locking Knob.
English
4
Page 6
English
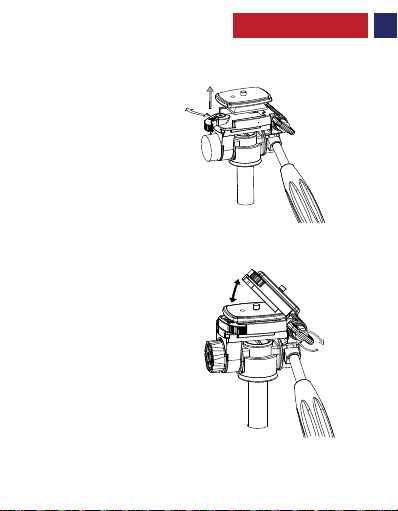
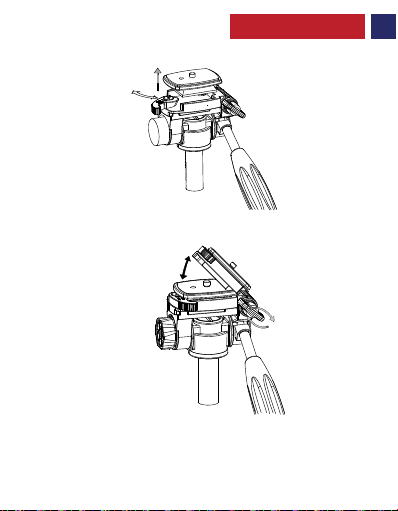
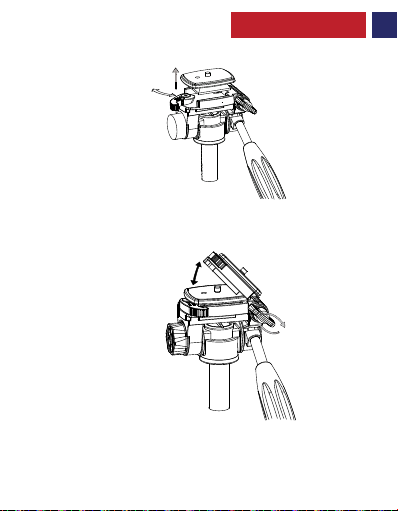
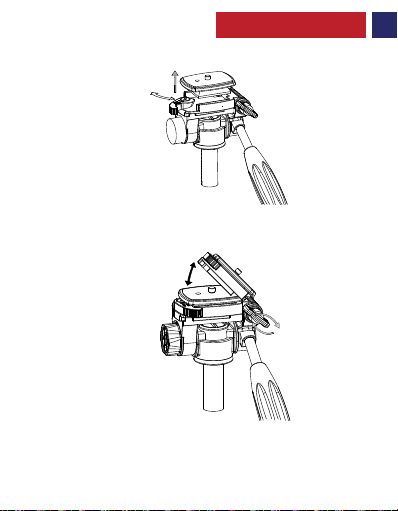
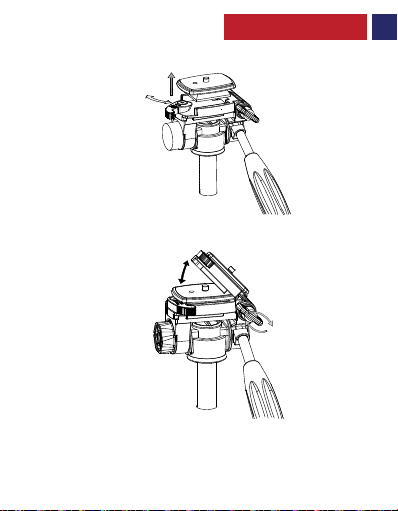
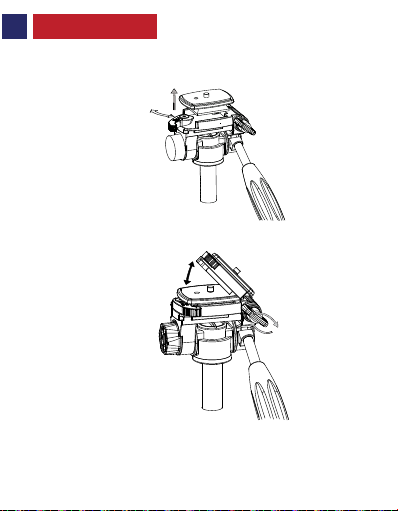
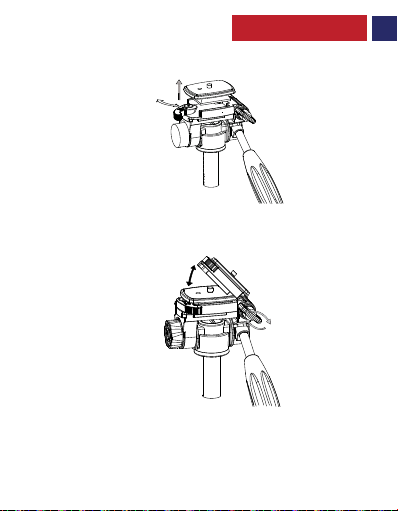
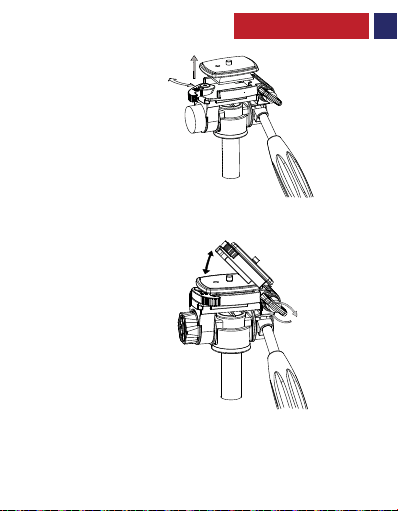
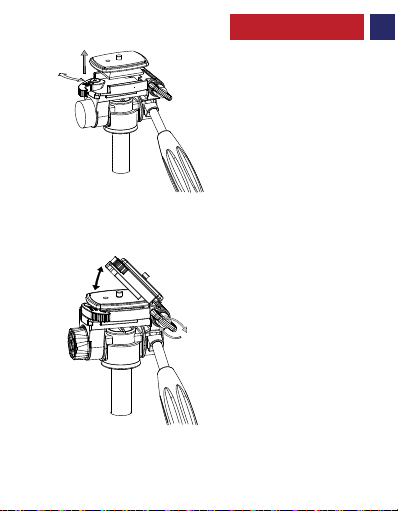
2. Installation and Removal Of Mounting Plate
• Pull the Quick Release Lock outward to release the Mounting Plate.
3. Adjusting the Tilt of the Mounting Plate
• Loosen the Vertical Tilt Lock Knob.
• Reposition the mounting plate to the desired angle.
• Tighten the Vertical Tilt Lock Knob.
5
Page 7
English
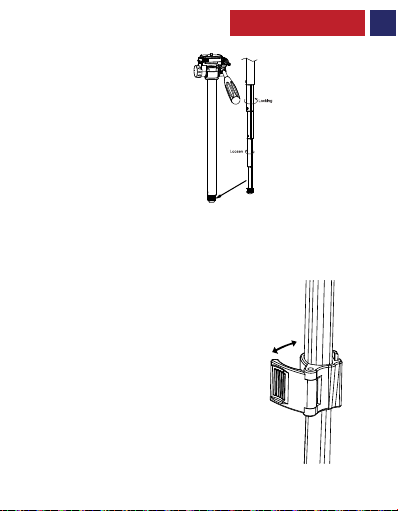
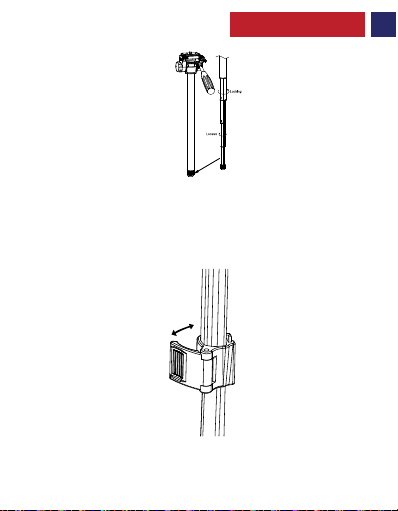
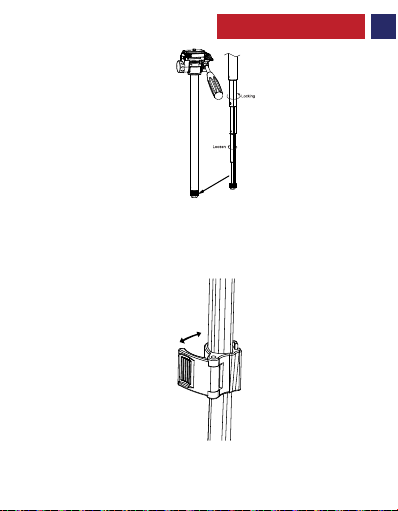
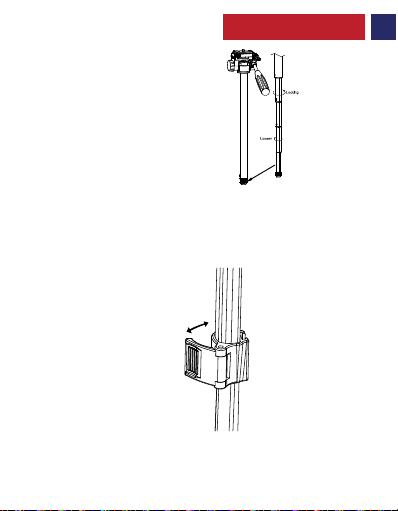
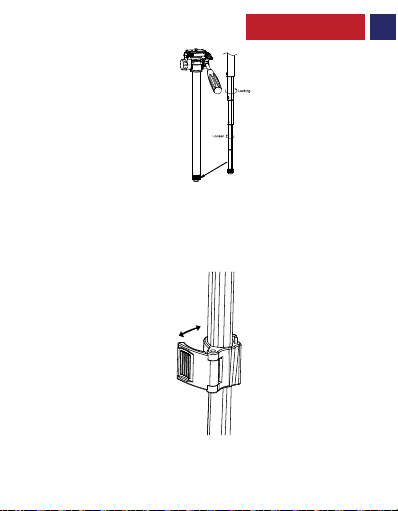
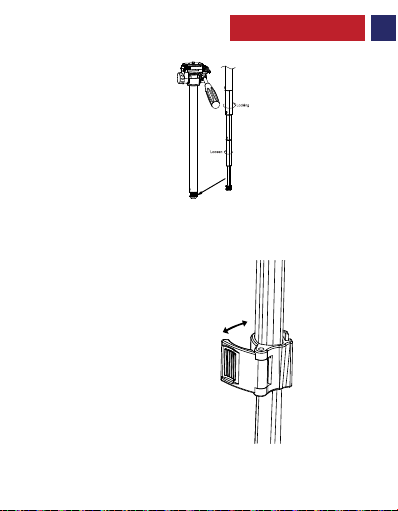
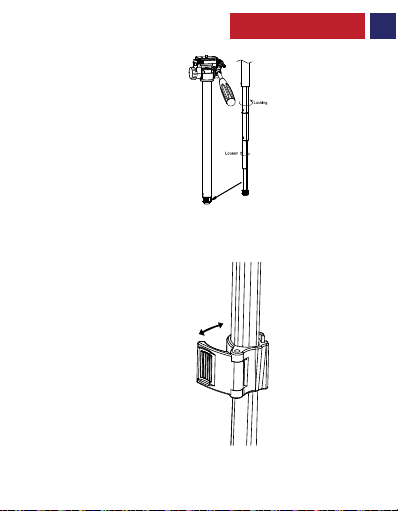
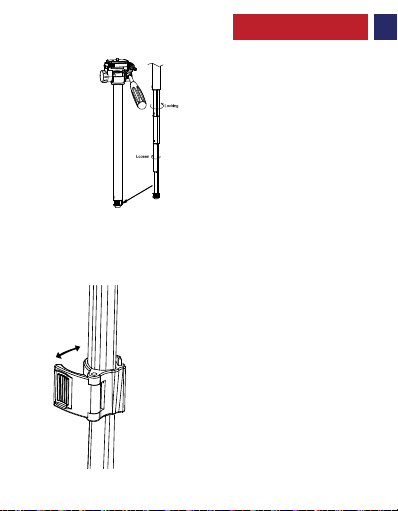
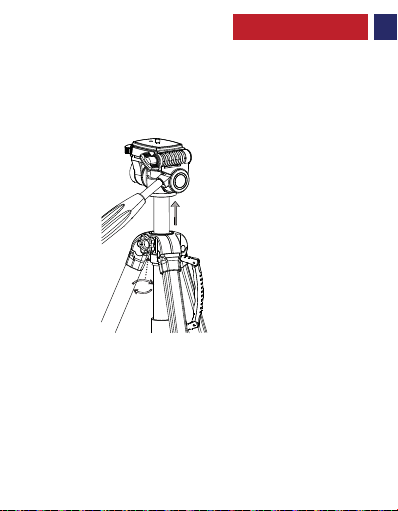
4. Monopod Functionality
• Pull out the center column along with the tripod head.
• Grasp the monopod’s rubber foot and twist it clockwise to loosen.
• Extend the monopod leg sec tions to the desired height.
• Twist the foot counter clockwise to lock the legs.
5. Using the Secure Leg Locks
• Pull the Secure Flip Leg Locks Outward as shown.
• Adjust the tripod leg height.
• Press the flip lock to secure the legs.
6
Page 8
Aspecto y Descripcion del Interfaz
1. Bloqueo de Liberación Rápida
2. Tornillo de montaje
3. Placa de montaje
4. Botón de bloqueo de inclinación
vertical
5. Botón de ajuste horizontal
6. Columna central de ajuste rápido
7. Perilla de bloqueo de la columna
central
8. Manija de control
9. Mango
10. Patas telescópicas
11. Bloqueo de la columna central
12. Gancho de gravedad
13. seguro de cierre de la pata
14. Pies de goma
Spanish
2
1
5
6
7
10
3
4
8
9
11
12
13
14
7
Page 9
Spanish
Instrucciones de Manejo
1. Ajustar la altura de la columna central the Height Of The Center Column:
• Aflojar la perilla de bloqueo de la columna central.
• Elevar la columna central a la altura deseada.
• Apretar la perilla de bloqueo de la columna central.
8
Page 10
Spanish
2. Installation and Removal Of Mounting Plate
• Tire de la cerradura de liberación rápida hacia afuera para liberar la placa de montaje
3. Adjusting the Tilt of the Mounting Plate
• Afloje la perilla de bloqueo de inclinación vertical.
• Vuelva a colocar la placa de montaje en el ángulo deseado.
• Apriete la perilla de bloqueo de inclinación vertical.
9
Page 11
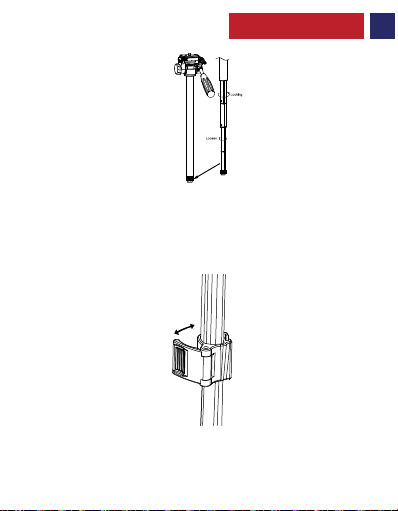
4. Función Monópodo
• Saque la columna central junto con la cabeza del trípode.
• Sujete el pie de goma del monópodo y gírelo en el sentido de las agujas del reloj
para aflojarlo.
• Extienda las secciones de la pata del monopod a la altura deseada.
• Gire el pie hacia la izquierda para bloquear las patas.
5. Using the Secure Leg Locks
• Tire de los cierres de seguridad de las patas hacia afuera como se muestra en el dibujo.
• Ajuste la altura de la pierna del trípode.
• Presione el bloqueo para asegurar las patas.
10
Spanish
Page 12
Apparence et Description d’Interface
1. Verrou à Blocage Rapide
2. Vis de Montage
3. Plaque de Montage
4. Bouton de Verrouillage Inclinable
Vertical
5. Bouton d’Ajustement Horizontal
6. Colonne Centrale d’Ajustement Rapide
7. Bouton de Verrouillage de la Colonne
Centrale
8. Poignée Panoramique
9. Poignée
10. Pieds Télescopiques
11. Verrou Colonne Centrale
12. Crochet Gravité
13. Verrous Sécurisés pour les Pieds
14. Pieds en Caoutchouc
French
2
1
5
6
7
10
3
4
8
9
11
12
13
14
11
Page 13
French
Instructions d’Utilisation
1. Réglage de la Hauteur De La Colonne Centrale :
• Desserrez le Bouton de Verrouillage de la Colonne Centrale.
• Haussez la colonne centrale à la hauteur souhaitée.
• Resserrez le Bouton de Verrouillage de la Colonne Centrale.
12
Page 14
French
2. Installation et Démontage De La Plaque de Montage
• Tirez le Verrou à Blocage Rapide vers l’extérieur pour libérer la Plaque de Montage.
3. Réglage de l’I nclinaison de la Plaque de Montage
• Desserrez le Bouton de Verrouillage Inclinable Vertical
• Repositionnez la plaque de montage à l'angle souhaité.
• Resserrez le Bouton de Verrouillage Inclinable Vertical.
13
Page 15
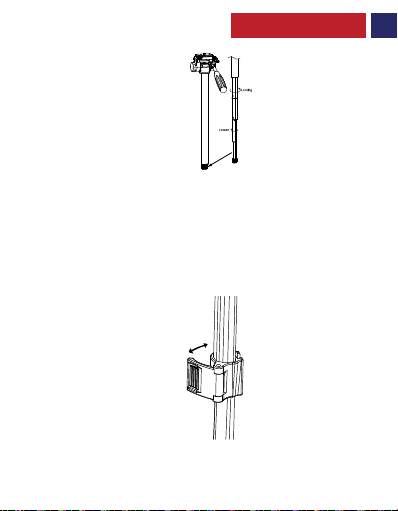
4. Fonctionnalité Monopied
• Tirez la colonne centrale avec la tête du trépied.
• Saisissez le pied en caoutchouc du monopied et tournez-le dans le sens des aiguilles
d’une montre pour le desserrer.
• Rallongez les sec tions de pied du monopied à la hauteur souhaitée.
• Tournez le pied dans le sens contraire des aiguilles d'une montre pour verrouiller les
pieds.
5. Utilisation des Verrous Sécurisés pour les Pieds
• Tirez les verrous sécurisés pour les pieds rabattus vers l'Extérieur comme indiqué.
• Réglez la hauteur des pied du trépied
• Pressez le verrou à rabat pour fixer les pieds.
French
14
Page 16
German
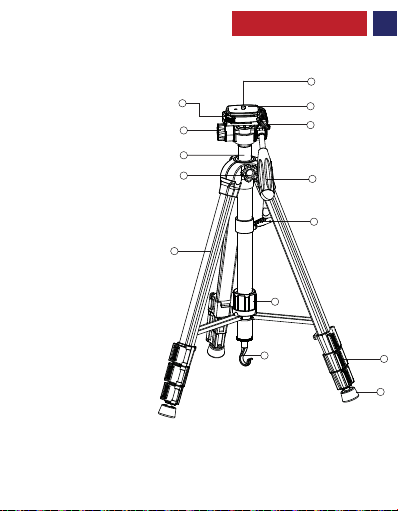
Aussehen & Schnittstellenbeschreibung
1. Schnellverschluss
2. Befestigungsschraube
3. Montageplatte
4. Vertikaler Verriegelungsknopf
5. Horizontaler Einstellknopf
6. Schnellverstellmittelsäule
7. Mittelsäuleverriegelungsk nopf
8. Schwenkgriff
9. Griff
10. Teleskopbeine
10
11. Mittelsäulenverschluss
12. Schwerkraftshaken
13. Beinsicherheitsverschlüsse
14. Gummifüße
2
1
5
6
7
3
4
8
9
11
12
13
14
15
Page 17
German
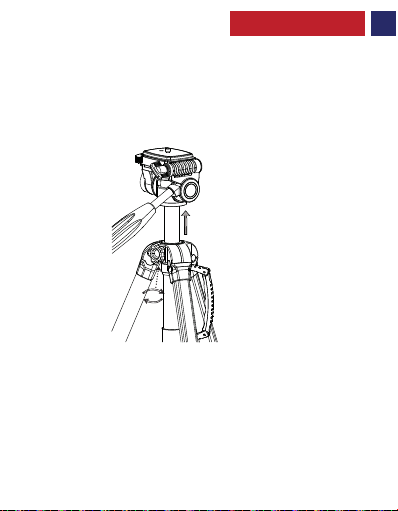
Benutzungsanleitung
1. Höhenjustierung der Mittelsäule:
• Lösen Sie den Verriegelungsknopf der Mittelsäule.
• Ziehen Sie die Mittelsäule bis zur gewünschten Höhe heraus.
• Ziehen Sie den Verriegelungsknopf der Mittelsäule an.
16
Page 18
German
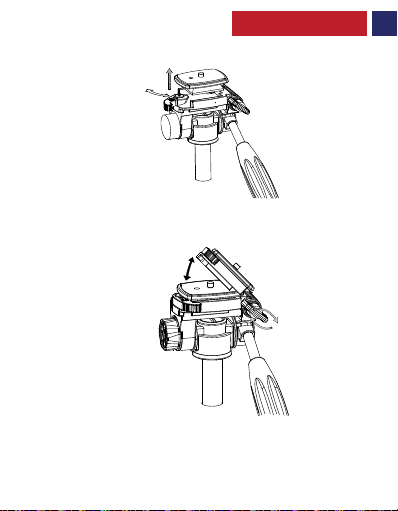
2. Installation und Entfernen der Montageplatte
• Ziehen Sie den Schnellverschluss nach außen, um die Montageplatte frei zu geben.
3. Anpassen des Neigungswinkels der Montageplatte
• Lösen Sie den vertikalen Verriegelungsknopf.
• Richten Sie die Montageplatte auf den gewünschten Winkel aus.
• Ziehen Sie den vertik alen Verriegelungsknopf an.
17
Page 19
4. Funktionalität des Einbeinstativs
• Ziehen Sie die Mittelsäule mit dem Stativkopf heraus.
• Fassen Sie den Gummifuß des Einbeinstativs und drehen ihn zum Lösen im
Uhrzeigersinn.
• verlängern Sie die Beinbereiche des Einbeinstativs auf die gewünschte Höhe.
• Drehen Sie den Fuß gegen den Uhrzeigersinn, um die Beine zu verriegeln.
5. Verwendung der Beinsicherheitsverschlüsse
• Ziehen Sie die Sicherheitsk lemmen für die Stativbeine wie abgebildet nach außen.
• Passen Sie die Höhe des Stativbeines an.
• Zum Sichern der Beine drücken Sie die Sicherheitsk lemme.
German
18
Page 20
Descrição da Aparência e Interface
1. Trava de desengate rápido
2. Parafuso de montagem
3. Placa de montagem
4. Maçaneta de bloqueio da inclinação
vertical
5. Maçaneta de ajuste horizontal
6. Coluna central de ajuste rápido
7. Maçaneta de bloqueio da coluna
central
8. Alça panorâmica
9. Alça
10. Pernas telescópicas
11. Trava da coluna central
12. Gancho de gravidade
13. Travas de pernas seguras
14. Pés de borracha
Portuguese
1
5
6
7
10
2
3
4
8
9
11
12
13
14
19
Page 21
Instruções de uso
1. Para ajustar a altura da coluna central:
• Solte a maçaneta de bloqueio da coluna central.
• Eleve a coluna central até à altura desejada.
• Aper te a maçaneta de bloqueio da coluna central.
Portuguese
20
Page 22
Portuguese
2. Instalação e Remoção da Placa de Montagem
• Puxe a trava de desengate rápido para fora para soltar a placa de montagem.
3. Ajuste da Inclinação da Placa de Montagem
• Solte a maçaneta de bloqueio da inclinação vertical.
• Coloque a placa de montagem no ângulo desejado.
• Aper te a maçaneta de bloqueio da inclinação vertical.
21
Page 23
Portuguese
4. Funcionalidade monopodálica
• Puxe a coluna central juntamente com a cabeça do tripé.
• Segure o pé de borracha do monopé e gire- o no sentido horário para soltá-lo.
• Estenda as seções da perna do monopé até atingir a altura desejada.
• Torça o pé no sentido anti-horário para bloquear as pernas.
5. Utilização das travas seguras das pernas
• Puxe as travas seguras para dobrar as pernas para fora como demonstrado na imagem.
• Ajuste a altura da perna do tripé.
• Pressione a trava de bloqueio para fixar as pernas.
22
Page 24
Romanian
Descriere Aspect și Interfață
1. Blocare cu Eliberare Rapidă
2. Șurub Montare
3. Placă de Montare
4. Buton de Blocare Verticală
5. Buton de Ajustare Orizontală
6. Ajustare Rapidă A Coloanei Centrale
7. Buton de Blocare a Coloanei Centrale
8. Mâner Pan
10
9. Mâner
10. Picioare telescopice
11. Blocare Coloană Centrală
12. Cârlig de Gravitate
13. Bocări Sigure pentru Picioare
14. Picioare de Cauciuc
2
1
5
6
7
3
4
8
9
11
12
13
14
23
Page 25
Instrucțiuni de Utilizare
1. Reglarea Înălțimii Coloanei Centrale:
• Slăbiți Butonul de Blocare a Coloanei Centrale
• Ridicați coloana centrală la înălțimea dorită.
• Strângeți Butonul de Blocare a Coloanei Centrale.
Romanian
24
Page 26
Romanian
2. Montarea și Demontarea Plăcii de Montare
• Trageți Blocarea de Eliberare Rapidă spre exterior pentru a elibera Placa de Montare.
3. Reglarea Înclinării Plăcii de Montare
• Slăbiți Butonul de Blocare Înclinată Vertical.
• Repoziționați placa de montare la unghiul dorit.
• Strângeți Butonul de Blocare Înclinată Vertical.
25
Page 27
4. Funcționalitatea Monopiedului
• Trageți coloana din mijloc împreună cu capul trepiedului.
• Apucați piciorul de cauciuc a monopiedului și răsucițițl în sens orar pentru a slăbi.
• Extindeți sec țiunile piciorului monopied la înălțimea dorită.
• Răsuciți contorul piciorului în sens orar pentru a bloca picioarele.
5. Utilizarea Blocării Securizate a Piciorului
• Trageți Clapa Încuietorii Securizate a Piciorului către Exterior ca în imagine.
• Reglați înălțimea piciorului trepied.
• Apăsați clapa încuietorii pentru a fixa picioarele.
Romanian
26
Page 28
Внешний вид и описание интерфейса
1. Быстроразъемный запор
2. Крепежный винт
3. Крепежная плас тина
4. Вращаемый регулятор фиксатора
вертикального наклона
1
5
6
7
5. Вращаемый регулятор
горизонтального положения
6. Центральная колонка быс трого
10
регулирования
7. Запорная вращаемая кнопк а центральной
колонки
8. Ручка под дона
9. Ручка
10. Телескопические ноги
11. Запор центральной колонки
12. Гравитационный крюк
13. Фиксаторы ног для обеспечения безопасности
14. Резиновые опоры
Russian
2
3
4
8
9
11
12
13
14
27
Page 29
Russian
Инструкция по применению
1. Нас тройка высоты центральной колонки:
• Ос лабить запорную вращаемую кнопку центральной колонки.
• Поднять центральную колонку на необходимую высоту.
• Закрепить запорную кнопку центральной колонки.
28
Page 30
Russian
2. Установка и снятие опорной пластины
• Чтобы освободить опорную пластину, потяните быстроразъемный запор наружу.
3. Нас тройка наклона опорной пластины
• Ос лабить вращаемый регулятор фиксатора вертикального наклона.
• Нак лонить опорную пластину под требуемым углом.
• Закрепить вращаемый регулятор фиксатора вертикального наклона.
29
Page 31
4. Действие опорной ноги
Russian
• Вытащить центральную колонку с головкой штатива.
• Чтобы ослабить крепление опорной ноги, взять резиновую опору и
повернуть ее по часовой стрелке.
• Раздвинуть секции опорной ноги на желаемую высоту.
• Повернуть опору против часовой стрелки, чтобы закрепить ноги.
5. Использование фиксаторов ног для обеспечения безопасности
• Потянуть защелку фиксаторов ног для обеспечения безопасности наружу,
как показано.
• Отрег улировать высоту ног треноги.
• Нажать на защелку замка, чтобы обеспечить безопасное положение ног.
30
Page 32
Turkish
Görünüm ve Arayüz Açıklaması
1. Çabuk Açılır Kilit
2. Montaj Vidası
3. Montaj Plakası
4. Dikey Kol Kilit Topuzu
5. Yatay Ayar Topuzu
6. Hızlı Ayar Merkez Sütunu
7. Merkez Sütun K ilit Topuzu
8. Sapı
9. Tutacak
10. T eleskopik Bacaklar
11. Merkez Sütun K ilidi
12. Ağırlık Kuvveti Kancası
13. Güvenli Bacak Kilitleri
14. Kauçuk Ayaklar
2
1
5
6
7
10
3
4
8
9
11
12
13
14
31
Page 33
Kullanım Talimatları
1. Merkez Sütunun Yüksekliğinin Ayarlanması:
• Merkez Sütun K ilit Topuzunu gevşetin.
• Merkez sütunu istenilen seviyeye yükseltin.
• Merkez Sütun K ilit Topuzunu sıkın.
Turkish
32
Page 34
Turkish
2. Montaj Plakasının Kurulumu ve Sökülmesi
• Çabuk Açılan Kilidi Montaj Plakasını açacak şek ilde dışarı doğru çekin.
3. Montaj Plakasının Eğimini Ayarlama
• Dikey Kol Kilit Topuzunu gevşetin.
• Montaj plak asını istenilen açıya konumlandırın.
• Dikey Kol Kilit Topuzunu sıkın.
33
Page 35
4. Monopod İşlevselliği
• Merkez sütunu tripod başlığıyla birlikte çekin.
• Monopodun k auçuk ayağını kavrayın ve saat yönünde bükerek gevşetin.
• Monopod bacak k ısımlarını istenilen yüksekliğe genişletin.
• Bacaklar ı kilitlemek için ayak tezgahını saatin tersi yönde bükün.
5. Güvenli Bacak Kilitlerinin Kullanımı
• Güvenli Döndürülen Bacak Kilitlerini gösterilen şek ilde dışarıya doğru çekin.
• Tripod bacak yüksekliğini ayarlayın.
• Bacaklar ı güvenli hale getirmek için döndürülebilir kilide basın.
Turkish
34
Page 36
Chinese
外观和接口描述
1. 快速释放锁
2. 安装螺丝
3. 安装板
4. 垂直倾斜锁定旋钮
5. 水平调节旋钮
6. 快速调节中心柱
7. 中心柱锁定旋钮
8. 圆把手
9. 手柄
10. 伸缩腿
11. 中心柱锁
12. 重力钩
13. 紧固腿锁
14. 橡胶脚
2
1
5
6
7
10
3
4
8
9
11
12
13
14
35
Page 37
使用说明
1. 调整中心柱的高度::
• 松开中心柱锁定旋钮。
• 将中心柱提升到所需高度。
• 拧紧中心柱锁定旋钮。
Chinese
36
Page 38
2. 安装板的安装和拆卸
• 向外拉快速释放锁,以松开安装板。
3. 调整安装板的倾斜度
• 松开垂直倾斜锁定旋钮。
• 将安装板重新放置到所需的角度。
• 拧紧垂直倾斜锁定旋钮。
Chinese
37
Page 39
4. 单脚架功能
• 沿着三脚架头拉出中心柱。
• 握住单脚架的橡胶脚,顺时针旋转松开。
• 将单脚架腿部伸长到所需高度。
• 逆时针转动脚以锁定脚。
5. 使用紧固腿锁
• 如图所示将紧固翻盖锁向外拉。
• 调整三脚架腿高度。
• 按下翻盖锁固定支脚。
Chinese
38
Page 40
Persian
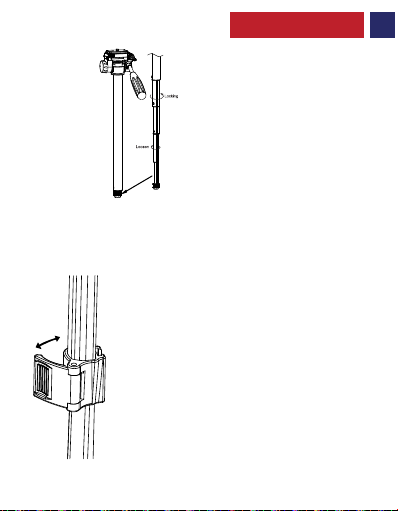
دﺎﭘﻮﻧﻮﻣ ناﻮﻨﻋ ﻪﺑ هدﺎﻔﺘﺳا ﺖﯿﻠﺑﺎﻗ .4
.ﺪﯿﻧﺎﺧﺮﭽﺑ ﺖﻋﺎﺳ یﺎھ ﻪﺑﺮﻘﻋ ﺖﮭﺟ رد ندﺮﮐ ﻞﺷ یاﺮﺑ و ﺪﯾﺮﯿﮕﺑ ار دﺎﭘﻮﻧﻮﻣ ﯽﮑﯿﺘﺳﻻ ﻪﯾﺎﭘ •
.ﺪﯿﺸﮑﺑ نوﺮﯿﺑ ﻪﯾﺎﭘ ﻪﺳ ﺮﺳ هاﺮﻤھ ﻪﺑ ار یﺰﮐﺮﻣ نﻮﺘﺳ •
.ﺪﯿﻨﮐ زﺎﺑ هاﻮﺨﻟد عﺎﻔﺗرا ﺎﺗ ار دﺎﭘﻮﻧﻮﻣ ﻪﯾﺎﭘ یﺎھ ﺖﻤﺴﻗ •
.دﻮﺷ ﻞﻔﻗ ﺎﺗ ﺪﯿﻧﺎﺧﺮﭽﺑ ﺖﻋﺎﺳ یﺎھ ﻪﺑﺮﻘﻋ ﺖﮭﺟ فﻼﺧ ار ﻪﯾﺎﭘ •
ﻪﯾﺎﭘ هﺪﻧراﺪﮭﮕﻧ یﺎھ ﻞﻔﻗ زا هدﺎﻔﺘﺳا .5
.ﺪﯿﺸﮑﺑ نوﺮﯿﺑ ﻪﺑ ﻞﮑﺷ ﻖﺒط ار ﻪﯾﺎﭘ هﺪﻧراﺪﮭﮕﻧ ﻦﻣﺎﺿ یﺎھ ﻞﻔﻗ •
.ﺪﯿﻨﮐ ﻢﯿﻈﻨﺗ ار ﻪﯾﺎﭘ عﺎﻔﺗرا •
.ﺪﯿھد رﺎﺸﻓ ﺎھ ﻪﯾﺎﭘ ندﺮﮐ ﻢﮑﺤﻣ یاﺮﺑ ار ﻦﻣﺎﺿ ﻞﻔﻗ •
39
Page 41
Persian
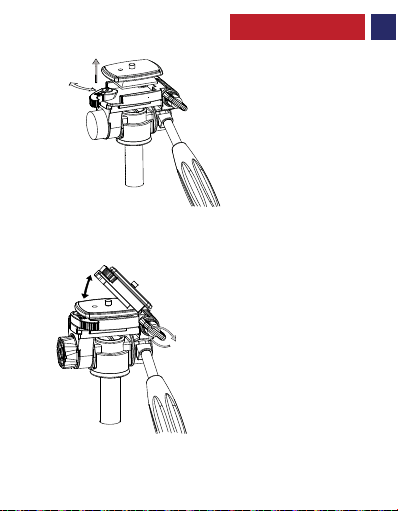
ﺐﺼﻧ ﻪﺤﻔﺻ نداد راﺮﻗ و ﻦﺘﺷادﺮﺑ .2
.دﻮﺷ ﺎھر ﺐﺼﻧ ﻪﺤﻔﺻ ﺎﺗ ﺪﯿﺸﮑﺑ نوﺮﯿﺑ ﻪﺑ ار ﻊﯾﺮﺳ یزﺎﺳدازآ ﻞﻔﻗ •
ﺐﺼﻧ ﻪﺤﻔﺻ ﺐﯿﺷ ﻢﯿﻈﻨﺗ .3
.ﺪﯿﻨﮐ ﻞﺷ ار یدﻮﻤﻋ ﺐﯿﺷ ﻞﻔﻗ ﭻﯿﭘ •
.ﺪﯿھد راﺮﻗ هاﻮﺨﻟد ﻪﯾواز ﺎﺑ هرﺎﺑود ار ﺐﺼﻧ ﻪﺤﻔﺻ •
.ﺪﯿﻨﮐ ﺖﻔﺳ ار یدﻮﻤﻋ ﺐﯿﺷ ﻞﻔﻗ ﭻﯿﭘ •
40
Page 42
Persian
هدﺎﻔﺘﺳا یﺎھ ﻞﻤﻌﻟارﻮﺘﺳد
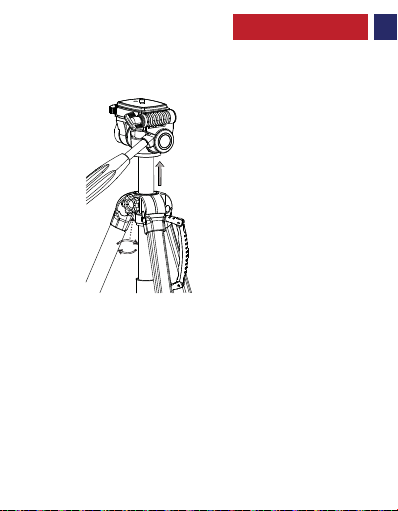
:یﺰﮐﺮﻣ نﻮﺘﺳ عﺎﻔﺗرا ﻢﯿﻈﻨﺗ .1
.ﺪﯿﻨﮐ ﻞﺷ ار یﺰﮐﺮﻣ نﻮﺘﺳ ﻞﻔﻗ ﭻﯿﭘ •
.ﺪﯾﺮﺒﺑ ﻻﺎﺑ هاﻮﺨﻟد عﺎﻔﺗرا ﺎﺗ ار یﺰﮐﺮﻣ نﻮﺘﺳ •
.ﺪﯿﻨﮐ ﺖﻔﺳ ار یﺰﮐﺮﻣ نﻮﺘﺳ ﻞﻔﻗ ﭻﯿﭘ •
41
Page 43
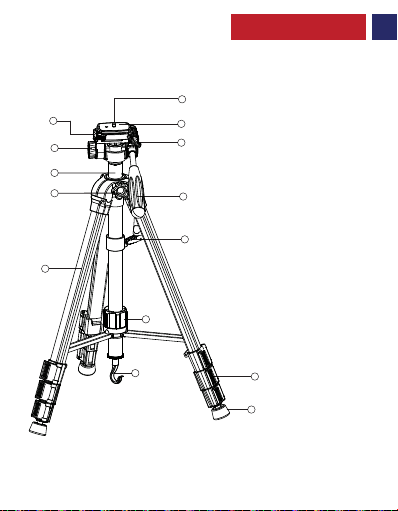
Persian
ﻂﺑار حﺮﺷ و ﺮھﺎﻇ
2
1
5
6
7
10
3
4
8
9
ﻊﯾﺮﺳ یزﺎﺳدازآ ﻞﻔﻗ .1
ﺐﺼﻧ ﭻﯿﭘ .2
ﺐﺼﻧ ﻪﺤﻔﺻ .3
یدﻮﻤﻋ ﺐﯿﺷ ﻞﻔﻗ ﭻﯿﭘ .4
ﯽﻘﻓا ﻢﯿﻈﻨﺗ ﭻﯿﭘ .5
ﻊﯾﺮﺳ ﻢﯿﻈﻨﺗ یﺰﮐﺮﻣ نﻮﺘﺳ .6
یﺰﮐﺮﻣ نﻮﺘﺳ ﻞﻔﻗ ﭻﯿﭘ .7
ﻦﭘ هﺮﯿﮕﺘﺳد .8
ﻪﺘﺳد .9
ﯽﭘﻮﮑﺴﻠﺗ یﺎھ ﻪﯾﺎﭘ .10
11
یﺰﮐﺮﻣ نﻮﺘﺳ ﻞﻔﻗ .11
ﻪﺑذﺎﺟ بﻼﻗ . 12
ﻪﯾﺎﭘ هﺪﻧراﺪﮭﮕﻧ یﺎھ ﻞﻔﻗ .13
12
13
14
ﯽﮑﯿﺘﺳﻻ ﻪﯾﺎﭘ .14
42
Page 44
Arabic
ﻞﺟرﻷا يدﺎﺣأ ﻞﻣﺎﺤﻟا ﻞﻤﻋ ﺔﯿﻔﯿﻛ .4
.ﺎﮭﻜﻔﻟ ﺔﻋﺎﺴﻟا برﺎﻘﻋ هﺎﺠﺗﺎﺑ ﺎھردأو ﻞﺟرﻷا يدﺎﺣأ ﻞﻣﺎﺤﻠﻟ ﺔﯿطﺎﻄﻤﻟا مﺪﻘﻟﺎﺑ ﻚﺴﻣأ •
.ﻞﺟرﻷا ﻲﺛﻼﺛ ﻞﻣﺎﺤﻟا سأر ﻊﻣ جرﺎﺨﻠﻟ ﺰﻛﺮﻤﻟا دﻮﻤﻋ ﺐﺤﺳا •
.بﻮﻏﺮﻤﻟا عﺎﻔﺗرﻻا ﻰﻠﻋ ﺎﮭﻄﺒﻀﻟ ﻞﺟرﻷا يدﺎﺣأ ﻞﻣﺎﺤﻟا قﺎﺳ ءاﺰﺟأ دﺪﻣ •
.ﻞﺟرﻷا ﻞﻔﻘﻟ ﺔﻋﺎﺴﻟا برﺎﻘﻋ ﺲﻜﻋ مﺪﻘﻟا ﺮﻳوﺪﺘﺑ ﻢﻗ •
ﺔﻨﻣﻵا قﺎﺴﻟا لﺎﻔﻗأ ماﺪﺨﺘﺳا .5
.ﺢﺿﻮﻣ ﻮھ ﺎﻤﻛ جرﺎﺨﻠﻟ ﺔﻨﻣﻵا ﺐﻠﻘﻟا قﺎﺳ لﺎﻔﻗأ ﺐﺤﺳا •
.ﻞﺟرﻷا ﻲﺛﻼﺛ ﻞﻣﺎﺤﻟا قﺎﺳ عﺎﻔﺗرا ﻂﺒﺿا •
.ﻞﺟرﻷا ﺖﯿﺒﺜﺘﻟ ﺐﻠﻘﻟا ﻞﻔﻗ ﻰﻠﻋ ﻂﻐﺿا •
43
Page 45
Arabic
ﻪﺘﻟازإو ﺐﯿﻛﺮﺘﻟا حﻮﻟ ﺖﯿﺒﺜﺗ .2
ﺐﯿﻛﺮﺘﻟا حﻮﻟ ﺮﻳﺮﺤﺘﻟ جرﺎﺨﻠﻟ ﻊﻳﺮﺴﻟا ﺮﻳﺮﺤﺘﻟا ﻞﻔﻗ ﺐﺤﺳا •
ﺐﯿﻛﺮﺘﻟا حﻮﻟ ﺔﻟﺎﻣإ ﻂﺒﺿ .3
.ﻲﺳأﺮﻟا ﺔﻟﺎﻣﻹا ﻞﻔﻗ ﺾﺒﻘﻣ ﻚﻔﺑ ﻢﻗ •
.ﺔﺑﻮﻏﺮﻤﻟا ﺔﻳواﺰﻟﺎﺑ ﺖﯿﺒﺜﺘﻟا حﻮﻟ ﻂﺒﺿ ﺪﻋأ •
ﻲﺳأﺮﻟا ﺔﻟﺎﻣﻹا ﻞﻔﻗ ﺾﺒﻘﻣ ﻂﺑرا •
44
Page 46
Arabic
ماﺪﺨﺘﺳﻻا تﺎﻤﯿﻠﻌﺗ
:ﺰﻛﺮﻤﻟا دﻮﻤﻋ عﺎﻔﺗرا ﻞﻳﺪﻌﺗ .1
.ﺰﻛﺮﻤﻟا دﻮﻤﻋ ﻞﻔﻗ ﺾﺒﻘﻣ ﻚﻔﺑ ﻢﻗ •
.بﻮﻏﺮﻤﻟا عﺎﻔﺗرﻻا ﻰﻟإ ﺰﻛﺮﻤﻟا دﻮﻤﻋ ﻊﻓرا •
.ﺰﻛﺮﻤﻟا دﻮﻤﻋ ﻞﻔﻗ ﺾﺒﻘﻣ ﻂﺑرا •
45
Page 47
Arabic
2
1
5
6
7
10
3
4
8
9
ﺔﮭﺟاﻮﻟا ﻒﺻوو ﻞﻜﺷ
ﻊﻳﺮﺴﻟا ﺮﻳﺮﺤﺘﻟا حﺎﺘﻔﻣ .1
ﺐﯿﻛﺮﺗ رﺎﻤﺴﻣ .2
ﺐﯿﻛﺮﺗ حﻮﻟ .3
ﻲﺳأﺮﻟا ﺔﻟﺎﻣﻹا ﻞﻔﻗ ﺾﺒﻘﻣ .4
ﻲﻘﻓﻷا ﻞﻳﺪﻌﺘﻟا ﺾﺒﻘﻣ .5
ﻊﻳﺮﺴﻟا ﻞﻳﺪﻌﺘﻟا ﺰﻛﺮﻣ دﻮﻤﻋ .6
ﺰﻛﺮﻤﻟا دﻮﻤﻋ ﻞﻔﻗ ﺾﺒﻘﻣ .7
ﺔﻔﻜﻟا ﺾﺒﻘﻣ .8
11
ﺾﺒﻘﻣ .9
ﺔﯿﺑﻮﻜﺴﻠﺗ ﻞﺟرأ .10
ﺰﻛﺮﻤﻟا دﻮﻤﻋ ﻞﻔﻗ .11
12
13
ﻦﯿﻣﺄﺘﻟا ﻞﺟر لﺎﻔﻗأ .13
14
ﺔﯿﺑذﺎﺠﻟا فﺎﻄﺧ .12
ﺔﯿطﺎﻄﻣ مﺪﻗ .14
46
Page 48

 Loading...