

Page 1
5-Section Aluminium Travel Tripod with
Integrated Monopod
Dual Bubble Level • Twist Leg Lock System • 360 Degree Panning Head
Precise-155
Page 2

The Precise-155 anodized aluminium tripod is a sturdy yet lightweight tripod with 5-section legs
that fold upward 180° to create an extremely compact package for transport – with the included
head attached, folded length is only 32 cm. With a maximum load capacity of 5kg, the tripod and
head ensure a stable base for many DSLR body/lens combinations. This tripod’s key feature is the
center column mechanism, which allows the column to be extended vertically with great fluidity
and can be detached easily to be used as a monopod. This makes it an extremely versatile tripod,
suitable for a wide range of photography and videography applications.
Introduction
• Precise-155
• Carry Case
• User Guide
Packaging Contents
•MaximumHeight:154cm
•MinimumHeight:44cm
•FoldedHeight:32cm
•Sections:5
•LoadCapacity:5kg
•Weight:1.15kg
Specifications
Features
• 360 Degree Pan and Tilt Head: The pan and tilt head allows for fluid camera positioning
and accurate alignment.
• Secure Twist Leg Locks:
Theflip-locksallowforquickandsecureadjustmentofthe
telescopingtripodlegs,whilethecenterbraceaddsstabilitybyconnectingthelegsto
makethemmorerigid.
• Anodized Aluminium Finish:
Theanodizedaluminiumbodyensuresthatthetripod
lastsmuchlongertowearandtear
• Rapid Adjustment Center Column:
Therapidcentercolumnallowsquickandeasy
cameraheightadjustment.
1
English
Page 3

• Bubble Level: The bubble level ensures that your shot is aligned to the best angle
always.
• Sure-Grip Rubber Feet: Get maximum traction on any surface for that impeccable
shot in any environment
• Lightweight & Portable: Specialized Twist Leg Lock System lets you fold the tripod to
just 32cm and fit it in a medium sized bag.
• Monopod Convertible: The rapid release column detaches to serve as an adjustable
5-section monopod.
• Carrying Case with Shoulder Strap: Carry this tripod anywhere easily using the
provided carry case
English
Please read all safety instructions and warnings thoroughly before using this product.
Improper use of this product may result in damage to this or attached products.
1. Do not disassemble the product or attempt to fix it.
2. Do not attempt to replace any part of this product.
3. Do not store or use the product in a high temperature environment, including
intense sunlight or heat.
Precautions:
2
Page 4
English
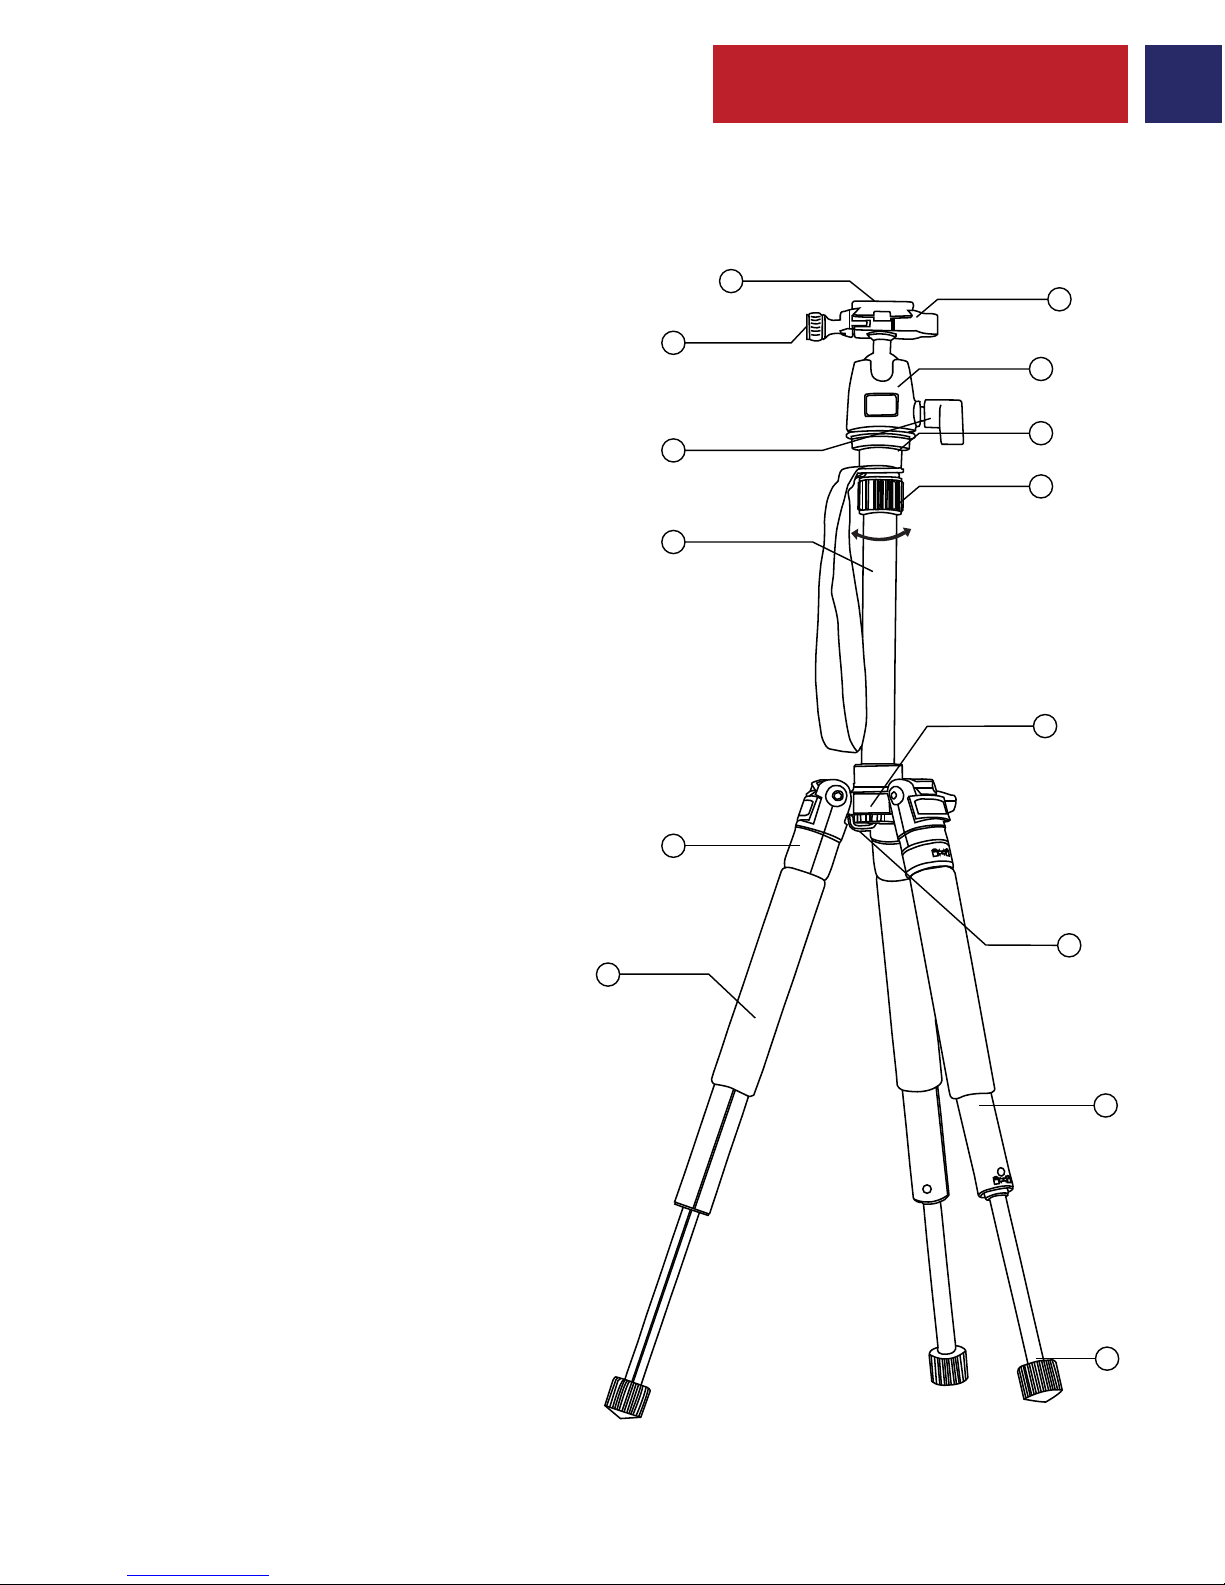
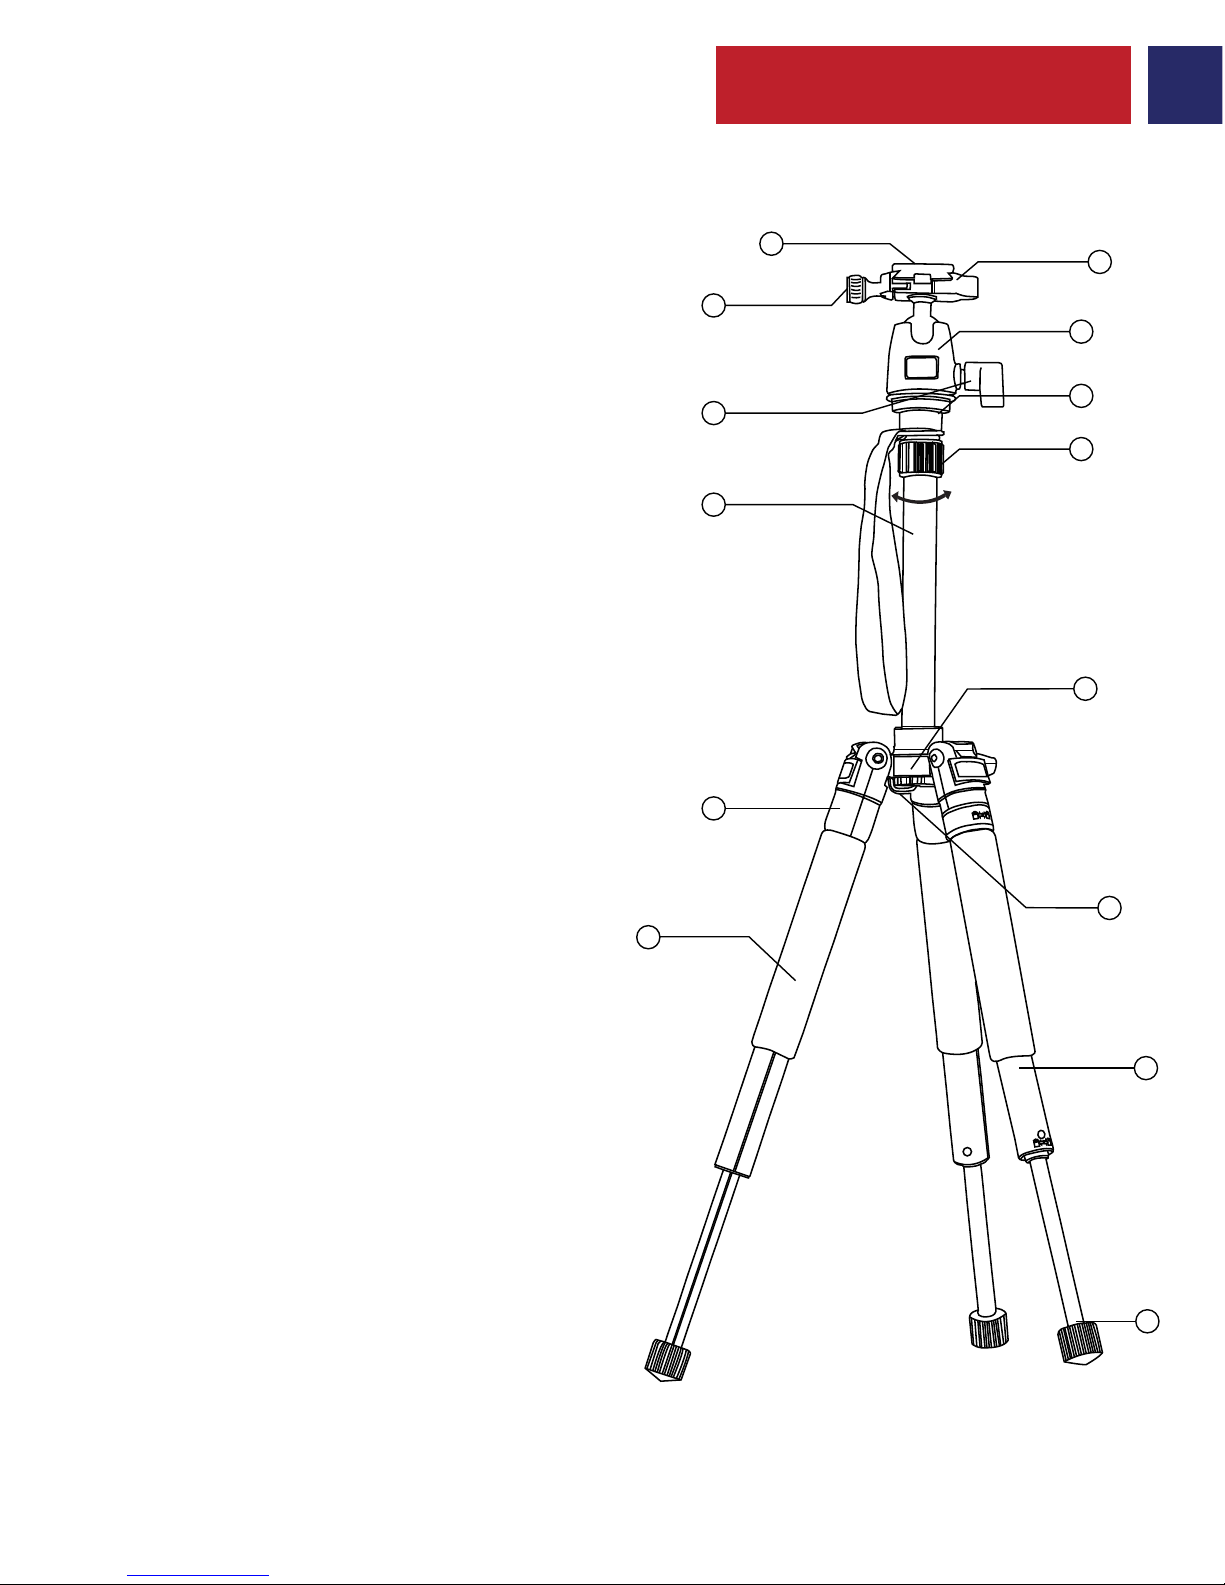
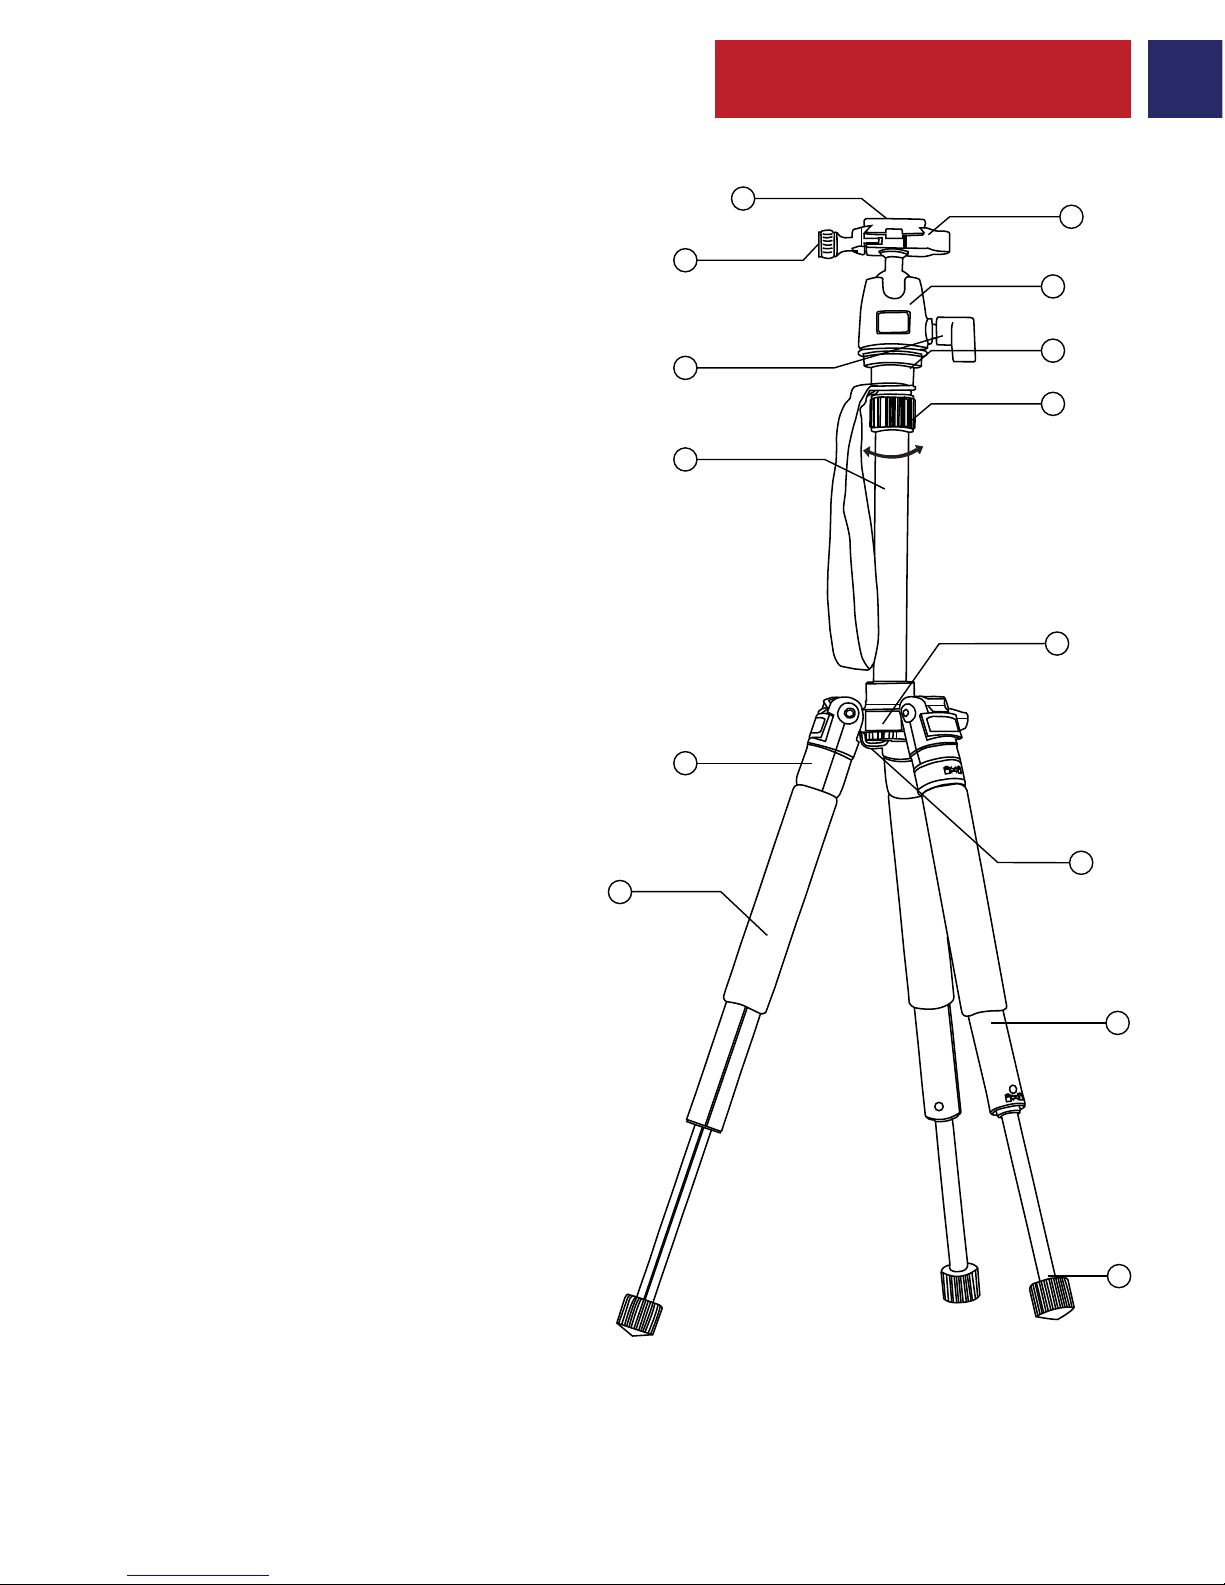
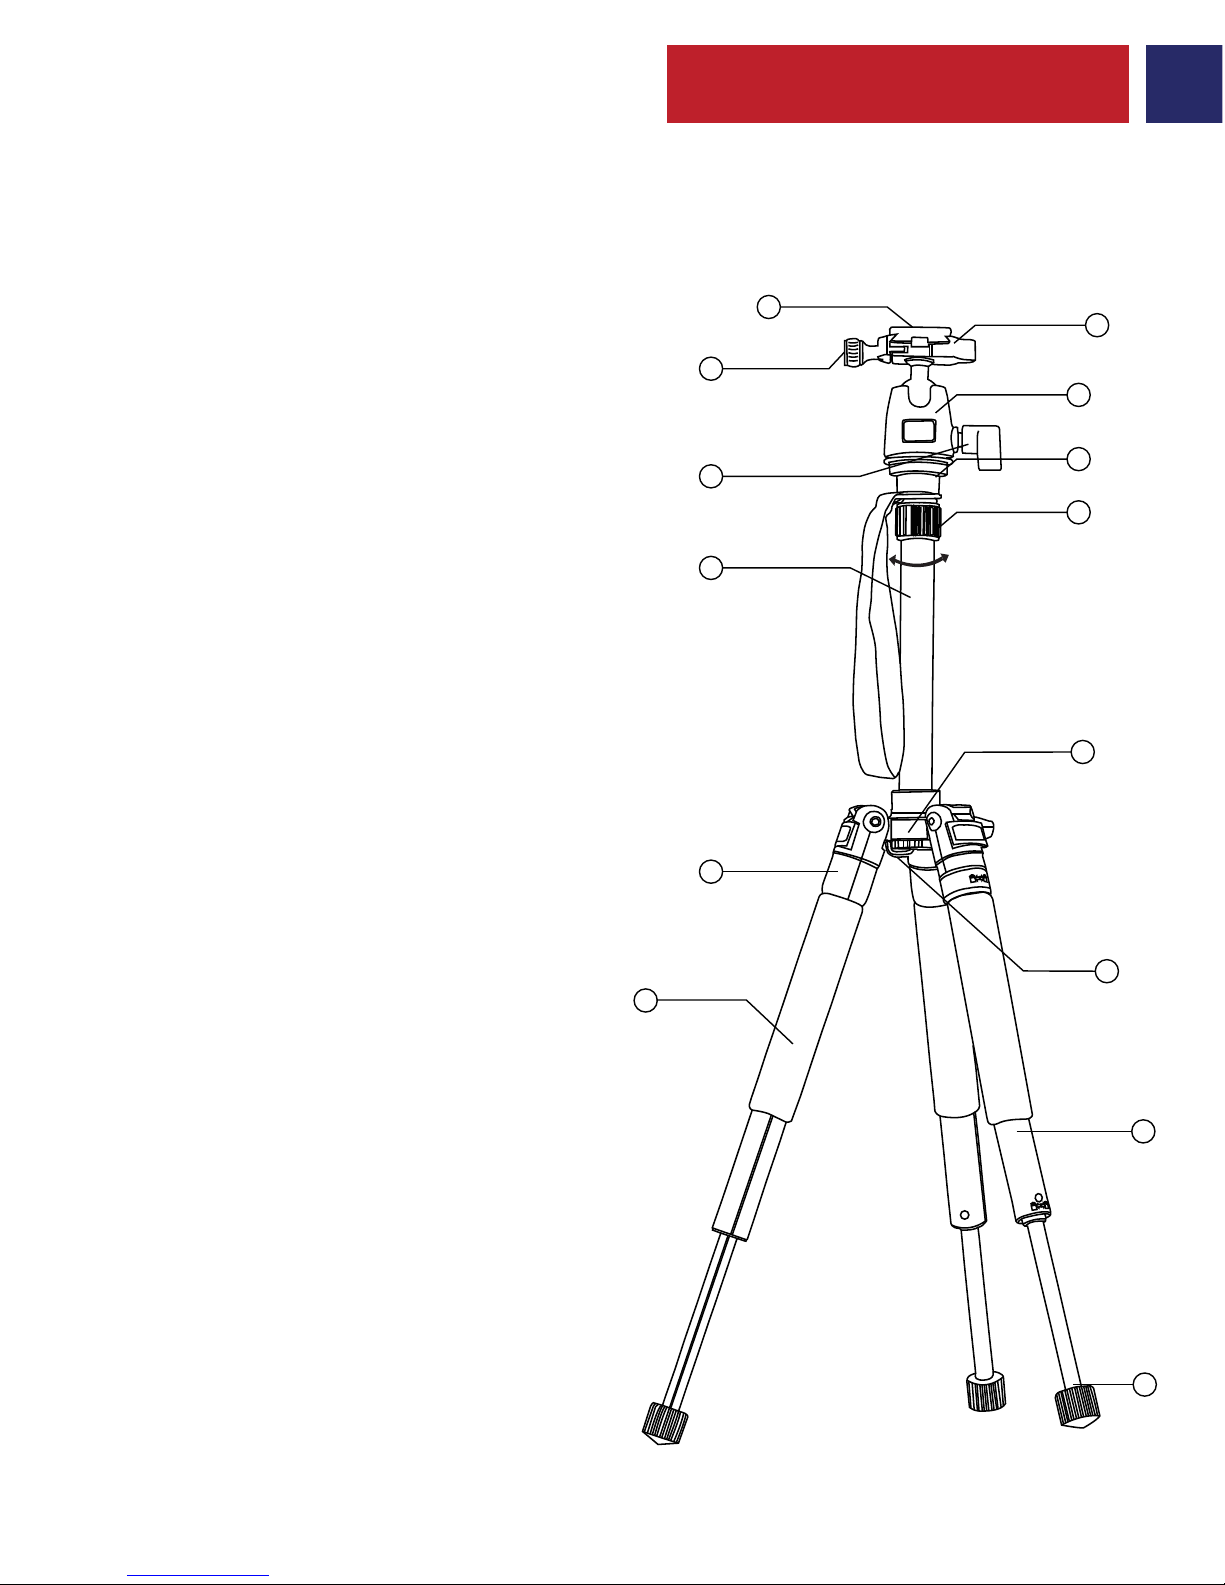
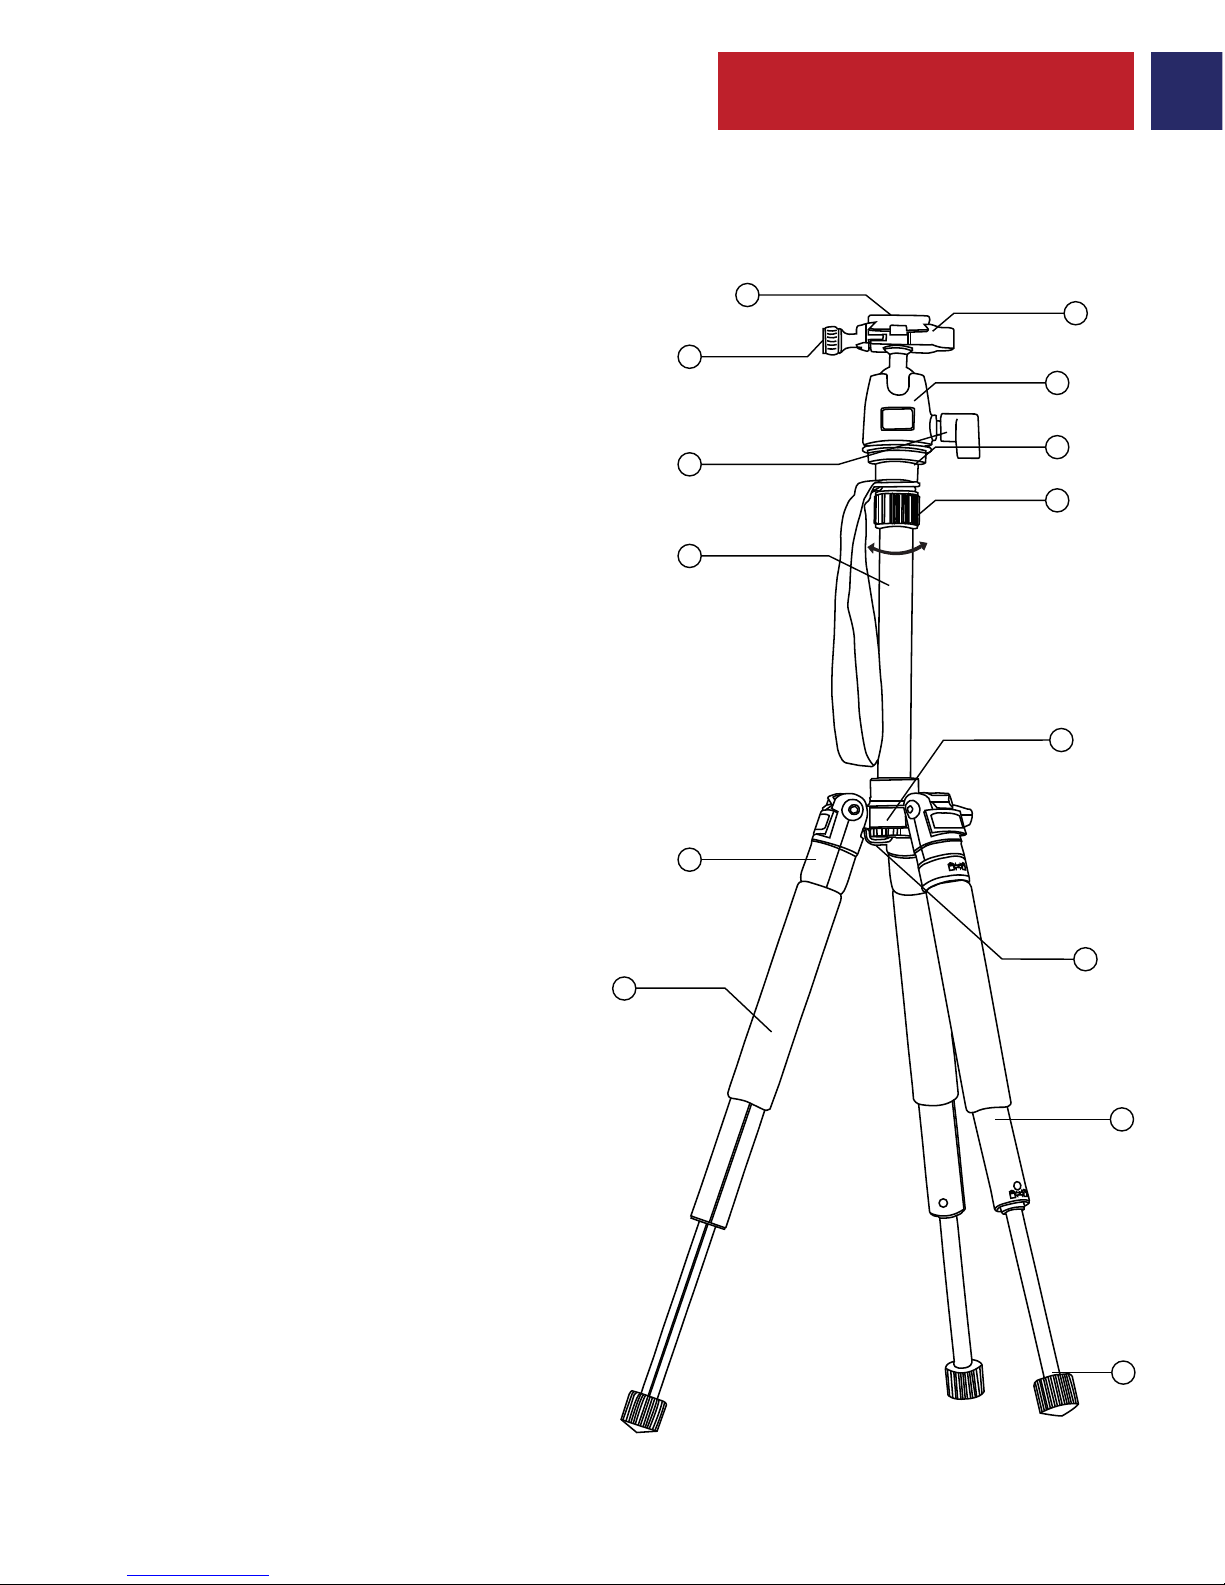
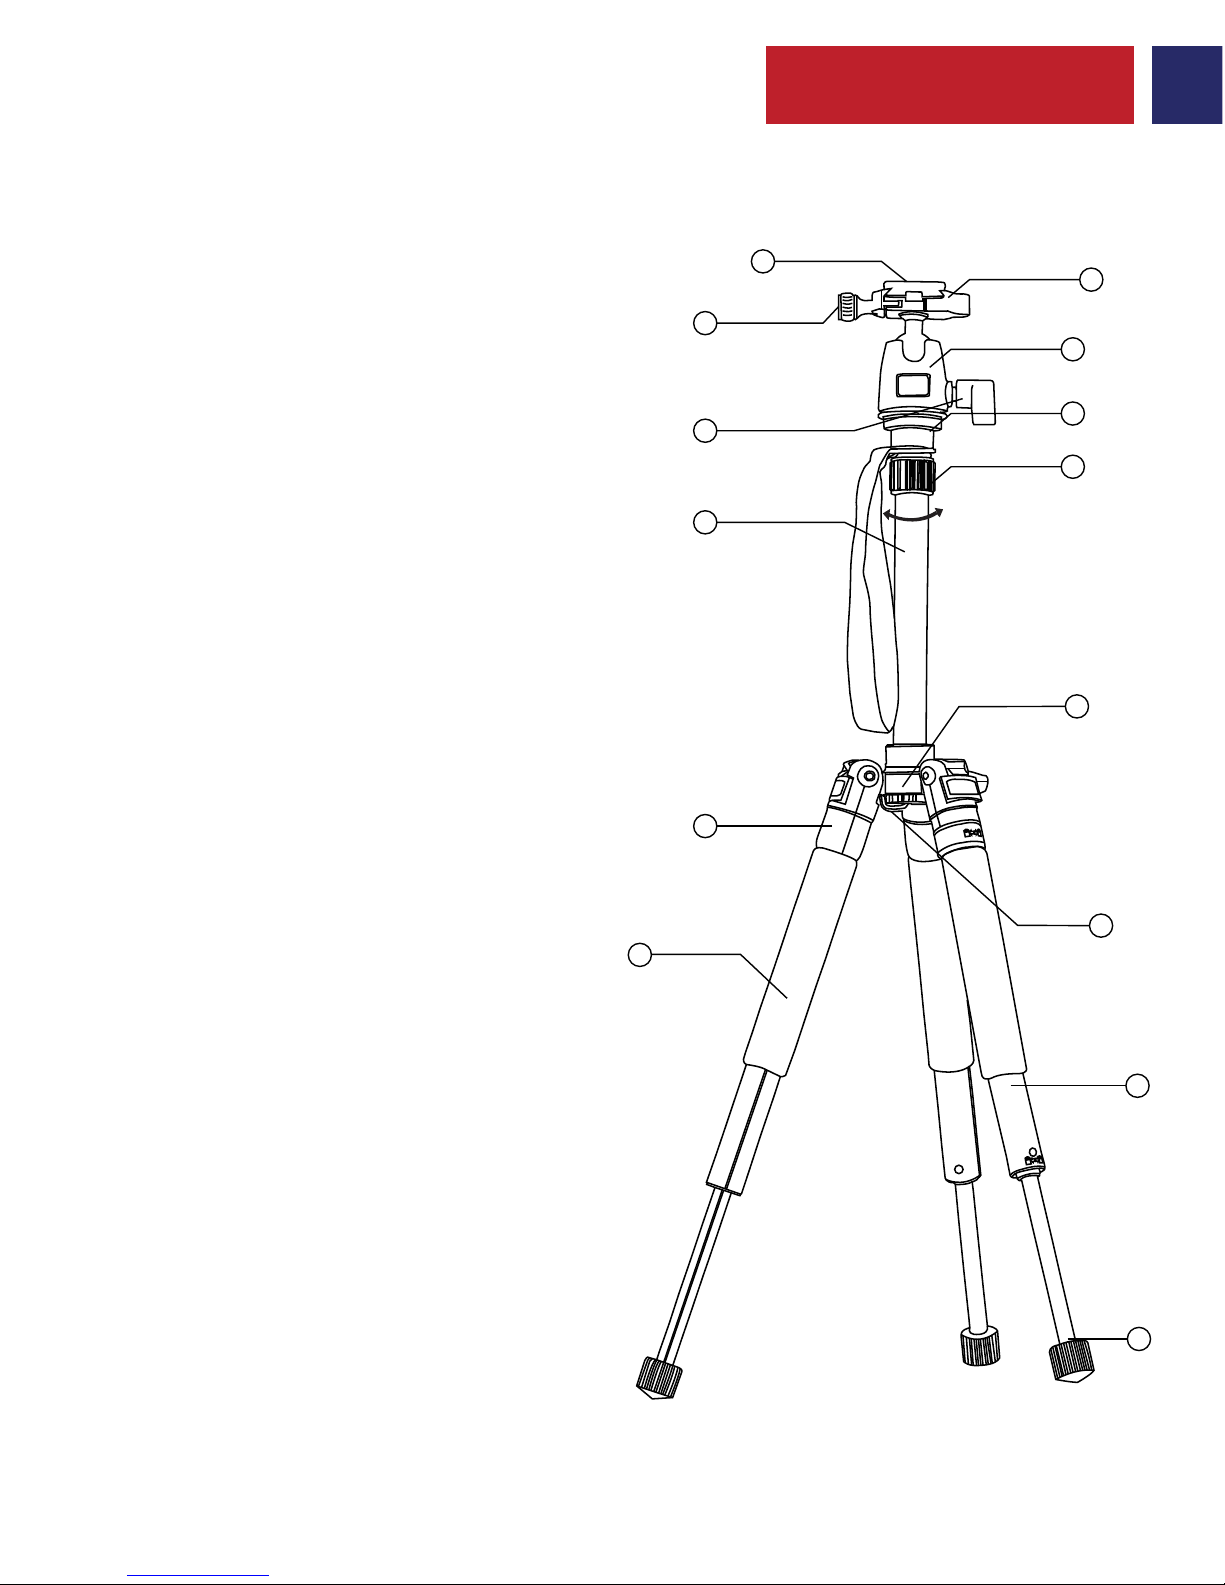
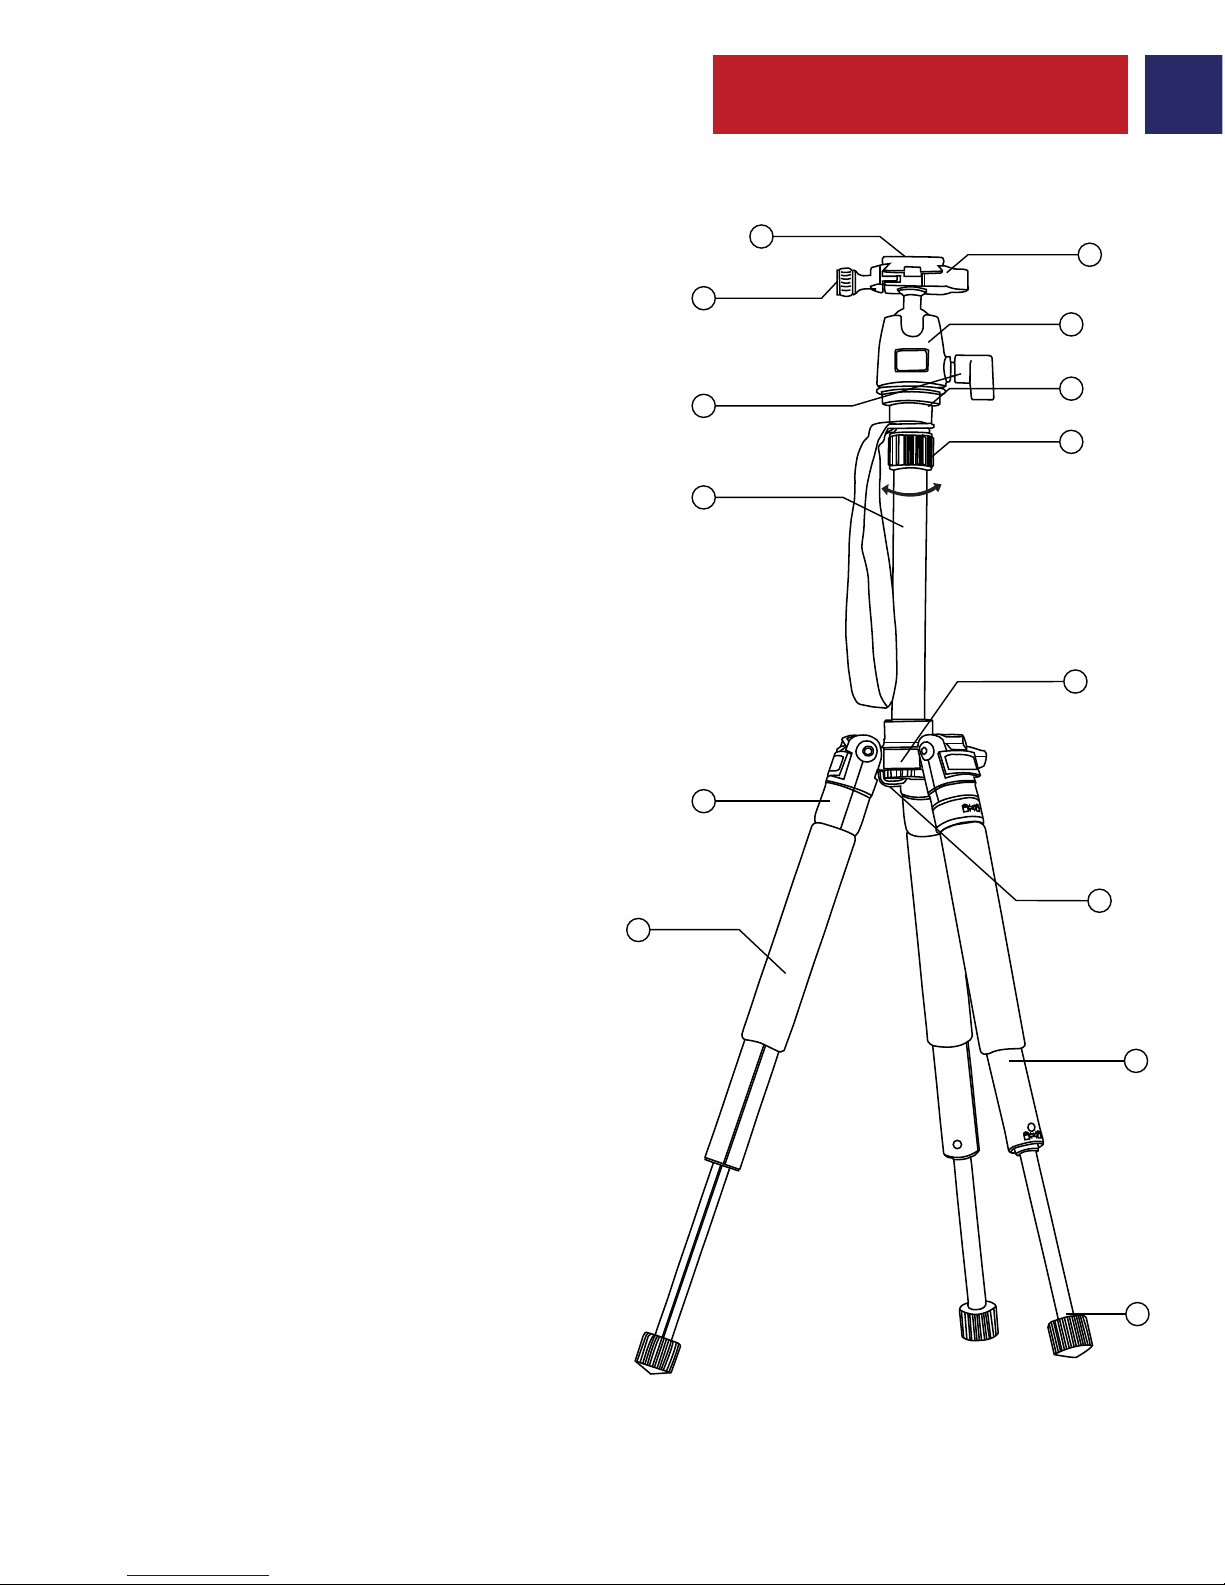
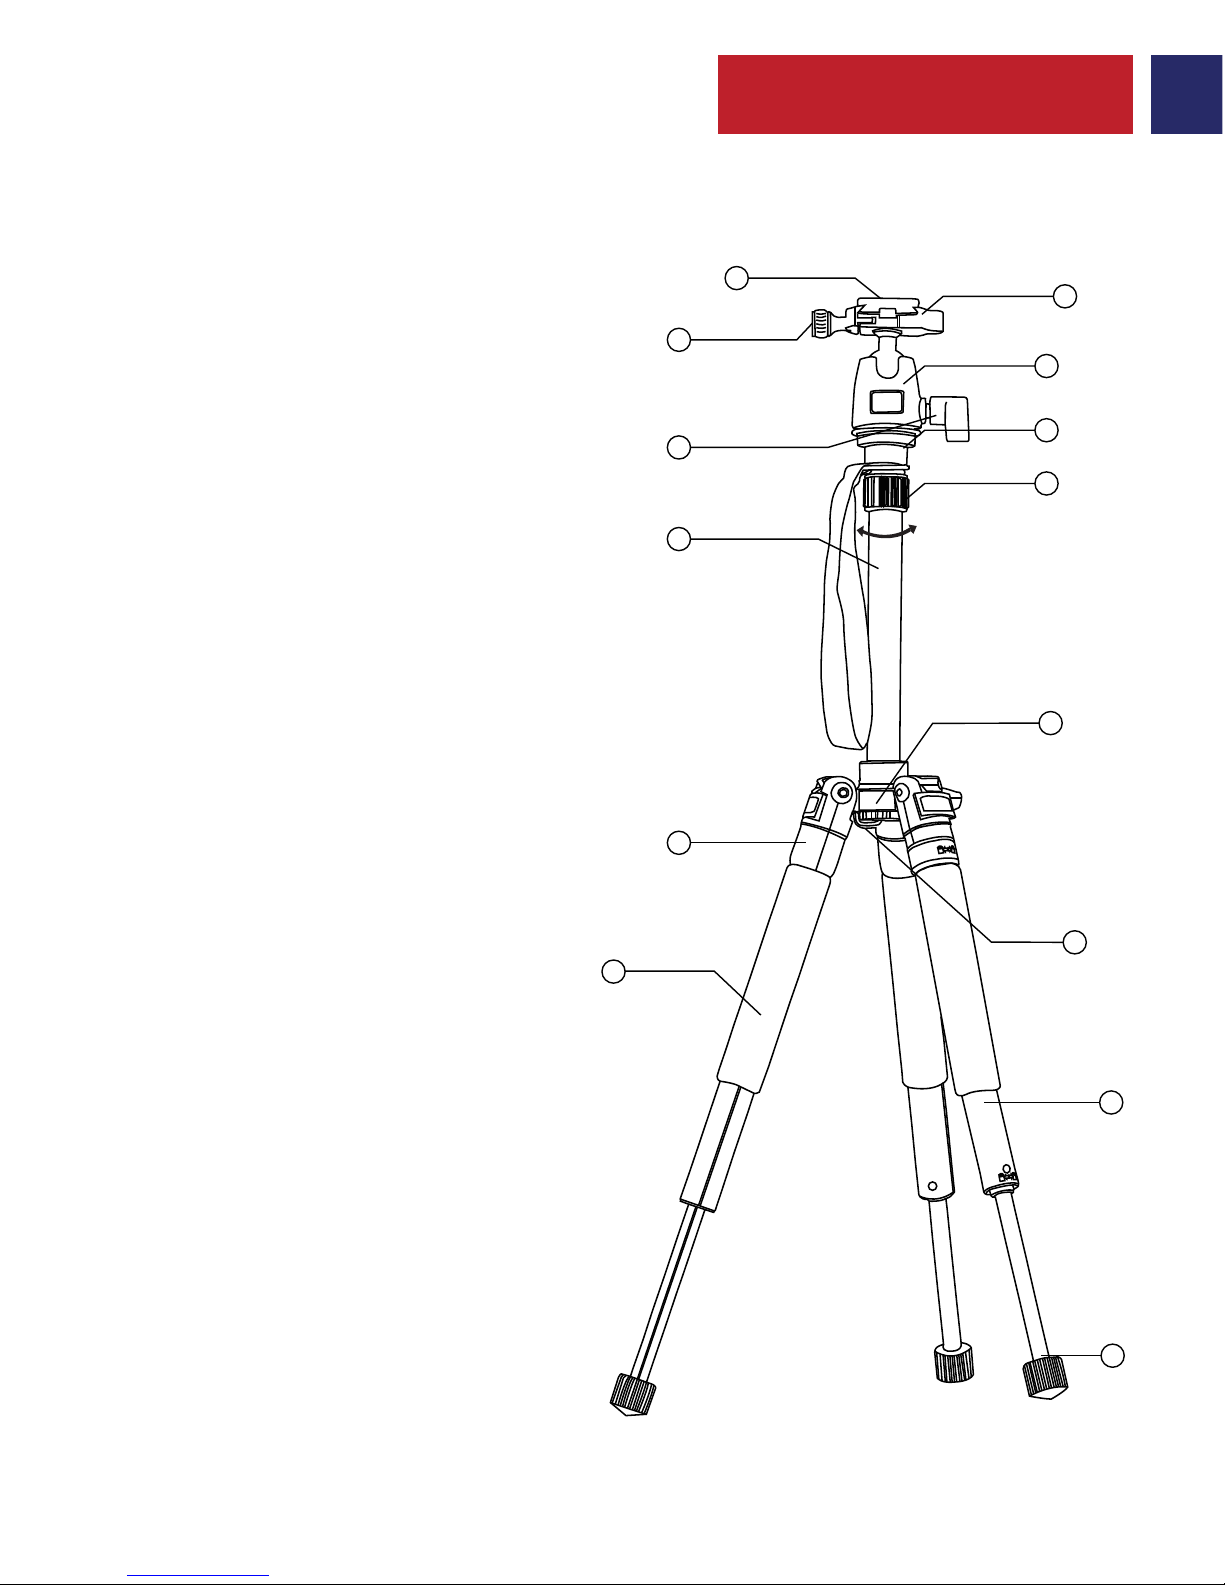
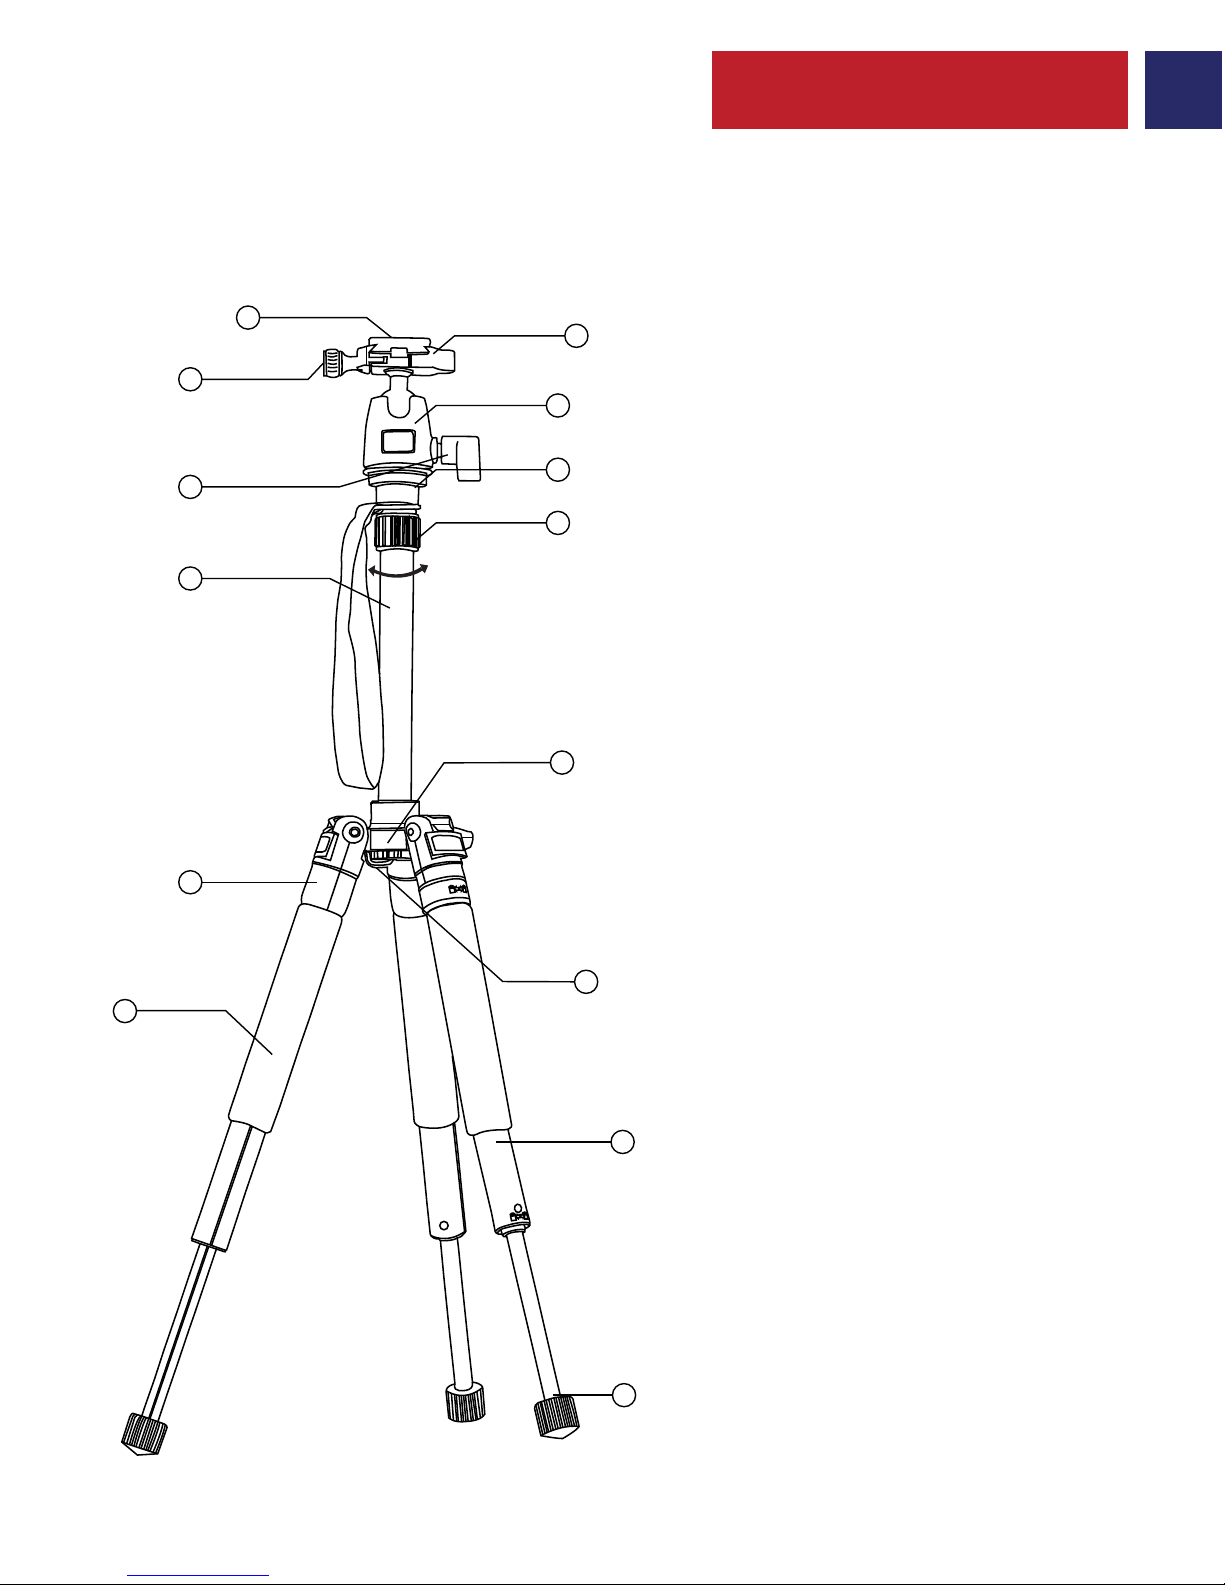
Appearance & Interface Description
3
1
3
5
7
10
11
2
4
8
9
12
6
13
14
Page 5
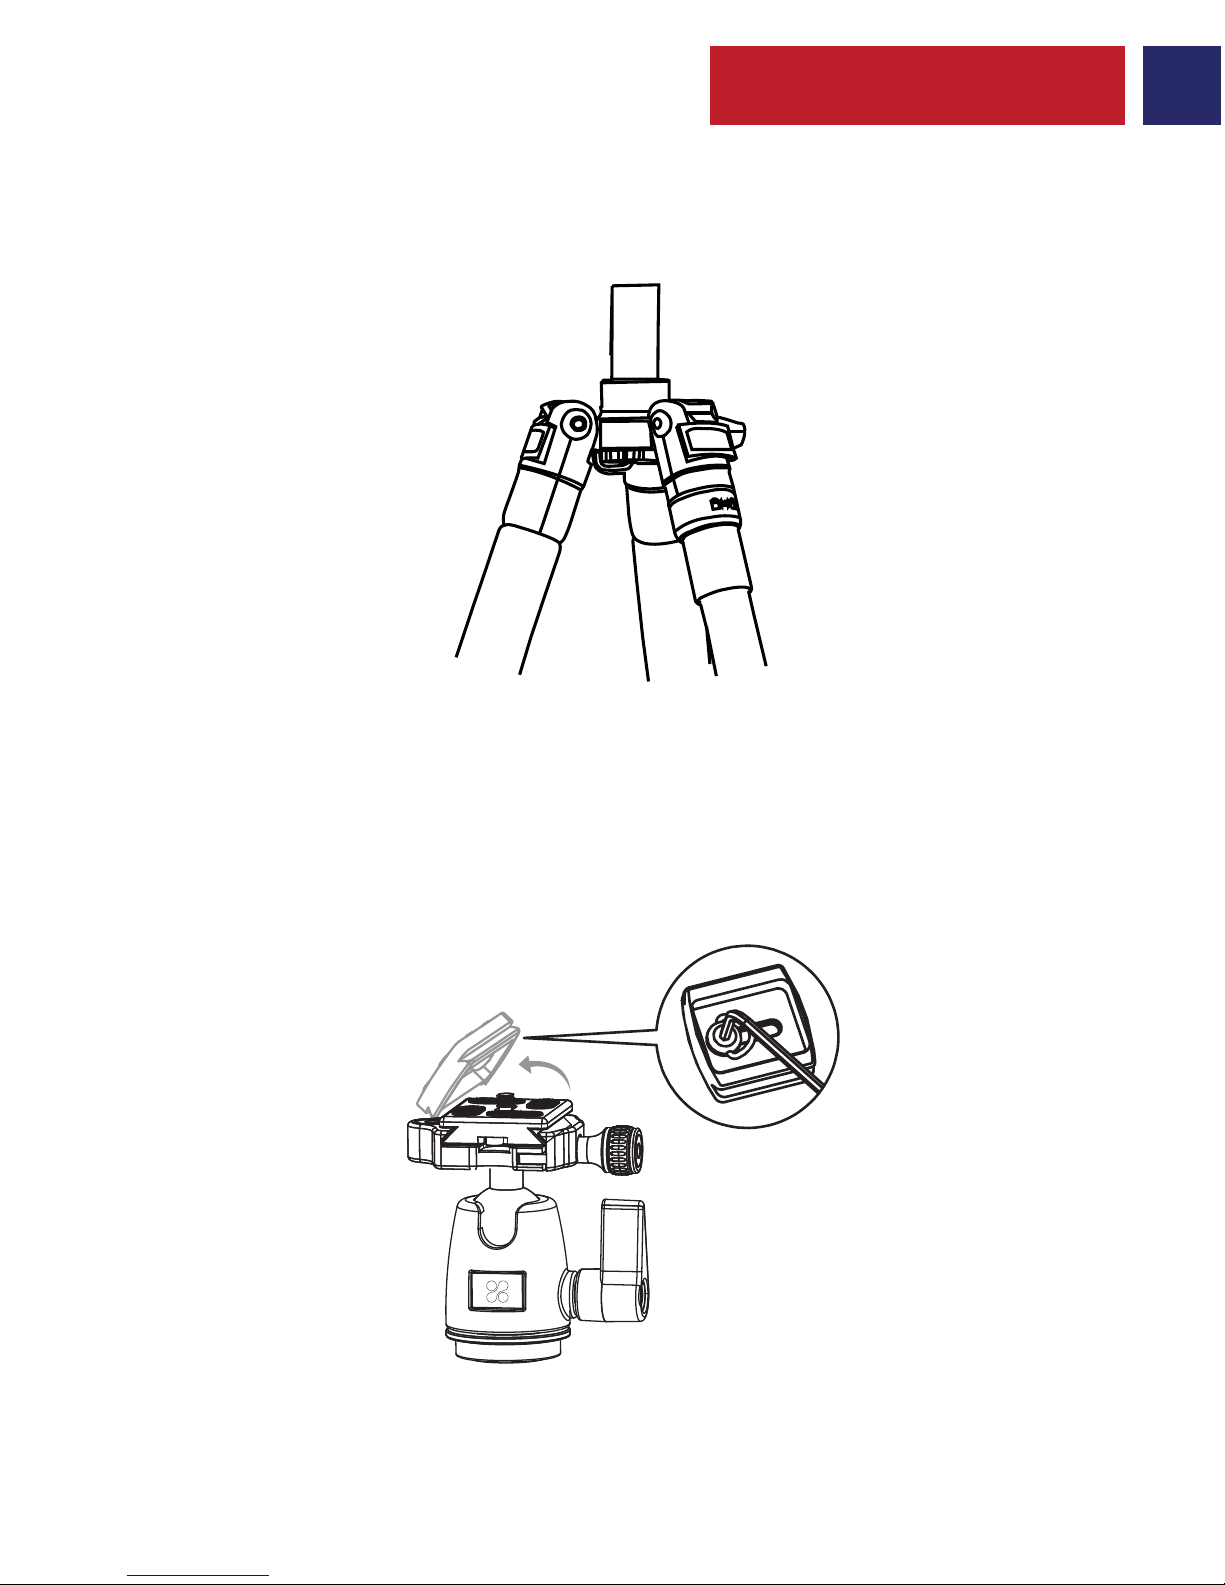
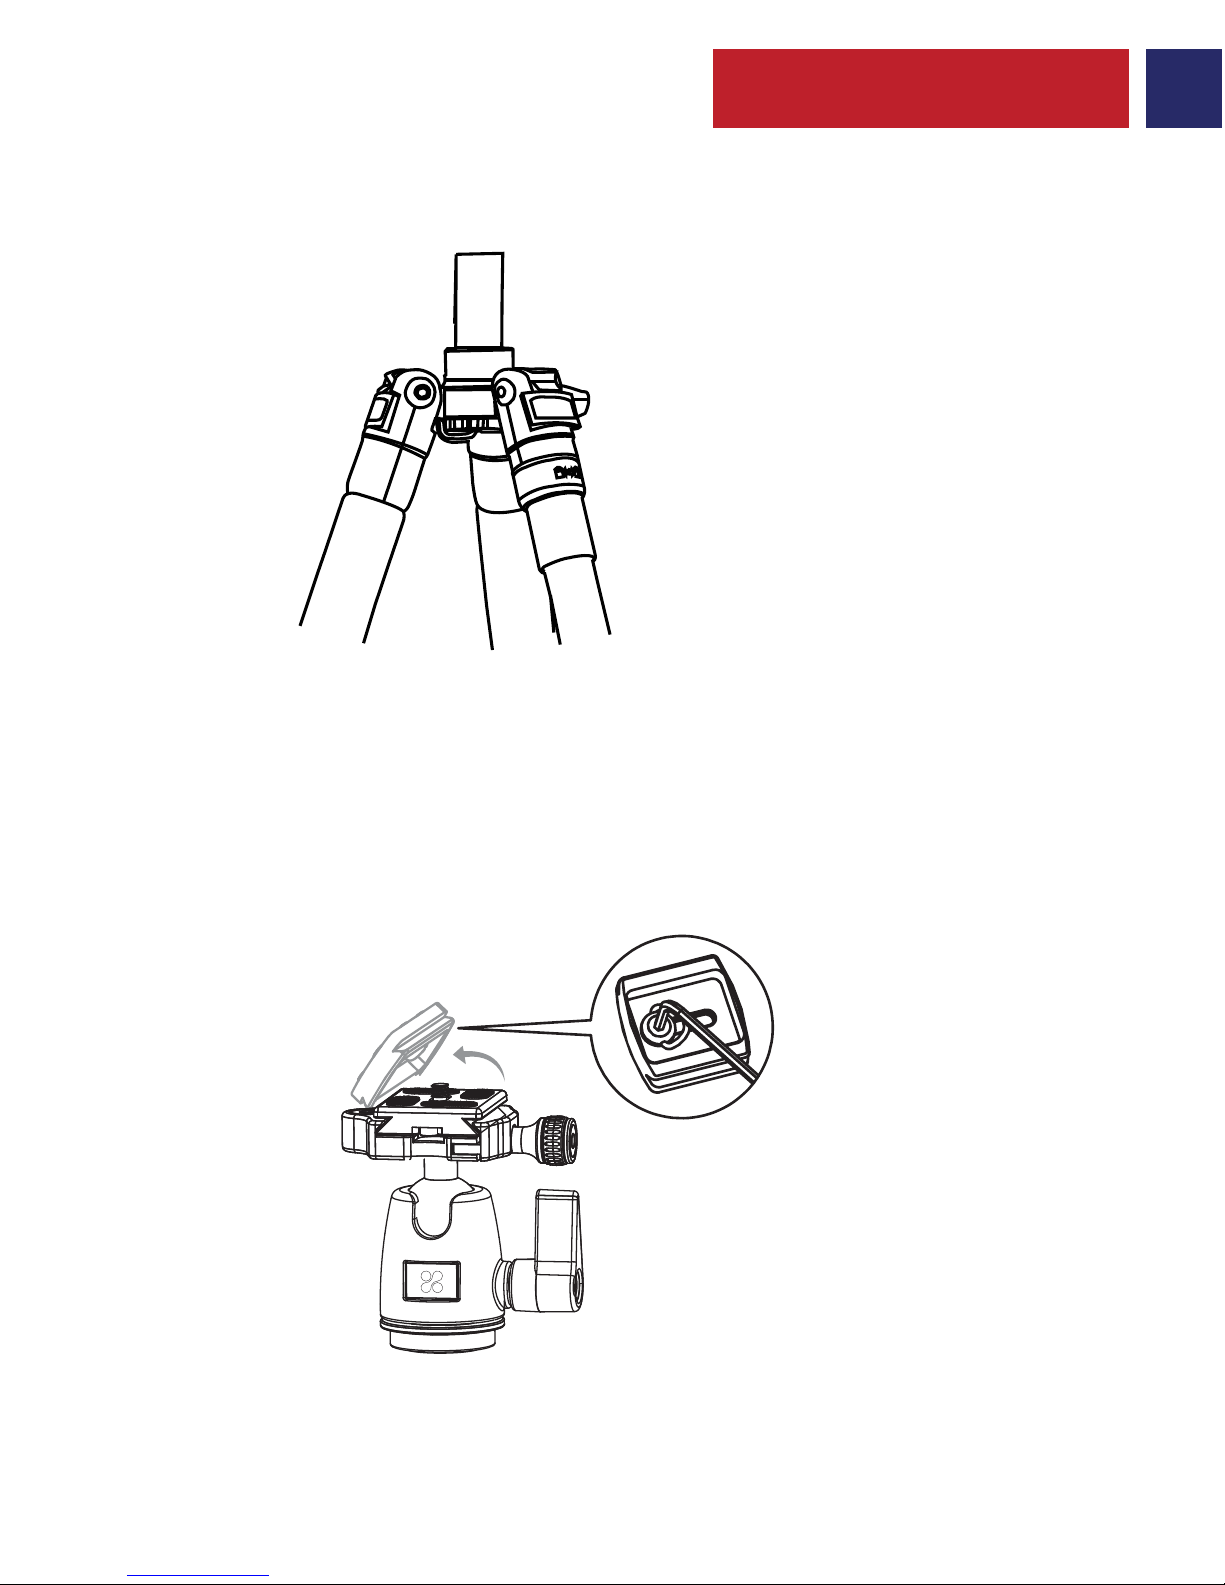
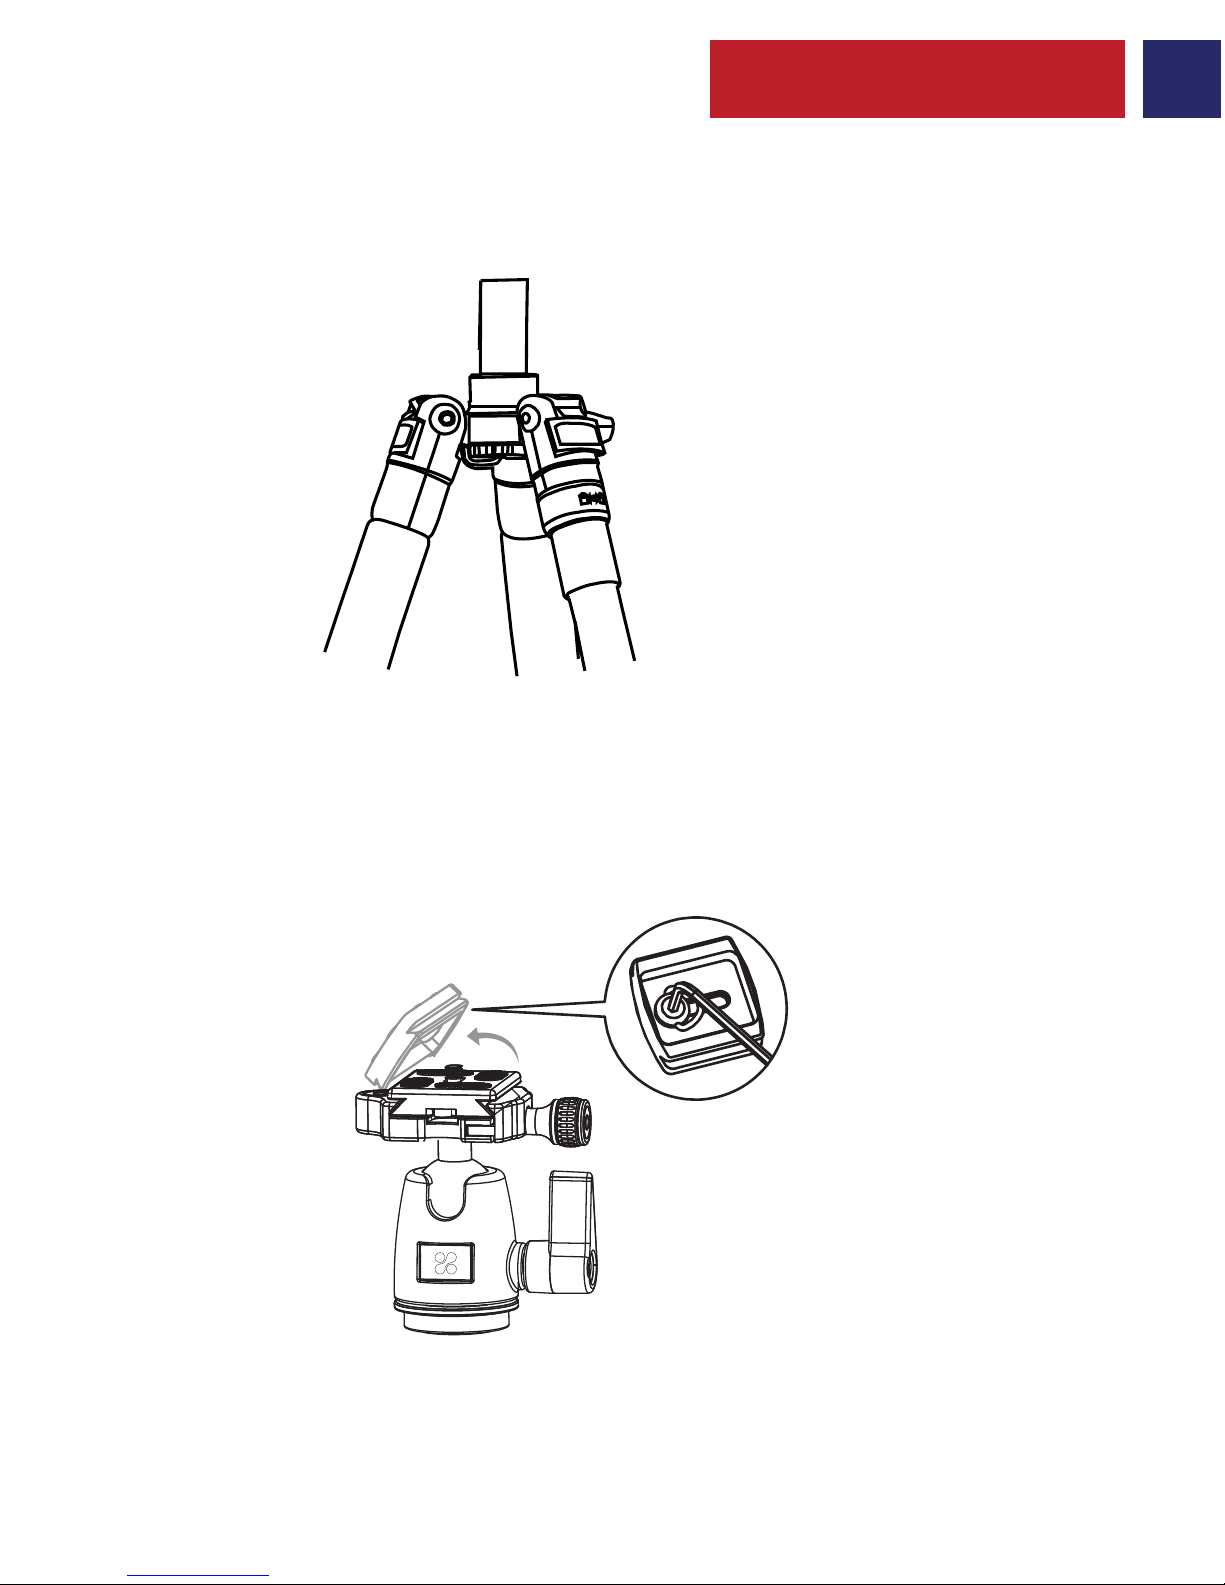
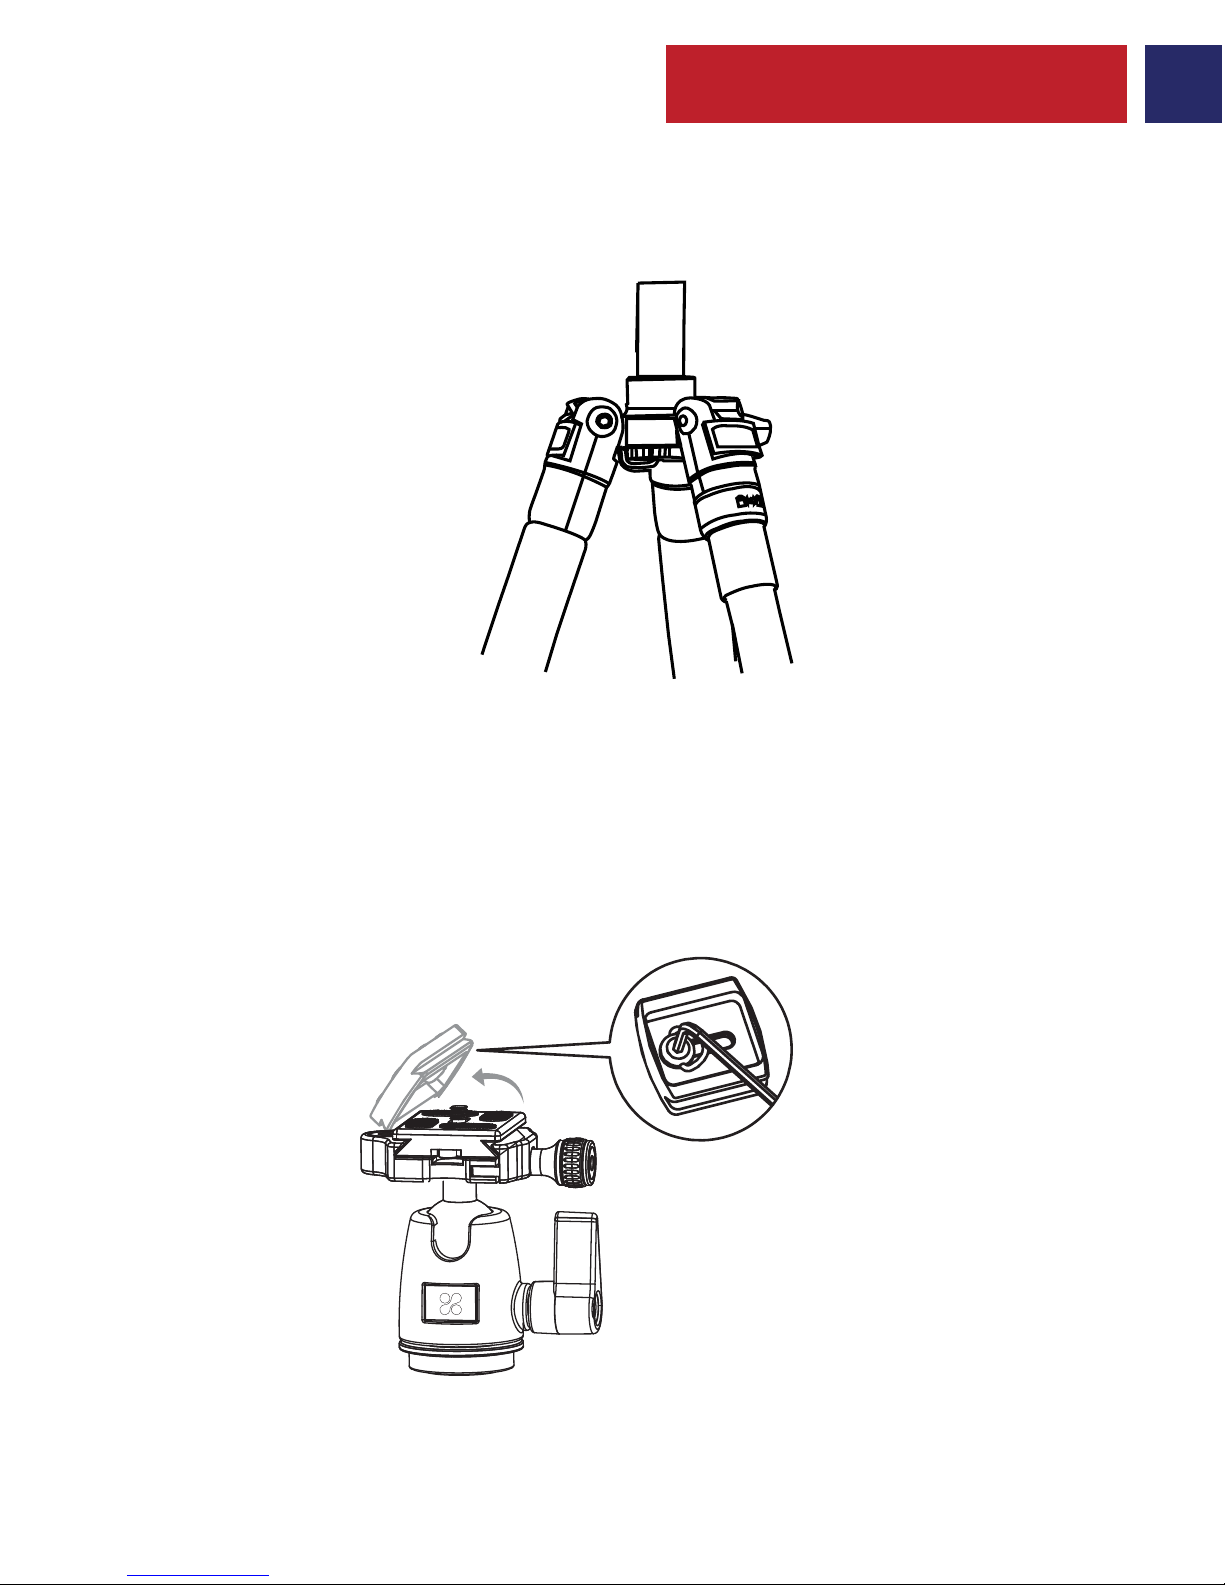
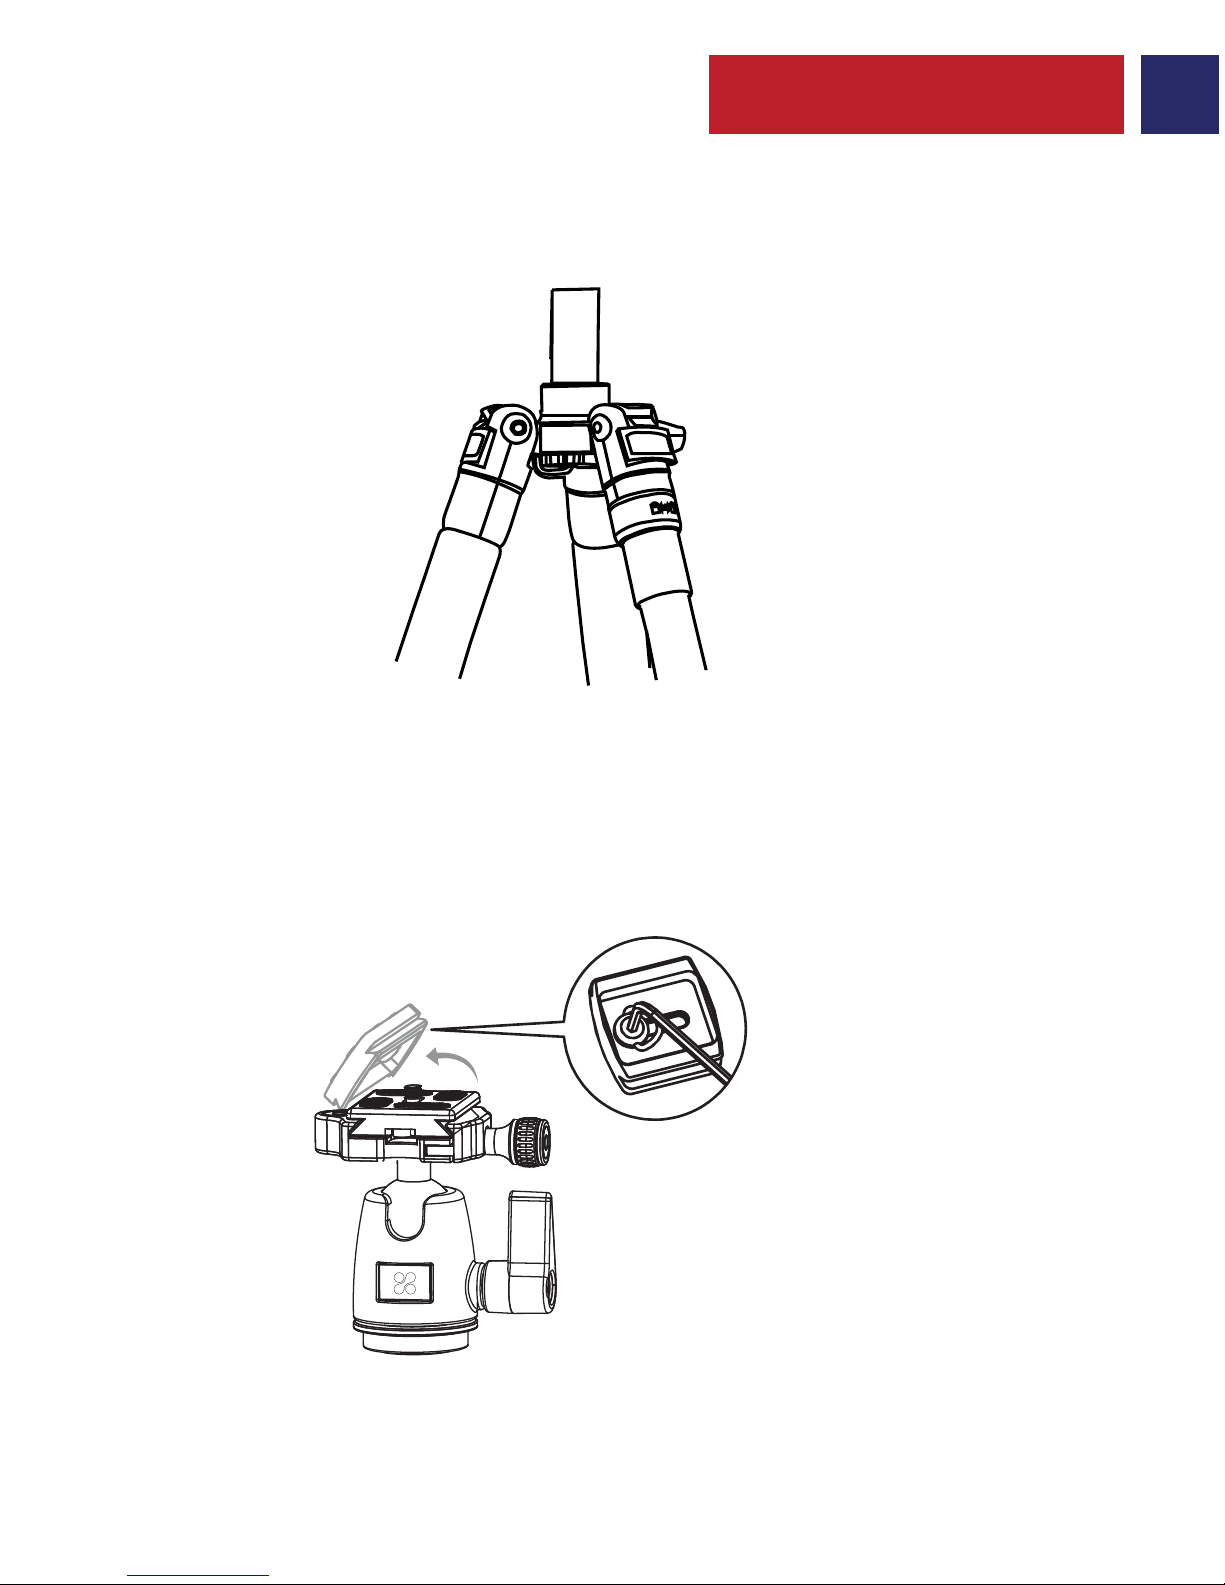
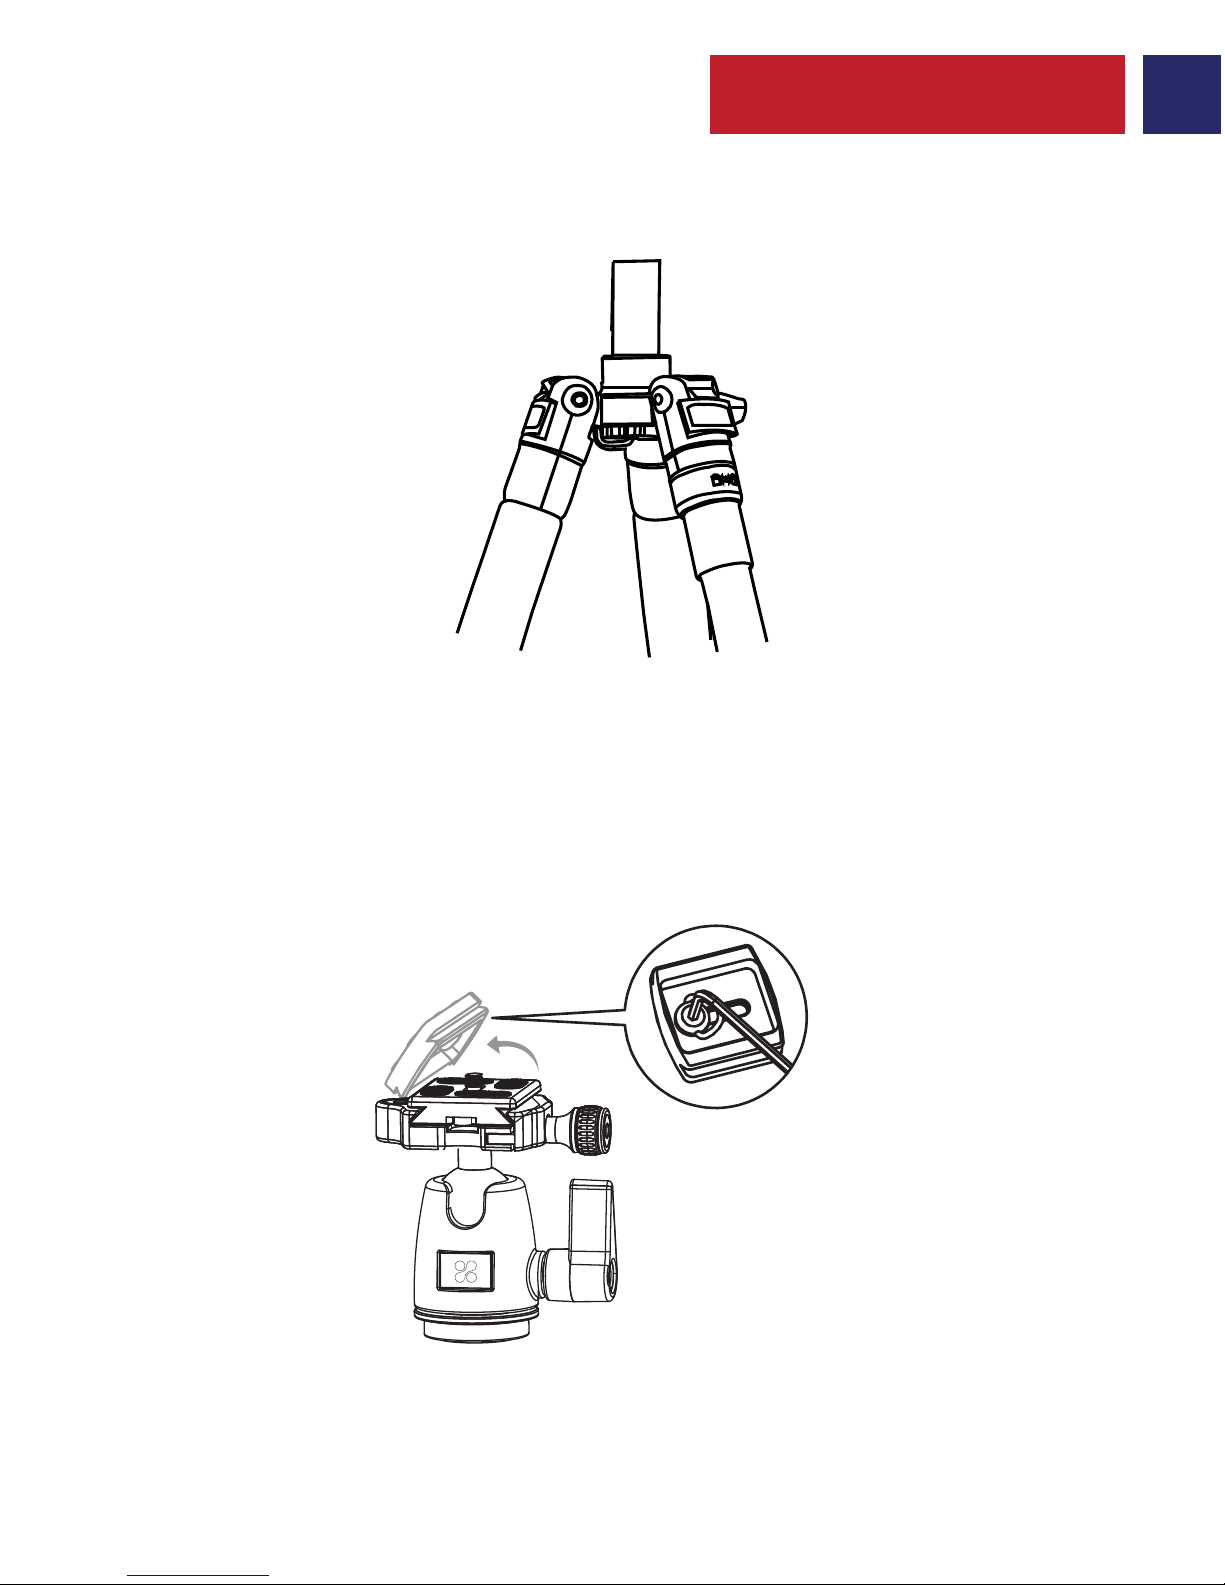
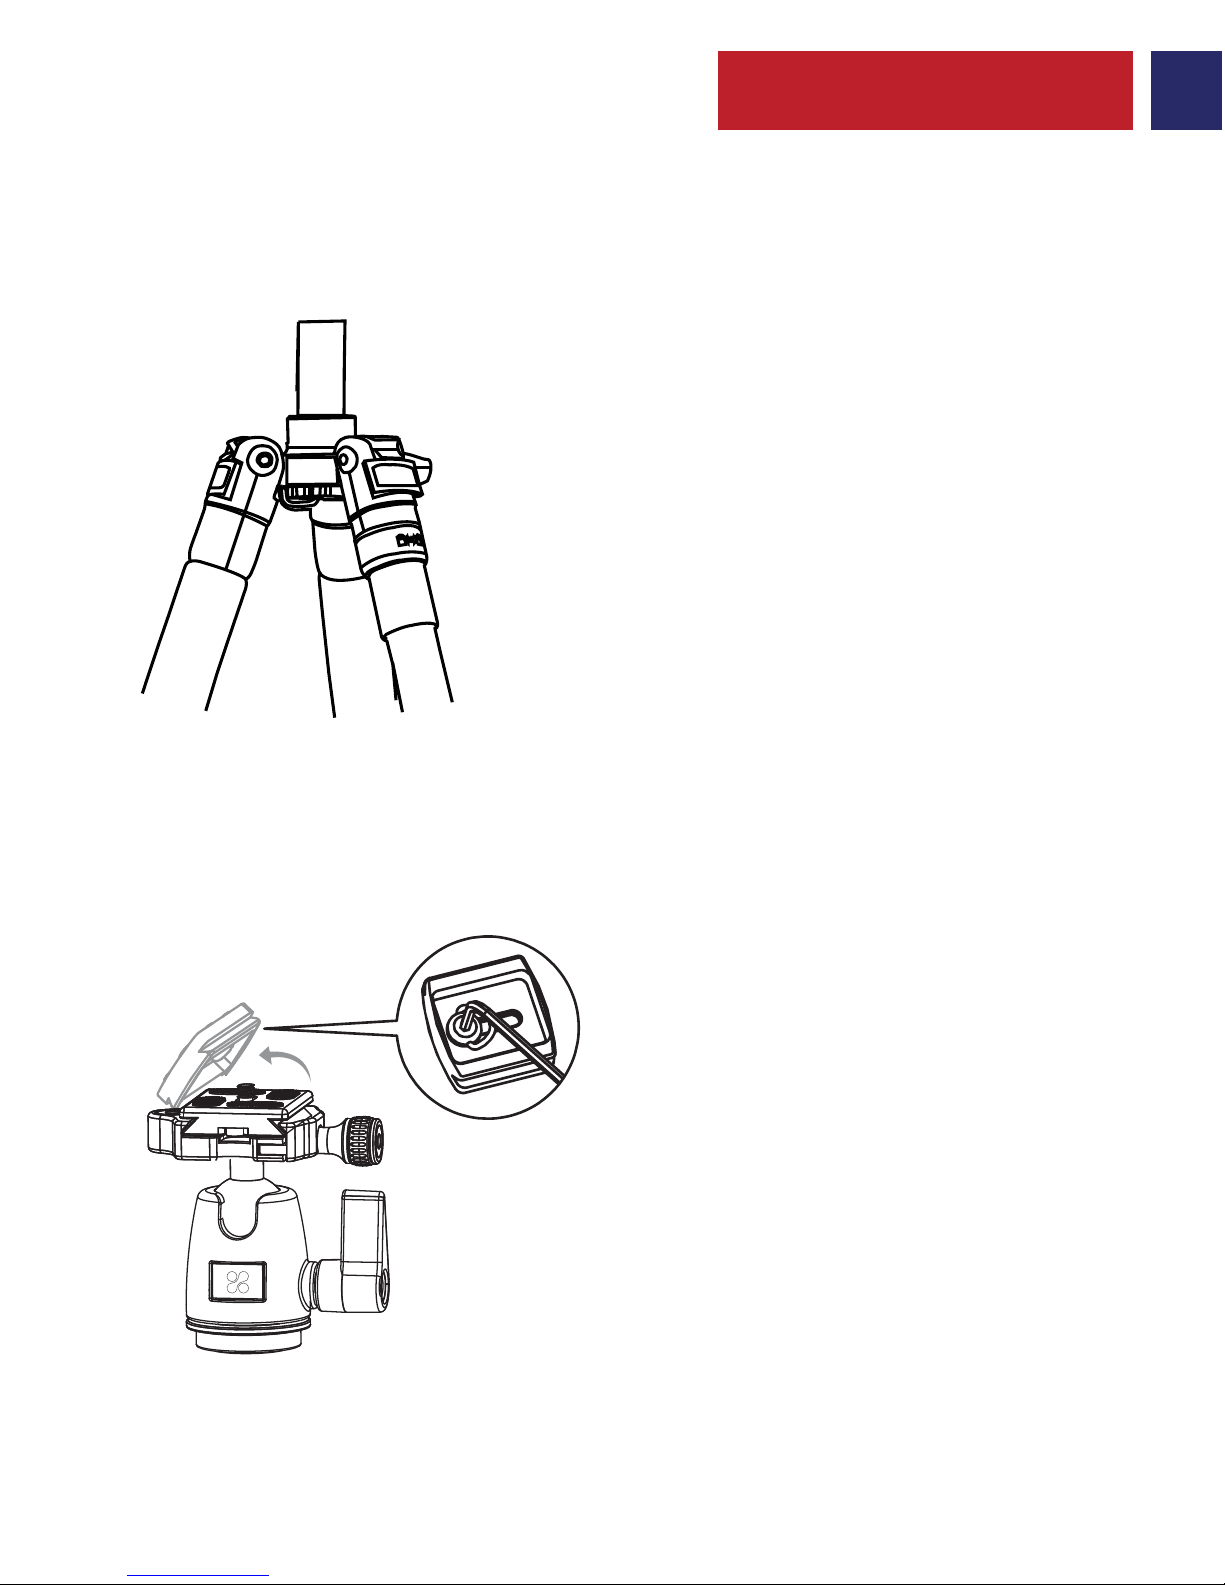
1. Adjusting the Height Of The Cente r Column:
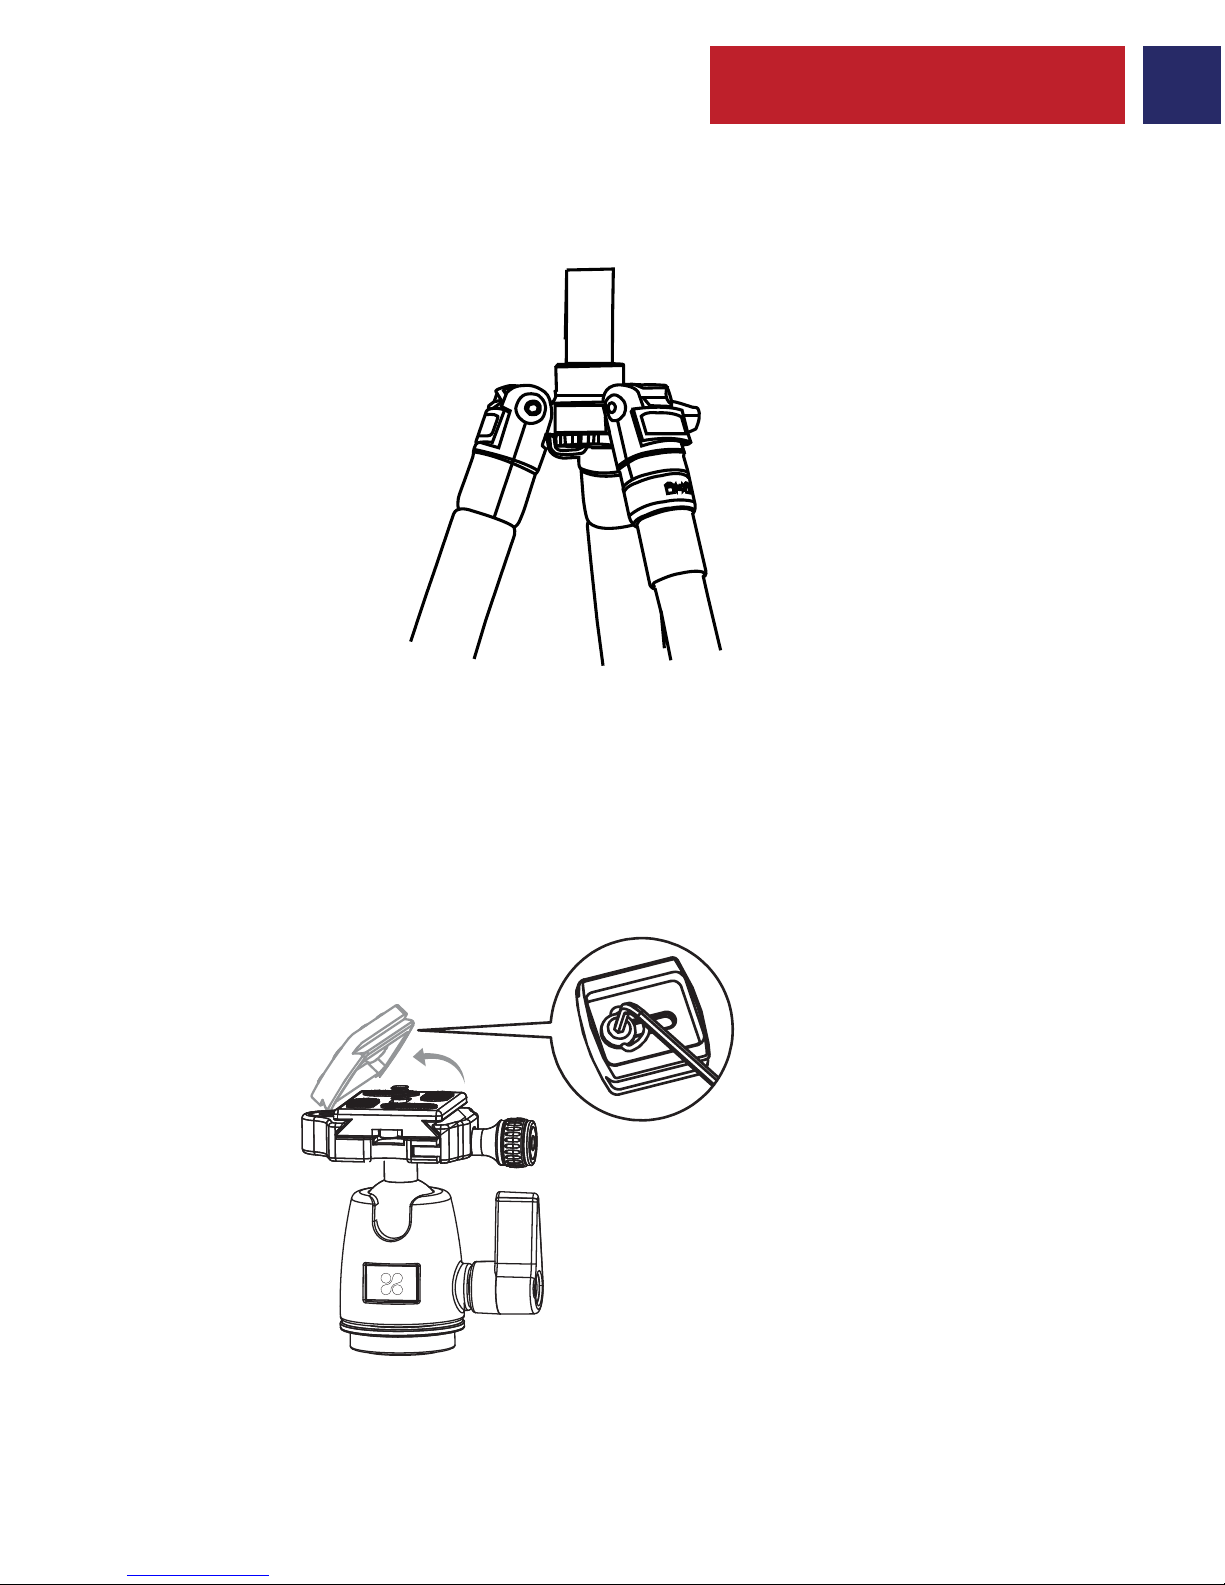
2. Installation and Removal Of Mounting Plate
Operation Instructions
English
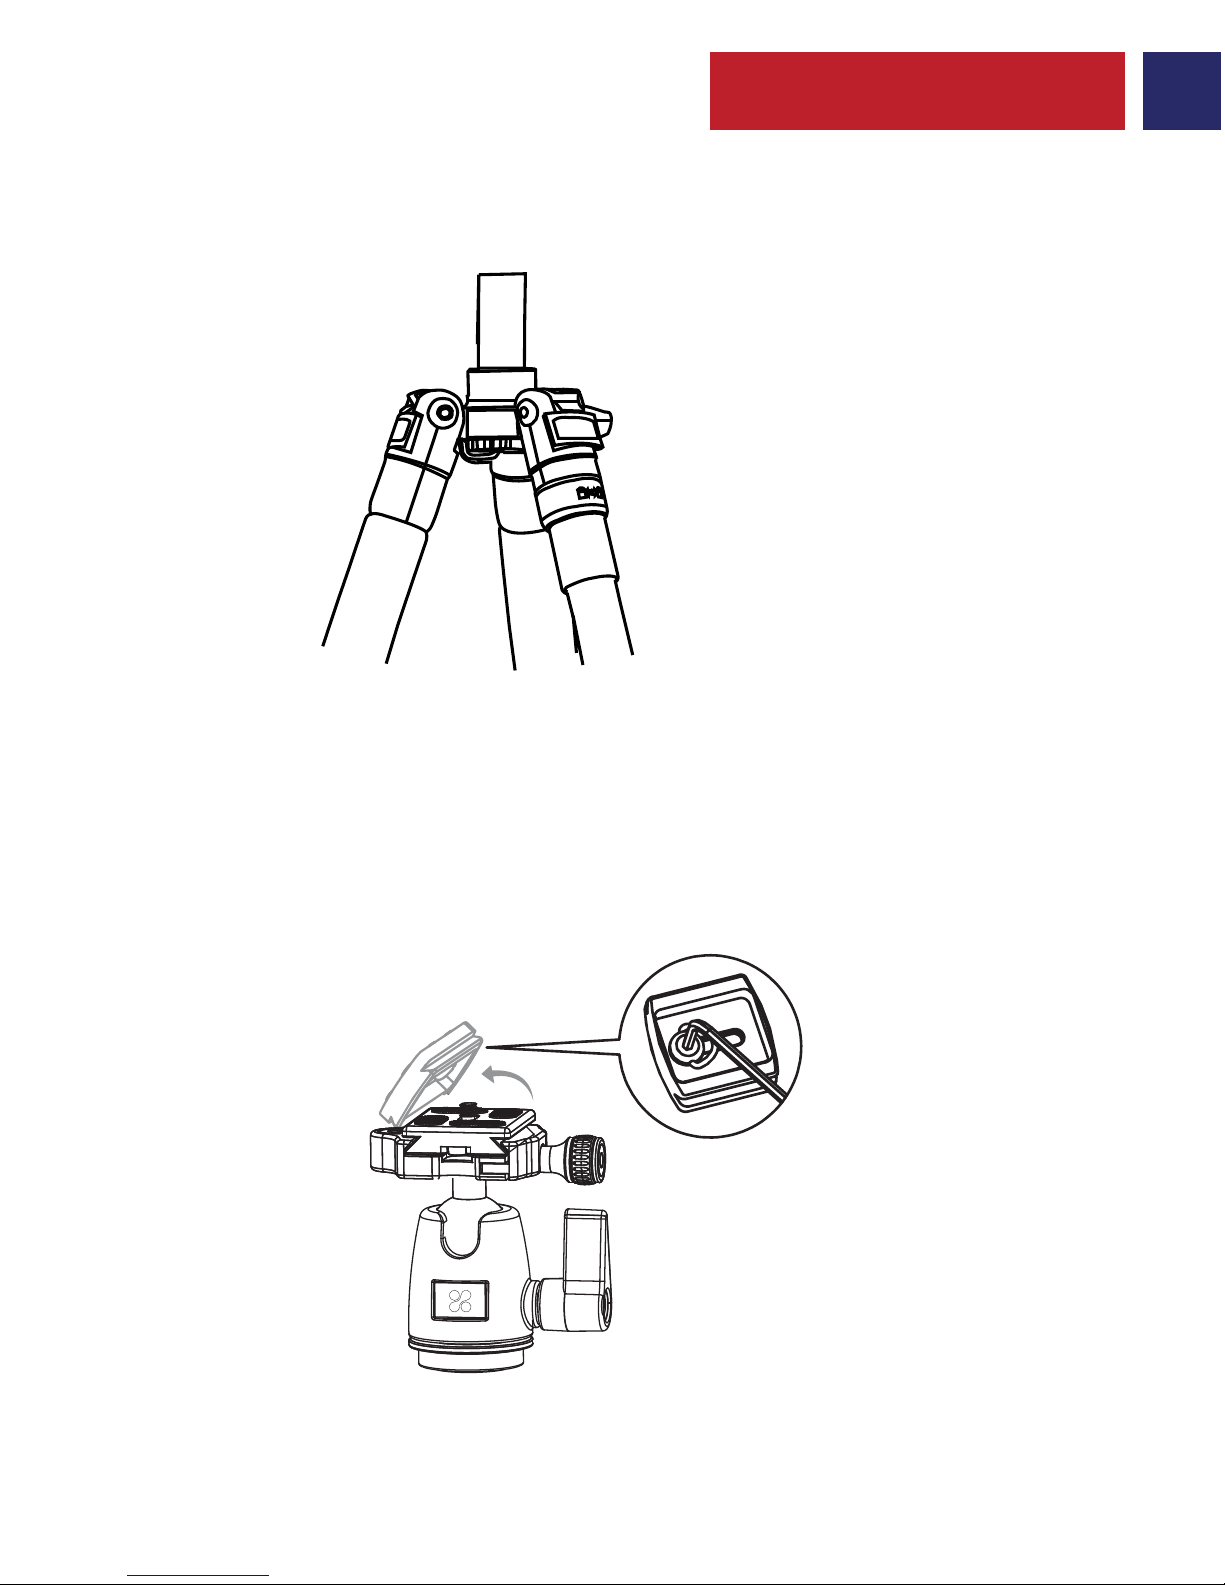
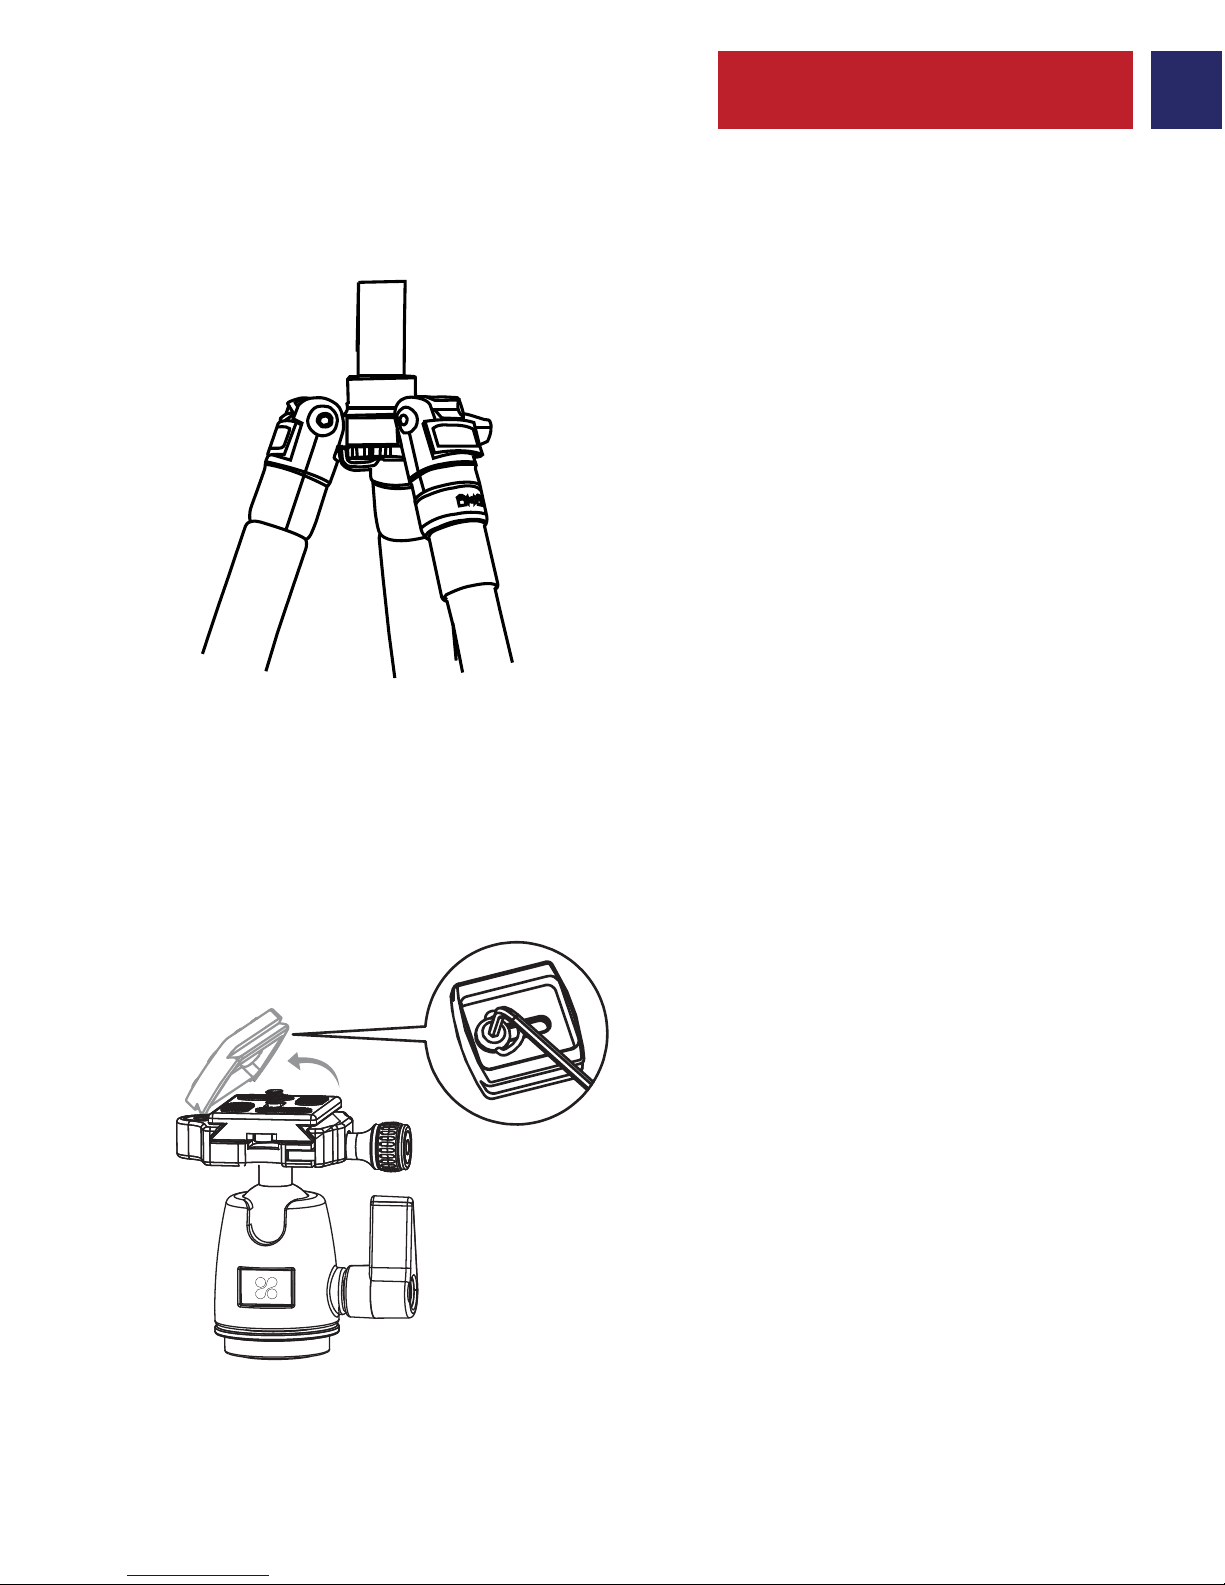
• Loosen the Center Column Locking Knob.
• Elevate the center column to the desired height.
• Tighten the Center Column Locking Knob.
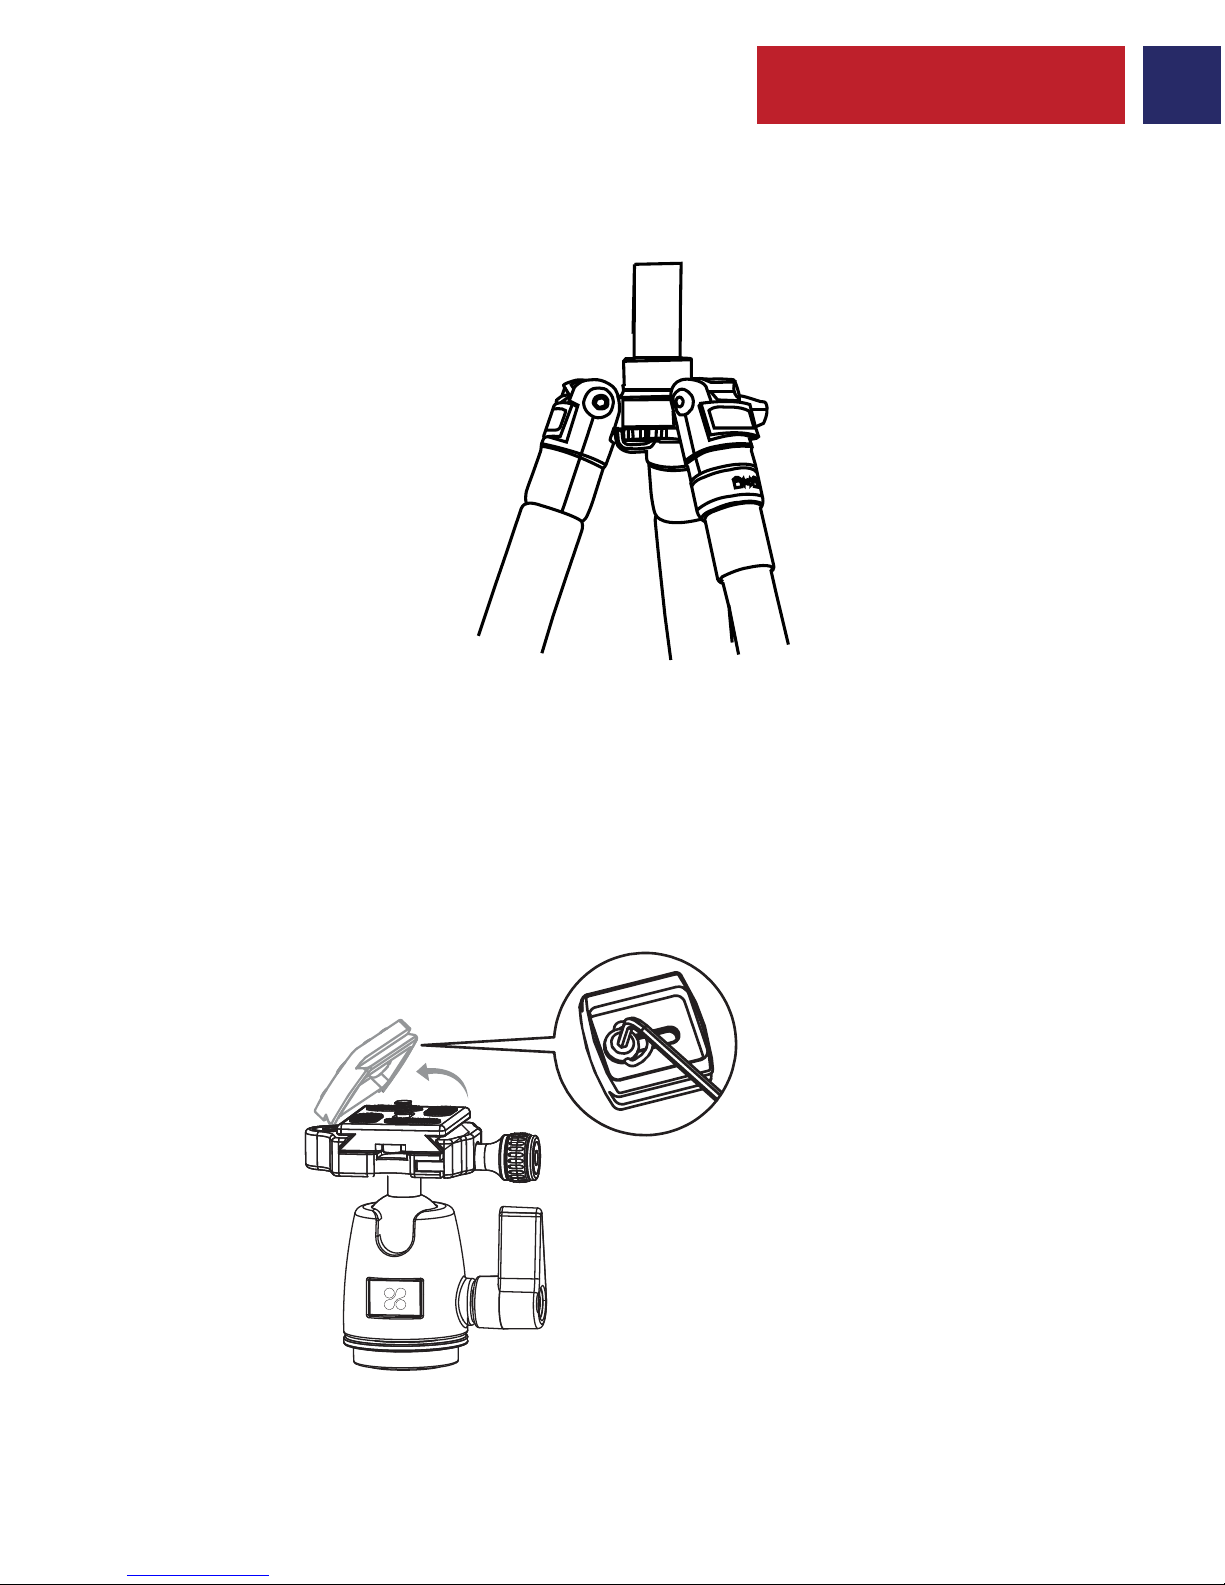
• Loosen the Locking Knob for Mounting Plate
• Flip up the Mounting Plate to release it.
4
Page 6
English
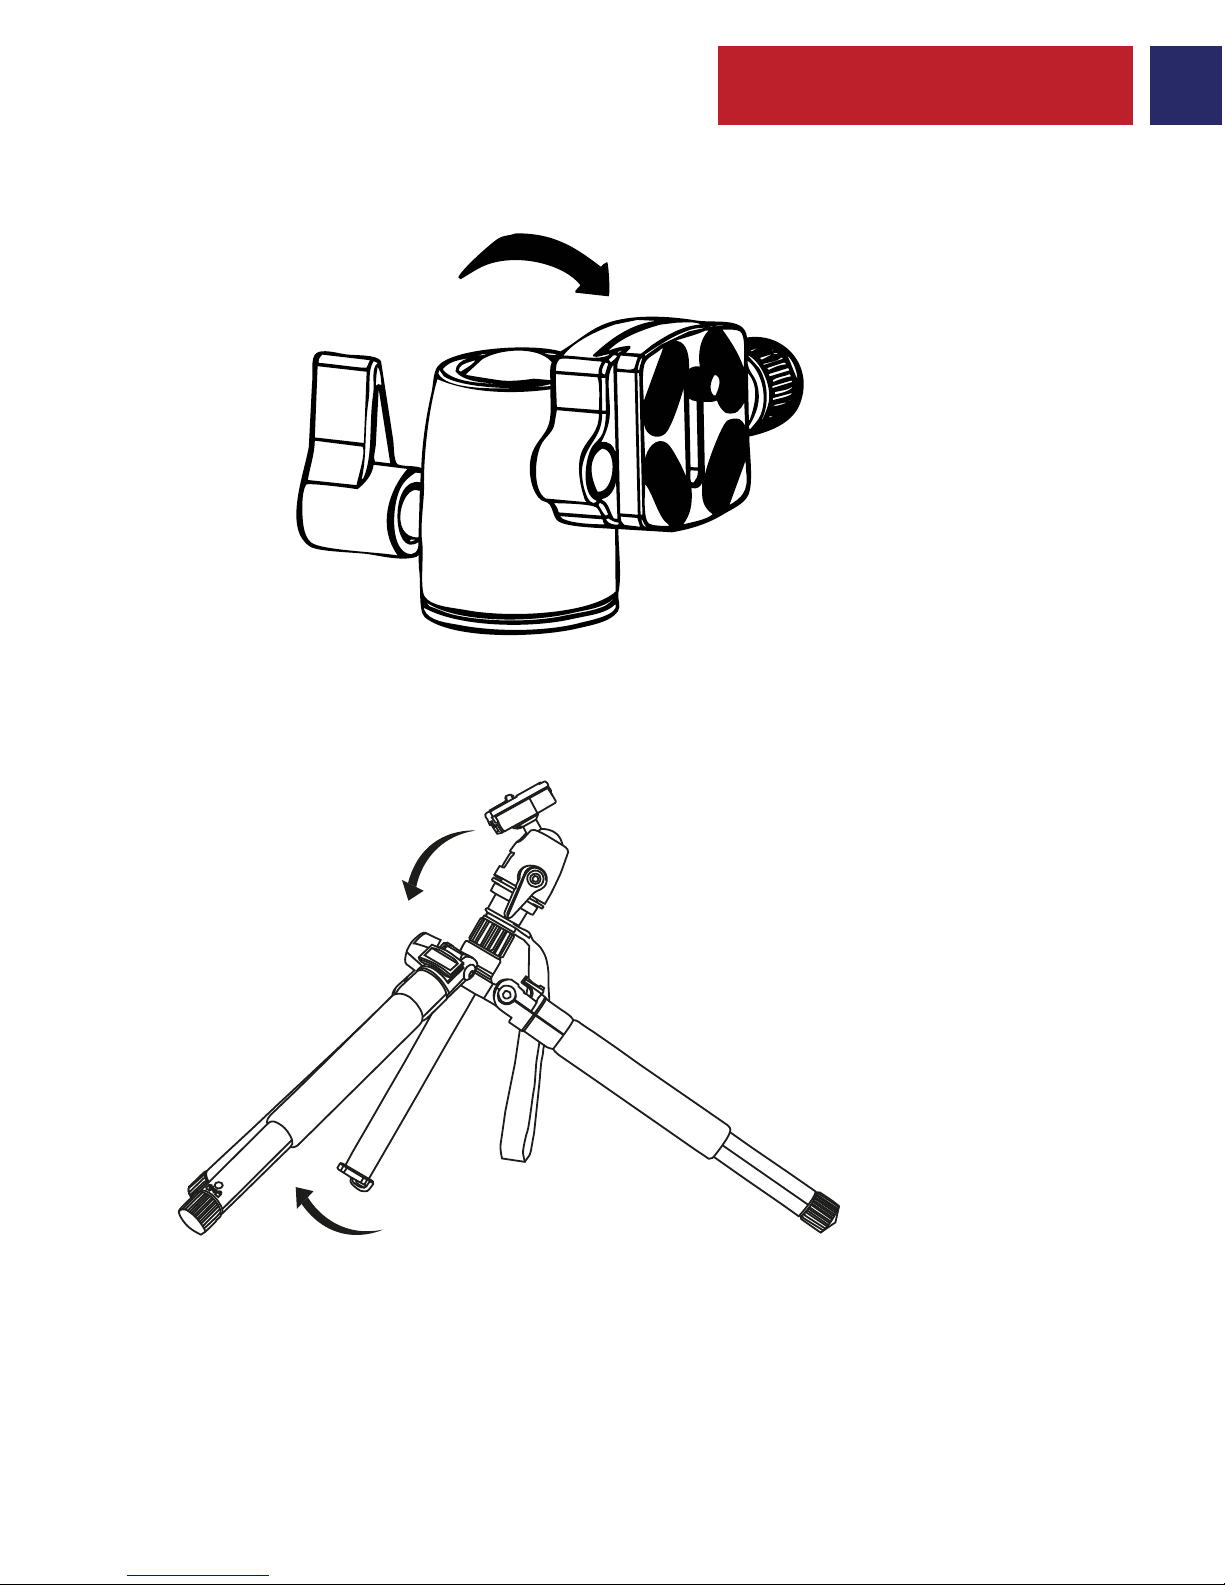
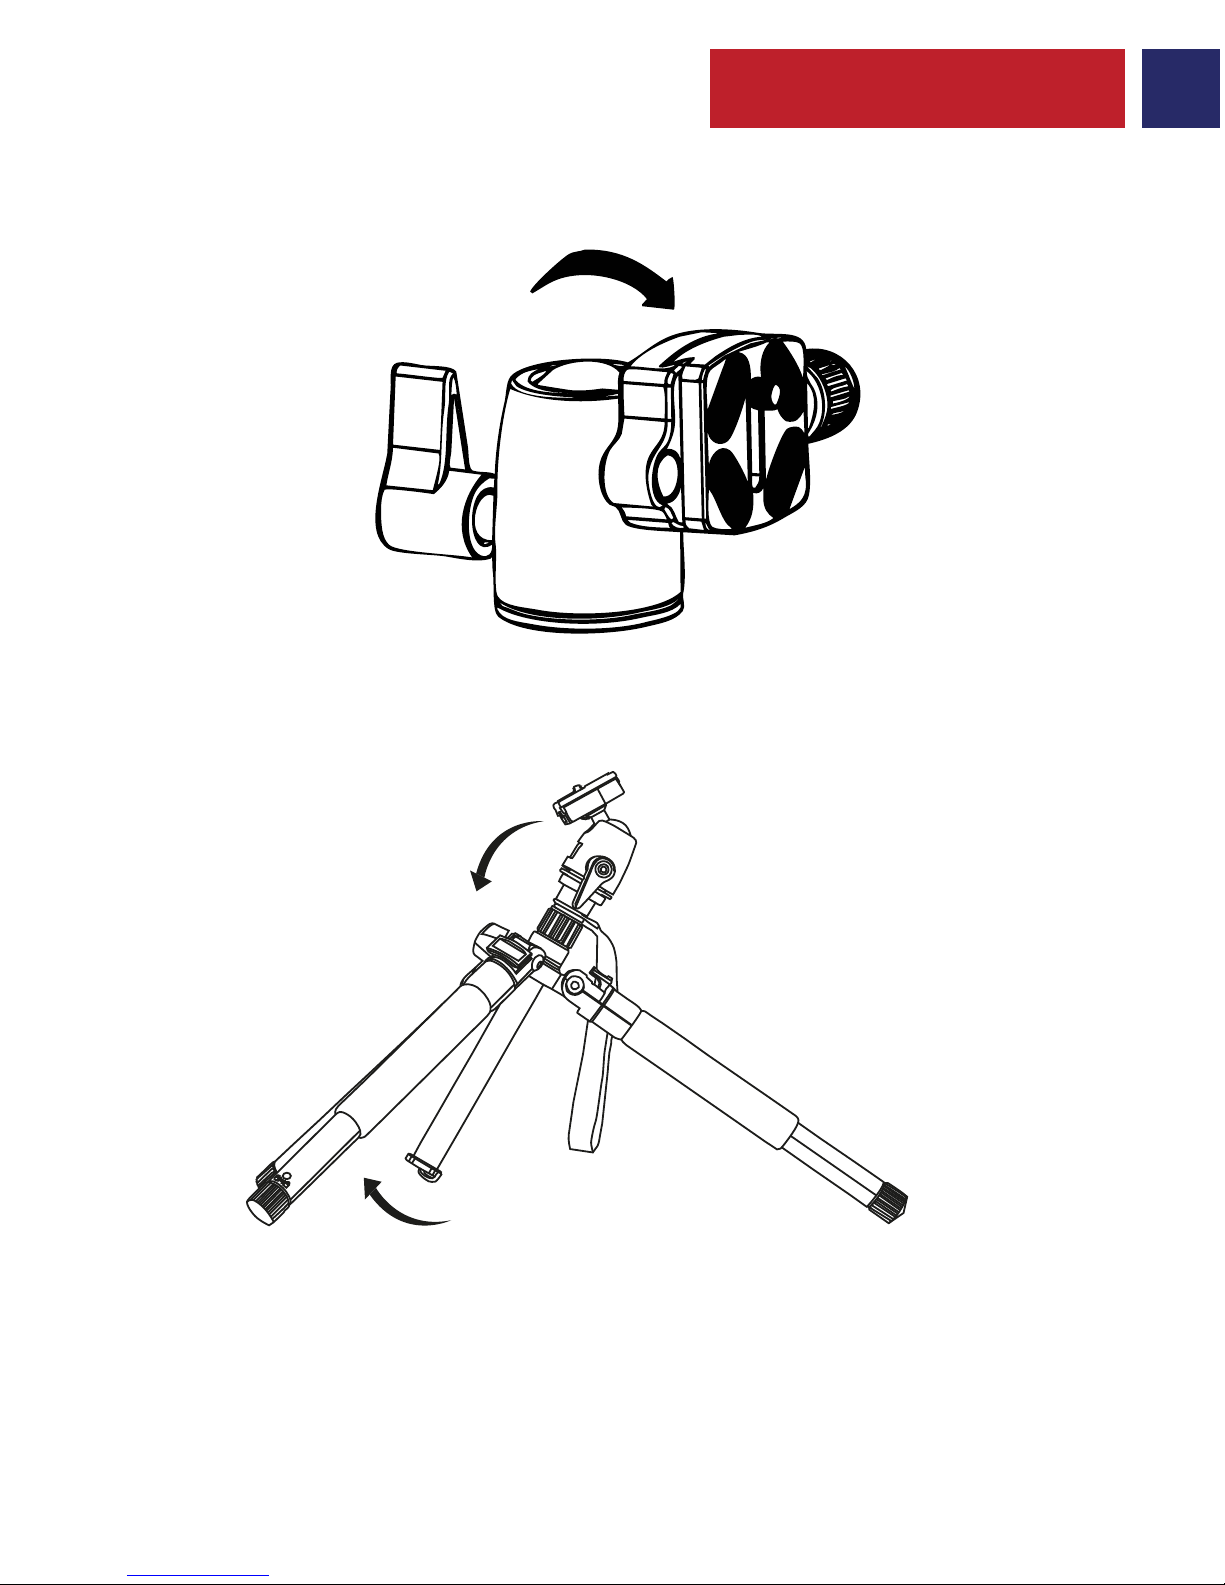
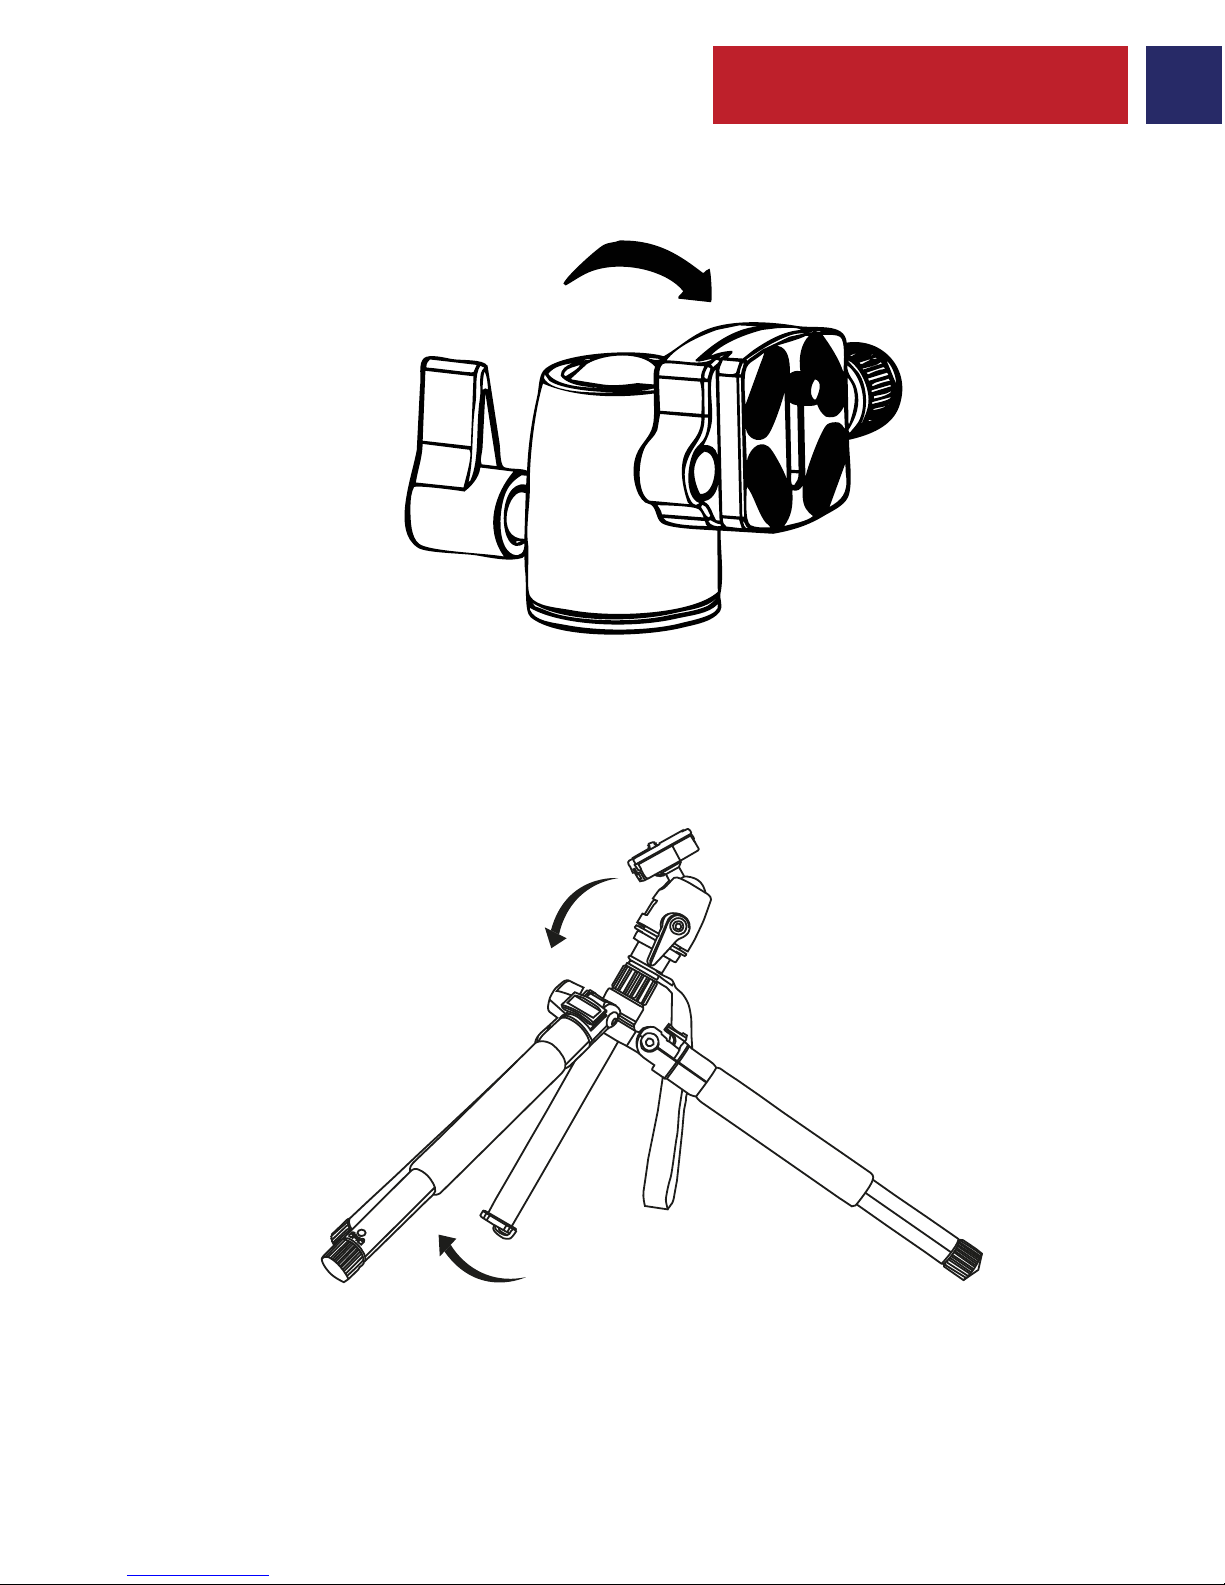
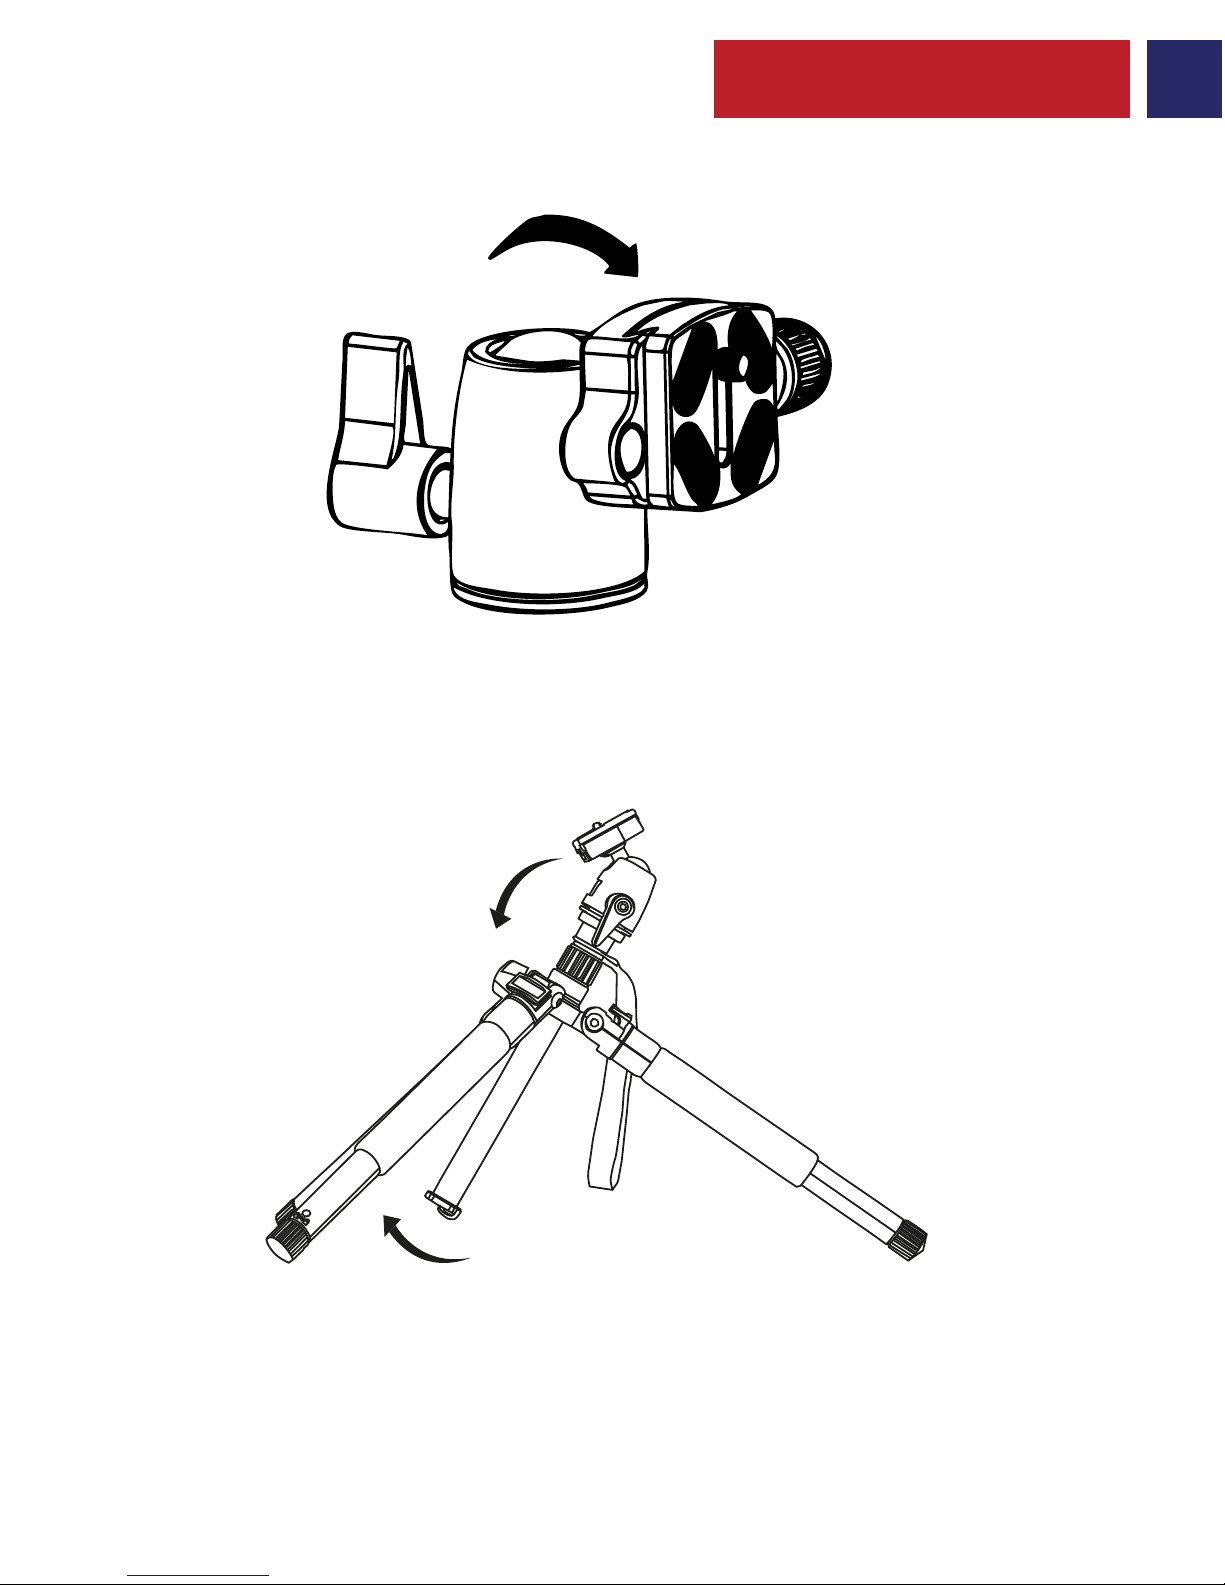
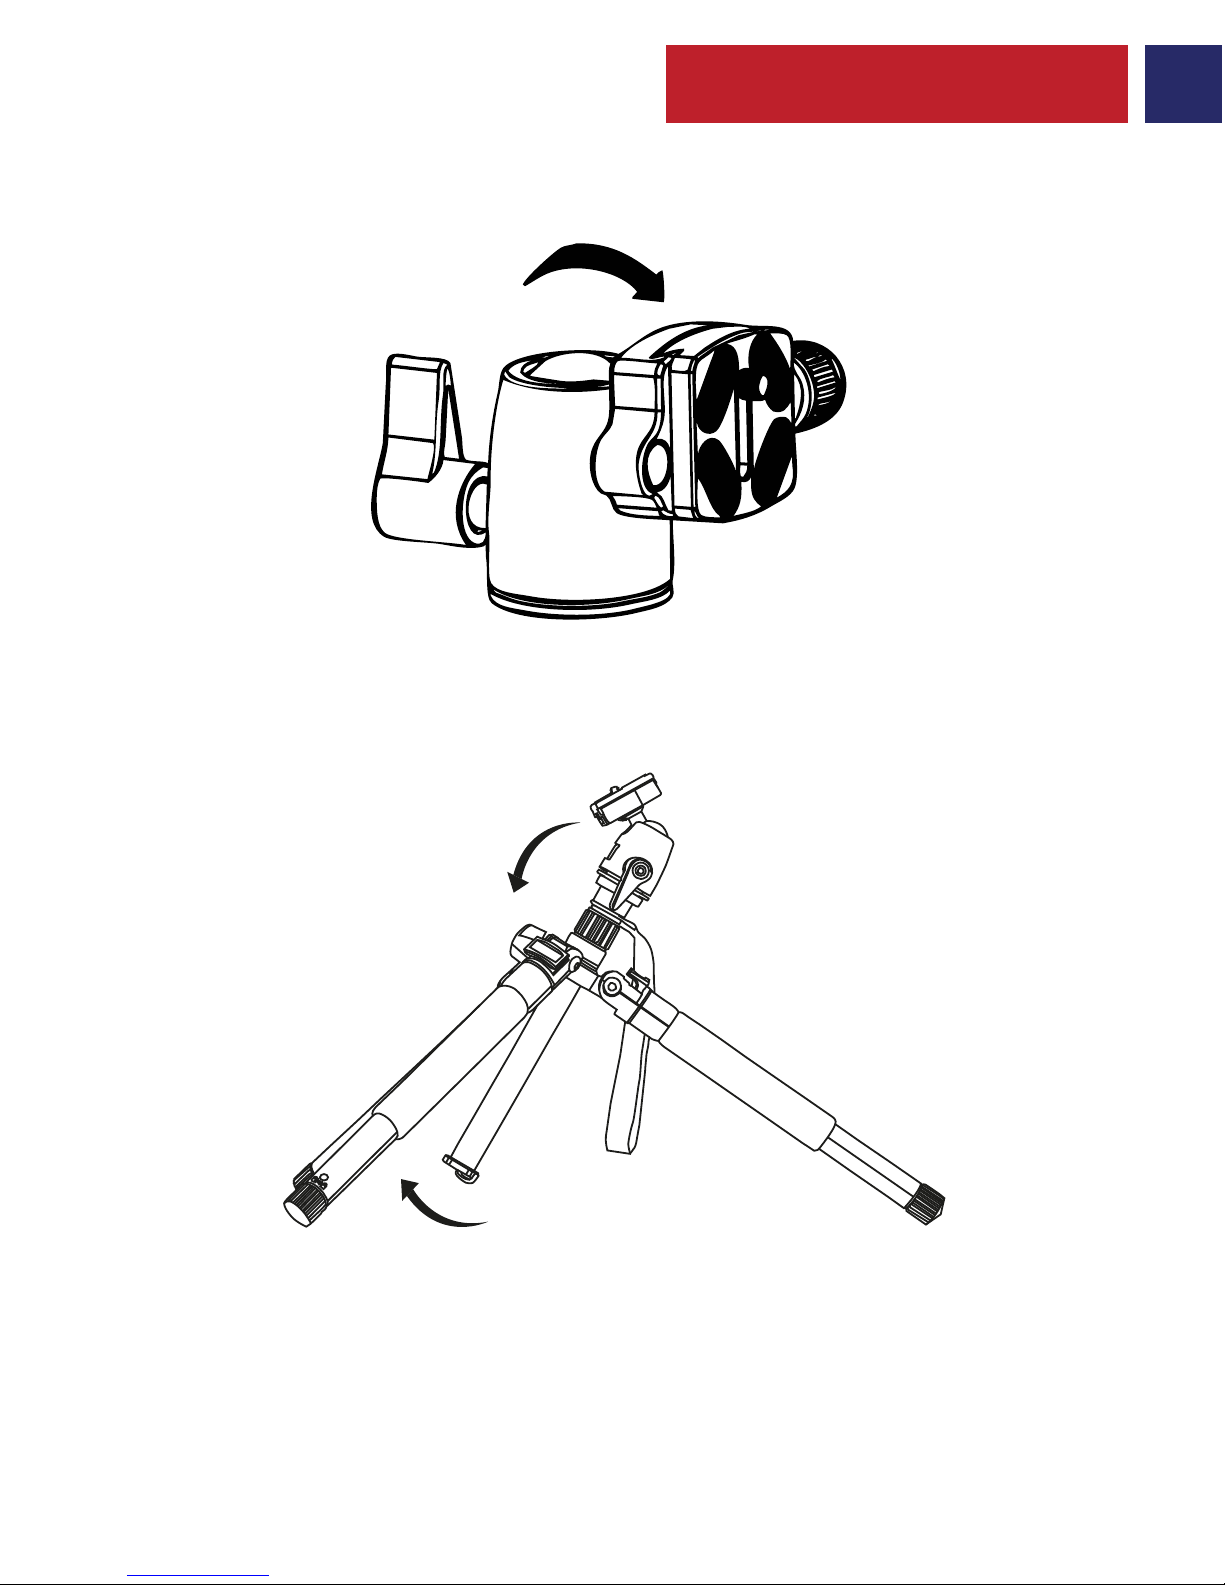
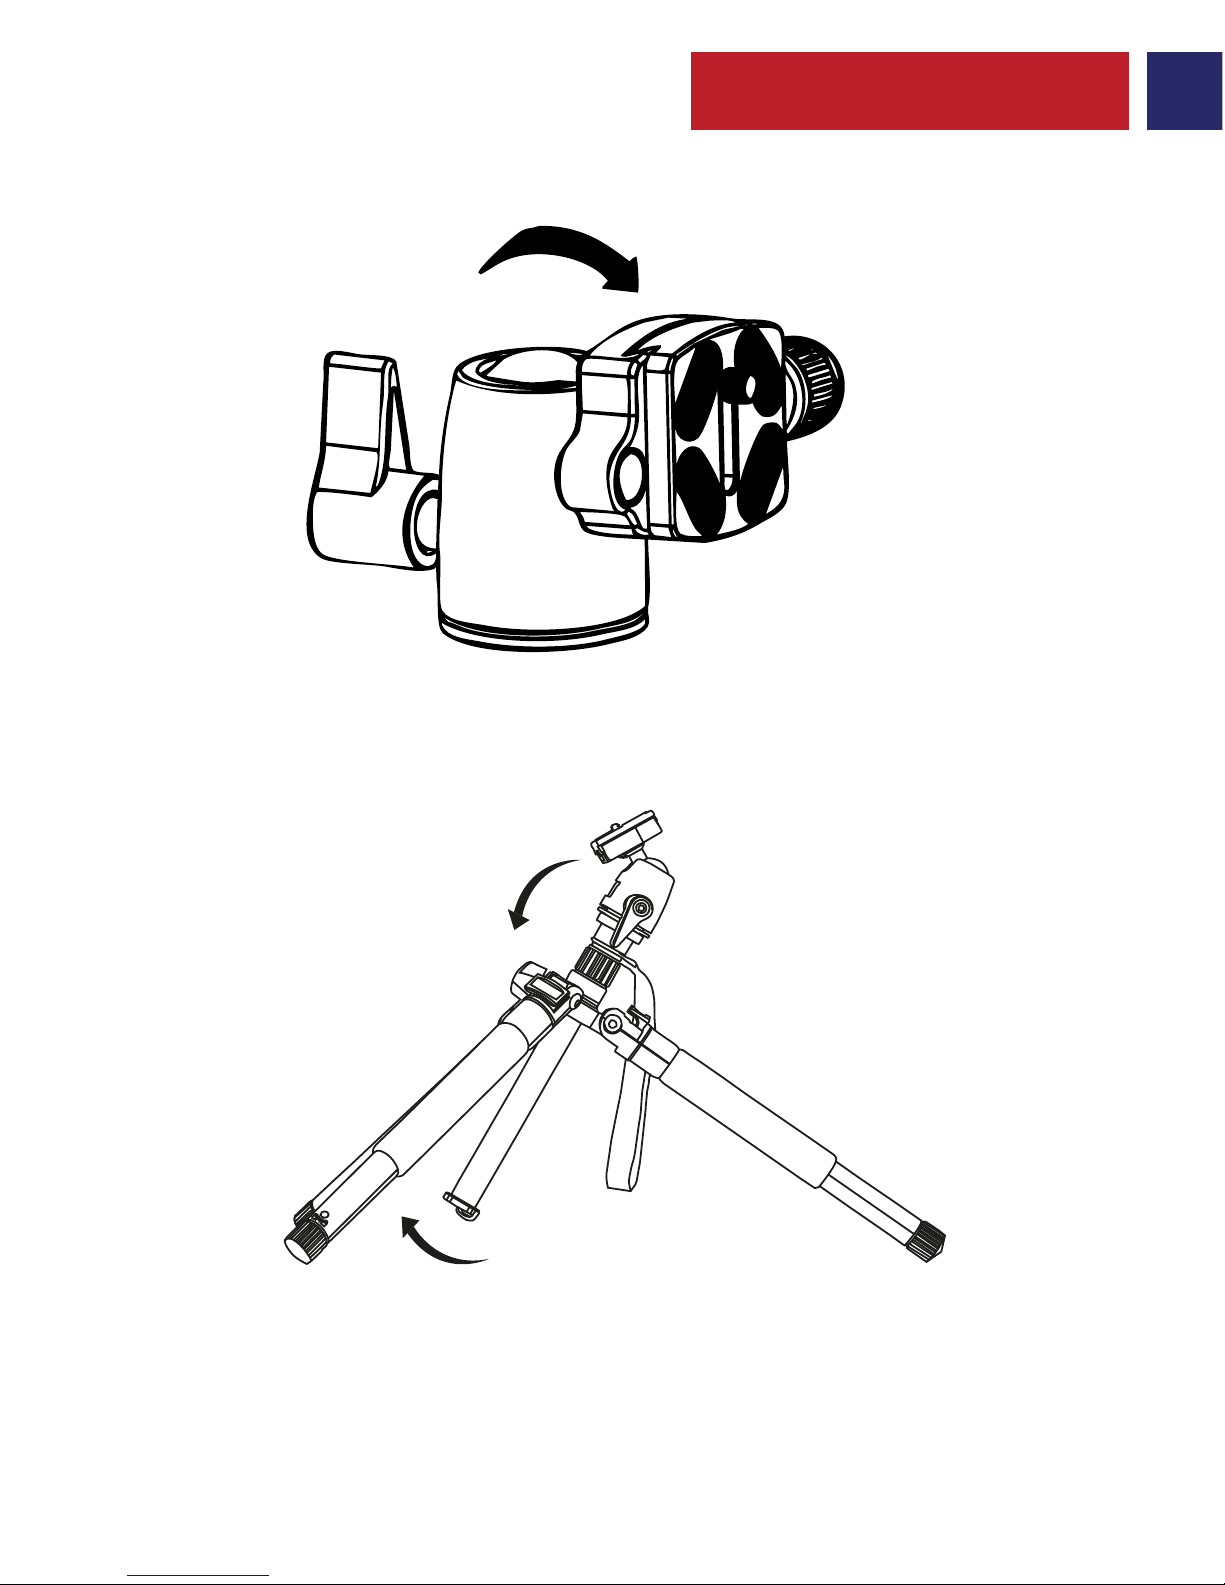
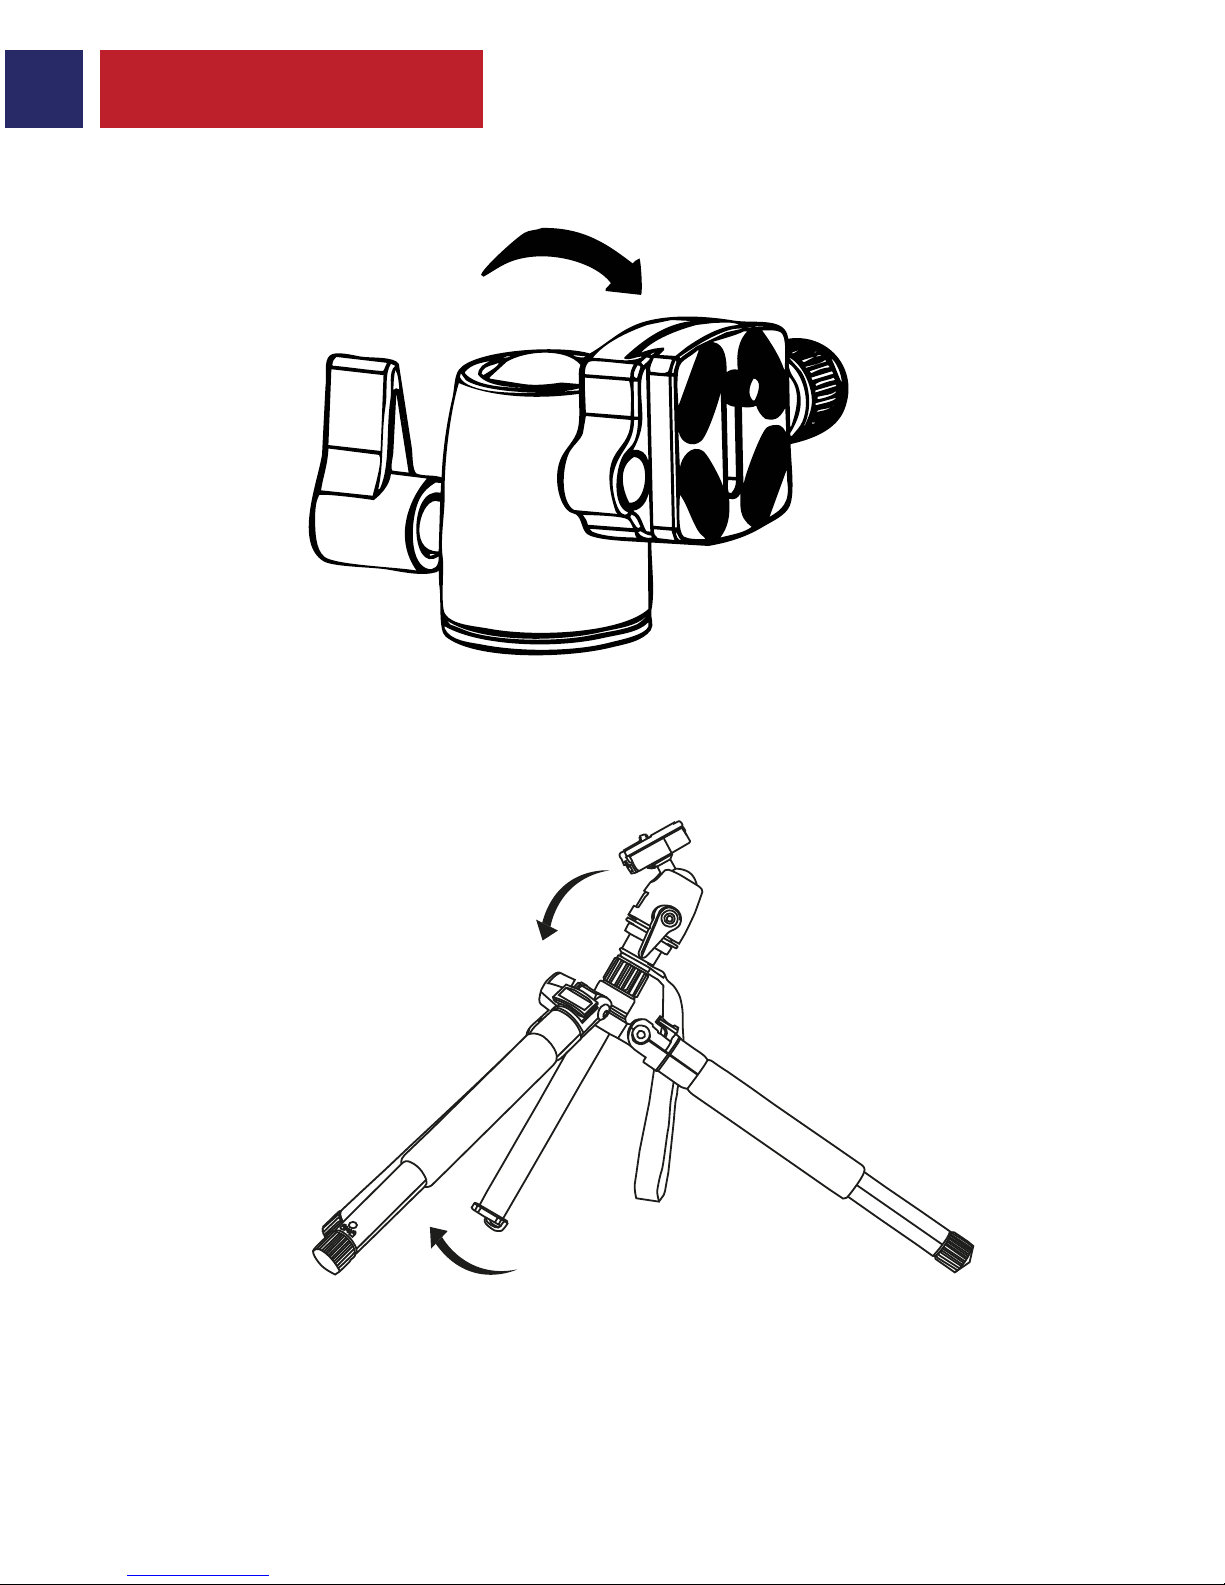
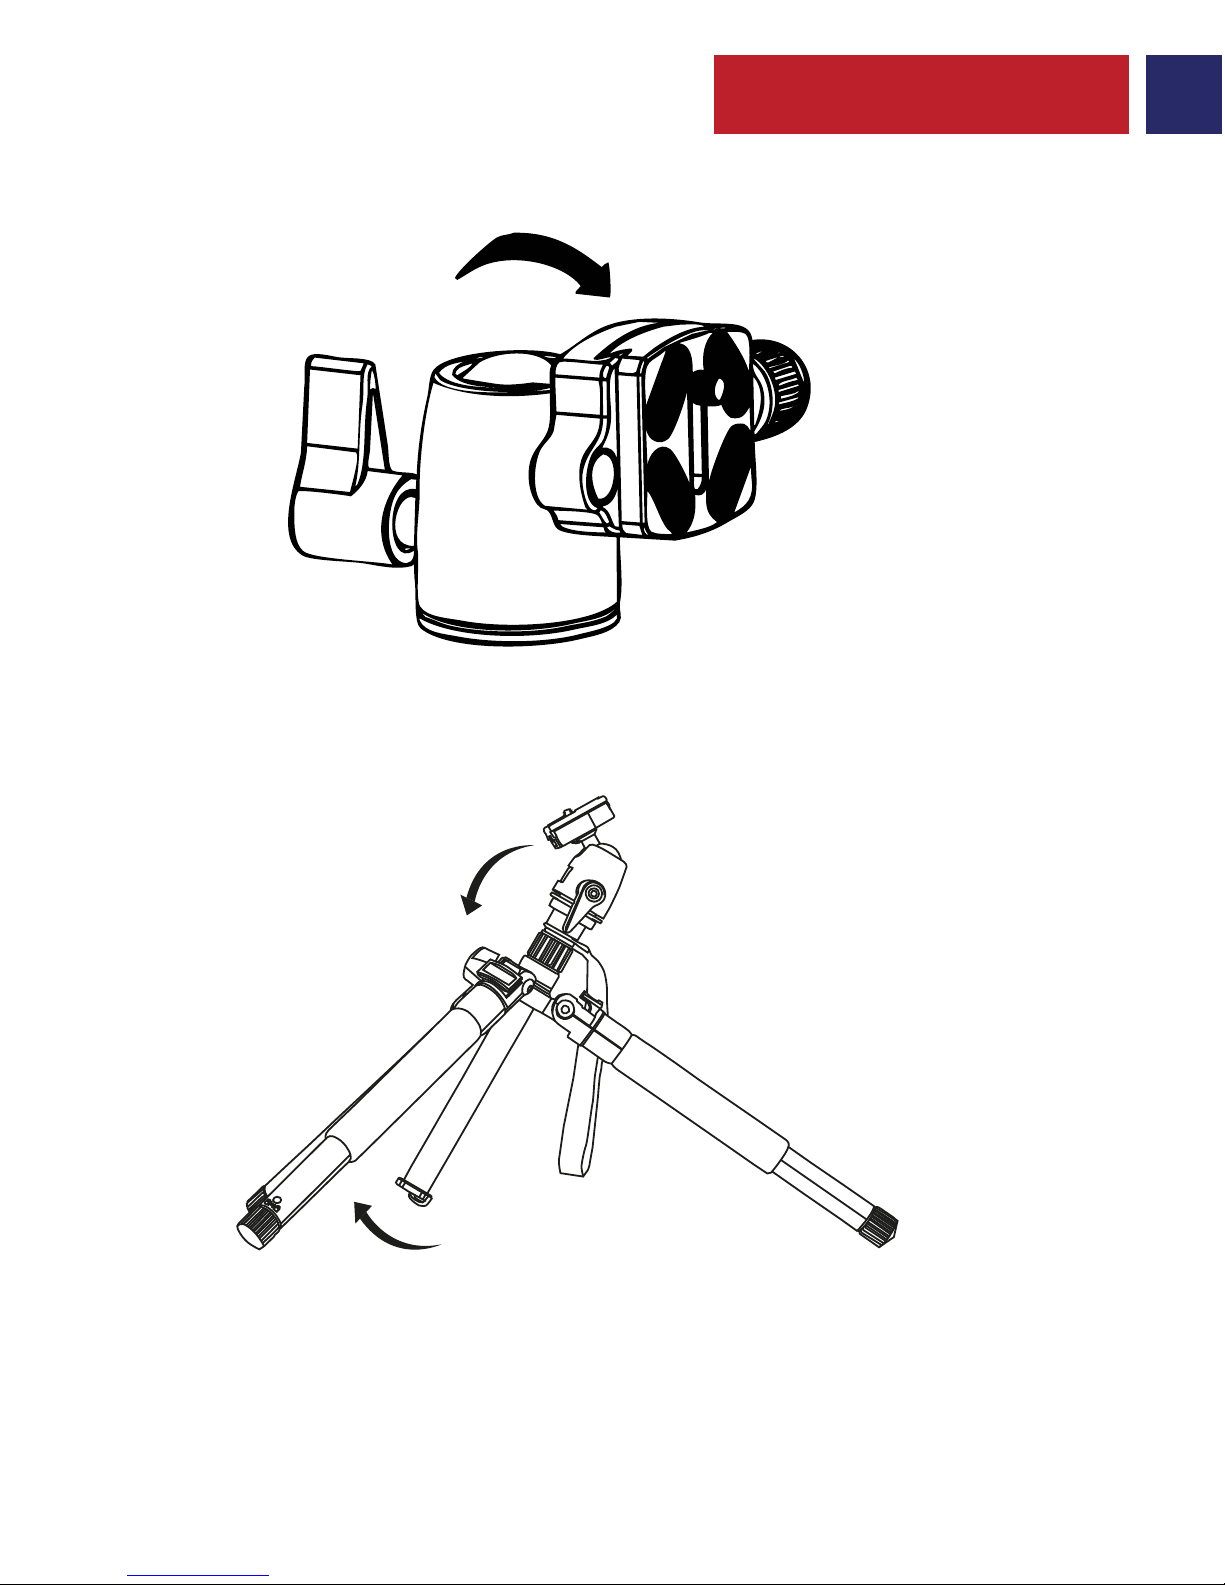
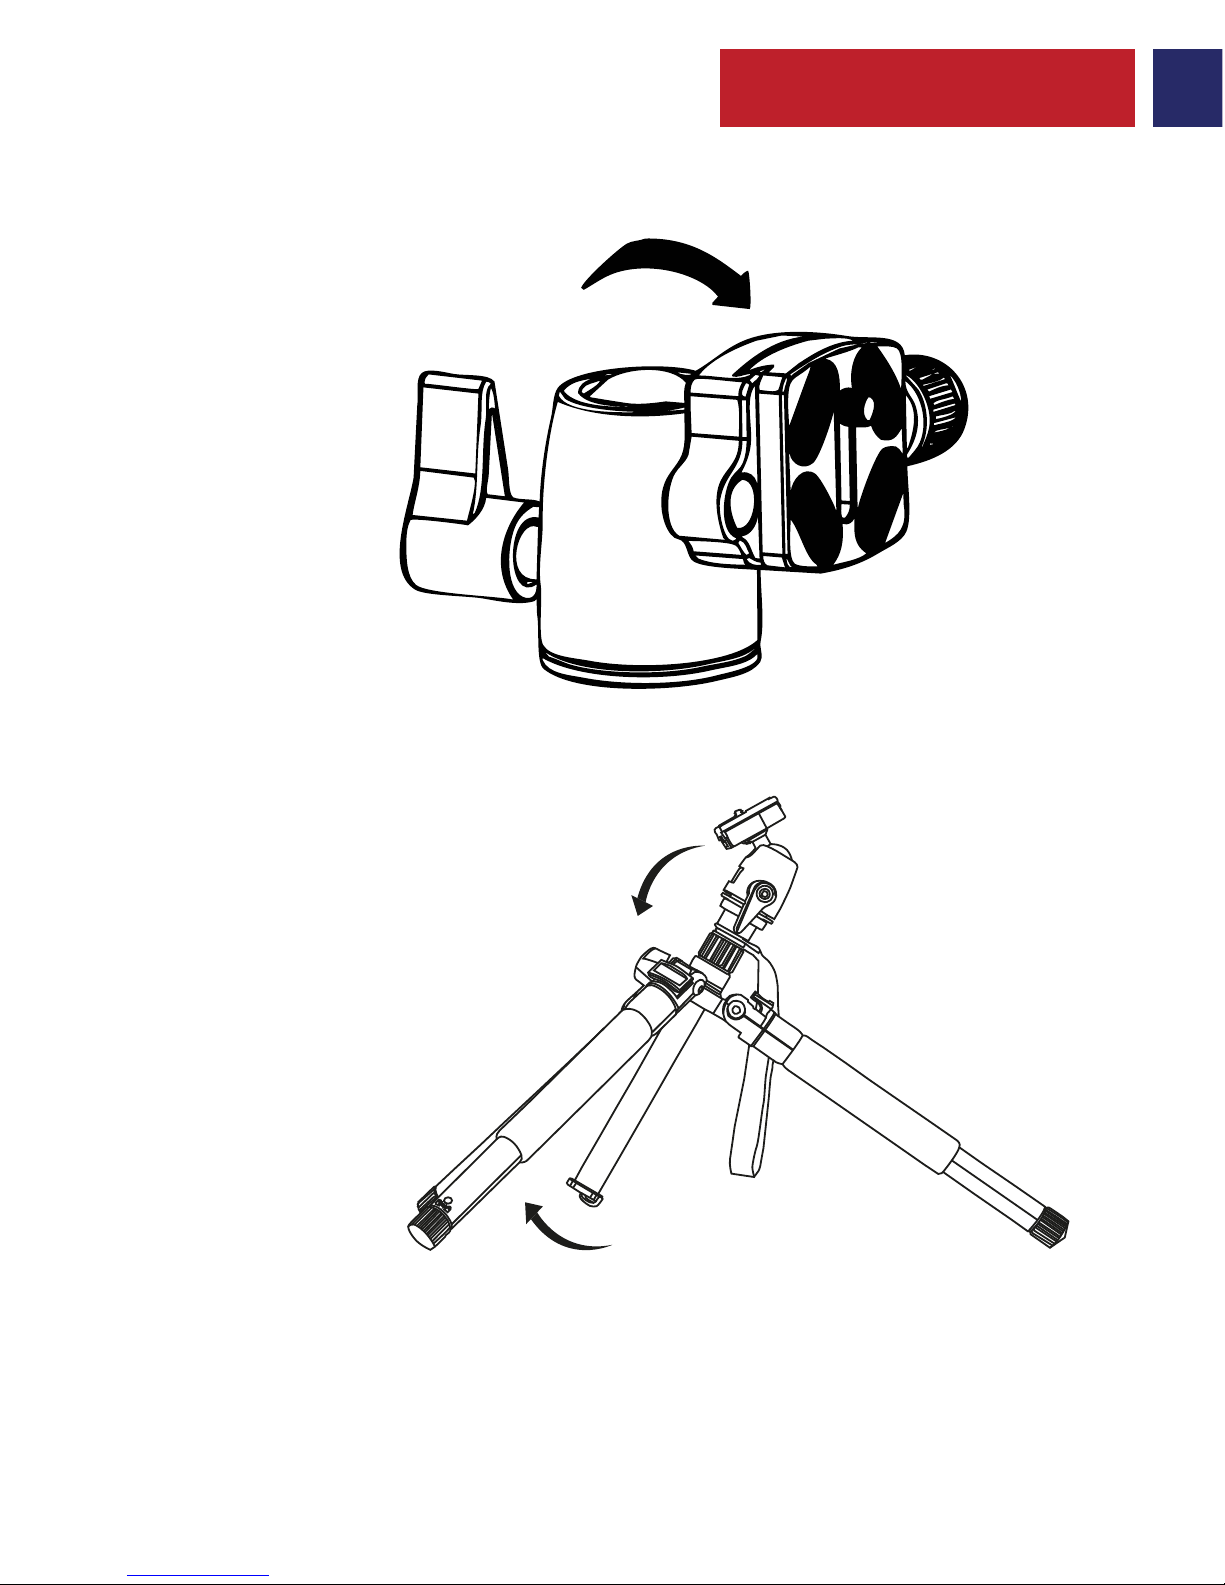
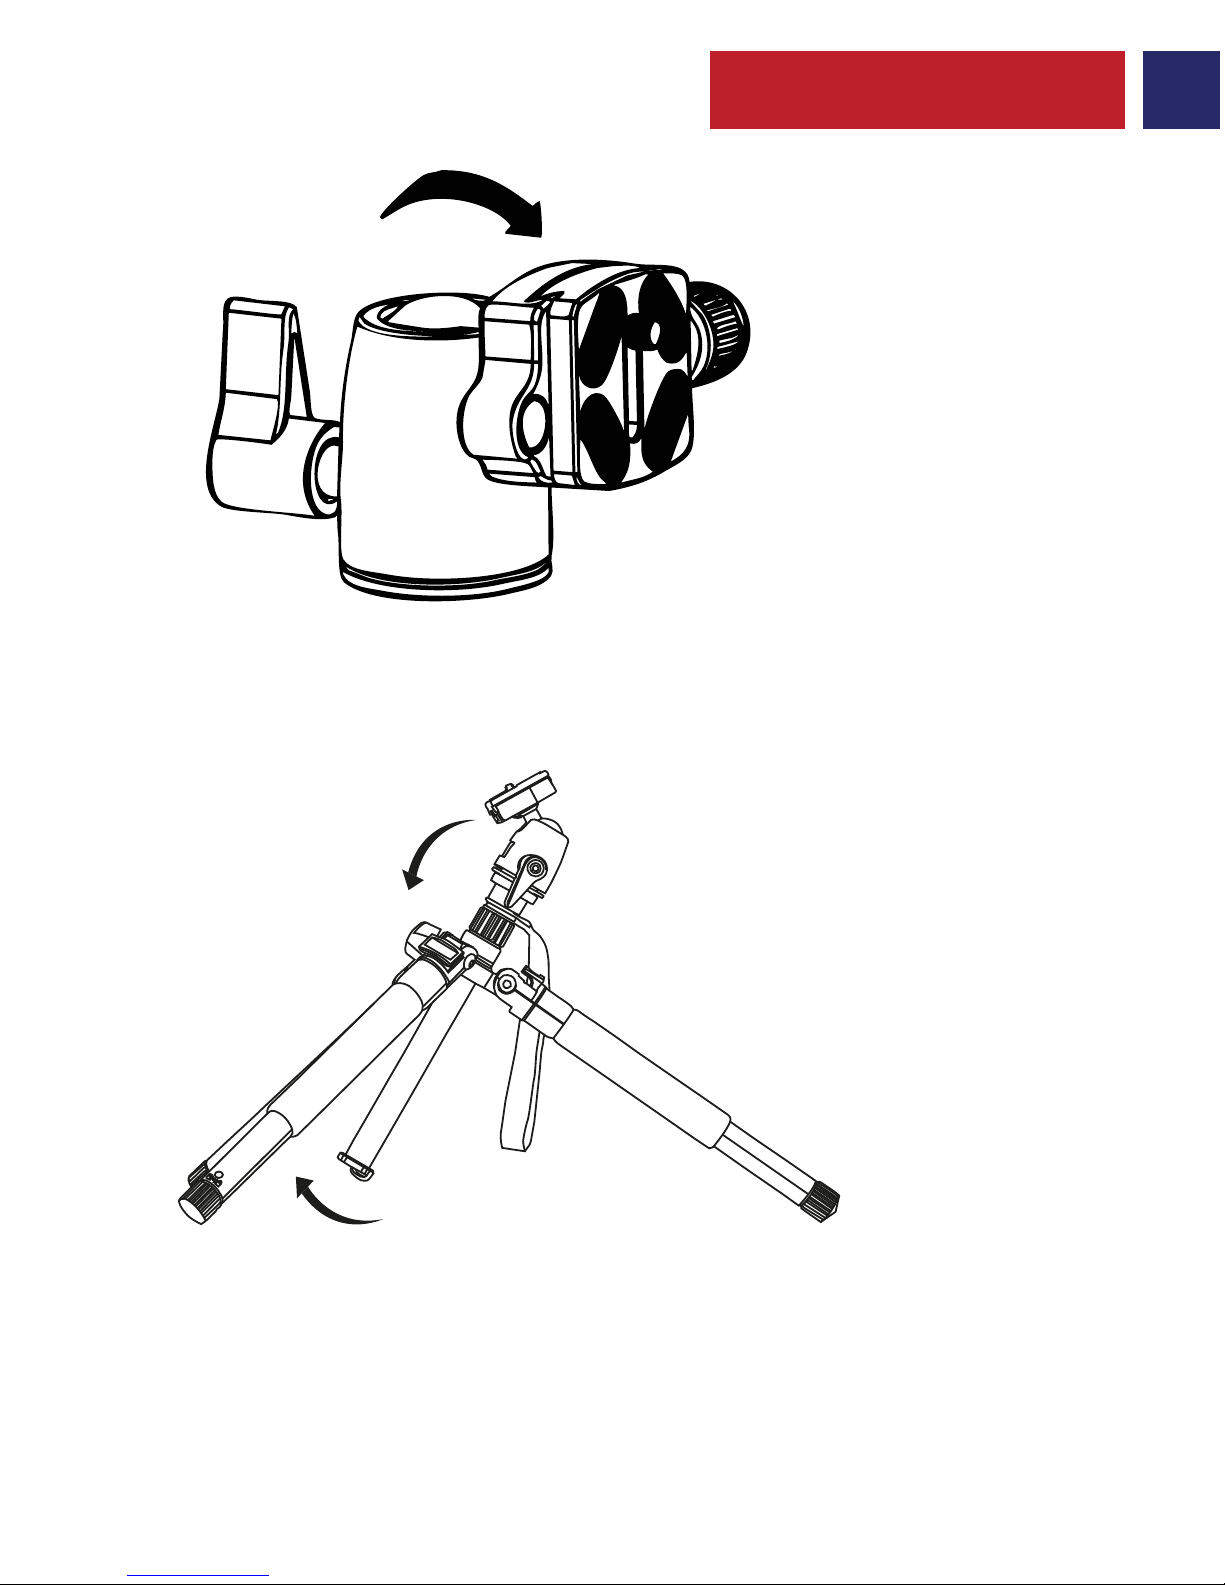
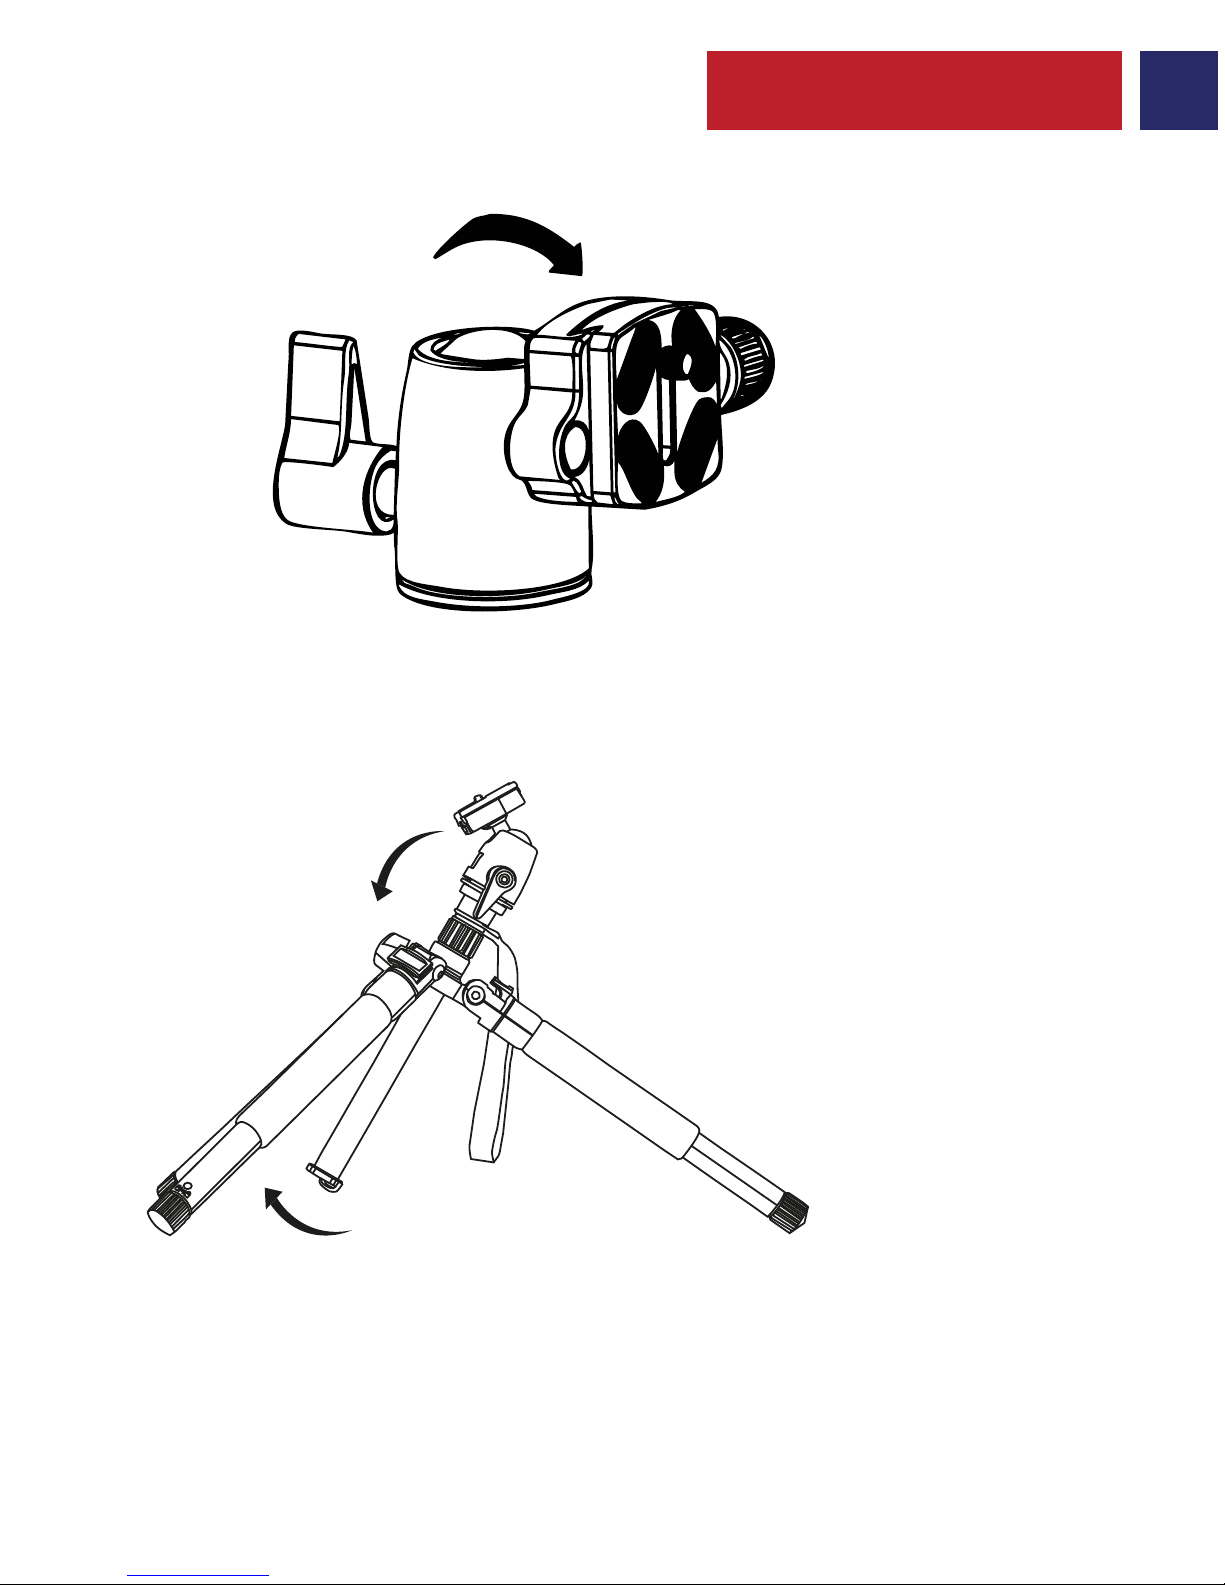
• The mounting plate can be tilted for portrait shots.
• Pull the Secure Flip Leg Locks Outward as shown.
• Adjust the tripod leg angle.
• Press the flip lock to secure the legs.
3. Adjusting the Tilt of the Mounting Plate
4. Using the Secure Leg Locks
5
Page 7
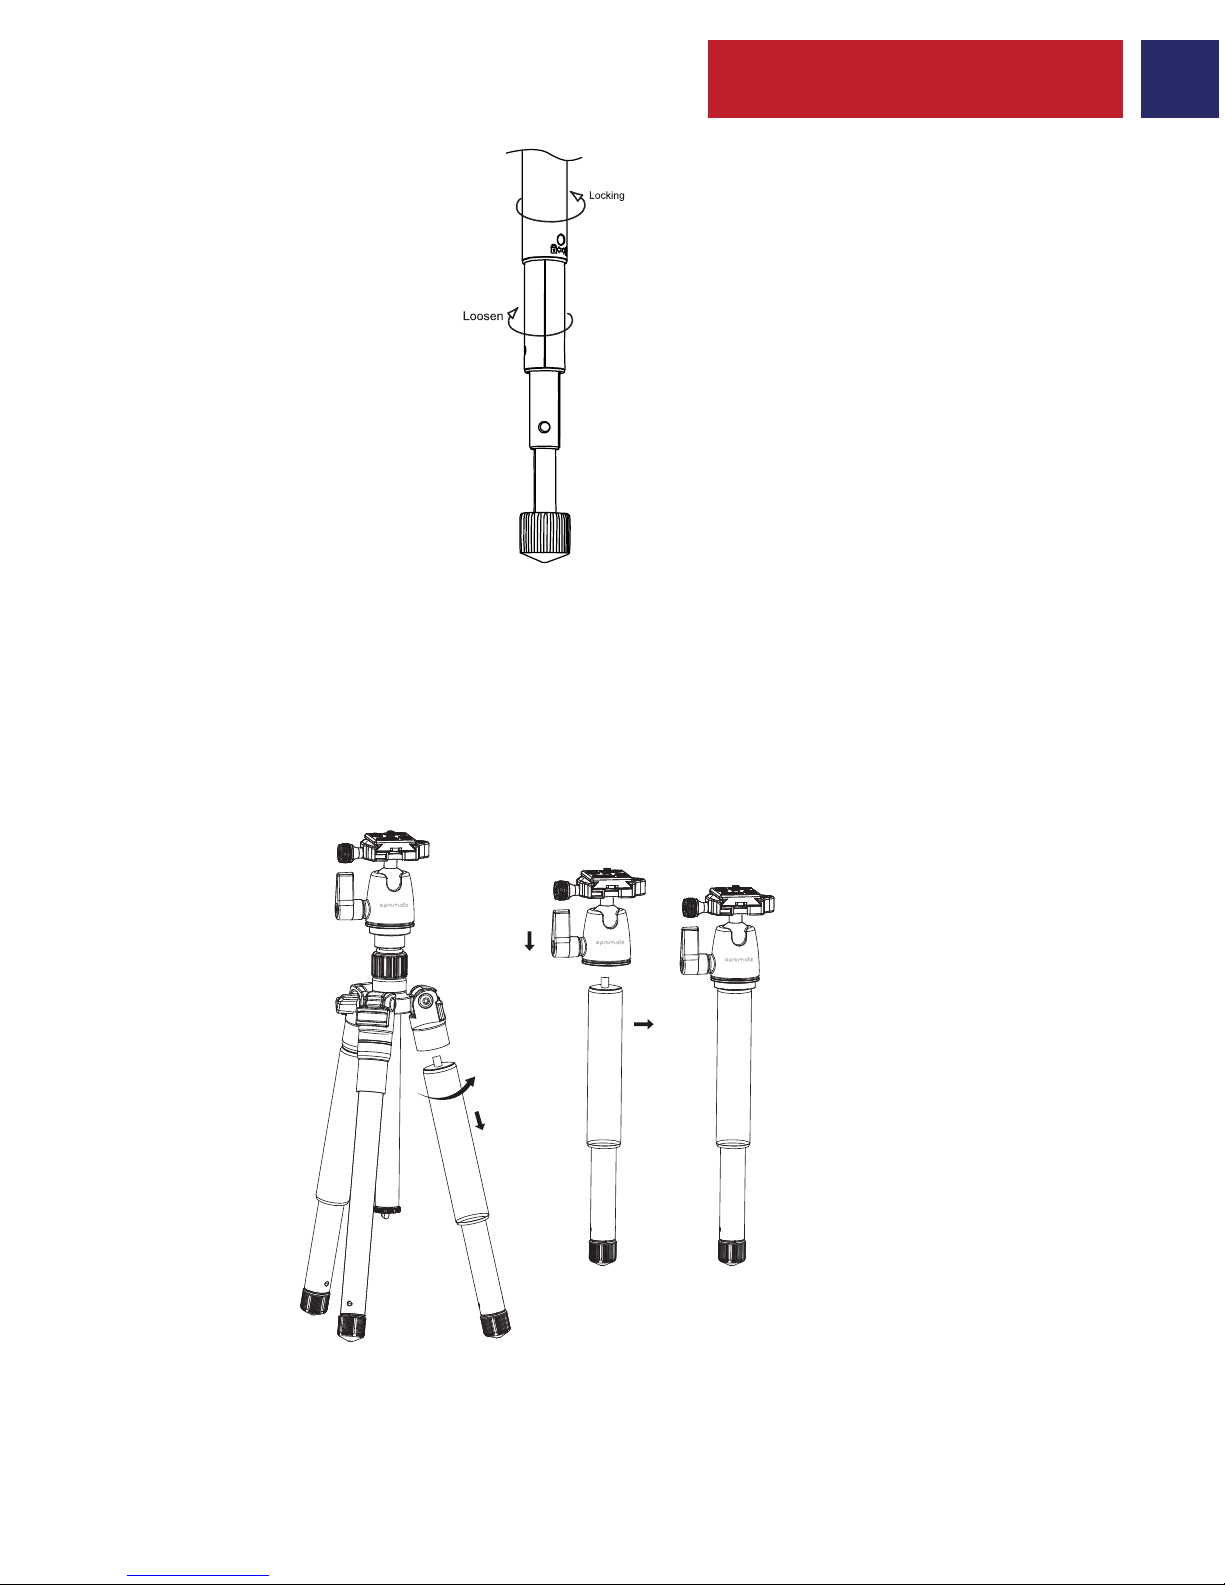
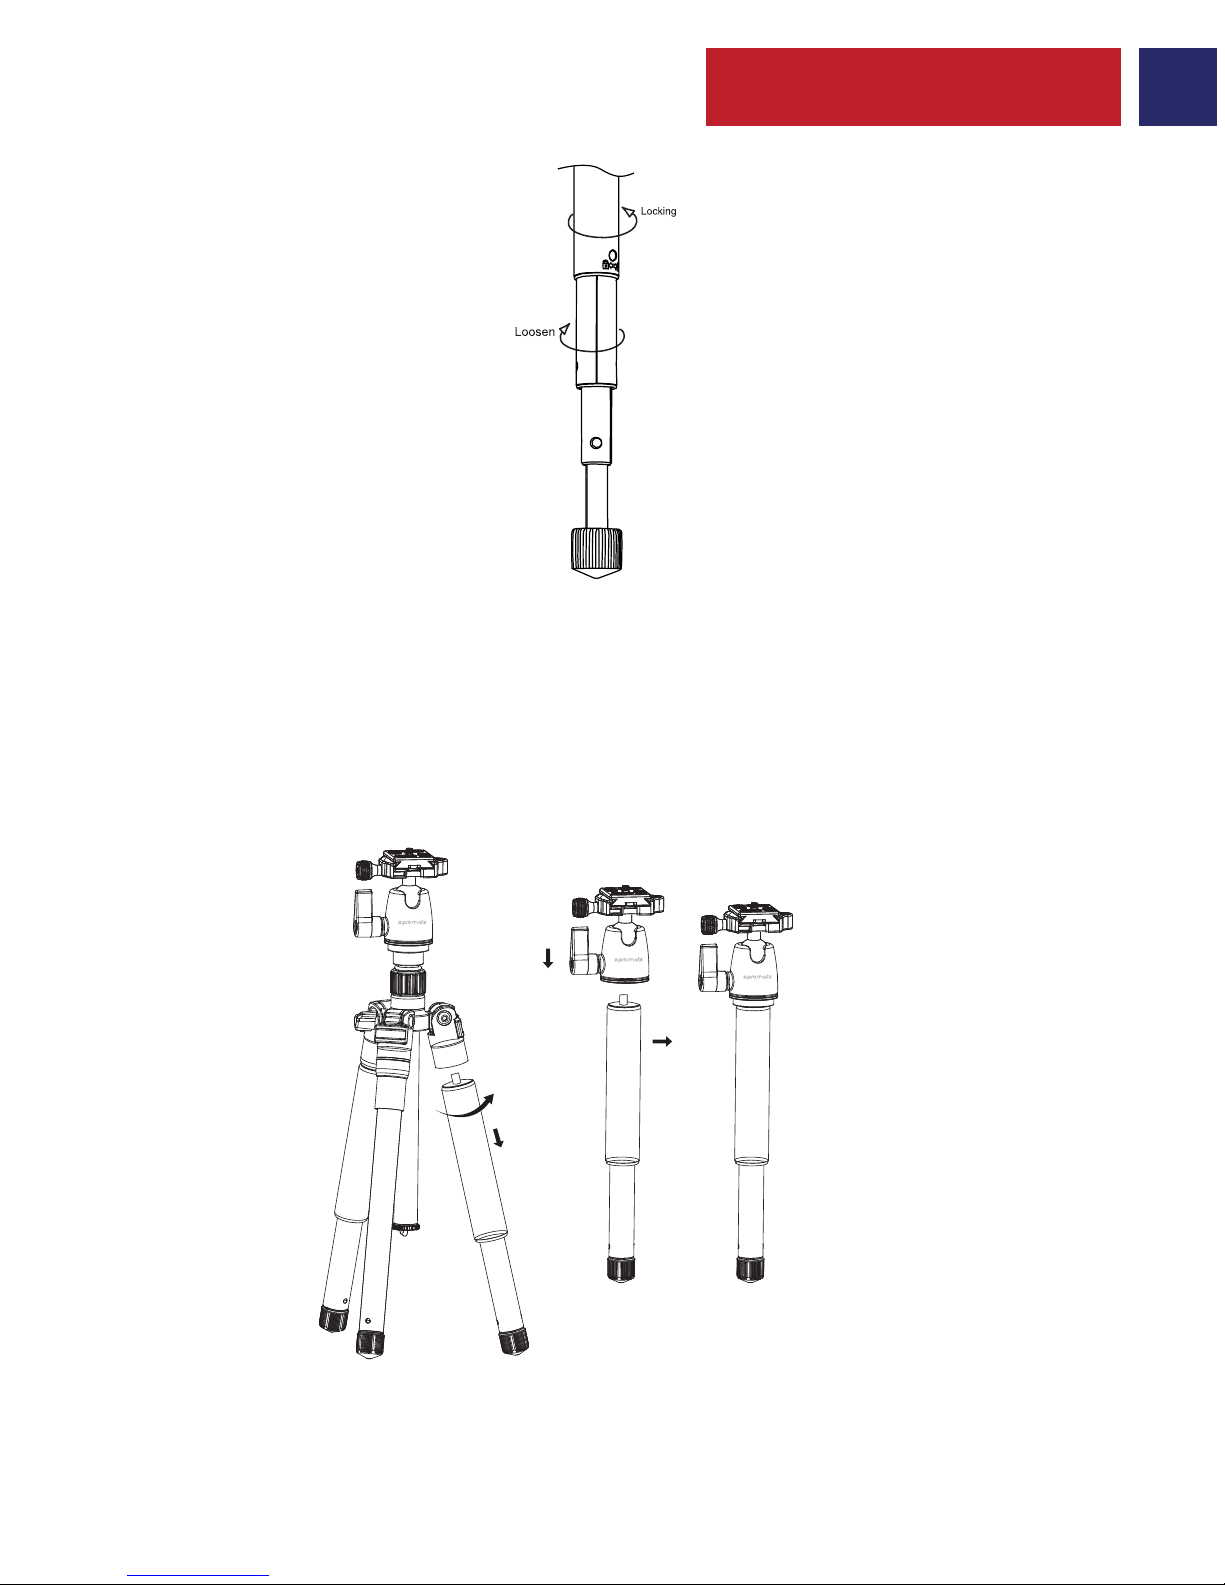
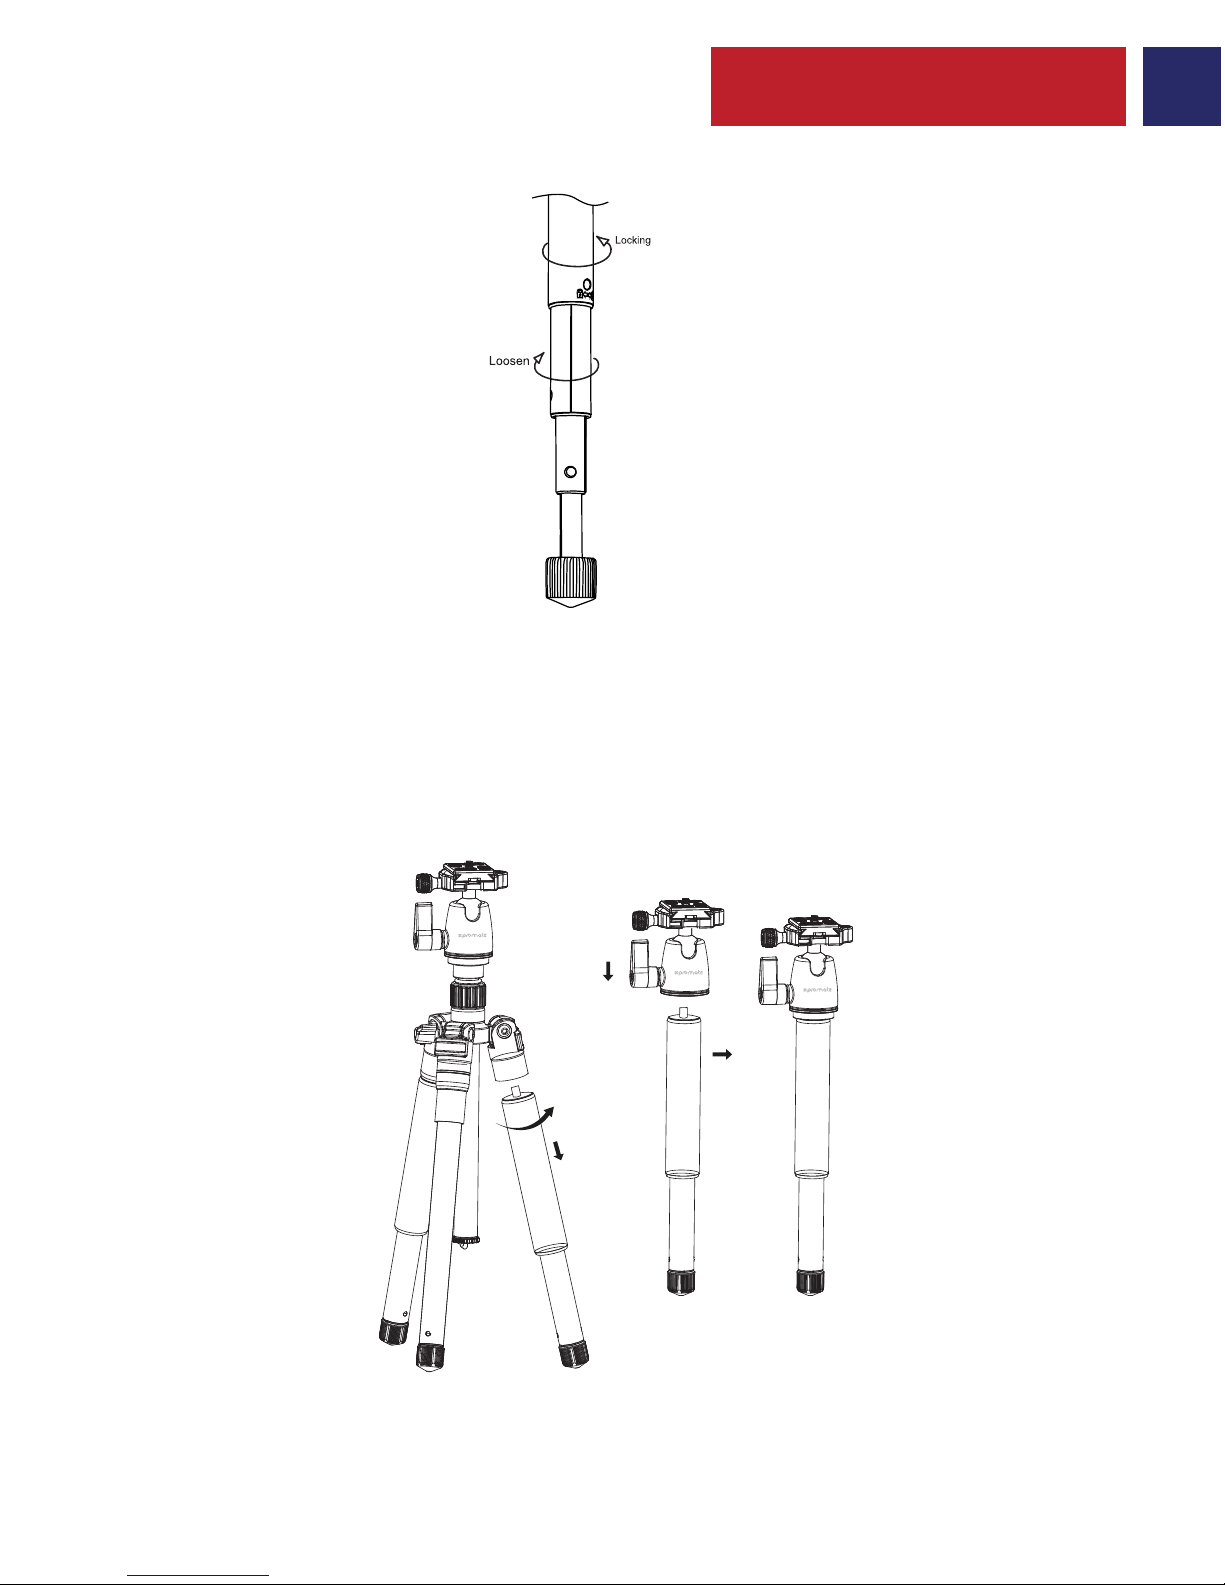
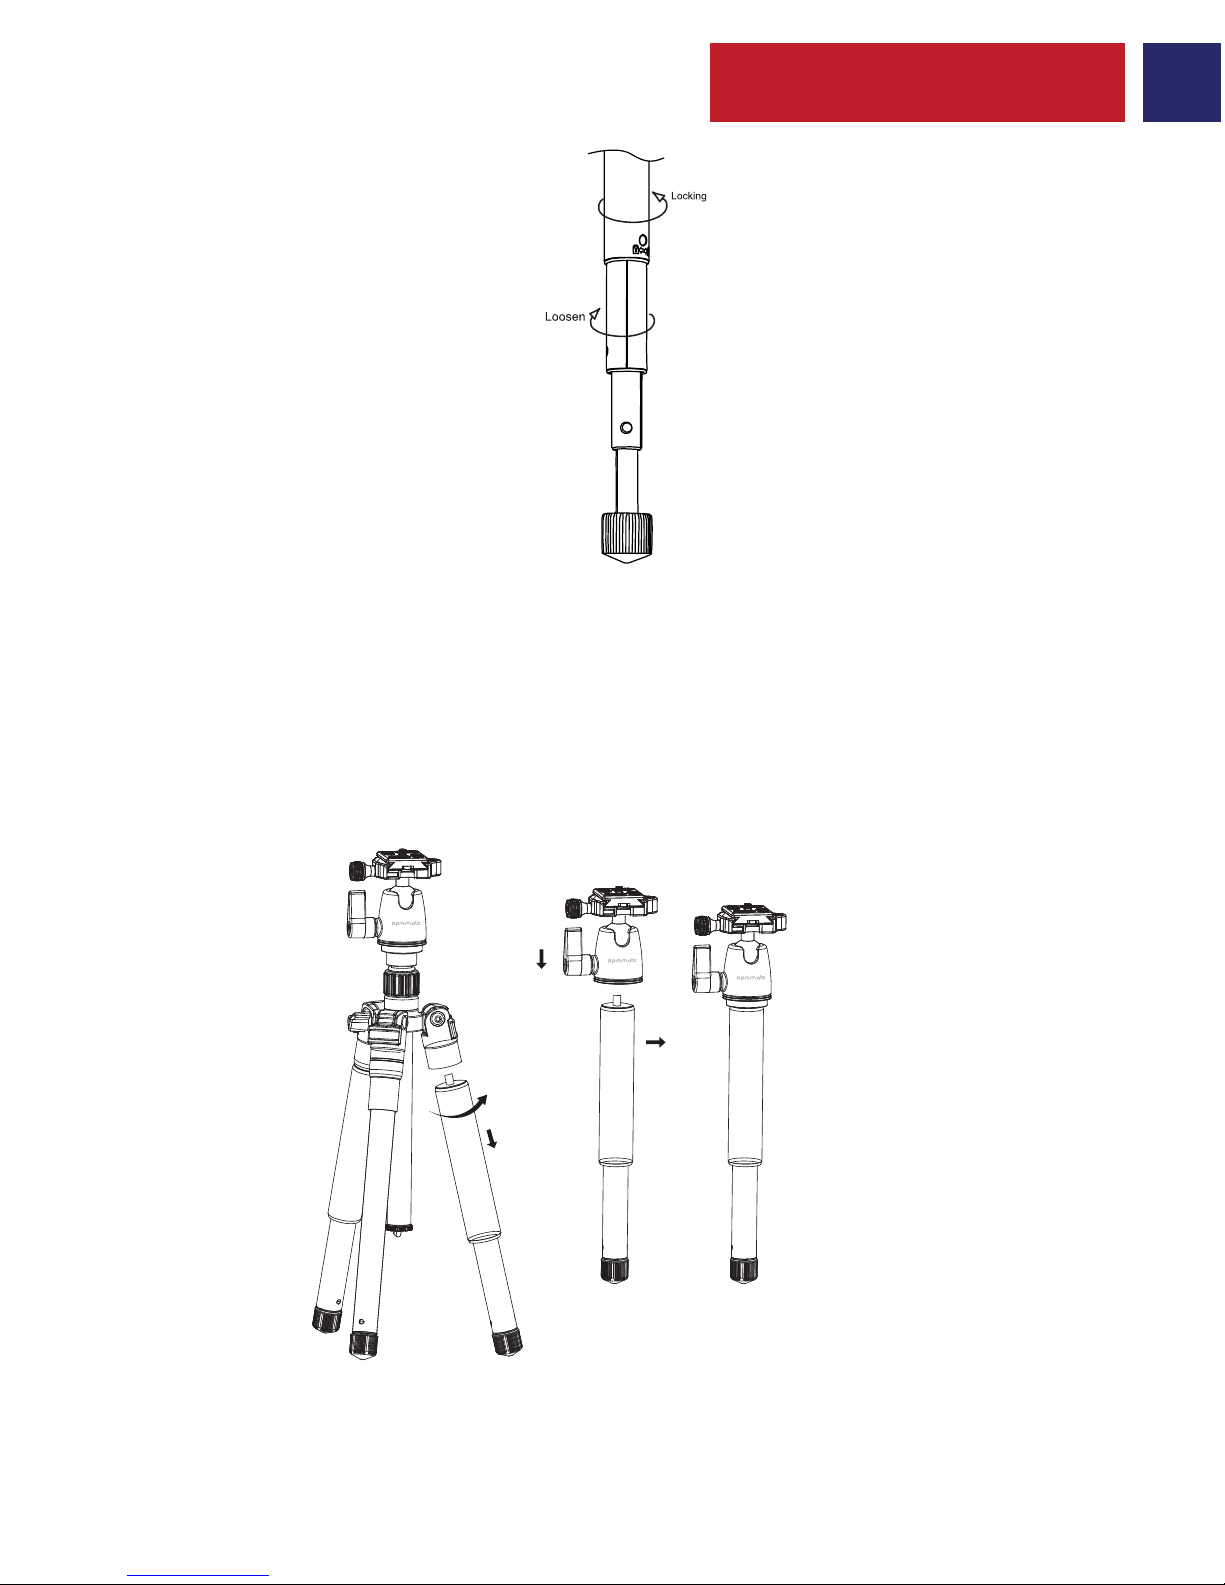
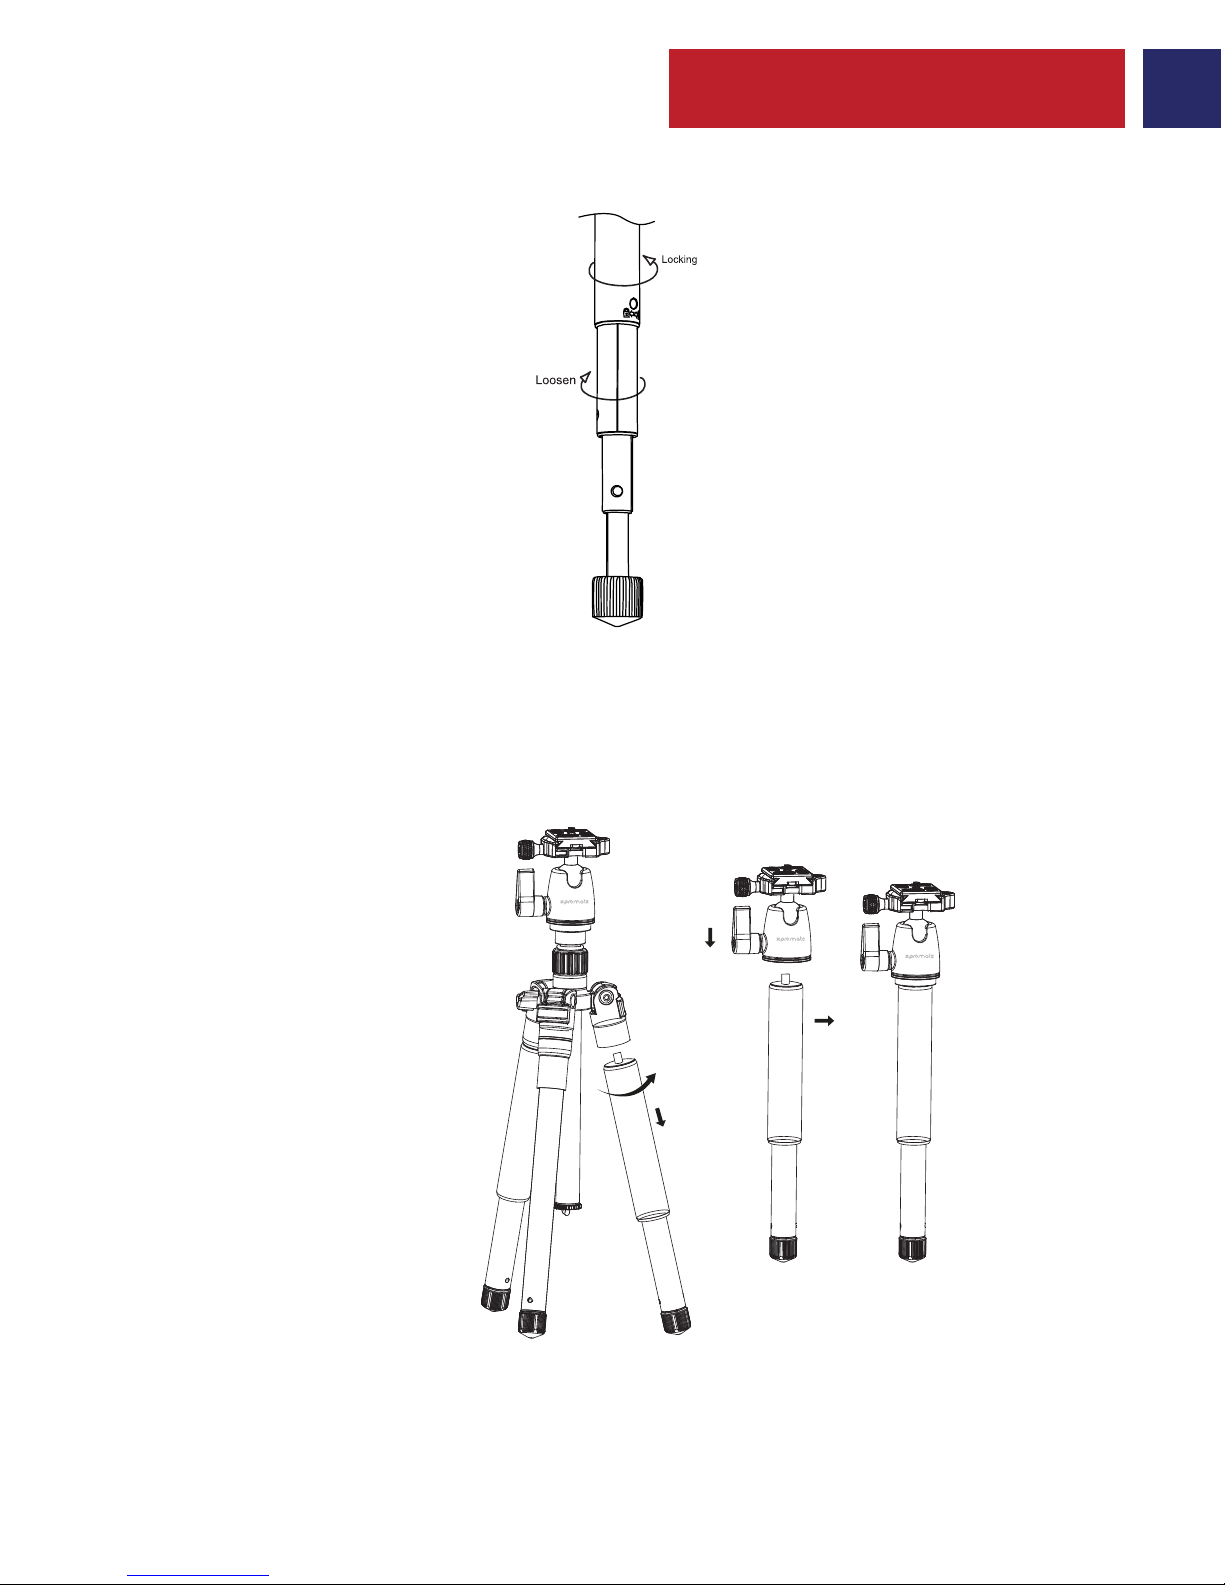
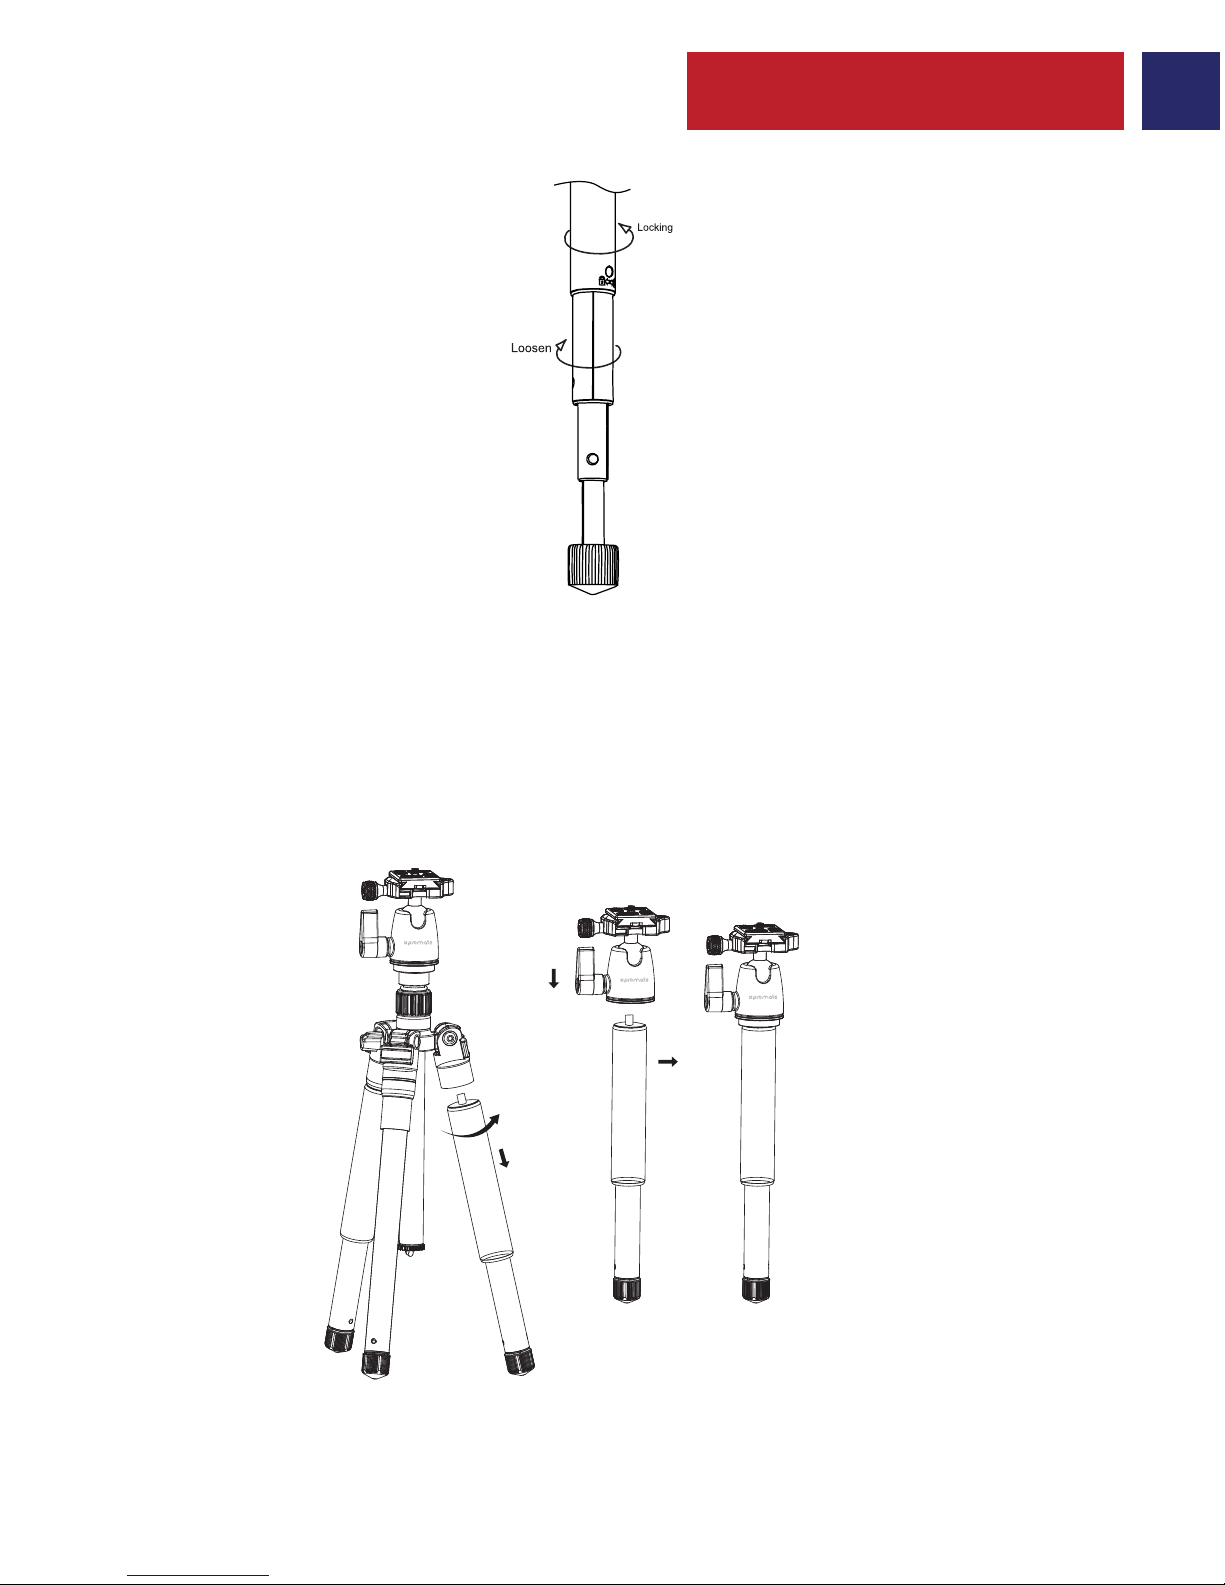
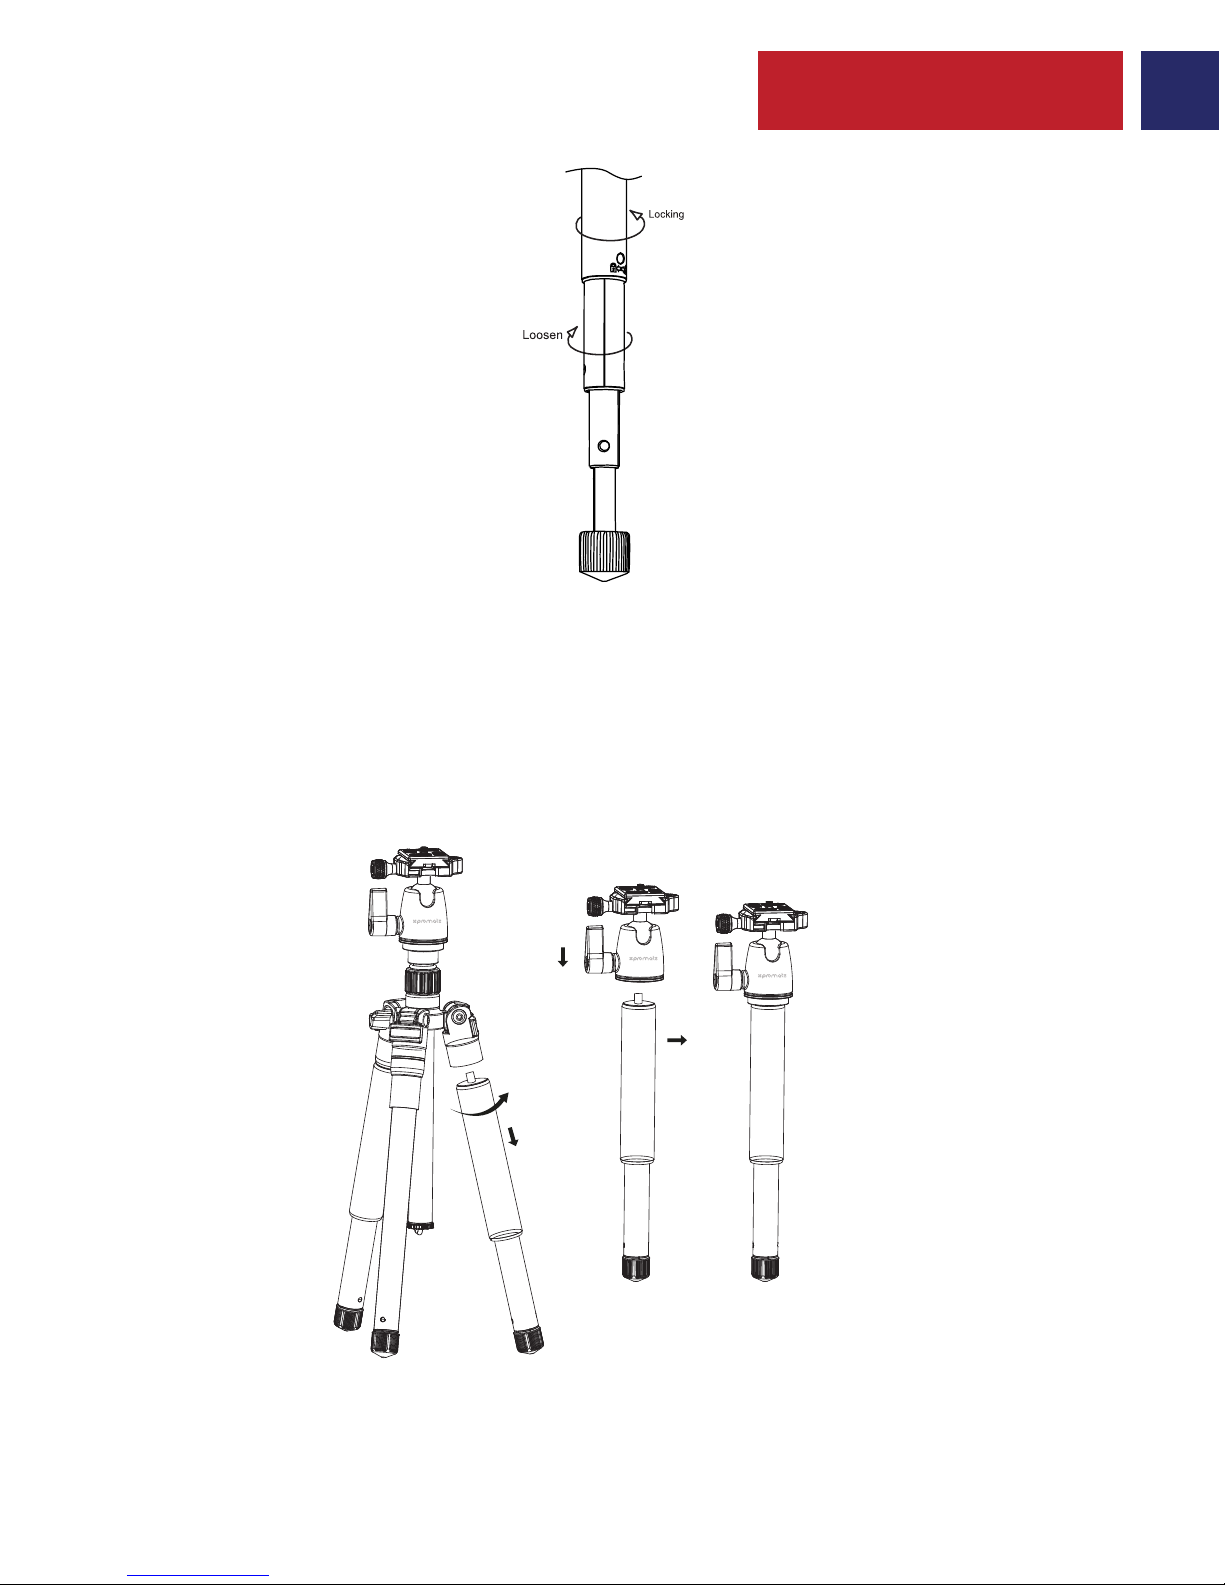
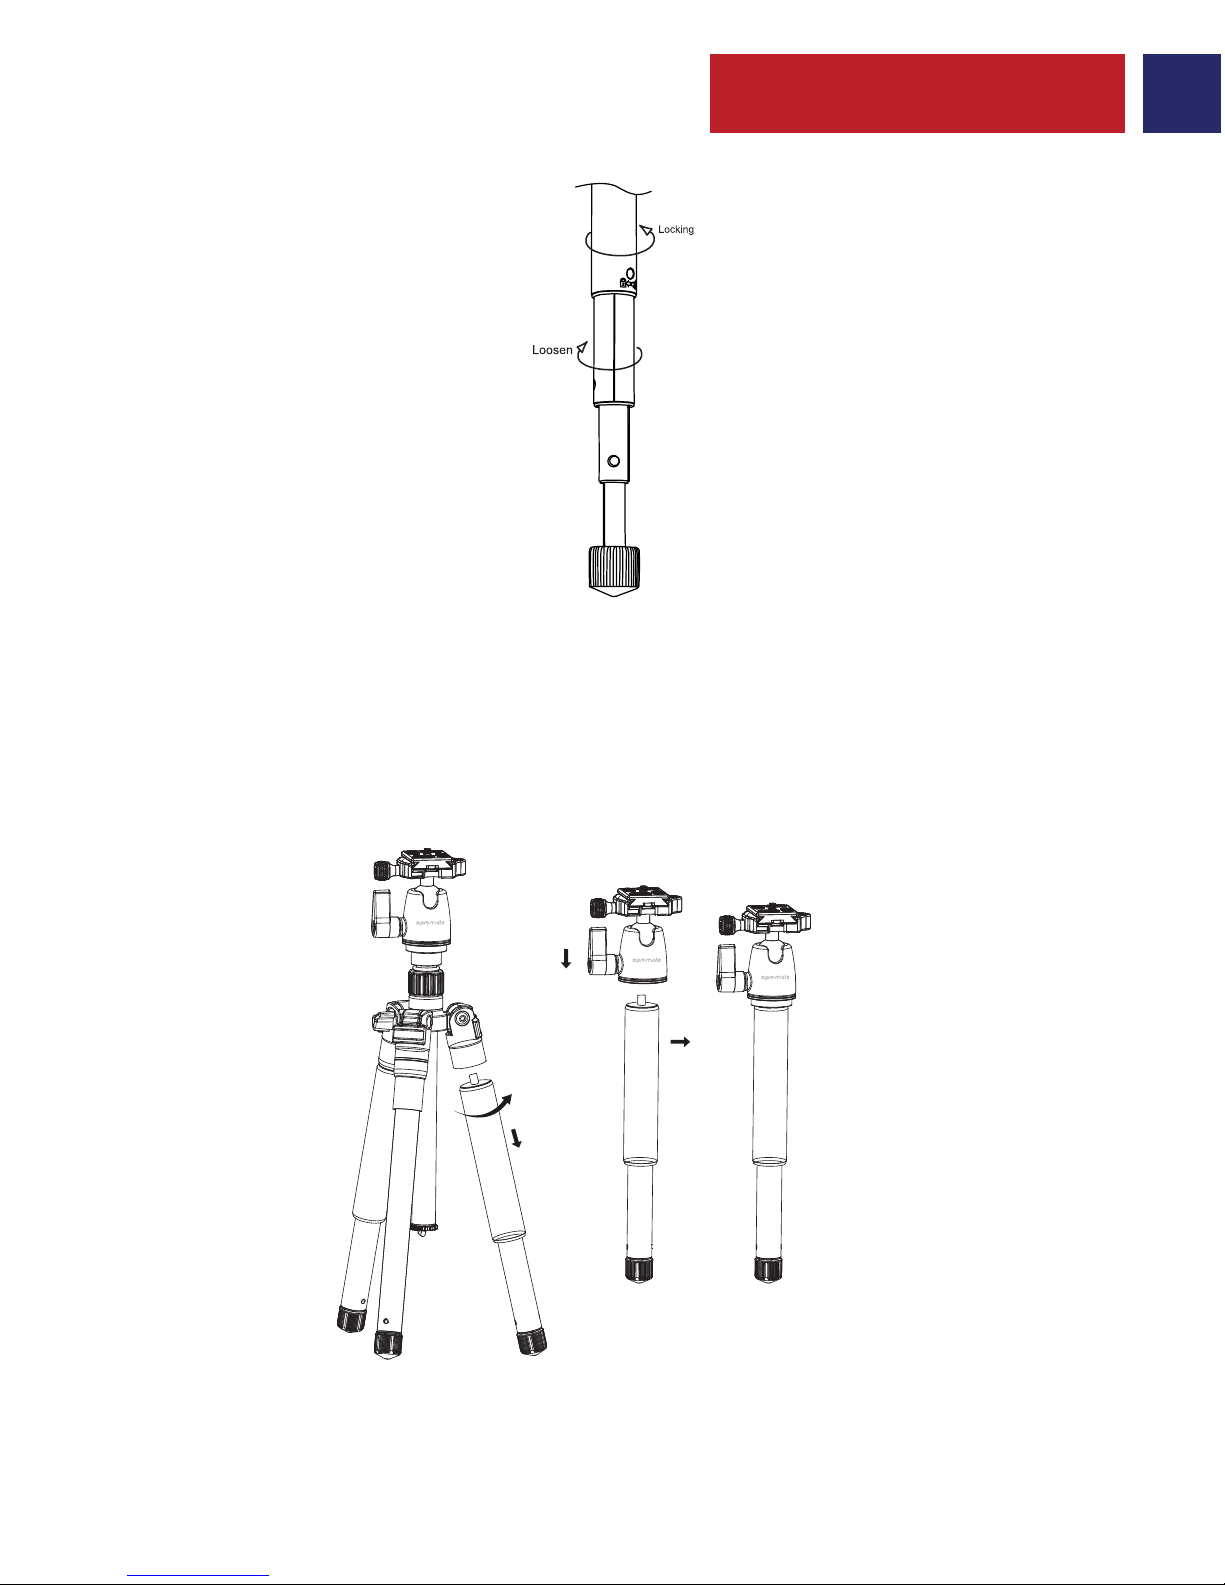
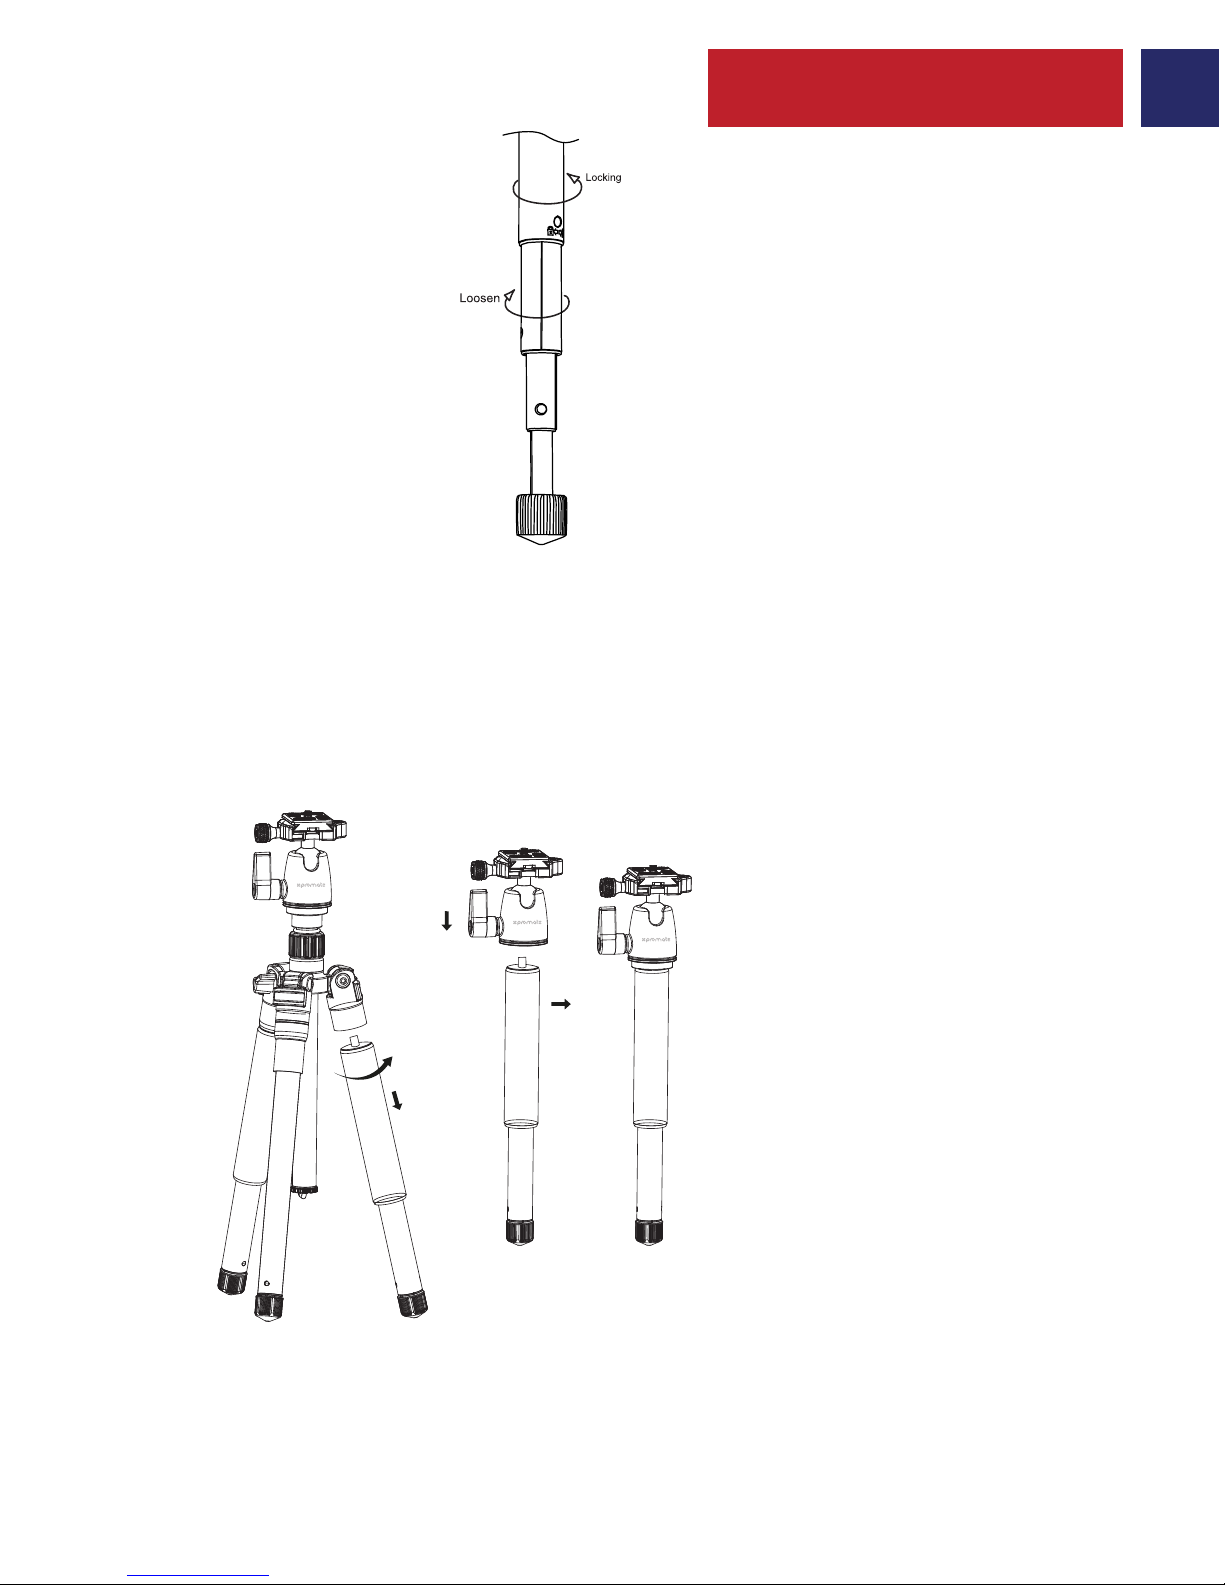
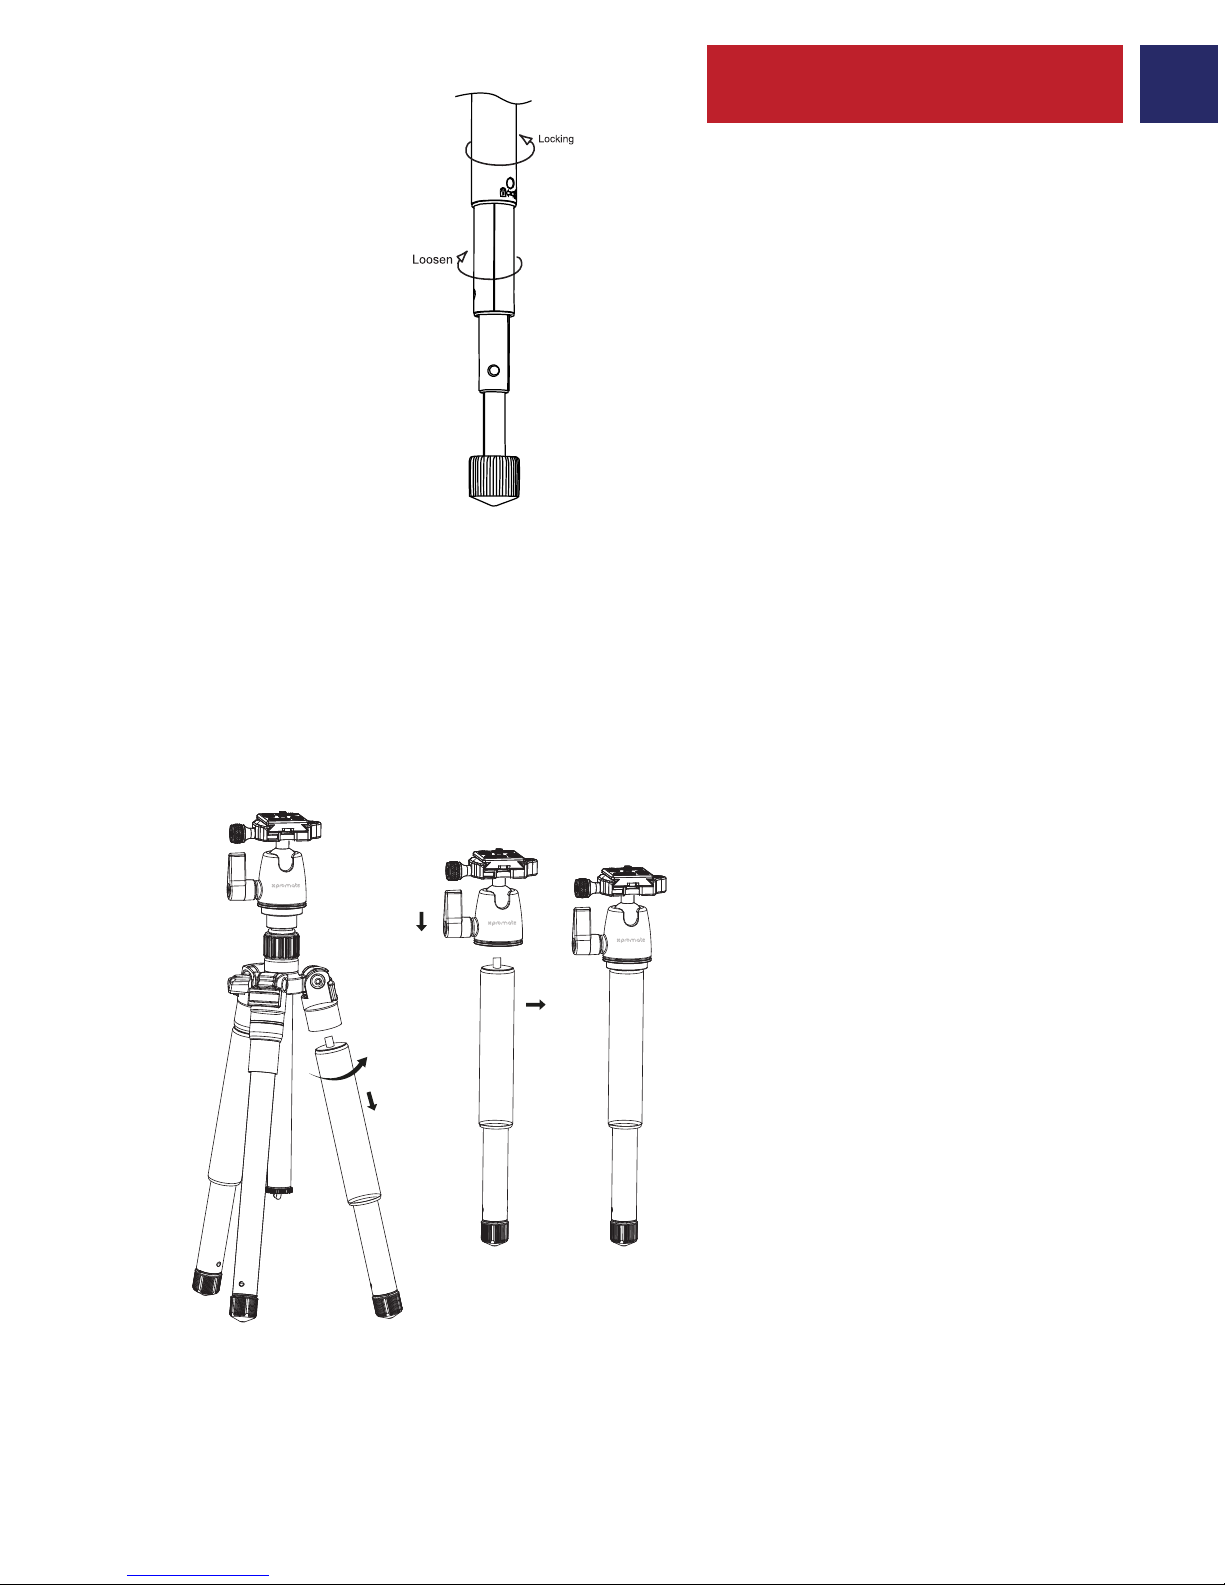
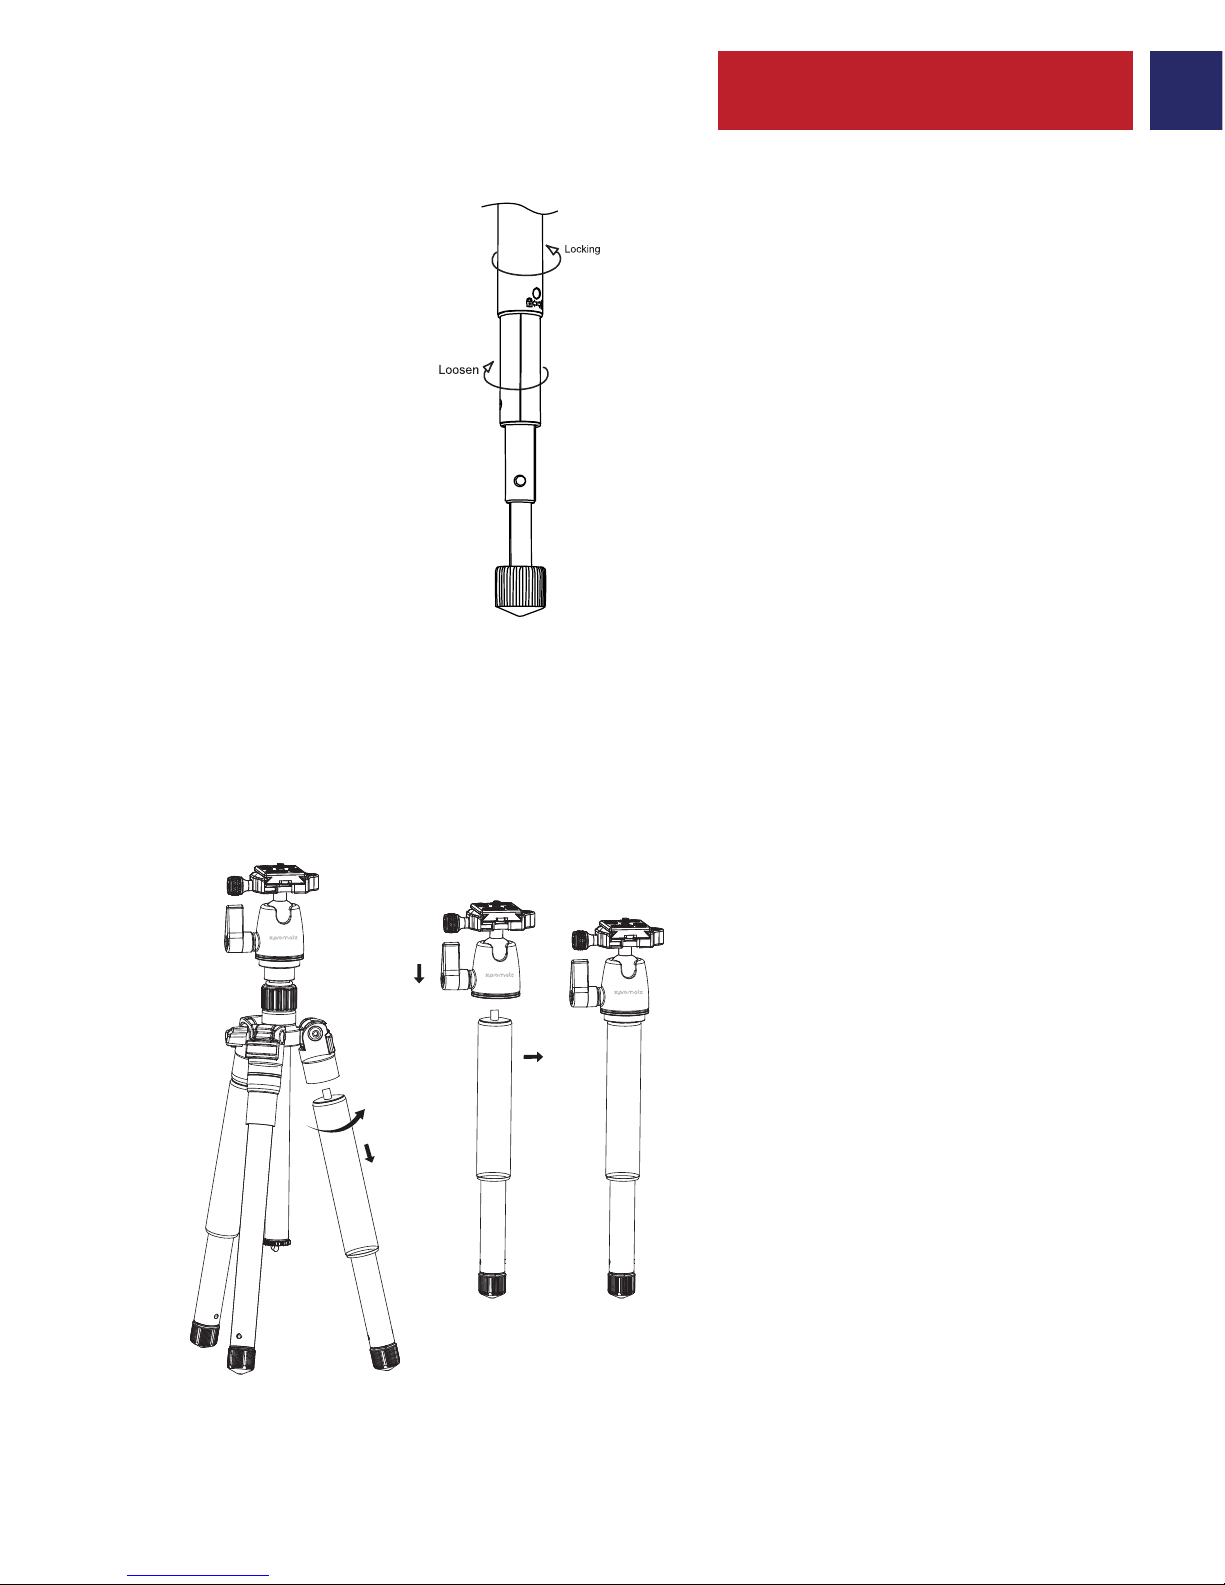
• Detach one of the tripod legs as shown.
• Detach the pivot head from the tripod.
• Screw the pivot head onto the detached tripod leg.
English
5. Extending the Tripod Legs:
6. Monopod Functionality
• Grasp the monopod’s rubber foot and twist it counter clockwise to loosen.
• Extend the monopod leg sections to the desired height.
• Twist the foot clockwise to lock the legs.
6
Page 8
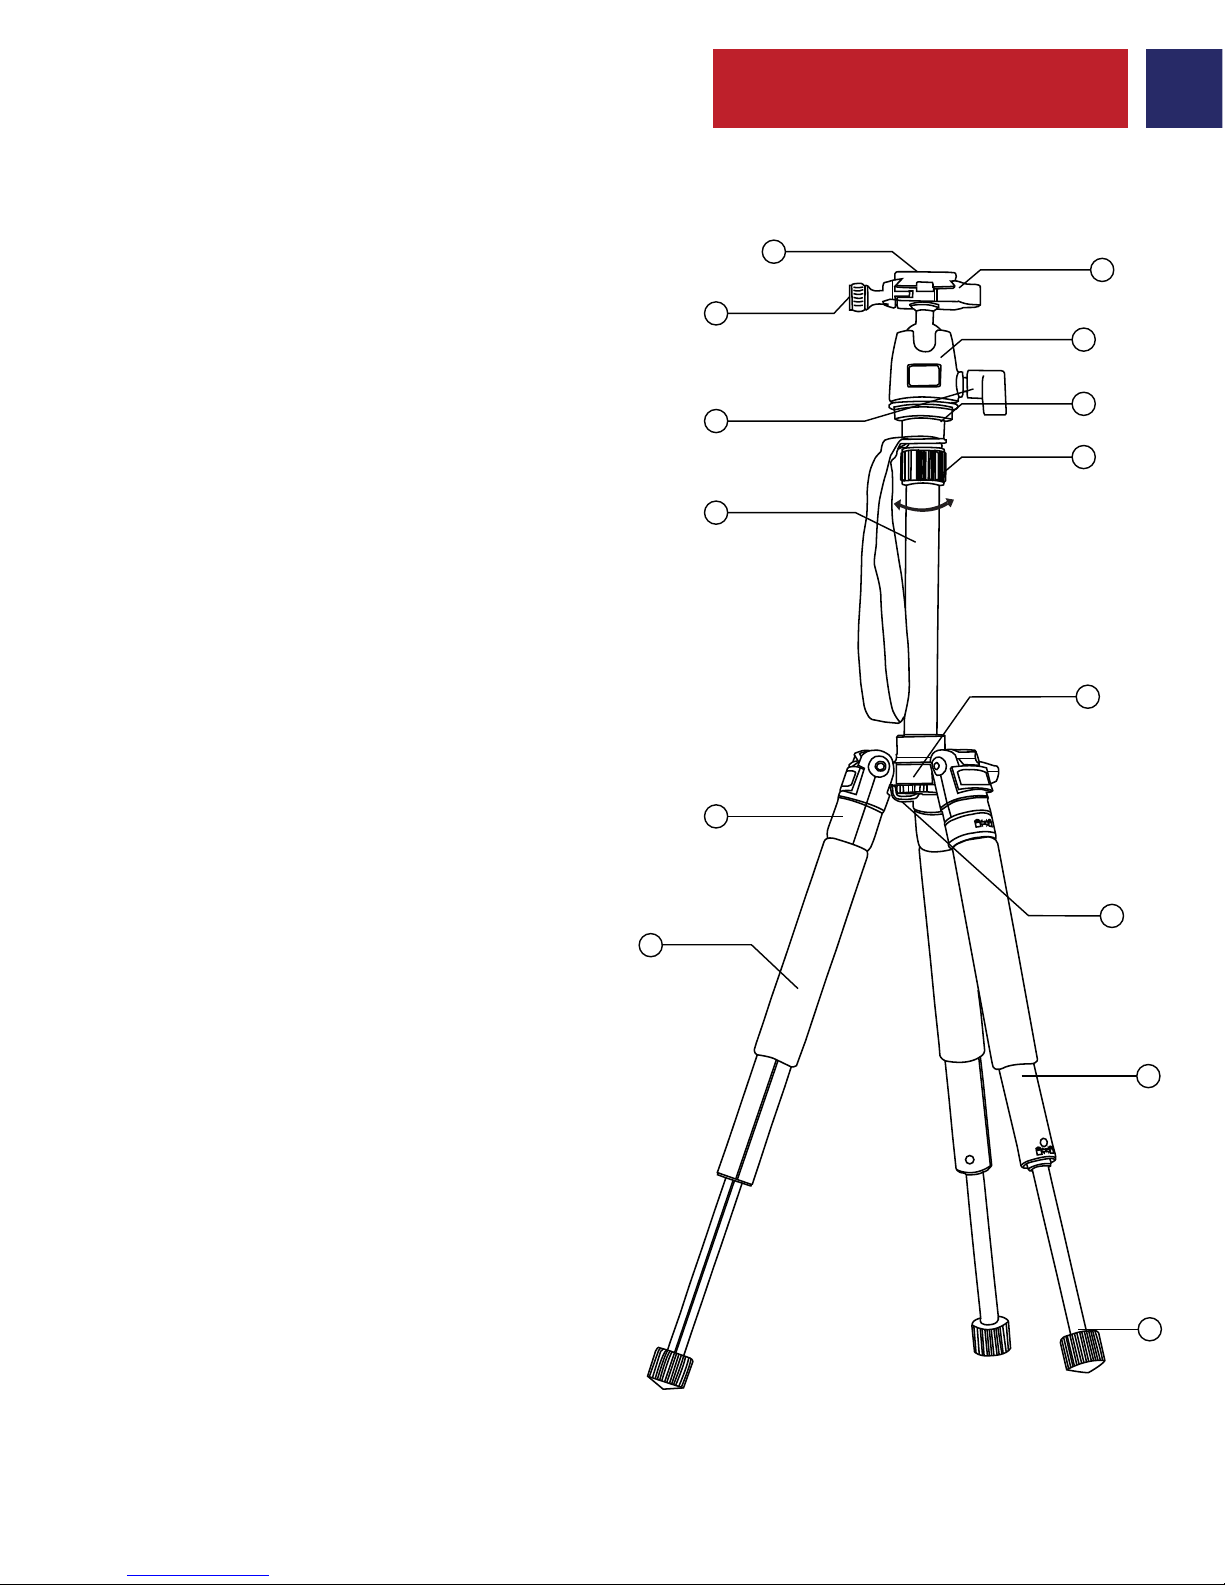
Appearance & Interface Description
1. Tornillo de montaje
2. Placa de montaje
3. Perilla de bloqueo para
la placa
de montaje con nivel de burbuja
4. Cabeza de pivote
5. Bloqueo de la cabeza de pivote
6. Columna de ajuste del
cabezal giratorio
7. Columna central de ajuste
rápido
8. Bloqueo de columna central
extendido
9. Bloqueo del ajuste de la columna
central
10. Cerraduras de la pierna del tirón
11. Patas telescópicas
12. Gancho de gravedad
13. Pierna Convertible en Monópodo
14. Pies de goma para bloqueo
de patas plegadas
7
1
3
5
7
10
11
2
4
8
9
12
6
13
14
Spanish
Page 9
Spanish
1. Ajuste de altura de Columna Central:
2. Instalación y Retirada de la Placa de Montaje
Instrucciones de Uso
• Aflojar la perilla de bloqueo de la columna central.
• Elevar la columna central a la altura deseada.
• Apretar la perilla de bloqueo de la Columna Central.
• Aflojar la perilla de Bloqueo de la Placa de Montaje.
• Levante la Placa de Montaje para soltarle.
8
Page 10
Spanish
• Tirar de los cierres de seguridad de las patas hacia fuera como se muestra.
• Ajustar el ángulo de la pata del trípode.
• Presionar el bloqueo para fijar las patas.
• La placa de montaje se puede inclinar para fotografías de retrato.
3. Ajustar la Inclinación de la Placa de Montaje
4. Uso de las cerraduras seguras
9
Page 11
Spanish
• Quitar una de las patas del trípode como se muestra.
• Quitar la cabeza del pivote del trípode.
• Atornillar la cabeza del pivote sobre la pata del trípode
5. Extender las patas del Trípode:
6. Funcionalidad del Monópodo
• Sujetar el pie de goma del monópodo y girarlo en sentido contrario a las agujas del
reloj para aflojarlo.
• Extender las secciones de la pata del monópodo a la altura deseada.
• Girar el pie en sentido horario para bloquear las patas.
10
Page 12
Description de l’apparence et de l’interface
1. Vis de montage
2. Plaque de montage
3. Bouton de verrouillage pour
plaque de montage à niveau
‘Bubbble’
4. Tête pivotante
5. Verrouillage de la tête pivotante
6. Colonne de réglage de la tête
pivotante
7. Colonne centrale d'ajustement
rapide
8. Verrouillage centralisé de la
colonne centrale
9. Verrou de réglage de la colonne
centrale
10. Verrouillage du repli des pieds
11. Pieds télescopiques
12. Crochet de gravité
13. Pied convertible monopode
14. Embout à visser en caoutchouc
de blocage du pied
11
1
3
5
7
10
11
2
4
8
9
12
6
13
14
French
Page 13
French
1. Ajustement de la hauteur de la colonne centrale :
2. Installation et enlèvement de la plaque de montage
Instructions d’utilisation
• Dévisser le bouton de verrouillage de la colonne centrale
• Etirer la colonne centrale à la hauteur désirée
• Resserrer le bouton de verrouillage de la colonne centrale.
• Dévisser le bouton de verrouillage de la plaque de montage
• Faire basculer la plaque de montage pour la retirer.
12
Page 14
French
• La plaque de montage peut être orientée de façon à réaliser des prises en mode
‘portraits’.
3. Ajuster l’orientation de la plaque de montage
4. Utiliser le verrouillage sécurité des pieds
• Dépliez les pieds vers l'extérieur comme illustré.
• Ajustez les angles des pieds du tripode.
• Appuyez sur le verrouillage du repli des pieds pour fixer les pieds de façon sécurisée.
13
Page 15
French
• Détachez l’un des pieds du tripode comme illustré.
• Détachez la tête pivotante du tripode.
• Vissez la tête pivotante sur le pied détaché.
5. Prolonger les pieds du tripode :
• Dévisser l’embout des pieds dans le sens contraire des aiguilles d’une montre.
• Etirer les sections des pieds télescopiques à la hauteur désirée.
• Revisser l’embout pour verrouiller les pieds.
6. Fonctionnalité monopode
14
Page 16
Aussehen & Schnittstellenbeschreibung
1. Befestigungsschraube
2. Befestigungsplatte
3.
Feststellknopf für
Befestigungsplatte mit Wasserwaage
4. Schwenkkopf
5. Schwenkkopfverriegelung
6. Schwenkkopf-Justiersäule
7. Schnellverstellung der
Mittelsäule
8. Verlängerung der
Mittelsäulenverriegelung
9. Einstellsperre der Mittelsäule
10. Klemmarretierung der
Stativbeine
11. Teleskopbeine
12. Schwerkrafthaken
13. Umrüstbein für Einbeinstativ
14. Drehbeinverriegelung
Gummifuss
15
1
3
5
7
10
11
2
4
8
9
12
6
13
14
German
Page 17
German
1. Anpassung der Höhe der Mittelsäule:
2. Installation und Entfernung der Befestigungsplatte
Benutzungsanleitung
• Lösen Sie den Verriegelungsknopf der Mittelsäule.
• Heben Sie die Mittelsäule bis auf die gewünschte Höhe an.
• Ziehen Sie den Verriegelungsknopf der Mittelsäule fest.
• Lösen Sie den Verriegelungsknopf der Befestigungsplatte
• Legen Sie die Befestigungsplatte zur Freigabe um.
16
Page 18
German
• Die Befestigungsplatte kann für Porträtaufnahmen geneigt werden.
3. Anpassung der Neigung der Befestigungsplatte
4. Verwendung der Sicherheitsverschlüsse der Beine
• Ziehen Sie die Klemmarretierung der Beine nach außen wie gezeigt.
• Passen Sie den Winkel der Stativbeine an.
• Drücken Sie die Klemmarretierung, um die Beine zu sichern.
17
Page 19
German
• Entfernen Sie die eines der Stativbeine wie gezeigt.
• Entfernen Sie den Schwenkkopf von dem Stativ.
• Schrauben Sie den Schwenkkopf auf das entfernte Stativbein.
5. Verlängerung der Stativbeine:
6. Funktionalität des Einbeinstativs
• Fassen Sie den Gummifuss des Einbeinstativs und drehen ihn zum Lösen gegen
den Uhrzeigersinn.
• Verlängern Sie die Abschnitte des Einbeinstativs auf die gewünschte Höhe.
• Drehen Sie den Fuss im Uhrzeigersinn zum Verriegeln der Beine.
18
Page 20
Appearance & Interface Description
1. Parafuso de montagem
2. Placa de montagem
3. Botão de bloqueio para
placa de montagem com
nível de bolha
4. Cabeça do eixo
5. Trava da cabeça do eixo
6. Coluna de ajuste da cabeça do
eixo
7. Coluna central de ajuste rápido
8. Trava de coluna central estendida
9. Trava de ajuste da coluna central
10. Travas da perna
11. Pernas telescópicas
12. Gancho de gravidade
13. Perna conversível monopódica
14. Pés de borracha da trava da
perna giratória
19
1
3
5
7
10
11
2
4
8
9
12
6
13
14
Portuguese
Page 21
Portuguese
1. Para ajustar a altura da coluna central:
2. Para instalar e remover a placa de montagem
Instruções de uso
• Solte a maçaneta da trava da coluna central.
• Eleve a coluna central até atingir a altura desejada.
• Aperte a maçaneta da trava da coluna central.
• Solte a maçaneta da trava da placa de montagem
• Levante a placa de montagem para a soltar.
20
Page 22
Portuguese
• A placa de montagem pode ser inclinada para tirar fotos de retrato.
3. Para ajustar a inclinação da placa de montagem
4. Para usar as travas seguras de perna:
• Puxe as travas seguras das pernas para fora como demonstrado.
• Ajuste o ângulo do pé do tripé.
• Pressione a trava para fixar as pernas.
21
Page 23
Portuguese
• Retire uma das pernas do tripé como demonstrado.
• Retire a cabeça do eixo do tripé.
• Aparafuse a cabeça do eixo na perna do tripé.
5. Para estender as pernas do tripé:
6. Funcionalidade monopódica
• Segure o pé de borracha do monopé e gire-o no sentido anti-horário para o soltar.
• Estenda as seções da perna do monopé até atingir a altura desejada.
• Gire o pé no sentido horário para bloquear as pernas.
22
Page 24
Descriera aspectului și interfeței
1. Șurub de montare
2. Placă de montare
3. Buton de blocare pentru placa de
montare cu poloboc
4. Cap pivotant
5. Blocare cap pivotant
6. Coloană de reglare cap pivotant
7. Coloană centrală pentru reglare
rapidă
8. Blocare coloană centrală extinsă
9. Blocare reglare coloană centrală
10. Blocări picioare basculante
11. Picioare telescopice
12. Cârlig gravitație
13. Picior convertibil monopied
14. Picioare cauciuc blocare picior
răsucit
23
1
3
5
7
10
11
2
4
8
9
12
6
13
14
Romanian
Page 25
Romanian
1. Reglarea înălțimii coloanei centrale:
2. Instalarea și demontarea plăcii de montare
Instrucțiuni de utilizare
• Desfaceți butonul de blocare a coloanei centrale.
• Ridicați coloana centrală la înălțimea dorită.
• Strângeți butonul de blocare a coloanei centrale.
• Desfaceți butonul de blocare al plăcii de montare
• Basculați în sus placa de montare pentru a o elibera
24
Page 26
• Placa de montare poate fi înclinată pentru fotografii portret.
3. Reglarea înclinării plăcii de montare
4. Utilizarea blocării sigure a piciorului
• Trageți blocările basculante securizante ale picioarelor, după cum se arată în imagine.
• Reglați unghiul piciorului trepiedului.
• Apăsați blocarea basculantă pentru a securiza picioarele.
25
Romanian
Page 27
Romanian
• Desprindeți unul dintre picioarele trepiedului așa cum se arată în imagine.
• Desprindeți capul pivotant de trepied.
• Înșurubați capul pivotant pe piciodul desprins al trepiedului.
5. Extinderea picioarelor trepiedului:
• Apucați piciorul de cauciul al monopiedului și răsuciți-l în sensul invers al
acelor de ceasornic pentru a-l desface.
• Extindeți secțiunile piciorului monopiedului până la înălțimea dorită.
• Răsuciți piciorul în sensul acelor de ceasornic pentru a bloca picioarele.
6. Funcționalitatea monopiedului
26
Page 28
Внешний вид и описание интерфейса
1. Крепежный винт
2. Монтажная пластина
3. Фиксирующая ручка для
монтажной пластины с
пузырьковым уровнем
4. Поворотная головка
5. Зажим поворотной головки
6. Регулировочная колонна
поворотной головки
7. Центральная колонна
быстрого перемещения
8. Замок выдвижной центральной
колонны
9. Замок перемещения
центральной колонны
10. Флажковые замки стоек
11. Телескопические стойки
12. Гравитационный затвор
13. Стойка с возможностью
использования как монопод
14. Резиновые ножки поворотных
замков стоек
27
1
3
5
7
10
11
2
4
8
9
12
6
13
14
Russian
Page 29
Russian
1. Регулировка высоты центральной колонны:
2. Установка и снятие монтажной пластины
Инструкция по применению
• Ослабьте фиксирующую ручку центральной колонны.
• Поднимите центральную колонну на требуемую высоту.
• Затяните фиксирующую ручку центральной колонны.
• Ослабьте фиксирующую ручку монтажной пластины
• Откиньте монтажную пластину, чтобы снять ее.
28
Page 30
Russian
• Монтажную пластину можно наклонять для производства портретных снимков.
3. Регулировка наклона монтажной пластины
4. Использование замков фиксации стоекнаклона монтажной пластины
• Entfernen Sie die eines der Stativbeine wie gezeigt.
• Entfernen Sie den Schwenkkopf von dem Stativ.
• Schrauben Sie den Schwenkkopf auf das entfernte Stativbein.
29
Page 31
Russian
• Отсоедините одну из стоек треноги, как показано на рисунке.
• Снимите поворотную головку с треноги.
• Прикрутите поворотную головку к отсоединенной стойке треноги.
6. Использование в качестве монопода
5. Выдвижение стоек треноги:
• Возьмитесь за резиновую ножку монопода и поверните ее против
часовой стрелки для того, чтобы ослабить ее.
• Выдвините секции стойки монопода на требуемую высоту.
• Закрутите ножку по часовой стрелке для фиксации стоек.
30
Page 32
Appearance & Interface Description
1. Montaj Vidası
2. Montaj Plakası
3. Montaj Plakası için Baloncuk
Seviyesinde Kilit Topuzu
4. Mil Başlığı
5. Mil Başlığı Kilidi
6. Mil Başlığı Ayar Sütunu
7. Hızlı Ayar Merkez Sütunu
8. Uzatılmış Merkez Sütun Kilidi
9. Merkez Sütun Ayar Kilidi
10. Döndürülebilir Bacak Kilitleri
11. Teleskopik Bacaklar
12. Ağırlık Kancası
13. Monopod Dönüştürülebilir Bacak
14. Bükülebilen Bacak Kilidi Kauçuk
Ayaklar
31
1
3
5
7
10
11
2
4
8
9
12
6
13
14
Turkish
Page 33
Turkish
1. Merkez Sütunun Yüksekliğini Ayarlama:
2. Montaj Plakasının Kurulumu ve Sökülmesi
Kullanım Talimatları
• Merkez Sütun Kilit Topuzunu Gevşetin.
• Merkez sütunu istenilen seviyeye yükseltin.
• Merkez Sütun Kilit Topuzunu sıkın.
• Loosen the Locking Knob for Mounting Plate
• Montaj Plakasını yukarı çevirerek serbest bırakın.
32
Page 34
Turkish
• Montaj plakası portre çekimleri için eğilebilir.
3. Montaj Plakasının Eğiminin Ayarlanması
4. Güvenli Bacak Kilitlerinin Kullanımı
• Güvenli Döndürülebilir Bacak Kilitlerini gösterilen şekilde Dışarıya Doğru çekin.
• Tripodun bacak açısını ayarlayın.
• Döndürülebilir kilide basarak bacakları güvenli hale getirin.
33
Page 35
Turkish
• Tripod bacaklarından birini gösterilen şekilde çıkarın.
• Mil başlığını tripoddan ayırın.
• Mil başlığını sökülmüş olan tripod bacağına vidalayın
5. Tripod Bacaklarını Uzatma:
6. Monopod İşlevselliği
• Monopodun kauçuk ayağını tutarak saatin tersi yönde bükün ve gevşetin.
• Monopodun bacak kısımlarını istenilen yüksekliğe uzatın.
• Bacakları kilitlemek için ayağı saat yönünde bükün.
34
Page 36
外观和接口描述
1. 安装螺丝
2. 安装板
3. 带气泡水平校准仪的安装板用锁定旋钮
4. 枢轴头
5. 枢轴头锁
6. 枢轴头调整柱
7. 快速调节中心柱
8. 扩展中心柱锁
9. 中心柱调整锁
10. 翻转腿锁
11. 伸缩腿
12. 重力钩
13. 独脚架可转换腿
14. 扭曲腿锁橡胶脚
35
1
3
5
7
10
11
2
4
8
9
12
6
13
14
Chinese
Page 37
Chinese
1. 调整中心柱的高度:
2. 安装板的安装和拆卸
使用说明
• 松开中心柱锁定旋钮。
• 将中心柱升高到所需高度。
• 拧紧中心柱锁定旋钮
• 松开安装板的锁定旋钮
• 向上翻转安装板以松开它。
36
Page 38
• 安装板可以倾斜以用于人像拍摄。
• 如图所示将固定脚蹬锁向外拉。
• 调整三脚架支脚角度。
• 按下翻盖锁固定支脚。
3. 调整安装板的倾斜度
4. 使用固定腿锁
37
Chinese
Page 39
Chinese
• 如图所示拆下其中一个三脚架支脚。
• 从三角架上拆下枢轴头。
• 将枢轴头旋到拆下的三脚架腿上。
5. : 延伸三脚架腿:
6. 独脚架功能
• 抓住独脚架的橡胶脚,逆时针旋转以松开。
• 将独脚架腿部延长至所需高度。
• 顺时针扭动脚以锁定独脚架腿。
38
Page 40
Persian
:ﻪﯾﺎﭘ ﻪﺳ یﺎھ ﻪﯾﺎﭘ ندﺮﮐ زﺎﺑ .5
دﺎﭘﻮﻧﻮﻣ ﺖﯿﻠﺑﺎﻗ .6
ﺎﺗ ﺪﯿﻧﺎﺧﺮﭽﺑ ﺖﻋﺎﺳ یﺎھ ﻪﺑﺮﻘﻋ ﺖﮭﺟ فﻼﺧ و ﺪﯾﺮﯿﮕﺑ ﻢﮑﺤﻣ ار دﺎﭘﻮﻧﻮﻣ ﯽﮑﯿﺘﺳﻻ ﻪﯾﺎﭘ •
.دﻮﺷ ﻞﺷ
.ﺪﯿﻨﮐ زﺎﺑ هاﻮﺨﻟد عﺎﻔﺗرا ﺎﺗ ار دﺎﭘﻮﻧﻮﻣ ﻪﯾﺎﭘ یﺎﮭﺘﻤﺴﻗ •
.ﺪﻧﻮﺷ ﻞﻔﻗ ﺎھ ﻪﯾﺎﭘ ﺎﺗ ﺪﯿﻧﺎﺧﺮﭽﺑ ﺖﻋﺎﺳ یﺎھ ﻪﺑﺮﻘﻋ ﺖﮭﺟ فﻼﺧ ار ﻪﯾﺎﭘ •
.ﺪﯿﻨﮐ اﺪﺟ ﻞﮑﺷ ﻖﺒط ار ﻪﯾﺎﭘ ﻪﺳ یﺎھ ﻪﯾﺎﭘ زا ﯽﮑﯾ •
.ﺪﯿﻨﮐ اﺪﺟ ﻪﯾﺎﭘ ﻪﺳ زا ار ﯽﺸﺧﺮﭼ ﺮﺳ •
.ﺪﯿﻨﮐ ﻞﺻو هﺪﺷ اﺪﺟ ﻪﯾﺎﭘ ﻪﺑ ار ﯽﺸﺧﺮﭼ ﺮﺳ •
39
Page 41
Persian
.دﺮﮐ ﺞﮐ هﺮﺗﺮﭘ یﺎﮭﺴﮑﻋ ﻦﺘﻓﺮﮔ یاﺮﺑ ناﻮﺗ ﯽﻣ ار ﺐﺼﻧ ﻪﺤﻔﺻ •
.ﺪﯿﺸﮑﺑ نوﺮﯿﺑ ﻪﺑ ﻞﮑﺷ ﻖﺒط ار ﻪﯾﺎﭘ هﺪﻧراﺪﮭﮕﻧ ﻞﻔﻗ •
.ﺪﯿﻨﮐ ﻢﯿﻈﻨﺗ ار ﻪﯾﺎﭘ ﻪﺳ یﺎھ ﻪﯾﺎﭘ ﻪﯾواز •
.ﺪﯿھد رﺎﺸﻓ ﺎھ ﻪﯾﺎﭘ هدﺮﮐ ﻢﮑﺤﻣ یاﺮﺑ ار ﻞﻔﻗ •
ﺐﺼﻧ ﻪﺤﻔﺻ ﺐﯿﺷ ﻢﯿﻈﻨﺗ .3
ﻪﯾﺎﭘ هﺪﻧراﺪﮭﮕﻧ ﻞﻔﻗ زا هدﺎﻔﺘﺳا .4
40
Page 42
Persian
:یﺰﮐﺮﻣ نﻮﺘﺳ عﺎﻔﺗرا ﻢﯿﻈﻨﺗ .1
ﺐﺼﻧ ﻪﺤﻔﺻ ﻦﺘﺷادﺮﺑ و ﻦﺘﺷاﺬﮔ .2
تﺎﯿﻠﻤﻋ یﺎھ ﻞﻤﻌﻟارﻮﺘﺳد
.ﺪﯿﻨﮐ ﻞﺷ ار یﺰﮐﺮﻣ نﻮﺘﺳ ﻞﻔﻗ ﭻﯿﭘ •
.ﺪﯾروﺎﯿﺑ ﻻﺎﺑ هاﻮﺨﻟد عﺎﻔﺗرا ﺎﺗ ار یﺰﮐﺮﻣ نﻮﺘﺳ •
ﺪﯿﻨﮐ ﺖﻔﺳ ار یﺰﮐﺮﻣ نﻮﺘﺳ ﻞﻔﻗ ﭻﯿﭘ •
ﺪﯿﻨﮐ ﻞﺷ ار ﺐﺼﻧ ﻪﺤﻔﺻ ﻞﻔﻗ ﭻﯿﭘ •
.دﻮﺷ دازآ ﺎﺗ ﺪﯿﺸﮑﺑ ﻻﺎﺑ ار ﺐﺼﻧ ﻪﺤﻔﺻ •
41
Page 43
Persian
ﻂﺑار حﺮﺷ و ﺮھﺎﻇ
ﺐﺼﻧ ﭻﯿﭘ .1
ﺐﺼﻧ ﻪﺤﻔﺻ .2
زاﺮﺗ ﺎﺑ ﺐﺼﻧ ﻪﺤﻔﺻ یاﺮﺑ ﻞﻔﻗ ﭻﯿﭘ .3
ﯽﺸﺧﺮﭼ ﺮﺳ .4
ﯽﺸﺧﺮﭼ ﺮﺳ ﻞﻔﻗ .5
ﯽﺸﺧﺮﭼ ﺮﺳ ﻢﯿﻈﻨﺗ نﻮﺘﺳ .6
ﻊﯾﺮﺳ ﻢﯿﻈﻨﺗ یﺰﮐﺮﻣ نﻮﺘﺳ .7
هﺪﺷ زﺎﺑ یﺰﮐﺮﻣ نﻮﺘﺳ ﻞﻔﻗ .8
یﺰﮐﺮﻣ نﻮﺘﺳ ﻢﯿﻈﻨﺗ ﻞﻔﻗ .9
ﻪﯾﺎﭘ یﺎھ ﻞﻔﻗ .10
ﯽﭘﻮﮑﺴﻠﺗ یﺎھ ﻪﯾﺎﭘ .11
ﻪﺑذﺎﺟ ﻪﻘﻠﺣ .12
دﺎﭘﻮﻧﻮﻣ ﻪﺑ ﻞﯾﺪﺒﺗ ﻞﺑﺎﻗ ﻪﯾﺎﭘ .13
ﯽﺸﺧﺮﭼ ﻪﯾﺎﭘ ﻞﻔﻘﯿﮑﯿﺘﺳﻻ ﻪﯾﺎﭘ .14
42
1
3
5
7
10
11
2
4
8
9
12
6
13
14
Page 44
.ﻒﯿﻔﺨﺘﻠﻟ ﺔﻋﺎﺴﻟا برﺎﻘﻋ هﺎﺠﺗا ﺲﻜﻋ ﻪًﯿﻟو نوﺎﻘﯿﺴﻟا ﻦﻣ ةﺪﺣاو كﺎﺴﻣﺎﺑ ﻢﻗ •
.بﻮﻠﻄﻤﻟا عﺎﻔﺗرﻻا ﻰﻟإ ﺔﻳدﺎﺣﻷا قﺎﺴﻟا مﺎﺴﻗا ﺪﻳﺪﻤﺘﺑ ﻢﻗ •
. نﺎﻘﯿﺴﻟا قﻼﻏﻻ ﺔﻋﺎﺴﻟا هﺎﺠﺗا ﻰﻓ مﺪﻘﻟا ًﻲﻠﺑ ﻢﻗ •
.ﻦﯿﺒﻣ ﻮھ ﺎﻤﻛ ﺔﯿﺛﻼﺜﻟا نﺎﻘﯿﺴﻟا ﻦﻣ ﺪﺣاو ﻞﺼﻓا •
.ﻰﺛﻼﺜﻟا ﻦﻣ رﻮﺤﻤﻟا سار ﻞﺼﻓا •
ﺔﻠﺼﻔﻨﻤﻟا ﺔﯿﺛﻼﺜﻟا ﻖﺴﻟا ﻲﻓ رﻮﺤﻤﻟا سأر ﻞﺧدأ •
ﺔﯿﺛﻼﺜﻟا نﺎﻘﯿﺴﻟا ﺪﻳﺪﻤﺗ .5
ﺔﻳدﺎﺣﻻا ﺔﻔﯿﻇﻮﻟا .6
43
Arabic
Page 45
.ﻦﯿﺒﻣ ﻮھ ﺎﻤﻛ جرﺎﺨﻟا ﻰﻟإ قﺎﺴﻠﻟ ﺔﻨﻣﻷا لﺎﻔﻗﻷا ﺐﺤﺳإ •
.ﺔﯿﺛﻼﺜﻟا قﺎﺴﻟا ﺔﻳواز ﻂﺒﺿإ •
. نﺎﻘﯿﺴﻟا ﻦﯿﻣﺄﺘﻟ بﻼﻘﻟا ﻞﻔﻘﻟا ﻰﻠﻋ ﻂﻐﺿا •
Arabic
.ةﺮﻳﻮﺼﺘﻟا تﺎﻄﻘﻠﻟ ﺐﯿﻛﺮﺘﻟا ﺔﺣﻮﻟ ﺔﻟﺎﻣا ﻦﻜﻤﻳ •
ﺐﯿﻛﺮﺘﻟا ﺔﺣﻮﻠﻟ ﻞﯿﻤﻟا ﻞﻳﺪﻌﺗ .3
ﺔﻨﻣﻵا قﺎﺴﻟا لﺎﻔﻗا ماﺪﺨﺘﺳأ . 4
44
Page 46
Arabic
ﻂﺳوﻷا دﻮﻣﺎﻌﻟا عﺎﻔﺗرا ﻂﺒﺿ .1
ﺐﯿﻛﺮﺘﻟا ﺔﺣﻮﻟ ﺔﻟازا و ﺐﯿﻛﺮﺗ .2
لﺎﻤﻌﺘﺳﻻا تﺎﻤﯿﻠﻌﺗ
.ﻂﺳوﻷا دﻮﻣﺎﻌﻠﻟ ﻞﻔﻘﻟا ﺾﺒﻘﻣ ﻲﺧر •
.بﻮﻠﻄﻤﻟا عﺎﻔﺗرﻻا ﻰﻟإ ﻂﺳوﻷا دﻮﻣﺎﻌﻟا ﻊﻓرإ •
.ﻂﺳوﻷا دﻮﻣﺎﻌﻟا ﻞﻔﻘﻟا ﺾﺒﻘﻣ ﻢﻜﺣا •
ﺐﯿﻛﺮﺘﻟا ﺔﺣﻮﻠﻟ ﻞﻘﻘﻟا ﺾﺒﻘﻣ ﻲﺧرأ •
.ﺎﮭﺟاﺮﺧﻻ ﻲﻠﻋﻷا ﻲﻟا ﺐﯿﻛﺮﺘﻟا ﺔﺣﻮﻟ ﺐﻠﻗا •
45
Page 47

Arabic
ﺔﮭﺟاﻮﻟا و ﺮﮭﻈﻤﻟا ﻒﺻو
.ﻲﺒﻟﻮﻠﻟا رﺎﻤﺴﻤﻟا ﺐﯿﻛﺮﺗ .1
ﺐﯿﻛﺮﺘﻟا ﺔﺣﻮﻟ .2
ىﻮﺘﺴﻣ ﻊﻣ ﺐﯿﻛﺮﺘﻟا ﺔﺣﻮﻠﻟ ﻞﻔﻘﻟا ﺾﺒﻘﻣ .3
. ﺔﻋﺎﻘﻔﻟا
.رﻮﺤﻤﻟا سأر .4
.رﻮﺤﻤﻟا سأر ﻞﻔﻗ .5
رﻮﺤﻤﻟا سار ﻞﻳﺪﻌﺗ دﻮﻣﺎﻋ .6
.ﻂﺳوﻷا دﻮﻣﺎﻌﻠﻟ ﻊﻳﺮﺴﻟا ﻞﻳﺪﻌﺘﻟا .7
.ﻂﺳوﻷا دﻮﻣﺎﻌﻟا ﺪﻳﺪﻤﺗ ﻞﻔﻗ .8
.ﻂﺳوﻷا دﻮﻣﺎﻌﻟا ﻞﻳﺪﻌﺗ ﻞﻔﻗ .9
.ﻲﻄﻠﻟ ﺔﻠﺑﺎﻘﻟا نﺎﻘﯿﺴﻠﻟ لﺎﻔﻗأ .10
ﺔﻠﺧاﺪﺘﻣ نﺎﻘﯿﺳ .11
.ﺔﯿﺑذﺎﺠﻟا ﻚﺒﺸﻣ 12
ﻞﻳﻮﺤﺘﻠﻟ ﺔﻠﺑﺎﻘﻟا ﺔﻳدﺎﺣﻷا قﺎﺴﻟا .13
قﺎﺴﻠﻟ ﺔﻔﻠﻐﻤﻟا ﺔﯿﻧوﺰﻠﺤﻟا ﺔﯿطﺎﻄﻤﻟا مﺪﻘﻟا .14
46
Page 48

 Loading...