

Page 1

fits nikon d500
code 9217
One Year Unconditional Warranty
If for any reason, this ProMaster product fails within ONE YEAR of the date of purchase, return
this product to your ProMaster dealer and it will be exchanged for you at no charge. ProMaster
products are guaranteed for ONE FULL YEAR against defects in workmanship and materials. If at
any time after one year, your ProMaster product fails under normal use, we invite you to return it
to ProMaster for evaluation.
Page 2

Caution
• This product should only be used with compatible devices specified in this instruction sheet.
• Use ONLY the batteries and battery holder recommended.
• Cover the power terminals with the contact cap when not in use. This prevents electrical
shorts caused by metal objects touching the terminals.
• When the battery holder is removed from the grip, remove the batteries or place the holder
in a container to prevent electrical shorts caused by contact with other metal objects.
• The battery level may not display properly if batteries are inserted before attaching the grip
to the camera.
• Remove batteries from the grip when not in use for an extended period.
• Do not disassemble or repair this product yourself. Doing so will void your warranty.
• Avoid water or extreme humidity and be sure to store in a cool, dry location.
• Do not dispose of in fire or extremely high temperature environment.
• Keep the product or parts away from children to avoid hazard from swallowing.
Congratulations on your purchase of the ProMaster Vertical Control Power Grip for Nikon D500.
This battery grip will provide longer shooting times for your camera, comfortable photography
when taking vertical-orientation shots, and a more stable overall camera rig which reduces the
chance of shake and blur.
To ensure proper operation, please read this manual thoroughly before using the product.
This grip is specially designed for the Nikon D500 camera. It is equipped with an alternate shutter
button and main dial for easy shooting in a vertical position. This battery grip can hold one
EN-EL15 battery while a second EN-EL15 battery is used in the D500’s battery chamber to
extend your shooting time. This grip includes a secondary battery tray for powering the D500 by
use of 8 AA alkaline of NiMH batteries.
Page 3
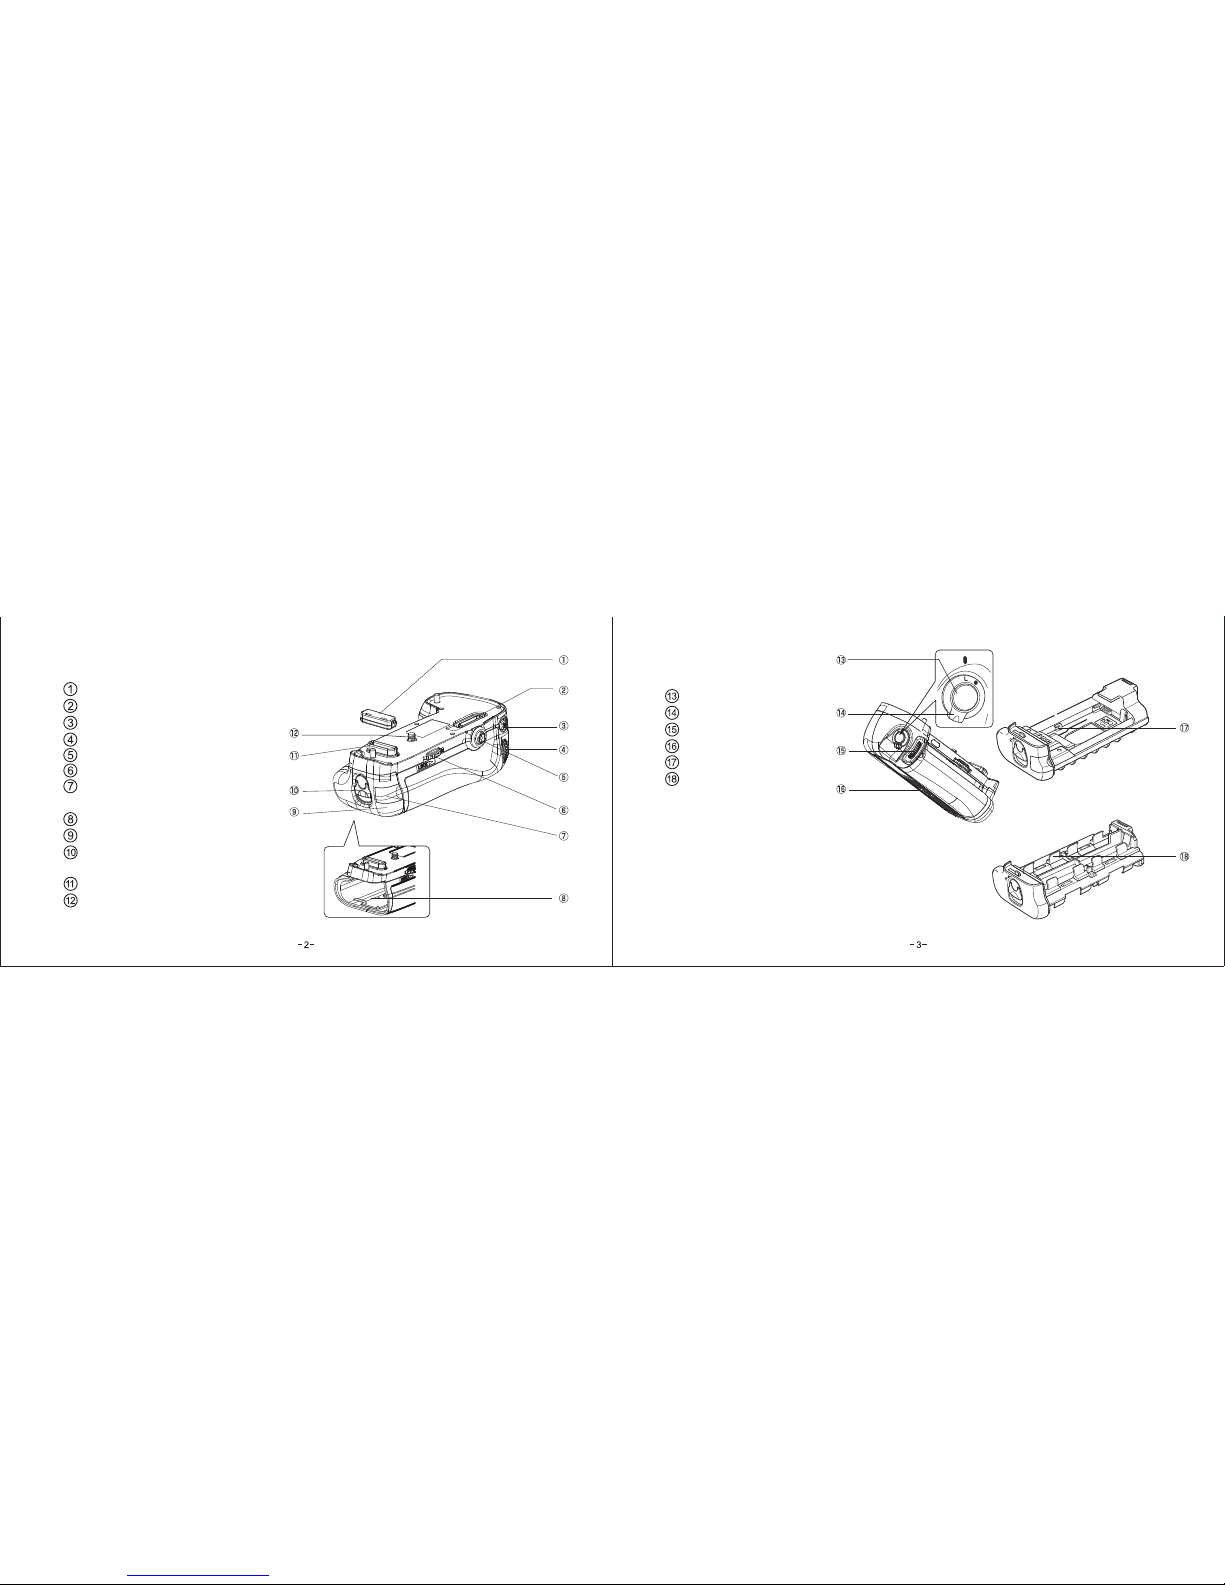
Part Names
Protective Cover
Holder for Protective Cover
AF-ON button
Main Command Dial
Multi Selector
Attachment Wheel
Cover for optional
AC cord
Battery Tray Chamber
Battery Tray
Battery Holder
Release Handle
Power/Signal Contacts
Attachment Screw
Shutter Button
Control Lock
Sub-command Dial
Tripod Socket
EN-EL15 Battery Tray
AA Battery Tray
Page 4
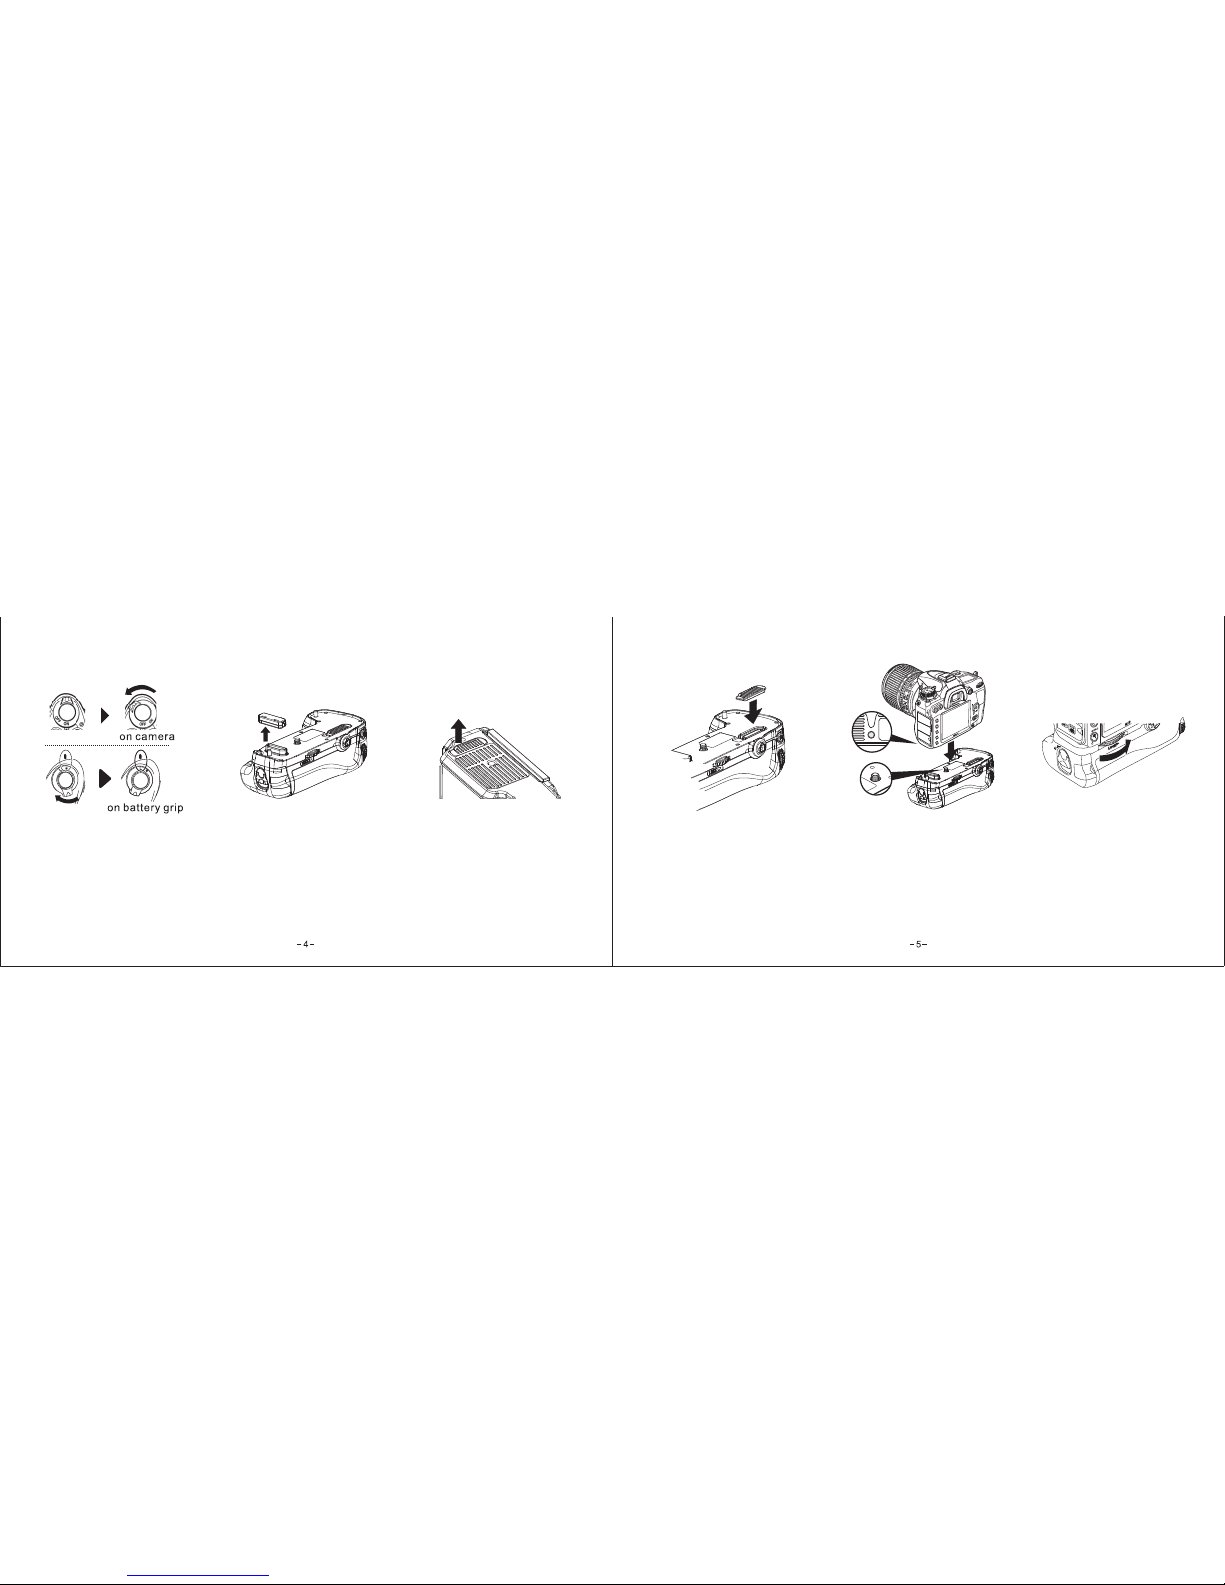
Attaching Your Camera
1. Please turn off the switch
on the camera and ensure
that the Control Lock (14)
on the grip is in the “L”
position before attaching.
2. Remove the Protective
Cover (1) from the battery
grip.
3. The contacts for the battery
grip are on the bottom of
the camera where they are
protected by a contact
cover. Remove the contact
cover before mounting
the grip.
4. To prevent loss, place the
Protective Cover (1) into
the Holder for Protective
Cover (2) for storage.
5.
Align the Attachment Screw
(12) with the camera’s
tripod socket.
6. Turn the Attachment Wheel
(6) in the direction of the
LOCK arrow to tighten
securely.
Page 5
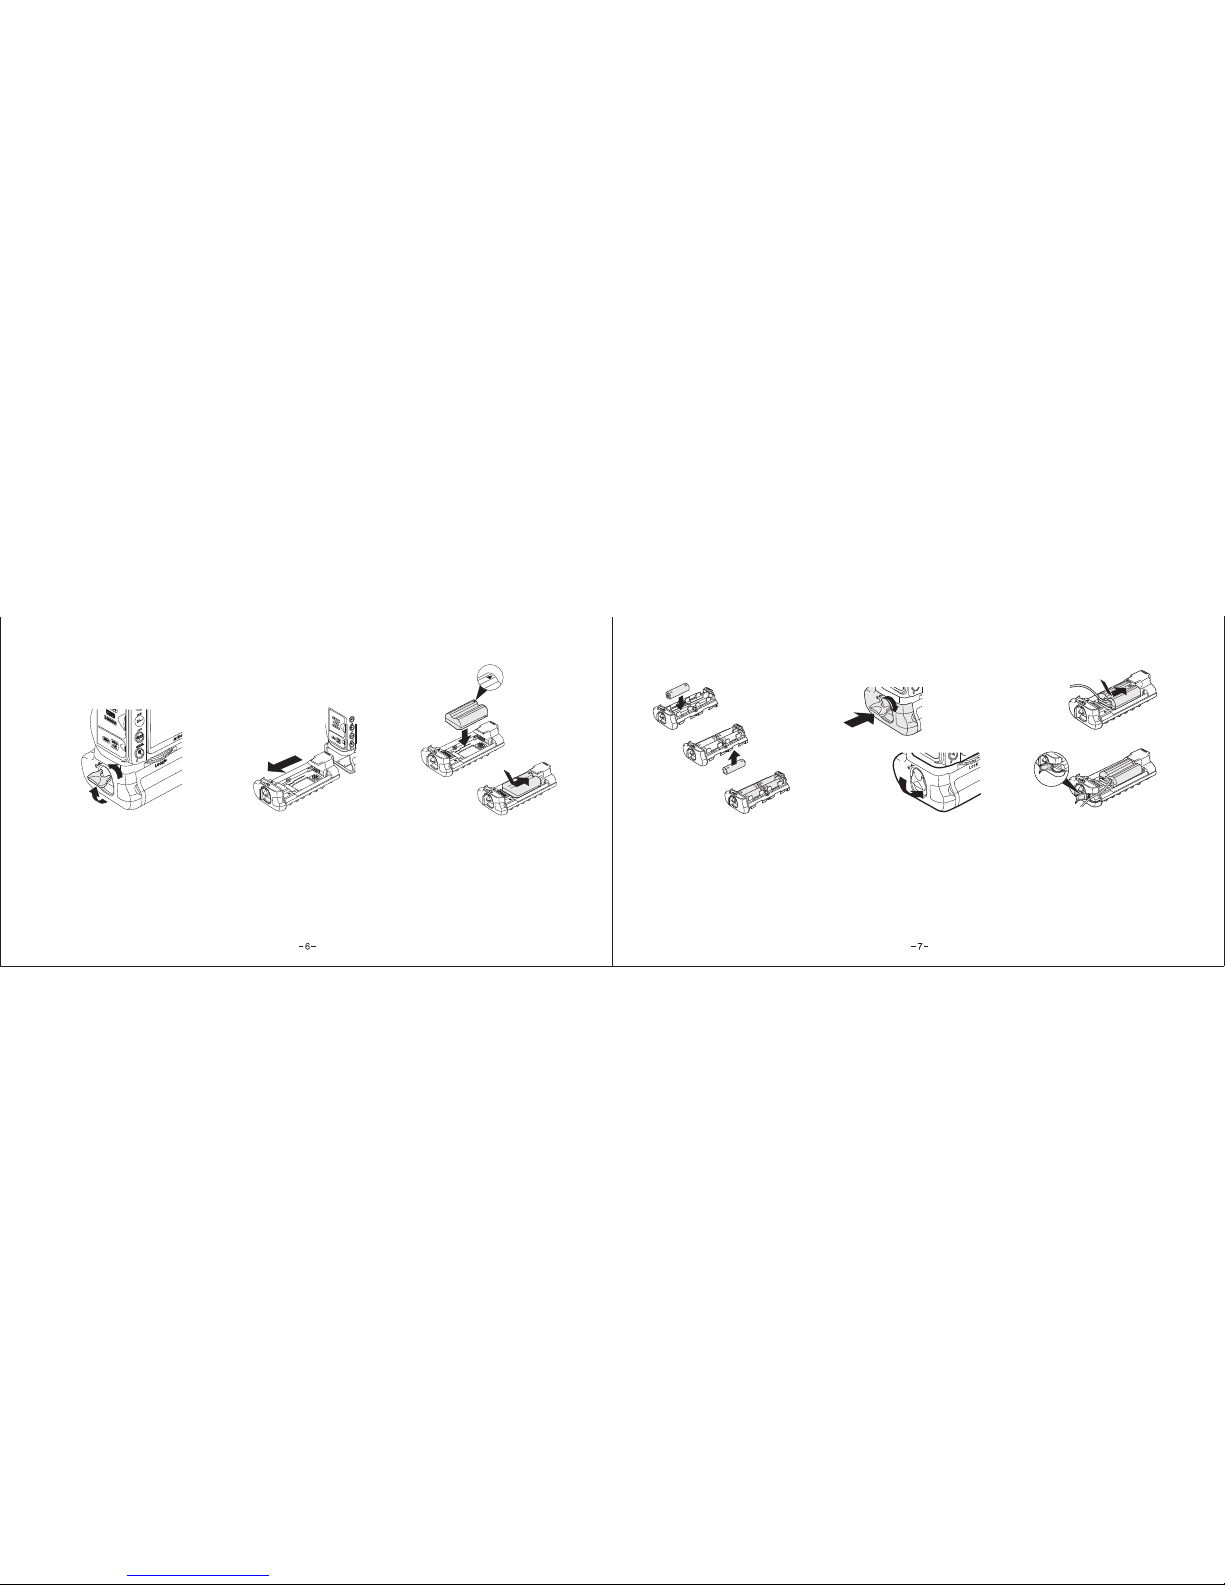
1. Ensure the camera is turned
OFF and the Control Lock
(14) on the grip is in the “L”
position. Turn the Battery
Holder Release Handle (10)
counter-clockwise to unlatch
it from the grip.
2. Remove the Battery Tray (9)
from the grip.
3. For EN-EL15 Li-ion batteries,
match the power contacts of
the battery with the contacts
in the EN-EL15 Battery Tray
(17).
4.
For AA batteries, place eight
AA batteries of the same type
into the AA Battery Tray (18)
while ensuring they are in the
correct orientation. Be sure
not to mix old and new AA
batteries.
5.
Insert the Battery Tray into the
grip. Turn the Battery Holder
Release Handle (10) clockwise
to lock it into the grip. Turn on
the camera and then switch the
grip’s Control Lock (14) to ON
by rotating it away from the “L”
position and lining up the two dots.
6.
If you wish to use an AC
adapter (sold separately) to
power the camera, insert the
adapter into the EN-EL15
Battery Tray (17) and open
the Cover for Optional AC
Cord (7) to allow the cord to
pass through.
Installing The Batteries
Page 6

Specifications
Approximate measurements
All the trademarks are the property of their respective owners
Specification and design are subject to change without notice
Model 9217
Power Source 1 EN-EL15 battery or 8 AA alkaline or NiMH cells
Camera Compatibility Nikon D500
Replacement for MBD-17
Operating Temperature 0~40º C (32~104°F)
Dimensions 151 mm x 50 mm x 82 mm
Weight (without batteries) 8.1 oz / 230 g
(grip + 1 tray)
Operation and Use of the Grip
1. Your camera must be turned ON for the grip to operate. When your camera is ON the grip
may be switched ON or OFF by using the Control Lock (14). Please note, the grip will
continue to supply power to your camera whether the Control Lock (14) is ON of OFF.
Setting the Control Lock (14) to OFF ( “L” position ) only disables the operation of the grip’s
camera controls.
2. At default settings, the battery in the camera’s chamber will be used only after the battery in
the grip is depleted. The Battery order option in the camera setup menu can be used to
change the order in which the batteries are used.
3. Use the grip’s Shutter Button (13) to comfortably auto focus and take photographs while
holding your camera in a vertical position.
4. Use the Main Command Dial (4), Multi Selector (5), and Sub-command Dial (15), as you
would on your camera.
5. Use the Tripod Socket (16) to mount your grip and camera to a tripod or quick release plate.
 Loading...