

Page 1
.. |
If for any reason, this ProMaster product fails within ONE
YEAR of the date of purchase, return this product to your
ProMaster dealer and it will be exchanged for you at no
charge. ProMaster products are guaranteed for ONE FULL
YEAR against defects in workmanship and materials. If at
any time after one year, your ProMaster product fails under
normal use, we invite you to return it to ProMaster for
evaluation.
canon
Made in China
Code 8574
One Year
Unconditional Warranty
-
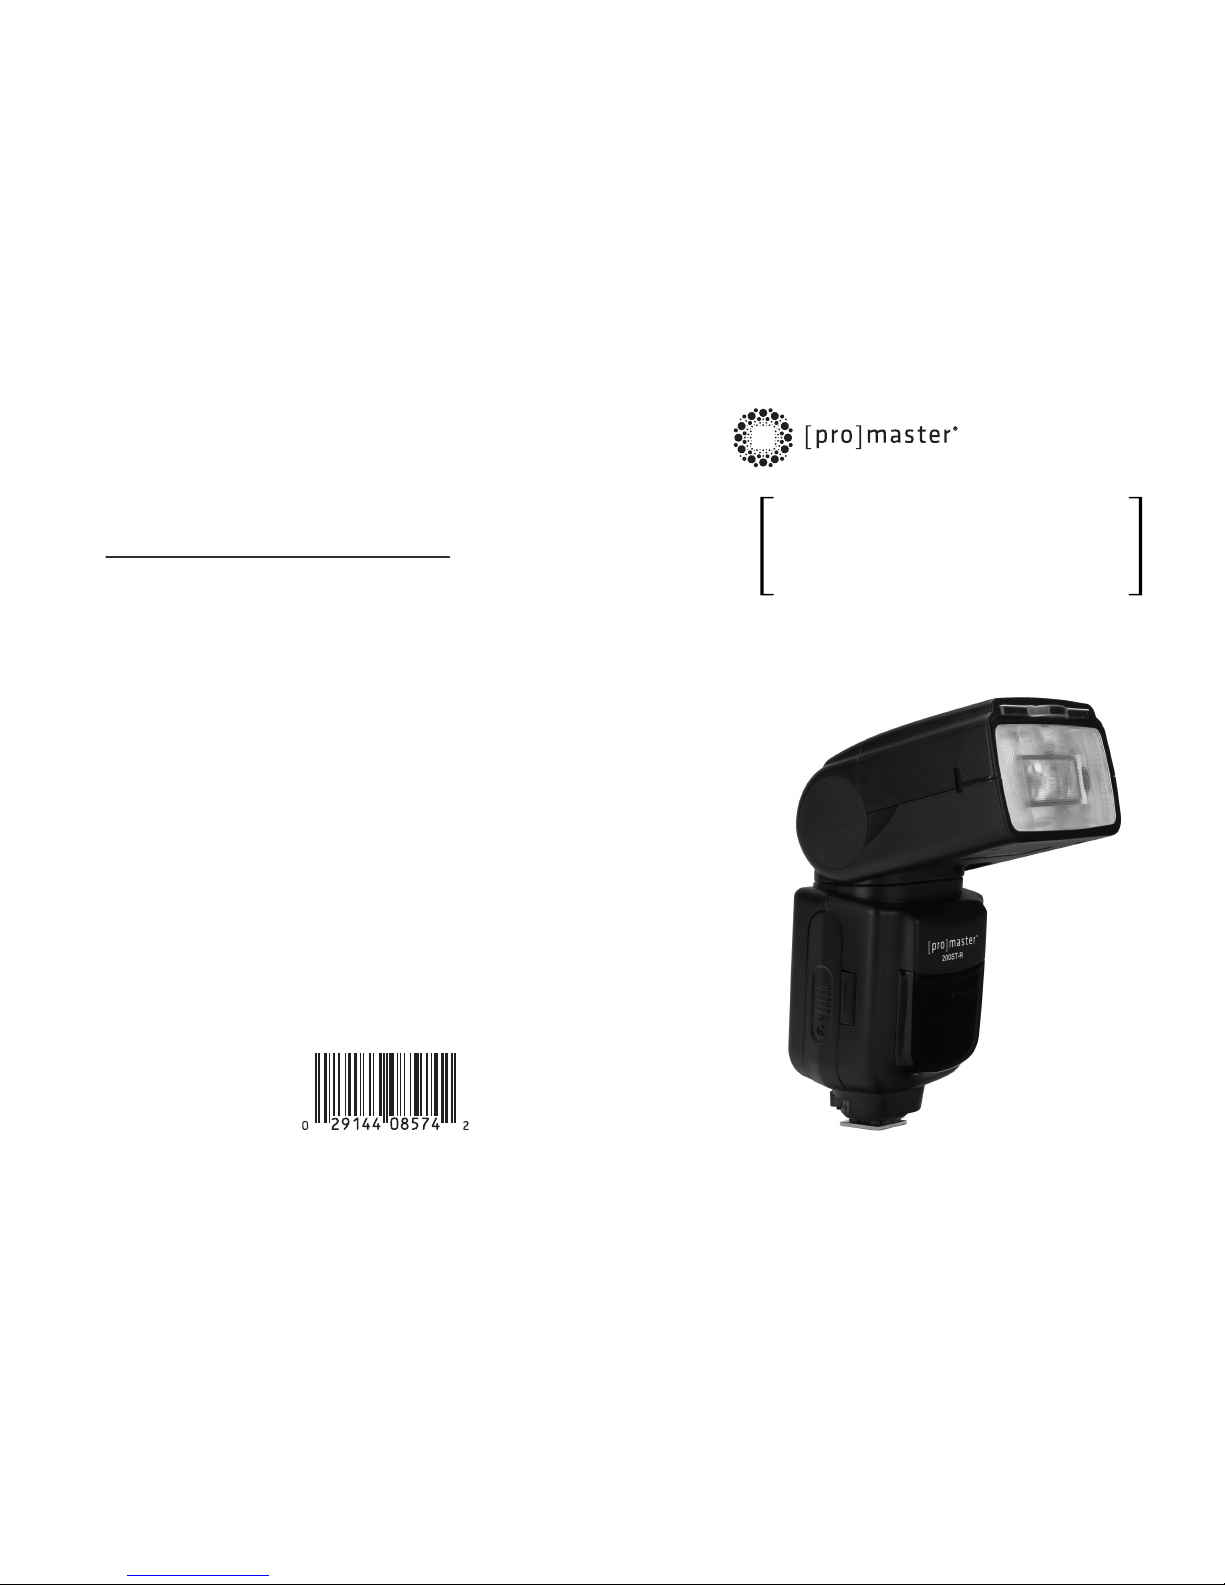
TTL Speedlight for Canon
-
Speedlight
Canon
Page 2
Contents
1
Precautions
Foreword
Inserting the Batteries
Attaching and Detaching
Turning On the Power
Setting Custom and Personal functions
TTL: E-TTL II Mode
M: Manual Mode
Repeating Flash Mode
2.4 GHz Slave Mode (Radio)
Power Zoom Function
AF Assist Beam Emitter
Bounce Flash Operation
Parts Identification
Utility Menu Custom Functions:
LCD Screen Icons
Home Screen and Key Lock
Utility Menu Personal Functions:
Protection Film
FEB
Slave Mode F1 (Optical)
Slave Mode F2 (Optical)
Using the Bounce Card
Using the Wide Panel
Additional Interfaces
Appendix
Specifications
8
9
10
11
12
14
15
16
17
18
19
20
21
22
23
24
25
26
13
27
6
29
30
31
32
High-speed Sync
Second-curtain Sync
Diffusion Dome
Color Filters
28
FEL: FE Lock
33
35
34
Page 3

1. Do not disassemble, open, or repair this speedlight by yourself.
2. Always use batteries of the same type, brand, and age. Always
replace all 4 batteries at the same time. Do not combine different
types, brands, old, or new batteries. This could cause the batteries to
overheat, leak, or explode.
3. This product is not water-resistant. Keep it away from rain, snow, and
high humidity areas.
4. Install the batteries in proper orientation as indicated in the battery
chamber. Installing the batteries incorrectly could cause them to
overheat ,leak, or explode.
5. If you change the batteries after a period of sustained continuous
firing of the speedlight, the batteries may become warm or hot.
This is normal, however you should be careful
when handling these batteries.
6. Always switch the speedlight off before changing batteries.
7. Do not fire the speedlight from a short distance directly into the
eyes of people or animals. This can cause damage to the retina and
may even lead to blindness.
8. Avoid corrosive or flammable substances when cleaning this speedlight.
9. Do not touch the speedlight with wet hands. This could cause an
electrical shock.
10. Remove batteries from the unit before storing.
Precautions
2
Page 4

3
Thank you for purchasing the [pro]master 200ST-R.
The ProMaster 200ST-R speedlight is a high performance, feature-rich
unit designed to work with your camera's automatic and advanced
functions. It can work as your primary on-camera flash or slave unit in
a wireless, multiple flash setup (ProMaster ST1C required as master).
Here are some of the 200ST-R's features:
E-TTL lI Mode
In a Canon flash system, monitor pre-flashes are fired at all times. The
subject is correctly exposed and the overall exposure is less affected
by challenging ambient light conditions.
Manual Mode
By setting the camera’s aperture and the speedlight output level, you
can manually control exposure. 22 levels of light control are available
in manual mode.
Repeating Flash Mode (RPT)
The 200ST-R fires repeatedly to create stroboscopic multipleexposure effects in RPT Mode. This is useful when shooting a fastmoving subject for a creative effect.
Flash Exposure Lock
Flash exposure Lock, or "FEL" controls the amount of flash exposure
for a subject .Using FELock with a compatible camera you can lock in the
appropriate flash exposure for the main subject . This flash exposure is
locked in, even if you change the aperture or composition, or zoom the
lens in and out.
HSS High-Speed Sync
High-Speed flash synchronization at the compatible camera's highest
shutter speed is possible. This is useful when you want to use a wider
aperture to achieve shallow depth of field to blur the background or
create a "stop-motion" effect in your photograph while shooting in
conditions with bright ambient light.
Foreword
Page 5

4
Flash Exposure Compensation.
Flash output level compensation is performed by modifying the flash
output level for the flash illuminated subject.
Rear-Curtain Sync
Rear-Curtain flash sync. creates a picture in which the blur of a moving
subject appears behind the subject and not in front. In this mode, the
speedlight fires just before the rear shutter curtain starts to close.
Bounce Flash
By tilting or rotating the flash head, you can bounce the light off a ceiling
or wall to make use of reflected light to create a large, soft illumination.
Key Lock
The speedlights's control buttons can be locked to prevent them from
being pressed accidentally.
AF-Assist Illuminator
The 200ST-R emits an AF-Assist beam to help the camera properly auto
focus in low light situations.
LCD Panel Backlight
This function sets the LCD panel backlight to on or off.
2.4G Wireless Slave
The 200ST-R uses a 2.4GHz wireless slave system. It can receive
signals from an ST1 (sold separately). You can use up to 5 groups with
a wireless range of 325' / 100 meters .
● Read this instruction manual while also referring to your
camera's instruction manual.
● The 200ST-R’s features rely on having a compatible camera.
Foreword (continued)
Page 6
Protection Film
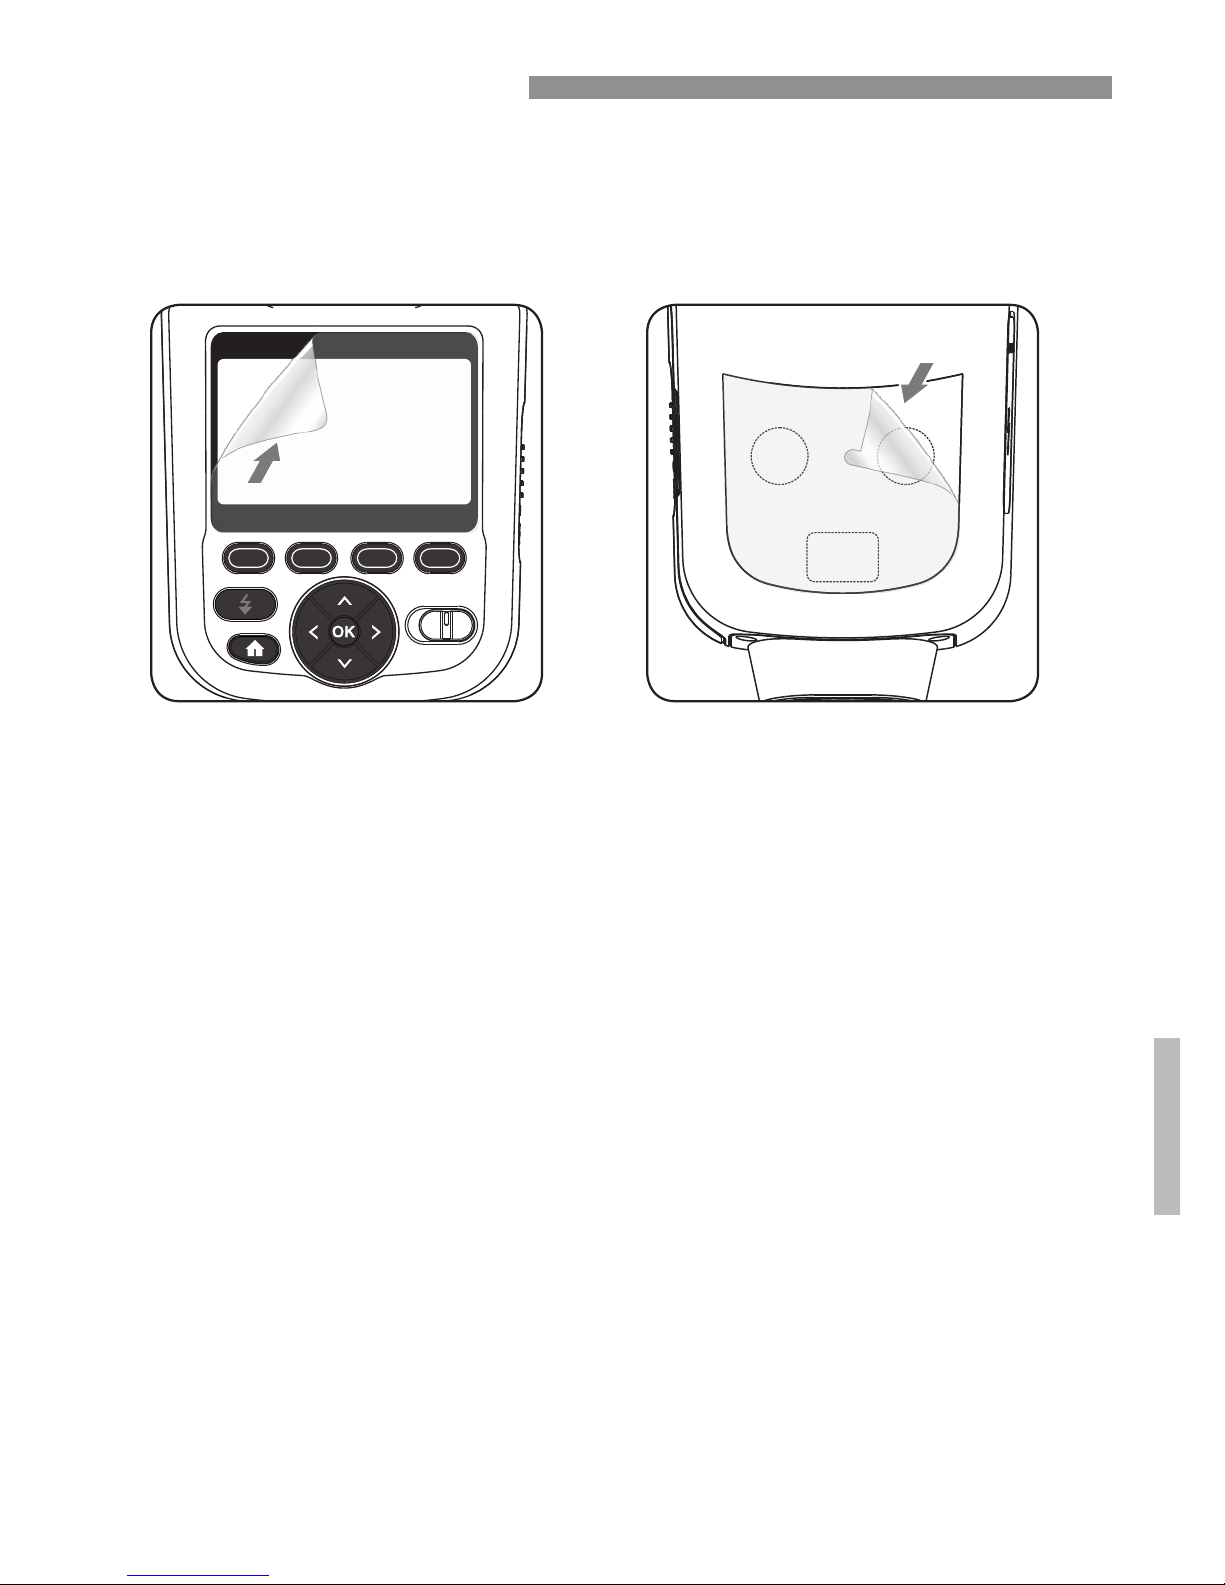
5
200ST-R has a protection film over the LCD screen and red lens (front
cover). It can protect the LCD screen and front cover from scratches
and damage. You may move the protection film or leave it in place if you
wish.
Page 7
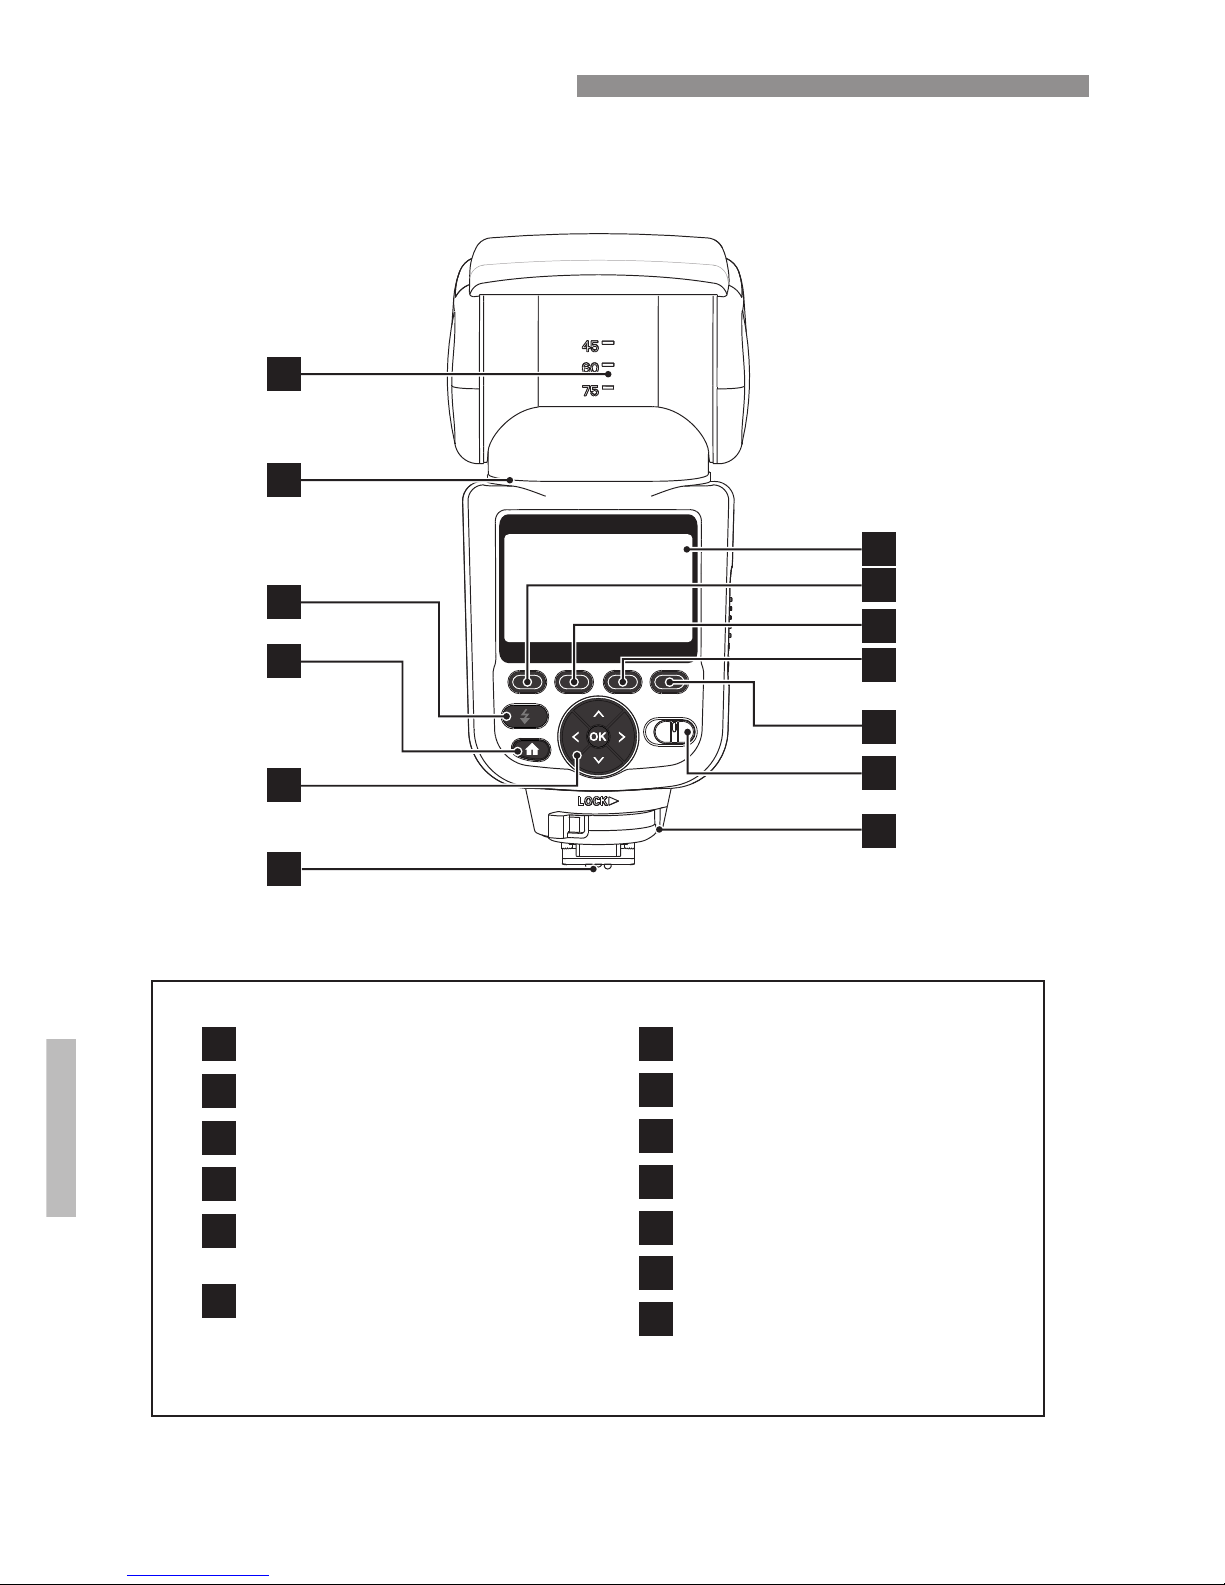
Parts Identification
2
3
1
4
5
8
9
10
11
13
12
6
7
Test firing button/Ready light
Rotating angle scale
Home button
2
3
4
5
Hot foot/
Communication contacts
6
LCD panel
71
Function button 1
8
9
Function button 2
10
Function button 3
Function button 4
11
Locking lever
13
Power switch(OFF/ON)
12
Tilting angle scale
Up/Down/Left/
Right/OK buttons
6
Page 8
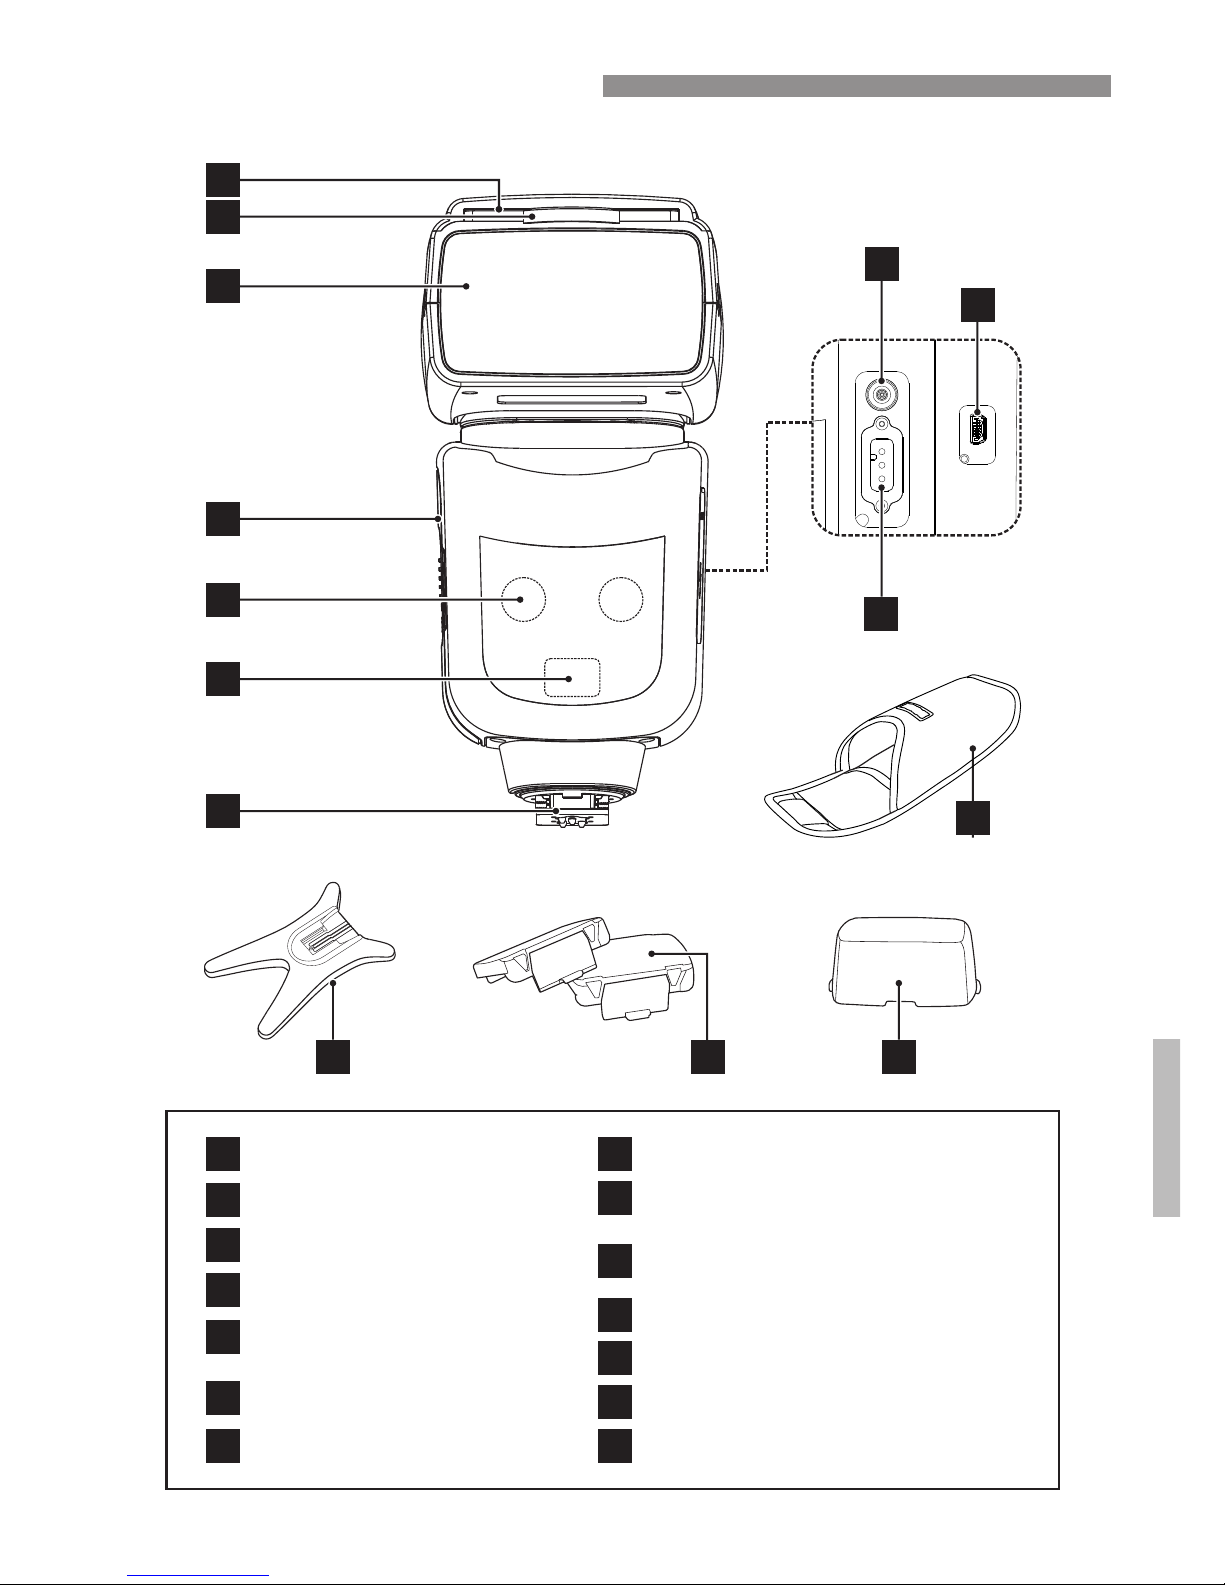
4
5
6
7
2
3
1
10
8
9
11
12 14
13
2
3
4
5
1
6
Bounce card
Built-in wide panel
Flash head
Battery door
AF-assist beam emitter
(Ready-light)
Optical slave
7
Locking pin
Speedlight stand
Protective storage case
8
9
10
12
USB firmware upgrade port
(Mini-B 5-pin)
PC sync. terminal
External power
source socket (H.V. port)
11
Color filters
13
14
Speedlight diffuser
7
Parts Identification
Page 9
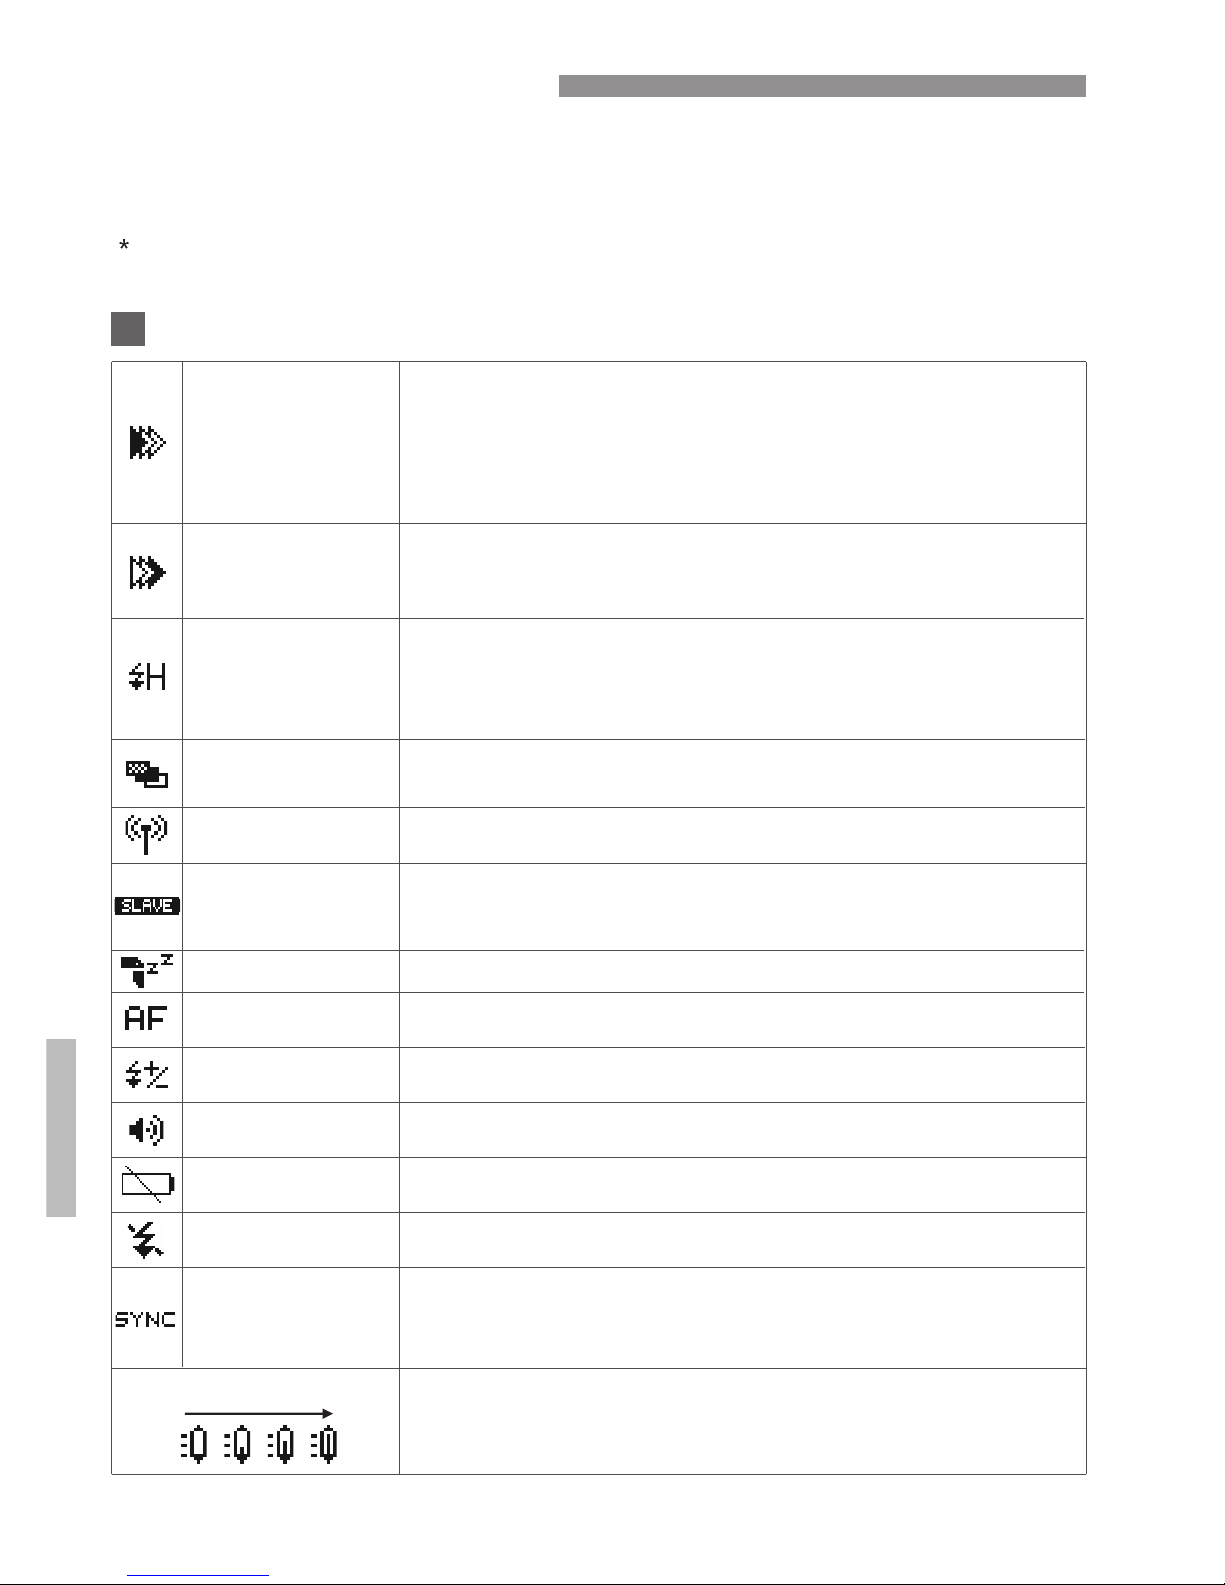
Shown below are some of the more common icons you will see on the LCD screen of
the 200ST-R while using various modes. Additional icons are shown and explained
throughout this manual to help you better understand each mode and its features.
LCD Screen Icons
Note: many of the modes used with these icons are dependent on your camera’s
capabilities. Refer to its instruction manual.
Icons
Front-curtain sync
Rear-curtain sync
High speed sync
Exposure bracketing
Radio(2.4G)
wireless state
Controls when the 200ST-R will flash relative to the timing of the
camera’s shutter. In front-curtain sync. the flash fires when the shutter
is first opened. In rear-curtain sync the 200ST-R will fire as the shutter
closes. This is particularly important when shooting a subject in motion
using a long shutter speed to get a blur.
Allows the flash to synchronize with your camera set to a very fast
shutter speed (up to 1/8,000 second). This is useful when using a
large lens aperture to achieve shallow depth of field in bright
ambient light conditions where flash illumination is also used.
Works with your camera to take a series of pictures at different flash
exposures from dark to light.
Indicates communication with a compatible ProMaster ST1
transceiver in a wireless flash environment.
This icon simply means the 200ST-R is set to some type of slave
mode. This includes 2.4GHz wireless slave mode and the F1 / F2
optical slave modes.
Exposure
compensation
Audible alert
Slave icon
Standby
AF-assist beam
emitter on
Means the speedlight has entered sleep mode to conserve power.
Allows the 200ST-R’s red-patterned beam to aid your camera in
focusing in dark situations.
Is the amount of light the 200ST-R will emit above or below the
average exposure setting.
Is an icon that will appear so you know the 200ST-R’s audible
alert system is turned on and is active.
Batteries low power
Flash firing OFF
Front-Curtain/
Rear-Curtain/
High-speed sync
switching
Low
High
High temperature icon
Alerts you it is time to replace the batteries.
Indicates the proper function button to press and enter Sync.
Mode, whereyou can choose among front-curtain, rear-curtain,
and high-speed sync.
Shows the temperature of the flash head from low to high by the
increasing scale inside of this icon.
Using rear-curtain sync will show the subject sharp (from the flash
illumination) at the end of the blur for a more natural look. For most
other types of photography front-curtain sync is advisable.
Prevents the 200ST-R from firing even though the unit is turned on.
8
Page 10
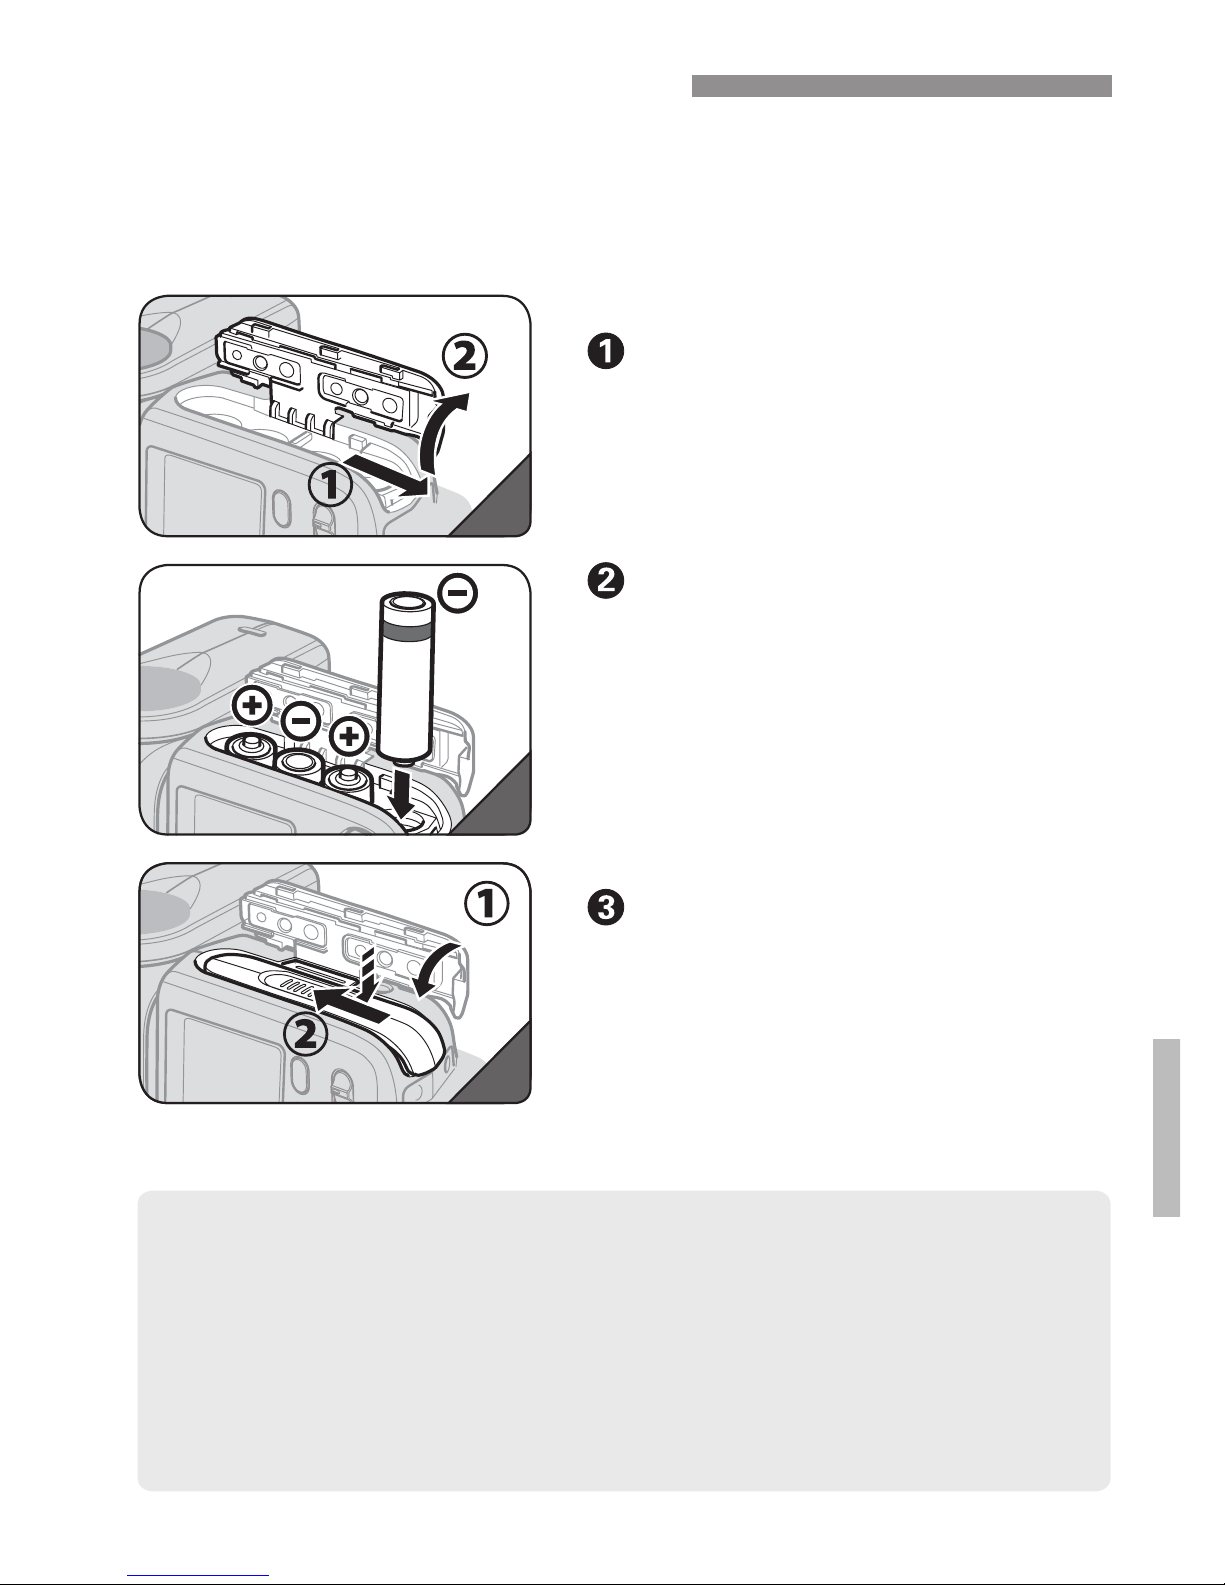
● Do not use the Lithium iron phosphate batteries and Carbon
zinc batteries.
● If you change the batteries after firing many continuous flashes,
be aware that the batteries might be hot.
● Before changing the batteries, be sure to turn off the speedlight.
● When you change the batteries, be sure to use the same type and
with full power.
● Remove batteries from the speedlight before storing.
Slide the cover in the direction
of the arrow and flip it open.
Open the cover.
Make sure the + and - battery
contacts are properly oriented
as shown inside the battery
compartment.
Install the batteries.
Close the battery compartment
cover by flipping it down,
pressing, and sliding it closed.
Close the cover.
Use any of the following three types of AA battery.
● Alkaline batteries ● Ni-MH batteries ● Lithium-metal batteries
Inserting the Batteries
3
2
1
9
Page 11
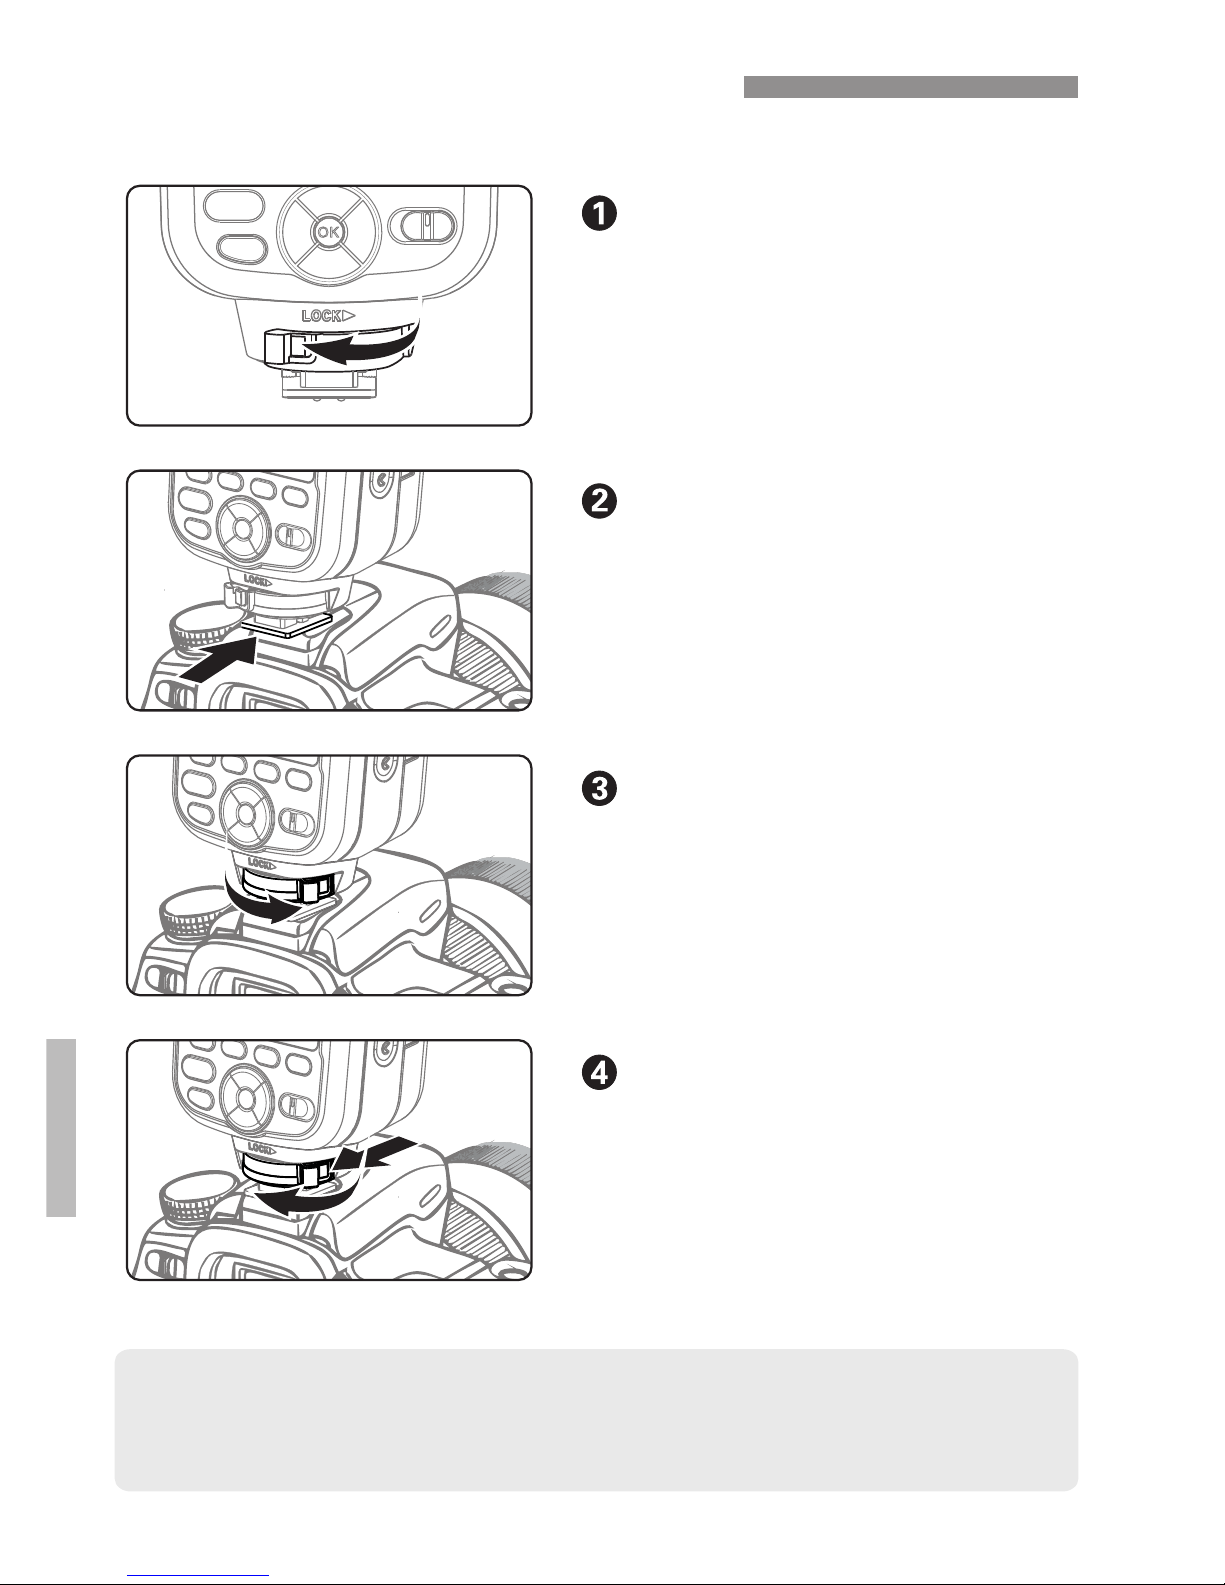
Securing the Speedlight.
On the mounting foot, slide the
locking lever to the right until it
locks in place.
Attaching the Speedlight.
Mount the Speedlight into the
camera's hot shoe all the way.
Slide the locking lever to the left.
If the lever is in the locked position
(to the right) push its button to
release it before sliding left.
Prepare to attach the
Speedlight.
Detaching the Speedlight.
While pressing the lock-release
button, slide the locking lever to
the left and detach the speedlight
by sliding it out of the camera's
shoe.
Attaching and Detaching
● Before attaching or detaching the speedlight, be sure to turn off the
speedlight.
10
Page 12
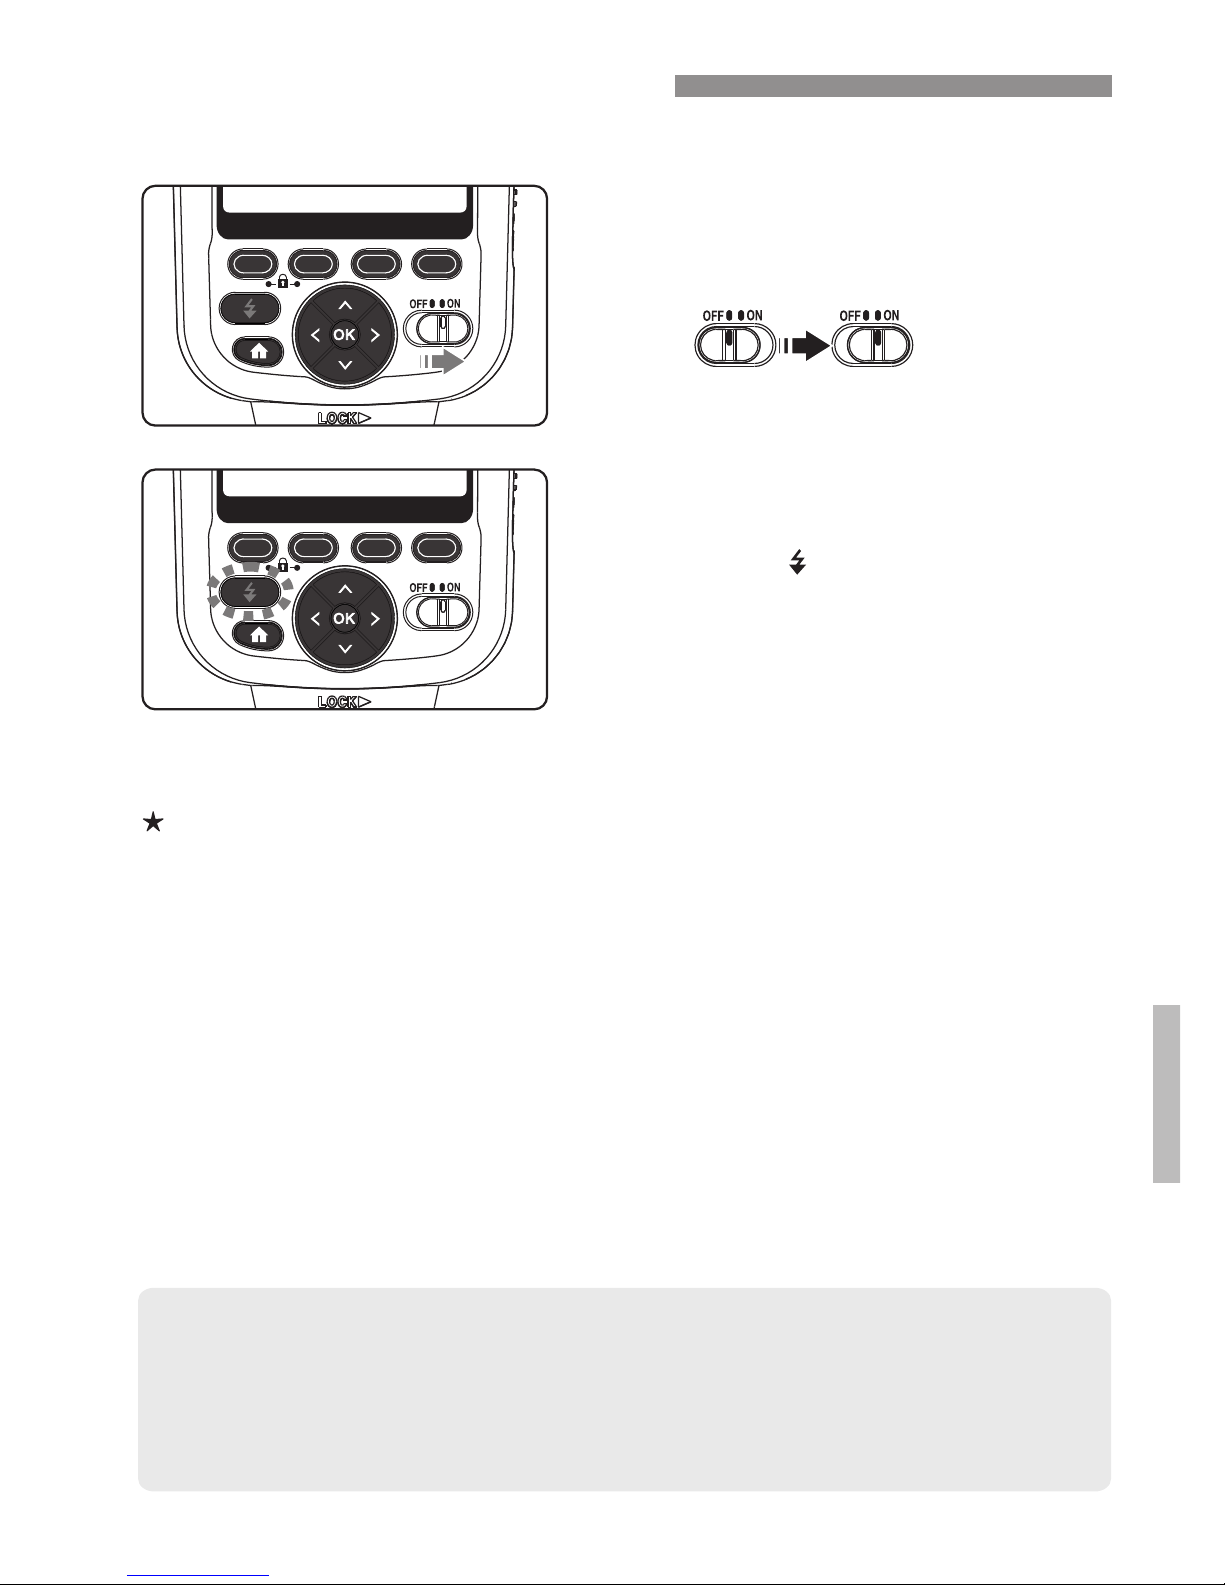
Turning On the Power
● Slide the power switch to
[ON].
● The test firing button / ready
light [ ] will glow red while
the 200ST-R is charging. It
will turn green when the
speedlight is ready to flash.
Please note the test firing button requires more pressure to operate
than the other buttons on the 200ST-R. This is intentionally designed
to prevent accidental firing.
● If the test firing button remains red over 20 seconds, or the low power
icon is displayed, please replace the batteries with new ones.
● The 200ST-R will enter sleep/standby mode after 90 seconds of non use. You can press the test firing button to wake it up. This feature can
be disabled in the Utility menu.
11
Page 13
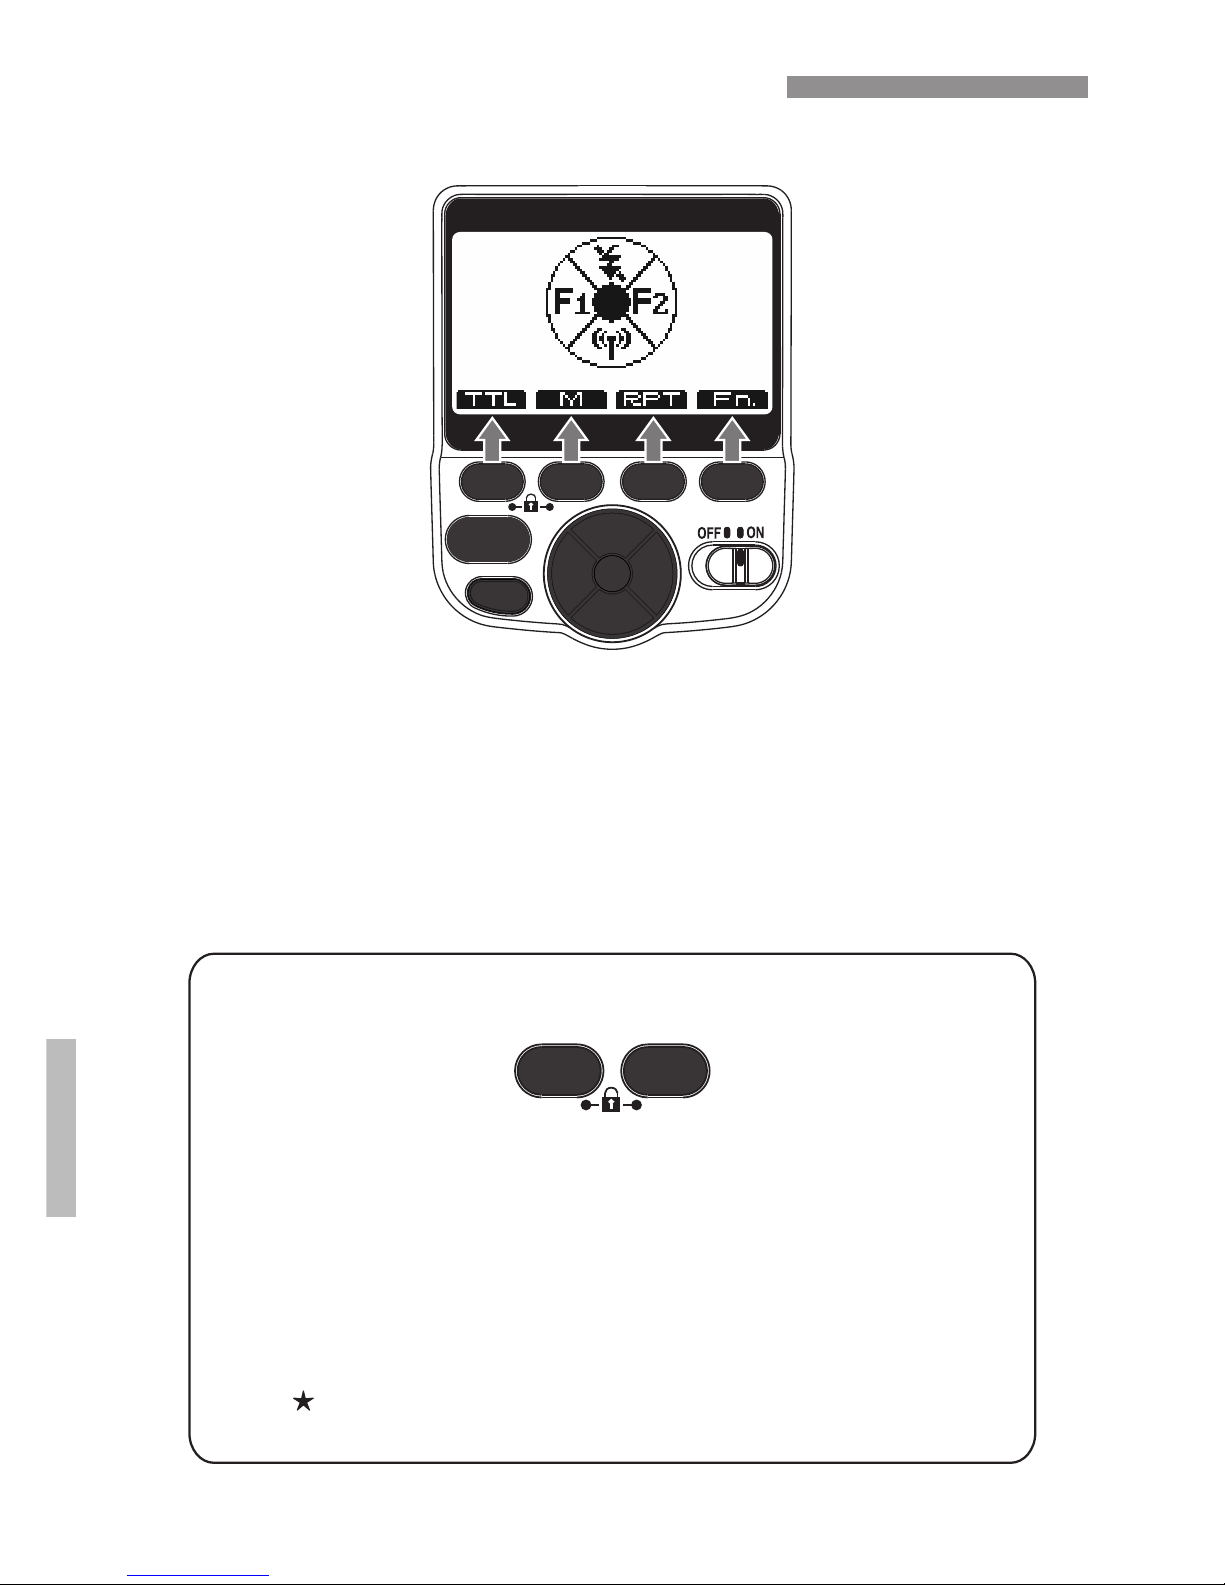
Home Screen and Key Lock
The home screen can be reached by pressing the home button. From
here you can change the 200ST-R's mode. Notice the icons on the
home screen visually identify which button you should press to access
each mode. From the home screen you can quickly access TTL,
Manual, Repeat, Custom Functions (Utility menu), Flash OFF, or any of
3 types of wireless slave modes with the press of a button.
Function 1
Right
Function 2 Function 3 Function 4
Left
Down
Home
Up
Test firing
Key Lock
Function 1
Function 2
Using the 200ST-R's Key Lock function allows you to prevent
accidental changes to the settings. It locks all buttons from
functioning except the test firing button.
Press function buttons 1 and 2, between which a lock icon is
printed, simultaneously for 2 seconds. The key lock icon
[LOCKED] will appear on the LCD and the buttons are locked.
To cancel key lock, press function buttons 1 and 2 again,
simultaneously for 2 seconds.
The test button is not limited by lock function.
12
Page 14
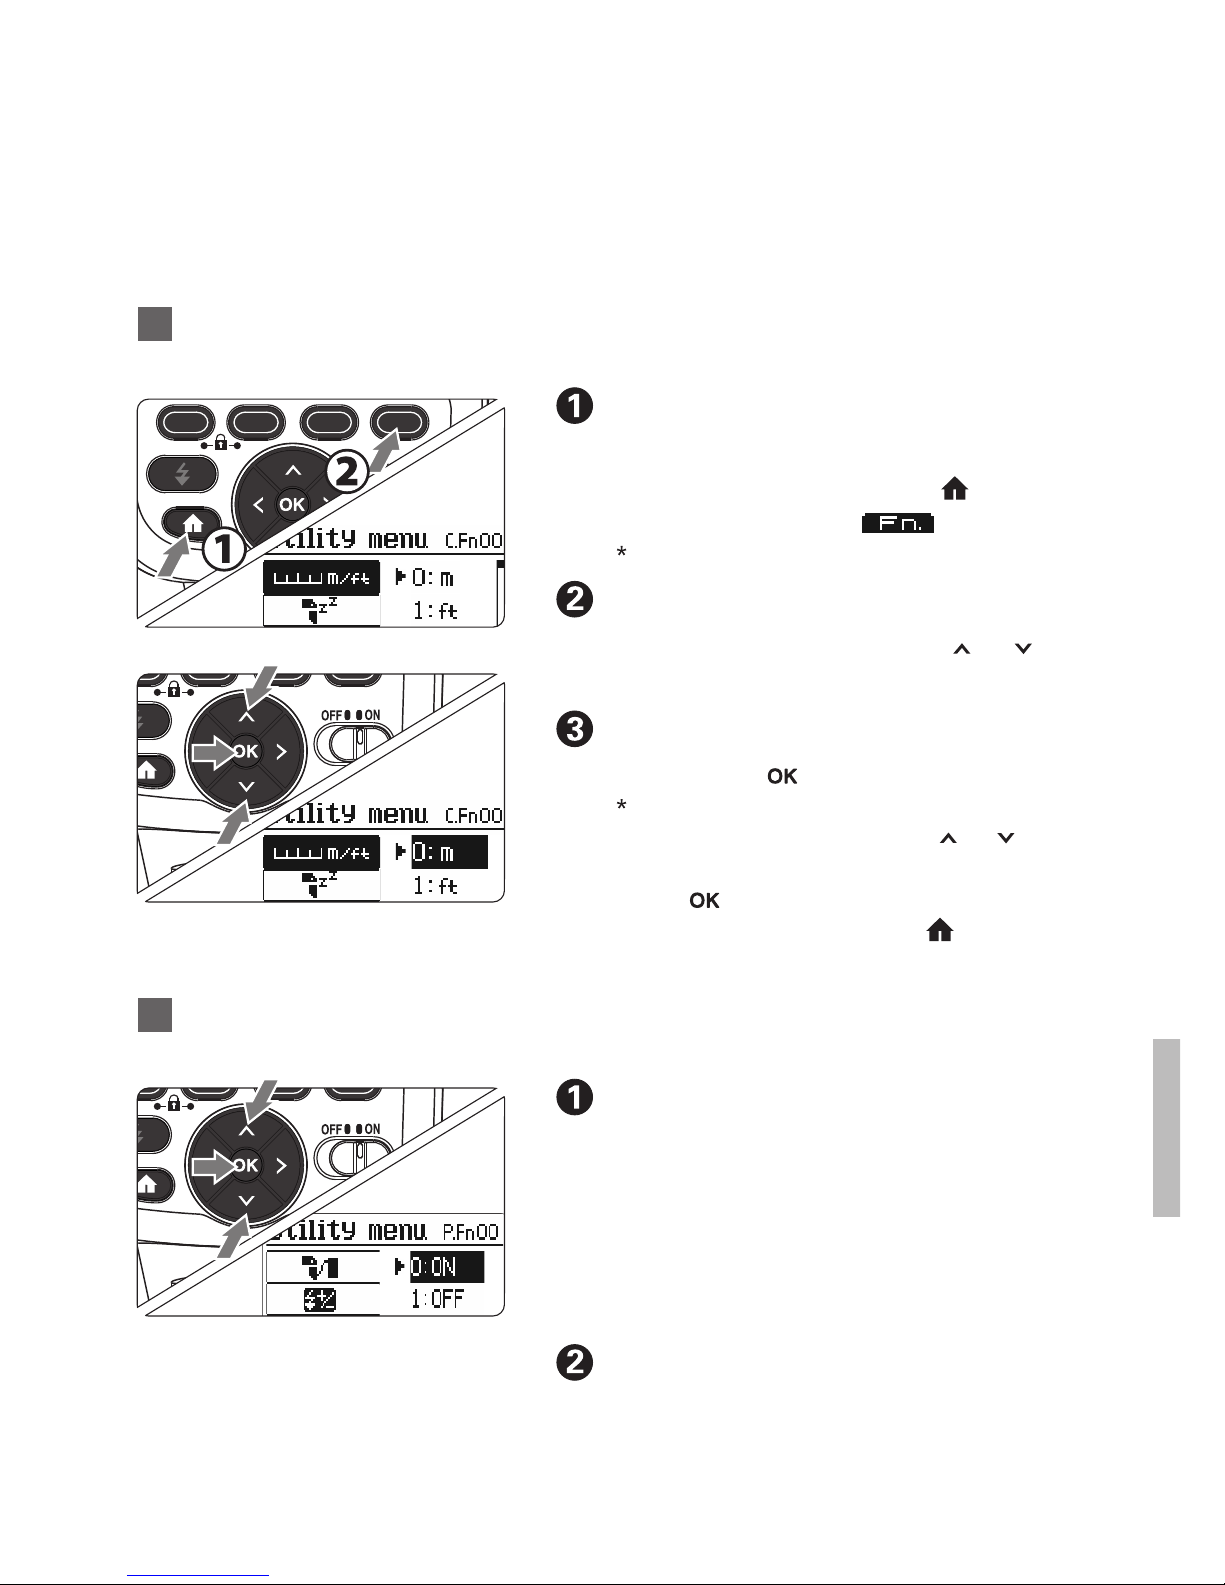
You can customize the speedlight’s features to suit your
shooting preferences with Custom Functions and Personal
Functions. Personal Functions are customizable functions
unique to the 200ST-R.
C.Fn: Custom functions(C.Fn)
● Enter the Utility Menu the same way
you did in step 1 above. Next use the
down arrow button to move through all
the custom functions until the personal
functions appear.
Display the Personal
Functions screen.
● Set the Personal Function in the
same way as steps 2 and 3 for the
Custom Functions above.
Set the function.
P.Fn: Personal functions(P.Fn)
Display the Custom Functions
screen (Utility menu).
● Press to the arrow buttons [ ] [ ]
select a custom function to set.
Select a Custom Function.
● Press the [ ] button.
● Press the arrow buttons [ ] [ ] to
change the setting , and then press
the [ ] button to confirm the change.
● Press the home button [ ] to exit the
Utility Menu.
Change the setting.
The custom function setting is displayed.
The Utility Menu screen is displayed.
● Press the home button [ ] .
● Press function 4 [ ] .
13
/
/
Setting Custom and Personal functions
Page 15
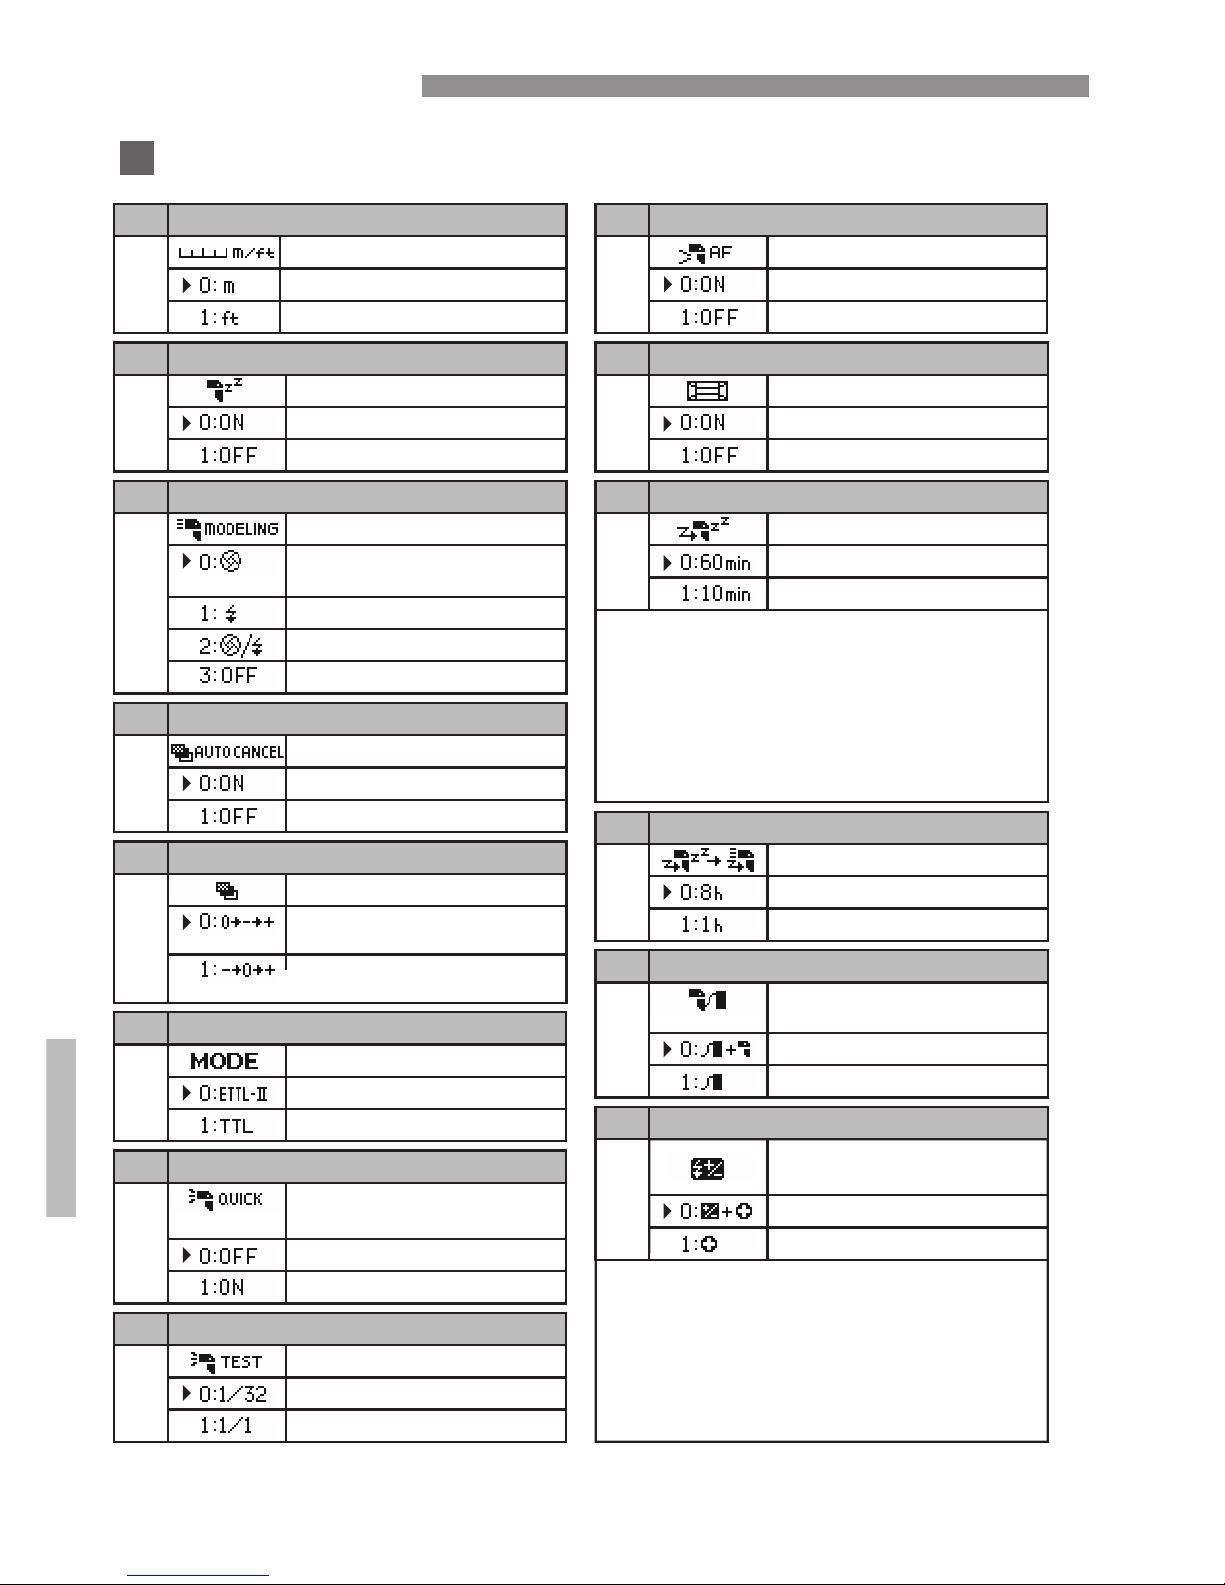
Utility Menu
14
Custom Functions
C.Fn 01
ON/ Enabled
OFF/ Disabled
C.Fn 02
Modeling light
Enabled/ Test firing button
Enabled/ With both buttons
C.Fn 05
Flash metering mo de
E-TTL II
TTL
C.Fn 06
Quick flash with
continuous shot
Enabled/Depth -of-field
preview button
C.Fn 00
NO.
Meters
Feet
Functional description
Distance indicator display
Auto power off (90 seconds)
ON/ Enabled
OFF/ Disabled
OFF/ Disabled
Functional description
Functional description
NO.
NO.
Functional description
NO.
Functional description
NO.
C.Fn 07
1/32 output
1/1 full output
Test firing in TTL mode
Functional description
NO.
C.Fn 03
C.Fn 04
FEB sequence
Decreased→Stand ard→
Increased
FEB auto cancel
Standard→Decrea sed→
Increased
ON/ Enabled
OFF/ Disabled
Functional description
NO.
Functional description
NO.
C.Fn 09
Auto zoom for senso r size
ON/ Enabled
OFF/ Disabled
NO.
Functional description
C.Fn 10
60 minutes
10 minutes
The 200ST-R will enter standby mode after
60 minutes or 10 minutes of non-use,
depending on your setting for C.Fn10. If it is
in F1 or F2 slave mode, you will need to press
the slave's test button to wake it up. If it is in
2.4GHz slave mode, a test fire from the
master ST1 will wake it up.
F1/F2 Slave auto st andby
NO.
Functional description
C.Fn 08
AF-assist beam
ON/ Enabled
OFF/ Disabled
Functional description
NO.
C.Fn 11
C.Fn 12
Slave auto power off cancel
Within 8 hours
Within 1 hour
Flash recycle wit h
external power( H.V. port)
External & intern al power
External power on ly
NO.
Functional description
NO.
Functional description
C.Fn 13
Flash exposure
compensation se tting
Function 2 and left/right button
Left/right butt on only
NO.
Functional description
* C.Fn 13 applies to TTL and M modes. When
set to [0] you must press the +/- Fn button
before making an exposure compensation
change with the left / right arrow buttons. If set
to [1] you can simply press the left or right
arrow to change the exposure compensation
without pressing the +/- Fn button first.
Page 16
Custom menu setting
OK button
Fn.
/ button
OK button
/ button
● C.fn 06 allows the 200ST-R to flash even if it is has not fully recycled. This means
it can work faster from shot to shot but may not fire at the correct exposure.
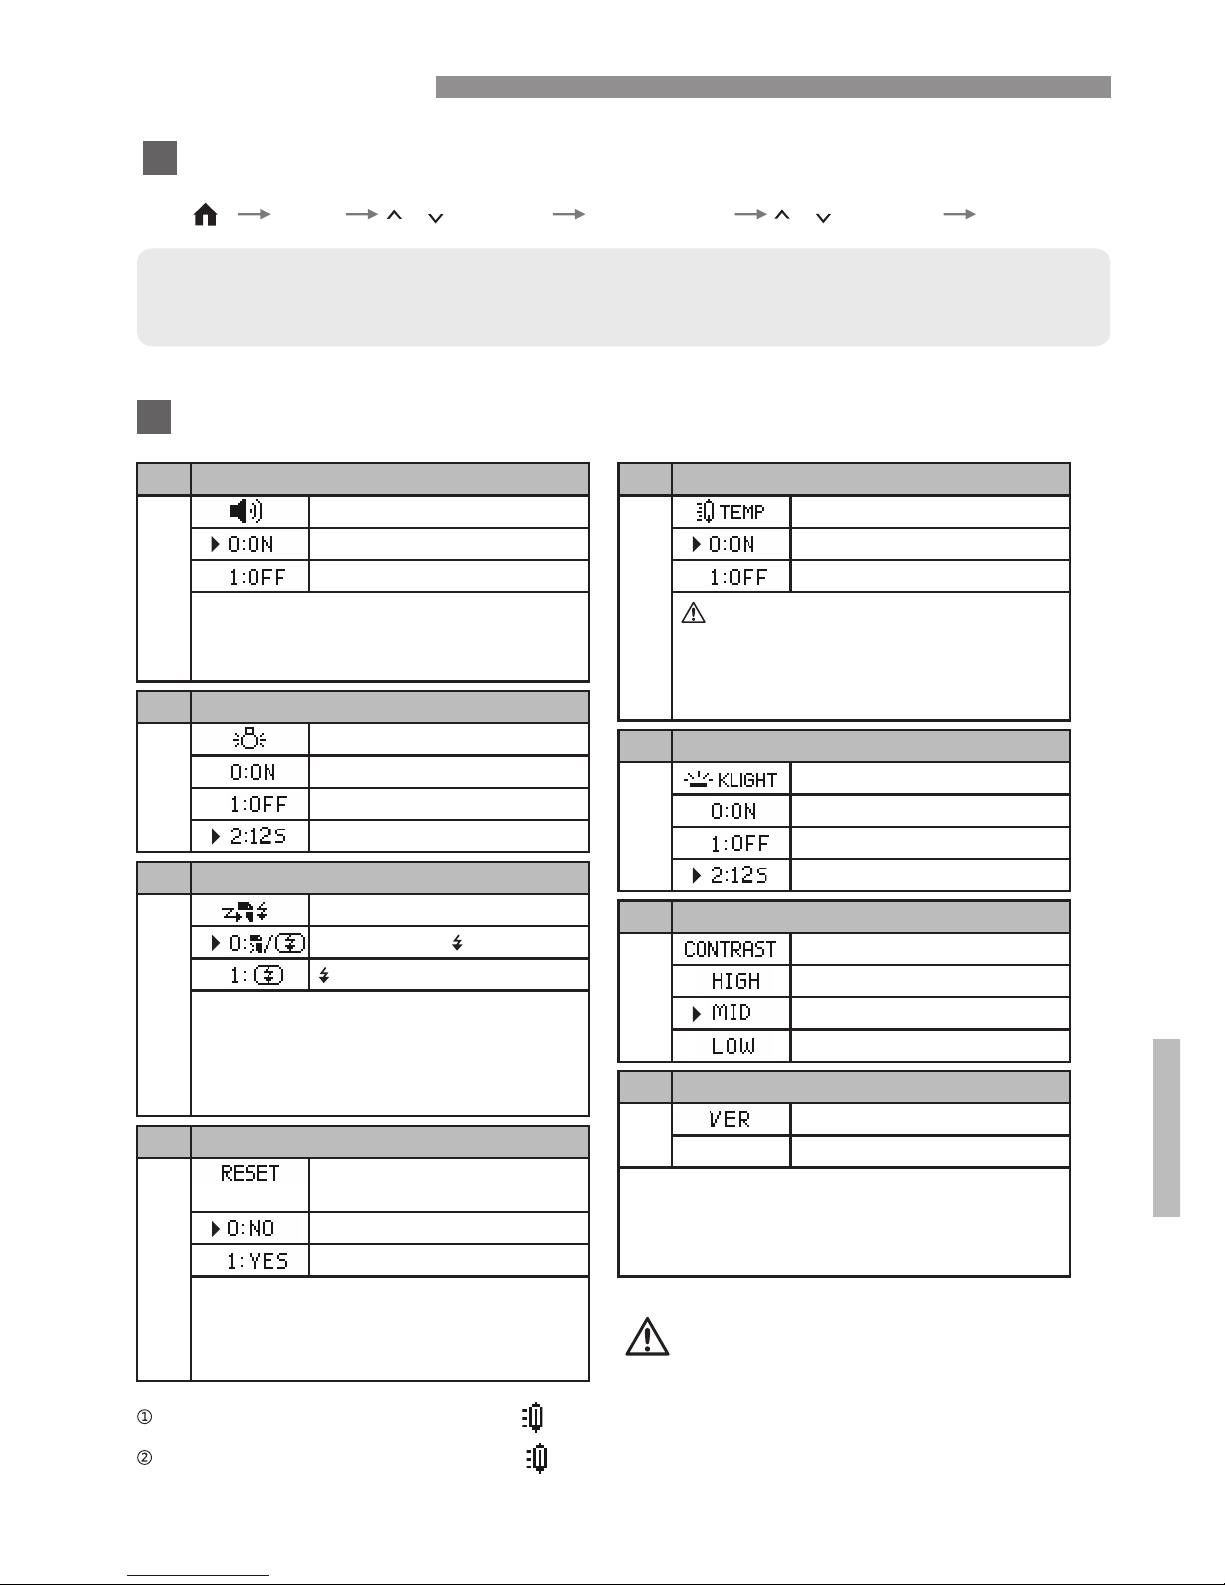
Utility Menu
Sound monitor(b eep)
P.Fn 00
ON/ Enabled
OFF/ Disabled
Soundsmonitor be eps when:
Power on / Press buttons / Low power
High temperature / Firing
Functional description
NO.
P.Fn 01
ON/ Enabled
OFF/ Disabled
On for 12 seconds
Display backlig ht
Functional description
NO.
P.Fn 02
Slave unit recycl e state
AF flashes & Ready light
Ready light only
With the 200ST-R in slave mode and this
function set to [0] the AF light will flash to
alert you when the unit is ready to fire. When
set to [1] this function is cancelled, and only
the ready light will alert you by glowing green.
Functional description
NO.
P.Fn 03
Reset all Custom &
Personal function settings
Not reset
Reset
Functional description
NO.
Press [1] and then the [OK] button and
all custom and personal functions will
be cleared and returned to factory
settings.
P.Fn 04
ON/ Enabled
OFF/ Disabled
Temperature monit or
If you turn off the Temperature
monitor, flash recycle time will be
extended to prevent overheating
and you may shorten the life of
the flash tube.
Functional description
NO.
P.Fn 05
Key(buttons) backlight
ON/ Enabled
OFF/ Disabled
On for 12 seconds
Functional description
NO.
P.Fn 06
LCD Display screen contrast
High level
Middle level
Low level
Functional description
NO.
v x.x
P.Fn 07
Version of firmwar e
Version
Functional description
NO.
When 200ST-R flashes in rapid sequence
many times, the Temperature Monitor may
be activated.
Temperatu re mo nitor enab led: When the ico n displays a nd fl ashes, the s pee dlight won ’t flash.
Temperatu re mo nitor disa bled: When the ic on display s and f lashes, th e spe edlight ca n fire,
but the rec ycl e time will be e xtended.
Personal Functions
15
P.Fn07 simply displays the current version of
firmware your 200ST-R is using. You cannot
change it from this function. You can only
view it here.
Page 17
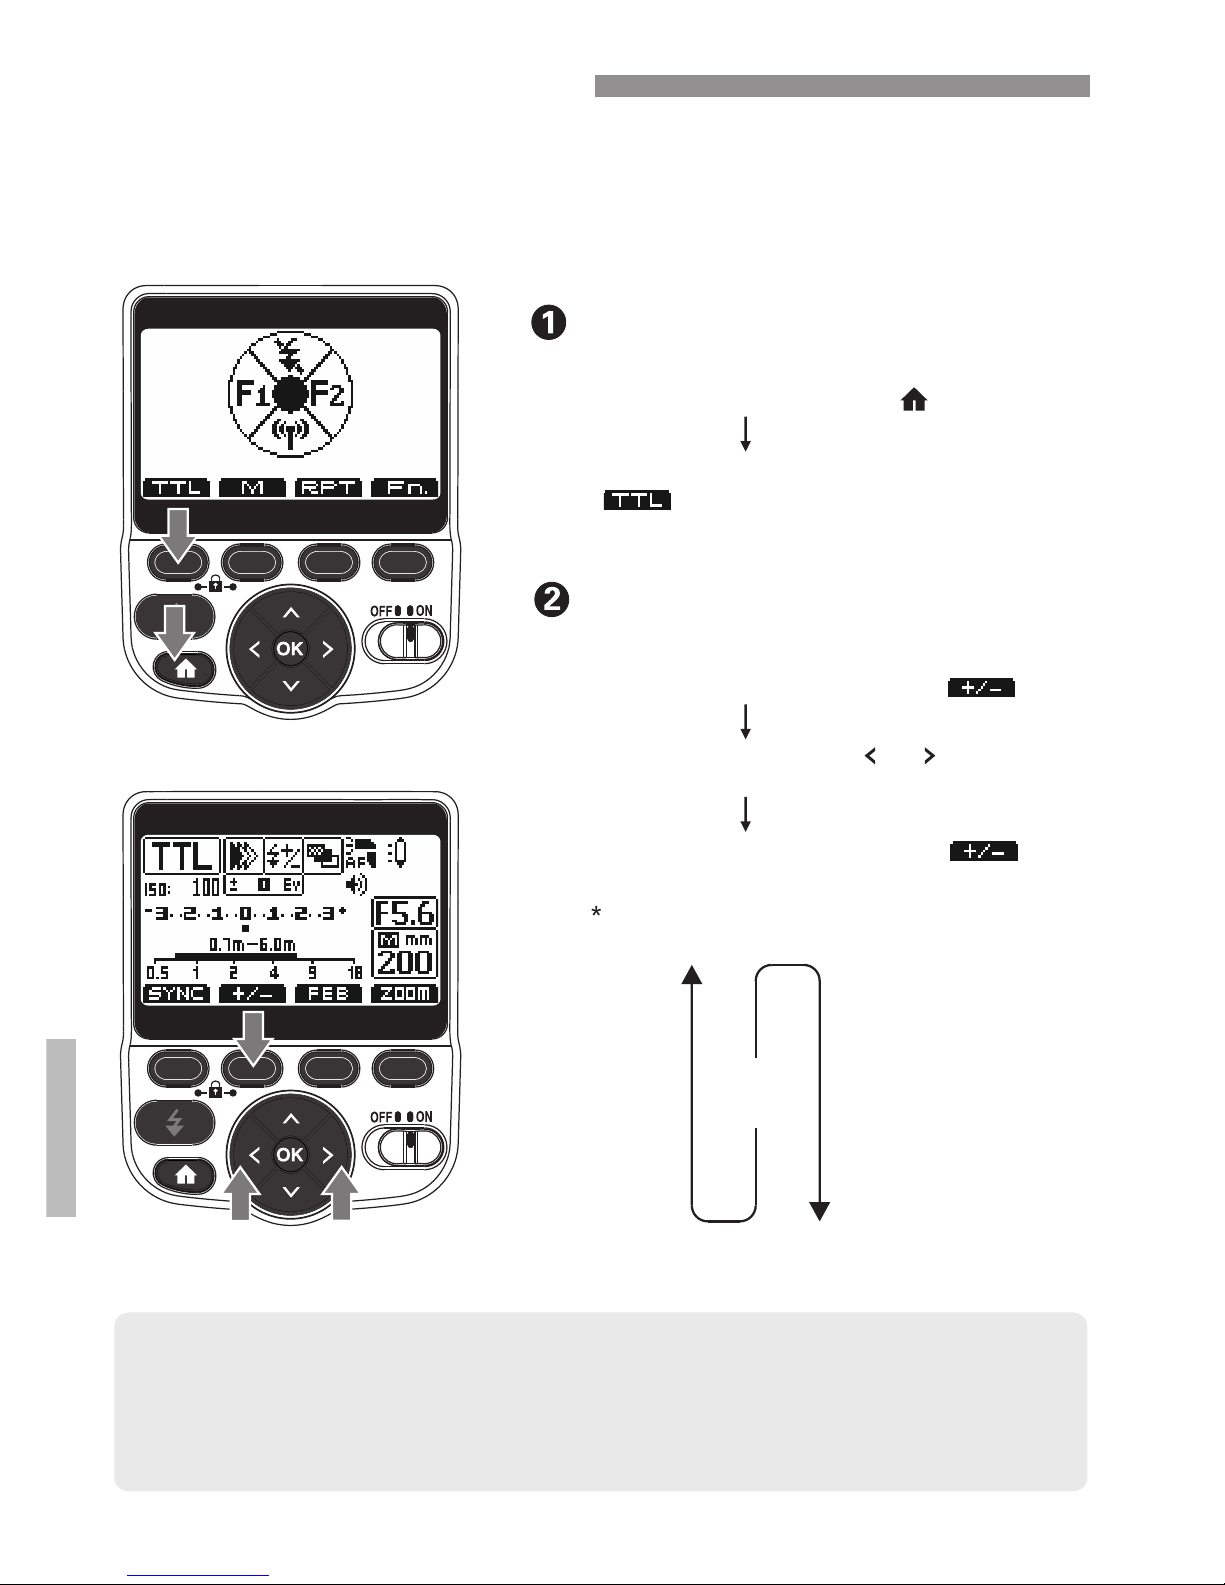
TTL: E-TTL II Mode
-3 Ev
-2.7Ev
-2.3Ev
-2 Ev
-1.7Ev
-1.3Ev
-1 Ev
-0.7Ev
-0.3Ev
+0.3Ev
+0.7Ev
+1Ev
+1.3Ev
+1.7Ev
+2Ev
+2.3Ev
+2.7Ev
+3Ev
0
EV compensation scale shown for your reference
Adjust the exposure
compensation amount
In this mode information obtained by monitor pre-flashes and
exposure control information is integrated by the camera to
automatically adjust flash output levels for proper exposure.
You also ca n also use the [ ] but ton or half pr ess OK
the camer a's s hutter but ton to confirm yo ur selection
● If you prefer to adjust exposure compensation by simply pressing the
left/right arrows and without having to press the Function 2 button first,
you can set this as a custom function for the 200ST-R in its Utility
menu. It is C.Fn13.
Enter TTL mode
Press the [ ] button to set toFunction 1
[ ]
16
Press the Function 2 button [ ]
Use the arrow buttons [ ] [ ] for
adjustment
Press the Function 2 button [ ] to
confirm your selection
/
Press the home button [ ]
Page 18
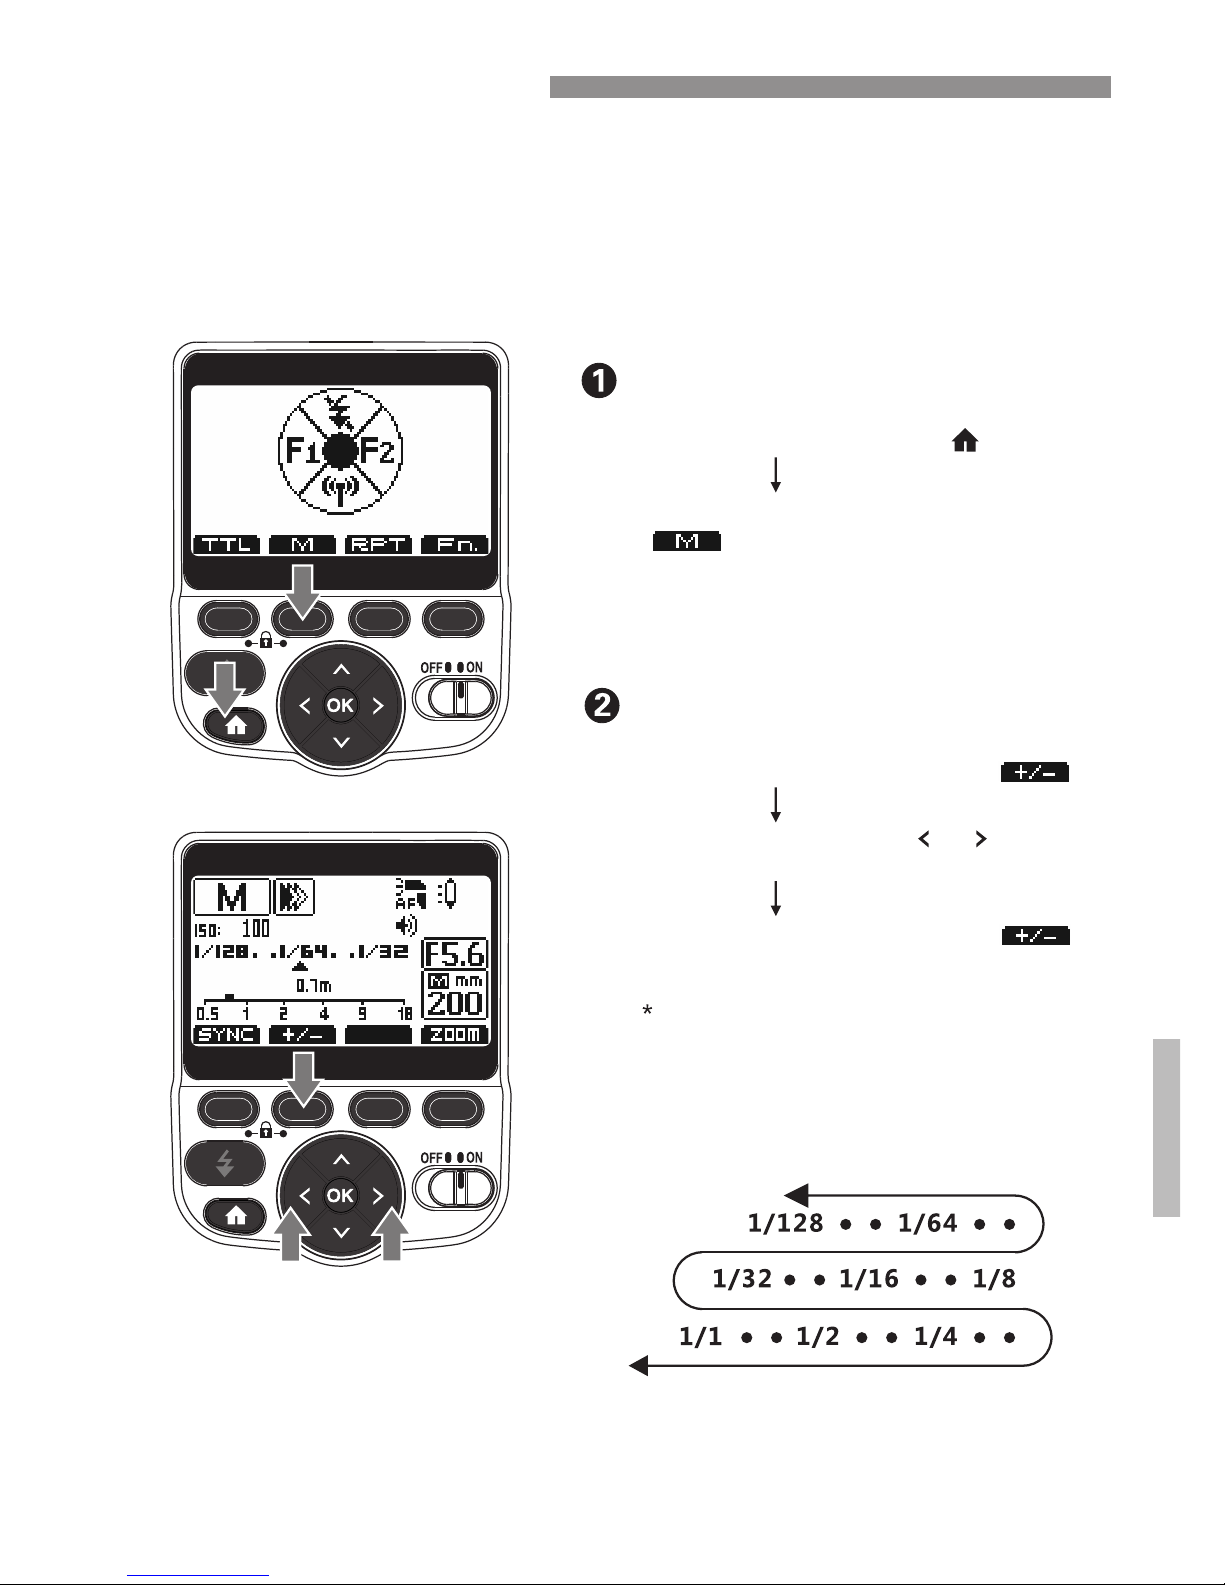
M: Manual Mode
In manual mode you can set the flash output from 1/128
power to 1/1 full output in 1/3 steps increments. The 200ST-R
will flash at your manually set power level without any TTL,
automatic exposure control.
Enter M mode
Set the flash output
You can also use the [ ] button or OK
half press the camera's shutter button
to confirm your selection
17
Manual adjustment scale shown for your reference.
22 levels of light output control are possible.
Minimum power flash
Full power flash
Press the [ ] button to set toFunction 2
[ ]
Press the Function 2 button [ ]
Use the arrow buttons [ ] [ ] for
adjustment
Press the Function 2 button [ ] to
confirm your selection
/
Press the home button [ ]
Page 19
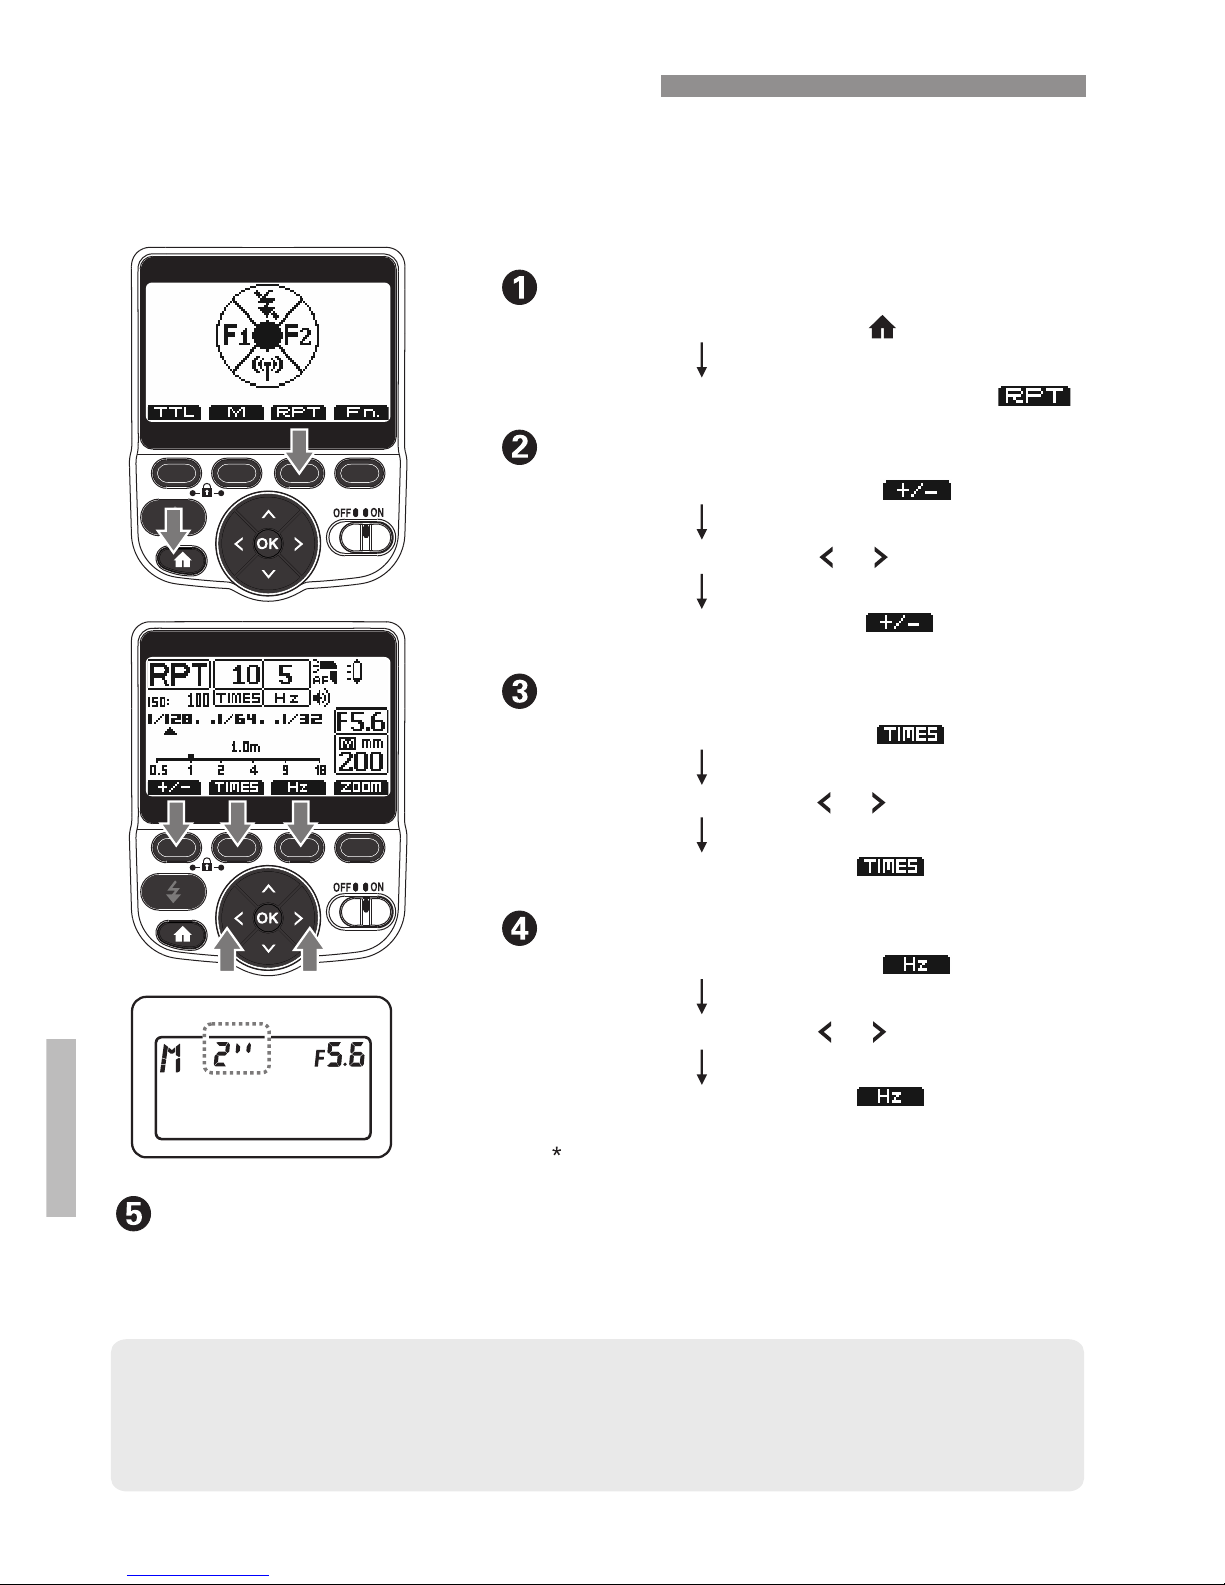
Press the Function 1 button [ ]
Press the Function 1 button [ ] to confirm
your selection
Use the arrow buttons [ ] [ ] for adjustment
Repeating Flash Mode
In RPT mode, the 200ST-R fires repeatedly during a single
exposure, creating stroboscopic multiple-exposure effects.
This is useful when shooting fast-moving subjects.
Enter RPT mode
Set the number of flashes (times)
Set the flash firing frequency
Set the camera’s shutter speed
● Shutter speed= Number of flashes ÷ flash frequency
For example, if the number of flashes is set to 10 (times) and the flash frequency to
5(HZ), set the shutter speed to 2 sec. or longer.
● “Bulb” mode can also be used for the shutter speed.
● The maximum flash firing number is a function of flash output level and flash firing frequency.
See the table in the Appendix for more details. The 200ST-R will not allow you to set an unachievable
combination of these settings.
● To avoid overheating and damaging the flash head, do not use RPT flash more than 10 times in
succession. After shooting 10 times, allow a rest time of 5-10 minutes to prolong the life of the flash tube.
Set the flash output
You can also use the [ ] butto n or half press the OK
camer a's shutter button to con firm your selection.
18
Press the Function 2 button[ ]
Press the Function 2 button [ ] to confirm
your selection
Use the arrow buttons [ ] [ ] for adjustment
Press the Function 3 button [ ]
Press the Function 3 button [ ] to confirm
your selection
Use the arrow buttons [ ] [ ] for adjustment
Press the [ ] button to set to [ ]Function 3
/
/
/
Press the home button [ ]
Page 20
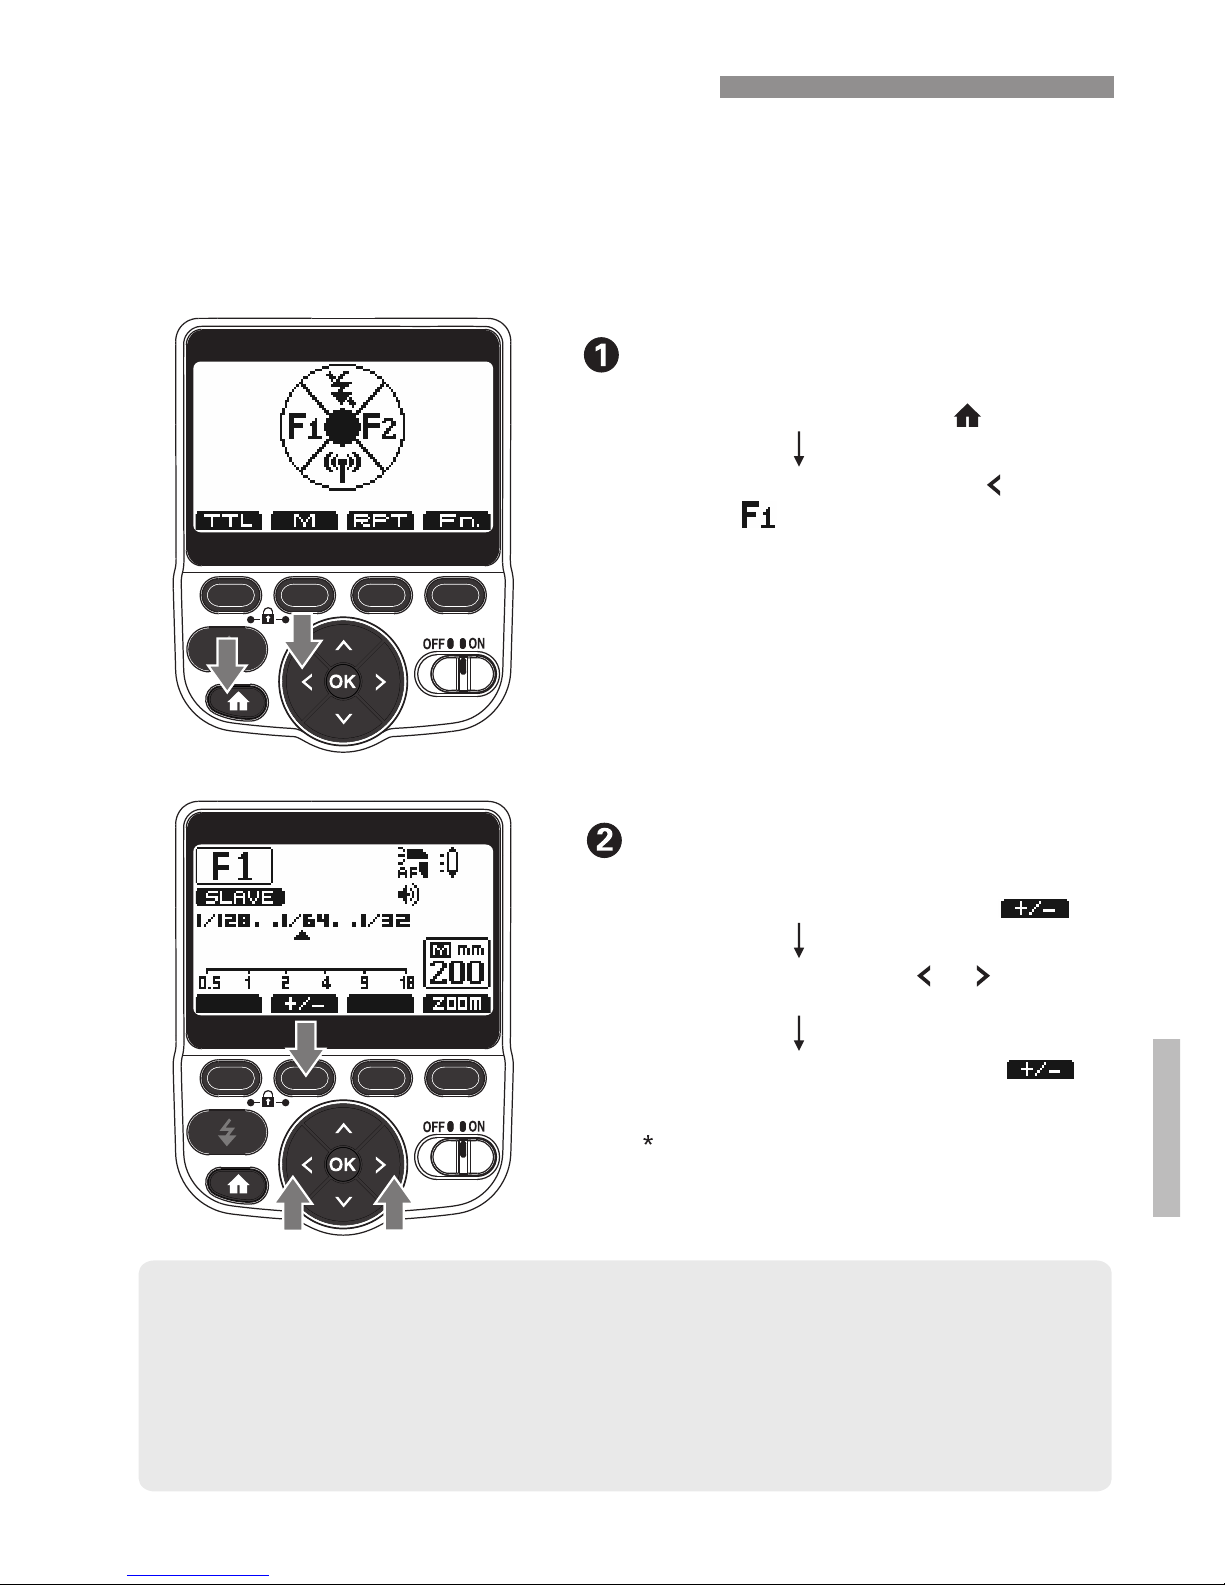
Slave Mode F1 (Optical)
The F1 slave mode is used in a manual flash environment.
The 200ST-R is triggered optically by another flash (non-radio)
by the first burst of light it sees. It will not ignore a pre-flash if
one exists from the master.
● When the 200ST-R is in F1 slave mode, it will fire in-sync. with the
master flash. To use this mode correctly, the master speedlight should
be set as a manual flash and its TTL flash mode with pre-flash and
red-eye reduction modes should not be used so as to avoid firing the
200ST-R slave out of sync. The master should be aimed at the front of
the 200ST-R so its optical slave can see the master's flash.
Enter F1 slave mode
Set the flash output
19
Press the left arrow button to [ ]
select [ ] mode
You can also use the [ ] button to OK
confirm your selection
Press the Function 2 button [ ]
Press the Function 2 button [ ] to
confirm your selection
/
Use the arrow buttons [ ] [ ] for
adjustment
Press the home button [ ]
Page 21
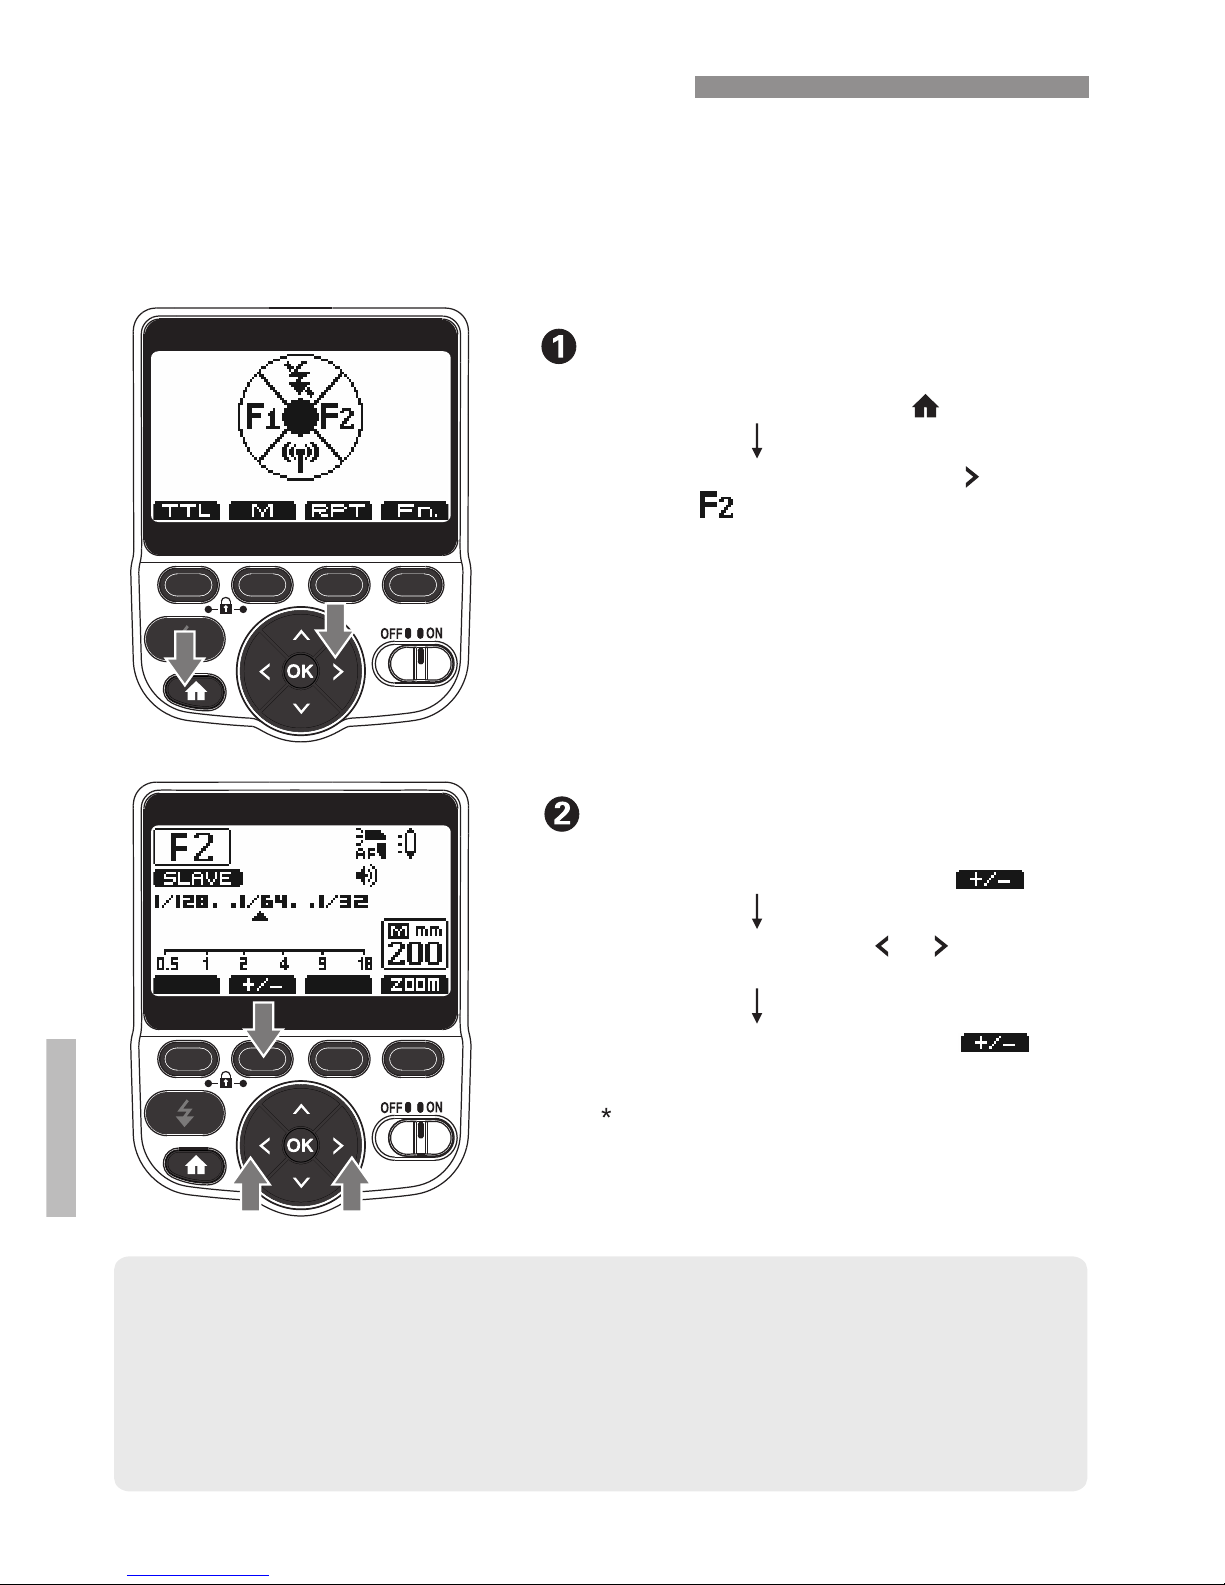
Use the arrow buttons [ ] [ ] for
adjustment
/
Slave Mode F2 (Optical)
The F2 slave mode is normally used when the master flash is in
TTL mode. F2 slave works as an optical slave and ignores the
first burst of light it sees, thereby ignoring the master's preflash monitor and firing in-sync. with the master's true flash.
Enter F2 slave mode
● When the speedlight is in F2 mode it can support the master speedlight
in TTL mode.
● As a basic guide, the effective shooting distance between the master
and slave units in F1 or F2 is approx. 10M (33 ft.). The range will vary
slightly depending on the ambient light. Don't place any obstacles
between the master and slave units (F1/F2).
Set the flash output
20
Press the right arrow button to [ ]
select [ ] mode
You can also use the [ ] button to OK
confirm your selection
Press the Function 2 button [ ]
Press the Function 2 button [ ] to
confirm your selection
Press the home button [ ]
Page 22
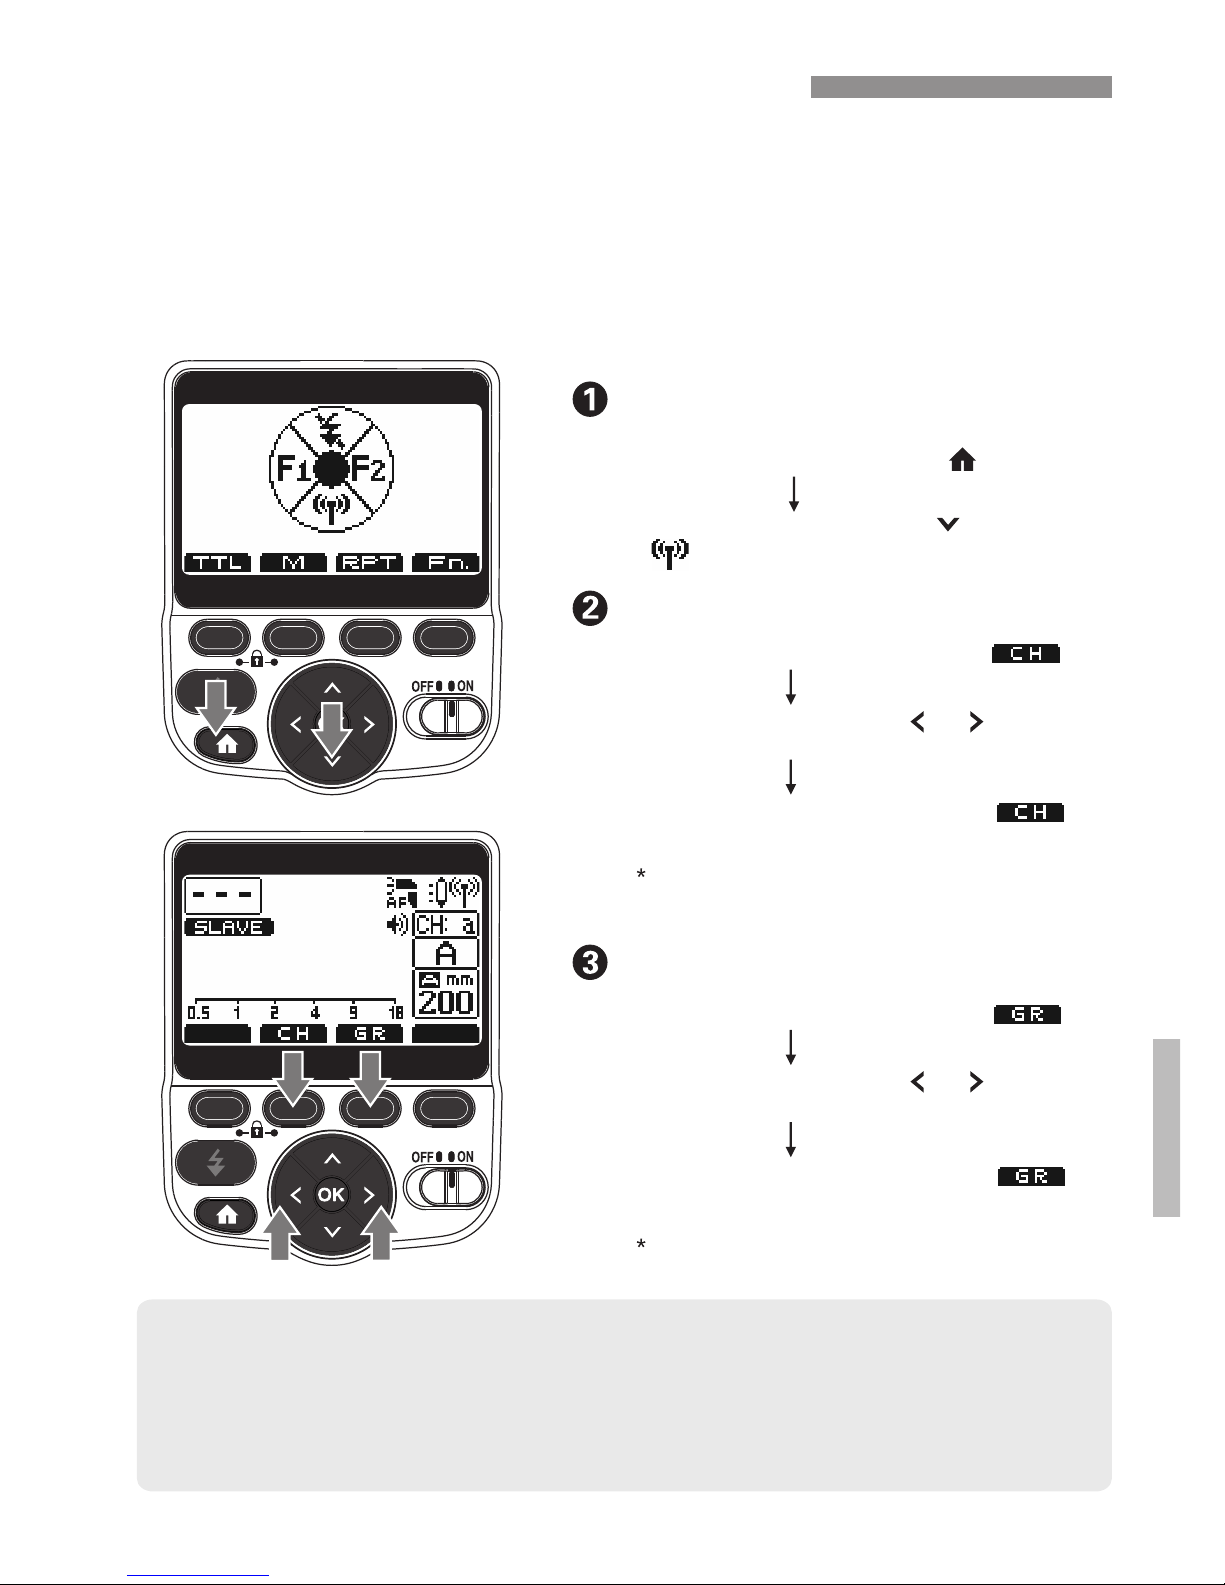
Press the Function 2 button [ ]
Use the arrow buttons [ ] [ ] for
adjustment
Press the Function 2 button [ ]
button to confirm your selection
Press the arrow button [ ] to set to
[ ]
Set the channel (CH)
2.4 GHz Slave Mode (Radio)
Enter 2.4 GHz slave mode
Set the group (GR)
● If another photographer is using the same type and same channel of
transmitter nearby, your speedlight may accidentally fire in-sync. with that
photographer’s transmitter. Please change to a different channel number.
● Be sure the 200ST-R is set to the same channel as the ST1C master.
When set as a radio slave unit, the 200ST-R can receive signals
from a ProMaster ST1C transceiver (sold separately) in master
mode. TheST1C can control up to 5 groups using one of 15
channels or auto channel for its slave units ,reliably, over a long
distance (325' / 100 m), with optional TTL exposure and other
advanced features.
You can also use the [ ] butto n to confirm OK
your se lection. Channel Rang e: a (auto) + 1-15
You can also use the [ ] butto n to confirm OK
your se lection. Group Range: A, B , C, D, E
21
Press the Function 3 button [ ]
Press the Function 3 button [ ] to
confirm your selection
/
Use the arrow buttons [ ] [ ] for
adjustment
/
Press the home button [ ]
Page 23
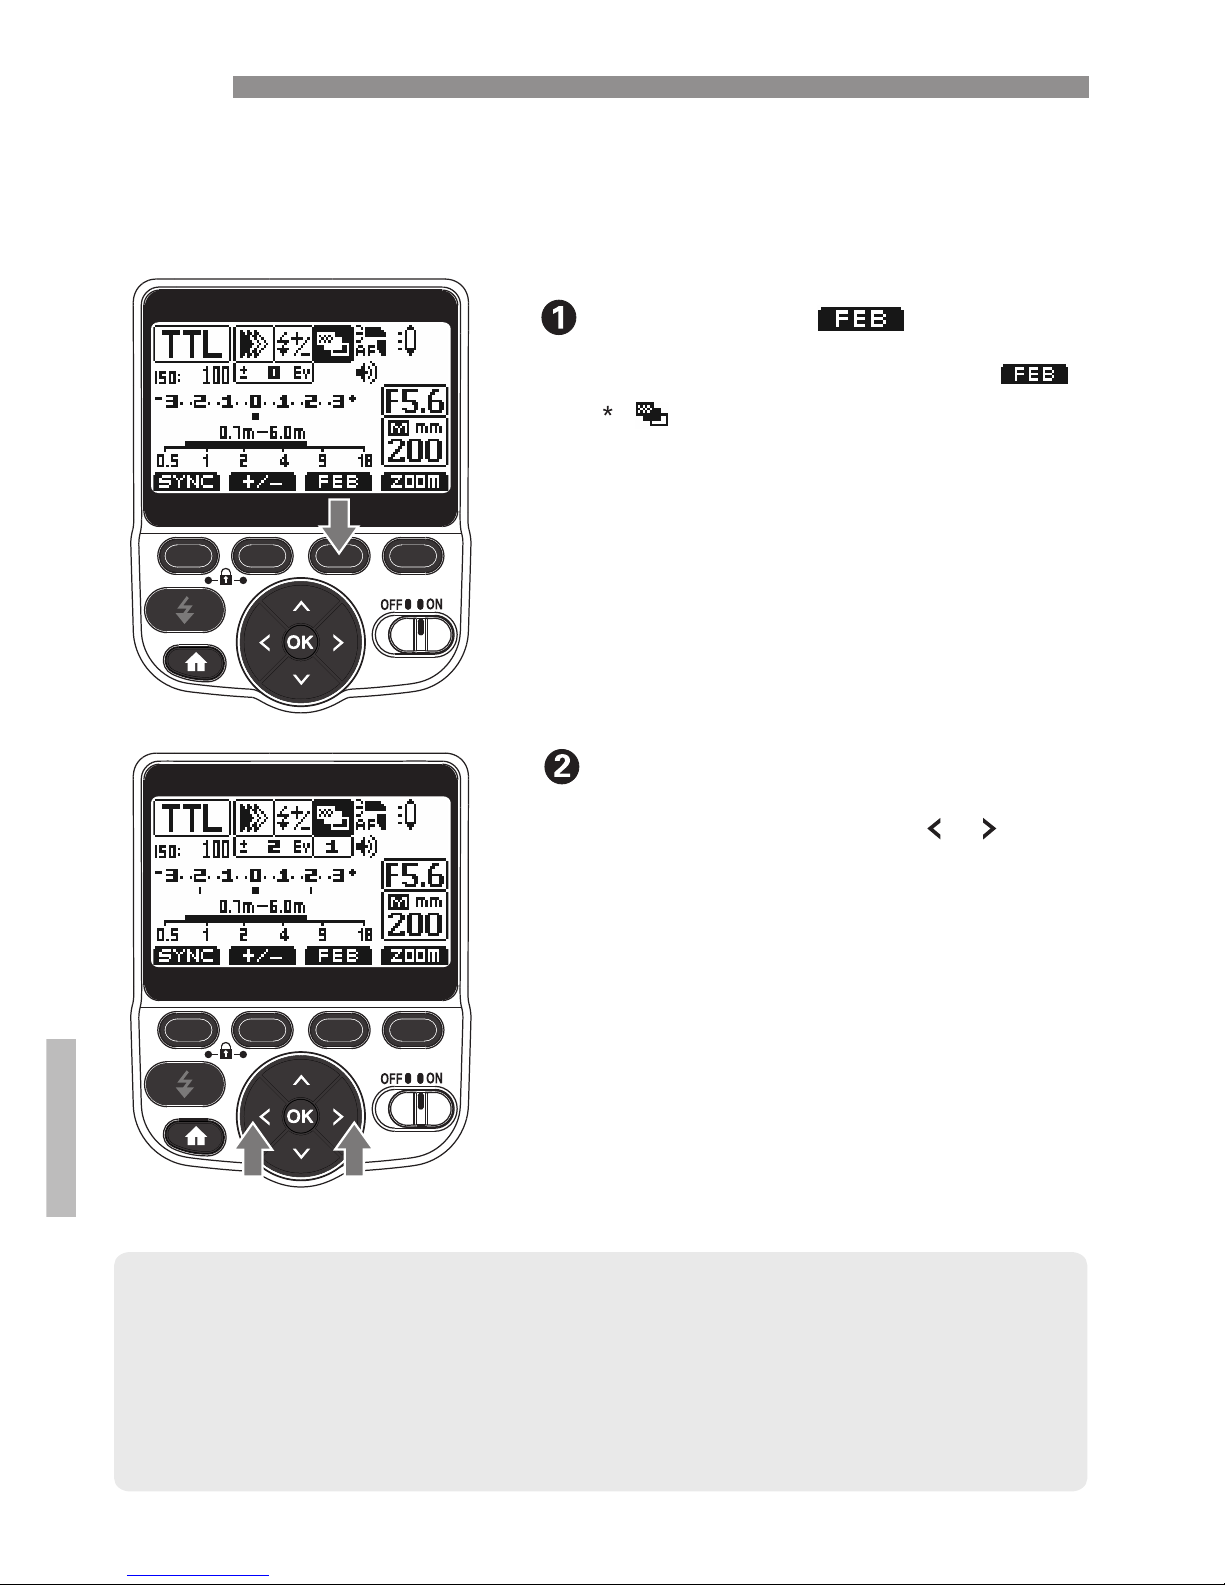
FEB
You can take three shots while automatically changing the flash
output. This is called FEB (Flash Exposure Bracketing). The
settable range is up to ±3 stops in 1/3-stop increments.
Press the [ ] button
● After the three shots are taken, FEB is canceled automatically.
● Before shooting with FEB, it is recommend to set the camera’s drive mode
to single shooting and check that the flash is recycled.
● You can use FEB together with flash exposure compensation or FE lock.
● You can set FEB to remain enabled after shooting the three shots(C.Fn-03).
● You can change the FEB shooting sequence(C.FN-04).
22
● Press the Function 3 button [ ].
Set the FEB level.
● “0.3” indicates 1/3 stops and “0.7”
indicates 2/3 stops.
● When used together with flash
exposure compensation, FEB
shooting is performed based on the
flash exposure compensation amount.
When the FEB range exceeds ±3
stops, the end of the flash exposure
level shows.
[ ] [ ]
● Use the arrow buttons to set
the FEB level.
[ ]is displayed and the FEB level
display is highlighted.
/
Page 24
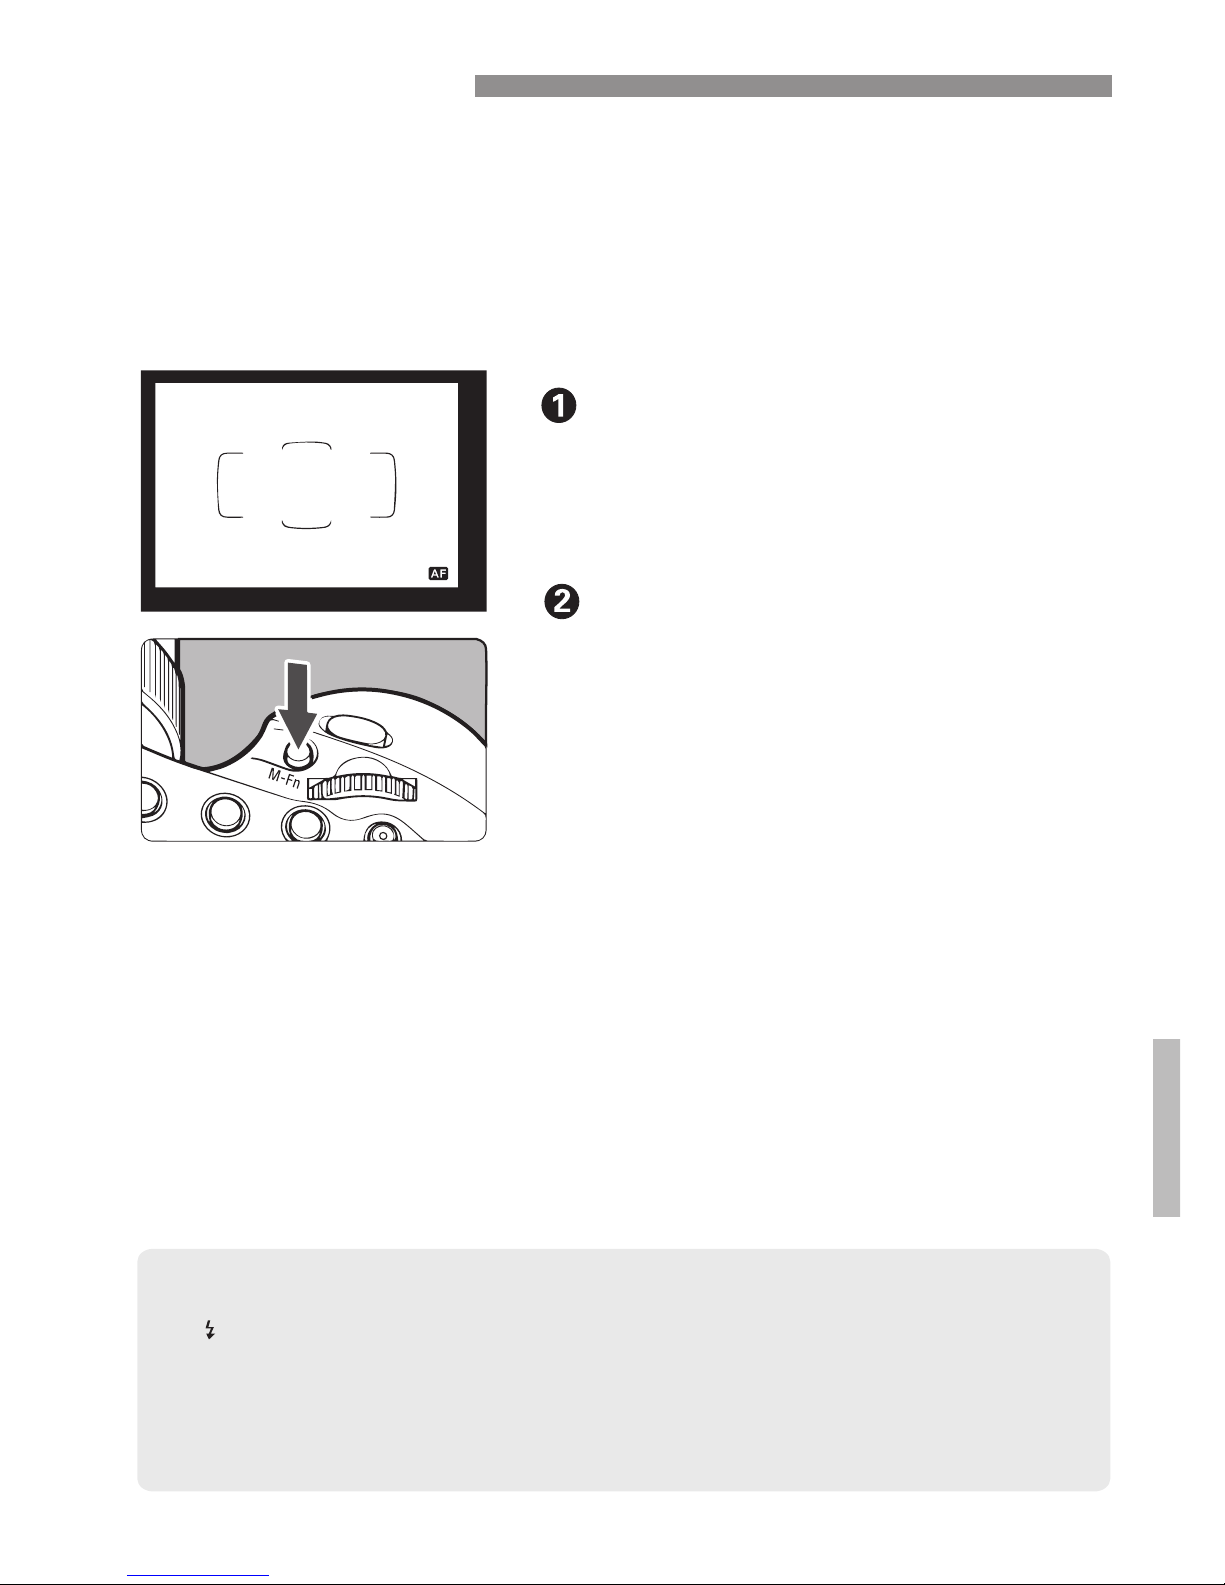
FEL: FE Lock
FE (Flash Exposure) lock locks the correct flash exposure
setting for any part of the scene.
While [TTL] is displayed on the LCD panel, press the camera's
[M-Fn] button. On cameras without a [M-Fn] button, press the
[FEL] or [ ] (AE lock) button.
23
● lf a correct exposure cannot be obtained when FE lock is performed,
[ ] blinks in the viewfinder. Move closer to the subject, open the
aperture, and perform FE lock again. You can also increase the ISO
speed and perform FE lock again when using a digital camera.
● If the target subject is too small in the viewfinder, FE lock might not
work effectively.
*
Focus the subject.
Press the <M-Fn> button.
● Aim the center of the viewfinder at the
subject and press the <M-Fn> button.
* The Speedligh t fires a preflash, and the f lash output
requi red for the subject is reta ined in the memory.
* "FEL' w ill be displayed in the vie wfinder for 0.5 sec.
Each time you press the <M-Fn>●
button, a preflash will be fired and the
new flash output required at that time
is retained in the memory.
Page 25
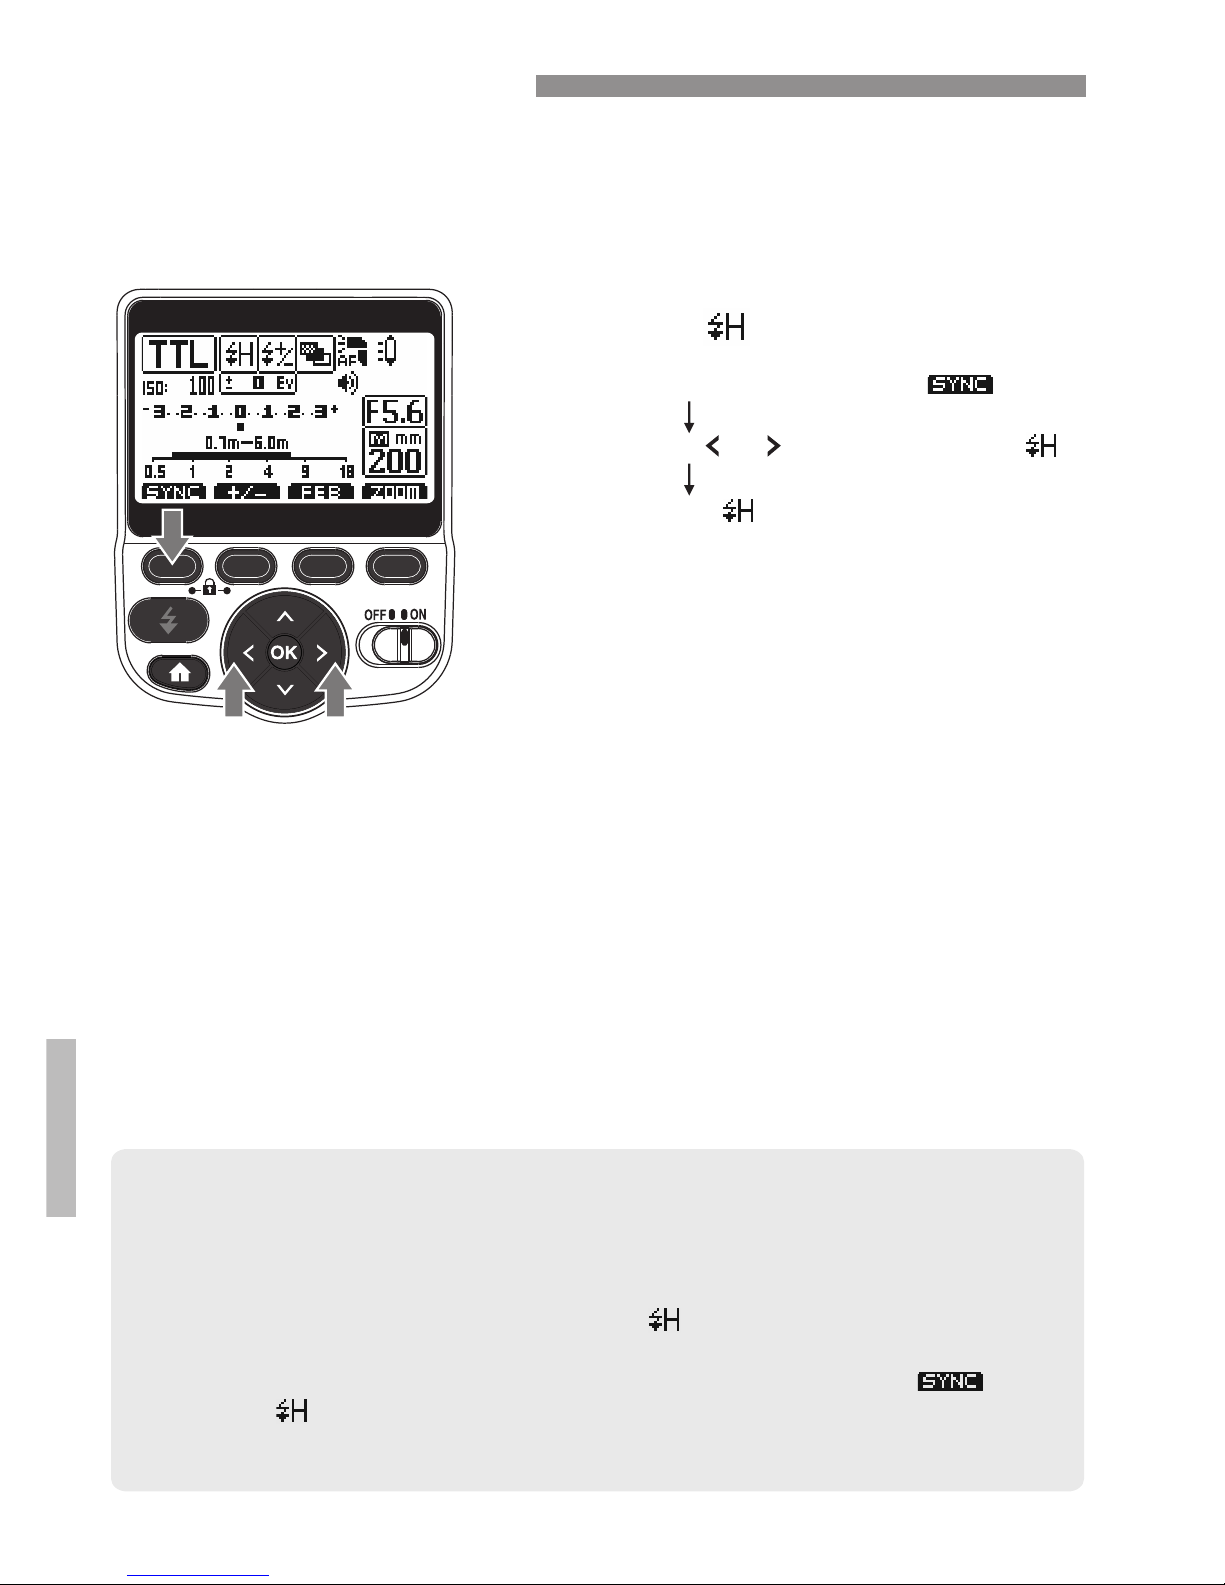
High-speed Sync
With high-speed sync, the flash can synchronize with all shutter
speeds. This is convenient when you want to use aperturepriority AE for fill-flash portraits of a subject.
Check that [ ] is lit in the viewfinder
Press the [ ] [ ] button to display [ ]
Press the Function 1 button [ ]
/
● With high-speed sync, the faster the shutter speed, the shorter the
effective flash range(distance) will be. Check the effective flash range
on the LCD panel.
● If you set a shutter speed that is equal to or slower than the camera's
maximum 'normal' flash sync speed, [ ] will not be displayed in the
viewfinder.
● To return to normal flash shooting, press function button 1 [ ] to
turn off [ ].
● High-speed sync is not available during stroboscopic (RPT) flash.
Enter [ ] mode
24
Page 26
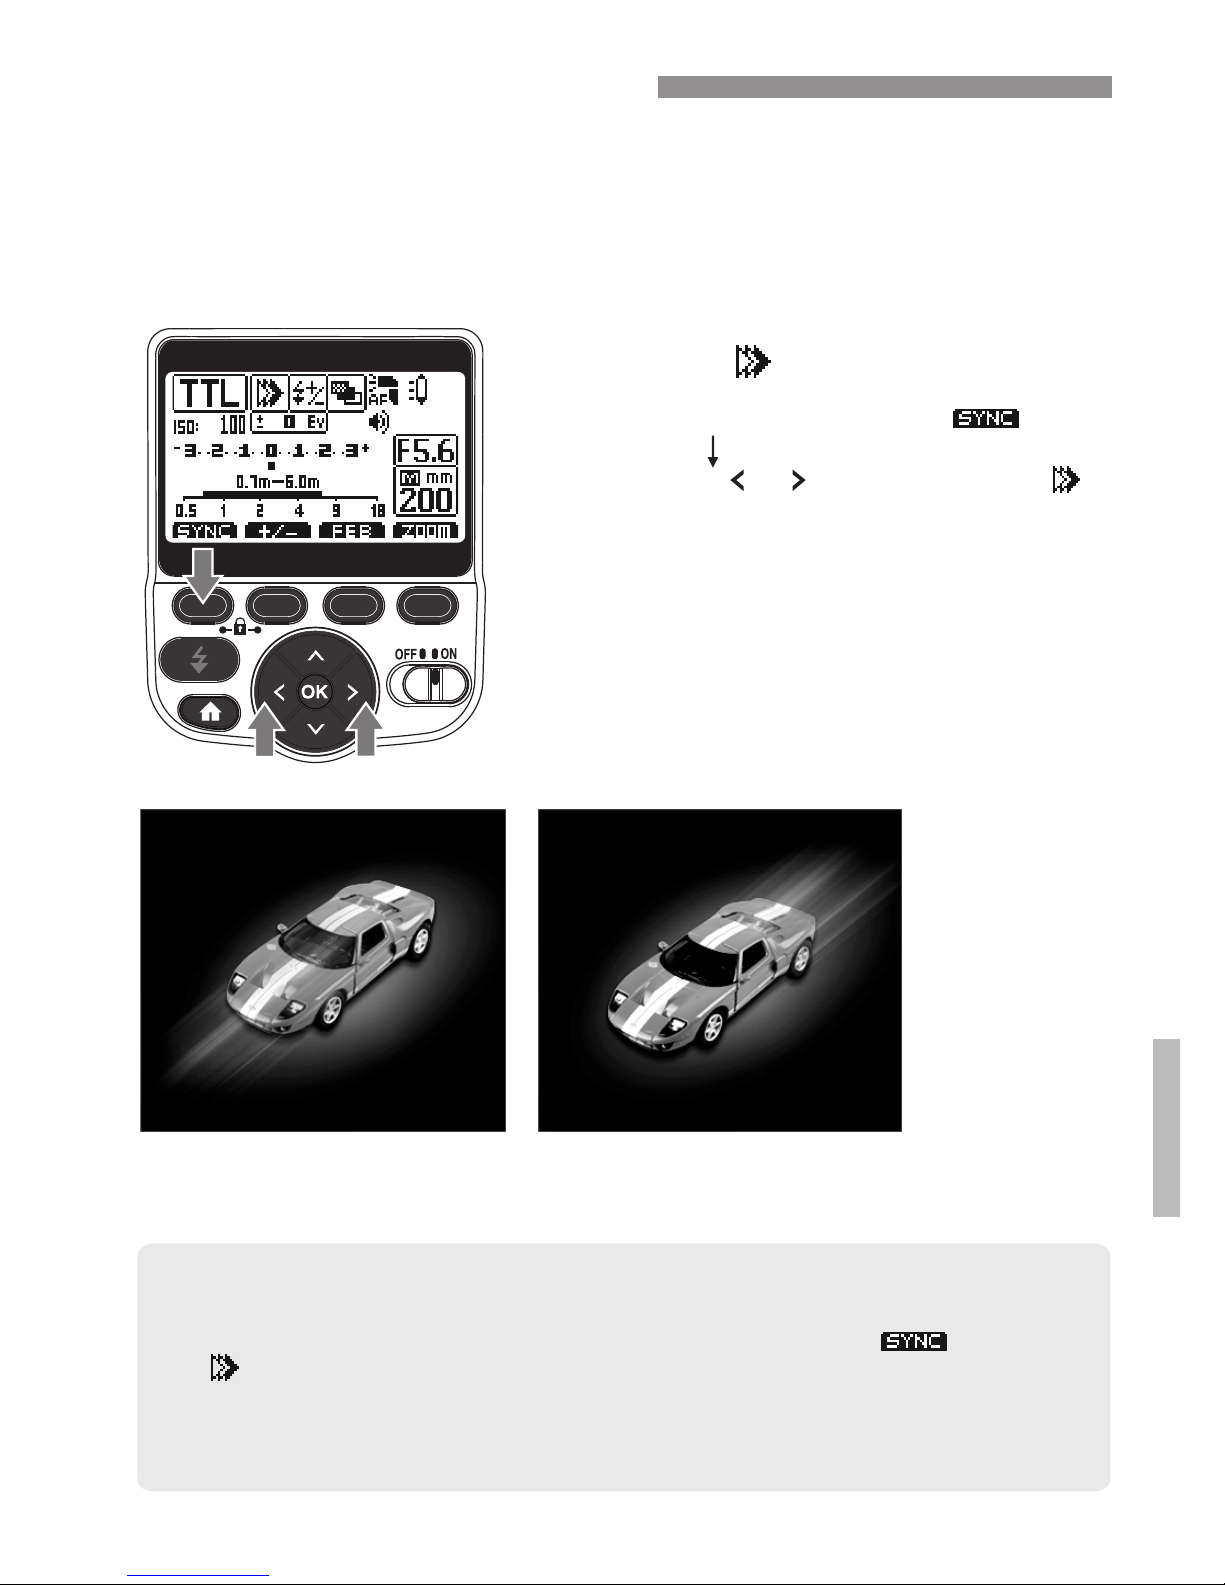
Second-curtain Sync
Shooting with a slow shutter speed and second-curtain sync
captures the blur of moving objects, such as a moving car, in a
natural way. The flash fires right before the exposure finishes
(shutter closes) and the blur appears behind the object's
direction of motion.
● Second-curtain sync works well when the camera's shooting mode is set
to "BULB".
● To return to normal flash shooting, press function button 1 [ ] to turn off
[ ] .
● When the flash mode is set to [TTL], the flash fires twice. This first flash is a
preflash to determine the flash output. It is not a malfunction,
● Second-curtain sync is not available during wireless flash shooting.
Enter [ ] mode
Press the Function 1 button [ ]
/
Press the [ ] [ ] button to display [ ]
25
First(front)-curtain sync
Second(rear)-curtain sync
Page 27
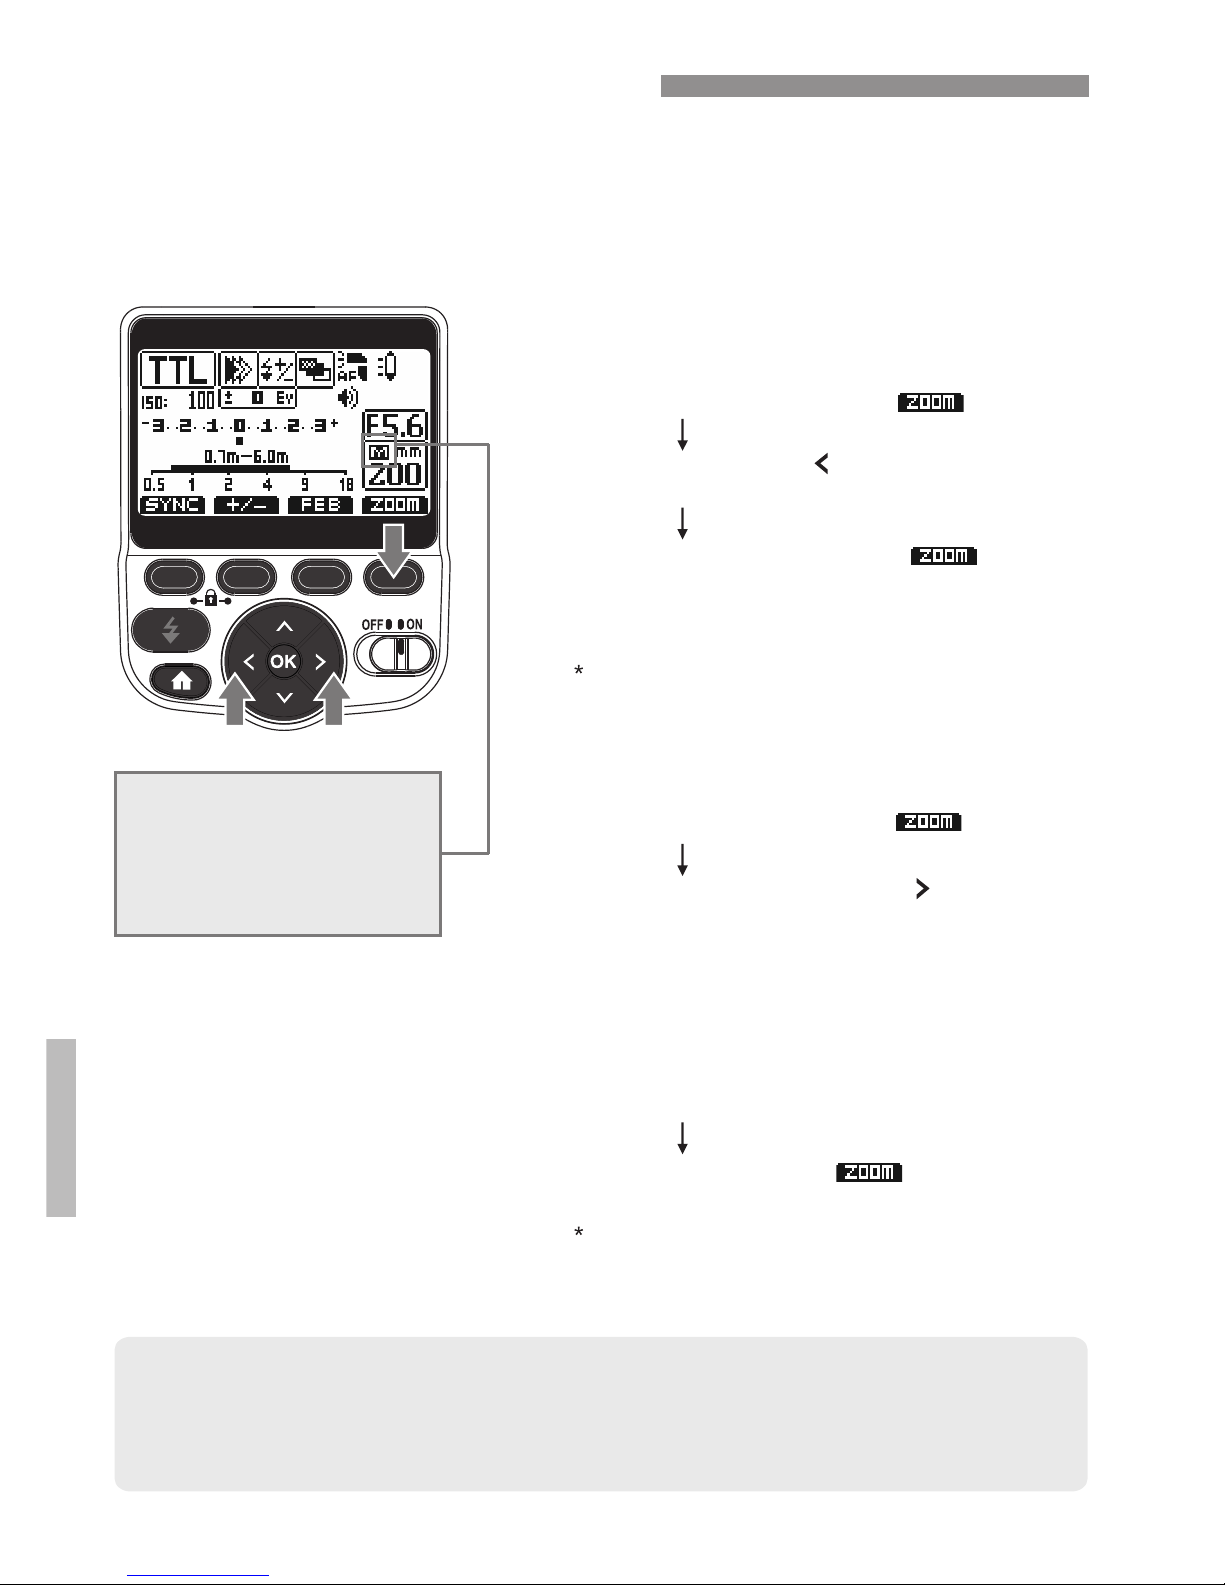
24--28--35--50--70--80–
105--135--200mm
The 200ST-R's zoom
range scale
Power Zoom Function
The power zoom function automatically adjusts the flash zoom
head position to match the lens focal length. Zoom positions can
be adjusted between 24mm and 200mm. You can also adjust the
flash zoom head position manually.
A= Automatic
(The fl ash zooms in
sync wi th camera lens)
M= Manual zoom
● If you use a PC. sync. cord to connect your camera to the speedlight's
PC terminal, set the flash zoom manually.
● If you use the wide panel, the flash zoom will lock in at 18mm.
Set Auto zoom
Press the Function 4 button [ ]
to confirm the A setting. Zoom your
lens and watch the power zoom
match its focal length setting.
Press the left arrow [ ] button
until A is displayed
Set Manual zoom
Press the right arrow button [ ] to take the
200ST-R out of A mode and into M mode.
Keep pressing the right arrow button to
manually adjust the power zoom up the
scale and use the left arrow button to
adjust down the scale. Notice the equivalent
focal length is shown in mm. If you press the
left arrow button beyond 24mm the zoom will
return to A mode.
Press the Function 4 [ ] button to
confirm the M zoom setting.
Press the Function 4 button [ ]
You can also use the [ ] butto n or half press the OK
camer a's shutter button to con firm your selection.
Press the Function 4 button [ ]
You can also use the [ ] butto n or half press the OK
camer a's shutter button to con firm your selection.
26
Page 28
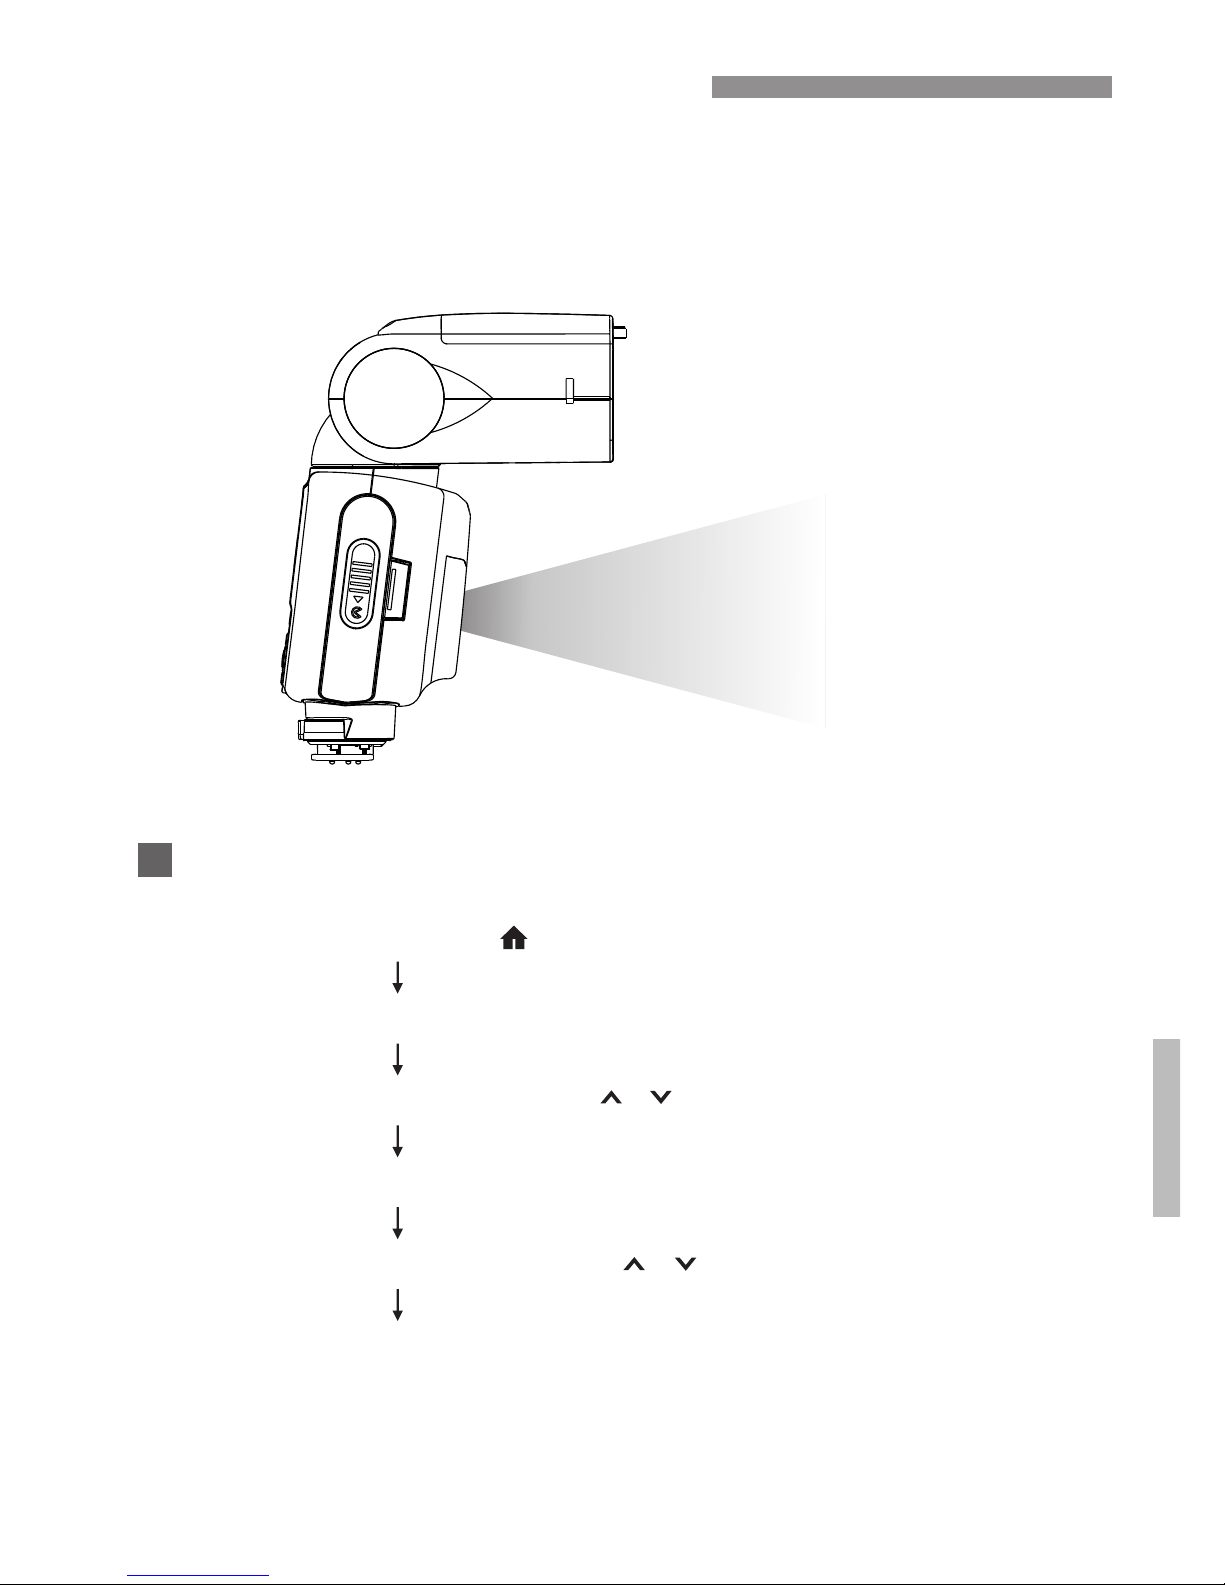
AF Assist Beam Emitter
In low light conditions the AF assist light will automatically emit a
red beam pattern towards the subject so the camera can autofocus.
Turning the AF Assist Beam Off or On
Press the Fn 4 button to enter the Utility Menu
Press the up/down arrow buttons to highlight <ON> or <OFF>
[ ] [ ]
Press the [ ] button to enter C.Fn08 OK
Use the up/down arrow buttons to display C.Fn08
[ ] [ ]
Press the [ ] button to confirm your selectionOK
Press the home button [ ]
/
/
27
Page 29
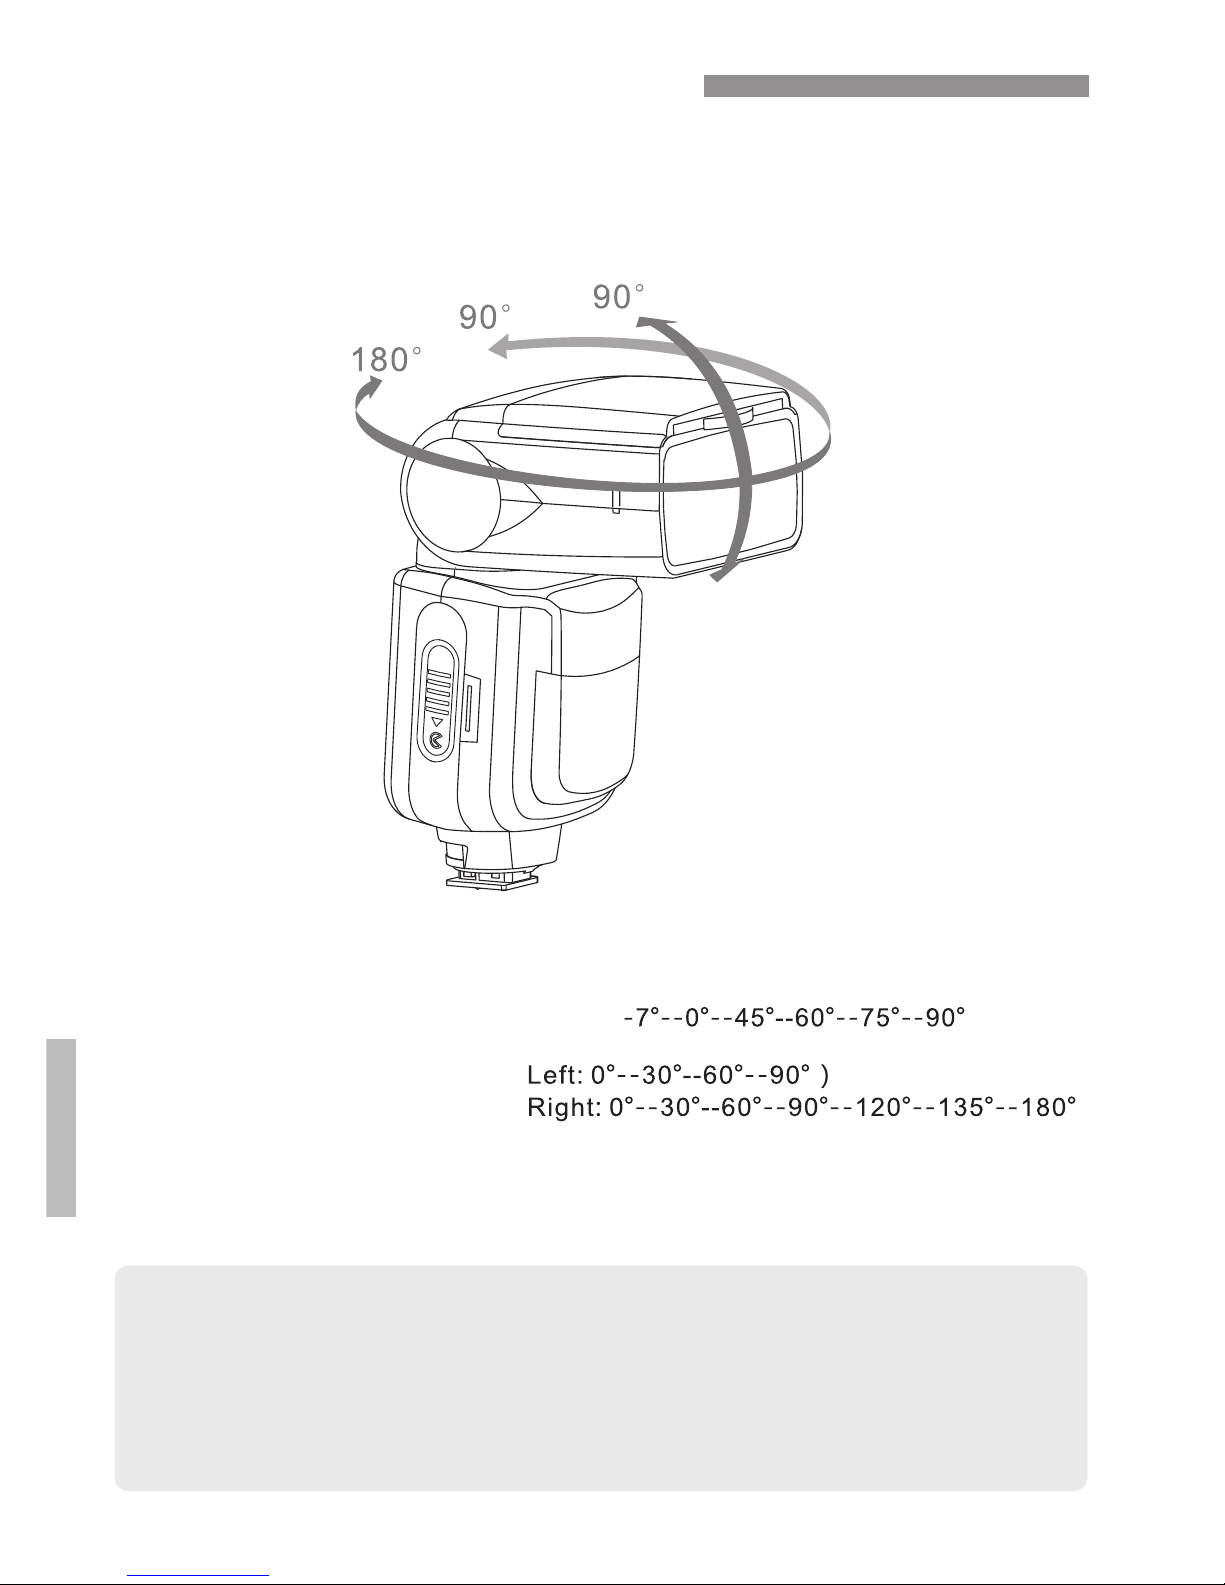
0°
-7°
Bounce Flash Operation
Tilt or rotate the 200ST-R’s flash head to bounce the light off a
ceiling or walls, providing more natural-looking pictures of
people with softer shadows.
Vertical angle adjustment:
Rotation adjustment:
● If the wall or ceiling is too far away, the bounced flash might be
too weak and can result in under exposure.
● Be sure to select a white/neutral surface to bounce the light off of.
Otherwise your pictures will have an unnatural looking color cast
similar to that of the reflecting surface.
28
Page 30
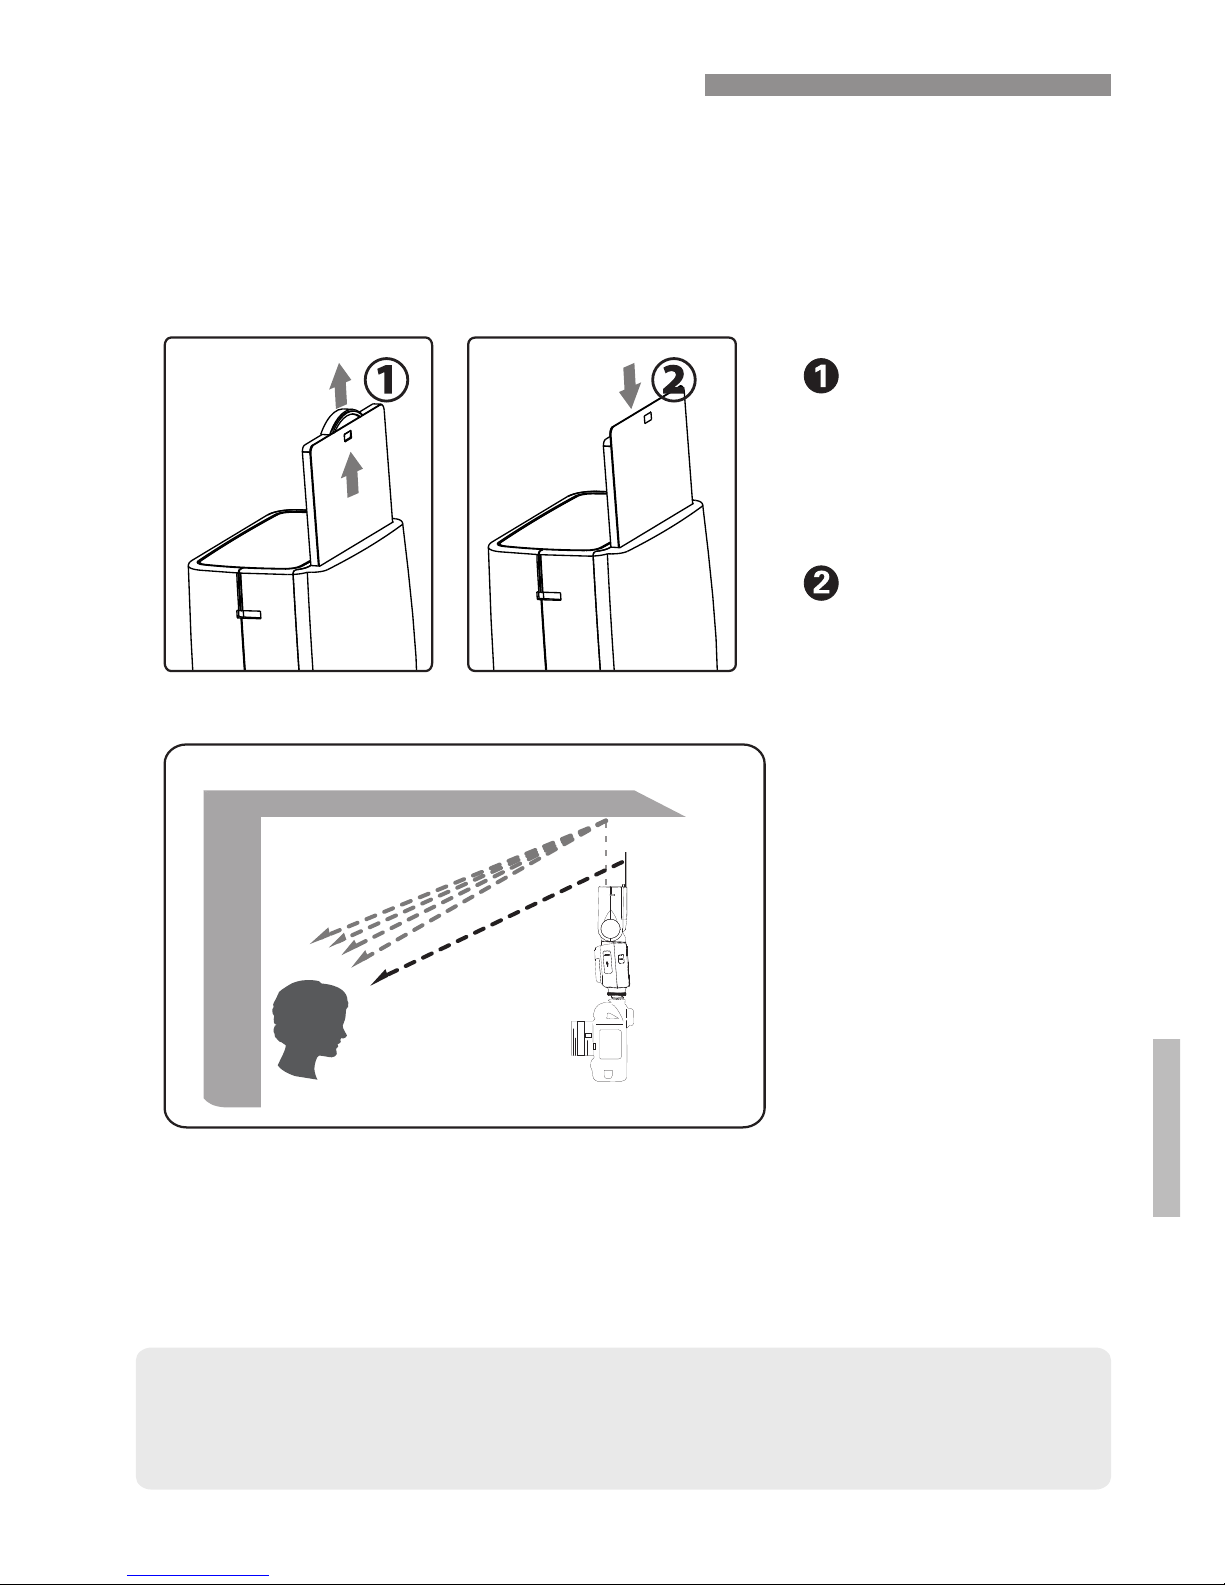
● Before pushing in bounce panel, you should slide out the wide panel
and push both in together. This is easier and will protect the bounce
panel from damage.
● Direct the flash head forward and straight up by 90°. The bounce
card will not work properly if you swing the flash head left or right.
● For maximum effect, stay within 1.5m (4.9ft) of your subject.
Using the Bounce Card
You can use the 200ST-R’s built-in bounce card to create a
highlight in the subject’s eyes, soften the light output, and
reduce the chance of red-eye (by creating more distance
between the light and the lens).
Pull the round tab.
The bounce panel
will slide out at the
same time as the
wide panel.
Push in only the
wide panel leaving
the bounce panel
exposed.
29
Page 31
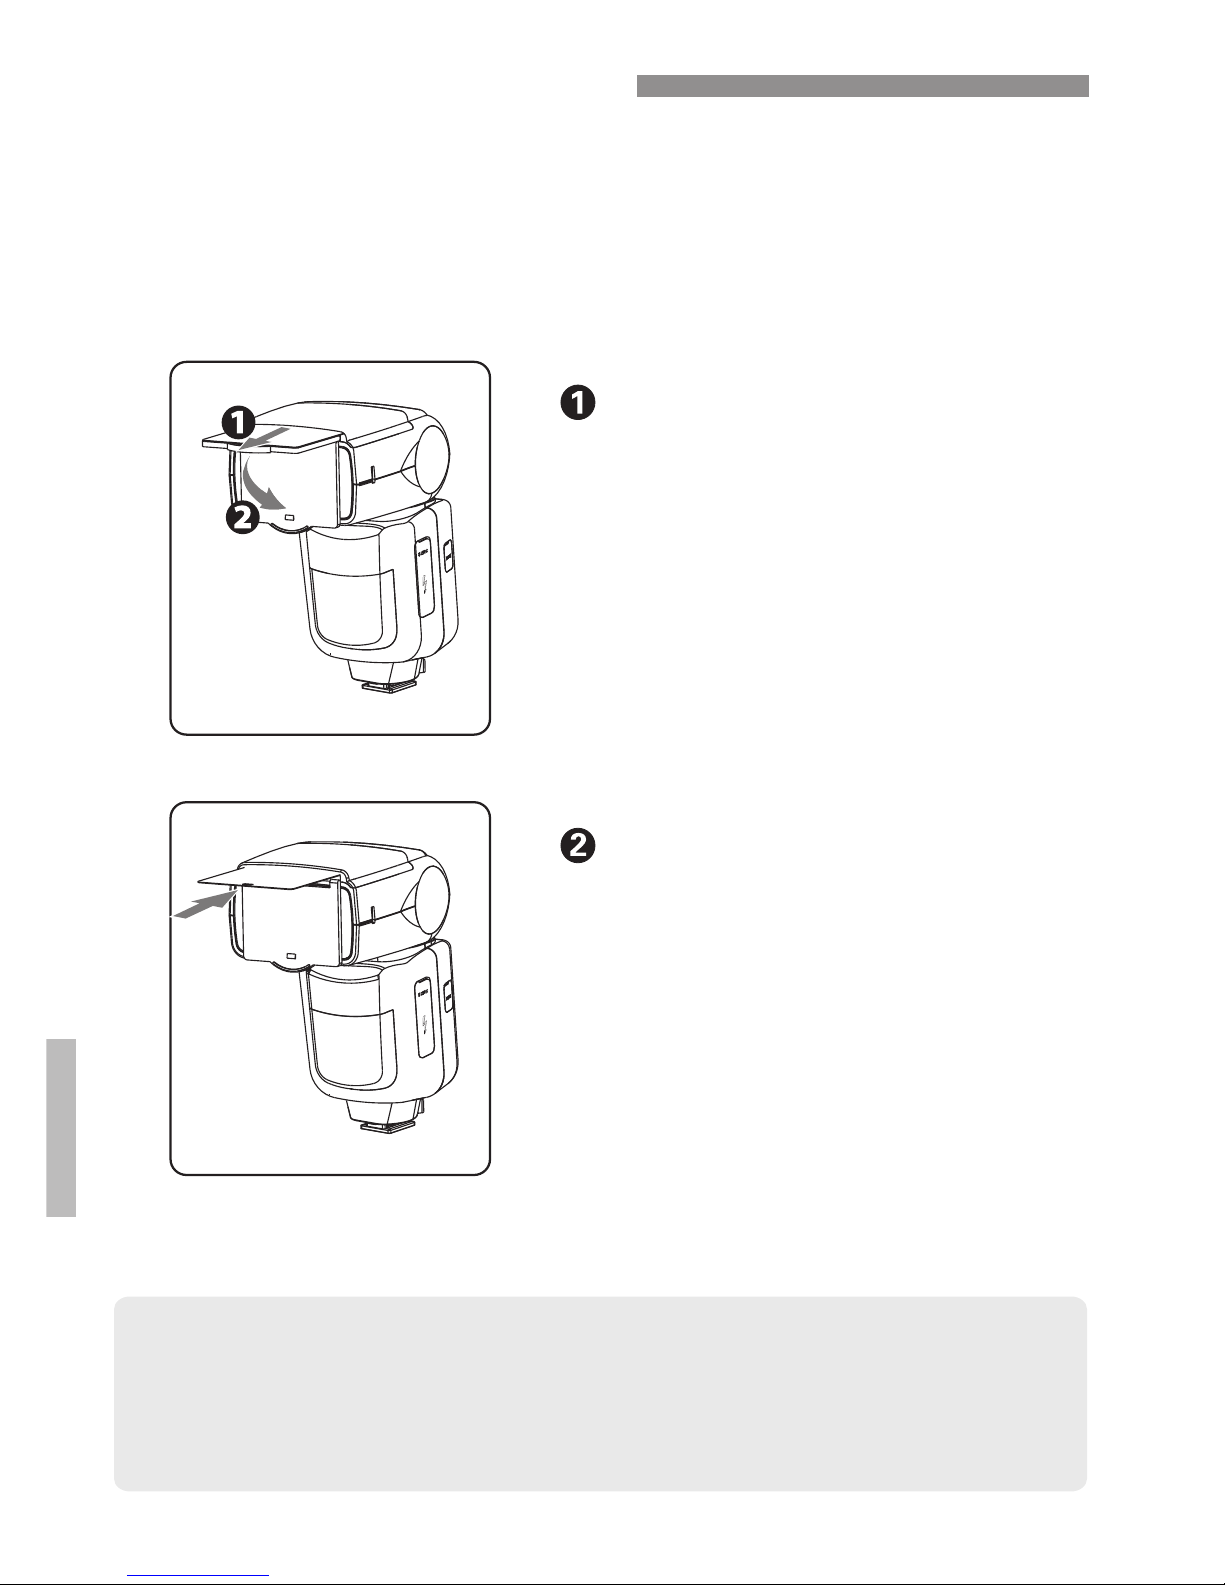
Using the Wide Panel
When the distance between the camera an subject is less than
approx.6 1/2' / 2m, you can take more natural-looking close-up
pictures using the wide panel. The zoom position will
automatically set itself to 18mm when the built-in wide panel is
used.
● The wide panel softens and widens the 200ST-R's light beam to
approximately 18mm while reducing the maximum distance the light
can travel. Do not use this feature when your subject is far away or the
flash may become too weak for proper exposure.
Pull out the wide panel.
Push the bounce
card back in.
Slowly pull out the
wide panel all the way,
and position it over
the flash head.
Push in only the bounce
card. Leave the wide
panel out.
30
Page 32
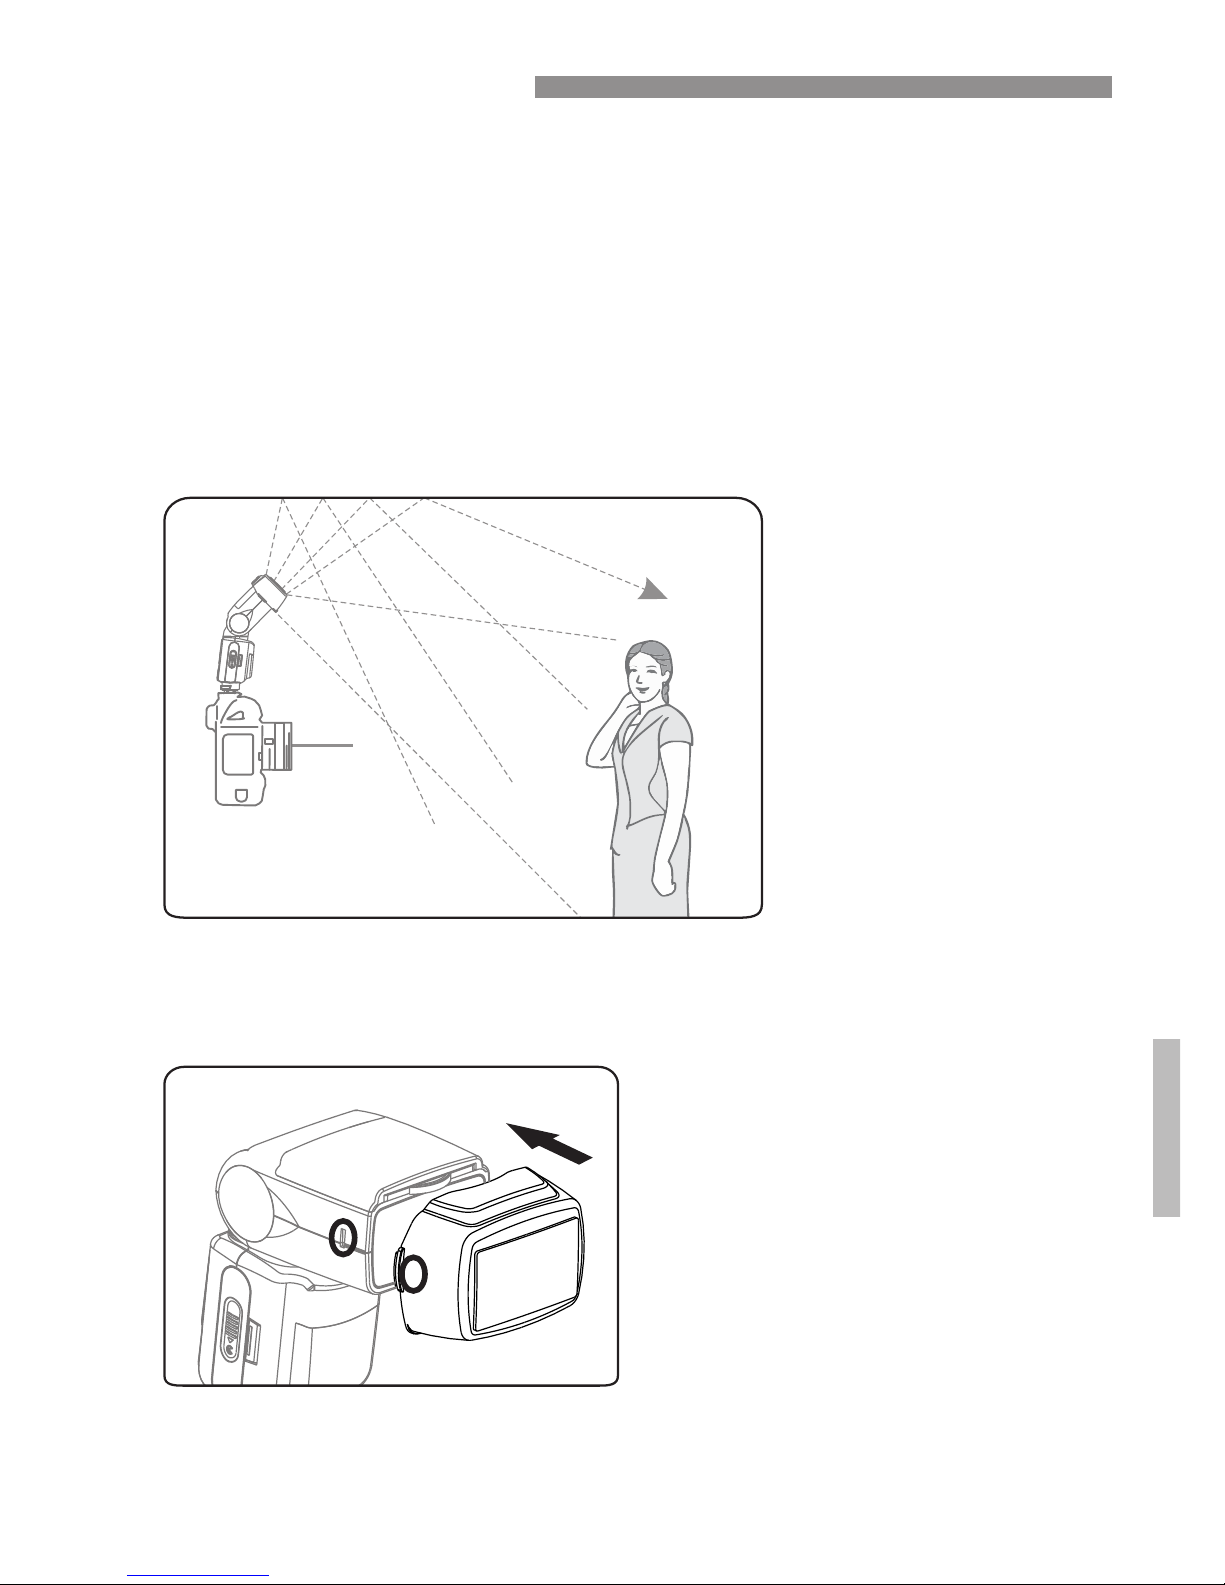
Diffusion Dome
31
● By attaching the included ProMaster Diffusion Dome over the
flash head, light can be further diffused during bounce flash
photography to create extremely soft light with virtually no
shadows.
● The same effect can be achieved with the camera in either
a horizontal or vertical position so long as the speedlight is
oriented properly.
● Light is more effectively diffused when the built-in wide panel
is used in addition to the diffusion dome.
Attaching the ProMaster Diffusion Dome
Attach the ProMaster
Diffusion Dome as shown
in the diagram.
Page 33
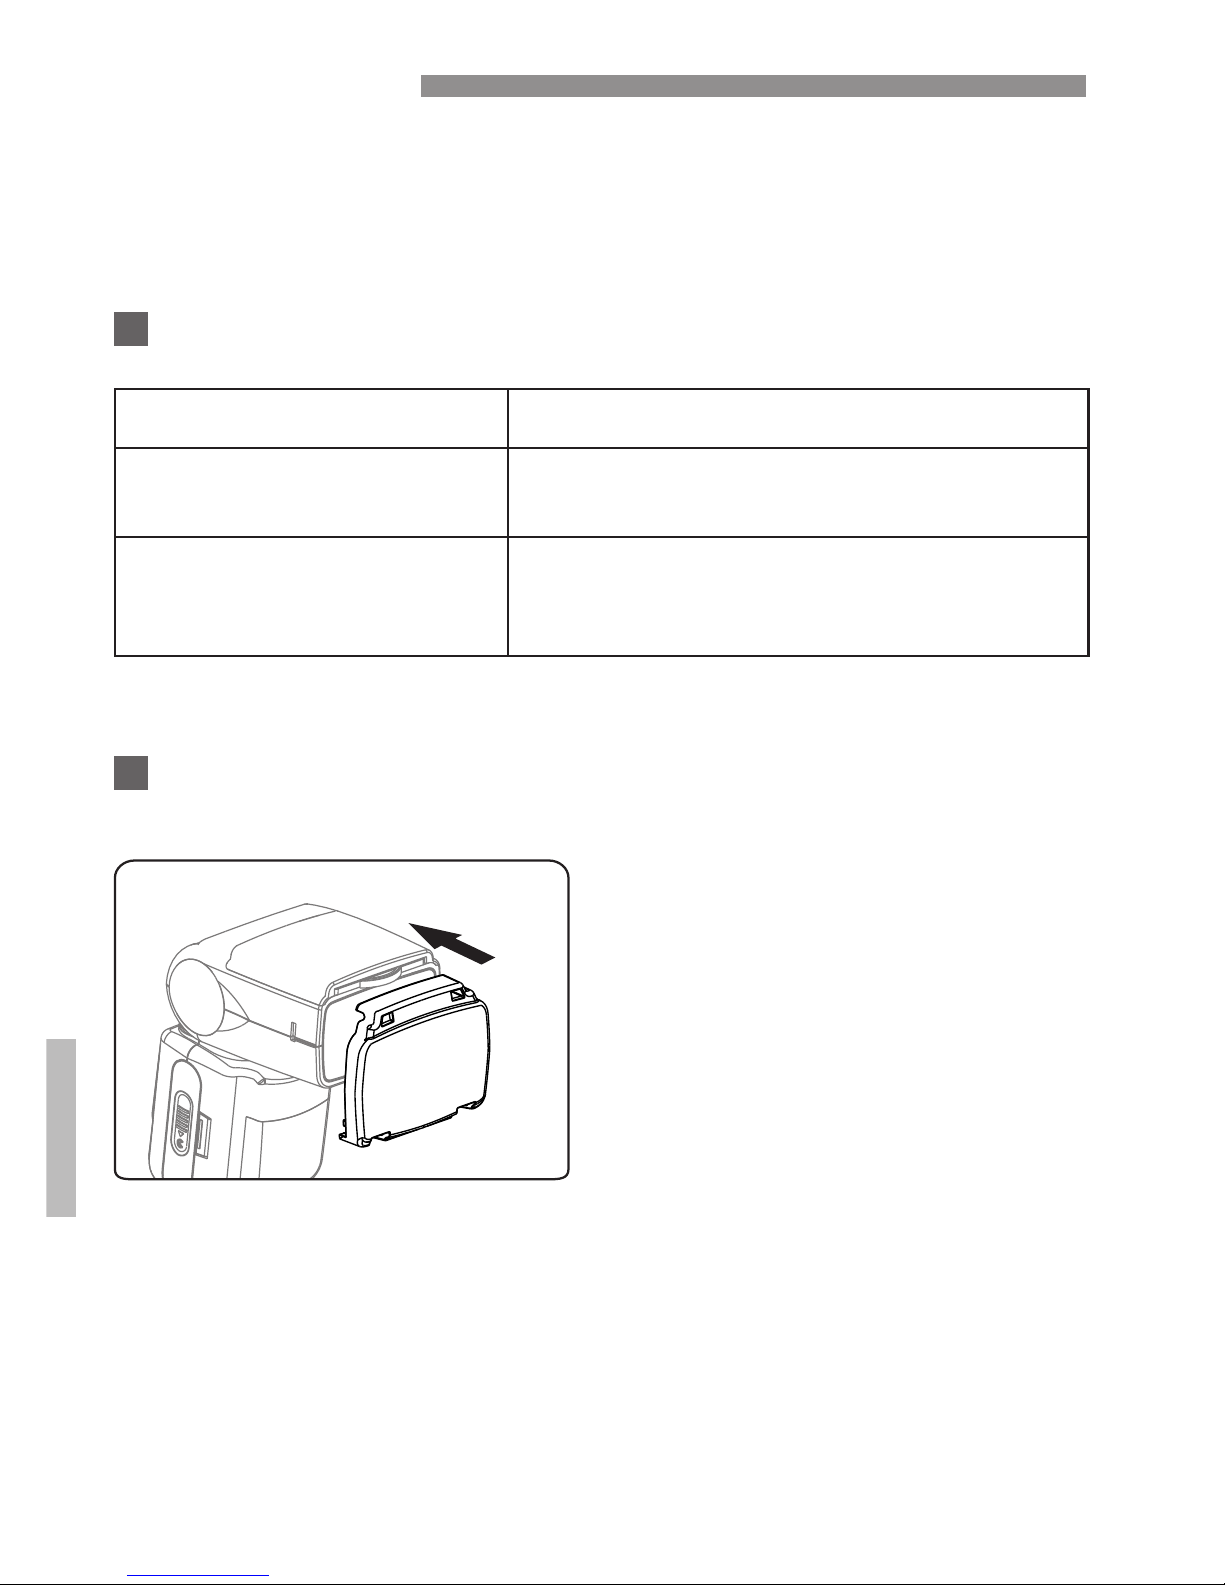
Color Filters
Filters
Fluorescent filter(Green)
included
Balance the color of light from the flash to
match that of fluorescent lighting
Fluorescent filter(Orange)
included
Balance the color of light from the flash to
match that of incandescent or tungsten
lighting
Purpose
Using color compensation filters and color filters
How to attach color compensation filters (included)
32
Place the filter on the flash
head and insert into the slit
at the top.
Place the filter as the shown
in the diagram.
Color compensation filters (fluorescent filter and an incandescent
filter) are included with the 200ST-R for use with flash photography
under incandescent/tungsten and fluorescent lighting.
Page 34
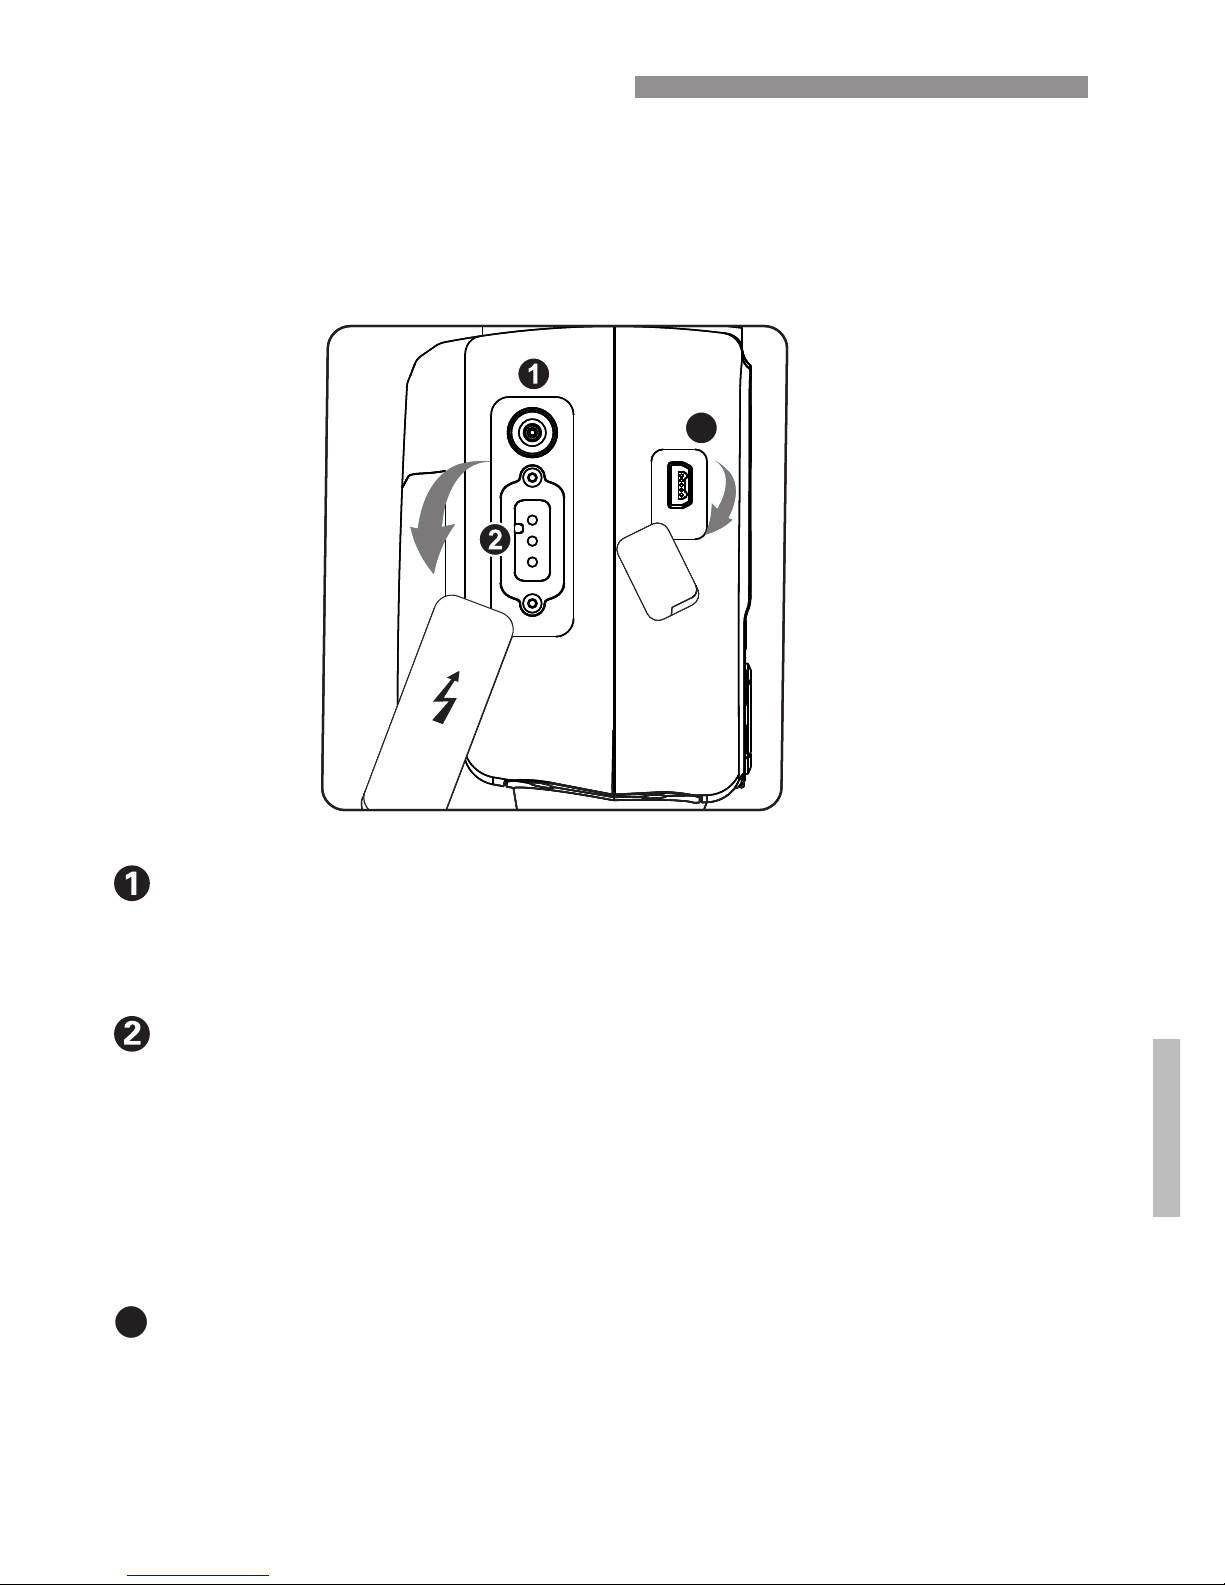
Additional Interfaces
The 200ST-R has external connections for use of an external
power source (High Voltage battery pack) and PC sync. It also
has a USB port for use when upgrading the unit's firmware. This
port is compatible with a USB mini-B 5-pin connection.
The 200ST-R has a USB upgrade port. You can update the firmware
with a newer version, when available. Refer to www.promaster.com
3
Accessing the external power connector and PC sync.
Usage.
1. PC Sync. terminal: The speedlight can fire in-sync. with a camera
using this socket and a compatible PC sync. cord.
2. External power connector: The H.V. (high voltage) port provides
a stable power supply using an external battery and compatible
power cable. You can choose to draw power from only the H.V.
port or from the H.V. port + AA batteries with C.Fn12 in the Utility
menu.
Pull open the rubber cover on the side of the 200ST-R and rotate it
out of the way.
USB upgrade port
SYNC
USB
3
SYNC
USB
3
33
Page 35
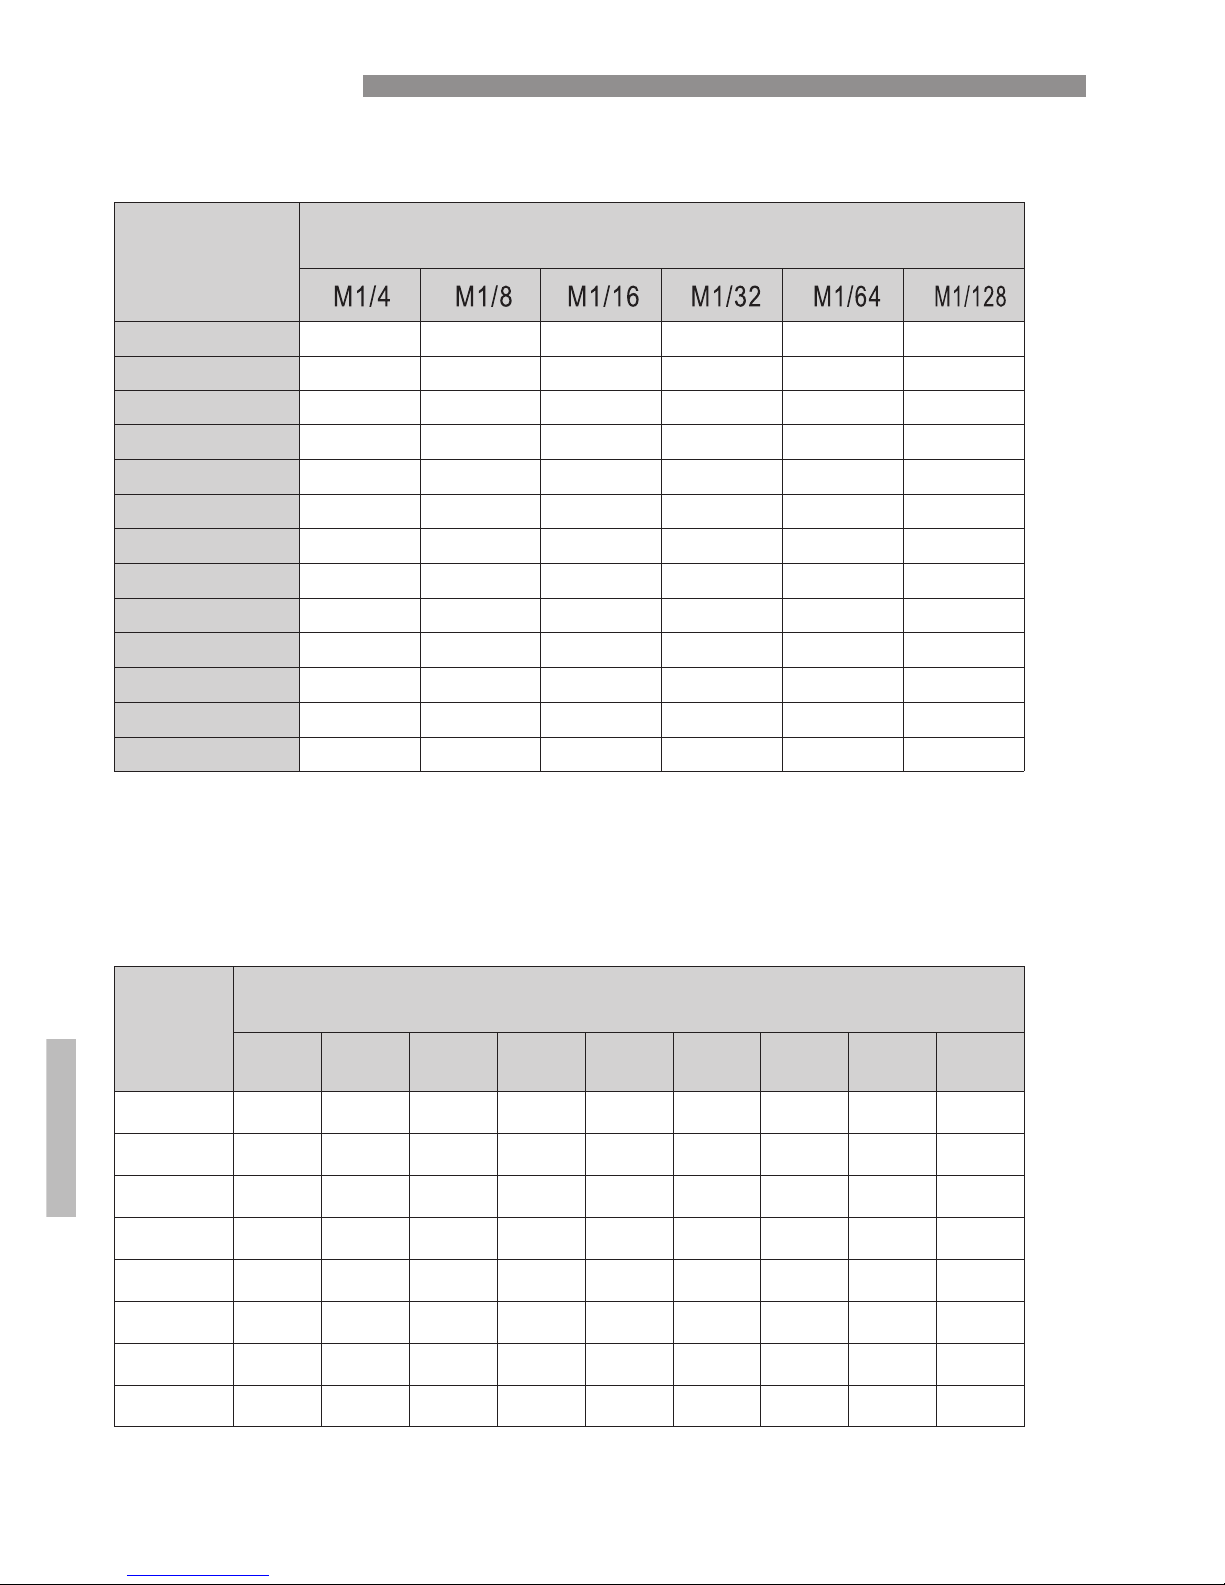
Appendix
Flash Coverage (mm)
Flash
Output
56.3
39.8
28.2
19.9
14.1
10.0
7.1
5.0
60.0
42.0
30.0
21.0
15.0
10.5
7.5
5.2
50.0
35.4
25.0
17.7
12.5
8.9
6.3
4.5
47.2
33.4
23.6
16.7
11.7
8.4
5.9
4.2
43.0
30.4
21.5
15.2
10.8
7.6
5.4
3.8
37.7
26.7
18.9
13.4
9.5
6.7
4.8
3.4
33.5
23.7
16.8
11.9
8.4
6.0
4.2
3.0
30.5
21.6
15.3
10.8
7.7
5.4
3.9
2.7
26.6
18.8
13.3
9.4
6.7
4.7
3.4
2.4
1/1
1/2
1/4
1/8
1/16
1/32
1/64
1/128
24 28 35 50 70 85 105 135 200
When the number of the flashes is displayed as “---”(bar display) in the
LCD, the maximum number of flashes is as shown in this table.
Flash Output
1Hz
2Hz
3Hz
4Hz
5Hz
6-7Hz
8-9Hz
10Hz
11Hz
12-14Hz
15-19Hz
20-50Hz
60-199Hz
7
6
5
4
4
3
3
2
2
2
2
2
2
14
14
12
10
8
6
5
4
4
4
4
4
4
30
30
30
20
20
20
10
8
8
8
8
8
8
60
60
60
50
50
40
30
20
20
20
18
16
12
90
90
90
80
80
70
60
50
40
40
35
30
20
100
100
100
100
100
90
80
70
70
60
50
40
40
Frequency
Guide No.: (ISO 100, in meters )
Maximum number of flash firings in RPT mode
34
Page 36
Specifications
TTL/M/RPT
5600K
On-camera, E-TTL II speedlight
Approximately 60m/200' (at 200mm zoom / ISO100)
24 to 200mm (18mm when using wide panel )
● Manual zoom ● Automatic
90° Up, 7° Down, 90° Left, 180° Right
F1 / F2
LCD display
White
Fires with camera or speedlight button
3.0 EV to +3.0 EV in increments of
1/3 EV steps
1/128 to 1/1 power (1/3 steps increments)
Raster pattern
Normal Flash mode : Approx. 0.15~3 seconds with Ni-MH cells
Quick Flash mode (C.Fn06): Approx. 0.1~2 seconds with Ni-MH cells
via USB mini-B 5-pin connection
Supports Custom menu in-camera and via speedlight Utility menu
Supports on-camera mode
(auto standby after 90 sec. nonuse)
1-199Hz
1/800~1/20,000 sec.
Front-curtain sync, Rear-curtain sync, and HSS
high-speed sync up to 1/8,000 second
Approx. 7 3/4" x 3 1/16" x 2 5/16" /
196.8 mm x 77.8 mm x 58.7 mm
Approx. 15 oz / 425 g (speedlight only)
Support
Support via H.V. port
Support
Type
Guide No.
Flash coverage
Bounce angle
Flash modes
Optic slave modes
Display type
Button backlight
Color temperature
Modeling flash
Flash exposure
compensation
Manual flash
AF assist
beam emitter
Recycle time
Firmware update
Custom functions
Standby function
Repeating Flash
Flash duration
range
Camera's sync
modes
FE lock
External power
Dimensions
Weight
PC terminal
Radio wireless
slave mode
● System type: Digital FSK 2.4GHz wireless
● Distance: 100 m / 325'.
● Channels: Auto + CH 1-15
● Groups: 5 groups (A/B/C/D/E), up to 15 units in a group.
35
 Loading...