

Page 1

English: 2 I Español: 18
Cordless Screwdriver 4.8V
User’s Manual
Model No.: PRO-SD480
Page 2
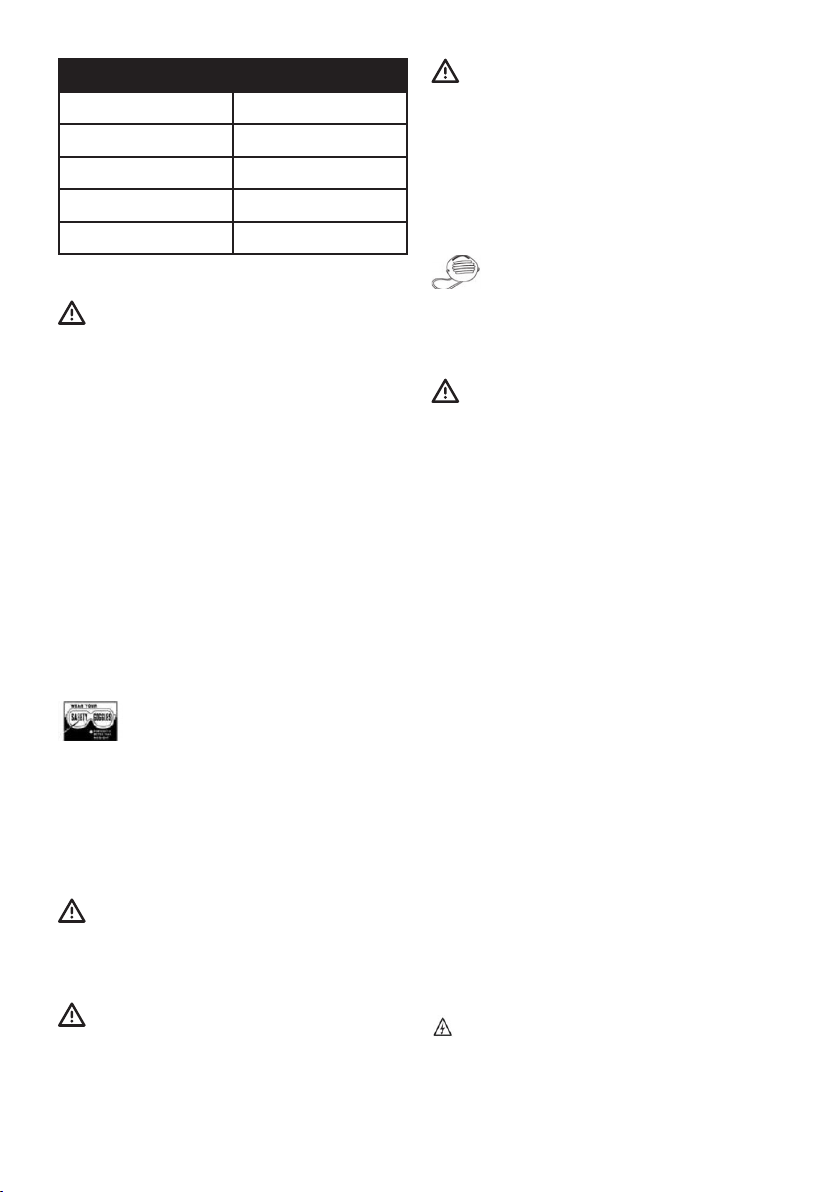
Technical Specications
Battery Ni-Cd
Voltage 4.8V Ni-Cd
Speed 220rpm
Weight 1.01Lbs
Max Torque 3Nm
WARNING: Before using this
tool or any of its accessories,
read this manual and follow all
Safety Rules and Operating
Instructions. The important
precautions, safeguards and
instructions appearing in this
manual are not meant to cover all
possible situations. It must be
understood that common sense
and caution are factors which
cannot be built into the product.
EYE, EAR & LUNG PROTECTION
ALWAYS WEAR EYE
PROTECTION THAT
CONFORMS WITH CSA REQUIREMENTS
or ANSI SAFETY STANDARD Z87.1.
FLYING DEBRIS can cause
permanent eye damage.
. Prescription eyeglasses ARE
NOT a replacement for proper eye
protection.
WARNING: Use hearing
protection, particularly during
extended periods of operation of the
tool, or if the operation is noisy.
GENERAL SAFETY WARNINGS
WEAR A DUST MASK THAT
IS DESIGNED TO BE USED
WHEN OPERATING A POWER
TOOL IN A DUSTY ENVIRONMENT.
WARNING: Dust that is created
by power sanding, sawing, grinding,
drilling, and other construction
activities may contain chemicals
that are known to cause cancer,
birth defects, or other genetic
abnormalities. These chemicals
include:
Lead from lead-based paints.
Crystalline silica from bricks, cement,
and other masonry products Arsenic
and chromium from chemically treated
lumber.
The level of risk from exposure to these
chemicals varies, according to how
often this type of work is performed.
In order to reduce exposure to these
chemicals, work in a well-ventilated
area, and use approved safety
equipment, such as a dust mask that
is specically designed to lter out
microscopic particles.
WARNING: Non-compliant
eyewear can cause serious injury if
broken during the operation of a
power tool.
WARNING: To avoid electrical
hazards, re hazards or damage
to the power tool, use proper
circuit protection.
2
Page 3

This tool is wired at the factory
for 120V AC operation. It must
be connected to a 120V AC, 15 A
circuit that is protected by a timedelayed fuse or circuit breaker. To
avoid shock or re, replace power
cord immediately if it is worn, cut or
damaged in any way.
POWER TOOL SAFETY
WARNING: Read all safety
warnings and instructions. Failure
to follow the warnings and
instructions may result in electric
shock, re and/or serious injury.
Save all warnings and instructions
for future reference.
outlet. Never modify the plug in
any way. Do not use any adapter
plugs with earthed (grounded)
power tools. Unmodied plugs and
matching outlets will reduce risk of
electric shock.
Avoid body contact with earthed
or grounded surfaces such as
pipes, radiators, ranges and
refrigerators. There is an increased
risk of electric shock if your body is
earthed or grounded.
Do not expose power tools to rain
or wet conditions. Water entering
a power tool will increase the risk of
electric shock.
Work area safety
Keep work area clean and well
lit. Cluttered or dark areas invite
accidents.
Do not operate power tools in
explosive atmospheres, such
as in the presence of ammable
liquids, gases or dust. Power tools
create sparks which may ignite the
dust or fumes.
Keep children and bystanders
away while operating a power
tool. Distractions can cause you to
lose control.
Electrical safety
Power tool plugs must match the
Do not abuse the cord. Never use
the cord for carrying, pulling or
unplugging the power tool. Keep
cord away from heat, oil, sharp
edges or moving parts. Damaged
or entangled cords increase the risk
of electric shock.
When operating a power tool
outdoors, use an extension cord
suitable for outdoor use. Use
of a cord suitable for outdoor use
reduces the risk of electric.
If operating a power tool in a
damp location is unavoidable, use
a residual current device (RCD)
protected supply. Use of a ground
fault circuit interrupter (GFCI)
reduces the risk of electric shock.
3
Page 4

Personal safety
Stay alert, watch what you are
doing and use common sense
when operating a power tool. Do
not use a power tool while you
are tired or under the inuence
of drugs, alcohol or medication.
A moment of inattention while
operating power tools may result in
serious personal injury.
Use personal protective
equipment. Always wear eye
protection. Protective equipment
such as dust mask, non-skid safety
shoes, hard hat, or hearing protection
used for appropriate conditions will
reduce personal injuries.
enables better control of the power
tool in unexpected situations.
Dress properly. Do not wear loose
clothing or jewellery. Keep your
hair, clothing and gloves away
from moving parts. Loose clothes,
jewellery or long hair can be caught
in moving parts.
If devices are provided for the
connection of dust extraction and
collection facilities, ensure these
are connected and properly used.
Use of dust collection can reduce
dust- related hazards.
Power tool use and care
Prevent unintentional starting.
Ensure the switch is in the offposition before connecting to
power source and/or battery
pack, picking up or carrying the
tool.Carrying power tools with your
nger on the switch or energizing
power tools that have the switch on
invites accidents.
Remove any adjusting key or
wrench before turning the power
tool on. A wrench or a key left
attached to a rotating part of the
power tool may result in personal
injury.
Do not overreach. Keep proper
footing and balance at all times. This
Do not force the power tool. Use
the correct power tool for your
application. The correct power tool
will do the job better and safer at the
rate for which it was designed.
Do not use the power tool if the
switch does not turn it on and
off. Any power tool that cannot
be controlled with the switch is
dangerous and must be repaired.
Disconnect the plug from the
power source and/or the battery
pack from the power tool before
making any adjustments,
changing accessories, or storing
power tools. Such preventive
safety measures reduce the risk of
starting the power tool accidentally.
4
Page 5
Store idle power tools out of
the reach of children and do not
allow persons unfamiliar with the
power tool or these instructions
to operate the power tool. Power
tools are dangerous in the hands of
untrained users.
Maintain power tools. Check
for misalignment or binding of
moving parts, breakage of parts
and any other condition that may
affect the power tool’s operation.
If damaged, have the power
tool repaired before use. Many
accidents are caused by poorly
maintained power tools.
Keep cutting tools sharp and
clean. Properly maintained cutting
tools with sharp cutting edges are
less likely to bind and are easier to
control.
Use the power tool, accessories
and tool bits etc. in accordance
with these instructions, taking into
account the working conditions and
the work to be performed. Use of the
power tool for operations different
from those intended could result in
a hazardous situation.
Hold power tools by insulated
gripping surfaces when performing
an operation where the cutting tool
may contact hidden wiring or its own
cord. Contact with a “live” wire will
make exposed metal parts of the tool
“live” and could give the operator an
electric shock.
Service
Have your power tool serviced by
a qualied repair person using
only identical replacement parts.
This will ensure that the safety of the
power tool is maintained.
SPECIFIC SAFETY RULES
WARNING: Know your
cordless screwdriver. Do not plug
in the charger until you have read
and understand this Instruction
Manual. Learn the tool’s
applications and limitations, as
well as the specic potential
hazards related to this tool.
Following this rule will reduce the
risk of electric shock, re, or serious
injury.
Always wear eye protection.
Any power tool can throw
foreign objects into your eyes and
cause permanent eye damage.
ALWAYS wear safety goggles (not
glasses) that comply with ANSI
safety standard 287.1. Everyday
glasses have only impact resistant
lenses. They ARE NOT safety
glasses.
WARNING: Glasses or goggles
not in compliance with ANSI Z87.1
could cause serious injury when
5
Page 6

they break.
Always check to make sure the area
where screws are being driven or
where holes are being drilled does
not have any hidden wiring. Contact
with a “live” wire will make exposed
metal parts of the tool “live” and
could result in an electric shock to
the operator.
Do not drive screws or break into
existing walls or other blind areas
where electrical wiring may exist. If
this situation is unavoidable, remove
all fuses or disconnect all breakers
feeding the work area.
Secure the workpiece in a vice or
with clamps. Never hold it in your
hand or across your legs. The
rotating action of the driver may
cause the bit to come loose from the
screw and cause injury.
Never carry the cordless driver with
your nger on the switch. The tool
is always in an “ON” condition when
the battery is charged.
Never hold the body of the cordless
driver near the switch while
changing bits. Accidentally touching
the switch may start the tool and
possibly cause an injury.
screwdriver bit that will properly t
into the head of the screw.
Do not use worn or damaged
screwdriver bits. Worn or damaged
screwdriver bits will not drive the
screw properly and may jump out
of the screw head, causing possible
injury and damage to the workpiece.
BATTERY AND CHARGER
SAFETY
WARNING: Only use the charger
supplied with this kit to charge the
battery. Charging any other batteries
may damage the charger and possibly
cause serious injury.
The battery pack for this driver is
contained within the main housing
of the tool. Never attempt to open
the battery housing for any reason.
If the battery housing breaks or
cracks, immediately discontinue use
and do not recharge.
Do not charge the battery if the
battery housing is wet or shows any
evidence of corrosion.
A small leakage from the battery
may occur under extreme usage,
charging or temperature conditions.
Always use the correct shape of
screwdriver bit that matches the
head of the screw.
Always use the largest size
This does not indicate a failure.
However, if the outer seal is broken
and this leakage gets on your skin,
follow these steps:
6
Page 7

1. Wash immediately with soap
and water.
2. If liquid gets into your eyes,
ush immediately with clean water
for a minimum of 10 minutes and
seek medical attention.
NOTE: The battery liquid is slightly
acidic.
Do not incinerate the battery. It can
explode in a re.
Do not operate the charger if it
has received a sharp blow, been
dropped or otherwise damaged in
any way. Have a qualied technician
examine the charger and repair it if
necessary. Do not disassemble the
charger.
Do NOT charge the batteries
when the work area or the battery
temperature is at or below 32° F (0°
C) or above 113° F (45° C).
Do not use an extension cord. Plug
the charger cord directly into an
electrical outlet.
Use the charger only in a standard
120V, 60 Hz electrical outlet.
Do not use the charger in wet or
damp conditions. It is intended for
indoor use only. Do not use the
charger near sinks or tubs. Do not
immerse the charger in water.
Do not allow the cord to hang over
the edge of a table or counter or
touch hot surfaces. The charger
should be placed away from sinks
and hot surfaces.
Do not use the charger to charge
any batteries other than this 3.6V
cordless screwdriver. Other batteries
may explode.
Do not operate the charger if the
cord or plug is damaged. Replace
the damaged cord and plug
immediately.
Unplug the charger when not in use
and before cleaning or maintenance.
Battery Pack Recycling
To preserve our natural resources,
please recycle or dispose of
batteries properly.
The batteries charged by this charger
may contain chemicals and metals
that are harmful to the environment.
Never dispose of re¬chargeable
batteries in your normal household
garbage or in landll sites.
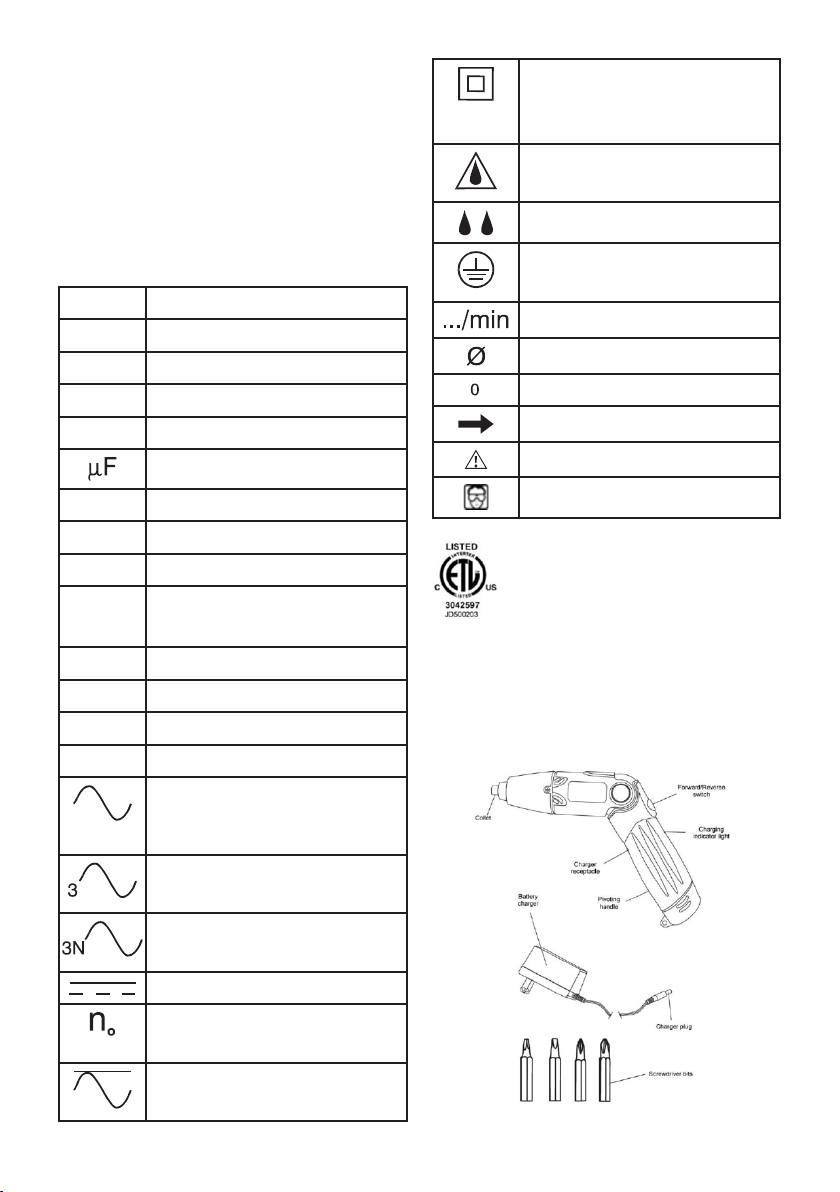
Symbols
WARNING: ASome of the following
symbols may appear on the
screwdriver. Study these symbols
and learn their meaning. Proper
interpretation of these symbols will
allow for more efcient and safer
7
Page 8
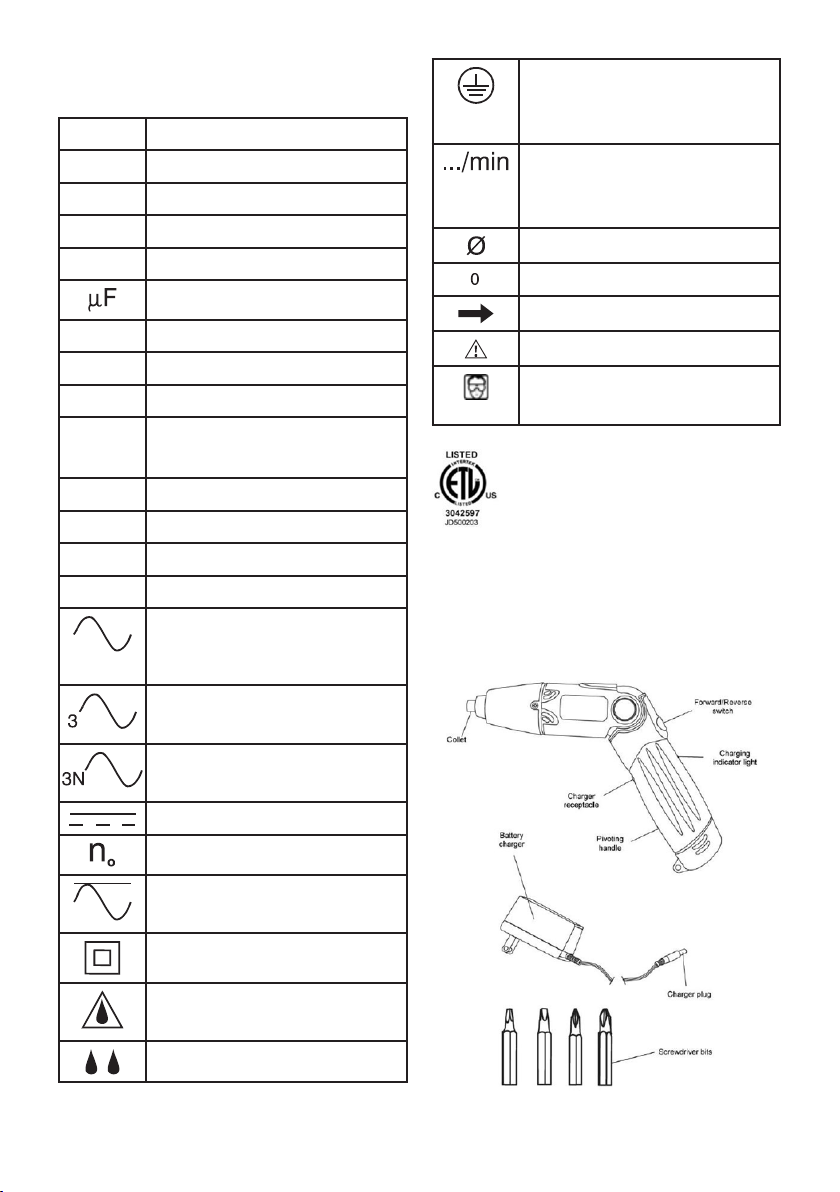
operation of this tool.
V Volts
A Amperes
Hz Hertz
W Watts
kW Kilowatts
Microfarads
L Liters
kg Kilograms
H Hours
N/cm2 Newtons per square
centimeter
Pa Pascals
OPM Oscillations per minute
Min Minutes
S Seconds
Protective grounding
at grounding terminal,
Class I tools
Revolutions or
reciprocations per
minute
Diameter
Off position
Arrow
Warning symbol
Wear your safety
glasses
This symbol designates that
this tool is listed with U.S. and
Canadian requirements by
Underwriters Laboratories.
Conforms to UL Std. 60745-1
and 60745-2-2.
C, A.
Alternating current
Three-phase alternating
current
Three-phase alternating
current with neutral
Direct current
No load speed
Alternating or direct
current
Class II construction
Splash-proof construction
Watertight construction
KNOW YOUR SCREWDRIVER
8
Page 9
ASSEMBLY AND OPERATING
INSTALLING SCREWDRIVER
BITS
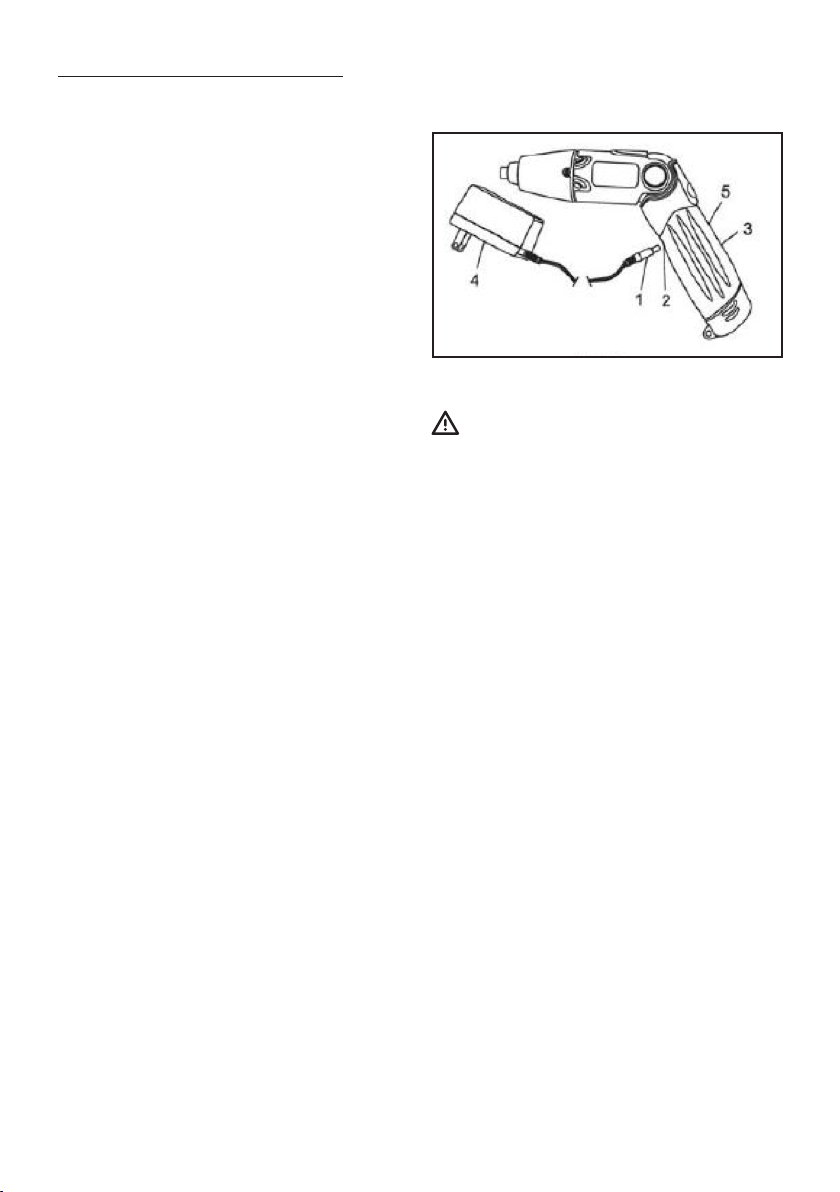
CHARGING THE BATTERY
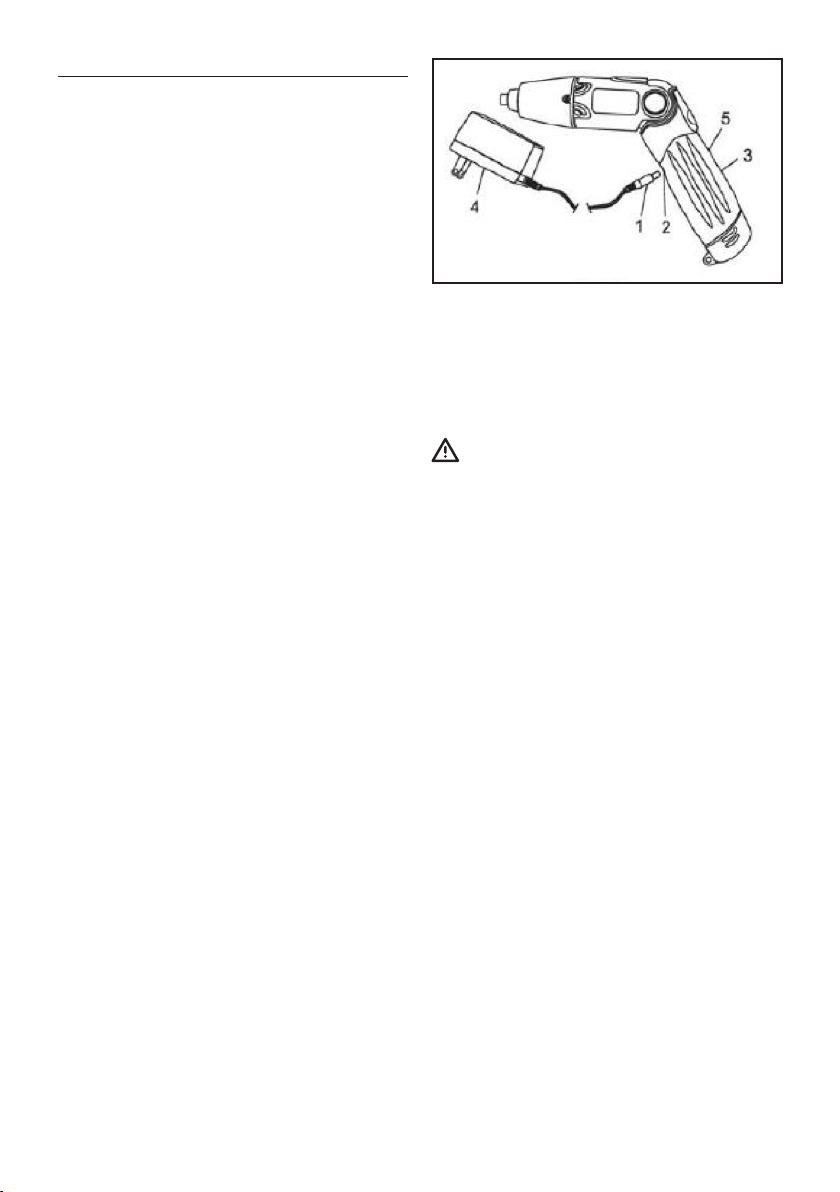
1. Place the cordless
screwdriver near a 120 V, 60 Hz
electrical outlet.
2. Insert the battery charger
plug (1) into the charger receptacle
(2) In the handle of the cordless
screwdriver (3) (Fig. 1).
cordless screwdriver near the
3. Plug the battery charger (4)
into a 120 V 60 Hz wall receptacle.
switch while changing
screwdriver bits. Accidentally
touching the switch may start the
NOTES:
tool and possibly cause an injury.
a) The red indicator light (5) in
the handle will turn ON, indicating a
positive connection with the charger.
b) The red indicator light will
remain ON until the charger is
disconnected.
c) A new battery or one that
is completely run down should be
charged for 5 hours. After normal
use, a battery should be fully
charged in about 3 hours or more.
1. Select an appropriate
screwdriver bit that ts the head of
the screw being driven.
NOTES:
a) Use the largest size
screwdriver bit that will properly t
the screw head.
b) Make sure the screwdriver
bit is in good condition and is neither
damaged nor worn.
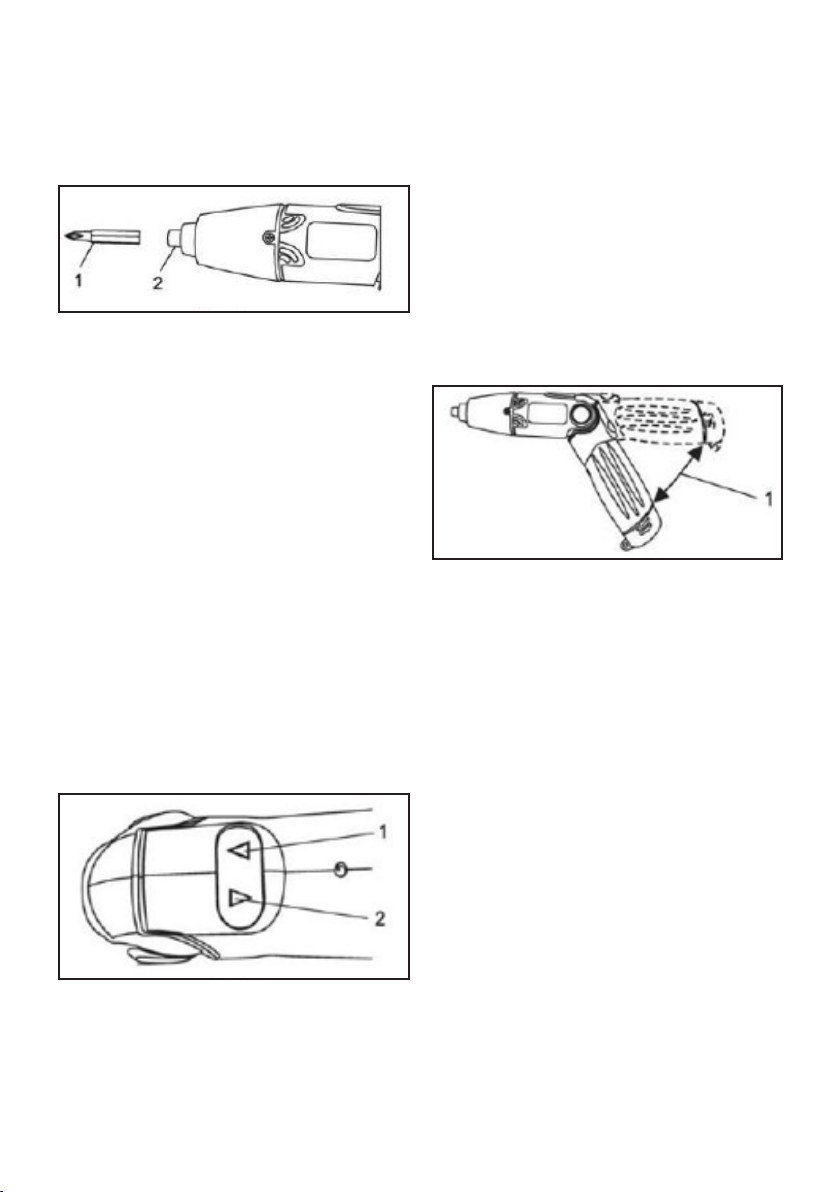
2. Insert the screwdriver bit (1)
d) If the battery does not charge
properly, check to make sure the
fully into the screwdriver collet (2)
(Fig. 2).
electrical outlet is “live” and that the
temperature range in the work area
is between 10^t0°C (50-104°F).
NOTE: Make sure the screwdriver
bit is fully inserted into the collet.
Fig.1
Never hold the body of the
9
Page 10
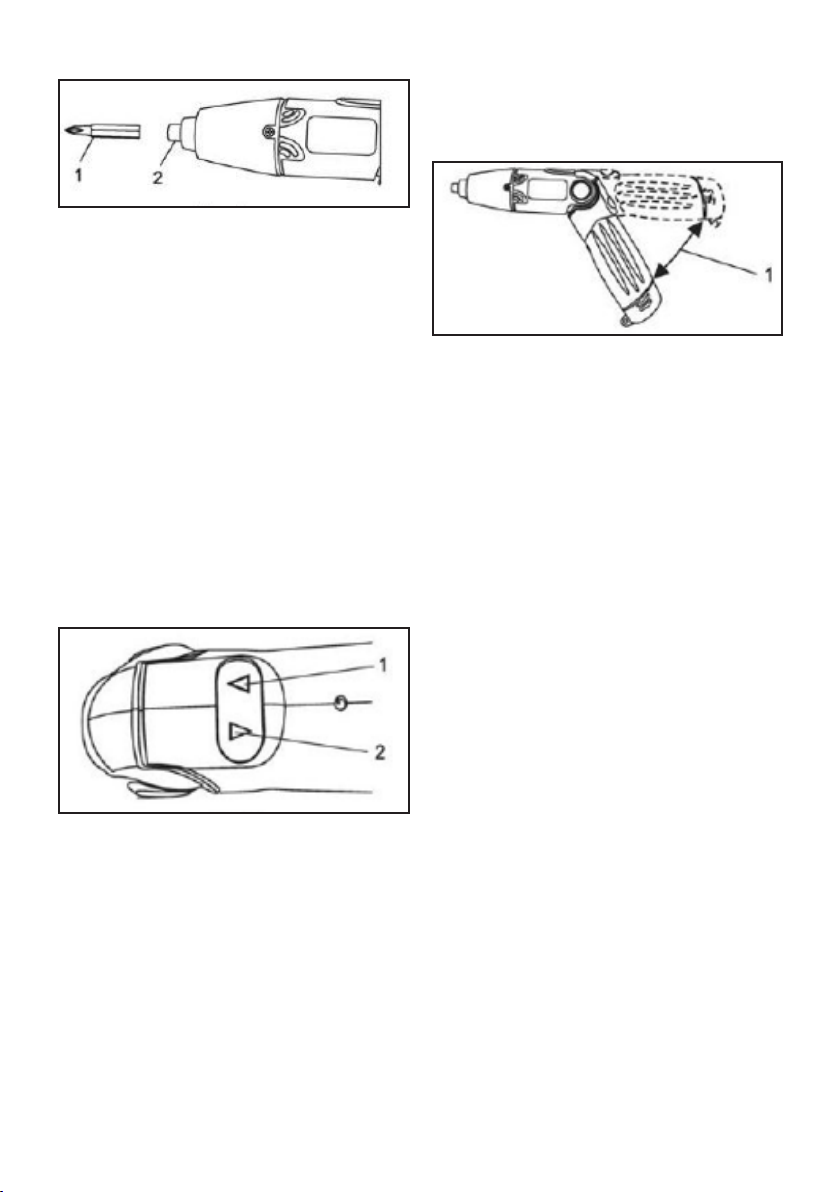
Fig.2
FORWARD/REVERSE SWITCH
The cordless screwdriver is
equipped with a convenient switch
that functions as both an ON/OFF
switch and FORWARD/REVERSE
switch.
1. To drive screws, press the
right hand side of the switch (1) (Fig.
3). To turn the switch OFF, release
the switch.
2. To remove screws, press the
left hand side of the switch (2).
To pivot the handle, simply “bend” the
tool in the middle to the appropriate
angle (1) (Fig. 4)
Fig.4
PREPARING SCREW HOLES
It is important to prepare screw
holes before attempting to fasten
two pieces of wood together. Proper
preparation will make screws drive
easier and prevent misaligned
components, stripped screw heads,
splitting and separating of wood
components.
Fig.3
PIVOTING HANDLE
The handle of the cordless
screwdriver is designed to pivot to
various angles. This feature allows
you to congure the tool for easier
access in hard to reach locations. It
also makes it easier to apply extra
torque in manual mode.
1. Clamp components that
are to be screwed together in their
desired position (Fig. 5).
2. Drill a pilot hole (1) through
the outer piece (2) and into the inner
piece (3). Drill hole 2/3 the diameter
of the smooth portion of the screw
shank.
NOTE: If the wood is soft, drill the
hole 2/3 the length of the screw. If
the wood is hard, drill the hole the
full length of the screw.
3. Remove the clamp from the
two pieces to be screwed together.
4. Enlarge the hole (1) in the
outer piece (2) so that it is the same
10
Page 11
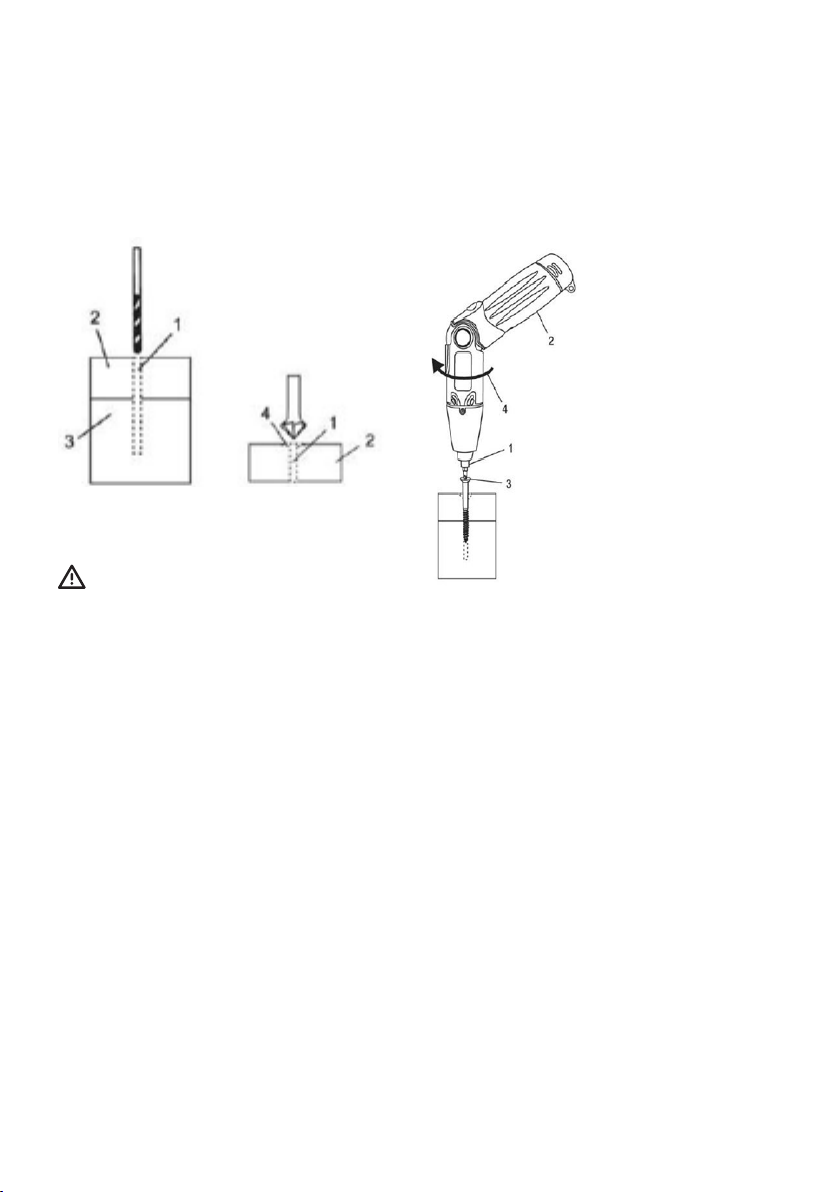
size as the smooth portion of the
screw shank (Fig. 6).
5. If using a at head screw, counter-
sink the hole (4) so the head of the
screw will be ush with the surface
when fully driven into place.
Fig.5 Fig.6
WARNING
For safety reasons, the operator
must read the sections of
this Owner’s Manual entitled
“GENERAL SAFETY WARNINGS”,
“POWER TOOL SAFETY”,
“SPECIFIC SAFETY RULES”,
“BATTERY AND CHARGER
SAFETY” and “SYMBOLS” before
using this screwdriver.
Verify the following every time
the screwdriver is used:
1. Screwdriver bit is the
correct type & size, not worn and
not damaged in any way.
2. Workpiece is properly
secured.
3. Safety glasses are being
worn.
Failure to observe these safety
rules will signicantly increase
the risk of injury.
DRIVING SCREWS
When driving
screws, care must
be taken to use the
bit that correctly ts
the head of the
screw being driven.
Make sure you use
the largest bit size
that will properly t
into the head of the
screw. The bits must
also be in good
condition and not
Fig.7
worn so they will
drive screws without
slipping out of the screw head.
1. Select the correct
screwdriver bit for the screw being
driven.
2. Insert the bit fully into the
screwdriver collet (1) (Fig. 7).
3. Pivot handle to a comfortable
position (2).
While holding the screwdriver rmly
against the screw, press the right
hand side of the switch to start the
screwdriver and drive the screw.
When the screw is driven as far as
possible, release the switch and the
screwdriver will stop.
When the switch is released and
the screwdriver stops turning, the
spindle will automatically lock.
11
Page 12
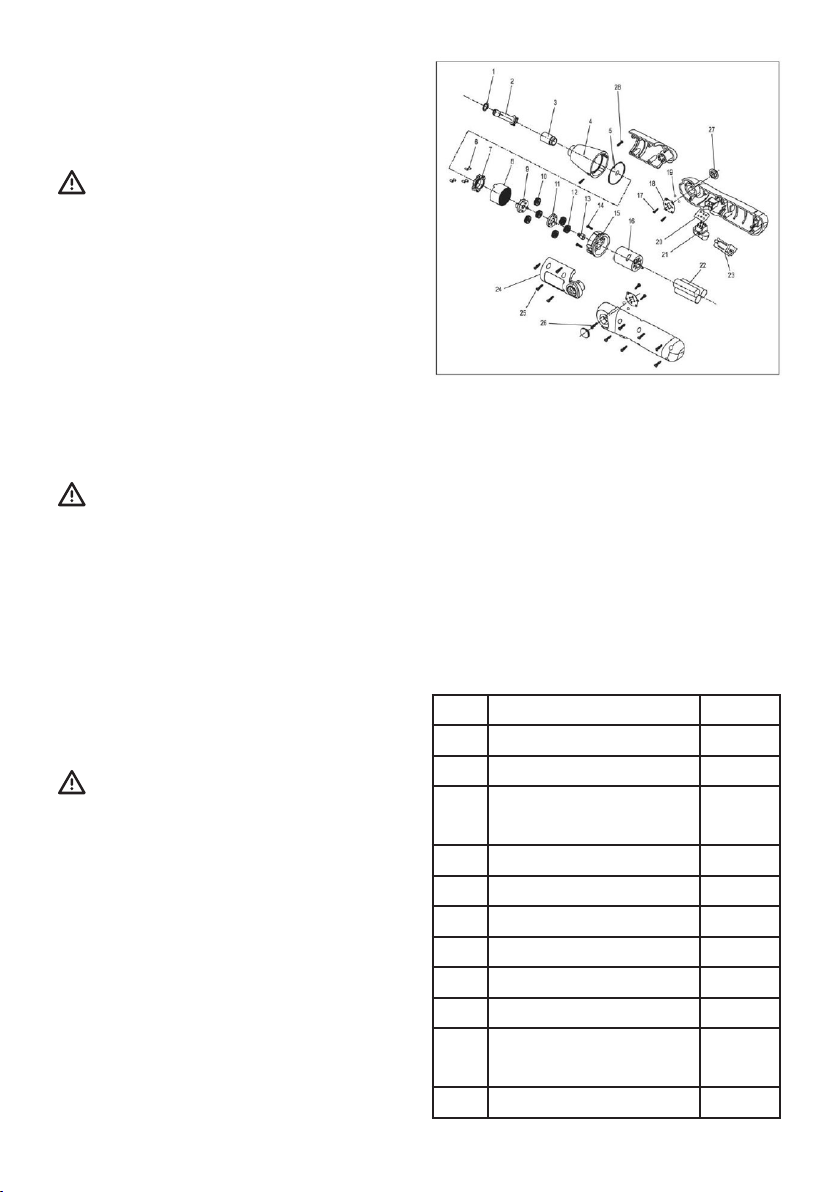
Fully tighten the screw by manually
rotating the screwdriver handle in a
clockwise direction (4).
MAINTENANCE
WARNING: When servicing, use
only identical replacement parts.
The use of any other part may create
a hazard or cause product damage.
DO NOT use solvents when
cleaning plastic parts. Plastics are
susceptible to damage from various
types of commercial solvents and
may be damaged by their use. Use
a clean cloth to remove dirt, dust,
oil, grease etc.
WARNING: Do not allow brake
uids, gasoline, petroleum-based
products, penetrating oils, etc. to
come into contact with plastic
parts. They contain chemicals
that can damage, weaken or
destroy plastic.
DO NOT abuse power tools. Abusive
practices can damage the tool and
the workpiece.
WARNING: DO NOT attempt to
modify tools or create
accessories. Any such alteration
or modication is misuse and
could result in a hazardous
condition leading to possible
serious injury. It will also void the
warranty.A WARNING: DO NOT
attempt to modify tools or create
accessories. Any such alteration
or modication is misuse and
could result in a hazardous
condition leading to possible
serious injury. It will also void the
warranty.
LUBRICATION
All of the bearings in this tool are
lubricated with a sufcient amount
of high-grade lubricant for the life
of the unit under normal conditions.
Therefore, no further lubrication is
required.
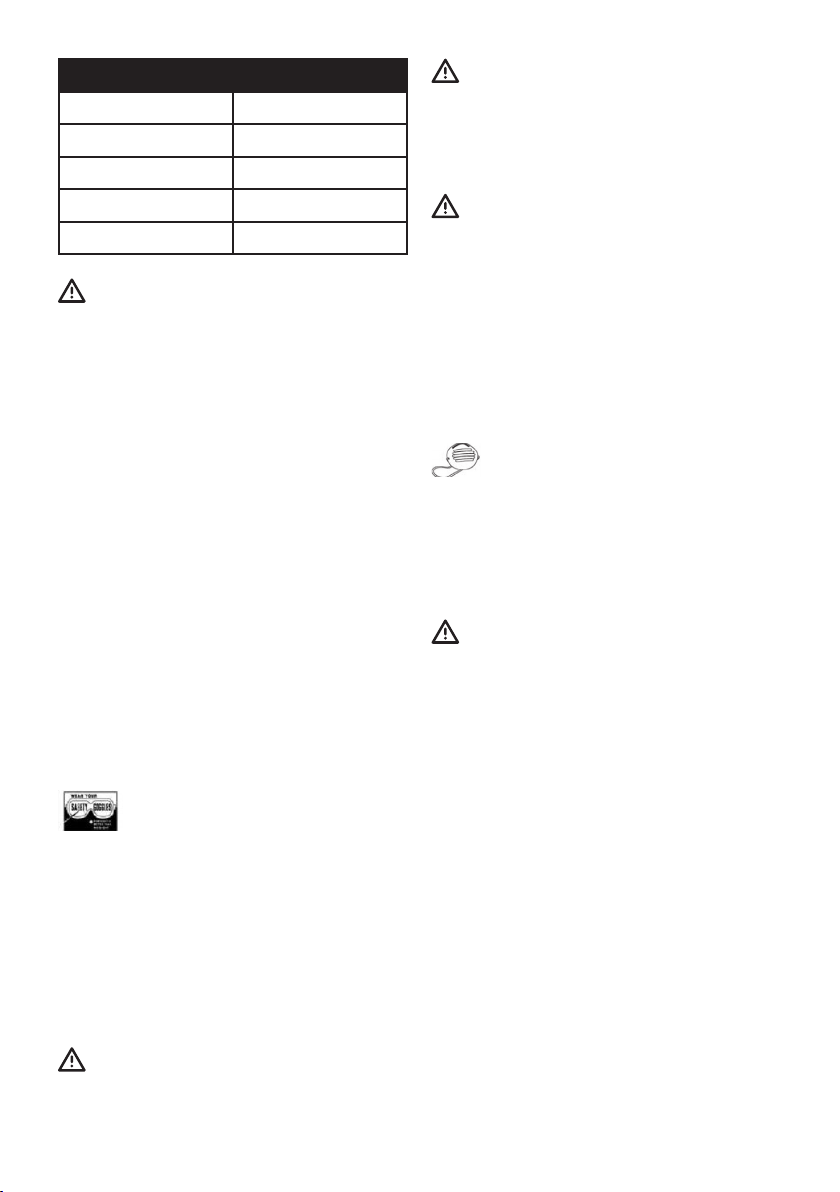
EXPLODED VIEW
PARTS LIST
WARNING: When servicing, use
only original equipment replacement
parts. The use of any other parts
may create a safety hazard or cause
damage to the screwdriver.
Any attempt to repair or replace
electrical parts on this screwdriver
may create a safety hazard unless
repairs are performed by a qualied
technician.
# Part Name Qty.
1 Retaining ring 1
2 Output shaft 1
3 Self lubricating bear-
ing
4 Gear housing 1
5 Clamping plate 1
6 Pin 6
7 Positioning ring 1
8 Rinq qear 1
9 Driving block 1
10 Powdered metal plan-
etary qear
11 Planetary carrier 1
1
3
12
Page 13

12 Plastic planetary gear 3
13 Motor gear 1
14 Screw M2.5X4.5 3
15 Motor mounting ange 1
16 Motor 1
17 Screw ST2.5X8 2
18 Connecting plate 2
19 Ball 4
20 PCB for switch 1
21 Switch 1
22 Battery pack 1
23 Charging PCB 1
24 Enclosure 1
25 Screw ST2.9X16 9
26 Screw ST2.9X25 4
27 Decoration button 1
28 Screw ST2.5X8 2
WARRANTY
1. PROMAKER®, through its PX2
warranty for power tools, has the
following characteristics:
• It covers the products for 2 years
from the date of purchase against
any defect in its operation, for
faults in the materials or labor
used in its manufacture.
• Provides 2 years of free
maintenance service and labor
for replacement of consumables.
• Provides a trial period of
2 months where you can
exchange the tool for a higher
capacity one if the original does
not meet your requirement, by
paying the difference in price.
• All the attributes offered by the
warranty are valid presenting
the original purchase invoice.
contact the present the warranty
card and the original invoice for the
warranty service.
3. This Warranty DOES NOT
applies for:
• Transportation damages after sales.
• Services not provided by our
authorized service centers.
• Accessories and spare parts, if
any, provided in the package.
• Damage resulted from commercial
or industrial use, as this product is
intended for DIY use only.
•
•
EC DECLARATION OF
CONFORMITY
We hereby declare that the machine
described below complies with the
relevant basic safety Directives, both
in its basic design and construction
as well as in the version put into
circulation by us. This declaration
shall cease to be valid if the
machine is modied without our
prior approval.
Product: Cordless Screwdriver 4.8V
Type: PRO-SD480
2. For warranty service, please
13
Page 14

NOTES
Page 15

NOTES
Page 16

www.promakertools.com
Page 17

Destornillador Inalámbrico 4.8V
Manual del Usuario
Modelo No.: PRO-SD480
Page 18
Especicaciones Técnicas
Batería Ni-Cd
Voltaje 4.8V Ni-Cd
Gafas inadecuadas pueden
causar lesiones graves si se rompen
durante el funcionamiento de una
herramienta eléctrica.
Velocidad 220rpm
Peso 0.46kg
Torque Máximo 3Nm
ADVERTENCIA: Use Protección
Auditiva, particularmente durante
períodos entendidos de operación
ADVERTENCIA: Antes de
utilizar esta herramienta o
de la herramienta, o si la operación
es ruidosa.
cualquiera de sus accesorios, lea
este manual y siga todas las
Reglas de Seguridad e
ADVERTENCIAS GENERALES
DE SEGURIDAD
Instrucciones de Funcionamiento.
Las precauciones, protecciones
e instrucciones importantes que
aparecen en este manual no
tienen por objeto cubrir todos los
riesgos posibles. Debe
entenderse que el sentido común
USE UNA MÁSCARA
CONTRA-POLVO DISEÑADA
ESPECIFICAMENTE PARA
USARSE AL OPERAR UNA
HERRAMIENTA ELECTRICA EN
UN AMBIENTE POLVORIENTO.
y la precaución son factores que
no pueden ser incorporados en el
producto.
ADVERTENCIA: El polvo que se
crea mediante lijado, aserrado,
molido, taladrado y otras actividades
PROTECCION DE OJOS, OIDOS Y
PULMONES
de construcción, pueden contener
sustancias químicas, que se sabe,
causan cáncer, defectos de
SIEMPRE USE PROTECCIÓN
OCULAR EN CONFORMIDAD
CON LOS REQUERIMIENTOS
CSA y ESTANDARES DE
SEGURIDAD ANSI Z87.1
RESIDUOS VOLADORES
nacimiento u otras anomalías
genéticas. Estos productos incluyen:
Plomo proveniente de pinturas.
Sílice cristalina de ladrillos, cemento
y otros productos de albañilería.
Arsénico y Cromo de la madera
tratada químicamente.
pueden causar daños oculares
permanentes. La prescripción de:
El nivel de riesgo de la exposición
a estos productos químicos varía
Gafas de Seguridad no es
suciente para su propia protección.
según la frecuencia con la que
se realiza este tipo de trabajo.
Para reducir la exposición a estos
18
Page 19

productos químicos, trabaje en
un área bien ventilada y utilice un
de trabajo desordenadas u oscuras
invitan a accidentes.
equipo de seguridad aprobado,
así como una máscara de polvo
diseñada especícamente para
ltrar partículas microscópicas.
No utilice herramientas eléctricas
en atmósferas explosivas, como
tampoco en presencia de líquidos
inamables, gases ni polvo.
ADVERTENCIA: Para evitar
riesgos eléctricos, riesgos de
incendio o daños en la
Las herramientas eléctricas crean
chispas que pueden encender
polvos o vapores.
herramienta, use la Protección de
Circuito adecuada.
Mantenga alejados a los niños
y transeúntes mientras maneja
Esta herramienta está cableada en
fábrica para el funcionamiento de
CA a 120V. Debe estar conectado
una herramienta eléctrica. Las
distracciones pueden ocasionar que
usted pierda el control.
a un circuito de CA de 120V,
15ª que esté protegido por un
Seguridad Eléctrica.
fusible de acción retardado por un
disyuntor de circuito. Para evitar
descargas eléctricas o incendio,
reemplace el cable de alimentación
inmediatamente, si está desgastado,
cortado o dañado de alguna manera.
SEGURIDAD CON HERRAMIENTAS
ELÉCTRICAS
ADVERTENCIA: Lea todas las
Advertencias e Instrucciones de
Los enchufes de la herramienta
eléctrica deben coincidir con el
tomacorriente. Nunca modique
el enchufe de ninguna manera.
No utilice enchufes adaptadores
con herramientas eléctricas
conectadas a tierra. Los enchufes
no modicados y los tomacorrientes
coincidentes reducirán el riesgo de
descarga eléctrica.
Seguridad. El no seguir las
Advertencias e Instrucciones puede
causar descargas eléctricas,
incendio y/o lesiones personales
graves.
Evite el contacto corporal con
supercies conectadas a tierra,
tales como tuberías, radiadores,
estufas y refrigeradores. existe un
mayor riesgo de descarga eléctrica
Guarde todas las Advertencias
si su cuerpo esta conectado a tierra.
e Instrucciones para futura
referencia.
Seguridad en el área de trabajo.
No exponga las herramientas
eléctricas a la lluvia o a
condiciones húmedas. El agua
Mantenga el área de trabajo
limpia y bien iluminada. Las áreas
que entra en una herramienta
19
Page 20

eléctrica aumentará el riesgo de
descarga eléctrica.
No abuse del cable. Nunca use
el cable para transportar, tirar
o desenchufar la herramienta
eléctrica. Mantenga el cable
alejado del calor, aceite, bordes
alados o partes móviles. Los
cables dañados o enredados
aumentan el riesgo de descarga
eléctrica.
al operar herramientas eléctricas
puede resultar en lesiones
personales graves.
Equipo de protección personal.
Siempre utilice protección ocular.
Equipos de protección, tales como,
mascarilla anti polvo, zapatos de
seguridad antideslizantes, casco
duro o protección auditiva, utilizados
en forma adecuada, reducirá el
riesgo de lesiones personales.
Cuando utilice una herramienta
eléctrica al aire libre, utilice un
cable de extensión adecuado
para uso en exteriores. El uso
de un cable adecuado para uso
en exteriores reduce el riesgo de
choque eléctrico.
Si el funcionamiento de una
herramienta eléctrica en una
ubicación húmeda es inevitable,
utilice un suministro protegido de
Dispositivo de Corriente Residual
(DCR). El uso de un Interruptor
de Circuito de Falla a Tierra (CFT)
reduce el riesgo de descarga
eléctrica.
Seguridad Personal.
Manténgase alerta, observe
lo que está haciendo y use el
sentido común para operar una
herramienta eléctrica. No use una
herramienta eléctrica mientras
esté cansado o bajo inuencia de
drogas, alcohol o medicamentos.
Un momento de falta de atención
Evite el arranque involuntario.
Asegúrese de que el interruptor
esté en la posición de apagado
antes de conectar la herramienta
a la fuente de alimentación y/o
batería, recogerla o transportarla.
Llevar la herramienta con el dedo
en el interruptor o energizar las
herramientas cuando el interruptor
está en posición de encendido
induce a accidentes.
Retire toda llave de ajuste o
llave inglesa antes de encender
la herramienta eléctrica. Dejar
una llave colocada a elementos
giratorios de la herramienta eléctrica
puede producir lesiones personales.
No se extienda demasiado.
Mantenga la postura y el equilibrio
a todo momento. Esto permite un
mejor control de la herramienta en
situaciones inesperadas.
Vístase apropiadamente. No use
20
Page 21

ropa suelta o joyas. Mantenga
el cabello, la ropa y los guantes
alejados de las partes móviles.
La ropa suelta, la joyería o el pelo
largo pueden quedar atrapados en
las partes móviles.
realizar cualquier ajuste, cambio
de accesorios o almacenamiento
de herramientas eléctricas. Estas
medidas preventivas de seguridad
reducen el riesgo de arrancar la
herramienta accidentalmente.
Si se proporcionan dispositivos
para la conexión de las
instalaciones de extracción y
recolección de polvo, asegúrese
de que estén conectados y
utilizados correctamente. El uso
sistemas de recolección puede
reducir los peligros relacionados
con el polvo.
Uso y cuidado de herramientas
eléctricas
No fuerce la herramienta eléctrica.
Utilice la herramienta eléctrica
adecuada para su aplicación. La
herramienta eléctrica apropiada
hará mejor el trabajo, más seguro
y a la velocidad para la que fue
diseñada.
No utilice la herramienta eléctrica
si el interruptor no la enciende o
no apaga. Cualquier herramienta
eléctrica que no pueda ser
controlada con el interruptor debe
ser reparada.
Desconecte el enchufe de la
fuente de alimentación y/o
el paquete de baterías de la
herramienta eléctrica antes de
Guarde las herramientas
inactivas fuera del alcance de los
niños y No permita que personas
que no están familiarizadas
con la Herramienta o con
estas instrucciones, utilicen
la herramienta eléctrica. Las
herramientas eléctricas son
peligrosas en manos de usuarios
inexpertos.
Mantenga en buen estado
las herramientas eléctricas.
Compruebe la desalineación,
el atascamiento de las piezas
móviles, la rotura de las piezas
y cualquier otra condición que
afecte el funcionamiento de
la herramienta eléctrica. Si la
herramienta está dañada, hágala
reparar antes de usarla de nuevo.
Muchos accidentes son causados
por uso de herramientas mal
mantenidas.
Mantenga las herramientas
de corte limpias y aladas.
Las herramientas de corte
adecuadamente mantenidas con
bordes de corte alados son menos
propensas a trabarse y son más
fáciles de controlar.
21
Page 22
Utilice la herramienta eléctrica,
sus accesorios, brocas,
etc. Cumpliendo con estas
instrucciones, teniendo en
cuenta sus condiciones
operativas y el trabajo a realizar.
El uso de la herramienta eléctrica
para operaciones diferentes de
las previstas podría dar lugar a
situaciones riesgosas.
manual de instrucciones.
Aprenda las aplicaciones y
limitaciones de la herramienta,
así como los peligros potenciales
especícos relacionados con
esta herramienta. Seguir esta
Norma reducirá el riesgo de
descarga eléctrica, incendio o
lesiones graves.
Sujete las herramientas eléctricas
por las manijas de agarre aisladas
cuando realice una operación en
la que la herramienta de corte
pueda entrar en contacto con
cables ocultos o en su propio
cable. El contacto con alambres
de cables “en vivo” hará que las
partes metálicas expuestas de la
herramienta estén energizadas
en “vivo” y podría causar una
eléctrica puede lanzar objetos
extraños a los ojos y causar daños
oculares permanentes. Siempre use
gafas de seguridad (No gafas) que
cumplan con la Norma de Seguridad
ANSI Z87.1.
Los anteojos de uso diario sólo
tienen lentes resistentes al impacto.
NO SON Gafas de Seguridad.
descarga eléctrica al operario.
Servicio
anteojos que no cumplen con la
Norma ANSI Z87.1 podrían causar
lesiones graves cuando se
Solo haga reparar su herramienta
rompen.
eléctrica por un técnico
autorizado utilizando únicamente
repuestos genuinos. Esto
garantizará mantener la seguridad
de su herramienta eléctrica.
Compruebe siempre para
asegurarse que el área donde los
tornillos están siendo introducidos
o donde los agujeros están siendo
perforados no presenta ningún cable
NORMAS DE SEGURIDAD
ESPECÍFICAS
oculto. El contacto con un alambre
“vivo” hará que las partes metálicas
expuestas de la herramienta estén
ADVERTENCIA: Conozca su
Destornillador Inalámbrico. No
en “vivo” y podría resultar en un
choque eléctrico para el operador.
enchufe el cargador hasta que
haya leído y comprendido este
No accione los tornillos ni perfore
Siempre use protección
ocular. Cualquier herramienta
ADVERTENCIA: Gafas o
22
Page 23

paredes existentes ni otras áreas
donde exista cableado eléctrico. Si
esta situación es inevitable, retire
todos los fusibles o desconecte
todos los interruptores que
alimentan el área de trabajo.
Asegure la pieza de trabajo en un
banco de tornillo o con abrazaderas.
Nunca lo sostenga con las manos o
entre sus piernas.
La acción del controlador de rotación
puede ocasionar que la broca se
salga del tornillo y causar lesiones.
y puede saltar de la cabeza
del tornillo, causando lesiones
personales y daños a la pieza de
trabajo.
SEGURIDAD DE LA BATERIA Y
EL CARGADOR
ADVERTENCIA: Utilice únicamente
el cargador suministrado con este
Equipo para cargar la batería.
Cargar cualquier otra pila puede
dañar el cargador y posiblemente
generar lesiones graves.
Nunca lleve el controlador
inalámbrico con el dedo en el
interruptor. La herramienta está
siempre en condición “ON” cuando
la batería está cargada.
Nunca sujete el cuerpo del
controlador inalámbrico cerca
del interruptor mientras cambia
las brocas. Si toca el interruptor
accidentalmente, puede arrancar la
herramienta y causar una lesión.
Utilice siempre la posición correcta
de la broca del destornillador, de tal
manera que coincida con la cabeza
del tornillo.
Utilice siempre el tamaño más
apropiado del Destornillador que
encajará correctamente en la
cabeza del tornillo
No utilice destornilladores desgastados
o dañados.
Las brocas del destornillador
desgastadas o dañadas no
impulsarán el tornillo correctamente
La batería de este controlador está
contenida en la carcasa principal
de la herramienta. Nunca intente
abrir la carcasa de la batería por
ningún motivo. Si la carcasa de
la batería se rompe o se agrieta,
suspenda inmediatamente el uso y
no recargue.
No cargue la batería si la carcasa de
la batería está húmeda o si presenta
alguna evidencia de corrosión.
Unas pequeñas fugas de la batería
pueden ocurrir bajo condiciones
extremas de uso, carga o
temperatura. Esto no indica un fallo.
Sin embargo, si el sello externo está
roto y esa fuga toca la piel, siga
estos pasos:
1) Lávese inmediatamente con
agua y jabón.
2) Si el líquido entra en los ojos,
enjuáguelos inmediatamente con
agua limpia durante un mínimo
de 10 minutos y busque atención
médica.
23
Page 24

NOTA: El líquido de la batería es
ligeramente ácido.
No incinere la batería puede explotar
y generar incendio.
No utilice un cable de extensión.
Conecte el cable del cargador
directamente a un toma-corriente.
Utilice el cargador sólo en un
tomacorriente estándar de 120V,
60 Hz.
enchufe dañados.
No opere el cargador si ha recibido
un golpe brusco, se ha caído o se ha
averiado de alguna manera. Pida a
un técnico calicado que examine el
cargador y lo repare si es necesario.
No desmonte el cargador.
No cargue las baterías cuando el
área de trabajo o la temperatura de
la batería se hallen por debajo de
32ºF (0ºC) o por encima de 113ºF
(45ºC).
No utilice el cargador en
condiciones húmedas o mojadas.
Está diseñado únicamente para uso
en interiores. No utilice el cargador
cerca de fregaderos o bañeras. No
enjuague el cargador dentro de
agua. No permita que el cable toque
supercies calientes o cuelgue sobre
el borde de una mesa o supercie.
El Cargador debe hallarse lejos de
lavaderos o supercies calientes.
No utilice para cargar baterías
un cargador diferente al que
corresponde a este inalámbrico
3.6V. Otra batería puede explotar.
No utilice el cargador si el cable o el
enchufe están dañados. Reemplace
inmediatamente el cable o el
Desconecte el cargador cuando no
estén uso y antes de la limpieza o
mantenimiento.
Reciclaje de la batería
Para preservar nuestros recursos
naturales, recicle o deseche las
baterías adecuadamente.
Las baterías cargadas por este
cargador pueden contener productos
químicos y metales que son dañinos
para el medio ambiente. Nunca
deseche las baterías recargables
en la basura doméstica normal o
en los vertederos de agua, ya que
se añadirán a la contaminación del
medio ambiente.
SIMBOLOS
24
Page 25
ADVERTENCIA: Algunos de
los siguientes símbolos pueden
aparecer en el taladro. Estudie estos
símbolos y aprenda su signicado.
Una interpretación adecuada
de estos símbolos permitirá un
funcionamiento más eciente y
seguro de esta herramienta.
V Voltios
A Amperios
Hz Hertz
W Vatios
kW Kilovatios
Microfaradios
L Litros
kg Kilogramos
H Horas
N/cm2 Newtons por centímetro
cuadrado
Pa Pascales
OPM Oscilaciones por minuto
Min Minutos
S Segundos
CONOZCA SU DESTORNILLADOR
INALÁMBRICO
Construcción Clase II
Doble Aislamiento de
protección
Protegido contra salpicaduras de agua
Estanco de agua
Con conductor de
protección
…../por minuto
Diámetro
Posición apagado (OFF)
Dirección
Advertencia
Use gafas de seguridad
Este símbolo indica que esta
herramienta está ajustada a
los requisitos de los EE. UU. y
Canadá por Underwriters
Laboratories.
C, A.
Corriente Alterna
Corriente Alterna de tres
fases
Corriente alterna de tres
fases con Neutro
Corriente continua
Sin velocidad de carga
(al vacío)
Corriente alterna o continua
25
Page 26
ENSAMBLAJE Y FUNCIONAMIENTO
CARGANDO LA BATERÍA
1) Coloque el destornillador inalámbrico en una toma eléctrica de
120V,60 Hz.
2) Inserte el enchufe del cargador
de batería (1) dentro del receptáculo
del cargador(2) en el mango del
destornillador in-alámbrico(3)
(Fig.1)
3) Enchufe el cargador de batería
(4) en un receptáculo de pared
(120V 60Hz)
INSTALACIÓN DE LAS
MECHAS (BROCAS) DEL
DESTORNILLADOR
ADVERTENCIA: Nunca sujete
el cuerpo del destornillador inalámbrico cerca del interruptor
mientras cambia las brocas del
NOTAS:
a) La luz roja indicadora del mango
(5) se encenderá, indicando
conexiones positivas en el cargador.
b) La luz roja indicadora
permanecerá encendida hasta que
el cargador sea desconectado.
destornillador. Al tocar
accidentalmente el interruptor
puede iniciar la herramienta y
provocar una lesión.
1) Seleccione una broca adecuada
del destornillador, que encaje en
la cabeza del tornillo que se está
accionando.
c) Una batería nueva o
completamente agotada se debe
cargar durante 5 horas. Después
del uso normal, la batería debe estar
NOTAS:
a) Utilice la broca de tamaño más
grande que encaje correctamente
en la cabeza del tornillo.
completamente cargada en aprox. 3
horas más.
b) Asegúrese de que la broca del
destornillador se halle en buenas
d) Si la batería no se carga
correctamente, compruebe que el
toma-corriente esté “vivo” y que el
rango de trabajo esté entre 10/40 ºC
(50/104 ºF).
condiciones y no esté dañada ni
desgastada.
2) Inserte completamente la broca (1)
en el colector del destornillador (2)
(Fig. 2).
Fig.1
26
Page 27
NOTA: Asegúrese de que la
broca del destornillador se halle
completamente insertado dentro del
colector.
Fig.2
INTERRUPTOR DE AVANCE/
RETROCESO
El destornillador inalámbrico está
equipado con un conveniente
interruptor que funciona como
Interruptor de encendido/Apagado e
interruptor de marcha atrás.
alámbrico está diseñado para girar
en varios ángulos. Esta propiedad
permite congurar la herramienta
para un acceso más fácil para
alcanzar lugares de difícil posición.
También hace más fácil apretar
adicionalmente de manera manual.
Para hacer girar el mango,
simplemente “curve” la herramienta
al ángulo apropiado (1) (Fig. 4)
1. Para atornillar, presione el lado
derecho del interruptor (1) (Fig. 3).
Para apagar el interruptor, suelte el
interruptor.
2. Para quitar tornillos, presione el
lado izquierdo del interruptor (2)
Fig.3
MANIJA GIRATORIA
El mango del destornillador in-
Fig.4
ELABORACIÓN DE AGUJEROS
PARA TORNILLOS.
Es importante preparar los agujeros
de los tornillos antes de intentar
sujetar dos piezas de madera. La
preparación adecuada facilitará que
los tornillos sean más fáciles de
accionar y evitar desalineación entre
dos los componentes, cabezas de
tornillos lisos y la separación de los
componentes de madera.
1. Unir en la posición deseada los
componentes que se van a atornillar.
(Fig. 5).
27
Page 28
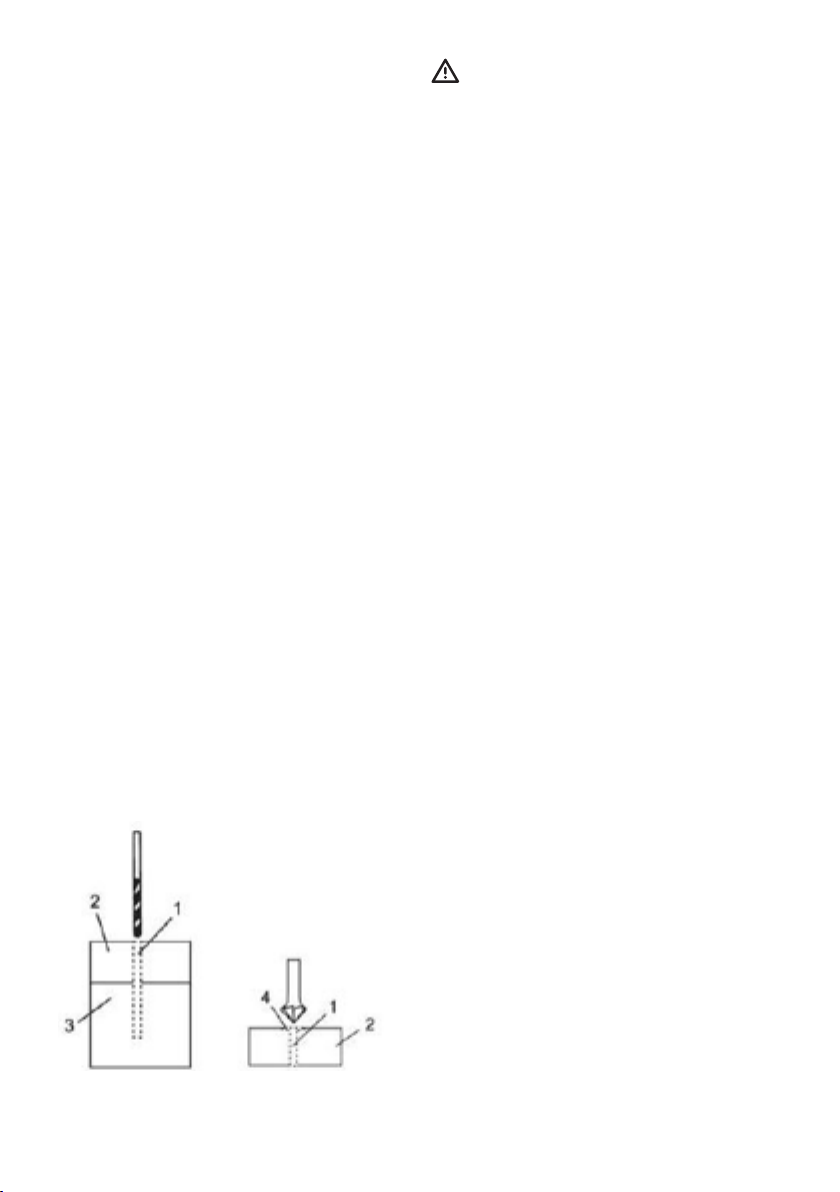
2. Taladre un agujero piloto (1) a
través de la pieza exterior (2) y en la
pieza interior (3). Taladre el agujero
2/3 del diámetro de la porción lisa
del vástago del tornillo.
NOTA: Si la madera es blanda,
taladre el agujero 2/3 de la longitud
del tornillo. Si la madera es dura,
taladre el agujero en toda la longitud
del tornillo.
3. Retire la abrazadera de las dos
piezas que se van a atornillar.
4. Agrandar el oricio (1) en la pieza
exterior (2) de modo que tenga el
mismo tamaño que la porción lisa
del vástago del tornillo (Fig. 6).
ADVERTENCIA
Por razones de seguridad, el
operador debe leer las secciones
de este manual del usuario
tituladas “ADVERTENCIAS
GENERALES DE SEGURIDAD”,
“SEGURIDAD DE LA
HERRAMIENTA ELÉCTRICA”.
“NORMAS ESPECÍFICAS DE
SEGURIDAD”, “SEGURIDAD DE
LA BATERIA Y EL CARGADOR” y
“SÍMBOLOS” antes de usar este
destornillador.
Compruebe los siguientes
factores cada vez que se use el
destornillador:
5. Si usa un tornillo de cabeza plana,
contra-hunda el oricio (4) de modo
que la cabeza del tornillo quede a
ras con la supercie cuando esté
totalmente encajada en su lugar.
Fig.5 Fig.6
1) El destornillador es del tipo y
tamaño correctos, no se hallan
desgastados ni de ninguna
manera averiados.
2) Las piezas de trabajo están
adecuadamente aseguradas.
3) Se están usando Gafas de
Seguridad.
El incumplimiento de estas
normas de seguridad aumentará
signicativamente el riesgo de
lesiones.
28
Page 29
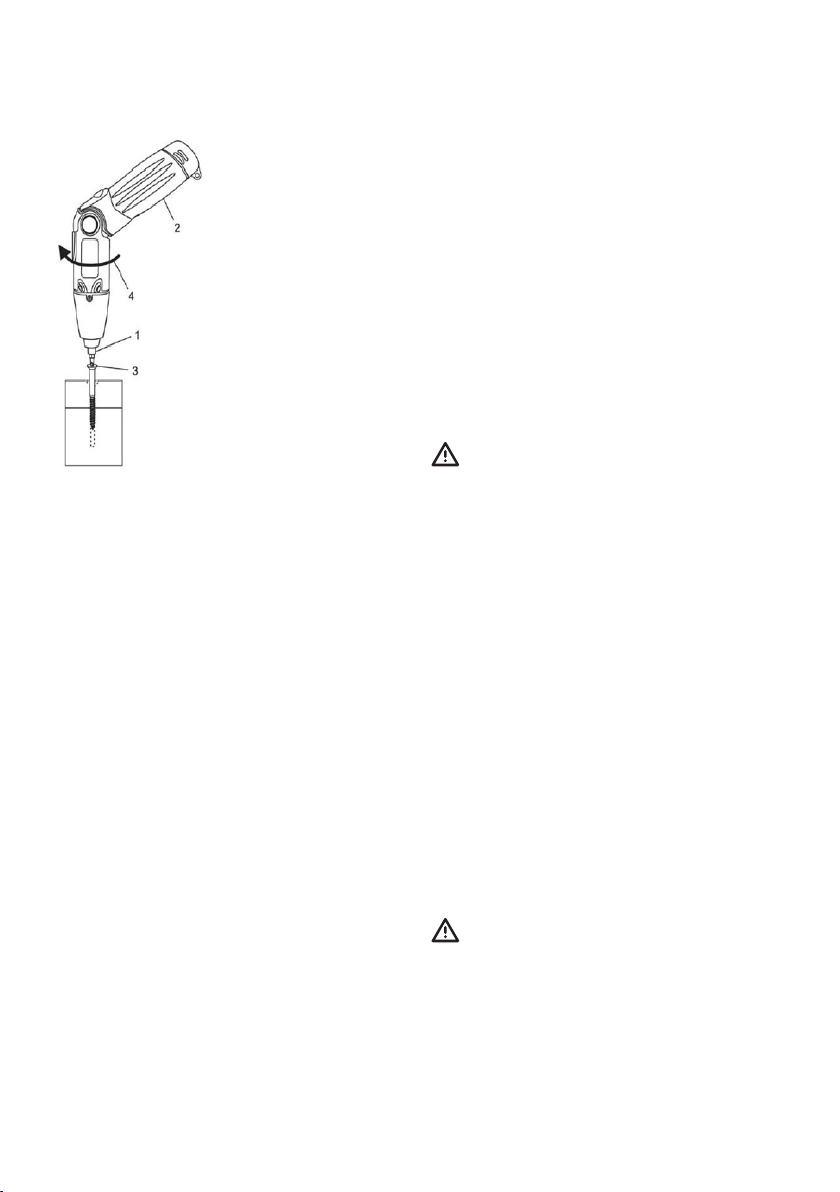
ACCIONAMIENTO DE TORNILLOS.
Al accionar tornillos,
se debe tener
cuidado de utilizar la
broca que encaja en
forma precisa en la
cabeza del tornillo
que se está
accionando.
Asegúrese de
utilizar el tamaño de
broca más grande
que encajará en
forma precisa en la
Fig.7
cabeza del tornillo.
Las brocas deben estar en buenas
condiciones y no desgastadas para
no deslizarse fuera de la cabeza del
tornillo.
hasta donde es posible, suelte el
interruptor y el destornillador se
detendrá.
Cuando se suelte el interruptor y el
destornillador deje de girar, el eje
se bloqueará automáticamente.
Apriete completamente el tornillo
manualmente girando el mango del
destornillador en el sentido de las
agujas del reloj (4).
MANTENIMIENTO PREVENTIVO
ADVERTENCIA: Cuando
realice reparaciones, utilice
únicamente piezas de repuesto
genuinamente originales. El uso
de piezas de diferente origen
crean un alto riesgo o causar
daños al producto.
1. Seleccione el destornillador
correcto para el tornillo que se está
accionando.
2. Introduzca completamente la
broca en el destornillador (1) (Fig.7).
3. Girar el mango hasta una posición
cómoda (2).
Mientras sostiene rmemente el
destornillador contra el tornillo,
presione el lado del interruptor para
iniciar el destornillador y accionar el
tornillo.
Cuando el tornillo es accionado
NO use solventes cuando limpie
piezas plásticas. Los plásticos son
susceptibles al daño de diversos
tipos de solventes comerciales y
su uso puede deteriorar el equipo.
Utilice un paño limpio para eliminar
la suciedad, polvo, aceite, grasas
etc.
ADVERTENCIA: NO permita
que los líquidos de frenos,
gasolina, derivados del petróleo,
aceites penetrantes, etc. Entren
en contacto con piezas de
plástico. Contienen productos
químicos que pueden dañar,
29
Page 30
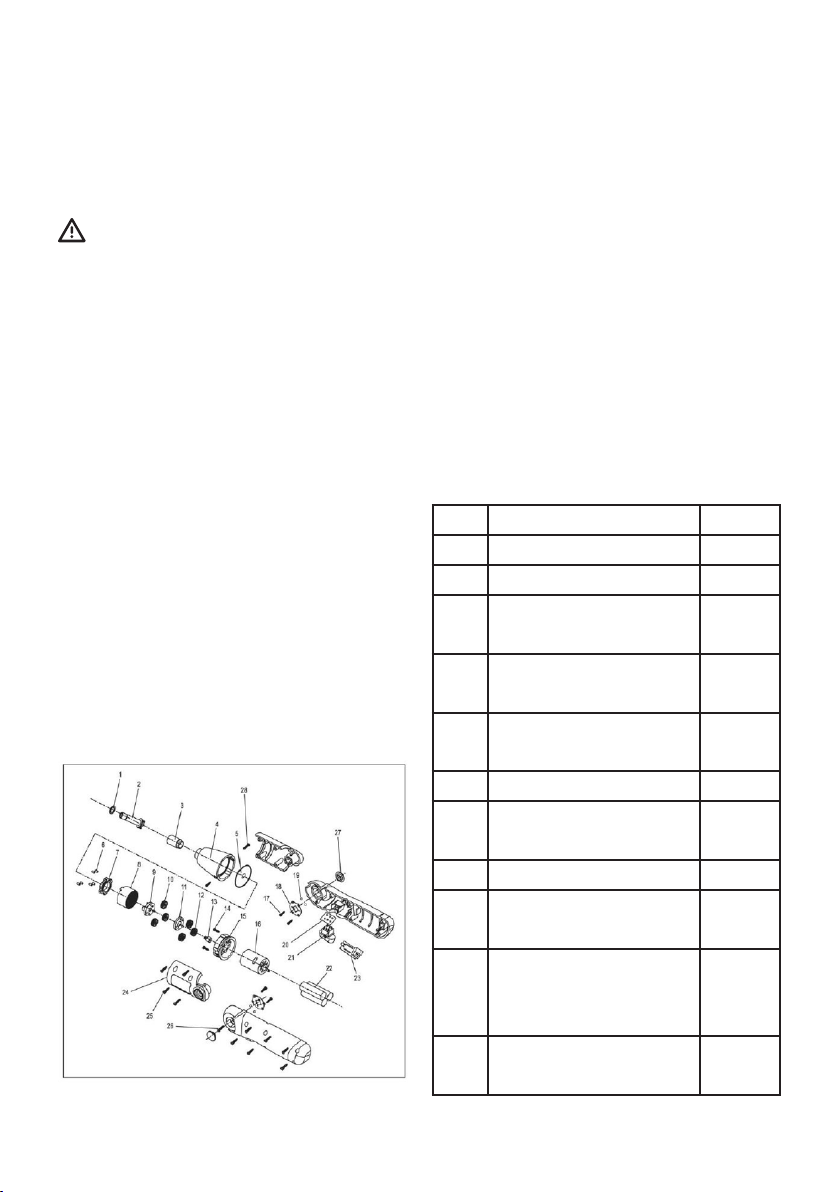
debilitar o destruir el plástico.
LISTA DE PIEZAS
NO abuse de las herramientas
eléctricas. Las prácticas abusivas
pueden dañar la herramienta y las
piezas de trabajo.
ADVERTENCIA: NO intente
modicar herramientas ni crear
accesorios. Cualquier alteración
o modicación de este tipo es
considerado mal uso y podría
resultar en una condición
peligrosa que podría generar
lesiones graves. También anulará
la Garantía.
LUBRICACIÓN
Todos los rodamientos de esta
herramienta están lubricados con
una cantidad suciente de lubricante
de alto grado para la vida útil de la
unidad en condiciones normales.
Por lo tanto, NO se requiere
lubricación adicional.
VISTA EN DESPIECE ORDENADO
ADVERTENCIA: Cuando realice
reparaciones, utilice únicamente
piezas de repuesto del equipo
original. El uso de otras piezas
puede crear un peligro para la
Seguridad Personal o causar daños
al destornillador.
Cualquier intento de reparar o
reemplazar piezas eléctricas en
este destornillador puede crear un
peligro de seguridad a menos que
las reparaciones sean realizadas
por un técnico calicado.
# Nombre de la pieza Cant.
1 Anillo de retención 1
2 Eje de transmisión 1
3 Rodamiento
auto-lubricado
4 Carcasa de
engranaje
5 Placa redonda de
sujeción
6 Perno 6
7 Anillo de
posicionamiento
8 Anillo de engranaje 1
9 Impulsor de
bloqueo
10 Engranaje
planetario de metal
energizado
11 Porta-cargas
planetario
1
1
1
1
1
3
1
30
Page 31

12 Engranaje
planetario plástico
13 Engranaje del motor 1
14 Tornillos M2.5X4.5 3
15 Tuerca de montaje del
motor
16 Motor 1
17 Tornillos ST2.5X8 2
18 Placa de conexión 2
19 Esfera 4
20 PCB (tarjeta) para el
interruptor
21 Interruptor 1
22 Paquete de
baterías
23 PCB (tarjeta)de carga 1
24 Cubierta 1
25 Tornillo ST2.9X16 9
26 Tornillo ST2.9X25 4
27 Botón decorativo 1
28 Tornillo ST2.5X8 2
3
1
1
1
GARANTÍA
1. PROMAKER®, mediante su
garantía PX2 para herramientas
eléctricas consta de las siguientes
características:
• Cubre los productos durante
2 años a partir de la fecha de
compra contra cualquier defecto
en su funcionamiento, por fallas
en los materiales o mano de obra
empleada en su fabricación.
• Ofrece 2 años de servicio de
mantenimiento y mano de
obra gratuita para cambio de
consumibles.
• Otorga un periodo de prueba de
2 meses donde puede canjear
la herramienta por una de mayor
capacidad si el rendimiento no
cumple con su requerimiento,
abonando la diferencia del
precio.
• Todos los atributos ofrecidos
por la garantía son válidos
presentando la factura de
compra original.
2. Para el servicio de garantía, por favor
póngase en contacto con el Centro
de Servicio Autorizado, Presente la
tarjeta de garantía y la factura original
para el servicio de garantía.
3. La presente Garantía NO aplica en:
• Daños por transporte después
de las ventas.
• Servicios no proporcionados por
nuestros centros de servicio
autorizado.
• Accesorios y piezas de
repuesto, si los hay, incluidos en
el embalaje (Paquete).
• El daño producido por el uso
comercial o industrial, ya que
este producto es pensado
solo para uso en Hágalo usted
mismo (DIY).
EC DECLARACIÓN DE
CONFORMIDAD
Declaramos que la máquina
descrita a continuación cumple con
las Directrices básicas de seguridad
pertinentes, tanto en su diseño
básico como en su construcción,
así como en la versión puesta
en circulación por nosotros. Esta
declaración dejará de ser válida si
la máquina se modica sin nuestra
previa aprobación.
Producto: Destornillador Inalámbrico
4.8V
Modelo Tipo: PRO-SD480
31
Page 32

www.promakertools.com
 Loading...