

Page 1

English: 2 I Español: 14
Lithium Battery Cordless Screwdriver
User’s Manual
Model No.: PRO-SD360
Page 2
234
Page 3
Page 4
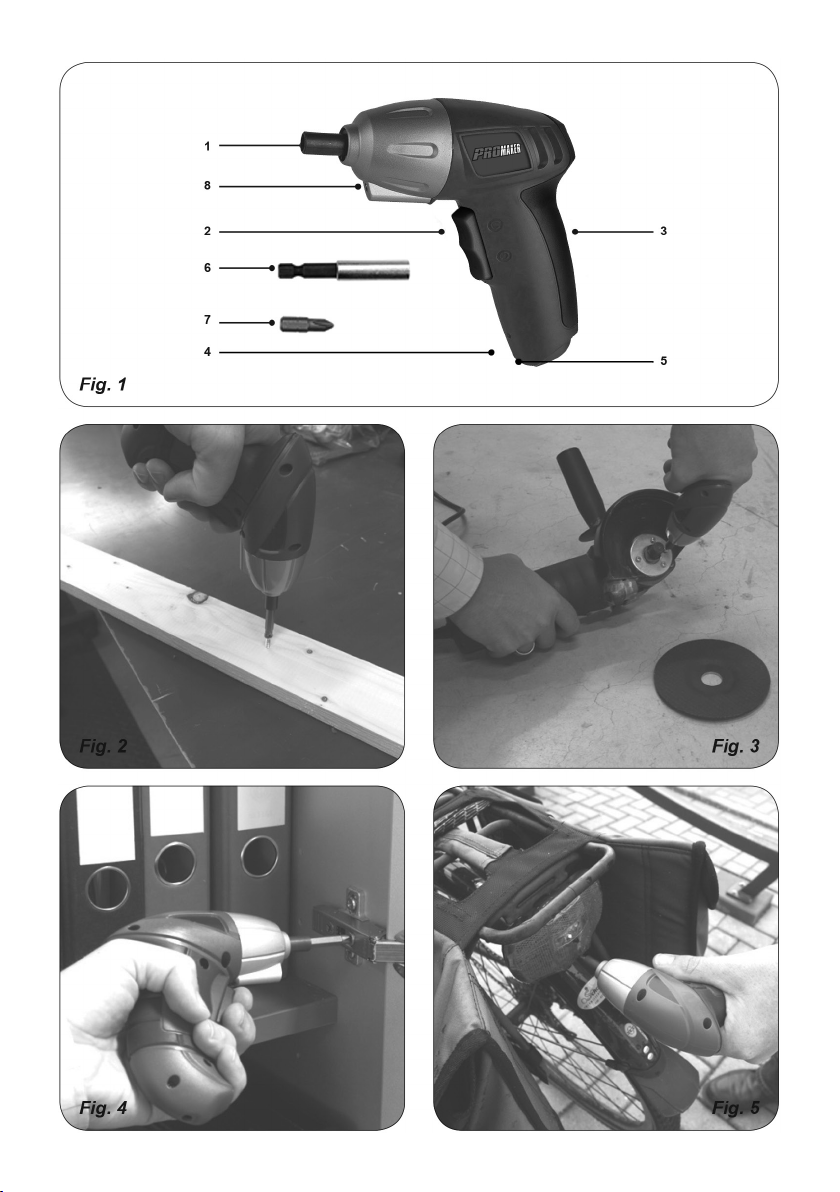
The numbers in the text refer to
the diagrams on pages 2 - 3.
to vibration when using the tool for
the applications mentioned.
Read the operating
instructions carefully before
using this device. Familiarise
yourself with its functions and
basic operation. Service the device
as per the instructions to ensure
that it always functions properly.
The operating instructions and the
accompanying documentation must
be kept in the vicinity of the device.
Introduction
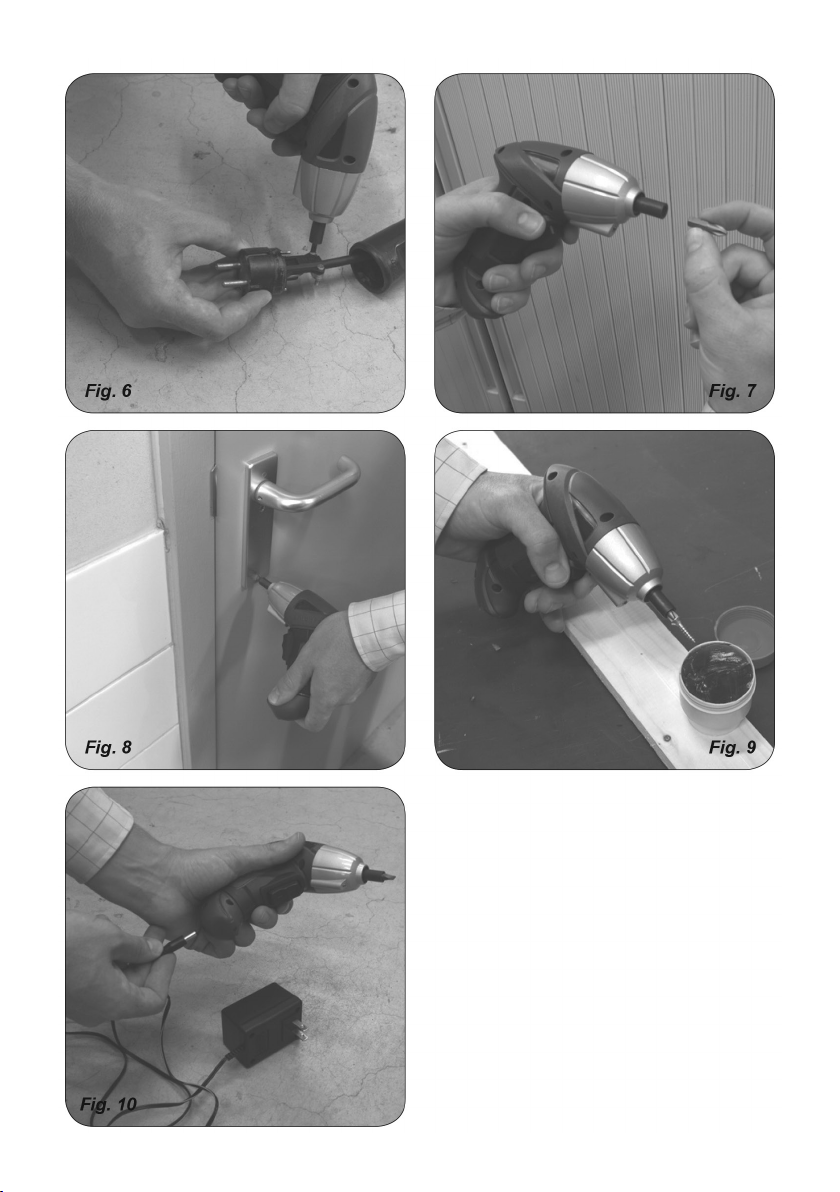
This screwdriver is intended for
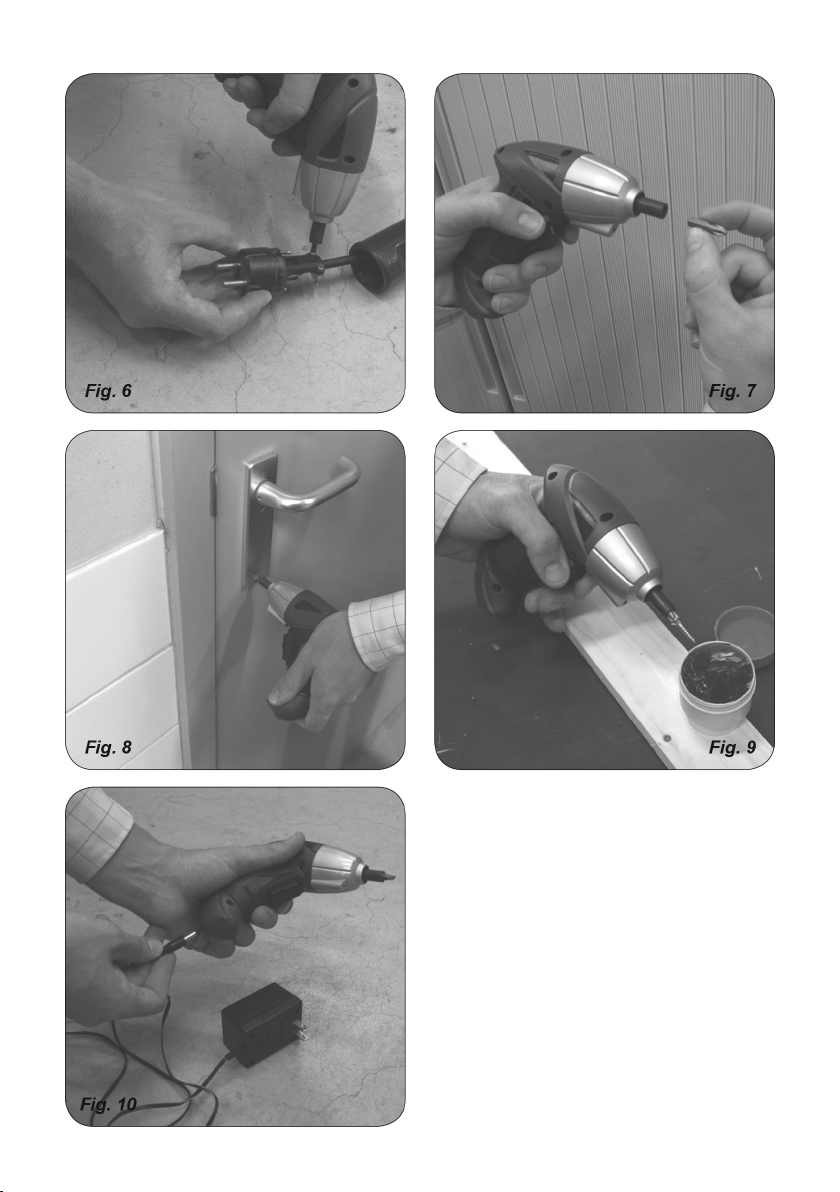
tightening and loosening screws
(Fig. 2 - 9). The screwdriver is not
suitable for screwdriving heavy
constructions, for example repairing
a big fence.
1. MACHINE INFORMATION
Specications
Battery Li-ion
Voltage 3.6V Li-ion
Speed 220rpm
Weigh 0.81lbs
Max Torque 3Nm
• Using the tool for different
applications, or with different or
poorly maintainted accessories,
may signicantly increase the
exposure level.
• The times when the tool is
switched off or when it is running
but not actually doing the job,
may signi cantly reduce the
exposure level
Protect yourself against the effects
of vibration by maintaining the tool
and its accessories, keeping your
hands warm, and organizing your
work patterns.
Contents of packing
1 Cordless screwdriver
1 Charger
1 Instruction manual
Check the appliance, any loose
parts and accessories for damage
caused during transport.
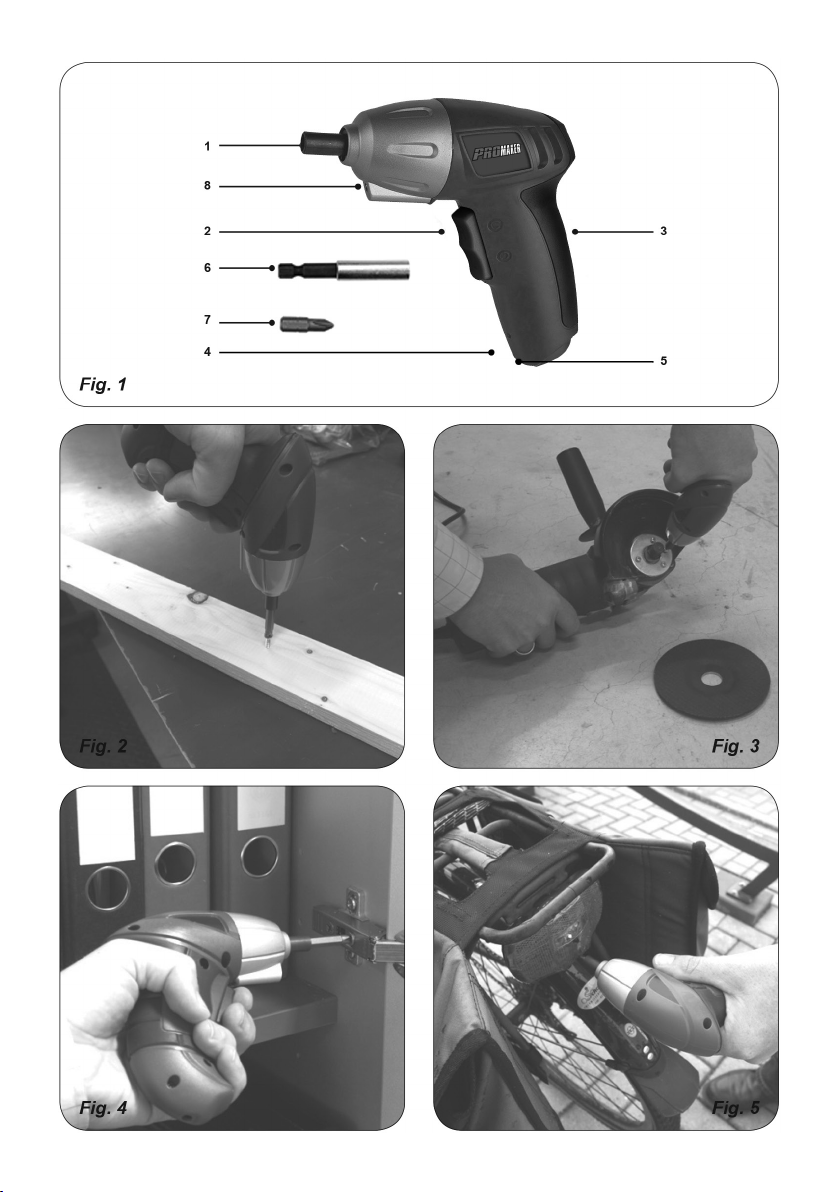
Product information
Fig. 1
Vibration level
The vibration emission level stated
in this instruction manual has been
measured in accordance with a
standardised test given in EN
60745; it may be used to compare
one tool with another and as a
preliminary assessment of exposure
1. Bit holder
2. On/Off-switch
3. Softgrip
4. LED (Red)
5. Charger connection
6. Extension piece
7. Bit
8. LED (White)
Page 5
2. SAFETY INSTRUCTIONS
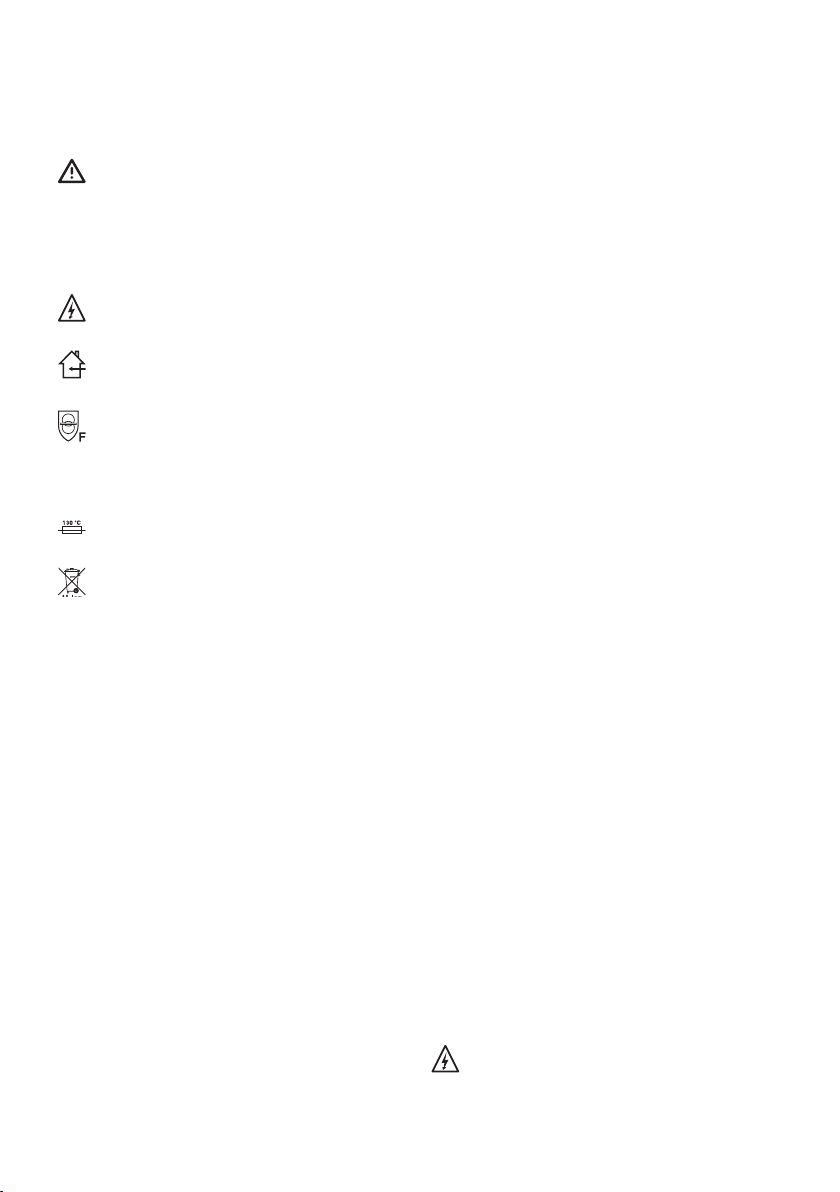
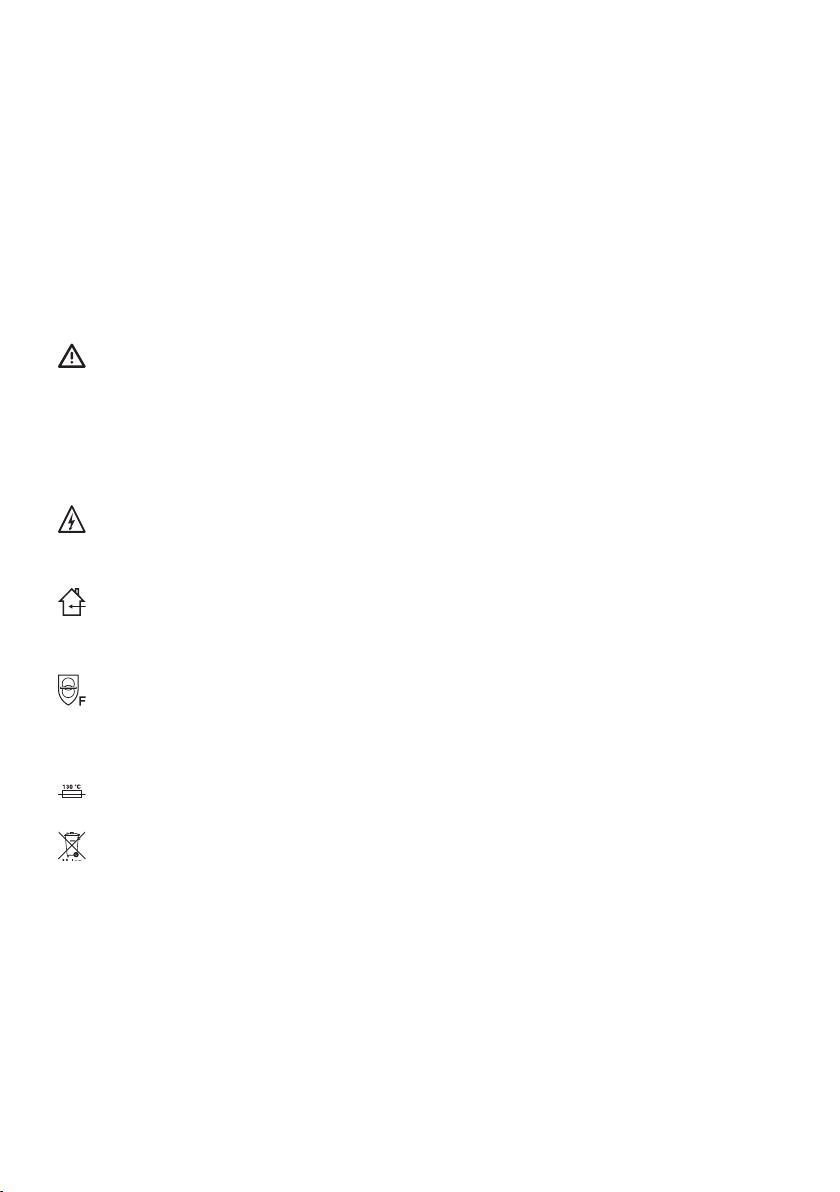
Explanation of the symbols
Denotes risk of personal injury,
loss of life or damage to the tool in
case of non-observance of the
instructions in this manual.
Indicates electrical shock hazard.
Indoor use only.
In case of failure, the transformer
is not dangerous
Thermic protector.
Do not dispose of in household
waste.
Specic safety instructions
• Only use the accumulator block
with the battery charger provided
– using other chargers could be
dangerous.
• Keep the accumulator block, tool
and battery charger away from
damp and wet conditions.
• Before using the battery charger,
check all wires are properly
connected.
• If any wires on the charger are
damaged, do not use it until these
have been replaced.
• When the charger is not in use it
should not be plugged in. When
unplugging, do not pull the plug out
by the cable.
• If the charger breaks down or suffers
from other technical problems, take
it to a recognised dealership to be
checked before using it again. Any
damaged parts must be replaced.
• Take care when handling the
accumulator block, do not drop it or
knock it against other things.
• Never attempt to repair the battery
charger or accumulator block
yourself; this can be extremely
dangerous. Repairs should always
be carried out by a recognised
dealership.
• Always unplug the charger before
cleaning or carrying out any other
maintenance on it.
• Do not attempt to charge the
accumulator block in temperatures
of below 5 degrees or above 40
degrees centigrade.
• Never throw the accumulator block
into water or a re – it may explode.
• Turn the drill immediately off after
the screw is fastened. Overloading
and damaging the battery or motor
can be prevented this way. Use the
torque to loosen the fastened screw.
Electrical safety
When using electric machines
always observe the safety
regulations applicable in your
country to reduce the risk of re,
electric shock and personal injury.
Read the following safety
instructions.
Always check that the power
supply corresponds to the voltage
on the rating plate.
5
Page 6

Class ll machine. Your machine
is double insulated; therefore no
earthwire is required.
Replacing cables or plugs
Immediately throw away old
cables or plugs when they have
been replaced by new ones. It is
dangerous to insert the plug of a
loose cable in the wall outlet.
3. ASSEMBLING INSTRUCTIONS
Inserting and removing bits
Fig. 1+7
The bits can easily be placed directly
into the bit holder or on the extension
piece. The extension piece can be
used for screws that are difcult to
reach.
automatic spindle lock feature.
When the On/Off switch (2) is not
pressed, the spindle is locked. Now
it is possible to use the screwdriver
(even when the battery is empty) as
a manual tool.
Screwdriving
Fig. 1
• To switch the tool on, press the On/
Off switch (2).
• Press the tumbler switch (R)
for clockwise rotation (tightening
screws)
• Press the tumbler switch (L) for
counterclockwise rotation (loosening
screws).
To switch the tool off, release the on/
off switch.
4. OPERATION
The white LED will illuminate when
the tumbler switch is pressed.
Always observe the safety
instructions and applicable
regulations.
LED light for a prolonged period of
time from close distance can cause
Firmly hold the machine and ferm
damage to the eyes.
the bit with even pressure into
the workpiece. Do not force the
machine. Use only bits that do not
yet show any signs of wear. Worn
bits have a negative effect on the
efciency of the machine.
User tips for optimum use
• Always hold the tool and screwdriver
bit in a straight line with the screw
and always use the correct type and
size of bit.
• If screws are difcult to tighten, try
Locking the screwdriver
Fig. 8
applying a small amount of washing
liquid or soap as a lubricant (Fig. 9).
• Use the spindle lock feature to
The screwdriver is tted with an
loosen very tight screws or to rmly
Warning! Looking straight into
6
Page 7

tighten screws.
• When screwing in wood, it is
recommended to drill a hole with a
depth equal to almost the length of
the screw. A pilot hole guides the
screw and prevents splintering or
distortion of the work piece.
5. CHARGING THE BATTERY
Charging Li-Ion battery
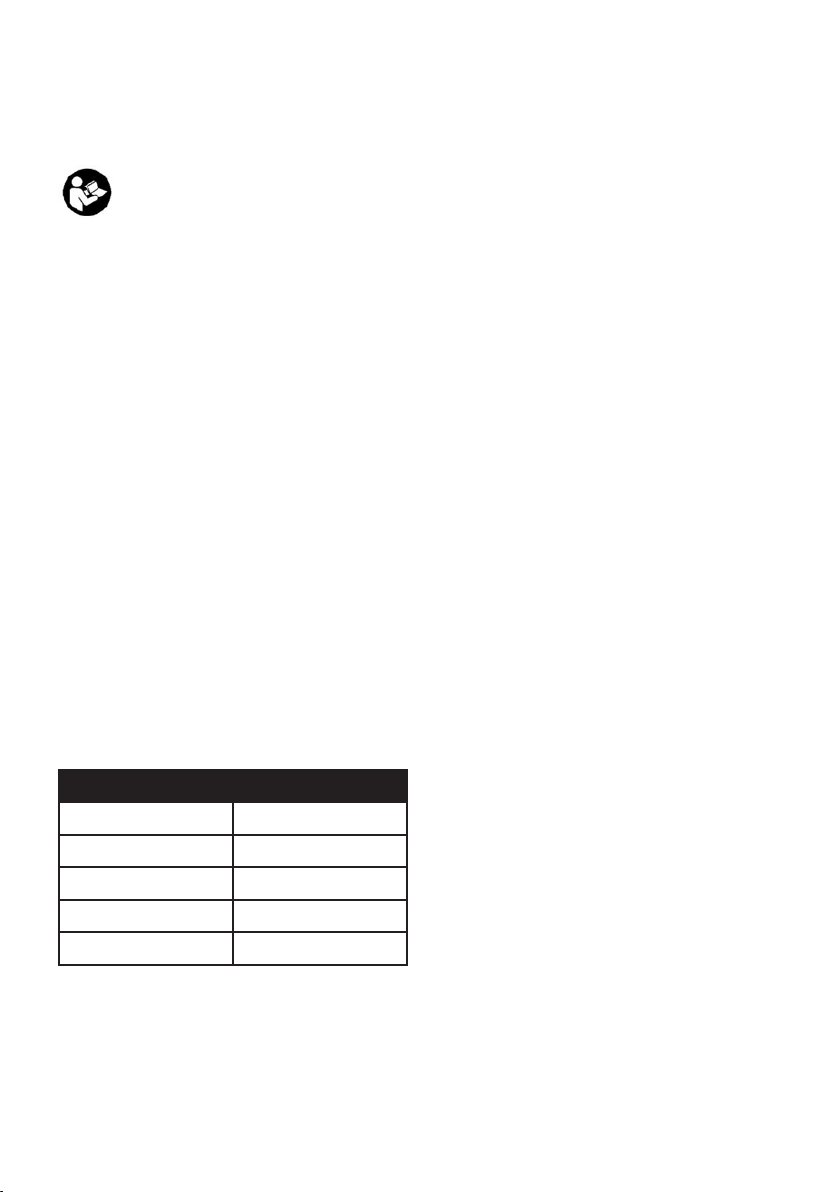
Fig.10
The battery charger supplied is
matched to the Li-Ion battery
installed in the machine. Do not use
another battery charger.
The Li-Ion battery is protected
against deep discharging. When
the battery is empty, the machine
is switched off by means of a
protective circuit: the tool holder no
longer rotates. Caution: if the On/Off
switch is subject to continued use,
the Li-Ion battery can be damaged.
The charging procedure starts as
soon as the mains plug of the battery
charger is inserted into the socket
and the adapter plug is connected
to the appliance (the underside of
the handgrip).
• Put the adapter plug of the charger
into the handle (underside).
• Plug the mains adapter into the
(wall) socket.
• The charging process starts; the
red LED is now on.
• The battery is fully charged when
the red LED goes out.
• Charging the battery takes
maximum 5 hours.
• During the charging procedure, the
handgrip of the machine warms up.
This is normal.
6. SERVICE & MAINTENANCE
Make sure that the machine is
not live when carrying out
maintenance work on the motor.
These machines have been designed
to operate over a long period of time
with a minimum of maintenance.
Continuous satisfactory operation
depends upon proper machine care
and regular cleaning.
Cleaning.
Keep the ventilation slots of
the machine clean to prevent
overheating of the engine.
Regularly clean the machine
housing with a soft cloth, preferably
after each use. Keep the ventilation
slots free from dust and dirt. If the
dirt does not come off use a soft
cloth moistened with soapy water.
Never use solvents such as petrol,
alcohol, ammonia water, etc. These
solvents may damage the plastic
parts.
Lubrication.
The machine requires no additional
lubrication.
Faults.
Should a fault occur, e.g. after
wear of a part, please contact the
service address on the warranty
7
Page 8
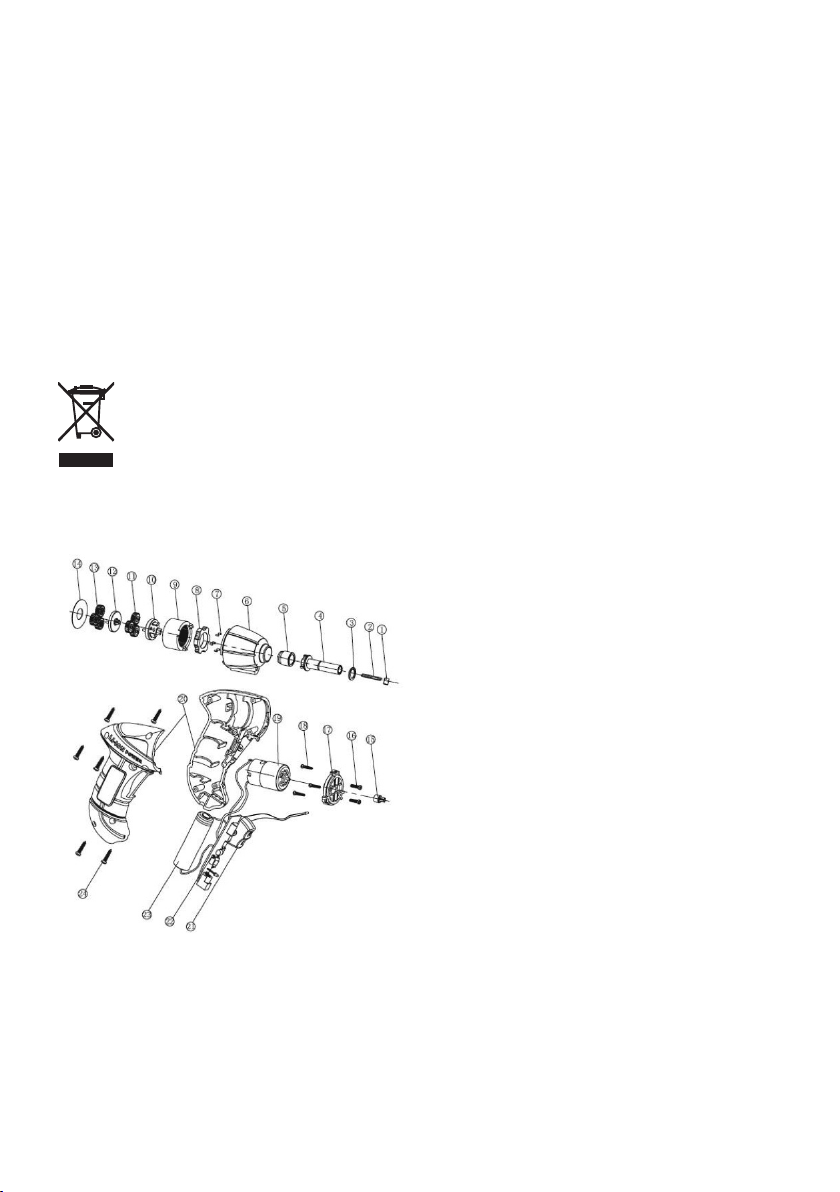
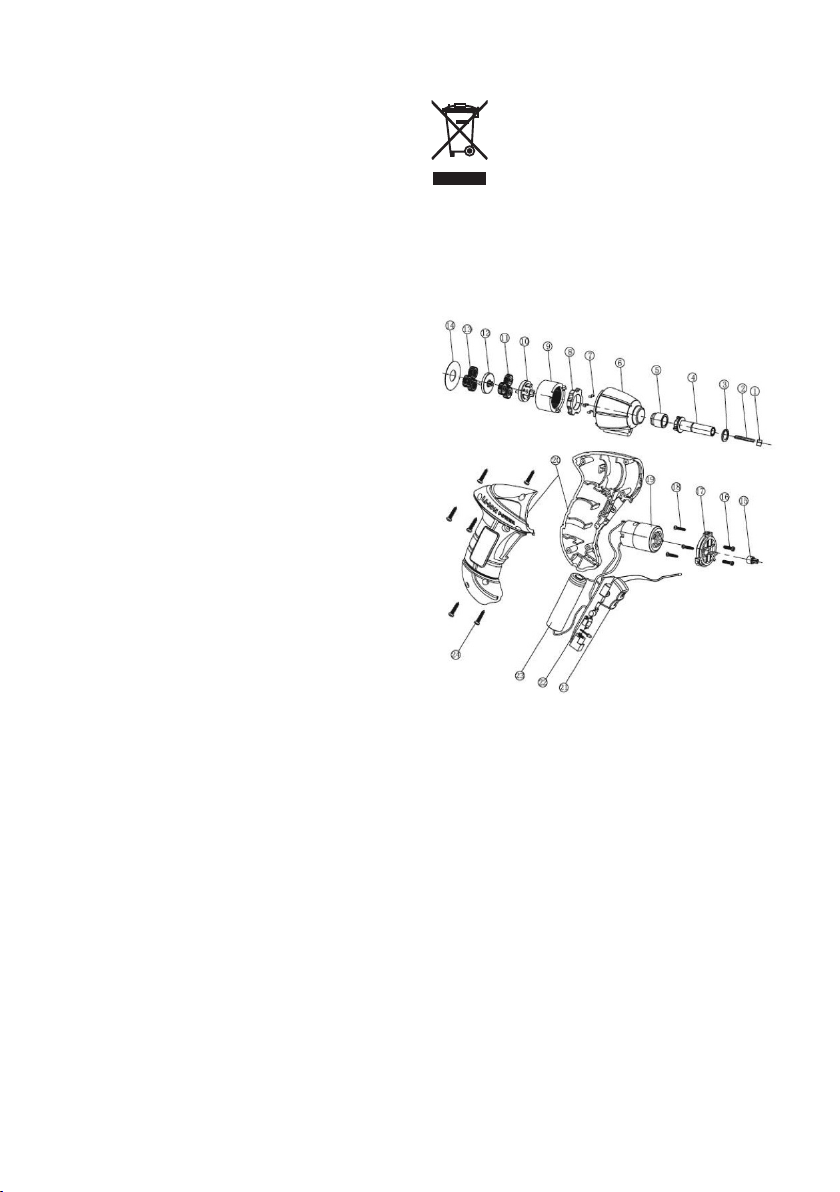
card. Separate you nd an exploded
view showing the parts that can be
ordered.
Environment.
To prevent damage during transport,
the appliance is delivered in a solid
packaging which consists largely of
reusable material. Therefore please
make use of options for recycling
the packaging.
Faulty and/or discarded
electrical or electronic
apparatus have to be
collected at the appropriate
recycling locations.
Exploded view.
8
Page 9

WARRANTY
1. PROMAKER®, through its PX2
warranty for power tools, has the
following characteristics:
• It covers the products for 2 years
from the date of purchase against
any defect in its operation, for
faults in the materials or labor
used in its manufacture.
• Provides 2 years of free
maintenance service and labor
for replacement of consumables.
• Provides a trial period of
2 months where you can
exchange the tool for a higher
capacity one if the original does
not meet your requirement, by
paying the difference in price.
• All the attributes offered by the
warranty are valid presenting
the original purchase invoice.
EC DECLARATION OF
CONFORMITY
We hereby declare that the machine
described below complies with the
relevant basic safety Directives, both
in its basic design and construction
as well as in the version put into
circulation by us. This declaration
shall cease to be valid if the
machine is modied without our
prior approval.
Product: Lithium Battery Cordless
Screwdriver
Type: PRO-SD360
2. For warranty service, please
contact the present the warranty
card and the original invoice for the
warranty service.
3. This Warranty DOES NOT
applies for:
• Transportation damages after sales.
• Services not provided by our
authorized service centers.
• Accessories and spare parts, if
any, provided in the package.
• Damage resulted from commercial
or industrial use, as this product is
intended for DIY use only.
9
Page 10

NOTES
Page 11

NOTES
Page 12

www.promakertools.com
Page 13

Destornillador Inalámbrico con Batería de Lithium
Manual del Usuario
Modelo No.: PRO-SD360
Page 14
141516
Page 15
Page 16
Los números indicados en el
manual se reeren a las imágenes
de las páginas 14 y 15.
Lea las instrucciones de
funcionamiento cuidadosamente,
antes de usar este Equipo.
Familiarícese con sus funciones y
operaciones básicas. Use el equipo
según las instrucciones para
asegurarse de que siempre funcione
correctamente. El manual de
instrucciones y la documentación
que lo acompaña deben mantenerse
cerca de la herramienta.
Introducción
El destornillador se halla destinado
a apretar y aojar tornillos (Fig.2 y
9). El destornillador no es adecuado
para atornillar construcciones de
gran magnitud, por ejemplo construir
una cerca extensa.
1.INFORMACIÓN DE LA
HERRAMIENTA
estandarizado dado en la Norma
EN 60745; Puede utilizarse para
comparar una herramienta con otra
y como evaluación preliminar de la
exposición a la vibración cuando
se utiliza la herramienta para las
aplicaciones mencionadas.
• El nivel de exposición puede
incrementarse signicativamente
al utilizar la herramienta para
diferentes aplicaciones, con
accesorios no autorizados o
poco mantenimiento preventivo.
• El nivel de exposición se reduce
signicativamente cuando la
herramienta se halle encendida,
pero no en actividad, o cuando
se halla apagada.
Protéjase de los efectos de
alta vibración contando con un
adecuado mantenimiento tanto para
su herramienta como accesorios
y organizando sus patrones de
trabajo.
Especicaciones Técnicas
Batería Li-ion
Voltaje 3.6V Li-ion
Velocidad 220rpm
Peso 0.37kg
Torque Máximo 3Nm
Nivel de vibración
El nivel de emisión de vibraciones
indicado en este manual de
instrucciones ha sido medido
de acuerdo según un ensayo
Contenido del empaque
1 Destornillador in-alámbrico
1 Cargador de batería
1 Manual de instrucciones.
Compruebe que la herramienta,
las piezas sueltas y los accesorios
no hayan sufrido daños durante el
transporte.
Información del Equipo
Fig. 1
1. Soporte de broca
2. Interruptor ON / OFF
Page 17
3. Mango suave de agarre
4. LED (Rojo)
5. Conexión Cargador
6. Pieza de extensión
7. Broca
8. LED (Blanco)
2. INSTRUCCIONES DE SEGURIDAD
Explicación de Símbolos
Advierte riesgos de lesiones
personales, pérdidas de vida o
daños a la herramienta en caso de
no cumplir las instrucciones
indicadas en este manual.
Indica Riesgo de choque
eléctrico.
Solo puede ser usado dentro de
casa o instalaciones cubiertas.
En caso de falla, el transformador
no es peligroso.
Protector térmico.
No desechar la herramienta en la
basura doméstica.
Instrucciones especícas de
Seguridad
• Solo use el Cargador
suministrado con la batería, el uso
de otros cargadores podría ser
peligroso.
• Mantenga la herramienta,
la batería y el cargador, fuera de
condiciones húmedas o mojadas.
• Antes de usar el cargador de
batería, compruebe que todos los
cables se hallen adecuadamente
conectados.
• Si alguno de los cables del
cargador se halla averiado, no lo
use, debe ser reemplazado.
• Cuando el cargador no esté
en uso, no debe enchufarse. Al
desenchufar, no tire del enchufe por
el cable.
• Si el cargador se rompe o
sufre de otros problemas técnicos,
llévelo a un centro de servicio
autorizado para que lo revisen
antes de volver a usarlo. Las piezas
dañadas deben ser reemplazadas.
• Tenga cuidado al manipular
la batería, no la deje caer ni la
golpee contra otros objetos.
• Nunca intente reparar la
batería o el cargador de batería, esto
es extremadamente peligroso. Las
reparaciones deben ser realizadas
por un centro de servicio autorizado.
• Cuando la batería se halle
a una temperatura inferior a 5º F o
40ºC, desenchufe el cargador.
• Nunca arroje la batería al
agua o al fuego, puede explotar.
• Pare el equipo al llegar el
tornillo al tope, evitando de esta
manera sobrecarga a la batería o
motor. Use el control del torque para
aojar el tornillo sujetado.
Seguridad eléctrica.
Cuando use equipos eléctricos
siempre cumpla con las normas
de seguridad aplicables en su país
17
Page 18

para reducir los riesgos de incendio,
choque eléctrico y lesiones
personales.
Lea las siguientes normas de
seguridad.
Compruebe siempre que la
alimentación eléctrica corresponda
a la tensión indicada en la placa de
características.
Equipo Clase II. Su equipo es de
aislamiento doble frente a la tensión
nominal; por lo tanto no se requiere
un polo a tierra.
Sustitución de cables o enchufes.
Deseche inmediatamente los cables
o enchufes viejos cuando hayan sido
reemplazados por otros nuevos. Es
riesgoso insertar el enchufe de un
cable suelto en un tomacorriente.
Normas Aplicables.
Sujete rmemente el destornillador
y coloque la broca con presión
uniforme sobre la pieza de trabajo.
No fuerce la herramienta. Utilice solo
brocas que no presenten signos de
desgaste. Las brocas desgastadas
tienen un efecto negativo en la
eciencia del destornillador.
Bloqueo del destornillador
Fig. 8
El destornillador está equipado con
una función de bloqueo automático
del eje. Cuando no se presiona el
interruptor Encendido/Apagado (2),
el eje se bloquea. Es posible utilizar
el destornillador (incluso cuando la
batería está descargada) como una
herramienta manual.
3. INSTRUCCIONES DE
ENSAMBLAJE
Insertando y removiendo brocas.
Fig. 1+7
Las brocas se pueden colocar
fácilmente en el soporte de la broca
o en la pieza de extensión. La
pieza de extensión se puede utilizar
para tornillos que son difíciles de
alcanzar.
4. FUNCIONAMIENTO
Siempre cumpla con las
instrucciones de Seguridad y las
Destornillador
Fig. 1
• Para encender la
herramienta, presione el interruptor
de Encendido/Apagado (2)
• Presione el interruptor
giratorio (R) para girar en sentido
horario (tornillos de apriete).
• Presione el interruptor
giratorio (L) para girar en sentido
contrario a las agujas del reloj
(tornillos de aojamiento).
Para apagar la herramienta, suelte el
interruptor de encendido/apagado.
El LED Blanco se iluminará cuando
se presione el interruptor de resorte.
18
Page 19

¡Advertencia! Mirar directamente
la luz LED durante un período de
tiempo prolongado desde una
distancia cercana puede causar
daño a los ojos.
Sugerencias para un uso óptimo.
• Sostenga siempre la broca y
el destornillador en línea recta con
el tornillo y utilice siempre el tipo y
el tamaño correcto de la mecha.
• Si los tornillos son difíciles de
apretar, intente aplicar una pequeña
cantidad de detergente líquido o
jabón como lubricante (Fig. 9)
• Utilice la función Bloqueo
del usillo (eje) para aojar tornillos
muy apretados o para apretar
rmemente los tornillos.
• Al atornillar madera, se
recomienda perforar un oricio
con una profundidad igual a casi
la longitud del tornillo. Un oricio
guía conduce el tornillo y previene
el astillamiento o deformación de la
pieza de trabajo.
el porta-herramientas no gira.
Precaución: si el Interruptor de
encendido/apagado está sujeto a
un uso continuo, la Batería puede
resultar afectada.
El proceso de carga comienza tan
pronto el enchufe del cargador
de Batería está conectado a la
herramienta (parte inferior del
equipo) y se inserta en el tomacorriente.
• Inserte el enchufe adaptador
del Cargador en la parte inferior del
Asa del equipo.
• Enchufe el adaptador de red
en el enchufe (de pared).
• Se inicia el proceso de
carga; El LED rojo está encendido.
• La batería está
completamente cargada cuando el
LED rojo deja de estar encendido.
• Cargar la batería tarda un
máximo de 5 horas.
• Durante el proceso de
carga, el mango del destornillador
se calienta. Esto es normal.
5. CARGANDO LA BATERIA Li-Ion
Cargando la Batería Li-Ion
Fig.10
El Cargador de Batería suministrado
se adapta a la batería instalada
en la herramienta. No utilice otro
cargador de baterías.
La Batería de Iones de Litio está
protegida contra fuertes descargas.
Cuando la Batería está descargada,
la herramienta se desconecta
mediante un circuito de protección:
6. SERVICIO Y MANTENIMIENTO
Asegúrese que la Herramienta
no se halle activa durante los
trabajos de mantenimiento del
motor.
Estas Herramientas han sido
diseñadas para funcionar durante
un largo período de tiempo con
un mínimo de mantenimiento.
El satisfactorio funcionamiento
continuo depende del cuidado
19
Page 20
adecuado y limpieza regular del
equipo.
Limpieza.
Mantenga limpias las ranuras de
ventilación de la Herramienta para
evitar el sobrecalentamiento del
motor. Limpie periódicamente la
carcasa del equipo con un paño
suave, preferiblemente después
de cada uso. Mantenga las ranuras
de ventilación libres de polvo y
suciedad. Si la suciedad no se
desprende, utilice un paño suave
humedecido con agua jabonosa.
Nunca utilice solventes tales como
gasolina, alcohol, agua amoniacal,
etc. Estos disolventes pueden dañar
las piezas de plástico.
Lubricación.
La Herramienta no requiere
lubricación adicional.
opciones para reciclar el embalaje.
Los aparatos eléctricos o
electrónicos defectuosos y/o
descartados deben ser
recogidos en lugares
adecuados de reciclado.
VISTA ORDENADA DE PIEZAS
Averías.
Si se produce una avería, por
ejemplo, después del desgaste de
un pieza, póngase en contacto con
la Dirección de Servicio indicada en
la Tarjeta de Garantía. En anexo
aparte usted encontrará una vista
ordenada de las piezas que se
pueden requerir.
Medio Ambiente.
Para evitar daños durante su
transporte, la Herramienta se
entrega en un embalaje sólido que
consiste en gran parte de material
reutilizable. Por lo tanto, utilice las
20
Page 21

GARANTÍA
1. PROMAKER®, mediante su
garantía PX2 para herramientas
eléctricas consta de las siguientes
características:
• Cubre los productos durante
2 años a partir de la fecha de
compra contra cualquier defecto
en su funcionamiento, por fallas
en los materiales o mano de obra
empleada en su fabricación.
• Ofrece 2 años de servicio de
mantenimiento y mano de
obra gratuita para cambio de
consumibles.
• Otorga un periodo de prueba de
2 meses donde puede canjear
la herramienta por una de mayor
capacidad si el rendimiento no
cumple con su requerimiento,
abonando la diferencia del
precio.
• Todos los atributos ofrecidos
por la garantía son válidos
presentando la factura de
compra original.
EC DECLARACIÓN DE
CONFORMIDAD
Declaramos que la máquina
descrita a continuación cumple con
las Directrices básicas de seguridad
pertinentes, tanto en su diseño
básico como en su construcción,
así como en la versión puesta
en circulación por nosotros. Esta
declaración dejará de ser válida si
la máquina se modica sin nuestra
previa aprobación.
Producto: Destornillador Inalámbrico
con Batería de Lithium
Modelo Tipo: PRO-SD360
2. Para el servicio de garantía, por favor
póngase en contacto con el Centro
de Servicio Autorizado, Presente la
tarjeta de garantía y la factura original
para el servicio de garantía.
3. La presente Garantía NO aplica en:
• Daños por transporte después
de las ventas.
• Servicios no proporcionados por
nuestros centros de servicio
autorizado.
• Accesorios y piezas de
repuesto, si los hay, incluidos en
el embalaje (Paquete).
• El daño producido por el uso
comercial o industrial, ya que
este producto es pensado
solo para uso en Hágalo usted
mismo (DIY).
21
Page 22

NOTAS
Page 23

NOTAS
Page 24

www.promakertools.com
 Loading...