

Pro Mach Wexxar BEL Series, Wexxar BEL 505, Wexxar BEL 505S Operation & Service Manual

OPERATION & SERVICE MANUAL 65-11-7
BEL 505 / BEL 505S
SEMI-AUTOMATIC CASE FORMER
AND PACKING STATION
65-11-07 2/5/2007
Wexxar Packaging Inc
Phone (604) 270-0811 • Fax (604) 270-7897
E-mail: sales@wexxar.com
.

BEL 505/505S SEMI-AUTOMATIC C ASE F ORMER & PACK S TATION 2
SSAAFFEETTYY CCAAUUTTIIOONN
Although the BEL 505 & 505 ‘S’ packing stations can be used in conjunction with competitive case
taper/sealers, BELCOR cannot assume responsibility for safety issues resulting from these applications
We specifically do not recommend using these packing stations in close proximity with
conventional back flap “kickers” and three-flap folders.
Be sure that:
• the main on/off valve at the air connection is shut off and that the red emergency stop button is
pushed down before connecting an air supply to the machine.
• the machine is disconnected from the air source before undertaking any maintenance or service
procedures. This is to avoid inadvertent machine actuation that could result in personal injury.
Never leave the machine unattended with the air switch on.
.
Only qualified personnel must operate the machine!
65-11-07 2/5/2007

BEL 505/505S SEMI-AUTOMATIC C ASE F ORMER & PACK S TATION 3
BEL 505
SEMI-AUTOMATIC CASE FORMER AND PACKING STATION
Standard Case Size Range:
Length Width Height
Minimum 8” (203mm) 6” (152mm) 3.5” (89mm)
Maximum 26.5” (673mm) 16” (406) Unlimited
Machine Size 37.5 (953mm) 25 (635mm) 18.5” (470mm) [min]
Case Infeed/Outfeed Height:
• UHMW Pads: 21.5” (546mm) [min] 28.5” (724mm) [max]
• Castors: 25” (635mm) [min] 32” (813mm) [max]
Power Requirements (standard):
• Compressed Air: 80-90 PSI ; 0.1 CF/Cycle
BEL 505 ‘S’
SEMI-AUTOMATIC CASE FORMER AND PACKING STATION
Standard Case Size Range
Length Width Height
Minimum 8” (203mm) 5” (127mm) 3.5” (89mm)
Maximum 16” (406mm) 15” (381mm) Unlimited
Machine Size 27.5” (700mm) 25” (635mm) 22 (560)
Case Infeed/Outfeed Height:
• UHMW Pads: 21.5” (546mm) 28.5” (724mm)
• Castors: 25” (635mm) 32” (813mm)
Power Requirements (standard):
• Compressed Air: 80-90 PSI ; 0.1 CF/Cycle
65-11-7 2/5/2007

BEL 505/505S SEMI-AUTOMATIC C ASE F ORMER & PACK S TATION 4
TABLE OF CONTENTS
INTRODUCTION.......................................................................................................... 5
ABOUT THIS MANUAL ............................................................................................................................................. 5
INSTALLATION PROCEDURES ................................................................................. 6
INSTALLING THE BEL 505 & 505 ‘S’ ........................................................................................................................6
L
EVELLING THE MACHINE ..................................................................................................................................... 6
A
IR CONNECTION ................................................................................................................................................... 7
OPERATION & ADJUSTMENT PROCEDURES.......................................................... 8
MACHINE SET-UP ADJUSTMENTS...............................................................................................................................8
C
ASE WIDTH ........................................................................................................................................................... 8
C
ASE LENGTH ......................................................................................................................................................... 9
M
AJOR FLAP FOLDER ROLLER PLATES ..............................................................................................................10
M
ACHINE OPERATION ..............................................................................................................................................11
TARTING THE MACHINE .....................................................................................................................................11
S
E
RECTING A CASE................................................................................................................................................. 11
M
ACHINE OPERATING CYCLE ............................................................................................................................. 12
TROUBLESHOOTING GUIDE ............................................................................................. 14
65-11-7 2/5/2007

BEL 505/505S SEMI-AUTOMATIC C ASE F ORMER & PACK S TATION 5
INTRODUCTION
The BEL 505 & 505 ‘S’ are designed for semi-automatic folding of new corrugated cases. The machines
combine the following functions:
1. A bottom major and minor flap folder mechanism assist in erecting flat cartons ready for packing.
2. A packing station position to fill the case with product.
The machine does not require a high level of technical knowledge to operate.
A
BOUT THIS MANUAL
The Installation section in the beginning of the manual is intended for those who will be installing and
maintaining the machine.
The Machine Set-up and Machine Operation instructions should provide a new operator with the
knowledge needed to run the machine safely and effectively.
first reading this manual.
No one should operate the machine without
Following the operating instructions is a Troubleshooting section to provide solutions to common problems that
may occur with the quality of corrugated cartons used and effectiveness of the case folding process.
A separate “Technical Reference” manual or manual section provides details on parts kits, parts identification
and machine construction for those who will service and repair the machine.
PLEASE NOTE:
Best performance with BEL machines will occur when adjusted, operated and maintained in accordance
with the instructions in this manual. We cannot be responsible for unauthorized changes to the machine
or methods of its operation.
The following information is a reference guide for our standard machines. We strive to provide up-to-date
manuals with machines but we are continually improving our products and the details in the manual
provided might not exactly match the machine at the time it is shipped. Many machines are modified in
response to customer requests or as required by the case samples supplied at the time the machine is built
and the manual may not provide a complete reference to the changes or modifications. If there are any
questions about your machine not covered by the manual, please contact us and we will do our best to
provide the additional information you need.
65-11-7 2/5/2007

BEL 505/505S SEMI-AUTOMATIC C ASE F ORMER & PACK S TATION 6
INSTALLATION PROCEDURES
INSTALLING THE BEL 505 & 505 ‘S’
Unpack the machine and remove any packing material from the interior or supports from underneath used
to protect components during shipping.
Install the legs at each of the three positions on the machine frame with one nut and washer for each leg
underneath the frame and another nut and washer on the inside. If the 505 or 505S is to be mounted on
[and supported from] the case sealer with mounting options 70-378 or 70-395, refer to the instructions
included with them.
LEVELLING THE MACHINE
If standing directly on the floor, the base of the frame should be made level to ensure personnel safety,
provide optimum performance and avoid frame stress.
Please note that the standard BEL 505 & 505 ‘S’ are intended to operate in a horizontal position.
Attempting to tilt the 505 or 505 ‘S’ toward the operator will cause excessive wear in the case width
adjustment mechanism and may case it to bind or damage the width adjustment screw. A width
adjustment equalizer option 70-380 is on BEL 505’s that are used with side-tilt mounted systems.
[Another possibility for a side-tilt system is the BEL Model 507 Tilt Packing Station. It is designed to tilt
towards the operator for case erecting and loading and then back to the horizontal position for feeding
into a sealer or onto a conveyor.]
ALIGNING THE MACHINE
The machine should be securely mounted to adjoining equipment to prevent the machine moving as it
operates. If being directly connected to a BEL case sealer, it is important that the centers of both
machines be in line for ease of case transfer between machines. When a BEL 505 is provided together
with a BEL sealer a jig is provided to further assist aligning the machines. The BEL 505 should be level
with, or slightly higher than, the case sealer conveyor.
Alignment Jig
65-11-7 2/5/2007

BEL 505/505S SEMI-AUTOMATIC C ASE F ORMER & PACK S TATION 7
AIR CONNECTION
SSAAFFEETTYY CCAAUUTTIIOONN
Make sure that the red emergency stop button is pushed down (off)
before connecting an air supply to the machine.
The air may come from either a separate source or by tapping off the supply of an adjoining case sealer.
The supply must be clean factory air and must be lubricated by the unit on the machine.
Air pressure should be set to 80 psi. for most applications with a minimum setting of 65 psi. and
maximum of 100 psi.
65-11-7 2/5/2007

BEL 505/505S SEMI-AUTOMATIC C ASE F ORMER & PACK S TATION 8
OPERATION & ADJUSTMENT PROCEDURES
SSAAFFEETTYY CCAAUUTTIIOONN
Switch off or disconnect the air supply to the machine before making any changes or
adjustments.
MACHINE SET-UP ADJUSTMENTS
Setting up the BEL 505 & 505 ‘S’ to fold a particular box size is accomplished with two main
adjustments for case width and length. There is a third adjustment to reposition the major flap folder
plates that, after initial setup, will need to be changed only where there is a large difference between cases
widths.
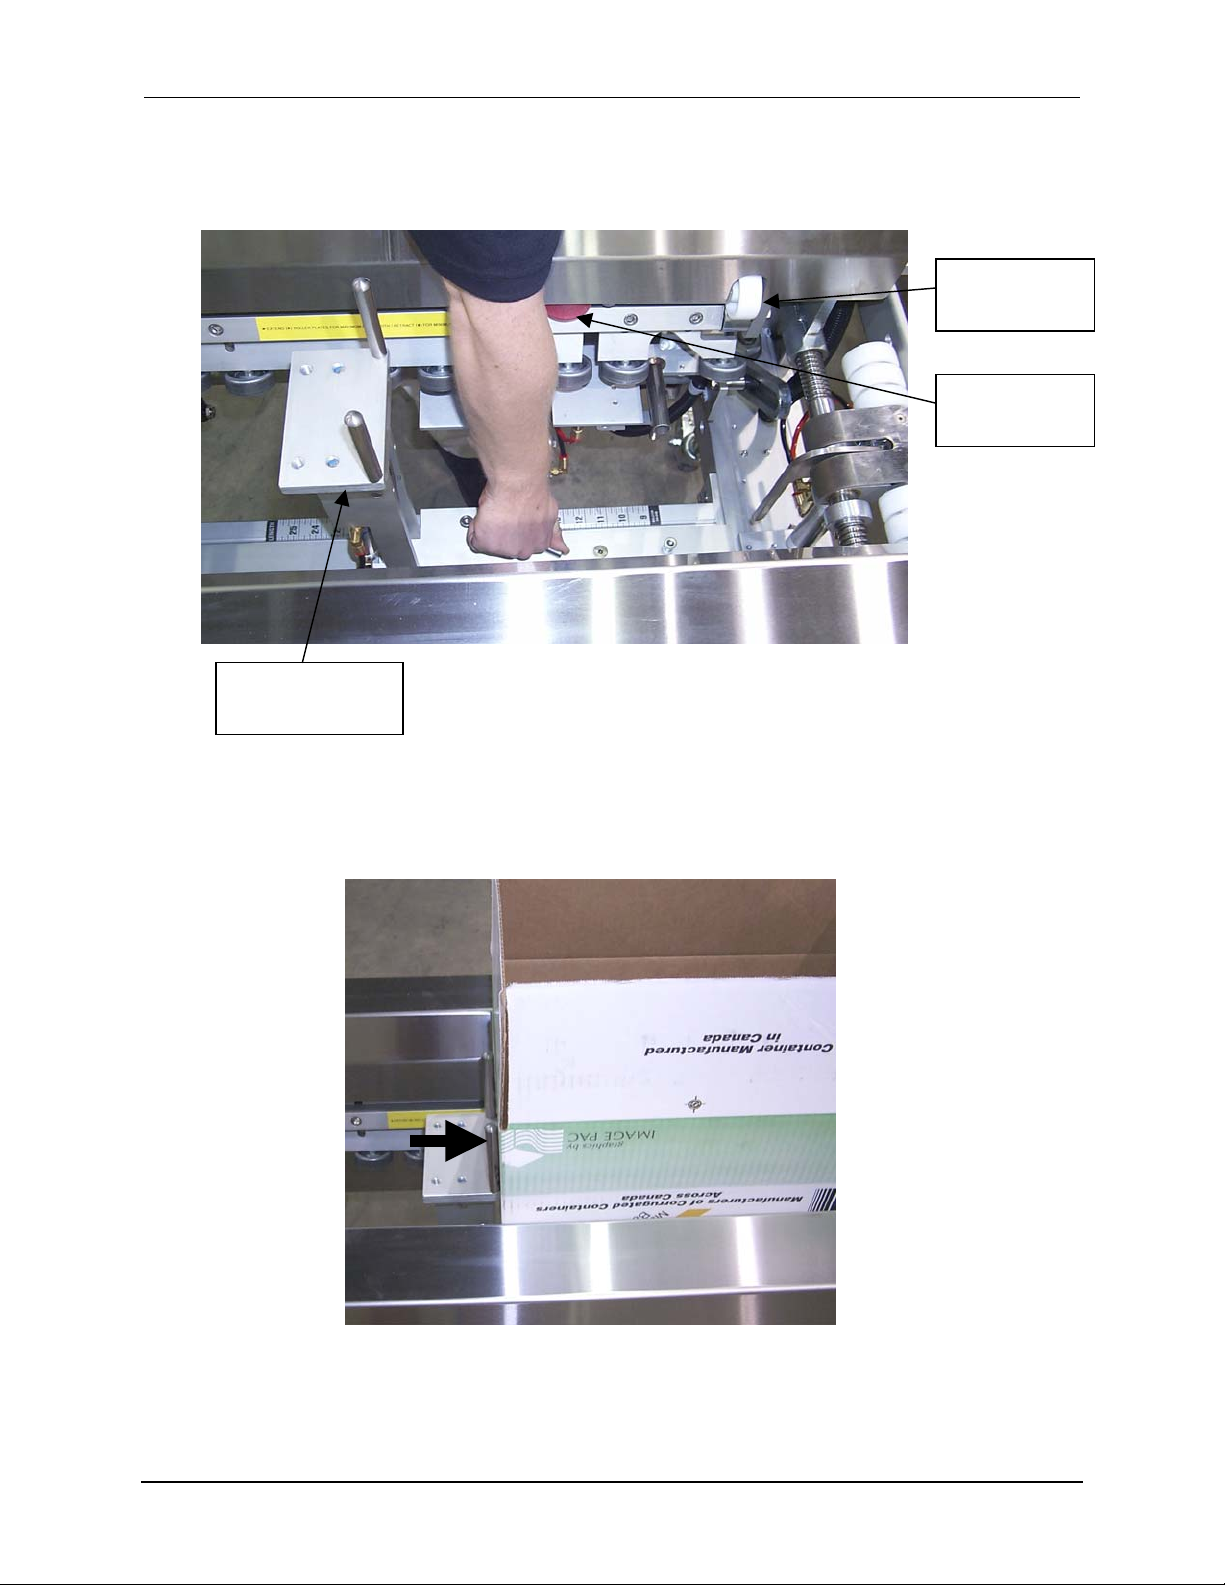
CASE WIDTH
1. Loosen the hand
knobs at the end
of the BEL 505
or 505 ‘S’.
2. Attach the hand
crank supplied
with the machine
on the square
shaft that extends
from either side
of the frame.
Adjust the frame
to be wider than
the case.
3. Open a case from the flat blank and insert it into the m
4. Crank in the width adjustment until the red case
hold-down rollers are lightly gripping the sides
of the case. It should be easy to insert and
remove the case without forcing but it must
maintain contact on the white “body “ switch
roller until the case leaves the machine.
5. Re-tighten the hand knobs.
65-11-7 2/5/2007
achine.
Case holddown roller
“Body”
switch roller
BEL 505/505S SEMI-AUTOMATIC C ASE F ORMER & PACK S TATION 9
CASE LENGTH
1. Remove the case and loosen the clamp at the base of the front minor flap folding “tower “
“Body”
switch roller
Case holddown roller
Minor flap
folding “tower”
2. Reinsert the case into the machine and position it ½” back from the minor flap folder at the exit end
of the machine. Push the tower forwards until it just contacts the back of the case. Remove the case
and tighten the tower clamp
65-11-7 2/5/2007

BEL 505/505S SEMI-AUTOMATIC C ASE F ORMER & PACK S TATION 10
MAJOR FLAP FOLDER ROLLER PLATES
The major flap folding plates and wheels may need to be extended to provide additional support for wide
heavy cases or retracted for narrow ones.
Important Note Regarding Major Folder Plates Adjustment: Sliding the plates in towards the
machine centre increases the case bottom support but limits the minimum width adjustment when the
major flap folder wheels hit the minor folder tower. Also, extended folder plates in the down position will
wedge against the bottom control valve / flap opener bracket as the machine is adjusted for minimum
width. If forced, either of these conditions can damage machine components.
There are two major folder plates on each side of the machine, one small and one large that are adjusted
independently.
1. Loosen the four socket-head cap screws on each side that hold the folder rollers in place. Slide the
front [large] folder to the desired position and retighten the screws.
Front [large] major
flap folder plate
2. Adjust the rear [small] major folder
plate. Make sure that the plate will
not contact the “floor” switch valve
arm as it moves through its arc. For
wide cases, the small folder plate will
not be able to be extended as far as
the large plate and has a separate
adjustment for this reason.
Plate adjustment
clamp screws
Rear [small]
major folder
65-11-7 2/5/2007
“Floor” switch
valve arm
BEL 505/505S SEMI-AUTOMATIC C ASE F ORMER & PACK S TATION 11
Additional Note: For wide cases on 18” & 20” maximum width 505 versions, optional roller wheels are
mounted on extensions from the folding plates to place them closer to the centre of the box for better folding
performance and product support. Extensions may need to be removed for narrow cases run on the same
machine to avoid interference with other machine components. If your application requires these extensions and
they are not provided with your machine, contact BELCOR for information and parts.
MACHINE OPERATION
SSAAFFEETTYY CCAAUUTTIIOONN
Make sure that the main on/off valve at the air connection is shut off and that the
red emergency stop button is pushed down before connecting an air supply to the machine.
S
TARTING THE MACHINE
Prior to starting, hand swing all moving parts to check adjustment and for any mechanical
interference. Turn on main supply valve, keeping hands clear of moving parts.
E
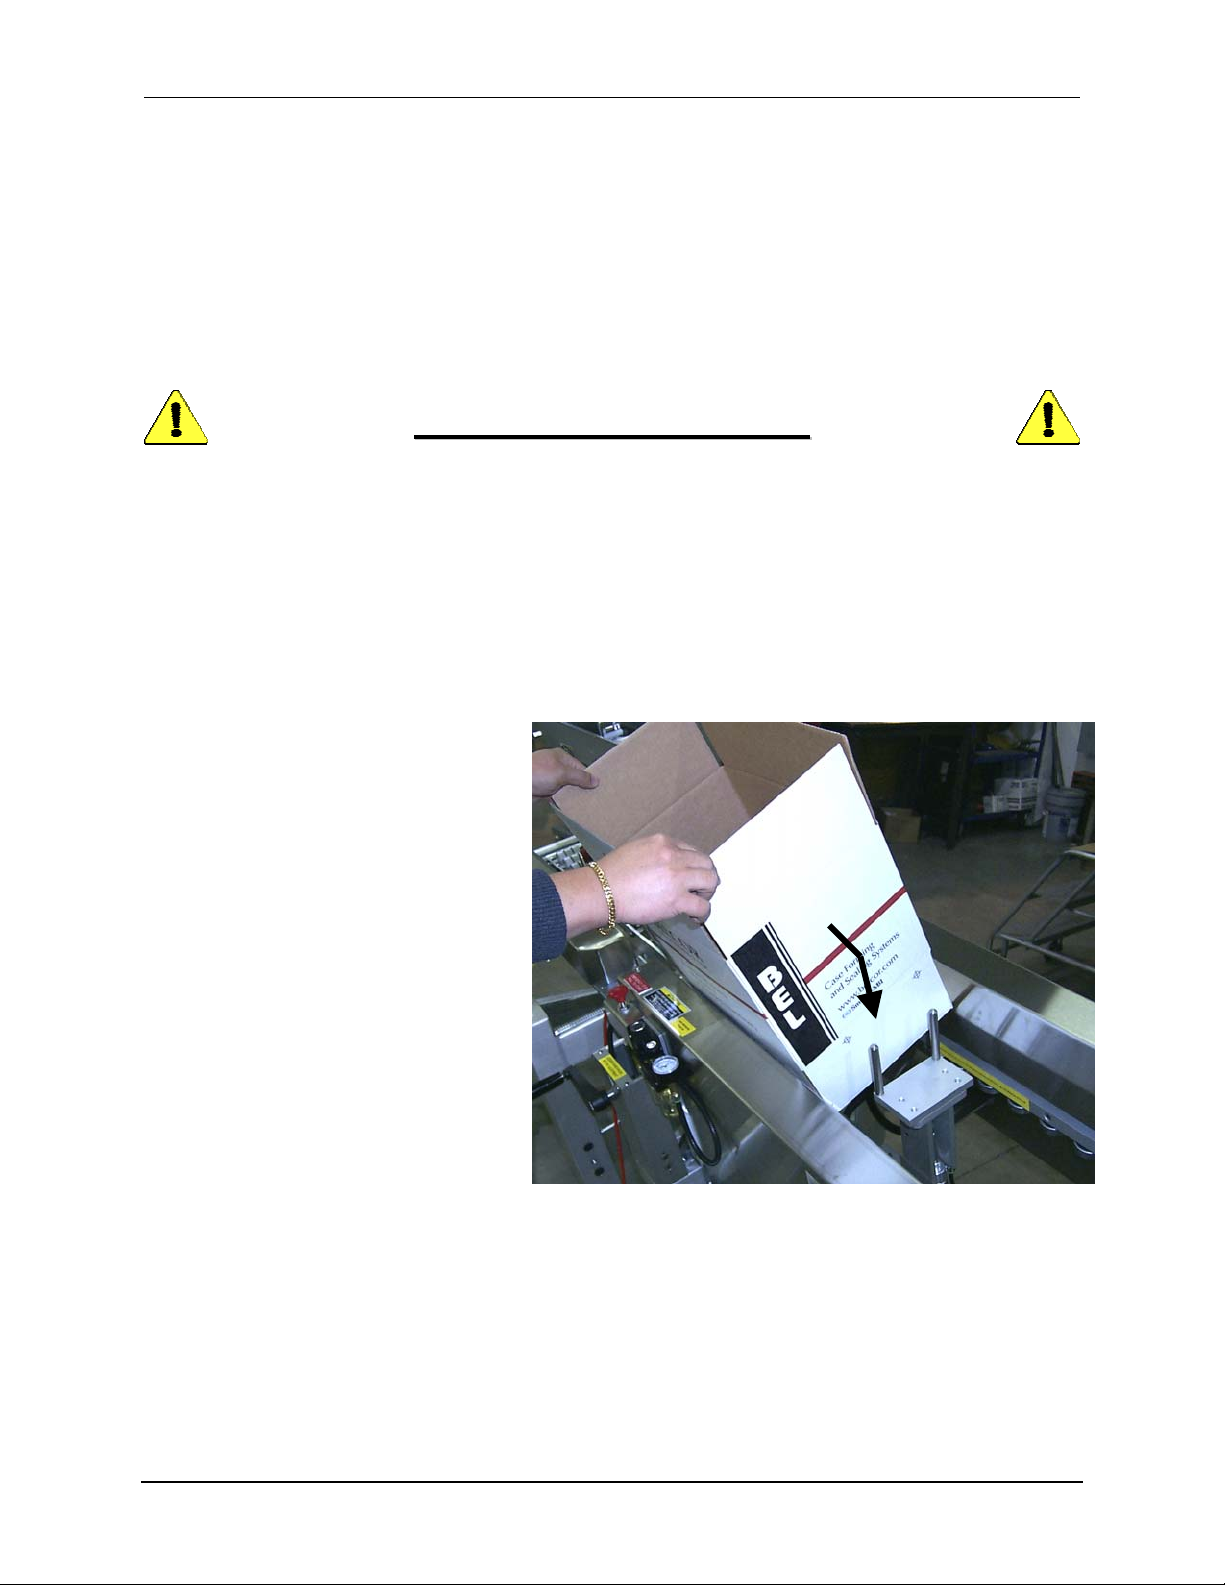
RECTING A CASE
1. Open a case so that it is fairly square.
2. Place the open bottom into the BEL
505 or 505 ‘S’, pushing the case all
the way down to the floor switches
3. The machine will first fold the front
and rear end minor flaps, then the two
side major flaps. The case is held in
place and is ready to fill, if desired
4. When filled, or if the case is just
erected for filling downstream, push
it out of the packing station to the
next operation
.
5. As the end of the case breaks contact
with the “body” switch, the 505 will
automatically reset ready for the next
case.
65-11-7 2/5/2007

BEL 505/505S SEMI-AUTOMATIC C ASE F ORMER & PACK S TATION 12
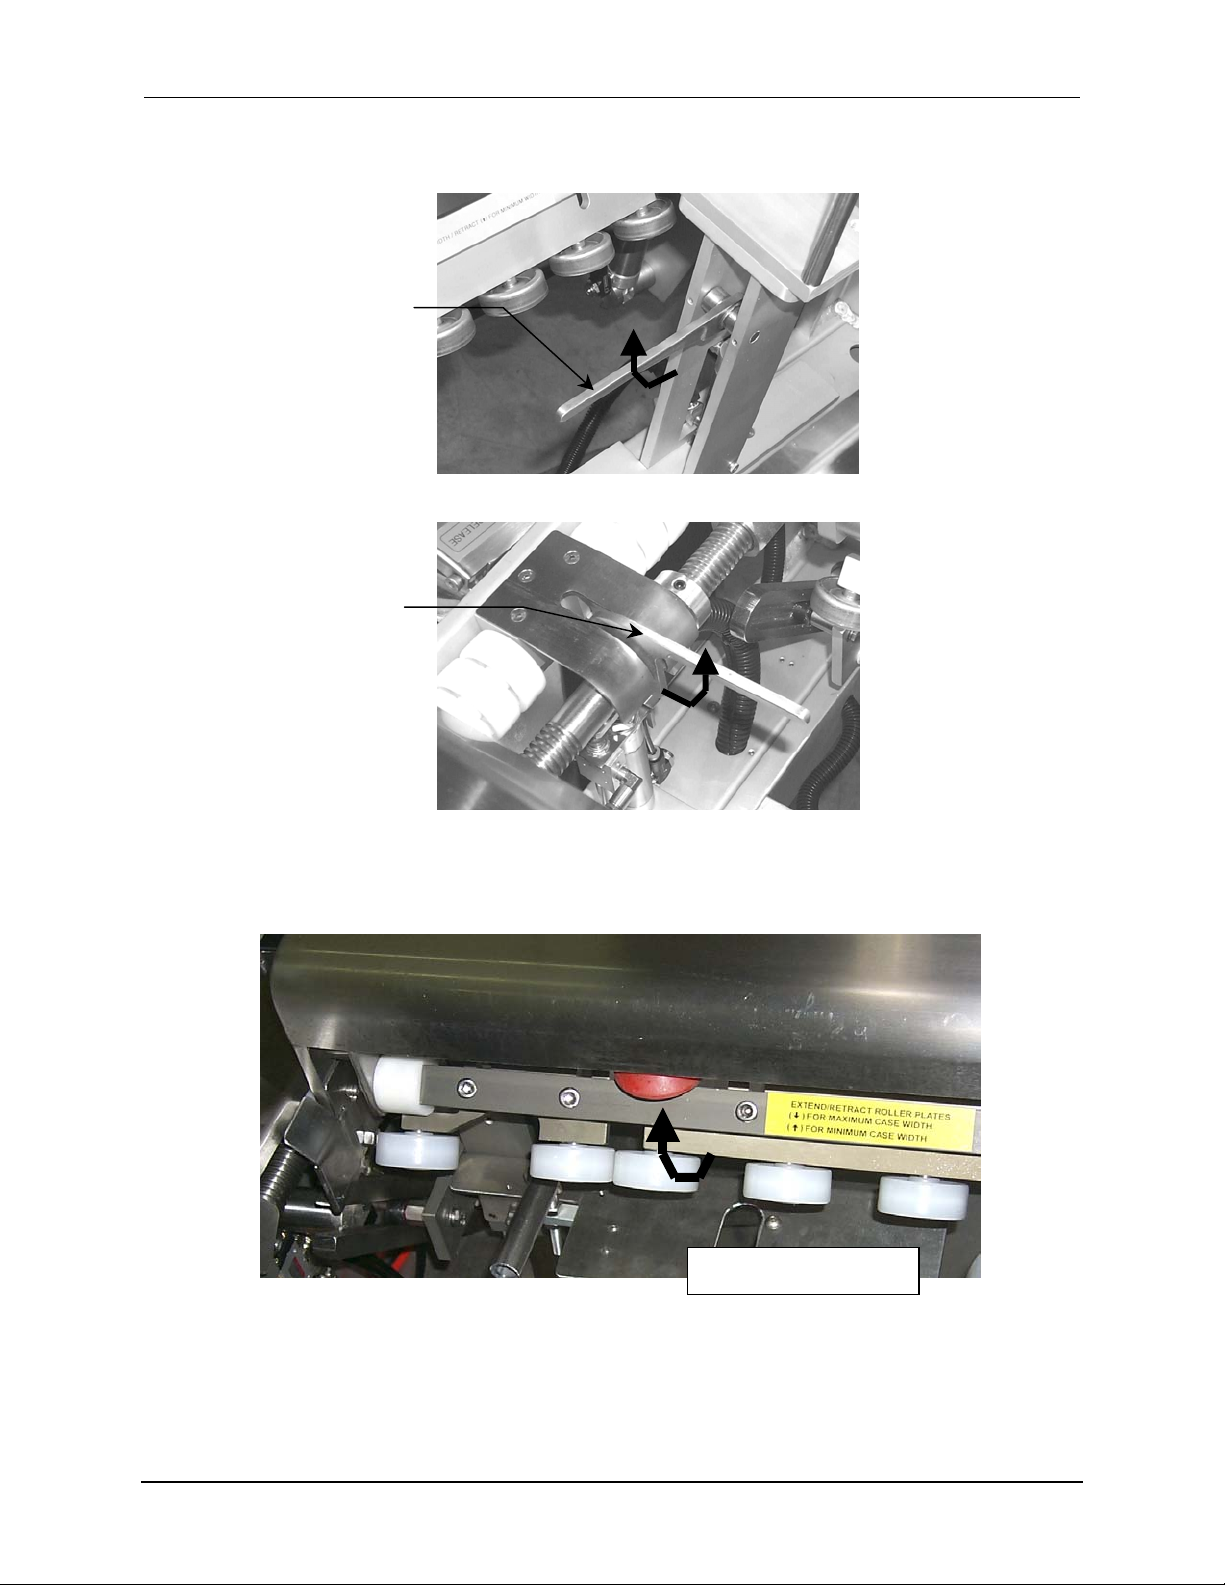
MACHINE OPERATING CYCLE
1. The bottom edges of the major flaps depress the actuators of the two “floor” switch valves and
the side of the case depresses the wheeled “body” switch valve. All three switches must be
actuated for the machine cycle to start.
“Body” switch
“Floor”
switches
2. The two small levers of the major (side) flap openers momentarily open the bottom major flaps
wider to clear the minor (end) flaps.
65-11-7 2/5/2007
Bottom major flap
opener
BEL 505/505S SEMI-AUTOMATIC C ASE F ORMER & PACK S TATION 13
3. The minor flap folders fold up both end flaps of the box bottom and retract.
Front [tower] Minor Flap
Folder
Front Minor Flap Folder
Rear Minor Flap Folder
[Machine out-feed end]
Rear Minor Flap Folder
4. The major flap folders then fold up both side flaps of the bottom and stay in position to support
the box for packing.
Major folder [RH
5. Pushing the box out of the machine breaks contact with the body switch inside the packing
station. The machine then resets, ready for the next case.
65-11-7 2/5/2007
 Loading...