

Page 1

User’s Guide
For Use with Version 5 Signs
Page 2

WELCOME...
...to the world of electronic moving message systems! We are pleased that you
have chosen the Pro-Lite TruColorXP electronic message sign.
We trust that you will enjoy the benefits from using the Pro-Lite sign. Should you
have any questions or suggestions about the Pro-Lite product, please feel free to
contact us:
E-mail: [email protected] | Web: www.pro-lite.com/feedback
Phone: 714-668-9988
SO THAT WE MAY BETTER SERVE YOU...
Please write your product information down and keep handy. The information is
found on the backside of the sign.
Model Number: ________________________
Batch/Serial Number: ____________________
Purchase Date: ________________________
REGISTRATION...
Mail your included warranty registration card today to receive additional product
benefits for free!
1 YEAR LIMITED MANUFACTURERS WARRANTY
FREE Phone Technical Support
NEW PRODUCT ANNOUNCEMENTS AND PRODUCT DISCOUNTS
*Warranty card must be mailed within 30-days of purchase and accompanied by a
copy of the purchase receipt to be valid. If you did not receive a registration card,
please email [email protected].
Pro-Lite, Inc. has made every effort to ensure the accuracy of this manual.
However, due to continued product innovation, the information in this manual is
subject to change without notice.
TRADEMARKS
Tru-ColorII and Trivia-In-Motion are registered trademarks of Pro-Lite, Inc.
Copyright © 2012 Pro-Lite, Inc. All Rights Reserved
Page 3

TABLE OF CONTENTS
1
SECTION I
UNPACKING, INSTALLATION AND SET UP ................................................ 2
SECTION II
SIGN OPERATION OVERVIEW ................................................................ 3
SECTION III
REMOTE KEYBOARD OVERVIEW ........................................................4-5
SECTION IV
MESSAGE PROGRAMMING
Getting Started ........................................................................................ 6
Message Correcting ................................................................................. 7
Font Size and Color ..............................................................................8-9
Effects ................................................................................................. 10
Figures and Symbols ............................................................................. 11
European Characters and Graphics .......................................................... 12
Graphic Editing ..................................................................................... 13
Set Clock, ID, Baud, Beep, Trivia, and Password .................................. 14-16
Timers (scheduling and running multiple pages) .................................... 17-18
Delete Pages, Timers, and Graphics ................................................... 19-20
SECTION V
FREQUENTLY ASKED QUESTIONS .................................................. 21-22
TROUBLESHOOTING AND ADDITIONAL ASSISTANCE ........................... 23
SECTION VI
APPENDIX TABLES
Appendix I – Color Codes ....................................................................... 24
Appendix II – Character Size Codes ......................................................... 25
Appendix III – Graphic Codes ............................................................. 25-26
Appendix IV – Effect Codes .................................................................... 27
Appendix V – European Character Codes ................................................. 28
SECTION VII
GENERAL SPECIFICATIONS ................................................................. 29
RETURN FOR REPAIR PROCEDURE ..................................................... 29
Page 4
SECTION I
2
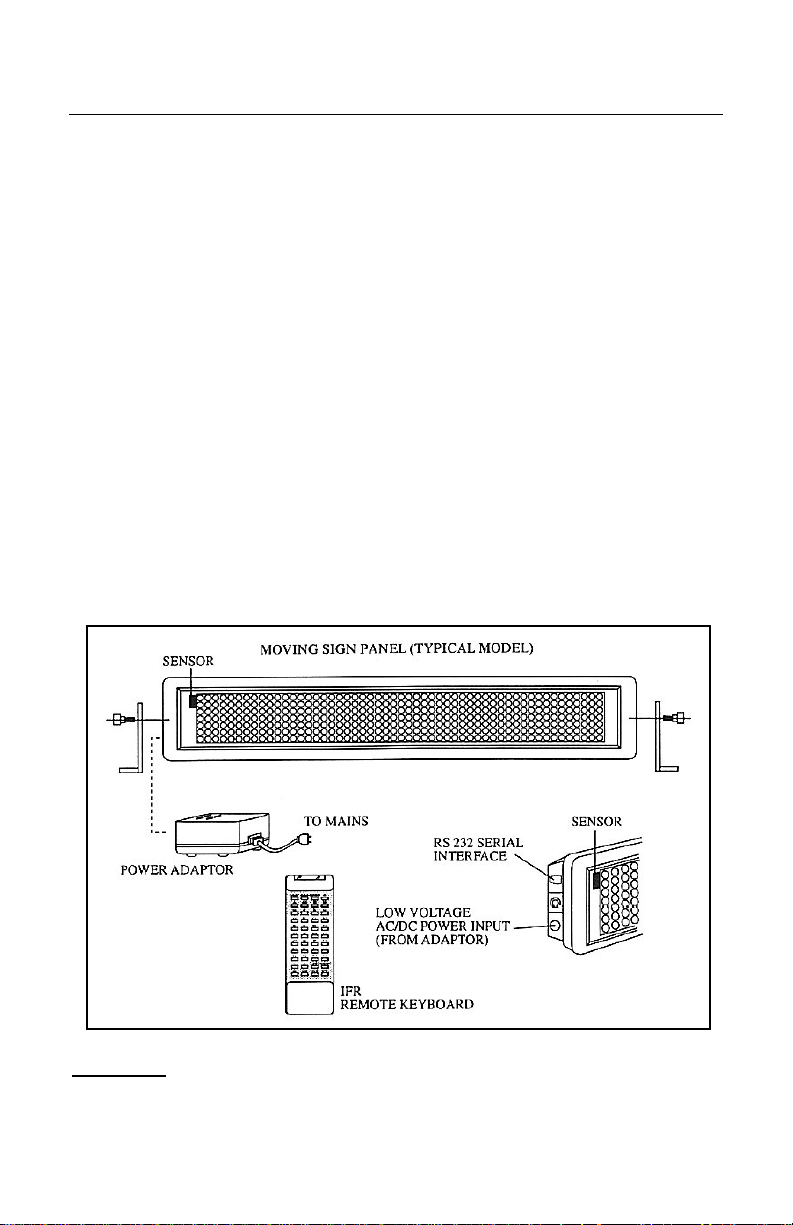
UNPACKING
You should receive the following items in the package:
1. Sign
2. Remote keyboard
3. Power adaptor
4. User manual
5. Warranty Registration Card
6. Two mounting brackets (wall mounting screws not included)
7. Software and Communication cable.
8. Accessories Brochure/Order form
If there is any missing item(s) please contact Pro-Lite within 7 days of
purchase.
INSTALLATION AND SET UP
1. Mount the brackets onto the chosen wall location. Use the mounting
screws included with the display to fasten the brackets onto the sign.
2. There are two wires from the power adapter. First connect the “mains” to
any 110V/120V AC wall outlet. Secondly, connect the opposite end to the
sign power input.
3. The sign will automatically light up and show the "demo" message.
4. Surge protectors are recommended if you are in an area where power
out-ages are frequent.
WARNING! U.S. PATENT NOTICE
Pro-Lite displays are protected by one or more U.S. Patents. Companies or
individuals that copy or infringe Pro-Lite products in part or in whole will be
prosecuted to the full extent possible under the law of the United States.
Page 5

SECTION II
3
SIGN OPERATION OVERVIEW
2 Run Modes: Page and Timer
Page is used to store the prepared message which will be shown on the
screen. Message content can be programmed with various colors, effects
and graphics just by using the remote keyboard. There are 26 Pages (A - Z)
available for message programming. This allows you to program multiple
messages into different Pages.
Timer is a dual-function feature of the Tru-ColorII. It has the ability to
display multiple pages in sequence and/or run a specific pre-programmed
page at a specific time of day. There are 10 Timers (A – J) available for you
to program. Inside each Timer, a maximum of 32 different combinations of
pages can be arranged.
2 Unique Functions: Auto and Trivia-In-Motion.
Auto is a simple way to bring more attention to your message without
having to read the complete manual. To get started simply do the following:
Press ESC E P A , sign will show: (START)
Press the AUTO key and begin to type your message.
When you are done, press ESC R P A
To edit your message, repeat the first step, and use the DEL keys to
make changes accordingly.
Trivia-In-Motion are Trivia questions and answers that are automatically
inserted between your programmed messages. Whether your message is
simply informative or even promotional, Trivia-In-Motion is proven to entice
people to read your programmed messages by giving the reader the
opportunity to read your message while anticipating the answer to the
question.
Built-in Backup Battery.
In order for the memory to perform reliably you must plug the sign in for at
least 8 hours continuously when new to fully charge up the battery. As
further precaution to safeguard the memory, you should always plug the
sign power adaptor to a surge protector. Power spikes and surges can
cause the sign memory to be deleted.
For additional information, refer to the Frequently Asked Questions
section on page 21.
CAUTION!
The TruColorII is not designed for outdoor use.
Page 6
SECTION III
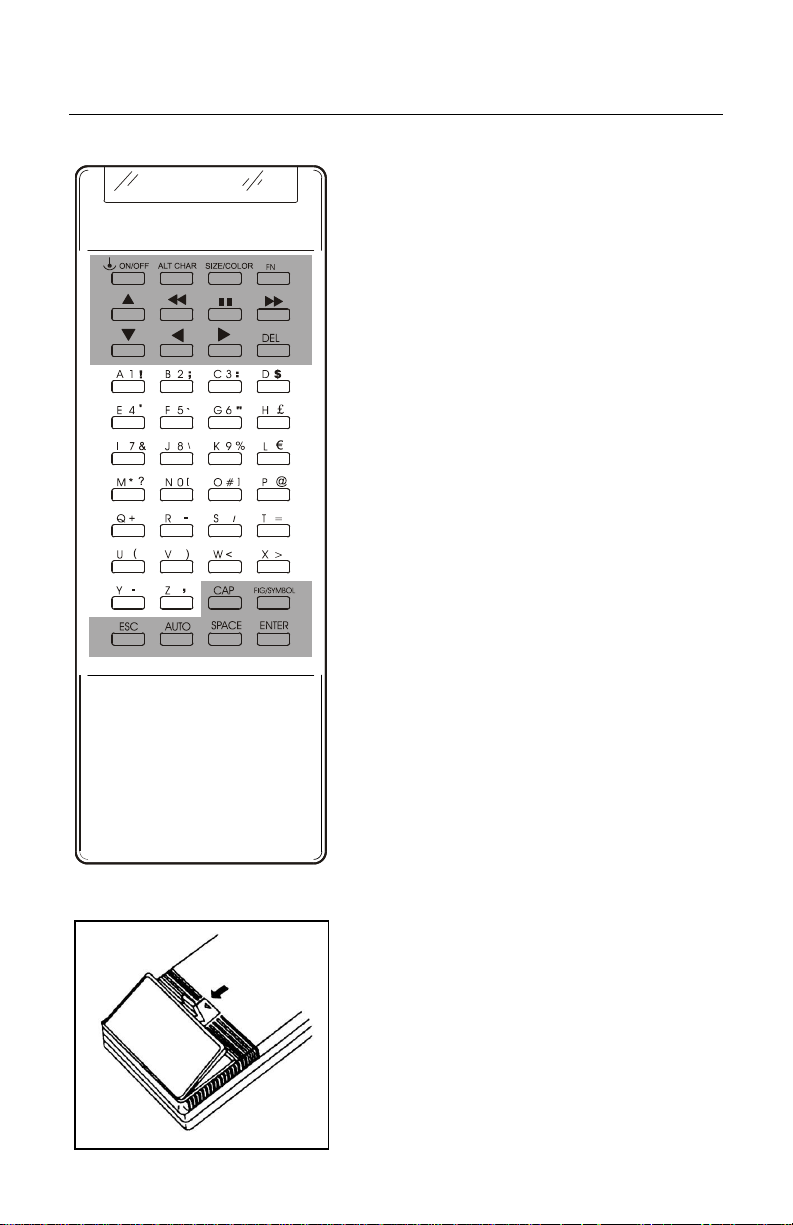
Character Keys
Consists of 95 standard alphabet, numeric,
symbol characters and 52 European
characters.
Upper Case (26) : A-Z
Lower Case (26) : a-z
Numeric (10) : 0-9
Symbol (29) : !”…
European (52) : éæ…
Refer to page 28 for European character
codes.
Command Keys
Refer to following page for detailed
description of Command Keys.
Note:
1) Remote keyboard must be pointed at the
built-in Infra-red sensor located at the left
hand corner of the moving sign.
2) Optimum operating distance should be
around 5ft. to 30ft.
3) Do not subject the remote keyboard to
impact, water or excessive humidity.
4) The remote keyboard operates two (AA)
1.5 volt batteries.
4
REMOTE KEYBOARD OVERVIEW
INSERTING BATTERIES
Page 7
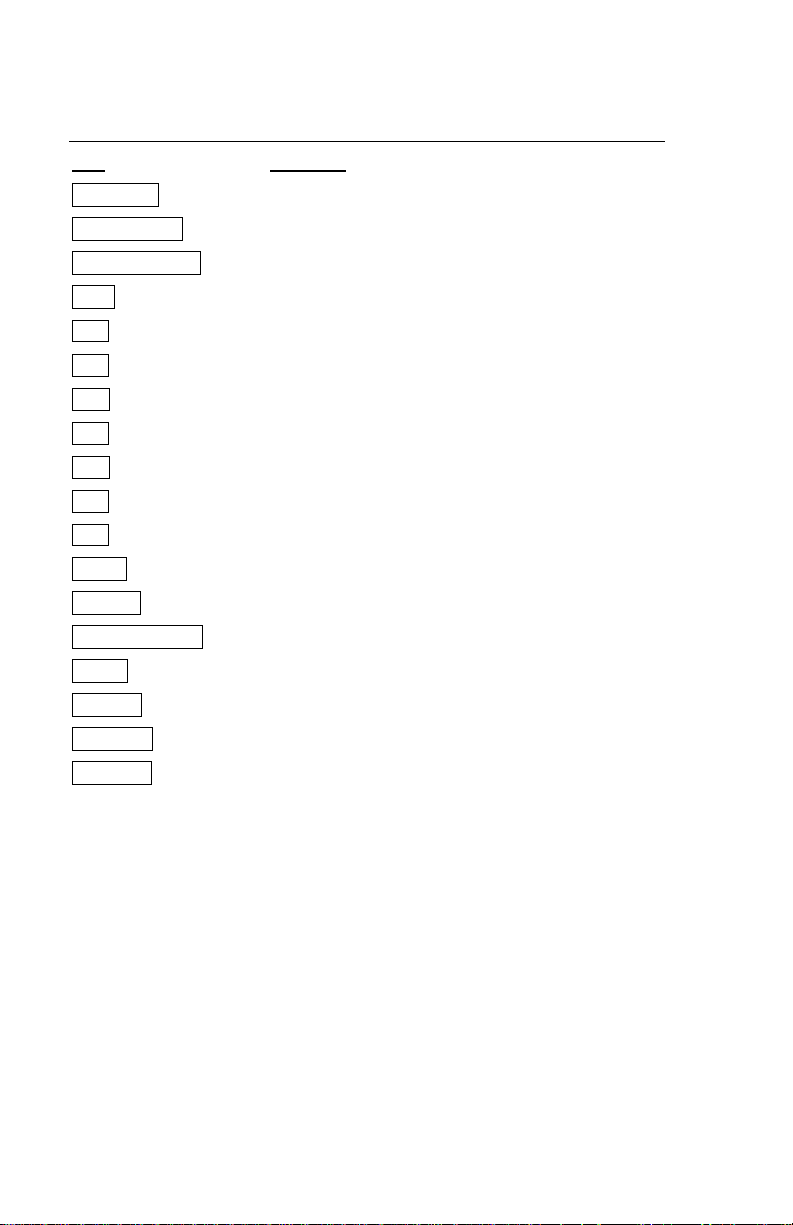
REMOTE KEYBOARD LAYOUT (continued)
5
Description of the Command Keys
Key Function
ON/OFF Display ON/OFF
ALT CHAR English, European, and Graphic mode
SIZE/COLOR Select Character Size and Color
FN Select effect
Scroll upward to select Color, Timer or Graphics
Advance cursor backwards by 10 characters
Pause message currently running
Advance cursor forward by 10 characters
Scroll downward to view Color, Timer or Graphics
Advance cursor backwards by 1 character
Advance cursor forward by 1 character
DEL Delete unwanted items
CAPS Toggle between uppercase and lower case
FIG/SYMBOL Toggle between figures and symbols
ESC Exit to main menu from Edit or Run mode
AUTO Insert random effect in message
SPACE Blank item insertion
ENTER Confirm selection or entry
Page 8
SECTION IV
6
GETTING STARTED
Let’s program “Hello” by going into the edit mode.
Press the ESC key for main menu, the screen shows: Ed Rn Del Set
TIP: The blinking capital letters are options you can press to enter a specific mode.
Press the E key for edit mode, the screen shows: Page Tmr Gfx
Press the P key for Page mode, the screen shows: PAGE(A-Z)?A
Press the A key to edit Page A, the screen shows: (START)
Type in the message “Hello” using the following keys:
H CAPS E L L O Space
TIP: If you enter a wrong character, simply press DEL to delete the last
character entered.
Now that our message is programmed, let’s put our sign in run mode.
Press the ESC key, the screen returns to: Ed Rn Del Set
Press the R key for Run mode, the screen will show: Page Tmr
Press the P key, the screen shows: PAGE(A-Z)?
Press the A key and your message “Hello” will shift from the right side
continuously in the default rainbow color.
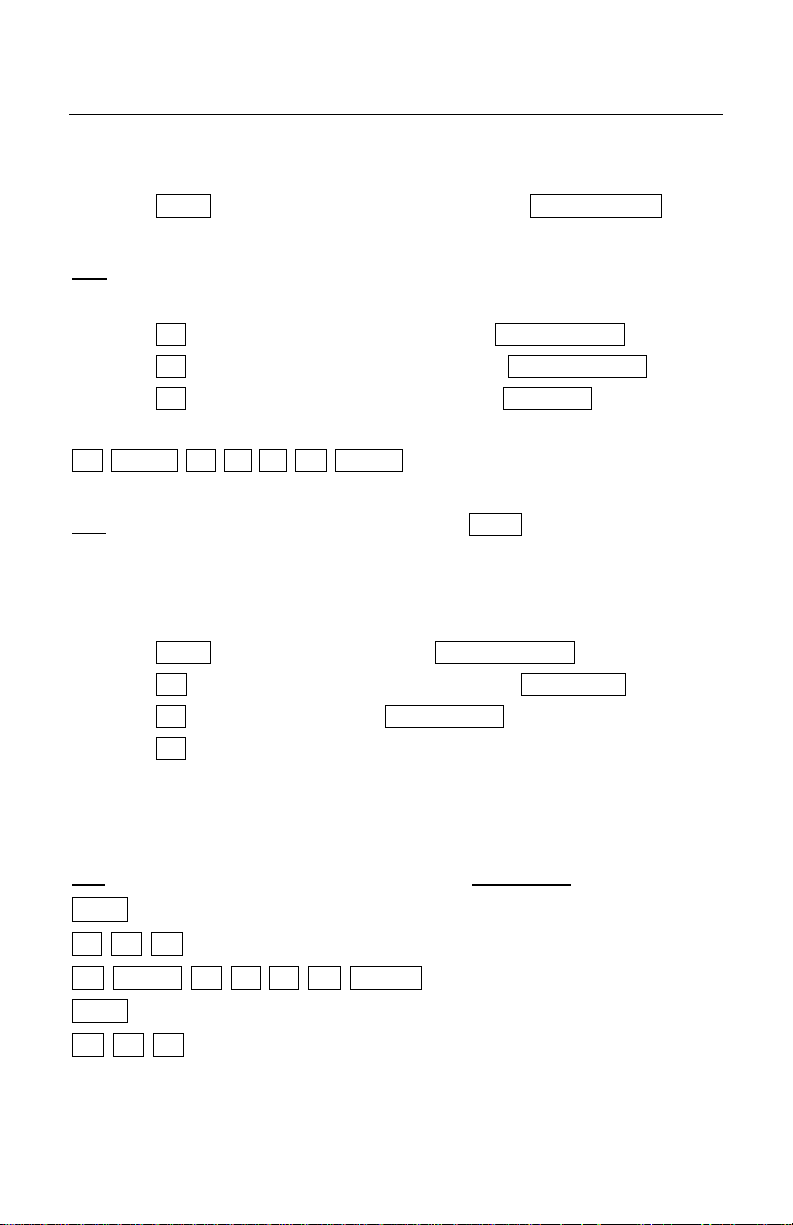
Summarized Sequence:
Key Description
ESC Exit Run mode
E P A Edit page A
H CAPS E L L O Space Program message
ESC Exit message editing
R P A Run Page A
Page 9
MESSAGE CORRECTING
7
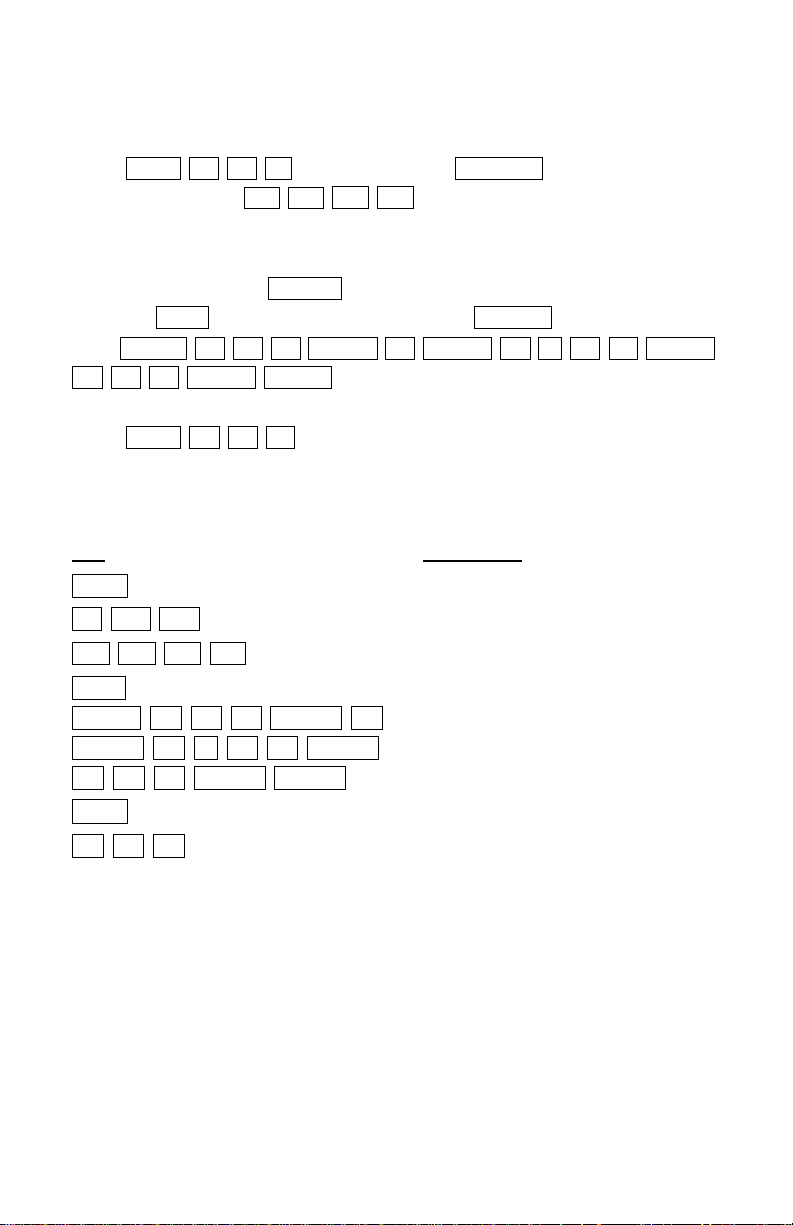
Let’s change our message in Page A to “Have a nice day”
Press ESC E P A , the screen shows: (START)
For practice, use the to get a feel of how to navigate
around your message.
Now let’s edit our message. Use the arrow keys to position the letter “O” on the far
right side of the screen, Hello
Press the DEL key 4 times, the screen shows H
Type CAPS A V E Space A Space N I C E Space
D A Y Space Space
Now that our message has been edited, let’s put our sign in run mode.
Press ESC R P A
The message “Have a nice day” is shifting from right to left.
Summarized Sequence:
Key Description
ESC Exit Run mode
E P A Edit page A
Position the cursor
DEL Remove unwanted items
CAPS A V E Space A Program message
Space N I C E Space
D A Y Space Space
ESC Exit message editing
R P A Run Page A
Refer to page 19 to delete the complete message and start over.
Page 10
FONT SIZE AND COLOR
8
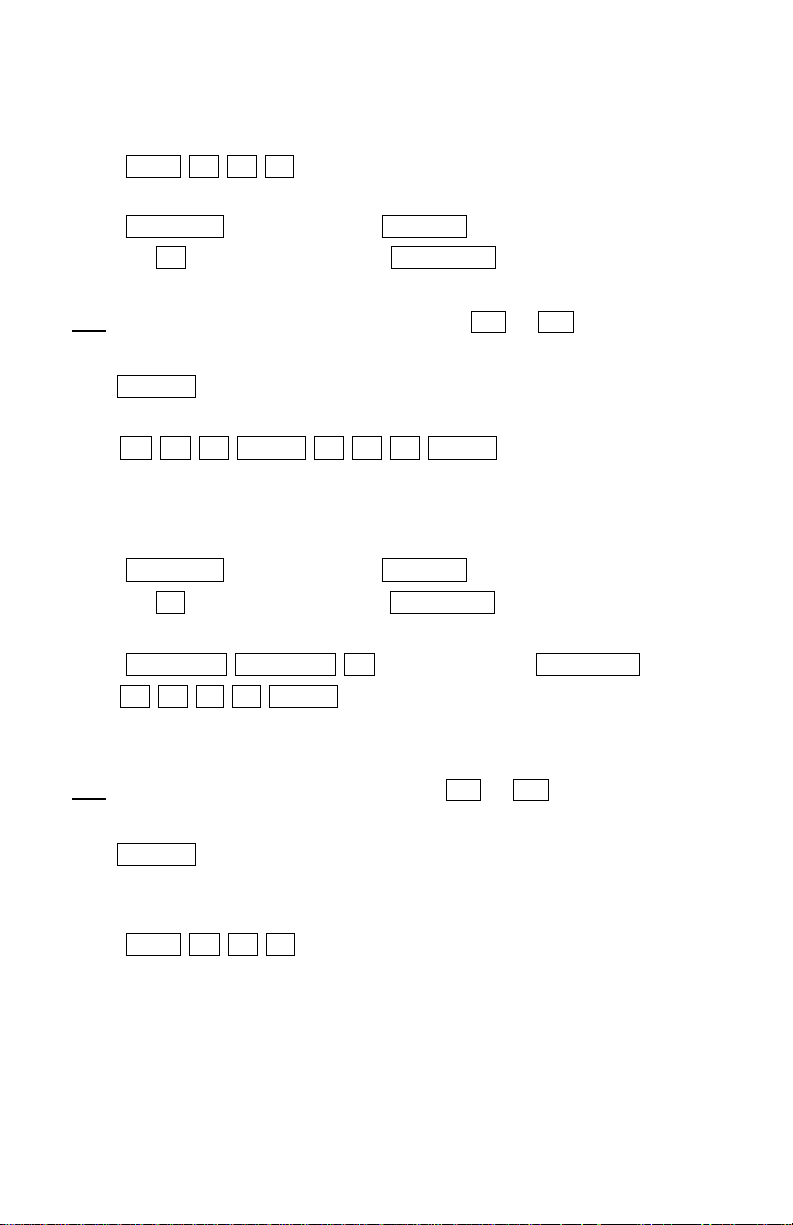
Let’s program “ONE DAY SALE” in page B using font size and color.
Press ESC E P B keys to begin editing.
Before typing any letter, let’s first select Bold font size.
Press Size/Color , the screen shows SIZE : A
Press the B key. The screen shows: (START)
TIP: For Font Size selection, you can also use the or key to view all the
available font sizes. When you are satisfied with the font size, simply press
ENTER to begin using your font selection.
Type O N E Space D A Y Space to display the word “ONE
DAY” in Bold font using the default Rainbow color.
For the last word, we’ll use a Bold Flashing Font size in a Bright Red Color.
Let’s begin by first selecting the Bold Flashing font size.
Press Size/Color , the screen shows SIZE : A
Press the F key. The screen shows: (START)
Now let’s select the color Bright Red.
Press Size/Color Size/Color C the screen shows: (START)
Type S A L E Space to display the word “SALE” in Bold Flashing
Font size using a Bright Red Color.
TIP: For Color selection, you can also use the or key to view all the
available colors. When you are satisfied with the color, simply press
ENTER to begin using your color selection.
Now that our message is programmed, let’s put our sign in run mode.
Press ESC R P B
The message “One Day SALE” is shifting from right to left.
Page 11
FONT SIZE AND COLOR (continued)
9
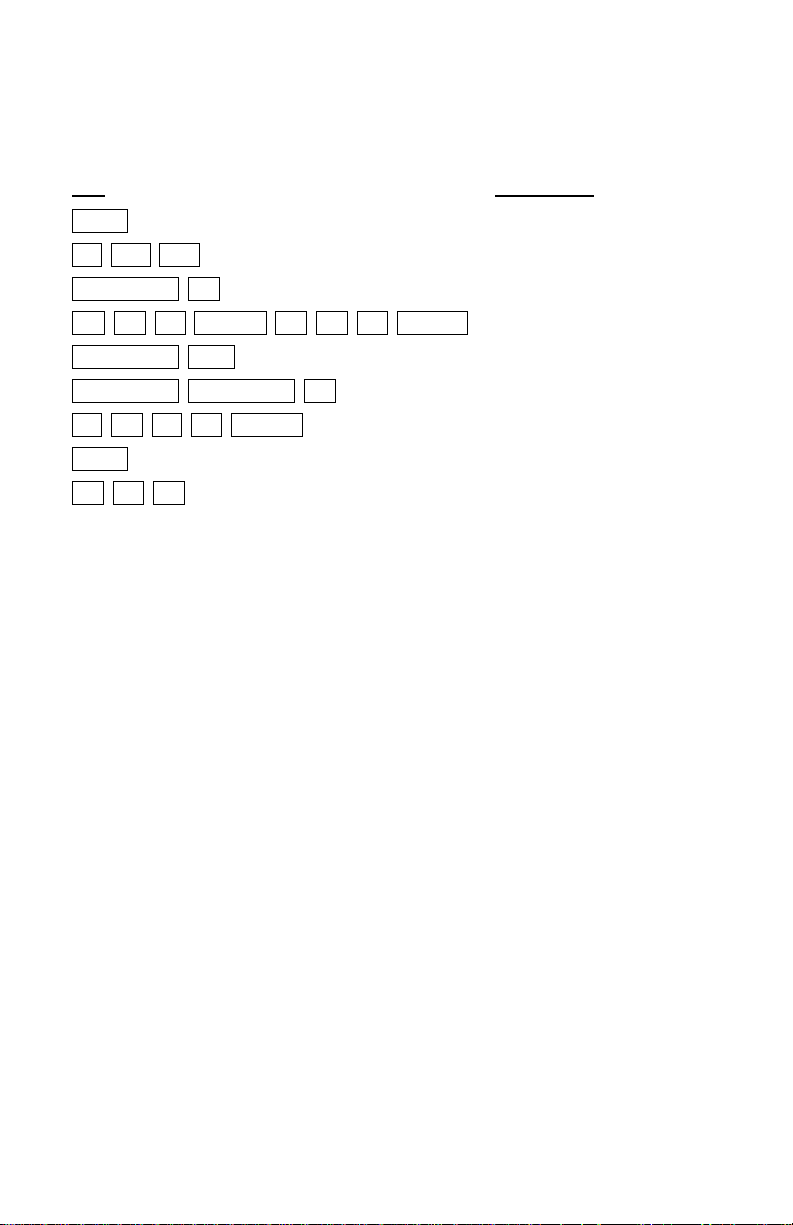
Summarized Sequence:
Key Description
ESC Exit Run mode
E P B Edit page B
Size/Color B Select Bold font size
O N E Space D A Y Space Program message
Size/Color F Select Bold Flashing font
Size/Color Size/Color C Select Color Bright Red
S A L E Space Program message
ESC Exit message editing
R P B Run Page B
There are 26 color variations to choose from. Refer to Appendix I for the
Color Code Table.
There are 8 font sizes to choose from. Refer to Appendix II for the Character
Size Code Table.
Page 12
EFFECTS
10
Let’s program “Football Game” in page C using some effects!
Press ESC E P C
Before typing any letter, let’s first select the Open effect.
Press FN , the screen shows: (AUTO):A
Press B , the screen will show: (OPEN<>)
TIP: For Effects selection, you can also use the or key to view all the
available effects. When you have decided which effect to use, simply press
ENTER to insert the effect in your message.
Type F CAPS O O T B A L L Space CAPS G
CAPS A M E
Now that our message is programmed, let’s put our sign in run mode.
Press ESC R P C
The message “Football Game” is using the Open effect.
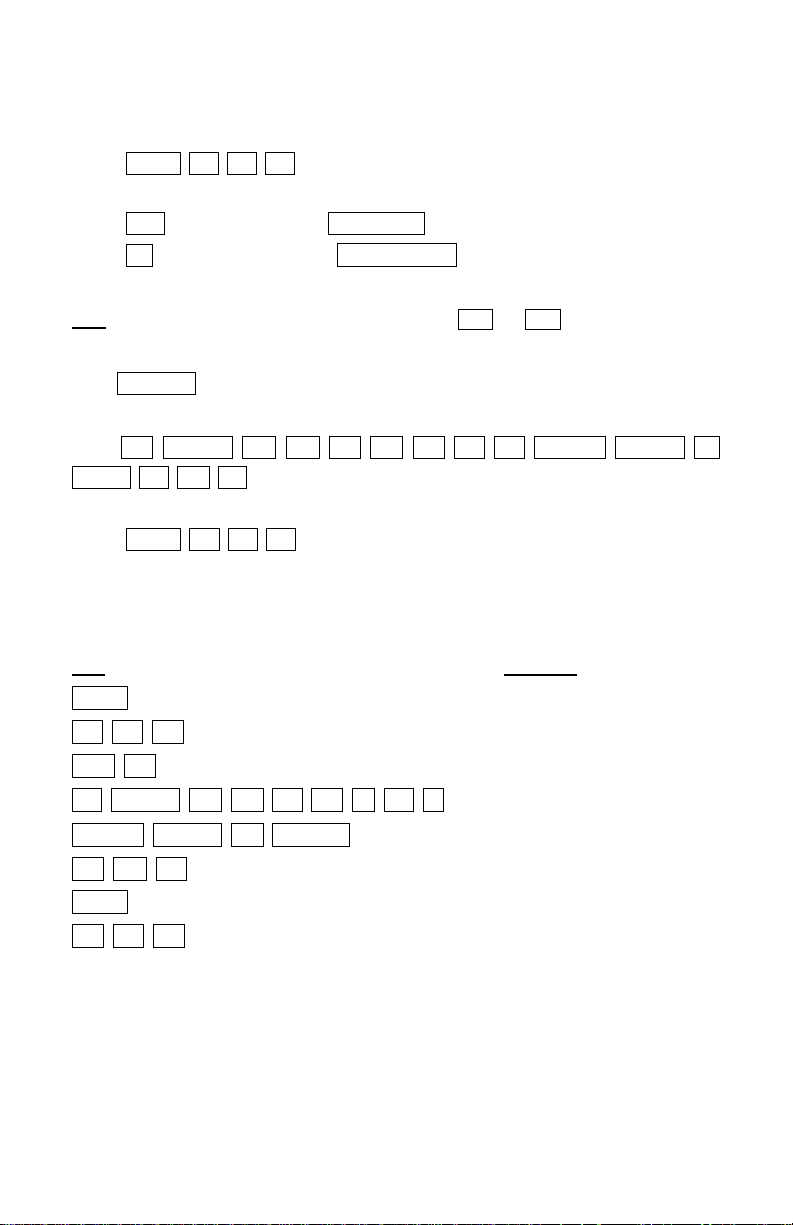
Summarized Sequence:
Key Meaning
ESC Exit Run mode
E P C Edit Page C
FN B Select Open effect
F CAPS O O T B A L L Program message
Space CAPS G CAPS
A M E
ESC Exit message editing
R P C Run Page C
There are 26 effects to choose from. Refer to Appendix IV for the Effects
Code Table.
Page 13
FIGURES AND SYMBOLS
11
Let’s program a few Figures and Symbols.
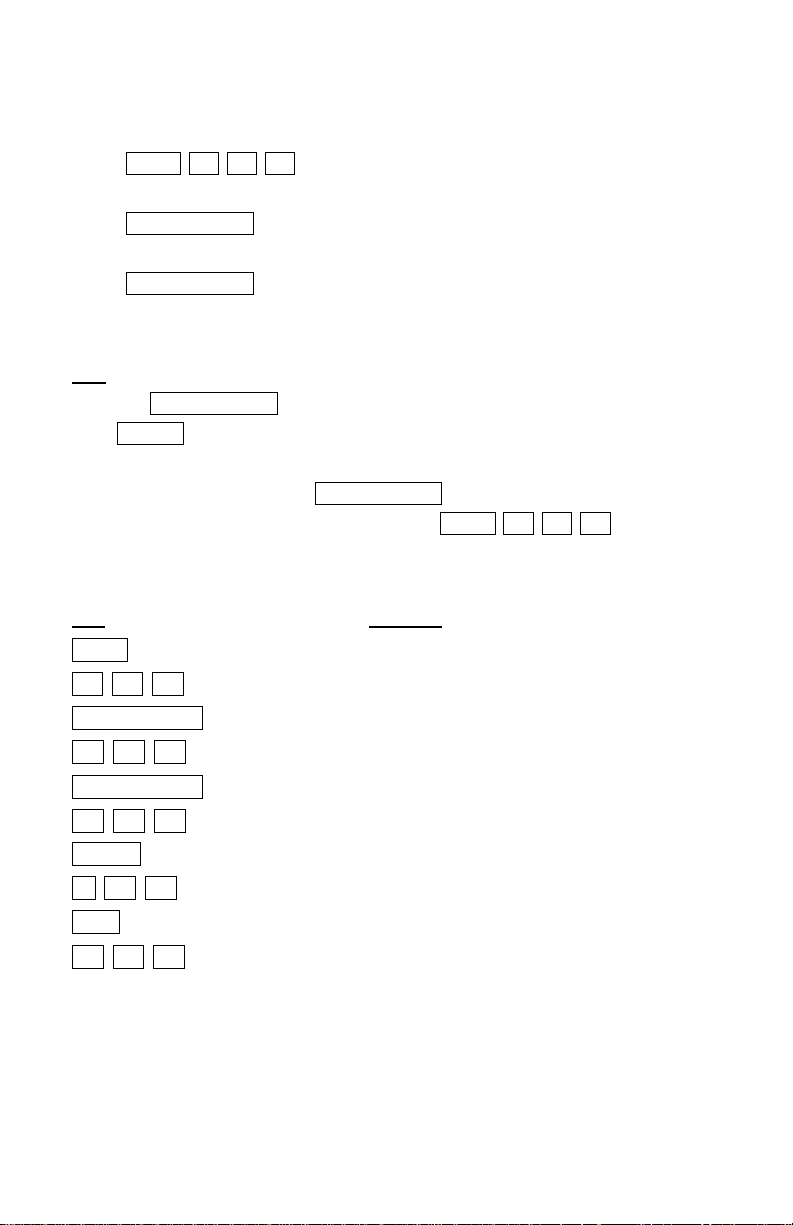
Press ESC E P D
Before typing, let’s first go into the Figures mode.
Press FIG/SYMBOL and you will automatically be in the Figures mode.
Now press any of the white character keys to display figures.
Press FIG/SYMBOL again to go into Symbols mode.
Now press any of the green character keys to display symbols.
TIP: At any time you can toggle between Figures and Symbols mode by pressing
the FIG/SYMBOL key. To go back to alphabet mode, simply press the
CAPS key.
Now that we’ve seen what the FIG/SYMBOL key can do, let’s put our sign in run
mode to see our Figures and Symbols. Press ESC R P D
Summarized Sequence:
Key Meaning
ESC Exit Run mode
E P D Edit Page D
FIG/SYMBOL Figures mode
A B C . . . Program figures
FIG/SYMBOL Symbols mode
A B C . . . Program symbols
CAPS Alphabet mode
A B C . . . Program standard alphabet characters
ESC Exit message editing
R P D Run Page D
Page 14
EUROPEAN CHARACTERS AND GRAPHICS
12
Let’s program a few European characters.
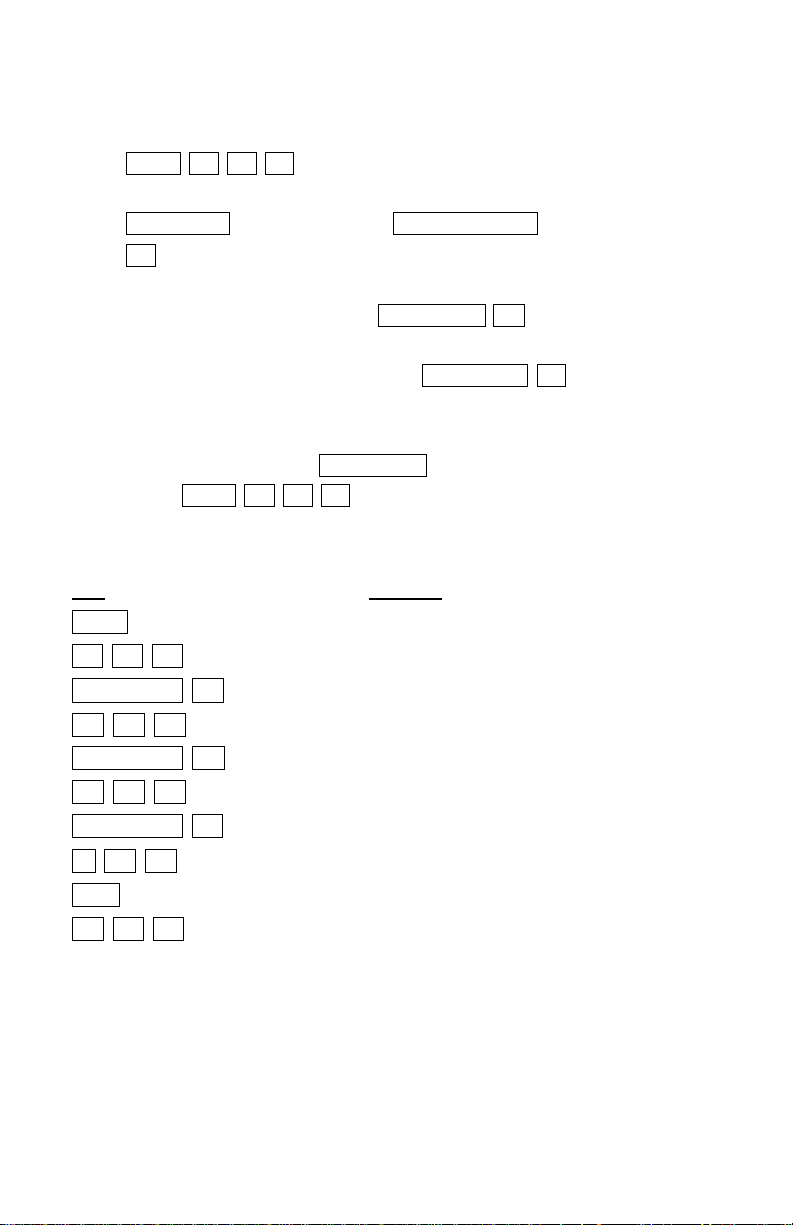
Press ESC E P E
Before typing, let’s first go into the European mode.
Press ALT CHAR , the screen shows: E , U or G ?
Press E to go into the European mode.
Use any of the letter keys to display European characters.
Now let’s try the graphic mode. Press ALT CHAR G
Use any of the letter keys to display graphics.
Now let’s go back to alphabet mode. Press ALT CHAR E
Use any of the letter keys to display standard alphabet characters.
At any time you can toggle between European, graphics, and alphabet modes.
Now that we’ve seen what the ALT CHAR key can do, let’s put our sign in run
mode. Press ESC R P E
Summarized Sequence:
Key Meaning
ESC Exit Run mode
E P E Edit Page E
ALT CHAR U European mode
A B C . . . Program European characters
ALT CHAR G Graphic mode
A B C . . . Program graphic images
ALT CHAR E Alphabet mode
A B C . . . Program standard alphabet characters
ESC Exit message editing
R P E Run Page E
Refer to Appendix V for the European Code Table.
There are 26 graphic images to choose from. Refer to Appendix III for the
Graphics Code Table.
Page 15
GRAPHIC EDITING
Image edit area.
13
Editing existing graphics is a great way to create custom graphic images to use in
your message! Let’s try an exercise to get you familiar with this feature.
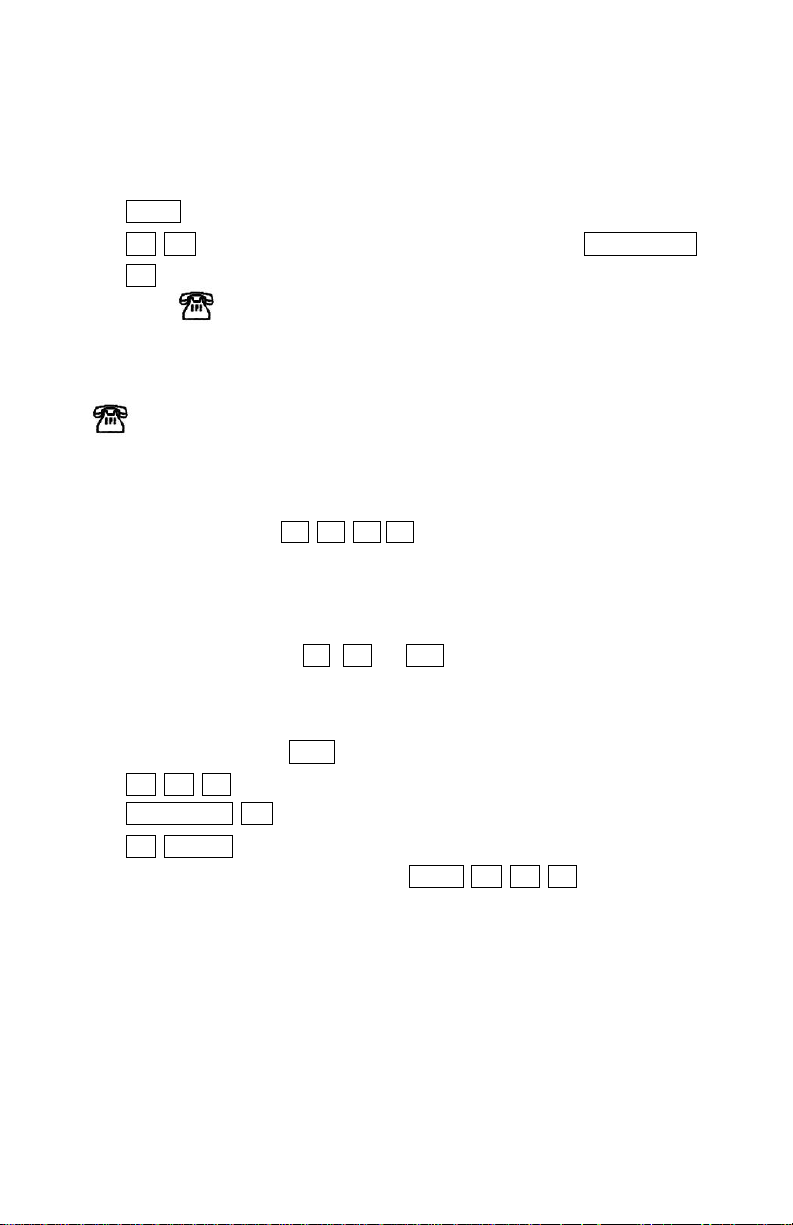
Press ESC
Press E G to select an existing graphic. Screen will show: GFX(A-Z)?
Press A to select graphic A (telephone graphic). The screen will show:
RGYBP| | | |
RGYB are colors Red, Green, Yellow and Black.
P is the place cursor indicator.
| | Cursor position area.
The concept is to use the keys to place or color the dots in the
image edit area.
The default selection is “P”. Use the arrow keys to place the cursor indicator where
you would like to start coloring.
Press one of the color keys, R , G , or Y
Now use the arrow keys to begin to customize your graphic.
Go ahead and try different colors and cursor placement.
When you are done, press ESC to save your custom graphic image.
Press E P F
Press ALT CHAR G
Press A Space
Now let’s put our sign in run mode. Press ESC R P F
Your custom graphic is now shifting from right to left.
Refer to page 19 to restore the original graphic image.
Page 16
SET CLOCK, ID, BAUD, BEEP, TRIVIA AND PASSWORD
14
Set Clock
Press ESC
Press S to enter the Set mode, screen will show: YEAR : 00
Type the last 2digits of the current year.
Press ENTER , screen will show: MONTH : 00
Type the 2 digit current month; 01=JAN, 02=FEB . . . . . .12=DEC.
Press ENTER , screen will show: DAY : 00
Type the 2 digit current date.
Press ENTER , screen will show: WEEKDAY : 00
Type the 2 digit current day; 00=Sunday, 01=Monday . . . . . . 06=Saturday.
Press ENTER , screen will show: HOUR : 00
Type the 2 digit current hour.
Press ENTER , screen will show: MINUTE : 00
Type the 2 digit current minutes.
Press ENTER , screen will show: 24 HOUR Y/N ?
Select the hour display format.
Type Y for 24 hour format or N for 12 hour, screen will show: ID = 01
Set ID
The ID setting is only applicable when sign is connected to a computer. If you have
several signs, each sign can have a different ID so that unique messages can be
transmitted to each sign. For Remote Keyboard users, this can be left at the default
value. Press ENTER , screen will show: 2400 BAUD
Set Baud Rate
The Baud Rate setting is only applicable when sign is connected to a computer.
The speed of the data transmission from computer to sign can be adjusted. For
Remote Keyboard users, this can be left at the default value.
Press ENTER , screen will show: BEEP ON
Set Beep On/Off
Press or to select your option followed by Enter to confirm option.
Screen will show: Q & A ON
Set Trivia On/Off
Press or to select your option followed by Enter to confirm option.
Screen will show: PASSWORD ? N
Page 17

SET CLOCK, ID, BAUD, BEEP, TRIVIA AND PASSWORD (continued)
15
Password Setting
A password can be set to prevent others from changing the message on the sign.
First select yes or no by typing Y or N
Press ENTER to confirm your selection.
If no, you will be returned to the main menu.
If yes, the screen will show: PASSWORD= _ _ _ _
TIP: Once in the Password area, you must enter a password to proceed. If you
decide you did not want to set a password, you can return to the Set mode after
entering a password and set the password setting to No.
Now type a one to four character password.
Press Enter to confirm your entry. The password will go into effect as soon as
you put the sign in Run mode. Before making any changes to your message, the
sign will prompt you for the password. When prompted, you will have 10 seconds
to enter your password and a maximum of 4 attempts before the sign automatically
goes into Run mode again.
Page 18
SET CLOCK, ID, BAUD, BEEP, TRIVIA AND PASSWORD (continued)
16
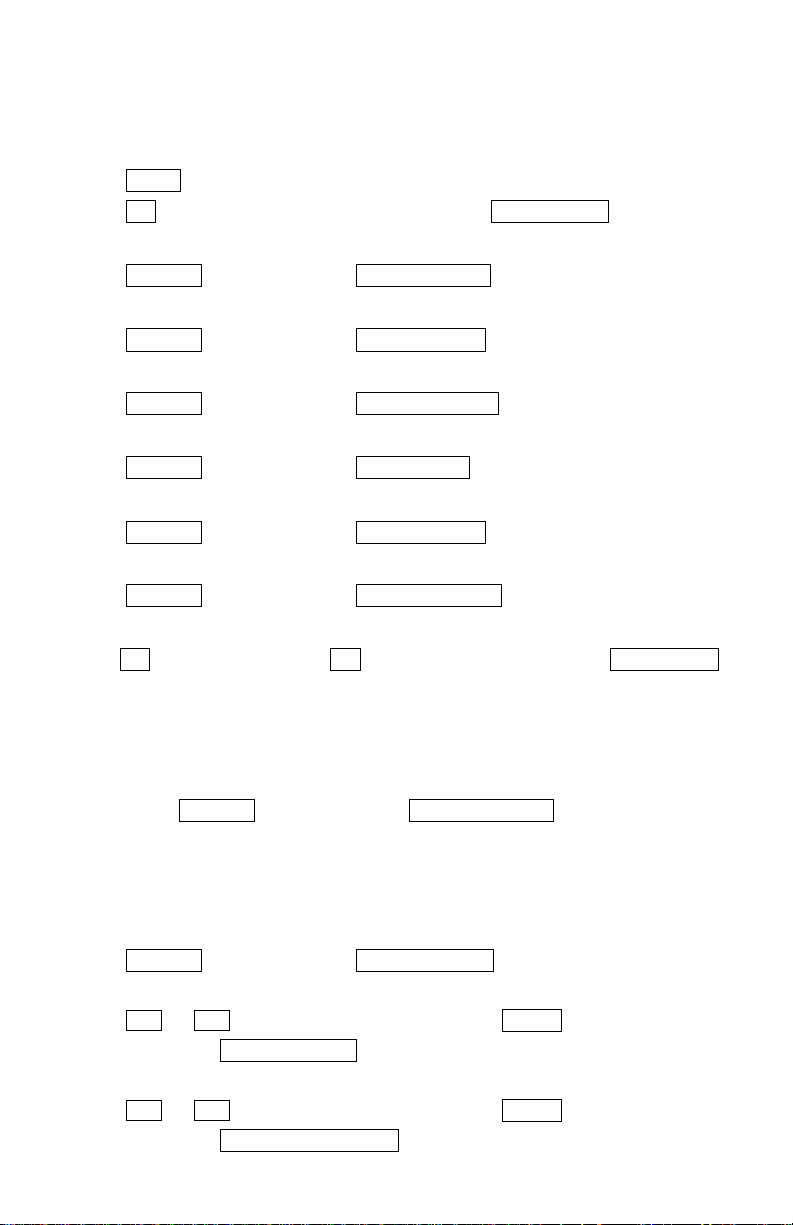
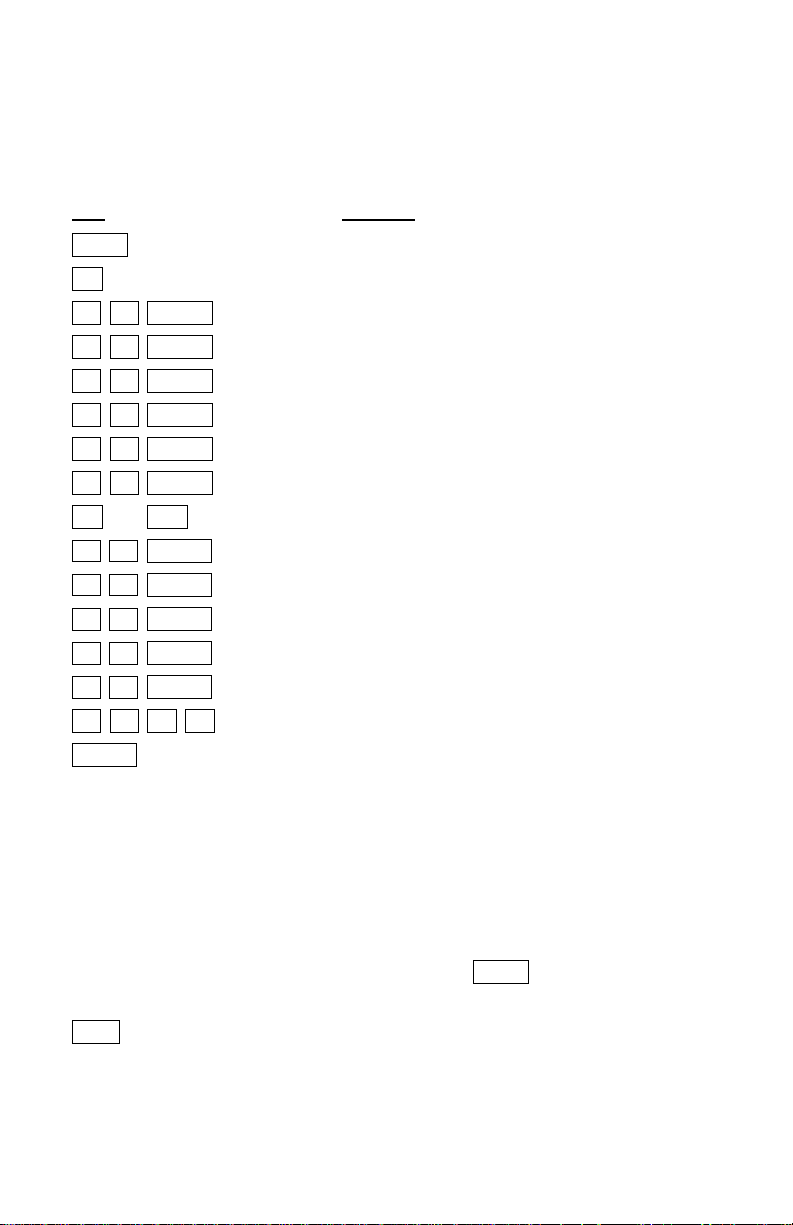
Summarized Sequence:
Key Meaning
ESC Exit Run mode
S Enter Set mode
# # Enter Enter last 2 digits of current year
# # Enter Enter 2 digit current month
# # Enter Enter 2 digit current date
# # Enter Enter 2 digit current weekday
# # Enter Enter 2 digit current hour
# # Enter Enter 2 digit current minutes
Y or N Select hour display format
Enter Set I.D. (computer application only)
Enter Set Baud Rate (computer application only)
Enter Set Beep On/Off
Enter Set Trivia-In-Motion On/Off
Enter Enable/disable password setting
# # # # If yes, enter 1 to 4 character password
Enter Confirm password entry
When complete, you will automatically be returned to the Main Menu.
Clock will reset to 00:00 Monday 01 Jan, 96 if power is removed from sign.
If you forgot the Password, you can bypass the Password by doing the
following (you may need the assistance of another person):
Stand 5 feet from the sign. Press and hold the ESC key while removing
the power plug from the sign. Now reverse the process. Press and hold the
ESC key while connecting the power plug to the sign. The signs will show
the Main Menu. You can now go into Set mode to change or disable the
password.
Page 19
TIMERS
17
For this example we want the prepared Pages A,B & C to be included in Timer A
and to be displayed at 9:30 AM every Monday
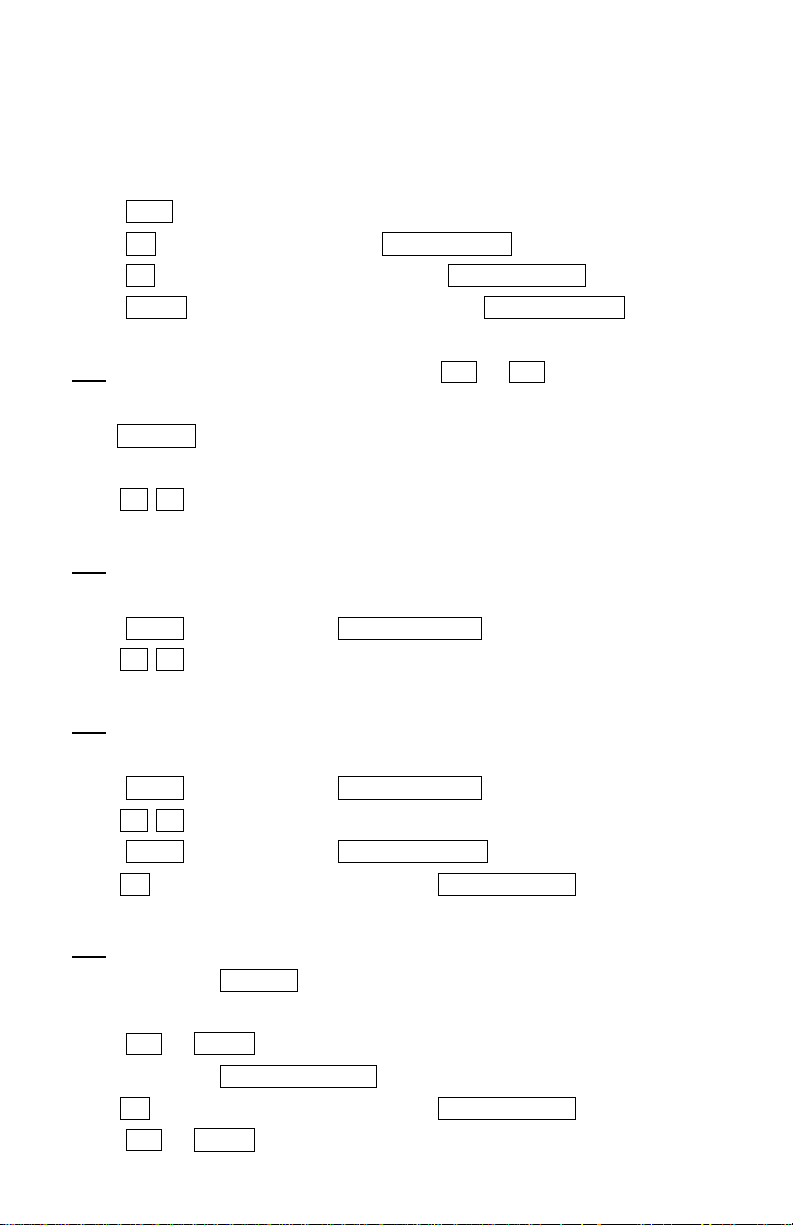
Press ESC
Press E for edit, the screen shows: Page Tmr Gfx
Press T for Timer mode, the screen shows: Timer(A-J) ?A
Press Enter to select Timer A, screen will show: WEEKDAY:99
TIP: For Timer selection, you can also use the or key to select different
Timers. When you are satisfied with the Timer selection, simply press
ENTER to begin to configure the Timer.
Type 0 1 to set weekday activation for Monday.
TIP: 00=Sunday, 01=Monday, 02=Tuesday . . . . . .06=Saturday.
Press Enter , screen will show: HOUR:99
Type 0 9 to set hour activation to 9.
TIP: Hour entry must be in 24 hour mode; 09=9am, 14=2pm
Press Enter , screen will show: MINUTE:99
Type 3 0 to set minutes activation to 30.
Press Enter , screen will show: STEP 00:_ _ _ _
Type A to select Page A, screen will show STEP 00:PG A
TIP: To change your Page entry, simply type another character. To remove an
entry, press SPACE
Press or Enter to confirm your entry.
Screen will show: STEP 01:_ _ _ _
Type B to select Page B, screen will show STEP 01:PG B
Press or Enter to confirm your entry.
Page 20
TIMERS (continued)
18
Screen will show: STEP 02:_ _ _ _
Type C to select Page C, screen will show STEP 00:PG C
Now that Timer A is configured, let’s run our Timer.
Press ESC R T A
The message “Football Game” is using the Open effect.
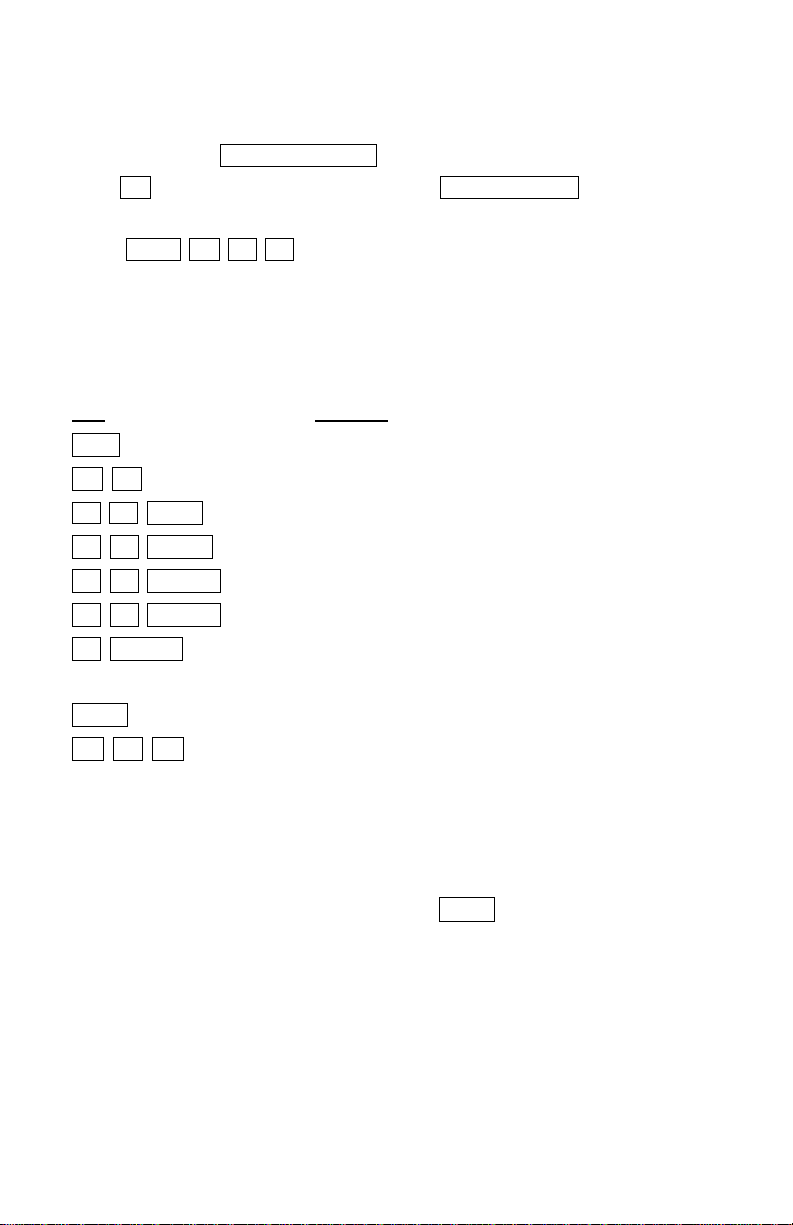
Summarized Sequence:
Key Meaning
ESC Exit Run mode
E T Timer mode
Enter Select a Timer (A-J) and confirm selection
# # Enter Enter 2 digit weekday schedule
# # Enter Enter 2 digit hour schedule
# # Enter Enter 2 digit minute schedule
n Enter Select and enter Page to be stored in Timer
Repeat to add pages to run sequentially.
ESC Exit message editing
R T A Run Timer A
Use “99” for weekday to execute every day. Use “99” for hour to execute
every hour. Use “99” for minute to execute every minute.
To cancel running the Timer, simply press ESC to exit Run mode. At your
option, you can now run a single preprogrammed Page or select a different
preconfigured Timer to run.
Page 21
DELETE PAGES, TIMERS, AND GRAPHICS
19
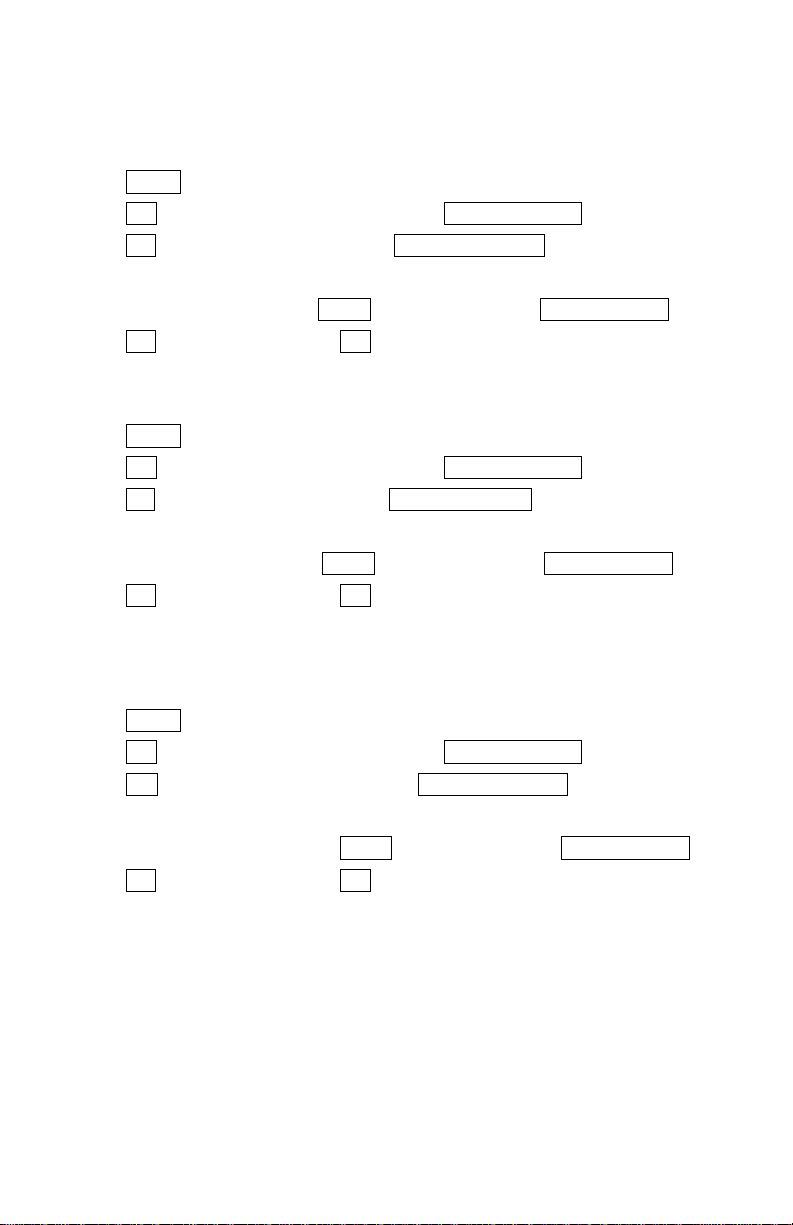
Delete single Page or all Pages
Press ESC
Press D for delete mode, screen will show: Page Tmr Gfx
Press P for Page, screen will show: PAGE(A-Z,Del)?
To delete a single Page, type the letter of the Page you would like to delete.
To delete all Pages, press the DEL key, sign will show: SURE Y/N?
Press Y to confirm deletion or N to cancel.
Delete single Timer or all Timers
Press ESC
Press D for delete mode, screen will show: Page Tmr Gfx
Press T for Timer, screen will show: T(A-J, Del) ?A
To delete a single Timer, type the letter of the Timer you would like to delete.
To delete all Timers, press the DEL key, sign will show: SURE Y/N?
Press Y to confirm deletion or N to cancel.
Delete single Graphic or all Graphics
Deleting a graphic(s) will recall the original factory programmed graphic.
Press ESC
Press D for delete mode, screen will show: Page Tmr Gfx
Press G for Graphics, screen will show: G (A-Z, Del) ?A
To delete a single Graphic, type the letter of the Graphic you would like to delete.
To delete all Graphics, press the DEL key, sign will show: SURE Y/N?
Press Y to confirm deletion or N to cancel.
Page 22

DELETE PAGES, TIMERS, AND GRAPHICS (continued)
20
Summarized Sequence:
Key Meaning
ESC Exit Run Mode
D Delete mode
P or T or G Select to delete Page, Timer, or Graphics
n or DEL Enter corresponding letter or delete all
Y or N Select yes to delete or no to cancel
When complete, you will automatically be returned to the Main Menu.
Page 23

SECTION V
21
FREQUENTLY ASKED QUESTIONS
I can’t get rid of the DEMO message.
The DEMO message cannot be erased. It is only designed to run when there is no
message programmed in the page you are running.
I programmed my message but I am not satisfied with the color? Can I
change it instantly?
No. When a color or font is selected, the message you type thereafter will
be permanent with your selections. It is good practice to select a color
and/or font, type a short message, and run the message to see if you are
satisfied with the selection before typing your complete message. Also
consider using the included software for easy programming.
I programmed my message but it shows characters I do not want?
To solve this problem, simply return to the page where your message is
stored and delete the unwanted characters. Refer to page 7.
How do I show the TIME and DATE in my message.
When editing your message, press FN T .
I removed the power from sign and now the TIME and DATE is wrong.
This is normal operation. Any interruption of power will reset the clock and
will require you to input the correct time again. Your preprogrammed
messages will not be lost when removing power.
My Timer is not working correctly.
Make sure the current Time and Date has been programmed on the sign. It
is also good to note that any power interruption will reset the clock on the
sign. Refer to the Timer section on page 18.
I have multiple Pages programmed. How do I run them together.
Program a Timer and make sure weekday, hour and minutes are all set to
‘99’. Refer to page 18.
My Timer is not running the Pages in the correct order?
This is caused by two conflicting Timers. If two Timers are programmed with
identical weekday, hour and minutes, the sign will not be sure which Timer to run.
To solve this problem, it is best to delete all your Timers, and program just one
Timer with your desired pages.
Do you have additional TRIVIA questions that I can load onto the sign?
Yes, we have SPORTS, SAFETY and additional GENERAL TRIVIA packages.
For more information, please refer to the enclosed Accessories Order Form that
was included with your sign or contact our sales department, 714-668-9988.
I forgot my password, how do I erase it?
Please refer to page 16.
Page 24

Every key I press shows symbols. How do I type letters?
22
Press the CAPS key to exit the figure and symbols mode.
My TRIVIA questions are not showing with my message?
The TRIVIA option may not be enabled. Refer to page 16 to enable Trivia.
How do I slow down the shifting speed of the display?
In most cases, you are standing too close to the display. Try stepping further away
from the sign. If it is still too fast, you can insert Speed2 or Speed3 before your
message to reduce the shift speed. Refer to Appendix IV.
How many characters can program onto the sign?
Each page can hold up to 1,000 characters (1,000 bytes). The total available
character memory is 12,000 bytes. Graphics and effects occupy additional
character space therefore using up more bytes.
My sign shows “memory full” when I try to program?
The maximum characters available to input in the page has been reached. Please
try another page. If the same message appears, memory capacity for the whole
sign has been reached. To enter additional messages, you will have to delete
some of your existing content from the sign.
Can I increase the memory of my sign?
No.
Can I program my sign through a computer?
Yes. For more information, please refer to the enclosed Accessories Order Form
that was included with your sign or call our sales department, 714-668-9988.
Can I program my sign through the LAN?
Yes. You will need to purchase a Mini-Web LAN serial server. For more
information, refer to the enclosed Accessories Order Form that was
included with your sign or call our sales department, 714-668-9988.
I program a message, but when I move the sign to another location my
message is gone.
In order for the memory to perform reliably you must plug the sign in for at
least 8 hours continuously when new to fully charge up the battery. As
further precaution to safeguard the memory, you should always plug the
sign power adaptor to a surge protector. Power spikes and surges can
cause the sign memory to be deleted.
Does the ON/OFF button on the remote shut the power to the sign off?
No. The sign is still running but in quiet mode.
Can I show only one of the animated graphics?
No. The animated graphics are fixed and cannot be changed.
I want to use my computer to send messages to the sign but it does not
have a COM PORT?
You can use a USB to Serial adaptor. Please call our sales department for
more information, 714-668-9988.
Page 25

TROUBLESHOOTING
23
The sign will not turn on.
Please check the following:
The original power adaptor is being used
o refer to page 29 for general specifications
The outlet you are using is working.
o connect a lamp to the outlet to see if it turns on
Press the ON/OFF key to see if the sign turns on
The sign is not responding to the remote.
Please check the following items:
Try a new set of batteries.
Stand 5 feet from sign and try pressing the ESC key.
My messages are erased when I remove power to the sign.
In order for the memory to perform reliably you must plug the sign in for at
least 8 hours continuously when new to fully charge up the battery. As
further precaution to safeguard the memory, you should always plug the
sign power adaptor to a surge protector. Power spikes and surges can
cause the sign memory to be deleted.
The sign is turning off by itself, what can I do?
Please check the following:
The original power adaptor is being used
o refer to page 29 for general specifications
All Timers are deleted (refer to page V).
Go into Edit mode and check to see if the ‘SLEEP’ function is in
your message. If so, delete it from your message.
My sign has stopped working completely. Can I send my sign in for repair?
Yes. Please read the Return for Repair Procedure on page 29. You can
also contact our Customer Service department at 714-668-9988 for Return
instructions.
ADDITIONAL ASSISTANCE
Most solutions can be found by reviewing this manual or by going online
and using our step by step troubleshooting guide.
http://www.pro-lite.com/support
If you are still unable to find a solution, please feel free to contact our
Customer Support department.
E-mail: [email protected]
Phone Support: (714) 668-9988
Page 26

SECTION VI
CORRES.
LETTER
FOREGROUND
COLOR
BACKGROUND
COLOR
SHADOW
COLOR
SHADOW
SWITCH
A
B
C
D
E
F
G
H
I
J
K
L
M
N
O
P
Q
R
S
T
U
V
W
X
Y
Z
DIM RED
RED
BRIGHT RED
ORANGE
BRIGHT ORANGE
LT-YELLOW
YELLOW
BRIGHT YELLOW
LIME
DIM LIME
BRIGHT LIME
BRIGHT GREEN
GREEN
LT-GREEN
LT-YELLOW
RAINBOW
RED
RED
GREEN
GREEN
GREEN
RED
ORANGE
DIM-LIME
GREEN
RED
BLACK
BLACK
BLACK
BLACK
BLACK
BLACK
BLACK
BLACK
BLACK
BLACK
BLACK
BLACK
BLACK
BLACK
GREEN
BLACK
BLACK
BLACK
BLACK
BLACK
RED
GREEN
GREEN
RED
RED
GREEN
-
-
-
-
-
-
-
-
-
-
-
-
-
RED
GREEN
LT-YELLOW
RED
LT-YELLOW
-
BLACK
BLACK
BLACK
BLACK
OFF
OFF
OFF
OFF
OFF
OFF
OFF
OFF
OFF
OFF
OFF
OFF
OFF
OFF
ON
OFF
ON
ON
ON
ON
OFF
OFF
ON
ON
ON
ON
24
APPENDIX TABLES
APPENDIX I
Color Code Table
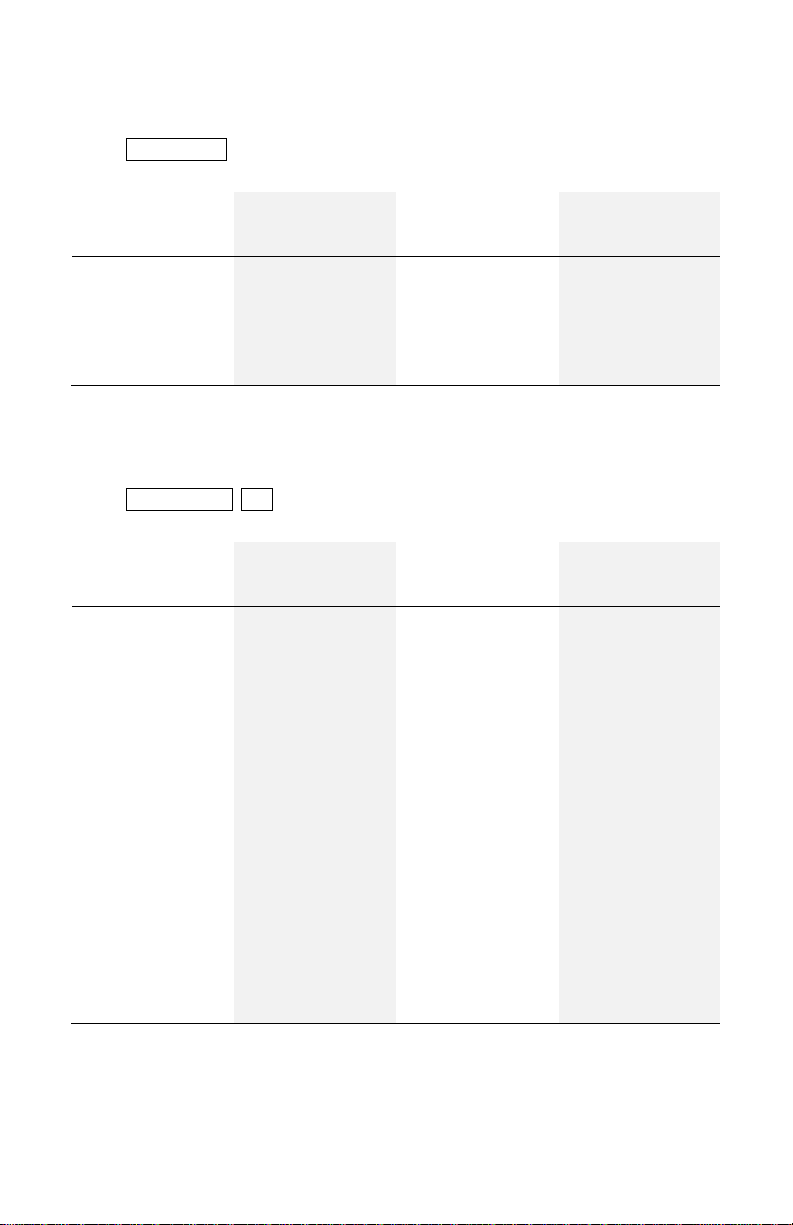
Press Size/Color twice followed by the corresponding letter.
Page 27
APPENDIX II
CORRES.
LETTER
CHARACTER
FONT
CORRES.
LETTER
CHARACTER
FONT
A
NORMAL
E
FLASH NORMAL
B
BOLD
F
FLASH BOLD
C
ITALIC
G
FLASH ITALIC
D
BOLD ITALIC
H
FLASH BOLD ITALIC
CORRES.
LETTER
GRAPHIC
CORRES.
LETTER
GRAPHIC
A
TELEPHONE
N
DUCK
B
GLASSES
O
MOTORCYCLE
C
TAP P BICYCLE
D
ROCKET
Q
CROWN
E
MONSTER
R
SWEET HEART
F
KEY S ARROW
G
SHIRT
T
ARROW
H
HELICOPTER
U
ARROW
I
CAR V ARROW
J
TANK
W
GLASS OF BEER
K
HOUSE
X
CHAIR
L
TEA POT
Y
HIGH-HEELED SHOE
M
KNIFE & FORK
Z
WINE GLASS
25
Character Size Code Table
Press Size/Color followed by the corresponding letter.
APPENDIX III
Graphic Code Table
Press ALT CHAR G followed by the corresponding letter.
Refer to following page for Graphic Patterns.
Page 28
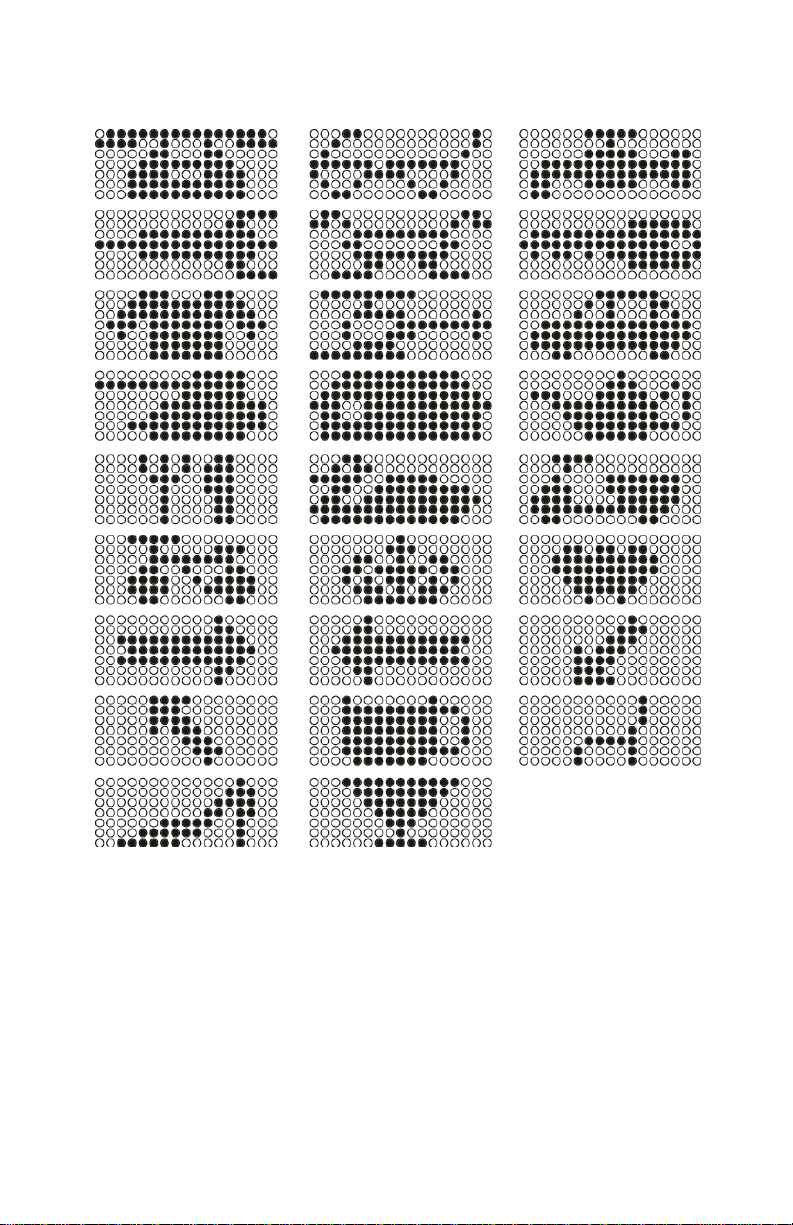
Graphic Patterns A - Z
A
D
G
J
M
P
S
V
Y
B
E
H
K
N
Q
T
W
Z
C
F
I
L
O
R
U
X
26
Page 29

APPENDIX IV
CORRES.
LETTER
EFFECT
DESCRIPTION
A
AUTO
Auto effects
B
OPEN < - - >
Open from center to both ends
C
COVER < - - >
New message covers from center to both ends
D
APPEAR < - - >
Shows message instantly on screen
E
CYCLING
Rolling color
F
CLOSE <
Close from right to left
G
CLOSE - >
Close from left to right
H
CLOSE - > < -
Close from both end to center
I
SCROLL UP
Scroll bottom to top
J
SCROLL DOWN
Scroll from top to bottom
K
OVERLAP
Form message from two shifting layers
L
STACKING
Form message by piling dots
M
COMIC 1
Animated Graphic 1
N
COMIC 2
Animated Graphic 2
O
BEEP
Beep Sound
P
PAUSE
Freeze the moving message
Q
SLEEP
Display nothing on screen
R
RANDOM
Formed message by random dots
S
SHIFT < - -
Shift message from right to left (Default)
T
TIME/DATE
Show current time & date
U
MAGIC
Auto change message color
V
THANK YOU
Script message with effect
W
WELCOME
Script message with effect
X
SPEED 1
Standard speed
Y
SPEED 2
Slow speed
Z
SPEED 3
Slower speed
27
Effect Code Table
Press FN followed by the corresponding letter.
Underlined letters designate effects which should be used after a word/message.
Page 30
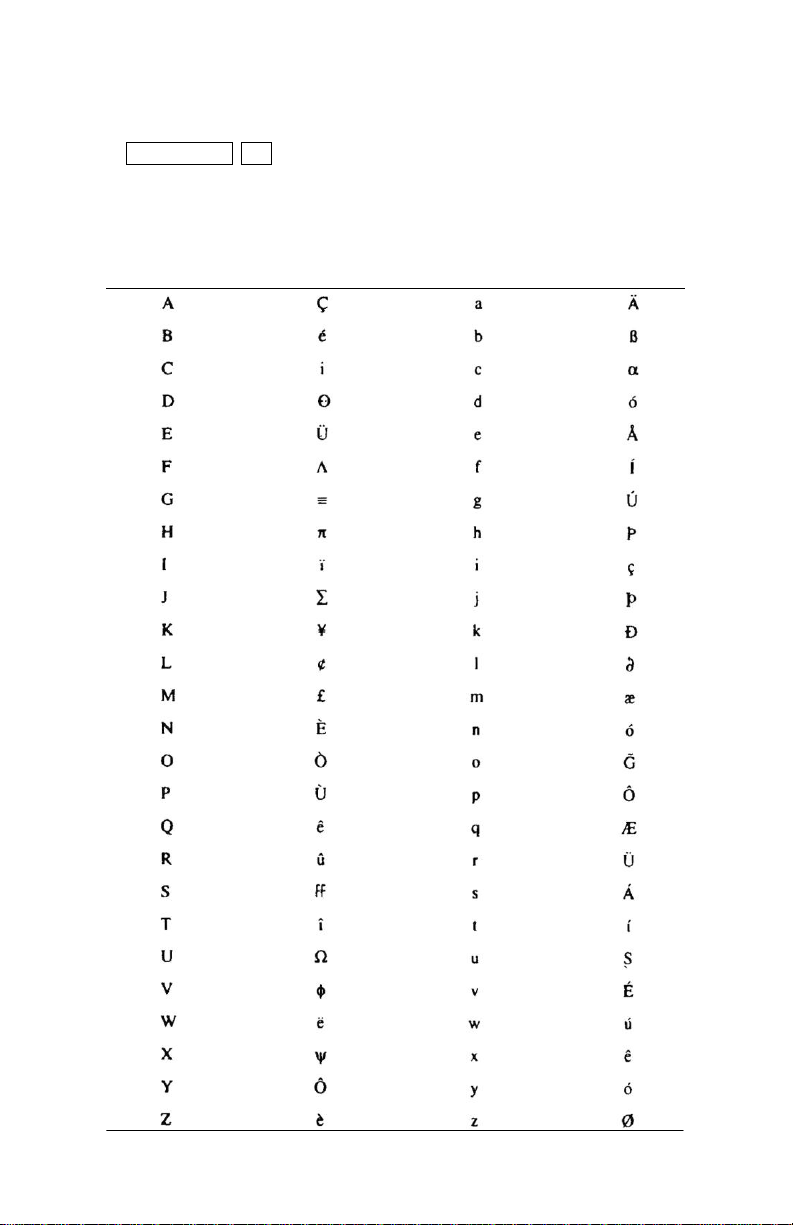
APPENDIX V
CORRES.
UPPER CASE
LETTER
CHARACTER
CORRES.
LOWER CASE
LETTER
CHARACTER
28
European Code Table
Press ALT CHAR U followed by the corresponding letter.
Page 31

SECTION VII
29
GENERAL SPECIFICATIONS
Character Height:: 2”
Screen matrix (H x W): 7 x 80
No. of Colors : 16
Display Area (H x W): 2.1” x 24”
No. of Characters : 14
Character Set: English & European Characters
Remote Keyboard: Infrared
RS232 Port Type: RJ11 (not for use with standard phone line)
Maximum Baud Rate: 9600
Operating Voltage: 9VAC
Operating Amperage: 2.5A min
Power Adapter AC Input: 110V / 220V / 240V AC
Dimensions (H x W x D): 4.5” x 28” x 1.875”
Battery Backup: 90 days
* All specifications above are subject to change without notice
RETURN FOR REPAIR PROCEDURE
STEP 1
Contact Pro-Lite, Inc. at 714-668-9988 to determine if your sign qualifies to be
returned for repair.
STEP 2
If your sign qualifies, we will issue a Return Materials Authorization Number. This
number must be written on the outside of the box that it will be returned in.
STEP 3
Ship the unit in its original container postage paid. If the original container is not
available, pack the unit in a strong box made of corrugated cardboard with plenty
of packing material. Unit should be returned to:
Pro-Lite, Inc.
Technical Support Department
3505 Cadillac Ave., Bldg. D
Costa Mesa, CA 92626
RMA #
• Units will be refused if no RMA number is found on the package.
• All units returned must be shipped postage prepaid with tracking capability.
• Units shipped COD will not be accepted.
• Pro-Lite accepts no responsibility for lost or damaged packages sent via
mail or parcel company.
Page 32

ONE YEAR LIMITED WARRANTY
PRO-LITE, INC. warrants to the original consumer that each of its PRO-LITE products and all
components therein contained will be free from defects in materials and/or workmanship for
one year from the date of purchase. Any warranty hereunder is extended only to the original
consumer purchaser and is not assignable.
In the event of malfunction or other indication of failure attributable directly to faulty
workmanship and/or material, PRO-LTTE, INC will at its option, repair or replace said products
or components to whatever extent it shall deem necessary to restore said product to proper
operating condition, provided the consumer purchaser has previously returned the enclosed
Warrants Registration Card to PROLITE, INC. Before returning a product for repair, the
customer must call PRO-LITE, INC. Customer Service at (714) 668-9988 for a Return Materials
Number. This number should be included with the customer's mailing address and telephone
number when the product is returned. Products should be returned to: PRO-LITE, INC.,
Attention: Warranty/Repair, 3505 Cadillac Ave. Bldg. D, Costa Mesa, CA 92626 (postage
prepaid). During the first year after the date of purchase, all labor and materials will be provided
without charge. There shall be no warranty for either parts or labor after the expiration of one
year from the date of purchase. PRO-LITE, INC does not warranty bulbs in combivision or
fluorescent board products.
Units must be returned postage prepaid. It is recommended that the unit be insured when
shipped. Units returned for which a Warranty Registration Card has not been submitted or
out-of-warranty units returned will be repaired or replaced (at the option of PRO-LITE, INC) and
the customer will be charged for parts and labor
Products will be returned to customer after repair or replacement has been completed by carrier
and method chosen by PRO-LITE, INC. to any destination within the United States of America.
Should the customer desire some other specific form of conveyance, or be located outside the
border of the U. S. then the customer must bear the cost of return shipment.
The customer shall be solely responsible for failure of any PRO-LITE, INC. product or
component thereof, resulting from accident, abuse or misapplication of the product, and
PRO-LITE, INC. assumes no liability as a consequence of such events under the terms of the
Warranty.
This Warranty gives you specific legal rights and you also have other rights that vary from state
to state.
This Warranty is in lieu of all other express warranties, which now or hereafter might otherwise
arise with respect to this product. ANY AND ALL IMPLIED WARRANTIES OF
MERCHANTABILITY AND FITNESS FOR PARTICULAR USE SHALL HAVE NO GREATER
DURATION THAN THE PERIOD FOR THE EXPRESS WRITTEN WARRANTY APPLICABLE
TO THIS PRODUCT AS SHOWN ABOVE AND SHALL TERMINATE AUTOMATICALLY AT
THE EXPIRATION OF SUCH PERIOD. No action shall be brought for breach of any implied or
express warranty after one year subsequent to the expiration of the period of the express
written warranty. (Some states do not allow limitations or how long an implied warranty lasts, so
this limitation may not apply to you.)
Incidental and consequential damages caused by malfunctions, defect, or otherwise and with
respect to breach of any express or implied warranty, are not the responsibility of PRO-LITE,
INC. and to the extent permitted by law are hereby excluded both for property and, to the extent
of unconscionable, for personal injury damage. (Some states do not allow the exclusion or
limitations of incidental or consequential damages, so the above may not apply to you.)
Visit our website to view our complete line of products,
www.pro-lite.com
For sales inquiries please call,
(714) 668-9988
 Loading...