

Page 1
USER GUIDE
Version 1.0
Sign Version 3.0 (Gray Remote)
Page 2
IMPORTANT SAFETY INSTRUCTIONS
READ BEFORE OPERATING DISPLAY
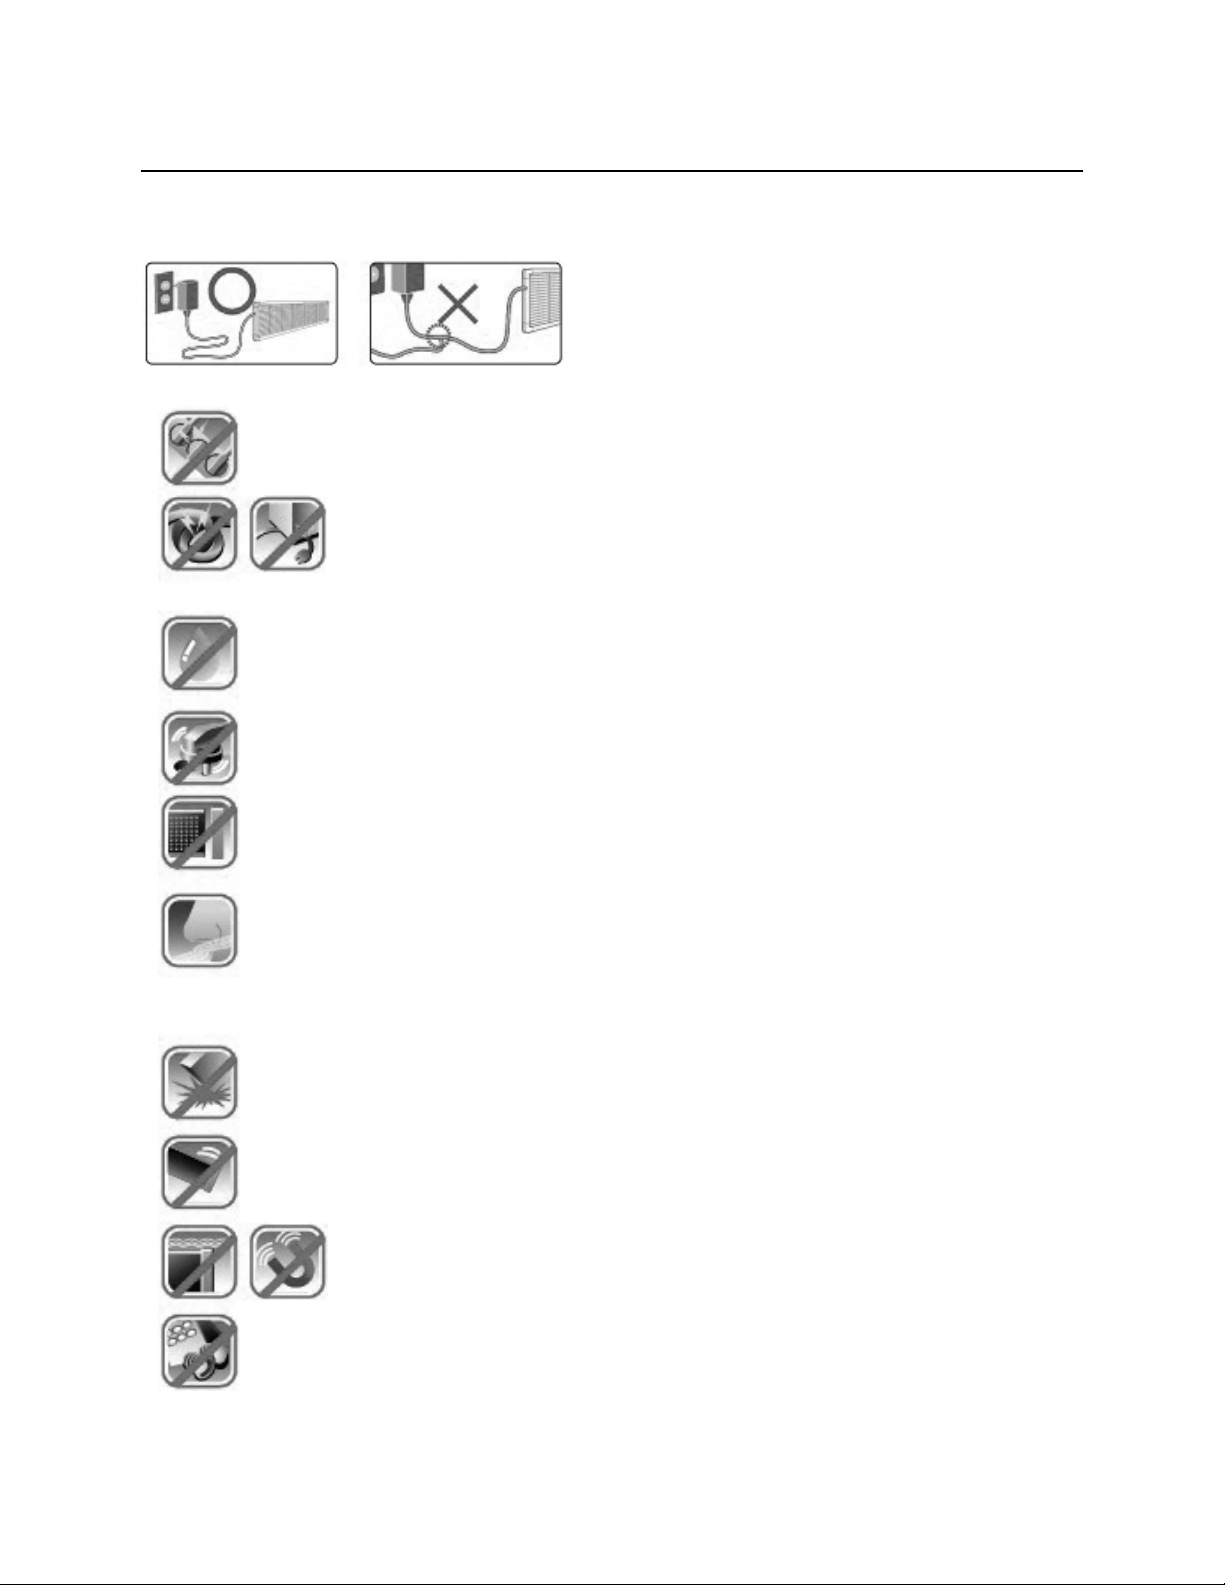
Do not share or split the power cable of the display.
This may cause serious injury and electrical shock.
Do not plug more than two plugs into a single outlet.
Sharing several plugs on a single outlet is a fire hazard and may cause overheating.
Do not bend, twist, or place heavy objects on the power cord.
Excessive binding or twisting may cause the wires inside to short circuit
causing a potential fire hazard.
Do not touch outlet or handle power plug with moist or wet hands.
This may cause electrical shock and serious injury.
The power plug must be securely connected to the outlet.
Loose plugs can be hazardous and cause serious injury.
Do not open, modify or disassemble any part of the display.
This will void warranty and may result in electrical shock and serious injury.
If there is any sign of smoke or unusual burning odor from the operation of
this display, unplug the unit immediately and contact the Pro-Lite Service
Center. Continued operation during smoke or unusual burning odor can be
dangerous and result in a fire or serious injury.
Handle with care when transporting or carrying the display.
Dropping the display may cause permanent damage and void warranty.
During installation, properly mount and fastened the display.
Improperly mounted displays can fall causing bodily harm and injury.
Do not allow the sign to swing. Do not install near a magnetic source.
These may cause the display to operate undesirably.
Do not open, modify or disassemble the remote control.
This may cause permanent damage to the remote and void warranty.
Page 3

FEATURES
UNIQUE CAPABILITIES
Standard English input with multi-language support.
(European, Spanish, Russian, Japanese, and Korean character sets included)
10 adjustable brightness settings for daytime and nighttime.
Display important viewer information such as TIME and DATE.
Fonts are completely customizable: 8 font types, 22 font colors, 4 font sizes, 21 font
effects.
Personalize your messages by including any one of the built-in animations and icons.
Put the final touches on your message by selecting one of several message transition
effects.
Built-In scheduling feature for automatic message startup and shutdown.
The display’s extra sensitive IR Sensor will accurately respond to every input from the
Remote Control.
The Banner-Lite display is both light weight and durable for easy handling and
installation.
The Banner-Lite display is dependable for years of worry–free operation.
Customer service support is friendly and available when assistance is required.
Page 4

TABLE OF CONTENTS
REMOTE CONTROL ………………..………………………………………………………………………………
Button Functions & Description …………………………………………………………………
Menu and Sub-Menu Options ……………………………. ……………………………………..
GETTING STARTED ………..………………………………………………………………………………………
How To Use This Manual .…... ……………………………………………………………………
NEW CONTENT ……………………………………………………………………..………………………………
Create A Single-Line Message ……………………………………………………………………
Create A Double-Line Message ………………………………………………………………….
FONT STYLES CONTENT …………………………………………………………………………………………
Apply Font Styles To Your Message…………………………………………………………….
EFFECTS CONTENT ………..………………………………………………………………………………………
Apply Effects To Your Message ………………………………………………………………….
SPECIAL CHARACTERS CONTENT ……………………………………………………………………………
Insert Symbols, Icons, And International Characters …..……………………………….
VISUAL CONTENT……………………………………………………………………………………………………
Graphic Animations …………………………………………………………………………………..
Time, Date ………………………………………………………………………………………………..
COUNTER CONTENT ……….………………………………………………………………………………………
Dday, Dtime, And Event …………………………………………………………………………….
CONTENT MODIFICATION…..……………………………………………………………………………………
Modify, Insert, and Index Content ..…………………………………………………………….
CONTENT DELETION…..…………………………………………………………………………………………..
Erase Unwanted Messages ………………………………………………………………………..
TIME/DATE AND TIMER ..………………………………………………………………………………………..
Set Current Time, Date And Timer Setting …………………………………………………..
ADDITIONAL FEATURES ..………………………………………………………………………………………..
Stop Watch And Password………………………………………………………………. ………..
SETTINGS ………………………………………………………………………………………………………………
Reservation, Sound, Direction, Password Enable/Disable, Brightness..…………
APPENDIX ………………………………………………………………………………………………………………
Special Characters ….…………………………………………………………………………………
Graphic Animations ……………………………………………………………………………………
Effects Table ………..……………………………………………………………………………………
FAQS - TROUBLESHOOTING ……………………………………………………………………………………
Frequently Asked Questions ………………………………………………………………………
Troubleshooting ………………………………………………………………………………………..
CUSTOMER SERVICE - WARRANTY …………………………………………………………………………..
Technical Support ……………………………………………………………………………………..
Warranty …………………………………………………………………………………………………..
1
1
2
3
3
4
4
5
6
6-7
8
8
9
9-10
11
11
12
13
13-14
15
15
16
16
17
17
18
18
19
19
20
20
21
22
23
23
23
24
24
24
Page 5
REMOTE CONTROL
p
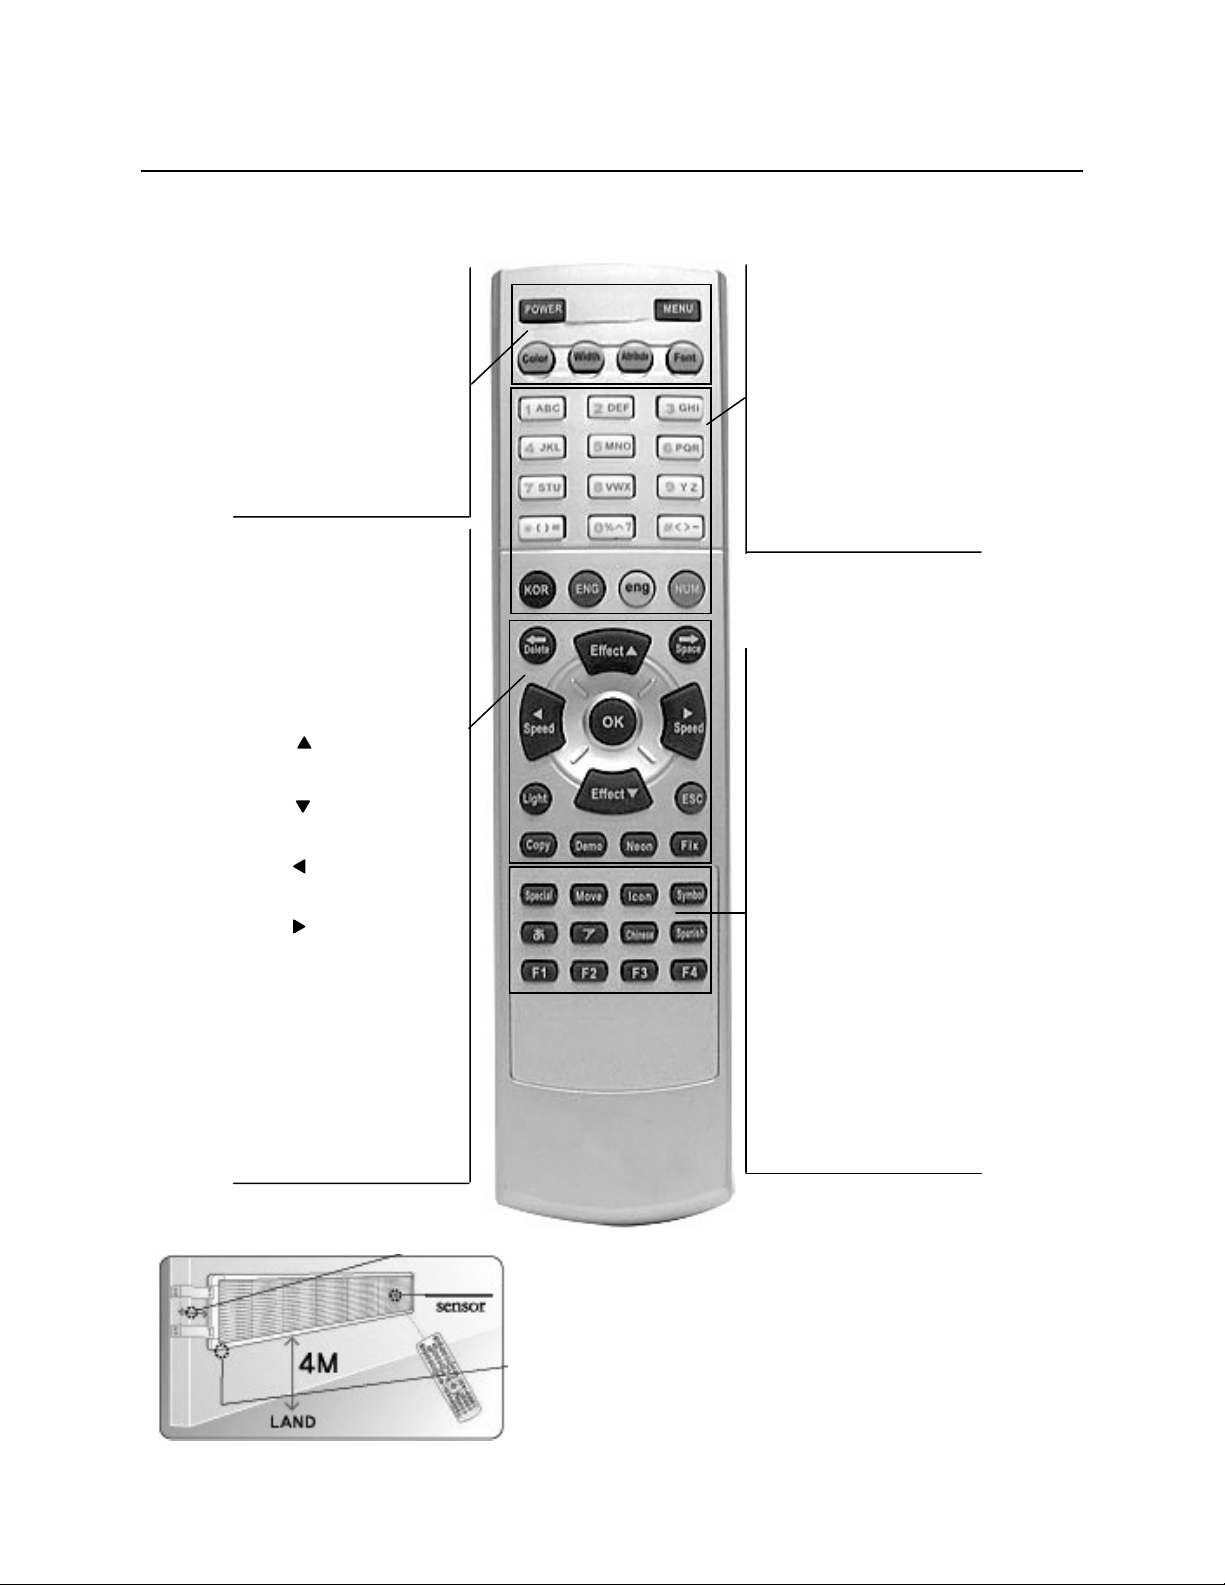
BUTTON FUNCTIONS & DESCRIPTION
POWER
Turns the display ON and OFF.
MENU
Program/Modify sign settings.
COLOR
Change font color.
WIDTH
Change font width.
ATTRIBUTE
Apply font effect.
FONT
Change font type.
DELETE
Remove unwanted characters.
SPACE
Inserts a space between words
or characters.
LIGHT
No function.
ESC
Cancels menu selection or
character entry.
EFFECT
Scroll Up key for menu and
effects selection.
EFFECT
Scroll Down key for menu and
effects selection.
SPEED
Left key for cursor placement
and speed selection.
SPEED
Right key for cursor placement
and speed selection.
COPY
No Function.
DEMO
Activates factory
demonstration message.
NEON
Applies a border effect
FIX
Automatically adjusts the width
a word to fit the screen.
CHARACTER/NUMBER
Displays the corresponding
letter, number, or symbol.
KOR
Enables input of Korean
characters.
ENG
Enables input of English
upper-case characters.
eng
Enables input of English
lower-case characters.
NUM
Enables input of numbers.
SPECIAL
Alternate character selection.
MOVE
Moving animation selection
ICON
Stationary animation selection.
SYMBOL
Symbol selection.
HE-RA
Set 1 of Japanese characters.
GA-DA
Set 2 of Japanese characters.
CHINESE
Not supported.
SPANISH
Spanish characters selection.
F1
Preprogrammed headlines
selection.
F2
No Function
F3
European characters selection.
F4
Russian characters selection.
Do not install sign higher than 4 meters (13 feet) from
the ground. Doing so will effect remote control
eration.
o
Page 1
Page 6
REMOTE CONTROL
I
[11]
y
[3]
[1]
[2]
[3]
[4]
[5]
[6]
[7]
[8]
[9]
[10]
[11]
[12]
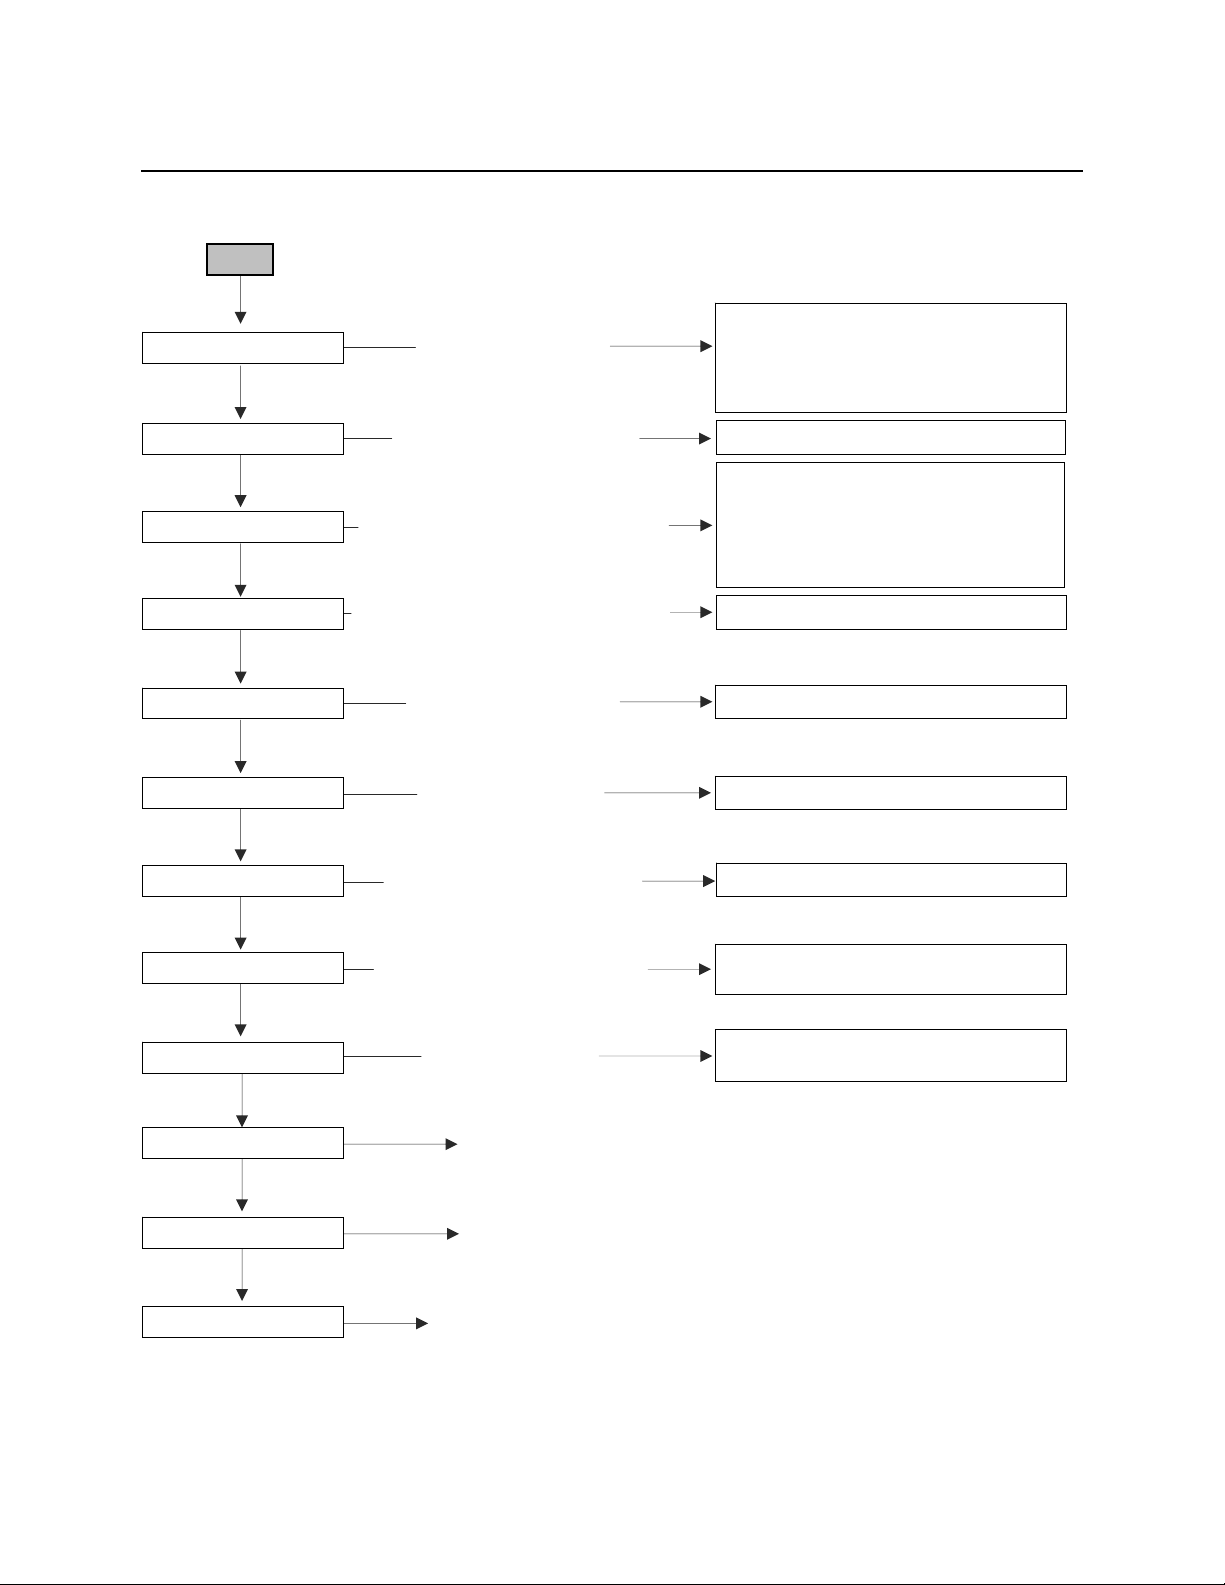
MENU AND SUB-MENU OPTIONS
MENU
ADD CONTENTS
MODIFY
INSERT CONTENTS
INDEX CONTENTS
DELETE CONTENTS
STOP WATCH
PASSWORD
SET TIME
SETTING UP
TPEG NEWS
MANAGER
(Button)
CDMA
Create new message content.
Select an existing message to modify.
nsert new content before an existing message.
Enable and disable existing content to be shown.
Delete existing message content.
Enable Stop Watch feature.
Prevents unauthorized changes to sign.
Set current Time/Date and Timer On/Off.
Additional display settings.
Not supported
Not supported
Manufacturer use only.
[1] Add Message [2] Add Dual Message
[3] Add Image [4] Add Picture [5] Add Video
[6] Display Date [7] Display Time [8] Add Dday
[9] Add Dtime [10] Add Temperature
[11] Add Humidity [12] Add Event
[1] Select content.
[1] Sentence Insertion [2] Dual Message Insertion
[3] Image Insertion [4] Picture Insertion
[5] Video Insertion [6] Display Date
[7] Display Time [8] Dday Insertion
[9] Dtime Insertion [10] Temperature
Humidit
[1] Select content.
[1] Delete Option [2] Delete all
[1] Increment Mode [2] Decrement Mode
[1] Enter Password.
[1] Set Time [2] Set Date
Set Timer ON [4] Set Timer OFF
[1] Reservation [2] Sound [3] Direction
[4] Password [5] Brightness
Page 2
Page 7

GETTING STARTED
HOW TO USE THIS MANUAL
For beginners, it is important that you follow all the examples provided in this manual. This
will give you a better understanding on using the display features more effectively.
After reviewing the manual once, an intermediate user can reference any section to faster
achieve the desired results.
The manual will provide the icons below followed by important information.
NOTE: Look for this icon for important notes.
TIP: Look for this icon for important tips and shortcuts.
Page 3
Page 8
NEW CONTENT
CREATE A SINGLE-LINE MESSAGE
Enter the Edit Mode
1) Press the [MENU] button.
2) The Add Contents option appears. Press [OK].
3) The Add Message option appears. Press [OK].
NOTE: When a momentary prompt appears, simply wait until it disappears
from the display before proceeding to press a button. If a button is
pressed during a prompt, simply press the designated button again.
4) When you see the flashing cursor to the left, you are ready to proceed.
Input the word “HELLO WORLD”
5) Press [3 GHI]. The letter “G” appears.
6) Press [3 GHI] again. The letter “H” appears.
NOTE: Each Character/Number button supports multiple letters.
7) Now press [2 DEF] twice. The letter “E” appears.
8) Press [4 JKL] three times. The letter “L” appears.
TIP: Correct mistakes easily by using the [DELETE] button.
9) Now press the arrow button to advance the cursor.
[ ]
NOTE: If necessary to use the same Character/Number button to display an
additional letter, simply press the arrow button to advance the cursor
to the right, than press the designated Character/Number button again.
10) Press [4 JKL] three times again. The letter “L” appears.
11) Press [5 MNO] three times. The letter “O” appears.
12) Press [SPACE] and continue to input the word “WORLD”.
[ ]
TIP: The [FIX] button resizes the word to fit the entire display. Go ahead, try it!
Exit the Edit Mode
13) Press [OK].
14) The Automatic Effect option appears. Press [OK].
15) You are now returned to the Add Contents option.
Run your message
16) Finally press [ESC] to run your message.
Page 4
Page 9

NEW CONTENT (continued)
CREATE A DOUBLE-LINE MESSAGE
Enter the Edit Mode
1) Press the [MENU] button.
2) Press [OK].
3) Press the arrow button once. The Add Dual Message option appears.
4) Press [OK].
5) When you see the flashing cursor to the left, you are ready to proceed.
Input the word “THANK YOU”
6) First let’s input the word “THANK”.
7) Press [7 STU] twice. The letter “T” appears.
8) Press [3 GHI] twice. The letter “H” appears.
9) Press [1 ABC]. The letter “A” appears.
10) Press [5 MNO] twice. The letter “N” appears.
11) Press [4 JKL] twice. The letter “K” appears
12) Now press the arrow button once to place the cursor on the second line below.
13) Continue to input the word “YOU”.
Exit the Edit Mode
14) Press [OK].
15) The Automatic Effect option appears. Press [OK].
16) You are now returned to the Add Contents option.
Run your message
17) Press [ESC] to run your message.
PRACTICE
17) Go ahead! Try adding a couple more Single-Line and Double-Line messages.
NOTE: All new messages created will run in succession.
[ ]
[ ]
Page 5
Page 10
FONT STYLES CONTENT
APPLY FONT STYLES TO YOUR MESSAGE
Now that you are familiar with adding new content, let’s create a new message and make
your fonts come to life!
Enter the Edit Mode
1) Press [MENU].
2) Press [OK] twice.
Input the word “Awesome”
3) Use the designated Character/Number buttons to input the word “Awesome”.
TIP: The [ENG] and [eng] buttons can be used to toggle between lowercase and
uppercase letters.
4) Press the arrow button once and the cursor will move one space to the left.
5) Now continue to use the arrow button to move the cursor back to the letter “A”.
[ ]
[ ]
TIP: The and arrow buttons can be used to position the cursor anywhere
on the display.
Color Style – Changes the font color.
6) Press the [COLOR] button once and the font color will change. Now continue to press
the [COLOR] button several times to preview all the font colors available.
When you are satisfied with your selection, press the arrow button to move to the
next letter.
Width Style – Changes the font size.
7) Press the [WIDTH] several times to preview the font sizes available.
8) When you are satisfied with your selection, press the arrow button to move to the
next letter.
Attribute Style – Adds a font effect.
9) Press the [ATTRIBUTE] button several times to preview the font effects available.
10) When you are satisfied with your selection, press the arrow button to move to the
next letter.
Font Style – Changes the font type.
11) Press the [FONT] button and the font color will change. Now continue to press the
[COLOR] button several times to preview the font styles available.
12) When you are satisfied with your selection, press the arrow button to move to the
next letter.
[ ]
[ ]
[ ]
[ ]
[ ]
[ ]
Page 6
Page 11

FONT STYLES CONTENT (continued)
PRACTICE
13) Go ahead! Change the font styles to the remaining letters.
TIP: [COLOR], [WIDTH], [ATTRIBUTE], and [FONT] can all be used in combination.
Go ahead, try it!
Exit the Edit Mode
14) Press [OK] twice.
NOTE: Remember to wait until the prompt disappears from the display before
proceeding to press a button. If a button is pressed during a prompt,
simply press the designated button again.
Run your message
15) Finally Press [ESC] to run your message.
Page 7
Page 12
EFFECTS CONTENT
APPLY EFFECTS TO YOUR MESSAGE
Now let’s customize a new message using the effects that fit your preference.
Enter the Edit Mode
1) Press [MENU].
2) Press [OK] twice.
Input the phrase “Huge Sale”
3) Use the designated Character/Number buttons to input the word “Awesome”.
4) When your message is complete, press [OK].
Insertion Effect – The effect used to control how your message will jump on the display.
14) Use the or arrow buttons to scroll through the effects.
[ ]
NOTE: Press [OK] to preview the effect with your message. Press [ESC] to go
back to the effects selection menu.
[ ]
TIP: When previewing an effect, try using the or arrow buttons to see a
variation of the selected effect. Also try using the or arrow buttons to
manipulate the speed of the effect.
15) When you are satisfied with your effect preview, press [OK].
Preservation Effect – The effect used when your message is stationary on the display.
16) Use the or arrow buttons to scroll through the effects.
17) When you are satisfied with your effect preview, press [OK].
Hold Time – How long your message will remain on the display before Release Effect.
18) Use the or arrow buttons to select a number from 01 – 99 (seconds).
19) When you are satisfied with your setting, press [OK].
Release Effect – The effect used to remove your message from the display.
20) Use the or arrow buttons to scroll through the effects.
21) When you are satisfied with your effect preview, press [OK].
[ ] [ ]
[ ] [ ]
[ ] [ ]
[ ] [ ]
[ ] [ ]
NOTE: Refer to the Appendix Section for a list of all effects.
Connection – This setting has no function at this time.
22) Press [OK].
Run your message
23) Press [ESC] to run your message.
Page 8
Page 13
SPECIAL CHARACTERS CONTENT
INSERT SYMBOLS, ICONS, AND INTERNATIONAL CHARACTERS
Special characters help complete your message.
NOTE: Special characters content can be inserted into your message at any time.
Enter the Edit Mode
1) Press [MENU].
2) Press [OK] twice.
Special – Large English and European characters, number and symbols.
3) Press [SPECIAL].
4) Use the and arrow buttons to scroll through all the available characters.
5) When you see a Special character you would like to use, simply press the [OK] button
to insert the character in your message.
Move – Animated icons.
6) Press [MOVE].
7) Use the and arrow buttons to scroll through all the available Icons.
8) Press [OK] to insert a Move icon.
Icon – Stationary icons.
9) Press [ICON].
10) Use the and arrow buttons to scroll through all the available Icons.
11) Press [OK] to insert an Icon.
Symbol – Grammer punctuations.
12) Press [SYMBOL].
13) Use the and arrow buttons to scroll through all the available Symbols.
14) Press [OK] to insert a Symbol.
HE-RA (Japanese) – Japanese character set 1.
15) Press the “HE-RA” button (Refer to Remote Control Section for assistance).
16) Use the and arrow buttons to scroll through all the available characters.
17) Press [OK] to insert a Japanese character.
GA-DA (Japanese) – Japanese character set 2.
18) Press the “GA-DA” button (Refer to Remote Control Section for assistance).
19) Use the and arrow buttons to scroll through all the available Symbols.
20) Press [OK] to insert a Japanese character.
Chinese – This button has no function at this time.
Spanish – Spanish characters.
21) Press [SPANISH].
22) Use the and arrow buttons to scroll through all the available characters.
23) Press [OK] to insert a Spanish character.
[ ] [ ]
[ ] [ ]
[ ] [ ]
[ ] [ ]
[ ] [ ]
[ ] [ ]
[ ] [ ]
[ ] [ ]
Page 9
Page 14

SPECIAL CHARACTERS CONTENT (continued)
F1 – Headline messages.
24) Press [F1].
25) Use the and arrow buttons to scroll through all the available Headlines.
26) Press [OK] to insert a Headline.
F2 – This button has no function at this time.
F3 – European characters.
27) Press [F3].
28) Use the and arrow buttons to scroll through all the available characters.
29) Press [OK] to insert a European character.
F4 – Russian characters.
30) Press [F4].
31) Use the and arrow buttons to scroll through all the available characters.
32) Press [OK] to insert a Russian character.
PRACTICE
33) Go ahead! Enter additional special characters.
Exit the Edit Mode
34) Press [OK] twice.
Run your Message
35) Press [ESC] to run your message.
[ ] [ ]
[ ] [ ]
[ ] [ ]
NOTE: Refer to the Appendix Section for a list of all Special characters content.
Page 10
Page 15
VISUAL CONTENT
GRAPHIC ANIMATIONS
Add eye-catching messages with moving graphics!
Add Image – Graphic animations with headlines.
1) Press the [MENU] button.
2) Press [OK].
3) Press the arrow button until the Add Image option appears.
4) Press [OK].
5) Use the and arrow buttons to scroll through all the available Images.
6) Press [OK] to add the Image to your message.
7) Press [ESC] to run your message.
NOTE: Visual content is added as a standalone messages separate from your
custom message. Visual content is designed to automatically run with
your custom message.
Add Picture – Large graphics.
1) Press the [MENU] button.
2) Press [OK].
3) Press the arrow button until the Add Picture option appears.
4) Press [OK].
5) Use the and arrow buttons to scroll through all the available Pictures.
6) Press [OK] to add the Picture to your message.
7) Press [ESC] to run your message.
Add Video – Large graphic animations.
1) Press the [MENU] button.
2) Press [OK].
3) Press the arrow button until the Add Video option appears.
4) Press [OK].
5) Use the and arrow buttons to scroll through all the available Videos.
6) Press [OK] to add the Video to your message.
7) Press [ESC] to run your message.
[ ]
[ ] [ ]
[ ]
[ ] [ ]
[ ]
[ ] [ ]
TIP: When previewing Images, Pictures, or Video content, use the and
arrow buttons to set the speed of the graphic or animation.
[ ][ ]
NOTE: Refer to the Appendix Section for a list of all Graphic content.
Page11
Page 16

VISUAL CONTENT (continued)
TIME, DATE
Useful content for the public eye.
Display Date – Change the appearance of the Date with your custom message.
1) Press the [MENU] button.
2) Press [OK].
3) Press the arrow button until the Display Date option appears.
4) Press [OK].
5) Use the and arrow buttons to select a number
6) Now apply any one or a combination of Font Styles to the numbers.
NOTE: The [ATTRIBUTE] Font Style is not applicable to the Date and Time.
NOTE: The Date cannot be set from this option. Please refer to the
TIME/DATE AND TIMER section for Date settings.
7) When you are satisfied with your changes, press [OK].
8) The Automatic Effect option appears. Choose a preferred effect or press [OK] to
continue (refer to the Effects Content section for assistance).
9) The Add Contents option appears, press [OK].
10) Press [ESC] to run your message.
Display Time – Change the appearance of the Date with your custom message.
11) Press the [MENU] button.
12) Press [OK].
13) Press the arrow button until the Display Time option appears.
14) Press [OK].
15) Use the and arrow buttons to select a number
16) Now apply any one or a combination of Font Styles to the numbers.
NOTE: The Time cannot be set from this option. Please refer to the
TIME/DATE AND TIMER section for Time settings.
17) When you are satisfied with your changes, press [OK].
18) The Automatic Effect option appears. Choose a preferred effect or press [OK] to
continue (refer to the Effects Content section for assistance).
19) The Add Contents option appears, press [OK].
20) Press [ESC] to run your message.
[ ]
[ ] [ ]
[ ]
[ ] [ ]
Page 12
Page 17
COUNTER CONTENT
D-DAY, D-TIME, AND EVENT
Count down by time, day, or event.
Add Dday – Count down to an event by days.
1) Press the [MENU] button.
2) Press [OK].
3) Press the arrow button until the Add Dday option appears.
4) Press [OK].
5) Set the event date using the and arrow buttons.
6) To move between the month, day, and year, use the and arrow buttons.
7) Press [OK] to confirm the event date.
8) Input your event message and press [OK].
9) Your message will automatically be previewed on the display. Press [ESC] to make a
change or press [OK] to confirm your entries.
10) Press [ESC] to run your message.
NOTE: Your Dday message will automatically run with your existing messages
and also show the remaining days. For example: “New Years Day D-128”,
where D-128 is the days remaining.
Add Dtime – Count down to an event by time.
1) Press the [MENU] button.
2) Press [OK].
3) Press the arrow button until the Add Dtime option appears.
4) Press [OK].
5) Set the event time using the and arrow buttons.
6) To move between am/pm, hour, and minutes, use the and arrow buttons.
7) Press [OK] to confirm the event time.
8) Input your event message and press [OK].
9) Your message will automatically be previewed on the display. Press [ESC] to make a
change or press [OK] to confirm your entries.
10) Press [ESC] to run your message.
NOTE: Your Dtime message will automatically run with your existing messages
and also show the remaining time. For example: “New Years Day It is
before 0 hours and 20 minutes”.
Add Event – Event message.
1) Press the [MENU] button.
2) Press [OK].
3) Press the arrow button until the Add Event option appears.
4) Press [OK].
5) Enter your event message and press [OK].
6) The Automatic Effect option appears. Choose a preferred effect or press [OK] to
continue (refer to the Effects Content section for assistance).
[ ]
[ ]
[ ]
[ ]
[ ] [ ]
[ ]
[ ][ ]
Page13
Page 18

COUNTER CONTENT (continued)
7) The Add Contents option appears, press [OK].
8) Press [ESC] to run your message.
Page 14
Page 19
CONTENT MODIFICATION
MODIFY, INSERT, AND INDEX CONTENT
By now you should have a good feel for creating new content. Now let’s try to make some
changes.
Modify Contents – Revise an existing custom message.
1) Press the [MENU] button.
2) Press the arrow button. The Modify Contents option appears.
3) Press [OK].
4) Use the and arrow buttons to scroll through your existing messages.
5) Select any custom message to revise by pressing [OK].
6) You are now free to delete, add or modify your message.
7) When your revisions are complete, exit the edit mode and run your message.
Insert Contents – Inserts new content before an existing message.
1) Press the [MENU] button.
2) Press the arrow button until the Insert Contents option appears.
3) Press [OK].
4) Use the and arrow buttons to scroll through your existing messages.
5) When you have selected the location of the new content to be inserted, press [OK].
6) Use the and arrow buttons to select an insertion option type.
NOTE: Insertion options: (1) Sentence Insertion (2) Dual Message Insertion
(3) Image Insertion (4) Picture Insertion (5) Video Insertion
(6) Display Date (7) Display Time (8) Dday Insertion (9) Dtime Insertion.
7) Select your option by pressing [OK].
8) Enter your content accordingly and, exit the edit mode and run your message.
NOTE: All insertion options have been covered earlier in this manual. Please
review the sections previous to this one for assistance.
Index Content – Organize your message playlist.
1) Press the [MENU] button.
2) Press the arrow button until the Index Contents option appears.
3) Press [OK].
4) Use the and arrow buttons to scroll through your existing messages.
5) Press [OK] to change enable/disable a message. Selecting “X” will disable the
message from running in your message playlist. Selecting “O” will enable the
message to run in your playlist.
NOTE: By default, all messages are enabled to run in the playlist.
6) When you are satisfied with your changes press [ESC].
7) Now press [ESC] again to run your message.
[ ]
[ ] [ ]
[ ]
[ ] [ ]
[ ] [ ]
[ ]
[ ] [ ]
Page 15
Page 20

CONTENT DELETION
ERASE UNWANTED MESSAGES
Select to delete a single message or all your messages from memory.
Delete Option – Erase a single message.
1) Press the [MENU] button.
2) Press the arrow button until the Delete Contents option appears.
3) Press [OK].
4) The Delete Option will appear.
5) Use the and arrow buttons to scroll through your existing messages.
6) Select the message you would like to delete by pressing [OK].
7) The Delete? (OK/ESC) prompt will appear.
8) Press [OK] to confirm deletion or [ESC] to cancel deletion.
9) The Delete Option will appear. Press [ESC]
10) Now press [ESC] again to run your message.
Delete All – Erase all stored messages.
1) Press the [MENU] button.
2) Press the arrow button until the Delete Contents option appears.
3) Press [OK].
4) The Delete Option will appear.
5) Press the arrow button. The Delete All option appears.
6) Press [OK].
7) The Delete? (OK/ESC) prompt will appear.
8) Press [OK] to confirm deletion or [ESC] to cancel deletion.
9) The Delete All option will appear. Press [ESC]
1) Now press [ESC] again to run your message.
NOTE: ANY MESSAGES DELETED WILL BE PERMANENTLY REMOVED FROM THE
DISPLAY MEMORY AND CANNOT BE RECOVERED FOR FUTURE USE.
[ ]
[ ] [ ]
[ ]
[ ]
Page 16
Page 21
TIME/DATE AND TIMER
SET CURRENT TIME, DATE, AND TIMER SETTING
Set Time – Set current time.
1) Press the [MENU] button.
2) Press the arrow button until the Set Time option appears.
3) Press [OK]. The Set Time option appears.
4) Use the and arrow buttons to set the time.
5) Use the and arrow buttons to move the cursor
6) Press [OK] to confirm your changes.
7) Press [ESC] twice to exit the Set Time option.
Set Date – Set current date.
1) Press the [MENU] button.
2) Press the arrow button until the Set Time option appears.
3) Press [OK]. The Set Time option appears.
4) Press the arrow button until the Set Date option appears.
5) Use the and arrow buttons to set the date.
6) Use the and arrow buttons to move the cursor
NOTE: The date format is YEAR/MONTH/DAY.
7) Press [OK] to confirm your changes.
8) Press [ESC] twice to exit the Set Date option.
Set Timer ON – Set the time the display will turn ON automatically.
1) Press the [MENU] button.
2) Press the arrow button until the Set Time option appears.
3) Press [OK]. The Set Time option appears.
4) Press the arrow button until the Set Timer On option appears.
5) Press [OK].
6) Use the and arrow buttons to set the time.
7) Use the and arrow buttons to move the cursor
8) Press [OK] to confirm your changes.
9) Press [ESC] twice to exit the Set Date option.
Set Timer OFF – Set the time the display will turn OFF automatically.
1) Press the [MENU] button.
2) Press the arrow button until the Set Time option appears.
3) Press [OK]. The Set Time option appears.
4) Press the arrow button until the Set Timer Off option appears.
5) Press [OK].
6) Use the and arrow buttons to set the time.
7) Use the and arrow buttons to move the cursor
8) Press [OK] to confirm your changes.
9) Press [ESC] twice to exit the Set Date option.
[ ]
[ ] [ ]
[ ]
[ ]
[ ]
[ ] [ ]
[ ]
[ ]
[ ]
[ ] [ ]
[ ]
[ ]
[ ]
[ ] [ ]
[ ]
[ ]
[ ]
[ ]
[ ]
Page 17
Page 22
ADDITIONAL FEATURES
STOP WATCH AND PASSWORD
Increment Mode – Starts the watch at 00:00:00 and increases the number.
1) Press the [MENU] button.
2) Press the arrow button until the Stop Watch option appears.
3) Press [OK]. The Increment Mode option appears.
4) Press [OK] to select the current option.
5) To begin or pause the Stop Watch, press [OK].
TIP: Reset the watch by pressing any arrow button.
6) Press [MENU] at any time to exit the Stop Watch option.
Decrement Mode – Starts the watch at 12:59:59 and decreases the number.
1) Press the [MENU] button.
2) Press the arrow button until the Stop Watch option appears.
3) Press [OK]. The Increment Mode option appears.
4) Use the arrow button to scroll to the Decrement Mode option.
5) Press [OK] to select the current option.
6) To begin or pause the Stop Watch, press [OK].
[ ]
[ ]
[ ]
TIP: The and arrow buttons can be used to set the Stop Watch while the
and arrow buttons can be used to move the cursor.
7) Press [MENU] at any time to exit the Stop Watch option.
Password– Password protect your messages from being changed by another user.
1) Press the [MENU] button.
2) Press the arrow button until the Password option appears.
3) Press [OK].
4) When the Password box appears, use the Character/Number buttons to enter your
secret 4 digit PIN number.
[ ] [ ]
[ ]
[ ]
[ ]
NOTE: To cancel Password entry, simply press [ESC] at anytime.
NOTE: WRITE DOWN YOUR PASSWORD FOR SAFE KEEPING!
5) Now re-enter your 4 digit PIN number again.
6) Press [MENU] to exit the Password option.
Page 18
Page 23
SETTINGS
RESERVATION, SOUND, DIRECTION, PASSWORD ENABLE/DISABLE, BRIGHTNESS
Setting Up
1) Press the [MENU] button.
2) Press the arrow button until the Setting Up option appears.
3) Press [OK]. The Reservation setting appears (enables/disables the Timer).
NOTE: Press [OK] to enable/disable a setting. Selecting “X” will disable the
setting while “O” will enable the setting.
4) Set accordingly and press the arrow button to go to the next setting.
5) The Sound setting appears (enables/disables sound).
6) Set accordingly and press the arrow button to go to the next setting.
7) The Direction setting appears (displays vertical or horizontal viewing).
8) Set accordingly and press the arrow button to go to the next setting.
9) The Password setting appears (enables/disables password).
10) Set accordingly and press the arrow button to go to the next setting.
11) The Brightness setting appears (set the brightness level).
12) Press [OK] to enter the additional setting available for brightness.
13) Use the and arrow buttons to select a Daytime brightness.
14) Press [OK].
15) Use the and arrow buttons to select a Nighttime brightness.
16) Press[OK].
17) Set the time when nighttime begins.
18) Press[OK].
19) Set the time when nighttime ends.
20) Press[OK].
21) Press [ESC].
22) Press [ESC] again to exit the Setting Up option.
[ ]
[ ]
[ ]
[ ]
[ ]
[ ] [ ]
[ ] [ ]
Page 19
Page 24
APPENDIX
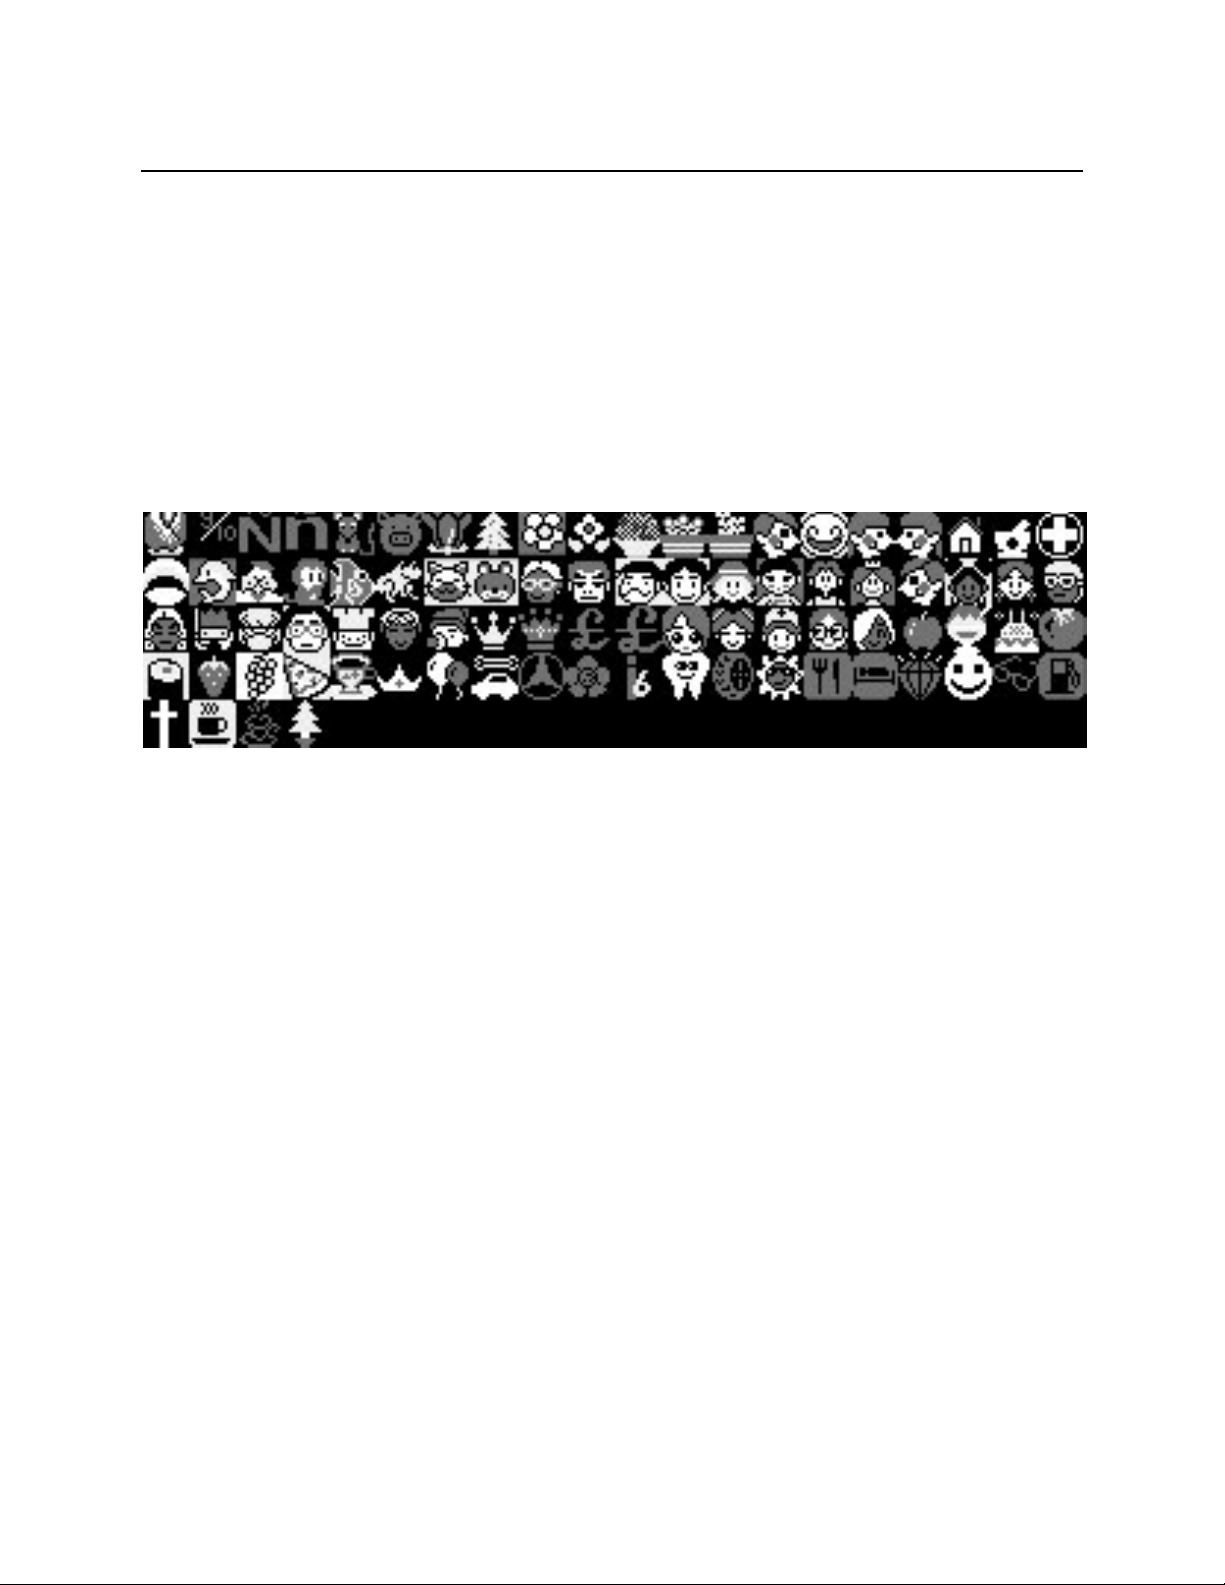
SPECIAL CHARACTERS
Special – Large English and European characters, numbers and symbols.
1 2 3 4 5 6 A B C D E F G H I J K L M N O P Q R S T U V X Y Z a b c d e f g h i j
k l m n o p q r s t u v w x y z Á á É é Í í Ó ó Ö ö Ő ő Ú ú Ü ü Ű ű
Additional
Move – Animated icons.
Not available in this manual.
Icon – Stationary icons.
symbols not available in this manual.
Symbol – Symbols and punctuations.
! “ # $ % & ‘ ( ) * + , - . / : ; < = > ? @ [ ¢ ] ^ _ ` { | }
HE-RA – Japanese character set 1.
Not available in this manual.
GA-DA – Japanese character set 2.
Not available in this manual.
Spanish – Spanish character set.
A B C Ch D E F G H I J K L Ll M N Ň O P Q R RR S T U V W X Y Z a b c ch d e f
g h i j k l ll m n ñ o p q r rr s t u v w x y z ¿ ¡ á é í ó ú
F1 – Headline messages.
01: WELCOME TO
02: HAPPY HOUR
03: NIGHTLY ENTERTAINMENT
04: ENTERTAINMENT
05: FOOD SPECIALS
06: DAILY SPECIALS
07: PINTS
08: BOTTLES
09: OPEN 7 DAYS
10: OPEN
11: NFL HEADQUARTERS
12: NASCAR-HAPPY HOLIDAYS
13: NASCAR-HAPPY HOLIDAYS
14: LABOR DAY
15: MEMORIAL DAY
16: HALLOWEEN
17: SUPER BALL
18: PLAYOFFS
19: VISIT NJCOORS.COM OR TEXT #46786
FOR COORS LIGHT HOT SPOTS
Page 20
Page 25
APPENDIX (continued)
F3 - European character set
Ä á É é ĺ í Ó Ö Õ ó ö õ Ú Ü Ű ú ü ũ
F4 – Russian character set.
Not available in this manual.
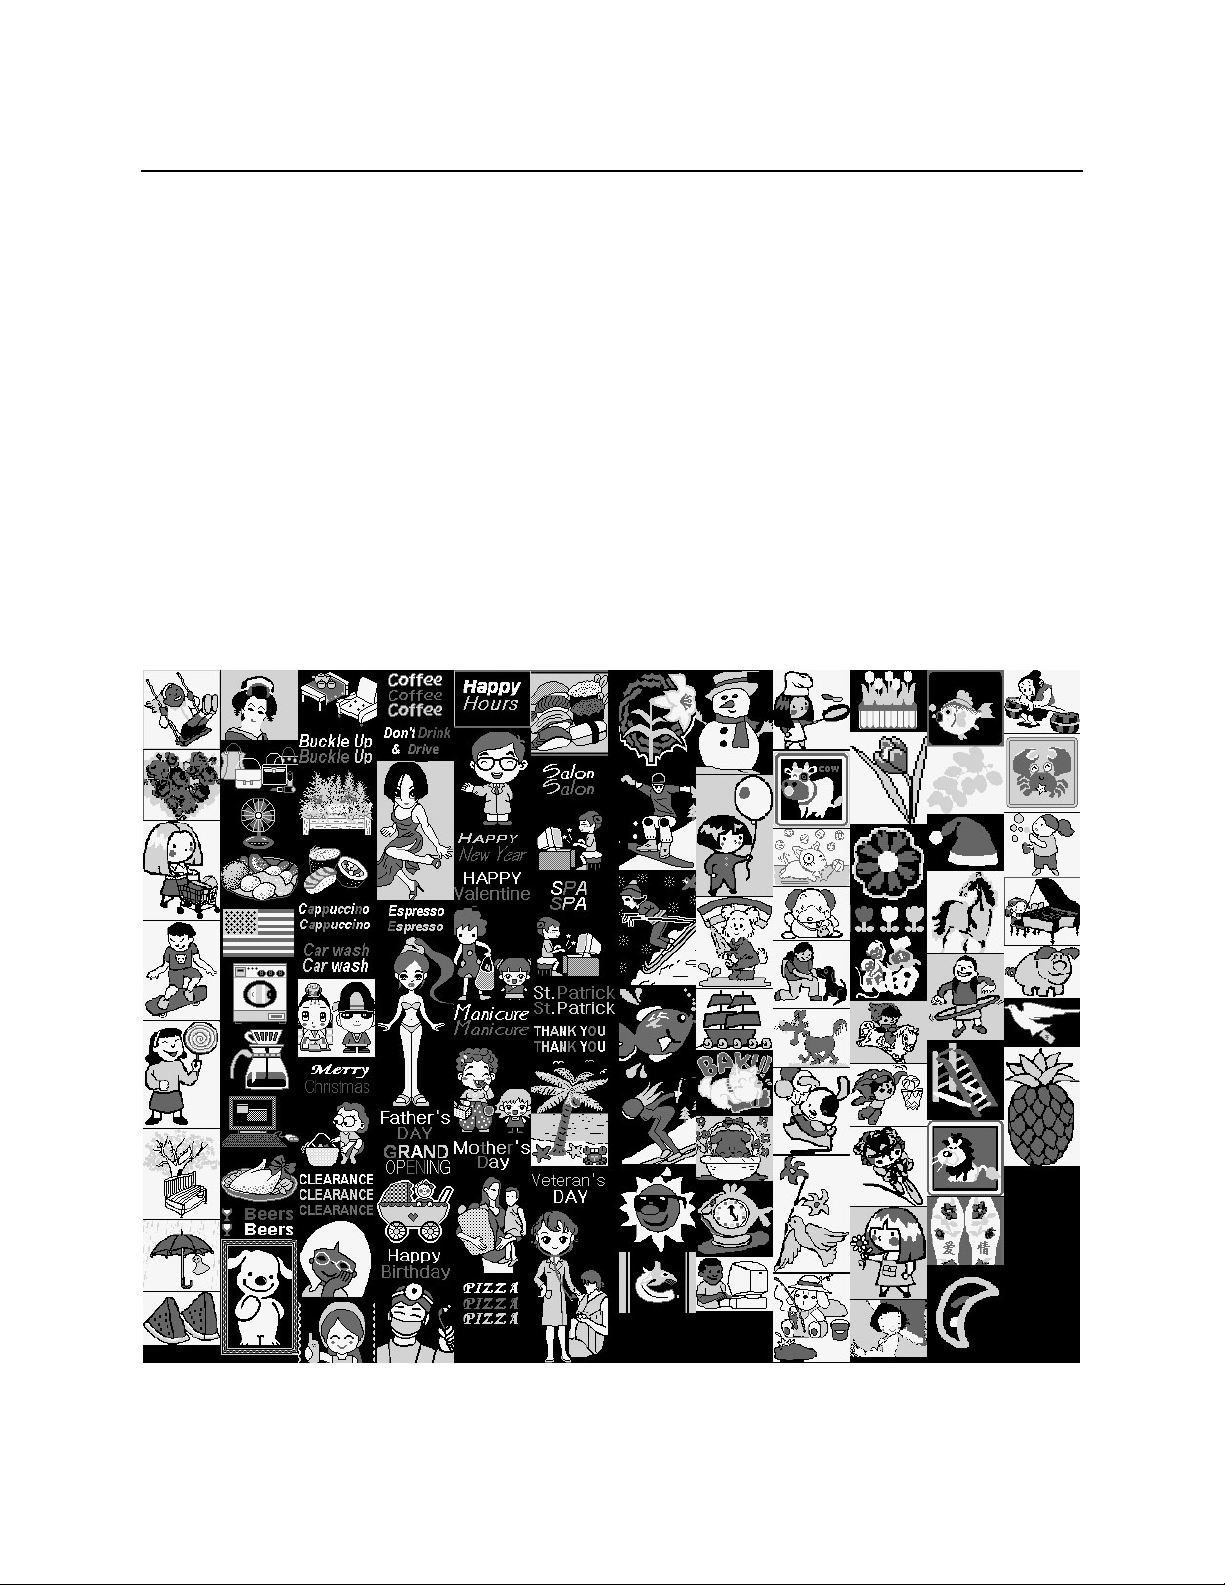
GRAPHIC ANIMATIONS
Add Image – Graphic animations with headlines.
Bowling
Dart
Jewelry
Music
Have A Nice Day
Add Picture – Large graphics.
Thank You
Welcome
Car Crash and Tow
Closed
Merry Christmas
Music Notes
Open
Ride Horse
Sell Umbrella
Page 21
Page 26

APPENDIX (continued)
Add Video – Large graphic animations.
Golfing
Crab
Female Singer
Snowman
Pigs Talking
Girl Riding Tricycle
NOTE: All graphics and animations may vary from sign to sign.
EFFECTS TABLE
Insertion Effects – The effect used to control how your message will jump on the display.
1) Automatic – random effects (default)
2) Drama – curtain effects
3) Scroll – scroll up/down/left/right
4) Gathering – merge lines left/right/up/down/diagonal
5) Hurricane – rotation effect
6) Tornado – twisting effect
7) Lens - expands and contracts letters in multiple directions
8) To Appear –displays different letters in multiple forms.
9) By Color –combines and separates colors individually or in groups.
10) Beam – laser beam effects
11) Wave – wave effect
Maintaining Effects – The effect used when your message is stationary on the display.
1) Drama – curtain effects
2) Reverse – inverse color effect
3) To Shake – letters/characters shake effect
4) Hurricane – rotation effect
5) Tornado – twisting effects.
6) Lens – expands and contracts letters in multiple directions
7) Fruitless – no effect
Display Effects – The effect used to remove your message from the display.
1) Drama – random effects (default)
2) Scroll – scroll up/down/left/right
3) Hurricane – rotation effect
4) Tornado – twisting effect
5) Dividing – closes message using various shapes
6) Lens – expands and contracts letters in multiple directions
7) Erasing – erase effect
8) By Color – combines and separates colors individually or in groups.
Female Brunette
Lobster
Pinata
Medical
Santa & Reindeer
Santa/Reindeer/Boy
Bowing
Girl Opening Gift
Doll
Candles & Wreath
Turkey
Christmas Tree
Page 22
Page 27

FAQS - TROUBLESHOOTING
FREQUENTLY ASKED QUESTIONS
Why do words get cutoff?
Edit your message and try using the [FIX] button. It is practical to create several messages
consisting of 2 – 3 words. By default all your messages will run as one long message.
Can I display the Temperature and Humidity?
No. This feature is not supported.
Can I recover any deleted messages?
No. If you use the delete option, your information will be permanently removed from the
display.
Why will my timer not work?
Make sure the Reservation setting is turned ON. Refer to Settings section.
I set a password but I am still able to make changes.
Make sure the Password setting is turned ON. Refer to the Setting section.
I created a Double-Line message but could not apply the Font Style I wanted.
Not all Font Styles may be available due to the reduced font size used to achieve a DoubleLine message.
TROUBLESHOOTING
I plugged my sign to the power outlet but it did not light up?
1) Unplug the power cord from the outlet.
2) Make sure that there is power at the outlet location by plugging in a lamp. If a lamp is
not available, please try another power outlet and make sure that it outputs the
required 110VAC ~ 120VAC.
I am sure that the outlet I am using meets the voltage requirements but my sign still does
not light up.
1) Insert the batteries into the remote.
2) Press the [MENU] button. If the sign lights up, return to the beginning of the manual
for further instructions. If the sign still fails to light up, please contact the Pro-Lite
technical support department.
My sign does not respond to the remote controller.
1) Make sure the batteries are inserted correctly following the polarity diagram inside
the battery compartment.
2) Stand approximately 5 feet from the sign.
3) Press the [MENU] button to see if the sign responds. If no response, please try a new
set of batteries. If remote continues to fail, please contact the Pro-Lite technical
support department.
Page 23
Page 28

CUSTOMER SERVICE - WARRANTY
TECHNICAL SUPPORT
Available 7:30 am – 4:30pm PST
Phone (714) 668-9988
Email: [email protected]
Web: www.pro-lite.com
WARRANTY
ONE YEAR LIMITED WARRANTY
PRO-LITE, INC. warrants to the original consumer that each of its PRO-LITE products and all components therein
contained will be free from defects in materials and/or workmanship for one year from the date of purchase. Any
warranty hereunder is extended only to the original consumer purchaser and is not assignable.
In the event of malfunction or other indication of failure attributable directly to faulty workmanship and/or material,
PRO-LTTE, INC will at its option, repair or replace said products or components to whatever extent it shall deem
necessary to restore said product to proper operating condition, provided the consumer purchaser has previously
returned the enclosed Warrants Registration Card to PROLITE, INC. Before returning a product for repair, the
customer must call PRO-LITE, INC. Customer Service at (714) 668-9988 for a Return Materials Number. This number
should be included with the customer's mailing address and telephone number when the product is returned.
Products should be returned to: PRO-LITE, INC., Attention: Warranty/Repair, 3505 Cadillac Ave. Bldg. D, Costa Mesa,
CA 92626 (postage prepaid). During the year after the date of purchase, all labor and materials will be provided
without charge. There shall be no warranty for either parts or labor after the expiration of one year from the date of
purchase.
Units must be returned postage prepaid. It is recommended that the unit be insured when shipped. Units returned
for which a Warranty Registration Card has not been submitted or out-of-warranty units returned will be repaired or
replaced (at the option of PRO-LITE, INC) and the customer will be charged for parts and labor
Products will be returned to customer after repair or replacement has been completed by carrier and method chosen
by PRO-LITE, INC. to any destination within the United States of America. Should the customer desire some other
specific form of conveyance, or be located outside the border of the U. S. then the customer must bear the cost of
return shipment.
The customer shall be solely responsible for failure of any PRO-LITE, INC. product or component thereof, resulting
from accident, abuse or misapplication of the product, and PRO-LITE, INC. assumes no liability as a consequence of
such events under the terms of the Warranty.
This Warranty gives you specific legal rights and you also have other rights that vary from state to state.
This Warranty is in lieu of all other express warranties, which now or hereafter might otherwise arise with respect to
this product. ANY AND ALL IMPLIED WARRANTIES OF MERCHANTABILITY AND FITNESS FOR PARTICULAR USE SHALL
HAVE NO GREATER DURATION THAN THE PERIOD FOR THE EXPRESS WRITTEN WARRANTY APPLICABLE TO THIS
PRODUCT AS SHOWN ABOVE AND SHALL TERMINATE AUTOMATICALLY AT THE EXPIRATION OF SUCH PERIOD. No
action shall be brought for breach of any implied or express warranty after one year subsequent to the expiration of
the period of the express written warranty. (Some states do not allow limitations or how long an implied warranty
lasts, so this limitation may not apply to you.)
Incidental and consequential damages caused by malfunctions, defect, or otherwise and with respect to breach of
any express or implied warranty, are not the responsibility of PRO-LITE, INC. and to the extent permitted by law are
hereby excluded both for property and, to the extent of unconscionable, for personal injury damage. (Some states do
not allow the exclusion or limitations of incidental or consequential damages, so the above may not apply to you.)
 Loading...