

Page 1

User’s Man ua l
for
M VG A-NVT NT 2A
M VG A-NVTNT2AL
DOC NO:54-00007-07 Rev. B
DAT E:1999/05/03
Page 2
FCC Req u irement
This device has been certified to comply with the limits for a Class B computing device pursuant to
WARNING:
This equipment generates and uses radio frequency energy and, if not installed and
used properly, that is, in strict accordance with the manufacturer’s instructions, may
It has been tested and found to comply with the limits for a Class B compliant device in accordance
with the specifications in Subpart J of Part 15 of FCC Rules, which are designed to provide reasonable
If this equipment does cause interference to radio or television reception, which can be determined by
turning the equipment off and on, the user is encouraged to try to correct the interference by one or
Ensure that the card
If necessary, consult your dealer, service representative, or an experienced radio/television technician
Stock No.
Subpart. J of Part 15 of the FCC Rules. See instructions if interference to radio reception is suspe cted.
cause interference to radio or television reception.
protection against such interference in a residential installation.
However, there is no guarantee that interference-will not occur in a particular installation.
more of the following measures:
Reorient the receiving antenna
˙
Relocate the computer away from the receiver
˙
Move the computer away from the receiver
˙
Plug the computer into a different outlet so that the computer and the receiver are on
˙
different branch circuits
˙
are tightly secured
Ensure that slot covers are installed in all unused slots
˙
’s mounting screws, attachment connector screws, and ground wires
for additional suggestions.
The manufacturer is not responsible for any radio or TV interference caused by unauthorized
modifications to this equipment. It is the responsibility of the user to correct such interference.
The user may find the following booklet prepared by the Federal Communications Commission helpful:
How to Identify and Resolve Radio-TV Interf erence Problems.
This booklet is available from the Government Printing Office, Washington, D.C. 20402,
004-000345-4.
NOTE:
CAUTION:
You must use shielded interface cables with a ferrite bead in order to maintain compliance
with the limits for a Class B device.
CHANGES OR MODIFICATIONS NOT EXPRESSLY APPROVED BY THE
PARTY RESPONSIBLE FOR COMPLIANCE COULD VOID THE USER’S
AUTHORITY TO OPERATE THE EQUIPMENT
II
Page 3

Notice
damages arising out of the use or the inability to use the product or documentation, eve n if
period of one (1) year from the date of purchase. During the warranty period, a product
the product has been damaged
be held liable for incidental or consequential damages, such as lost revenue or lost
The information in this document is subject to change in order to improve reliability,
design, or function without prior notice and does not represent a commitment on the part
of this company.
In no event will we be liable for direct, indirect, special, incidental, or consequential
advised of the possibility of such damages.
No part of this reference manual may be reproduced or transmitted in any form or by any
means without the prior written permission of this company.
1999
Tr ademark Acknow l edgement
All Brand- names and Trademarks are the property of their owners.
Limi ted Warr ant y
Our company warrants this product against defects in materials and workmanship for a
determined by us to be defective in form or function will be repaired or at our option, to
be replaced at no charge. This warranty does not apply if
by accident, abuse, misuse, or as a result of service or modification other than by us.
This warranty is in lieu of any other warranty expressed or implied. In no event shall we
business opportunities arising from the purchase of a this product.
III
Page 4

TABL E OF CONTENTS
System Requirements
Adapter Configuration
Installing drivers onto your Windows 95/98
Installing DirectX on your Windows 95/98
Resolution Table 32MB Video Memory
5.MVGA-NVTNT2A/AL FAQ
....................................
1. I nt roduction .......................................................................................... 1
Features .............................................................................................. 1
........................................................................ 1
Package Contents ............................................................................... 2
2. H ardwar e Installation .......................................................................... 3
....................................................................... 3
Installing the MVGA-NVTNT2A/AL adapter card…………… 4
3. Software Installation ............................................................................ 5
Autorun Instruction ............................................................................ 5
..................................... 6
....................................... 6
Installing drivers onto your Windows NT 4.0(SP3)………….……. 7
4.Display Information …………………………………………………... 8
……………………………. 8
……....………
10
IV
Page 5

CHAPTER 1 INTRODUCTION
The MVGA-NVTNT2A/AL (TwiN-Texel) architecture is the second
generation integrated
cycle enabling single-pass multi-texturing.MVGA-NVTNT2A/AL 32-bit
mapping precision delivers unsurpassed quality and performance allowing
TwiN-Texel(TNT)32bit graphics pipeline providing 2 texture mapped ,
Supports Windows 95
Windows2000
Optimized for Direct3D acceleration with complete support for DirectX
NTSC and PAL digital output port supporting external digital TV
Microsoft Windows 95 (OSR2.1)/ Windows 98/ Windows 2000 or
1. Intr od uct ion
,128-bit 3D Processor that processes 2 pixels-per-clock
color pipeline, 24-bit Z-buffering, 8-bit stencil buffer and per-pixel mip-
developers to write standards based applications with stunning visual effects
and realism.
Feat ur es
High performance 2D/3D processor Riva TNT2
□
SDRAM/SGRAM memory on board
□
128-bit wide frame buffer interface up to 32Mbyte memory devices
□
□
lit pixels per clock and single pass multi-texture rending
32-bit ARGB rending with destination alpha
□
24-bit Z buffer , 8-bit stencil buffer
□
□
□
5.X、6.Xand OpenGL
Integrated true-color 250MHz RAMDAC interface
□
High performance 128-bit 2D/GUI/DirectDraw acceleration
□
Video acceleration for DirectShow MPEG 1/2 and Indeo
□
AGP 4x/2x interface with full sideband support
□
Supports high screen resolutions up to 1920x1200@75Hz
□
Supports DDC1/2B monitor
□
DVD sub-picture alpha blend composite
□
1MB Flash-ROM on board (optional)
□
□
encorders(optional)
’ (OSR2.1), 98’, & NT 4.0(sp3)、
System Requ ir ements
Pentium/Pentium II / Pentium III motherboard with AGP bus.
□
□
Windows NT 4.0 with service pack 3(sp3)
DirectX 5.X/6.X driver
□
1
Page 6

CHAPTER 1 INTRODUCTION
Package Con tent s
MVGA-NVTNT2A/AL Without TV-OUT
MVGA-NVTNT2A/AL adapter
□
AutoRun Driver CD-Title
□
User’s Manual
□
IVI’s WINDVD CD-Title (optional)
□
MVGA-NVTNT2A/AL With TV-OUT
MVGA-NVTNT2A/AL adapter
□
AutoRun Driver CD-Title
□
User’s Manual
□
IVI’s WINDVD CD-Title (optional)
□
RCA cable
□
S-VIDEO cable (optional)
□
2
Page 7
CHAPTER 2 HARDWARE INSTALL
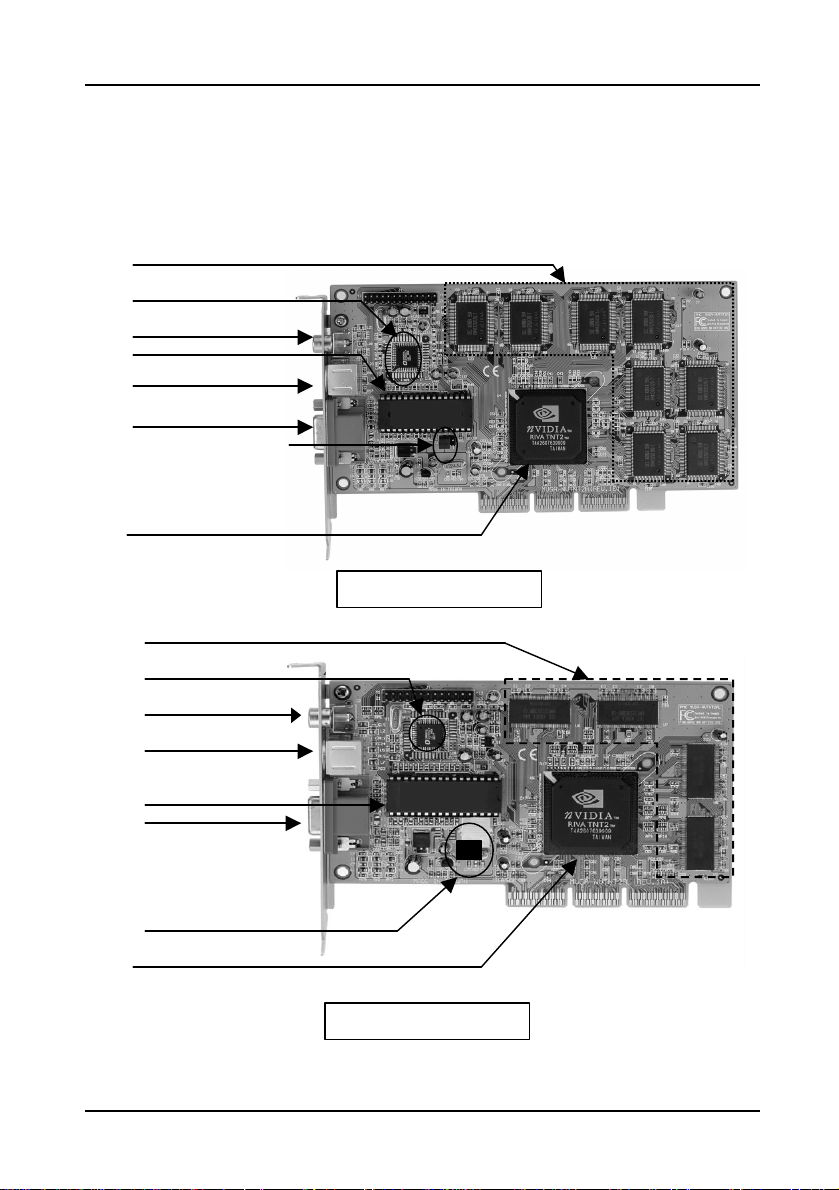
To monitor
MVGA-NVTNT2A
To monitor
S-Video
MVGA-NVTNT2AL
1 3
NTSC Jp1, Jp2;2-3 Short
NTSC Jp1, Jp2;2-3 Short
S-Video
2. Har dware Ins tall ati o n
Adapter Configuration
32/16MB SGRAM on board
TV-Out encoder chip(Optional)
Composite output(Optional)
Bios
output(Optional)
PAL Jp1, Jp2;1-2 Short
Riva TNT2 VGA chip set
32MB SDRAM on board
TV-Out encoder chip(Optional)
Composite output(Optional)
Bios
PAL Jp1, Jp2;1-2 Short
Riva TNT2 VGA chip set
output(Optional)
Jp2
3
Page 8
CHAPTER 2 HARDWARE INSTALL
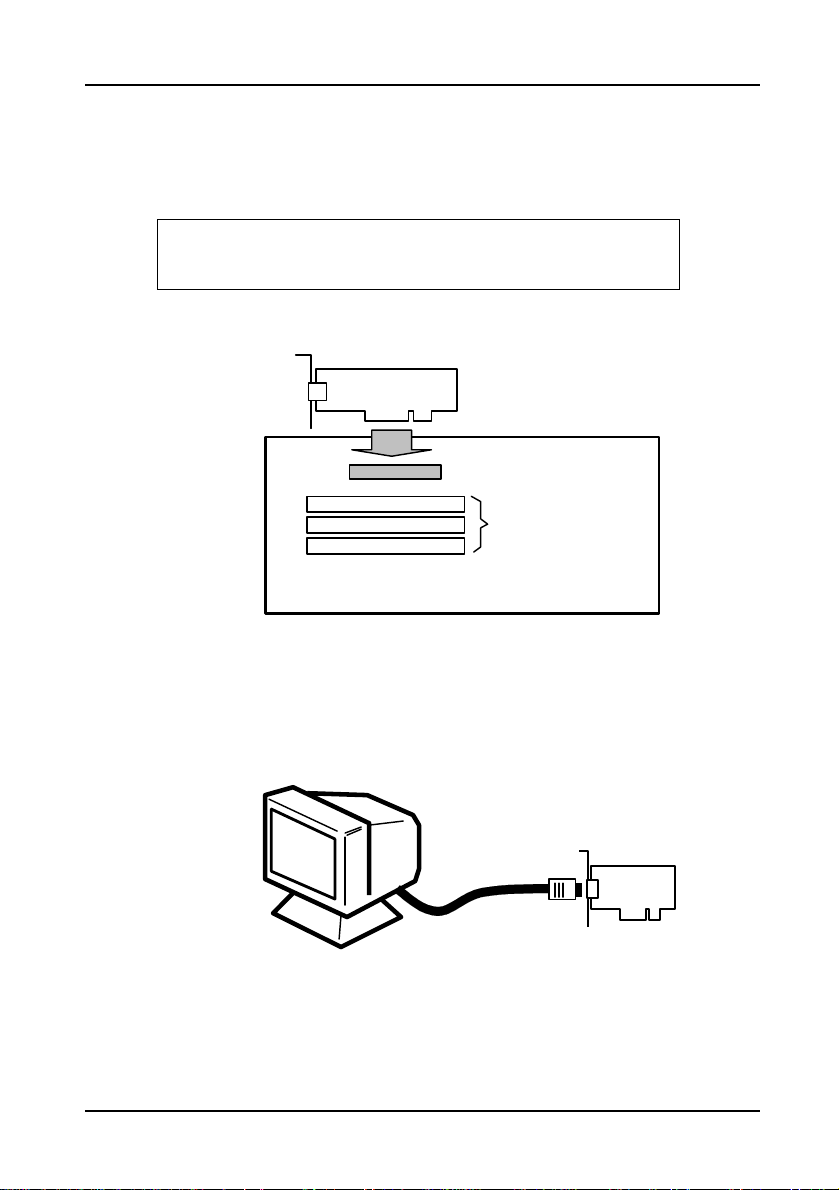
Turn OFF your computer, remove the computer case, and then ground
Not e:
Before installing the MVGA-NVTNT2A/AL card you
Align and secure the mounting bracket of the card to the computer and
Inst all i n g th e MVGA-NVTNT2A/AL adapter card
1.
yourself by touching the power supply of the computer.
must first set the VGA option to either standard
VGA or Standard Display VGA.
2. Remove your old graphics card, and install your new MVGANVTNT2A/AL card into the AGP slot.
MVGA-NVTNT2A/AL
AGP slot
PCI s lot
AGP mainboard
3.
replace the computer case.
4. Connect the monitor cable to the DB-15 connector of the card.
5. Turn ON your computer.
4
Page 9
CHAPTER 3 SOFTWARE INSTALL
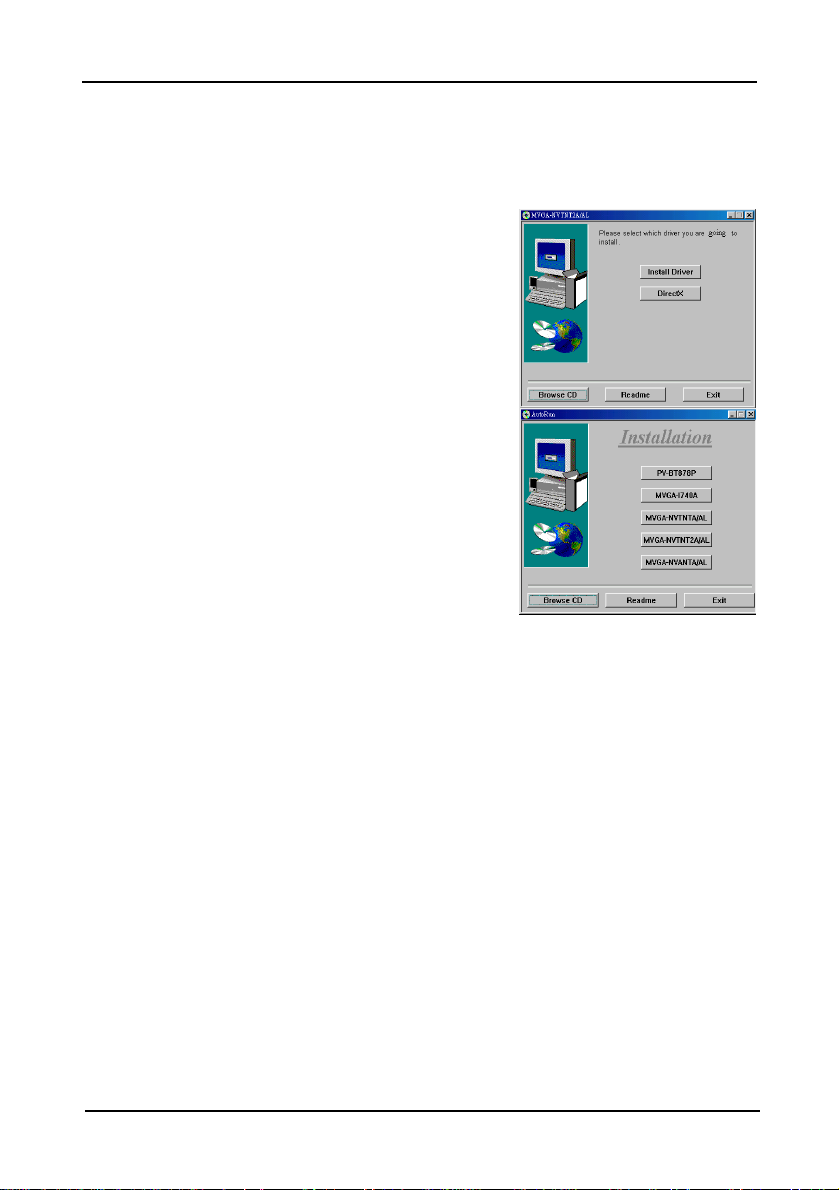
AutoRun CD-ROM driver (wait
a few seconds). You will see a windows
If you can not see that windows, please
from right
95/98 system. Not necessary, if it has already been installed in your
3. Soft w are inst all
Autorun Instructio n
1. Insert the
show below.
2.
click ‘MVGA-NVTNT2A/AL’
side windows.
2. Click-on ‘Insta ll Driver’ to install the VGA driver.
3. Click-on ‘Dir ectX’ to install Microsoft DirectX onto your Windows
system.
4. Click-on ‘Readme’, to view detailed information regarding the various
Drivers/Programs and FAQ’s located on the CD.
5. Click-on ‘Br owse CD’ to view the contents of the CD.
6. Click-on ‘Exit’ to exit the AutoRun tool .
5
Page 10
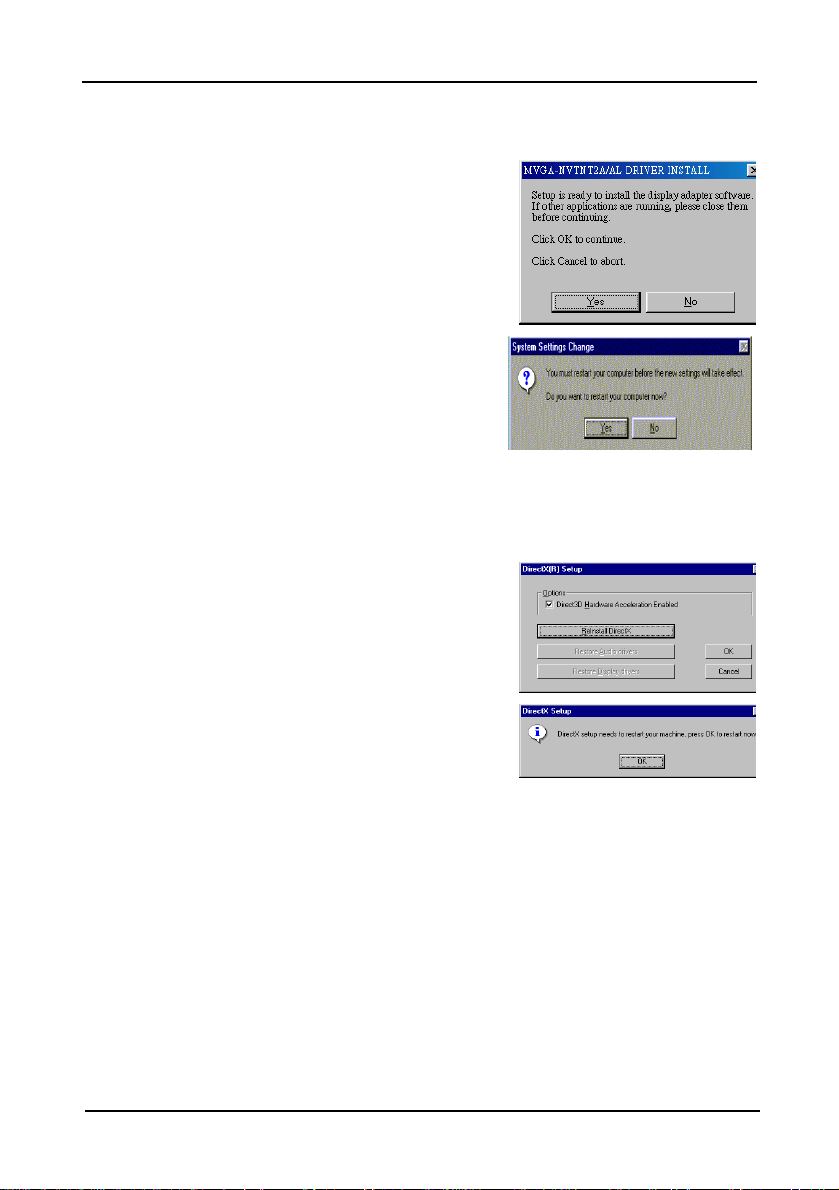
CHAPTER 3 SOFTWARE INSTALL
ROM drive, and click-on ‘Install Driver
to setup the VGA driver. Please click
After the installation is complete, the
system will ask you whether you want to
restart your computer now. Please click
, to reboot your system and activate
is already on your system. However, if
t have it and want to install it
ReInsta ll DirectX’ to install the
When it is done, please click
to
Installin g dri vers ont o your Windows 95/98
1. Insert the AutoRun driver into the CD-
’
‘OK’.
2.
‘OK’
the program.
Install in g DirectX on your Window s 95/98
1. There is no need to re-install DirectX, if it
you don’
click-on ‘
DirectX program.
2.
reboot windows.
‘OK’
6
Page 11

CHAPTER 3 SOFTWARE INSTALL
Start Windows NT
After your computer restarts, right-click the desktop and click
Browse CD” to select
You will see a list of NVTNT2 Series driver. Select NT4.0 driver and
Windows NT will once again prompt for confirmation. All appropriate
11
System Setting C ha nge” dialog box is displayed. Click
Windows NT will restart with the default settings. The display applet will
Install i n g dr i vers ont o you r Wind ows NT 4.0 (SP3)
1.
640x480 pixels), then restart your computer to make the change.
2.
“Pr opert ies”.
3. Click the “Settings” tab.
4. Select “Display Type”.
5. Select Adapter Type and click “Chan ge”
6. Click “Have Disk”.
7. Insert the AutoRun driver into the CD-ROM drive.
8. Click (assuming your CD-ROM disc driver X) “
the path X:\NVTNT2\NT4.0 of the display driver for Windows NT.
9.
then click “OK”.
10
files are then copied to the hard disk. When all files are copied, go back to
the “Display Properties” box by clicking “Close”. Click “App ly”.
The “
restart Windows.
12
appear to allow for mode selection.
, switch display properties to VGA mode (16 colors,
“Y es” to
7
Page 12
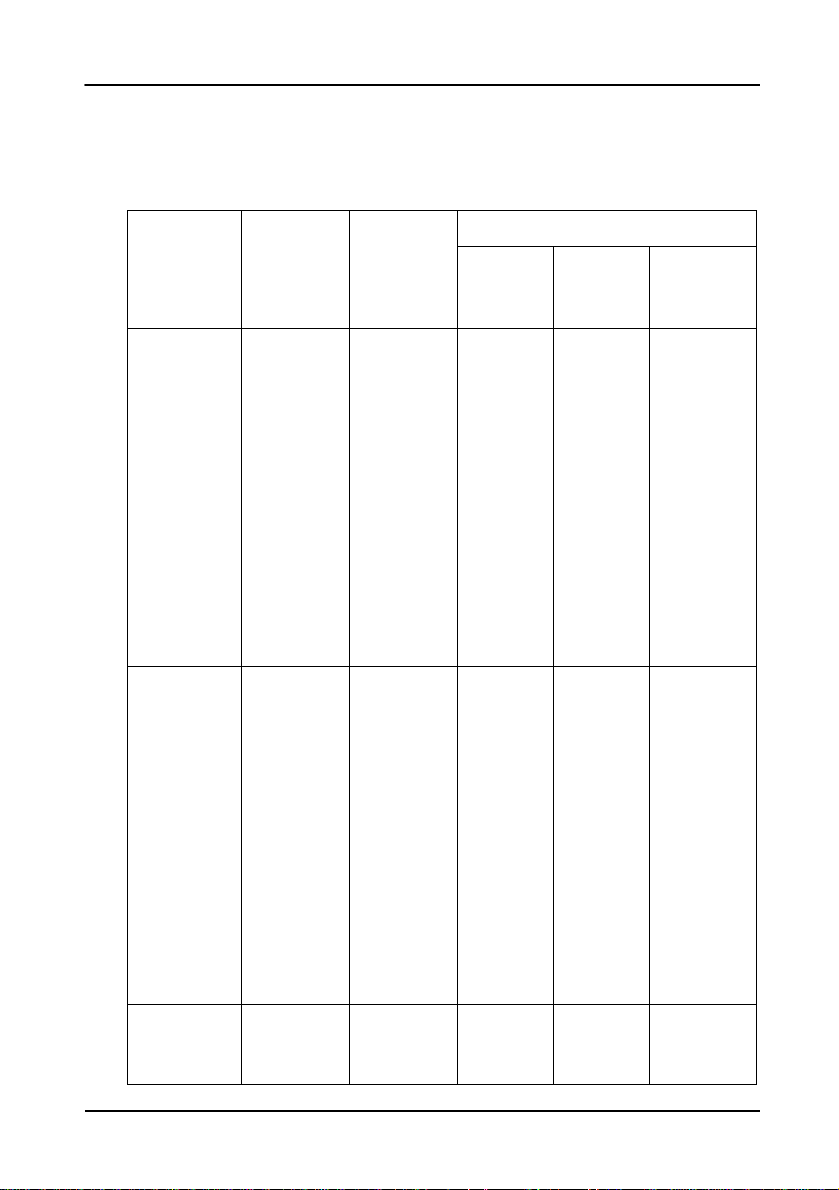
CHAPTER 4 DISPLAY INFORMATION
Vertical
Frequency
256 colors
60Hz
31.3KHz
[[[
70Hz
35.0KHz
[[[
72 Hz
36.0KHz
[[[
75 Hz
37.6KHz
[[[
85Hz
43.0KHz
[[[
100Hz
51.0KHz
[[[
120Hz
61.8KHz
[[[
140Hz
73.0KHz
[[[
144Hz
75.3KHz
[[[
150Hz
78.6KHz
[[[
170Hz
91.9KHz
[[[
200Hz
108.2KHz
[[[
240Hz
133.0KHz
[[[
60Hz
38.0KHz
[[[
70Hz
43.6KHz
[[[
72 Hz
45.0KHz
[[[
75 Hz
47.1KHz
[[[
85Hz
52.9KHz
[[[
100Hz
63.7KHz
[[[
120Hz
77.2KHz
[[[
140Hz
91.0KHz
[[[
144Hz
94.2KHz
[[[
150Hz
98.0KHz
[[[
170Hz
112.9KHz
[[[
200Hz
135.2KHz
[[[
240Hz
166.0KHz
[[[
60Hz
48.4KHz
70Hz
56.1KHz
[[[
[[[
4. Di sp lay Info r mati on
Resolu t i o n Tabl e 32MB Video Memory
Reso luti on
640 x 480
800 X 600
Hor izontal
Fr equency
8bpp=
Standard
Color Depth
16bpp=
65kcolors
Standard
32bpp=
16.7Mcolors
Standard
1024 X 768
72 Hz 57.5KHz
8
Page 13
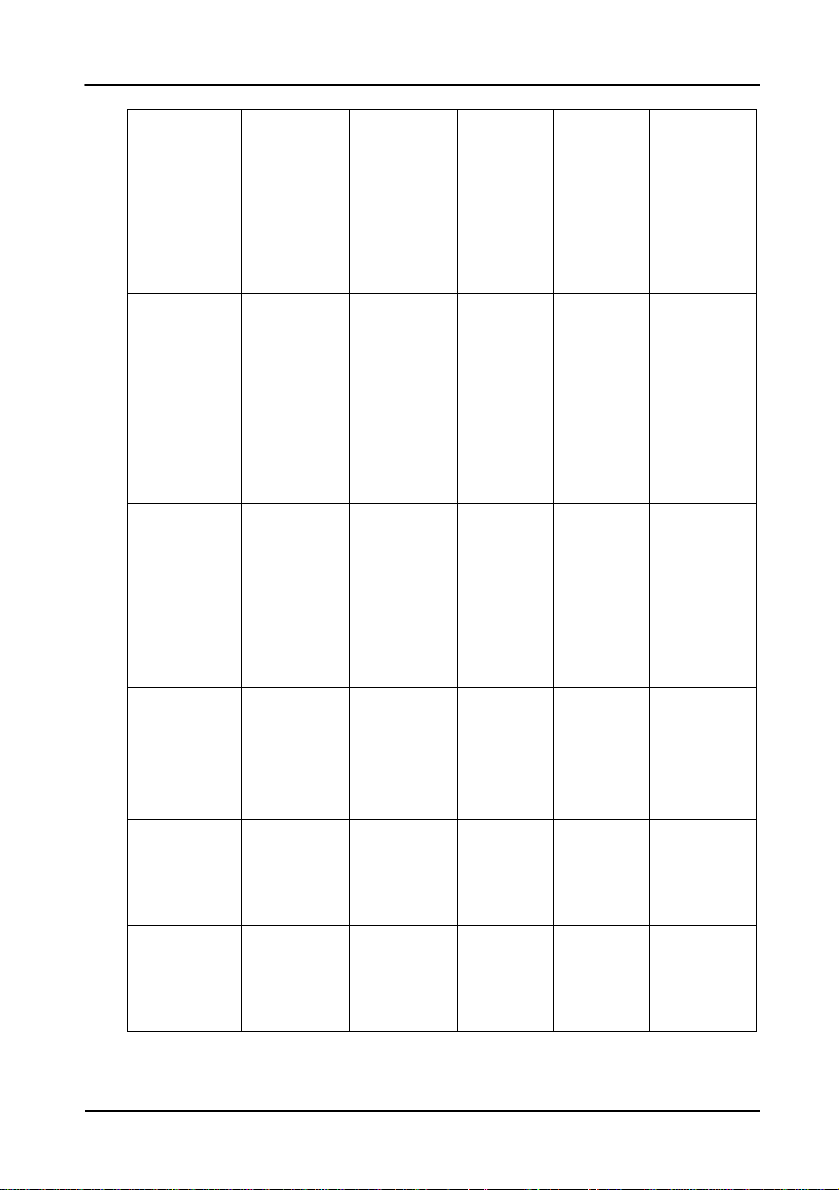
CHAPTER 4 DISPLAY INFORMATION
75 Hz
60.1KHz
[[[
85Hz
68.9KHz[[[100Hz
81.7KHz
[[[
120Hz
98.2KHz
[[[
140Hz
116.6KHz[[[144Hz
120.2KHz
[[[
60Hz
53.7KHz
70Hz
62.9KHz
[[[
72 Hz
65.0KHz[[[75 Hz
67.9KHz
85Hz
77.9KHz
[[[
100Hz
91.7KHz[[[120Hz
111.2KHz
1152 X 864
140Hz
132.6KHz
[[[
60Hz
64.4KHz
70Hz
74.1KHz
[[[
72 Hz
76.5KHz[[[75 Hz
80.1KHz
[[[
85Hz
91.0KHz
[[[
100Hz
108.7KHz[[
[
[
[
60Hz
74.6KHz[[
[
70Hz
87.5KHz
[[[
72 Hz
90.2KHz
[[[
75 Hz
84.1KHz[[
[
[
[
60Hz
67.2KHz[[[70Hz
78.5KHz
72 Hz
81.0KHz
[[[
75 Hz
84.5KHz[[
60Hz
74.5KHz
[[[
70Hz
87.2KHz[[
72 Hz
90.2KHz
75 Hz
93.9KHz
[
[
1024 X 768
1280 X 1024
1600 X 1200
1920 X 1080
150Hz 125.7KHz
120Hz 131.5KHz
85Hz 131.4KHz
[ [ [
1920 X 1200
9
Page 14

CHAPTER 5 MVGA-NVTNT2A/AL FAQ
While installing on a Windows 95
operating system, my
A:
Please check your monitor
DDC signal to ground: Which causes the BIOS to not detect your
monitor. Therefore, causing your MVGA-NVTNT2A/AL to not receive
Q:
If your operating system isn’t the OSR2.1 version, you won’t be able to
When tested with the 3D
test with 2D
The image on my monitor keeps on flickering and the driver
Show All Devices’ and choose your monitor type.
5. MVGA-NVTNT2A/AL FAQ
Q:
’ or 98’
comp u ter los es the Vertic al Sync.
’s specifications. Some monitors connect the
any data or refresh rates.
I can’t install the driver on my Window s 95’ sy s tem.
A:
install the driver.
to fix the problem:
Please change your operating system to the OSR2.1 version.
Windows 95’ OSR2.1 Installation.
1. Install Windows 95’ OSR2.1
2. Execute USBSUPP
3. Install DirectX ver 5.0 or higher
4. Install the VGA driver
Q:
What is the performance difference between 16MB memory
and 32MB memory on bo ard?
A:
Winbench, the 32MB memory out performed the 16MB
memory.
Winmark, they tested the same. However, when
Q:
can’t change the refresh rate.
The problem is due to a failed DDC monitor detection.
A:
To fix the problem:
1. Go to ‘Settings’è’Control Panel’ è’Display’ è
2. Select ‘Settings’ è
3. Select ‘Advanced Properties’
4. Select ‘Monitor’
5. Select ‘Change’
6. Select ‘
If your monitor type is not listed, Please select one that is
as similar as possible.
10
Page 15

CHAPTER 5 MVGA-NVTNT2A/AL FAQ
How do I change the resolutio n, color, and refresh-rat e on my
My Computer’ folder and select the ‘Control Panel’ icon.
then select
. A new menu will appear
Color Palette’ to change the
values. Choose ‘Desktop area
How do I change the resolutio n, color, and refresh-rat e on my
A:
& 98’ system.
Except that you must select
, so that the changes can
Q:
Window s 95’/98’ s ystem?
Open the ‘
A:
Double-click on ‘Display’
choose ‘
to change the Resolution (screen image size). From the same screen clickon ‘Advanced Properties’ to access the Refresh-rate.
Q:
‘Settings’
Color
Windows NT s ys t em?
The procedure is basically the same as above, for the 95’
‘Test’, then ‘OK’
take affect.
’
11
 Loading...