

Page 1

USER'S MANUAL
ENGLISH
December 2008
Page 2
ENGLISH
CONTENTS
BEFORE YOU START ............................................................................................. 5
Make sure you have everything ..................................................................................... 5
Familiarize yourself with the computer ........................................................................ 6
OPENING THE DISPLAY PANEL ................................................................................ 6
FRONT OVERVIEW .................................................................................................... 7
LEFT SIDE OVERVIEW .............................................................................................. 9
RIGHT SIDE OVERVIEW .......................................................................................... 10
BACK OVERVIEW ..................................................................................................... 11
FRANÇAIS
DEUTSCH
BOTTOM OVERVIEW ................................................................................................ 12
GETTING STARTED ............................................................................................. 13
Power Sources ............................................................................................................. 13
CONNECTING THE POWER ADAPTERS ............................................................... 13
PRESERVING BATTERY LIFE.................................................................................. 13
RECHARGING THE BATTERY ................................................................................. 14
Starting Your Notebook................................................................................................. 15
POWER ON .............................................................................................................. 15
Status Indicators ...................................................................................................... 16
Using Function Keys ................................................................................................ 18
Using the TouchPad................................................................................................. 19
TROUBLESHOOTING ........................................................................................... 20
Identifying the Problem................................................................................................. 20
ESPAÑOL
ITALIANO
2
Page 3
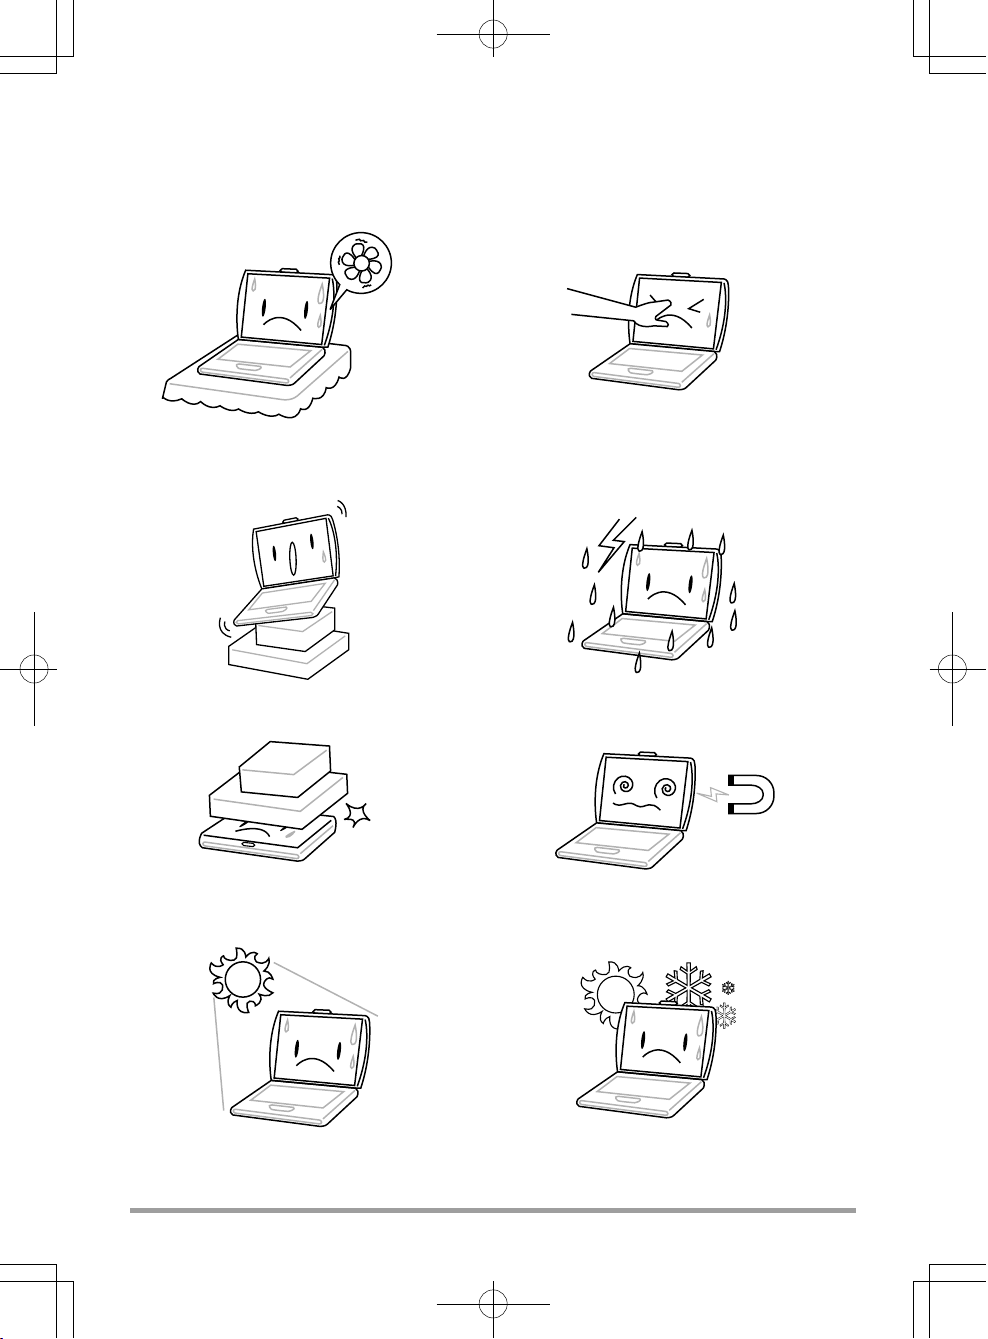
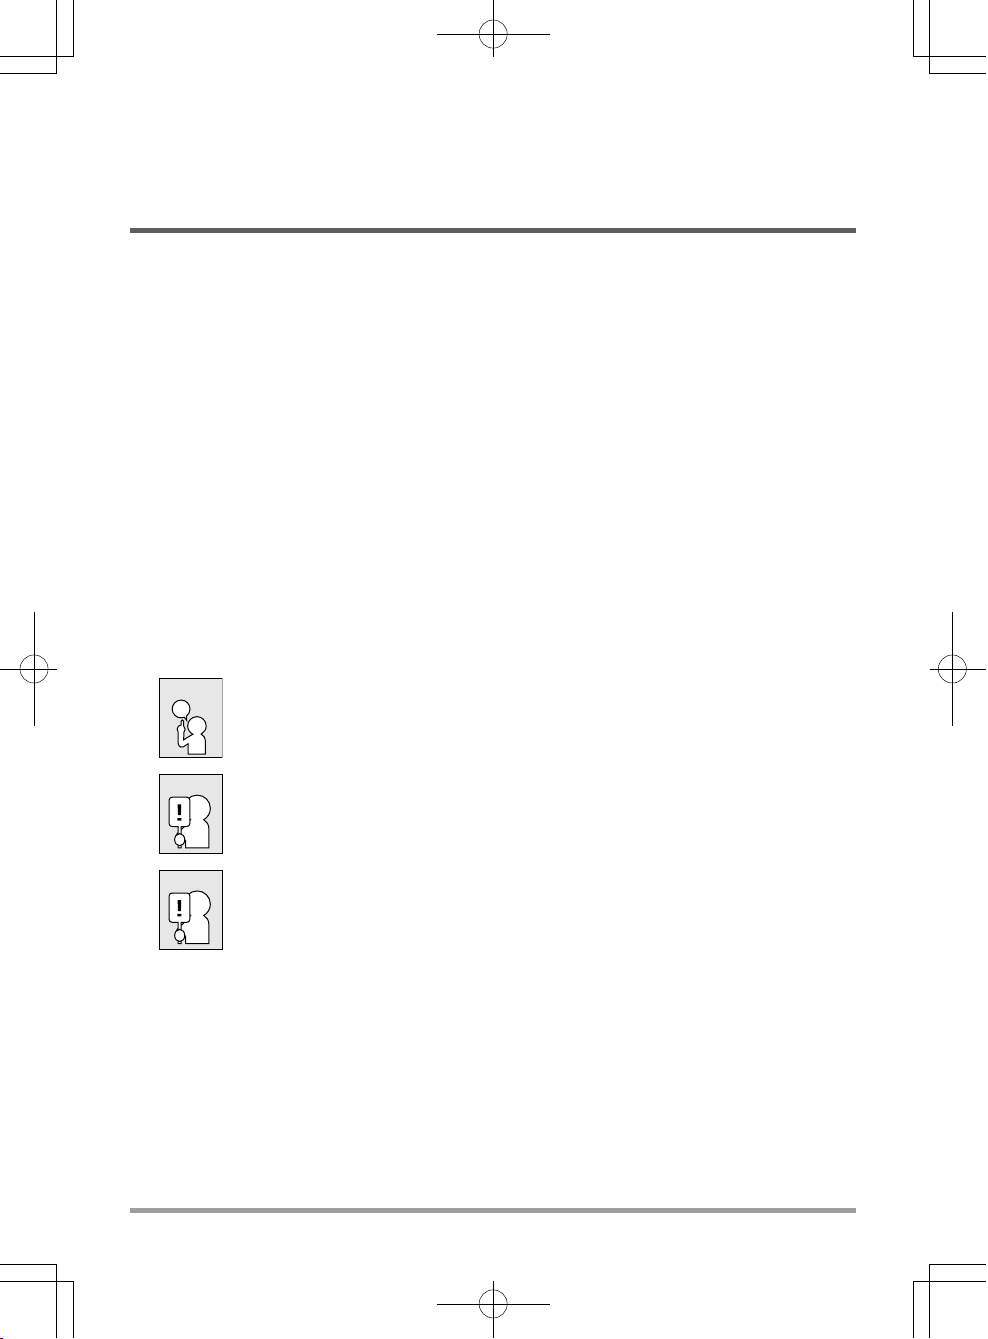
TAKING CARE OF YOUR NOTEBOOK PC
To prevent possible overheating of the computer's
processor, make sure you don't block the openings provided for ventilation.
DO NOT place on uneven or unstable work
surfaces.
DO NOT place or drop objects on the computer
and DO NOT apply heavy pressure on it.
DO NOT press or touch the display panel.
DO NOT use your notebook computer under
harsh conditions.
DO NOT subject the computer to magnetic
fields.
DO NOT expose to direct sunlight. DO NOT use or store in extreme temperatures.
3
Page 4

ENGLISH
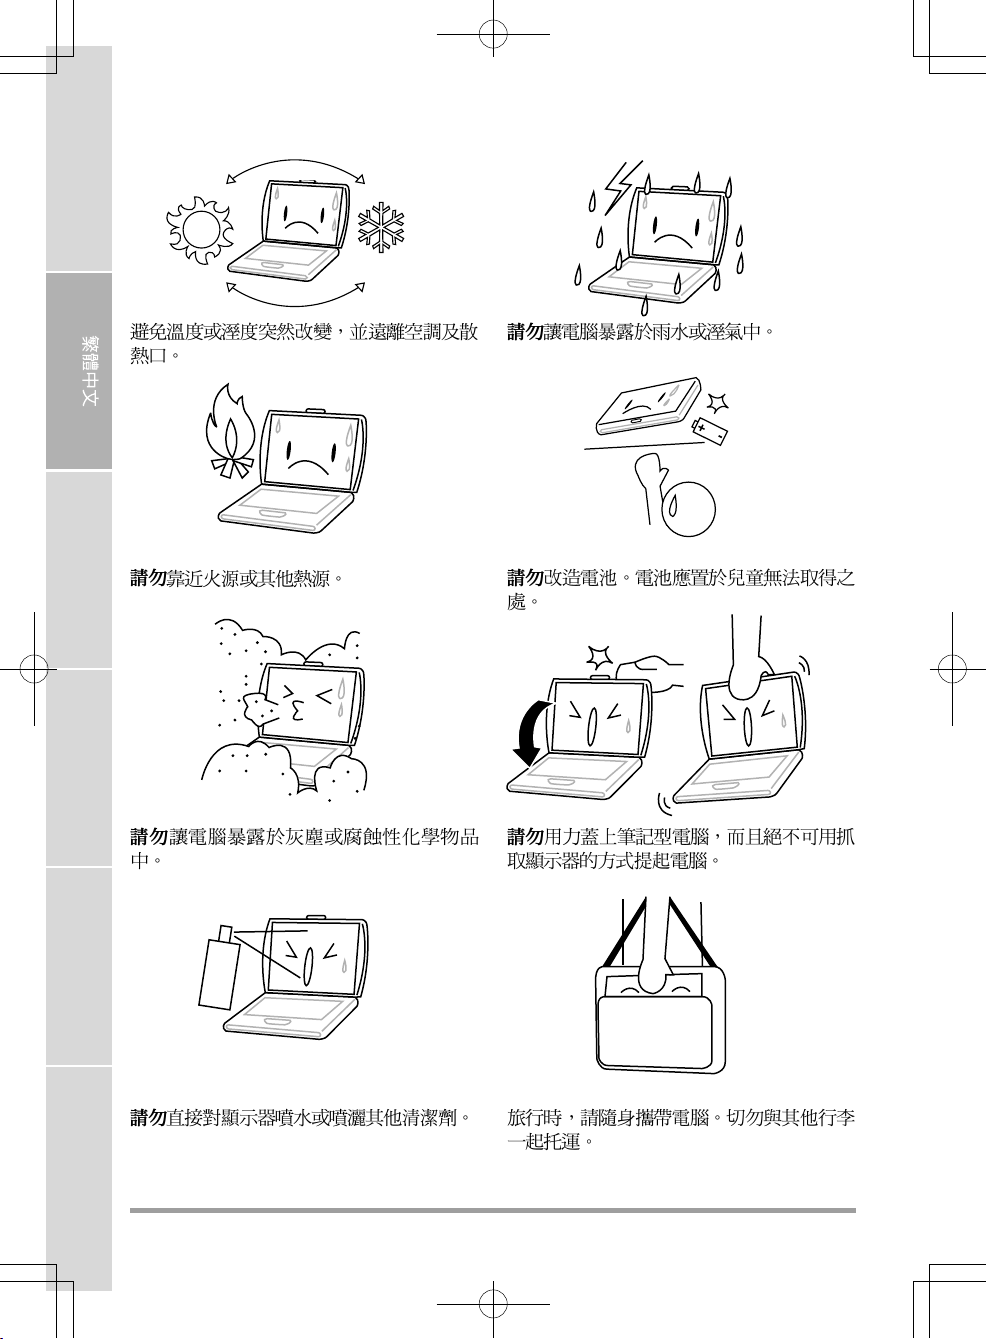
Avoid sudden changes in temperature or humidity by keeping it away fromA/C and heating vents.
FRANÇAIS
DO NOT place near fire or other sources of heat. DO NOT tamper with the batteries. Keep them
DEUTSCH
DO NOT expose to dust and/or corrosive
chemicals.
ESPAÑOL
DO NOT expose the computer to rain or
moisture.
away from children.
DO NOT slam your notebook shut and never
pick up or hold your notebook by the display.
ITALIANO
DO NOT spray water or any other cleaning fluids
directly on the display.
4
If you are traveling with your computer, remember to carry it as hand luggage. Do not check it in
as baggage.
Page 5
BEFORE YOU START
Make sure you have everything
When you receive your notebook PC, unpack it carefully, and check to make sure you have all the
items listed below. For a pre-configured model you should have the following:
• Notebook Computer
• Lithium-Ion battery
• AC adapter with power cord
• Driver and Applications CD
• Quick Start Guide or User Guide
Depending upon the configuration of your notebook, you may also need the following items:
• DVD / CD-RW Combo Application CD
• Dual DVD+/-RW Application CD
• Super Multi DVD RW Application CD
Once you have checked and confirmed that your notebook system is complete, read through the
following pages to learn about all of your notebook components.
NOTE
Depending on the model you purchased, the actual appearance of your notebook may vary from that shown in this manual.
5
Page 6
ENGLISH
BEFORE YOU START
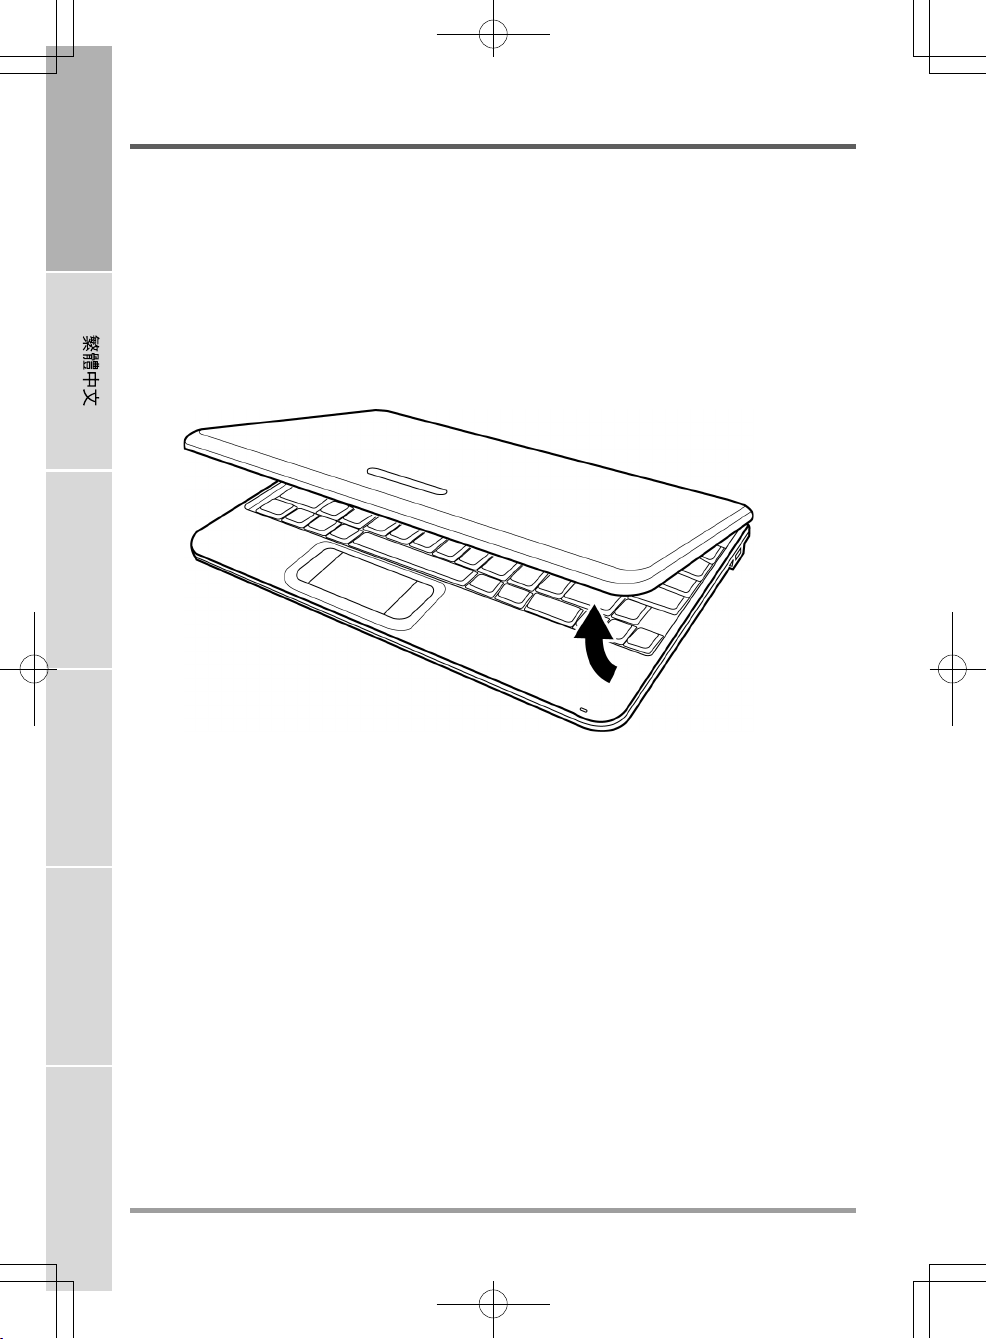
Familiarize yourself with the computer
OPENING THE DISPLAY PANEL
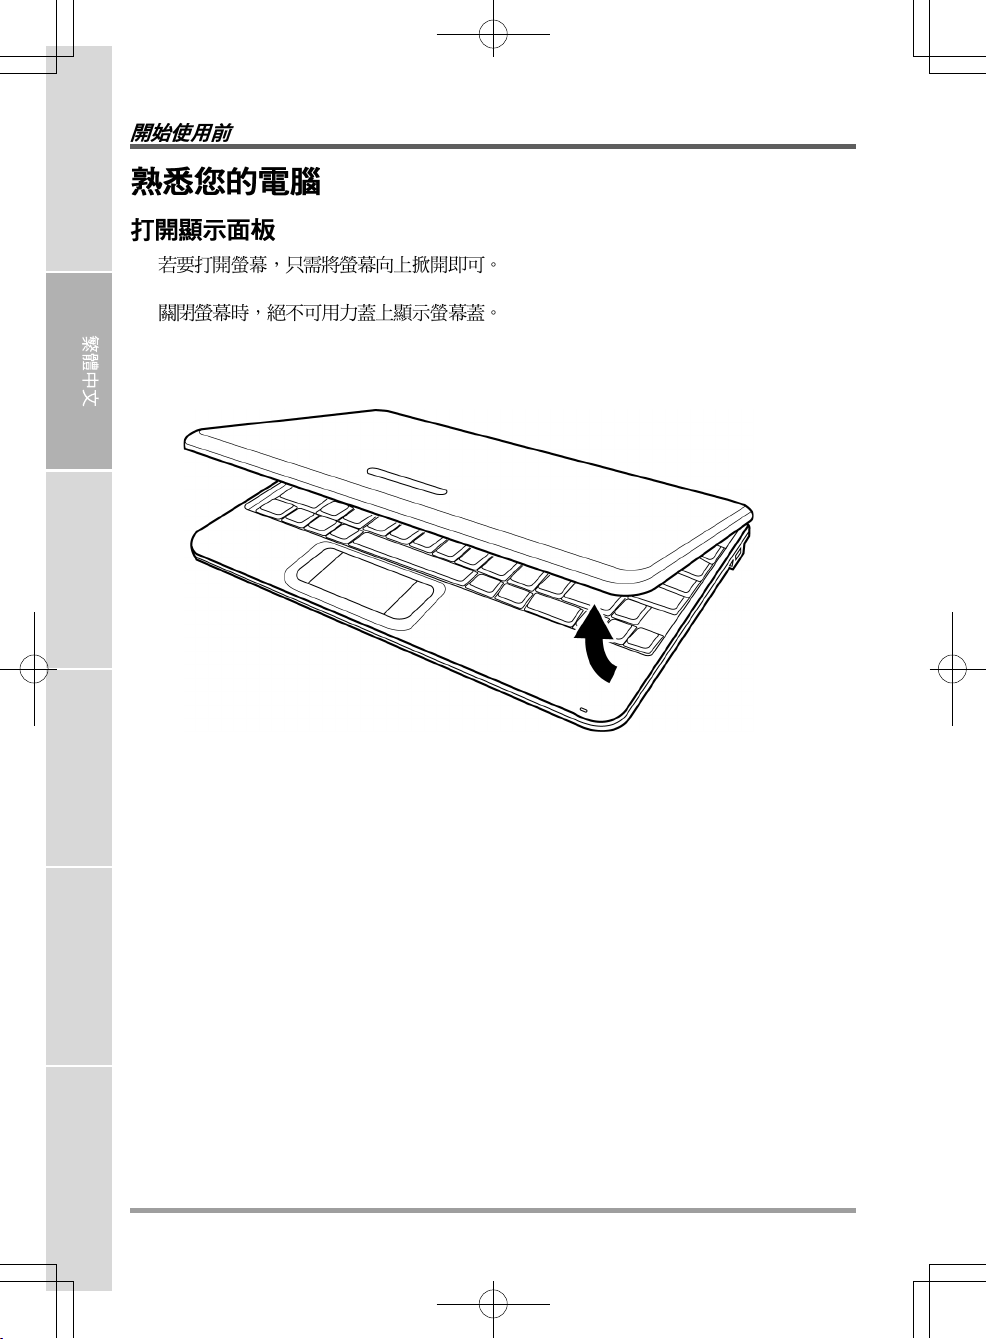
To open the display panel, simply lift the lid up.
When closing it, be sure not to slam it shut.
FRANÇAIS
DEUTSCH
ESPAÑOL
ITALIANO
6
Page 7
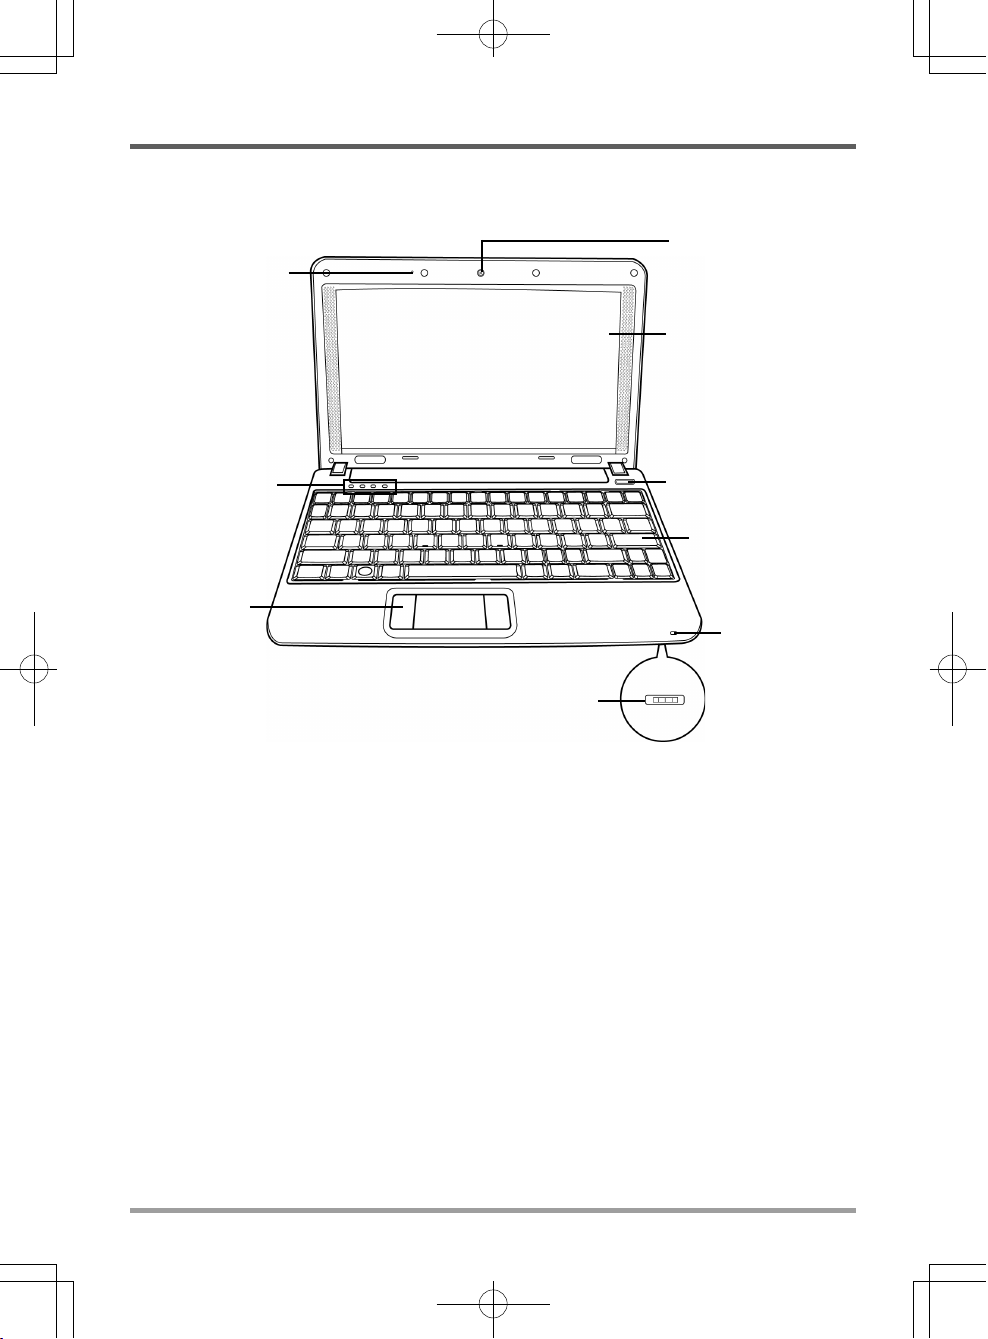
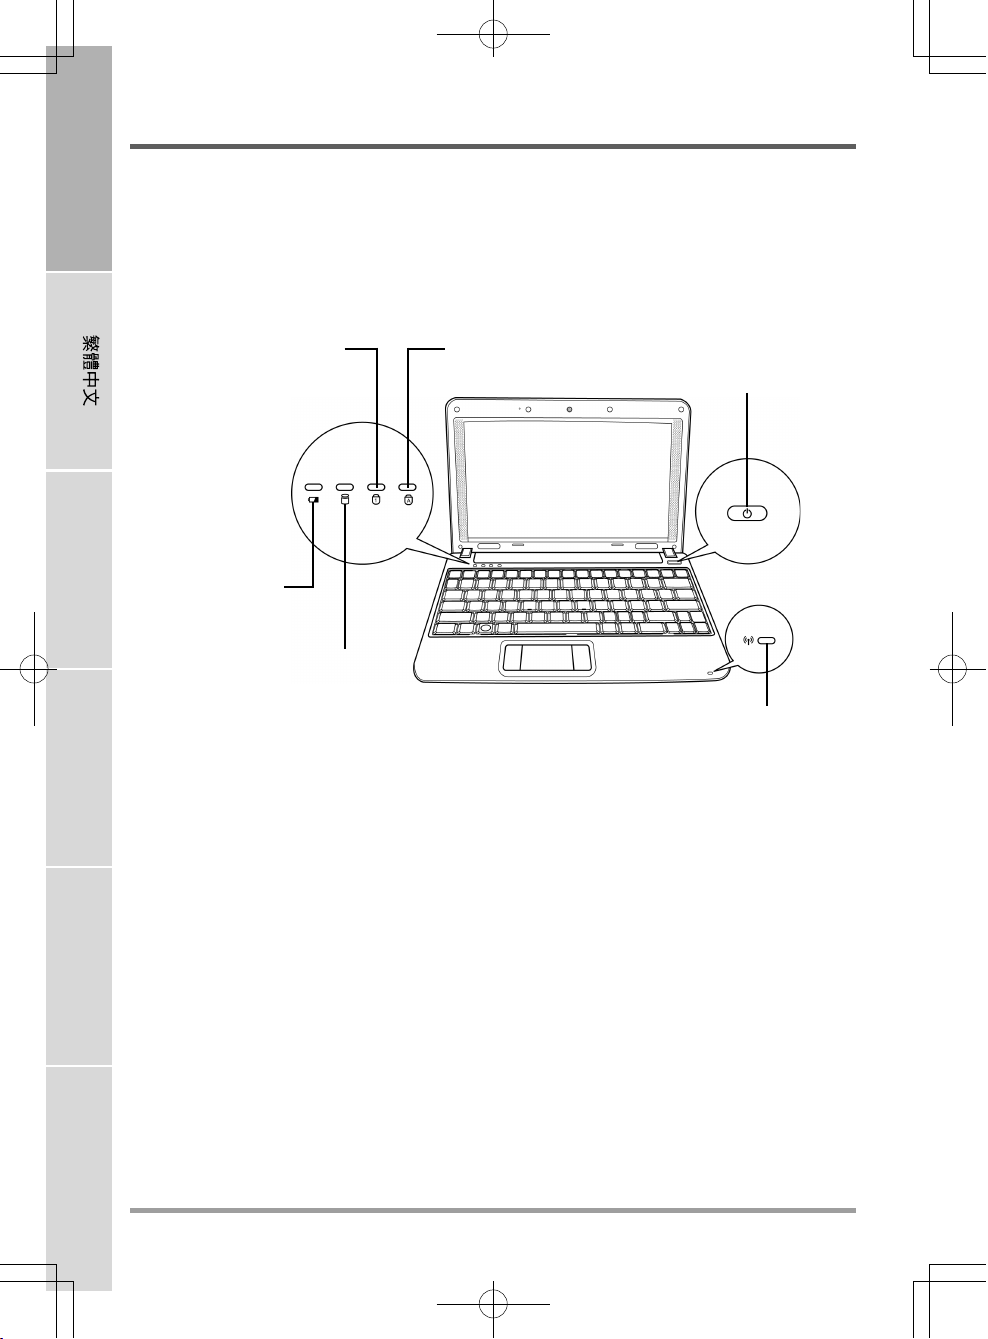
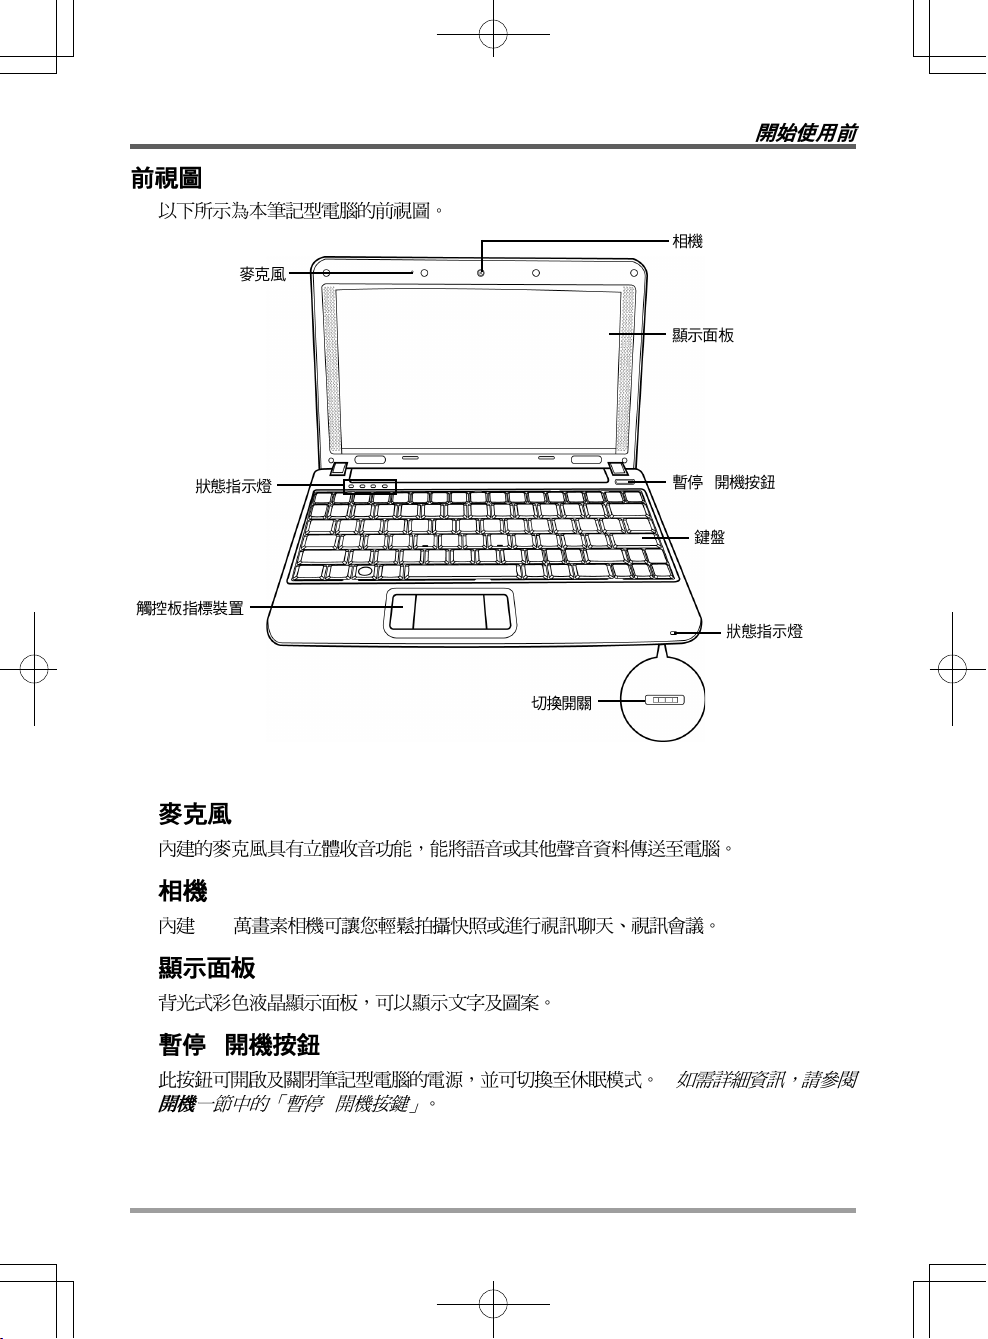
FRONT OVERVIEW
The following is an overview of the front of the notebook.
Microphone
BEFORE YOU START
Camera
Display Panel
Status Indicator
Lights
TouchPad
Pointing
Device
3G/Wireless LAN Switch
Suspend/Power On
Button
Keyboard
Status Indicator
Light
Microphone
The built-in microphone allows for stereo reception and transmission of voice and/or other audio
data onto your notebook.
Camera
The built-in 0.3 megapixel camera allows you to snap a photo or create a video chat or video
conference with just a click.
Display Panel
The display panel is a color LCD panel with back lighting for the display of text and graphics.
Suspend/Power On Button
This button turns your notebook on and off or puts it to sleep. (See Suspend/Power On Button in
the Power On section for more information.)
7
Page 8
ENGLISH
BEFORE YOU START
Keyboard
The keyboard comes with 84 keys, including dedicated Windows® keys.
Status Indicator Lights
The Status indicator lights correspond to specific operating modes. These modes are: Power on/
Suspend status, battery/AC adapter status, hard drive activity (HDD), Num Lock, Caps Lock,
and 3G/Wireless LAN activity.
3G/Wireless LAN Switch
The 3G/Wireless LAN switch allows you to switch your wireless connection between 3G and
Wireless LAN. Switch to the left for 3G connection, and switch to the right to turn on Wireless
LAN.
FRANÇAIS
DEUTSCH
ESPAÑOL
TouchPad Pointing Device
The TouchPad pointing device is a mouse-like cursor control with two buttons and a touch
sensitive movement pad.
ITALIANO
8
Page 9
BEFORE YOU START
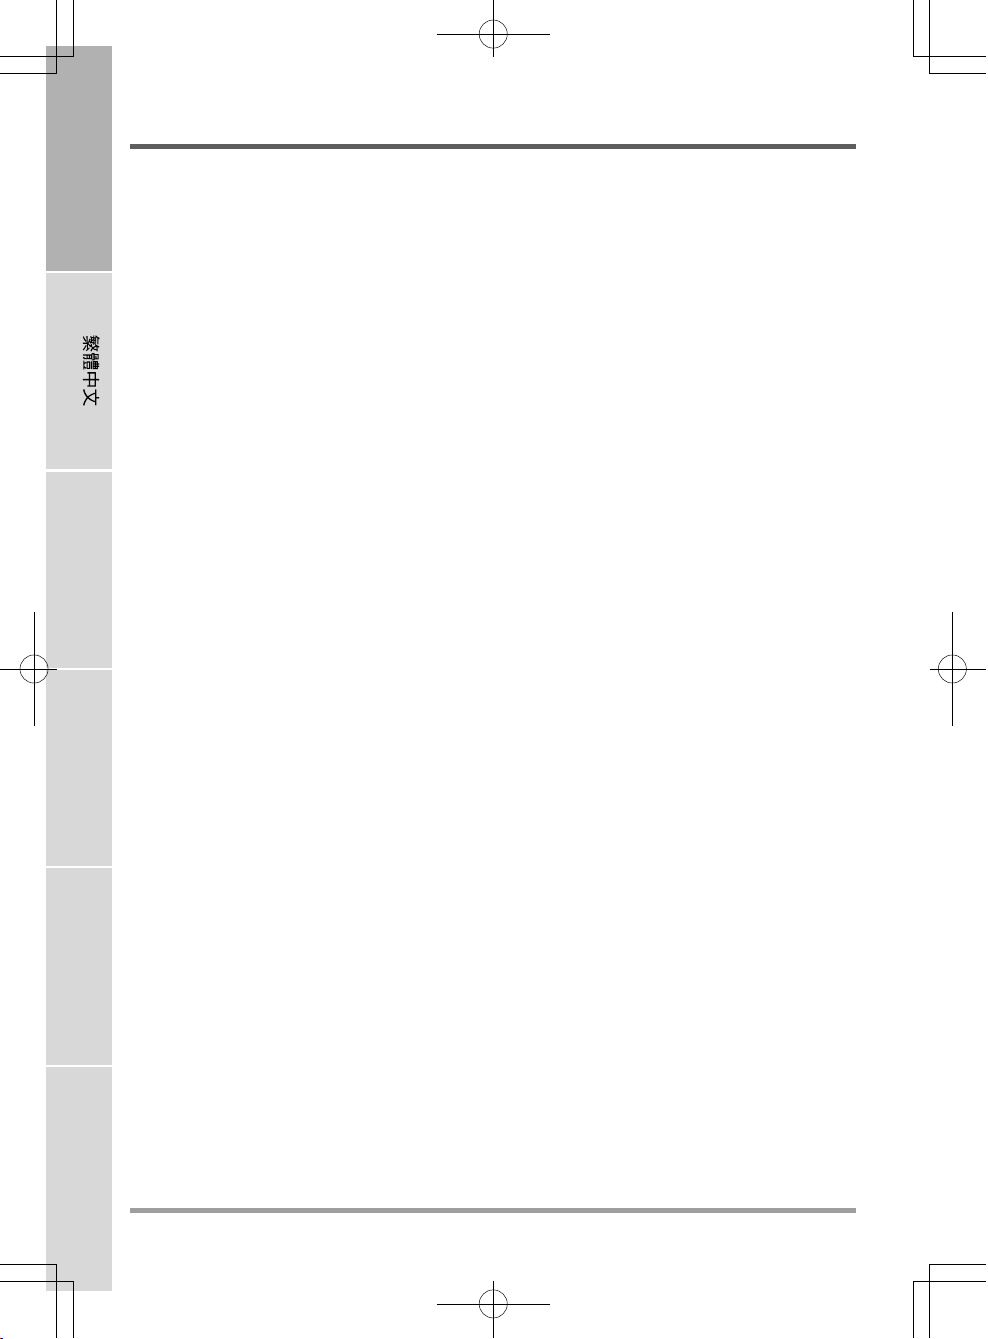
LEFT SIDE OVERVIEW
The following is a brief description of the left side of the notebook.
Power Adapter Port LAN (RJ-45) Port
External Monitor Port USB Port
Power Adapter Port
The power adapter port allows you to plug in the AC adapter to power your notebook and charge
the internal Lithium-Ion battery.
External Monitor Port
The external monitor port allows you to connect an external monitor.
LAN (RJ-45) Port
The LAN port is designed to support a 10/100 Base-TX standard RJ-45 plug.
USB Port
The USB port allows you to connect a Universal Serial Bus device. It supports v2.0 of the USB
standard, which allows data exchange rates as high as 480 Mb/s.
9
Page 10
ENGLISH
BEFORE YOU START
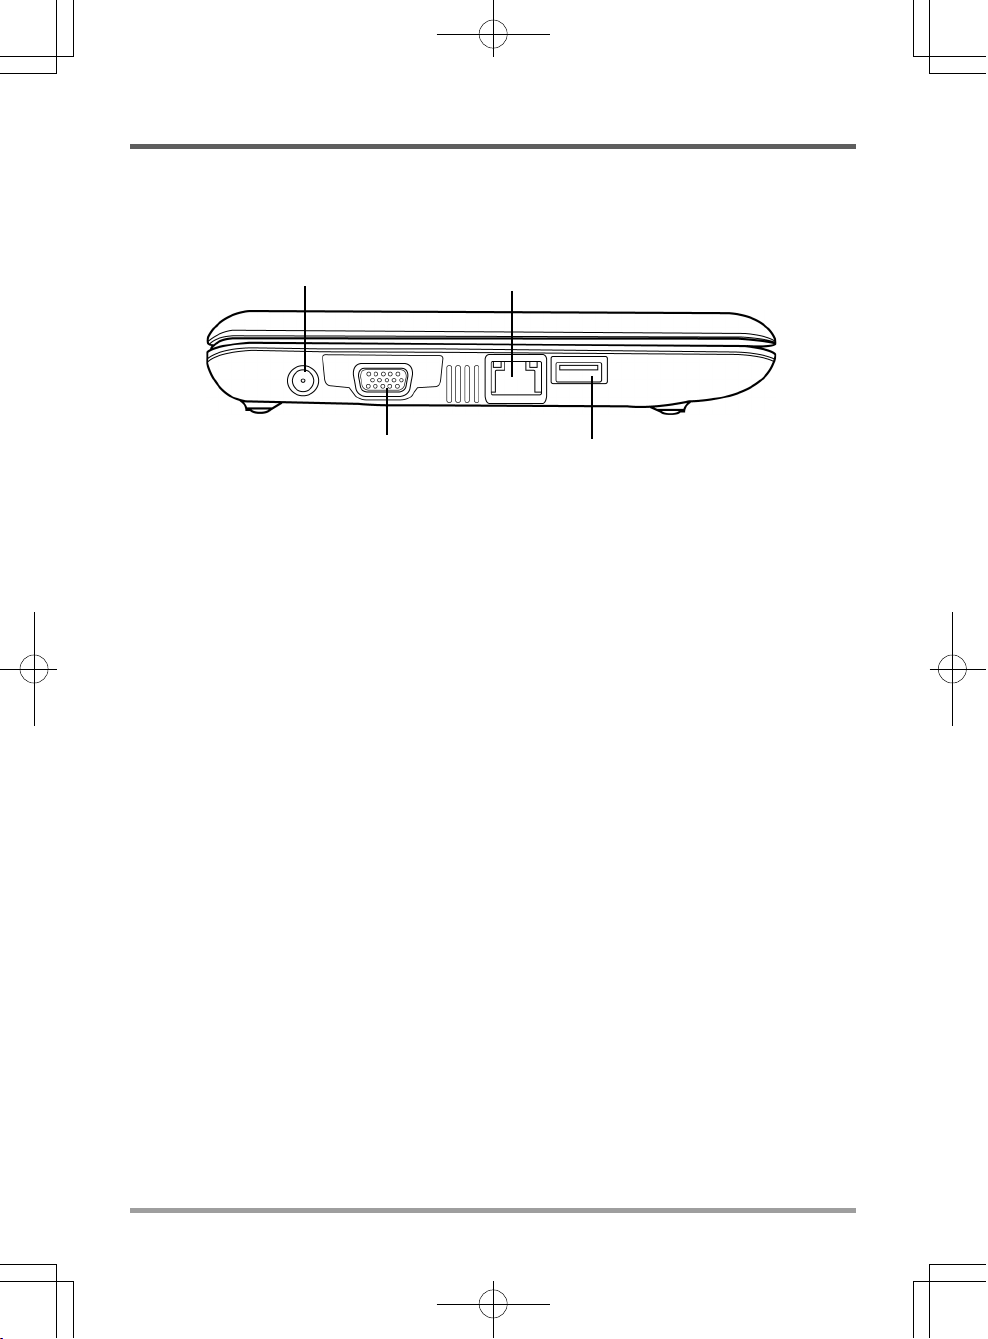
RIGHT SIDE OVERVIEW
The following is a brief description of the right side of the notebook.
FRANÇAIS
Microphone Jack
The microphone jack allows you to connect an external mono microphone.
Headphone Jack
DEUTSCH
The headphone jack allows you to connect headphones or external speakers and amplifiers.
Headphone Jack Memory Card Reader
USB PortsMicrophone Jack Kensington Lock Slot
USB Ports
The USB ports allow you to connect Universal Serial Bus devices. They support v2.0 of the USB
standard, which allows data exchange rates as high as 480 Mb/s.
ESPAÑOL
ITALIANO
Memory Card Reader
The memory card reader offers the fastest and most convenient method to transfer pictures, music
and data between your notebook and flash compatible devices such as digital cameras, MP3
players, mobile phones, and PDAs.
10
Page 11
BEFORE YOU START
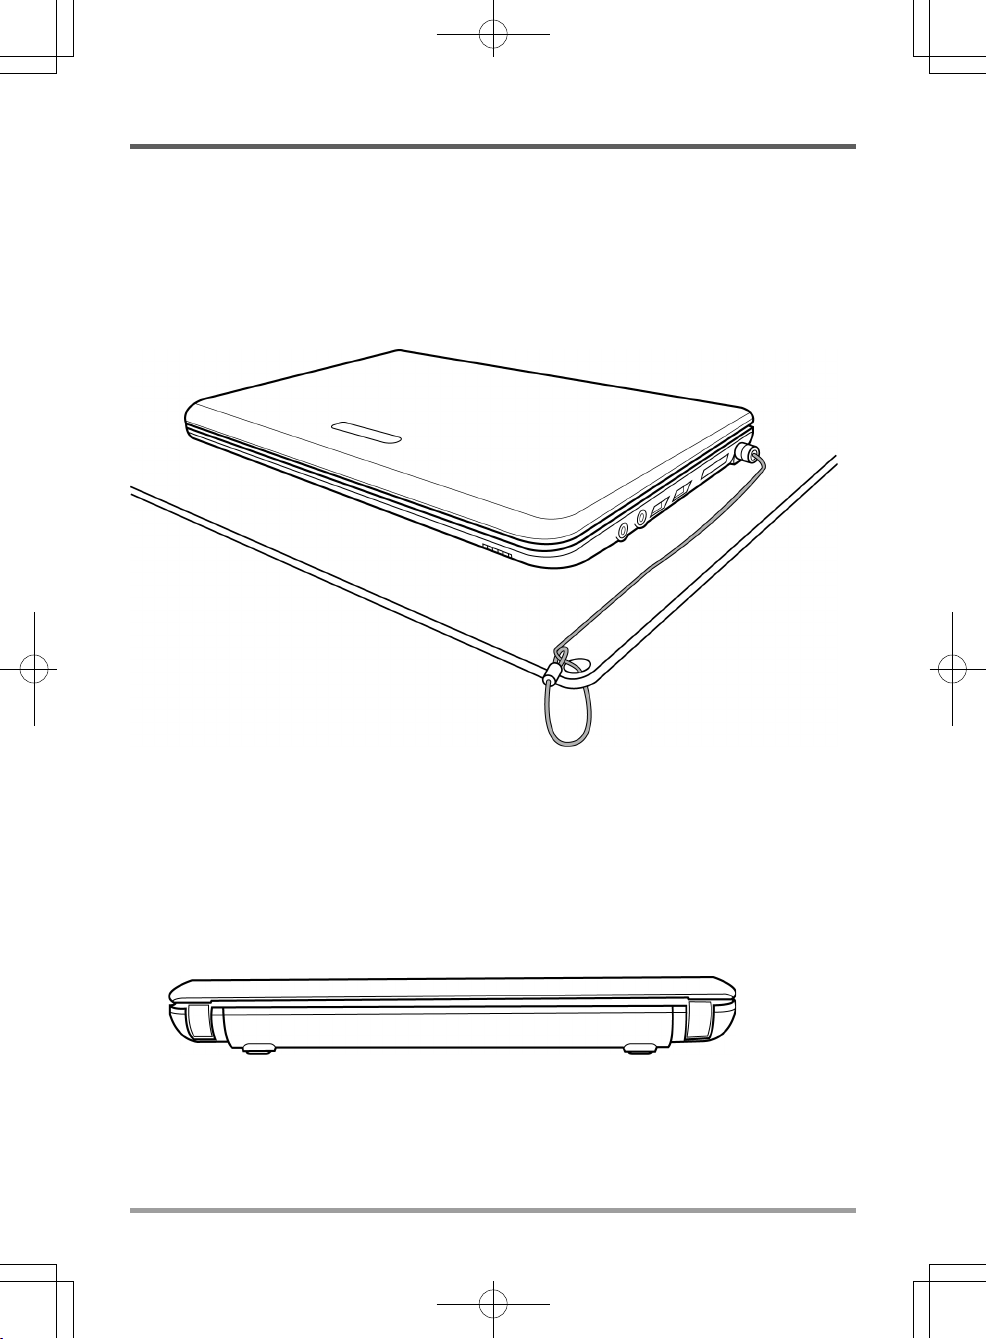
Kensington Lock Slot
The Kensington lock slot allows you to secure your notebook to an immovable object with an
optional security cable.
BACK OVERVIEW
The following is an overview of the back of the notebook.
11
Page 12
ENGLISH
BEFORE YOU START
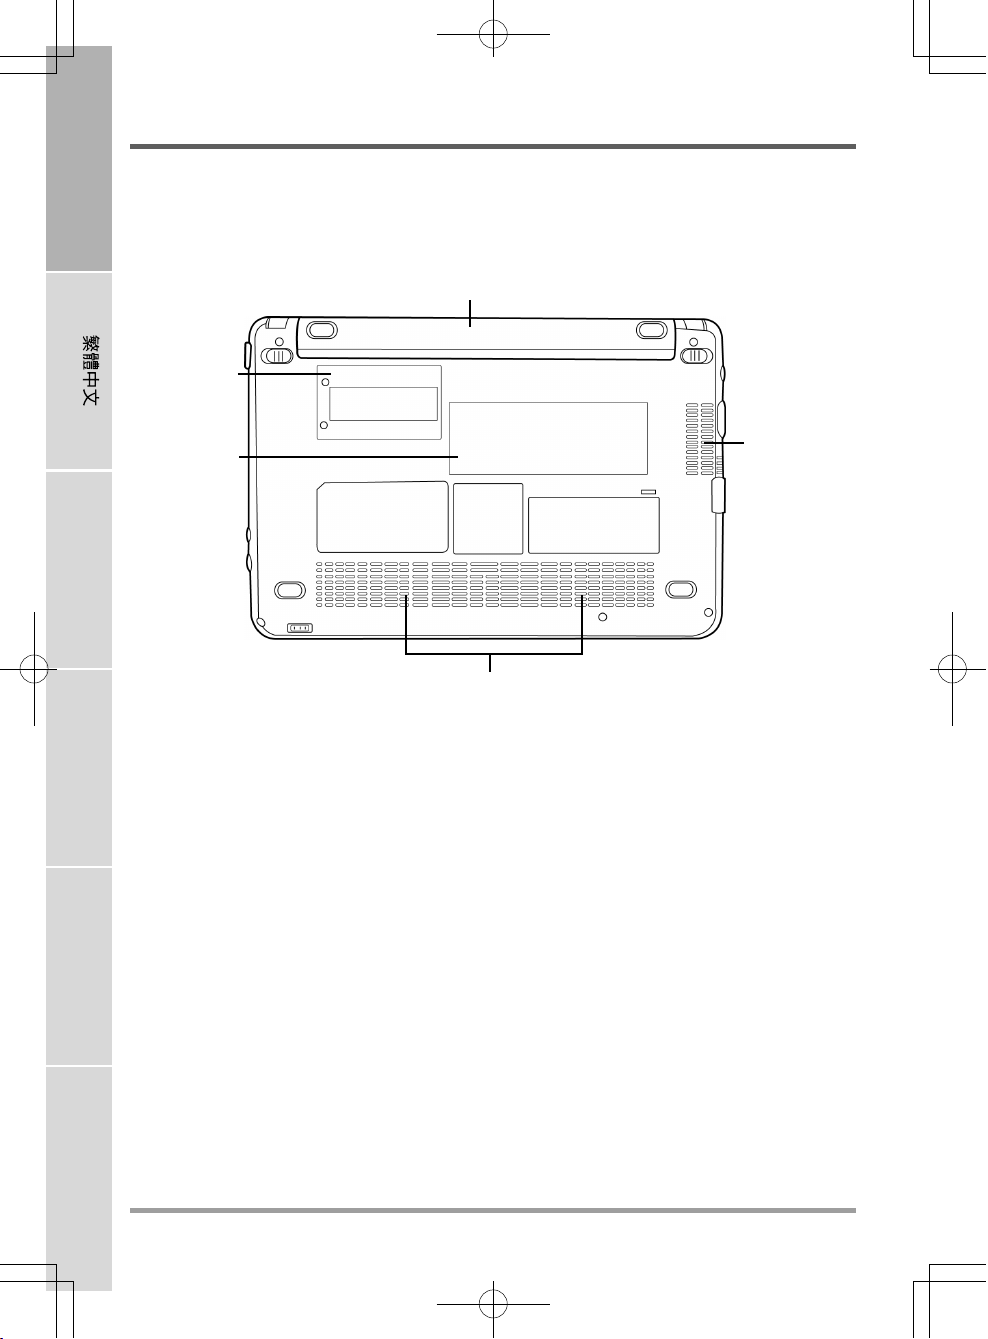
BOTTOM OVERVIEW
The following is an overview of the bottom of the notebook.
Compartment
Cover
Lithium-Ion Battery Bay
Rating Label
FRANÇAIS
DEUTSCH
Lithium-Ion Battery Bay
The battery bay contains the internal Lithium-Ion battery. It can be opened for the removal of the
battery when stored over a long period of time or for swapping a discharged battery with a
charged Lithium-Ion battery.
Fan Outlet
ESPAÑOL
This is an open port for the fan to dissipate heat from the computer's internal components. Do not
block or place the computer in such a position that you inadvertently allow the outlet to become
blocked.
Stereo Speakers
The built-in dual speakers allow for stereo sound.
Fan Outlet
Stereo Speakers
Rating Label
ITALIANO
The label shows the model number and other information about your notebook.
Compartment Cover
The 3G module compartment contains the 3G module (Not available in all configurations).
12
Page 13
GETTING STARTED
Power Sources
Your computer has two types of power source: a Lithium-Ion battery or an AC adapter.
CONNECTING THE POWER ADAPTERS
The AC adapter provides power for operating your notebook PC and charging the battery.
Connecting the AC Adapter
1. Plug the DC output cable into the DC power jack of your notebook PC.
2. Plug the AC adapter into an AC electrical outlet.
Switching from AC Adapter Power to Battery Power
1. Be sure that you have at least one charged battery installed.
2. Remove the AC adapter. Your notebook will automatically switch from DC power to battery
power.
NOTE
CAUTION
CAUTION
The Lithium-Ion battery is not charged upon purchase. Initially, you will need
to connect the AC adapter to use your notebook PC.
To protect your notebook from damage, use only Lithium-Ion batteries that
meet the specification. Improper use of batteries may lead to explosion and
bodily harm.
Do not dispose of batteries with household waste. Contact your local recycling
center or waste disposal operator to properly dispose of batteries according to
the local laws and regulations of your region.
PRESERVING BATTERY LIFE
• Fully discharge and recharge the battery every 30 days to prolong battery life.
• If the battery is not used for a month or longer, remove and store the battery in a cool, dry
place. Fully recharge the battery before using again.
13
Page 14
ENGLISH
GETTING STARTED
RECHARGING THE BATTERY
The Lithium-Ion battery is recharged internally using the AC adapter. To recharge the battery,
make sure the battery is installed and the computer is connected to the AC adapter.
There is no "memory effect" in Lithium-Ion batteries; therefore you do not need to discharge the
battery completely before recharging. The charge times will be significantly longer if your notebook is in use while the battery is charging. If you want to charge the battery more quickly, put
your computer into Suspend mode, or turn it off while the adapter is charging the battery.
Low Battery State
When the battery charge is low, a notification message appears. If you do not respond to the low
battery message, the battery continues to discharge until it is too low to operate. When this
happens, your notebook PC goes into Suspend mode. There is no guarantee your data will be
FRANÇAIS
saved once the notebook reaches this point.
CAUTION
Once your notebook goes into Suspend mode as a result of a dead battery you will be unable to
resume operation until you provide a source of power either from an adapter, or a charged battery.
DEUTSCH
ESPAÑOL
ITALIANO
Once you have provided power, you can press the Suspend/ Resume button to resume operation.
In Suspend mode, your data is maintained for some time, but if a power source is not provided
promptly, the Power indicator stops flashing and the light goes out, in which case you have lost
the data that was not saved. Once you provide power, you can continue to use your computer
while an adapter charges the battery.
To protect your computer from damage, use only the power adapter that came
with it because each power adapter has its own power output rating.
14
Page 15
GETTING STARTED
Starting Your Notebook
POWER ON
Suspend/Power On Button
The suspend/power on button is used to turn on your notebook from its off state. Once you have
connected your AC adapter or charged the internal Lithium-Ion battery, you can power on your
notebook by pressing the suspend/power on button located above the keyboard. If you need to
take an extended break, press the button again to turn it off.
CAUTION
When you power on your notebook, it will perform a Power On Self Test (POST) to check the
internal parts and configuration for correct functionality. If a fault is found, your computer emits
an audio warning and or displays an error message.
Depending on the nature of the problem, you may be able to continue by starting the operating
system or by entering the BIOS setup utility and revising the settings.
After satisfactory completion of the Power On Self Test (POST), your notebook loads the
installed operating system.
CAUTION
Do not carry your notebook around with the power on or subject it to shocks or
vibration, as you risk damaging the hard disk.
Never turn off your notebook during the Power On Self Test (POST), or an
unrecoverable error may occur.
15
Page 16
ENGLISH
GETTING STARTED
Status Indicators
The status indicator lights correspond to specific operating modes. These modes are: Power on/
Suspend status, battery/AC adapter status, hard drive activity (HDD), Num Lock, Caps Lock,
and 3G/Wireless LAN activity.
FRANÇAIS
Battery Indicator
Hard Disk Drive (HDD) Activity
DEUTSCH
Battery Indicator
The Battery indicator tells you whether the Lithium-Ion battery is charging or is already fully
ESPAÑOL
charged.
• If you are charging your battery, the Battery indicator remains on even if your notebook is
shut off.
• If there is no battery activity, the power adapters are not connected, or the power switch is
Off, the Battery indicator will also be off.
• Batteries subjected to shocks, vibrations or extreme temperatures can be permanently damaged.
Num Lock Indicator
Indicator
Caps Lock Indicator
Power On/Suspend Indicator
3G/Wireless LAN Activity Indicator
Hard Disk Drive (HDD) Activity Indicator
ITALIANO
The Hard Disk Drive (HDD) Activity indicator tells you whether your internal hard drive is being
accessed and, if so, how fast.
16
Page 17

GETTING STARTED
The Num Lock Indicator
This indicator shows when the internal keyboard is in ten-key numeric keypad mode.
The Caps Lock Indicator
This indicator tells you that the keyboard is set to type in all capital letters.
3G/Wireless LAN Activity Indicator
The 3G/Wireless LAN Activity indicator tells you whether your computer is connected to a
wireless network or not.
• Green light indicates a 3G connection.
• Orange light indicates a Wireless LAN connection.
• Use the 3G/Wireless LAN switch on the front of the notebook to switch the indicator light.
Power On/Suspend Indicator
The light on the power button illuminates when the computer is powered on, and flashes when
the computer is in the Suspend mode.
17
Page 18

ENGLISH
GETTING STARTED
Using Function Keys
Your computer has 8 function keys, F1 through F8. The functions assigned to these keys differ
for each application. You should refer to your software documentation to find out how these keys
are used.
The [FN] key provides extended functions for the notebook and is always used in conjunction
with another key.
• [FN+F1]: Places the notebook in Suspend mode. Pressing the Power button returns it to
active mode.
• [FN+F2]: Enables or disables the wireless network connection.
FRANÇAIS
DEUTSCH
ESPAÑOL
• [FN+F3]: Allows you to change your selection of where to send your display video. Each
time you press the combination of keys you will step to the next choice. The choices, in
order, are: built-in display panel only, both built-in display panel and external monitor, or
external monitor only.
• [FN+F4]: Decreases the screen Brightness.
• [FN+F5]: Increases the screen Brightness.
• [FN+F6]: Mutes the computer's volume.
• [FN+F7]: Decreases the computer's volume.
• [FN+F8]: Increases the computer's volume.
ITALIANO
18
Page 19
GETTING STARTED
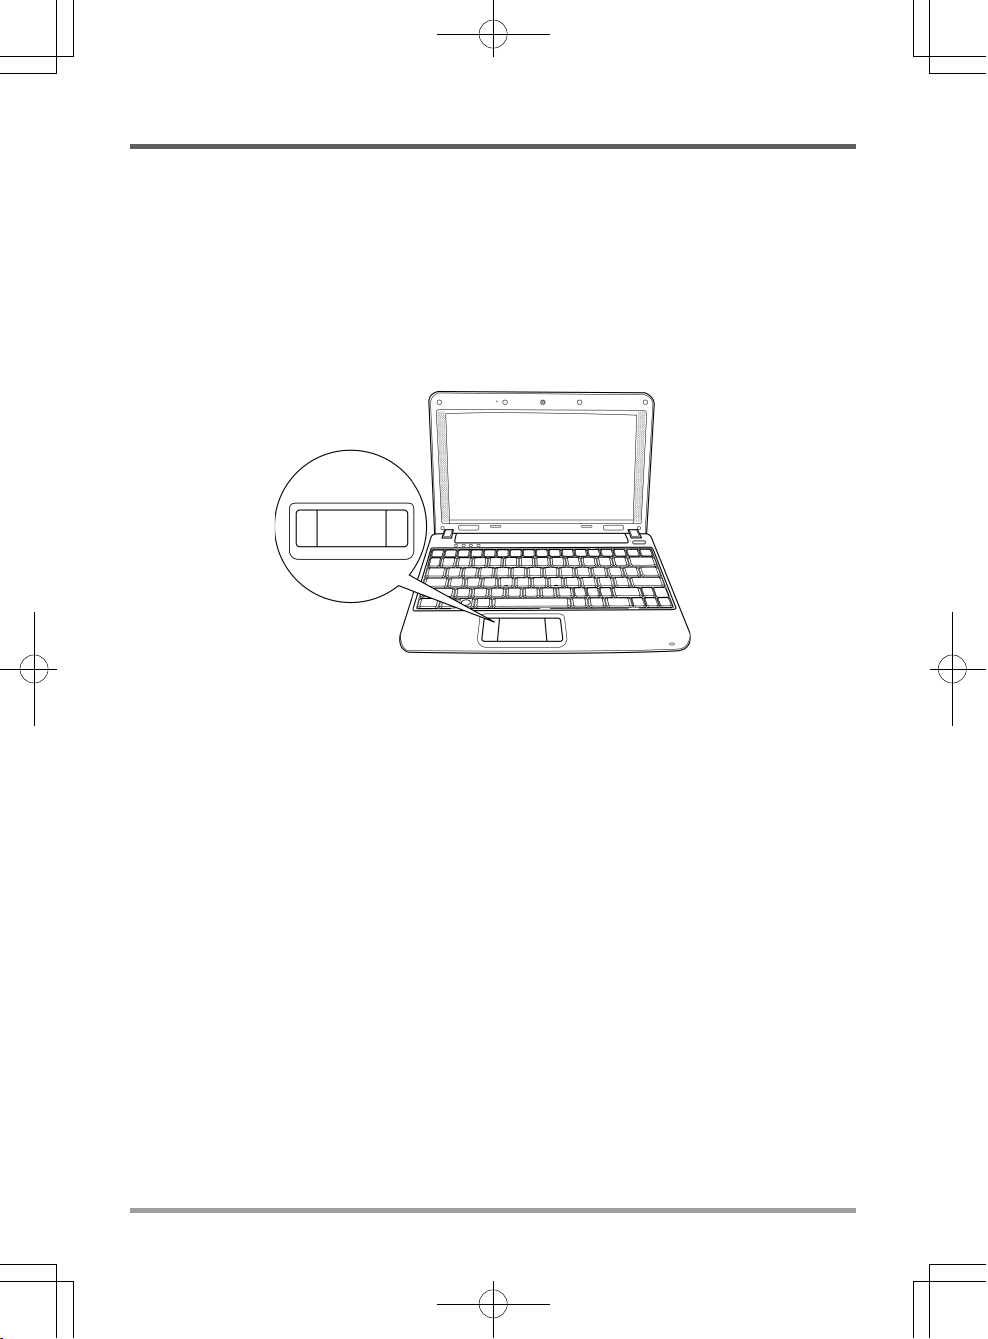
Using the TouchPad
A TouchPad pointing device comes built into your computer. It is used to control the movement
of the pointer to select items on your display panel.
The TouchPad consists of a cursor control, a left button and a right button. The cursor control
works the same way a mouse does, and moves the cursor around the display. It only requires light
pressure from the tip of your finger. The left and right buttons function the same as mouse
buttons. The actual functionality of the buttons may vary depending on the application that is
being used.
Clicking
Clicking means pushing and releasing a button. To left-click, move the cursor to the item you wish
to select, press the left button once, and then immediately release it. To right click, move the
mouse cursor to the item you wish to select, press the right button once, and then immediately
release it. You also have the option to perform the clicking operation by tapping lightly on the
TouchPad once.
Double-Clicking
Double-clicking means pushing and releasing the left button twice in rapid succession. This
procedure does not function with the right button. To double-click, move the cursor to the item
you wish to select, press the left button twice, and then immediately release it. You also have the
option to perform the double-click operation by tapping lightly on the TouchPad twice.
Dragging
Dragging means pressing and holding the left button, while moving the cursor. To drag, move the
cursor to the item you wish to move. Press and hold the left button while moving the item to its
new location and then release it. Dragging can also be done using the TouchPad. First, tap the
TouchPad twice over the item you wish to move making sure to leave your finger on the pad after
the final tap. Next, move the object to its new location by moving your finger across the TouchPad,
and then release your finger.
19
Page 20

ENGLISH
TROUBLESHOOTING
Your notebook PC is sturdy and subject to few problems in the field. However, you may encounter simple setup or operating problems that you can solve on the spot, or problems with peripheral devices, that you can solve by replacing the device. The information in this section helps you
isolate and resolve some of these straightforward problems and identify failures that require
service.
Identifying the Problem
If you encounter a problem, go through the following procedure before pursuing complex
FRANÇAIS
DEUTSCH
ESPAÑOL
troubleshooting:
1. Turn off your notebook.
2. Make sure the AC adapter is plugged into your notebook and to an active AC power source.
3. Make sure that any devices connected to the external connectors are plugged in properly. You
can also disconnect such devices, thus eliminating them as possible causes of failure.
4. Turn on your notebook. Make sure it has been off at least 10 seconds before you turn it on.
5. Go through the boot sequence.
6. If the problem has not been resolved, contact your support representative.
Before you place the call, you should have the following information ready so that the customer
support representative can provide you with the fastest possible solution:
• Product name
• Product configuration number
• Product serial number
• Purchase date
• Conditions under which the problem occurred
• Any error messages that have occurred
• Hardware configuration
• Type of device connected, if any
See the Configuration Label on the bottom of your notebook for configuration and serial numbers.
ITALIANO
20
Page 21
Copyright-protected technology
This product incorporates copyright protection technology that is protected by U.S. patents and
other intellectual property rights. Use of this copyright protection technology must be authorized by Macrovision, and is intended for home and other limited viewing uses only unless
otherwise authorized by Macrovision. Reverse engineering or disassembly is prohibited.
21
Page 22
MEMO
Page 23
2008 12
Page 24
ENGLISH
FRANÇAIS
DEUTSCH
..............................................................................................................
....................................................................................................................
....................................................................................................................
..............................................................................................................
.........................................................................................................................
.........................................................................................................................
.......................................................................................................................
.......................................................................................................................
.......................................................................................................................
......................................................................................
.................................................................................................................................
.........................................................................................................
.....................................................................................................
............................................................................................................
................................................................................................
...........................................................................................................................
................................................................................................................
................................................................................................................
................................................................................................................
.........................................................................................................
................................................................................................................
..........................................................................................................................
5
5
6
6
7
9
10
11
12
13
13
13
13
14
15
15
16
18
19
19
20
20
ESPAÑOL
ITALIANO
2
Page 25

3
Page 26
ENGLISH
FRANÇAIS
DEUTSCH
ESPAÑOL
ITALIANO
4
Page 27
•
•
•
•
•
•
DVD/CD-RW CD
•
Dual DVD+/-RW CD
•
Super Multi DVD RW
CD
5
Page 28
ENGLISH
FRANÇAIS
DEUTSCH
ESPAÑOL
ITALIANO
6
Page 29
300
/
/
3G/Wireless LAN
(
/ )
7
Page 30
ENGLISH
3G/Wireless LAN
3G/Wireless LAN 3G Wireless LAN 3G
FRANÇAIS
84 Window
Wireless LAN
/ /
(HDD) 3G/Wireless LAN
DEUTSCH
ESPAÑOL
ITALIANO
8
Page 31

LAN (RJ-45)
USB
LAN (RJ-45)
LAN 10/100 Base-TX RJ-45
USB
USB 2.0
480 Mb/s
9
Page 32

ENGLISH
FRANÇAIS
USB Kensington
DEUTSCH
USB
USB USB USB USB v2.0
480 Mb/s
ESPAÑOL
ITALIANO
10
MP3
PDA
Page 33

Kensington
Kensington
11
Page 34

ENGLISH
FRANÇAIS
DEUTSCH
ESPAÑOL
ITALIANO
3G 3G ( )
12
Page 35

2
1.
2.
1.
2.
30
13
Page 36

ENGLISH
AC
FRANÇAIS
/
DEUTSCH
ESPAÑOL
ITALIANO
14
Page 37

/
/
/
(POST)
BIOS
(POST)
(POST)
15
Page 38

ENGLISH
FRANÇAIS
/ /
HDD 3G/Wireless LAN
/
(HDD)
DEUTSCH
ESPAÑOL
ITALIANO
16
3G/Wireless LAN
(HDD)
Page 39

3G/Wireless LAN
3G
WLAN
/
3G/Wireless LAN
17
Page 40

ENGLISH
[FN]
[FN+F1]
[FN+F2]
[FN+F3]
FRANÇAIS
[FN+F4]
[FN+F5]
[FN+F6]
8 F1 F8
DEUTSCH
ESPAÑOL
ITALIANO
[FN+F7]
[FN+F8]
18
Page 41

2 2
19
Page 42

ENGLISH
FRANÇAIS
DEUTSCH
ESPAÑOL
1.
2.
3.
4. 10
5.
6.
ITALIANO
20
Page 43

Macrovision Macrovision
21
Page 44

MEMO
Page 45

MANUEL DE L’UTILISATEUR
FRANÇAIS
Décembre 2008
Page 46

ENGLISH
TABLE DES MATIÈRES
AVANT DE COMMENCER ....................................................................................... 5
Vérifiez que vous avez tout ............................................................................................ 5
Familiarisez-vous avec l’ordinateur .............................................................................. 6
OUVRIR LE PANNEAU D’AFFICHAGE ...................................................................... 6
PRÉSENTATION DE LA FACE AVANT ......................................................................... 7
PRÉSENTATION DU CÔTÉ GAUCHE ........................................................................ 9
PRÉSENTATION DU CÔTÉ DROIT .......................................................................... 10
PRÉSENTATION DE LA FACE ARRIÈRE .................................................................. 11
FRANÇAIS
DEUTSCH
VUE DE DESSOUS ................................................................................................... 12
MISE EN ROUTE ................................................................................................... 13
Sources d’alimentation ................................................................................................ 13
CONNECTER L’ADAPTATEUR D’ALIMENTATION .................................................. 13
PRÉSERVER LA DURÉE DE VIE DE LA BATTERIE ................................................ 13
RECHARGER LA BATTERI ...................................................................................... 14
Démarrer votre Notebook ............................................................................................ 15
MISE EN MARCHE .................................................................................................... 15
Témoins d’état ......................................................................................................... 16
Utilisation des touches de fonction ......................................................................... 18
Utilisation du TouchPad ........................................................................................... 19
DÉPANNAGE ......................................................................................................... 20
Identifier le problème.................................................................................................... 20
ESPAÑOL
ITALIANO
2
Page 47

PRENDRE SOIN DE VOTRE NOTEBOOK
Pour éviter toute surchauffe du processeur de
l’ordinateur, faites attention à ne pas boucher les
ouvertures prévues pour la ventilation.
NE PAS le placer sur une surface de travail
instable.
NE PAS placer ni faire tomber d'objets sur
l'ordinateur et NE PAS y appliquer une forte
pression.
NE PAS toucher ni appuyer sur le panneau
d'affichage.
NE PAS utiliser votre notebook dans des conditions particulièrement difficiles.
NE PAS soumettre l'ordinateur à des champs
magnétiques.
NE PAS exposer aux rayons directs du soleil. NE PAS utiliser ou stocker à des températures
extrêmes.
3
Page 48

ENGLISH
Eviter les changements soudains de température
ou d’humidité en le maintenant à l’écart d’orifices
d’A/C et de chauffage.
FRANÇAIS
NE PAS placer près d'un feu ou autre source de
chaleur.
DEUTSCH
NE PAS exposer à la poussière et/ou à des
produits corrosifs.
ESPAÑOL
NE PAS exposer l'ordinateur à la pluie ou à
l'humidité.
NE PAS agir à la légère avec les batteries. Rangezles hors de portée des enfants.
NE PAS fermer votre notebook en le claquant et
ne prenez ou ne soulevez jamais votre notebook
par l'affichage.
ITALIANO
NE PAS vaporiser d'eau ou tout autre liquide de
nettoyage directement sur l'affichage.
4
Si vous voyagez avec votre ordinateur, pensez à
le prendre comme bagage à main. Ne l’enregistrez
pas comme bagage de soute.
Page 49

AVANT DE COMMENCER
Vérifiez que vous avez tout
Quand vous recevez votre notebook, déballez-le avec précaution, et vérifiez que vous avez tous
les éléments mentionnés ci-dessous. Pour un modèle pré-configuré vous devez avoir ce qui suit:
• Ordinateur Notebook
• Batterie Lithium Ion
• Adaptateur CA avec cordon d’alimentation CA
• CD de pilotes et d’applications
• Guide de démarrage rapide ou Guide de l’utilisateur
En fonction de la configuration de votre notebook, vous aurez peut-être aussi besoin des éléments
suivants:
• CD d’application de Combo DVD / CD-RW
• CD d’application du DVD+/- RW Double
• CD d’application du Super Multi DVD RW
Après avoir vérifié et confirmé que votre notebook est complet, lisez les pages suivantes pour en
savoir plus sur tous les composants de votre notebook.
Selon le modèle acheté, l’apparence de votre notebook peut être différent de
celui présenté dans ce manuel.
5
Page 50

ENGLISH
AVANT DE COMMENCER
Familiarisez-vous avec l’ordinateur
OUVRIR LE PANNEAU D’AFFICHAGE
Pour ouvrir le panneau d’affichage, soulevez simplement le couvercle.
Quand vous le fermez, prenez soin de ne pas le claquer.
FRANÇAIS
DEUTSCH
ESPAÑOL
ITALIANO
6
Page 51

PRÉSENTATION DE LA FACE AVANT
Voici une présentation de la face avant du notebook.
Microphone
AVANT DE COMMENCER
Appareil Photo
Panneau d’affichage
Lampes témoin
d’état
Périphérique
de pointage
TouchPad
Commutateur LAN 3G/Sans fil
Bouton Suspension/
Marche
Clavier
Lampes témoin
d’état
Microphone
Le microphone intégré permet la réception stéréo et la transmission vocale et/ou autres données
audio sur votre notebook.
Appareil Photo
L’appareil photo intégré de 3,0 méga pixels vous permet de prendre une photo ou de créer un chat
vidéo ou une conférence vidéo en un clic.
Panneau d’affichage
Le panneau d’affichage est un panneau LCD couleur avec rétroéclairage pour l’affichage du texte
et des graphiques.
Bouton Suspension/Marche
Ce bouton allume et éteint votre notebook ou le met en veille. (Voir Bouton Suspension/Marche
dans la section Mise sous tension pour plus d’informations.)
7
Page 52

ENGLISH
AVANT DE COMMENCER
Clavier
Le clavier comporte 84 touches, y compris les touches Windows® dédiées.
Lampes témoin d’état
Les lampes témoin d’état correspondent à des modes de traitement spécifiques. Ces modes sont:
Etat Marche/Suspension, Etat Batterie/Adaptateur CA, activité du disque dur (HDD), Verr Num,
Verr Maj, et activité LAN 3G/Sans fil.
Commutateur LAN 3G/Sans fil
Le commutateur LAN 3G/Sans fil vous permet de basculer votre connexion sans fil entre 3G et
LAN sans fil. Basculez sur la gauche pour la connexion 3G, et basculez sur la droite pour activer
LAN sans fil.
FRANÇAIS
DEUTSCH
ESPAÑOL
Périphérique de pointage TouchPad
Le périphérique de pointage TouchPad est un contrôle du curseur fonctionnant comme une souris
à deux boutons et un pavé tactile sensible aux mouvements.
ITALIANO
8
Page 53

AVANT DE COMMENCER
PRÉSENTATION DU CÔTÉ GAUCHE
Voici une brève description du côté gauche du notebook.
Port d’adaptateur d’alimentation Port LAN (RJ-45)
Port du moniteur externe Port USB
Port d’adaptateur d’alimentation
Le port d’adaptateur d’alimentation vous permet de brancher un adaptateur d’alimentation CA
pour alimenter votre notebook et charger la batterie Lithium Ion interne.
Port du moniteur externe
Le moniteur externe vous permet de connecter un moniteur externe.
Port LAN (RJ-45)
Le port LAN est conçu pour prendre en charge une prise RJ-45 Base-TX standard 10/100.
Port USB
Le port USB vous permet de connecter un périphériques USB. Il prend en charge la version v2.0
du standard USB, offrant des vitesses d’échange de données allant jusqu’à 480 Mb/s.
9
Page 54

ENGLISH
AVANT DE COMMENCER
PRÉSENTATION DU CÔTÉ DROIT
Voici une brève description du côté droit du notebook.
Prise casque Lecteur de carte mémoire
FRANÇAIS
Prise Microphone
La prise microphone vous permet de connecter un microphone mono externe.
Prise casque
DEUTSCH
La prise casque vous permet de connecter des casques ou des haut-parleurs externes et des
amplificateurs.
Ports USBPrise Microphone Logement de verrouillage Kensington
Ports USB
Les ports USB vous permettent de connecter des périphériques USB. Ils peuvent prendre en
charge la version v2.0 du standard USB, offrant des vitesses d’échange de données allant jusqu’à
480 Mb/s.
Lecteur de carte mémoire
ESPAÑOL
ITALIANO
Le lecteur de carte mémoire offre la méthode la plus récente et la plus pratique pour transférer des
photos, de la musique et des données entre votre notebook et des périphériques compatibles flash
tels que des appareils photo numériques, des lecteurs MP3, des téléphones mobiles et des PDA
(assistant numérique personnel).
10
Page 55

AVANT DE COMMENCER
Logement de verrouillage Kensington
Le connecteur du verrouillage Kensington vous permet d’attacher votre notebook à un objet
inamovible à l’aide du câble de sécurité optionnel.
PRÉSENTATION DE LA FACE ARRIÈRE
Vous trouverez ci-dessous une présentation de la face arrière du notebook.
11
Page 56

ENGLISH
AVANT DE COMMENCER
VUE DE DESSOUS
Voici une présentation de la partie inférieure du notebook.
Couvercle du
compartiment
Baie de batterie Lithium Ion
Label de
contrôle
FRANÇAIS
DEUTSCH
Baie de batterie Lithium Ion
La baie de la batterie contient la batterie Lithium Ion interne. Elle peut être ouverte pour retirer la
batterie lors d’un stockage pour une période prolongée ou pour échanger une batterie déchargée
par une batterie Lithium Ion chargée.
Sortie du ventilateur
C’est une ouverture permettant au ventilateur de dissiper la chaleur provenant des composants
ESPAÑOL
internes de l’ordinateur. Faites attention à ne pas placer l’ordinateur dans une position telle que la
sortie de ventilation pourrait être obstruée.
Haut-parleurs stéréo
Les haut-parleurs stéréo offrent un son stéréo.
Sortie du
ventilateur
Haut-parleurs stéréo
Label de contrôle
Le label indique le numéro du modèle et autres informations concernant votre notebook.
ITALIANO
Couvercle du compartiment
Le compartiment du module 3G contient le module 3G. (Pas disponible dans toutes les
configurations.).
12
Page 57

MISE EN ROUTE
Sources d’alimentation
Votre ordinateur possède deux sources d’alimentation : une batterie Lithium-Ion et un adaptateur CA.
CONNECTER L’ADAPTATEUR D’ALIMENTATION
L’adaptateur CA fournit l’alimentation pour faire fonctionner votre notebook et recharger la
batterie.
Connexion de l’adaptateur CA
1. Branchez le câble de sortie CC dans la prise d’alimentation CC de votre notebook.
2. Branchez l’adaptateur CA à la prise de courant CA.
Passer de l’alimentation par adaptateur CA à l’alimentation par
batterie
1. Veillez à avoir au moins une batterie chargée d’installée.
2. Retirez l’adaptateur CA. Votre notebook passera automatiquement de l’alimentation CC à
l’alimentation par batterie.
La batterie Lithium-Ion n’est pas chargée à l’achat. Lors de la première
utilisation, vous devrez connecter l’adaptateur CA pour utiliser votre notebook.
Pour éviter d’endommager votre notebook, utilisez uniquement des batteries
Lithium-Ion conformes aux spécifications. Toute utilisation incorrecte des
batteries pourrait provoquer une explosion et des blessures corporelles.
Ne jetez pas les batteries avec les ordures ménagères. Contactez votre centre
de recyclage ou le service d’élimination des déchets afin d’éliminer correctement
les batteries conformément aux lois et règlementations locales en vigueur
dans votre région.
PRÉSERVER LA DURÉE DE VIE DE LA BATTERIE
• Déchargez et rechargez entièrement la batterie tous les 30 jours afin de prolonger la durée de
vie de la batterie.
• Si la batterie n’est pas utilisée pendant un mois ou plus, retirez et rangez la batterie dans un
endroit frais et sec. Rechargez complètement la batterie avant de l’utiliser à nouveau.
13
Page 58

ENGLISH
MISE EN ROUTE
RECHARGER LA BATTERI
La batterie Lithium-Ion est rechargée de façon interne à l’aide de l’adaptateur CA. Pour recharger
la batterie, vérifiez que la batterie est installée et que l’ordinateur est connecté à l’adaptateur CA.
Les batteries Lithium-Ion n’ont pas d’“effet mémoire”; vous n’avez donc pas à décharger
entièrement la batterie avant de la recharger. La durée de charge sera sensiblement plus longue si
vous utilisez votre notebook pendant le chargement de la batterie. Si vous voulez charger la
batterie plus rapidement, placez votre ordinateur en mode Veille ou éteignez-le pendant que
l’adaptateur recharge la batterie.
Batterie déchargée
Quand la batterie est déchargée, un message d’avertissement apparaît. Si vous ne répondez pas au
message de batterie faible, la batterie continue de se décharger jusqu’à ce qu’elle soit trop faible
FRANÇAIS
pour opérer. Lorsque cela se produit, votre PC notebook passe en mode Suspendu. Il n’y a
aucune garantie que vos données seront sauvegardées une fois que le notebook atteint cet état.
Pour éviter d’endommager votre ordinateur, utilisez uniquement l’adaptateur
d’alimentation fourni avec celui-ci car chaque adaptateur d’alimentation possède
son propre étalonnage de sortie.
DEUTSCH
ESPAÑOL
ITALIANO
Quand votre notebook entre en mode Suspension du fait que la batterie est déchargée, vous ne
pourrez pas continuer à travailler avant d’avoir fourni une source d’alimentation provenant d’un
adaptateur, ou d’une batterie rechargée. Une fois que vous avez fourni l’alimentation, vous
pouvez appuyer sur le bouton Veille/Reprise pour reprendre l’utilisation. En mode Veille, vos
données sont conservées un certain temps, mais si aucune source d’alimentation, n’est pas fournie
rapidement l’indicateur d’alimentation s’arrête de clignoter et s’éteint, ce qui entraîne la perte des
données non enregistrées. Une fois que vous avez fourni l’alimentation, vous pouvez continuer à
utiliser votre ordinateur pendant que l’adaptateur recharge la batterie.
14
Page 59

MISE EN ROUTE
Démarrer votre Notebook
MISE EN MARCHE
Bouton Suspension/Marche
Le bouton veille/marche sert à allumer votre notebook quand il est éteint. Une fois que vous avez
connecté votre adaptateur CA ou rechargé la batterie Lithium-Ion interne, vous pouvez allumer
votre notebook en appuyant sur le bouton suspension/marche situé au-dessus du clavier. Si vous
devez faire une pause prolongée, appuyez à nouveau sur le bouton pour l’éteindre.
Ne déplacez pas votre notebook quand il est allumé, ou ne lui faites pas subir
des chocs ou des vibrations, cas vous risquez d’endommager son disque dur.
Quand vous allumez votre notebook, il effectue un Auto-test de démarrage (POST) pour vérifier
que les parties internes et la configuration sont correctes. Si une erreur est trouvée, votre ordinateur
émet un son d’avertissement et/ou affiche un message d’erreur.
En fonction de la nature du problème, vous pourrez continuer en redémarrant le système
d’exploitation ou en entrant dans l’utilitaire de configuration du BIOS et en modifiant les paramètres.
Après l’exécution réussie de l’Auto-test de démarrage (POST), votre notebook charge le système
d’exploitation installé.
N’éteignez jamais votre notebook pendant l’Auto-test de démarrage (POST),
ou une erreur irrécupérable risque de se produire.
15
Page 60

ENGLISH
MISE EN ROUTE
Témoins d’état
Les lampes témoin d’état correspondent à des modes de traitement spécifiques. Ces modes sont:
Etat Marche/Veille, état batterie/adaptateur CA, activité du disque dur (HDD), Verr Num, Verr
Maj, et activité 3G/LAN sans fil.
FRANÇAIS
Témoin de Batterie
Témoin d’activité du disque dur
DEUTSCH
Témoin de Batterie
La lampe témoin de Batterie vous indique si la batterie Lithium Ion est en train de se charger ou si
elle est déjà entièrement rechargée.
• Si vous rechargez votre batterie, la lampe témoin de batterie reste allumée même si votre
ESPAÑOL
notebook est éteint.
• S’il n’y a pas d’activité de batterie, si les adaptateurs d’alimentation ne sont pas connectés, ou
si le commutateur d’alimentation est sur la position Eteint, la lampe témoin de batterie sera
aussi éteint.
• Les batteries soumises à des chocs, des vibrations ou des températures extrêmes peuvent être
irrémédiablement endommagées.
Le témoin VerrNum
Le témoin VerrMaj
Témoin de Marche/Veille
(HDD)
Témoin d’activité 3G/LAN sans fil
Témoin d’activité du disque dur (HDD)
ITALIANO
Le témoin d’activité du disque dur (HDD) vous indique si votre disque dur interne est en cours
d’accès et, si c’est le cas, à quelle vitesse.
16
Page 61

MISE EN ROUTE
Le témoin VerrNum
Ce témoin indique quand le clavier interne est paramétré en mode de pavé numérique à dix touches.
Le témoin VerrMaj
Ce témoin vous indique que le clavier est paramétré pour taper tout en lettres capitales.
Témoin d’activité 3G/LAN sans fil
Le témoin d’activité 3G/LAN sans fil vous indique si votre ordinateur est connecté ou non à un
réseau sans fil.
• La lumière verte indique une connexion 3G.
• La lumière orange indique une connexion LAN sans fil.
• Utilisez le commutateur 3G/LAN sans fil situé à l’avant du notebook pour basculer le témoin
lumineux.
Témoin de Marche/Veille
La lumière sur le bouton d’alimentation s’illumine quand l’ordinateur est allumé, et clignote quand
l’ordinateur est en mode Veille.
17
Page 62

ENGLISH
MISE EN ROUTE
Utilisation des touches de fonction
Votre ordinateur possède 8 touches de fonction, F1 à F8. Les fonctions attribuées à ces touches
diffèrent pour chaque application. Vous devez vous reporter à la documentation de votre logiciel
pour découvrir comment ces touches sont utilisées.
La touche [FN] offre des fonctions étendues pour le notebook et est toujours utilisée
conjointement avec une autre touche.
• [FN+F1]: Met le notebook en mode Suspension. Appuyer sur le bouton d’alimentation
pour le rétablir en mode actif.
• [FN+F2]: Active ou désactive la connexion réseau sans fil.
FRANÇAIS
DEUTSCH
ESPAÑOL
• [FN+F3]: Vous permet de changer votre sélection de l’endroit où envoyer votre vidéo
d’affichage. Chaque fois que vous appuyez sur la combinaison de touches vous passez au
choix suivant. Les choix, dans l’ordre, sont : panneau d’affichage intégré seulement, à la fois
le panneau d’affichage intégré et le moniteur externe, ou moniteur externe seulement.
• [FN+F4]: Diminue la luminosité de l’écran.
• [FN+F5]: Augmente la luminosité de l’écran.
• [FN+F6]: Désactive le volume de l’ordinateur.
• [FN+F7]: Diminue le volume de l’ordinateur.
• [FN+F8]: Augmente le volume de l’ordinateur.
ITALIANO
18
Page 63

MISE EN ROUTE
Utilisation du TouchPad
Un dispositif de pointage TouchPad est intégré à votre ordinateur. Il est utilisé pour contrôler le
mouvement du pointeur pour sélectionner les éléments sur votre panneau d’affichage.
Le TouchPad est composé d’un contrôle du curseur, d’un bouton gauche et d’un bouton droit. Le
contrôle du curseur fonctionne de la même façon que celui d’une souris, et déplace le curseur sur
l’affichage. Il nécessite seulement une légère pression du bout du doigt. Les boutons gauche et
droit fonctionnent de la même façon que les boutons d’une souris. La fonctionnalité effective des
boutons peut varier en fonction de l’application utilisée.
Cliquer
Cliquer signifie appuyer sur un bouton et le relâcher. Pour faire un clic gauche, déplacez le curseur
sur l’élément que vous désirez sélectionner, appuyez une fois sur le bouton gauche, et relâchezle immédiatement. Pour faire un clic droit, déplacez le curseur sur l’élément que vous désirez
sélectionner, appuyez une fois sur le bouton droit, et relâchez-le immédiatement. Vous avez aussi
la possibilité d’effectuer le clic en tapant légèrement une fois sur le TouchPad.
Double-cliquer
Double cliquer signifie appuyer et relâcher deux fois le bouton gauche en succession rapide. Cette
procédure ne fonctionne pas avec le bouton droit. Pour faire un double clic, déplacez le curseur
sur l’élément que vous désirez sélectionner, appuyez deux fois sur le bouton gauche, et relâchezle immédiatement. Vous avez aussi la possibilité d’effectuer le double clic en tapant légèrement
deux fois sur le TouchPad.
Faire glisser
Faire glisser signifie appuyer sur le bouton gauche et le maintenir enfoncé, tout en déplaçant le
curseur. Pour faire glisser, déplacez le curseur sur l’élément que vous désirez déplacer. Appuyez
sur le bouton gauche et maintenez-le enfoncé tout en déplaçant l’élément à son nouvel emplacement et relâchez-le ensuite. Faire glisser peut aussi être effectué à l’aide du TouchPad. D’abord,
tapez deux fois sur le TouchePad au-dessus de l’élément que vous désirez déplacer en prenant soin
de laisser votre doigt sur le pavé tactile après le taper final. Ensuite, déplacez l’objet à son nouvel
emplacement en déplaçant votre doigt sur le TouchPad, et en relâchant ensuite la pression de votre
doigt.
19
Page 64

ENGLISH
DÉPANNAGE
Votre notebook est robuste et présente rarement de problèmes dans ce domaine. Cependant, vous
pouvez rencontrer de simples problèmes de configuration ou d’utilisation que vous pouvez
résoudre sur place, ou des problèmes avec des périphériques, que vous pouvez résoudre en
remplaçant le périphérique. Les informations contenues dans cette section vous aident à isoler et
résoudre certains de ces problèmes simples et à identifier les pannes qui nécessitent une réparation.
Identifier le problème
Si vous rencontrez un problème, effectuez tout d’abord la procédure suivante avant de vous lancer
FRANÇAIS
DEUTSCH
dans un dépannage complexe.
1. Eteignez votre notebook.
2. Vérifiez que l’adaptateur CA est branché à votre notebook et à une source d’alimentation CA.
3. Vérifiez que les périphériques connectés aux connecteurs externes sont correctement branchés.
Vous pouvez aussi déconnecter ces périphériques, éliminant ainsi les causes possibles de
panne.
4. Allumez votre notebook. Assurez-vous qu’il est resté éteint au moins 10 secondes avant de le
rallumer.
5. Effectuez la séquence de démarrage.
6. Si le problème n’a pas été résolu, contactez votre représentant de l’assistance technique.
Avant d’appeler, vous devez préparer les informations suivantes afin que le représentant
d’assistance technique puisse vous fournir la solution la plus rapide possible :
• Nom du produit
• Numéro de configuration du produit
• Numéro de série du produit
ESPAÑOL
ITALIANO
• Date d’achat
• Conditions dans lesquelles le problème s’est produit
• Tout message d’erreur ayant apparu
• Configuration matérielle
• Type de périphérique connecté, le cas échéant
Voir l’étiquette de configuration sous votre notebook pour connaître les numéros de configuration
et de série.
20
Page 65

Technologie protégée par Copyright
Ce produit incorpore la technologie de protection par copyright qui est protégée par les brevets
U.S. et autres droits de propriété intellectuelle. L’utilisation de cette technologie de protection
par copyright doit être autorisée par Macrovision, et est destinée à des utilisations domestiques
et autres visualisations limitées à moins qu’autorisé différemment par Macrovision. Toute ingénierie
inverse ou démontage sont interdits.
21
Page 66

MEMO
Page 67

BENUTZERHANDBUCH
DEUTSCH
Dezember 2008
Page 68

ENGLISH
INHALT
ZUM BEGINN .......................................................................................................... 5
Überprüfen der Lieferung auf Vollständigkeit .............................................................. 5
Lernen Sie das Notebook kennen ................................................................................. 6
ÖFFNEN DES BILDSCHIRMS .................................................................................... 6
VORDERSEITE .......................................................................................................... 7
LINKE SEITE .............................................................................................................. 9
RECHTE SEITE ........................................................................................................ 10
RÜCKSEITE ............................................................................................................. 11
FRANÇAIS
DEUTSCH
UNTERSEITE ........................................................................................................... 12
ERSTE SCHRITTE ................................................................................................ 13
Stromversorgung .......................................................................................................... 13
ANSCHLIESSEN DES NETZADAPTER ................................................................... 13
ZUR AKKULEBENSDAUER ..................................................................................... 13
WIEDERAUFLADEN DES AKKUS ............................................................................ 14
Einschalten des Notebooks ......................................................................................... 15
EINSCHALTEN ......................................................................................................... 15
Statusanzeigen ......................................................................................................... 16
Die Funktionstasten ................................................................................................. 18
Benutzen des TouchPads ........................................................................................ 19
FEHLERBEHEBUNG ............................................................................................. 20
Identifizieren eines Problems ...................................................................................... 20
ESPAÑOL
ITALIANO
2
Page 69

PFLEGE DES NOTEBOOKS
Achten Sie darauf, dass die Lüftungsöffnungen
nicht verdeckt werden, um eine Überhitzung des
Prozessors zu vermeiden.
Legen Sie das Notebook NICHT auf unebene oder
wacklige Unterlagen.
Stellen oder legen Sie KEINE Gegenstände auf
das Notebook, und lassen Sie nichts darauf fallen.
Üben Sie KEINE Gewalt auf das Gerät aus.
Drücken Sie NICHT auf den Bildschirm.
Verwenden Sie das Notebook NICHT bei
extremen Umgebungsbedingungen.
Setzen Sie das Notebook KEINEN Magnetfeldern
aus.
Setzen Sie das Notebook KEINEM direkten
Sonnenlicht aus.
Setzen Sie das Notebook NICHT extremen
Temperaturen aus.
3
Page 70

ENGLISH
Vermeiden Sie plötzliche Veränderungen von
Temperatur und Luftfeuchtigkeit, und stellen Sie
das Notebook nicht in die Nähe von Adaptern
und Lüftungsöffnungen anderer Geräte.
FRANÇAIS
Stellen Sie das Notebook NICHT in der Nähe
von Feuer und anderen Wärmequellen auf.
DEUTSCH
Setzen Sie das Notebook NICHT Staub und/oder
korrosiven Chemikalien aus.
ESPAÑOL
Setzen Sie das Notebook NICHT Regen und
Feuchtigkeit aus.
Versuchen Sie NICHT, den Akku zu manipulieren.
Halten Sie ihn außerhalb der Reichweite von
Kindern.
Schlagen Sie das Notebook NICHT zu, und heben
Sie es nicht am Bildschirm hoch.
Sprühen Sie KEIN Wasser oder andere
ITALIANO
Reinigungsflüssigkeiten direkt auf den Bildschirm.
4
Wenn Sie das Notebook auf Reisen mitnehmen,
achten Sie darauf, es als Handgepäck
mitzunehmen. Checken Sie es nicht mit dem
anderen Gepäck ein.
Page 71

ZUM BEGINN
Überprüfen der Lieferung auf Vollständigkeit
Wenn Sie das Notebook erhalten haben, packen Sie es vorsichtig aus, und überprüfen Sie, ob alle
nachfolgend aufgeführten Teile enthalten sind. Bei einem vorkonfigurierten Modell sollten die
folgenden Teile dabei sein:
• Notebook
• Lithium-Ionen-Akku
• AC-Netzadapter mit Netzkabel
• Treiber- und Programm-CD
• Kurzanleitung oder Benutzerhandbuch
Je nach Konfiguration des Notebooks ist es möglich, dass noch die folgenden Teile benötigt
werden:
• Programm-CD für das DVD-/CD-RW-Combolaufwerk
• Programm-CD für das DVD+/-RW-Laufwerk
• Super Multi DVD RW Anwendungs-CD
Wenn Sie sichergestellt haben, dass das Notebook-System vollständig ist, lesen Sie sich die
folgenden Seiten durch, um alles über die Komponenten des Notebooks zu erfahren.
Je nachdem, welches Modell Sie erworben haben, kann Ihr Notebook von dem
in diesem Benutzerhandbuch abgebildeten Notebook abweichen.
5
Page 72

ENGLISH
ZUM BEGINN
Lernen Sie das Notebook kennen
ÖFFNEN DES BILDSCHIRMS
Um mit dem Gerät zu arbeiten, klappen Sie einfach den Deckel hoch.
Achten Sie beim Schließen darauf, dass der Deckel nicht zugeknallt wird.
FRANÇAIS
DEUTSCH
ESPAÑOL
ITALIANO
6
Page 73

VORDERSEITE
Hier sehen Sie eine Ansicht des Notebooks von vorne.
Mikrofon
ZUM BEGINN
Kamera
Bildschirm
Statusanzeigelampen
TouchPadZeigegerät
3G/Wireless-LAN-Schalter
Taste Suspend/
Wiederaufnahme
Tastatur
Statusanzeigelampen
Mikrofon
Das eingebaute Mikrofon empfängt Stereoton und sendet Stimm- und/oder andere Audiodaten in
Ihr Notebook.
Kamera
Mit der eingebauten 3,0-Megapixel-Kamera können Sie mit nur einem Klick fotografieren und
einen Video-Chat oder eine Videokonferenz führen.
Bildschirm
Beim Bildschirm handelt es sich um einen LCD-Farbmonitor mit Hintergrundbeleuchtung. Auf
ihm werden die Texte und Grafiken angezeigt.
Taste Suspend/Wiederaufnahme
Mit dieser Taste schalten Sie das Notebooks ein, aus und in den Ruhezustand. (Weitere
Informationen dazu finden Sie im Abschnitt Einschalten unter Taste Suspend/Wiederaufnahme.)
7
Page 74

ENGLISH
ZUM BEGINN
Tastatur
Die Tastatur hat 84 Tasten, darunter auch spezielle Windows®-Tasten.
Statusanzeigelampen
Die Statusanzeigelampen entsprechen den spezifischen Betriebsmodi. Diese Modi sind: Betriebs-/
Suspend-Status, Batterie-/Netzadapterstatus, Festplattenaktivität (HDD), Num-Lock, Caps-Lock
und 3G/Wireless-LAN-Aktivität.
3G/Wireless-LAN-Schalter
Mit dem 3G/Wireless-LAN-Schalter können Sie zwischen 3G und Wireless LAN schalten. Für
die 3G-Verbindung muss der Schalter links, für die Wireless-LAN-Verbindung muss er rechts
stehen.
FRANÇAIS
DEUTSCH
ESPAÑOL
TouchPad-Zeigegerät
Beim TouchPad handelt es sich um eine mausähnliche Einrichtung zur Steuerung des Cursors mit
zwei Tasten (Links, Rechts und zwei Scroll-Tasten) und einem berührungsempfindlichen
Bewegungsfeld.
ITALIANO
8
Page 75

ZUM BEGINN
LINKE SEITE
Hier folgt eine kurze Beschreibung der linken Seite des Notebooks.
Netzadapteranschluss LAN-Port (RJ-45)
Anschluss für externen Monitor USB-Anschluss
Netzadapteranschluss
An den Netzadapteranschluss wird der AC-Netzadapter angeschlossen, über den das Notebook
mit Strom versorgt und der interne Lithium-Ionen-Akku aufgeladen wird.
Anschluss für externen Monitor
An diesen Anschluss kann ein externer Monitor angeschlossen werden.
LAN-Port (RJ-45)
Der LAN-Port ist für einen RJ-45-Stecker für den Standard 10/100 Base-TX vorgesehen.
USB-Anschluss
An den USB-Anschluss werden USB-Geräte angeschlossen. Er unterstützt den USB-Standard
V2.0, mit dem Datenübertragungsraten bis zu 48ß MB/s möglich sind.
9
Page 76

ENGLISH
ZUM BEGINN
RECHTE SEITE
Hier folgt eine kurze Beschreibung der rechten Seite des Notebooks.
FRANÇAIS
Mikrofonanschluss
An den Mikrofonanschluss können Sie ein externes Mono-Mikrofon anschließen.
Kopfhöreranschluss Speicherkartenleser
USB-AnschlüsseMikrofonanschluss Öffnung für Kensington-Schloss
DEUTSCH
An den Kopfhöreranschluss können Sie Kopfhörer oder externe Lautsprecher und Verstärker
anschließen.
USB-Anschlüsse
Kopfhöreranschluss
An die USB-Anschlüsse können USB-Geräte angeschlossen werden. Die Anschlüsse unterstützen
den USB-Standard v2.0, der Datenaustauschraten von 480 Mb/s ermöglicht.
ESPAÑOL
ITALIANO
Speicherkartenleser
Der Speicherkartenleser bietet die schnellste und einfachste Möglichkeit, Bilder, Musik und
Daten zwischen dem Notebook und Speichergeräten wie Digitalkameras, MP3-Playern, Handys
und PDAs zu übertragen.
10
Page 77

ZUM BEGINN
Öffnung für Kensington-Schloss
Mit Hilfe des Stahlkabels des Kensington-Schlosses können Sie das Notebook an einem festen
Gegenstand befestigen und sichern.
RÜCKSEITE
Hier sehen Sie eine Ansicht des Notebooks von hinten.
11
Page 78

ENGLISH
ZUM BEGINN
UNTERSEITE
Hier sehen Sie eine Ansicht des Notebooks von unten.
Abdeckung
Fach für den Lithium-Ionen-Akku
Konfigurationsetikett
FRANÇAIS
DEUTSCH
Fach für den Lithium-Ionen-Akku
Das Akkufach enthält den Lithium-Ionen-Akku. Das Fach kann geöffnet werden, um den Akku zu
entnehmen, wenn das Notebook z.B. über einen längeren Zeitraum nicht benutzt wird oder wenn
ein entladenen Akku durch einen gefüllten ersetzt wird.
Lüfterauslass
ESPAÑOL
Aus dieser Öffnung gelangt die heiße Luft aus dem Innern des Geräts nach außen. Stellen Sie das
Gerät immer so hin, dass diese Öffnung nicht verdeckt wird.
Stereolautsprecher
Die zwei eingebauten Stereolautsprecher geben Stereoton wieder.
Lüfterauslass
Stereolautsprecher
Konfigurationsetikett
Auf dem Konfigurationsetikett sind die Modellnummer und andere Informationen über das Notebook verzeichnet.
ITALIANO
Abdeckung
Das 3G-Modulfach enthält das 3G-Modul. (Nicht bei allen Konfigurationen verfügbar.)
12
Page 79

ERSTE SCHRITTE
Stromversorgung
Das Notebook kann auf zwei Arten mit Strom versorgt werden: mit einem Lithium-Ionen-Akku
oder einem AC-Netzadapter, der an das Stromnetz angeschlossen wird.
ANSCHLIESSEN DES NETZADAPTER
Der AC-Netzadapter versorgt das Notebook mit Strom und lädt gleichzeitig den Akku, wenn
dieser sich im Notebook befindet.
Anschließen des AC-Netzadapters
1. Schließen Sie das DC-Kabel an die DC-Netzanschlussbuchse des Notebooks an.
2. Verbinden Sie den AC-Netzadapter mit einer Netzsteckdose.
Wechseln zwischen Netzstrom und Akkustrom
1. Stellen Sie sicher, dass der eingesetzte Akku geladen ist.
2. Trennen Sie den AC-Netzadapter ab. Das Notebook wechselt automatisch zur Stromversorgung
über den Akku.
Der Lithium-Ionen-Akku ist beim Kauf nicht geladen. Wenn Sie also das Notebook benutzen möchten, muss es zunächst mit Netzstrom versorgt werden.
Um das Notebook vor Schäden zu schützen, verwenden Sie nur einen LithiumIonen-Akku, der den erforderlichen Spezifikationen entspricht. Werden Akkus
unsachgemäß verwendet, besteht Explosions- und Verletzungsgefahr.
Batterien und Akkus dürfen nicht im normalen Hausmüll entsorgt werden.
Entsorgen Sie Altbatterien und -akkus entsprechend den Vorschriften bei Ihrem
Müllentsorgungs- oder Recyclingunternehmen.
ZUR AKKULEBENSDAUER
• Die Akkulebensdauer kann verlängert werden, wenn Sie den Akku alle 30 Tage einmal vollständig
entladen und dann wieder vollständig laden.
• Wenn der Akku über einen Monat nicht verwendet wird, nehmen Sie ihn aus dem Gerät heraus,
und bewahren Sie ihn an einem trockenen, kühlen Ort auf. Laden Sie den Akku erst einmal
vollständig auf, bevor Sie ihn wieder verwenden.
13
Page 80

ENGLISH
ERSTE SCHRITTE
WIEDERAUFLADEN DES AKKUS
Der Lithium-Ionen-Akku wird im Gerät aufgeladen, wenn das Notebook an eine Netzsteckdose
angeschlossen ist. Um den Akku aufzuladen, stellen Sie sicher, dass der Akku eingesetzt und der
Computer an das Stromnetz angeschlossen ist.
Bei Lithium-Ionen-Akkus tritt kein “Memory-Effekt” auf, so dass Sie den Akku vor dem
Neuaufladen nicht erst vollständig entladen müssen. Die Ladedauer ist bedeutend länger, wenn Sie
während des Ladevorgangs mit dem Notebook arbeiten. Der Akku wird schneller aufgeladen, wenn
sich das Notebook im Suspend-Modus befindet oder ausgeschaltet ist.
Niedriger Akkuladestand
Wenn der Akkuladestand sehr niedrig ist, erscheint eine entsprechende Meldung. Nachdem die
Akkuwarnung erschienen ist, läuft das Gerät so lange weiter, bis die Ladung für einen weiteren Betrieb
FRANÇAIS
nicht mehr ausreicht. In diesem Fall wechselt das Notebook in den Suspend-Modus. Wenn das Notebook diesen Punkt erreicht hat, ist eine Datenspeicherung nicht mehr sicher.
Verwenden Sie nur den Netzadapter, den Sie zusammen mit dem Notebook
erhalten haben, da dieser genau die benötigten Ausgabestromwerte hat. Wenn
Sie andere Netzadapter verwenden könnte das Notebook beschädigt werden.
DEUTSCH
ESPAÑOL
ITALIANO
Wenn das Notebook aufgrund niedriger Akkuladung in den Suspend-Modus versetzt wurde, kann
er erst wieder gestartet werden, wenn er entweder über den Netzadapter an das Stromnetz
angeschlossen, oder wenn ein geladener Akku eingesetzt wird. Sobald das Gerät wieder mit Strom
versorgt wird, können Sie es durch Drücken auf die Taste Suspend/Wiederaufnahme wieder starten.
Im Suspend-Modus werden die Daten einige Zeit lang gespeichert. Wenn das Gerät aber nicht bald
wieder mit Strom versorgt wird, wird das Gerät abgeschaltet, die Stromanzeigelampe geht aus, und
alle Daten, die nicht gespeichert wurden, gehen verloren. Wenn Sie das Gerät über das Stromnetz
mit Strom versorgen, können Sie mit dem notebook arbeiten, während gleichzeitig der Akku neu
geladen wird.
14
Page 81

ERSTE SCHRITTE
Einschalten des Notebooks
EINSCHALTEN
Taste Suspend/Wiederaufnahme
Drücken Sie auf die Suspend/Power-Taste, um das Notebook einzuschalten. Das Notebook kann
eingeschaltet werden, wenn es mit dem AC-Netzadapter an das Stromnetz angeschlossen oder
über den internen Lithium-Ionen-Akku mit Strom versorgt wird. Drücken Sie zum Einschalten auf
die Taste Suspend/Wiederaufnahme, die sich oberhalb der Tastatur befindet. Wenn Sie eine längere
Arbeitspause machen, drücken Sie noch einmal auf diese Taste um das Notebook auszuschalten.
Das Notebook darf nicht in eingeschaltetem Zustand transportiert und Stößen
oder Vibrationen ausgesetzt werden, da dabei die Festplatte beschädigt werden
kann.
Wenn Sie das Notebook einschalten, wird zunächst ein POST-Test (Power On Self Test) ausgeführt,
bei dem überprüft wird, ob alle Bauteile und Konfigurationen einwandfrei funktionieren. Wird ein
Fehler gefunden, ertönt ein Warnsignal und/oder es wird eine Fehlermeldung angezeigt.
Je nach Art des Problems können Sie einfach fortfahren, indem Sie das Betriebssystem starten,
oder Sie müssen in das BIOS-Programm gehen, um die entsprechenden Einstellungen zu ändern.
Nach erfolgreichem Abschluss des POST-Tests wird das installierte Betriebssystem geladen.
Schalten Sie das Notebook niemals während des POST-Tests aus, da dadurch
nicht behebbare Fehler auftreten können.
15
Page 82

ENGLISH
ERSTE SCHRITTE
Statusanzeigen
Die Statusanzeigelampen entsprechen den spezifischen Betriebsmodi. Diese Modi sind: Betrieb/
Suspend-Status, Akku/AC-Adapterstatus, Festplattenaktivität (HDD), Num-Lock, Caps-Lock
und 3G/Wireless-LAN-Aktivität.
FRANÇAIS
Akkuanzeige
Anzeige für Festplattenaktivität
DEUTSCH
Akkuanzeige
Anhand der Akkuanzeige können Sie erkennen, ob der Lithium-Ionen-Akku gerade geladen wird
oder ob er bereits voll geladen ist.
ESPAÑOL
• Während des Ladevorgangs leuchtet die Akkuanzeige auch dann weiter, wenn Sie das Notebook
ausgeschaltet haben.
• Die Akkuanzeige ist auch dann ausgeschaltet, wenn der Akku nicht aktiv ist, wenn der
Netzadapter nicht angeschlossen ist oder wenn das Notebook ausgeschaltet ist.
• Wenn Akkus Stößen, Vibrationen und extremen Temperaturen ausgesetzt werden, können sie
dauerhaft beschädigt werden.
Num-Lock-Anzeige
Anzeige der Feststelltaste (Caps-Lock)
Betrieb/Suspend-Anzeige
(HDD)
3G/Wireless-LAN-Aktivitäts-LED
Anzeige für Festplattenaktivität (HDD)
ITALIANO
An dieser Anzeige können Sie erkennen, ob und mit welcher Geschwindigkeit das System gerade
auf die Festplatte zugreift.
16
Page 83

ERSTE SCHRITTE
Num-Lock-Anzeige
Diese LED zeigt an, wenn das Zahlenfeld der Tastatur aktiviert ist.
Anzeige der Feststelltaste (Caps-Lock)
An dieser Anzeige können Sie erkennen, ob die Feststelltaste aktiv ist.
3G/Wireless-LAN-Aktivitäts-LED
Die 3G/Wireless-LAN-Aktivitäts-LED zeigt an, ob Ihr Gerät mit einem Drahtlosnetzwerk
verbunden ist.
• Leuchtet sie grün, besteht eine 3G-Verbindung.
• Leuchtet sie orangefarben, besteht eine Wireless-LAN-Verbindung.
• Mit dem 3G/Wireless-LAN-Schalter an der Vorderseite des Notebooks können Sie die Funktion
wechseln.
Betrieb/Suspend-Anzeige
Die LED an der Ein/Aus-Taste leuchtet, wenn das Gerät eingeschaltet ist, und sie blinkt, wenn es
sich im Suspend-Modus befindet.
17
Page 84

ENGLISH
ERSTE SCHRITTE
Die Funktionstasten
Das Notebook verfügt über die 8 Funktionstasten F1 bis F8. Je nach Programm sind die Funktionen,
die diesen Tasten zugewiesen sind, unterschiedlich. In der Software-Dokumentation finden Sie
die Funktionen der jeweiligen Tasten.
Die Taste [FN] bietet dem Notebook zusätzliche Funktionen und wird immer zusammen mit einer
anderen Taste gedrückt.
• [FN+F1]: Versetzt das Notebook in den Suspend-Modus. Durch Drücken der Ein/AusTaste wird das Notebook wieder aktiviert.
• [FN+F2]: Aktiviert bzw. deaktiviert die Drahtlosnetzwerkverbindung.
FRANÇAIS
DEUTSCH
ESPAÑOL
• [FN+F3]: Hier wird festgelegt, auf welchem Gerät das Bild angezeigt werden soll. Bei jedem
Drücken dieser Tastenkombination wird die nächste Option angezeigt. Die Reihenfolge ist:
nur eingebauter Monitor, eingebauter Monitor und externer Monitor, nur externer Monitor.
• [FN+F4]: Verringert die Helligkeit des Bildschirms.
• [FN+F5]: Erhöht die Helligkeit des Bildschirms.
• [FN+F6]: Stellt den Ton des Computers aus.
• [FN+F7]: Verringert die Lautstärke des Computers.
• [FN+F8]: Erhöht die Lautstärke des Computers.
ITALIANO
18
Page 85

ERSTE SCHRITTE
Benutzen des TouchPads
Das TouchPad ist ein Zeigegerät, das in das Notebook integriert ist. Es kann zur Steuerung der
Cursorbewegungen auf dem Bildschirm verwendet.
Das TouchPad besteht aus einer Cursorsteuerung, einer linken und einer rechten Maustaste. Die
Cursorsteuerung kann wie eine Maus den Cursor über den Bildschirm steuern. Sie müssen dazu
die Fläche nur ganz leicht mit den Fingerspitzen berühren. Die linke und rechte Taste haben die
gleiche Funktion wie Maustasten.
Klicken
Klicken bedeutet ein kurzes Drücken und wieder Loslassen einer Taste. Bei einem Linksklick
bewegen Sie den Cursor auf das Element, das Sie auswählen möchten, und drücken dann kurz auf
die linke Taste. Bei einem Rechtsklick bewegen Sie den Cursor auf das Element, das Sie auswählen
möchten, und drücken dann kurz auf die rechte Taste. Sie können auch klicken, indem Sie einmal
kurz das TouchPad berühren.
Doppelklicken
Beim Doppelklicken klicken Sie zweimal schnell hintereinander die linke Taste an. Der Doppelklick
funktioniert nur bei der linken Taste. Bei einem Doppelklick bewegen Sie den Cursor auf das
Element, das Sie auswählen möchten, und drücken dann kurz zweimal auf die linke Taste. Sie
können auch doppelklicken, indem Sie zweimal kurz das TouchPad berühren.
Verschieben
Beim Verschieben halten Sie die linke Taste gedrückt während der Cursor verschoben wird.
Schieben Sie zunächst den Cursor auf das Element, das verschoben werden soll. Drücken Sie dann
auf die linke Taste und halten diese gedrückt. Verschieben Sie dabei das Element an die neue
Position und lassen dann die Taste los. Auch mit Hilfe des TouchPads können Sie ein Element
verschieben. Schieben Sie den Cursor auf das Element, das verschoben werden soll. Berühren Sie
dann zweimal schnell hintereinander mit dem Finger das TouchPad. Nach dem zweiten Berühren
muss der Finger auf dem Pad liegen bleiben. Verschieben Sie dann das Element an die neue Position,
indem Sie den Finger über das TouchPad schieben. Nehmen Sie dann den Finger hoch, um das
Element loszulassen.
19
Page 86

ENGLISH
FEHLERBEHEBUNG
Das Notebook ist sehr robust und sollte in dieser Hinsicht keinen Anlass zu Beschwerden geben.
Es ist jedoch möglich, dass einfache Installations- und Betriebsprobleme auftreten, die Sie auf der
Stelle beheben können. Es kann auch Probleme mit Peripheriegeräten geben, die behoben werden
können, indem Sie das entsprechende Gerät austauschen. Die Informationen dieses Abschnitts
sollen Ihnen dabei helfen, die einfachen Probleme von den schwerwiegenden Fehlern zu
unterscheiden und selbst zu lösen.
Identifizieren eines Problems
Wenn Sie auf ein Problem stoßen sollten, führen Sie vor einer komplexen Fehlerbehebung zunächst
FRANÇAIS
DEUTSCH
die folgenden Schritte aus:
1. Schalten Sie das Notebook aus.
2. Stellen Sie sicher, dass der AC-Netzadapter angeschlossen und dieser mit einer funktionierenden
Netzsteckdose verbunden ist.
3. Stellen Sie sicher, dass alle an die externen Anschlüsse angeschlossenen Geräte richtig
angeschlossen wurden. Sie können auch diese Geräte abtrennen, und so weitere mögliche
Fehlerquellen ausschließen.
4. Schalten Sie das Notebook an. Es sollte nach dem Ausschalten mindestens 10 Sekunden lang
ausgeschaltet bleiben, ehe Sie es wieder anschalten.
5. Lassen Sie das Notebook den Bootvorgang ausführen.
6. Wenn das Problem weiterhin besteht, wenden Sie sich an den technischen Kundendienst.
Halten Sie für den Anruf die folgenden Daten zur Verfügung, so dass der Kundendienst Ihnen
schnellstmöglich helfen kann:
• Produktname
• Konfigurationsnummer des Produkts
ESPAÑOL
ITALIANO
• Seriennummer des Produkts
• Kaufdatum
• Bedingungen, bei denen das Problem aufgetreten ist
• Alle Fehlermeldungen, die angezeigt wurden
• Hardwarekonfiguration
• Art der angeschlossenen Geräte, falls zutreffend
Die Konfigurations- und Seriennummer des Geräts finden Sie auf dem Konfigurationsetikett, das
sich auf der Unterseite des Notebooks befindet.
20
Page 87

Urheberrechtlich geschützte Technologien
Dieses Produkt enthält urheberrechtlich geschützte Technologien. Sie sind geschützt durch USamerikanische Patente und andere Rechte an intellektuellem Eigentum. Die Verwendung dieser
urheberrechtlich geschützten Technologie muss von Macrovision genehmigt sein, und sie darf nur
für private und andere begrenzte Vorführzwecke verwendet werden. Die Verwendung für andere
Zwecke bedarf der Genehmigung von Macrovision. Reverse Engineering und Disassemblieren ist
untersagt.
21
Page 88

MEMO
Page 89

MANUAL DEL USUARIO
ESPAÑOL
Diciembre 2008
Page 90

ENGLISH
CONTENIDO
ANTES DE COMENZAR .......................................................................................... 5
Asegúrese de tenerlo todo ............................................................................................ 5
Familiarícese con el ordenador ..................................................................................... 6
ABRIR LA PANTALLA .................................................................................................. 6
VISTA PREVIA FRONTAL ............................................................................................ 7
VISTA PREVIA DEL LATERAL IZQUIERDO ................................................................ 9
VISTA PREVIA DEL LATERAL DERECHO ................................................................ 10
VISTA PREVIA POSTERIOR ...................................................................................... 11
FRANÇAIS
DEUTSCH
VISTA PREVIA INFERIOR ......................................................................................... 12
PRIMEROS PASOS .............................................................................................. 13
Fuentes de alimentación .............................................................................................. 13
CONECTAR LOS ADAPTADORES DE ALIMENTACIÓN .......................................... 13
AHORRO DE BATERÍA ............................................................................................. 13
CARGAR LA BATERÍA ............................................................................................... 14
Iniciar su portátil ........................................................................................................... 15
ENCENDER ............................................................................................................. 15
Indicadores de estado ............................................................................................. 16
Usar las teclas de función ....................................................................................... 18
Usar el TouchPad..................................................................................................... 19
SOLUCIÓN DE PROBLEMAS .............................................................................. 20
Identificar el problema ................................................................................................. 20
ESPAÑOL
ITALIANO
2
Page 91

CUIDADOS DE SU PC PORTÁTIL
Para evitar el posible calentamiento del procesador
del ordenador, asegúrese de no bloquear las
aperturas de ventilación.
NO lo coloque en superficies desiguales o
inestables.
NO coloque o deje caer objetos sobre el ordenador
y NO ejerza una presión fuerte sobre él.
NO presione ni toque la pantalla.
NO utilice su ordenador portátil en condiciones
adversas.
NO exponga el ordenador a campos magnéticos.
NO lo exponga a la luz directa del sol. NO lo utilice ni lo almacene a temperaturas
extremas.
3
Page 92

ENGLISH
Evite cambios bruscos de temperatura o humedad
manteniéndolo alejado del aire acondicionado y
calefactores.
FRANÇAIS
NO lo coloque cerca del fuego u otras fuentes de
calor.
DEUTSCH
NO lo exponga al polvo y/o a químicos
corrosivos.
ESPAÑOL
NO exponga el ordenador a la lluvia o a la
humedad.
NO manipule las baterías. Manténgalas fuera del
alcance de los niños.
NO cierre de golpe el portátil y nunca levante o
sostenga el portátil por la pantalla.
ITALIANO
NO pulverice agua u otros fluidos de limpieza
directamente sobre la pantalla.
4
Si viaja con el ordenador, recuerde llevarlo como
equipaje de mano. No lo facture como equipaje.
Page 93

ANTES DE COMENZAR
Asegúrese de tenerlo todo
Cuando reciba su PC portátil, retire el embalaje con cuidado y compruebe si tiene todos los
artículos listados a continuación. Para un modelo preconfigurado debería tener lo siguiente:
• Ordenador portátil
• Batería de litio
• Adaptador de CA con cable de alimentación
• CD del controlador y aplicaciones
• Guía de inicio rápido o Guía del usuario
Dependiendo de la configuración de su portátil, puede que también necesite estos artículos:
• CD de aplicación para DVD / CD-RW Combo
• CD de aplicación para DVD+/- RW Dual
• CD de Aplicación Super Multi DVD RW
Tras haber comprobado y confirmado que el sistema de su portátil está al completo, lea las
siguientes páginas para conocer más todos los componentes de su portátil.
Dependiendo del modelo comprado, la apariencia real de su portátil puede ser
distinta a la mostrada en este manual.
5
Page 94

ENGLISH
ANTES DE COMENZAR
Familiarícese con el ordenador
ABRIR LA PANTALLA
Para abrir la pantalla, simplemente levante la tapa.
Cuando la cierre, asegúrese de no golpearla bruscamente.
FRANÇAIS
DEUTSCH
ESPAÑOL
ITALIANO
6
Page 95

VISTA PREVIA FRONTAL
Esta es una vista previa de la parte frontal del portátil.
Micrófono
ANTES DE COMENZAR
Cámara
Pantalla
Luces indicadoras
de estado
Dispositivo
puntero
TouchPad
Switch 3G/LAN Inalámbrica
Botón suspender/
encender
Teclado
Luces indicadoras
de estado
Micrófono
El micrófono incorporado permite la recepción y transmisión en estéreo de la voz y/u otros datos
de audio en el portátil.
Cámara
La cámara incorporada de 3,0 mega píxeles le permite tomar fotos o chatear y hacer videoconferencia
con sólo un clic.
Pantalla
La pantalla es una pantalla LCD de color con luz de fondo para la visualización de texto y gráficos.
Botón suspender/encender
Este botón enciende y apaga su portátil o lo deja en estado de suspensión. (Ver Botón suspender/
encender en la sección Encender para más información).
7
Page 96

ENGLISH
ANTES DE COMENZAR
Teclado
El teclado viene con 84 teclas, incluyendo las teclas dedicadas de Windows®.
Luces indicadoras de estado
Las luces indicadoras de estado corresponden a modos de operación específicos. Estos modos
son: Estado Encendido/Suspensión, estado Batería/Adaptador AC, actividad del disco duro (HDD),
Bloqueo numérico, Bloqueo mayúsculas y actividad de 3G/LAN inalámbrica.
Switch 3G/LAN Inalámbrica
El switch 3G/LAN inalámbrica le permite cambiar su conexión inalámbrica entre 3G y LAN
inalámbrica. Active el interruptor a la izquierda para la conexión 3G y hacia la derecha para activar
LAN inalámbrica.
FRANÇAIS
DEUTSCH
ESPAÑOL
Dispositivo puntero TouchPad
El dispositivo puntero TouchPad es un control de cursor como un ratón con dos botones y una
plataforma táctil sensible al movimiento.
ITALIANO
8
Page 97

ANTES DE COMENZAR
VISTA PREVIA DEL LATERAL IZQUIERDO
A continuación se presenta una breve descripción del lateral izquierdo del portátil.
Puerto del adaptador de
alimentación
Puerto para monitor externo Puerto USB
Puerto LAN (RJ-45)
Puerto del adaptador de alimentación
El puerto del adaptador de alimentación le permite conectar un adaptador CA para alimentar su
portátil y cargar la batería interna de litio.
Puerto para monitor externo
El puerto para monitor externo le permite conectar un monitor externo.
Puerto LAN (RJ-45)
El puerto LAN esta disenado para soportar un enchufe RJ-45 estandar Base-TX de 10/100.
Puerto USB
El puerto USB le permite conectar un dispositivo Bus Serie Universal (USB). Soporta la v2.0 del
estándar USB, que le permite tasas de intercambio de datos de hasta 480 Mb/s.
9
Page 98

ENGLISH
ANTES DE COMENZAR
VISTA PREVIA DEL LATERAL DERECHO
A continuación se presenta una breve descripción del lateral derecho del portátil.
Clavija de auriculares Lector de tarjetas de memoria
Puertos USBClavija de micrófono Ranura de bloqueo Kensington
FRANÇAIS
Clavija de micrófono
La clavija de micrófono le permite conectar un micrófono mono externo.
DEUTSCH
Clavija de auriculares
La clavija de auriculares le permite conectar auriculares o altavoces externos y amplificadores.
Puertos USB
Los puertos USB le permiten conectar dispositivos de Bus Serie Universal (USB). Soportan la
v2.0 del estandar USB, que le permite tasas de intercambio de datos de hasta 480 Mb/s.
Lector de tarjetas de memoria
ESPAÑOL
ITALIANO
El lector de tarjetas de memoria ofrece el método más rápido y cómodo para transferir imágenes,
música y datos entre su portátil y dispositivos compatibles con flash como cámaras digitales,
reproductores MP3, teléfonos móviles y PDAs.
10
Page 99

ANTES DE COMENZAR
Ranura de bloqueo Kensington
La ranura de bloqueo Kensington le permite fijar su portátil a un objeto fijo a traves de un cable de
seguridad opcional
VISTA PREVIA POSTERIOR
Esta es una vista previa de la parte posterior del portátil.
11
Page 100

ENGLISH
ANTES DE COMENZAR
VISTA PREVIA INFERIOR
Esta es una vista previa de la parte inferior del portátil.
Tapa del
compartimiento
Bahia de bateria de litio
Etiqueta de
clasificacion
FRANÇAIS
DEUTSCH
Bahia de bateria de litio
La bahia de la bateria de litio contiene la bateria de litio interna. Se puede abrir para quitar la bateria
y guardarla durante mucho tiempo o para cambiar una bateria gastada por una bateria de litio
cargada.
Salida del ventilador
ESPAÑOL
Es un puerto abierto para que el ventilador disipe el calor de los componentes internos del
ordenador. No bloquee ni coloque el ordenador en una posición en que se pueda bloquear la salida.
Altavoces estéreo
Los altavoces duales incorporados permiten un sonido estéreo.
Salida del
ventilador
Altavoces estéreo
Etiqueta de clasificacion
La etiqueta muestra el numero de modelo y otra informacion acerca de su portatil.
ITALIANO
Tapa del compartimiento
El compartimiento del módulo 3G contiene el módulo 3G. (No disponible en todas las
configuraciones).
12
 Loading...