

Page 1

PROLINK HSDPA Modem PC Manager User Guide
CONTENTS
The main window..............................................................................3
Data Link........................................................................................... 4
Establishing a data link .....................................................................................................4
Disconnect a data link.......................................................................................................4
Profiles (Dialup Configuration).........................................................5
Add a dialup Configuration...............................................................................................5
Set AS Default...................................................................................................................5
Modify a dialup configuration ..........................................................................................5
Delete a dialup configuration............................................................................................5
Restore ..............................................................................................................................5
Internet (Data Flow)..........................................................................6
SMS ................................................................................................... 6
Read New SMS.................................................................................................................7
Edit and send SMS............................................................................................................8
Reply SMS........................................................................................................................8
Forward SMS....................................................................................................................9
Re-send SMS.....................................................................................................................9
Delete / Delete All.............................................................................................................9
Contacts...........................................................................................9
Add a new contact...........................................................................................................10
Modify a contact .............................................................................................................10
Send a message to contact...............................................................................................10
Delete..............................................................................................................................11
Options............................................................................................ 11
Auto Launch on Startup..................................................................................................11
Auto Minimized..............................................................................................................12
Link Auto Reactivation ...................................................................................................12
Prompt Before Exit .........................................................................................................12
USIM Card Preferred......................................................................................................12
Local Preferred................................................................................................................12
Options for SMS .............................................................................................................13
1. Change the number of SMS service center.................................................................13
2. Change SMS Routing..................................................................................................13
3. Validity period of sending SMS ..................................................................................13
Network Options.............................................................................................................14
1. Choose the Frequency Band........................................................................................14
2. Select the Network......................................................................................................14
Security Options..............................................................................................................15
1. Enable / Disable PIN1.................................................................................................15
2. Change PIN1...............................................................................................................15
3. Unlock PIN1 ...............................................................................................................15
Sound Options .................................................................................................................16
Notifying sound for SMS................................................................................................16
Flow Warning..................................................................................................................16
1. display.........................................................................................................................16
2. Flow Warning..............................................................................................................16
USSD ..............................................................................................................................17
Version.............................................................................................17
1
Page 2

Help Topics .....................................................................................17
Safety Indication .............................................................................17
FQA & Answ ers ..............................................................................18
Why the PROLINK HSDPA Modem PC Manager always displays "Can not find port..."
................................................................................................................................................18
Why the PROLINK HSDPA Modem PC Manager displays "No USIM Card"..............18
Why the PROLINK HSDPA Modem PC Manager displays "No Service".....................18
Failed to send a SMS ......................................................................................................19
Failed to connect internet................................................................................................19
Appendix.........................................................................................20
Light Indications of data card .........................................................................................20
2
Page 3
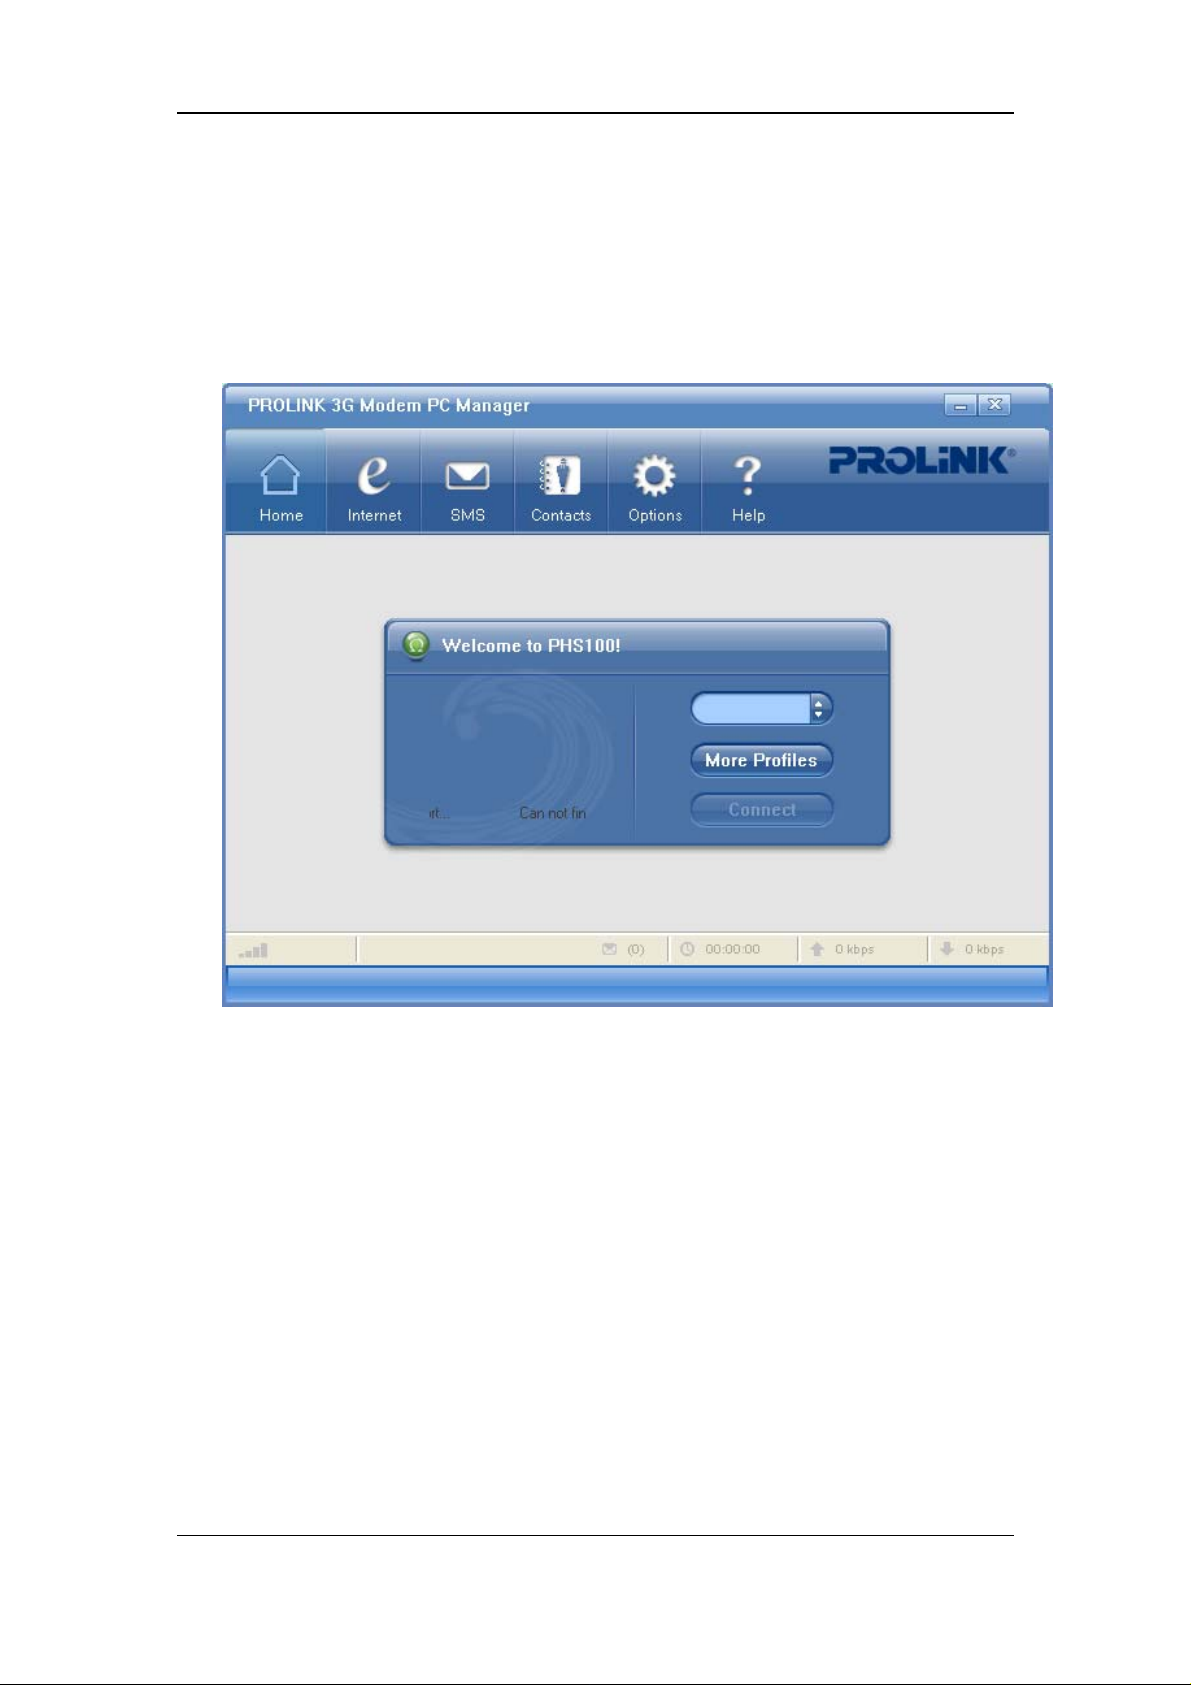
The main window
Here’s the main window of data card’s PROLINK HSDPA Modem PC Manager:
The display of data card’s status, where items included are status bar, carrier’s logo, network in
use, number of unread messages, network connecting time and forward/reverse rate. If there’s no
USIM card inserted, a message “No USIM Card!” shows.
Main menu, including Home, Internet, SMS, Contacts, Options, Help. Make proper
configuration to functions and the data card.
3
Page 4
Data Link
You can establish a dialup data link over GSM/WCDMA via the data card.
The dialup data link requires the coverage of GSM, GPRS, EDGE or WCDMA. In each of
the link, the data card will be connected to a specific phone number.
The data card support HSDPA up to 3.6 Mbps and WCDMA 384kbps.
Establishing a data link
1) Select More Profiles,
2) Choose a profile in the list, and then click on “Set As Default”,
3) Click on the button “Connect”, to establish a data link.
Disconnect a data link
To disconnect, Click on the button “Disconnect”.
4
Page 5

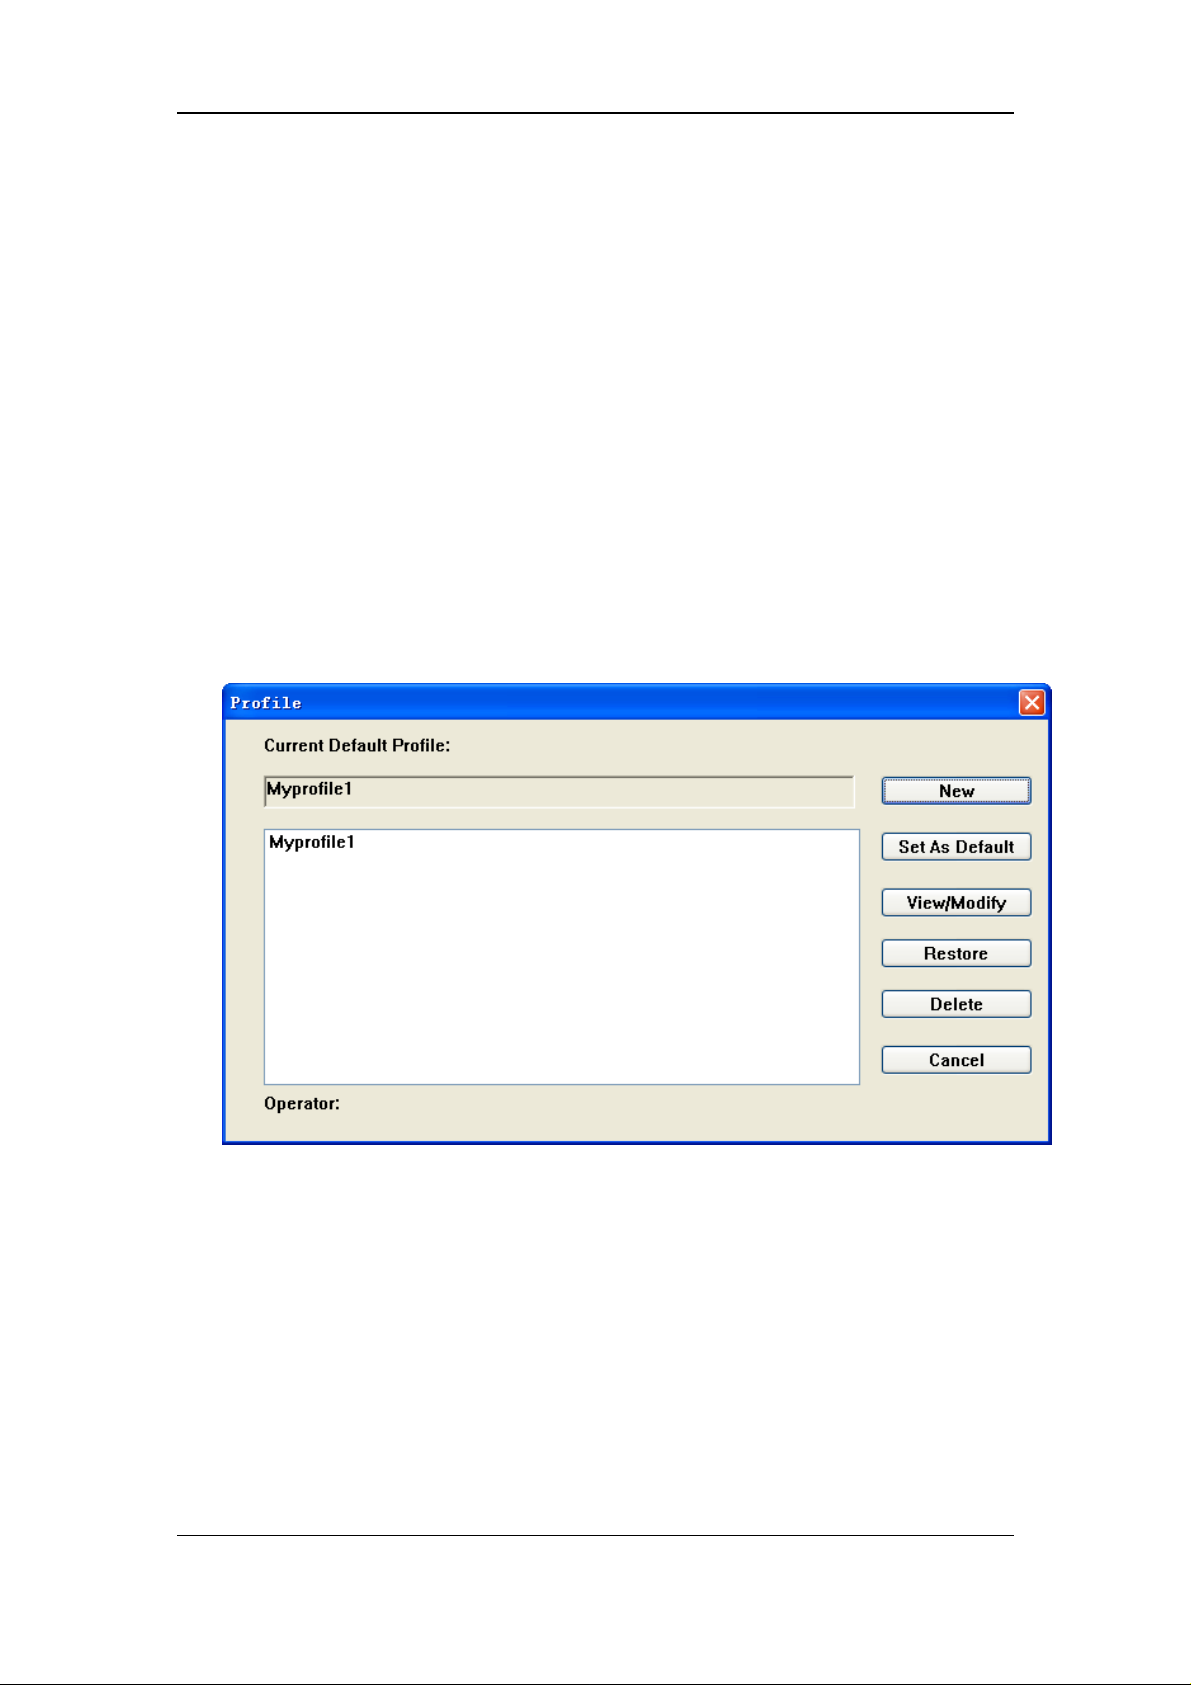
Profiles (Dialup Configuration)
Add a dialup Configuration
1) Select "Home-->More Profiles";
2) Select "New", enter the Profile Name and choose a Network in the popup window; setup
for the dialup in the advanced options; click on "Finish" to save and close the window;
Each profile depends on the setup settings of the carriers. For example, China Mobile's GPRS
only requires to set the dialup number as *98#, APN "CMNET".
If the settings of CSD, DNS, PPP and TCP/IP are needed, click on "Advanced Settings" and
make proper selections. After completing, click on "OK" to save and close the window. Refer to
Windows' network properties for these settings.
Set AS Default
1) Select "Home-->More Profiles";
2) Choose a profile in the list, and then click on “Set As Default”.
Modify a dialup configuration
1) Select "Home-->More Profiles";
2) Choose a profile in the list, and then click on “View/Modify”;
3) Make proper modifications;
4) Click on “Finish” to save and close the window.
Delete a dialup configuration
1) Select "Home-->More Profiles";
2) Choose a profile in the list, and then click on “Delete”;
3) In the confirmation box, click on “OK” to proceed.
Restore
1) Select "Home-->More Profiles";
2) Click on “Restore” for initial settings.
5
Page 6
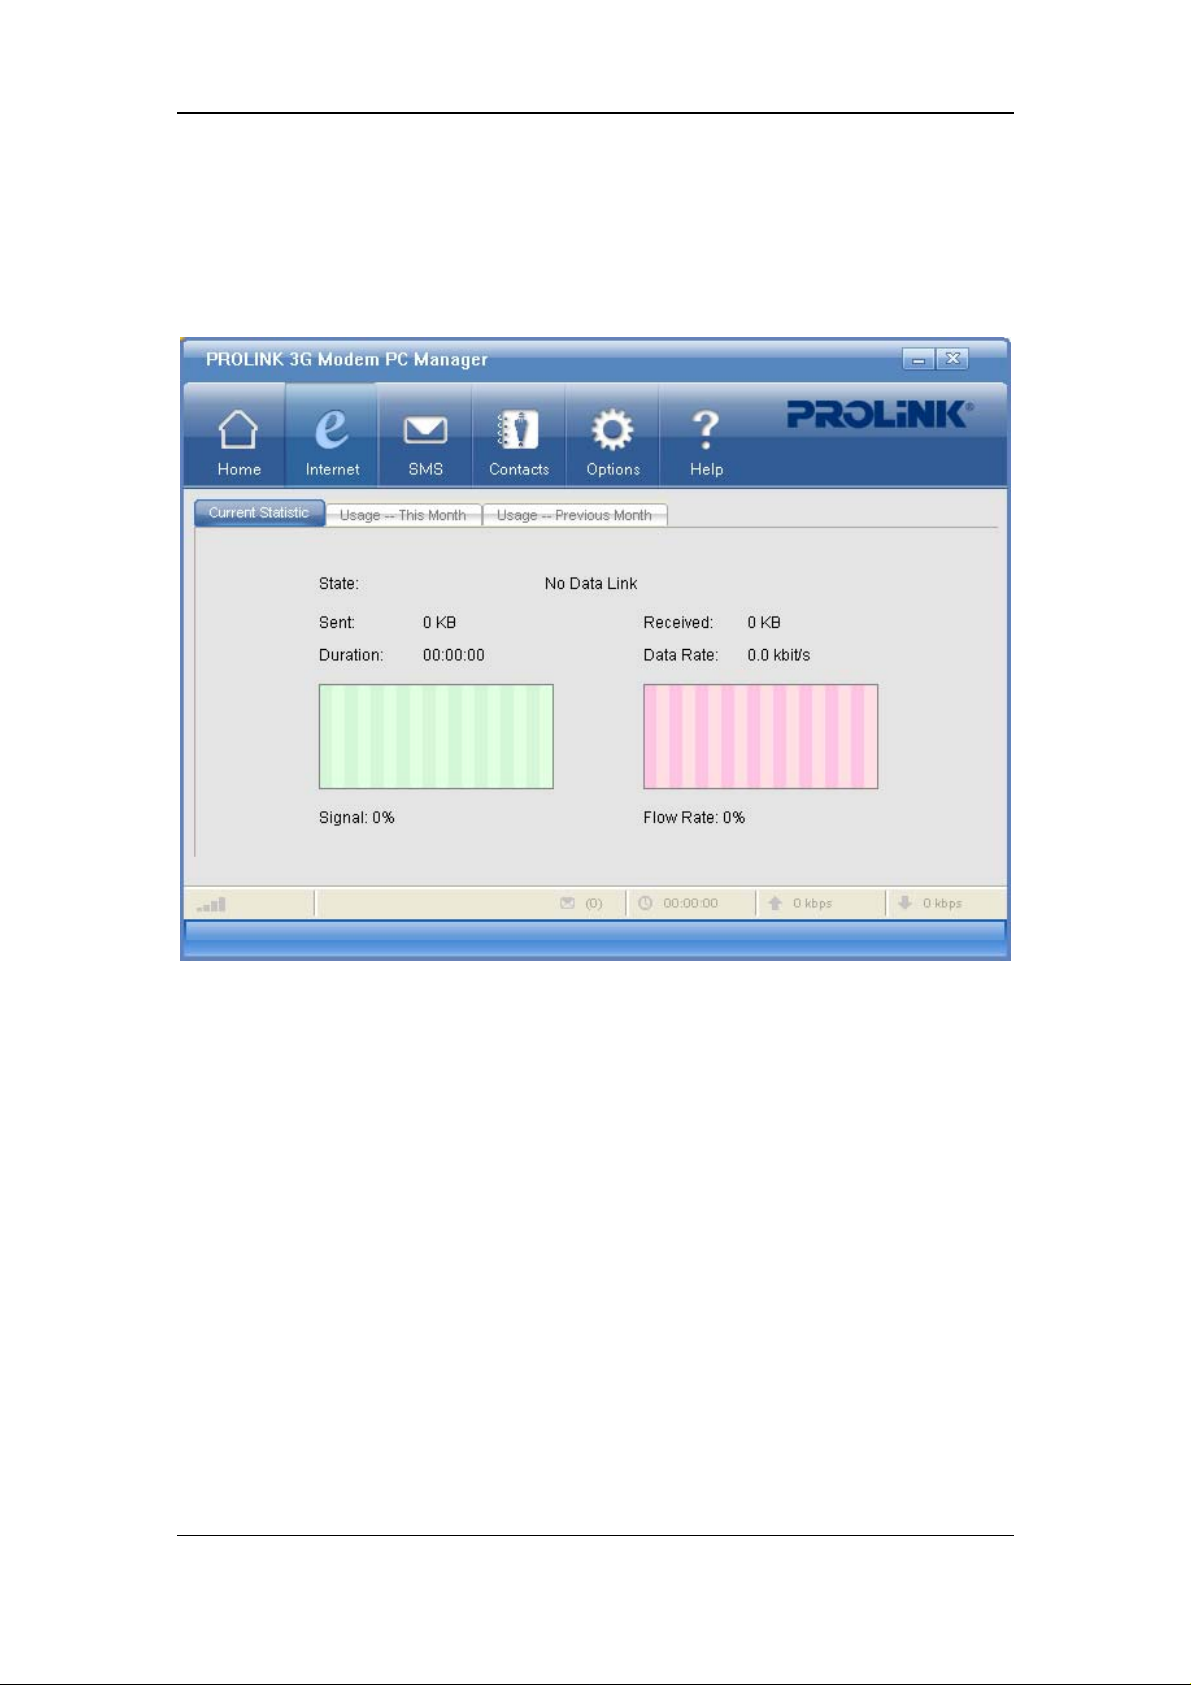
Internet (Data Flow)
To view the data card’s data flow statistics in real time or of current or last month, select
“Internet”.
SMS
SMS, or Short Messaging Service, is a value-added service provided by carriers, which
allows you send and receive short messages. It requires subscription, so contact your service
provider to make sure you are authorized to use SMS.
If you are a subscriber, any other people can send short messages through any ways
supported by your service provider.
When you’re offline, the short messages are stored temporarily on the network. And once you
are connected, they will be sent to your USIM card and you will be notified by PROLINK HSDPA
Modem PC Manager of new messages. If the capacity of SMS is full, you will not be able to
receive any new messages unless you remove some of the old messages. When new messages
6
Page 7

coming as the window is minimized, a message box on the system bar will remind you there are
new incoming messages.
In the SMS window, you may:
y Read,
y Edit and send,
y View the sent,
y Reply or forward,
y Delete SMS.
Read New SMS
1) Select “SMS” to open the “Inbox”;
2) Double-click an unread SMS(
)to view.
- SMS stored in local; - SMS stored in the USIM card.
On the upper right corner shows the total capacity (of both Local and the USIM card) and the
used amount. The total capacity varies with different USIM cards.
Click on "From" or "To" to sort the list by name or phone number; or click on "Time" to sort
list by receiving or sending time.
7
Page 8

Edit and send SMS
1) Select the "SMS" view to open the "Inbox", "Outbox" or "Draft";
2) Click on “New”;
3) Edit your short message and enter the phone number, click on “Send”.
In the SMS editing window,
• Select "Add temp numbers" after editing a phone number, the phone number will be added
into the dropdown list.
• Select the dropdown list to open the phone book and choose a contact.
• Click on “Save” to store the message in the "Draft".
• Click on “Clear” to blank all the editing.
• Click on “Cancel” to revoke and close the window.
Reply SMS
1) Select “SMS” to open the “Inbox”
2) Choose the message and click on “Reply”
8
Page 9

3) Edit your short message, and then click on “Send”.
Forward SMS
1) Select “SMS” to open the “Inbox” or “Outbox”;
2) Choose the message and click on “Forward”;
3) Enter the forwarded phone number or select one from the dropdown list, and then click on
“Send”.
Re-send SMS
1) Select “SMS” to open the “Outbox”;
2) Select the message, and then click on “Retry”.
Delete / Delete All
1) Select the "SMS" view to open the "Inbox" , "Outbox" or "Draft".
";
2) Choose the message(s) and click on “Delete”; Or click on “Delete All” to remove all your
messages;
3) In the confirmation box, click on “OK” to proceed.
Contacts
Select “Contacts”. There are two tabs – Local and USIM.
9
Page 10

• Click on Name or Phone Number to sort either by name or by phone number.
• On the upper right corner shows the tota l capacity and the used amount. For the USIM the
total capacity varies with different USIM cards.
Add a new contact
1) Select “Contacts”;
2) Click on “New”;
3) Enter the name and phone number;
4) Click on “OK” to save.
Modify a contact
1) Select “Contacts”;
2) Choose the contact in the list and click on “Modify”, or double-click the entry;
3) Edit the name and phone number;
4) Click on “OK” to save.
Send a message to contact
1) Select “Contacts”;
10
Page 11

2) Choose the contact and click on “SMS”;
3) Edit your short message, and then click on “Send”.
Delete
1) Select “Contacts”;
2) Choose the contact and click on “Delete” to remove your contact;
3) In the confirmation box, click on “OK” to proceed.
Options
In “Options”, you can set all the necessary features or configure the data card.
Auto Launch on Startup
If selected, PROLINK HSDPA Modem PC Manager will come up and running after
Windows startup. Otherwise, you have to do it manually (either by clicking on a shortcut on the
11
Page 12

desktop or from “Start” menu).
1) In the main window, select “OptionsÆGeneral”;
2) Select the checkbox “Auto Launch on Startup”.
Auto Minimized
If selected, PROLINK HSDPA Modem PC Manager will be minimized. You can check the
current status on the system bar.
1) In the main window, select “OptionsÆGeneral”;
2) Select the checkbox “Auto Minimized”.
Link Auto Reactivation
If selected, PC Manager will try to reactive the internet link disconnected by Out Of Service
when the service recovers.
1) In the main window, select "Options-->General";
2) Select the checkbox "Link Auto Reactivation".
Prompt Before Exit
If selected, PC Manager will prompt a message window before exit.
Note: Closing the PC Manager will cause the data card to power off, this may need some
seconds usually.
1) In the main window, select "Options-->General";
2) Select the checkbox "Prompt Before Exit".
USIM Card Preferred
If selected, short messages will be saved into the USIM card first.
1) In the main window, select “OptionsÆGeneral”;
2) Select the radio button “USIM Card Preferred”.
Local Preferred
If selected, short messages will be saved into the local storage first.
1) In the main window, select “OptionsÆGeneral”;
12
Page 13

2) Select the radio button “Local Preferred”.
Options for SMS
You may:
y Change the SMSC number
y Change the default routing
y Change the valid time of sending SMS
1. Change the number of SMS service center
When a short message is sent, it will be kept in the SMSC until it reaches the receiver. This
number is the SMSC that your messages go to, and it can be obtained from the USIM card.
Change the number only under your service provider’s suggestion.
1) In the main window, select “OptionsÆSMS”;
2) Change the number of “Service Center” per requirement;
3) Click on “Apply” to save.
2. Change SMS Routing
SMS Routing is the preferred domain to send SMS. It will be either “CS preferred”
(default) or “PS preferred”:
1) In the main window, select “OptionsÆSMS”;
2) Select “CS preferred” or “PS preferred” in the dropdown list of “Routing” per
requirement.
3. Validity period of sending SMS
It is the length of time that your messages will be stored for on the network waiting to be sent.
If the receiver cannot receive SMS for disconnection or any other reasons (e.g., the capacity of
SMS is full), your message will be saved on the network for the time you specified here. If the
valid time has past, the messages won’t be sent.
1) In the main window, select “OptionsÆSMS”;
2) Select the time unit in “Unit” dropdown list, and time value in “Value”.
Unit Value
Hours 1 hour, 6 hours, 12 hours
13
Page 14

Days 1 day, 2 days, 4 days, 6 days
Weeks 1 week, 2 weeks, 3 weeks, 4 weeks
Maximum
Network Options
Depending on the region, you may be covered by several networks at the same time. By
default, the data card will choose an availabl e network by your account. You may also choose the
network from the list in PC Manager while your options are up to your account.
1. Choose the Frequency Band
By default, the data card will pick a Frequency Band automatically, unless the carrier has a
special instruction.
1) In the main window, select “OptionsÆNetwork”;
2) Select one in “Frequency Band” dropdown list.
Details of each frequency band (FB):
Item Description
Auto Auto choose the network and bands
2G 850/1900 The data card is only for 2G (GPRS/EDGE) with GSM850 and
2G 1900 The data card is only for 2G (GPRS/EDGE) with GSM1900 band
2G 900/1800 The data card is only for 2G (GPRS/EDGE) with GSM900 and
2G 850 The data card is only for 2G (GPRS/EDGE) with GSM850 band
2G 900 The data card is only for 2G (GPRS/EDGE) with GSM900 band
All GSM The data card is only for 2G (GPRS/EDGE) with all bands
3G 2100 The data card is only for 3G (WCDMA/HSDPA) with
3G 2100
2G 900/1800
3G 850/1900
2G 850/1900
3G 850/1900 The data card is only for 3G (WCDMA/HSDPA) with
GSM1900 bands (mostly in North America)
(mostly in North America)
GSM1900 bands (mostly outside North America)
(mostly in North America)
(mostly in Europe and Asia)
WCDMA2100 band (mostly in Europe, Asia and Australia)
The data card is only for WCDMA2100, GSM900 and GSM1800
bands (mostly outside North America)
The data card is only for WCDMA850, WCDMA1900, GSM850
bands and GSM1900 (mostly in North America)
WCDMA850 and WCDMA1900 bands (mostly in North America)
2. Select the Network
1) In the main window, select “OptionsÆNetwork”;
2) Select “Automatic” or “Manual” in “Network Selection”;
y Automatic – the data card will choose a proper network;
14
Page 15

y Manual – users will pick the network in PC Manager.
Security Options
USIM card is a microchip containing important information which will be used by the
network to identify you ID for available services.
There are two PINs in the card:
y PIN1 is to enable/disable the security function of USIM card, preventing unauthorized
use of your account if the USIM card is lost or stolen.
y PIN2 is to enable/disable Fixed Dialing Numbers, restricting outbound calls with limited
phone numbers.
You have limited times (usually 3) of entering PIN1 or PIN2. If you have incorrect inputs for
more than the limited times, the PIN will be locked up.
1. Enable / Disable PIN1
PIN1 is to prevent unauthorized users from using your USIM card. Once your USIM card has
been protected by activated PIN1, a correct PIN1 must be entered before using the USIM card in a
data card or other devices (such as a mobile phone).
Contact your carrier for PIN1 before you enable this feature.
Once the USIM card activated, PIN1 is required whenever you insert or restart your data
card.
1) In the main window, select “OptionsÆSecurity”;
2) If PIN1 is now disabled, click on “Enable” and enter the PIN1; Or if PIN1 is already
enabled, click on “Disable” and enter the PIN1 to disable the feature.
2. Change PIN1
1) In the main window, select “OptionsÆSecurity”;
2) If PIN1 is now disabled, enable it;
3) Click on “Change”;
4) Enter the old PIN1;
5) Enter the new PIN1;
6) Retype the new PIN1 to confirm;
7) Click on “OK” to save.
3. Unlock PIN1
1) Obtain the PUK1 code from your carrier;
2) Enter the PUK1;
15
Page 16

3) Enter the new PIN1;
4) Retype the new PIN1 to confirm;
5)Confirm the change.
Sound Options
In “Options”, the “Sound” page contains the settings of notifying sound for SMS. And you
can also preview your sound after settings.
Notifying sound for SMS
Pick your favorite music as notifying sound for incoming messages, only the wav format is
supported.
1) In the main window, select “OptionsÆSound”;
2) Choose one in the “Message Ring”, or click on “Select from” to locate a music file in your
PC as your notifying sound.
Flow Wa rning
In “Options”, “Flow Warning” contains settings of displaying contents and mode of flow
statistics and setting of threshold for alert.
1. display
The display of statistics on flow can be set by data or by time:
1) In the main window, select “OptionsÆFlow W arning”;
2) Select the checkbox “Warn when a limit is approaching” to activate;
3) To display by data, select “Data Limits (MB)” and enter the value of data range; or to
display by time, select “Time Limits (Hours)” and enter the value of time range;
4) In the dropdown list “Beginning day of month to calculate flow”, choose the starting date
of the statistics;
5) Click on “Apply” to save.
• To clear all the records of flow statistics, click on “Delete History” and confirm to proceed.
2. Flow Warning
When the data flow or network connection time has reached into some pre-set range, a
notifying message will be popped up to alert.
16
Page 17

1) In the main window, select “OptionsÆFlow W arning”;
2) In the dropdown list “First warning point (%)”, select one for the first-time notification;
3) In the dropdown list “Second warning point (%):, select one for the second-time
notification;
4) Click on “Apply” to save.
USSD
To view USSD, select "Options-->USSD" in the main window.
Your USIM card may contain the USSD function.
1) In the main window, select "Options'USSD";
2) Input the USSD command. For details, please check with your service provider;
3) Click on "Send" to send the USSD command then the USSD message will be displayed.
Version
To view versions, select Options > Version in the main window.
Help Topics
Through Help Topics, you can learn the details of each menu in PROLINK HSDPA Modem PC
Manager for a quick understanding of functions of data card.
To read, select “Help” in the main window.
Safety Indication
Remove the data card
1) Close PROLINK HSDPA Modem PC Manager;
17
Page 18

2) Click on the icon “Remove the hardware safely” on the system bar to stop the data card.
3)Remove the data card
FQA & Answers
If you have the following problems when using the data card, you can try the following
resolutions. If the problem still exists, please contact the data card's technical support.
Why the PROLINK HSDPA Modem PC Manager always displays "Can not find
port..."
1) The data card isn't inserted properly, please reinsert the data card again.
2) The data card driver is not installed or has problems, please check the Windows "Device
Manager", reinsert the data card or reinstall the driver, restart Windows if necessary.
3) On some version Vista system, you may need to turn off the "User Account
Control(UAC)" function. Please select the Windows "Control Panel"/"User
Account"/"Enable/Disable User Account Control" and turn off the function.
4) On some system, you may need to reinstall the drivers after changing the USB port.
Why the PROLINK HSDPA Modem PC Manager displays "No USIM Card"
1) the USIM card isn't inserted properly, such as inserted reverse, please insert the USIM card
correctly again.
2) the USIM card was corrupted or unsupported.
Why the PROLINK HSDPA Modem PC Manager displays "No Service"
1) There's no GSM or WCDMA network coverage or the signal is poor, please change to a
place there's good network coverage or use the USB cord.
2) Sometimes the data card need more time to acquire the network, eg. the network coverage
is complex, please wait a little longer.
18
Page 19

3) The network setting is wrong, such as set to only use the 3G frequency band at a place
where has only 2G network. Refer to the "Network Options".
4) The USIM account is stopped.
Failed to send a SMS
1) The SMS center is wrong, please set a correct SMS center number in the "SMS service
center".
2) Other network reason, such as network is busy, please try later.
Failed to connect internet
1) The USIM account is without data service.
2) The internet profile is not correct, e.g. the APN (Access Point Name) is wrong. Please set a
correct internet profile, refer to the "Profiles (Dialup Configuration)".
3) Windows' error or modem error, please check the error code in modem log.txt, this file is
in the folder where the PROLINK HSDPA Modem PC Manager is installed. For more
information, please refer to the Windows online help.
4) Network error, please check the error code in modem log.txt, this file is in the folder where
the PROLINK HSDPA Modem PC Manager is installed. For more information, please refer
to the Windows online help.
19
Page 20

Appendix
Light Indications of data card
Indicator Meaning
red
Magenta
blue
white
cyan
green
Yellow
Others
Red light keeps
flashing
If a network is not being found after startup, or no USIM card,
or line dropped (disconnected) in session
When GSM is found or attaches to GPRS
When EDGE
When DATA CALL has connected with network
When in receiving SMS
Note: For incoming SMS, it flashes 3 times and goes back to the
original color.
When attaches to HSDPA
When WCDMA is found, and not attaches to HSDPA
The temperature of network interface card is over 60 Celsius degree
20
 Loading...