

Pro-Line Boats PRO-Fusion SC 4×4 Instruction Manual

INSTRUCTION MANUAL
INSTRUCTION MANUAL

Thank you for purchasing Pro-Line’s PRO-Fusion SC 4×4! For Over
35 years, Pro-Line has designed and manufactured the best RC
products in the world. This 1:10 scale 4×4 SC truck has been
1:10 4WD SHORT COURSE TRUCK
READY-TO-BUILD KIT
developed from the ground up for extreme performance, durability,
versatility, and most importantly, fun! Thank you for choosing the
PRO-Fusion SC 4×4 and joining Team Pro-Line in making history!
This assembly manual contains instructions for building your
new PRO-Fusion SC 4×4. Please take your time building the kit
according to the instructions and become familiar with the steps.
Equipment Needed
RADIO
ESC
RECEIVER
550 SIZE OR 1:8 SIZE
MOTOR
PRECAUTIONS
CHARGER RC BODY & PAINT
SHORT COURSE
SERVO
(HORNS INCLUDED)
LIPO BATTERY
2S, 3S, OR 4S
TIRES & WHEELS
SC OR 2.8" MT - 17MM HEX
Precautions
To prevent serious personal injury and/or property damage, operate all remotely
controlled models in a responsible manner as described herein.
Choose the right place to operate your RC model:
• Do not run RC vehicles on public streets or highways
• Do not run RC vehicles near people or animals
• Do not run RC vehicles where noise can disturb others
Inspect your vehicle before operation:
• Make sure that all screws and nuts are properly tightened
• Always use fresh batteries in your radio
• Always test the throttle and steering before setting the vehicle on the ground
After operation of your RC vehicle:
• To prevent a runaway, turn off the vehicle fi rst, then the radio
• Replace any battery that has puffed, has been dented, or has frayed wiring
• Keep your vehicle clean and free of excess dirt and debris
• Immediately after use, do not touch any equipment on the vehicle such as the
• Store your vehicle and battery in a place where a fi re cannot spread
Pro-Line is continually improving our products; consequently, actual
parts included in the PRO-Fusion SC 4×4 kit may appear slightly
different than the images that appear in the manual.
motor or ESC, as they could generate high temperatures and cause burns
Recommended Tools
HEX DRIVERS
1.5MM, 2MM, 2.5MM
SERVO TAPE THREAD LOCK
NUT DRIVERS
5.5MM AND 7MM
INCLUDED TOOLS
WHEEL WRENCH
17MM
HEX KEY
3MM
SIDE CUTTERS
WARNING!
This is NOT a toy and is NOT suitable for children under 14 years of age. This RC
vehicle contains many small parts which are potential choking hazards. Keep all
components out of reach of small children.
HEALTH WARNING!
This product contains chemicals known to the State of California to cause cancer,
birth defects, or other reproductive harm. This RC vehicle is a high performance
radio controlled model and can cause harm or personal injury. All liquids contained
in this RC vehicle are not to be swallowed. Never touch rotating parts as this can
cause injury.
Help & Information
Installation manuals and videos can be found on our website at
www.prolineracing.com/pro-fusion-sc4x4.
If you need any technical assistance or have questions about your PRO-Fusion,
please submit a Support Ticket at support.prolineracing.com.
2 PRO-LINE RACING / PRO-FUSION SC 4×4 / INSTRUCTION MANUAL
HARDWARE USED
BAG A
× 3
18 × 12 × 4 Bearings
× 6
Large Diff Shim
× 6
8 × 1.5 O-Ring
× 6
4.7 × 0.5 O-Ring
× 6
Diff Drive Pin
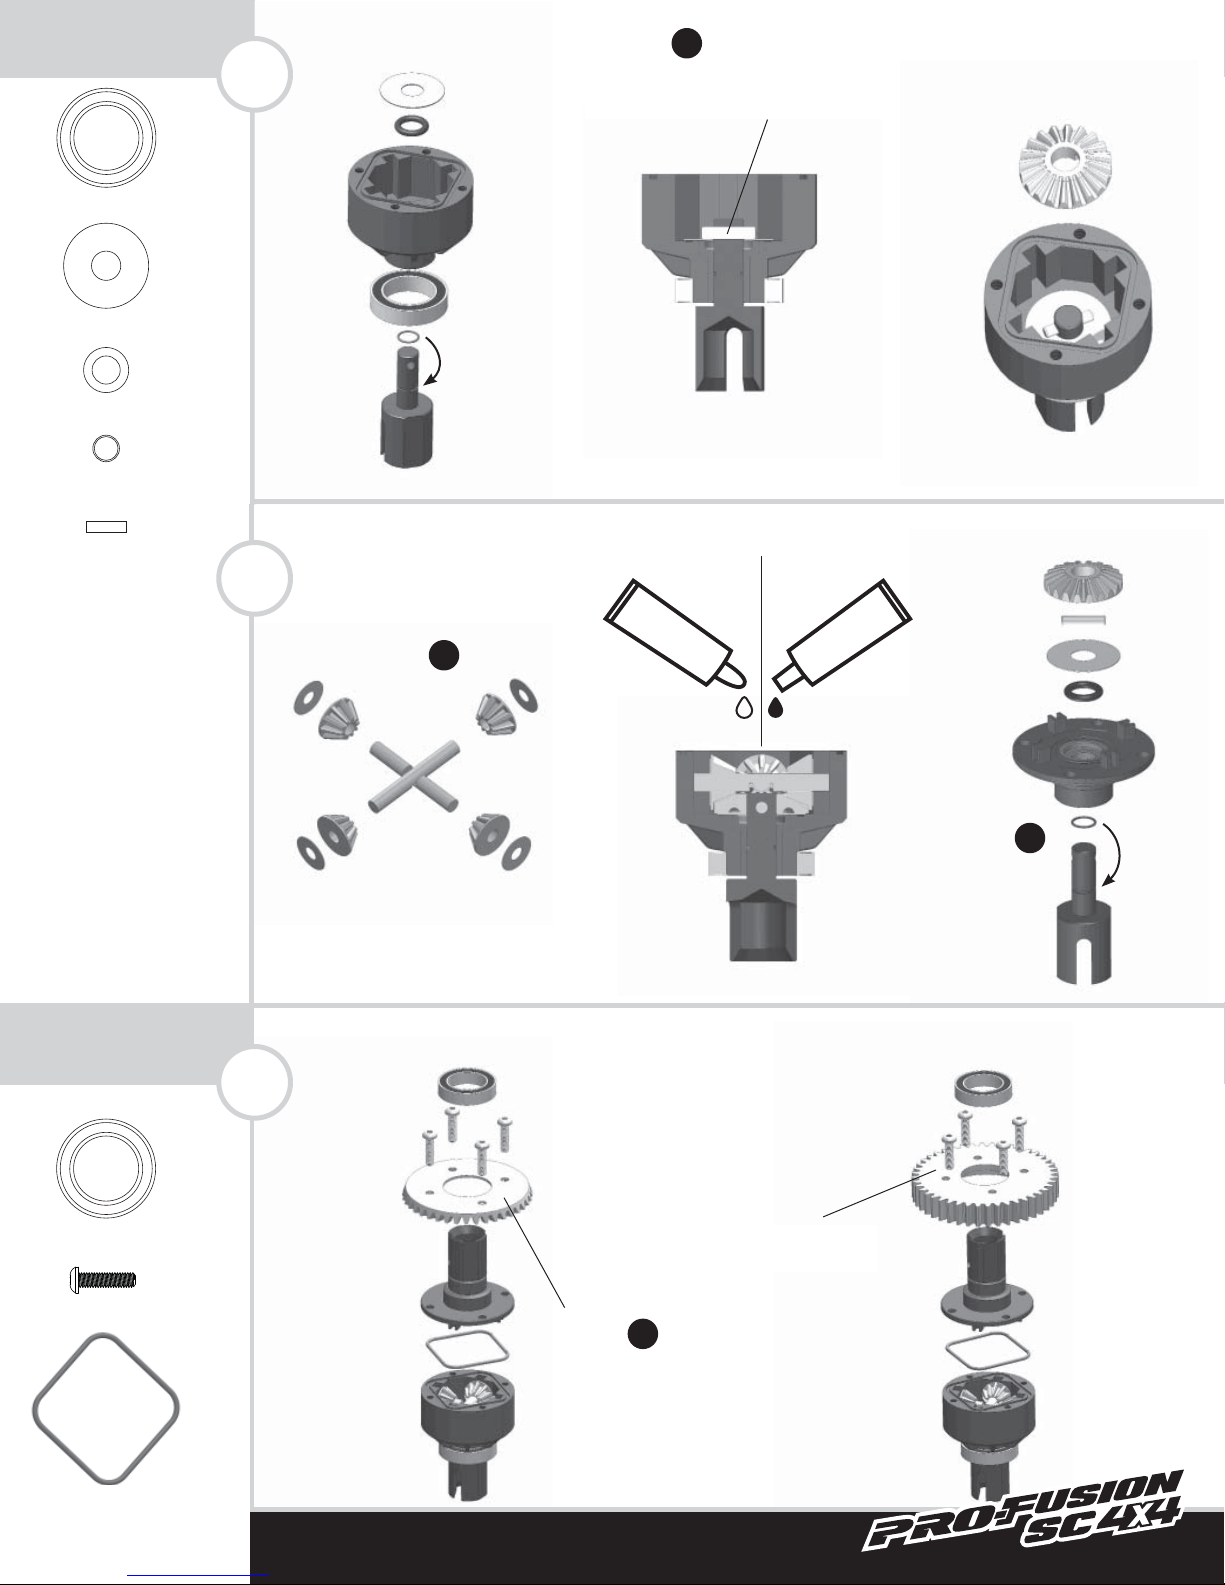
Differential Assembly - Build
BAG A
Differential Assembly
BAG A
× 3
18 × 12 × 4 Bearings
× 12
M2.5 × 10 BHCS
× 3
Diff Seal O-Ring
Differential Assembly
Build
Build
Build
(ACTUAL SIZE)
Differential Assembly - Build
3×
× 3
× 6
× 6
× 6
× 6
18 × 12 × 4 Bearings
Large Diff Shim
8 × 1.5 O-Ring
4.7 × 0.5 O-Ring
Diff Drive Pin
1
2
BAG A
Differential Assembly
BAG A
Build
3×
INSTALL DRIVE PIN
FOR CENTER DIFF
(included)
500,000 WT. OIL
Fill to top of
cross pins. Do
not overfi ll!
FRONT & REAR
DIFFS
(included)
BLACK GREASE
Apply liberally
to gears.
HARDWARE USED
(ACTUAL SIZE)
× 3
× 12
18 × 12 × 4 Bearings
M2.5 × 10 BHCS
3
Differential Assembly
BAG A
FOR CENTER DIFF
Use 44T MOD1 spur gear
Build
FOR FRONT & REAR DIFFS
Use 40T MOD1 Straight Bevel Gear
2×
Build
3×
× 3
Diff Seal O-Ring
3
HARDWARE USED
CHASSIS BAG + BAG A
× 5
M4 × 12 FHCS
× 3
M3 × 10 FHCS
× 3
M3 Locknut
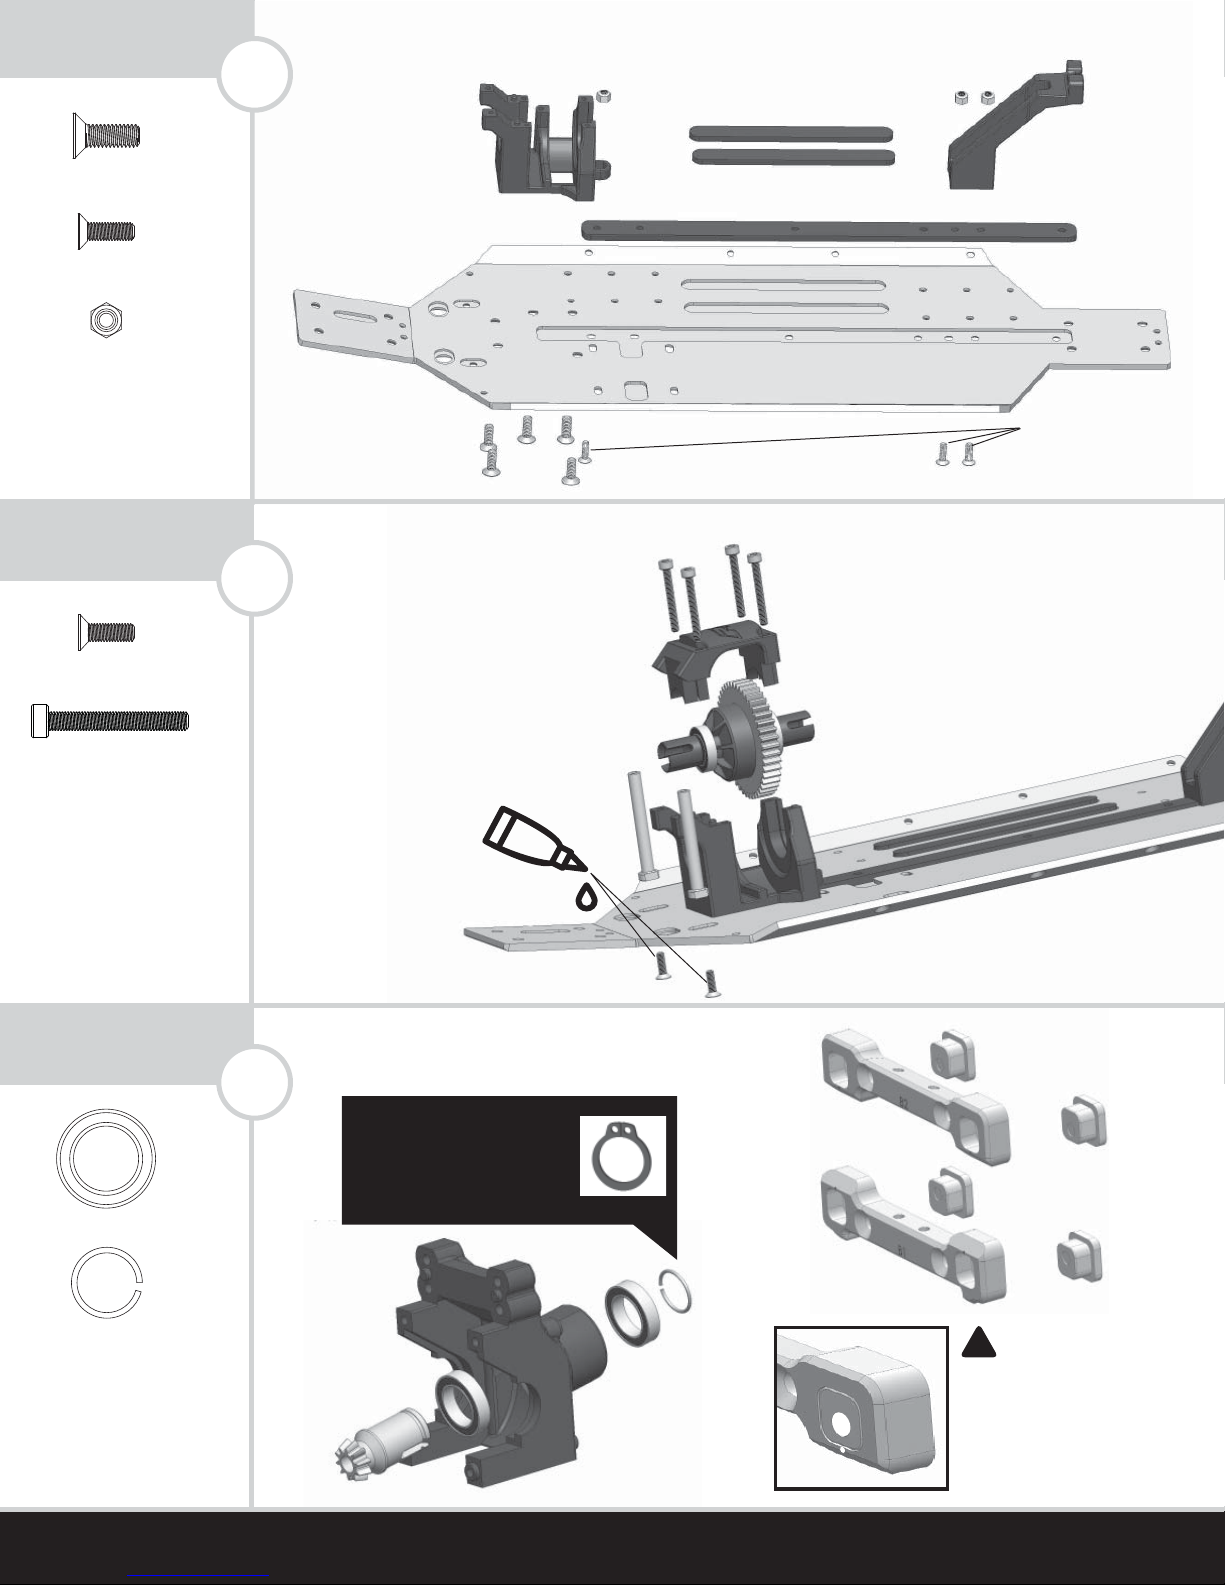
Center Diff Mount, Battery Foam & Chassis Braces
CHASSIS BAG + BAG A
× 2
M3 × 10 FHCS
× 4
M3 × 25 SHCS
× 2
18 × 12 × 4 Bearings
× 1
Diff Gear Clip
Center Diff & Steering Posts
BAG B
Front Diff Case Assembly
(ACTUAL SIZE)
× 5
× 3
× 3
M4 × 12 FHCS
M3 × 10 FHCS
M3 Locknut
4
Center Diff Mount, Battery Foam & Chassis Braces
CHASSIS BAG + BAG A
M4 × 12 FHCS x5
M3 × 10 FHCS x3
HARDWARE USED
(ACTUAL SIZE)
× 2
M3 × 10 FHCS
M3 × 25 SHCS
× 4
HARDWARE USED
(ACTUAL SIZE)
× 2
18 × 12 × 4 Bearings
5
6
Center Diff & Steering Posts
CHASSIS BAG + BAG A
THREAD
LOCK
(not included)
Front Diff Case Assembly
BAG B
PRO TIP
Optional HD outdrive clip
included for use with extreme
power. May require snap ring
pliers (not included) to install.
UPPER: B2
LOWER: B1
× 1
Diff Gear Clip
4 PRO-LINE RACING / PRO-FUSION SC 4×4 / INSTRUCTION MANUAL
NOTE ORIENTATION
!
On all hinge pin inserts, align
the large dot pointing towards
the marking on the mount. This
is the stock setting.
HARDWARE USED
BAG B
× 4
M3 × 14 FHCS
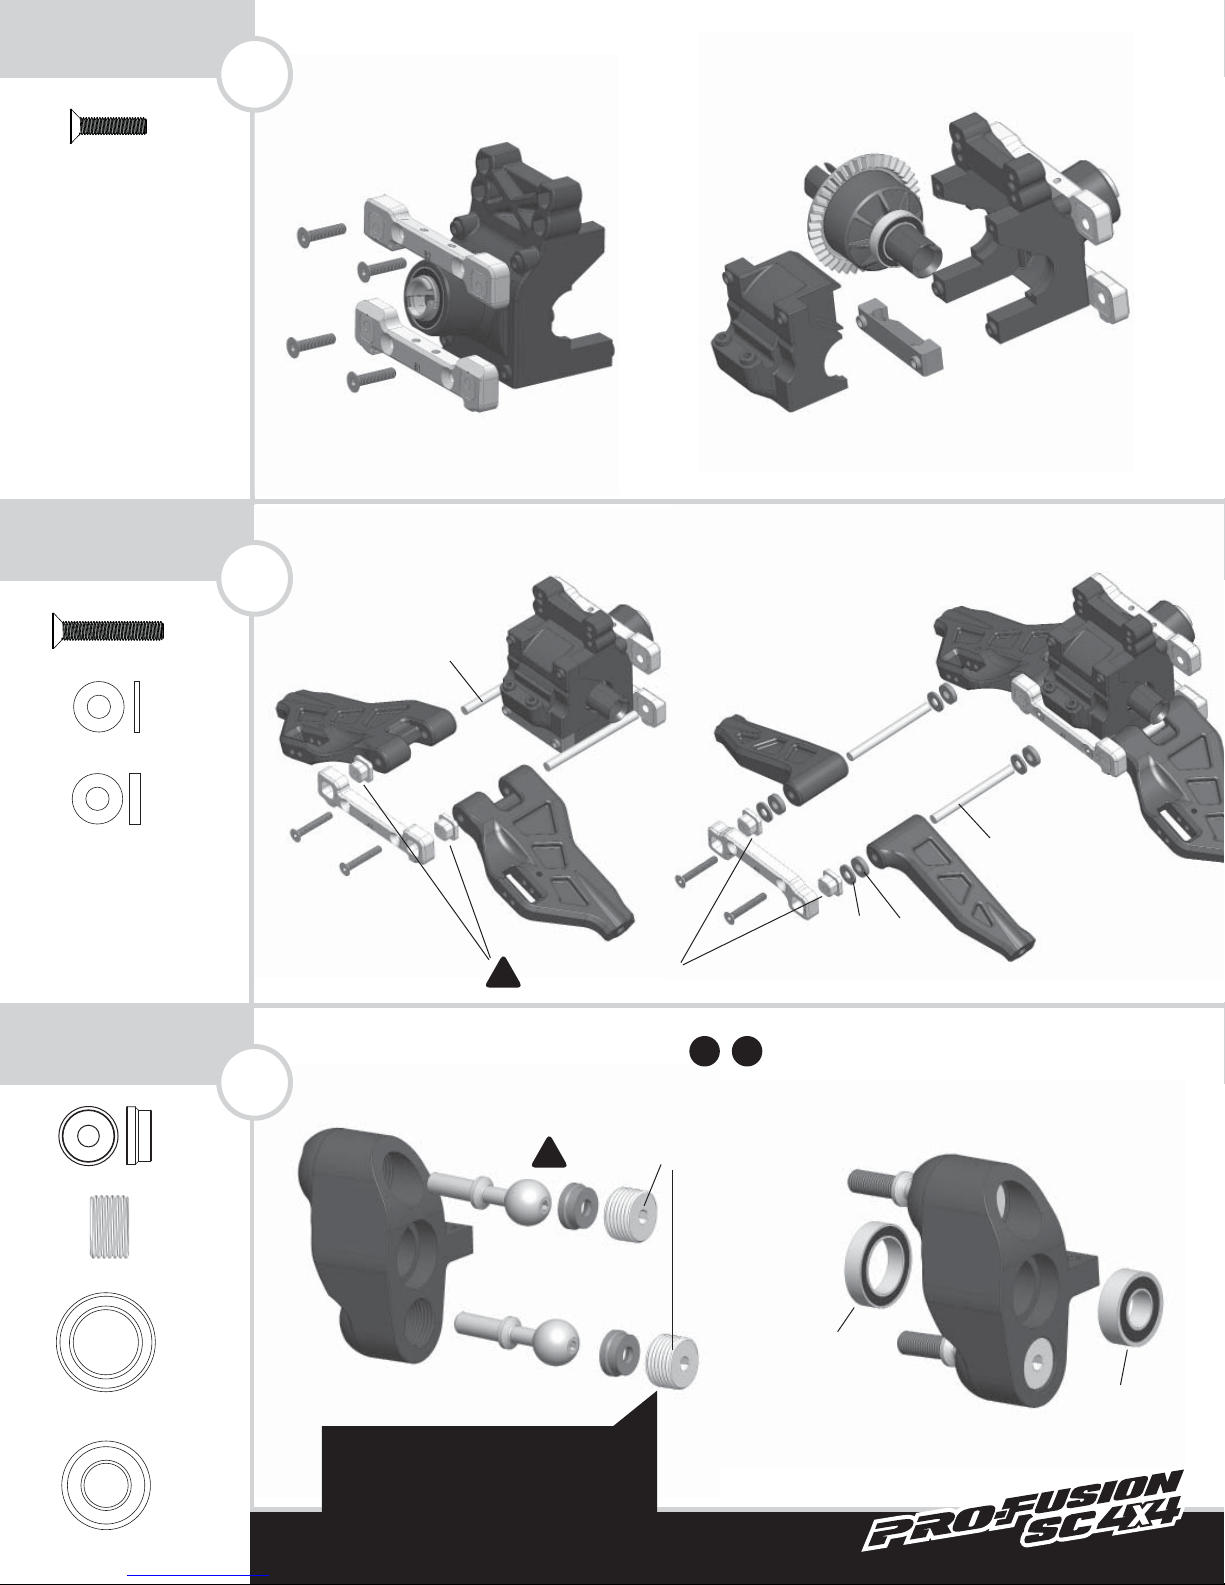
Front Diff Case Assembly
BAG B
× 4
M3 × 20 FHCS
× 4
1mm Shim
× 4
2mm Shim
Front Arms & Hinge Pins
BAG C
× 4
Pivot Ball Inserts
× 4
Pivot Ball Set Screws
× 2
18 × 12 × 4 Bearings
× 2
16 × 8 × 5 Bearings
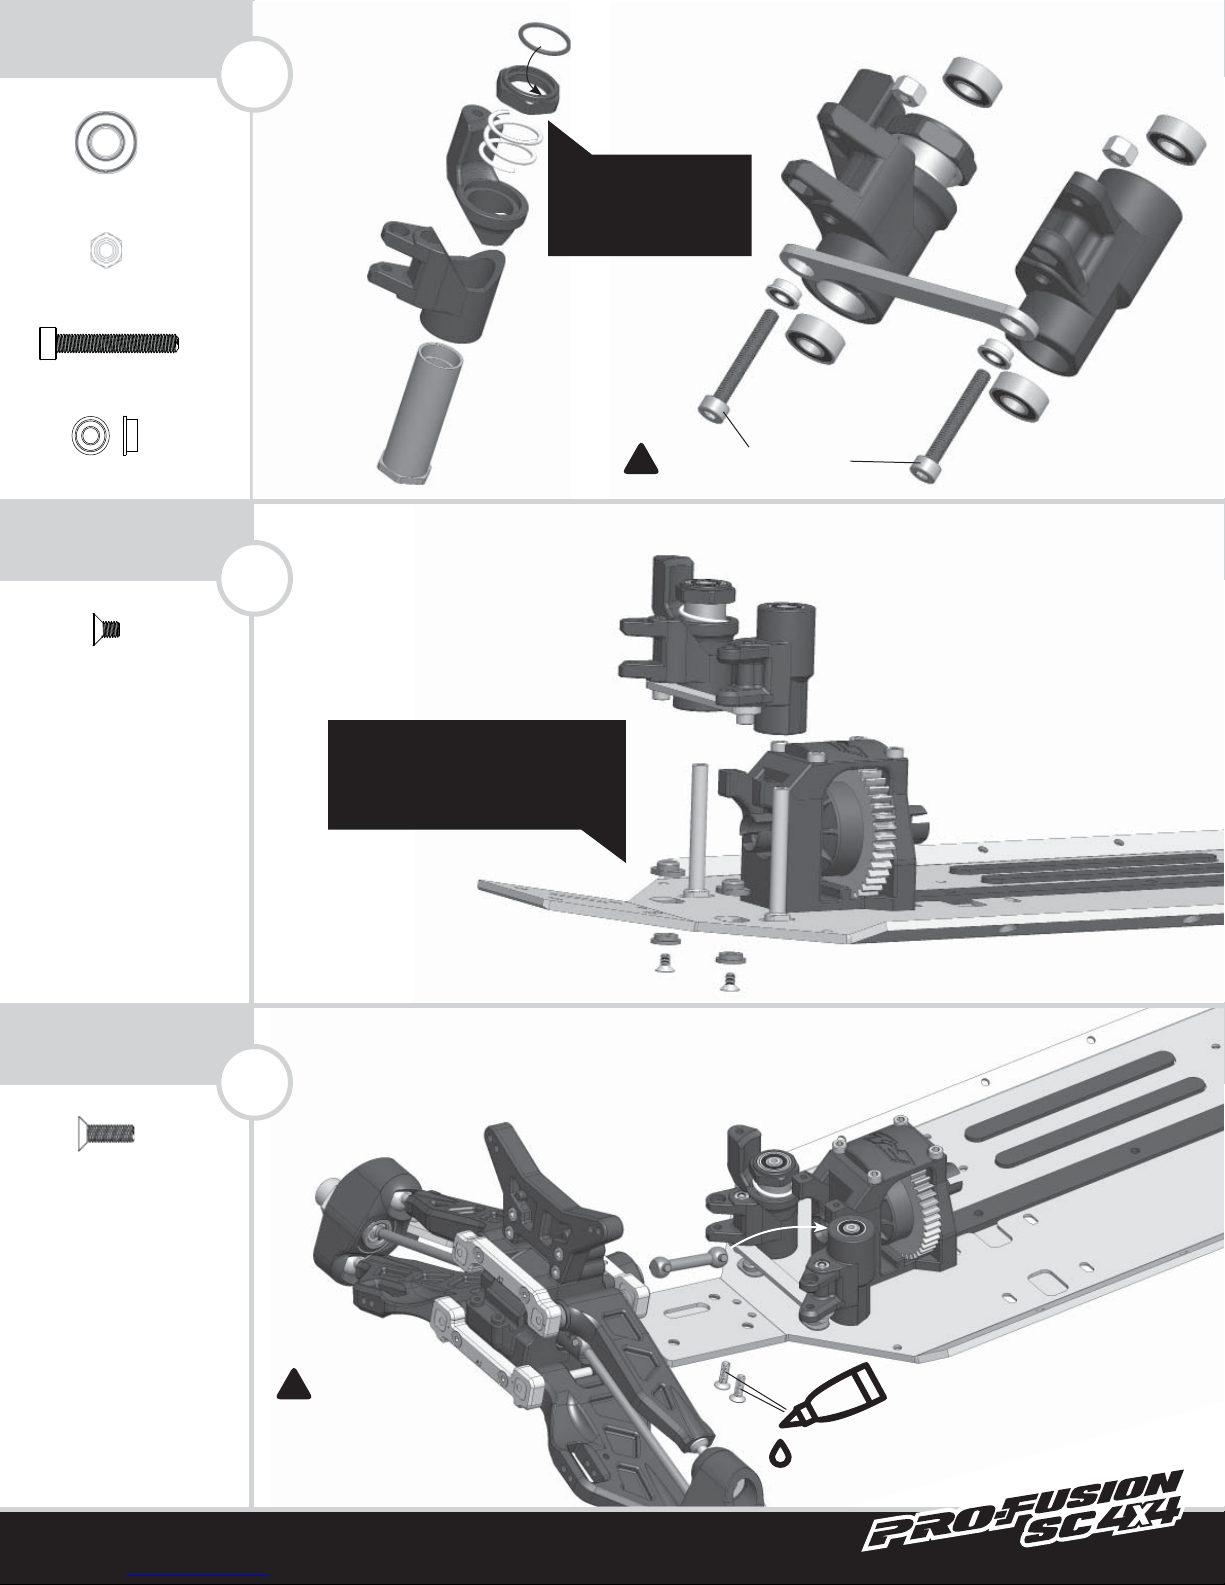
Front Hub & Pivot Balls - Build
+
(ACTUAL SIZE)
Front Diff Case Assembly
× 4
M3 × 14 FHCS
HARDWARE USED
(ACTUAL SIZE)
M3 × 20 FHCS
× 4
7
8
BAG B
B2
B1
Front Arms & Hinge Pins
BAG B
Use long hinge pins
LOWER:
× 4
1mm Shim
× 4
2mm Shim
HARDWARE USED
(ACTUAL SIZE)
× 4
× 4
Pivot Ball Inserts
Pivot Ball Set Screws
9
A1
NOTE ORIENTATION
!
Front Hub & Pivot Balls - Build
BAG C
!
A2
+
L
DO NOT OVERTIGHTEN
UPPER:
Use short hinge pins
1mm 2mm
R
× 2
18 × 12 × 4 Bearings
16 × 8 × 5 Bearings
× 2
PRO TIP
Install using the included 3mm hex key
included with the kit.
18x12x4
16x8x5
5
HARDWARE USED
BAG C
× 2
Drive Pin
× 2
Drive Pin Cup
× 2
M3 Set Screw
× 2
M4 × 16 Modifi ed Set
Screw
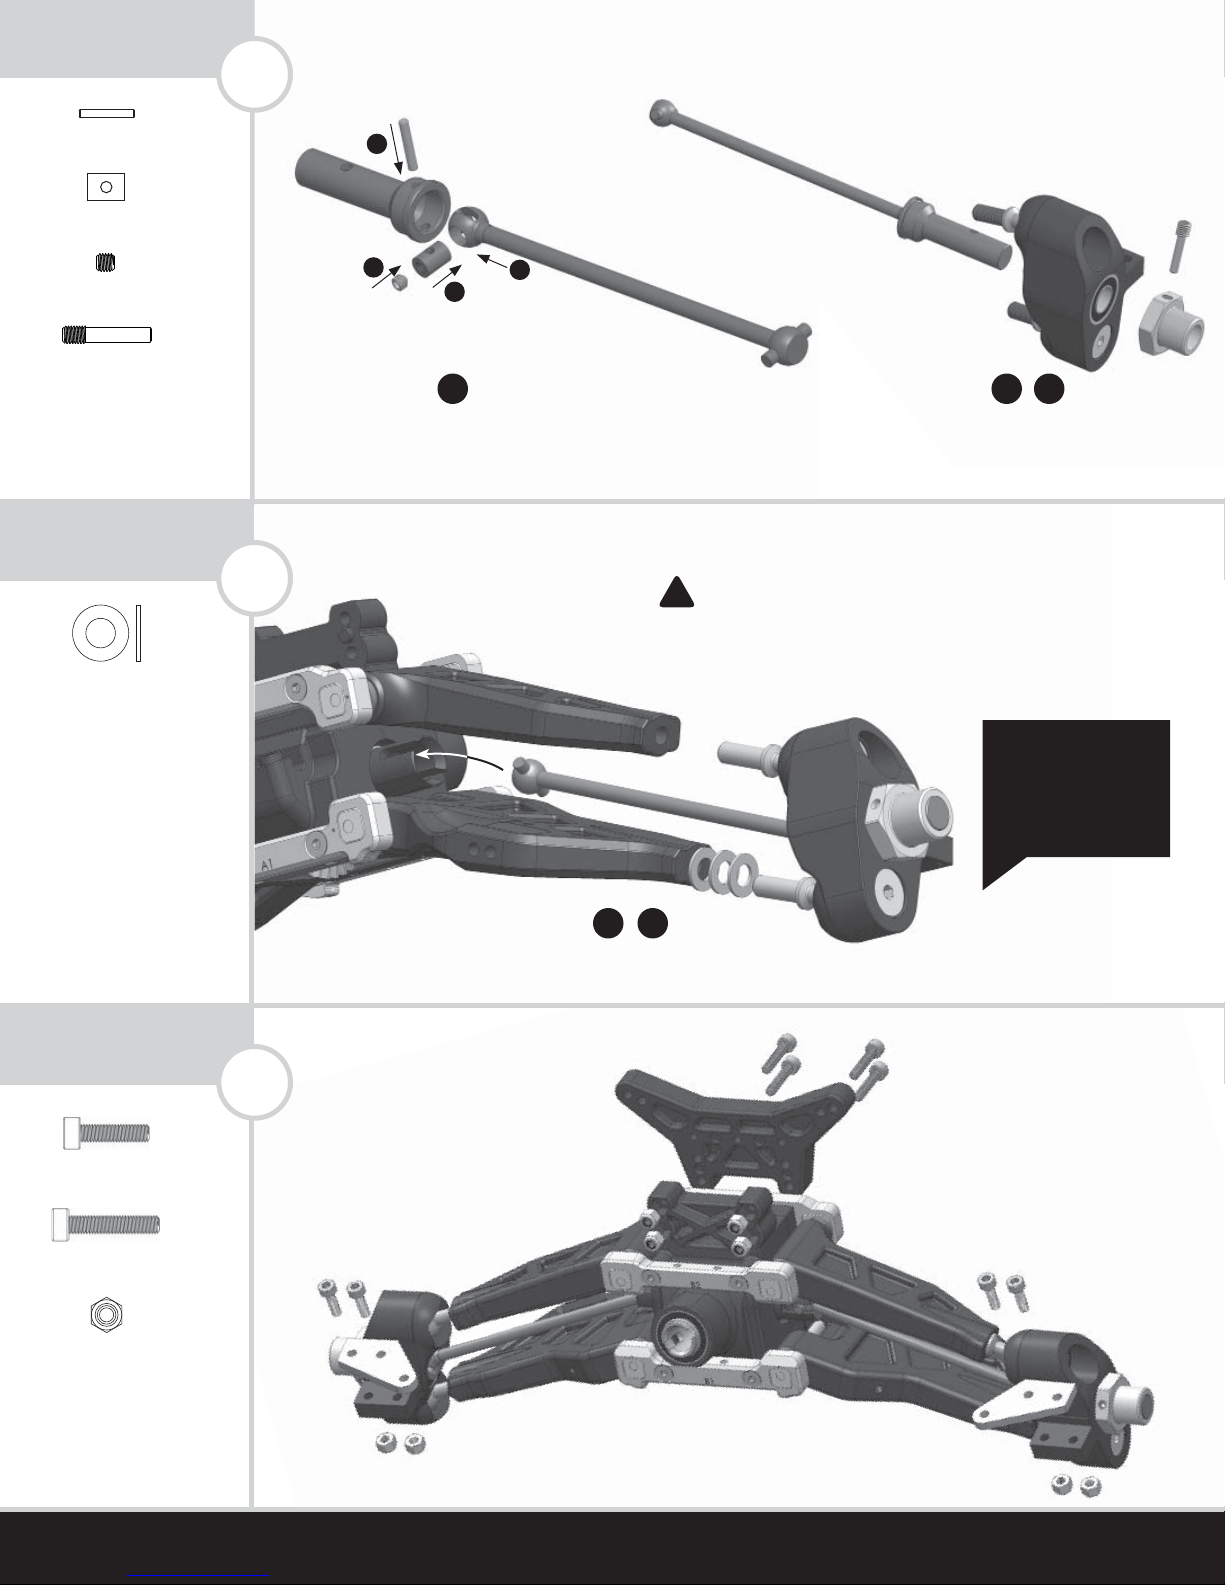
Front Axle & Hub Assembly
BAG C
× 6
0.75mm Shim
Pivot Balls to Front Arms
BAG C
× 4
M3 × 10 SHCS
× 4
M3 × 16 SHCS
× 8
M3 Locknut
Steering Plates & Shock Tower
Build
Build
+
Build
+
M3 × 10 SHCS
M3 × 16 SHCS
(ACTUAL SIZE)
Front Axle & Hub Assembly
× 2
Drive Pin
× 2
Drive Pin Cup
× 2
M3 Set Screw
× 2
M4 × 16 Modifi ed Set
Screw
HARDWARE USED
(ACTUAL SIZE)
× 6
0.75mm Shim
10
11
BAG C
3
4
1
Build
Pivot Balls to Front Arms
BAG C
2×
2
+
L
Build
IMPORTANT
!
Ensure driveshaft is seated into outdrive
before screwing pivot balls to arms.
Alternate tightening top and bottom pivot
balls to ensure both are tightened evenly.
R
HARDWARE USED
(ACTUAL SIZE)
× 4
× 8
× 4
M3 × 10 SHCS
M3 × 16 SHCS
M3 Locknut
12
Steering Plates & Shock Tower
BAG C
M3 × 10 SHCS
Build
PRO TIP
Access the pivot
ball through the set
screw using a 2mm
hex driver (not included).
+
L
R
M3 × 16 SHCS
6 PRO-LINE RACING / PRO-FUSION SC 4×4 / INSTRUCTION MANUAL
HARDWARE USED
BAG D
× 4
11 × 5 × 4 Bearing
× 2
M3 Locknut
× 2
M3 × 22 SHCS
× 2
Flanged Bearings
Steering Rack
BAG D
× 2
M3 × 5 FHCS
Steering Rack to Chassis
BAG D
× 2
M3 × 10 FHCS
Front Clip to Chassis
To lower B1 hinge pin holder
(ACTUAL SIZE)
× 4
× 2
× 2
× 2
11 × 5 × 4 Bearing
M3 Locknut
M3 × 22 SHCS
Flanged Bearings
13
Steering Rack
BAG D
Groove inside
PRO TIP
Use included 17mm
wheel nut wrench to
tighten servo saver collar.
DO NOT OVERTIGHTEN
!
Center link should move freely.
HARDWARE USED
(ACTUAL SIZE)
× 2
M3 × 5 FHCS
HARDWARE USED
(ACTUAL SIZE)
× 2
M3 × 10 FHCS
14
15
Steering Rack to Chassis
BAG D
PRO TIP
These chassis plugs can be removed
for easy access to the steering rack
screws without removing the top deck.
Front Clip to Chassis
BAG D
IMPORTANT
!
Ensure short driveshaft is seated
into both front diff and center diff
outdrives before attaching front
clip to chassis.
THREAD
LOCK
(not included)
To lower B1 hinge pin holder
7
HARDWARE USED
BAG D
× 6
M3 × 10 SHCS
Install Top Plate
BAG D
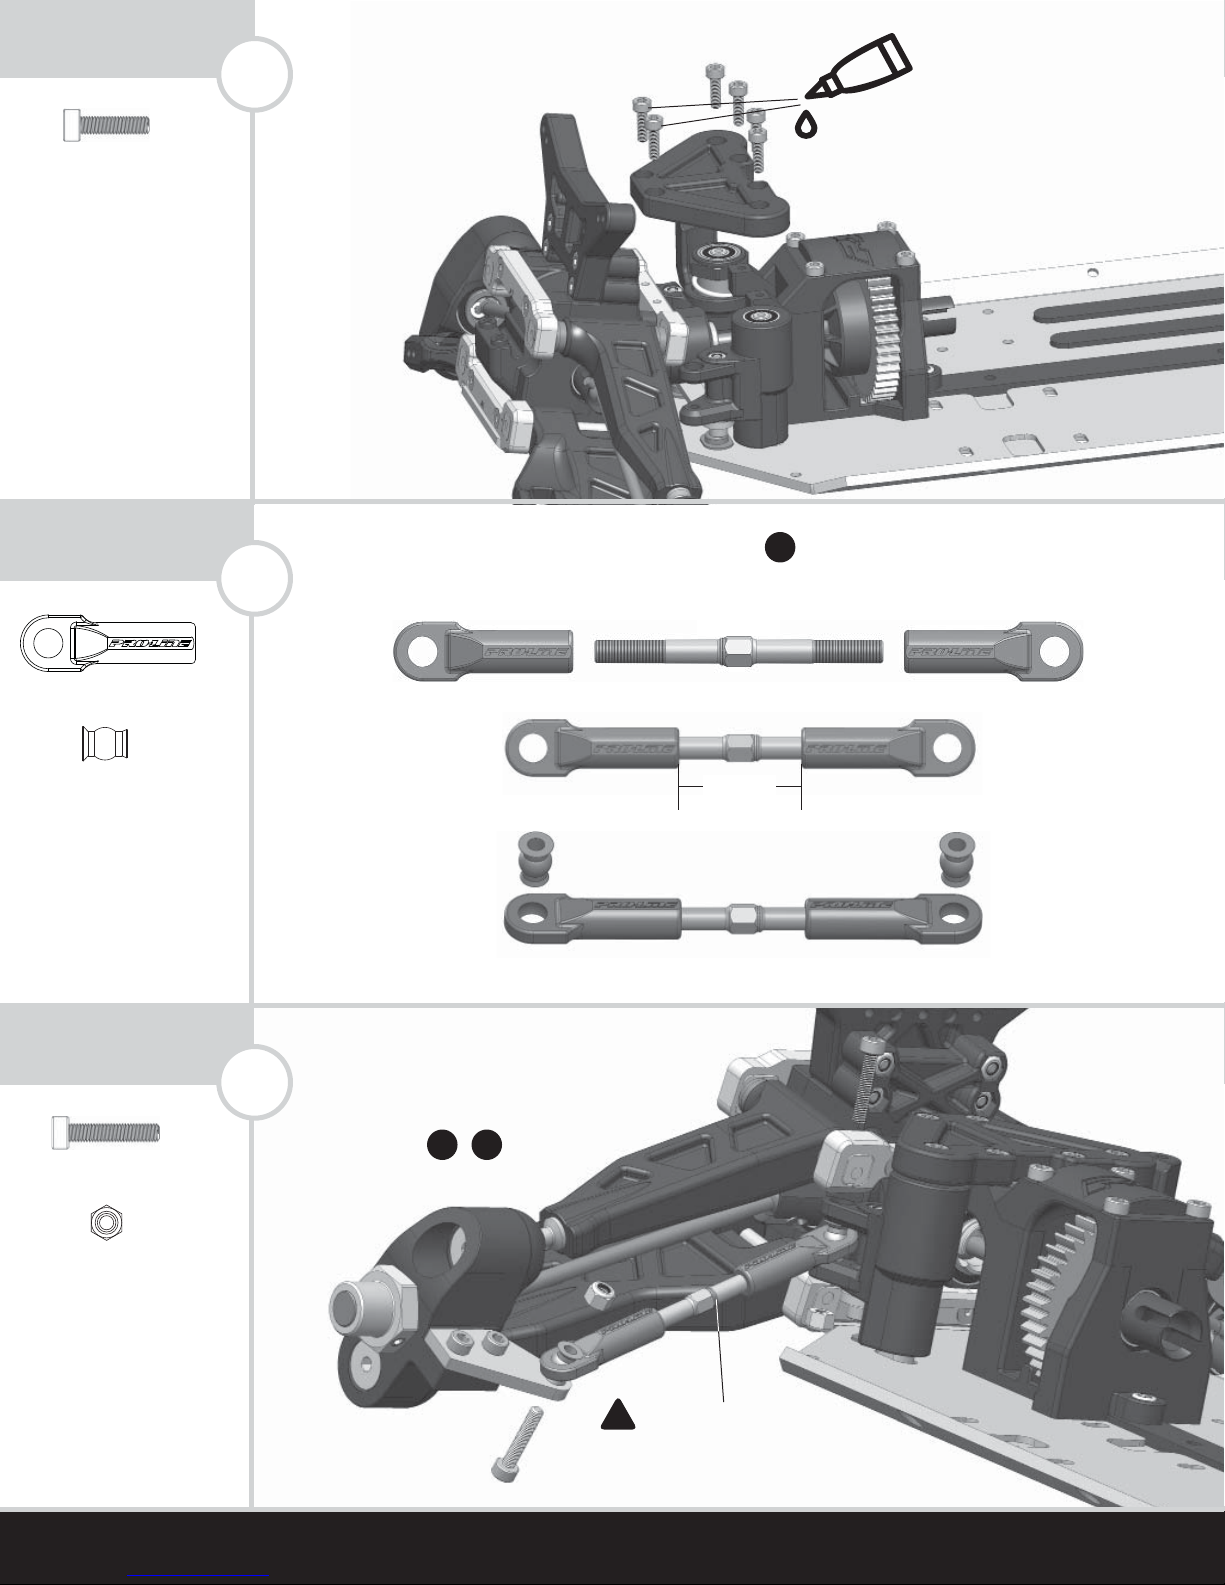
× 4
Long Rod End
× 4
Steering Pivot Balls
Steering Turnbuckle Assembly - Build
BAG D
× 4
M3 × 16 SHCS
× 4
M3 Locknut
Install Steering Turnbuckles
Build
+
(ACTUAL SIZE)
× 6
M3 × 10 SHCS
16
Install Top Plate
BAG D
THREAD
LOCK
(not included)
HARDWARE USED
(ACTUAL SIZE)
× 4
× 4
Long Rod End
Steering Pivot Balls
HARDWARE USED
(ACTUAL SIZE)
× 4
M3 × 16 SHCS
17
18
Steering Turnbuckle Assembly - Build
BAG D
Step 1
Step 2
Step 3
Install Steering Turnbuckles
BAG D
+
L
Build
R
(actual size)
22mm
(actual size)
2×
× 4
M3 Locknut
8 PRO-LINE RACING / PRO-FUSION SC 4×4 / INSTRUCTION MANUAL
NOTE ORIENTATION
!
Orient the notch to the right
throughout the kit.
 Loading...